Vacmaster AA12V1 Manual de usuario
- Categoría
- Aspiradoras
- Tipo
- Manual de usuario
Este manual también es adecuado para

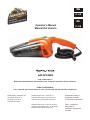
Operator’s Manual
Manual Del Usuario
AA12V1 0901
FOR YOUR SAFETY
Read and understand this manual before use. Keep this manual for future reference.
PARA SU SEGURIDAD
Lea y entienda este manual antes de usar. Guarde este manual para futura referencia.
Distributed By / Distribuido Por
Cleva North America, Inc.
601 Regent Park Court
Greenville, SC 29607
©2020 Energizer Auto. Armor All is a
trademark of Energizer Auto and is used
under license by Cleva North America, Inc.
©2020 Energizer Auto. Armor All es marca
registrada de Energizer Auto y se utiliza bajo
licencia de Cleva North America, Inc.
Replacement Filters &
Accessories available
at vacmaster.com/armorall
Filtros y accesorios
disponibles en
vacmaster.com/armorall
repuesto.
EN
P. 02
ES
P. 08

2
TABLE OF CONTENTS
SECTION Page
Warranty…………………………………………………………………………………………………......................
Safety Instructions and Warnings………………………………………………………………….......................….
Getting To Know Your Vacuum………………………………………………………………….......................…….
Vacuum Operation…………………………………………………………………………………......................…...
Cleaning And Maintenance…………………………………………………………………………......................….
Troubleshooting……………………………………………………………………………………..........................…
Thank you for purchasing this Armor All
®
12 volt wet/dry vacuum cleaner. Feel confident that with
our wet/dry vac you are obtaining a high quality product engineered for optimal performance. This
vacuum is capable of picking up liquids and dry materials.
FOR YOUR SAFETY CAREFULLY READ AND UNDERSTAND ALL INSTRUCTIONS
We take pride in producing a high quality, durabl
Not Covered by Warranty
• Any part that has become inoperative due to misuse, negligence, direct/indirect abuse, accidents, improper
maintenance, repairs or alterations;
• Consumables such as cartridge filters, cloth filters, dust collection bags, foam filter sleeves;
• Normal wear and tear of parts and attachments, such as hose, nozzles, or casters;
• Normal deterioration of the exterior finish due to use or exposure;
• Any product where serial number/data label is tampered with or removed;
• Any product purchased from an unauthorized retailer.
e product. This vac carries a limited one (1) year warranty
against defects in workmanship and materials from date of purchase under normal household use. Warranty
does not apply to defects due to direct or indirect abuse, negligence, misuse, accidents, repairs or
alterations and lack of maintenance. Please keep your receipt as proof of purchase. This warranty gives
you specific legal rights, and you may have other rights, which vary from state to state. For product service
call Cleva Customer Service at (866) 384-8432.
TABLE OF CONTENTS
WARRANTY
2
3
4
4
6
7
EN

3
FOR YOUR SAFETY CAREFULLY READ AND UNDERSTAND ALL INSTRUCTIONS
When using an electrical appliance, basic precautions should always be followed including the
following:
IMPORTANT SAFETY INSTRUCTIONS
Read and understand all instructions before using this vacuum.
Read and understand this owner’s manual and all labels on the Wet/Dry Vacuum cleaner before operating.
Safety is a combination of common sense, staying alert and knowing how your vacuum works. Use this
Wet/Dry Vac only as described in this manual.
This appliance is intended for household use only and not for commercial or industrial.
SAVE THIS MANUAL FOR FUTURE REFERENCE.
WARNING: TO REDUCE THE RISK OF FIRE, ELECTRIC SHOCK OR INJURY:
• Do not run vac unattended.
• Do not vacuum, or use this Wet/Dry Vac near flammable liquids, gases, or explosive vapors like gasoline
or other fuels, lighter fluids, cleaners, oil-based paints,
natural gas, hydrogen, or explosive dusts like coal
dust, magnesium dust, grain dust, or gun power. Sparks inside the motor can ignite flammable vapors or
dust.
• The intended use is described in this manual. The use of any accessory or attachment or the performance
of any operation with this appliance other than those recommended in this instruction manual may present
a risk of personal injury.
• Do not allow to be used as a toy. Close attention is necessary when used by or near children.
• Keep children and animals at a safe distance when using this appliance.
• Do not unplug by pulling on the cord. To unplug, grasp the plug, not the cord.
• Keep the cord away from heat, oil and sharp edges.
• Be careful not to pinch the cord in the vehicles’ doors, windows or levers.
• D
o not use with damaged cord, plug or other parts.
• If appliance is not working as it should, has been dropped, damaged, left outdoors, or dropped into water,
return it to a service center.
• Do not put any object into ventilation openings. Do not vacuum with any ventilation openings blocked.
Keep free of dust, lint, hair or anything that may reduce airflow.
• Do not insert accessories when unit is running.
• Do not use this vacuum with a torn filter or without the filter installed. Replace a damaged filter promptly.
• Do not vacuum anything that is burning or smoking, such as cigarettes, matches, or hot ashes.
• Keep cord away from heated surfaces.
• Do not use or store near hazardous materials.
• Do not leave Wet/Dry Vac unattended when plugged in. Unplug from outlet when not in use and before
servicing.
• Do not expose to rain. Store in a dry place
when not in use.
• Before use, check the appliance for damaged or defective parts. Check for breakage of parts, damage to
switches and any other conditions that may affect its operation.
• Have any damaged or defective parts repaired or replaced by an authorized repair agent.
• Regularly check the power cord for damage. Replace the cord if it is damaged or defective.
• Never attempt to remove or replace any parts other than those specified in this manual.
• The appliance is designed for use with 12V negative ground vehicle battery systems.
• Turn off the vacuum before unplugging.
• DO NOT handle plug or the vacuum with wet hands.
• To reduce the risk of health hazards from vapors or dusts, do not vacuum toxic materials.
SAFETY INSTRUCTIONS & WARNINGS

4
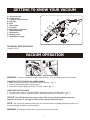
A. 12V power plug
B. On/Off switch
C. Container release button
D. LED light
E. Filter
F. Filter holder
G. Container
H. Retractable crevice tool
I. Rubber squeegee
J. Detail brush
K. Storage pouch
L. Detail brush storage
TECHNICAL SPECIFICATIONS:
Voltage: 12V DC
WARNING: Do not run the vehicle’s engine while cleaning. This can shorten the life of the vacuum.
CONNECTING TO THE VEHICLE’S POWER SUPPLY
1. Make sure that the vacuum is switched to the OFF position. (fig. 1)
2. Remove the cigarette lighter from the socket.
3. Insert the 12V power plug (A) into the 12V power socket. (fig. 2)
OPERATING THE APPLIANCE
1. To power on the vacuum, slide the ON/OFF switch (B) forward to the ON position. (fig. 1)
2. To power off the vacuum, slide the ON/OFF switch (B) back to the OFF position. (fig. 1)
NOTICE! The LED light (D) in the upper portion of the vacuum will be illuminated when the
appliance is turned on. The light is useful to see in poorly illuminated areas.
NOTE: The vac can be used for periods of up to 30 minutes without noticeably affecting the power of a
normally charged car battery in good condition.
WARNING: Extended use of the vacuum will drain the car battery power.
VACUUM OPERATION
GETTING TO KNOW YOUR VACUUM
A
B
L
C
D
E
F
G
K
I
J
H
2
1

5
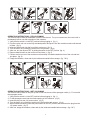
OPERATING INSTRUCTIONS – DRY VACUUMING
The vacuum can be used as assembled or with the crevice tool. For your convenience, the crevice tool is
permanently built-in onto the top portion of the container.
1. Verify that the switch is in the OFF position before plugging in. (fig. 1)
2. Flip the crevice tool over to the fully extended position and push it into the container nozzle until secured
in place. (fig. 2)
3. Insert the detail brush into the front of the crevice tool. (fig. 3)
4. Turn the motor on by sliding the switch to the ON position. (fig. 4)
5. After use, turn the vacuum OFF by sliding the switch to the OFF position. (fig. 4)
6. Remove detail brush from the crevice tool and store it. (fig. 5)
7. Pull the crevice tool out of the container nozzle and flip it forward towards the front of the unit an
d lock
into place. (fig. 6)
8. Empty the container, clean and dry the inside and outside before storage. (fig. 7 & 8)
OPERATING INSTRUCTIONS – WET VACUUMING
The vacuum can be used for wet pick up with or with out the use of the squeegee nozzle (J). For use with
the squeegee nozzle:
1. Verify that the switch is in the OFF position before plugging in. (fig. 1)
2. Fit the squeegee nozzle into the nozzle opening on the container. (fig. 2)
3. Insert the plug into the 12V power socket. (fig. 3)
4. Turn the motor on by sliding the switch to the ON position and vacuum. (fig. 4)
5. When finished vacuuming, slide the power switch to the OFF position and disconnect the plug from the
12V power socket. (fig. 5)
6. After use, empty the container, clean and dry the inside and outside be
fore storage. (fig. 6 & 7)
2
5
1
4
3
8
7
6
2
3
5
1 4
7
6

6
IMPORTANT:
1. The appliance is designed for vacuuming only small amounts of liquid.
2. STOP vacuuming if the liquid in the container reaches the “max” indicator line on the container. (fig. 8)
3. Empty it immediately before next use or storage.
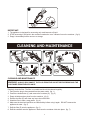
CLEANING AND MAINTENANCE
Regularly clean the filter. The filter is re-usable and should be cleaned regularly.
1. Verify that the plug is disconnected from the power outlet. (fig. 1)
2. Press the release button (C) and remove the container (G). (fig. 2)
3. Empty all debris and any dust from the container. (fig. 3)
4. Remove the filter (E) and clean any loose dust off the filter.
5. Wash the filter in warm, soapy water. (fig. 4)
6. Make sure the dust bowl and filter are c
lean and dry before using it again. DO NOT immerse the
appliance in water. (fig. 5)
7. Refit the filter (E) onto the appliance. (fig. 6)
8. Refit the container onto the appliance. Make sure the container clicks into place. (fig. 7)
WARNING:
ALWAYS DISCONNECT THE PLUG FROM THE SOCKET BEFORE REMOVING THE
CONTAINER FROM THE APPLIANCE.
CLEANING AND MAINTENANCE
8
1
3
2
4
5
7
6

7
NOTE: Make sure the vacuum is completely dry before using it again.
IMPORTANT: To assure product SAFETY and RELIABILITY, repairs, maintenance and adjustments (other
than those listed in this manual) should be performed by an authorized service center or other qualified
service organizations, always using identical replacement parts.
MAINTENANCE
Use only mild soap and damp cloth to clean the vac. Never let any liquid get inside the vacuum motor area;
never immerse any part of the vacuum into liquids.
IMPORTANT! Clean or change the dust filter regularly for best performance. If the machine is used with
out the dust filter, the motor will burn out and the warranty will be voided.
IMPORTANT! Optimum dust collection will only be achieved with clean filters and an empty container. If
dust begins to fall out
of the appliance after switching it off, this indicates that the dust bowl is full and must
be emptied.
WARNING: Never use the appliance without the filters installed.
WARNING: TO REDUCE THE RISK OF ELECTRIC SHOCK-UNPLUG BEFORE TROUBLESHOOTING
Symptom
Possible Causes
Corrective Action
Vacuum will not operate
1) No power supply.
1) Check power supply –vehicle
battery, 12V power socket, cord,
breakers, and fuses.
2) Faulty power cord.
2) Unplug and check the power
cord. If damaged, have it repaired
by a professional.
3) Container full.
3) Empty container.
Dust comes from motor cover.
1) The reusable cloth filter is missing or
damaged.
1) Attach or replace the reusable
cloth filter.
Reduced efficiency and
motor/speed vibration.
1) There is a blockage in the nozzle, or
the vacuum inlets, or the dust filter is
blocked by fine dust.
1) Check nozzle, and inlets for
blockage. Take off the filter and
clean it, or install new filter.
TROUBLESHOOTING

8
SECCIÓN Página
Garantía ………………………………………………………………………………………………………...............8
Instrucciones y advertencias de seguridad …………………………………………………………............………. 9
Las partes de su aspiradora ……………………………………………………………………………............…...10
Funcionamiento de la aspiradora ………………………………………………………………………............….. 10
Limpieza y mantenimiento ………………………………………………………………………………............…..13
Solución de problemas ……………………………………………………………………………………............. 14
Gracias por adquirir esta aspiradora para agua y polvo de 12 voltios Armor All
®
. Le garantizamos
que con nuestra aspiradora para agua y polvo usted obtiene un producto de alta calidad diseñado
para ofrecer un rendimiento óptimo. Esta aspiradora puede levantar líquidos y materiales secos.
PARA SU SEGURIDAD, LEA ATENTAMENTE Y ENTIENDA TODAS LAS
INSTRUCCIONES.
Nosotros nos
No cubierto por la garantía
• Cualquier parte que esté inoperativa por culpa de uso indebido, negligencia, abuso directo/indirecto,
accidentes, mantenimiento inadecuado, reparaciones inadecuadas o alteraciones.
• Consumibles, tales como filtros de cartucho, filtros de tela, bolsas recolectoras de polvo y mangas de filtro
de espuma.
• Desgaste y rotura normal de piezas y accesorios, tales como mangueras, boquillas o ruedecillas.
• Deterioro normal del acabado exterior debido al uso o exposición.
• Cualquier producto cuya etiqueta con el número de serie/datos esté alterada o faltante.
• Cualquier producto adquirido en un punto de ventas no autorizado.
enorgullecemos en producir un producto durable de alta calidad. Este producto de Armor
All
®
tiene una garantía limit ada de un (1) año contra defectos en la ejecución y materiales a partir de la
fecha de compra bajo uso normal en su hogar. La garantía no se aplica a los defectos causados por abuso,
negligencia, uso erróneo, accidentes, reparaciones o alteraciones directas o indirectas y falta de
mantenimiento. Guarde por favor su recibo como prueba de la compra. Esta garantía le da derechos
legales específicos, y puede tener otros derechos, que varían de estado en estado. Para servicio de su
producto llame a Servicio al Cliente de Cleva al (866) 384-8432.
ÍNDICE
GARANTÍA
ES

9
PARA SU SEGURIDAD, LEA ATENTAMENTE Y ENTIENDA TODAS LAS
INSTRUCCIONES.
Al utilizar un aparato eléctrico, se deben tomar siempre las precauciones básicas, incluidas las
siguientes:
INSTRUCCIONES IMPORTANTES DE
SEGURIDAD
Lea y entienda todas las instrucciones antes de utilizar esta aspiradora.
Lea y entienda este manual y todas las etiquetas de la aspiradora para polvo y agua antes de ponerla en
funcionamiento. La seguridad es una combinación de tres factores: tener sentido común, permanecer
alerta y saber cómo funciona su aspiradora. Utilice esta aspiradora para polvo y agua únicamente como
se describe en este manual.
Este aparato está diseñado sólo para uso doméstico y no para uso comercial ni industrial.
GUARDE ESTE MANUAL PARA FUTURA REFERENCIA.
ADVERTENCIA: PARA REDUCIR EL RIESGO DE INCENDIO, CHOQUE
ELÉCTRICO O LESIONES:
• No descuide la aspiradora c
uando está en funcionamiento.
• No aspire ni utilice esta aspiradora para polvo y agua cerca de líquidos inflamables, sustancias tóxicas,
gases o vapores explosivos como los de gasolina y otros combustibles, líquidos para encendedores,
limpiadores, pinturas a base de petróleo, gas natural, hidrógeno o polvos explosivos como polvo de carbón,
polvo de magnesio, polvo de granos o pólvora. Las chispas dentro del motor pueden encender los
vapores inflamables o el polvo.
• El uso previsto está descrito en este manual. El uso de cualquier accesorio o dispositivo, o la ejecución
de cualquier función con este aparato que no sean los recomendados en este manual de instrucciones
pueden representar un riesgo de lesiones personales.
• No permita que se use como juguete.
Ponga especial atención cuando el aparato es usado por niños o
cerca de éstos.
• Mantenga a los niños y animales a una distancia segura al usar este aparato.
• No tire del cable para desenchufar el aparato. Para desenchufarlo, tome el enchufe, no el cable.
• Mantenga el cable alejado del calor, el aceite y bordes afilados.
• Tenga cuidado de no apretar el cable en puertas de vehículos, ventanas o palancas.
• No use el aparato si el cable, el enchufe u otras partes están dañados.
• Si el aparato no funciona como debería, se ha caído, dañado, ha estado a la intemperie o se ha caído al
agua, llévelo a un centro de servicio.
• No introduzca objetos en las aberturas de ventilación. No use la aspiradora si alguna abertura de
ventilación está bloqueada.
Manténgala libre de polvo, pelusas, cabellos o cualquier c
osa que podría reducir el flujo de aire.
• No inserte accesorios cuando la unidad está en funcionamiento.
• No use esta aspiradora con un filtro roto o sin el filtro colocado. Reemplace el filtro dañado
inmediatamente.
• No aspire nada que esté ardiendo o humeando, como cigarrillos, fósforos o cenizas calientes.
INSTRUCCIONES Y ADVERTENCIAS DE
SEGURIDAD

10
• Mantenga el cable alejado de superficies calientes.
• No use ni guarde el aparato cerca de materiales peligrosos.
• No descuide la aspiradora para polvo y agua cuando esté enchufada. Desenchúfela del tomacorriente
cuando no esté en uso y antes de realizar el servicio.
• No la exponga a la lluvia. Guárdela en un lugar seco cuando no esté en uso.
• Antes de usarlo, verifique que el aparato no tenga piezas defectuosas o dañadas. Verifique que no haya
piezas rotas, interruptores dañados o cualquier otra condición que podría afectar su funcionamiento.
• Haga reparar o reemplace todas las piezas defectuosas o dañadas con un agente de reparación
autorizado.
• Verifique periódicamente que el cable de alimentación no esté dañado. Reemplace el cable si está
dañado o es defectuoso.
• Nunca intente extraer ni reemplazar ninguna pieza que no e
sté especificada en este manual.
• El aparato está diseñado para ser usado con sistemas de batería de vehículos con puesta a tierra
negativa de 12 voltios.
• Apague la aspiradora antes de desenchufarla.
• NO manipule el enchufe o la aspiradora con las manos mojadas.
• Para reducir el riesgo de peligros a la salud causados por vapores y polvos, no aspire materiales tóxicos.
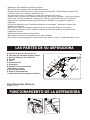
A. Enchufe de toma de corriente de 12 V
B. Interruptor de encendido/apagado (on/off)
C. Botón de liberación del contenedor
D. Luz LED
E. Filtro
F. Soporte del filtro
G. Contenedor
H. Boquilla para ranuras retráctil
I. Escurridor de caucho
J. Escobilla para detalles
K. Bolsa de almacenamiento
L. Compartimiento de escobilla para detalles
ESPECIFICACIONES TÉCNICAS:
Voltaje: 12 V CC
A
B
L
C
D
E
F
G
K
I
J
H
2
1
FUNCIONAMIENTO DE LA ASPIRADORA
LAS PARTES DE SU ASPIRADORA

11
ADVERTENCIA: No ponga en funcionamiento el motor del vehículo durante la limpieza. Esto puede acortar
la vida útil de la aspiradora.
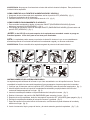
CÓMO CONECTAR A LA FUENTE DE ALIMENTACIÓN DEL VEHÍCULO
1. Asegúrese de que el interruptor de la aspiradora esté en la posición OFF (APAGADO). (fig. 1)
2. Extraiga el encendedor de su alojamiento.
3. Inserte el enchufe de 12 V (A) en el tomacorriente de 12 V. (fig. 2)
CÓMO PONER EN FUNCIONAMIENTO EL APARATO
1. Para encender la aspiradora, deslice el interruptor ON/OFF (ENCENDIDO/APAGADO) (B) hacia
adelante a la posición ON (ENCENDIDO). (fig. 1)
2. Para apagar la aspiradora, deslice el interruptor ON/OFF (ENCENDIDO/APAGADO) (B) hacia atrás a la
posición OFF (APAGADO). (fig. 1)
¡AVISO! La luz LED (D) en la parte superior de la aspiradora se encenderá cuando se ponga en
marcha el aparato. La luz sirve para ver en áreas
poco iluminadas.
NOTA: La aspiradora puede usarse por períodos de hasta 30 minutos sin que se vea notablemente
afectada la potencia de una batería de automóvil normalmente cargada y en buenas condiciones.
ADVERTENCIA: El uso extendido de la aspiradora agotará la potencia de la batería del auto.
INSTRUCCIONES DE USO. ASPIRACIÓN EN SECO
La aspiradora puede utilizarse de la forma en que viene ensamblada o con la boquilla rinconera. Para su
comodidad, la boquilla rinconera está integrada en forma permanente a la parte superior del contenedor.
1. Verifique que el interruptor esté en la posición OFF (APAGADO) antes de enchufar la aspiradora. (fig. 1).
2. Abra la boquilla rincon
era a la posición completamente extendida y empújela dentro del orificio del
contenedor hasta asegurarla en su lugar. (fig. 2)
3. Inserte la escobilla para detalles en la parte delantera de la boquilla rinconera. (fig. 3)
4. Deslice el interruptor a la posición ON (ENCENDIDO) para encender el motor. (fig. 4)
5. Después de usar la aspiradora, deslice el interruptor a la posición OFF (APAGADO) para apagarla. (fig. 4)
6. Extraiga la escobilla para detalles de la boquilla rinconera y guárdela. (fig. 5)
7. Saque la boquilla rinconera del orificio del contenedor, muévala hacia la parte delantera de la unidad y
trábela en su lugar. (fig. 6)
8. Vacíe el contenedor, limpie y seque el interior y el exterior antes de guardar la aspiradora. (fig. 7 y 8)
2
5
1
4
3
8
7
6

12
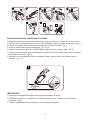
INSTRUCCIONES DE USO. ASPIRACIÓN DE LIQUIDOS
La aspiradora puede usarse para levantar líquidos con o sin el escurridor (J). Para usar con el escurridor:
1. Verifique que el interruptor esté en la posición OFF (APAGADO) antes de enchufar la aspiradora (fig. 1).
2. Coloque el escurridor dentro de la abertura para el escurridor del contenedor. (fig. 2)
3. Inserte el enchufe dentro del tomacorriente de 12 V. (fig. 3)
4. Deslice el interruptor a la posición ON (ENCENDIDO) para encender el motor y aspire. (fig. 4)
5. Cuando termine de aspirar, deslice el interruptor a la posición OFF (APAGADO) y desconecte el enchufe
del tomacorriente de 12 V. (fig. 5)
6. Después de usar la aspiradora, vacíe el contenedor, limpie y seque el interior y el exterior antes de
guardarla. (fig. 6 y 7)
IMPORTANTE:
1. El aparato está diseñado para aspirar sólo pequeñas cantidades de líquido.
2. DETENGA la aspiración si el líquido en el contenedor alcanza el nivel “máximo” en el indicador del
contenedor. (fig. 8)
3. Vacíelo inmediatamente antes de guardar o volver a utilizar la aspiradora.
2
3
5
1 4
7
6
8

13
LIMPIEZA Y MANTENIMIENTO
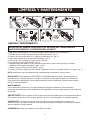
Limpie el filtro periódicamente. El filtro es reutilizable y debe limpiarse en forma periódica.
1. Verifique que el enchufe esté desconectado del tomacorriente. (fig. 1)
2. Presione el botón de liberación (C) y extraiga el contenedor (G). (fig. 2)
3. Quite todos los desechos y el polvo del contenedor. (fig. 3)
4. Retire el filtro (E) y extraiga los restos de polvo del filtro.
5. Lave el filtro con agua tibia jabonosa. (fig. 4)
6. Asegúrese de que el platillo y el filtro del polvo estén limpios y secos antes de volver a utilizar la
aspiradora. NO sumerja el aparato en agua. (fig. 5)
7. Vuelva a colocar el filtro (E) en el aparato. (fig. 6)
8. Vuelva a colocar el contenedor en el aparato. Asegúrese d
e que el contenedor encaje en su lugar. (fig. 7)
NOTA: Asegúrese de que la aspiradora esté completamente seca antes de volver a usarla.
IMPORTANTE: Para garantizar la SEGURIDAD y CONFIABILIDAD del producto, las reparaciones, el
mantenimiento y los ajustes (distintos a los que se enumeran en este manual) deben ser realizados en
centros de servicio autorizados u otras organizaciones de servicio cualificadas, y deben usarse siempre
piezas de repuesto idénticas.
MANTENIMIENTO
Use únicamente un jabón suave y un paño húmedo para limpiar la aspiradora. Nunca permita la
penetración de líquido dentro del área del motor de la aspiradora; nunca sumerja ninguna pieza del aparato
en líquidos.
¡IMPORTANTE! Limpie o cambie el filtro de polvo periódicamente para lograr un funcionamiento óptimo.
Si la máquina se usa con un filtro de polvo diferente, el motor se sobrecargará y se anulará la garantía.
¡IMPORTANTE! Para lograr una óptima recolección de polvo, use únicamente filtros limpios y un
contenedor vacío. Si el polvo comienza a caer del aparato después de apagarlo, esto indica que el platillo
de polvo está lleno y debe vaciarse.
ADVERTENCIA: Nunca use el aparato sin los filtros colocados.
ADVERTENCIA: SIEMPRE DESCONECTE EL ENCHUFE DEL TOMACORRIENTE
ANTES DE EXTRAER EL CONTENEDOR DEL APARATO.
1
3
2
4
5
7
6
LIMPIEZA Y MANTENIMIENTO

14
ADVERTENCIA: PARA REDUCIR EL RIESGO DE CHOQUE ELÉCTRICO, DESENCHUFE ANTES DE
INTENTAR SOLUCIONAR PROBLEMAS.
Síntoma
Causas posibles
Acción correctiva
La aspiradora no funciona.
1) No hay suministro de energía.
1) Revise el suministro de energía
eléctrica: la batería del vehículo,
el
2) El cable de alimentación está
dañado.
2) Desenchufe y revise el cable
de alimentación. Si está dañado,
hágalo reparar por un profesional.
3) El contenedor está lleno.
3) Vacíe el contenedor.
Sale polvo de la cubierta del
motor.
1) El filtro de tela reutilizable no está
puesto o está dañado.
1) Coloque o reemplace el filtro de
tela reutilizable.
Se redujo el rendimiento y el
motor vibra.
1) Hay una obstrucción en la boquilla
o en las entradas de la aspiradora, o
el filtro de polvo está bloqueado con
polvo fino.
1) Verifique que no haya
obstrucciones en la boquilla ni en
las entradas. Retire el filtro y
límpielo, o coloque un filtro nuevo.
SOLUCIÓN DE PROBLEMAS
-
 1
1
-
 2
2
-
 3
3
-
 4
4
-
 5
5
-
 6
6
-
 7
7
-
 8
8
-
 9
9
-
 10
10
-
 11
11
-
 12
12
-
 13
13
-
 14
14


Vacmaster AA12V1 Manual de usuario
- Categoría
- Aspiradoras
- Tipo
- Manual de usuario
- Este manual también es adecuado para
En otros idiomas
- English: Vacmaster AA12V1 User manual
Documentos relacionados
Otros documentos
-
 ArmorAll AA12V1 0901 Handheld Car Vacuum Cleaner Manual de usuario
-
 ArmorAll AA255 Manual de usuario
-
 Armor All AA155 El manual del propietario
-
Craftsman VWM510SC El manual del propietario
-
-
-
Continental KL83125 Manual de usuario


