Polk Audio SWA500 Manual de usuario
- Categoría
- Subwoofers
- Tipo
- Manual de usuario

IMPORTANT SAFETY INSTRUCTIONS
READ BEFORE OPERATING EQUIPMENT
1. Read these instructions.
2. Keep these instructions.
3. Heed all warnings.
4. Follow all instructions.
5. Do not use this apparatus near water.
6. Clean only with dry cloth.
7. Do not block any ventilation openings. Install in accordance with the
manufacturer's instructions.
8. Do not install near any heat sour
ces such as radiators, heat registers,
stoves, or other apparatus (including amplifiers) that produce heat.
9. Do not defeat the safety purpose of the polarized or grounding-type plug. A
polarized plug has two blades with one wider than the other. A grounding type
plug has two blades and a third grounding prong. The wide blade or the third
prong are provided for your safety. If the provided plug does not fit into your
outlet, consult an electrician for r
eplacement of the obsolete outlet.
10. Protect the power cord from being walked on or pinched particularly at plugs,
convenience receptacles, and the point where they exit from the apparatus.
11. Only use attachments/accessories specified by the manufactur
er
.
12. Unplug this apparatus during lightning storms or when unused for long periods
of time.
13. Refer all servicing to qualified service personnel. Servicing is required when the
apparatus has been damaged in any way, such as power-supply cord or plug is
damaged, liquid has been spilled or objects have fallen into the apparatus, the
apparatus has been exposed to rain or moistur
e, does not operate nor
mally
, or
has been dropped.
14.
WARNING: To reduce the risk of fire or electric shock, this apparatus should not
be exposed to rain or moisture and objects filled with liquids, such as vases,
should not be placed on this apparatus.
15. To completely disconnect this equipment from the mains, disconnect the power
supply cord plug from the receptacle.
16. The main plug of the power supply cord shall remain readily operable.
SWA500
HIGH PERFORMANCE
POWERED SUBWOOFER
AMPLIFIER
IMPORTANTES INSTRUCCIONES DE SEGURIDAD
LEER ANTES DE HACER FUNCIONAR EL EQUIPO
1. Lea estas instrucciones.
2. Guarde estas instrucciones.
3. Respete todas las advertencias.
4. Siga todas las instrucciones.
5. No use este aparato cerca del agua.
6. Límpielo solamente con un paño seco.
7. No bloquee las aberturas de ventilación. Instale el aparato de acuerdo con
las instrucciones del fabricante.
8. No lo instale cerca de fuentes de calor, tales como radiadores, rejillas de
piso, cocinas u otros aparatos (incluso amplificadores) que producen calor.
9. No anule la seguridad implícita en el enchufe polarizado o con conexión
a tierra. Los enchufes polarizados tienen dos patas, una más ancha que
la otra. Los enchufes con conexión a tierra tienen dos patas iguales y una
clavija de conexión a tierra. La pata ancha o la clavija de conexión a tierra
han sido incorporadas al diseño por la seguridad del usuario. Si el enchufe
no entra en el tomacorrientes, consulte a un electricista para que cambie el
tomacorrientes obsoleto.
10.
Evite que el cor
dón de alimentación sea pisado o aplastado, en par
ticular cerca
del enchufe, cer
ca del tomacor
rientes y en el punto en que el cor
dón sale del
aparato.
11.
Use sólo los accesorios especificados por el fabricante.
12.
Desenchufe el aparato durante tor
mentas eléctricas o cuando no lo use
durante largos períodos de tiempo.
13. Encargue todo servicio del aparato al personal de servicio calificado. Se
requiere servicio cuando el aparato ha sido dañado de alguna manera, tal
como cuando se ha dañado el enchufe o el cordón de alimentación, han caído
líquidos u objetos dentro del aparato o el aparato se ha dejado caer, ha dejado
de funcionar normalmente o ha sido expuesto a la lluvia o a la humedad.
14.
ADVERTENCIA. Para reducir el riesgo de incendio o de descarga eléctrica,
este aparato no debe ser expuesto a la lluvia o a la humedad, y no se le deben
colocar encima objetos llenos de líquido, tales como floreros.
15. Para desconectar completamente este equipo del tomacorrientes de CA de la
par
ed, desenchufe del tomacor
rientes el enchufe del cordón de alimentación.
La página se está cargando...
La página se está cargando...

4 Contact Polk Audio Customer Ser
vice 1-800-377-7655 (Outside US: 410-358-3600)
Monday-Friday
, 9:00 AM-6:00 PM Easter
n T
ime,
CARACTERÍSTICAS DEL SW
A500
Amplificador clase D híbrido: Produce 250 W de potencia continua en 8 Ohms y 500 W de potencia
continua en 4 Ohms.
T
arjeta SPEX: La tarjeta SPEX configura la ecualización, el crossover y la circuitería de
control de alimentación para que corresponda al subwoofer de Polk.
Nota. En el SW
A500, el puerto para la tarjeta SPEX tiene la siguiente etiqueta:
Antes de encender este amplificador
, es necesario instalar la tarjeta SPEX
correspondiente al subwoofer que se esté usando.
Indicador
es luminosos del panel frontal, Indicador luminoso de protección del panel frontal,
Indicador luminoso de alimentación del panel fr
ontal.
Circuito de protección: El SWA500 tiene protección térmica de control de alimentación
dinámica y pr
otección contra cortocircuitos y excesos de corriente.
Detector automático de encendido y apagado:
El amplificador sale del modo de espera cuando se presenta una señal en las entradas de audio.
La señal debe ser: a nivel de línea: > de 5 mV r
ms, a nivel de altavoz: > de 35 mV rms
Filtro ajustable de pasabajas: 40 a 120 Hz (-3 dB pts), 24 dB/oct, Butterworth
Conmutador de fase: 0
° ó 180° para compensar la ubicación del subwoofer con respecto a los
altavoces fr
ontales a fin de producir una combinación óptima entre los dos tipos de altavoz.
Entradas y salidas
Entradas: enchufes RCA enchapados en oro con insertos rojo y blanco
enchufes RCA enchapados en or
o para Efectos de Baja Frecuencia (Low Frequency
Ef
fects, LFE) con inserto amarillo
Entrada de alto nivel: terminales de cinco modos enchapadas en oro
Salidas: ter
minales de cinco modos enchapadas en oro 2 conjuntos, cableadas en paralelo
enchufes de paso libre RCA enchapados en oro con insertos rojo y blanco
CARACTÉRISTIQUES DU SW
A500
Amplificateur Classe D Hybride: Génèr
e 250W continus en 8 Ohms et 500W continus en 4 Ohms.
Car
te SPEX: La carte SPEX configure l’égalisation, la fréquence de séparation et le circuit de
contrôle de puissance répondant aux exigences spécifiques de chaque subwoofer Polk.
Note:L
’étiquette suivante est attachée au port de la carte SPEX sur le SWA500:
A
vant de pouvoir mettre cet amplificateur sous tension la carte SPEX
appropriée au subwoofer utilisé doit être installée.
V
oyants DEL du panneau avant, DEL de protection sur le panneau avant, DEL de
tension sur le panneau avant.
Circuits de protection:Le SWA500 offre contrôle de puissance dynamique, protection
ther
mique et protection contre les courts circuits et le courant excessif.
Senseur « Auto On/Off »:
L’amplificateur quitte le mode de mise en veille (standby)
à la présence d’un signal aux entrées audio.
Le signal doit êtr
e de:Niveau de ligne: >5mVrms, Niveau H.P. : >75mVrms
Filtre passe-bas ajustable: 40-120Hz (-3dB pts), 24dB/oct, Butterworth.
Commutateur de phase:0 ou 180 degrés selon la position du subwoofer en r
elation avec les
enceintes avant. Ceci assure l’homogénéité optimale entre le subwoofer et les enceintes avant.
Entrées/Sor
ties
Entrées: Prises RCA plaquées or avec inserts rouge et blanc
Prise RCA LFE plaquée or avec inser
t jaune
Entrés haut niveau: Bornes « 5 façons » plaquées or
Sor
ties: Bornes « 5 façons » plaquées or
2 jeux connectés en parallèle
Prises RCA plaquées or - sor
tie transversale
avec inserts rouge et blanc

For more information visit our website at www.polkaudio.com 5
SPEX CARD INST
ALLATION/INSTALAÇÃO DE PLACA SPEX/SPEX-KARTENINSTALLATION
INSTALLAZIONE SCHEDA SPEX/INSTALACIÓN DE LA TARJETA SPEX/INSTALLATION DE LA CARTE SPEX
The SW
A500 Amplifier comes with SPEX Card(s), one each for the
specific Polk In-wall Subwoofer to be installed.
NOTE: One of the SPEX Car
ds must be installed in the SWA500 Amplifier
for the amplifier to function.
1. Locate the SPEX Car
d that corresponds to the Polk subwoofer model to which
the SW
A500 Amplifier will be connected.
2. Remove the two (2) thumb screws from the rear of the amplifier.
3. Remove the label covering the SPEX Car
d slot.
4. Connect the ribbon connector coming from the SPEX Card opening to its mating connector
on the SPEX Card.
5. Inser
t the SPEX Card into the opening and screw the retaining plate onto the back panel.
O amplificador SW
A500 vem com placa(s) SPEX, cada uma para um determinado
subwoofer tipo in-wall Polk a ser instalado.
NOTA: Uma das placas SPEX deve ser instalada no amplificador SWA500 para que ele funcione.
1. Localize a placa SPEX que cor
responde ao modelo de subwoofer Polk ao qual o amplificador
SWA500 será conectado.
2. Retir
e os dois parafusos borboleta (2) da parte traseira do amplificador.
3. Retire a etiqueta que cobre o slot da placa SPEX.
4. Conecte o conector de fita da abertura da placa SPEX ao conector correspondente
na placa SPEX
.
5. Insira a placa SPEX na abertura e parafuse a placa de retenção no painel traseiro.
Der SWA500 Verstärker wird mit drei SPEX-Karten geliefert, eine für jeden
spezifischen Wandeinbau-Subwoofer Polk.
HINWEIS: Damit der Verstärker funktioniert, muss eine der SPEX-Karten im SWA500
Verstärker installiert sein.
1. Suchen Sie die SPEX-Karte, die dem Subwoofer-Modell Polk entspricht, an den der SWA500
Verstärker angeschlossen wird.
2. Entfernen Sie die zwei (2) Rändelschrauben von der Rückseite des Verstärkers.
3. Entfernen Sie die Abdeckung des SPEX-Kar
tensteckplatzes.
4. Schließen Sie das Flachkabel von der SPEX-Kartenöffnung an den entsprechenden
Anschluss an der SPEX-Karte an.
5. Führen Sie die SPEX-Karte in die Öffnung ein und schrauben Sie die Halterung an
der Rückseite an.
L’amplificatore SWA 500 include schede SPEX, una per ciascun subwoofer Polk da
montare nella parete.
NOTA: per poter utilizzare l’amplificatore SWA 500 deve essere installata almeno
una delle schede SPEX.
1. Identificare la scheda SPEX corrispondente al modello di subwoofer Polk a cui verrà
collegato l’amplificator
e SW
A 500.
2. Rimuovere le due (2) viti zigrinate dal retro dell’amplificatore.
3. Rimuover
e l’etichetta che copre lo slot per la scheda SPEX.
4. Collegare la piattina dall’apertura per la scheda SPEX al connettore corrispondente
sulla scheda SPEX.
5. Inserire la scheda SPEX nell’aper
tura e avvitare la piastra di contenimento al
pannello posteriore.
El amplificador SW
A500 viene con tarjeta(s) SPEX, una para cada uno de los subwoofers Polk
empotrados de la pared específicos que se van a instalar.
NOTA. Para funcionar, el amplificador SWA500 debe tener instalada una de las tarjetas SPEX.
1. Ubique la tarjeta SPEX que corresponde al modelo de subwoofer Polk al cual se va a
conectar el amplificador.
2. Quite los dos (2) tornillos de mariposa de la parte de atrás del amplificador.
3. Quite la etiqueta que cubre la abertura para la tarjeta SPEX.
4. Conecte el cable plano que sale de la abertura al conector correspondiente de la tarjeta SPEX.
5. Inserte la tarjeta SPEX en la abertura y atornille la placa de retención en el panel de atrás.
L’amplificateur SWA500 est livré avec trois cartes SPEX, chacune conçue spécifiquement
pour l’un des subwoofers « In Wall ».
NOTE : L’amplificateur SWA500 ne fonctionnera que si une des cartes SPEX est installée.
1. Déterminez la carte SPEX qui correspond au modèle de subwoofer qui sera utilisé
avec le SWA500.
2. Retirez la plaque de retenue sur le panneau arrière de l’amplificateur en retirant
les deux vis à serrage à main.
3. Retirez l’étiquette qui recouvre la fente de connexion de la carte SPEX.
4. Branchez le connecteur du câble r
uban pr
ovenant de l’ouver
tur
e de la car
te SPEX sur
l’amplificateur au connecteur correspondant sur la carte SPEX.
5. Insér
ez la car
te SPEX dans l’ouverture et replacez la plaque de retenue sur le panneau arrière.

6 Contact Polk Audio Customer Ser
vice 1-800-377-7655 (Outside US: 410-358-3600)
Monday-Friday
, 9:00 AM-6:00 PM Easter
n T
ime,
INSTALLING THE SWA500
NOTE: Ensur
e the amplifier’s power is off before making any connections.
REMEMBER: If you‘re not rack mounting this amplifier, ensure that it’s located with its
feet solidly r
esting on a flat level surface.
Ensure the installation area is well ventilated. You may need to provide additional
cooling if there is not adequate ventilation.
Never block the amplifier’
s ventilation holes.
Never expose the amplifier to heat sources or moisture.
When the amplifier is installed ther
e should be a minimum 3" clearance on
the top and sides of the chassis.
INST
ALAÇÃO DO AMPLIFICADOR SWA500
NOTA: Sempre desligue a fonte de alimentação do amplificador antes de fazer qualquer ligação.
LEMBRE-SE: Se este amplificador não for ser instalado em rack, os pés devem estar muito bem
apoiados em uma super
fície plana.
Certifique-se de que a área de instalação seja bem ventilada. Pode ser que seja necessário
pr
ovidenciar ventilação adicional se a ventilação não for adequada.
Nunca tampe os orifícios de ventilação do amplificador.
Nunca exponha o amplificador ao calor ou à umidade.
Recomendamos que um espaço livr
e mínimo de 8 cm seja deixado na parte
superior e nas laterais da unidade quando o amplificador for instalado.
INSTALLATION DES SWA500
HINWEIS: V
or dem Anschließen müssen Sie stets sicherstellen, dass der Netzschalter des
Verstärkers ausgeschaltet ist.
WICHTIG: Wenn Sie den Verstärker nicht in einem Rack montieren, müssen Sie sicherstellen,
dass er mit den Füßen fest auf einer ebenen Oberfläche ruht.
Stellen Sie sicher, dass der Installationsbereich gut gelüftet ist. Wenn nicht genug Lüftung
vorhanden ist, müssen Sie eventuell für zusätzliche Kühlung sorgen.
Sie dürfen nie die Lüftungslöcher des Verstärkers blockieren.
Der Verstärker darf nie Hitzequellen oder Feuchtigkeit ausgesetzt werden.
Bei der Installation des Verstärkers sollte mindestens ein Freiraum von 8 cm
seitlich von und über dem Gehäuse freigelassen werden.
INSTALLAZIONE DEL SWA500
NOT
A: prima di eseguire qualunque collegamento, verificare che l’alimentazione
dell'amplificator
e sia spenta.
RICORDARE:Se l’amplificator
e non viene montato su rack, verificare che sia posizionato
in modo che i piedini siano appoggiati fer
mamente su una superficie orizzontale e piatta.
Verificare che l’area di montaggio abbia un'adeguata ventilazione. Nel caso in cui la
ventilazione non fosse suf
ficiente, sarà necessario fornire un raffreddamento ulteriore.
Non bloccar
e mai le aperture di ventilazione dell’amplificatore.
Non espor
re mai l’amplificatore a fonti di calore o umidità.
Quando l’amplificator
e è installato è necessario avere almeno 7,6 cm di spazio libero al
di sopra dell’involucro dell’unità e sui lati.
INST
ALACIÓN DEL SWA500
NOT
A. El amplificador debe estar apagado antes de hacer las conexiones.
RECUERDE: Si no va a montar este amplificador en un anaquel, las patas deben ir
sólidamente apoyadas en super
ficies niveladas horizontales.
El ár
ea de instalación debe estar bien ventilada. Puede ser necesario suministrar
enfriamiento adicional si no hay ventilación adecuada.
Nunca bloquee los agujer
os de ventilación del amplificador.
Nunca exponga el amplificador a fuentes de calor o humedad.
Se recomienda dejar un espacio libre mínimo de 3 plg. de anchura alrededor de la superficie
superior y las superficies laterales del chasis cuando se instale el amplificador.
INST
ALLATION DU SWA500
NOTE:Assurez-vous toujours que l’amplificateur est hors tension avant de faire des connexions.
NOTEZ BIEN:Si vous n’installez pas cet amplificateur sur un bâti, assurez-vous qu’il repose
sur ses pieds sur une surface plate et de niveau.
Assurez-vous que le lieu d’installation est bien ventilé. S’il n’y a pas assez de ventilation,
vous devrez prévoir un refroidissement adéquat.
Ne bloquez jamais les trous de ventilation de l’amplificateur.
N’exposez jamais l’amplificateur à une source de chaleur ou à l’humidité.
Assurez un dégagement minimum de 7,5 cm (3 po) des parois supérieur et latéraux
du châssis de l'amplificateur.
Rack Mounts: The SWA 500 comes with rack mounts as illustrated.
Racks: O SWA500 é fornecido com racks, como mostrado na figura.
Rack-Befestigungen: Der SWA500 wird, wie abgebildet, mit Rack-Befestigungen ausgeliefert.
Montaggio su rack: L’unità SWA 500 può essere montata su rack, come mostrato in figura.
Monturas para armazón: El SWA500 viene con monturas para armazón, tal como se ilustra.
Montage sur bâti: Le SWA500 est livré avec des bâtis tel qu’illustré.
5-way binding posts
Conector de 5 pinos
5-fach-Terminals
Per
ni di collegamento a 5 vie
Terminales de cinco modos
Bornes « 5 façons »

For more information visit our website at www.polkaudio.com 7
RL
RECEIVER
SUB-OUT
-
+
-
+
RCA CABLE
FRONT
SWA500
1st SUBWOOFER
2nd SUBWOOFER
(Optional)
SWA500
1st SUBWOOFER
2nd SUBWOOFER
(Optional)
SWA500
LR
PRE-OUT
RL
POWER AMPLIFIER
INPUT
FRONT
-
+
-
+
LR
PRE-AMP OR PROCESSOR
RCA CABLES
1st SUBWOOFER
2nd
SUBWOOFER
(Optional)
SUBWOOFER CONNECTION OPTIONS/OPÇÕES DE CONEXÃO DO SUBWOOFER/SUBWOOFER-ANSCHLUSSOPTIONEN/
OPZIONI COLLEGAMENTO SUBWOOFER/OPCIONES DE CONEXIÓN DEL SUBWOOFER/OPTIONS DE CONNEXION DU SUBWOOFER
Speaker Level Connection/Conexão de nível das caixas acústicas/Lautsprecherpegelanschluss
Collegamento livello altoparlanti/Conexión de nivel de altavoz/Connexion niveau h.p.
*This connection method requires that your receiver's setup instructions for
the front speakers be set to "large" or unfiltered.
* Para este método de conexão, as instruções de instalação do receiver devem definir que
as caixas acústicas frontais são “large” (grandes) ou “unfiltered” (não filtradas).
*Bei dieser Anschlussmethode ist der Receiver-Setup für die vorderen Lautsprecher
auf „Large“ oder ungefiltert einzustellen.
*Per questo metodo di collegamento le istruzioni di impostazione del ricevitore devono indicare
che gli altoparlanti anteriori devono essere impostati su “large” o senza filtri.
*Con este método de conexión, el receptor debe configurarse para altavoces frontales
grandes (Large) o sin filtro.
*Pour cette méthode de connexion, réglez le contrôle des haut parleurs avant du
menu du récepteur à la position « large » ou « unfiltered » (sans filtre).
Unfiltered Pre-Amp Level Connection/Conexão de nível do pré-amplificador não filtrada/
Ungefilterter Vorverstärker-Pegelanschluss/Collegamento livello pre-amp non filtrato/Unfiltered
Pre-Amp Level Connection/Conexión de nivel de preamplificación sin filtro/
Connexion niveau pré-ampli sans filtre
Filtered, Sub-Out Connection/Conexão de saída sub, filtrada/Gefilterter Subwooferausgang
Collegamento uscita sub filtrata/Conexión de salida de subwoofer filtrada/
Connexion sortie subwoofer avec filtre

15 June 2005
HBP958
SWA500_front.eps
Full Size
MKL
100% PANTONE Cool Gray 7
n/a
n/a
n/a
Marketing
Date
Drawing #
File Name
Scale
Drawn By
Color
Emboss Ht.
Deboss Depth
Finish
Engineering
Date
Revision
Part #
System Engineering
Approval
Q.A. Approval
Mechanical Design Approval
Comments
power
protection
low pass (Hz)
40
80
120
volume
min
max
17.00
3.48
power
protection
low pass (Hz)
40
80
120
volume
min
max
SWA5 00
SWA5 00
8 Contact Polk Audio Customer Ser
vice 1-800-377-7655 (Outside US: 410-358-3600)
Monday-Friday
, 9:00 AM-6:00 PM Easter
n T
ime,
Lowpass Filter Adjustment
T
urning the Low Pass Filter Setting HIGHER gives
mor
e lower mid-range/upper-bass output. Turning
the Low Pass Filter Setting LOWER gives less
lower mid-range upper bass output. This control
only works with LINE LEVEL and SPEAKER LEVEL.
It has no ef
fect on LFE hookups.
Volume Adjustment
Contr
ols the subwoofer(s) volume, with minimum
and maximum settings indicated.
LED Indicator Lights
Power LED Indicators:
Active LED: ON = GREEN and indicates
the amplifier is active.
Protection LED: Protection = RED and indicates a
fault condition.
Fr
ont Panel LED Indicators with Power Switch
Positions: The SWA 500 power status can be
configured in one of three options using The
Power Switch on the back panel:
Power LED: see char
t on page 9.
Pr
otection LED:
Power Of
f – LED shows no light
Fault -LED is Red
Power On- No fault; LED shows no light
Ajuste do filtro passa-baixa
Girando o botão seletor do filtro passa-baixa
no sentido HIGHER (Máx.), você terá mais
potência na faixa de freqüência média inferior.
Girando o referido botão no sentido LOWER
(Mín.), você terá menos potência na faixa de
freqüência mencionada. Este controle só funciona
em NÍVEL DE LINHA e NÍVEL DE ALTO-FALANTE.
Não tem nenhum efeito em conexões LFE.
Ajuste de volume
Controla o volume do(s) subwoofer(s), com os
valores mínimo e máximo indicados.
LEDs Indicadores
LEDs indicadores Lig/Desl:
LED "Ligado" ON (Lig) = VERDE e significa que
o amplificador está ligado.
LED "Proteção"
Proteção = VERMELHO e indica uma falha no
cir
cuito elétrico, alto-falante ou amplificador
.
LEDs indicadores do painel frontal com posições
da chave seletora de modo de alimentação:
O modo de alimentação do SW
A500 pode ser
configurado em uma das três opções abaixo
usando-se A chave seletora de modo de alimen-
tação que se encontra no painel traseir
o:
LED Lig/Desl:veja mapa em página 9
LED "Proteção":
Desligado – LED desligado (sem luz)
Falha -LED V
ermelho
Einstellung des T
iefpass-Filters
W
enn Sie die Tiefpass-Filtereinstellung HÖHER
drehen, liefert dies mehr Leistung im unteren
Mitteltonbereich. Wenn Sie die Tiefpass-
Filter
einstellung NIEDRIGER drehen, liefert dies
weniger Leistung im unter
en Mitteltonbereich,
aber präziseren Bass. Dieser Regler funktioniert
nur mit LINE LEVEL und SPEAKER LEVEL. Er hat
keine Auswirkungen auf LFE-Anschlüsse.
Lautstärker
egler
Kontrolliert die Lautstärke des/der Subwoofer(s),
wobei die Minimum- und Maximumeinstellungen
markier
t sind.
LED-ANZEIGELEUCHTEN
Netz-LEDs: Aktive LED
EIN = GRÜN, was anzeigt, dass der
Verstärker aktiv ist.
Schutz-LED
Schutz = ROT, was einen Fehler in den Kabeln,
dem Lautsprecher oder dem Verstärker anzeigt.
LED-Anzeigen an der Vorderseite mit
Betriebsmodusschalter-Positionen
Der Betriebsmodus des SWA500 kann mit dem
Betriebsmodusschalter an der Rückseite auf eine
von drei Optionen eingestellt werden:
Netz-LED:Siehe Diagramm auf Seite 9
Schutz-LED:
Strom aus – LED leuchtet nicht auf
Fehler – LED ist rot
AMPLIFIER OPERA
TION/OPERAÇÃO DO AMPLIFICADOR/VERSTÄRKERBETRIEB/FUNZIONAMENTO DELL'AMPLIFICATORE/FUNCIONAMIENTO DEL AMPLIFICADOR
/OPÉRA
TION DE L’AMPLIFICATEUR
Fr
ont Panel Controls/Controles Do Painel Frontal/BEDIENELEMENTE AN DER VORDERSEITE/CONTROLLI
P
ANNELLO ANTERIORE/CONTROLES DEL PANEL FRONTAL/Controles Du Panneau Avant
Regolazione filtr
o passa basso
ALZANDO il filtro passa basso si ottengono più
toni midrange in uscita.ABBASSANDO il filtr
o
passa basso si ottengono meno toni midrange
ma maggior
e precisione nei bassi in uscita.
Questo controllo viene utilizzato solo con
LIVELLO DI LINEA e LIVELLO ALTOPARLANTI.
Non ha alcun ef
fetto su collegamenti LFE.
Regolazione del volume
Controlla il volume dei subwoofer, indicando
le impostazioni minima e massima.
INDICATORI LUMINOSI LED
Indicatori luminosi LED dell’alimentazione:
LED attivo ON = VERDE indica che
l’amplificator
e è attivo.
Indicatore LED protezione
Protezione = ROSSO indica un guasto nei
cavi, nell’altoparlante o nell'amplificator
e.
Indicatori LED del pannello anteriore con
posizioni interruttori in modalità accensione:
Lo stato di accensione dell’unità SW
A 500 può
essere configurato su una delle tre opzioni
utilizzando gli interruttori modalità accensione
sul pannello posteriore:
Indicatore luminoso LED dell’alimentazione:
vedere il grafico sulla pagina 9
Indicatore LED protezione:
Alimentazione spenta – LED spento
Guasto -LED rosso
Ajuste del filtro de pasabajas
SUBIR el ajuste del filtro de pasabajas
produce más salida de frecuencias medias y
bajas.BAJAR el ajuste del filtro de pasabajas
produce menos salida de frecuencias medias y
bajas y una salida de bajos más precisa. Este
control funciona solamente con el NIVEL DE
LÍNEA y el NIVEL DE ALTAVOZ. No tiene efecto
en las conexiones de LFE.
Ajuste del volumen
Controla el volumen de los subwoofers y tiene
indicaciones de máximo y mínimo.
INDICADORES LUMINOSOS
Indicador
es luminosos de alimentación:
Indicador luminoso de actividad
Encendido: ver
de; indica que el amplificador
está activo.
Indicador luminoso de pr
otección
Pr
otección: rojo; indica que hay una falla en el
cableado, el altavoz o el amplificador
.
Indicadores luminosos del panel frontal con posi-
ciones del selector de modo de alimentación:
El estado de alimentación del SW
A500 se puede
configurar de una de tres maneras por medio del
selector de modo de alimentación que hay en el
panel traser
o:
Indicador luminoso de alimentación:
vea el gráfico en la página 9
Indicador luminoso de pr
otección:
Alimentación en posición off: apagado
Falla: rojo
Réglage du filtr
e passe-bas
Régler le contrôle du filtr
e passe-bas plus
haut augmente la sortie des médiums graves.
Régler le contrôle du filtre passe-bas plus bas
réduit la sor
tie des médiums graves mais accroît
la précision des graves. Ce contrôle ne fonctionne
qu’avec le NIVEAU DE LIGNE et LE NIVEAU H.P
.
Il n’affecte pas les connexions LFE.
Contrôle de volume
Règle le volume du (des) subwoofer(s) -
réglages maximum et minimum indiqués.
Voyants DEL de tension
DEL active
SOUS TENSION (On) = VERTE - indique
que l’amplificateur est actif.
DEL de protection
Protection = ROUGE - indique un problème relatif
au filage, à l’amplificateur ou au haut-parleur.
Voyants DEL du panneau avant selon le
réglage du commutateur « Power Mode »
L’état de tension de SWA500 peut être configuré
de trois façons en utilisant le commutateur «
Power Mode » situé sur le panneau arrière:
DEL de tension: voir le graphique à la page 9
DEL de protection :
Hors tension (off) -La DEL est éteinte
Anomalie-La DEL est Rouge

for more information visit our website at www.polkaudio.com 9
Rear Panel Contr
ols/CONTROLES DO PAINEL TRASEIRO/BEDIENELEMENTE AN DER RÜCKSEITE
CONTROLLI P
ANNELLO POSTERIORE/CONTROLES DEL PANEL DE ATRÁS/Controles Du Panneau Arriere
AC Main Switch
This switch controls the main power to
the amp. ”I” is ON, ”O” is OFF
.
Phase Switch
This switch enables you to compensate for dif
fer-
ent sound path lengths of the subwoofer and
fr
ont speakers. If the subwoofer is in the same
1/3 of the room area as the front speakers, leave
the switch at “0.” Move the toggle switch to
“180” if the subwoofer is located outside the
same r
oom area as the front speakers.
Power Switch
Standby: W
ith the Power Switch in this position,
and the AC main toggle swtich on, the amp
is in Standby.
Auto: W
ith the Power Switch in this position,
the amplifier will switch “On” when it receives
a signal and will turn off after 15 min. of
no signal.
On: W
ith the Power Switch set to “On,” and
the AC Main toggle on, the amp is always
active (”On”).
Chave geral (Lig/Desl)
LIGAR via REDE PÚBLICA (CA)
Comutador de fase
Esta chave permite a compensação de diferentes
extensões de vias de propagação sonora do sub-
woofer e caixas acústicas. Se o subwoofer estiv-
er no mesmo 1/3 da área da sala, como as caixas
frontais, deixe o comutador em “0.” Passe a
chave bipolar para “180”, caso o subwoofer este-
ja fora da mesma área da sala, como as caixas
acústicas.
Chave seletora de modo de alimentação
Standby: Com a chave seletora nesta posição, e a
chave geral (CA) ligada, o LED Lig/Desl no painel
frontal fica AMARELO/VERDE quando o amplifi-
cador é energizado.
Automático: Com a chave seletora nesta posição,
o amplificador liga ao ser energizado e desliga
quando não estiver mais energizado. O LED
Lig/Desl do painel frontal fica VERDE quando o
amplificador é energizado.
Lig (On): Com a chave seletora na posição "Lig"
(On), e chave geral (CA) ligada, o amplificador
estará per
manentemente energizado. O LED
Lig/Desl na fr
ente do painel frontal ficará VERDE.
Netzschalter
Über Netzschalter EINSCHALTEN
Phasenwahlschalter
Dieser Schalter er
möglicht es, für den
Unterschied in den Schall-Laufwegen vom
Subwoofer und den vorderen Lautsprechern her
zu kompensier
en. Wenn sich der Subwoofer im
gleichen Drittel des Raums befindet wie die
vorderen Lautsprecher, sollten Sie den Schalter
auf „0“ lassen. Wenn sich der Subwoofer außer-
halb des Ber
eichs der vorderen Lautsprecher
befindet, stellen Sie den Schalter auf „180“.
Betriebsmodus-Wahlschalter
Standby: W
enn der Betriebsmodusschalter in
dieser Stellung ist und der Netzschalter an ist,
leuchtet die Netz-LED an der Vorderseite auf
(GELB/GRÜN), wenn Spannung vorliegt.
Auto: Wenn der Betriebsmodusschalter in dieser
Stellung ist, schaltet sich der Verstärker ein,
wenn eine Spannung vor
handen ist, und schaltet
sich aus, wenn die Spannung nicht mehr vorhan-
den ist. Wenn Spannung vorhanden ist, leuchtet
die NETZ-LED an der Vorderseite GRÜN auf.
Ein: Wenn der Betriebsmodusschalter auf „Ein“
steht und der Netzschalter an ist, erhält der
Verstärker eine konstante Stromversorgung. Die
NETZ-LED an der Vorderseite leuchtet GRÜN auf.
Interruttore di alimentazione
ACCENSIONE tramite INTERRUTTORE
CA PRINCIPALE
Interruttore fase
Questo interruttore permette di compensare per
la diversa distanza del percorso del suono per il
subwoofer e gli altoparlanti anteriori. Se il sub-
woofer si trova nello stesso terzo della stanza in
cui si trovano anche gli altoparlanti anteriori, las-
ciare l'interruttore nella posizione “0.” Se invece
il subwoofer non si tr
ova nella stessa parte della
stanza in cui si tr
ovano gli altoparlanti anteriori,
spostare l'interruttore sulla posizione “180.”
Inter
ruttore di selezione della
modalità di accensione
Standby/Attesa: Quando l’interruttore di
selezione della modalità di accensione viene
posizionato su questa opzione e l’inter
ruttore
principale dell’alimentazione è acceso,
l’indicatore LED dell’ALIMENTAZIONE sul
pannello anterior
e passa al color GIALLO/VERDE
quando è pr
esente una tensione in ingresso.
Auto/Automatico: Quando l’interruttore di
selezione della modalità di accensione viene
posizionato su questa opzione, l’amplificator
e si
accende automaticamente quando riceve una ten-
sione in ingresso e si spegne quando la tensione
non è più pr
esente. L’indicatore LED dell’ALIMEN-
T
AZIONE sul pannello anteriore passa al color
VERDE quando è presente una tensione.
On/Acceso: Quando l’inter
r
uttore di selezione
della modalità di accensione viene posizionato su
“On” e l’interruttore principale dell'alimentazione
è acceso, l’alimentazione viene sempre fornita
all’amplificator
e. L’indicatore LED dell’ALIMEN-
TAZIONE sul pannello anteriore passa
al color VERDE.
Inter
ruptor de alimentación
ENCENDIDO por medio del INTERRUPTOR
PRINCIPAL DE CA
Conmutador de fase
Este conmutador permite compensar la diferencia
entre la distancia de los subwoofers a la posición
de audición y la distancia de los altavoces
frontales a la posición de audición. Si el sub-
woofer está en el mismo tercio de la sala en que
están los altavoces frontales, deje este selector
en “0.” Cambie el ajuste a “180” si el subwoofer
no está en el área de la habitación en que están
los altavoces frontales.
Selector de modo de alimentación
Standby: Cuando el selector de modo de ali-
mentación está en esta posición y el interruptor
basculante principal de CA está en la posición
"On", el indicador luminoso de alimentación en el
panel fr
ontal se ilumina de color AMARILLO/
VERDE en presencia de voltaje.
Auto: Cuando el selector de modo de ali
-
mentación está en esta posición, el amplificador
se enciende al recibir un voltaje y se apaga cuan-
do deja de haber voltaje. El indicador luminoso de
alimentación del panel fr
ontal se ilumina de color
VERDE cuando hay voltaje.
On: Cuando el selector de modo de alimentación
está en esta posición y el inter
ruptor basculante
principal de CA está encendido, el amplificador
está recibiendo alimentación constante. El indi-
cador luminoso de alimentación del panel fr
ontal
está VERDE.
Commutateur de tension
MISE SOUS TENSION via le secteur CA
Commutateur de phase
Ce commutateur vous per
met d’équilibrer la
sonorité du subwoofer et des enceintes avant
selon la distance que doivent parcourir les ondes
sonor
es. Si le subwoofer est situé dans le même
1/3 de la pièce que les enceintes avant, laissez le
commutateur à la position « 0 ». Choisissez la
position « 180 » si le subwoofer est situé hors de
la zone immédiate des enceintes avant.
Commutateur « Power »
Standby (veille)
Avec le commutateur « Power Mode » à la posi-
tion « Standby » et le commutateur de secteur
CA sous tension.
Auto
Avec le commutateur « Power » à la
position « On », l’amplificateur se mettra sous
en présence de voltage et se mettra hors tension
lors d’absence de voltage. LE VOYANT DEL sur
le panneau avant sera VERT lors de la présence
de voltage.
On
Avec le commutateur « Power » à la
position « On » et le commutateur de secteur
CA sous tension, l’amplificateur sera constam-
ment sous tension. Le voyant DEL sur le
panneau avant sera VERT.
AC MAIN SWITCH/REDE PÚB. (CA)/EINSCHALTEN Power Switch/Chave Geral/Netzschalter Color (Power LED)/Cor (LED Lig/Desl)/ Condition/Condição/Bedingung
INTERRUTTORE CA PRINCIPALE/INTERRUPTOR Interruptor de alimentación/ Farbe (Aktive LED)/Colore (Lum. De Activ.)/ Condizione/Condición/Condition
PRINCIPAL DE CA/MISE SOUS TENSION Power Switch/Commutateur de tension Color (Indic. Lum. de Ali.)/Couleur (DEL de Tension)
OFF/DESL/AUS-POS./FUORI DI/LEJOS/DE Any/Qualquer/Irgendein/ Un-Lit/Sem Luz/Nicht Auf/Spento/ Amp is off/Desligado/Strom aus/Alimentetazoine spenta/
ualanque/Cualquira/Quels Apagado/Eteinte Alimentación en posición off/Hors tension
ON/LIG/EIN-POS./SU/EN/SUR
Standby/Standby/Standby
Red/Vermelho/Rot/Rosso/Rojo/Rouge Amp in Standby position/Posição Standby/Standby-position
Standby/Standby/Standby
Posizione Standby/Posición Standby/Position état de veille
ON/LIG/EIN-POS./SU/EN/SUR Auto/Auto/Autom./Auto/Auto/Auto Green/Verde/Grun/Verde/Verde/Verte Amp is On and will switch to Standby in absence of signal.
Amp está ligado e mudará para prontidão na ausência de sinal.
V
er
. ist An und schaltet auf Standby, wenn kein Signal vorliegt.
Posizione On, Posizione Standby con nessuno segnale.
Posición On, Posición Standby con ninguna señal.
Position On, Position état de veille avec aucun signal.
ON/LIG/EIN-POS./SU/EN/SUR Auto/Auto/Autom./Auto/Auto/Auto Red/Vermelho/Rot/Rosso/Rojo/Rouge Amp in Standby and will switch On with signal.
Amp está em pr
ontidão e ligará ao r
eceber o sinal.
V
er ist in Standby und schaltet auf An, wenn Signal vorliegt.
Posizione Standby, Posizione On con segnale.
Posición Standby, Posición On con señal.
Position état de veille, Position On avec signal.
ON/LIG/EIN-POS./SU/EN/SUR On/Lig/Ein-Pos./Su/En/Sur Green/Verde/Grun/Verde/Verde/Verte Amp is On/Posição Lig/Ein-Position/Posizione On/
Posición On/Position On

10 Contact Polk Audio Customer Ser
vice 1-800-377-7655 (Outside US: 410-358-3600)
Monday-Friday
, 9:00 AM-6:00 PM Easter
n T
ime,
SW
A500 Specifications/Especificações do amplificador SWA500/SWA500 Daten
Caratteristiche tecniche SWA500/Especificaciones del SWA500/Fiche technique du SWA500
AMPLIFIER POWER
500 W
atts Continuous into 4 Ohms
250 W
atts Continuous into 8 Ohms
MINIMUM FREQUENCY BANDWIDTH
20Hz – 500Hz (without filters or EQ)
CROSSOVER FREQUENCY
Adjustable 40Hz – 120Hz
PHASE CONTROL
Switch normal and reverse (0 or 180)
INPUT IMPEDANCE
Line Level:
≥ 20k Ohms
Speaker Level:
≥ 200 Ohms
INPUTS
Speaker and Line level (filter adjustable)
LFE line level (unfiltered)
LINE LEVEL OUTPUTS
Unfilter
ed
SPEAKER LEVEL OUTPUTS
Parallel outputs
DIMENSIONS (HxWxD):
3.48"x17.0"x12.59"
8.85cmx43.18cmx31.97cm
SHIPPING WEIGHT
approx. 17 lbs.
POTÊNCIA
500 Watts contínuos em 4 ohms
250 Watts contínuos em 8 ohms
AMPLITUDE MÍNIMA DE FAIXA
DE FREQÜÊNCIA
20 Hz – 500 Hz (sem filtros ou EQ)
FREQÜÊNCIA DE CROSSOVER
Ajustável 40 Hz – 120 Hz
CONTROLE DE F
ASE
Nor
mal ou inversa (0 ou 180)
IMPEDÂNCIA DE ENTRADA
Nível de linha:
≥
20 k Ohms
Nível de alto-falante:
≥
200 ohms
SINAIS DE ENTRADA
nível de linha e de alto-falante
(ajustável por filtr
o)
nível de linha LFE (sem filtr
o)
SAÍDAS DE NÍVEL DE LINHA
Não filtradas
SAÍDAS DE NÍVEL DAS CAIXAS ACÚSTICAS
Saídas paralelas
DIMENSÕES (AxLxP):
3.48"x17.0"x12.59"
8.85cmx43.18cmx31.97cm
PESO EMBALADO
aprox. 17lbs
VERSTÄRKERLEISTUNG
500 W
att Dauerleistung an 4 Ohm
250 W
att Dauerleistung an 8 Ohm
MINIMALE FREQUENZBANDBREITE
20Hz – 500Hz (ohne Filter oder EQ)
CROSSOVER-FREQUENZ
Einstellbar
, 40Hz – 120Hz
PHASENREGELUNG
Schalter normal und umgekehrt (0 oder 180)
EINGANGSIMPEDANZ
Line-Pegel:
≥ 20 k Ohm
Lautspr
echerpegel: ≥ 200 Ohm
EINGÄNGE
Lautsprecher und Line-Level
(einstellbarer Filter)
LFE Line-Level (ohne Filter)
LINE-PEGEL-AUSGÄNGE
Ungefilter
t
LAUTSPRECHERPEGELANSCHLÜSSE
Parallelausgänge
ABMESSUNGEN (HxBxT)
3.48"x17.0"x12.59"
8.85cmx43.18cmx31.97cm
VERSANDGEWICHT
ungefähr. 17lbs.
POTENZA AMPLIFICATORE
500 Watt costanti in un carico da 4 Ohm
250Watt costanti in un carico da 8 Ohm
LARGHEZZA DI BANDA MINIMA
20Hz – 500Hz (senza filtri né EQ)
FREQUENZA DI TAGLIO
Regolabile 40Hz – 120Hz
CONTROLLO FASE
Commutazione tra normale e inversa (0 o 180)
IMPEDENZA DI INGRESSO
Livello di linea: ≥ 20k Ohms
Livello altoparlante: ≥ 200 Ohm
INGRESSI
Livello altoparlanti e di linea (filtro regolabile)
Livello linea LFE (senza filtri)
USCITE LIVELLI LINEA
Non filtrati
USCITE LIVELLI ALTOPARLANTI
Uscite parallele
DIMENSIONI (AxLxP)
3.48"x17.0"x12.59"
8.85cmx43.18cmx31.97cm
PESO DI SPEDIZIONE
appross. 17lbs
POTENCIA DEL AMPLIFICADOR
500 W continua en 4 Ohms
250 W continua en 8 Ohms
ANCHO DE BANDA DE FRECUENCIAS MÍNIMO
20 Hz a 500 Hz (sin filtros ni EQ)
FRECUENCIA DE CROSSOVER
Ajustable de 40 Hz a 120 Hz
CONTROL DE F
ASE
Normal o inversa (0 ó 180)
IMPEDANCIA DE ENTRADA
Nivel de línea:
≥ 20k Ohms
Nivel de altavoz:
≥ 200 Ohms
ENTRADAS
Nivel de altavoz y nivel de línea
(ajustable con filtros)
Nivel de LFE (sin filtros)
SALIDAS DE NIVEL DE LÍNEA
Sin filtr
o
SALIDAS DE NIVEL DE ALTAVOZ
Salidas paralelas
DIMENSIONES (HxWxD)
3.48"x17.0"x12.59"
8.85cmx43.18cmx31.97cm
PESO DE TRANSPORTE
aprox. 17lbs
PUISSANCE DE L’AMPLIFICATEUR
500 Watts continus en 4 Ohms
250 Watts continus en 8 Ohms
BANDE PASSANTE MINIMUM
20Hz – 500Hz (sans filtre ou égalisation)
CROSSOVER FREQUANCY
Adjustable 40Hz – 120Hz
CONTROLE DE PHASE
Commutateur « normal »
ou « reverse » (0 or 180)
IMPEDANCE D’ENTREE:
Niveau de ligne: 20k Ohms
Niveau H.P: 200 Ohms
ENTREES
Niveau de H.P. et de ligne (filtre ajustable)
Niveau de ligne LFE (sans filtre)
SORTIES NIVEAU DE LIGNE
Sans filtre
SORTIES NIVEAU H.P.
Sorties parallèles
DIMENSIONS (HxLxP):
3.48"x17.0"x12.59"
8.85cmx43.18cmx31.97cm
POIDS A L’ EXPEDITION
appox. 17lbs

for more information visit our website at www.polkaudio.com 11
TECHNICAL ASSISTANCE OR SERVICE
If after following the hook-up directions, you experience difficulty, please double check
all wir
e connections. Should you isolate the pr
oblem to the speaker
, contact the authorized Polk
Audio dealer where you made your purchase or call Polk Audio’s Customer Service Department at
1-800-377-7655 (calls from US or Canada only) from 9am to 6pm, Eastern Time, Monday through
Friday
. Y
ou may also contact us via email: [email protected].
APOYO O SERVICIO TÉCNICO
Si tiene problemas después de seguir las instr
ucciones de conexión, r
evise dos veces todas las
conexiones de cables. Si logra ubicar el problema en el altavoz, póngase en contacto con el
proveedor autorizado Polk Audio donde lo compró o comuníquese con el departamento de servicio
al cliente de Polk Audio llamando al 1-800-377-7655 (sólo en EE.UU. y Canadá) de lunes a vier
nes,
de 9:00 a.m. a 6:00 p.m., hora del Este. También puede enviarnos un mensaje por correo
electrónico a [email protected].
ASSISTANCE TECHNIQUE OU SERVICE
Si après avoir suivi le mode de connexion vous éprouvez des difficultés, vérifier toutes vos connexions.
Si le pr
oblème semble pr
ovenir du haut-parleur
, contactez le r
evendeur Polk agréé de qui vous avez
acheté le produit ou communiquez avec le Service à la Clientèle de Polk Audio au 1-800-377-7655
(appels du Canada et des É.U. seulement) du lundi au vendredi, 9h00 - 18h00 HNE.
V
ous pouvez également communiquer avec nous par cour
riel: [email protected].
POLK AUDIO HISTOR
Y—
A P
ASSION FOR SOUND
Polk Audio was founded in Baltimor
e in 1972 by Johns Hopkins University graduates Matthew Polk and George Klopfer. Today, Polk Audio is a leading international manufacturer of high quality home and
automotive loudspeakers. Polk pr
oducts emphasize superior sound and build quality, and feature many patented and award-winning innovations. Polk Audio has built a reputation as “The Speaker Specialists.” Polk
pr
oducts are sold throughout the USA, Canada and in over 50 countries around the world. Polk Audio’s mission has always been to build high quality, great sounding speakers at affordable prices. For the people of
Polk Audio, building speakers is not just a job; it’
s a passion.
HISTÓRIA DA POLK AUDIO—
UMA P
AIXÃO POR SOM
A Polk Audio foi fundada em Baltimor
e em 1972 por Matthew Polk e George Klopfer, universitários formados pela Johns Hopkins University. Atualmente, a Polk Audio é um dos maiores fabricantes internacionais
de caixas acústicas/alto-falantes domésticos e automotivos de alta qualidade, com mais de 50 patentes de criações e novidades tecnológicas. Os pr
odutos Polk se caracterizam pelo seu som de altíssimo nível de
qualidade e por incorporar uma série de inovações patenteadas e premiadas. Os produtos Polk são vendidos em todos os Estados Unidos, Canadá e em mais de 50 países no mundo todo. A missão da Polk Audio
tem sido sempre desenvolver caixas acústicas/alto-falantes de alto nível de qualidade e de alto padrão a preços acessíveis. Para os funcionários da Polk Audio, fabricar caixas acústicas/alto-falantes não é apenas
um trabalho; é também uma paixão.
DIE GESCHICHTE VON POLK AUDIO—
EINE LEIDENSCHAFT FÜR SOUND
Polk Audio wurde 1972 in Baltimore von Matthew Polk und George Klopfer, zwei Absolventen der Johns Hopkins University, gegründet. Heute ist Polk Audio ein international führender Hersteller hochwertiger
Heim- und Autolautsprecher, mit über 50 Patenten für technologische Innovationen und Design. Polk-Produkte bieten hervorragenden Sound und überragende Verarbeitungsqualität und basieren auf zahlreichen
patentierten und preisgekrönten Innovationen. Polk-Produkte werden in den USA, Kanada und in über 50 anderen Ländern der Welt vertrieben. Es war immer das Ziel von Polk Audio, hochwertige Lautsprecher mit
überragendem Sound zu vernünftigen Preisen herzustellen. Für die Mitarbeiter von Polk Audio ist die Herstellung von Lautsprechern nicht nur ein Job, sondern eine Leidenschaft.
IL P
ASSATO DI POLK AUDIO—
IL SUONO È LA NOSTRA PASSIONE
Polk Audio è stata fondata a Baltimor
e nel 1972 da due laureati della Johns Hopkins University, Matthew Polk e George Klopfer. Oggi Polk Audio è un’azienda leader nella produzione di altoparlanti di qualità per la
casa e per l’auto, con più di 50 br
evetti per innovazioni tecnologiche e del design. I prodotti Polk evidenziano una qualità eccezionale del suono e un’ottima costruzione e includono numerose innovazioni brevettate
che hanno vinto molti premi. I prodotti Polk sono venduti negli Stati Uniti, nel Canada e in più di altri 50 Paesi nel mondo. L’obiettivo di Polk Audio è sempre stato di creare altoparlanti di ottima qualità, con un suono
eccezionale e a prezzi ragionevoli. Per i dipendenti della Polk Audio, fabbricare altoparlanti non è solo un lavoro, è una passione.
HISTORIA DE POLK AUDIO—
PASIÓN POR EL SONIDO
Polk Audio fue fundada en Baltimore en 1972 por Matthew Polk y George Klopfer, egresados de la Universidad Johns Hopkins. Hoy en día, Polk Audio es uno de los principales fabricantes internacionales de
altavoces de alta calidad para la casa y el automóvil y tiene más de 50 patentes por innovaciones de tecnología y diseño. Los productos de Polk Audio enfatizan la superioridad del sonido y la calidad de la
fabricación, y tienen muchas innovaciones patentadas y galardonadas. Los productos de Polk Audio se venden en Estados Unidos, en Canadá y en más de 50 países de todo el mundo. La misión de Polk Audio ha
sido siempre fabricar altavoces de alta calidad que produzcan un sonido magnífico a precios accesibles. Para el personal de Polk Audio, fabricar altavoces no es simplemente un trabajo; es una pasión.
L’HISTOIRE DE POLK AUDIO—
LA PASSION DU SON
Polk Audio a été fondée à Baltimore en 1972 par deux gradués de l’Université John Hopkins, Matthew Polk et George Klopfer. Aujourd’hui, Polk Audio est un des plus importants fabricants de haut-parleurs
pour la maison et l’automobile. Polk Audio détient plus de 50 brevets pour ses technologies et ses designs innovateurs; ses produits sont reconnus mondialement pour leur qualité de fabrication et leur sonorité
incomparable. Ils sont vendus aux États-Unis, au Canada et dans plus de 50 pays autour du monde. La mission de Polk a toujours été de construire des haut-parleurs de la plus haute qualité - tout en les offrant
à prix abordables. Pour ceux et celles qui oeuvrent chez Polk, bâtir des haut-parleurs n’est pas seulement une occupation, c’est une passion.
La página se está cargando...
Transcripción de documentos
SWA500 HIGH PERFORMANCE POWERED SUBWOOFER AMPLIFIER IMPORTANT SAFETY INSTRUCTIONS READ BEFORE OPERATING EQUIPMENT 1. 2. 3. 4. 5. 6. 7. Read these instructions. Keep these instructions. Heed all warnings. Follow all instructions. Do not use this apparatus near water. Clean only with dry cloth. Do not block any ventilation openings. Install in accordance with the manufacturer's instructions. 8. Do not install near any heat sources such as radiators, heat registers, stoves, or other apparatus (including amplifiers) that produce heat. 9. Do not defeat the safety purpose of the polarized or grounding-type plug. A polarized plug has two blades with one wider than the other. A grounding type plug has two blades and a third grounding prong. The wide blade or the third prong are provided for your safety. If the provided plug does not fit into your outlet, consult an electrician for replacement of the obsolete outlet. 10. Protect the power cord from being walked on or pinched particularly at plugs, convenience receptacles, and the point where they exit from the apparatus. 11. Only use attachments/accessories specified by the manufacturer. 12. Unplug this apparatus during lightning storms or when unused for long periods of time. 13. Refer all servicing to qualified service personnel. Servicing is required when the apparatus has been damaged in any way, such as power-supply cord or plug is damaged, liquid has been spilled or objects have fallen into the apparatus, the apparatus has been exposed to rain or moisture, does not operate normally, or has been dropped. 14. WARNING: To reduce the risk of fire or electric shock, this apparatus should not be exposed to rain or moisture and objects filled with liquids, such as vases, should not be placed on this apparatus. 15. To completely disconnect this equipment from the mains, disconnect the power supply cord plug from the receptacle. 16. The main plug of the power supply cord shall remain readily operable. IMPORTANTES INSTRUCCIONES DE SEGURIDAD LEER ANTES DE HACER FUNCIONAR EL EQUIPO 1. 2. 3. 4. 5. 6. 7. 8. 9. 10. 11. 12. 13. 14. 15. Lea estas instrucciones. Guarde estas instrucciones. Respete todas las advertencias. Siga todas las instrucciones. No use este aparato cerca del agua. Límpielo solamente con un paño seco. No bloquee las aberturas de ventilación. Instale el aparato de acuerdo con las instrucciones del fabricante. No lo instale cerca de fuentes de calor, tales como radiadores, rejillas de piso, cocinas u otros aparatos (incluso amplificadores) que producen calor. No anule la seguridad implícita en el enchufe polarizado o con conexión a tierra. Los enchufes polarizados tienen dos patas, una más ancha que la otra. Los enchufes con conexión a tierra tienen dos patas iguales y una clavija de conexión a tierra. La pata ancha o la clavija de conexión a tierra han sido incorporadas al diseño por la seguridad del usuario. Si el enchufe no entra en el tomacorrientes, consulte a un electricista para que cambie el tomacorrientes obsoleto. Evite que el cordón de alimentación sea pisado o aplastado, en particular cerca del enchufe, cerca del tomacorrientes y en el punto en que el cordón sale del aparato. Use sólo los accesorios especificados por el fabricante. Desenchufe el aparato durante tormentas eléctricas o cuando no lo use durante largos períodos de tiempo. Encargue todo servicio del aparato al personal de servicio calificado. Se requiere servicio cuando el aparato ha sido dañado de alguna manera, tal como cuando se ha dañado el enchufe o el cordón de alimentación, han caído líquidos u objetos dentro del aparato o el aparato se ha dejado caer, ha dejado de funcionar normalmente o ha sido expuesto a la lluvia o a la humedad. ADVERTENCIA. Para reducir el riesgo de incendio o de descarga eléctrica, este aparato no debe ser expuesto a la lluvia o a la humedad, y no se le deben colocar encima objetos llenos de líquido, tales como floreros. Para desconectar completamente este equipo del tomacorrientes de CA de la pared, desenchufe del tomacorrientes el enchufe del cordón de alimentación. CARACTERÍSTICAS DEL SWA500 CARACTÉRISTIQUES DU SWA500 Amplificador clase D híbrido: Produce 250 W de potencia continua en 8 Ohms y 500 W de potencia continua en 4 Ohms. Amplificateur Classe D Hybride: Génère 250W continus en 8 Ohms et 500W continus en 4 Ohms. Tarjeta SPEX: La tarjeta SPEX configura la ecualización, el crossover y la circuitería de control de alimentación para que corresponda al subwoofer de Polk. Nota. En el SWA500, el puerto para la tarjeta SPEX tiene la siguiente etiqueta: Antes de encender este amplificador, es necesario instalar la tarjeta SPEX correspondiente al subwoofer que se esté usando. Indicadores luminosos del panel frontal, Indicador luminoso de protección del panel frontal, Indicador luminoso de alimentación del panel frontal. Circuito de protección: El SWA500 tiene protección térmica de control de alimentación dinámica y protección contra cortocircuitos y excesos de corriente. Carte SPEX: La carte SPEX configure l’égalisation, la fréquence de séparation et le circuit de contrôle de puissance répondant aux exigences spécifiques de chaque subwoofer Polk. Note:L’étiquette suivante est attachée au port de la carte SPEX sur le SWA500: Avant de pouvoir mettre cet amplificateur sous tension la carte SPEX appropriée au subwoofer utilisé doit être installée. Voyants DEL du panneau avant, DEL de protection sur le panneau avant, DEL de tension sur le panneau avant. Circuits de protection:Le SWA500 offre contrôle de puissance dynamique, protection thermique et protection contre les courts circuits et le courant excessif. Detector automático de encendido y apagado: El amplificador sale del modo de espera cuando se presenta una señal en las entradas de audio. La señal debe ser: a nivel de línea: > de 5 mV rms, a nivel de altavoz: > de 35 mV rms Senseur « Auto On/Off »: L’amplificateur quitte le mode de mise en veille (standby) à la présence d’un signal aux entrées audio. Le signal doit être de:Niveau de ligne: >5mVrms, Niveau H.P. : >75mVrms Filtro ajustable de pasabajas: 40 a 120 Hz (-3 dB pts), 24 dB/oct, Butterworth Filtre passe-bas ajustable: 40-120Hz (-3dB pts), 24dB/oct, Butterworth. Conmutador de fase: 0° ó 180° para compensar la ubicación del subwoofer con respecto a los altavoces frontales a fin de producir una combinación óptima entre los dos tipos de altavoz. Commutateur de phase:0 ou 180 degrés selon la position du subwoofer en relation avec les enceintes avant. Ceci assure l’homogénéité optimale entre le subwoofer et les enceintes avant. Entradas y salidas Entradas: enchufes RCA enchapados en oro con insertos rojo y blanco enchufes RCA enchapados en oro para Efectos de Baja Frecuencia (Low Frequency Effects, LFE) con inserto amarillo Entrada de alto nivel: terminales de cinco modos enchapadas en oro Entrées/Sorties Entrées: Prises RCA plaquées or avec inserts rouge et blanc Prise RCA LFE plaquée or avec insert jaune Entrés haut niveau: Bornes « 5 façons » plaquées or Sorties: Bornes « 5 façons » plaquées or 2 jeux connectés en parallèle Prises RCA plaquées or - sortie transversale avec inserts rouge et blanc Salidas: terminales de cinco modos enchapadas en oro 2 conjuntos, cableadas en paralelo enchufes de paso libre RCA enchapados en oro con insertos rojo y blanco 4 Contact Polk Audio Customer Service 1-800-377-7655 (Outside US: 410-358-3600) Monday-Friday, 9:00 AM-6:00 PM Eastern Time, [email protected] SPEX CARD INSTALLATION/INSTALAÇÃO DE PLACA SPEX/SPEX-KARTENINSTALLATION INSTALLAZIONE SCHEDA SPEX/INSTALACIÓN DE LA TARJETA SPEX/INSTALLATION DE LA CARTE SPEX The SWA500 Amplifier comes with SPEX Card(s), one each for the specific Polk In-wall Subwoofer to be installed. NOTE: One of the SPEX Cards must be installed in the SWA500 Amplifier for the amplifier to function. 1. Locate the SPEX Card that corresponds to the Polk subwoofer model to which the SWA500 Amplifier will be connected. 2. Remove the two (2) thumb screws from the rear of the amplifier. 3. Remove the label covering the SPEX Card slot. 4. Connect the ribbon connector coming from the SPEX Card opening to its mating connector on the SPEX Card. 5. Insert the SPEX Card into the opening and screw the retaining plate onto the back panel. O amplificador SWA500 vem com placa(s) SPEX, cada uma para um determinado subwoofer tipo in-wall Polk a ser instalado. NOTA: Uma das placas SPEX deve ser instalada no amplificador SWA500 para que ele funcione. 1. Localize a placa SPEX que corresponde ao modelo de subwoofer Polk ao qual o amplificador SWA500 será conectado. 2. Retire os dois parafusos borboleta (2) da parte traseira do amplificador. 3. Retire a etiqueta que cobre o slot da placa SPEX. 4. Conecte o conector de fita da abertura da placa SPEX ao conector correspondente na placa SPEX . 5. Insira a placa SPEX na abertura e parafuse a placa de retenção no painel traseiro. El amplificador SWA500 viene con tarjeta(s) SPEX, una para cada uno de los subwoofers Polk empotrados de la pared específicos que se van a instalar. NOTA. Para funcionar, el amplificador SWA500 debe tener instalada una de las tarjetas SPEX. 1. Ubique la tarjeta SPEX que corresponde al modelo de subwoofer Polk al cual se va a conectar el amplificador. Der SWA500 Verstärker wird mit drei SPEX-Karten geliefert, eine für jeden spezifischen Wandeinbau-Subwoofer Polk. HINWEIS: Damit der Verstärker funktioniert, muss eine der SPEX-Karten im SWA500 Verstärker installiert sein. 1. Suchen Sie die SPEX-Karte, die dem Subwoofer-Modell Polk entspricht, an den der SWA500 Verstärker angeschlossen wird. 2. Quite los dos (2) tornillos de mariposa de la parte de atrás del amplificador. 3. Quite la etiqueta que cubre la abertura para la tarjeta SPEX. 4. Conecte el cable plano que sale de la abertura al conector correspondiente de la tarjeta SPEX. 5. Inserte la tarjeta SPEX en la abertura y atornille la placa de retención en el panel de atrás. 2. Entfernen Sie die zwei (2) Rändelschrauben von der Rückseite des Verstärkers. 3. Entfernen Sie die Abdeckung des SPEX-Kartensteckplatzes. 4. Schließen Sie das Flachkabel von der SPEX-Kartenöffnung an den entsprechenden Anschluss an der SPEX-Karte an. 5. Führen Sie die SPEX-Karte in die Öffnung ein und schrauben Sie die Halterung an der Rückseite an. L’amplificateur SWA500 est livré avec trois cartes SPEX, chacune conçue spécifiquement pour l’un des subwoofers « In Wall ». NOTE : L’amplificateur SWA500 ne fonctionnera que si une des cartes SPEX est installée. 1. Déterminez la carte SPEX qui correspond au modèle de subwoofer qui sera utilisé avec le SWA500. 2. Retirez la plaque de retenue sur le panneau arrière de l’amplificateur en retirant les deux vis à serrage à main. L’amplificatore SWA 500 include schede SPEX, una per ciascun subwoofer Polk da montare nella parete. NOTA: per poter utilizzare l’amplificatore SWA 500 deve essere installata almeno una delle schede SPEX. 1. Identificare la scheda SPEX corrispondente al modello di subwoofer Polk a cui verrà collegato l’amplificatore SWA 500. 3. Retirez l’étiquette qui recouvre la fente de connexion de la carte SPEX. 4. Branchez le connecteur du câble ruban provenant de l’ouverture de la carte SPEX sur l’amplificateur au connecteur correspondant sur la carte SPEX. 5. Insérez la carte SPEX dans l’ouverture et replacez la plaque de retenue sur le panneau arrière. 2. Rimuovere le due (2) viti zigrinate dal retro dell’amplificatore. 3. Rimuovere l’etichetta che copre lo slot per la scheda SPEX. 4. Collegare la piattina dall’apertura per la scheda SPEX al connettore corrispondente sulla scheda SPEX. 5. Inserire la scheda SPEX nell’apertura e avvitare la piastra di contenimento al pannello posteriore. F o r m o r e i n f o r m a t i o n v i s i t o u r w e b s i t e a t w w w. p o l k a u d i o . c o m 5 INSTALLING THE SWA500 INSTALLAZIONE DEL SWA500 NOTE: Ensure the amplifier’s power is off before making any connections. NOTA: prima di eseguire qualunque collegamento, verificare che l’alimentazione dell'amplificatore sia spenta. REMEMBER: If you‘re not rack mounting this amplifier, ensure that it’s located with its feet solidly resting on a flat level surface. Ensure the installation area is well ventilated. You may need to provide additional cooling if there is not adequate ventilation. RICORDARE:Se l’amplificatore non viene montato su rack, verificare che sia posizionato in modo che i piedini siano appoggiati fermamente su una superficie orizzontale e piatta. Verificare che l’area di montaggio abbia un'adeguata ventilazione. Nel caso in cui la ventilazione non fosse sufficiente, sarà necessario fornire un raffreddamento ulteriore. Never block the amplifier’s ventilation holes. Non bloccare mai le aperture di ventilazione dell’amplificatore. Never expose the amplifier to heat sources or moisture. Non esporre mai l’amplificatore a fonti di calore o umidità. When the amplifier is installed there should be a minimum 3" clearance on the top and sides of the chassis. Quando l’amplificatore è installato è necessario avere almeno 7,6 cm di spazio libero al di sopra dell’involucro dell’unità e sui lati. INSTALAÇÃO DO AMPLIFICADOR SWA500 INSTALACIÓN DEL SWA500 NOTA: Sempre desligue a fonte de alimentação do amplificador antes de fazer qualquer ligação. LEMBRE-SE: Se este amplificador não for ser instalado em rack, os pés devem estar muito bem apoiados em uma superfície plana. Certifique-se de que a área de instalação seja bem ventilada. Pode ser que seja necessário providenciar ventilação adicional se a ventilação não for adequada. Nunca tampe os orifícios de ventilação do amplificador. NOTA. El amplificador debe estar apagado antes de hacer las conexiones. RECUERDE: Si no va a montar este amplificador en un anaquel, las patas deben ir sólidamente apoyadas en superficies niveladas horizontales. El área de instalación debe estar bien ventilada. Puede ser necesario suministrar enfriamiento adicional si no hay ventilación adecuada. Nunca exponha o amplificador ao calor ou à umidade. Nunca bloquee los agujeros de ventilación del amplificador. Recomendamos que um espaço livre mínimo de 8 cm seja deixado na parte superior e nas laterais da unidade quando o amplificador for instalado. Nunca exponga el amplificador a fuentes de calor o humedad. INSTALLATION DES SWA500 HINWEIS: Vor dem Anschließen müssen Sie stets sicherstellen, dass der Netzschalter des Verstärkers ausgeschaltet ist. Se recomienda dejar un espacio libre mínimo de 3 plg. de anchura alrededor de la superficie superior y las superficies laterales del chasis cuando se instale el amplificador. INSTALLATION DU SWA500 NOTE:Assurez-vous toujours que l’amplificateur est hors tension avant de faire des connexions. WICHTIG: Wenn Sie den Verstärker nicht in einem Rack montieren, müssen Sie sicherstellen, dass er mit den Füßen fest auf einer ebenen Oberfläche ruht. Stellen Sie sicher, dass der Installationsbereich gut gelüftet ist. Wenn nicht genug Lüftung vorhanden ist, müssen Sie eventuell für zusätzliche Kühlung sorgen. NOTEZ BIEN:Si vous n’installez pas cet amplificateur sur un bâti, assurez-vous qu’il repose sur ses pieds sur une surface plate et de niveau. Assurez-vous que le lieu d’installation est bien ventilé. S’il n’y a pas assez de ventilation, vous devrez prévoir un refroidissement adéquat. Sie dürfen nie die Lüftungslöcher des Verstärkers blockieren. Ne bloquez jamais les trous de ventilation de l’amplificateur. Der Verstärker darf nie Hitzequellen oder Feuchtigkeit ausgesetzt werden. N’exposez jamais l’amplificateur à une source de chaleur ou à l’humidité. Bei der Installation des Verstärkers sollte mindestens ein Freiraum von 8 cm seitlich von und über dem Gehäuse freigelassen werden. Assurez un dégagement minimum de 7,5 cm (3 po) des parois supérieur et latéraux du châssis de l'amplificateur. Rack Mounts: The SWA 500 comes with rack mounts as illustrated. 5-way binding posts Racks: O SWA500 é fornecido com racks, como mostrado na figura. Conector de 5 pinos Rack-Befestigungen: Der SWA500 wird, wie abgebildet, mit Rack-Befestigungen ausgeliefert. 5-fach-Terminals Montaggio su rack: L’unità SWA 500 può essere montata su rack, come mostrato in figura. Perni di collegamento a 5 vie Monturas para armazón: El SWA500 viene con monturas para armazón, tal como se ilustra. Terminales de cinco modos Montage sur bâti: Le SWA500 est livré avec des bâtis tel qu’illustré. Bornes « 5 façons » 6 Contact Polk Audio Customer Service 1-800-377-7655 (Outside US: 410-358-3600) Monday-Friday, 9:00 AM-6:00 PM Eastern Time, [email protected] SUBWOOFER CONNECTION OPTIONS/OPÇÕES DE CONEXÃO DO SUBWOOFER/SUBWOOFER-ANSCHLUSSOPTIONEN/ OPZIONI COLLEGAMENTO SUBWOOFER/OPCIONES DE CONEXIÓN DEL SUBWOOFER/OPTIONS DE CONNEXION DU SUBWOOFER PRE-AMP OR PROCESSOR PRE-OUT L R RCA CABLES SWA500 SWA500 POWER AMPLIFIER FRONT R L - + - + L R INPUT 1st SUBWOOFER 2nd SUBWOOFER (Optional) *This connection method requires that your receiver's setup instructions for the front speakers be set to "large" or unfiltered. * Para este método de conexão, as instruções de instalação do receiver devem definir que as caixas acústicas frontais são “large” (grandes) ou “unfiltered” (não filtradas). 2nd SUBWOOFER (Optional) 1st SUBWOOFER Speaker Level Connection/Conexão de nível das caixas acústicas/Lautsprecherpegelanschluss Collegamento livello altoparlanti/Conexión de nivel de altavoz/Connexion niveau h.p. Unfiltered Pre-Amp Level Connection/Conexão de nível do pré-amplificador não filtrada/ Ungefilterter Vorverstärker-Pegelanschluss/Collegamento livello pre-amp non filtrato/Unfiltered Pre-Amp Level Connection/Conexión de nivel de preamplificación sin filtro/ Connexion niveau pré-ampli sans filtre *Bei dieser Anschlussmethode ist der Receiver-Setup für die vorderen Lautsprecher auf „Large“ oder ungefiltert einzustellen. *Per questo metodo di collegamento le istruzioni di impostazione del ricevitore devono indicare che gli altoparlanti anteriori devono essere impostati su “large” o senza filtri. *Con este método de conexión, el receptor debe configurarse para altavoces frontales grandes (Large) o sin filtro. RECEIVER SUB-OUT FRONT R L - + - + *Pour cette méthode de connexion, réglez le contrôle des haut parleurs avant du menu du récepteur à la position « large » ou « unfiltered » (sans filtre). RCA CABLE SWA500 1st SUBWOOFER 2nd SUBWOOFER (Optional) Filtered, Sub-Out Connection/Conexão de saída sub, filtrada/Gefilterter Subwooferausgang Collegamento uscita sub filtrata/Conexión de salida de subwoofer filtrada/ Connexion sortie subwoofer avec filtre F o r m o r e i n f o r m a t i o n v i s i t o u r w e b s i t e a t w w w. p o l k a u d i o . c o m 7 AMPLIFIER OPERATION/OPERAÇÃO DO AMPLIFICADOR/VERSTÄRKERBETRIEB/FUNZIONAMENTO DELL'AMPLIFICATORE/FUNCIONAMIENTO DEL AMPLIFICADOR /OPÉRATION DE L’AMPLIFICATEUR Front Panel Controls/Controles Do Painel Frontal/BEDIENELEMENTE AN DER VORDERSEITE/CONTROLLI PANNELLO ANTERIORE/CONTROLES DEL PANEL FRONTAL/Controles Du Panneau Avant Lowpass Filter Adjustment Turning the Low Pass Filter Setting HIGHER gives more lower mid-range/upper-bass output. Turning the Low Pass Filter Setting LOWER gives less lower mid-range upper bass output. This control only works with LINE LEVEL and SPEAKER LEVEL. It has no effect on LFE hookups. Volume Adjustment Controls the subwoofer(s) volume, with minimum and maximum settings indicated. LED Indicator Lights Power LED Indicators: Active LED: ON = GREEN and indicates the amplifier is active. Protection LED: Protection = RED and indicates a fault condition. Front Panel LED Indicators with Power Switch Positions: The SWA 500 power status can be configured in one of three options using The Power Switch on the back panel: Power LED: see chart on page 9. Protection LED: Power Off – LED shows no light Fault -LED is Red Power On- No fault; LED shows no light Ajuste do filtro passa-baixa Girando o botão seletor do filtro passa-baixa no sentido HIGHER (Máx.), você terá mais potência na faixa de freqüência média inferior. Girando o referido botão no sentido LOWER (Mín.), você terá menos potência na faixa de freqüência mencionada. Este controle só funciona em NÍVEL DE LINHA e NÍVEL DE ALTO-FALANTE. Não tem nenhum efeito em conexões LFE. Ajuste de volume Controla o volume do(s) subwoofer(s), com os valores mínimo e máximo indicados. LEDs Indicadores LEDs indicadores Lig/Desl: LED "Ligado" ON (Lig) = VERDE e significa que o amplificador está ligado. LED "Proteção" Proteção = VERMELHO e indica uma falha no circuito elétrico, alto-falante ou amplificador. Regolazione filtro passa basso ALZANDO il filtro passa basso si ottengono più toni midrange in uscita.ABBASSANDO il filtro passa basso si ottengono meno toni midrange ma maggiore precisione nei bassi in uscita. Questo controllo viene utilizzato solo con LIVELLO DI LINEA e LIVELLO ALTOPARLANTI. Non ha alcun effetto su collegamenti LFE. LEDs indicadores do painel frontal com posições da chave seletora de modo de alimentação: O modo de alimentação do SWA500 pode ser configurado em uma das três opções abaixo usando-se A chave seletora de modo de alimentação que se encontra no painel traseiro: LED Lig/Desl:veja mapa em página 9 LED "Proteção": Desligado – LED desligado (sem luz) Falha -LED Vermelho Encendido: verde; indica que el amplificador está activo. Indicador luminoso de protección Protección: rojo; indica que hay una falla en el cableado, el altavoz o el amplificador. Indicadores luminosos del panel frontal con posiciones del selector de modo de alimentación: El estado de alimentación del SWA500 se puede configurar de una de tres maneras por medio del selector de modo de alimentación que hay en el panel trasero: Regolazione del volume Controlla il volume dei subwoofer, indicando le impostazioni minima e massima. Indicador luminoso de alimentación: vea el gráfico en la página 9 INDICATORI LUMINOSI LED Indicatori luminosi LED dell’alimentazione: LED attivo ON = VERDE indica che l’amplificatore è attivo. Indicatore LED protezione Protezione = ROSSO indica un guasto nei cavi, nell’altoparlante o nell'amplificatore. Einstellung des Tiefpass-Filters Wenn Sie die Tiefpass-Filtereinstellung HÖHER drehen, liefert dies mehr Leistung im unteren Mitteltonbereich. Wenn Sie die TiefpassFiltereinstellung NIEDRIGER drehen, liefert dies weniger Leistung im unteren Mitteltonbereich, aber präziseren Bass. Dieser Regler funktioniert nur mit LINE LEVEL und SPEAKER LEVEL. Er hat keine Auswirkungen auf LFE-Anschlüsse. Indicador luminoso de protección: Alimentación en posición off: apagado Falla: rojo Indicatori LED del pannello anteriore con posizioni interruttori in modalità accensione: Lautstärkeregler Kontrolliert die Lautstärke des/der Subwoofer(s), wobei die Minimum- und Maximumeinstellungen markiert sind. Lo stato di accensione dell’unità SWA 500 può essere configurato su una delle tre opzioni utilizzando gli interruttori modalità accensione sul pannello posteriore: LED-ANZEIGELEUCHTEN Netz-LEDs: Aktive LED EIN = GRÜN, was anzeigt, dass der Verstärker aktiv ist. Schutz-LED Schutz = ROT, was einen Fehler in den Kabeln, dem Lautsprecher oder dem Verstärker anzeigt. Indicatore luminoso LED dell’alimentazione: vedere il grafico sulla pagina 9 Réglage du filtre passe-bas Régler le contrôle du filtre passe-bas plus haut augmente la sortie des médiums graves. Régler le contrôle du filtre passe-bas plus bas réduit la sortie des médiums graves mais accroît la précision des graves. Ce contrôle ne fonctionne qu’avec le NIVEAU DE LIGNE et LE NIVEAU H.P. Il n’affecte pas les connexions LFE. Contrôle de volume Règle le volume du (des) subwoofer(s) réglages maximum et minimum indiqués. Indicatore LED protezione: Alimentazione spenta – LED spento Guasto -LED rosso LED-Anzeigen an der Vorderseite mit Betriebsmodusschalter-Positionen Voyants DEL de tension DEL active SOUS TENSION (On) = VERTE - indique que l’amplificateur est actif. DEL de protection Protection = ROUGE - indique un problème relatif au filage, à l’amplificateur ou au haut-parleur. Ajuste del filtro de pasabajas SUBIR el ajuste del filtro de pasabajas produce más salida de frecuencias medias y bajas.BAJAR el ajuste del filtro de pasabajas produce menos salida de frecuencias medias y bajas y una salida de bajos más precisa. Este control funciona solamente con el NIVEL DE LÍNEA y el NIVEL DE ALTAVOZ. No tiene efecto en las conexiones de LFE. Der Betriebsmodus des SWA500 kann mit dem Betriebsmodusschalter an der Rückseite auf eine von drei Optionen eingestellt werden: Netz-LED:Siehe Diagramm auf Seite 9 Schutz-LED: Strom aus – LED leuchtet nicht auf Fehler – LED ist rot Voyants DEL du panneau avant selon le réglage du commutateur « Power Mode » L’état de tension de SWA500 peut être configuré de trois façons en utilisant le commutateur « Power Mode » situé sur le panneau arrière: Ajuste del volumen Controla el volumen de los subwoofers y tiene indicaciones de máximo y mínimo. DEL de tension: voir le graphique à la page 9 DEL de protection : Hors tension (off) -La DEL est éteinte Anomalie-La DEL est Rouge 17.00INDICADORES LUMINOSOS Indicadores luminosos de alimentación: Indicador luminoso de actividad SWA500 80 3.48 power protection 120 40 min low pass (Hz) max volume SWA500 80 power protection 120 40 low pass (Hz) 8 min max volume Marketing Customer Service Engineering 1-800-377-7655 (Outside US: 410-358-3600) Monday-Friday, 9:00 AM-6:00 PM Eastern Time, [email protected] Contact Polk Audio Date Drawing # File Name Scale Drawn By Color Emboss Ht. Deboss Depth 15 June 2005 HBP958 SWA500_front.eps Full Size MKL 100% PANTONE Cool Gray 7 n/a n/a Date Revision Part # System Engineering Approval Q.A. Approval Mechanical Design Approval Comments Rear Panel Controls/CONTROLES DO PAINEL TRASEIRO/BEDIENELEMENTE AN DER RÜCKSEITE CONTROLLI PANNELLO POSTERIORE/CONTROLES DEL PANEL DE ATRÁS/Controles Du Panneau Arriere AC Main Switch This switch controls the main power to the amp. ”I” is ON, ”O” is OFF. Phase Switch This switch enables you to compensate for different sound path lengths of the subwoofer and front speakers. If the subwoofer is in the same 1/3 of the room area as the front speakers, leave the switch at “0.” Move the toggle switch to “180” if the subwoofer is located outside the same room area as the front speakers. Power Switch Standby: With the Power Switch in this position, and the AC main toggle swtich on, the amp is in Standby. Auto: With the Power Switch in this position, the amplifier will switch “On” when it receives a signal and will turn off after 15 min. of no signal. On: With the Power Switch set to “On,” and the AC Main toggle on, the amp is always active (”On”). Chave geral (Lig/Desl) LIGAR via REDE PÚBLICA (CA) Comutador de fase Esta chave permite a compensação de diferentes extensões de vias de propagação sonora do subwoofer e caixas acústicas. Se o subwoofer estiver no mesmo 1/3 da área da sala, como as caixas frontais, deixe o comutador em “0.” Passe a chave bipolar para “180”, caso o subwoofer esteja fora da mesma área da sala, como as caixas acústicas. Chave seletora de modo de alimentação Standby: Com a chave seletora nesta posição, e a chave geral (CA) ligada, o LED Lig/Desl no painel frontal fica AMARELO/VERDE quando o amplificador é energizado. Automático: Com a chave seletora nesta posição, o amplificador liga ao ser energizado e desliga quando não estiver mais energizado. O LED Lig/Desl do painel frontal fica VERDE quando o amplificador é energizado. Lig (On): Com a chave seletora na posição "Lig" (On), e chave geral (CA) ligada, o amplificador estará permanentemente energizado. O LED Lig/Desl na frente do painel frontal ficará VERDE. il subwoofer non si trova nella stessa parte della stanza in cui si trovano gli altoparlanti anteriori, spostare l'interruttore sulla posizione “180.” Interruttore di selezione della modalità di accensione Netzschalter Über Netzschalter EINSCHALTEN Phasenwahlschalter Dieser Schalter ermöglicht es, für den Unterschied in den Schall-Laufwegen vom Subwoofer und den vorderen Lautsprechern her zu kompensieren. Wenn sich der Subwoofer im gleichen Drittel des Raums befindet wie die vorderen Lautsprecher, sollten Sie den Schalter auf „0“ lassen. Wenn sich der Subwoofer außerhalb des Bereichs der vorderen Lautsprecher befindet, stellen Sie den Schalter auf „180“. Betriebsmodus-Wahlschalter Standby: Wenn der Betriebsmodusschalter in dieser Stellung ist und der Netzschalter an ist, leuchtet die Netz-LED an der Vorderseite auf (GELB/GRÜN), wenn Spannung vorliegt. Auto: Wenn der Betriebsmodusschalter in dieser Stellung ist, schaltet sich der Verstärker ein, wenn eine Spannung vorhanden ist, und schaltet sich aus, wenn die Spannung nicht mehr vorhanden ist. Wenn Spannung vorhanden ist, leuchtet die NETZ-LED an der Vorderseite GRÜN auf. Ein: Wenn der Betriebsmodusschalter auf „Ein“ steht und der Netzschalter an ist, erhält der Verstärker eine konstante Stromversorgung. Die NETZ-LED an der Vorderseite leuchtet GRÜN auf. Interruttore di alimentazione ACCENSIONE tramite INTERRUTTORE CA PRINCIPALE Interruttore fase Questo interruttore permette di compensare per la diversa distanza del percorso del suono per il subwoofer e gli altoparlanti anteriori. Se il subwoofer si trova nello stesso terzo della stanza in cui si trovano anche gli altoparlanti anteriori, lasciare l'interruttore nella posizione “0.” Se invece Standby/Attesa: Quando l’interruttore di selezione della modalità di accensione viene posizionato su questa opzione e l’interruttore principale dell’alimentazione è acceso, l’indicatore LED dell’ALIMENTAZIONE sul pannello anteriore passa al color GIALLO/VERDE quando è presente una tensione in ingresso. Auto/Automatico: Quando l’interruttore di selezione della modalità di accensione viene posizionato su questa opzione, l’amplificatore si accende automaticamente quando riceve una tensione in ingresso e si spegne quando la tensione non è più presente. L’indicatore LED dell’ALIMENTAZIONE sul pannello anteriore passa al color VERDE quando è presente una tensione. On/Acceso: Quando l’interruttore di selezione della modalità di accensione viene posizionato su “On” e l’interruttore principale dell'alimentazione è acceso, l’alimentazione viene sempre fornita all’amplificatore. L’indicatore LED dell’ALIMENTAZIONE sul pannello anteriore passa al color VERDE. Interruptor de alimentación ENCENDIDO por medio del INTERRUPTOR PRINCIPAL DE CA "On", el indicador luminoso de alimentación en el panel frontal se ilumina de color AMARILLO/ VERDE en presencia de voltaje. Auto: Cuando el selector de modo de alimentación está en esta posición, el amplificador se enciende al recibir un voltaje y se apaga cuando deja de haber voltaje. El indicador luminoso de alimentación del panel frontal se ilumina de color VERDE cuando hay voltaje. On: Cuando el selector de modo de alimentación está en esta posición y el interruptor basculante principal de CA está encendido, el amplificador está recibiendo alimentación constante. El indicador luminoso de alimentación del panel frontal está VERDE. Commutateur de tension MISE SOUS TENSION via le secteur CA Commutateur de phase Ce commutateur vous permet d’équilibrer la sonorité du subwoofer et des enceintes avant selon la distance que doivent parcourir les ondes sonores. Si le subwoofer est situé dans le même 1/3 de la pièce que les enceintes avant, laissez le commutateur à la position « 0 ». Choisissez la position « 180 » si le subwoofer est situé hors de la zone immédiate des enceintes avant. Commutateur « Power » Conmutador de fase Este conmutador permite compensar la diferencia entre la distancia de los subwoofers a la posición de audición y la distancia de los altavoces frontales a la posición de audición. Si el subwoofer está en el mismo tercio de la sala en que están los altavoces frontales, deje este selector en “0.” Cambie el ajuste a “180” si el subwoofer no está en el área de la habitación en que están los altavoces frontales. Standby (veille) Avec le commutateur « Power Mode » à la position « Standby » et le commutateur de secteur CA sous tension. Auto Avec le commutateur « Power » à la position « On », l’amplificateur se mettra sous en présence de voltage et se mettra hors tension lors d’absence de voltage. LE VOYANT DEL sur le panneau avant sera VERT lors de la présence de voltage. Selector de modo de alimentación Standby: Cuando el selector de modo de alimentación está en esta posición y el interruptor basculante principal de CA está en la posición On Avec le commutateur « Power » à la position « On » et le commutateur de secteur CA sous tension, l’amplificateur sera constamment sous tension. Le voyant DEL sur le panneau avant sera VERT. AC MAIN SWITCH/REDE PÚB. (CA)/EINSCHALTEN INTERRUTTORE CA PRINCIPALE/INTERRUPTOR PRINCIPAL DE CA/MISE SOUS TENSION Power Switch/Chave Geral/Netzschalter Interruptor de alimentación/ Power Switch/Commutateur de tension Color (Power LED)/Cor (LED Lig/Desl)/ Condition/Condição/Bedingung Farbe (Aktive LED)/Colore (Lum. De Activ.)/ Condizione/Condición/Condition Color (Indic. Lum. de Ali.)/Couleur (DEL de Tension) OFF/DESL/AUS-POS./FUORI DI/LEJOS/DE Any/Qualquer/Irgendein/ ualanque/Cualquira/Quels Un-Lit/Sem Luz/Nicht Auf/Spento/ Apagado/Eteinte Amp is off/Desligado/Strom aus/Alimentetazoine spenta/ Alimentación en posición off/Hors tension ON/LIG/EIN-POS./SU/EN/SUR Standby/Standby/Standby Standby/Standby/Standby Red/Vermelho/Rot/Rosso/Rojo/Rouge Amp in Standby position/Posição Standby/Standby-position Posizione Standby/Posición Standby/Position état de veille ON/LIG/EIN-POS./SU/EN/SUR Auto/Auto/Autom./Auto/Auto/Auto Green/Verde/Grun/Verde/Verde/Verte Amp is On and will switch to Standby in absence of signal. Amp está ligado e mudará para prontidão na ausência de sinal. Ver. ist An und schaltet auf Standby, wenn kein Signal vorliegt. Posizione On, Posizione Standby con nessuno segnale. Posición On, Posición Standby con ninguna señal. Position On, Position état de veille avec aucun signal. ON/LIG/EIN-POS./SU/EN/SUR Auto/Auto/Autom./Auto/Auto/Auto Red/Vermelho/Rot/Rosso/Rojo/Rouge Amp in Standby and will switch On with signal. Amp está em prontidão e ligará ao receber o sinal. Ver ist in Standby und schaltet auf An, wenn Signal vorliegt. Posizione Standby, Posizione On con segnale. Posición Standby, Posición On con señal. Position état de veille, Position On avec signal. ON/LIG/EIN-POS./SU/EN/SUR On/Lig/Ein-Pos./Su/En/Sur Green/Verde/Grun/Verde/Verde/Verte Amp is On/Posição Lig/Ein-Position/Posizione On/ Posición On/Position On f o r m o r e i n f o r m a t i o n v i s i t o u r w e b s i t e a t w w w. p o l k a u d i o . c o m 9 SWA500 Specifications/Especificações do amplificador SWA500/SWA500 Daten Caratteristiche tecniche SWA500/Especificaciones del SWA500/Fiche technique du SWA500 AMPLIFIER POWER 500 Watts Continuous into 4 Ohms 250 Watts Continuous into 8 Ohms VERSTÄRKERLEISTUNG 500 Watt Dauerleistung an 4 Ohm 250 Watt Dauerleistung an 8 Ohm POTENCIA DEL AMPLIFICADOR 500 W continua en 4 Ohms 250 W continua en 8 Ohms MINIMUM FREQUENCY BANDWIDTH 20Hz – 500Hz (without filters or EQ) MINIMALE FREQUENZBANDBREITE 20Hz – 500Hz (ohne Filter oder EQ) ANCHO DE BANDA DE FRECUENCIAS MÍNIMO 20 Hz a 500 Hz (sin filtros ni EQ) CROSSOVER FREQUENCY Adjustable 40Hz – 120Hz CROSSOVER-FREQUENZ Einstellbar, 40Hz – 120Hz FRECUENCIA DE CROSSOVER Ajustable de 40 Hz a 120 Hz PHASE CONTROL Switch normal and reverse (0 or 180) PHASENREGELUNG Schalter normal und umgekehrt (0 oder 180) CONTROL DE FASE Normal o inversa (0 ó 180) INPUT IMPEDANCE Line Level: ≥ 20k Ohms Speaker Level: ≥ 200 Ohms EINGANGSIMPEDANZ Line-Pegel: ≥ 20 k Ohm Lautsprecherpegel: ≥ 200 Ohm IMPEDANCIA DE ENTRADA Nivel de línea: ≥ 20k Ohms Nivel de altavoz: ≥ 200 Ohms INPUTS Speaker and Line level (filter adjustable) LFE line level (unfiltered) EINGÄNGE Lautsprecher und Line-Level (einstellbarer Filter) LFE Line-Level (ohne Filter) ENTRADAS Nivel de altavoz y nivel de línea (ajustable con filtros) Nivel de LFE (sin filtros) LINE-PEGEL-AUSGÄNGE Ungefiltert SALIDAS DE NIVEL DE LÍNEA Sin filtro LAUTSPRECHERPEGELANSCHLÜSSE Parallelausgänge SALIDAS DE NIVEL DE ALTAVOZ Salidas paralelas ABMESSUNGEN (HxBxT) 3.48"x17.0"x12.59" 8.85cmx43.18cmx31.97cm DIMENSIONES (HxWxD) 3.48"x17.0"x12.59" 8.85cmx43.18cmx31.97cm VERSANDGEWICHT ungefähr. 17lbs. PESO DE TRANSPORTE aprox. 17lbs POTENZA AMPLIFICATORE 500 Watt costanti in un carico da 4 Ohm 250Watt costanti in un carico da 8 Ohm PUISSANCE DE L’AMPLIFICATEUR 500 Watts continus en 4 Ohms 250 Watts continus en 8 Ohms AMPLITUDE MÍNIMA DE FAIXA DE FREQÜÊNCIA 20 Hz – 500 Hz (sem filtros ou EQ) LARGHEZZA DI BANDA MINIMA 20Hz – 500Hz (senza filtri né EQ) BANDE PASSANTE MINIMUM 20Hz – 500Hz (sans filtre ou égalisation) FREQÜÊNCIA DE CROSSOVER Ajustável 40 Hz – 120 Hz FREQUENZA DI TAGLIO Regolabile 40Hz – 120Hz CROSSOVER FREQUANCY Adjustable 40Hz – 120Hz CONTROLE DE FASE Normal ou inversa (0 ou 180) CONTROLLO FASE Commutazione tra normale e inversa (0 o 180) CONTROLE DE PHASE Commutateur « normal » ou « reverse » (0 or 180) IMPEDENZA DI INGRESSO Livello di linea: ≥ 20k Ohms Livello altoparlante: ≥ 200 Ohm IMPEDANCE D’ENTREE: Niveau de ligne: 20k Ohms Niveau H.P: 200 Ohms SINAIS DE ENTRADA nível de linha e de alto-falante (ajustável por filtro) nível de linha LFE (sem filtro) INGRESSI Livello altoparlanti e di linea (filtro regolabile) Livello linea LFE (senza filtri) ENTREES Niveau de H.P. et de ligne (filtre ajustable) Niveau de ligne LFE (sans filtre) SAÍDAS DE NÍVEL DE LINHA Não filtradas USCITE LIVELLI LINEA Non filtrati SORTIES NIVEAU DE LIGNE Sans filtre SAÍDAS DE NÍVEL DAS CAIXAS ACÚSTICAS Saídas paralelas DIMENSÕES (AxLxP): 3.48"x17.0"x12.59" 8.85cmx43.18cmx31.97cm USCITE LIVELLI ALTOPARLANTI Uscite parallele SORTIES NIVEAU H.P. Sorties parallèles DIMENSIONI (AxLxP) 3.48"x17.0"x12.59" 8.85cmx43.18cmx31.97cm DIMENSIONS (HxLxP): 3.48"x17.0"x12.59" 8.85cmx43.18cmx31.97cm PESO DI SPEDIZIONE appross. 17lbs POIDS A L’ EXPEDITION appox. 17lbs LINE LEVEL OUTPUTS Unfiltered SPEAKER LEVEL OUTPUTS Parallel outputs DIMENSIONS (HxWxD): 3.48"x17.0"x12.59" 8.85cmx43.18cmx31.97cm SHIPPING WEIGHT approx. 17 lbs. POTÊNCIA 500 Watts contínuos em 4 ohms 250 Watts contínuos em 8 ohms IMPEDÂNCIA DE ENTRADA Nível de linha: ≥ 20 k Ohms Nível de alto-falante: ≥ 200 ohms PESO EMBALADO aprox. 17lbs 10 Contact Polk Audio Customer Service 1-800-377-7655 (Outside US: 410-358-3600) Monday-Friday, 9:00 AM-6:00 PM Eastern Time, [email protected] POLK AUDIO HISTORY— A PASSION FOR SOUND Polk Audio was founded in Baltimore in 1972 by Johns Hopkins University graduates Matthew Polk and George Klopfer. Today, Polk Audio is a leading international manufacturer of high quality home and automotive loudspeakers. Polk products emphasize superior sound and build quality, and feature many patented and award-winning innovations. Polk Audio has built a reputation as “The Speaker Specialists.” Polk products are sold throughout the USA, Canada and in over 50 countries around the world. Polk Audio’s mission has always been to build high quality, great sounding speakers at affordable prices. For the people of Polk Audio, building speakers is not just a job; it’s a passion. HISTÓRIA DA POLK AUDIO— UMA PAIXÃO POR SOM A Polk Audio foi fundada em Baltimore em 1972 por Matthew Polk e George Klopfer, universitários formados pela Johns Hopkins University. Atualmente, a Polk Audio é um dos maiores fabricantes internacionais de caixas acústicas/alto-falantes domésticos e automotivos de alta qualidade, com mais de 50 patentes de criações e novidades tecnológicas. Os produtos Polk se caracterizam pelo seu som de altíssimo nível de qualidade e por incorporar uma série de inovações patenteadas e premiadas. Os produtos Polk são vendidos em todos os Estados Unidos, Canadá e em mais de 50 países no mundo todo. A missão da Polk Audio tem sido sempre desenvolver caixas acústicas/alto-falantes de alto nível de qualidade e de alto padrão a preços acessíveis. Para os funcionários da Polk Audio, fabricar caixas acústicas/alto-falantes não é apenas um trabalho; é também uma paixão. DIE GESCHICHTE VON POLK AUDIO— EINE LEIDENSCHAFT FÜR SOUND Polk Audio wurde 1972 in Baltimore von Matthew Polk und George Klopfer, zwei Absolventen der Johns Hopkins University, gegründet. Heute ist Polk Audio ein international führender Hersteller hochwertiger Heim- und Autolautsprecher, mit über 50 Patenten für technologische Innovationen und Design. Polk-Produkte bieten hervorragenden Sound und überragende Verarbeitungsqualität und basieren auf zahlreichen patentierten und preisgekrönten Innovationen. Polk-Produkte werden in den USA, Kanada und in über 50 anderen Ländern der Welt vertrieben. Es war immer das Ziel von Polk Audio, hochwertige Lautsprecher mit überragendem Sound zu vernünftigen Preisen herzustellen. Für die Mitarbeiter von Polk Audio ist die Herstellung von Lautsprechern nicht nur ein Job, sondern eine Leidenschaft. IL PASSATO DI POLK AUDIO— IL SUONO È LA NOSTRA PASSIONE Polk Audio è stata fondata a Baltimore nel 1972 da due laureati della Johns Hopkins University, Matthew Polk e George Klopfer. Oggi Polk Audio è un’azienda leader nella produzione di altoparlanti di qualità per la casa e per l’auto, con più di 50 brevetti per innovazioni tecnologiche e del design. I prodotti Polk evidenziano una qualità eccezionale del suono e un’ottima costruzione e includono numerose innovazioni brevettate che hanno vinto molti premi. I prodotti Polk sono venduti negli Stati Uniti, nel Canada e in più di altri 50 Paesi nel mondo. L’obiettivo di Polk Audio è sempre stato di creare altoparlanti di ottima qualità, con un suono eccezionale e a prezzi ragionevoli. Per i dipendenti della Polk Audio, fabbricare altoparlanti non è solo un lavoro, è una passione. HISTORIA DE POLK AUDIO— PASIÓN POR EL SONIDO Polk Audio fue fundada en Baltimore en 1972 por Matthew Polk y George Klopfer, egresados de la Universidad Johns Hopkins. Hoy en día, Polk Audio es uno de los principales fabricantes internacionales de altavoces de alta calidad para la casa y el automóvil y tiene más de 50 patentes por innovaciones de tecnología y diseño. Los productos de Polk Audio enfatizan la superioridad del sonido y la calidad de la fabricación, y tienen muchas innovaciones patentadas y galardonadas. Los productos de Polk Audio se venden en Estados Unidos, en Canadá y en más de 50 países de todo el mundo. La misión de Polk Audio ha sido siempre fabricar altavoces de alta calidad que produzcan un sonido magnífico a precios accesibles. Para el personal de Polk Audio, fabricar altavoces no es simplemente un trabajo; es una pasión. L’HISTOIRE DE POLK AUDIO— LA PASSION DU SON Polk Audio a été fondée à Baltimore en 1972 par deux gradués de l’Université John Hopkins, Matthew Polk et George Klopfer. Aujourd’hui, Polk Audio est un des plus importants fabricants de haut-parleurs pour la maison et l’automobile. Polk Audio détient plus de 50 brevets pour ses technologies et ses designs innovateurs; ses produits sont reconnus mondialement pour leur qualité de fabrication et leur sonorité incomparable. Ils sont vendus aux États-Unis, au Canada et dans plus de 50 pays autour du monde. La mission de Polk a toujours été de construire des haut-parleurs de la plus haute qualité - tout en les offrant à prix abordables. Pour ceux et celles qui oeuvrent chez Polk, bâtir des haut-parleurs n’est pas seulement une occupation, c’est une passion. TECHNICAL ASSISTANCE OR SERVICE If after following the hook-up directions, you experience difficulty, please double check all wire connections. Should you isolate the problem to the speaker, contact the authorized Polk Audio dealer where you made your purchase or call Polk Audio’s Customer Service Department at 1-800-377-7655 (calls from US or Canada only) from 9am to 6pm, Eastern Time, Monday through Friday. You may also contact us via email: [email protected]. ASSISTANCE TECHNIQUE OU SERVICE Si après avoir suivi le mode de connexion vous éprouvez des difficultés, vérifier toutes vos connexions. Si le problème semble provenir du haut-parleur, contactez le revendeur Polk agréé de qui vous avez acheté le produit ou communiquez avec le Service à la Clientèle de Polk Audio au 1-800-377-7655 (appels du Canada et des É.U. seulement) du lundi au vendredi, 9h00 - 18h00 HNE. Vous pouvez également communiquer avec nous par courriel: [email protected]. APOYO O SERVICIO TÉCNICO Si tiene problemas después de seguir las instrucciones de conexión, revise dos veces todas las conexiones de cables. Si logra ubicar el problema en el altavoz, póngase en contacto con el proveedor autorizado Polk Audio donde lo compró o comuníquese con el departamento de servicio al cliente de Polk Audio llamando al 1-800-377-7655 (sólo en EE.UU. y Canadá) de lunes a viernes, de 9:00 a.m. a 6:00 p.m., hora del Este. También puede enviarnos un mensaje por correo electrónico a [email protected]. f o r m o r e i n f o r m a t i o n v i s i t o u r w e b s i t e a t w w w. p o l k a u d i o . c o m 11-
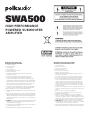 1
1
-
 2
2
-
 3
3
-
 4
4
-
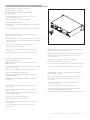 5
5
-
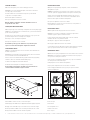 6
6
-
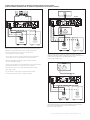 7
7
-
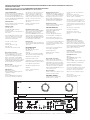 8
8
-
 9
9
-
 10
10
-
 11
11
-
 12
12


Polk Audio SWA500 Manual de usuario
- Categoría
- Subwoofers
- Tipo
- Manual de usuario
en otros idiomas
- français: Polk Audio SWA500 Manuel utilisateur
- italiano: Polk Audio SWA500 Manuale utente
- English: Polk Audio SWA500 User manual
- Deutsch: Polk Audio SWA500 Benutzerhandbuch
- português: Polk Audio SWA500 Manual do usuário
Artículos relacionados
-
Polk Audio PA250.2 Manual de usuario
-
Polk Audio CSW200 Manual de usuario
-
-
-
-
-
-
-
-
