Kingston DATATRAVELER LOCKER G2/DTLPG2 El manual del propietario
- Tipo
- El manual del propietario

Installation Guide
DataTraveler Locker+ G2
Find the language and latest documentation for your Kingston® DataTraveler Locker+ G2 here.
DataTraveler Locker+ G2 Installation Guide
Simplied Chinese .....
Traditional Chinese ....
............ For instructions in English
. . . . . . . . . . . . . . . . . . Para instrucciones en español
......... Für Anleitungen in Deutsch
. . . . . . . . . . . . . . . . . . Pour des instructions en français
. . . . . . . . . . . . . . . . . . Per le istruzioni in italiano
............Por as instruções em português
. . . . . . . . . . . . . . . . . . Instrukcje w jezyku polskim
. . . . . . . . . . . . . . . . . . Japanese
. . . . . . . . . . . . . . . . . . Thai

Document No. 48002017-001.A03 DataTraveler
®
Locker+ G2 Page 1 of 26
DataTraveler
®
Locker+ G2 User Manual

Document No. 48002017-001.A03 DataTraveler
®
Locker+ G2 Page 2 of 26
Table of Contents
About This User Guide ............................................................................................................ 3
System Requirements ............................................................................................................. 3
Recommendations .................................................................................................................. 3
Setup (Windows Environment) ............................................................................................... 4
Device Initialization (Windows Environment) ....................................................................... 5
Device Usage (Windows Environment) ................................................................................. 9
Device Options (Windows Environment) ............................................................................. 10
Setup (Mac Environment) ..................................................................................................... 14
Device Initialization (Mac Environment) .............................................................................. 15
Device Usage (Mac Environment) ........................................................................................ 19
Device Options (Mac Environment) ..................................................................................... 20
Help and Troubleshooting .................................................................................................... 24
Device Lockout ........................................................................................................................................................... 24
Forgot Password ........................................................................................................................................................ 25
Drive Letter Conflict (Windows Operating Systems) ........................................................................................ 26

Document No. 48002017-001.A03 DataTraveler
®
Locker+ G2 Page 3 of 26
About This User Guide
This user manual covers the DataTraveler
®
Locker+ G2 (referred to simply as DTL+ G2 from
this point forward) based on the factory image with no implemented customizations.
System Requirements
PC Platform
• Pentium III (or faster) processor equivalent
• 15MB free disk space
• USB 2.0 / 3.0 port
• Two consecutive drive letters after the last
physical drive*
PC Operating System Support
• Windows
®
7
• Windows
®
Vista SP1, SP2
• Windows
®
XP SP2, SP3
Mac Platform
• 15MB free disk space
• USB 2.0 / 3.0 port
Operating System Support
• Mac OS X 10.5.x
• Mac OS X 10.6.x
• Mac OS X 10.7x
Recommendations
To ensure there is ample power provided to the DTL+ G2 device, insert it directly into a USB
port on your notebook or desktop, as seen in
Figure 1.1. Avoid connecting the DTL+ G2 to any
peripheral device(s) that may feature a USB port, such as a keyboard or USB-powered hub, as
seen in Figure 1.2.
Figure 1.1 – Recommended Usage
Figure 1.2 – Not Recommended
*Note: See ‘Drive Letter Conflict’ on page 26.

Document No. 48002017-001.A03 DataTraveler
®
Locker+ G2 Page 4 of 26
Setup (Windows Environment)
1. Insert the DTL+ G2 into an available USB port on
your notebook or desktop and wait for Windows
to detect it.
• Windows XP users will receive a ‘Found New
Hardware’ notification as seen in
Figure 2.1.
• Windows Vista/7 users will receive a device
driver notification as seen in
Figure 2.2.
Once the new hardware detection is complete,
Windows will begin the initialization process.
• If the Windows autorun function is enabled,
you can skip the next step and go to page 5 –
Device Initialization.
• If the Windows autorun function is disabled, as
it is in Windows 7 by default, you may see an
AutoPlay window similar to the one in
Figure
2.3
.
2. Select the option ‘Run DTLplus_Launcher.exe’.
If Windows does not AutoPlay, simply browse to the
CD-ROM partition (
Figure 2.4) and manually execute
the DTLplus_Launcher program. This will also start
the initialization process.
Figure 2.4 – DTL+ G2 Contents
Figure 2.1 – Found New Hardware
(Windows XP)
Figure 2.2 – Device Driver Installation
(Windows Vista/7)
Figure 2.3 – AutoPlay Window
(Windows Vista/7)
(Note: Menu options in the AutoPlay
window may vary depending on what
programs are currently installed on
your computer. If enabled, AutoRun
will start the initialization process
automatically.
)

Document No. 48002017-001.A03 DataTraveler
®
Locker+ G2 Page 5 of 26
Device Initialization (Windows Environment)
1. Select your language preference from the drop-down menu and click ‘Next’ (Figure 3.1.)
Figure 3.1 – Language Selection
2. Review the license agreement and click ‘Next’ (Figure 3.2.) (Note: You must accept the
license agreement before continuing; otherwise the ‘Next’ button will remain disabled.)
Figure 3.2 – License Agreement

Document No. 48002017-001.A03 DataTraveler
®
Locker+ G2 Page 6 of 26
3. Create a password to protect your data on the DTL+ G2. Enter it in the ‘Password’ field,
then re-enter it in the ‘Password Confirmation’ field, as seen below in
Figure 3.3. The
password you create must meet the following criteria before the initialization process will
allow you to continue:
1. Passwords must contain 6 characters or more (up to 16 characters.)
2. Passwords must contain three (3) of the following criteria options:
- UPPER CASE, lower case, numeric, and/or special characters (!, $, etc.)
You may also enter a password hint, but it is not a mandatory field. The hint field can be
useful in providing a clue as to what the password is, should the password ever be
forgotten. (Note: The hint CANNOT be an exact match to the password.)
Figure 3.3 – Password Setup

Document No. 48002017-001.A03 DataTraveler
®
Locker+ G2 Page 7 of 26
4. Enter your contact information into the text boxes provided (see Figure 3.4) (Note: The
information you enter in these fields may NOT contain the password string you created in
Step 3. However, these fields are optional and can be left blank, if so desired.)
• The ‘Name’ field may contain up to 32 characters, but cannot contain the
exact password.
• The ‘Company’ field may contain up to 32 characters, but cannot contain
the exact password.
• The ‘Details’ field may contain up to 156 characters, but cannot contain
the exact password.
Figure 3.4 – Contact Information
5. Click ‘Finish’ to complete the device initialization process.

Document No. 48002017-001.A03 DataTraveler
®
Locker+ G2 Page 8 of 26
The DTL+ G2 will now format the secure data partition (Figure 3.5) and notify you when it is
complete (
Figure 3.6.)
Note: If operating under Windows XP in Non-Admin mode, the ‘Format’ routine
can take up to a minute.*
6. Click ‘OK’ to continue.
Figure 3.5 – Formatting DTL+ G2 Figure 3.6 – Format Complete
Initialization complete.
*Note: Times may vary based on system hardware and the capacity of the DTL+ G2 drive.

Document No. 48002017-001.A03 DataTraveler
®
Locker+ G2 Page 9 of 26
Device Usage (Windows Environment)
Once the DTL+ G2 has been initialized, you
can access the secure data partition and utilize
the device options by logging into the device
with your password. To do so, follow these
steps:
1. Insert the DTL+ G2 into a USB port on your
notebook or desktop and enter your pass-
word (see Figure 4.1.)
2. Once you’ve typed your password, click the
‘Login’ button to continue.
• If the correct password is entered, the
DTL+ G2 will unlock and you can
begin using the device.
• If an incorrect password is entered, an
error message will appear just below
the ‘Hint’ field, indicating a login
failure (see Figure 4.2.)
Figure 4.1 – Login Window
During the login process, if a bad password
is entered, you will be given another
opportunity to enter the correct password;
however, there is a built-in security feature
that tracks the number of failed login
attempts
*. If this number reaches the pre-
configured value of 10 failed attempts, the
DTL+ G2 will lock and require a device
format of the secure data partition prior to
next use.
THIS MEANS THAT ALL DATA STORED
ON THE DTL+ G2 WILL BE LOST.
For more details on this feature, see
‘Device Lockout’ on page 24.
Figure 4.2 – Login Failure
*Note: Once you authenticate to the device successfully, the failed login counter will reset.

Document No. 48002017-001.A03 DataTraveler
®
Locker+ G2 Page 10 of 26
Device Options (Windows Environment)
While you are logged into the device, there will be a ‘DTL+ G2’ icon located in the right-hand
corner of the Windows taskbar (
Figure 5.1.) (Note: Windows 7 users will need to click on the
up-arrow button in the taskbar in order to access the ‘DTL+ G2’ icon (
Figure 5.2.)
Clicking once on the DTL+ G2 icon will display the following menu:
Figure 5.1 – DTL+ G2 icon in taskbar
(Windows XP users)
Figure 5.2 – DTL+ G2 icon in taskbar
(Windows 7 users)
DTL+ G2 Settings
• Allows you to change your password and/or hint (Figure 5.3)
• Allows you to store username and password information (see Page 11)
• Allows you to add/view/change your contact information (Figure 5.4)
• Allows you to change your current language selection (Figure 5.5)
(Note: For security purposes, your current DTL+ G2 password is required to update and/or
modify any of these settings.)
Figure 5.3
Change Password
Figure 5.4
Contact Information
Figure 5.5
Select Language

Document No. 48002017-001.A03 DataTraveler
®
Locker+ G2 Page 11 of 26
Password Manager
Password Manager is an area found within the settings menu of the DTL+ G2 that allows you
to store and access username and password account information (for up to 20 accounts.)
To store an account, just follow these simple steps:
1. Click the ‘Add’ button (shown in Figure 5.6a) to create a new account.
2. Type in the information you would like to store, using the following criteria:
a. The ‘Description’ field is mandatory and can hold up to 40 characters.
(Note: This field must contain at least 1 character. It cannot be left blank.)
b. The ‘Username’ field is optional. It can hold up to 40 characters.
c. The ‘Password’ field is optional. It can hold up to 40 characters. By default,
each character is masked by an asterisk. If you would like to store the password
in plain text, simply de-select the ‘Hide Password’ checkbox located below the
‘Comments’ field. (See Figure 5.6b)
d. The ‘Comments’ field is optional. It can hold up to 360 characters.
3. If you would like to protect this item using a password, simply select the ‘Password
protect’ checkbox located below the ‘Comments’ field. (See Figure 5.6b)
(Note: The password used to protect this item is the same password you use to log into
the DTL+ G2 device.)
Figure 5.6a
Figure 5.6b
Password Manager Screenshots

Document No. 48002017-001.A03 DataTraveler
®
Locker+ G2 Page 12 of 26
To update or change an existing account in
‘Password Manager’, do the following:
1. Double-click the line item you wish to
update or change.
2. If you password-protected the item you
are trying to update or remove, you will be
prompted for the device password, which
is the same password you use to unlock
the DTL+ G2 device at login. You must
enter this password correctly before the
account window will open for that specific
item.
3. When the account window opens, you can
modify any of the fields by clicking in the
text box of the specific field you want to
update and make the necessary changes.
When you are finished making changes,
click on the ‘Save’ button.
To delete an existing account in ‘Password
Manager’, do the following:
1. Double-click the line item you wish to delete.
2. If you password-protected the item you are trying to delete, you will be prompted for the
device password, which is the same password you use to unlock the DTL+ G2 device at
login. You must enter this password correctly before the account window will open for
that specific item.
3. When the account window opens, simply click the ‘Remove’ button and you are finished

Document No. 48002017-001.A03 DataTraveler
®
Locker+ G2 Page 13 of 26
Browse DTL+ G2
• Allows you to browse the contents of the secure data partition while you are logged in
Format DTL+ G2*
• Allows you to format the secure data partition
(Warning: All data will be erased.) (Figure 5.7)
Online Support (Requires Internet access)
• Opens your Internet browser and navigates to
http://www.kingston.com/support/ where you
can access additional support information
Figure 5.7 – Format Warning
About DTL+ G2
• Provides specific details about the DTL+ G2,
including Application and Firmware version
information (Figure 5.8)
Shutdown DTL+ G2
• Properly shuts down the DTL+ G2, allowing
you to safely remove it from your system
Figure 5.8 – About DTL+ G2
*Note: Your current DTL+ G2 password is required in Windows Vista and Windows 7
-Windows Section Complete-

Document No. 48002017-001.A03 DataTraveler
®
Locker+ G2 Page 14 of 26
Setup (Mac Environment)
Insert the DTL+ G2 into an available USB port on your notebook or
desktop and wait for the Mac operating system to detect it. When it
does, you will see a DTLplus volume appear on the desktop, as seen in
Figure 6.1.
1. Double-click the DTL+ G2 CD-ROM icon.
2. Double-click the Mac folder found in the window displayed in
Figure 6.2.
Figure 6.1 – DTLplus
3. Double-click the DTLplus application icon found in the
window displayed in Figure 6.3. This will start the initialization
process.
Figure 6.2 – DTL+ G2 Contents
Figure 6.3 – DTL+ G2 Application

Document No. 48002017-001.A03 DataTraveler
®
Locker+ G2 Page 15 of 26
Device Initialization (Mac Environment)
1. Select your language preference from the drop-down menu and click ‘Next’ (Figure 7.1.)
Figure 7.1 – Language Selection
2. Review the license agreement and click ‘Next’ (Figure 7.2.) (Note: You must accept the
license agreement before continuing; otherwise the ‘Next’ button will remain disabled.)
Figure 7.2 – License Agreement

Document No. 48002017-001.A03 DataTraveler
®
Locker+ G2 Page 16 of 26
3. Create a password to protect your data on the DTL+ G2. Enter it in the ‘Password’ field,
then re-enter it in the ‘Password Confirmation’ field, as seen below in
Figure 7.3. The
password you create must meet the following criteria before the initialization process will
allow you to continue:
1. Passwords must contain 6 characters or more (up to 16 characters.)
2. Passwords must contain three (3) of the following criteria options:
- UPPER CASE, lower case, numeric, and/or special characters (!, $, etc.)
You may also enter a password hint, but it is not a mandatory field. The hint field can be
useful in providing a clue as to what the password is, should the password ever be
forgotten. (Note: The hint CANNOT be an exact match to the password.)
Figure 7.3 – Password Setup

Document No. 48002017-001.A03 DataTraveler
®
Locker+ G2 Page 17 of 26
4. Enter your contact information into the text boxes provided (see Figure 7.4) (Note: The
information you enter in these fields may NOT contain the password string you created in
Step 3. However, these fields are optional and can be left blank, if so desired.)
• The ‘Name’ field may contain up to 32 characters, but cannot contain the
exact password.
• The ‘Company’ field may contain up to 32 characters, but cannot contain
the exact password.
• The ‘Details’ field may contain up to 156 characters, but cannot contain
the exact password.
Figure 7.4 – Contact Information
5. Click ‘Finish’ to complete the device initialization process.

Document No. 48002017-001.A03 DataTraveler
®
Locker+ G2 Page 18 of 26
The DTL+ G2 will now format the secure data partition (Figure 7.5) and notify you when it is
complete (
Figure 7.6.)
6. Click ‘OK’ to continue.
Figure 7.5 – Formatting DTLocker+ G2 Figure 7.6 – Format Complete
Initialization complete.

Document No. 48002017-001.A03 DataTraveler
®
Locker+ G2 Page 19 of 26
Device Usage (Mac Environment)
Once the DTL+ G2 has been initialized, you
can access the secure data partition and utilize
the device options by logging into the device
with your password. To do so, follow these
steps:
1. Insert the DTL+ G2 into a USB port on your
notebook or desktop and enter your pass-
word (see Figure 8.1.)
2. Once you’ve typed your password, click the
‘Login’ button to continue.
• If the correct password is entered, the
DTL+ G2 will unlock and you can
begin using the device.
• If an incorrect password is entered, an
error message will appear just below
the ‘Hint’ field, indicating a login
failure (see Figure 8.2.)
Figure 8.1 – Login Window
During the login process, if a bad password
is entered, you will be given another
opportunity to enter the correct password;
however, there is a built-in security feature
that tracks the number of failed login
attempts
*. If this number reaches the pre-
configured value of 10 failed attempts, the
DTL+ G2 will lock and require a device
format of the secure data partition prior to
next use.
THIS MEANS THAT ALL DATA STORED
ON THE DTL+ G2 WILL BE LOST.
For more details on this feature, see
‘Device Lockout’ on page 24.
Figure 8.2 – Login Failure
*Note: Once you authenticate to the device successfully, the failed login counter will reset.

Document No. 48002017-001.A03 DataTraveler
®
Locker+ G2 Page 20 of 26
Device Options (Mac Environment)
While you are logged into the device, there will be a ‘DTLplus_Launcher’ icon located in the
Mac OS X Dock as seen in
Figure 9.1 below:
Figure 9.1 – DTL+ G2 Icon In Mac OS X Dock
Holding down the ‘control’ key on your keyboard and clicking once
on the ‘DTLplus_Launcher’ icon will display the menu shown in
Figure 9.2 to the right.
DTL+ G2 Settings
• Allows you to change your password and/or hint (Figure
9.3
)
• Allows you to store username and password information
(see Page 21)
• Allows you to add/view/change your contact information
(Figure 9.4)
• Allows you to change your language preference (Figure 9.5)
Figure 9.2
DTL+ G2 Options
Figure 9.3
Change Password
Figure 9.4
Contact Information
Figure 9.5
Select Language
(Note: For security purposes, your current DTL+ G2 password is required to update and/or modify any
of these settings.)

Document No. 48002017-001.A03 DataTraveler
®
Locker+ G2 Page 21 of 26
Password Manager
Password Manager is an area found within the settings menu of the DTL+ G2 that allows you
to store and access username and password account information (for up to 20 accounts.)
To store an account, just follow these simple steps:
4. Click the ‘Add’ button (shown in Figure 5.6a) to create a new account.
5. Type in the information you would like to store, using the following criteria:
a. The ‘Description’ field is mandatory and can hold up to 40 characters.
(Note: This field must contain at least 1 character. It cannot be left blank.)
b. The ‘Username’ field is optional. It can hold up to 40 characters.
c. The ‘Password’ field is optional. It can hold up to 40 characters. By default,
each character is masked by an asterisk. If you would like to store the password
in plain text, simply de-select the ‘Hide Password’ checkbox located below the
‘Comments’ field. (See Figure 9.6b)
d. The ‘Comments’ field is optional. It can hold up to 360 characters.
6. If you would like to protect this item using a password, simply select the ‘Password
protect’ checkbox located below the ‘Comments’ field. (See Figure 9.6b)
(Note: The password used to protect this item is the same password you use to log into
the DTL+ G2 device.)
Figure 9.6a
Figure 9.6b
Password Manager Screenshots

Document No. 48002017-001.A03 DataTraveler
®
Locker+ G2 Page 22 of 26
To update or change an existing account in
‘Password Manager’, do the following:
1. Highlight the line item you wish to update
or change.
2. If you password-protected the item you
are trying to update or remove, you will be
prompted for the device password, which
is the same password you use to unlock
the DTL+ G2 device at login. You must
enter this password correctly before the
account window will open for that specific
item.
3. When the account window opens, you can
modify any of the fields by clicking in the
text box of the specific field you want to
update and make the necessary changes.
When you are finished making changes,
click on the ‘Save’ button.
To delete an existing account in ‘Password
Manager’, do the following:
1. Highlight the line item you wish to delete and click ‘Edit.’
2. If you password-protected the item you are trying to delete, you will be prompted for the
device password, which is the same password you use to unlock the DTL+ G2 device at
login. You must enter this password correctly before the account window will open for
that specific item.
3. When the account window opens, simply click the ‘Remove’ button and you are finished

Document No. 48002017-001.A03 DataTraveler
®
Locker+ G2 Page 23 of 26
Browse DTL+ G2
• Allows you to browse the contents of the secure data partition while you are logged in
Format DTL+ G2
• Allows you to format the secure data partition
(Warning: All data will be erased.) (Figure 9.7)
Online Support (Requires Internet access)
• Opens your Internet browser and navigates to
http://www.kingston.com/support/ where you
can access additional support information
Figure 9.7 – Format Warning
About DTL+ G2
• Provides specific details about the DTL+ G2,
including Application and Firmware version
information (Figure 9.8)
Shutdown DTL+ G2
• Properly shuts down the DTL+ G2, allowing
you to safely remove it from your system
Figure 9.8 – About DTL+ G2
-Mac Section Complete-

Document No. 48002017-001.A03 DataTraveler
®
Locker+ G2 Page 24 of 26
Help and Troubleshooting
Device Lockout
The DTL+ G2 includes a security feature that prevents unauthorized access to the data
partition once a maximum number of consecutive failed login attempts (MaxNoA for short)
has been made; the default “out-of-box” configuration has a pre-configured value of 10 (no. of
attempts.)
The ‘lock-out’ counter tracks each failed login and gets reset one of two ways: 1) A successful
login prior to reaching MaxNoA or 2) reaching MaxNoA and performing a device format.*
If an incorrect password is entered, an error
message will appear just below the ‘Hint’ field,
indicating a login failure. See Figure 10.1.
If and when a 7
th
failed attempt is made, you will
see an additional error message indicating you
have 3 attempts left before reaching MaxNoA
(which is set to 10 by default.) See Figure 10.2.
After a 10
th
failed login attempt, the DTL+ G2 will
permanently block the data partition and require
a device format prior to next use. This means
that all data stored on the DTL+ G2 will be
lost and you will need to create a new
password.
Figure 10.1 – Login Failure
This security measure limits someone (who
does not have your password) from attempting
countless login attempts and gaining access to
your sensitive data.
If you are the owner of the DTL+ G2 and have
forgotten your password, the same security
measures will be enforced, including a device
format.*
For more on this feature, see ‘Forgot Password’
on page 25.
Figure 10.2 – 7
th
Login Failure
*Note: A device format will erase ALL of the information stored on the DTL+ G2’s secure data
partition.

Document No. 48002017-001.A03 DataTraveler
®
Locker+ G2 Page 25 of 26
Forgot Password
If you forget your password, you can click on
the ‘Reset Password’ link that appears in the
device login window when DTLplus_Launcher
is executed (see Figure 10.3.)
This option will allow you to create a new
password, but in order to protect the privacy of
your data, the DTL+ G2 will be formatted.
This means that all of your data will be erased
in the process.*
When you do click on ‘Reset Password’, a
message box (Figure 10.4) will appear and ask
if you want to enter a new password prior to
executing the format. At this point, you can
either 1) click ‘OK’ to confirm or 2) click
‘Cancel’ to return to the login window.
Figure 10.3 – Forgot Password
If you opt to continue, you will be prompted to
create a new complex password and a new
hint. The hint is not a mandatory field, but it
can be useful in providing a clue as to what
the password is, should the password ever be
forgotten.
(Note: The hint CANNOT be an exact match
to the DTL+ G2 device password.)
Figure 10.4 – Prompt Before Format
*Note: A device format will erase ALL of the information stored on the DTL+ G2’s secure data
partition.

Document No. 48002017-001.A03 DataTraveler
®
Locker+ G2 Page 26 of 26
Drive Letter Conflict (Windows Operating Systems)
As mentioned in the ‘System Requirements’ section of this manual (on page 3), the DTL+ G2
requires two consecutive drive letters AFTER the last physical disk that appears before the
‘gap’ in drive letter assignments (see Figure 10.5.) This does NOT pertain to network shares
because they are specific to user-profiles and not the system hardware profile itself, thus
appearing available to the OS.
What this means is, Windows may assign the DTL+ G2 a drive letter that’s already in use by a
network share or Universal Naming Convention (UNC) path, causing a drive letter conflict. If
this happens, please consult your administrator or helpdesk department on changing drive
letter assignments in Windows Disk Management (administrator privileges required.)
Figure 10.5 – My Computer
In this example, the DTL+ G2 uses drive F:, which is the first available drive letter after drive E:
(the last physical disk before the drive letter gap.) Because letter G: is a network share and
not part of the hardware profile, the DTL+ G2 may attempt to use it as its second drive letter,
causing a conflict.
If there are no network shares on your system and the DTL+ G2 still won’t load, it is possible
that a card reader, removable disk, or other previously-installed device is holding on to a drive-
letter assignment and still causing a conflict.
Please note that Drive Letter Management, or DLM, has improved significantly in Windows XP
SP3, Vista, and 7, so you may not come across this issue, but if you are unable to resolve the
conflict, please contact Kingston’s Technical Support Department for further assistance.
© 2011 Kingston Technology Corporation. All rights reserved. All registered trademarks and trademarks are the property of their respective owners.

Documento No. 48002017-001.A03
DataTraveler
®
Locker+ G2
Página 1 de 22
Manual del usuario del DataTraveler
®
Locker+ G2

Documento No. 48002017-001.A03
DataTraveler
®
Locker+ G2
Página 2 de 22
Índice
ACERCA DE ESTA GUÍA DEL USUARIO ................................................................................. 3!
REQUISITOS DEL SISTEMA ..................................................................................................... 3!
RECOMENDACIONES ............................................................................................................... 3!
CONFIGURACIÓN (ENTORNO DE WINDOWS) ....................................................................... 4!
INICIALIZACIÓN DEL DISPOSITIVO (ENTORNO DE WINDOWS) .......................................... 5!
UTILIZACIÓN DEL DISPOSITIVO (ENTORNO DE WINDOWS) ............................................... 9!
OPCIONES DEL DISPOSITIVO(ENTORNO DE WINDOWS) .................................................. 10!
CONFIGURACIÓN (ENTORNO DE MAC) ............................................................................... 12!
INICIALIZACIÓN DEL DISPOSITIVO (ENTORNO DE MAC) .................................................. 13!
UTILIZACIÓN DEL DISPOSITIVO(ENTORNO DE MAC) ........................................................ 17!
OPCIONES DEL DISPOSITIVO (ENTORNO DE MAC) ........................................................... 18!
AYUDA Y SOLUCIÓN DE PROBLEMAS ................................................................................ 20!
Bloqueo del dispositivo .............................................................................................................................. 20
Olvidó su contraseña .................................................................................................................................. 21
Conflicto de letras de dispositivo (sistema operativo Windows) ........................................................... 22

Documento No. 48002017-001.A03
DataTraveler
®
Locker+ G2
Página 3 de 22
Acerca de esta Guía del usuario
Este manual del usuario cubre el DataTraveler
®
Locker+ G2 (mencionado simplemente como
DTL+ G2 de ahora en adelante) sobre la base de la imagen de fábrica, sin haberse realizado
personalizaciones.
Requisitos del sistema
Plataforma de PC
• Procesador equivalente a Pentium III (o
superior)
• 15MB de espacio libre en disco
• Puerto USB 2.0 / 3.0
• Dos letras de dispositivo consecutivas
después del último dispositivo físico*
Soporte para sistema operativo de PC
• Windows
®
7
• Windows
®
Vista SP1, SP2
• Windows
®
XP SP2, SP3
Plataforma Mac
• 15MB de espacio libre en disco
• Puerto USB 2.0 / 3.0
Soporte para sistema operativo
• Mac OS X 10.5.x
• Mac OS X 10.6.x
• Mac OS X 10.7.x
Recomendaciones
Para asegurarse de que se disponga de adecuada energía para el dispositivo DTL+ G2,
insértelo directamente en un puerto USB de su notebook o computadora de escritorio, como
se ve en la Figura 1.1. Evite conectar el DTL+ G2 a cual(es)quier dispositivo(s) periférico(s)
que pueda ofrecer un puerto USB, tal como un teclado o un concentrador alimentado por
USB, como se ve en Figura 1.2.
Figura 1.1 - Uso recomendado
Figura 1.2 - No se recomienda
*Nota: Ver "Conflicto de letras de dispositivo" en la página 22.

Documento No. 48002017-001.A03
DataTraveler
®
Locker+ G2
Página 4 de 22
Configuración (entorno de Windows)
1. Inserte el DTL+ G2 en un puerto USB disponible
en su notebook o computadora de escritorio, y
espere a que Windows lo detecte.
• Los usuarios de Windows XP recibirán una
notificación sobre "Nuevo hardware
encontrado" tal como se ve en la Figura 2.1.
• Los usuarios de Windows Vista/7 recibirán
una notificación sobre controlador de
dispositivo tal como se ve en la Figura 2.2..
Una vez que la detección de nuevo hardware se
haya terminado, Windows comenzará con el
proceso de inicialización.
• Si la función de ejecución automática de
Windows está activada, usted puede omitir el
paso siguiente e ir a la página 5 -
Inicialización de dispositivo.
• Si la función de ejecución automática de
Windows está desactivada, como sucede en
Windows 7 en forma predeterminada, es posible
que aparezca una ventana de Reproducción
automática similar a la de la Figura 2.3.
2. Seleccione la opción "Run DTLplus_Launcher.exe".
Si Windows no ejecuta automáticamente,
simplemente vaya a la partición del CD-ROM
(Figura 2.4), y ejecute manualmente el programa
DTLplus_Launcher. Esto también dará comienzo al
proceso de inicialización.
Figura 2.4 – Contenido del DTL+ G2
Figura 2.1 – Nuevo hardware encontrado
(Windows XP)
Figura 2.2 – Instalación de controlador de
dispositivo
(Windows Vista/7)
Figura 2.3 – Ventana de Reproducción
automática
(Windows Vista/7)
(Nota: Las Opciones de menú en la
ventana de Reproducción automática
pueden variar dependiendo de qué
programas están actualmente
instalados en la computadora. Si está
activada, la Ejecución automática
dará comienzo al proceso de
inicialización de forma automática.)

Documento No. 48002017-001.A03
DataTraveler
®
Locker+ G2
Página 5 de 22
Inicialización del dispositivo (entorno de Windows)
1. Seleccione sus preferencia de idioma en el menú desplegable y haga clic en "Siguiente"
(Figura 3.1).
Figura 3.1 – Selección de idioma
2. Revise el acuerdo de licencia y haga clic en "Siguiente" (Figura 3.2.) (Nota: Usted debe
aceptar el acuerdo de licencia antes de continuar; de lo contrario el botón "Siguiente"
permanecerá desactivado).
Figura 3.2 – Acuerdo de licencia

Documento No. 48002017-001.A03
DataTraveler
®
Locker+ G2
Página 6 de 22
3. Cree una contraseña para proteger sus datos en el DTL+ G2. Introdúzcala en el campo
"Contraseña", a continuación vuelva a ingresarla en el campo "Confirmación de la
contraseña", como se ve abajo en la Figura 3.3. La contraseña que usted crea debe cumplir
con los siguientes criterios antes de que el proceso de inicialización le permita continuar:
1. Las contraseñas deben contener 6 caracteres o más (hasta 16 caracteres).
2. Las contraseñas deben contener tres (3) de las siguientes opciones de criterios:
- MAYÚSCULAS, minúsculas, numéricos y/o caracteres especiales (!, $, etc.)
Usted también puede ingresar una sugerencia para la contraseña, pero no es un campo
obligatorio. El campo de sugerencia puede ser útil para proporcionar una pista acerca de
cuál es la contraseña, en caso de que se olvidara la contraseña. (Nota: La sugerencia NO
PUEDE coincidir exactamente con la contraseña.)
Figura 3.3 – Establecimiento de contraseña

Documento No. 48002017-001.A03
DataTraveler
®
Locker+ G2
Página 7 de 22
4. Ingrese su información de contacto en los cuadros de texto previstos (ver la Figura 3.4)
(Nota: La información que usted ingrese en estos campos NO puede contener la cadena de
la contraseña que creó en el Paso 3. Sin embargo, estos campos son opcionales y pueden
dejarse en blanco, si así se desea.)
• El campo "Nombre" puede contener hasta 32 caracteres, pero no puede
contener la contraseña exacta.
• El campo "Compañía" puede contener hasta 32 caracteres, pero no
puede contener la contraseña exacta.
• El campo "Detalles" puede contener hasta 156 caracteres, pero no puede
contener la contraseña exacta.
Figura 3.4 – Información de contacto

Documento No. 48002017-001.A03
DataTraveler
®
Locker+ G2
Página 8 de 22
5. Haga clic en "Finalizar" para completar el proceso de inicialización del dispositivo.
Ahora el DTL+ G2 formateará la partición de datos segura (Figura 3.5) y le notificará cuando
esto termine (Figura 3.6.)
Nota: Cuando se opera bajo Windows XP en el modo que no es de
Administrador, la rutina "Formatear" puede demorarse hasta un minuto.*
6. Haga clic en "Aceptar" para continuar.
Figura 3.5 – Para formatear el DTL+ G2
Figura 3.6 – Formatear completo
Inicialización completa.
*Nota: Los tiempos pueden variar en función de hardware del sistema y la capacidad del
dispositivo DTL+ G2.

Documento No. 48002017-001.A03
DataTraveler
®
Locker+ G2
Página 9 de 22
Utilización del dispositivo (entorno de Windows)
Una vez se ha inicializado el DTL+ G2, puede
acceder a la partición de datos segura y
utilizar las opciones del dispositivo, iniciando
sesión en el dispositivo con su contraseña.
Para ello siga estos pasos:
1. Inserte el DTL+ G2 en un puerto USB en
su notebook o computadora de escritorio, e
ingrese su contraseña (ver Figura 4.1.)
2. Una vez hayas tecleado su contraseña,
haga clic en el botón "Iniciar sesión" para
continuar.
• Si se ingresa la contraseña correcta, el
DTL + G2 se desbloqueará y usted
puede empezar a utilizar el dispositivo.
• Si se ingresa una contraseña
incorrecta, aparecerá un mensaje de
error justo debajo del campo
"Sugerencia", lo que indica un error
de inicio de sesión (ver la Figura 4.2.)
Figura 4.1 – Ventana de inicio de sesión
Durante el proceso de inicio de sesión, si
se introduce una contraseña incorrecta, se
le dará otra oportunidad de introducir la
contraseña correcta; sin embargo, existe
una característica de seguridad integrada
que controla el número de intentos fallidos
de inicio de sesión*. Si este número
alcanza el valor pre-configurado de 10
intentos fallidos, el DTL+ G2 se bloqueará
y requerirá el formatear el dispositivo para
la partición de datos segura antes de la
próxima utilización.
ESTO SIGNIFICA QUE SE VAN A
PERDER TODOS LOS DATOS
ALMACENADOS EN EL DTL+ G2.
Para obtener más detalles sobre esta
función, ver "Bloqueo del dispositivo" en la
página 20.
Figura 4.2 – Error de inicio de sesión
*Nota: Una vez que se haya autentificado con éxito ante el dispositivo, el contador de inicios
de sesión fallidos se reiniciará.

Documento No. 48002017-001.A03
DataTraveler
®
Locker+ G2
Página 10 de 22
Opciones del dispositivo(entorno de Windows)
Mientras tenga una sesión iniciada en el dispositivo, aparecerá un icono "DTL + G2" situado
en la esquina derecha de la barra de tareas de Windows (Figura 5.1.) (Nota: Los usuarios de
Windows 7 tendrán que hacer clic en el botón de flecha hacia arriba en la barra de tareas a fin
de tener acceso al icono "DTL+ G2" (Figura 5.2.)
Al hacer clic una vez en el icono de DTL+ G2 aparecerá el menú siguiente:
Figura 5.1 – Icono DTL+ G2 en la barra de tareas
(usuarios de Windows XP)
Figura 5.2 – Icono DTL+ G2 en la barra de tareas
(usuarios de Windows 7)
Configuración del DTL+ G2
• Le permite cambiar su contraseña y/o sugerencia (Figura 5.3)
• Le permite agregar/visualizar/cambiar su información de contacto (Figura 5.4)
• Le permite cambiar su preferencia actual de idioma (Figura 5.5)
(Nota: Por razones de seguridad, es necesaria su contraseña actual del DTL+ G2 para
actualizar y/o modificar cualquiera de estos ajustes.)
Figura 5.3
Cambiar contraseña
Figura 5.4
INFORMACIÓN DE CONTACTO
Figura 5.5
Seleccione el idioma

Documento No. 48002017-001.A03
DataTraveler
®
Locker+ G2
Página 11 de 22
Examinar DTL+ G2
• Le permite navegar por el contenido de la partición de datos segura, mientras que esté
con sesión iniciada
Formatear DTL+ G2*
• Le permite formatear la partición de datos
segura (Advertencia: Se borrarán todos los
datos). (Figura 5.7)
Soporte en línea (se requiere acceso a Internet)
• Abre su navegador Web y se desplaza a
http://www.kingston.com/support/, donde
puede tener acceso a información de soporte
adicional
Figura 5.7 – Advertencia para formatear
Acerca de DTL+ G2
• Proporciona detalles específicos acerca del
DTL+ G2, incluida la información sobre la
aplicación y la versión del firmware (Figura
5.8)
Apagar DTL+ G2
• Apaga en forma apropiada el DTL+ G2, lo que
le permite retirarlo de forma segura de su
sistema
Figura 5.8 – Acerca de DTL+ G2
(Recomendación: Después de apagar su DTL+ G2, siempre es una mejor práctica
apagar o reiniciar la estación de trabajo huésped a la que su dispositivo estaba
conectado, especialmente si está en un lugar público o utilizando una estación de
trabajo que sea compartida por múltiples personas.)
*Nota: En Windows Vista y Windows 7 se requiere su contraseña actual para el DTL+ G2
-Terminada la sección para Windows-

Documento No. 48002017-001.A03
DataTraveler
®
Locker+ G2
Página 12 de 22
Configuración (entorno de Mac)
Inserte el DTL+ G2 en un puerto USB disponible en su notebook o
computadora de escritorio, y espere a que el sistema operativo Mac lo
detecte. Cuando lo haga, verá que un volumen DTLplus aparece en el
escritorio, como se ve en la Figura 6.1.
1. Haga doble clic en el icono del CD-ROM de DTL+ G2.
2. Haga doble clic en la carpeta de Mac ubicada en la ventana
mostrada en la Figura 6.2.
Figura 6.1 – DTLplus
3. Haga doble clic el icono de la aplicación DTLplus ubicado en
la ventana mostrada en la Figura 6.3. Esto dará comienzo al
proceso de inicialización.
Figura 6.2 – Contenido del DTL+ G2
Figura 6.3 – Aplicación DTL+ G2

Documento No. 48002017-001.A03
DataTraveler
®
Locker+ G2
Página 13 de 22
Inicialización del dispositivo (entorno de MAC)
1. Seleccione sus preferencia de idioma en el menú desplegable y haga clic en "Siguiente"
(Figura 7.1).
Figura 7.1 – Selección de idioma
2. Revise el acuerdo de licencia y haga clic en "Siguiente" (Figura 7.2.) (Nota: Usted debe
aceptar el acuerdo de licencia antes de continuar; de lo contrario el botón "Siguiente"
permanecerá desactivado).
Figura 7.2 – Acuerdo de licencia

Documento No. 48002017-001.A03
DataTraveler
®
Locker+ G2
Página 14 de 22
3. Cree una contraseña para proteger sus datos en el DTL+ G2. Introdúzcala en el campo
"Contraseña", a continuación vuelva a ingresarla en el campo "Confirmación de la
contraseña", como se ve abajo en la Figura 7.3. La contraseña que usted crea debe cumplir
con los siguientes criterios antes de que el proceso de inicialización le permita continuar:
1. Las contraseñas deben contener 6 caracteres o más (hasta 16 caracteres).
2. Las contraseñas deben contener tres (3) de las siguientes opciones de criterios:
- MAYÚSCULAS, minúsculas, numéricos y/o caracteres especiales (!, $, etc.)
Usted también puede ingresar una sugerencia para la contraseña, pero no es un campo
obligatorio. El campo de sugerencia puede ser útil para proporcionar una pista acerca de
cuál es la contraseña, en caso de que se olvidara la contraseña. (Nota: La sugerencia NO
PUEDE coincidir exactamente con la contraseña.)
Figura 7.3 – Establecimiento de contraseña

Documento No. 48002017-001.A03
DataTraveler
®
Locker+ G2
Página 15 de 22
4. Ingrese su información de contacto en los cuadros de texto previstos (ver la Figura 7.4)
(Nota: La información que usted ingrese en estos campos NO puede contener la cadena de
la contraseña que creó en el Paso 3. Sin embargo, estos campos son opcionales y pueden
dejarse en blanco, si así se desea.)
• El campo "Nombre" puede contener hasta 32 caracteres, pero no puede
contener la contraseña exacta.
• El campo "Compañía" puede contener hasta 32 caracteres, pero no
puede contener la contraseña exacta.
• El campo "Detalles" puede contener hasta 156 caracteres, pero no puede
contener la contraseña exacta.
Figura 7.4 – Información de contacto

Documento No. 48002017-001.A03
DataTraveler
®
Locker+ G2
Página 16 de 22
5. Haga clic en "Finalizar" para completar el proceso de inicialización del dispositivo.
Ahora el DTL+ G2 formateará la partición de datos segura (Figura 7.5) y le notificará cuando
esto termine (Figura 7.6.)
6. Haga clic en "Aceptar" para continuar.
Figura 7.5 – Para formatear el DTLocker+ G2
Figura 7.6 – Formatear completo
Inicialización completa.

Documento No. 48002017-001.A03
DataTraveler
®
Locker+ G2
Página 17 de 22
Utilización del dispositivo(entorno de MAC)
Una vez se ha inicializado el DTL+ G2, puede
acceder a la partición de datos segura y
utilizar las opciones del dispositivo, iniciando
sesión en el dispositivo con su contraseña.
Para ello siga estos pasos:
1. Inserte el DTL+ G2 en un puerto USB en
su notebook o computadora de escritorio, e
ingrese su contraseña (ver Figura 8.1.)
2. Una vez hayas tecleado su contraseña,
haga clic en el botón "Iniciar sesión" para
continuar.
• Si se ingresa la contraseña correcta,
el DTL + G2 se desbloqueará y usted
puede empezar a utilizar el
dispositivo.
• Si se ingresa una contraseña
incorrecta, aparecerá un mensaje de
error justo debajo del campo
"Sugerencia", lo que indica un error
de inicio de sesión (ver la Figura 8.2.)
Figura 8.1 – Ventana de inicio de sesión
Durante el proceso de inicio de sesión, si se
introduce una contraseña incorrecta, se le
dará otra oportunidad de introducir la
contraseña correcta; sin embargo, existe una
característica de seguridad integrada que
controla el número de intentos fallidos de inicio
de sesión*. Si este número alcanza el valor
pre-configurado de 10 intentos fallidos, el
DTL+ G2 se bloqueará y requerirá el
formatear el dispositivo para la partición de
datos segura antes de la próxima utilización.
ESTO SIGNIFICA QUE SE VAN A
PERDER TODOS LOS DATOS
ALMACENADOS EN EL DTL+ G2.
Para obtener más detalles sobre esta
función, ver "Bloqueo del dispositivo" en la
página 20.
Figura 8.2 – Error de inicio de sesión
*Nota: Una vez que se haya autentificado con éxito ante el dispositivo, el contador de inicios
de sesión fallidos se reiniciará.

Documento No. 48002017-001.A03
DataTraveler
®
Locker+ G2
Página 18 de 22
Opciones del dispositivo (entorno de MAC)
Mientras tenga una sesión iniciada en el dispositivo, aparecerá un icono "DTLplus_Launcher"
situado en el Dock de Mac OS X como se muestra en la Figura 9.1 a continuación:
Figura 9.1 – Icono DTL+ G2 en el "Dock" de Mac OS X
Si se mantiene presionada la tecla "control" en su teclado y se
hace clic una vez sobre el icono "DTLplus_Launcher",
aparecerá el menú que se muestra en la Figura 9.2 a la
derecha.
Configuración del DTL+ G2
• Le permite cambiar su contraseña y/o sugerencia (Figura
9.3)
• Le permite agregar/visualizar/cambiar su información de
contacto (Figura 9.4)
• Le permite cambiar su preferencia de idioma (Figura 9.5)
Figura 9.2
Opciones para DTL+ G2
Figura 9.3
Cambiar contraseña
Figura 9.4
INFORMACIÓN DE CONTACTO
Figura 9.5
Seleccione el idioma
(Nota: Por razones de seguridad, es necesaria su contraseña actual del DTL+ G2 para actualizar y/o
modificar cualquiera de estos ajustes.)

Documento No. 48002017-001.A03
DataTraveler
®
Locker+ G2
Página 19 de 22
Examinar DTL+ G2
• Le permite navegar por el contenido de la partición de datos segura, mientras que esté
con sesión iniciada
Formatear DTL+ G2
• Le permite formatear la partición de datos
segura (Advertencia: Se borrarán todos los
datos). (Figura 9.7)
Soporte en línea (se requiere acceso a Internet)
• Abre su navegador Web y se desplaza a
http://www.kingston.com/support/, donde
puede tener acceso a información de soporte
adicional
Figura 9.7 – Advertencia para formatear
Acerca de DTL+ G2
• Proporciona detalles específicos acerca del
DTL+ G2, incluida la información sobre la
aplicación y la versión del firmware (Figura
9.8)
Apagar DTL+ G2
• Apaga en forma apropiada el DTL+ G2, lo que
le permite retirarlo de forma segura de su
sistema
Figura 9.8 – Acerca de DTL+ G2
(Recomendación: Después de apagar su DTL+ G2, siempre es una mejor práctica
apagar o reiniciar la estación de trabajo huésped a la que su dispositivo estaba
conectado, especialmente si está en un lugar público o utilizando una estación de
trabajo que sea compartida por múltiples personas.)
-Termina la Sección para Mac-

Documento No. 48002017-001.A03
DataTraveler
®
Locker+ G2
Página 20 de 22
Ayuda y solución de problemas
Bloqueo del dispositivo
El DTL+ G2 incluye una característica de seguridad que impide el acceso no autorizado a la
partición de datos, una vez que se ha hecho un número máximo de intentos de inicio de
sesión fallidos consecutivos (MaxNoA, para abreviar); la configuración predeterminada "listo
para usar" tiene un valor pre-configurado de 10 (no. de intentos).
El contador de "bloqueo" hace el seguimiento de cada inicio de sesión fallido y se restablece
de una de dos maneras: 1) Un inicio de sesión exitoso antes de llegar a MaxNoA o 2) llegar a
MaxNoA y formatear el dispositivo.*
Si se ingresa una contraseña incorrecta,
aparecerá un mensaje de error justo debajo del
campo "Sugerencia", lo que indica un error de
inicio de sesión. Ver la Figura 10.1.
Si y cuando se ha realizado un 7
o
intento fallido,
verá un mensaje de error adicional que indica
que le quedan 3 intentos antes de llegar a
MaxNoA (que está establecido como 10 de
forma predeterminada). Ver la Figura 10.2.
Después de un 10
o
intento fallido de inicio de
sesión, el DTL+ G2 bloqueará
permanentemente la partición de datos y
requerirá el formatear el dispositivo antes del
próximo uso. Esto significa que se van a perder
todos los datos almacenados en el DTL+ G2,
y que tendrá que crear una nueva contraseña.
Figura 10.1 – Error de inicio de sesión
Esta medida de seguridad evita que alguien
(que no tenga la contraseña) realice
innumerables intentos de inicio de sesión y
obtenga acceso a su información confidencial.
Si usted es el propietario del DTL+ G2 y ha
olvidado su contraseña aplican las mismas
medidas de seguridad, incluyendo el formatear
el dispositivo.*
Para obtener más información sobre esta función,
ver "Olvidó su contraseña" en la página 21.
Figura 10.2 – 7
o
Error de inicio de sesión
*Nota: El formatear un dispositivo borrará TODA la información almacenada en la partición de
datos segura del DTL + G2.

Documento No. 48002017-001.A03
DataTraveler
®
Locker+ G2
Página 21 de 22
Olvidó su contraseña
Si usted olvida su contraseña, puede hacer
clic en el vínculo "Inicializar contraseña" que
aparece en la ventana de inicio de sesión del
dispositivo cuando se ejecuta
DTLplus_Launcher (ver la Figura 10.3).
Esta opción le permitirá crear una nueva
contraseña, pero el DTL+ G2 será formateado
con el fin de proteger la privacidad de sus
datos. Esto significa que en el proceso se
borrarán todos sus datos.*
Cuando haga clic en "Inicializar contraseña",
aparecerá un cuadro de mensaje (Figura 10.4)
y le preguntará si desea introducir una nueva
contraseña antes de ejecutar el formato. En
este punto, podrá: 1) hacer clic en "Aceptar"
para confirmar, o 2) hacer clic en "Cancelar"
para volver a la ventana de inicio de sesión.
Figura 10.3 – Olvidó su contraseña
Si opta por continuar, se le pedirá que cree
una nueva contraseña compleja y una nueva
sugerencia. El campo de sugerencia no es
obligatorio, pero puede ser útil para
proporcionar una pista acerca de cuál es la
contraseña, en caso de que se olvidara la
contraseña.
(Nota: La sugerencia NO PUEDE coincidir
exactamente con la contraseña del dispositivo
DTL+ G2.)
Figura 10.4 – Mensaje guía antes de formatear
*Nota: El formatear un dispositivo borrará TODA la información almacenada en la partición de
datos segura del DTL + G2.

Documento No. 48002017-001.A03
DataTraveler
®
Locker+ G2
Página 22 de 22
Conflicto de letras de dispositivo (sistema operativo Windows)
Como se ha mencionado en la sección "Requerimientos del sistema" de este manual (en la
página 3), el DTL+ G2 requiere dos letras consecutivas de dispositivo DESPUÉS del último
disco físico que aparece antes de la "brecha" en las asignaciones de letras de dispositivo (ver
Figura 10.5.) Lo anterior NO se refiere a los recursos compartidos de red, dado que son
específicos de los perfiles de usuario y no del perfil del hardware del sistema mismo, por lo
que ante el sistema operativo se muestran como disponibles.
Lo anterior significa que Windows podría asignar al DTL+ G2 una o dos letras de dispositivo
que ya estén en uso por uno o varios recursos compartidos de red o en una ruta UNC
(Convención de Nomenclatura Universal), lo que causa un conflicto en las letras de
dispositivo. Si eso ocurre, pida asistencia al administrador de su sistema o al departamento
de soporte técnico respecto al cambio de las asignaciones de letras de unidad en la utilidad
"Administración de discos" de Windows (se requieren privilegios administrativos)
Figura 10.5 – Mi PC
En este ejemplo, el DTL+ G2 utiliza la letra F:, que es la primera letra de dispositivo disponible
después del dispositivo E: (el último disco físico antes de la brecha en las letras de unidad).
Dado que la letra G: está asignada a un recurso compartido de red y no forma parte del perfil
del hardware, el sistema operativo podría intentar asignar dicha letra al DTL+G2 como su
segunda letra de dispositivo, lo que causaría un conflicto.
Si en su sistema no hay recursos compartidos de red y el DTL+ G2 todavía no carga, es
posible que haya un dispositivo previamente instalado, como un lector de tarjetas o un disco
extraíble, que retenga la asignación de letra de dispositivo y cause un conflicto.
Tenga en cuenta que la administración DLM de letras de dispositivo ha mejorado en gran
medida en Windows XP SP3, Vista y 7, de modo que es posible que usted no tenga problema
alguno; pero si no puede solucionar el conflicto, comuníquese con el departamento de soporte
técnico de Kingston para recibir asistencia adicional.
© 2011 Kingston Technology Corporation. Todos los derechos reservados. Todas las marcas comerciales y las marcas registradas son propiedad
exclusiva de sus respectivos dueños.

Dokument Nr. 48002017-001.A03
DataTraveler
®
Locker+ G2
Seite 1 von 25
DataTraveler
®
Locker+ G2 Benutzerhandbuch

Dokument Nr. 48002017-001.A03
DataTraveler
®
Locker+ G2
Seite 2 von 25
Inhalt
TOC
Über dieses Handbuch
Dieses Benutzerhandbuch bezieht sich auf den DataTraveler
®
Locker+ G2 (im Folgenden als
DTL+ G2 bezeichnet) auf Basis des Factory Image ohne kundenspezifische Einstellungen.
Systemvoraussetzungen
PC-Plattform
• Mindestens Pentium III oder äquivalenter
Prozessor
• 15MB freier Speicher
• USB 2.0 / 3.0 Anschluss
• Zwei freie, aufeinanderfolgende
Laufwerksbuchstaben nach dem letzten
physischen Speicher*
Unterstützte PC-Betriebssysteme
• Windows
®
7
• Windows
®
Vista SP1, SP2
• Windows
®
XP SP2, SP3
Mac Plattform
• 15MB freier Speicher
• USB 2.0 / 3.0 Anschluss
Unterstützte Betriebssysteme
• Mac OS X 10.5.x
• Mac OS X 10.6.x
• Mac OS X 10.7x
Empfehlungen
Um eine ausreichende Stromversorgung des DTL+ G2 sicherzustellen, stecken Sie ihn direkt
in einen USB-Anschluss Ihres Notebooks oder Desktops, siehe Abb. 1.1. Vermeiden Sie den

Dokument Nr. 48002017-001.A03
DataTraveler
®
Locker+ G2
Seite 3 von 25
Anschluss des DTL+ G2 in Peripheriegeräte mit einem USB-Anschluss wie eine Tastatur oder
ein USB-Hub, siehe Abb. 1.2.
Abb. 1.1 – Empfohlener Anschluss
Abb. 1.2 – Nicht empfehlenswert
*Hinweis: Siehe 'Laufwerksbuchstabenkonflikt' auf Seite 22.
Installation & Einrichtung (Windows Umgebung)
1. Stecken Sie den DTL+ G2 in einen freien USB-
Anschluss Ihres Notebooks oder Desktops und
warten Sie, bis Windows ihn erkannt hat.
• Windows XP Anwendern wird die Meldung
‘Neue Hardware gefunden’ angezeigt, siehe
Abb. 2.1.
• Windows Vista/7 Anwendern wird eine
Gerätetreiber-Meldung angezeigt, siehe Abb.
2.2.
Nach Abschluss der Hardwareerkennung beginnt
Windows mit dem Installationsprozess.
• Wenn die Windows Autorunfunktion aktiviert
ist, können Sie den nächsten Schritt
überspringen und weitergehen zu Seite 5 –
Geräteinstallation.
• Wenn die Windows Autorunfunktion
deaktiviert ist, standardmäßig bei Windows 7,
wird ein AutoPlay-Fenster angezeigt, ähnlich
wie in Abb. 2.3.
2. Wählen Sie die Option ‘Run
Abb. 2.1 – Neue Hardware gefunden
(Windows XP)
Abb. 2.2 – Installation des Gerätetreibers
(Windows Vista/7)

Dokument Nr. 48002017-001.A03
DataTraveler
®
Locker+ G2
Seite 4 von 25
DTLplus_Launcher.exe’.
Wenn Windows AutoPlay nicht startet, rufen Sie die
CD-ROM-Partition (Abb. 2.4) auf und starten Sie das
DTLplus_Launcher Programm manuell. Dadurch
wird der Installationsprozess gestartet.
Abb. 2.4 – DTL+ G2 Inhalt
Abb. 2.3 – Fenster AutoPlay
(Windows Vista/7)
(Hinweis: Die Menüoptionen im
Fenster AutoPlay können je nach den
aktuell auf Ihrem Computer
installierten Programmen
unterschiedlich sein. Wenn AutoRun
aktiviert ist, wird der
Installationsprozess automatisch
gestartet.)
Geräteinstallation (Windows Umgebung)
1. Wählen Sie die von Ihnen gewünschte Sprache aus dem Drop-Down-Menü und klicken Sie
auf ‘Weiter’ (Abb. 3.1.)

Dokument Nr. 48002017-001.A03
DataTraveler
®
Locker+ G2
Seite 5 von 25
Abb. 3.1 – Sprachauswahl
2. Lesen und akzeptieren Sie die Lizenzvereinbarung und klicken Sie auf ‘Weiter’ (Abb. 3.2.)
(Hinweis: Die Schaltfläche ‘Weiter’ wird erst aktiviert, nachdem Sie die Lizenzvereinbarung
akzeptiert haben.)
Abb. 3.2 – Lizenzvereinbarung

Dokument Nr. 48002017-001.A03
DataTraveler
®
Locker+ G2
Seite 6 von 25
3. Erstellen Sie ein Passwort, um Ihre Daten auf dem DTL+ G2 zu schützen. Geben Sie es im
Feld ‘Passwort’ ein und erneut im Feld ‘Passwortbestätigung’ siehe Abb. 3.3. Bevor Sie mit
der Installationseinrichtung fortfahren können, müssen Sie ein Passwort nach folgenden
Kriterien eingeben:
1. Das Passwort muss mindestens 6 Zeichen lang sein (bis zu 16 Zeichen.)
2. Das Passwort muss 3 (drei) der folgenden Kriterien enthalten:
- GROSSBUCHSTABE, Kleinbuchstabe, Ziffer und/oder Sonderzeichen (!, $
usw.)
Sie können auch einen Passwort-Hinweis eingeben, es ist jedoch kein Pflichtfeld. Der
Passwort-Hinweis kann eine nützliche Hilfestellung zur Erinnerung an das Passwort sein,
wenn Sie es vergessen haben sollten. (Hinweis: Der Hinweis und das Passwort dürfen
NICHT identisch sein.)
Abb. 3.3 – Passworteinrichtung

Dokument Nr. 48002017-001.A03
DataTraveler
®
Locker+ G2
Seite 7 von 25
4. Geben Sie Ihre Kontaktdaten in den angezeigten Textfeldern ein (siehe Abb. 3.4) (Hinweis:
Die in diesen Feldern eingegebenen Daten dürfen NICHT die in Schritt 3 eingegebene
Passwort-Zeichenfolge enthalten. Das Ausfüllen dieser Felder ist optional und sie können
auch leer belassen werden.)
• Im Feld ‘Name’ können bis zu 32 Zeichen eingegeben werden, das
genaue Passwort darf jedoch nicht darin enthalten sein.
• Im Feld ‘Firma’ können bis zu 32 Zeichen eingegeben werden, das
genaue Passwort darf jedoch nicht darin enthalten sein.
• Im Feld ‘Adresse’ können bis zu 156 Zeichen eingegeben werden, das
genaue Passwort darf jedoch nicht darin enthalten sein.
Abb. 3.4 – Kontaktdaten

Dokument Nr. 48002017-001.A03
DataTraveler
®
Locker+ G2
Seite 8 von 25
5. Klicken Sie zum Abschließen des Installationsprozesses für das Gerät auf ‘Fertigstellen’.
Der DTL+ G2 wird jetzt die sichere Datenpartition formatieren (Abb. 3.5) und anzeigen, wenn
dieser Vorgang abgeschlossen ist (Abb. 3.6.)
Hinweis: Unter Windows XP im Nicht-Administrator-Modus kann die
Formatierung bis zu einer Minute dauern.*
6. Klicken Sie zum Fortfahren auf ‘OK’.
Abb. 3.5 – DTL+ G2 Formatierung
Abb. 3.6 – Formatierung fertiggestellt
Der Installationsprozess ist abgeschlossen.

Dokument Nr. 48002017-001.A03
DataTraveler
®
Locker+ G2
Seite 9 von 25
*Hinweis: Die erforderliche Zeit hängt von der Systemhardware und der Speicherkapazität des
DTL+ G2 Sticks ab.
Verwendung des Geräts (Windows Umgebung)
Nach Abschluss des Installationsprozesses
des DTL+ G2 können Sie sich mit Ihrem
Passwort im Gerät einloggen, haben Zugriff
auf die sichere Datenpartition und können mit
dem Stick arbeiten. Führen Sie dazu folgende
Schritte aus:
1. Stecken Sie den DTL+ G2 in einen USB-
Anschluss Ihres Notebooks oder Desktops
ein und geben Sie Ihr Passwort ein (siehe
Abb. 4.1.)
2. Geben Sie Ihr Passwort ein und klicken Sie
zum Fortfahren auf ‘Login’.
• Wenn das eingegebene Passwort
korrekt ist, wird der DTL+ G2
freigegeben und Sie können ihn
benutzen.
• Wenn ein falsches Passwort
eingegeben wurde, wird mit einer
Fehlernachricht unter dem Feld
‘Hinweis’ angezeigt, dass das
Einloggen fehlgeschlagen ist (siehe
Abb. 4.2.)
Abb. 4.1 – Anmeldefenster
Wenn das Passwort zum Einloggen falsch
war, haben Sie die Möglichkeit, es erneut
einzugeben. Das integrierte
Sicherheitsmodul registriert alle
fehlgeschlagenen Loginversuche*. Wenn
die voreingestellte Anzahl von 10
fehlgeschlagenen Loginversuchen erreicht
wurde, wird der DTL+ G2 gesperrt und die
sichere Datenpartition muss vor der
weiteren Benutzung neu formatiert werden.

Dokument Nr. 48002017-001.A03
DataTraveler
®
Locker+ G2
Seite 10 von 25
DIES BEDEUTET, DASS ALLE AUF
DEM DTL+ G2 GESPEICHERTEN
DATEN VERLORENGEHEN.
Weitere Einzelheiten zu dieser Funktion
siehe ‘Sperrfunktion’ auf Seite 20.
Abb. 4.2 – Fehlgeschlagene Anmeldung
*Hinweis: Der Zähler für fehlgeschlagene Loginversuche wird nach Eingabe des korrekten
Passworts zurückgesetzt.
Geräteoptionen (Windows Umgebung)
Solange Sie im Gerät eingeloggt sind, wird das Symbol ‘DTL+ G2’ in der rechten Ecke der
Windows Taskleiste angezeigt (Abb. 5.1.) (Hinweis: Windows 7 Anwender müssen zum
Aufrufen des ‘DTL+ G2’ Symbols in der Taskleiste auf den Pfeil nach oben klicken (Abb. 5.2.)
Nach einmaligem Klicken auf das DTL+ G2 Symbol wird folgendes Menü angezeigt:
Abb. 5.1 – DTL+ G2 Symbol in Taskleiste
(Windows XP Anwender)
Abb. 5.2 – DTL+ G2 Symbol in Taskleiste
(Windows 7 Anwender)
DTL+ G2 Einstellungen

Dokument Nr. 48002017-001.A03
DataTraveler
®
Locker+ G2
Seite 11 von 25
• Sie können Ihr Passwort bzw. Ihren Hinweis ändern (Abb. 5.3)
• Sie können Kontaktdaten hinzufügen, ansehen oder ändern (Abb. 5.4)
• Sie können die gewählte Sprache ändern (Abb. 5.5)
(Hinweis: Aus Sicherheitsgründen müssen Sie zum Aktualisieren bzw. Modifizieren dieser
Einstellungen jeweils Ihr aktuelles DTL+ G2 Passwort eingeben.)
Abbildung 5.3.
Passwort ändern
Abbildung 5.4.
Kontaktinformationen
Abbildung 5.5.
Sprache wählen
DTL+ G2 durchsuchen
• Wenn Sie eingeloggt sind, können Sie mit dieser Funktion den Inhalt der sicheren
Datenpartition durchsuchen.
DTL+ G2* formatieren
• Mit dieser Funktion können Sie die sichere
Datenpartition formatieren (Achtung: Hierbei
werden alle Daten gelöscht.) (Abb. 5.7)
Online Support (Erfordert Internetanschluss)
• Öffnet Ihren Internet-Browser und navigiert
Sie zu http://www.kingston.com/support/, wo
Sie Zugang zu weiteren Support-
Informationen haben.
Abb. 5.7 – Warnung bei Formatierung
Über DTL+ G2

Dokument Nr. 48002017-001.A03
DataTraveler
®
Locker+ G2
Seite 12 von 25
• Enthält spezifische Angaben über den DTL+
G2, einschließlich Versionsangaben über die
Anwendung und die Firmware (Abb. 5.8)
DTL+ G2 herunterfahren
• Fährt den DTL+ G2 ordnungsgemäß herunter,
damit Sie ihn sicher aus Ihrem System
entfernen können
Abb. 5.8 – Über DTL+ G2
(Empfehlung: Nach dem Herunterfahren Ihres DTL+ G2 empfiehlt es sich immer, den
Host-Computer, in dem Ihr Laufwerk eingesteckt war, herunterzufahren oder neu zu
starten. Dies ist vor allem anzuraten, wenn Sie es an einem allgemein zugänglichen
oder mit mehreren Personen gemeinsam genutzten Computer eingesteckt hatten.)
*Hinweis: In Windows Vista und in Windows 7 müssen Sie Ihr aktuelles DTL+ G2 Passwort
eingeben
- Abschnitt Windows abgeschlossen -
Installation & Einrichtung (Mac Umgebung)
Stecken Sie den DTL+ G2 in einen freien USB-Anschluss Ihres
Notebooks oder Desktops ein und warten Sie, bis das Mac
Betriebssystem ihn erkannt hat. Dies wird durch das DTLplus
Volumensymbol am Desktop angezeigt, siehe Abb. 6.1.
1. Doppelklicken Sie auf das CD-ROM-Symbol des DTL+ G2.
2. Doppelklicken Sie auf die im Fenster angezeigte Mac Datei,
siehe Abb. 6.2.
Abb. 6.1 – DTLplus
3. Doppelklicken Sie auf die im Fenster angezeigte DTLplus
Anwendung, siehe Abb. 6.3. Dadurch wird der
Installationsprozess gestartet.

Dokument Nr. 48002017-001.A03
DataTraveler
®
Locker+ G2
Seite 13 von 25
Abb. 6.2 – DTL+ G2 Inhalt
Abb. 6.3 – DTL+ G2 Anwendung
Installationseinrichtung (Mac Umgebung)
1. Wählen Sie die von Ihnen gewünschte Sprache aus dem Drop-Down-Menü und klicken Sie
auf ‘Weiter’ (Abb. 7.1.)

Dokument Nr. 48002017-001.A03
DataTraveler
®
Locker+ G2
Seite 14 von 25
Abb. 7.1 – Sprachauswahl
2. Lesen und akzeptieren Sie die Lizenzvereinbarung und klicken Sie auf ‘Weiter’ (Abb. 7.2.)
(Hinweis: Die Schaltfläche ‘Weiter’ wird erst aktiviert, nachdem Sie die Lizenzvereinbarung
akzeptiert haben.)
Abb. 7.2– Lizenzvereinbarung
3. Erstellen Sie ein Passwort, um Ihre Daten auf dem DTL+ G2 zu schützen. Geben Sie es im
Feld ‘Passwort’ ein und erneut im Feld ‘Passwortbestätigung’ siehe Abb. 7.3. Bevor Sie mit

Dokument Nr. 48002017-001.A03
DataTraveler
®
Locker+ G2
Seite 15 von 25
der Installationseinrichtung fortfahren können, müssen Sie ein Passwort nach folgenden
Kriterien eingeben:
1. Das Passwort muss mindestens 6 Zeichen lang sein (bis zu 16 Zeichen.)
2. Das Passwort muss 3 (drei) der folgenden Kriterien enthalten:
- GROSSBUCHSTABE, Kleinbuchstabe, Ziffer und/oder Sonderzeichen (!, $
usw.)
Sie können auch einen Passwort-Hinweis eingeben, es ist jedoch kein Pflichtfeld. Der
Passwort-Hinweis kann eine nützliche Hilfestellung zur Erinnerung an das Passwort sein,
wenn Sie es vergessen haben sollten. (Hinweis: Der Hinweis und das Passwort dürfen
NICHT identisch sein.)
Abb. 7.3 – Passworteinrichtung

Dokument Nr. 48002017-001.A03
DataTraveler
®
Locker+ G2
Seite 16 von 25
4. Geben Sie Ihre Kontaktdaten in den angezeigten Textfeldern ein (siehe Abb. 7.4) (Hinweis:
Die in diesen Feldern eingegebenen Daten dürfen NICHT die in Schritt 3 eingegebene
Passwort-Zeichenfolge enthalten. Das Ausfüllen dieser Felder ist optional und sie können
auch leer belassen werden.)
• Im Feld ‘Name’ können bis zu 32 Zeichen eingegeben werden, das
genaue Passwort darf jedoch nicht darin enthalten sein.
• Im Feld ‘Firma’ können bis zu 32 Zeichen eingegeben werden, das
genaue Passwort darf jedoch nicht darin enthalten sein.
• Im Feld ‘Adresse’ können bis zu 156 Zeichen eingegeben werden, das
genaue Passwort darf jedoch nicht darin enthalten sein.
Abb. 7.4 – Kontaktdaten

Dokument Nr. 48002017-001.A03
DataTraveler
®
Locker+ G2
Seite 17 von 25
5. Klicken Sie zum Abschließen des Installationsprozesses für das Gerät auf ‘Fertigstellen’.
Der DTL+ G2 wird jetzt die sichere Datenpartition formatieren (Abb. 7.5) und anzeigen, wenn
dieser Vorgang abgeschlossen ist (Abb. 7.6.)
6. Klicken Sie zum Fortfahren auf ‘OK’.
Abb. 7.5 – DTL+ G2 Formatierung
Abb. 7.6 – Formatierung fertiggestellt
Der Installationsprozess ist abgeschlossen.

Dokument Nr. 48002017-001.A03
DataTraveler
®
Locker+ G2
Seite 18 von 25
Verwendung des Geräts (Mac Umgebung)
Nach Abschluss des Installationsprozesses
des DTL+ G2 können Sie sich mit Ihrem
Passwort im Gerät einloggen, haben Zugriff
auf die sichere Datenpartition und können mit
dem Stick arbeiten. Führen Sie dazu folgende
Schritte aus:
1. Stecken Sie den DTL+ G2 in einen USB-
Anschluss Ihres Notebooks oder Desktops
ein und geben Sie Ihr Passwort ein (siehe
Abb. 8.1.)
2. Geben Sie Ihr Passwort ein und klicken Sie
zum Fortfahren auf ‘Login’.
• Wenn das eingegebene Passwort
korrekt ist, wird der DTL+ G2
freigegeben und Sie können ihn
benutzen.
• Wenn ein falsches Passwort
eingegeben wurde, wird mit einer
Fehlernachricht unter dem Feld
‘Hinweis’ angezeigt, dass das
Einloggen fehlgeschlagen ist (siehe
Abb. 8.2.)
Abb. 8. – Anmeldefenster
Wenn das Passwort zum Einloggen falsch
war, haben Sie die Möglichkeit, es erneut
einzugeben. Das integrierte
Sicherheitsmodul registriert alle
fehlgeschlagenen Loginversuche*. Wenn
die voreingestellte Anzahl von 10
fehlgeschlagenen Loginversuchen erreicht
wurde, wird der DTL+ G2 gesperrt und die
sichere Datenpartition muss vor der
weiteren Benutzung neu formatiert werden.
DIES BEDEUTET, DASS ALLE AUF
DEM DTL+ G2 GESPEICHERTEN
DATEN VERLORENGEHEN.

Dokument Nr. 48002017-001.A03
DataTraveler
®
Locker+ G2
Seite 19 von 25
Weitere Einzelheiten zu dieser Funktion
siehe ‘Sperrfunktion’ auf Seite 20.
Abb. 8.2 – Fehlgeschlagene Anmeldung
*Hinweis: Der Zähler für fehlgeschlagene Loginversuche wird nach Eingabe des korrekten
Passworts zurückgesetzt.
Geräteoptionen (Mac Umgebung)
Wenn Sie im Gerät eingeloggt sind, wird im Mac OS X Dock das Symbol ‘DTLplus_Launcher’
angezeigt, siehe nachstehende Abb. 9.1:
Abb. 9.1 – DTL+ G2 Symbol in Mac OS X Dock
Halten Sie die ‘Strg’ Taste Ihrer Tastatur gedrückt und klicken
Sie einmal auf das Symbol ‘DTLplus_Launcher’; das in Abb. 9.2
abgebildete Menü wird rechts angezeigt.
DTL+ G2 Einstellungen
• Sie können Ihr Passwort bzw. Ihren Hinweis ändern
(Abb. 9.3)
• Sie können Kontaktdaten hinzufügen, ansehen oder
ändern (Abb. 9.4)
• Sie können die gewünschte Sprache ändern (Abb. 9.5)
Abbildung 9.2
DTL+ G2 Optionen

Dokument Nr. 48002017-001.A03
DataTraveler
®
Locker+ G2
Seite 20 von 25
Abbildung 9.3
Passwort ändern
Abbildung 9.4
Kontaktinformationen
Abbildung 9.5
Sprache wählen
(Hinweis: Aus Sicherheitsgründen müssen Sie zum Aktualisieren bzw. Modifizieren dieser
Einstellungen jeweils Ihr aktuelles DTL+ G2 Passwort eingeben.)
DTL+ G2 durchsuchen
• Wenn Sie eingeloggt sind, können Sie mit dieser Funktion den Inhalt der sicheren
Datenpartition durchsuchen.
DTL+ G2 formatieren
• Mit dieser Funktion können Sie die sichere
Datenpartition formatieren (Achtung: Hierbei
werden alle Daten gelöscht.) (Abb. 9.7)
Online Support (Erfordert Internetanschluss)
• Öffnet Ihren Internet-Browser und navigiert
Sie zu http://www.kingston.com/support/, wo
Sie Zugang zu weiteren Support-
Informationen haben.
Abb. 9.7 – Warnung bei Formatierung

Dokument Nr. 48002017-001.A03
DataTraveler
®
Locker+ G2
Seite 21 von 25
Über DTL+ G2
• Enthält spezifische Angaben über den DTL+
G2, einschließlich Versionsangaben über
die Anwendung und die Firmware (Abb. 9.8)
DTL+ G2 herunterfahren
• Fährt den DTL+ G2 ordnungsgemäß
herunter, damit Sie ihn sicher aus Ihrem
System entfernen können
Abb. 9.8 – Über DTL+ G2
(Empfehlung: Nach dem Herunterfahren Ihres DTL+ G2 empfiehlt es sich immer, den
Host-Computer, in dem Ihr Laufwerk eingesteckt war, herunterzufahren oder neu zu
starten. Dies ist vor allem anzuraten, wenn Sie es an einem allgemein zugänglichen
oder mit mehreren Personen gemeinsam genutzten Computer eingesteckt hatten.)
- Abschnitt Mac abgeschlossen -
Hilfe und Fehlerbehebung
Sperrfunktion
Der DTL+ G2 enthält eine Sicherheitsfunktion, die den unbefugten Zugriff auf die
Datenpartition verhindert, wenn die maximale Anzahl aufeinanderfolgender fehlgeschlagener
Loginversuche (Kurzform MaxNoA) erreicht wurde; standardmäßig ist die “Out-of-Box”
Konfiguration auf einen Wert von 10 (Anzahl der Versuche) festgelegt.
Der 'Sperrzähler' registriert jeden fehlgeschlagenen Loginversuch und kann auf zwei Wegen
zurückgesetzt werden: 1) Durch erfolgreiches Einloggen vor Erreichen des MaxNoA, oder 2)
Erreichen des MaxNoA und Durchführung einer Geräteformatierung.*

Dokument Nr. 48002017-001.A03
DataTraveler
®
Locker+ G2
Seite 22 von 25
Wenn ein falsches Passwort eingegeben wurde,
wird mit einer Fehlernachricht unter dem Feld
‘Hinweis’ angezeigt, dass das Einloggen
fehlgeschlagen ist. Siehe Abb. 10.1.
Wenn der Anmeldeversuch zum 7. Mal
fehlgeschlagen ist, wird eine weitere
Fehlernachricht mit der Mitteilung angezeigt,
dass Ihnen noch 3 Versuche bis zum Erreichen
des MaxNoA bleiben (der standardmäßig auf 10
eingestellt ist.) Siehe Abb. 10.2.
Nach dem10. fehlgeschlagenen
Anmeldeversuch wird der DTL+ G2 die
Datenpartition dauerhaft sperren und vor der
nächsten Benutzung muss eine
Geräteformatierung durchgeführt werden. Dies
bedeutet, dass alle auf dem DTL+ G2
gespeicherten Daten verlorengehen und Sie
ein neues Passwort erstellen müssen.
Abb. 10.1 – Fehlgeschlagene Anmeldung
Diese Sicherheitsmaßnahme begrenzt die
Möglichkeit von Unbefugten, unzählige
Loginversuche durchzuführen, um Zugang zu
Ihren sensiblen Daten zu erhalten.
Auch wenn Sie der Besitzer des DTL+ G2 sind
und Ihr Passwort vergessen haben, werden
dieselben Sicherheitsmaßnahmen ausgeführt,
einschließlich der Geräteformatierung.*
Weitere Einzelheiten zu dieser Funktion siehe
‘Sperrfunktion’ auf Seite 21.
Abb. 10.2 – 7. Fehlgeschlagene Anmeldung
*Hinweis: Bei einer Geräteformatierung werden ALLE in der sicheren Datenpartition des DTL+
G2 gespeicherten Daten gelöscht.
Passwort vergessen

Dokument Nr. 48002017-001.A03
DataTraveler
®
Locker+ G2
Seite 23 von 25
Wenn Sie Ihr Passwort vergessen haben,
können Sie auf den Link ‘Passwort
zurücksetzen’ klicken, der beim Starten des
DTLplus_Launcher im Anmeldefenster
angezeigt wird (siehe Abb. 10.3.)
Mit dieser Option können Sie ein neues
Passwort erstellen, jedoch wird der DTL+ G2
zum Schutz Ihrer Daten formatiert. Dies
bedeutet, dass Ihre gesamten Daten bei der
Durchführung gelöscht werden.*
Wenn Sie auf ‘Passwort zurücksetzen’ klicken,
wird eine Nachricht mit der Frage angezeigt,
ob Sie vor dem Durchführen der Formatierung
ein neues Passwort eingeben möchten. (Abb.
10.4) Sie haben jetzt die Wahl 1) dies durch
Klicken auf ‘OK’ zu bestätigen oder 2) durch
Klicken auf ‘Abbrechen’ abzubrechen und zum
Anmeldefenster zurückzukehren.
Abb. 10.3 – Passwort vergessen
Wenn Sie Fortfahren gewählt haben, werden
Sie aufgefordert, ein neues vollständiges
Passwort und einen neuen Hinweis
einzugeben. Der Hinweis ist kein Pflichtfeld,
kann jedoch eine nützliche Hilfestellung zur
Erinnerung an das Passwort sein, wenn Sie
es vergessen haben sollten.
(Hinweis: Der Hinweis und das Passwort des
DTL+ G2 dürfen NICHT identisch sein.)
Abb. 10.4 – Abfrage vor Formatierung

Dokument Nr. 48002017-001.A03
DataTraveler
®
Locker+ G2
Seite 24 von 25
*Hinweis: Bei einer Geräteformatierung werden ALLE in der sicheren Datenpartition des DTL+
G2 gespeicherten Daten gelöscht.
Konflikt von Laufwerksbuchstaben (Windows Betriebssystem)
Wie bereits im Abschnitt ‘Systemanforderungen’ dieses Handbuchs (auf Seite 3) erwähnt,
benötigt der DTL+ G2 2 freie, aufeinanderfolgende Laufwerksbuchstaben NACH dem letzten
physischen Speicher, der vor der ‘Lücke’ in in den Laufwerksbuchstabenzuweisungen
erscheint (siehe Abb. 10.5.) Dies bezieht sich NICHT auf Netzwerkfreigaben, da diese speziell
für Benutzerprofile sind und sich nicht auf das System-Hardwareprofil selbst beziehen und
daher im Betriebssystem als verfügbar erscheinen.
Dies bedeutet, dass Windows dem DTL+ G2 einen Laufwerksbuchstaben zuordnen kann, der
bereits durch eine Netzwerkfreigabe oder einen Universal Naming Convention (UNC) Pfad
verwendet wird, wodurch ein Laufwerksbuchstabenkonflikt entsteht. Sollte dies passiert sein,
wenden Sie sich für die Änderung von Laufwerkbuchstabenzuweisungen in Windows Disk
Management (Administratorrechte erforderlich) bitte an Ihren Administrator oder an die
Helpdesk-Abteilung.
Abb. 10.5 – Mein Computer
In diesem Beispiel verwendet der DTL+ G2 Laufwerk F:. Es ist das erste verfügbare Laufwerk
nach Laufwerk E: (dem letzten physikalischen Laufwerk vor der Laufwerksbuchstaben-Lücke).
Da der Buchstabe G: eine Netzwerkfreigabe und kein Teil des Hardware-Profils ist, versucht
der DTL+ G2 möglicherweise, ihn als zweiten Laufwerksbuchstaben zu verwenden, was zu
einem Konflikt führen würde.
Wenn es in Ihrem System keine Netzwerkfreigaben gibt und der DTL+ G2 dennoch nicht
geladen wird, hält möglicherweise ein Kartenleser, ein Wechselmedium oder ein früher
installiertes Gerät die Laufwerksbuchstabenzuordnung und verursacht deshalb noch einen
Konflikt.

Dokument Nr. 48002017-001.A03
DataTraveler
®
Locker+ G2
Seite 25 von 25
Beachten Sie bitte, dass sich das Drive Letter Management (DLM) in Windows XP SP3, Vista
und 7 erheblich verbessert hat, so dass dieser Fehler möglicherweise nicht auftritt. Wenn Sie
den Konflikt nicht lösen können, wenden Sie sich für weitere Unterstützung bitte an die
Abteilung für technischen Support bei Kingston.
©2011 Kingston Technology Europe Ltd und Kingston Digital Europe Ltd. Alle Rechte vorbehalten. Alle Marken und eingetragenen Marken sind
Eigentum ihrer jeweiligen Besitzer.

Document Nº. 48002017-001.A03
DataTraveler
®
Locker+ G2
Page 1 sur 22
DataTraveler
®
Locker+ G2 – Manuel d'utilisation

Document Nº. 48002017-001.A03
DataTraveler
®
Locker+ G2
Page 2 sur 22
Table des Matières
À PROPOS DE CE MANUEL D'UTILISATION ......................................................................... 3
CONFIGURATION SYSTÈME .................................................................................................. 3
RECOMMANDATIONS ............................................................................................................. 3
CONFIGURATION (ENVIRONNEMENT WINDOWS)............................................................... 3
INITIALISATION DU PÉRIPHÉRIQUE (ENVIRONNEMENT WINDOWS) ................................ 4
UTILISATION DU PÉRIPHÉRIQUE (ENVIRONNEMENT WINDOWS) .................................... 9
OPTIONS DU PÉRIPHÉRIQUE(ENVIRONNEMENT WINDOWS) ......................................... 10
CONFIGURATION (ENVIRONNEMENT MAC) ...................................................................... 12
INITIALISATION DU PÉRIPHÉRIQUE (ENVIRONNEMENT MAC) ....................................... 13
UTILISATION DU PÉRIPHÉRIQUE(ENVIRONNEMENT MAC) ............................................. 17
OPTIONS DU PÉRIPHÉRIQUE (ENVIRONNEMENT MAC) .................................................. 18
AIDE ET DÉPANNAGE........................................................................................................... 20
Verrouillage du périphérique ...................................................................................................................... 20
Mot de passe oublié ..................................................................................................................................... 21
Conflit de lettres de lecteur (Environnement Windows) .......................................................................... 22

Document Nº. 48002017-001.A03
DataTraveler
®
Locker+ G2
Page 3 sur 22
À propos de ce manuel d'utilisation
Ce manuel d'utilisation est destiné à la clé USB DataTraveler
®
Locker+ G2 (ou DTL+ G2 dans
ce document) basée sur la version en sortie d'usine, sans personnalisation.
Configuration système
Plateforme PC
Processeur Pentium III (ou équivalent ou
plus rapide)
15Mo d'espace disque libre
Port USB 2.0 / 3.0
Deux lettres de lecteur consécutives après
le dernier disque physique*
Systèmes d'exploitation supportés
Windows
®
7
Windows
®
Vista SP1, SP2
Windows
®
XP SP2, SP3
Plateforme Mac
15Mo d'espace disque libre
Port USB 2.0 / 3.0
Prise en charge des systèmes d'exploitation
Mac OS X 10.5.x
Mac OS X 10.6.x
Mac OS X 10.7x
Recommandations
Pour que la DTL+ G2 bénéficie d'une alimentation suffisante, elle doit être insérée sur un port
USB directement sur un ordinateur portable ou de bureau, comme indiqué à la Figure 1.1.
Évitez de brancher la DTL+ G2 sur un périphérique équipé d'un port USB, par exemple un
clavier ou un concentrateur USB alimenté, comme indiqué à la Figure 1.2.
Figure 1.1 – Utilisation conseillée
Figure 1.2 – Déconseillé
*Remarque : Voir la section "Conflit de lettres de lecteur" page 26.
Configuration (Environnement Windows)

Document Nº. 48002017-001.A03
DataTraveler
®
Locker+ G2
Page 4 sur 22
1. Insérez la DTL+ G2 dans un port USB disponible
de votre ordinateur de bureau ou portable et
attendez que Windows la détecte.
Les utilisateurs de Windows XP verront
s'afficher une notification Nouveau matériel
détecté, comme indiquée à la Figure 2.1.
Les utilisateurs de Windows Vista/ 7 verront
s'afficher une notification de pilote de
périphérique, comme indiquée à la Figure 2.2.
Lorsque la détection du nouveau matériel est
terminée, Windows lance le processus d'initialisation.
Si la fonction d'exécution automatique de
Windows est activée, vous pouvez ignorer
l'étape suivante et passer à la page 5 –
Initialisation du périphérique.
Si la fonction d'exécution automatique de
Windows est désactivée, comme c'est le cas
par défaut sous Windows 7, une fenêtre
AutoPlay sera affichée (voir Figure 2.3).
2. Sélectionnez l'option Exécuter
DTLplus_Launcher.exe.
Si la fonction AutoPlay de Windows ne démarre pas,
naviguez sur le CD-ROM (Figure 2.4) et lancez
manuellement le programme DTLplus_Launcher. Le
processus d’installation démarrera.
Figure 2.4 – Contenus de la DTL+ G2
Figure 2.1 – Nouveau matériel détecté
(Windows XP)
Figure 2.2 – Installation du pilote de
périphérique
(Windows Vista/7)
Figure 2.3 – Fenêtre AutoPlay
(Windows Vista/7)
(Remarque : Les options du Menu
affiché dans la fenêtre AutoPlay
peuvent varier selon les programmes
installés sur votre ordinateur. Si elle
est activée, l'exécution automatique
lancera automatiquement le
processus d'initialisation).
Initialisation du périphérique (Environnement Windows)

Document Nº. 48002017-001.A03
DataTraveler
®
Locker+ G2
Page 5 sur 22
1. Sélectionnez votre langue préférée dans le menu déroulant et cliquez sur Suivant
(Figure 3.1).
Figure 3.1 – Sélection de la langue
2. Lisez l'accord de licence et cliquez sur Suivant (Figure 3.2). (Remarque : Vous devez
accepter l'accord de licence pour continuer. Sinon, le bouton "Suivant" reste désactivé).
Figure 3.2 – Accord de licence

Document Nº. 48002017-001.A03
DataTraveler
®
Locker+ G2
Page 6 sur 22
3. Créez un mot de passe pour protéger les données sur votre DTL+ G2. Saisissez-le dans le
champ Mot de passe, puis répétez-le dans le champ Confirmation du mot de passe,
comme indiqué à la Figure 3.3. Le mot de passe doit respecter les critères suivants pour
que le processus d'initialisation vous autorise à continuer :
1. Le mot de passe doit contenir entre 6 et 16 caractères.
2. Le mot de passe doit utiliser trois (3) des critères suivants :
- MAJUSCULES, minuscules, caractères numériques, et/ou caractères spéciaux
(!, $, etc).
Vous pouvez aussi utiliser l'indice du mot passe, mais ce champ n'est pas obligatoire.
L'indice pourra vous aider à vous souvenir du mot de passe oublié. (Remarque : L'indice
NE DOIT PAS être une copie exacte du mot de passe de la connexion à la DTL+ G2).
Figure 3.3 – Configuration du mot de passe

Document Nº. 48002017-001.A03
DataTraveler
®
Locker+ G2
Page 7 sur 22
4. Saisissez vos informations personnelles dans les champs de texte affichés (voir Figure 3.4)
(Remarque : Les informations saisies dans ces champs NE DOIVENT PAS contenir la
chaîne des caractères du mot de passe, tel que saisi à l'étape 3. Ces champs sont
optionnels et peuvent être laissés vides, si vous le souhaitez).
Le champ Nom peut contenir jusqu'à 32 caractères, mais ne doit pas
contenir le mot de passe exact.
Le champ Entreprise peut contenir jusqu'à 32 caractères, mais ne doit pas
contenir le mot de passe exact.
Le champ Détails peut contenir jusqu'à 156 caractères, mais ne doit pas
contenir le mot de passe exact.
Figure 3.4 – Informations personnelles
5. Cliquez sur Terminer pour terminer le processus d'initialisation du périphérique.

Document Nº. 48002017-001.A03
DataTraveler
®
Locker+ G2
Page 8 sur 22
La DTL+ G2 formate ensuite la partition des données sécurisées (Figure 3.5) et vous avertit
lorsque cette opération est terminée (Figure 3.6).
Remarque : Si vous utilisez Windows XP en mode Non-Admin, le programme de
formatage peut durer une minute au maximum.*
6. Cliquez sur OK pour continuer.
Figure 3.5 – Formatage de la DTL+ G2
Figure 3.6 – Formatage terminé
Initialisation terminée.
*Remarque : La durée du formatage peut varier selon l'ordinateur et la capacité de la DTL+ G2.

Document Nº. 48002017-001.A03
DataTraveler
®
Locker+ G2
Page 9 sur 22
Utilisation du périphérique (Environnement Windows)
Lorsque l'initialisation de la DTL+ G2 est
terminée, vous pouvez accéder avec votre mot
de passe à la partition des données
sécurisées et utiliser ses fonctions. Pour cela,
suivez les instructions ci-dessous.
1. Insérez la DTL+ G2 dans un port USB, sur
un ordinateur portable ou de bureau, et
saisissez votre mot de passe (voir Figure
4.1).
2. Après avoir saisi le mot de passe, cliquez
sur le bouton Connexion pour continuer.
Si le mot de passe est correct, la
DTL+ G2 autorise l'accès et vous
pouvez l'utiliser.
Si le mot de passe est erroné, un
message d'erreur s'affiche sous le
champ Indice, indiquant un échec de
la connexion (voir Figure 4.2).
Figure 4.1 – Fenêtre de connexion
Pendant la procédure de connexion, si un
mot de passe erroné est saisi, vous pouvez
immédiatement réessayer. Mais une
fonction de sécurité intégrée gère le
nombre de tentatives de connexion*. Après
10 tentatives de connexion erronées, la
DTL+ G2 se verrouille et ne pourra être
utilisée qu'après un formatage de la
partition des données sécurisées.
PAR CONSÉQUENT, TOUTES LES
DONNÉES QUE LA DTL+ G2 CONTIENT
SERONT DÉTRUITES.
Pour en savoir plus sur cette fonction, voir
Verrouillage du périphérique, page 24.
Figure 4.2 – Échec de la connexion
*Remarque : Lorsque la connexion entre l'ordinateur et la clé est établie, le compteur de
tentatives est remis à zéro.

Document Nº. 48002017-001.A03
DataTraveler
®
Locker+ G2
Page 10 sur 22
Options du périphérique (Environnement Windows)
Tant que vous êtes connecté au périphérique, une icône DTL+ G2 est affichée dans le coin
supérieur droit de la barre des tâches Windows (Figure 5.1). (Remarque : Les utilisateurs
Windows 7 doivent cliquer sur le bouton Flèche haute dans la barre des tâches pour accéder à
l'icône DTL+ G2 (Figure 5.2.)
Cliquez une fois sur l'icône DTL+ G2 pour afficher le menu suivant :
Figure 5.1 – Icône DTL+ G2
dans la barre des tâches
(Utilisateurs Windows XP)
Figure 5.2 – Icône DTL+ G2
dans la barre des tâches
(Utilisateurs Windows 7)
Paramètres de la DTL+ G2
Vous pouvez modifier votre mot de passe et/ou l'indice (Figure 5.3)
Vous pouvez ajouter/ afficher/ modifier vos informations personnelles (Figure 5.4)
Vous pouvez modifier la langue sélectionnée (Figure 5.5)
(Remarque : Pour des raisons de sécurité, le mot de passe actuel de votre DTL+ G2 vous sera
demandé pour modifier ces paramètres).
Figure 5.3
Modifier le mot de passe
Figure 5.4
Informations personnelles
Figure 5.5
Sélectionnez la langue

Document Nº. 48002017-001.A03
DataTraveler
®
Locker+ G2
Page 11 sur 22
Parcourir la DTL+ G2
Vous pouvez parcourir le contenu de la partition des données sécurisées pendant que
vous êtes connecté.
Formater la DTL+ G2*
Vous pouvez formater la partition des
données sécurisées (Avertissement : Toutes
les données seront détruites). (Figure 5.7)
Assistance en ligne (nécessite une connexion
internet)
Cette fonction ouvre votre navigateur internet
et affiche la page
http://www.kingston.com/support/ pour vous
permettre de consulter les informations
supplémentaires de l'assistance.
Figure 5.7 – Avertissement avant
formatage
À propos de la DTL+ G2
Cette section affiche des informations
spécifiques à la DTL+ G2, incluant les
données des versions de l'application et du
firmware (Figure 5.8)
Fermeture de la DTL+ G2
Permet de fermer correctement la DTL+ G2
avant de la déconnecter physiquement du
système et en toute sécurité.
Figure 5.8 – À propos de la DTL+ G2
(Recommandation : Après la fermeture de votre DTL+ G2, il est conseillé de fermer ou
de redémarrer l’ordinateur auquel votre clé USB était connectée, en particulier si vous
êtes dans un lieu public, ou si vous utilisez un poste partagé par plusieurs personnes.)
*Remarque : Le mot de passe actuel de votre DTL+ G2 est nécessaire sous Windows Vista et
Windows 7
- Fin de la section Windows -

Document Nº. 48002017-001.A03
DataTraveler
®
Locker+ G2
Page 12 sur 22
Configuration (Environnement Mac)
Insérez la DTL+ G2 dans un port USB disponible sur votre ordinateur
de bureau ou portable et attendez que le système d'exploitation Mac la
détecte. Lorsque la clé est détectée, un volume DTLplus est affiché sur
le bureau, voir la Figure 6.1.
1. Double-cliquez sur l'icône CD-ROM DTL+ G2.
2. Double-cliquez sur le dossier Mac affiché dans la fenêtre
indiquée à la Figure 6.2.
Figure 6.1 – DTLplus
3. Double-cliquez sur l'icône d'application DTLplus affichée
dans la fenêtre indiquée à la Figure 6.3. Le processus
d’initialisation démarrera.
Figure 6.2 – Contenus de la DTL+ G2
Figure 6.3 – Application DTL+ G2

Document Nº. 48002017-001.A03
DataTraveler
®
Locker+ G2
Page 13 sur 22
Initialisation du périphérique (Environnement Mac)
1. Sélectionnez votre langue préférée dans le menu déroulant et cliquez sur Suivant (Figure
7.1).
Figure 7.1 – Sélection de la langue
2. Lisez l'accord de licence et cliquez sur Suivant (Figure 7.2). (Remarque : Vous devez
accepter l'accord de licence pour continuer. Sinon, le bouton "Suivant" reste désactivé).
Figure 7.2 – Accord de licence

Document Nº. 48002017-001.A03
DataTraveler
®
Locker+ G2
Page 14 sur 22
3. Créez un mot de passe pour protéger les données sur votre DTL+ G2. Saisissez-le dans le
champ Mot de passe, puis répétez-le dans le champ Confirmation du mot de passe,
comme indiqué à la Figure 7.3. Le mot de passe doit respecter les critères suivants pour
que le processus d'initialisation vous autorise à continuer :
1. Le mot de passe doit contenir entre 6 et 16 caractères.
2. Le mot de passe doit respecter trois (3) des critères suivants :
- MAJUSCULES, minuscules, caractères numériques, et/ou caractères spéciaux
(!, $, etc).
Vous pouvez aussi utiliser l'indice du mot passe, mais ce champ n'est pas obligatoire.
L'indice pourra vous aider à vous souvenir du mot de passe oublié. (Remarque : L'indice
NE DOIT PAS être une copie exacte du mot de passe de la connexion à la DTL+ G2).
Figure 7.3 – Configuration du mot de passe

Document Nº. 48002017-001.A03
DataTraveler
®
Locker+ G2
Page 15 sur 22
4. Saisissez vos informations personnelles dans les champs de texte affichés (voir Figure 7.4)
(Remarque : Les informations saisies dans ces champs NE DOIVENT PAS contenir la
chaîne des caractères du mot de passe, tel que saisi à l'étape 3. Ces champs sont
optionnels et peuvent être vides, si vous le souhaitez).
Le champ Nom peut contenir jusqu'à 32 caractères, mais ne doit pas
contenir le mot de passe exact.
Le champ Entreprise peut contenir jusqu'à 32 caractères, mais ne doit pas
contenir le mot de passe exact.
Le champ Détails peut contenir jusqu'à 156 caractères, mais ne doit pas
contenir le mot de passe exact.
Figure 7.4 – Informations personnelles
5. Cliquez sur Terminer pour terminer le processus d'initialisation du périphérique.

Document Nº. 48002017-001.A03
DataTraveler
®
Locker+ G2
Page 16 sur 22
La DTL+ G2 formate ensuite la partition des données sécurisées (Figure 7.5) et vous avertit
lorsque cette opération est terminée (Figure 7.6).
6. Cliquez sur OK pour continuer.
Figure 7.5 – Formatage de la DTL+ G2
Figure 7.6 – Formatage terminé
Initialisation terminée.

Document Nº. 48002017-001.A03
DataTraveler
®
Locker+ G2
Page 17 sur 22
Utilisation du périphérique(Environnement Mac)
Lorsque l'initialisation de la DTL+ G2 est
terminée, vous pouvez accéder avec votre mot
de passe à la partition des données
sécurisées et utiliser ses fonctions. Pour cela,
suivez les instructions ci-dessous.
1. Insérez la DTL+ G2 dans un port USB, sur
un ordinateur portable ou de bureau, et
saisissez votre mot de passe (voir Figure
8.1).
2. Après avoir saisi le mot de passe, cliquez
sur le bouton Connexion pour continuer.
Si le mot de passe est correct, la
DTL+ G2 autorise l'accès et vous
pouvez l'utiliser.
Si le mot de passe est erroné, un
message d'erreur s'affiche sous le
champ Indice, indiquant un échec de
la connexion (voir Figure 8.2).
Figure 8.1 – Fenêtre de connexion
Pendant la procédure de connexion, si un
mot de passe erroné est saisi, vous pouvez
immédiatement réessayer. Mais une
fonction de sécurité intégrée gère le
nombre de tentatives de connexion*. Après
10 tentatives de connexion erronées, la
DTL+ G2 se verrouille et ne pourra être
utilisée qu'après un formatage de la
partition des données sécurisées.
PAR CONSÉQUENT, TOUTES LES
DONNÉES QUE LA DTL+ G2 CONTIENT
SERONT DÉTRUITES.
Pour en savoir plus sur cette fonction, voir
Verrouillage du périphérique, page 24.
Figure 8.2 – Échec de connexion
*Remarque : Lorsque la connexion entre l'ordinateur et la clé est établie, le compteur de
tentatives est remis à zéro.

Document Nº. 48002017-001.A03
DataTraveler
®
Locker+ G2
Page 18 sur 22
Options du périphérique (Environnement Mac)
Tant que vous êtes connecté au périphérique, une icône DTLplus_Launcher est affichée dans
le Dock Mac OS X (Figure 9.1).
Figure 9.1 – Icône DTL+ G2 dans le Dock Mac OS X
Maintenez la touche control du clavier et cliquez une fois sur
l'icône DTLplus_Launcher pour afficher le menu indiqué à la
Figure 9.2 à droite.
Paramètres de la DTL+ G2
Vous pouvez modifier votre mot de passe et/ou l'indice
(Figure 9.3)
Vous pouvez ajouter/ afficher/ modifier vos informations
personnelles (Figure 9.4)
Vous pouvez modifier la langue sélectionnée (Figure 9.5)
Figure 9.2
Options DTL+ G2
Figure 9.3
Modifier le mot de passe
Figure 9.4
Informations personnelles
Figure 9.5
Sélectionnez la langue
(Remarque : Pour des raisons de sécurité, le mot de passe actuel de votre DTL+ G2 vous sera
demandé pour modifier ces paramètres).

Document Nº. 48002017-001.A03
DataTraveler
®
Locker+ G2
Page 19 sur 22
Parcourir la DTL+ G2
Vous pouvez parcourir le contenu de la partition des données sécurisées pendant que
vous êtes connecté.
Formater la DTL+ G2
Vous pouvez formater la partition des
données sécurisées (Avertissement : Toutes
les données seront détruites). (Figure 9.7)
Assistance en ligne (nécessite une connexion
internet)
Cette fonction ouvre votre navigateur internet
et affiche la page
http://www.kingston.com/support/ pour vous
permettre de consulter les informations
supplémentaires de l'assistance.
Figure 9.7 – Avertissement avant formatage
À propos de la DTL+ G2
Cette section affiche des informations
spécifiques à la DTL+ G2, incluant les
données des versions de l'application et du
firmware (Figure 9.8)
Fermeture de la DTL+ G2
Permet de fermer correctement la DTL+ G2
avant de la déconnecter physiquement du
système et en toute sécurité.
Figure 9.8 – À propos de la DTL+ G2
(Recommandation : Après la fermeture de votre DTL+ G2, il est conseillé de fermer ou
de redémarrer l’ordinateur auquel votre clé était connectée, en particulier si vous êtes
dans un lieu public, ou si vous utilisez un poste partagé par plusieurs personnes.)
- Fin de la section Mac -

Document Nº. 48002017-001.A03
DataTraveler
®
Locker+ G2
Page 20 sur 22
Aide et dépannage
Verrouillage du périphérique
La DTL+ G2 est dotée d'une fonction de sécurité qui bloque tout accès non autorisé à la
partition des données après un nombre prédéterminé de tentatives de connexion erronées
consécutives (cette valeur est désignée par l'abréviation MaxNoA [max number of access]).
La limite par défaut définie en usine est de 10 tentatives.
Le compteur de tentatives enregistre chaque échec de connexion. Il est remis à zéro dans un
des deux cas suivants : 1) Le mot de passe saisi est correct et la connexion à la clé USB est
établie avant d'atteindre la limite MaxNoA ; ou 2) La limite MaxNoA est atteinte et le formatage
de la clé USB a été exécuté.*
Si le mot de passe est erroné, un message
d'erreur s'affiche sous le champ Indice, indiquant
un échec de la connexion. Voir la Figure 10.1.
Après la septième tentative erronée
consécutive, un message d'erreur
supplémentaire avertit l'utilisateur qu'il lui reste
trois tentatives avant d'atteindre la limite
MaxNoA (définie à 10 tentatives par défaut).
Voir la Figure 10.2.
Après la dixième tentative de connexion erronée,
la DTL+ G2 verrouille définitivement la partition
des données et ne pourra être utilisée qu'après un
formatage. Par conséquent, toutes les données
présentes sur la DTL+ G2 seront détruites et
vous devrez saisir un nouveau mot de passe.
Figure 10.1 – Échec de connexion
Cette mesure de sécurité évite qu'une personne
non autorisée puisse tenter indéfiniment
d'accéder à vos données sensibles.
Si vous êtes le propriétaire de la DTL+ G2 et
que vous avez oublié votre mot de passe, cette
mesure de sécurité sera également appliquée et
aboutira au formatage de la clé.*
Pour en savoir plus sur cette fonction, voir Mot
de passe oublié, page 25.
Figure 10.2 – Septième échec de connexion
*Remarque : Un formatage efface définitivement TOUTES les données enregistrées dans la
partition sécurisée de la DTL+ G2.

Document Nº. 48002017-001.A03
DataTraveler
®
Locker+ G2
Page 21 sur 22
Mot de passe oublié
Si vous avez oublié votre mot de passe, vous
pouvez cliquer sur le lien Réinitialiser le mot
de passe, qui est affiché dans la fenêtre de
connexion après le démarrage du
DTLplus_Launcher (voir Figure 10.3).
Cette option vous permet de créer un mot de
passe, mais pour protéger vos données, la
DTL+ G2 sera formatée. Par conséquent, ce
processus effacera définitivement toutes vos
données.*
Lorsque vous cliquez sur le bouton
Réinitialiser le mot de passe, un message
(Figure 10.4) vous demande si vous souhaitez
saisir un nouveau mot de passe avant le
lancement du formatage. Vous pouvez alors
1) cliquer sur OK pour confirmer, ou 2) cliquer
sur "Annuler" pour revenir à la fenêtre de
connexion.
Figure 10.3 – Mot de passe oublié
Si vous choisissez de continuer, vous pourrez
saisir un nouveau mot de passe complexe et
un nouvel indice. L'indice n'est pas obligatoire,
mais il pourra vous aider à vous souvenir du
mot de passe oublié.
(Remarque : L'indice NE DOIT PAS être une
copie exacte du mot de passe de la connexion
à la DTL+ G2).
Figure 10.4 – Message avant formatage
*Remarque : Un formatage efface TOUTES les données enregistrées dans la partition
sécurisée de la DTL+ G2.

Document Nº. 48002017-001.A03
DataTraveler
®
Locker+ G2
Page 22 sur 22
Conflit de lettres de lecteur (Environnement Windows)
Comme indiqué dans la section Configuration système (page 3), la DTL+ G2 nécessite deux
lettres de lecteur consécutives APRÈS le dernier disque physique affiché avant "l'écart"
d'attribution des lettres de lecteur (voir Figure 10.5). Cette attribution est indépendante des
partages de réseau parce que ces partages sont spécifiques aux profils d'utilisateur. Ils sont
indépendants du profil matériel du système. Une lettre attribuée à un volume du réseau peut
donc apparaître comme disponible pour le système d'exploitation.
Par conséquent, Windows peut attribuer à une DTL+ G2 une lettre de lecteur qui est déjà
utilisée par un volume connecté au réseau ou sur un chemin UNC (Universal Naming
Convention). Ce qui provoque un conflit de lettres de lecteur. Dans ce cas, veuillez consulter
votre administrateur ou service d'assistance pour modifier l'attribution des lettres de lecteur
dans le gestionnaire des disques de Windows (les droits d'administrateur sont nécessaires).
Figure 10.5 – Mon ordinateur
Dans cet exemple, la DTL+ G2 utilise le volume F:, qui est la première lettre disponible après le
volume E: (qui est le dernier disque physique affiché avant l'écart dans l'attribution des lettres de
lecteurs). Puisque la lettre G: est un volume de réseau et ne fait pas partie du profil matériel, la
DTL+ G2 peut tenter de l'utiliser comme deuxième lettre de lecteur et génère alors un conflit.
Si vous n'avez aucun volume de réseau sur votre système et que la DTL+ G2 ne se charge
toujours pas, il est possible qu'un lecteur de cartes, un disque amovible ou un autre périphérique
précédemment utilisé, conserve une lettre de lecteur attribuée et génère un conflit.
Précisons que la gestion des lettres de lecteur (Drive Letter Management – DLM) a été
considérablement améliorée dans Windows XP SP3, Vista, et 7, et peut vous éviter ce
problème. Mais si vous ne parvenez pas à résoudre un conflit de lettres de lecteur, veuillez
contacter le service d'assistance technique de Kingston.
©2012 Kingston Technology Europe Ltd et Kingston Digital Europe Ltd. Tous droits réservés. Toutes les marques de commerce et les marques de
commerce déposées appartiennent à leurs propriétaires respectifs.

Documento N. 48002017-001.A03
DataTraveler
®
Locker+ G2
Pagina 1 di 23
Manuale d'uso del drive DataTraveler
®
Locker+ G2

Documento N. 48002017-001.A03
DataTraveler
®
Locker+ G2
Pagina 2 di 23
Sommario
INFORMAZIONI SULLA GUIDA UTENTE ................................................................................. 3
REQUISITI DI SISTEMA ............................................................................................................. 3
RACCOMANDAZIONI ................................................................................................................ 3
CONFIGURAZIONE (AMBIENTI WINDOWS) ............................................................................ 4
INIZIALIZZAZIONE DEL DISPOSITIVO (AMBIENTI WINDOWS) ............................................. 5
UTILIZZO DEL DISPOSITIVO (AMBIENTI WINDOWS) ............................................................ 9
OPZIONI DEL DISPOSITIVO (AMBIENTI WINDOWS) ........................................................... 10
CONFIGURAZIONE (AMBIENTI MAC) .................................................................................... 12
INIZIALIZZAZIONE DEL DISPOSITIVO (AMBIENTI MAC) ..................................................... 14
UTILIZZO DEL DISPOSITIVO (AMBIENTI MAC) .................................................................... 18
OPZIONI DEL DISPOSITIVO (AMBIENTI MAC) ..................................................................... 19
SUPPORTO E SOLUZIONE DEI PROBLEMI .......................................................................... 21
Blocco del dispositivo ................................................................................................................................ 21
Password dimenticata ................................................................................................................................ 21
Conflitti con le lettere di unità (Sistemi operativi Windows) ................................................................... 22

Documento N. 48002017-001.A03
DataTraveler
®
Locker+ G2
Pagina 3 di 23
Informazioni sulla Guida Utente
Questa guida utente contiene le istruzioni per l'uso del drive DataTraveler
®
Locker+ G2 (d'ora
in poi denominato più semplicemente DTL+ G2); le istruzioni contenute nella guida sono
riferite all'unità dotata della configurazione standard di fabbrica, senza alcun tipo di
personalizzazione.
Requisiti di sistema
Piattaforma PC
• Processore Pentium III (o superiore)
• 15MB di spazio libero su disco
• Porta USB 2.0/3.0
• Due lettere di unità libere consecutive
dopo quella associata all'ultimo drive fisico
presente sull'unità*
Sistemi operativi supportati
• Windows
®
7
• Windows
®
Vista SP1, SP2
• Windows
®
XP SP2, SP3
Piattaforma Mac
• 15MB di spazio libero su disco
• Porta USB 2.0/3.0
Sistemi operativi supportati
• Mac OS X 10.5.x
• Mac OS X 10.6.x
• Mac OS X 10.7x
Raccomandazioni
Per garantire una potenza adeguata al funzionamento del drive DTL+ G2, inserirlo
direttamente all'interno di una porta USB sul computer notebook o desktop, come illustrato in
Figura 1.1. Evitare di collegare il drive DTL+ G2 a qualunque tipo di periferica dotata di porta
USB, come tastiere o hub USB, come illustrato in Figura 1.2.
Figura 1.1 – Tipi di collegamento raccomandati
Figura 1.2 – Tipi di collegamento sconsigliati
*Nota: Vedere sezione "Conflitti con le lettere di unità", a pagina 22.

Documento N. 48002017-001.A03
DataTraveler
®
Locker+ G2
Pagina 4 di 23
Configurazione (Ambienti Windows)
1. Inserire il drive DTL+ G2 in una delle porte USB
disponibili sul computer notebook o desktop in uso e
attendere il rilevamento da parte di Windows.
• Gli utenti di Windows XP riceveranno la notifica
"Rilevato nuovo hardware", come illustrato in
Figura 2.1.
• Gli utenti di Windows Vista/7 riceveranno la
notifica dell'installazione del driver software per il
nuovo hardware, come illustrato in Figura 2.2.
Una volta completata la fase di rilevamento del
nuovo hardware, Windows avvierà la procedura di
inizializzazione.
• Se la funzione di esecuzione automatica di
Windows è attiva, è possibile saltare il punto
successivo e passare direttamente alla pagina
5 – Inizializzazione del dispositivo.
• Se la funzione di esecuzione di Windows è
disabilitata, come nel caso di Windows 7, in
cui tale funzione è disattivata per
impostazione di default, verrà visualizzata la
finestra di dialogo della funzione AutoPlay,
come quella mostrata in Figura 2.3.
2. Selezionare l'opzione "Run DTLplus_Launcher.exe",
(Esegui DTLplus_Launcher.exe).
Se la funzione AutoPlay non dovesse essere attiva,
accedere alla partizione del CD-ROM e lanciare
manualmente l'esecuzione del programma
DTLplus_Launcher (Figura 2.4). Verrà avviata la
procedura di inizializzazione.
Figura 2.4 – Contenuto del drive DTL+ G2
Figura 2.1 - Notifica di rilevamento del
nuovo hardware
(Windows XP)
Figura 2.2 – Notifica di installazione del
driver del dispositivo
(Windows Vista/7)
Figura 2.3 – Finestra AutoPlay di
Windows (Windows Vista/7)
(Nota: le opzioni del menu nella
finestra di AutoPlay possono variare
in base ai programmi attualmente
installati sul computer in uso. Quando
abilitata, la funzione di esecuzione
automatica avvierà il processo di
inizializzazione automaticamente.)

Documento N. 48002017-001.A03
DataTraveler
®
Locker+ G2
Pagina 5 di 23
Inizializzazione del dispositivo (Ambienti Windows)
1. Selezionare la lingua preferita dal menu a discesa e fare clic sulla voce "Next" (Successivo)
(Figura 3.1).
Figura 3.1 – Selezione della lingua
2. Leggere l'accordo di licenza e quindi fare clic su "Next" (Successivo) (Figura 3.2). (Nota: è
necessario accettare l'accordo di licenza prima di proseguire; in caso contrario il pulsante
"Next" (Successivo) resterà disabilitato).

Documento N. 48002017-001.A03
DataTraveler
®
Locker+ G2
Pagina 6 di 23
Figura 3.2 – Accordo di licenza
3. Creazione di una password per proteggere i dati contenuti nel drive DTL+ G2. Inserire la
password nel relativo campo "Password" (Password); quindi, reinserirla nel campo
"Password Confirmation" (Conferma password), come illustrato in Figura 3.3, sotto. Affinché
sia possibile proseguire la procedura di inizializzazione, è necessario creare una password
avente i seguenti requisiti:
1. Le password devono essere composte da un minimo di 6 fino a un massimo di 16
caratteri.
2. Le password devono contenere tre (3) dei seguenti criteri opzionali:
- MAIUSCOLE, minuscole, numeri, e/o caratteri speciali (!, $, ecc.)
È anche possibile inserire un suggerimento per ricordare la password, ma tale campo è
facoltativo. Il campo "Hint" (Suggerimento), può rivelarsi utile per aiutare l'utente a ricordare
la password, qualora questa vada persa o dimenticata. (Nota: il suggerimento NON DEVE
corrispondere alla stessa password utilizzata per l'accesso.)

Documento N. 48002017-001.A03
DataTraveler
®
Locker+ G2
Pagina 7 di 23
Figura 3.3 – Impostazione della password
4. Inserire le informazioni di contatto nei relativi campi di testo (vedere Figura 3.4) (Nota: Le
informazioni immesse in questi campi NON possono contenere la stringa password creata
durante la procedura di cui al Punto 3. Tuttavia, questi campi sono facoltativi e pertanto
possono anche essere lasciati vuoti, se lo si vuole).
• Il campo "Name" (Nome) può contenere fino a 32 caratteri, ma non può
contenere la password esatta.
• Il campo "Company" (Azienda) può contenere fino a 32 caratteri, ma non
può contenere la password esatta.
• Il campo "Details" (Dettagli) può contenere fino a 156 caratteri, ma non
può contenere la password esatta.
Figura 3.4 – Finestra dei dati di contatto

Documento N. 48002017-001.A03
DataTraveler
®
Locker+ G2
Pagina 8 di 23
5. Fare clic su "Finish" (Fine) per completare la procedura di inizializzazione del dispositivo.
Il drive DTL+ G2 effettuerà ora la formattazione della partizione dati sicura (Figura 3.5),
informando l'utente quando la procedura è stata completata (Figura 3.6).
Nota: se si sta operando su una piattaforma Windows XP in modalità Non-
Amministratore, la routine di "Formattazione" può richiedere fino a un minuto.*
6. Fare clic su "OK", per proseguire.
Figura 3.5 – Finestra di formattazione del drive DTL+
G2
Figura 3.6 – Finestra di completamento della
formattazione
Inizializzazione completata.

Documento N. 48002017-001.A03
DataTraveler
®
Locker+ G2
Pagina 9 di 23
*Nota: i tempi di esecuzione possono variare in base all'hardware di sistema e alla capacità del
driver DTL+ G2 utilizzato.
Utilizzo del dispositivo (Ambienti Windows)
Una volta che il drive DTL+ G2 è stato
inizializzato, sarà possibile accedere alla
partizione dati sicura, e utilizzare le opzioni del
dispositivo, accedendovi mediante la propria
password utente. Per effettuare l'accesso,
seguire la procedura seguente:
1. Inserire il drive DTL+ G2 in una delle porte
USB del computer notebook o desktop in
uso e quindi inserire la password (vedere
Figura 4.1).
2. Una volta inserita la password, fare clic sul
pulsante "Login" (Login) per proseguire.
• Se è stata inserita la password
corretta, il drive DTL+ G2 verrà
sbloccato, e sarà possibile iniziare a
utilizzare il dispositivo.
• Se viene inserita una password errata,
sotto il campo "Hint" (Suggerimento)
verrà visualizzato un messaggio di
errore indicante il tentativo di accesso
fallito, (vedere Figura 4.2).
Figura 4.1 – Finestra di login
Se durante il processo di login viene
inserita una password non corretta, l'utente
avrà a disposizione un'altra possibilità di
inserire la password corretta; tuttavia, il
drive dispone di una funzione di sicurezza
integrata che conta il numero di tentativi di
login falliti.* Se il numero di tentativi falliti
supera il valore preimpostato di default (10
tentativi), il drive DTL+ G2 verrà bloccato,
e per poterlo riutilizzare sarà necessario
formattare l'intera partizione dati sicura.
CIÒ SIGNIFICA CHE TUTTI I DATI
CONTENUTI NEL DRIVE DTL+ G2
ANDRANNO PERSI.
Per ulteriori dettagli su questa funzione,
Figura 4.2 – Finestra di login fallito

Documento N. 48002017-001.A03
DataTraveler
®
Locker+ G2
Pagina 10 di 23
consultare la sezione, "Blocco del
dispositivo", a pagina 20.
*Nota: una volta effettuata con successo l'autenticazione sul dispositivo, il contatore dei
tentativi di login falliti verrà azzerato.
Opzioni del dispositivo (Ambienti Windows)
Durante l'accesso al dispositivo, sull'angolo destro della barra applicazioni di Windows verrà
visualizzata l'icona del drive "DTL+ G2" (Figura 5.1.) (Nota: Gli utenti della piattaforma
Windows 7 devono cliccare sul pulsante "Freccia in alto" della barra applicazioni, per poter
accedere all'icona del drive "DTL+ G2" (Figura 5.2.).
Cliccando una volta sull'icona del drive DTL+ G2 verrà visualizzato il menu seguente:
Figura 5.1 – Icona del drive DTL+ G2 sulla barra
applicazioni
(Utenti di Windows XP)
Figura 5.2 – Icona del drive DTL+ G2 sulla barra
applicazioni
(Utenti di Windows 7)
Sezione impostazioni del drive DTL+ G2
• Consente di modificare la password e/o il suggerimento, (Figura 5.3)
• Consente di aggiungere/visualizzare/modificare le informazioni di contatto dell'utente
(Figura 5.4)
• Consente di modificare le impostazioni della lingua corrente, (Figura 5.5).
(Nota: per motivi di sicurezza, l'aggiornamento e la modifica di queste impostazioni richiedono
sempre l'inserimento della password di accesso all'unità DTL+ G2)

Documento N. 48002017-001.A03
DataTraveler
®
Locker+ G2
Pagina 11 di 23
Figura 5.3
Schermata modifica password
Figura 5.4
Schermata informazioni di
contatto
Figura 5.5
Schermata selezione lingua
Navigazione all'interno dell'unità DTL+ G2
• Questa funzione consente di navigare all'interno dei contenuti della partizione dati
sicura, dopo aver effettuato l'accesso al dispositivo
Formattazione dell'unità DTL+ G2
• Questa funzione consente di formattare la
partizione dati sicura (Attenzione: tutti i dati
contenuti nell'unità verranno eliminati). (Figura
5.7)
Supporto Online (Richiede un accesso a Internet)
• Questa funzione esegue automaticamente
il browser Internet e apre il link
http://www.kingston.com/support/, dal quale è
possibile accedere a una serie di informazioni
di supporto aggiuntive
Figura 5.7 – Finestra di notifica della
formattazione
Informazioni sull'unità DTL+ G2
• Questa sezione contiene dettagli specifici sul
drive DTL+ G2, tra cui i dati relativi alle
applicazioni e alla versione del firmware
(Figura 5.8)
Arresto dell'unità DTL+ G2
• Questa funzione permette di arrestare
correttamente l'unità DTL+ G2, consentendo
all'utente di scollegare il drive dal computer in
tutta sicurezza
Figura 5.8 – Schermata informazioni su
DTL+ G2

Documento N. 48002017-001.A03
DataTraveler
®
Locker+ G2
Pagina 12 di 23
(Raccomandazione: dopo aver arrestato l'unità DTL + G2, è sempre opportuno spegnere
o riavviare la workstation host a cui il drive era stato collegato, specialmente se ci si
trova in un luogo pubblico, oppure se la workstation è condivisa da utenti multipli).
*Nota: sui sistemi Windows Vista e Windows 7 è richiesto l'inserimento della password di
accesso all'unità DTL+ G2
-Fine sezione Windows-
Configurazione (Ambienti Mac)
Inserire il drive DTL+ G2 in una delle porte USB disponibili sul
computer notebook o desktop in uso e attendere il rilevamento da parte
del sistema operativo Mac. Una volta che il drive viene rilevato, sul
desktop del computer Mac in uso verrà visualizzata l'icona del volume
DTLplus, come illustrato in Figura 6.1.
1. Fare doppio clic sull'icona del CD-ROM dell'unità DTL+ G2.
2. Fare doppio clic sulla cartella "Mac" visualizzata nella
finestra raffigurata in Figura 6.2.
Figura 6.1 - Icona
DTLplus
3. Fare doppio clic sull'icona dell'applicazione DTLplus
visualizzata nella finestra raffigurata in Figura 6.3. Verrà
avviata la procedura di inizializzazione.
Figura 6.2 – Contenuto del drive DTL+ G2
Figura 6.3 – Icona applicazione di DTL+ G2

Documento N. 48002017-001.A03
DataTraveler
®
Locker+ G2
Pagina 13 di 23

Documento N. 48002017-001.A03
DataTraveler
®
Locker+ G2
Pagina 14 di 23
Inizializzazione del dispositivo (Ambienti Mac)
1. Selezionare la lingua preferita dal menu a discesa e fare clic sulla voce "Next" (Successivo)
(Figura 7.1).
Figura 7.1 – Selezione della lingua
2. Leggere l'accordo di licenza e quindi fare clic su "Next" (Successivo) (Figura 7.2). (Nota: è
necessario accettare l'accordo di licenza prima di proseguire; in caso contrario il pulsante
"Next" (Successivo) resterà disabilitato).
Figura 7.2 – Accordo di licenza

Documento N. 48002017-001.A03
DataTraveler
®
Locker+ G2
Pagina 15 di 23
3. Creazione di una password per proteggere i dati contenuti nel drive DTL+ G2. Inserire la
password nel relativo campo "Password" (Password); quindi, reinserirla nel campo
"Password Confirmation" (Conferma password), come illustrato in Figura 7.3, sotto. Affinché
sia possibile proseguire la procedura di inizializzazione, è necessario creare una password
avente i seguenti requisiti:
1. Le password devono essere composte da un minimo di 6 fino a un massimo di 16
caratteri.
2. Le password devono contenere tre (3) dei seguenti criteri opzionali:
- MAIUSCOLE, minuscole, numeri, e/o caratteri speciali (!, $, ecc.)
È anche possibile inserire un suggerimento per ricordare la password, ma tale campo è
facoltativo. Il campo "Hint" (Suggerimento), può rivelarsi utile per aiutare l'utente a ricordare
la password, qualora questa vada persa o dimenticata. (Nota: il suggerimento NON DEVE
corrispondere alla stessa password utilizzata per l'accesso.)
Figura 7.3 – Impostazione della password

Documento N. 48002017-001.A03
DataTraveler
®
Locker+ G2
Pagina 16 di 23
4. Inserire le informazioni di contatto nei relativi campi di testo (vedere Figura 7.4) (Nota: Le
informazioni immesse in questi campi NON possono contenere la stringa password creata
durante la procedura di cui al Punto 3. Tuttavia, questi campi sono facoltativi e pertanto
possono anche essere lasciati vuoti, se lo si vuole).
• Il campo "Name" (Nome) può contenere fino a 32 caratteri, ma non può
contenere la password esatta.
• Il campo "Company" (Azienda) può contenere fino a 32 caratteri, ma non
può contenere la password esatta.
• Il campo "Details" (Dettagli) può contenere fino a 156 caratteri, ma non
può contenere la password esatta.
Figura 7.4 – Finestra dei dati di contatto

Documento N. 48002017-001.A03
DataTraveler
®
Locker+ G2
Pagina 17 di 23
5. Fare clic su "Finish" (Fine) per completare la procedura di inizializzazione del dispositivo.
Il drive DTL+ G2 effettuerà ora la formattazione della partizione dati sicura (Figura 7.5),
informando l'utente quando la procedura è stata completata (Figura 7.6).
6. Fare clic su "OK", per proseguire.
Figura 7.5 – Formattazione del drive DTLocker+ G2
Figura 7.6 – Finestra di completamento della
formattazione
Inizializzazione completata.

Documento N. 48002017-001.A03
DataTraveler
®
Locker+ G2
Pagina 18 di 23
Utilizzo del dispositivo (Ambienti Mac)
Una volta che il drive DTL+ G2 è stato
inizializzato, sarà possibile accedere alla
partizione dati sicura, e utilizzare le opzioni del
dispositivo, accedendovi mediante la propria
password utente. Per effettuare l'accesso,
seguire la procedura seguente:
1. Inserire il drive DTL+ G2 in una delle porte
USB del computer notebook o desktop in
uso e quindi inserire la password (vedere
Figura 8.1).
2. Una volta inserita la password, fare clic sul
pulsante "Login" (Login) per proseguire.
• Se è stata inserita la password
corretta, il drive DTL+ G2 verrà
sbloccato, e sarà possibile iniziare a
utilizzare il dispositivo.
• Se viene inserita una password errata,
sotto il campo "Hint" (Suggerimento)
verrà visualizzato un messaggio di
errore indicante il tentativo di accesso
fallito, (vedere Figura 8.2).
Figura 8.1 – Finestra di login
Se durante il processo di login viene
inserita una password non corretta, l'utente
avrà a disposizione un'altra possibilità di
inserire la password corretta; tuttavia, il
drive dispone di una funzione di sicurezza
integrata che conta il numero di tentativi di
login falliti.* Se il numero di tentativi falliti
supera il valore preimpostato di default (10
tentativi), il drive DTL+ G2 verrà bloccato,
e per poterlo riutilizzare sarà necessario
formattare l'intera partizione dati sicura.
CIÒ SIGNIFICA CHE TUTTI I DATI
CONTENUTI NEL DRIVE DTL+ G2
ANDRANNO PERSI.
Per ulteriori dettagli su questa funzione,
consultare la sezione, "Blocco del
dispositivo", a pagina 20.
Figura 8.2 – Finestra di login fallito

Documento N. 48002017-001.A03
DataTraveler
®
Locker+ G2
Pagina 19 di 23
*Nota: una volta effettuata con successo l'autenticazione sul dispositivo, il contatore dei
tentativi di login falliti verrà azzerato.
Opzioni del dispositivo (Ambienti Mac)
Durante l'accesso al dispositivo, nel Dock di Mac OS X verrà visualizzata l'icona
"DTLplus_Launcher" (, come illustrato in Figura 9.1, sotto:
Figura 9.1 – L'icona del drive DTL+ G2 nel Dock di Mac OS X
Tenendo premuto il tasto "control" (ctrl) sulla tastiera, e
cliccando una volta sull'icona "DTLplus_Launcher" verrà
visualizzato il menu illustrato in Figura 9.2, a destra.
Sezione impostazioni del drive DTL+ G2
• Consente di modificare la password e/o il suggerimento,
(Figura 9.3)
• Consente di aggiungere/visualizzare/modificare le
informazioni di contatto dell'utente (Figura 9.4)
• Consente di modificare le impostazioni della lingua,
(Figura 9.5)
Figura 9.2
Menu opzioni del drive
DTL+ G2
Figura 9.3
Schermata modifica password
Figura 9.4
Schermata informazioni di
contatto
Figura 9.5
Schermata selezione lingua
(Nota: per motivi di sicurezza, l'aggiornamento e la modifica di queste impostazioni richiedono sempre
l'inserimento della password di accesso all'unità DTL+ G2)

Documento N. 48002017-001.A03
DataTraveler
®
Locker+ G2
Pagina 20 di 23
Navigazione all'interno dell'unità DTL+ G2
• Questa funzione consente di navigare all'interno dei contenuti della partizione dati
sicura, dopo aver effettuato l'accesso al dispositivo
Formattazione dell'unità DTL+ G2
• Questa funzione consente di formattare la
partizione dati sicura (Attenzione: tutti i dati
contenuti nell'unità verranno eliminati). (Figura
9.7)
Supporto Online (Richiede un accesso a Internet)
• Questa funzione esegue automaticamente il
browser Internet e apre il link
http://www.kingston.com/support/, dal quale è
possibile accedere a una serie di informazioni
di supporto aggiuntive
Figura 9.7 – Finestra di notifica della
formattazione
Informazioni sull'unità DTL+ G2
• Questa sezione contiene dettagli specifici sul
drive DTL+ G2, tra cui i dati relativi alle
applicazioni e alla versione del firmware
(Figura 9.8)
Arresto dell'unità DTL+ G2
• Questa funzione permette di arrestare
correttamente l'unità DTL+ G2, consentendo
all'utente di scollegare il drive dal computer in
tutta sicurezza
Figura 9.8 – Schermata informazioni su
DTL+ G2
(Raccomandazione: dopo aver arrestato l'unità DTL + G2, è sempre opportuno spegnere
o riavviare la workstation host a cui il drive era stato collegato, specialmente se ci si
trova in un luogo pubblico, oppure se la workstation è condivisa da utenti multipli).
-Fine sezione Mac-

Documento N. 48002017-001.A03
DataTraveler
®
Locker+ G2
Pagina 21 di 23
Supporto e soluzione dei problemi
Blocco del dispositivo
Il drive DTL+ G2 è dotato di una funzionalità di sicurezza che impedisce l'accesso alla
partizione dati dopo un determinato numero di tentativi di accesso consecutivi falliti (Definiti
come MaxNoA, in forma abbreviata); il numero di tentativi preimpostato in fabbrica come
valore di default è pari a 10 (n. max di tentativi consecutivi).
Il contatore che attiva il blocco tiene traccia di ogni tentativo di accesso fallito, e può essere
resettato in due modi: 1) Inserendo la password di accesso corretta prima di raggiungere il
valore MaxNoA prestabilito, oppure 2) formattando il dispositivo dopo aver superato il numero
di tentativi specificati dal valore MaxNoA.*
Se viene inserita una password errata, sotto il
campo "Hint" (Suggerimento) verrà visualizzato
un messaggio di errore indicante il tentativo di
accesso fallito. Vedere Figura 10.1.
Raggiunto il 7
°
tentativo fallito, verrà visualizzato
un ulteriore messaggio di errore che informa
l'utente che ha a disposizione solo altri 3 tentativi
prima di raggiungere il numero di tentativi
specificati dal valore MaxNoA (impostato su 10
per default). Vedere Figura 10.2.
Raggiunto il 10
°
tentativo di accesso fallito,
l'accesso ai dati contenuti nel drive DTL+ G2
verrà bloccato permanentemente, e per poter
utilizzare nuovamente il dispositivo sarà
necessario effettuare una formattazione. Ciò
significa che tutti i dati memorizzati sul drive
DTL+ G2 andranno persi e l'utente dovrà
creare una nuova password di accesso.
Figura 10.1 – Finestra di login fallito
Questa misura di sicurezza ha lo scopo di
limitare l'accesso a coloro che non dispongono
della password, impedendo di effettuare tentativi
di accesso ripetuti all'infinito allo scopo di
accedere ai vostri dati sensibili.
Per i proprietari del drive DTL+ G2 che hanno
scordato la loro password di accesso, verranno
applicate le medesime misure di sicurezza,
compresa la formattazione del dispositivo.*
Per ulteriori dettagli su questa funzione,
consultare la sezione, "Password dimenticata",
a pagina 21.
Figura 10.2 – Finestra di notifica del 7
°
tentativo
di login fallito
*Nota: la formattazione del dispositivo causerà l'eliminazione di TUTTI i dati contenuti nella
partizione dati sicura dell'unità DTL+ G2.
Password dimenticata

Documento N. 48002017-001.A03
DataTraveler
®
Locker+ G2
Pagina 22 di 23
Se l'utente dimentica la password, è possibile
fare clic sul link "Reset Password" (Reset
password), che viene visualizzato nella
finestra di login quando viene eseguito il file
DTLplus_Launcher (vedere Figura 10.3).
Questa opzione consente di creare una nuova
password. Tuttavia, al fine di garantire la
privacy dei dati contenuti nel drive DTL+ G2,
l'unità verrà formattata. Ciò significa che
durante tale procedura tutti i vostri dati
andranno persi.*
Cliccando sul pulsante "Reset Password"
(Reset password), verrà visualizzata una
finestra di notifica in cui si chiede all'utente se
desidera inserire una nuova password prima
della formattazione, (Figura 10.4). A questo
punto, è possibile 1) cliccare su "OK" per
confermare, oppure 2) cliccare su "Cancel"
(Annulla), per tornare alla schermata di
accesso.
Figura 10.3 – Finestra di password dimenticata
Se si decide di proseguire con l'operazione,
verrà chiesto all'utente di creare una nuova
password complessa, e il relativo
suggerimento. Il campo suggerimento (hint),
non è obbligatorio, ma può rivelarsi utile per
aiutare l'utente a ricordare la password,
qualora questa vada persa o venga
dimenticata.
(Nota: il suggerimento NON DEVE
corrispondere alla stessa password utilizzata
per l'accesso al drive DTL+ G2.)
Figura 10.4 – Notifica prima della formattazione
*Nota: la formattazione del dispositivo causerà l'eliminazione di TUTTI i dati contenuti nella
partizione dati sicura dell'unità DTL+ G2.
Conflitti con le lettere di unità (Sistemi operativi Windows)

Documento N. 48002017-001.A03
DataTraveler
®
Locker+ G2
Pagina 23 di 23
Come citato nella sezione "Requisiti di sistema" di questo manuale (a pagina 3), il drive DTL+
G2 richiede due lettere di unità consecutive DOPO quella assegnata all'ultimo disco fisico che
appare prima delle lettere di unità assegnate ai profili non hardware. (vedere Figura 10.5).
L'assegnazione delle lettere di unità in ordine cronologico NON interessa le unità di rete
condivise in quanto queste sono unità associate a profili utente specifici e non assegnate al
profilo hardware di sistema e pertanto appaiono disponibili per il sistema operativo.
Ciò significa che Windows potrebbe assegnare al drive DTL+ G2 una lettera di unità che è già
utilizzata da una unità di rete condivisa, o assegnata a un percorso UNC (Universal Naming
Convention), causando un conflitto tra le lettere assegnate ai vari drive. In tal caso, sarà
necessario contattare l'amministratore di rete o il reparto assistenza, chiedendo di modificare
le lettere di unità assegnate da Gestione Disco di Windows (l'operazione richiede l'accesso
con diritti di amministratore).
Figura 10.5 – Finestra "Risorse del computer"
In questo esempio, all'unità DTL+ G2 è assegnata la lettera "F:", che è la prima lettera disponibile
dopo l'unità "E:", (l'ultima lettera di unità assegnata a un disco fisico prima dell'elenco di lettere di
unità assegnate a unità non fisiche). Dato che alla lettera "G:" è assegnata a una condivisione di
rete, che non appartiene al profilo hardware del computer in uso, l'unità DTL+ G2 tenterà di utilizzare
tale lettera come seconda unità, generando un conflitto.
Se sul computer in uso non sono presenti condivisioni di rete, ma l'unità DTL+ G2 continua a non
avviarsi, è possibile che altri dispositivi esterni, come lettori di schede, dischi rimovibili o altri
dispositivi installati in precedenza, stiano utilizzando la lettera di unità richiesta per il funzionamento
dell'unità DataTraveler, causando ulteriori conflitti.
Si noti che le funzionalità di Gestione delle Lettere di Unità (DLM) sono migliorate significativamente
su Windows XP SP3, Vista e 7; pertanto, tale problema non dovrebbe manifestarsi. Tuttavia, se
l'utente non dovesse essere in grado di risolvere il conflitto, si raccomanda di contattare la divisione
Supporto Tecnico di Kingston per richiedere ulteriore assistenza.
© 2011 Kingston Technology Corporation. Tutti i diritti riservati. Tutti i marchi e i marchi registrati sono di proprietà dei rispettivi titolari.

Documento nº 48002017-001.A03
DataTraveler
®
Locker+ G2
Página 1 de 22
DataTraveler
®
Locker+ G2 - Manual do Usuário

Documento nº 48002017-001.A03
DataTraveler
®
Locker+ G2
Página 2 de 22
Índice
SOBRE ESTE MANUAL DO USUÁRIO ..................................................................................... 3!
REQUISITOS DO SISTEMA ....................................................................................................... 3!
RECOMENDAÇÕES ................................................................................................................... 3!
INSTALAÇÃO (AMBIENTE WINDOWS) ................................................................................... 4!
INICIALIZAÇÃO DO DISPOSITIVO (AMBIENTE WINDOWS) .................................................. 5!
USO DO DISPOSITIVO (AMBIENTE WINDOWS) ..................................................................... 9!
OPÇÕES DO DISPOSITIVO (AMBIENTE WINDOWS) ........................................................... 10!
CONFIGURAÇÃO (AMBIENTE MAC) ..................................................................................... 12!
INICIALIZAÇÃO DO DISPOSITIVO (AMBIENTE MAC) .......................................................... 13!
USO DO DISPOSITIVO (AMBIENTE MAC) ............................................................................. 17!
OPÇÕES DO DISPOSITIVO (AMBIENTE MAC) ..................................................................... 18!
AJUDA E RESOLUÇÃO DE PROBLEMAS ............................................................................. 20!
Bloqueio do dispositivo .............................................................................................................................. 20
Esqueceu a senha ....................................................................................................................................... 20
Conflito de Letra de Drive (Sistemas Operacionais Windows) ............................................................... 21

Documento nº 48002017-001.A03
DataTraveler
®
Locker+ G2
Página 3 de 22
Sobre este Manual do Usuário
Este manual do usuário abrange o DataTraveler
®
Locker+ G2 (daqui em diante mencionado
simplesmente como DTL+ G2) com base no padrão de fábrica sem qualquer customização
implementada.
Requisitos do Sistema
Plataforma de PC
• Processador equivalente a Pentium III (ou
mais rápido)
• 15MB de espaço livre no disco
• Porta USB 2.0 / 3.0
• Duas letras consecutivas de drives após o
último drive físico*
Suporte do Sistema Operacional do PC
• Windows
®
7
• Windows
®
Vista SP1, SP2
• Windows
®
XP SP2, SP3
Plataforma Mac
• 15MB de espaço livre no disco
• Porta USB 2.0 / 3.0
Suporte a Sistema Operacional
• Mac OS X 10.5.x
• Mac OS X 10.6.x
• Mac OS X 10.7x
Recomendações
Para garantir que haja energia bastante para o dispositivo DTL+ G2, encaixe-o diretamente
em uma porta USB em seu notebook ou computador, como mostrado na Figura 1.1. Evite
conectar o DTL+ G2 a um dispositivo periférico que possua uma porta USB, como um teclado
ou hub USB, como mostrado na Figura 1.2.
Figura 1.1 – Uso recomendado
Figura 1.2 – Não Recomendado
*Observação: Consulte 'Conflito de Letra de Drive' na página 22.

Documento nº 48002017-001.A03
DataTraveler
®
Locker+ G2
Página 4 de 22
Instalação (Ambiente Windows)
1. Insira o DTL+ G2 em uma porta USB disponível
em seu notebook ou PC e aguarde o Windows
detectá-lo.
• Os usuários de Windows XP receberão um
aviso ‘Novo hardware encontrado’ como
mostrado na Figura 2.1.
• Os usuários de Windows XP receberão um
aviso de driver de dispositivo como mostrado
na Figura 2.2.
Quando o novo hardware tiver sido detectado, o
Windows irá começar o processo de inicialização.
• Se a função autorun estiver ativada, você
pode pular a próxima etapa e ir para a página
5 – Inicialização do Dispositivo.
• Se a função autorun do Windows estiver
desativada, como está no Windows 7 por
padrão, você poderá ver uma janela AutoPlay
similar à mostrada na Figura 2.3.
2. Selecione a opção ‘Run DTLplus_Launcher.exe’.
Se o Windows não executar automaticamente em
AutoPlay, navegue até a partição de CD-ROM
(Figura 2.4) e execute manualmente o programa
DTLplus_Launcher. Isso também fará começar o
processo de inicialização.
Figura 2.4 – Conteúdo do DTL+ G2
Figura 2.1 – Novo hardware encontrado
(Windows XP)
Figura 2.2 – Instalação do Driver do
Dispositivo
(Windows Vista/7)
Figura 2.3 - Janela AutoPlay
(Windows Vista/7)
(Observação: As opções do menu na
janela do AutoPlay podem variar
dependendo dos programas
atualmente instalados em seu
computador.. Se ativado, o AutoRun
fará começar o processo de
inicialização automaticamente.)

Documento nº 48002017-001.A03
DataTraveler
®
Locker+ G2
Página 5 de 22
Inicialização do dispositivo (Ambiente Windows)
1. Selecione o idioma de preferência a partir do menu suspenso e clique em ‘Próximo’ (Figura 3.1.)
Figura 3.1 – Seleção de idioma
2. Examine o contrato de licença e clique em ‘Próximo’ (Figura 3.2.) (Observação: Você deve
aceitar o contrato de licença antes de continuar; de outra forma o botão 'Próximo'
permanecerá desativado.)
Figura 3.2 – Contrato de Licença

Documento nº 48002017-001.A03
DataTraveler
®
Locker+ G2
Página 6 de 22
3. Crie uma senha para proteger seus dados no DTL+ G2. Digite a senha no campo ‘Senha’
e novamente no campo ‘Confirmação de senha’, como mostrado abaixo na Figura 3.3. A
senha que você criar deve seguir os seguintes critérios antes do processo de inicialização
permitir que você continue:
1. As senhas devem conter 6 caracteres ou mais (até 16 caracteres).
2. As senhas devem conter três (3) das seguintes opções:
- LETRAS MAIÚSCULAS, letras minúsculas, caracteres numéricos e/ou
caracteres especiais (!, $, etc.)
Você também pode digitar uma dica de senha, mas não é um campo obrigatório. O campo
da dica pode ser útil para fornecer uma pista sobre a senha, se algum dia ela for
esquecida. (Observação: A dica NÃO PODE ser exatamente igual à senha.)
Figura 3.3 – Configuração da Senha

Documento nº 48002017-001.A03
DataTraveler
®
Locker+ G2
Página 7 de 22
4. Digite suas informações de contato nas caixas de texto fornecidas (veja Figura 3.4)
(Observação: As informações que você digitar nesses campos NÃO podem conter a senha
que você criou na Etapa 3. Entretanto, esses campos são opcionais e podem ser deixados
em branco, se desejar.)
• O campo ‘Nome’ pode conter até 32 caracteres, mas não pode conter a
senha exata.
• O campo ‘Empresa’ pode conter até 32 caracteres, mas não pode conter
a senha exata.
• O campo ‘Detalhes’ pode conter até 156 caracteres, mas não pode conter
a senha exata.
Figura 3.4 – Informações de contato

Documento nº 48002017-001.A03
DataTraveler
®
Locker+ G2
Página 8 de 22
5. Clique em ‘Finalizar’ para concluir o processo de inicialização do dispositivo.
O DTL+ G2 irá agora formatar a partição de dados de segurança (Figura 3.5) e você será
avisado quando estiver concluído (Figura 3.6.)
Observação: Se estiver operando em Windows XP no modo de não-
administrador, o processo de ‘Formatar’ pode levar até 1 minuto.*
6. Clique em ‘OK’ para continuar.
Figura 3.5 – Formatando o DTL+ G2
Figura 3.6 – Formatação concluída
Inicialização concluída.
*Observação: O tempo pode variar dependendo do hardware do sistema e da capacidade da
unidade DTL+ G2.

Documento nº 48002017-001.A03
DataTraveler
®
Locker+ G2
Página 9 de 22
Uso do dispositivo (Ambiente Windows)
Depois do DTL+ G2 ter sido inicializado, você
pode acessar a partição de dados de
segurança e utilizar as opções do dispositivo
fazendo o login no dispositivo com sua senha.
Para isso, siga estas etapas:
1. Insira o DTL+ G2 em uma porta USB
disponível em seu notebook ou PC e digite
sua senha (veja a Figura 4.1.)
2. Depois de digitar sua senha, clique no
botão ‘Login’ para continuar.
• Se a senha correta for digitada, o
DTL+ G2 será desbloqueado e você
poderá começar a usar o dispositivo.
• Se for digitada uma senha incorreta,
uma mensagem de erro irá aparecer
logo abaixo do campo ‘Dica’
indicando uma falha no login (veja
Figura 4.2.)
Figura 4.1 - Janela Login
Durante o processo de login, se for
digitada uma senha errada, você terá outra
oportunidade para digitar a senha correta;
entretanto há um recurso de segurança
integrado que monitora o número de
tentativas erradas de login*. Se esse
número alcançar o valor predefinido de 10
tentativas erradas, o DTL+ G2 será
bloqueado e será necessária a formatação
da partição dos dados de segurança do
dispositivo antes da próxima utilização.
ISSO SIGNIFICA QUE TODOS OS
DADOS ARMAZENADOS NO DTL+ G2
SERÃO PERDIDOS.
Para mais detalhes sobre esse recurso,
veja ‘Bloqueio do dispositivo’ na página 20.
Figura 4.2 - Erro de Login
*Observação: Depois que você fizer a autenticação no dispositivo corretamente, o contador de
erros de login será reiniciado.

Documento nº 48002017-001.A03
DataTraveler
®
Locker+ G2
Página 10 de 22
Opções do Dispositivo (Ambiente Windows)
Enquanto você estiver conectado ao dispositivo, haverá um ícone ‘DTL+ G2’ localizado no
canto direito da barra de tarefas do Windows (Figura 5.1.) (Observação: Os usuários do
Windows 7 precisarão clicar no botão de seta para cima na barra de tarefas para acessar o
ícone ‘DTL+ G2’ (Figura 5.2.)
Ao clicar uma vez no ícone DTL+ G2 será exibido o seguinte menu:
Figura 5.1 – Ícone DTL+ G2 na barra de tarefas
(Usuários Windows XP)
Figura 5.2 – Ícone DTL+ G2 na barra de tarefas
(Usuários Windows 7)
Configurações do DTL+ G2
• Permite que você altere sua senha e/ou dica (Figura 5.3)
• Permite que você adicione/visualize/altere suas informações de contato (Figura 5.4)
• Permite que você altere sua seleção de idioma atual (Figura 5.5)
(Observação: Para finalidades de segurança, sua senha atual do DTL+ G2 é necessária para
atualizar e/ou modificar qualquer uma dessas configurações.)
Figura 5.3
Alterar Senha
Figura 5.4
Informações de Contato
Figura 5.5
Selecione o Idioma

Documento nº 48002017-001.A03
DataTraveler
®
Locker+ G2
Página 11 de 22
Navegar no DTL+ G2
• Permite que você navegue pelo conteúdo da partição de dados de segurança enquanto
está conectado
Formatar o DTL+ G2*
• • Permite que você formate a partição
de dados de segurança (Aviso: Todos os
dados serão apagados). (Figura 5.7:.
Suporte on-line (É necessário o acesso à Internet)
• Abra seu navegador na Internet e navegue
para http://www.kingston.com/support/ onde
você poderá acessar mais informações de
suporte
Figura 5.7 – Aviso sobre formatação
Sobre o DTL+ G2*
• Fornece detalhes específicos sobre o DTL+
G2, incluindo informações sobre a versão do
Aplicativo e do Firmware (Figura 5.8)
Encerrar o DTL+ G2
• Encerra de modo apropriado o DTL+ G2,
permitindo que seja removido com segurança
de seu sistema
Figura 5.8 – Sobre o DTL+ G2
(Recomendação: Depois de encerrar seu DTL+ G2 é sempre uma boa prática encerrar
ou reiniciar a estação de trabalho host na qual sua unidade estava conectada,
especialmente se estiver em um local público ou usando uma estação de trabalho
compartilhada por várias pessoas.)
*Observação: Sua senha atual no DTL+ G2 é necessária no Windows Vista e Windows 7
-Seção Windows concluída-

Documento nº 48002017-001.A03
DataTraveler
®
Locker+ G2
Página 12 de 22
Configuração (Ambiente Mac)
Insira o DTL+ G2 em uma porta USB disponível em seu notebook ou
computador de mesa e aguarde o sistema operacional Mac detectá-lo.
Quando o fizer, você verá um volume DTLplus aparecer na área de
trabalho, como mostrado na Figura 6.1.
1. Clique duas vezes no ícone do CD-ROM DTL+ G2.
2. Clique duas vezes na pasta Mac encontrada na janela
exibida na Figura 6.2.
Figura 6.1 – DTLplus
3. Clique duas vezes no ícone do aplicativo DTLplus
encontrada na janela exibida na Figura 6.3. Isso fará
começar o processo de inicialização.
Figura 6.2 – Conteúdo do DTL+ G2
Figura 6.3 – Aplicativo DTL+ G2

Documento nº 48002017-001.A03
DataTraveler
®
Locker+ G2
Página 13 de 22
Inicialização do dispositivo (Ambiente Mac)
1. Selecione o idioma de preferência a partir do menu suspenso e clique em ‘Próximo’ (Figura 7.1.)
Figura 7.1 – Seleção de idioma
2. Examine o contrato de licença e clique em ‘Próximo’ (Figura 7.2.) (Observação: Você deve
aceitar o contrato de licença antes de continuar; de outra forma o botão 'Próximo'
permanecerá desativado.)
Figura 7.2 – Contrato de Licença

Documento nº 48002017-001.A03
DataTraveler
®
Locker+ G2
Página 14 de 22
3. Crie uma senha para proteger seus dados no DTL+ G2. Digite a senha no campo ‘Senha’
e novamente no campo ‘Confirmação de senha’, como mostrado abaixo na Figura 7.3. A
senha que você criar deve seguir os seguintes critérios antes do processo de inicialização
permitir que você continue:
1. As senhas devem conter 6 caracteres ou mais (até 16 caracteres).
2. As senhas devem conter três (3) das seguintes opções:
- LETRAS MAIÚSCULAS, letras minúsculas, caracteres numéricos e/ou
caracteres especiais (!, $, etc.)
Você também pode digitar uma dica de senha, mas não é um campo obrigatório. O campo
da dica pode ser útil para fornecer uma pista sobre a senha, se algum dia ela for
esquecida. (Observação: A dica NÃO PODE ser exatamente igual à senha.)
Figura 7.3 – Configuração da Senha

Documento nº 48002017-001.A03
DataTraveler
®
Locker+ G2
Página 15 de 22
4. Digite suas informações de contato nas caixas de texto fornecidas (veja a Figura 7.4)
(Observação: As informações que você digitar nesses campos NÃO podem conter a senha
que você criou na Etapa 3. Entretanto, esses campos são opcionais e podem ser deixados
em branco, se desejar.)
• O campo ‘Nome’ pode conter até 32 caracteres, mas não pode conter a
senha exata.
• O campo ‘Empresa’ pode conter até 32 caracteres, mas não pode conter
a senha exata.
• O campo ‘Detalhes’ pode conter até 156 caracteres, mas não pode conter
a senha exata.
Figura 7.4 – Informações de contato

Documento nº 48002017-001.A03
DataTraveler
®
Locker+ G2
Página 16 de 22
5. Clique em ‘Finalizar’ para concluir o processo de inicialização do dispositivo.
O DTL+ G2 irá agora formatar a partição de dados de segurança (Figura 7.5) e você será
avisado quando estiver concluído (Figura 7.6.)
6. Clique em ‘OK’ para continuar.
Figura 7.5 – Formatando o DTLocker+ G2
Figura 7.6 – Formatação concluída
Inicialização concluída.

Documento nº 48002017-001.A03
DataTraveler
®
Locker+ G2
Página 17 de 22
Uso do Dispositivo (Ambiente Mac)
Depois do DTL+ G2 ter sido inicializado, você
pode acessar a partição de dados de
segurança e utilizar as opções do dispositivo
fazendo o login no dispositivo com sua senha.
Para isso, siga estas etapas:
1. Insira o DTL+ G2 em uma porta USB
disponível em seu notebook ou PC e digite
sua senha (veja a Figura 8.1.)
2. Depois de digitar sua senha, clique no
botão ‘Login’ para continuar.
• Se a senha correta for digitada, o
DTL+ G2 será desbloqueado e você
poderá começar a usar o dispositivo.
• Se for digitada uma senha incorreta,
uma mensagem de erro irá aparecer
logo abaixo do campo ‘Dica’
indicando uma falha no login (veja
Figura 8.2.)
Figura 8.1 - Janela de Login
Durante o processo de login, se for
digitada uma senha errada, você terá outra
oportunidade para digitar a senha correta;
entretanto há um recurso de segurança
integrado que monitora o número de
tentativas erradas de login*. Se esse
número alcançar o valor predefinido de 10
tentativas erradas, o DTL+ G2 será
bloqueado e será necessária a formatação
da partição dos dados de segurança do
dispositivo antes da próxima utilização.
ISSO SIGNIFICA QUE TODOS OS
DADOS ARMAZENADOS NO DTL+ G2
SERÃO PERDIDOS.
Para mais detalhes sobre esse recurso,
veja ‘Bloqueio do dispositivo’ na página 20.
Figura 8.2 - Erro de Login
*Observação: Depois que você fizer a autenticação no dispositivo corretamente, o contador de
erros de login será reiniciado.

Documento nº 48002017-001.A03
DataTraveler
®
Locker+ G2
Página 18 de 22
Opções do dispositivo (Ambiente Mac)
Enquanto você estiver conectado ao dispositivo, haverá um ícone ‘DTLplus_Launcher’
localizado no Dock do Mac OS X como mostrado na Figura 9.1 abaixo:
Figura 9.1 – Ícone DTL+ G2 no Dock do Mac OS X
Pressionando a tecla ‘control’ em seu teclado e clicando uma vez
no ícone ‘DTLplus_Launcher’ irá exibir o menu mostrado na Figura
9.2 à direita.
Configurações do DTL+ G2
• Permite que você altere sua senha e/ou dica (Figura 9.3)
• Permite que você adicione/visualize/altere suas informações
de contato (Figura 9.4)
• • Permite que você altere sua seleção de
idioma(Figura 9.5)
Figura 9.2
Opções do DTL+ G2
Figura 9.3
Alterar Senha
Figura 9.4
Informações de Contato
Figura 9.5
Selecione o Idioma
(Observação: Para finalidades de segurança, sua senha atual do DTL+ G2 é necessária para atualizar
e/ou modificar qualquer uma dessas configurações.)
Navegar no DTL+ G2

Documento nº 48002017-001.A03
DataTraveler
®
Locker+ G2
Página 19 de 22
• Permite que você navegue pelo conteúdo da partição de dados de segurança enquanto
está conectado
Formatar o DTL+ G2
• Permite que você formate a partição de
dados de segurança (Aviso: Todos os dados
serão apagados). (Figura 9.7)
Suporte on-line (É necessário o acesso à Internet)
• Abra seu navegador na Internet e navegue
para http://www.kingston.com/support/ onde
você poderá acessar mais informações de
suporte
Figura 9.7 – Aviso sobre formatação
Sobre o DTL+ G2
• Fornece detalhes específicos sobre o DTL+
G2, incluindo informações sobre a versão do
Aplicativo e do Firmware (Figura 9.8)
Encerrar o DTL+ G2
• Encerra de modo apropriado o DTL+ G2,
permitindo que seja removido com segurança
de seu sistema
Figura 9.8 – Sobre o DTL+ G2
(Recomendação: Depois de encerrar seu DTL+ G2 é sempre uma boa prática encerrar
ou reiniciar a estação de trabalho host na qual sua unidade estava conectada,
especialmente se estiver em um local público ou usando uma estação de trabalho
compartilhada por várias pessoas.)
-Seção Mac concluída-

Documento nº 48002017-001.A03
DataTraveler
®
Locker+ G2
Página 20 de 22
Ajuda e Resolução de Problemas
Bloqueio do dispositivo
O DTL+ G2 inclui um recurso de segurança que impede o acesso não-autorizado à partição
de dados quando o número máximo de tentativas erradasconsecutivas (MaxNoA) for
atingido; a configuração padrão de fábrica tem o valor predefinido em 10 (nº de tentativas).
O contador de bloqueio monitora cada login errado e pode ser reiniciado de duas maneiras: 1)
Um login correto antes de atingir o MaxNoA ou 2) Atingindo o MaxNoA e realizando uma
formatação no dispositivo.*
Se for digitada uma senha incorreta, uma
mensagem de erro irá aparecer logo abaixo do
campo ‘Dica’ , indicando uma falha no login.
Veja Figura 10.1.
Se e quando for feita uma 7
a
tentativa errada,
você verá uma mensagem de erro adicional
indicando que só tem 3 tentativas restantes
antes de atingir o MaxNoA (que é definido em
10 por padrão). Veja Figura 10.2.
Após a 10
a
tentativa errada de login, o DTL+ G2
irá bloquear permanentemente a partição de
dados e será necessária uma formatação do
dispositivo antes da próxima utilização. Isso
significa que todos os dados armazenados no
DTL+ G2 serão perdidos e você precisará criar
uma nova senha.
Figura 10.1 - Erro de Login
Essa medida de segurança impede que alguém
(que não tenha a sua senha) faça incontáveis
tentativas de login e consiga acesso aos seus
dados confidenciais.
Se você for o proprietário do DTL+ G2 e
esquecer sua senha, as mesmas medidas de
segurança serão aplicadas, incluindo a
formatação do dispositivo.*
Para mais detalhes sobre esse recurso, veja
‘Esqueci a senha’ na página 21.
Figura 10.2 – 7
o
Erro de Login
*Observação: A formatação do dispositivo irá apagar TODAS as informações armazenadas na
partição de dados de segurança do DTL+ G2.
Esqueceu a senha

Documento nº 48002017-001.A03
DataTraveler
®
Locker+ G2
Página 21 de 22
Se você esquecer sua senha, você pode
clicar no link ‘Redefinir Senha’ que aparece na
janela de login do dispositivo quando é
executado o DTLplus_Launcher (veja Figura
10.3.)
Esta opção irá permitir que você crie uma
nova senha, mas para proteger a privacidade
de seus dados, o DTL+ G2 será formatado.
Isso significa que todos os seus dados serão
apagados no processo.*
Quando você clicar em ‘Redefinir Senha’, uma
caixa de mensagem (Figura 10.4) irá aparecer
e perguntar se você deseja digitar uma nova
senha antes de executar a formatação. Neste
momento, você pode 1) clicar em ‘OK’ para
confirmar ou 2) clicar em ‘Cancelar’ para
voltar à janela de login.
Figura 10.3 – Esqueci a senha
Se você optar por continuar, você será
solicitado a criar uma nova senha complexa e
uma nova dica. A dica não é um campo
obrigatório, mas pode ser útil para fornecer
uma pista sobre a senha, se algum dia ela for
esquecida.
(Observação: A dica NÃO PODE ser
exatamente igual à senha do dispositivo DTL+
G2 ).
Figura 10.4 – Prompt antes da formatação
*Observação: A formatação do dispositivo irá apagar TODAS as informações armazenadas na
partição de dados de segurança do DTL+ G2.
Conflito de Letra de Drive (Sistemas Operacionais Windows)

Documento nº 48002017-001.A03
DataTraveler
®
Locker+ G2
Página 22 de 22
Como mencionado na seção ‘Requisitos do Sistema’ deste manual (na página 3), o DTL+ G2
exige duas letras consecutivas de drive APÓS o último disco físico que aparece antes do
'espaço' na designação de letras de drives (veja a Figura 10.5.) Isto NÃO está relacionado
com compartilhamentos de rede porque eles são específicos aos perfis de usuário e não ao
perfil de hardware de sistema, logo aparecendo disponível no Sistema Operacional.
Isto significa que o Windows pode atribuir ao DTL+ G2 uma letra de unidade que já está
sendo utilizada por um compartilhamento de rede ou caminho de Convenção de
Nomenclatura Universal (UNC), causando um conflito de letra de drive. Se isto ocorrer,
consulte o seu administrador ou departamento de assistência técnica para alterar a atribuição
de letras de unidade no Gerenciamento do Disco do Windows (necessários privilégios de
administrador.)
Figura 10.5 – Meu Computador
Neste exemplo, o DTL+ G2 utiliza a unidade F:, que é a primeira letra de drive disponível após
a unidade E: (o último disco físico antes do intervalo de letra de unidade). Porque a letra G: é
um compartilhamento de rede e não faz parte do perfil de hardware, o DTL+ G2 pode tentar
utilizá-lo como sua segunda letra de drive, causando um conflito.
Se não existirem compartilhamentos de rede no seu sistema e o DTL+ G2 continuar não
carregando, é possível que um leitor de cartões, um disco removível ou outro dispositivo
previamente instalado esteja conservando a letra de drive atribuída causando o conflito.
Observe que o Gerenciamento de Letra de Drive, ou DLM, melhorou significativamente no
Windows XP SP3, Vista, e 7, então pode ser que não encontre este problema, mas se você
não conseguir resolver o conflito, entre em contato com o Departamento de Suporte Técnico
da Kingston para mais assistência.
©2011 Kingston Technology Corporation. Todos os direitos reservados. Todas as marcas comerciais registradas e marcas registradas pertencem a
seus respectivos proprietários.

Nr dokumentu: 48002017-001.A03
DataTraveler
®
Locker+ G2
Strona 1 z 22
Instrukcja obsługi pamięci DataTraveler
®
Locker+ G2

Nr dokumentu: 48002017-001.A03
DataTraveler
®
Locker+ G2
Strona 2 z 22
Spis treści
INFORMACJE O TEJ INSTRUKCJI OBSŁUGI ......................................................................... 3!
WYMAGANIA SYSTEMOWE ..................................................................................................... 3!
ZALECENIA ................................................................................................................................ 3!
INSTALACJA (ŚRODOWISKO WINDOWS) .............................................................................. 4!
INICJOWANIE URZĄDZENIA (ŚRODOWISKO WINDOWS) .................................................... 5!
UŻYTKOWANIE URZĄDZENIA (ŚRODOWISKO WINDOWS) ................................................. 9!
OPCJE URZĄDZENIA (ŚRODOWISKO WINDOWS) .............................................................. 10!
INSTALACJA (ŚRODOWISKO MAC) ...................................................................................... 12!
INICJOWANIE URZĄDZENIA (ŚRODOWISKO MAC) ............................................................ 13!
UŻYTKOWANIE URZĄDZENIA (ŚRODOWISKO MAC) ......................................................... 17!
OPCJE URZĄDZENIA (ŚRODOWISKO MAC) ........................................................................ 18!
POMOC I ROZWIĄZYWANIE PROBLEMÓW ......................................................................... 20!
Blokada urządzenia ..................................................................................................................................... 20
Nie pamiętam hasła ..................................................................................................................................... 21
Konflikt liter dysków (systemy operacyjne Windows) ............................................................................. 22

Nr dokumentu: 48002017-001.A03
DataTraveler
®
Locker+ G2
Strona 3 z 22
Informacje o tej Instrukcji obsługi
Ta instrukcja obsługi dotyczy pamięci DataTraveler
®
Locker+ G2 (nazywanej dalej w skrócie
DTL+ G2) w formie fabrycznej, bez wprowadzonych dostosowań.
Wymagania systemowe
Platforma PC
• Procesor Pentium III (lub szybszy) lub jego
odpowiednik
• 15MB wolnego miejsca na dysku
• Port USB 2.0/3.0
• Dwie kolejne litery dysku po ostatnim
dysku fizycznym*
Obsługiwane systemy operacyjne
komputerów PC
• Windows
®
7
• Windows
®
Vista SP1, SP2
• Windows
®
XP SP2, SP3
Platforma Mac
• 15MB wolnego miejsca na dysku
• Port USB 2.0/3.0
Obsługiwane systemy operacyjne
• Mac OS X 10.5.x
• Mac OS X 10.6.x
• Mac OS X 10.7x
Zalecenia
Aby zagwarantować odpowiednie zasilanie pamięci DTL+ G2, należy włożyć ją bezpośrednio
do portu USB w notebooku lub komputerze stacjonarnym, tak jak pokazano na Ilustracji 1.1.
Należy unikać podłączania pamięci DTL+ G2 do urządzeń peryferyjnych z portem USB, takich
jak klawiatura czy koncentrator USB, tak jak pokazano na Ilustracji 1.2.
Ilustracja 1.1. Zalecane użytkowanie
Ilustracja 1.2. Niezalecane użytkowanie
*Uwaga: zobacz „Konflikt liter dysków” na stronie 22.

Nr dokumentu: 48002017-001.A03
DataTraveler
®
Locker+ G2
Strona 4 z 22
Instalacja (środowisko Windows)
1. Włóż pamięć DTL+ G2 do dostępnego portu w
notebooku lub komputerze stacjonarnym i
poczekaj, aż system Windows ją wykryje.
• Użytkownicy systemu Windows XP zobaczą
powiadomienie Znaleziono nowy sprzęt, tak
jak pokazano na Ilustracji 2.1.
• Użytkownicy systemów Windows Vista/7
zobaczą powiadomienie dotyczące sterownika
urządzenia, tak jak pokazano na Ilustracji 2.2.
Po zakoń czeniu wykrywania nowego sprzętu system
Windows rozpocznie proces inicjowania.
• Jeżeli jest włączona funkcja autouruchamiania
w systemie Windows, można pominąć kolejny
punkt i przejść na stronę 5 do sekcji
Inicjowanie urządzenia.
• Jeżeli funkcja autouruchamiania jest
wyłączona (ustawienie domyślne w systemie
Windows 7), może zostać wyświetlone okno
autoodtwarzania podobne do pokazanego na
Ilustracji 2.3.
2. Wybierz opcję Uruchom DTLplus_Launcher.exe.
Jeżeli system Windows nie wyświetli okna
autoodtwarzania, przejdź na partycję dysku CD-
ROM (Ilustracja 2.4) i ręcznie uruchom program
DTLplus_Launcher. Spowoduje to rozpoczęcie
procesu inicjowania.
Ilustracja 2.4. Zawartość pamięci DTL+ G2
Ilustracja 2.1. Znaleziono nowy sprzęt
(Windows XP)
Ilustracja 2.2. Instalacja sterownika
urządzenia
(Windows Vista/7)
Ilustracja 2.3. Okno autoodtwarzania
(Windows Vista/7)
(Uwaga: Opcje menu w oknie
autoodtwarzania mogą się różnić w
zależności od tego, jakie programy są
w rzeczywistości zainstalowane na
komputerze. Jeżeli funkcja
autouruchamiania jest włączona,
proces inicjowania rozpocznie się
automatycznie).

Nr dokumentu: 48002017-001.A03
DataTraveler
®
Locker+ G2
Strona 5 z 22
Inicjowanie urządzenia (środowisko Windows)
1. Wybierz preferowany język z menu rozwijanego i kliknij przycisk Next (Dalej) (Ilustracja 3.1).
Ilustracja 3.1. Wybór języka
2. Zapoznaj się z umową licencyjną i kliknij przycisk Next (Dalej)(Ilustracja 3.2). (Uwaga: przed
kontynuowaniem należy zaakceptować umowę licencyjną; w przeciwnym razie przycisk
Next (Dalej) pozostanie wyłączony).
Ilustracja 3.2. Umowa licencyjna

Nr dokumentu: 48002017-001.A03
DataTraveler
®
Locker+ G2
Strona 6 z 22
3. Utwórz hasło, aby zabezpieczyć dane w pamięci DTL+ G2. Wprowadź je w polu Password
(Hasło), a następnie wprowadź je ponownie w polu Password Confirmation (Potwierdzenie
hasła), tak jak pokazano na Ilustracji 3.3. Utworzone hasło musi spełniać poniższe kryteria,
aby można było kontynuować proces inicjowania:
1. Hasło musi zawierać co najmniej 6 znaków (maks. 16 znaków).
2. Hasło musi zawierać znaki należące do trzech (3) z następujących kategorii:
- WIELKIE LITERY, małe litery, cyfry i/lub znaki specjalne (!, $ itp.).
Można również wprowadzić wskazówkę dotyczącą hasła, ale nie jest to obowiązkowe. Pole
wskazówki może pomóc w przypomnieniu sobie zapomnianego hasła. (Uwaga: wskazówka
NIE MOŻE być taka sama jak hasło).
Ilustracja 3.3. Konfiguracja hasła

Nr dokumentu: 48002017-001.A03
DataTraveler
®
Locker+ G2
Strona 7 z 22
4. W wyświetlonych polach tekstowych wprowadź informacje kontaktowe (zobacz Ilustracja
3.4) (Uwaga: Informacje wprowadzone w tych polach NIE MOGĄ zawierać ciągu hasła
utworzonego w kroku 3. Pola te są jednak opcjonalne i można pozostawić je puste).
• Pole Name (Nazwa) może zawierać do 32 znaków, ale nie może zawierać
dokładnego hasła.
• Pole Company (Firma) może zawierać do 32 znaków, ale nie może
zawierać dokładnego hasła.
• Pole Details (Szczegóły) może zawierać do 156 znaków, ale nie może
zawierać dokładnego hasła.
Ilustracja 3.4. Informacje kontaktowe

Nr dokumentu: 48002017-001.A03
DataTraveler
®
Locker+ G2
Strona 8 z 22
5. Kliknij przycisk Finish (Zakończ), aby zakończyć proces inicjowania urządzenia.
Pamięć DTL+ G2 sformatuje teraz bezpieczną partycję danych (Ilustracja 3.5) i powiadomi o
zakończeniu operacji (Ilustracja 3.6).
Uwaga: w przypadku pracy w systemie Windows XP w trybie innym niż tryb
administratora procedura formatowania może zająć do minuty.*
6. Kliknij przycisk OK, aby kontynuować.
Ilustracja 3.5. Formatowanie pamię ci DTL+ G2
Ilustracja 3.6. Formatowanie zakoń czone
Inicjowanie zostało zakończone.
*Uwaga: czas trwania operacji może się różnić w zależności do sprzętu komputera i
pojemności pamięci DTL+ G2.

Nr dokumentu: 48002017-001.A03
DataTraveler
®
Locker+ G2
Strona 9 z 22
Użytkowanie urządzenia (środowisko Windows)
Po zainicjowaniu pamięci DTL+ G2 można
uzyskać dostęp do bezpiecznej partycji danych
i korzystać z opcji pamięci, logując się do niej
przy użyciu hasła. W tym celu wykonaj
następujące kroki:
1. Włóż pamięć DTL+ G2 do portu USB w
notebooku lub komputerze stacjonarnych i
wprowadź hasło (zobacz Ilustracja 4.1).
2. 2. Po wpisaniu hasła kliknij przycisk Login
(Zaloguj), aby kontynuować.
• Po wprowadzeniu poprawnego hasła
pamięć DTL+ G2 zostanie
odblokowana i będzie można
rozpocząć korzystanie z niej.
• Jeżeli wprowadzone hasło będzie
nieprawidłowe, tuż pod polem Hint
(Wskazówka) zostanie wyświetlony
komunikat o błędzie wskazujący na
niepowodzenie logowania (zobacz
Ilustracja 4.2).
Ilustracja 4.1. Okno logowania
Jeżeli podczas logowania zostanie
wprowadzone błędne hasło, będzie można
ponownie spróbować wprowadzić poprawne
hasło, ale wbudowana funkcja zabezpieczeń
zlicza nieudane próby logowania*. Po 10
(wstępnie skonfigurowana liczba)
nieudanych próbach logowania pamięć
DTL+ G2 zostanie zablokowana i przed
ponownym jej użyciem będzie konieczne
sformatowanie bezpiecznej partycji danych.
OZNACZA TO UTRATĘ WSZYSTKICH
DANYCH ZAPISANYCH W PAMIĘCI
DTL+ G2.
Aby uzyskać więcej informacji dotyczących
tej funkcji, zobacz sekcję Blokada
urządzenia na stronie 20.
Ilustracja 4.2. Niepowodzenie logowania
*Uwaga: po pomyślnym uwierzytelnieniu użytkownika licznik nieudanych logowań jest
resetowany.

Nr dokumentu: 48002017-001.A03
DataTraveler
®
Locker+ G2
Strona 10 z 22
Opcje urządzenia (środowisko Windows)
Po zalogowaniu się do urządzenia w prawym rogu paska zadań systemu Windows będzie
wyświetlana ikona DTL+ G2 (Ilustracja 5.1). (Uwaga: użytkownicy systemu Windows 7 muszą
kliknąć przycisk strzałki w górę na pasku zadań, aby uzyskać dostęp do ikony DTL+ G2
(Ilustracja 5.2).
Kliknięcie ikony DTL+ G2 spowoduje wyświetlenie następującego menu:
Ilustracja 5.1. Ikona DTL+ G2 na pasku zadań
(użytkownicy systemu Windows XP)
Ilustracja 5.2. Ikona DTL+ G2 na pasku zadań
(użytkownicy systemu Windows 7)
Polecenie DTL+ G2 Settings (Ustawienia pamięci DTL+ G2)
• Umożliwia zmianę hasła i/lub wskazówki (Ilustracja 5.3).
• Umożliwia dodanie/wyświetlenie/zmianę informacji kontaktowych (Ilustracja 5.4).
• Umożliwia zmianę używanego języka (Ilustracja 5.5).
(Uwaga: ze względów bezpieczeństwa aktualizacja i/lub modyfikacja tych ustawień wymaga
podania aktualnego hasła pamięci DTL+ G2).
Ilustracja 5.3.
Zmiana hasła
Ilustracja 5.4.
Informacje kontaktowe
Ilustracja 5.5.
Wybór języka

Nr dokumentu: 48002017-001.A03
DataTraveler
®
Locker+ G2
Strona 11 z 22
Polecenie Browse DTL+ G2 (Przeglądaj pamięć DTL+ G2)
• Umożliwia przeglądanie zawartości bezpiecznej partycji danych (po zalogowaniu się).
Polecenie Format DTL+ G2 (Formatuj pamięć
DTL+ G2)*
• Umożliwia sformatowanie bezpiecznej partycji
danych. Ostrzeżenie: wszystkie dane zostaną
wymazane). (Ilustracja 5.7)
Polecenie Online Support (Pomoc techniczna
online) (wymaga dostępu do Internetu)
• Otwiera przeglądarkę internetową i przechodzi
pod adres http://www.kingston.com/support/,
gdzie są dostępne dodatkowe informacje
pomocy technicznej.
Ilustracja 5.7. Ostrzeżenie dotyczące
formatowania
Polecenie About DTL+ G2 (Informacje o pamięci
DTL+ G2)
• Wyświetla szczegółowe informacje dotyczące
pamięci DTL+ G2, w tym informacje o
wersjach aplikacji i oprogramowania
sprzętowego (Ilustracja 5.8).
Polecenie Shutdown DTL+ G2 (Wyłącz pamięć
DTL+ G2)
• Prawidłowo wyłącza pamięć DTL+ G2,
umożliwiając bezpieczne odłączenie jej od
komputera.
Ilustracja 5.8. Informacje o pamięci DTL+
G2
(Zalecenie: po wyłączeniu pamięci DTL+ G2 zawsze warto wyłączyć lub ponownie
uruchomić stację roboczą, do której była podłączona ta pamięć, zwłaszcza jeśli znajduje
się ona w miejscu publicznym lub jest używana przez wiele osób).
*Uwaga: w systemach Windows Vista i Windows 7 wymagane jest podanie aktualnego hasła
pamięci DTL+ G2.
-Koniec sekcji dotyczącej systemu Windows-

Nr dokumentu: 48002017-001.A03
DataTraveler
®
Locker+ G2
Strona 12 z 22
Instalacja (środowisko Mac)
Włóż pamięć DTL+ G2 do dostępnego portu w notebooku lub
komputerze stacjonarnym i poczekaj, aż system operacyjny komputera
Mac ją wykryje. Gdy tak się stanie, na pulpicie zostanie wyświetlony
wolumin DTLplus, tak jak pokazano na Ilustracji 6.1.
1. Kliknij dwukrotnie ikonę dysku CD-ROM pamięci DTL+ G2.
2. 2. Kliknij dwukrotnie folder Mac widoczny w oknie
pokazanym na Ilustracji 6.2.
Ilustracja 6.1. DTLplus
3. Kliknij dwukrotnie ikonę aplikacji DTLplus widoczną w oknie
pokazanym na Ilustracji 6.3. Spowoduje to rozpoczęcie
procesu inicjowania.
Ilustracja 6.2. Zawartość pamięci DTL+ G2
Ilustracja 6.3. Aplikacja pamięci DTL+ G2

Nr dokumentu: 48002017-001.A03
DataTraveler
®
Locker+ G2
Strona 13 z 22
Inicjowanie urządzenia (środowisko Mac)
1. Wybierz preferowany język z menu rozwijanego i kliknij przycisk Next (Dalej) (Ilustracja 7.1).
Ilustracja 7.1. Wybór języka
2. Zapoznaj się z umową licencyjną i kliknij przycisk Next (Dalej)(Ilustracja 7.2). (Uwaga: przed
kontynuowaniem należy zaakceptować umowę licencyjną; w przeciwnym razie przycisk
Next (Dalej) pozostanie wyłączony).
Ilustracja 7.2. Umowa licencyjna

Nr dokumentu: 48002017-001.A03
DataTraveler
®
Locker+ G2
Strona 14 z 22
3. Utwórz hasło, aby zabezpieczyć dane w pamięci DTL+ G2. Wprowadź je w polu Password
(Hasło), a następnie wprowadź je ponownie w polu Password Confirmation (Potwierdzenie
hasła), tak jak pokazano na Ilustracji 7.3. Utworzone hasło musi spełniać poniższe kryteria,
aby można było kontynuować proces inicjowania:
1. Hasło musi zawierać co najmniej 6 znaków (maks. 16 znaków).
2. Hasło musi zawierać znaki należące do trzech (3) z następujących kategorii:
- WIELKIE LITERY, małe litery, cyfry i/lub znaki specjalne (!, $ itp.).
Można również wprowadzić wskazówkę dotyczącą hasła, ale nie jest to obowiązkowe. Pole
wskazówki może pomóc w przypomnieniu sobie zapomnianego hasła. (Uwaga: wskazówka
NIE MOŻE być taka sama jak hasło).
Ilustracja 7.3. Konfiguracja hasła

Nr dokumentu: 48002017-001.A03
DataTraveler
®
Locker+ G2
Strona 15 z 22
4. W wyświetlonych polach tekstowych wprowadź informacje kontaktowe (zobacz Ilustracja
7.4) (Uwaga: Informacje wprowadzone w tych polach NIE MOGĄ zawierać ciągu hasła
utworzonego w kroku 3. Pola te są jednak opcjonalne i można pozostawić je puste).
• Pole Name (Nazwa) może zawierać do 32 znaków, ale nie może zawierać
dokładnego hasła.
• Pole Company (Firma) może zawierać do 32 znaków, ale nie może
zawierać dokładnego hasła.
• Pole Details (Szczegóły) może zawierać do 156 znaków, ale nie może
zawierać dokładnego hasła.
Ilustracja 7.4. Informacje kontaktowe

Nr dokumentu: 48002017-001.A03
DataTraveler
®
Locker+ G2
Strona 16 z 22
5. Kliknij przycisk Finish (Zakończ), aby zakończyć proces inicjowania urządzenia.
Pamięć DTL+ G2 sformatuje teraz bezpieczną partycję danych (Ilustracja 7.5) i powiadomi o
zakończeniu operacji (Ilustracja 7.6).
6. Kliknij przycisk OK, aby kontynuować.
Ilustracja 7.5. Formatowanie pamię ci DTL+ G2
Ilustracja 7.6. Formatowanie zakoń czone
Inicjowanie zostało zakończone.

Nr dokumentu: 48002017-001.A03
DataTraveler
®
Locker+ G2
Strona 17 z 22
Użytkowanie urządzenia (środowisko Mac)
Po zainicjowaniu pamięci DTL+ G2 można
uzyskać dostęp do bezpiecznej partycji danych i
korzystać z opcji pamięci, logując się do niej przy
użyciu hasła. W tym celu wykonaj następujące
kroki:
1. Włóż pamięć DTL+ G2 do portu USB w
notebooku lub komputerze stacjonarnych i
wprowadź hasło (zobacz Ilustracja 8.1).
2. Po wpisaniu hasła kliknij przycisk Login
(Zaloguj), aby kontynuować.
• Po wprowadzeniu poprawnego hasła
pamięć DTL+ G2 zostanie odblokowana
i będzie można rozpocząć korzystanie z
niej.
• Jeżeli wprowadzone hasło będzie
nieprawidłowe, tuż pod polem Hint
(Wskazówka) zostanie wyświetlony
komunikat o błędzie wskazujący na
niepowodzenie logowania (zobacz
Ilustracja 8.2).
Ilustracja 8.1. Okno logowania
Jeżeli podczas logowania zostanie
wprowadzone błędne hasło, będzie można
ponownie spróbować wprowadzić poprawne
hasło, ale wbudowana funkcja zabezpieczeń
zlicza nieudane próby logowania*. Po 10
(wstępnie skonfigurowana liczba) nieudanych
próbach logowania pamięć DTL+ G2 zostanie
zablokowana i przed ponownym jej użyciem
będzie konieczne sformatowanie bezpiecznej
partycji danych.
OZNACZA TO UTRATĘ WSZYSTKICH
DANYCH ZAPISANYCH W PAMIĘCI DTL+
G2.
Aby uzyskać więcej informacji dotyczących tej
funkcji, zobacz sekcję Blokada urządzenia na
stronie 20.
Ilustracja 8.2. Niepowodzenie logowania
*Uwaga: po pomyślnym uwierzytelnieniu użytkownika licznik nieudanych logowań jest
resetowany.

Nr dokumentu: 48002017-001.A03
DataTraveler
®
Locker+ G2
Strona 18 z 22
Opcje urządzenia (środowisko Mac)
Po zalogowaniu się do urządzenia w doku systemu Mac OS X będzie widoczna ikona
DTLplus_Launcher, tak jak pokazano na Ilustracji 9.1 poniżej:
Ilustracja 9.1. Ikona DTL+ G2 w doku systemu Mac OS X
Przytrzymanie klawisza control na klawiaturze i kliknięcie ikony
DTLplus_Launcher spowoduje wyświetlenie menu pokazanego na
Ilustracji 9.2 po prawej.
Polecenie DTL+ G2 Settings (Ustawienia pamięci DTL+ G2)
• Umożliwia zmianę hasła i/lub wskazówki (Ilustracja 9.3).
• Umożliwia dodanie/wyświetlenie/zmianę informacji
kontaktowych (Ilustracja 9.4).
• Umożliwia zmianę używanego języka (Ilustracja 9.5).
Ilustracja 9.2.
Opcje pamięci DTL+ G2
Ilustracja 9.3.
Zmiana hasła
Ilustracja 9.4.
Informacje kontaktowe
Ilustracja 9.5.
Wybór języka
(Uwaga: ze względów bezpieczeństwa aktualizacja i/lub modyfikacja tych ustawień wymaga podania
aktualnego hasła pamięci DTL+ G2).

Nr dokumentu: 48002017-001.A03
DataTraveler
®
Locker+ G2
Strona 19 z 22
Polecenie Browse DTL+ G2 (Przeglądaj pamięć DTL+ G2)
• Umożliwia przeglądanie zawartości bezpiecznej partycji danych (po zalogowaniu się).
Polecenie Format DTL+ G2 (Formatuj pamięć
DTL+ G2)
• Umożliwia sformatowanie bezpiecznej
partycji danych. Ostrzeżenie: wszystkie
dane zostaną wymazane). (Ilustracja 9.7)
Polecenie Online Support (Pomoc techniczna
online) (wymaga dostępu do Internetu)
• Otwiera przeglądarkę internetową i
przechodzi pod adres
http://www.kingston.com/support/, gdzie są
dostępne dodatkowe informacje pomocy
technicznej.
Ilustracja 9.7. Ostrzeżenie dotyczące
formatowania
Polecenie About DTL+ G2 (Informacje o
pamięci DTL+ G2)
• Wyświetla szczegółowe informacje
dotyczące pamięci DTL+ G2, w tym
informacje o wersjach aplikacji i
oprogramowania sprzętowego (Ilustracja
9.8).
Polecenie Shutdown DTL+ G2 (Wyłącz pamięć
DTL+ G2)
• Prawidłowo wyłącza pamię ć DTL+ G2,
umożliwiając bezpieczne odłączenie jej od
komputera.
Ilustracja 9.8. Informacje o pamięci DTL+ G2
(Zalecenie: po wyłączeniu pamięci DTL+ G2 zawsze warto wyłączyć lub ponownie
uruchomić stację roboczą, do której była podłączona ta pamięć, zwłaszcza jeśli znajduje
się ona w miejscu publicznym lub jest używana przez wiele osób).
-Koniec sekcji dotyczącej systemu Mac-

Nr dokumentu: 48002017-001.A03
DataTraveler
®
Locker+ G2
Strona 20 z 22
Pomoc i rozwiązywanie problemów
Blokada urządzenia
Pamięć DTL+ G2 zawiera funkcję zabezpieczeń zapobiegającą nieautoryzowanemu dostępowi
do partycji danych po maksymalnej liczbie następujących po sobie nieudanych prób
logowania (w skrócie MaxNoA). Domyślna liczba dozwolonych nieudanych prób to 10.
Licznik blokady zlicza nieudane logowania i można go zresetować na jeden z dwóch
sposobów: 1) Logując się przed osiągnięciem limitu MaxNoA lub 2) osiągając limit MaxNoA i
formatując urządzenie.*
Jeżeli zostanie wprowadzone nieprawidłowe
hasło, tuż pod polem Hint (Wskazówka)
zostanie wyświetlony komunikat o błędzie
wskazujący na niepowodzenie logowania.
Zobacz Ilustracja 10.1.
Po siódmej nieudanej próbie zostanie
wyświetlony dodatkowy komunikat o błędzie
informujący o tym, że pozostały trzy próby przed
osiągnięciem limitu MaxNoA (ustawionego
domyślnie na 10). Zobacz Ilustracja 10.2.
Po dziesiątej nieudanej próbie logowania
pamięć DTL+ G2 trwale zablokuje partycję
danych, przez co dalsze używanie pamięci
będzie wymagało jej sformatowania. Oznacza
to, że wszystkie dane przechowywane w
pamięci DTL+ G2 zostaną utracone i trzeba
będzie utworzyć nowe hasło.
Ilustracja 10.1. Niepowodzenie logowania
Ten środek bezpieczeństwa ma na celu
uniemożliwienie osobom, które nie znają hasła,
podjęcia nieograniczonej liczby prób logowania, i
uzyskania dostępu do poufnych danych.
Jeżeli właściciel pamięci DTL+ G2 zapomni
hasła, zostaną zastosowane te same środki
bezpieczeństwa, w tym formatowanie
urządzenia*.
Aby uzyskać więcej informacji dotyczących tej
funkcji, zobacz sekcję Nie pamiętam hasła na
stronie 21.
Ilustracja 10.2. Siódma nieudana próba logowania
*Uwaga: sformatowanie urządzenia spowoduje usunięcie WSZYSTKICH informacji
przechowywanych na bezpiecznej partycji danych pamięci DTL+ G2.

Nr dokumentu: 48002017-001.A03
DataTraveler
®
Locker+ G2
Strona 21 z 22
Nie pamiętam hasła
W przypadku zapomnienia hasła można
kliknąć łącze Reset Password (Resetuj hasło),
które jest wyświetlane w oknie logowania do
urządzenia po uruchomieniu programu
DTLplus_Launcher (zobacz Ilustracja 10.3).
Ta opcja umożliwia utworzenie nowego hasła,
ale w celu ochrony poufności danych pamięć
DTL+ G2 zostanie sformatowana. Oznacza to,
że wszystkie dane zostaną wymazane.*
Po kliknięciu łącza Reset Password (Resetuj
hasło) zostanie wyświetlony komunikat
(Ilustracja 10.4) z pytaniem, czy chcesz
wprowadzić nowe hasło przed rozpoczęciem
formatowania. Na tym etapie można 1) kliknąć
przycisk OK, aby potwierdzić, lub 2) kliknąć
przycisk Cancel (Anuluj), aby wrócić do okna
logowania.
Ilustracja 10.3. Zapomniane hasło
W przypadku wybrania opcji kontynuowania
zostanie wyświetlony monit o utworzenie
nowego złożonego hasła oraz nowej
wskazówki. Wypełnienie pola wskazówki nie
jest obowiązkowe, ale może pomóc w
przypomnieniu sobie zapomnianego hasła.
(Uwaga: wskazówka NIE MOŻE być taka
sama jak hasło urządzenia DTL+ G2).
Ilustracja 10.4. Monit przed formatowaniem
*Uwaga: sformatowanie urządzenia spowoduje usunięcie WSZYSTKICH informacji
przechowywanych na bezpiecznej partycji danych pamięci DTL+ G2.

Nr dokumentu: 48002017-001.A03
DataTraveler
®
Locker+ G2
Strona 22 z 22
Konflikt liter dysków (systemy operacyjne Windows)
Jak wspomniano w sekcji Wymagania systemowe tej instrukcji obsługi (strona 3), pamięć
DTL+ G2 wymaga dwóch kolejnych liter dysku PO ostatnim dysku fizycznym wyświetlanym
przed luką w przypisanych do dysków literach (zobacz Ilustracja 10.5). NIE ma to
zastosowania do udziałów sieciowych, ponieważ są one specyficzne dla profilów użytkownika,
a nie profilu sprzętu, przez co wydają się one dostępne dla systemu operacyjnego.
Oznacza to, że system Windows może przypisać pamięci DTL+ G2 literę dysku używaną już
przez udział sieciowy lub ścieżkę UNC (Universal Naming Convention), co powoduje konflikt
liter dysku. Jeśli ten problem występuje, należy skonsultować się z administratorem lub
działem pomocy technicznej w celu zmiany przypisania liter dysku w obszarze Zarządzanie
dyskami systemu Windows (wymagane są uprawnienia administratora).
Ilustracja 10.5. Mój komputer
W tym przykładzie pamięć DTL+ G2 używa litery dysku F:, która jest pierwszą dostępną literą
po literze E: (przypisaną do ostatniego dysku fizycznego przed przerwą). Ponieważ litera G:
jest udziałem sieciowym nieobjętym profilem sprzętu, pamięć DTL+ G2 może podjąć próbę
użycia jej jako drugiej litery, co spowoduje konflikt.
Jeśli w systemie nie ma udziałów sieciowych, ale nadal nie można uruchomić pamięci DTL+
G2, prawdopodobnie konflikt powoduje inne, wcześniej zainstalowane urządzenie, do którego
przypisano literę dysku (np. czytnik kart lub dysk wymienny).
Należy zauważyć, że funkcja zarządzania literami dysków została znacznie ulepszona w
systemach Windows XP z dodatkiem SP3, Vista i 7, wię c powyższy problem może nie
dotyczyć użytkownika, ale jeśli konfliktu nie można rozwiązać, należy skontaktować się z
działem pomocy technicznej firmy Kingston w celu uzyskania dalszej pomocy.
©2011 Kingston Technology Europe Ltd i Digital Europe Ltd. Wszelkie prawa zastrzeżone. Wszelkie znaki towarowe i zastrzeżone znaki towarowe są
własnością odpowiednich właścicieli.

文書番 48002017-001.A03
DataTraveler
®
Locker+ G2
1 / 22 ペジ
DataTraveler
®
Locker+ G2

48002017-001.A03
DataTraveler
®
Locker+ G2
2 / 22
............................................................................................................................. 3
............................................................................................................................. 3
..................................................................................................................................... 3
(WINDOWS ) ................................................................................................... 4
(WINDOWS ) ........................................................................... 5
(WINDOWS ) ............................................................................... 9
(WINDOWS ) .......................................................... 10
(MAC ) ........................................................................................................... 12
(MAC ) ................................................................................... 13
(MAC ) ....................................................................................... 17
(MAC ) .................................................................... 18
........................................................................................ 20
....................................................................................................................................... 20
................................................................................................................................... 21
(Windows OS ) ..................................................................................... 22

48002017-001.A03
DataTraveler
®
Locker+ G2
3 / 22
DataTraveler
®
Locker+ G2 (
DTL+ G2
PC
• Pentium ( )
• 15MB
• USB 2.0/3.0
• 2
*
(OS)
• Windows
®
7
• Windows
®
Vista SP1 SP2
• Windows
®
XP SP2 SP3
Mac
• 15MB
• USB 2.0/3.0
OS
• Mac OS X 10.5.x
• Mac OS X 10.6.x
• Mac OS X 10.7x
DTL+ G2 1.1
USB 1.2
USB USB
DTL+ G2
1.1 –
1.2 –

48002017-001.A03
DataTraveler
®
Locker+ G2
4 / 22
* : (22 )
(Windows )
1. DTL+ G2
USB
Windows
• Windows XP 2.1
• Windows Vista 7
2.2
Windows
• Windows
(5 )
• Windows
(Windows 7
) 2.3
AutoPlay
2. DTLplus_Launcher.exe
Windows AutoPlay CD-
ROM ( 2.4)
DTLplus_Launcher
2.1 –
(Windows XP)
2.2 –
(Windows Vista/7)
2.3 – AutoPlay
(Windows Vista/7)
( :AutoPlay
AutoRun
)

48002017-001.A03
DataTraveler
®
Locker+ G2
5 / 22
2.4 – DTL+ G2
(Windows )
1. [ ] ( 3.1)
3.1 –
2. [ ] ( 3.2) ( :
[ ]
)

48002017-001.A03
DataTraveler
®
Locker+ G2
6 / 22
3.2 –
3. DTL+ G2
( 3.3 )
1. 6 ( 16 )
2. 3
- (! $ )
( :
)
3.3 –

48002017-001.A03
DataTraveler
®
Locker+ G2
7 / 22
4. ( 3.4 )
( : 3
)
• [ ] 32
• [ ] 32
• [ ] 156
3.4 –

48002017-001.A03
DataTraveler
®
Locker+ G2
8 / 22
5. [ ]
DTL+ G2 ( 3.5)
( 3.6)
:Windows XP
*
6. [OK]
3.5 – DTL+ G2
3.6 –
* : DTL+ G2

48002017-001.A03
DataTraveler
®
Locker+ G2
9 / 22
(Windows )
DTL+ G2
1. DTL+ G2
USB
( 4.1
)
2. [ ]
•
DTL+ G2
•
( 4.2 )
4.1 –
10
DTL+ G2
DTL+ G2
[
](20 )
4.2 –
* :

48002017-001.A03
DataTraveler
®
Locker+ G2
10 / 22
(Windows )
Windows [DTL+ G2]
( 5.1) ( : Windows 7 [DTL+ G2]
( 5.2)
DTL+ G2
5.1 – DTL+ G2
(Windows XP )
5.2 – DTL+ G2
(Windows 7 )
DTL+ G2
• ( 5.3)
• / / ( 5.4)
• ( 5.5)
( :
DTL+ G
)
5.3
5.4
5.5

48002017-001.A03
DataTraveler
®
Locker+ G2
11 / 22
DTL+ G2
•
DTL+ G2 *
•
( :
( 5.7)
(
)
•
http://www.kingston.com/support/
5.7 –
DTL+ G2
•
DTL+ G2
( 5.8)
DTL+ G2
• DTL+ G2
5.8 – DTL+ G2
( : DTL+ G2
)
* :DTL+ G2 Windows Vista Windows 7
-Windows -

48002017-001.A03
DataTraveler
®
Locker+ G2
12 / 22
(Mac )
DTL+ G2 USB
Mac
6.1 DTLplus
1. [DTL+ G2 CD-ROM]
2. 6.2 Mac
6.1 – DTLplus
3. 6.3 DTLplus
6.2 – DTL+ G2
6.3 – DTL+ G2

48002017-001.A03
DataTraveler
®
Locker+ G2
13 / 22
(Mac )
1. [ ] ( 7.1)
7.1 –
2. [ ] ( 7.2) ( :
[ ]
)
7.2 –

48002017-001.A03
DataTraveler
®
Locker+ G2
14 / 22
3. DTL+ G2
( 7.3 )
1. 6 ( 16 )
2. 3
- (! $ )
( :
)
7.3 –

48002017-001.A03
DataTraveler
®
Locker+ G2
15 / 22
4. ( 7.4 )
( : 3
)
• [ ] 32
• [ ] 32
• 156
7.4 –

48002017-001.A03
DataTraveler
®
Locker+ G2
16 / 22
5. [ ]
DTL+ G2 ( 7.5)
( 7.6)
6. [OK]
7.5 – DTLocker+ G2
7.6 –

48002017-001.A03
DataTraveler
®
Locker+ G2
17 / 22
(Mac )
DTL+ G2
1. DTL+ G2
USB
( 8.1
)
2. [ ]
•
DTL+ G2
•
[ ]
( 8.2 )
8.1 –
10
DTL+ G2
DTL+ G2
(20 )
8.2 –
* :

48002017-001.A03
DataTraveler
®
Locker+ G2
18 / 22
(Mac )
9.1 Mac OS X Dock
[DTLplus_Launcher]
9.1 – Mac OS X Dock [DTL+ G2]
[Control]
[DTLplus_Launcher] 1
9.2
DTL+ G2
• ( 9.3)
• / / ( 9.4)
• ( 9.5)
9.2
DTL+ G2
9.3
9.4
9.5
( : DTL+ G2
)

48002017-001.A03
DataTraveler
®
Locker+ G2
19 / 22
DTL+ G2
•
DTL+ G2
•
( :
( 9.7)
(
)
•
http://www.kingston.com/support/
9.7 –
DTL+ G2
•
DTL+ G2
( 9.8)
DTL+ G2
• DTL+ G2
9.8 – DTL+ G2
( : DTL+ G2
)
- Mac -

48002017-001.A03
DataTraveler
®
Locker+ G2
20 / 22
DTL+ G2 (MaxNoA)
10
2
1)MaxNoA
2) MaxNoA *
10.1
7 3
MaxNoA ( 10
)
10.2
10
DTL+ G2
DTL+ G2
10.1 –
(
)
DTL+ G2
*
(21 )
10.2 – 7
* : DTL+ G2

48002017-001.A03
DataTraveler
®
Locker+ G2
21 / 22
DTLplus_Launcher
Reset
Password
( 10.3 )
DTL+ G2
*
[ ]
( 10.4)
[OK] [
]
10.3 –
( : DTL+ G2
)
10.4 –
* : DTL+ G2

48002017-001.A03
DataTraveler
®
Locker+ G2
22 / 22
(Windows OS )
(3 ) DTL+ G2
2
( 10.5 )
OS
Windows Universal Naming Convention (UNC)
DTL+ G2
Windows [ ] (
)
10.5 –
DTL+ G2 E: F:
(E: )
G: DTL+ G2
2 G:
DTL+ G2
Drive Letter Management (DLM) Windows XP SP3 Vista 7
©2012 Kingston Technology Far East Co. Ltd (Asia Headquarters)

48002017-
001.A03
DataTraveler
®
Locker+ G2
1 22
คู่มือผู้ใช้ DataTraveler
®
Locker+ G2

!"#$%&!' ()*+ 48002017-001.A03
DataTraveler
®
Locker+ G2
!"#$ 2 22
สารบัญ
เกี่ยวกับคูมือผูใชชุดนี้ .............................................................................................................................. 2!
เงื่อนไขทางระบบ .................................................................................................................................. 2!
คำแนะนำ .......................................................................................................................................... 3!
การติดตั้ง (ระบบ WINDOWS) ............................................................................................................. 3!
การเริ่มการทํางานของอุปกรณ (ระบบ WINDOWS) ....................................................................................... 4!
การใชงานอุปกรณ (ระบบ WINDOWS) .................................................................................................... 8!
ฟงกชั่นการทํางานของอุปกรณ (ระบบ WINDOWS) ...................................................................................... 10!
การติดตั้ง (ระบบ MAC) ..................................................................................................................... 11!
การเริ่มการทํางานของอุปกรณ (ระบบ MAC) ............................................................................................... 12!
ฟงกชั่นการทํางานของอุปกรณ (ระบบ MAC) ................................................................................................ 17!
ฟงกชั่นการทํางานของอุปกรณ (ระบบ MAC) ................................................................................................ 18!
วิธีใชและการแกไขปญหา ....................................................................................................................... 19!
Device Lockout ............................................................................................................................................ 19
ลืมรหัสผาน .......................................................................................................................................................... 21!
ขอขัดแยงอักขระกํากับไดรฟ (ระบบปฏ ิบัติการ Windows) ................................................................................................... 21!
เกี่ยวกับคูมือผูใชชุดนี้
คูมือผูใชชุดนี้จัดทําขึ้นสําหรับ DataTraveler
®
Locker+ G2 (เรียกเปน DTL+ G2 ตอจากนี้)
โดยใชภาพที่ไดจากโรงงานโดยไมมีการปรับแตงเพิ่มเติมใด ๆ
เงื่อนไขทางระบบ

!"#$%&!' ()*+ 48002017-001.A03
DataTraveler
®
Locker+ G2
!"#$ 3 22
สถาปตยกรรม PC
• โปรเซสเซอรระดับ Pentium III (หรือเร็วกวา)
• พื้นที่วางบนดิสก 15MB
• พอรต USB 2.0 / 3.0
• อักขระกํากับไดรฟตอเนื่องวางสองตัวตอจากไดรฟ
ทางภายภาพตัวลาสุด*
การรองรับระบบปฏิบัติการสําหรับ PC
• Windows
®
7
• Windows
®
Vista SP1, SP2
• Windows
®
XP SP2, SP3
สถาปตยกรรม Mac
• พื้นที่วางบนดิสก 15MB
• พอรต USB 2.0 / 3.0
ระบบปฏิบัติการที่รองรับ
• Mac OS X 10.5.x
• Mac OS X 10.6.x
• Mac OS X 10.7x
คำแนะนำ
เพื่อใหแนใจวาคุณจะสามารถใชงาน DTL+ G2 ไดอยางเต็มประสิทธิภาพ ใหเสียบไดรฟเขาที่พอรต
USB ของโนตบุกหรือเครื่องเดสกทอปโดยตรงตาม
ภาพที่
1.1 หลีกเลี่ยงการตอ DTL+ G2 กับอุปกรณตอพวงที่มีพอรต USB เชน
แปนพิมพหรือฮับ USB ตาม
ภาพที่
1.2
ภาพที่
1.1 –
การใชงานที่แนะนํา
ภาพที่
1.2 -
ไมแนะนํา
*
หมายเหตุ
:
ดู
"
ปญหาอักขระกํากับไดรฟ
"
ในหนา
22
การติดตั้ง (ระบบ Windows)
1. เสียบ DTL+ G2 เขาที่พอรต USB ในโนตบุกหรือ เดสกทอป จากนั้นรอให
Windows ทำการตรวจหา
• ผูใช Windows XP จะไดรับแจง ‘Found New Hardware’
ตาม
ภาพที่
2.1
• ผูใช Windows Vista/7 จะไดรับการแจงเตือนเกี่ยว
กับไดรเวอรอุปกรณตาม
ภาพที่
2.2
หลังจากตรวจหาฮารดแวรใหมเสร็จสิ้น Windows จะเริ่มขั้นตอนการทํางาน
• หากเปดระบบเรียกใชอัตโนมัติของ Windows ไว
คุณสามารถขามขั้นตอนถัดไป แลวไปหนา 5 –
การเริ่มการทํางานของอุปกรณ
• หากปดระบบเรียกใชอัตโนมัติของ Windows ไว (Windows 7
ภาพที่
2.1 -
ฮารดแวรใหมที่พบ
(Windows XP)

!"#$%&!' ()*+ 48002017-001.A03
DataTraveler
®
Locker+ G2
!"#$ 4 22
ปดใชงานเปนคาเริ่มตน) จะเห็นหนา ตาง AutoPlay
ปรากฏขึ้นคลายกับ
ภาพที่
2.3
2. เลือกตัวเลือก ‘Run DTLplus_Launcher.exe’
หาก Windows ไมเปดทํางานอัตโนมัติ ใหไปที่พารติชั่นของ CD-ROM (
ภาพที่
2.4) จากนั้นเรียกใช DTLplus_Launcher ดวยตัวเอง
ขั้นตอนนี้เปนการเริ่มการทํางานเชนกัน
ภาพที่
2.4 -
สวนประกอบของ
DTL+ G2
ภาพที่
2.2 -
การติดตั้งไดรเวอรอุปกรณ
(Windows Vista/7)
ภาพ
2.3 -
หนาตาง
AutoPlay
(Windows Vista/7)
(
หมายเหตุ
:
ตัวเลือกเมนูในหนาตาง
AutoPlay
อาจแตกตางกันไปตามโปร แกรมที่ติดตั้งในคอมพิวเตอร
หากเปดใชงาน
AutoRun
จะเร ิ่มการทํางานอัตโน มัติ
)
การเริ่มการทำงานของอุปกรณ์ (ระบบ Windows)
1. เลือกภาษาของคุณจากเมนูแสดงรายการ จากนั้นคลิกที่ ‘Next’ (
ภาพที่
3.1)

!"#$%&!' ()*+ 48002017-001.A03
DataTraveler
®
Locker+ G2
!"#$ 5 22
ภาพที่
3.1 -
การเลือกภาษา
2. ตรวจสอบขอตกลงสิทธิ์ใชงาน จากนั้นคลิกที่ 'Next’ (
ภาพที่
3.2) (
หมายเหตุ
:
คุณตองตอบรับขอตกลง สิทธิ์ใชงานกอนดําเนินการตอ
ไมเชนนั้นปุม
'Next'
จะไมสามารถใชงานได
)
ภาพที่
3.2 -
ขอตกลงสิท ธิ์ใชงาน
3. กําหนดรหัสผานเพื่อปองกันขอมูลใน DTL+ G2 กรอกในฟลด ‘Password’ จากนั้นกรอกซ้ําในฟลด ‘Password Confirmation’
ตามตัวอยางดานลางใน
ภาพที่
3.3 รหัสผานที่คุณจัดทําจะตองเขา หลักเกณฑตอไปนี้กอนเริ่มการทํางานเพื่อใชงานตอไป:
1. รหัสผานตองมีอักขระ 6 ตัวขึ้นไป (สูงสุด 16 ตัว)
2. รหัสผานจะตองมีสวนประกอบสาม (3) อยางตอไปนี้
- ตัวพิมพใหญ พิมพเล็ก ตัวเลขและ/หรืออักขระพิเศษ (!, $ ฯลฯ)
นอกจากนี้คุณยังสามารถกรอกคําใบรหัสผาน ทั้งนี้จะกรอกหรือไมก็ได ฟลดคําใบเปนประโยชนในการชวยเดารหัสผานในกรณีที่ลืมรหัสผาน
(
หมายเหตุ
:
คําใบจะตองไมเหมือนกันกับรหัสผาน
)

!"#$%&!' ()*+ 48002017-001.A03
DataTraveler
®
Locker+ G2
!"#$ 6 22
ภาพที่
3.3 -
การตั้งคารหัสผาน
4. กรอกขอมูลติดตอในกลองขอความที่จัดไวให (ดูใน
ภาพที่
3.4) (
หมายเหตุ
:
ขอมูลที่คุณกรอกในฟลดเหลานี้จะตองไมม ีชุดอักขระในรหัสผานที่จัดทําในขั้นตอนที่
3
ทั้งนี้ฟลดเหลานี้เปนฟลดเผื่อเลือกและสามารถปลอยวางไดถาตองการ
)
• ฟลด 'Name’ รองรับอักขระสูงสุด 32 ตัว แตจะตองไมมีรหัสผานที่ตรงกัน
• ฟลด 'Company’ รองรับอักขระสูงสุด 32 ตัว แตจะตองไมมีรหัสผานที่ตรงกัน
• ฟลด 'Details’ รองรับอักขระสูงสุด 156 ตัว แตจะตองไมมีรหัสผานที่ตรงกัน

!"#$%&!' ()*+ 48002017-001.A03
DataTraveler
®
Locker+ G2
!"#$ 7 22
ภาพที่
3.4 -
ขอมูลติดตอ
5. คลิก ‘Finish’ เพื่อสิ้นสุดขั้นตอนเริ่มการทํางานของอุปกรณ
จากนี้ DTL+ G2 จะทําการฟอรแมตพารติชั่นนิรภัย (
ภาพที่
3.5) และแจงใหคุณทราบเมื่อดํา เนินการเสร็จสิ้น (
ภาพที่
3.6)
หมายเหตุ: หากใชงานจาก Windows XP โดยไมใชสิทธิ์ผูดูแลระบบ การ "ฟอรตแมต" อาจใชเวลาถึงหนึ่งนาที*
6. คลิก ‘OK’ เพื่อดําเนินการตอ

!"#$%&!' ()*+ 48002017-001.A03
DataTraveler
®
Locker+ G2
!"#$ 8 22
ภาพที่
3.5 -
การฟอรแมต
DTL+ G2
ภาพที่
3.6 -
ฟอรแมตเสร็จสิ้น
สิ้นสุดการเริ่มทํางาน
*
หมายเหตุ
:
เวลาดําเนินการอาจแตกตางกันไปตามฮารดแวรและความจุของไดรฟ
DTL+ G2
การใช้งานอุปกรณ์ (ระบบ Windows)
หลังจากเริ่มการทํางานของ DTL+ G2 แลว
คุณจะสามารถเรียกคนพารติชั่นนิรภัยและใชฟงกชั่นตาง ๆ
ของอุปกรณโดยล็อกอินดวยรหัสผานของคุณ ทําไดงาย ๆ ตามขั้นตอนตอไปนี้
1. เสียบ DTL+ G2 เขาที่พอรต USB ของโนตบุกหรือ เดสกทอป
จากนั้นกรอกรหัสผาน (ดูใน
ภาพที่
4.1)
2. หลังจากพิมพรหัสผานแลว ใหคลิกที่ปุม 'Login’ เพื่อดําเนินการตอ
• หากกรอกรหัสผานถูกตอง DTL+ G2
จะปลดล็อคและคุณจะสามารถเริ่มใชงานอุปกรณได
• หากกรอกรหัสผานไมถูกตอง ขอความแจง
ขอผิดพลาดจะปรากฏขึ้นดานลางฟลด ‘Hint’

!"#$%&!' ()*+ 48002017-001.A03
DataTraveler
®
Locker+ G2
!"#$ 9 22
เพื่อแจงวาไมผานการล็อกอิน (ดูใน
ภาพที่
4.2)
ภาพ
4.1 -
หนาตางล็อกอิน
ระหวางขั้นตอนการล็อกอิน หากกรอกร หัสผานไมถูกตอง
คุณจะสามารถกรอกรหัสผา นที่ถูกตองไดใหม
ทั้งนี้ระบบความปลอดภัยจะตร
วจสอบจำนวนการกรอกรหัสล็อกอินที่ลมเหลวไว*
หากจํานวนเกินคาที่กําหนดไวเบื้องตนที่ 10 ครั้ง DTL+ G2
จะล็อคการทํางาน โดยคุณจะตองฟอ
รแมตอุปกรณสําหรับพารติชั่นนิรภัยกอนการใชงานตอไป
ซึ่งหมายถึงขอมูลทั้งหมดที่จัดเก็บใน DTL+ G2
จะสูญหายไปดวย
ตรวจสอบรายละเอียดเพิ่มเติมเกี่ยวกับคุณสมบัตินี้ไดจาก 'Device
Lockout’ ในหนา 20
ภาพ
4.2 -
ล็อกอินลมเหลว
*
หมายเหตุ
:
หลังจากตรวจสอบยืนยันอุปกรณเสร็จสิ้น
จํานวนการล็อกอินลมเหลวที่บันทึกไวจะถูกรีเซ็ต

!"#$%&!' ()*+ 48002017-001.A03
DataTraveler
®
Locker+ G2
!"#$ 10 22
ฟังก์ชั่นการทำงานของอุปกรณ์ (ระบบ Windows)
ขณะล็อกอินเขาที่อุปกรณ จะพบไอคอน ‘DTL+ G2’ ที่มุมดานขวาของทาสกบารของ Windows (
ภาพที่
5.1) (
หมายเหตุ
:
ผูใช
Windows 7
จะตองคลิกที่ปุมลูกศรขึ้นในทาสกบารเพื่อเขาถึงไอคอน
'DTL+ G2' (
ภาพที่
5.2)
คลิกหนึ่งครั้งที่ไอคอน DTL+ G2 เพื่อแสดงเมนูตอไปนี้
ภาพ
5.1 -
ไอคอน
DTL+ G2
ที่ทาสกบาร
(
ผูใช
Windows XP)
ภาพ
5.2 -
ไอคอน
DTL+ G2
ที่ทาสกบาร
(
ผูใช
Windows 7)
DTL+ G2 Settings
• ชวยใหคุณสามารถเปลี่ยนรหัสผานและ/หรือคําใบ (
ภาพที่
5.3)
• ชวยใหสามารถเพิ่ม/ดู/แกไขขอมูลติดตอของคุณ (
ภาพที่
5.4)
• ชวยใหสามารถแกไขคาภาษาที่เลือกในปจจุบัน (
ภาพที่
5.5)
(
หมายเหตุ
:
เพื่อความปลอดภัย
คุณจะตองใชรหัสผาน
DTL+ G2
ในปจจุบันเพื่ออัพเดตและ
/
หรือปรับแตงคาเหลานี้
)
ภาพ
5.3
เปลี่ยนรหัสผาน
ภาพ
5.4
ขอมูลการติดตอ
ภาพ
5.5
เลือกภาษา
Browse DTL+ G2
• คุณสามารถเรียกคนขอมูลในพารติชั่นนิรภัยไดขณะล็อกอิน

!"#$%&!' ()*+ 48002017-001.A03
DataTraveler
®
Locker+ G2
!"#$ 11 22
Format DTL+ G2*
• ใชเพื่อฟอรแมตพารติชั่นนิรภัย (คําเตือน: ขอมูลทั้งหมดจะถูกลบทิ้ง) (
ภาพ
5.7)
Online Support (ตองมีการเชื่อมตออินเทอรเน็ต)
• เปดอินเทอรเน็ตเบราเซอรและเขาไปที่
http://www.kingston.com/support/
โดยคุณสามารถแทรกขอมูลการใหบริการเพิ่มเติม
ภาพที่
5.7 -
แจงเตือนการฟอรแมต
About DTL+ G2
• ระบุรายละเอียดเกี่ยวกับ DTL+ G2
รวมทั้งขอมูลเวอรชั่นแอพพลิเคชั่นและเฟรมแวร (
ภาพที่
5.8)
Shutdown DTL+ G2
• ปด DTL+ G2 ใหถูกตามขั้นตอนเพื่อใหสามารถถอด แยกจากเครื่อง
ภาพที่
5.8 -
เกี่ยวกับ
DTL+ G2
(
คำแนะนำ
:
หลังปด
DTL+G2
แนะนําใหปดหรือรีบูตเวิรคสเตชั่นโฮสตที่อุปกรณใชเชื่อมตอ
โดยเฉพาะอยางยิ่งหากเปนพื้นที่สาธารณะหรือหากเปนเวิรคสเตชั่นที่แชรโดยผูใชหลายคน
)
*
หมายเหตุ
:
ตองกรอกรหัสผาน
DTL+ G2
ในปจจุบันสําหรับ
Windows Vista
และ
Windows 7
-สิ้นสุดเนื้อหาสำหรับ Windows-
การติดตั้ง (ระบบ Mac)
เสียบ DTL+ G2 เขาที่พอรต USB ในโนตบุกหรือเดสกทอป จากนั้นรอใหระบบปฏิบัติการ Mac
ทำการตรวจหา หลังจากตรวจพบ คุณจะพบไดรฟ DTLplus ที่เดสกทอป ตาม
ภาพที่
6.1
1. ดับเบิลคลิกที่ไอคอน DTL+ G2 CD-ROM
2. ดับเบิลคลิกที่โฟลเดอร Mac ที่พบในหนาตางที่ปรากฏขึ้นใน
ภาพที่
6.2

!"#$%&!' ()*+ 48002017-001.A03
DataTraveler
®
Locker+ G2
!"#$ 12 22
ภาพ
6.1 - DTLplus
3. ดับเบิลคลิกที่ไอคอนแอพพลิเคชั่น DTLplus ที่พบในหนาตางที่ปรากฏขึ้นใน
ภาพที่
6.3
ขั้นตอนนี้เปนการเริ่มการทํางาน
ภาพที่
6.2 -
สวนประกอบของ
DTL+ G2
ภาพที่
6.3 -
แอพพลิเคช ั่น
DTL+ G2
การเริ่มการทำงานของอุปกรณ์ (ระบบ Mac)
1. เลือกภาษาของคุณจากเมนูแสดงรายการ จากนั้นคลิกที่ ‘Next’ (
ภาพที่
7.1)

!"#$%&!' ()*+ 48002017-001.A03
DataTraveler
®
Locker+ G2
!"#$ 13 22
ภาพที่
7.1 -
การเลือกภาษา
2. ตรวจสอบขอตกลงสิทธิ์ใชงาน จากนั้นคลิกที่ 'Next’ (
ภาพที่
7.2) (
หมายเหตุ
:
คุณตองตอบรับขอตกลงสิทธิ์ใชงานกอนดําเนินการตอ
ไมเชนนั้นปุม
'Next'
จะไมสามารถใชงานได
)
ภาพที่
7.2 -
ขอตกลงสิท ธิ์ใชงาน
3. กําหนดรหัสผานเพื่อปองกันขอมูลใน DTL+ G2 กรอกในฟลด ‘Password’ จากนั้นกรอกซ้ําในฟลด ‘Password Confirmation’
ตามตัวอยางดานลางใน
ภาพที่
7.3 รหัสผานที่คุณจัดทําจะตองเขาหลักเกณฑตอไปนี้กอนเริ่มการทํางานเพื่อใชงานตอไป:
1. รหัสผานตองมีอักขระ 6 ตัวขึ้นไป (สูงสุด 16 ตัว)

!"#$%&!' ()*+ 48002017-001.A03
DataTraveler
®
Locker+ G2
!"#$ 14 22
2. รหัสผานจะตองมีสวนประกอบสาม (3) อยางตอไปนี้
- ตัวพิมพใหญ พิมพเล็ก ตัวเลขและ/หรืออักขระพิเศษ (!, $ ฯลฯ)
นอกจากนี้คุณยังสามารถกรอกคําใบรหัสผาน ทั้งนี้จะกรอกหรือไมก็ได ฟลดคําใบเปนประโยชนในกา รชวยเดารหัสผานในกรณีที่ลืมรหัสผาน
(
หมายเหตุ
:
คําใบจะตองไมเหมือนกันกับรหัสผาน
)
ภาพที่
7.3 -
การตั้งคารหัสผาน
4. กรอกขอมูลติดตอในกลองขอความที่จัดไวให (ดูใน
ภาพที่
7.4) (
หมายเหตุ
:
ขอมูลที่คุณกรอกในฟลดเหลานี้จะตองไมม ีชุดอักขระในรหัสผานที่จัดทําในขั้นตอนที่
3
ทั้งนี้ฟลดเหลานี้เปนฟลดเผื่อเลือกและสามารถปลอยวางไดถาตองการ
)
• ฟลด 'Name’ รองรับอักขระสูงสุด 32 ตัว แตจะตองไมมีรหัสผานที่ตรงกัน
• ฟลด 'Company’ รองรับอักขระสูงสุด 32 ตัว แตจะตองไมมีรหัสผานที่ตรงกัน
• ฟลด 'Details’ รองรับอักขระสูงสุด 156 ตัว แตจะตองไมมีรหัสผานที่ตรงกัน

!"#$%&!' ()*+ 48002017-001.A03
DataTraveler
®
Locker+ G2
!"#$ 15 22
ภาพที่
7.4 -
ขอมูลติดตอ

!"#$%&!' ()*+ 48002017-001.A03
DataTraveler
®
Locker+ G2
!"#$ 16 22
5. คลิก ‘Finish’ เพื่อสิ้นสุดขั้นตอนเริ่มการทํางานของอุปกรณ
จากนี้ DTL+ G2 จะทําการฟอรแมตพารติชั่นนิรภัย (
ภาพที่
7.5) และแจงใหคุณทราบเมื่อดําเนินการเสร็จสิ้น (
ภาพที่
7.6)
6. คลิก ‘OK’ เพื่อดําเนินการตอ
ภาพที่
7.5 -
การฟอรแมต
DTLocker+ G2
ภาพที่
7.6 -
ฟอรแมตเสร็จสิ้น
สิ้นสุดการเริ่มทํางาน

!"#$%&!' ()*+ 48002017-001.A03
DataTraveler
®
Locker+ G2
!"#$ 17 22
ฟังก์ชั่นการทำงานของอุปกรณ์ (ระบบ Mac)
หลังจากเริ่มการทํางานของ DTL+ G2 แลว
คุณจะสามารถเรียกคนพารติชั่นนิรภัยและใชฟงกชั่นตาง ๆ
ของอุปกรณโดยล็อกอินดวยรหัสผานของคุณ ทําไดงาย ๆ ตามขั้นตอนตอไปนี้
1. เสียบ DTL+ G2 เขาที่พอรต USB ของโนตบุกหรือ เดสกทอป
จากนั้นกรอกรหัสผาน (ดูใน
ภาพที่
8.1)
2. หลังจากพิมพรหัสผานแลว ใหคลิกที่ปุม 'Login’ เพื่อดําเนินการตอ
• หากกรอกรหัสผานถูกตอง DTL+ G2 จะปลดล็อค
และคุณจะสามารถเริ่มใชงานอุปกรณได
• หากกรอกรหัสผานไมถูกตอง ขอความแจง
ขอผิดพลาดจะปรากฏขึ้นดานลางฟลด ‘Hint’
เพื่อแจงวาไมผานการล็อกอิน (ดูใน
ภาพที่
8.2)
ภาพ
8.1 -
หนาตางล็อกอิน
ระหวางขั้นตอนการล็อกอิน หากกรอกรหัสผานไมถูกตอง
คุณจะสามารถกรอกรหัสผานที่ถูกตองไดใหม ทั้งนี้ระบ
บความปลอดภัยจะตรวจสอบจํานวนการกรอกรหัสล็อกอินที่ลมเหลวไว*
หากจํานวนเกินคาที่กําหนดไวเบื้องตนที่ 10 ครั้ง DTL+ G2 จะล็อคการทํางาน
โดยคุณจะตองฟอรแมตอุปกรณสําหรับพารติชั่นนิรภัยกอนการใชงานตอไป
ซึ่งหมายถึงขอมูลทั้งหมดที่จัดเก็บใน DTL+ G2 จะสูญหายไปดวย
ตรวจสอบรายละเอียดเพิ่มเติมเกี่ยวกับคุณสมบัตินี้ไดจาก 'Device Lockout’
ในหนา 20
ภาพ
8.2 -
ล็อกอินลมเหลว
*
หมายเหตุ
:
หลังจากตรวจสอบยืนยันอุปกรณเสร็จสิ้น
จํานวนการล็อกอินลมเหลวที่บันทึกไวจะถูกรีเซ็ต

!"#$%&!' ()*+ 48002017-001.A03
DataTraveler
®
Locker+ G2
!"#$ 18 22
ฟังก์ชั่นการทำงานของอุปกรณ์ (ระบบ Mac)
ขณะล็อกอินอยูในอุปกรณ ไอคอน ‘DTLplus_Launcher’ จะปรากฏขึ้นที่ Dock ของ Mac OS X ตาม
ภาพที่
9.1 ดานลาง:
ภาพที่
9.1 -
ไอคอน
DTL+ G2
ใน
Dock
ของ
Mac OS X
การกดปุม ‘control’ ที่แปนพิมพคางไวแลวคลิกหนึ่งครั้งที่ไอคอน 'DTLplus_Launcher’
จะเปนการแสดงเมนูที่ปรากฏใน
ภาพที่
9.2 ทางดานขวา
DTL+ G2 Settings
• ชวยใหคุณสามารถเปลี่ยนรหัสผานและ/หรือคําใบ (
ภาพที่
9.3)
• ชวยใหสามารถเพิ่ม/ดู/แกไขขอมูลติดตอของคุณ (
ภาพที่
9.4)
• ชวยใหสามารถแกไขคาภาษาที่เลือก (
ภาพที่
9.5)
ภาพ
9.2
ฟงกชั่นของ
DTL+ G2
ภาพ
9.3
เปลี่ยนรหัสผาน
ภาพ
9.4
ขอมูลการติดตอ
ภาพ
9.5
เลือกภาษา
(
หมายเหตุ
:
เพื่อความปลอดภัย
คุณจะตองใชรหัสผาน
DTL+ G2
ในปจจุบัน เพื่ออัพเดตและ
/
หรือปรับแตงคาเ หลานี้
)
Browse DTL+ G2
• คุณสามารถเรียกคนขอมูลในพารติชั่นนิรภัยไดขณะล็อกอิน

!"#$%&!' ()*+ 48002017-001.A03
DataTraveler
®
Locker+ G2
!"#$ 19 22
Format DTL+ G2
• ใชเพื่อฟอรแมตพารติชั่นนิรภัย (คําเตือน: ขอมูลทั้งหมดจะถูกลบทิ้ง) (
ภาพ
9.7)
Online Support (ตองมีการเชื่อมตออินเทอรเน็ต)
• เปดอินเทอรเน็ตเบราเซอรและเขาไปที่
http://www.kingston.com/support/
โดยคุณสามารถแทรกขอมูลการใหบริการเพิ่มเติม
ภาพที่
9.7 -
แจงเตือนการฟอรแมต
About DTL+ G2
• ระบุรายละเอียดเกี่ยวกับ DTL+ G2 รวมทั้งขอมูล
เวอรชั่นแอพพลิเคชั่นและเฟรมแวร (
ภาพที่
9.8)
Shutdown DTL+ G2
• ปด DTL+ G2 ใหถูกตามขั้นตอนเพื่อใหสา มารถถอดแยกจากเครื่อง
ภาพที่
9.8 -
เกี่ยวกับ
DTL+ G2
(
คำแนะนำ
:
หลังปด
DTL+G2
แนะนําใหปดหรือรีบูตเวิรคสเตชั่นโฮสตที่อุปกรณใชเชื่อมตอ
โดยเฉพาะอยางยิ่งหากเปนพื้นที่สาธารณะหรือหากเปนเวิรคสเตชั่นที่แชรโดยผูใชหลายคน
)
-สิ้นสุดเนื้อหาสำหรับ Mac-
วิธีใช้และก ารแก้ไขปัญหา
Device Lockout
DTL+ G2 มีระบบความปลอดภัยที่ชวยปองกันการเรียกคนพารติชั่นขอมูลที่ไมไดรับอนุญาตเมื่อมีการล็อก อินลมเหลวตอเนื่องเกินจํานวนครั้งที่กําหนด
(เรียกสั้น ๆ วา MaxNoA) คาเริ่มตนของผลิตภัณฑ "ที่จําหนาย" กําหนดจํานวนการล็อกอินไวที่ 10 ครั้ง
ตัวนับจํานวน 'lock-out' จะตรวจสอบจํานวนการล็อกอินที่ลมเหลว โดยสามารถรีเซ็ตไดสองวิธีไดแก
1) ล็อกอินตามขั้นตอนกอนเกิด MaxNoA หรือ 2) เกิด MaxNoA จากนั้นทําการฟอรแมตอุปกรณ*

!"#$%&!' ()*+ 48002017-001.A03
DataTraveler
®
Locker+ G2
!"#$ 20 22
หากกรอกรหัสผานไมถูกตอง ขอความแจงขอผิดพลาดจะปรา กฏขึ้นดานลางฟลด ‘Hint’
เพื่อแจงวาไมผานการล็อกอิน
ดูในภาพที่
10.1
หากล็อกอินผิดพลาดครั้งที่ 7 คุณจะพบขอความแจงเตือนแจง ใหทราบวาเหลือเวลาล็อกอินอีก 3
ครั้งกอน MaxNoA (ตั้งคาเริ่มตนไวที่ 10 ครั้ง) ดูใน
ภาพที่
10.2
หลังล็อกอินผิดพลาด 10 ครั้ง DTL+ G2
จะบล็อคพารติชั่นขอมูลและกําหนดใหตองฟอรแมตอุปกรณกอนการใชงานครั้งถัดไป
ซึ่งหมายความวาขอมูลทั้งหมดที่จัดเก็บใน DTL+ G2 จะสูญหาย
โดยคุณจะตองกําหนดรหัสผานใหมขึ้นมา
ภาพ
10.1 -
ล็อกอินลมเหลว
ระบบความปลอดภัยนี้เปนการจํากัดความพยายามของบุคคล (ที่ไมมีรหัสผาน)
ในการทดลองล็อกอินเพื่อเรียก คนขอมูลที่สําคัญแบบไมมีขอจํากัด
หากคุณมี DTL+ G2 และลืมรหัสผาน ระบบความปลอดภัย
ลักษณะเดียวกันนี้จะถูกเปดใช รวมทั้งระบบฟอรแมตอุปกรณ*
ตรวจสอบรายละเอียดเพิ่มเติมเกี่ยวกับคุณสมบัตินี้ไดจาก 'Forgot Password’
ในหนา 21
ภาพที่
10.2 –
ล็อกอินผิดพลาดครั้งที่
*
หมายเหตุ
:
การฟอรแมตอุปกรณเปนการลบขอมูลทั้งหมดที่จัดเก็บในพารติชั่นนิรภัยของ
DTL+ G2

!"#$%&!' ()*+ 48002017-001.A03
DataTraveler
®
Locker+ G2
!"#$ 21 22
ลืมรหัสผาน
หากคุณลืมรหัสผาน สามารถคลิกที่ลิงค ‘Reset Password’
ที่ปรากฏขึ้นที่หนาตางล็อกอินของ อุปกรณขณะเรียกใช
DTLplus_Launcher (ดูใน
ภาพที่
10.3)
ตัวเลือกนี้ชวยใหสามารถกําหนดรหัสผานใหม
แตเพื่อเปนการปองกันขอมูลสวนตัวของคุณ DTL+ G2 จะถูกฟอรแมต
ซึ่งหมายความวาขอมูลทั้งหมดของ คุณจะถูกลบทิ้งในขั้นตอนนี้*
หลังจากคลิกที่ ‘Reset Password’ กลองขอความ (
ภาพที่
10.4)
จะปรากฏขึ้นและถามวาคุณตองการกรอ กรหัสผานใหมกอนทําการฟอรแมตหรือไม
ถึงตอนนี้คุณสามารถ 1) คลิก ‘OK’ เพื่อยืนยันหรือ 2) คลิก 'Cancel'
เพื่อกลับไปที่หนาตางล็อกอิน
ภาพ
10.3 -
ลืมรหัสผาน
หากคุณเลือกดําเนินการตอ คุณจะไดรับแจงใ
หจัดทํารหัสผานใหมที่ซับซอนกวาพรอมคําใบชุดใหม
คำใบไมใชฟลดบังคับแตจะเปนประโยชนในการชวยเดารหัสผานในกรณีที่คุณลืมร
หัสผาน
(
หมายเหตุ
:
คําใบจะตองไมเหมือนกันกับรหัสผานของ
DTL+ G2)
ภาพ
10.4 -
ถามกอนทําการฟอรแมต
*
หมายเหตุ
:
การฟอรแมตอุปกรณเปนการลบขอมูลทั้งหมดที่จัดเก็บในพารติชั่นนิรภัยของ
DTL+ G2
ขอขัดแยงอักขระกํากับไดรฟ (ระบบปฏิบัติการ Windows)
ตามที่ไดกลาวไปในหัวขอ '
เงื่อนไขทางระบบ
’ ของคูมือชุดนี้ (หนา 3) DTL+ G2 ตองการอักขระกํากับไดรฟตอ
เนื่องสองตัวตอจากดิสกทางกายภาพที่อยูกอนหนาอักขระกํากับ "ที่วางอยู" (ดูใน
ภาพที่
10.5) ซึ่งไมเกี่ยวของ กับการแชรเครือขาย
เนื่องจากเปนการกําหนดรายการตามโพรไฟลผูใช ไมใชโพรไฟลฮารดแวรระบบ จึงมีการแจงใน OS
ซึ่งหมายความวา Windows อาจกําหนดอักขระกํากับไดรฟใหกับ DTL+ G2 ซึ่งถูกใชงานอยูโดยสว นแชรเครือขายหรือในเสนทาง Universal
Naming Convention (UNC) ทําใหอักขระกํากับไดรฟชนกัน ในกรณีนี้ กรุณาติดตอผูดูแลระบบหรือฝายใหบริการเพื่อแกไขอักขระกํากับไดรฟใน
Windows Disk Manager (ตองใชสิทธิ์ผูดูแลระบบ)

!"#$%&!' ()*+ 48002017-001.A03
DataTraveler
®
Locker+ G2
!"#$ 22 22
ภาพ
10.5 - My Computer
จากตัวอยางนี้ DTL+ G2 ใช F: ซึ่งเปนอักขระกํากับไดรฟตัวแรกที่มีตอจาก E: (ดิสกกายภาพลาสุดกอ นชองวางในอักขระกํากับไดรฟ เนื่องจากตัว G:
เปนสวนแชรเครือขาย ไมใชโพรไฟลฮารดแวร DTL+ G2 อาจพยายามใชเปนอักขระกํากับไดรฟตัวที่สอง ทําใหเกิดอักขระซ้ํากันขึ้น
หากไมมีสวนแชรเครือขายในระบบของคุณ แต DTL+ G2 ยังไมยอมโหลดขึ้นมา อาจเปนไปไดวาการดรีดเดอร
ดิสกตอพวงหรืออุปกรณอื่นที่ติดตั้งไวกอนหนาใชอักขระกํากับไดรฟดังกลาว และทําใหเกิดขอขัดแยงขึ้น
ทั้งนี้ Drive Letter Management หรือ DLM มีการปรับปรุงใหดีขึ้นมากใน Windows XP SP3, Vista และ 7 คุณจึงอาจไมพบปญหานี้
แตหากยังไมสามารถแกไขปญหาได กรุณาติดตอฝายบริการทางเทคนิคของ Kingston เพื่อรับความชวยเหลือเพิ่มเติม
© 2011 Kingston Technology Corporation สงวนลิขสิทธิ์ เครื่องหมายการคาและเครื่องหมายการคาจดทะเบียนทั้งหมดถือเปนกรรมสิทธิ์ของผูเปนเจาของ

48002017-001.A03
DataTraveler
®
Locker+ G2
1 22
DataTraveler
®
Locker+ G2

48002017-001.A03
DataTraveler
®
Locker+ G2
2 22
于本用 手 ......................................................................................................................... 3
系 要求 ..................................................................................................................................... 3
建 ............................................................................................................................................. 3
安装(WINDOWS 境) .......................................................................................................... 4
初始化 (WINDOWS 境) ............................................................................................. 5
使用 (WINDOWS 境) ................................................................................................. 9
(WINDOWS 境) ................................................................................................ 10
安装(MAC 境) .................................................................................................................. 12
初始化 (MAC 境) ..................................................................................................... 13
使用(MAC 境) .......................................................................................................... 17
(MAC 境) ......................................................................................................... 18
助和故障排除 ....................................................................................................................... 19
定 ....................................................................................................................................................... 20
忘 密 ....................................................................................................................................................... 21
器 符冲突(Windows 操作系 ) ................................................................................................... 22

48002017-001.A03
DataTraveler
®
Locker+ G2
3 22
DataTraveler
®
Locker+ G2
DTL+ G2
PC
• Pentium III
• 15MB
• USB 2.0 / 3.0
•
*
PC
• Windows
®
7
• Windows
®
Vista SP1 SP2
• Windows
®
XP SP2 SP3
Mac
• 15MB
• USB 2.0 / 3.0
• Mac OS X 10.5.x
• Mac OS X 10.6.x
• Mac OS X 10.7x
DTL+ G2 USB
1.1 DTL+ G2 USB USB
1.2
1.1 –
1.2 –

48002017-001.A03
DataTraveler
®
Locker+ G2
4 22
* 26 “ ”
Windows
1. DTL+ G2 USB
Windows
• Windows XP “ ”
2.1
• Windows Vista/7
2.2
Windows
• Windows
5 –
• Windows
Windows 7
(AutoPlay) 2.3
2. “ DTLplus_Launcher.exe”
Windows CD-ROM
2.4 DTLplus_Launcher
2.1 –
(Windows XP)
2.2 –
(Windows Vista/7)
2.3 – (AutoPlay)
(Windows Vista/7)
(AutoPlay)

48002017-001.A03
DataTraveler
®
Locker+ G2
5 22
2.4 – DTL+ G2
Windows
1. “ ”(Next) 3.1
3.1 –
2. “ ”(Next) 3.2 (
“ ”(Next)

48002017-001.A03
DataTraveler
®
Locker+ G2
6 22
3.2 –
3. DTL+ G2 “ ”(Password) “
”(Password Confirmation) 3.3
1. 6 16
2. ua (3)
- / ! $
(
3.3 –

48002017-001.A03
DataTraveler
®
Locker+ G2
7 22
4. 3.4
3
• “ ”(Name) 32
• “ ”(Company) 32
• “ ”(Details) 156
3.4 –

48002017-001.A03
DataTraveler
®
Locker+ G2
8 22
5. “ ”(Finish)
DTL+ G2 3.5 3.6
Windows XP “ ”
*
6. “ ”(OK)
3.5 – DTL+ G2
3.6 –
* DTL+ G2

48002017-001.A03
DataTraveler
®
Locker+ G2
9 22
Windows
DTL+ G2
1. DTL+ G2
USB 4.1
2. “ ”(Login)
• DTL+ G2
• “
”(Hint)
4.2
4.1 – (Login)
*
10
DTL+ G2
DTL+ G2
24
“ ”
4.2 –

48002017-001.A03
DataTraveler
®
Locker+ G2
10 22
*
Windows
Windows “DTL+ G2” 5.1 (
Windows 7 “DTL+ G2” 5.2
DTL+ G2
5.1 – DTL+ G2
Windows XP
5.2 – DTL+ G2
Windows 7
DTL+ G2
• / 5.3
• / / 5.4
• 5.5
/ DTL+ G2
5.3
5.4
5.5

48002017-001.A03
DataTraveler
®
Locker+ G2
11 22
DTL+ G2
•
DTL+ G2*
•
( 5.7
•
http://www.kingston.com/support/
5.7 –
DTL+ G2
• DTL+ G2
5.8
DTL+ G2
• DTL+ G2
5.8 – DTL+ G2
DTL+ G2
* Windows Vista Windows 7 DTL+ G2

48002017-001.A03
DataTraveler
®
Locker+ G2
12 22
-Windows -
Mac
DTL+ G2 USB Mac
DTLplus
6.1
1. DTL+ G2 CD-ROM
2. 6.2 Mac
6.1 – DTLplus
3. 6.3 DTLplus
6.2 – DTL+ G2
6.3 – DTL+ G2

48002017-001.A03
DataTraveler
®
Locker+ G2
13 22
Mac
1. “ ”(Next) 7.1
7.1 –
2. “ ”(Next) 7.2 (
“ ”(Next)
7.2 –

48002017-001.A03
DataTraveler
®
Locker+ G2
14 22
3. DTL+ G2 “ ”(Password) “
”(Password Confirmation) 7.3
1. 6 16
2. (3)
- / ! $
(
7.3 –

48002017-001.A03
DataTraveler
®
Locker+ G2
15 22
4. 7.4
3
• “ ”(Name) 32
• “ ”(Company) 32
• “ ”(Details) 156
7.4 –

48002017-001.A03
DataTraveler
®
Locker+ G2
16 22
5. “ ”(Finish)
DTL+ G2 7.5 7.6
6. “ ”(OK)
7.5 – DTLocker+ G2
7.6 –

48002017-001.A03
DataTraveler
®
Locker+ G2
17 22
Mac
DTL+ G2
1. DTL+ G2
USB 8.1
2. “ ”(Login)
• DTL+ G2
• “
”(Hint)
8.2
8.1 – (Login)
*
10
DTL+ G2
DTL+ G2
24
“ ”
8.2 –
*

48002017-001.A03
DataTraveler
®
Locker+ G2
18 22
Mac
Mac OS X Dock “DTLplus_Launcher” 9.1
9.1 – Mac OS X Dock DTL+ G2
“ (control)” “DTLplus_Launcher”
9.2
DTL+ G2
• / 9.3
• / / 9.4
• 9.5
9.2
DTL+ G2
9.3
9.4
9.5
/ DTL+ G2
DTL+ G2

48002017-001.A03
DataTraveler
®
Locker+ G2
19 22
•
DTL+ G2
•
( 9.7
•
http://www.kingston.com/support/
9.7 –
DTL+ G2
• DTL+ G2
9.8
DTL+ G2
• DTL+ G2
9.8 – DTL+ G2
DTL+ G2
-Mac -

48002017-001.A03
DataTraveler
®
Locker+ G2
20 22
DTL+ G2 MaxNoA
“ ” 10
“ ” 1) MaxNoA
2) MaxNoA *
“ ”(Hint)
10.1
7
MaxNoA 3
10 10.2
10 DTL+ G2
DTL+ G2
10.1 –
DTL+ G2
*
25
“ ”
10.2 – 7
* DTL+ G2

48002017-001.A03
DataTraveler
®
Locker+ G2
21 22
DTLplus_Launcher
“ ”(Reset Password)
10.3
DTL+ G2
*
“ ”(Reset Password)
10.4
1)
“ ”(OK) 2) “ ”(Cancel)
10.3 –
DTL+ G2
10.4 –
* DTL+ G2

48002017-001.A03
DataTraveler
®
Locker+ G2
22 22
Windows
“ ” 3 DTL+ G2 2
“ ” 10.5
Windows DTL+ G2 (UNC)
Windows
10.5 –
DTL+ G2 F: E:
G:
DTL+ G2
DTL+ G2
DLM Windows XP SP3 Vista 7
©2012 Kingston Technology Corporation.

48002017-001.A03
DataTraveler
®
Locker+ G2
1/26
DataTraveler
®
Locker+ G2

48002017-001.A03
DataTraveler
®
Locker+ G2
2/26
..................................................................................................................... 3
..................................................................................................................................... 3
............................................................................................................................................. 3
(WINDOWS ) .............................................................................................................. 4
(WINDOWS ) ................................................................................................... 5
(WINDOWS ) ................................................................................................... 9
(WINDOWS ) ..................................................................................................... 10
(MAC ) ...................................................................................................................... 14
(MAC ) ........................................................................................................... 15
(MAC ) ............................................................................................................ 19
(MAC ) .............................................................................................................. 20
....................................................................................................................... 24
....................................................................................................................................................... 24
....................................................................................................................................................... 25
(Windows ) ....................................................................................................... 26

48002017-001.A03
DataTraveler
®
Locker+ G2
3/26
DataTraveler
®
Locker+ G2 ( DTL+ G2)
PC
• Pentium III ( )
• 15MB
• USB 2.0 / 3.0
• DataTraveler
*
PC
• Windows
®
7
• Windows
®
Vista SP1 SP2
• Windows
®
XP SP2 SP3
Mac
• 15MB
• USB 2.0 / 3.0
• Mac OS X 10.5.x
• Mac OS X 10.6.x
• Mac OS X 10.7x
DTL+G2 USB 1.1
DTL+ G2 USB ( USB ) 1.2
1.1 –
1.2 –

48002017-001.A03
DataTraveler
®
Locker+ G2
4/26
* 26
(Windows )
1. DTL+ G2
USB Windows
• Windows XP
2.1
• Windows Vista/7
2.2
Windows
• Windows
5 –
• Windows ( Windows 7
) 2.3
2. DTLplus_Launcher.exe
Windows CD-ROM
( 2.4) DTLplus_Launcher
2.4 – DTL+ G2
2.1 –
(Windows XP)
2.2 –
(Windows Vista/7)
2.3 –
(Windows Vista/7)
(
)

48002017-001.A03
DataTraveler
®
Locker+ G2
5/26
(Windows )
1. Next ( ) ( 3.1)
3.1 –
2. Next ( ) ( 3.2) (
Next ( ) )
3.2 –

48002017-001.A03
DataTraveler
®
Locker+ G2
6/26
3. DTL+ G2 Password ( )
Password Confirmation ( ) 3.3
1. 6 ( 16 )
2. (3)
- / (! $ )
( )
3.3 –

48002017-001.A03
DataTraveler
®
Locker+ G2
7/26
4. ( 3.4) (
3 ( ) )
• Name ( ) 32
• Company ( ) 32
• Details ( ) 156
3.4 –

48002017-001.A03
DataTraveler
®
Locker+ G2
8/26
5. Finish ( )
DTL+ G2 ( 3.5) ( 3.6)
Windows XP
*
6. OK ( )
3.5 – DTL+ G2
3.6 –

48002017-001.A03
DataTraveler
®
Locker+ G2
9/26
* DTL+ G2
(Windows )
DTL+ G2
1. DTL+ G2
USB (
4.1 )
2. Login ( )
• DTL+ G2
• Hint ( )
( 4.2)
4.1 –
*
10 DTL+ G2
DTL+ G2
24
4.2 –
*

48002017-001.A03
DataTraveler
®
Locker+ G2
10/26
(Windows )
DTL+ G2 Windows ( 5.1) ( Windows 7
DTL+ G2 ( 5.2)
DTL+ G2
5.1 – DTL+ G2
(Windows XP )
5.2 – DTL+ G2
(Windows 7 )
DTL+ G2
• / ( 5.3)
• 11 )
• / / ( 5.4)
• ( 5.5)
( DTL+ G2 / )
5.3
5.4
5.5

48002017-001.A03
DataTraveler
®
Locker+ G2
11/26
DTL+ G2 (
20 )
1. Add ( ) ( 5.6a )
2.
a. Description ( ) 40
( 1 )
b. Username ( ) 40
c. Password ( ) 40
Comments
( ) Hide Password ( ) ( 5.6b)
d. Comments ( ) 360
3. Comments ( )
Password protect ( ) ( 5.6b)
( DTL+ G2 )
5.6a
5.6b

48002017-001.A03
DataTraveler
®
Locker+ G2
12/26
1.
2.
DTL+ G2
3.
Save ( )
1.
2.
DTL+ G2
3. Remove ( )

48002017-001.A03
DataTraveler
®
Locker+ G2
13/26
DTL+ G2
•
DTL+ G2*
• (
)( 5.7)
( )
•
http://www.kingston.com/support/
5.7 –
DTL+ G2
• DTL+ G2
( 5.8)
DTL+ G2
• DTL+ G2
5.8 – DTL+ G2
* Windows Vista Windows 7 DTL+ G2
-Windows -

48002017-001.A03
DataTraveler
®
Locker+ G2
14/26
(Mac )
DTL+ G2 USB
Mac DTLplus
6.1
1. DTL+ G2 CD-ROM
2. 6.2 Mac
6.1 – DTLplus
3. 6.3 DTLplus
6.2 – DTL+ G2
6.3 – DTL+ G2

48002017-001.A03
DataTraveler
®
Locker+ G2
15/26
(Mac )
1. Next ( ) ( 7.1)
7.1 –
2. Next ( ) ( 7.2) (
Next ( ) )

48002017-001.A03
DataTraveler
®
Locker+ G2
16/26
7.2 –
3. DTL+ G2 Password ( )
Password Confirmation ( ) 7.3
1. 6 ( 16 )
2. (3)
- / (! $ )
( )
7.3 –

48002017-001.A03
DataTraveler
®
Locker+ G2
17/26
4. ( 7.4) (
3 ( ) )
• Name ( ) 32
• Company ( ) 32
• Details ( ) 156
7.4 –

48002017-001.A03
DataTraveler
®
Locker+ G2
18/26
5. Finish ( )
DTL+ G2 ( 7.5) ( 7.6)
6. OK ( )
7.5 – DTL+ G2
7.6 –

48002017-001.A03
DataTraveler
®
Locker+ G2
19/26
(Mac )
DTL+ G2
1. DTL+ G2
USB (
8.1 )
2. Login ( )
• DTL+ G2
• Hint ( )
( 8.2)
8.1 –
*
10
DTL+ G2
DTL+ G2
24
8.2 –
*

48002017-001.A03
DataTraveler
®
Locker+ G2
20/26
(Mac )
DTLplus_Launcher Mac OS X ( 9.1 )
9.1 – Mac OS X DTL+ G2
DTLplus_Launcher
9.2
DTL+ G2
• / ( 9.3)
• 21 )
• / / ( 9.4)
• ( 9.5)
9.2
DTL+ G2
9.3
9.4
9.5
( DTL+ G2 / )

48002017-001.A03
DataTraveler
®
Locker+ G2
21/26
DTL+ G2 (
20 )
4. Add ( ) ( 5.6a )
5.
a. Description ( ) 40
( 1 )
b. Username ( ) 40
c. Password ( ) 40
Comments
( ) Hide Password ( ) ( 9.6b)
d. Comments ( ) 360
6. Comments ( )
Password protect ( ) ( 9.6b)
( DTL+ G2 )
9.6a
9.6b

48002017-001.A03
DataTraveler
®
Locker+ G2
22/26
1.
2.
DTL+ G2
3.
Save ( )
1. Edit ( )
2.
DTL+ G2
3. Remove ( )

48002017-001.A03
DataTraveler
®
Locker+ G2
23/26
DTL+ G2
•
DTL+ G2
•
( )( 9.7)
( )
•
http://www.kingston.com/support/
9.7 –
DTL+ G2
• DTL+ G2
( 9.8)
DTL+ G2
• DTL+ G2
9.8 – DTL+ G2
-Mac -

48002017-001.A03
DataTraveler
®
Locker+ G2
24/26
DTL+ G2 ( MaxNoA)
10 ( )
1) MaxNoA
2) MaxNoA *
Hint ( )
10.1
7
3
MaxNoA ( 10) 10.2
10 DTL+ G2
DTL+ G2
10.1 –
(
)
DTL+ G2
*
25
10.2 – 7
* DTL+ G2

48002017-001.A03
DataTraveler
®
Locker+ G2
25/26
DTLplus_Launcher
(
10.3)
DTL+ G2
*
Reset Password ( )
( 10.4)
1) OK ( )
2) Cancel ( )
10.3 –
( DTL+ G2
)
10.4 –
* DTL+ G2

48002017-001.A03
DataTraveler
®
Locker+ G2
26/26
(Windows )
( 3 ) DTL+ G2
( ) ( 10.5)
Windows (UNC)
DTL+ G2
Windows ( )
10.5 –
DTL+ G2 F: E:(
) G:
DTL+ G2
DTL+ G2
Windows XP SP3 Vista Win7 ( DLM)
Kingston
©2012 Kingston Technology Far East Co. Ltd (Asia Headquarters).
Transcripción de documentos
Installation Guide DataTraveler Locker+ G2 Find the language and latest documentation for your Kingston® DataTraveler Locker+ G2 here. DataTraveler Locker+ G2 Installation Guide . . . . . . . . . . . . For instructions in English . . . . . . . . . . . . . . . . . . Para instrucciones en español . . . . . . . . . Für Anleitungen in Deutsch . . . . . . . . . . . . . . . . . . Pour des instructions en français . . . . . . . . . . . . . . . . . . Per le istruzioni in italiano . . . . . . . . . . . . Por as instruções em português . . . . . . . . . . . . . . . . . . Instrukcje w jezyku polskim . . . . . . . . . . . . . . . . . . Japanese . . . . . . . . . . . . . . . . . . Thai Simplified Chinese. . . . . Traditional Chinese . . . . DataTraveler® Locker+ G2 User Manual Document No. 48002017-001.A03 ® DataTraveler Locker+ G2 Page 1 of 26 Table of Contents About This User Guide ............................................................................................................ 3 System Requirements ............................................................................................................. 3 Recommendations .................................................................................................................. 3 Setup (Windows Environment) ............................................................................................... 4 Device Initialization (Windows Environment) ....................................................................... 5 Device Usage (Windows Environment) ................................................................................. 9 Device Options (Windows Environment)............................................................................. 10 Setup (Mac Environment) ..................................................................................................... 14 Device Initialization (Mac Environment) .............................................................................. 15 Device Usage (Mac Environment) ........................................................................................ 19 Device Options (Mac Environment) ..................................................................................... 20 Help and Troubleshooting .................................................................................................... 24 Device Lockout ........................................................................................................................................................... 24 Forgot Password ........................................................................................................................................................ 25 Drive Letter Conflict (Windows Operating Systems) ........................................................................................ 26 Document No. 48002017-001.A03 ® DataTraveler Locker+ G2 Page 2 of 26 About This User Guide This user manual covers the DataTraveler® Locker+ G2 (referred to simply as DTL+ G2 from this point forward) based on the factory image with no implemented customizations. System Requirements PC Platform • • • • PC Operating System Support • • • Pentium III (or faster) processor equivalent 15MB free disk space USB 2.0 / 3.0 port Two consecutive drive letters after the last physical drive* Mac Platform • • Windows® 7 Windows® Vista SP1, SP2 Windows® XP SP2, SP3 Operating System Support • • • 15MB free disk space USB 2.0 / 3.0 port Mac OS X 10.5.x Mac OS X 10.6.x Mac OS X 10.7x Recommendations To ensure there is ample power provided to the DTL+ G2 device, insert it directly into a USB port on your notebook or desktop, as seen in Figure 1.1. Avoid connecting the DTL+ G2 to any peripheral device(s) that may feature a USB port, such as a keyboard or USB-powered hub, as seen in Figure 1.2. Figure 1.1 – Recommended Usage Figure 1.2 – Not Recommended *Note: See ‘Drive Letter Conflict’ on page 26. Document No. 48002017-001.A03 ® DataTraveler Locker+ G2 Page 3 of 26 Setup (Windows Environment) 1. Insert the DTL+ G2 into an available USB port on your notebook or desktop and wait for Windows to detect it. • Windows XP users will receive a ‘Found New Hardware’ notification as seen in Figure 2.1. • Windows Vista/7 users will receive a device driver notification as seen in Figure 2.2. Figure 2.1 – Found New Hardware (Windows XP) Once the new hardware detection is complete, Windows will begin the initialization process. • If the Windows autorun function is enabled, you can skip the next step and go to page 5 – Device Initialization. Figure 2.2 – Device Driver Installation (Windows Vista/7) • If the Windows autorun function is disabled, as it is in Windows 7 by default, you may see an AutoPlay window similar to the one in Figure 2.3. 2. Select the option ‘Run DTLplus_Launcher.exe’. If Windows does not AutoPlay, simply browse to the CD-ROM partition (Figure 2.4) and manually execute the DTLplus_Launcher program. This will also start the initialization process. Figure 2.3 – AutoPlay Window (Windows Vista/7) (Note: Menu options in the AutoPlay window may vary depending on what programs are currently installed on your computer. If enabled, AutoRun will start the initialization process automatically.) Figure 2.4 – DTL+ G2 Contents Document No. 48002017-001.A03 ® DataTraveler Locker+ G2 Page 4 of 26 Device Initialization (Windows Environment) 1. Select your language preference from the drop-down menu and click ‘Next’ (Figure 3.1.) Figure 3.1 – Language Selection 2. Review the license agreement and click ‘Next’ (Figure 3.2.) (Note: You must accept the license agreement before continuing; otherwise the ‘Next’ button will remain disabled.) Figure 3.2 – License Agreement Document No. 48002017-001.A03 ® DataTraveler Locker+ G2 Page 5 of 26 3. Create a password to protect your data on the DTL+ G2. Enter it in the ‘Password’ field, then re-enter it in the ‘Password Confirmation’ field, as seen below in Figure 3.3. The password you create must meet the following criteria before the initialization process will allow you to continue: 1. Passwords must contain 6 characters or more (up to 16 characters.) 2. Passwords must contain three (3) of the following criteria options: - UPPER CASE, lower case, numeric, and/or special characters (!, $, etc.) You may also enter a password hint, but it is not a mandatory field. The hint field can be useful in providing a clue as to what the password is, should the password ever be forgotten. (Note: The hint CANNOT be an exact match to the password.) Figure 3.3 – Password Setup Document No. 48002017-001.A03 ® DataTraveler Locker+ G2 Page 6 of 26 4. Enter your contact information into the text boxes provided (see Figure 3.4) (Note: The information you enter in these fields may NOT contain the password string you created in Step 3. However, these fields are optional and can be left blank, if so desired.) • The ‘Name’ field may contain up to 32 characters, but cannot contain the exact password. • The ‘Company’ field may contain up to 32 characters, but cannot contain the exact password. • The ‘Details’ field may contain up to 156 characters, but cannot contain the exact password. Figure 3.4 – Contact Information 5. Click ‘Finish’ to complete the device initialization process. Document No. 48002017-001.A03 ® DataTraveler Locker+ G2 Page 7 of 26 The DTL+ G2 will now format the secure data partition (Figure 3.5) and notify you when it is complete (Figure 3.6.) Note: If operating under Windows XP in Non-Admin mode, the ‘Format’ routine can take up to a minute.* 6. Click ‘OK’ to continue. Figure 3.5 – Formatting DTL+ G2 Figure 3.6 – Format Complete Initialization complete. *Note: Times may vary based on system hardware and the capacity of the DTL+ G2 drive. Document No. 48002017-001.A03 ® DataTraveler Locker+ G2 Page 8 of 26 Device Usage (Windows Environment) Once the DTL+ G2 has been initialized, you can access the secure data partition and utilize the device options by logging into the device with your password. To do so, follow these steps: 1. Insert the DTL+ G2 into a USB port on your notebook or desktop and enter your password (see Figure 4.1.) 2. Once you’ve typed your password, click the ‘Login’ button to continue. • If the correct password is entered, the DTL+ G2 will unlock and you can begin using the device. Figure 4.1 – Login Window • If an incorrect password is entered, an error message will appear just below the ‘Hint’ field, indicating a login failure (see Figure 4.2.) During the login process, if a bad password is entered, you will be given another opportunity to enter the correct password; however, there is a built-in security feature that tracks the number of failed login attempts*. If this number reaches the preconfigured value of 10 failed attempts, the DTL+ G2 will lock and require a device format of the secure data partition prior to next use. THIS MEANS THAT ALL DATA STORED ON THE DTL+ G2 WILL BE LOST. Figure 4.2 – Login Failure For more details on this feature, see ‘Device Lockout’ on page 24. *Note: Once you authenticate to the device successfully, the failed login counter will reset. Document No. 48002017-001.A03 ® DataTraveler Locker+ G2 Page 9 of 26 Device Options (Windows Environment) While you are logged into the device, there will be a ‘DTL+ G2’ icon located in the right-hand corner of the Windows taskbar (Figure 5.1.) (Note: Windows 7 users will need to click on the up-arrow button in the taskbar in order to access the ‘DTL+ G2’ icon (Figure 5.2.) Clicking once on the DTL+ G2 icon will display the following menu: Figure 5.1 – DTL+ G2 icon in taskbar Figure 5.2 – DTL+ G2 icon in taskbar (Windows XP users) (Windows 7 users) DTL+ G2 Settings • • • • Allows you to change your password and/or hint (Figure 5.3) Allows you to store username and password information (see Page 11) Allows you to add/view/change your contact information (Figure 5.4) Allows you to change your current language selection (Figure 5.5) (Note: For security purposes, your current DTL+ G2 password is required to update and/or modify any of these settings.) Figure 5.3 Change Password Document No. 48002017-001.A03 Figure 5.4 Contact Information ® DataTraveler Locker+ G2 Figure 5.5 Select Language Page 10 of 26 Password Manager Password Manager is an area found within the settings menu of the DTL+ G2 that allows you to store and access username and password account information (for up to 20 accounts.) To store an account, just follow these simple steps: 1. Click the ‘Add’ button (shown in Figure 5.6a) to create a new account. 2. Type in the information you would like to store, using the following criteria: a. The ‘Description’ field is mandatory and can hold up to 40 characters. (Note: This field must contain at least 1 character. It cannot be left blank.) b. The ‘Username’ field is optional. It can hold up to 40 characters. c. The ‘Password’ field is optional. It can hold up to 40 characters. By default, each character is masked by an asterisk. If you would like to store the password in plain text, simply de-select the ‘Hide Password’ checkbox located below the ‘Comments’ field. (See Figure 5.6b) d. The ‘Comments’ field is optional. It can hold up to 360 characters. 3. If you would like to protect this item using a password, simply select the ‘Password protect’ checkbox located below the ‘Comments’ field. (See Figure 5.6b) (Note: The password used to protect this item is the same password you use to log into the DTL+ G2 device.) Figure 5.6b Figure 5.6a Password Manager Screenshots Document No. 48002017-001.A03 ® DataTraveler Locker+ G2 Page 11 of 26 To update or change an existing account in ‘Password Manager’, do the following: 1. Double-click the line item you wish to update or change. 2. If you password-protected the item you are trying to update or remove, you will be prompted for the device password, which is the same password you use to unlock the DTL+ G2 device at login. You must enter this password correctly before the account window will open for that specific item. 3. When the account window opens, you can modify any of the fields by clicking in the text box of the specific field you want to update and make the necessary changes. When you are finished making changes, click on the ‘Save’ button. To delete an existing account in ‘Password Manager’, do the following: 1. Double-click the line item you wish to delete. 2. If you password-protected the item you are trying to delete, you will be prompted for the device password, which is the same password you use to unlock the DTL+ G2 device at login. You must enter this password correctly before the account window will open for that specific item. 3. When the account window opens, simply click the ‘Remove’ button and you are finished Document No. 48002017-001.A03 ® DataTraveler Locker+ G2 Page 12 of 26 Browse DTL+ G2 • Allows you to browse the contents of the secure data partition while you are logged in Format DTL+ G2* • Allows you to format the secure data partition (Warning: All data will be erased.) (Figure 5.7) Online Support (Requires Internet access) • Opens your Internet browser and navigates to http://www.kingston.com/support/ where you can access additional support information Figure 5.7 – Format Warning About DTL+ G2 • Provides specific details about the DTL+ G2, including Application and Firmware version information (Figure 5.8) Shutdown DTL+ G2 • Properly shuts down the DTL+ G2, allowing you to safely remove it from your system Figure 5.8 – About DTL+ G2 *Note: Your current DTL+ G2 password is required in Windows Vista and Windows 7 -Windows Section Complete- Document No. 48002017-001.A03 ® DataTraveler Locker+ G2 Page 13 of 26 Setup (Mac Environment) Insert the DTL+ G2 into an available USB port on your notebook or desktop and wait for the Mac operating system to detect it. When it does, you will see a DTLplus volume appear on the desktop, as seen in Figure 6.1. 1. Double-click the DTL+ G2 CD-ROM icon. 2. Double-click the Mac folder found in the window displayed in Figure 6.2. 3. Double-click the DTLplus application icon found in the window displayed in Figure 6.3. This will start the initialization process. Figure 6.2 – DTL+ G2 Contents Document No. 48002017-001.A03 Figure 6.1 – DTLplus Figure 6.3 – DTL+ G2 Application ® DataTraveler Locker+ G2 Page 14 of 26 Device Initialization (Mac Environment) 1. Select your language preference from the drop-down menu and click ‘Next’ (Figure 7.1.) Figure 7.1 – Language Selection 2. Review the license agreement and click ‘Next’ (Figure 7.2.) (Note: You must accept the license agreement before continuing; otherwise the ‘Next’ button will remain disabled.) Figure 7.2 – License Agreement Document No. 48002017-001.A03 ® DataTraveler Locker+ G2 Page 15 of 26 3. Create a password to protect your data on the DTL+ G2. Enter it in the ‘Password’ field, then re-enter it in the ‘Password Confirmation’ field, as seen below in Figure 7.3. The password you create must meet the following criteria before the initialization process will allow you to continue: 1. Passwords must contain 6 characters or more (up to 16 characters.) 2. Passwords must contain three (3) of the following criteria options: - UPPER CASE, lower case, numeric, and/or special characters (!, $, etc.) You may also enter a password hint, but it is not a mandatory field. The hint field can be useful in providing a clue as to what the password is, should the password ever be forgotten. (Note: The hint CANNOT be an exact match to the password.) Figure 7.3 – Password Setup Document No. 48002017-001.A03 ® DataTraveler Locker+ G2 Page 16 of 26 4. Enter your contact information into the text boxes provided (see Figure 7.4) (Note: The information you enter in these fields may NOT contain the password string you created in Step 3. However, these fields are optional and can be left blank, if so desired.) • The ‘Name’ field may contain up to 32 characters, but cannot contain the exact password. • The ‘Company’ field may contain up to 32 characters, but cannot contain the exact password. • The ‘Details’ field may contain up to 156 characters, but cannot contain the exact password. Figure 7.4 – Contact Information 5. Click ‘Finish’ to complete the device initialization process. Document No. 48002017-001.A03 ® DataTraveler Locker+ G2 Page 17 of 26 The DTL+ G2 will now format the secure data partition (Figure 7.5) and notify you when it is complete (Figure 7.6.) 6. Click ‘OK’ to continue. Figure 7.5 – Formatting DTLocker+ G2 Figure 7.6 – Format Complete Initialization complete. Document No. 48002017-001.A03 ® DataTraveler Locker+ G2 Page 18 of 26 Device Usage (Mac Environment) Once the DTL+ G2 has been initialized, you can access the secure data partition and utilize the device options by logging into the device with your password. To do so, follow these steps: 1. Insert the DTL+ G2 into a USB port on your notebook or desktop and enter your password (see Figure 8.1.) 2. Once you’ve typed your password, click the ‘Login’ button to continue. • If the correct password is entered, the DTL+ G2 will unlock and you can begin using the device. Figure 8.1 – Login Window • If an incorrect password is entered, an error message will appear just below the ‘Hint’ field, indicating a login failure (see Figure 8.2.) During the login process, if a bad password is entered, you will be given another opportunity to enter the correct password; however, there is a built-in security feature that tracks the number of failed login attempts*. If this number reaches the preconfigured value of 10 failed attempts, the DTL+ G2 will lock and require a device format of the secure data partition prior to next use. THIS MEANS THAT ALL DATA STORED ON THE DTL+ G2 WILL BE LOST. For more details on this feature, see ‘Device Lockout’ on page 24. Figure 8.2 – Login Failure *Note: Once you authenticate to the device successfully, the failed login counter will reset. Document No. 48002017-001.A03 ® DataTraveler Locker+ G2 Page 19 of 26 Device Options (Mac Environment) While you are logged into the device, there will be a ‘DTLplus_Launcher’ icon located in the Mac OS X Dock as seen in Figure 9.1 below: Figure 9.1 – DTL+ G2 Icon In Mac OS X Dock Holding down the ‘control’ key on your keyboard and clicking once on the ‘DTLplus_Launcher’ icon will display the menu shown in Figure 9.2 to the right. DTL+ G2 Settings • Allows you to change your password and/or hint (Figure 9.3) • • • Allows you to store username and password information (see Page 21) Allows you to add/view/change your contact information (Figure 9.4) Allows you to change your language preference (Figure 9.5) Figure 9.3 Change Password Figure 9.4 Contact Information Figure 9.2 DTL+ G2 Options Figure 9.5 Select Language (Note: For security purposes, your current DTL+ G2 password is required to update and/or modify any of these settings.) Document No. 48002017-001.A03 ® DataTraveler Locker+ G2 Page 20 of 26 Password Manager Password Manager is an area found within the settings menu of the DTL+ G2 that allows you to store and access username and password account information (for up to 20 accounts.) To store an account, just follow these simple steps: 4. Click the ‘Add’ button (shown in Figure 5.6a) to create a new account. 5. Type in the information you would like to store, using the following criteria: a. The ‘Description’ field is mandatory and can hold up to 40 characters. (Note: This field must contain at least 1 character. It cannot be left blank.) b. The ‘Username’ field is optional. It can hold up to 40 characters. c. The ‘Password’ field is optional. It can hold up to 40 characters. By default, each character is masked by an asterisk. If you would like to store the password in plain text, simply de-select the ‘Hide Password’ checkbox located below the ‘Comments’ field. (See Figure 9.6b) d. The ‘Comments’ field is optional. It can hold up to 360 characters. 6. If you would like to protect this item using a password, simply select the ‘Password protect’ checkbox located below the ‘Comments’ field. (See Figure 9.6b) (Note: The password used to protect this item is the same password you use to log into the DTL+ G2 device.) Figure 9.6b Figure 9.6a Password Manager Screenshots Document No. 48002017-001.A03 ® DataTraveler Locker+ G2 Page 21 of 26 To update or change an existing account in ‘Password Manager’, do the following: 1. Highlight the line item you wish to update or change. 2. If you password-protected the item you are trying to update or remove, you will be prompted for the device password, which is the same password you use to unlock the DTL+ G2 device at login. You must enter this password correctly before the account window will open for that specific item. 3. When the account window opens, you can modify any of the fields by clicking in the text box of the specific field you want to update and make the necessary changes. When you are finished making changes, click on the ‘Save’ button. To delete an existing account in ‘Password Manager’, do the following: 1. Highlight the line item you wish to delete and click ‘Edit.’ 2. If you password-protected the item you are trying to delete, you will be prompted for the device password, which is the same password you use to unlock the DTL+ G2 device at login. You must enter this password correctly before the account window will open for that specific item. 3. When the account window opens, simply click the ‘Remove’ button and you are finished Document No. 48002017-001.A03 ® DataTraveler Locker+ G2 Page 22 of 26 Browse DTL+ G2 • Allows you to browse the contents of the secure data partition while you are logged in Format DTL+ G2 • Allows you to format the secure data partition (Warning: All data will be erased.) (Figure 9.7) Online Support (Requires Internet access) • Opens your Internet browser and navigates to http://www.kingston.com/support/ where you can access additional support information Figure 9.7 – Format Warning About DTL+ G2 • Provides specific details about the DTL+ G2, including Application and Firmware version information (Figure 9.8) Shutdown DTL+ G2 • Properly shuts down the DTL+ G2, allowing you to safely remove it from your system Figure 9.8 – About DTL+ G2 -Mac Section Complete- Document No. 48002017-001.A03 ® DataTraveler Locker+ G2 Page 23 of 26 Help and Troubleshooting Device Lockout The DTL+ G2 includes a security feature that prevents unauthorized access to the data partition once a maximum number of consecutive failed login attempts (MaxNoA for short) has been made; the default “out-of-box” configuration has a pre-configured value of 10 (no. of attempts.) The ‘lock-out’ counter tracks each failed login and gets reset one of two ways: 1) A successful login prior to reaching MaxNoA or 2) reaching MaxNoA and performing a device format.* If an incorrect password is entered, an error message will appear just below the ‘Hint’ field, indicating a login failure. See Figure 10.1. If and when a 7th failed attempt is made, you will see an additional error message indicating you have 3 attempts left before reaching MaxNoA (which is set to 10 by default.) See Figure 10.2. After a 10th failed login attempt, the DTL+ G2 will permanently block the data partition and require a device format prior to next use. This means that all data stored on the DTL+ G2 will be lost and you will need to create a new password. Figure 10.1 – Login Failure This security measure limits someone (who does not have your password) from attempting countless login attempts and gaining access to your sensitive data. If you are the owner of the DTL+ G2 and have forgotten your password, the same security measures will be enforced, including a device format.* For more on this feature, see ‘Forgot Password’ on page 25. Figure 10.2 – 7th Login Failure *Note: A device format will erase ALL of the information stored on the DTL+ G2’s secure data partition. Document No. 48002017-001.A03 ® DataTraveler Locker+ G2 Page 24 of 26 Forgot Password If you forget your password, you can click on the ‘Reset Password’ link that appears in the device login window when DTLplus_Launcher is executed (see Figure 10.3.) This option will allow you to create a new password, but in order to protect the privacy of your data, the DTL+ G2 will be formatted. This means that all of your data will be erased in the process.* When you do click on ‘Reset Password’, a message box (Figure 10.4) will appear and ask if you want to enter a new password prior to executing the format. At this point, you can either 1) click ‘OK’ to confirm or 2) click ‘Cancel’ to return to the login window. Figure 10.3 – Forgot Password If you opt to continue, you will be prompted to create a new complex password and a new hint. The hint is not a mandatory field, but it can be useful in providing a clue as to what the password is, should the password ever be forgotten. (Note: The hint CANNOT be an exact match to the DTL+ G2 device password.) Figure 10.4 – Prompt Before Format *Note: A device format will erase ALL of the information stored on the DTL+ G2’s secure data partition. Document No. 48002017-001.A03 ® DataTraveler Locker+ G2 Page 25 of 26 Drive Letter Conflict (Windows Operating Systems) As mentioned in the ‘System Requirements’ section of this manual (on page 3), the DTL+ G2 requires two consecutive drive letters AFTER the last physical disk that appears before the ‘gap’ in drive letter assignments (see Figure 10.5.) This does NOT pertain to network shares because they are specific to user-profiles and not the system hardware profile itself, thus appearing available to the OS. What this means is, Windows may assign the DTL+ G2 a drive letter that’s already in use by a network share or Universal Naming Convention (UNC) path, causing a drive letter conflict. If this happens, please consult your administrator or helpdesk department on changing drive letter assignments in Windows Disk Management (administrator privileges required.) Figure 10.5 – My Computer In this example, the DTL+ G2 uses drive F:, which is the first available drive letter after drive E: (the last physical disk before the drive letter gap.) Because letter G: is a network share and not part of the hardware profile, the DTL+ G2 may attempt to use it as its second drive letter, causing a conflict. If there are no network shares on your system and the DTL+ G2 still won’t load, it is possible that a card reader, removable disk, or other previously-installed device is holding on to a driveletter assignment and still causing a conflict. Please note that Drive Letter Management, or DLM, has improved significantly in Windows XP SP3, Vista, and 7, so you may not come across this issue, but if you are unable to resolve the conflict, please contact Kingston’s Technical Support Department for further assistance. © 2011 Kingston Technology Corporation. All rights reserved. All registered trademarks and trademarks are the property of their respective owners. Document No. 48002017-001.A03 ® DataTraveler Locker+ G2 Page 26 of 26 Manual del usuario del DataTraveler® Locker+ G2 Documento No. 48002017-001.A03 ® DataTraveler Locker+ G2 Página 1 de 22 Índice ACERCA DE ESTA GUÍA DEL USUARIO .................................................................................3 REQUISITOS DEL SISTEMA .....................................................................................................3 RECOMENDACIONES ...............................................................................................................3 CONFIGURACIÓN (ENTORNO DE WINDOWS) .......................................................................4 INICIALIZACIÓN DEL DISPOSITIVO (ENTORNO DE WINDOWS) ..........................................5 UTILIZACIÓN DEL DISPOSITIVO (ENTORNO DE WINDOWS) ...............................................9 OPCIONES DEL DISPOSITIVO(ENTORNO DE WINDOWS) ..................................................10 CONFIGURACIÓN (ENTORNO DE MAC) ...............................................................................12 INICIALIZACIÓN DEL DISPOSITIVO (ENTORNO DE MAC) ..................................................13 UTILIZACIÓN DEL DISPOSITIVO(ENTORNO DE MAC) ........................................................17 OPCIONES DEL DISPOSITIVO (ENTORNO DE MAC) ...........................................................18 AYUDA Y SOLUCIÓN DE PROBLEMAS ................................................................................20 Bloqueo del dispositivo .............................................................................................................................. 20 Olvidó su contraseña .................................................................................................................................. 21 Conflicto de letras de dispositivo (sistema operativo Windows) ........................................................... 22 Documento No. 48002017-001.A03 ® DataTraveler Locker+ G2 Página 2 de 22 Acerca de esta Guía del usuario Este manual del usuario cubre el DataTraveler® Locker+ G2 (mencionado simplemente como DTL+ G2 de ahora en adelante) sobre la base de la imagen de fábrica, sin haberse realizado personalizaciones. Requisitos del sistema Plataforma de PC • • • • Soporte para sistema operativo de PC Procesador equivalente a Pentium III (o superior) 15MB de espacio libre en disco Puerto USB 2.0 / 3.0 Dos letras de dispositivo consecutivas después del último dispositivo físico* • • • Plataforma Mac • • Windows® 7 Windows® Vista SP1, SP2 Windows® XP SP2, SP3 Soporte para sistema operativo 15MB de espacio libre en disco Puerto USB 2.0 / 3.0 • • • Mac OS X 10.5.x Mac OS X 10.6.x Mac OS X 10.7.x Recomendaciones Para asegurarse de que se disponga de adecuada energía para el dispositivo DTL+ G2, insértelo directamente en un puerto USB de su notebook o computadora de escritorio, como se ve en la Figura 1.1. Evite conectar el DTL+ G2 a cual(es)quier dispositivo(s) periférico(s) que pueda ofrecer un puerto USB, tal como un teclado o un concentrador alimentado por USB, como se ve en Figura 1.2. Figura 1.1 - Uso recomendado Figura 1.2 - No se recomienda *Nota: Ver "Conflicto de letras de dispositivo" en la página 22. Documento No. 48002017-001.A03 ® DataTraveler Locker+ G2 Página 3 de 22 Configuración (entorno de Windows) 1. Inserte el DTL+ G2 en un puerto USB disponible en su notebook o computadora de escritorio, y espere a que Windows lo detecte. • Los usuarios de Windows XP recibirán una notificación sobre "Nuevo hardware encontrado" tal como se ve en la Figura 2.1. • Los usuarios de Windows Vista/7 recibirán una notificación sobre controlador de dispositivo tal como se ve en la Figura 2.2.. Figura 2.1 – Nuevo hardware encontrado (Windows XP) Una vez que la detección de nuevo hardware se haya terminado, Windows comenzará con el proceso de inicialización. • Si la función de ejecución automática de Windows está activada, usted puede omitir el paso siguiente e ir a la página 5 Inicialización de dispositivo. Figura 2.2 – Instalación de controlador de dispositivo (Windows Vista/7) • Si la función de ejecución automática de Windows está desactivada, como sucede en Windows 7 en forma predeterminada, es posible que aparezca una ventana de Reproducción automática similar a la de la Figura 2.3. 2. Seleccione la opción "Run DTLplus_Launcher.exe". Si Windows no ejecuta automáticamente, simplemente vaya a la partición del CD-ROM (Figura 2.4), y ejecute manualmente el programa DTLplus_Launcher. Esto también dará comienzo al proceso de inicialización. Figura 2.3 – Ventana de Reproducción automática (Windows Vista/7) (Nota: Las Opciones de menú en la ventana de Reproducción automática pueden variar dependiendo de qué programas están actualmente instalados en la computadora. Si está activada, la Ejecución automática dará comienzo al proceso de inicialización de forma automática.) Figura 2.4 – Contenido del DTL+ G2 Documento No. 48002017-001.A03 ® DataTraveler Locker+ G2 Página 4 de 22 Inicialización del dispositivo (entorno de Windows) 1. Seleccione sus preferencia de idioma en el menú desplegable y haga clic en "Siguiente" (Figura 3.1). Figura 3.1 – Selección de idioma 2. Revise el acuerdo de licencia y haga clic en "Siguiente" (Figura 3.2.) (Nota: Usted debe aceptar el acuerdo de licencia antes de continuar; de lo contrario el botón "Siguiente" permanecerá desactivado). Figura 3.2 – Acuerdo de licencia Documento No. 48002017-001.A03 ® DataTraveler Locker+ G2 Página 5 de 22 3. Cree una contraseña para proteger sus datos en el DTL+ G2. Introdúzcala en el campo "Contraseña", a continuación vuelva a ingresarla en el campo "Confirmación de la contraseña", como se ve abajo en la Figura 3.3. La contraseña que usted crea debe cumplir con los siguientes criterios antes de que el proceso de inicialización le permita continuar: 1. Las contraseñas deben contener 6 caracteres o más (hasta 16 caracteres). 2. Las contraseñas deben contener tres (3) de las siguientes opciones de criterios: - MAYÚSCULAS, minúsculas, numéricos y/o caracteres especiales (!, $, etc.) Usted también puede ingresar una sugerencia para la contraseña, pero no es un campo obligatorio. El campo de sugerencia puede ser útil para proporcionar una pista acerca de cuál es la contraseña, en caso de que se olvidara la contraseña. (Nota: La sugerencia NO PUEDE coincidir exactamente con la contraseña.) Figura 3.3 – Establecimiento de contraseña Documento No. 48002017-001.A03 ® DataTraveler Locker+ G2 Página 6 de 22 4. Ingrese su información de contacto en los cuadros de texto previstos (ver la Figura 3.4) (Nota: La información que usted ingrese en estos campos NO puede contener la cadena de la contraseña que creó en el Paso 3. Sin embargo, estos campos son opcionales y pueden dejarse en blanco, si así se desea.) • El campo "Nombre" puede contener hasta 32 caracteres, pero no puede contener la contraseña exacta. • El campo "Compañía" puede contener hasta 32 caracteres, pero no puede contener la contraseña exacta. • El campo "Detalles" puede contener hasta 156 caracteres, pero no puede contener la contraseña exacta. Figura 3.4 – Información de contacto Documento No. 48002017-001.A03 ® DataTraveler Locker+ G2 Página 7 de 22 5. Haga clic en "Finalizar" para completar el proceso de inicialización del dispositivo. Ahora el DTL+ G2 formateará la partición de datos segura (Figura 3.5) y le notificará cuando esto termine (Figura 3.6.) Nota: Cuando se opera bajo Windows XP en el modo que no es de Administrador, la rutina "Formatear" puede demorarse hasta un minuto.* 6. Haga clic en "Aceptar" para continuar. Figura 3.5 – Para formatear el DTL+ G2 Figura 3.6 – Formatear completo Inicialización completa. *Nota: Los tiempos pueden variar en función de hardware del sistema y la capacidad del dispositivo DTL+ G2. Documento No. 48002017-001.A03 ® DataTraveler Locker+ G2 Página 8 de 22 Utilización del dispositivo (entorno de Windows) Una vez se ha inicializado el DTL+ G2, puede acceder a la partición de datos segura y utilizar las opciones del dispositivo, iniciando sesión en el dispositivo con su contraseña. Para ello siga estos pasos: 1. Inserte el DTL+ G2 en un puerto USB en su notebook o computadora de escritorio, e ingrese su contraseña (ver Figura 4.1.) 2. Una vez hayas tecleado su contraseña, haga clic en el botón "Iniciar sesión" para continuar. • Si se ingresa la contraseña correcta, el DTL + G2 se desbloqueará y usted puede empezar a utilizar el dispositivo. Figura 4.1 – Ventana de inicio de sesión • Si se ingresa una contraseña incorrecta, aparecerá un mensaje de error justo debajo del campo "Sugerencia", lo que indica un error de inicio de sesión (ver la Figura 4.2.) Durante el proceso de inicio de sesión, si se introduce una contraseña incorrecta, se le dará otra oportunidad de introducir la contraseña correcta; sin embargo, existe una característica de seguridad integrada que controla el número de intentos fallidos de inicio de sesión*. Si este número alcanza el valor pre-configurado de 10 intentos fallidos, el DTL+ G2 se bloqueará y requerirá el formatear el dispositivo para la partición de datos segura antes de la próxima utilización. ESTO SIGNIFICA QUE SE VAN A PERDER TODOS LOS DATOS ALMACENADOS EN EL DTL+ G2. Figura 4.2 – Error de inicio de sesión Para obtener más detalles sobre esta función, ver "Bloqueo del dispositivo" en la página 20. *Nota: Una vez que se haya autentificado con éxito ante el dispositivo, el contador de inicios de sesión fallidos se reiniciará. Documento No. 48002017-001.A03 ® DataTraveler Locker+ G2 Página 9 de 22 Opciones del dispositivo(entorno de Windows) Mientras tenga una sesión iniciada en el dispositivo, aparecerá un icono "DTL + G2" situado en la esquina derecha de la barra de tareas de Windows (Figura 5.1.) (Nota: Los usuarios de Windows 7 tendrán que hacer clic en el botón de flecha hacia arriba en la barra de tareas a fin de tener acceso al icono "DTL+ G2" (Figura 5.2.) Al hacer clic una vez en el icono de DTL+ G2 aparecerá el menú siguiente: Figura 5.1 – Icono DTL+ G2 en la barra de tareas (usuarios de Windows XP) Figura 5.2 – Icono DTL+ G2 en la barra de tareas (usuarios de Windows 7) Configuración del DTL+ G2 • • • Le permite cambiar su contraseña y/o sugerencia (Figura 5.3) Le permite agregar/visualizar/cambiar su información de contacto (Figura 5.4) Le permite cambiar su preferencia actual de idioma (Figura 5.5) (Nota: Por razones de seguridad, es necesaria su contraseña actual del DTL+ G2 para actualizar y/o modificar cualquiera de estos ajustes.) Figura 5.3 Cambiar contraseña Documento No. 48002017-001.A03 Figura 5.4 INFORMACIÓN DE CONTACTO ® DataTraveler Locker+ G2 Figura 5.5 Seleccione el idioma Página 10 de 22 Examinar DTL+ G2 • Le permite navegar por el contenido de la partición de datos segura, mientras que esté con sesión iniciada Formatear DTL+ G2* • Le permite formatear la partición de datos segura (Advertencia: Se borrarán todos los datos). (Figura 5.7) Soporte en línea (se requiere acceso a Internet) • Abre su navegador Web y se desplaza a http://www.kingston.com/support/, donde puede tener acceso a información de soporte adicional Figura 5.7 – Advertencia para formatear Acerca de DTL+ G2 • Proporciona detalles específicos acerca del DTL+ G2, incluida la información sobre la aplicación y la versión del firmware (Figura 5.8) Apagar DTL+ G2 • Apaga en forma apropiada el DTL+ G2, lo que le permite retirarlo de forma segura de su sistema Figura 5.8 – Acerca de DTL+ G2 (Recomendación: Después de apagar su DTL+ G2, siempre es una mejor práctica apagar o reiniciar la estación de trabajo huésped a la que su dispositivo estaba conectado, especialmente si está en un lugar público o utilizando una estación de trabajo que sea compartida por múltiples personas.) *Nota: En Windows Vista y Windows 7 se requiere su contraseña actual para el DTL+ G2 -Terminada la sección para WindowsDocumento No. 48002017-001.A03 ® DataTraveler Locker+ G2 Página 11 de 22 Configuración (entorno de Mac) Inserte el DTL+ G2 en un puerto USB disponible en su notebook o computadora de escritorio, y espere a que el sistema operativo Mac lo detecte. Cuando lo haga, verá que un volumen DTLplus aparece en el escritorio, como se ve en la Figura 6.1. 1. Haga doble clic en el icono del CD-ROM de DTL+ G2. 2. Haga doble clic en la carpeta de Mac ubicada en la ventana mostrada en la Figura 6.2. 3. Haga doble clic el icono de la aplicación DTLplus ubicado en la ventana mostrada en la Figura 6.3. Esto dará comienzo al proceso de inicialización. Figura 6.2 – Contenido del DTL+ G2 Documento No. 48002017-001.A03 Figura 6.1 – DTLplus Figura 6.3 – Aplicación DTL+ G2 ® DataTraveler Locker+ G2 Página 12 de 22 Inicialización del dispositivo (entorno de MAC) 1. Seleccione sus preferencia de idioma en el menú desplegable y haga clic en "Siguiente" (Figura 7.1). Figura 7.1 – Selección de idioma 2. Revise el acuerdo de licencia y haga clic en "Siguiente" (Figura 7.2.) (Nota: Usted debe aceptar el acuerdo de licencia antes de continuar; de lo contrario el botón "Siguiente" permanecerá desactivado). Figura 7.2 – Acuerdo de licencia Documento No. 48002017-001.A03 ® DataTraveler Locker+ G2 Página 13 de 22 3. Cree una contraseña para proteger sus datos en el DTL+ G2. Introdúzcala en el campo "Contraseña", a continuación vuelva a ingresarla en el campo "Confirmación de la contraseña", como se ve abajo en la Figura 7.3. La contraseña que usted crea debe cumplir con los siguientes criterios antes de que el proceso de inicialización le permita continuar: 1. Las contraseñas deben contener 6 caracteres o más (hasta 16 caracteres). 2. Las contraseñas deben contener tres (3) de las siguientes opciones de criterios: - MAYÚSCULAS, minúsculas, numéricos y/o caracteres especiales (!, $, etc.) Usted también puede ingresar una sugerencia para la contraseña, pero no es un campo obligatorio. El campo de sugerencia puede ser útil para proporcionar una pista acerca de cuál es la contraseña, en caso de que se olvidara la contraseña. (Nota: La sugerencia NO PUEDE coincidir exactamente con la contraseña.) Figura 7.3 – Establecimiento de contraseña Documento No. 48002017-001.A03 ® DataTraveler Locker+ G2 Página 14 de 22 4. Ingrese su información de contacto en los cuadros de texto previstos (ver la Figura 7.4) (Nota: La información que usted ingrese en estos campos NO puede contener la cadena de la contraseña que creó en el Paso 3. Sin embargo, estos campos son opcionales y pueden dejarse en blanco, si así se desea.) • El campo "Nombre" puede contener hasta 32 caracteres, pero no puede contener la contraseña exacta. • El campo "Compañía" puede contener hasta 32 caracteres, pero no puede contener la contraseña exacta. • El campo "Detalles" puede contener hasta 156 caracteres, pero no puede contener la contraseña exacta. Figura 7.4 – Información de contacto Documento No. 48002017-001.A03 ® DataTraveler Locker+ G2 Página 15 de 22 5. Haga clic en "Finalizar" para completar el proceso de inicialización del dispositivo. Ahora el DTL+ G2 formateará la partición de datos segura (Figura 7.5) y le notificará cuando esto termine (Figura 7.6.) 6. Haga clic en "Aceptar" para continuar. Figura 7.5 – Para formatear el DTLocker+ G2 Figura 7.6 – Formatear completo Inicialización completa. Documento No. 48002017-001.A03 ® DataTraveler Locker+ G2 Página 16 de 22 Utilización del dispositivo(entorno de MAC) Una vez se ha inicializado el DTL+ G2, puede acceder a la partición de datos segura y utilizar las opciones del dispositivo, iniciando sesión en el dispositivo con su contraseña. Para ello siga estos pasos: 1. Inserte el DTL+ G2 en un puerto USB en su notebook o computadora de escritorio, e ingrese su contraseña (ver Figura 8.1.) 2. Una vez hayas tecleado su contraseña, haga clic en el botón "Iniciar sesión" para continuar. • Si se ingresa la contraseña correcta, el DTL + G2 se desbloqueará y usted puede empezar a utilizar el dispositivo. Figura 8.1 – Ventana de inicio de sesión • Si se ingresa una contraseña incorrecta, aparecerá un mensaje de error justo debajo del campo "Sugerencia", lo que indica un error de inicio de sesión (ver la Figura 8.2.) Durante el proceso de inicio de sesión, si se introduce una contraseña incorrecta, se le dará otra oportunidad de introducir la contraseña correcta; sin embargo, existe una característica de seguridad integrada que controla el número de intentos fallidos de inicio de sesión*. Si este número alcanza el valor pre-configurado de 10 intentos fallidos, el DTL+ G2 se bloqueará y requerirá el formatear el dispositivo para la partición de datos segura antes de la próxima utilización. ESTO SIGNIFICA QUE SE VAN A PERDER TODOS LOS DATOS ALMACENADOS EN EL DTL+ G2. Para obtener más detalles sobre esta función, ver "Bloqueo del dispositivo" en la página 20. Figura 8.2 – Error de inicio de sesión *Nota: Una vez que se haya autentificado con éxito ante el dispositivo, el contador de inicios de sesión fallidos se reiniciará. Documento No. 48002017-001.A03 ® DataTraveler Locker+ G2 Página 17 de 22 Opciones del dispositivo (entorno de MAC) Mientras tenga una sesión iniciada en el dispositivo, aparecerá un icono "DTLplus_Launcher" situado en el Dock de Mac OS X como se muestra en la Figura 9.1 a continuación: Figura 9.1 – Icono DTL+ G2 en el "Dock" de Mac OS X Si se mantiene presionada la tecla "control" en su teclado y se hace clic una vez sobre el icono "DTLplus_Launcher", aparecerá el menú que se muestra en la Figura 9.2 a la derecha. Configuración del DTL+ G2 • • • Le permite cambiar su contraseña y/o sugerencia (Figura 9.3) Le permite agregar/visualizar/cambiar su información de contacto (Figura 9.4) Le permite cambiar su preferencia de idioma (Figura 9.5) Figura 9.3 Cambiar contraseña Figura 9.4 INFORMACIÓN DE CONTACTO Figura 9.2 Opciones para DTL+ G2 Figura 9.5 Seleccione el idioma (Nota: Por razones de seguridad, es necesaria su contraseña actual del DTL+ G2 para actualizar y/o modificar cualquiera de estos ajustes.) Documento No. 48002017-001.A03 ® DataTraveler Locker+ G2 Página 18 de 22 Examinar DTL+ G2 • Le permite navegar por el contenido de la partición de datos segura, mientras que esté con sesión iniciada Formatear DTL+ G2 • Le permite formatear la partición de datos segura (Advertencia: Se borrarán todos los datos). (Figura 9.7) Soporte en línea (se requiere acceso a Internet) • Abre su navegador Web y se desplaza a http://www.kingston.com/support/, donde puede tener acceso a información de soporte adicional Figura 9.7 – Advertencia para formatear Acerca de DTL+ G2 • Proporciona detalles específicos acerca del DTL+ G2, incluida la información sobre la aplicación y la versión del firmware (Figura 9.8) Apagar DTL+ G2 • Apaga en forma apropiada el DTL+ G2, lo que le permite retirarlo de forma segura de su sistema Figura 9.8 – Acerca de DTL+ G2 (Recomendación: Después de apagar su DTL+ G2, siempre es una mejor práctica apagar o reiniciar la estación de trabajo huésped a la que su dispositivo estaba conectado, especialmente si está en un lugar público o utilizando una estación de trabajo que sea compartida por múltiples personas.) -Termina la Sección para Mac- Documento No. 48002017-001.A03 ® DataTraveler Locker+ G2 Página 19 de 22 Ayuda y solución de problemas Bloqueo del dispositivo El DTL+ G2 incluye una característica de seguridad que impide el acceso no autorizado a la partición de datos, una vez que se ha hecho un número máximo de intentos de inicio de sesión fallidos consecutivos (MaxNoA, para abreviar); la configuración predeterminada "listo para usar" tiene un valor pre-configurado de 10 (no. de intentos). El contador de "bloqueo" hace el seguimiento de cada inicio de sesión fallido y se restablece de una de dos maneras: 1) Un inicio de sesión exitoso antes de llegar a MaxNoA o 2) llegar a MaxNoA y formatear el dispositivo.* Si se ingresa una contraseña incorrecta, aparecerá un mensaje de error justo debajo del campo "Sugerencia", lo que indica un error de inicio de sesión. Ver la Figura 10.1. Si y cuando se ha realizado un 7o intento fallido, verá un mensaje de error adicional que indica que le quedan 3 intentos antes de llegar a MaxNoA (que está establecido como 10 de forma predeterminada). Ver la Figura 10.2. Después de un 10o intento fallido de inicio de sesión, el DTL+ G2 bloqueará permanentemente la partición de datos y requerirá el formatear el dispositivo antes del próximo uso. Esto significa que se van a perder todos los datos almacenados en el DTL+ G2, y que tendrá que crear una nueva contraseña. Figura 10.1 – Error de inicio de sesión Esta medida de seguridad evita que alguien (que no tenga la contraseña) realice innumerables intentos de inicio de sesión y obtenga acceso a su información confidencial. Si usted es el propietario del DTL+ G2 y ha olvidado su contraseña aplican las mismas medidas de seguridad, incluyendo el formatear el dispositivo.* Para obtener más información sobre esta función, ver "Olvidó su contraseña" en la página 21. o Figura 10.2 – 7 Error de inicio de sesión *Nota: El formatear un dispositivo borrará TODA la información almacenada en la partición de datos segura del DTL + G2. Documento No. 48002017-001.A03 ® DataTraveler Locker+ G2 Página 20 de 22 Olvidó su contraseña Si usted olvida su contraseña, puede hacer clic en el vínculo "Inicializar contraseña" que aparece en la ventana de inicio de sesión del dispositivo cuando se ejecuta DTLplus_Launcher (ver la Figura 10.3). Esta opción le permitirá crear una nueva contraseña, pero el DTL+ G2 será formateado con el fin de proteger la privacidad de sus datos. Esto significa que en el proceso se borrarán todos sus datos.* Cuando haga clic en "Inicializar contraseña", aparecerá un cuadro de mensaje (Figura 10.4) y le preguntará si desea introducir una nueva contraseña antes de ejecutar el formato. En este punto, podrá: 1) hacer clic en "Aceptar" para confirmar, o 2) hacer clic en "Cancelar" para volver a la ventana de inicio de sesión. Figura 10.3 – Olvidó su contraseña Si opta por continuar, se le pedirá que cree una nueva contraseña compleja y una nueva sugerencia. El campo de sugerencia no es obligatorio, pero puede ser útil para proporcionar una pista acerca de cuál es la contraseña, en caso de que se olvidara la contraseña. Figura 10.4 – Mensaje guía antes de formatear (Nota: La sugerencia NO PUEDE coincidir exactamente con la contraseña del dispositivo DTL+ G2.) *Nota: El formatear un dispositivo borrará TODA la información almacenada en la partición de datos segura del DTL + G2. Documento No. 48002017-001.A03 ® DataTraveler Locker+ G2 Página 21 de 22 Conflicto de letras de dispositivo (sistema operativo Windows) Como se ha mencionado en la sección "Requerimientos del sistema" de este manual (en la página 3), el DTL+ G2 requiere dos letras consecutivas de dispositivo DESPUÉS del último disco físico que aparece antes de la "brecha" en las asignaciones de letras de dispositivo (ver Figura 10.5.) Lo anterior NO se refiere a los recursos compartidos de red, dado que son específicos de los perfiles de usuario y no del perfil del hardware del sistema mismo, por lo que ante el sistema operativo se muestran como disponibles. Lo anterior significa que Windows podría asignar al DTL+ G2 una o dos letras de dispositivo que ya estén en uso por uno o varios recursos compartidos de red o en una ruta UNC (Convención de Nomenclatura Universal), lo que causa un conflicto en las letras de dispositivo. Si eso ocurre, pida asistencia al administrador de su sistema o al departamento de soporte técnico respecto al cambio de las asignaciones de letras de unidad en la utilidad "Administración de discos" de Windows (se requieren privilegios administrativos) Figura 10.5 – Mi PC En este ejemplo, el DTL+ G2 utiliza la letra F:, que es la primera letra de dispositivo disponible después del dispositivo E: (el último disco físico antes de la brecha en las letras de unidad). Dado que la letra G: está asignada a un recurso compartido de red y no forma parte del perfil del hardware, el sistema operativo podría intentar asignar dicha letra al DTL+G2 como su segunda letra de dispositivo, lo que causaría un conflicto. Si en su sistema no hay recursos compartidos de red y el DTL+ G2 todavía no carga, es posible que haya un dispositivo previamente instalado, como un lector de tarjetas o un disco extraíble, que retenga la asignación de letra de dispositivo y cause un conflicto. Tenga en cuenta que la administración DLM de letras de dispositivo ha mejorado en gran medida en Windows XP SP3, Vista y 7, de modo que es posible que usted no tenga problema alguno; pero si no puede solucionar el conflicto, comuníquese con el departamento de soporte técnico de Kingston para recibir asistencia adicional. © 2011 Kingston Technology Corporation. Todos los derechos reservados. Todas las marcas comerciales y las marcas registradas son propiedad exclusiva de sus respectivos dueños. Documento No. 48002017-001.A03 ® DataTraveler Locker+ G2 Página 22 de 22 DataTraveler® Locker+ G2 Benutzerhandbuch Dokument Nr. 48002017-001.A03 ® DataTraveler Locker+ G2 Seite 1 von 25 Inhalt TOC Über dieses Handbuch Dieses Benutzerhandbuch bezieht sich auf den DataTraveler® Locker+ G2 (im Folgenden als DTL+ G2 bezeichnet) auf Basis des Factory Image ohne kundenspezifische Einstellungen. Systemvoraussetzungen PC-Plattform • • • • Unterstützte PC-Betriebssysteme Mindestens Pentium III oder äquivalenter Prozessor 15MB freier Speicher USB 2.0 / 3.0 Anschluss Zwei freie, aufeinanderfolgende Laufwerksbuchstaben nach dem letzten physischen Speicher* • • • Mac Plattform • • Windows® 7 Windows® Vista SP1, SP2 Windows® XP SP2, SP3 Unterstützte Betriebssysteme 15MB freier Speicher USB 2.0 / 3.0 Anschluss • • • Mac OS X 10.5.x Mac OS X 10.6.x Mac OS X 10.7x Empfehlungen Um eine ausreichende Stromversorgung des DTL+ G2 sicherzustellen, stecken Sie ihn direkt in einen USB-Anschluss Ihres Notebooks oder Desktops, siehe Abb. 1.1. Vermeiden Sie den Dokument Nr. 48002017-001.A03 ® DataTraveler Locker+ G2 Seite 2 von 25 Anschluss des DTL+ G2 in Peripheriegeräte mit einem USB-Anschluss wie eine Tastatur oder ein USB-Hub, siehe Abb. 1.2. Abb. 1.1 – Empfohlener Anschluss Abb. 1.2 – Nicht empfehlenswert *Hinweis: Siehe 'Laufwerksbuchstabenkonflikt' auf Seite 22. Installation & Einrichtung (Windows Umgebung) 1. Stecken Sie den DTL+ G2 in einen freien USBAnschluss Ihres Notebooks oder Desktops und warten Sie, bis Windows ihn erkannt hat. • Windows XP Anwendern wird die Meldung ‘Neue Hardware gefunden’ angezeigt, siehe Abb. 2.1. Abb. 2.1 – Neue Hardware gefunden (Windows XP) • Windows Vista/7 Anwendern wird eine Gerätetreiber-Meldung angezeigt, siehe Abb. 2.2. Nach Abschluss der Hardwareerkennung beginnt Windows mit dem Installationsprozess. • Wenn die Windows Autorunfunktion aktiviert ist, können Sie den nächsten Schritt überspringen und weitergehen zu Seite 5 – Geräteinstallation. Abb. 2.2 – Installation des Gerätetreibers (Windows Vista/7) • Wenn die Windows Autorunfunktion deaktiviert ist, standardmäßig bei Windows 7, wird ein AutoPlay-Fenster angezeigt, ähnlich wie in Abb. 2.3. 2. Wählen Sie Dokument Nr. 48002017-001.A03 die Option ‘Run ® DataTraveler Locker+ G2 Seite 3 von 25 DTLplus_Launcher.exe’. Wenn Windows AutoPlay nicht startet, rufen Sie die CD-ROM-Partition (Abb. 2.4) auf und starten Sie das DTLplus_Launcher Programm manuell. Dadurch wird der Installationsprozess gestartet. Abb. 2.3 – Fenster AutoPlay (Windows Vista/7) (Hinweis: Die Menüoptionen im Fenster AutoPlay können je nach den aktuell auf Ihrem Computer installierten Programmen unterschiedlich sein. Wenn AutoRun aktiviert ist, wird der Installationsprozess automatisch gestartet.) Abb. 2.4 – DTL+ G2 Inhalt Geräteinstallation (Windows Umgebung) 1. Wählen Sie die von Ihnen gewünschte Sprache aus dem Drop-Down-Menü und klicken Sie auf ‘Weiter’ (Abb. 3.1.) Dokument Nr. 48002017-001.A03 ® DataTraveler Locker+ G2 Seite 4 von 25 Abb. 3.1 – Sprachauswahl 2. Lesen und akzeptieren Sie die Lizenzvereinbarung und klicken Sie auf ‘Weiter’ (Abb. 3.2.) (Hinweis: Die Schaltfläche ‘Weiter’ wird erst aktiviert, nachdem Sie die Lizenzvereinbarung akzeptiert haben.) Abb. 3.2 – Lizenzvereinbarung Dokument Nr. 48002017-001.A03 ® DataTraveler Locker+ G2 Seite 5 von 25 3. Erstellen Sie ein Passwort, um Ihre Daten auf dem DTL+ G2 zu schützen. Geben Sie es im Feld ‘Passwort’ ein und erneut im Feld ‘Passwortbestätigung’ siehe Abb. 3.3. Bevor Sie mit der Installationseinrichtung fortfahren können, müssen Sie ein Passwort nach folgenden Kriterien eingeben: 1. Das Passwort muss mindestens 6 Zeichen lang sein (bis zu 16 Zeichen.) 2. Das Passwort muss 3 (drei) der folgenden Kriterien enthalten: - GROSSBUCHSTABE, Kleinbuchstabe, Ziffer und/oder Sonderzeichen (!, $ usw.) Sie können auch einen Passwort-Hinweis eingeben, es ist jedoch kein Pflichtfeld. Der Passwort-Hinweis kann eine nützliche Hilfestellung zur Erinnerung an das Passwort sein, wenn Sie es vergessen haben sollten. (Hinweis: Der Hinweis und das Passwort dürfen NICHT identisch sein.) Abb. 3.3 – Passworteinrichtung Dokument Nr. 48002017-001.A03 ® DataTraveler Locker+ G2 Seite 6 von 25 4. Geben Sie Ihre Kontaktdaten in den angezeigten Textfeldern ein (siehe Abb. 3.4) (Hinweis: Die in diesen Feldern eingegebenen Daten dürfen NICHT die in Schritt 3 eingegebene Passwort-Zeichenfolge enthalten. Das Ausfüllen dieser Felder ist optional und sie können auch leer belassen werden.) • Im Feld ‘Name’ können bis zu 32 Zeichen eingegeben werden, das genaue Passwort darf jedoch nicht darin enthalten sein. • Im Feld ‘Firma’ können bis zu 32 Zeichen eingegeben werden, das genaue Passwort darf jedoch nicht darin enthalten sein. • Im Feld ‘Adresse’ können bis zu 156 Zeichen eingegeben werden, das genaue Passwort darf jedoch nicht darin enthalten sein. Abb. 3.4 – Kontaktdaten Dokument Nr. 48002017-001.A03 ® DataTraveler Locker+ G2 Seite 7 von 25 5. Klicken Sie zum Abschließen des Installationsprozesses für das Gerät auf ‘Fertigstellen’. Der DTL+ G2 wird jetzt die sichere Datenpartition formatieren (Abb. 3.5) und anzeigen, wenn dieser Vorgang abgeschlossen ist (Abb. 3.6.) Hinweis: Unter Windows XP im Nicht-Administrator-Modus Formatierung bis zu einer Minute dauern.* kann die 6. Klicken Sie zum Fortfahren auf ‘OK’. Abb. 3.5 – DTL+ G2 Formatierung Abb. 3.6 – Formatierung fertiggestellt Der Installationsprozess ist abgeschlossen. Dokument Nr. 48002017-001.A03 ® DataTraveler Locker+ G2 Seite 8 von 25 *Hinweis: Die erforderliche Zeit hängt von der Systemhardware und der Speicherkapazität des DTL+ G2 Sticks ab. Verwendung des Geräts (Windows Umgebung) Nach Abschluss des Installationsprozesses des DTL+ G2 können Sie sich mit Ihrem Passwort im Gerät einloggen, haben Zugriff auf die sichere Datenpartition und können mit dem Stick arbeiten. Führen Sie dazu folgende Schritte aus: 1. Stecken Sie den DTL+ G2 in einen USBAnschluss Ihres Notebooks oder Desktops ein und geben Sie Ihr Passwort ein (siehe Abb. 4.1.) 2. Geben Sie Ihr Passwort ein und klicken Sie zum Fortfahren auf ‘Login’. Abb. 4.1 – Anmeldefenster • Wenn das eingegebene Passwort korrekt ist, wird der DTL+ G2 freigegeben und Sie können ihn benutzen. • Wenn ein falsches Passwort eingegeben wurde, wird mit einer Fehlernachricht unter dem Feld ‘Hinweis’ angezeigt, dass das Einloggen fehlgeschlagen ist (siehe Abb. 4.2.) Wenn das Passwort zum Einloggen falsch war, haben Sie die Möglichkeit, es erneut einzugeben. Das integrierte Sicherheitsmodul registriert alle fehlgeschlagenen Loginversuche*. Wenn die voreingestellte Anzahl von 10 fehlgeschlagenen Loginversuchen erreicht wurde, wird der DTL+ G2 gesperrt und die sichere Datenpartition muss vor der weiteren Benutzung neu formatiert werden. Dokument Nr. 48002017-001.A03 ® DataTraveler Locker+ G2 Seite 9 von 25 DIES BEDEUTET, DASS ALLE AUF DEM DTL+ G2 GESPEICHERTEN DATEN VERLORENGEHEN. Weitere Einzelheiten zu dieser Funktion siehe ‘Sperrfunktion’ auf Seite 20. Abb. 4.2 – Fehlgeschlagene Anmeldung *Hinweis: Der Zähler für fehlgeschlagene Loginversuche wird nach Eingabe des korrekten Passworts zurückgesetzt. Geräteoptionen (Windows Umgebung) Solange Sie im Gerät eingeloggt sind, wird das Symbol ‘DTL+ G2’ in der rechten Ecke der Windows Taskleiste angezeigt (Abb. 5.1.) (Hinweis: Windows 7 Anwender müssen zum Aufrufen des ‘DTL+ G2’ Symbols in der Taskleiste auf den Pfeil nach oben klicken (Abb. 5.2.) Nach einmaligem Klicken auf das DTL+ G2 Symbol wird folgendes Menü angezeigt: Abb. 5.1 – DTL+ G2 Symbol in Taskleiste (Windows XP Anwender) Abb. 5.2 – DTL+ G2 Symbol in Taskleiste (Windows 7 Anwender) DTL+ G2 Einstellungen Dokument Nr. 48002017-001.A03 ® DataTraveler Locker+ G2 Seite 10 von 25 • • • Sie können Ihr Passwort bzw. Ihren Hinweis ändern (Abb. 5.3) Sie können Kontaktdaten hinzufügen, ansehen oder ändern (Abb. 5.4) Sie können die gewählte Sprache ändern (Abb. 5.5) (Hinweis: Aus Sicherheitsgründen müssen Sie zum Aktualisieren bzw. Modifizieren dieser Einstellungen jeweils Ihr aktuelles DTL+ G2 Passwort eingeben.) Abbildung 5.3. Passwort ändern Abbildung 5.4. Kontaktinformationen Abbildung 5.5. Sprache wählen DTL+ G2 durchsuchen • Wenn Sie eingeloggt sind, können Sie mit dieser Funktion den Inhalt der sicheren Datenpartition durchsuchen. DTL+ G2* formatieren • Mit dieser Funktion können Sie die sichere Datenpartition formatieren (Achtung: Hierbei werden alle Daten gelöscht.) (Abb. 5.7) Online Support (Erfordert Internetanschluss) • Öffnet Ihren Internet-Browser und navigiert Sie zu http://www.kingston.com/support/, wo Sie Zugang zu weiteren SupportInformationen haben. Abb. 5.7 – Warnung bei Formatierung Über DTL+ G2 Dokument Nr. 48002017-001.A03 ® DataTraveler Locker+ G2 Seite 11 von 25 • Enthält spezifische Angaben über den DTL+ G2, einschließlich Versionsangaben über die Anwendung und die Firmware (Abb. 5.8) DTL+ G2 herunterfahren • Fährt den DTL+ G2 ordnungsgemäß herunter, damit Sie ihn sicher aus Ihrem System entfernen können Abb. 5.8 – Über DTL+ G2 (Empfehlung: Nach dem Herunterfahren Ihres DTL+ G2 empfiehlt es sich immer, den Host-Computer, in dem Ihr Laufwerk eingesteckt war, herunterzufahren oder neu zu starten. Dies ist vor allem anzuraten, wenn Sie es an einem allgemein zugänglichen oder mit mehreren Personen gemeinsam genutzten Computer eingesteckt hatten.) *Hinweis: In Windows Vista und in Windows 7 müssen Sie Ihr aktuelles DTL+ G2 Passwort eingeben - Abschnitt Windows abgeschlossen Installation & Einrichtung (Mac Umgebung) Stecken Sie den DTL+ G2 in einen freien USB-Anschluss Ihres Notebooks oder Desktops ein und warten Sie, bis das Mac Betriebssystem ihn erkannt hat. Dies wird durch das DTLplus Volumensymbol am Desktop angezeigt, siehe Abb. 6.1. 1. Doppelklicken Sie auf das CD-ROM-Symbol des DTL+ G2. 2. Doppelklicken Sie auf die im Fenster angezeigte Mac Datei, siehe Abb. 6.2. 3. Doppelklicken Sie auf die im Fenster angezeigte DTLplus Anwendung, siehe Abb. 6.3. Dadurch wird der Installationsprozess gestartet. Dokument Nr. 48002017-001.A03 ® DataTraveler Locker+ G2 Abb. 6.1 – DTLplus Seite 12 von 25 Abb. 6.2 – DTL+ G2 Inhalt Abb. 6.3 – DTL+ G2 Anwendung Installationseinrichtung (Mac Umgebung) 1. Wählen Sie die von Ihnen gewünschte Sprache aus dem Drop-Down-Menü und klicken Sie auf ‘Weiter’ (Abb. 7.1.) Dokument Nr. 48002017-001.A03 ® DataTraveler Locker+ G2 Seite 13 von 25 Abb. 7.1 – Sprachauswahl 2. Lesen und akzeptieren Sie die Lizenzvereinbarung und klicken Sie auf ‘Weiter’ (Abb. 7.2.) (Hinweis: Die Schaltfläche ‘Weiter’ wird erst aktiviert, nachdem Sie die Lizenzvereinbarung akzeptiert haben.) Abb. 7.2– Lizenzvereinbarung 3. Erstellen Sie ein Passwort, um Ihre Daten auf dem DTL+ G2 zu schützen. Geben Sie es im Feld ‘Passwort’ ein und erneut im Feld ‘Passwortbestätigung’ siehe Abb. 7.3. Bevor Sie mit Dokument Nr. 48002017-001.A03 ® DataTraveler Locker+ G2 Seite 14 von 25 der Installationseinrichtung fortfahren können, müssen Sie ein Passwort nach folgenden Kriterien eingeben: 1. Das Passwort muss mindestens 6 Zeichen lang sein (bis zu 16 Zeichen.) 2. Das Passwort muss 3 (drei) der folgenden Kriterien enthalten: - GROSSBUCHSTABE, Kleinbuchstabe, Ziffer und/oder Sonderzeichen (!, $ usw.) Sie können auch einen Passwort-Hinweis eingeben, es ist jedoch kein Pflichtfeld. Der Passwort-Hinweis kann eine nützliche Hilfestellung zur Erinnerung an das Passwort sein, wenn Sie es vergessen haben sollten. (Hinweis: Der Hinweis und das Passwort dürfen NICHT identisch sein.) Abb. 7.3 – Passworteinrichtung Dokument Nr. 48002017-001.A03 ® DataTraveler Locker+ G2 Seite 15 von 25 4. Geben Sie Ihre Kontaktdaten in den angezeigten Textfeldern ein (siehe Abb. 7.4) (Hinweis: Die in diesen Feldern eingegebenen Daten dürfen NICHT die in Schritt 3 eingegebene Passwort-Zeichenfolge enthalten. Das Ausfüllen dieser Felder ist optional und sie können auch leer belassen werden.) • Im Feld ‘Name’ können bis zu 32 Zeichen eingegeben werden, das genaue Passwort darf jedoch nicht darin enthalten sein. • Im Feld ‘Firma’ können bis zu 32 Zeichen eingegeben werden, das genaue Passwort darf jedoch nicht darin enthalten sein. • Im Feld ‘Adresse’ können bis zu 156 Zeichen eingegeben werden, das genaue Passwort darf jedoch nicht darin enthalten sein. Abb. 7.4 – Kontaktdaten Dokument Nr. 48002017-001.A03 ® DataTraveler Locker+ G2 Seite 16 von 25 5. Klicken Sie zum Abschließen des Installationsprozesses für das Gerät auf ‘Fertigstellen’. Der DTL+ G2 wird jetzt die sichere Datenpartition formatieren (Abb. 7.5) und anzeigen, wenn dieser Vorgang abgeschlossen ist (Abb. 7.6.) 6. Klicken Sie zum Fortfahren auf ‘OK’. Abb. 7.5 – DTL+ G2 Formatierung Abb. 7.6 – Formatierung fertiggestellt Der Installationsprozess ist abgeschlossen. Dokument Nr. 48002017-001.A03 ® DataTraveler Locker+ G2 Seite 17 von 25 Verwendung des Geräts (Mac Umgebung) Nach Abschluss des Installationsprozesses des DTL+ G2 können Sie sich mit Ihrem Passwort im Gerät einloggen, haben Zugriff auf die sichere Datenpartition und können mit dem Stick arbeiten. Führen Sie dazu folgende Schritte aus: 1. Stecken Sie den DTL+ G2 in einen USBAnschluss Ihres Notebooks oder Desktops ein und geben Sie Ihr Passwort ein (siehe Abb. 8.1.) 2. Geben Sie Ihr Passwort ein und klicken Sie zum Fortfahren auf ‘Login’. • Wenn das eingegebene Passwort korrekt ist, wird der DTL+ G2 freigegeben und Sie können ihn benutzen. Abb. 8. – Anmeldefenster • Wenn ein falsches Passwort eingegeben wurde, wird mit einer Fehlernachricht unter dem Feld ‘Hinweis’ angezeigt, dass das Einloggen fehlgeschlagen ist (siehe Abb. 8.2.) Wenn das Passwort zum Einloggen falsch war, haben Sie die Möglichkeit, es erneut einzugeben. Das integrierte Sicherheitsmodul registriert alle fehlgeschlagenen Loginversuche*. Wenn die voreingestellte Anzahl von 10 fehlgeschlagenen Loginversuchen erreicht wurde, wird der DTL+ G2 gesperrt und die sichere Datenpartition muss vor der weiteren Benutzung neu formatiert werden. DIES BEDEUTET, DASS ALLE AUF DEM DTL+ G2 GESPEICHERTEN DATEN VERLORENGEHEN. Dokument Nr. 48002017-001.A03 ® DataTraveler Locker+ G2 Seite 18 von 25 Weitere Einzelheiten zu dieser Funktion siehe ‘Sperrfunktion’ auf Seite 20. Abb. 8.2 – Fehlgeschlagene Anmeldung *Hinweis: Der Zähler für fehlgeschlagene Loginversuche wird nach Eingabe des korrekten Passworts zurückgesetzt. Geräteoptionen (Mac Umgebung) Wenn Sie im Gerät eingeloggt sind, wird im Mac OS X Dock das Symbol ‘DTLplus_Launcher’ angezeigt, siehe nachstehende Abb. 9.1: Abb. 9.1 – DTL+ G2 Symbol in Mac OS X Dock Halten Sie die ‘Strg’ Taste Ihrer Tastatur gedrückt und klicken Sie einmal auf das Symbol ‘DTLplus_Launcher’; das in Abb. 9.2 abgebildete Menü wird rechts angezeigt. DTL+ G2 Einstellungen • • • Sie können Ihr Passwort bzw. Ihren Hinweis ändern (Abb. 9.3) Sie können Kontaktdaten hinzufügen, ansehen oder ändern (Abb. 9.4) Sie können die gewünschte Sprache ändern (Abb. 9.5) Dokument Nr. 48002017-001.A03 ® DataTraveler Locker+ G2 Abbildung 9.2 DTL+ G2 Optionen Seite 19 von 25 Abbildung 9.3 Passwort ändern Abbildung 9.4 Kontaktinformationen Abbildung 9.5 Sprache wählen (Hinweis: Aus Sicherheitsgründen müssen Sie zum Aktualisieren bzw. Modifizieren dieser Einstellungen jeweils Ihr aktuelles DTL+ G2 Passwort eingeben.) DTL+ G2 durchsuchen • Wenn Sie eingeloggt sind, können Sie mit dieser Funktion den Inhalt der sicheren Datenpartition durchsuchen. DTL+ G2 formatieren • Mit dieser Funktion können Sie die sichere Datenpartition formatieren (Achtung: Hierbei werden alle Daten gelöscht.) (Abb. 9.7) Online Support (Erfordert Internetanschluss) • Öffnet Ihren Internet-Browser und navigiert Sie zu http://www.kingston.com/support/, wo Sie Zugang zu weiteren SupportInformationen haben. Dokument Nr. 48002017-001.A03 ® DataTraveler Locker+ G2 Abb. 9.7 – Warnung bei Formatierung Seite 20 von 25 Über DTL+ G2 • Enthält spezifische Angaben über den DTL+ G2, einschließlich Versionsangaben über die Anwendung und die Firmware (Abb. 9.8) DTL+ G2 herunterfahren • Fährt den DTL+ G2 ordnungsgemäß herunter, damit Sie ihn sicher aus Ihrem System entfernen können Abb. 9.8 – Über DTL+ G2 (Empfehlung: Nach dem Herunterfahren Ihres DTL+ G2 empfiehlt es sich immer, den Host-Computer, in dem Ihr Laufwerk eingesteckt war, herunterzufahren oder neu zu starten. Dies ist vor allem anzuraten, wenn Sie es an einem allgemein zugänglichen oder mit mehreren Personen gemeinsam genutzten Computer eingesteckt hatten.) - Abschnitt Mac abgeschlossen Hilfe und Fehlerbehebung Sperrfunktion Der DTL+ G2 enthält eine Sicherheitsfunktion, die den unbefugten Zugriff auf die Datenpartition verhindert, wenn die maximale Anzahl aufeinanderfolgender fehlgeschlagener Loginversuche (Kurzform MaxNoA) erreicht wurde; standardmäßig ist die “Out-of-Box” Konfiguration auf einen Wert von 10 (Anzahl der Versuche) festgelegt. Der 'Sperrzähler' registriert jeden fehlgeschlagenen Loginversuch und kann auf zwei Wegen zurückgesetzt werden: 1) Durch erfolgreiches Einloggen vor Erreichen des MaxNoA, oder 2) Erreichen des MaxNoA und Durchführung einer Geräteformatierung.* Dokument Nr. 48002017-001.A03 ® DataTraveler Locker+ G2 Seite 21 von 25 Wenn ein falsches Passwort eingegeben wurde, wird mit einer Fehlernachricht unter dem Feld ‘Hinweis’ angezeigt, dass das Einloggen fehlgeschlagen ist. Siehe Abb. 10.1. Wenn der Anmeldeversuch zum 7. Mal fehlgeschlagen ist, wird eine weitere Fehlernachricht mit der Mitteilung angezeigt, dass Ihnen noch 3 Versuche bis zum Erreichen des MaxNoA bleiben (der standardmäßig auf 10 eingestellt ist.) Siehe Abb. 10.2. Nach dem10. fehlgeschlagenen Anmeldeversuch wird der DTL+ G2 die Datenpartition dauerhaft sperren und vor der nächsten Benutzung muss eine Geräteformatierung durchgeführt werden. Dies bedeutet, dass alle auf dem DTL+ G2 gespeicherten Daten verlorengehen und Sie ein neues Passwort erstellen müssen. Abb. 10.1 – Fehlgeschlagene Anmeldung Diese Sicherheitsmaßnahme begrenzt die Möglichkeit von Unbefugten, unzählige Loginversuche durchzuführen, um Zugang zu Ihren sensiblen Daten zu erhalten. Auch wenn Sie der Besitzer des DTL+ G2 sind und Ihr Passwort vergessen haben, werden dieselben Sicherheitsmaßnahmen ausgeführt, einschließlich der Geräteformatierung.* Weitere Einzelheiten zu dieser Funktion siehe ‘Sperrfunktion’ auf Seite 21. Abb. 10.2 – 7. Fehlgeschlagene Anmeldung *Hinweis: Bei einer Geräteformatierung werden ALLE in der sicheren Datenpartition des DTL+ G2 gespeicherten Daten gelöscht. Passwort vergessen Dokument Nr. 48002017-001.A03 ® DataTraveler Locker+ G2 Seite 22 von 25 Wenn Sie Ihr Passwort vergessen haben, können Sie auf den Link ‘Passwort zurücksetzen’ klicken, der beim Starten des DTLplus_Launcher im Anmeldefenster angezeigt wird (siehe Abb. 10.3.) Mit dieser Option können Sie ein neues Passwort erstellen, jedoch wird der DTL+ G2 zum Schutz Ihrer Daten formatiert. Dies bedeutet, dass Ihre gesamten Daten bei der Durchführung gelöscht werden.* Wenn Sie auf ‘Passwort zurücksetzen’ klicken, wird eine Nachricht mit der Frage angezeigt, ob Sie vor dem Durchführen der Formatierung ein neues Passwort eingeben möchten. (Abb. 10.4) Sie haben jetzt die Wahl 1) dies durch Klicken auf ‘OK’ zu bestätigen oder 2) durch Klicken auf ‘Abbrechen’ abzubrechen und zum Anmeldefenster zurückzukehren. Abb. 10.3 – Passwort vergessen Wenn Sie Fortfahren gewählt haben, werden Sie aufgefordert, ein neues vollständiges Passwort und einen neuen Hinweis einzugeben. Der Hinweis ist kein Pflichtfeld, kann jedoch eine nützliche Hilfestellung zur Erinnerung an das Passwort sein, wenn Sie es vergessen haben sollten. Abb. 10.4 – Abfrage vor Formatierung (Hinweis: Der Hinweis und das Passwort des DTL+ G2 dürfen NICHT identisch sein.) Dokument Nr. 48002017-001.A03 ® DataTraveler Locker+ G2 Seite 23 von 25 *Hinweis: Bei einer Geräteformatierung werden ALLE in der sicheren Datenpartition des DTL+ G2 gespeicherten Daten gelöscht. Konflikt von Laufwerksbuchstaben (Windows Betriebssystem) Wie bereits im Abschnitt ‘Systemanforderungen’ dieses Handbuchs (auf Seite 3) erwähnt, benötigt der DTL+ G2 2 freie, aufeinanderfolgende Laufwerksbuchstaben NACH dem letzten physischen Speicher, der vor der ‘Lücke’ in in den Laufwerksbuchstabenzuweisungen erscheint (siehe Abb. 10.5.) Dies bezieht sich NICHT auf Netzwerkfreigaben, da diese speziell für Benutzerprofile sind und sich nicht auf das System-Hardwareprofil selbst beziehen und daher im Betriebssystem als verfügbar erscheinen. Dies bedeutet, dass Windows dem DTL+ G2 einen Laufwerksbuchstaben zuordnen kann, der bereits durch eine Netzwerkfreigabe oder einen Universal Naming Convention (UNC) Pfad verwendet wird, wodurch ein Laufwerksbuchstabenkonflikt entsteht. Sollte dies passiert sein, wenden Sie sich für die Änderung von Laufwerkbuchstabenzuweisungen in Windows Disk Management (Administratorrechte erforderlich) bitte an Ihren Administrator oder an die Helpdesk-Abteilung. Abb. 10.5 – Mein Computer In diesem Beispiel verwendet der DTL+ G2 Laufwerk F:. Es ist das erste verfügbare Laufwerk nach Laufwerk E: (dem letzten physikalischen Laufwerk vor der Laufwerksbuchstaben-Lücke). Da der Buchstabe G: eine Netzwerkfreigabe und kein Teil des Hardware-Profils ist, versucht der DTL+ G2 möglicherweise, ihn als zweiten Laufwerksbuchstaben zu verwenden, was zu einem Konflikt führen würde. Wenn es in Ihrem System keine Netzwerkfreigaben gibt und der DTL+ G2 dennoch nicht geladen wird, hält möglicherweise ein Kartenleser, ein Wechselmedium oder ein früher installiertes Gerät die Laufwerksbuchstabenzuordnung und verursacht deshalb noch einen Konflikt. Dokument Nr. 48002017-001.A03 ® DataTraveler Locker+ G2 Seite 24 von 25 Beachten Sie bitte, dass sich das Drive Letter Management (DLM) in Windows XP SP3, Vista und 7 erheblich verbessert hat, so dass dieser Fehler möglicherweise nicht auftritt. Wenn Sie den Konflikt nicht lösen können, wenden Sie sich für weitere Unterstützung bitte an die Abteilung für technischen Support bei Kingston. ©2011 Kingston Technology Europe Ltd und Kingston Digital Europe Ltd. Alle Rechte vorbehalten. Alle Marken und eingetragenen Marken sind Eigentum ihrer jeweiligen Besitzer. Dokument Nr. 48002017-001.A03 ® DataTraveler Locker+ G2 Seite 25 von 25 DataTraveler® Locker+ G2 – Manuel d'utilisation Document Nº. 48002017-001.A03 ® DataTraveler Locker+ G2 Page 1 sur 22 Table des Matières À PROPOS DE CE MANUEL D'UTILISATION......................................................................... 3 CONFIGURATION SYSTÈME .................................................................................................. 3 RECOMMANDATIONS ............................................................................................................. 3 CONFIGURATION (ENVIRONNEMENT WINDOWS)............................................................... 3 INITIALISATION DU PÉRIPHÉRIQUE (ENVIRONNEMENT WINDOWS)................................ 4 UTILISATION DU PÉRIPHÉRIQUE (ENVIRONNEMENT WINDOWS) .................................... 9 OPTIONS DU PÉRIPHÉRIQUE(ENVIRONNEMENT WINDOWS) ......................................... 10 CONFIGURATION (ENVIRONNEMENT MAC) ...................................................................... 12 INITIALISATION DU PÉRIPHÉRIQUE (ENVIRONNEMENT MAC) ....................................... 13 UTILISATION DU PÉRIPHÉRIQUE(ENVIRONNEMENT MAC) ............................................. 17 OPTIONS DU PÉRIPHÉRIQUE (ENVIRONNEMENT MAC) .................................................. 18 AIDE ET DÉPANNAGE........................................................................................................... 20 Verrouillage du périphérique ...................................................................................................................... 20 Mot de passe oublié ..................................................................................................................................... 21 Conflit de lettres de lecteur (Environnement Windows) .......................................................................... 22 Document Nº. 48002017-001.A03 DataTraveler® Locker+ G2 Page 2 sur 22 À propos de ce manuel d'utilisation Ce manuel d'utilisation est destiné à la clé USB DataTraveler® Locker+ G2 (ou DTL+ G2 dans ce document) basée sur la version en sortie d'usine, sans personnalisation. Configuration système Plateforme PC Processeur Pentium III (ou équivalent ou plus rapide) 15Mo d'espace disque libre Port USB 2.0 / 3.0 Deux lettres de lecteur consécutives après le dernier disque physique* Plateforme Mac Systèmes d'exploitation supportés Windows® 7 Windows® Vista SP1, SP2 Windows® XP SP2, SP3 Prise en charge des systèmes d'exploitation 15Mo d'espace disque libre Port USB 2.0 / 3.0 Mac OS X 10.5.x Mac OS X 10.6.x Mac OS X 10.7x Recommandations Pour que la DTL+ G2 bénéficie d'une alimentation suffisante, elle doit être insérée sur un port USB directement sur un ordinateur portable ou de bureau, comme indiqué à la Figure 1.1. Évitez de brancher la DTL+ G2 sur un périphérique équipé d'un port USB, par exemple un clavier ou un concentrateur USB alimenté, comme indiqué à la Figure 1.2. Figure 1.1 – Utilisation conseillée Figure 1.2 – Déconseillé *Remarque : Voir la section "Conflit de lettres de lecteur" page 26. Configuration (Environnement Windows) Document Nº. 48002017-001.A03 DataTraveler® Locker+ G2 Page 3 sur 22 1. Insérez la DTL+ G2 dans un port USB disponible de votre ordinateur de bureau ou portable et attendez que Windows la détecte. Les utilisateurs de Windows XP verront s'afficher une notification Nouveau matériel détecté, comme indiquée à la Figure 2.1. Figure 2.1 – Nouveau matériel détecté (Windows XP) Les utilisateurs de Windows Vista/ 7 verront s'afficher une notification de pilote de périphérique, comme indiquée à la Figure 2.2. Lorsque la détection du nouveau matériel est terminée, Windows lance le processus d'initialisation. Si la fonction d'exécution automatique de Windows est activée, vous pouvez ignorer l'étape suivante et passer à la page 5 – Initialisation du périphérique. Figure 2.2 – Installation du pilote de périphérique (Windows Vista/7) Si la fonction d'exécution automatique de Windows est désactivée, comme c'est le cas par défaut sous Windows 7, une fenêtre AutoPlay sera affichée (voir Figure 2.3). 2. Sélectionnez l'option Exécuter DTLplus_Launcher.exe. Si la fonction AutoPlay de Windows ne démarre pas, naviguez sur le CD-ROM (Figure 2.4) et lancez manuellement le programme DTLplus_Launcher. Le processus d’installation démarrera. Figure 2.3 – Fenêtre AutoPlay (Windows Vista/7) (Remarque : Les options du Menu affiché dans la fenêtre AutoPlay peuvent varier selon les programmes installés sur votre ordinateur. Si elle est activée, l'exécution automatique lancera automatiquement le processus d'initialisation). Figure 2.4 – Contenus de la DTL+ G2 Initialisation du périphérique (Environnement Windows) Document Nº. 48002017-001.A03 DataTraveler® Locker+ G2 Page 4 sur 22 1. Sélectionnez votre langue préférée dans le menu déroulant et cliquez sur Suivant (Figure 3.1). Figure 3.1 – Sélection de la langue 2. Lisez l'accord de licence et cliquez sur Suivant (Figure 3.2). (Remarque : Vous devez accepter l'accord de licence pour continuer. Sinon, le bouton "Suivant" reste désactivé). Figure 3.2 – Accord de licence Document Nº. 48002017-001.A03 DataTraveler® Locker+ G2 Page 5 sur 22 3. Créez un mot de passe pour protéger les données sur votre DTL+ G2. Saisissez-le dans le champ Mot de passe, puis répétez-le dans le champ Confirmation du mot de passe, comme indiqué à la Figure 3.3. Le mot de passe doit respecter les critères suivants pour que le processus d'initialisation vous autorise à continuer : 1. Le mot de passe doit contenir entre 6 et 16 caractères. 2. Le mot de passe doit utiliser trois (3) des critères suivants : - MAJUSCULES, minuscules, caractères numériques, et/ou caractères spéciaux (!, $, etc). Vous pouvez aussi utiliser l'indice du mot passe, mais ce champ n'est pas obligatoire. L'indice pourra vous aider à vous souvenir du mot de passe oublié. (Remarque : L'indice NE DOIT PAS être une copie exacte du mot de passe de la connexion à la DTL+ G2). Figure 3.3 – Configuration du mot de passe Document Nº. 48002017-001.A03 DataTraveler® Locker+ G2 Page 6 sur 22 4. Saisissez vos informations personnelles dans les champs de texte affichés (voir Figure 3.4) (Remarque : Les informations saisies dans ces champs NE DOIVENT PAS contenir la chaîne des caractères du mot de passe, tel que saisi à l'étape 3. Ces champs sont optionnels et peuvent être laissés vides, si vous le souhaitez). Le champ Nom peut contenir jusqu'à 32 caractères, mais ne doit pas contenir le mot de passe exact. Le champ Entreprise peut contenir jusqu'à 32 caractères, mais ne doit pas contenir le mot de passe exact. Le champ Détails peut contenir jusqu'à 156 caractères, mais ne doit pas contenir le mot de passe exact. Figure 3.4 – Informations personnelles 5. Cliquez sur Terminer pour terminer le processus d'initialisation du périphérique. Document Nº. 48002017-001.A03 DataTraveler® Locker+ G2 Page 7 sur 22 La DTL+ G2 formate ensuite la partition des données sécurisées ( Figure 3.5) et vous avertit lorsque cette opération est terminée (Figure 3.6). Remarque : Si vous utilisez Windows XP en mode Non-Admin, le programme de formatage peut durer une minute au maximum.* 6. Cliquez sur OK pour continuer. Figure 3.5 – Formatage de la DTL+ G2 Figure 3.6 – Formatage terminé Initialisation terminée. *Remarque : La durée du formatage peut varier selon l'ordinateur et la capacité de la DTL+ G2. Document Nº. 48002017-001.A03 DataTraveler® Locker+ G2 Page 8 sur 22 Utilisation du périphérique (Environnement Windows) Lorsque l'initialisation de la DTL+ G2 est terminée, vous pouvez accéder avec votre mot de passe à la partition des données sécurisées et utiliser ses fonctions. Pour cela, suivez les instructions ci-dessous. 1. Insérez la DTL+ G2 dans un port USB, sur un ordinateur portable ou de bureau, et saisissez votre mot de passe (voir Figure 4.1). 2. Après avoir saisi le mot de passe, cliquez sur le bouton Connexion pour continuer. Figure 4.1 – Fenêtre de connexion Si le mot de passe est correct, la DTL+ G2 autorise l'accès et vous pouvez l'utiliser. Si le mot de passe est erroné, un message d'erreur s'affiche sous le champ Indice, indiquant un échec de la connexion (voir Figure 4.2). Pendant la procédure de connexion, si un mot de passe erroné est saisi, vous pouvez immédiatement réessayer. Mais une fonction de sécurité intégrée gère le nombre de tentatives de connexion*. Après 10 tentatives de connexion erronées, la DTL+ G2 se verrouille et ne pourra être utilisée qu'après un formatage de la partition des données sécurisées. PAR CONSÉQUENT, TOUTES LES DONNÉES QUE LA DTL+ G2 CONTIENT SERONT DÉTRUITES. Pour en savoir plus sur cette fonction, voir Verrouillage du périphérique, page 24. Figure 4.2 – Échec de la connexion *Remarque : Lorsque la connexion entre l'ordinateur et la clé est établie, le compteur de tentatives est remis à zéro. Document Nº. 48002017-001.A03 DataTraveler® Locker+ G2 Page 9 sur 22 Options du périphérique (Environnement Windows) Tant que vous êtes connecté au périphérique, une icône DTL+ G2 est affichée dans le coin supérieur droit de la barre des tâches Windows (Figure 5.1). (Remarque : Les utilisateurs Windows 7 doivent cliquer sur le bouton Flèche haute dans la barre des tâches pour accéder à l'icône DTL+ G2 (Figure 5.2.) Cliquez une fois sur l'icône DTL+ G2 pour afficher le menu suivant : Figure 5.1 – Icône DTL+ G2 dans la barre des tâches Figure 5.2 – Icône DTL+ G2 dans la barre des tâches (Utilisateurs Windows XP) (Utilisateurs Windows 7) Paramètres de la DTL+ G2 Vous pouvez modifier votre mot de passe et/ou l'indice (Figure 5.3) Vous pouvez ajouter/ afficher/ modifier vos informations personnelles (Figure 5.4) Vous pouvez modifier la langue sélectionnée (Figure 5.5) (Remarque : Pour des raisons de sécurité, le mot de passe actuel de votre DTL+ G2 vous sera demandé pour modifier ces paramètres). Figure 5.3 Modifier le mot de passe Document Nº. 48002017-001.A03 Figure 5.4 Informations personnelles DataTraveler® Locker+ G2 Figure 5.5 Sélectionnez la langue Page 10 sur 22 Parcourir la DTL+ G2 Vous pouvez parcourir le contenu de la partition des données sécurisées pendant que vous êtes connecté. Formater la DTL+ G2* Vous pouvez formater la partition des données sécurisées (Avertissement : Toutes les données seront détruites). (Figure 5.7) Assistance en ligne (nécessite une connexion internet) Cette fonction ouvre votre navigateur internet et affiche la page http://www.kingston.com/support/ pour vous permettre de consulter les informations supplémentaires de l'assistance. Figure 5.7 – Avertissement avant formatage À propos de la DTL+ G2 Cette section affiche des informations spécifiques à la DTL+ G2, incluant les données des versions de l'application et du firmware (Figure 5.8) Fermeture de la DTL+ G2 Permet de fermer correctement la DTL+ G2 avant de la déconnecter physiquement du système et en toute sécurité. Figure 5.8 – À propos de la DTL+ G2 (Recommandation : Après la fermeture de votre DTL+ G2, il est conseillé de fermer ou de redémarrer l’ordinateur auquel votre clé USB était connectée, en particulier si vous êtes dans un lieu public, ou si vous utilisez un poste partagé par plusieurs personnes.) *Remarque : Le mot de passe actuel de votre DTL+ G2 est nécessaire sous Windows Vista et Windows 7 - Fin de la section Windows - Document Nº. 48002017-001.A03 DataTraveler® Locker+ G2 Page 11 sur 22 Configuration (Environnement Mac) Insérez la DTL+ G2 dans un port USB disponible sur votre ordinateur de bureau ou portable et attendez que le système d'exploitation Mac la détecte. Lorsque la clé est détectée, un volume DTLplus est affiché sur le bureau, voir la Figure 6.1. 1. Double-cliquez sur l'icône CD-ROM DTL+ G2. 2. Double-cliquez sur le dossier Mac affiché dans la fenêtre indiquée à la Figure 6.2. 3. Double-cliquez sur l'icône d'application DTLplus affichée dans la fenêtre indiquée à la Figure 6.3. Le processus d’initialisation démarrera. Figure 6.2 – Contenus de la DTL+ G2 Document Nº. 48002017-001.A03 DataTraveler® Locker+ G2 Figure 6.1 – DTLplus Figure 6.3 – Application DTL+ G2 Page 12 sur 22 Initialisation du périphérique (Environnement Mac) 1. Sélectionnez votre langue préférée dans le menu déroulant et cliquez sur Suivant (Figure 7.1). Figure 7.1 – Sélection de la langue 2. Lisez l'accord de licence et cliquez sur Suivant (Figure 7.2). (Remarque : Vous devez accepter l'accord de licence pour continuer. Sinon, le bouton "Suivant" reste désactivé). Figure 7.2 – Accord de licence Document Nº. 48002017-001.A03 DataTraveler® Locker+ G2 Page 13 sur 22 3. Créez un mot de passe pour protéger les données sur votre DTL+ G2. Saisissez-le dans le champ Mot de passe, puis répétez-le dans le champ Confirmation du mot de passe, comme indiqué à la Figure 7.3. Le mot de passe doit respecter les critères suivants pour que le processus d'initialisation vous autorise à continuer : 1. Le mot de passe doit contenir entre 6 et 16 caractères. 2. Le mot de passe doit respecter trois (3) des critères suivants : - MAJUSCULES, minuscules, caractères numériques, et/ou caractères spéciaux (!, $, etc). Vous pouvez aussi utiliser l'indice du mot passe, mais ce champ n'est pas obligatoire. L'indice pourra vous aider à vous souvenir du mot de passe oublié. (Remarque : L'indice NE DOIT PAS être une copie exacte du mot de passe de la connexion à la DTL+ G2). Figure 7.3 – Configuration du mot de passe Document Nº. 48002017-001.A03 DataTraveler® Locker+ G2 Page 14 sur 22 4. Saisissez vos informations personnelles dans les champs de texte affichés (voir Figure 7.4) (Remarque : Les informations saisies dans ces champs NE DOIVENT PAS contenir la chaîne des caractères du mot de passe, tel que saisi à l'étape 3. Ces champs sont optionnels et peuvent être vides, si vous le souhaitez). Le champ Nom peut contenir jusqu'à 32 caractères, mais ne doit pas contenir le mot de passe exact. Le champ Entreprise peut contenir jusqu'à 32 caractères, mais ne doit pas contenir le mot de passe exact. Le champ Détails peut contenir jusqu'à 156 caractères, mais ne doit pas contenir le mot de passe exact. Figure 7.4 – Informations personnelles 5. Cliquez sur Terminer pour terminer le processus d'initialisation du périphérique. Document Nº. 48002017-001.A03 DataTraveler® Locker+ G2 Page 15 sur 22 La DTL+ G2 formate ensuite la partition des données sécurisées (Figure 7.5) et vous avertit lorsque cette opération est terminée (Figure 7.6). 6. Cliquez sur OK pour continuer. Figure 7.5 – Formatage de la DTL+ G2 Figure 7.6 – Formatage terminé Initialisation terminée. Document Nº. 48002017-001.A03 DataTraveler® Locker+ G2 Page 16 sur 22 Utilisation du périphérique(Environnement Mac) Lorsque l'initialisation de la DTL+ G2 est terminée, vous pouvez accéder avec votre mot de passe à la partition des données sécurisées et utiliser ses fonctions. Pour cela, suivez les instructions ci-dessous. 1. Insérez la DTL+ G2 dans un port USB, sur un ordinateur portable ou de bureau, et saisissez votre mot de passe (voir Figure 8.1). 2. Après avoir saisi le mot de passe, cliquez sur le bouton Connexion pour continuer. Si le mot de passe est correct, la DTL+ G2 autorise l'accès et vous pouvez l'utiliser. Figure 8.1 – Fenêtre de connexion Si le mot de passe est erroné, un message d'erreur s'affiche sous le champ Indice, indiquant un échec de la connexion (voir Figure 8.2). Pendant la procédure de connexion, si un mot de passe erroné est saisi, vous pouvez immédiatement réessayer. Mais une fonction de sécurité intégrée gère le nombre de tentatives de connexion*. Après 10 tentatives de connexion erronées, la DTL+ G2 se verrouille et ne pourra être utilisée qu'après un formatage de la partition des données sécurisées. PAR CONSÉQUENT, TOUTES LES DONNÉES QUE LA DTL+ G2 CONTIENT SERONT DÉTRUITES. Pour en savoir plus sur cette fonction, voir Verrouillage du périphérique, page 24. Figure 8.2 – Échec de connexion *Remarque : Lorsque la connexion entre l'ordinateur et la clé est établie, le compteur de tentatives est remis à zéro. Document Nº. 48002017-001.A03 DataTraveler® Locker+ G2 Page 17 sur 22 Options du périphérique (Environnement Mac) Tant que vous êtes connecté au périphérique, une icône DTLplus_Launcher est affichée dans le Dock Mac OS X (Figure 9.1). Figure 9.1 – Icône DTL+ G2 dans le Dock Mac OS X Maintenez la touche control du clavier et cliquez une fois sur l'icône DTLplus_Launcher pour afficher le menu indiqué à la Figure 9.2 à droite. Paramètres de la DTL+ G2 Vous pouvez modifier votre mot de passe et/ou l'indice (Figure 9.3) Vous pouvez ajouter/ afficher/ modifier vos informations personnelles (Figure 9.4) Vous pouvez modifier la langue sélectionnée (Figure 9.5) Figure 9.3 Modifier le mot de passe Figure 9.4 Informations personnelles Figure 9.2 Options DTL+ G2 Figure 9.5 Sélectionnez la langue (Remarque : Pour des raisons de sécurité, le mot de passe actuel de votre DTL+ G2 vous sera demandé pour modifier ces paramètres). Document Nº. 48002017-001.A03 DataTraveler® Locker+ G2 Page 18 sur 22 Parcourir la DTL+ G2 Vous pouvez parcourir le contenu de la partition des données sécurisées pendant que vous êtes connecté. Formater la DTL+ G2 Vous pouvez formater la partition des données sécurisées (Avertissement : Toutes les données seront détruites). (Figure 9.7) Assistance en ligne (nécessite une connexion internet) Cette fonction ouvre votre navigateur internet et affiche la page http://www.kingston.com/support/ pour vous permettre de consulter les informations supplémentaires de l'assistance. Figure 9.7 – Avertissement avant formatage À propos de la DTL+ G2 Cette section affiche des informations spécifiques à la DTL+ G2, incluant les données des versions de l'application et du firmware (Figure 9.8) Fermeture de la DTL+ G2 Permet de fermer correctement la DTL+ G2 avant de la déconnecter physiquement du système et en toute sécurité. Figure 9.8 – À propos de la DTL+ G2 (Recommandation : Après la fermeture de votre DTL+ G2, il est conseillé de fermer ou de redémarrer l’ordinateur auquel votre clé était connectée, en particulier si vous êtes dans un lieu public, ou si vous utilisez un poste partagé par plusieurs personnes.) - Fin de la section Mac - Document Nº. 48002017-001.A03 DataTraveler® Locker+ G2 Page 19 sur 22 Aide et dépannage Verrouillage du périphérique La DTL+ G2 est dotée d'une fonction de sécurité qui bloque tout accès non autorisé à la partition des données après un nombre prédéterminé de tentatives de connexion erronées consécutives (cette valeur est désignée par l'abréviation MaxNoA [max number of access]). La limite par défaut définie en usine est de 10 tentatives. Le compteur de tentatives enregistre chaque échec de connexion. Il est remis à zéro dans un des deux cas suivants : 1) Le mot de passe saisi est correct et la connexion à la clé USB est établie avant d'atteindre la limite MaxNoA ; ou 2) La limite MaxNoA est atteinte et le formatage de la clé USB a été exécuté.* Si le mot de passe est erroné, un message d'erreur s'affiche sous le champ Indice, indiquant un échec de la connexion. Voir la Figure 10.1. Après la septième tentative erronée consécutive, un message d'erreur supplémentaire avertit l'utilisateur qu'il lui reste trois tentatives avant d'atteindre la limite MaxNoA (définie à 10 tentatives par défaut). Voir la Figure 10.2. Après la dixième tentative de connexion erronée, la DTL+ G2 verrouille définitivement la partition des données et ne pourra être utilisée qu'après un formatage. Par conséquent, toutes les données présentes sur la DTL+ G2 seront détruites et vous devrez saisir un nouveau mot de passe. Figure 10.1 – Échec de connexion Cette mesure de sécurité évite qu'une personne non autorisée puisse tenter indéfiniment d'accéder à vos données sensibles. Si vous êtes le propriétaire de la DTL+ G2 et que vous avez oublié votre mot de passe, cette mesure de sécurité sera également appliquée et aboutira au formatage de la clé.* Pour en savoir plus sur cette fonction, voir Mot de passe oublié, page 25. Figure 10.2 – Septième échec de connexion *Remarque : Un formatage efface définitivement TOUTES les données enregistrées dans la partition sécurisée de la DTL+ G2. Document Nº. 48002017-001.A03 DataTraveler® Locker+ G2 Page 20 sur 22 Mot de passe oublié Si vous avez oublié votre mot de passe, vous pouvez cliquer sur le lien Réinitialiser le mot de passe, qui est affiché dans la fenêtre de connexion après le démarrage du DTLplus_Launcher (voir Figure 10.3). Cette option vous permet de créer un mot de passe, mais pour protéger vos données, la DTL+ G2 sera formatée. Par conséquent, ce processus effacera définitivement toutes vos données.* Lorsque vous cliquez sur le bouton Réinitialiser le mot de passe, un message (Figure 10.4) vous demande si vous souhaitez saisir un nouveau mot de passe avant le lancement du formatage. Vous pouvez alors 1) cliquer sur OK pour confirmer, ou 2) cliquer sur "Annuler" pour revenir à la fenêtre de connexion. Figure 10.3 – Mot de passe oublié Si vous choisissez de continuer, vous pourrez saisir un nouveau mot de passe complexe et un nouvel indice. L'indice n'est pas obligatoire, mais il pourra vous aider à vous souvenir du mot de passe oublié. (Remarque : L'indice NE DOIT PAS être une copie exacte du mot de passe de la connexion à la DTL+ G2). Figure 10.4 – Message avant formatage *Remarque : Un formatage efface TOUTES les données enregistrées dans la partition sécurisée de la DTL+ G2. Document Nº. 48002017-001.A03 DataTraveler® Locker+ G2 Page 21 sur 22 Conflit de lettres de lecteur (Environnement Windows) Comme indiqué dans la section Configuration système (page 3), la DTL+ G2 nécessite deux lettres de lecteur consécutives APRÈS le dernier disque physique affiché avant "l'écart" d'attribution des lettres de lecteur (voir Figure 10.5). Cette attribution est indépendante des partages de réseau parce que ces partages sont spécifiques aux profils d'utilisateur. Ils sont indépendants du profil matériel du système. Une lettre attribuée à un volume du réseau peut donc apparaître comme disponible pour le système d'exploitation. Par conséquent, Windows peut attribuer à une DTL+ G2 une lettre de lecteur qui est déjà utilisée par un volume connecté au réseau ou sur un chemin UNC (Universal Naming Convention). Ce qui provoque un conflit de lettres de lecteur. Dans ce cas, veuillez consulter votre administrateur ou service d'assistance pour modifier l'attribution des lettres de lecteur dans le gestionnaire des disques de Windows (les droits d'administrateur sont nécessaires). Figure 10.5 – Mon ordinateur Dans cet exemple, la DTL+ G2 utilise le volume F:, qui est la première lettre disponible après le volume E: (qui est le dernier disque physique affiché avant l'écart dans l'attribution des lettres de lecteurs). Puisque la lettre G: est un volume de réseau et ne fait pas partie du profil matériel, la DTL+ G2 peut tenter de l'utiliser comme deuxième lettre de lecteur et génère alors un conflit. Si vous n'avez aucun volume de réseau sur votre système et que la DTL+ G2 ne se charge toujours pas, il est possible qu'un lecteur de cartes, un disque amovible ou un autre périphérique précédemment utilisé, conserve une lettre de lecteur attribuée et génère un conflit. Précisons que la gestion des lettres de lecteur (Drive Letter Management – DLM) a été considérablement améliorée dans Windows XP SP3, Vista, et 7, et peut vous éviter ce problème. Mais si vous ne parvenez pas à résoudre un conflit de lettres de lecteur, veuillez contacter le service d'assistance technique de Kingston. ©2012 Kingston Technology Europe Ltd et Kingston Digital Europe Ltd. Tous droits réservés. Toutes les marques de commerce et les marques de commerce déposées appartiennent à leurs propriétaires respectifs. Document Nº. 48002017-001.A03 DataTraveler® Locker+ G2 Page 22 sur 22 Manuale d'uso del drive DataTraveler® Locker+ G2 Documento N. 48002017-001.A03 ® DataTraveler Locker+ G2 Pagina 1 di 23 Sommario INFORMAZIONI SULLA GUIDA UTENTE .................................................................................3 REQUISITI DI SISTEMA .............................................................................................................3 RACCOMANDAZIONI ................................................................................................................3 CONFIGURAZIONE (AMBIENTI WINDOWS) ............................................................................4 INIZIALIZZAZIONE DEL DISPOSITIVO (AMBIENTI WINDOWS) .............................................5 UTILIZZO DEL DISPOSITIVO (AMBIENTI WINDOWS) ............................................................9 OPZIONI DEL DISPOSITIVO (AMBIENTI WINDOWS) ...........................................................10 CONFIGURAZIONE (AMBIENTI MAC) ....................................................................................12 INIZIALIZZAZIONE DEL DISPOSITIVO (AMBIENTI MAC) .....................................................14 UTILIZZO DEL DISPOSITIVO (AMBIENTI MAC) ....................................................................18 OPZIONI DEL DISPOSITIVO (AMBIENTI MAC) .....................................................................19 SUPPORTO E SOLUZIONE DEI PROBLEMI ..........................................................................21 Blocco del dispositivo ................................................................................................................................ 21 Password dimenticata ................................................................................................................................ 21 Conflitti con le lettere di unità (Sistemi operativi Windows) ................................................................... 22 Documento N. 48002017-001.A03 ® DataTraveler Locker+ G2 Pagina 2 di 23 Informazioni sulla Guida Utente Questa guida utente contiene le istruzioni per l'uso del drive DataTraveler® Locker+ G2 (d'ora in poi denominato più semplicemente DTL+ G2); le istruzioni contenute nella guida sono riferite all'unità dotata della configurazione standard di fabbrica, senza alcun tipo di personalizzazione. Requisiti di sistema Piattaforma PC • • • • Sistemi operativi supportati Processore Pentium III (o superiore) 15MB di spazio libero su disco Porta USB 2.0/3.0 Due lettere di unità libere consecutive dopo quella associata all'ultimo drive fisico presente sull'unità* • • • Piattaforma Mac • • Windows® 7 Windows® Vista SP1, SP2 Windows® XP SP2, SP3 Sistemi operativi supportati 15MB di spazio libero su disco Porta USB 2.0/3.0 • • • Mac OS X 10.5.x Mac OS X 10.6.x Mac OS X 10.7x Raccomandazioni Per garantire una potenza adeguata al funzionamento del drive DTL+ G2, inserirlo direttamente all'interno di una porta USB sul computer notebook o desktop, come illustrato in Figura 1.1. Evitare di collegare il drive DTL+ G2 a qualunque tipo di periferica dotata di porta USB, come tastiere o hub USB, come illustrato in Figura 1.2. Figura 1.1 – Tipi di collegamento raccomandati Figura 1.2 – Tipi di collegamento sconsigliati *Nota: Vedere sezione "Conflitti con le lettere di unità", a pagina 22. Documento N. 48002017-001.A03 ® DataTraveler Locker+ G2 Pagina 3 di 23 Configurazione (Ambienti Windows) 1. Inserire il drive DTL+ G2 in una delle porte USB disponibili sul computer notebook o desktop in uso e attendere il rilevamento da parte di Windows. • Gli utenti di Windows XP riceveranno la notifica "Rilevato nuovo hardware", come illustrato in Figura 2.1. • Gli utenti di Windows Vista/7 riceveranno la notifica dell'installazione del driver software per il nuovo hardware, come illustrato in Figura 2.2. Figura 2.1 - Notifica di rilevamento del nuovo hardware (Windows XP) Una volta completata la fase di rilevamento del nuovo hardware, Windows avvierà la procedura di inizializzazione. • Se la funzione di esecuzione automatica di Windows è attiva, è possibile saltare il punto successivo e passare direttamente alla pagina 5 – Inizializzazione del dispositivo. Figura 2.2 – Notifica di installazione del driver del dispositivo (Windows Vista/7) • Se la funzione di esecuzione di Windows è disabilitata, come nel caso di Windows 7, in cui tale funzione è disattivata per impostazione di default, verrà visualizzata la finestra di dialogo della funzione AutoPlay, come quella mostrata in Figura 2.3. 2. Selezionare l'opzione "Run DTLplus_Launcher.exe", (Esegui DTLplus_Launcher.exe). Se la funzione AutoPlay non dovesse essere attiva, accedere alla partizione del CD-ROM e lanciare manualmente l'esecuzione del programma DTLplus_Launcher (Figura 2.4). Verrà avviata la procedura di inizializzazione. Figura 2.3 – Finestra AutoPlay di Windows (Windows Vista/7) (Nota: le opzioni del menu nella finestra di AutoPlay possono variare in base ai programmi attualmente installati sul computer in uso. Quando abilitata, la funzione di esecuzione automatica avvierà il processo di inizializzazione automaticamente.) Figura 2.4 – Contenuto del drive DTL+ G2 Documento N. 48002017-001.A03 ® DataTraveler Locker+ G2 Pagina 4 di 23 Inizializzazione del dispositivo (Ambienti Windows) 1. Selezionare la lingua preferita dal menu a discesa e fare clic sulla voce "Next" (Successivo) (Figura 3.1). Figura 3.1 – Selezione della lingua 2. Leggere l'accordo di licenza e quindi fare clic su "Next" (Successivo) (Figura 3.2). (Nota: è necessario accettare l'accordo di licenza prima di proseguire; in caso contrario il pulsante "Next" (Successivo) resterà disabilitato). Documento N. 48002017-001.A03 ® DataTraveler Locker+ G2 Pagina 5 di 23 Figura 3.2 – Accordo di licenza 3. Creazione di una password per proteggere i dati contenuti nel drive DTL+ G2. Inserire la password nel relativo campo "Password" (Password); quindi, reinserirla nel campo "Password Confirmation" (Conferma password), come illustrato in Figura 3.3, sotto. Affinché sia possibile proseguire la procedura di inizializzazione, è necessario creare una password avente i seguenti requisiti: 1. Le password devono essere composte da un minimo di 6 fino a un massimo di 16 caratteri. 2. Le password devono contenere tre (3) dei seguenti criteri opzionali: - MAIUSCOLE, minuscole, numeri, e/o caratteri speciali (!, $, ecc.) È anche possibile inserire un suggerimento per ricordare la password, ma tale campo è facoltativo. Il campo "Hint" (Suggerimento), può rivelarsi utile per aiutare l'utente a ricordare la password, qualora questa vada persa o dimenticata. (Nota: il suggerimento NON DEVE corrispondere alla stessa password utilizzata per l'accesso.) Documento N. 48002017-001.A03 ® DataTraveler Locker+ G2 Pagina 6 di 23 Figura 3.3 – Impostazione della password 4. Inserire le informazioni di contatto nei relativi campi di testo (vedere Figura 3.4) (Nota: Le informazioni immesse in questi campi NON possono contenere la stringa password creata durante la procedura di cui al Punto 3. Tuttavia, questi campi sono facoltativi e pertanto possono anche essere lasciati vuoti, se lo si vuole). • Il campo "Name" (Nome) può contenere fino a 32 caratteri, ma non può contenere la password esatta. • Il campo "Company" (Azienda) può contenere fino a 32 caratteri, ma non può contenere la password esatta. • Il campo "Details" (Dettagli) può contenere fino a 156 caratteri, ma non può contenere la password esatta. Figura 3.4 – Finestra dei dati di contatto Documento N. 48002017-001.A03 ® DataTraveler Locker+ G2 Pagina 7 di 23 5. Fare clic su "Finish" (Fine) per completare la procedura di inizializzazione del dispositivo. Il drive DTL+ G2 effettuerà ora la formattazione della partizione dati sicura (Figura 3.5), informando l'utente quando la procedura è stata completata (Figura 3.6). Nota: se si sta operando su una piattaforma Windows XP in modalità NonAmministratore, la routine di "Formattazione" può richiedere fino a un minuto.* 6. Fare clic su "OK", per proseguire. Figura 3.5 – Finestra di formattazione del drive DTL+ G2 Figura 3.6 – Finestra di completamento della formattazione Inizializzazione completata. Documento N. 48002017-001.A03 ® DataTraveler Locker+ G2 Pagina 8 di 23 *Nota: i tempi di esecuzione possono variare in base all'hardware di sistema e alla capacità del driver DTL+ G2 utilizzato. Utilizzo del dispositivo (Ambienti Windows) Una volta che il drive DTL+ G2 è stato inizializzato, sarà possibile accedere alla partizione dati sicura, e utilizzare le opzioni del dispositivo, accedendovi mediante la propria password utente. Per effettuare l'accesso, seguire la procedura seguente: 1. Inserire il drive DTL+ G2 in una delle porte USB del computer notebook o desktop in uso e quindi inserire la password (vedere Figura 4.1). 2. Una volta inserita la password, fare clic sul pulsante "Login" (Login) per proseguire. • Se è stata inserita la password corretta, il drive DTL+ G2 verrà sbloccato, e sarà possibile iniziare a utilizzare il dispositivo. Figura 4.1 – Finestra di login • Se viene inserita una password errata, sotto il campo "Hint" (Suggerimento) verrà visualizzato un messaggio di errore indicante il tentativo di accesso fallito, (vedere Figura 4.2). Se durante il processo di login viene inserita una password non corretta, l'utente avrà a disposizione un'altra possibilità di inserire la password corretta; tuttavia, il drive dispone di una funzione di sicurezza integrata che conta il numero di tentativi di login falliti.* Se il numero di tentativi falliti supera il valore preimpostato di default (10 tentativi), il drive DTL+ G2 verrà bloccato, e per poterlo riutilizzare sarà necessario formattare l'intera partizione dati sicura. CIÒ SIGNIFICA CHE TUTTI I DATI CONTENUTI NEL DRIVE DTL+ G2 ANDRANNO PERSI. Figura 4.2 – Finestra di login fallito Per ulteriori dettagli su questa funzione, Documento N. 48002017-001.A03 ® DataTraveler Locker+ G2 Pagina 9 di 23 consultare la sezione, "Blocco del dispositivo", a pagina 20. *Nota: una volta effettuata con successo l'autenticazione sul dispositivo, il contatore dei tentativi di login falliti verrà azzerato. Opzioni del dispositivo (Ambienti Windows) Durante l'accesso al dispositivo, sull'angolo destro della barra applicazioni di Windows verrà visualizzata l'icona del drive "DTL+ G2" (Figura 5.1.) (Nota: Gli utenti della piattaforma Windows 7 devono cliccare sul pulsante "Freccia in alto" della barra applicazioni, per poter accedere all'icona del drive "DTL+ G2" (Figura 5.2.). Cliccando una volta sull'icona del drive DTL+ G2 verrà visualizzato il menu seguente: Figura 5.1 – Icona del drive DTL+ G2 sulla barra applicazioni Figura 5.2 – Icona del drive DTL+ G2 sulla barra applicazioni (Utenti di Windows XP) (Utenti di Windows 7) Sezione impostazioni del drive DTL+ G2 • • • Consente di modificare la password e/o il suggerimento, (Figura 5.3) Consente di aggiungere/visualizzare/modificare le informazioni di contatto dell'utente (Figura 5.4) Consente di modificare le impostazioni della lingua corrente, (Figura 5.5). (Nota: per motivi di sicurezza, l'aggiornamento e la modifica di queste impostazioni richiedono sempre l'inserimento della password di accesso all'unità DTL+ G2) Documento N. 48002017-001.A03 ® DataTraveler Locker+ G2 Pagina 10 di 23 Figura 5.3 Schermata modifica password Figura 5.4 Schermata informazioni di contatto Figura 5.5 Schermata selezione lingua Navigazione all'interno dell'unità DTL+ G2 • Questa funzione consente di navigare all'interno dei contenuti della partizione dati sicura, dopo aver effettuato l'accesso al dispositivo Formattazione dell'unità DTL+ G2 • Questa funzione consente di formattare la partizione dati sicura (Attenzione: tutti i dati contenuti nell'unità verranno eliminati). (Figura 5.7) Supporto Online (Richiede un accesso a Internet) • Questa funzione esegue automaticamente il browser Internet e apre il link http://www.kingston.com/support/, dal quale è possibile accedere a una serie di informazioni di supporto aggiuntive Figura 5.7 – Finestra di notifica della formattazione Informazioni sull'unità DTL+ G2 • Questa sezione contiene dettagli specifici sul drive DTL+ G2, tra cui i dati relativi alle applicazioni e alla versione del firmware (Figura 5.8) Arresto dell'unità DTL+ G2 • Questa funzione permette di arrestare correttamente l'unità DTL+ G2, consentendo all'utente di scollegare il drive dal computer in tutta sicurezza Documento N. 48002017-001.A03 ® DataTraveler Locker+ G2 Figura 5.8 – Schermata informazioni su DTL+ G2 Pagina 11 di 23 (Raccomandazione: dopo aver arrestato l'unità DTL + G2, è sempre opportuno spegnere o riavviare la workstation host a cui il drive era stato collegato, specialmente se ci si trova in un luogo pubblico, oppure se la workstation è condivisa da utenti multipli). *Nota: sui sistemi Windows Vista e Windows 7 è richiesto l'inserimento della password di accesso all'unità DTL+ G2 -Fine sezione WindowsConfigurazione (Ambienti Mac) Inserire il drive DTL+ G2 in una delle porte USB disponibili sul computer notebook o desktop in uso e attendere il rilevamento da parte del sistema operativo Mac. Una volta che il drive viene rilevato, sul desktop del computer Mac in uso verrà visualizzata l'icona del volume DTLplus, come illustrato in Figura 6.1. 1. Fare doppio clic sull'icona del CD-ROM dell'unità DTL+ G2. 2. Fare doppio clic sulla cartella "Mac" visualizzata nella finestra raffigurata in Figura 6.2. 3. Fare doppio clic sull'icona dell'applicazione DTLplus visualizzata nella finestra raffigurata in Figura 6.3. Verrà avviata la procedura di inizializzazione. Figura 6.2 – Contenuto del drive DTL+ G2 Documento N. 48002017-001.A03 Figura 6.1 - Icona DTLplus Figura 6.3 – Icona applicazione di DTL+ G2 ® DataTraveler Locker+ G2 Pagina 12 di 23 Documento N. 48002017-001.A03 ® DataTraveler Locker+ G2 Pagina 13 di 23 Inizializzazione del dispositivo (Ambienti Mac) 1. Selezionare la lingua preferita dal menu a discesa e fare clic sulla voce "Next" (Successivo) (Figura 7.1). Figura 7.1 – Selezione della lingua 2. Leggere l'accordo di licenza e quindi fare clic su "Next" (Successivo) (Figura 7.2). (Nota: è necessario accettare l'accordo di licenza prima di proseguire; in caso contrario il pulsante "Next" (Successivo) resterà disabilitato). Figura 7.2 – Accordo di licenza Documento N. 48002017-001.A03 ® DataTraveler Locker+ G2 Pagina 14 di 23 3. Creazione di una password per proteggere i dati contenuti nel drive DTL+ G2. Inserire la password nel relativo campo "Password" (Password); quindi, reinserirla nel campo "Password Confirmation" (Conferma password), come illustrato in Figura 7.3, sotto. Affinché sia possibile proseguire la procedura di inizializzazione, è necessario creare una password avente i seguenti requisiti: 1. Le password devono essere composte da un minimo di 6 fino a un massimo di 16 caratteri. 2. Le password devono contenere tre (3) dei seguenti criteri opzionali: - MAIUSCOLE, minuscole, numeri, e/o caratteri speciali (!, $, ecc.) È anche possibile inserire un suggerimento per ricordare la password, ma tale campo è facoltativo. Il campo "Hint" (Suggerimento), può rivelarsi utile per aiutare l'utente a ricordare la password, qualora questa vada persa o dimenticata. (Nota: il suggerimento NON DEVE corrispondere alla stessa password utilizzata per l'accesso.) Figura 7.3 – Impostazione della password Documento N. 48002017-001.A03 ® DataTraveler Locker+ G2 Pagina 15 di 23 4. Inserire le informazioni di contatto nei relativi campi di testo (vedere Figura 7.4) (Nota: Le informazioni immesse in questi campi NON possono contenere la stringa password creata durante la procedura di cui al Punto 3. Tuttavia, questi campi sono facoltativi e pertanto possono anche essere lasciati vuoti, se lo si vuole). • Il campo "Name" (Nome) può contenere fino a 32 caratteri, ma non può contenere la password esatta. • Il campo "Company" (Azienda) può contenere fino a 32 caratteri, ma non può contenere la password esatta. • Il campo "Details" (Dettagli) può contenere fino a 156 caratteri, ma non può contenere la password esatta. Figura 7.4 – Finestra dei dati di contatto Documento N. 48002017-001.A03 ® DataTraveler Locker+ G2 Pagina 16 di 23 5. Fare clic su "Finish" (Fine) per completare la procedura di inizializzazione del dispositivo. Il drive DTL+ G2 effettuerà ora la formattazione della partizione dati sicura (Figura 7.5), informando l'utente quando la procedura è stata completata (Figura 7.6). 6. Fare clic su "OK", per proseguire. Figura 7.5 – Formattazione del drive DTLocker+ G2 Figura 7.6 – Finestra di completamento della formattazione Inizializzazione completata. Documento N. 48002017-001.A03 ® DataTraveler Locker+ G2 Pagina 17 di 23 Utilizzo del dispositivo (Ambienti Mac) Una volta che il drive DTL+ G2 è stato inizializzato, sarà possibile accedere alla partizione dati sicura, e utilizzare le opzioni del dispositivo, accedendovi mediante la propria password utente. Per effettuare l'accesso, seguire la procedura seguente: 1. Inserire il drive DTL+ G2 in una delle porte USB del computer notebook o desktop in uso e quindi inserire la password (vedere Figura 8.1). 2. Una volta inserita la password, fare clic sul pulsante "Login" (Login) per proseguire. • Se è stata inserita la password corretta, il drive DTL+ G2 verrà sbloccato, e sarà possibile iniziare a utilizzare il dispositivo. Figura 8.1 – Finestra di login • Se viene inserita una password errata, sotto il campo "Hint" (Suggerimento) verrà visualizzato un messaggio di errore indicante il tentativo di accesso fallito, (vedere Figura 8.2). Se durante il processo di login viene inserita una password non corretta, l'utente avrà a disposizione un'altra possibilità di inserire la password corretta; tuttavia, il drive dispone di una funzione di sicurezza integrata che conta il numero di tentativi di login falliti.* Se il numero di tentativi falliti supera il valore preimpostato di default (10 tentativi), il drive DTL+ G2 verrà bloccato, e per poterlo riutilizzare sarà necessario formattare l'intera partizione dati sicura. CIÒ SIGNIFICA CHE TUTTI I DATI CONTENUTI NEL DRIVE DTL+ G2 ANDRANNO PERSI. Per ulteriori dettagli su questa funzione, consultare la sezione, "Blocco del dispositivo", a pagina 20. Documento N. 48002017-001.A03 Figura 8.2 – Finestra di login fallito ® DataTraveler Locker+ G2 Pagina 18 di 23 *Nota: una volta effettuata con successo l'autenticazione sul dispositivo, il contatore dei tentativi di login falliti verrà azzerato. Opzioni del dispositivo (Ambienti Mac) Durante l'accesso al dispositivo, nel Dock di Mac OS X verrà visualizzata l'icona "DTLplus_Launcher" (, come illustrato in Figura 9.1, sotto: Figura 9.1 – L'icona del drive DTL+ G2 nel Dock di Mac OS X Tenendo premuto il tasto "control" (ctrl) sulla tastiera, e cliccando una volta sull'icona "DTLplus_Launcher" verrà visualizzato il menu illustrato in Figura 9.2, a destra. Sezione impostazioni del drive DTL+ G2 • • • Consente di modificare la password e/o il suggerimento, (Figura 9.3) Consente di aggiungere/visualizzare/modificare le informazioni di contatto dell'utente (Figura 9.4) Consente di modificare le impostazioni della lingua, (Figura 9.5) Figura 9.3 Schermata modifica password Figura 9.4 Schermata informazioni di contatto Figura 9.2 Menu opzioni del drive DTL+ G2 Figura 9.5 Schermata selezione lingua (Nota: per motivi di sicurezza, l'aggiornamento e la modifica di queste impostazioni richiedono sempre l'inserimento della password di accesso all'unità DTL+ G2) Documento N. 48002017-001.A03 ® DataTraveler Locker+ G2 Pagina 19 di 23 Navigazione all'interno dell'unità DTL+ G2 • Questa funzione consente di navigare all'interno dei contenuti della partizione dati sicura, dopo aver effettuato l'accesso al dispositivo Formattazione dell'unità DTL+ G2 • Questa funzione consente di formattare la partizione dati sicura (Attenzione: tutti i dati contenuti nell'unità verranno eliminati). (Figura 9.7) Supporto Online (Richiede un accesso a Internet) • Questa funzione esegue automaticamente il browser Internet e apre il link http://www.kingston.com/support/, dal quale è possibile accedere a una serie di informazioni di supporto aggiuntive Figura 9.7 – Finestra di notifica della formattazione Informazioni sull'unità DTL+ G2 • Questa sezione contiene dettagli specifici sul drive DTL+ G2, tra cui i dati relativi alle applicazioni e alla versione del firmware (Figura 9.8) Arresto dell'unità DTL+ G2 • Questa funzione permette di arrestare correttamente l'unità DTL+ G2, consentendo all'utente di scollegare il drive dal computer in tutta sicurezza Figura 9.8 – Schermata informazioni su DTL+ G2 (Raccomandazione: dopo aver arrestato l'unità DTL + G2, è sempre opportuno spegnere o riavviare la workstation host a cui il drive era stato collegato, specialmente se ci si trova in un luogo pubblico, oppure se la workstation è condivisa da utenti multipli). -Fine sezione Mac- Documento N. 48002017-001.A03 ® DataTraveler Locker+ G2 Pagina 20 di 23 Supporto e soluzione dei problemi Blocco del dispositivo Il drive DTL+ G2 è dotato di una funzionalità di sicurezza che impedisce l'accesso alla partizione dati dopo un determinato numero di tentativi di accesso consecutivi falliti (Definiti come MaxNoA, in forma abbreviata); il numero di tentativi preimpostato in fabbrica come valore di default è pari a 10 (n. max di tentativi consecutivi). Il contatore che attiva il blocco tiene traccia di ogni tentativo di accesso fallito, e può essere resettato in due modi: 1) Inserendo la password di accesso corretta prima di raggiungere il valore MaxNoA prestabilito, oppure 2) formattando il dispositivo dopo aver superato il numero di tentativi specificati dal valore MaxNoA.* Se viene inserita una password errata, sotto il campo "Hint" (Suggerimento) verrà visualizzato un messaggio di errore indicante il tentativo di accesso fallito. Vedere Figura 10.1. Raggiunto il 7° tentativo fallito, verrà visualizzato un ulteriore messaggio di errore che informa l'utente che ha a disposizione solo altri 3 tentativi prima di raggiungere il numero di tentativi specificati dal valore MaxNoA (impostato su 10 per default). Vedere Figura 10.2. Raggiunto il 10° tentativo di accesso fallito, l'accesso ai dati contenuti nel drive DTL+ G2 verrà bloccato permanentemente, e per poter utilizzare nuovamente il dispositivo sarà necessario effettuare una formattazione. Ciò significa che tutti i dati memorizzati sul drive DTL+ G2 andranno persi e l'utente dovrà creare una nuova password di accesso. Figura 10.1 – Finestra di login fallito Questa misura di sicurezza ha lo scopo di limitare l'accesso a coloro che non dispongono della password, impedendo di effettuare tentativi di accesso ripetuti all'infinito allo scopo di accedere ai vostri dati sensibili. Per i proprietari del drive DTL+ G2 che hanno scordato la loro password di accesso, verranno applicate le medesime misure di sicurezza, compresa la formattazione del dispositivo.* Per ulteriori dettagli su questa funzione, consultare la sezione, "Password dimenticata", a pagina 21. ° Figura 10.2 – Finestra di notifica del 7 tentativo di login fallito *Nota: la formattazione del dispositivo causerà l'eliminazione di TUTTI i dati contenuti nella partizione dati sicura dell'unità DTL+ G2. Password dimenticata Documento N. 48002017-001.A03 ® DataTraveler Locker+ G2 Pagina 21 di 23 Se l'utente dimentica la password, è possibile fare clic sul link "Reset Password" (Reset password), che viene visualizzato nella finestra di login quando viene eseguito il file DTLplus_Launcher (vedere Figura 10.3). Questa opzione consente di creare una nuova password. Tuttavia, al fine di garantire la privacy dei dati contenuti nel drive DTL+ G2, l'unità verrà formattata. Ciò significa che durante tale procedura tutti i vostri dati andranno persi.* Cliccando sul pulsante "Reset Password" (Reset password), verrà visualizzata una finestra di notifica in cui si chiede all'utente se desidera inserire una nuova password prima della formattazione, (Figura 10.4). A questo punto, è possibile 1) cliccare su "OK" per confermare, oppure 2) cliccare su "Cancel" (Annulla), per tornare alla schermata di accesso. Figura 10.3 – Finestra di password dimenticata Se si decide di proseguire con l'operazione, verrà chiesto all'utente di creare una nuova password complessa, e il relativo suggerimento. Il campo suggerimento (hint), non è obbligatorio, ma può rivelarsi utile per aiutare l'utente a ricordare la password, qualora questa vada persa o venga dimenticata. Figura 10.4 – Notifica prima della formattazione (Nota: il suggerimento NON DEVE corrispondere alla stessa password utilizzata per l'accesso al drive DTL+ G2.) *Nota: la formattazione del dispositivo causerà l'eliminazione di TUTTI i dati contenuti nella partizione dati sicura dell'unità DTL+ G2. Conflitti con le lettere di unità (Sistemi operativi Windows) Documento N. 48002017-001.A03 ® DataTraveler Locker+ G2 Pagina 22 di 23 Come citato nella sezione "Requisiti di sistema" di questo manuale (a pagina 3), il drive DTL+ G2 richiede due lettere di unità consecutive DOPO quella assegnata all'ultimo disco fisico che appare prima delle lettere di unità assegnate ai profili non hardware. (vedere Figura 10.5). L'assegnazione delle lettere di unità in ordine cronologico NON interessa le unità di rete condivise in quanto queste sono unità associate a profili utente specifici e non assegnate al profilo hardware di sistema e pertanto appaiono disponibili per il sistema operativo. Ciò significa che Windows potrebbe assegnare al drive DTL+ G2 una lettera di unità che è già utilizzata da una unità di rete condivisa, o assegnata a un percorso UNC (Universal Naming Convention), causando un conflitto tra le lettere assegnate ai vari drive. In tal caso, sarà necessario contattare l'amministratore di rete o il reparto assistenza, chiedendo di modificare le lettere di unità assegnate da Gestione Disco di Windows (l'operazione richiede l'accesso con diritti di amministratore). Figura 10.5 – Finestra "Risorse del computer" In questo esempio, all'unità DTL+ G2 è assegnata la lettera "F:", che è la prima lettera disponibile dopo l'unità "E:", (l'ultima lettera di unità assegnata a un disco fisico prima dell'elenco di lettere di unità assegnate a unità non fisiche). Dato che alla lettera "G:" è assegnata a una condivisione di rete, che non appartiene al profilo hardware del computer in uso, l'unità DTL+ G2 tenterà di utilizzare tale lettera come seconda unità, generando un conflitto. Se sul computer in uso non sono presenti condivisioni di rete, ma l'unità DTL+ G2 continua a non avviarsi, è possibile che altri dispositivi esterni, come lettori di schede, dischi rimovibili o altri dispositivi installati in precedenza, stiano utilizzando la lettera di unità richiesta per il funzionamento dell'unità DataTraveler, causando ulteriori conflitti. Si noti che le funzionalità di Gestione delle Lettere di Unità (DLM) sono migliorate significativamente su Windows XP SP3, Vista e 7; pertanto, tale problema non dovrebbe manifestarsi. Tuttavia, se l'utente non dovesse essere in grado di risolvere il conflitto, si raccomanda di contattare la divisione Supporto Tecnico di Kingston per richiedere ulteriore assistenza. © 2011 Kingston Technology Corporation. Tutti i diritti riservati. Tutti i marchi e i marchi registrati sono di proprietà dei rispettivi titolari. Documento N. 48002017-001.A03 ® DataTraveler Locker+ G2 Pagina 23 di 23 DataTraveler® Locker+ G2 - Manual do Usuário Documento nº 48002017-001.A03 ® DataTraveler Locker+ G2 Página 1 de 22 Índice SOBRE ESTE MANUAL DO USUÁRIO .....................................................................................3 REQUISITOS DO SISTEMA .......................................................................................................3 RECOMENDAÇÕES ...................................................................................................................3 INSTALAÇÃO (AMBIENTE WINDOWS) ...................................................................................4 INICIALIZAÇÃO DO DISPOSITIVO (AMBIENTE WINDOWS) ..................................................5 USO DO DISPOSITIVO (AMBIENTE WINDOWS) .....................................................................9 OPÇÕES DO DISPOSITIVO (AMBIENTE WINDOWS) ...........................................................10 CONFIGURAÇÃO (AMBIENTE MAC) .....................................................................................12 INICIALIZAÇÃO DO DISPOSITIVO (AMBIENTE MAC) ..........................................................13 USO DO DISPOSITIVO (AMBIENTE MAC) .............................................................................17 OPÇÕES DO DISPOSITIVO (AMBIENTE MAC) .....................................................................18 AJUDA E RESOLUÇÃO DE PROBLEMAS .............................................................................20 Bloqueio do dispositivo.............................................................................................................................. 20 Esqueceu a senha ....................................................................................................................................... 20 Conflito de Letra de Drive (Sistemas Operacionais Windows) ............................................................... 21 Documento nº 48002017-001.A03 ® DataTraveler Locker+ G2 Página 2 de 22 Sobre este Manual do Usuário Este manual do usuário abrange o DataTraveler® Locker+ G2 (daqui em diante mencionado simplesmente como DTL+ G2) com base no padrão de fábrica sem qualquer customização implementada. Requisitos do Sistema Plataforma de PC • • • • Suporte do Sistema Operacional do PC Processador equivalente a Pentium III (ou mais rápido) 15MB de espaço livre no disco Porta USB 2.0 / 3.0 Duas letras consecutivas de drives após o último drive físico* • • • Plataforma Mac • • Windows® 7 Windows® Vista SP1, SP2 Windows® XP SP2, SP3 Suporte a Sistema Operacional 15MB de espaço livre no disco Porta USB 2.0 / 3.0 • • • Mac OS X 10.5.x Mac OS X 10.6.x Mac OS X 10.7x Recomendações Para garantir que haja energia bastante para o dispositivo DTL+ G2, encaixe-o diretamente em uma porta USB em seu notebook ou computador, como mostrado na Figura 1.1. Evite conectar o DTL+ G2 a um dispositivo periférico que possua uma porta USB, como um teclado ou hub USB, como mostrado na Figura 1.2. Figura 1.1 – Uso recomendado Figura 1.2 – Não Recomendado *Observação: Consulte 'Conflito de Letra de Drive' na página 22. Documento nº 48002017-001.A03 ® DataTraveler Locker+ G2 Página 3 de 22 Instalação (Ambiente Windows) 1. Insira o DTL+ G2 em uma porta USB disponível em seu notebook ou PC e aguarde o Windows detectá-lo. • Os usuários de Windows XP receberão um aviso ‘Novo hardware encontrado’ como mostrado na Figura 2.1. Figura 2.1 – Novo hardware encontrado (Windows XP) • Os usuários de Windows XP receberão um aviso de driver de dispositivo como mostrado na Figura 2.2. Quando o novo hardware tiver sido detectado, o Windows irá começar o processo de inicialização. • Se a função autorun estiver ativada, você pode pular a próxima etapa e ir para a página 5 – Inicialização do Dispositivo. Figura 2.2 – Instalação do Driver do Dispositivo (Windows Vista/7) • Se a função autorun do Windows estiver desativada, como está no Windows 7 por padrão, você poderá ver uma janela AutoPlay similar à mostrada na Figura 2.3. 2. Selecione a opção ‘Run DTLplus_Launcher.exe’. Se o Windows não executar automaticamente em AutoPlay, navegue até a partição de CD-ROM (Figura 2.4) e execute manualmente o programa DTLplus_Launcher. Isso também fará começar o processo de inicialização. Figura 2.3 - Janela AutoPlay (Windows Vista/7) (Observação: As opções do menu na janela do AutoPlay podem variar dependendo dos programas atualmente instalados em seu computador.. Se ativado, o AutoRun fará começar o processo de inicialização automaticamente.) Figura 2.4 – Conteúdo do DTL+ G2 Documento nº 48002017-001.A03 ® DataTraveler Locker+ G2 Página 4 de 22 Inicialização do dispositivo (Ambiente Windows) 1. Selecione o idioma de preferência a partir do menu suspenso e clique em ‘Próximo’ (Figura 3.1.) Figura 3.1 – Seleção de idioma 2. Examine o contrato de licença e clique em ‘Próximo’ (Figura 3.2.) (Observação: Você deve aceitar o contrato de licença antes de continuar; de outra forma o botão 'Próximo' permanecerá desativado.) Figura 3.2 – Contrato de Licença Documento nº 48002017-001.A03 ® DataTraveler Locker+ G2 Página 5 de 22 3. Crie uma senha para proteger seus dados no DTL+ G2. Digite a senha no campo ‘Senha’ e novamente no campo ‘Confirmação de senha’, como mostrado abaixo na Figura 3.3. A senha que você criar deve seguir os seguintes critérios antes do processo de inicialização permitir que você continue: 1. As senhas devem conter 6 caracteres ou mais (até 16 caracteres). 2. As senhas devem conter três (3) das seguintes opções: - LETRAS MAIÚSCULAS, letras minúsculas, caracteres numéricos e/ou caracteres especiais (!, $, etc.) Você também pode digitar uma dica de senha, mas não é um campo obrigatório. O campo da dica pode ser útil para fornecer uma pista sobre a senha, se algum dia ela for esquecida. (Observação: A dica NÃO PODE ser exatamente igual à senha.) Figura 3.3 – Configuração da Senha Documento nº 48002017-001.A03 ® DataTraveler Locker+ G2 Página 6 de 22 4. Digite suas informações de contato nas caixas de texto fornecidas (veja Figura 3.4) (Observação: As informações que você digitar nesses campos NÃO podem conter a senha que você criou na Etapa 3. Entretanto, esses campos são opcionais e podem ser deixados em branco, se desejar.) • O campo ‘Nome’ pode conter até 32 caracteres, mas não pode conter a senha exata. • O campo ‘Empresa’ pode conter até 32 caracteres, mas não pode conter a senha exata. • O campo ‘Detalhes’ pode conter até 156 caracteres, mas não pode conter a senha exata. Figura 3.4 – Informações de contato Documento nº 48002017-001.A03 ® DataTraveler Locker+ G2 Página 7 de 22 5. Clique em ‘Finalizar’ para concluir o processo de inicialização do dispositivo. O DTL+ G2 irá agora formatar a partição de dados de segurança (Figura 3.5) e você será avisado quando estiver concluído (Figura 3.6.) Observação: Se estiver operando em Windows XP no modo de nãoadministrador, o processo de ‘Formatar’ pode levar até 1 minuto.* 6. Clique em ‘OK’ para continuar. Figura 3.5 – Formatando o DTL+ G2 Figura 3.6 – Formatação concluída Inicialização concluída. *Observação: O tempo pode variar dependendo do hardware do sistema e da capacidade da unidade DTL+ G2. Documento nº 48002017-001.A03 ® DataTraveler Locker+ G2 Página 8 de 22 Uso do dispositivo (Ambiente Windows) Depois do DTL+ G2 ter sido inicializado, você pode acessar a partição de dados de segurança e utilizar as opções do dispositivo fazendo o login no dispositivo com sua senha. Para isso, siga estas etapas: 1. Insira o DTL+ G2 em uma porta USB disponível em seu notebook ou PC e digite sua senha (veja a Figura 4.1.) 2. Depois de digitar sua senha, clique no botão ‘Login’ para continuar. • Se a senha correta for digitada, o DTL+ G2 será desbloqueado e você poderá começar a usar o dispositivo. Figura 4.1 - Janela Login • Se for digitada uma senha incorreta, uma mensagem de erro irá aparecer logo abaixo do campo ‘Dica’ indicando uma falha no login (veja Figura 4.2.) Durante o processo de login, se for digitada uma senha errada, você terá outra oportunidade para digitar a senha correta; entretanto há um recurso de segurança integrado que monitora o número de tentativas erradas de login*. Se esse número alcançar o valor predefinido de 10 tentativas erradas, o DTL+ G2 será bloqueado e será necessária a formatação da partição dos dados de segurança do dispositivo antes da próxima utilização. ISSO SIGNIFICA QUE TODOS OS DADOS ARMAZENADOS NO DTL+ G2 SERÃO PERDIDOS. Figura 4.2 - Erro de Login Para mais detalhes sobre esse recurso, veja ‘Bloqueio do dispositivo’ na página 20. *Observação: Depois que você fizer a autenticação no dispositivo corretamente, o contador de erros de login será reiniciado. Documento nº 48002017-001.A03 ® DataTraveler Locker+ G2 Página 9 de 22 Opções do Dispositivo (Ambiente Windows) Enquanto você estiver conectado ao dispositivo, haverá um ícone ‘DTL+ G2’ localizado no canto direito da barra de tarefas do Windows (Figura 5.1.) (Observação: Os usuários do Windows 7 precisarão clicar no botão de seta para cima na barra de tarefas para acessar o ícone ‘DTL+ G2’ (Figura 5.2.) Ao clicar uma vez no ícone DTL+ G2 será exibido o seguinte menu: Figura 5.1 – Ícone DTL+ G2 na barra de tarefas (Usuários Windows XP) Figura 5.2 – Ícone DTL+ G2 na barra de tarefas (Usuários Windows 7) Configurações do DTL+ G2 • • • Permite que você altere sua senha e/ou dica (Figura 5.3) Permite que você adicione/visualize/altere suas informações de contato (Figura 5.4) Permite que você altere sua seleção de idioma atual (Figura 5.5) (Observação: Para finalidades de segurança, sua senha atual do DTL+ G2 é necessária para atualizar e/ou modificar qualquer uma dessas configurações.) Figura 5.3 Alterar Senha Documento nº 48002017-001.A03 Figura 5.4 Informações de Contato ® DataTraveler Locker+ G2 Figura 5.5 Selecione o Idioma Página 10 de 22 Navegar no DTL+ G2 • Permite que você navegue pelo conteúdo da partição de dados de segurança enquanto está conectado Formatar o DTL+ G2* • • Permite que você formate a partição de dados de segurança (Aviso: Todos os dados serão apagados). (Figura 5.7:. Suporte on-line (É necessário o acesso à Internet) • Abra seu navegador na Internet e navegue para http://www.kingston.com/support/ onde você poderá acessar mais informações de suporte Figura 5.7 – Aviso sobre formatação Sobre o DTL+ G2* • Fornece detalhes específicos sobre o DTL+ G2, incluindo informações sobre a versão do Aplicativo e do Firmware (Figura 5.8) Encerrar o DTL+ G2 • Encerra de modo apropriado o DTL+ G2, permitindo que seja removido com segurança de seu sistema Figura 5.8 – Sobre o DTL+ G2 (Recomendação: Depois de encerrar seu DTL+ G2 é sempre uma boa prática encerrar ou reiniciar a estação de trabalho host na qual sua unidade estava conectada, especialmente se estiver em um local público ou usando uma estação de trabalho compartilhada por várias pessoas.) *Observação: Sua senha atual no DTL+ G2 é necessária no Windows Vista e Windows 7 -Seção Windows concluídaDocumento nº 48002017-001.A03 ® DataTraveler Locker+ G2 Página 11 de 22 Configuração (Ambiente Mac) Insira o DTL+ G2 em uma porta USB disponível em seu notebook ou computador de mesa e aguarde o sistema operacional Mac detectá-lo. Quando o fizer, você verá um volume DTLplus aparecer na área de trabalho, como mostrado na Figura 6.1. 1. Clique duas vezes no ícone do CD-ROM DTL+ G2. 2. Clique duas vezes na pasta Mac encontrada na janela exibida na Figura 6.2. 3. Clique duas vezes no ícone do aplicativo DTLplus encontrada na janela exibida na Figura 6.3. Isso fará começar o processo de inicialização. Figura 6.2 – Conteúdo do DTL+ G2 Documento nº 48002017-001.A03 Figura 6.1 – DTLplus Figura 6.3 – Aplicativo DTL+ G2 ® DataTraveler Locker+ G2 Página 12 de 22 Inicialização do dispositivo (Ambiente Mac) 1. Selecione o idioma de preferência a partir do menu suspenso e clique em ‘Próximo’ (Figura 7.1.) Figura 7.1 – Seleção de idioma 2. Examine o contrato de licença e clique em ‘Próximo’ (Figura 7.2.) (Observação: Você deve aceitar o contrato de licença antes de continuar; de outra forma o botão 'Próximo' permanecerá desativado.) Figura 7.2 – Contrato de Licença Documento nº 48002017-001.A03 ® DataTraveler Locker+ G2 Página 13 de 22 3. Crie uma senha para proteger seus dados no DTL+ G2. Digite a senha no campo ‘Senha’ e novamente no campo ‘Confirmação de senha’, como mostrado abaixo na Figura 7.3. A senha que você criar deve seguir os seguintes critérios antes do processo de inicialização permitir que você continue: 1. As senhas devem conter 6 caracteres ou mais (até 16 caracteres). 2. As senhas devem conter três (3) das seguintes opções: - LETRAS MAIÚSCULAS, letras minúsculas, caracteres numéricos e/ou caracteres especiais (!, $, etc.) Você também pode digitar uma dica de senha, mas não é um campo obrigatório. O campo da dica pode ser útil para fornecer uma pista sobre a senha, se algum dia ela for esquecida. (Observação: A dica NÃO PODE ser exatamente igual à senha.) Figura 7.3 – Configuração da Senha Documento nº 48002017-001.A03 ® DataTraveler Locker+ G2 Página 14 de 22 4. Digite suas informações de contato nas caixas de texto fornecidas (veja a Figura 7.4) (Observação: As informações que você digitar nesses campos NÃO podem conter a senha que você criou na Etapa 3. Entretanto, esses campos são opcionais e podem ser deixados em branco, se desejar.) • O campo ‘Nome’ pode conter até 32 caracteres, mas não pode conter a senha exata. • O campo ‘Empresa’ pode conter até 32 caracteres, mas não pode conter a senha exata. • O campo ‘Detalhes’ pode conter até 156 caracteres, mas não pode conter a senha exata. Figura 7.4 – Informações de contato Documento nº 48002017-001.A03 ® DataTraveler Locker+ G2 Página 15 de 22 5. Clique em ‘Finalizar’ para concluir o processo de inicialização do dispositivo. O DTL+ G2 irá agora formatar a partição de dados de segurança (Figura 7.5) e você será avisado quando estiver concluído (Figura 7.6.) 6. Clique em ‘OK’ para continuar. Figura 7.5 – Formatando o DTLocker+ G2 Figura 7.6 – Formatação concluída Inicialização concluída. Documento nº 48002017-001.A03 ® DataTraveler Locker+ G2 Página 16 de 22 Uso do Dispositivo (Ambiente Mac) Depois do DTL+ G2 ter sido inicializado, você pode acessar a partição de dados de segurança e utilizar as opções do dispositivo fazendo o login no dispositivo com sua senha. Para isso, siga estas etapas: 1. Insira o DTL+ G2 em uma porta USB disponível em seu notebook ou PC e digite sua senha (veja a Figura 8.1.) 2. Depois de digitar sua senha, clique no botão ‘Login’ para continuar. • Se a senha correta for digitada, o DTL+ G2 será desbloqueado e você poderá começar a usar o dispositivo. • Se for digitada uma senha incorreta, uma mensagem de erro irá aparecer logo abaixo do campo ‘Dica’ indicando uma falha no login (veja Figura 8.2.) Figura 8.1 - Janela de Login Durante o processo de login, se for digitada uma senha errada, você terá outra oportunidade para digitar a senha correta; entretanto há um recurso de segurança integrado que monitora o número de tentativas erradas de login*. Se esse número alcançar o valor predefinido de 10 tentativas erradas, o DTL+ G2 será bloqueado e será necessária a formatação da partição dos dados de segurança do dispositivo antes da próxima utilização. ISSO SIGNIFICA QUE TODOS OS DADOS ARMAZENADOS NO DTL+ G2 SERÃO PERDIDOS. Para mais detalhes sobre esse recurso, veja ‘Bloqueio do dispositivo’ na página 20. Figura 8.2 - Erro de Login *Observação: Depois que você fizer a autenticação no dispositivo corretamente, o contador de erros de login será reiniciado. Documento nº 48002017-001.A03 ® DataTraveler Locker+ G2 Página 17 de 22 Opções do dispositivo (Ambiente Mac) Enquanto você estiver conectado ao dispositivo, haverá um ícone ‘DTLplus_Launcher’ localizado no Dock do Mac OS X como mostrado na Figura 9.1 abaixo: Figura 9.1 – Ícone DTL+ G2 no Dock do Mac OS X Pressionando a tecla ‘control’ em seu teclado e clicando uma vez no ícone ‘DTLplus_Launcher’ irá exibir o menu mostrado na Figura 9.2 à direita. Configurações do DTL+ G2 • • • Permite que você altere sua senha e/ou dica (Figura 9.3) Permite que você adicione/visualize/altere suas informações de contato (Figura 9.4) • Permite que você altere sua seleção de idioma(Figura 9.5) Figura 9.3 Alterar Senha Figura 9.4 Informações de Contato Figura 9.2 Opções do DTL+ G2 Figura 9.5 Selecione o Idioma (Observação: Para finalidades de segurança, sua senha atual do DTL+ G2 é necessária para atualizar e/ou modificar qualquer uma dessas configurações.) Navegar no DTL+ G2 Documento nº 48002017-001.A03 ® DataTraveler Locker+ G2 Página 18 de 22 • Permite que você navegue pelo conteúdo da partição de dados de segurança enquanto está conectado Formatar o DTL+ G2 • Permite que você formate a partição de dados de segurança (Aviso: Todos os dados serão apagados). (Figura 9.7) Suporte on-line (É necessário o acesso à Internet) • Abra seu navegador na Internet e navegue para http://www.kingston.com/support/ onde você poderá acessar mais informações de suporte Figura 9.7 – Aviso sobre formatação Sobre o DTL+ G2 • Fornece detalhes específicos sobre o DTL+ G2, incluindo informações sobre a versão do Aplicativo e do Firmware (Figura 9.8) Encerrar o DTL+ G2 • Encerra de modo apropriado o DTL+ G2, permitindo que seja removido com segurança de seu sistema Figura 9.8 – Sobre o DTL+ G2 (Recomendação: Depois de encerrar seu DTL+ G2 é sempre uma boa prática encerrar ou reiniciar a estação de trabalho host na qual sua unidade estava conectada, especialmente se estiver em um local público ou usando uma estação de trabalho compartilhada por várias pessoas.) -Seção Mac concluída- Documento nº 48002017-001.A03 ® DataTraveler Locker+ G2 Página 19 de 22 Ajuda e Resolução de Problemas Bloqueio do dispositivo O DTL+ G2 inclui um recurso de segurança que impede o acesso não-autorizado à partição de dados quando o número máximo de tentativas erradasconsecutivas (MaxNoA) for atingido; a configuração padrão de fábrica tem o valor predefinido em 10 (nº de tentativas). O contador de bloqueio monitora cada login errado e pode ser reiniciado de duas maneiras: 1) Um login correto antes de atingir o MaxNoA ou 2) Atingindo o MaxNoA e realizando uma formatação no dispositivo.* Se for digitada uma senha incorreta, uma mensagem de erro irá aparecer logo abaixo do campo ‘Dica’ , indicando uma falha no login. Veja Figura 10.1. Se e quando for feita uma 7a tentativa errada, você verá uma mensagem de erro adicional indicando que só tem 3 tentativas restantes antes de atingir o MaxNoA (que é definido em 10 por padrão). Veja Figura 10.2. Após a 10a tentativa errada de login, o DTL+ G2 irá bloquear permanentemente a partição de dados e será necessária uma formatação do dispositivo antes da próxima utilização. Isso significa que todos os dados armazenados no DTL+ G2 serão perdidos e você precisará criar uma nova senha. Figura 10.1 - Erro de Login Essa medida de segurança impede que alguém (que não tenha a sua senha) faça incontáveis tentativas de login e consiga acesso aos seus dados confidenciais. Se você for o proprietário do DTL+ G2 e esquecer sua senha, as mesmas medidas de segurança serão aplicadas, incluindo a formatação do dispositivo.* Para mais detalhes sobre esse recurso, veja ‘Esqueci a senha’ na página 21. o Figura 10.2 – 7 Erro de Login *Observação: A formatação do dispositivo irá apagar TODAS as informações armazenadas na partição de dados de segurança do DTL+ G2. Esqueceu a senha Documento nº 48002017-001.A03 ® DataTraveler Locker+ G2 Página 20 de 22 Se você esquecer sua senha, você pode clicar no link ‘Redefinir Senha’ que aparece na janela de login do dispositivo quando é executado o DTLplus_Launcher (veja Figura 10.3.) Esta opção irá permitir que você crie uma nova senha, mas para proteger a privacidade de seus dados, o DTL+ G2 será formatado. Isso significa que todos os seus dados serão apagados no processo.* Quando você clicar em ‘Redefinir Senha’, uma caixa de mensagem (Figura 10.4) irá aparecer e perguntar se você deseja digitar uma nova senha antes de executar a formatação. Neste momento, você pode 1) clicar em ‘OK’ para confirmar ou 2) clicar em ‘Cancelar’ para voltar à janela de login. Figura 10.3 – Esqueci a senha Se você optar por continuar, você será solicitado a criar uma nova senha complexa e uma nova dica. A dica não é um campo obrigatório, mas pode ser útil para fornecer uma pista sobre a senha, se algum dia ela for esquecida. (Observação: A dica NÃO PODE ser exatamente igual à senha do dispositivo DTL+ G2 ). Figura 10.4 – Prompt antes da formatação *Observação: A formatação do dispositivo irá apagar TODAS as informações armazenadas na partição de dados de segurança do DTL+ G2. Conflito de Letra de Drive (Sistemas Operacionais Windows) Documento nº 48002017-001.A03 ® DataTraveler Locker+ G2 Página 21 de 22 Como mencionado na seção ‘Requisitos do Sistema’ deste manual (na página 3), o DTL+ G2 exige duas letras consecutivas de drive APÓS o último disco físico que aparece antes do 'espaço' na designação de letras de drives (veja a Figura 10.5.) Isto NÃO está relacionado com compartilhamentos de rede porque eles são específicos aos perfis de usuário e não ao perfil de hardware de sistema, logo aparecendo disponível no Sistema Operacional. Isto significa que o Windows pode atribuir ao DTL+ G2 uma letra de unidade que já está sendo utilizada por um compartilhamento de rede ou caminho de Convenção de Nomenclatura Universal (UNC), causando um conflito de letra de drive. Se isto ocorrer, consulte o seu administrador ou departamento de assistência técnica para alterar a atribuição de letras de unidade no Gerenciamento do Disco do Windows (necessários privilégios de administrador.) Figura 10.5 – Meu Computador Neste exemplo, o DTL+ G2 utiliza a unidade F:, que é a primeira letra de drive disponível após a unidade E: (o último disco físico antes do intervalo de letra de unidade). Porque a letra G: é um compartilhamento de rede e não faz parte do perfil de hardware, o DTL+ G2 pode tentar utilizá-lo como sua segunda letra de drive, causando um conflito. Se não existirem compartilhamentos de rede no seu sistema e o DTL+ G2 continuar não carregando, é possível que um leitor de cartões, um disco removível ou outro dispositivo previamente instalado esteja conservando a letra de drive atribuída causando o conflito. Observe que o Gerenciamento de Letra de Drive, ou DLM, melhorou significativamente no Windows XP SP3, Vista, e 7, então pode ser que não encontre este problema, mas se você não conseguir resolver o conflito, entre em contato com o Departamento de Suporte Técnico da Kingston para mais assistência. ©2011 Kingston Technology Corporation. Todos os direitos reservados. Todas as marcas comerciais registradas e marcas registradas pertencem a seus respectivos proprietários. Documento nº 48002017-001.A03 ® DataTraveler Locker+ G2 Página 22 de 22 Instrukcja obsługi pamięci DataTraveler® Locker+ G2 Nr dokumentu: 48002017-001.A03 ® DataTraveler Locker+ G2 Strona 1 z 22 Spis treści INFORMACJE O TEJ INSTRUKCJI OBSŁUGI .........................................................................3 WYMAGANIA SYSTEMOWE .....................................................................................................3 ZALECENIA ................................................................................................................................3 INSTALACJA (ŚRODOWISKO WINDOWS) ..............................................................................4 INICJOWANIE URZĄDZENIA (ŚRODOWISKO WINDOWS) ....................................................5 UŻYTKOWANIE URZĄDZENIA (ŚRODOWISKO WINDOWS) .................................................9 OPCJE URZĄDZENIA (ŚRODOWISKO WINDOWS) ..............................................................10 INSTALACJA (ŚRODOWISKO MAC) ......................................................................................12 INICJOWANIE URZĄDZENIA (ŚRODOWISKO MAC) ............................................................13 UŻYTKOWANIE URZĄDZENIA (ŚRODOWISKO MAC) .........................................................17 OPCJE URZĄDZENIA (ŚRODOWISKO MAC) ........................................................................18 POMOC I ROZWIĄZYWANIE PROBLEMÓW .........................................................................20 Blokada urządzenia ..................................................................................................................................... 20 Nie pamiętam hasła ..................................................................................................................................... 21 Konflikt liter dysków (systemy operacyjne Windows)............................................................................. 22 Nr dokumentu: 48002017-001.A03 ® DataTraveler Locker+ G2 Strona 2 z 22 Informacje o tej Instrukcji obsługi Ta instrukcja obsługi dotyczy pamięci DataTraveler® Locker+ G2 (nazywanej dalej w skrócie DTL+ G2) w formie fabrycznej, bez wprowadzonych dostosowań. Wymagania systemowe Platforma PC • • • • Obsługiwane systemy operacyjne komputerów PC Procesor Pentium III (lub szybszy) lub jego odpowiednik 15MB wolnego miejsca na dysku Port USB 2.0/3.0 Dwie kolejne litery dysku po ostatnim dysku fizycznym* • • • Platforma Mac • • Windows® 7 Windows® Vista SP1, SP2 Windows® XP SP2, SP3 Obsługiwane systemy operacyjne 15MB wolnego miejsca na dysku Port USB 2.0/3.0 • • • Mac OS X 10.5.x Mac OS X 10.6.x Mac OS X 10.7x Zalecenia Aby zagwarantować odpowiednie zasilanie pamięci DTL+ G2, należy włożyć ją bezpośrednio do portu USB w notebooku lub komputerze stacjonarnym, tak jak pokazano na Ilustracji 1.1. Należy unikać podłączania pamięci DTL+ G2 do urządzeń peryferyjnych z portem USB, takich jak klawiatura czy koncentrator USB, tak jak pokazano na Ilustracji 1.2. Ilustracja 1.1. Zalecane użytkowanie Ilustracja 1.2. Niezalecane użytkowanie *Uwaga: zobacz „Konflikt liter dysków” na stronie 22. Nr dokumentu: 48002017-001.A03 ® DataTraveler Locker+ G2 Strona 3 z 22 Instalacja (środowisko Windows) 1. Włóż pamięć DTL+ G2 do dostępnego portu w notebooku lub komputerze stacjonarnym i poczekaj, aż system Windows ją wykryje. • Użytkownicy systemu Windows XP zobaczą powiadomienie Znaleziono nowy sprzęt, tak jak pokazano na Ilustracji 2.1. • Użytkownicy systemów Windows Vista/7 zobaczą powiadomienie dotyczące sterownika urządzenia, tak jak pokazano na Ilustracji 2.2. Ilustracja 2.1. Znaleziono nowy sprzęt (Windows XP) Po zakończeniu wykrywania nowego sprzętu system Windows rozpocznie proces inicjowania. • Jeżeli jest włączona funkcja autouruchamiania w systemie Windows, można pominąć kolejny punkt i przejść na stronę 5 do sekcji Inicjowanie urządzenia. Ilustracja 2.2. Instalacja sterownika urządzenia (Windows Vista/7) • Jeżeli funkcja autouruchamiania jest wyłączona (ustawienie domyślne w systemie Windows 7), może zostać wyświetlone okno autoodtwarzania podobne do pokazanego na Ilustracji 2.3. 2. Wybierz opcję Uruchom DTLplus_Launcher.exe. Jeżeli system Windows nie wyświetli okna autoodtwarzania, przejdź na partycję dysku CDROM (Ilustracja 2.4) i ręcznie uruchom program DTLplus_Launcher. Spowoduje to rozpoczęcie procesu inicjowania. Ilustracja 2.3. Okno autoodtwarzania (Windows Vista/7) (Uwaga: Ilustracja 2.4. Zawartość pamięci DTL+ G2 Nr dokumentu: 48002017-001.A03 ® DataTraveler Locker+ G2 Opcje menu w oknie autoodtwarzania mogą się różnić w zależności od tego, jakie programy są w rzeczywistości zainstalowane na komputerze. Jeżeli funkcja autouruchamiania jest włączona, proces inicjowania rozpocznie się automatycznie). Strona 4 z 22 Inicjowanie urządzenia (środowisko Windows) 1. Wybierz preferowany język z menu rozwijanego i kliknij przycisk Next (Dalej) (Ilustracja 3.1). Ilustracja 3.1. Wybór języka 2. Zapoznaj się z umową licencyjną i kliknij przycisk Next (Dalej)(Ilustracja 3.2). (Uwaga: przed kontynuowaniem należy zaakceptować umowę licencyjną; w przeciwnym razie przycisk Next (Dalej) pozostanie wyłączony). Ilustracja 3.2. Umowa licencyjna Nr dokumentu: 48002017-001.A03 ® DataTraveler Locker+ G2 Strona 5 z 22 3. Utwórz hasło, aby zabezpieczyć dane w pamięci DTL+ G2. Wprowadź je w polu Password (Hasło), a następnie wprowadź je ponownie w polu Password Confirmation (Potwierdzenie hasła), tak jak pokazano na Ilustracji 3.3. Utworzone hasło musi spełniać poniższe kryteria, aby można było kontynuować proces inicjowania: 1. Hasło musi zawierać co najmniej 6 znaków (maks. 16 znaków). 2. Hasło musi zawierać znaki należące do trzech (3) z następujących kategorii: - WIELKIE LITERY, małe litery, cyfry i/lub znaki specjalne (!, $ itp.). Można również wprowadzić wskazówkę dotyczącą hasła, ale nie jest to obowiązkowe. Pole wskazówki może pomóc w przypomnieniu sobie zapomnianego hasła. (Uwaga: wskazówka NIE MOŻE być taka sama jak hasło). Ilustracja 3.3. Konfiguracja hasła Nr dokumentu: 48002017-001.A03 ® DataTraveler Locker+ G2 Strona 6 z 22 4. W wyświetlonych polach tekstowych wprowadź informacje kontaktowe (zobacz Ilustracja 3.4) (Uwaga: Informacje wprowadzone w tych polach NIE MOGĄ zawierać ciągu hasła utworzonego w kroku 3. Pola te są jednak opcjonalne i można pozostawić je puste). • Pole Name (Nazwa) może zawierać do 32 znaków, ale nie może zawierać dokładnego hasła. • Pole Company (Firma) może zawierać do 32 znaków, ale nie może zawierać dokładnego hasła. • Pole Details (Szczegóły) może zawierać do 156 znaków, ale nie może zawierać dokładnego hasła. Ilustracja 3.4. Informacje kontaktowe Nr dokumentu: 48002017-001.A03 ® DataTraveler Locker+ G2 Strona 7 z 22 5. Kliknij przycisk Finish (Zakończ), aby zakończyć proces inicjowania urządzenia. Pamięć DTL+ G2 sformatuje teraz bezpieczną partycję danych (Ilustracja 3.5) i powiadomi o zakończeniu operacji (Ilustracja 3.6). Uwaga: w przypadku pracy w systemie Windows XP w trybie innym niż tryb administratora procedura formatowania może zająć do minuty.* 6. Kliknij przycisk OK, aby kontynuować. Ilustracja 3.5. Formatowanie pamięci DTL+ G2 Ilustracja 3.6. Formatowanie zakończone Inicjowanie zostało zakończone. *Uwaga: czas trwania operacji może się różnić w zależności do sprzętu komputera i pojemności pamięci DTL+ G2. Nr dokumentu: 48002017-001.A03 ® DataTraveler Locker+ G2 Strona 8 z 22 Użytkowanie urządzenia (środowisko Windows) Po zainicjowaniu pamięci DTL+ G2 można uzyskać dostęp do bezpiecznej partycji danych i korzystać z opcji pamięci, logując się do niej przy użyciu hasła. W tym celu wykonaj następujące kroki: 1. Włóż pamięć DTL+ G2 do portu USB w notebooku lub komputerze stacjonarnych i wprowadź hasło (zobacz Ilustracja 4.1). 2. 2. Po wpisaniu hasła kliknij przycisk Login (Zaloguj), aby kontynuować. • Po wprowadzeniu poprawnego hasła pamięć DTL+ G2 zostanie odblokowana i będzie można rozpocząć korzystanie z niej. Ilustracja 4.1. Okno logowania • Jeżeli wprowadzone hasło będzie nieprawidłowe, tuż pod polem Hint (Wskazówka) zostanie wyświetlony komunikat o błędzie wskazujący na niepowodzenie logowania (zobacz Ilustracja 4.2). Jeżeli podczas logowania zostanie wprowadzone błędne hasło, będzie można ponownie spróbować wprowadzić poprawne hasło, ale wbudowana funkcja zabezpieczeń zlicza nieudane próby logowania*. Po 10 (wstępnie skonfigurowana liczba) nieudanych próbach logowania pamięć DTL+ G2 zostanie zablokowana i przed ponownym jej użyciem będzie konieczne sformatowanie bezpiecznej partycji danych. OZNACZA TO UTRATĘ WSZYSTKICH DANYCH ZAPISANYCH W PAMIĘCI DTL+ G2. Aby uzyskać więcej informacji dotyczących tej funkcji, zobacz sekcję Blokada urządzenia na stronie 20. Ilustracja 4.2. Niepowodzenie logowania *Uwaga: po pomyślnym uwierzytelnieniu użytkownika licznik nieudanych logowań jest resetowany. Nr dokumentu: 48002017-001.A03 ® DataTraveler Locker+ G2 Strona 9 z 22 Opcje urządzenia (środowisko Windows) Po zalogowaniu się do urządzenia w prawym rogu paska zadań systemu Windows będzie wyświetlana ikona DTL+ G2 (Ilustracja 5.1). (Uwaga: użytkownicy systemu Windows 7 muszą kliknąć przycisk strzałki w górę na pasku zadań, aby uzyskać dostęp do ikony DTL+ G2 (Ilustracja 5.2). Kliknięcie ikony DTL+ G2 spowoduje wyświetlenie następującego menu: Ilustracja 5.1. Ikona DTL+ G2 na pasku zadań Ilustracja 5.2. Ikona DTL+ G2 na pasku zadań (użytkownicy systemu Windows XP) (użytkownicy systemu Windows 7) Polecenie DTL+ G2 Settings (Ustawienia pamięci DTL+ G2) • • • Umożliwia zmianę hasła i/lub wskazówki (Ilustracja 5.3). Umożliwia dodanie/wyświetlenie/zmianę informacji kontaktowych (Ilustracja 5.4). Umożliwia zmianę używanego języka (Ilustracja 5.5). (Uwaga: ze względów bezpieczeństwa aktualizacja i/lub modyfikacja tych ustawień wymaga podania aktualnego hasła pamięci DTL+ G2). Ilustracja 5.3. Zmiana hasła Nr dokumentu: 48002017-001.A03 Ilustracja 5.4. Informacje kontaktowe ® DataTraveler Locker+ G2 Ilustracja 5.5. Wybór języka Strona 10 z 22 Polecenie Browse DTL+ G2 (Przeglądaj pamięć DTL+ G2) • Umożliwia przeglądanie zawartości bezpiecznej partycji danych (po zalogowaniu się). Polecenie Format DTL+ G2 (Formatuj pamięć DTL+ G2)* • Umożliwia sformatowanie bezpiecznej partycji danych. Ostrzeżenie: wszystkie dane zostaną wymazane). (Ilustracja 5.7) Polecenie Online Support (Pomoc techniczna online) (wymaga dostępu do Internetu) • Otwiera przeglądarkę internetową i przechodzi pod adres http://www.kingston.com/support/, gdzie są dostępne dodatkowe informacje pomocy technicznej. Ilustracja 5.7. Ostrzeżenie dotyczące formatowania Polecenie About DTL+ G2 (Informacje o pamięci DTL+ G2) • Wyświetla szczegółowe informacje dotyczące pamięci DTL+ G2, w tym informacje o wersjach aplikacji i oprogramowania sprzętowego (Ilustracja 5.8). Polecenie Shutdown DTL+ G2 (Wyłącz pamięć DTL+ G2) • Prawidłowo wyłącza pamięć DTL+ G2, umożliwiając bezpieczne odłączenie jej od komputera. Ilustracja 5.8. Informacje o pamięci DTL+ G2 (Zalecenie: po wyłączeniu pamięci DTL+ G2 zawsze warto wyłączyć lub ponownie uruchomić stację roboczą, do której była podłączona ta pamięć, zwłaszcza jeśli znajduje się ona w miejscu publicznym lub jest używana przez wiele osób). *Uwaga: w systemach Windows Vista i Windows 7 wymagane jest podanie aktualnego hasła pamięci DTL+ G2. -Koniec sekcji dotyczącej systemu WindowsNr dokumentu: 48002017-001.A03 ® DataTraveler Locker+ G2 Strona 11 z 22 Instalacja (środowisko Mac) Włóż pamięć DTL+ G2 do dostępnego portu w notebooku lub komputerze stacjonarnym i poczekaj, aż system operacyjny komputera Mac ją wykryje. Gdy tak się stanie, na pulpicie zostanie wyświetlony wolumin DTLplus, tak jak pokazano na Ilustracji 6.1. 1. Kliknij dwukrotnie ikonę dysku CD-ROM pamięci DTL+ G2. 2. 2. Kliknij dwukrotnie folder Mac widoczny w oknie pokazanym na Ilustracji 6.2. 3. Kliknij dwukrotnie ikonę aplikacji DTLplus widoczną w oknie pokazanym na Ilustracji 6.3. Spowoduje to rozpoczęcie procesu inicjowania. Ilustracja 6.2. Zawartość pamięci DTL+ G2 Nr dokumentu: 48002017-001.A03 Ilustracja 6.1. DTLplus Ilustracja 6.3. Aplikacja pamięci DTL+ G2 ® DataTraveler Locker+ G2 Strona 12 z 22 Inicjowanie urządzenia (środowisko Mac) 1. Wybierz preferowany język z menu rozwijanego i kliknij przycisk Next (Dalej) (Ilustracja 7.1). Ilustracja 7.1. Wybór języka 2. Zapoznaj się z umową licencyjną i kliknij przycisk Next (Dalej)(Ilustracja 7.2). (Uwaga: przed kontynuowaniem należy zaakceptować umowę licencyjną; w przeciwnym razie przycisk Next (Dalej) pozostanie wyłączony). Ilustracja 7.2. Umowa licencyjna Nr dokumentu: 48002017-001.A03 ® DataTraveler Locker+ G2 Strona 13 z 22 3. Utwórz hasło, aby zabezpieczyć dane w pamięci DTL+ G2. Wprowadź je w polu Password (Hasło), a następnie wprowadź je ponownie w polu Password Confirmation (Potwierdzenie hasła), tak jak pokazano na Ilustracji 7.3. Utworzone hasło musi spełniać poniższe kryteria, aby można było kontynuować proces inicjowania: 1. Hasło musi zawierać co najmniej 6 znaków (maks. 16 znaków). 2. Hasło musi zawierać znaki należące do trzech (3) z następujących kategorii: - WIELKIE LITERY, małe litery, cyfry i/lub znaki specjalne (!, $ itp.). Można również wprowadzić wskazówkę dotyczącą hasła, ale nie jest to obowiązkowe. Pole wskazówki może pomóc w przypomnieniu sobie zapomnianego hasła. (Uwaga: wskazówka NIE MOŻE być taka sama jak hasło). Ilustracja 7.3. Konfiguracja hasła Nr dokumentu: 48002017-001.A03 ® DataTraveler Locker+ G2 Strona 14 z 22 4. W wyświetlonych polach tekstowych wprowadź informacje kontaktowe (zobacz Ilustracja 7.4) (Uwaga: Informacje wprowadzone w tych polach NIE MOGĄ zawierać ciągu hasła utworzonego w kroku 3. Pola te są jednak opcjonalne i można pozostawić je puste). • Pole Name (Nazwa) może zawierać do 32 znaków, ale nie może zawierać dokładnego hasła. • Pole Company (Firma) może zawierać do 32 znaków, ale nie może zawierać dokładnego hasła. • Pole Details (Szczegóły) może zawierać do 156 znaków, ale nie może zawierać dokładnego hasła. Ilustracja 7.4. Informacje kontaktowe Nr dokumentu: 48002017-001.A03 ® DataTraveler Locker+ G2 Strona 15 z 22 5. Kliknij przycisk Finish (Zakończ), aby zakończyć proces inicjowania urządzenia. Pamięć DTL+ G2 sformatuje teraz bezpieczną partycję danych (Ilustracja 7.5) i powiadomi o zakończeniu operacji (Ilustracja 7.6). 6. Kliknij przycisk OK, aby kontynuować. Ilustracja 7.5. Formatowanie pamięci DTL+ G2 Ilustracja 7.6. Formatowanie zakończone Inicjowanie zostało zakończone. Nr dokumentu: 48002017-001.A03 ® DataTraveler Locker+ G2 Strona 16 z 22 Użytkowanie urządzenia (środowisko Mac) Po zainicjowaniu pamięci DTL+ G2 można uzyskać dostęp do bezpiecznej partycji danych i korzystać z opcji pamięci, logując się do niej przy użyciu hasła. W tym celu wykonaj następujące kroki: 1. Włóż pamięć DTL+ G2 do portu USB w notebooku lub komputerze stacjonarnych i wprowadź hasło (zobacz Ilustracja 8.1). 2. Po wpisaniu hasła kliknij przycisk Login (Zaloguj), aby kontynuować. • Po wprowadzeniu poprawnego hasła pamięć DTL+ G2 zostanie odblokowana i będzie można rozpocząć korzystanie z niej. Ilustracja 8.1. Okno logowania • Jeżeli wprowadzone hasło będzie nieprawidłowe, tuż pod polem Hint (Wskazówka) zostanie wyświetlony komunikat o błędzie wskazujący na niepowodzenie logowania (zobacz Ilustracja 8.2). Jeżeli podczas logowania zostanie wprowadzone błędne hasło, będzie można ponownie spróbować wprowadzić poprawne hasło, ale wbudowana funkcja zabezpieczeń zlicza nieudane próby logowania*. Po 10 (wstępnie skonfigurowana liczba) nieudanych próbach logowania pamięć DTL+ G2 zostanie zablokowana i przed ponownym jej użyciem będzie konieczne sformatowanie bezpiecznej partycji danych. OZNACZA TO UTRATĘ WSZYSTKICH DANYCH ZAPISANYCH W PAMIĘCI DTL+ G2. Aby uzyskać więcej informacji dotyczących tej funkcji, zobacz sekcję Blokada urządzenia na stronie 20. Ilustracja 8.2. Niepowodzenie logowania *Uwaga: po pomyślnym uwierzytelnieniu użytkownika licznik nieudanych logowań jest resetowany. Nr dokumentu: 48002017-001.A03 ® DataTraveler Locker+ G2 Strona 17 z 22 Opcje urządzenia (środowisko Mac) Po zalogowaniu się do urządzenia w doku systemu Mac OS X będzie widoczna ikona DTLplus_Launcher, tak jak pokazano na Ilustracji 9.1 poniżej: Ilustracja 9.1. Ikona DTL+ G2 w doku systemu Mac OS X Przytrzymanie klawisza control na klawiaturze i kliknięcie ikony DTLplus_Launcher spowoduje wyświetlenie menu pokazanego na Ilustracji 9.2 po prawej. Polecenie DTL+ G2 Settings (Ustawienia pamięci DTL+ G2) • • • Umożliwia zmianę hasła i/lub wskazówki (Ilustracja 9.3). Umożliwia dodanie/wyświetlenie/zmianę informacji kontaktowych (Ilustracja 9.4). Umożliwia zmianę używanego języka (Ilustracja 9.5). Ilustracja 9.3. Zmiana hasła Ilustracja 9.4. Informacje kontaktowe Ilustracja 9.2. Opcje pamięci DTL+ G2 Ilustracja 9.5. Wybór języka (Uwaga: ze względów bezpieczeństwa aktualizacja i/lub modyfikacja tych ustawień wymaga podania aktualnego hasła pamięci DTL+ G2). Nr dokumentu: 48002017-001.A03 ® DataTraveler Locker+ G2 Strona 18 z 22 Polecenie Browse DTL+ G2 (Przeglądaj pamięć DTL+ G2) • Umożliwia przeglądanie zawartości bezpiecznej partycji danych (po zalogowaniu się). Polecenie Format DTL+ G2 (Formatuj pamięć DTL+ G2) • Umożliwia sformatowanie bezpiecznej partycji danych. Ostrzeżenie: wszystkie dane zostaną wymazane). (Ilustracja 9.7) Polecenie Online Support (Pomoc techniczna online) (wymaga dostępu do Internetu) • Otwiera przeglądarkę internetową i przechodzi pod adres http://www.kingston.com/support/, gdzie są dostępne dodatkowe informacje pomocy technicznej. Ilustracja 9.7. Ostrzeżenie dotyczące formatowania Polecenie About DTL+ G2 (Informacje o pamięci DTL+ G2) • Wyświetla szczegółowe informacje dotyczące pamięci DTL+ G2, w tym informacje o wersjach aplikacji i oprogramowania sprzętowego (Ilustracja 9.8). Polecenie Shutdown DTL+ G2 (Wyłącz pamięć DTL+ G2) • Prawidłowo wyłącza pamięć DTL+ G2, umożliwiając bezpieczne odłączenie jej od komputera. Ilustracja 9.8. Informacje o pamięci DTL+ G2 (Zalecenie: po wyłączeniu pamięci DTL+ G2 zawsze warto wyłączyć lub ponownie uruchomić stację roboczą, do której była podłączona ta pamięć, zwłaszcza jeśli znajduje się ona w miejscu publicznym lub jest używana przez wiele osób). -Koniec sekcji dotyczącej systemu Mac- Nr dokumentu: 48002017-001.A03 ® DataTraveler Locker+ G2 Strona 19 z 22 Pomoc i rozwiązywanie problemów Blokada urządzenia Pamięć DTL+ G2 zawiera funkcję zabezpieczeń zapobiegającą nieautoryzowanemu dostępowi do partycji danych po maksymalnej liczbie następujących po sobie nieudanych prób logowania (w skrócie MaxNoA). Domyślna liczba dozwolonych nieudanych prób to 10. Licznik blokady zlicza nieudane logowania i można go zresetować na jeden z dwóch sposobów: 1) Logując się przed osiągnięciem limitu MaxNoA lub 2) osiągając limit MaxNoA i formatując urządzenie.* Jeżeli zostanie wprowadzone nieprawidłowe hasło, tuż pod polem Hint (Wskazówka) zostanie wyświetlony komunikat o błędzie wskazujący na niepowodzenie logowania. Zobacz Ilustracja 10.1. Po siódmej nieudanej próbie zostanie wyświetlony dodatkowy komunikat o błędzie informujący o tym, że pozostały trzy próby przed osiągnięciem limitu MaxNoA (ustawionego domyślnie na 10). Zobacz Ilustracja 10.2. Po dziesiątej nieudanej próbie logowania pamięć DTL+ G2 trwale zablokuje partycję danych, przez co dalsze używanie pamięci będzie wymagało jej sformatowania. Oznacza to, że wszystkie dane przechowywane w pamięci DTL+ G2 zostaną utracone i trzeba będzie utworzyć nowe hasło. Ilustracja 10.1. Niepowodzenie logowania Ten środek bezpieczeństwa ma na celu uniemożliwienie osobom, które nie znają hasła, podjęcia nieograniczonej liczby prób logowania, i uzyskania dostępu do poufnych danych. Jeżeli właściciel pamięci DTL+ G2 zapomni hasła, zostaną zastosowane te same środki bezpieczeństwa, w tym formatowanie urządzenia*. Aby uzyskać więcej informacji dotyczących tej funkcji, zobacz sekcję Nie pamiętam hasła na stronie 21. Ilustracja 10.2. Siódma nieudana próba logowania *Uwaga: sformatowanie urządzenia spowoduje usunięcie WSZYSTKICH przechowywanych na bezpiecznej partycji danych pamięci DTL+ G2. Nr dokumentu: 48002017-001.A03 ® DataTraveler Locker+ G2 informacji Strona 20 z 22 Nie pamiętam hasła W przypadku zapomnienia hasła można kliknąć łącze Reset Password (Resetuj hasło), które jest wyświetlane w oknie logowania do urządzenia po uruchomieniu programu DTLplus_Launcher (zobacz Ilustracja 10.3). Ta opcja umożliwia utworzenie nowego hasła, ale w celu ochrony poufności danych pamięć DTL+ G2 zostanie sformatowana. Oznacza to, że wszystkie dane zostaną wymazane.* Po kliknięciu łącza Reset Password (Resetuj hasło) zostanie wyświetlony komunikat (Ilustracja 10.4) z pytaniem, czy chcesz wprowadzić nowe hasło przed rozpoczęciem formatowania. Na tym etapie można 1) kliknąć przycisk OK, aby potwierdzić, lub 2) kliknąć przycisk Cancel (Anuluj), aby wrócić do okna logowania. Ilustracja 10.3. Zapomniane hasło W przypadku wybrania opcji kontynuowania zostanie wyświetlony monit o utworzenie nowego złożonego hasła oraz nowej wskazówki. Wypełnienie pola wskazówki nie jest obowiązkowe, ale może pomóc w przypomnieniu sobie zapomnianego hasła. (Uwaga: wskazówka NIE MOŻE być taka sama jak hasło urządzenia DTL+ G2). Ilustracja 10.4. Monit przed formatowaniem *Uwaga: sformatowanie urządzenia spowoduje usunięcie WSZYSTKICH przechowywanych na bezpiecznej partycji danych pamięci DTL+ G2. Nr dokumentu: 48002017-001.A03 ® DataTraveler Locker+ G2 informacji Strona 21 z 22 Konflikt liter dysków (systemy operacyjne Windows) Jak wspomniano w sekcji Wymagania systemowe tej instrukcji obsługi (strona 3), pamięć DTL+ G2 wymaga dwóch kolejnych liter dysku PO ostatnim dysku fizycznym wyświetlanym przed luką w przypisanych do dysków literach (zobacz Ilustracja 10.5). NIE ma to zastosowania do udziałów sieciowych, ponieważ są one specyficzne dla profilów użytkownika, a nie profilu sprzętu, przez co wydają się one dostępne dla systemu operacyjnego. Oznacza to, że system Windows może przypisać pamięci DTL+ G2 literę dysku używaną już przez udział sieciowy lub ścieżkę UNC (Universal Naming Convention), co powoduje konflikt liter dysku. Jeśli ten problem występuje, należy skonsultować się z administratorem lub działem pomocy technicznej w celu zmiany przypisania liter dysku w obszarze Zarządzanie dyskami systemu Windows (wymagane są uprawnienia administratora). Ilustracja 10.5. Mój komputer W tym przykładzie pamięć DTL+ G2 używa litery dysku F:, która jest pierwszą dostępną literą po literze E: (przypisaną do ostatniego dysku fizycznego przed przerwą). Ponieważ litera G: jest udziałem sieciowym nieobjętym profilem sprzętu, pamięć DTL+ G2 może podjąć próbę użycia jej jako drugiej litery, co spowoduje konflikt. Jeśli w systemie nie ma udziałów sieciowych, ale nadal nie można uruchomić pamięci DTL+ G2, prawdopodobnie konflikt powoduje inne, wcześniej zainstalowane urządzenie, do którego przypisano literę dysku (np. czytnik kart lub dysk wymienny). Należy zauważyć, że funkcja zarządzania literami dysków została znacznie ulepszona w systemach Windows XP z dodatkiem SP3, Vista i 7, więc powyższy problem może nie dotyczyć użytkownika, ale jeśli konfliktu nie można rozwiązać, należy skontaktować się z działem pomocy technicznej firmy Kingston w celu uzyskania dalszej pomocy. ©2011 Kingston Technology Europe Ltd i Digital Europe Ltd. Wszelkie prawa zastrzeżone. Wszelkie znaki towarowe i zastrzeżone znaki towarowe są własnością odpowiednich właścicieli. Nr dokumentu: 48002017-001.A03 ® DataTraveler Locker+ G2 Strona 22 z 22 DataTraveler® Locker+ G2 ユーザーマニュアル 文書番 48002017-001.A03 ® DataTraveler Locker+ G2 1 / 22 ペ ジ 目次 本書について .............................................................................................................................3 システム要件 .............................................................................................................................3 推奨事項 .....................................................................................................................................3 設定 (WINDOWS 環境の場合)...................................................................................................4 デバイスの初期化 (WINDOWS 環境の場合) ...........................................................................5 デバイスの使用 (WINDOWS 環境の場合) ...............................................................................9 デバイスの各種オプション (WINDOWS 環境の場合)..........................................................10 設定 (MAC 環境の場合)...........................................................................................................12 デバイスの初期化 (MAC 環境の場合) ...................................................................................13 デバイスの使用 (MAC 環境の場合) .......................................................................................17 デバイスの各種オプション (MAC 環境の場合)....................................................................18 ヘルプとトラブルシューティング ........................................................................................20 デ バ イ ス の ロ ッ ク ....................................................................................................................................... 20 パ ス ワ ー ド の 再 設 定 ................................................................................................................................... 21 ド ラ イ ブ ・ レ タ ー の 競 合 (Windows OS の 場 合 ) ..................................................................................... 22 文書番号 48002017-001.A03 ® DataTraveler Locker+ G2 2 / 22 ページ 本書について このユーザーマニュアル(以降は、「本書」と略します)は、DataTraveler® Locker+ G2 (以 降は、「DTL+ G2」と略します)について、カスタマイズを行っていない製造時のイメージ を基本にして、説明しています。 システム要件 PC プラットフォーム • • • • 対応オペレーティングシステム (OS) Pentium Ⅲ (以降の) プロセッサまたは等 価のもの 15MB のディスク空き容量 USB 2.0/3.0 ポート 最後の物理ドライブの後の、2 つの連続し たドライブ・レター* • • • Mac プラットフォーム • • Windows® 7 Windows® Vista SP1、SP2 Windows® XP SP2、SP3 対応オペレーティング・システム (OS) 15MB のディスク空き容量 USB 2.0/3.0 ポート • • • Mac OS X 10.5.x Mac OS X 10.6.x Mac OS X 10.7x 推奨事項 DTL+ G2 デバイスに十分な電力を提供するために、以下の図 1.1 に示すように、ノートパソ コンまたはデスクトップパソコンの USB ポートに直接、差し込んでください。図 1.2 に示す ようなキーボードや USB から給電するハブなどのように、USB ポートを持つ周辺機器には、 DTL+ G2 を接続しないでください。 図 1.1 – 推奨する使い方 文書番号 48002017-001.A03 図 1.2 – 推奨しない使い方 ® DataTraveler Locker+ G2 3 / 22 ページ *注:「ドライブ・レターの競合」(22 ページ) を参照してください。 設定 (Windows 環境の場合) 1. DTL+ G2 を、ノートパソコンまたはデスクトッ プパソコンの USB の空きポートに差し込み、 Windows がこのドライブを検出するまで待機し ます。 • Windows XP のユーザーに対し、図 2.1 に示 すように、「 新しいハードウェアが見つかり ました」というメッセージが示されます。 図 2.1 – 「新しいハードウェアが見つかり ました」 (Windows XP) • Windows Vista または 7 のユーザーに対して は、図 2.2 に示すように、デバイスドライバ の通知メッセージが示されます。 新しいハードウェアの検出が終わると、Windows は 初期化プロセスを開始します。 • Windows の自動再生機能が有効な場合は、次 のステップを省略して、デ バ イ ス の 初 期 化 (5 ページ) に進むことができます。 図 2.2 – デバイスドライバのインストール (Windows Vista/7) • Windows の 自 動 再 生 機 能 が 無 効 の 場 合 (Windows 7 では、デフォルトで無効に設定さ れ て い ま す ) 、 図 2.3 の そ れ と 類 似 し た AutoPlay ウィンドウが表示されます。 2. 「 DTLplus_Launcher.exe を実行する 」のオプショ ンを選択します。 Windows が AutoPlay を実行しない場合は、CDROM のパーティションを閲覧し (図 2.4)、マニュア ル操作で DTLplus_Launcher プログラムを実行して ください。この場合でも、初期化プロセスが開始さ れます。 図 2.3 – AutoPlay ウィンドウ (Windows Vista/7) (注:AutoPlay ウィンドウのメニュー項 目は、ユーザーのパソコンにインスト ールしているプログラムによって異な ります。有効に設定されている場合、 AutoRun は初期化プロセスを自動的 に開始します。) 文書番号 48002017-001.A03 ® DataTraveler Locker+ G2 4 / 22 ページ 図 2.4 – DTL+ G2 のコンテンツ デバイスの初期化 (Windows 環境の場合) 1. ドロップダウンメニューで、使用する言語を選択し、[次へをクリックします] (図 3.1)。 図 3.1 – 言語の選択 2. 使用許諾契約の内容に目を通し、[次へ] (図 3.2)をクリックします。(注:次のステップに進む 前に、使用許諾契約に同意する必要があります。同意しないと、[次へ] のボタンは有効に なりません。) 文書番号 48002017-001.A03 ® DataTraveler Locker+ G2 5 / 22 ページ 図 3.2 – 使用許諾契約 3. DTL+ G2 に保存するユーザーデータを保護するために、パスワードを決めます。そのパス ワードを「パスワード」フィールドにキー入力します。確認のために、同じパスワードを 「パスワードの確認」フィールドに再入力します (図 3.3 を参照)。ユーザーが作成するパス ワードは、初期化プロセスを継続するために、以下の基準に合っていなければなりません。 1. パスワードは、6 文字以上の長さ (最大 16 文字) でなければなりません。 2. パスワードには、以下の各種文字の中の 3 種類が含まれていなければなりません。 - 大文字、小文字、数字、特殊文字 (! や $ など) また、パスワードのヒントを入力することもできますが、これは必須項目ではありません。 ヒントフィールドは、パスワードを忘れた場合に、パスワードの「手がかり」を示してく れるため、役立ちます。(注:パスワードと同じ文字列をヒントフィールドに入力することは できません。) 図 3.3 – パスワードの設定 文書番号 48002017-001.A03 ® DataTraveler Locker+ G2 6 / 22 ページ 4. 表示されたテキストボックスに、ユーザーの連絡先の情報を入力します(図 3.4 を参照)。 (注:このフィールドに入力する情報には、ステップ 3 で作成したパスワードの文字列を含 め る こ と は で き ま せ ん 。しかし、これらのフィールドは任意選択であり、空白のまま残す こともできます。) • [フィールド名] には、最大 32 文字を入力できますが、パスワードと正確 に同じ文字列を入力することはできません。 • [会社名] のフィールドには、最大 32 文字を入力できますが、パスワード と正確に同じ文字列を入力することはできません。 • [詳細] のフィールドには、最大 156 文字を入力できますが、パスワード と正確に同じ文字列を含めることはできません。 図 3.4 – 連絡先の情報 文書番号 48002017-001.A03 ® DataTraveler Locker+ G2 7 / 22 ページ 5. [終了] をクリックして、デバイスの初期化プロセスを終了します。 DTL+ G2 はセキュリティで保護されたデータパーティションのフォーマットを開始し (図 3.5)、 その終了時間を表示します (図 3.6)。 注:Windows XP で、非管理者モードで実行した場合、「初期化」ルーチンの実 行 に 数分かかることがあります。* 6. [OK] をクリックして続行します。 図 3.5 – DTL+ G2 の初期化 図 3.6 – 初期化終了のメッセージ 初期化が完了しました。 *注:初期化の時間は、システムハードウェアや DTL+ G2 ドライブの容量によって異なります。 文書番号 48002017-001.A03 ® DataTraveler Locker+ G2 8 / 22 ページ デバイスの使用 (Windows 環境の場合) DTL+ G2 を初期化した後、ユーザーはセキュ リティで保護されたデータパーティションに アクセスし、パスワードを使ってデバイスに ログインして、デバイスの各種オプションを 利用できます。これを行うには、以下の手順 に従ってください。 1. DTL+ G2 をノートパソコンまたはデスク トップパソコンの USB ポートに差し込 み、パスワードを入力します (図 4.1 を参 照)。 2. パスワードを入力し、[ログイン] ボタンを クリックして続行します。 図 4.1 – ログイン・ウィンドウ • 正しいパスワードが入力されると、 DTL+ G2 はロックを解除し、ユーザ ーはこのデバイスを使用できるよう になります。 • 間違ったパスワードが入力された場 合は、「 ヒント 」フィールドの下に 次のようなエラーメッセージが表示 されます (図 4.2 を参照)。 ログインプロセスの実行中に、間違ったパ スワードを入力した場合、ユーザーは正し いパスワードの入力をやり直すことができ ます。しかし、 不正アクセス回数 を記録す るセキュリティ機能が内蔵されています。 あらかじめ設定済の 10 回の不正アクセス 回数に達した場合、DTL+ G2 はロックさ れ、次に使用する前にセキュリティで保護 されたデータパーティションのデバイスフ ォーマットが。 こ れ は 、 DTL+ G2 に 保 存 さ れ て い る デ ータがすべて消去されることを意味し ます。 図 4.2 – ログインに失敗した場合 この機能の詳細は、[ デバイスのロックア ウト](20 ページ) をご覧ください。 *注:デバイスの認証が正常に行われた場合、ログイン失敗カウンタの値はリセットされます。 文書番号 48002017-001.A03 ® DataTraveler Locker+ G2 9 / 22 ページ デバイスの各種オプション (Windows 環境の場合) デバイスにログインすると、Windows のタスクバーの右端に [DTL+ G2] アイコンが表示され ます (図 5.1)。(注: Windows 7 をご使用の場合は、[DTL+ G2] アイコンにアクセスするには、 タスクバーの上矢印のボタンをクリックする必要があります (図 5.2)。 DTL+ G2 のアイコンを一度クリックすると、以下のようなメニューが表示されます。 図 5.2 – タスクバー内の DTL+ G2 アイコン 図 5.1 – タスクバー内の DTL+ G2 アイコン (Windows 7 の場合 ) (Windows XP の場合 ) DTL+ G2 の設定 • • • パスワードとヒントの変更が可能になります (図 5.3) 連絡先の情報の追加/表示/変更が可能になります (図 5.4) 言語選択の変更が可能になります (図 5.5) (注:安全性の確保のため、これらの設定を更新あるいは変更する際には、現在の のパスワードが求められます。。) 図 5.3 パスワードの変更 文書番号 48002017-001.A03 図 5.4 連絡先情報 ® DataTraveler Locker+ G2 DTL+ G2 図 5.5 言語の選択 10 / 22 ページ DTL+ G2 の内容表示 • ログイン時に、セキュリティで保護されたデータパーティションの内容を閲覧できます。 DTL+ G2 の初期化* • セキュリティで保護されたデータパーティシ ョンの初期化が可能です。(警告: すべてのデ ータが消去されます。(図 5.7) オ ン ラ イ ン ・ サ ポ ー ト (インターネットアクセス が必要です) • インターネット・ブラウザーを開き、追加の サ ポ ー ト 情 報 に ア ク セ ス 可 能 な http://www.kingston.com/support/ にアクセス してください。 図 5.7 – 初期化時の警告 DTL+ G2 の詳細 • アプリケーションやファームウェアバージョ ンの情報を含む DTL+ G2 の詳細が示されま す (図 5.8)。 DTL+ G2 のシャットダウン • DTL+ G2 を正常にシャットダウンすることに より、ユーザーシステムから安全に切り離すこ とができます。 図 5.8 – DTL+ G2 の詳細 (推奨内容 : DTL+ G2 を停止した後は、ユーザードライブを接続したホストワークステ ーションをできるかぎり、シャットダウン、あるいはリブートすることが勧められま す。特に、公共の場で使用している場合や、ワークステーションを複数のユーザーが 共用している場合は、これが必要です 。) *注:DTL+ G2 の現在のパスワードは、Windows Vista および Windows 7 で必要です。 -Windows の項は、ここまでです- 文書番号 48002017-001.A03 ® DataTraveler Locker+ G2 11 / 22 ページ 設定 (Mac 環境の場合) DTL+ G2 を、ノートパソコンまたはデスクトップパソコンの USB の 空きポートに差し込み、Mac がこのドライブを検出するまで待機しま す。検出が終わると、図 6.1 に示すように、DTLplus ボリュームがデ スクトップに表示されます。 1. [DTL+ G2 CD-ROM] アイコンをダブルクリックします。 2. 図 6.2 に示すウィンドウ内で、Mac フォルダーをダブルク リックします。 3. 図 6.3 に示すウィンドウ内で、DTLplus のアプリケーション アイコンをダブルクリックします。これにより、初期化プロ セスが開始されます。 図 6.2 – DTL+ G2 のコンテンツ 文書番号 48002017-001.A03 図 6.1 – DTLplus 図 6.3 – DTL+ G2 のアプリケーション ® DataTraveler Locker+ G2 12 / 22 ページ デバイスの初期化 (Mac 環境の場合) 1. ドロップダウンメニューで、使用する言語を選択し、[次へ] (図 7.1) をクリックします。 図 7.1 – 言語の選択 2. 使用許諾契約の内容に目を通し、[次へ] (図 7.2) をクリックします。(注:次のステップに進 む前に、使用許諾契約に同意する必要があります。同意しないと、[次へ] のボタンは有効 になりません。) 図 7.2 – 使用許諾契約 文書番号 48002017-001.A03 ® DataTraveler Locker+ G2 13 / 22 ページ 3. DTL+ G2 に保存するユーザーデータを保護するために、パスワードを決めます。そのパス ワードを「パスワード」フィールドにキー入力します。確認のために、同じパスワードを 「パスワードの確認」フィールドに再入力します (図 7.3 を参照)。ユーザーが作成するパ スワードは、初期化プロセスを継続するために、以下の基準に合っていなければなりません。 1. パスワードは、6 文字以上の長さ (最大 16 文字) でなければなりません。 2. パスワードには、以下の各種文字の中の 3 種類が含まれていなければなりません。 - 大文字、小文字、数字、特殊文字 (! や $ など) また、パスワードのヒントを入力することもできますが、これは必須項目ではありません。 ヒントフィールドは、パスワードを忘れた場合に、パスワードの「手がかり」を示してく れるため、役立ちます。(注:パスワードと同じ文字列をヒントフィールドに入力することは できません。) 図 7.3 – パスワードの設定 文書番号 48002017-001.A03 ® DataTraveler Locker+ G2 14 / 22 ページ 4. 表示されたテキストボックスに、ユーザーの連絡先の情報を入力します(図 7.4 を参照)。 (注:このフィールドに入力する情報には、ステップ 3 で作成したパスワードの文字列を含 め る こ と は で き ま せ ん 。しかし、これらのフィールドは任意選択であり、空白のまま残す こともできます。) • [フィールド名] には、最大 32 文字を入力できますが、パスワードと正確 に同じ文字列を入力することはできません。 • [会社名] のフィールドには、最大 32 文字を入力できますが、パスワード と正確に同じ文字列を入力することはできません。 • 「詳細」フィールドには、最大 156 文字を入力できますが、パスワード と正確に同じ文字列を含めることはできません。 図 7.4 – 連絡先の情報 文書番号 48002017-001.A03 ® DataTraveler Locker+ G2 15 / 22 ページ 5. [終了] をクリックして、デバイスの初期化プロセスを終了します。 DTL+ G2 はセキュリティで保護されたデータパーティションのフォーマットを開始し (図 7.5)、 その終了時間を表示します (図 7.6)。 6. [OK] をクリックして続行します。 図 7.5 – DTLocker+ G2 の初期化 図 7.6 – 初期化終了のメッセージ 初期化が完了しました。 文書番号 48002017-001.A03 ® DataTraveler Locker+ G2 16 / 22 ページ デバイスの使用 (Mac 環境の場合) DTL+ G2 を初期化した後、ユーザーはセキュ リティで保護されたデータパーティションに アクセスし、パスワードを使ってデバイスに ログインして、デバイスの各種オプションを 利用できます。これを行うには、以下の手順 に従ってください。 1. DTL+ G2 をノートパソコンまたはデスク トップパソコンの USB ポートに差し込 み、パスワードを入力します (図 8.1 を参 照)。 2. パスワードを入力し、[ログイン] ボタンを クリックして続行します。 図 8.1 – ログイン・ウィンドウ • 正しいパスワードが入力されると、 DTL+ G2 はロックを解除し、ユーザ ーはこのデバイスを使用できるよう になります。 • 間違ったパスワードが入力された場 合は、[ヒント] フィールドの下に次の ようなエラーメッセージが表示され ます (図 8.2 を参照)。 ログインプロセスの実行中に、間違ったパ スワードを入力した場合、ユーザーは正し いパスワードの入力をやり直すことができ ます。しかし、 不正アクセス回数 を記録す るセキュリティ機能が内蔵されています。 あらかじめ設定済の 10 回の不正アクセス 回数に達した場合、DTL+ G2 はロックさ れ、次に使用する前にセキュリティで保護 されたデータパーティション初期化が必要 になります。 これは、DTL+ G2 に保存されているデー タがすべて消去されることを意味しま す。 図 8.2 – ログインに失敗した場合 この機能の詳細は、「デバイスのロック」 (20 ページ) をご覧ください。 *注:デバイスの認証が正常に行われた場合、ログイン失敗カウンタの値はリセットされます。 文書番号 48002017-001.A03 ® DataTraveler Locker+ G2 17 / 22 ページ デバイスの各種オプション (Mac 環境の場合) デ バ イ ス に ロ グ オ ン す る と 、 以 下 の 図 9.1 に 示 す よ う に 、 Mac OS X Dock 内 に [DTLplus_Launcher] アイコンが表示されます。 図 9.1 – Mac OS X Dock 内の [DTL+ G2] アイコン キ ー ボ ー ド の [Control] キ ー を 押 し 込 ん だ 状 態 で 、 [DTLplus_Launcher] アイコンを 1 回ほどクリックすると、右側の 図 9.2 に示すメニューが表示されます。 DTL+ G2 の設定 • • • パスワードとヒントの変更が可能になります (図 9.3) 連絡先の情報の追加/表示/変更が可能になります (図 9.4) 使用する言語の選択が可能になります (図 9.5) 図 9.3 パスワードの変更 図 9.4 連絡先情報 図 9.2 DTL+ G2 のオプション 図 9.5 言語の選択 (注:安全性を確保するために、あらかじめ設定されている DTL+ G2 のパスワードを別のものに更新ま たは変更する必要があります。) 文書番号 48002017-001.A03 ® DataTraveler Locker+ G2 18 / 22 ページ DTL+ G2 の内容表示 • ログイン時に、セキュリティで保護されたデータパーティションの内容を閲覧できます。 DTL+ G2 の初期化 • セキュリティで保護されたデータパーティシ ョンの初期化が可能です。(警告: すべてのデ ータが消去されます。(図 9.7) オ ン ラ イ ン ・ サ ポ ー ト (インターネットアクセス が必要です) • インターネット・ブラウザーを開き、追加の サ ポ ー ト 情 報 に ア ク セ ス 可 能 な http://www.kingston.com/support/ にアクセス してください。 図 9.7 – 初期化時の警告 DTL+ G2 の詳細 • アプリケーションやファームウェアバージョ ンの情報を含む DTL+ G2 の詳細が示されま す (図 9.8)。 DTL+ G2 のシャットダウン • DTL+ G2 を正常にシャットダウンすることに より、ユーザーシステムから安全に切り離すこ とができます。 図 9.8 – DTL+ G2 の詳細 (推奨内容 : DTL+ G2 を停止した後は、ユーザードライブを接続したホストワークステ ーションを必ず停止するか、再起動してください。特に、公共の場で使用している場 合や、ワークステーションを複数のユーザーが共用している場合は、これが必要で す 。) - Mac の項は、ここまでです - 文書番号 48002017-001.A03 ® DataTraveler Locker+ G2 19 / 22 ページ ヘルプとトラブルシューティング デバイスのロック DTL+ G2 には、連続した不正アクセス回数 (MaxNoA) に達した場合に、不正アクセスを防止 するセキュリティ機能が内蔵されています。規定のアクセス回数は、10 回にデフォルト設定 されています。 「ロックアウト」カウンタは、不正アクセス回数を記録しており、この値は以下の 2 つの方 法のいずれかでリセットされます。1)MaxNoA の回数に達する前に、正常にログインした場 合 2) MaxNoA の回数に達した場合、デバイスの初期化を行います。* 間違ったパスワードが入力された場合は、「ヒ ント」フィールドの下にエラーメッセージが表 示され、ログインが失敗したことを示します。 図 10.1 を参照。 ログインが続けて 7 回失敗した場合、あと 3 回 で MaxNoA の回数 (これは 10 回にデフォルト設 定されています) に達することを示す追加のエラ ーメッセージが表示されます。図 10.2 を参照。 あらかじめ設定済の 10 回の不正アクセス回数 に達した場合、DTL+ G2 はデータパケットを恒 久的にロックし、次に使用する前に、デバイス の初期化が必要になります。これは、DTL+ G2 に保存されているデータがすべて消去され る ことを意味しており、またユーザーは新しい パスワードを作成する必要があります。 図 10.1 – ログインに失敗した場合 このセキュリティ対策は、(パスワードを持って いない) 第三者によるログインの試みや重要な データへのアクセスを制限するものです。 DTL+ G2 の正規ユーザーの方がパスワードを忘 れた場合でも、デバイスの初期化を含む同じセ キュリティ対策が行われます。* この機能の詳細は、「パスワードの再設定」 (21 ページ) をご覧ください。 図 10.2 – 7 回目のログインに失敗した場合 *注:デバイスの初期化により、DTL+ G2 のセキュリティで保護されたデータパーティション に保存されている情報はすべて消去されます。 文書番号 48002017-001.A03 ® DataTraveler Locker+ G2 20 / 22 ページ パスワードの再設定 パ ス ワ ー ド を 忘 れ た 場 合 は 、 DTLplus_Launcher の起動時にデバイスのロ グ イ ン ウ ィ ン ド ウ に 表 示 さ れ る 「 Reset Password」リンクをクリックしてください (図 10.3 を参照)。 このオプションを選択して新しいパスワード を作成できますが、ユーザーデータのプライ バシーを保護するために、DTL+ G2 は初期化 されます。これは、上記のプロセス時にユー ザーデータがすべて消去されることを意味し ます。* 図 10.3 – パスワードの設定 [パスワードのリセット] をクリックすると、 メッセージボックス (図 10.4) が表示され、初 期化を行う前に新しいパスワードの入力を求 めるかどうか質問してきます。この時点で、 [OK] をクリックして確認するか、または [キ ャンセル] をクリックしてログインウィンドウ に戻ることができます。 次に進む場合、新しいパスワードと新しいヒ ントの作成を求められます。ヒントは入力が 必要な必須フィールドではありませんが、パ スワードを忘れた場合に、パスワードの「手 がかり」を示してくれるため、役立ちます。 (注: DTL+ G2 デバイスのパスワードと同じも のを、ヒントフィールドに入力することはで きません。) 図 10.4 – 初期化の前のプロンプト *注:デバイスの初期化により、DTL+ G2 のセキュリティで保護されたデータパーティション に保存されている情報はすべて消去されます。 文書番号 48002017-001.A03 ® DataTraveler Locker+ G2 21 / 22 ページ ドライブ・レターの競合 (Windows OS の場合) 本書の「システム要件」(3 ページ) で説明したように、DTL+ G2 は、ドライブ文字の割り当 ての「ギャップ」の直前の最後の物理ディスクに続く、2 つの連続したドライブ文字を必要と します (図 10.5 を参照)。ユーザープロファイルに特有のものであり、ハードウェアプロファ イルそのものとは関係がないため、これはネットワーク共有とは関連しません。ですから、 OS からすると利用可能に見えるのです。 つまり、Windows はネットワーク共有や Universal Naming Convention (UNC) パスですでに 使用されているドライブ文字を DTL+ G2 に割り当てることがあり、ドライブ文字の競合が発 生します。競合が発生した場合、管理者またはヘルプデスク部門にお問い合わせいただき、 Windows の [ディスクの管理] にてドライブ文字の変更方法をお尋ね下さい (変更には管理者 権限が必要です)。 図 10.5 – マイ・コンピュータ この例で言えば、DTL+ G2 はドライブ E: の後の最初の利用可能なドライブ文字である F: を 使用しています。(E: がドライブ文字のギャップ前の最後の物理ディスクです。)ドライブ文字 G:は、ネットワーク共有であり、ハードウェアプロファイルの一部ではないため、DTL+ G2 は 2 番目のドライブ文字として G: を使用する可能性があり、競合が発生します。 システムにネットワーク共有がないのに DTL+ G2 が読み込まれない場合、カードリーダーや リムーバブルディスク、その他以前にインストールされているデバイスがドライブ文字の割り 当てを持ち続けており、結果として競合が発生しています。 Drive Letter Management (DLM) は、Windows XP SP3、Vista および 7 では大幅に改善して いるので、この問題が発生しないかもしれません。ですが競合を解消できない場合は、キング ストンの技術サポート部門まで詳細をお問い合わせください。 ©2012 Kingston Technology Far East Co. Ltd (Asia Headquarters)無断複写・転載厳禁。すべての商標および登録商標は、各所有者に帰属します。 文書番号 48002017-001.A03 ® DataTraveler Locker+ G2 22 / 22 ページ คู่มือผู้ใช้ DataTraveler® Locker+ G2 48002017001.A03 ® DataTraveler Locker+ G2 1 22 สารบัญ เกี่ยวกับคูมือผูใชชุดนี้..............................................................................................................................2 เงื่อนไขทางระบบ ..................................................................................................................................2 คำแนะนำ ..........................................................................................................................................3 การติดตั้ง (ระบบ WINDOWS) .............................................................................................................3 การเริ่มการทํางานของอุปกรณ (ระบบ WINDOWS) .......................................................................................4 การใชงานอุปกรณ (ระบบ WINDOWS) ....................................................................................................8 ฟงกชั่นการทํางานของอุปกรณ (ระบบ WINDOWS)......................................................................................10 การติดตั้ง (ระบบ MAC) .....................................................................................................................11 การเริ่มการทํางานของอุปกรณ (ระบบ MAC) ...............................................................................................12 ฟงกชั่นการทํางานของอุปกรณ (ระบบ MAC)................................................................................................17 ฟงกชั่นการทํางานของอุปกรณ (ระบบ MAC)................................................................................................18 วิธีใชและการแกไขปญหา .......................................................................................................................19 Device Lockout ............................................................................................................................................ 19 ลืมรหัสผาน .......................................................................................................................................................... 21 ขอขัดแยงอักขระกํากับไดรฟ (ระบบปฏิบัติการ Windows) ................................................................................................... 21 เกี่ยวกับคูม ือผูใชชุดนี้ คูมือผูใชชุดนี้จัดทําขึ้นสําหรับ DataTraveler® Locker+ G2 (เรียกเปน DTL+ G2 ตอจากนี)้ โดยใชภาพที่ไดจากโรงงานโดยไมมีการปรับแตงเพิ่มเติมใด ๆ เงื่อนไขทางระบบ ������������ 48002017-001.A03 ® DataTraveler Locker+ G2 ��� 2 22 สถาปตยกรรม PC • • • • การรองรับระบบปฏิบัติการสําหรับ PC โปรเซสเซอรระดับ Pentium III (หรือเร็วกวา) พื้นที่วางบนดิสก 15MB พอรต USB 2.0 / 3.0 อักขระกํากับไดรฟตอเนื่องวางสองตัวตอจากไดรฟ ทางภายภาพตัวลาสุด* • • • ระบบปฏิบัติการที่รองรับ สถาปตยกรรม Mac • • Windows® 7 Windows® Vista SP1, SP2 Windows® XP SP2, SP3 พื้นที่วางบนดิสก 15MB พอรต USB 2.0 / 3.0 • • • Mac OS X 10.5.x Mac OS X 10.6.x Mac OS X 10.7x คำแนะนำ เพื่อใหแนใจวาคุณจะสามารถใชงาน DTL+ G2 ไดอยางเต็มประสิทธิภาพ ใหเสียบไดรฟเขาที่พอรต USB ของโนตบุกหรือเครื่องเดสกทอปโดยตรงตามภาพที่ 1.1 หลีกเลี่ยงการตอ DTL+ G2 กับอุปกรณตอพวงที่มีพอรต USB เชน แปนพิมพหรือฮับ USB ตามภาพที่ 1.2 ภาพที่ 1.1 – การใชงานที่แนะนํา ภาพที่ 1.2 - ไมแนะนํา *หมายเหตุ: ดู "ปญหาอักขระกํากับไดรฟ" ในหนา 22 การติดตั้ง (ระบบ Windows) 1. เสียบ DTL+ G2 เขาที่พอรต USB ในโนตบุกหรือ เดสกทอป จากนั้นรอให Windows ทำการตรวจหา • ผูใช Windows XP จะไดรับแจง ‘Found New Hardware’ ตามภาพที่ 2.1 • ผูใช Windows Vista/7 จะไดรับการแจงเตือนเกี่ยว กับไดรเวอรอุปกรณตามภาพที่ 2.2 ภาพที่ 2.1 - ฮารดแวรใหมที่พบ (Windows XP) หลังจากตรวจหาฮารดแวรใหมเสร็จสิ้น Windows จะเริ่มขั้นตอนการทํางาน • หากเปดระบบเรียกใชอัตโนมัติของ Windows ไว คุณสามารถขามขั้นตอนถัดไป แลวไปหนา 5 – การเริ่มการทํางานของอุปกรณ • หากปดระบบเรียกใชอัตโนมัติของ Windows ไว (Windows 7 ������������ 48002017-001.A03 ® DataTraveler Locker+ G2 ��� 3 22 ปดใชงานเปนคาเริ่มตน) จะเห็นหนา ตาง AutoPlay ปรากฏขึ้นคลายกับภาพที่ 2.3 ภาพที่ 2.2 - การติดตั้งไดรเวอรอุปกรณ (Windows Vista/7) 2. เลือกตัวเลือก ‘Run DTLplus_Launcher.exe’ หาก Windows ไมเปดทํางานอัตโนมัติ ใหไปที่พารติชั่นของ CD-ROM (ภาพที่ 2.4) จากนั้นเรียกใช DTLplus_Launcher ดวยตัวเอง ขั้นตอนนี้เปนการเริ่มการทํางานเชนกัน ภาพที่ 2.4 - สวนประกอบของ DTL+ G2 ภาพ 2.3 - หนาตาง AutoPlay (Windows Vista/7) (หมายเหตุ: ตัวเลือกเมนูในหนาตาง AutoPlay อาจแตกตางกันไปตามโปร แกรมที่ติดตั้งในคอมพิวเตอร หากเปดใชงาน AutoRun จะเริ่มการทํางานอัตโนมัติ) การเริ่มการทำงานของอุปกรณ์ (ระบบ Windows) 1. เลือกภาษาของคุณจากเมนูแสดงรายการ จากนั้นคลิกที่ ‘Next’ (ภาพที่ 3.1) ������������ 48002017-001.A03 ® DataTraveler Locker+ G2 ��� 4 22 ภาพที่ 3.1 - การเลือกภาษา 2. ตรวจสอบขอตกลงสิทธิ์ใชงาน จากนั้นคลิกที่ 'Next’ (ภาพที่ 3.2) (หมายเหตุ: คุณตองตอบรับขอตกลง สิทธิ์ใชงานกอนดําเนินการตอ ไมเชนนั้นปุม 'Next' จะไมสามารถใชงานได) ภาพที่ 3.2 - ขอตกลงสิทธิ์ใชงาน 3. กําหนดรหัสผานเพื่อปองกันขอมูลใน DTL+ G2 กรอกในฟลด ‘Password’ จากนั้นกรอกซ้ําในฟลด ‘Password Confirmation’ ตามตัวอยางดานลางในภาพที่ 3.3 รหัสผานที่คุณจัดทําจะตองเขา หลักเกณฑตอไปนี้กอนเริ่มการทํางานเพื่อใชงานตอไป: 1. รหัสผานตองมีอักขระ 6 ตัวขึ้นไป (สูงสุด 16 ตัว) 2. รหัสผานจะตองมีสวนประกอบสาม (3) อยางตอไปนี้ - ตัวพิมพใหญ พิมพเล็ก ตัวเลขและ/หรืออักขระพิเศษ (!, $ ฯลฯ) นอกจากนี้คุณยังสามารถกรอกคําใบรหัสผาน ทั้งนี้จะกรอกหรือไมก็ได ฟลดคําใบเปนประโยชนในการชวยเดารหัสผานในกรณีที่ลืมรหัสผาน (หมายเหตุ: คําใบจะตองไมเหมือนกันกับรหัสผาน) ������������ 48002017-001.A03 ® DataTraveler Locker+ G2 ��� 5 22 ภาพที่ 3.3 - การตั้งคารหัสผาน 4. กรอกขอมูลติดตอในกลองขอความที่จัดไวให (ดูในภาพที่ 3.4) (หมายเหตุ: ขอมูลที่คุณกรอกในฟลดเหลานี้จะตองไมมชี ุดอักขระในรหัสผานที่จัดทําในขั้นตอนที่ 3 ทั้งนี้ฟลดเหลานี้เปนฟลดเผื่อเลือกและสามารถปลอยวางไดถาตองการ) • ฟลด 'Name’ รองรับอักขระสูงสุด 32 ตัว แตจะตองไมมีรหัสผานที่ตรงกัน • ฟลด 'Company’ รองรับอักขระสูงสุด 32 ตัว แตจะตองไมมีรหัสผานที่ตรงกัน • ฟลด 'Details’ รองรับอักขระสูงสุด 156 ตัว แตจะตองไมมีรหัสผานที่ตรงกัน ������������ 48002017-001.A03 ® DataTraveler Locker+ G2 ��� 6 22 ภาพที่ 3.4 - ขอมูลติดตอ 5. คลิก ‘Finish’ เพื่อสิ้นสุดขั้นตอนเริ่มการทํางานของอุปกรณ จากนี้ DTL+ G2 จะทําการฟอรแมตพารติชั่นนิรภัย (ภาพที่ 3.5) และแจงใหคุณทราบเมื่อดํา เนินการเสร็จสิ้น (ภาพที่ 3.6) หมายเหตุ: หากใชงานจาก Windows XP โดยไมใชสิทธิ์ผูดูแลระบบ การ "ฟอรตแมต" อาจใชเวลาถึงหนึ่งนาที* 6. คลิก ‘OK’ เพื่อดําเนินการตอ ������������ 48002017-001.A03 ® DataTraveler Locker+ G2 ��� 7 22 ภาพที่ 3.5 - การฟอรแมต DTL+ G2 ภาพที่ 3.6 - ฟอรแมตเสร็จสิ้น สิ้นสุดการเริ่มทํางาน *หมายเหตุ: เวลาดําเนินการอาจแตกตางกันไปตามฮารดแวรและความจุของไดรฟ DTL+ G2 การใช้งานอุปกรณ์ (ระบบ Windows) หลังจากเริ่มการทํางานของ DTL+ G2 แลว คุณจะสามารถเรียกคนพารติชั่นนิรภัยและใชฟงกชั่นตาง ๆ ของอุปกรณโดยล็อกอินดวยรหัสผานของคุณ ทําไดงาย ๆ ตามขั้นตอนตอไปนี้ 1. เสียบ DTL+ G2 เขาที่พอรต USB ของโนตบุกหรือ เดสกทอป จากนั้นกรอกรหัสผาน (ดูในภาพที่ 4.1) 2. หลังจากพิมพรหัสผานแลว ใหคลิกที่ปุม 'Login’ เพื่อดําเนินการตอ • หากกรอกรหัสผานถูกตอง DTL+ G2 จะปลดล็อคและคุณจะสามารถเริ่มใชงานอุปกรณได • หากกรอกรหัสผานไมถูกตอง ขอความแจง ขอผิดพลาดจะปรากฏขึ้นดานลางฟลด ‘Hint’ ������������ 48002017-001.A03 ® DataTraveler Locker+ G2 ��� 8 22 เพื่อแจงวาไมผานการล็อกอิน (ดูในภาพที่ 4.2) ภาพ 4.1 - หนาตางล็อกอิน ระหวางขั้นตอนการล็อกอิน หากกรอกร หัสผานไมถูกตอง คุณจะสามารถกรอกรหัสผา นที่ถูกตองไดใหม ทั้งนี้ระบบความปลอดภัยจะตร วจสอบจำนวนการกรอกรหัสล็อกอินที่ลมเหลวไว* หากจํานวนเกินคาทีก่ ําหนดไวเบื้องตนที่ 10 ครั้ง DTL+ G2 จะล็อคการทํางาน โดยคุณจะตองฟอ รแมตอุปกรณสําหรับพารติชั่นนิรภัยกอนการใชงานตอไป ซึ่งหมายถึงขอมูลทั้งหมดที่จัดเก็บใน DTL+ G2 จะสูญหายไปดวย ตรวจสอบรายละเอียดเพิ่มเติมเกี่ยวกับคุณสมบัตินี้ไดจาก 'Device Lockout’ ในหนา 20 *หมายเหตุ: หลังจากตรวจสอบยืนยันอุปกรณเสร็จสิ้น จํานวนการล็อกอินลมเหลวที่บันทึกไวจะถูกรีเซ็ต ������������ 48002017-001.A03 ® DataTraveler Locker+ G2 ภาพ 4.2 - ล็อกอินลมเหลว ��� 9 22 ฟังก์ชั่นการทำงานของอุปกรณ์ (ระบบ Windows) ขณะล็อกอินเขาที่อุปกรณ จะพบไอคอน ‘DTL+ G2’ ที่มุมดานขวาของทาสกบารของ Windows (ภาพที่ 5.1) (หมายเหตุ: ผูใช Windows 7 จะตองคลิกที่ปุมลูกศรขึ้นในทาสกบารเพื่อเขาถึงไอคอน 'DTL+ G2' (ภาพที่ 5.2) คลิกหนึ่งครั้งที่ไอคอน DTL+ G2 เพื่อแสดงเมนูตอไปนี้ ภาพ 5.2 - ไอคอน DTL+ G2 ที่ทาสกบาร ภาพ 5.1 - ไอคอน DTL+ G2 ที่ทาสกบาร (ผูใช Windows 7) (ผูใช Windows XP) DTL+ G2 Settings • • • ชวยใหคุณสามารถเปลี่ยนรหัสผานและ/หรือคําใบ (ภาพที่ 5.3) ชวยใหสามารถเพิ่ม/ดู/แกไขขอมูลติดตอของคุณ (ภาพที่ 5.4) ชวยใหสามารถแกไขคาภาษาที่เลือกในปจจุบัน (ภาพที่ 5.5) (หมายเหตุ: เพื่อความปลอดภัย คุณจะตองใชรหัสผาน DTL+ G2 ในปจจุบันเพื่ออัพเดตและ/หรือปรับแตงคาเหลานี้) ภาพ 5.4 ขอมูลการติดตอ ภาพ 5.3 เปลี่ยนรหัสผาน ภาพ 5.5 เลือกภาษา Browse DTL+ G2 • คุณสามารถเรียกคนขอมูลในพารติชั่นนิรภัยไดขณะล็อกอิน ������������ 48002017-001.A03 ® DataTraveler Locker+ G2 ��� 10 22 Format DTL+ G2* • ใชเพื่อฟอรแมตพารติชั่นนิรภัย (คําเตือน: ขอมูลทั้งหมดจะถูกลบทิ้ง) (ภาพ 5.7) Online Support (ตองมีการเชื่อมตออินเทอรเน็ต) • เปดอินเทอรเน็ตเบราเซอรและเขาไปที่ http://www.kingston.com/support/ โดยคุณสามารถแทรกขอมูลการใหบริการเพิ่มเติม ภาพที่ 5.7 - แจงเตือนการฟอรแมต About DTL+ G2 • ระบุรายละเอียดเกี่ยวกับ DTL+ G2 รวมทั้งขอมูลเวอรชั่นแอพพลิเคชั่นและเฟรมแวร (ภาพที่ 5.8) Shutdown DTL+ G2 • ปด DTL+ G2 ใหถูกตามขั้นตอนเพื่อใหสามารถถอด แยกจากเครื่อง ภาพที่ 5.8 - เกี่ยวกับ DTL+ G2 (คำแนะนำ: หลังปด DTL+G2 แนะนําใหปดหรือรีบูตเวิรคสเตชั่นโฮสตที่อุปกรณใชเชื่อมตอ โดยเฉพาะอยางยิ่งหากเปนพื้นที่สาธารณะหรือหากเปนเวิรคสเตชั่นที่แชรโดยผูใชหลายคน) *หมายเหตุ: ตองกรอกรหัสผาน DTL+ G2 ในปจจุบันสําหรับ Windows Vista และ Windows 7 -สิ้นสุดเนื้อหาสำหรับ Windowsการติดตั้ง (ระบบ Mac) เสียบ DTL+ G2 เขาทีพ่ อรต USB ในโนตบุกหรือเดสกทอป จากนั้นรอใหระบบปฏิบัติการ Mac ทำการตรวจหา หลังจากตรวจพบ คุณจะพบไดรฟ DTLplus ที่เดสกทอป ตามภาพที่ 6.1 1. ดับเบิลคลิกที่ไอคอน DTL+ G2 CD-ROM 2. ดับเบิลคลิกที่โฟลเดอร Mac ที่พบในหนาตางที่ปรากฏขึ้นในภาพที่ 6.2 ������������ 48002017-001.A03 ® DataTraveler Locker+ G2 ��� 11 22 ภาพ 6.1 - DTLplus 3. ดับเบิลคลิกที่ไอคอนแอพพลิเคชั่น DTLplus ที่พบในหนาตางที่ปรากฏขึ้นในภาพที่ 6.3 ขั้นตอนนี้เปนการเริ่มการทํางาน ภาพที่ 6.2 - สวนประกอบของ DTL+ G2 ภาพที่ 6.3 - แอพพลิเคชั่น DTL+ G2 การเริ่มการทำงานของอุปกรณ์ (ระบบ Mac) 1. เลือกภาษาของคุณจากเมนูแสดงรายการ จากนั้นคลิกที่ ‘Next’ (ภาพที่ 7.1) ������������ 48002017-001.A03 ® DataTraveler Locker+ G2 ��� 12 22 ภาพที่ 7.1 - การเลือกภาษา 2. ตรวจสอบขอตกลงสิทธิ์ใชงาน จากนั้นคลิกที่ 'Next’ (ภาพที่ 7.2) (หมายเหตุ: คุณตองตอบรับขอตกลงสิทธิ์ใชงานกอนดําเนินการตอ ไมเชนนั้นปุม 'Next' จะไมสามารถใชงานได) ภาพที่ 7.2 - ขอตกลงสิทธิ์ใชงาน 3. กําหนดรหัสผานเพื่อปองกันขอมูลใน DTL+ G2 กรอกในฟลด ‘Password’ จากนั้นกรอกซ้ําในฟลด ‘Password Confirmation’ ตามตัวอยางดานลางในภาพที่ 7.3 รหัสผานที่คุณจัดทําจะตองเขาหลักเกณฑตอไปนี้กอนเริ่มการทํางานเพื่อใชงานตอไป: 1. รหัสผานตองมีอักขระ 6 ตัวขึ้นไป (สูงสุด 16 ตัว) ������������ 48002017-001.A03 ® DataTraveler Locker+ G2 ��� 13 22 2. รหัสผานจะตองมีสวนประกอบสาม (3) อยางตอไปนี้ - ตัวพิมพใหญ พิมพเล็ก ตัวเลขและ/หรืออักขระพิเศษ (!, $ ฯลฯ) นอกจากนี้คุณยังสามารถกรอกคําใบรหัสผาน ทั้งนี้จะกรอกหรือไมก็ได ฟลดคําใบเปนประโยชนในกา รชวยเดารหัสผานในกรณีที่ลืมรหัสผาน (หมายเหตุ: คําใบจะตองไมเหมือนกันกับรหัสผาน) ภาพที่ 7.3 - การตั้งคารหัสผาน 4. กรอกขอมูลติดตอในกลองขอความที่จัดไวให (ดูในภาพที่ 7.4) (หมายเหตุ: ขอมูลที่คุณกรอกในฟลดเหลานี้จะตองไมมชี ุดอักขระในรหัสผานที่จัดทําในขั้นตอนที่ 3 ทั้งนี้ฟลดเหลานี้เปนฟลดเผื่อเลือกและสามารถปลอยวางไดถาตองการ) • ฟลด 'Name’ รองรับอักขระสูงสุด 32 ตัว แตจะตองไมมีรหัสผานที่ตรงกัน • ฟลด 'Company’ รองรับอักขระสูงสุด 32 ตัว แตจะตองไมมีรหัสผานที่ตรงกัน • ฟลด 'Details’ รองรับอักขระสูงสุด 156 ตัว แตจะตองไมมีรหัสผานที่ตรงกัน ������������ 48002017-001.A03 ® DataTraveler Locker+ G2 ��� 14 22 ภาพที่ 7.4 - ขอมูลติดตอ ������������ 48002017-001.A03 ® DataTraveler Locker+ G2 ��� 15 22 5. คลิก ‘Finish’ เพื่อสิ้นสุดขั้นตอนเริ่มการทํางานของอุปกรณ จากนี้ DTL+ G2 จะทําการฟอรแมตพารติชั่นนิรภัย (ภาพที่ 7.5) และแจงใหคุณทราบเมื่อดําเนินการเสร็จสิ้น (ภาพที่ 7.6) 6. คลิก ‘OK’ เพื่อดําเนินการตอ ภาพที่ 7.5 - การฟอรแมต DTLocker+ G2 ภาพที่ 7.6 - ฟอรแมตเสร็จสิ้น สิ้นสุดการเริ่มทํางาน ������������ 48002017-001.A03 ® DataTraveler Locker+ G2 ��� 16 22 ฟังก์ชั่นการทำงานของอุปกรณ์ (ระบบ Mac) หลังจากเริ่มการทํางานของ DTL+ G2 แลว คุณจะสามารถเรียกคนพารติชั่นนิรภัยและใชฟงกชั่นตาง ๆ ของอุปกรณโดยล็อกอินดวยรหัสผานของคุณ ทําไดงาย ๆ ตามขั้นตอนตอไปนี้ 1. เสียบ DTL+ G2 เขาที่พอรต USB ของโนตบุกหรือ เดสกทอป จากนั้นกรอกรหัสผาน (ดูในภาพที่ 8.1) 2. หลังจากพิมพรหัสผานแลว ใหคลิกที่ปุม 'Login’ เพื่อดําเนินการตอ • หากกรอกรหัสผานถูกตอง DTL+ G2 จะปลดล็อค และคุณจะสามารถเริ่มใชงานอุปกรณได • หากกรอกรหัสผานไมถูกตอง ขอความแจง ขอผิดพลาดจะปรากฏขึ้นดานลางฟลด ‘Hint’ เพื่อแจงวาไมผานการล็อกอิน (ดูในภาพที่ 8.2) ภาพ 8.1 - หนาตางล็อกอิน ระหวางขั้นตอนการล็อกอิน หากกรอกรหัสผานไมถูกตอง คุณจะสามารถกรอกรหัสผานที่ถูกตองไดใหม ทั้งนี้ระบ บความปลอดภัยจะตรวจสอบจํานวนการกรอกรหัสล็อกอินที่ลมเหลวไว* หากจํานวนเกินคาที่กําหนดไวเบื้องตนที่ 10 ครั้ง DTL+ G2 จะล็อคการทํางาน โดยคุณจะตองฟอรแมตอุปกรณสําหรับพารติชั่นนิรภัยกอนการใชงานตอไป ซึ่งหมายถึงขอมูลทั้งหมดที่จัดเก็บใน DTL+ G2 จะสูญหายไปดวย ตรวจสอบรายละเอียดเพิ่มเติมเกี่ยวกับคุณสมบัตินี้ไดจาก 'Device Lockout’ ในหนา 20 *หมายเหตุ: หลังจากตรวจสอบยืนยันอุปกรณเสร็จสิ้น จํานวนการล็อกอินลมเหลวที่บันทึกไวจะถูกรีเซ็ต ������������ 48002017-001.A03 ® DataTraveler Locker+ G2 ภาพ 8.2 - ล็อกอินลมเหลว ��� 17 22 ฟังก์ชั่นการทำงานของอุปกรณ์ (ระบบ Mac) ขณะล็อกอินอยูในอุปกรณ ไอคอน ‘DTLplus_Launcher’ จะปรากฏขึ้นที่ Dock ของ Mac OS X ตามภาพที่ 9.1 ดานลาง: ภาพที่ 9.1 - ไอคอน DTL+ G2 ใน Dock ของ Mac OS X การกดปุม ‘control’ ที่แปนพิมพคางไวแลวคลิกหนึ่งครั้งที่ไอคอน 'DTLplus_Launcher’ จะเปนการแสดงเมนูที่ปรากฏในภาพที่ 9.2 ทางดานขวา DTL+ G2 Settings • • • ชวยใหคุณสามารถเปลี่ยนรหัสผานและ/หรือคําใบ (ภาพที่ 9.3) ชวยใหสามารถเพิ่ม/ดู/แกไขขอมูลติดตอของคุณ (ภาพที่ 9.4) ชวยใหสามารถแกไขคาภาษาที่เลือก (ภาพที่ 9.5) ภาพ 9.2 ฟงกชั่นของ DTL+ G2 ภาพ 9.3 เปลี่ยนรหัสผาน ภาพ 9.4 ขอมูลการติดตอ ภาพ 9.5 เลือกภาษา (หมายเหตุ: เพื่อความปลอดภัย คุณจะตองใชรหัสผาน DTL+ G2 ในปจจุบันเพื่ออัพเดตและ/หรือปรับแตงคาเหลานี้) Browse DTL+ G2 • คุณสามารถเรียกคนขอมูลในพารติชั่นนิรภัยไดขณะล็อกอิน ������������ 48002017-001.A03 ® DataTraveler Locker+ G2 ��� 18 22 Format DTL+ G2 • ใชเพื่อฟอรแมตพารติชั่นนิรภัย (คําเตือน: ขอมูลทั้งหมดจะถูกลบทิ้ง) (ภาพ 9.7) Online Support (ตองมีการเชื่อมตออินเทอรเน็ต) • เปดอินเทอรเน็ตเบราเซอรและเขาไปที่ http://www.kingston.com/support/ โดยคุณสามารถแทรกขอมูลการใหบริการเพิ่มเติม ภาพที่ 9.7 - แจงเตือนการฟอรแมต About DTL+ G2 • ระบุรายละเอียดเกี่ยวกับ DTL+ G2 รวมทั้งขอมูล เวอรชั่นแอพพลิเคชั่นและเฟรมแวร (ภาพที่ 9.8) Shutdown DTL+ G2 • ปด DTL+ G2 ใหถูกตามขั้นตอนเพื่อใหสา มารถถอดแยกจากเครื่อง ภาพที่ 9.8 - เกี่ยวกับ DTL+ G2 (คำแนะนำ: หลังปด DTL+G2 แนะนําใหปดหรือรีบูตเวิรคสเตชั่นโฮสตที่อุปกรณใชเชื่อมตอ โดยเฉพาะอยางยิ่งหากเปนพื้นที่สาธารณะหรือหากเปนเวิรคสเตชั่นที่แชรโดยผูใชหลายคน) -สิ้นสุดเนื้อหาสำหรับ Macวิธีใช้และการแก้ไขปัญหา Device Lockout DTL+ G2 มีระบบความปลอดภัยที่ชวยปองกันการเรียกคนพารติชั่นขอมูลที่ไมไดรับอนุญาตเมื่อมีการล็อก อินลมเหลวตอเนื่องเกินจํานวนครั้งที่กําหนด (เรียกสั้น ๆ วา MaxNoA) คาเริ่มตนของผลิตภัณฑ "ที่จําหนาย" กําหนดจํานวนการล็อกอินไวที่ 10 ครั้ง ตัวนับจํานวน 'lock-out' จะตรวจสอบจํานวนการล็อกอินที่ลมเหลว โดยสามารถรีเซ็ตไดสองวิธีไดแก 1) ล็อกอินตามขั้นตอนกอนเกิด MaxNoA หรือ 2) เกิด MaxNoA จากนั้นทําการฟอรแมตอุปกรณ* ������������ 48002017-001.A03 ® DataTraveler Locker+ G2 ��� 19 22 หากกรอกรหัสผานไมถูกตอง ขอความแจงขอผิดพลาดจะปรา กฏขึ้นดานลางฟลด ‘Hint’ เพื่อแจงวาไมผานการล็อกอิน ดูในภาพที่ 10.1 หากล็อกอินผิดพลาดครั้งที่ 7 คุณจะพบขอความแจงเตือนแจง ใหทราบวาเหลือเวลาล็อกอินอีก 3 ครั้งกอน MaxNoA (ตั้งคาเริ่มตนไวที่ 10 ครั้ง) ดูในภาพที่ 10.2 หลังล็อกอินผิดพลาด 10 ครั้ง DTL+ G2 จะบล็อคพารติชั่นขอมูลและกําหนดใหตองฟอรแมตอุปกรณกอนการใชงานครั้งถัดไป ซึ่งหมายความวาขอมูลทั้งหมดที่จัดเก็บใน DTL+ G2 จะสูญหาย โดยคุณจะตองกําหนดรหัสผานใหมขึ้นมา ภาพ 10.1 - ล็อกอินลมเหลว ระบบความปลอดภัยนี้เปนการจํากัดความพยายามของบุคคล (ที่ไมมีรหัสผาน) ในการทดลองล็อกอินเพื่อเรียก คนขอมูลที่สําคัญแบบไมมีขอจํากัด หากคุณมี DTL+ G2 และลืมรหัสผาน ระบบความปลอดภัย ลักษณะเดียวกันนี้จะถูกเปดใช รวมทั้งระบบฟอรแมตอุปกรณ* ตรวจสอบรายละเอียดเพิ่มเติมเกี่ยวกับคุณสมบัตินี้ไดจาก ในหนา 21 'Forgot Password’ ภาพที่ 10.2 – ล็อกอินผิดพลาดครั้งที่ *หมายเหตุ: การฟอรแมตอุปกรณเปนการลบขอมูลทั้งหมดที่จัดเก็บในพารติชั่นนิรภัยของ DTL+ G2 ������������ 48002017-001.A03 ® DataTraveler Locker+ G2 ��� 20 22 ลืมรหัสผาน หากคุณลืมรหัสผาน สามารถคลิกที่ลิงค ‘Reset Password’ ที่ปรากฏขึ้นที่หนาตางล็อกอินของ อุปกรณขณะเรียกใช DTLplus_Launcher (ดูในภาพที่ 10.3) ตัวเลือกนี้ชวยใหสามารถกําหนดรหัสผานใหม แตเพื่อเปนการปองกันขอมูลสวนตัวของคุณ DTL+ G2 จะถูกฟอรแมต ซึ่งหมายความวาขอมูลทั้งหมดของ คุณจะถูกลบทิ้งในขั้นตอนนี*้ หลังจากคลิกที่ ‘Reset Password’ กลองขอความ (ภาพที่ 10.4) จะปรากฏขึ้นและถามวาคุณตองการกรอ กรหัสผานใหมกอนทําการฟอรแมตหรือไม ถึงตอนนี้คุณสามารถ 1) คลิก ‘OK’ เพื่อยืนยันหรือ 2) คลิก 'Cancel' เพื่อกลับไปที่หนาตางล็อกอิน ภาพ 10.3 - ลืมรหัสผาน หากคุณเลือกดําเนินการตอ คุณจะไดรับแจงใ หจัดทํารหัสผานใหมที่ซับซอนกวาพรอมคําใบชุดใหม คำใบไมใชฟลดบังคับแตจะเปนประโยชนในการชวยเดารหัสผานในกรณีที่คุณลืมร หัสผาน (หมายเหตุ: คําใบจะตองไมเหมือนกันกับรหัสผานของ DTL+ G2) ภาพ 10.4 - ถามกอนทําการฟอรแมต *หมายเหตุ: การฟอรแมตอุปกรณเปนการลบขอมูลทั้งหมดที่จัดเก็บในพารติชั่นนิรภัยของ DTL+ G2 ขอขัดแยงอักขระกํากับไดรฟ (ระบบปฏิบัติการ Windows) ตามที่ไดกลาวไปในหัวขอ 'เงื่อนไขทางระบบ’ ของคูมือชุดนี้ (หนา 3) DTL+ G2 ตองการอักขระกํากับไดรฟตอ เนื่องสองตัวตอจากดิสกทางกายภาพที่อยูกอนหนาอักขระกํากับ "ที่วางอยู" (ดูในภาพที่ 10.5) ซึ่งไมเกี่ยวของ กับการแชรเครือขาย เนื่องจากเปนการกําหนดรายการตามโพรไฟลผูใช ไมใชโพรไฟลฮารดแวรระบบ จึงมีการแจงใน OS ซึ่งหมายความวา Windows อาจกําหนดอักขระกํากับไดรฟใหกับ DTL+ G2 ซึ่งถูกใชงานอยูโดยสว นแชรเครือขายหรือในเสนทาง Universal Naming Convention (UNC) ทําใหอักขระกํากับไดรฟชนกัน ในกรณีนี้ กรุณาติดตอผูดูแลระบบหรือฝายใหบริการเพื่อแกไขอักขระกํากับไดรฟใน Windows Disk Manager (ตองใชสิทธิ์ผูดูแลระบบ) ������������ 48002017-001.A03 ® DataTraveler Locker+ G2 ��� 21 22 ภาพ 10.5 - My Computer จากตัวอยางนี้ DTL+ G2 ใช F: ซึ่งเปนอักขระกํากับไดรฟตัวแรกที่มีตอจาก E: (ดิสกกายภาพลาสุดกอ นชองวางในอักขระกํากับไดรฟ เนื่องจากตัว G: เปนสวนแชรเครือขาย ไมใชโพรไฟลฮารดแวร DTL+ G2 อาจพยายามใชเปนอักขระกํากับไดรฟตัวที่สอง ทําใหเกิดอักขระซ้ํากันขึ้น หากไมมีสวนแชรเครือขายในระบบของคุณ แต DTL+ G2 ยังไมยอมโหลดขึ้นมา อาจเปนไปไดวาการดรีดเดอร ดิสกตอพวงหรืออุปกรณอื่นที่ติดตั้งไวกอนหนาใชอักขระกํากับไดรฟดังกลาว และทําใหเกิดขอขัดแยงขึ้น ทั้งนี้ Drive Letter Management หรือ DLM มีการปรับปรุงใหดีขึ้นมากใน Windows XP SP3, Vista และ 7 คุณจึงอาจไมพบปญหานี้ แตหากยังไมสามารถแกไขปญหาได กรุณาติดตอฝายบริการทางเทคนิคของ Kingston เพื่อรับความชวยเหลือเพิ่มเติม © 2011 Kingston Technology Corporation สงวนลิขสิทธิ์ เครื่องหมายการคาและเครื่องหมายการคาจดทะเบียนทั้งหมดถือเปนกรรมสิทธิ์ของผูเปนเจาของ ������������ 48002017-001.A03 ® DataTraveler Locker+ G2 ��� 22 22 DataTraveler® Locker+ G2 用户手册 文档编号 48002017-001.A03 ® DataTraveler Locker+ G2 第 1 页,共 22 页 目录 关于本用户手册 .........................................................................................................................3 系统要求 .....................................................................................................................................3 建议 .............................................................................................................................................3 安装(WINDOWS 环境) ..........................................................................................................4 设备初始化 (WINDOWS 环境) .............................................................................................5 设备使用 (WINDOWS 环境) .................................................................................................9 设备选项(WINDOWS 环境) ................................................................................................10 安装(MAC 环境) ..................................................................................................................12 设备初始化 (MAC 环境) .....................................................................................................13 设备使用(MAC 环境) ..........................................................................................................17 设备选项 (MAC 环境) .........................................................................................................18 帮助和故障排除 .......................................................................................................................19 设备锁定 ....................................................................................................................................................... 20 忘 记密 码 ....................................................................................................................................................... 21 驱动器 盘符 冲 突 ( Windows 操 作 系 统) ................................................................................................... 22 文档编号 48002017-001.A03 ® DataTraveler Locker+ G2 第 2 页,共 22 页 关于本用户手册 本用户手册适用于以出厂外观为基础、没有进行定制的 DataTraveler® Locker+ G2(以后简称 为 DTL+ G2)。 系统要求 PC 平台 • • • • PC 操作系统支持 与 Pentium III(或更快的)处理器性能 相当的处理器 15MB 可用磁盘空间 USB 2.0 / 3.0 接口 最后一个物理驱动器之后的两个连续的 驱动器盘符* • • • Mac 平台 • • Windows® 7 Windows® Vista SP1、SP2 Windows® XP SP2、SP3 操作系统支持 15MB 可用磁盘空间 USB 2.0 / 3.0 接口 • • • Mac OS X 10.5.x Mac OS X 10.6.x Mac OS X 10.7x 建议 为了确保 DTL+ G2 闪存盘获得足够的供电,请将其直接插入笔记本电脑或台式机的 USB 接口 中,如图 1.1 所示。避免将 DTL+ G2 连接到任何带有 USB 接口的外围设备中,如键盘或 USB 供电集线器,如图 1.2 所示。 图 1.1 – 建议使用方法 文档编号 48002017-001.A03 图 1.2 – 不建议 ® DataTraveler Locker+ G2 第 3 页,共 22 页 *注意:参见第 26 页的“驱动器盘符冲突”。 安装(Windows 环境) 1. 将 DTL+ G2 插入笔记本电脑或台式机的可用 USB 接口,等待 Windows 检测到该闪存盘。 • Windows XP 用户将收到“发现新硬件” 通知,如图 2.1 所示。 • Windows Vista/7 用户将收到设备驱动程序 通知,如图 2.2 所示。 图 2.1 – 发现新硬件 (Windows XP) 新硬件检测完成之后,Windows 会开始初始化过程。 • 如果启用了 Windows 自动运行功能,那么您 可以跳过下一步并转向第 5 页 – 设备初始 化。 图 2.2 – 设备驱动程序安装 (Windows Vista/7) • 如果禁用了 Windows 自动运行功能,默认 情况下在 Windows 7 中,您可以看到自动 播放 (AutoPlay) 窗口,类似于图 2.3 中的 那个窗口。 2. 选择选项“运行 DTLplus_Launcher.exe”。 如果 Windows 没有自动播放,只需浏览到 CD-ROM 分区(图 2.4)并手动执行 DTLplus_Launcher 程序。这同样能够开始初始化过程。 图 2.3 – 自动播放 (AutoPlay) 窗口 (Windows Vista/7) (注意:自动播放 (AutoPlay) 窗口中 的菜单选项根据计算机上目前安装程序 的不同可能有所差异。如果启用,自动 运行将自动开始初始化过程。) 文档编号 48002017-001.A03 ® DataTraveler Locker+ G2 第 4 页,共 22 页 图 2.4 – DTL+ G2 内容 设备初始化 (Windows 环境) 1. 从下拉菜单中选择首选语言并单击“下一步”(Next)(图 3.1。) 图 3.1 – 语言选择 2. 查看许可证协议并单击“下一步”(Next)(图 3.2。 ) (注意:您在继续操作之前必须接受许可证 协议;否则“下一步”(Next) 按钮将一直处于禁用状态。) 文档编号 48002017-001.A03 ® DataTraveler Locker+ G2 第 5 页,共 22 页 图 3.2 – 许可证协议 3. 创建密码保护 DTL+ G2 中的数据。在“密码”(Password) 字段中输入密码,然后在“密码确 认”(Password Confirmation) 字段中再次输入,如下图 3.3 所示。创建的密码必须符合以下条 件,然后才能继续进行初始化过程: 1. 密码必须包含 6 个或更多字符(最多 16 个字符)。 2. 密码必须包含下列条件 ua 选项中的三 (3) 个: - 大写、小写、数字和/或特殊字符(!、$ 等) 您还可以输入密码提示,但这不是必填字段。提示字段在忘记密码时很有用,它可以提供有 关密码的提示。(注意:提示内容不得与密码完全相同。) 图 3.3 – 密码设置 文档编号 48002017-001.A03 ® DataTraveler Locker+ G2 第 6 页,共 22 页 4. 在提供的文本框中输入您的联系信息(参见图 3.4)(注意:在这些字段中输入的信息可以不 必 包含第 3 步中创建的密码字符串。不过,这些字段是选填字段,如果需要的话可以留空。) • “姓名”(Name) 字段最多可包含 32 个字符,但是不得包含准确的密码。 • “公司”(Company) 字段最多可包含 32 个字符,但是不得包含准确的密码。 • “详细信息”(Details) 字段最多可包含 156 个字符,但是不得包含准确的密 码。 图 3.4 – 联系信息 文档编号 48002017-001.A03 ® DataTraveler Locker+ G2 第 7 页,共 22 页 5. 单击“完成”(Finish) 完成设备初始化过程。 DTL+ G2 现在将格式化安全数据分区(图 3.5)并在完成时发出通知(图 3.6)。 注意:如果在 Windows XP 的非管理员模式下工作,“格式化”过程最多可能会持 续 一分钟。* 6. 单击“确定”(OK) 继续。 图 3.5 – 格式化 DTL+ G2 图 3.6 – 格式化完成 初始化完成。 *注意:根据系统硬件和 DTL+ G2 闪存盘的存储容量不同,所花费的时间可能有所差异。 文档编号 48002017-001.A03 ® DataTraveler Locker+ G2 第 8 页,共 22 页 设备使用 (Windows 环境) 对 DTL+ G2 进行初始化之后,便可以访问安全 数据分区并使用密码登录设备以便运用设备选 项。为此,请执行以下步骤: 1. 将 DTL+ G2 插入笔记本电脑或台式机的 USB 接口,并输入密码(见图 4.1)。 2. 键入密码后,单击“登录”(Login) 按钮 继续。 • 如果输入了正确的密码,DTL+ G2 将 解锁,您便可以开始使用设备。 图 4.1 – 登录 (Login) 窗口 • 如果输入了错误的密码,将在“提 示 ”(Hint) 字 段 下 方 出 现 一 条 错 误 消 息,说明登录失败(见图 4.2)。 在登录期间,如果输入了错误的密码,您还 有机会输入正确的密码;但是,有一项内置 安全功能会记录失败登录尝试的次数*。如果 失败尝试次数达到了预先配置的 10 次, DTL+ G2 将锁定设备并要求设备格式化安 全数据分区,之后才能再次使用。 这 意 味 着 DTL+ G2 上 存 储 的 所 有 数 据 都 将丢失。 更多有关该功能的信息,请参见第 24 页的 “设备锁定”。 图 4.2 – 登录失败 文档编号 48002017-001.A03 ® DataTraveler Locker+ G2 第 9 页,共 22 页 *注意:成功通过设备的身份认证之后,失败登录计数器将重置。 设备选项(Windows 环境) 登录到设备之后,在 Windows 任务栏的右下角将出现一个“DTL+ G2”图标(图 5.1)。(注意: Windows 7 用户需要单击任务栏中向上箭头按钮才能访问“DTL+ G2”图标(图 5.2)。 单击 DTL+ G2 图标将显示以下菜单: 图 5.2 – 任务栏中的 DTL+ G2 图标 图 5.1 – 任务栏中的 DTL+ G2 图标 ( Windows 7 用户) ( Windows XP 用户) DTL+ G2 设置 • • • 允许您更改密码和/或提示(图 5.3) 允许您添加/查看/更改联系信息(图 5.4) 允许您更改当前语言选择(图 5.5) (注意:出于安全考虑,在更新和/或修改上述设置时需要提供 DTL+ G2 密码)。 图 5.3 更改密码 文档编号 48002017-001.A03 图 5.4 联系信息 ® DataTraveler Locker+ G2 图 5.5 选择语言 第 10 页,共 22 页 浏览 DTL+ G2 • 允许您在登录后浏览安全数据分区中的内容 格式化 DTL+ G2* • 允许您格式化安全数据分区(警告:所有数据 都将被擦除。)(图 5.7) 在线支持(需要互联网接入) • 打开互联网浏览器并导航至 http://www.kingston.com/support/, 您可以在这里访问更多的支持信息 图 5.7 – 格式化警告 关于 DTL+ G2 • 提供有关 DTL+ G2 的特定详细信息,包括应 用程序和固件版本信息(图 5.8) 关闭 DTL+ G2 • 正确关闭 DTL+ G2,允许您将其从系统上安全 删除 图 5.8 – 关于 DTL+ G2 (建议:在关闭 DTL+ G2 之后,最好关闭或重启连接驱动器的主机工作站,尤其是在公共区域 或使用多人共享的工作站时。) *注意:在 Windows Vista 和 Windows 7 中需要您目前使用的 DTL+ G2 密码 文档编号 48002017-001.A03 ® DataTraveler Locker+ G2 第 11 页,共 22 页 -Windows 部分完成安装(Mac 环境) 将 DTL+ G2 插入笔记本电脑或台式机的可用 USB 接口,等待 Mac 操 作系统检测到该闪存盘。检测到之后,您将看到 DTLplus 卷出现在桌面 上,如图 6.1 所示。 1. 双击 DTL+ G2 CD-ROM 图标。 2. 双击图 6.2 所示窗口中出现的 Mac 文件夹。 图 6.1 – DTLplus 3. 双击图 6.3 所示窗口中出现的 DTLplus 应用程序图标。这将开 始初始化过程。 图 6.2 – DTL+ G2 内容 文档编号 48002017-001.A03 图 6.3 – DTL+ G2 应用程序 ® DataTraveler Locker+ G2 第 12 页,共 22 页 设备初始化 (Mac 环境) 1. 从下拉菜单中选择首选语言并单击“下一步”(Next)(图 7.1。) 图 7.1 – 语言选择 2. 查看许可证协议并单击“下一步”(Next)(图 7.2。)(注意:您在继续操作之前必须接受许可证 协议;否则“下一步”(Next) 按钮将一直处于禁用状态。) 图 7.2 – 许可证协议 文档编号 48002017-001.A03 ® DataTraveler Locker+ G2 第 13 页,共 22 页 3. 创建密码保护 DTL+ G2 中的数据。在“密码”(Password) 字段中输入密码,然后在“密码确 认”(Password Confirmation) 字段中再次输入,如下图 7.3 所示。创建的密码必须符合以下条 件,然后才能继续进行初始化过程: 1. 密码必须包含 6 个或更多字符(最多 16 个字符)。 2. 密码必须包含下列条件选项中的三 (3) 个: - 大写、小写、数字和/或特殊字符(!、$ 等) 您还可以输入密码提示,但这不是必填字段。提示字段在忘记密码时很有用,它可以提供有 关密码的提示。(注意:提示内容不得与密码完全相同。) 图 7.3 – 密码设置 文档编号 48002017-001.A03 ® DataTraveler Locker+ G2 第 14 页,共 22 页 4. 在提供的文本框中输入您的联系信息(参见图 7.4)(注意:在这些字段中输入的信息 可以不必 包含第 3 步中创建的密码字符串。然而,这些字段是选填字段,如果需要的话 可以留空。) • “姓名”(Name) 字段最多可包含 32 个字符,但是不得包含准确的密码。 • “公司”(Company) 字段最多可包含 32 个字符,但是不得包含准确的密码 。 • “详细信息”(Details) 字段最多可包含 156 个字符,但是不得包含准确的密 码。 图 7.4 – 联系信息 文档编号 48002017-001.A03 ® DataTraveler Locker+ G2 第 15 页,共 22 页 5. 单击“完成”(Finish) 完成设备初始化过程。 DTL+ G2 现在将格式化安全数据分区(图 7.5)并在完成时发出通知(图 7.6)。 6. 单击“确定”(OK) 继续。 图 7.5 – 格式化 DTLocker+ G2 图 7.6 – 格式化完成 初始化完成。 文档编号 48002017-001.A03 ® DataTraveler Locker+ G2 第 16 页,共 22 页 设备使用(Mac 环境) 对 DTL+ G2 进行初始化之后,便可以访问安全 数据分区并使用密码登录设备以运用设备选 项。为此,请执行以下步骤: 1. 将 DTL+ G2 插入笔记本电脑或台式机的 USB 接口,并输入密码(见图 8.1)。 2. 键入密码后,单击“登录”(Login) 按钮 继续。 • 如果输入了正确的密码,DTL+ G2 将 解锁,您便可以开始使用设备。 • 如果输入了错误的密码,将在“提 示 ”(Hint) 字 段 下 方 出 现 一 条 错 误 消 息,说明登录失败(见图 8.2)。 图 8.1 – 登录 (Login) 窗口 在登录期间,如果输入了错误的密码,您还 有机会输入正确的密码;但是,有一项内置 安全功能会记录失败登录尝试的次数*。如果 失败尝试次数达到了预先配置的 10 次, DTL+ G2 将锁定设备并要求设备格式化安 全数据分区,之后才能再次使用。 这 意 味 着 DTL+ G2 上 存 储 的 所 有 数 据 都 将丢失。 更多有关该功能的信息,请参见第 24 页的 “设备锁定”。 图 8.2 – 登录失败 *注意:成功通过设备的身份认证之后,失败登录计数器将重置。 文档编号 48002017-001.A03 ® DataTraveler Locker+ G2 第 17 页,共 22 页 设备选项 (Mac 环境) 登录到设备之后,Mac OS X Dock 上将出现一个“DTLplus_Launcher”图标,如下图 9.1 所示: 图 9.1 – Mac OS X Dock 中的 DTL+ G2 图标 按住键盘上的“控制(control)”键并单击“DTLplus_Launcher”图标, 将显示右侧图 9.2 所示的菜单。 DTL+ G2 设置 • • • 允许您更改密码和/或提示(图 9.3) 允许您添加/查看/更改联系信息(图 9.4) 允许您更改语言首选项(图 9.5) 图 9.2 DTL+ G2 选项 图 9.3 更改密码 图 9.4 联系信息 图 9.5 选择语言 (注意:出于安全考虑,在更新和/或修改上述设置时需要提供 DTL+ G2 密码)。 浏览 DTL+ G2 文档编号 48002017-001.A03 ® DataTraveler Locker+ G2 第 18 页,共 22 页 • 允许您在登录后浏览安全数据分区中的内容 格式化 DTL+ G2 • 允许您格式化安全数据分区(警告:所有数据 都将被擦除。)(图 9.7) 在线支持(需要互联网接入) • 打开互联网浏览器并导航至 http://www.kingston.com/support/, 您可以在这里访问更多的支持信息 图 9.7 – 格式化警告 关于 DTL+ G2 • 提供有关 DTL+ G2 的特定详细信息,包括 应用程序和固件版本信息(图 9.8) 关闭 DTL+ G2 • 正确关闭 DTL+ G2,允许您将其从系统上安全 删除 图 9.8 – 关于 DTL+ G2 (建议:在关闭 DTL+ G2 之后,最好关闭或重启连接驱动器的主机工作站,尤其是在公共区域 或使用多人共享的工作站时。) -Mac 部分完成帮助和故障排除 文档编号 48002017-001.A03 ® DataTraveler Locker+ G2 第 19 页,共 22 页 设备锁定 DTL+ G2 具有一项安全功能,可以在达到连续失败登录尝试的最大次数(简称为 MaxNoA) 之后禁止未授权访问数据分区;默认的“实际”配置采用了预先配置的值 10(尝试次数)。 “锁定”计数器记录每次的失败登录,并且在达到下列两种条件之一时重置:1) 达到 MaxNoA 之 前成功登录或 2) 达到 MaxNoA 并格式化设备。* 如果输入了错误的密码,将在“ 提示 ”(Hint) 字段 下方出现一条错误消息,说明登录失败。 见 图 10.1。 如果进行了 7 次尝试失败,您将看到另外一条错 误消息,提醒您在达到 MaxNoA 之前还有 3 次尝 试(默认设置为 10)。见 图 10.2。 在第 10 次登录尝试失败之后,DTL+ G2 将永久 性地隔离数据分区,并要求设备进行格式化,之 后才能再次使用。这意味着 DTL+ G2 上存储的 所有数据都将丢失,且您需要新建一个密码。 图 10.1 – 登录失败 该安全措施可防止他人(没有您的密码)无休止 地尝试登录以便访问您的敏感数据。 如果您是 DTL+ G2 的所有者,但忘记了密码, 那么相同的安全措施将同样会生效,包括设备 格式化。* 更多有关该功能的信息,请参见第 25 页的 “忘记密码”。 图 10.2 – 第 7 次登录失败 *注意:设备格式化将擦除 DTL+ G2 安全数据分区中存储的所有信息。 文档编号 48002017-001.A03 ® DataTraveler Locker+ G2 第 20 页,共 22 页 忘记密码 如 果 忘 记 密 码 , 您 可 以 单 击 执 行 DTLplus_Launcher 时出现在设备登录窗口中 的 “ 重 置 密 码 ”(Reset Password) 链 接 ( 见 图 10.3)。 您可以通过这一选项新建密码,但是为了保护 您数据的隐私,DTL+ G2 将被格式化。这意味 着所有数据在此期间都将被擦除。* 单击“重置密码”(Reset Password) 之后,将出 现一个消息框(图 10.4)并询问您是否要在进 行格式化之前输入新密码。此时,您可以 1) 单 击“确定”(OK) 以确认或 2) 单击“取消”(Cancel) 以返回登录窗口。 图 10.3 – 忘记密码 如果选择继续,系统将提示您新建一个复杂的 密码和提示。提示不是必填字段,但是该字段 在忘记密码时很有用,它可以提供有关密码的 提示。 (注意:提示内容不得与 DTL+ G2 闪存盘密 码完全相同。) 图 10.4 – 格式化之前提示 *注意:设备格式化将擦除 DTL+ G2 安全数据分区中存储的所有信息。 文档编号 48002017-001.A03 ® DataTraveler Locker+ G2 第 21 页,共 22 页 驱动器盘符冲突(Windows 操作系统) 正如本手册“系统要求”部分(第 3 页)所述,DTL+ G2 需要使用 2 个连续的驱动器盘符(在驱 动器盘符分配“缺口”之前出现的最后一个物理磁盘之后)(见图 10.5)。这不属于网络共享,因 为它们是用户配置文件所特有的的,而不是系统硬件配置文件本身,因此对操作系统而言是可用 的。 这意味着,Windows 可能会给 DTL+ G2 分配已经被网络共享或者通用命名约定 (UNC) 路径所 占用的驱动器盘符,从而导致驱动器盘符冲突。如果发生这种情况,请联系您的管理员或服务部 门,以便在 Windows 磁盘管理中更改驱动器盘符分配(需要管理员权限)。 图 10.5 – 我的计算机 在本例中,DTL+ G2 使用驱动器 F:,这是驱动器 E: 之后第一个可供使用的驱动器盘符(驱动 器盘符缺口之前的最后一个物理磁盘。)由于盘符 G:是一个网络共享而不是硬件配置文件的一 部分,所以 DTL+ G2 可能会尝试将它用作其第二个驱动器盘符,从而导致冲突。 如果您的系统中没有网络共享,但 DTL+ G2 仍然不能加载,那可能是读卡器、可移动磁盘或者 其他以前安装的设备正在占用驱动器盘符分配,并仍然导致冲突。 请注意,驱动器盘符管理(或 DLM)在 Windows XP SP3、Vista 和 7 中已大大改善,因此您 可能不会遇到此问题,但是如果您无法解决冲突,请联系金士顿技术支持部门获取进一步的 协助。 ©2012 Kingston Technology Corporation.保留所有权利。所有商标和注册商标均为各自所有人之财产。 文档编号 48002017-001.A03 ® DataTraveler Locker+ G2 第 22 页,共 22 页 DataTraveler® Locker+ G2 使用者手冊 文件編號 48002017-001.A03 ® DataTraveler Locker+ G2 頁碼 1/26 目錄 關於此使用者手冊 .....................................................................................................................3 系統需求 .....................................................................................................................................3 建議 .............................................................................................................................................3 設定 (WINDOWS 環境) ..............................................................................................................4 裝置初始化 (WINDOWS 環境)...................................................................................................5 裝置使用率 (WINDOWS 環境)...................................................................................................9 裝置選項(WINDOWS 環境) .....................................................................................................10 設定 (MAC 環境) ......................................................................................................................14 裝置初始化 (MAC 環境)...........................................................................................................15 裝置使用率(MAC 環境)............................................................................................................19 裝置選項 (MAC 環境) ..............................................................................................................20 協助與疑難排解 .......................................................................................................................24 裝 置 解 鎖 ....................................................................................................................................................... 24 忘 記 密 碼 ....................................................................................................................................................... 25 磁 碟 機 代 號 衝 突 (Windows 作 業 系 統 ) ....................................................................................................... 26 文件編號 48002017-001.A03 ® DataTraveler Locker+ G2 頁碼 2/26 關於此使用者手冊 此使用者手冊適用於 DataTraveler® Locker+ G2 (下文簡稱 DTL+ G2),係依據原廠影像且不含 自訂配置。 系統需求 PC 平台 • • • • PC 作業系統支援 Pentium III (或更快) 等效處理器 15MB 可用磁碟空間 USB 2.0 / 3.0 連接埠 這款 DataTraveler 隨身碟需要兩個連續 磁碟機代號,而且這兩個代號是跟隨在 最後一個實體磁碟的後面* • • • Mac 平台 • • Windows® 7 Windows® Vista SP1、SP2 Windows® XP SP2、SP3 作業系統支援 15MB 可用磁碟空間 USB 2.0 / 3.0 連接埠 • • • Mac OS X 10.5.x Mac OS X 10.6.x Mac OS X 10.7x 建議 請將 DTL+G2 插入筆記型電腦或桌上型電腦的 USB 連接埠中以進行使用,如圖 1.1 所示。避免 將 DTL+ G2 連接至任何具有 USB 連接埠 (如鍵盤或 USB 供電的集線器) 的週邊裝置,如圖 1.2 所示。 圖 1.1 – 建議使用 文件編號 48002017-001.A03 圖 1.2 – 不建議使用 ® DataTraveler Locker+ G2 頁碼 3/26 *注意:請參閱第 26 頁「磁碟機代號衝突」。 設定 (Windows 環境) 1. 將 DTL+ G2 插入至筆記型電腦與桌上型電腦上 可用的 USB 連接埠,或是由 Windows 偵測。 • Windows XP 使用者將會收到「找到新硬體」 通知,如圖 2.1 所示。 • Windows Vista/7 使用者將會收到裝置驅動 程式通知,如圖 2.2 所示。 圖 2.1 – 找到新硬體 (Windows XP) 完成新硬體的偵測之後,Windows 就會開始初始化 程序。 • 如果已啟用 Windows 自動執行功能,則可略過 下一個步驟並前往第 5 頁 – 裝置初始化。 圖 2.2 – 裝置驅動程式安裝 (Windows Vista/7) • 如果停用 Windows 自動執行功能 (如 Windows 7 中的預設設定),您就會看到類似於圖 2.3 的 「自動播放」視窗。 2. 選取「執行 DTLplus_Launcher.exe」選項。 若是 Windows 未自動播放,只需瀏覽至 CD-ROM 磁碟分割 (圖 2.4) 並手動執行 DTLplus_Launcher 程式即可。初始化程序即會開始進行。 圖 2.3 – 自動播放視窗 (Windows Vista/7) ( 注意:「自動播放」視窗中的功能表 選項將依照目前安裝於您電腦上的程式 而有所不同。如果已啟用,「自動執行 」即會開始執行初始化程序。) 圖 2.4 – DTL+ G2 的內容 文件編號 48002017-001.A03 ® DataTraveler Locker+ G2 頁碼 4/26 裝置初始化 (Windows 環境) 1. 從下拉式功能表取語言偏好並按一下「Next」(下一步) (圖 3.1)。 圖 3.1 – 語言選項 2. 檢閱授權合約並按一下「Next」(下一步) (圖 3.2)。 (注意:您必須先接受授權合約才能繼續, 否則「Next」(下一步) 按鈕將呈現停止狀態。) 圖 3.2 – 授權合約 文件編號 48002017-001.A03 ® DataTraveler Locker+ G2 頁碼 5/26 3. 建立密碼以保護 DTL+ G2 上的資料。在「Password」(密碼) 欄位中輸入密碼,然後在 「Password Confirmation」(確認密碼) 欄位中再次輸入密碼,如下方圖 3.3 所示。您建立 的密碼必須符合下列條件,系統才會讓您繼續初始化程序: 1. 密碼必須包含 6 個字元或以上 (最多 16 個字元)。 2. 密碼必須包含下列三 (3) 個條件選項: - 大寫字母、小寫字母、數字及/或特殊字元 (!、$ 等)。 您也可以輸入密碼提示,但這不是必填欄位。如果您忘記密碼,提示欄位可幫助您提供密碼 線索。(注意:提示不得與密碼完全相符。) 圖 3.3 – 密碼設定 文件編號 48002017-001.A03 ® DataTraveler Locker+ G2 頁碼 6/26 4. 在提供的文字方塊中輸入您的聯絡資訊 (請參閱圖 3.4) (注意:您在這些欄位輸入的資訊不 得 包含您在步驟 3 中建立的密碼字串。但這些欄位是選擇性欄位所以可保留空白 (如有需要)。) • 「Name」(名稱) 欄位可包含多達 32 個字元,但不得包含確切密碼。 • 「Company」(公司) 欄位可包含多達 32 個字元,但不得包含確切密碼。 • 「Details」(詳細資料) 欄位可包含多達 156 個字元,但不得包含確切密碼。 圖 3.4 – 聯絡資訊 文件編號 48002017-001.A03 ® DataTraveler Locker+ G2 頁碼 7/26 5. 按一下「Finish」(完成) 以完成裝置初始化程序。 DTL+ G2 現在會格式化安全資料磁碟分割 (圖 3.5) 並在完成時通知您 (圖 3.6)。 注意:如果是在 Windows XP 的非管理員模式下作業,則「格式化」例行性作業 可能 需要約一分鐘才能完成。* 6. 按一下「OK」(確定) 以繼續。 圖 3.5 – 格式化 DTL+ G2 圖 3.6 – 格式化完成 初始化完成。 文件編號 48002017-001.A03 ® DataTraveler Locker+ G2 頁碼 8/26 *注意:時間將依系統硬體及 DTL+ G2 隨身碟容量而有所不同。 裝置使用率 (Windows 環境) 初始化 DTL+ G2 之後,您就能以密碼登入裝 置,然後存取安全資料磁碟分割和使用裝置 選項。請依下列步驟進行: 1. 將 DTL+ G2 插入至筆電或桌上型電腦 的 USB 連接埠,然後輸入密碼 (請參閱 圖 4.1。) 2. 輸入密碼之後,按一下「Login」(登入) 按鈕以繼續。 • 如果輸入的密碼正確無誤,DTL+ G2 便會解鎖,您就可以開始使用裝置。 圖 4.1 – 登入視窗 • 如果輸入密碼不正確,「Hint」(提示) 欄位下方便會顯示錯誤訊息,表示 發生登入錯誤 (請參閱圖 4.2)。 在登入程序期間,如果輸入錯誤密碼,您可 嘗試第二次登入,但是系統內建的安全性功 能會自動紀錄嘗試登入失敗的次數 *。如果登 入失敗的次數達到 10 次,DTL+ G2 便會鎖 定並且在下次使用前要求針對安全資料磁碟 分割進行裝置格式化。 這 表 示 所 有 儲 存 在 DTL+ G2 上 的 資 料 將 會被移除。 如需此功能的更多資料,請參閱第 24 頁的 「裝置鎖定」。 圖 4.2 – 登入失敗 *注意:成功驗證裝置之後,登入失敗的計數器便會重設。 文件編號 48002017-001.A03 ® DataTraveler Locker+ G2 頁碼 9/26 裝置選項(Windows 環境) 登入裝置時,「DTL+ G2」圖示會出現在 Windows 工作列右側 (圖 5.1)。(注意:Windows 7 使用者必須按一下工作列的向上箭號按鈕,才能存取「DTL+ G2」圖示 (圖 5.2)。 在「DTL+ G2」圖示上按一下可顯示下列功能表: 圖 5.1 – 工作列中的 DTL+ G2 圖示 圖 5.2 – 工作列中的 DTL+ G2 圖示 (Windows XP 使用者 ) (Windows 7 使用者 ) DTL+ G2 設定 • • • • 可讓您變更密碼及/或提示 (圖 5.3) 可讓您儲存使用者名稱及密碼資訊 請參閱第 11 頁 ) 可讓您新增/檢視/變更聯絡資訊 (圖 5.4) 可讓您變更目前語言選項 (圖 5.5) (注意:基於安全考量,您目前的 DTL+ G2 密碼需要更新及/或修改其中任一設定。) 圖 5.3 變更密碼 文件編號 48002017-001.A03 圖 5.4 聯絡資訊 ® DataTraveler Locker+ G2 圖 5.5 選取語言 頁碼 10/26 密碼管理程式 密碼管理程式是 DTL+ G2 的設定功能表中的區域,可讓您儲存及存取使用者和密碼帳戶資訊 ( 多達 20 個帳戶)。 若要儲存帳戶,只要依照下列步驟執行即可: 1. 按一下「Add」(新增) 按鈕 (如圖 5.6a 所示) 以建立新帳戶。 2. 遵照下列準則,輸入您欲儲存的資訊: a. 「Description」(說明) 欄位是必填欄位,最多可包含 40 個字元。 (注意:此欄位必須至少包含 1 個字元。不可保留空白。 ) b. 「Username」(使用者名稱) 欄位是選填欄位。最多可包含 40 個字元。 c. 「Password」(密碼) 欄位是選填欄位。最多可包含 40 個字元。系統會自動隱藏 您輸入的每個字元。如果您希望以純文字儲存密碼,只要取消選取「Comments」 (註解) 欄位下方的「Hide Password」(隱藏密碼) 核取方塊即可。(請參閱圖 5.6b) d. 「Comments」(註解) 欄位是選填欄位。最多可包含 360 個字元。 3. 如 果 您 希 望 使 用 密 碼 保 護 此 項 目 , 只 要 選 取 「 Comments 」 ( 註 解 ) 欄 位 下 方 的 「 Password protect」(密碼保護) 核取方塊即可。(請參閱圖 5.6b) (注意:此組密碼與您登入 DTL+ G2 裝置為同一組密碼。) 圖 5.6b 圖 5.6a 密碼管理程式螢幕擷取畫面 文件編號 48002017-001.A03 ® DataTraveler Locker+ G2 頁碼 11/26 若要更新或變更「密碼管理程式」中的現有帳戶 ,請依照下列方式進行: 1. 連按兩下您欲更新或修改的項目。 2. 如果您有用密碼保護您欲更新或移除的項 目,系統會要求您輸入裝置密碼,也就是 您在登入時用於解鎖 DTL+ G2 裝置的密碼 。您必須先輸入正確的密碼,才會開啟該 項目的視窗。 3. 帳戶視窗開啟時,您可以按一下文字方塊 以進行更新及修改。完成變更後,按一下 「Save」(儲存) 按鈕。 若要刪除「密碼管理程式」中的現有帳戶,請依 照下列方式進行: 1. 連按兩下您要刪除的行項目。 2. 如果您有用密碼保護您嘗試刪除的項目,系統會要求您輸入裝置密碼,也就是您在登入時 用於解鎖 DTL+ G2 裝置的密碼。您必須先輸入正確的密碼,才會開啟該項目的視窗。 3. 帳戶視窗開啟時,只要按一下「Remove」(移除) 按鈕即可完成 文件編號 48002017-001.A03 ® DataTraveler Locker+ G2 頁碼 12/26 瀏覽 DTL+ G2 • 可讓您在登入時,瀏覽安全資料磁碟分割的內容 格式化 DTL+ G2* • 可讓您格式化安全資料磁碟分割 (警告:將會 清除所有資料。)(圖 5.7) 線上支援 (需要網際網路存取) • 開啟網際網路瀏覽器並導覽至 http://www.kingston.com/support/, 您可以在該網站存取其他支援資訊 圖 5.7 – 格式化警告 關於 DTL+ G2 • 提供關於 DTL+ G2 的詳細資料,包含應用 程式及韌體版本資訊 (圖 5.8) 關閉 DTL+ G2 • 正確關閉 DTL+ G2,即可從系統安全地移除 圖 5.8 – 關於 DTL+ G2 *注意:Windows Vista 及 Windows 7 需要您目前的 DTL+ G2 密碼 -Windows 區域完成- 文件編號 48002017-001.A03 ® DataTraveler Locker+ G2 頁碼 13/26 設定 (Mac 環境) 將 DTL+ G2 插入至筆記型電腦與桌上型電腦上可用的 USB 連接埠,或 是由 Mac 作業系統自動偵測。偵測到裝置時,您將會看到 DTLplus 磁 碟區出現在桌面上,如圖 6.1 所示。 1. 連按兩下 DTL+ G2 CD-ROM 圖示。 2. 連按兩下圖 6.2 中顯示視窗的 Mac 資料夾。 圖 6.1 – DTLplus 3. 連按兩下圖 6.3 中顯示視窗的 DTLplus 應用程式圖示。即開始 進行初始化程序。 圖 6.2 – DTL+ G2 的內容 文件編號 48002017-001.A03 圖 6.3 – DTL+ G2 應用程式 ® DataTraveler Locker+ G2 頁碼 14/26 裝置初始化 (Mac 環境) 1. 從下拉式功能表取語言偏好並按一下「Next」(下一步) (圖 7.1)。 圖 7.1 – 語言選項 2. 檢閱授權合約並按一下「Next」(下一步) (圖 7.2)。(注意:您必須先接受授權合約才能繼續, 否則「Next」(下一步) 按鈕將呈現停止狀態。) 文件編號 48002017-001.A03 ® DataTraveler Locker+ G2 頁碼 15/26 圖 7.2 – 授權合約 3. 建立密碼以保護 DTL+ G2 上的資料。在「Password」(密碼) 欄位中輸入密碼,然後在 「Password Confirmation」(確認密碼) 欄位中再次輸入密碼,如下方圖 7.3 所示。建立的 密碼必須符合下列條件,系統才會讓您繼續初始化程序: 1. 密碼必須包含 6 個字元或以上 (最多 16 個字元)。 2. 密碼必須包含下列三 (3) 個條件選項: - 大寫字母、小寫字母、數字及/或特殊字元 (!、$ 等)。 您也可以輸入密碼提示,但這並非必填欄位。如果您忘記密碼,提示欄位可幫助您提供密碼 線索。(注意:提示不得與密碼完全相符。) 圖 7.3 – 密碼設定 文件編號 48002017-001.A03 ® DataTraveler Locker+ G2 頁碼 16/26 4. 在提供的文字方塊中輸入您的聯絡資訊 (請參閱圖 7.4) (注意:您在這些欄位輸入的資訊不 得 包含您在步驟 3 中建立的密碼字串。但這些欄位是選擇性欄位所以可保留空白 (如有需要)。) • 「Name」(名稱) 欄位可包含多達 32 個字元,但不得包含完整的密碼。 • 「Company」(公司) 欄位可包含多達 32 個字元,但不得包含完整的密碼 。 • 「Details」(詳細資料) 欄位可包含多達 156 個字元,但不得包含完整的密 碼。 圖 7.4 – 聯絡資訊 文件編號 48002017-001.A03 ® DataTraveler Locker+ G2 頁碼 17/26 5. 按一下「Finish」(完成) 以完成裝置初始化程序。 DTL+ G2 現在會格式化安全資料磁碟分割 (圖 7.5) 並在完成時通知您 (圖 7.6)。 6. 按一下「OK」(確定) 以繼續。 圖 7.5 – 格式化 DTL+ G2 圖 7.6 – 格式化完成 初始化完成。 文件編號 48002017-001.A03 ® DataTraveler Locker+ G2 頁碼 18/26 裝置使用率(Mac 環境) 初始化 DTL+ G2 之後,您就能以密碼登入裝 置,然後存取安全資料磁碟分割和使用裝置 選項。若要這麼做,請依照下列步驟執行: 1. 將 DTL+ G2 插入至筆記型電腦或桌上型 電腦的 USB 連接埠,然後輸入密碼 (請參閱 圖 8.1。) 2. 輸入密碼之後,按一下「Login」(登入) 按鈕以繼續。 • 如果輸入的密碼正確無誤,DTL+ G2 便會解鎖,您就可以開始使用裝置。 圖 8.1 – 登入視窗 • 如果輸入密碼不正確,「Hint」(提示) 欄位下方便會顯示錯誤訊息,表示發 生登入錯誤 (請參閱圖 8.2)。 在登入程序期間,如果輸入錯誤密碼,您將 有另一次機會可輸入正確密碼,但是系統內 建的安全性功能會追蹤嘗試登入失敗的次數 * 。如果這個次數達到預先設定的 10 次登入 嘗試次數,DTL+ G2 便會鎖定並要求在下 次使用前針對安全資料磁碟分割進行裝置格 式化。 這 表 示 所 有 儲 存 在 DTL+ G2 上 的 資 料 會 遺失。 如需此功能的更多資料,請參閱第 24 頁的 「裝置鎖定」。 圖 8.2 – 登入失敗 *注意:成功驗證裝置之後,失敗的登入計數器便會重設。 文件編號 48002017-001.A03 ® DataTraveler Locker+ G2 頁碼 19/26 裝置選項 (Mac 環境) 登入裝置時,「DTLplus_Launcher」圖示會出現在 Mac OS X 停駐區中 (如圖 9.1 所示)。 圖 9.1 – Mac OS X 停駐區中的 DTL+ G2 圖示 按住鍵盤上的「控制鍵」,按一下「DTLplus_Launcher」圖示,圖 9.2 中顯示的功能表就會出現在右側。 DTL+ G2 設定 • • • • 可讓您變更密碼及/或提示 (圖 9.3) 可讓您儲存使用者名稱及密碼資訊 請參閱第 21 頁 ) 可讓您新增/檢視/變更聯絡資訊 (圖 9.4) 可讓您變更語言偏好 (圖 9.5) 圖 9.3 變更密碼 圖 9.4 聯絡資訊 圖 9.2 DTL+ G2 選項 圖 9.5 選取語言 (注意:基於安全考量,您目前的 DTL+ G2 密碼需要更新及/或修改其中任一設定。) 文件編號 48002017-001.A03 ® DataTraveler Locker+ G2 頁碼 20/26 密碼管理程式 密碼管理程式是 DTL+ G2 的設定功能表中的區域,可讓您儲存及存取使用者和密碼帳戶資訊 ( 多達 20 個帳戶)。 若要儲存帳戶,只要遵守下列簡單步驟即可: 4. 按一下「Add」(新增) 按鈕 (如圖 5.6a 所示) 以建立新帳戶。 5. 遵照下列準則,輸入您希望儲存的資訊: a. 「Description」(說明) 欄位是必填欄位,最多可包含 40 個字元。 (注意:此欄位必須至少包含 1 個字元。不可保留空白。 ) b. 「Username」(使用者名稱) 欄位是選填欄位。最多可包含 40 個字元。 c. 「Password」(密碼) 欄位是選填欄位。最多可包含 40 個字元。依預設,每個字 元都會以星號遮罩。如果您希望以純文字儲存密碼,只要取消選取「Comments」 (註解) 欄位下方的「Hide Password」(隱藏密碼) 核取方塊即可。(請參閱圖 9.6b) d. 「Comments」(註解) 欄位是選填欄位。最多可包含 360 個字元。 6. 如 果 您 希 望 使 用 密 碼 保 護 此 項 目 , 只 要 選 取 「 Comments 」 ( 註 解 ) 欄 位 下 方 的 「 Password protect」(密碼保護) 核取方塊即可。(請參閱圖 9.6b) (注意:用於保護此項目的密碼是您用於登入 DTL+ G2 裝置的同一組密碼。) 圖 9.6b 圖 9.6a 密碼管理程式螢幕擷取畫面 文件編號 48002017-001.A03 ® DataTraveler Locker+ G2 頁碼 21/26 若要更新或變更「密碼管理程式」中的現有帳戶 ,請依照下列方式進行: 1. 亮顯您希望更新或變更的行項目。 2. 如果您以密碼保護您嘗試更新或移除的項 目,系統便會提示您輸入裝置密碼,也就 是您在登入時用於解鎖 DTL+ G2 裝置的同 一組密碼。您必須先正確地輸入此密碼, 才會開啟該特定項目的帳戶視窗。 3. 帳戶視窗開啟時,您可以藉由按一下您希 望更新及進行必要變更之指定欄位中的文 字方塊,從而對任何欄位進行修改。完成 變更後,按一下「Save」(儲存) 按鈕。 若要刪除「密碼管理程式」中的現有帳戶,請依 照下列方式進行: 1. 亮顯您希望刪除的行項目並按一下「Edit」(編輯)。 2. 如果您以密碼保護您嘗試刪除的項目,系統便會提示您輸入裝置密碼,也就是您在登入時 用於解鎖 DTL+ G2 裝置的同一組密碼。您必須先正確地輸入此密碼,才會開啟該特定項 目的帳戶視窗。 3. 帳戶視窗開啟時,只要按一下「Remove」(移除) 按鈕即可完成 文件編號 48002017-001.A03 ® DataTraveler Locker+ G2 頁碼 22/26 瀏覽 DTL+ G2 • 可讓您在登入時,瀏覽安全資料磁碟分割的內容 格式化 DTL+ G2 • 可讓您格式化安全資料磁碟分割 (警告:將會清除所有資料。)(圖 9.7) 線上支援 (需要網際網路存取) • 開啟網際網路瀏覽器並導覽至 http://www.kingston.com/support/, 您可以在該網站存取其他支援資訊 圖 9.7 – 格式化警告 關於 DTL+ G2 • 提供關於 DTL+ G2 的特定詳細資料,包含 應用程式及韌體版本資訊 (圖 9.8) 關閉 DTL+ G2 • 正確關閉 DTL+ G2,這可讓您從系統安全地 將其移除 圖 9.8 – 關於 DTL+ G2 -Mac 區段完成- 文件編號 48002017-001.A03 ® DataTraveler Locker+ G2 頁碼 23/26 協助與疑難排解 裝置解鎖 DTL+ G2 包含安全性功能,可在達到連續登入失敗嘗試次數上限 (簡稱為 MaxNoA) 時,防止資 料磁碟分割遭到未經授權的存取;預設的「立即可用」設定的預先設定值為 10 (嘗試次數)。 「鎖定」計數器會追蹤每次登入失敗次數,並以下列兩種方式之一進行重設:1) 達到 MaxNoA 之前成功登入,或是 2) 達到 MaxNoA 並執行裝置格式化。* 如果輸入密碼不正確,「Hint」(提示) 欄位下方 便會顯示錯誤訊息,表示發生登入錯誤。請 參 閱 圖 10.1。 如果嘗試進行第 7 次登入,您就會看到其他錯誤 訊息,表示您再進行 3 次嘗試登入就會達到 MaxNoA (預設值為 10)。請參閱圖 10.2。 第 10 次嘗試登入失敗之後,DTL+ G2 便會永久 封鎖資料磁碟分割,並要求在下次使用前進行裝 置格式化。這代表儲存在 DTL+ G2 的所有資料 將會遺失,而且您必須建立新密碼。 圖 10.1 – 登入失敗 此安全性措施可限制某人 (也就是沒有您密碼的 人) 進行無數登入次數和存取您的敏感性資料。 如果您是 DTL+ G2 的擁有者且忘記密碼,系統 也會強制執行相同的安全性措施,包含裝置格 式化。* 如需此功能的更多資料,請參閱第 25 頁的 「忘記密碼」。 圖 10.2 – 第 7 次登入失敗 *注意:裝置格式化會清除儲存在 DTL+ G2 之安全資料磁碟分割中的資訊。 文件編號 48002017-001.A03 ® DataTraveler Locker+ G2 頁碼 24/26 忘記密碼 如 果 您 忘 記 密 碼 , 則 可 以 在 執 行 DTLplus_Launcher 時,按一下出現在「裝置 登入」視窗中的「 重設密碼 」連結 (請參閱 圖 10.3)。 此選項可讓您建立新密碼,但如果是為了保護 您資料的隱私權,則會格式化 DTL+ G2。這表 示您的所有資料在過程中都會遭到清除。* 當您按一下「Reset Password」(重設密碼) 時,便會顯示一個訊息方塊 (圖 10.4) 且會詢 問您是否希望先輸入新密碼,然後再執行格式 化。此時,您可以 1) 按一下「OK」(確定) 確 認,或是,2) 按一下「Cancel」(取消) 返回 登入視窗。 圖 10.3 – 忘記密碼 如果您選擇繼續,系統便會提示您建立新的 強化密碼和新提示。提示不是必填欄位,但 如果您忘記密碼,提示欄位可幫助您提供密碼 線索。 ( 注意:提示不得與 DTL+ G2 裝置密碼完全 相符。) 圖 10.4 – 格式化前進行提示 *注意:裝置格式化會清除儲存在 DTL+ G2 之安全資料磁碟分割中的資訊。 文件編號 48002017-001.A03 ® DataTraveler Locker+ G2 頁碼 25/26 磁碟機代號衝突 (Windows 作業系統) 如同此手冊之「系統需求」區段 (第 3 頁) 所述,DTL+ G2 會要求兩個是跟隨在最後一個實體磁 碟 (也就是磁碟機代號「間隙」的前一個磁碟機) 的「後面」(請參閱圖 10.5)。此實體磁碟「不」 屬於網路共用磁碟機,因為它專屬於使用者設定檔,而不是系統硬體設定檔本身,因此可供作業 系統使用。 這表示 Windows 可能會將網路共用磁碟機或「通用命名慣例」(UNC) 路徑已使用的磁碟機代 號,指定給 DTL+ G2,因而造成磁碟機代號衝突。若發生這種情況,請向系統管理員或技術 支援洽詢,瞭解在 Windows「磁碟管理」變更磁碟機代號指派的事宜 (需要用到管理員權限)。 圖 10.5 – 我的電腦 在這個例子中,DTL+ G2 使用磁碟機 F:,這是磁碟機 E:(磁碟機代號間隙前的最後一個實體磁 碟機) 之後第一個可用的磁碟機代號。因為代號 G:為網路共用磁碟機,而不是硬體設定檔的一部 分,所以 DTL+ G2 可能會將它當作自己的第二個磁碟機代號,因而造成衝突。 如果您的系統上沒有網路共用,卻仍然無法載入 DTL+ G2,可能是因為讀卡機、卸除式磁碟或 其他先前安裝的裝置佔用了指定的磁碟機代號,因此造成衝突。 請注意,Windows XP SP3、Vista 及 Win7 已大幅改善了「磁碟機代號管理」(或 DLM) 的功 能,因此您可能不會有這方面的問題,不過如果您無法解決衝突的問題,請聯繫 Kingston 的 技術支援部門,以獲得進一步的協助。 ©2012 Kingston Technology Far East Co. Ltd (Asia Headquarters).版權所有,保留所有權利。所有商標及註冊商標係屬於各自所有者之智慧財產權。 文件編號 48002017-001.A03 ® DataTraveler Locker+ G2 頁碼 26/26-
 1
1
-
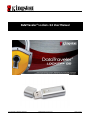 2
2
-
 3
3
-
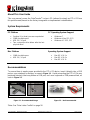 4
4
-
 5
5
-
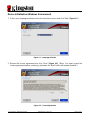 6
6
-
 7
7
-
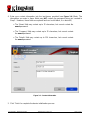 8
8
-
 9
9
-
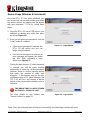 10
10
-
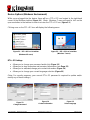 11
11
-
 12
12
-
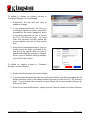 13
13
-
 14
14
-
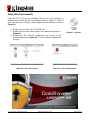 15
15
-
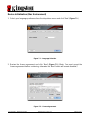 16
16
-
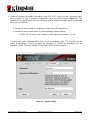 17
17
-
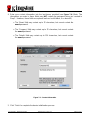 18
18
-
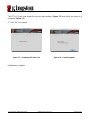 19
19
-
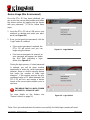 20
20
-
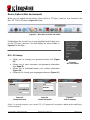 21
21
-
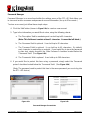 22
22
-
 23
23
-
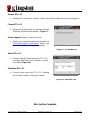 24
24
-
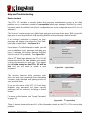 25
25
-
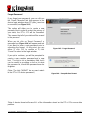 26
26
-
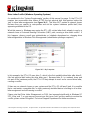 27
27
-
 28
28
-
 29
29
-
 30
30
-
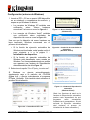 31
31
-
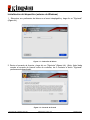 32
32
-
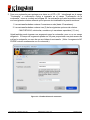 33
33
-
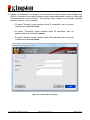 34
34
-
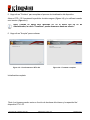 35
35
-
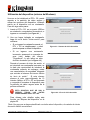 36
36
-
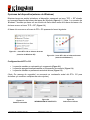 37
37
-
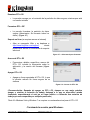 38
38
-
 39
39
-
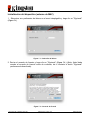 40
40
-
 41
41
-
 42
42
-
 43
43
-
 44
44
-
 45
45
-
 46
46
-
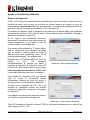 47
47
-
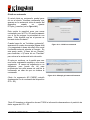 48
48
-
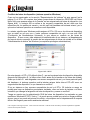 49
49
-
 50
50
-
 51
51
-
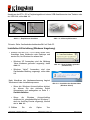 52
52
-
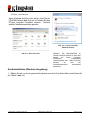 53
53
-
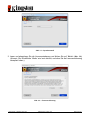 54
54
-
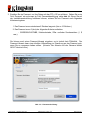 55
55
-
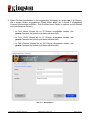 56
56
-
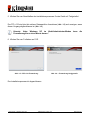 57
57
-
 58
58
-
 59
59
-
 60
60
-
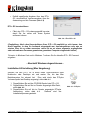 61
61
-
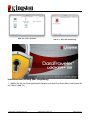 62
62
-
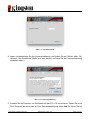 63
63
-
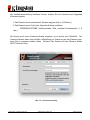 64
64
-
 65
65
-
 66
66
-
 67
67
-
 68
68
-
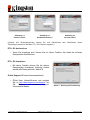 69
69
-
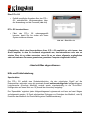 70
70
-
 71
71
-
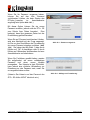 72
72
-
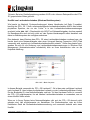 73
73
-
 74
74
-
 75
75
-
 76
76
-
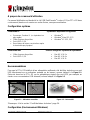 77
77
-
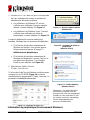 78
78
-
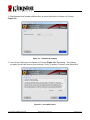 79
79
-
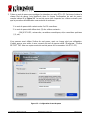 80
80
-
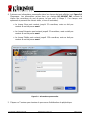 81
81
-
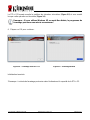 82
82
-
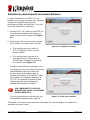 83
83
-
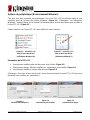 84
84
-
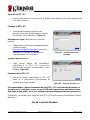 85
85
-
 86
86
-
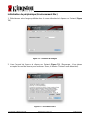 87
87
-
 88
88
-
 89
89
-
 90
90
-
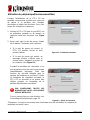 91
91
-
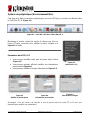 92
92
-
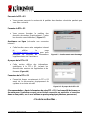 93
93
-
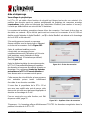 94
94
-
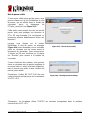 95
95
-
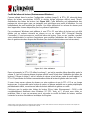 96
96
-
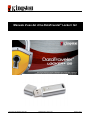 97
97
-
 98
98
-
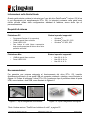 99
99
-
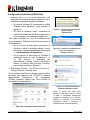 100
100
-
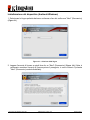 101
101
-
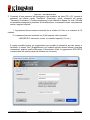 102
102
-
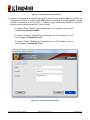 103
103
-
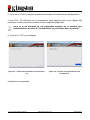 104
104
-
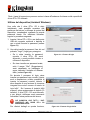 105
105
-
 106
106
-
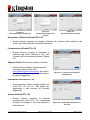 107
107
-
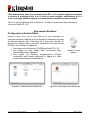 108
108
-
 109
109
-
 110
110
-
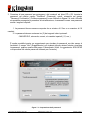 111
111
-
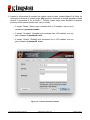 112
112
-
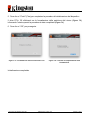 113
113
-
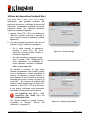 114
114
-
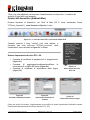 115
115
-
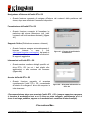 116
116
-
 117
117
-
 118
118
-
 119
119
-
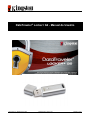 120
120
-
 121
121
-
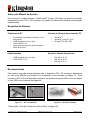 122
122
-
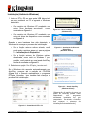 123
123
-
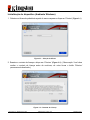 124
124
-
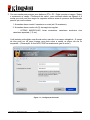 125
125
-
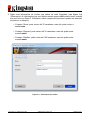 126
126
-
 127
127
-
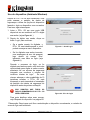 128
128
-
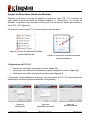 129
129
-
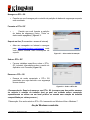 130
130
-
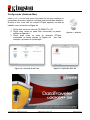 131
131
-
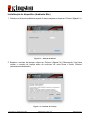 132
132
-
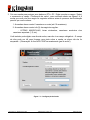 133
133
-
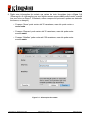 134
134
-
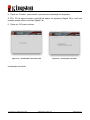 135
135
-
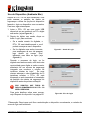 136
136
-
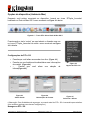 137
137
-
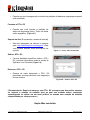 138
138
-
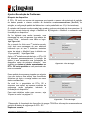 139
139
-
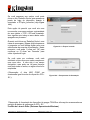 140
140
-
 141
141
-
 142
142
-
 143
143
-
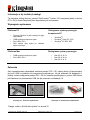 144
144
-
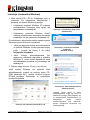 145
145
-
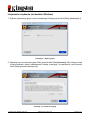 146
146
-
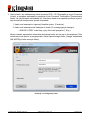 147
147
-
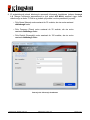 148
148
-
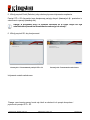 149
149
-
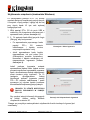 150
150
-
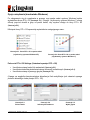 151
151
-
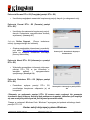 152
152
-
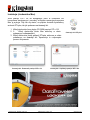 153
153
-
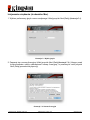 154
154
-
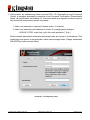 155
155
-
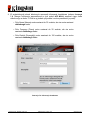 156
156
-
 157
157
-
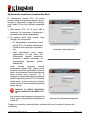 158
158
-
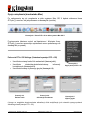 159
159
-
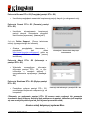 160
160
-
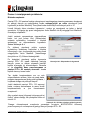 161
161
-
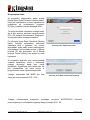 162
162
-
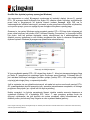 163
163
-
 164
164
-
 165
165
-
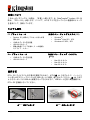 166
166
-
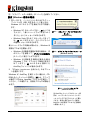 167
167
-
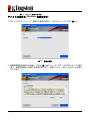 168
168
-
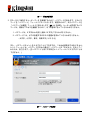 169
169
-
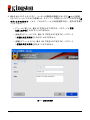 170
170
-
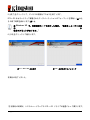 171
171
-
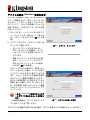 172
172
-
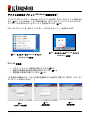 173
173
-
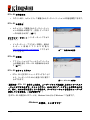 174
174
-
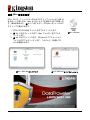 175
175
-
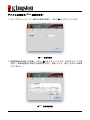 176
176
-
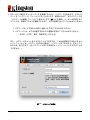 177
177
-
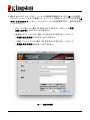 178
178
-
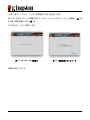 179
179
-
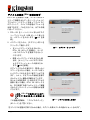 180
180
-
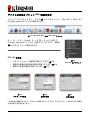 181
181
-
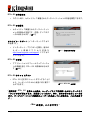 182
182
-
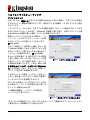 183
183
-
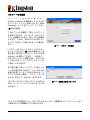 184
184
-
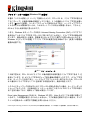 185
185
-
 186
186
-
 187
187
-
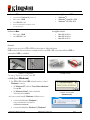 188
188
-
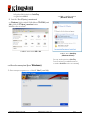 189
189
-
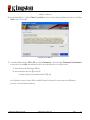 190
190
-
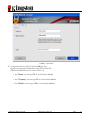 191
191
-
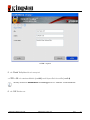 192
192
-
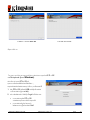 193
193
-
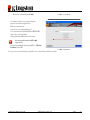 194
194
-
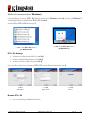 195
195
-
 196
196
-
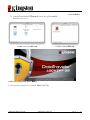 197
197
-
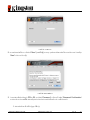 198
198
-
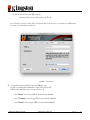 199
199
-
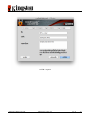 200
200
-
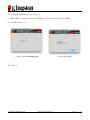 201
201
-
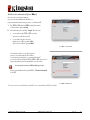 202
202
-
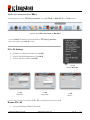 203
203
-
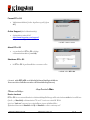 204
204
-
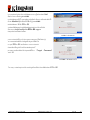 205
205
-
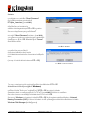 206
206
-
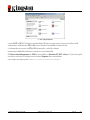 207
207
-
 208
208
-
 209
209
-
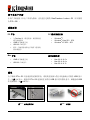 210
210
-
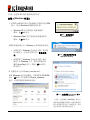 211
211
-
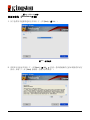 212
212
-
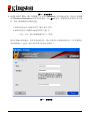 213
213
-
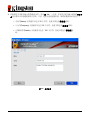 214
214
-
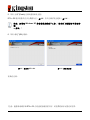 215
215
-
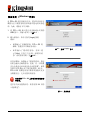 216
216
-
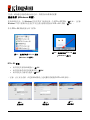 217
217
-
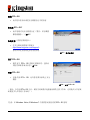 218
218
-
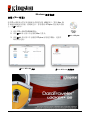 219
219
-
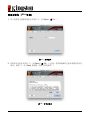 220
220
-
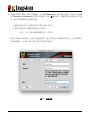 221
221
-
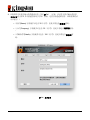 222
222
-
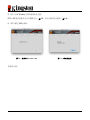 223
223
-
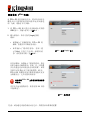 224
224
-
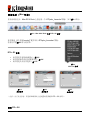 225
225
-
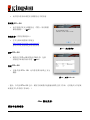 226
226
-
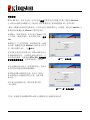 227
227
-
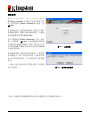 228
228
-
 229
229
-
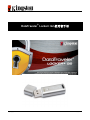 230
230
-
 231
231
-
 232
232
-
 233
233
-
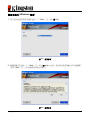 234
234
-
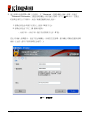 235
235
-
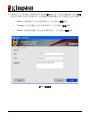 236
236
-
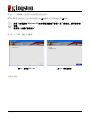 237
237
-
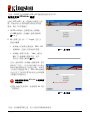 238
238
-
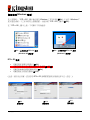 239
239
-
 240
240
-
 241
241
-
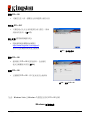 242
242
-
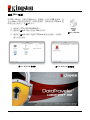 243
243
-
 244
244
-
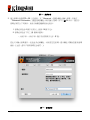 245
245
-
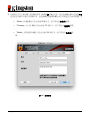 246
246
-
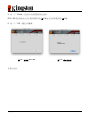 247
247
-
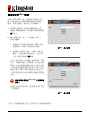 248
248
-
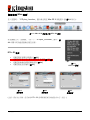 249
249
-
 250
250
-
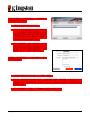 251
251
-
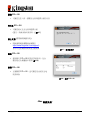 252
252
-
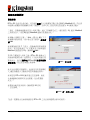 253
253
-
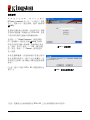 254
254
-
 255
255


Kingston DATATRAVELER LOCKER G2/DTLPG2 El manual del propietario
- Tipo
- El manual del propietario
en otros idiomas
- français: Kingston DATATRAVELER LOCKER G2/DTLPG2 Le manuel du propriétaire
- italiano: Kingston DATATRAVELER LOCKER G2/DTLPG2 Manuale del proprietario
- English: Kingston DATATRAVELER LOCKER G2/DTLPG2 Owner's manual
- Deutsch: Kingston DATATRAVELER LOCKER G2/DTLPG2 Bedienungsanleitung
- português: Kingston DATATRAVELER LOCKER G2/DTLPG2 Manual do proprietário
- polski: Kingston DATATRAVELER LOCKER G2/DTLPG2 Instrukcja obsługi
- 日本語: Kingston DATATRAVELER LOCKER G2/DTLPG2 取扱説明書
Artículos relacionados
Otros documentos
-
Kingston Technology Computer Drive DTLPG3 Manual de usuario
-
-
Emtec CL USB S450 AES El manual del propietario
-
Panasonic AW-E860L Manual de usuario
-
Samsung SCC-641P Manual de usuario
-
-
-
-
-
Elkay EZSTLDDSFC Guía de instalación