
Write the model and serial
numbers here:
Model # _________________
Serial # _________________
You can find them on a label on
the bottom of the disposer.
GE is a trademark of the General Electric Company. Manufactured under trademark license.
OWNER’S MANUAL
AND INSTALLATION
INSTRUCTIONS
DISPOSALL
®
49-5903-3 12-18 GEA
ENGLISH/FRANÇAIS/
ESPAÑOL
SAFETY INFORMATION ..........3
USING THE DISPOSER
Continuous Feed Models ................5
Batch Feed Models .....................5
CARE AND CLEANING .............6
INSTALLATION INSTRUCTIONS
Preparation ...........................7
Components and Installation ............8
Installation of Sink Flange ..............8
Dishwasher Connection .................9
Attach the Discharge Elbow .............9
Connect Disposer to Sink Flange .......10
Dimensions .......................... 11
Some Typical Installations ............. 11
TROUBLESHOOTING ............12
LIMITED WARRANTY ...........15
CONSUMER SUPPORT ..........16
Food Waste Disposer
GFC320N
GFC325N
GFC520N
GFC525N
GFC530N
GFC535N
GFC720N
GFB760N
GFC1020N

2 49-5903-3
THANK YOU FOR MAKING GE APPLIANCES A PART OF YOUR HOME.
Whether you grew up with GE Appliances, or this is your first, we’re happy to have you in the family.
We take pride in the craftsmanship, innovation and design that goes into every GE Appliances
product, and we think you will too. Among other things, registration of your appliance ensures that we
can deliver important product information and warranty details when you need them.
Register your GE appliance now online. Helpful websites and phone numbers are available in the
Consumer Support section of this Owner’s Manual. You may also mail in the pre-printed registration
card included in the packing material.

49-5903-3 3
IMPORTANT SAFETY INFORMATION
READ ALL INSTRUCTIONS BEFORE USING THE APPLIANCE
SAFETY INFORMATION
WARNING
For your safety, the information in this manual must be followed to minimize
the risk of fire, explosion, electric shock, and to prevent property damage, personal injury,
or death.
WARNING
WHEN USING YOUR ELECTRICAL APPLIANCES, BASIC SAFETY
PRECAUTIONS SHOULD BE FOLLOWED, INCLUDING THE FOLLOWING:
Ŷ 8VHWKLVDSSOLDQFHRQO\IRULWVLQWHQGHGSXUSRVHDV
described in this Owner’s Manual.
Ŷ 5HDGDOOWKHLQVWUXFWLRQVEHIRUHXVLQJWKHDSSOLDQFH
Ŷ 7RUHGXFHWKHULVNRILQMXU\FORVHVXSHUYLVLRQLV
required when a disposer is used near children.
Ŷ 'RQRWSXWILQJHUVRUKDQGVLQWRDZDVWHGLVSRVHU
Ŷ 7XUQWKHSRZHUVZLWFKWRWKH2))SRVLWLRQEHIRUH
DWWHPSWLQJWRFOHDUDMDPRUUHPRYHDQREMHFWIURP
the disposer.
Ŷ :KHQDWWHPSWLQJWRORRVHQDMDPLQDZDVWH
GLVSRVHUXVHDORQJZRRGHQREMHFWVXFKDVD
wooden spoon or the wooden handle of a broom or
mop.
Ŷ :KHQDWWHPSWLQJWRUHPRYHREMHFWVIURPDZDVWH
disposer, use long-handled tongs or pliers. If
the disposer is magnetically actuated, use only
nonmagnetic tools.
Ŷ 7RUHGXFHWKHULVNRILQMXU\E\PDWHULDOVWKDWPD\
be expelled by a waste disposer, do not put the
following into a disposer:
a. Clam or oyster shells
b. Caustic drain cleaners or similar products
c. Glass, china or plastic
d. Large whole bones
e. Metal, such as bottle caps, tin cans, utensils
or aluminum foil
f. Hot grease or other hot liquids
g. Whole corn husks
Ŷ :KHQQRWRSHUDWLQJDGLVSRVHUOHDYHWKHGUDLQ
VWRSSHULQSODFHWRUHGXFHWKHULVNRIREMHFWVIDOOLQJ
into the disposer.
Ŷ )RUSURSHUJURXQGLQJLQVWUXFWLRQVVHHWKH
CONNECTING ELECTRICITY portion of this
manual.
READ AND SAVE THESE INSTRUCTIONS
If you are not familiar with electrical power and procedures, call a qualified electrician.
WARNING
Improper connection of
the equipment-grounding conductor can
result in a risk of electric shock. Check
with a qualified electrician or serviceman
if you are in doubt as to whether the
appliance is properly grounded. Do
not modify the plug provided with the
appliance if it will not fit the outlet; have
a proper outlet installed by a qualified
electrician.
For Models Equipped with a Grounded Cord:
GROUNDING INSTRUCTIONS: 7KLVGLVSRVHUPXVW
be grounded to reduce the risk of electric shock in
the event of a malfunction or breakdown. Grounding
provides a path of least resistance for electric current.
7KLVGLVSRVHULVHTXLSSHGZLWKDFRUGKDYLQJDQ
equipment-grounding conductor and a grounding
SOXJ7KHSOXJPXVWEHSOXJJHGLQWRDQRXWOHWWKDWLV
properly installed and grounded in accordance with all
local codes and ordinances.
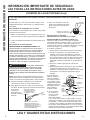
CONNECTING ELECTRICITY

4 49-5903-3
SAFETY INFORMATION
IMPORTANT SAFETY INFORMATION
READ ALL INSTRUCTIONS BEFORE USING THE APPLIANCE
If you are not familiar with electrical power and procedures, call a qualified electrician.
7KHSRZHUFRUGDQGRUFRQQHFWLRQVPXVWFRPSO\ZLWK
WKH1DWLRQDO(OHFWULFDO&RGH6HFWLRQDQGRUORFDO
codes and ordinances.
For Models Not Equipped with a Cord:
If your disposer does not come equipped with a cord,
you can connect it in two ways:
1. Attach a power cord, minimum 18” in length and
QRWWRH[FHHG´LQOHQJWK8VH*($3DUW1XPEHU
30;
or
2. Wire the disposer directly into the house current.
To Attach a Power Cord:
GROUNDING INSTRUCTIONS: 7KLVGLVSRVHUPXVW
be grounded to reduce the risk of electric shock in
the event of a malfunction or breakdown. Grounding
provides a path of least resistance for electric current.
7KLVGLVSRVHULVHTXLSSHGZLWKDFRUGKDYLQJDQ
equipment-grounding conductor and a grounding
SOXJ7KHSOXJPXVWEHSOXJJHGLQWRDQRXWOHWWKDWLV
properly installed and grounded in accordance with all
local codes and ordinances.
WARNING
Improper connection of the
equipment-grounding conductor can result in
a risk of electric shock. Check with a qualified
electrician or serviceman if you are in doubt as to
whether the appliance is properly grounded.
NOTE: 'LVFRQQHFWHOHFWULFSRZHUWRGLVSRVHUFLUFXLW
EHIRUHLQVWDOODWLRQ7XUQWKHFLUFXLWEUHDNHUWRWKH2))
position or remove the fuse.
A. Connect the disposer to 110-120 Volt, 60 Hz AC
current only.
B. If a plug-in cord
is used, use
a three prong
plug. Ground
wire should be
attached to the
ground screw in
the bottom of the
disposer (end
bell).
&8VHDFDEOH
clamp strain relief
connector where
power cord enters
the disposer.
To Wire Your Disposer Directly into the House
Current:
GROUNDING INSTRUCTIONS: 7KLVGLVSRVHUPXVW
be connected to a grounded, metal, permanent wiring
system; or an equipment-grounding conductor must
be run with the circuit conductors and connected
to the equipment-grounding terminal or lead on the
appliance.
$,I\RXXVH%;FDEOH
7KHVHSURGXFWVDUHGHVLJQHGIRUKRXVHKROGXVH
2. Connect white wire to white lead of disposer with
a wire nut. Connect black wire to black lead of
disposer with a wire nut. Connect bare ground
ZLUHWRWKHJURXQGVFUHZ7KHJURXQGZLUHVKRXOG
be clamped and held by a strain relief.
'RQRWXVHDULJLGFRQGXLWIRUWKHZLULQJ
connection.
4. A dedicated acceptable motor switch, with the
off position marked, shall be provided for this
GLVSRVHUDWWKHWLPHRILQVWDOODWLRQ7KHVZLWFK
shall be mounted in sight of the disposer or the
sink opening
for the
disposer.
,I%;FDEOHLVQRW
used, provide a
separate ground
wire to nearest
reliable ground,
using the screw in
the end bell for the
ground wire.
B. If your power
supply does not
include a ground wire, you must provide one unless
metal cable is used. Attach a copper wire securely
to disposer ground screw and attach other end of
ZLUHWRDUHOLDEOHJURXQG8VHRQO\8/DSSURYHG
ground clamp. If plastic pipe is used in your home,
a qualified electrician should install a proper ground.
CONNECTING ELECTRICITY (Cont)
READ AND SAVE THESE INSTRUCTIONS
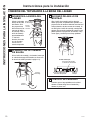
7UDFHOHDGFRQQHFWHG
to this blade and attach
that lead to white wire
on disposer
NOTE: When viewing face of
electrical plug with grounding
pin at top, the larger left blade is
connected to the identified wire.
Ribbed
Side
Strain
Relief
Nut
Heyco Box
Connectors
3DUW1R
Red
Reset
Button
Remove
Bottom Cap
Wire Nuts
Ground Screw
7R+RXVH
Current
RU3RZHU
Cord
%RWWRPRIWKH'LVSRVHUHQGEHOO

49-5903-3
USING THE DISPOSER
Using the Disposer
READ ALL SAFETY INSTRUCTIONS ON PAGES 3 AND 4 BEFORE USING THIS DISPOSER.
7KLVGLVSRVHUXVHVDQWLMDPVZLYHOLPSHOOHUVWKDWPDNHDFOLFNLQJVRXQGDVWKH\VZLQJLQWRSODFH7KLVLQGLFDWHV
normal operation.
Continuous Feed Models
A. Remove the sink stopper and turn on a medium flow
of cold water.
B.7XUQWKHVZLWFKWR21
C.6FUDSHLQIRRGZDVWH7RVSHHGXSIRRGZDVWH
disposal, cut or break up large bones, rinds and
cobs. Large bones and fibrous husks require
considerable grinding time and are more easily
WKURZQDZD\ZLWKRWKHUWUDVK'RQRWEHDODUPHGWKDW
WKHGLVSRVHUVORZVGRZQZKLOHJULQGLQJ7KHGLVSRVHU
is actually increasing torque (grinding power) and is
operating under normal conditions.
D. Before turning the disposer off, let the water and
WKHGLVSRVHUUXQIRUDSSUR[LPDWHO\VHFRQGV
DIWHUVKUHGGLQJVWRSV7KLVDVVXUHVWKDWDOOZDVWHLV
thoroughly flushed through the trap and drain.
E. 'RQRWXVHKRWZDWHUZKLOHUXQQLQJWKHGLVSRVHU&ROG
water will keep food waste and fats solid so they can
be flushed down the drain.
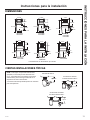
Batch Feed Models
A. Remove the sink stopper and turn on a medium flow
of cold water.
B. Scrape in food waste.
C. Inset the stopper to
start the disposer. One
of the 2 small slots in
the stopper base must
line up with the switch
plunger inside the neck
of the disposer.
NOTE: 7KHRYDOVKDSHG
handle aligns with the 2
small slots in the stopper.
Push down firmly to start.
D.5XQWKHGLVSRVHUIRU
seconds after shredding
VWRSV7KLVDVVXUHVWKDWDOO
waste is thoroughly flushed
through the trap and drain.
Lift the stopper to shut the disposer off.
E. 7RILOOWKHVLQNLQVHUWWKHVWRSSHUVRWKDWWKHODUJHVW
VORWOLQHVXSZLWKWKHVZLWFKSOXQJHU7KHVWRSSHU
can now be pushed down to seal the sink without
starting the disposer. When the medium-sized slot in
the stopper base is lined up with the switch plunger,
water can drain, but tableware, etc., cannot be
accidentally dropped into the disposer.
WARNING
Do not tamper with stopper or use
anything other than the supplied stopper to move
the plunger that actuates the on/off switch inside the
neck of the disposer.
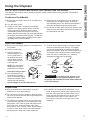
Helpful Hints
A. Be sure the disposer is empty before using the
dishwasher so it can drain properly.
B. You may want to leave the stopper in the drain when
QRWLQXVHWRSUHYHQWXWHQVLOVDQGIRUHLJQREMHFWVIURP
falling into the disposer.
C. 7KHGLVSRVHULVUXJJHGO\EXLOWWRJLYH\RX\HDUVDQG
years of trouble-free service. It will handle all normal
IRRGZDVWHV%87LWZLOOQRWJULQGDQGGLVSRVHVXFK
items as tin cans, bottles and bottle caps, glass,
china, leather, cloth, crockery, rubber, string, feathers,
RUFODPRUR\VWHUVKHOOV7KHVHDUHZDVWHPDWHULDOV
and belong in the trash can or trash compactor.
D.7263(('83)22':$67(',6326$/&XWRU
break up large bones, melon rinds, grapefruit skins
and corn cobs. Items such as large bones, fibrous
husks like lima bean pods and corn husks, require
FRQVLGHUDEOHFXWWLQJWLPH)RUWKLVUHDVRQ\RX
may prefer to place them in the trash can or trash
compactor.
Oval Handle
Small
Small
Medium
Large

6 49-5903-3
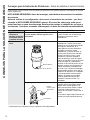
Care and Cleaning
CARE AND CLEANING
THE MOTOR IS PERMANENTLY LUBRICATED FOR LIFE. DO NOT ATTEMPT TO LUBRICATE YOUR
DISPOSER. 7KHGLVSRVHULVVHOIFOHDQLQJDQGVFRXUVLWVHOIZLWKHDFKXVH
Ŷ1(9(5SXWO\HRUFKHPLFDOFOHDQHUVLQWRWKHGLVSRVHU
as they cause serious corrosion of metal parts.
Ŷ<RXUGLVSRVHUH[FHSWIRUWKH%DWFK)HHGPRGHOLV
equipped with a removable splash guard for ease of
cleaning or replacement. Remove the splash guard by
SXOOLQJLWRXWIURPWKHWRS7RUHSODFHLQVHUWLQWRWKH
sink flange and push down until it is properly seated.
Ŷ,IDQRGRUGHYHORSVUXQRUDQJHRUOHPRQULQGV
through the disposer. A dozen ice cubes sprinkled with
a little household scouring powder will also work.

49-5903-3 7
STOP
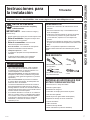
BEFORE YOU BEGIN
Read these instructions completely and
carefully.
IMPORTANT – Observe all governing codes
and ordinances.
• Save these instructions for local inspector’s use.
• Note to Installer – Be sure to leave these
instructions with the Consumer.
• Note to Consumer – Keep these instructions
for future reference.
• Skill level – Installation of this appliance requires
basic mechanical skills.
• Completion time– 1 hour
•3URSHULQVWDOODWLRQLVWKHUHVSRQVLELOLW\RIWKH
installer.
•3URGXFWIDLOXUHGXHWRLPSURSHULQVWDOODWLRQLVQRW
covered under the Warranty.
WARNING
• )253(5621$/6$)(7<5HPRYHKRXVH
fuse or open circuit breaker before beginning
LQVWDOODWLRQ'RQRWXVHDQH[WHQVLRQFRUGRU
adapter plug with this appliance.
• )253(5621$/6$)(7<:KLOHSHUIRUPLQJ
installations described in this booklet, gloves
and eye protection (safety glasses or equivalent)
should be worn.
• )253(5621$/6$)(7<'RQRWSRVLWLRQ\RXU
head or body under disposer; unit could fall during
removal or installation.
• 7KHLPSURSHUFRQQHFWLRQRIWKHHTXLSPHQW
grounding conductor can result in a risk of electric
shock. Check with a qualified electrician or service
representative if you are in doubt that the appliance
is properly grounded.
• If house wiring is not 2-wire with ground, a ground
must be provided by the installer. When house
ZLULQJLVDOXPLQXPEHVXUHWRXVH8//LVWHG
anti-oxidant compound and aluminum-to-copper
connectors.
PREPARATION
'LVFRQQHFWHOHFWULFDOSRZHUVXSSO\WRGLVSRVHU
2. Remove old disposer or sink flange assembly.
3. Inspect drain line. If it is heavily coated with
hardened grease and accumulations, rout out
with a plumber’s snake.
4. Remove old sealing materials and gasketing from
sink opening, both top and bottom.
NOTE:7RSDQGERWWRPRIVLQNVXUIDFHVPXVWEHIUHH
of any materials to prevent leaks.
ADDITIONAL MATERIALS YOU
MAY NEED
ƒ6WHHOSXQFKRUZRRGHQGRZHO
ƒ3HWUROHXPMHOO\RUOLTXLGVRDS
ƒ+RVHFODPS
ƒ'LVKZDVKHUGUDLQFRQQHFWRU
ƒ$GMXVWDEOHSLSHZUHQFK
ƒ3OXPEHU¶VSXWW\IRUFDVWVLQNV
ƒ6WHSSHGUXEEHUGUDLQDGDSWHU
ƒ:LUHQXWV
ƒ&DEOHFRQQHFWRU
ƒ)OH[LEOHGUDLQSLSH
ƒ3RZHUFRUGNLW3DUW1R30;
WHAT YOU WILL NEED
INSTALLATION INSTRUCTIONS
Installation Instructions
Disposer
Questions? Call 800.GE.CARES (800.432.2737) or visit our Website at: GEAppliances.com
In Canada, call 1.800.561.3344 or visit our Website at: GEAppliances.ca
ƒ3KLOOLSVDQGIODWEODGH
screwdriver
ƒ+DPPHU
ƒ1XW'ULYHU
ƒ&KDQQHOORFNSOLHUVVOLS
MRLQW

8 49-5903-3
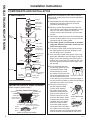
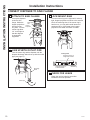
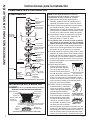
INSTALLATION OF SINK FLANGE
(Read completely before starting.)
Correctly Installed Sink Flange
(shown for proper orientation)
INSTALLATION INSTRUCTIONS
COMPONENTS AND INSTALLATION
Installation Instructions
COMPONENTS
Rubber Gasket
6LQN)ODQJH
Support
Ring
)LEHU
Gasket
Groove
Bottom
Bead
Sink
)ODQJH
Cushion
Mount
Mount Ring should be
free to move up and down
Open Area
No Obstruction
Bottom Bead of
Cushion Mount
Sink
NOTE:3D\FORVHDWWHQWLRQWRWKHRUGHURIWKHVLQN
flange parts, as they have been correctly assembled
by the factory.
A.'LVDVVHPEOHWKHVLQNIODQJHDVVHPEO\IURPWKH
disposer by turning the mount ring to the left
(clockwise) and removing it.
B. Raise the mount ring toward the top of the sink
flange. Remove the cushion mount and the mount
ring. You may want to practice installing the
cushion mount at this point before you are under
the sink.
C.8QVFUHZWKHVXSSRUWULQJIURPWKHVLQNIODQJHDQG
remove the fiber gasket. You are now left with the
sink flange and the rubber gasket.
D. The rubber gasket is used instead of plumbers
putty with stainless steel sinks. Some cast iron
sinks will require putty.
E. If no putty is used, insert the sink flange through
WKHUXEEHUJDVNHWLQWRWKHVLQNRSHQLQJ'RQRW
turn the flange once it is seated.
F. If you use putty instead of the gasket, form a ring
around the underside of the sink flange. Insert the
flange into the sink opening, press down hard to
VTXHH]HRXWH[FHVVSXWW\)RUXQGHUWKHVLQNWULP
off excess putty flush with the bottom edge of the
sink opening.
G.)URPXQGHUQHDWKWKHVLQN
slip the fiber gasket onto the
exposed sink flange. With
arrows pointing up, screw
the support ring onto the sink
flange and hand-tighten until
the sink flange will not move.
At this point you may want to insert the stopper in
the sink and fill with water to check the sink flange
seal and insure there are no leaks.
H.3ODFHWKHPRXQWULQJRYHU
the sink flange and hold
in place while installing
the cushion mount (large
side down). Make sure the
groove on the inside of the
cushion mount fits over the
lip on the sink flange, similar
to putting the lid on a plastic
container. Run your fingers
around the entire cushion
mount with slight pressure.
'RQRWSUHVVWRRKDUG:KHQ
the cushion mount is properly
seated, the mount ring can be pulled downward
over the cushion mount and will be free to turn.
Hand-tighten sink flange
7RSGroove
Bottom Bead
Cushion Mount Detail
*Stopper
*Removable
Splash Guard
6LQN)ODQJH
)LEHU*DVNHW
Mounting Ring
Elbow Gasket
Hopper
Groove
Screws
Elbow
)ODQJH
Rating Label
in this Area
End Bell
(Electrical
Connections)
'LVKZDVKHU
'LVFKDUJH,QOHW
7LJKWHQLQJ
Ears
Cushion
Mount
Support Ring
(Note Arrows
,QGLFDWLQJ8S
Sink
Rubber Sink
)ODQJH*DVNHW
Sink
)ODQJH
Assembly
'LVSRVHU
'LVFKDUJH
Elbow
*Not used with batch feed model

49-5903-3 9
INSTALLATION INSTRUCTIONS
Installation Instructions
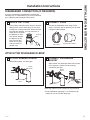
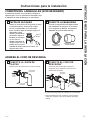
DISHWASHER CONNECTION (IF REQUIRED)
ATTACH THE DISCHARGE ELBOW
1
KNOCK OUT PLUG
8VLQJDEOXQWLQVWUXPHQWVWHHOSXQFKRUZRRGHQ
GRZHONQRFNRXWWKHHQWLUHSOXJ'RQRWXVHD
screwdriver or sharp instrument. When knockout
plug falls into disposer, you may remove it or
simply grind it up when
the disposer is used.
7KLVZLOOQRWGDPDJH
the disposer in any
way, but may take
some time to grind,
over the course of
several uses.
1
ATTACH RUBBER GASKET
Slide rubber gasket over drain pipe.
2
CONNECT HOSE
Connect the dishwasher hose using a hose
clamp. If the hose size is different, you will need
a stepped rubber adapter.
2
CONNECT DISCHARGE
ELBOW*
Slide bracket over discharge elbow and connect
to the disposer.** Make sure all plumbing
connections are tight.
If you are connecting to a dishwasher, complete the
following step. If a dishwasher is not to be connected,
JRWR³$WWDFKLQJWKH'LVFKDUJH(OERZ´EHORZ
'LVFKDUJHHOERZPXVWEHLQVWDOOHGE\DSURIHVVLRQDO
** Some installations (see page 11 for example) may
require the use of a flexible drain pipe.
Knock out
plug
Hose Clamp
Stepped Rubber Adapter
Rubber
Gasket
Rubber
Gasket
'LVFKDUJH
Elbow
'LVFKDUJH
Elbow

10 49-5903-3
Installation Instructions
CONNECT DISPOSER TO SINK FLANGE
1
ATTACH TO SINK FLANGE
Line up the disposer
under the sink
flange. Guide the
KRSSHUSURMHFWLRQV
into the mount
ULQJVORWV7XUQWKH
mount ring about
´WRWKHULJKWVR
that the disposer
is temporarily
supported.
4
CHECK FOR LEAKS
Check the unit for leaks 24 hours after
installation and first operation.
3
LOCK MOUNT RING
7XUQWKHPRXQWULQJWRWKHULJKWXQWLOLWORFNVXS
WLJKW+RSSHUSURMHFWLRQVPXVWEHWRWKHH[WUHPH
left of the mounting slots. If the mount ring is
hard to turn, you may add a small amount of
SHWUROHXPMHOO\RUOLTXLGVRDSWRWKHKRSSHU
SURMHFWLRQ5XQZDWHUDQGFKHFNIRUOHDNV
2
LINE UP WITH OUTLET PIPE
7XUQWKHPRXQWULQJDQGWKHGLVSRVHUXQWLOWKH
disposer discharge elbow lines up with the outlet
pipe (see page 11).
INSTALLATION INSTRUCTIONS
Mount Ring
Slot
Hopper
3URMHFWLRQ
'LVFKDUJH
Elbow
2XWHU3LSH
+RSSHU3URMHFWLRQLQ
³6XSSRUWHG´3RVLWLRQ
Locking Detail
+RSSHU3URMHFWLRQLQ
³/RFNHG´3RVLWLRQ
Mount Ring

49-5903-3 11
INSTALLATION INSTRUCTIONS
Installation Instructions
DIMENSIONS
SOME TYPICAL INSTALLATIONS
GFC320N
GFC325N
5-3/16"
8-1/2"
8-1/2"
8-1/2"
5-1/16"
7-3/4"
6-3/16"
7-1/4"
9-3/8"
7-1/4"
6-1/8"
6-15/16"
4-1/2"
4-1/2"
4-1/2"
4-1/2"
4-1/2"
4-1/2"
1-1/2"
1-1/2"
1-1/2"
1-1/2"
1-1/2"
1-1/2"
5-3/8"
5-9/16"
5-9/16"
5-9/16"
5-3/8"
5-3/8"
12-11/16"
14-1/2"
16-5/8"
16-1/6"
12-11/16"
13-7/16"
GFC520N
GFC525N
GFC530N
GFC535N
GFC720N
GFB760N
Batch Feed Operation
GFC1020N
NOTE: It is essential for the proper operation of the
disposer that this dimension be 9”-12”, depending
upon the models listed above, to avoid standing
water in disposer motor housing.
)OH[LEOH GUDLQ SLSH PD\ EH QHFHVVDU\ IRU WKLV
application.
SINGLE BOWL
*Approx.
DOUBLE BOWL
CENTER OUTLET**
*Approx.
DOUBLE BOWL
END OUTLET**
*Approx.

12 49-5903-3
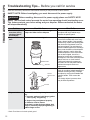
Problem Possible Cause What To Do
Loud noises (other
than those during
grinding of bones
and fruit pits)
Silverware, bottle cap or other foreign
object has fallen into the disposer
Remove the splash guard* and remove
WKHREMHFWZLWKORQJKDQGOHGWRQJV
Replace the splash guard*.
Disposer does not
start
Reset button has been tripped With the splash guard* removed, check
to see if the turntable will move freely
using a broom handle. If the turntable
moves freely, replace the splash guard*
and check the reset button to see if it
KDVEHHQWULSSHG7KHUHVHWEXWWRQLV
red and located opposite the discharge
elbow, near the bottom of the disposer.
3XVKWKHEXWWRQLQXQWLOLWFOLFNVDQG
remains depressed. If the reset button
has not been tripped, check for a
shorted or broken wire connecting to
the disposer. Check the electrical power
switch, fuse box or circuit breaker.
If wiring and electrical components
are intact, the unit may have internal
problems that require service or
replacement.
Turntable cannot rotate. If the turntable does not turn freely,
FKHFNIRUDQREMHFWORGJHGEHWZHHQWKH
WXUQWDEOHDQGWKHJULQGULQJ'LVORGJH
WKHREMHFWE\PRYLQJWKHWXUQWDEOHZLWK
DEURRPKDQGOH7KHQUHPRYHWKH
REMHFW
,IQRIRUHLJQREMHFWLVSUHVHQWWKHUH
may be internal problems.
Disposer leaks If the leak is at the top, it may be caused
by:
1. Improper seating of sink flange (gasket
choice, putty, or tightening.
2. Support ring not tightened properly.
3. Defective cushion mount.
If the leak is at the discharge elbow, leak
may be caused by improper tightening of
elbow flange screws.
TROUBLESHOOTING TIPS
Troubleshooting Tips... Before you call for service
Save time and money! Review the charts below first and you may not need to call for service.
SAFETY NOTE: Before investigating, you must disconnect the power supply.
WARNING
Before resetting, disconnect the power supply-please see SAFETY NOTE
above. The overload control prevents the motor from operating should overloading occur.
This feature protects your house wiring and your disposer. When overloaded, the motor
will stop automatically.
Reset Button
Serial No.
Remove
Splash Guard
7XUQWDEOH
%DWFK)HHGGRHVQRWLQFOXGHVSODVKJXDUG

49-5903-3 13
NOTES
Notes

14 49-5903-3
Notes
NOTES

49-5903-3
GEAppliances.com
$OOZDUUDQW\VHUYLFHLVSURYLGHGE\RXU)DFWRU\6HUYLFH&HQWHUVRUDQDXWKRUL]HG&XVWRPHU&DUH
®
WHFKQLFLDQ7RVFKHGXOH
service online, visit us at geappliances.com/service_and_support/, or call GE Appliances at 800.GE.CARES
3OHDVHKDYH\RXUVHULDOQXPEHUDQG\RXUPRGHOQXPEHUDYDLODEOHZKHQFDOOLQJIRUVHUYLFH
LIMITED WARRANTY
GE Appliances Disposer Limited Warranty
For the period of GE Appliances will replace
One Year
)URPWKHGDWHRIWKH
original purchase
7KHHQWLUHGLVSRVHULIWKHUHLVDGHIHFWLQPDWHULDOVRUZRUNPDQVKLSUHODWLQJWRIXQFWLRQDO
SDUWVRQO\DSSHDUDQFHSDUWVDUHH[FOXGHG'XULQJWKLVlimited one-year warranty,
GE Appliances will also provide, free of charge, all labor charges related to replacing the
original disposer along with the replacement disposer within the first year.
Additional One Year
)URPWKHGDWHRIWKH
original purchase
0RGHOV*)&1*)&1,IWKHUHLVDGHIHFWLQPDWHULDOVRUZRUNPDQVKLSUHODWLQJWR
IXQFWLRQDOSDUWVRQO\DSSHDUDQFHSDUWVDUHH[FOXGHG'XULQJWKHone-year extended
limited warranty period, you will be responsible for all installation charges relating to the
replacement disposer.
Additional Two Years
)URPWKHGDWHRIWKH
original purchase
0RGHOV*)&1*)&1,IWKHUHLVDGHIHFWLQPDWHULDOVRUZRUNPDQVKLSUHODWLQJWR
IXQFWLRQDOSDUWVRQO\DSSHDUDQFHSDUWVDUHH[FOXGHG'XULQJWKLVWwo-year extended
limited warranty period, you will be responsible for all installation charges relating to the
replacement disposer.
Additional Four Years
from the date of the
original purchase
0RGHOV*)&1*)%1,IWKHUHLVDGHIHFWLQPDWHULDOVRUZRUNPDQVKLSUHODWLQJWR
IXQFWLRQDOSDUWVRQO\DSSHDUDQFHSDUWVDUHH[FOXGHG'XULQJWKLVfour-year extended
limited warranty period, you will be responsible for all installation charges relating to the
replacement disposer.
Additional Six Years
)URPWKHGDWHRIWKH
original purchase
0RGHO*)&1,IWKHUHLVDGHIHFWLQPDWHULDOVRUZRUNPDQVKLSUHODWLQJWRIXQFWLRQDO
SDUWVRQO\DSSHDUDQFHSDUWVDUHH[FOXGHG'XULQJWKLVsix-year extended limited
warranty period, you will be responsible for all installation charges relating to the
replacement disposer.
6WDSOH\RXUUHFHLSWKHUH3URRIRIWKHRULJLQDOSXUFKDVH
date is needed to obtain service under the warranty.
What GE Appliances will not cover:
Ŷ Service trips to your home to teach you how to use
the product.
Ŷ Improper installation or maintenance.
Ŷ )DLOXUHRIWKHSURGXFWLILWLVDEXVHGPLVXVHGRUXVHGIRU
other than the intended purpose or used commercially.
Ŷ Replacement of house fuses or resetting of circuit
breakers.
Ŷ 'DPDJHWRWKHSURGXFWFDXVHGE\DFFLGHQWILUH
floods, or acts of God.
Ŷ Incidental or consequential damage caused by
possible defects with this appliance.
Ŷ 3URGXFWQRWDFFHVVLEOHWRSURYLGHUHTXLUHGVHUYLFH
EXCLUSION OF IMPLIED WARRANTIES
Your sole and exclusive remedy is product repair as provided in this Limited Warranty. Any implied warranties, including the implied
warranties of merchantability or fitness for a particular purpose, are limited to one year or the shortest period allowed by law.
7KLVOLPLWHGZDUUDQW\LVH[WHQGHGWRWKHRULJLQDOSXUFKDVHUDQGDQ\VXFFHHGLQJRZQHUIRUSURGXFWVSXUFKDVHGIRUKRPHXVHZLWKLQ
WKH86$,IWKHSURGXFWLVORFDWHGLQDQDUHDZKHUHVHUYLFHE\D*($SSOLDQFHV$XWKRUL]HG6HUYLFHULVQRWDYDLODEOH\RXPD\EH
responsible for a trip charge or you may be required to bring the product to an Authorized GE Appliances Service location for service. In
Alaska, the limited warranty excludes the cost of shipping or service calls to your home.
6RPHVWDWHVGRQRWDOORZWKHH[FOXVLRQRUOLPLWDWLRQRILQFLGHQWDORUFRQVHTXHQWLDOGDPDJHV7KLVOLPLWHGZDUUDQW\JLYHV\RX
VSHFLILFOHJDOULJKWVDQG\RXPD\DOVRKDYHRWKHUULJKWVZKLFKYDU\IURPVWDWHWRVWDWH7RNQRZZKDW\RXUOHJDOULJKWVDUHFRQVXOW
your local or state consumer affairs office or your state’s Attorney General.
Warrantor: GE Appliances, a Haier company
Louisville, KY 40225

16 49-5903-3
Consumer Support
CONSUMER SUPPORT
3ULQWHGLQ&KLQD
GE Appliances Website
+DYHDTXHVWLRQRUQHHGDVVLVWDQFHZLWK\RXUDSSOLDQFH"7U\WKH*($SSOLDQFHV:HEVLWHKRXUVDGD\DQ\GD\
of the year! You can also shop for more great GE Appliances products and take advantage of all our on-line support
VHUYLFHVGHVLJQHGIRU\RXUFRQYHQLHQFH,QWKH86GEAppliances.com
In Canada: GEAppliances.ca
Register Your Appliance
5HJLVWHU\RXUQHZDSSOLDQFHRQOLQHDW\RXUFRQYHQLHQFH7LPHO\SURGXFWUHJLVWUDWLRQZLOODOORZIRUHQKDQFHG
communication and prompt service under the terms of your warranty, should the need arise. You may also mail in the
SUHSULQWHGUHJLVWUDWLRQFDUGLQFOXGHGLQWKHSDFNLQJPDWHULDO,QWKH86GEAppliances.com/register
In Canada: Prodsupport.mabe.ca/crm/Products/ProductRegistration.aspx
Schedule Service
Expert GE Appliances repair service is only one step away from your door. Get on-line and schedule your service at
\RXUFRQYHQLHQFHDQ\GD\RIWKH\HDU,QWKH86GEAppliances.com/service or call 800.432.2737 during normal
business hours.
In Canada: GEAppliances.ca/en/support/service-request RUFDOO
Extended Warranties
3XUFKDVHD*($SSOLDQFHVH[WHQGHGZDUUDQW\DQGOHDUQDERXWVSHFLDOGLVFRXQWVWKDWDUHDYDLODEOHZKLOH\RXU
warranty is still in effect. You can purchase it on-line anytime. GE Appliances Services will still be there after your
ZDUUDQW\H[SLUHV,QWKH86GEAppliances.com/extended-warranty or call 800.626.2224 during normal business
hours.
In Canada: GEAppliances.ca/en/support/purchase-extended-warranty or call 866.277.9842.
Parts and Accessories
Individuals qualified to service their own appliances can have parts or accessories sent directly to their homes
9,6$0DVWHU&DUGDQG'LVFRYHUFDUGVDUHDFFHSWHG2UGHURQOLQHWRGD\KRXUVHYHU\GD\
,QWKH86GEApplianceparts.comRUE\SKRQHDWGXULQJQRUPDOEXVLQHVVKRXUV
In Canada: GEAppliances.ca/en/products/parts-filters-accessories or call 800.661.1616.
Instructions contained in this manual cover procedures to be performed by any user. Other servicing
generally should be referred to qualified service personnel. Caution must be exercised, since improper
servicing may cause unsafe operation.
Contact Us
If you are not satisfied with the service you receive from GE Appliances, contact us on our Website with all the
details including your phone number, or write to:
,QWKH86*HQHUDO0DQDJHU&XVWRPHU5HODWLRQV_*($SSOLDQFHV$SSOLDQFH3DUN_/RXLVYLOOH.<
GEAppliances.com/contact
,Q&DQDGD'LUHFWRU&RQVXPHU5HODWLRQV0&&200(5&,$/,1&_6XLWH)DFWRU\/DQH_0RQFWRQ1%(&0
GEAppliances.ca/en/contact-us

Escriba los números de modelo y
de serie aquí:
Nº de Modelo ____________
Nº de Serie ______________
Los encontrará en una etiqueta en
la parte inferior del triturador.
GE es una marca registrada de General Electric Company. Fabricado bajo licencia de marca.
MANUAL DEL
PROPIETARIO E
INSTRUCCIONES DE
INSTALACIÓN
49-5903-3 12-18 GEA
GFC320N
GFC325N
GFC520N
GFC525N
GFC530N
GFC535N
GFC720N
GFB760N
GFC1020N
INFORMACIÓN
DE SEGURIDAD ...................3
USO DEL TRITURADOR
Modelos de Alimentación Continua ......5
Modelos de Alimentación por Tandas .....5
CUIDADO Y LIMPIEZA ...........6
INSTRUCCIONES DE
INSTALACIÓN
Preparación ...........................7
Componentes e Instalación .............8
Instalación de la Brida para el Lavabo ....8
Conexión del Lavavajillas ...............9
Adhiera del Codo de Descarga ..........9
Conexión del Triturador a la Brida del
Lavabo ..............................10
Dimensiones ......................... 11
Ciertas Instalaciones Típicas ........... 11
SOLUCIÓN DE PROBLEMAS. . . . 12
GARANTÍA LIMITADA ...........15
SOPORTE PARA EL CLIENTE ..16
Triturador de Desechos de Comida
DISPOSALL
®

2 49-5903-3
GRACIAS POR HACER QUE GE APPLIANCES SEA PARTE DE SU HOGAR.
Ya sea que haya crecido usando GE Appliances, o que ésta es su primera vez, nos complace
tenerlo en la familia.
Sentimos orgullo por el nivel de arte, innovación y diseño de cada uno de los electrodomésticos de
GE Appliances, y creemos que usted también. Entre otras cosas, el registro de su electrodoméstico
asegura que podamos entregarle información importante del producto y detalles de la garantía
cuando los necesite.
Registre su electrodoméstico GE ahora a través de Internet. Sitios Web y números telefónicos útiles
están disponibles en la sección de Soporte para el Consumidor de este Manual del Propietario.
También puede enviar una carta en la tarjeta de inscripción preimpresa que se incluye con
el material embalado.

49-5903-3 3
INFORMACIÓN IMPORTANTE DE SEGURIDAD
LEA TODAS LAS INSTRUCCIONES ANTES DE USAR
INFORMACIÓN DE SEGURIDAD
ADVERTENCIA
Para su seguridad, siga las instrucciones de este manual a fin de
minimizar riesgos de incendio, explosión, descargas eléctricas, y para evitar daños en
su propiedad, lesiones personales o la muerte.
ADVERTENCIA
AL USAR SUS ELECTRODOMÉSTICOS, SE DEBERÁN SEGUIR
PRECAUCIONES BÁSICAS DE SEGURIDAD, INCLUYENDO LO SIGUIENTE:
Ŷ 8VHHVWHHOHFWURGRPpVWLFRVyORSDUDVXSURSyVLWR
original, como se describe en el Manual del Propietario.
Ŷ /HDWRGDVODVLQVWUXFFLRQHVDQWHVGHXVDUHVWH
electrodoméstico.
Ŷ $ILQGHUHGXFLUHOULHVJRGHOHVLRQHVVHUi
necesaria una supervisión de cerca cuando se
utilice un triturador cerca de los niños.
Ŷ 1RFRORTXHORVGHGRVQLODVPDQRVHQXQWULWXUDGRU
de desperdicios.
Ŷ &RORTXHHOLQWHUUXSWRUGHFRUULHQWHHQODSRVLFLyQ
OFF (Apagado) antes de intentar despejar un
atasco o de retirar un objeto del triturador.
Ŷ $OLQWHQWDUDIORMDUXQDWDVFRHQXQWULWXUDGRUGH
desperdicios, utilice un objeto largo de madera
tal como una cuchara de madera o la manija de
madera de una escoba o mopa.
Ŷ $OLQWHQWDUUHWLUDUREMHWRVGHOWULWXUDGRUGHGHVSHUGLFLRV
use pinzas o tenazas con manijas largas. Si el
triturador es accionado de forma magnética, use
herramientas no magnéticas únicamente.
Ŷ $ILQGHUHGXFLUHOULHVJRGHOHVLRQHVFDXVDGDV
por materiales que puedan ser expulsados por un
triturador de desperdicios, no coloque lo siguiente
en un triturador:
a. Valvas de almejas u ostras
E/LPSLDGRUHVGHGUHQDMHFiXVWLFRVRSURGXFWRV
similares
c. Vidrio, porcelana o plástico
d. Huesos grandes enteros
e. Metales, tales como tapas de botellas, latas,
utensilios o papel de aluminio
f. Grasa caliente u otros líquidos calientes
g. Hojas de maíz enteras
Ŷ &XDQGRQRXWLOLFHXQWULWXUDGRUGHMHHOWDSyQGH
drenaje en su posición y reduzca el riesgo de que
lo objetos caigan en el triturador.
Ŷ 3DUDDFFHGHUDLQVWUXFFLRQHVSDUDXQDFRQH[LyQD
tierra adecuada, consulte la sección de CONEXIÓN
DE LA ELECTRICIDAD de este manual.
LEA Y GUARDE ESTAS INSTRUCCIONES
Si no está familiarizado con la corriente eléctrica y sus procedimientos, comuníquese
con un electricista calificado.
ADVERTENCIA
Una conexión inadecuada
del conductor de conexión a tierra del equipo
podrá producir riesgos de descargas eléctricas.
Si tiene dudas de que el electrodoméstico se
encuentre conectado a tierra apropiadamente,
consulte a un electricista calificado o a personal
del servicio. No modifique el enchufe provisto
con el electrodoméstico si éste no coincide
con el tomacorriente; solicite la instalación
de
un tomacorriente apropiado a un electricista
calificado.
Para los Modelos Equipados con Cable a Tierra:
INSTRUCCIONES DE CONEXIÓN A TIERRA: Este
triturador deberá ser conectado a tierra a fin de
reducir el riesgo de descargas eléctricas en caso de
XQDIDOODGHIXQFLRQDPLHQWRRDYHUtD/DFRQH[LyQD
tierra brinda un camino de menor resistencia para la
corriente eléctrica. Este triturador está equipado con
un cable con un conductor para la conexión a tierra
del equipo y un enchufe con conexión a tierra. El
enchufe deberá estar conectado a un tomacorriente
instalado en forma adecuada y con conexión a tierra
de acuerdo con todos los códigos y ordenanzas
locales.
CONEXIÓN DE LA ELECTRICIDAD

4 49-5903-3
INFORMACIÓN DE SEGURIDAD
INFORMACIÓN IMPORTANTE DE SEGURIDAD
LEA TODAS LAS INSTRUCCIONES ANTES DE USAR
Si no está familiarizado con la parte eléctrica y sus procedimientos, llame a un electricista
calificado.
El cable eléctrico y/ o las conexiones deben cumplir con el
FyGLJR1DWLRQDO(OHFWULF6HFFLyQ\RFyGLJRVORFDOHV\
ordenanzas.
Para modelos no equipados con un cable:
Si su triturador no viene equipado con un cable, usted puede
conectarlo de dos maneras:
1. Adhiera un cable eléctrico, de una longitud mínima de 18”
\TXHQRH[FHGD´8VDUODSLH]D*(Q~PHUR30;
o
2. Conecte el triturador directamente al sistema eléctri co de
la casa.
Para conectar un cable eléctrico:
INSTRUCCIONES DE CONEXÍON A TIERRA: Este
triturador deberá ser conectado a tierra a fin de reducir
el riesgo de descargas eléctricas en caso de una falla de
IXQFLRQDPLHQWRRDYHUtD/DFRQH[LyQDWLHUUDEULQGDXQ
camino de menor resistencia para la corriente eléctrica. Este
triturador está equipado con un cable con un conductor para
la conexión a tierra del equipo y un enchufe con conexión a
tierra. El enchufe deberá estar conectado a un tomacorriente
instalado de forma adecuada y con conexión a tierra de
acuerdo con todos los códigos y ordenanzas locales.
ADVERTENCIA
La conexión incorrecta del
sistema de polo a tierra puede resultar en el riesgo
de descarga eléctrica. Consulte con un electricista
calificado o con un proveedor de servicios si tiene
dudas de que el aparato esté correctamente conectado
a tierra.
NOTA: Desconecte la energía eléctrica hacia el circuito
del triturador antes de la instalación. Fije el interruptor del
circuito en la posición de apagado (OFF) o retire el fusible.
A. Conecte el triturador únicamente a una corriente de
110-120 voltios, 60 Hz de corriente alterna (AC).
B. Si se utiliza un enchufe con cable, use un enchufe de
tres patas. Se debe agregar una línea de tierra al tornillo
de conecxión
a tierra en la
parte inferior del
triturador (campana
extremo).
&8WLOLFHXQFRQHFWDGRUGHDOLYLRGH
presión de la abrazadera del cable
donde el cable de corriente entra
al triturador.
Para Conectar el Triturador
Directamente a la Corriente de su Hogar:
INSTRUCCIONES DE CONEXIÓN A TIERRA: Este
triturador se debe conectar a un sistema de cableado
permanente, metálico conectado a tierra, o se debe correr
un conductor de conexión a tierra para equipos con los
conductores del circuito y conectarse al terminal de conexión
a tierra para equipos o al conductor en el aparato.
$6LXWLOL]DXQFDEOH%;
1. Estos productos están diseñados para uso doméstico.
2. Conecte el cable blanco al conductor blanco del
triturador con una tuerca para alambre. Conecte el
cable negro al conductor negro del triturador con una
tuerca para alambre. Conecte el cable a tierra sin forro
al tornillo de conexión a tierra. El cable de conexión a
tierra debe sujetarse y sostenerse con un liberador de
tensión.
1RXVHXQFRQGXFWRUtJLGRSDUDODFRQH[LyQGHO
cableado.
4. Debe proporcionarse un interruptor de motor aceptable
exclusivo para el triturador en el momento de la
instalación. El interruptor debe montarse a la vista cerca
del triturador o en la abertura del fregadero para el
triturador.
Si no se utiliza un
FDEOH%;LQVWDOHXQ
cable por separado
de conexión a tierra a
una conexión a tierra
confiable más cercana,
utilizando el tornillo en
la campana extremo
para el cable de
conexión a tierra.
B. Si su suministro
de corriente no
incluye un cable
de conexión a
tierra, debe adquirir
uno a menos que se utilice un cable metálico. Conecte
firmemente un cable de cobre al tornillo de polo a tierra
del triturador y conecte el otro extremo del cable a una
FRQH[LyQDWLHUUDFRQILDEOH8VHVRODPHQWHDEUD]DGHUDV
GHFRQH[LyQDWLHUUDDSUREDGDVSRU8/6LHQVXFDVDVH
utilizan tuberías de plástico, un electricista calificado debe
instalar una conexión a tierra adecuada.
CONEXIÓN DE LA ELECTRICIDAD (Cont)
LEA Y GUARDE ESTAS INSTRUCCIONES
Busque el conductor
conectado a esta hoja
y una ese conductor
al cable blanco del
triturador.
NOTA: Al ver el costado
del enchufe eléctrico con el
dispositivo de conexión a tierra
en la parte superior, la hoja
izquierda más larga se conecta
con el cable identificado.
/DGR
con
costura
/LEHUDFLyQ
de presión
Tuerca
Pieza de conexión de la
FDMD+(<&212
Botón rojo
para
reposición
Retire la
tapa
Tuercas del
cable
Tornillo de
conexión a
tierra
Hacia la
corriente
de la
casa o
cable de
corriente
Fondo del triturador (campana extremo)

49-5903-3
USO DEL TRITURADOR
Uso del triturador
ANTES DE USAR ESTE TRITURADOR, LEA TODAS LAS INSTRUCCIONES DE SEGURIDAD QUE FIGURAN EN LAS
PÁGINAS 3 Y 4.
Este triturador utiliza impulsores giratorios anti atascos que hacen un sonido de clic al balancearse en su posición.
Esto indica un funcionamiento normal.
Modelos de Alimentación Continua
A. Retire el tapón del lavabo y abra el agua fría en un
flujo de nivel medio.
B.*LUHHOLQWHUUXSWRUD21(QFHQGLGR
C. Raspe los restos de comida para retirarlos. A fin
de acelerar el retiro de los desperdicios de comida,
corte o rompa los huesos grandes, las cáscaras
\HORWHV/RVKXHVRVJUDQGHV\ODVFiVFDUDV
fibrosas requieren un tiempo considerable para ser
pulverizados y es más fácil desecharlos con otros
UHVWRVGHEDVXUD1RVHDODUPHVLHOWULWXUDGRUUHGXFH
su rendimiento mientras realiza el pulverizado. En
realidad, el triturador está incrementando su rotación
(fuerza para pulverizar) y se encuentra funcionando
bajo condiciones normales.
D. Antes de apagar el triturador, deje que el agua y el
WULWXUDGRUHVWpQDFWLYRVGXUDQWHDSUR[LPDGDPHQWH
segundos una vez que la trituración haya finalizado.
Esto asegura que todos los desperdicios sean
descargados a través del colector y del drenaje.
E. 1RXVHDJXDFDOLHQWHPLHQWUDVHOGLVSHQVDGRUHVWi
en funcionamiento. El agua fría mantendrá los
desperdicios de comida y los sólidos con grasa, de
modo que puedan ser descargados por el drenaje.
Modelos de Alimentación por Tandas
A. Retire el tapón del lavabo y
abra el agua fría en un flujo de
nivel medio.
B. Raspe los restos de comida
para retirarlos.
C.,QVHUWHHOWDSyQSDUDDFWLYDUHOWULWXUDGRU8QDGHODV
2 ranuras pequeñas de la base del tapón deberá
estar alineada con el émbolo del interruptor dentro
del cuello del triturador.
NOTA: La manija con forma ovalada está alineada
con las 2 ranuras pequeñas en el tapón.
Presione hacia abajo
de manera firme para
comenzar.
D. Deje correr el dispensador
GXUDQWHVHJXQGRVOXHJR
de que la trituración haya
finalizado. Esto asegurará
que todos los desperdicios
sean descargados a través del colector y del drenaje.
Levante el tapón para apagar el triturador.
E. Para llenar el lavabo, inserte el tapón de modo que la
ranura más grande quede alineada con el émbolo del
interruptor. Ahora se puede presionar el tapón hacia
abajo para sellar el lavabo sin activar el triturador.
Cuando la ranura de tamaño medio en la base del
tapón se encuentre alineada con el émbolo del
interruptor, se podrá drenar agua, pero la vajilla, etc.,
no podrán caer accidentalmente en el triturador.
ADVERTENCIA
No altere el tapón y sólo use
el tapón suministrado para mover el émbolo que
impulsa el interruptor de encendido/ apagado dentro
del cuello del triturador.
Consejos Útiles
A. Asegúrese de que el dispensador esté vacío antes de
usar el lavavajillas, de modo que el drenaje pueda ser
realizado de forma correcta.
B. Se recomienda que el tapón se encuentre en el
drenaje cuando no esté en uso, a fin de evitar que los
utensilios y otros objetos caigan en el triturador.
C. El triturador posee una construcción robusta para
brindarle muchos años de uso sin la necesidad de
acceder al servicio técnico. Puede triturar todos
los desperdicios de comida normales – PERO no
pulverizará ni desechará ítems tales como latas,
botellas o tapas de botellas, vidrio, porcelana, cuero,
tela, loza, goma, cuerdas, plumas o valvas de almejas
u ostras. Estos son materiales desechables y deberán
ser arrojados al cesto de basura o al compactador de
basura.
D.3$5$$&(/(5$5/$(/,0,1$&,Ï1'(5(6726
DE COMIDA: Corte o rompa los huesos largos,
cáscaras de melón, cáscaras de pomelo y mazorcas
GHPDt]/RVtWHPVWDOHVFRPRKXHVRVJUDQGHV
cáscaras fibrosas como la lima, cápsulas de granos
y cáscaras de maíz, requieren un tiempo de corte
considerable. Por esta razón, es posible que prefiera
colocarlos en el cesto de basura o en el compactador
de basura.
Mango Ovalado
Pequeño
Pequeño
Mediano
Grande

6 49-5903-3
Cuidado y limpieza
CUIDADO Y LIMPIEZA
EL MOTOR ES LUBRICADO DE FORMA PERMANENTE Y DE POR VIDA. NO INTENTE LUBRICAR
EL TRITURADOR. El triturador cuenta con limpieza automática y realiza un fregado luego de cada uso.
Ŷ181&$FRORTXHVRGDFiXVWLFDQLOLPSLDGRUHV
químicos en el triturador, ya que podrán ocasionar
una corrosión grave en las partes metálicas.
Ŷ6XWULWXUDGRUH[FHSWRHQORVPRGHORVGH$OLPHQWDFLyQ
por Tandas, se encuentra equipado con un protector
contra salpicaduras extraíble para una fácil limpieza
o reemplazo. Retire el protector contra salpicaduras,
empujando el mismo hacia afuera desde la parte
superior. Para realizar su reemplazo, inserte la brida
para el lavabo y empuje hacia abajo hasta que quede
correctamente insertado.
Ŷ Si se produce olor, pase cáscaras de naranja o limón
a través del triturador. También funcionará el uso de
una docena de cubos de hielo rociados con polvo de
limpieza.

49-5903-3 7
STOP
ANTES DE EMPEZAR
Lea estas instrucciones completa y
cuidadosamente.
IMPORTANTE – Observe todos los códigos y
órdenes de ley.
• Guarde estas instrucciones para uso del inspector local.
• Nota al instalador– Asegúrese de dejar estas
instrucciones con el consumidor.
• Nota al consumidor– Conserve estas
instrucciones para referencia futura.
• Nivel de destreza – /DLQVWDODFLyQGHHVWHDSDUDWR
requiere de destrezas mecánicas básicas.
• Tiempo de ejecución – 1 hora
/DLQVWDODFLyQDSURSLDGDHVODUHVSRQVDELOLGDGGHO
instalador.
/DIDOODGHOSURGXFWRGHELGRDXQDLQVWDODFLyQ
inadecuada no está cubierta por la garantía.
PREPARACIÓN
1. Desconecte el suministro del cable eléctrico hacia el
triturador.
2. Remueva el triturador viejo o la ensambladura de la
brida del lavaplatos.
3. Inspeccione la línea de drenaje. Si la línea de drenaje
se encuentra muy cubierta con grasa endurecida
y acumulaciones, serpentee con una serpiente de
plomero.
4. Remueva los materiales de sellado viejos y los pedazos
de juntas de la abertura del lavaplatos, tanto arriba como
abajo.
NOTA:/DVVXSHUILFLHVVXSHULRUHVHLQIHULRUHVGHO
lavaplatos deben estar libres de materiales para prevenir
fugas.
MATERIALES ADICIONALES QUE
USTED PODRÍA NECESITAR
• Punzón de acero o clavija de madera
• Petrolato o jabón liquido
• Abrazadera de manguera
• Conectador de drenaje para lavadora de platos
/ODYHGHWXERVDMXVWDEOH
• Masilla de plomero (para sellado del lavaplatos)
• Adaptador de drenaje de caucho escalonado
• Tuercas de alambre
• Cable conectador
• Tubería de drenaje flexible
.LWGHOFDEOHHOpFWULFR3DUWH1R30;
QUÉ NECESITA
INSTRUCCIONES PARA LA INSTALACIÓN
Instrucciones para
la instalación
Triturador
Preguntas? Ilame al 1-800-GECARES o visite nuestra página en la red: www.GEAppliances.com
ƒ'HVWRUQLOODGVRUGHHVWUHOOD\
con hoja plana
ƒ0DUWLOOR
ƒ/ODYH
ƒ$OLFDWHVGHFLHUUHGHFDQDO
de juntas deslizantes
ADVERTENCIA
• 3$5$6(*85,'$'3(5621$/4XLWHHOIXVLEOHR
abra el interruptor de circuitos antes de comenzar
ODLQVWDODFLyQ1RXWLOLFHXQFDEOHGHH[WHQVLyQRXQ
enchufe adaptador con este artefacto.
• 3$5$686(*85,'$'$OUHDOL]DUODVLQVWDODFLRQHV
descriptas en este manual, se deberán usar guantes
y protección ocular (gafas de seguridad o un producto
equivalente).
• 3$5$686(*85,'$'1RSRVLFLRQHVXFDEH]DR
su cuerpo debajo del triturador; la unidad podrá caer
durante el retiro o la instalación.
• /DFRQH[LyQLQDGHFXDGDGHOFRQGXFWRUGHFRQH[LyQD
tierra del equipamiento puede provocar un riesgo de
descarga eléctrica. Consulte a un electricista calificado o
representante de servicio técnico si tiene dudas sobre la
correcta conexión a tierra del aparato.
• Si el cableado doméstico no cuenta con un cable de 2
hilos con conexión a tierra, un instalador debe realizar
una conexión a tierra. Cuando el cableado doméstico
es de aluminio, asegúrese de usar un compuesto
antioxidante y conectores de aluminio a cobre
DSUREDGRVSRU8/

8 49-5903-3
INSTALACIÓN EN LA BRIDA DEL
LAVABO
/HHUHQVXWRWDOLGDGDQWHVGHFRPHQ]DU
Brida del Lavabo Instalada Correctamente
(mostrado para una orientación adecuada)
INSTRUCCIONES PARA LA INSTALACIÓN
COMPONENTES E INSTALACIÓN
Instrucciones para la instalación
Junta de goma
Brida del lavabo
Anillo de
Soporte
Junta
de Fibra
Ranura
Reborde
Inferior
Brida del
lavabo
Montaje de
Amortiguación
Área abierta
Sin obstrucción
Reborde Inferior del
montaje de
amortiguación
/DYDER
El Anillo de montaje deberá estar
libre para poder moverse hacia
arriba y abajo
NOTA: Preste especial atención al orden de
las partes de la brida del lavabo, ya que fueron
ensambladas de forma correcta en la fábrica.
A. Desensamble la brida del lavabo desde el
triturador, girando el anillo de montaje hacia la
izquierda (en sentido horario) y retire la misma.
B./HYDQWHHODQLOORGHPRQWDMHKDFLDODSDUWHVXSHULRU
de la brida del lavabo. Retire la Montaje de
Amortiguación y el anillo de montaje. Es posible que
desee practicar la instalación de la goma de montaje
en este punto, antes de estar debajo del lavabo.
C. Desenrosque el anillo de soporte de la brida del
lavabo y retire la junta de fibra. Ahora tiene la
brida del lavabo y la junta de goma.
D. La junta de goma es usada en lugar de masilla
de plomería en los lavabos de acero inoxidable.
Algunos lavabos de hierro fundido requieren masilla.
E. Si no se usa masilla, inserte la brida del lavabo a
través de la junta de goma dentro de la abertura
GHOODYDER1RJLUHODEULGDXQDYH]FRORFDGD
F. Si usará masilla en lugar de la junta, forme un anillo
alrededor de la parte inferior de la brida del lavabo.
Inserte la brinda en la abertura del lavabo, y presione
hacia abajo con fuerza para expulsar el exceso de
masilla. Desde abajo del lavabo, recorte el exceso
de masilla descargado en el extremo inferior de la
abertura del lavabo.
G. Desde abajo del lavabo,
deslice la junta de fibra por
la brida del lavabo expuesta.
Con las flechas hacia arriba,
atornille el anillo de soporte en
la brida del lavabo y realice un
ajuste manual hasta que la brida del lavabo no se
mueva. En este punto, es recomendable insertar
el tapón en el lavabo y llenar el mismo con agua a
fin de controlar el sellado de la brida del lavabo y
asegurar que no haya pérdidas.
H.
Coloque el anillo de montaje sobre
la brida del lavabo y mantenga el
mismo en su posición mientras
instala el Montaje de Amortiguación
(el lado largo hacia abajo).
Asegúrese de que la ranura que
se encuentra dentro del Montaje
de Amortiguación calce sobre
el borde de la brida del lavabo,
como si se colocara la tapa en
un contenedor de plástico. Pase
los dedos por todo el Montaje
GH$PRUWLJXDFLyQHMHUFLHQGRXQDSUHVLyQOHYH1R
presione con demasiada fuerza. Cuando el Montaje
de Amortiguación esté correctamente colocado, el
anillo de montaje podrá ser empujado hacia abajo
sobre la goma de montaje y estará libre para girar.
Ajuste la brida del lavabo
de forma manual
Parte superiorRanura
Reborde Inferior
Detalle del Montaje
de Amortiguación
*Tapón
*Protector contra
salpicaduras
extraíble
Brida del lavabo
Junta de fibra
Anillo de montaje
Junta del codo
Tonelero
Ranura
Tornillos
Brida
del
codo
Etiqueta de
calificación
en esta area
Campana
trasera
(Conexiones
eléctricas)
Entrada de descarga
del lavavajillas
Espigas de
ajuste
Montaje de
amortiguación
/DYDER
Junta de goma de
la brida del lavabo
Anillo de Soporte
(Observe las flechas
que indican hacia
arriba)
Ensamble
de la brida
del lavabo
Triturador
Codo de
descarga
1RVHXVDFRQHOPRGHORGHDOLPHQWDFLyQSRUWDQGDV
COMPONENTES

49-5903-3 9
INSTRUCCIONES PARA LA INSTALACIÓN
Instrucciones para la instalación
CONEXIÓN DEL LAVAVAJILLAS (SI ES NECESARIO)
ADHIERA EL CODO DE DESCARGA
1
TAPÓN DE BLOQUEO
8VDQGRXQLQVWUXPHQWRVLQILORSXQ]yQGHDFHUR
o clavija de madera), arrastre todo el tapón.
1RXVHXQGHVWRUQLOODGRURXQLQVWUXPHQWR
filoso. Cuando el tapón de bloqueo caiga en el
dispensador, podrá
retirarlo o simplemente
pulverizarlo cuando el
triturador se encuentre
en uso. Esto no
dañará el triturador de
ninguna forma, pero es
posible que lleve cierta
cantidad de tiempo pulverizar el mismo, a lo
largo de varios usos.
1
CONECTE LA JUNTA DE
CAUCHO
Deslice la junta de caucho sobre el codo de drenaje.
2
CONECTE LA MANGUERA
Conecte la manguera del lavavajillas usando
una abrazadera de manguera. Si el tamaño
de la manguera es diferente, necesitará un
adaptador de goma de doble tamaño.
2
CONECTE EL CODO DE
DESCARGA*
Conecte el codo de descarga al triturador.**
Asegúrese de que todas las conexiones de la
tubería estén apretadas.
Si realizará la conexión a un lavavajillas, complete el
siguiente paso. Si no se conectará un lavavajillas, vaya
a “Adhesión del Codo de Descarga” a continuación.
* El codo de descarga debe ser instalado por un profesional.
** Algunas instalaciones (ver la página 11 para ejemplos)
puede que requieran el uso de una tubería de drenaje
flexible.
Tapón de
bloqueo
Abrazadera de
la Manguera
Adaptador de Goma
de Doble Tamaño
Empaque
de caucho
Codo de
descarga
Empaque
de caucho
Codo de
descarga

10 49-5903-3
Instrucciones para la instalación
CONEXIÓN DEL TRITURADOR A LA BRIDA DEL LAVABO
1
ADHESIÓN A LA BRIDA DEL
LAVABO
Alinee el triturador
debajo de la brida
del lavabo. Guie
las proyecciones
del tonelero en las
ranuras del anillo
de montaje. Gire el
anillo de montaje
aproximadamente
¼” hacia la
derecha, de modo
que el triturador
cuente con un
sostén temporario.
4
CONTROL DE PÉRDIDAS
Controle que no haya pérdidas en la unidad
durante 24 horas luego de su instalación y
durante el primer uso.
3
BLOQUEO DE ANILLO DE
MONTAJE
Gire el anillo de montaje hacia la derecha
KDVWDTXHTXHGHFRPSOHWDPHQWHDMXVWDGR/DV
proyecciones del tonelero deberán estar hacia el
extremo derecho de las ranuras de montaje. Si
es difícil girar el anillo de montaje, usted podrá
agregar una pequeña cantidad de vaselina o de
jabón líquido a la proyección del tonelero. Deje
correr agua y controle que no haya pérdidas.
2
ALINEAR CON LA TUBERÍA
DE SALIDA
Gire el anillo de montaje y el triturador hasta que
el codo de descarga del triturador se alinee con
la tubería de salida (consulte la página 11).
INSTRUCCIONES PARA LA INSTALACIÓN
Ranura del An-
illo de Montaje
Proyec-
ción del
Tonelero
Codo de
Descarga
Tubería
Externa
Proyección del Tonelero
en la Posición “Sostenida”
Detalle del Bloqueo
Proyección del Tonelero en
la Posición “Bloqueada”
Anillo de
Montaje

49-5903-3 11
INSTRUCCIONES PARA LA INSTALACIÓN
Instrucciones para la instalación
DIMENSIONES
CIERTAS INSTALACIONES TÍPICAS
GFC320N
GFC325N
5-3/16"
8-1/2"
8-1/2"
8-1/2"
5-1/16"
7-3/4"
6-3/16"
7-1/4"
9-3/8"
7-1/4"
6-1/8"
6-15/16"
4-1/2"
4-1/2"
4-1/2"
4-1/2"
4-1/2"
4-1/2"
1-1/2"
1-1/2"
1-1/2"
1-1/2"
1-1/2"
1-1/2"
5-3/8"
5-9/16"
5-9/16"
5-9/16"
5-3/8"
5-3/8"
12-11/16"
14-1/2"
16-5/8"
16-1/6"
12-11/16"
13-7/16"
GFC520N
GFC525N
GFC530N
GFC535N
GFC720N
GFB760N
Funcionamiento con Alimentación por Tandas
GFC1020N
NOTA: Para lograr una operación del triturador
apropiada, es esencial que esta dimensión sea
9”–12”. dependiendo de los modelos enumerados
anteriormente, para evitar agua estancada en el
alojamiento del motor del triturdaor.
8QDWXEHUtDGHGUHQDMHIOH[LEOHSRGUtDVHUQHFHVDULD
para esta aplicación.
SINGLE BOWL
*Approx.
DOUBLE BOWL
CENTER OUTLET**
*Approx.
DOUBLE BOWL
END OUTLET**
*Approx.
5(&,3,(17(6,03/(
6$/,'$(1(/&(1752
&215(&,3,(17('2%/(
6$/,'$(1(/(;75(02
&215(&,3,(17('2%/(
*Aprox.
*Aprox.
*Aprox.

12 49-5903-3
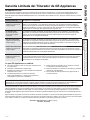
Problema Causa Posible Qué Hacer
Ruidos fuertes
(diferentes a
aquellos producidos
al pulverizar huesos
y semillas de frutas)
Elementos de la vajilla, una tapa de botella
u otros objetos externos cayeron en la
trituradora.
Retire el protector contra salpicaduras*
y retire el objeto con tenazas largas.
Reemplace el protector contra
salpicaduras*
El triturador no se
inicia
El botón de reinicio fue activado. 8QDYH]UHWLUDGRHOSURWHFWRUFRQWUD
salpicaduras*, controle que el plato
giratorio se mueva libremente usando
el mango de una escoba. Si el
plato giratorio se mueve libremente,
reemplace el protector contra
salpicaduras* y controle el botón de
reinicio para verificar si fue activado.
El botón de reinicio es rojo y está
ubicado en la posición opuesta al
codo de descarga, cerca de la parte
inferior del triturador. Presione el botón
hasta que haga clic y permanezca
oprimido. Si el botón de reinicio no fue
activado, controle que ninguno de los
cables conectados al triturador esté
en corto o roto. Controle el interruptor
del encendido eléctrico, de la caja de
fusibles o del disyuntor. Si el cableado
y los componentes eléctricos están
intactos, es posible que la unidad
presente problemas internos que
requieran el servicio técnico o su
reemplazo.
El plato giratorio no puede rotar. Si el plato giratorio no gira libremente,
controle que no haya ningún objeto
alojado entre el plato giratorio y el
anillo para pulverizar. Retire el objeto
moviendo el plato giratorio con el
PDQJRGHXQDHVFRED/XHJRUHWLUHHO
objeto.
De no haber ningún objeto presente, es
posible que haya problemas internos.
CONSEJOS PARA LA SOLUCIÓN DE PROBLEMAS
Consejos para la Solución de Problemas... Antes de solicitar el servicio técnico
¡Ahorre tiempo y dinero! Primero revise los cuadros que aparecen en las siguientes páginas y es posible que no necesite
solicitar reparaciones.
NOTA SOBRE SEGURIDAD: Antes de investigar, usted deberá desconectar el suministro
de corriente.
Antes de realizar la reconfiguración, desconecte el suministro de corriente – por favor
consulte la NOTA SOBRE SEGURIDAD anterior. El control de sobrecarga evita que el
motor funcione en caso de sobrecarga. Esta función protege el cableado de su hogar y
su triturador. Cuando se encuentre sobrecargado, el motor se detendrá automáticamente.
Botón de Reinicio
1GH6HULH
Retire el
Protector contra
Salpicaduras
Plato Giratorio
/D$OLPHQWDFLyQSRU7DQGDVQRLQFOX\HHOSURWHFWRUFRQWUDVDOSLFDGXUDV

49-5903-3 13
CONSEJOS PARA LA SOLUCIÓN DE PROBLEMAS
Consejos para la Solución de Problemas... Antes de solicitar el servicio técnico
Problema Causa Posible Qué Hacer
Pérdida en el
Triturador
Si la pérdida se encuentra en la parte
superior, podrá haber sido causada por:
1. Colocación incorrecta de la brida del
lavabo (elección de la junta, masilla o
ajuste).
2. El anillo de soporte no está
correctamente ajustado.
3. Montaje de Amortiguación defectuoso
Si la pérdida se encuentra en el codo
de descarga, es posible que haya sido
causada por un ajuste inadecuado de los
tornillos de la brida del codo.
/D$OLPHQWDFLyQSRU7DQGDVQRLQFOX\HHOSURWHFWRUFRQWUDVDOSLFDGXUDV

14 49-5903-3
Notas
NOTAS

49-5903-3
GEAppliances.com
Todo el servicio de garantía es provisto por nuestros Centros de Servicio de Fabricación, o un técnico autorizado de Servicio al
Cliente (Customer Care®). Para programar una visita del servicio técnico, visítenos a través de Internet en GEAppliances.com, o
llame GE Appliances al 800.GE.CARES (800.432.2737). Cuando llame para solicitar el servicio, tenga los números de serie y modelo
disponibles.
GARANTÍA LIMITADA
Garantía Limitada del Triturador de GE Appliances
Para el período de: GE Appliances reemplazará:
Un año
A partir de la fecha de la
compra original
El triturador doméstico de desechos de alimentos será reemplazado en su totalidad si existe algún
defecto en los materiales o en la fabricación relacionado con las partes funcionales solamente
(excluyendo las partes de apariencia). Durante esta garantía limitada por un año, GE Appliances
proporcionará también, sin cargo, toda la mano de obra relacionada con el reemplazo del triturador
original junto con el triturador de reemplazo durante el primer año.
Un año adicional
FA partir de la fecha
de la compra original
instalación
/RVPRGHORV*)&1*)&16LH[LVWHDOJ~QGHIHFWRHQORVPDWHULDOHVRHQODIDEULFDFLyQ
relacionado con las partes funcionales solamente (excluyendo las partes de apariencia). Durante
este año de garantía extendida limitada, usted será responsable por de todos los cargos de
relacionados con el reemplazo del triturador.
Dos años adicionales
A partir de la fecha de la
compra original
/RVPRGHORV*)&1*)&16LH[LVWHDOJ~QGHIHFWRHQORVPDWHULDOHVRHQODIDEULFDFLyQ
relacionado con las partes funcionales solamente (excluyendo las partes de apariencia). Durante
esta garantía extendida limitada de dos años, usted será responsable por de todos los cargos de
instalación relacionados con el reemplazo del triturador.
Cuatro años adicionales
A partir de la fecha de la
compra original
3DUDORVPRGHORV*)&1*)%16LH[LVWHDOJ~QGHIHFWRHQORVPDWHULDOHVRHQODIDEULFDFLyQ
relacionado con las partes funcionales solamente (excluyendo las partes de apariencia). Durante
esta garantía extendida limitada de cuatro años, usted será responsable por de todos los cargos de
instalación relacionados con el reemplazo del triturador.
Seis años adicionales
A partir de la fecha de a
compra original
/RVPRGHORV*)&16LH[LVWHDOJ~QGHIHFWRHQORVPDWHULDOHVRHQODIDEULFDFLyQUHODFLRQDGR
con las partes funcionales solamente (excluyendo las partes de apariencia). Durante esta garantía
extendida limitada de seis años, usted será responsable por de todos los cargos de instalación
relacionados con el reemplazo del triturador.
Abroche su recibo aquí. Para acceder al servicio técnico de
acuerdo con la garantía deberá contar con la prueba de la fecha
original de compra.
Lo que GE Appliances no cubrirá:
Ŷ /RVYLDMHVGHVHUYLFLRKDFLDVXFDVDSDUDHQVHxDUOHFyPR
usar el producto.
Ŷ Instalación o mantenimiento inadecuado.
Ŷ Remplazo de fusibles de su casa o reajuste del sistema de
interruptores de su casa.
Ŷ /RVIDOORVGHOSURGXFWRVLHOPLVPRHVDEXVDGR
usado inapropiadamente, o usado para propósitos no
contemplados, o para usos comerciales.
Ŷ Daños al producto causados por un accidente, incendio,
inundaciones o desastres naturales.
Ŷ Daños incidentales o consecuentes causados por posibles
defectos de este dispositivo.
Ŷ 1RHVSRVLEOHDFFHGHUDOSURGXFWRSDUDSURSRUFLRQDUHO
servicio requerido.
EXCLUSIÓN DE GARANTÍAS IMPLÍCITAS – Su único y exclusivo recurso es la reparación del producto según lo
establecido en esta Garantía limitada. Cualquier garantía implícita, incluidas las garantías implícitas de comercialización o
idoneidad para un propósito específico, están limitadas a un año o al período más corto permitido por la ley.
Esta garantía limitada se extiende al comprador original y a cualquier propietario que lo suceda para el caso de productos comprados
SDUDXVRGRPpVWLFRQRUPDOHQORV(VWDGRV8QLGRV6LHOSURGXFWRVHHQFXHQWUDHQXQiUHDGRQGHQRKD\DXQ6HUYLFLRDXWRUL]DGR
de GE Appliances, es posible que deba pagar un costo por traslado o que se le exija que traiga el producto a un centro de Servicio
autorizado de GE Appliances para obtener servicio. En Alaska, la garantía limitada excluye el costo de envío o llamadas del servicio a
su hogar.
Algunos estados no permiten la exclusión o limitación de daños incidentales o consecuencia les. Esta garantía limitada le proporciona
derechos legales específicos, y puede tener otros derechos que pueden variar de un estado a otro. Para conocer los derechos legales
de su estado, consulte con su oficina local de asuntos del consumidor o al procurador general de su estado.
Garantidor: GE Appliances, a Haier company
Louisville, KY 40225

16 49-5903-3
Impreso en China
SOPORTE PARA EL CONSUMIDOR
Soporte para el cliente
Sitio Web de GE Appliances
¿Desea realizar una consulta o necesita ayuda con su electrodoméstico? ¡Intente a través del Sitio Web de
*($SSOLDQFHVODVKRUDVGHOGtDFXDOTXLHUGtDGHODxR8VWHGWDPELpQSXHGHFRPSUDUPiVHOHFWURGRPpVWLFRV
maravillosos de GE Appliances y aprovechar todos nuestros servicios de soporte a través de Internet, diseñados
para su conveniencia. GEAppliances.com
Registre su Electrodoméstico
£5HJLVWUHVXHOHFWURGRPpVWLFRQXHYRDWUDYpVGH,QWHUQHWVHJ~QVXFRQYHQLHQFLD8QUHJLVWURSXQWXDOGHVXSURGXFWR
permitirá una mejor comunicación y un servicio más puntual de acuerdo con los términos de su garantía, en caso
de surgir la necesidad. También puede enviar una carta en la tarjeta de inscripción preimpresa que se incluye con el
material embalado. GEAppliances.com/register
Servicio Programado
El servicio de reparación de expertos de GE Appliances está a sólo un paso de su puerta. Conéctese a través de
Internet y programe su servicio a su conveniencia cualquier día del año.
GEAppliances.com/service
o comuníquese al 800.432.2737 durante el horario de atención comercial.
Garantías Extendidas
Adquiera una garantía extendida de GE Appliances y conozca los descuentos especiales que están disponibles
PLHQWUDVVXJDUDQWtDD~QHVWiYLJHQWH/DSXHGHDGTXLULUHQFXDOTXLHUPRPHQWRDWUDYpVGH,QWHUQHW/RVVHUYLFLRV
de GE Appliances aún estarán allí cuando su garantía caduque.
GEAppliances.com/extended-warranty
o comuníquese al 800.626.2224 durante el horario de atención comercial.
Piezas y Accesorios
Aquellos individuos calificados para realizar el servicio técnico de sus propios electrodomésticos podrán solicitar el
envío de piezas o accesorios directamente a sus hogares (se aceptan las tarjetas VISA, MasterCard y Discover).
Ordene hoy a través de Internet durante las 24 horas, todos los días. GEApplianceparts.com o de forma telefónica
DOGXUDQWHHOKRUDULRGHDWHQFLyQFRPHUFLDO
Las instrucciones que figuran en este manual cubren los procedimientos que serán realizados por cualquier
usuario. Otros servicios técnicos generalmente deben ser derivados a personal calificado del servicio. Se
deberá tener cuidado, ya que una reparación indebida podrá hacer que el funcionamiento no sea seguro.
Contáctenos
Si no se encuentra satisfecho con el servicio que recibió de GE Appliances, comuníquese con nosotros a través de
nuestro sitio Web con todos los detalles, incluyendo su número telefónico, o escriba a:
*HQHUDO0DQDJHU&XVWRPHU5HODWLRQV_*($SSOLDQFHV$SSOLDQFH3DUN_/RXLVYLOOH.<
GEAppliances.com/contact
-
 1
1
-
 2
2
-
 3
3
-
 4
4
-
 5
5
-
 6
6
-
 7
7
-
 8
8
-
 9
9
-
 10
10
-
 11
11
-
 12
12
-
 13
13
-
 14
14
-
 15
15
-
 16
16
-
 17
17
-
 18
18
-
 19
19
-
 20
20
-
 21
21
-
 22
22
-
 23
23
-
 24
24
-
 25
25
-
 26
26
-
 27
27
-
 28
28
-
 29
29
-
 30
30
-
 31
31
-
 32
32


GE GFC525N El manual del propietario
- Tipo
- El manual del propietario
en otros idiomas
- English: GE GFC525N Owner's manual
Artículos relacionados
-
GE Appliances GFC535N Manual de usuario
-
GE GFC700F Manual de usuario
-
-
-
-
-
-
GE AZ91H18E2E El manual del propietario
-
GE AZ91H18E5C El manual del propietario
-
Otros documentos
-
Kenmore 3/4 Horsepower Deluxe Disposer - Dark Gray El manual del propietario
-
-
Kenmore Elite 70351 El manual del propietario
-
-
Magic Chef MCSTCW21W2 Manual de usuario
-
 FrankeUSA 16340127 Guía de instalación
-
 FrankeUSA 16340135 Guía de instalación
-
 FrankeUSA 16340101 Guía de instalación
-
 FrankeUSA 16340150 Guía de instalación
-
 FrankeUSA 16340036 Guía de instalación


