Kenmore 66568610890 El manual del propietario
- Categoría
- Microondas
- Tipo
- El manual del propietario

Owner's Guide
Guia del usuario
I II IIJ IJl __ -
\
II'qw't 1I,
I':
Microwave Hood Combination
Combinaci6n Microondas Campana
. , , .,,. . ,. ,
Warranty .......................................... 2
Sears Se_/i©e .................................. 2
Minrowtve Oven Safety ............... 3.5
Installation Instmet_ns ................. 6
Getting to Know Your
MIcfownvo Oven ......... ,.................... 8
Using Your Microwave Oven ......... 21
.......... w.
Caring for Your Microwave Oven ..... 37
....... 40
Cooking Guide ...........................
Questions a_td Answers .................... 42
Troubleshooting ................................ 43
Index ........ ,...................................... 45
_per..aibn en Espahol ............ ,............. 47
Sears Toll.Free Numbers ................ 100
• . . _ .
8169426 s_ _ ,_o_o..H_,.nE_ __0_r_u.s_ MODIEL/MODEL068610/1/2

Microwave Oven Warranty
FULL ONE-YEAR WARRANTY ON MICROWAVE OVEN
For one year from the date of purchase, if this Kenmore Microwave Oven fails due to a defect in material or
workmanship. Sears will repair it free of charge.
FULL FIVE-YEAR WARRANTY ON THE MAGNETRON
For five years from the date of purchase, if the magnetron in this Kenmore Microwave Oven fails due to a
defect in material or workmanship, Sears will repair it free of charge.
The above warranty coverage applies only to Microwave Ovens which are used for private household purposes.
WARRANTY SERVICE IS AVAILABLE BY SIMPLY CONTACTING THE NEAREST SEARS STORE OR
SERVICE CENTER IN THE UNITED STATES.
This warranty applies only while this product is in use in the United States.
This warranty gives you specific legal rights, and you may also have other rights which vary from state to state.
Sears, Roebuck and Co., For service call:
Dept. 817WA, 1-800-4-REPAIR
Hoffman Estates, IL 60179 1-800-473-7247
Sears Service
"We service what we sell"
"We service what we sell" is our assurance to you that you can depend on Sears for service because Sears
Service is nationwide.
Your Sears Kenmore Microwave Oven has added value when you consider that Sears has a service unit near
you, staffed by Sears Trained Technicians - professional technicians specifically trained on Sears Kenmore
Microwave Ovens, having the parts, tools, and equipment to insure that we meet our pledge to you -
"We ' i,,service what we sell.
To further add to the value of your microwave oven,
buy a Sears Maintenance Agreement.
Sears Kenmore Microwave Ovens are designed, manufactured, and tested for years of dependable operation.
Yet, any modem appliance may require service from time to time. A Sears Maintenance Agreement is more
than an extension of the Warranty. It provides complete protection from unexpected repair bills and undue
inconvenience. It assures you of maximum efficiency from your Microwave Oven.
Here's a comparative Warranty and Maintenance Agreement chart showing you the benefits of a Sears
Microwave Oven Maintenance Agreement.
YEARS OF OWNERSHIP COVERAGE
Replacement of defective parts other than magnetron
Replacement of magnetron
Annual preventative maintenance check at your request
I ST YR.
W
W
MA
2NDYR. THRU5THYR.
MA
W
MA
W - WARRANTY
MA - MAINTENANCE AGREEMENT
Contact your Sears salesperson or local Sears Service Center today and purchase a Sears Maintenance
Agreement.
Keep this book and the sales slip together in a safe place for future reference.

Microwave Oven Safety
Your safety and the safety of others is very important.
We haveprovidedmany importantsafety messagesinthis manualand on yourappliance.Always read and
obey all safety messages.
This isthe safety alertsymbol.
This symbolalerts youto hazardsthatcan killorhurtyouand others.
All safety messageswillbe preceded bythesafety alertsymboland the word "DANGER"or
=WARNING."These wordsmean:
You will be killed or earlously Injured if you don't
follow Instructions.
You can be killed or eadouely Injured if you don't
follow Instructions.
All safety messageswillidentify the hazard,tell you howto reducethe chance ofinjury,and tell youwhat can
happen ifthe instructionsare notfollowed.
IMPORTANT SAFETY INSTRUCTIONS
When usingelectricalappliancesbasicsafety precautionsshouldbe followed,includingthefollowing:
WARNING - To reducethe risk of burns,
electdc shock, fire,injuryto personsor exposure
to excessivemicrowaveenergy:
• Read all instructionsbefore usingthe
microwave oven.
• Read and follow the specific"PRECAUTIONS TO
AVOID POSSIBLE EXPOSURE TO EXCESSIVE
MICROWAVE ENERGY"found inthis section.
• The microwaveoven mustbe grounded. Connect
only to pmpedy grounded outlet.See =GROUND-
ING INSTRUCTIONS" found at the end ofthis
section.
• Installor locate the microwaveoven only in
accordance with the providedinstallation
instructions.
• Some products suchas whole eggs and sealed
containers- for example, closedglass jars-
may explode and shouldnot be heated inthe
microwaveoven.
• Use the microwaveoven onlyfor its intendeduse
as described in this manual.Do not use corrosive
chemicalsor vapors inthe microwaveoven.This
type ofoven isspecificallydesignedto heat,
cook, or dry food. It isnot designedfor industrial
or laboratoryuse.
• Aswith anyappliance, close supervisionis
necessarywhen used by children.
• Do not operatethe microwave oven if ithas a
damagedcord or plug, ifit is notworking properly,
or ifit hasbeen damaged or dropped.
• The microwave oven should be servicedonlyby
qualifiedservice personnel. Call an authorized
servicecompany for examination,repair or
adjustment.
• Do not cover or blockany openingson the
microwaveoven.
• DOnot store the microwaveoven outdoors.DOnot
usethe microwaveoven nearwater- for example,
neara kitchensink,in a wet basement,or neara
swimmingpool, and the like.
• Do not immerse cord or plug inwater.
• Keep cord away from heated surfaces.
• Do not letcord hang over edge of table or
counter.
• See door surfacecleaninginstructionsin the
=Cadngfor Your Microwave Oven" section.
• Do not mountover a sink.
• Do not store anything directlyon top of the
microwaveoven when the microwave oven is
in operation.
- SAVE THESE INSTRUCTIONS -
€onUnued on next page

IMPORTANT SAFETY INSTRUCTIONS
To reduce the risk of fire in the oven cavity: • Suitable for use above both gas and electric
- Do not overcook food. Carefully attend the
microwave oven if paper, plastic, or other •
combustible materials are placed inside the
oven to facilitatecooking. •
- Remove wire twist-ties from paper or plastic
bags before placingbag in oven.
- If materialsinsidethe oven shouldignite,keep •
oven door closed, turnoven off, end disconnect
the power cord, or shutoff power at the fuse •
or circuit breakerpanel.
- Do not usathe cavityforstoragepurposes.Do
not leave paper products,cookingutensils,or
foodin the cavitywhen not inuse.
cooking equipment.
Intended to be used above ranges with maximum
width of 36 inches.
Clean VentilatingHoodsFrequently- Grease
shouldnot be allowedto accumulateon hoed
or filter.
When flaming foods under the hood, turn the fan
on
Usa care when cleaningthe vent-hoodfilter.
Corrosive cleaningagents,suchas lye-based
oven cleaners, may damage thefilter.
- SAVE THESE INSTRUCTIONS -
PRECAUTIONS TO AVOID POSSIBLE EXPOSURE TO
EXCESSIVE MICROWAVE ENERGY
(a| Do not attempt to operate this oven with the door
open since open-door operation can result in
harmful exposure to microwave energy. It is
important not to defeat or tamper with the safety
interlocks.
(b)Do not place any object between the ovenfront
face and the door or allow soilor cleanerresidue
to accumulateon sealingsurfaces.
(c) Do not operatethe oven ifit isdamaged. It is
particularlyimportantthatthe oven door close
properlyand that there isno damage to the:
(1) door (bent),
(2) hingesand latches(brokenor loosened),
(3) door sealsand sealingsurfaces.
(d)The ovenshouldnotbe adjustedor repairedby
enyone except properlyqualifiedservicepersonnel.
4

Electrical requirements
Observe all goveming codes and ordinances.
A 120 Volt, 60 Hz, AC only, 15 or 20 ampfused
electrical supply isrequired.(A time-delayfuse is
recommended.) It isrecommendedthat a separate
circuit servingonlythis appliance be provided.
Electrical Shock Hazard
Plug into a grounded 3 prong outlet.
Do not remove ground prong.
Do not use an adapter.
Do not use an extension cord.
Failure to follow these insblJctions can
result in death, fire, or electrical shock.
GROUNDING INSTRUCTIONS
Forall cord connected appliances:
The microwave oven must be grounded. In the event
ofan electrical shortcircuit,groundingreducesthe
riskof electricshock byprovidinganescape wire
for theelectric current.The microwave oven is
equipped with a cord havinga groundingwire with
a groundingplug.The plug must be plugged into
anoutlet that is properly installedand grounded.
WARNING: Improper use of the groundingcan
resultin a dsk of electricshock.
Consulta qualified electricianor servicemanifthe
groundinginstructionsare notcompletelyunderstood,
or ifdoubt existsas to whether the microwaveoven
isproperly grounded.
Do not use anextension cord. Ifthe power supply
cord istoo short,have a qualified electrician or
serviceman install an outlet near the microwave oven.
Fora permanently connected appliance:
Thismicrowave oven must be connected to a
grounded,metallic, permanent wiringsystem, or
an equipment groundingconductorshouldbe run
withthe circuitconductors and connected to the
equipment groundingterminalor lead on the
microwaveoven.
5

Installation Instructions
Space requirements
NOTE: There must beat least one wall stud within
cabinet opening.
Check the opening where the microwave
oven hood will be installed. The location must
provide:
• 2 inchx 4 inch wood studdingand % inch
thickness drywallor plasterlath
• Supportfor microwave oven hood weightof
150 pounds plusthe weightof itemsplaced in
the oven or upper cabinet
• 30 inchwide minimumopening
• t3V2" inchclearancebetweenthe bottomof micro-
wave oven hoodand the cooktop
• Protectionfrom draft areas, such as windows,
doom, and strongheatingvents
• Grounded electricaloutlet(see "Electrical
requirements"inthe "Microwave Oven
Safety" section)
66" rain. Exhaustoutlet
mounting connectsto
heightfrom 30" min. 31/_"x10"
floor widthrequired duct
""231Aa" door
open
Shipped ready for ventless (recirculating) operation,
converts to b)p or rear discharge,
14
CRITICAL DIMENSIONS
30" min.from cookingsurface
(orcountertop) below microwaveoven
totop of wall mountingbracket
131/2"rain. to cookingsurface
(orcountertop)below microwaveoven
r,=========

Removing and replacing the microwave oven
If you need to remove your Microwave Hood Combi-
nation for any reason, follow these simple steps:
5. Grasp the microwave oven. Rotate the microwave
oven downward. (Be
careful that door does
not swing open.) Lift off
the support tabs _ at
the bottom of the mount-
ing plate. Set the micro-
wave oven aside on a
protected surface.
To remove:
1. Unplug microwave oven or disconnect power.
2. Remove filters and vent grille.
• If filters O are
installed, push in at the
tab and slide filter to the
outside edge to remove.
• Remove the two
screws O from the top
of the microwave oven
cabinet (the screws
located closest to the
front corners). Do not
remove the screws
located towards the center of the cabinet.
• Remove the vent grille _. Set the screws and
grille aside. (If grille cannot be removed, see pt. 4.)
3. After removing all oven contents, including the
turntable and support,
tape the door in the
closed position. Then
remove the two bolts
securing the
microwave oven to the
upper cabinet.
/ H H "4
I<-
4, Hold microwave hood combination in place with
in pt. 2.), insert a thin
looped wire or similar
tool through an opening
in grille to pull hook.
one hand. Pull hook
to release microwave
hood from mounting
plate. If grille cannot be
removed (per instructions 5. Untape the door and replace the turntable and
support.
6. Replace the vent grille.
7. Replace the two screws in the top of microwave
oven cabinet (the screws located closest to front
corners).
8. Re-install filters (see "Installing and caring for the
filters" in the "Caring for Your Microwave Oven"
section, if needed).
To replace:
1. Carefully lift microwave oven and hang it on the
support tabs at the bottom of the mounting plate.
2. Rotate the front of the microwave oven cabinet
downward. Thread the power supply cord through
the power supply cord hole in the bottom of the
upper cabinet.
3. Rotate the microwave oven towards the cabinet.
Push the microwave oven against the mounting
plate until locking latch snaps into the cabinet.
4. Replace the two bolts securing the microwave
oven to the upper
cabinet.
9. Plug in microwave oven or reconnect power.
7

Getting to Know Your
Microwave Oven
This section discusses the concepts behind microwave cooking. It also shows you the basics you need to
know to operate your microwave oven. Please read this information before you use your microwave oven.
How your microwave oven works
Microwave ovens are safe. Microwave energy is
not hot. It causes food to make its own heat, and
it's this heat that cooks the food.
Microwaves are like TV waves or light waves. You
cannot see them, but you can see what they do.
A magnetron in the microwave oven produces
microwaves. The microwaves move into the oven
where they contact food as it turns on the turntable.
Magnetron
The glass tumtable of yourmicrowaveoven lets
microwavespassthrough.Thenthey bounceoff a
metal floor, back throughthe glasstumtable, and
areabsorbed by the food.
Oven cavity
Metal floor Glasstumtable
8

How your microwave oven works (cont.)
Microwaves pass through most glass, paper, and
plastics without heating
them so food absorbs
the energy. Microwaves
bounce off metal con-
tainers so food does
not absorb the energy.
Microwaves may not reach the center of a roast.
The heat spreads to
the center from the
outer, cooked areas
just as in regular oven
cooking. This is one
of the masons for
letting some foods
(for example, roasts
or baked potatoes)
stand for a while after
cooking, or for stirring
some foods during the cooking time.
The microwaves disturb water molecules in the
food. As the molecules bounce around bumping
into each other, heat is made, like rubbing your
hands together. This is the heat that does the
cooking.
NOTE: Do not deep fry in the oven. Microwavable
cookware is not suitable and it is difficult to
maintain appropriate deep frying temperatures.
For the best cooking results
• Always cook food for the shortestcookingtime
recommended.Check to see how the food is
cooking.If needed, touchADD ONE MINUTE while
the oven isoperatingor afterthe cookingcycle is
over (seathe "Using ADD ONE MINUTE" section).
• To help make surethe food isevenly cooked, stir,
turnover,or rearrangethefood about halfway
throughthe cookingtime.
• Ifyou do not havea cover for a dish, usewax
paper, or microwave-approved paper towels or
plasticwrap. Rememberto turn back a comer of
the plasticwrap 1_to ½ inchtovent steam during
heatingor cooking.
Radio interference
Using yourmicrowave oven may cause interference
to yourradio,"IV,or similarequipment.When there
isinterference,you can reduceit or remove itby:
• Cleaningthe door and sealingsurfacesof
the oven.
• Adjusting the receiving antennaof the radio
or television.
• Movingthe radioor "IVawayfrom the microwave
oven.
• Pluggingthe microwaveoven intoa different
outletsothat the microwaveoven and radio or TV
are on differentbranchcircuits.
Testing your microwave oven
To test the oven put about I cup ofcold water Ina
glasscontainerinthe oven.Close the
door and make sure itlatches.Follow
the directionsin "Cooking at high
cook power" Inthe "Using Your
MicrowaveOven" sectionto set the
oven to cook for 2 minutes. Whenthe time isup,
the water shouldbe heated.

Testing your dinnerware or cookware
Test dinnerware or cookware before using. Some dishes (melamine, some ceramic dinnerware,
To test a dish for safe etc.) absorb microwave energy, becoming too hot to
use, put it into the oven handle and slowing cooking times. Cooking in metal
with a cup of water containers not designed for microwave use could
beside it. Cook at 100% damage the oven, as could containers with hidden
cook power for 1 minute, metal (twist-ties, foil lining, staples, metallic glaze
If the dish gets hot and or trim).
water stays cool, do
not use it.
Operating safety precautions
Never cook or reheat a whole egg inside the
i he,. Steam buildupin whole eggs may
cause them to burst
and burn you, and
possibly damage the
oven. Slice hard-boiled
eggs before heating.
In rare cases, poached
eggs have been known
to explode. Cover
poached eggs and
allow a standing time of 1 minute before cutting
into them.
For best results, stir any liquid several times
during heating or
reheating, Liquids
heated in certain
containers (especially
containers shaped like
cylinders) may become
overheated. The liquid
may splash out with a
loud noise during or
after heating or when
adding ingredients
(coffee granules, tea bags, etc.). This can harm
the oven and possibly injure someone.
Never lean on the door or allowa child to swingon it
when the door isopen.
Injurycouldresult.
Use hot pads. Microwave energydoes not heat
containers,but the heat
- from thefood can make
the containerhot.
10

Operating safety precautions (cont.)
Do not overcook potatoes. Fire could result. At
the end of the recom-
mended cooking time,
potatoes should be
slightly firm because
they will continue cook-
ing during standing
time. After micro-
waving, let potatoes
stand for 5 minutes,
They will finish cooking
while standing,
Do not start a microwaveoven when it is empty.
Product life may be
shortened,
If you practice
programming the oven,
put a container of
water in the oven.
It is normal for the
oven door to look wavy
after the oven has been
running for a while,
Do not use newspaper or other printed paper in the
oven. Fire could result.
Do not dry flowers,
fruit, herbs, wood,
paper, gourds, or
clothes in the oven.
Fire could result.
Do not try to melt paraffin wax in the oven. Paraffin
I wax will not melt in a
microwave oven because
it allows microwaves to
pass through it.
Do not operate the microwave oven unless the
glass turntable is
securely in place and
can rotate freely on the
support rollers. The
turntable can rotate in
either direction.
Make sure the rollers
are completely inside
the center circle of the
turntable; this will let the
turntable rotate properly.
Make sure the turntable is correct-side up in the
oven. Carefully place the cookware on your
turntable to avoid possibly breaking it.
Handle your turntable with care when removing
it from the oven to avoid possibly breaking it. If your
turntable cracks or breaks, contact Sears for a
replacement.
When you use a browning dish, the browning
dish bottom must be at least 3/16inch (.5 cm) above
the tumtable. Follow the directions supplied with the
browning dish.
Electrical connection
If your electric power line or outlet voltage is
Circuit breaker
or fuse box
less than 110 volts,
cookingtimes may be
longer. Have a qualified
electriciancheck your
electdcalsystem.
11

Microwave oven features
@ @
@
®
Your microwaveoven isdesignedto make your
cooking experienceas enjoyableand productiveas
possible. To help get you up and runningquickly,
the following isa listof the oven's basicfeatures:
1. Door Handle. Pullto open door.
2. Door Safety Lock System. The oven willnot
operate unlessthe door is securelyclosed.
3. Window with Metal Shield. Shieldprevents
microwaves from escaping. Itisdesigned as a
screen to allowyou to viewfood as itcooks.
4. Cooking Rack. Usefor extra space when
cooking in more than one containerat the same
time. See page 16 for more information.
5. Glass Turntable (PartNo. 4393754) (not
shown). Included inoven cavity - see below
for installationinstructions.Thisturntableturns
food as itcooks for more even cooking. Itmust
be in the oven during operationfor bestcooking
results.The turntable issunkenintothe cavity
floor to give you more cookingspace and better
cooking results. See pages 8, 11, 37, 42, end 44
for more details.
6. Charcoal and Grease Rltere. Includedin oven
cavity. See page 38 for installationinstructions
end cleaninginformation.
7. Cooktop/Countertop Light. Turnon to lightyour
cooktop or countertop orturnon as a night light.
See page 17 for more information.
8. Cooking Guide Label. Use as a quick reference
for AutoCook, AutoReheat,AutoDefrost,
Popcorn,Beverage, Baked Potato,Frozen
Vegetable, and Frozen Entreesettings.
9. Exhaust Fan and Cooktop Light Switches.
See page 17 for more information.
10. Control Panel. Touchthe pads on thispanel to
performall functions. See pages 13-15 for more
information.
11. Vent Grille.
12. Oven Cavity LlghL
13. Microwave Inlet Cover.
14. Model and Serial Number Plate. See page 44
for more information.
To install turntable and support:
• Fitthe hub(PN 4393754 ontothe shaft.
Raised,
curved_
Hu t=_
_3"-v_-.--Shall
• Placethe support
(PN 4393752) on the
cavity bottom.
• Placethe turntableon
the hub. Make sure the
raised,curved linesin
the center of the
turntablebottomare
between the three
"spokes"ofthe hub.
• The rollers(PN 4393753) on the supportshouldfit
insidethe ridge onthe bottomofthe turntable.
• The turntableturnsbothclockwiseand counter-
clockwise.This isnormal.
12

Control panel features
1. Display. Thisdisplay includesa clockand
indicatorsto tell you the timeofday, cooking
time settings,and cooking functions youchose.
2. POPCORN. Touchthis pad when poppingpop.
corn in yourmicrowaveoven. The ovenwill
automatically heat for a preset timeat a preset
cook power.See page 31 for more information.
3. BEVERAGE. Touchthispad to heat t or 2 cups
of a beverage.The oven willautomaticallyheat
for a presettime at a presetcook power. See
page 32 for more information.
4. BAKED POTATO. Touchthis pad tocook 1 to 4
potatoes. The oven willautomatically cookfor a
preset timeat a preset cook power.See page 33
for more information.
5. FROZEN VEGETABLE. Touchthis pad tocook
1 to4 cups ofa frozenvegetable. The oven will
automaticallycookfor a preset timeat a preset
cook power. See page 34 for more information.
6. FROZEN ENTREE. Touchthis padto cook a
10- or 20-ouncefrozen entree.The oven will
automaticallycookfor a preset timeat a preset
cook power. See page 35 for more information.
7. HOLD WARM. Touchthispad to keephot,
cooked foods safelywarm in yourmicrowave
ovenfor up to 99 minutes,99 seconds. HOLD
WARM can be used byitself, or itcan auto-
matically follow a cooking cycle. See page 36
for more information.
8. AUTO COOK. Touchthis pad to cook
mierowavable foods withoutentering timesand
cook powers. See page 26 for more information.
9. AUTO DEFROST. Touchthis padto defrost
frozen foods withoutenteringtimesand cook
powers. See page 28 for more information.
10. AUTO REHEAT. Touchthis pad to reheat
microwavable foods withoutenteringtimesand
cook powers. See page 27 for more information.
11. ADD ONE MINUTE. Touchthis pad tocookfor
1 minute, at 100% cook power, or toadd an
extra minutetoyourcookingcycleat theset
cook power. See page 20 for more information.
12. CLOCK. Touchthis pad to enterthe correct
time ofday. See page 18 for more information.
13. KITCHEN TIMER. Touchthispad to set the
Kitchen"13mer.See page 19 for more information.
14. Number pads. TouchNumberpads to enter
cooking times, cook powers, quantities,
weights,or food categories.
15. COOK TIME. Touchthis pad followed by Number
pads toset a cookingtime. See pages 21, 22,
and 24 for more information.
®
16. POWER. Touchthispad afterthe cooking time
has been set, followed bya Number pad toset
the amount of microwaveenergyreleased to
cook the food. Alsotouchthis padto lengthen
or shortena presetcooking time. See pages 20
and 22 for more information.
17. TURNTABLE ON/OFF. Touchthispad toturn
yourturntableon and off. See page 15 for more
information.
18. START/ENTER. Touchthis pad tostarta
function.See page 14 for more information.
19. OFF/CANCEL Touchthispad to erase an
incorrectcommand, cancel a programduring
cooking, or toclear the display.See page 14 for
more information.
20. EXHAUST FAN HIGN/LOWIOFF. Touchthis pad
totum on the fan at highor low speed.Alsouse
itto turnthe fanoff. See page 17 for more
information.
21. UGHT ON/NIGHTIOFR Touchthis pad to tum
the lightor nightlighton or off.See page 17 for
more information.
€onUnued on next page
13

Control panel features (cont.)
NOTES:
• If you have enteredall settings for a function
but do not touch START/ENTER in 5 seconds,
the Start? indicator lightwillshow.
* If you open the door whilethe oven ison and
then shut the door,the Start? indicatorlight
willshow. Touch START/ENTERto continue.
• If you choosea functionbut do not press
another Command pad within1 minute,the
display returnsto the time ofday and you have
to startover.
Audible signals
Your microwaveoven comeswith audible
signalsthat can guide youwhen settingand
usingyour oven:
• [_ A programmingtone willsound eachtime
you toucha pad.
• [_ One long tone signalstheend of a
KitchenTimer countdown.
• 1 1 -I1 _11<) IF°ur tones signaltheand
ofa cookingcycle.
• [_][_ Two quick, shorttones sound once
every minutefor the first 15 minutesafteran
end-of-cooking signalas a reminderifthefood
hasnot been removedfrom the oven.
• [_r_ Two quick, shorttones willsound
while enteringand exitingfrom a hiddenfeature
(forexample, Child Lock)ortime of day.
• I_)-I1_)-II ";)))IThreatonessound ifyou have
made an incorrect entry.
To disable the programming tone:
TOUCH
CSD
and hold for 4 seconds
To h,m the programming tone back on:
TOUCH
and hold for 4 seconds
To disable all audible signals except the
end-of-timer signal:
TOUCH
CSD
and hold for 4 seconds
To turn signals back on:
TOUCH
CSD
and hold for 4 seconds
NOTE: Two tones willsoundwhen audiblesignals
are turnedon or off.
Interrupting cooking
You can stopthe ovendudnga cycle byopening
the door.The oven stopsheatingand the fan stops,
but the lightstayson. To restartcooking,close the
door and
TOUCH
If you do not want to conUnue cooking:
• Closethedoor and the lightgoes off.
OR
* TOUCH
NOTE: Beforesettinga function,touch
OFF/CANCEL to make sureno other
function ison.
14

Conlbrol panel features (cont.)
Heating more than one plate of food
When heating platesof foodwith a cook time that
you set, you can heat
two 10-inch platesside
by side or one dish
larger then the turntable.
You can heat 2 more
plates on the Cooking
Rackfor a possibletotal
of 4 plates. Forbest
results,halfway through
cookingturnthe plates
halfwayarounduntilthe
food in the frontisin the beck. Do the same when
heating a larger(9- to 13-inch)casserole. When
heating 4 dinnerplatesturnas describedabove and
switch the top plateswith the bottom plates.
To heat 2 bottom platestogether or one larger
dish,the tumtab|e shouldnot be
turning.You can shutthe
turntableoff by touching
TURNTABLE ON/OFF.
"TURNTABLE OFF" appearson thedisplay.
If youtouchTURNTABLE ON/OFF beforestarting
to set the cookingfunction, youroven willprompt
you to entera cookingtime without you needingto
touchCOOK TIME. Your tumtablawill beturned
beck on when cookingisover or when you touch
OFF/CANCEL.
NOTE: You cannotturn offthe turntablewhen using
an =auto"function.
Using the child lock
The Child Lock locksthe controlpanel so chil-
dren cannot usathe microwaveoven when you
do not want them to.
To lock the control panel:
TOUCH
and holdfor 4 seconds
Two tones willsound end _ will appear on
the display.Whenthe controlpanel islocked,
3 tones willsoundend LOCKwill appear whenyou
touch any pad exceptfor EXHAUST FAN end
LIGHT, Number pads I and 2, and START/ENTER.
To unlock the control panel:
TOUCH
andholdfor 4 seconds
Two tones willsound and Pi willbe clearedfrom
the display.
Using the demo/learning feature
You can sat your microwave oven to display your
commends as you enterthem withoutturningthe
magnetron on.This feature hell_ you learnto use
youroven without actuallycookingfood.
To set the demo/leamlng feature:
TOUCH
endholdfor4 seconds
Two tones willsoundand a small =d"willappear
on the display.
To cancel the demo/leamlng feature:
TOUCH
Two toneswillsound and the small =d" will
disappearfrom the display.
15

Using the cooking rack
The Cooking Rack gives you extra space when
cooking in more than one container at the same
time.
If you need a replacement rack, you can order
one from your Sears Service Center, or by calling
1-800-366-7278. Make sure to have your model
number when ordering.
Inserting the rack
Insert the rack securely into the rack supports
on the side walls of
the oven.
NOTES:
• Use oven mitts to remove items from microwave.
• Do not store the metal rack in the oven. Arcing
and damage to the oven could result if someone
accidentally starts the oven.
• Do not operate the oven with the metal rack
stored on the floor of the oven. Damage to the
interior finish will result.
• Use rack only in the microwave oven.
• Do not use rack with browning dish.
• Do not let food container on rack touch the top
or sides of the oven.
• Do not cook foods directly on rack. Put them in
microwave-safe containers first.
• Do not place a metal cooking container on rack.
• Only use the Cooking Rack when cooking at
more than one level.
16

Using the exhaust fan
The pad on the bottom leftofthe controlpanel
controls the 2-speed exhaust fan.
1. Choose fan speed.
NOTE: ffthe temperaturefrom the rangeor
cooktop belowtheoven getstoo hot,the ex-
haust fan inthe vent hoodwill automaticallyturn
on at the HIGH setting to protect the oven. It
may stay on up to an hour to cool the oven.
When this occurs, the FAN pad will not tom
the fan off.
TOUCH
(once for high speed, twice for low speed)
2. Turn off fan when desired.
TOUCH
(1 or 2 more _mes, depending on fan speed)
UsinQ the cooktop/countertop light
The pad on the bottom rightof the controlpanel
controls the cooktorYcountertoplight.
1. Turn on light. TOUCH
(once for regular light, twice for night light)
2. Tum off lightwhen desired.
TOUCH
(1 or 2 more times, depe_llng on light setting)
17

Setting the clock
When your microwaveoven is firstplugged in,or
after a power failure, the display willflash ":". If a
time of day is not set, ":" will flash until you touch
any pad.
1. Touch CLOCK.
NOTES:
• Ifyou touchin an invalidtime and touch CLOCK,
3 tones willsound. Enterthe correcttime.
• ff you touchOFF/CANCEL whilesettingthe clock,
the displaywillshowthe lasttime ofday set.
• To turnoffthe clock,touch CLOCK, Numberpad
0, and CLOCK again,the set time willdisappear
and ":"willshow on the display.
TOUCH
YOU SEE
2. Enterthe time of day.
Examplefor 12:00:
YOU SEE
3. Complete your entry.
TOUCH YOU SEE
18

Using the kitchen timer
You can useyour microwaveoven as a kitchen
timer. Use the KitchenTimer for timingup to
99 minutes,99 seconds.
1, Touch KITCHEN TIMER.
NOTE: The oven can operate while the Kitchen Timer
is in use. To see the Kitchen Timer while the oven is
cooking, touch KITCHEN TIMER.
TOUCH
YOU SEE
2. Enterthe time to be counted down.
Example for 1 minute,30 seconds:
NOTE: If you enter more then 4 digits,thefirst
4 digits willdisappearand the followingdigit(s)
willappear on the rightside as you enter them.
TOUCH YOUSEE
3. Start the countdown.
NOTE: If you do not do this step within 5 sec-
onds of doing Step 2, "START?" will appear.
You then have 1 minute to touch KITCHEN
TIMER or START/ENTER before the display
returns to the time of day.
Atthe end of the countdown:
TOUCH
OR
YOU SEE
YOU SEE
To cancel the kitchen timer:.
Duringthe countdown:
TOUCH
(onelongtone willsound)
YOU SEE
(umeofday}
19

Using ADD GNE MINUTE
ADD ONE MINUTE lets you cook food for 1 minute
at 100% cook power or add an extra minute to your
cooking time cycle. You can also use it to extend
cooking time cycles in multiples of 1 minute, up to
99 minutes.
NOTES:
• To extend cooking time cycles in multiples of
1 minute, touch ADD ONE MINUTE repeatedly
during cooking.
• After closing the door, you can enter ADD ONE
MINUTE without having to touch START/ENTER.
o If you touch ADD ONE MINUTE during cooking,
the ovenwillcook at the currently selected cook
power. If you touch ADD ONE MINUTE after
cooking is over, the oven will cook at 100%
cook power, you can also change the cook power
after you touch ADD ONE MINUTE by touching
POWER,Number pads for the new cook power,
and START/ENTER.
• You can use ADD ONE MINUTE only for the cook
time function.
1. Make sure the food is in the oven.
2. Touch ADD ONE MINUTE.
Example for cooking for 1 minute:
TOUCH
YOU SEE
Changing preset cooking times
If a preset cooking time is too long or too short, you
can lengthen or shorten the cooking time after choos-
ing AUTO COOK, AUTO REHEAT, AUTO DEFROST,
POPCORN, BEVERAGE, BAKED POTATO, FROZEN
VEGETABLE, or FROZEN ENTREE. You can only
change cooking times before cooking starts.
For example, in AUTO REHEAT, after choosing the
type of food and entering the quantity:
To lengthen cookingtime: TOUCH
once
YOU SEE
To shorten cooking time:
To reset to the original cookingtime:
TOUCH
twice
TOUCH
three times
20
(examplefor auto reheat}
YOU SEE
YOU SEE

Using Your Microwave Oven
This section gives you instructions for operating each function. Please read these instructions carefully.
1. Put your food in the oven and close the door.
2. Touch COOK TIME.
TOUCH YOU SEE
3. Enterthe cookingtime.
Examplefor 1 minute, 30 seconds:
4. Start the oven.
TOUCH
TOUCH
YOU SEE
YOU SEE
At the end of the cooking time:
Changing instructions
You can change the cooking time any time
during cooking by repeating Steps 2, 3, and 4.
YOU SEE
(four tones will sound)
21

Cooking at different cook powers
Forbestre_JitS,somerecipescallfor differentcook
powers. The lower the cook power, the slowerthe
cooking. EachNumber pad alsostands fora
different percentage of cook power. Many micro-
wave cookbook recipestellyou bynumber,
percent, or name whichcook powerto use.
The following chartgives the percentage ofcook
power eachNumber pad standsfor, and the cook
power nameusuallyused.It alsotellsyou when to
useeach cook power. Followrecipeor food package
instructions ifavailable.
NOTE: Refer to a reliable cookbook for cooking times.
COOK POWER NAME WHEN TO USE IT
10=100% offull power High
(automatic)
9=90% offull power
8=80% offullpower
7=70% offull power
6--60°1oof full power
Medium-High
Medium
• Quick heatingmanyconveniencefoods and
foods with highwater content,such as soups
and beverages
• Cooking smalltender piecesof meat, ground
meat, poultry pieces,fish fillets,and most
vegetables
• Heating creamsoups
• Heating rice, pasta, or stirrablecasseroles
• Cooking and heatingfoods thatneed a cook
power lowerthan high(forexample,whole fish
and meat loaf)or whenfood iscookingtoo fast
• Reheatinga singleservingof food
• Cooking sensitivefoods, suchas cheeseand egg
dishes, pudding, and custards
• Cooking nonstirrablecasseroles, such as lasagna
• Cooking ham, wholepoultry,and pot roasts
• Meltingchocolate
5=50% offullpower
4=40% offull power
3=30% of full power Medium-Low, ° Defrostingfoods, suchas bread, fish, meats,
Defrost poultry,and precookedfoods
2=20% of fullpower • Softeningbutter,cheese, and icecream
1=10% of full power Low * Keepingfood warm
• Taking chillout offruit
NOTE:Once cook time has been enteredyou can alsousethe POWER pad as a secondKitchenTimer
by entering"0" for the cook power. The oven willcountdownthe cookingtime you set withoutcooking.
1.put yourfood inthe oven and closethe door.
2. Touch COOK TIME. TOUCH YOU SEE
• Simmeringstews
• Heatin9 pastdea
continued on next page
22

Cooking at different cook powers (cont.)
3. Enter the cooking time.
Example for 7 minutes, 30 seconds:
TOUCH
YOU SEE
4. Set the cook power. TOUCH YOU SEE
Example for 50% cook power:.
5. Start the oven.
TOUCH
C2D
ON
(repeat until desired
cook power appears)
TOUCH
YOU SEE
YOU SEE
Atthe end ofthe cookingtime:
Changing instructions
You can change the cooking time or cook power
any time during cooking by repeating Steps 2, 3
and/or 4 and 5.
YOU SEE
(four tones will sound)
23

Cooking in stages
For best results,some recipescall for one cook
power for a certain lengthof time, and another cook
power for anotherlengthof time. Youroven can be
set to change from one to another automatically,for
up to 3 stages.
You can set your chosen cook functions in any order.
However, if you use AUTO DEFROST it must be the
first stage.
1. Put yourfood in the oven and closethe door.
2.Touch COOK TIME. TOUCH YOU SEE
3. Enterthe cookingtimefor the firststage. TOUCH YOU SEE
Examplefor 7 minutes, 30 seconds:
4. Set the cook powerfor thefirst stage.
TOUCH YOU SEE
Examplefor 50% cook power:.
TOUCH YOU SEE
(repeat until desired
cook power appears)
5. Repeat Steps 2, 3, and 4 to set the cookingtime
and cook power for each additionalstage.
24

Cooking in stages (cont.)
6. Start the oven.
After the first stage is over, the next stage(s)
will count down.
At the end of the cooking time:
TOUCH YOU SEE
{first stage, when cooking
with 2 stages)
YOU SEE
Changing instructions
You can change cooking times or cook powers
for a stage any time after that stage starts by
repeating Steps 2, 3 and/or 4 and 5.
(four tones will sound)
25

Using AUTO COOK
You can cook microwavablefoodsjust by choosing
a category and quantity.AUTO COOK has preset
times and cook powersfor 7 categories(seechart
below).
To use AUTO COOK, follow the steps below:,
1. Touch
once
You see
2. Touch AUTO COOK 1 to 7 times to choose the
type of food.
_mp_
for rice
once
OR
Touch a Number pad to choose the type of food.
Example
for dce
You see
Example
for rice
3. Touch one or more Number pads to enter the
quantity.
Example
for I cup
You see
Example
for I cup
4. Touch
You see
(countdowntime
mayvary)
NOTES:
• If you do not enter a quantity within 2 seconds,
AUTO COOK will prompt you to choose a quan-
tity. You then have 1 minute to enter a quantity
and to touch START/ENTER. If you do not do so,
AUTO COOK will be canceled.
• If you touch AUTO COOK 8 times, the display
returns to the Rice setting.
• If you need more or less cooking time, do not
touch AUTO COOK again. Touch POWER before
you touch START/ENTER. (See "Changing preset
cooking times" in the "Getting to Know" section.)
• When cooking bacon, keep in mind that differ-
encas in the amount of fat, meat, thickness, and
curing process will affect how bacon is cooked.
Also, regular sliced bacon averages about 16
slices per pound.
This chart shows you how to choose a type offood and the amountsyou can choosefor each type.
TOUCH OR TOUCH
FOOD AUTO COOKt NUMBER PAD
Rice once 1
Fresh Vegetables twice 2
Frozen Vegetables 3 times 3
Canned Vegetables 4 times 4
Bacon 5 times 5
Camel (instant) 6 tirrP,,s 6
French Toast 7 times 7
t YOU must touch AUTO COOK once before choo_ng the food type.
AMOUNTS YOU
CAN CHOOSE
0.5, 1, 1.5, or 2 cup6rr
(118 mL, 237 mL 355 mL, or 473 mL)
1to 4 cup_ (237 mL to 946 mL)
1to 4 cups (237 mL to 946 mL)
1to 4 cups (237 mL to 946 mL)
1to 6 pieces, average thickness
1to 4 servings
1to 4 pieces
Set 0.5 cup by touching "0" and "5" or only "0" oronly "5". Set 1.0 cup by touching "1_and "0" or only "1". Set 1.5 cups by
touching "1"and "5". Set 2.0 cup_ bytouching "2"and "0_or only "2".
26

Using AUTO REHEAT
You can reheat microwavablefoods just by choos-
inga categoryand quantity. AUTO REHEAThas
presettimes and cook powersfor 5 categories(see
chart below).
To use AUTO REHEAT, follow the steps below:
1. Touch
once
You see
2. Touch AUTO REHEAT 1 to 5 times to choose the
type of food.
_ x..amplefor pizza
slice
once
OR
Touch a Number pad to choose the type
of food.
_:) xample for pizzaslice
You see
Example for
pizza slice
3. Touch a Number pad to enter the quantity.
Example for1 slice
You see
Example for
1 slice
4. Touch
You see
(countdown
time may
vary)
NOTES:
• If you do not enter a quantity within 2 seconds,
AUTO REHEAT will prompt you to choose a
quantity. You then have 1 minute to enter a
quantity and to touch START/ENTER. If you do
not do so, AUTO REHEAT will be canceled.
• If you touch AUTO REHEAT 6 times, the display
returns to the Pizza Slice setting.
• If you need more or less cooking time, do not
touch AUTO REHEAT again. Touch POWER before
you touch START/ENTER. (See "Changing preset
cooking times" in the "Getting to Know" section.)
• When reheating a large (4 oz) muffin or bagel
use the 2-piece setting. The 1-piece setting
warms 1 regular-size muffin or bagel, or 2 small
dinner rolls.
Thischart shows you howto choosea type offood and theamountsyou can choosefor each type.
TOUCH OR TOUCH AMOUNTS YOU
FOOD AUTO REHEATt NUMBER PAD CAN CHOOSE
Pizza Slice once 1 1 to 3 slices, 5 oz (142 g) each
Soup/Sauoe twice 2 1 to 4 cups (237 mL to 946 mL)
Casserole 3 times 3 1 to 4 cups (237 mL to 946 mL)
Baked Goods 4 times 4 1 to 6 pieces, 2 oz (57 g) each
Plate (of food) 5 times 5 1 serving (or 1 plate)
tYoumusttouchAUTOREHEAToncebeforechoosingthefoodtype.
27

Using AUTO DEFROST
You can defrost food by choosing a category and
setting a weight. AUTO DEFROST has preset times
and cook powers for 3 categories (see chart below).
To use AUTO DEFROST, follow the steps below:
1. Touch
once
YOU see
2. Touch AUTO DEFROST 1 to 3 times to choose
the type of food.
Example for meats
once
OR
Touch a Number pad to choose the type
of
food.
(1) Example for meats
You see
Example
for meats
4. Touch
You see
)
(countdown
tJrne may vary)
NOTES:
• If you do not enter a weight within 2 seconds,
AUTO DEFROST will prompt you to enter a
weight. You then have 1 minute to enter a weight
and to touch START/ENTER. If you do not do so,
AUTO DEFROST will be canceled.
• If you enter a weight higher than the highest
weight allowed for your food setting, 3 tones will
sound and "RETRY" will appear on the display
when you touch START/ENTER.
• If you touch AUTO DEFROST 4 times, the display
returns to the Meats setting.
• If you need more or less defrosting time, do not
touch AUTO DEFROST again. Touch POWER
before you touch START/ENTER. (See "Changing
preset cooking times" in the "Getting to Know"
section.)
• See the "Auto defrost chart" later in this section
for defrosting directions for each food.
• TO defrost items not listed in the "Auto defrost
chart," use 30% cook power. Refer to a reliable
cookbook for defrosting information.
3. Touch Number pad(s) to enter the weight.
Example for 1.1 Ibs
twice
You see
Example
for 1.1 Ibs
For even, complete defrosting
• The shape of the package affects how quickly
food will defrost. Shallow packages will defrost
more quickly than a deep block.
• As food begins to defrost, separate the pieces.
Separated pieces defrost more evenly.
• Use small pieces of aluminum foil to shield parts
of food such as chicken wings, leg tips, fish tails,
or areas that start to get warm. Make sure the
foil does not touch the sides, top, or bottom of
the oven.
This chart shows you how to choose a type of food and the weights you can set for each type.
TOUCH OR TOUCH
FOOD AUTO DEFROSII't NUMBER PAD
Meats once 1
Poultry twice 2
Rsh 3 times 3
WEIGHTS YOU CAN SET
(tenths of a pound)
.1 to 6.6 (45 g to2994 g)
.1 to 6.6 (45 gto 2994 _1)
.1 to4.4 (45 gto 1996 g)
t You must touch AUTO DEFROST once before choosing the food type.
28

Auto defrost chart
Meat setting
FOOD SPECIAL INSTRUCTIONS
Beef
Ground Beef, Bulk
Ground Beef, Patties
Round Steak, TenderloinSteak,
Pot Roast, Chuck Roast, Rib
Roast, RolledRump Roast
Stew Beef
Lamb
Cubes for Stew
Chops (1 inch[2.5 cm] thick)
Pork
Chops (V2inch[13 mm]thick),
Hot Dogs,Spareribs,Country-
StyleRibs,LoinRoast(Boneless),
Sausage,Links
Sausage,Bulk
Meat of irregular shape and large, fatty cuts of meat should have the
narrow or fatty areas shielded with foil at the beginning of a defrost cycle.
Do not defrost less than 1._Ib (133 g).
Do not defrost less than two 4 oz (133 g) patties.
Place on a microwavable masting rack.
Placein a microwavablabakingdish.
Placein a microwavablebakingdish.
Placeon a microwavable roastingrack.
Placeon a microwavableroastingrack.
Place in a microwavablebakingdish.
Fish setting
FOOD
Fish
Fillets
Steaks
Whole
Shell Fish
Crabmeat,
Lobster Tails,
Shrimp, Scallops
SPECIAL INSTRUCTIONS
Place in a microwavablebakingdish.Carefullyseparate filletsunder
coldwater.
Place ina microwavablebakingdish. Runcoldwater over to finish
defrosting.
Place ina microwavablebaking dish.Cover head and tail with foil;
do not let foil touch sidesof microwaveoven.Finishdefrostingby
immersingincold water.
Placein a microwavablebaking dish.
continued on next page
29

Auto defrost chart (cont.)
Poultry setting
FOOD SPECIAL INSTRUCTIONS
Chicken
Whole Place chicken breast-side up on a microwavable roasting rack. Finish defrosting by
(up to 91/2Ibe [4.3 kg]) immersing in cold water. Remove giblets when chicken is partially defrosted.
Cut Up Place on a microwavable roasting rack.
Finish defrosting by immersing in cold water.
Cornish Hens
Whole Place on a microwavable roasting rack. Finish defrosting by immersing in cold water.
Turkey
Breast Place on a microwavable roasting rack. Finish defrosting by immersing in cold water.
(under 6 Ibs [2.7 g])
Defrosting tips
• When using AUTO DEFROST, you need to enter
the net weight (the weight of the food minus
the container). Enter the weight to the nearest
1/_oIb (46 g).
• Only use AUTO DEFROST for raw food,
AUTO DEFROST gives best results when the
food to be thawed is completely frozen. If the
food is partially defrosted, always set a lower
food weight (for a shorter defrosting time) to
prevent cooking the food.
• For better results, a preset standing time is
included in the defrosting time. This may make
the defrosting time seem longer than expected.
(For more information on standing time, see
the "Microwave cooking tips" in the "Cooking
Guide" section.)
Weight conversion chart
You are probablyused to food weightsas being in
pounds and ouncesthat arefractionsof a pound
(for example 4 ouncesequals1/4pound).However,
in order to enter food weight inAUTO DEFROST,
you must specifypounds end tenths of a pound.
Iftheweighton thefood package isinfractions of a
pound,you canuse thefollowing charttoconvert the
weightto decimals.
DECIMAL WEIGHT
.10
.20
.25 One-Quarter Pound
.30
.40
.50 One-Half Pound
.60
.70
.75 Three-Quarters Pound
.80
.90
1.00 One Pound
EQUIVALENT GRAM WEIGHT
45
91
113
136
181
227
272
318
34O
363
4O8
454
3O

Using POPCORN
You can pop commercially packaged microwave
popoom by touching just one pad. The number of
times you touch this pad determines which size
bag of popcorn your oven will pop.
For best results:
• Pop only 1 package at a time.
• If you are using a microwave popcorn popper,
follow manufacturer's instructions.
To use POPCORN, follow the steps below:
1. Place the bag In the center of the turntable.
2. Touch POPCORN 1 to 3 times to choose the
bag size.
Example for
3.5 oz
once
You see
Example for
3.5 oz
NOTES:
+ If you touch POPCORN 4 times, the display
returns to the 3.5 ounce (100 g) setting.
• You do not need to touch START/ENTER to start
the oven. The oven will start in 5 seconds.
• Ifyou need more or less cookingtime, do not
touch POPCORN again. Touch POWER before
the oven starts cooking. (See "Changing preset
cooking times" in the "Getting to Know" section.)
Popcorn brands make a difference
How well your popcorn cooks will depend on the
brand of popoom and how much fat it has in it. Try
several brands to decide which pops the best. For
best results, use fresh bags of popoom.
(countdown
time may
vary)
This chart shows you how to choose a bag size.
BAG SIZE TOUCH
(ounces) POPCORN
3.5 (100 g) once
3.0 (85 g) twice
1.75 (50 g) 3 times
31

Using BEVERAGE
You can heat one ortwo 8-ounce (227 g) cups of
a beverage by touching just one pad. The number
of times you touch this pad determines the number
of cups your oven will heat.
NOTES:
• If you touch BEVERAGE 3 times, the display
retums to the 1-cup setting.
• You do not need to touch START/ENTER to start
the oven. The oven will start heating by itself
in 5 seconds.
• If you need more or less heating time, do not touch
BEVERAGE again. Touch POWER before the
oven starts cooking. (See "Changing preset
cooking times" in the "Getting to Know" section.)
1. Place your cup(s)of beveragein the ovenand
close the door.
2. Touch BEVERAGE.
ff you want to heat I cup, just wait 5 seconds
and the oven willstart heatingautomatically
for I cup.
TOUCH YOU SEE
3. Change to 2 cups, if desired.
After 5 seconds, the oven willstart heating.
TOUCH
OR
CSD
YOU SEE
YOU SEE
At end of heating time:
(countdown time - may vary
from above)
(example for 2 cups)
YOU SEE
32
(four tones will sound)

Using BAKED POTATO
You can cook one to four baking potatoes (10 oz
[284 g] to 13 oz [369 g] each) by touching just one
pad. The number of times you touch this pad deter-
mines the number of potatoes your oven will cook.
NOTES:
• If you touch BAKED POTATO 5 times, the display
returns to the 1-potato setting.
• You do not need to touch START/ENTER to start
the oven. The oven will start cooking by itself in
5 seconds.
• If you need more or less cooking time, do not touch
BAKED POTATO again. Touch POWER before the
oven starts cooking. (See "Changing preset cook-
ing times" in the "Getting to Know" section.)
For a better baked potato
Before baking, remember to pierce the potato with
a fork several times. After cooking, let potatoes
stand 5 minutes to finish cooking.
1. Put pierced potato(es) in the oven and close
the door.
2. Touch BAKED POTATO. TOUCH YOU SEE
If you want to cook 1 potato, just wait 5 seconds.
3. Change to 2 to 4 potatoes, if desired.
Example for 2 potatoes:
After 5 seconds, the oven will start cooking.
Example for 2 potatoes:
TOUCH
OR
CSD
(a Number pad)
YOU SEE
YOU SEE
At end of cooking time:
(countdown time - may vary
from above)
YOU SEE
(four tones will sound)
33

Using FROZEN VEGETABLE
You can cook I to 4 cups of a frozen vegetable by
touchingjust one pad. The number oftimesyou
touch this pad determinesthe numberof cups your
oven will cook.
NOTES:
• If you touch FROZEN VEGETABLE5 times, the
display returnsto the 1-cup setting.
• You do not need to touchSTART/ENTERto start
the oven. The oven willstart cooking by itself
in 5 seconds.
• If you need more or less cooking time, do not touch
FROZEN VEGETABLEagain. Touch POWER before
the oven starts cooking. (See "Changing preset
cooking times" in the "Getting to Know" section.)
1. Put yourvegetables in the oven and close
the door.
TOUCH YOU SEE
2. Touch FROZEN VEGETABLE.
Ifyou want to cook 1 cup ofvegetables,
just wait 5 seconds.
3. Change to 2 to 4 cups, if desired.
Example for 2 cups:
TOUCH YOU SEE
After 5 seconds, the oven willstartcooking,
Examplefor 2 cups:
(a Number pad)
YOU SEE
At end ofcookingtime:
(_untdown time- mayvary
h_n above)
YOU SEE
34
(fourtoneswillsound)

Using FROZEN ENTREE
You can cook a 10- or 20-ounce (284 g or 568 g)
frozen entree by touching just one pad. The number
oftimes you touch this pad determines the size of
entree your oven will cook.
NOTES:
• If you touch FROZEN ENTREE 3 times, the display
returns to the 10-ounce (284 g) setting.
• You do not need to touch START/ENTER to
start the oven. The oven will start cooking by
itself in 5 seconds.
• If you need more or less cooking time, do not touch
FROZEN ENTREEagain. Touch POWER before
the oven starts cooking. (See "Changing preset
cooking times" in the "Getting to Know" section.)
1. Place your frozen entreeon the turntableand
close the door.
2. Touch FROZEN ENTREE.
If you want tocook a 10-ounce (284 g)frozen
entree, just wait 5 seconds.
TOUCH YOU SEE
3. Change to 20 ounces (568 g), if desired.
After5 seconds,the oven willstartcooking.
Examplefor 20 punces:
TOUCH YOU SEE
YOU SEE
At end of cooking time:
(countdown Ume - may vary
from above)
YOU SEE
(four tones will sound)
35

Using HOLD WARM
You can safely keephot, cookedfood warm in
your microwave oven for up to 99 minutes,
99 seconds(about 1 hour,40 minutes).You can
useHOLD WARM by itself,or to automatically
follow a cookingcycle.
NOTES:
• HOLD WARM operatesfor up to 99 minuteq,
99 seconds.
• Openingthe oven dour cancelsHOLD WARM.
Close the door and touch HOLD WARM, then
touch START/ENTER if additionalHOLD WARM
time isdesired.
- Food cooked coveredshouldbe covereddudng
HOLD WARM.
, Pastryitems(pies,turnovers,etc.)shouldbe
uncovereddudng HOLDWARM.
• Complete meals keptwarmon a dinnerplate
shouldbe coveredduringHOLDV_/ARM.
• Do not usemore than one completeHOLD WARM
cycle(about 1 hour,40 minutes).The qualityof
some foods willsufferwithextendedtime.
1.put hot, cooked food inthe oven and close
the door.
2. Touch HOLD WARM. TOUCH YOU SEE
3. S_theovec.
TOUCH YOU SEE
To make HOLD WARM automatically
follow another cycle:
• W"nileenteringcookinginstructions,touch
HOLD WARM before touchingSTART/ENTER,
or duringcooking.
• Whenthe lastcookingcycle isover,you willhear
two tones."WARM" willcome on whilethe oven
continuesto run.
36

Caring for Your Microwave
ven
To make sure your microwave oven looks good and works well for a long time, you should maintain it properly.
For proper care, please follow these instructions carefully.
For interior surfaces: Wash often with warm,
sudsy water and a
sponge or soft cloth.
Use only mild, nonabra-
sive soaps or a mild
detergent. Be sure to
keep the areas clean
where the door and
oven frame touch
when closed. Wipe well
with clean water. Over
time, stains can occur
on the surfaces as the result of food particles
spattering during cooking. This is normal.
For stubborn soil, boil a cup of water in the oven for
2 or 3 minutes. Steam
will soften the soil. To
get rid of odors inside
the oven, boil a cup of
water with lemon juice
or vinegar.
For exterior surfaces and control panel: Use a
soft cloth with spray
glass cleaner. Apply the
spray glass cleaner to
the soft cloth; do not
spray directly on the
oven.
NOTE: Abrasive
cleansers, steel-wool
pads, gritty wash
cloths, some paper
towels, etc., can
damage the control panel and the interior and
exterior oven surfaces.
To clean turntable and turntable support, wash
Glass turntable in mild, sudsy water;
for heavily soiled areas
use a mild cleanser and
scouring sponge. The
turntable and turntable
support are dishwasher
safe.
Turntable
Cleaning the cooking rack
• Wash by hand with a mild detergent and a soft
_ sponge or nylon scrub
brush. Dry completely.
• Do not use abrasive
scrubbers or cleansers
to clean rack.
37

Installing and caring for the filters
Do not allow greese and soil to build up in the
grease filters. It will decrease the exhaust fan
efficiency and could cause a fire. Remove and
clean grease filters at least once a month.
NOTE: Your microwavehood combinationcomes
with a charcoal filter to provideclean, recirculatedair.
The charcoal filter cannot be cleaned and should
be replaced every 6 to 12 mouths. You can order
replacements{Part No. 4393690) from yournearest
Sears ServiceCenter.
Electrical Shock Hazard
Disconnect power before removing filters.
Replace all panels before operating.
Failure to do so can result In death
or electrical shock.
Removing, cleaning, and replacing
1. Unplug microwave oven or disconnect power.
2. To remove the grease filters, push each filter
up on the side opposite
the tab. Grasp the tab
and slide the filter to
the side. Pull the filter
downward. It will
drop out.
Push
up
3. To remove the charcoal filters, push the back
of each filter away from
you. This will slide the
_' front of the filter off the
lower lip. Swing the
front of the filter down
and slide the filter out.
Low
lip
4. Soak grease filters in hot water and a mild
deterge_. Scruband
swishto remove
embedded dirtand
grease. Rinsewell
and shaketo dry.
Do not use ammonia,
corro_ve cleaning
agerJ_ such so
lye-based oven
cleanere, or place
in a dishweaher. The
filter will turn black or could be damaged.
5. To replace the charcoal filters, push each filter
to the back of the
opening, between the
upper and lower lips
against the springs.
Swing the front of the
filter up against the
upper lip. Slide the filter
forward while pushing it
Lower up against the upper
lip lip. The filter will now be
held in position be-
tween the lips by the
spring.
6. To replace the grease filters, slide each filter
into the outer side of
the filter opening. Make
sure you are sliding in
the side of the filtar that
does not have the tab.
Hold the tab with your
other hand. Push up the
tab side of the filter and
slide the filter to the
other side of the opening
to lock into place.
7. Plug in microwave oven or reconnect power.
NOTE: Do not operatethe ventfan withoutthe filters
in place.
38

Replacing the cooktop and oven lights
The cooktop light
1. Unplug microwave oven or disconnect power.
2. Remove the bulb cover mounting screw and
carefully remove
the cover.
Mounting
screw
3. Replace bulb(s) with candelabra-base 30-watt
bulb(s) (Part No. 4393681) available from your
Sears Service Center.
4. Plug inmicrowave oven or reconnect power.
The oven light
1. Unplug microwave oven or disconnect power,
2. Remove the two vent grille mounting screws
located above the cover
(the two outer screws).
5. Replace the bulb with a candelabra-base
30-watt bulb (Part No. 4393681) available from
your Sears Service Center.
6. Close the bulb cover.
7. Slide the top of the vent grille into place. Push
I I the b°tt°m until it snaps
into place. Replace the
mounting screws.
3. Tip the grille forward, then lift out to remove.
8. Plug in microwave oven or reconnect power.
4. Lift up the bulb cover.
39

Cooking Guide
Ricrowave cooking tips
Amount of food
• If you increase or decrease the amount of food
you prepare, the time it takes to cook that food
will also change. For example, ifyou double a
recipe, add a little more than half the original
cooking time. Check for donaneas and, if
necessary, add more time in small increments.
Starting temperature of food
• The lower the temperature of the food being
put into the microwave oven, the longer it takes
to cook. Food at room temperature will be re-
heated more quickly than food at refrigerator
temperature.
Composition of food
• Food with a lot of fat and sugar will be heated
faster than food containing a lot of water. Fat and
sugar will also reach a higher temperature than
water in the cooking process.
• The more dense the food, the longer it takes
to heat. "Very dense" food like meat takes longer
to reheat than lighter, more porous food like
sponge cakes.
Size and shape
• Smaller pieces of food will cook faster than
larger pieces. Also, same-shaped pieces cook
more evenly than different-shaped pieces.
• With foods that have different thicknesses,
the thinner parts will cook faster than the thicker
parts. Place the thinner parts of chickan wings
and legs in the center of the dish.
Stirring, turning foods
• Stirring and turning foods spreads heat quickly
to the canter of the dish and avoids overcooking
at the outer edges of the food.
Covering food
Cover food to:
• Reduce splattering
• Shorten cooking times
• Keep food moist
You can use any covering that lets microwaves pass
through.
Releasing pressure in foods
• Several foods (for example: baked petatoos,
sausages, egg yolks, and some fruits) are tightly
covered by a skin or membrane, Steam can build
up under the membrane during cooking, causing
the food to burst. To relieve the pressure and to
prevent bursting, pierce these foods before
cooking with a fork, cocktail pick, or toothpick.
Using standing time
• Always allow food to stand after cooking. Stand-
ing time after defrosting and cooking allows the
temperature to evenly spread throughout the food,
improving the cooking results.
• The length of the standing time depends on
how much food you are cooking and how dense
it is. Sometimes it can be as short as the time it
takes you to remove the food from the oven and
take it to the serving table. However, with larger,
denser food, the standing time may be as long
as 10 minutes.
4O

Microwave cooking tips (cont.)
Arranging food
For best results, place food evenly on the plate.
You can do this in several ways:
• If you are cooking several items of the same
food, such as baked potatoes, place them in a
ring pattern for uniform cooking.
• When cooking foods of uneven shapes or
thickness, such as chicken breasts, place the
smaller or thinner area of the food towards the
center of the dish where it will be heated last.
• Layer thin slices of meat on top of each other.
• When you cook or reheat whole fish, score
the skin - this prevents cracking.
• Do not let food or a container touch the top
or sides of the oven. This will prevent possible
arcing.
Using aluminum foil
Metal containers should not be used in a micro-
wave oven. There are, however, some exceptions.
If you have purchased food which is prepackaged
in an aluminum foil container, refer to the instruc-
tions on the package. When using aluminum foil
containers, cooking times may be longer because
microwaves will only penetrate the top of the food.
If you use aluminum containers without package
instructions, follow these guidelines:
• Place the container in a glass bowl and add some
water so that it covers the bottom of the container,
not more than V4inch (6 mm) high. This ensures
even heating of the container bottom.
• Always remove the lid to avoid damage to
the oven.
• Use only undamaged containers.
• Do not use containers taller than 3/4inch (19 mm).
• Container must be at least half filled.
• To avoid arcing, there must be a minimum
V4inch (6 ram) between the aluminum container
and the walls of the oven and also between two
aluminum containers.
= Always place the container on the turntable.
• Reheating food in aluminum foil containers usually
takes up to double the time compared to reheating
in plastic, glass, china, or paper containers. The
time when food is ready will vary depending upon
the type of container you use.
• Let food stand for 2 to 3 minutes after heating so
that heat is spread evenly throughout container.
Cooking you should not do in your
microwave oven
• Do not do canning of foods in the oven. Closed
glass jars may explode, resulting in damage to
the oven or possible personal injury.
• Do not use the microwave oven to sterilize objects
(baby bottles, etc.). It is difficult to keep the oven at
the high temperature needed for safe sterilization.
41

Questions and Answers
QUES_ONS
Can I operate my microwave oven without the
tumtable or tum the turntable over to hold a
large dish?
ANSWERS
You can turn off the turntable to heat 2 dinner
plates side by side or one dish that's larger than
the turntable. However, if you only need to heat
one plate on the turntable, keep the turntable on
for best cocking results. Also, you should not turn
over the turntable. A plate used on the tumtable
must fit on it when the turntable is correct side up.
Can I use a rack in my microwave oven so that I You can use a rack only it the rack is supplied
may reheat or cook on two levels at a time? with your microwave oven. If you use a rack not
supplied with the microwave oven, you can get
poor cooking performance and/or arcing.
Can I use either metal or aluminum pans in my You can use aluminum foil for shielding (use
microwave oven? small, flat pieces), small skewers, and shallow
foil trays (if tray is ¾ inch [19 mm] _leep or less and
at least half filled with food to absorb microwave
energy). Never allow metal to touch walls or door.
(For more information, see =Using aluminum foil"
in the "Cocking Guide" section.)
Is it normal for the turntable to turn in Yes. The turntable rotates clockwise or counter-
either direction? clockwise, depending on the rotation of the
motor when the cooking cycle begins.
Sometimes the door of my microwave oven This appearance is normal and does not affect the
appears wavy. Is this normal? operation of your oven.
What are the humming noises that I hear when my You hear the sound of the transformer when the
microwave oven is operating? magnetron tube cycles on.
Why does the dish become hot when I microwave As the food becomes hot it will conduct the heat
food in it? I thought that this should not happen, to the dish. Be prepared to use hot pads to
remove food after cocking.
What does "standing time" mean? "Standing time" means that food should be
removed from the oven and covered for additional
time to allow it to finish cooking. This frees the
oven for other cooking.
Why does steam come out of the air exhaust vent? Steam is normally produced during cooking. The
microwave oven has been designed to vent this
steam out the vent.
Can I pep popeom in my microwave oven? Yes. Pop packaged microwave popcorn
How do I get the best results? following manufacturer's guidelines or use the
preset POPCORN pad. Do not use regular paper
bags. Use the =listening test" by stopping the
oven as soon as the popping slows to a "pop"
every I or 2 seconds. Do not repep unpopped
kernels. Do not pep pepeam in glass cookware.
42

Troubleshooting
Most cooking problems often are caused by little things you can find and fix without tools of any kind. Check
the lists below and on the next page before calling for assistance or service. If you still need help, see the
"Sears Toll-Free Numbers" section on page 100.
Microwave oven does not work
PROBLEM CAUSE
Nothing works.
The microwave oven
will not run.
• The power supplycord isnot pluggedintoa live circuitwiththe proper
voltage. (Seethe "Electdcal requirements"sectionon page 5 and the
=Electrical connection"sectiononpage 11.)
• A householdfuse hasblown or a circuit breakerhastripped.
• The electriccompanyhas had a powerfailure.
• You are using the oven as a timer. Touch OFF/CANCEL to cancel the
Kitchen Timer.
• The door is not firmly closed and latched.
• You did not touch START/ENTER.
• You did not follow directions exactly.
• An operation that you set earlier is still running. Touch OFF/CANCEL to
cancel that operation.
Cooking times
PROBLEM CAUSE
Food is not cooked
enough.
• The electricsupplyto yourhome or wall outletsislow or lowerthan normal.
Your electriccompanycantell you ifthe linevoltage istow. Your electrician
or service techniciancan tell you ifthe outletvoltage islow.
• The cook power isnot at the recommendedsetting. Check the chart on
page 22.
• You havenot allowedenoughcookingtimefor theamount offood being
cooked. Largeramountsoffood need longercookingtimes.
The display showsa time • The oven door isnot closedcompletely.
countingdown but the • You haveset the controlsas a kitchentimer.Touch OFF/CANCEL to cancel
oven is notcooking, the KitchenTimer.
continued on next page
43

Turntable
PROBLEM
The turntable will
not turn.
CAUSE
• You have turned offthe turntable. (See the "Heating more than one plate of
food" section on page 15.)
• The turntable is not correctly in place. It should be correct-side up and sitting
firmly on the center shaft.
• The support is.not operating correctly. Remove the turntable and restart the
oven. Ifthe support stilldoes not move, call an authorized service technician
for repair. Cooking without the turntable can give you poor results.
Tones
PROBLEM
You do not hear the
programming or
end-of-cycle tone.
CAUSE
• You have not entered the correct command.
• You have turned off the tone. (See the "Audible signals" section on
page 14.)
Display messages
I ROBLEM CAUSE
The display is flashing ":". • Therehas been a powerinterruption.Resetthe clock.(Seethe "Setting the
clock" sectionon page 18,)
If none of these items are causing your problem, see the "Sears Toll-Free Numbers" section on page 100.
Please record your model's information.
Whenever you call to request service for your appliance,
you need to know your complete model number and
serial number. You can find this information on the
model and serial number label/plate (see "Microwave
oven features" in the "Getting to Know" section). Also,
record the other information shown in the next column,
Model Number
Serial Number
Purchase Date
Dealer Name
Dealer Address
Dealer Phone
44

Index
This indexis alphabetical. It containsallthe topics includedinthis manual, along with the page(s) on whichyou
can find each topic.
TOPIC PAGE TOPIC PAGE
ALUMINUM FOIL ....................................................... 41 FILTERS ................................................................... 38
AUDIBLE SIGNALS .................................................. 14 HOW YOUR MICROWAVE OVEN WORKS ............ 8-9
CARING FOR YOUR MICROWAVE OVEN .............37 INSTALLATION INSTRUCTIONS ............................ 6-7
CHARTS
Auto cook ............................................................... 26
Auto defrost ............................................... 28, 29-30
Auto reheat ............................................................ 27
Cook powers ......................................................... 22
Popcorn ................................................................. 31
Weight conversion ................................................. 30
CONTROL PANEL .............................................. 13-15
ADD ONE MINUTE ................................................ 20
AUTO COOK .......................................................... 26
AUTO DEFROST .................................................. 28
AUTO REHEAT ...................................................... 27
BAKED POTATO ................................................... 33
BEVERAGE ........................................................... 32
Changing presetcookingtimes ............................. 20
Child lock ................................................................ 15
CLOCK ................................................................... 18
Cooking at high cook power .................................. 21
Cooking at different cook powers .................... 22, 23
COOK TIME .............................................. 21, 22, 24
Demo/learning feature ........................................... 15
Display .................................................................. 13
Fan ........................................................................ 17
FROZEN ENTREE ................................................. 35
FROZEN VEGETABLE .......................................... 34
HOLD WARM ......................................................... 36
Interrupting cooking ............................................... 14
Kitchen timer ......................................................... 19
Ught ...................................................................... 17
Number pads ......................................................... 13
OFF/CANCEL ........................................................ 14
POPCORN ............................................................ 31
POWER ..................................................... 22, 23, 24
Stage cooking ................................................. 24-25
START/ENTER ..................................................... 14
TURNTABLE ON/OFF ........................................... 15
ELECTRICAL REQUIREMENTS ........................... 5, 11
EXHAUST FAN ......................................................... 17
LIGHTS
Replacing .............................................................. 39
Using ..................................................................... 17
PARTS AND FEATURES
Cooking guidelabel ............................................... 12
Cooking rack .................................................... 12, 16
Door handle ........................................................... 12
Doorsafety locksystem ........................................ 12
Magnetron ......................................................... 8, 42
Microwave inlet cover ............................................. 12
Model and serial number plate .............................. 12
Oven cavity light ..................................................... 12
Turntable .................................... 8, 11, 12, 37, 42, 44
Vent grille .............................................................. 12
Window ................................................................. 12
QUESTIONS AND ANSWERS ................................. 42
RACK .................................................................. 16, 42
RADIO INTERFERENCE ............................................ 9
REPLACING COOKTOP AND OVEN LIGHTS ......... 39
SAFETY ....................................................... 3-5, 10-11
SERVICE .................................................................... 2
STANDING TIME .......................................... 30, 40, 42
TESTING YOUR DINNERWARE
OR COOKVVARE ....................................................... 10
•TESTING YOUR MICROWAVE OVEN ....................... 9
TIPS
Baked potato .......................................................... 33
Cooking ........................................................... 40-41
Defrosting .............................................................. 30
Popcorn .................................................................. 31
TOLbFREE NUMBERS ......................................... 100
TROUBLESHOOTING ........................................ 43-44
WARRANTY ................................................................ 2
45

Notes
46

Tabla de contenidos
Garantla ............................................... 48
Servicio Sears ...................................... 48
Seguridad del homo
de microondas ................................ 49.51
Instruceiones de instalaci6n .............. 52
Conozca su homo
de microondas ..................................... 55
C6mo utilizar su homo
de microondas ................................... 69
C6mo ¢uidar su homo
de micmondas ..................................... 87
Guia de cocina ..................................... 9t
Preguntas y respuestas ....................... 93
Soluci6n de problems ........................ 94
Jndice ................................................... 99
Llame sin costo ................................. 100
47

Garantia del horno de
microondas
GARANT|A TOTAL POR UN AI;IO DEL HORNO DE MICROONDAS
Sien un periodo deun a_o a partirde lafecha de compra, este homo de microondassufrieraalgunafalla
debido a defectos ensu materialomano de obra,Sears Io reparar_sincargo.
GARANTJA TOTAL POR ClNCO AI_IOS PAPA EL MAGNETR(_N
Si en un periodo de cincoa_os a partirde lafecha de compra, el magnetr6n de este Homo de Microondas
Kenmore sufrieraalgunafalladebido a defectos ensu material o mano de obra, SearsIo reparar_sin cargo.
La coberturade esta garantfaincluyesolamentehomospara usodom6stico.
PODR/_ HACER EFECTIVA ESTA GARANI"iA CON SOLO PONERSE EN CONTACTO CON LA TIENDA
SEARS O EL CENTRO DE SERVlClO M/_ CERCANO EN LOS ESTADOS UNIDOS.
Estagarant_atienevalidez siemprey cuando este productoest6 en usoen los EstadosUnidos.
Esta garantfaleotorga derechos legalesespecificosque podrianvariarde un estado a otro.
Sears, Roebuck and Co., Pars servicio I|ame al telMono:
Dept. 817WA, 1-800-4-REPAIR
Hoffman Estates, IL 60179 1-800-473-7247
Servicio Sears
"Damos servicio a Io que vendemos"
"Damos servicioa Io que vendemos",es asicomo le aseguramosque puede contarcon Sears para cualquier
servicio porque el Servicio Sears se ofrece a nivel naeional.
Su Homo de Microondas Kenmore de Sears adquiere un valor agregado considerando que Sears tiene una
unidad de servicio cerca de usted, atendida por t_cnicos capacitados por Sears - t6cnicos profesionales
eapecializados en Homos de Microondas Kenmore de Sears y cuentan con las partes, herramientas y equipo
para asegurar el cumplimiento de nuestro compromisocon usted - "iDamosservicio a Io que vendemos!"
Para agregar valor a su horno de microondas, adquiera
un Contrato de mantenimiento Sears.
Los homos de microondas Kenmore de Sears estdn dise_ados, fabdcados y probados para durar atios de
operaciones confiabies. Sin embargo, cualquier articulo modemo puede requerir mantenimiento
ocasionalmente. Un Contrato de mantenimiento Sears es mSs que una extensibn de la garantia. Proporciona
proteccibn total contra gastos imprevistos por reparaciones inesperadas y molest|as innecesarias. Le asegura
m_lximo rendimiento a su homo de microondas.
A continuacibn le presentamos una tabla comparativa de Garantia y Contrato de mantenimiento la cual le
muestra las ventajas del Contrato de mantenimiento Sears para homos de microondas.
AI_IOSDE COBERTURA DE PROPIEDAD 1ER AI_IO. Del 2° AI_IOal 5° AI_IO.
Cambio de partesdefectuosasque no sea el magnetr6n G CM
Cambio del magnetr6n G G
Revisi6nanualde mantenimientopreventivocuando usted Io sol|cite CM CM
G- GARANTIA
CM -CONTRATO DEMANTENIMIENTO
Consulte a surepresentantede ventasSearso a suCentro de servicioSears localhoymismo y adquieraun
Contrato de mantenimientoSears.
Guarde este libro y la factura de venta juntos en algOn lugar seguro para
consultas futuras.
48

Seguridad del horno de
microondas
Su seguridad y la seguridad de los demos es muy importante.
Hemos inctuido muchos mensajesimportantesde seguridaden este manualy en suelectrodomestico.Lea
y obedezca siempretodoslosmensajes de seguridad.
Este es el simbolo de advertencia de seguridad.
Este simbolo le llama la atenci6nsobre peligros que pueden ocasionarla muerte ouna lesi6n
a usted y a los dem_.s.
Todos los mensajes de seguridad ir&n precedidos por el simbolo de advertencia de seguridad
y la palabra "PELIGRO" o "ADVERTENClA". Estas palabras significan:
Sl no slgue las instrucciones, usted morir_t
o sufrlr,t una lesl6n grave.
Si no sigue las instrucciones, usted t)uede
morlr o sufrir una lesl6n grave.
Todos los mensajes de seguridad identificar&nel peligro, le informar&ncbmoreducir las posibilidades
de sufrir una lesibn y Ioque puede suceder si no sigue las instrucciones.
INSTRUCCIONES IMPORTANTES DE SEGURIDAD
AI usar aparatoselectrodom_sticosdeben seguirseprecaucionesbasicasde seguridad, incluyendolas
siguientes:
ADVERTENCIA - Para reducir el riesgo de
quemaduras, ehoque elL=ctrioo,inoendio, lesiones
a personas o exposicibn excesiva a la energia del
homo de microondas:
• Antes de usar su homo, lea cuidadosamente
todas lasinstrucciones.
• Lea y siga las =PRECAUCIONESPARAEVITAR
LA POSIBLE EXPOSICION EXCESIVAA LA
ENERGiA DEL HORNO DE MICROONDAS" que
se encuentra en esta seccibn.
• El homo de microondas debe estar conectado a
tierra. Con_=ctelo 6nicamente en un
tomacorriente puesto a tierra. Ver
"INSTRUCClONES DE CONEXlON A TIERRA"
que se encuentran al final de esta seccibn.
• Instale o coloque el homo de microondas
13nicamente de acuerdo con las instrucciones de
instalacibn provistas.
• Algunos productos tales como los huevos
enteros en su cascara y los recipientes sellados
- por ejemplo, tarros de vidrio eerrados -
pueden explotar y no deben ser calentados en el
homo de microondas.
Use el homo de microondas sblo para los fines
descritos en este manual. No use substancias
quimicas ni vapores corrosivos en el homo de
microondas. Este tipo de homo ha sido
disefiado especificamente para calentar, cocinar
o secar los alimentos. No ha sido disefiado para
uso industrial o en laboratorios.
• Como con euatquier aparato electrodomestico,
es necesario supervisar dgurosamente et uso del
homo de microondas per nifios.
• No opere el homo de microondas si tiene un
cable o enchufe dafiado, si no funciona
debidamente, si ha sido dafiado o si se ha ca[do.
• Sblo un miembro calificado del personal de
servicio puede reparar este homo de
microondas. Llame a una compafiia de sePJicio
autorizada para examinar, reparar o regular este
homo de microondas.
• No cubra ni bloquea ningt3n orificio del homo de
microondas.
- GUARDE ESTAS INSTRUCClONES -
contin"a en la sigulente p&gina
49

INSTRUCCIONES IMPORTANTES DE SEGURIDAD
• No guarde el homo de microondasalaire libre.
No Io usecerca del agua - par ejemplo,cerca del
fregadero, en unsbtanoh_medo, o cercade una
piscinao lugaressemejantes.
• No sumerjael cable oel enchufeen agua.
• Mantenga el cable de alimentacibnalejado de
las superficiescalientes.
. No deje que el cable cuelguedel horde deuna
mesa o superficle.
• Vea las Instrucelones de cbmo limpiarla
superrmiede la puertaen la seccibn"Cbmo
cuidarsu homo de microondas".
• No Io instalesobreun fregadero.
• No guarde ningOnobjetodimctamente sobrela
parte superiordel homode microondascuando
el homo de microondasest_ en funcionamieflto.
• Para reducirel desgode incendioell la cavidad
del homo:
- No cocine demasiado los alimentos. VigUe
cuidadosamente el homo de microondassise
coloca dentro del mismo,papel, pkfisticoo
cualquier materialcombustible10amfacilitar
la coccibn.
- Quite losalarnbresque sujetanlas bolsasde
papelo de pl_sticoantes de colocarlasenel
homo.
- Si losmaterialesdentro del homo prenden
fuego, mantengacerradala puertadel homo,
apf=gueloy desconecteel cable de
alimentacibn,o corte laenergiaen el fusible
o en el panelinterruptorde circuitos.
- No usela cavidaddel homo de microondas
para guardarobjetos.No deje productosde
papel, utensiliosde cocinao alimentosen la
cavidadcuando no est6 usandoel aparato.
• Adecuado para usosobreequiposde cocinade
gas y ek_;'tdcos.
• Para usarsesobre cocinescon anchura m_xima
de 36 pulgadas.
• Umple con frecuencialascampanes extractoras
- no debe dejarseque la grasase acumuleen la
campana o en elfiltro.
• Cuando este cocinando elimentos con
llama debajo de la campana, ponga el
ventilador ha funcionar.
• Umpie con cuidadoel filtrode lacampana
extractora.Los productosde limpieza
corrosivos,tales oomo los limpiadoresde
homo a basede lejle,puedenda_ar elfiitro.
- GUARDE ESTAS INSTRUCCIONES -
PRECAUClONES PARA EVITAR LA POSlBLE
EXPOSlCI(SN EXCESlVA A LA ENERG|A DE LAS
MICROONDAS
(a) No trate de poner enfuncionamientoeste homo
de microondascon la puertaabierta, pues esto
puede causar laexposici6nperjudiciela la
energla del microondas.Esimportanteno
desactivar nl forzarIo_ int_'clemssde seguridad.
{Ib)No o01oquonlng(inobjetoentre lacam frontal
del homo y la puertanideje que se acumulen
residuosde polvoo de productosde limplezaen
las superficiesde sellado.
(¢) No useel homosi est_ da5ado. Esmuy
importanteque lapuertadel homo se cierre
debidamentey que no est(_nda_ados:
(1)La puerta (doblada),
(2)Las blsagras y pestillos(quebradoso flojos),
(3)Los clerresherrn6ticosde lapuertao las
superficiesde sellado.
(d) Elhomo no debe set reguladoni reparadopar
ningunapersonaque no seaun mlembro
califlcadodel personalde serviclo.
50

Requisitos el ctricos
Cumpla con todos loscbdigosy reglamentos
vigentes. Se requiem un suministroel_ctricode
120 voltios, 60 hertz, sblo de CA, 15 b 20
amperios con fusible. (Se recomienda un fusible
de retardo). Se recomienda el uso de un circuito
el_=ctdcoindependiente para la alimentacibnde
este aparato.
Pellgro de Choque El6ctrlco
Cone€re a un €ontacto de pared de conexl6n
a tlerra de 3 termlnales.
No qulte el terminal de €onexl6n a tlerra.
No use un adaptador.
No use un cable eldctrlco de extensl6n.
No segulr estas instrucclones puede
ocaslonar la muerte, Incendlo o
choque el6ctrlco.
INSTRUCCIONES DE CONEXION A TIERRA
Para todos los aparatoselectrodom6sticos
conectados con cable de alimentacibn:
Estehomo de microondas debe ser conectado a
tierra. Encaso de un cortocimuitoek_ctdco,la
conexibna tierra reduceel riesgode un choque
ekb_'tdcoal proporcionarun alambre de escapea la
cordenteel6ctrica. El homo de microondasest_
equipado con un cable de alimentacibnprovistode
una alambre de conexibna tierracon un enchufede
conexi6n a tlerra. Elenchufedebe ser conectado a
untomacordente debidamente instaladoy
conectado a tierra.
No use cordbn de exteosibn. Si el cable de
alimentacibn ek_ctrica es muy corto, haga que un
elestdcista calificado o un t_cnico de servicio instale
un tomacordentecerca del homo de microondas.
Para un aparato electrodom6stico permanentemente
conestado:
Este homo de microondas debe set conecteqo a un
sistemade instalacibn ek_3ctdcadefinitiva, met.&licoy
puesto a tierra, o debe instalarse un conductor a
tierra para el material en los conductoresde circuito
y conectarseal terminal o alambre de conexibn a
tierra para el material en el homo microondos.
ADVERTENCIA: Eluso indebidode la
conexibna Uerrapueqe ocasionarriesgode choque
el6ctrico.
Consultecon un electricistacalificadoo t6cnicode
serviciosino entiende completamente las
instruccionesde conexibna tierrao sitiene dudas
sobresi el homode microondasest&conectado a
tiemacorrectamente.
51

Instrucciones de
instalaci6n
Requerimientos de espacio
NOTA: Debe haber por Io menosuna clavijade
conexibnen laabertura del gabinete.
Verifk:lue el espaclo donde so va a Instelar el
homo de mlcroondas. La ubicaci6n debe tener
las sigulentes caracterlsticas:
• 2 x 4 pulgadasde resaltode contactosde
madera y % pulgadasde grosorde paredseca o
de listonesy yeso
• Soporte del peso (150 libras)del homode
microondas m_s el paso de los articulosque se
pondr_n en el homo o enel gabinete superior
• 30 pulgadasde ancho m[nlmo
• 13½" pulgadasde espacio libreentre la partede
abajo de su homo de microondasy la parte
supadorde lasuperficiepara prepararlos
alimentos
• Proteccibncontra corrientesde aire
provenientesde ventanas, puertasy vent,as
de calefaccibn
• Toma de corrientecon conexibna tisrra(vea
=Requisitos el(§ctricos"en laseccibn=Segurided
del homo de microondas")
66" de Elextractor se
altura mfnima conecta a un
desde ducto de
el piso Anchura ml'nima 3t,4.x10,,
requerida de 30"
El paquete Induido llsto para operaci6n sin ventllacl6n
(reclrcular), Io adapta para descarga por la parte
supedor o por la parte tmsera.
66" de altura
m(nirna desde
el piso para
montarlo
DIMENSIONES CRITICAS
Minimo 30• entre la suparficie10am
cocinar (ode labarra)bajo elhomo de
microondasy la parte superiordel
soporte de montajea la pared
Minimo 13½" entre lasuperficiepare
cocinar (oalturade labarra)y la parte
baja del homode microondas
52

Desmontar y reinstalar el horno de microondas
Peligro de Peso Excesivo
Use dos o m_s personas para mover
o instalar del homo de microondas.
No seguir esta instruccibn puede ocasionar
una herida a la espalda u otra herida.
Si necesita desmontar su combinaci6n Microondas
Campana por algOn motivo, siga estos sencillos
pasos:
Para desmontar:
1. Desenchufe el homo de microondas o
desconecte el suministro de energia.
2. Quite los filtros y la rejilla de ventilaci6n.
• Si los filtros O est&n
mm
mm
instalados, presione
hacia dentro, empuje
la lengQeta y deslice
el filtro a la orilla para
quitarlo.
• Quite los dos tornil-
los _ de la parte
superior del gabinete
del homo de
microondas (los
tornillos ubicados ma.s cerca de ias esquinas del
frente). No quite los tornillos que se encuentran
mas hacia el centro del gabinete.
• Quite la rejilla de ventilaci6n _. Ponga a un lado
los torniUos y la rejilla. (Si no puede quitar la
rejilla, ver el punto 4).
3. Despu6s de vaciar completamente el interior del
homo, incluyendo el
plato giratorio y el
soporte, selle la puerta
con cinta adhesiva.
Quite los dos tornillos
que aseguran al
homo de microondas a
la parte superior del
gabinete.
4. Con una mano detenga en su sitio a la
combinaci6n microondas
@ campana. Jale el gancho
para liberar la
combinaci6n microondas
campana de la placa
donde se monta. Si no se
puede quitar la rejilla (ver
las instrucciones en el
punto 2), inserte un
- alambre delgado en
forma de lazo o alguna
herramienta parecida a trav6s de una abertura en
la rejilla para jalar el gancho.
5. Tome el homo de microondas. Gire el homo de
microondas hacia abajo.
(Tenga cuidado para evitar
que la puerta se abra de
golpe.) Levante las
lengOetas de soporte
en la parte de abajo de la
placa donde se monta.
Ponga el homo de
microondas en una
superficie protegida.
contin,',a en la siguiente p=tgina
53

Desmontar y reinstalar el horno de microondas (cont.)
Para reinstalar:
1. Levante cuidadosamente el homo de microondas
y cuelguelo de las leeg0etas de soporte en la
parte de abajo de la placa donde se monta.
2. Gire la par_e del frente del gabinete del homo
de microondas hacia abajo. Pase el cable de
corriente a traves del orificio para el cable de
corriente al final del gabinete superior.
3. Gire el homo de microondas hacia el gabinete.
Empuje el homo de microondas contra la placa
de montaje hasta que los pernos de seguridad
produzcan un chasquido al entrar al gabinete
4, Atornille los dos tomillos de seguridad del
f H H _1
tl--
homo de microondas
que Io sujetan al
gabinete superior.
5. Retire la cinta adhesiva, y coloque los soportes
y el plato giratorio en sus posiciones.
6. Coloque la rejilla de ventilacion.
7. Coloque los dos tornillos en la parte superior del
gabinete del homo de microondas (los tornillos
ubicados m_.s cerca de las esquinas del frente).
8. Reemplace los filtros (consulte "C6mo instalar y
cuidar filtros", en la secci6n "C6mo cuidar su
homo de microondas" en caso de ser necesario).
9. Enchufe el homo de microondas o reconecte el
suministro de energfa.
54

Conozca su horno de
microondas
Esta seccibn trata acerca de los conceptos que encierra la cocina con microondas. Tambi6n le muestra los
conceptos b&sicos que necesita conocer para operar su homo de microondas. Por favor, lea esta informacibn
antes de utilizar su homo de microondas.
C6mo funciona su horno de microondas
Los homos de microondas son soguros. La
energia por microondasno es caliente. Provoca
que la comida produzcesu propiocaloryes este
calor elque cuece los alimentos.
Lasmicroondas son como lasondasde TV o
como lasondas de luz. Usted no laspusde ver,
perosf ve Io que hacen.
El magnetrbn en elhomo de microondasproduce
microondas.Las microondasse mueven haciael
intedordel homo donde hacen contactocon la
comida mientrasque _sta giraen el platogiratodo.
Magneb'6n
Interior del homo
El plato giratorio de viddo de su homo de
microondas permitepasar lasmicroondas.Luego
rebotan contra lasuperficiemetdlice,regresanal
plato giratoriode viddo y despu6s lasabsorben
los alimentos.
U
SuperficieL metal Platoglmtodo
€onUnOa en la siguiente pbglna
55

C6mo funciona su horno de microondas (cont.)
La_i microondas pasan a traves del vidrio, papel y
plastico sin calentarlos,
asi que son los
aiimentos los que
absorben la energia.
Las microondas rebetan
contra los recipientes de
metal, asi que la comida
no Iogra absorber la
energfa.
AI rostizar, es posible que las microondas no
alcancen el centro de
la pieza de came. El
calor se distribuye
hacia el centro desde
las &reas exteriores
cocidas tal y como
sucede al cocinar con
homos tradicionales.
Esta es una de las
razones para dejar
reposar algunoe
alimentos (por ejemplo, piezas rostizadas o papas
homeadas) un tiempo despues de cocinarlos o
para mover algunos alimentos durante el tiempo
de coccibn.
Las microondas alteran las moleculas del agua
en la comida. AI rebotar las moleculas unas contra
otras, se produce el calor, como cuando junta sus
manos y las frota. Este es el calor que cocina.
NOTA: No frfa alimentos en el homo. Los recipientes
para microondas no son apropiados para freir y
adem&s resulta muy dificil mantener la temperatura
necesaria.
Para obtener mejores resultados al
cocinar
• Siempre cocine los alimentos en el tiempo minimo
recomendado. Revise c6mo se va cociendo la
comida. Si es necesafio, oprima el botbn ADD ONE
MINUTE (UN MINUTO MAS) mientras el homo se
encuentra en operaci6n o despues de que haya
concluido el ciclo de cocci6n (vea la secci6n
"C6mo utilizar ADD ONE MINUTE").
• Para asegurarse que los alimentos esten
completamente cocidos, remu6valos o volt_elos
o reorganicelo a la mitad del tiempo de cocci6n.
• Si no tiene la tapa de un recipiente, use papel
encerado o toallas de papel para microondas o
envolturas de pl_stico para microondas. Recuerde
hacer un doblez de _,_om a 1 cmen una esquina
de la envoltura de pl&stico para ventilar el vapor
al calentar o cocinar.
Interferencia con ondas de radio
AI usar su homo de mioroondas, se puede
producir una interferencia en su radio, "IV o
equipos similares. Cuando haya interferencia, la
puede reducir o eliminar haciendo uno o varios de
los siguientes movimientos:
• Limpie la puerta y los empaques del homo.
• Ajuste la antena receptora del radio o television.
• Aleje el radio o TV del homo de microondas.
• Conecte el homo de microondas en un contacto
diferente para que el homo de microondas y el
radio o TV esten en distintos circuitos el6ctricos.
Para probar su horno de microondas
Para probar el homo ponga una taza de agua fria
en un recipiente de vidrio dentro del
homo. Cierre la puerta y asegL_rese
de que cierre hermeticamente. Siga
las instrucciones en "Cocinar a
potencia de coccibn alta" en ta
seccibn de "Cbmo utilizar su homo de microondas"
para programar el homo a que cocine por 2 minutos.
Cuando el tiempo termine, el agua deber_ estar
caliente.
56

C6mo probar su vajilla y recipientes de cocina
Pmebe su vajilla y sus recipientes antes de usarles.
Para comprobar que
un plato se pueda usar
en el microondas,
colbqueto dentro del
homo junto con una
taza de agua. Cocine
a1100% de la energia
de ooccibn durante
1 minuto. Si el plato
se calienta y el agua
permanece fda, no
Io use.
Algunos platos (de melamina,algunasvajillasde
cer&mica,etc.) absorben la energia de microondas,
calent_ndose demesiado, como para manejades y
retardan los tiempes de coccibn.El cocinar en
recipientes de metal no diser3ados para usoen
micrcondas podda dar_arel homo, al igual que los
reciplentes con metal no visible (con alambres de
sujecibn, con recubrimientos de aluminio, grapes o
aros y decorados met&licos).
Medidas de seguridad de operaci6n
Nunca cocine o recaliente un huevo entero con
[ ] todo y cascarbn. La
acumulacibnde vapor
dentro de un huevo
enteropueden
provocarque explote
y le cause
quemaduras a ustedy
posiblementedaSeel
homo. Rebane los
huevoscocidos antes
de calentarlos.Se ha
sabido queen raras ocesioneslos huevospoch6
explotan.Cubra loshuevos poch_ y ddjelos
reposar durante 1 minuto antesde abridos.
Para mejores resuRadoe, mueva cualquier
II'quido ,.,arias
vecee durante el
calentamiento o el
recalentamlento.
LOSliquidos que se
calientan en ciertos
recipientes
(especialmente
recipientes en forma
de cUindro) pueden
sobrecalentarse. El
Ifquido puede salpicar haciendo un fuerte ruido al
calentado o despu_s de hacerlo, o al agregar
ciertos ingredientes (granos de caf_, bolsas de t_,
etc.). Esto puede daSar el homo y posiblemente
herir a alguien.
Nunoa se recargue en lapuerta ni permitaque un
nitiose cuelguede ella
cuando est_ abierta.
Podria lastimarse.
Utilice guantes de cocina. La energiade
microondasno calienta
directamente los
recipientes, pero elcalor
de losalimentospuede
hacerque el recipiente
se caliente.
€ontinq_a en la Mgulente I_glna
57

Medidas de seguridad de operaci6n (cont.)
40 cueza las papas demasiado. PodHa provocar
reposardurante5 minutos.
mientras reposan.
un incendio. Cuando
termine el tiempo de
coccibn recomendado,
las papas deber&n
estar ligeramente
firmes porque se
seguirdn cocinando
durante el tiempo de
reposo. Despuds de
cocinarlas en el
mlcroondes, ddjelas
Terminardn de cocerse
No encienda el homo cuando est_vacio. Lavida
de este producto
puede acortarse.
Si tratade programar
el homo, ponga un
recipientecon agua en
el mismo.
EscomOnque la
puertadel homo se
vea onduladadespuds
de haberfuncionado
duranteciertotiempo.
No utilice papel pedbdico ni ningQnotto papel con
impresi6n en el homo.
Podria provocarun
incendio.
No seque flores,
fruta, hierbas,madera,
papel, jfcaras,ni ropa
en el homo. Podda
provocar un incendio.
No trate de derretir cera parafina en el horno. La
parafina no se derrite
en el homo porque
permite que las
microondas la
traspasen.
No opare elhomo de micrcondasa menos que el
platogiratorioestd bien
aseguradoen sulugar,
y puedagirar libremente
en los rodillosde
soporte.El plato
giratoriodebe poder
girar encualquier
direccibn.
Asegdrese de que
losmdillos est6n
totalmentedentro del
circulodel centrodel platogiratorio;esto permitird
que el platogiratoriod6 vueltascorrectamente.
Aseg,',rese de que el platogiratoriose
encuentrecara arribadentrodel homo. Coloque
con todo cuidado susrecipientessobreel plato
giratoriopara evitarromparlo.
Maneje su plato giratorio ouidadosamente al
retirarlodel homo para evitar mmparlo. Sisu plato
giratorioIlegaraa estrellarseo a romperse,
contacte a Searspara que se Iocambie.
Cuando utiliceun recipientepara dorar,la parte
inferiorde _ste deber&estar, el menos, a ¾e
pulgadas(.5 cm) porarribadel platogiratorio.
Siga lasinstruccionesque se incluyenen el plato
para dorar.
Conexi6n el6ctrica
Si el voltaje de su linea de energl'a eldctrlca o
Interruptor general
o panel de fusibles
contacto es menor a
110 voltios,lostiempos
de cocclbnset'an
mayores.Haga que un
electricistacaliflcado
revisesuInstalacibn
el6ctrica.
58

Funciones del horno de microondas
Su homo de microondas est_ dise£_ado para hacer
que su experiencia en la cocina sea Io m_s
placentera y productiva posible Para ayudarle a
estar preparado y listo r_lpidamente, la siguiente
es una lista de las funciones basicas de su homo
de microondas:
1. Aea de la puerta. Jale para abrir la puerta.
2. Sistema de seguro para la puerta. El horno
no operar_ a menos que la puerta este cerrada
o asegurada.
3. Ventana con proteccibn de metal. La
proteccibn de metal evita que se escapen
las microondas, Esta disefiada en forma de
ventana para permitirle ver los alimentos
mientras se cocinan.
4. ParrUla de coccibn. Uso de espacio extra
cuando cocina en m&s de un recipiente a
la vez. Vea la p_gina 64 para mayor
informacibn.
5. Plato giratorio de vidrio (Nt_mero de parte
4393751) (no se muestra). Incluido en el interior
del homo, vea mas adelante las instrucciones
de instalacibn. Este plato giratorio da vuelta a
los alimentos mientras los cocina para una
coccibn rods uniforme. Para mejores resultados,
el plato debera estar dentro del homo mientras
este operando. El plato giratorio esta hundido
en el piso del interior del homo para darle un
mayor espacio para cocinar y obtener mejores
resultados. Vea las p_lginas 55, 58, 87, 93, 95
para mayores de_alles.
6. Filtros de carbbn y grasa, Incluido en el
interior del homo. Vea las paginas 88-89 para
instrucciones de instalaci6n y limpieza.
7. Luz de la superficie para cocinar. Encienda la
luz para iluminar la superficie para cocinar o
utilicela como una luz nocturna. Vea la p&gina 65
para mayor informacion.
8. Etiqueta de guia de cocina. Utilicela como una
referencia rapida para ver los programas de
Cocci6n automatica, Recatentado automatico,
Descongelado automa.tico, Palomitas de maiz,
Bebidas, Papas al horno, Verduras congeladas y
Programacion para platillos congelados.
9. Interruptores del extractor y de la luz de la
superficie para cocinar. Vea la p_gina 65 para
mayor informaci6n.
10. Panel de control. Oprima los botones en este
panel para reaiizar todas las funciones. Vea
las p_lginas 60-63 para mayor informaci6n.
11. Rejilla de ventilacibn.
12. Luz interior del horno.
13. Cubierta interna del homo de microondas.
14. Placa con modelo y ndmero de eerie. Vea la
p_.gina 95 para mayor informaci6n.
contin,',a en la siguiente p_gina
59

Funciones del horno de microondas (cont.)
Para instalar el plato giratorio en
su soporte:
Inserteeleje (Nt_merode
Lineascurvas
en_i_
Cen
_"_-- Eje
_arte4393754) en
elcentro.
• Coloque elsoporte
(Nt_merode parte
4393752) enel fondo
de la cavidad.
• Coloqueel plato
giratorioenel centro.
Cercibresede que las
curvasen relievedel
centrede laparte
inferiordel plato
giratorio est6n entre los tres =rayos" del centro.
• Lasrodillos(Nt_memde parte4393753) del
soportedeber&nentraren el carrilde laparte
inferiordel platogiratodo.
• Elplatogiretoriorota Iomismoen elsentido de las
manecillasdel relojque ensentidocontrario.Esto
es normal.
Funciones del panel de control
1. Pantalla. Estapantalla incluyeunreloje
indicadorespara mostrarle lahoradel dia, los
valoresdeltiempo de coccibn y funciones de
coccibn que usted elija.
2. POPCORN (PALOMITAS DE MAI'Z).Oprima
este botbncuando prepare palomitasde ma{z
en su homode microondas. El homocalentard
autom&ticamenteduranteun tiempoy a una
energia de cocci6n preestablecidos.Vea la
p_.gina81 paramayor informacibn.
3. BEVERAGE (BEBIDAS).Oprimaeste botbn
pare calentar1 b 2 tazas de alguna bebida.
Elhomo calentar_tautom_ticamente durante
untiempo y a una energiade coccibn
preestablecidos.Vea la pdgina82 para
mayor informacibn.
4. BAKED POTATO pAPAS AL HORNO). Opdma
este botbn pare cocinar de 1 a 4 papas. El
homo cocinar&autom_ticamentedurante
untiempo y a una energia de coccibn
prestablecidos.Vea la p&gina83 para mayor
informacibn.
5. FROZEN VEGETABLE (VERDURAS
CONGELADAS).Oprimaeste botbn para
cocinar de I a 4 tazasde verdurascongeladas.
Elhomo cocinar&autom&Ucamentedurante
un tiempoy a una energla de coccibn
preestablecidos.Vea lap_gina 84 para mayor
informaci6n.
6. FROZEN ENTREE (PLATILLOS
CONGELADOS). Oprirnaeste bot<_ para
cocinar plat,los congelados de 10 6 20 onzas.
Elhomo cocinar_ autom_tticamentedurante
un tiempo y a una energlade coccibn
preestablecidos.Vea la p_gina85 pare mayor
inforrnacibn.
®
@
®
®
6O

Funciones del panel de control (cont.)
7. HOLD WARM (CONSERVAR CALIENTE).
Oprimaeste bot6n para consewarcalientes
los alimentos cocinadosen su homode
microondashasta per 99 minutos,99 segundos.
HOLD WARM se puede utilizarindividualmente
o puede seguirautom&ticamente a un ciclode
coccibn.Vea la p&gina86 para mayor
informaci6n.
8. AUTO COOK (COCCI6N AUTOMATICA).
Oprimaeste bot6npara cocinaralimentos
preparadospara microondassintener que
programarlostiemposnilas energiasde
cocci6n.Vea lasp&ginas74-75 para mayor
informaci6n.
9. AUTO DEFROST (DESCONGELADO
AUTOMATICO). Optima este bot6npara
descongelaralimentossintener que programar
lostiemposni las energias de cocci6n.Vea la
p_gina 77 para mayor informackSn.
10. AUTO REHEAT (RECALENTADO
AUTOMATICO). Optima este botbnpara
recalentaralimentospreparadospara
microondassin tener que programarlostiempes
nilas energia de cocci6n.Vea la p_.gina76 para
mayorinformacibn.
11. ADD ONE MINUTE (UN MINUTO MAS). Oprima
este bot6npara cocinarpor I minuto, a una
energfade cocci6nde1100% o para agregar
un minuto extraa un ciclode coccibnalnivelde
energia que establecib.Vea la p&gina68 para
mayor infonnacibn.
12. CLOCK (RELOJ). Optima este bot6npara
programarla horacorrectadel dia. Vea lap&gina
66 para mayorinformacibn.
13. KITCHEN TIMER (CRON6METRO). Oprima
este bot6npara programarel cron6metrode
cocina. Vea la p&gina67 para mayor
informaci6n.
14. Botones num_'lcoa. Oprima losbotones
numdricospara introducirlos tiemposde
cocci6n,el nivelde energla de cocci6n,las
cantidades,pesoso categor|asde alimentos.
15. COOK TIME (TIEMPO DE COCCI_N). Optima
este bot6nseguidode los botonesnum6ricos
para programarun tiempode cocci6n.Vea las
p&ginas69, 70, 72 para mayorinformaci6n.
16. POWER (ENERGJA).Oprimaeste botbn
despu6sde programarel tiempode coccibn,
seguidode losbotones num_dcospara
programar lacantidadde energ|a de microondas
a usar para cocinarlos alimentos.Tambi_n
opdma este bot6npara aumentarodisminuirun
tiempode cocck_nprogramado.Voa las p_ginas
68 y 70 para mayorinformaci6n.
17.TURNTABLE ON/OFF (ACTIVAR/DESACTIVAR
ELPLATOGIRATORIO). Oprima este bot6n
para activaro desactivarel platogiratorio.Vea
lap_gina 63 para mayor inlormaci6n.
18. START/ENTER (INICIAR/PROGRAMAR).
Opdma este bot6n para iniciaruna funci6n.Vea
la p&gina 61 para mayor informaci6n.
19.OFF/CANCEL (APAGAR/CANCELAR). Oprima
este botbn para borrar una instrucci6n
incorrecta, cancelar un programa durante la
coccibno limpiar la pantalla. Vea la p_gina 62
para mayor informaci6n.
20.EXHAUST FAN HIGH/LOWlOFF (EXTRACTOR
ALTO/BAJO/APAGADO). Oprima este bot6n
para encender el extractoren velocidadaltao
baja. Tambidnutilicelopara apagar el extractor.
Vea la p_gina65 para mayorinformaci6n.
21. MGHT ON/NIGHTIOFF (LUZ ENCENDIDN
NOCTURNNAPAGADA). Oprimaeste botbn
para encender o apagar la luzo la luznocturna.
VeaJap_gina 65 para mayor informaci6n.
OBSERVACIONES:
• Siintrodujolos valorespara una funcidnpero
no oprimibSTART/ENTER en 5 segundos,
aparecer&el indicador START?(INICIAR?).
• Siabre la puertamientras el homo (}st&
funcionandoy luegola cierraaparecerael
indicadorSTART?..Oprima START/ENTER
paracontinuar.
• Si eligeuna funcibn pero no oprime otrobotbn
de comando en un minuto,la pantallaregmsar_
a lahora del aliay tendr_,que empezar de nuevo.
Se_ales Sonoras
Su homo de microondas emiteseSalessonoras
que lepueden guiar al programaro utilizarsu
homo:
• [_ Un tonode programacibnsonar;tcada vez
que optima un bot6n
• [_ Un tonolargo indica que termin6la cuenta
regresivadel cronbmetrode la cocina.
"_1_1 "))))II"))))JCuatro tonosindicanque
terrain6el ciclode coccibn.
• [_ Dos tonos cortos y r_pidos suenan
cada vez cada minuto durante los pdmeros 15
minutos despu6s de la sepal de fin de ciclo de
coccibn como recordatodo si no se han sac,ado
los alimentos del homo.
contin6a en la siguiente piTigina 61

Funciones del panel de control (cont.)
• i%_'1[_] Dos tonos cortos y r&pidos sonar&n
al entrar y salir de una funcibn no visible, (por
ejemplo, seguro para ni_os), hora del dla o
siguiente pantalla con prioridad m_ls alta.
• {_-][_ Sonar_tn tres tonos si hizo una
entrada errbnea.
Para desactivar las sehales sonores:
OPRIMA
C6mo interrumpir la cocci6n
Puede detener elfuncionamiento del homo
durante un ciclo si abre lapuerta. El homo deja
de calentary se detieneel extractorpero la luz
permaneceencendida. Parareiniciarla coccibn
cierrela puertay
OPRIMA
durante 4 segundos
Para activarlas de nuevo:
OPRIMA
durante 4 segundos
Para desactivar todas las sehales eonoras
excepto la de fin del cron6metro:
OPRIMA
CSD
durante 4 segundos
Para activar de nuevo las se_ales:
SIno desea contlnuar coclnando:
• Cierre lapuertay se apagar&laluz.
O
• OPRIMA
[0,,1=
NOTA:Antesde prograrnarunafuncibnopdma
OFF/CANCEL (APAGAR/CANCELAR)para
asegurarsede que noest6 activa ningunaotra
funcibn.
OPRIMA
durante 4 segundos
NOTA: Dos tonos sonar&ncuandose activeno
desactivenla se_alessonoras.
62

Funciones del panel de control (cont.)
Cbmo calentar mbs de un plato con
alimentos
Cuando calienta platos con alimentos a un tiempo
de cocci6n de su
eleccion, usted podr&
calentar dos platos de
10 pulgadas juntos o un
plato m&s grande que
el plato giratorio. Usted
podr& calentar 2 platos
m&s en la parrilla de
cocci6n para tenet
un total posible de 4
platos. Para mejores
resultados, a la mitad de la coccibn gire los platos
de manera que los alimentos de enfrente ahora se
encuentren atr&s. Haga Io mismo cuando caUente
una cacerola mas grande (9 a 13 puigadas). Cuando
caliente 4 platos extendidos, girelos tal y como se
describi6 anteriormente y cambie los dos platos de
arriba por los dos de abajo,
Para calentar 2 platos juntos en la parte de abajo
y ademas un plato m&s grande, el
plato giratorio no deber_, estar en
movimiento. Puede apagar el plato
giratorio con s61o tocar TURN-
TABLE ON/OFF. Aparecer& 'q'URN TABLE OFF"
en la pantalla. Si oprime TURNTABLE ON/OFF
antes de comenzar a programar la funci6n de
cocei6n, su homo le solicitar& que introduzca un
tiempo de coccibn sin necesidad de que usted
optima COOK TIME. Su plato giratorio regresar_, a
su posicion original cuando la coccion haya
terminado o cuando oprima OFF/CANCEL.
NOTA: No puede apagarel plato giratoriocuando
est(_utilizandoalgunafunci6nautom&tica.
Cbmo utilizar el seguro para ni_os
El seguro para nifios bloquea el panel de control
para que los nifios no puedan utilizar el homo de
microondas si usted no desea que Io hagan.
Para bloquear el panel de control:
OPRIMA
durante 4 segundos
Se escuchar&n dos tonos y _1 aparecerd en la
3antalla. Cuando se haya bloqueado el panel,
se escuchar&n 3 tonos y aparecer_ LOCK
(BLOOUEAR) cuando oprima cualesquiera de
los botones a excepci6n de EXHAUST FAN y
LIGHT, los n_meros 1 y 2, y START/ENTER.
Para desbloquear el panel de control, realice Io
siguiente:
OPRIMA
duJ'ante 4 ,s_un_:los
Se escuchar&n dos tonos y _1 se eliminar_ de
la pantalla.
Cbmo utilizar la funcibn
demostracibn/aprendizaje
Puede programar su homo de microondas para
visualizar las instrucciones conforme las vaya
introduciendo sin tener que encender el
magnetrbn. Esta funcibn le ayudara a aprender
cbmo utilizar su homo sin necesidad de cocinar
alimentos realmente,
Para programar la funcibn demostracibn
aprendizaje:
OPRIMA
durante 4 segundos
Sonardn dos tonos y aparecer_, una "d" pequefia
en la pantalla.
Para cancelar la funci6n demostracibn/
aprendizaje:
OPRIMA
durante 4 segundos
Se eseuchar_n dos tonos y desaparecer:_ la "d"
de la pantalla.
63

C6mo utilizar la parrilla de cocci6n
La pan'ilia de coccibn le proporciona un espacio
adicional para cocinar en m:_s de un recipiente a
la vez.
Si necesita una parrilla de repuesto, puede
ordenar una a Centro de Servicio Sears, o
Ilamando al 1-800-366-7278. Aseg,',rese de tener
a la mano el n_mero de modelo cuando ordene.
Cbmo colocar la parrilla
Coloque la parrilla hasta cue se encuentre bien
firme en los soportes
para la parrilla que
se encuentran en las
paredes laterales del
homo.
OBSERVACIONES:
• Use guantes para homos para sacar alimentos
del homo de microondas,
• No deje la parrUla metdlica en el homo. Podria
ocasionarse una descarga el_ctdca o daff;ar
el homo si alguien enciende el homo
accidentalmente.
• No opere el homo con la pan'ilia met_,lica en el
piso del homo. Esto da_aria el acabado interior.
• Utilice la parrilla solamente en el homo de
microondas.
• No utilice la parrilla con el recipiente para dorer.
• No permita que el recipiente con alimentos que
se encuentre en la parrilla toque las partes
supedor y laterales del homo.
• No cocine alimentos directamente sobre la
parrilla. Colbquelos en recipientes especiales
para homos de microondas.
• No coloque recipientes met_licos para cocinar
sobre la pardlle.
• Utilice la parrilla de coccibn solamente cuando
cocine a mds de un nivel.
64

C6mo utilizar el extractor
El bot6n en la parte inferior izquierda del panel de
control regula el extractor de 2 velocidades.
1. Elija la velocidad del extractor.
NOTA:Si la temperatura de la superficie infedor
de cocci6n o su margen Ilegara a calentarse
demasiado, el extractor en la campana de
ventilaci6n se activar& autom&ticamente en la
velocidad HIGH (ALTA) para proteger el horno.
Es posible que permanezca encendido hasta
por una hora para enfriar el homo. Si esto
ocurre, el bot6n FAN (EXTRACTOR) no
apagar_ el ventilador.
OPRIMA
(una vez para velocidad alia y dos
veces para ve|ocidad baja)
2. Apague el ventilador cuando Io desee.
OPRIMA
116 2 veces, dependiendo de la
velocidad del ventilador}
C6mo utilizar la luz para la la superficie de preparaci6n
de alimentos
El boton en la parle inferior derecha del panel de
control regula la luz de para la superficie de
preparaci6n de alimentos/tablero.
1,Encienda la luz.
OPRIMA
(una vez para luz est_ndar y dos
veces pare luz noctuma)
2. Apague la luz cuando Io desee.
OPRIMA
(1 6 2 veces, dependiendo de la
programaci6n de la luz)
65

C6mo programar el reloj
Cuando conecte pot primera vez su homo de
microondas o despues de una falla eldctdca, la
pantalla desplegar_ el signo ":" de manera
intermitente. Si no se programa una hora, el signo
":', destellar& hasta que presione alg_n botbn.
1. Oprima CLOCK.
OBSERVACIONES:
• Si selecciona una horano v&lida y oprime
CLOCK (RELOJ),-seescuchar_n 3 tonos.
Introduzca la hora correcta.
• Si oprime OFF/CANCEL (APAGAR/CANCELAR)
alprogramar el reloj, la pantalla desplegar& la
t31timahora que se programb del dia.
• Para apagar el reloj, opdma CLOCK, el n_mero 0
y CLOCK nuevamente, la hora que se habia
programado desaparecerd y aparecer_ el signo
":"en la pantalla
OPRIMA
USTED VIERA
2. Introduzcalahora del dia.
Ejemplo para las12:00:
OPRIMA uS'rED VERA
3. Termine la programacibn.
OPRIMA USTED_
66

C6mo utilizar el cron6metro
Puede utilizar su homo de microondas como un
cron6metro. Utilice el cronometro para cronometrar
hasta 99 minutos y 99 segundos.
1. Opdma KITCHEN TIMER.
NOTA: El homo puede funcionar mientras se
utiliza el cron6metro. Para ver el cron6metro
mientras funciona el homo, oprima KITCHEN TIMER
(CRONOMETRO).
OPRIMA
USTEDVERA
2. Programe el tiempo a contar en forma regresiva.
Por ejemplo, para 1 minuto, 30 segundos:
NOTA: Si programa m&s de 4 digitos,
desaparecer_ln los primeros 4 y apareceran
los siguientes a la derecha.
OPRIMA USTEDVERA
3. Inicie la cuenta regresiva.
NOTA: Si no realiza este paso dentro de los
5 segundos despues de realizar el paso 2,
aparecera "START?(&INICIAR?)". Despues
tendrA 1 minuto para oprimir START/ENTER
(INICIAR/INTRODUCIR) o para oprimir el
KITCHEN TIMER (CRONOMETRO) antes de
que la pantalla vuelva a la hora del dia.
AI final de la cuenta regresiva:
OPRIMA
o
START
m
USTEDVERA
1
USTEDVERA
Para cancelar el cronbmetro:
Durante la cuenta regresiva:
OPRIMA
( 0")--
(se escuchar_ un tono largo)
USTEDVERA
(horn del dla)
67

C6mo utilizar ADD ONE MINUTE (UNMINUTOMAS)
ADD ONE MINUTE permitecocinar losalimefltos
durante I minutoa un nivelde energiade coccibn
de 100%, o bien, agregarun minutoextraal ciclo
de coccibn. TambiL,n Io puedeutilizarpara
prolongarlos ciclosde coccibnen mt_ltiplosde
1 minuto, hasta 99 minutos.
OBSERVACIONES:
• Para prolongarlos ciclosde coccibnen mdltiplos
de 1 minuto,opdmaADD ONE MINUTE
repetidamente durantela cocci6n.
• Despu_s de cerrarla puerta, puede introducir
ADD ONE MINUTE sintener que opdmir
START/ENTER (INICIAR/INTRODUCIR).
• Si opdmeADD ONE MINUTE durante lacoccibn,
el homococinar=lal nivelde energiade coccibn
seleccionadapreviamente.Sioprime ADD ONE
MINUTE despu_sde haberterminadolacoccibn,
el homococinardal nivelde energ{ade coccibn
del 100%. Puede cambiarlatemperaturade
coccibnsioprime POWER (ENERGIA),despu_s de
haberoprimidoel botbnADD ONE MINUTE, y
luegooprimirlosbotonesnum6dcospara
determinarlanuevatemperaturade cocci6n, y
finalmenteSTART/ENTER(INICIAR/INTRODUCIR).
• Puede utilizarADD ONEMINUTE sblo para la
funcibn de ciclode coccibn.
1. Cercibresede que lacomidaest6 dentrodelhomo.
2. OprimaADD ONE MINUTE. OPRIMA uS'rED VER/k
minuto:Ejemplo,para cocinardurante 1
C6mo cambiar los tiempos de cocci6n preestablecidos
Si algt_ntiempo de coccibn preestablecido es
demasiado largo o demasiado corto, puede
prolongaro reducirel tiempo de coccibndespu_}s
de seleccionarAUTO COOK, AUTO REHEAT,
AUTO DEFROST, POPCORN, BEVERAGE, BAKED
POTATO, FROZEN VEGETABLE o FROZEN
ENTREE. Sblo podrd cambiar los tiempos de
coccibn antes de iniciar estos.
Por ejemplo,en AUTO REHEAT,despu6s de
seleccionarel tipo de alimento e introducir
la canUdad:
Para prolongarel tiempode coccibn: OPRIMA uS'rED VE FI_,
UnB vez
Para reducirel tiempode coccibn: OPRIMA
dos vece8
(ejemplo para recalefltar
auton_carnente)
USTED VER/t.
Para restablecereltiempo de coccibn original: OPRIMA
trim vece8
68
USTED VEFIA

C6mo utilizar su horno de
microondas
Esta seccion le proporciona las instrucciones para operar cada funci6n. Por favor, lea cuidadosamente estas
instrucciones.
Cocinar a potencia de cocci6n alta
1. Coloque la comida dentro del homo y cierre
la puerta.
2. Oprima COOK TIME (TIEMPO DE COCCION).
OPRIMA
COOKTIME
USTED VERA
3. Introduzca el tiempo de cocci6n.
Ejemplo para 1 minuto, 30 segundos:
OPRIMA USTED VEP_
4. Encienda el homo.
OPRIMA
I START
ENTER PI
]
USTED VERA
AI terminar el tiempo de cocci6n:
C6mo cambiar las instrucciones
Puede cambiar el tiempo de coccibn en
cualquier momento durante la cocci6n si
repite los pasos 2, 3, y 4,
USTED VER/_,
{se escuchar6n cuatro
tonos)
69

Como cocinar a diferentes energias de cocci6n
Para mejores resultados, algunas recetas
requieren diferentes niveles de energia de cocci6n.
Mientras menor sea la energia de cocci6n, m&s
lenta ser_i esta. Cada n6mero en el panel
corresponde tambi6n a un porcentaje distinto
de la energia de coccion. Muchas recetas en los
recetarios de homes de microondas le indican por
nL_mero, porcentaje o nombre, el nivel de energia
de cocci6n que debe utilizar.
El siguiente esquema le proporciona el porcentaje
de energia de cocci6n para cada nSmero en el panel
correspondiente, asi como el hombre de la energfa
de cocci6n que se utiliza m&s com0nmente. Tambien
le indica cuando utilizar cada uno de los niveles de
energia de cocci6n. Siga las instrucciones de la
receta o del empaque, si las tiene.
NOTA: Consulte un recetario confiable para obtener
los tiempos de cecci6n.
ENERGiA DE COCCI(_N NOMBRE CUANDO SE UTILIZA
10=100% de la energia total Alta • Para calentar r_pidamente muchos alimentos
(autom_tica) de facil preparaci6n y alimentos con alto
contenido de agua, tales come sopas y bebidas
• Para cocinar trozos peque_os de came suave,
came molida, piezas de ayes, filetes de
pescado y la mayoria de las verduras
9=90% de la energia total • Para calentar cremas
8--80% de la energia total • Para calentar arroz, pasta o platilios al homo
que se derraman
7=70% de la energia total Media-Alta • Para cocinar y calentar alimentos que
necesiten una energia de cecci(_n menor que
la alta (por ejemplo, pescado entero y pastel
de came) o cuando la comida se este
cocinando demasiado r_lpido.
° Para volver a calentar una sola porci6n de
comida
6--60% de la energia total • Para cocinar alimentos que requieran
cuidados especiales, tales como queso y
platillos a base de huevo, budines y natillas
• Para cocinar platillos que no se derraman,
tales como la lasaSa
5=50% de la energia total Media • Para cocer jam6n, aves enteras y asados a
fuego lento
• Para derretir chocolate
4=40% de la energia total • Para cocer a fuego lento los estofados
• Para calentar pastas
3=30% de la energia total Media-Baja, • Para descongelar alimentos, tales como pan,
Descongelar pescado, Games, ayes y alimentos precocidos
2=20% de la energia total • Para suavizar mantequilla, queso y helados
1=10% de la energia total Baja • Para mantener la comida caliente
• Para quitade Io frio alas frutas
NOTA: Despues de que haya intreducido el tiempo de cocci6n, tambi6n podr_l utiUzar el bot6n de
POWER (ENERG{A) como un segundo cron6metro si introduce "0" como energia de cocci6n. El homo
contara en forma regresiva el tiempo de cocci6n que estableci6 sin cocinar.
7O

C6mo cocinar a diferentes energias de cocci6n (cont.)
1. Coloque su comida en el homo y cierre la puerta.
2. Oprima COOK TIME (TIEMPO DE COCCI_N). OPRIMA USTED VERA
3. Introduzcaeltiempo de coccibn.
Por ejemplo, para 7 minutos,30 segundos:
OPRIMA USTED VEFL4
4. Establezcael nivelde energiade coccibn.
OPRIMA
USTED VERA
Por ejemplo, para un nivelde energ{ade
coccibn de150%:
OPRIMA USTED VEFLA
O
(repitaesta operac_6nbasra
clue aparezca el nivel de
energla de coccl6n deseado)
conUn_a en la sigulente p_llna
71

Como cocinar a diferentes energias de cocci6n (cont.)
5. Encienda el homo. OPRIMA USTED VERA
( START 1re'hEn_
AI terminar el tiempode coccibn:
C6mo cambiar las instrucciones
Puede cambiar el tiempo o la energ|a de coccl6n
en cualquler rnomento si repite los pasos 2, 3
y/b 4y5.
;6mo cocinar por pasos
Para mejores resultados, algunas recetas requieren
una energia de coccion para un determinado lapso
de tiempo y otra energ{a de coccibn para otro lapso
de tiempo. Puede programar su homo para cambiar
de un nivel de energfa a otro autom&ticamente
hasta tres pasos diferentes.
USTED VER/_
(seescuchar6ncuatro
tonos)
Puede programarsusfunciones de coccibnon
cualquierorden. Sinembargo, siutiliza AUTO
DEFROST (DESCONGELADOAUTOMATICO),
6ste deber&set el primerpaso a realizar.
1. Coloque lacomida en el homo y cierrela puerta.
2. Oprima COOK TIME (TIEMPO DE COCCION). OPRIMA uS'rED VERA
3. Introduzca el tiempo de coccibn para el
primer paso.
Por ejernplo, para 7 minutos, 30 segundos:
OPRIMA USTEDVER/t,
72

C6mo cocinar por pasos (cont.)
4. Establezcala energia de cocci6n para el OPRIMA
primer paso.
USTED VERA
Ejemplo,para un nivelde energiade coccibn
del 50%:
OPRIMA
0
(repita la operad6n hasta
que aparezca la energla
de cocd6n deseada)
USTED VERA
5. Repita los pasos 2, 3 y 4 para programarel tiempo
y laenergfade coccibn para cada paso adicionaL
6. Encienda el homo. OPRIMA USTED VEFLA
Despu6s de haber completado el primer paso,
los siguientes se contar_n de manera regresiva.
AI terminar eltiempo de coccibn:
(elprimerpasosicodna en
des pasos)
USTED VE PJt,
Cbmo cambiar las instrucciones
Puede cambiar los tiempos de cocci6n o los
niveles de energ|a de un paso en cualquier
momento despu6s de que se Inloie el proceso,
si replte los pasos 2, 3 y/6 4 y 5.
(se escucharfm 4 tonos)
73

C6mo utilizar AUTO COOK (COCCIbN AUTOMATICA)
Puede cocinar alimentos preparados para homos
de microondas seleccionando simplemente una
cantidad y categoda. AUTO COOK tiene tiempos y
niveles de energ[a de coccibn preestablecidos
para 7 categodas (vet el esquema siguiente).
Para utilizar AUTO COOK, siga estos pasos:
1. Oprima
una vez
Usted
ver_
2. Oprima AUTO COOK de I a 7 veces para
seleccionar el Upo de alimento,
_ Ejemplo
para arroz
0 una voz
Oprima un ntlmero del panel para seleccionar
el tipo de alimento.
(_ Ejemplo
pafa arroz
Usted
ver_
Sjem_o
para 8rroz
3. Optima unoo m;_sn_merosdel panelpara
introducirla cantidad.
_ jemploparauna taza
Usted
ver_
Eiemplo para
unataza
4. Oprlma
Usted
vertt
(la cuenta
regre_va
puede variar)
OBSERVACIONES:
• Si no introduceuna cantidaden 2 segundos,
AUTO COOK lesolicitar&que elijauna cantidad.
Tendr_ 1 minuto para introducirla cantidady para
oprimirSTART/ENTER. Deno ser asi,AUTO
COOK se cancelar&.
• Si oprimeAUTO COOK 8 veces,la pantalla
volver_al programapara arroz.
• Si necesita m;_so menostiempo de coccibn,no
oprima el botbnAUTO COOK nuevamente.
Oprimael botbn POWER antesde oprimirSTART/
ENTER. (Vea =Chinocarnbiartiemposde coccibn
preestablecidos"en laseccibn"Conozca su
homo de microondas").
• Cuandococine tocino,tengaen cuenta que las
diferenciasde grasa,came, espasor y procesos
de curado afectar_n lacoccibn deltocino.
Generalmentelos trozos regularesde tocino
promedianaproximadamente16 rebanadas
por libra.
74

C6mo utilizar AUTO COOK (COCClON AUTOMATICA) (cont.)
Este tabla le muestra como seleccionar un tipo de alimento y las cantidades que puede elegir para cada tipo.
OPRIMA U OPRIMA EL NUMERO
ALIMENTO AUTO COOKt DEL PANEL CANTIDADES QUE PUEDE ELEGIR
Arroz una 1 0.5, 1, 1.5 6 2 tazas t_
(118 ml, 237 ml, 355 ml 6 473 ml)
Verduras frescas dos veces 2 1 a 4 tazas (237 ml a 946 ml)
Verduras congeladas 3 veces 3 1 a 4 tazas (237 ml a 946 ml}
Verduras enlatadas 4 veces 4 1 a 4 tazas (237 ml a 946 ml)
Tocino 5 veces 5 1 a 6 piezas, espesor normal
Cereal (instan_neo) 6 veces 6 1 a 4 porciones
Pan tostado francds 7 veces 7 1 a 4 piezas
t DebeopdmirAUTOCOOKunavezantesde elegireltipodecomida.
tt Programe0,5tazasaloprimir"0" y"5"osolamente"0" o solamente"5".Programe1.0tazaaloprimir"1" y "0" o solamente"1".
Programe 1.5tazasaloprimir "1" y "5".Programe2.0tazasaloprimir "2"y "0" oso_amante"2".
75

C6mo utilizar AUTO REHEAT (RECALENTADOAUTOM/ TICO)
Puede volver a calentar alimentos preparados
para hornos de microondas simplemante
seleucionando una cantidad y categoHa. AUTO
REHEAT bane tiempos y niveles de energ|a de
coccibn preestablecidos para 5 categorias (ver la
tabla siguiente).
Para utilizar AUTO REHEAT, siga estos pasos:
1. Oprima
urm vez
Ustod
ver'_
3. Oprima un n_merodel panelpara introducirla
cantidad.
Ejemplo para
1 rebanada
Uated
ver_
Ejernplo pare
1rebanada
4. Oprima
Usted
ver_
(cuentaregmsiva
puedevariar)
2. Oprima AUTO REHEAT de 1 a 5 veces para
elegir eltipo de comida.
_ .jeml_o pare
1rebanada
der_=a
un8 vez
0
Oprima un nOmerodel panel para elegir eltipo
de comida.
_ jemplopara
t rebanada
dep_za
Usted
ver_
Ejemplopare
1 rebanada
dep_zza
OBSERVACIONES:
• Si no introduceunacantidad en 2 segundos,
AUTO REHEATle solicitardqua elija una
cantidad.TendrbI minutopara introduciruna
cantidady pulsarSTART/ENTER(INICIAR/
INTRODUCIR). De no serasi, AUTO REHEAT
se cancelan_.
• Si pulsaAUTO REHEAT6 veces, iapantalla
volverdal programapara rebanadade pizza.
• Sinecesita mbs, omenos tiempode cocci6n, no
optimaAUTO REHEAT nuevamente.Optima el
botbnde POWER (ENERGIA)antesde oprimir
START/ENTER.(Vea=Cambiar tiemposde
coccibnpreestablecidos"en lasecci6n
=Conozcasu..." ).
• Cuandosaliente nuevamenteun muffino bagel
grande(4 onzas), utiliceel programapara
2 piezas.El programapara 1 piezacalienta
1 muffino bagelde tamat_oregular,b 2 panes
de cenar paquetios.
Esta tabla le mostrar_ c6mo elegir el tipo de comida y las cantidades que puede seleccionar para cada tipo.
OPR|MA O OPRIMA UN CANTIDADES QUE PUEDE
COMIDA AUTO REHEAT t- NOMERO DEL PANEL ELEGIR
Rebanada de pizza una vez 1 1 a 3 rebanadas, 5 onzas
(142 gr) cada una
Sopa/Salsa dos veces 2 1 a 4 tazas (237 ml a 946 ml)
Platlllos al homo 3 veces 3 1 a 4 tazas (237 ml a 946 ml)
AIIrnentos horneados 4 veces 4 1 a 6 piezas, 2 onzas (57 gr)
cada una
Plato (de comma) 5 veces 5 1 porcibn (6 1 plato)
tDebeoprimirAUTOREHEATunavezantesdeelegirelIJpodecomida.
76

C6mo utUizar AUTO DEFROST (DESCONGELADOAUTOMATICO
Puede descongelar alimentos si elige una categoria 4.Oprima ("
y establece un peso. AUTO DEFROST tiene L START
tiempos y niveles de energia de cocci6n _T_.
preestablecidos para 3 categories (vea la tabla
Usted
siguiente), verd
Para utilizar AUTO DEFROST, realice los
siguientes pasos:
1.0prima _
una VOZ
Usted
verd
2.Oprima AUTO DEFROST de 1 a 3 veces para
seleccionar el tipo de comida.
Ejemp|o para
cames
una vez
0
Pulse un nt3mero del panel para elegir el tipo
de comida.
Ejemplo carnes
para
Usted
Ver_
Ejemplo para
cames
3.Oprima et n0mero(s)de bot6n para introducir
el peso.
Ejemplo pars 1.1 Ibs
Usted
verd
dos veces
Ejemplo para
1,1 Ibs
}
(cuenta regresiva
puede variar)
OBSERVACIONES:
°Si no introduce un peso en 2 segundos, AUTO
DEFROST le solicitara que introduzca un peso.
Tendr& 1 minuto para introducir el peso y para
oprimir START/ENTER (INIClAR/INTRODUCIR).
De no ser as(, AUTO DEFROST se cancelar&,
• Si introduce un peso mayor que el peso mas alto
permitido para su programaci6n de alimentos, se
escuchar&n 3 tonos y aparecera en la pantalla
"RETRY" (REINTENTAR) cuando oprima
START/ENTER.
°Si selecciona AUTO DEFROST 4 veces, la
pantalla volverd al programa para Cames.
"Si necesita mas o menos tiempo de
descongelado, no oprima AUTO DEFROST
nuevamente. Optima el botSn de POWER
(ENERG[A) antes de oprimir START/ENTER.
(Vea "Cambiar niveles de energia de cocci6n
preestablecidos" en la seccion "Conozca su ...").
"Vea la "Tabla de descongelado automa.tico"
mas adelante en esta secci6n para vet las
instrucciones para descongelar cada alimento.
"Para descongelar los articulos que nose
encuentren en la tabfa "descongelado
automdtico," utilice el 30% de la energia
de cocci6n. Consulte un recetario confiable
para obtener informaci6n acerca de la
descongelaci6n.
Para un descongelado parejo y
completo
°La forrna del empaque afecta la rapidez con la
que se descongelardn los alimentos. Los empaques
con poca profundidad se descongelar&n mas
r&pido que un envase profundo.
• Separe les piezas conforme empiecen a
descongelarse los alimentos. Las piezas separadas
se descongeian de manera mas unfforme.
°Utilice pequefios pedazos de papel aluminio para
proteger partes de los alimentos tales como alas
de polio, los extremos de las patas, colas de
pescado o las areas que empiecen a calentarse.
Cercibrese de que el papel aluminio no toque los
lados, el fondo o la parte superior del homo.
continOa en la sigulente plglna
77

Como utilizar AUTO DEFROST (DESCONGELADOAUTOMATICO)
cont.)
Esta tabla le indica la manera de elegir el tipo de comida y los pesos que puede establecer para cada tipe.
OPRIMA O OPRIMA EL NUMERO PESOS QUE PUEDE ESTABLECER
COMIDA AUTO DEFROST t DEL PANEL (en d_cimas de libra)
Cames una vez 1 1 a 6.6 (45 gr a 2994 gr)
Ayes dos veces 2 1 a 6.6 (45 gr a 2994 gr)
Pescado 3 veces 3 1 a 4.4 (45 gr a 1996 gr)
t_ oprimirAUTODEFROSTunavezantesde elegireltipode comida,
Tabla de descongelado autom tico
Programaci6n para carnes
AUMENTO
INSTRUCCIONES ESPECIALES
Came de res
Came molida
Came molida, Tortitas
Medallones, Lomo en bisteces,
Estofado al homo, Estofado de
espaldilla, Estofado de rollos
de came
Estofado
Cordero
Cubos para estofado
Chuletas (1 pulgada [2,5 cm]
de grueso)
Cerdo
Chuletas (1,_pulgada [13 mini
de grueso), Hot Dogs, Costillas
de cerdo, Costillas estilo
campestre, Estofado de Iomo
(sin hueso), Salchich6n
Salchich6n
Se debe cubrircon papelaluminiolaspartesgrasosaso angostasde
cames grandesde forma irregulary cortes de came grasosaal iniciode
los ciclosdedescongelado.
No descongelemenos de _Ade libra(133 gr).
No descongelemenos de dos tortitasde 4 onzas(133 gr).
Coloque en una parrillapara rostizaren microondas.
Coloque en un plat6n pera homearen microondas.
Coloque en un platbnpara homearen microondas.
Coloque en una parrillapara rostizaren microondas.
Coloque en una parrillapara rostizaren microondas.
Coloque en un plat6n Loamhomearen microondas.
78

Tabla de descongelado autom tico (cont.)
Programacibn para pescados
ALIMENTO
INSTRUCCIONES ESPECIALES
Pescados
Filetes
Bisteces
Entero
Coloque en un platon para homear en microondas. Separe
cuidadosamente los filetes bajo agua fria.
Coloque en un platbn para homear en microondas. Haga correr
agua ffia sobre el pescado para terminar de descongelar.
Coloque en un plat6n para hornear en microondas. Cubra la cabeza
y la cola con papel aluminio. No deje que el papel toque los lados
del homo. Para terminar de descongelar sumerja en agua fria.
Mariscos
Cangrejo, Colas
de langosta,
Camarbn, Cane
de hacha
Coloque en un platbn para hornear en microondas.
Programacibn para ayes
ALIMENTO INDICACIONES ESPEClALES
Polio
Entero
(hasta 91/2Ibs [4.3 Kg])
Coloque el polio con la pechuga hacia arriba en una parrilla especial
para rostizar para microondas. Termine de descongelarlo
sumergi6ndolo en agua fria. Retire las menudencias cuando el polio
est# parcialmente descongelado.
En piezas Colbquelo en una parrilla para rostizar en microondas,
Termine de descongelarlo sumergiendolo en agua frfa.
Codomices
Enteras Colbquelas en una parrilla para rostizar en microondas. Termine de
descongelarlas sumergiendolas en agua fr{a.
Pavo
Pechuga
(menos de 6 Ibs [2.7 gr_
Colbqueloen una parrilla para rostizar en microondas.Termine de
descongelarlosumergi6ndoloen agua fria.
79

Consejos de descongelado
. Cuando utilice AUTO DEFROST,
(DESCONGELADO AUTOMATICO), necesita
introducir el peso nato (el peso del alimento
menos el del recipiente). Introduzca el peso Io
mas cercano a 1A0Ib (46 g).
• $61o utilice el AUTO DEFROST para alimentos
crudos. AUTO DEFROST le brinda los mejores
resultados cuando el alimento a descongelar est&
completamente congelado. Si el alimento est_
parcialmente descongelado, siempre programe
un peso rnenor (para un periodo de
descongelamiento menor), para evitar que el
alimento se cueza.
• Para obtener mejores resultados, se incluye un
tiempo de reposo preestablecido en el perfodo de
descongelamiento. Esto pudiera hacer que el
tiempo de descongelamiento parezca m&s largo
de Io esperado. (Para mayor informaci6n acerca
del periodo de reposo, consulte la secci6n
"Consejos pera cocinar con microondas, en la
"Guia de cocina").
Tabla de conversi6n de peso
Probablemente est_ usted acostumbrado a que el
peso de los alimentos se describa en libras y onzas
(por ejemplo 4 onzas equivalen a _Ade libra). Sin
embargo, para poder programar el peso del
alirnento en el AUTO DEFROST, debe especificado
en libras y dL_cimasde libra.
Siel peso en el empaque del alimentoseexpresa
en libras, usted puede utilizarla siguientetabla
para convertirel peso a dL=cimas.
PESO EN DI_CIMAS
.10
.20
.25 Un cuartode libra
.30
.40
.50 Media libra
.60
.70
.75 Tres cuartos de libra
.80
.90
1.00 Una libra
PESO EQUIVALENTE EN GRAMOS
45
91
113
136
181
227
272
318
340
363
408
454
80

C6mo utilizar POPCORN (PALOMITASDE MAIZ)
Usted puede preparar palomitas de ma{z
empacadas comercialmente para homo de
microondas con s61o opdmir un botbn. La
cantidad de veces que oprima el botbn deterrnina
el tamaSo de la bolsa de palomitas que su homo
cocinar&.
Para obtener mejores resultados:
• Cocine s61ouna bolsa a la vez.
• Si est& usando un recipiente especial para
preparar palomitas de maiz en microondaS, siga
las instrucciones del fabricante.
Para utilizar el bot6n POPCORN slga los
siguientes pasos:
1. Coloque la bolsa en el cen_o del plato
giratorio.
2. Oprima el botbn POPCORN de 1 a 3 veces
para seleccionar el tamaSo de la bolsa.
Ejemplopan.
3.5onzas
Una vez
Ustod
ver_
Ejemplo para
3.5 onzas
OBSERVACIONES:
" Si oprimeel botbn POPCORN 4 veces, la
pantallaregresar&al programa de 3.5 onzas
(100 gr).
• No necesitaoprimirSTART/ENTER para iniciar
laoperaci6ndel homo. El homo iniciar&la
operacibnen 5 segundos.
• Sinecesita mayor o menor tiempode coccibn,
nooprima el bot6n POPCORN de nuevo. Oprima
elbotbn POWERantesde que el homo empiece
a cocinar.(Vea "Cbmo cambiar lostiempos
de coccibnpreestablecidos"en laseccibn
"Conozca suhomo de microondas").
Existen diferencias entre las distintas
mareas de palomitas de maiz
Quetan biense cocinensus palomitas,depender&
de la mareay de lacantidad de grasa que tengan.
Pruebecon variasmarcas pera decidircu&lse
cocinamejor. Paraobtener mejoresresultadosuse
bolsasnuevasde palomitasde maiz.
(Is cuenta
regresiva
puede vadar)
Esta tabla lemuestra como seleccionaruntamaSo
de bolsa.
TAMAI_O DE _ BOLSA OPRIMA EL
(onzas) BOT_)N POPCORN
3.5 (100 gr) una vez
3.0 (85 gr) dos veces
1.75 (50 gr) 3 veces
81

C6mo utilizar BEVERAGE (BEBIDAS)
Puede calentar una o dos tazas de 8 onzas (227 gr)
de alguna bebida con s61o oprimir un boton. La
cantidad de veces que oprima este botbn,
determinar_ el n0mero de tazas que su homo
calentar&
OBSERVACIONES:
• Si oprime el boton BEVERAGE 3 veces, la pantalla
regresa a la programaci6n para una taza.
• No necesita oprimir el bot6n START/ENTER para
que el homo inicie su operaci6n. El homo
6omenzar& a calentar por s[ solo en 5 segundos.
• Si usted quiere mayor o menor tiempo de
calentamiento, no optima el botbn BEVERAGE
de nuevo. Optima el botbn POWER antes de que
el homo empiece a cocinar. (Vea "Cbmo cambiar
los tiempos de coccibn preestablecidos" en la
seccibn "Conozca su homo de microondas".).
1. Coloque su(s) taza(s) de bebida(s) en el homo y
cierre la puerta.
USTED VEI_2. Oprima el botbn BEVERAGE.
Si quierecalentar I taza, espere 5 segundosy
el homo comenzaraa calentarautombticamente
para 1 taza.
OPRIMA
3. Cambie a 2 tazas, si Io desea.
OPRIMA USTED VERA
Despuesde 5 segundos,el homo empezaraa
calentar.
USTEDVERA
AI finalizar el tiempo de calentado:
(la cuenta regresiva - puede
variar de la anterior)
(ejemplo para 2 tazas)
USTED VER/_
82
(sonardn cuatro tonos)

C6mo utilizar BAKED POTATO (PAPASAL HORNO)
Puede cocinar de 1 a 4 papas para homear
(10 onzes [284 gr] a 13 onzes [369 gr] cada una),
a! presionar un sblobotbn. El nOmero de veces
que oprima este botbn determinar& el nt_merode
papas que su homo cocinar&.
OBSERVACIONES:
• Siopdme BAKEDPOTATO 5 veces, la pantalla
regresaal programa para 1 papa.
• No necesita opdmirSTART/ENTER para que homo
iniciesu operacibn.Elhomo empezar_ a cocinar
por s[s61oen 5 segundos.
• Si necesita mayoro menor tiempode cocci6n, no
opdma el bot6n BAKED POTATO nuevamente.
Oprima el bot6n POWER antes de que elhomo
empiece a cocinar.(Vea "Cbmo cambiar los
tiemposde coccibn preestablecidos"enlaseccibn
"Conozcasu homo de microondas").
Para obtener mejor papas al homo
Antesde homear, recuerdepicar laspapas con
untenedor variasveces. Despu6sde cocinarlas,
mantengalaspapas en el homo5 minutos m_s
paraque terminende cocinarse.
1. Coloque laspapas perforadasen el homoy
cierrela puerta.
2. Optima el botbn BAKED POTATO.
Si desea c.ocinar I papa. sblo espere 5
segundos,
OPRIMA USTED VEFLA
3. Si Iodesea puede cambiaresta opcibn
para 2 a 4 papas.
Ejemplopara 2 papas:
OPRIMA USTED VER/_
O
Despu6sde 5 segundos,el homo comenzar&
a cocinar.
Ejemplopara 2 papas:
(un _tO,n nurl_rl¢,o)
USTED VERA
AI finaldel tiempo de coccibn:
0a o_enta regreslva puede
varlar de la antedor)
USTED VER/_
(sonar_n 4 tonos)
83

Puede cocinar de I a 4 taz_s de verduras congeladas
con sblo oprimir un bot6n. La cantidad de veces que
opdma el bot6n determinara el nemero detazas que
su homo cocinar&.
OBSERVACIONES:
- Si oprime el bot6n FROZEN VEGETABLE 5 veces,
la pantalla regresar_ at programa para 1 taza.
* No necesita opdmir START/ENTER para que el
homo inicie su operaci6n. El homo comenzar& a
cocinar por si solo en 5 segundos.
,' Si necesita un mayor o menor tiempo de coccibn,
no oprima el boton FROZEN VEGETABLE
nuevamente. Oprima el bot6n POWER antes de
que el homo empiece a cocinar. (Yea "Cbmo
cambiar los tiempos de cocci6n preestablecidos"
en la secci6n "Conozca su homo de microondas".)
1. Coloque las verduras en el homo y cierre
la puerta.
2. Oprima el bot6n FROZEN VEGETABLE. OPRIMA USTED VEI:_
Si desea cocinar 1taza de verduras,
sblo espere 5 segundos.
3. Cambie a 2 6 4 tazas si Io desea.
Ejemplo para 2 tazas:
OPRIMA
0
USTED VEPu_
Despu6s de 5 segundos,el homo comenzar&
a cocinar.
Ejemplo para 2 tazas:
(unbot6n nun_rico)
USTED VER.&.
AI finalizar el tiempo de coccibn:
(lacuentaregresivapuede
variarde laantedor)
USTEDVERA
84
(sormr4n cuatro tonos)

C6mo utilizar FROZEN ENTREE (PLATILLOSCONGELADOS)
Puede cocinar platillos congelados de 10 b 20 onzas
(284 gr b 568 gr) con sblo oprimir un botbn. La
cantidad de veces que oprima el botbn determinara
el tamaSo del platillo congelado que su homo cocine.
OBSERVACIONES:
• Si oprime el botbn FROZEN ENTREE3 veces, la
pantallaregresar&al programapara 10 onzas
(284 gr).
• No necesita oprimir START/ENTER para que el
homo inicie su operacibn. El homo comenzar& a
cocinar por s{sblo en 5 segundos.
• Si necesita un mayor o menor tiempo de coccibn,
no oprima el botbn FROZEN ENTREE nuevamente.
Optima el botbn POWER antes de que el homo
empiece a cocinar. (Vea "Cbmo cambiar los
tiempos de coccibn preestablecidos" en la
seccibn "Conozca su homo de rnicroondas").
1. Coloque su platillocongelado en el plato giratorio
y cierre la puerta.
2. Optima el botbn FROZEN ENTREE.
Sidesea cocinarun platillocongelado de
10-onzas (284 gr),sbloespere 5 segundos.
OPRIMA USTED VEFL_
3. Cambie a 20 onzas(568 gr),si asf Iodesea.
OPRIMA USTED VEP_
O
Desp_es de 5 segundos,el homo comenzar&
a cocinar.
Ejemplopara 20 onzas:
USTED VEI:_
AI finalizar el tiempo de coccibn:
(la cuenta regreslva puede
variar de la anterior)
USTED VERA
(sonar_n 4 tonos)
85

C6mo utilizar HOLD WARM (CONSERVARCALIENTE)
Usted puede de manera segura conse_ar calientes
los alimantos cocinadosen su homo de microondas
hasta por 99 minutos, 99 segundos (alrededor de
1 hora, 40 minutos), Puede utilizar HOLD WARM
por si solo, o bien seguido autom&ticamente por un
ciclode coccibn.
OBSERVACIONES:
• HOLD WARM opera hasta per 99 minutos,
99 segundes.
• Abdr lapuertadel homo cancela HOLD WARM.
Cierre la puerta y oprima HOLD WARM; an
seguida, oprima START/ENTER(INICIAR/
INTRODUCIR) sirequiem m&s tiempe para la
funcibnHOLD WARM.
• Losalimentosque se cocinentapedos deber&n
mantenerse cubiertosal utilizarHOLD WARM.
• Enpasteleria,lospasteles,voltesdos,etc., depen
destaparsecuando se use HOLDWARM.
• Pararhantenercalianteslos alimentos,depen
cubdrsecuando se useHOLD WARM.
• No utilicem_s de un ciclode HOLD WARM
(alrededorde I hora,40 minutos).La calidadde
algunosalimantosse deteriorasise excede de
este tiempo.
1. Ponga el alimentocaliantecocinadoen el homo
y cierre la puerta.
2. Oprima HOLD WARM.
OPRIMA USTED VERA
3. Encienda el homo.
OPRIMA
[ START 1-- _
USTEDVER_,
Para hacer que HOLD WARM siga
automdticamente otro ciclo:
• Mientras est6 programandolas instrucclonespara
cocinar,oprima HOLD WARM antesde opdmir
START/ENTER, o durante elciclo.
• Cuando termineel t_ltimociclode coccibn
escuchar& dos tonos. Aparecer&la palabra
=WARM" ("CALIENTE")mientrasel homo
continuatrabajando.
86

C6mo cuidar su horno de
microondas
Para asegurarse que su homo de microondas se vea y funcione bien por mucho tiempo, debe darle el
mantenimiento apropiado. Para un cuidado adecuado, por favor siga cuidadosamente estas instrucciones.
Para las superficies interiores: Lave frecuentemente
con agua tibia jabonosa
y una esponja o lienzo
suave. Utilice solamente
jabones suaves, no
abrasivos o un
detergente suave.
Aseg,_rese de
mantener limpias las
dreas donde la puerta
y el marco del homo
convergen cuando
est_ cerrado. Limpie bien con agua limpia. Con el
tiempo pueden aparecer manchas en las superficies
debido a part{culas de comida salpicadas al
cocinar. Esto es normal.
Para manchas dificiles, hierva una taza de agua en
el homo durante 2 b 3
minutos. El vapor
suavizar_ las manchas.
Para eliminar olores
dentro del homo, hierva
una taza de agua con
jugo de limon o vinagre,
Para limpiar el plato giratorio y el soporte del
Plato giratorio plato giratorio, I_vese
con agua suave
jabonosa; para _reas
muy manchadas, utilice
un limpiador suave y una
esponja para tallar. El
plato giratorio y el
soporte del plato
giratorio son resistentes
platogiratorio a lavavajillas.
C6mo limpiar la parrilla de cocci6n
• L&vese a mano con un detergente y esponja
suaves o un cepillo
de nylon. S6quese
por completo,
• No utilice fibras o
limpiadores abrasivos
para limpiar ]a parrilla.
Para las superficies exteriores y el panel de
control: Utilice un
.-,...,..
lienzo suave con
limpiador de cristales
en aerosol. Aplique el
limpiador de cristales
en aerosol en el Iienzo
suave; no Io aplique
direetamente en el
homo.
NOTA: Los
limpiadores abrasivos,
flbras de acero o lana, trapos viejos, algunas
toallas de papel, etc., pueden da_ar el panel
de control y las superficies interiores y exteriores
del homo.
87

C6mo instalar y cuidar los filtros
No permita que la grasa y la mugre se acumulen en
los filtros para grasa. Esto reducira la eficiencia del
ventilador de! extractor y puede provocar un
incendio. Quite y limpie tos filtros para grasa al
menos una vez al mes.
NOTA: Su combinacion microondas campana viene
con un filtro de carbSn instalado para proveer aire
limpio y recirculado. El filtro de earbbn no puede
limpiarse y deber_ reemplazarse cada 6 a 12
meses. El accesorio (Nt_mero de parte 4393690)
est& disponible en su centro de servicio Sears
m&s cercano.
Peligro de Choque Electrico
Desconecte el suministro de energia antes
de quitar los filtros.
Vuelva a colocar todos los paneles antes de
hacer funcionar.
No seguir estas instrucciones puede
ocasionar la muerte o choque eldctrico.
Como quitar, limpiar y reinstalar
1. Desenchufe el horno de microondas o
desconecte el suministro de energia.
2. Para quitar los filtros de grasa empuje cada
filtro hacia arriba del
lado contrario a la
cejilla. Sujete la cejilla y
deslice el filtro hacia ue
lado. Jale el filtro hacia
abajo. El filtro caera.
Empuje
hacia arriba
3, Para quitar los filtros de carbbn, empuje la
parte de atras de cada
filtro. Esto liberara la
parte frontal del filtro,
del borde inferior. Haga
girar la parte frontal del
filtro hacia abajo y
deslocelo hacia afuera.
inferior
4. Remoje los filtros para
Mp AOO_IES AMONIA _
pondr_ negro o podria
rasa en agua caliente y
detergente suave.
Frote y agite para quitar
la grasa y mugre
pegada. Enjuague bien
y sacuda para secar.
No use amonia,
agentes de limpieza
corrosivos como
limpiadores de homo
base de lejia ni use
lavavajillas. El filtro se
daharse.
88

C6mo instalar y cuidar los filtros (cont.)
Borde
Borde
Inferior
5. Para cambiar los filtros de carb6n, empuje
c_da filtro hacia la
parte de atr_ls de la
abertura, entre los
J'_ hordes de arriba y de
)
abajo, contra los
resor{es. Haga girar la
parte frontal del filtro
hacia arriba contra el
borde superior. Deslice
el filtro hacia adelante
mientras Io empuja
contm el borde superior. El filtro quedar8
sotenido por el resorte entre los hordes.
6. Para volver a colocar los filb'os para grasa
deslice cada filtro hacia
el exterior de la
Aseg_rese de deslizar
el lado del filtro que no
tenga la cejilia. Sostenga
la cejilla con la otra
mano. Empuje hacia
arriba el lado de la
cejilla del filtro y deslice
el filtro af otto lado de
la abertura para
asegurarlo en su lugar.
7. Enchufe el homo de microondas o reconecte el
suministro de energia.
NOTA: No ponga en operacibnel ventiladorsinIo6
filtrosensu lugar.
C6mo cambiar las luces del horno y de la superficie
)ara preparaci6n de alimentos
La luz de la superficie para
preparacibn de alimentos
1. Desenchufe el homo de microondas o
desconecte el suministro de energ(a.
2. Quite el tomillo de montaje de la cubierta del
foco y retirela con
cuidado.
Tornillo
de montaje
3. Cambie el foco(s) por uno de 30 watts con
portalamparas (NOmero de parte 4393681),
elcual puede conseguiren su centro de servicio
Sears mds cercano.
4. Enchufe el homo de microondas o reconecte el
suministro de energia.
conUm_a en la sigulente I_glna
89

C6mo cambiar las luces del horno y de la superficie
)ara preparaci6n de alimentos (cont.)
La luz del horno
1. Desenchufe el homo de microondas o
desconecte el suministro de energia.
2. Quite los dos tomillos de montaje de las rejillas
de ventilaci6n que se
encuentran arriba de
la cubierta (los dos
tomillos exteriores).
3. Recorra la rejilla hacia adelante y levantela para
i quitarla.
5. Cambie el foco por uno de 30 watts con
porta[&mparas (N_mero de parte 4393681), el
cual puede conseguir en su centro de servicio
Sears mas cercano.
6. Cierre la cubierta del foco.
7. Deslice la parte superior de la rejil]a de
ventilacion a su lugar.
Oprima la par_e inferior
hasta que quede
perfectamente colocada.
Vuelva a colocar los
tomillos de montaje.
8. Enchufe el homo de microondas o reconecte el
suministro de energfa.
4. Levante la cubierta del foco.
Cubier_ delfoco
9O

Guia de cocina
Consejos para cocinar con microondas
Cantidad de alimentos
• Si usted incrementa o disminuye la cantidad
de alimentos que prepara, el tiempo que toma
para cocinarlos tambien cambiara. Por ejemplo,
si duplica las cantidades de una receta, agregue
un poco mas de la mitad del tiempo odginal para
cocimiento. Verifique el termino de cocimiento y
si es necesario incremente el tiempo en periodos
pequefios.
Temperatura inicial de los alimentos
• Mientras mas baja sea la temperatura de los
alimentos al momento de introducirlos al homo
de microondas, mayor sera el tiempo de
coccibn. Los alimentos a temperatura ambiente
se recalentar_n con mayor rapidez que los
refrigerados.
Composicibn de los alimentos
• Los alimentos con mucha grasa y azt_car se
calentar&n con mayor rapidez que aquellos que
contengan mucha agua. La grasa y el azecar
tambien alcanzaran una temperatura mds alta
que el agua en el proceso de cocci6n.
• Mientras m_s densos sean los alimentos,
mayor sera su tiempo de calentamiento. "Los
alimentos muy densos" como la came, roman
mas tiempo para volver a calentarse que otros
m&s ligeros, m&s porosos como los pasteles
esponjados.
Tama_o y forma
• Los pedazos m_s pequehos de alimentos se
coceran m_s r&pidamente que los grandes. De
igual manera, los pedazos con forma similar
entre si se cocinaran m_s uniformemente que los
que tienen formas distintas.
• En alimentos que tienen distintos grosores,
las partes mas delgadas se cocinaran con mayor
rapidez que las mas gruesas. Coloque las partes
mds delgadas de las alas y piernas de polio en el
centro del plato.
Cbmo cubrir los alimentos
Cubra los alimentos para:
• Evitar que salpiquen
• Reducir los tiempos de cocci6n
• Evitar que los alimentos se resequen
Cualquier cubierta que utiUce para tapados, debe
permitir el paso de tas microondas.
Cbmo liberar la presibn en los
alimentos
• Algunos alimentos (por ejemplo: papas al
homo, salchichas, yemas de huevo, y algunas
frutas) estan cubiertos firmemente por una piel
o membrana. Se podria formar vapor bajo la
membrana durante la coccibn, Io que pmvocaria
que los alimentos explotaran. Con et fin de
disminuir dicha presibn y evitar que exploten,
haga peque_as incisiones en los alimentos con
un tenedor o un palillo antes de cocinarlos.
Cbmo utilizar el tiempo de reposo
• Siempre deje reposar los alimentos despu_s
de cocinarlos. El dejar reposar los alimentos
despues de haberse descongelado o cocinado
permite que la temperatura se distribuya
uniformemente para mejorar el resultado en la
cocoi6n.
• El tiempo de reposo que destine depender& de
la cantidad de los alimentos que vaya a cocinar
asi como de su densidad. Algunas veces este
tiempo puede ser tan breve como el que toma
para sacar los alimentos del homo y Ilevarlos a
la mesa. Sin embargo, en alimentos de mayor
densidad yen cantidades tambi6n mayores, el
tiempo de reposo puede Ilegar a ser hasta de
10 minutos.
Mover y voltear los alimentos
• AI mover y voltear los alimentos, el calor
se distribuye r_pidamente hacia el centro del
plato, con Io que se evita el sobrecoc;miento
en las orillas.
contln,',a en la siguiente p&gina
91

Consejos para cocinar con microondas (cont.)
Acomodo de los alimentos
Para obtener mejores resultados, coloque los
alimentos uniformemente en el plato. Puede
hacerlo de distintas maneras:
• Si est_ cocinando varios alimentos iguales,
tales como papas al homo, colbquelas en forma
circular para obtener un cocimiento uniforme.
• Cuando cocine alimentos con formas o
grosores ir_gulares tales como pechugas de
polio, coloque las partes mas peque_as o
delgadas de los alimentos hacia el centro del
plato, lugar al que ei calor Ilegar_ al final.
• Acomode las rebanadas delgadas de came en
capas una sobre la otra.
• Cuando cocine o recaliente un pescado
entero, haga cortes en la piel - para evitar
que se agriete,
• No permita que los alimentos o recipientes
toquen las paredes del homo. Esto es con el
fin de evitar posibles descargas el_ctdcas.
Corno utilizar el papel aluminio
No deberan utilizarse recipientes de metal en un
homo de microondas. Aunque existen algunas
excepoiones. Si se trata de alimentos
preempacados en algun recipiente de papel
aluminio siga las instrucciones impresas en e_
empaque. Cuando se utilizan recipientes de papel
aluminio, los tiempos de cocci6n Ix)dr{an ser m_ls
largos debido a que las microondas solamente
penetrar_ln en la parte superior de los alimentos.
Si utiliza recipientes de alumlnio sin instrucciones
en el empaque, tome en cuenta Io siguiente:
• Coloque el recipiente dentro de otre de vidrio y
al_ada un Ix)co de agua de tal manera que cubra
el fondo del mismo a no mds de 1/4de pulgada
(6 mm) de alto. Esto asegurar_l un calentamiento
uniforme hasta el rondo del recipiente.
• Quite siempre la tapa para evitar da_ar el homo.
• Utilice solamente recipientes en buen estado.
• No uUlice recipientes con una profundidad
mayor que 3/4pulgada (19 ram).
• El recipiente debe estar Ileno [)or Io menos
hasta la mitad.
• Para evitar descargas el_ctticas debe existir
un m{nimo de 1/4pulgada (6mm) entre el
recipiente de aluminio y las paredes del homo,
I0 mismo entre dos recipientes de aluminio.
• Coloque siempre el recipiente sobre el plato
giratodo.
• Generalmente toma el doble de tiempo
recalentar alimentos en recipientes de papel
aluminio comparado con el que toma el hacerlo
en recipientes de plastico, vidrio, poreelana 0
papeL El tiempo en que un alimento est& listo
variard dependiendo del tipo de recipiente que
utilice.
• Deje reposar los alimentos de 2 a 3 minutos
despues de calentadospara que el calorse
distribuyade manera uniformeportodo el
recipiente.
Lo que no debera cocinar en su
horno de microondas
• No elabore conservas en el homo. Los frescos
de vidrio cerrados pueden explotar y causar
da_os al homo o lastimar a alguien.
• No utilice el homo de microondas para esterilizar
objetos (biberones, etc). Es dificil mantener el
homo a la temperatura necesaria para una
esterilizacibn segura.
92

Preguntas y respuestas
PREGUNTAS RESPUESTAS
i_Puedo poner en operacibn mi homo de
microondas sin el plato giratodo o voltear este
para colocar un plato m_.s grande?
i,Puedo utilizaruna parrillaen mi homo de
microondas para poder recalentar o cocinar en
dos niveles al mismo tiempo?
i,Puedo utilizarsartenesde metal oaluminio
indistintamenteen mi homo de microondas?
No. Si quita o voltea el plato giratorio obtendra
resultados poco satisfactorios. Los platos utilizados
en su homo deben ajustarse a la medida del plato
giratorio.
Puede utilizar una parrilla s61osi 6sta forma parte
de su homo de microondas. Si utiliza una parrilla
ajena a su homo de microondas podria obtener
resultados poco satisfactodos y/o provocar una
descarga el._ctrica.
Puede utilizarpapel aluminiopara proteccibn
(utilicepedazos pequeSosy sin arrugas),alambres
para brochetasy charolasde papelaluminiopoco
profundas(silachamla tiene ¾ de pulgada[19 ram]
de profundidado menos,debe Ilenarseal menos
hasta lamitad con alimentospara absorberla
energiade lasmicroondas).Nunca permitaque
metal algunotoque las paredeso la puerta. (Para
mayorinformacibnconsulte "C6mo utilizarpapel
aluminio"en la seccibn"Guia para cocinar").
i_Esnormalque el platogiratodose mueva en SL Elplatogiratoriose mueveen el sentidode las
cualquierdireccibn? manecillas del relojo en direccibncontraria, esto
depende de la rotacibndel motoral momento de
iniciarseel ciclode coccibn.
Algunasveces la puerta de mi homo de Estaaparienciaes normal y no afecta el
microondasse ve ondulada,i,Es esto normal? funcionamiento de su homo.
_,Qu_son esoszumbidos que seoyen cuando mi Lo que usted escuchaes el ruidodel transformador
homo de microondasest_ funcionando? cuandoel tubo magnetrbnest&en movimiento.
i,Por qu_ se calientael platocuando cocino en _l? AI calentarse los alimentos estosconduciran el
Pens6 que esto no deberfa suceder, calor al plato. Tenga a la mano guantes o
almohadillas aislantes para sacar los alimentos
despues de cocinarlos.
&Qu6 significa"tiempo de reposo"? "Tiempo de reposo" significa que los alimentos
deben retirarse del homo y cubdrse durante un
tiempo adicional para permitir que la coccibn
termine. Esto deja libre al homo para seguir
cocinando.
i,Por que sale vapor por la salida del extractor? Es normal que se produzca vapor al cocinar. El
homo de microondas ha sido diser3adopara sacar
este vaporpor la salidadel extractor.
_,Puedohacer palomitasde maiz en mi homo de
microondas?_,Cbmo puedo obtener los mejores
resultados?
Si. Haga palomitas de maiz especiales para homo
de microondassiguiendolas instruccionesdel
fabricante o utilizancloel botbn POPCORN
(PALOMITAS).No utilicebolsasde pabel normales.
Utilicela "prueba de o(do"deteniendo la operacibn
del homotan pronto como el sonidode los granos
reventandodecrezca a un =pop" cada 1 6 2
segundos.No vuelva a cocinar los granosque no
hayanreventado. No haga palomitasen recipientes
de vidrio.
93

Soluci6n de problemas
Muchos de los problemas al cocinar se deben generalmente a pequefios detalles que puede encontrar y
arreglar sin necesidad de herramientas de ningun tipo. Verifique la lista que aparece en esta pagina y la
siguiente antes de solicitar alg6n tipo de servicio. Si despues de esto todavia necesita ayuda consulte la
secci6n "Llame sin costo de Sears" en la p_lgina 100.
El horno de microondas no funciona
PROBLEMA CAUSA
Nada funciona.
El homo de microondas
no funciona.
• El cable no est& conectado a un circuito con el voltaje adecuado. (Consulte
las secciones: "Requisites electricos" en la pagina 51 y "Conexi6n el_ctrica"
en la p_lgina 58.)
• Se quem6 un fusible dom6stico o se desconect6 un interruptor de circuitos.
• La compafiia de luz tuvo una falla de energia.
• Esta utilizando el homo como cronbmetro. Oprima el boton OFF/CANCEL
(APAGAR/CANCELAR) para desactivar el cron6metro.
• La puerta no est& bien cerrada ni asegurada.
• No oprimi6 START/ENTER (INICIAR/INTRODUCIR).
• No sigui6 las instrucciones al pie de la letra.
• Una operaci6n que inicio anteriormente todav[a no termina. Oprima OFF/
CANCEL para cancelar la operaci6n.
Tiempos de cocci6n
PROBLEMA
La cornida no est_
bien cocida.
La pantalla muestra un
conteo de tiempo
decreciente pero el homo
no cocina.
CAUSA
• El suministro de energia electrica de su casa o los contactos en las paredes
es bajo, o m&s debil de Io normal. La compafiia de luz puede decide si el
voltaje de linea esta bajo. Su electricista o tecnico de servicio pueden
decirle si el voltaje est_l bajo.
• El nivel de energ{a de cocci6n no se programo segl3n las recomendaciones.
Verifique la tabla en la pagina 70.
• No program6 el tiempo suficiente para la cantidad de alimentos a cocinarse.
A cantidades mayores de alimentos, mayores tiempos de cocci6n.
• La puerta del homo no esta completamente cerrada.
• Programo los controles para la funcion de cronometro. Oprima
OFF/CANCEL para cancelar el cron6metro.
94

Plato giratorio
PROBLEMA
El plato giratorio
no gira.
CAUSA
• Ha apagado la funcion del plato giratorio (TURNTABLE ON/OFF). (Consulte
la seccion "C6mo calentar m&s de un plato con alimentos" en la pagina 63).
• El plato giratorio no est& colocado correctamente. Debe estar con el lado
correcto hacia arriba y descansar firmemente sobre el eje del centro,
• El soporte no funciona correctamente. Retire el plato giratorio y vuelva a
iniciar la operaci6n del homo. Si el soporte al3n no se mueve, Ilame al
t_cnico autorizado para su reparaci6n. Cocinar sin el plato giratorio puede
producir resultados poco satisfactorios.
Tonos
PROBLEMA CAUSA
No se escucha el tono
de programaci6n o de
fin de ciclo.
• No introdujo la instrucci6n correcta.
• Desactiv6 el tono. (Ver la secci6n "Sefiales sonoras" en la pdgina 61 .)
Visualizar mensajes
PROBLEMA
La pantalla parpadea ":".
CAUSA
• Hubo una interrupci6n de energia electrica. Vuelva a programar el reloj.
(Vea la secci6n "C6mo programar el reloj" en la p_igina 66.)
Si nada de Io anterior es la causa de1 problema vea la secci6n "N_meros de larga distancia sin costo de
SEARS" en la pdgina 100.
Por favor, registre la informacibn de su modelo.
Siempre que Ilame para solicitar servicio para su
aparato, necesita tener a ta mano los n,',meros
completos de modelo y serie. Puede encontrar esta
informaci6n en la plaoaJetiqueta del modelo y n_mero
de serie (yea "Funciones del homo de microondas" en
la secci6n "Conozca su ..."). Tambien registre la
informaci6n adicional que aparece en la siguiente
columna.
NOmero de modelo
NOnzerode serie
Fecha de compra
Nombre del distribuidor
Direcci6n del distribuidor
Teldfono del distribuidor
95

Notas
96

Notas
97

Notas
98

f
Indice
Este {ndicese encuentraen orden alfab_tico.Contiene todos los temas incluidosen este manual, junto con
la(s)p_gina(s)en lascualesusted podr_ encontrarcada tema.
TEMA PAGINA TEMA PAGINA
C6MO CAMBIAR LAS LUCES INTERIOR Y
DE LA SUPERF[CIE PARACOClNAR ................ 89-90
C6MO CUIDAR SU HORNO
DE MICROONDAS .................................................... 87
COMO FUNCIONA SU HORNO
DE MICROONDAS .............................................. 55-56
C6MO PROBAR SU HORNO
DE MICROONDAS .................................................... 56
COMO PROBAR SU REClPIENTE DE
COClNA O VAJILLA .................................................. 57
CONSEJOS
Como cocinar ................................................... 91-92
Cbmo descongelar ................................................. 80
Palomitas de maiz .................................................. 81
Papas al homo ....................................................... 83
EXTRACTOR ............................................................. 65
FILTROS .............................................................. 88-89
GARANT[A ................................................................. 48
INSTRUCClONES DE INSTALACI_N ................ 52-54
INTERFERENClA DE RADIO .................................... 56
LUCES
C6mo reemplazarlas ........................................ 89-90
C6mo utilizarlas ...................................................... 65
LLAME SIN COSTO ................................................. 100
FROZEN ENTREE (Platillos congelados) .............. 85
FROZEN VEGETABLE (Verduras congeladas)..... 84
Funci6n Demostraci6n/aprendizaje ........................ 63
HOLD WARM (Mantener caliente) ......................... 86
Luz ............................................................. 65, 89-90
OFF/CANCEL (Apagar/Cancelar) .......................... 62
Pantalla .................................................................. 60
POPCORN (Palomitas de mafz) ............................ 81
POWER (Energfa) ...................................... 68, 70-72
RELOJ .................................................................... 66
Seguro para nifios.................................................. 63
START/ENTER (Activar/Introducir) ........................ 61
TIEMPO DE COCClON ............................. 69, 70, 72
TURNTABLE ONtOFF
(Activar/Desactivar el plato giratorio)..................... 63
PAPEL ALUMINIO ..................................................... 92
PARRILLA ............................................................ 64, 93
PARTES Y FUNCIONES
Asa de la puerta..................................................... 59
Etiqueta de la gufa para cocinar ............................ 59
Magnetr6n ........................................................ 55, 93
Parrilla de coccibn ............................................ 59, 64
Placa con modelo y n_mero de serie ..................... 59
Plato giratorio ........................... 55, 58, 59, 87, 93, 95
Rejilla de ventilaci6n .............................................. 59
Sistema de seguridad de la puerta ........................ 59
Ventana .................................................................. 59
PREGUNTAS Y RESPUESTAS ................................ 93
PANEL DE CONTROL ......................................... 60-63
ADD ONE MINUTE (Un minuto m_is) .................... 68
AUTO COOK (Cocci6n autom&tica) ................. 74-75
AUTO DEFROST
(Descongelado autom&tico) ............................. 77-80
AUTO REHEAT (Recalentado autom&tico) ...........76
BAKED POTATO (Papas al homo) ........................ 83
BEVERAGE (Bebidas) ........................................... 82
Botones num_dcos ................................................ 61
Cbmo cambiar lostiempos de coccibn
pre-establecidos..................................................... 68
Cbmococinara dfferentesniveles
de energfa........................................................ 70-72
Cbmococinara un nivelalto deenergia ................ 69
Cbmococinar pasoa paso .............................. 72-73
Cbmo interrumpirla cocci0n.................................. 62
Cronbmetro............................................................ 67
SEGURIDAD .................. _.......................... 49-51,57-58
SEI_IALESSONORAS .......................................... 61-62
SERVlClO .................................................................. 48
REQUERIMIENTOS EL_CTRICOS .................... 51,58
SOLUClON DE PROBLEMAS ............................. 94-95
TABLAS
Autocook (Coccibn autom_.tica) ...................... 74-75
Autodefrost(Descongeladoautomatico)......... 78-79
Autoreheat (Recalentadoautom_.tico).................. 76
Conversionesde peso ........................................... 80
Energfasde coccibn............................................... 70
Popcorn(Palomitasde maiz) ................................. 81
TIEMPO DE REPOSO ................................... 80, 91,93
Extractor ................................................................. 65
99

For the repair or replacement parts you need
Call 7 am-7 pm, 7 days a week
1-800-366-PART
For in-home major brand repair service
Call 24 hours a day, 7 days a week
1-800-4-MY-HOME _M
For the location of a
Sears Parts and Service Center
in your area
Call 24 hours a day, 7 days a week
1-800-488-1222
For more information on purchasing a
Sears Maintenance Agreement
or to inquire about an existing Agreement
Call 9 am-5 pm, Monday-Saturday
1-800-827-6655
HomeCentral"
I
The Service Side of Sears.
4619-652-58594
-
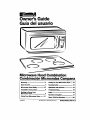 1
1
-
 2
2
-
 3
3
-
 4
4
-
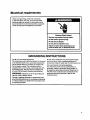 5
5
-
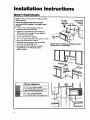 6
6
-
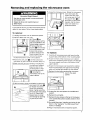 7
7
-
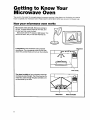 8
8
-
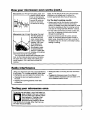 9
9
-
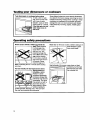 10
10
-
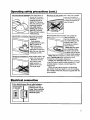 11
11
-
 12
12
-
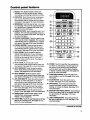 13
13
-
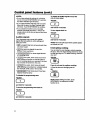 14
14
-
 15
15
-
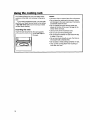 16
16
-
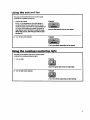 17
17
-
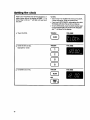 18
18
-
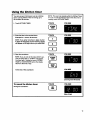 19
19
-
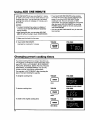 20
20
-
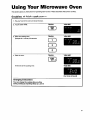 21
21
-
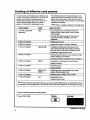 22
22
-
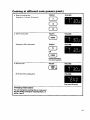 23
23
-
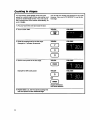 24
24
-
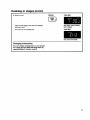 25
25
-
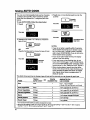 26
26
-
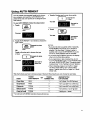 27
27
-
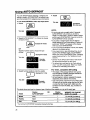 28
28
-
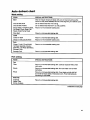 29
29
-
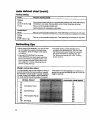 30
30
-
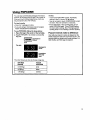 31
31
-
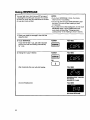 32
32
-
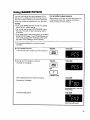 33
33
-
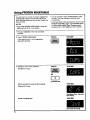 34
34
-
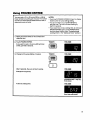 35
35
-
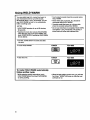 36
36
-
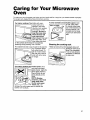 37
37
-
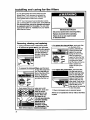 38
38
-
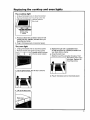 39
39
-
 40
40
-
 41
41
-
 42
42
-
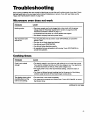 43
43
-
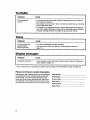 44
44
-
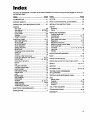 45
45
-
 46
46
-
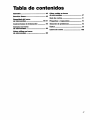 47
47
-
 48
48
-
 49
49
-
 50
50
-
 51
51
-
 52
52
-
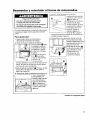 53
53
-
 54
54
-
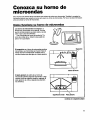 55
55
-
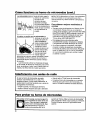 56
56
-
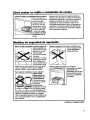 57
57
-
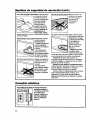 58
58
-
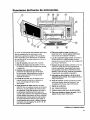 59
59
-
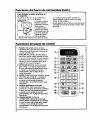 60
60
-
 61
61
-
 62
62
-
 63
63
-
 64
64
-
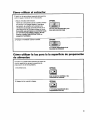 65
65
-
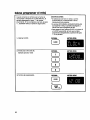 66
66
-
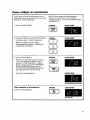 67
67
-
 68
68
-
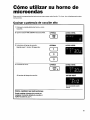 69
69
-
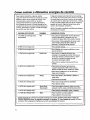 70
70
-
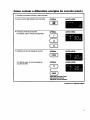 71
71
-
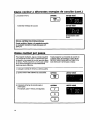 72
72
-
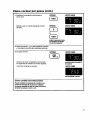 73
73
-
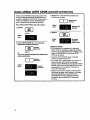 74
74
-
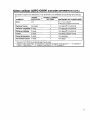 75
75
-
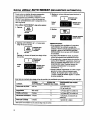 76
76
-
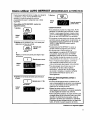 77
77
-
 78
78
-
 79
79
-
 80
80
-
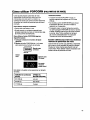 81
81
-
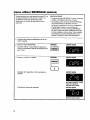 82
82
-
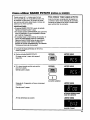 83
83
-
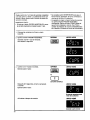 84
84
-
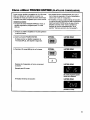 85
85
-
 86
86
-
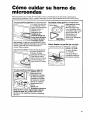 87
87
-
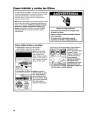 88
88
-
 89
89
-
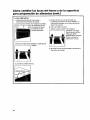 90
90
-
 91
91
-
 92
92
-
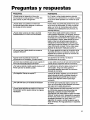 93
93
-
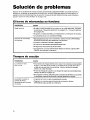 94
94
-
 95
95
-
 96
96
-
 97
97
-
 98
98
-
 99
99
-
 100
100


Kenmore 66568610890 El manual del propietario
- Categoría
- Microondas
- Tipo
- El manual del propietario
en otros idiomas
- English: Kenmore 66568610890 Owner's manual
Artículos relacionados
-
Kenmore 665.60629 Manual de usuario
-
-
-
-
-
-
-
-
Kenmore Elite 565.61582 El manual del propietario
-
Kenmore 721.63252301 El manual del propietario