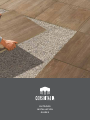
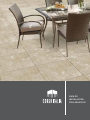
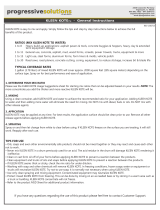
Corso Italia 550040002005 Guía de instalación
- Tipo
- Guía de instalación

OUTDOOR
INSTALLATION
GUIDES

ESPAÑOL
PÁGINA 5
ENGLISH
PAGE 3
ADHESIVE
INSTALLATION
GUIDE

ADHESIVE INSTALLATION GUIDE
PRECAUTIONS TO BE TAKEN BEFORE ANY FORM OF INSTALLATION
PRELIMINARY INFORMATION
Always call before you dig. It is important to contact all telecommunication and utility
companies, in order to mark existing cables and pipes before excavation.
Always read instruction manual for any equipment before use, and adhere to all safety
instructions.
Always use proper safety equipment when installing porcelain pavers: e.g. gloves, safety
goggles, knee pads, and hearing protection.
When lifting product always use assistance, and proper lifting techniques.
Always slope paved surface at least 2% away from buildings or foundations.
Never use a plate compactor on porcelain pavers.
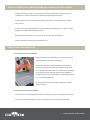
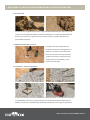
CUTTING PORCELAIN PAVERS
HANDLING PORCELAIN PAVERS
Always read instruction manual for any equipment before use, and adhere to all safety
instructions.
Due to the thickness and natural hardness of porcelain pavers, they require a wet saw with
at least 1.5 HP, and a 10” or 8” diamond blade. Take into consideration the length of cut
when choosing the appropriate saw for dierent sized porcelain pavers. The length of cut
should be at least 24”, or 38” for diagonal cuts.
Be aware that all cut porcelain edges will be very sharp; handle with care.
When lifting product always use assistance, and proper lifting techniques.

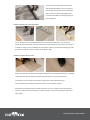
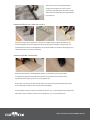
ADHESIVE INSTALLATION (HEAVY FOOT TRAFFIC)
Be sure that the existing concrete bed was installed correctly with proper
expansion joints, and with a slope of at least 2% away from buildings or
foundations.
Use only highly deformable cement-based premium adhesives. Any adhesive
under this class (class C2S2) will allow for the proper expansion of the concrete
base below the pavers.
Be sure to use the double spreading method when applying the adhesive to both
the paver and the surface.
Leave a joint of at least 5mm between pavers. Fill the joints with cement-based
premium mortar (class CG2).
Do not install pavers directly over expansion joints in the concrete slab.
1
2
3
4
5
ADHESIVE INSTALLATION GUIDE
CLEANING AND MAINTENANCE
Use a common neutral detergent and a direct water jet for proper cleaning of the surface.
For a more intense cleaning be sure to use a brush or broom with soft nylon bristles.

GUÍA DE
INSTALACIÓN
CON ADHESIVO

GUÍA DE INSTALACIÓN CON ADHESIVO
PRECAUCIONES A ADOPTAR ANTES DE CUALQUIER TIPO DE INSTALACIÓN
Antes de excavar es importante ponerse en contacto con todas las empresas de
telecomunicaciones y de servicios públicos con el n de marcar los cables y tuberías existentes.
Lea el manual de instrucciones de los equipos que vaya a usar, y siga las normas de seguridad.
Utilice siempre el equipo de seguridad adecuado al instalar adoquines de porcelana: por ejemplo,
guantes, gafas de seguridad, rodilleras y protectores auditivos.
Al levantar el producto, solicite ayuda y use técnicas apropiadas para levantar objetos. No utilice
jamás un compactador de placa en adoquines de porcelana.
CORTE DE LAS PIEZAS DE PORCELANA
MANEJO DE LAS PIEZAS DE PORCELANA
Lea el manual de instrucciones de los equipos que vaya a usar, y siga las normas de seguridad.
Debido al grosor y dureza natural de las piezas de porcelana, se recomienda una sierra de corte
húmedo con al menos 1,5 HP , y un disco de diamante de 10" u 8". Tenga en cuenta la longitud de
corte a la hora de elegir la sierra apropiada. La longitud de corte debe ser de al menos 24" o de 38"
si planea hacer cortes diagonales.
Tenga en cuenta que todos los bordes que haya cortado serán muy alados; tratar con cuidado.
Al levantar el producto, solicite ayuda y use técnicas apropiadas para levantar objetos.
INFORMACIÓN PRELIMINAR
LIMPIEZA Y MANTENIMIENTO
Utilice un detergente neutro común y un chorro directo de agua para la correcta limpieza
de la supercie.
Para una limpieza más intensa utilice un cepillo o escoba con cerdas de nylon suave.

Asegúrese de que la base de hormigón existente se instaló correctamente con juntas
de dilatación adecuadas y con una pendiente de al menos 2% alejándose de edificios
y cimientos.
Use adhesivos flexibles de cemento de primera calidad. Cualquier adhesivo de la clase
C2S2 permitirá la expansión adecuada de la base de hormigón por debajo de las piezas
de porcelana.
Asegúrese de aplicar el adhesivo tanto al pavimento como a la pieza.
Deje una junta de al menos 3-16"(5 mm) entre las piezas. Rellene las juntas con
mortero de alta calidad a base de cemento (clase CG2).
No instale adoquines directamente sobre juntas de expansión de la base de hormigón.
1
2
3
4
5
GUÍA DE INSTALACIÓN CON ADHESIVO
INSTALLACIÓN CON ADHESIVOS (TRÁFICO PEDESTRE PESADO)

ESPAÑOL
PÁGINA 11
ENGLISH
PAGE 9
WALKWAY
INSTALLATION
GUIDE

WALKWAY INSTALLATION GUIDE
PRECAUTIONS TO BE TAKEN BEFORE ANY FORM OF INSTALLATION
PRELIMINARY INFORMATION
Always call before you dig. It is important to contact all telecommunication and utility
companies, in order to mark existing cables and pipes before excavation.
Always read instruction manual for any equipment before use, and adhere to all safety
instructions.
Always use proper safety equipment when installing porcelain pavers: e.g. gloves, safety
goggles, knee pads, and hearing protection.
When lifting product always use assistance, and proper lifting techniques.
Never use a plate compactor on porcelain pavers.
CUTTING PORCELAIN PAVERS
Always read instruction manual for any equipment before use, and adhere to all safety
instructions.
Due to the thickness and natural hardness of porcelain pavers, they require a wet saw with
at least 1.5 HP, and a 10” or 8” diamond blade. Take into consideration the length of cut
when choosing the appropriate saw for dierent sized porcelain pavers. The length of cut
should be at least 24”, or 38” for diagonal cuts.
Be aware that all cut porcelain edges will be very sharp; handle with care.
CLEANING AND MAINTENANCE
HANDLING PORCELAIN PAVERS
Use a common neutral detergent and a direct water jet for proper cleaning of the surface.
For a more intense cleaning be sure to use a brush or broom with soft nylon bristles.
When lifting product always use assistance, and proper lifting techniques.

WALKWAY INSTALLATION GUIDE
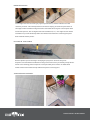
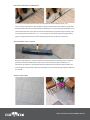
WALKWAY INSTALLATION (LIGHT FOOT TRAFFIC)
Lay pavers directly on the ground to determine where the pathway will be located.
Once placement is determined, lay a paver on the ground and use a flat shovel to
cut the ground around the paver.
Lift the paver and remove 4” of ground from the marked area, then flatten the
ground below with a steel tamper.
Fill the excavated area with paver base. Compact the paver base, while making
sure to leave a flat surface. The paver base should be ¼” below ground level.
Lay pavers directly on compacted paver base. Use a rubber mallet on the surface
of the slab to level out any unevenness.
Leave at least 3/4’” of space between each paver.
1
2
3
4
5
6

GUÍA DE
INSTALACIÓN
DE PASARELA

GUÍA DE INSTALACIÓN DE PASARELA
PRECAUCIONES A ADOPTAR ANTES DE CUALQUIER TIPO DE INSTALACIÓN
INFORMACIÓN PRELIMINAR
Antes de excavar es importante ponerse en contacto con todas las empresas de
telecomunicaciones y de servicios públicos con el n de marcar los cables y tuberías existentes.
Lea el manual de instrucciones de los equipos que vaya a usar, y siga las normas de seguridad.
Utilice siempre el equipo de seguridad adecuado al instalar adoquines de porcelana: por ejemplo,
guantes, gafas de seguridad, rodilleras y protectores auditivos.
Al levantar el producto, solicite ayuda y use técnicas apropiadas para levantar objetos. No utilice
jamás un compactador de placa en adoquines de porcelana.
CORTE DE LAS PIEZAS DE PORCELANA
Lea el manual de instrucciones de los equipos que vaya a usar, y siga las normas de seguridad.
Debido al grosor y dureza natural de las piezas de porcelana, se recomienda una sierra de corte
húmedo con al menos 1,5 HP , y un disco de diamante de 10" u 8". Tenga en cuenta la longitud de
corte a la hora de elegir la sierra apropiada. La longitud de corte debe ser de al menos 24" o de 38"
si planea hacer cortes diagonales.
Tenga en cuenta que todos los bordes que haya cortado serán muy alados; tratar con cuidado.
LIMPIEZA Y MANTENIMIENTO
MANEJO DE LAS PIEZAS DE PORCELANA
Utilice un detergente neutro común y un chorro directo de agua para la correcta limpieza
de la supercie.
Para una limpieza más intensa utilice un cepillo o escoba con cerdas de nylon suave.
Al levantar el producto, solicite ayuda y use técnicas apropiadas para levantar objetos.

GUÍA DE INSTALACIÓN DE PASARELA
INSTALLACIÓN DE PASEO (TRÁFICO LIGERO)
Coloque los adoquines directamente sobre el suelo para determinar dónde se
ubicará la vía.
Una vez determinada la vía, use una pala plana para cortar el suelo alrededor de la
pieza de porcelana.
Levante la pieza y quite 4" del suelo de la zona marcada, y aplane la tierra con un
pisón de acero.
Llene el área excavada con tierra de base, y vuelva a compactar con el pisón,
asegurándose de dejar una superficie plana. La pieza de porcelana debe quedar
¼" por debajo del nivel del suelo.
Coloque la porcelana directamente sobre la base aplanada. Si lo necesita, utilice
un mazo de goma en la superficie de la losa para nivelar las irregularidades.
Deje por lo menos 3/4" de espacio entre cada pieza.
1
2
3
4
5
6

ESPAÑOL
PÁGINA 19
ENGLISH
PAGE 15
SAND
INSTALLATION
GUIDE

SAND INSTALLATION GUIDE
PRECAUTIONS TO BE TAKEN BEFORE ANY FORM OF INSTALLATION
PRELIMINARY INFORMATION
Always call before you dig. It is important to contact all telecommunication and utility
companies, in order to mark existing cables and pipes before excavation.
Always read instruction manual for any equipment before use, and adhere to all safety
instructions.
Always use proper safety equipment when installing porcelain pavers: e.g. gloves, safety
goggles, knee pads, and hearing protection.
When lifting product always use assistance, and proper lifting techniques.
Never use a plate compactor on porcelain pavers.
CUTTING PORCELAIN PAVERS
Always read instruction manual for any equipment before
use, and adhere to all safety instructions.
Due to the thickness and natural hardness of porcelain
pavers, they require a wet saw with at least 1.5 HP, and a
10” or 8” diamond blade. Take into consideration the length
of cut when choosing the appropriate saw for dierent
sized porcelain pavers. The length of cut should be at least
24”, or 38” for diagonal cuts.
Be aware that all cut porcelain edges will be very sharp;
handle with care.
CLEANING AND MAINTENANCE
Use a common neutral detergent and a direct water jet for proper cleaning of the surface.
For a more intense cleaning be sure to use a brush or broom with soft nylon bristles.

SAND INSTALLATION GUIDE
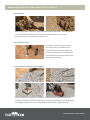
SAND INSTALLATION (PEDESTRIAN FOOT TRAFFIC)
When digging make sure to dig a depth that will include the entire base. The depth of the
base will be determined by preexisting soil and climate conditions in your area.
Most normal soils will require a total depth of 5”
Compact the soil ensuring a minimum
of 2% slope away from buildings and
foundations. This will increase the load
bearing strength of the soil, and minimize
movement due to freezing or thawing and
other seasonal changes.
EXCAVATION
SOIL COMPACTION
Prepare a sub-base to a depth of 4” using ¾” crushed gravel to allow for drainage and
stability. Compact the sub base and level o, ensuring a 2% slope away from any buildings
or foundations. Gently mist the compacted sub base to further compact this layer.
SUB-BASE AND LANDSCAPING FABRIC

SAND INSTALLATION GUIDE
Cover the top of the prepared sub-base
with landscaping fabric. Be sure to follow
the specic instructions of the landscape
fabric producer. Landscaping fabric will
increase the stability and the longevity of
the installation.
Lay 1” thick pipe (screed rails) parallel every couple of feet. Fill with 1” of paver base
material. Pass a at board over the screed rails to level out paver base, ensuring a slope of
at least 2% away from any buildings or foundations. Remove screed rails and ll gaps with
paver base material, and smooth the newly lled in gaps.
Select size and color of the pavers and place them gently on the prepared surface. Complete
the laying scheme according to the project specications or to your preferences.
To achieve a more natural look randomly select pavers from dierent boxes.
This will maximize the eect of shade variation on the installed surface.
Always leave a joint between the slabs of at least 3/16” inch, while using proper plastic
spacers. This will avoid porcelain to porcelain contact, and ensure proper joint lines and
joint width.
PREPARATION OF SETTING BED
INSTALLATION OF SLABS

SAND INSTALLATION GUIDE
Install edge restraints according to project specications, and the indications of the
restraint producer. This will help reduce horizontal creeping, and the loss paver base at
the edges of the installation. Edge restraints should be tall enough to contain paver base
material and pavers, but not higher than the installation (1 ¾”). The edge restrain will be
installed on top of the landscape fabric and will be instrumental in containing the paver
base material and the pavers.
Remove plastic spacers and begin sweeping the polymeric sand into the joints.
Polymeric sand should be installed according to the instructions provided by the producer.
Never use a vibrating plate compactor on the porcelain paver surface. A rubber/PVC
mallet can be used instead to help adhere the pavers to the support.
EDGE RESTRAINT
FILLING IN THE JOINTS
THE FINISHED PRODUCT

GUÍA DE
INSTALACIÓN
SOBRE ARENA

PRECAUCIONES A ADOPTAR ANTES DE CUALQUIER TIPO DE INSTALACIÓN
INFORMACIÓN PRELIMINAR
Antes de excavar es importante ponerse en contacto con todas las empresas de
telecomunicaciones y de servicios públicos con el n de marcar los cables y tuberías existentes.
Lea el manual de instrucciones de los equipos que vaya a usar, y siga las normas de seguridad.
Utilice siempre el equipo de seguridad adecuado al instalar adoquines de porcelana: por ejemplo,
guantes, gafas de seguridad, rodilleras y protectores auditivos.
Al levantar el producto, solicite ayuda y use técnicas apropiadas para levantar objetos.
No utilice jamás un compactador de placa en adoquines de porcelana.
CORTE DE LAS PIEZAS DE PORCELANA
Lea el manual de instrucciones de los equipos que vaya a
usar, y siga las normas de seguridad.
Debido al grosor y dureza natural de las piezas de
porcelana, se recomienda una sierra de corte húmedo con
al menos 1,5 hp , y un disco de diamante de 10" u 8". Tenga
en cuenta la longitud de corte a la hora de elegir la sierra
apropiada. La longitud de corte debe ser de al menos 24" o
de 38" si planea hacer cortes diagonales.
Tenga en cuenta que todos los bordes que haya cortado
serán muy alados; tratar con cuidado.
LIMPIEZA Y MANTENIMIENTO
Utilice un detergente neutro común y un chorro directo de agua para la correcta limpieza
de la supercie.
Para una limpieza más intensa utilice un cepillo o escoba con cerdas de nylon suave.
GUÍA DE INSTALACIÓN SOBRE ARENA

GUÍA DE INSTALACIÓN SOBRE ARENA
GUÍA PARA LA INSTALACIÓN SOBRE ARENA (TRÁFICO PEDESTRE)
Cuando excave, asegúrese que excava una profundidad suciente para que incluya toda
la base. La profundidad de la base viene determinada por las condiciones preexistentes
del suelo y el clima en su región. La mayoría de los suelos normales requerirán una
profundidad total de 5".
Compacte el suelo asegurando una
pendiente mínima de 2% alejándose de
edicios y cimientos. Esto aumentará
la fuerza de soporte de carga del suelo,
y reducir al mínimo el movimiento que
puedan provocar las heladas y otros
cambios estacionales.
EXCAVACIÓN
COMPACTACIÓN DEL SUELO
Prepare una sub-base a una profundidad de 4" usando gravilla de ¾" para permitir el drenaje
y la estabilidad. Compacte y nivele la sub base con una pendiente del 2% alejándose de
edicios y cimientos. Humedezca ligeramente la sub-base para una mejor compactación.
SUSTRATO Y TELA GEOTEXTIL

GUÍA DE INSTALACIÓN SOBRE ARENA
Cubra el sustrato con la tela Geotextil.
Asegúrese de seguir las instrucciones
especícas del fabricante de la tela. La tela
aumentará la estabilidad y la longevidad de
la instalación.
Coloque una guía de nivelación de 1" de grosor cada dos pies y rellene esta altura con
material de base. Pase una tabla plana sobre las guías para nivelarlas, asegurando una
pendiente de al menos el 2% alejándose de cualquier edicio o cimiento. Retire guías de y
rellene los huecos con material de base.
Seleccione el tamaño y tonalidad de las piezas, y coloquelos suavemente sobre
la supercie preparada. Completé el esquema de colocación de acuerdo con las
especicaciones del proyecto o con sus preferencias.
Para lograr una apariencia más natural seleccione al azar adoquines de diferentes cajas.
Esto maximizará el efecto de la variación de tonalidades.
Siempre deje una junta entre las losas de al menos 3/16", y utilice separadores de plástico
adecuados. Esto evitará el contacto entre las piezas, y su correcta alineación.
PREPARACIÓN DE LA CAMA DE AJUSTE
COLOCACIÓN DE LAS PIEZAS

GUÍA DE INSTALACIÓN SOBRE ARENA
Instale soportes laterales de acuerdo con las especicaciones del proyecto y las
instrucciones del producto. Esto ayudará a reducir movimientos horizontales y la pérdida
del material de sustrato en los bordes de la instalación. Los soportes laterales deben ser lo
sucientemente altos como para contener el material base y las piezas de porcelana, pero
no más alta que la instalación ( 1 ¾" ) . Los soportes se instalarán sobre la tela geotextil y
jugará un papel decisivo en la contención de las piezas de porcelana y el sustrato.
Retire los separadores y comience a barrer la arena polimérica sobre las juntas. La arena
polimérica se debe instalar de acuerdo con las instrucciones proporcionadas por el
fabricante. No utilice un compactador de placa vibrante en la supercie de porcelana. Un
mazo de goma / PVC puede utilizarse para ayudar a que las piezas de porcelana se adhieren
al sustrato.
DELIMITACIÓN DE LOS BORDES
RELLENANDO LAS JUNTAS
RESULTADO FINAL
-
 1
1
-
 2
2
-
 3
3
-
 4
4
-
 5
5
-
 6
6
-
 7
7
-
 8
8
-
 9
9
-
 10
10
-
 11
11
-
 12
12
-
 13
13
-
 14
14
-
 15
15
-
 16
16
-
 17
17
-
 18
18
-
 19
19
-
 20
20
-
 21
21
-
 22
22
-
 23
23


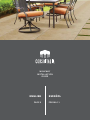
Corso Italia 550040002005 Guía de instalación
- Tipo
- Guía de instalación
en otros idiomas
Otros documentos
-
 Barrier BAR02-HDPBS Guía de instalación
-
RIDGID R4040S-FT3500-FT3508-FT7007-FT7001 Manual de usuario
-
RIDGID R4040S Guía del usuario
-
CAMBRIDGE Pre-Packaged Olde English Paver Fireplace Kit Deluxe Surround Manual de usuario
-
-
-
Suncast Greenhouse Kit RB50 Manual de usuario
-
-
 Kleen Kote 30800 Instrucciones de operación

