
Hardware Review
A
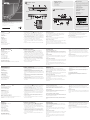
Front View
1. Port Selection Pushbuttons
2. Port LEDs
3. IR Receiver
4. HDMI Input Port
Rear View
1. Power Jack
2. HDMI Output Port
3. HDMI Input Port
4. RS-232 Serial Port
5. IR Extension Port
IR Remote Control
1. Port Up / Port Down Buttons
2. Port Selection Buttons
Description du matériel
A
Vue avant
1. Boutons de sélection de port
2. Voyants des ports
3. Récepteur infrarouge
4. Port d’entrée HDMI
Vue arrière
1. Prise d’alimentation
2. Port de sortie HDMI
3. Port d’entrée HDMI
4. Port série RS-232
5. Port d’extension infrarouge
Télécommande infrarouge
1. Boutons Port Up / Port Down (port suivant / port précédent)
2. Boutons de sélection de port
Hardwareübersicht
A
Vorderseitige Ansicht
1. Portauswahl-Drucktasten
2. Port-LEDs
3. Infrarot-Empfänger
4. HDMI-Eingang
Rückseitige Ansicht
1. Stromeingangsbuchse
2. HDMI-Ausgang
3. HDMI-Eingang
4. Serieller RS-232-Port
5. Port für Infrarot-Empfänger
Infrarot-Fernbedienung
1. Tasten Port auf / Port ab
2. Portauswahltasten
Presentación del hardware
A
Vista frontal
1. Botones de selección de puertos
2. Indicadores LED de los puertos
3. Receptor de infrarrojos
4. Puerto de entrada HDMI
Vista posterior
1. Entrada de alimentación
2. Puerto de salida HDMI
3. Puerto de entrada HDMI
4. Puerto serie RS-232
5. Puerto para receptor de infrarrojos
Mando a distancia por infrarrojos
1. Botones de selección de puerto anterior/siguiente (Port Up / Port
Down)
2. Botones de selección de puerto por número
Hardware
A
Vista anteriore
1. Pulsanti di selezione della porta
2. LED delle porte
3. Ricevitore a infrarossi
4. Porta d’ingresso HDMI
Vista posteriore
1. Presa d’alimentazione
2. Porta d’uscita HDMI
3. Porta d’ingresso HDMI
4. Porta seriale RS-232
5. Porta d’estensione infrarossi
Telecomando a infrarossi
1. Pulsanti Porta Su/Porta Giù
2. Pulsanti di selezione della porta
Hardware Installation
B
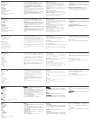
1. Use an HDMI cable to connect the HDMI input port on the video
display to the HDMI output port on the rear of the VS481B.
2. Use HDMI cables to connect the HDMI output ports on the source
devices to the HDMI input ports on the VS481B. Three HDMI input
ports are located on the rear of the switch; the fourth HDMI port is
located on the front of the switch.
3. (Optional) To edit the VS481B system settings through the RS-232
port, connect the hardware / software controller here.
4. (Optional) You can use the IR Extension Cable (Part No. 2XRT-
0003G) connected the VS481B. This cable is not included in this
package.
5. Plug the power adapter cable into the Power Jack on the VS481B.
Installation du matériel
B
1. Utilisez un câble HDMI pour relier le port d'entrée HDMI du
périphérique d'affi chage vidéo au port de sortie HDMI situé à
l'arrière du commutateur VS481B.
2. Utilisez des câbles HDMI pour relier les ports de sortie HDMI des
périphériques sources aux ports d'entrée HDMI du commutateur
VS481B. Trois des quatre ports d'entrée HDMI se trouvent à l'arrière
du commutateur. Le quatrième se trouve à l'avant du commutateur.
3. (Facultatif) Pour modifi er les réglages du système VS481B par le
biais du port RS-232, connectez ici le contrôleur matériel/logiciel.
4. (Facultatif) Vous pouvez utiliser le câble d’extension infrarouge
(Pièce N° 2XRT-0003G) et le connecter au commutateur VS481B.
Ce câble n’est pas fourni avec le produit.
5. Branchez le câble de l’adaptateur secteur dans la prise
d’alimentation du VS481B.
Hardware installieren
B
1. Verbinden Sie die HDMI-Eingangsbuchse am Video-Anzeigegerät
mit dem HDMI-Ausgang an der Rückseite des VS481B. Verwenden
Sie dazu ein HDMI-Kabel.
2. Verbinden Sie die HDMI-Ausgänge der Signalquellen mit den
HDMI-Eingängen am VS481B. Verwenden Sie dazu je ein HDMI-
Kabel. Drei der HDMI-Eingänge befi nden sich auf der Rückseite des
Switches. Der vierte HDMI-Port befi ndet sich auf der Vorderseite am
Switch.
3. (Optional) Um die Systemeinstellungen des VS481B über den RS-
232-Port einstellen zu können, schließen Sie hier den Hardware-/
Software-Controller an.
4. (Optional) Sie können das Infrarot-Verlängerungskabel (Artikelnr.
2XRT-0003G) an den VS481B anschließen. Dieses Kabel ist nicht im
Lieferumfang enthalten.
5. Verbinden Sie das Kabel des Netzteils mit der Stromeingangsbuchse
am VS481B.
Instalar el hardware
B
1. Conecte el puerto de entrada HDMI del dispositivo de visualización
al puerto de salida HDMI en la parte posterior del VS481B. Para
ello, utilice un cable HDMI.
2. Conecte los puertos de salida HDMI de los dispositivos fuente a
los puertos de entrada HDMI del VS481B. Para ello, utilice cables
HDMI. Tres de los cuatro puertos de entrada HDMI se encuentran
en la parte posterior del conmutador ; el cuarto se encuentra en el
panel frontal del conmutador.
3. (Opcional) Para ajustar la confi guración de sistema del VS481B a
través del puerto RS-232, conecte la controladora de hardware/
software aquí.
4. (Opcional) Puede conectar el cable alargador para infrarrojos
(número de artículo 2XRT-0003G) al VS481B. Este cable no está
incluido en el paquete.
5. Conecte el cable del adaptador de alimentación a la entrada de
alimentación del VS481B.
Installazione dell’hardware
B
1. Usare un cavo HDMI per collegare la porta di ingresso HDMI del
dispositivo video alla porta di uscita HDMI sul retro del VS481B.
2. Usare i cavi HDMI per collegare le porte di uscita HDMI dei
dispositivi sorgente alle porte di ingresso HDMI del VS481B. Tre
porte di ingresso HDMI si trovano sul retro dell’interruttore, mentre
le quarta è situata sul lato anteriore.
3. (Opzionale) Per modifi care le impostazioni di sistema del VS481B
tramite porta RS-232, collegare qui il controller hardware/software.
4. (Opzionale) È possibile utilizzare il cavo di estensione infrarossi
(numero del componente 2XRT-0003G) collegato al VS481B. Il cavo
non è incluso nella confezione.
5. Inserire il cavo dell’alimentatore nella presa d’alimentazione del
VS481B.
Operation
Source Device Selection
The VS481B HDMI Switch offers easy and fl exible source device
selection from the front panel pushbuttons, with the IR remote
control, or through the RS-232 serial interface.
Manual Selection
To select a source device, press the Port Selection button that
corresponds to the port it is connected to.
Remote Control Selection
To select a source device with the remote control, press the number
button that corresponds to the port it is connected to.
Alternatively, you may also cycle through the available source devices
by pushing the Port Up and Port Down buttons on the remote control
unit.
Fonctionnement
Sélection du périphérique source
Le commutateur HDMI VS481B permet de sélectionner rapidement
et simplement le périphérique source désiré à l'aide des boutons du
panneau avant, de la télécommande infrarouge ou de l'interface série
RS-232.
Sélection manuelle
Pour sélectionner manuellement un périphérique source, appuyez sur
le bouton de sélection du port correspondant au port auquel il est
connecté.
Sélection par télécommande
Pour sélectionner un périphérique source à l’aide de la télécommande,
appuyez sur la touche numérique correspondant au port auquel il est
connecté.
Vous pouvez également faire défi ler les périphériques sources
disponibles en appuyant sur les boutons Port Up et Port Down de la
télécommande.
Bedienung
Signalquelle auswählen
Der HDMI-Switch VS481B bietet eine einfache Auswahl der
gewünschten Signalquelle über die vorderseitigen Drucktasten, über
die Infrarot-Fernbedienung oder über die serielle RS-232-Schnittstelle.
Manuelle Auswahl
Um eine Signalquelle auszuwählen, drücken Sie den Auswahlschalter,
der den Port des angeschlossenen Gerätes darstellt.
Auswahl per Fernbedienung
Um eine Signalquelle über die Fernbedienung auszuwählen, drücken
Sie die Zifferntaste mit der Nummer, die den Port des angeschlossenen
Gerätes darstellt.
Alternativ dazu können Sie die Taste Port auf/ab auf der
Fernbedienung drücken, um zyklisch zwischen den Signalquellen
umzuschalten.
Funcionamiento
Selección de un dispositivo fuente
El conmutador HDMI VS481B permite seleccionar simple y
rápidamente el dispositivo fuente mediante los botones del panel
frontal, el mando a distancia o la interfaz serie RS-232.
Selección manual
Para seleccionar manualmente un dispositivo fuente, pulse el
conmutador del panel frontal que corresponde al puerto donde tiene
conectado el dispositivo en cuestión.
Selección mediante el mando a distancia
Para seleccionar un dispositivo fuente con el mando a distancia, pulse
la tecla numérica que corresponde al número del puerto donde tiene
conectado el dispositivo en cuestión.
También puede pulsar los botones Port Up y Port Down del mando
a distancia para alternar cíclicamente entre las diferentes fuentes de
señal.
Funzionamento
Selezione del dispositivo sorgente
Lo switch HDMI VS481B consente una facile e fl essibile selezione
del dispositivo sorgente tramite i pulsanti anteriori, il telecomando o
l’interfaccia seriale RS-232.
Selezione manuale
Per selezionare un dispositivo sorgente, premere l’interruttore di
selezione della porta corrispondente alla porta a cui è collegato il
dispositivo.
Selezione da telecomando
Per selezionare un dispositivo sorgente tramite telecomando, premere
il pulsante numerato corrispondente alla porta a cui è collegato il
dispositivo.
In alternativa, è possibile spostarsi circolarmente fra i dispositivi
sorgente disponibili premendo i pulsanti Porta Su/Porta Giù sul
telecomando.
• Use the Port Up button to select the next available port in ascending
order (from left to right on the front panel).
• Use the Port Down button to select the next available port in
descending order (from right to left on the front panel).
RS-232 Serial Interface
The VS481B’s built-in bi-directional RS-232 serial interface allows
system control through a high-end controller or PC.
• Utilisez le bouton Port Up pour sélectionner le port disponible
suivant dans l’ordre croissant (de gauche à droite sur le panneau
avant).
• Utilisez le bouton Port Down pour sélectionner le port disponible
suivant dans l’ordre décroissant (de droite à gauche sur le panneau
avant).
Interface série RS-232
L’interface série RS-232 bidirectionnelle intégrée au VS481B permet le
contrôle du système par un contrôleur haut de gamme ou un PC.
• Drücken Sie die Taste „Port auf“, um auf den nächsten verfügbaren
Port umzuschalten (von links nach rechts am vorderseitigen
Bedienfeld).
• Drücken Sie die Taste „Port ab“, um auf den vorigen verfügbaren
Port umzuschalten (von rechts nach links am vorderseitigen
Bedienfeld).
Serielle RS-232-Schnittstelle
Über die bidirektionale RS-232-Schnittstelle des VS481B ist die
Systemsteuerung über einen hochwertigen Controller oder PC
möglich.
• Pulse el botón Port Up para seleccionar el siguiente puerto
disponible en orden creciente (de izquierda a derecha en el panel
frontal).
• Pulse el botón Port Down para seleccionar el siguiente puerto
disponible en orden decreciente (de derecha a izquierda en el panel
frontal).
Interfaz serie RS-232
La interfaz serie RS-232 bidireccional incorporada del VS481B permite
controlar el sistema a través de una controladora de altas prestaciones
o del PC.
• Utilizzare il pulsante Porta Su per selezionare la porta disponibile in
ordine crescente (da sinistra a destra sul pannello anteriore).
• Utilizzare il pulsante Porta Giù per selezionare la porta disponibile in
ordine decrescente (da destra a sinistra sul pannello anteriore).
Interfaccia seriale RS-232
L’interfaccia seriale RS-232 bidirezionale incorporata nel VS481B
consente di controllare il sistema per mezzo di un controller sofi sticato
o di un PC.
B
Package Contents
1 VS481B 4-Port HDMI Switch
1 HDMI Cable
1 IR Remote Control
1 Power Adapter
1 User Instructions
Front View
Rear View
IR Remote Control
Hardware Installation
© Copyright 2014 ATEN
®
International Co., Ltd.
ATEN and the ATEN logo are trademarks of ATEN International Co., Ltd. All rights reserved. All
other trademarks are the property of their respective owners.
This product is RoHS compliant.
Part No. PAPE-1223-E10G Printing Date: 07/2014
4-Port HDMI Switch
Quick Start Guide
VS481B
VS481B 4-Port HDMI Switch Quick Start Guide
www.aten.com
Commutateur HDMI à 4 ports VS481B - Guide de démarrage rapide
www.aten.com
VS481B 4-Port-HDMI-Switch Kurzanleitung
www.aten.com
Conmutador HDMI de 4 puertos VS481B Guía rápida
www.aten.com
Switch HDMI a 4 porte VS481B – Guida rapida
www.aten.com
Important Notice
Considering environmental protection, ATEN
does not provide a fully printed user manual
for this product. If the information contained in
the Quick Start Guide is not enough for you to
confi gure and operate your product,
please visit
our website www.aten.com, and download
the full user manual.
Online Registration
http://eservice.aten.com
Technical Phone Support
International:
886-2-86926959
North America:
1-888-999-ATEN Ext: 4988
United Kingdom:
44-8-4481-58923
All information, documentation, firmware,
software utilities, and specifi cations contained in
this package are subject to change without prior
notifi cation by the manufacturer. Please visit our
website http://www.aten.com/download/?cid=dds
for the most up-to-date versions.
The following contains information that relates
to China:
ATEN VanCryst
™
4 1 3
2
1
2
1
2
3
4
5
or
2
5
1
3
4
A
Hardware Review
La página se está cargando...
Transcripción de documentos
A Package Contents Hardware Review Front View 4 1 Important Notice 1 VS481B 4-Port HDMI Switch 1 HDMI Cable 1 IR Remote Control 1 Power Adapter 1 User Instructions 3 Considering environmental protection, ATEN does not provide a fully printed user manual for this product. If the information contained in the Quick Start Guide is not enough for you to configure and operate your product, please visit our website www.aten.com, and download the full user manual. Online Registration B 2 http://eservice.aten.com Hardware Installation Technical Phone Support International: 886-2-86926959 Rear View North America: 1-888-999-ATEN Ext: 4988 United Kingdom: 2 ATEN VanCryst™ 44-8-4481-58923 4 VS481B 2 1 4-Port HDMI Switch Quick Start Guide 3 4 The following contains information that relates to China: 5 IR Remote Control 1 © Copyright 2014 ATEN® International Co., Ltd. 5 ATEN and the ATEN logo are trademarks of ATEN International Co., Ltd. All rights reserved. All other trademarks are the property of their respective owners. Part No. PAPE-1223-E10G 1 2 This product is RoHS compliant. or Printing Date: 07/2014 VS481B 4-Port HDMI Switch Quick Start Guide Hardware Review Front View 1. Port Selection Pushbuttons 2. Port LEDs 3. IR Receiver 4. HDMI Input Port Operation B 1. Use an HDMI cable to connect the HDMI input port on the video display to the HDMI output port on the rear of the VS481B. 2. Use HDMI cables to connect the HDMI output ports on the source devices to the HDMI input ports on the VS481B. Three HDMI input ports are located on the rear of the switch; the fourth HDMI port is located on the front of the switch. 3. (Optional) To edit the VS481B system settings through the RS-232 port, connect the hardware / software controller here. 4. (Optional) You can use the IR Extension Cable (Part No. 2XRT0003G) connected the VS481B. This cable is not included in this package. 5. Plug the power adapter cable into the Power Jack on the VS481B. Rear View 1. Power Jack 2. HDMI Output Port 3. HDMI Input Port 4. RS-232 Serial Port 5. IR Extension Port IR Remote Control 1. Port Up / Port Down Buttons 2. Port Selection Buttons Source Device Selection The VS481B HDMI Switch offers easy and flexible source device selection from the front panel pushbuttons, with the IR remote control, or through the RS-232 serial interface. Manual Selection To select a source device, press the Port Selection button that corresponds to the port it is connected to. • Use the Port Up button to select the next available port in ascending order (from left to right on the front panel). • Use the Port Down button to select the next available port in descending order (from right to left on the front panel). RS-232 Serial Interface The VS481B’s built-in bi-directional RS-232 serial interface allows system control through a high-end controller or PC. Remote Control Selection To select a source device with the remote control, press the number button that corresponds to the port it is connected to. Alternatively, you may also cycle through the available source devices by pushing the Port Up and Port Down buttons on the remote control unit. Commutateur HDMI à 4 ports VS481B - Guide de démarrage rapide Description du matériel All information, documentation, firmware, software utilities, and specifications contained in this package are subject to change without prior notification by the manufacturer. Please visit our website http://www.aten.com/download/?cid=dds for the most up-to-date versions. www.aten.com Hardware Installation A 3 www.aten.com Installation du matériel A Vue avant 1. Boutons de sélection de port 2. Voyants des ports 3. Récepteur infrarouge 4. Port d’entrée HDMI Vue arrière 1. Prise d’alimentation 2. Port de sortie HDMI 3. Port d’entrée HDMI 4. Port série RS-232 5. Port d’extension infrarouge Télécommande infrarouge 1. Boutons Port Up / Port Down (port suivant / port précédent) 2. Boutons de sélection de port Fonctionnement B 1. Utilisez un câble HDMI pour relier le port d'entrée HDMI du périphérique d'affichage vidéo au port de sortie HDMI situé à l'arrière du commutateur VS481B. 2. Utilisez des câbles HDMI pour relier les ports de sortie HDMI des périphériques sources aux ports d'entrée HDMI du commutateur VS481B. Trois des quatre ports d'entrée HDMI se trouvent à l'arrière du commutateur. Le quatrième se trouve à l'avant du commutateur. 3. (Facultatif) Pour modifier les réglages du système VS481B par le biais du port RS-232, connectez ici le contrôleur matériel/logiciel. 4. (Facultatif) Vous pouvez utiliser le câble d’extension infrarouge (Pièce N° 2XRT-0003G) et le connecter au commutateur VS481B. Ce câble n’est pas fourni avec le produit. 5. Branchez le câble de l’adaptateur secteur dans la prise d’alimentation du VS481B. Sélection du périphérique source Le commutateur HDMI VS481B permet de sélectionner rapidement et simplement le périphérique source désiré à l'aide des boutons du panneau avant, de la télécommande infrarouge ou de l'interface série RS-232. Sélection manuelle Pour sélectionner manuellement un périphérique source, appuyez sur le bouton de sélection du port correspondant au port auquel il est connecté. • Utilisez le bouton Port Up pour sélectionner le port disponible suivant dans l’ordre croissant (de gauche à droite sur le panneau avant). • Utilisez le bouton Port Down pour sélectionner le port disponible suivant dans l’ordre décroissant (de droite à gauche sur le panneau avant). Interface série RS-232 L’interface série RS-232 bidirectionnelle intégrée au VS481B permet le contrôle du système par un contrôleur haut de gamme ou un PC. Sélection par télécommande Pour sélectionner un périphérique source à l’aide de la télécommande, appuyez sur la touche numérique correspondant au port auquel il est connecté. Vous pouvez également faire défiler les périphériques sources disponibles en appuyant sur les boutons Port Up et Port Down de la télécommande. www.aten.com VS481B 4-Port-HDMI-Switch Kurzanleitung Hardwareübersicht Hardware installieren A Vorderseitige Ansicht 1. Portauswahl-Drucktasten 2. Port-LEDs 3. Infrarot-Empfänger 4. HDMI-Eingang Bedienung B 1. Verbinden Sie die HDMI-Eingangsbuchse am Video-Anzeigegerät mit dem HDMI-Ausgang an der Rückseite des VS481B. Verwenden Sie dazu ein HDMI-Kabel. 2. Verbinden Sie die HDMI-Ausgänge der Signalquellen mit den HDMI-Eingängen am VS481B. Verwenden Sie dazu je ein HDMIKabel. Drei der HDMI-Eingänge befinden sich auf der Rückseite des Switches. Der vierte HDMI-Port befindet sich auf der Vorderseite am Switch. 3. (Optional) Um die Systemeinstellungen des VS481B über den RS232-Port einstellen zu können, schließen Sie hier den Hardware-/ Software-Controller an. 4. (Optional) Sie können das Infrarot-Verlängerungskabel (Artikelnr. 2XRT-0003G) an den VS481B anschließen. Dieses Kabel ist nicht im Lieferumfang enthalten. 5. Verbinden Sie das Kabel des Netzteils mit der Stromeingangsbuchse am VS481B. Rückseitige Ansicht 1. Stromeingangsbuchse 2. HDMI-Ausgang 3. HDMI-Eingang 4. Serieller RS-232-Port 5. Port für Infrarot-Empfänger Infrarot-Fernbedienung 1. Tasten Port auf / Port ab 2. Portauswahltasten Signalquelle auswählen Der HDMI-Switch VS481B bietet eine einfache Auswahl der gewünschten Signalquelle über die vorderseitigen Drucktasten, über die Infrarot-Fernbedienung oder über die serielle RS-232-Schnittstelle. Manuelle Auswahl Um eine Signalquelle auszuwählen, drücken Sie den Auswahlschalter, der den Port des angeschlossenen Gerätes darstellt. Auswahl per Fernbedienung Um eine Signalquelle über die Fernbedienung auszuwählen, drücken Sie die Zifferntaste mit der Nummer, die den Port des angeschlossenen Gerätes darstellt. A Vista frontal 1. Botones de selección de puertos 2. Indicadores LED de los puertos 3. Receptor de infrarrojos 4. Puerto de entrada HDMI Vista posterior 1. Entrada de alimentación 2. Puerto de salida HDMI 3. Puerto de entrada HDMI 4. Puerto serie RS-232 5. Puerto para receptor de infrarrojos Mando a distancia por infrarrojos 1. Botones de selección de puerto anterior/siguiente (Port Up / Port Down) 2. Botones de selección de puerto por número www.aten.com Instalar el hardware Funcionamiento B 1. Conecte el puerto de entrada HDMI del dispositivo de visualización al puerto de salida HDMI en la parte posterior del VS481B. Para ello, utilice un cable HDMI. 2. Conecte los puertos de salida HDMI de los dispositivos fuente a los puertos de entrada HDMI del VS481B. Para ello, utilice cables HDMI. Tres de los cuatro puertos de entrada HDMI se encuentran en la parte posterior del conmutador ; el cuarto se encuentra en el panel frontal del conmutador. 3. (Opcional) Para ajustar la configuración de sistema del VS481B a través del puerto RS-232, conecte la controladora de hardware/ software aquí. 4. (Opcional) Puede conectar el cable alargador para infrarrojos (número de artículo 2XRT-0003G) al VS481B. Este cable no está incluido en el paquete. 5. Conecte el cable del adaptador de alimentación a la entrada de alimentación del VS481B. Selección de un dispositivo fuente El conmutador HDMI VS481B permite seleccionar simple y rápidamente el dispositivo fuente mediante los botones del panel frontal, el mando a distancia o la interfaz serie RS-232. Selección manual Para seleccionar manualmente un dispositivo fuente, pulse el conmutador del panel frontal que corresponde al puerto donde tiene conectado el dispositivo en cuestión. A Vista anteriore 1. Pulsanti di selezione della porta 2. LED delle porte 3. Ricevitore a infrarossi 4. Porta d’ingresso HDMI Vista posteriore 1. Presa d’alimentazione 2. Porta d’uscita HDMI 3. Porta d’ingresso HDMI 4. Porta seriale RS-232 5. Porta d’estensione infrarossi Telecomando a infrarossi 1. Pulsanti Porta Su/Porta Giù 2. Pulsanti di selezione della porta • Pulse el botón Port Up para seleccionar el siguiente puerto disponible en orden creciente (de izquierda a derecha en el panel frontal). • Pulse el botón Port Down para seleccionar el siguiente puerto disponible en orden decreciente (de derecha a izquierda en el panel frontal). Interfaz serie RS-232 La interfaz serie RS-232 bidireccional incorporada del VS481B permite controlar el sistema a través de una controladora de altas prestaciones o del PC. Selección mediante el mando a distancia Para seleccionar un dispositivo fuente con el mando a distancia, pulse la tecla numérica que corresponde al número del puerto donde tiene conectado el dispositivo en cuestión. También puede pulsar los botones Port Up y Port Down del mando a distancia para alternar cíclicamente entre las diferentes fuentes de señal. Switch HDMI a 4 porte VS481B – Guida rapida Hardware Serielle RS-232-Schnittstelle Über die bidirektionale RS-232-Schnittstelle des VS481B ist die Systemsteuerung über einen hochwertigen Controller oder PC möglich. Alternativ dazu können Sie die Taste Port auf/ab auf der Fernbedienung drücken, um zyklisch zwischen den Signalquellen umzuschalten. Conmutador HDMI de 4 puertos VS481B Guía rápida Presentación del hardware • Drücken Sie die Taste „Port auf“, um auf den nächsten verfügbaren Port umzuschalten (von links nach rechts am vorderseitigen Bedienfeld). • Drücken Sie die Taste „Port ab“, um auf den vorigen verfügbaren Port umzuschalten (von rechts nach links am vorderseitigen Bedienfeld). www.aten.com Installazione dell’hardware B 1. Usare un cavo HDMI per collegare la porta di ingresso HDMI del dispositivo video alla porta di uscita HDMI sul retro del VS481B. 2. Usare i cavi HDMI per collegare le porte di uscita HDMI dei dispositivi sorgente alle porte di ingresso HDMI del VS481B. Tre porte di ingresso HDMI si trovano sul retro dell’interruttore, mentre le quarta è situata sul lato anteriore. 3. (Opzionale) Per modificare le impostazioni di sistema del VS481B tramite porta RS-232, collegare qui il controller hardware/software. 4. (Opzionale) È possibile utilizzare il cavo di estensione infrarossi (numero del componente 2XRT-0003G) collegato al VS481B. Il cavo non è incluso nella confezione. 5. Inserire il cavo dell’alimentatore nella presa d’alimentazione del VS481B. Funzionamento Selezione del dispositivo sorgente Lo switch HDMI VS481B consente una facile e flessibile selezione del dispositivo sorgente tramite i pulsanti anteriori, il telecomando o l’interfaccia seriale RS-232. Selezione manuale Per selezionare un dispositivo sorgente, premere l’interruttore di selezione della porta corrispondente alla porta a cui è collegato il dispositivo. Selezione da telecomando Per selezionare un dispositivo sorgente tramite telecomando, premere il pulsante numerato corrispondente alla porta a cui è collegato il dispositivo. In alternativa, è possibile spostarsi circolarmente fra i dispositivi sorgente disponibili premendo i pulsanti Porta Su/Porta Giù sul telecomando. • Utilizzare il pulsante Porta Su per selezionare la porta disponibile in ordine crescente (da sinistra a destra sul pannello anteriore). • Utilizzare il pulsante Porta Giù per selezionare la porta disponibile in ordine decrescente (da destra a sinistra sul pannello anteriore). Interfaccia seriale RS-232 L’interfaccia seriale RS-232 bidirezionale incorporata nel VS481B consente di controllare il sistema per mezzo di un controller sofisticato o di un PC.-
 1
1
-
 2
2


ATEN VanCryst VS4818 Guía de inicio rápido
- Tipo
- Guía de inicio rápido
- Este manual también es adecuado para
en otros idiomas
- français: ATEN VanCryst VS4818 Guide de démarrage rapide
- italiano: ATEN VanCryst VS4818 Guida Rapida
- English: ATEN VanCryst VS4818 Quick start guide
- Deutsch: ATEN VanCryst VS4818 Schnellstartanleitung
- русский: ATEN VanCryst VS4818 Инструкция по началу работы
- português: ATEN VanCryst VS4818 Guia rápido
- 日本語: ATEN VanCryst VS4818 クイックスタートガイド
Artículos relacionados
-
ATEN VS481A Guía de inicio rápido
-
ATEN VS0801H Guía de inicio rápido
-
ATEN VM5808H Guía de inicio rápido
-
-
ATEN VS0401 Guía de inicio rápido
-
ATEN VS0801HB Guía de inicio rápido
-
ATEN VM0404HB Guía de inicio rápido
-
ATEN VM6404H-AT-U Guía de inicio rápido
-
-
ATEN VS1808T-AT-U Guía de inicio rápido