
B
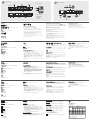
Installation Diagram
VS481
A
4-Port HDMI Switch Quick Start Guide
Commutateur HDMI VS481
A
à 4 ports – Guide de mise en route rapide
VS481
A
4-Port-HDMI-Switch Kurzanleitung
Conmutador HDMI de 4 puertos VS481
A
Guía rápida
www.aten.com
www.aten.com
www.aten.com
www.aten.com
A
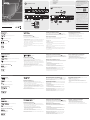
Hardware Review
Requirements
Source Device(s)
• HDMI Type A output connector(s)
Display Device
• A display device or receiver with an HDMI Type A input connector
Cables
• 4 HDMI cables
Note: Not all cables are included in this package.
Hardware review
A
Front View
1. HDMI In
2. Port Selection Pushbuttons
3. IR Receiver
4. Port LEDs
Rear View
1. Power Jack
2. HDMI Out
3. HDMI In
4. RS-232 Serial Port
IR Remote Control
1. Port Up / Port Down Buttons
2. Port Selection Buttons
Hardware Installation
B
• Ensure that all equipment to be connected is powered off.
• Make sure that all devices you will be connecting up are properly grounded.
1. Use an HDMI cable to connect the HDMI input port on the video display device to the HDMI output
port on the rear of the VS481
A
.
2. Use HDMI cables to connect the HDMI output ports on the source device(s) to the HDMI input
ports on the VS481
A
. Three HDMI input ports are located on the rear of the switch; the fourth
HDMI port is located on the front of the switch.
3. Plug the provided power adapter into an appropriate AC power source; plug the power adapter
cable into the Power Jack on the VS481
A
.
This completes the basic installation of the VS481
A
HDMI Switch. You may now power on the display
and source devices.
Installing the RS-232 Controller
B 4
In order to use the RS-232 serial interface to attach a high-end controller (such as a PC) to the
VS481
A
, use a serial cable such as a modem cable. The end connecting to the VS481
A
should have
a 9-pin male connector. Connect this to the serial interface on the rear of the VS481
A
.
Source Device Selection
The VS481
A
HDMI Switch offers easy and fl exible source device selection with either the front panel
pushbuttons, with the remote control, or through the RS-232 serial interface.
1. Manual Selection
To select a source device, press the Port Selection button that corresponds to the port it is
connected to.
2. Remote Control Selection
To select a source device with a remote control, press the number button that corresponds
to the port it is connected to.
Alternatively, you may also cycle through the available source devices by pushing the Port Up and
Port Down buttons on the remote control unit.
• Use the Port Up button to select the next available port in ascending order (from left to right
on the front view panel).
• Use the Port Down button to select the next available port in descending order (from right to
left on the front view panel).
Powering Off and Restarting
If you power off the VS481
A
, follows these steps before powering it on again:
1. Power off the attached devices.
2. Unplug the power adapter cable from the VS481
A
.
3. Wait 10 seconds, and then plug the power adapter cable back in.
4. After the VS481
A
is powered on, power on the attached devices.
Note: Whenever the VS481
A
is powered on, it automatically selects Port 1.
Confi guration requise
Périphérique(s) source
• Connecteur(s) de sortie HDMI de type A
Périphérique d’affi chage
• 1 périphérique d’affi chage ou récepteur équipé d’un connecteur d’entrée HDMI de type A
Câbles
• 4 câbles HDMI
Remarque : certains câbles mentionnés ne sont pas fournis avec le produit.
Description du matériel
A
Vue avant
1. Entrée HDMI
2. Boutons de sélection du port
3. Récepteur infrarouge
4. Voyants des ports
Vue arrière
1. Prise d’alimentation
2. Sortie HDMI
3. Entrée HDMI
4. Port série RS-232
Télécommande infrarouge
1. Boutons de sélection du port (Port Up / Port Down)
2. Boutons de sélection du port par numéro
Installation du matériel
B
• Vérifi ez que tous les appareils à connecter sont éteints.
• Assurez-vous que tous les appareils à connecter sont correctement reliés à la terre.
1. Utilisez un câble HDMI pour relier le port d’entrée HDMI du périphérique d’affi chage au port de
sortie HDMI situé à l’arrière du commutateur VS481
A
.
2. Utilisez des câbles HDMI pour relier les ports de sortie HDMI du ou des périphériques source aux
ports d’entrée HDMI du commutateur VS481
A
. Trois des quatre ports d’entrée HDMI se trouvent à l’
arrière du commutateur. Le quatrième se trouve à l’avant du commutateur.
3. Branchez une extrémité de l’adaptateur secteur fourni sur une prise de courant adaptée, et l’
autre extrémité sur la prise d’alimentation du commutateur VS481
A
.
L’installation de base du commutateur HDMI VS481
A
est terminée. Vous pouvez à présent allumer
les périphériques d’affi chage et source.
Confi guration de l’interface RS-232
B 4
Pour utiliser l’interface série RS-232 pour la connexion d’un contrôleur haut de gamme (ordinateur,
par exemple) au VS481
A
, utilisez un câble série, tel qu’un câble de modem. L’extrémité du câble à
relier au VS481
A
doit être équipée d’un connecteur mâle à 9 broches. Connectez-la à l’interface série
située à l’arrière du VS481
A
.
Sélection du périphérique source
Le commutateur HDMI VS481
A
permet de sélectionner rapidement et simplement le périphérique
source désiré à l’aide des boutons du panneau avant, de la télécommande ou de l’interface série RS-
232.
1. Sélection manuelle
Pour sélectionner manuellement un périphérique source, appuyez sur le bouton de
sélection du port correspondant au port auquel il est connecté.
2. Sélection à l’aide de la télécommande
Pour sélectionner un périphérique source à l’aide de la télécommande, appuyez sur la
touche numérique correspondant au numéro de port auquel il est connecté.
Vous pouvez également faire défi ler les périphériques source disponibles en appuyant sur les
boutons Port Up et Port Down de la télécommande.
• Utilisez le bouton Port Up pour sélectionner le port suivant disponible dans un ordre
croissant (de gauche à droite sur le panneau avant).
• Utilisez le bouton Port Down pour sélectionner le port suivant disponible dans un ordre
décroissant (de droite à gauche sur le panneau avant).
Arrêt et redémarrage du commutateur
Si vous éteignez le VS481
A
, procédez comme suit avant de le redémarrer :
1. Éteignez les périphériques auxquels il est relié.
2. Débranchez le câble de l’adaptateur secteur du VS481
A
.
3. Patientez 10 secondes, puis rebranchez le câble de l’adaptateur secteur.
4. Une fois le VS481
A
allumé, vous pouvez rallumer les périphériques auxquels il est relié.
Remarque : lorsque le VS481
A
est allumé, le port 1 est automatiquement sélectionné.
Voraussetzungen
Signalquelle(n)
• HDMI Typ A-Ausgang bzw. -Ausgänge
Anzeigegerät
• Anzeigegerät oder Receiver mit HDMI-Typ-A-Eingang
Kabel
• 4 HDMI-Kabel
Hinweis: Nicht alle Kabel sind im Lieferumfang enthalten.
Hardwareübersicht
A
Vorderseitige Ansicht
1. HDMI-Eingang
2. Portauswahl (Drucktasten)
3. Infrarot-Empfänger
4. Port-LEDs
Rückseitige Ansicht
1. Stromeingangsbuchse
2. HDMI-Ausgang
3. HDMI-Eingang
4. Serieller RS-232-Port
Infrarot-Fernbedienung
1. Tasten Port auf / Port ab
2. Portauswahltasten
Hardware installieren
B
• Schalten Sie alle anzuschließenden Geräte aus.
• Stellen Sie sicher, dass alle anzuschließenden Geräte ordnungsgemäß geerdet sind.
1. Verbinden Sie die HDMI-Eingangsbuchse am Video-Anzeigegerät mit dem HDMI-Ausgang an der
Rückseite des VS481
A
. Verwenden Sie dazu ein HDMI-Kabel.
2. Verbinden Sie die HDMI-Ausgänge der Signalquelle(n) mit den HDMI-Eingängen am VS481
A
.
Verwenden Sie dazu je ein HDMI-Kabel. Drei der HDMI-Eingänge befi nden sich auf der Rückseite
des Switches. Der vierte HDMI-Port befi ndet sich auf der Vorderseite am switch.
3. Schließen Sie das mitgelieferte Netzteil an eine stromführende Steckdose an, und verbinden Sie
das Kabel des Netzteils mit dem VS481
A
.
Damit ist die Installation des HDMI-Switches VS481
A
abgeschlossen. An dieser Stelle können Sie die
Anzeigegeräte und die Grafi ksignalquellen einschalten.
RS-232-Steuereinheit anschließen
B 4
Um die serielle RS-232-Schnittstelle mit einer Hochleistungs-Steuereinheit (z.B. einem PC) für den
VS481
A
einzusetzen, verwenden Sie ein serielles Kabel (z.B. ein Modemkabel). Das eine Ende des
Kabels sollte einen 9-poligen Stecker (Männlein) besitzen. Verbinden Sie diesen mit der seriellen
Schnittstelle auf der Rückseite des VS481
A
.
Signalquelle auswählen
Der HDMI-Switch VS481
A
bietet eine einfache Auswahl der gewünschten Signalquelle über die
vorderseitigen Drucktasten, über die Fernbedienung oder über die serielle RS-232-Schnittstelle.
1. Manuelle Auswahl
Um eine Signalquelle auszuwählen, drücken Sie den Auswahlschalter, der den Port des
angeschlossenen Gerätes darstellt.
2. Auswahl per Fernbedienung
Um eine Signalquelle über die Fernbedienung auszuwählen, drücken Sie die Zifferntaste
mit der Nummer, die den Port den angeschlossenen Gerätes darstellt.
Alternativ dazu können Sie die Taste Port auf/ab auf der Fernbedienung drücken, um zyklisch
zwischen den Signalquellen umzuschalten.
• Drücken Sie die Taste „Port auf“, um auf den nächsten verfügbaren Port umzuschalten (von
links nach rechts am vorderseitigen Bedienfeld).
• Drücken Sie die Taste „Port ab“, um auf den vorigen verfügbaren Port umzuschalten (von
rechts nach links am vorderseitigen Bedienfeld).
Ausschalten und neu starten
Wenn Sie den VS481
A
ausgeschaltet haben, gehen Sie folgendermaßen vor, um ihn wieder
einzuschalten:
1. Schalten Sie alle angeschlossenen Geräte aus.
2. Ziehen Sie das Kabel des Netzteils vom VS481
A
ab.
3. Warten Sie 10 Sekunden, und schließen Sie das Kabel des Netzteils wieder an.
4. Nachdem der VS481
A
eingeschaltet wurde, können Sie die angeschlossenen Geräte
einschalten.
Hinweis: Nachdem Sie den VS481
A
eingeschaltet haben, ist automatisch Port 1 ausgewählt.
Requisitos
Dispositivo(s) fuente
• Conector(es) de salida HDMI de tipo A
Dispositivo de visualización
• Un dispositivo de visualización o un receptor con entrada HDMI de tipo A
Cables
• 4 cables HDMI
Nota: no todos los cables vienen incluidos en el paquete.
Presentación del hardware
A
Vista frontal
1. Entrada HDMI
2. Botones de selección de puerto
3. Receptor de infrarrojos
4. Indicadores LED de los puertos
Vista posterior
1. Entrada de alimentación
2. Salida HDMI
3. Entrada HDMI
4. Puerto serie RS-232
Mando a distancia por infrarrojos
1. Botones de selección de puerto (Port Up / Port Down)
2. Botones de selección de puerto por número
Instalación del hardware
B
• A pague todos los equipos que vaya a conectar.
• Asegúrese de que todos los equipos que vaya a instalar tengan una toma de tierra adecuada.
1. Conecte el puerto de entrada HDMI del dispositivo de visualización al puerto de salida HDMI en la
parte posterior del VS481
A
. Para ello, utilice un cable HDMI.
2. Conecte los puertos de salida HDMI de los dispositivos fuente a los puertos de
entrada HDMI del VS481
A
. Para ello, utilice cables HDMI. Tres de los cuatro puertos
de entrada HDMI se encuentran en la parte posterior del conmutador ; el cuarto se
encuentra en el panel frontal del conmutador.
3. Conecte un extremo del adaptador de alimentación incluido a una toma eléctrica y el otro
extremo a la entrada de corriente del conmutador VS481
A
.
La instalación básica del conmutador HDMI VS481
A
ha concluido. A continuación podrá encender el
monitor y los dispositivos fuente de señal.
Confi guración de la interfaz RS-232
B 4
Para utilizar la interfaz serie RS-232 para la conexión de una controladora de altas prestaciones (por
ej. un ordenador) al VS481
A
, use un cable serie, como un cable de módem. El extremo del cable
que se conecta al VS481
A
debe disponer de un conector macho de 9 patillas. Conéctelo a la interfaz
serie en la parte posterior del VS481
A
.
Selección de un dispositivo fuente
El conmutador HDMI VS481
A
permite seleccionar simple y rápidamente el dispositivo fuente
mediante los botones del panel frontal, el mando a distancia o la interfaz serie RS-232.
1. Selección manual
Para seleccionar manualmente un dispositivo fuente, pulse el conmutador del panel frontal
que corresponde al puerto donde tiene conectado el dispositivo en cuestión.
2. Selección mediante el mando a distancia
Para seleccionar un dispositivo fuente con el mando a distancia, pulse la tecla numérica
que corresponde al número del puerto donde tiene conectado el dispositivo en cuestión.
También puede pulsar los botones Port Up y Port Down del mando a distancia para alternar
cíclicamente entre las diferentes fuentes de señal.
• Pulse el botón Port Up para seleccionar el siguiente puerto disponible en orden creciente
(de izquierda a derecha en el panel frontal).
• Pulse el botón Port Down para seleccionar el siguiente puerto disponible en orden
decreciente (de derecha a izquierda en el panel frontal).
Apagado y reinicio del conmutador
Si apaga el VS481
A
, siga estos pasos antes de volver a encenderlo:
1. Apague todos los dispositivos conectados.
2. Desconecte el cable del adaptador de alimentación del VS481
A
.
3. Espere 10 segundos y vuelva a conectar el adaptador de alimentación.
4. Una vez que el VS481
A
se haya iniciado, encienda los dispositivos conectados.
Nota: cuando el VS481
A
está encendido, el puerto 1 queda automáticamente seleccionado.
Package Contents
1 VS481A HDMI Switch
1 Standard HDMI Cable
1 Remote Control Unit
1 Power Adapter
1 User Instructions
Front View
Rear View
1 2 3
4
1
2
Power Adapter
IR Remote Control
HDTV (HDMI)
Projector
DVD Player Set-top Box
Computer
Hardware / Software Controller
1 2 3 4
2
3
1
4
© Copyright 2020 ATEN
®
International Co., Ltd.
ATEN and the ATEN logo are trademarks of ATEN International Co., Ltd. All rights reserved. All
other trademarks are the property of their respective owners.
Part No. PAPE-1223-363G Printing Date: 06/2020
4-Port HDMI Switch
Quick Start Guide
VS481A
ATEN VanCryst
™
이 기기는 업무용(A급) 전자파적합기기로서 판매자 또는 사용자는 이 점을
주의하시기 바라며, 가정외의 지역에서 사용하는 것을 목적으로 합니다.
Scan for
more information
EMC Information
FEDERAL COMMUNICATIONS COMMISSION INTERFERENCE
STATEMENT:
This equipment has been tested and found to comply with the limits
for a Class A digital device, pursuant to Part 15 of the FCC Rules.
These limits are designed to provide reasonable protection against
harmful interference when the equipment is operated in a commercial
environment. This equipment generates, uses, and can radiate radio
frequency energy and, if not installed and used in accordance with
the instruction manual, may cause harmful interference to radio
communications. Operation of this equipment in a residential area
is likely to cause harmful interference in which case the user will be
required to correct the interference at his own expense.
FCC Caution: Any changes or modifi cations not expressly approved by
the party responsible for compliance could void the user's authority to
operate this equipment.
Warning: Operation of this equipment in a residential environment
could cause radio interference.
This device complies with Part 15 of the FCC Rules. Operation is subject
to the following two conditions:(1) this device mat not cause harmful
interference, and(2) this device must accept any interference received,
including interference that may cause undesired operation.
Important. Before proceeding, download the Installation and
Operation Manual by visiting the website, www.aten.com and
navigating to the product page. The manual includes important
warnings, loading specifi cations and grounding instructions.
Achtung: Der Gebrauch dieses Geräts in Wohnumgebung kann
Funkstörungen verursachen.
S
upport and Documentation Notice
All information, documentation, fi rmware, software utilities,
and specifi cations contained in this package are subject to
change without prior notifi cation by the manufacturer.
To reduce the environmental impact of our products, ATEN
documentation and software can be found online at
http://www.aten.com/download/
Technical Support
www.aten.com/support
La página se está cargando ...
Transcripción de documentos
Package Contents A Support and Documentation Notice 1 VS481A HDMI Switch 1 Standard HDMI Cable 1 Remote Control Unit 1 Power Adapter 1 User Instructions Hardware Review All information, documentation, firmware, software utilities, and specifications contained in this package are subject to change without prior notification by the manufacturer. To reduce the environmental impact of our products, ATEN documentation and software can be found online at http://www.aten.com/download/ Technical Support www.aten.com/support 1 2 3 B Front View Installation Diagram Scan for more information 2 4 Rear View ATEN VanCryst™ DVD Player Set-top Box EMC Information Computer VS481A 4-Port HDMI Switch Quick Start Guide 1 2 3 4 4 Power Adapter 3 IR Remote Control © Copyright 2020 ATEN® International Co., Ltd. 1 ATEN and the ATEN logo are trademarks of ATEN International Co., Ltd. All rights reserved. All Hardware / Software Controller 1 other trademarks are the property of their respective owners. Part No. PAPE-1223-363G Projector HDTV (HDMI) This device complies with Part 15 of the FCC Rules. Operation is subject to the following two conditions:(1) this device mat not cause harmful interference, and(2) this device must accept any interference received, including interference that may cause undesired operation. Important. Before proceeding, download the Installation and Operation Manual by visiting the website, www.aten.com and navigating to the product page. The manual includes important warnings, loading specifications and grounding instructions. 2 Printing Date: 06/2020 FEDERAL COMMUNICATIONS COMMISSION INTERFERENCE STATEMENT: This equipment has been tested and found to comply with the limits for a Class A digital device, pursuant to Part 15 of the FCC Rules. These limits are designed to provide reasonable protection against harmful interference when the equipment is operated in a commercial environment. This equipment generates, uses, and can radiate radio frequency energy and, if not installed and used in accordance with the instruction manual, may cause harmful interference to radio communications. Operation of this equipment in a residential area is likely to cause harmful interference in which case the user will be required to correct the interference at his own expense. FCC Caution: Any changes or modifications not expressly approved by the party responsible for compliance could void the user's authority to operate this equipment. Warning: Operation of this equipment in a residential environment could cause radio interference. Achtung: Der Gebrauch dieses Geräts in Wohnumgebung kann Funkstörungen verursachen. 이 기기는 업무용(A급) 전자파적합기기로서 판매자 또는 사용자는 이 점을 주의하시기 바라며, 가정외의 지역에서 사용하는 것을 목적으로 합니다. VS481A 4-Port HDMI Switch Quick Start Guide Requirements www.aten.com Installing the RS-232 Controller IR Remote Control 1. Port Up / Port Down Buttons Source Device(s) • HDMI Type A output connector(s) 2. Port Selection Buttons Display Device Hardware Installation • A display device or receiver with an HDMI Type A input connector B Cables • Make sure that all devices you will be connecting up are properly grounded. Note: Not all cables are included in this package. 1. Use an HDMI cable to connect the HDMI input port on the video display device to the HDMI output Hardware review 2. Use HDMI cables to connect the HDMI output ports on the source device(s) to the HDMI input • 4 HDMI cables port on the rear of the VS481A. ports on the VS481A. Three HDMI input ports are located on the rear of the switch; the fourth Front View HDMI port is located on the front of the switch. 1. HDMI In 2. Port Selection Pushbuttons 3. IR Receiver 4. Port LEDs 3. Plug the provided power adapter into an appropriate AC power source; plug the power adapter Rear View This completes the basic installation of the VS481A HDMI Switch. You may now power on the display cable into the Power Jack on the VS481A. VS481A, use a serial cable such as a modem cable. The end connecting to the VS481A should have 1. Power off the attached devices. a 9-pin male connector. Connect this to the serial interface on the rear of the VS481A. 2. Unplug the power adapter cable from the VS481A. 4. After the VS481A is powered on, power on the attached devices. Source Device Selection The VS481A HDMI Switch offers easy and flexible source device selection with either the front panel pushbuttons, with the remote control, or through the RS-232 serial interface. Note: Whenever the VS481A is powered on, it automatically selects Port 1. 1. Manual Selection To select a source device, press the Port Selection button that corresponds to the port it is connected to. 2. Remote Control Selection To select a source device with a remote control, press the number button that corresponds to the port it is connected to. and source devices. 1. Power Jack 2. HDMI Out 3. HDMI In 4. RS-232 Serial Port If you power off the VS481A, follows these steps before powering it on again: 3. Wait 10 seconds, and then plug the power adapter cable back in. • Ensure that all equipment to be connected is powered off. A Powering Off and Restarting B 4 In order to use the RS-232 serial interface to attach a high-end controller (such as a PC) to the Alternatively, you may also cycle through the available source devices by pushing the Port Up and Port Down buttons on the remote control unit. • Use the Port Up button to select the next available port in ascending order (from left to right on the front view panel). • Use the Port Down button to select the next available port in descending order (from right to left on the front view panel). Commutateur HDMI VS481A à 4 ports – Guide de mise en route rapide Configuration requise www.aten.com Configuration de l’interface RS-232 Télécommande infrarouge 1. Boutons de sélection du port (Port Up / Port Down) Périphérique(s) source 2. Boutons de sélection du port par numéro • Connecteur(s) de sortie HDMI de type A Installation du matériel Périphérique d’affichage B • 1 périphérique d’affichage ou récepteur équipé d’un connecteur d’entrée HDMI de type A • Vérifiez que tous les appareils à connecter sont éteints. • Assurez-vous que tous les appareils à connecter sont correctement reliés à la terre. Câbles 1. Utilisez un câble HDMI pour relier le port d’entrée HDMI du périphérique d’affichage au port de sortie HDMI situé à l’arrière du commutateur VS481A. • 4 câbles HDMI Remarque : certains câbles mentionnés ne sont pas fournis avec le produit. Description du matériel 2. Utilisez des câbles HDMI pour relier les ports de sortie HDMI du ou des périphériques source aux ports d’entrée HDMI du commutateur VS481A. Trois des quatre ports d’entrée HDMI se trouvent à l’ arrière du commutateur. Le quatrième se trouve à l’avant du commutateur. 3. Branchez une extrémité de l’adaptateur secteur fourni sur une prise de courant adaptée, et l’ autre extrémité sur la prise d’alimentation du commutateur VS481A. A Vue avant L’installation de base du commutateur HDMI VS481A est terminée. Vous pouvez à présent allumer les périphériques d’affichage et source. 1. Entrée HDMI 2. Boutons de sélection du port 3. Récepteur infrarouge 4. Voyants des ports B 4 Arrêt et redémarrage du commutateur Pour utiliser l’interface série RS-232 pour la connexion d’un contrôleur haut de gamme (ordinateur, par exemple) au VS481A, utilisez un câble série, tel qu’un câble de modem. L’extrémité du câble à relier au VS481A doit être équipée d’un connecteur mâle à 9 broches. Connectez-la à l’interface série située à l’arrière du VS481A. Si vous éteignez le VS481A, procédez comme suit avant de le redémarrer : 1. Éteignez les périphériques auxquels il est relié. 2. Débranchez le câble de l’adaptateur secteur du VS481A. 3. Patientez 10 secondes, puis rebranchez le câble de l’adaptateur secteur. 4. Une fois le VS481A allumé, vous pouvez rallumer les périphériques auxquels il est relié. Sélection du périphérique source Remarque : lorsque le VS481A est allumé, le port 1 est automatiquement sélectionné. Le commutateur HDMI VS481A permet de sélectionner rapidement et simplement le périphérique source désiré à l’aide des boutons du panneau avant, de la télécommande ou de l’interface série RS232. 1. Sélection manuelle Pour sélectionner manuellement un périphérique source, appuyez sur le bouton de sélection du port correspondant au port auquel il est connecté. 2. Sélection à l’aide de la télécommande Pour sélectionner un périphérique source à l’aide de la télécommande, appuyez sur la touche numérique correspondant au numéro de port auquel il est connecté. Vous pouvez également faire défiler les périphériques source disponibles en appuyant sur les boutons Port Up et Port Down de la télécommande. • Utilisez le bouton Port Up pour sélectionner le port suivant disponible dans un ordre croissant (de gauche à droite sur le panneau avant). Vue arrière 1. Prise d’alimentation 2. Sortie HDMI 3. Entrée HDMI 4. Port série RS-232 • Utilisez le bouton Port Down pour sélectionner le port suivant disponible dans un ordre décroissant (de droite à gauche sur le panneau avant). VS481A 4-Port-HDMI-Switch Kurzanleitung Voraussetzungen www.aten.com RS-232-Steuereinheit anschließen Infrarot-Fernbedienung 1. Tasten Port auf / Port ab Signalquelle(n) 2. Portauswahltasten • HDMI Typ A-Ausgang bzw. -Ausgänge Hardware installieren Anzeigegerät B • Anzeigegerät oder Receiver mit HDMI-Typ-A-Eingang • Schalten Sie alle anzuschließenden Geräte aus. • Stellen Sie sicher, dass alle anzuschließenden Geräte ordnungsgemäß geerdet sind. Kabel 1. Verbinden Sie die HDMI-Eingangsbuchse am Video-Anzeigegerät mit dem HDMI-Ausgang an der Rückseite des VS481A. Verwenden Sie dazu ein HDMI-Kabel. • 4 HDMI-Kabel Hinweis: Nicht alle Kabel sind im Lieferumfang enthalten. Hardwareübersicht 2. Verbinden Sie die HDMI-Ausgänge der Signalquelle(n) mit den HDMI-Eingängen am VS481A. Verwenden Sie dazu je ein HDMI-Kabel. Drei der HDMI-Eingänge befinden sich auf der Rückseite des Switches. Der vierte HDMI-Port befindet sich auf der Vorderseite am switch. A B 4 Vorderseitige Ansicht 3. Schließen Sie das mitgelieferte Netzteil an eine stromführende Steckdose an, und verbinden Sie das Kabel des Netzteils mit dem VS481A. 1. HDMI-Eingang 2. Portauswahl (Drucktasten) 3. Infrarot-Empfänger 4. Port-LEDs Damit ist die Installation des HDMI-Switches VS481A abgeschlossen. An dieser Stelle können Sie die Anzeigegeräte und die Grafiksignalquellen einschalten. Rückseitige Ansicht Ausschalten und neu starten Signalquelle auswählen Wenn Sie den VS481A ausgeschaltet haben, gehen Sie folgendermaßen vor, um ihn wieder einzuschalten: 1. Schalten Sie alle angeschlossenen Geräte aus. 2. Ziehen Sie das Kabel des Netzteils vom VS481A ab. 3. Warten Sie 10 Sekunden, und schließen Sie das Kabel des Netzteils wieder an. 4. Nachdem der VS481A eingeschaltet wurde, können Sie die angeschlossenen Geräte einschalten. Der HDMI-Switch VS481A bietet eine einfache Auswahl der gewünschten Signalquelle über die vorderseitigen Drucktasten, über die Fernbedienung oder über die serielle RS-232-Schnittstelle. Hinweis: Nachdem Sie den VS481A eingeschaltet haben, ist automatisch Port 1 ausgewählt. Um die serielle RS-232-Schnittstelle mit einer Hochleistungs-Steuereinheit (z.B. einem PC) für den VS481A einzusetzen, verwenden Sie ein serielles Kabel (z.B. ein Modemkabel). Das eine Ende des Kabels sollte einen 9-poligen Stecker (Männlein) besitzen. Verbinden Sie diesen mit der seriellen Schnittstelle auf der Rückseite des VS481A. 1. Manuelle Auswahl Um eine Signalquelle auszuwählen, drücken Sie den Auswahlschalter, der den Port des angeschlossenen Gerätes darstellt. 2. Auswahl per Fernbedienung Um eine Signalquelle über die Fernbedienung auszuwählen, drücken Sie die Zifferntaste mit der Nummer, die den Port den angeschlossenen Gerätes darstellt. Alternativ dazu können Sie die Taste Port auf/ab auf der Fernbedienung drücken, um zyklisch zwischen den Signalquellen umzuschalten. • Drücken Sie die Taste „Port auf“, um auf den nächsten verfügbaren Port umzuschalten (von links nach rechts am vorderseitigen Bedienfeld). • Drücken Sie die Taste „Port ab“, um auf den vorigen verfügbaren Port umzuschalten (von rechts nach links am vorderseitigen Bedienfeld). 1. Stromeingangsbuchse 2. HDMI-Ausgang 3. HDMI-Eingang 4. Serieller RS-232-Port Conmutador HDMI de 4 puertos VS481A Guía rápida Requisitos www.aten.com Mando a distancia por infrarrojos 1. Botones de selección de puerto (Port Up / Port Down) Dispositivo(s) fuente 2. Botones de selección de puerto por número • Conector(es) de salida HDMI de tipo A Instalación del hardware Dispositivo de visualización B • Un dispositivo de visualización o un receptor con entrada HDMI de tipo A • A pague todos los equipos que vaya a conectar. • Asegúrese de que todos los equipos que vaya a instalar tengan una toma de tierra adecuada. Cables 1. Conecte el puerto de entrada HDMI del dispositivo de visualización al puerto de salida HDMI en la parte posterior del VS481A. Para ello, utilice un cable HDMI. • 4 cables HDMI Nota: no todos los cables vienen incluidos en el paquete. Presentación del hardware Vista frontal 1. Entrada HDMI 2. Botones de selección de puerto 3. Receptor de infrarrojos 4. Indicadores LED de los puertos Vista posterior 1. Entrada de alimentación 2. Salida HDMI 3. Entrada HDMI 4. Puerto serie RS-232 A 2. Conecte los puertos de salida HDMI de los dispositivos fuente a los puertos de entrada HDMI del VS481A. Para ello, utilice cables HDMI. Tres de los cuatro puertos de entrada HDMI se encuentran en la parte posterior del conmutador ; el cuarto se encuentra en el panel frontal del conmutador. 3. Conecte un extremo del adaptador de alimentación incluido a una toma eléctrica y el otro extremo a la entrada de corriente del conmutador VS481A. La instalación básica del conmutador HDMI VS481A ha concluido. A continuación podrá encender el monitor y los dispositivos fuente de señal. Configuración de la interfaz RS-232 B 4 Para utilizar la interfaz serie RS-232 para la conexión de una controladora de altas prestaciones (por ej. un ordenador) al VS481A, use un cable serie, como un cable de módem. El extremo del cable que se conecta al VS481A debe disponer de un conector macho de 9 patillas. Conéctelo a la interfaz serie en la parte posterior del VS481A. Selección de un dispositivo fuente El conmutador HDMI VS481A permite seleccionar simple y rápidamente el dispositivo fuente mediante los botones del panel frontal, el mando a distancia o la interfaz serie RS-232. 1. Selección manual Para seleccionar manualmente un dispositivo fuente, pulse el conmutador del panel frontal que corresponde al puerto donde tiene conectado el dispositivo en cuestión. 2. Selección mediante el mando a distancia Para seleccionar un dispositivo fuente con el mando a distancia, pulse la tecla numérica que corresponde al número del puerto donde tiene conectado el dispositivo en cuestión. También puede pulsar los botones Port Up y Port Down del mando a distancia para alternar cíclicamente entre las diferentes fuentes de señal. • Pulse el botón Port Up para seleccionar el siguiente puerto disponible en orden creciente (de izquierda a derecha en el panel frontal). • Pulse el botón Port Down para seleccionar el siguiente puerto disponible en orden decreciente (de derecha a izquierda en el panel frontal). Apagado y reinicio del conmutador Si apaga el VS481A, siga estos pasos antes de volver a encenderlo: 1. Apague todos los dispositivos conectados. 2. Desconecte el cable del adaptador de alimentación del VS481A. 3. Espere 10 segundos y vuelva a conectar el adaptador de alimentación. 4. Una vez que el VS481A se haya iniciado, encienda los dispositivos conectados. Nota: cuando el VS481A está encendido, el puerto 1 queda automáticamente seleccionado.-
 1
1
-
 2
2


ATEN VanCryst VS481A Guía de inicio rápido
- Tipo
- Guía de inicio rápido
- Este manual también es adecuado para
En otros idiomas
Documentos relacionados
-
ATEN VS481A Guía de inicio rápido
-
ATEN VS0801H Guía de inicio rápido
-
ATEN VM0404H Guía de inicio rápido
-
ATEN VS482 Guía de inicio rápido
-
ATEN VanCryst VS4818 Guía de inicio rápido
-
-
ATEN VS0801HB Guía de inicio rápido
-
ATEN VP1421 Guía de inicio rápido
-
-
ATEN VS481 Guía de inicio rápido