
Interactive Presentation System
1
www.infocus.com/SimpleShare
Models:
INA-SIMINT1
INA-SIMRINT1
English . Español . Français . Deutsche

- 2 -
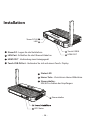
1
2
3
4
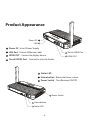
Power DC : Insert Power Supply
LAN Port : Connect Ethernet cable
HDMI OUT : Connect to display device
Touch USB IN Port : Connect to a touch display
5
6
7
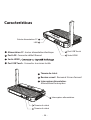
Status LED
Home button : Return to Home screen
Power Switch : Turn Receiver ON/OFF
Power DC
HDMI OUT
Touch USB IN Port
Power Switch
Home button
Status LED
LAN
Product Appearance

- 3 -
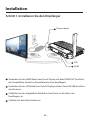
1
2
3
4
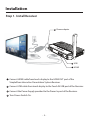
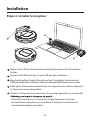
Installation
Connect HDMI cable from touch display to the HDMI OUT port of the
SimpleShare Interactive Presentation System Receiver.
Connect USB cable from touch display to the Touch IN USB port of the Receiver.
Connect the Power Supply provided to the Power In port of the Receiver.
Turn Power Switch On.
Step 1. Install Receiver
1
2
3
Power adapter
USB
HDMI

- 4 -
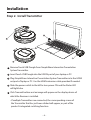
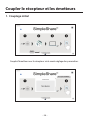
Installation
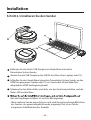
Step 2. Install Transmitter
1
2
3
4
5
Remove Touch USB Dongle from SimpleShare Interactive Presentation
System Transmitter.
Insert Touch USB Dongle into the USB IN port of your laptop or PC.
Plug SimpleShare Interactive Presentation System Transmitter in to the HDMI
out port of laptop or PC. Use the HDMI extension cable provided if needed.
Slide the power switch to the left to turn power ON and the Status LED
will light blue.
Click Transmit button and an image will appear on the display device of
which the Receiver is installed.
• If multiple Transmitters are connected, the corresponding screen of
the Transmitter that has just been clicked will appear, as part of the
product’s integrated switching function.

- 5 -
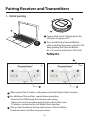
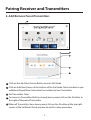
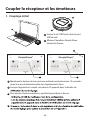
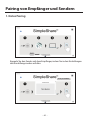
Pairing Receiver and Transmitters
1. Initial pairing
Pair the Transmitter with the Receiver by entering Set Mode in the Settings.
Ready for PAIRING
PAIR

- 6 -
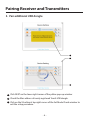
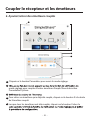
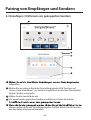
Pairing Receiver and Transmitters
1. Initial pairing
Connect the Touch USB dongle to the
USB port of laptop or PC.
Press and hold the Transmit Button
while switching the power switch to ON.
Keep holding the Transmit Button
for ~10 seconds until status LED starts
1
2
When paired, the IP address will appear on the Set Mode Check window.
Click on the X button at the top right corner of the Set Mode
Check window to exit the setup procedure.
For additional Transmitters, repeat above procedure.
- Remove the USB Dongle from laptop upon setup.
- Upon each new Transmitter paired, please check that a new
IP address is added on the Set Mode Check window.
3
4
5
3
5
4
2
2
1

- 7 -
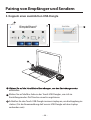
Pairing Receiver and Transmitters
2. Add/Remove Paired Transmitters
Click on the Add New Device Button to enter Set Mode
Click on Add New Device at the bottom of the Set Mode Check window to pair
additional
SimpleShare Interactive Presentation System Transmitter
.
Set Transmitter Color.
To remove a Transmitter that has already been paired, click on the X button to
the right of the paired Transmitter.
When all Transmitters have been paired, click on the X button at the top right
corner of the Set Mode Check window to exit the setup procedure
1
2
3
4
5
3
4
5
2
1

- 8 -
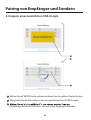
Click on the Add New Device Button to enter Set Mode.
Click on the Mac address of the Touch USB dongle to re-register within the Set
Mode Check window.
Connect the Touch USB dongle in a laptop to start pairing.
(Only one USB dongle shall be connected to laptop for new registration)
1
2
2
3
1
3
Pairing Receiver and Transmitters
3. Pair additional USB dongle

- 9 -
Pairing Receiver and Transmitters
3. Pair additional USB dongle
Click NEXT on the lower right corner of the yellow pop-up window
Check the Mac address of newly registered Touch USB dongle.
Click on the X button at top right corner of the Set Mode Check window to
exit the setup procedure.
4
5
6
4
6
5

- 10 -
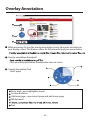
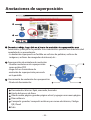
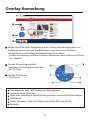
Overlay Annotation
While mirroring, click on the overlay annotation icon to take notes and draw on
your display screen. This feature allows for full interactivity of your presentation.
Overlay annotation thumbnail
- Click on overlay annotation thumbnail to view on screen
2
1
3
4
6
5
2
1
2
3
4
5
6
3
1
1
2
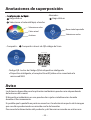
Basic tools : pen, highlighter, eraser
Set line thickness
Add new page : save current page and add a new page
White board
Exit
Overlay Annotation Tool
- Tool Layout
3

- 11 -
Overlay Annotation
Notice
The distance available for wireless application may vary depending on the user
environment.
The wireless device in use may be subjected to radio interference during operation.
The screen in part may not show if the aspect ratio of image being replayed does
not match with that of the monitor.
Turn power OFF of the product and of the Transmitter when not in use.
- Pen Setting :
Click Select pen color, width
1 2
QR Code : Smart device QR Code reader
Smart device, SimpleShare Interactive Presentation System Receiver must be
5
- Share : Share via E-mail, QR-code Scan, Cloud
Choose color
Current color
Width
Erase entire screen
Select width
1
- Eraser :
Click

- 12 -
RF Exposure
* American National Standards Institute; National Council on Radiation Protection
and Measurements ; International Commission on Non-Ionizing Radiation Protection.
Your wireless device is a low power radio transmitter and receiver.
When it is on, it receives and also sends out radio frequency (RF) signals.
In August, 1996, the Federal Communications Commissions (FCC) adopted RF
exposure guidelines with safety levels for wireless device. Those guidelines are
consistent with the safety standards previously set by both U.S. and international
standards bodies:
ANSI C95.1 (1992) *
NCRP Report 86 (1986)
ICNIRP (1996)
Those standards were based on comprehensive and periodic evaluations of the
physicians from universities, government health agencies, and industry reviewed the
available body of research to develop the ANSI Standard (C95.1).
The design of your device complies with the FCC guidelines (and those standards).
This equipment should be installed and operated with minimum 20 cm between
the radiator and your body.

sistema de presentación interactiva
1
www.infocus.com/SimpleShare
Modelos:
INA-SIMINT1
INA-SIMRINT1
English . Español . Français . Deutsche

- 14 -
1
2
3
4
Alimentación DC : Inserte la Fuente de alimentación
Puerto LAN : Conecte el cable Ethernet
Salida HDMI : Conecte al dispositivo de visualización
Puerto Touch USB IN : Conecte al dispositivo Touch
5
6
7
Estatus LED
Botón de inicio : Vuelve a la pantalla de inicio
Interruptor de encendido :
Encienda/ Apaga el receptor
Características
Alimentación DC IN
ENTRADA USB táctil
Salida HDMI
Interruptor de encendido
Botón de inicio
Estatus LED
LAN

- 15 -
1
2
3
4
Instalación
Conecte el cable HDMI de la pantalla táctil al puerto de salida HDMI del
receptor SimpleShare Interactive Presentation System.
Conecte el cable USB de la pantalla táctil al Puerto Touch IN US del receptor.
Conecte la Fuente de alimentación suministrada al Puerto de entrada de
alimentación del receptor.
Encienda el interruptor de alimentación
Paso 1. Instalar receptor
1
2
3
Power adapter
USB
HDMI

- 16 -
Instalación
Paso 2. Instalar transmisor
1
2
3
4
5
Retire el Dongle USB Touch del transmisor SimpleShare Interactive
Presentation System.
Inserte Touch USB Dongle en el Puerto USB IN de su computadora portáti o PC.
Conecte el trasmisor SimpleShare Interactive Presentation System en el Puerto
de salida HDMI del ordenador portátil o PC. Utilice el cable de extensión HDMI
proporcionado si es necesario.
Deslice el interruptor de encendido a la izquierda para encender y el LED de
estado se encenderá en azul.
Haga click en el botón transmitir y aparecerá una imagen en el dispositivo de
visualización del cual está instalado el receptor.
• Si hay vario
s trasmisores conectados, aparecerá la pantalla correspondiente
del transmisor que acaba de hacer click, como parte de la función de
conmutación integrada del producto.

- 17 -
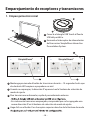
Emparejamiento de receptores y transmisores
1. Emparejamiento inicial
Ready for PAIRING
PAIR

- 18 -
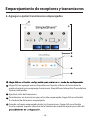
Emparejamiento de receptores y transmisores
1. Emparejamiento inicial
Conecte el dongle USB Touch al Puerto
USB del portátil o.
Encienda el interruptor de alimentación
del transmisor SimpleShare Interactive
Presentation System.
1
2
Mantenga presionado el botón de transmisor durante ~ 10 segundos hasta que
el estado de LED empiece a parpadear en azul.
Cuando se emparejan, la dirección IP aparecerá en la Ventana de selección de
modo de ajuste.
Haga click en el botón X en la esquina superior derecho de la Ventana de modo
Para transmisores adicionales, repita el procedimiento anterior.
- En cada nuevo transmisor emparejado, compruebe que se ha agregado una
nueva dirección IP en la Ventana de selección de modo de ajuste.
3
4
5
6
2
2
1
3
5
4

- 19 -
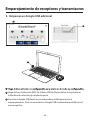
Emparejamiento de receptores y transmisores
2. Agregar o quitar transmisores emparejados
Haga click en agregar nuevo dispositivo en la parte inferior de la ventana de
modo de ajuste para emparejar trasmisores SimpleShare Interactive Presentation
System adicionales.
Ajusta el color del transmisor.
Para eliminar un transmisor que ya ha sido emparejado, haga click en el botón
X a la derecha del emisor emparejado.
Cuando se hayan emparejado todos los transmisores, haga click en el botón
X en la esquina superior derecho de la Ventana de modo de ajuste para salir del
1
2
3
4
5
3
4
5
2
1

- 20 -
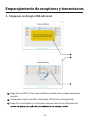
Haga click en la dirección MAC de la llave USB táctil para Volver a registrarla en
la Ventana de selección de modo de ajuste.
Conecte el dongle USB Touch en un ordenador portátil para iniciar el
emparejamiento. (Solo se conectará un dongle USB al ordenador portátil para el
nuevo registro)
1
2
3
Emparejamiento de receptores y transmisores
3. Empareje un dongle USB adicional
3
2
1

- 21 -
Emparejamiento de receptores y transmisores
3. Empareje un dongle USB adicional
Haga click en NEXT en la esquina inferior derecha de la ventana emergente
amarilla.
Compruebe la dirección MAC del dongle USB táctil recién registrado.
Haga click en el botón X en la esquina superior derecha de la Ventana de
4
5
6
4
6
5

- 22 -
Anotaciones de superposición
tomar notas y dibujar en la pantalla. Esta característica permite una interactividad
completa de su presentación.
- La anotación superpuesta es factible en archivos de palabras, archivos de
imágenes, archivos de navegador de internet, etc...
Superposición de miniatura de anotación
- Guardar anotaciones de superposición
como archivo PDF
- Haga click en la miniatura de
anotación de superposición para verla
en la pantalla
2
1
2
3
4
5
6
3
1
1
2
Herramientas básicas: lápiz, marcador, borrador
Ajuste del grosor de línea
Añadir nueva página: guardar página actual y agregar una nueva página
Pizarra blanca
Compartir: guardar/ compartir archivos por correo electrónico, Código
QR, Cloud
Salir
1
3
4
6
5
2
Herramienta de anotación de superposición
- Diseño de herramientas
3

- 23 -
Anotaciones de superposición
Aviso
La distancia disponible para la aplicación inalámbrica puede variar dependiendo
del entorno del usuario.
El dispositivo inalámbrico en uso puede estar sujeto a interferencias de radio
durante el funcionamiento.
Es posible que la pantalla en parte no muestre si la relación de aspecto de la imagen
que se está reproduciendo no coincide con la del monitor.
Desconecte la alimentación del producto y del transmisor cuando no esté en uso.
Haga click en
Seleccionar el color del lápiz, el ancho
1
2
Código QR : Lector de Código QR de dispositivo inteligente
Dispositivo inteligente, el receptor KinectIQ debe estar conectado a la
misma red Wi-Fi
5
- Compartir : Compartir a través de QR-código de Scan
Seleccionar color
Color actual
Anchura
Borrar toda la pantalla
Seleccionar ancho
1
-
Borrador :
Haga click en

- 24 -
Exposición a RF
Su teléfono portátil inalámbrico es un transmisor y receptor de radio de baja
potencia.
Cuando está encendido, recibe y envíe señales de radio frecuencia (RF).
En agosto de 1996, la Comisión Federal de Comunicaciones (FCC) adoptó las pautas
de exposición a RF con niveles de seguridad para los teléfonos inalámbricos portátiles.
por EE. UU. y organismos de estándares internacionales:
ANSI C95.1 (1992) *
NCRP Reporte 86 (1986)
ICNIRP (1996)
Estos estándares se basan en evaluaciones completas y periódicas de literatura
universidades, agencias de salud del gobierno y
la industria revisaron la investigación disponible para desarrollar el estándar ANSI
(C95.1).
Este equipo debe instalarse y operarse con un mínimo de 20 cm entre el emisor
de radiación y su cuerpo.
* Instituto Nacional de Estandarización Estadounidense; Consejo Nacional sobre
Protección y Mediciones de Radiación; la Comisión Internacional sobre Protección de
Radiación No Ionizante. El diseño de su teléfono cumple con las pautas de la FCC
(y los estándares mencionados).

Système de Présentation Interactif
1
www.infocus.com/SimpleShare
des modèles:
INA-SIMINT1
INA-SIMRINT1
English . Español . Français . Deutsche

- 26 -
1
2
3
4
Alimentation CC : Insérer alimentation électrique
Port LAN : Connecter câble Ethernet
Sortie HDMI
Port USB Touch : Connecter à un écran tactile
5
6
7
Témoin de statut
Bouton accueil : Renvoie à l'écran d'accueil
Interrupteur alimentation :
Allume/éteint le récepteur
Características
Entrée alimentation CC
Port USB Touch
Sotie HDMI
Interrupteur alimentation
Témoin de statut
Témoin de statut
LAN

- 27 -
1
2
3
4
Installation
Connectez le câble HDMI de l'écran tactile au port HDMI du récepteur
Simple Share Interactive Presentation System.
Connectez le câble USB de l'écran tactile au port USB Touch du récepteur.
Connectez l'alimentation électrique fournie au port d'alimentation du récepteur.
Allumez l’interrupteur alimentation.
Étape 1. Installer le récepteur
1
2
3
Power adapter
USB
HDMI

- 28 -
Installation
Étape 2. Installer le récepteur
1
2
3
4
5
Retirez la clé USB Touch de l’émetteur Simple Share Interactive Presentation
System.
Insérez la clé USB Touch dans le port USB de votre ordinateur.
Branchez l’émetteur Simple Share Interactive Presentation System au port
HDMI de l’ordinateur. Utilisez le câble de rallonge HDMI fourni si nécessaire.
Faites glisser l’interrupteur alimentation vers la gauche pour allumer l'appareil.
Le témoin lumineux devient bleu.
Cliquez sur le bouton de transmission et une image apparaîtra sur le dispositif
• Si plusieurs émetteurs sont connectés, l'image apparaîtra sur l'écran
correspondant à l'émetteur qui vient d’être activé grâce à la fonction de
commutation intégrée au produit.

- 29 -
Coupler le récepteur et les émetteurs
1. Couplage initial
Couplez l'émetteur avec le récepteur via le mode réglage des paramètres.
Ready for PAIRING
PAIR

- 30 -
Coupler le récepteur et les émetteurs
1. Couplage initial
Insérez la clé USB Touch dans le port
USB de votr
Allumez l'émetteur Simple Share
Interactive Presen
1
2
Maintenez le bouton de transmission enfoncé pendant environ 10 secondes
jusqu’à ce que le témoin émette des clignotements bleus.
Lorsque l'appareil est couplé, son adresse IP apparaît dans la fenêtre de
Pour ajouter d'autres émetteurs, répétez la procédure ci-dessus.
3
4
5
6
2
2
1
3
5
4

- 31 -
Coupler le récepteur et les émetteurs
2. Ajouter/retirer des émetteurs couplés
Cliquez sur le bouton Paramètres pour ouvrir le mode réglage.
mode réglage pour coupler d'autres émetteurs Simple Share Interactive
Presentation System.
Pour retirer un émetteur qui a déjà été couplé, cliquez sur le bouton X à la droite
de l'émetteur couplé.
Lorsque tous les émetteurs ont été couplés, cliquez sur le bouton X dans le
1
2
3
4
5
3
4
5
2
1

- 32 -
Cliquez sur le bouton Paramètres pour ouvrir le mode réglage.
Cliquez sur l’adresse MAC d’une clé USB Touch pour l’enregistrer à nouveau dans
Insérez la clé USB Touch dans un ordinateur pour débuter le couplage.
(Une seule clé USB doit être connectée à l’ordinateur pour être enregistrée.)
1
2
3
Coupler le récepteur et les émetteurs
3. Coupler d'autres clés USB
3
2
1

- 33 -
Coupler le récepteur et les émetteurs
3. Coupler d'autres clés USB
Cliquez sur SUIVANT dans le coin inférieur droit de la fenêtre contextuelle jaune.
4
5
6
4
6
5

- 34 -
Annotations superposées
En mode mirroring, cliquez sur l’icône des annotations superposées pour
Cette fonction vous permet de rendre votre présentation totalement interactive.
les navigateurs Web, etc.
Miniatures des annotations superposées
- Enregistrez les annotations superposées
- Cliquez sur les miniatures des annotations
2
1
2
3
4
5
6
3
1
1
2
Ajouter nouvelle page : enregistrer la page actuelle et ajouter une
nouvelle page
Tableau blanc
Quitter
1
3
4
6
5
2
Outil des annotations superposées
- Diseño de herramientas
3

- 35 -
Annotations superposées
Remarques
de l’utilisateur.
fonctionnement.
Une partie de l'écran peut ne pas apparaître si le rapport hauteur/largeur de l’image
Éteignez le produit et l’émetteur lorsque vous ne les utilisez pas.
- Réglage du stylo :
Cliquez
Sélectionnez la couleur et
l'épaisseur du stylo
1
2
QR code : Lecteur de QR code d'un appareil intelligent
L'appareil et le récepteur SimpleShare doivent être connectés au même
réseau Wi-Fi
5
- Partager : Partager via QR code
Choisir couleur
Couleur actuelle
Épaisseur
Sélectionner épaisseur
1
Clique

- 36 -
Exposition RF
puissance. Lorsqu'il est allumé, il reçoit et émet des signaux de fréquence radio.
En août 1996, la Federal Communications Commission (FCC) a adopté des directives
relatives à l’exposition aux RF contenant des niveaux de sécurité par rapport aux
précédemment établies par des organismes américains et internationaux :
ANSI C95.1 (1992) *
NCRP Report 86 (1986)
ICNIRP (1996)
Ces normes étaient basées sur des évaluations périodiques complètes de la littérature
d'agences gouvernementales pour la santé et de l’industrie ont révisé le corpus de
Ce dispositif doit être installé et utilisé en respectant une distance minimale
Votre téléphone a été conçu en conformité avec les directives de la FCC (et ces normes).

Interaktives Präsentationssystem
1
www.infocus.com/SimpleShare
Modelle:
INA-SIMINT1
INA-SIMRINT1
English . Español . Français . Deutsche

- 38 -
1
2
3
4
Strom DC : Legen Sie das Netzteil ein
LAN-Port : Schließen Sie das Ethernet-Kabel an
HDMI-OUT : Verbindung zum Anzeigegerät
Touch USB-IN Port : Verbinden Sie sich mit einem Touch- Display
5
6
7
Status-LED
Home-Taste : Zurück zum Home-Bildschirm
Stromschalter :
EIN/AUS-schalten des Empfängers
Installation
Strom DC-IN
Touch USB IN
HDMI OUT
Stromschalter
LED-Status
LAN

- 39 -
1
2
3
4
Installation
Verbinden Sie das HDMI-Kabel vom Touch-Display mit dem HDMI OUT-Anschluss
des SimpleShare Interactive Presentation System Empfängers.
Verbinden Sie das USB-Kabel vom Touch-Display mit dem Touch IN USB-Anschluss
des Receivers.
Schließen Sie das mitgelieferte Netzteil an den Power-In-Anschluss des
Empfängers an.
Schalten Sie den Netzschalter ein.
Schritt 1. Installieren Sie den Empfänger
1
2
3
Power adapter
USB
HDMI

- 40 -
Installation
Schritt 2. Installieren Sie den Sender
1
2
3
4
5
Entfernen Sie den Touch USB Dongle vom SimpleShare Interactive
Presentation System Sender.
Stecken Sie den USB-Dongle in den USB IN-Anschluss Ihres Laptops oder PCs.
Schließen Sie den SimpleShare Interactive Presentation System Sender an den
HDMI-Ausgang eines Laptops oder PCs an. Verwenden Sie bei Bedarf das
mitgelieferte HDMI-Verlängerungskabel.
Schieben Sie den Netzschalter nach links, um das Gerät einzuschalten, und die
Status-LED leuchtet blau.
dem der Empfänger installiert ist, wird ein Bild angezeigt.
• Wenn mehrere Sender angeschlossen sind, wird der entsprechende Bildschirm
des Senders, der gerade angeklickt wurde, angezeigt. Dies ist ein Teil der
integrierten Schaltfunktion des Produkts.

- 41 -
Pairing von Empfänger und Sendern
1. Erstes Pairing
Koppeln Sie den Sender mit dem Empfänger, indem Sie in den Einstellungen
den Einstellungsmodus aufrufen.
Ready for PAIRING
PAIR

- 42 -
Pairing von Empfänger und Sendern
1. Erstes Pairing
Schließen Sie den Touch USB-Dongle an
den USB-Port eines Laptops oder PCs an.
Schalten Sie den Hauptschalter des
SimpleShare Interactive Presentation
System Empfängers ein.
1
2
Halten Sie die Sendetaste ca. 10 Sekunden lang gedrückt, bis die Status-LED
blau zu blinken beginnt.
Nach dem Pairing erscheint die IP-Adresse im Einstellungsmodus-Prüf
(Set Mode Check)-Fenster.
Click on the X button at the top right corner of the Set Mode Check window to
exit the setup procedure.
Wiederholen Sie den obigen Vorgang für weitere Sender.
- Entfernen Sie den USB-Dongle beim Einrichten vom Laptop.
- Überprüfen Sie bei jedem neuen Sender, ob eine neue IP-Adresse im Fenster
Einstellungsmodus-Prüf-Fenster hinzugefügt wurde.
3
4
6
5
2
2
1
3
5
4

- 43 -
Pairing von Empfänger und Sendern
2. Hinzufügen / Entfernen von gekoppelten Sendern
aufzurufen.
Klicken Sie am unteren Rand des Einstellungsmodus-Prüf-Fensters auf
„Neues Gerät hinzufügen”, um weitere SimpleShare Interactive Presentation
System Sender zu koppeln.
Stellen Sie die Senderfarbe ein.
Um einen bereits gepaarten Sender zu entfernen, klicken Sie auf die
oberen rechten Ecke des Einstellungsmodus-Prüf(Set Mode Check)-Fensters,
um den Setup-Vorgang zu beenden.
1
2
3
4
5
3
4
5
2
1

- 44 -
aufzurufen.
Klicken Sie auf die Mac-Adresse des Touch USB-Dongles, um sich im
Einstellungsmodus-Prüf-Fenster erneut zu registrieren.
Schließen Sie den Touch USB-Dongle in einem Laptop an, um die Kopplung zu
starten. (Für die Neuanmeldung darf nur ein USB-Dongle mit dem Laptop
verbunden sein)
1
2
3
Pairing von Empfänger und Sendern
3. Koppeln eines zusätzlichen USB-Dongle
3
2
1

- 45 -
Pairing von Empfänger und Sendern
3. Koppeln eines zusätzlichen USB-Dongle
Klicken Sie auf WEITER in der unteren rechten Ecke des gelben Popup-Fensters.
Überprüfen Sie die Mac-Adresse des neu registrierten Touch USB-Dongles.
Einstellungsmodus-Prüf-Fensters, um den Setup-Vorgang zu beenden.
4
5
6
4
6
5

- 46 -
Overlay-Anmerkung
Klicken Sie während der Spiegelung auf das Overlay-Anmerkungssymbol, um
Notizen zu machen und auf dem Bildschirm zu zeichnen. Diese Funktion
ermöglicht eine vollständige Interaktivität Ihrer Präsentation.
- Overlay Anmerkung ist auf Word-Dateien, Bilddateien, Internet-Browser-Dateien
usw. möglich
Overlay-Anmerkungsminiatur
-Speichern Sie Overlay-Anmerkungen
als PDF-Datei
2
3
1
1
2
1
3
4
6
5
2
1
2
3
4
5
6
Grundlegende Tools: Stift, Textmarker, Radiergummi
Legen die Linienstärke fest
Neue Seite hinzufügen: Aktuelle Seite speichern und neue Seite hinzufügen
Whiteboard
Teilen: Speichern / teilen Sie Dateien per E-Mail, QR-Code, Cloud
Beenden
Overlay-Anmerkung
- Tool Layout
3

- 47 -
Overlay-Anmerkung
Hinweis
Die für drahtlose Anwendungen verfügbare Entfernung kann abhängig von der
Benutzerumgebung variieren.
Das verwendete drahtlose Gerät kann während des Betriebs Funkstörungen
ausgesetzt sein.
Der Bildschirm kann teilweise nicht angezeigt werden, wenn das Bildseitenverhältnis
des wiedergegebenen Bildes nicht mit dem des Monitors übereinstimmt.
Schalten Sie das Produkt und den Sender aus, wenn Sie das Gerät nicht verwenden.
- Stifteinstellung :
Klicken
Stiftfarbe, Breite auswählen
1
2
QR Code : Smart device QR Code reader
Das Smart-Devicen und der SimpleShare Interactive Presentation
SystemEmpfänger müssen mit demselben Wi-Fi-Netzwerk verbunden sein
5
- Teilen : Teilen über QR-Code-Scan
Wählen Sie eine Farbe
Aktuelle Farbe
Breite
Gesamten Bildschirm
löschen
Wählen Sie Breite
1
- Radiergummi :
Klicken Sie auf

- 48 -
RF-Exposition
Ihr kabelloses tragbares tragbares Telefon ist ein leistungsschwacher Radiosender
und -empfänger. Wenn es eingeschaltet ist, empfängt und sendet es auch
Hochfrequenzsignale (RF). Im August 1996 verabschiedete die Federal
Communications Commissions (FCC) Richtlinien für RF-Expositionen mit
Sicherheitsstufen für handgehaltene Mobiltelefone. Diese Leitlinien stehen im
Einklang mit den Sicherheitsstandards, die zuvor sowohl von US-amerikanischen als
auch internationalen Normungsgremien festgelegt wurden:
ANSI C95.1 (1992) *
NCRP-Bericht 86 (1986)
ICNIRP (1996)
Diese Normen beruhten auf umfassenden und regelmäßigen Bewertungen der
einschlägigen wissenschaftlichen Literatur.
Zum Beispiel überprüften über 120 Wissenschaftler, Ingenieure und Ärzte von
Universitäten, staatlichen Gesundheitsbehörden und der Industrie den verfügbaren
Forschungsbereich zur Entwicklung der ANSI Norm (C95.1).
Dieses
Gerät sollte bei mindestens 20 cm zwischen dem Strahler und Ihrem
Körper installiert und betrieben werden.
* Amerikanisches Nationales Standardinstitut; Nationaler Rat für Strahlenschutz und
Messungen ; Internationale Kommission zum Schutz vor nichtionisierender Strahlung.
Das Design Ihres Telefons entspricht den FCC-Richtlinien (und diesen Standards).
PN: GS369001A
-
 1
1
-
 2
2
-
 3
3
-
 4
4
-
 5
5
-
 6
6
-
 7
7
-
 8
8
-
 9
9
-
 10
10
-
 11
11
-
 12
12
-
 13
13
-
 14
14
-
 15
15
-
 16
16
-
 17
17
-
 18
18
-
 19
19
-
 20
20
-
 21
21
-
 22
22
-
 23
23
-
 24
24
-
 25
25
-
 26
26
-
 27
27
-
 28
28
-
 29
29
-
 30
30
-
 31
31
-
 32
32
-
 33
33
-
 34
34
-
 35
35
-
 36
36
-
 37
37
-
 38
38
-
 39
39
-
 40
40
-
 41
41
-
 42
42
-
 43
43
-
 44
44
-
 45
45
-
 46
46
-
 47
47
-
 48
48


Infocus INA-SIMRINT1 Guía del usuario
- Tipo
- Guía del usuario
- Este manual también es adecuado para
en otros idiomas
- français: Infocus INA-SIMRINT1 Mode d'emploi
- English: Infocus INA-SIMRINT1 User guide
- Deutsch: Infocus INA-SIMRINT1 Benutzerhandbuch