
A
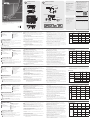
Présentation du matériel
Vue de dessus et vue de côté du
VE819T
1
LED d’état
2
Connecteur HDMI
3
Bouton Infos/Appairage
4
Fiche d’alimentation Mini USB
B
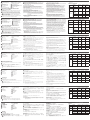
Installation du matériel
Confi guration de l’émetteur VE819T
1
Connectez l’émetteur au port HDMI de l’ordinateur ou de la source
multimédia.
2
Alimentez l'émetteur par l'une des deux options :
a
S’il est utilisé avec un lecteur Blu-Ray ou un appareil similaire, raccordez
l'émetteur à l'adaptateur d'alimentation USB.
b
S’il est utilisé avec un ordinateur, branchez le câble Mini USB vers USB
entre l'émetteur et un port USB de l'ordinateur.
A
Hardware Review
VE819T Top View and Side View
1
Status LED
2
HDMI Connector
3
Info/Pairing Button
4
Mini USB Power Jack
B
Hardware Installation
Setup the VE819T Transmitter
1
Connect the transmitter to the HDMI port of the computer or media source.
2
Power the transmitter through one of two options:
a
If used with a Blu-Ray player or similar device, connect the transmitter
to the USB power adapter.
b
If used with a computer, connect the Mini USB to USB cable from the
transmitter to a USB port on the computer.
Setup the VE819R Receiver
1
Connect the USB power adapter to the Mini-USB power jack on the receiver
and a wall outlet for power supply.
2
Connect the HDMI cable to the HDMI Output Port on the receiver and to
the HDMI Input Port on the HDTV / HD Display.
3
Power on the HDTV / HD Display. Once the link has been established
between the transmitter and receiver, video from the connected computer
or HDMI media source will be displayed on the HDTV / HD Display.
Computer Display Setting
You can adjust your display by going to your computer's screen resolution
preferences to change the display setting to “Duplicate,” “Extend” or “Project
Only”.
If all operation is normal, the LED lights on both should be static (not blinking).
Pairing Additional Transmitters
The Wireless HDMI Receiver can be paired with up to 3 additional Wireless
HDMI Transmitters (VE819T can be purchased separately).
Note: When adding an additional transmitter, make sure the transmitter
already linked to the receiver is powered off before entering the new
receiver into pairing mode.
Pairing Mode for the Transmitter:
1. Once the transmitter is powered on, press and hold the Pairing Button.
2. The transmitter is in Pairing Mode once the Power LED fl ashes slowly (1
fl ash/sec).
Pairing Mode for the Receiver:
1. Once the receiver is powered on, press the Transmitter No. button on the
Remote Control.
2. The On-screen Display (OSD) will appear on the HDTV / HD Display. Use the
UP or DOWN buttons to select SETUP.
3. Select Add New Transmitter to search for an available transmitter. The OSD
will display Searching. The Power LED on the receiver will fl ash PINK when it
is in Pairing Mode. To exit Searching Mode, press the Transmitter No. button
on the remote control.
4. When both the transmitter and receiver are in Pairing Mode, they will search
for each other and automatically pair. The power LED on the receiver will
fl ash PINK while the power LED on the transmitter will fl ash BLUE.
5. After the pairing is complete, both the transmitter and receiver will re-boot
and establish the link to each other automatically within 5 seconds.
Switching between Wireless HDMI Transmitters
1. Press the Transmitter No. button. The OSD will show a list of transmitters
linked to the receiver.
2. Use the Up / Down buttons to select the transmitter you want to display on
your HDTV / HD projector. Then press OK and allow 10-12 seconds for the
receiver and transmitter to re-establish a connection.
Operation
Mode
Status
Description
TX Power
LED
RX Power
LED
RX Status
LED
Active
Standby
For power saving
mode.
Off Static Red Off
Initial Boot
up and
linking
Wireless linking
Blinking
(Blue)
Blinking
(Blue)
Blinking
(Blue)
Linked Mode
No input from
selected source
… Static (Blue)
Blinking
(Quickly)
Video format not
recognized
… Static (Blue)
Blinking
(Slowly)
Video format is
recognized
Static (Blue) Static (Blue) Static (Blue)
VE819 Package Contents
1 VE819T HDMI Dongle Wireless
Transmitter
1 VE819R HDMI Dongle Wireless
Receiver
1 Mini USB to USB Cable
2 Mini USB Power Adapters
1 HDMI Cable
1 User Instructions
1 Warranty Card
1 Remote Control Unit with 2 AAA
Batteries
VE819T Package Contents:
1 VE819T HDMI Dongle Wireless
Transmitter
1 Mini USB to USB Cable
1 Mini USB Power Adapter
1 User Instructions
1 Warranty Card
© Copyright 2018 ATEN
®
International Co., Ltd.
ATEN and the ATEN logo are trademarks of ATEN International Co., Ltd. All rights reserved. All
other trademarks are the property of their respective owners.
Printing Date: 04/2018
HDMI Dongle Wireless Extender
Quick Start Guide
VE819
VE819 HDMI Dongle Wireless Extender
www.aten.com
Extension sans fi l dongle HDMI VE819
www.aten.com
HDMI-Dongle-WLAN-Extender VE819
www.aten.com
Prolongador inalámbrico de llave HDMI VE819
www.aten.com
Estensore per dongle VE819 HDMI wireless
www.aten.com
Support and Documentation Notice
All information, documentation, fi rmware,
software utilities, and specifi cations
contained in this package are subject to
change without prior notifi cation by
the manufacturer.
To reduce the environmental impact of our
products, ATEN documentation and software
can be found online at
http://www.aten.com/download/
Technical Support
www.aten.com/support
이 기기는 가정용(B급) 전자파적합기기로서 주로 가정
에서 사용하는
것을 목적으로 하며, 모든 지역에서 사용할 수 있습니다.
EMC Information
CE Statement: This equipment complies with EU radiation exposure
limits set forth for an uncontrolled environment. This equipment
should be installed and operated with minimum distance 20cm
between the radiator & your body.
해당 무선설비는 전파혼신 가능성이 있으므로 인명 안전과 관련된
서비스는 할 수 없습니다.
Scan for
more information
VE819R Top View and Side View
1
Power Pushbutton
2
Info Button
3
Video Status LED
4
Mini USB Power Jack
5
HDMI Output Port
6
IR Port
VE819R HDMI Dongle Wireless Extender
1
Raccordez l'adaptateur d'alimentation USB à la prise d'alimentation Mini-
USB du récepteur, et l'autre extrémité à une prise.
2
Raccordez le câble HDMI au port de sortie HDMI du récepteur et au port
d'entrée HDMI de l'écran HDTV / HD.
3
Mettez sous tension l'écran HDTV / HD. Une fois que la liaison a été établie
entre l'émetteur et le récepteur, la vidéo de l'ordinateur connecté ou de la
source multimédia HDMI s’affi che sur l'écran HDTV / HD.
Réglage de l’écran de l’ordinateur
Vous pouvez régler votre écran en allant dans les préférences de résolution
d'écran de votre ordinateur afi n de modifi er le paramètre d’affi chage
"Dupliquer", "Étendre" ou "Projecteur uniquement".
Si tout le fonctionnement est normal, les voyants LED des deux doivent être
statiques (sans clignoter).
Appairage d’émetteurs supplémentaires
Le récepteur HDMI sans fi l peut être appairé avec un maximum de 3 émetteurs
HDMI sans fi l supplémentaires (le VE819T peut être acheté séparément).
Remarque: Lors de l'ajout d'un émetteur supplémentaire, assurez-vous que
l'émetteur déjà lié au récepteur est hors tension avant de mettre
le nouveau récepteur en mode d'appairage.
Mode d’appairage pour l'émetteur :
1. Une fois l'émetteur sous tension, appuyez et maintenez enfoncé le bouton
d’appairage.
2. L'émetteur est en mode d’appairage une fois que la LED d’alimentation
clignote lentement (1 clignotement / s).
Mode d’appairage pour le récepteur :
1. Une fois le récepteur sous tension, appuyez sur le bouton correspondant au
n° de l’émetteur sur la télécommande.
2. L'affi chage à l'écran (OSD) apparaît sur l'écran HDTV / HD. Utilisez les
boutons HAUT ou BAS pour sélectionner CONFIGURATION.
3. Sélectionnez Ajouter un nouvel émetteur afi n de rechercher un émetteur
disponible. L'OSD affi che Recherche en cours. Le voyant LED d'alimentation
du récepteur clignote en ROSE quand il est en mode d’appairage. Pour
quitter le mode de Recherche, appuyez sur le bouton correspondant au
n°de l’émetteur sur la télécommande.
4. Lorsque l'émetteur et le récepteur sont en mode d'appairage, ils se
recherchent mutuellement et s’appairent automatiquement. La LED
d’alimentation sur le récepteur clignote en ROSE tandis que la LED
d’alimentation sur l’émetteur clignote en BLEU.
5. Une fois l’appairage terminé, l'émetteur et le récepteur redémarrent et
établissent automatiquement la liaison entre eux dans les 5 secondes.
Commutation entre les émetteurs HDMI sans fi l
1. L'OSD affi che une liste des émetteurs reliés au récepteur.
2. Utilisez les boutons haut / bas pour sélectionner l'émetteur que vous
voulez affi cher sur votre projecteur HDTV / HD. Appuyez ensuite sur OK et
patientez 10-12 secondes pour que le récepteur et l'émetteur rétablissent
une connexion.
Fonctionnement
Mode
Description
de l’état
LED
d’alimentation
TX
LED
d’alimentation
RX
LED d’état
RX
Veille
active
Pour le mode
d’économie
d'énergie .
Désactivé Rouge statique Désactivé
Amorçage
initial et
liaison
Liaison sans fi l
Clignotante
(Bleue)
Clignotante
(Bleue)
Clignotante
(Bleue)
Mode lié
Aucun entrée
de la source
sélectionnée
… Statique (Bleue)
Clignotante
(Rapidement)
Format vidéo
non reconnu
… Statique (Bleue)
Clignotante
(Lentement)
Le format
vidéo est
reconnu
Statique (Bleue) Statique (Bleue)
Statique
(Bleue)
Vue de dessus et vue de côté
du VE819R
1
Bouton poussoir d’alimentation
2
Bouton Infos
3
LED d’état vidéo
4
Fiche d’alimentation Mini USB
5
Port de sortie HDMI
6
Port IR
A
Hardwareübersich
VE819T – Ansicht von vorne und
Ansicht von oben
1
Status-LED
2
HDMI-Anschluss
3
Info/Kopplung-Taste
4
Mini-USB-Stromanschluss
B
Hardwareinstallation
VE819T-Sender einrichten
1
Verbinden Sie den Transmitter mit dem HDMI-Anschluss des Computers
oder der Medienquelle.
2
Versorgen Sie den Transmitter über eine der folgenden beiden Optionen mit
Strom:
a
Verbinden Sie den Transmitter beim Einsatz mit einem Blu-ray-Player
oder dergleichen mit dem USB-Netzteil.
b
Verbinden Sie den Transmitter beim Einsatz mit einem Computer über
ein Mini-USB-zu-USB-Kabel mit einem USB-Anschluss des Computers.
Empfänger VE819R einrichten
1
Verbinden Sie das USB-Netzteil mit dem Mini-USB-Stromanschluss am
Empfänger und das andere Ende mit einer Steckdose.
2
Verbinden Sie das HDMI-Kabel mit dem HDMI-Ausgang am Empfänger und
dem HDMI-Eingang am HDTV / HD-Display.
3
Schalten Sie den HDTV / das HD-Display ein. Sobald die Verbindung
zwischen Transmitter und Empfänger hergestellt wurde, wird das Video
vom angeschlossenen Computer oder der HDMI-Medienquelle am HDTV /
HD-Display angezeigt.
Computeranzeigeeinstellungen
Sie können Ihre Anzeige anpassen, indem Sie die Eigenschaften zur
Bildschirmaufl ösung Ihres Computers aufrufen und die Anzeigeeinstellung in
„Duplizieren“, „Erweitern“ oder „Nur projizieren“ ändern.
Bei einem störugsfreien Betrieb sollten die LEDs an beiden Geräten leuchten
(nicht blinken).
Weitere Transmitter koppeln
Der WLAN-HDMI-Empfänger kann mit bis zu 3 weiteren WLAN-HDMI-
Transmittern (VE819T, separat erhältlich) gekoppelt werden.
Hinweis: Achten Sie beim Zufügen eines weiteren Transmitters darauf,
dass der bereits mit dem Empfänger verbundene Transmitter
ausgeschaltet ist, bevor Sie den neuen Empfänger in den
Kopplungsmodus versetzen.
Kopplungsmodus beim Transmitter:
1. Halten Sie nach Einschalten des Transmitters die Kopplungstaste gedrückt.
2. Der Transmitter befi ndet sich im Kopplungsmodus, sobald die Betrieb-LED
langsam blinkt (1-mal/s).
Kopplungsmodus beim Empfänger:
1. Drücken Sie nach Einschalten des Empfängers die Transmitter-Nr.-Taste an
der Fernbedienung.
2. Die Bildschirmanzeige (OSD) wird am HDTV / HD-Display angezeigt. Wählen
Sie mit der Aufwärts-/Abwärtstaste Einrichtung.
3. Wählen Sie zur Suche nach einem verfügbaren Transmitter Neuen
Transmitter zufügen. Das OSD zeigt Searching (Suche). Die Betrieb-LED am
Empfänger blinkt im Kopplungsmodus rosa. Drücken Sie zum Beenden des
Suchmodus die Transmitter-Nr.-Taste an der Fernbedienung.
4. Wenn sich Transmitter und Empfänger im Kopplungsmodus befi nden,
suchen Sie nacheinander und koppeln sich automatisch. Die Betriebsanzeige-
LED am Empfänger blinkt ROSA, während die Betriebsanzeige-LED am
Sender BLAU blinkt.
5. Nach Abschluss der Kopplung starten Transmitter und Empfänger neu und
stellen automatisch innerhalb 5 Sekunden eine Verbindung zueinander her.
Zwischen WLAN-HDMI-Transmittern wechseln
1. Drücken Sie die Transmitter-Nr.-Taste. Das OSD zeigt eine Liste der mit dem
Empfänger verbundenen Transmitter.
2. Wählen Sie mit der Aufwärts-/Abwärtstaste den Transmitter, den Sie an
Ihrem HDTV / HD-Projektor anzeigen möchten. Drücken Sie dann OK und
warten Sie 10 bis 12 Sekunden, bis Empfänger und Transmitter erneut eine
Verbindung hergestellt haben.
Bedienung
Modus Statusbeschreibung
TX-
Betrieb-
LED
RX-
Betrieb-
LED
RX-
Status-
LED
Aktiver
Bereitschaftsmodus
Beim
Energiesparmodus.
Aus Leuchtet rot Aus
Startvorgang und
Verbindung
WLAN-Verbindung
Blinkt
(blau)
Blinkt (blau)
Blinkt
(blau)
Verbunden
Kein Eingang von
ausgewählter Quelle
…
Leuchtet
(blau)
Blinkt
(schnell)
Videoformat nicht
erkannt
…
Leuchtet
(blau)
Blinkt
(langsam)
Videoformat erkannt
Leuchtet
(blau)
Leuchtet
(blau)
Leuchtet
(blau)
VE819R – Ansicht von vorne
und Ansicht von oben
1
Ein/Aus-Drucktaste
2
Info-Taste
3
Videostatus-LED
4
Mini-USB-Stromanschluss
5
HDMI-Ausgang
6
IR-Anschluss
A
Resumen de hardware
Vista superior y lateral de VE819T
1
LED de estado
2
Conector HDMI
3
Botón Información/Asociación
4
Conector de alimentación Mini-USB
B
Instalación del hardware
Confi gurar el transmisor VE819T
1
Conecte el transmisor al puerto HDMI del equipo o del origen multimedia.
2
Proporcione alimentación al trasmisor mediante una de estas dos opciones:
a
Si se utiliza con un reproductor Blu-Ray o dispositivo similar, conecte el
transmisor al adaptador de alimentación USB.
b
Si se utiliza con un equipo, conecte el cable Mini-USB a USB desde el
transmisor a un puerto USB del equipo.
Confi gurar el receptor VE819R
1
Conecte el adaptador de alimentación USB al conector de alimentación
Mini-USB del receptor y conecte el otro extremo una toma de corriente
eléctrica.
2
Conecte el cable HDMI al puerto Salida HDMI del receptor y al puerto Entrada
HDMI del televisor o de la pantalla de alta defi nición (HD).
3
Encienda el televisor o la pantalla HD. Una vez establecido el enlace entre el
transmisor y el receptor, el vídeo del equipo conectado o del origen multimedia
HDMI se mostrará en el televisor o la pantalla HD.
Establecimiento de la pantalla del equipo
Puede ajustar la pantalla mediante las preferencias de resolución de pantalla del
equipo para cambiar la confi guración de visualización a “Duplicar”, “Extender” o
“Solo proyectar”.
Si todo el funcionamiento es normal, las luces de LED de ambos lados deben ser
estáticas (no intermitentes).
Asociar transmisores adicionales
El receptor HDMI inalámbrico se puede asociar con hasta 3 transmisores HDMI
inalámbricos adicionales (el VE819T se puede adquirir por separado).
Nota: Cuando agregue un transmisor adicional, asegúrese de que el transmisor ya
enlazado con el receptor está apagado antes de que el nuevo receptor entre
en el modo de asociación.
Modo de asociación para el transmisor:
1. Cuando el transmisor esté encendido, presione sin soltar el botón Asociación.
2. El transmisor se encuentra en el modo de asociación cuando el LED de
alimentación parpadea lentamente (1 parpadeo/s).
Modo de asociación para el receptor:
1. Cuando el receptor esté encendido, presione el botón Nº de transmisor del
mando a distancia.
2. El menú en pantalla (OSD) aparecerá en el televisor o en la pantalla HD. Utilice
los botones ARRIBA o ABAJO para seleccionar CONFIGURACIÓN.
3. Seleccione Agregar nuevo trasmisor para buscar un transmisor disponible. El
menú OSD mostrará el mensaje Buscando. El LED Alimentación del receptor
parpadeará en ROSA cuando se encuentre en el modo de asociación. Para
salir del modo de búsqueda, presione el botón Nº de transmisor del mando
a distancia.
4. Cuando tanto el transmisor como el receptor se encuentren en el modo
de asociación, se buscarán entre sí y se asociarán automáticamente; El
LED de alimentación en el receptor parpadeará en ROSADO, y el LED de
alimentación en el transmisor parpadeará en AZUL.
5. Cuando el modo de asociación se complete, tanto el transmisor como
receptor se reiniciarán y establecerán el enlace entre sí automáticamente
antes de que transcurran 5 segundos.
Cambiar entre transmisores HDMI inalámbricos
1. Presione el botón No. del Transmisor. El OSD mostrará una lista de
transmisores vinculados al receptor.
2. Utilice los botones Arriba y Abajo para seleccionar el transmisor que desea
mostrar en su HDTV o proyector HD. A continuación, presione OK (Aceptar)
y deje que transcurran 10-12 para que el receptor y el transmisor vuelvan a
establecer una conexión.
Funcionamiento
Modo
Descripción del
estado
LED de
alimentación
TX
LED de
alimentación
RX
LED de
estado RX
Espera
activa
Para el modo de
ahorro.
Apagado
Rojo
permanente
Apagado
Arranque
inicial y
enlace
Enlace
inalámbrico
Intermitente
(azul)
Intermitente
(azul)
Intermitente
(azul)
Modo
enlazado
No hay entrada
desde la fuente
seleccionada
…
Permanente
(azul)
Intermitente
(rápidamente)
Formato de
vídeo no
reconocido
…
Permanente
(azul)
Intermitente
(lentamente)
Formato
de vídeo
reconocido
Permanente
(azul)
Permanente
(azul)
Permanente
(azul)
Vistas superior y lateral de
VE819R
1
Pulsador de alimentación
2
Botón de información
3
LED de estado de vídeo
4
Conector de alimentación
Mini-USB
5
Puerto de salida HDMI
6
Puerto IR
A
Descrizione hardware
Vista dall'alto e frontale di
VE819T
1
LED di stato
2
Connettore HDMI
3
Tasto Info/Associazione
4
Jack di alimentazione mini USB
B
Installazione dell'hardware
Impostazione del trasmettitore VE819T
1
Collegare il trasmettitore alla porta HDMI del computer o del supporto
multimediale.
2
Alimentare il trasmettitore tramite una delle due opzioni:
a
Se utilizzato con un lettore Blu-Ray o un dispositivo simile, collegare il
tramettitore all'adattatore di alimentazione USB.
b
Se utilizzato con un computer, collegare il cavo Mini USB-USB dal
trasmettitore ad una porta USB del computer.
Impostazione del ricevitore VE819R
1
Collegare l'adattatore di alimentazione USB al connettore di alimentazione
Mini-USB del ricevitore e collegare l'altra estremità ad una presa.
2
Collegare il cavo HDMI alla porta di uscita HDMI del ricevitore e alla porta di
ingresso HDMI dell'HDTV/del display HD.
3
Accendere l'HDTVHDTV/il display HD. Una volta stabilito il collegamento tra il
trasmettitore e il ricevitore, il video del computer o della sorgente multimediale
HDMI collegati viene visualizzato sull'HDTV/sul display HD.
Impostazione del display del computer
È possibile regolare la visualizzazione dalle preferenze di risoluzione dello schermo
del computer per modifi care l'impostazione di visualizzazione su "Duplica",
"Estendi" o "Solo proiettore".
Se tutto funziona normalmente, i LED di entrambii dispositivi diventano fi ssi (non
lampeggianti).
Associazione di altri trasmettitori
Il ricevitore HDMI wireless può essere associato fi no a 3 ulteriori trasmettitori HDMI
wireless (il VE819T può essere acquistato separatamente).
Nota: Quando si aggiungono altri trasmettitori, assicurarsi che il trasmettitore
già collegato al ricevitore sia spento prima di portare il nuovo ricevitore in
modalità di associazione.
Modalità di associazione del trasmettitore:
1. Una volta acceso il trasmettitore, tenere premuto il tasto di associazione.
2. Il trasmettitore è in modalità di associazione quando il LED di alimentazione
lampeggia lentamente (1 lampeggio al secondo).
Modalità di associazione del ricevitore:
1. Una volta acceso il ricevitore, premere il tasto Transmitter No. del telecomando.
2. Il menu OSD appare sull'HDTV/sul display HD. Utilizzare i tasti SU o GIÙ per
selezionare IMPOSTA.
3. Selezionare Aggiungi nuovo trasmettitore per cercare un trasmettitore
disponibile. Sul menu OSD viene visualizzato Ricerca. Il LED di alimentazione del
ricevitore lampeggia in ROSA quando è in modalità di associazione. Per uscire
dalla modalità Ricerca, premere il tasto Transmitter No. del telecomando.
4. Quando il trasmettitore e il ricevitore sono in modalità di associazione,
viene effettuata la ricerca reciproca e l'associazione automatica ed i Il LED di
alimentazione sul ricevitore lampeggia in ROSA, mentre il LED di alimentazione
sul trasmettitore lampeggia in BLU.
5. Al termine dell'associazione, il trasmettitore e il ricevitore si riavviano e viene
stabilito il collegamento reciproco automatico entro 5 secondi.
Commutazione tra trasmettitore HDMI wireless
1. Premere il tasto Transmitter No. Sul menu OSD viene visualizzato un elenco di
trasmettitori collegati al ricevitore.
2. Utilizzare i tasti Su/Giù per selezionare il trasmettitore da visualizzare sull'HDTV/sul
proiettore HD. Quindi premere OK e attendere 10-12 secondi per il ricevitore e il
trasmettitore per ristabilire il collegamento.
Funzionamento
Modalità
Descrizione
dello stato
LED di
alimentazione
TX
LED di
alimentazione
RX
LED di stato
RX
Standby attivo
Per la modalità
di risparmio
energetico.
Off Rosso fi sso Off
Avvio iniziale e
collegamento
Collegamento
wireless
Lampeggiante
(blu)
Lampeggiante
(blu)
Lampeggiante
(blu)
Modalità di
collegamento
Nessun
ingresso dalla
sorgente
selezionata
… Fisso (blu)
Lampeggiante
(rapido)
Formato
video non
riconosciuto
… Fisso (blu)
Lampeggiante
(lento)
Formato video
riconosciuto
Fisso (blu) Fisso (blu) Fisso (blu)
Vista dall'alto e frontale di
VE819R
1
Pulsante di alimentazione
2
Tasto Info
3
LED di stato video
4
Jack di alimentazione mini USB
5
Porta uscita HDMI
6
Porta IR
ATEN VanCryst
™
B
A
Hardware Installation
Multicast HDMI Wireless ExtenderMulticast HDMI Wireless Extender
RECEIV ER
Vancryst VE819R
1
2
43
4 5 6
1
2
3
VE819T Top View
VE819R Top View
VE819R Side View
VE819T Side View
or
USB
USB
HDMI Display
HDMI Display
HDMI
HDMI
1
2
b
a
1
2
3
Setup the VE819T Transmitter
Setup the VE819R Receiver
Computer Display Setting
Computer only Duplicate Extend Project only
Hardware Review
La página se está cargando...
Transcripción de documentos
A B Hardware Review Support and Documentation Notice Hardware Installation VE819T Top View 1 VE819T HDMI Dongle Wireless Transmitter 1 VE819R HDMI Dongle Wireless Receiver 1 Mini USB to USB Cable 2 Mini USB Power Adapters 1 HDMI Cable 1 User Instructions 1 Warranty Card 1 Remote Control Unit with 2 AAA Batteries Setup the VE819T Transmitter 1 HDMI Display HDMI b 2 1 VE819T Side View or 2 3 4 USB VE819R Top View ATEN VanCryst™ All information, documentation, firmware, software utilities, and specifications contained in this package are subject to change without prior notification by the manufacturer. To reduce the environmental impact of our products, ATEN documentation and software can be found online at http://www.aten.com/download/ VE819 Package Contents Technical Support www.aten.com/support Scan for more information a Setup the VE819R Receiver VE819 EMC Information 1 2 3 HDMI Dongle Wireless Extender Quick Start Guide Multicast HDMI Wireless Extender Vancryst VE819R 3 HDMI USB © Copyright 2018 ATEN® International Co., Ltd. 1 2 ATEN and the ATEN logo are trademarks of ATEN International Co., Ltd. All rights reserved. All other trademarks are the property of their respective owners. VE819T Package Contents: 해당 무선설비는 전파혼신 가능성이 있으므로 인명 안전과 관련된 서비스는 할 수 없습니다. 1 VE819T HDMI Dongle Wireless Transmitter 1 Mini USB to USB Cable 1 Mini USB Power Adapter 1 User Instructions 1 Warranty Card Computer Display Setting RECEIVER CE Statement: This equipment complies with EU radiation exposure limits set forth for an uncontrolled environment. This equipment should be installed and operated with minimum distance 20cm between the radiator & your body. HDMI Display VE819R Side View 이 기기는 가정용(B급) 전자파적합기기로서 주로 가정 에서 사용하는 것을 목적으로 하며, 모든 지역에서 사용할 수 있습니다. Printing Date: 04/2018 Computer only 4 5 Duplicate Extend Project only 6 VE819 HDMI Dongle Wireless Extender A www.aten.com Hardware Review 2 Connect the HDMI cable to the HDMI Output Port on the receiver and to VE819T Top View and Side View VE819R Top View and Side View 1 Status LED 1 Power Pushbutton 2 HDMI Connector 2 Info Button 3 Info/Pairing Button 3 Video Status LED 4 Mini USB Power Jack 4 Mini USB Power Jack 5 HDMI Output Port 6 IR Port B the HDMI Input Port on the HDTV / HD Display. 3 Power on the HDTV / HD Display. Once the link has been established between the transmitter and receiver, video from the connected computer or HDMI media source will be displayed on the HDTV / HD Display. Computer Display Setting You can adjust your display by going to your computer's screen resolution preferences to change the display setting to “Duplicate,” “Extend” or “Project Only”. If all operation is normal, the LED lights on both should be static (not blinking). Hardware Installation Pairing Additional Transmitters Setup the VE819T Transmitter 1 Connect the transmitter to the HDMI port of the computer or media source. 2 Power the transmitter through one of two options: a If used with a Blu-Ray player or similar device, connect the transmitter to the USB power adapter. b If used with a computer, connect the Mini USB to USB cable from the transmitter to a USB port on the computer. Setup the VE819R Receiver 1 Connect the USB power adapter to the Mini-USB power jack on the receiver The Wireless HDMI Receiver can be paired with up to 3 additional Wireless HDMI Transmitters (VE819T can be purchased separately). Note: When adding an additional transmitter, make sure the transmitter already linked to the receiver is powered off before entering the new receiver into pairing mode. Pairing Mode for the Transmitter: 1. Once the transmitter is powered on, press and hold the Pairing Button. 2. The transmitter is in Pairing Mode once the Power LED flashes slowly (1 flash/sec). Pairing Mode for the Receiver: 1. Once the receiver is powered on, press the Transmitter No. button on the Remote Control. 2. The On-screen Display (OSD) will appear on the HDTV / HD Display. Use the UP or DOWN buttons to select SETUP. 3. Select Add New Transmitter to search for an available transmitter. The OSD will display Searching. The Power LED on the receiver will flash PINK when it is in Pairing Mode. To exit Searching Mode, press the Transmitter No. button on the remote control. 4. When both the transmitter and receiver are in Pairing Mode, they will search for each other and automatically pair. The power LED on the receiver will flash PINK while the power LED on the transmitter will flash BLUE. 5. After the pairing is complete, both the transmitter and receiver will re-boot and establish the link to each other automatically within 5 seconds. Operation Mode Status Description TX Power LED RX Power LED RX Status LED Active Standby For power saving mode. Off Static Red Off Initial Boot up and linking Wireless linking Blinking (Blue) Blinking (Blue) Blinking (Blue) No input from selected source … Static (Blue) Blinking (Quickly) Video format not … recognized Static (Blue) Blinking (Slowly) Video format is recognized Static (Blue) Static (Blue) Linked Mode Switching between Wireless HDMI Transmitters 1. Press the Transmitter No. button. The OSD will show a list of transmitters linked to the receiver. 2. Use the Up / Down buttons to select the transmitter you want to display on your HDTV / HD projector. Then press OK and allow 10-12 seconds for the receiver and transmitter to re-establish a connection. Static (Blue) and a wall outlet for power supply. Extension sans fil dongle HDMI VE819 A www.aten.com Présentation du matériel Vue de dessus et vue de côté du VE819T Vue de dessus et vue de côté du VE819R 1 LED d’état 1 Bouton poussoir d’alimentation 2 Connecteur HDMI 2 Bouton Infos 3 Bouton Infos/Appairage 3 LED d’état vidéo 4 Fiche d’alimentation Mini USB 4 Fiche d’alimentation Mini USB 5 Port de sortie HDMI 6 Port IR B Installation du matériel VE819R HDMI Dongle Wireless Extender 1 Raccordez l'adaptateur d'alimentation USB à la prise d'alimentation Mini- 2. L'émetteur est en mode d’appairage une fois que la LED d’alimentation clignote lentement (1 clignotement / s). 2 Raccordez le câble HDMI au port de sortie HDMI du récepteur et au port Mode d’appairage pour le récepteur : USB du récepteur, et l'autre extrémité à une prise. d'entrée HDMI de l'écran HDTV / HD. 3 Mettez sous tension l'écran HDTV / HD. Une fois que la liaison a été établie entre l'émetteur et le récepteur, la vidéo de l'ordinateur connecté ou de la source multimédia HDMI s’affiche sur l'écran HDTV / HD. Réglage de l’écran de l’ordinateur Vous pouvez régler votre écran en allant dans les préférences de résolution d'écran de votre ordinateur afin de modifier le paramètre d’affichage "Dupliquer", "Étendre" ou "Projecteur uniquement". Si tout le fonctionnement est normal, les voyants LED des deux doivent être statiques (sans clignoter). Configuration de l’émetteur VE819T 1 Connectez l’émetteur au port HDMI de l’ordinateur ou de la source multimédia. 2 Alimentez l'émetteur par l'une des deux options : a S’il est utilisé avec un lecteur Blu-Ray ou un appareil similaire, raccordez l'émetteur à l'adaptateur d'alimentation USB. b S’il est utilisé avec un ordinateur, branchez le câble Mini USB vers USB entre l'émetteur et un port USB de l'ordinateur. Appairage d’émetteurs supplémentaires Le récepteur HDMI sans fil peut être appairé avec un maximum de 3 émetteurs HDMI sans fil supplémentaires (le VE819T peut être acheté séparément). Remarque: Lors de l'ajout d'un émetteur supplémentaire, assurez-vous que l'émetteur déjà lié au récepteur est hors tension avant de mettre le nouveau récepteur en mode d'appairage. 1. Une fois le récepteur sous tension, appuyez sur le bouton correspondant au n° de l’émetteur sur la télécommande. 2. L'affichage à l'écran (OSD) apparaît sur l'écran HDTV / HD. Utilisez les boutons HAUT ou BAS pour sélectionner CONFIGURATION. 3. Sélectionnez Ajouter un nouvel émetteur afin de rechercher un émetteur disponible. L'OSD affiche Recherche en cours. Le voyant LED d'alimentation du récepteur clignote en ROSE quand il est en mode d’appairage. Pour quitter le mode de Recherche, appuyez sur le bouton correspondant au n°de l’émetteur sur la télécommande. 4. Lorsque l'émetteur et le récepteur sont en mode d'appairage, ils se recherchent mutuellement et s’appairent automatiquement. La LED d’alimentation sur le récepteur clignote en ROSE tandis que la LED d’alimentation sur l’émetteur clignote en BLEU. 5. Une fois l’appairage terminé, l'émetteur et le récepteur redémarrent et établissent automatiquement la liaison entre eux dans les 5 secondes. Fonctionnement Mode Description de l’état LED d’alimentation TX LED d’alimentation RX LED d’état RX Veille active Pour le mode d’économie d'énergie . Désactivé Rouge statique Désactivé Clignotante (Bleue) Clignotante (Bleue) Aucun entrée de la source … sélectionnée Statique (Bleue) Clignotante (Rapidement) Format vidéo non reconnu … Statique (Bleue) Clignotante (Lentement) Le format vidéo est reconnu Statique (Bleue) Statique (Bleue) Statique (Bleue) Amorçage Clignotante initial et Liaison sans fil (Bleue) liaison Mode lié Commutation entre les émetteurs HDMI sans fil Mode d’appairage pour l'émetteur : 1. Une fois l'émetteur sous tension, appuyez et maintenez enfoncé le bouton d’appairage. 1. L'OSD affiche une liste des émetteurs reliés au récepteur. 2. Utilisez les boutons haut / bas pour sélectionner l'émetteur que vous voulez afficher sur votre projecteur HDTV / HD. Appuyez ensuite sur OK et patientez 10-12 secondes pour que le récepteur et l'émetteur rétablissent une connexion. Empfänger VE819R einrichten Kopplungsmodus beim Transmitter: www.aten.com HDMI-Dongle-WLAN-Extender VE819 A Hardwareübersich VE819T – Ansicht von vorne und Ansicht von oben VE819R – Ansicht von vorne und Ansicht von oben 1 Status-LED 1 Ein/Aus-Drucktaste 2 HDMI-Anschluss 2 Info-Taste 3 Info/Kopplung-Taste 3 Videostatus-LED 4 Mini-USB-Stromanschluss 4 Mini-USB-Stromanschluss 5 HDMI-Ausgang 6 IR-Anschluss B Hardwareinstallation VE819T-Sender einrichten 1 Verbinden Sie den Transmitter mit dem HDMI-Anschluss des Computers oder der Medienquelle. 2 Versorgen Sie den Transmitter über eine der folgenden beiden Optionen mit Strom: a Verbinden Sie den Transmitter beim Einsatz mit einem Blu-ray-Player oder dergleichen mit dem USB-Netzteil. b Verbinden Sie den Transmitter beim Einsatz mit einem Computer über ein Mini-USB-zu-USB-Kabel mit einem USB-Anschluss des Computers. 1 Verbinden Sie das USB-Netzteil mit dem Mini-USB-Stromanschluss am Empfänger und das andere Ende mit einer Steckdose. 2 Verbinden Sie das HDMI-Kabel mit dem HDMI-Ausgang am Empfänger und dem HDMI-Eingang am HDTV / HD-Display. 3 Schalten Sie den HDTV / das HD-Display ein. Sobald die Verbindung zwischen Transmitter und Empfänger hergestellt wurde, wird das Video vom angeschlossenen Computer oder der HDMI-Medienquelle am HDTV / HD-Display angezeigt. Computeranzeigeeinstellungen Sie können Ihre Anzeige anpassen, indem Sie die Eigenschaften zur Bildschirmauflösung Ihres Computers aufrufen und die Anzeigeeinstellung in „Duplizieren“, „Erweitern“ oder „Nur projizieren“ ändern. Bei einem störugsfreien Betrieb sollten die LEDs an beiden Geräten leuchten (nicht blinken). Weitere Transmitter koppeln Der WLAN-HDMI-Empfänger kann mit bis zu 3 weiteren WLAN-HDMITransmittern (VE819T, separat erhältlich) gekoppelt werden. Hinweis: Achten Sie beim Zufügen eines weiteren Transmitters darauf, dass der bereits mit dem Empfänger verbundene Transmitter ausgeschaltet ist, bevor Sie den neuen Empfänger in den Kopplungsmodus versetzen. 1. Halten Sie nach Einschalten des Transmitters die Kopplungstaste gedrückt. 2. Der Transmitter befindet sich im Kopplungsmodus, sobald die Betrieb-LED langsam blinkt (1-mal/s). Kopplungsmodus beim Empfänger: 1. Drücken Sie nach Einschalten des Empfängers die Transmitter-Nr.-Taste an der Fernbedienung. 2. Die Bildschirmanzeige (OSD) wird am HDTV / HD-Display angezeigt. Wählen Sie mit der Aufwärts-/Abwärtstaste Einrichtung. 3. Wählen Sie zur Suche nach einem verfügbaren Transmitter Neuen Transmitter zufügen. Das OSD zeigt Searching (Suche). Die Betrieb-LED am Empfänger blinkt im Kopplungsmodus rosa. Drücken Sie zum Beenden des Suchmodus die Transmitter-Nr.-Taste an der Fernbedienung. 4. Wenn sich Transmitter und Empfänger im Kopplungsmodus befinden, suchen Sie nacheinander und koppeln sich automatisch. Die BetriebsanzeigeLED am Empfänger blinkt ROSA, während die Betriebsanzeige-LED am Sender BLAU blinkt. 5. Nach Abschluss der Kopplung starten Transmitter und Empfänger neu und stellen automatisch innerhalb 5 Sekunden eine Verbindung zueinander her. 2. Wählen Sie mit der Aufwärts-/Abwärtstaste den Transmitter, den Sie an Ihrem HDTV / HD-Projektor anzeigen möchten. Drücken Sie dann OK und warten Sie 10 bis 12 Sekunden, bis Empfänger und Transmitter erneut eine Verbindung hergestellt haben. Bedienung TXRXStatusbeschreibung Betrieb- BetriebLED LED Modus Aktiver Beim Bereitschaftsmodus Energiesparmodus. Aus Leuchtet rot Aus Startvorgang und Verbindung WLAN-Verbindung Blinkt (blau) Blinkt (blau) Blinkt (blau) Kein Eingang von ausgewählter Quelle … Leuchtet (blau) Blinkt (schnell) Videoformat nicht erkannt … Leuchtet (blau) Blinkt (langsam) Videoformat erkannt Leuchtet (blau) Leuchtet (blau) Leuchtet (blau) Verbunden Zwischen WLAN-HDMI-Transmittern wechseln 1. Drücken Sie die Transmitter-Nr.-Taste. Das OSD zeigt eine Liste der mit dem Empfänger verbundenen Transmitter. Prolongador inalámbrico de llave HDMI VE819 A Resumen de hardware Vista superior y lateral de VE819T 1 LED de estado 2 Conector HDMI 3 Botón Información/Asociación 4 Conector de alimentación Mini-USB B www.aten.com 2 Conecte el cable HDMI al puerto Salida HDMI del receptor y al puerto Entrada Vistas superior y lateral de VE819R Pulsador de alimentación Botón de información LED de estado de vídeo Conector de alimentación Mini-USB 5 Puerto de salida HDMI 6 Puerto IR 1 2 3 4 Instalación del hardware Configurar el transmisor VE819T 1 Conecte el transmisor al puerto HDMI del equipo o del origen multimedia. 2 Proporcione alimentación al trasmisor mediante una de estas dos opciones: a Si se utiliza con un reproductor Blu-Ray o dispositivo similar, conecte el transmisor al adaptador de alimentación USB. b Si se utiliza con un equipo, conecte el cable Mini-USB a USB desde el transmisor a un puerto USB del equipo. Configurar el receptor VE819R HDMI del televisor o de la pantalla de alta definición (HD). 3 Encienda el televisor o la pantalla HD. Una vez establecido el enlace entre el transmisor y el receptor, el vídeo del equipo conectado o del origen multimedia HDMI se mostrará en el televisor o la pantalla HD. Establecimiento de la pantalla del equipo Puede ajustar la pantalla mediante las preferencias de resolución de pantalla del equipo para cambiar la configuración de visualización a “Duplicar”, “Extender” o “Solo proyectar”. Si todo el funcionamiento es normal, las luces de LED de ambos lados deben ser estáticas (no intermitentes). Asociar transmisores adicionales El receptor HDMI inalámbrico se puede asociar con hasta 3 transmisores HDMI inalámbricos adicionales (el VE819T se puede adquirir por separado). Nota: Cuando agregue un transmisor adicional, asegúrese de que el transmisor ya enlazado con el receptor está apagado antes de que el nuevo receptor entre en el modo de asociación. Modo de asociación para el transmisor: 1. Cuando el transmisor esté encendido, presione sin soltar el botón Asociación. 2. El transmisor se encuentra en el modo de asociación cuando el LED de alimentación parpadea lentamente (1 parpadeo/s). 1 Conecte el adaptador de alimentación USB al conector de alimentación Mini-USB del receptor y conecte el otro extremo una toma de corriente eléctrica. Modo de asociación para el receptor: 1. Cuando el receptor esté encendido, presione el botón Nº de transmisor del mando a distancia. 2. El menú en pantalla (OSD) aparecerá en el televisor o en la pantalla HD. Utilice los botones ARRIBA o ABAJO para seleccionar CONFIGURACIÓN. 3. Seleccione Agregar nuevo trasmisor para buscar un transmisor disponible. El menú OSD mostrará el mensaje Buscando. El LED Alimentación del receptor parpadeará en ROSA cuando se encuentre en el modo de asociación. Para salir del modo de búsqueda, presione el botón Nº de transmisor del mando a distancia. 4. Cuando tanto el transmisor como el receptor se encuentren en el modo de asociación, se buscarán entre sí y se asociarán automáticamente; El LED de alimentación en el receptor parpadeará en ROSADO, y el LED de alimentación en el transmisor parpadeará en AZUL. 5. Cuando el modo de asociación se complete, tanto el transmisor como receptor se reiniciarán y establecerán el enlace entre sí automáticamente antes de que transcurran 5 segundos. Cambiar entre transmisores HDMI inalámbricos Funcionamiento Modo LED de Descripción del alimentación estado TX LED de alimentación RX LED de estado RX Espera activa Para el modo de Apagado ahorro. Rojo permanente Apagado Intermitente (azul) Intermitente (azul) Intermitente (azul) … Permanente (azul) Intermitente (rápidamente) … Permanente (azul) Intermitente (lentamente) Permanente (azul) Permanente (azul) Permanente (azul) Arranque Enlace inicial y inalámbrico enlace No hay entrada desde la fuente seleccionada Formato de Modo vídeo no enlazado reconocido Formato de vídeo reconocido 1. Presione el botón No. del Transmisor. El OSD mostrará una lista de transmisores vinculados al receptor. 2. Utilice los botones Arriba y Abajo para seleccionar el transmisor que desea mostrar en su HDTV o proyector HD. A continuación, presione OK (Aceptar) y deje que transcurran 10-12 para que el receptor y el transmisor vuelvan a establecer una conexión. Estensore per dongle VE819 HDMI wireless A Descrizione hardware Vista dall'alto e frontale di VE819T Vista dall'alto e frontale di VE819R 1 LED di stato 1 Pulsante di alimentazione 2 Connettore HDMI 2 Tasto Info 3 Tasto Info/Associazione 3 LED di stato video 4 Jack di alimentazione mini USB 4 Jack di alimentazione mini USB 5 Porta uscita HDMI 6 Porta IR B Installazione dell'hardware Impostazione del trasmettitore VE819T 1 Collegare il trasmettitore alla porta HDMI del computer o del supporto multimediale. 2 Alimentare il trasmettitore tramite una delle due opzioni: a Se utilizzato con un lettore Blu-Ray o un dispositivo simile, collegare il tramettitore all'adattatore di alimentazione USB. b Se utilizzato con un computer, collegare il cavo Mini USB-USB dal trasmettitore ad una porta USB del computer. RXStatusLED www.aten.com Impostazione del ricevitore VE819R 1 Collegare l'adattatore di alimentazione USB al connettore di alimentazione Mini-USB del ricevitore e collegare l'altra estremità ad una presa. 2 Collegare il cavo HDMI alla porta di uscita HDMI del ricevitore e alla porta di ingresso HDMI dell'HDTV/del display HD. 3 Accendere l'HDTVHDTV/il display HD. Una volta stabilito il collegamento tra il trasmettitore e il ricevitore, il video del computer o della sorgente multimediale HDMI collegati viene visualizzato sull'HDTV/sul display HD. Impostazione del display del computer È possibile regolare la visualizzazione dalle preferenze di risoluzione dello schermo del computer per modificare l'impostazione di visualizzazione su "Duplica", "Estendi" o "Solo proiettore". Se tutto funziona normalmente, i LED di entrambii dispositivi diventano fissi (non lampeggianti). Associazione di altri trasmettitori Il ricevitore HDMI wireless può essere associato fino a 3 ulteriori trasmettitori HDMI wireless (il VE819T può essere acquistato separatamente). Nota: Quando si aggiungono altri trasmettitori, assicurarsi che il trasmettitore già collegato al ricevitore sia spento prima di portare il nuovo ricevitore in modalità di associazione. Modalità di associazione del trasmettitore: 1. Una volta acceso il trasmettitore, tenere premuto il tasto di associazione. 2. Il trasmettitore è in modalità di associazione quando il LED di alimentazione lampeggia lentamente (1 lampeggio al secondo). Modalità di associazione del ricevitore: 1. Una volta acceso il ricevitore, premere il tasto Transmitter No. del telecomando. 2. Il menu OSD appare sull'HDTV/sul display HD. Utilizzare i tasti SU o GIÙ per selezionare IMPOSTA. 3. Selezionare Aggiungi nuovo trasmettitore per cercare un trasmettitore disponibile. Sul menu OSD viene visualizzato Ricerca. Il LED di alimentazione del ricevitore lampeggia in ROSA quando è in modalità di associazione. Per uscire dalla modalità Ricerca, premere il tasto Transmitter No. del telecomando. 4. Quando il trasmettitore e il ricevitore sono in modalità di associazione, viene effettuata la ricerca reciproca e l'associazione automatica ed i Il LED di alimentazione sul ricevitore lampeggia in ROSA, mentre il LED di alimentazione sul trasmettitore lampeggia in BLU. 5. Al termine dell'associazione, il trasmettitore e il ricevitore si riavviano e viene stabilito il collegamento reciproco automatico entro 5 secondi. Commutazione tra trasmettitore HDMI wireless 1. Premere il tasto Transmitter No. Sul menu OSD viene visualizzato un elenco di trasmettitori collegati al ricevitore. 2. Utilizzare i tasti Su/Giù per selezionare il trasmettitore da visualizzare sull'HDTV/sul proiettore HD. Quindi premere OK e attendere 10-12 secondi per il ricevitore e il trasmettitore per ristabilire il collegamento. Funzionamento Modalità Descrizione dello stato LED di LED di LED di stato alimentazione alimentazione RX TX RX Per la modalità Standby attivo di risparmio energetico. Off Rosso fisso Off Avvio iniziale e Collegamento collegamento wireless Lampeggiante (blu) Lampeggiante (blu) Lampeggiante (blu) Nessun ingresso dalla sorgente selezionata … Fisso (blu) Lampeggiante (rapido) Formato video non riconosciuto … Fisso (blu) Lampeggiante (lento) Formato video riconosciuto Fisso (blu) Fisso (blu) Fisso (blu) Modalità di collegamento-
 1
1
-
 2
2


ATEN HDMI Dongle Wireless Transmitter (1080p@10m) Guía de inicio rápido
- Tipo
- Guía de inicio rápido
- Este manual también es adecuado para
en otros idiomas
- français: ATEN HDMI Dongle Wireless Transmitter (1080p@10m) Guide de démarrage rapide
- italiano: ATEN HDMI Dongle Wireless Transmitter (1080p@10m) Guida Rapida
- English: ATEN HDMI Dongle Wireless Transmitter (1080p@10m) Quick start guide
- Deutsch: ATEN HDMI Dongle Wireless Transmitter (1080p@10m) Schnellstartanleitung
- русский: ATEN HDMI Dongle Wireless Transmitter (1080p@10m) Инструкция по началу работы
- português: ATEN HDMI Dongle Wireless Transmitter (1080p@10m) Guia rápido
- 日本語: ATEN HDMI Dongle Wireless Transmitter (1080p@10m) クイックスタートガイド
Artículos relacionados
-
ATEN VE849 Guía de inicio rápido
-
ATEN VanCryst VE872 Guía de inicio rápido
-
-
ATEN HDMI Wireless Extender (1080p@30m) Guía de inicio rápido
-
ATEN VE829 Guía de inicio rápido
-
ATEN VE8900R Guía de inicio rápido
-
ATEN KE8900ST Guía de inicio rápido
-
ATEN VE1812 Guía de inicio rápido
-
ATEN KE8950 Guía de inicio rápido
Otros documentos
-
Shure GLXD16 Manual de usuario
-
Shure GLXD14/MX53 Manual de usuario
-
Veris Multimedia Station E-Z Guía de instalación
-
Acer CastMaster(WPS1-H_WPT1-H) Guía de inicio rápido
-
YEHUA R1Y635Q7 Manual de usuario
-
 DieseRC Interrupteur de télécommande Haute Puissance sans Fil 433Mhz Manual de usuario
-
Infocus INA-SIMRINT1 Guía del usuario
-
Joby JB01751-BWW Impulse 2 Premium Bluetooth 5.0 Remote Trigger Manual de usuario
