
1 2
Recommended Tools and Accessories
Herramientas y materiales recomendados
Instalación
1. Desconecte la alimentación eléctrica en el disyuntor y
desmonte la lámpara existente con sus accesorios de montaje.
2. Desembale con cuidado su nueva lámpara y coloque todas las
piezas sobre una superficie despejada. Tenga cuidado de no
perder ninguna pieza pequeña.
3. Asegure la placa de montaje (B) a la caja de salida (A) con los
tornillos de la caja de salida (C). El lado de la placa de
montaje(B) marcado como “GND” debe estar hacia afuera.
4. A continuación, conecte los cables eléctricos de este modo:
Conecte el cable negro de la lámpara al cable negro (fase) de
la instalación eléctrica de la casa. Conecte el cable blanco de la
lámpara al cable blanco (neutro) de la instalación eléctrica de
la casa. Asegúrese de que todos los conectores de torsión
queden bien fijados. Si lo desea, puede proteger las onexiones
con cinta eléctrica. Si su toma de corriente dispone de un
cable de tierra (de cobre desnudo o con aislamiento verde),
conéctelo al cable de tierra de la lámpara. De lo contrario,
conecte el cable de tierra de la lámpara directamente a la
pletina de anclaje (B) mediante el tornillo verde incluido.
Recoja cuidadosamente las conexiones de cables dentro del
cajetín de toma de corriente (A).
5. Coloque el dispositivo en el tubo roscado de la placa de
montaje(B) y asegúrelo a la placa de la pared con la tuerca
ciega (G).
6. El vidrio (J) está fijo a la pared y los dos agujeros de montaje
están alineados con las perforaciones de los soportes (D).
7. Asegure el vidrio (J) en el soporte (D) con el adorno final (H) y
la arandela (I).
8. Enrosque la bombilla (no incluida) en el casquillo (F). Tenga en
cuenta la potencia indicada en la etiqueta de características
del plafón. No supere la potencia recomendada.
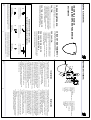
INDOOR WALL SCONCE
CANDELABRO DE PARED PARA INTERIOR
FLWL100BNORB
9211703 (FLWL100BNORB) 9211703 (FLWL100BNORB)
H
I
J
G
A
B
C
D
E
F
Installation
1. Shut off the power at the circuit breaker and remove existing
fixture, including the mounting hardware.
2. Carefully unpack your new fixture and lay out all the parts on
a clear area. Be careful not to lose any small parts necessary
for installation.
3. Secure mounting plate(B) to the outlet box(A) using
outlet box screws(C). The side of the mounting plate(B)
marked “GND” must face out.
4. Now connect the electrical wires as follows:Connect the black
wire from the fixture to the black house (hot) wire. Connect the
white wire from the fixture to the white (neutral) house wire.
Make sure all wire nuts are secured. You may wrap the
connections with electrical tape.If your outlet has a ground wire
(green or bare copper), connect fixture ground wire to it.
Otherwise, connect fixture ground wire directly to the mounting
plate(B) using the green screw provided. Tuck the wire
connections neatly into the outlet box(A).
5. Place the Fixture on the Treaded Pipe of the mounting plate(B)
and secure it to the wall plate by using cap nut(G).
6. The glass(J) is attached to the wall, and the two mounting holes
are aligned with the bracket(D) perforations.
7. Secure the glass(J) onto the bracket(D) with Finial(H) and
washer (I).
8. Install the bulb(not included) into socket(F). Please follow the
wattage label located on the fixture. Do not exceed the
recommended wattage.
A. Outlet box
B. Mounting plate
C. Outlet box mounting screws
D. Bracket
E. Fixture
F. Socket
G. Cap nut
H. Finial
I . Washer
J. Glass
(A) Wire Connectors (3pcs)
(A) Conectores de cable (3 pzas)
A
(B) Outlet Box Screws (2pcs)
(B) Tornillos de caja tomacorrientes (2 pzas)
B
(C) Mounting plate(1pcs)
(C) Soporte de montaje (1 pza)
C
(D) Cap nut(1pcs)
(D) Tuercas ciegas (1 pza)
D
(A) Finial(2pcs)
(A) Remate (2 pzas)
E
(F) Washer (2pcs)
(F) Arandela (2 pzas)
F
CARE AND MAINTENANCE:
To clean, wipe with damp cloth.
Do not use abrasive cleaners or cleaners that contain alcohol.
CAUTION:
• This fixture is intended for installation in accordance with the
National Electric Code (NEC) and all local code specifications.
• Supply wires are not intended for use through or concealed
behind walls, floors, or ceilings.
• If you are unfamiliar with proper electrical wiring connections
obtain the services of a qualified electrician.
CAUTION – RISK OF SHOCK
Disconnect Power at the main circuit breaker panel
or main fuse box before starting and during the installation.
CUIDADOS Y MANTENIMIENTO:
Para limpiar este producto, utilice un paño húmedo.
No utilice productos de limpieza abrasivos o que contengan alcohol.
PRECAUCIÓN:
• Esta lámpara está diseñada para su instalación de acuerdo con
todas las normas y reglamentos electrotécnicos vigentes a nivel
nacional y local.
• Los cables de alimentación no están diseñados para empotrar en
techos, pisos ni paredes..
• Si desconoce cómo realizar conexiones eléctricas correctamente,
acuda a un electricista calificado.
PRECAUCIÓN: RIESGO DE
DESCARGA ELÉCTRICA
Antes de comenzar cualquier trabajo de la instalación, y mientras
dure esta, desconecte la alimentación eléctrica en el cuadro de
disyuntores o cuadro de fusibles principal.
A. Caja de conexiones
B. Soporte de montaje
C. Tornillos de caja tomacorrientes
D. Soporte
E. Plafón de la lámpara
F. Enchufe
G. Tuerca ciega
H. Remate
I . Arandela
J. Vidrio
SAVE THIS MANUAL: RETAIN FOR CONSUMER’S USE. READ THESE INSTRUCTIONS
COMPLETELY BEFORE INSTALLING THE PRODUCT. FOR PRODUCT OR INSTALLATION
QUESTIONS PLEASE CALL CUSTOMER SERVICE AT 1-800-221-3379
GUARDE ESTE MANUAL: DEBE CONSERVARSE PARA USO DEL CONSUMIDOR. LEA
ESTAS INSTRUCCIONES ÍNTEGRAMENTE ANTES DE INSTALAR EL PRODUCTO. PARA
CUALQUIER PREGUNTA O DUDA SOBRE EL PRODUCTO O SU INSTALACIÓN, LLAME
AL SERVICIO DE ATENCIÓN AL CLIENTE EN EL NÚMERO 1-800-221-3379.
0121 0121
-
 1
1

Miseno 2147-BN Guía de instalación
- Tipo
- Guía de instalación
- Este manual también es adecuado para
en otros idiomas
- English: Miseno 2147-BN Installation guide
