
www.ghibliwirbel.com
Professional Cleaning Machines Since 1968
8050817
ed. 03/2022
IT
Uso e Manutenzione
EN
Use and Maintenance
FR
Utilisation et Entretien
DE
Gebrauch und wartung
ES
Uso y Mantenimiento
PT
Uso e manutenção
NL
Gebruik en Onderhoud
CS
RU
AR
Copertina POWER LINE_8050817_2ed_10-2018.indd 1 22/10/18 08:51

www.ghibliwirbel.com
Professional Cleaning Machines Since 1968
2
Mod.
Art.
Cap.ty
Vac mba
Air flow l/s
Nr
3
4
56
7
8
1
2
Copertina POWER LINE_8050817_1ed_04-2017.indd 2 21/04/17 09:58

www.ghibliwirbel.com
Professional Cleaning Machines Since 1968
3
1234
IT Produttore Modello Articolo Capacità fusto
EN Manufacturer Model Article Container capacity
FR Producteur Modèle Article Capacité de la cuve
DE Hersteller Modell Artikel
Fassungsvermögen des Körpers
ES Fabricante Modelo Artículo Capacidad del bidón
PT Produtor Modelo Artigo Capacidade do reservatório
NL Producent Model Artikel Inhoud reservoir
CS Výrobce Model Typ Obsah nádoby
RU
AR
5678
IT Capacità aspirazione Portata d’aria N° Matricola Caratteristiche elettriche
EN Vacuum Air flow Serial N° Electrical characteristics
FR Capacité d’aspiration Débit d’air N° Matricule Caractéristiques électriques
DE Ansaugleistung Luftdurchsatz Matrikelnr. Elektrische Eigenschaften
ES Capacidad de aspiración Caudal de aire N° Matrícola Características eléctricas
PT Capacidade de aspiração Caudal de ar Número de série Características elétricas
NL Zuigcapaciteit Luchtdebiet Serienummer Elektrische eigenschappen
CS Sací výkon
vzduchu Elektrické údaje
RU
AR
Copertina POWER LINE_8050817_1ed_04-2017.indd 3 21/04/17 09:58

www.ghibliwirbel.com
Professional Cleaning Machines Since 1968
4
Fig. 4
Fig. 1 Fig. 2
Fig. 10
Fig. 3
10
11
Fig. 9
Fig. 5
11
13
14
12
Fig. 6
14
16
Fig. 7
Fig. 8
8
15
16
15
3
4
1
26
7
5
17
19
20
18
19
20
19
21
22
20
9
46
Copertina POWER LINE_8050817_1ed_04-2017.indd 4 21/04/17 09:58

www.ghibliwirbel.com
Professional Cleaning Machines Since 1968
5
25
24
23
26
28
Fig. 22
27
30
34
33
36
38
37
36
35
Fig. 11 Fig. 12
Fig. 13
31
35
34
39
32
Fig. 16
Fig. 18
Fig. 19
Fig. 20 Fig. 21
Fig. 14
29
Fig. 15
Fig. 17
Copertina POWER LINE_8050817_1ed_04-2017.indd 5 21/04/17 09:58

www.ghibliwirbel.com
Professional Cleaning Machines Since 1968
6
35
40
35 40
Fig. 24
Fig. 23
41
42
Fig. 28
Fig. 27
43
44
Fig. 26
Fig. 25
Fig. 29
45
48 47
47
46
Fig. 30
Copertina POWER LINE_8050817_1ed_04-2017.indd 6 21/04/17 09:58

www.ghibliwirbel.com
Professional Cleaning Machines Since 1968
7
D 22.1 ■- 800 W 58 dbA 230 mbar 11 l 500 x 380
x 485
8,7 kg (P)
9,3 kg (I)
Ø 36 mm
WD 22.1 ■ ■ 1100 W 60 dbA 235 mbar 11 l 500 x 380
x 485
8,7 kg (P)
9,3 kg (I)
Ø 36 mm
WD 36.1
D 36.1
■ ■ 1100 W 60 dbA 235 mbar 25 l 500 x 380
x 685
8,7 kg (P)
9,3 kg (I)
Ø 40 mm
WD 50.1
D 50.1
■ ■ 1350 W 62 dbA 260 mbar 35 l 525 x 495
x 825
12,5 kg (P)
13,5 kg (I)
Ø 40 mm
WD 80.2 ■ ■ 2200 W 62 dbA 225 mbar 56 l 620 x 520
x 920
18,2 kg (P)
19,5 kg (I)
Ø 40 mm
WD 80.2 I TMT
■ ■ 2200 W 62 dbA 225 mbar 56 l 710 x 520
x 1005
20,3 kg Ø 40 mm
WD 80.2 TPT ■ ■ 2200 W 62 dbA 225 mbar 56 l 610 x 520
x 955
19 kg (P)
20,3 kg (I)
Ø 40 mm
220~240V
Copertina POWER LINE_8050817_1ed_04-2017.indd 7 20/07/17 11:00

www.ghibliwirbel.com
Professional Cleaning Machines Since 1968
8
CODICE - CODE
CODE - KENNNR.
CÓDIGO - CÓDIGO
CODE - KÓD
КОД -
زمرلا
WD 22.1 P 16538611950
16531210001
WD 22.1 I 16548711950
16544010001
WD 22.1 P EL 15688611950
15681210001
WD 36.1 P 15058611950
15051210001
WD 36.1 I 15068711950
15064010001
WD 36.1 9 EL FD 15708611950
15701210001
D 36.1 P EL 15728611950
15721210001
D 36.1 I EL 15768711950
15764010001
D 36.1 P COMBI 15748611950
15741210001
D 36.1 I COMBI 15788711950
15784010001
WD 50 . 1 P 15108611950
15101210001
WD 50.1 PD 15158611950
15151210001
WD 50.1 I 15118711950
15114010001
D 50.1 P EL 15808611950
15801210001
D 50.1 P COMBI 15408611950
15401210001
WD 80.2 P 14308611950
14301210001
WD 80.2 I 14358711950
14354010001
WD 80.2 P TPT 14408611950
14401210001
WD 80.2 I TPT 14458711950
14454010001
WD 80.2 I TMT 14438711950
14434010001
MODELLO -MODEL
MODÈLE - MODELL
MODELO - MODELO
MODEL - MODEL
МОДЕЛЬ -
زارطلا
Copertina POWER LINE_8050817_1ed_04-2017.indd 8 21/04/17 09:58

www.ghibliwirbel.com
Professional Cleaning Machines Since 1968
9
IT
Italiano ................................................................................................... ITALIANO -1
(Istruzioni originali)
EN
English ...................................................................................................ENGLISH -1
(Translation of original instructions)
FR
Français .............................................................................................. FRANÇAIS -1
(Traduction des instructions d’origine)
DE
Deutsch ................................................................................................ DEUTSCH -1
(Übersetzung der Originalanleitung)
ES
Español .................................................................................................ESPAÑOL -1
(
Traducción de las instrucciones originales
)
PT
Português ........................................................................................ PORTUGUÊS -1
(Tradução das instruções originais)
NL Nederlands ....................................................................................NEDERLANDS -1
(Vertalinig van de originele instructies)
CS
........................................................................................................ -1
(Překladoriginálníhonávodu)
RU
................................................................................................ -1
AR
...................................................................................................................... 1
( )
Copertina POWER LINE_8050817_1ed_04-2017.indd 9 21/04/17 09:58

Copertina POWER LINE_8050817_1ed_04-2017.indd 10 21/04/17 09:58

www.ghibliwirbel.com
Professional Cleaning Machines Since 1968
ITALIANO -
1
TIPO D’USO
Questi apparecchi sono stati concepiti per
aspirare solidi o liquidi o entrambi come da
tabella dati tecnici presente nella parte intro-
duttiva del manuale. Solo per questi utilizzi
sono stati concepiti.
PERICOLO:
Il costruttore non può essere ritenuto re-
sponsabile per eventuali danni dovuti ad
un uso improprio o scorretto.
Qualsiasi altro utilizzo solleva il costrut-
tore da responsabilità per danni a perso-
ne e/o cose e fa decadere qualsiasi condi-
zione di garanzia.
USO SCORRETTO
Non utilizzare l’apparecchio per:
- Aspirare sostanze infiammabili, esplosi-
ve, corrosive, tossiche.
- Aspirare sostanze calde.
- Non utilizzare l’apparecchio in versione
aspiraliquidi per aspirare polveri e vice-
versa.
Non utilizzare l’apparecchio in ambienti con
rischio di esplosione.
PREPARAZIONE
APPARECCHIO
Assemblaggio carrello
(per modelli dotati di carrello smon-
tabile)
- Posizionare a terra il carrello (1 Fig. 1)
- Inserire il maniglione ( 2 Fig. 1) nel carrel-
lo.
- É possibile regolare il maniglione in altez-
za posizionando e avvitando il pomello di
fermo ( 3 Fig. 1) in corrispondenza di uno
dei due fori ( 4 Fig. 1).
- Posizionare il fusto ( 5 Fig. 2) sul carrel-
lo agganciando il supporto in plastica ( 6
Fig. 2) al tubo ( 7 Fig. 2) del carrello.
Aspirapolvere
Per apparecchi dotati di adeguati accessori.
- Sganciare le leve (8 Fig.3) e rimuovere
il coperchio (9 Fig.4) completo di gruppo
motore.
- Controllare che sia presente il filtro in
Nylon (46 Fig. 4).
- Rimuovere il filtro (10 Fig.5) in poliestere.
- Controllare, se presente, che all’interno
dell’apparecchio sia montato il sacchetto
in carta (11 Fig.5).
- Se il sacchetto in carta (11 Fig.5) non è
presente, montarlo, se necessario, agen-
do come segue:
Calzare il sacchetto in carta (11 Fig.6)
nella bocchetta (12 Fig. 6) fino a oltrepas-
sare il collare (13 Fig.6)
- Rimontare il filtro (10 Fig.5) in poliestere.
- Rimontare il coperchio e bloccarlo tramite
le leve (8 Fig.3).
- Introdurre, fino a finecorsa, il manicotto
(14 Fig. 7) del tubo di aspirazione nella
bocchetta (15 Fig. 7) presente sul fusto.
- Per sganciare il manicotto (14 Fig. 7)
spostare la levetta (16 Fig. 7) in senso
orario quindi tirare verso l’esterno il ma-
nicotto (14 Fig. 7).
- Unire all’impugnatura ergonomica (17
Fig. 8) o al tubo flessibile (18 Fig.8) a se-
conda dei modelli, la prolunga (19 Fig.8).
- Unire le due prolunghe rigide (19-20 Fig.
9) facendo coincidere i due riferimenti
(21-22 Fig. 9).
- Unire alla prolunga rigida (20 Fig.10) l’ac-
cessorio voluto (bocchetta di aspirazione,
spazzola a pennello, bocchetta a lancia,
bocchetta pavimenti ecc..).
NOTA:
Per modelli dotati di impugnatura ergonomi-
ca è possibile regolare la forza di aspirazione
agendo sul selettore (23 Fig.11).
Aprendo la nestrella (24 Fig.11) si ha una
minore azione aspirante.
Manuale POWER LINE_8050817_1ed_04-2017.indd 1 21/04/17 10:02

www.ghibliwirbel.com
Professional Cleaning Machines Since 1968
ITALIANO -
2
Collegamento elettrospazzola
Per apparecchi dotati di presa:
- Collegare la spina dell’elettrospazzola
alla presa (25 Fig. 12) presente sulla te-
stata dell’aspirapolvere (massima poten-
za consentita 200 W)
Aspiraliquidi
Per apparecchi dotati di adeguati accessori.
- Sganciare le leve (8 Fig.3) e rimuovere
il coperchio (9 Fig.4) completo di gruppo
motore.
- Controllare che sia presente il filtro in
Nylon (46 Fig. 4).
- Rimuovere il filtro (10 Fig.5) in poliestere
se presente.
- Rimuovere il sacchetto in carta (11 Fig.5)
se presente.
- Rimontare il coperchio e bloccarlo tramite
le leve (8 Fig.3).
- Introdurre, fino a finecorsa, il manicotto
(14 Fig. 7) del tubo di aspirazione nella
bocchetta (15 Fig. 7) presente sul fusto.
- Per sganciare il manicotto (14 Fig. 7)
spostare la levetta (16 Fig. 7) in senso
orario quindi tirare verso l’esterno il ma-
nicotto (14 Fig. 7).
- Unire all’impugnatura ergonomica (17
Fig.8) o al tubo flessibile (18 Fig.8), a se-
conda dei modelli, la prolunga (19 Fig.8).
- Unire le due prolunghe rigide (19-20 Fig.
9) facendo coincidere i due riferimenti
(21-22 Fig. 9).
- Unire alla prolunga rigida (20 Fig.10) l’ac-
cessorio voluto (bocchetta di aspirazione,
bocchetta pavimenti ecc...
NOTA:
Per modelli dotati di impugnatura ergonomi-
ca è possibile regolare la forza di aspirazione
agendo sulla ghiera (23 Fig.11).
Aprendo la nestrella (24 Fig.11) si ha una
minore azione aspirante.
USO DELL’APPARECCHIO
- L’apparecchio è dotato di ruote e quindi
può essere spostato tramite le apposite
maniglie, oppure spinto tramite il mani-
glione (26 Fig. 13)
- Per il suo sollevamento inserire le dita
della mano nell’apposita maniglia (27
Fig.14) ricavata sulla parte superiore del
coperchio per la versione motore singolo
oppure in due persone tramite le maniglie
(28 Fig. 13)
Avviamento dell’apparecchio
- Inserire la spina (29 Fig.15) nella presa di
corrente.
Motore singolo
- Premere l’interruttore (30 Fig.16) su “I”
per avviare il motore di aspirazione, l’in-
terruttore si illumina.
Doppio motore
- A seconda della potenza richiesta è pos-
sibile avviare un solo motore premendo
l’interruttore (31 Fig.16) su “I” oppure en-
trambe gli interruttori (31 e 32 Fig.16) se
è richiesta una maggiore forza aspirante.
Con interruttore premuto il relativo pul-
sante si illumina.
NOTA:
Quando il serbatoio di recupero è pieno, si
ha un aumento di rumore e l’apparecchio
non aspira più, quindi spegnere l’apparec-
chio e svuotare il serbatoio come descritto
nei relativi paragrafi
Spegnimento dell’apparecchio
- Premere gli interruttori (30, 31, 32 Fig.16)
su “0” per spegnere l’apparecchio; le
lampade, se presenti sugli interruttori, si
spengono.
- Staccare la spina (29 Fig.15) dalla presa
di corrente.
- Avvolgere il cavo (33 Fig.17) e aggan-
ciarlo nell’apposita sede (34 Fig.17).
Manuale POWER LINE_8050817_1ed_04-2017.indd 2 21/04/17 10:02

www.ghibliwirbel.com
Professional Cleaning Machines Since 1968
ITALIANO -
3
PULIZIA E MANUTENZIONE
PERICOLO:
Prima di effettuare qualsiasi operazione
di manutenzione rimuovere la spina dalla
presa di corrente.
Rimozione e sostituzione sacchetto
raccogli polvere in carta (se presente)
- Sganciare le leve (8 Fig.3) e rimuovere il
coperchio (9 Fig.4) completo di motore.
- Rimuovere il filtro (10 Fig.5) in poliestere.
- Togliere il sacchetto in carta raccogli pol-
vere (11 Fig.5), e sostituirlo come indica-
to in precedenza.
- Rimontare il tutto procedendo in senso
inverso allo smontaggio.
Svuotamento serbatoio di recupero
- Sganciare le leve (8 Fig.3) e rimuovere la
testata (9 Fig.4) completa di motore.
- Posizionarsi su una piletta di scarico e
svuotare il liquido contenuto nel serbatoio
di recupero (35 Fig.18).
- Pulire l’interno del serbatoio con acqua
corrente quindi rimontare il tutto proce-
dendo in senso inverso allo smontaggio.
Per apparecchi dotati di tubo di scarico
- Sganciare il tubo di scarico (36 Fig.
19) da relativo supporto.
- Svitare il pomello (37 Fig.20), rimuo-
vere il tappo (38 Fig. 20) del tubo di
scarico (36 Fig. 21) e svuotare il liqui-
do contenuto nel serbatoio di recupe-
ro (35 Fig.21)
Per apparecchi dotati di fusto basculan-
te
- Sganciare le leve (8 Fig.3) e rimuo-
vere la testata (9 Fig.4) completo di
motore.
- Sganciare il fermo serbatoio agendo
sulla leva (39 Fig. 22) se presente.
- Sollevare il serbatoio (35 Fig.23) tra-
mite l’apposita maniglia (40 Fig.23)
fino al completo svuotamento.
- Rimontare il tutto procedendo in sen-
so inverso allo smontaggio.
Pulizia gionaliera
Controllo e pulizia filtro in poliestere
(se presente)
- Sganciare le leve (8 Fig.3) e rimuovere il
coperchio (9 Fig.4) completo di motore.
- Rimuovere il filtro (4 Fig. 5) in poliestere.
- Pulire il filtro (Fig.24) dall’interno verso
l’esterno con un getto d’aria; è possibile
lavare il filtro (Fig. 24) in acqua tiepida e
rimontarlo solo dopo una completa asciu-
gatura, se si presenta troppo sporco so-
stituirlo
- Rimontare il tutto procedendo in senso
inverso allo smontaggio.
Pulizia apparecchio
- Pulire il corpo apparecchio utilizzando un
panno umido d’acqua o detergente neu-
tro.
- Rimuovere la testata come indicato in
precedenza e pulire l’interno del serba-
toio con acqua corrente quindi svuotarlo
come indicato precedentemente.
Rimontare il tutto procedendo in senso
inverso allo smontaggio.
PERICOLO:
Non lavare l’apparecchio con getti d’ac-
qua.
Controlli periodici
Controllo filtro uscita aria
- Svitare le viti (41 Fig.25) e rimuovere il
coperchietto (42 Fig.25).
- Rimuovere la spugnetta filtro (43 Fig.26)
e le spugnette bugnate (44 Fig.27) se
presenti.
- Pulire le spugnette con un getto d’aria
(Fig.28).
È possibile lavare le spugnette filtro in
acqua tiepida e rimontarle solo dopo una
completa asciugatura; se si presentano
troppo sporche sostituirle.
- Rimontare il tutto procedendo in senso
inverso allo smontaggio.
Manuale POWER LINE_8050817_1ed_04-2017.indd 3 21/04/17 10:02

www.ghibliwirbel.com
Professional Cleaning Machines Since 1968
ITALIANO -
4
Controllo e pulizia filtro protezione
motore
- Rimuovere la testata come indicato in
precedenza.
- Rimuovere il filtro (46 Fig. 30)
- Lavare il filtro (46 Fig. 30) con acqua
corrente tiepida togliendo eventuali corpi
estranei e rimontarlo solo dopo una com-
pleta asciugatura.
- Inserire il filtro (46 Fig. 30) sulla calotta
del motore quindi tramite le fettucce (47
Fig. 30) agganciare la parte elastica su-
periore del filtro sulle rondelle (48 Fig.
30).
- Rimontare il tutto procedendo in senso
inverso.
PROBLEMA CAUSA RIMEDIO
Aspiratore non funziona. Interruttore non premuto.
Spina non inserita.
Mancanza corrente.
Premere l’interruttore.
Inserire la spina nella presa
di corrente.
Verificare la linea di
alimentazione.
L’aspirazione non è soddi-
sfacente.
Sacchetto in carta pieno.
Elementi filtranti intasati.
Accessori o tubi otturati.
Racla bocchetta aspirazione
usurata o rovinata.
Sostituire il sacchetto racco-
gli polvere.
Pulire gli elementi filtranti.
Controllare e pulire il tubo
flessibile e la bocchetta di
aspirazione.
Controllare e sostituire la ra-
cla.
Controllo funzionalità galleggiante
- Rimuovere la testata come indicato in
precedenza.
- Rimuovere il filtro (46 Fig. 30).
- Verificare che il galleggiante (45) sia in-
tegro e che scorra liberamente nella sua
sede.
- Rimontare il filtro (46 Fig. 30) come de-
scritto nel relativo paragrafo.
Manuale POWER LINE_8050817_1ed_04-2017.indd 4 21/04/17 10:02

www.ghibliwirbel.com
Professional Cleaning Machines Since 1968
ENGLISH -
1
TYPE OF USE
These devices were designed to vacuum liq-
uids or solids or both, according to the tech-
nical data table from the introduction to this
manual. They were designed only for this
use.
DANGER:
The manufacturer can not be held respon-
sible for any damage due to improper or
incorrect use.
Any other use releases the manufacturer
from liability for harm to persons and/or
property and invalidates any warranty
condition.
IMPROPER USE
Do not use the appliance to:
- Aspirate flammable, explosive, corrosive
and toxic substances.
- Aspirate hot substances.
- Do not use the appliance in liquid suction
mode to suction powder and vice versa.
Do not use the appliance in areas at risk of
explosion.
PREPARING
THE APPLIANCE
Trolley installation
(for models equipped with detachable trolley)
- Place the trolley on the ground (1 Fig.1)
- Insert the handle (2 Fig.1) in the trolley.
- It Is possible to adjust the handle’s height,
positioning it and tightening the fixing but-
ton (3 Fig.1) in one of the two positions (
4 Fig.1).
- Place the cover (5 Fig.2) on the trolley,
setting the support In the plastic (6 Fig.2)
on the trolley’s rod (7 Fig.2).
Vacuum cleaner
For appliances equipped with suitable acces-
sories.
- Release the levers (8 Fig.3) and remove
the cover (9 Fig.4) complete with the mo-
tor unit.
- Check for a filter in Nylon (46 Fig. 4).
- Remove the polyester filter (10 Fig.5).
- Check, if applicable, that inside the de-
vice to be set the paper bag (11 Fig.5).
- If the paper bag (11 Fig.5) is not there,
install it, if necessary, acting as follows:
Install the paper bag (11 Fig.6) in the noz-
zle (12 Fig.6) until it passes the banding
(13 Fig.6)
-
Reassemble the polyester filter
(10 Fig.5).
- Place the cover back on (8 Fig.3) and
lock it using the levers.
- Insert, as far as possible, the sleeve (14
Fig.7) of the suction hose into the nozzle
(15 Fig.7) on the drum.
- To release the sleeve (14 Fig.7) turn the
lever (16 Fig.7) clockwise and then pull
the sleeve outwards (14 Fig.7).
- Connect the ergonomic handle (17 Fig.8)
or the hose (18 Fig.8) depending on the
model, with the extension (19 Fig.8).
- Connect the two rigid extensions (19-
20 Fig.9) by aligning the two reference
points (21-22 Fig.9).
- Attach to the rigid extension (20 Fig.10)
the desired accessory ( the vacuum noz-
zle, the dust brush, the accessory for tight
spaces, the floor nozzle etc..
NOTES:
For models equipped with ergonomic handle
is possible to adjust the suction force, by act-
ing the selector (23 Fig.11).
By opening the window (24 Fig.11) you get a
lower suction force.
Manuale POWER LINE_8050817_1ed_04-2017.indd 1 21/04/17 10:02

www.ghibliwirbel.com
Professional Cleaning Machines Since 1968
ENGLISH -
2
Connecting the electrical brush
For devices with socket:
- Connect the electrical brush’s plug to the
socket (25 Fig.12) located on the top of
the vacuum (maximum output 200 W)
Liquid suction
For appliances equipped with suitable acces-
sories.
- Release the levers (8 Fig.3) and remove
the cover (9 Fig.4) complete with the mo-
tor unit.
- Check for a filter in Nylon (46 Fig. 4).
- Remove the polyester filter (10 Fig.5) if
present.
- Remove the paper bag (11 Fig.5) if pre-
sent.
- Place the cover back on and lock it using
the levers (8 Fig.3).
- Insert, as far as possible, the sleeve (14
Fig.7) of the suction hose into the nozzle
(15 Fig.7) on the drum.
- To release the sleeve (14 Fig.7) turn the
lever (16 Fig.7) clockwise and then pull
the sleeve outwards (14 Fig.7).
- Merge the ergonomic handle (17 Fig.8) or
hose (18 Fig.8) depending on the model,
with the extension (19 Fig.8).
- Connect the two rigid extensions (19-
20 Fig.9) by aligning the two reference
points (21-22 Fig.9).
- Mount on the rigid extension (20 Fig.10)
the desired accessory,( vacuum nozzle,
floor nozzle etc..)
NOTES:
For models equipped with ergonomic handle
it is possible to adjust the suction force acting
the nut (23 Fig.11).
By opening the little window (24 Fig.11) you
get a lower suction force.
USING THE APPLICANCE
- The device is equipped with wheels and
thus can be moved with the proper han-
dles, or it can be pushed with the help of
the handle (26 Fig.13)
- To lift it up insert your fingers under the
dedicated handle (27 Fig.14) on the top
of the cover of the single version motor or
lift with the help of two people using the
handles (28 Fig.13)
Starting up the appliance
- Insert the plug (29 Fig.15) into the socket.
Single motor
- Push the switch (30 Fig.16) on “I” to start
the suction motor; the switch lights up.
Double motor
- Depending on the power required it is
possible to start only one motor by press-
ing the switch (31 Fig.16) on “I” or both
switches (31 e 32 Fig.16) if a greater suc-
tion force is required.
When the switch pressed the correspond-
ing button lights up.
NOTES:
When the recovery tank is full, the noise
intensity increases and the device can no
longer aspire. Then you must switch off the
device and empty the tank as described in
the relevant paragraphs.
Switching off the appliance
- Push the switches (30, 31, 32 Fig.16) to
the “0” position to stop the device; the
lights, if any on the switches, will go off.
- Remove the plug (29 Fig.15) from the
electrical socket.
- Wind up the cable (33 Fig.17) and hook it
onto its housing (34 Fig.17).
Manuale POWER LINE_8050817_1ed_04-2017.indd 2 21/04/17 10:02

www.ghibliwirbel.com
Professional Cleaning Machines Since 1968
ENGLISH -
3
CLEANING AND
MAINTENANCE
DANGER:
Before performing any maintenance
operation, unplug the appliance from the
electrical socket.
Removing and replacing the paper
dust collection bag (if present)
- Release the levers (8 Fig.3) and remove
the cover (9 Fig.4) complete with motor.
- Remove the polyester filter (10 Fig.5).
- Remove the paper bag for collecting dust
(11 Fig.5), and replace it as described
above.
- Reassemble all the parts by following the
dismantling process steps in the reverse
order.
Emptying the recovery tank
- Release the lever (8 Fig.3) and remove
the top (9 Fig.4) along with the engine.
- Place it on the top of a drain and empty
the liquid in the recovery tank (35 Fig.18).
- Clean the inside of the tank with running
water and then re-install everything doing
the opposite of the disassembly.
For machines equipped with drain hose
- Release the exhaust tube (36 Fig.19)
from its base.
- Unscrew the button (37 Fig.20), re-
move the cap (38 Fig.20) of the ex-
haust hose (36 Fig.21) and drain the
liquid in the recovery tank (35 Fig.21)
For devices with rocking tank
- Release the lever (8 Fig.3) and re-
move the top (9 Fig.4) along with the
engine.
- Remove the tank locking device by
acting the lever (39 Fig.22) if any
- Lift the tank (35 Fig.23) with the ap-
propriate lever (40 Fig.23) until com-
pletely emptied.
- Replace everything doing the oppo-
site of the disassembly.
Daily cleaning
Checking and cleaning the polyester
filter (if present)
- Release the levers (8 Fig.3) and remove
the cover (9 Fig.4) complete with motor.
- Remove the polyester (4 Fig.5) filter.
- Clean the filter (Fig.24) from the inside
out with a blast of air; the filter can be
washed (Fig.24) in warm water and must
only be replaced once it is completely
dry. If it is too dirty, replace it.
- Reassemble all the parts by following the
dismantling process steps in the reverse
order.
Cleaning the appliance
- Clean the unit body with a cloth damp-
ened with water or a mild detergent.
- Remove the top, as described above and
clean the inside with running water and
then empty it, as indicated above.
Replace everything doing the opposite of
the disassembly.
DANGER:
Do not wash the appliance using jets of
water.
Periodic checks
Checking the air outlet filter
- Loosen the screws (41 Fig.25) and re-
move the cover (42 Fig.25).
- Remove the foam tank (43 Fig.26) and
the texture sponges (44 Fig.27) if any.
- Clean the sponges with a blast of air
(Fig.28).
The filter sponges can be washed in
warm water and must only be replaced
once they are completely dry; if too dirty,
replace them with new ones.
- Reassemble all the parts by following the
dismantling process steps in the reverse
order.
Manuale POWER LINE_8050817_1ed_04-2017.indd 3 21/04/17 10:02

www.ghibliwirbel.com
Professional Cleaning Machines Since 1968
ENGLISH -
4
Checking and cleaning the motor
protection filter
- Remove the cylinder head as previously
indicated.
- Removethelter(46Fig.30)
- Wash the lter (46 Fig. 30) with warm
running water removing all foreign par-
ticles and reassemble only after a thor-
ough drying.
- Insertthelter(46Fig.30)onthemotor
hood then through the straps (47 Fig. 30)
hooking the elastic part on the top of the
lterwithwashers(48Fig.30).
- Reassemble in reverse order.
PROBLEM CAUSE SOLUTION
The vacuum cleaner does
not work.
Switch not pressed.
Plug not inserted.
No current.
Press the switch.
Insert the plug into the sock-
et.
Check the power supply line.
Suction is not satisfactory. Paper bag full.
Filter elements clogged.
Accessories or tubes
clogged.
Suction nozzle squeegee
worn or damaged.
Replace the dust bag.
Clean the filter elements.
Check and clean the flexible
hose and the suction nozzle.
Check and replace the
squeegee.
Checking the floater
- Remove the top as shown above.
- Remove the filter (46 Fig. 30).
- Check If the floater (45) is In good condi-
tion and if it moves freely in its space.
- Replace the filter (46 Fig. 30) as de-
scribed in the relevant section.
Manuale POWER LINE_8050817_1ed_04-2017.indd 4 21/04/17 10:02

www.ghibliwirbel.com
Professional Cleaning Machines Since 1968
FRANÇAIS -
1
TYPE D’UTILISATION
Ces dispositifs ont été conçus pour aspirer
des liquides ou des solides ou des deux, se-
lon le tableau avec les données techniques
de l’introduction du manuel. Seulement pour
cette utilisation a été conçu.
DANGER :
Le constructeur ne peut être retenu res-
ponsable des éventuels dommages dus
à une utilisation impropre ou incorrecte.
Toute autre utilisation dégage le fabricant
de toute responsabilité pour endomma-
gements sur des personnes et/ou choses
et annule toute condition de garantie.
UTILISATION INCORRECTE
Ne pas utiliser l’appareil pour :
- Aspirer des substances inflammables,
explosives, corrosives, toxiques.
- Aspirer des substances chaudes.
- Ne pas utiliser l’appareil en version as-
pirateur pour liquides pour aspirer des
poussières et vice-versa.
Ne pas utiliser l’appareil dans des milieux
ayant un risque d’explosion.
PRÉPARATION
APPAREIL
Montage du chariot
(pour les modèles équipés de chariot
démontable)
- Placez le chariot sur le terrain (1 Fig. 1)
- Insérez la hauteur ( 2 Fig. 1) dans le cha-
riot.
- Est possible d’ajuster la hauteur de la
poignée, le positionnant et en serrant le
bouton de fixation (3 Fig. 1) au droit de
chacune des deux positions ( 4 Fig. 1).
- Placez le boîtier (5 Fig. 2) sur le chariot,
mise l’appui dans le plastique (6 fig. 2) de
la tige (7 Fig. 2) du chariot.
Aspirateur de poussières
Pour des appareils pourvus des accessoires
adéquats.
- Décrocher les clips (8 Fig.3) et retirer le
couvercle (9 Fig.4) avec le groupe mo-
teur.
- Vérifier qui est présent le filtre de Nylon
(46 Fig. 4).
- Retirer le filtre (10 Fig.5) en polyester.
- Vérifiez, le cas échéant, que à l’intérieur
de l’appareil est monté le sac en papier
(11 Fig.5).
- Si le sac en papier (11 Fig.5) n’est pas
présent, l’installer, si nécessaire, agir
comme suit:
Remplacer le sac en papier (11 Fig.6) en
la buse (12 Fig. 6) en faisant passer du
collier (13 Fig.6)
- Remonter le filtre (10 Fig.5) en polyester.
- Remonter le couvercle et le bloquer avec
les clips (8 Fig.3).
- Introduire, jusqu’en fin de course, le man-
chon (14 Fig. 7) du tuyau d’aspiration
dans la bouche (15 Fig. 7) présente sur
la cuve.
- Pour décrocher le manchon (14 Fig. 7)
déplacer le levier (16 Fig. 7) dans le sens
horaire puis tirer le manchon vers l’exté-
rieur (14 Fig. 7).
- Installer la poignée ergonomique (17 Fig.
8) ou le tube flexible (18 Fig 8) selon le
modèle, avec l’extension (19 Fig.8).
- Unir les deux extensions rigides (19-20
Fig. 9) par l’alignement des deux points
de référence (21-22 Fig. 9).
- Monté sur l’extension rigide (20 Fig.10)
l’accessoire désiré (buse, brosse à pous-
sière, suceur plat, crevasse, suceur, etc..
REMARQUE:
Pour les modèles équipés avec poignée
ergonomique est possible de régler la force
d’aspiration agissante du sélecteur (23
Fig.11).
Par l’ouverture de la fenêtre (24 Fig.11) on
obtient moins de force d’aspiration.
Manuale POWER LINE_8050817_1ed_04-2017.indd 1 21/04/17 10:02

www.ghibliwirbel.com
Professional Cleaning Machines Since 1968
FRANÇAIS -
2
Connexion de la brosse électrique
Pour les appareils avec prise:
- Connectez le brosse électrique a la sortie
(25 Fig. 12) présente en haut de l’aspira-
teur (maximale 200 W)
Aspirateur pour liquides
Pour des appareils pourvus des accessoires
adéquats :
- Décrocher les clips (8 Fig.3) et retirer le
couvercle (9 Fig.4) avec le groupe mo-
teur.
- Vérifier qui est présent le filtre de Nylon
(46 Fig. 4).
- Retirer le filtre (10 Fig.5) en polyester, si
présent.
- Retirer le sac en papier (11 Fig.5) si pré-
sent.
- Remonter le couvercle et le bloquer avec
les clips (8 Fig.3).
-
Introduire, jusqu’en fin de course, le man-
chon
(14 Fig. 7)
du tuyau d’aspiration dans
la bouche
(15 Fig. 7)
présente sur la cuve
.
- Pour décrocher le manchon (14 Fig. 7)
déplacer le levier (16 Fig. 7) dans le sens
horaire puis tirer le manchon vers l’exté-
rieur (14 Fig. 7).
- Installer la poignée ergonomique (17 Fig.
8) ou le tube flexible (18 Fig 8) selon le
modèle, avec l’extension (19 Fig.8).
- Unir les deux extensions rigides (19-20
Fig. 9) par l’alignement des deux points
de référence (21-22 Fig. 9).
- Monté sur l’extension rigide (20 Fig.10)
l’accessoire désiré (buse, brosse à pous-
sière, suceur plat, crevasse, suceur, etc..
REMARQUE:
Pour les modèles équipés avec poignée
ergonomique est possible de régler la force
d’aspiration agissante du sélecteur (23
Fig.11).
Par l’ouverture de la fenêtre (24 Fig.11) on
obtient moins de force d’aspiration.
UTILISATION DE
L’APPAREIL
- Le dispositif est équipé de roues et ainsi
peut être déplacé avec des poignées ap-
propriées, ou être poussé au moyen de
manipuler (26 Fig. 13)
-
Pour le soulever, introduire les doigts de
la main dans la poignée
(27 Fig.14)
située
sur la partie supérieure du couvercle pour
la version avec moteur simple ou bien à
deux au moyen des poignées
(28 Fig. 13)
Démarrage de l’appareil
- Insérer la fiche (29 Fig.15) dans la prise
de courant.
Moteur simple
- Mettre l’interrupteur (30 Fig.16) sur “I”
pour démarrer le moteur d’aspiration,
l’interrupteur s’allume.
Moteur double
- Selon la puissance exigée, il est possible
de démarrer un seul moteur en position-
nant l’interrupteur (31 Fig.16) sur “I” ou
bien en appuyant sur les deux interrup-
teurs (31 e 32 Fig.16) si une force d’aspi-
ration majeure est nécessaire.
Avec l’interrupteur appuyé, le bouton re-
latif s’allume.
REMARQUE:
Lorsque le réservoir de récupération est
plein, l’intensité du bruit augmente et le dis-
positif n’aspire pas. Alors vous avez arrêté le
dispositif et vidé le réservoir, comme décrit
dans les paragraphes pertinents
Extinction de l’appareil
- Appuyez les interrupteurs (30, 31, 32
Fig.16) sur “0” pour désactiver le disposi-
tif; lumières, s’il est les interrupteurs sont
éteints.
-
Débrancher la fiche
(29 Fig.15)
de la
prise de courant
.
-
Enrouler le câble
(33 Fig.17)
et le fixer
dans son siège
(34 Fig.17).
Manuale POWER LINE_8050817_1ed_04-2017.indd 2 21/04/17 10:02

www.ghibliwirbel.com
Professional Cleaning Machines Since 1968
FRANÇAIS -
3
NETTOYAGE ET
ENTRETIEN
DANGER :
Avant d’effectuer toute opération d’entre-
tien, débrancher la fiche de la prise de
courant.
Retrait et remplacement du sac récolte-
poussières en papier (si présent
)
- Décrocher les leviers (8 Fig.3) et retirer
le couvercle (9 Fig.4) avec le groupe mo-
teur.
- Retirer le filtre (10 Fig.5) en polyester.
- Retirer le sac en papier pour recueillir
de la poussière (11 Fig.5), et remplacé
comme décrit ci-dessus.
- Remonter le tout en procédant dans le
sens contraire du démontage.
Vidage du réservoir de récupération
- Relâchez le levier (8 Fig.3) et enlever le
haut (9 Fig.4) avec le moteur
- Positionnez-vous sur une drains et drai-
ner le liquide du réservoir de récupération
(35 Fig.18).
- Nettoyer le réservoir avec l’eau courante
puis remplacer tous a faire le contraire de
démontage.
Pour les machines équipées avec un
tube d’évacuation
- Retirer le tube d’évacuation (36 fig.
19) de sa base.
- Dévissez le bouton (37 Fig.20), enle-
ver le bouchon (38 fig. 20) du tuyau
d’évacuation (36 fig. 21) et drainer le
liquide du réservoir de récupération
(35 Fig.21)
Pour les machines équipées avec réser-
voir bascule
- Relâchez le levier (8 Fig.3) et enlever
le haut (9 Fig.4) avec le moteur
- Desserrer le blocage de la cuve, à
action de levier (39 Fig. 22) s’il est
- Soulevez le réservoir (35 Fig.23)
avec le levier appropriée (40 Fig.23)
jusqu’à la vidange complète
- Remplacer tous a faire le contraire de
démontage
Nettoyage quotidien
Contrôle et nettoyage du filtre en
polyester (si présent)
-
Décrocher les leviers
(8 Fig.3)
et retirer le
couvercle
(9 Fig.4)
avec le groupe moteur
.
- Retirer le filtre (4 Fig. 5) en polyester.
- Nettoyer le filtre (Fig.24) de l’intérieur
vers l’extérieur avec un jet d’air ; il est
possible de laver le filtre (Fig. 24) avec de
l’eau tiède et de le remonter une fois qu’il
est complètement sec, s’il est trop sale, le
remplacer.
- Remonter le tout en procédant dans le
sens contraire du démontage.
Nettoyage de l’appareil
- Nettoyer le corps de l’appareil en utilisant
un chiffon humidifié avec de l’eau ou un
détergent neutre.
- Enlever la partie supérieure, comme
indiqué ci-dessus et nettoyer le réser-
voir avec de l’eau courante, puis vider,
comme indiqué ci-dessus.
Remplacer tous a faire le contraire de
démontage.
DANGER :
Ne pas laver l’appareil avec des jets d’eau
.
Contrôles périodiques
Contrôle du filtre sortie de l’air
- Dévisser les vis (41 Fig.25) et retirer le
couvercle (42 Fig.25).
- Retirer filtre d’éponge (43 Fig.26) et
éponges texture (44 Fig.27) s’il est.
- Nettoyer les éponges avec un jet d’air
(Fig.28).
Il est possible de laver les éponges dans
de l’eau tiède et de les replacer seule-
ment une fois qu’elles seront complè-
tement sèches ; si elles résultent trop
sales, il faut les remplacer.
- Remonter le tout en procédant dans le
sens contraire du démontage.
Manuale POWER LINE_8050817_1ed_04-2017.indd 3 21/04/17 10:02

www.ghibliwirbel.com
Professional Cleaning Machines Since 1968
FRANÇAIS -
4
Vérifiez et nettoyez le filtre de protec-
tion du moteur
- Déposer la culasse comme indiqué pré-
cédemment.
- Enleverleltre(46Fig.30).
- Nettoyerleltre(46Fig.30)avecdel’eau
tiède, en supprimant tout corps étrangers
et montons seulement après un séchage
complet.
- Insérerleltre(46Fig.30)surlaculasse
puis à travers la sangle (47 Fig. 30) rac-
corder l’élastique sur le dessus de la ron-
delledeltrage(48Fig.30).
- Remonter le tout en procédant dans le
sens inverse.
PROBLÈME CAUSE REMÈDE
L’aspirateur ne fonctionne
pas.
Interrupteur non enclenché.
Fiche non insérée.
Panne de courant.
Appuyer sur l’interrupteur.
Insérerlachedanslaprise
de courant.
Vérifier la ligne d' alimenta-
tion.
L'aspiration n'est pas satis-
faisante.
Sac en papier plein.
Éléments filtrants encrassés.
Accessoires ou tuyaux bou-
chés.
Raclette buse d'aspiration
usée ou abîmée.
Remplacer le sac récolte
poussières.
Nettoyer les éléments fil-
trants.
Contrôler et nettoyer le tuyau
flexible et la bouche d'aspi-
ration.
Contrôler et remplacer la
raclette.
Vérification du fonctionnement du
flotteur
- Enlever la partie supérieure, comme indi-
qué ci-dessus.
- Retirer le filtre (46 Fig. 30).
- Verifier si le flotteur (45) est en bon état et
se déplacer librement dans l’espace.
- Remplacez le filtre (46 Fig. 30) comme
décrit dans la section correspondante.
Manuale POWER LINE_8050817_1ed_04-2017.indd 4 21/04/17 10:02

www.ghibliwirbel.com
Professional Cleaning Machines Since 1968
DEUTSCH -
1
ART DER ANWENDUNG
Diese Geräte wurden für das Absaugen von
flüssigen oder festen Stoffen, oder beides
entworfen, gemäß der Tabelle mit den tech-
nischen Daten in dem Einführungsteil des
Handbuches. Es wurden nur für diese Ver-
wendung entworfen.
GEFAHR:
Der Hersteller haftet nicht für eventuelle
Schäden, die auf einen unangemessenen
oder unsachgemäßen Gebrauch zurück-
zuführen sind.
Jede andere Art der Anwendung enthebt
den Hersteller von seiner Verantwortung
für Personen- oder Sachschäden und führt
zum Verfall sämtlicher Garantieansprüche.
UNSACHGEMÄSSE
ANWENDUNG
Benutzen Sie das Gerät nicht zum:
- Saugen von brennbaren, explosiven, ät-
zenden und giftigen Stoffen.
- Saugen von heißen Stoffen.
- Benutzen Sie das Gerät in der Version
als Nasssauger nicht, um Staub zu sau-
gen und umgekehrt.
Benutzen Sie das Gerät nicht in explosions-
gefährdeten Umgebungen.
VORBEREITUNG
DES GERÄTS
Montage der Wagen
(für die Modelle ausgerüstet mit
abnehmbaren Wagen)
- Sen Wagen auf den Fußboden stellen (1
Abb. 1)
- Den Griff ( 2 Abb. 1) in den Wagen ste-
cken.
-
Es ist möglich, den Handgriff auf die Höhe
einzustellen, indem Sie ihn einstecken, und
den Knopf ( 3 Abb. 1) in einer der zwei Stel-
lungen festdrehen ( 4 Abb. 1).
- Das Gehäuse ( 5 Abb. 2) auf den Wagen
stellen, und den Halter in die Plastik ( 6
Abb. 2) auf dem Wagenstab ( 7 Abb. 2)
befestgen.
Staubsauger
Für Geräte mit entsprechendem Zubehör.
- Die Hebel (8 Abb.3) lösen und den De-
ckel (9 Abb.4) mitsamt dem Motorblock
entfernen.
- Überprüfen Sie, dass es einen Filter in
Nylon (46 Abb. 4) gibt.
- Den Polyesterfilter (10 Abb.5) entfernen.
- Kontrollieren, wenn nötig, dass der Pa-
pierbeutel (11 Abb. 5) in dem Gerät mon-
tiert ist
- Wenn der Papierbeutel (11 Abb. 5) nicht
anwesend ist, montieren Sie ihn, wenn
nötig, wie folgt:
Den Papoerbeutel (11 Abb. 6) in die
Duse montieren (12 Abb. 6) bis es an den
Binder (13 Abb. 6) vorbeigeht.
- Den Polyesterfilter (10 Abb.5) wieder
montieren.
- Den Deckel wieder aufsetzen und mittels
der Hebel (8 Abb.3) befestigen.
- Die Saugrohrmuffe (14 Abb. 7) bis zum
Endanschlag in den Stutzen (15 Abb. 7)
am Behälter einfügen.
- Zum Lösen der Muffe (14 Abb. 7) den
Hebel (16 Abb. 7) im Uhrzeigersinn ver-
schieben, dann die Muffe nach außen ab-
ziehen (14 Abb. 7).
- Den ergonomischen Griff (17 Abb. 8)
oder den flexiblen Schlauch (18 Abb. 8)
je nach dem Modell, mit der Verlänge-
rung (19 Abb. 8) verbinden.
- Die zwei starren Verlängerungen (19-20
Abb. 9) durch die Ausrichtung der beiden
Bezugspunkte (21-22 Abb. 9) verbinden.
- Auf der starren Verlängerung (20 Abb.
10) den gewünschten Zubehör (Saugdü-
se, Staubbürstel, Fugendüse, Bodendü-
se, etc) montieren..
BEMERKUNG:
Für die mit dem ergonomischen Handgriff
ausgerüsteten Modellen ist die Einstellung
der Saugkraft mit dem Wähler (23 Abb. 11)
möglich.
Durch das Öffnen des Fensters (24 Abb. 11)
wird eine niedrigere Saugkraft erzeugt.
Manuale POWER LINE_8050817_1ed_04-2017.indd 1 21/04/17 10:03

www.ghibliwirbel.com
Professional Cleaning Machines Since 1968
DEUTSCH -
2
Anschließen der elektrischen Bürste
Für die Geräte ausgerüstet mit Steckdose:
- Den Stecker der elektrischen Bürste in
die Steckdose (25 Abb. 12) an der obere
Seite des Saubsaugers einstecken (ma-
ximal zugelassene Kraft 200 W).
Flüssigkeitssauger
Für Geräte mit entsprechendem Zubehör.
- Die Hebel (8 Abb.3) lösen und den De-
ckel (9 Abb.4) mitsamt dem Motorblock
entfernen.
- Überprüfen Sie, dass es einen Filter in
Nylon (46 Abb. 4) gibt.
- Den Polyesterfilter, (10 Abb.5) falls vor-
handen, entfernen.
- Den Papierbeutel (11 Abb.5), falls vor-
handen, entfernen.
- Den Deckel wieder aufsetzen und mit
den Hebeln (8 Abb.3) blockieren.
- Die Saugrohrmuffe (14 Abb. 7) bis zum
Endanschlag in den Stutzen (15 Abb. 7)
am Behälter einfügen.
- Zum Lösen der Muffe (14 Abb. 7) den
Hebel (16 Abb. 7) im Uhrzeigersinn ver-
schieben, dann die Muffe nach außen ab-
ziehen (14 Abb. 7).
- Den ergonomischen Griff (17 Abb. 8)
oder den flexiblen Schlauch (18 Abb. 8)
je nach dem Modell, mit der Verlänge-
rung (19 Abb. 8) verbnden.
- Die zwei starren Verlängerungen (19-20
Abb. 9) duch die Ausrichtung der beiden
Bezugspunkte (21-22 Abb. 9) verbinden.
- Auf der starren Verlängerung (20 Abb.
10) den gewünschten Zubehör (Saugdü-
se, Staubbürstel, Fugendüse, Bodendü-
se, etc) montieren..
BEMERKUNG:
Für die mit dem ergonomischen Handgriff
ausgerüsteten Modellen ist die Einstellung
der Saugkraft mit der Mutter (23 Abb. 11)
möglich.
Durch das Öffnen des Fensters (24 Abb. 11)
wird eine niedrigere Saugkraft erzeugt.
ANWENDUNG DES GERÄTS
- Das Gerät ist mit Rädern ausgerüstet und
somit kann es mit Hilfe der entsprechen-
den Handgriffe bewegt oder mit Hilfe des
Handgriffs (26 Abb. 13) weggeschoben
werden)
- Um das Gerät zu heben, in der Version
mit Einzel-Motor, die Finger in den ent-
sprechenden Griff (27 Abb.14) am obe-
ren Teil des Deckels einfügen, oder das
Gerät mit zwei Personen an den Griffen
(28 Abb. 13) anfassen und heben.
Inbetriebnahme des Geräts
- Den Stecker (29 Abb.15) in die Steckdo-
se stecken.
Einzel-Motor
- Den Schalter (30 Abb.16) auf “I” setzen,
um den Saugmotor einzuschalten, der
Schalter leuchtet auf.
Doppel-Motor
- In Abhängigkeit der erforderlichen Leis-
tung kann durch Drücken des Schalters
(31 Abb.16) auf „I“ ein einzelner Motor
eingeschaltet werden, oder es können
beide Schalter (31 und 32 Abb.16) ge-
drückt werden, wenn eine stärkere Saug-
leistung benötigt wird.
Mit gedrücktem Schalter leuchtet die ent-
sprechende Taste auf.
BEMERKUNG:
Wenn der Wiedergewinnungsbehälter voll
ist, steigt der Lärm und das Gerät saugt nicht
mehr, Dann soll das Gerät ausgeschaltet
und der Behälter wie ober beschrieben ent-
leert werden
Ausschalten des Geräts
- Die Schalter (30, 31, 32 Abb. 16) in die
Stellung “0” drücken um das Gerät aus-
zuschalten; das Licht, wenn es welche
auf die Schalter gibt, geht aus.
- Den Stecker (29 Abb.15) aus der Steck-
dose ziehen.
- Das Kabel (33 Abb.17) aufwickeln und im
entsprechenden Sitz (34 Abb.17) befesti-
gen.
Manuale POWER LINE_8050817_1ed_04-2017.indd 2 21/04/17 10:03

www.ghibliwirbel.com
Professional Cleaning Machines Since 1968
DEUTSCH -
3
REINIGUNG UND WARTUNG
GEFAHR:
Bevor irgendein Wartungseingriff vorge-
nommen wird, den Stecker aus der Steck-
dose ziehen.
Entfernung und Austausch des
Papierstaubbeutels (falls vorhanden)
-
Den Hebel (8 Abb.3) lösen und den Deckel
(9 Abb.4) mitsamt dem Motor entfernen.
- Den Polyesterfilter (10 Abb.5) entfernen.
- Den Papierbeutel für den Staub (11 Abb.
5) entfernen und ihn wie oben beschrie-
ben ersetzen.
- Alles in umgekehrter Reihenfolge wieder
montieren.
Entleerung des
Schmutzwasserbehälters
-
Den Hebel (8 Abb.3) lösen und den Deckel
(9 Abb.4) mitsamt dem Motor entfernen.
- Sich über einen Ausguß stellen und die
Flüßigkeit aus dem Behälter (35 Abb. 18)
entleeren
- Das Innere des Behälteres mit flussigem
Wasser reinigen, und alles in umgekehr-
ter Reihenfolge wieder montieren.
Für die Geräte ausgerüstet mit einem
Entleerungsschlauch
- Den Entleerungsschlauch (36 Abb.
19) aus seinem Halter rausnehmen
- Den Knopf (37 Abb. 20) abschrauben,
den Verschluß (38 Abb. 20) des Ent-
leerungsschlauches (36 Abb. 21) ent-
fernen und den Behälter (35 Abb. 21)
entleeren
Für die Geräte ausgerüstet mit Kipp-
behälter
- Den Hebel (8 Abb.3) lösen und den
Deckel (9 Abb.4) mitsamt dem Motor
entfernen.
- Die Behältersperre anhand des He-
bels (39 Abb. 22) lösen, wenn es gibt
- Den Behälter (35 Abb. 23) mit Hilfe
des entsprechenden Griffes (40 Abb.
23) bis zur vollständigen Entleerung
anheben
- Alles in umgekehrter Reihenfolge
wieder montieren.
Tägliche Reinigung
Prüfung und Reinigung des Polyes-
terfilters (falls vorhanden)
- Den Hebel (8 Abb.3) lösen und den De-
ckel (9 Abb.4) mitsamt dem Motor entfer-
nen.
- Den Polyesterfilter (4 Abb. 5) entfernen.
- Den Filter (Abb.24) von Innen nach Au-
ßen mit einem Luftstrahl reinigen. Der
Filter kann auch (Abb. 24) in lauwarmem
Wasser gewaschen und wenn er kom-
plett getrocknet ist, wieder montiert wer-
den. Sollte der Filter zu sehr verschmutzt
sein, tauschen Sie ihn aus
- Alles in umgekehrter Reihenfolge wieder
montieren.
Reinigung des Gerätes
- Den Gerätekörper mit einem Tuch, das
mit Wasser oder neutralem Reinigungs-
mittel angefeuchtet wurde, reinigen.
- Den Deckel gemäß den Anweisungen
oben entfernen und das Innere des Be-
hälteres mit flussigem Wasser reinigen,
dann alles entleeren, wie oben gezeigt
Alles in umgekehrter Reihenfolge wieder
montieren.
GEFAHR: Das Gerät nicht mit Was-
serstrahlen reinigen.
Regelmäßige Kontrollen
Kontrolle des Luftaustrittsfilters
- Die Schrauben (41 Fig.25) lösen und den
Deckel (42 Fig.25) entfernen.
- Den Schwammfilter (43 Abb. 26) und die
Texturschwämme (44 Abb. 27)beseiti-
gen, wenn es gibt.
- Den Schwamm mit einem Luftstrahl
(Fig.28) reinigen.
Die Filterschwämme können in lauwar-
mem Wasser gewaschen und wenn sie
komplett getrocknet sind, wieder montiert
werden. Sollten sie zu sehr verschmutzt
sein, diese austauschen.
- Alles in umgekehrter Reihenfolge wieder
montieren.
Manuale POWER LINE_8050817_1ed_04-2017.indd 3 21/04/17 10:03

www.ghibliwirbel.com
Professional Cleaning Machines Since 1968
DEUTSCH -
4
Kontrolle und Reinigung des Motor-
schutzfilters
- Entfernen Sie den Zylinderkopf, wie zu-
vor angegeben.
- Entfernen Sie den Filter (46 Abb. 30).
- Waschen Sie den Filter (46 Abb. 30) mit
ießendem warmen Wasser und entfer-
nen Sie alle Fremdkörper, dan montieren
Sie ihn wieder nach der kmpletten Trock-
nung erst nach.
- Setzen Sie den Filter (46 Abb. 30) an
den Zylinderkopf durch den Gurtband (47
Abb. 30) indem Sie die elastische Ha-
ken auf der Oberseite des Filters an die
Scheiben (48 Abb. 30) hängen.
- Montieren Sie alles in umgekehrten Rei-
ehnfolge wieder.
PROBLEM URSACHE BEHEBUNG
Sauger funktioniert nicht. Der Schalter ist nicht
gedrückt.
Stecker nicht angeschlossen.
Kein Strom vorhanden.
Schalter drücken.
Den Stecker in die Steckdose
stecken.
Die Versorgungsleitung prü-
fen.
Die Saugleistung ist ungenü-
gend.
Papierbeutel voll.
Filterelemente verstopft.
Zubehör oder Rohre verstopft.
Abstreifer Saugdüse abge-
nutzt oder beschädigt.
Den Staubbeutel
austauschen.
Die Filterelemente reinigen.
Den Schlauch und die Saug-
düse überprüfen und reinigen.
Den Abstreifer überprüfen und
austauschen.
Funktion des Schwimmers überprü-
fen
- Den Deckel gemäß den Anweisungen
oben entfernen.
- Entfernen Sie den Filter (46 Abb. 30).
- Überprüfen ob der Schwimmer (45) im
guten Zustand ist und sich frei in seinem
Raum bewegt.
- Ersetzen Sie den Filter (46 Abb. 30) wie
im entsprechenden Abschnitt beschrie-
ben.
Manuale POWER LINE_8050817_1ed_04-2017.indd 4 21/04/17 10:03

www.ghibliwirbel.com
Professional Cleaning Machines Since 1968
ESPAÑOL -
1
TIPO DE USO
Estos dispositivos fueron diseñados para as-
pirar líquidos o sólidos, o ambos, según el
cuadro con datos técnicos de la introducción
al manual. Sólo para este uso han sido di-
señadon.
PELIGRO:
El fabricante no asume ninguna responsabili-
dad por los daños que puedan generarse por
el uso inadecuado o incorrecto del aparato.
Cualquier otro uso releva de responsabi-
lidad al fabricante por los daños que se
le ocasionen a las personas o las cosas y
deja sin efectos la garantía.
USO INCORRECTO
No utilizar el aparato para:
- Aspirar sustancias inflamables, explosi-
vas, corrosivas o tóxicas.
- Aspirar sustancias calientes.
- No utilizar el aparato en versión aspira-
dor de líquidos para aspirar polvo y vice-
versa.
Tampoco utilice el aparato en lugares con
riesgo de explosión.
PREPARACIÓN DEL
APARATO
Montaje de carrito
(por los modelos equipados con ca-
rrito extraíble)
- Coloque el carrito en el suelo (1 Fig. 1)
- Inserte la manija (2 Fig. 1) en el carrito
- Es posible ajustar la altura del mango,
posicionándola y apretando el botón de
fijación (3 Fig. 1) al derecho de cualquie-
ra de dos posiciones ( 4 Fig. 1).
- Coloque la carcasa (5 Fig. 2) en el carri-
to, fijando el soporte en el plástico (6 Fig.
2) de la varilla (7 Fig. 2) del carrito.
Aspirador de polvo
Para aparatos que están dotados de acceso-
rios adecuados.
- Desconectar las palancas (8 Fig.3) y qui-
tar la tapa (9 Fig.4) con la unidad motor.
- Compruebe si hay un filtro de nylon (46
Fig. 4).
- Quitar el filtro (10 Fig.5) de poliéster.
- Revisar, en su caso, de que la bolsa de
papel se coloca dentro de la máquina (11
Fig.5).
- Si la bolsa de papel (11 Fig.5) no está
presente, se debe instalar, en caso nece-
sario, actuando como sigue:
Colocar la bolsa de papel (11 Fig. 6) en la
boquilla (12 Fig. 6) al pasar el collar (13
Fig. 6)
- Poner el filtro (10 Fig.5) de poliéster.
- Volver a colocar la tapa y bloquearla con
las palancas (8 Fig.3).
- Introducir el manguito hasta el final (14
Fig. 7) del tubo de aspiración de la boca
(15 Fig. 7) del bidón.
- Para desconectar el manguito (14 Fig. 7)
mover la palanca (16 Fig. 7) en sentido
horario tirando hacia el exterior el man-
guito (14 Fig. 7).
- Combinar la empuñadura ergonómica
(17 Fig. 8) o la manguera (18 Fig. 8), de-
pendiendo del modelo, con la exstension
(19 Fig. 8).
- Unir a las dos extensiones rígidas (19-20
Fig. 9) mediante la alineación de los dos
puntos de referencia (21-22 Fig. 9).
- Montar sobre la extensión rígida (20 Fig.
10) el accesorio deseado (boquilla, cepi-
llo para el polvo, boquilla para rincones,
boquilla para suelos, etc..)
NOTA:
Para los modelos equipados con el empuña-
dura ergonómica es posible ajustar la fuerza
de succión, actuando sobre el selector (23
Fig.11).
Al abrir la ventana (24 Fig.11) obtener una
fuerza inferior de succión.
Manuale POWER LINE_8050817_1ed_04-2017.indd 1 21/04/17 10:03

www.ghibliwirbel.com
Professional Cleaning Machines Since 1968
ESPAÑOL -
2
Conectar el cepillo eléctrico
Para los aparatos con enchufe:
- Conectar el enchufe del cepillo eléctrico
(25 Fig. 12) presente en la parte superior
de la aspiradora (200 W potencia máxi-
ma).
Aspirador de líquidos
Para aparatos que están dotados de acceso-
rios adecuados.
- Desconectar las palancas (8 Fig.3) y qui-
tar la tapa (9 Fig.4) con la unidad motor.
- Compruebe si hay un filtro de nylon (46
Fig. 4).
- Quitar el filtro (10 Fig.5) de poliéster si se
encuentra presente.
- Retirar la bolsa de papel (11 Fig.5) si se
encuentra presente.
- Volver a poner la tapa y bloquearla con
las palancas (8 Fig.3).
- Introducir el manguito hasta el final (14
Fig. 7) del tubo de aspiración de la boca
(15 Fig. 7) del bidón.
- Para desconectar el manguito (14 Fig. 7)
mover la palanca (16 Fig. 7) en sentido
horario tirando hacia el exterior el man-
guito (14 Fig. 7).
- Combinar la empuñadura ergonómica
(17 fig. 8) o la manguera (18 Fig. 8), de-
pendiendo del modelo, con la exstension
(19 Fig. 8).
-
Unir a las dos extensiones rígidas (19-20
Fig
.
9) mediante la alineación de los dos puntos
de referencia (21-22
Fig
. 9).
- Montar sobre la extensión rígida (20 Fig.
10) el accesorio deseado (boquilla, cepi-
llo para el polvo, boquilla para rincones,
boquilla para suelos, etc..
NOTA:
Para los modelos equipados con el empuña-
dura ergonómica es posible ajustar la fuer-
za de succión, actuando sobre la tuerca (23
Fig.11).
Al abrir la ventana (24 Fig.11) obtener una
fuerza inferior.de succión.
USO DEL APARATO
- El dispositivo está equipado con ruedas y
por lo tanto se puede mover con las ma-
nijas apropiadas o puede ser empujado a
través de las manijas (26 Fig. 13)
- Para levantarlo introducir los dedos de la
mano en la correspondiente manilla (27
Fig.14) situada en la parte superior de la
tapa en la versión con un solo motor o
bien entre dos personas a través de las
manillas (28 Fig. 13).
Encendido del aparato
- Introducir el enchufe (29 Fig.15) en la
toma de corriente.
Un solo motor
- Presionar el interruptor (30 Fig.16) en “I”
para activar el motor de aspiración y el
interruptor se ilumina.
Doble motor
-
Dependiendo de la potencia disponible es
posible activar un solo motor pulsando el
interruptor (31 Fig.16) en “I” o bien ambos
interruptores (31 y 32 Fig.16) si se requie-
re una mayor fuerza de aspiración.
Con el interruptor pulsado el correspon-
diente botón se ilumina.
NOTA:
Cuando el tanque de recuperación es com-
pleto, aumenta la intensidad del ruido y el
dispositivo no aspira, a continuación, apagar
y desocupe el tanque, tal como se describe
en los párrafos pertinentes
Apagado del aparato
-
Pulse los conmutadores (30, 31, 32 Fig.16)
a “0” para apagar el dispositivo; las luces, si
hay sobre los interruptores, se apagan.
- Desconectar el enchufe (29 Fig.15) de la
toma de corriente.
- Enrrollar el cable (33 Fig.17) y engan-
charlo en su correspondiente lugar (34
Fig.17).
Manuale POWER LINE_8050817_1ed_04-2017.indd 2 21/04/17 10:03

www.ghibliwirbel.com
Professional Cleaning Machines Since 1968
ESPAÑOL -
3
LIMPIEZA Y
MANTENIMIENTO
PELIGRO:
Antes de realizar cualquier operación de
mantenimiento desconecte el enchufe de
la toma de corriente.
Retiro y reemplazo de la bolsa de pa-
pel recolectora de polvos
(si se encuentra presente)
- Desconectar las palancas (8 Fig.3) y qui-
tar la tapa (9 Fig.4) con el motor.
- Quitar el filtro (10 Fig.5) de poliéster.
- Retire la bolsa de papel para el polvo (11
Fig. 5), y reemplazarlo como se describió
anteriormente.
- Volver a instalar todo procediendo en
sentido contrario.
Vaciado del depósito de recupera-
ción
- Desconectar las palancas (8 Fig.3) y qui-
tar la tapa (9 Fig.4) con la unidad motor.
- Colóquese en la parte superior de des-
agües y drenar el líquido del tanque de
recuperación (35 Fig. 18).
- Limpiar el tanque con agua corriente y
luego vuelva a colocar todo haciendo lo
contrario al desmontaje.
Para máquinas equipadas con man-
guera de descarga
- Soltar el tubo de escape (36 fig. 19)
desde su base.
- Desenrosquer el botón (37 Fig. 20),
retirar la tapa (38 fig. 20) de la man-
guera de descarga (36 fig. 21) y dre-
nar el líquido del tanque de recupera-
ción (35 Fig. 21).
Para las máquinas equipadas con tan-
que basculante
- Desconectar las palancas (8 Fig.3) y
quitar la tapa (9 Fig.4) con la unidad
motor.
- Soltar el bloqueo del tanque, actuan-
do la palanca (39 fig. 22) si hay.
- Levantar el tanque(35 Fig.23) con la
palanca adecuada (40 Fig.23) hasta
el vaciado completo.
- Vuelva a colocar todo haciendo lo
contrario al desmontaje.
Limpieza diaria
Control y limpieza del filtro de
poliéster (si está presente)
- Desconectar las palancas (8 Fig.3) y qui-
tar la tapa (9 Fig.4) con el motor.
- Quitar el filtro (4 Fig. 5) de poliéster.
- Limpiar el filtro (Fig.24) del interior hacia
el exterior con un chorro de agua; el filtro
se puede lavar (Fig. 24) con agua tibia,
luego secarlo bien para volverlo a instalar
o cambiarlo si está muy sucio.
- Volver a instalar todo procediendo en
sentido contrario.
Limpieza del aparato
- Limpiar el cuerpo del aparato con trapo
humedecido con agua o detergente neu-
tro.
- Retirar la parte superior, como se ha des-
crito anteriormente, limpiar el tanque con
agua corriente y luego vacíarlo, como se
ha indicado anteriormente
Vuelva a colocar todo haciendo lo contra-
rio al desmontaje.
PELIGRO:
No lavar el aparato con chorro de agua.
Controles periódicos
Control del filtro salida del aire
- Desatornillar los tornillos (41 Fig.25) y re-
tirar la tapa (42 Fig.25).
- Retire el filtro de esponja (43 Fig. 26) y
las esponjas de textura (44 Fig. 27), si
hay.
- Limpiarlas con un chorro de agua
(Fig.28).
Es posible lavarlas con agua tibia, en este
caso se deben secar bien para volverlas a
instalar o cambiarlas si están muy sucias
.
- Volver a instalar todo procediendo en
sentido contrario.
Manuale POWER LINE_8050817_1ed_04-2017.indd 3 21/04/17 10:03

www.ghibliwirbel.com
Professional Cleaning Machines Since 1968
ESPAÑOL -
4
Comprobación y limpieza del filtro de
protección del motor
- Retire la culata, como se indica anterior-
mente.
- Quiteelltro(46Fig.30).
- Laveelltro(46Fig.30)conaguatibia,
eliminando cualquier cuerpos extraños y
vuelva a montar sólo después de un se-
cado completo.
- Inserteelltro(46Fig.30)enlacubierta
del motor, entonces a través de la cinta
(47 Fig. 30) enganchar el elástico en la
partesuperiorde lasarandelasde ltro
(48 Fig. 30).
- Volve a montar todo, procediendo en el
reverso.
PROBLEMA CAUSA SOLUCIÓN
El aspirador no funciona. Interruptor del aspirador no
presionado.
Enchufe no conectado.
No hay corriente
Presionar el interruptor.
Introducir el enchufe en la
toma de corriente.
Controlar la línea de
alimentación.
La aspiración no es satisfac-
toria
Bolsa de papel llena.
Elementos filtrantes obstruí-
dos.
Accesorios o tubería obstrui-
da.
Extensión de la boca de as-
piración desgastada o arrui-
nada.
Cambiar la bolsa
recogedora de polvos.
Limpiar los elementos filtran-
tes.
Controlar y limpiar el tubo
flexible y la boca de aspira-
ción.
Controlar y sustituir la exten-
sión.
Comprobación del funcionamiento
del flotador
- Quitar la parte superior, como se indicó
anteriormente.
- Retire el filtro (46 Fig. 30).
- Comprobar si el flotador (45) está en
buenas condiciones y se mueva libre-
mente en su espacio.
- Reemplace el filtro (46 Fig. 30), como se
describe en la sección pertinente.
Manuale POWER LINE_8050817_1ed_04-2017.indd 4 21/04/17 10:03

www.ghibliwirbel.com
Professional Cleaning Machines Since 1968
PORTUGUÊS -
1
TIPO DE USO
Estes dispositivos foram concebidos para
aspirar a líquidos ou sólidos, ou ambos, de
acordo com a tabela com os dados técnicos
da introdução do manual. Somente para este
uso foram concebidos.
PERIGO:
O fabricante não pode ser responsabili-
zado por eventuais danos decorrentes de
uso impróprio ou incorreto.
Quaisquer outros usos isentam o fabri-
cante de eventuais responsabilidades
por danos a pessoas e/ou bens e provo-
ca a anulação das condições de garantia.
USO INCORRETO
Não utilizar o aparelho para:
- Aspirar substâncias inflamáveis, explosi-
vas, corrosivas, tóxicas.
- Aspirar substâncias aquecidas.
- Não utilizar o aparelho para aspirar poei-
ras quando o mesmo estiver preparado
para aspirar líquidos e vice-versa.
Não utilizar o aparelho em ambientes poten-
cialmente explosivos.
PREPARAÇÃO
APARELHO
Instalação de carrinho
(modelos equipados com carrinho
destacável)
- Coloque o carrinho no chão (1 Fig. 1)
- Insira o cabo (2 fig. 1) no carrinho
- É possível ajustar a alça em altura, po-
sicionando-o e apertando o botão de fi-
xação (3 fig. 1) o direito de uma de duas
posições (4 Fig. 1).
- Coloque carcaça (5 fig. 2) sobre o car-
rinho, definindo o suporte de plástico (6
Fig. 2) da haste (7 Fig. 2) de carrinho.
Aspirador de pó
Para aparelhos dotados de acessórios apro-
priados.
- Desenganchar as alavancas (8, Fig.3)
e remover o elemento de cobertura (9,
Fig.4) juntamente com o conjunto motor.
- Verifique se há um filtro em nylon (46 Fig.
4).
- Remover o filtro (10, Fig.5) em poliéster.
- Verificar, se aplicável, que no interior do
dispositivo está montado o saco de papel
(11 Fig.5).
- Se saco de papel (11 Fig.5) não estiver
presente, instalar-lo, se necessário, agin-
do como se segue:
Substitua o saco de papel (11 Fig.6) no
bocal (12 Fig. 6), passando o colar (13
Fig.6)
- Remontar o filtro (10, Fig.5) em poliéster.
- Remontar o elemento de cobertura e
bloqueá-lo por meio das alavancas (8,
Fig.3).
- Introduzir, até alcançar o final do curso,
a junta (14, Fig. 7) do tubo de sucção no
bocal (15, Fig. 7) presente no tambor.
-
Para desengatar deslocar a alavanca
(14,
Fig. 7)
para o lado direito
(16, Fig. 7)
(sen-
tido horário) e puxar, a seguir, a junta
(14,
Fig. 7).
- Combine alça ergonômica (17 fig. 8) ou
a mangueira (18 Fig.8) dependendo do
modelo, com prolongada (19 Fig.8).
- Unir as duas extensões rígidas (19-20
fig. 9), alinhando os dois pontos de refe-
rência (21-22 fig. 9).
- Montado em extensão rígida (20 Fig.10)
acessório desejado (bico, escova de
poeira, bocal para piso, etc).
OBSERVAÇÕES:
Para os modelos equipados com alça ergo-
nômica é possível ajustar a força de sucção
atuando seletor (23 Fig.11).
Ao abrir a janela (24 Fig.11) se obter uma
menor força de sucção.
Manuale POWER LINE_8050817_1ed_04-2017.indd 1 21/04/17 10:03

www.ghibliwirbel.com
Professional Cleaning Machines Since 1968
PORTUGUÊS -
2
Conectando escova elétrica
Para dispositivos com plug:
- Conectar tomada de corrente da escova
a saída (25 Fig. 12) presente na parte su-
perior do vácuo ( potência máxima 200
W).
Aspirador de líquidos
Para aparelhos dotados de acessórios apro-
priados.
- Desenganchar as alavancas (8, Fig.3)
e remover o elemento de cobertura (9,
Fig.4) juntamente com o conjunto motor.
- Verifique se há um filtro em nylon (46 Fig.
4).
- Remover o filtro (10, Fig.5) em poliéster,
se presente.
- Remover o saco de papel (11, Fig.5), se
presente.
- Remontar o elemento de cobertura e
bloqueá-lo por meio das alavancas (8,
Fig.3).
- Introduzir, até alcançar o final do curso,
a junta (14, Fig. 7) do tubo de sucção no
bocal (15, Fig. 7) presente no tambor.
-
Para desengatar deslocar a alavanca
(14,
Fig. 7)
para o lado direito (sentido horário)
e puxar, a seguir, a junta
(14, Fig. 7).
- Combine alça ergonômica (17 fig. 8) ou
a mangueira (18 Fig.8) dependendo do
modelo, com prolongada (19 Fig.8).
- Unir as duas extensões rígidas (19-20
fig. 9), alinhando os dois pontos de refe-
rência (21-22 fig. 9).
- Montado em extensão rígida (20 Fig.10)
acessório desejado (bico, escova de
poeira, bocal para piso, etc..
OBSERVAÇÕES:
Pentru modelele dotate cu mâner ergono-
mic este posibilă reglarea forţei de aspirare,
acţionând a noz (23 Fig.11).
Ao abrir a janela (24 Fig.11) se obter uma
menor força de sucção.
USO DO APARELHO
- O dispositivo está equipado com rodas
e, portanto, pode ser movido com alças
apropriada, ou pode ser empurrado com
o punho (26 Fig. 13.)
- Para as operações de elevação inse-
rir os dedos da mão na específica alça
(27, Fig.14) formada na parte superior
do elemento de cobertura, relativamente
às versões com motor simples, ou com o
auxílio de outra pessoa utilizando as pre-
silhas laterais (28, Fig. 13)
Colocação em funcionamento do
aparelho
- Inserir a ficha (29, Fig.15) na tomada de
corrente.
Motor simples
-
Premir o interruptor (30, Fig.16) até que o
mesmo alcance a posição “I”, para acionar o
motor de sucção: o interruptor iluminar-se-á.
Motor duplo
- É possível acionar somente um motor
premindo o interruptor (31, Fig.16), até
que o mesmo alcance a posição “I”, ou
ambos os motores premindo os interrup-
tores (31 e 32 Fig.16), de acordo com a
potência de sucção necessária.
Após a pressão do interruptor o respecti-
vo botão iluminar-se-á.
OBSERVAÇÕES:
Quando o tanque de recuperação é cheio,
aumentar o ruído de intensidade e o apa-
relho não aspirar, em seguida, desliga-se e
esvaziar o tanque. tal como descrito nos pa-
rágrafos relevantes
Desligamento do aparelho
-
Pressione os comutadores (30, 31, 32
Fig.16) para “0” para parar o dispositivo;
as luzes, se os interruptores, for deixado.
- Retirar a ficha (29, Fig.15) da tomada de
corrente.
- Enrolar o cabo (33, Fig.17) e enganchá-
-lo corretamente na peça (34, Fig.17).
Manuale POWER LINE_8050817_1ed_04-2017.indd 2 21/04/17 10:03

www.ghibliwirbel.com
Professional Cleaning Machines Since 1968
PORTUGUÊS -
3
LIMPEZA E MANUTENÇÃO
PERIGO:
Remover a ficha da tomada de corrente
antes de efetuar quaisquer operações de
limpeza e/ou manutenção.
Remoção e substituição do saco de
papel para a recolha de pós e sujida-
des (se presente)
- Desenganchar as alavancas (8, Fig.3) e
remover o elemento de cobertura (9, Fig.
4) juntamente com o conjunto motor.
- Remover o filtro (10, Fig.5) em poliéster.
- Retire o saco de papel para coletar a
poeira (11 Fig.5), e substituí-lo como
descrito acima.
- Remontar o conjunto seguindo uma or-
dem inversa.
Esvaziamento do reservatório de
recuperação
- Desenganchar as alavancas (8, Fig.3)
e remover o elemento de cobertura (9,
Fig.4) juntamente com o conjunto motor..
- Posicione-se em cima de esgotos e dre-
nar o líquido do tanque de recuperação
(35 Fig.18).
- Limpe o tanque com água corrente e de-
pois substituir todos fazendo o oposto de
desmontagem.
Para dispositivos equipadas com tubo
de descarga
- Remover o tubo de descarga (36 Fig.
19) a partir da sua base.
- Desaperte o botão (37 Fig.20), retire
a tampa (38 Fig. 20) de tubo de des-
carga (36 Fig. 21) e drenar o líquido
do tanque de recuperação (35 Fig.21)
Para dispositivos equipadas com tan-
que basculante
-
Desenganchar as alavancas (8, Fig.3)
e remover o elemento de cobertura (9,
Fig.4) juntamente com o conjunto motor.
- Solte o bloqueio do tanque, atuando
de alavanca (39 Fig 22) se presente.
- Levante o tanque (35 Fig.23) com a
alavanca adequada (40 Fig.23) até o
esvaziamento completo.
- Substituir todos fazendo o oposto de
desmontagem.
Limpeza diária
Controlo e limpeza do filtro em
poliéster (se presente)
- Desenganchar as alavancas (8, Fig.3)
e remover o elemento de cobertura (9 ,
Fig.4) juntamente com o conjunto motor.
- Remover o filtro (4, Fig. 5) em poliéster.
- Limpar o filtro (Fig.24), a partir do interior
para o exterior, com um jato de ar com-
primido; é possível lavar o filtro (Fig. 24)
com água morna e remontá-lo após uma
completa secagem. Se o mesmo estiver
demasiado sujo ou desgastado será ne-
cessário substituí-lo
- Remontar o conjunto seguindo uma or-
dem inversa.
Limpeza do aparelho
- Limpar o corpo do aparelho utilizando um
pano ligeiramente humedecido em água
e detergente neutro.
- Remover o topo, como mostrado acima
e limpar o tanque com água corrente e,
em seguida, esvaziá-lo, como indicado
acima
Substituir todos fazendo o oposto de des-
montagem.
PERIGO:
Não lavar o aparelho com jatos de água
diretos
Controlos periódicos
Controlo do filtro de saída do ar
-
Desparafusar os parafusos
(41, Fig.25)
e
retirar o painel de cobertura
(42, Fig.25).
- Remover filtro de esponja (43 Fig.26) e
esponjas de textura (44 Fig.27) se for
caso disso.
- Limpar as esponjas com um jato de ar
comprimido (Fig.28).
É possível lavar as esponjas filtrantes
com água morna e remontá-las somente
após uma completa secagem; substituir
estes elementos caso estiverem dema-
siado sujos ou desgastados.
- Remontar o conjunto seguindo uma or-
dem inversa.
Manuale POWER LINE_8050817_1ed_04-2017.indd 3 21/04/17 10:03

www.ghibliwirbel.com
Professional Cleaning Machines Since 1968
PORTUGUÊS -
4
Verificação e limpeza do filtro de
proteção do motor
- Retire a cabeça do cilindro, conforme in-
dicado anteriormente.
- Retireoltro(46Fig.30).
- Laveoltro(46Fig.30)comáguamor-
na, retirando corpos estranhos e remon-
tar somente após a secagem completa.
- Coloqueoltro(46Fig.30)sobreaco-
bertura do motor, em seguida, através da
correia (47 Fig. 30) ligar o elástico na par-
tesuperiordas anilhasdeltro (48Fig.
30).
- Recoloque tudo, procedendo em sentido
inverso.
PROBLEMA CAUSA SOLUÇÃO
O aspirador não funciona. Interruptor não premido.
Ficha não inserida na
tomada.
Falta de corrente de alimen-
tação.
Premir o interruptor.
Inserirachanatomadade
corrente.
Verificar a linha de alimenta-
ção.
A sucção não é satisfatória. Saco de papel repleto.
Elementos filtrantes
ocluídos.
Acessórios e/ou tubos obtu-
rados.
Raspador de borracha para
sucção danificado ou des-
gastado.
Substituir o saco para reco-
lha de pós e sujidades.
Limpar os elementos filtran-
tes.
Controlar e limpar o tubo fle-
xível e o acessório terminal
de sucção.
Controlar e substituir o ras-
pador.
Verificar operação de flutuador
- Remover o topo, como mostrado acima.
- Retire o filtro (46 Fig. 30).
- Verifique flutuador (45) está em boas
condições e se mover livremente em seu
espaço.
- Substitua o filtro (46 Fig. 30), como des-
crito na secção relevante.
Manuale POWER LINE_8050817_1ed_04-2017.indd 4 21/04/17 10:03

www.ghibliwirbel.com
Professional Cleaning Machines Since 1968
NEDERLANDS -
1
SOORT GEBRUIK
Deze apparaten worden voor het winnen van
vloeistoffen en vaste stoffen, of beide ont-
worpen, volgens de tabel met de technische
gegevens in het inleidende gedeelte van de
handleiding. Er werden alleen voor dit ge-
bruik ontworpen.
GEVAARLIJK:
De fabrikant acht zich niet verantwoor-
delijk voor mogelijke schade veroorzaakt
door een onjuist of verkeerd gebruik.
Elk ander gebruik ontheft de fabrikant
van de aansprakelijkheid voor schade
aan personen en/of voorwerpen en zorgt
ervoor dat de garantie erover vervalt.
ONJUIST GEBRUIK
Gebruik het apparaat niet voor:
- Het opzuigen van ontvlambare, ontplof-
fingsgevaarlijke, giftige stoffen.
- Het opzuigen van warme stoffen.
- Gebruik het apparaat in de versie vloei-
stofzuiger nooit als een stofzuiger en om-
gekeerd.
Gebruik het apparaat niet in ontploffingsge-
vaarlijke omgevingen.
VOORBEREIDING
APPARAAT
Montage van transportwagen
(voor de modellen uitgerust met af-
neembar wagen)
- Plaats de wagen op de grond (1 Afb. 1.)
- Steek de handgreep (2 Afb. 1.) in de wa-
gen
- U kunt het handvat op hoogte aanpas-
sen, door de positionering en het aan-
scherpen van de vaststelling knop (3 afb
1.) op en van de twee posities (4 Afb. 1.).
- Plaats het huis (5 afb. 2) op de wagen,
dior instelling van de geleider (6 afb. 2) in
de stang (7 afb. 2) van de wagen.
Stofzuiger
Voor apparaten voorzien van de juiste ac-
cessoires.
- Haal de hendels (8 Afb.3) los en verwij-
der de deksel met de motor (9 Afb.4).
- Controleer op er een filter in Nylon (46
afb. 4) is.
- Demonteer het polyester filter (10 Afb.5).
- Controleer, indien van toepassing, dat
een papieren zak (11 Afb.5) in het appa-
raat gemonteerd is).
- Als de papieren zak (11 Afb.5) niet aan-
wezig is, installeer het, indien nodig, als
volgt:
Vervang de papieren zak (11 Afb.6) in het
mondstuk (12 Afb. 6) ter passeren van de
ketting (13 Afb.6)
- Hermonteer het polyester filter (10 Afb.5).
- Hermonteer de deksel en zet hem met de
hendels vast (8 Afb.3).
- Breng de mof (14 Afb. 7) van de zuig-
slang helemaal aan in de opening (15
Afb. 7) van de houder.
- Haal de mof los (14 Afb. 7) los door de
hendel (16 Afb. 7) rechtsom te draaien en
vervolgens de mof (14 Afb. 7) naar buiten
te trekken.
- Combineer de ergonomische handgreep
(17 Afb. 8) of de flexibele slang (18 Afb.8)
afhankelijk van het model met de verlen-
ging (19 Afb.8).
- De twee stijve extensies (19-20 Afb. 9)
door de uitlijning van de twee referentie-
punten (21-22 Afb. 9)aansluiten.
- Monteer op de stijve uitbreiding (20
Afb.10) de benodigde accessoires (trek-
ker, Staubbürstel, spleetmondstuk, vloer-
mondstuk, etc..)
OPMERKING:
Voor de modellen uitgerust met de ergono-
mische handgreep is het instellen van de
zuigkracht van de kiezers (23 Afb. 11) moge-
lijk te maken. (23 Afb.11).
Door het openen van het venster (24 Afb.11)
wordt een onderste zuigkracht opgewekt.
Manuale POWER LINE_8050817_1ed_04-2017.indd 1 21/04/17 10:03

www.ghibliwirbel.com
Professional Cleaning Machines Since 1968
NEDERLANDS -
2
Ansluiten van de elektrische borstel
Voor de apparaten met stopcontact:
- De aansluiting van de elektrische borstel
in het stopcontact (25 Afb.12) aan de bo-
venzijde van de stofzuiger sticken (maxi-
maal toegestane vermogen 200 W)
Vloeistofzuiger
Voor apparaten voorzien van de juiste ac-
cessoires.
- Haal de hendels (8 Afb.3) los en verwij-
der de deksel met de motor (9 Afb.4).
- Controleer op er een filter in Nylon (46
afb. 4) is.
- Demonteer het polyester filter (10 Afb.5),
indien aanwezig.
- Verwijder de papieren zak (11 Afb.5), in-
dien aanwezig.
- Hermonteer de deksel en zet hem met de
hendels (8 Afb ig.3) vast.
- Breng de mof (14 Afb. 7) van de zuig-
slang helemaal aan in de opening (15
Afb. 7) van het reservoir.
- Haal de mof (14 Afb. 7) los door de hen-
del (16 Afb. 7) rechtsom te draaien en
vervolgens de mof (14 Afb. 7) naar buiten
te trekken.
- Combineer de ergonomische handgreep
(17 Afb. 8) of de flexibele slang (18 Afb.8)
afhankelijk van het model met de verlen-
ging (19 Afb.8).
- De twee stijve extensies (19-20 Afb. 9)
door de uitlijning van de twee referentie-
punten (21-22 Afb. 9)aansluiten.
- Monteer op de stijve uitbreiding (20
Afb.10) de benodigde accessoires (trek-
ker, Staubbürstel, spleetmondstuk, vloer-
mondstuk, etc..
OPMERKING:
Voor de modellen uitgerust met de ergono-
mische handgreep is het instellen van de
zuigkracht van de nut (23 Afb.11).
Door het openen van het venster (24 Afb.11)
wordt een onderste zuigkracht opgewekt.
HET APPARAAT
GEBRUIKEN
- Het apparaat is uitgerust met wieltjes
en kan dus gebruik maken van de juiste
handvatten verplaatst of geduwd worden
met behulp van de handgreep (26 Afb.
13)
- Til het apparaat op door uw vingers aan
de brengen in het speciale handvat (27
Afb.14) aan de bovenkant van de deksel
als het apparaat een enkele motor heeft,
of til het apparaat met zijn tweeën op aan
de handvatten (28 Afb. 13)
Het apparaat inschakelen
- Steek de stekker (29 Afb.15) in het stop-
contact.
Enkele motor
- Druk de schakelaar (30 Afb.16) op “I” om
de zuigmotor op te starten. Het lampje in
de schakelaar gaat branden.
Dubbele motor
- Afhankelijk van het vereiste vermogen
kunt u één motor inschakelen door de
schakelaar (31 Afb.16) op “I” te drukken.
U kunt de beide schakelaars (31 e 32
Afb.16) indrukken als een groter zuigver-
mogen nodig is.
De knop gaat branden als u de schake-
laar indrukt.
OPMERKING:
Als de vuilwatertank vol is, verhoogt zich het
lawaai en het apparaat zuigt niet meer. Ver-
volgens de toestel wordt uitgeschakeld en de
tanks geleegd zoals hierboven beschreven
Het apparaat uitschakelen
- De schakelaars (30, 31, 32 Afb.16) op “0”
drukken om het apparaat uit te schakelen
en het licht, wanneer er op de schakelaar
is, gaat uit.
- Haal de stekker (29 Afb.15) uit het stop-
contact.
- Wikkel de kabel (33 Afb.17) op en haak
hem op de speciale plaats vast (34
Afb.17).
Manuale POWER LINE_8050817_1ed_04-2017.indd 2 21/04/17 10:03

www.ghibliwirbel.com
Professional Cleaning Machines Since 1968
NEDERLANDS -
3
REINIGING EN ONDERHOUD
GEVAARLIJK:
Haal de stekker uit het stopcontact alvo-
rens u een willekeurige handeling aan de
machine verricht.
De papieren stofzak (indien aanwe-
zig) verwijderen en vervangen.
- Haal de hendels (8 Afb.3) los en verwij-
der de deksel met de motor (9 Afb.4).
- Demonteer het polyester filter (10 Afb.5).
- Verwijder het papieren zak om stof verza-
melen (11 Afb.5), en vervang deze zoals
hierboven beschreven.
- Hermonteer het geheel door de demonta-
geprocedure in omgekeerde volgorde uit
te voeren.
De opvangtank legen
- Haal de hendels (8 Afb.3) los en verwij-
der de deksel met de motor (9 Afb.4).
- Plaats jezelf op de top van riolering en af-
voer het vloeistof uit de tank (35 Afb.18).
- Reinig de tank met water jet, vervolgens
installeer alle het tegenovergestelde
doen van demontage.
Voor de apparaten voorzien van een af-
voerslang
- De afvoerslang (36 Afb. 19) van de
houder uitmaken.
- De knop (37 Afb.20) los schroeven,
de sluiting (38 Afb. 20) van de afvoer-
slang (36 Afb. 21) verwijderen en de-
reservoir (35 Afb.21) lege doen.
Voor de apparaten voorzien van een
kantelen reservoir
- Haal de hendels (8 Afb.3) los en
verwijder de deksel met de motor (9
Afb.4).
- Draai het slot van de tank los , wer-
kende de hendel (39 Afb. 22) als er is.
- Til de tank (35 Afb.23) met de juiste
hendel (40 Afb.23) tot volledige ledi-
ging.
- Installeer alle het tegenovergestelde
doen van demontage.
Dagelijkse reiniging
Het polyester filter (indien aanwezig)
controleren en reinigen
- Haal de hendels (8 Afb.3) los en verwij-
der de deksel met de motor (9 Afb.4).
- Verwijder het polyester filter (4 Afb. 5).
- Reinig het filter (Afb.24) van binnen naar
buiten met perslucht. U kunt het filter
(Afb. 24) in lauwwarm water wassen en
uitsluitend als het helemaal droog is her-
monteren; vervang het filter als het erg
vuil is.
- Hermonteer het geheel door de demonta-
geprocedure in omgekeerde volgorde uit
te voeren.
Het apparaat reinigen
- Reinig het apparaat met behulp van een
doek bevochtigd met water of een neu-
traal reinigingsmiddel.
- Demonteer de bovenkant, zoals hierbo-
ven beschreven, reinigen de tank met
stromend water en daarna leeggooien,
zoals hierboven aangegeven
Installeer alle het tegenovergestelde
doen van demontage.
GEVAARLIJK:
Reinig het apparaat nooit met waterstra-
len.
Periodieke controles
Controle filter luchtuitvoer
- Draai de schroeven (41 Afb.25) los en
verwijder het klepje (42 Afb.25).
- Verwijder de spons filter (43 Afb.26) en
de textuur sponzen (44 Afb.27) als er zijn.
- Reinig de filters met perslucht (Afb.28).
U kunt de filters in lauwwarm water was-
sen en uitsluitend als ze helemaal droog
zijn hermonteren. Vervang de filters als
ze erg vuil zijn.
- Hermonteer het geheel door de demonta-
geprocedure in omgekeerde volgorde uit
te voeren.
Manuale POWER LINE_8050817_1ed_04-2017.indd 3 21/04/17 10:03

www.ghibliwirbel.com
Professional Cleaning Machines Since 1968
NEDERLANDS -
4
Controleer en reinig het motorbe-
schermingsfilter
- Verwijder de cilinderkop, zoals eerder
aangegeven.
- Verwijder het filter (46 Afb. 30).
- Was het filter (46 Afb. 30) met warm stro-
mend water, verwijderend van vreemde
voorwerpen en monteer het pas na een
grondige droging.
- Plaats de deksel van de motor de filter
(46 Afb. 30), dan door de riem (47 Afb.
30) haak de veer boven het filter ringen
(48 Afb. 30).
- Monteer alles in omgekeerde opeenvol-
ging.
PROBLEEM OORZAAK OPLOSSING
Het zuigapparaat functio-
neert niet.
Schakelaar niet ingedrukt.
Stekker niet in het stopcon-
tact gestoken.
Geen stroom.
Druk de schakelaar in.
Steek de stekker in het stop-
contact.
Controleer de voedingskabel.
Onvoldoende zuigkracht. Papieren zak is vol.
Filterelementen verstopt.
Accessoires of slangen ver-
stopt.
Trekker zuigmond versleten
of defect.
Vervang de papieren stof-
zak.
Reinig filterelementen.
Controleer en reinig de flexi-
bele slang en de zuigmond.
De trekker controleren en
vervangen.
Controleer de werking van de vlotter
- Demonteer de bovenkant, zoals hierbo-
ven beschreven.
- Verwijder de filter (46 afb. 30).
- Controleer dat vlotter (45) in goede staat
is en zich vrij bewegt.
- Vervang het filter (46 afb. 30), zoals be-
schreven in de desbetreffende sectie.
Manuale POWER LINE_8050817_1ed_04-2017.indd 4 21/04/17 10:03

www.ghibliwirbel.com
Professional Cleaning Machines Since 1968
Česky -
1
PŘEDPOKLÁDANÉ POUŽITÍ
Tyto stroje byly navrženy tak, aby vysávaly
tekuté, pevné látky nebo obojí, jak je uve-
deno v tabulce s technickými údaji z úvodní
části tohoto návodu. Byly navrženy pouze
pro toto použití.
NEBEZPEČÍ:
Výrobce odmítá jakoukoli odpovědnost
za případné škody způsobené nepředpo-
kládaným či nesprávným použitím.
Jakékoli jiné použití zbavuje výrobce zod-
povědnosti za škody na osobách a/nebo
věcech a bude mít za následek pozbytí
platnosti veškerých záručních podmínek.
NEPŘEDPOKLÁDANÉ
POUŽITÍ
Nepoužívejte zařízení pro tyto účely:
- Odsávání hořlavých, výbušných, koroziv-
ních či toxických látek.
- Odsávání teplých materiálů.
- Nepoužívejte zařízení určené pro odsá-
vání tekutin pro odsávání prachu a na-
opak.
Nepoužívejte zařízení v prostředí, ve kterém
hrozí nebezpečí výbuchu.
PŘÍPRAVA
SPOTŘEBIČE
Montáž vozíku
(pro modely vybavené odpojitelným
vozíkem)
- Umístěte vozík na zem (1 Obr. 1).
- Nasaďte rukojeť (2 Obr. 1) na vozík.
- Můžete nastavit výšku rukojeti tím, že po
jejím umístění do požadované pozice,
zatáhnete zajišťovací šroub (3 Obr. 1) na
úrovni jedné ze dvou pozic (4 Obr. 1).
- Umístěte kostru (5 Obr. 2) na vozík a
upevněte podstavec na plast (6 Obr. 2)
nacházející se na tyči (7 Obr. 2) vozíku.
Vysavač prachu
Pro přístroje vybavené vhodným příslušen-
stvím.
- Uvolnit páčky (8 Obr.3) a vyjmout víko (9
Obr.4) spojené s motorovou jednotkou.
- Zkontrolujte, zda je filtr z nylonu (46 obr.
4).
- Vyjmout polystyrénový filtr (10 Obr.5).
- Pokud je potřeba, zkontrolujte, zda je
namontován papírový sáček (11 Obr. 5)
uvnitř stroje.
- Pokud chybí papírový sáček (11 Obr. 5),
namontujte jej následujícím způsobem:
Vložte papírový sáček (11 Obr. 6) do trys-
ky (12 Obr. 6) až za límec (13 Obr. 6)
- Znovu vložit polystyrénový filtr (10 Obr.5).
- Znovu nasadit víko (8 Obr.3) a zajistit jej
páčkami.
- Zasuňte objímku (14 Obr. 7) sací trubice
až ke koncovému dorazu otvoru (15 Obr.
7) na nádobě.
- Pro uvolnění objímky (14 Obr. 7) posuňte
páčku (16 Obr. 7) ve směru hodinových
ručiček a vysuňte objímku směrem ven
(14 Obr. 7).
- Spojte ergonomickou rukojeť (17 Obr. 8)
nebo flexibilní hadici (18 Obr. 8), podle
modelu, s prodloužením (19 Obr. 8).
- Spojte dvě pevné předlužení (19-20 Obr.
9) paralelním umístěním dvou referenč-
ních bodů (21-22 Obr. 9).
- Připojte k pevnému prodloužení (20 Obr.
10) požadované příslušenství (sací hubi-
ci, kartáč na prach, úzký nástavec, pod-
lahovou hubici atd.)
POZNÁMKA:
U modelů vybavených ergonomickou rukoje-
tí můžete nastavit sací sílu pomocí přepína-
če (23 Obr. 11).
Otevřením okna (24 Obr. 11) dosáhnete sní-
žení sací síly.
Manuale POWER LINE_8050817_1ed_04-2017.indd 1 21/04/17 10:04

www.ghibliwirbel.com
Professional Cleaning Machines Since 1968
Česky -
2
Připojení elektrického kartáče
V případě strojů vybavených zástrčkou:
- Připojte zástrčku elektrického kartáče do
zásuvky (25 Obr. 12) nacházející se v
horní části vysávače (povolený maximál-
ní výkon 200 W).
Vysavač tekutin
Pro přístroje vybavené vhodným příslušens
tvím.
- Uvolnit páčky (8 Obr.3) a vyjmout víko (9
Obr.4) spojené s motorovou jednotkou.
- Zkontrolujte, zda je filtr z nylonu (46 obr.
4).
- Vyjmout polystyrénový filtr (10 Obr.5),
pokud je přítomný.
- Vyjměte papírový sáček (11 Obr.5), po-
kud je přítomný.
- Znovu nasaďte víko a zajistěte jej páčka-
mi (8 Obr.3).
- Zasuňte objímku (14 Obr. 7) sací trubice
až ke koncovému dorazu otvoru (15 Obr.
7) na nádobě.
- Pro uvolnění objímky (14 Obr. 7) posuňte
páčku (16 Obr. 7) ve směru hodinových
ručiček a vysuňte objímku směrem ven
(14 Obr. 7).
- Spojte ergonomickou rukojeť (17 Obr. 8)
nebo flexibilní hadici (18 Obr. 8), podle
modelu, s prodloužením (19 Obr. 8).
- Spojte dvě pevné předlužení (19-20 Obr.
9) paralelním umístěním dvou referenč-
ních bodů (21-22 Obr. 9).
- Připojte k pevnému prodloužení (20 Obr.
10) požadované příslušenství (sací hubi-
ci, kartáč na prach, úzký nástavec, pod-
lahovou hubici atd.)
POZNÁMKA:
U modelů vybavených ergonomickou rukoje-
tí můžete nastavit sací slu pomocí přepínače
(23 Obr. 11).
Otevřením okna (24 Obr. 11) dosáhnete sní-
žení sací síly.
POUŽITÍ PŘÍSTROJE
- Stroj je vybaven kolečky, a proto může
být posouván tažením nebo tlačením po-
mocí příslušných rukojetí (26 Obr. 13)
- Při zdvihání spotřebiče zasuňte prsty do
příslušného držadla (27 Obr.14) na horní
části víka u verze s jedním motorem nebo
jej ve dvou zvedejte za držadla (28 Obr.
13).
Zapínání přístroje
- Zasunout zástrčku (29 Obr.15) do elek-
trické zásuvky.
Jeden motor
- Stiskněte vypínač (30 Obr.16) do polohy
“I” pro spuštění sacího motoru, vypínač
se rozsvítí.
Dva motory
- Podle požadovaného výkonu je možné
spustit jen jeden motor stisknutím vypína-
če (31 Obr.16) na “I” nebo obou vypínačů
(31 a 32 Obr.16), pokud požadujete vyšší
sací výkon.
Se stisknutým vypínačem se rozsvítí pří-
slušné tlačítko.
POZNÁMKA:
Když se naplní nádrž na odpadní vodu, zvýší
se intenzita zvuku a stroj přestává dýchat. V
takovém případě vypněte stroj a vyprázdněte
nádrž dle instrukcí uvedených v příslušných
odstavcích
Vypínání přístroje
- Stroj se vypíná stisknutím přepínačů (30,
31, 32 Obr. 16) do pozice “0”; světla na
přepínačích, pokud se vyskytují, násled-
ně zhasnou.
- Odpojte zástrčku (29 Obr.15) z elektrické
zásuvky.
- Navijte kabel (33 Obr.17) a uchyťte jej do
svého uložení (34 Obr.17).
Manuale POWER LINE_8050817_1ed_04-2017.indd 2 21/04/17 10:04

www.ghibliwirbel.com
Professional Cleaning Machines Since 1968
Česky -
3
ČIŠTĚNÍ A ÚDRŽBA
NEBEZPEČÍ:
Před jakoukoli údržbou vždy odpojte pří-
stroj z elektrické zásuvky.
Vyjímání a výměna papírového sáčku
na sběr prachu (pokud je přítomný)
- Uvolnit páčky (8 Obr.3) a vyjmout víko (9
Obr.4) spojené s motorovou jednotkou.
- Vyjmout polystyrénový filtr (10 Obr.5).
- Vyjměte papírový sáček na sběr prachu
(11 Obr. 5) a nahraďte jej podle výše uve-
dených pokynů.
- Znovu vše sestavte opačným postupem.
Vyprazdňování sběrné nádrže
- Uvolněte páku (8 Obr. 3) a odstraňte
vrchní část (9 Obr. 4) spolu s motorem.
- Umístěte stroj v blízkosti odtokového
kanálu a vyprázdněte nádrž na odpadní
vodu (35 Obr. 18).
- Vyčistěte proudem vody vnitřek nádrže
na odpadní vodu, následně znovu všech-
no namontujte opačným postupem.
Pro stroje vybavené vypouštěcí hadicí
- Uvolněte vypouštěcí hadici (36 Obr.
19) z držáku.
- Uvolněte šroub (37 Obr. 20), odstraň-
te zátku (38 Obr. 20) vypouštěcí hadi-
ce (36 Obr. 21) a vyprázdněte nádrž
na odpadní vodu (35 Obr. 21)
Pro stroje vybavené sklápěcí nádrží
- Uvolněte páku (8 Obr. 3) a odstraňte
vrchní část (9 Obr. 4) spolu s moto-
rem.
- Uvolněte blokovací zařízení pomocí
páky (39 Obr. 22), pokud je součásti
stroje.
- Zvedněte nádrž (35 Obr. 23) pomocí
příslušné páky (40 Obr. 23) až do úpl-
ného vyprázdnění.
- Znovu namontujte, postupujte v opač-
ném pořadí úkonů.
Každodenní čištění
Kontrola a čištění polystyrénového
filtru (pokud je přítomný)
- Uvolnit páčky (8 Obr.3) a vyjmout víko (9
Obr.4) spojené s motorovou jednotkou.
- Vyjmout polystyrénový filtr (4 Obr. 5).
- Vyčistit filtr (Obr.24) proudem vzduchu z
vnitřní strany směrem ven; filtr (Obr. 24)
je možné čistit vlažnou vodou a po doko-
nalém osušení jej znovu nasadit, je-li filtr
příliš zašpiněný, je nutné jej vyměnit.
- Znovu vše sestavte opačným postupem.
Čištění přístroje
- Těleso přístroje čistěte hadrem navlhče-
ným ve vodě nebo v neutrálním čistícím
přípravku.
- Odstraňte vrchní část dle výše uvede-
ných pokynů a vyčistěte vnitřek nádrže
proudem vody, následně vyprázdněte
nádrž podle výše uvedených pokynů.
Znovu namontujte, postupujte v opačném
pořadí úkonů.
NEBEZPEČÍ:
Nikdy nemyjte přístroj proudem vody.
Pravidelné kontroly
Kontrola filtru výstupu vzduchu
- Vyšroubujte šrouby (41 Obr.25) a od-
straňte víko (42 Obr.25).
- Odstraňte pěnový filtr (43 Obr. 26) a tex-
turovanou pěnu (44 Obr. 27), pokud se
vyskytuje.
- Vyčistěte houbičky proudem vzduchu
(Obr.28).
Houbičky filtru lze čistit vlažnou vodou a
znovu je nasadit po dokonalém vysušení;
pokud jsou velmi zanesené, je nutné je
vyměnit.
- Znovu vše sestavte opačným postupem.
Manuale POWER LINE_8050817_1ed_04-2017.indd 3 21/04/17 10:04

www.ghibliwirbel.com
Professional Cleaning Machines Since 1968
Česky -
4
Zkontrolujte a vyčistěte ochranný filtr
motoru
- Demontovat hlavu válců, jak je uvedeno
výše.
- Vyjměte filtr (46 Obr. 30).
- Umyjte filtr (46 Obr. 30) s tekoucí teplou
vodou, odstranit veškeré cizí tělesa a
znovu ji pouze po důkladném vysušení.
- Vložte filtr (46 Obr. 30) na krytu motoru,
a pak prostřednictvím popruhu (47 Obr.
30), háček pružinu na horní podložek fil-
tru (48 Obr. 30).
- Zase vše v opačném pořadí.
PORUCHA PŘÍČINA ŘEŠENÍ
Vysavač nefunguje. Vypnutý vypínač.
Zástrčka nebyla zasunuta.
Výpadek elektrického
proudu.
Stiskněte vypínač.
Zasuňte zástrčku do
elektrické zásuvky.
Zkontrolujte přívod
elektrického proudu.
Nedostatečný sací výkon. Příliš plný papírový sáček.
Zanesené filtry.
Ucpaná hadice nebo násta-
vec.
Stěrač sacího nátrubku je
opotřebený nebo poškozený.
Vyměnit papírový sáček na
sběr prachu.
Vyčistit filtry.
Zkontrolujte a vyčistěte
ohebnou hadici a sací
nástavec.
Zkontrolujte a vyměňte
stěrač.
Kontrola funkčnosti plováku
- Odstraňte vrchní část podle výše uvede-
ných pokynů.
- Vyjměte filtr (46 obr. 30).
- Zkontrolujte, zda plovák (45) je neporu-
šený a zda se pohybuje volně na svém
místě.
- Vyměňte filtr (46 obr. 30), jak je popsáno
v příslušné části.
Manuale POWER LINE_8050817_1ed_04-2017.indd 4 21/04/17 10:04

www.ghibliwirbel.com
Professional Cleaning Machines Since 1968
Русский -
1
ТИП ИСПОЛЬЗОВАНИЯ
Эти аппараты были разработаны чтобы
всасываться жидкость или твердые веще-
ства или оба, в соответствии с таблицей
с техническими данными вводной части
руководства. Только для такого использо-
вания были разработаны.
ОПАСНОСТЬ:
Изготовитель не несет ответственно-
сти за возможный ущерб, возникший
при ненадлежащем или неправильном
использовании.
Любое другое использование осво-
бождает изготовителя от ответствен-
ности за ущерб, причиненный людям
и/или имуществу, и влечет за собой по-
терю гарантии.
НЕПРАВИЛЬНОЕ
ИСПОЛЬЗОВАНИЕ
Не использовать прибор для:
- Всасывания горючих, взрывчатых,
коррозийных, токсических веществ.
- Всасывания горячих веществ.
- Не использовать прибор в версии для
всасывания жидкостей для всасыва-
ния пыли и наоборот.
Не использовать прибор во взрывоопас-
ных помещениях.
ПОДГОТОВКА ПРИБОРА
Монтаж тележки
(для модели оснащены съемными
тележками)
- Поставьте тележку нa грунте (1 Рис 1.)
- Вставьте ручку (2 Рис 1.) тележки
- Возможность регулирования высоты
ручки, позиционируя еe и нажать кноп-
ку фиксации (3 Рис 1.) напротив одной
из двух положений (4 Рис 1.)
- Поставить каркас (5 Рис 2.) на теле-
жку, фиксируя подставку в пластикe (6
Рис 2.) стержни (7 Рис 2.) тележки.
Сухая уборка
Для приборов, оснащенных соответству-
ющими аксессуарами.
- Открыть защелки (8 Рис.3) и снять
крышку (9 Рис.4) вместе с двигателем.
- Проверьте фильтр в нейлон (46 рис.
4).
- Снять полиэфирный фильтр (10
Рис.5).
- Проверить, если это уместно, что вну-
три аппарата установлен бумажный
мешок (11 рис.5).
- Если бумажного мешка нет, установи-
те его, если это необходимо, действуя
следующим образом:
Установите бумажный мешок (11
рис.6) в cопло (12 рис.6) до прохожде-
ния кольца(13 рис.6)
- Установить полиэфирный фильтр (10
Рис.5).
- Снова установить крышку, зафиксиро-
вав ее с помощью защелок (8 Рис.3).
- Вставить до ограничителя муфту (14
Рис. 7) всасывающего шланга в па-
трубок (15 Рис. 7), расположенный на
баке.
- Для отсоединения муфты (14 Рис. 7)
сместить рычажок (16 Рис. 7) по часо-
вой стрелке, затем потянуть муфту по
направлению наружу (14 Рис. 7).
- Объедините эргономическую ручку (17
рис. 8) или гибкую трубку (18 рис. 8) в
зависимости от модели, с удлините-
лем (19 Рис.8).
- Присоедините обе жесткие удлините-
ли(19-20 Рис 9.), совместив две кон-
трольные точки (21-22 Рис 9.)
- Установите в жесткий удлинитель (20
рис. 10) желаемый аксессуар (всасы-
вающий сопел, щетки для пыли, аксес-
суар для узких пространств, cопло для
пола, и т.д. )
ПРИМЕЧАНИЯ:
Для модели оснащены эргономичной руч-
кой можно регулировать силу всасывания,
при использовании селекторa (23 рис. 11)
При открыти окна (24 рис. 11) получается
более низкую силу всасывания.
Manuale POWER LINE_8050817_1ed_04-2017.indd 1 21/04/17 10:04

www.ghibliwirbel.com
Professional Cleaning Machines Since 1968
Русский -
2
Подключение электрической щетке
Для аппараты оснащены розеткой:
- Подключить штекер электрической
щетке к розетки (25 рис. 12) в верхней
части пылесоса (максимальная мощ-
ность 200 Вт)
Влажная уборка
Для приборов, оснащенных соответству-
ющими аксессуарами.
- Открыть защелки (8 Рис.3) и снять
крышку (9 Рис.4) вместе с двигателем.
- Проверьте фильтр в нейлон (46 рис.
4).
- Снять полиэфирный фильтр (10
Рис.5), если имеется.
- Снять бумажный мешок (11 Рис.5),
если имеется.
- Снова установить крышку, зафиксиро-
вав ее с помощью защелок (8 Рис.3).
- Вставить до ограничителя муфту (14
Рис. 7) всасывающего шланга в па-
трубок (15 Рис. 7), расположенный на
баке.
- Для отсоединения муфты (14 Рис. 7)
сместить рычажок (16 Рис. 7) по часо-
вой стрелке, затем потянуть муфту по
направлению наружу (14 Рис. 7).
- Объедините эргономическую ручку (17
рис. 8) или гибкую трубку (18 рис. 8) в
зависимости от модели, с удлините-
лем (19 Рис.8).
- Присоедините обе жесткие удлините-
ли(19-20 Рис 9.), совместив две кон-
трольные точки (21-22 Рис 9.)
- Установите в жесткий удлинитель (20
рис. 10) желаемый аксессуар (всасы-
вающий сопел, cопло для пола, и т.д. )
ПРИМЕЧАНИЯ:
Для модели оснащены эргономичной руч-
кой можно регулировать силу всасыва-
ния, при использовании гайки (26 рис. 11)
При открытии окна (24 рис. 11) получается
более низкую силу всасывания.
ИСПОЛЬЗОВАНИЕ
ПРИБОРА
- Аппарат оснащен колесами и таким
образом может быть перемещен с
соответствующими рычагами, может
быть выдвинута с помощью рычага (23
рис. 13)
- Для подъема прибора взяться рукой
за специальную ручку (27 Рис.14), вы-
полненную в верхней части крышки в
версии с одиночным двигателем или
же выполнять подъем вдвоем с помо-
щью ручек (28 Рис. 13)
Включение прибора
- Вставить штепсельную вилку (29
Рис.15) в электрическую розетку.
Одиночный двигатель
- Для включения двигателя всасывания
перевести переключатель (30 Рис.16)
в положение “I” - загорится кнопка пе-
реключателя.
Двойной двигатель
- В соответствии с требуемой мощно-
стью можно включить только один
двигатель, установив переключатель
(31 Рис.16) на “I”, или оба переключа-
теля (31 и 32 Рис.16), если требуется
большая всасывающая сила.
При нажатии переключателя загорает-
ся соответствующая кнопка.
ПРИМЕЧАНИЯ:
Когда восстановительный резервуар за-
полнен, интенсивность шума увеличи-
вается и аппарат больше не всасывает.
Тогда аппарат должен быть выключен и
опорожните резервуар, как описано в со-
ответствующих пунктах.
Выключение прибора
- Нажмите переключатели (30, 31, 32
рис.16) в положение “0” для отключе-
ния аппарата; светы, если находится
на переключателе, выключаются.
- Отключить штепсельную вилку (29
Рис.15) от электрической розетки.
-
Смотать кабель (33 Рис.17) и закрепить его
в соответствующем гнезде (34 Рис.17).
Manuale POWER LINE_8050817_1ed_04-2017.indd 2 21/04/17 10:04

www.ghibliwirbel.com
Professional Cleaning Machines Since 1968
Русский -
3
ЧИСТКА И УХОД
ОПАСНОСТЬ:
Перед выполнением каких-либо опера-
ций по уходу, вытащить штепсельную
вилку из электрической розетки.
Удаление и замена бумажного меш-
ка для сбора пыли (если имеется)
- Открыть защелки (8 Рис.3) и снять
крышку (9 Рис.4) вместе с двигателем.
- Снять полиэфирный фильтр (10
Рис.5).
- Снимите бумажный мешок для сбора
пыли (11 рис. 5) и заменитe его, как
указано выше.
- Собрать все, выполняя операции в об-
ратном порядке.
Опорожнение бака регенерации
-
Освободите рычаг (8 рис.3 ) и снимите верх-
нюю часть (9 рис.4 ) вместе с двигателем.
-
Расположитесь над сливом и oпорожните
восстановительный резервуар охлаждаю-
щей жидкости (35 рис.18).
- Очистить внутренний резервуар стру-
ей воды, а затем заменить все, делать
противоположный монтаж.
Аппараты оснащены дренажным
шлангом
- Отпустить дренажную трубку (36
рис.19) c своей поддержке.
-
Отвинтите кнопку (37 рис.20),
cнимите пробку (38 рис.20 ) дренаж-
ного шланга (36 рис.21) oпорожните
восстановительный резервуар ох-
лаждающей жидкости (35 рис.21)
Аппараты оснащены наклонном ре-
зервуаром
- Освободите рычаг (8 рис.3 ) и сни-
мите верхнюю часть (9 рис.4 ) вме-
сте с двигателем.
- Ослабьте устройство блокировки
резервуара, используя рычаг (39
рис.22), если есть.
- Поднимите резервуар (35 Рис.23)
с соответствующим рычагом (40
Рис.23) до полного опорожнения.
- Заменить все, делать противопо-
ложный монтаж.
Ежедневная чистка
Контроль и чистка полиэфирного
фильтра (если имеется)
- Открыть защелки (8 Рис.3) и снять
крышку (9 Рис.4) вместе с двигателем.
-
Удалить фильтр (4 Рис. 5) из полиэфира.
- Очистить фильтр (Рис.24) изнутри по
направлению наружу с помощью струи
воздуха; можно вымыть фильтр (Рис.
24) в теплой воде и снова установить
его только после полного высыхания;
при чрезмерном загрязнении фильтра
следует заменить его
- Собрать все, выполняя операции в об-
ратном порядке.
Чистка прибора
- Очистить корпус прибора с помощью
ткани, смоченной водой или нейтраль-
ным моющим средством.
- Снимите верхнюю часть , как указано
выше и oчиститe внутренний резер-
вуар струей воды, опорожните его как
указано выше
Заменить все, делать противополож-
ный монтаж.
ОПАСНОСТЬ:
Не мыть прибор под струей воды.
Периодические проверки
Контроль выходного воздушного
фильтра
- Отвинтить винты (41 Рис.25) и снять
крышку (42 Рис.25).
- Удалите фильтр с губками (43 Рис.26)
и текстурированные губки (44 Рис.27),
если есть.
- Очистить губки с помощью струи сжа-
того воздуха (Рис.28).
Можно вымыть фильтры-губки в те-
плой воде и установить их обратно
только после полного высыхания; при
чрезмерном загрязнении следует за-
менить их.
- Собрать все, выполняя операции в об-
ратном порядке.
Manuale POWER LINE_8050817_1ed_04-2017.indd 3 21/04/17 10:04

www.ghibliwirbel.com
Professional Cleaning Machines Since 1968
Русский -
4
Проверка и чистка фильтра защи-
ты двигателя
- Снимите головку цилиндров, как указа-
но выше.
- Снимите фильтр (46 Рис. 30).
- Промойте фильтр (46 Рис. 30). Теплой
проточной водой удаления любых ино-
родных тел и заменить его только по-
сле полного высыхания.
- Вставьте фильтр (46 Рис. 30). На ко-
жух двигателя, затем через лямки (47
Рис. 30) крючок эластичные шайбы на
верхней части фильтра (48 Рис. 30).
- Соберите все, в обратном.
ПРОБЛЕМА ПРИЧИНА УСТРАНЕНИЕ
Пылесос не работает. Переключатель не нажат.
Штепсельная вилка не
подсоединена.
Отсутствует электрический
ток.
Нажать переключатель.
Вставить вилку в
электрическую розетку.
Проверить линию питания.
Недостаточное всасыва-
ние.
Бумажный мешок
заполнен.
Фильтрующие элементы
засорены.
Насадки или трубки
засорены.
Скребок всасывающего па-
трубка изношен или
поврежден.
Заменить мешок для сбора
пыли.
Очистить фильтрующие
элементы.
Проверить и очистить
гибкую трубку и
всасывающий патрубок.
Проверить и заменить
скребок.
Проверка работы поплавка
- Снимите верхнюю часть, как показано
выше.
- Снимите фильтр (46 рис 30).
-
Проверьте если поплавок (45) находится
в хорошем состоянии и может свободно
перемещаться в пространстве.
- Замените фильтр (46 рис. 30), как опи-
сано в соответствующем разделе.
Manuale POWER LINE_8050817_1ed_04-2017.indd 4 21/04/17 10:04

www.ghibliwirbel.com
Professional Cleaning Machines Since 1968
-
1
.)30
.)30
4
-
Manuale POWER LINE_8050817_1ed_04-2017.indd 1 21/04/17 10:05

www.ghibliwirbel.com
Professional Cleaning Machines Since 1968
-
2
93
10
11
93
19
20
2120
21
93
2239
23
23
93
.)
.
.)
3
-
Manuale POWER LINE_8050817_1ed_04-2017.indd 2 21/04/17 10:05

www.ghibliwirbel.com
Professional Cleaning Machines Since 1968
-
3
12
W200
93
.)
10
11
3
19
9
9
10 20
11 23
11
13
13
29
I30
31
3231I
0323130
29
33
2
-
Manuale POWER LINE_8050817_1ed_04-2017.indd 3 21/04/17 10:05

www.ghibliwirbel.com
Professional Cleaning Machines Since 1968
-
4
)11
12
13
.)1
2
2
2
93
.)
10
11
11
1211
13
10
3
)
19
9 2
9
10 20
11 23
11
12
W200
1
-
Manuale POWER LINE_8050817_1ed_04-2017.indd 4 21/04/17 10:05

Copertina POWER LINE_8050817_1ed_04-2017.indd 15 21/04/17 09:58

Professional Cleaning Machines Since 1968
DEALER
Cod. 8050817 - 3^ ed. - 03/2022
GHIBLI & WIRBEL S.p.A.
Registered office:
Via Enrico Fermi, 43 - 37136 Verona (VR) - Italy
Headquarters:
Via Circonvallazione, 5 - 27020 Dorno (PV) - Italy
www.ghibliwirbel.com
100% MADE IN ITALY
NUOVO RETRO A5.indd 2NUOVO RETRO A5.indd 2 09/03/2022 09:25:1909/03/2022 09:25:19
-
 1
1
-
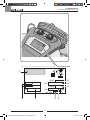 2
2
-
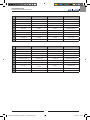 3
3
-
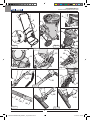 4
4
-
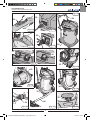 5
5
-
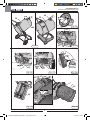 6
6
-
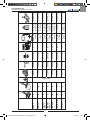 7
7
-
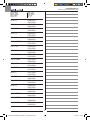 8
8
-
 9
9
-
 10
10
-
 11
11
-
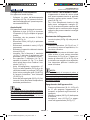 12
12
-
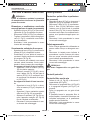 13
13
-
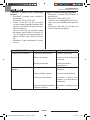 14
14
-
 15
15
-
 16
16
-
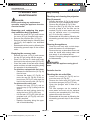 17
17
-
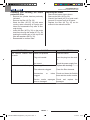 18
18
-
 19
19
-
 20
20
-
 21
21
-
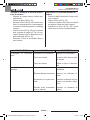 22
22
-
 23
23
-
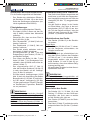 24
24
-
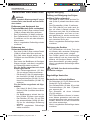 25
25
-
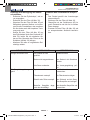 26
26
-
 27
27
-
 28
28
-
 29
29
-
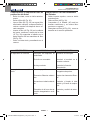 30
30
-
 31
31
-
 32
32
-
 33
33
-
 34
34
-
 35
35
-
 36
36
-
 37
37
-
 38
38
-
 39
39
-
 40
40
-
 41
41
-
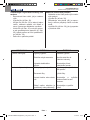 42
42
-
 43
43
-
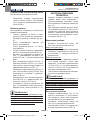 44
44
-
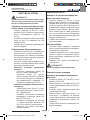 45
45
-
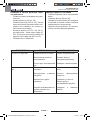 46
46
-
 47
47
-
 48
48
-
 49
49
-
 50
50
-
 51
51
-
 52
52


Ghibli & Wirbel POWER D 22 P Use And Maintenance
- Tipo
- Use And Maintenance
- Este manual también es adecuado para
en otros idiomas
- français: Ghibli & Wirbel POWER D 22 P
- italiano: Ghibli & Wirbel POWER D 22 P
- Nederlands: Ghibli & Wirbel POWER D 22 P
- português: Ghibli & Wirbel POWER D 22 P
Artículos relacionados
-
 Ghibli & Wirbel POWER WD 80.2 I TPT Use And Maintenance
-
 Ghibli & Wirbel InPump 90.2 SP CF Use And Maintenance
-
 Ghibli & Wirbel POWER EXTRA 7 I Use And Maintenance
-
 Ghibli & Wirbel M 26 I Auto CEME Use And Maintenance
-
 Ghibli & Wirbel TOOL PRO WDA 40 L Use And Maintenance
-
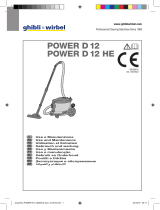 Ghibli & Wirbel POWER D 12 Use And Maintenance
-
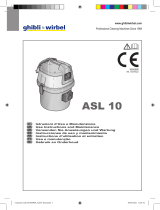 Ghibli & Wirbel S-Team 6 V Use And Maintenance
-
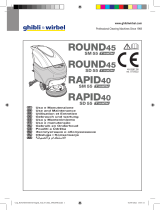 Ghibli & Wirbel ROUND 45 SD 55 BC TOUCH Use And Maintenance
-
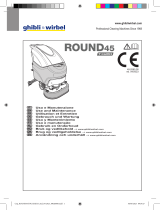 Ghibli & Wirbel ROUND 45 M 55 BC CHEM TOUCH Use And Maintenance
-
 Ghibli & Wirbel FR 30 SM 45 TOUCH Use And Maintenance


