Maruyama MM180 El manual del propietario
- Categoría
- Sopladores / secadores de aire
- Tipo
- El manual del propietario

Lea y entienda este manual a fondo, antes de usar este aparato.
Mister
Atomizadore
MM180
OWNER'S/OPERATOR'S MANUAL
MANUAL DEL PROPIETARIO U OPERADOR

— 1 —
English
TABLE OF CONTENTS
FOREWORD
This Owner’s/Operator’s Manual is designed to familiarize the operator with the various features
and component parts of the equipment and to assist you with the assembly, operation and
maintenance of your new Backpack Mist Blower.
It is essential that any operator of this Backpack Mist Blower product reads and
understands the contents of this manual before using the Backpack Mist Blower.
Important safety instructions will be identified by the following safety symbol:
Failure to comply with the instructions in this manual may result in serious injury or death.
For additional assistance, contact any local authorized Maruyama dealer or Maruyama U.S., Inc.,
4770 Mercantile Drive, suite100, Fort Worth, TX 76137 U.S.A.
phone : 940-383-7400
web : www.maruyama-us.com
MANUAL SAFETY SYMBOLS
Throughout this manual and on the product itself, you will find safety alerts and helpful, information
message preceded by symbols or key words. The following is an explanation of those symbols and
key words and what they mean to you.
Warning label
• Always remove dirt or mud to make the indications legible.
• The following alarm labels are attached.
Alarm label
Foreword ··························································1 Name of each part ···········································4
Safety symbols·················································1 Operating instructions······································7
Warning label ·················································· 1 Regular maintenance······································ 9
Specifications ·················································· 3 Storage···························································11
Assembly instructions ····································· 3 Emission control information ························ 11
This symbol accompanied by the words WARNING and
DANGER calls attention to an act or condition that can lead
to serious personal injury to operator and bystanders.
Read Owner's/Operator's Manual thoroughly.
Make sure you read the Owner's/Operator's
Manual thoroughly prior to use.
Wear a protector.
Wear protectors such as hat, safety
glasses, ear plugs during work.
Cautions for high temperatures
Muffler of engine, fin of cylinder, etc. are at
high temperatures. Don't touch them.
Prohibition of fire
Don't put a naked flame close to a place
where supplying fuel or doing maintenance.
Cautions for exhaust gas.
Take care not to breathe in exhaust gas
from the engine.

— 2 —
English
WARNING
1. Read and understand this Owner's/Operator's Manual before using this product. Be thoroughly familiar with the
proper use of this product.
2. Do not allow children to operate this product. It is not a toy. Never allow adults to operate the unit without first reading
the Owner's / Operator's Manual.
3. Become familiar with the controls and know how to stop the engine quickly.
4. Always use eye protection and hearing protection.
5. Keep the area of operation clear of all persons, particularly small children and pets.
6. Do not point the pipe in the direction of people or pets.
7. Do not operate a product when you are fatigued, sickness, intoxicated, and pregnant.
8. Do not operate a product without proper guards or other protective safety devices in place.
9. Dress properly; do not wear loose clothing or jewelry that can be caught in moving parts. Always wear substantial
footwear, long pant, and long sleeved shirt.
10. Gasoline is highly flammable; handle it carefully.
A. Do not smoke while handling gasoline.
B. Use an approved fuel container for storing the gasoline/oil mixture.
C. Do not fill the fuel tank when the engine is hot or running
D. Fill the fuel tank outdoors and only up to one-half inch from the top of the tank. Do not fill the filler neck.
E. Wipe away any spilled gasoline before starting the engine.
11. Always be sure of your footing; keep a firm hold of the blower pipes, and walk, do not run while operating a mist
blower.
12. Use the correct accessories. Do not use this product for any job except that for which it is intended.
13. Keep all fasteners tight and be sure this product is in safe working condition. Follow the maintenance instructions
provided on page 10 - 11 of this manual.
14. Do not put hands or feet near or under the rotating parts. Keep clear at all times.
15. If this product should start to vibrate abnormally, stop the engine immediately and check for the cause. Vibration is
generally a warning of trouble.
16. Avoid using this product near rocks, gravel, stones and similar matter in order to avoid dangerous flying debris.
17. Use this product only in daylight or good artificial light.
18. Do not allow bystanders in work area.
19. Do not operate in unventilated area.
20. To reduce the risk of injury associated with the inhalation of dust, use a face filter mask in dusty conditions.
21. To reduce the risk of injury associated with contacting rotating part, stop the engine before installing or removing
attachments.
22. To reduce the risk of fire and burn injury:
-Move at least 10ft (3m) away from the fueling point before starting engine.
-Always store gasoline in approved container.
Operating techniques
A. Operate power equipment only at reasonable hours - not early in the morning or late at night when people might be
disturbed. Comply with times listed in local ordinances. Usual recommendations are 9:00 am. to 5:00 p.m., Monday
through Saturday.
B. To reduce noise levels, limit the number of pieces of equipment used at any one time.
C. To reduce noise levels, operate mist blowers at the lowest possible throttle speed to do the job.
D. Check your equipment before operation, especially the muffler, air intakes, and air filters.
E. Use rakes and brooms to loosen debris before blowing.
F. In dusty conditions, slightly dampen surfaces when water is available.
G. Conserve water by using mist blowers instead of hoses for many lawn and garden applications, including areas such
as gutters, screens, patios, grills, porches, and gardens.
H. Watch out for children, pets, open windows, or freshly washed cars, and blow debris safely away.
I. Use the full blower nozzle extension so the air stream can work close to the ground.
J. After using this product and other equipment, CLEAN UP! Dispose of debris in trash receptacles.

— 3 —
English
The MARUYAMA MIST BLOWER comes with an Owner's / Operator's Manual and a Warranty
Registration Card. Assembly and attachment of the throttle lever bracket and blower pipes are
required.
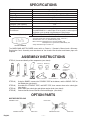
SPECIFICATIONS
Dimensions L x W x H
Dry Weight
Engine Type
Displacement
Ignition System
Carburetor
Chemical Tank Capacity
Fuel Tank Capacity
MM180
375 x 480 x 590 mm
11.2 kg
Kawasaki/2-Stroke Air cooled TK65 for EPA
64.7 cc
Electric
All position diaphragm
13 lit
2 lit
Fuel Mixture
50:1
Using MARUYAMA 50:1 2-stroke Engine Oil or any quality 2-stroke engine oil
designed for use in air-cooled, high performance 2-stroke engines.
Flexible Pipe, Swivel Pipe, Straight Pipe, Mist Pipe, Bent PipeAttachiments (Standard)
SERIAL NIMBER
At the Rated Operation (Engine Rotational Speed : 6350 mn-1)
Vibration Value :3.87 m/s
2
(Shoulder Bearing Part)
Noise emissions Sound power level, measured, dB(A) 108
Sound power level, guaranteed, LWAG dB(A) 109
Safety Inclination Degree is within 10°.
ASSEMBLY INSTRUCTIONS
STEP #1) Locate and identify all the components (see sketch).
STEP #2) Using the BANDS, connect the FLEXIBLE PIPE to the blower, and the SWIVEL PIPE to
the flexible pipe (see sketch).
STEP #3) Assemble the STRAIGHT PIPE, and MIST PIPE, then connect them to the swivel pipe
(see sketch).
STEP #4) Slide handle over swivel pipe and tighten retainer knob. (see sketch).
STEP #5) Connect the Mist hose to the Mist cock and Mist pipe. (see sketch)
BANDS(S)
8cm
FLEXIBLE
PIPE
OWNER'S/
OPERATOR'S
MANUAL
BOX SPANNER
SWIVEL
PIPE
STRAIGHT
PIPE
MIST PIPE
BANDS(S)
10cm
HOSE BAND X 2
HOSE CLAMP X 2 HOSE ASSY DIFFUSION SLIT
Models
OPTION PARTS
MIST DEFLECTOR CAP
DEFRECTOR CAP MIST PIPEMIST PIPEDEFRECTOR CAP
ONE WAY TYPE
DUAL TYPE
BENT PIPE

— 4 —
English
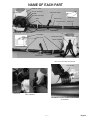
CHEMICAL TANK
RECOIL STARTER
BLOWER HOUSING
BAND
AIR CLEANER
PRIMER BULB
FUEL TANK
FLEXIBLE PIPE
HOSE BAND
MIST PIPE
SWIVEL PIPE
THROTTLE LEVER
LID
MIST PIPE ASSEMBLE
NAME OF EACH PART
STRAIGHT PIPE
ENGINE
MIST HOSE
HOSE BAND
MIST COCK
SHOULDER STRAP
SERIAL NUMBER
BACK PAD
LEVER BAND
MIST COCK
HOSE CONNECT
MIST HOSE
MIST COCK SETTING PROCEDURE
SET METAL FITTINGS OF "MIST COCK" IN THE
"LEVER BAND".
BENT PIPE

— 5 —
English
FUEL: MIXING GASOLINE AND OIL
CAUTION! The engine used on this product is of a 2-stroke design. The internal moving parts of the
engine, i.e., crankshaft bearings, piston pin bearings and piston to cylinder wall contact surfaces,
require oil mixed with the gasoline for lubrication. Failure to add oil to the gasoline or failure to mix oil
with the gasoline at the appropriate ratio will cause major engine damage which will void your warranty.
For your fuel premix, only use Maruyama 50:1 2-Stroke Oil or a quality oil designed for 2-stroke air-
cooled engine.
FUEL MIXTURE: When using genuine Maruyama 50:1 2-Stroke Oil, or a quality oil designed for 2-
stroke air-cooled engines, oil ratio is 50 parts gasoline to 1 part oil or 50:1.
CAUTION! If Maruyama brand oil is not used, never use a mixing ratio less than 50:1 regardless of
the oil package mixing instructions. Ratios less the 50:1, reduce the amount of lubrication to the
internal moving parts of the engine and can cause damage.
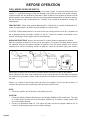
MIXING INSTRUCTIONS: Always mix fuel and oil in a clean container approved for gasoline.
Mark the container to identify it as fuel mix for the product. Use regular unleaded gasoline and fill
the container with half the required amount of gasoline. Pour the correct amount of oil into the
container then add the remaining amount of gasoline. Close the container tightly and shake it
momentarily to evenly mix the oil and the gasoline before filling the fuel tank on the product.
When refilling the fuel tank, clean around the fuel tank cap to prevent dirt and debris for entering
the tank during cap removal. Always shake the premix fuel container momentarily before filling the
fuel tank.
Always use a spout or funnel when fueling to reduce fuel spillage. Only fill the tank to within 1/2
inch from the top of the tank. Avoid filing to the top of the tank filler neck.
NOTE:
1. Do not mix gasoline and oil directly in the product fuel tank.
CAUTION!
1. Do not use National Marine Manufacturer’s Association (NMMA) or BIA certified oils. This type
or 2-stroke engine oil does not have the proper additives for air-cooled, 2-stroke engines and
can cause engine damage.
2. Do not use automotive motor oil. This type of oil does not have the proper additives for air
cooled, 2-stroke engines and can cause engine damage.
BEFORE OPERATION
GAS GAS
FILL MARK
HALF GASOLINE
ADD OIL
ADD REMAINING
GASOLINE
SHAKE
(MIX OIL AND GASOLINE)
OIL

— 6 —
English
CAUTION!
2.Shutting Engine Off
Before shutting the engine off, allow it to idle for a short
while.
• Never stop the engine by closing the choke.
• Never stop the engine during operation while running
above idle speed.
3.Transporting and Storage
• Shut off the engine and allow it to cool before transporting or storing the unit.
• Do not put the unit on dry grass or near any flammable object unless the engine is cold or cooled
down.
The lowest position of lever is "STOP" setting, and the highest position is the "FULL THROTTLE"
setting.
Be sure the mist blower is correctly assembled and all fasteners and fittings are properly secured.
THROTTLE LEVER
Before operating the mist blower, release the knob, knob the throttle grip to the
position in the illustration, and tighten knob to secure in place.
When the mist blower is strapped to the back of the operator, the throttle lever of
is located on the tube.
THROTTLE
LEVER
HIGH SPEED
IDLE SPEED
STOP
HIGH
KNOB
IDLE
Chemicals
*Read the labels of chemicals to be used carefully and understand the method of use and cautions.
Use the chemicals directly after opening the package. Chemicals left for a long time after the
package is open may cause poor discharging due to moisture absorption.
*Mistaking the discharge quantity re category of chemicals may cause damage.
*Do not leave the chemicals in the chemical tank for a long time. The machine might malfunction.
*Store chemicals in a safe place, and be careful not to break open their containers during
transportation.
*Treat chemical containers to ensure safety.
*Dispose the used chemical or fertilizer bags in a manner that will not cause injury.
*Pay attention to the handling of chemicals and fertilizer. If a chemical enters into eye or mouth, wash it
off with water immediately. If you feel ill, see a doctor immediately.
*According to wind direction, change the discharging method to protect workers and houses. When
discharging chemicals, work from upwind to downwind. Also give consideration to prevent chemicals
from drifting or scattering on crops, enclosures, fish-breeding ponds, and houses nearby.
*When preparing chemicals, prepare the necessary amount only in accordance with the established
spraying plan. If too much chemicals are left over, action is difficult.

— 7 —
English
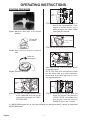
OPERATING INSTRUCTIONS
STEP #5) Move the "CHOKE LEVER" fully up
ward to the closed position. If the
engine is already warm, only a
partial or open (no choke) choke
setting may be required.
Step#1) Move the “Mist cock” to the closed
position.
PRIMER
BULB
FUEL
RETURN LINE
CHOKE
LEVER
CLOSE
OPEN
STARTER GRIP
HIGH SPEED
IDLE SPEED
STOP
STARTING PROCEDURE
Step#2) Pour chemical into the chemical
tank.
Step#3) Close the lib tightly.
STEP #4) Pump the "PRIMER BULB" under
of the carburetor until fuel can be
seen flowing through the "FUEL-
RETURN LINE".
STEP #6) Set the throttle lever at 1/2 speed.
CAUTION! Pull the "STARTER GRIP" briskly
to start the engine.
NOTE: Only short pulls are necessary. Never
pull the starter cord to its fullest extension.
Never let go of the starter grip until it is at the
fully returned position.
Close the
cover tightly
Do not spill
the liquid
OPEN
STEP #7)
Warming up the engine. When the
engine has started, slowly move the
"CHOKE LEVER" fully upward to the
open position. Allow the engine to
"WARM-UP" at less than 1/2 speed.
If a MARUYAMA engine fails to start after following the above procedures, contact an authorized
MARUYAMA dealer.

— 8 —
English
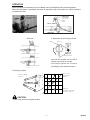
OPERATION
When the engine has warmed-up, the mist blower can be positioned on the back of the operator.
When the mist blower is positioned and ready for operation, adjust the throttle to a speed required to
accomplish the task.
OPERATING POSITION
INTAKE GRILLE
OF THE BLOWER
HOUSING
01
1
2
3
4
5
2345
Discharging volume
Aperture
(Number on the dial
of volume switch)
The nozzle
being held
nlevel
CAUTION
• Avoid using too dense hydrate solution.
Discharging volume
( /min)
Nozzle holding
position
1. Mist cock 2. Adjustment of discharging volume
• Coincide the number on the dial of
volume switch with the market.
• Discharging volume will increase
accordingly as the number increases.
Volume switch
Close
Open
Stop
mark

— 9 —
English
WARNING
• Never operate a mist blower when you are fatigued.
• Never operate a mist blower without proper guards or other protective safety devices in place.
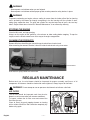
WARNING
To prevent overheating and engine seizure, cooling air comes from the intake grille of the fan housing
and is pushed by the blower fan through an opening in the fan housing over the cylinder fin area,
taking away combustion heat. The grille and cylinder fins must be kept clean of grass, dust and any
debris. Engine failure due to lack of this "Normal Maintenance" is not covered by warranty.
STOPPING THE ENGINE
Close the Mist cock, and stop spraying.
Always run the engine at idle speed for a few minutes to allow cooling before stopping. To stop the
engine, move the throttle control lever all the way to the engine stop position.
CLEANING THE PRODUCTS
Remove Mist hose from Mist pipe, and discharge chemical from chemical tank.
After recovering the remnant chemical, clean the inside chemical tank using clean water.
Also wash the spray nozzle with clear water.
WASHING
DISCHARGING
MISTCOCK OPEN
DISCHARGING
REGULAR MAINTENANCE
Before each use, the mist blower should be inspected for proper assembly and fitness of all
components. All fasteners should be checked for correct tightness. Always inspect for fuel leaks.
WARNING
Do not attempt to start or operate a mist blower that indicates a fuel leak.
AIR FILTER
The air filter should be inspected each time the mist
blower is used (or more often with extreme conditions).
To inspect, remove the air filter cover and remove the
filter from the case.
Clean air filter(s) by gently tapping element or cleaning
with a suitabe solvent the filter should be completely dry
before using again.
AIR FILTER
(PAPER)

— 10 —
English
SPARK PLUG
The spark plug should be removed from the engine and checked
after each fifty (50) hours of use. The tips can be cleaned with a
stiff brush. Adjust the gap to 0.8 - 0.9 mm (see sketch). Replace
the spark plug if it is oil-fouled or damaged.
CAUTION!
The correct torque for the spark plug is 13.6 - 16.3 Nm. Do not
over-tighten.
FUEL FIL
TER
The fuel filter should be cleaned and inspected for damage after each twenty (20) hours of use.
The fuel filter is attached to the fuel pick-up tube inside the fuel tank. Loosen the clamp and take out
the fuel filter.
To clean the fuel filter, remove it from the fuel tube and wash it with safety solvent. Inspect and clean
the fuel tank before re-installing the fuel filter.
Always replace a defective fuel filter.
TIPS
PROPER GAP
0.8 - 0.9 mm.
FUEL TUBE
GROMMET
FUEL FILTER
CLAMP WEIGHT
FUEL FILTER
COOLING FINS
Free passage of air flow through the cylinder cooling fins is required to prevent poor engine
performance and shortened engine life. Regularly check and clean all debris from the cooling fins by
removing the engine cover (see sketch).
MUFFLER AND EXHAUST PORTS
The muffler should be removed and serviced after each one fifty (50) hours of use. At the same time,
the exhaust ports should be cleaned and inspected. An AUTHORIZED MARUYAMA DEALER should
be contacted for this service.
ENGINE COVER
COOLING FINS

— 11 —
English
GENERAL CLEANING AND TIGHTENING
The MARUYAMA mist blower will provide maximum performance for many hours, if it is maintained
properly. Good maintenance includes regular checking of all fasteners for correct tightness, and cleaning
the entire machine. Contact an authorized MARUYAMA dealer for additional maintenance suggestions.
SPARK ARRESTER
1. Remove the screw from the muffler.
2. Take the spark arrester out off the muffler, and then clean by brushing it.
3. Return the spark arrester to the muffler.
4. Tighten the screw securely.
STORAGE
For long-term storage of the mist blower, first perform all regular maintenance procedures and needed
repairs. Empty the fuel tank. Disconnect the fuel supply line from the carburetor and depress the
primer bulb until fuel stops discharging from the fuel-return line.
Start the engine and allow it to run until it stops. Pull the starter cord a few times to remove any excess
fuel from the engine. Remove the spark plug and insert a small amount of oil into the cylinder. Slowly
pull the starter cord and bring the piston to a position closest to the spark plug hole. Re-install the
spark plug. Apply a thin coating of oil to all the metal surfaces and store the mist blower in a dry place.
EMISSION CONTROL INFORMATION
FUEL INFORMATION
THIS ENGINE IS CERTIFIED TO OPERATE ON UNLEADED REGULAR GRADE GASOLINE ONLY.
A minimum of 87 octane of the antiknock index is recommended.
EMISSION CONTROL INFORMATION
To protect the environment in which we all live, Kawasaki has incorporated an exhaust emission
control system.
EXHAUST EMISSION CONTROL SYSTEM (EM)
The system reduces the amount of pollutants discharged into the atmosphere by the exhaust of this
engine. The fuel, ignition and exhaust systems of this engine have been carefully designed and
constructed to ensure an efficient engine with low exhaust pollutant levels. The exhaust system of the
engine includes a catalytic converter system.
MAINTENANCE AND WARRANTY
Proper maintenance is necessary to ensure that your engine will continue to have low emission levels.
This Owner's/Operator's Manual contains those maintenance recommendations for your engine.
Those items identified by the Periodic Maintenance Chart are necessary to ensure compliance with
the applicable standards.
As the owner of the (Mist Blower, Blower, Trimmer, Hedge Trimmer), you have the responsibility to
make sure that the recommended maintenance is carried out according to the instructions in this
Owner's/Operator's Manual at your own expense.
The Maruyama Limited Emission Control System Warranty requires that you return your
(Mist Blower,Blower, Trimmer, Hedge Trimmer) to an authorized Maruyama (Mist Blower, Blower,
Trimmer, Hedge Trimmer) dealer for remedy under warranty. Please read the warranty carefully, and
keep it valid by complying with the owner's obligations it contains.
SCREW
SPARK
ARRESTER
MUFFLER

— 12 —
English
TAMPERING WITH EMISSION CONTROL SYSTEM PROHIBITED
Federal law and California State law prohibit the following acts or the causing there of:
(1) the removal or rendering inoperative by any person other than for purposes of maintenance, repair,
or replacement, of any device or element of design incorporated into any new engine for the purposes
of emission control prior to its sale or delivery to the ultimate purchaser or while it is in use, or (2) the
use of the engine after such device or element of design has been removed or rendered inoperative by
any person.
Among those acts presumed to constitute tampering are acts listed below:
Do not tamper with the original emission related parts.
• Carburetor and internal parts • Fuel tank
• Spark plug
• Magneto or electronic ignition system
• Fuel filter
• Muffler or any internal portion of the muffler
• Air cleaner element
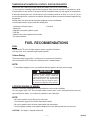
FUEL RECOMMENDATIONS
FUEL
The Kawasaki TK series 2-stroke engines require a gasoline-oil mixture.
Use only clean, fresh, unleaded regular grade gasoline.
Octane Rating
The octane rating of a gasoline is a measure of its resistance to "knocking".
Use of a minimum of 87 octane of the antiknock index is recommended.
NOTE:
• If "knocking or pinging" occurs, use a different brand of gasoline or higher octane rating.
2-STROKE ENGINE OIL MIXING
Gasoline is extremely flammable and can be explosive under certain conditions.
Turn the engine switch OFF. Do not smoke. Make sure the area is well ventilated and free from any
source of flame of sparks : this includes any appliance with a pilot light.
NOTE:
• Do not mix gasoline and oil directly in the fuel tank.
• The lubricative quality of this mixture deteriorates rapidly.
• Do not use gasoline that has been stored longer than two months.
• To ensure proper starting at low ambient temperatures, fresh winter grade fuel must be used.
CAUTION: The engine is shipped without fuel.
Gasoline is extremely flammable and can be
explosive under certain conditions.
Turn the engine switch OFF. Do not smoke.
Make sure the area is well ventilated and
free from any source of flame of sparks :
this includes any appliance with a pilot light.
WARNING

— 13 —
English
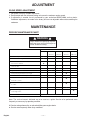
ADJUSTMENT
IDLING SPEED ADJUSTMENT
1. Idle speed is the only available adjustment.
2. Do not tamper with the carburetor setting to increase the maximum engine speed.
3. If adjustment is needed, have it performed by your authorized MARUYAMA service dealer.
Carburetor adjustments are made at the factory and are not adjustable without disassembling the
carburetor.
MAINTENANCE
PERIODIC MAINTENANCE CHART
Note: The service intervals indicated are to be used as a guide. Service to be performed more
frequently as necessary by operating condition.
M: Service to be performed by an authorized Maruyama engine dealer.
★
: Service more frequently under dusty conditions.
Always remove the spark plug cap from
spark plug when servicing the engine to
prevent accidental starting.
WARNING
MAINTENANCE Interval
Daily First Every Every Every
20 hours 20 hours 50 hours 100 hours
Check and replenish fuel
●
Check for fuel leakage
●
Check bolts, nuts and screws
for looseness and loss
●
Clean fuel filter
●
★
Clean air filter element
●
Tighten bolts and nuts
●●
Clean spark plug and adjust electrode gap
●
★
Remove dust and dirt from cylinder fins
●
M
Remove carbon deposits on piston head
and inside cylinder
●
M
Remove carbon deposits in the exhaust pipe
of muffler
●
M Clean net of spark arrester (if equipped)
●
M
Check the sliding portion of crankshaft,
connecting rod etc.
●
Fuel tube It is recommended to replace every 3 years.

Spanish
— 14 —
INDICE
PREFACIO
Este Manual del Propietario u Operador está diseñado para familiarizar al operador con las
diversas características y piezas componentes del equipo, y también para ayudarle con el
armado, la operación y el mantenimiento de su nueva Atomizadore de cargar a la espalda.
Es esencial que todo operador de este producto, Atomizadore de Espalda, lea y entienda el
contenido de este manual antes de usar la Atomizadore de Espalda.
Las instrucciones importantes sobre seguridad se identificarán mediante el siguiente icono:
El no observar las instrucciones de este manual, puede producir lesiones graves o incluso la
muerte.
Para asistencia adicional, póngase en contacto con cualquier distribuidor local autorizado de
Maruyama o con Maruyama U.S., Inc. 4770 Mercantile Drive, suite100, Fort Worth, TX 76137 U.S.A.
Teléfono: 940-383-7400
Página de Internet: www.maruyama-us.com
SIMBOLOS DE SEGURIDAD DEL MANUAL
En este manual y en el producto mismo, usted encontrará alertas de seguridad y útiles mensajes
informativos precedidos por iconos o palabras claves. A continuación una explicación de esos
iconos y de las palabras claves y de lo que significan para usted.
Etiqueta de advertencia
• Limpie la suciedad o el barro de la unidad para que las indicaciones siempre estén legibles.
• Encontrará las siguientes etiquetas de alarma fijadas en la unidad.
Etiquetas de alarma
Prefacio ··························································14 Nombres de las partes ································· 17
Etiqueta de advertencia·································14 Instrucciones de Operación·························· 20
Instrucciones de Seguridad···························15 Mantenimiento Corriente ······························ 22
Especificaciones ··········································· 16 Almacenamiento ··········································· 24
Instrucciones de Armado·······························16 Información Sobre Control de Emisiones ···· 24
Este icono, acompañado de las palabras ADVERTENCIA y
PELIGRO llama su atención hacia un acto o una condición
que puede conducir a que el operador o quienes están
cerca, sufran lesiones graves.
Lea detenidamente el Manual del Propietario u Operador.
Asegúrese de haber leído completamente el Manual
del Propietario u Operador antes de operar la unidad.
Prevención de incendios.
Nunca maneje combustible o haga mantenimiento
de la unidad cerca de un fuego abierto.
Precauciones con las piezas calientes.
El silenciador del motor, las aletas de cilindro, y otras piezas
de la unidad funcionan a altas temperaturas. No las toque.
SUse elementos de protección.
Use en el trabajo elementos de protección tales como:
casco, gafas de seguridad, tapones para los oídos, etc,.
Precauciones con el gas de escape.
Tenga cuidado de no respirar el gas de
escape del motor de la unidad.

Spanish
— 15 —
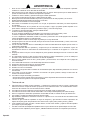
ADVERTENCIA
1. Antes de usar el atomizador, lea cuidadosamente y entienda a cabalidad este Manual del Propietario u Operador.
Familiarícese a fondo con el uso adecuado del atomizador.
2. Nunca permita que los niños utilicen este atomizador. No es un juguete. Nunca permita que los adultos utilicen el
aparato sin haber leído antes el Manual del Propietario u Operador.
3. Familiarícese con los controles y aprenda cómo apagar el motor rápidamente.
4. Use siempre la protección para los ojos y la protección para los oídos.
5. Mantenga el área de funcionamiento libre de personas, particularmente de niños pequeños y de mascotas.
6. No dirija la boquilla del atomizador hacia personas o mascotas.
7. Nunca utilice un atomizador si usted está fatigado.
8. Nunca utilice un atomizador sin tener puestas o en su lugar, las protecciones adecuadas y los demás dispositivos
de seguridad.
9. Vístase adecuadamente; no use prendas de vestir muy amplias, ni joyas que puedan quedar atrapadas en las
piezas móviles. Siempre use calzado firme, pantalones largos, y camisa de manga larga.
10. La gasolina es altamente inflamable, manéjela cuidadosamente.
A. No fume mientras maneja gasolina.
B. Use un recipiente aprobado para combustibles, para almacenar la mezcla de gasolina y aceite.
C. No llene el depósito de combustible cuando el motor está caliente o en marcha.
D. Llene el depósito de combustible estando en el exterior y únicamente hasta media pulgada antes del borde
superior del depósito. No llene el cuello de llenado.
E. Antes de poner el motor en marcha, limpie la gasolina que se haya derramado.
11. Siempre asegúrese de estar bien calzado; sostenga con firmeza los tubos del atomizador, y camine, nunca corra,
cuando utilice un atomizador.
12. Use los accesorios correctos. No use el atomizador para realizar una labor diferente de aquellas para las cuales se
ha fabricado el atomizador.
13. Mantenga apretados todos los sujetadores y asegúrese de que el atomizador esté en condiciones seguras de
funcionamiento. Observe las instrucciones de mantenimiento que se suministran en las páginas 27 – 29 de este
manual.
14. No ponga las manos ni los pies cerca ni debajo de las piezas giratorias. Manténgase fuera de su alcance en todo
momento.
15. Si el atomizador empezara a vibrar en forma anormal, detenga el motor inmediatamente y revise la unidad para
descubrir la causa. Generalmente la vibración es la señal de un problema.
16. Evite el uso del soplador cerca de rocas, gravilla, piedras y material similar, con el objeto de evitar el peligro de
desechos lanzados.
17. Use el atomizador únicamente a la luz del día o bajo una buena luz artificial.
18. No permita la presencia de personas en el área de trabajo.
19. No utilice sin tener puestas las debidas protecciones.
20. No utilice en un área sin ventilación.
21. Para reducir el riesgo de lesiones asociadas con la inhalación de polvo, bajo condiciones polvorientas use máscara
con filtro facial.
22. Para reducir el riesgo de lesiones, asociadas con contactos con piezas giratorias, detenga el motor antes de
instalar o de remover accesorios.
23. Para reducir el riesgo de incendio y quemaduras:
- Antes de dar arranque al motor, aléjese por lo menos 3 metros del punto de abastecimiento de combustible.
- Siempre almacene la gasolina en un recipiente aprobado.
Técnicas de uso
A. Unicamente utilice el equipo en horas razonables – ni temprano en la mañana ni tarde en la noche, cuando puede
molestar a los demás. Cumpla los horarios que aparecen en las ordenanzas locales. Las recomendaciones usuales
son de 9:00 de la mañana a las 5:00 de la tarde, de lunes a sábado.
B. Para reducir los niveles de ruido, limite el número de piezas de equipo usadas al mismo tiempo.
C. Para reducir los niveles de ruido, utilice los atomizadores a la más baja velocidad posible para realizar el trabajo.
D. Revise su equipo antes de utilizarlo, especialmente el silenciador de ruido, las entradas de aire y los filtros de aire.
E. Use rastrillos y escobas para aflojar los desechos antes de soplar.
F. Bajo condiciones polvorientas, humedezca levemente las superficies o use el accesorio de rocío de neblina cuando
haya agua disponible.
G. Conserve el agua usando las sopladoras en lugar de mangueras y agua lanzada en muchas aplicaciones de
limpieza de césped y jardín, incluyendo áreas tales como cunetas, rejillas, patios, parrillas, porches y jardines.
H. Tenga cuidado con los niños, mascotas, ventanas abiertas, o carros recién lavados, y sople los desechos fijándose
que se alejen sin presentar peligro.
I. Use toda la extensión de la boquilla del soplador de manera que la corriente de aire pueda trabajar cerca del suelo.
J. Después de usar los sopladores y demás equipos, ¡LIMPIELOS! Bote los desechos en receptáculos para la basura.

Spanish
— 16 —
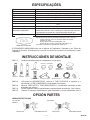
El ATOMIZADOR MARUYAMA viene con un Manual del Propietario u Operador y una Tarjeta de
Registro de Garantía. Se debe montar e instalar la ménsula de la palanca de aceleración y tubos
sopladores.
ESPECIFICAÇÕES
Dimensiones Pr. x An. x Al.
Peso en seco
Tipo de motor
Cilindrada
Sistema de ignición
Carburador
Capacidad del depósito de combustible
MM180
375 x 480 x 590 mm
11,2 kg
Kawasaki/2-Tiempos Enfriado al aire TK65 para EPA
64,7 cc
Eléctrico
Diafragma para todas posiciones
13 lit
2,1 galones (2,0 litros)
Mezcla de combustible
50:1
Utilizando aceite de motor de 2 ciclos 50:1 de Maruyama o cualquier otro aceite de motor de 2
ciclos diseñado para uso en motores de 2 ciclos de alto rendimiento, enfriados a aire.
TUBO FLEXIBLE, TUBO ORIENTABLE, TUBO RECTO, TUBO NEBULIZADOR, TUBO ACODADO
Accesorios (Estándar)
NUMERO DE SERIE
Bajo funcionamiento nominal (Velocidad rotacional del motor: 6350 mn-1)
Valor de vibración: 3,87 m/s2 (Parte del soporte de hombro)
Emisiones de ruido
Nivel de potencia sonora, medido, dB(A) 108
Nivel de potencia sonora, garantizado, LWAG dB(A) 109
*El grado de inclinación de seguridad está dentro de 10°
INSTRUCCIONES DE MONTAJE
PASO 1) Localice e identifique todos los componentes (vea la figura).
PASO 2) Utilizando las ABRAZADERAS, conecte el TUBO FLEXIBLE al soplador y, a
continuación, el TUBO ORIENTABLE al tubo flexible (vea la figura).
PASO 3) Monte el TUBO RECTO y TUBO NEBULIZADOR y, a continuación, conéctelos al tubo
orientable (vea la figura).
PASO 4) Deslice la palanca sobre el tubo orientable y apriete el botón de retención. (vea la figura)
PASO 5) Conecte la manguera nebulizadora al grifo nebulizador y al tubo nebulizador. (vea la
Modelos
OPCIÓN PARTES
NIEBLA DEFLECTOR PAC
DEFLECTOR TUBO NEBULIZADORTUBO NEBULIZADORDEFLECTOR
TIPO DE UNA
MANERA
TIPO DOBLE
ABRAZADERA(S)
8cm
TUBO
FLEXIBLE
MANUAL DEL
PROPIETARIO
U OPERADOR
LLAVE DE TUBO
TUBO
ORIENTABLE
TUBO
RECTO
TUBO NEBULIZADOR
ABRAZADERA(S)
10cm
ABRAZADERA DE
MANGUERA X 2
ABRAZADERA DE MANGUERA X 2
CONJUNTO DE MANGUERA
ITSL DIFUSIÓN
TUBO ACODADO

— 17 —
Spanish
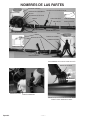
ESTANQUE QUÍMICO
ARRANCADOR DE REBOBINADO
ALOJAMIENTO DEL SOPLADOR
BANDA
FILTRO DE AIRE
BULBO DE IMPRIMADOR
ESTANQUE DE COMBUSTIBLE
TUBO FLEXIBLE
BANDA DE MANGUERA
TUBO DE ROCÍO
TUBO GIRATORIO
PALANCA DEL ESTRANGULADOR
TAPA
NOMBRES DE LAS PARTES
TUBO RECTO
MOTOR
MANGUERA DE ROCÍO
BANDA
GRIFO DE ROCÍO
CORREA DE HOMBRO
NÚMERO DE SERIE
COJÍN POSTERIOR
BANDA DE PALANCA
GRIFO DE ROCÍO
CONEXIÓN DE MANGUERA
MANGUERA DE ROCÍO
PROCEDIMIENTO DE AJUSTE DEL GRIFO DE ROCÍO
AJUSTE LOS ACCESORIOS METÁLICOS DEL “GRIFO
DE ROCÍO” EN LA “BANDA DE PALANCA”
ENSAMBLE DE TUBO DE ROCÍO
TUBO ACODADO

— 18 —
Spanish
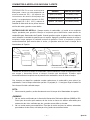
COMBUSTIBLE: MEZCLA DE GASOLINA Y ACEITE
PRECAUCION! Si no usa aceite marca
Maruyama, nunca use una proporción de
mezcla menor de 50:1, sin importar las
instrucciones de mezcla del empaque del
aceite. Las proporciones menores de 50:1
(por ejemplo, 60:1, 80:1, 100:1), reducen la
cantidad de lubricación de las piezas internas
móviles del motor y pueden causar daños.
INSTRUCCIONES DE MEZCLA: Siempre mezcla el combustible y el aceite en un recipiente
limpio, aprobado para gasolina. Marque el recipiente para identificarlo como mezcla de
combustible para Atomizadore de Espalda. Usando gasolina regular sin plomo, llene el recipiente
con la mitad de la cantidad de gasolina que se requiere. Agregue la cantidad correcta de aceite al
recipiente, luego agregue la cantidad restante de gasolina. Cierre el recipiente y agítelo
momentáneamente para mezclar bien el aceite y la gasolina antes de llenar el tanque de la
Atomizadore de Espalda.
Cuando llene de nuevo el tanque de combustible, limpie alrededor de la tapa del tanque para evitar
que mugre y desechos entren al tanque cuando está destapado. Siempre agite
momentáneamente el recipiente con la premezcla de combustible, antes de llenar el tanque.
Use siempre una boquilla o embudo cuando reabastezca el combustible, para reducir las
salpicaduras. Llene el tanque sólo hasta que falte 1/2 pulgada (6 – 12 mm) para llegar al borde. No
llene hasta el final del cuello del tanque.
NOTA:
1. Nunca mezcle gasolina y aceite directamente en el el tanque de la Atomizadore de espalda.
!CUIDADO!
1. No use aceites certificados por la Asociación Nacional de Fabricantes Marinos (NMMA) o BIA.
Estos tipos de aceites para motores de dos ciclos no tienen los aditivos adecuados para
motores de dos ciclos, enfriados por aire y pueden causar daño en el motor.
2. No use aceite motor para automóviles. Este tipo de aceite no tiene los aditivos adecuados
para motores de dos ciclos, enfriados por aire y puede causar daño al motor.
GASOLINA GASOLINA
MARCA DE
LLENADO
1/2 GASOLINA AGREGUE ACEITE AGREGUE EL RESTO
DE LA GASOLINA
AGITE
(MEZCLA DE ACEITE Y GASOLINA)
ACEITE
Gasolina
Aceite 50:1 para 2 Ciclos
1 galón (3,78 litros) 2.6 onzas (76 ml)
2-1/2 galones (9,46 litros)
6.4 onzas (189 ml)
5 galones (18,9 litros) 12.8 onzas (378 ml)
!

— 19 —
Spanish
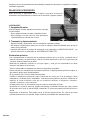
¡PRECAUCIÓN!
1. Apagado del motor
Antes de apagar el motor, póngalo en marcha al vacío por
un corto tiempo.
• Nunca apague el motor cerrando el regulador de aire.
• Nunca apague el motor mientras esté operando a
velocidad mayor de la de marcha al vacío.
2. Transporte y almacenamiento
• Apague el motor y déjelo enfriar antes de transportar o guardar la unidad.
• No coloque la unidad sobre grama seca o cerca de cualquier material inflamable antes de que el
motor se haya enfriado.
La posición más baja de la palanca de aceleración es la graduación de “MARCHA EN VACIO”, y la
posición más alta es la graduación de “ACELERACIÓN COMPLETA”.
Asegúrese de que el atomizador esté correctamente armado y de que todos los sujetadores y acoples
estén bien asegurados.
PALANCA DE ACELERACIÓN
Antes de utilizar el atomizador, suelte la perilla, haga girar el brazo del
acelerador hasta la posición que se muestra en la ilustración, y apriete la perilla.
PALANCA DE
ACELERACIÓN
ALTA VELOCIDAD
VELOCIDAD DE
MARCHA AL VACÍO
APAGADO
ALTA VELOCIDAD
PERILLA
MARCHA AL VACÍO
Sustancias químicas
*Lea cuidadosamente las etiquetas de los productos químicos que va a utilizar, y entienda bien el
modo de utilización y las precauciones a tomar. Pulverizar por tanque (1000 m2) o equivocarse de
sustancia química puede causar daños.
*Almacene los productos químicos en un lugar seguro, y evite que los contenedores se abran
durante el transporte de los mismos.
*Trate los contenedores o depósitos de manera que garantice seguridad.
*Preste atención a la manipulación de productos químicos. Si algún producto químico le salpica en
ojos o boca, aplique agua inmediatamente.
*Si se encuentra mal, visite un médico de inmediato.
*Cambie el método de pulverización según la dirección del viento, con el fin de proteger a otros
trabajadores y viviendas de los alrededores. Cuando pulverice productos químicos, colóquese de
espaldas al viento. Asimismo, evite que las sustancias químicas se esparzan a cosechas,
cercados, estanques y casas cercanas.
*Cuando pulverice en un invernadero, tenga en cuenta la ventilación del lugar.
*Al preparar las sustancias químicas, prepare únicamente la cantidad necesaria que vaya a utilizar
de acuerdo con el plan de pulverización establecido. El exceso de producto químico dificulta la
acción.
*No pulverice el disolvente. Éste puede causar el fallo de algunas piezas. En caso de que haya
utilizado disolvente en este aparato, limpie a fondo el pulverizador con abundante agua.

— 20 —
Spanish
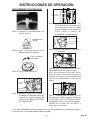
INSTRUCCIONES DE OPERACIÓN
PASO 5) Desplace la "PALANCA DEL
ESTRANGUDOR" completamente
hacia la posición de cierre. Si el motor
ya está calentado, sólo se requiere un
ajuste parcial o abierto del
estrangulador (sin estrangulación).
PASO 1) Desplace el "Grifo nebulizador" a la
posición de cierre.
BULBO DE
CEBADO
LÍNEA DE RETORNO
DE COMBUSTIBLE
PALANCA DEL
ESTRANGUDOR
CERRAR
ABRIR
ASIDERO DEL ARRANCADOR
ALTA VELOCIDAD
MARCHA LENTA
DETENCIÓN
PROCEDIMIENTO DE ARRANQUE
PASO 2) Vierta el producto químico en el
depósito de producto químico.
PASO 3) Cierra la tapa firmemente.
PASO 4) Bombee el "BULBO DE CEBADO"
por debajo del carburador hasta que
se pueda ver el flujo de combustible
a través de la "LÍNEA DE RETORNO
DE COMBUSTIBLE".
PASO 6) Ajuste la palanca del acelerador a
1/2 velocidad.
¡PRECAUCIÓN! Tire vigorosamente del "ASIDERO
DEL ARRANCADOR" para arrancar el motor.
NOTA: Sólo se requieren tirajes cortos. No tire
nunca del cable del arrancador hasta toda su
extensión. No suelte nunca el asidero del arrancador
hasta que esté completamente en su posición de
retorno.
Cierra la cubierta
firmemente
No derrame el
líquido
ABRIR
PASO 7) Calentamiento del motor. Una vez
que arranque el motor, desplace lentamente
la "PALANCA DEL ESTRANGULADOR"
completamente hacia la posición de abertura.
Permita que el motor "SE CALIENTE" a
menos que 1/2 velocidad.
Si un motor MARUYAMA no arranca después de seguir los procedimientos precedentes, póngase
en contacto con un distribuidor MARUYAMA autorizado.

— 21 —
Spanish
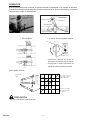
OPERACIÓN
Una vez que el motor esté calentado, se puede posicionar el atomizador en la espalda del operador.
Cuando el atomizador está posicionado y listo para funcionamiento, ajuste el acelerador a la velocidad
necesaria para cumplir la tarea deseada.
POSICIÓN DE OPERACIÓN
REJA DE ADMISIÓN DEL
COMPARTIMIENTO DEL
SOPLADOR
01
1
2
3
4
5
2345
descargando volumen
Numere en el dial
de interruptor de
volumen
El cambio de la
descarga para el
ángulo de tubo.
PRECAUCIÓN
• No use el hidrato de la densidad alta.
descargando
volumen( /min)
ángulo del
tubo
1. Grifo de Rocio 2. El ajuste de descargando volumen
• Coincida el número en el dial de
interruptor de volumen con la marca.
•
Descargando el volumen aumentarán de
acuerdo con como los aumentos del número.
Dial de ajuste
cerca
abra
parad
mark
APAGADO
ALTA VELOCIDAD
MARCHA LENTA
ALTA VELOCIDAD
MARCHA AL VACÍO
GRIFO DE ROCÍO

— 22 —
Spanish
ADVERTENCIA
• Nunca opere un atomizador cuando esté fatigado.
•
Nunca opere un atomizador sin los protectores apropiados u otros dispositivos de seguridad en posición.
ADVERTENCIA
Para prevenir el sobrecalentamiento y agarrotamiento del motor, el aire de enfriamiento sale de la reja
de admisión del compartimiento del ventilador y se impulsa por el ventilador centrífugo a través de una
abertura en el compartimiento del ventilador sobre el área de las aletas del cilindro, descargando el
calor de combustión. La reja y las aletas del cilindro deben mantenerse libres de césped, polvo y
cualesquiera residuos. Un fallo del motor debido a no observación de este "Mantenimiento Normal" no
está cubierto por la garantía.
APAGADO DEL MOTOR
Cierre el grifo nebulizador y detenga la pulverización. Siempre deje el motor en marcha lenta durante
algunos minutos para permitir que se enfríe antes de apagarlo. Para apagar el motor, desplace la
palanca de mando del acelerador completamente hacia la posición de detención del motor.
LIMPIEZA DE LOS PRODUCTOS
Quite la manguera nebulizadora del tubo nebulizador y, a continuación, descargue el producto químico del depósito de producto
químico. Después recuperar el producto químico remanente, limpie el interior del depósito de producto químico utilizando agua limpia.
Lave también la tobera rociadota con agua limpia.
LAVADO
DESCARGA
GRIFO NEBULIZADOR ABIERTO
DESCARGA
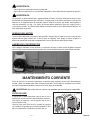
MANTENIMIENTO CORRIENTE
Antes de cada uso, es necesario inspeccionar la sopladora para asegurarse de que esté adecuadamente
armado y todos sus componentes estén firmemente colocados. Revise todos los sujetadores para verificar
que estén correctamente apretados. Siempre revise si hay fugas de combustible.
ADVERTENCIA No intente arrancar u operar una sopladora que muestre fuga de combustible.
FILTRO DE AIRE
El filtro de aire se debe inspeccionar cada vez que se usa la
sopladora (o con más frecuencia bajo condiciones extremas).
Para realizar la inspección, retire la tapa del filtro de aire y
retire el filtro de la caja.
Limpia un filtro (unos filtros) de aire, sacando un elemento
con cuidado o lo limpiando con un solvento apropiado. El filtro
debe ser complemente secado antes de usarlo otra vez.
FILTRO DE AIRE
(PAPEL)

BUJÍA
La bujía debe retirarse del motor y revisarse después de cada
cincuenta (50) horas de uso. Los electrodos se pueden limpiar con
un cepillo metálico. Ajuste la tolerancia en 0,8 – 0,9 mm (ver
dibujo). Reemplace la bujía si se ha ensuciado con aceite.
PRECAUCION!
La torsión correcta de la bujía es entre 13,6 y 16,3 Nm. No la
apriete demasiado.
FIL
TRO DE COMBUSTIBLE
El filtro de combustible se debe limpiar e inspeccionar en busca de daños después de cada veinte (20)
horas de uso. El filtro de combustible está fijado en el tubo de captación, dentro del depósito de
combustible. Afloje la abrazadera y saque el filtro de aire.
Para limpiar el filtro de aire, retírelo del tubo de combustible y lávelo usando la mezcla de combustible
con la que funciona el motor.
Inspeccione y limpie el depósito de combustible antes de volver a instalar el filtro de combustible.
Siempre reemplace un filtro de combustible defectuoso.
ELECTRODOS
TOLERANCIA ADECUADA
DE 0,8 A 0,9 MM
TUBO DE
COMBUSTIBLE
ARO DE
REFUERZO
FILTRO DE
COMBUSTIBLE
ABRAZADERA PESO
FILTRO DE
COMBUSTIBLE
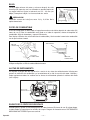
ALETAS DE ENFRIAMIENTO
Se requiere el pasaje libre del flujo de aire a través de las aletas de enfriamiento del cilindro para
prevenir la reducción del rendimiento y el acortamiento de la vida de servicio del motor. Verifique y
limpie regularmente todos los residuos de las aletas de enfriamiento quitando la cubierta del motor
(vea la figura).
SILENCIOSO Y ORIFICIOS DE ESCAPE
Se debe quitar y reparar el silencioso después de cada cincuenta (50) horas de uso. Al mismo tiempo,
se debe limpiar e inspeccionar los orificios de escape. Póngase en contacto con un DISTRIBUIDOR
MARUYAMA AUTORIZADO para este servicio.
CUBIERTA DEL
MOTOR
ALETAS DE
ENFRIAMIENTO
— 23 —
Spanish

— 24 —
Spanish
LIMPIEZA Y APRIETE GENERAL
El atomizador MARUYAMA ofrecerá su rendimiento máximo durante muchas horas, si se realiza el
mantenimiento adecuado. El buen mantenimiento incluye la verificación regular del apriete correcto de
todos los sujetadores y la limpieza de toda la máquina. Póngase en contacto con un distribuidor
MARUYAMA autorizado para sugerencias de mantenimiento adicionales.
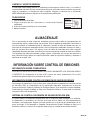
PARACHISPAS
1. Quite el tornillo del silenciador.
2. Saque el parachispas del silenciador y a continuación límpielo
cepillándolo.
3. Instale de nuevo el parachispas en el silenciador.
4. Apretar el tornillo.
ALMACENAJE
Para el almacenaje de largo tiempo del atomizador, primero realice todos los procedimientos del
mantenimiento regular y repare cuando sea necesario. Vacíe el depósito de combustible. Desconecte la
línea de suministro de combustible desde el carburador y presione el bulbo de cebado hasta que se
interrumpa la descarga de combustible desde la línea de retorno de combustible. Arranque el motor y
deje que funcione hasta parar. Tire algunas veces del cable del arrancador para sacar cualquier
combustible remanente del motor. Quite la bujía e inserte una pequeña cantidad de aceite en el cilindro.
Tire lentamente del cable del arrancador y traiga el pistón a la posición más cercana del orificio de la
bujía. Reinstale la bujía. Aplique una capa fina de aceite a todas las superficies metálicas y almacene el
atomizador en un lugar seco.
INFORMACIÓN SOBRE CONTROL DE EMISIONES
INFORMACIÓN SOBRE COMBUSTIBLE
ESTE MOTOR ESTA CERTIFICADO PARA FUNCIONAR UNICAMENTE CON GASOLINA GRADO
CORRIENTE. Se recomienda un mínimo de 87 octanos del índice antidetonante. Este índice
antidetonante aparece fijado en las estaciones de servicio.
INFORMACIÓN SOBRE CONTROL DE EMISIÓN DE GASES DE ESCAPE
Para proteger el Ambiente en el que vivimos todos, Kawasaki tiene incorporado un sistema de control
de emisiones (EM), en cumplimiento de las regulaciones aplicables expedidas por la Junta de
Recursos de Aire de California (California Air Resources Board). Si ha comprado su unidad (Soplador,
Recortadora de Césped, Podadora de Seto) en el Estado de California, el motor tiene una duración
asignada de 300 horas de operación.
SISTEMA DE CONTROL DE EMISIÓN DE GASES DE ESCAPE (EM)
El sistema reduce la cantidad de contaminantes que el escape del motor descarga en la atmósfera.
El combustible, el encendido y los sistemas de escape de este motor han sido cuidadosamente
diseñados y construidos para asegurar un motor eficiente con un nivel bajo de contaminantes en los
gases de escape. Si ha comprado su (Soplador, Recortadora de Césped, Podadora de Seto) en el
estado de California, el sistema de escape del motor incluye un sistema de convertidor catalítico.
TORNILLO
PARACHISPAS
SILENCIADOR

— 25 —
Spanish
MANTENIMIENTO Y GARANTÍA
Es necesario un mantenimiento adecuado para garantizar que su motor continuará teniendo bajos
niveles de emisión. Este Manual del Propietario u Operador. contiene tales recomendaciones de
mantenimiento para su motor. Esos procedimientos, identificados en el Cuadro de Mantenimiento
Periódico, son necesarios para asegurar el cumplimiento de los estándares aplicables.
Como propietario de esta unidad (Soplador, Recortadora de Césped, Podadora de Seto) usted tiene
la responsabilidad de asegurarse de que el mantenimiento recomendado se realiza, a su costo, de
acuerdo con las instrucciones contenidas en este Manual del Propietario u Operador.
La Garantía Limitada Maruyama del Sistema de Control de Emisiones, exige que usted devuelva su
uniddad (Soplador, Recortadora de Césped, Podadora de Seto) a un distribuidor autorizado
Maruyama para que se remedie cualquier defecto bajo garantía. Por favor lea cuidadosamente la
garantía y manténgala válida, y cumpla con las obligaciones de propietario que en ella se detallan.
LA MANIPULACIÓN INDEBIDA DEL SISTEMA DE CONTROL DE EMISIONES ESTÁ PROHIBIDA
La ley del Estado de California prohíbe los actos especificados a continuación, o que se cause
cualquiera de los siguientes hechos: (1) el que cualquier persona, para propósitos diferentes a
mantenimiento, reparación, o reemplazo, retire o deje inoperante cualquier dispositivo o elemento de
diseño incorporado a cualquier motor nuevo para propósitos de control de emisiones, antes de su
venta o entrega al comprador final o mientras tal motor está en uso, o (2) el uso del motor después de
que cualquier persona haya retirado o dejado inoperante tal dispositivo o elemento de diseño.
Los actos relacionados a continuación están entre los actos que se presume constituyen
manipulación indebida:
No manipule indebidamente las piezas originales relacionadas con Tanque de combustible la emisión:
• Carburador y piezas internas • Tanque de combustible
• Bujía
• Magneto o sistema de ignición electrónica
• Filtro de Combustible
• El silenciador ou cualquier otra parte interna del silenciador
• Filtro de aire
RECOMENDACIONES SOBRE COMBUSTIBLE
COMBUSTIBLE
Los motores Kawasaki de 2 tiempos, serie TK requieren mezcla de gasolina – aceite.
Use únicamente gasolina limpia, fresca, sin plomo y de grado corriente.
Grado de Octanaje
El grado de octanaje de una gasolina es la medida de su resistencia a la “detonación”.
Se recomienda usar un octanaje de por lo menos 87, según el índice antidetonante. Este índice
antidetonante se encuentra fijado en las carteleras de las estaciones de servicio.
NOTA:
• Si se presenta “golpeteo o martilleo de válvula”, use una marca diferente de gasolina o gasolina de
más alto octanaje.
La gasolina es extremadamente inflamable y puede ser
explosiva en ciertas condiciones. Gire el interruptor de
arranque del motor a la posición de APAGADO (OFF).
No fume. Asegúrese de que el área esté bien ventilada y
libre de cualquier fuente de llama o chispas: esto incluye
cualquier artefacto de gas con llama piloto.
ADVERTENCIA

— 26 —
Spanish
MEZCLA DE ACEITE PARA EL MOTOR DE 2 TIEMPOS
El aceite se debe mezclar con la gasolina para lubricar el pistón, el cilindro, el cigüeñal, los cojinetes y
los cojinetes de las bielas.
Aceite de Motor Recomendado: aceite formulado para motor de 2 tiempos, enfriado por aire.
Proporción de mezcla de la gasolina y el aceite motor: 1:50 (50 partes de gasolina por 1 parte de
Aceite para Motor de 2 tiempos).
NOTA:
• No mezcle directamente la gasolina y el aceite en el depósito de combustible.
• La calidad lubricante de esta mezcla se deteriora rápidamente.
• No use gasolina que haya estado guardada por más de dos meses.
• Para garantizar un arranque adecuado en ambientes a bajas temperaturas, debe usar combustible
fresco formulado para invierno.
PRECAUCION: El motor se despacha sin combustible.
AJUSTE
AJUSTE DE MARCHA EN VACIO
1. La marcha en vacío es el único ajuste posible.
2. No manipule indebidamente la graduación del carburador para aumentar la velocidad máxima del motor.
3. Si necesita ajustarlo, hágalo a su comerciante autorizado de servicios de MARUYAMA. El
carburador es ajustado en la fábrica; por lo tanto, no puede hacerlo sin desarmar.
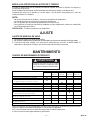
MANTENIMIENTO
CUADRO DE MANTENIMIENTO PERIODICO
Nota: Los intervalos de servicio indicados son para usarse como guía. Se puede dar servicio con más
frecuencia según la necesidad indicada por las condiciones de operación.
M: El servicio lo debe realizar un distribuidor autorizado de motores Maruyama.
★
: Servicio más frecuente bajo condiciones polvorientas.
Siempre retire de la bujía la tapa
cuando dé servicio al motor para evitar
que el motor arranque accidentalmente.
ADVERTENCIA
MANTENIMIENTO Intervalo
Diariamente Primeras Cada Cada Cada
20 horas 20 horas 50 horas 100 horas
Revise y reabastezca el combustible
●
Revise si hay alguna fuga de combustible
●
Revise los pernos, tuercas y tornillos para
asegurarse de que no estén flojos o sueltos
●
Limpie el filtro de combustible
●
★
Limpie el elemento del filtro de aire
●
Apriete los pernos y las tuercas
●●
Limpie la bujía y ajuste la separación de los electrodos
●
★
Limpie el polvo y la mugre acumulados en las aletas del cilindro
●
M
Remueva los depósitos de carbón en la
cabeza del pistón y dentro del cilindro
●
M
Remueva los depósitos de carbón del
tubo de salida del silenciador
●
M Limpie la malla del guarda chispas (si lo hay)
●
M
Revise la porción deslizante del
cigüeñal, la biela, etc.
●
Tubo de combustible Se recomienda reemplazar cada 3 años.

Maruyama U.S., Inc.
4770 Mercantile Drive, suite100,
Fort Worth, TX 76137 U.S.A.
Phone 940-383-7400
Fax 940-383-7466
www.maruyama-us.com
P/N 277117-01_16.03 TAP/F
®
-
 1
1
-
 2
2
-
 3
3
-
 4
4
-
 5
5
-
 6
6
-
 7
7
-
 8
8
-
 9
9
-
 10
10
-
 11
11
-
 12
12
-
 13
13
-
 14
14
-
 15
15
-
 16
16
-
 17
17
-
 18
18
-
 19
19
-
 20
20
-
 21
21
-
 22
22
-
 23
23
-
 24
24
-
 25
25
-
 26
26
-
 27
27
-
 28
28


Maruyama MM180 El manual del propietario
- Categoría
- Sopladores / secadores de aire
- Tipo
- El manual del propietario
en otros idiomas
- English: Maruyama MM180 Owner's manual
Artículos relacionados
-
Maruyama MD830-1 El manual del propietario
-
-
-
-
Maruyama BL9000-GT-HA El manual del propietario
-
-
-
-
-