Oster 133093-005-000 Manual de usuario
- Categoría
- Batidoras
- Tipo
- Manual de usuario
Este manual también es adecuado para

User Manual
BLENDERS
Manual de Instrucciones
LICUADORAS
Manuel d’Instructions
MÉLANGEURS
P.N. 133093-005-000
www.oster.com
For product questions contact:
Sunbeam Consumer Service
USA : 1.800.334.0759
Canada : 1.800.667.8623
Mexico : 1.800.506.1700
www.oster.com
© 2011 Sunbeam Products, Inc. doing business as Jarden Consumer Solutions.
All rights reserved. Distributed by Sunbeam Products, Inc. doing business as
Jarden Consumer Solutions, Boca Raton, Florida 33431.
Para preguntas sobre los productos llama:
Sunbeam Consumer Service
EE.UU. : 1.800.334.0759
Canadá : 1.800.667.8623
México : 1.800.506.1700
www.oster.com
© 2011 Sunbeam Products, Inc. operando bajo el nombre de Jarden Consumer Solutions.
Todos los derechos reservados. Distribuido por Sunbeam Products, Inc. operando bajo
el nombre de Jarden Consumer Solutions, Boca Raton, Florida 33431.
Pour les questions de produit:
Sunbeam Consumer Service
États-Unis : 1.800.334.0759
Canada : 1.800.667.8623
Mexique : 1.800.506.1700
www.oster.com
© 2011 Sunbeam Products, Inc. faisant affaires sous le nom de Jarden Consumer Solutions.
Tous droits reservés. Distribué Sunbeam Corporation(Canada) Limited faisant affaires sous le nom de
Jarden Consumer Solutions, 20B Hereford Street, Brampton (Ontario) L6Y 0M1.
SPR071111-475
Printed in U.S.A. Impreso en EE.UU Imprimé aux États-Unis
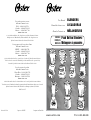
Push Button Blenders
Mélangeurs à poussoirs
MODELS/
MODELOS
MODÈLES

A
B
C
D
E
*F
G
I
J
2 3
We l c o m e
Congratulations on your purchase of an Oster
®
Blender!
To learn more about
OSTER
®
products, please visit us at www.oster.com.
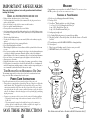
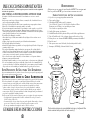
Fe a t u r e s o F Yo u r Bl e n d e r
A. Feeder cap for adding ingredients while blending
B. Leak-proof lid
C. Your
Oster
®
Blender includes one of the following:
5 or 6-cup (1.2–1.4 L) Dishwasher-Safe Glass Jar
8-cup (1.89 L) Party Pitcher Glass Jar
6-cup (1.4 L) Break-Resistant Plastic Jar
D. Sealing ring for tight seal
E. Ice Crusher Blade pulverizes ice for smooth frozen drinks
F. Threaded Jar Nut or Threaded Jar Skirt (Select Models Feature a Threaded
Jar Skirt)
G. Powerful motor with ALL-METAL-DRIVE for lasting durability
H. Control panel
I. Pulse for precise blending control (Location varies per model)
J. HIGH/LOW Switch (Select Models Only)
IMPORTANT SAFEGUARDS
When using electrical appliances, basic safety precautions should be followed,
including the following:
Re a d a l l i n s t R u c t i o n s b e f o R e u s e
• Unplugcordfromoutletwhennotinuseorbeforecleaning.
• Toprotectagainstriskofelectricalshock,donotimmersethecord,plugormotorbasein
water or any other liquids.
• Donotletcordhangoveredgeoftableorcounterortouchhotsurfaces.
• Neverleaveapplianceunattendedwheninuse.
• Closesupervisionisnecessarywhenusedbyornearchildren.
• Avoidcontactwithmovingparts.Keephandsandutensilsoutofjarwhileblendingtoprevent
personal injury or damage to the blender. A rubber spatula may be used only when the blender
is not running.
• Thebladeissharp.Handlewithcare.
• Toreducetheriskofinjury,neverplacecutter-assemblybladesonbasewithoutjarproperly
attached.
• Alwaysputthelidonthejarbeforeoperatingtheblender.
• Donotblendboilingliquidsintheblender.
•Whenblendinghotliquidsbewareofsteam.Removethefillercapfromthelidtoallowsteam
to escape.
• Donotoperateanyappliancewithadamagedcordorplugoraftertheappliancemalfunctions
or is dropped or damaged in any manner. Return the appliance to the nearest Authorized
Sunbeam Appliance Service Center for examination, repair or electrical mechanical adjustment.
• Donotuseoutdoorsorforcommercialpurposes;thisapplianceisforhouseholduseonly.
• Alwaysoperateonaflatsurface.
• Unplugtheblenderwhennotinuse,beforetakingofforputtingonpartsandbeforecleaning.
• Usethisapplianceforitsintendeduseasdescribedinthismanual.Theuseofattachmentsnot
made by the manufacturer, including canning or ordinary jar and processing assembly parts, is
not recommended by Sunbeam Products, Inc. and may cause injury.
th i s PR o d u c t is f o R ho u s e h o l d us e on l y
The maximum rating marked on the product is based on the attachment that draws
the greatest load. Other attachments may draw less power.
Po W e r co r d In s t r u c t I o n s
Please follow the instructions below to ensure the safe use of the power cord.
• Thisapplianceisequippedwithapolarizedplug.Thistypeofplughasonebladethat
is wider than the other. This plug will fit in a polarized outlet only one way. This is
a safety feature intended to help reduce the risk of electrical shock. If you are unable
to insert the plug into the outlet, contact a qualified electrician to replace the obsolete
outlet. Do not attempt to defeat the safety purpose of the polarized plug by modifying
the plug in any way.
• Youmayuseanextensioncord,ifnecessary,butbecertaintofollowtheseguidelines:
– The marked electrical rating of the extension cord must be at least 120/127 Volt,
60 Hz, 10A.
–
The extension must be arranged so that it will not drape over the countertop
or
tabletop, will not be within the reach of children, and will not be tripped over.
– Do not pull, twist or otherwise abuse the power cord.
SAVE THESE INSTRUCTIONS
*Note: Blender models will feature a Threaded Jar Nut OR a Threaded Jar Skirt (F)
H

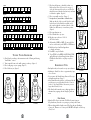
5. Place threaded jar nut or threaded jar skirt over
blade and jar (Note: If there are slots on top of
collar, line them up with notches on jar.) Place the
threaded jar nut or threaded jar skirt on jar and turn
it clockwise to tighten. (Figure 4)
6. Place jar assembly onto base. (Figure 5)
7.
Line up tabs of jar with tabs on blender base.
Make sure the tab of the jar on the
left
side is in the
back of the tab of the blender base and the tab of
the jar on the right side is in front of the tab of the
blender base. Make sure jar is seated into position.
(Figure 6)
8. Place ingredients into jar.
9. Place lid with feeder cap on jar.
10. Plug the power cord into a 120 Volt
AC electrical outlet.
11. Slide switch to HIGH or LOW. (If your model does
not have a slide switch, push HIGH or LOW button.)
12. Push desired speed and blend ingredients
to desired consistency.
13. Press OFF to stop the blender.
14. To use PULSE, select HIGH or LOW. Push PULSE
and hold down for desired length of time. Release
PULSE and allow blade to stop. Repeat cycle as
desired.
Blending Tips
•Putliquidsinthejarfirst,unlessarecipesaysotherwise.
•Crushingice:Crush6icecubesorapproximately2cups
of ice at a time.
•Donotremovethelidwhileinuse.Removefillercapto
add smaller ingredients. (Figure 7)
•Cutallfirmfruitsandvegetables,cookedmeats,fishand
seafood into pieces no larger than 3/4 inch (1.8 cm) to
1 inch (2.5 cm). Cut all kinds of cheeses into pieces no
larger than 3/4 inch (1.8 cm).
•Thisblenderwillnotmashpotatoes,whipeggwhitesor
substitute dairy toppings, mix stiff dough or grind raw
meat.
Hot Foods
•OpentheFillerCaptoventsteam.TiltFillerCapawayfromyou.
Keephandsawayfromthecoveropeningtopreventpossibleburns.
•Whenworkingwithhotliquids,removeFillerCapandstartblendingat
a low speed. Then move to a faster speed. DO NOT add liquid over the 4 cup
(1 liter) level.
54
Using Your Blender
1. Clean blender according to the instructions in the “Cleaning and Storing
Your Blender” section.
2. Turn jar upside down so the small opening is at the top. (Figure 1)
3. Place sealing ring over jar opening. (Figure 2)
4. Place blade into jar. (Figure 3)
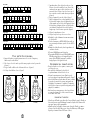
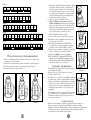
12345678910 11 12
EASY CLEAN
PURÉE CREAM CHOP WHIPMIX GRATE BLENDSHRED GRINDLIQUEFY
ICE CRUSH
LOW HIGH
16-Speed
LOW HIGH
1234567891011121314
EASYCLEAN
BEAT PURÉE CREAM CHOP WHIPMIX MINCEGRATE BLENDSHRED GRINDLIQUEFY ICE CRUSH
14-Speed
LOW HIGH
12-Speed
LOW HIGH
12345678910
EASY CLEAN
PURÉE CHOP WHIPMIX GRATE BLENDGRIND LIQUEFY
ICE CRUSH
10-Speed
LOW HIGH
12345678
PURÉE CHOP MIX PULSE LIQUEFY SHAKE SMOOTHIEICE CRUSH
8-Speed
12345678910111213141516
PULSE
EASY CLEAN
STIR BEAT PURÉE CHOP WHIP MIX
ICECRUSH
GRATEBLEND SHREDGRIND MASH LIQUEFY FRAPPÉ
Figure 1 Figure 2 Figure 3
Figure 4
Figure 5
Figure 6
Figure 7

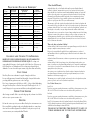
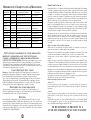
Processing Foods in Blender*
PR o c e s s e d un P R o c e s s e d sP e c i a l
fo o d Qu a n t i t y Qu a n t i t y in s t R u c t i o n s
Breadcrumbs 1/2-cup (125 ml) 1 slice, torn in 8 pieces Pulse on low
Celery 3/4-cup (200 ml) 1-cup (250 ml) of 1-inch (2.5 cm) pieces Pulse on low
Cheese, Cheddar 1-cup (250 ml) 1-cup (250 ml) of 1-inch (2.5 cm) pieces Pulse on low
Cheese, Swiss 1-cup (250 ml) 1-cup (250 ml) of 1-inch (2.5 cm) pieces Pulse on low
Cheese, Hard
or Semi-Hard 1-cup (250 ml) 1-cup (250 ml) of 1-inch (2.5 cm) pieces Chop continuously
Coffee Beans 1-cup (250 ml) 1-cup (250 ml) Grind 45 seconds or to
desired consistency
Cookies, Wafer 1/2-cup (125 ml) 10 wafers Pulse on low
Crackers, Graham 1/2-cup (125 ml) 8 crackers Pulse on low
Peppers 2/3-cup (150 ml) 1-cup (250 ml) Pulse on high
Meat, Boneless,
Cooked 1-cup (250 ml) 1-cup (250 ml) of 1-inch (2.5 cm) pieces Chop continuously
Nuts, almonds,
peanuts, pecans, 1-cup (250 ml) 1-cup (250 ml) Pulse on high
walnuts
76
Cleaning and Storing Your Blender
IMPORTANT: UNPLUG BEFORE CLEANING. DO NOT IMMERSE THE
BLENDER BASE IN WATER OR ANY OTHER LIQUID.
Use a damp, soft
sponge with mild detergent to clean the outside of the blender base. All parts except
for the blender base are dishwasher-safe. Place sealing ring in bottom basket of
dishwasher. You can also wash the parts in warm, soapy water. Rinse well and dry.
Easy Clean
Note: Easy Clean is not a substitute for regular cleaning described above.
It is especially important to disassemble and thoroughly clean your blender when
processing milk, dairy products, meats, seafood and eggs.
Pour 3 cups of warm water in the blender jar. Add 1 – 2 drops of liquid dishwashing
detergent. Select Easy Clean or blend on lowest speed. Blend detergent for 10 – 15
seconds. Empty jar of soapy water into sink. Rinse jar thoroughly with clean water.
Storing Your Blender
After cleaning, reassemble blade to jar with sealing ring and jar bottom. Store blender
with cover ajar to prevent container odor.
Recipes
For fun and creative recipes for your new Oster
®
blender please visit www.oster.com.
Here you will find everything from the perfect Breakfast Smoothie to creamy Soups,
Sauces and a host of Oster signature Frozen Drinks. For the perfect recipe for any
occasion—turn on your creativity with Oster
®
Blenders!
1-Year Limited Warranty
Sunbeam Products, Inc, or if in Canada, Sunbeam Corporation (Canada) Limited
(collectively “Sunbeam”) warrants that for a period of one year from the date of purchase,
this product will be free from defects in material and workmanship. Sunbeam, at its option,
will
repair or replace this product or any component of the product found to be defective during
the warranty period. Replacement will be made with a new or remanufactured product or
component. If the product is no longer available, replacement may be made with a similar
product of equal or greater value. This is your exclusive warranty.
This warranty is valid for the original retail purchaser from the date of initial retail purchase and
isnottransferable.Keeptheoriginalsalesreceipt.Proofofpurchaseisrequiredtoobtainwarranty
performance. Sunbeam
®
dealers, service centers, or retail stores selling Sunbeam
®
products do not
have the right to alter, modify or any way change the terms and conditions of this warranty.
This warranty does not cover normal wear of parts or damage resulting from any of the following:
negligent use or misuse of the product, use on improper voltage or current, use contrary to the
operating instructions, disassembly, repair or alteration by anyone other than Sunbeam or an
authorized Sunbeam
®
service center. Further, the warranty does not cover: Acts of God, such as
fire, flood, hurricanes and tornadoes.
What are the limits on Sunbeam’s Liability?
Sunbeam shall not be liable for any incidental or consequential damages caused by the breach of
any express, implied or statutory warranty or condition.
Except to the extent prohibited by applicable law, any implied warranty or condition of
merchantability or fitness for a particular purpose is limited in duration to the duration of the
above warranty.
Sunbeam disclaims all other warranties, conditions or representations, express, implied, statutory
or otherwise.
Sunbeam shall not be liable for any damages of any kind resulting from the purchase,
use or
misuse of, or inability to use the product including incidental, special, consequential
or similar damages
or loss of profits, or for any breach of contract, fundamental or otherwise,
or for any claim brought
against purchaser by any other party.
Some provinces, states or jurisdictions do not allow the exclusion or limitation of incidental
or
consequential damages or limitations on how long an implied warranty lasts, so the above
limitations or exclusion may not apply to you.
This warranty gives you specific legal rights, and you may also have other rights that vary
from
province to province, state to state or jurisdiction to jurisdiction.
How To Obtain Warranty Service
In the U.S.A.
If you have any question regarding this warranty or would like to obtain warranty service, please
call 1 800-334-0759 and a convenient service center address will be provided to you.
In Canada
If you have any question regarding this warranty or would like to obtain warranty service, please
call 1 800-667-8623 and a convenient service center address will be provided to you.
In the U.S.A., this warranty is offered by Sunbeam Products, Inc located in Boca Raton, Florida
33431. In Canada, this warranty is offered by Sunbeam Corporation (Canada) Limited, located
at 20B Hereford Street Brampton, Ontario L6Y 0M1.
PLEASE DO NOT RETURN THIS PRODUCT TO ANY OF
THESE ADDRESSES OR TO THE PLACE OF PURCHASE.
*Suggested processing and blending guidelines.

98
PRECAUCIONES IMPORTANTES
Al usar electrodomésticos, deben seguirse precauciones básicas de seguridad,
incluidas las siguientes:
LEA TODAS LAS INSTRUCCIONES ANTES DE USAR
•Desenchufeelcabledeltomacorrientecuandoelelectrodomésticonoestéenusooantesde
limpiarlo.
•Paraprotegercontraelriesgodechoqueseléctricos,nosumerjaelcable,elenchufenilabasecon
motor en agua ni en ningún otro líquido.
•Nodejequeelcablecuelguedelbordedelamesaomostradorniquetoquesuperficiescalientes.
•Nuncadejeelelectrodomésticosinsupervisióncuandoloestéusando.
•Esnecesariaunasupervisiónatentacuandoelelectrodomésticoesusadoporniñosocercadeellos.
•Eviteelcontactoconlaspiezasenmovimiento.Mantengalasmanosyutensiliosfueradelajarra
cuandolicúeparaevitarlesionespersonalesocausardañoalalicuadora.Puedeusarunaespátulade
gomasólocuandolalicuadoranoestéenfuncionamiento.
•Lacuchillaesfilosa.Manipuleconcuidado.
•Parareducirelriesgodeherida,nuncaasambleadehojadelugarenlabasesinfrascoconectó
apropiadamente.
•Siemprecoloquelatapaenlajarraantesdeponerlalicuadoraenfuncionamiento.
•Nolicúelíquidoshirviendoenlalicuadora.
•Cuandolicúelíquidoscalientestengacuidadoconelvapor.Quitelatapadellenadodelatapapara
permitir que salga el vapor.
•Nopongaenfuncionamientoningúnelectrodomésticoquetengauncableoenchufedañadoo
despuésdequeelelectrodomésticofuncionemalosehayacaídoosehayadañadodealgúnmodo.
Devuelva el electrodoméstico al Centro de servicio autorizado de electrodomésticos Sunbeam más
cercano para que sea revisado, reparado o para ajustes electromecánicos.
•Nouseenexterioresniconfinescomerciales;esteelectrodomésticoessóloparausodoméstico.
•Siempreuseenunasuperficiehorizontal.
•Desenchufelalicuadoracuandonoestéenuso,antesdequitarocolocarpiezasyantesdelimpiarla.
•Useesteelectrodomésticoparaelfinqueestádiseñadosegúnsedescribeenestemanual.Elusode
accesorios no fabricados por el fabricante, incluyendo latas o jarras comunes y piezas del ensamble
del procesador no está recomendado por Sunbeam Products, Inc. y puede provocar lesiones.
es t e PR o d u c t o es só l o P a R a us o do m é s t i c o
La potencia máxima marcada en el producto se basa en el accesorio que soporta la carga más grande.
Otros accesorios pueden requerir menos potencia.
In s t r u c c I o n e s so B r e e l ca B l e al I m e n t a c I ó n
Sigalasinstruccionesqueaparecenacontinuaciónparaasegurarelusosegurodelcabledecorriente.
•Esteelectrodomésticoestáequipadoconunenchufepolarizado.Estetipodeenchufe
tiene una clavija que es más ancha que la otra. Este enchufe encajará en un tomacorriente
polarizado en un solo sentido. Esta es una característica de seguridad con el fin de
ayudar a reducir el riesgo de choques eléctricos. Si no puede introducir el enchufe en
eltomacorriente,póngaseencontactoconunelectricistacalificadoparaquecambieel
tomacorriente obsoleto. No intente modificar el enchufe de ningún modo para eliminar el
propósitodeseguridaddelenchufepolarizado.
•Puedeusaruncabledeextensión,sifueranecesario,peroasegúresedeseguirestaspautas:
–Laclasificacióneléctricamarcadadelcabledeextensióndebeserdeporlomenos
120/127 voltios, 60 Hz, 10 A.
–Laextensióndebecolocarsedemodoquenoquedecolgandodelmostradorolamesa,
quenoestéalalcancedelosniños,yendondenopuedatropezarseconella.
– No tire, gire ni maltrate de ningún otro modo el cable de corriente.
GUARDE ESTAS INSTRUCCIONES
Bi e n v e n i d o
¡Felicitaciones por su compra de una Licuadora
OSTER
®
! Para averiguar más
sobre los productos
OSTER
®
, por favor visítenos en www.oster.com.
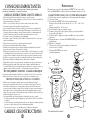
Ca r a C t e r í s t i C a s d e su Li C u a d o r a
A. Copa de acceso para agregar ingredientes mientras licua
B. Tapa a prueba de fugas
C. Su Licuadora
OSTER
®
incluye uno de los siguientes:
Vaso de Vidrio de 5–6 tazas (1,2–1,4 L) Lavable en Lavadora de Platos
Resistente vaso de Plástico con capacidad para 6 tazas
Vaso de vidrio con capcidad para 8 tazas
D. Anillo sellador para un cierre hermético
E. Cuchilla Trituradora de Hielo pulveriza el hielo para las bebidas congeladas suaves
F. DiscodeFondoRoscadoóelAro(solamente algunos modelos incluyen el Ars.)
G. Motor poderoso con el sistema ALL-METAL-DRIVE para una mayor durabilidad
H. Panel de control
I. Pulso para un exacto control de licuado (Localización depende del modelo)
J. Interruptor (ALTA/BAJA) (Solamente Modelos Selectos)
*
Ciertos modelos incluyen el aro para estabilidad en la mesa y el refigerador. Otros
modelos solamente incluyen el disco de fondo roscado (F).
A
B
C
D
E
*F
G
I
J
H

5. Junte hasta traber el disco de fondo roscado con el aro.
Coloque el aro sobre la cuchilla y el vaso. (Nota: Si hay
ranuras en la parte superior del aro, alinéelas con las
muescas del vaso.) Coloque el aro sobre el vaso y gire el
disco con fondo roscado en sentido horario para apretar.
(Figura 4)
6. Ponga el conjunto del vaso sobre la base. (Figura 5)
7. Alinee las lengüetas del vaso con las lengüetas de la base
de la licuadora. Asegúrese de que la lengüeta del vaso en
el lado izquierdo esté en el dorso de la lengüeta de la base
de la licuadora y la lengüeta del vaso en el lado derecho
esté adelante de la lengüeta de la base de la licuadora.
Asegúresequeelvasoseasienteenposición.(Figura 6)
8. Coloque los ingredientes en el vaso.
9. Coloque la tapa con la copa de acceso en el vaso.
10. Enchufeelcordóndealimentaciónenuntomacorriente
de 120 volts CA.
11. Deslice el interruptor a ALTO o BAJO. (Si su modelo no
tiene un interruptor deslizante, presione el botón ALTO o
BAJO.)
12. Empuje la velocidad deseada y licue los ingredientes a la
consistencia deseada.
13. Presione APAGAR para parar la licuadora.
14. Para utilizar PULSO, seleccione ALTO o BAJO. Presione
PULSO y reténgalo abajo por la longitud deseada de
tiempo. Libere PULSO y permita que la cuchilla se
detenga. Repita el ciclo según lo deseado.
Sugerencias para Licuar
•Pongaloslíquidosenelvasoprimero,amenosquela
receta diga otra cosa.
•Parapicarhielo:Machaque6cubosdehielo
o aproximadamente 2 tazas de hielo a la vez.
•Noquitelatapamientrasestéenuso.Quitelacopade
accesoparaagregarlosingredientesmáspequeños.(Figura 7)
•Cortetodaslasfrutasyvegetalesfirmes,lascarnescocinadas,
los pescados y los mariscos en piezas no más grandes que
3/4 pulgada (1,8 centímetros) a 1 pulgada (2,5 centímetros).
Corte toda clase de quesos en piezas no más grandes que 3/4
pulgada (1,8 centímetros).
•Estalicuadoranotriturapatatas,nobateclarasdehuevo
ni cremas de substitutos de la leche, no mezcla la masa
tiesa ni muele carne cruda.
Alimentos Calientes
•Abralatapadellenadoparadejarsalirelvapor.Inclinelatapadellenadoen
direcciónopuestaausted.Mantengalasmanosalejadasdelaaberturadela
tapa para evitar posibles quemaduras.
•Cuandotrabajeconlíquidoscalientes,quitelatapadellenadoycomience
a licuar a baja velocidad. Luego pase a una velocidad mayor. NO agregue
líquidos por encima del nivel de 4 tazas (1 litro).
1110
Uso de Su Licuadora
1. Limpielalicuadorasegúnlasinstruccionesenlasección“Limpiezay
Almacenaje de su Licuadora”.
2. Gireelvasoalrevésdemodoquelaaberturapequeñaestéenlapartealta.
(Figura 1)
3. Ponga el anillo sellador sobre la abertura del vaso. (Figura 2)
4. Coloque la cuchilla en el vaso. (Figura 3)
12345678910 11 12
LIMPIA
TRITURAR
FACIL
PURÉ CREMA PICAR BATIR MEZCLAR RALLAR MEZCLAR CORTAR MOLER LICUAR
HIELO
BAJA ALTA
16 Velocidades
BAJA ALTA
12345678910 11 12 13 14
LIMPIA
TRITURAR
FACIL
BATIR PURE CREMA PICAR BATIR MEZCLAR MOLER RALLAR MEZCLAR CORTAR MOLER LICUAR
HIELO
14 Velocidades
BAJA ALTA
12 Velocidades
BAJA ALTA
12345678910
LIMPIA
TRITURAR
FACIL
PURÉ PICAR BATIR MEZCLAR RALLAR MEZCLAR MOLER LICUAR
HIELO
10 Velocidades
BAJA ALTA
12345678
TRITURAR
PURÉ PICAR MEZCLAR PULSO LICUAR
FRAPPÉ SMOOTHIE
HIELO
8 Velocidades
12345678910111213141516
LIMPIA TRITURAR
PULSO
FACIL
REVOLVER
BATIR PURÉ PICAR BATIR MEZCLAR
HIELO
RALLAR
MEZCLAR CORTARMOLER PURÉLICUAR FRAPPÉ
Figura 1 Figura 2 Figura 3
Figura 4
Figura 5
Figura 6
Figura 7

có m o PR o c e s a R al i m e n t o s e n l a li c u a d o R a *
ca n t i d a d in s t R u c c i o n e s
a l i m e n t o s PR o c e s a d a ca n t i d a d no PR o c e s a d a es P e c i a l e s
Pan Rallado 1/2 taza (125 ml)
1 rodaja, cortada en 8 partes
Pulso de los bajos
Apio 3/4 taza (200 ml) 1 taza (250 ml) de trozos de 1 pulg. (2,5 cm) Pulso de los bajos
Queso,Amarillo 1taza(250ml) 1taza(250ml)detrozosde1pulg.(2,5cm) Pulsodelosbajos
Queso,Suizo 1taza(250ml) 1taza(250ml)detrozosde1pulg.(2,5cm) Pulsodelosbajos
Queso,
Duro o Semiduro 1 taza (250 ml) 1 taza (250 ml) de trozos de 1 pulg. (2,5 cm) Picar continuamente
Granos de Café 1 taza (250 ml) 1 taza (250 ml)
Moler los granes de café
hasta la consistencia deseada
Bizcochitos, Oblea 1/2 taza (125 ml) 10 obleas Pulso de los bajos
Galletitas, Graham 1/2 taza (125 ml) 8 galletitas Pulso de los bajos
Pimienta 2/3 taza (150 ml) 1 taza (250 ml) Pulso en alto
Carne, Sin Hueso,
Cocida 1 taza (250 ml) 1 taza (250 ml) de trozos de 1 pulg. (2,5 cm) Picar continuamente
Nueces, almendras,
maní, nueces lisas 1 taza (250 ml) 1 taza (250 ml) Pulso en alto
nueces de nogal
1312
Garantía Limitada de 1 Año
Sunbeam Products, Inc., o si en Canadá, Sunbeam Corporation (Can adá) Limited (colectivamente
“Sunbeam”)
garantiza que este producto estará libre de defectos en material o mano de obra
porun período deunañoa partirdelafechade lacompra.Sunbeam,a su elección,reparará
o reemplazará este producto o cualquier
componente del producto que se encuentre defectuoso
durante el período de garantía. El reemplazo será efectuado por un producto o componente
nuevo o remanufacturado. Si el producto ya no está disponible,
el reemplazo podrá ser efectuarlo
por un producto similar de igual o mayor valor. Esta es su garantía exclusiva.
Esta garantía es válida para el comprador original al detalle desde la fecha de compra original
al detalle y no es
transferible. Guarde el recibo de venta original. Se requiere prueba de compra
para obtener la garantía. Los
concesionarios Sunbeam®, centros de servicio, o almacenes de ventas
al detalle de productos Sunbeam® no
tienen el derecho de alterar, modificar o cambiar, de manera
alguna, los términos y condiciones de esta garantía.
Estagarantíano cubre el desgaste normal delaspiezasodañosresultantesde cualquiera de
los siguientes:
uso negligente o mal uso del producto, uso en voltaje o corriente inapropiada, uso
contrario a las instrucciones
deoperación,desarme,reparaciónoalteraciónporcualquierpersona
que no sea Sunbeam o de un centro de servicio autorizado Sunbeam.
®
Además, esta garantía
no cubre: Actos de la naturaleza, tales como incendios, inundaciones, huracanes o tornados.
¿Cuáles Son los Límites de Responsabilidad de Sunbeam?
Sunbeam no será responsable por ningún daño incidental o consecuente causados por el
incumplimientodelagarantíaocondiciónexpresa,implícitaoreglamentaria.
Excepto hasta donde lo prohíben las leyes aplicables, cualquier garantía implícita o condición
decomerciabilidad o aptitud para un propósito particular,está limitada en duracióna la duración
de la garantía descrita arriba.
Sunbeam niega cualquier otra garantía, condición o representación, expresa, implícita, reglamentaria
o de otra manera.
Sunbeam no será responsable por ningún tipo de daño que resulte de la compra, uso o mal uso,
o inhabilidad de
usar el producto incluyendo daños incidentales, especiales, consecuentes o similares
o pérdida de lucro, o por cualquier
incumplimiento de contrato, fundamental o de otra
manera, o por
cualquier reclamo contra el comprador iniciado por cualquier otra tercera persona.
Algunasprovincias, estados o jurisdiccionesnopermiten la exclusión olalimitación de daños incidentales
o consecuentes,
o limitaciones sobre cuánto dura una garantía implícita, de modo que las limitaciones
o exclusiones mencionadas
arriba pueda que no le aplique a usted.
Esta garantía le otorga derechos legales específicos, y pueda que usted tenga otros derechos,
los cuales varían
deprovinciaaprovincia,deestadoaestadoodejurisdicciónajurisdicción.
Cómo Obtener Servicio de Garantía
En los Estados Unidos –
Si usted tiene alguna pregunta relacionada con esta garantía o quisiera obtener servicio de garantía,
porfavorllamealteléfono1.800.334.0759yleproporcionaremosladireccióndelcentrodeservicio
más conveniente para usted.
En Canadá –
Si usted tiene alguna pregunta relacionada con esta garantía o quisiera obtener servicio de garantía,
porfavorllamealteléfono1.800.667.8623yleproporcionaremosladireccióndelcentrodeservicio
más conveniente para usted.
En México –
Si usted tiene alguna pregunta relacionada con esta garantía o quisiera obtener servicio de garantía,
porfavorllamealteléfono1.800.506.1700yleproporcionaremosladireccióndelcentrodeservicio
más conveniente para usted.
En México, esta garantía es ofrecida por Sunbeam Mexicana, S.A. de C.V., situada en Av. Juarez
No. 40-201, Ex-Hacienda de Santa Monica, tlalnepantla, Estado de México C.P. 54050.
En los Estados Unidos, esta garantía es ofrecida por Sunbeam Products, Inc., situada en Boca
Ratón,Florida33431.EnCanadá,estagarantíaesofrecidaporSunbeamCorporation(Canadá)
Limited, situada en 20B Hereford Street Brampton, Ontario L6Y 0M1.
POR FAVOR, NO REGRESE ESTE PRODUCTO A NINGUNA
DE ESTAS DIRECCIONES NI AL LUGAR DONDE LO COMPRÓ.
Limpieza y Guardado de Su Licuadora
IMPORTANTE: DESENCHUFE ANTES DE LIMPIAR LA BASE y NO
SUMERJA LA BASE DE LA LICUADORA EN AGUA NI EN NINGÚN
OTRO LÍQUIDO
.
Utilice una esponja suave húmeda con detergente suave para
limpiarelexteriordelabasedelalicuadora.Todaslaspiezasaexcepcióndela
base de la licuadora son lavable a máquina. Ponga el anillo de sello en el fondo
de la canasta del lavaplatos. Usted puede también lavar las piezas en agua tibia,
jabonosa. Enjuague bien y seque.
Función para una fácil limpieza
no t a :
La Limpieza Fácil no es un substituto para la limpieza regular descrita arriba.
Es especialmente importante desmontar y limpiar a fondo su licuadora al procesar
la leche, los productos lácteos, las carnes, los mariscos y los huevos.
Vierta 3 tazas de agua tibia en el vaso de la licuadora. Agregue 1 – 2 gotas de detergente
líquido para lavar platos. Seleccione Limpieza Fácil o licue en la velocidad más baja.
Licue el detergente por 10 – 15 segundos. Vacíe el vaso de agua jabonosa en el fregadero.
Enjuague el vaso a conciencia con agua limpia.
Almacenar Su Licuadora
Después de limpiar, vuelva a montar la cuchilla en el vaso con el anillo de sellar y el collar
del vaso. Almacene la licuadora con la cubierta entornada para evitar olor del envase.
Recetas
Para divertidas y creativas recetas para su nueva licuadora Oster
®
visite www.oster.com.
Aquí encontrará todo desde el licuado perfecto para el desayuno hasta cremosas sopas,
salsas y una gran cantidad de bebidas congeladas de Oster. ¡Para la receta perfecta para
todaocasión—enciendasucreatividadconOster
®
!
*Sugerencias para el procesamiento y mezcla.

1514
CONSIGNES IMPORTANTES
L’utilisation de tout appareil électroménager exige l’observation de certaines
précautions fondamentales, y compris des suivantes :
LISEZ LES INSTRUCTIONS AVANT L’EMPLOI
•Débranchezl’appareilàlaprisequandilnesertpasetavantdelenettoyer.
•Pouréviterleschocsélectriques,n’immergezlecordon,laficheoulesocle-moteurnidansl’eau
nidansunautreliquide,quelqu’ilsoit.
•Veillezàcequelecordonnependepasetqu’ilnetoucheàaucunesurfacechaude.
•Nelaissezpasl’appareilsanssurveillancequandilfonctionne.
•Soyeztrèsvigilantlorsquelemélangeurestemployépardesenfantsouàproximitéd’eux.
•Éviteztoutcontactaveclespiècesenmouvement.Gardezmainsettousustensileshorsdu
récipient lors du fonctionnement, pour éviter blessures corporelles ou endommagement de
l’appareil.N’utilisezunespatuledecaoutchoucquelorsquelemoteurestaurepos.
•Lecouteauestacéré,nelemanipulezquetrèsprudemment.
•Pourréduirelerisquedeblessure,jamaisl’assembléedelamedelieusurlabasesanslepota
attaché convenablement.
•Placeztoujourslecouverclesurlerécipientavantlamiseenmarche.
•Netraitezpasdeliquidesbouillantsdanslemélangeur.
•Méfiez-vousdelavapeurlorsquevousmélangezdesliquideschauds.Retirezlebouchon-
mesureducouvercleafinquelavapeurpuisses’échapper.
•N’utilisezpasl’appareilsisoncordonousaficheestabîmé,s’ilamalfonctionné,aétééchappé
ou endommagé de quelque façon. Retournez-le au centre de service agréé de Sunbeam le plus
proche pour le faire examiner et lui faire subir les réglages électriques ou mécaniques requis.
•N’employezcetappareilconçupourl’usagedomestiquenidehorsniàdesfinscommerciales.
•Faitestoujoursfonctionnerlemélangeursurunesurfaceplaneetd’aplomb.
•Débranchez-lelorsqu’ilnesertpas,pourmonteroudémontertoutepièceetpourlenettoyer.
•N’utilisezl’appareilqu’auxfinsdécritesdanslanoticed’emploi.SunbeamProducts,Inc.
déconseillel’emploid’accessoiresnonmanufacturésparlefabricant–bocauxdeconserveou
ordinairesetpiècesmobiles,parexemple–carilspourraientprovoquerdesblessures.
es t u n i Q u e m e n t d e s t i n é à l’u s a g e d o m e s t i Q u e
Lapuissancenominalemaximaleindiquéesurleproduitestbaséesurl’accessoirequi
utiliseleplusd’énergie.Certainsdesaccessoirespeuventenconsommermoins.
in s t r u C t i o n s r e L a t i v e s a u C o r d o n
Veuillez observer les instructions suivantes pour assurer une utilisation sans risques.
•Cetappareilestéquipéd’unefichepolarisée–unebrancheestpluslargequel’autre.La
fichen’enfoncedanslesprisesdecourantpolariséesquedansunsens.Cettemesurede
sécurité a pour but de réduire les risques de choc électrique. Si vous ne pouvez pas enfoncer
lafichedanslaprisedecourant,demandezàunélectricienqualifiéderemplacerlaprise
désuète.N’essayezenaucuncasdeneutraliserlamesuredesécuritédelafichepolariséeenla
modifiant de quelque façon que ce soit.
•Vouspouvezutiliseruncordonprolongateuràconditionderespectercesconseils:
–Latensionassignéeducordonprolongateurdoitêtred’aumoins120/127volts,60Hzet
10ampères.
– Le cordon ne doit pas pendre du plateau de table ou autre, afin que les enfants ne puissent
pasletireretqu’ilnerisquepasdefaireaccidentellementtrébucher.
–Neletirezpasd’uncoupsec,nel’entortillezpasetnel’utilisezpasabusivement.
gaRdeZ ces instRuctions
Bi e n v e n u e
Félicitationpourvotreachatd’unmélangeurOSTER
®
! Pour en savoir plus
sur les produits OSTER
®
,veuillezvisiternotresiteInternetàwww.oster.com
.
C a r a C t é r i s t i q u e s d e v o t r e m é L a n g e u r
A. Goulotte pour ajouter des ingrédients lors du fonctionnement du mélangeur
B. Couvercle étanche
C. Votre mélangeur
OSTER
®
inclutl’undesarticlessuivants:
Récipient en verre lavable au lave-vaisselle de 1,2 l – 1,41 – 1,89 (5–6–8
tasses)
Récipient incassable de 1,4 l (6 tasses)
D. Jointd’étanchéitépourunefermetureétanche
E. La lame de broyage de la glace pulvérise la glace pour la préparation de
boissons glacées moelleuses
F. FonddurécipientóBaguepourassuierlastabilité(sur certains
modèles
sealement)
G. MoteurpuissantaveclesystèmeALL-METAL-DRIVEpourunelongévité
supplémentaire
H. Panneau de commandel
I Pulse pour un contrôle précis du mélange (L’emplacement
pent varier sclon le modéle)
J. Commande HAUT/BAS
(sur certains
modèles uniquement)
*Sur certains modéles seulement.
A
B
C
D
E
*F
G
I
K
J
H

5. Enclencherlabaguedansl’anneaudefixation.Mettre
la bague par-dessus de la bague, les aligner avec les
crans du récipient. (Remarque :S’il y a des rainures
sur le dessus de la bague, aligner-les avec les crans du
le récipient.) Mettre la bague sur le récipient et visser
l’anneaudefixationdanslesensdesaiguillesd’une
montre pour bien la fixer. (Figure 4)
6. Placezlerécipientsurl’embase. (Figure 5)
7. Alignez les languettes du récipient avec celles de
l’embase du mélangeur. Assurez-vous que la languette
gauchedurécipientestderrièrecelledel’embasedu
mélangeur et que la languette droite du récipient est
devantcelledel’embasedumélangeur.Assurez-vous
que le récipient repose en position. (Figure 6)
8. Placez des ingrédients dans le récipient.
9. Placez le couvercle avec la goulotte sur le récipient.
10.Branchezlecordond’alimentationélectriqueàune
prise électrique de 120 V CA.
11. Faites glisser la commande vers HAUT ou BAS.
(Si votre modèle n’est pas pourvu d’une commande
coulissante, poussez le bouton HAUT ou BAS.)
12. Poussez la vitesse souhaitée et mélangez les ingrédients
jusqu’àl’obtentiondelaconsistancesouhaitée.
13. Appuyez sur ARRÊT pour arrêter le mélangeur.
14. Pour utiliser PULSE, sélectionnez HAUT ou BAS.
Appuyez sur le bouton PULSE et maintenez-le enfoncé
pendant la durée souhaitée. Relâchez PULSE laissez la
lames’arrêter.Répétezcecycleaubesoin.
Conseils de mélange
•Mettezd’abordlesliquidesdanslerécipient,saufsila
recette indique le contraire.
•Broyagedelaglace:Broyez6glaçonsouenviron
2tassesdeglaceàlafois.
•Neretirezpaslecouvercleencoursd’utilisation.Retirez
la goulotte pour ajouter de petits ingrédients. (Figure 7)
•Coupeztouslesfruitsetleslégumesfermes,lesviandes,
les poissons, les crustacés cuits en morceaux de 1,8 cm
(3/4pouce)à2,5cm(1pouce)aumaximum.Coupez
les fromages en morceaux de 1,8 cm (3/4 pouce) au
maximum.
•Cemélangeurnehachepaslespommesdeterre,nebat
pas les œufs en neige ou les garnitures de produits de
substitution au lait, ne bat pas la pâte épaisse ou ne
broie pas la viande crue.
Aliments Chauds
•Retirezlebouchon-mesurepourlaisseréchapperlavapeurloindevous.
Écartezvosmainsdel’ouvertureafindelimiterlesrisquesdebrûlures.
•Quandvoustraitezdesalimentschauds,retirezlebouchon-mesurepuisdébutez
lemélangeàvitessebasseavantd’augmenterl’allure.NEdépassezPASle
niveau 4 tasses (1 litre) indiqué sur le récipient.
1716
Utilisation de votre mélangeur
1. Nettoyez le mélangeur selon les instructions de la section « Nettoyage et
rangement de votre mélangeur ».
2. Renversez le récipient afin que sa petite ouverture soit en haut. (Figure 1)
3. Placezlejointd’étanchéitésurl’ouverturedurécipient. (Figure 2)
4. Placez la lame dans le récipient. (Figure 3)
12345678910 11 12
FACILE À
BROY. DE
NETTOYER
PURÉE CRÊME HACHER FOUETTER MÉLANGER RÂPERMÉLANGERRÂPER FINMOUDRELIQUÉFIER
GLACE
BAS RAPID
16 Vitesses
BAS RAPID
1234567891011121314
FACILE À
BROY. DE
NETTOYER
BATTRE PURÉE CRÊME HACHER FOUETTER MÉLANGERRÂPER FINRÂPER MÉLANGER RÂPERMOUDRELIQUÉFIER
GLACE
14 Vitesses
BAS RAPID
12 Vitesses
BAS RAPID
12345678910
FACILE À
BROY DE
NETTOYER PURÉE
HACHER FOUETTER MÉLANGER RÂPER MÉLANGERMOUDRELIQUÉFIER
GLACE
10 Vitesses
BAS RAPID
12345678
BROY DE
PURÉE HACHER MÉLANGER POULS LIQUÉFIER FRAPPÉ SMOOTHIE
GLACE
8 Vitesses
12345678910111213141516
FACILE À
BROY. DE
POULS
NETTOYER REMUER BATTRE PURÉE HACHER
FOUETTER
MÉLANGER
GLACE
RÂPER
MÉLANGER RÂPER FINMOUDRE PURÉELI QUÉFIER FRAPPÉ
Figure 1 Figure 2 Figure 3
Figure 4
Figure 5
Figure 6
Figure 7

1918
Garantie limitée de un an
Sunbeam Products, Inc., ou au Canada, Sunbeam Corporation (Canada) Limited (collectivement
«Sunbeam»)garantitquependantunepériodedeunanàpartirdeladated’achat,ceproduit
seraexemptdedéfautsdematériauxetdemain-d’œuvre.Sunbeam,selonsonchoix,réparera
ou
remplacera ce produit ou tout composant du produit étant trouvé défectueux durant la
périodedecouverturedelagarantie.Leremplacementseraréaliséaumoyend’unproduitou
composant neuf
oureconstruit. Si le produit n’est plus disponible,un produit d’une valeur
similaire ou supérieure
fera lieu de replacement. Ceci est votre garantie exclusive.
Cette garantie est valide pour l’acheteur au détail d’origine à partir de la date d’achat au détail
initiale
etn’estpastransférable.Gardez le reçu de vente d’origine. Une preuve d’achat est requise
pour obtenir
l’applicationdelagarantie.Lesconcessionnaires,lescentresderéparationSunbeam
ou les magasins
audétailvendantdesproduitsSunbeamn’ontpasledroitd’altérer,demodifier
ou de quelconque
façon
changer les termes et conditions de cette garantie.
Cettegarantienecouvrepasl’usurenormaledespiècesnilesdégâtsprovenantd’undessuivants:
mauvaise ou négligente utilisation du produit, emploi sur un mauvais courant ou une mauvaise
tension,
utilisation contraire aux instructions de fonctionnement, démontage, réparation ou
modification
par quiconque autre que Sunbeam ou un centre de réparation Sunbeam agréé. De
plus,lagarantienecouvrepaslescasdeforcemajeure,telsqu’incendies,inondations,ouragans
et tornades.
Quelles Sont les Limites de Responsabilité de Sunbeam ?
Sunbeam ne sera pas responsable des dégâts secondaires ou conséquents provoqués par la
rupture
de toute garantie ou condition exprimée, tacite ou statutaire.
Danslamesuredesloisapplicables,toutegarantieouconditiontacited’aptitudeàêtrevendu
ouutilisédansunbutparticulierestlimitéeenduréeàladuréedelagarantieci-dessus.
Sunbeam rejette toute autre garantie, condition ou représentation exprimée, tacite, statutaire
ou autre.
Sunbeamneserapasresponsablelesdégâts,quellequ’ensoitlasorte,résultantdel’achat,
del’utilisation,
del’abusduproduitoudel’incapacitéàutiliserleproduitycomprislesdégâts
secondaires, spéciaux,
conséquentsousimilaires;nidespertesderevenus;nidetouterupture
decontrat,fondamentaleouautre;nidetouteplaintecontrel’acheteurpartouteautrepartie.
Quelquesprovinces,étatsoujuridictionsnepermettentpasl’exclusionoulalimitationdesdégâts
secondaires ou conséquents ni les limitations sur la durée de garantie tacite, donc il se peut que
leslimitationsouexclusionsci-dessusnes’appliquentpasàvous.
Cettegarantievousdonnedesdroitslégauxprécisetilsepeutquevousayezaussid’autresdroits
quivarientd’uneprovince,d’unétatoud’unejuridictionàl’autre.
Comment obtenir une réparation sous garantie
Aux États-Unis –
Pour toute question au sujet de cette garantie ou si vous désirez obtenir une réparation sous
garantie,
veuillezappelerle1.800.334.0759etl’adressed’uncentrederéparationconvenablevous
sera fournie.
Au Canada –
Pour toute question au sujet de cette garantie ou si vous désirez obtenir une réparation sous garantie,
veuillez appeler le 1.800.667.8623 et l’adresse d’un centre de réparation convenable vous sera
fournie.
Aux
États-Unis
,cette garantie est offerteparSunbeam Products, Inc., siseàBoca Raton, Florida
33431. Au Canada, cette garantie est offerte par Sunbeam Corporation (Canada) Limited,
situéeà
20B Hereford Street Brampton, Ontario L6Y 0M1.
.
NE RETOURNEZ CE PRODUIT NI À
L’UNE DES ADRESSES NI AU LIEU D’ACHAT.
Nettoyage et rangement de votre mélangeur
IMPORTANT : DÉBRANCHEZ AVANT TOUT NETTOYAGE DE
L’EMBASE
et N’IMMERGEZ PAS L’EMBASE DU MÉLANGEUR DANS
L’EAU OU
TOUT
AUTRE LIQUIDE
.
Utilisez une éponge humide et douce avec un
détergent doux pour
nettoyerl’extérieurdel’embasedumélangeur.Tousleséléments,
àl’exceptiondel’embase
du mélangeur, sont lavables au lave-vaisselle. Placez le joint
d’étanchéitédanslepanier
inférieur du lave-vaisselle. Les éléments peuvent aussi être lavés
àl’eauchaudesavonneuse.
Bien rincez et séchez.
Caractéristique Easy Clean
Re m a R Q u e :
Easy Clean ne remplace pas le lavage régulier décrit ci-dessus. Il est
particulièrementimportantdedémonteretdenettoyercomplètementvotremélangeur
lorsdutraitementdulait,deproduitslaitiers,deviandes,depoissonetd’œufs.
Verser3tassesd’eauchaudedanslerécipientdumélangeur.Ajouter1ou2gouttesde
détergentliquidepourlave-vaisselle.SélectionnezEasyCleanoumélangezàlavitesse
lapluslente.Mélangezledétergentpendant10à15secondes.Videzl’eausavonneuse
durécipientdansl’évier.Rincezcomplètementlerécipientàl’eauclaire.
Rangement de votre mélangeur
Aprèslenettoyage,remontezlalamesurlerécipientaveclejointd’étanchéitéetle
fond du récipient. Rangez le mélangeur avec le récipient fermé pour éviter la formation
lacontaminationparlesodeursdel’espacederangement.
Recettes
Pour le plaisir pur et simple ainsi que pour découvrir de nouvelles recettes créées pour
votre nouveau mélangeur Oster
®
, veuillez visiter au www.oster.com. Vous y trouverez une
profusiondedélices,depuislesmoothieparexcellencepourledéjeunerjusqu’auxpotages
crémeuxdélectables,enpassantparlessaucesonctueuses,ainsiqu’unevariétédeboissons
frappéespropresàOster.Quellequesoitl’occasion,donnezlibrecoursàvotrecréativité
et imagination avec Oster
®
mékabgeur
!
PR é P a R a t i o n d’al i m e n t d a n s l e mé l a n g e u R
al i m e n t s Qu a n t i t é
P
a R t i c u l i è R e s bR o y é e Qu a n t i t é n o n bR o y é e co n s i g n e s
Chapelure 1/2 tasse (125 ml) 1 tranche, cassée en 8 morceaux Appuyer sur « Pulse » Bas
Céleri 3/4 tasse (200 ml) 1 tasse (250 ml) de morceaux de 1 pouce (2,5 cm) Appuyer sur « Pulse » Bas
Fromage, cheddar 1 tasse (250 ml) 1 tasse (250 ml) de morceaux de 1 pouce (2,5 cm) Appuyer sur « Pulse » Bas
Fromage, suisse 1 tasse (250 ml) 1 tasse (250 ml) de morceaux de 1 pouce (2,5 cm) Appuyer sur « Pulse » Bas
Fromage,
dur ou mi-dur 1 tasse (250 ml) 1 tasse (250 ml) de morceaux de 1 pouce (2,5 cm) Hacher continuellement
Grains de café 1 tasse (250 ml) 1 tasse (250 ml) Moudre 45 s de la consistance désirée
Biscuits, gaufrettes 1/2 tasse (125 ml) 10 gaufrettes Appuyer sur « Pulse » Bas
Biscuits graham 1/2 tasse (125 ml) 8 biscuits Appuyer sur « Pulse » Bas
Piments 2/3 tasse (175 ml) 1 tasse (250 ml) Appuyer sur « Pulse » Rapid
Viande, désossée, cuite 1 tasse (250 ml) 1 tasse (250 ml) de morceaux de 1 pouce (2,5 cm) Hacher continuellement
Noix, amandes, 1 tasse (250 ml) 1 tasse (250 ml) Appuyer sur « Pulse » Rapid
arachides, pacanes
*Suggestions pour le traitement et le mélange.
-
 1
1
-
 2
2
-
 3
3
-
 4
4
-
 5
5
-
 6
6
-
 7
7
-
 8
8
-
 9
9
-
 10
10


Oster 133093-005-000 Manual de usuario
- Categoría
- Batidoras
- Tipo
- Manual de usuario
- Este manual también es adecuado para
en otros idiomas
- français: Oster 133093-005-000 Manuel utilisateur