Pro-Team ProForce 1500 Manual de usuario
- Categoría
- Aspiradoras
- Tipo
- Manual de usuario
La página se está cargando...
La página se está cargando...
La página se está cargando...

1500
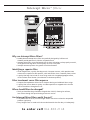
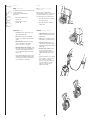
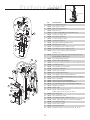
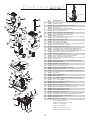
1. Vacuum Housing
cuerpo de la aspiradora
2. Bolt
Tornillo
3. Carry Handle
manija o asa para transportarla
4. Intercept Micro Filter
Bolsa de la aspiradora
5.
Handle T
ube Assembly with Cord
Pieza de ensamblaje con manija y cable
6. Owner’s Manual
Manual
7. Quick Start Instructions
Instrucciones de inicio rápido
parts identification......................................................2
introduction to your new vacuum ..............................3
warnings for usage ....................................................4
assembly ....................................................................5
basics ........................................................................6
f
ilters ..........................................................................7
accessories..................................................................8
clearing blockages......................................................9
troubleshooting........................................................10
limited warranty ......................................................11
parts list ..............................................................12-13
Identificación de las partes . . . . . . . . . . . . . . . . . . . .2
Introducción acerca de su nueva aspiradora . . . . . . .3
precauciones para el uso de la aspiradora . . . . . . . . .4
ensamblaje . . . . . . . . . . . . . . . . . . . . . . . . . . . . . . . .5
operaciones básicas . . . . . . . . . . . . . . . . . . . . . . . . . .6
a
ccesorios . . . . . . . . . . . . . . . . . . . . . . . . . . . . . . . . .7
filtros . . . . . . . . . . . . . . . . . . . . . . . . . . . . . . . . . . . . .8
limpieza de obstrucciones . . . . . . . . . . . . . . . . . . . . .9
solución de problemas . . . . . . . . . . . . . . . . . . . . . .10
garantía limitada . . . . . . . . . . . . . . . . . . . . . . . . . . .11
la lista de partes ..................................................12-13
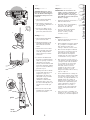
Handle
Manija
Cord Storage Release
Soporte para colocar
el cable
Power Supply Cord
Cable
HEPA Media
Exhaust Filter Cover
Cubierta del filtro
de escape
On/Off Switch
Interruptor de
encendido apagado
Filter Cover
Cubierta del filtro
Filter Housing
Compartimiento
del filtro
Motor Housing
Compartimiento
del motor
Power Nozzle
Boquilla de succión ancha
carton contents
el contenido del cartón
parts identification
identificación de las partes
english español
table of contents
2

1500
español
Lea este material introductorio antes de utilizar su
aspiradora ProForce 1500.
Revise su nuevo producto
ProTeam prueba y revisa minuciosamente todas las
aspiradoras antes de empacarlas y enviarlas; sin embargo,
pueden ocurrir daños durante el transporte o envío.
Desempaque y revise con cuidado su nueva ProForce 1500.
Para conocer las instrucciones que debe seguir respecto a
cualquier problema o daño durante el envío, contacte
inmediatamente al servicio al cliente de ProTeam al
866.888.2168. Todas las devoluciones deben tener un
Número de autorización de retorno (sigla en inglés RAN).
Uso adecuado
Esta guía del sistema eléctrico y mecánico para la aspiradora
ProTeam ProForce 1500 le ayudará a usarla de manera
segura y a prolongar la vida de su nueva aspiradora.
Motores eléctricos de aire frío thru-flow
(que se enfrían con el paso del aire aspirado)
La aspiradora ProForce 1500 contiene un motor eléctrico aire
frío thru-flow, diseñado para ser usado con materiales SECOS
y NO TÓXICOS. Este tipo de motor permite que el aire
aspirado pase sobre el bobinado eléctrico para enfriarlo.
Nunca utilice la ProForce 1500 en:
1) condiciones de humedad
2) situaciones en las que estén presentes
materiales químicos secos u otros materiales
volátiles, o
3) situaciones en las que el flujo de aire pueda ser
limitado o estar bloqueado.
Requerimientos acerca del voltaje
La ProTeam ProForce 1500 es una aspiradora de 120Vg. Los
cambios bruscos de voltaje, sean subidas o bajadas de
voltaje, pueden ocasionar el daño del motor y que el motor
comience a fallar muy rápido. Los números de modelos y las
especificaciones se pueden obtener llamando al Servicio al
cliente ProTeam al 866.888.2168.
Instrucciones para la conexión a tierra
ESTA ASPIRADORA SE DEBE CONECTAR A TIERRA. Si una
aspiradora no funciona bien o deja de funcionar, la conexión
a tierra proporciona un camino para que haya menor
resistencia a la corriente eléctrica y por lo tanto reduce el
riesgo de choques eléctricos. El cable de la ProFor
ce 1500
contiene un equipo de conducción a tierra y un enchufe a
tierra que se debe insertar en un toma corriente adecuado,
que esté bien instalado y conectado a tierra de acuerdo con
los códigos y ordenanzas locales. Pro Team no acepta
ninguna responsabilidad relacionada con unidades a las que
les corten el cable conectado a tierra o con las que utilicen
un cable que no tenga un enchufe con conexión a tierra y
anulará la garantía de la aspiradora.
english
Review this introductory material prior to using your
ProForce 1500 vacuum.
inspect your new product
ProTeam tests and thoroughly inspects all vacuums before
shipping; however damage during shipping can occur.
C
arefully unpack and inspect your new ProForce 1500. For
i
nstructions regarding any shipping damage, immediately
c
ontact ProTeam Customer Service at 866.888.2168. All
returns must have a Return Authorization Number (RAN).
proper usage
These mechanical and electrical system guidelines for the
ProTeam ProForce 1500 vacuum will help you safely use and
prolong the life of your new vacuum.
electric thru-flow motors
The ProForce 1500 contains an electric thru-flow vacuum
motor, designed for use with DRY, NON-TOXIC materials.
These motors permit the vacuumed air to pass over and cool
the electrical components.
Never use the ProForce 1500 in:
1) wet or moist conditions
2) where dry chemical or other volatile materials are
present
3) where airflow may be restricted or blocked.
voltage requirements
Your ProTeam ProForce 1500 is a 120V vacuum. Severe
changes in voltage, either too high or too low, can cause
damage to the motor and cause premature motor failure.
Model numbers and specifications can be obtained by calling:
ProTeam Customer Service at 866.888.2168.
grounding instructions
THIS VACUUM MUST BE GROUNDED. If a vacuum
malfunctions or stops working, grounding provides a path of
least resistance for electrical current, and reduces the risk of
electrical shock. The ProForce 1500 cord has an
equipment-grounding conductor and grounding plug that
must be inserted in an outlet that is installed and grounded
in accordance with all local codes and ordinances. ProTeam
accepts no liability associated with units having cut-off ground
wire or cords not equipped with a ground plug, and will void
the warranty on the vacuum.
introduction
3

1500
english
important safety instructions
READ ALL INSTRUCTIONS BEFORE USING THIS VACUUM
CLEANER.
usage warnings
T
o reduce the risk of fire, electric shock, or injury:
1
. Do not leave vacuum unattended. Unplug from outlet
w
hen not in use and before servicing.
2. Do not use outdoors or on wet surfaces. This vacuum is for
DRY RECOVERY only.
3. Use only as described in this manual. Use only
manufacturer’s recommended attachments and
replacement parts.
4. Do not use a damaged cord or plug. If the vacuum is not
working as it should, or if it has been dropped, damaged,
left outdoors, or exposed to water, return it to an
authorized ProTeam Warranty Station for inspection.
5. Do not pull or carry the vacuum by the cord or use the
cord as a handle. Do not close a door on the cord or pull
the cord around sharp edges or corners. Do not run over
the cord. Keep the cord away from heated surfaces.
6. To unplug, grasp the plug, not the cord. Do NOT pull on
cord to unplug.
7. Do not handle the plug or vacuum with wet hands.
8. Do not put any objects into openings. Keep hair, loose
clothing, fingers, and all parts of the body away from
openings and moving parts. Do not let long hair hang
over or near the unit.
9. Do not vacuum flammable or combustible materials or
anything that is burning or smoking, such as cigarettes,
matches or hot ashes.
10.Remove the Intercept Micro Filter after every use and
before storage. Some types of wood dust and debris
may catch combust.
11.Turn off the unit before unplugging.
12.
Connect to a properly grounded outlet only.
13.Use with care when cleaning stairs.
14.Do not allow the vacuum to be used as a toy. Use caution
when vacuuming near children.
save these instructions
Violation of any of these instructions may void any and all
warranties.
4
español
Instrucciones importantes de seguridad
LEA TODAS LAS INSTRUCCIONES ANTES DE UTILIZAR
ESTA ASPIRADORA
Precauciones de uso
Para reducir el riesgo de fuego, choque eléctrico o lesiones:
1. No deje la aspiradora desatendida. Desconéctela del
tomacorriente cuando la unidad no esté en uso.
2. No la utilice en exteriores o en superficies húmedas. Esta
aspiradora es únicamente para ASPIRAR EN SECO.
3. Utilícela sólo y tal como se describe en este manual.
Use únicamente los aditamentos y los repuestos
recomendados por el fabricante.
4. No use un cable o un enchufe dañado. Si la unidad no
está funcionando o no funciona como debería, o si se ha
golpeado, dañado, si ha sido dejada al aire libre o
expuesta al agua, llévela auna estación de garantía
autorizada ProTeam para que le hagan una revisión.
5. No tire ni hale la aspiradora por el cable ni utilice el cable
para cargar la aspiradora. No cierreninguna puerta sobre
el cable ni pase el cable cerca de bordes con filo o
esquinas. No pise elcable. Mantenga el cable alejado de
superficies calientes.
6. NO jale el cable para desconectarlo. Tome el enchufe
desde el tomacorriente y jálelo.
7. No manipule el tomacorriente o la aspiradora con las
manos húmedas.
8. No coloque ningún objeto cerca de las aberturas de la
unidad. Mantenga el cabello, la ropa,los dedos y todas
las partes del cuerpo alejados de las aberturas y de las
partes en movimiento.El cabello largo no debe colgar
sobre o cerca de la unidad.
9. No aspire materiales inflamables o combustibles ni nada
que se esté quemando o produciendohumo como los
cigarrillos, los fósforos o las cenizas calientes.
10.Desocupe la bolsa del micro filtro después de cada uso y
antes de guardar la aspiradora.Algunos tipos de polvo de
madera y escombros podrían incendiarse.
11.Apague la unidad siempre antes de desconectarla.
12.Conéctela únicamente a un tomacorriente adecuado
conectado a tierra.
13.Use con cuidado al limpiar escaleras.
14.No permita que la aspiradora sea usada como juguete.
Úsela con precaución cuando aspire cerca de niños.
Siga estas instrucciones
La violación de cualquiera de estas instrucciones puede
anular cualquiera o todas las garantías.
warnings

1500
english
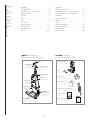
two steps to assemble
1. Install cord and attach handle
to the vacuum
• Fully insert power cord
into receptacle on back of
vacuum (a).
• Insert handle tube in
receptacle (b).
• Locate the small rivet on the
rear lower portion of the
handle tube (c).
• Apply downward pressure on
the handle until only half of
the rivet is visible.
2. Place carry handle over
handle tube and align the
hole in the carry handle with
the hole in the handle tube.
Insert handle screw through
the carry handle and handle
tube. Tighten screw into
handle nut plate (d).
1
5
español
dos pasos para ensamblar a
aspiradora
1. Instale el cable y acople las
manijas a la aspiradora
• Inserte completamente el cable
en el receptáculo (a).
• Inserte el tubo de la manija en el
receptáculo (b).
• Localice (small rivet) en la base
del el tubo de la manija (c).
• Aplique hacia abajo presión en
el tubo de la manija que sólo
mitad del (rivet) sea visable.
2. Coloque la manija para
transportar la aspiradora sobre
el tubo de la manija y haga
coincidir el agujero de este con
el de la manija para transportar
la aspiradora. Inserte el tornillo a
través de los dos agujeros.
Apriete el tornillo en la tuerca
de la manija (d).
assembly
a
b
c
d
2

1500
6
basics
english
indicator lights
The panel on the front of the
vacuum contains the indicators
listed below: (A)
bag full
Indicator is lit when Intercept
Micro Filter should be changed.
power nozzle on
Indicator is lit when power nozzle
is turned on.
jammed brush roll
Indicator is lit when brush roll is
jammed.
reset switch
Press red reset switch to restart
motor after clearing a blockage.
(B)
on/off switch
Make sure the vacuum is plugged
in to a 3-prong outlet, then press
the Off/On switch to start or stop
the vacuum. (C)
The switch positions are:
I = Vacuum Motor On
O = Off
II = Power Nozzle and
Vacuum Motor On
lowering the handle
Place foot on base cover and pull
handle toward you. (D)
D
A
B
C
español
luces indicadoras
El panel de la parte frontal de la
aspiradora contiene los siguientes
indicadores: (A)
bolsa llena
Este indicador se enciende cuando
se debe cambiar la bolsa.
boquilla de succión ancha
encendida
Este indicador se enciende cuando
la boquilla de succión ancha está
en funcionamiento.
obstrucción en el rodillo del
cepillo
Este indicador se enciende cuando
el rodillo del cepillo está obstruido.
interruptor de reinicio
Presione rojo el interruptor
automático del circuito para
reiniciar el motor después de
limpiar un atasco u obstrucción.
(B)
interruptor de encendido/
apagado
Revise que la aspiradora esté
conectada a un tomacorriente de
tres puntas, luego presione el
interruptor de encendido/
apagado para encender o detener
la aspiradora. (C)
Las posiciones del interruptor son:
O = Apagado
I = Motor de la aspiradora
encendido
II = Motores de la
aspiradora y de la
boquilla de succión
ancha encendidos
Bajar la manija
Coloque el pie en la cubierta de la
base y hale la manija hacia usted.
(D)
R
E
S
E
T
R
E
S
E
T

1500
changing micro filter bag
NOTE: Check and Intercept Micro
Filter frequently! (A)
1. To open the filter bag cover, press
the release button on top of the
bag cover and open cover.
2. Remove the used
Intercept Micro
Filter
from the vacuum and
discard. Do not reuse bag.
3. Insert the new
Intercept Micro Filter
.
4. Close the cover and snap into
place.
c
hanging
m
otor intake filter
The motor intake filter is located
under the
Intercept Micro Filter
. (B)
1. Remove the
Intercept Micro Filter
,
then lift the motor intake filter
from the filter bag housing. (B)
2. Wash the motor intake filter in
warm, soapy water, rinse, and let
THOROUGHLY DRY.
3. Replace the motor intake filter,
then the
Intercept Micro Filter
.
4. Close the cover and snap into
place.
changing HEPA media exhaust filter
1. Remove the exhaust filter cover.
Press the release latch and pull
from vacuum. (C)
2. Remove the old HEPA media
exhaust filter.
3. Insert the new HEPA media
exhaust filter. DO NOT REUSE
EXHAUST FILTER.
4. Clean or dust exhaust filter cover
and replace.
maintaining the filters
HINT
: Protect your motor! Keep
your filters clean.
CHECK:
•
Intercept Micro Filter before
you vacuum (F)
• Intercept Micro Filter after you
vacuum
• Motor Intake Filter, alternating
when you change Intercept
Micro Filter
• Exhaust Filter, alternating when
you change Intercept Micro Filter
CAUTION: Always place switch
in OFF, or “O” position, and unplug
cord from outlet before changing
filters or clearing obstructions.
7
A
B
cambio de la bolsa de micro filtro
NOTA: Revise y cambia la bolsa del
micro filtro con frecuencia! (A)
1. Para abrir la cubierta de bolsa de
filtro, apretar el botón de la lib-
eración encima de la cubierta de
bolsa y abrir la cubierta.
2
. Retire la bolsa del micro filtro de la
a
spiradora y bótela. No reutilice la
bolsa.
3. Inserte la nueva bolsa del micro
filtro.
4. Levante la cubierta y ajústela bien.
cambio del filtro de
entrada del motor
El filtro de entrada del motor está
localizado debajo de la bolsa del
micro filtro (B)
1. Retire la bolsa del micro filtro, saque
el filtro de entrada del motor del
compartimiento de la bolsa del filtro.
(B)
2. Lave el filtro de entrada del
motor en agua jabonosa tibia,
enjuague y DEJE SECAR
COMPLETAMENTE.
3. Vuelva a colocar el filtro de
entrada del motor y luego la
bolsa del micro filtro.
4. Cierre la cubierta y ajuste bien.
cambio del filtro de escape
1. Quite la cubierta del filtro del
escape. Prensa libere trampa y
levan-
tar
la aspiradora.(C)
2. Quite el filtro de escape usado.
3. Inserte el nuevo filtro de escape. NO
REUTILICE EL FIL
TRO DE ESCAPE.
4. limpie o quite el polvo la cubierta
del filtro del escape y reemplaza
mantenimiento de los filtros
SUGERENCIA: Proteja su motor!
Mantenga los filtros limpios.
REVISE:
•
el micro filtro antes de aspirar
• el micro filtro después de aspirar
•
alternar motriz de filtro de toma
cuando usted cambia bolsa Micro
de filtro
•
el filtro del escape que alterna
cuando usted cambia bolsa Micro
de filtro
ADVERTENCIA: Coloque siempre el
interruptor en la posición de APAGA-
DO u “OFF” y desconecte el cable del
tomacorriente antes de cambiar los
filtros y limpiar las obstrucciones o
atascos.
filters
C
HEPA
media
exhaust
filter
exhaust
cover

1500
8
english
using carry handle
To support vacuum and carry when need-
ed, two options are
recommended depending on
preference:
• Place hand under carry
handle. (A)
• Place hand over carry
handle. (B)
electrical cord care
• CAUTION: Leave slack in the cord
while vacuuming. (C)
• DO NOT stretch the cord tightly
between the vacuum and electrical
outlet.
• RELEASE CORD. Turn cord storage
release and place in the down
position to release cord. (D)
• REWIND CORD FOR STORAGE. Turn
the cord storage release and place in
the up position. Wind cord around
lower cord holder and cord storage
release. (E)
• To avoid damaging the power cord
and strain relief, always wrap power
coard counter-clockwise around the
top and bottom cord wraps.
español
uso de la manija o asa para
transportarla
Para sostener la aspiradora y
transportarla cuando sea necesario,
le recomendamos dos opciones
que dependen de su preferencia:
• Coloque la mano por debajo
de la manija. (A)
• Coloque la mano sobre la
manija. (B)
cuidado del cable eléctrico
• ADVERTENCIA: Permita que el
cable no qued tensionado al
aspirar. (C)
• NO tensione el cable entre la
aspiradora y el tomacorriente.
• SOLTAR EL CABLE. Voltee el
soporte para colocar el cable
hacia abajo para poder soltar el
cable. (D)
• ENROLLAR EL CABLE. Voltee
el soporte para colocar el
cable hacia arriba. Enrolle el
cable alrededor del soporte.
(E)
• Para evitar daños en el sujeta-
dor de cable, envuelva siem-
pre el cable en sentido
opuesto a las manecillas del
reloj alrededor de la parte
superior e inferior de la
cubierta del cable.
accessories
A
B
C
D
E

1500
english
clearing the brush roll
CAUTION: Obstructions such as
hair, string, and throw rugs may
cause the brush indicator light to
be illuminated and power nozzle
to shut off.
1
. Turn off vacuum and unplug
p
ower cord from outlet.
2. On underside of vacuum, pull
out, or cut away, obstructions on
the brush roll. (A)
3. Press the reset button on top
side of powerhead (B). Plug-in
power cord, and restart motor.
clearing blockages
1. Turn off vacuum and unplug
power cord from outlet
2. Open Bag Housing Cover (C)
and replace Intercept Micro
Filter. A full filter will restrict
airflow.
3. Disconnect the lower air duct
hose on the back of the power
nozzle (D). Visually check the
lower air duct hose for debris
and remove.
4. To check for unobstructed air
flow, turn on vacuum and place
hand over opening on lower air
duct. (D) If you feel proper
suction, reconnect lower air duct
and resume vacuuming. If block-
age is not in lower air duct hose,
proceed to step 4.
5. Carefully insert a broom handle
(or any similar item like a short
length of hose, pipe, etc )
approximately 14 inches into
wand guide on top of vacuum
housing (E) to dislodge
obstruction or debris. Debris
should then drop or move into
the lower air duct (D) where you
can then remove it with your
hand.
6.
Reconnect the lower air duct
and upper hose assembly, and
power on the vacuum.
9
español
limpieza del rodillo del cepillo
ADVERTENCIA: Las obstrucciones de
cabello, cuerdas y alfombras arru-
gadas pueden hacer que el indi-
cador del cepillo se encienda y que
la boquilla de succión ancha (Power
Nozzle) se apague.
1. Apague la aspiradora y desconecte el
cable del tomacorriente.
2. En la parte inferior de la aspiradora,
retire, hale o corte cualquier
obstrucción del rodillo. (A)
3. Presione el botón del interruptor
automático del circuito (B).
Conecte el cable y vuelva a
encender el motor.
limpieza obstrucciones
1. Apague la aspiradora y desconecte el
cable del tomacorriente.
2. Abra la cubierta protectora de la bolsa
(C) y reemplace el reemplace Micro
Filtro Intercept. Un filtro lleno
restringe o limita la corriente de aire.
3. Desconecte la manguera conductora
de aire inferior en la parte trasera de
la boquilla de succión ancha (D).
Revise visualmente la manguera
conductora de aire inferior para saber
si existe basura o restos y retírelos.
4. Para revisar si la corriente de aire no
está obstruida, encienda la aspiradora
y coloque la mano sobre la abertura
en el conducto de aire inferior (D).
Si usted siente que la succión es
adecuada, vuelva a conectar el
conducto de aire inferior y siga a
spirando. el bloque no es en la
manguera conductora de aire inferior,
siga con el paso 4.
5.
Inserte cuidadosamente el mango de
una escoba (o cualquier objeto similar
como la parte angosta del tubo, o de
otro tubo, etc.) aproximadamente 14
pulgadas dentro de la guía de la
manguera sobre la parte superior de
la cubierta de la aspiradora (E) para
retirar la obstrucción o basura. La
basura debe caer o irse hacia el
conducto de aire inferior (D) donde
entonces usted podrá retirarlo con
su mano.
6. Vuelva a conectar el ensamblaje del
conducto de aire inferior y superior de
la manguera y encienda la aspiradora.
clearing blockages
D
A
port
lower
air duct
guide
C
E
R
E
S
E
T
R
E
S
E
T
B

1500
10
I
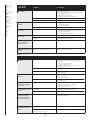
f you are having
THIS PROBLEM. . . It COULD BE . . . Then DO THIS . . .
T
HE VACUUM WILL
N
OT OPERATE
N
o power
I
ntercept Micro Filter not in place
M
ake sure that:
1
. The power switch is “ON”
2. The power supply cord is firmly connected to the vacuum
and plugged into the outlet
3
. Circuit breaker for your building is on
4
. The handle is fully inserted into the receptacle
R
eplace Intercept Micro Filter
D
efective power switch
T
ake to authorized ProTeam Warranty Station
T
HE POWER CORD
IS WARM
A
n extension cord that is too long
Faulty wiring
U
se a safety-colored cord no longer than:
• 50’ at 14 gauge or greater
(Do NOT use 16-gauge)
Take to authorized ProTeam Warranty Station
EXHAUST FROM VACUUM
T
OO WARM
Clogged filter Check the filters (pg. 7)
•
Change the Intercept Micro Filter if not in place or full
•
Clean the motor intake filter
• Replace the HEPA media exhaust filter
V
ACUUM HAS
NO SUCTION
P
lugged hose
D
irty filter
C
heck the hose and clear any obstructions (pg. 9)
C
heck the filters and clean or change (pg. 7)
P
OWER NOZZLE MOTOR
I
S ON BUT BRUSH ROLL
DOES NOT TURN
N
eeds new belt
R
eplace belt/take to an authorized ProTeam Warranty Station
P
OWER NOZZLE WILL NOT
OPERATE
O
bstructions cleared but reset switch not reset
P
ress reset switch on power nozzle
Si tiene este problema…
Podría ser que... Entonces haga lo siguiente...
¡LA ASPIRADORA NO
FUNCIONA!
No hay energía
La bolsa del micro filtro no está en su lugar
Revise sí:
1. El interruptor esté en la posición de encendido “ON”
2. El cable esté:
• Bien conectado a la aspiradora
• Conectado al tomacorriente
3. El interruptor automático del circuito en su casa o
apartamento esté encendido
Vuelva a colocar la bolsa del micro filtro
Interruptor defectuoso de poder Lleve la aspiradora a una estación o centro de Garantía
Autorizado ProTeam
EL CABLE ESTÁ TIBIO O
CALIENTE!
El cable de extensión es demasia o largo
Instalación defectuosa
Utilice un cable de seguridad de color que no sea más largo de:
•
50’ de calibre 14 o mayor
(NO utilice calibre 16)
Lleve la aspiradora a una estación o centro de Garantía
Autorizado ProTeam
EL ESCAPE DE LA
ASPIRADORA ESTÁ DEMASIA-
DO CALIENTE!
El filtro está atascado Revise los filtros:
• Cambie la bolsa del micro filtro si está llena.
• Limpie el filtro de entrada del motor
• Reemplace el filtro de escape
LA ASPIRADORA NO TIENE
SUCCIÓN!
Manga tapada
Filtro sucio
Verifique la manga para cualquier obstrucción
Revise los filtros y límpielos o cámbielos
EL MOTOR DE LA BOQUILLA DE
SUCCIÓN ANCHA (POWER
NOZZLE) ESTÁ ENCENDIDO
PERO EL CEPILLO NO VOLTEA!
Necesita una banda o correa nueva Reemplace la banda o correa o lleve a una estación o centro de
Garantía Autorizado ProTeam
LA BOQUILLA DE SUCCIÓN
ANCHA (POWER NOZZLE) NO
FUNCIONA
El interruptor de la boquilla de succión ancha no está
en la posición II
Se limpiaron las obstrucciones pero el
interruptor de reinicio no reinicia
Coloque el interruptor de reinicio en la posición II
Presione rojo circuito el interruptor de reinicio
Cuadro de problemas
troubleshooting

1500
11
warranty
g
arantía
l
imitada
ProTeam, Inc. garantiza que esta aspiradora no tiene problemas rela-
cionados con materiales y mano de obra que surjan tras el uso normal
y cuidado en los siguientes términos:
Tres (3) años o 1400 horas en total de funcionamiento (lo que ocurra
primero) en todas las partes, mano de obra y motor y de succión
Domel, Dos (2) años en el motor de cepillo de rodillo Johnson y garan-
tía de por vida en todas las partes moldeadas de la aspiradora.
E
sta garantía se aplica desde la fecha de compra sólo si la aspiradora se
utiliza de acuerdo con las instrucciones de funcionamiento de ProTeam.
Esta garantía no se aplica para:
El desgaste normal de las partes que requieran cambio bajo el uso nor-
mal que incluye pero no se limita a: correas, cepillos de rodillo,
mangueras, filtros, interruptores, cepillos de motor de carbono y acce-
sorios.
El desgaste normal y las obstrucciones que puedan ocurrir al usarla.
El daño por uso no autorizado o incorrecto, modificación, alteración,
servicio o reparación.
El motor de succión Domel de la aspiradora está garantizado sólo si se
cumple con la siguiente programación de mantenimiento del cepillo de
c
arbono y si se proporciona el comprobante de mantenimiento:
1. Los cepillos de carbono del motor de la aspiradora se deben reem-
plazar después de las primeras 800 horas de funcionamiento en un cen-
tro de garantía o de servicio autorizado de ProTeam.
2. Los cepillos de carbono se deben volver a reemplazar después de las
siguientes 400 horas de funcionamiento en un centro de garantía o de
servicio autorizado de ProTeam.
3. Los cepillos de carbono se deben volver a reemplazar después de las
siguientes 200 horas de funcionamiento en un centro de garantía o de
servicio autorizado de ProTeam.
Si la anterior programación no se sigue, la estructura del motor de la
aspiradora se deteriorará prematuramente y la cobertura de la garantía
se anulará.
Esta garantía se extiende únicamente al comprador original de la aspi-
radora. Si se encuentra que la aspiradora no funciona bien durante el
período de garantía, Proteam tendrá la opción de reemplazarla o
repararla, sin ningún costo, si se regresa de acuerdo con las siguientes
instrucciones:
La aspiradora se debe limpiar y empacar cuidadosamente en una caja
de cartón bien acolchada y devolverla, con el costo del transporte
prepagado, o se debe llevar a cualquier estación de garantía autorizada
por ProTeam (ver la página xxxx para los lugares de garantía autoriza-
dos). ProTeam no se hace responsable de reparaciones a productos por
un empaque inapropiado.
Se debe expedir un Número de autorización de devolución (siglas en
inglés RAN) antes de recibir el equipo devuelto. Contacte al departa-
mento de servicio al cliente de ProTeam al 866.888.2168 para solicitar
el RAN – exigido para cualquier correspondencia de garantía.
Si no se ha enviado a ProT
eam la tarjeta de garantía diligenciada, se
debe adjuntar una prueba de compra escrita, con la fecha, junto con
una declaración que contenga la naturaleza del malfuncionamiento y el
Número de Autorización de Devolución.
Cualquier arreglo o repuesto bajo esta garantía no extenderá el período
de garantía.
LA ANTERIOR GARANTÍA ESCRITA CONSTITUIRÁ LA RESPONSABILIDAD
EXCLUSIV
A DE PROTEAM.
La anterior garantía es exclusiva y en lugar de todas las otras garantías
expresadas sean orales o escritas. Bajo ninguna circunstancia, sea
supuesta como resultado de incumplimiento de contrato o garantía,
negligencia o de otro modo, ProTeam deberá responsabilizarse ante el
comprador, o ante la persona que la recibe como regalo, o ante
cualquier otra persona, por daños consecuenciales o incidentales espe-
ciales o naturaleza, incluyendo, sin limitación, daños o pérdida del uso
de la propiedad. La responsabilidad de ProTeam bajo ninguna circun-
stancia excederá el precio de compra de la aspiradora. Ningún agente,
empleado o representante de ProT
eam ni ninguna otra persona está
autorizada para modificar esta garantía en ningún aspecto.
limited warranty
ProTeam, Inc. warrants this vacuum cleaner to be free from
defects in materials and workmanship arising under normal
usage and care for the following terms:
Three (3) years or 1400 total hours of operation (whichever
comes first) on all parts, labor and Domel suction motor, Two
(2) years on Johnson brush roll motor and Lifetime on all
molded body parts.
T
his warranty applies from the date of purchase only when the
vacuum cleaner is used in accordance with ProTeam’s operating
instructions.
This warranty does not apply to:
• Normal wear parts that require replacement under normal use
including, but not limited to: belts, brush rolls, hoses, filters,
switches, carbon motor brushes and attachments.
• Ordinary wear and tear and blockages which occur during use.
• Damage due to unauthorized or improper use, modification,
alteration, service or repair.
The Domel vacuum suction motor is guaranteed only if the
following carbon brush maintenance schedule is completed
and proof of maintenance provided:
1. Carbon brushes on the vacuum motor replaced after the first
800 hours
of operation by a ProTeam authorized service or
warranty center.
2.
Carbon brushes replaced again after the next 400 hours of
operation by a ProTeam authorized service or warranty center.
3.
Carbon brushes replaced again after the next 200 hours of
operation by a ProTeam authorized service or warranty center.
If the above schedule is not followed, the vacuum motor
armature will wear out prematurely and will void the warran-
ty coverage.
This warranty is extended only to the original purchaser of the
vacuum cleaner. If the vacuum cleaner is found to be defective
during the warranty period, it will be ProTeam’s option to replace
or repair it, without charge, if returned in accordance with the
following instructions:
The vacuum cleaner should be cleaned and packed carefully in a
well padded carton and returned, shipping charges prepaid, or
taken to any authorized ProTeam Warranty Station. ProTeam will
not be responsible for repairs to products due to improper
packing.
A Return Authorization Number (RAN) must be issued prior to
receiving returned equipment. Contact ProTeam’s customer
ser
vice department at 866.888.2168 to request a RAN – required
for all warranty correspondence.
If a completed warranty card has not been returned to ProT
eam,
a dated, written proof-of-purchase must be enclosed with a
statement advising the nature of the malfunction and a Return
Authorization Number.
Any repair or replacement under this warranty shall not extend
the warranty period.
THE FOREGOING WRITTEN WARRANTY SHALL CONSTITUTE
THE EXCLUSIVE LIABILITY OF PROTEAM.
The above warranty is exclusive and in lieu of all other expressed
warranties whether oral or written. Under no circumstances,
whether alleged as a result of breach of contract or warranty,
negligence or otherwise, shall ProTeam be liable to the purchaser
or gift recipient or any other person for special incidental or
consequential damages or nature, including, without limitation,
damages to or loss of use of property. ProTeam’s liability under
any circumstances will not exceed the purchase price of the
vacuum cleaner. No agent, employee, or representative of
ProT
eam, nor any other person, is authorized to modify this
warranty in any respect.
La página se está cargando...
La página se está cargando...
La página se está cargando...
Transcripción de documentos
table of contents 1500 english español parts identification......................................................2 Identificación de las partes . . . . . . . . . . . . . . . . . . . .2 introduction to your new vacuum ..............................3 Introducción acerca de su nueva aspiradora . . . . . . .3 warnings for usage ....................................................4 precauciones para el uso de la aspiradora . . . . . . . . .4 assembly ....................................................................5 ensamblaje . . . . . . . . . . . . . . . . . . . . . . . . . . . . . . . .5 basics ........................................................................6 operaciones básicas . . . . . . . . . . . . . . . . . . . . . . . . . .6 filters ..........................................................................7 accesorios . . . . . . . . . . . . . . . . . . . . . . . . . . . . . . . . .7 accessories..................................................................8 filtros . . . . . . . . . . . . . . . . . . . . . . . . . . . . . . . . . . . . .8 clearing blockages ......................................................9 limpieza de obstrucciones . . . . . . . . . . . . . . . . . . . . .9 troubleshooting........................................................10 solución de problemas . . . . . . . . . . . . . . . . . . . . . .10 limited warranty ......................................................11 garantía limitada . . . . . . . . . . . . . . . . . . . . . . . . . . .11 parts list ..............................................................12-13 la lista de partes ..................................................12-13 parts identification identificación de las partes carton contents el contenido del cartón Handle Manija On/Off Switch Interruptor de encendido apagado 1. Vacuum Housing cuerpo de la aspiradora Cord Storage Release Soporte para colocar el cable 2. Bolt Tornillo Power Supply Cord Cable Filter Cover Cubierta del filtro Filter Housing Compartimiento del filtro 3. Carry Handle manija o asa para transportarla 4. Intercept Micro Filter Bolsa de la aspiradora Motor Housing Compartimiento del motor 5. Handle Tube Assembly with Cord HEPA Media Exhaust Filter Cover Cubierta del filtro de escape Pieza de ensamblaje con manija y cable 6. Owner’s Manual Manual 7. Quick Start Instructions Instrucciones de inicio rápido Power Nozzle Boquilla de succión ancha 2 Review this introductory material prior to using your ProForce 1500 vacuum. Lea este material introductorio antes de utilizar su aspiradora ProForce 1500. inspect your new product Revise su nuevo producto ProTeam tests and thoroughly inspects all vacuums before shipping; however damage during shipping can occur. Carefully unpack and inspect your new ProForce 1500. For instructions regarding any shipping damage, immediately contact ProTeam Customer Service at 866.888.2168. All returns must have a Return Authorization Number (RAN). ProTeam prueba y revisa minuciosamente todas las aspiradoras antes de empacarlas y enviarlas; sin embargo, pueden ocurrir daños durante el transporte o envío. Desempaque y revise con cuidado su nueva ProForce 1500. Para conocer las instrucciones que debe seguir respecto a cualquier problema o daño durante el envío, contacte inmediatamente al servicio al cliente de ProTeam al 866.888.2168. Todas las devoluciones deben tener un Número de autorización de retorno (sigla en inglés RAN). proper usage These mechanical and electrical system guidelines for the ProTeam ProForce 1500 vacuum will help you safely use and prolong the life of your new vacuum. Uso adecuado electric thru-flow motors Esta guía del sistema eléctrico y mecánico para la aspiradora ProTeam ProForce 1500 le ayudará a usarla de manera segura y a prolongar la vida de su nueva aspiradora. The ProForce 1500 contains an electric thru-flow vacuum motor, designed for use with DRY, NON-TOXIC materials. These motors permit the vacuumed air to pass over and cool the electrical components. Motores eléctricos de aire frío thru-flow (que se enfrían con el paso del aire aspirado) Never use the ProForce 1500 in: 1) wet or moist conditions 2) where dry chemical or other volatile materials are present 3) where airflow may be restricted or blocked. voltage requirements Your ProTeam ProForce 1500 is a 120V vacuum. Severe changes in voltage, either too high or too low, can cause damage to the motor and cause premature motor failure. Model numbers and specifications can be obtained by calling: ProTeam Customer Service at 866.888.2168. grounding instructions THIS VACUUM MUST BE GROUNDED. If a vacuum malfunctions or stops working, grounding provides a path of least resistance for electrical current, and reduces the risk of electrical shock. The ProForce 1500 cord has an equipment-grounding conductor and grounding plug that must be inserted in an outlet that is installed and grounded in accordance with all local codes and ordinances. ProTeam accepts no liability associated with units having cut-off ground wire or cords not equipped with a ground plug, and will void the warranty on the vacuum. La aspiradora ProForce 1500 contiene un motor eléctrico aire frío thru-flow, diseñado para ser usado con materiales SECOS y NO TÓXICOS. Este tipo de motor permite que el aire aspirado pase sobre el bobinado eléctrico para enfriarlo. Nunca utilice la ProForce 1500 en: 1) condiciones de humedad 2) situaciones en las que estén presentes materiales químicos secos u otros materiales volátiles, o 3) situaciones en las que el flujo de aire pueda ser limitado o estar bloqueado. Requerimientos acerca del voltaje La ProTeam ProForce 1500 es una aspiradora de 120Vg. Los cambios bruscos de voltaje, sean subidas o bajadas de voltaje, pueden ocasionar el daño del motor y que el motor comience a fallar muy rápido. Los números de modelos y las especificaciones se pueden obtener llamando al Servicio al cliente ProTeam al 866.888.2168. Instrucciones para la conexión a tierra ESTA ASPIRADORA SE DEBE CONECTAR A TIERRA. Si una aspiradora no funciona bien o deja de funcionar, la conexión a tierra proporciona un camino para que haya menor resistencia a la corriente eléctrica y por lo tanto reduce el riesgo de choques eléctricos. El cable de la ProForce 1500 contiene un equipo de conducción a tierra y un enchufe a tierra que se debe insertar en un toma corriente adecuado, que esté bien instalado y conectado a tierra de acuerdo con los códigos y ordenanzas locales. Pro Team no acepta ninguna responsabilidad relacionada con unidades a las que les corten el cable conectado a tierra o con las que utilicen un cable que no tenga un enchufe con conexión a tierra y anulará la garantía de la aspiradora. 3 1500 español introduction english warnings 1500 english español important safety instructions Instrucciones importantes de seguridad READ ALL INSTRUCTIONS BEFORE USING THIS VACUUM CLEANER. LEA TODAS LAS INSTRUCCIONES ANTES DE UTILIZAR ESTA ASPIRADORA usage warnings Precauciones de uso To reduce the risk of fire, electric shock, or injury: 1. Do not leave vacuum unattended. Unplug from outlet when not in use and before servicing. Para reducir el riesgo de fuego, choque eléctrico o lesiones: 2. Do not use outdoors or on wet surfaces. This vacuum is for DRY RECOVERY only. 3. Use only as described in this manual. Use only manufacturer’s recommended attachments and replacement parts. 1. No deje la aspiradora desatendida. Desconéctela del tomacorriente cuando la unidad no esté en uso. 2. No la utilice en exteriores o en superficies húmedas. Esta aspiradora es únicamente para ASPIRAR EN SECO. 3. Utilícela sólo y tal como se describe en este manual. Use únicamente los aditamentos y los repuestos recomendados por el fabricante. 4. Do not use a damaged cord or plug. If the vacuum is not working as it should, or if it has been dropped, damaged, left outdoors, or exposed to water, return it to an authorized ProTeam Warranty Station for inspection. 5. Do not pull or carry the vacuum by the cord or use the cord as a handle. Do not close a door on the cord or pull the cord around sharp edges or corners. Do not run over the cord. Keep the cord away from heated surfaces. 6. To unplug, grasp the plug, not the cord. Do NOT pull on cord to unplug. 4. No use un cable o un enchufe dañado. Si la unidad no está funcionando o no funciona como debería, o si se ha golpeado, dañado, si ha sido dejada al aire libre o expuesta al agua, llévela auna estación de garantía autorizada ProTeam para que le hagan una revisión. 5. No tire ni hale la aspiradora por el cable ni utilice el cable para cargar la aspiradora. No cierreninguna puerta sobre el cable ni pase el cable cerca de bordes con filo o esquinas. No pise elcable. Mantenga el cable alejado de superficies calientes. 6. NO jale el cable para desconectarlo. Tome el enchufe desde el tomacorriente y jálelo. 7. Do not handle the plug or vacuum with wet hands. 8. Do not put any objects into openings. Keep hair, loose clothing, fingers, and all parts of the body away from openings and moving parts. Do not let long hair hang over or near the unit. 9. Do not vacuum flammable or combustible materials or anything that is burning or smoking, such as cigarettes, matches or hot ashes. 10.Remove the Intercept Micro Filter after every use and before storage. Some types of wood dust and debris may catch combust. 7. No manipule el tomacorriente o la aspiradora con las manos húmedas. 8. No coloque ningún objeto cerca de las aberturas de la unidad. Mantenga el cabello, la ropa,los dedos y todas las partes del cuerpo alejados de las aberturas y de las partes en movimiento.El cabello largo no debe colgar sobre o cerca de la unidad. 9. No aspire materiales inflamables o combustibles ni nada que se esté quemando o produciendohumo como los cigarrillos, los fósforos o las cenizas calientes. 10.Desocupe la bolsa del micro filtro después de cada uso y antes de guardar la aspiradora.Algunos tipos de polvo de madera y escombros podrían incendiarse. 11.Turn off the unit before unplugging. 12.Connect to a properly grounded outlet only. 11.Apague la unidad siempre antes de desconectarla. 13.Use with care when cleaning stairs. 14.Do not allow the vacuum to be used as a toy. Use caution when vacuuming near children. save these instructions 12.Conéctela únicamente a un tomacorriente adecuado conectado a tierra. 13.Use con cuidado al limpiar escaleras. 14.No permita que la aspiradora sea usada como juguete. Úsela con precaución cuando aspire cerca de niños. Violation of any of these instructions may void any and all warranties. Siga estas instrucciones La violación de cualquiera de estas instrucciones puede anular cualquiera o todas las garantías. 4 two steps to assemble dos pasos para ensamblar a aspiradora 1. Install cord and attach handle to the vacuum 1. Instale el cable y acople las manijas a la aspiradora • Fully insert power cord into receptacle on back of vacuum (a). • Inserte completamente el cable en el receptáculo (a). • Inserte el tubo de la manija en el receptáculo (b). • Insert handle tube in receptacle (b). b • Localice (small rivet) en la base del el tubo de la manija (c). • Locate the small rivet on the rear lower portion of the handle tube (c). • Aplique hacia abajo presión en el tubo de la manija que sólo mitad del (rivet) sea visable. • Apply downward pressure on the handle until only half of the rivet is visible. c 2 2. d Place carry handle over handle tube and align the hole in the carry handle with the hole in the handle tube. Insert handle screw through the carry handle and handle tube. Tighten screw into handle nut plate (d). 5 2. Coloque la manija para transportar la aspiradora sobre el tubo de la manija y haga coincidir el agujero de este con el de la manija para transportar la aspiradora. Inserte el tornillo a través de los dos agujeros. Apriete el tornillo en la tuerca de la manija (d). assembly a español 1500 1 english basics 1500 english español indicator lights luces indicadoras The panel on the front of the vacuum contains the indicators listed below: (A) El panel de la parte frontal de la aspiradora contiene los siguientes indicadores: (A) bag full Indicator is lit when Intercept Micro Filter should be changed. bolsa llena Este indicador se enciende cuando se debe cambiar la bolsa. power nozzle on Indicator is lit when power nozzle is turned on. boquilla de succión ancha encendida Este indicador se enciende cuando la boquilla de succión ancha está en funcionamiento. jammed brush roll Indicator is lit when brush roll is jammed. obstrucción en el rodillo del cepillo Este indicador se enciende cuando el rodillo del cepillo está obstruido. interruptor de reinicio Press red reset switch to restart motor after clearing a blockage. (B) Presione rojo el interruptor automático del circuito para reiniciar el motor después de limpiar un atasco u obstrucción. (B) on/off switch interruptor de encendido/ apagado B S E T RE reset switch A RE S E T Make sure the vacuum is plugged in to a 3-prong outlet, then press the Off/On switch to start or stop the vacuum. (C) The switch positions are: I = Vacuum Motor On O = Off II = Power Nozzle and Vacuum Motor On Revise que la aspiradora esté conectada a un tomacorriente de tres puntas, luego presione el interruptor de encendido/ apagado para encender o detener la aspiradora. (C) C Las posiciones del interruptor son: O = Apagado I = Motor de la aspiradora encendido II = Motores de la aspiradora y de la boquilla de succión ancha encendidos Bajar la manija lowering the handle Place foot on base cover and pull handle toward you. (D) Coloque el pie en la cubierta de la base y hale la manija hacia usted. (D) D 6 NOTE: Check and Intercept Micro Filter frequently! (A) NOTA: Revise y cambia la bolsa del micro filtro con frecuencia! (A) 1. To open the filter bag cover, press the release button on top of the bag cover and open cover. 1. Para abrir la cubierta de bolsa de filtro, apretar el botón de la liberación encima de la cubierta de bolsa y abrir la cubierta. 2. Remove the used Intercept Micro Filter from the vacuum and discard. Do not reuse bag. 3. Insert the new Intercept Micro Filter. 4. Close the cover and snap into place. changing motor intake filter The motor intake filter is located under the Intercept Micro Filter. (B) 1. Remove the Intercept Micro Filter, then lift the motor intake filter from the filter bag housing. (B) 2. Wash the motor intake filter in warm, soapy water, rinse, and let THOROUGHLY DRY. 3. Replace the motor intake filter, then the Intercept Micro Filter. B 4. Close the cover and snap into place. changing HEPA media exhaust filter 1. Remove the exhaust filter cover. Press the release latch and pull from vacuum. (C) cambio del filtro de entrada del motor El filtro de entrada del motor está localizado debajo de la bolsa del micro filtro (B) 1. Retire la bolsa del micro filtro, saque el filtro de entrada del motor del compartimiento de la bolsa del filtro. (B) 2. Lave el filtro de entrada del motor en agua jabonosa tibia, enjuague y DEJE SECAR COMPLETAMENTE. 3. Vuelva a colocar el filtro de entrada del motor y luego la bolsa del micro filtro. 4. Cierre la cubierta y ajuste bien. cambio del filtro de escape 3. Insert the new HEPA media exhaust filter. DO NOT REUSE EXHAUST FILTER. 2. Quite el filtro de escape usado. HINT: Protect your motor! Keep your filters clean. CHECK: • Intercept Micro Filter before you vacuum (F) • Intercept Micro Filter after you vacuum • Motor Intake Filter, alternating when you change Intercept Micro Filter • Exhaust Filter, alternating when you change Intercept Micro Filter HEPA media exhaust filter 4. Levante la cubierta y ajústela bien. 1. Quite la cubierta del filtro del escape. Prensa libere trampa y levantar la aspiradora.(C) maintaining the filters C 3. Inserte la nueva bolsa del micro filtro. 2. Remove the old HEPA media exhaust filter. 4. Clean or dust exhaust filter cover and replace. exhaust cover 2. Retire la bolsa del micro filtro de la aspiradora y bótela. No reutilice la bolsa. CAUTION: Always place switch in OFF, or “O” position, and unplug cord from outlet before changing filters or clearing obstructions. 7 3. Inserte el nuevo filtro de escape. NO REUTILICE EL FILTRO DE ESCAPE. 4. limpie o quite el polvo la cubierta del filtro del escape y reemplaza mantenimiento de los filtros SUGERENCIA: Proteja su motor! Mantenga los filtros limpios. REVISE: • el micro filtro antes de aspirar • el micro filtro después de aspirar • alternar motriz de filtro de toma cuando usted cambia bolsa Micro de filtro • el filtro del escape que alterna cuando usted cambia bolsa Micro de filtro ADVERTENCIA: Coloque siempre el interruptor en la posición de APAGADO u “OFF” y desconecte el cable del tomacorriente antes de cambiar los filtros y limpiar las obstrucciones o atascos. filters cambio de la bolsa de micro filtro 1500 A changing micro filter bag accessories 1500 english español using carry handle uso de la manija o asa para transportarla To support vacuum and carry when needed, two options are recommended depending on preference: • Place hand under carry handle. (A) • Place hand over carry handle. (B) electrical cord care • CAUTION: Leave slack in the cord while vacuuming. (C) • DO NOT stretch the cord tightly between the vacuum and electrical outlet. • RELEASE CORD. Turn cord storage release and place in the down position to release cord. (D) • REWIND CORD FOR STORAGE. Turn the cord storage release and place in the up position. Wind cord around lower cord holder and cord storage release. (E) • To avoid damaging the power cord and strain relief, always wrap power coard counter-clockwise around the top and bottom cord wraps. Para sostener la aspiradora y transportarla cuando sea necesario, le recomendamos dos opciones que dependen de su preferencia: A • Coloque la mano por debajo de la manija. (A) • Coloque la mano sobre la manija. (B) cuidado del cable eléctrico B • ADVERTENCIA: Permita que el cable no qued tensionado al aspirar. (C) • NO tensione el cable entre la aspiradora y el tomacorriente. • SOLTAR EL CABLE. Voltee el soporte para colocar el cable hacia abajo para poder soltar el cable. (D) • ENROLLAR EL CABLE. Voltee el soporte para colocar el cable hacia arriba. Enrolle el cable alrededor del soporte. (E) • Para evitar daños en el sujetador de cable, envuelva siempre el cable en sentido opuesto a las manecillas del reloj alrededor de la parte superior e inferior de la cubierta del cable. C D E 8 limpieza del rodillo del cepillo CAUTION: Obstructions such as hair, string, and throw rugs may cause the brush indicator light to be illuminated and power nozzle to shut off. ADVERTENCIA: Las obstrucciones de cabello, cuerdas y alfombras arrugadas pueden hacer que el indicador del cepillo se encienda y que la boquilla de succión ancha (Power Nozzle) se apague. 1. Turn off vacuum and unplug power cord from outlet. 1. Apague la aspiradora y desconecte el cable del tomacorriente. 2. On underside of vacuum, pull out, or cut away, obstructions on the brush roll. (A) 2. En la parte inferior de la aspiradora, retire, hale o corte cualquier obstrucción del rodillo. (A) 3. Press the reset button on top side of powerhead (B). Plug-in power cord, and restart motor. 3. Presione el botón del interruptor automático del circuito (B). Conecte el cable y vuelva a encender el motor. C clearing blockages 1. Turn off vacuum and unplug power cord from outlet 2. Open Bag Housing Cover (C) and replace Intercept Micro Filter. A full filter will restrict airflow. 3. Disconnect the lower air duct hose on the back of the power nozzle (D). Visually check the lower air duct hose for debris and remove. D 4. To check for unobstructed air flow, turn on vacuum and place hand over opening on lower air duct. (D) If you feel proper suction, reconnect lower air duct and resume vacuuming. If blockage is not in lower air duct hose, proceed to step 4. 5. Carefully insert a broom handle (or any similar item like a short length of hose, pipe, etc ) approximately 14 inches into wand guide on top of vacuum housing (E) to dislodge obstruction or debris. Debris should then drop or move into the lower air duct (D) where you can then remove it with your hand. E port 6. Reconnect the lower air duct and upper hose assembly, and power on the vacuum. guide lower air duct 9 limpieza obstrucciones 1. Apague la aspiradora y desconecte el cable del tomacorriente. 2. Abra la cubierta protectora de la bolsa (C) y reemplace el reemplace Micro Filtro Intercept. Un filtro lleno restringe o limita la corriente de aire. 3. Desconecte la manguera conductora de aire inferior en la parte trasera de la boquilla de succión ancha (D). Revise visualmente la manguera conductora de aire inferior para saber si existe basura o restos y retírelos. 4. Para revisar si la corriente de aire no está obstruida, encienda la aspiradora y coloque la mano sobre la abertura en el conducto de aire inferior (D). Si usted siente que la succión es adecuada, vuelva a conectar el conducto de aire inferior y siga a spirando. el bloque no es en la manguera conductora de aire inferior, siga con el paso 4. 5. Inserte cuidadosamente el mango de una escoba (o cualquier objeto similar como la parte angosta del tubo, o de otro tubo, etc.) aproximadamente 14 pulgadas dentro de la guía de la manguera sobre la parte superior de la cubierta de la aspiradora (E) para retirar la obstrucción o basura. La basura debe caer o irse hacia el conducto de aire inferior (D) donde entonces usted podrá retirarlo con su mano. 6. Vuelva a conectar el ensamblaje del conducto de aire inferior y superior de la manguera y encienda la aspiradora. 1500 RE E T E T clearing the brush roll S RE S B español clearing blockages A english troubleshooting 1500 If you are having THIS PROBLEM. . . It COULD BE . . . Then DO THIS . . . No power Make sure that: 1. The power switch is “ON” 2. The power supply cord is firmly connected to the vacuum and plugged into the outlet 3. Circuit breaker for your building is on 4. The handle is fully inserted into the receptacle Intercept Micro Filter not in place Replace Intercept Micro Filter Defective power switch Take to authorized ProTeam Warranty Station An extension cord that is too long Use a safety-colored cord no longer than: • 50’ at 14 gauge or greater (Do NOT use 16-gauge) Faulty wiring Take to authorized ProTeam Warranty Station EXHAUST FROM VACUUM TOO WARM Clogged filter Check the filters (pg. 7) • Change the Intercept Micro Filter if not in place or full • Clean the motor intake filter • Replace the HEPA media exhaust filter VACUUM HAS NO SUCTION Plugged hose Check the hose and clear any obstructions (pg. 9) Dirty filter Check the filters and clean or change (pg. 7) POWER NOZZLE MOTOR IS ON BUT BRUSH ROLL DOES NOT TURN Needs new belt Replace belt/take to an authorized ProTeam Warranty Station POWER NOZZLE WILL NOT OPERATE Obstructions cleared but reset switch not reset Press reset switch on power nozzle Si tiene este problema… Podría ser que... Entonces haga lo siguiente... ¡LA ASPIRADORA NO FUNCIONA! No hay energía Revise sí: 1. El interruptor esté en la posición de encendido “ON” 2. El cable esté: • Bien conectado a la aspiradora • Conectado al tomacorriente 3. El interruptor automático del circuito en su casa o apartamento esté encendido La bolsa del micro filtro no está en su lugar Vuelva a colocar la bolsa del micro filtro Interruptor defectuoso de poder Lleve la aspiradora a una estación o centro de Garantía Autorizado ProTeam El cable de extensión es demasia o largo Utilice un cable de seguridad de color que no sea más largo de: • 50’ de calibre 14 o mayor (NO utilice calibre 16) Instalación defectuosa Lleve la aspiradora a una estación o centro de Garantía Autorizado ProTeam EL ESCAPE DE LA ASPIRADORA ESTÁ DEMASIADO CALIENTE! El filtro está atascado Revise los filtros: • Cambie la bolsa del micro filtro si está llena. • Limpie el filtro de entrada del motor • Reemplace el filtro de escape LA ASPIRADORA NO TIENE SUCCIÓN! Manga tapada Verifique la manga para cualquier obstrucción Filtro sucio Revise los filtros y límpielos o cámbielos EL MOTOR DE LA BOQUILLA DE SUCCIÓN ANCHA (POWER NOZZLE) ESTÁ ENCENDIDO PERO EL CEPILLO NO VOLTEA! Necesita una banda o correa nueva Reemplace la banda o correa o lleve a una estación o centro de Garantía Autorizado ProTeam LA BOQUILLA DE SUCCIÓN ANCHA (POWER NOZZLE) NO FUNCIONA El interruptor de la boquilla de succión ancha no está en la posición II Coloque el interruptor de reinicio en la posición II Se limpiaron las obstrucciones pero el interruptor de reinicio no reinicia Presione rojo circuito el interruptor de reinicio THE VACUUM WILL NOT OPERATE THE POWER CORD IS WARM Cuadro de problemas EL CABLE ESTÁ TIBIO O CALIENTE! 10 ProTeam, Inc. warrants this vacuum cleaner to be free from defects in materials and workmanship arising under normal usage and care for the following terms: ProTeam, Inc. garantiza que esta aspiradora no tiene problemas relacionados con materiales y mano de obra que surjan tras el uso normal y cuidado en los siguientes términos: Three (3) years or 1400 total hours of operation (whichever comes first) on all parts, labor and Domel suction motor, Two (2) years on Johnson brush roll motor and Lifetime on all molded body parts. Tres (3) años o 1400 horas en total de funcionamiento (lo que ocurra primero) en todas las partes, mano de obra y motor y de succión Domel, Dos (2) años en el motor de cepillo de rodillo Johnson y garantía de por vida en todas las partes moldeadas de la aspiradora. This warranty applies from the date of purchase only when the vacuum cleaner is used in accordance with ProTeam’s operating instructions. Esta garantía se aplica desde la fecha de compra sólo si la aspiradora se utiliza de acuerdo con las instrucciones de funcionamiento de ProTeam. This warranty does not apply to: • Normal wear parts that require replacement under normal use including, but not limited to: belts, brush rolls, hoses, filters, switches, carbon motor brushes and attachments. • Ordinary wear and tear and blockages which occur during use. • Damage due to unauthorized or improper use, modification, alteration, service or repair. The Domel vacuum suction motor is guaranteed only if the following carbon brush maintenance schedule is completed and proof of maintenance provided: 1. Carbon brushes on the vacuum motor replaced after the first 800 hours of operation by a ProTeam authorized service or warranty center. 2. Carbon brushes replaced again after the next 400 hours of operation by a ProTeam authorized service or warranty center. 3. Carbon brushes replaced again after the next 200 hours of operation by a ProTeam authorized service or warranty center. If the above schedule is not followed, the vacuum motor armature will wear out prematurely and will void the warranty coverage. This warranty is extended only to the original purchaser of the vacuum cleaner. If the vacuum cleaner is found to be defective during the warranty period, it will be ProTeam’s option to replace or repair it, without charge, if returned in accordance with the following instructions: The vacuum cleaner should be cleaned and packed carefully in a well padded carton and returned, shipping charges prepaid, or taken to any authorized ProTeam Warranty Station. ProTeam will not be responsible for repairs to products due to improper packing. A Return Authorization Number (RAN) must be issued prior to receiving returned equipment. Contact ProTeam’s customer service department at 866.888.2168 to request a RAN – required for all warranty correspondence. If a completed warranty card has not been returned to ProTeam, a dated, written proof-of-purchase must be enclosed with a statement advising the nature of the malfunction and a Return Authorization Number. Any repair or replacement under this warranty shall not extend the warranty period. THE FOREGOING WRITTEN WARRANTY SHALL CONSTITUTE THE EXCLUSIVE LIABILITY OF PROTEAM. The above warranty is exclusive and in lieu of all other expressed warranties whether oral or written. Under no circumstances, whether alleged as a result of breach of contract or warranty, negligence or otherwise, shall ProTeam be liable to the purchaser or gift recipient or any other person for special incidental or consequential damages or nature, including, without limitation, damages to or loss of use of property. ProTeam’s liability under any circumstances will not exceed the purchase price of the vacuum cleaner. No agent, employee, or representative of ProTeam, nor any other person, is authorized to modify this warranty in any respect. Esta garantía no se aplica para: El desgaste normal de las partes que requieran cambio bajo el uso normal que incluye pero no se limita a: correas, cepillos de rodillo, mangueras, filtros, interruptores, cepillos de motor de carbono y accesorios. El desgaste normal y las obstrucciones que puedan ocurrir al usarla. El daño por uso no autorizado o incorrecto, modificación, alteración, servicio o reparación. El motor de succión Domel de la aspiradora está garantizado sólo si se cumple con la siguiente programación de mantenimiento del cepillo de carbono y si se proporciona el comprobante de mantenimiento: 1. Los cepillos de carbono del motor de la aspiradora se deben reemplazar después de las primeras 800 horas de funcionamiento en un centro de garantía o de servicio autorizado de ProTeam. 2. Los cepillos de carbono se deben volver a reemplazar después de las siguientes 400 horas de funcionamiento en un centro de garantía o de servicio autorizado de ProTeam. 3. Los cepillos de carbono se deben volver a reemplazar después de las siguientes 200 horas de funcionamiento en un centro de garantía o de servicio autorizado de ProTeam. Si la anterior programación no se sigue, la estructura del motor de la aspiradora se deteriorará prematuramente y la cobertura de la garantía se anulará. Esta garantía se extiende únicamente al comprador original de la aspiradora. Si se encuentra que la aspiradora no funciona bien durante el período de garantía, Proteam tendrá la opción de reemplazarla o repararla, sin ningún costo, si se regresa de acuerdo con las siguientes instrucciones: La aspiradora se debe limpiar y empacar cuidadosamente en una caja de cartón bien acolchada y devolverla, con el costo del transporte prepagado, o se debe llevar a cualquier estación de garantía autorizada por ProTeam (ver la página xxxx para los lugares de garantía autorizados). ProTeam no se hace responsable de reparaciones a productos por un empaque inapropiado. Se debe expedir un Número de autorización de devolución (siglas en inglés RAN) antes de recibir el equipo devuelto. Contacte al departamento de servicio al cliente de ProTeam al 866.888.2168 para solicitar el RAN – exigido para cualquier correspondencia de garantía. Si no se ha enviado a ProTeam la tarjeta de garantía diligenciada, se debe adjuntar una prueba de compra escrita, con la fecha, junto con una declaración que contenga la naturaleza del malfuncionamiento y el Número de Autorización de Devolución. Cualquier arreglo o repuesto bajo esta garantía no extenderá el período de garantía. LA ANTERIOR GARANTÍA ESCRITA CONSTITUIRÁ LA RESPONSABILIDAD EXCLUSIVA DE PROTEAM. La anterior garantía es exclusiva y en lugar de todas las otras garantías expresadas sean orales o escritas. Bajo ninguna circunstancia, sea supuesta como resultado de incumplimiento de contrato o garantía, negligencia o de otro modo, ProTeam deberá responsabilizarse ante el comprador, o ante la persona que la recibe como regalo, o ante cualquier otra persona, por daños consecuenciales o incidentales especiales o naturaleza, incluyendo, sin limitación, daños o pérdida del uso de la propiedad. La responsabilidad de ProTeam bajo ninguna circunstancia excederá el precio de compra de la aspiradora. Ningún agente, empleado o representante de ProTeam ni ninguna otra persona está autorizada para modificar esta garantía en ningún aspecto. 11 warranty garantía limitada 1500 limited warranty-
 1
1
-
 2
2
-
 3
3
-
 4
4
-
 5
5
-
 6
6
-
 7
7
-
 8
8
-
 9
9
-
 10
10
-
 11
11
-
 12
12
-
 13
13
-
 14
14
-
 15
15
-
 16
16


Pro-Team ProForce 1500 Manual de usuario
- Categoría
- Aspiradoras
- Tipo
- Manual de usuario
en otros idiomas
- English: Pro-Team ProForce 1500 User manual