Domo DO986BFK DO987BFK El manual del propietario
- Categoría
- Frigoríficos-congeladores
- Tipo
- El manual del propietario

PRODUCT OF
DO986BFK
Handleiding Koelkast met diepvriezer
Mode d’emploi Réfrigérateur avec congélateur
Gebrauchsanleitung Kühlschrank und Gefrierschrank
Instruction booklet Refrigerator and freezer
Manual de instrucciones Frigo-congelatore
Istruzioni per l’uso Frigoríco, congelador
Návod k použití Kombinovaná lednice
Návod na použitie Kombinovaná chladnička

Lees aandachtig alle instructies - bewaar deze handleiding voor latere raadpleging.
Lisez attentivement les instructions - gardez le mode d’emploi pour utilisation ultérieur.
Lesen Sie genau die Anweisungen - bewahren Sie die Gebrauchsanleitung für spätere
heranziehung.
Read all instructions carefully - save this instruction manual for future reference.
Lea detenidamente todas las instrucciones - Conserve este manual para futura referencia.
Leggere con attenzione le istruzioni - conservarle per future consultazioni
Před použitím si důkladně přečtěte tento manuál - manuál si uschovejte i pro případ
budoucího nahlédnutí.
Pred použitím si dôkladne prečítajte tento manuál - manuál si uschovajte aj pre prípad
budúceho nahliadnutie.
Required for R32/R290 Refrigerant only
CAUTION
: RISK OF FIRE
NL Nederlands 3
FR Français 17
DE Deutsch 31
EN English 46
ES Espagnol 59
IT Italiano 73
CZ Čeština 86
SK Slovenčina 100

3
DO986BFK
www.domo-elektro.be
NL
GARANTIE
Geachte klant,
Al onze producten ondergaan steeds een strenge kwaliteitscontrole,
alvorens ze aan je worden aangeboden. Mocht je desondanks toch nog
problemen hebben met jouw toestel, dan betreuren wij dit ten zeerste.
In dat geval verzoeken wij je contact op te nemen met onze klantendienst.
Onze medewerkers zullen je met plezier verder helpen.
+32 14 21 71 91 [email protected]
Maandag – Donderdag : 8.30u – 12.00u en van 13.00u – 17.00u
Vrijdag : 8.30u – 12.00u en van 13.00u – 16.30u
Dit apparaat heeft een garantietermijn van 2 jaar vanaf de datum van aankoop. Gedurende de
garantieperiode zal de distributeur volledige verantwoording op zich nemen voor gebreken die
aanwijsbaar berusten op materiaal- of constructiefouten. Wanneer dergelijke gebreken voorkomen, zal
het apparaat, indien nodig, vervangen of gerepareerd worden. De garantieperiode van 2 jaar zal op dit
moment niet terug beginnen, maar loopt verder tot 2 jaar na de aankoop van het toestel. De garantie
wordt verleend op basis van het kassaticket. Indien je apparaat defect is binnen de garantietermijn van 2
jaar, dan mag je het toestel samen met het originele kassaticket binnenbrengen in de winkel waar je het
toestel hebt aangekocht.
De garantie op accessoires en onderdelen die onderhevig zijn aan slijtage, bedraagt 6 maanden.
De garantie en verantwoordelijkheid/aansprakelijkheid van de leverancier en fabrikant vervallen
automatisch in de volgende gevallen:
· Bij het niet naleven van de instructies in deze handleiding.
· Bij verkeerde aansluiting, vb. te hoge elektrische spanning.
· Bij verkeerd, hardhandig of abnormaal gebruik.
· Bij onvoldoende of verkeerd onderhoud.
· Bij herstelling of wijziging van het toestel door de consument of niet gemachtigde derden.
· Bij gebruik van onderdelen of accessoires welke niet worden aanbevolen of geleverd door de
leverancier / fabrikant.
VEILIGHEIDSVOORSCHRIFTEN
Wanneer je elektrische toestellen gebruikt, moeten volgende veiligheidsinstructies in acht genomen
worden:
· Lees deze instructies zorgvuldig door. Bewaar deze handleiding om later te raadplegen.
· Verwijder voor het eerste gebruik alle verpakkingsmaterialen en eventuele promotionele stickers.
Zorg ervoor dat kinderen niet met de verpakkingsmaterialen spelen.
· Dit toestel is geschikt om te gebruiken in de huishoudelijke omgeving en in gelijkaardige omgevingen
zoals:
· Keukenhoek voor personeel van winkels, kantoren en andere gelijkaardige professionele
omgevingen
· Boerderijen
· Hotel- en motelkamers en andere omgevingen met een residentieel karakter
· Gastenkamers, of gelijkaardige

4
DO986BFK
NL
· Dit toestel mag gebruikt worden door kinderen vanaf 16 jaar en personen met een fysieke of
sensoriële beperking of mensen met een beperkte mentale capaciteit of gebrek aan ervaring of
kennis, op voorwaarde dat deze personen toezicht krijgen of instructies hebben gekregen over het
gebruik van het toestel op een veilige manier en dat ze ook de gevaren kennen bij het gebruik van het
toestel. Kinderen mogen niet met het toestel spelen. Het onderhoud en de reiniging van het toestel
mogen niet door kinderen gebeuren tenzij ze ouder zijn dan 16 jaar en onder toezicht staan.
· Houd het toestel en de voedingskabel buiten het bereik van kinderen jonger dan 16 jaar.
· Opgelet: het toestel mag niet gebruikt worden met een externe timer of een aparte
afstandsbediening.
· Lees alle instructies voor gebruik.
· Kijk voor gebruik na of het voltage vermeld op het toestel overeenkomt met het voltage van het
elektriciteitsnet.
· Laat het snoer niet op een heet oppervlak of over de rand van een tafel of aanrecht hangen.
· Gebruik het toestel nooit wanneer het snoer of de stekker beschadigd is, na een slechte werking
van het toestel of wanneer het toestel beschadigd is. Breng het toestel dan naar het dichtsbijzijnde
gekwaliceerde service center voor nazicht en reparatie.
· Streng toezicht is noodzakelijk wanneer het toestel door of in de buurt van kinderen gebruikt wordt.
· Het gebruik van accessoires die niet aanbevolen of verkocht worden door de fabrikant, kan brand,
elektrische schokken of verwondingen veroorzaken.
· Trek de stekker uit het stopcontact wanneer het toestel niet in gebruik is, vooraleer onderdelen te
monteren of demonteren en vooraleer het toestel te reinigen. Zet eerst alle knoppen in de ‘uit’-stand
en trek de stekker bij de stekker zelf uit het stopcontact. Trek nooit aan het snoer om de stekker uit het
stopcontact te trekken.
· Zet dit toestel nooit op of in de buurt van een gasvuur of elektrisch vuur of op een plaats waar het in
contact zou kunnen komen met een warm toestel.
· Gebruik het toestel niet buiten.
· Gebruik het toestel enkel voor het doel waarvoor het bestemd is.
· Gebruik het toestel altijd op een stevig, droog, een oppervlak.
· Gebruik het toestel alleen voor huishoudelijk gebruik. De fabrikant is niet verantwoordelijk voor
ongelukken die een gevolg zijn van verkeerd gebruik van het toestel, of het niet naleven van de regels
zoals ze vermeld zijn in deze handleiding.
· Alle herstellingen, buiten het gewone onderhoud van het toestel, moeten uitgevoerd worden door de
fabrikant of zijn dienst na verkoop. Probeer het toestel nooit zelf te repareren.
· Dompel het toestel, het elektrisch snoer of de stekker nooit onder in water of een andere vloeistof.
· Zorg ervoor dat kinderen het elektrisch snoer niet kunnen aanraken.
· Hou het snoer uit de buurt van scherpe randen en hete onderdelen of andere warmtebronnen.
· Verwijder voor het eerste gebruik alle verpakkingsmaterialen en eventuele promotionele stickers.
· Hou de ventilatie-openingen vrij, zorg ervoor dat ze niet versperd of belemmerd zijn.
· Gebruik geen andere elektrische toestellen in de koelkast, tenzij ze voor dit doel zijn goedgekeurd
door de fabrikant.
· Bewaar geen explosieve stoen in het toestel, zoals bijvoorbeeld spuitbussen met brandbaar drijfgas.
· Zorg ervoor dat het koelcircuit niet beschadigd raakt, bv. tijdens transport of installatie.
· Zorg ervoor dat de stekker niet geplet wordt of beschadigd raakt door de achterkant van het toestel.
Dit kan oververhitting en bijgevolg brand veroorzaken.
· Zorg ervoor dat je toegang hebt tot de stekker van het toestel.
· Trek niet aan het snoer.
· Als het stopcontact los zit, steek de stekker dan niet in het stopcontact. (risico op elektrische schok of
brand)

5
DO986BFK
www.domo-elektro.be
NL
· Dit toestel is zwaar. Wees voorzichtig tijdens het verplaatsen ervan.
· Vermijd lange blootstelling aan zonlicht.
· Het toestel mag niet gebruikt worden met een verlengsnoer of een stekkerdoos.
· Volg onderstaande instructies om besmetting van voedsel te voorkomen:
· Het langdurig openen van de deur kan de temperatuur in de compartimenten van het
apparaat aanzienlijk verhogen.
· Reinig regelmatig oppervlakken die in contact kunnen komen met voedsel. Houd het
condensatiekanaal en afvoergat achteraan het toestel schoon.
· Bewaar rauw vlees en vis in geschikte containers in de koelkast zodat het niet in contact
komt met of druppelt op ander voedsel.
· Als het apparaat gedurende lange tijd leeg blijft, dien je het uit te schakelen, te
ontdooien en te reinigen. Laat het drogen en laat de deur open om te voorkomen dat er
schimmel in het apparaat ontstaat.
WAARSCHUWING! Zet dit toestel nooit op of in de buurt van een gasvuur of elektrisch
vuur of op een plaats waar het in contact zou kunnen komen met een warmtebron. Aan
de achterkant van het apparaat bevinden zich ontvlambare materialen.
Let op het symbool “brandgevaar - ontvlambaar materiaal” dat zich aan de achterkant
van het apparaat bevindt.
ONDERDELEN
1. Glazen leggers
2. Deksel voor groentelade
3. Groentelade
4. Vershoudlade
5. Deurrekken
6. Diepvriesladen
7. Stelvoetjes
2YHUYLHZ
Note: Above picture is for reference only. Real appliance probably is different.
FridgeShelves
Fridge
Balconies
Crisper
Crisper Cover
Fresh convertible box
Freezer Drawers
Leveling Feet
6
1
2
3
4
6
7
5

6
DO986BFK
NL
INSTALLATIE
· Verwijder alle verpakkingsmateriaal, zowel binnenin als aan de buitenkant. Maak de buitenkant van
het toestel schoon met een droge doek. De binnenkant kan je reinigen met een zachte, vochtige doek.
· Plaats het toestel niet in een nauwe doorgang, direct zonlicht of vocht.
· Zorg ervoor dat de lucht vrij rond de koelkast kan circuleren. De
achterkant van de koelkast moet minstens 10 cm verwijderd zijn van de
muur.
· Zorg voor voldoende ruimte om te deur te openen.
· Zet de koelkast op een stevige, vlakke ondergrond. Men kan het toestel
waterpas zetten met behulp van de voorste stelvoetjes, verstel deze
door ze in of uit het toestel te schroeven.
· Vermijd direct zonlicht en warmte. Zonlicht kan de buitenkant van de
koelkast aantasten. Warmte zal voor een hoger verbruik zorgen.
· Vermijd een te hoge vochtigheidsgraad. Te veel vocht in de lucht zal
ervoor zorgen dat er te snel vorst gevormd wordt in de koelkast.
· Controleer voordat je de koelkast op de netvoeding aansluit of de
spanning op het typeplaatje van het apparaat overeenstemt met
de spanning bij je thuis. Een andere spanning kan het apparaat
beschadigen.
· De stekker is de enige manier om het apparaat van de voeding te ontkoppelen, zorg dat deze altijd
makkelijk bereikbaar is. Om de voeding naar het apparaat te ontkoppelen, schakel het apparaat uit en
haal vervolgens de stekker uit het stopcontact.
· Het apparaat moet geaard zijn. De fabrikant is niet verantwoordelijk voor schade die ontstaat door het
niet gebruiken van een aarding.
· Laat het toestel na installatie 8 uur staan vooraleer het aan te zetten. Zo kan het koelmiddel zich
zetten.
· Laat het apparaat gedurende 24 uur werken zonder levensmiddelen zodat de kast tot de gepaste
temperatuur aoelt.
· Dit apparaat is ontworpen om te werken in een omgevingstemperatuur tussen 16°C en 38°C. In een
ruimte met een lagere of hogere temperatuur zal het apparaat niet juist werken.
· Het toestel mag alleen binnen gebruikt worden.
· De diepvriezer maakt geluid wanneer de compressor het koelmiddel rondpompt. Dit is normaal.
DRAAIRICHTING VAN DEUR WIJZIGEN
Als je de scharnieren van de deur naar de andere kant wilt brengen, is het aanbevolen om contact op
te nemen met een erkende reparateur om hem het werk te laten uitvoeren. Voordat je de draairichting
wijzigt, controleer of de stekker uit het stopcontact is gehaald en dat het apparaat leeg is. Laat het toestel
na het omkeren van de deur 8 uur staan vooraleer het aan te zetten. Zo kan het koelmiddel zich zetten.
Het is aanbevolen om een platte schroevendraaier, een kruisschroevendraaier en een moersleutel te
gebruiken (niet meegeleverd), alsook onderstaande meegeleverde componenten.
Scharnierafdekplaatje
,QVWDOODWLRQ
Door Reversibility
Left Aid-Closer on Upper Door x 1 Left Aid-Closer on Lower Door x 1
nscrew top hinge cover and disconnect connectors of door switch and harness.
2.Unscrew top hinge
3.Remove the pin with a screwdriver and filp the hinge bracket. Then refit the pin to hinge bracket
unscrew
screw
8
Deurstopper bovenste deur
,QVWDOODWLRQ
Door Reversibility
Left Aid-Closer on Upper Door x 1 Left Aid-Closer on Lower Door x 1
nscrew top hinge cover and disconnect connectors of door switch and harness.
2.Unscrew top hinge
3.Remove the pin with a screwdriver and filp the hinge bracket. Then refit the pin to hinge bracket
unscrew
screw
8
Deurstopper onderste deur
,QVWDOODWLRQ
Door Reversibility
Left Aid-Closer on Upper Door x 1 Left Aid-Closer on Lower Door x 1
nscrew top hinge cover and disconnect connectors of door switch and harness.
2.Unscrew top hinge
3.Remove the pin with a screwdriver and filp the hinge bracket. Then refit the pin to hinge bracket
unscrew
screw
8
y
y
,QVWDOODWLRQ
1007NN
1071NN
6SDFH5HTXLUHPHQW
Keep enough space of door open.
Keep at least 50mm gap at two sides.
To do this adjust the two levelling feet at front of the unit.
If the unit is not level, the doors and magnetic seal
alignments will not be covered properly.
/HYHOOLQJWKHXQLW
13
y
y
,QVWDOODWLRQ
1007NN
1071NN
6SDFH5HTXLUHPHQW
Keep enough space of door open.
Keep at least 50mm gap at two sides.
To do this adjust the two levelling feet at front of the unit.
If the unit is not level, the doors and magnetic seal
alignments will not be covered properly.
/HYHOOLQJWKHXQLW
13

7
DO986BFK
www.domo-elektro.be
NL
1. Draai de schroeven van het scharnierafdekplaatje los en verwijder het plaatje. Ontkoppel beide
connectoren van de kabels.
,QVWDOODWLRQ
Door Reversibility
Left Aid-Closer on Upper Door x 1 Left Aid-Closer on Lower Door x 1
nscrew top hinge cover and disconnect connectors of door switch and harness.
2.Unscrew top hinge
3.Remove the pin with a screwdriver and filp the hinge bracket. Then refit the pin to hinge bracket
unscrew
screw
8
2. Schroef de bouten van de scharnieren los en verwijder de deur.
,QVWDOODWLRQ
Door Reversibility
Left Aid-Closer on Upper Door x 1 Left Aid-Closer on Lower Door x 1
nscrew top hinge cover and disconnect connectors of door switch and harness.
2.Unscrew top hinge
3.Remove the pin with a screwdriver and filp the hinge bracket. Then refit the pin to hinge bracket
unscrew
screw
8
3. Neem het scharnierplaatje van de deur. Haal de pin uit het scharnierplaatje en draai het plaatje 180°.
Bevestig de pin terug in het scharnierplaatje. Zorg dat het plastic rondsel rond de pin blijft.
,QVWDOODWLRQ
Door Reversibility
Left Aid-Closer on Upper Door x 1 Left Aid-Closer on Lower Door x 1
nscrew top hinge cover and disconnect connectors of door switch and harness.
2.Unscrew top hinge
3.Remove the pin with a screwdriver and filp the hinge bracket. Then refit the pin to hinge bracket
unscrew
screw
8
4. Verplaats de deurschakelaar van het rechtse scharnierafdekplaatje naar het linkse
scharnierafdekplaatje dat je kan terugvinden in het meegeleverde accessoirezakje. Om de
deurschakelaar te verwijderen moet je het klepje ervan aan de achterkant van het afdekplaatje
ingedrukt houden.
,QVWDOODWLRQ
5.Detach cover in top of upper door and move harness from right side to left side, then replace the cover.
6.Move top left cover to right side
7. Take off the upper door, take out the screw from the middle hinge by cross screwdriver,
then take off the lower door.
4.Move door switch from right hinge cover to left hinge cover in accessary bag.
9

8
DO986BFK
NL
5. Verwijder het afwerkingspaneel van de bovenkant van de bovenste deur. Verplaats de kabel en
connector van de ene kant naar de andere kant. Plaats het afwerkingspaneel terug.
,QVWDOODWLRQ
5.Detach cover in top of upper door and move harness from right side to left side, then replace the cover.
6.Move top left cover to right side
7. Take off the upper door, take out the screw from the middle hinge by cross screwdriver,
then take off the lower door.
4.Move door switch from right hinge cover to left hinge cover in accessary bag.
9
6. Verplaats het afdekplaatje bovenop de koelkast van de linker- naar de rechterkant.
,QVWDOODWLRQ
5.Detach cover in top of upper door and move harness from right side to left side, then replace the cover.
6.Move top left cover to right side
7. Take off the upper door, take out the screw from the middle hinge by cross screwdriver,
then take off the lower door.
4.Move door switch from right hinge cover to left hinge cover in accessary bag.
9
7. Schroef de bouten van het middelste scharnier los en hef de onderste deur uit de scharnierpin.
,QVWDOODWLRQ
5.Detach cover in top of upper door and move harness from right side to left side, then replace the cover.
6.Move top left cover to right side
7. Take off the upper door, take out the screw from the middle hinge by cross screwdriver,
then take off the lower door.
4.Move door switch from right hinge cover to left hinge cover in accessary bag.
9
8. Verplaats de schroefafdekkingen van de linker- naar de rechterkant.
,QVWDOODWLRQ
8 .
9. Unscrew bottom hinge. Then remove the adjustable feet from both side.
10. Unscrew and remove the bottom hinge pin, turn the bracket over and replace it.
unscrew
screw
10

9
DO986BFK
www.domo-elektro.be
NL
9. Leg de koelkast plat. Verwijder de stelvoetjes van beide kanten en schroef de bouten van het
onderste scharnier los. Verwijder de schroef van de behuizing en plaats deze terug aan de andere
kant.
,QVWDOODWLRQ
8 .
9. Unscrew bottom hinge. Then remove the adjustable feet from both side.
10. Unscrew and remove the bottom hinge pin, turn the bracket over and replace it.
unscrew
screw
10
10. Verwijder het pinnetje van het onderste scharnier. Draai het plaatje 180° en bevestig de pin terug.
,QVWDOODWLRQ
8 .
9. Unscrew bottom hinge. Then remove the adjustable feet from both side.
10. Unscrew and remove the bottom hinge pin, turn the bracket over and replace it.
unscrew
screw
10
11. Plaats het scharnierplaatje terug op de onderkant van het toestel. Plaats beide stelvoetjes terug.
,QVWDOODWLRQ
13.Detach the Fridge and the Freezer door gaskets and then attach them after rotating.
11.Refit the bracket fitting the bottom hinge pin. Replace both adjustable feet.
12.Remove aid-closers from bottom of upper and lower doors, then take new aid-closers from
accessary bag and install them to left side.
11
12. Verwijder de deurstopper vanuit de onderzijde van beide deuren. Plaats de nieuwe deurstoppers
aan de linkerkant van beide deuren. De nieuwe deurstoppers kan je vinden in het meegeleverde
accessoirezakje.
,QVWDOODWLRQ
13.Detach the Fridge and the Freezer door gaskets and then attach them after rotating.
11.Refit the bracket fitting the bottom hinge pin. Replace both adjustable feet.
12.Remove aid-closers from bottom of upper and lower doors, then take new aid-closers from
accessary bag and install them to left side.
11

10
DO986BFK
NL
13. Verwijder de rubberen dichtingen van beide deuren, keer ze om, en plaats deze terug.
,QVWDOODWLRQ
13.Detach the Fridge and the Freezer door gaskets and then attach them after rotating.
11.Refit the bracket fitting the bottom hinge pin. Replace both adjustable feet.
12.Remove aid-closers from bottom of upper and lower doors, then take new aid-closers from
accessary bag and install them to left side.
11
14. Plaats de onderste deur terug en schroef deze weer vast.
,QVWDOODWLRQ
15.Replace upper door, please ensure the door align with the cabinet to make sure door gasket seal
the cabinet tightly. Then connect door with cabinet by tightly fixed top hinge.
16.Connect harnesses from door and cabinet. Then replace top hinge cover. Before screw the cover,
connect terminals of door switch.
14. Install the lower door, adjust and fix the middle hinge onto the cabinet.
12
15. Plaats de bovenste deur terug en schroef deze weer vast. Let hierbij goed op dat de deur horizontaal
uitgelijnd staat en de deurdichting volledig sluit.
,QVWDOODWLRQ
15.Replace upper door, please ensure the door align with the cabinet to make sure door gasket seal
the cabinet tightly. Then connect door with cabinet by tightly fixed top hinge.
16.Connect harnesses from door and cabinet. Then replace top hinge cover. Before screw the cover,
connect terminals of door switch.
14. Install the lower door, adjust and fix the middle hinge onto the cabinet.
12
16. Verbind beide connectoren van de kabels bovenop het toestel weer met de deur. Plaats het
scharnierafdekplaatje terug en schroef dit vast. Zorg ervoor dat de kabels in de geleider zitten en dat
de deurschakelaar contact maakt met de deur.
,QVWDOODWLRQ
15.Replace upper door, please ensure the door align with the cabinet to make sure door gasket seal
the cabinet tightly. Then connect door with cabinet by tightly fixed top hinge.
16.Connect harnesses from door and cabinet. Then replace top hinge cover. Before screw the cover,
connect terminals of door switch.
14. Install the lower door, adjust and fix the middle hinge onto the cabinet.
12

11
DO986BFK
www.domo-elektro.be
NL
GEBRUIK
BEDIENINGSPANEEL
Touch screen toetsen
A. Temperatuur koelkast
B. Temperatuur diepvries
C. Functies
Display
1. Temperatuur koelkast
2. Temperatuur diepvries
3. ECO Modus
4. Super Modus
5. Vakantiemodus
6. Kinderbeveiliging
Het bedieningspaneel gaat automatisch in slaapstand. De display licht op wanneer een toets aangeraakt
wordt en wanneer de deuren geopend worden.
TEMPERATUURREGELING
· De temperatuur van de koelkast kan je instellen tussen 2 en 8°C. In normale omstandigheden kies
je best 4°C. Druk op de “FRIDGE”-toets (temperatuur koelkast) en blijf drukken tot de gewenste
temperatuur verschijnt op de display.
8VHULQWHUIDFH
Using the Control Panel
A.Temperature Control of Fridge Compartment
B.Temperature Control of Freezer Compartment
C.Mode/ Locking / Unlocking
1.1 BUTTON OPERATION
2.1.1The panel will be lit up for 2 minutes once the door of fridge compartment is opened.
2.1 DISPLAY
1.Temperature of Fridge Comparment
2.Temperature of Freezer Comparment
3.ECO Mode
4.Holiday Mode
5.Super Mode
6.Locking / Unlocking
1.2 LED DISPLAY
a.The control panel is 100% lit up for 3 seconds, which operates exactly as per the setting
(mode and temperature) before the poweroff. The system will be automatically locked 25
seconds after the last button operation. After locking, the light of the panel would be out 30
seconds after the last button operation.
b.Both preset temperatures of fridge compartemnt and freezer compartment would be shown
on the display.
2.0 OPERATING CONDITION
1
2
A
B
C
3
4
5
6
14
· De temperatuur van de diepvries kan je instellen tussen -14 en -22°C. In normale omstandigheden kies
je best -18°C. Druk op de “FREEZER”-toets (temperatuur diepvries) en blijf drukken tot de gewenste
temperatuur verschijnt op de display.
8VHULQWHUIDFH
Using the Control Panel
A.Temperature Control of Fridge Compartment
B.Temperature Control of Freezer Compartment
C.Mode/ Locking / Unlocking
1.1 BUTTON OPERATION
2.1.1The panel will be lit up for 2 minutes once the door of fridge compartment is opened.
2.1 DISPLAY
1.Temperature of Fridge Comparment
2.Temperature of Freezer Comparment
3.ECO Mode
4.Holiday Mode
5.Super Mode
6.Locking / Unlocking
1.2 LED DISPLAY
a.The control panel is 100% lit up for 3 seconds, which operates exactly as per the setting
(mode and temperature) before the poweroff. The system will be automatically locked 25
seconds after the last button operation. After locking, the light of the panel would be out 30
seconds after the last button operation.
b.Both preset temperatures of fridge compartemnt and freezer compartment would be shown
on the display.
2.0 OPERATING CONDITION
1
2
A
B
C
3
4
5
6
14
· De werkingstijd en –temperatuur worden beïnvloed door de plaats waar de koelkast wordt gebruikt,
het aantal keer de deur wordt geopend en de temperatuur van de kamer waar de koelkast zich in
bevindt.
FUNCTIES INSTELLEN
8VHULQWHUIDFH
Using the Control Panel
A.Temperature Control of Fridge Compartment
B.Temperature Control of Freezer Compartment
C.Mode/ Locking / Unlocking
1.1 BUTTON OPERATION
2.1.1The panel will be lit up for 2 minutes once the door of fridge compartment is opened.
2.1 DISPLAY
1.Temperature of Fridge Comparment
2.Temperature of Freezer Comparment
3.ECO Mode
4.Holiday Mode
5.Super Mode
6.Locking / Unlocking
1.2 LED DISPLAY
a.The control panel is 100% lit up for 3 seconds, which operates exactly as per the setting
(mode and temperature) before the poweroff. The system will be automatically locked 25
seconds after the last button operation. After locking, the light of the panel would be out 30
seconds after the last button operation.
b.Both preset temperatures of fridge compartemnt and freezer compartment would be shown
on the display.
2.0 OPERATING CONDITION
1
2
A
B
C
3
4
5
6
14
Druk op de “MODE”-toets (functies) om te kiezen tussen de functies ECO Modus, Vakantiemodus en
Super Modus.
ECO Modus
8VHULQWHUIDFH
Using the Control Panel
A.Temperature Control of Fridge Compartment
B.Temperature Control of Freezer Compartment
C.Mode/ Locking / Unlocking
1.1 BUTTON OPERATION
2.1.1The panel will be lit up for 2 minutes once the door of fridge compartment is opened.
2.1 DISPLAY
1.Temperature of Fridge Comparment
2.Temperature of Freezer Comparment
3.ECO Mode
4.Holiday Mode
5.Super Mode
6.Locking / Unlocking
1.2 LED DISPLAY
a.The control panel is 100% lit up for 3 seconds, which operates exactly as per the setting
(mode and temperature) before the poweroff. The system will be automatically locked 25
seconds after the last button operation. After locking, the light of the panel would be out 30
seconds after the last button operation.
b.Both preset temperatures of fridge compartemnt and freezer compartment would be shown
on the display.
2.0 OPERATING CONDITION
1
2
A
B
C
3
4
5
6
14
Door het selecteren van deze functie wordt de koelkast temperatuur ingesteld op 5°C en de diepvries
temperatuur op -18°C. De “FRIDGE”-toets en “FREEZER”-toets worden geblokkeerd. Deze functie kan je
aan- en uitzetten met de “MODE”-toets (functies). Het symbool is te zien op de display.
Vakantiemodus
8VHULQWHUIDFH
Using the Control Panel
A.Temperature Control of Fridge Compartment
B.Temperature Control of Freezer Compartment
C.Mode/ Locking / Unlocking
1.1 BUTTON OPERATION
2.1.1The panel will be lit up for 2 minutes once the door of fridge compartment is opened.
2.1 DISPLAY
1.Temperature of Fridge Comparment
2.Temperature of Freezer Comparment
3.ECO Mode
4.Holiday Mode
5.Super Mode
6.Locking / Unlocking
1.2 LED DISPLAY
a.The control panel is 100% lit up for 3 seconds, which operates exactly as per the setting
(mode and temperature) before the poweroff. The system will be automatically locked 25
seconds after the last button operation. After locking, the light of the panel would be out 30
seconds after the last button operation.
b.Both preset temperatures of fridge compartemnt and freezer compartment would be shown
on the display.
2.0 OPERATING CONDITION
1
2
A
B
C
3
4
5
6
14
· Deze functie helpt energie besparen tijdens periodes wanneer het toestel niet regelmatig gebruikt
wordt, zoals bvb. vakanties.
8VHULQWHUIDFH
Using the Control Panel
A.Temperature Control of Fridge Compartment
B.Temperature Control of Freezer Compartment
C.Mode/ Locking / Unlocking
1.1 BUTTON OPERATION
2.1.1The panel will be lit up for 2 minutes once the door of fridge compartment is opened.
2.1 DISPLAY
1.Temperature of Fridge Comparment
2.Temperature of Freezer Comparment
3.ECO Mode
4.Holiday Mode
5.Super Mode
6.Locking / Unlocking
1.2 LED DISPLAY
a.The control panel is 100% lit up for 3 seconds, which operates exactly as per the setting
(mode and temperature) before the poweroff. The system will be automatically locked 25
seconds after the last button operation. After locking, the light of the panel would be out 30
seconds after the last button operation.
b.Both preset temperatures of fridge compartemnt and freezer compartment would be shown
on the display.
2.0 OPERATING CONDITION
1
2
A
B
C
3
4
5
6
14
A
4
3
1
B
C
2
5
6

12
DO986BFK
NL
· Door het selecteren van deze functie wordt de koelkast temperatuur ingesteld op 17°C. De “FRIDGE”-
toets wordt geblokkeerd.
· Deze functie kan je aan- en uitzetten met de “MODE”-toets (functies). Het symbool is te zien op de
display.
Super Modus
8VHULQWHUIDFH
Using the Control Panel
A.Temperature Control of Fridge Compartment
B.Temperature Control of Freezer Compartment
C.Mode/ Locking / Unlocking
1.1 BUTTON OPERATION
2.1.1The panel will be lit up for 2 minutes once the door of fridge compartment is opened.
2.1 DISPLAY
1.Temperature of Fridge Comparment
2.Temperature of Freezer Comparment
3.ECO Mode
4.Holiday Mode
5.Super Mode
6.Locking / Unlocking
1.2 LED DISPLAY
a.The control panel is 100% lit up for 3 seconds, which operates exactly as per the setting
(mode and temperature) before the poweroff. The system will be automatically locked 25
seconds after the last button operation. After locking, the light of the panel would be out 30
seconds after the last button operation.
b.Both preset temperatures of fridge compartemnt and freezer compartment would be shown
on the display.
2.0 OPERATING CONDITION
1
2
A
B
C
3
4
5
6
14
· Selecteer deze functie als de standaard temperatuur niet voldoende koelt. Bijvoorbeeld: bij extreem
warm weer, als de deur veel geopend wordt, bij een hoge omgevingstemperatuur, als je verse
levensmiddelen wilt invriezen, ...
· Door het selecteren van deze functie wordt de temperatuur van de diepvriezer verlaagd tot -25°C
gedurende 50 uur. Het is aangeraden om de functie 24 uur voor het invriezen te selecteren.
· Deze functie wordt na verloop van tijd automatisch uitgeschakeld. De vooraf ingestelde temperatuur
wordt terug aangehouden. De “FREEZER”-toets wordt geblokkeerd.
· Deze functie kan je aan- en uitzetten met de “MODE”-toets (functies). Het symbool is te zien op de
display.
KINDERBEVEILIGING
8VHULQWHUIDFH
Using the Control Panel
A.Temperature Control of Fridge Compartment
B.Temperature Control of Freezer Compartment
C.Mode/ Locking / Unlocking
1.1 BUTTON OPERATION
2.1.1The panel will be lit up for 2 minutes once the door of fridge compartment is opened.
2.1 DISPLAY
1.Temperature of Fridge Comparment
2.Temperature of Freezer Comparment
3.ECO Mode
4.Holiday Mode
5.Super Mode
6.Locking / Unlocking
1.2 LED DISPLAY
a.The control panel is 100% lit up for 3 seconds, which operates exactly as per the setting
(mode and temperature) before the poweroff. The system will be automatically locked 25
seconds after the last button operation. After locking, the light of the panel would be out 30
seconds after the last button operation.
b.Both preset temperatures of fridge compartemnt and freezer compartment would be shown
on the display.
2.0 OPERATING CONDITION
1
2
A
B
C
3
4
5
6
14
De kinderbeveiliging blokkeert automatisch de toetsen voor veiligheid. Druk 3 seconden op de “LOCK”-
toets (kinderbeveiling) om het paneel te blokkeren. Op de display kan je een gesloten slotje zien. Druk 3
seconden op de “UNLOCK”-toets (kinderbeveiling) om het paneel te deblokkeren. Op de display verdwijnt
het slotje.
ALARM
Als de deur van de koelkast gedurende 90 seconden geopend blijft, hoor je een signaal. Dit alarm is een
waarschuwing zodat je niet per ongeluk de deur laat openstaan en je voedingsmiddelen bederven. Het
alarm stopt zodra de deur terug gesloten is.
VERSHOUDLADE
Je kan de temperatuur van de vershoudlade bepalen met de schakelaar aan de
achterwand. Deze instelling heeft geen invloed op de groentelade.
· Plaats de schakelaar in de ‘crisper’ positie voor het vershouden en langer bewaren van
groenten en fruit. De perfecte temperatuur en vochtigheid wordt aangehouden.
· Plaats de schakelaar in de ‘chiller’ positie voor verse, beperkt houdbare
levensmiddelen zoals vis. De temperatuur is koeler. De voeding wordt vers gehouden,
maar niet bevroren.
LEGGERS EN DEURREK VERPLAATSEN
· Maak de koelkast leeg voor het verplaatsen van de leggers of de deurrekken.
· Om een legger te verplaatsen, hef je deze omhoog en trek deze naar je toe.
· Om een deurrek te verplaatsen, neem deze vast met 2 handen. Hef het deurrek omhoog en trek deze
naar je toe.
'DLO\8VH'DLO\8VH
Cleaning
For hygienic reasons the appliance interior, including interior accessories, should be cleaned regularly.
Caution! The appliance may not be connected to the mains during cleaning. Danger of electrical
shock! Before cleaning switch the appliance off and remove the plug from the mains, or switch off or
turn out the circuit breaker or fuse. Never clean the appliance with a steam cleaner. Moisture could
accumulate in electrical components, danger of electrical shock! Hot vapors can lead to the damage
of plastic parts. The appliance must be dry before it is placed back into service.
Important! Ethereal oils and organic solvents can attack plastic parts, e.g. lemon juice or the juice form
orange peel, butyric acid, cleanser that contain acetic acid.
Do not allow such substances to come into contact the appliance parts.
Do not use any abrasive cleaners
Remove the food from the freezer. Store them in a cool place, well covered.
Switch the appliance off and remove the plug from the mains, or switch off or turn out the circuit breaker
of fuse.
Clean the appliance and the interior accessories with a cloth and lukewarm water. After cleaning wipe
with fresh water and rub dry.
After everything is dry place appliance back into service.
Hints for refrigeration
Useful hints:
Make (all types): wrap in polythene bags and place on the glass shelves above the vegetable drawer.
For safety, store in this way only one or two days at the most.
Cooked foods, cold dishes, etc...: these should be covered and may be placed on any shelf.
Fruit and vegetables: these should be thoroughly cleaned and placed in the special drawer(s) provided.
butter and cheese: these should be placed in special airtight containers or wrapped in aluminum foil or
polythene bags to exclude as much air as possible.
Milk bottle: these should have a cap and should be stored in the balconies on the door.
Bananas, potatoes, onions and garlic, if not packed, must not be kept in the fridge.
Fresh Zone Temperature Control
18

13
DO986BFK
www.domo-elektro.be
NL
VERLICHTING
De verlichting in de koelkast is een LED lamp. Deze is ecologischer en gemaakt om een leven lang mee
te gaan. Deze moet dus niet vervangen worden. Als er toch problemen ontstaan met de verlichting,
contacteer dan een gekwaliceerd service center in jouw buurt.
APPARAAT VERPLAATSEN
Als het apparaat om welke reden dan ook wordt uitgeschakeld, wacht 10 minuten voordat je het opnieuw
inschakelt. De druk in het koelsysteem dient eerst te worden gestabiliseerd voordat je het apparaat
opnieuw inschakelt.
· Schakel het apparaat uit en haal de stekker uit het stopcontact. Verwijder alle
levensmiddelen. Verwijder tevens alle losse onderdelen (leggers, accessoires, etc.) of maak ze vast in
de koelkast om schokken te vermijden.
· Verplaats het apparaat en installeer. Als het apparaat tijdens het verplaatsen op zijn zijde werd
gehouden, zelfs al was dit zeer kort, laat het apparaat minstens 10 minuten in de rechtopstaande
positie staan voordat je het apparaat inschakelt.
Het apparaat gebruikt isobutaan (R600a) als koelmiddel. Niettegenstaande dat R600a een
milieuvriendelijk en natuurlijk gas is, is het explosief. Wees dus zeer voorzichtig tijdens het verplaatsen
of installeren van het apparaat om schade aan de koelelementen te vermijden. In geval van een lek
dat werd veroorzaakt door schade aan de koelelementen, haal de koelkast weg van open vlammen of
warmtebronnen en verlucht de kamer waar het apparaat zich in bevindt gedurende enkele minuten.
LEVENSMIDDELEN IN DE KOELKAST BEWAREN
De koelkast zorgt voor een langere bewaartijd van verse, beperkt houdbare levensmiddelen.
Bewaren van vers voedsel voor het beste resultaat:
· Bewaar alleen zeer verse levensmiddelen van een goede kwaliteit.
· Zorg dat de levensmiddelen goed zijn verpakt of afgedekt voordat je ze bewaart. Dit vermijdt dat de
levensmiddelen uitdrogen, bleker worden of aan smaak verliezen en zorgt voor een langere versheid.
Dit vermijdt tevens overdracht van geuren.
· Zorg dat levensmiddelen met een sterke geur goed verpakt en afgedekt zijn en bewaar deze uit de
buurt van boter, melk en room en andere levensmiddelen die door een sterke geur aangetast kunnen
worden.
· Laat warme levensmiddelen aoelen voordat je ze in de koelkast plaatst.
LEVENSMIDDELEN IN DE DIEPVRIES INVRIEZEN EN BEWAREN
Gebruik de diepvries
· Om diepgevroren levensmiddelen te bewaren.
· Om ijsblokjes te maken.
· Om levensmiddelen in te vriezen.
Opmerking: zorg dat de deur van de diepvries altijd juist gesloten is. Open de deur van de diepvries alleen
indien nodig.
Diepvriesproducten kopen
· De verpakking mag niet beschadigd zijn.
· Gebruik binnen de minimale houdbaarheidsdatum.
· Indien mogelijk, transporteer diepgevroren levensmiddelen in een thermische tas en plaats de
levensmiddelen snel in de diepvries.

14
DO986BFK
NL
Vers voedsel invriezen
Vries alleen vers en onbeschadigd voedsel in. Om de best mogelijke voedingswaarde, smaak en kleur te
behouden, blancheer groenten voordat je ze invriest.
Aubergines, paprika’s, courgettes en asperges moeten niet worden geblancheerd.
Opmerking: houd de in te vriezen levensmiddelen uit de buurt van levensmiddelen die reeds ingevroren
zijn.
· De volgende levensmiddelen zijn geschikt om in te vriezen: cakes en gebak, vis en schaal- en
schelpdieren, vlees, wild, pluimvee, groenten, fruit, specerijen, eieren zonder schaal, zuivelproducten
zoals kaas en boter, kant-en-klaar gerechten en etensrestjes zoals soep, stoofschotels, gekookt vlees
en vis, aardappelgerechten, soués en desserts.
· De volgende levensmiddelen zijn niet geschikt om in te vriezen: groenten die over het algemeen
rauw worden gegeten zoals sla, radijzen, eieren in de schaal, druiven, appels, peren en perziken,
hardgekookte eieren, yoghurt, zure melk, zure room en mayonaise.
Diepvriesproducten bewaren
Om te vermijden dat levensmiddelen hun smaak verliezen of uitdrogen, steek ze in een luchtdichte
verpakking:
1. Plaats de levensmiddelen in de verpakking.
2. Verwijder alle lucht.
3. Dicht de verpakking af.
4. Label de verpakking met de inhoud en datum van invriezen.
Gepaste verpakking: plastic folie, buisfolie van polyethyleen, aluminiumfolie of houders geschikt voor in
de diepvries.
Aanbevolen bewaartijden van diepvriesproducten in de diepvries
Deze tijden kunnen verschillen naargelang het soort voedsel. De ingevroren levensmiddelen kunnen
tussen 1 en 12 maanden worden bewaard (minimum op -18°C).
Levensmiddel Bewaartijd
Spek, stoofschotels, melk 1 maand
Brood, roomijs, worst, erwten, bereide schelpdieren, vette vis 2 maanden
Niet-vette vis, schelpdieren, pizza, scones en muns 3 maanden
Ham, cakes, koeken, rundvlees en lamskoteletjes, stukken pluimvee 4 maanden
Boter, groenten (geblancheerd), volledig ei en dooiers, gekookte rivierkreeften,
gehakt (rauw), varkensvlees (rauw)
6 maanden
Fruit (droog of in siroop), eiwit, rundvlees (rauw), volledige kip, lamsvlees (rauw),
fruitcakes
12 maanden
Nooit vergeten:
· Als je verse levensmiddelen met een minimale houdbaarheidsdatum invriest, moet je deze voor het
verstrijken van deze datum invriezen.
· Controleer of de levensmiddelen vroeger reeds niet werden ingevroren. Ingevroren levensmiddelen
die volledig ontdooid zijn, mogen niet opnieuw worden ingevroren.
· Eenmaal ontdooid, eet de levensmiddelen snel op.

15
DO986BFK
www.domo-elektro.be
NL
STROOMPANNE
· De meeste stroompannes worden hersteld in 1 of 2 uur en zullen de temperatuur van jouw toestel
niet veranderen. Je moet wel het openen van de deur tot een minimum beperken tijdens een
stroompanne.
· Tijdens een langere stroompanne moet je maatregelen nemen om het voedsel te beschermen, bv.
door droog ijs op het voedsel te leggen.
· Bevroren levensmiddelen blijven goed als de stroomuitval niet langer dan 15 uur duurt. Vries bevroren
levensmiddelen die volledig ontdooid zijn niet opnieuw in. De levensmiddelen kunnen je gezondheid
schaden.
REINIGING EN ONDERHOUD
· Gebruik geen agressieve schoonmaakmiddelen of oplosmiddelen.
· Haal de stekker uit het stopcontact.
· Haal de levensmiddelen uit en berg deze in een koele ruimte op.
· Maak het apparaat schoon met een zachte doek, warm water en een mild schoonmaakmiddel.
· Reinig de dichting alleen met schoon water en droog vervolgens grondig af.
· Na reiniging, steek de stekker in het stopcontact en stel de temperatuurregelaar op de gewenste
positie in.
· Plaats de levensmiddelen opnieuw in het apparaat.
PROBLEEM EN OPLOSSING
Probleem Mogelijke oorzaak Oplossing
Het toestel werkt niet. · De stekker steekt niet (volledig)
in het stopcontact.
· De zekering is gesprongen.
· Het stopcontact is defect.
· Steek de stekker in het
stopcontact.
· Controleer de zekeringen.
· Contacteer een elektricien.
Vreemde geuren. · Het eten in de koelkast is
bedorven.
· Reinig de binnenkant van de
koelkast.
De deuren sluiten niet
volledig.
· De koelkast of vriezer is te vol
gevuld.
· Het toestel staat niet waterpas.
· Zorg ervoor dat eten of drinken
de sluiting van de deuren niet
hindert.
· Breng de stelvoetjes op één lijn.
Ongebruikelijke geluiden. · Het toestel staat niet waterpas.
· Het toestel raakt een muur of
een ander object.
· Hermonteer de stelvoetjes en
zet het toestel waterpas.
· Verplaats zachtjes het toestel.
· Contacteer de
herstellingsdienst.
Zoemend of borrelend
geluid.
· De compressor springt aan/is in
werking.
· Het koelgas circuleert in het
toestel.
· Dit is normaal.
Het zijpaneel is warm. · Het condensatiekanaal is aan
deze zijde.
· Dit is normaal.

16
DO986BFK
NL
MILIEURICHTLIJNEN
Dit symbool op het product of op de verpakking wijst erop dat dit product niet
als huishoudafval mag worden behandeld. Het moet naar een plaats worden
gebracht waar elektrische en elektronische apparatuur wordt gerecycleerd.
Als je ervoor zorgt dat dit product op de correcte manier wordt verwijderd,
voorkom je mogelijk voor mens en milieu negatieve gevolgen die zich zouden
kunnen voordoen in geval van verkeerde afvalbehandeling. Voor meer
details in verband met het recycleren van dit product, neem je best contact
op met de gemeentelijke instanties, het bedrijf of de dienst belast met de
verwijdering van huishoudafval of de winkel waar je het product hebt gekocht.
Het verpakkingsmateriaal is recycleerbaar. Behandel de verpakking
milieubewust.

17
DO986BFK
www.domo-elektro.be
FR
GARANTIE
Cher client,
Tous nos produits sont soumis à des contrôles qualité stricts avant
d’être proposés à la vente. Si vous deviez toutefois rencontrer
un problème avec votre appareil, nous le déplorons vivement.
Dans ce cas, nous vous invitons à prendre contact avec notre service à la clientèle.
Nos collaboratrices se feront un plaisir de vous aider !
+32 14 21 71 91 [email protected]
Du lundi au jeudi : 8 h 30 – 12 h et 13 h – 17 h
Vendredi : 8 h 30 – 12 h et 13 h – 16 h 30
Cet appareil est garanti 2 ans à compter de la date d’achat. Durant la période de garantie, le distributeur
assumera l’entière responsabilité en cas de défauts de fonctionnement (matériel) ou de fabrication. Si un
tel problème survient, l’appareil sera remplacé ou réparé. La période de garantie de 2 ans ne reprend pas
à zéro, mais se poursuit (jusqu’à 2 ans à compter de la date d’achat de l’appareil). La garantie est accordée
sur la base du ticket de caisse.
Pour les accessoires et les éléments d’usure, une garantie de 6 mois s’applique.
La garantie et la responsabilité du fournisseur et du fabricant n’ont plus eet dans les cas suivants :
· Les instructions du manuel n’ont pas été suivies.
· Mauvais raccordement, par ex. tension électrique trop forte.
· Utilisation contraire, brutale ou anormale.
· Entretien insusant ou non conforme.
· Réparation ou modication de l’appareil par le consommateur ou un tiers non autorisé.
· Utilisation d’éléments ou d’accessoires qui ne sont pas recommandés ou fournis par le fournisseur/
fabricant.
CONSIGNES DE SÉCURITÉ
Les consignes de sécurité suivantes doivent être respectées lors de l’utilisation de tout appareil électrique:
· Lisez ces consignes très attentivement. Conservez ce mode d’emploi an de pouvoir le consulter
ultérieurement.
· Avant la première utilisation, enlevez tous les éléments d’emballage et les éventuels autocollants
promotionnels. Veillez à ce que les enfants ne jouent pas avec les matériaux d’emballage.
· Cet appareil est conçu pour être utilisé dans un environnement domestique ou dans des
environnements comparables, tels que :
· Coin-cuisine du personnel dans les commerces, les bureaux et autres environnements
professionnels comparables
· Fermes
· Chambres d’hôtel ou de motel et autres environnements à caractère résidentiel
· Chambres d’hôtes ou comparables
· Cet appareil peut être utilisé par des enfants âgés de 16 ans ou plus et par des personnes présentant
un handicap physique ou sensoriel, une capacité mentale limitée ou un manque d’expérience ou
de connaissances, à condition que ces personnes soient sous surveillance ou qu’elles aient reçu des
instructions sur la manière d’utiliser l’appareil en toute sécurité et qu’elles connaissent les dangers liés
à son utilisation. Les enfants ne peuvent pas jouer avec cet appareil. L’entretien et le nettoyage de

18
DO986BFK
FR
l’appareil ne peuvent pas être eectués par des enfants, sauf s’ils sont âgés de plus de 16 ans et sous la
surveillance d’un adulte.
· Gardez l’appareil et le cordon électrique hors de portée des enfants.
· Attention: l’appareil ne peut pas être utilisé avec une minuterie externe ou une commande à distance
séparée.
· Veuillez lire toutes les instructions avant d’utiliser l’appareil.
· Vériez avant usage si la tension indiquée sur l’appareil correspond à la tension du réseau électrique de
votre domicile.
· Ne laissez pas le cordon pendre sur une surface chaude ou sur le rebord d’une table.
· N’utilisez jamais l’appareil lorsque le cordon ou la che sont endommagés, après un mauvais
fonctionnement de l’appareil ou lorsque l’appareil est endommagé. Amenez alors l’appareil au centre
de services le plus proche pour contrôle et réparation.
· Soyez très attentif lorsque l’appareil est utilisé par des enfants ou à proximité d’enfants.
· L’utilisation d’accessoires non préconisés par le fabricant peut provoquer un incendie, une
électrocution ou des blessures.
· Retirez la che de la prise lorsque l’appareil n’est pas utilisé, avant d’installer ou d’enlever des pièces et
avant de nettoyer l’appareil. Mettez tous les boutons en position « arrêt » et retirez la che de la prise.
Ne tirez jamais sur le câble pour retirer la che de la prise.
· Ne laissez jamais un appareil en service sans surveillance.
· Ne placez jamais cet appareil sur ou à proximité d’un feu au gaz ou d’un feu électrique où il pourrait
entrer en contact avec un appareil chaud.
· N’utilisez pas l’appareil à l’extérieur.
· Utilisez l’appareil uniquement dans le but auquel il est destiné.
· Utilisez toujours l’appareil sur une surface solide, sèche et plane.
· Cet appareil ne convient qu’à un usage domestique. Le fabricant décline toute responsabilité pour
des accidents qui découleraient d’un mauvais usage de l’appareil ou du non-respect des instructions
fournies dans ce manuel.
· Toutes les réparations, en dehors de l’entretien ordinaire de l’appareil, doivent être réalisées par le
fabricant ou son service après-vente.
· N’immergez jamais le cordon électrique, la che ou l’appareil lui-même dans l’eau ou tout autre milieu
liquide.
· Veillez à ce que les enfants ne puissent pas toucher à l’appareil ou au cordon électrique.
· Tenez le cordon éloigné de rebords tranchants et de pièces brûlantes ou d’autres sources de chaleur.
· Avant la première utilisation, enlevez tous les éléments d’emballage et les éventuels autocollants
promotionnels.
· Gardez les orices de ventilation dégagés, veillez à ce qu’ils ne soient ni encombrés ni entravés.
· Ne recourez à aucun moyen mécanique ou autre pour accélérer le processus de dégivrage.
· N’utilisez aucun autre appareil électrique dans le réfrigérateur, sauf s’il est agréé à cette n par le
fabricant.
· Ne conservez jamais de matière explosive dans l’appareil, comme p.ex. des aérosols à gaz propulseur
inammable.
· Veillez à ne pas endommager le circuit de refroidissement, p.ex. lors du transport ou de l’installation.
· Veillez à ce que le cordon d’alimentation ne soit ni écrasé ni endommagé par l’arrière de l’appareil. Ceci
pourrait provoquer une surchaue et par conséquent un incendie.
· Veillez à avoir accès à la che de l’appareil.
· Ne tirez pas sur le cordon.
· Si la prise électrique n’est pas bien xée, ne branchez pas l’appareil (risque de choc électrique ou
d’incendie).

19
DO986BFK
www.domo-elektro.be
FR
· Cet appareil est lourd. Soyez prudent en le déplaçant.
· Ne touchez pas le contenu du compartiment congélateur lorsque vous avez les mains humides ou
mouillées. Ceci peut provoquer des blessures ou des brûlures à la peau.
· Évitez une exposition prolongée à la lumière solaire.
· L’appareil ne peut pas être utilisé avec une rallonge ou un bloc multiprise.
· Respectez les instructions ci-dessous an d’éviter toute contamination des aliments :
· Une ouverture prolongée de la porte peut entraîner une augmentation substantielle de la
température au sein des compartiments de l’appareil.
· Nettoyez régulièrement les surfaces pouvant entrer en contact avec les aliments. Nettoyez
régulièrement le canal et le trou d’évacuation de la condensation de l’appareil.
· Conservez la viande crue et le poisson dans des récipients séparés pour qu’ils ne puissent ni
entrer en contact avec d’autres aliments, ni goutter sur ceux-ci.
· Éteignez, dégivrez et nettoyez l’appareil en cas de période d’inutilisation prolongée. Laissez-
le sécher et laissez la porte ouverte pour éviter la formation de moisissure.
AVERTISSEMENT ! Ne placez jamais cet appareil sur ou à proximité d’un feu au gaz, d’un
feu électrique, ou à tout autre endroit où il pourrait entrer en contact avec une source de
chaleur. L’arrière de l’appareil comporte des matériaux inammables.
Tenez compte du symbole « Risque d’incendie – Matériaux inammables » qui se trouve
à l’arrière de l’appareil.
PARTIES
1. Clayettes
2. Couvercle du bac à légumes
3. Bac à légumes
4. Bac produits frais
5. Balconnets de porte
6. Tiroirs de congélation
7. Pieds de mise à niveau
2YHUYLHZ
Note: Above picture is for reference only. Real appliance probably is different.
FridgeShelves
Fridge
Balconies
Crisper
Crisper Cover
Fresh convertible box
Freezer Drawers
Leveling Feet
6
1
2
3
4
6
7
5

20
DO986BFK
FR
INSTALLATION
· Ôtez tout le matériel d’emballage, tant à l’intérieur qu’à l’extérieur. Nettoyez l’extérieur de l’appareil
à l’aide d’un chion sec. Vous pouvez nettoyer l’intérieur de l’appareil à l’aide d’un chion doux et
humide.
· Ne placez pas l’appareil dans un passage étroit, sous la lumière directe du soleil ou dans l’humidité.
· Veillez à ce que l’air puisse circuler librement autour du réfrigérateur.
L’arrière du réfrigérateur doit s’écarter d’au moins 10 cm du mur.
· Placez le réfrigérateur sur un sol ferme et plat. Les pieds réglables
permettent de placer l’appareil horizontalement. Réglez ceux-ci en les
dévissant de l’appareil.
· Évitez la lumière directe du soleil et la chaleur. La lumière du soleil
risque de dégrader l’extérieur du réfrigérateur. La chaleur augmentera la
consommation d’énergie.
· Évitez un taux d’humidité trop élevé. Trop d’humidité dans l’air
accélérera la formation de glace dans votre réfrigérateur.
· Avant de brancher le réfrigérateur pour la première fois, vériez que la
tension du courant fourni par le réseau électrique de votre habitation
correspond à la tension de fonctionnement du réfrigérateur indiquée
sur la plaque signalétique de l’appareil. Une tension diérente pourrait
endommager l’appareil.
· L’appareil peut uniquement être débranché de l’alimentation par
le câble, veillez à ce que celle-ci soit toujours bien accessible. An de débrancher l’appareil de
l’alimentation, il sut d’éteindre l’appareil et d’enlever le câble de la prise murale.
· L’appareil doit être relié à la terre. Le fabricant n’est pas responsable pour les dommages se produisant
à cause de l’utilisation de l’appareil sans mise à la terre.
· Après installation, laissez l’appareil reposer pendant 8 heures avant de le mettre sous tension. Le gaz
réfrigérant pourra ainsi se stabiliser.
· Laissez l’appareil fonctionner à vide pendant 24 heures de sorte que les compartiments puissent
refroidir à la température appropriée.
· Cet appareil est conçu pour fonctionner sous une température ambiante entre 16 et 38°C. Si la
température est inférieure ou supérieure, l’appareil ne fonctionnera pas correctement.
· L’appareil ne peut être utilisé qu’à l’intérieur.
· Le congélateur ronronne un peu quand le compresseur fait circuler le gaz réfrigérant. C’est normal.
CHANGEMENT DU SENS D’OUVERTURE DE LA PORTE
Si vous avez besoin de monter la porte du réfrigérateur dans l’autre sens, il est recommandé d’appeler
votre agent d’entretien agréé pour eectuer cette inversion, ou de demander à un technicien.
Avant d’inverser le sens d’ouverture de la porte, vous devez vous assurer que l’appareil est débranché
et vide. Après avoir inversé la porte, laissez l’appareil en position verticale pendant 8 heures avant de le
mettre en marche. Cela permet au liquide réfrigérant de se stabiliser.
Il est recommandé d’utiliser un tournevis plat, un tournevis cruciforme et une clé à écrous (non fournis),
ainsi que les éléments fournis ci-dessous.
y
y
,QVWDOODWLRQ
1007NN
1071NN
6SDFH5HTXLUHPHQW
Keep enough space of door open.
Keep at least 50mm gap at two sides.
To do this adjust the two levelling feet at front of the unit.
If the unit is not level, the doors and magnetic seal
alignments will not be covered properly.
/HYHOOLQJWKHXQLW
13
y
y
,QVWDOODWLRQ
1007NN
1071NN
6SDFH5HTXLUHPHQW
Keep enough space of door open.
Keep at least 50mm gap at two sides.
To do this adjust the two levelling feet at front of the unit.
If the unit is not level, the doors and magnetic seal
alignments will not be covered properly.
/HYHOOLQJWKHXQLW
13

21
DO986BFK
www.domo-elektro.be
FR
Plaque de recouvrement de la
charnière
,QVWDOODWLRQ
Door Reversibility
Left Aid-Closer on Upper Door x 1 Left Aid-Closer on Lower Door x 1
nscrew top hinge cover and disconnect connectors of door switch and harness.
2.Unscrew top hinge
3.Remove the pin with a screwdriver and filp the hinge bracket. Then refit the pin to hinge bracket
unscrew
screw
8
Cale-porte porte supérieure
,QVWDOODWLRQ
Door Reversibility
Left Aid-Closer on Upper Door x 1 Left Aid-Closer on Lower Door x 1
nscrew top hinge cover and disconnect connectors of door switch and harness.
2.Unscrew top hinge
3.Remove the pin with a screwdriver and filp the hinge bracket. Then refit the pin to hinge bracket
unscrew
screw
8
Cale-porte porte inférieure
,QVWDOODWLRQ
Door Reversibility
Left Aid-Closer on Upper Door x 1 Left Aid-Closer on Lower Door x 1
nscrew top hinge cover and disconnect connectors of door switch and harness.
2.Unscrew top hinge
3.Remove the pin with a screwdriver and filp the hinge bracket. Then refit the pin to hinge bracket
unscrew
screw
8
1. Dévissez les vis de la plaque de recouvrement de la charnière et retirez la plaque. Débranchez les
deux connecteurs des câbles.
,QVWDOODWLRQ
Door Reversibility
Left Aid-Closer on Upper Door x 1 Left Aid-Closer on Lower Door x 1
nscrew top hinge cover and disconnect connectors of door switch and harness.
2.Unscrew top hinge
3.Remove the pin with a screwdriver and filp the hinge bracket. Then refit the pin to hinge bracket
unscrew
screw
8
2. Dévissez les boulons des charnières et retirez la porte.
,QVWDOODWLRQ
Door Reversibility
Left Aid-Closer on Upper Door x 1 Left Aid-Closer on Lower Door x 1
nscrew top hinge cover and disconnect connectors of door switch and harness.
2.Unscrew top hinge
3.Remove the pin with a screwdriver and filp the hinge bracket. Then refit the pin to hinge bracket
unscrew
screw
8
3. Retirez la plaque de charnière de la porte. Retirez la goupille de la plaque de charnière et faites
pivoter la plaque sur 180°. Resserrez la goupille dans la plaque de charnière. Veillez à ce que le
pignon en plastique reste autour de la goupille.
,QVWDOODWLRQ
Door Reversibility
Left Aid-Closer on Upper Door x 1 Left Aid-Closer on Lower Door x 1
nscrew top hinge cover and disconnect connectors of door switch and harness.
2.Unscrew top hinge
3.Remove the pin with a screwdriver and filp the hinge bracket. Then refit the pin to hinge bracket
unscrew
screw
8

22
DO986BFK
FR
4. Déplacez l’interrupteur de porte de la plaque de recouvrement de la charnière droite vers la plaque
de recouvrement de la charnière gauche qui se trouve dans le sachet d’accessoires fourni. Pour
retirer l’interrupteur de porte, vous devez maintenir son clapet situé au dos du couvercle enfoncé.
,QVWDOODWLRQ
5.Detach cover in top of upper door and move harness from right side to left side, then replace the cover.
6.Move top left cover to right side
7. Take off the upper door, take out the screw from the middle hinge by cross screwdriver,
then take off the lower door.
4.Move door switch from right hinge cover to left hinge cover in accessary bag.
9
5. Retirez le panneau de nition de la partie supérieure de la porte supérieure. Déplacez le câble et le
connecteur d’un côté vers l’autre. Replacez le panneau de nition.
,QVWDOODWLRQ
5.Detach cover in top of upper door and move harness from right side to left side, then replace the cover.
6.Move top left cover to right side
7. Take off the upper door, take out the screw from the middle hinge by cross screwdriver,
then take off the lower door.
4.Move door switch from right hinge cover to left hinge cover in accessary bag.
9
6. Déplacez la plaque de recouvrement au-dessus du réfrigérateur de la gauche vers la droite.
,QVWDOODWLRQ
5.Detach cover in top of upper door and move harness from right side to left side, then replace the cover.
6.Move top left cover to right side
7. Take off the upper door, take out the screw from the middle hinge by cross screwdriver,
then take off the lower door.
4.Move door switch from right hinge cover to left hinge cover in accessary bag.
9
7. Dévissez les boulons de la charnière centrale et retirez la porte inférieure de la goupille de la
charnière.
,QVWDOODWLRQ
5.Detach cover in top of upper door and move harness from right side to left side, then replace the cover.
6.Move top left cover to right side
7. Take off the upper door, take out the screw from the middle hinge by cross screwdriver,
then take off the lower door.
4.Move door switch from right hinge cover to left hinge cover in accessary bag.
9

23
DO986BFK
www.domo-elektro.be
FR
8. Déplacez les cache-vis du côté gauche vers le côté droit.
,QVWDOODWLRQ
8 .
9. Unscrew bottom hinge. Then remove the adjustable feet from both side.
10. Unscrew and remove the bottom hinge pin, turn the bracket over and replace it.
unscrew
screw
10
9. Placez le réfrigérateur à plat. Retirez les pieds de réglage des deux côtés et dévissez les boulons de la
charnière inférieure. Retirez la vis du boîtier et replacez-la de l’autre côté.
,QVWDOODWLRQ
8 .
9. Unscrew bottom hinge. Then remove the adjustable feet from both side.
10. Unscrew and remove the bottom hinge pin, turn the bracket over and replace it.
unscrew
screw
10
10. Retirez la petite goupille de la charnière inférieure. Faites pivoter la plaque sur 180° et resserrez la
goupille.
,QVWDOODWLRQ
8 .
9. Unscrew bottom hinge. Then remove the adjustable feet from both side.
10. Unscrew and remove the bottom hinge pin, turn the bracket over and replace it.
unscrew
screw
10
11. Replacez la plaque de charnière sur la face inférieure de l’appareil. Replacez les deux pieds de
réglage.
,QVWDOODWLRQ
13.Detach the Fridge and the Freezer door gaskets and then attach them after rotating.
11.Refit the bracket fitting the bottom hinge pin. Replace both adjustable feet.
12.Remove aid-closers from bottom of upper and lower doors, then take new aid-closers from
accessary bag and install them to left side.
11

24
DO986BFK
FR
12. Retirez le cale-porte du côté inférieur des deux portes. Placez les nouveaux cale-portes sur le côté
gauche des deux portes. Vous trouverez les nouveaux cale-portes dans le sachet d’accessoires fourni.
,QVWDOODWLRQ
13.Detach the Fridge and the Freezer door gaskets and then attach them after rotating.
11.Refit the bracket fitting the bottom hinge pin. Replace both adjustable feet.
12.Remove aid-closers from bottom of upper and lower doors, then take new aid-closers from
accessary bag and install them to left side.
11
13. Enlevez les joints en caoutchouc des deux portes, retournez-les et replacez-les.
,QVWDOODWLRQ
13.Detach the Fridge and the Freezer door gaskets and then attach them after rotating.
11.Refit the bracket fitting the bottom hinge pin. Replace both adjustable feet.
12.Remove aid-closers from bottom of upper and lower doors, then take new aid-closers from
accessary bag and install them to left side.
11
14. Replacez la porte inférieure et revissez-la.
,QVWDOODWLRQ
15.Replace upper door, please ensure the door align with the cabinet to make sure door gasket seal
the cabinet tightly. Then connect door with cabinet by tightly fixed top hinge.
16.Connect harnesses from door and cabinet. Then replace top hinge cover. Before screw the cover,
connect terminals of door switch.
14. Install the lower door, adjust and fix the middle hinge onto the cabinet.
12
15. Replacez la porte supérieure et revissez-la. Assurez-vous que la porte est alignée horizontalement et
que le joint de la porte se ferme complètement.
,QVWDOODWLRQ
15.Replace upper door, please ensure the door align with the cabinet to make sure door gasket seal
the cabinet tightly. Then connect door with cabinet by tightly fixed top hinge.
16.Connect harnesses from door and cabinet. Then replace top hinge cover. Before screw the cover,
connect terminals of door switch.
14. Install the lower door, adjust and fix the middle hinge onto the cabinet.
12

25
DO986BFK
www.domo-elektro.be
FR
16. Rebranchez les deux connecteurs des câbles au-dessus de l’appareil à la porte. Replacez la plaque de
recouvrement de la charnière et vissez-la. Assurez-vous que les câbles se trouvent dans le guidage et
que l’interrupteur de la porte est en contact avec la porte.
,QVWDOODWLRQ
15.Replace upper door, please ensure the door align with the cabinet to make sure door gasket seal
the cabinet tightly. Then connect door with cabinet by tightly fixed top hinge.
16.Connect harnesses from door and cabinet. Then replace top hinge cover. Before screw the cover,
connect terminals of door switch.
14. Install the lower door, adjust and fix the middle hinge onto the cabinet.
12
UTILISATION
PANNEAU DE COMMANDE
Boutons Touch screen
A. Température du réfrigérateur
B. Température du congélateur
C. Fonctions
Écran
1. Température du réfrigérateur
2. Température du congélateur
3. Mode ECO
4. Mode Super
5. Mode vacances
6. Sécurité enfants
Le panneau de commande passe automatiquement en mode veille. L’écran s’éclaire à l’ouverture des
portes et lorsqu’on touche un bouton.
RÉGLAGE DE LA TEMPÉRATURE
· Vous pouvez régler la température du réfrigérateur entre 2 et 8 °C. Dans des conditions normales,
nous vous conseillons de le régler sur 4 °C. Maintenez le bouton « FRIDGE. » (température
réfrigérateur) enfoncé jusqu’à ce que la température souhaitée s’ache sur l’écran.
8VHULQWHUIDFH
Using the Control Panel
A.Temperature Control of Fridge Compartment
B.Temperature Control of Freezer Compartment
C.Mode/ Locking / Unlocking
1.1 BUTTON OPERATION
2.1.1The panel will be lit up for 2 minutes once the door of fridge compartment is opened.
2.1 DISPLAY
1.Temperature of Fridge Comparment
2.Temperature of Freezer Comparment
3.ECO Mode
4.Holiday Mode
5.Super Mode
6.Locking / Unlocking
1.2 LED DISPLAY
a.The control panel is 100% lit up for 3 seconds, which operates exactly as per the setting
(mode and temperature) before the poweroff. The system will be automatically locked 25
seconds after the last button operation. After locking, the light of the panel would be out 30
seconds after the last button operation.
b.Both preset temperatures of fridge compartemnt and freezer compartment would be shown
on the display.
2.0 OPERATING CONDITION
1
2
A
B
C
3
4
5
6
14
· La température du congélateur va de -14 à -22 °C. Dans des conditions normales, nous vous
conseillons de le régler sur -18 °C. Maintenez le bouton « FREEZER » (température congélateur)
enfoncé jusqu’à ce que la température souhaitée s’ache sur l’écran.
8VHULQWHUIDFH
Using the Control Panel
A.Temperature Control of Fridge Compartment
B.Temperature Control of Freezer Compartment
C.Mode/ Locking / Unlocking
1.1 BUTTON OPERATION
2.1.1The panel will be lit up for 2 minutes once the door of fridge compartment is opened.
2.1 DISPLAY
1.Temperature of Fridge Comparment
2.Temperature of Freezer Comparment
3.ECO Mode
4.Holiday Mode
5.Super Mode
6.Locking / Unlocking
1.2 LED DISPLAY
a.The control panel is 100% lit up for 3 seconds, which operates exactly as per the setting
(mode and temperature) before the poweroff. The system will be automatically locked 25
seconds after the last button operation. After locking, the light of the panel would be out 30
seconds after the last button operation.
b.Both preset temperatures of fridge compartemnt and freezer compartment would be shown
on the display.
2.0 OPERATING CONDITION
1
2
A
B
C
3
4
5
6
14
A
4
3
1
B
C
2
5
6

26
DO986BFK
FR
· L’endroit où le réfrigérateur est utilisé, la fréquence d’ouverture de la porte et la température de la
pièce dans laquelle se trouve l’appareil inuencent la durée et la température de fonctionnement de ce
dernier.
RÉGLAGE DES FONCTIONS
8VHULQWHUIDFH
Using the Control Panel
A.Temperature Control of Fridge Compartment
B.Temperature Control of Freezer Compartment
C.Mode/ Locking / Unlocking
1.1 BUTTON OPERATION
2.1.1The panel will be lit up for 2 minutes once the door of fridge compartment is opened.
2.1 DISPLAY
1.Temperature of Fridge Comparment
2.Temperature of Freezer Comparment
3.ECO Mode
4.Holiday Mode
5.Super Mode
6.Locking / Unlocking
1.2 LED DISPLAY
a.The control panel is 100% lit up for 3 seconds, which operates exactly as per the setting
(mode and temperature) before the poweroff. The system will be automatically locked 25
seconds after the last button operation. After locking, the light of the panel would be out 30
seconds after the last button operation.
b.Both preset temperatures of fridge compartemnt and freezer compartment would be shown
on the display.
2.0 OPERATING CONDITION
1
2
A
B
C
3
4
5
6
14
Appuyez sur la touche « MODE » (fonctions) pour basculer entre les fonctions Mode ECO, Mode Vacances
et Mode Super.
Mode ECO
8VHULQWHUIDFH
Using the Control Panel
A.Temperature Control of Fridge Compartment
B.Temperature Control of Freezer Compartment
C.Mode/ Locking / Unlocking
1.1 BUTTON OPERATION
2.1.1The panel will be lit up for 2 minutes once the door of fridge compartment is opened.
2.1 DISPLAY
1.Temperature of Fridge Comparment
2.Temperature of Freezer Comparment
3.ECO Mode
4.Holiday Mode
5.Super Mode
6.Locking / Unlocking
1.2 LED DISPLAY
a.The control panel is 100% lit up for 3 seconds, which operates exactly as per the setting
(mode and temperature) before the poweroff. The system will be automatically locked 25
seconds after the last button operation. After locking, the light of the panel would be out 30
seconds after the last button operation.
b.Both preset temperatures of fridge compartemnt and freezer compartment would be shown
on the display.
2.0 OPERATING CONDITION
1
2
A
B
C
3
4
5
6
14
Si vous sélectionnez cette fonction, la température du réfrigérateur sera réglée à 5°C et celle du
congélateur à -18°C. La touche « FRIDGE » et la touche « FREEZER » sont verrouillées. Vous pouvez
activer et désactiver cette fonction à l’aide de la touche « MODE » (fonctions). Le symbole est aché sur
l’écran.
Mode vacances
8VHULQWHUIDFH
Using the Control Panel
A.Temperature Control of Fridge Compartment
B.Temperature Control of Freezer Compartment
C.Mode/ Locking / Unlocking
1.1 BUTTON OPERATION
2.1.1The panel will be lit up for 2 minutes once the door of fridge compartment is opened.
2.1 DISPLAY
1.Temperature of Fridge Comparment
2.Temperature of Freezer Comparment
3.ECO Mode
4.Holiday Mode
5.Super Mode
6.Locking / Unlocking
1.2 LED DISPLAY
a.The control panel is 100% lit up for 3 seconds, which operates exactly as per the setting
(mode and temperature) before the poweroff. The system will be automatically locked 25
seconds after the last button operation. After locking, the light of the panel would be out 30
seconds after the last button operation.
b.Both preset temperatures of fridge compartemnt and freezer compartment would be shown
on the display.
2.0 OPERATING CONDITION
1
2
A
B
C
3
4
5
6
14
· Cette fonction permet d’économiser de l’énergie lorsque l’appareil n’est pas utilisé de façon régulière
pendant une certaine période, par ex. durant les vacances.
· Si vous sélectionnez cette fonction, la température du réfrigérateur sera réglée à 17°C. La touche «
FRIDGE » est verrouillée.
· Vous pouvez (dés-)activer cette fonction en appuyant sur le bouton « MODE ». Le symbole s’ache
alors à l’écran.
Mode Super
8VHULQWHUIDFH
Using the Control Panel
A.Temperature Control of Fridge Compartment
B.Temperature Control of Freezer Compartment
C.Mode/ Locking / Unlocking
1.1 BUTTON OPERATION
2.1.1The panel will be lit up for 2 minutes once the door of fridge compartment is opened.
2.1 DISPLAY
1.Temperature of Fridge Comparment
2.Temperature of Freezer Comparment
3.ECO Mode
4.Holiday Mode
5.Super Mode
6.Locking / Unlocking
1.2 LED DISPLAY
a.The control panel is 100% lit up for 3 seconds, which operates exactly as per the setting
(mode and temperature) before the poweroff. The system will be automatically locked 25
seconds after the last button operation. After locking, the light of the panel would be out 30
seconds after the last button operation.
b.Both preset temperatures of fridge compartemnt and freezer compartment would be shown
on the display.
2.0 OPERATING CONDITION
1
2
A
B
C
3
4
5
6
14
· Sélectionnez cette fonction si la température standard ne refroidit pas assez vos aliments. Par
exemple en cas de température extérieure très élevée, si les portes ont été ouvertes à plusieurs
reprises, en cas de température ambiante élevée, si vous mettez dans l’appareil une grande quantité
d’aliments non refroidis/non congelés, etc.
· En sélectionnant cette fonction, la température du congélateur baisse jusqu’à -25 °C, et ce, pendant
maximum 50 heures. Nous vous conseillons de l’activer 24 heures avant la congélation.
· Passé ce délai, la fonction se désactive automatiquement. L’appareil se remet alors à la température
initiale. La touche « FREEZER » est verrouillée.
· Vous pouvez (dés-)activer cette fonction en appuyant sur le bouton « MODE» (fonctions). Le symbole
s’ache à l’écran.
SÉCURITÉ ENFANTS
8VHULQWHUIDFH
Using the Control Panel
A.Temperature Control of Fridge Compartment
B.Temperature Control of Freezer Compartment
C.Mode/ Locking / Unlocking
1.1 BUTTON OPERATION
2.1.1The panel will be lit up for 2 minutes once the door of fridge compartment is opened.
2.1 DISPLAY
1.Temperature of Fridge Comparment
2.Temperature of Freezer Comparment
3.ECO Mode
4.Holiday Mode
5.Super Mode
6.Locking / Unlocking
1.2 LED DISPLAY
a.The control panel is 100% lit up for 3 seconds, which operates exactly as per the setting
(mode and temperature) before the poweroff. The system will be automatically locked 25
seconds after the last button operation. After locking, the light of the panel would be out 30
seconds after the last button operation.
b.Both preset temperatures of fridge compartemnt and freezer compartment would be shown
on the display.
2.0 OPERATING CONDITION
1
2
A
B
C
3
4
5
6
14
La sécurité enfants bloque automatiquement les touches. Appuyez sur le bouton « LOCK » (sécurité
enfant) pendant 3 secondes pour verrouiller le panneau. Un cadenas fermé s’ache à l’écran. Appuyez 3
secondes sur le bouton « UNLOCK » (sécurité enfants) pour débloquer le panneau de commande. L’icône
de cadenas disparaît de l’écran.
ALARME
Si la porte du réfrigérateur reste ouverte pendant 90 secondes, vous entendrez un signal. Cette alarme
est un avertissement qui vous évite de laisser la porte ouverte par mégarde et de gâcher vos aliments.
L’alarme s’arrête dès que la porte est refermée.

27
DO986BFK
www.domo-elektro.be
FR
BAC PRODUITS FRAIS
Vous pouvez régler la température du bac à légumes au moyen de l’interrupteur situé à
l’arrière. Cette fonction n’a aucune répercussion sur le bac à legumes .
Placez l’interrupteur en position « crisper » pour conserver vos fruits et légumes au
frais et et plus longtemps. La température et le taux d’humidité seront parfaitement
maintenus. Placez l’interrupteur en position « chiller » pour les aliments frais et
périssables, comme le poisson. La température sera plus fraîche. Les aliments seront
alors conservés au frais, mais sans risque de geler.
DÉPLACER LES CLAYETTES ET LES ÉTAGÈRES DE PORTE
· Avant de déplacer les clayettes et les étagères de porte, videz le réfrigérateur.
· Pour déplacer une clayette, soulevez-la et tirez-la vers vous.
· Pour déplacer une étagère de porte, empoignez-la des deux mains. Soulevez-la et tirez-la vers vous.
ÉCLAIRAGE
Le réfrigérateur et le congélateur sont éclairés à l’aide de lampes LED. Celles-ci sont plus écologiques et
ont une durée de vie prolongée. Elles ne doivent donc pas être remplacées. Si un problème d’éclairage
devait toutefois survenir, prenez contact avec un service de dépannage agréé près de chez vous.
DÉPLACEMENT DE VOTRE RÉFRIGÉRATEUR
Si l’appareil est éteint pour une raison quelconque, attendez 10 minutes avant de le remettre en marche.
Cela permettra à la pression du système de réfrigération de s’égaliser avant le redémarrage.
· Éteignez l’appareil et débranchez le câble d’alimentation de la prise secteur Enlevez tous les aliments.
Enlevez également toutes les pièces mobiles (clayettes, accessoires, etc.) ou attachez-les dans le
réfrigérateur an d’éviter tout risque de choc.
· Déplacez l’appareil jusqu’à son nouvel emplacement. Si l’appareil a été placé sur un des ses côtés
durant un certain temps, remettez-le en position verticale et attendez au moins 10 minutes avant de le
mettre en marche.
Votre réfrigérateur utilise de l’isobutane (R600a) comme réfrigérant. Bien que le R600a soit un gaz
écologique et naturel, il est explosif. Vous devez donc faire attention pendant le transport et l’installation
pour éviter que les éléments de réfrigération de l’appareil ne soient endommagés. En cas de fuite due à la
détérioration des éléments de réfrigération, éloignez votre réfrigérateur des ammes nues et des sources
de chaleur, et ventilez la pièce où il se trouve durant quelques minutes.
CONSERVATION DES ALIMENTS DANS LE RÉFRIGÉRATEUR
Le réfrigérateur permet de prolonger la durée de conservation des denrées périssables.
Conservation des aliments frais pour des résultats optimaux :
· Ne conservez que des aliments qui sont très frais et de bonne qualité.
· Veiller à ce que les aliments soient bien emballés ou couverts avant d’être stockés. Cela permettra
d’éviter que les aliments se déshydratent, que leur couleur se détériore ou qu’ils perdent leur goût et
aidera à maintenir leur fraîcheur. Cela permettra également d’empêcher le transfert d’odeurs.
· Assurez-vous que les aliments à forte odeur sont emballés ou couverts et entreposés à l’écart des
aliments tels que le beurre, le lait et la crème qui sont susceptibles de se gâter du fait des odeurs
fortes.
· Faites refroidir les aliments chauds avant de les mettre au réfrigérateur.
'DLO\8VH'DLO\8VH
Cleaning
For hygienic reasons the appliance interior, including interior accessories, should be cleaned regularly.
Caution! The appliance may not be connected to the mains during cleaning. Danger of electrical
shock! Before cleaning switch the appliance off and remove the plug from the mains, or switch off or
turn out the circuit breaker or fuse. Never clean the appliance with a steam cleaner. Moisture could
accumulate in electrical components, danger of electrical shock! Hot vapors can lead to the damage
of plastic parts. The appliance must be dry before it is placed back into service.
Important! Ethereal oils and organic solvents can attack plastic parts, e.g. lemon juice or the juice form
orange peel, butyric acid, cleanser that contain acetic acid.
Do not allow such substances to come into contact the appliance parts.
Do not use any abrasive cleaners
Remove the food from the freezer. Store them in a cool place, well covered.
Switch the appliance off and remove the plug from the mains, or switch off or turn out the circuit breaker
of fuse.
Clean the appliance and the interior accessories with a cloth and lukewarm water. After cleaning wipe
with fresh water and rub dry.
After everything is dry place appliance back into service.
Hints for refrigeration
Useful hints:
Make (all types): wrap in polythene bags and place on the glass shelves above the vegetable drawer.
For safety, store in this way only one or two days at the most.
Cooked foods, cold dishes, etc...: these should be covered and may be placed on any shelf.
Fruit and vegetables: these should be thoroughly cleaned and placed in the special drawer(s) provided.
butter and cheese: these should be placed in special airtight containers or wrapped in aluminum foil or
polythene bags to exclude as much air as possible.
Milk bottle: these should have a cap and should be stored in the balconies on the door.
Bananas, potatoes, onions and garlic, if not packed, must not be kept in the fridge.
Fresh Zone Temperature Control
18

28
DO986BFK
FR
CONGÉLATION ET CONSERVATION DES ALIMENTS DANS LE CONGÉLATEUR
Utilisation du congélateur
· Pour conserver les aliments surgelés.
· Pour fabriquer des glaçons.
· Pour congeler les aliments.
Remarque : Assurez-vous que la porte du congélateur a été fermée correctement.
Évitez d’ouvrir la porte du compartiment du congélateur inutilement.
Achat d’aliments congelés
· L’emballage ne doit pas être endommagé.
· Consommez-les avant la date de péremption / limite d’utilisation / date de consommation.
· Si possible, transportez les aliments surgelés dans un sac isotherme et placez-les rapidement dans le
compartiment du congélateur.
Congélation des aliments frais
Ne congelez que des aliments frais et en bon état. Pour conserver le mieux possible la valeur nutritive,
la saveur et la couleur, les légumes doivent être blanchis avant d’être congelés. Il n’est pas nécessaire de
blanchir les aubergines, les poivrons, les courgettes et les asperges. Remarque : Les aliments à congeler
ne doivent pas entrer en contact avec les aliments déjà congelés.
· Les aliments suivants peuvent être congelés: Les gâteaux et les pâtisseries, les poissons et les fruits
de mer, la viande, le gibier, la volaille, les légumes, les fruits, les herbes, les oeufs sans coquilles, les
produits laitiers comme le fromage et le beurre, les plats cuisinés et les restes tels que les soupes, les
ragoûts, la viande cuite et le poisson, les plats de pommes de terre, les soués et les desserts.
· Les aliments suivants ne sont pas adaptés à la congélation: Les types de légumes qui sont
généralement consommés crus, comme la laitue ou les radis, les oeufs en coquilles, les raisins, les
pommes entières, les poires et les pêches, les oeufs durs, les yaourts, le lait caillé, la crème sure et la
mayonnaise.
Emballage des aliments surgelés
Utilisez des emballages hermétiques pour conserver les aliments : cela permet d’éviter qu’ils ne se
déshydratent ou ne perdent leur saveur.
1. Placez les aliments dans des emballages.
2. Retirez l’air.
3. Scellez l’emballage.
4. Étiquetez l’emballage avec le contenu et la date de congélation.
Emballage approprié : Film plastique, lm tubulaire de polyéthylène, papier d’aluminium, récipients de
congélation.
Durée de stockage des aliments surgelés recommandée dans le congélateur
Ces durées varient en fonction du type d’aliment. Les aliments que vous congelez peuvent être conservés
de 1 à 12 mois (minimum à -18 ° C).
Aliment Durée de congélation
Bacon, ragoût, lait 1 mois
Pain, glace, saucisses, tartes, fruits de mer préparés, poissons gras 2 mois
Poissons non gras, crustacés, pizzas, scones et muns 3 mois

29
DO986BFK
www.domo-elektro.be
FR
Jambon, gâteaux, biscuits, boeuf, côtelettes d’agneau, morceaux de
volaille
4 mois
Beurre, légumes (blanchis), oeufs entiers et jaunes d’oeufs, écrevisses
cuites, viande hachée (crue), porc (cru)
6 mois
Fruits (secs ou au sirop), blancs d’oeufs, boeuf (cru), poulet entier,
agneau (cru), gâteaux aux fruits
12 mois
N’oubliez jamais :
· Lorsque vous congelez des aliments frais comportant une « date de péremption / limite d’utilisation /
date de consommation «, vous devez les congeler avant l’expiration de cette date.
· Vériez que les aliments n’ont pas déjà été congelés. En eet, les aliments congelés qui ont
complètement décongelé ne doivent pas être recongelés.
· Une fois décongelés, les aliments doivent être consommés rapidement.
PANNE DE COURANT
La plupart des pannes de courant sont rétablies endéans 1 ou 2 heures et ne modieront pas la
température de votre réfrigérateur. Vous devez toutefois réduire au minimum l’ouverture de la porte au
cours d’une panne de courant.
Au cours d’une panne de courant prolongée, vous devez prendre des mesures pour protéger la nourriture,
p.ex. en la couvrant de glace sèche.
Les aliments congelés ne seront pas aectés si la panne dure moins de 15 heures.
Ne recongelez pas les aliments une fois complètement dégelés. Leur consommation serait alors
potentiellement dangereuse.
NETTOYAGE ET ENTRETIEN
NETTOYAGE
N’utilisez pas de produits nettoyants abrasifs ou des solvants.
1. Éteignez l’appareil. Débranchez le câble d’alimentation de la prise murale.
2. Sortez les aliments et conservez-les dans un endroit frais.
3. Nettoyez l’appareil avec un chion doux imprégné d’eau chaude et de détergent.
4. Après le nettoyage, branchez l’alimentation électrique de l’appareil et réglez la température selon
vos préférences.
5. Après le nettoyage, reconnectez l’appareil et réglez la température désirée.
6. Replacez les aliments dans l’appareil.
PROBLÈMES ET LEURS SOLUTIONS
Problème Cause possible Solution
L'appareil ne fonctionne
pas.
· L’appareil n’est pas
(convenablement) branché.
· Le fusible a sauté.
· La prise de courant est
défectueuse.
· Branchez l’appareil.
· Vériez les fusibles.
· Contactez un électricien.
Odeurs étranges. · La nourriture dans le
réfrigérateur a avarié.
· Nettoyez l’intérieur du
réfrigérateur.

30
DO986BFK
FR
Les portes ne ferment pas
complètement.
· Le réfrigérateur ou le
congélateur est trop plein.
· L’appareil n’est pas de niveau.
· Faites attention que la
nourriture ou les boissons
n’empêchent pas la fermeture
des portes.
· Alignez les pieds réglables.
Bruits anormaux. · L’appareil n’est pas placé
horizontalement.
· L’appareil touche un mur ou un
autre objet.
· Remontez les pieds
réglables et placez l’appareil
horizontalement.
· Déplacez doucement l’appareil.
· Contactez votre service de
réparation.
Son bourdonnant ou
bouillonnant.
· Le compresseur démarre / est
en marche.
· Le gaz de refroidissement
circule dans l’appareil.
· Ceci est normal.
Le panneau latéral est
chaud.
· Le canal de condensation se
trouve de ce côté.
· C’est normal.
MISE AU REBUT
Ce symbole sur le produit ou son emballage indique que ce produit ne peut
être traité comme déchet ménager. Il doit plutôt être remis au point de
ramassage concerné, se chargeant du recyclage du matériel électrique et
électronique. En vous assurant que ce produit est éliminé correctement, vous
favorisez la prévention des conséquences négatives pour l’environnement et
la santé humaine qui, sinon, seraient le résulat d’un traitement inapproprié
des déchets de ce produit. Pour obtenir plus de détails sur le recyclage de ce
produit, veuillez prendre contact avec le bureau municipal de votre région,
votre service d’éliminiation des déchets ménagers ou le magasin où vous avez
acheté le produit.
L’emballage est recyclable. Traitez l’emballage écologiquement.

31
DO986BFK
www.domo-elektro.be
DE
GARANTIE
Sehr geehrter Kunde,
Sämtliche unserer Produkte unterliegen einer strengen Qualitätskontrolle,
bevor Sie Ihnen angeboten werden. Sollten dennoch
Probleme mit Ihrem Gerät auftreten, bedauern wir dies zutiefst.
Wir möchten Sie in diesem Fall bitten, unseren Kundenservice zu kontaktieren.
Unsere Mitarbeiter helfen Ihnen gern weiter!
+32 14 21 71 91 [email protected]
Montag – Donnerstag: 8:30 Uhr – 12:00 Uhr und von 13:00 Uhr – 17:00 Uhr
Freitag: 8:30 Uhr – 12:00 Uhr und von 13:00 Uhr – 16:30 Uhr
Dieses Gerät hat eine Garantiefrist von 2 Jahren ab dem Kaufdatum. Während der Garantiezeit
übernimmt der Hersteller die vollständige Verantwortung für Mängel, die nachweislich auf Material- oder
Konstruktionsfehler zurückzuführen sind. Wenn derartige Mängel auftreten, wird das Gerät wenn nötig
ausgetauscht oder repariert. Die Garantiezeit von 2 Jahren beginnt in diesem Moment nicht erneut,
sondern sie läuft bis 2 Jahre nach dem Kaufdatum weiter. Die Garantie wird auf der Grundlage des
Kassenbons gewährt.
Die Garantie auf Accessoires und Verschleißteile beträgt 6 Monate.
Die Garantie und die Verantwortung/Haftung des Lieferanten und Herstellers entfallen automatisch in
den folgenden Fällen:
· Bei Nichtbeachtung der Anweisungen in dieser Bedienungsanleitung.
· Bei falschem Anschluss, z.B. bei einer zu hohen Stromspannung.
· Bei falscher, grober oder abnormaler Verwendung.
· Bei unzureichender oder falscher Wartung.
· Bei vom Verbraucher oder von nicht ermächtigten Dritten vorgenommenen Reparaturen oder
Änderungen am Gerät.
· Bei der Verwendung von Ersatzteilen oder Accessoires, die nicht vom Lieferanten / Hersteller
empfohlen oder geliefert werden.
SICHERHEITSVORKEHRUNGEN
Wenn Sie elektrische Geräte verwenden, müssen folgende Sicherheitshinweise beachtet werden:
· Lesen Sie diese Hinweise sorgfältig durch. Bewahren Sie diese Bedienungsanleitung zum späteren
Nachschlagen auf.
· Entfernen Sie vor dem ersten Gebrauch alle Verpackungsmaterialien und möglichen Werbeauleber.
Sorgen Sie dafür, dass Kinder nicht mit den Verpackungsmaterialien spielen.
· Dieses Gerät eignet sich für den Einsatz im Haushalt und in ähnlichen Umfeldern, zum Beispiel in
folgenden Bereichen:
· Küchenbereich für Mitarbeiter von Geschäften, Büros und anderen ähnlichen beruichen
Umfeldern.
· Bauernhöfe
· Hotel- und Motelzimmer und andere Bereiche mit wohnungsähnlichem Charakter
· Gästezimmer oder Ähnliches

32
DO986BFK
DE
· Diese Gerät darf von Kindern ab 16 Jahren und Menschen mit körperlichen oder sensorischen
Behinderungen oder Menschen mit eingeschränkten geistigen Fähigkeiten oder mangelnder
Erfahrung bzw. Sachkenntnis unter der Bedingung verwendet werden, dass diese Personen
beaufsichtigt werden oder sie eine Anleitung zur sicheren Verwendung des Geräts erhalten haben und
sich der Gefahren bei der Verwendung des Geräts bewusst sind. Kinder dürfen nicht mit dem Gerät
spielen. Die Wartung und Reinigung des Geräts darf nicht durch Kinder ausgeführt werden, außer
diese sind älter als 16 Jahre und werden von einem Erwachsenen beaufsichtigt.
· Achtung: das Gerät darf nicht mit einer externen Zeitschaltuhr oder Fernbedienung gebraucht
werden.
· Vor der Benutzung prüfen, ob die Spannung, die auf dem Gerät angegeben ist, mit der Spannung Ihres
Stromnetzes übereinstimmt.
· Lassen Sie das Netzkabel nicht über den Tisch oder die Anrichte hängen, oder in Kontakt mit heißen
Oberächen kommen.
· Benutzen Sie das Gerät niemals, wenn die Kabelschnur oder der Stecker beschädigt ist, nach
beeinträchtigtem Funktionieren des Gerätes, oder wenn das Gerät beschädigt ist. Bringen Sie in
solchen Fällen das Gerät zur nächsten qualizierten Servicestelle zur Überprüfung und/oder Reparatur.
· Beim Einsatz des Gerätes in Anwesenheit von Kindern ist strenge Aufsicht geboten.
· Die Verwendung von Zubehör, das nicht vom Hersteller empfohlen oder verkauft wird, besteht die
Gefahr von Brand, elektrischen Schlages oder von Verletzungen.
· Ziehen Sie den Stecker aus der Steckdose, wenn das Gerät nicht im Einsatz ist, Einzelteile montiert
oder demontiert werden, oder das Gerät gereinigt wird. Ziehen Sie den Stecker direkt am Stecker
selber und nicht an der Kabelschnur aus der Steckdose.
· Lassen Sie das im Betrieb bendliche Gerät nicht unbeaufsichtigt.
· Stellen Sie das Gerät nicht in der Nähe oder auf einer Gasamme, einer elektrischen Platte oder an
einer Stelle ab, auf der es in Kontakt mit einem Elektroofen oder einem anderen heißen Geräten
kommen kann.
· Benutzen Sie das Gerät nicht im Freien.
· Benutzen Sie das Gerät ausschließlich für den Zweck, für den es gedacht ist.
· Stellen Sie das Gerät immer auf eine stabile, ache und trockene Oberäche.
· Das Gerät ist nur auf den privaten Gebrauch ausgelegt. Der Hersteller ist nicht verantwortlich für
Unfälle, die als Folge von unsachgemäßem Gebrauch des Geräts oder Nichtbefolgen der in dieser
Anleitung aufgeführten Regeln entstehen.
· Sämtliche Reparaturen, abgesehen von der gewöhnlichen Pege, sind durch den Hersteller oder
dessen Kundendienst zu übernehmen.
· Das Gerät, das Kabel oder den Stecker niemals in Wasser oder in andere Flüssigkeiten tauchen.
· Sorgen Sie dafür, dass Kinder das Netzkabel oder das Gerät nicht berühren können.
· Netzkabel vor scharfen Kanten, heißen Gegen-ständen oder anderen Wärmequellen schützen.
· Beim ersten Gebrauch Verpackungsmaterial und mögliche Werbeauleber komplett entfernen.
· Halten Sie die Lüftungsönungen frei und sorgen Sie dafür, dass diese nicht verstopft oder behindert
werden.
· Verwenden Sie keine mechanischen Geräte oder andere Hilfsmittel, um den Abtauprozess zu
beschleunigen.
· Verwenden Sie keine anderen elektrischen Geräte im Kühlschrank, außer wenn sie vom Hersteller für
diesen Zweck zugelassen wurden.
· Fassen Sie die Lampe nicht an, wenn diese lange gebrannt hat. Sie kann sehr heiß sein.
· Die Lampe ist nur für dieses Gerät bestimmt. Verwenden Sie diese nie als Innenraumbeleuchtung.
· Bewahren Sie keine explosiven Stoe im Gerät, wie beispielsweise Sprühaschen mit brennbarem
Triebmittel.

33
DO986BFK
www.domo-elektro.be
DE
· Sorgen Sie dafür, dass der Kühlkreislauf nicht beschädigt wird, z.B. während des Transports oder bei
der Montage.
· Achten Sie darauf, dass das Kabel nicht durch die Rückseite des Gerätes platt gedrückt oder
beschädigt wird. Dies kann Überhitzung oder Feuer verursachen.
· Achten Sie darauf, dass Sie Zugang zum Stecker des Gerätes haben.
· Ziehen Sie nicht am Kabel.
· Wenn die Steckdose lose ist, stecken Sie den Stecker nicht in diese Steckdose. (Risiko eines
Stromschlags oder Brandgefahr)
· Dieses Gerät ist schwer. Seien Sie beim Transport vorsichtig.
· Berühren Sie Lebensmittel im Tieühlfach nicht mit feuchten oder nassen Händen. Dies kann zu
(Gefrierbrand-)wunden der Haut führen.
· Vermeiden Sie eine lange Exposition gegenüber Sonnenlicht.
· Das Gerät darf nicht mit einem Verlängerungskabel oder einer Verteilersteckdose verwendet werden.
· Halten Sie die unten angegebenen Anweisungen ein, um eine Kontamination von Lebensmitteln zu
vermeiden:
· Durch eine langfristige Önung der Tür kann sich die Temperatur in den Fächern des Geräts
beträchtlich erhöhen.
· Reinigen Sie die Oberächen regelmäßig, die in Kontakt mit Lebensmitteln kommen
können. Halten Sie den Kondensationskanal und das Ablauoch an der Rückseite des Geräts
sauber.
· Bewahren Sie rohes Fleisch und Fisch in geeigneten Behältern im Kühlschrank auf, sodass
diese nicht in Kontakt mit anderen Lebensmitteln kommen oder darauf tropfen.
· Wenn das Gerät längere Zeit leer bleibt, müssen Sie es ausschalten, abtauen und reinigen.
Lassen Sie es trocknen und lassen Sie die Tür oen, um zu vermeiden, dass sich im Gerät
Schimmel bildet.
WARNHINWEIS! Gerät nie auf oder in die Nähe einer Gasamme oder elektrischen
Platte oder an einen Ort stellen, an dem es mit einer Wärmequelle in Kontakt kommen
könnte. An der Rückseite des Geräts benden sich brennbare Materialien.
Achten Sie auf das Symbol „Brandgefahr - brennbares Material“, das sich an der
Rückseite des Geräts bendet.

34
DO986BFK
DE
TEILE
1. Regale
2. Deckel für Gemüsefach
3. Gemüsefach
4. Frischefach
5. Türregal
6. Gefrierschubladen
7. Stellfüße
ANSCHLUSS
· Das Verpackungsmaterial sowohl innen als auch außen entfernen. Die Außenseite des Apparats mit
einem sauberen, feuchten Tuch reinigen. Die Innenseite kann mit einem weichen, feuchten Tuch
gereinigt werden.
· Das Gerät nicht in einen schmalen Gang, direktes Sonnenlicht oder Feuchtigkeit stellen.
· Die Luft rund um den Kühlschrank sollte frei zirkulieren können. Die Rückseite des Kühlschranks muss
mindestens 10 cm von der Wand entfernt sein.
· Den Kühlschrank auf einen stabilen, achen Untergrund stellen. Das
Gerät kann über die Stellfüße waagerecht ausgerichtet werden. Diese
können durch Ein- oder Ausschrauben eingestellt werden.
· Direktes Sonnenlicht und Wärme vermeiden. Sonnenlicht kann die
Außenseite des Kühlschranks angreifen. Wärme verursacht einen
höheren Stromverbrauch.
· Einen zu hohen Feuchtigkeitsgrad vermeiden. Zuviel Luftfeuchtigkeit
sorgt für schnellere Eisbildung im Kühlschrank.
· Bevor Sie den Kühlschrank an das Stromnetz anschließen, kontrollieren
Sie, ob die Spannung auf dem Typenschild Ihres Geräts mit der
Spannung in Ihrer Wohnung übereinstimmt. Eine andere Spannung
kann das Gerät beschädigen.
· Sie können das Gerät nur über den Stecker vom Stromnetz trennen.
Sorgen Sie dafür, dass er immer einfach zugänglich ist. Um das Gerät
vom Stromnetz zu trennen, schalten Sie das Gerät aus und ziehen Sie
den Stecker anschließend aus der Steckdose.
2YHUYLHZ
Note: Above picture is for reference only. Real appliance probably is different.
FridgeShelves
Fridge
Balconies
Crisper
Crisper Cover
Fresh convertible box
Freezer Drawers
Leveling Feet
6
1
2
3
4
6
7
5
y
y
,QVWDOODWLRQ
1007NN
1071NN
6SDFH5HTXLUHPHQW
Keep enough space of door open.
Keep at least 50mm gap at two sides.
To do this adjust the two levelling feet at front of the unit.
If the unit is not level, the doors and magnetic seal
alignments will not be covered properly.
/HYHOOLQJWKHXQLW
13
y
y
,QVWDOODWLRQ
1007NN
1071NN
6SDFH5HTXLUHPHQW
Keep enough space of door open.
Keep at least 50mm gap at two sides.
To do this adjust the two levelling feet at front of the unit.
If the unit is not level, the doors and magnetic seal
alignments will not be covered properly.
/HYHOOLQJWKHXQLW
13

35
DO986BFK
www.domo-elektro.be
DE
· Das Gerät muss geerdet sein. Der Hersteller ist nicht für Schäden verantwortlich, die aus dem Fehlen
einer Erdung resultieren.
· Das Gerät nach dem Aufstellen vor dem Einschalten 8 Stunden stehen lassen. So kann das Kühlmittel
sich verteilen.
· Lassen Sie das Gerät 24 Stunden ohne Lebensmittel in Betrieb, sodass der Kühlschrank auf eine
angemessene Temperatur abkühlt.
· Dieses Gerät wurde so entworfen, dass es bei einer Umgebungstemperatur zwischen 16°C und 38°C
funktioniert. In einem Raum mit einer geringeren oder höheren Temperatur funktioniert das Gerät
nicht ordnungsgemäß.
· Dieses Gerät darf nur in Innenräumen verwendet werden.
· Die Gefrierbox macht Geräusche, wenn der Kompressor das Kühlmittel bewegt. Dies ist normal.
ÖFFNUNGSRICHTUNG DER TÜR ÄNDERN
Wenn Sie die Scharniere der Tür auf die andere Seite versetzen möchten, empfehlen wir, einen
anerkannten Fachmann zu kontaktieren und ihn diese Arbeiten durchführen zu lassen. Bevor Sie die
Önungsrichtung ändern, kontrollieren Sie, ob der Stecker aus der Steckdose gezogen wurde und dass
das Gerät leer ist.
Das Gerät nach dem Wechsel des Türanschlags erst 8 Stunden lang stehen lassen, bevor es eingeschaltet
wird. Dies ermöglicht das Absetzen des Kühlmittels. Es wird empfohlen, einen Flachschraubenzieher,
einen Kreuzschraubenzieher und einen Schraubenschlüssel (nicht im Lieferumfang enthalten) sowie die
unten aufgeführten Bauteile zu verwenden.
Scharnier-Abdeckplatte
,QVWDOODWLRQ
Door Reversibility
Left Aid-Closer on Upper Door x 1 Left Aid-Closer on Lower Door x 1
nscrew top hinge cover and disconnect connectors of door switch and harness.
2.Unscrew top hinge
3.Remove the pin with a screwdriver and filp the hinge bracket. Then refit the pin to hinge bracket
unscrew
screw
8
Türanschlag obere Tür
,QVWDOODWLRQ
Door Reversibility
Left Aid-Closer on Upper Door x 1 Left Aid-Closer on Lower Door x 1
nscrew top hinge cover and disconnect connectors of door switch and harness.
2.Unscrew top hinge
3.Remove the pin with a screwdriver and filp the hinge bracket. Then refit the pin to hinge bracket
unscrew
screw
8
Türanschlag untere Tür
,QVWDOODWLRQ
Door Reversibility
Left Aid-Closer on Upper Door x 1 Left Aid-Closer on Lower Door x 1
nscrew top hinge cover and disconnect connectors of door switch and harness.
2.Unscrew top hinge
3.Remove the pin with a screwdriver and filp the hinge bracket. Then refit the pin to hinge bracket
unscrew
screw
8
1. Die Schrauben der Scharnierabdeckplatte lösen und die Platte entfernen. Beide Stecker von den
Kabeln trennen.
,QVWDOODWLRQ
Door Reversibility
Left Aid-Closer on Upper Door x 1 Left Aid-Closer on Lower Door x 1
nscrew top hinge cover and disconnect connectors of door switch and harness.
2.Unscrew top hinge
3.Remove the pin with a screwdriver and filp the hinge bracket. Then refit the pin to hinge bracket
unscrew
screw
8

36
DO986BFK
DE
2. Die Scharnierbolzen lösen und die Tür entfernen.
,QVWDOODWLRQ
Door Reversibility
Left Aid-Closer on Upper Door x 1 Left Aid-Closer on Lower Door x 1
nscrew top hinge cover and disconnect connectors of door switch and harness.
2.Unscrew top hinge
3.Remove the pin with a screwdriver and filp the hinge bracket. Then refit the pin to hinge bracket
unscrew
screw
8
3. Die Scharnierplatte von der Tür abnehmen. Den Stift von der Scharnierplatte entfernen und die
Platte um 180° drehen. Den Stift wieder in der Scharnierplatte befestigen. Es ist zu beachten, dass
das Kunststoritzel sich um den Stift herum bendet.
,QVWDOODWLRQ
Door Reversibility
Left Aid-Closer on Upper Door x 1 Left Aid-Closer on Lower Door x 1
nscrew top hinge cover and disconnect connectors of door switch and harness.
2.Unscrew top hinge
3.Remove the pin with a screwdriver and filp the hinge bracket. Then refit the pin to hinge bracket
unscrew
screw
8
4. Den Türschalter von der rechten Scharnierabdeckplatte auf die linke Scharnierabdeckplatte
verlegen, die sich im mitgelieferten Zubehörbeutel bendet. Um den Türschalter zu entfernen, muss
dessen Lasche auf der Rückseite der Abdeckung eingedrückt werden.
,QVWDOODWLRQ
5.Detach cover in top of upper door and move harness from right side to left side, then replace the cover.
6.Move top left cover to right side
7. Take off the upper door, take out the screw from the middle hinge by cross screwdriver,
then take off the lower door.
4.Move door switch from right hinge cover to left hinge cover in accessary bag.
9
5. Die Abschlussplatte oben an der oberen Tür entfernen. Kabel und Stecker von der einen Seite auf die
andere verlegen. Die Abschlussplatte wieder einsetzen.
,QVWDOODWLRQ
5.Detach cover in top of upper door and move harness from right side to left side, then replace the cover.
6.Move top left cover to right side
7. Take off the upper door, take out the screw from the middle hinge by cross screwdriver,
then take off the lower door.
4.Move door switch from right hinge cover to left hinge cover in accessary bag.
9

37
DO986BFK
www.domo-elektro.be
DE
6. Die Abdeckplatte auf der Oberseite des Kühlschranks von der linken auf die rechte Seite versetzen.
,QVWDOODWLRQ
5.Detach cover in top of upper door and move harness from right side to left side, then replace the cover.
6.Move top left cover to right side
7. Take off the upper door, take out the screw from the middle hinge by cross screwdriver,
then take off the lower door.
4.Move door switch from right hinge cover to left hinge cover in accessary bag.
9
7. Die Bolzen des mittleren Scharniers lösen und die untere Tür aus dem Scharnierstift herausheben.
,QVWDOODWLRQ
5.Detach cover in top of upper door and move harness from right side to left side, then replace the cover.
6.Move top left cover to right side
7. Take off the upper door, take out the screw from the middle hinge by cross screwdriver,
then take off the lower door.
4.Move door switch from right hinge cover to left hinge cover in accessary bag.
9
8. Die Schraubenabdeckungen von der linken auf die rechte Seite versetzen.
,QVWDOODWLRQ
8 .
9. Unscrew bottom hinge. Then remove the adjustable feet from both side.
10. Unscrew and remove the bottom hinge pin, turn the bracket over and replace it.
unscrew
screw
10
9. Den Kühlschrank ach legen. Die Stellfüße von beiden Seiten entfernen und die Bolzen des unteren
Scharniers abschrauben. Die Schraube aus dem Gehäuse entfernen und auf der anderen Seite
wieder einsetzen.
,QVWDOODWLRQ
8 .
9. Unscrew bottom hinge. Then remove the adjustable feet from both side.
10. Unscrew and remove the bottom hinge pin, turn the bracket over and replace it.
unscrew
screw
10

38
DO986BFK
DE
10. Den Stift aus dem unteren Scharnier entfernen. Die Platte um 180° drehen und den Stift wieder
befestigen.
,QVWDOODWLRQ
8 .
9. Unscrew bottom hinge. Then remove the adjustable feet from both side.
10. Unscrew and remove the bottom hinge pin, turn the bracket over and replace it.
unscrew
screw
10
11. Die Scharnierplatte an der Unterseite des Geräts wieder einsetzen. Beide Stellfüße wieder
anbringen.
,QVWDOODWLRQ
13.Detach the Fridge and the Freezer door gaskets and then attach them after rotating.
11.Refit the bracket fitting the bottom hinge pin. Replace both adjustable feet.
12.Remove aid-closers from bottom of upper and lower doors, then take new aid-closers from
accessary bag and install them to left side.
11
12. Den Türanschlag von der Unterseite beider Türen entfernen. Die neuen Türanschläge auf der
linken Seite beider Türen anbringen. Die neuen Türanschläge benden sich im mitgelieferten
Zubehörbeutel.
,QVWDOODWLRQ
13.Detach the Fridge and the Freezer door gaskets and then attach them after rotating.
11.Refit the bracket fitting the bottom hinge pin. Replace both adjustable feet.
12.Remove aid-closers from bottom of upper and lower doors, then take new aid-closers from
accessary bag and install them to left side.
11
13. Die Gummidichtungen an beiden Türen entfernen, umdrehen und wieder anbringen.
,QVWDOODWLRQ
13.Detach the Fridge and the Freezer door gaskets and then attach them after rotating.
11.Refit the bracket fitting the bottom hinge pin. Replace both adjustable feet.
12.Remove aid-closers from bottom of upper and lower doors, then take new aid-closers from
accessary bag and install them to left side.
11

39
DO986BFK
www.domo-elektro.be
DE
14. Die untere Tür wieder einsetzen und anschrauben.
,QVWDOODWLRQ
15.Replace upper door, please ensure the door align with the cabinet to make sure door gasket seal
the cabinet tightly. Then connect door with cabinet by tightly fixed top hinge.
16.Connect harnesses from door and cabinet. Then replace top hinge cover. Before screw the cover,
connect terminals of door switch.
14. Install the lower door, adjust and fix the middle hinge onto the cabinet.
12
15. Die obere Tür wieder einsetzen und anschrauben. Es ist zu beachten, dass die Tür horizontal
ausgerichtet ist und die Türdichtung vollständig schließt.
,QVWDOODWLRQ
15.Replace upper door, please ensure the door align with the cabinet to make sure door gasket seal
the cabinet tightly. Then connect door with cabinet by tightly fixed top hinge.
16.Connect harnesses from door and cabinet. Then replace top hinge cover. Before screw the cover,
connect terminals of door switch.
14. Install the lower door, adjust and fix the middle hinge onto the cabinet.
12
16. Die beiden Stecker der Kabel auf der Oberseite des Geräts wieder an die Tür anschließen. Die
Abdeckplatte des Scharniers wieder einsetzen und festschrauben. Es ist zu beachten, dass die Kabel
in der Führung liegen und der Türschalter Kontakt mit der Tür hat.
,QVWDOODWLRQ
15.Replace upper door, please ensure the door align with the cabinet to make sure door gasket seal
the cabinet tightly. Then connect door with cabinet by tightly fixed top hinge.
16.Connect harnesses from door and cabinet. Then replace top hinge cover. Before screw the cover,
connect terminals of door switch.
14. Install the lower door, adjust and fix the middle hinge onto the cabinet.
12

40
DO986BFK
DE
GEBRAUCH
BEDIENPANEEL
Touch Screen-Tasten
A. Temperatur Kühlschrank
B. Temperatur Gefrierschrank
C. Funktionen
Display
1. Temperatur Kühlschrank
2. Temperatur Gefrierschrank
3. ECO-Modus
4. Super-Modus
5. Urlaubsmodus
6. Kindersicherung
Das Bedienpaneel wird automatisch in den Standby-Modus versetzt. Das Display leuchtet auf, wenn eine
Taste berührt wird und wenn die Türen geönet werden.
TEMPERATURREGELUNG
· Die Temperatur des Kühlschranks können Sie zwischen 2 und 8°C einstellen. Normalerweise wählen
Sie am besten 4°C. Drücken Sie die „FRIDGE“-Taste (Temperatur Kühlschrank) und drücken Sie diese
so lange, bis die gewünschte Temperatur im Display angezeigt wird.
8VHULQWHUIDFH
Using the Control Panel
A.Temperature Control of Fridge Compartment
B.Temperature Control of Freezer Compartment
C.Mode/ Locking / Unlocking
1.1 BUTTON OPERATION
2.1.1The panel will be lit up for 2 minutes once the door of fridge compartment is opened.
2.1 DISPLAY
1.Temperature of Fridge Comparment
2.Temperature of Freezer Comparment
3.ECO Mode
4.Holiday Mode
5.Super Mode
6.Locking / Unlocking
1.2 LED DISPLAY
a.The control panel is 100% lit up for 3 seconds, which operates exactly as per the setting
(mode and temperature) before the poweroff. The system will be automatically locked 25
seconds after the last button operation. After locking, the light of the panel would be out 30
seconds after the last button operation.
b.Both preset temperatures of fridge compartemnt and freezer compartment would be shown
on the display.
2.0 OPERATING CONDITION
1
2
A
B
C
3
4
5
6
14
· Den Gefrierschrank können Sie zwischen -14 und -22°C einstellen. Normalerweise wählen Sie am
besten -18°C. Drücken Sie die „FREEZER“-Taste (Temperatur Gefrierschrank) und drücken Sie diese so
lange, bis die gewünschte Temperatur im Display angezeigt wird.
8VHULQWHUIDFH
Using the Control Panel
A.Temperature Control of Fridge Compartment
B.Temperature Control of Freezer Compartment
C.Mode/ Locking / Unlocking
1.1 BUTTON OPERATION
2.1.1The panel will be lit up for 2 minutes once the door of fridge compartment is opened.
2.1 DISPLAY
1.Temperature of Fridge Comparment
2.Temperature of Freezer Comparment
3.ECO Mode
4.Holiday Mode
5.Super Mode
6.Locking / Unlocking
1.2 LED DISPLAY
a.The control panel is 100% lit up for 3 seconds, which operates exactly as per the setting
(mode and temperature) before the poweroff. The system will be automatically locked 25
seconds after the last button operation. After locking, the light of the panel would be out 30
seconds after the last button operation.
b.Both preset temperatures of fridge compartemnt and freezer compartment would be shown
on the display.
2.0 OPERATING CONDITION
1
2
A
B
C
3
4
5
6
14
· Die Betriebszeit und die -temperatur werden durch den Ort, an dem der Kühlschrank verwendet wird,
durch die Häugkeit der Türönung und durch die Temperatur des Raums beeinusst, in dem sich der
Kühlschrank bendet.
EINSTELLUNG DER FUNKTIONEN
8VHULQWHUIDFH
Using the Control Panel
A.Temperature Control of Fridge Compartment
B.Temperature Control of Freezer Compartment
C.Mode/ Locking / Unlocking
1.1 BUTTON OPERATION
2.1.1The panel will be lit up for 2 minutes once the door of fridge compartment is opened.
2.1 DISPLAY
1.Temperature of Fridge Comparment
2.Temperature of Freezer Comparment
3.ECO Mode
4.Holiday Mode
5.Super Mode
6.Locking / Unlocking
1.2 LED DISPLAY
a.The control panel is 100% lit up for 3 seconds, which operates exactly as per the setting
(mode and temperature) before the poweroff. The system will be automatically locked 25
seconds after the last button operation. After locking, the light of the panel would be out 30
seconds after the last button operation.
b.Both preset temperatures of fridge compartemnt and freezer compartment would be shown
on the display.
2.0 OPERATING CONDITION
1
2
A
B
C
3
4
5
6
14
Drücken Sie die „MODE“-Taste (Funktionen), um zwischen ECO-Modus, Urlaubsmodus und Super-Modus
umzuschalten.
ECO-Modus
8VHULQWHUIDFH
Using the Control Panel
A.Temperature Control of Fridge Compartment
B.Temperature Control of Freezer Compartment
C.Mode/ Locking / Unlocking
1.1 BUTTON OPERATION
2.1.1The panel will be lit up for 2 minutes once the door of fridge compartment is opened.
2.1 DISPLAY
1.Temperature of Fridge Comparment
2.Temperature of Freezer Comparment
3.ECO Mode
4.Holiday Mode
5.Super Mode
6.Locking / Unlocking
1.2 LED DISPLAY
a.The control panel is 100% lit up for 3 seconds, which operates exactly as per the setting
(mode and temperature) before the poweroff. The system will be automatically locked 25
seconds after the last button operation. After locking, the light of the panel would be out 30
seconds after the last button operation.
b.Both preset temperatures of fridge compartemnt and freezer compartment would be shown
on the display.
2.0 OPERATING CONDITION
1
2
A
B
C
3
4
5
6
14
Durch die Auswahl dieser Funktion wird die Temperatur des Kühlschranks auf 5 °C und die des
Gefrierschranks auf -18 °C eingestellt. Die Taste „FRIDGE“ und die Taste „FREEZER“ sind gesperrt. Sie
können diese Funktion mit der „MODE“-Taste (Funktionen) ein- und ausschalten. Das Symbol erscheint
auf der Anzeige.
8VHULQWHUIDFH
Using the Control Panel
A.Temperature Control of Fridge Compartment
B.Temperature Control of Freezer Compartment
C.Mode/ Locking / Unlocking
1.1 BUTTON OPERATION
2.1.1The panel will be lit up for 2 minutes once the door of fridge compartment is opened.
2.1 DISPLAY
1.Temperature of Fridge Comparment
2.Temperature of Freezer Comparment
3.ECO Mode
4.Holiday Mode
5.Super Mode
6.Locking / Unlocking
1.2 LED DISPLAY
a.The control panel is 100% lit up for 3 seconds, which operates exactly as per the setting
(mode and temperature) before the poweroff. The system will be automatically locked 25
seconds after the last button operation. After locking, the light of the panel would be out 30
seconds after the last button operation.
b.Both preset temperatures of fridge compartemnt and freezer compartment would be shown
on the display.
2.0 OPERATING CONDITION
1
2
A
B
C
3
4
5
6
14
A
4
3
1
B
C
2
5
6

41
DO986BFK
www.domo-elektro.be
DE
Urlaubsmodus
8VHULQWHUIDFH
Using the Control Panel
A.Temperature Control of Fridge Compartment
B.Temperature Control of Freezer Compartment
C.Mode/ Locking / Unlocking
1.1 BUTTON OPERATION
2.1.1The panel will be lit up for 2 minutes once the door of fridge compartment is opened.
2.1 DISPLAY
1.Temperature of Fridge Comparment
2.Temperature of Freezer Comparment
3.ECO Mode
4.Holiday Mode
5.Super Mode
6.Locking / Unlocking
1.2 LED DISPLAY
a.The control panel is 100% lit up for 3 seconds, which operates exactly as per the setting
(mode and temperature) before the poweroff. The system will be automatically locked 25
seconds after the last button operation. After locking, the light of the panel would be out 30
seconds after the last button operation.
b.Both preset temperatures of fridge compartemnt and freezer compartment would be shown
on the display.
2.0 OPERATING CONDITION
1
2
A
B
C
3
4
5
6
14
· Diese Funktion unterstützt Sie dabei, in Zeiträumen, wenn das Gerät nicht regelmäßig verwendet
wird, wie z.B. im Urlaub, Energie zu sparen.
· Durch die Auswahl dieser Funktion wird die Temperatur des Kühlschranks auf 17 °C eingestellt. Die
Taste „FRIDGE“ ist gesperrt.
· Diese Funktion können Sie mit der „MODE“-Taste an- und ausschalten. Das Symbol wird auf dem
Display anzeigt.
Super-Modus
8VHULQWHUIDFH
Using the Control Panel
A.Temperature Control of Fridge Compartment
B.Temperature Control of Freezer Compartment
C.Mode/ Locking / Unlocking
1.1 BUTTON OPERATION
2.1.1The panel will be lit up for 2 minutes once the door of fridge compartment is opened.
2.1 DISPLAY
1.Temperature of Fridge Comparment
2.Temperature of Freezer Comparment
3.ECO Mode
4.Holiday Mode
5.Super Mode
6.Locking / Unlocking
1.2 LED DISPLAY
a.The control panel is 100% lit up for 3 seconds, which operates exactly as per the setting
(mode and temperature) before the poweroff. The system will be automatically locked 25
seconds after the last button operation. After locking, the light of the panel would be out 30
seconds after the last button operation.
b.Both preset temperatures of fridge compartemnt and freezer compartment would be shown
on the display.
2.0 OPERATING CONDITION
1
2
A
B
C
3
4
5
6
14
· Wählen Sie diese Funktion, wenn die Standardtemperatur nicht ausreichend kühlt. Beispielsweise:
Bei extrem warmem Wetter, wenn die Türen häug geönet werden, bei einer hohen
Umgebungstemperatur, wenn eine große Menge nicht gekühlter/nicht gefrorener Lebensmittel in das
Gerät gelegt wird, ...
· Durch die Auswahl dieser Funktion wird die Temperatur des Gefrierschranks für maximal 50 Stunden
auf -25°C gesenkt. Es wird empfohlen, die Funktion 24 Stunden vor dem Einfrieren einzustellen.
· Nach Ablauf dieser Zeit wird diese Funktion automatisch deaktiviert. Die vorab eingestellte
Temperatur wird gehalten. Die Taste „FREEZER“ ist gesperrt.
· Diese Funktion können Sie mit der „MODE“-Taste (Funktionen) an- und ausschalten. Das Symbol wird
auf dem Display angezeigt.
KINDERSICHERUNG
8VHULQWHUIDFH
Using the Control Panel
A.Temperature Control of Fridge Compartment
B.Temperature Control of Freezer Compartment
C.Mode/ Locking / Unlocking
1.1 BUTTON OPERATION
2.1.1The panel will be lit up for 2 minutes once the door of fridge compartment is opened.
2.1 DISPLAY
1.Temperature of Fridge Comparment
2.Temperature of Freezer Comparment
3.ECO Mode
4.Holiday Mode
5.Super Mode
6.Locking / Unlocking
1.2 LED DISPLAY
a.The control panel is 100% lit up for 3 seconds, which operates exactly as per the setting
(mode and temperature) before the poweroff. The system will be automatically locked 25
seconds after the last button operation. After locking, the light of the panel would be out 30
seconds after the last button operation.
b.Both preset temperatures of fridge compartemnt and freezer compartment would be shown
on the display.
2.0 OPERATING CONDITION
1
2
A
B
C
3
4
5
6
14
Die Kindersicherung blockiert automatisch zur Sicherheit alle Tasten. Drücken Sie 3 Sekunden lang die
„LOCK“-Taste, um das Panel zu sperren. Auf dem Display wird ein geschlossenes Schloss angezeigt.
Drücken Sie die „UNLOCK“-Taste (Kindersicherung) 3 Sekunden lang, um das Bedienpaneel zu
entsperren. Das Symbol des Schlosses auf dem Display erlischt.
ALARM
Wenn die Kühlschranktür 90 Sekunden lang geönet bleibt, ertönt ein Signal. Dieser Alarm ist eine
Warnung, damit die Tür nicht versehentlich geönet bleibt und die Lebensmittel verderben. Der Alarm
stoppt, sobald die Tür wieder geschlossen wird.
FRISCHEFACH
Mit dem Schalter an der Rückwand können Sie die Temperatur des Frischefachs
bestimmen. Diese Einstellung hat keinen Einuss auf das Gemüsefach.
· Bringen Sie den Schalter in die Position „Crisper“, um Obst und Gemüse länger frisch
zu halten. Die perfekte Temperatur und Luftfeuchtigkeit werden beibehalten.
· Stellen Sie den Schalter in die Position „Chiller“ für frische, verderbliche Lebensmittel
wie Fisch. Die Temperatur ist kühler. Die Lebensmittel werden frisch gehalten, jedoch
nicht eingefroren.
EINLEGEBÖDEN UND TÜRFÄCHER VERSETZEN
· Leeren Sie den Kühlschrank, bevor Sie Einschübe oder Türfächer versetzen.
· Um einen Einschub zu versetzen, heben Sie ihn an und ziehen Sie ihn in Ihre Richtung.
· Um ein Türfach zu versetzen, halten Sie es mit 2 Händen fast. Heben Sie das Türfach nach oben an und
ziehen Sie es in Ihre Richtung.
'DLO\8VH'DLO\8VH
Cleaning
For hygienic reasons the appliance interior, including interior accessories, should be cleaned regularly.
Caution! The appliance may not be connected to the mains during cleaning. Danger of electrical
shock! Before cleaning switch the appliance off and remove the plug from the mains, or switch off or
turn out the circuit breaker or fuse. Never clean the appliance with a steam cleaner. Moisture could
accumulate in electrical components, danger of electrical shock! Hot vapors can lead to the damage
of plastic parts. The appliance must be dry before it is placed back into service.
Important! Ethereal oils and organic solvents can attack plastic parts, e.g. lemon juice or the juice form
orange peel, butyric acid, cleanser that contain acetic acid.
Do not allow such substances to come into contact the appliance parts.
Do not use any abrasive cleaners
Remove the food from the freezer. Store them in a cool place, well covered.
Switch the appliance off and remove the plug from the mains, or switch off or turn out the circuit breaker
of fuse.
Clean the appliance and the interior accessories with a cloth and lukewarm water. After cleaning wipe
with fresh water and rub dry.
After everything is dry place appliance back into service.
Hints for refrigeration
Useful hints:
Make (all types): wrap in polythene bags and place on the glass shelves above the vegetable drawer.
For safety, store in this way only one or two days at the most.
Cooked foods, cold dishes, etc...: these should be covered and may be placed on any shelf.
Fruit and vegetables: these should be thoroughly cleaned and placed in the special drawer(s) provided.
butter and cheese: these should be placed in special airtight containers or wrapped in aluminum foil or
polythene bags to exclude as much air as possible.
Milk bottle: these should have a cap and should be stored in the balconies on the door.
Bananas, potatoes, onions and garlic, if not packed, must not be kept in the fridge.
Fresh Zone Temperature Control
18

42
DO986BFK
DE
BELEUCHTUNG
Die Beleuchtung des Gefrierschranks und des Kühlschranks sind LED-Leuchten. Diese sind ökologischer
so konzipiert, dass sie die gesamte Lebensdauer des Gerätes halten. Sie müssen deshalb nicht
ausgetauscht werden. Sollten dennoch Probleme mit der Beleuchtung auftreten, kontaktieren Sie einen
qualizierten Kundendienst in Ihrer Nähe.
VERSETZEN DES GERÄTS
Wen Sie das Gerät, unabhängig aus welchem Grund, ausschalten, warten Sie 10 Minuten, bis Sie es erneut
einschalten. Der Druck im Kühlsystem muss zunächst stabilisiert werden, bevor Sie das Gerät erneut
einschalten.
· Schalten Sie das Gerät aus und ziehen Sie den Netzstecker aus der Steckdose. Sämtliche Lebensmittel
entnehmen. Entfernen Sie außerdem alle abnehmbaren Teile (Regale, Zubehör, usw.) oder befestigen
Sie diese im Kühlschrank, um Erschütterungen zu vermeiden.
· Versetzen Sie das Gerät und installieren Sie es. Wenn Sie das Gerät während des Transports auf die
Seite gelegt haben, auch wenn dies nur sehr kurz der Fall war, lassen Sie das Gerät mindestens 10
Minuten gerade stehen, bevor Sie es erneut einschalten.
Ihr Gerät verwendet das Kühlmittel Isobutan (R600a). Obwohl R600a ein umweltfreundliches und
natürliches Gas ist, ist es explosiv. Seien Sie deshalb während des Transports oder bei der Installation des
Geräts sehr vorsichtig, um Schäden an den Kühlelementen zu vermeiden. Im Falle eines Lecks durch eine
Beschädigung der Kühlelemente halten Sie den Kühlschrank von oenem Feuer oder Wärmequellen fern
und lüften Sie den Raum, in dem sich das Gerät bendet, für einige Minuten.
LEBENSMITTEL IM KÜHLSCHRANK AUFBEWAHREN
Der Kühlschrank sorgt für eine längere Auewahrungszeit von frischen Lebensmitteln mit begrenzter
Haltbarkeit. Für eine Auewahrung von frischen Lebensmitteln mit den besten Ergebnissen:
· Verwenden Sie nur sehr frische Lebensmittel einer sehr guten Qualität.
· Sorgen Sie dafür, dass die Lebensmittel gut verpackt oder abgedeckt sind, bevor Sie diese
auewahren. Dies vermeidet, dass die Lebensmittel austrocknen, ausbleichen oder ihren Geschmack
verlieren. Dadurch bleiben sie länger frisch. Es vermeidet außerdem die Übertragung von Gerüchen.
· Sorgen Sie dafür, dass Lebensmittel mit einem starken Geruch gut verpackt und abgedeckt sind und
bewahren Sie diese fern von Butter, Milch und Sahne sowie anderen Lebensmitteln auf, die durch
einen starken Geruch beeinträchtigt werden können.
· Lassen Sie warme Lebensmittel abkühlen, bevor Sie diese in den Kühlschrank stellen.
LEBENSMITTEL IM GEFRIERSCHRANK EINFRIEREN UND AUFBEWAHREN
Verwendung des Gefrierschranks
· Zur Auewahrung von Tieühlware
· Zur Herstellung von Eiswürfeln
· Zum Einfrieren von Lebensmitteln
Hinweis: Achten Sie darauf, dass die Tür des Gefrierschranks immer ordnungsgemäß geschlossen ist.
Önen Sie die Türen des Gefrierschranks nur wenn nötig.
Tieühlwaren kaufen
· Die Verpackung darf nicht beschädigt sein.

43
DO986BFK
www.domo-elektro.be
DE
· Innerhalb des Mindesthaltbarkeitsdatums verbrauchen.
· Transportieren Sie Tieühlware nach Möglichkeit in einer Kühltasche und legen Sie diese schnell in
den Gefrierschrank.
Einfrieren von frischen Lebensmitteln
Frieren Sie nur frische und unbeschädigte Lebensmittel ein. Zur Erhaltung des bestmöglichen
Nährwertes, des Geschmacks und der Farbe blanchieren Sie Gemüse, bevor Sie es einfrieren.
Auberginen, Paprika, Zucchini und Spargel müssen nicht blanchiert werden.
Hinweis: Halten Sie die einzufrierenden Lebensmittel fern von Lebensmitteln, die bereits eingefroren
sind.
· Die folgenden Lebensmittel eignen sich zum Einfrieren: Kuchen und Gebäck, Fisch und Schalen- und
Krustentiere, Fleisch, Wild, Geügel, Gemüse, Obst, Gewürze, Eier ohne Schale, Milchprodukte wie
Käse und Butter, Fertiggerichte und Reste von Gerichten, wie Suppe, Schmorgerichte, gekochtes
Fleisch und Fisch, Kartoelgerichte, Soués und Desserts.
· Die folgenden Lebensmittel eignen sich nicht zum Einfrieren: Gemüse, die allgemein roh verzehrt
werden, wie Salat, Radieschen, Eier mit Schale, Trauben, Äpfel, Birnen und Prsiche, hart gekochte
Eier, Joghurt, Sauermilch, Sauerrahm und Mayonnaise.
Auewahrung von Tieühlware
Zur Vermeidung des Geschmacksverlusts und von Austrocknung geben Sie die Lebensmittel in eine
luftdichte Verpackung.
1. Geben Sie die Lebensmittel in die Verpackung.
2. Entfernen Sie sämtliche Luft.
3. Dichten Sie die Verpackung ab.
4. Etikettieren Sie die Verpackung mit dem Datum des Einfrierens.
Geeignete Verpackung:
Plastikfolie, Schlauchfolie aus Polyethylen, Aluminiumfolie oder Behälter für Tieühlware.
Empfohlene Auewahrungszeiten für Tieühlware im Gefrierschrank
Diese Zeiten können je nach Art der Speisen abweichen. Die eingefrorenen Lebensmittel können
zwischen 1 und 12 Monaten auewahrt werden (mindestens bei -18°C).
Lebensmittel
Aue-
wahrungszeit
Speck, Schmorgerichte, Milch 1 Monat
Brot, Sahneeis, Wurst, Erbsen, zubereitete Schalentiere, fetter Fisch 2 Monate
Nicht-fetter Fisch, Schalentiere, Pizza, Scones und Muns 3 Monate
Schinken, Kuchen, Rindeisch und Lammkoteletts, Geügelteile 4 Monate
Butter, Gemüse (blanchiert), komplettes Ei und Dotter, gekochter Flusskrebs, Ge-
hacktes (roh), Schweineeisch (roh)
6 Monate
Obst (trocken oder in Sirup), Eiweiß, Rindeisch (roh), ganzes Huhn, Lammeisch
(roh), Obstkuchen
12 Monate
Niemals vergessen:
· Wenn Sie frische Lebensmittel mit einem Mindesthaltbarkeitsdatum einfrieren, müssen Sie diese vor
Ablauf des Mindesthaltbarkeitsdatums einfrieren.
· Kontrollieren Sie, ob die Lebensmittel nicht bereits einmal eingefroren wurden. Eingefrorene
Lebensmittel, die komplett aufgetaut sind, dürfen nicht erneut eingefroren werden.

44
DO986BFK
DE
· Verzehren Sie einmal aufgetaute Lebensmittel schnell.
STROMAUSFALL
Die meisten Stromausfälle werden innerhalb von 1 bis 2 Stunden behoben und ändern die Temperatur des
Kühlschranks nicht. Die Türe, während eines Stromausfalls, so wenig wie möglich önen.
Während eines längeren Stromausfalls, Maßnahmen ergreifen, um die Lebensmittel zu schützen, zum
Beispiel mit Hilfe von Trockeneis.
Gefrorene Lebensmittel halten sich, wenn der Stromausfall nicht länger als 15 Stunden dauert.
Frieren Sie gefrorene Lebensmittel, die vollständig aufgetaut sind, nicht erneut ein. Die Lebensmittel
können Ihrer Gesundheit schaden.
REINIGUNG UND WARTUNG
Verwenden Sie keine aggressiven Reinigungs- oder Lösungsmittel.
1. Schalten Sie das Gerät aus. Ziehen Sie den Stecker aus der Steckdose.
2. Entnehmen Sie die Lebensmittel und bewahren Sie diese an einem kühlen Ort auf.
3. Reinigen Sie das Gerät mit einem weichen Tuch mit warmem Wasser und einem milden
Reinigungsmittel.
4. Reinigen Sie die Türdichtung nur mit warmem Wasser und reiben Sie diese anschließend gründlich
ab.
5. Stecken Sie den Stecker nach der Reinigung in die Steckdose und stellen Sie die gewünschte
Temperatur ein.
6. Legen Sie die Lebensmittel wieder in das Gerät.
PROBLEME UND DEREN LÖSUNG
Problem Mögliche Ursache Lösung
Das Gerät funktioniert
nicht.
· Der Stecker steckt nicht
(vollständig) in der Steckdose.
· Die Sicherung ist
herausgesprungen.
· Die Steckdose ist defekt.
· Stecken Sie den Stecker in die
Steckdose.
· Kontrollieren Sie die
Sicherungen.
· Kontaktieren Sie einen
Elektriker.
Unangenehme Gerüche. · Die Lebensmittel im
Kühlschrank sind verdorben.
· Reinigen Sie das Innere des
Kühlschranks.
Die Türen schließen nicht
vollständig.
· Der Kühlschrank oder der
Gefrierschrank sind zu voll.
· Das Gerät steht nicht
waagerecht.
· Achten Sie darauf, dass
Lebensmittel oder Getränke
das Schließen der Türen nicht
behindert.
· Richten Sie die Stellfüße aus.
Ungewöhnliche
Geräusche.
· Das Gerät steht nicht
waagerecht.
· Das Gerät hat Kontakt zur Wand
oder zu einem anderen Objekt.
· Stellen Sie die Stellfüße neu
ein und stellen Sie das Gerät
waagerecht auf.
· Verschieben Sie das Gerät
vorsichtig.
· Kontaktieren Sie den
Kundendienst.

45
DO986BFK
www.domo-elektro.be
DE
Summend oder
gurgelndes Geräusch.
· Der Kompressor springt an/ist
in Betrieb.
· Das Kühlgas zirkuliert im Gerät.
· Dies ist normal.
Das Seitenpaneel ist
warm.
· Der Kondenswasserkanal
bendet sich an dieser Seite.
· Dies ist normal.
ENTSORGEN
Dieses Symbol auf dem Produkt oder seiner Verpackung weist darauf hin, dass
dieses Produkt nicht als normaler Haushaltsabfall zu behandeln ist, sondern
an einem Sammelpunkt für das Recyling von elektrischen und elektronischen
Geräten abgegeben werden muss. Durch Ihren Beitrag zum korrekten
Entsorgen dieses Produkts schützen Sie die Umwelt und die Gesundheit Ihrer
Mitmenschen. Umwelt und Gesundheit werden durch falsches Entsorgen
gefährdet. Weitere Informationen über das Recycling dieses Produkts
erhalten Sie von Ihren Rathaus, Ihrer Müllabfuhr oder dem Geschäft, in dem
Sie das Produkt gekauft haben.
Das Verpackungsmaterial ist wiederverwertbar. Entsorgen Sie die Verpackung
umweltgerecht und führen Sie sie der Wertstosammlung zu.

46
DO986BFK
EN
WARRANTY
Dear client ,
All of our products are always submitted to a strict quality control before they are sold to you.
Should you nevertheless experience problems with your device, we sincerely regret this.
In that case, we kindly request you to contact our customer service.
Our sta will gladly assist you.
+32 14 21 71 91 [email protected]
Monday – Thursday: 8.30 – 12.00 and 13.00 – 17.00
Friday: 8.30 – 12.00 and 13.00 – 16.30
This appliance has a two year warranty period. During this period the manufacturer is responsible for
any failures that are the direct result of construction failure. When these failures occur the appliance will
be repaired or replaced if necessary. The warranty will not be valid when the damage to the appliance is
caused by wrong use, not following the instructions or repairs executed by a third party. The guarantee is
issued with the original till receipt. All parts, which are subject to wear, are excluded from the warranty.
If your device breaks down within the 2-year warranty period, you can return the device together with
your receipt to the shop where you purchased it.
The guarantee on accessories and components that are liable to wear-and-tear is only 6 months.
The guarantee and responsibility of the supplier and manufacturer lapse automatically in the following
cases:
· If the instructions in this manual have not been followed.
· In case of incorrect connection, e.g., electrical voltage that is too high.
· In case of incorrect, rough or abnormal use.
· In case of insucient or incorrect maintenance.
· In case of repairs or alterations to the device by the consumer or non-authorised third parties.
· If the customer used parts or accessories that are not recommended or provided by the supplier /
manufacturer.
SAFETY INSTRUCTIONS
When using electrical appliances, basic safety precautions should always be taken, including the
following:
· Read all instructions carefully. Keep this manual for future reference.
· Make sure all packaging materials and promotional stickers have been removed before using the
appliance for the rst time. Make sure children cannot play with the packaging materials.
· This appliance is intended to be used in household and similar applications such as:
· sta kitchen areas in shops, oces and other working environments;
· farm houses;
· by clients in hotels, motels and other residential type environments;
· bed and breakfast type environments.
· Children should be supervised to ensure that they do not play with the appliance.
· This appliance can be used by children aged from 16 years and above and persons with reduced
physical, sensory or mental capabilities or lack of experience and knowledge if they have been given

47
DO986BFK
www.domo-elektro.be
EN
supervision or instruction concerning use of the appliance in a safe way and understand the hazards
involved. Children shall not play with the appliance. Cleaning and user maintenance shall not be made
by children unless they are older than 16 and supervised.
· Keep the appliance and its cord out of reach of children younger than 16 years.
· Attention: This appliance cannot be used with an external timer or a separate remote control.
· Before use, check if the voltage stated on the appliance corresponds with the voltage of the power net
at your home.
· Do not let the cord hang on a hot surface or on the edge of a table or counter top.
· Never use the appliance when the cord or plug is damaged, after malfunction or when the appliance
itself is damaged. In that case, take the appliance to the nearest qualied service center for check-up
and repair.
· Close supervision is necessary when the appliance is used near or by children.
· The use of accessories that are not recommended or sold by the manufacturer can cause re, electrical
shock or injuries.
· Unplug the appliance when it is not in use, before assembling or disassembling any parts and before
cleaning the appliance. Put all buttons and knobs into the ‘o’ position and unplug the appliance by
grasping the plug. Never unplug by pulling the cord.
· Do not leave a working appliance unattended.
· Never place this appliance near a gas stove or electrical stove or in a place where it may come into
contact with a warm appliance.
· Do not use the appliance outdoors.
· Only use the appliance for its intended use.
· Always use the appliance on a steady, dry and level surface.
· Only use the appliance for domestic use. The manufacturer can not be held responsible for accidents
that result from improper use of the appliance or not following the instructions described in this
manual.
· All repairs should be carried out by the manufacturer or its aftersales service.
· Never immerse the appliance, the cord or the plug in water or any other liquid.
· Make sure that children do not touch the cord or appliance.
· Keep the cord away from sharp edges and hot parts or other heat sources.
· Before use, remove all packaging materials and any promotional stickers.
· Keep the ventilation openings free of obstructions.
· Do not use any mechanical or other devices to speed up the defrosting process.
· Do not use any other electrical appliance inside the fridge, unless they are approved for this purpose
by the manufacturer.
· Do not keep any explosive substances inside the appliance, like for instance aerosol cans with a
ammable propellant.
· Make sure that the refrigerant circuit does not get damaged, for instance during transportation or
installation.
· Make sure that the plug does not get squashed or damaged by the back of the appliance. A squashed
or damaged power plug may overheat and cause re.
· Make sure that you have access to the plug of the appliance.
· Do not pull the cord.
· If the socket is loose, do not plug in the appliance. (risk of electric shock or re)
· This is a heavy appliance. Be careful when moving it.
· Do not touch anything that comes out of the freezer with damp or wet hands. This could cause skin
burns.
· Avoid long exposure to direct sunlight.

48
DO986BFK
EN
· The appliance may not be used with an extension lead or a multiple socket.
· Follow the instructions below to prevent contamination of food:
· Keeping the door open for long periods may cause the temperature in the compartments of
the appliance to rise considerably.
· Clean the surfaces that could come into contact with food regularly. Keep the condensation
channel and drainage hole at the back of the appliance clean.
· Store raw meat and sh in suitable containers in the refrigerator so that they do not come
into contact with or drip onto other food.
· If the appliance is left empty for longer periods, it should be turned o, defrosted and
cleaned. Allow it dry and leave the door ajar to prevent mould from growing in the appliance.
WARNING! Never place this appliance on or in the neighbourhood of a gas or electric re
or in a place where it could come into contact with a heat source. There are ammable
materials located on the back of the appliance.
Pay attention to the symbol ‘Fire risk – ammable materials’ located on the back of the
appliance.
PARTS
1. Shelves
2. Cover for vegetable container
3. Vegetable container
4. Crisper drawer
5. Door shelves
6. Freezer drawers
7. Levelling feet
INSTALLATION
· Remove the exterior and interior packing, wipe the outside thoroughly with a soft dry cloth and the
inside with a wet, lukewarm cloth.
· Avoid placing the cabinet in a narrow recess or near any leave source, direct sunlight, or moisture.
· Let air circulate freely around the cabinet. Keep the rear of the refrigerator 10 cm away from the wall.
· Select a place with a strong, level oor. One can level the appliance using adjustable legs. The
adjustable legs can be adjusting by screwing them in or out of the appliance.
2YHUYLHZ
Note: Above picture is for reference only. Real appliance probably is different.
FridgeShelves
Fridge
Balconies
Crisper
Crisper Cover
Fresh convertible box
Freezer Drawers
Leveling Feet
6
1
2
3
4
6
7
5

49
DO986BFK
www.domo-elektro.be
EN
· Avoid direct sunlight and heat. Direct sunlight may aect the acrylic
coating. Heat sources nearby will cause higher electricity consumption.
· Avoid very moist places. Too much moisture in the air will cause frost to
from very quickly on the evaporator, and your refrigerator.
· Before connecting your refrigerator to the power supply, check that the
voltage stated on the rating label of your appliance corresponds to the
voltage in your home. A dierent voltage could damage the appliance.
· The appliance must be grounded. The manufacturer is not responsible
for damages that may occur as a result of usage without grounding.
· After installation, leave the freezer for 8 hours before turning it on. This
way the refrigerant can settle.
· Allow the appliance to run empty for 24 hours so the compartment can
cool to the appropriate temperature.
· This appliance is designed to operate in ambient temperature between
16°C and 38°C. If these temperatures are exceeded, i.e. colder or
warmer, the appliance will not operate correctly.
· The appliance may only be used indoors.
· The freezer makes noise when the compressor pumps the coolant. This is normal.
DOOR CONVERSION
If you need to hinge your door on the opposite side it is recommended that you call your local authorised
service agent to make this conversion or ask a technician. Before you reverse the door, you should ensure
the appliance is unplugged and empty.
After reversing the door, leave the appliance alone for 8 hours before switching it on. This allows the
coolant to set. We recommend using a slotted screwdriver, a Phillips screwdriver, and a wrench (not
included), as well as the components supplied below.
Hinge cover plate
,QVWDOODWLRQ
Door Reversibility
Left Aid-Closer on Upper Door x 1 Left Aid-Closer on Lower Door x 1
nscrew top hinge cover and disconnect connectors of door switch and harness.
2.Unscrew top hinge
3.Remove the pin with a screwdriver and filp the hinge bracket. Then refit the pin to hinge bracket
unscrew
screw
8
Top door stopper
,QVWDOODWLRQ
Door Reversibility
Left Aid-Closer on Upper Door x 1 Left Aid-Closer on Lower Door x 1
nscrew top hinge cover and disconnect connectors of door switch and harness.
2.Unscrew top hinge
3.Remove the pin with a screwdriver and filp the hinge bracket. Then refit the pin to hinge bracket
unscrew
screw
8
Bottom door stopper
,QVWDOODWLRQ
Door Reversibility
Left Aid-Closer on Upper Door x 1 Left Aid-Closer on Lower Door x 1
nscrew top hinge cover and disconnect connectors of door switch and harness.
2.Unscrew top hinge
3.Remove the pin with a screwdriver and filp the hinge bracket. Then refit the pin to hinge bracket
unscrew
screw
8
1. Loosen the screws of the hinge cover plate and remove the plate. Disconnect both connectors of the
cables.
,QVWDOODWLRQ
Door Reversibility
Left Aid-Closer on Upper Door x 1 Left Aid-Closer on Lower Door x 1
nscrew top hinge cover and disconnect connectors of door switch and harness.
2.Unscrew top hinge
3.Remove the pin with a screwdriver and filp the hinge bracket. Then refit the pin to hinge bracket
unscrew
screw
8
y
y
,QVWDOODWLRQ
1007NN
1071NN
6SDFH5HTXLUHPHQW
Keep enough space of door open.
Keep at least 50mm gap at two sides.
To do this adjust the two levelling feet at front of the unit.
If the unit is not level, the doors and magnetic seal
alignments will not be covered properly.
/HYHOOLQJWKHXQLW
13
y
y
,QVWDOODWLRQ
1007NN
1071NN
6SDFH5HTXLUHPHQW
Keep enough space of door open.
Keep at least 50mm gap at two sides.
To do this adjust the two levelling feet at front of the unit.
If the unit is not level, the doors and magnetic seal
alignments will not be covered properly.
/HYHOOLQJWKHXQLW
13

50
DO986BFK
EN
2. Unscrew the hinge bolts and remove the door.
,QVWDOODWLRQ
Door Reversibility
Left Aid-Closer on Upper Door x 1 Left Aid-Closer on Lower Door x 1
nscrew top hinge cover and disconnect connectors of door switch and harness.
2.Unscrew top hinge
3.Remove the pin with a screwdriver and filp the hinge bracket. Then refit the pin to hinge bracket
unscrew
screw
8
3. Take the hinge plate o the door. Remove the pin from the hinge plate and turn the plate 180°.
Attach the pin back into the hinge plate. Keep the plastic pinion around the pin.
,QVWDOODWLRQ
Door Reversibility
Left Aid-Closer on Upper Door x 1 Left Aid-Closer on Lower Door x 1
nscrew top hinge cover and disconnect connectors of door switch and harness.
2.Unscrew top hinge
3.Remove the pin with a screwdriver and filp the hinge bracket. Then refit the pin to hinge bracket
unscrew
screw
8
4. Move the door switch from the right hinge cover plate to the left hinge cover plate, which can be
found in the supplied accessory pocket. To remove the door switch, press and hold the it’s latch on
the back of the cover plate.
,QVWDOODWLRQ
5.Detach cover in top of upper door and move harness from right side to left side, then replace the cover.
6.Move top left cover to right side
7. Take off the upper door, take out the screw from the middle hinge by cross screwdriver,
then take off the lower door.
4.Move door switch from right hinge cover to left hinge cover in accessary bag.
9
5. Remove the nishing panel from the top of the top door. Move the cable and connector from one
side to the other. Replace the nishing panel.
,QVWDOODWLRQ
5.Detach cover in top of upper door and move harness from right side to left side, then replace the cover.
6.Move top left cover to right side
7. Take off the upper door, take out the screw from the middle hinge by cross screwdriver,
then take off the lower door.
4.Move door switch from right hinge cover to left hinge cover in accessary bag.
9

51
DO986BFK
www.domo-elektro.be
EN
6. Move the cover plate on top of the refrigerator from the left to the right side.
,QVWDOODWLRQ
5.Detach cover in top of upper door and move harness from right side to left side, then replace the cover.
6.Move top left cover to right side
7. Take off the upper door, take out the screw from the middle hinge by cross screwdriver,
then take off the lower door.
4.Move door switch from right hinge cover to left hinge cover in accessary bag.
9
7. Unscrew the bolts of the middle hinge and lift the bottom door out of the hinge pin.
,QVWDOODWLRQ
5.Detach cover in top of upper door and move harness from right side to left side, then replace the cover.
6.Move top left cover to right side
7. Take off the upper door, take out the screw from the middle hinge by cross screwdriver,
then take off the lower door.
4.Move door switch from right hinge cover to left hinge cover in accessary bag.
9
8. Move the screw covers from the left side to the right side.
,QVWDOODWLRQ
8 .
9. Unscrew bottom hinge. Then remove the adjustable feet from both side.
10. Unscrew and remove the bottom hinge pin, turn the bracket over and replace it.
unscrew
screw
10
9. Lay the fridge down at. Remove the adjusting feet from both sides and unscrew the bolts of the
bottom hinge. Remove the screw from the housing and put it back on the other side.
,QVWDOODWLRQ
8 .
9. Unscrew bottom hinge. Then remove the adjustable feet from both side.
10. Unscrew and remove the bottom hinge pin, turn the bracket over and replace it.
unscrew
screw
10

52
DO986BFK
EN
10. Remove the pin from the bottom hinge. Turn the plate 180° and refasten the pin.
,QVWDOODWLRQ
8 .
9. Unscrew bottom hinge. Then remove the adjustable feet from both side.
10. Unscrew and remove the bottom hinge pin, turn the bracket over and replace it.
unscrew
screw
10
11. Replace the hinge plate on the underside of the appliance. Replace both adjusting feet.
,QVWDOODWLRQ
13.Detach the Fridge and the Freezer door gaskets and then attach them after rotating.
11.Refit the bracket fitting the bottom hinge pin. Replace both adjustable feet.
12.Remove aid-closers from bottom of upper and lower doors, then take new aid-closers from
accessary bag and install them to left side.
11
12. Remove the door stopper from the underside of both doors. Place the new door stoppers on the left
side of both doors. The new door stoppers can be found in the included accessory pocket.
,QVWDOODWLRQ
13.Detach the Fridge and the Freezer door gaskets and then attach them after rotating.
11.Refit the bracket fitting the bottom hinge pin. Replace both adjustable feet.
12.Remove aid-closers from bottom of upper and lower doors, then take new aid-closers from
accessary bag and install them to left side.
11
13. Remove the rubber seals from both doors, turn them over, and replace them.
,QVWDOODWLRQ
13.Detach the Fridge and the Freezer door gaskets and then attach them after rotating.
11.Refit the bracket fitting the bottom hinge pin. Replace both adjustable feet.
12.Remove aid-closers from bottom of upper and lower doors, then take new aid-closers from
accessary bag and install them to left side.
11

53
DO986BFK
www.domo-elektro.be
EN
14. Replace the bottom door and screw it back into place.
,QVWDOODWLRQ
15.Replace upper door, please ensure the door align with the cabinet to make sure door gasket seal
the cabinet tightly. Then connect door with cabinet by tightly fixed top hinge.
16.Connect harnesses from door and cabinet. Then replace top hinge cover. Before screw the cover,
connect terminals of door switch.
14. Install the lower door, adjust and fix the middle hinge onto the cabinet.
12
15. Replace the top door and screw it back into place. Make sure that the door is aligned horizontally
and that the door seal closes completely.
,QVWDOODWLRQ
15.Replace upper door, please ensure the door align with the cabinet to make sure door gasket seal
the cabinet tightly. Then connect door with cabinet by tightly fixed top hinge.
16.Connect harnesses from door and cabinet. Then replace top hinge cover. Before screw the cover,
connect terminals of door switch.
14. Install the lower door, adjust and fix the middle hinge onto the cabinet.
12
16. Reconnect both connectors of the cables on top of the appliance to the door. Replace the hinge
cover plate and screw it into place. Make sure that the cables are in the conductor and that the door
switch makes contact with the door.
,QVWDOODWLRQ
15.Replace upper door, please ensure the door align with the cabinet to make sure door gasket seal
the cabinet tightly. Then connect door with cabinet by tightly fixed top hinge.
16.Connect harnesses from door and cabinet. Then replace top hinge cover. Before screw the cover,
connect terminals of door switch.
14. Install the lower door, adjust and fix the middle hinge onto the cabinet.
12

54
DO986BFK
EN
USE
CONTROL PANEL
Touch screen buttons
A. Temperature of fridge
B. Temperature of freezer
C. Functions
Display
1. Temperature of fridge
2. Temperature of freezer
3. ECO Mode
4. Super Mode
5. Vacation mode
6. Child safety lock
The control panel goes into sleep mode automatically. The display lights up when a button is touched and
when the doors are opened.
TEMPERATURE CONTROLS
· The temperature of the fridge can be set between 2 and 8°C. Under normal conditions, it is best
to select 4°C. Press “FRIDGE” button (temperature fridge) and continue to press until the desired
temperature is displayed.
8VHULQWHUIDFH
Using the Control Panel
A.Temperature Control of Fridge Compartment
B.Temperature Control of Freezer Compartment
C.Mode/ Locking / Unlocking
1.1 BUTTON OPERATION
2.1.1The panel will be lit up for 2 minutes once the door of fridge compartment is opened.
2.1 DISPLAY
1.Temperature of Fridge Comparment
2.Temperature of Freezer Comparment
3.ECO Mode
4.Holiday Mode
5.Super Mode
6.Locking / Unlocking
1.2 LED DISPLAY
a.The control panel is 100% lit up for 3 seconds, which operates exactly as per the setting
(mode and temperature) before the poweroff. The system will be automatically locked 25
seconds after the last button operation. After locking, the light of the panel would be out 30
seconds after the last button operation.
b.Both preset temperatures of fridge compartemnt and freezer compartment would be shown
on the display.
2.0 OPERATING CONDITION
1
2
A
B
C
3
4
5
6
14
· The freezer can be set between -14 and -22°C. Under normal conditions, it is best to select -18°C. Press
the “FREEZER” button (temperature freezer) and continue to press until the desired temperature is
displayed.
8VHULQWHUIDFH
Using the Control Panel
A.Temperature Control of Fridge Compartment
B.Temperature Control of Freezer Compartment
C.Mode/ Locking / Unlocking
1.1 BUTTON OPERATION
2.1.1The panel will be lit up for 2 minutes once the door of fridge compartment is opened.
2.1 DISPLAY
1.Temperature of Fridge Comparment
2.Temperature of Freezer Comparment
3.ECO Mode
4.Holiday Mode
5.Super Mode
6.Locking / Unlocking
1.2 LED DISPLAY
a.The control panel is 100% lit up for 3 seconds, which operates exactly as per the setting
(mode and temperature) before the poweroff. The system will be automatically locked 25
seconds after the last button operation. After locking, the light of the panel would be out 30
seconds after the last button operation.
b.Both preset temperatures of fridge compartemnt and freezer compartment would be shown
on the display.
2.0 OPERATING CONDITION
1
2
A
B
C
3
4
5
6
14
· The operating time and temperature is inuenced by the location of the fridge, the number of times
the door is opened and the temperature of the room the fridge is in.
SETTING THE FUNCTIONS
8VHULQWHUIDFH
Using the Control Panel
A.Temperature Control of Fridge Compartment
B.Temperature Control of Freezer Compartment
C.Mode/ Locking / Unlocking
1.1 BUTTON OPERATION
2.1.1The panel will be lit up for 2 minutes once the door of fridge compartment is opened.
2.1 DISPLAY
1.Temperature of Fridge Comparment
2.Temperature of Freezer Comparment
3.ECO Mode
4.Holiday Mode
5.Super Mode
6.Locking / Unlocking
1.2 LED DISPLAY
a.The control panel is 100% lit up for 3 seconds, which operates exactly as per the setting
(mode and temperature) before the poweroff. The system will be automatically locked 25
seconds after the last button operation. After locking, the light of the panel would be out 30
seconds after the last button operation.
b.Both preset temperatures of fridge compartemnt and freezer compartment would be shown
on the display.
2.0 OPERATING CONDITION
1
2
A
B
C
3
4
5
6
14
Press the ‘MODE’ button(s) to toggle between ECO Mode, Holiday Mode, and Super Mode.
ECO Mode
8VHULQWHUIDFH
Using the Control Panel
A.Temperature Control of Fridge Compartment
B.Temperature Control of Freezer Compartment
C.Mode/ Locking / Unlocking
1.1 BUTTON OPERATION
2.1.1The panel will be lit up for 2 minutes once the door of fridge compartment is opened.
2.1 DISPLAY
1.Temperature of Fridge Comparment
2.Temperature of Freezer Comparment
3.ECO Mode
4.Holiday Mode
5.Super Mode
6.Locking / Unlocking
1.2 LED DISPLAY
a.The control panel is 100% lit up for 3 seconds, which operates exactly as per the setting
(mode and temperature) before the poweroff. The system will be automatically locked 25
seconds after the last button operation. After locking, the light of the panel would be out 30
seconds after the last button operation.
b.Both preset temperatures of fridge compartemnt and freezer compartment would be shown
on the display.
2.0 OPERATING CONDITION
1
2
A
B
C
3
4
5
6
14
By selecting this function, the refrigerator temperature is set to 5°C and the freezer temperature to -18°C.
The ‘FRIDGE’ key and ‘FREEZER’ key are locked. You can turn this function on and o with the ‘MODE’
button (functions). The symbol appears on the display.
Vacation mode
8VHULQWHUIDFH
Using the Control Panel
A.Temperature Control of Fridge Compartment
B.Temperature Control of Freezer Compartment
C.Mode/ Locking / Unlocking
1.1 BUTTON OPERATION
2.1.1The panel will be lit up for 2 minutes once the door of fridge compartment is opened.
2.1 DISPLAY
1.Temperature of Fridge Comparment
2.Temperature of Freezer Comparment
3.ECO Mode
4.Holiday Mode
5.Super Mode
6.Locking / Unlocking
1.2 LED DISPLAY
a.The control panel is 100% lit up for 3 seconds, which operates exactly as per the setting
(mode and temperature) before the poweroff. The system will be automatically locked 25
seconds after the last button operation. After locking, the light of the panel would be out 30
seconds after the last button operation.
b.Both preset temperatures of fridge compartemnt and freezer compartment would be shown
on the display.
2.0 OPERATING CONDITION
1
2
A
B
C
3
4
5
6
14
· This function helps save energy during those periods when the appliance is used irregularly, such as,
for example, during vacations.
· By selecting this function, the refrigerator temperature is set to 17°C. The ‘FRIDGE’ key is locked.
· This function can be turned on and o with the “MODE” button. The symbol will be displayed.
8VHULQWHUIDFH
Using the Control Panel
A.Temperature Control of Fridge Compartment
B.Temperature Control of Freezer Compartment
C.Mode/ Locking / Unlocking
1.1 BUTTON OPERATION
2.1.1The panel will be lit up for 2 minutes once the door of fridge compartment is opened.
2.1 DISPLAY
1.Temperature of Fridge Comparment
2.Temperature of Freezer Comparment
3.ECO Mode
4.Holiday Mode
5.Super Mode
6.Locking / Unlocking
1.2 LED DISPLAY
a.The control panel is 100% lit up for 3 seconds, which operates exactly as per the setting
(mode and temperature) before the poweroff. The system will be automatically locked 25
seconds after the last button operation. After locking, the light of the panel would be out 30
seconds after the last button operation.
b.Both preset temperatures of fridge compartemnt and freezer compartment would be shown
on the display.
2.0 OPERATING CONDITION
1
2
A
B
C
3
4
5
6
14
A
4
3
1
B
C
2
5
6

55
DO986BFK
www.domo-elektro.be
EN
Super Mode
8VHULQWHUIDFH
Using the Control Panel
A.Temperature Control of Fridge Compartment
B.Temperature Control of Freezer Compartment
C.Mode/ Locking / Unlocking
1.1 BUTTON OPERATION
2.1.1The panel will be lit up for 2 minutes once the door of fridge compartment is opened.
2.1 DISPLAY
1.Temperature of Fridge Comparment
2.Temperature of Freezer Comparment
3.ECO Mode
4.Holiday Mode
5.Super Mode
6.Locking / Unlocking
1.2 LED DISPLAY
a.The control panel is 100% lit up for 3 seconds, which operates exactly as per the setting
(mode and temperature) before the poweroff. The system will be automatically locked 25
seconds after the last button operation. After locking, the light of the panel would be out 30
seconds after the last button operation.
b.Both preset temperatures of fridge compartemnt and freezer compartment would be shown
on the display.
2.0 OPERATING CONDITION
1
2
A
B
C
3
4
5
6
14
· Select this function if the standard temperature does not cool suciently. For example: with
extremely hot weather, if the doors are opened often, with a high environmental temperature, if a
large quantity of uncooled/unfrozen food is placed in the appliance, etc.
· By selecting this function, the freezer temperature is lowered to -25°C for a maximum of 50 hours. It is
recommended that this function be selected 24 hours prior to the freezing.
· This function is switched o automatically after the time has elapsed. The previously set temperature
will once again be maintained.The ‘FREEZER’ key is locked.
· This function can be turned on and o with the “MODE” button (functions). The symbol will be
displayed. CL
·
CHILD SAFETY LOCK
8VHULQWHUIDFH
Using the Control Panel
A.Temperature Control of Fridge Compartment
B.Temperature Control of Freezer Compartment
C.Mode/ Locking / Unlocking
1.1 BUTTON OPERATION
2.1.1The panel will be lit up for 2 minutes once the door of fridge compartment is opened.
2.1 DISPLAY
1.Temperature of Fridge Comparment
2.Temperature of Freezer Comparment
3.ECO Mode
4.Holiday Mode
5.Super Mode
6.Locking / Unlocking
1.2 LED DISPLAY
a.The control panel is 100% lit up for 3 seconds, which operates exactly as per the setting
(mode and temperature) before the poweroff. The system will be automatically locked 25
seconds after the last button operation. After locking, the light of the panel would be out 30
seconds after the last button operation.
b.Both preset temperatures of fridge compartemnt and freezer compartment would be shown
on the display.
2.0 OPERATING CONDITION
1
2
A
B
C
3
4
5
6
14
The child safety lock automatically blocks the buttons for safety. Hold down the ‘LOCK’ button for 3
seconds to lock the panel. The display will show a closed lock. Press the “UNLOCK” button (child safety
lock) for 3 seconds to unblock the panel. The lock icon will disappear from the display.
ALARM
If the refrigerator door remains open for 90 seconds, you will hear a signal. This alarm is a warning so that
you do not accidentally leave the door open and spoil your food. The alarm stops as soon as the door is
closed again.
CRISPER DRAWER
You can determine the temperature of the crisper drawer using the switch on the rear
wall. This setting does not aect the vegetable container.
Place the switch in the ‘crisper’ position to keep fruit and vegetables fresh and store
them for longer. The perfect temperature and humidity is maintained.
Place the switch in the ‘chiller’ position for fresh, perishable foods such as sh. The
temperature is colder. The food is kept fresh, but not frozen.
MOVING THE SHELVES AND DOOR RACK
· Empty the fridge before moving the shelves or the door racks.
· To move a shelf, raise it and pull it towards you.
· To move a door rack, grip it rmly with 2 hands. Raise the door rack and pull it towards you.
LIGHTING
The lighting in the freezer and the fridge are LED lights. These are more ecological and manufactured for
a long life. For this reason, these may not be replaced. If there is a problem with the lighting, contact a
qualied service centre in your area.
MOVING YOUR APPLIANCE
If the appliance is turned o for any reason, wait for 10 minutes before turning it back on. This will allow
the refrigeration system pressures to equalise before restarting.
· Turn o the appliance and unplug it from the mains socket. Remove all food. Also remove all mobile
parts (shelves, accessories, etc.) or x them into the fridge to avoid any shock.
· Relocate and install. If the appliance has been left on its side for any length of time, leave it standing
upright for at least 10 minutes before turning on.
'DLO\8VH'DLO\8VH
Cleaning
For hygienic reasons the appliance interior, including interior accessories, should be cleaned regularly.
Caution! The appliance may not be connected to the mains during cleaning. Danger of electrical
shock! Before cleaning switch the appliance off and remove the plug from the mains, or switch off or
turn out the circuit breaker or fuse. Never clean the appliance with a steam cleaner. Moisture could
accumulate in electrical components, danger of electrical shock! Hot vapors can lead to the damage
of plastic parts. The appliance must be dry before it is placed back into service.
Important! Ethereal oils and organic solvents can attack plastic parts, e.g. lemon juice or the juice form
orange peel, butyric acid, cleanser that contain acetic acid.
Do not allow such substances to come into contact the appliance parts.
Do not use any abrasive cleaners
Remove the food from the freezer. Store them in a cool place, well covered.
Switch the appliance off and remove the plug from the mains, or switch off or turn out the circuit breaker
of fuse.
Clean the appliance and the interior accessories with a cloth and lukewarm water. After cleaning wipe
with fresh water and rub dry.
After everything is dry place appliance back into service.
Hints for refrigeration
Useful hints:
Make (all types): wrap in polythene bags and place on the glass shelves above the vegetable drawer.
For safety, store in this way only one or two days at the most.
Cooked foods, cold dishes, etc...: these should be covered and may be placed on any shelf.
Fruit and vegetables: these should be thoroughly cleaned and placed in the special drawer(s) provided.
butter and cheese: these should be placed in special airtight containers or wrapped in aluminum foil or
polythene bags to exclude as much air as possible.
Milk bottle: these should have a cap and should be stored in the balconies on the door.
Bananas, potatoes, onions and garlic, if not packed, must not be kept in the fridge.
Fresh Zone Temperature Control
18

56
DO986BFK
EN
Your appliance uses isobutane (R600a) as a refrigerant. Although R600a is an environmentally friendly
and natural gas, it is explosive. Therefore you should be careful during shipment and installation to
prevent your appliance’s cooler elements from being damaged. In the event of a leak caused by damage
to the cooler elements, move your fridge from open ame or heat sources and ventilate the room where
the appliance is located for a few minutes.
STORING FOOD IN THE FRIDGE
The fridge helps to extend the storage times of fresh perishable foods.
Fresh food care for best results:
· Store foods that are very fresh and of good quality.
· Ensure that food is well wrapped or covered before it is stored. This will prevent food from
dehydrating, deteriorating in colour or losing taste and will help maintain freshness. It will also prevent
odour transfer.
· Make sure that strong smelling foods are wrapped or covered and stored away from foods such as
butter, milk and cream which can be tainted by strong odours.
· Cool hot foods down before placing them in the fridge.
FREEZING AND STORING FOOD IN THE FREEZER
Use the freezer
· To store deep-frozen food.
· To make ice cubes.
· To freeze food.
Note: Ensure that the freezer door has been closed properly. Avoid opening the freezer drawers
unnecessarily.
Purchasing frozen food
· Packaging must not be damaged.
· Use by the ‘use by /best before/best by/’ date.
· If possible, transport deep-frozen food in an insulated bag and place quickly in the freezer.
Freezing fresh food
Freeze fresh and undamaged food only. To retain the best possible nutritional value, avour and colour,
vegetables should be blanched before freezing.
Aubergines, peppers, zucchini and asparagus do not require blanching.
Note: Keep food to be frozen away from food which is already frozen.
· The following foods are suitable for freezing: Cakes and pastries, sh and seafood, meat, game,
poultry, vegetables, fruit, herbs, eggs without shells, dairy products such as cheese and butter, ready
meals and leftovers such as soups, stews, cooked meat and sh, potato dishes, soués and desserts.
· The following foods are not suitable for freezing:Types of vegetables, which are usually consumed raw,
such as lettuce or radishes, eggs in shells, grapes, whole apples, pears and peaches, hard-boiled eggs,
yoghurt, soured milk, sour cream, and mayonnaise.
Packing frozen food
To prevent food from losing its avour or drying out, place food in airtight packaging.
1. Place food in packaging.
2. Remove air.
3. Seal the wrapping.
4. Label packaging with contents and dates of freezing.

57
DO986BFK
www.domo-elektro.be
EN
Suitable packaging:
Plastic lm, tubular lm made of polyethylene, aluminium foil, freezer containers.
Recommended storage times of frozen food in the freezer
These times vary depending on the type of food. The food that you freeze can be preserved from 1 to 12
months (minimum at -18°C).
Food Storage time
Bacon, casseroles, milk 1 month
Bread, ice cream, sausages, pies, prepared shellsh, oily sh 2 months
Non-oily sh, shellsh, pizza, scones and muns 3 months
Ham, cakes, biscuits, beef and lamb chops, poultry pieces 4 months
Butter, vegetables (blanched), eggs whole and yolks, cooked craysh, minced meat
(raw), pork (raw)
6 months
Fruit (dry or in syrup), egg whites, beef (raw), whole chicken, lamb
(raw), fruit cakes
12 months
Never forget:
· When you freeze fresh foods whit a ‘use by /best before/best by/’ date, you must freeze them before
the expiry of this date.
· Check that the food was not already frozen. Indeed, frozen food that has thawed completely must not
be refrozen.
· Once defrosted, food should be consumed quickly.
POWER FAILURE
Most power failures are corrected within an hour or two and will not aect your refrigerator temperatures.
However, you should minimize the number of door openings while the power is o. During power failures
of longer duration, take steps to protect your food by blacking dry ice on top of packages.
Frozen food should not be aected if the power failure lasts for less than 15 hours.
Do not refreeze frozen foods that have thawed completely. The food may be dangerous to eat.
CLEANING AND MAINTENANCE
Do not use abrasive cleaning agents or solvents.
1. Turn the appliance o. Disconnect the mains plug from the mains socket.
2. Take out the food and store in a cool location.
3. Clean the appliance with a soft cloth, warm water and detergent.
4. Wipe the door seal with clear water only and then wipe dry thoroughly.
5. After cleaning, put the plug in the socket and set the desired temperature.
6. Put the food back into the appliance.

58
DO986BFK
EN
TROUBLE SHOOTING
Problem Possible causes Solution
The appliance doesn’t
work.
· The plug is not fully in the wall
outlet.
· The fuse is blown.
· The wall socket is faulty.
· Put the plug in the mains.
· Check the fuses.
· Contact an electrician.
Strange odours. · The food in the refrigerator has
been spoiled.
· Clean the inside of the
refrigerator.
The doors do not close
completely.
· The refrigerator or the freezer
is too full.
· The appliance is not level.
· Make sure food or drinks do
not obstruct the closing of the
doors.
· Aline the adjustable feet.
Unusual sounds. · The appliance is not level.
· The unit it touching a wall or
another object.
· Readjust the adjusting feet and
level the unit.
· Gently move the appliance.
· Contact your repair service.
Buzzing or bubbling
sound.
· The compressor starts / is
operating.
· The cooling gas circulates in the
appliance.
· This is normal.
The side panel is hot. · The condensation duct is on
this side.
· This is normal.
ENVIRONMENTAL GUIDELINES
This symbol on the product or on its packaging indicates that this product
may not be treated as household waste. Instead it must be brought to
the applicable collection point for recycling of electrical and electronic
equipment. By ensuring this product is disposed of correctly, you will help
prevent potential negative consequences for the environment and human
health, which could otherwise be caused by inappropriate waste handling of
this product. For more detailed information about recycling of this product,
please contact your local city oce, your household waste disposal service or
the shop where you purchased the product.
The packaging is recyclable. Please treat the packaging ecologically.

59
DO986BFK
www.domo-elektro.be
ES
GARANTIA
Este aparato tiene un periodo de garantía de 2 años a partir de la fecha de compra. Durante el periodo
de garantía, el distribuidor será completamente responsable de los defectos directamente asignables
a errores del material y fabricación. Cuando se detecten este tipo de errores, y siempre que se estime
necesario, el aparato se sustituirá o reparará. A partir de ese momento, el periodo de garantía de 2 años
no volverá a iniciarse, sino que seguirá siendo de 2 años a partir del momento de compra. La garantía se
concede sobre la base del recibo de caja.
La garantía de los accesorios y componentes sujetos a desgaste es de 6 meses.
La garantía y la responsabilidad/imputabilidad del proveedor y el fabricante expiran automáticamente en
los siguientes casos:
· Cuando no se cumplan las instrucciones que aparecen en este manual.
· En el caso de una conexión inadecuada, por ejemplo, a una tensión eléctrica demasiado alta.
· En caso de uso incorrecto, brusco o anormal.
· En caso de insuciente o incorrecto mantenimiento.
· Si el consumidor o un tercero no autorizado realizan reparaciones o modicaciones en el aparato.
· Si se usan componentes o accesorios que no están recomendados o que no son suministrados por el
proveedor/fabricante.
INSTRUCCIONES DE SEGURIDAD
Cuando utilice aparatos eléctricos, se deben seguir las instrucciones de seguridad mencionadas a
continuación:
· Lea detenidamente estas instrucciones. Conserve este manual para consultarlo posteriormente.
· Antes del primer uso retire todos los materiales de embalaje y etiquetas promocionales. Asegúrese de
que los niños no puedan jugar con el material de embalaje.
· Este aparato es adecuado para su uso en el ámbito doméstico y entornos similares como:
· Zona de cocina para el personal de tiendas, ocinas y otros entornos profesionales similares.
· Granjas.
· Habitaciones de hoteles y moteles, y otros entornos de carácter residencial.
· Habitaciones de invitados o similares.
· Supervise en todo momento a los niños para que no jueguen con el aparato.
· Este aparato puede ser utilizado por niños de 16 años o más, personas con discapacidad física o
sensorial, o personas con capacidad mental limitada o falta de experiencia o conocimiento, siempre,
y en tanto en cuanto, dichas personas estén vigiladas o hayan recibido instrucciones sobre el uso del
aparato de manera segura y conozcan los peligros del uso del mismo. Los niños no deben jugar con el
ventilador. El mantenimiento y la limpieza del dispositivo no deben ser realizados por niños, a menos
que tengan 16 años o más y estén supervisados por un adulto.
· Mantenga el aparato fuera del alcance de los niños.
· Atención: el aparato no puede ser utilizado con un temporizador externo o un mando a distancia
separado.
· Lea todas las instrucciones antes del uso.
· Antes de utilizarlo, compruebe si el voltaje indicado en el aparato corresponde al voltaje de la
electricidad de su casa.
· No permita que el cable cuelgue sobre una supercie o el borde de una mesa o encimera.
· No utilice nunca el aparato si el cable o el enchufe están dañados, después de un mal funcionamiento
de la unidad o si están dañados. Lleve el aparato al distribuidor autorizado más cercano centro para la
inspección y reparación.

60
DO986BFK
ES
· Se requiere supervisión cuando el aparato es usado por o cerca de niños.
· El uso de accesorios no recomendados o vendidos por el fabricante puede causar incendios, descargas
eléctricas o lesiones.
· Desenchufe la toma de corriente cuando no se usa, para montar o desmontar piezas y antes de
limpiarlo. Ponga todos los botones en posición desconectado (“o”) y desconecte el enchufe de la
toma de corriente. Nunca tire del cable para desenchufarlo.
· No deje que el aparato funcione sin supervisión.
· No encienda nunca el aparato cerca de una estufa de gas o eléctrica, ni en un lugar donde pueda entrar
en contacto con un horno eléctrico o con otro aparato caliente.
· No utilice el aparato en el exterior.
· Utilice el aparato sólo para el n para el que se ha fabricado.
· Coloque siempre el aparato sobre una supercie rme, horizontal y seca.
· Utilice el aparato sólo para uso doméstico. El fabricante no es responsable de los accidentes que
resulten del uso incorrecto del aparato, ni del incumplimiento de las normas establecidas en este
manual.
· Todas las reparaciones aparte del mantenimiento ordinario de la unidad deben ser efectuadas por el
fabricante o por su servicio post-venta.
· No sumerja nunca el aparato, el cable o el enchufe en agua o cualquier otro líquido.
· Asegúrese de que los niños no puedan tocar el cable eléctrico o el aparato.
· Mantenga el cable alejado de bordes alados y piezas calientes u otras fuentes de calor.
· Antes del primer uso retire todos los materiales de embalaje y etiquetas de promoción.
· Mantenga las ranuras de ventilación libres y asegúrese de que no están bloqueadas u obstruidas.
· No utilice instrumentos mecánicos o de otro tipo para acelerar el proceso de descongelación.
· No utilice ningún otro aparato eléctrico en el interior del frigoríco, a menos que el mismo esté
aprobado para este n por el fabricante.
· Nunca almacene materiales explosivos en el aparato como, por ejemplo, aerosoles con gas propulsor
inamable.
· Asegúrese de que el circuito de refrigeración no se daña, por ejemplo, durante el transporte o la
instalación.
· Asegúrese de que el cable no quede aplastado o dañado por la parte trasera de la unidad. Esto puede
causar sobrecalentamiento y, en consecuencia, se podría producir un incendio.
· Asegúrese de tener acceso al enchufe del aparato.
· No tire del cable.
· Si la toma de corriente está suelta, no inserte el enchufe en la toma de corriente (riesgo de descarga
eléctrica o incendio).
· Este aparato es pesado. Tenga cuidado al desplazarlo.
· No toque ningún objeto que se encuentre en el congelador con las manos mojadas. Esto puede
ocasionar heridas (quemaduras) en la piel.
· Evite una exposición prolongada a la luz solar.
· El aparato no se puede utilizar con un cable alargador o con una regleta.
· Siga las instrucciones indicadas a continuación para evitar la contaminación de los alimentos:
· La apertura prolongada de la puerta puede aumentar considerablemente la temperatura en
los compartimentos del aparato.
· Limpie regularmente las supercies que puedan entrar en contacto con los alimentos.
Mantenga limpios el canal de condensación y el oricio de drenaje en la parte posterior del
aparato.
· Guarde la carne y el pescado crudos en el frigoríco, en recipientes adecuados, para que no
entren en contacto con otros alimentos.

61
DO986BFK
www.domo-elektro.be
ES
· Si el aparato permanece vacío durante mucho tiempo debe apagarlo, descongelarlo y
limpiarlo. Deje que se seque y deje la puerta abierta para evitar que se forme moho dentro
del aparato.
¡ADVERTENCIA! Nunca utilice el aparato sobre, o cerca de, una cocina de gas o eléctrica,
ni en un lugar donde pueda entrar en contacto con una fuente de calor. Los materiales
inamables se encuentran en la parte posterior del aparato.
Preste atención al símbolo “Riesgo de incendio: material inamable” ubicado en la parte
posterior del aparato.
PIEZAS
1. Estantes
2. Tapa para la bandeja de verduras
3. Compartimento de verduras
4. Cajón de frigoríco
5. Estantes de la puerta
6. Cajón del congelador
7. Patas ajustables
INSTALACIÓN
· Retire todo el material de embalaje, tanto del interior como del exterior.
Limpie el exterior del aparato con un paño seco. El interior puede
limpiarlo con un paño suave y húmedo.
· No coloque el aparato en un paso estrecho o en un lugar húmedo o que
reciba la luz directa del sol.
· Asegúrese de que pueda circular el aire alrededor del frigoríco. La
parte posterior del frigoríco debe estar separada de la pared al menos
10 cm.
· Coloque el frigoríco sobre una supercie rme y nivelada. Mediante
las patas de ajuste se puede nivelar el aparato. Ajústelas al girarlas hacia
dentro o fuera del aparato.
· Evite la luz directa del sol y el calor. La luz solar puede deteriorar el
exterior del frigoríco. El calor aumentará el consumo.
2YHUYLHZ
Note: Above picture is for reference only. Real appliance probably is different.
FridgeShelves
Fridge
Balconies
Crisper
Crisper Cover
Fresh convertible box
Freezer Drawers
Leveling Feet
6
1
2
3
4
6
7
5
y
y
,QVWDOODWLRQ
1007NN
1071NN
6SDFH5HTXLUHPHQW
Keep enough space of door open.
Keep at least 50mm gap at two sides.
To do this adjust the two levelling feet at front of the unit.
If the unit is not level, the doors and magnetic seal
alignments will not be covered properly.
/HYHOOLQJWKHXQLW
13
y
y
,QVWDOODWLRQ
1007NN
1071NN
6SDFH5HTXLUHPHQW
Keep enough space of door open.
Keep at least 50mm gap at two sides.
To do this adjust the two levelling feet at front of the unit.
If the unit is not level, the doors and magnetic seal
alignments will not be covered properly.
/HYHOOLQJWKHXQLW
13

62
DO986BFK
ES
· Evite un grado de humedad demasiado elevado. Demasiada humedad ambiental causará que se
forme hielo demasiado rápido en el frigoríco.
· Antes de conectar el frigoríco a la red eléctrica se debe comprobar que la tensión de la placa de
especicaciones del aparato se corresponde con el voltaje de su hogar. Otra tensión puede dañar el
aparato.
· El enchufe es la única forma de desconectar el aparato de la alimentación, asegúrese de que es fácil
acceder al mismo. Para desconectar la alimentación al aparato, apague el aparato y retire el enchufe
de la toma de corriente.
· El aparato debe estar conectado a tierra. El fabricante no se hace responsable de los daños causados
por no utilizar una conexión a tierra.
· Deje el aparato después de la instalación 8 horas antes de encenderlo. Así se puede asentar el
refrigerante.
· Deje que el aparato funcione durante 24 horas sin alimentos hasta que este se enfríe y alcance la
temperatura adecuada.
· Este aparato se ha diseñado para funcionar a una temperaturas ambiente de entre 16°C y 38°C. En una
habitación con una temperatura inferior o superior, el aparato no funcionará correctamente.
· Este aparato solo se puede utilizar en interior.
· El congelador hace ruido cuando el compresor hace circular el refrigerante. Esto es algo normal.
CAMBIO DE DIRECCIÓN DE LA PUERTA
Si quiere trasladar las bisagras de la puerta hacia el otro lado, le recomendamos que se ponga en contacto
con un taller de reparación autorizado para llevar a cabo el trabajo. Antes de cambiar la dirección de giro,
compruebe que el enchufe se ha desconectado de la toma de corriente y que el aparato está vacío.
Después de invertir la puerta, no mueva el aparato durante 8 horas antes de encenderlo. Esto permitirá
que el refrigerante se asiente. Se recomienda utilizar un destornillador plano, un destornillador en
cruz y una llave inglesa (no suministrados), así como los componentes suministrados que se indican a
continuación.
Placa de cubierta de la bisagra
,QVWDOODWLRQ
Door Reversibility
Left Aid-Closer on Upper Door x 1 Left Aid-Closer on Lower Door x 1
nscrew top hinge cover and disconnect connectors of door switch and harness.
2.Unscrew top hinge
3.Remove the pin with a screwdriver and filp the hinge bracket. Then refit the pin to hinge bracket
unscrew
screw
8
Tope de puerta superior
,QVWDOODWLRQ
Door Reversibility
Left Aid-Closer on Upper Door x 1 Left Aid-Closer on Lower Door x 1
nscrew top hinge cover and disconnect connectors of door switch and harness.
2.Unscrew top hinge
3.Remove the pin with a screwdriver and filp the hinge bracket. Then refit the pin to hinge bracket
unscrew
screw
8
Tope de puerta inferior
,QVWDOODWLRQ
Door Reversibility
Left Aid-Closer on Upper Door x 1 Left Aid-Closer on Lower Door x 1
nscrew top hinge cover and disconnect connectors of door switch and harness.
2.Unscrew top hinge
3.Remove the pin with a screwdriver and filp the hinge bracket. Then refit the pin to hinge bracket
unscrew
screw
8
1. Aoje los tornillos de la placa de cubierta de la bisagra y retire la placa. Desconecte ambos
conectores de los cables.
,QVWDOODWLRQ
Door Reversibility
Left Aid-Closer on Upper Door x 1 Left Aid-Closer on Lower Door x 1
nscrew top hinge cover and disconnect connectors of door switch and harness.
2.Unscrew top hinge
3.Remove the pin with a screwdriver and filp the hinge bracket. Then refit the pin to hinge bracket
unscrew
screw
8

63
DO986BFK
www.domo-elektro.be
ES
2. Desenrosque los pernos de las bisagras y retire la puerta.
,QVWDOODWLRQ
Door Reversibility
Left Aid-Closer on Upper Door x 1 Left Aid-Closer on Lower Door x 1
nscrew top hinge cover and disconnect connectors of door switch and harness.
2.Unscrew top hinge
3.Remove the pin with a screwdriver and filp the hinge bracket. Then refit the pin to hinge bracket
unscrew
screw
8
3. Retire la placa de la bisagra de la puerta. Retire el pasador de la placa de la bisagra y gire la placa
180°. Vuelva a colocar el pasador en la placa de la bisagra. Asegúrese de que el piñón de plástico se
mantiene alrededor del pasador.
,QVWDOODWLRQ
Door Reversibility
Left Aid-Closer on Upper Door x 1 Left Aid-Closer on Lower Door x 1
nscrew top hinge cover and disconnect connectors of door switch and harness.
2.Unscrew top hinge
3.Remove the pin with a screwdriver and filp the hinge bracket. Then refit the pin to hinge bracket
unscrew
screw
8
4. Desplace el interruptor de la puerta de la placa de cubierta de la bisagra derecha hasta la placa de
cubierta de la bisagra izquierda que se encuentra en la bolsa de accesorios suministrada. Para retirar
el interruptor de la puerta, presione y mantenga la tapa en la parte posterior de la placa de cubierta.
,QVWDOODWLRQ
5.Detach cover in top of upper door and move harness from right side to left side, then replace the cover.
6.Move top left cover to right side
7. Take off the upper door, take out the screw from the middle hinge by cross screwdriver,
then take off the lower door.
4.Move door switch from right hinge cover to left hinge cover in accessary bag.
9
5. Retire el panel de acabado de la parte superior de la puerta superior. Desplace el cable y el conector
de un lado al otro lado. Vuelva a montar el panel de acabado.
,QVWDOODWLRQ
5.Detach cover in top of upper door and move harness from right side to left side, then replace the cover.
6.Move top left cover to right side
7. Take off the upper door, take out the screw from the middle hinge by cross screwdriver,
then take off the lower door.
4.Move door switch from right hinge cover to left hinge cover in accessary bag.
9

64
DO986BFK
ES
6. Desplace la placa de cubierta que se encuentra sobre la nevera de la parte izquierda a la derecha.
,QVWDOODWLRQ
5.Detach cover in top of upper door and move harness from right side to left side, then replace the cover.
6.Move top left cover to right side
7. Take off the upper door, take out the screw from the middle hinge by cross screwdriver,
then take off the lower door.
4.Move door switch from right hinge cover to left hinge cover in accessary bag.
9
7. Desenrosque los pernos de la bisagra central y levante la puerta inferior del pasador de bisagra.
,QVWDOODWLRQ
5.Detach cover in top of upper door and move harness from right side to left side, then replace the cover.
6.Move top left cover to right side
7. Take off the upper door, take out the screw from the middle hinge by cross screwdriver,
then take off the lower door.
4.Move door switch from right hinge cover to left hinge cover in accessary bag.
9
8. Desplace las cubiertas de los tornillos de la parte izquierda a la derecha.
,QVWDOODWLRQ
8 .
9. Unscrew bottom hinge. Then remove the adjustable feet from both side.
10. Unscrew and remove the bottom hinge pin, turn the bracket over and replace it.
unscrew
screw
10
9. Coloque el frigoríco en posición horizontal. Retire las patas de ajuste de ambos lados y desatornille
los pernos de la bisagra inferior. Retire el tornillo de la carcasa y vuelva a colocarlo en el otro lado.
,QVWDOODWLRQ
8 .
9. Unscrew bottom hinge. Then remove the adjustable feet from both side.
10. Unscrew and remove the bottom hinge pin, turn the bracket over and replace it.
unscrew
screw
10

65
DO986BFK
www.domo-elektro.be
ES
10. Retire el pasador de la bisagra inferior. Gire la placa 180° y vuelva a jar el pasador.
,QVWDOODWLRQ
8 .
9. Unscrew bottom hinge. Then remove the adjustable feet from both side.
10. Unscrew and remove the bottom hinge pin, turn the bracket over and replace it.
unscrew
screw
10
11. Vuelva a colocar la placa de la bisagra en la parte inferior del aparato. Vuelva a colocar ambas patas
de ajuste.
,QVWDOODWLRQ
13.Detach the Fridge and the Freezer door gaskets and then attach them after rotating.
11.Refit the bracket fitting the bottom hinge pin. Replace both adjustable feet.
12.Remove aid-closers from bottom of upper and lower doors, then take new aid-closers from
accessary bag and install them to left side.
11
12. Retire el tope de la puerta de la parte inferior de ambas puertas. Coloque los nuevos topes de puerta
en el lado izquierdo de ambas puertas. Puede encontrar los nuevos topes de puerta en la bolsa de
accesorios suministrada.
,QVWDOODWLRQ
13.Detach the Fridge and the Freezer door gaskets and then attach them after rotating.
11.Refit the bracket fitting the bottom hinge pin. Replace both adjustable feet.
12.Remove aid-closers from bottom of upper and lower doors, then take new aid-closers from
accessary bag and install them to left side.
11
13. Retire los sellos de goma de ambas puertas, deles la vuelta y vuelva a colocarlos en su lugar.
,QVWDOODWLRQ
13.Detach the Fridge and the Freezer door gaskets and then attach them after rotating.
11.Refit the bracket fitting the bottom hinge pin. Replace both adjustable feet.
12.Remove aid-closers from bottom of upper and lower doors, then take new aid-closers from
accessary bag and install them to left side.
11

66
DO986BFK
ES
14. Vuelva a colocar la puerta inferior y atorníllela de nuevo.
,QVWDOODWLRQ
15.Replace upper door, please ensure the door align with the cabinet to make sure door gasket seal
the cabinet tightly. Then connect door with cabinet by tightly fixed top hinge.
16.Connect harnesses from door and cabinet. Then replace top hinge cover. Before screw the cover,
connect terminals of door switch.
14. Install the lower door, adjust and fix the middle hinge onto the cabinet.
12
15. Vuelva a colocar la puerta superior y atorníllela de nuevo. Al hacerlo, asegúrese de que la puerta
esté alineada horizontalmente y de que la junta de la puerta se cierre completamente.
,QVWDOODWLRQ
15.Replace upper door, please ensure the door align with the cabinet to make sure door gasket seal
the cabinet tightly. Then connect door with cabinet by tightly fixed top hinge.
16.Connect harnesses from door and cabinet. Then replace top hinge cover. Before screw the cover,
connect terminals of door switch.
14. Install the lower door, adjust and fix the middle hinge onto the cabinet.
12
16. Vuelva a conectar los dos conectores de los cables de la parte superior del aparato a la puerta.
Vuelva a colocar la placa de cubierta de la bisagra y atorníllela bien. Asegúrese de que los cables se
encuentran en el conductor y de que el interruptor de la puerta hace contacto con la puerta.
,QVWDOODWLRQ
15.Replace upper door, please ensure the door align with the cabinet to make sure door gasket seal
the cabinet tightly. Then connect door with cabinet by tightly fixed top hinge.
16.Connect harnesses from door and cabinet. Then replace top hinge cover. Before screw the cover,
connect terminals of door switch.
14. Install the lower door, adjust and fix the middle hinge onto the cabinet.
12

67
DO986BFK
www.domo-elektro.be
ES
USO
PANEL DE CONTROL
Teclas de la pantalla táctil
A. Temperatura del refrigerador
B. Temperatura del congelador
C. Funciones
Pantalla
1. Temperatura del refrigerador
2. Temperatura del congelador
3. Modo ECO
4. Modo Super
5. Modo vacaciones
6. Bloqueo de seguridad para niños
El panel de control pasa automáticamente al modo en espera. La pantalla se ilumina cuando se presiona
una tecla y cuando se abren las puertas.
REGULACIÓN DE TEMPERATURA
· La temperatura del refrigerador se puede ajustar entre 2 y 8 °C. En circunstancias normales, usted
debe escoger 4ºC. Presione la tecla “FRIDGE” (temperatura del refrigerador) y manténgala presionada
hasta que la temperatura deseada aparezca en la pantalla.
8VHULQWHUIDFH
Using the Control Panel
A.Temperature Control of Fridge Compartment
B.Temperature Control of Freezer Compartment
C.Mode/ Locking / Unlocking
1.1 BUTTON OPERATION
2.1.1The panel will be lit up for 2 minutes once the door of fridge compartment is opened.
2.1 DISPLAY
1.Temperature of Fridge Comparment
2.Temperature of Freezer Comparment
3.ECO Mode
4.Holiday Mode
5.Super Mode
6.Locking / Unlocking
1.2 LED DISPLAY
a.The control panel is 100% lit up for 3 seconds, which operates exactly as per the setting
(mode and temperature) before the poweroff. The system will be automatically locked 25
seconds after the last button operation. After locking, the light of the panel would be out 30
seconds after the last button operation.
b.Both preset temperatures of fridge compartemnt and freezer compartment would be shown
on the display.
2.0 OPERATING CONDITION
1
2
A
B
C
3
4
5
6
14
· Puede ajustar el congelador entre -14 y -22 °C. En circunstancias normales, debe escoger -18ºC Pulse
la tecla “FREEZER” (temperatura del congelador) y manténgala presionada hasta que la temperatura
deseada aparezca en la pantalla.
8VHULQWHUIDFH
Using the Control Panel
A.Temperature Control of Fridge Compartment
B.Temperature Control of Freezer Compartment
C.Mode/ Locking / Unlocking
1.1 BUTTON OPERATION
2.1.1The panel will be lit up for 2 minutes once the door of fridge compartment is opened.
2.1 DISPLAY
1.Temperature of Fridge Comparment
2.Temperature of Freezer Comparment
3.ECO Mode
4.Holiday Mode
5.Super Mode
6.Locking / Unlocking
1.2 LED DISPLAY
a.The control panel is 100% lit up for 3 seconds, which operates exactly as per the setting
(mode and temperature) before the poweroff. The system will be automatically locked 25
seconds after the last button operation. After locking, the light of the panel would be out 30
seconds after the last button operation.
b.Both preset temperatures of fridge compartemnt and freezer compartment would be shown
on the display.
2.0 OPERATING CONDITION
1
2
A
B
C
3
4
5
6
14
· El tiempo de funcionamiento y la temperatura se ven afectados por la ubicación en la que se utiliza el
refrigerador, el número de veces que se abre la puerta y la temperatura de la habitación en la que se
encuentra el refrigerador.
AJUSTAR LAS FUNCIONES
8VHULQWHUIDFH
Using the Control Panel
A.Temperature Control of Fridge Compartment
B.Temperature Control of Freezer Compartment
C.Mode/ Locking / Unlocking
1.1 BUTTON OPERATION
2.1.1The panel will be lit up for 2 minutes once the door of fridge compartment is opened.
2.1 DISPLAY
1.Temperature of Fridge Comparment
2.Temperature of Freezer Comparment
3.ECO Mode
4.Holiday Mode
5.Super Mode
6.Locking / Unlocking
1.2 LED DISPLAY
a.The control panel is 100% lit up for 3 seconds, which operates exactly as per the setting
(mode and temperature) before the poweroff. The system will be automatically locked 25
seconds after the last button operation. After locking, the light of the panel would be out 30
seconds after the last button operation.
b.Both preset temperatures of fridge compartemnt and freezer compartment would be shown
on the display.
2.0 OPERATING CONDITION
1
2
A
B
C
3
4
5
6
14
Presione en el botón “MODE” (funciones) para cambiar entre el modo ECO, el modo Vacaciones y el modo
Super.
Modo ECO
8VHULQWHUIDFH
Using the Control Panel
A.Temperature Control of Fridge Compartment
B.Temperature Control of Freezer Compartment
C.Mode/ Locking / Unlocking
1.1 BUTTON OPERATION
2.1.1The panel will be lit up for 2 minutes once the door of fridge compartment is opened.
2.1 DISPLAY
1.Temperature of Fridge Comparment
2.Temperature of Freezer Comparment
3.ECO Mode
4.Holiday Mode
5.Super Mode
6.Locking / Unlocking
1.2 LED DISPLAY
a.The control panel is 100% lit up for 3 seconds, which operates exactly as per the setting
(mode and temperature) before the poweroff. The system will be automatically locked 25
seconds after the last button operation. After locking, the light of the panel would be out 30
seconds after the last button operation.
b.Both preset temperatures of fridge compartemnt and freezer compartment would be shown
on the display.
2.0 OPERATING CONDITION
1
2
A
B
C
3
4
5
6
14
Al seleccionar esta función, la temperatura del frigoríco se ajusta a 5 °C, mientras que la del congelador
se ajusta a -18 °C. Los botones “FRIDGE” (frigoríco) y “FREEZER” (congelador) se bloquean. Puede
activar y desactivar esta función con el botón “MODE” (funciones). El símbolo aparece en la pantalla.
8VHULQWHUIDFH
Using the Control Panel
A.Temperature Control of Fridge Compartment
B.Temperature Control of Freezer Compartment
C.Mode/ Locking / Unlocking
1.1 BUTTON OPERATION
2.1.1The panel will be lit up for 2 minutes once the door of fridge compartment is opened.
2.1 DISPLAY
1.Temperature of Fridge Comparment
2.Temperature of Freezer Comparment
3.ECO Mode
4.Holiday Mode
5.Super Mode
6.Locking / Unlocking
1.2 LED DISPLAY
a.The control panel is 100% lit up for 3 seconds, which operates exactly as per the setting
(mode and temperature) before the poweroff. The system will be automatically locked 25
seconds after the last button operation. After locking, the light of the panel would be out 30
seconds after the last button operation.
b.Both preset temperatures of fridge compartemnt and freezer compartment would be shown
on the display.
2.0 OPERATING CONDITION
1
2
A
B
C
3
4
5
6
14
A
4
3
1
B
C
2
5
6

68
DO986BFK
ES
Modo vacaciones
8VHULQWHUIDFH
Using the Control Panel
A.Temperature Control of Fridge Compartment
B.Temperature Control of Freezer Compartment
C.Mode/ Locking / Unlocking
1.1 BUTTON OPERATION
2.1.1The panel will be lit up for 2 minutes once the door of fridge compartment is opened.
2.1 DISPLAY
1.Temperature of Fridge Comparment
2.Temperature of Freezer Comparment
3.ECO Mode
4.Holiday Mode
5.Super Mode
6.Locking / Unlocking
1.2 LED DISPLAY
a.The control panel is 100% lit up for 3 seconds, which operates exactly as per the setting
(mode and temperature) before the poweroff. The system will be automatically locked 25
seconds after the last button operation. After locking, the light of the panel would be out 30
seconds after the last button operation.
b.Both preset temperatures of fridge compartemnt and freezer compartment would be shown
on the display.
2.0 OPERATING CONDITION
1
2
A
B
C
3
4
5
6
14
· Esta función ayuda a ahorrar energía durante los períodos en los cuales el aparato no se utiliza con
frecuencia, como ejemplo. durante las vacaciones.
· Al seleccionar esta función, la temperatura del frigoríco se ajusta a 17 °C. El botón “FRIDGE” se
bloquea.
· Esta función se puede activar y desactivar con la tecla “MODE”. El símbolo aparece en la pantalla.
Modo Super
8VHULQWHUIDFH
Using the Control Panel
A.Temperature Control of Fridge Compartment
B.Temperature Control of Freezer Compartment
C.Mode/ Locking / Unlocking
1.1 BUTTON OPERATION
2.1.1The panel will be lit up for 2 minutes once the door of fridge compartment is opened.
2.1 DISPLAY
1.Temperature of Fridge Comparment
2.Temperature of Freezer Comparment
3.ECO Mode
4.Holiday Mode
5.Super Mode
6.Locking / Unlocking
1.2 LED DISPLAY
a.The control panel is 100% lit up for 3 seconds, which operates exactly as per the setting
(mode and temperature) before the poweroff. The system will be automatically locked 25
seconds after the last button operation. After locking, the light of the panel would be out 30
seconds after the last button operation.
b.Both preset temperatures of fridge compartemnt and freezer compartment would be shown
on the display.
2.0 OPERATING CONDITION
1
2
A
B
C
3
4
5
6
14
· Seleccione esta opción si la temperatura por defecto no enfría lo suciente. Por ejemplo: cuando el
clima es demasiado caluroso, cuando las puertas se abren mucho, cuando la temperatura ambiente es
alta, cuando en el aparato hay una gran cantidad de alimentos no refrigerados/no congelados, etc.
· Al seleccionar esta función, la temperatura del congelador bajará hasta -25 °C durante un máximo de
50 horas. Se aconseja seleccionar la función de congelación 24 horas antes de congelar.
· Esta función se desactiva automáticamente después de algún tiempo. El sistema recupera la
temperatura preestablecida anteriormente. El botón “FREEZER” se bloquea.
· Esta función se puede activar y desactivar con la tecla “MODE” (funciones). El símbolo se muestra en
pantalla.
BLOQUEO DE SEGURIDAD PARA NIÑOS
8VHULQWHUIDFH
Using the Control Panel
A.Temperature Control of Fridge Compartment
B.Temperature Control of Freezer Compartment
C.Mode/ Locking / Unlocking
1.1 BUTTON OPERATION
2.1.1The panel will be lit up for 2 minutes once the door of fridge compartment is opened.
2.1 DISPLAY
1.Temperature of Fridge Comparment
2.Temperature of Freezer Comparment
3.ECO Mode
4.Holiday Mode
5.Super Mode
6.Locking / Unlocking
1.2 LED DISPLAY
a.The control panel is 100% lit up for 3 seconds, which operates exactly as per the setting
(mode and temperature) before the poweroff. The system will be automatically locked 25
seconds after the last button operation. After locking, the light of the panel would be out 30
seconds after the last button operation.
b.Both preset temperatures of fridge compartemnt and freezer compartment would be shown
on the display.
2.0 OPERATING CONDITION
1
2
A
B
C
3
4
5
6
14
Para garantizar la seguridad, el dispositivo de bloqueo de seguridad para niños bloquea automáticamente
las teclas. Presione el botón “LOCK” (seguridad para niños) durante 3 segundos para bloquear el panel. En
la pantalla aparece un candado cerrado. Presione 3 segundos la tecla “UNLOCK” (bloqueo de seguridad
para niños) para desbloquear el panel. En la pantalla desaparece el icono del candado.
ALARMA
Si la puerta del frigoríco permanece abierta durante 90 segundos se escuchará una señal. Esta alarma es
una advertencia para que no deje la puerta abierta accidentalmente, ya que esto podría ocasionar que los
alimentos se estropeen. La alarma se detiene tan pronto como la puerta se vuelva a cerrar.
CAJÓN DE FRIGORÍFICO
Puede determinar la temperatura del cajón de frigoríco con el interruptor de la pared
trasera. Este ajuste no inuye en el compartimento de verduras.
Ponga el interruptor en la posición “crisper” para mantener la fruta y la verdura frescas
y para conservarlas durante más tiempo. Se mantienen la temperatura y la humedad
perfectas.
Ponga el interruptor en la posición ”chiller” para alimentos frescos y perecederos como
el pescado. La temperatura es más fría. Los alimentos se mantienen frescos, pero no se
congelan.
COLOCAR LOS ESTANTES Y EL ESTANTE DE LA PUERTA
· Vacíe el refrigerador antes de desplazar los estantes y el estante de la puerta.
· Para mover un estante, levántelo y tire de él hacia usted.
· Para mover un estante de la puerta, sujételo con las dos manos. Levante el estante de la puerta y tire
de él hacia usted.
'DLO\8VH'DLO\8VH
Cleaning
For hygienic reasons the appliance interior, including interior accessories, should be cleaned regularly.
Caution! The appliance may not be connected to the mains during cleaning. Danger of electrical
shock! Before cleaning switch the appliance off and remove the plug from the mains, or switch off or
turn out the circuit breaker or fuse. Never clean the appliance with a steam cleaner. Moisture could
accumulate in electrical components, danger of electrical shock! Hot vapors can lead to the damage
of plastic parts. The appliance must be dry before it is placed back into service.
Important! Ethereal oils and organic solvents can attack plastic parts, e.g. lemon juice or the juice form
orange peel, butyric acid, cleanser that contain acetic acid.
Do not allow such substances to come into contact the appliance parts.
Do not use any abrasive cleaners
Remove the food from the freezer. Store them in a cool place, well covered.
Switch the appliance off and remove the plug from the mains, or switch off or turn out the circuit breaker
of fuse.
Clean the appliance and the interior accessories with a cloth and lukewarm water. After cleaning wipe
with fresh water and rub dry.
After everything is dry place appliance back into service.
Hints for refrigeration
Useful hints:
Make (all types): wrap in polythene bags and place on the glass shelves above the vegetable drawer.
For safety, store in this way only one or two days at the most.
Cooked foods, cold dishes, etc...: these should be covered and may be placed on any shelf.
Fruit and vegetables: these should be thoroughly cleaned and placed in the special drawer(s) provided.
butter and cheese: these should be placed in special airtight containers or wrapped in aluminum foil or
polythene bags to exclude as much air as possible.
Milk bottle: these should have a cap and should be stored in the balconies on the door.
Bananas, potatoes, onions and garlic, if not packed, must not be kept in the fridge.
Fresh Zone Temperature Control
18

69
DO986BFK
www.domo-elektro.be
ES
ILUMINACIÓN
Lámparas LED iluminan el congelador y el refrigerador. Estas lámparas son ecológicas y se han
desarrollado para durar toda la vida. No será necesario cambiarlas. Si, no obstante, se produce algún
problema con la iluminación, póngase en contacto con un centro de servicio cualicado en su zona.
DESPLAZAR SU APARATO
Si el aparato se apaga por cualquier motivo, espere 10 minutos antes de volver a encenderlo. La presión
en el sistema de refrigeración se debe estabilizar antes de volver a encenderlo.
· Apague el aparato y retire el enchufe de la toma de corriente. Retire todos los alimentos. También
debe retirar todas las partes móviles (estantes, accesorios, etc.) o jarlos en el frigoríco para evitar
choques.
· Desplace el aparato e instálelo. Si el dispositivo se mantuvo posicionado sobre un lado mientras se
trasladaba, aunque fuera durante un tiempo muy corto, el aparato deberá ponerse en posición vertical
durante al menos 10 minutos antes de encender el aparato.
Su aparato utiliza isobutano (R600a) como refrigerante. A pesar de que el R600a es un gas respetuoso con
el medio ambiente y natural, es explosivo. Por lo tanto, debe tener mucho cuidado al mover o instalar el
aparato para evitar daños en los elementos de refrigeración. En el caso de que se produzca una fuga por
un daño en los elementos de refrigeración, mantenga el frigoríco alejado de llamas o fuentes de calor y
ventile la habitación donde se encuentra el aparato durante algunos minutos.
CONSERVAR ALIMENTOS EN EL FRIGORÍFICO
El frigoríco asegura una vida útil más prolongada de los alimentos frescos y perecederos. Conservación
de alimentos frescos para obtener los mejores resultados:
· Conserve solo alimentos muy frescos y de buena calidad.
· Asegúrese de que los alimentos están bien envasados o cúbralos antes de almacenarlos. Esto evita que
los alimentos se sequen, pierdan color o sabor y hará que se conserven frescos durante más tiempo.
Esto también evita la transferencia de olores.
· Asegúrese de que los alimentos con un olor fuerte se envasan bien y se cubren. Manténgalos alejados
de mantequilla, leche y nata, así como otros alimentos que pueden verse afectados por un fuerte olor.
· Deje que los alimentos calientes se enfríen antes de introducirlos en el frigoríco.
CONGELACIÓN Y CONSERVACIÓN DE ALIMENTOS EN EL CONGELADOR
Utilice el congelador
· Para conservar alimentos congelados.
· Para fabricar cubitos de hielo.
· Para congelar alimentos.
Nota: asegúrese de que la puerta del congelador esté siempre bien cerrada. Abra la puerta del congelador
únicamente cuando sea necesario.
Compra de productos congelados
· El envase no puede encontrarse dañado.
· Consuma antes de la fecha de caducidad.
· Si es posible, transporte los alimentos congelados en una bolsa térmica e introdúzcalos rápidamente
en el congelador.

70
DO986BFK
ES
Congelación de alimentos frescos
Congele únicamente alimentos frescos en buen estado. Para preservar lo mejor posible los valores
nutritivos, el sabor y el color, escalde las verduras antes de congelarlas.
No es necesario escaldar las berenjenas, pimientos, calabacines o espárragos.
Nota: mantenga los alimentos que va a congelar alejados de los alimentos ya congelados.
· Son adecuados para congelar los siguientes alimentos: bizcochos y repostería, pescado y marisco,
carne, caza, aves, verdura, fruta, especias, huevos sin cáscara, productos lácteos como queso o
mantequilla, platos preparados y restos de comidas como sopas, guisos, carne y pescado cocinados,
platos a base de patatas, sués y postres.
· No son adecuados para congelar los siguientes alimentos: verduras que se toman generalmente
crudas, como lechuga, rábanos, huevos con cáscara, uvas, manzanas, peras y melocotones, huevos
duros, yogur, leche agria, nata agria y mayonesa.
Conservación de productos congelados
Para evitar que los alimentos pierdan su sabor o se sequen, guárdelos en un envase hermético.
1. Introduzca los alimentos en el envase.
2. Extraiga todo el aire.
3. Cierre el envase.
4. Añada al envase una etiqueta con su contenido y la fecha de congelación.
Envases adecuados:
película de plástico, rollo de película de polietileno, papel de aluminio o recipientes aptos para el
congelador.
Tiempo de conservación en el congelador recomendado para los productos congelados
Este tiempo puede variar según el tipo de alimento. Los alimentos congelados se pueden conservar entre
1 y 12 meses (a un mínimo de -18°C).
Alimento Tiempo de
conservación
Tocino, guisos, leche 1 mes
Pan, helados, salchichas, guisantes, marisco cocido, pescado azul 2 meses
Pescado blanco, marisco, pizza, bollos y magdalenas 3 meses
Jamón, bizcochos, galletas, carne de ternera y chuletas de cordero, aves troceadas 4 meses
Mantequilla, verdura (escaldada), huevo entero y yemas, cangrejos de río cocidos,
carne picada (cruda), carne de cerdo (cruda)
6 meses
Fruta (seca o en almíbar), clara de huevo, carne de ternera (cruda), pollo entero,
carne de cordero (cruda), bizcochos de frutas
12 meses
No olvidar:
Si congela alimentos frescos que tengan una fecha de caducidad, deberá congelarlos antes de que se
alcance esa fecha de caducidad.
Asegúrese de que los alimentos no se hayan congelado anteriormente. Los alimentos congelados que se
han descongelado por completo no pueden volver a congelarse.
Una vez descongelados, consuma rápidamente los alimentos.

71
DO986BFK
www.domo-elektro.be
ES
APAGÓN
La mayoría de los apagones duran entre 1 y 2 horas y no suelen alterar la temperatura del frigoríco.
Limite la apertura de la puerta en la mayor medida posible durante un apagón.
Durante un apagón más largo, debe adoptar otras medidas para conservar los alimentos, por ejemplo,
colocar hielo seco sobre los alimentos.
Los alimentos congelados se mantienen en buenas condiciones si el fallo de alimentación no dura más de
15 horas.
No vuelva a congelar los alimentos que se hayan descongelado por completo. Esos alimentos pueden
perjudicar su salud.
LIMPIEZA Y MANTENIMIENTO
LIMPIEZA
No utilice productos de limpieza agresivos o disolventes.
1. Retire el enchufe de la toma de corriente.
2. Retire los alimentos del aparato y almacénelos en un lugar fresco.
3. Limpie el aparato con un paño suave, agua tibia y un detergente suave.
4. Limpie la junta de la puerta solo con agua limpia y, a continuación, frote a fondo.
5. Después de la limpieza, introduzca el enchufe en la toma de corriente y ajuste la temperatura
deseada.
6. Vuelva a colocar los alimentos en el aparato.
PROBLEMAS Y SUS SOLUCIONES
Problema Posible causa Solución
El aparato no funciona. · El enchufe no se encuentra
(completamente) en la toma de
corriente.
· El fusible se ha fundido.
· La toma de corriente no
funciona.
· Introduzca el enchufe en la toma
de corriente.
· Compruebe los fusibles.
· Póngase en contacto con un
electricista.
Olores extraños. · La comida en el refrigerador
está podrida.
· Limpie el interior del
refrigerador.
Las puertas no cierran
completamente.
· El refrigerador o congelador
está demasiado lleno.
· El dispositivo no está nivelado.
· Asegúrese de que los alimentos
o bebidas no obstruyan el cierre
de las puertas.
· Alinee los pies ajustables.
Ruidos extraños. · El aparato no está nivelado.
· El aparato contacta con la pared
u otro objeto.
· Vuelva a montar las patas de
ajuste y nivele el aparato.
· Desplace el aparato con
cuidado.
· Póngase en contacto con su
servicio técnico.

72
DO986BFK
ES
Sonido zumbido o
burbujeante.
· El compresor arranca / está
funcionando.
· El gas de enfriamiento circula en
el aparato.
· Eso es normal.
El panel lateral está
caliente.
· El canal de condensación se
encuentra en ese lado.
· Esto es normal.
DIRECTRICES MEDIOAMBIENTALES
El símbolo en el producto o en el embalaje indica que este producto no puede
ser tratado como residuo doméstico. Se debe llevar a un lugar en el que se
reciclan equipos eléctricos y electrónicos. Si se asegura de que este producto
se desecha correctamente, usted ayudará a evitar posibles consecuencias
negativas para las personas y el medio ambiente que serían causadospor
un tratamiento de residuos inadecuado. Para obtener información más
detallada sobre el reciclaje de este producto, póngase en contacto con su
ayuntamiento, o con la empresa o departamento responsable del servicio de
recogida de basura doméstica, o con la tienda donde adquirió el producto.
El material de embalaje es reciclable. Trate el embalaje de una manera
medioambientalmente responsable.

73
DO986BFK
www.domo-elektro.be
IT
GARANZIA
La garanzia dell’apparecchio è valida per 2 anni a partire dalla data di acquisto. Durante il periodo di
validità della garanzia, il distributore si assume la piena responsabilità dei difetti dei materiali o di quelli
di fabbricazione. In caso di presenza di tali difetti, se necessario, si procederà alla sostituzione o alla
riparazione dell’apparecchio. Il periodo di garanzia di 2 anni non ricomincia in quel momento, ma continua
per 2 anni dalla data di acquisto dell’apparecchio. Per la garanzia fa fede la data riportata sullo scontrino.
Se l’apparecchio si rivela difettoso nel periodo di validità della garanzia, cioè 2 anni, potete portarlo,
insieme allo scontrino, nel negozio dove l’avete acquistato.
La garanzia sugli accessori e sui componenti soggetti a usura è di 6 mesi.
La garanzia e la responsabilità del negoziante e del produttore decadono automaticamente nei seguenti
casi:
· mancata osservanza delle istruzioni contenute nel presente manuale;
· errato collegamento, per esempio con tensione elettrica troppo alta;
· uso errato, anormale e manesco;
· manutenzione insuciente o errata;
· riparazione o modiche all’apparecchio eseguite dal cliente o da terzi non autorizzati;
· uso di accessori o componenti non raccomandati o forniti dal negoziante o dal produttore.
INDICAZIONI DI SICUREZZA
· Quando si utilizzano dispositivi elettrici, è necessario tenere presenti le seguenti istruzioni di sicurezza:
· Leggere con attenzione le presenti istruzioni. Conservare le istruzioni per possibili future consultazioni.
· Prima di utilizzare il prodotto, togliere tutti gli imballi e gli eventuali adesivi promozionali. Assicurarsi
che i bambini non giochino con gli imballaggi.
· Questo apparecchio è destinato unicamente all’uso domestico e in ambienti analoghi, quali:
· angoli cottura riservati al personale nei negozi, negli uci e in altri ambienti professionali
· Fattorie
· Camere di alberghi, motel e altre strutture ricettive residenziali
· Camere per vacanze o ambienti analoghi
· L’apparecchio può essere utilizzato da bambini di età superiore a 16 anni e da persone con ridotte
capacità siche, sensoriali o mentali, o con mancanza di esperienza o conoscenza, solo se sorvegliati
o se hanno ricevuto istruzioni sull’uso sicuro dell’apparecchio e ne comprendono i rischi. I bambini
non possono giocare con l’apparecchio. Le operazioni di pulizia e di manutenzione non devono essere
eettuate dai bambini di età inferiore a 16 anni e senza sorveglianza.
· Tenere l’apparecchio fuori dalla portata dei bambini di età inferiore a 16 anni.
· Attenzione: l’apparecchio non è stato progettato per essere utilizzato con un timer esterno o un
sistema di telecomando separato.
· Leggere attentamente le istruzioni prima dell’uso.
· Prima dell’uso, controllare che il voltaggio riportato sull’apparecchio corrisponda a quello della rete
elettrica.
· Non lasciare mai il cavo appoggiato su una supercie calda o penzolante dal bordo di un tavolo o della
cucina.
· Non utilizzare mai l’apparecchio se il cavo di alimentazione o la spina sono danneggiati, dopo un
malfunzionamento o quando è danneggiato. In caso di guasto, portare l’apparecchio presso il centro di
assistenza clienti più vicino, in modo che sia controllato e riparato.
· Prestare molta attenzione quando l’apparecchio viene utilizzato da bambini o in loro presenza.
· L’utilizzo di accessori non consigliati o non venduti dal produttore può causare incendi, scosse
elettriche o lesioni.

74
DO986BFK
IT
· Togliere la spina dalla presa quando l’apparecchio non è in funzione, prima di montarne o smontarne
i componenti e prima di pulirlo. Mettere tutti gli interruttori in posizione “o” e aerrare la spina per
staccarla dalla presa di corrente. Non tirare mai il cavo o l’apparecchio per estrarre la spina dalla presa
di corrente.
· Non posizionare mai l’apparecchio sopra o vicino a un fornello a gas o un fornello elettrico o in luoghi
in cui possa venire a contatto con apparecchiature calde.
· Non utilizzare l’apparecchio all’aperto.
· Utilizzare l’apparecchio solo per lo scopo previsto.
· Utilizzare sempre l’apparecchio su una supercie stabile, asciutta e in piano.
· L’apparecchio è inteso solo per uso domestico. Il produttore non è responsabile di incidenti causati
da uso improprio dell’apparecchio o dalla mancata osservanza delle istruzioni riportate nel presente
manuale.
· Le riparazioni diverse dalla normale manutenzione dell’apparecchio devono essere eettuate dal
produttore o dal suo servizio assistenza. Non cercare mai di riparare da soli l’apparecchio.
· Non immergere mai l’apparecchio, il cavo elettrico o la spina in acqua o in altri liquidi.
· Evitare che i bambini tocchino il cavo elettrico.
· Tenere il cavo lontano da spigoli e bordi taglienti, da oggetti a elevata temperatura o da altre fonti di
calore.
· Prima di utilizzare il prodotto per la prima volta, togliere tutti gli imballaggi ed eventuali adesivi
promozionali.
· Le aperture di ventilazione devono essere libere; assicurarsi che non siano ostruite o coperte.
· Non utilizzare nessuno strumento o tecnica particolare per accelerare il processo di sbrinamento.
· Non utilizzare nessuna apparecchiatura elettrica all’interno del frigorifero, a meno che tale dispositivo
non sia approvato dal produttore.
· Non conservare sostanze esplosive nell’apparecchio, come per esempio bombolette spray con gas
inammabile.
· Assicurarsi che il circuito di rareddamento non subisca danneggiamenti, per esempio durante il
trasporto o l’installazione.
· Assicurarsi che la spina dietro all’apparecchio non si pieghi e non subisca danni. Ciò potrebbe causare
surriscaldamento o incendio.
· Assicurarsi di avere libero accesso alla spina dell’apparecchio.
· Non tirare il cavo.
· Se la presa di corrente è staccata, non inserirvi la spina. (Rischio di incendio o scossa elettrica)
· Questo apparecchio è pesante. Fare attenzione durante gli spostamenti.
· Non toccare il contenuto del freezer con le mani bagnate o umide. Ciò potrebbe causare ferite (ustioni)
alla pelle.
· Evitare la prolungata esposizione ai raggi del sole.
· L’apparecchio non è stato progettato per essere utilizzato con un timer esterno o con un sistema di
telecomando separato.
· Seguire le istruzioni riportate sotto per evitare la contaminazione dei cibi.
· Se la porta viene tenuta aperta a lungo, la temperatura negli scomparti dell’apparecchio può
diminuire molto.
· Pulire con regolarità le superci che entrano in contatto con i cibi. Tenere pulito lo scolo
condensa e il foro di drenaggio dietro all’apparecchio.
· Tenere la carne e il pesce crudo in contenitori appositi all’interno del frigorifero, anché non
entrino in contatto con altri cibi o gocciolino.
· Se il frigorifero rimane vuoto per molto tempo, è necessario spegnerlo, sbrinarlo e pulirlo.
Lasciarlo asciugare e lasciare aperta la porta per evitare la formazione di mua.

75
DO986BFK
www.domo-elektro.be
IT
ATTENZIONE! Non posizionare mai l’apparecchio sopra o vicino a un fornello a gas o
elettrico oppure in luoghi in cui possa venire a contatto con fonti di calore. Sul retro
dell’apparecchio si trovano materiali inammabili.
Attenzione al simbolo “Rischio di incendio - materiale inammabile” che si trova sulla
parte posteriore dell’apparecchio.
COMPONENTI
1. Ripiani in vetro
2. Coperchio per cassetto verdure
3. Cassetto per verdure
4. Compartimento zona fresca
5. Scaali sportello
6. Cassetti congelatore
7. Piedini regolabili
INSTALLAZIONE
· Rimuovere tutto il materiale di imballaggio, sia interno sia esterno. Pulire l’esterno dell’apparecchio
con un panno asciutto. L’interno può essere pulito con un panno umido morbido.
· Non posizionare l’apparecchio in un passaggio stretto, sotto la luce del sole diretta o in un ambiente
umido.
· Assicurarsi che l’aria possa circolare liberamente attorni al frigorifero. Il lato posteriore del frigorifero
deve essere ad almeno 10 cm di distanza dal muro.
· Assicurare suciente spazio per aprire lo sportello.
· Posizionare il frigorifero su una supercie stabile e piana. L’apparecchio può essere messo in posizione
perfettamente orizzontale avvitando o svitando i piedini regolabili anteriori.
· Evitare luce del sole diretta e calore. La luce del sole può intaccare l’esterno del frigorifero. Il calore
causa un maggiore consumo.
· Evitare un livello di umidità troppo elevato. Un’eccessiva umidità dell’ambiente causa una formazione
di brina troppo rapida nel frigorifero.
· Prima di collegare il frigorifero all’alimentazione di rete, controllare che la tensione elettrica riportata
sulla targhetta dell’apparecchio corrisponda alla tensione elettrica della rete. Una tensione elettrica
diversa può danneggiare l’apparecchio.
2YHUYLHZ
Note: Above picture is for reference only. Real appliance probably is different.
FridgeShelves
Fridge
Balconies
Crisper
Crisper Cover
Fresh convertible box
Freezer Drawers
Leveling Feet
6
1
2
3
4
6
7
5

76
DO986BFK
IT
· La spina è l’unico modo per scollegare l’apparecchio dall’alimentazione
di rete. Pertanto assicurarsi che la spina sia sempre facilmente
raggiungibile. Per scollegare l’alimentazione verso l’apparecchio,
spegnere quest’ultimo poi estrarre la spina dalla presa.
· L’apparecchio deve essere collegato a una messa a terra. Il produttore
non è responsabile per danni causati dal mancato utilizzo della messa a
terra.
· Una volta installato l’apparecchio, attendere 8 ore prima di accenderlo.
In questo modo si garantisce il posizionamento del refrigerante.
· Lasciare l’apparecchio acceso vuoto per 24 ore in modo che l’interno si
rareddi raggiungendo la temperatura appropriata.
· L’apparecchio è progettato per funzionare a una temperatura ambiente
compresa tra 16 °C e 38 °C. L’apparecchio non funzionerà correttamente
in un ambiente con temperatura inferiore o superiore.
· L’apparecchio può essere utilizzato solo in ambienti chiusi.
· Il congelatore emette del rumore quando il compressore fa circolare il
refrigerante. Questo è normale.
INVERSIONE DELL’APERTURA DELLO SPORTELLO
Se si desidera spostare dal lato opposto le cerniere dello sportello, è consigliato contattare un riparatore
autorizzato per fare eseguire il lavoro. Prima di invertire l’apertura, controllare che la spina sia rimossa
dalla presa e che l’apparecchio sia vuoto.
Una volta invertita l’apertura, attendere 8 ore prima di accendere l’apparecchio. In questo modo si
garantisce il posizionamento del refrigerante. Si consiglia di usare un cacciavite a punta piatta, un
cacciavite con punta a stella e una chiave (non forniti) oltre ai seguenti componenti forniti.
Piastrina di copertura per cerniera
,QVWDOODWLRQ
Door Reversibility
Left Aid-Closer on Upper Door x 1 Left Aid-Closer on Lower Door x 1
nscrew top hinge cover and disconnect connectors of door switch and harness.
2.Unscrew top hinge
3.Remove the pin with a screwdriver and filp the hinge bracket. Then refit the pin to hinge bracket
unscrew
screw
8
Stop sportello superiore
,QVWDOODWLRQ
Door Reversibility
Left Aid-Closer on Upper Door x 1 Left Aid-Closer on Lower Door x 1
nscrew top hinge cover and disconnect connectors of door switch and harness.
2.Unscrew top hinge
3.Remove the pin with a screwdriver and filp the hinge bracket. Then refit the pin to hinge bracket
unscrew
screw
8
Stop sportello inferiore
,QVWDOODWLRQ
Door Reversibility
Left Aid-Closer on Upper Door x 1 Left Aid-Closer on Lower Door x 1
nscrew top hinge cover and disconnect connectors of door switch and harness.
2.Unscrew top hinge
3.Remove the pin with a screwdriver and filp the hinge bracket. Then refit the pin to hinge bracket
unscrew
screw
8
1. Svitare le viti della piastrina di copertura per cerniera e rimuovere la piastrina. Scollegare entrambi i
connettori dei cavi.
,QVWDOODWLRQ
Door Reversibility
Left Aid-Closer on Upper Door x 1 Left Aid-Closer on Lower Door x 1
nscrew top hinge cover and disconnect connectors of door switch and harness.
2.Unscrew top hinge
3.Remove the pin with a screwdriver and filp the hinge bracket. Then refit the pin to hinge bracket
unscrew
screw
8
y
y
,QVWDOODWLRQ
1007NN
1071NN
6SDFH5HTXLUHPHQW
Keep enough space of door open.
Keep at least 50mm gap at two sides.
To do this adjust the two levelling feet at front of the unit.
If the unit is not level, the doors and magnetic seal
alignments will not be covered properly.
/HYHOOLQJWKHXQLW
13
y
y
,QVWDOODWLRQ
1007NN
1071NN
6SDFH5HTXLUHPHQW
Keep enough space of door open.
Keep at least 50mm gap at two sides.
To do this adjust the two levelling feet at front of the unit.
If the unit is not level, the doors and magnetic seal
alignments will not be covered properly.
/HYHOOLQJWKHXQLW
13

77
DO986BFK
www.domo-elektro.be
IT
2. Svitare i bulloni delle cerniere e rimuovere lo sportello.
,QVWDOODWLRQ
Door Reversibility
Left Aid-Closer on Upper Door x 1 Left Aid-Closer on Lower Door x 1
nscrew top hinge cover and disconnect connectors of door switch and harness.
2.Unscrew top hinge
3.Remove the pin with a screwdriver and filp the hinge bracket. Then refit the pin to hinge bracket
unscrew
screw
8
3. Prendere la piastrina della cerniera dello sportello. Estrarre il perno dalla piastrina della cerniera e
girare la piastrina di 180°. Fissare di nuovo il perno nella piastrina della cerniera. Assicurarsi che la
rondella in plastica rimanga attorno al perno.
,QVWDOODWLRQ
Door Reversibility
Left Aid-Closer on Upper Door x 1 Left Aid-Closer on Lower Door x 1
nscrew top hinge cover and disconnect connectors of door switch and harness.
2.Unscrew top hinge
3.Remove the pin with a screwdriver and filp the hinge bracket. Then refit the pin to hinge bracket
unscrew
screw
8
4. Spostare l’interruttore di sportello dalla piastrina di copertura per cerniera destra alla piastrina
di copertura per cerniera sinistra che si trova nel sacchetto accessori fornito. Per rimuovere
l’interruttore di sportello, tenerne premuto il tassello sul retro della piastrina di copertura.
,QVWDOODWLRQ
5.Detach cover in top of upper door and move harness from right side to left side, then replace the cover.
6.Move top left cover to right side
7. Take off the upper door, take out the screw from the middle hinge by cross screwdriver,
then take off the lower door.
4.Move door switch from right hinge cover to left hinge cover in accessary bag.
9
5. Rimuovere il pannello di rinitura dal lato superiore dello sportello superiore. Spostare il cavo e il
connettore da un lato all’altro. Riposizionare il pannello di rinitura.
,QVWDOODWLRQ
5.Detach cover in top of upper door and move harness from right side to left side, then replace the cover.
6.Move top left cover to right side
7. Take off the upper door, take out the screw from the middle hinge by cross screwdriver,
then take off the lower door.
4.Move door switch from right hinge cover to left hinge cover in accessary bag.
9

78
DO986BFK
IT
6. Spostare la piastrina di copertura sopra il frigorifero dal lato sinistro al lato destro.
,QVWDOODWLRQ
5.Detach cover in top of upper door and move harness from right side to left side, then replace the cover.
6.Move top left cover to right side
7. Take off the upper door, take out the screw from the middle hinge by cross screwdriver,
then take off the lower door.
4.Move door switch from right hinge cover to left hinge cover in accessary bag.
9
7. Svitare i bulloni della cerniera centrale e sollevare lo sportello inferiore rimuovendolo dal perno della
cerniera.
,QVWDOODWLRQ
5.Detach cover in top of upper door and move harness from right side to left side, then replace the cover.
6.Move top left cover to right side
7. Take off the upper door, take out the screw from the middle hinge by cross screwdriver,
then take off the lower door.
4.Move door switch from right hinge cover to left hinge cover in accessary bag.
9
8. Spostare le coperture delle viti dal lato sinistro al lato destro.
,QVWDOODWLRQ
8 .
9. Unscrew bottom hinge. Then remove the adjustable feet from both side.
10. Unscrew and remove the bottom hinge pin, turn the bracket over and replace it.
unscrew
screw
10
9. Mettere il frigorifero in posizione orizzontale. Rimuovere i piedini regolabili da entrambi i lati e
svitare i bulloni della cerniera inferiore. Rimuovere la vite dall’alloggiamento e posizionarlo sull’altro
lato.
,QVWDOODWLRQ
8 .
9. Unscrew bottom hinge. Then remove the adjustable feet from both side.
10. Unscrew and remove the bottom hinge pin, turn the bracket over and replace it.
unscrew
screw
10

79
DO986BFK
www.domo-elektro.be
IT
10. Rimuovere il perno dalla cerniera inferiore. Girare di 180° la piastrina e ssare il perno.
,QVWDOODWLRQ
8 .
9. Unscrew bottom hinge. Then remove the adjustable feet from both side.
10. Unscrew and remove the bottom hinge pin, turn the bracket over and replace it.
unscrew
screw
10
11. Riposizionare la piastrina della cerniera sul lato inferiore dell’apparecchio. Riposizionare entrambi i
piedini regolabili.
,QVWDOODWLRQ
13.Detach the Fridge and the Freezer door gaskets and then attach them after rotating.
11.Refit the bracket fitting the bottom hinge pin. Replace both adjustable feet.
12.Remove aid-closers from bottom of upper and lower doors, then take new aid-closers from
accessary bag and install them to left side.
11
12. Rimuovere lo stop sportello dal lato inferiore di entrambi gli sportelli. Posizionare i nuovi stop
sportello sul lato sinistro di entrambi gli sportelli. I nuovi stop sportello si trovano nel sacchetto
accessori fornito.
,QVWDOODWLRQ
13.Detach the Fridge and the Freezer door gaskets and then attach them after rotating.
11.Refit the bracket fitting the bottom hinge pin. Replace both adjustable feet.
12.Remove aid-closers from bottom of upper and lower doors, then take new aid-closers from
accessary bag and install them to left side.
11
13. Rimuovere le guarnizioni in gomma da entrambi gli sportelli, capovolgerle e riposizionarle.
,QVWDOODWLRQ
13.Detach the Fridge and the Freezer door gaskets and then attach them after rotating.
11.Refit the bracket fitting the bottom hinge pin. Replace both adjustable feet.
12.Remove aid-closers from bottom of upper and lower doors, then take new aid-closers from
accessary bag and install them to left side.
11

80
DO986BFK
IT
14. Riposizionare lo sportello inferiore e ssarlo avvitando.
,QVWDOODWLRQ
15.Replace upper door, please ensure the door align with the cabinet to make sure door gasket seal
the cabinet tightly. Then connect door with cabinet by tightly fixed top hinge.
16.Connect harnesses from door and cabinet. Then replace top hinge cover. Before screw the cover,
connect terminals of door switch.
14. Install the lower door, adjust and fix the middle hinge onto the cabinet.
12
15. Riposizionare lo sportello superiore e ssarlo avvitando. Assicurarsi che lo sportello sia ben allineato
orizzontalmente e che la guarnizione chiuda completamente.
,QVWDOODWLRQ
15.Replace upper door, please ensure the door align with the cabinet to make sure door gasket seal
the cabinet tightly. Then connect door with cabinet by tightly fixed top hinge.
16.Connect harnesses from door and cabinet. Then replace top hinge cover. Before screw the cover,
connect terminals of door switch.
14. Install the lower door, adjust and fix the middle hinge onto the cabinet.
12
16. Ricollegare allo sportello entrambi i connettori dei cavi sulla parte alta dell’apparecchio.
Riposizionare la piastrina di copertura per cerniera e ssarla avvitando. Assicurarsi che i cavi siano
nella guida e che l’interruttore di sportello faccia contatto con lo sportello.
,QVWDOODWLRQ
15.Replace upper door, please ensure the door align with the cabinet to make sure door gasket seal
the cabinet tightly. Then connect door with cabinet by tightly fixed top hinge.
16.Connect harnesses from door and cabinet. Then replace top hinge cover. Before screw the cover,
connect terminals of door switch.
14. Install the lower door, adjust and fix the middle hinge onto the cabinet.
12

81
DO986BFK
www.domo-elektro.be
IT
UTILIZZO
PANNELLO DI CONTROLLO
Tasti touch screen
A. Temperatura frigorifero
B. Temperatura freezer
C. Funzioni
Display
1. Temperatura frigorifero
2. Temperatura freezer
3. Modalità ECO
4. Modalità Super
5. Modalità vacanza
6. Sicurezza bambini
Il pannello comandi va automaticamente in modalità “sleep”. Il display lampeggia quando viene toccato
un tasto e quando vengono aperte le porte.
REGOLAZIONE DELLA TEMPERATURA
· La temperatura del frigorifero può essere impostata tra 2 e 8 °C. In situazioni normali, selezionare 4
°C. Premere il tasto “FRIDGE” (temperatura frigorifero) e tenerlo premuto no a quando il display non
visualizza la temperatura desiderata.
8VHULQWHUIDFH
Using the Control Panel
A.Temperature Control of Fridge Compartment
B.Temperature Control of Freezer Compartment
C.Mode/ Locking / Unlocking
1.1 BUTTON OPERATION
2.1.1The panel will be lit up for 2 minutes once the door of fridge compartment is opened.
2.1 DISPLAY
1.Temperature of Fridge Comparment
2.Temperature of Freezer Comparment
3.ECO Mode
4.Holiday Mode
5.Super Mode
6.Locking / Unlocking
1.2 LED DISPLAY
a.The control panel is 100% lit up for 3 seconds, which operates exactly as per the setting
(mode and temperature) before the poweroff. The system will be automatically locked 25
seconds after the last button operation. After locking, the light of the panel would be out 30
seconds after the last button operation.
b.Both preset temperatures of fridge compartemnt and freezer compartment would be shown
on the display.
2.0 OPERATING CONDITION
1
2
A
B
C
3
4
5
6
14
· Il freezer può essere impostato tra -14 e -22 °C. In situazioni normali, selezionare -18 °C. Premere il
tasto “FREEZER” (temperatura freezer) e tenerlo premuto no a quando il display non visualizza la
temperatura desiderata.
8VHULQWHUIDFH
Using the Control Panel
A.Temperature Control of Fridge Compartment
B.Temperature Control of Freezer Compartment
C.Mode/ Locking / Unlocking
1.1 BUTTON OPERATION
2.1.1The panel will be lit up for 2 minutes once the door of fridge compartment is opened.
2.1 DISPLAY
1.Temperature of Fridge Comparment
2.Temperature of Freezer Comparment
3.ECO Mode
4.Holiday Mode
5.Super Mode
6.Locking / Unlocking
1.2 LED DISPLAY
a.The control panel is 100% lit up for 3 seconds, which operates exactly as per the setting
(mode and temperature) before the poweroff. The system will be automatically locked 25
seconds after the last button operation. After locking, the light of the panel would be out 30
seconds after the last button operation.
b.Both preset temperatures of fridge compartemnt and freezer compartment would be shown
on the display.
2.0 OPERATING CONDITION
1
2
A
B
C
3
4
5
6
14
· Il tempo e la temperatura di funzionamento sono inuenzati dal luogo in cui il frigorifero viene
utilizzato, dal numero di volte cui la porta viene aperta e dalla temperatura della stanza in cui
l’apparecchio si trova.
IMPOSTARE LE FUNZIONI
8VHULQWHUIDFH
Using the Control Panel
A.Temperature Control of Fridge Compartment
B.Temperature Control of Freezer Compartment
C.Mode/ Locking / Unlocking
1.1 BUTTON OPERATION
2.1.1The panel will be lit up for 2 minutes once the door of fridge compartment is opened.
2.1 DISPLAY
1.Temperature of Fridge Comparment
2.Temperature of Freezer Comparment
3.ECO Mode
4.Holiday Mode
5.Super Mode
6.Locking / Unlocking
1.2 LED DISPLAY
a.The control panel is 100% lit up for 3 seconds, which operates exactly as per the setting
(mode and temperature) before the poweroff. The system will be automatically locked 25
seconds after the last button operation. After locking, the light of the panel would be out 30
seconds after the last button operation.
b.Both preset temperatures of fridge compartemnt and freezer compartment would be shown
on the display.
2.0 OPERATING CONDITION
1
2
A
B
C
3
4
5
6
14
Premere il tasto MODE (funzionalità) per scegliere tra le modalità ECO, Vacanza e Super.
Modalità ECO
8VHULQWHUIDFH
Using the Control Panel
A.Temperature Control of Fridge Compartment
B.Temperature Control of Freezer Compartment
C.Mode/ Locking / Unlocking
1.1 BUTTON OPERATION
2.1.1The panel will be lit up for 2 minutes once the door of fridge compartment is opened.
2.1 DISPLAY
1.Temperature of Fridge Comparment
2.Temperature of Freezer Comparment
3.ECO Mode
4.Holiday Mode
5.Super Mode
6.Locking / Unlocking
1.2 LED DISPLAY
a.The control panel is 100% lit up for 3 seconds, which operates exactly as per the setting
(mode and temperature) before the poweroff. The system will be automatically locked 25
seconds after the last button operation. After locking, the light of the panel would be out 30
seconds after the last button operation.
b.Both preset temperatures of fridge compartemnt and freezer compartment would be shown
on the display.
2.0 OPERATING CONDITION
1
2
A
B
C
3
4
5
6
14
Se si seleziona questa funzionalità, la temperatura del frigorifero viene impostata su 5°C e la temperatura
del congelatore su -18°C. I tasti FRIDGE e FREEZER vengono bloccati. Questa funzionalità si può attivare
e disattivare con il tasto MODE (funzionalità). Il simbolo è visualizzato sul display.
Modalità vacanza
8VHULQWHUIDFH
Using the Control Panel
A.Temperature Control of Fridge Compartment
B.Temperature Control of Freezer Compartment
C.Mode/ Locking / Unlocking
1.1 BUTTON OPERATION
2.1.1The panel will be lit up for 2 minutes once the door of fridge compartment is opened.
2.1 DISPLAY
1.Temperature of Fridge Comparment
2.Temperature of Freezer Comparment
3.ECO Mode
4.Holiday Mode
5.Super Mode
6.Locking / Unlocking
1.2 LED DISPLAY
a.The control panel is 100% lit up for 3 seconds, which operates exactly as per the setting
(mode and temperature) before the poweroff. The system will be automatically locked 25
seconds after the last button operation. After locking, the light of the panel would be out 30
seconds after the last button operation.
b.Both preset temperatures of fridge compartemnt and freezer compartment would be shown
on the display.
2.0 OPERATING CONDITION
1
2
A
B
C
3
4
5
6
14
· Questa funzione serve per risparmiare energia durante i periodi in cui l’apparecchio non viene
utilizzato con regolarità, per esempio quando si va in vacanza.
8VHULQWHUIDFH
Using the Control Panel
A.Temperature Control of Fridge Compartment
B.Temperature Control of Freezer Compartment
C.Mode/ Locking / Unlocking
1.1 BUTTON OPERATION
2.1.1The panel will be lit up for 2 minutes once the door of fridge compartment is opened.
2.1 DISPLAY
1.Temperature of Fridge Comparment
2.Temperature of Freezer Comparment
3.ECO Mode
4.Holiday Mode
5.Super Mode
6.Locking / Unlocking
1.2 LED DISPLAY
a.The control panel is 100% lit up for 3 seconds, which operates exactly as per the setting
(mode and temperature) before the poweroff. The system will be automatically locked 25
seconds after the last button operation. After locking, the light of the panel would be out 30
seconds after the last button operation.
b.Both preset temperatures of fridge compartemnt and freezer compartment would be shown
on the display.
2.0 OPERATING CONDITION
1
2
A
B
C
3
4
5
6
14
A
4
3
1
B
C
2
5
6

82
DO986BFK
IT
· Se si seleziona questa funzionalità, la temperatura del frigorifero viene impostata su 17°C. Il tasto
FRIDGE viene bloccato.
· Questa funzione può essere attivata e disattivata con il tasto “MODE”. Il simbolo è visibile sul display.
Modalità Super
8VHULQWHUIDFH
Using the Control Panel
A.Temperature Control of Fridge Compartment
B.Temperature Control of Freezer Compartment
C.Mode/ Locking / Unlocking
1.1 BUTTON OPERATION
2.1.1The panel will be lit up for 2 minutes once the door of fridge compartment is opened.
2.1 DISPLAY
1.Temperature of Fridge Comparment
2.Temperature of Freezer Comparment
3.ECO Mode
4.Holiday Mode
5.Super Mode
6.Locking / Unlocking
1.2 LED DISPLAY
a.The control panel is 100% lit up for 3 seconds, which operates exactly as per the setting
(mode and temperature) before the poweroff. The system will be automatically locked 25
seconds after the last button operation. After locking, the light of the panel would be out 30
seconds after the last button operation.
b.Both preset temperatures of fridge compartemnt and freezer compartment would be shown
on the display.
2.0 OPERATING CONDITION
1
2
A
B
C
3
4
5
6
14
· Selezionare questa funzione se la temperatura standard non raredda a sucienza. Esempio: in caso
di caldo estremo, se le porte vengono aperte spesso e la temperatura ambiente è elevata, se vengono
messe nel frigorifero grandi quantità di alimenti non freddi/non congelati, ecc.
· Selezionando questa funzione la temperatura del freezer viene abbassata no a -25 °C per un massimo
di 50 ore. Si consiglia di selezionare questa temperatura 24 ore prima del congelamento.
· Questa funzione si spegne automaticamente con il passare del tempo. L’apparecchio torna alla
temperatura impostata in precedenza. Il tasto FREEZER viene bloccato.
· Questa funzione può essere attivata e disattivata con il tasto (le funzioni) “MODE”. Il simbolo è visibile
sul display.
SICUREZZA BAMBINI
8VHULQWHUIDFH
Using the Control Panel
A.Temperature Control of Fridge Compartment
B.Temperature Control of Freezer Compartment
C.Mode/ Locking / Unlocking
1.1 BUTTON OPERATION
2.1.1The panel will be lit up for 2 minutes once the door of fridge compartment is opened.
2.1 DISPLAY
1.Temperature of Fridge Comparment
2.Temperature of Freezer Comparment
3.ECO Mode
4.Holiday Mode
5.Super Mode
6.Locking / Unlocking
1.2 LED DISPLAY
a.The control panel is 100% lit up for 3 seconds, which operates exactly as per the setting
(mode and temperature) before the poweroff. The system will be automatically locked 25
seconds after the last button operation. After locking, the light of the panel would be out 30
seconds after the last button operation.
b.Both preset temperatures of fridge compartemnt and freezer compartment would be shown
on the display.
2.0 OPERATING CONDITION
1
2
A
B
C
3
4
5
6
14
La sicurezza bambini blocca automaticamente i tasti.Tenere il tasto LOCK (sicurezza bambini) premuto
per 3 secondi per bloccare il pannello. Sul display appare un lucchetto chiuso. Tenere premuto per 3
secondi il tasto “UNLOCK” (sicurezza bambini) per sbloccare il pannello. L’icona del lucchetto sul display
scompare.
ALLARME
Se lo sportello del frigorifero rimane aperto per 90 secondi, si udirà un segnale acustico. Si tratta di un
avvertimento per evitare che lo sportello rimanga aperto involontariamente e il cibo si deteriori. L’allarme
smette appena lo sportello viene richiuso.
COMPARTIMENTO ZONA FRESCA
È possibile impostare la temperatura del compartimento zona fresca mediante
l’interruttore sulla parete posteriore. Questa impostazione non ha nessun eetto sul
cassetto per verdure.
Posizionare l’interruttore su “crisper” per mantenere fresche e più a lungo verdure e
frutta. Verranno mantenute la temperatura e l’umidità ideali.
Posizionare l’interruttore su “chiller” per conservare cibi freschi con tempi di
conservazione limitati come il pesce. La temperatura è più bassa. Il cibo viene
mantenuto fresco ma non congelato.
SPOSTARE I RIPIANI DEL FRIGO E I BALCONCINI DELLA PORTA
· Svuotare il frigorifero prima di spostare i ripiani e i balconcini della porta.
· Per spostare i ripiani, è necessario sollevarli e tirarli verso di sé.
· Per spostare i balconcini della porta, aerrarli con 2 mani. Sollevarli e tirarli verso di sé.
ILLUMINAZIONE
L’illuminazione del freezer e del frigorifero è assicurata da lampadine a LED. Sono più ecologiche e sono
state progettate per durare più a lungo. Non devono quindi essere sostituite. In caso di problemi con
l’illuminazione, contattare un centro di assistenza specializzato.
'DLO\8VH'DLO\8VH
Cleaning
For hygienic reasons the appliance interior, including interior accessories, should be cleaned regularly.
Caution! The appliance may not be connected to the mains during cleaning. Danger of electrical
shock! Before cleaning switch the appliance off and remove the plug from the mains, or switch off or
turn out the circuit breaker or fuse. Never clean the appliance with a steam cleaner. Moisture could
accumulate in electrical components, danger of electrical shock! Hot vapors can lead to the damage
of plastic parts. The appliance must be dry before it is placed back into service.
Important! Ethereal oils and organic solvents can attack plastic parts, e.g. lemon juice or the juice form
orange peel, butyric acid, cleanser that contain acetic acid.
Do not allow such substances to come into contact the appliance parts.
Do not use any abrasive cleaners
Remove the food from the freezer. Store them in a cool place, well covered.
Switch the appliance off and remove the plug from the mains, or switch off or turn out the circuit breaker
of fuse.
Clean the appliance and the interior accessories with a cloth and lukewarm water. After cleaning wipe
with fresh water and rub dry.
After everything is dry place appliance back into service.
Hints for refrigeration
Useful hints:
Make (all types): wrap in polythene bags and place on the glass shelves above the vegetable drawer.
For safety, store in this way only one or two days at the most.
Cooked foods, cold dishes, etc...: these should be covered and may be placed on any shelf.
Fruit and vegetables: these should be thoroughly cleaned and placed in the special drawer(s) provided.
butter and cheese: these should be placed in special airtight containers or wrapped in aluminum foil or
polythene bags to exclude as much air as possible.
Milk bottle: these should have a cap and should be stored in the balconies on the door.
Bananas, potatoes, onions and garlic, if not packed, must not be kept in the fridge.
Fresh Zone Temperature Control
18

83
DO986BFK
www.domo-elektro.be
IT
SPOSTARE L’APPARECCHIO
Se l’apparecchio viene spento per una qualsiasi ragione, attendere 10 minuti prima di riaccenderlo. Prima
di riaccenderlo, è necessario che la pressione del sistema di rareddamento si stabilizzi.
· Spegnere l’apparecchio e togliere la spina dalla presa di corrente. Togliere tutti gli alimenti. Togliere
prima tutti i componenti mobili (ripiani, accessori, ecc.) oppure ssarli all’interno del frigorifero per
evitare urti.
· Spostare l’apparecchio e ssarlo nella nuova posizione. Se durante lo spostamento l’apparecchio viene
messo su un lato, anche solo per un breve periodo di tempo, è necessario lasciarlo diritto per almeno
10 minuti prima di accenderlo.
Il liquido di rareddamento utilizzato nell’apparecchio è l’isobutano (R600a). Nonostante si tratti di un
gas ecologico e naturale, è esplosivo. È quindi necessario prestare molta attenzione quando si sposta o
si installa l’apparecchio, per evitare danni agli elementi di rareddamento. In caso di perdite causate da
danni agli elementi di rareddamento, tenere il frigorifero lontano da amme libere o da fonti di calore e
arieggiare per qualche minuto la stanza in cui si trova l’apparecchio.
CONSERVAZIONE DEI CIBI IN FRIGORIFERO
Il frigorifero garantisce una maggiore durata di conservazione degli alimenti freschi. Conservazione di
alimenti freschi per il risultato migliore:
· Conservare solo alimenti molto freschi e di buona qualità.
· Assicurarsi che gli alimenti siano confezionati in modo corretto o siano coperti prima di essere
messi in frigorifero. Questo evita che si secchino e che perdano colore o sapore; in questo modo si
conserveranno più a lungo. Inoltre, si evita la proliferazioni di odore.
· Assicurarsi che gli alimenti con odore intenso siano ben confezionati e coperti e tenerli lontano da
burro, latte e panna e da tutti gli alimenti che possono essere contaminati dagli odori forti.
· Prima di essere messi in frigorifero, gli alimenti caldi devono essere lasciati rareddare.
SURGELARE E CONSERVARE GLI ALIMENTI IN FREEZER
Utilizzare il freezer
· per conservare alimenti surgelati
· per fare i cubetti di ghiaccio
· per surgelare gli alimenti
Nota: assicurarsi che la porta del freezer sia sempre perfettamente chiusa. Aprire la porta del freezer solo
quando è necessario.
Acquistare prodotti surgelati
· La confezione non deve essere danneggiata.
· Utilizzare prima della data di scadenza.
· Se possibile, trasportare gli alimenti surgelati in una borsa termica e metterli al più presto in freezer.
Congelare alimenti freschi
Congelare solo alimenti freschi e non adulterati. Per mantenere al meglio il valore nutritivo, il sapore e il
colore, sbollentare le verdure prima di congelarle.
Le melanzane, i peperoni, le zucchine e gli asparagi non devono essere sbollentati.
Nota: gli alimenti da congelare devono essere tenuti lontani da quelli già congelati.

84
DO986BFK
IT
· Possono essere congelati i seguenti alimenti: torte e dolciumi, pesci, molluschi e crostacei, carne,
selvaggina, pollame, verdure, frutta, spezie, uova senza guscio, prodotti lattiero-caseari come
formaggio e burro, piatti pronti o porzioni avanzate come minestre, arrosti, carne e pesci cotti, piatti a
base di patate, soué e dessert.
· I seguenti alimenti non sono adatti alla congelazione: verdure che vengono in genere consumate crude
come insalata e rapanelli, uova con il guscio, uva, mele, pere e pesche, uova sode, yogurt, latte acido,
panna acida e maionese.
Conservare i prodotti congelati
Per evitare che gli alimenti perdano il sapore o si disidratino, inserirli in una confezione ermetica.
1. Mettere gli alimenti nella confezione.
2. Togliere completamente l’aria.
3. Sigillare la confezione.
4. Etichettare la confezione indicando il contenuto e la data di congelamento.
Materiale adatto al confezionamento: pellicola in plastica, pellicola in polietilene, pellicola in alluminio o
contenitori adatti al freezer.
Tempi di conservazione consigliati per i prodotti surgelati
I tempi indicati possono variare secondo il tipo di alimento. Gli alimenti congelati possono essere
conservati da 1 a 12 mesi (ad almeno -18 °C).
Alimenti Conservazione
Pancetta, piatti stufati, latte 1 mese
Pane, gelato, salsicce, piselli, frutti di mare cotti, pesci grassi 2 mesi
Pesci non grassi, frutti di mare, pizza, scones e muns 3 mesi
Prosciutto, dolci, biscotti, carne bovina e costolette di agnello, pollame a pezzi 4 mesi
Burro, verdure (sbollentate), uova intere e tuorli, gamberi di ume cotti, carne
macinata (cruda), carne di maiale (cruda)
6 mesi
Frutta (secca o sciroppata), albumi, carne bovina (cruda), polli interi, carne di
agnello (cruda), torte alla frutta
12 mesi
Da non dimenticare:
· Se si congelano alimenti freschi che indicano una data di scadenza minima, è necessario che vengano
congelati prima della scadenza di tale data.
· Controllare che gli alimenti non siano già stati congelati in precedenza. Gli alimenti congelati che sono
stati completamente scongelati non possono più essere congelati.
· Una volta scongelati, gli alimenti devono essere consumati in fretta.
INTERRUZIONE DELLA CORRENTE ELETTRICA
In genere, le interruzioni di corrente vengono riparate entro una o due ore e non modicano la
temperatura dell’apparecchio. In caso di interruzione della corrente elettrica, è comunque necessario
ridurre al minimo le aperture della porta.
Per interruzioni di maggiore durata, è necessario proteggere il cibo, per esempio con del ghiaccio secco.
Gli alimenti congelati rimangono intatti se la corrente non manca per più di 15 ore. Gli alimenti che si sono
completamente scongelati non devono essere ricongelati. Potrebbero essere dannosi per la salute.

85
DO986BFK
www.domo-elektro.be
IT
PULIZIA E MANUTENZIONE
Non utilizzare detergenti aggressivi o solventi.
1. Togliere la spina dalla presa di corrente.
2. Togliere gli alimenti dall’apparecchio e conservarli in un luogo fresco.
3. Pulire l’apparecchio con un panno morbido e pulito, utilizzando acqua calda e un detergente
delicato.
4. Pulire la guarnizione della porta solo con acqua, passandola con cura.
5. Dopo la pulizia, inserire la spina nella presa e impostare la temperatura desiderata.
6. Rimettere gli alimenti nel freezer.
MISURE AMBIENTALI
Il simbolo sul prodotto o sulla confezione indica che esso non deve essere
trattato come riuto domestico. Deve, al contrario, essere conferito al
punto di raccolta predisposto per il riciclo delle apparecchiature elettriche
ed elettroniche. Facendo in modo che questo prodotto venga smaltito
correttamente aiuterete a prevenire potenziali conseguenze negative per
l’ambiente e la salute dell’uomo, che potrebbero essere causate da uno
smaltimento non corretto. Per maggiori informazioni sul riciclo di questo
prodotto, consultare le autorità comunali, l’azienda o il servizio responsabili
della raccolta dei riuti domestici o il negozio in cui il prodotto è stato
acquistato.
Il materiale di imballaggio è riciclabile. Lo smaltimento dell’imballaggio deve
avvenire al ne di tutelare l’ambiente.

86
DO986BFK
CZ
ZÁRUKA
Práva a povinnosti prodávajícího a kupujícího ohledně práv z vadného plnění se řídí příslušnými obecně
závaznými předpisy dle občanského zákoníku.
1. Trvání záruky: 2 roky
2. Záruka se nevztahuje
a) na mechanické poškození
b) nesprávné používání v rozporu s návodem k použití
3. Záruka zaniká:
- při použití spotřebiče jinak než v je uvedeno v manuálu (nesprávným postupem)
- při provádění opravy nebo změny na spotřebiči osobou jinou než pověřenou naším servisem
Prodávající odpovídá kupujícímu, že zboží při převzetí nemá vady. Zejména prodávající odpovídá
kupujícímu, že v době, kdy kupující zboží převzal:
· má zboží takové vlastnosti, které výrobce v tomto návodu popisuje,
· se zboží hodí k účelu, ke kterému výrobce uvádí,
· zboží odpovídá jakostí nebo provedením smluvenému vzorku nebo předloze, byla-li jakost nebo
provedení určeno podle smluveného vzorku nebo předlohy,
· zboží vyhovuje požadavkům právních předpisů.
Projeví-li se vada v průběhu šesti měsíců od převzetí, má se za to, že zboží bylo vadné již při převzetí.
Pokud není u výrobku uvedeno jinak, činí záruční doba 24 měsíců. Záruční doba počíná běžet od převzetí
věci kupujícím.
Práva z vadného plnění uplatňuje kupující u prodávajícího na adrese jeho provozovny, v níž je přijetí
reklamace možné s ohledem na sortiment prodávaného zboží, případně i v sídle nebo místě podnikání. Za
okamžik uplatnění reklamace se považuje okamžik, kdy prodávající obdržel od kupujícího reklamované
zboží.
Reklamaci lze také uplatnit v servisním středisku na adrese DOMO-elektro s.r.o., Na Kobyle 783, 345 06
Kdyně, Česká republika, tel. (+420) 379 422 550, [email protected]
Pro rychlé a bezproblémové vyřízení reklamace doporučujeme přiložit k reklamaci doklad o koupi a průvodní
dopis s popisem závady a zpáteční adresou s telefonickým kontaktem.
BEZPEČNOSTNÍ POKYNY
Při používání jakkéhokoli el. spotřebiče dbejte zvýšené opatrnosti a dodržujte určitá bezpečnostní
pravidla:
· Pečlivě si přečtěte tyto informace a manuál nechte i pro pozdější nahlédnutí.
· Ujistěte se, že před použitím odlepíte a odstraníte veškeré reklamní a ochranné fólie.
· Děti si s ochrannými ani reklamními polepy nesmí hrát.
· Přístroj je určen pro používání v domácnostech a podobných prostředích, tak jako je:
· kuchyňky v obchodech, kancelářích atd.
· chaty, chalupy
· hotely, penziony a jiné dočasné ubytování
· Dohlédněte, aby si děti nehrály s přístrojem.

87
DO986BFK
www.domo-elektro.be
CZ
· Tento spotřebič mohou používat děti ve věku 16 let a starší a osoby se sníženými fyzickými,
smyslovými nebo mentálními schopnostmi, nebo nedostatkem zkušeností a znalostí pokud jsou
pod neustálým dozorem nebo byly poučeny o používání spotřebiče bezpečným způsobem a rozumí
případným nebezpečím. Děti si s přístrojem nesmějí hrát. Čištění a údržbu prováděnou uživatelem
nesmějí provádět děti bez dozoru.
· Čistění a běžnou údržbu smí provádět pouze osoby starší 16 let a při tom být pod dohledem.
· Přístroj a jeho el. kabel skladujte mimo dosah dětí.
· Pozor: Tento přístroj je zakázáno používat s externím časovačem nebo jiným dálkovým ovládáním.
· Před použitím si ověřte, zda napětí Vaší elektrické sítě odpovídá parametrům přístroje uvedeným na
jeho výrobním štítku.
· Nenechávejte viset elektrický kabel přístroje přes hranu stolu, nebo pracovního pultu a nedovolte, aby
kabel přišel do styku s horkými plocham, tak aby se nepoškodil.
· Nikdy nepoužívejte přístroj s poškozeným kabelem, nebo zástrčkou, nebo pokud je přístroj poškozený
a nepracuje správně. V takovém případě předejte přístroj do nejbližšího odborného servisu ke kontrole
a opravě.
· Dbejte zvýšené opatrnosti, pokud se kolem přístroje pohybují děti.
· Použitím příslušenství, které nebylo dodáno výrobcem, může dojít až ke vzniku požáru, úrazu
elektrickým proudem, nebo jinému zranění.
· Přístroj vždy odpojte od elektrické sítě pokud jej nepoužíváte, před demontáží, či montáží částí
přístroje a před čištěním. Nastavte všechny přepínače a ovladače na polohy vypnuto a tažením za
zástrčku přístroj odpojte od sítě. Nikdy zástrčku nevytahujte ze zásuvky tažením za kabel.
· Nenechávejte přístroj běžet bez dozoru.
· Nikdy neumisťujte přístroj v blízkosti plynového, nebo elektrického sporáku, či trouby, nebo do
blízkosti jiného přístroje produkujícího teplo.
· Nepoužívejte přístroj venku.
· Používejte přístroj pouze k účelům ke kterým je určený.
· Přístroj vždy používejte pouze na stabilním, suchém a rovném místě.
· Přístroj je určený pouze pro použití v domácnostech. Výrobce nemůže ručit za škody a nehody
způsobené nevhodným použitím přístroje, nebo nedodržením zde popsaných bezpečnostních
instrukcí.
· Veškeré opravy přístroje smí provádět pouze výrobce, nebo autorizovaný servis.
· Nikdy neponořujte přístroj, elektrický kabel ani zástrčku do vody, ani jiných tekutin.
· Ujistěte se, že se děti nemohou dotýkat elektrického kabelu, nebo přístroje.
· Dbejte na to, aby nebyl elektrický kabel ohnutý přes ostré rohy a nedotýkal se horkých částí přístroje,
nebo nebyl v blízkosti jiných zdrojů tepla.
· Před prvním použitím odstraňte veškeré obalové materiály a samolepky.
· Ventilační otvory přístroje udržujte čisté a průchodné.
· Nepoužívejte žádné mechanické nástroje, nebo jiné přístroje pro urychlení procesu odmrazování.
· Nepoužívejte uvnitř lednice žádné další elektrické přístroje, pokud nejsou pro toto použití přímo
schválené výrobcem.
· Neskladujte uvnitř přístroje žádné výbušné látky, jako například spreje naplněné hořlavým plynem.
· Po převozu a instalaci přístroje se vždy ujistěte, že není nijak poškozen chladící okruh.
· Ujistěte se, aby zadní část přístroje nepoškodila, či zmáčkla elektrickou zástrčku. Zmáčknutá, nebo
jinak poškozená zástrčka se může přehřát a způsobit požár.
· Ujistěte se, že máte k zástrčce volný přístup.
· Nikdy netahejte za samotný kabel.
· Nikdy nepřipojujte přístroj do uvolněné zásuvky (riskujete úraz elektrickým proudem, nebo požár).
· Tento přístroj je těžký. Pokud s přístrojem manipulujete, dbejte zvýšené opatrnosti.

88
DO986BFK
CZ
· Na zmražené věci, ani na vnitřní části mrazáku nikdy nesahejte mokrýma, ani vlhkýma rukama. Mohlo
by dojít až k popálení kůže.
· Nevystavujte přístroj na delší dobu přímému slunečnímu záření.
· Přístroj nesmí být používán s prodlužovacím kabelem ani zapojován do zásuvky s rozbočkou (více
zásuvkami na konci).
· Držte se následujících informací, tak aby se zabránilo kontaminace potravin:
· Dlouhodobé a časté otevírání dveří může způsobit výrazné zvýšení teploty uvnitř spotřebiče.
· Povrchy, které by mohly přijít do styku s potravinami udržujte čisté a pravidelně je omývejte.
Kondenzační kanálek a odvodňovací otvor udržujte v čistotě.
· Syrové maso a ryby skladujte ve vhodných nádobách tak, aby se nedostaly do styku s jinými
potravinami.
· Pokud by byl spotřebič delší dobu prázdný, tak ho doporučujeme vypnout, odmrazit a
vyčistit. Po takovém vyčištění nechte vnitřek vyschnout a nezavírejte dvířka, aby mohl
prostor ventilovat a nemnožily se tam plísně.
VAROVÁNÍ! Tento přístroj nikdy neumísťujte do blízkosti ohně, ani na jiné místo kde by
mohl přijít do styku s tepelným zdrojem. V zadní straně přístroje v chlazení je chladivo,
které je velmi hořlavé a vznětlivé.
Věnujte pozornost symbolu „Nebezpečí požáru - hořlavé materiály“, který se nachází na
zadní straně spotřebiče a dbejte bezpečnostních pokynů a bezpečnosti práce.
ČÁSTI
1. Poličky
2. Víko poličky na zeleninu
3. Přihrádka na zeleninu
4. Zásuvka na zeleninu
5. Poličky ve dveřích
6. Šuplíky / přihrádky
7. Nastavitelné nožičky
2YHUYLHZ
Note: Above picture is for reference only. Real appliance probably is different.
FridgeShelves
Fridge
Balconies
Crisper
Crisper Cover
Fresh convertible box
Freezer Drawers
Leveling Feet
6
1
2
3
4
6
7
5

89
DO986BFK
www.domo-elektro.be
CZ
PŘED PRVNÍM POUŽITÍM
· Lednici rozbalte, vyjměte veškeré příslušenství zevnitř přístroje. Z vnější strany odlepte ochranné
a reklamní polepy. Vnější povrch důkladně otřete jemným suchým hadrem a vnitřek můžete otřít
jemným navlhčeným hadříkem.
· Neumisťujte lednici do těsné blízkosti tepelných zdrojů ani na přímé
sluneční záření.
· Zadní část ledničky musí být minimálně 10 cm ode zdi, tak aby mohla
být zaručená optimální cirkulace vzduchu.
· Vyberte rovnou podlahu, s vysokou nosností. Pokud přístroj nestojí
rovně, můžete ho zkusit vyrovnat pomocí výškově nastavitelných
nožiček. Nožičky přístroje můžete našroubovat či vyšroubovat a tím
upravit výšku či špatný náklon přístroje.
· Vyvarujte se umístění na přímý sluneční svit. Přímé slunce způsobuje
změnu
barvy povrchu. Zvýšené teplo v okolí zvyšuje spotřebu přístroje a může
zkracovat jeho životnost.
· Vyvarujte se velmi vlhkému prostředí. Velká vlhkost má za následek
zvýšené namražování vnitřního prostoru a výparníku.
· Před zapojením si důkladně zkontrolujte, zda parametry vaší zástrčky
korespondují s požadavky na přístroji. Rozdílné parametry el. sítě mohou přístroj poškodit.
· Lednici můžete odpojit od elektrické energie pouze vypojením z el. sítě, proto by měla být zástrčka
stále přístupná. Chcete-li lednici odpojit, nastavte ovladač do polohy OFF a poté odpojte z el. sítě.
· Lednice musí být uzemněna. Výrobce ani prodejce není schopen krýt rizika, pokud tomu tak není.
· Po umístění nechte přístroj alespoň 8 hodin stát v klidu a až potom ho zapněte. Při stěhování se
rozvířilo chladivo a je potřeba, aby se znovu usadilo.
· Lednici nechte alespoň 24 hodiny v klidu odstát a běžet naprázdno. Takto necháte nachladit vnitřní
prostor.
· Lednice je zkonstruována a navrhnuta na používání v místech s průměrnou teplotou 16 – 38 °C. Pokud
je tato teplota v okolí překročena (nižší nebo vyšší), tak nemusí lednice chladit správně.
· Spotřebič může býr používán pouze v interiéru.
· Ve chvíli, kdy je kompresor sepnutý a čerpá chladící kapalinu v oběhu, tak je přístroj mírně hlučný.
PŘEHOZENÍ PANTŮ DVEŘÍ
Pokud potřebujete přehodit otevírání dveří na opačnou stranu, musí se přemontovat panty.
Doporučujeme, pozvat si servisního mechanika nebo proškolenou osobu z okolí. Ještě dříve než začněte
panty přemontovávat, lednici vypněte a vše z ní vyndejte pryč.
Po přehození dveří doporučujeme přístroj ještě před zapnutím nechat odstát (8 hodin). Aby se
usadilo chladivo. Pro snadnou práci doporučujeme používat šroubovák (není v balení) a níže vypsané
příslušenství.
Kryt horního závěsu
,QVWDOODWLRQ
Door Reversibility
Left Aid-Closer on Upper Door x 1 Left Aid-Closer on Lower Door x 1
nscrew top hinge cover and disconnect connectors of door switch and harness.
2.Unscrew top hinge
3.Remove the pin with a screwdriver and filp the hinge bracket. Then refit the pin to hinge bracket
unscrew
screw
8
Horní zarážka dveří
,QVWDOODWLRQ
Door Reversibility
Left Aid-Closer on Upper Door x 1 Left Aid-Closer on Lower Door x 1
nscrew top hinge cover and disconnect connectors of door switch and harness.
2.Unscrew top hinge
3.Remove the pin with a screwdriver and filp the hinge bracket. Then refit the pin to hinge bracket
unscrew
screw
8
Dolní zarážka dveří
,QVWDOODWLRQ
Door Reversibility
Left Aid-Closer on Upper Door x 1 Left Aid-Closer on Lower Door x 1
nscrew top hinge cover and disconnect connectors of door switch and harness.
2.Unscrew top hinge
3.Remove the pin with a screwdriver and filp the hinge bracket. Then refit the pin to hinge bracket
unscrew
screw
8
y
y
,QVWDOODWLRQ
1007NN
1071NN
6SDFH5HTXLUHPHQW
Keep enough space of door open.
Keep at least 50mm gap at two sides.
To do this adjust the two levelling feet at front of the unit.
If the unit is not level, the doors and magnetic seal
alignments will not be covered properly.
/HYHOOLQJWKHXQLW
13
y
y
,QVWDOODWLRQ
1007NN
1071NN
6SDFH5HTXLUHPHQW
Keep enough space of door open.
Keep at least 50mm gap at two sides.
To do this adjust the two levelling feet at front of the unit.
If the unit is not level, the doors and magnetic seal
alignments will not be covered properly.
/HYHOOLQJWKHXQLW
13

90
DO986BFK
CZ
1. Povolte šrouby krytu závěsu a kryt odejměte. Odpojte konektory od kabelů.
,QVWDOODWLRQ
Door Reversibility
Left Aid-Closer on Upper Door x 1 Left Aid-Closer on Lower Door x 1
nscrew top hinge cover and disconnect connectors of door switch and harness.
2.Unscrew top hinge
3.Remove the pin with a screwdriver and filp the hinge bracket. Then refit the pin to hinge bracket
unscrew
screw
8
2. Odšroubujte šrouby závěsu, následně půjdou vyndat celé dveře.
,QVWDOODWLRQ
Door Reversibility
Left Aid-Closer on Upper Door x 1 Left Aid-Closer on Lower Door x 1
nscrew top hinge cover and disconnect connectors of door switch and harness.
2.Unscrew top hinge
3.Remove the pin with a screwdriver and filp the hinge bracket. Then refit the pin to hinge bracket
unscrew
screw
8
3. Vezměte závěs, který byl nahoře na lednici vyšroubujte z něj středový kolík (čep) – je zašroubovaný
na závit. Samotný závěs otočte o 180° a znovu našroubujte středový kolík (čep). Na čepu by stále
měl být gumový chránící potah.
,QVWDOODWLRQ
Door Reversibility
Left Aid-Closer on Upper Door x 1 Left Aid-Closer on Lower Door x 1
nscrew top hinge cover and disconnect connectors of door switch and harness.
2.Unscrew top hinge
3.Remove the pin with a screwdriver and filp the hinge bracket. Then refit the pin to hinge bracket
unscrew
screw
8
4. V přiloženém příslušenství najdete opačný kryt na horní závěs dveří (po přehození). Z původního
krytu vezměte vypínač a přendejte ho na nový kryt. Spínač vyndáte tím, že ze zadní strany stisknete
západky a vytáhnete ho.
,QVWDOODWLRQ
5.Detach cover in top of upper door and move harness from right side to left side, then replace the cover.
6.Move top left cover to right side
7. Take off the upper door, take out the screw from the middle hinge by cross screwdriver,
then take off the lower door.
4.Move door switch from right hinge cover to left hinge cover in accessary bag.
9

91
DO986BFK
www.domo-elektro.be
CZ
5. Z horní části dveří vyjměte krycí lištu, vytáhněte kablík a přeložte ho na druhou stranu.
,QVWDOODWLRQ
5.Detach cover in top of upper door and move harness from right side to left side, then replace the cover.
6.Move top left cover to right side
7. Take off the upper door, take out the screw from the middle hinge by cross screwdriver,
then take off the lower door.
4.Move door switch from right hinge cover to left hinge cover in accessary bag.
9
6. Pomocí šroubováku odmontujte kryt z druhé strany lednice (na horní části).
,QVWDOODWLRQ
5.Detach cover in top of upper door and move harness from right side to left side, then replace the cover.
6.Move top left cover to right side
7. Take off the upper door, take out the screw from the middle hinge by cross screwdriver,
then take off the lower door.
4.Move door switch from right hinge cover to left hinge cover in accessary bag.
9
7. Odšroubujte šroubky ze středního závěsu mezi dveřmi a spodní dveře nadzvedněte a sundejte.
,QVWDOODWLRQ
5.Detach cover in top of upper door and move harness from right side to left side, then replace the cover.
6.Move top left cover to right side
7. Take off the upper door, take out the screw from the middle hinge by cross screwdriver,
then take off the lower door.
4.Move door switch from right hinge cover to left hinge cover in accessary bag.
9
8. Na rozdělující příčce (lednice/mrazák) přendejte kryty, které kryjí otvory pro střední závěs (pant).
,QVWDOODWLRQ
8 .
9. Unscrew bottom hinge. Then remove the adjustable feet from both side.
10. Unscrew and remove the bottom hinge pin, turn the bracket over and replace it.
unscrew
screw
10

92
DO986BFK
CZ
9. Položte ledničku na zadní stranu (pokud to jde, tak jen mírně do šikma). Odšroubujte výškově
nastavitelné nožičky z obou stran a odšroubujte spodní závěs (pant).
,QVWDOODWLRQ
8 .
9. Unscrew bottom hinge. Then remove the adjustable feet from both side.
10. Unscrew and remove the bottom hinge pin, turn the bracket over and replace it.
unscrew
screw
10
10. Vyjměte čep a přemístěte ho na druhou stranu závěsu. Musíte povolit matici čepu zespodu a
následně vyjmout, přemístit a znovu upevnit.
,QVWDOODWLRQ
8 .
9. Unscrew bottom hinge. Then remove the adjustable feet from both side.
10. Unscrew and remove the bottom hinge pin, turn the bracket over and replace it.
unscrew
screw
10
11. Takto připravený spodní pant připevněte na opačnou spodní stranu lednice než bylo původně
(zašroubujte). Následně našroubujte zpět obě nožičky.
,QVWDOODWLRQ
13.Detach the Fridge and the Freezer door gaskets and then attach them after rotating.
11.Refit the bracket fitting the bottom hinge pin. Replace both adjustable feet.
12.Remove aid-closers from bottom of upper and lower doors, then take new aid-closers from
accessary bag and install them to left side.
11
12. Z obou dveří ze spodních stran odšroubujte zarážky. Následně na opačné strany našroubujte nové
zarážky, které najdete v balení příslušenství.
,QVWDOODWLRQ
13.Detach the Fridge and the Freezer door gaskets and then attach them after rotating.
11.Refit the bracket fitting the bottom hinge pin. Replace both adjustable feet.
12.Remove aid-closers from bottom of upper and lower doors, then take new aid-closers from
accessary bag and install them to left side.
11

93
DO986BFK
www.domo-elektro.be
CZ
13. Na obou dveřích je potřeba prohodit těsnění. Opatrně ho vyjměte, otočte a nasaďte zpět.
,QVWDOODWLRQ
13.Detach the Fridge and the Freezer door gaskets and then attach them after rotating.
11.Refit the bracket fitting the bottom hinge pin. Replace both adjustable feet.
12.Remove aid-closers from bottom of upper and lower doors, then take new aid-closers from
accessary bag and install them to left side.
11
14. Nyní už můžete nasazovat dveře zpět. Začněte spodními, tak že je nasadíte na spodní pant, a z horní
části přišroubujte závěsem (pantem).
,QVWDOODWLRQ
15.Replace upper door, please ensure the door align with the cabinet to make sure door gasket seal
the cabinet tightly. Then connect door with cabinet by tightly fixed top hinge.
16.Connect harnesses from door and cabinet. Then replace top hinge cover. Before screw the cover,
connect terminals of door switch.
14. Install the lower door, adjust and fix the middle hinge onto the cabinet.
12
15. Nasaďte horní dveře lednice, z horní strany zajistěte pantem (závěsem) a přišroubujte. Zkontrolujte,
zda dveře těsní po celém svém obvodu.
,QVWDOODWLRQ
15.Replace upper door, please ensure the door align with the cabinet to make sure door gasket seal
the cabinet tightly. Then connect door with cabinet by tightly fixed top hinge.
16.Connect harnesses from door and cabinet. Then replace top hinge cover. Before screw the cover,
connect terminals of door switch.
14. Install the lower door, adjust and fix the middle hinge onto the cabinet.
12
16. Přepojte (zapojte) konektory dveří a zarážku dveří. Nasaďte horní kryt pantu a ještě před
přišroubováním zkontrolujte, aby někde kryt nemačkal na kabelové vedení nebo se kablík neskřípl
mezi dveře).
,QVWDOODWLRQ
15.Replace upper door, please ensure the door align with the cabinet to make sure door gasket seal
the cabinet tightly. Then connect door with cabinet by tightly fixed top hinge.
16.Connect harnesses from door and cabinet. Then replace top hinge cover. Before screw the cover,
connect terminals of door switch.
14. Install the lower door, adjust and fix the middle hinge onto the cabinet.
12

94
DO986BFK
CZ
POUŽITÍ
DOTYKOVÁ TLAČÍTKA:
A. Nastavení teploty lednice
B. Nastavení teploty mrazáku
C. Volba funkce
Údaje na displeji:
1. Teplota v lednici
2. Teplota v marzáku
3. ECO mód
4. SUPER mód
5. Klidový ECO režim
6. Bezpečnostní zámek
Displej se automaticky vypíná a zhasíná. Svítí jen pokud jsou otveřený dveře a se dotknete ovládacích
tlačítek.
NASTAVENÍ TEPLOTY
· Teplota v lednici může být nastavena v rozmezí 2 – 8°C. Při běžných podmínách je obecně
doporučováno nastavit teplotu na 4 °C. Stiskněte tlačítko “FRIDGE” (teplota v lednici) a každým dalším
stiskem si upravujete nastavení. Můžete mačkat do chvíle, kdy si navolíte požadovanou teplotu.
8VHULQWHUIDFH
Using the Control Panel
A.Temperature Control of Fridge Compartment
B.Temperature Control of Freezer Compartment
C.Mode/ Locking / Unlocking
1.1 BUTTON OPERATION
2.1.1The panel will be lit up for 2 minutes once the door of fridge compartment is opened.
2.1 DISPLAY
1.Temperature of Fridge Comparment
2.Temperature of Freezer Comparment
3.ECO Mode
4.Holiday Mode
5.Super Mode
6.Locking / Unlocking
1.2 LED DISPLAY
a.The control panel is 100% lit up for 3 seconds, which operates exactly as per the setting
(mode and temperature) before the poweroff. The system will be automatically locked 25
seconds after the last button operation. After locking, the light of the panel would be out 30
seconds after the last button operation.
b.Both preset temperatures of fridge compartemnt and freezer compartment would be shown
on the display.
2.0 OPERATING CONDITION
1
2
A
B
C
3
4
5
6
14
· Teplota v mrazáku může být nastavena v rozmezí -14 až -22 °C. Při běžných podmínách je obecně
doporučováno nastavit teplotu na -18 °C. Stiskněte tlačítko “FREEZER” (teplota v mrazáku) a každým
dalším stiskem si upravujete nastavení. Můžete mačkat do chvíle, než se na displeji objeví požadovaná
teplota.
8VHULQWHUIDFH
Using the Control Panel
A.Temperature Control of Fridge Compartment
B.Temperature Control of Freezer Compartment
C.Mode/ Locking / Unlocking
1.1 BUTTON OPERATION
2.1.1The panel will be lit up for 2 minutes once the door of fridge compartment is opened.
2.1 DISPLAY
1.Temperature of Fridge Comparment
2.Temperature of Freezer Comparment
3.ECO Mode
4.Holiday Mode
5.Super Mode
6.Locking / Unlocking
1.2 LED DISPLAY
a.The control panel is 100% lit up for 3 seconds, which operates exactly as per the setting
(mode and temperature) before the poweroff. The system will be automatically locked 25
seconds after the last button operation. After locking, the light of the panel would be out 30
seconds after the last button operation.
b.Both preset temperatures of fridge compartemnt and freezer compartment would be shown
on the display.
2.0 OPERATING CONDITION
1
2
A
B
C
3
4
5
6
14
· Doba nachlazení a aktuální teplota je vždy závislá na více faktorech: prostředí kde přístroj stojí, jak
často se otevírají dveře nebo teplota místnosti, kde lednice stojí.
NASTAVENÍ ZVOLENÉ FUNKCE
8VHULQWHUIDFH
Using the Control Panel
A.Temperature Control of Fridge Compartment
B.Temperature Control of Freezer Compartment
C.Mode/ Locking / Unlocking
1.1 BUTTON OPERATION
2.1.1The panel will be lit up for 2 minutes once the door of fridge compartment is opened.
2.1 DISPLAY
1.Temperature of Fridge Comparment
2.Temperature of Freezer Comparment
3.ECO Mode
4.Holiday Mode
5.Super Mode
6.Locking / Unlocking
1.2 LED DISPLAY
a.The control panel is 100% lit up for 3 seconds, which operates exactly as per the setting
(mode and temperature) before the poweroff. The system will be automatically locked 25
seconds after the last button operation. After locking, the light of the panel would be out 30
seconds after the last button operation.
b.Both preset temperatures of fridge compartemnt and freezer compartment would be shown
on the display.
2.0 OPERATING CONDITION
1
2
A
B
C
3
4
5
6
14
Stlačením tlačítka MODE můžete vybírat a přepínat mezi jednotlivým nastavením ECO, prázdninový nebo
SUPER mód.
ECO
8VHULQWHUIDFH
Using the Control Panel
A.Temperature Control of Fridge Compartment
B.Temperature Control of Freezer Compartment
C.Mode/ Locking / Unlocking
1.1 BUTTON OPERATION
2.1.1The panel will be lit up for 2 minutes once the door of fridge compartment is opened.
2.1 DISPLAY
1.Temperature of Fridge Comparment
2.Temperature of Freezer Comparment
3.ECO Mode
4.Holiday Mode
5.Super Mode
6.Locking / Unlocking
1.2 LED DISPLAY
a.The control panel is 100% lit up for 3 seconds, which operates exactly as per the setting
(mode and temperature) before the poweroff. The system will be automatically locked 25
seconds after the last button operation. After locking, the light of the panel would be out 30
seconds after the last button operation.
b.Both preset temperatures of fridge compartemnt and freezer compartment would be shown
on the display.
2.0 OPERATING CONDITION
1
2
A
B
C
3
4
5
6
14
Takové nastavení je předvoleno na optimální hodnoty s menší spotřebou. V části lednice je pevně
nastaveno 5 °C a v mrazáku bude udržována teplota -18 °C. Tlačítka pro regulaci teploty budou uzamčena
a na displeji bude svítit symbol ECO nastavení. Funkce lze vypnout/zapnout opět tlačítkem MODE.
8VHULQWHUIDFH
Using the Control Panel
A.Temperature Control of Fridge Compartment
B.Temperature Control of Freezer Compartment
C.Mode/ Locking / Unlocking
1.1 BUTTON OPERATION
2.1.1The panel will be lit up for 2 minutes once the door of fridge compartment is opened.
2.1 DISPLAY
1.Temperature of Fridge Comparment
2.Temperature of Freezer Comparment
3.ECO Mode
4.Holiday Mode
5.Super Mode
6.Locking / Unlocking
1.2 LED DISPLAY
a.The control panel is 100% lit up for 3 seconds, which operates exactly as per the setting
(mode and temperature) before the poweroff. The system will be automatically locked 25
seconds after the last button operation. After locking, the light of the panel would be out 30
seconds after the last button operation.
b.Both preset temperatures of fridge compartemnt and freezer compartment would be shown
on the display.
2.0 OPERATING CONDITION
1
2
A
B
C
3
4
5
6
14
A
4
3
1
B
C
2
5
6

95
DO986BFK
www.domo-elektro.be
CZ
Prázdninový ECO režim
8VHULQWHUIDFH
Using the Control Panel
A.Temperature Control of Fridge Compartment
B.Temperature Control of Freezer Compartment
C.Mode/ Locking / Unlocking
1.1 BUTTON OPERATION
2.1.1The panel will be lit up for 2 minutes once the door of fridge compartment is opened.
2.1 DISPLAY
1.Temperature of Fridge Comparment
2.Temperature of Freezer Comparment
3.ECO Mode
4.Holiday Mode
5.Super Mode
6.Locking / Unlocking
1.2 LED DISPLAY
a.The control panel is 100% lit up for 3 seconds, which operates exactly as per the setting
(mode and temperature) before the poweroff. The system will be automatically locked 25
seconds after the last button operation. After locking, the light of the panel would be out 30
seconds after the last button operation.
b.Both preset temperatures of fridge compartemnt and freezer compartment would be shown
on the display.
2.0 OPERATING CONDITION
1
2
A
B
C
3
4
5
6
14
· Takto nastavená lednice se přepne do úsporného režimu a šetří energii hlavně tehdy, když není
využívána jako např. dlouhodobější dovolené atd. Mrazák stále běží na zvolenou teplotu.
· Při výběru tohoto nastavení bude část lednice nastavena na 17°C. Tlačítka pro nastavení teploty v
lednici budou zamčena. Je potřeba zajistit, aby lednice byla vyklizena, nebo tam byly jen trvanlivé
potraviny odolné 17 °C. Část mrazáku bude pracovat beze změny.
· Klidovou funkci můžete zapnout/vypnout pomocí tlačítka “MODE”. Při zapnutí se na displeji zobrazí
symbol
SUPER mód
8VHULQWHUIDFH
Using the Control Panel
A.Temperature Control of Fridge Compartment
B.Temperature Control of Freezer Compartment
C.Mode/ Locking / Unlocking
1.1 BUTTON OPERATION
2.1.1The panel will be lit up for 2 minutes once the door of fridge compartment is opened.
2.1 DISPLAY
1.Temperature of Fridge Comparment
2.Temperature of Freezer Comparment
3.ECO Mode
4.Holiday Mode
5.Super Mode
6.Locking / Unlocking
1.2 LED DISPLAY
a.The control panel is 100% lit up for 3 seconds, which operates exactly as per the setting
(mode and temperature) before the poweroff. The system will be automatically locked 25
seconds after the last button operation. After locking, the light of the panel would be out 30
seconds after the last button operation.
b.Both preset temperatures of fridge compartemnt and freezer compartment would be shown
on the display.
2.0 OPERATING CONDITION
1
2
A
B
C
3
4
5
6
14
· Tato funkce je vhodná ve chvíli, kdy standartdní nastavení teploty nestačí. Např: pokud je v okolí
lednice extrémní horko, pokud se lednice nadměrně často otevírá a v místnosti je příliš teplo a nebo
jste lednici kompletně naplnili nezchlazenými potravinami.
· Při takovém nastavení začne mrazák mrazit na -25 °C a takto nízkou teplotu bude udržovat nejvýše
na 50 hodin. Používá se hlavně na šokové zmrazení, proto doporučujeme funkci zapnout přibližně 24
hodin před vložením surovin (aby se prostor stihl maximálně namrazit).
· Funkce SUPER se automaticky sama vypne po uplynutí zmíněné doby. Po automatickém vypnutí
funkce se vrátí do původního nastavení mrazáku a bude mrazit již jen na vámi nastavenou teplotu. Při
funkci SUPER je zablokovaná regulace teploty pro mrazák.
· Funkce maximálního namražení se zapíná/vypíná pomocí tlačítka „MODE“ (funkce). Na displeji bude
vždy svítit aktuální symbol zvoleného režimu.
DĚTSKÝ BEZPEČNOSTNÍ ZÁMEK
8VHULQWHUIDFH
Using the Control Panel
A.Temperature Control of Fridge Compartment
B.Temperature Control of Freezer Compartment
C.Mode/ Locking / Unlocking
1.1 BUTTON OPERATION
2.1.1The panel will be lit up for 2 minutes once the door of fridge compartment is opened.
2.1 DISPLAY
1.Temperature of Fridge Comparment
2.Temperature of Freezer Comparment
3.ECO Mode
4.Holiday Mode
5.Super Mode
6.Locking / Unlocking
1.2 LED DISPLAY
a.The control panel is 100% lit up for 3 seconds, which operates exactly as per the setting
(mode and temperature) before the poweroff. The system will be automatically locked 25
seconds after the last button operation. After locking, the light of the panel would be out 30
seconds after the last button operation.
b.Both preset temperatures of fridge compartemnt and freezer compartment would be shown
on the display.
2.0 OPERATING CONDITION
1
2
A
B
C
3
4
5
6
14
Slouží pro zneaktivnění a zamčení ovládacího panelu. Ovládací panel lze uzamknout, stačí přidržet
tlačítko „LOCK“ po dobu 3 vteřin. Pokud je zámek aktivní, tak na displeji bude svítit symbol zamčeného
zámku. Pro odemknutí stiskněte tlačítko “UNLOCK”a držte alespoň 3 vteřiny. Z displeje zmizí ikonka
„zamčeno“
ALARM
Pokud zůstanou dveře chladničky otevřené po dobu 90 sekund, tak se ozve zvukový upozorňující signál.
Tento alarm je varováním, abyste nenechali náhodou dveře otevřené a jídlo se nezkazilo. Pokud dveře
zavřete, tak se zvuk vypne.
FRESH ZÁSUVKA NA ZELENINU
Pomocí regulace na zadní straně zásuvky lze měnit podmínky uvnitř zásuvky.
· Pro zaručení perfektní teploty a vlhkosti pro stále čerstvou zeleninu stačí přepnout
regulaci do polohy „crisper“.
· Pokud přepnete regulátor do polohy „chiller“, tak se uvnitř bude udržovat nižší
teplota, potraviny se uchovávají chladnější/čerstvé, ale ne zmrazené. Tím se výrazně
prodlouží skladovatelnost.
NASTAVENÍ A PŘEMÍSTĚNÍ POLIČEK
· Před přemišťováním poliček vždy lednici vyprázdněte.
· Skleněnou poličku lehce nadzvedněte a táhněte směrem k sobě. Držte ji pevně.
· Poličku na dvěřích pevně uchopte oběma rukama. Tlačte směrem nahoru a přitom lehce tahejte k
sobě, dokud se polička neuvolní.
'DLO\8VH'DLO\8VH
Cleaning
For hygienic reasons the appliance interior, including interior accessories, should be cleaned regularly.
Caution! The appliance may not be connected to the mains during cleaning. Danger of electrical
shock! Before cleaning switch the appliance off and remove the plug from the mains, or switch off or
turn out the circuit breaker or fuse. Never clean the appliance with a steam cleaner. Moisture could
accumulate in electrical components, danger of electrical shock! Hot vapors can lead to the damage
of plastic parts. The appliance must be dry before it is placed back into service.
Important! Ethereal oils and organic solvents can attack plastic parts, e.g. lemon juice or the juice form
orange peel, butyric acid, cleanser that contain acetic acid.
Do not allow such substances to come into contact the appliance parts.
Do not use any abrasive cleaners
Remove the food from the freezer. Store them in a cool place, well covered.
Switch the appliance off and remove the plug from the mains, or switch off or turn out the circuit breaker
of fuse.
Clean the appliance and the interior accessories with a cloth and lukewarm water. After cleaning wipe
with fresh water and rub dry.
After everything is dry place appliance back into service.
Hints for refrigeration
Useful hints:
Make (all types): wrap in polythene bags and place on the glass shelves above the vegetable drawer.
For safety, store in this way only one or two days at the most.
Cooked foods, cold dishes, etc...: these should be covered and may be placed on any shelf.
Fruit and vegetables: these should be thoroughly cleaned and placed in the special drawer(s) provided.
butter and cheese: these should be placed in special airtight containers or wrapped in aluminum foil or
polythene bags to exclude as much air as possible.
Milk bottle: these should have a cap and should be stored in the balconies on the door.
Bananas, potatoes, onions and garlic, if not packed, must not be kept in the fridge.
Fresh Zone Temperature Control
18

96
DO986BFK
CZ
OSVĚTLENÍ
Přístroj je vybaven LED osvětlením uvnitř lednice i mrazáku. Tento typ osvětlení má menší spotřebu a
delší životnost. Takové osvětlení by nemělo potřebovat žádnou údržbu. V případě, že osvětlení i přesto
přestane fungovat, kontaktuje odborný servis.
MANIPULSCE S PŘÍSTROJEM
Pokud se přístroj z jakéhokoli důvodu vypnul, tak počkejte alespoň 10 min před jeho opětovným
zapnutím. Chladící systém potřebuje vyrovnat tlaky uvnitř chladícího okruhu.
· Přístroj vypněte a vypojte z el. sítě. Z lednice vyndejte všechno jídlo. Vyndejte nebo zajistěte všechny
volné poličky a regály proti pohybu.
· Přemístěte na nové místo a uveďte znovu do provozu. Po stěhování lednice ji nechte alespoň 10 min v
klidu stát, a až potom ji zapojte.
Přístroj používá chladivo R600a. Chladivo R600a je isobutan, který je šetrný k životnímu prostředí, ale
zároveň náchylný ke vznícení. Proto byste měli být velmi opatrní a dbát na to, aby se chladící systém
nepoškodil. V případě poškození a nechtěného úniku chladiva, zamezte styku s otevřeným ohněm či se
zdrojem tepla a místnost rychle vyvětrejte.
JÍDLO V LEDNICI
Lednice prodlužuje trvanlivost jídla (zejména jídla podléhající rychlé zkáze).
Pokud vložíte čerstvé potraviny, tak ty vydrží v lednici nejdéle.
· Neskladujte jídlo, které již není čerstvé.
· Před vložením do lednice jídlo zabalte nebo zakryjte, jinak by jídlo vysychalo a měnilo barvu a
samozřejmě ztrácelo na čerstvosti i chuti.
· Potraviny se silným aroma důkladně zabalte, aby se vůně/zápach nepřenesla na ostatní potraviny.
· Před vložením do lednice, nechte všechny potraviny vychladnout.
ZAMRAZOVÁNÍ A SKLADOVÁNÍ V MRAZÁKU
Přístroj můžete využít:
· uchovávat hluboce zamražené potraviny
· výroba kostek ledu
· zamražovat potraviny
UPOZORNĚNÍ: vždy se přesvědčte, že jste důkladně zavřeli dveře. Dveře neotevírejte zbytečně.
Uchování mražených potravin
· Obal ani krabička potravin nesmí být poškozeny,
· Popisujte si balíčky s informacemi o datem trvanlivosti / vložení atd …
· Pokud možno, všechny zmražené potraviny přenášejte z obchodu v chladící tašce a co nejrychleji je
vložte do mrazáku.
Zamrazování čerstvých potravin
Zamražujte pouze čerstvé ovoce ve 100% kvalitě. Aby se zachovala co nejlepší chuť, barva i výživová
hodnota, doporučujeme všechnu zeleninu před zmrazením lehce z blanšírovat.
Lilek, papriky, cukety ani chřest blanšírování nepotřebují.
POZNÁMKA: Potraviny, které se chystáte mrazit, držte mimo již zamražené suroviny.

97
DO986BFK
www.domo-elektro.be
CZ
· Následující potraviny jsou vhodné ke zmražení: cukrářské výrobky, ryby, maso, drůbež, ovoce,
zelenina, sýry, máslo, zbytky vařených jídel, polévky, dušená masa atd …
· Následující potraviny nejsou vhodné ke zmražení: Druhy zeleniny, které se konzumují syrové (jako
např. ledový salát, ředkev, hroznové víno, celá jablka, hrušky, broskve), vařená vejce natvrdo, jogurt,
majonéza, smetana, atd...
Balení potravin ke zmražení
Aby potraviny v mrazáku neztrácely chuť a nevysychaly, musí být zabaleny.
1. Potraviny vložte do obalu.
2. Vytlačte co nejvíce přebytečného vzduchu.
3. Obal uzavřete.
4. Balíček popište datem spotřeby / vložení.
Do čeho nejlépe balit:
Plastová potravinová fólie, sáčky do mrazáku, alobal, nádoby vhodné do mrazáku.
Doporučená doba uchování v mrazáku
Níže zmíněné časy jsou orientační a závisí na typu potraviny. Jídlo obecně může být v mrazáku 1-12
měsíců (při teplotě pod -18 °C)
Druh potraviny Doba
Slanina, dušené maso se zeleninou, mléko 1 měsíc
Chleba, zmrzlina, párky, koláče, předvařené měkkýši, tučné ryby 2 měsíce
Málo tučné ryby, hluboce zamražené měkkýši, pizza, muny 3 měsíce
Šunka, sušenky, hovězí/skopové kotlety, naporcovaná drůběž 4 měsíce
Máslo, zelenina (blanšírovaná), vejce a žloutky, vařený rak, mleté masi (syrové),
vepřové (syrové)
6 měsíce
Ovoce (sušené, syrup), vaječné bílky, hovězí (syrové), celé kuře, skopové (syrové),
ovocné koláče
12 měsíce
POZOR: Pokud zamražujete čerstvé potraviny s označeným datem spotřeby, musí se zamrazit před tímto
datem. Zkontrolujte, zda potraviny už nebyly jednou zamražené, neboť každé jídlo se smí zamražovat
pouze jednou.
VÝPADEK PROUDU
· Výpadek proudu je převážně kratší než 1-2 hodiny, na takto krátký čas se neděje nic špatného, nižší
teplota se v uzavřené lednici udrží. Nesmí se však otevírat dveře lednice a zbytečně větrat. Během
delšího výpadku proudu můžete do lednice vkládat větší množství ledu, které vnitřní prostor částečně
ochladí.
· Pokud je výpadek kratší než 15 hodin, tak by mělo všechno zamražené jídlo vydržet a udržet si svoji
kvalitu.
· Pokud již nějaké potraviny kompletně rozmrzly, nikdy je nezamražujte zpět.

98
DO986BFK
CZ
ČIŠTĚNÍ A ÚDRŽBA
Nikdy na čištění nepoužívejte drsné ani agresivní čistící prostředky.
1. Před čištěním přístroj vypněte a vypojte z elektrické zásuvky.
2. Během čištění lednici vyprázdněte a potraviny nechte na chladném místě.
3. Přístroj čistěte (otírejte) jemným hadříkem, který povrch neponičí.
4. Těsnění ve dveřích stačí čistit jen čistou vodou, před dalším spuštěním musí být těsnění dokonale
suché.
5. Po vyčištění musí být přístroj suchý, následně ho zapojte do elektrické sítě, zapněte a nastavte
požadovanou teplotu.
6. Po vyčištění a zapnutí už můžete vložit jídlo zpět do lednice.
ŘEŠENÍ MOŽNÝCH PROBLÉMŮ
Problém Možné příčiny Řešení
Přístroj nefunguje. · Zástrčka není dostatečně
zapojena do sítě.
· Jsou vypnuty jističe nebo hlavní
pojistka.
· Závada ve vaší el. síti.
· Znovu a důkladně zástrčku
zapojte.
· Zkontrolujte jističe i pojistku.
· Kontaktujte místního
elektrikáře.
Podivný zápach. · Potraviny v chladničce jsou
zkažené.
· Vyčistěte vnitřek chladničky.
Dveře se úplně nezavřou. · Chladnička nebo mraznička jsou
příliš plné.
· Přístroj není vyrovnaný.
· Ujistěte se, že jídlo nebo nápoje
nebrání v zavírání dveří.
· Přizpůsobte nastavitelné nohy.
Neobvyklé zvuky. · Přístroj nestojí v rovině.
· Přístroj se opírá o stěnu nebo
jiný přístroj (vibrace).
· Vyrovnejte pomocí
nastavitelných nožiček.
· Přístroj lehce odtáhněte, aby se
ničeho nedotýkal.
· Zavolejte opraváře, ať vše
zkontroluje.
Hučící nebo bublající
zvuk.
· Kompresor se spouští / pracuje.
· Chladící plyn cirkuluje ve
spotřebiči.
· To je normální.
Boční strana přístroje je
teplá.
· Na této straně je odvodní hadice
zkondenzované vody.
· Pokud ano, je ta situace
normální.

99
DO986BFK
www.domo-elektro.be
CZ
OHLED NA ŽÍVOTNÍ PROSTŘEDÍ
Symbol na přístroji či na jeho obalu znamená, že s tímto výrobkem není možno
nakládat jako s běžným domovním odpadem, nýbrž musí být odevzdán na místech
určených ke sběru a likvidaci elektrických a elektronických zařízení. Dodržením
tohoto doporučení chráníte životní prostředí a zdraví spoluobčanů. Více informací o
možnostech likvidace nebezpečného odpadu obdržíte na obecních nebo městských
úřadech, sběrných dvorech nebo v prodejně, kde jste přístroj zakoupili.
Obalové materiály jsou recyklovatelné, nakládejte s nimi podle předpisů pro životní
prostředí.

100
DO986BFK
SK
ZÁRUKA
Práva a povinnosti predávajúceho a kupujúceho ohľadom práv z chybného plnenia sa riadi príslušnými
všeobecne záväznými predpismi podľa občianskeho zákonníka.
1. Trvanie záruky: 2 roky
2. Záruka sa nevzťahuje
a) na mechanické poškodenie
b) nesprávne používanie v rozpore s návodom na použitie
3. Záruka zaniká:
- pri použití spotrebiča inak ako v je uvedené v manuále (nesprávnym postupom)
- pri vykonávaní opravy alebo zmeny na spotrebiči osobou inou než poverenou naším servisom
Predávajúci zodpovedá kupujúcemu, že tovar pri prevzatí nemá vady. Najmä predávajúci zodpovedá
kupujúcemu, že v čase, keď kupujúci tovar prevzal:
· má tovar také vlastnosti, ktoré výrobca v tomto návode popisuje,
· sa tovar hodí k účelu, ku ktorému výrobca uvádza,
· tovar zodpovedá kvalitou alebo prevedením dohovorené vzorky alebo predlohe, ak bola akosť alebo
prevedenie určené podľa dohodnutého vzorky alebo predlohy,
· tovar vyhovuje požiadavkám právnych predpisov.
Ak sa prejavia vada v priebehu šiestich mesiacov od prevzatia, má sa za to, že tovar bol chybný už pri
prevzatí.
Pokiaľ nie je pri výrobku uvedené inak, je záručná doba 24 mesiacov. Záručná doba začína plynúť od
prevzatia veci kupujúcim.
Práva z chybného plnenia uplatňuje kupujúci u predávajúceho na adrese jeho prevádzky, v ktorej je
prijatie reklamácie možné s ohľadom na sortiment predávaného tovaru, prípadne aj v sídle alebo mieste
podnikania. Za okamih uplatnenia reklamácie sa považuje okamih, kedy predávajúci dostal od kupujúceho
reklamovaný tovar.
Reklamáciu možno tiež uplatniť v servisnom stredisku na adrese DOMO-elektro s.r.o., Na Kobyle 783,
345 06 Kdyně, Česká republika, tel. (+420) 379 422 550, [email protected]
Pre rýchle a bezproblémové vybavenie reklamácie odporúčame priložiť k reklamácii doklad o kúpe a
sprievodný list s popisom závady a spiatočnou adresou s telefonickým kontaktom.
BEZPEČNOSTNÉ POKYNY
· Pri používaní jakkéhokoli el. spotrebiče dbajte na zvýšenú opatrnosť a dodržujte určitá bezpečnostné
pravidlá:
· Starostlivo si prečítajte tieto informácie a manuál nechajte aj k neskoršiemu nahliadnutiu.
· Uistite sa, že pred použitím odlepíte a odstránite všetky reklamné a ochranné fólie.
· Deti sa s ochrannými ani reklamnými polepy nesmie hrať.
· Prístroj je určený pre používanie v domácnostiach a podobných prostrediach, tak ako je:
· kuchynky v obchodoch, kanceláriách atď.
· chaty, chalupy
· hotely, penzióny a iné dočasné ubytovanie
· Dohliadnite, aby sa deti nehrali s prístrojom.

101
DO986BFK
www.domo-elektro.be
SK
· Tento spotrebič môžu používať deti vo veku 16 rokov a staršie a osoby so zníženými fyzickými,
zmyslovými alebo mentálnymi schopnosťami, alebo nedostatkom skúseností a znalostí ak sú pod
neustálym dozorom alebo boli poučené o používaní spotrebiča bezpečným spôsobom a rozumejú
prípadným nebezpečenstvám. Deti si s prístrojom nesmú hrať. Čistenie a údržbu vykonávanú
používateľom nesmú vykonávať deti bez dozoru.
· Čistenie a bežnú údržbu môžu vykonávať len osoby staršie ako 16 rokov a pri tom byť pod
dohľadom.
· Prístroj a jeho el. kábel skladujte mimo dosahu detí.
· Pozor: Tento prístroj je zakázané používať s externým časovačom alebo iným diaľkovým ovládaním.
· Pred použitím si overte, či napätie vašej elektrickej siete zodpovedá parametrom prístroja uvedeným
na jeho výrobnom štítku.
· Nenechávajte visieť elektrický kábel prístroja cez hranu stola, alebo pracovného pultu a nedovoľte, aby
kábel prišiel do styku s horúcimi plochám, tak aby sa nepoškodil.
· Nikdy nepoužívajte prístroj s poškodeným káblom, alebo zástrčkou, alebo ak je prístroj poškodený a
nepracuje správne. V takom prípade odovzdajte prístroj do najbližšieho odborného servisu na kontrolu
a opravu.
· Dbajte na zvýšenú opatrnosť, pokiaľ sa okolo prístroja pohybujú deti.
· Použitím príslušenstva, ktoré nebolo dodané výrobcom, môže dôjsť až k vzniku požiaru, úrazu
elektrickým prúdom, alebo inému zraneniu.
· Prístroj vždy odpojte od elektrickej siete pokiaľ ho nepoužívate, pred demontážou, či montážou častí a
pred čistením. Nastavte všetky prepínače a ovládače na polohy vypnuté a ťahaním za zástrčku prístroj
odpojte od siete. Nikdy zástrčku nevyťahujte zo zásuvky ťahaním za kábel.
· Nenechávajte prístroj bežať bez dozoru.
· Nikdy neumiestňujte prístroj v blízkosti plynového, alebo elektrického sporáka, či rúry, alebo do
blízkosti iného prístroja produkujúceho teplo.
· Nepoužívajte prístroj vonku.
· Používajte prístroj iba na účely ku ktorým je určený.
· Prístroj vždy používajte iba na stabilnom, suchom a rovnom mieste.
· Prístroj je určený len na použitie v domácnostiach. Výrobca nemôže ručiť za škody a nehody
spôsobené nevhodným použitím prístroja, alebo nedodržaním tu popísaných bezpečnostných
inštrukcií.
· Všetky opravy prístroja smie vykonávať len výrobca, alebo autorizovaný servis.
· Nikdy neponárajte prístroj, elektrický kábel ani zástrčku do vody, ani iných tekutín.
· Uistite sa, že sa deti nemôžu dotýkať elektrického kábla, alebo prístroje.
· Dbajte na to, aby nebol elektrický kábel ohnutý cez ostré rohy a nedotýkal sa horúcich častí prístroja,
alebo nebol v blízkosti iných zdrojov tepla.
· Pred prvým použitím odstráňte všetky obalové materiály a samolepky.
· Ventilačné otvory prístroja udržujte čisté a priechodné.
· Nepoužívajte žiadne mechanické nástroje, alebo iné prístroje na urýchlenie procesu odmrazovania.
· Nepoužívajte vnútri chladničky žiadne ďalšie elektrické prístroje, pokiaľ nie sú na toto použitie priamo
schválené výrobcom.
· Neskladujte vo vnútri prístroja žiadne výbušné látky, ako napríklad spreje naplnené horľavým plynom.
· Po prevoze a inštalácii prístroja sa vždy uistite, že nie je nijako poškodený chladiaci okruh.
· Uistite sa, aby zadná časť prístroja nepoškodila, či stlačila elektrickú zástrčku. Stlačená, alebo inak
poškodená zástrčka sa môže prehriať a spôsobiť požiar.
· Uistite sa, že máte k zástrčke voľný prístup.
· Nikdy neťahajte za samotný kábel.
· Nikdy nepripájajte prístroj do uvoľnenej zásuvky (riskujete úraz elektrickým prúdom, alebo požiar).

102
DO986BFK
SK
· Tento prístroj je ťažký. Pokiaľ s prístrojom manipulujete, dbajte na zvýšenú opatrnosť.
· Na zmrazené veci, ani na vnútornej časti mrazničky nikdy nesiahajte mokrými, ani vlhkými rukami.
Mohlo by dôjsť až k popáleniu pokožky.
· Nevystavujte prístroj na dlhšiu dobu priamemu slnečnému žiareniu.
· Prístroj nesmie byť používaný s predlžovacím káblom ani zapájaný do zásuvky s Rozbočky (viac
zásuvkami na konci).
· Držte sa nasledujúcich informácií, tak aby sa zabránilo kontaminácie potravín:
· Dlhodobé a časté otváranie dverí môže spôsobiť výrazné zvýšenie teploty vo vnútri
spotrebiča.
· Povrchy, ktoré by mohli prísť do styku s potravinami udržujte čisté a pravidelne ich umývajte.
Kondenzačné kanálik a odvodňovacie otvor udržujte v čistote.
· Surové mäso a ryby skladujte vo vhodných nádobách tak, aby sa nedostali do styku s inými
potravinami.
· Ak by bol spotrebič dlhšiu dobu prázdny, tak ho odporúčame vypnúť, odmraziť a vyčistiť.
Po takomto vyčistení nechajte vnútro vyschnúť a nezatvárajte dvierka, aby mohol priestor
ventilovať a nemnožili sa tam plesne.
VAROVANIE! Tento prístroj nikdy neumiestňujte do blízkosti ohňa, ani na iné miesto
kde by mohol prísť do styku s tepelným zdrojom. V zadnej strane prístroja v chladenia je
chladivo, ktoré je veľmi horľavé a zápalné.
Venujte pozornosť symbolu “Nebezpečenstvo požiaru - horľavé materiály”, ktorý sa
nachádza na zadnej strane spotrebiča a dbajte bezpečnostných pokynov a bezpečnosti
práce.
ČASTI
1. Poličky
2. Veko poličky na zeleninu
3. Priehradka na zeleninu
4. Zásuvka na zeleninu
5. Poličky vo dverách
6. Šuplíky / priehradky
7. Nastaviteľné nožičky
2YHUYLHZ
Note: Above picture is for reference only. Real appliance probably is different.
FridgeShelves
Fridge
Balconies
Crisper
Crisper Cover
Fresh convertible box
Freezer Drawers
Leveling Feet
6
1
2
3
4
6
7
5

103
DO986BFK
www.domo-elektro.be
SK
PRED PRVÝM POUŽITÍM
· Chladničku rozbaľte, vyberte všetko príslušenstvo zvnútra prístroja. Z vonkajšej strany odlepte
ochranné a reklamné polepy. Vonkajší povrch dôkladne utrite suchou handrou a vnútro môžete utrieť
jemnou navlhčenou handričkou.
· Neumiestňujte chladničku do tesnej blízkosti tepelných zdrojov ani na
priame slnečné žiarenie.
· Vyberte rovnú podlahu, s vysokou nosnosťou. Pokiaľ prístroj nestojí
rovno, môžete ho skúsiť vyrovnať pomocou výškovo nastaviteľných
nožičiek. Nožičky prístroja môžete naskrutkovať či vyskrutkovať a tým
upraviť výšku či zlý náklon prístroja.
· Nechajte aspoň 10 cm medzeru medzi zadnou stranou a stenou.
· Vyvarujte sa umiestnenia na priamy slnečný svit. Priame slnko
spôsobuje zmenu farby povrchu. Zvýšené teplo v okolí zvyšuje spotrebu
prístroja a môže skracovať jeho životnosť.
· Vyvarujte sa veľmi vlhkému prostrediu. Veľká vlhkosť má za následok
zvýšené namrazovanie vnútorného priestoru a výparníka.
· Pred zapojením si dôkladne skontrolujte, či parametre vašej zástrčky
korešpondujú s požiadavkami na prístroji. Rozdielne parametre el. siete
môžu prístroj poškodiť.
· Lednici môžete odpojiť od elektrickej energie iba vypojením z el. siete,
preto by mala byť zástrčka stále prístupná. Ak chcete chladničku odpojiť, nastavte ovládač do polohy
OFF a odpojte z el. siete.
· Chladnička musí byť uzemnená. Výrobca ani predajca nie je schopný kryť riziká, ak to tak nie je.
· Po umiestnení nechajte prístroj aspoň 8 hodín stáť v pokoji a až potom ho zapnite. Pri sťahovaní sa
rozvírilo chladivo a je potrebné, aby sa znovu usadilo.
· Lednici nechajte aspoň 24 hodín v pokoji odstáť a bežať naprázdno. Takto necháte nachladit vnútorný
priestor.
· Lednice je skonštruovaná a navrhnutá na používanie v miestach s priemernou teplotou 16 - 38 ° C. Ak
je táto teplota v okolí prekročená (nižšie alebo vyššie), tak nemusí chladničky chladiť správne.
· Spotrebič môžete badať používaný iba v interiéri.
· Vo chvíli, kedy je kompresor zopnutý a čerpá chladiacu kvapalinu v obehu, tak je prístroj mierne
hlučný.
PREHODENIE PÁNTOV DVERÍ
Ak potrebujete prehodiť otváranie dverí na opačnú stranu, musí sa premontovať pánty. Odporúčame,
pozvať si servisného mechanika alebo vyškolenú osobu z okolia.
Ešte skôr ako začnete pánty přemontovávat, chladničku vypnite a všetko z nej vyberte preč.
Po prehodenie dverí odporúčame prístroj ešte pred zapnutím nechať odstáť (8 hodín). Aby sa usadilo
chladivo. Pre jednoduchú prácu odporúčame používať skrutkovač (nie je v balení) a nižšie vypísané
príslušenstvo.
Kryt horného závesu
,QVWDOODWLRQ
Door Reversibility
Left Aid-Closer on Upper Door x 1 Left Aid-Closer on Lower Door x 1
nscrew top hinge cover and disconnect connectors of door switch and harness.
2.Unscrew top hinge
3.Remove the pin with a screwdriver and filp the hinge bracket. Then refit the pin to hinge bracket
unscrew
screw
8
Horná zarážka dverí
,QVWDOODWLRQ
Door Reversibility
Left Aid-Closer on Upper Door x 1 Left Aid-Closer on Lower Door x 1
nscrew top hinge cover and disconnect connectors of door switch and harness.
2.Unscrew top hinge
3.Remove the pin with a screwdriver and filp the hinge bracket. Then refit the pin to hinge bracket
unscrew
screw
8
Dolné zarážka dverí
,QVWDOODWLRQ
Door Reversibility
Left Aid-Closer on Upper Door x 1 Left Aid-Closer on Lower Door x 1
nscrew top hinge cover and disconnect connectors of door switch and harness.
2.Unscrew top hinge
3.Remove the pin with a screwdriver and filp the hinge bracket. Then refit the pin to hinge bracket
unscrew
screw
8
y
y
,QVWDOODWLRQ
1007NN
1071NN
6SDFH5HTXLUHPHQW
Keep enough space of door open.
Keep at least 50mm gap at two sides.
To do this adjust the two levelling feet at front of the unit.
If the unit is not level, the doors and magnetic seal
alignments will not be covered properly.
/HYHOOLQJWKHXQLW
13
y
y
,QVWDOODWLRQ
1007NN
1071NN
6SDFH5HTXLUHPHQW
Keep enough space of door open.
Keep at least 50mm gap at two sides.
To do this adjust the two levelling feet at front of the unit.
If the unit is not level, the doors and magnetic seal
alignments will not be covered properly.
/HYHOOLQJWKHXQLW
13

104
DO986BFK
SK
1. Povoľte skrutky krytu závesu a kryt odoberte. Odpojte konektory od káblov.
,QVWDOODWLRQ
Door Reversibility
Left Aid-Closer on Upper Door x 1 Left Aid-Closer on Lower Door x 1
nscrew top hinge cover and disconnect connectors of door switch and harness.
2.Unscrew top hinge
3.Remove the pin with a screwdriver and filp the hinge bracket. Then refit the pin to hinge bracket
unscrew
screw
8
2. Odstráňte skrutky závesu, následne pôjdu vybrať celé dvere.
,QVWDOODWLRQ
Door Reversibility
Left Aid-Closer on Upper Door x 1 Left Aid-Closer on Lower Door x 1
nscrew top hinge cover and disconnect connectors of door switch and harness.
2.Unscrew top hinge
3.Remove the pin with a screwdriver and filp the hinge bracket. Then refit the pin to hinge bracket
unscrew
screw
8
3. Vezmite záves, ktorý bol hore na chladničku vyskrutkujte z neho stredový kolík (čap) - je zatiahnutá
na závit. Samotný záves otočte o 180 ° a znovu naskrutkujte stredový kolík (čap). Na čapu by stále
mala byť gumový chrániace poťah.
,QVWDOODWLRQ
Door Reversibility
Left Aid-Closer on Upper Door x 1 Left Aid-Closer on Lower Door x 1
nscrew top hinge cover and disconnect connectors of door switch and harness.
2.Unscrew top hinge
3.Remove the pin with a screwdriver and filp the hinge bracket. Then refit the pin to hinge bracket
unscrew
screw
8
4. V priloženom príslušenstva nájdete opačný kryt na hornej záves dverí (po prehodenie). Z pôvodného
krytu vezmite vypínač a preložte ho na nový kryt. Spínač vyberiete tým, že zo zadnej strany stlačíte
západky a vytiahnete ho.
,QVWDOODWLRQ
5.Detach cover in top of upper door and move harness from right side to left side, then replace the cover.
6.Move top left cover to right side
7. Take off the upper door, take out the screw from the middle hinge by cross screwdriver,
then take off the lower door.
4.Move door switch from right hinge cover to left hinge cover in accessary bag.
9

105
DO986BFK
www.domo-elektro.be
SK
5. Z hornej časti dverí vyberte kryciu lištu, vytiahnite káblik a preložte ho na druhú stranu.
,QVWDOODWLRQ
5.Detach cover in top of upper door and move harness from right side to left side, then replace the cover.
6.Move top left cover to right side
7. Take off the upper door, take out the screw from the middle hinge by cross screwdriver,
then take off the lower door.
4.Move door switch from right hinge cover to left hinge cover in accessary bag.
9
6. Pomocou skrutkovača odmontujte kryt z druhej strany chladničky (na hornej časti).
,QVWDOODWLRQ
5.Detach cover in top of upper door and move harness from right side to left side, then replace the cover.
6.Move top left cover to right side
7. Take off the upper door, take out the screw from the middle hinge by cross screwdriver,
then take off the lower door.
4.Move door switch from right hinge cover to left hinge cover in accessary bag.
9
7. Odstráňte skrutky zo stredového závesu medzi dverami a spodné dvere nadvihnite a zložte.
,QVWDOODWLRQ
5.Detach cover in top of upper door and move harness from right side to left side, then replace the cover.
6.Move top left cover to right side
7. Take off the upper door, take out the screw from the middle hinge by cross screwdriver,
then take off the lower door.
4.Move door switch from right hinge cover to left hinge cover in accessary bag.
9
8. Na rozdeľujúce priečke (chladnička / mraznička) preložte kryty ktoré kryjú otvory pre stredné záves
(pánt).
,QVWDOODWLRQ
8 .
9. Unscrew bottom hinge. Then remove the adjustable feet from both side.
10. Unscrew and remove the bottom hinge pin, turn the bracket over and replace it.
unscrew
screw
10

106
DO986BFK
SK
9. Položte chladničku na zadnú stranu (pokiaľ to ide, tak len mierne do šikma). Odskrutkujte výškovo
nastaviteľné nožičky z oboch strán a odskrutkujte spodný záves (pánt).
,QVWDOODWLRQ
8 .
9. Unscrew bottom hinge. Then remove the adjustable feet from both side.
10. Unscrew and remove the bottom hinge pin, turn the bracket over and replace it.
unscrew
screw
10
10. Vyberte čap a premiestnite ho na druhú stranu závesu. Musíte povoliť maticu čapu zospodu a
následne vybrať, premiestniť a znovu upevniť.
,QVWDOODWLRQ
8 .
9. Unscrew bottom hinge. Then remove the adjustable feet from both side.
10. Unscrew and remove the bottom hinge pin, turn the bracket over and replace it.
unscrew
screw
10
11. Takto pripravený spodné pánt pripevnite na opačnú spodnú stranu chladničky než bolo pôvodne
(zaskrutkujte). Následne naskrutkujte späť obe nožičky.
,QVWDOODWLRQ
13.Detach the Fridge and the Freezer door gaskets and then attach them after rotating.
11.Refit the bracket fitting the bottom hinge pin. Replace both adjustable feet.
12.Remove aid-closers from bottom of upper and lower doors, then take new aid-closers from
accessary bag and install them to left side.
11
12. Z oboch dverí zo spodných strán odskrutkujte zarážky. Následne na opačnej strany naskrutkujte
nové zarážky, ktoré nájdete v balení príslušenstva.
,QVWDOODWLRQ
13.Detach the Fridge and the Freezer door gaskets and then attach them after rotating.
11.Refit the bracket fitting the bottom hinge pin. Replace both adjustable feet.
12.Remove aid-closers from bottom of upper and lower doors, then take new aid-closers from
accessary bag and install them to left side.
11

107
DO986BFK
www.domo-elektro.be
SK
13. Na oboch dverách je potreba prehodiť tesnenie. Opatrne ho vyberte, otočte a nasaďte späť.
,QVWDOODWLRQ
13.Detach the Fridge and the Freezer door gaskets and then attach them after rotating.
11.Refit the bracket fitting the bottom hinge pin. Replace both adjustable feet.
12.Remove aid-closers from bottom of upper and lower doors, then take new aid-closers from
accessary bag and install them to left side.
11
14. Teraz už môžete nasadzovať dvere späť. Začnite spodnými, tak že ich nasadíte na spodnej pánt, a z
hornej časti priskrutkujte závesom (pántom).
,QVWDOODWLRQ
15.Replace upper door, please ensure the door align with the cabinet to make sure door gasket seal
the cabinet tightly. Then connect door with cabinet by tightly fixed top hinge.
16.Connect harnesses from door and cabinet. Then replace top hinge cover. Before screw the cover,
connect terminals of door switch.
14. Install the lower door, adjust and fix the middle hinge onto the cabinet.
12
15. Nasaďte horné dvere chladničky, z hornej strany zaistite pántom (závesom) a priskrutkujte.
Skontrolujte či dvere tesnia po celom svojom obvode.
,QVWDOODWLRQ
15.Replace upper door, please ensure the door align with the cabinet to make sure door gasket seal
the cabinet tightly. Then connect door with cabinet by tightly fixed top hinge.
16.Connect harnesses from door and cabinet. Then replace top hinge cover. Before screw the cover,
connect terminals of door switch.
14. Install the lower door, adjust and fix the middle hinge onto the cabinet.
12
16. Prepojte (pripojte) konektory dverí a zarážku dverí. Nasaďte horný kryt závesu a ešte pred
priskrutkovaním skontrolujte, aby niekde kryt nekrčil na káblové vedenie alebo sa káblik nepricvikli
medzi dvere).
,QVWDOODWLRQ
15.Replace upper door, please ensure the door align with the cabinet to make sure door gasket seal
the cabinet tightly. Then connect door with cabinet by tightly fixed top hinge.
16.Connect harnesses from door and cabinet. Then replace top hinge cover. Before screw the cover,
connect terminals of door switch.
14. Install the lower door, adjust and fix the middle hinge onto the cabinet.
12

108
DO986BFK
SK
POUŽITIE
Dotykové tlačidlá:
A. Nastavenie teploty chladničky
B. Nastavenie teploty mrazničky
C. Voľba funkcie
Údaje na displeji:
1. Teplota v chladničke
2. Teplota v marzáku
3. ECO mód
4. SUPER mód
5. Režim ECO režim
6. Bezpečnostný zámok
Displej sa automaticky vypína a zhasína. Svieti len ak sú otveřený dvere a sa dotknete ovládacích tlačidiel.
NASTAVENIE TEPLOTY
· Teplota v chladničke môže byť nastavená v rozmedzí 2 - 8 ° C. Pri bežných podmínách je všeobecne
doporučované nastaviť teplotu na 4 ° C. Stlačte tlačidlo “FRIDGE” (teplota v chladničke) a každým
ďalším stlačením si upravujete nastavenia. Môžete stláčať do chvíle, kedy si navolíte požadovanú
teplotu.
8VHULQWHUIDFH
Using the Control Panel
A.Temperature Control of Fridge Compartment
B.Temperature Control of Freezer Compartment
C.Mode/ Locking / Unlocking
1.1 BUTTON OPERATION
2.1.1The panel will be lit up for 2 minutes once the door of fridge compartment is opened.
2.1 DISPLAY
1.Temperature of Fridge Comparment
2.Temperature of Freezer Comparment
3.ECO Mode
4.Holiday Mode
5.Super Mode
6.Locking / Unlocking
1.2 LED DISPLAY
a.The control panel is 100% lit up for 3 seconds, which operates exactly as per the setting
(mode and temperature) before the poweroff. The system will be automatically locked 25
seconds after the last button operation. After locking, the light of the panel would be out 30
seconds after the last button operation.
b.Both preset temperatures of fridge compartemnt and freezer compartment would be shown
on the display.
2.0 OPERATING CONDITION
1
2
A
B
C
3
4
5
6
14
· Teplota v mrazničke môže byť nastavená v rozmedzí -14 až -22 °C. Pri bežných podmínách je
všeobecne doporučované nastaviť teplotu na -18 °C. Stlačte tlačidlo “FREEZER” (teplota v mrazničke)
a každým ďalším stlačením si upravujete nastavenia. Môžete stláčať do chvíle, než sa na displeji objaví
požadovaná teplota.
8VHULQWHUIDFH
Using the Control Panel
A.Temperature Control of Fridge Compartment
B.Temperature Control of Freezer Compartment
C.Mode/ Locking / Unlocking
1.1 BUTTON OPERATION
2.1.1The panel will be lit up for 2 minutes once the door of fridge compartment is opened.
2.1 DISPLAY
1.Temperature of Fridge Comparment
2.Temperature of Freezer Comparment
3.ECO Mode
4.Holiday Mode
5.Super Mode
6.Locking / Unlocking
1.2 LED DISPLAY
a.The control panel is 100% lit up for 3 seconds, which operates exactly as per the setting
(mode and temperature) before the poweroff. The system will be automatically locked 25
seconds after the last button operation. After locking, the light of the panel would be out 30
seconds after the last button operation.
b.Both preset temperatures of fridge compartemnt and freezer compartment would be shown
on the display.
2.0 OPERATING CONDITION
1
2
A
B
C
3
4
5
6
14
· Doba prechladnutie a aktuálna teplota je vždy závislá na viacerých faktoroch: prostredie kde prístroj
stojí, ako často sa otvárajú dvere alebo teplota miestnosti, kde chladničky stojí.
NASTAVENIE VYBRANEJ FUNKCIE
8VHULQWHUIDFH
Using the Control Panel
A.Temperature Control of Fridge Compartment
B.Temperature Control of Freezer Compartment
C.Mode/ Locking / Unlocking
1.1 BUTTON OPERATION
2.1.1The panel will be lit up for 2 minutes once the door of fridge compartment is opened.
2.1 DISPLAY
1.Temperature of Fridge Comparment
2.Temperature of Freezer Comparment
3.ECO Mode
4.Holiday Mode
5.Super Mode
6.Locking / Unlocking
1.2 LED DISPLAY
a.The control panel is 100% lit up for 3 seconds, which operates exactly as per the setting
(mode and temperature) before the poweroff. The system will be automatically locked 25
seconds after the last button operation. After locking, the light of the panel would be out 30
seconds after the last button operation.
b.Both preset temperatures of fridge compartemnt and freezer compartment would be shown
on the display.
2.0 OPERATING CONDITION
1
2
A
B
C
3
4
5
6
14
Stlačením tlačidla MODE môžete vyberať a prepínať medzi jednotlivým nastavením ECO, PRÁZDNINOVÝ
alebo SUPER mód.
ECO
8VHULQWHUIDFH
Using the Control Panel
A.Temperature Control of Fridge Compartment
B.Temperature Control of Freezer Compartment
C.Mode/ Locking / Unlocking
1.1 BUTTON OPERATION
2.1.1The panel will be lit up for 2 minutes once the door of fridge compartment is opened.
2.1 DISPLAY
1.Temperature of Fridge Comparment
2.Temperature of Freezer Comparment
3.ECO Mode
4.Holiday Mode
5.Super Mode
6.Locking / Unlocking
1.2 LED DISPLAY
a.The control panel is 100% lit up for 3 seconds, which operates exactly as per the setting
(mode and temperature) before the poweroff. The system will be automatically locked 25
seconds after the last button operation. After locking, the light of the panel would be out 30
seconds after the last button operation.
b.Both preset temperatures of fridge compartemnt and freezer compartment would be shown
on the display.
2.0 OPERATING CONDITION
1
2
A
B
C
3
4
5
6
14
Takéto nastavenie je predvolené na optimálne hodnoty s menšou spotrebou. V časti chladničky je
pevne nastavené 5 ° C a v mrazničke bude udržiavaná teplota -18 ° C. Tlačidlá pre reguláciu teploty budú
uzamknuté a na displeji bude svietiť symbol ECO nastavenia. Funkcie je možné vypnúť / zapnúť opäť
tlačidlom MODE.
8VHULQWHUIDFH
Using the Control Panel
A.Temperature Control of Fridge Compartment
B.Temperature Control of Freezer Compartment
C.Mode/ Locking / Unlocking
1.1 BUTTON OPERATION
2.1.1The panel will be lit up for 2 minutes once the door of fridge compartment is opened.
2.1 DISPLAY
1.Temperature of Fridge Comparment
2.Temperature of Freezer Comparment
3.ECO Mode
4.Holiday Mode
5.Super Mode
6.Locking / Unlocking
1.2 LED DISPLAY
a.The control panel is 100% lit up for 3 seconds, which operates exactly as per the setting
(mode and temperature) before the poweroff. The system will be automatically locked 25
seconds after the last button operation. After locking, the light of the panel would be out 30
seconds after the last button operation.
b.Both preset temperatures of fridge compartemnt and freezer compartment would be shown
on the display.
2.0 OPERATING CONDITION
1
2
A
B
C
3
4
5
6
14
A
4
3
1
B
C
2
5
6

109
DO986BFK
www.domo-elektro.be
SK
Prázdninový ECO režim
8VHULQWHUIDFH
Using the Control Panel
A.Temperature Control of Fridge Compartment
B.Temperature Control of Freezer Compartment
C.Mode/ Locking / Unlocking
1.1 BUTTON OPERATION
2.1.1The panel will be lit up for 2 minutes once the door of fridge compartment is opened.
2.1 DISPLAY
1.Temperature of Fridge Comparment
2.Temperature of Freezer Comparment
3.ECO Mode
4.Holiday Mode
5.Super Mode
6.Locking / Unlocking
1.2 LED DISPLAY
a.The control panel is 100% lit up for 3 seconds, which operates exactly as per the setting
(mode and temperature) before the poweroff. The system will be automatically locked 25
seconds after the last button operation. After locking, the light of the panel would be out 30
seconds after the last button operation.
b.Both preset temperatures of fridge compartemnt and freezer compartment would be shown
on the display.
2.0 OPERATING CONDITION
1
2
A
B
C
3
4
5
6
14
· Takto nastavená chladničky sa prepne do úsporného režimu a šetrí energiu hlavne vtedy, keď nie je
využívaná ako napr. Dlhodobejší dovolenky atď. Mraznička stále beží na zvolenú teplotu.
· Pri výbere tohto nastavenia bude časť chladničky nastavená na 17 ° C. Tlačidlá pre nastavenie teploty v
chladničke budú zamknutá. Je potrebné zabezpečiť, aby chladnička bola vyprataná, alebo tam boli len
trvalé potraviny odolné 17 ° C. Časť mrazničky bude pracovať bez zmeny.
· Kľudovú funkciu môžete zapnúť / vypnúť pomocou tlačidla “MODE”. Pri zapnutí sa na displeji zobrazí
symbol.
SUPER mód
8VHULQWHUIDFH
Using the Control Panel
A.Temperature Control of Fridge Compartment
B.Temperature Control of Freezer Compartment
C.Mode/ Locking / Unlocking
1.1 BUTTON OPERATION
2.1.1The panel will be lit up for 2 minutes once the door of fridge compartment is opened.
2.1 DISPLAY
1.Temperature of Fridge Comparment
2.Temperature of Freezer Comparment
3.ECO Mode
4.Holiday Mode
5.Super Mode
6.Locking / Unlocking
1.2 LED DISPLAY
a.The control panel is 100% lit up for 3 seconds, which operates exactly as per the setting
(mode and temperature) before the poweroff. The system will be automatically locked 25
seconds after the last button operation. After locking, the light of the panel would be out 30
seconds after the last button operation.
b.Both preset temperatures of fridge compartemnt and freezer compartment would be shown
on the display.
2.0 OPERATING CONDITION
1
2
A
B
C
3
4
5
6
14
· Táto funkcia je vhodná vo chvíli, keď standartdní nastavenie teploty nestačí. Napr: ak je v okolí
chladničky extrémne teplo, ak sa chladnička nadmerne často otvára a v miestnosti je príliš teplo a
alebo ste chladničku kompletne naplnili nezchlazenými potravinami.
· Pri takomto nastavení začne mraznička mraziť na -25 ° C a takto nízku teplotu bude udržiavať na
maximálne 50 hodín. Používa sa hlavne na šokové zmrazenie, preto odporúčame funkciu zapnúť
približne 24 hodín pred vložením surovín (aby sa priestor stihol maximálne namraziť).
· Funkcia SUPER sa automaticky sama vypne po uplynutí takejto doby. Po automatickom vypnutí
funkcie sa vráti do pôvodného nastavenia mrazničky a bude mraziť už len na vami nastavenú teplotu.
Pri funkcii SUPER je zablokovaná regulácia teploty pre mrazničku.
· Funkcia maximálneho namrazená sa zapína / vypína pomocou tlačidla “MODE” (funkcie). Na displeji
bude vždy svietiť aktuálne symbol zvoleného režimu.
DETSKÝ BEZPEČNOSTNÝ ZÁMOK
8VHULQWHUIDFH
Using the Control Panel
A.Temperature Control of Fridge Compartment
B.Temperature Control of Freezer Compartment
C.Mode/ Locking / Unlocking
1.1 BUTTON OPERATION
2.1.1The panel will be lit up for 2 minutes once the door of fridge compartment is opened.
2.1 DISPLAY
1.Temperature of Fridge Comparment
2.Temperature of Freezer Comparment
3.ECO Mode
4.Holiday Mode
5.Super Mode
6.Locking / Unlocking
1.2 LED DISPLAY
a.The control panel is 100% lit up for 3 seconds, which operates exactly as per the setting
(mode and temperature) before the poweroff. The system will be automatically locked 25
seconds after the last button operation. After locking, the light of the panel would be out 30
seconds after the last button operation.
b.Both preset temperatures of fridge compartemnt and freezer compartment would be shown
on the display.
2.0 OPERATING CONDITION
1
2
A
B
C
3
4
5
6
14
Slúži pre zneaktívnená a zamknutie ovládacieho panela. Ovládací panel je možné uzamknúť, stačí pridržať
tlačítko “LOCK” po dobu 3 sekúnd. Ak je zámok aktívny, tak na displeji bude svietiť symbol zamknutého
zámku. Na odblokovanie stlačte tlačidlo “UNLOCK” a držte aspoň 3 sekundy. Z displeja zmizne ikona
“zamknuté”.
ALARM
Ak zostanú dvere chladničky otvorené po dobu 90 sekúnd, tak sa ozve zvukový upozorňujúce signál. Tento
alarm je varovaním, aby ste nenechali náhodou dvere otvorené a jedlo sa nepokazilo. Ak dvere zatvoríte,
tak sa zvuk vypne.
FRESH ZÁSUVKA NA ZELENINU
Pomocou regulácie na zadnej strane zásuvky možno meniť podmienky vo vnútri zásuvky.
· Pre zaručenie perfektné teploty a vlhkosti pre stále čerstvú zeleninu stačí prepnúť
reguláciu do polohy “crisper”.
· Ak prepnete regulátor do polohy “chiller”, tak sa vo vnútri bude udržiavať nižšia
teplota, potraviny sa uchovávajú chladnejšie / čerstvé, ale nie mrazené. Tým sa
výrazne predĺži skladovateľnosť.
NASTAVENIE A PREMIESTNENIA POLIČOK
· Pred premiestňovaním poličiek vždy chladničku vyprázdnite.
· Sklenenú poličku mierne nadvihnite a ťahajte smerom k sebe. Držte ju pevne.
· Poličku na dverách pevne uchopte oboma rukami. Tlačte smerom hore a pritom ľahko ťahajte k sebe,
kým sa polička neuvoľní.
'DLO\8VH'DLO\8VH
Cleaning
For hygienic reasons the appliance interior, including interior accessories, should be cleaned regularly.
Caution! The appliance may not be connected to the mains during cleaning. Danger of electrical
shock! Before cleaning switch the appliance off and remove the plug from the mains, or switch off or
turn out the circuit breaker or fuse. Never clean the appliance with a steam cleaner. Moisture could
accumulate in electrical components, danger of electrical shock! Hot vapors can lead to the damage
of plastic parts. The appliance must be dry before it is placed back into service.
Important! Ethereal oils and organic solvents can attack plastic parts, e.g. lemon juice or the juice form
orange peel, butyric acid, cleanser that contain acetic acid.
Do not allow such substances to come into contact the appliance parts.
Do not use any abrasive cleaners
Remove the food from the freezer. Store them in a cool place, well covered.
Switch the appliance off and remove the plug from the mains, or switch off or turn out the circuit breaker
of fuse.
Clean the appliance and the interior accessories with a cloth and lukewarm water. After cleaning wipe
with fresh water and rub dry.
After everything is dry place appliance back into service.
Hints for refrigeration
Useful hints:
Make (all types): wrap in polythene bags and place on the glass shelves above the vegetable drawer.
For safety, store in this way only one or two days at the most.
Cooked foods, cold dishes, etc...: these should be covered and may be placed on any shelf.
Fruit and vegetables: these should be thoroughly cleaned and placed in the special drawer(s) provided.
butter and cheese: these should be placed in special airtight containers or wrapped in aluminum foil or
polythene bags to exclude as much air as possible.
Milk bottle: these should have a cap and should be stored in the balconies on the door.
Bananas, potatoes, onions and garlic, if not packed, must not be kept in the fridge.
Fresh Zone Temperature Control
18

110
DO986BFK
SK
OSVETLENIE
Prístroj je vybavený LED osvetlením vnútri chladničky aj mrazničky. Tento typ osvetlenia má menšiu
spotrebu a dlhšiu životnosť. Takéto osvetlenie by nemalo potrebovať žiadnu údržbu. V prípade, že
osvetlenie aj napriek tomu prestane fungovať, kontaktuje odborný servis.
MANIPULSCE S PRÍSTROJOM
Ak sa prístroj z akéhokoľvek dôvodu vypol, tak počkajte aspoň 10 min pred jeho opätovným zapnutím.
Chladiaci systém potrebuje vyrovnať tlaky vo vnútri chladiaceho okruhu.
· Prístroj vypnite a vypojte z el. siete. Z chladničky vyberte všetko jedlo. Vyberte alebo zabezpečte
všetky voľné poličky a regály proti pohybu.
· Premiestnite na nové miesto a uveďte znovu do prevádzky. Po sťahovaní chladničky ju nechajte aspoň
10 min v kľude stáť, a až potom ju zapojte.
Prístroj používa chladivo R600a. Chladivo R600a je izobután, ktorý je šetrný k životnému prostrediu, ale
zároveň náchylný k vznieteniu. Preto by ste mali byť veľmi opatrní a dbať na to, aby sa chladiaci systém
nepoškodil. V prípade poškodenia a nechceného úniku chladiva, zamedzte styku s otvoreným ohňom či so
zdrojom tepla a miestnosť rýchlo vyvetrajte.
JEDLO V CHLADNIČKE
Chladničky predlžuje trvanlivosť jedla (najmä jedlá podliehajúce skaze).
Ak vložíte čerstvé potraviny, tak tie vydržia v chladničke najdlhšie.
· Neskladujte jedlo, ktoré už nie je čerstvé.
· Pred vložením do chladničky jedlo zabaľte alebo zakryte, inak by jedlo vysýchalo a menilo farbu a
samozrejme strácalo na čerstvosti i chuti.
· Potraviny sa silnou arómou dôkladne zabaľte, aby sa vôňa / zápach nepreniesla na ostatné potraviny.
· Pred vložením do chladničky, nechajte všetky potraviny vychladnúť.
ZAMRAZOVANIE A SKLADOVANIE V MRAZNIČKE
Prístroj môžete využiť:
· uchovávať hlboko zamrazené potraviny
· výroba kociek ľadu
· zamrazovať potraviny
UPOZORNENIE: vždy sa presvedčte, že ste dôkladne zavreli dvere. Dvere neotvárajte zbytočne.
Uchovanie mrazených potravín
· Obal ani krabička potravín nesmú byť poškodené,
· Popisujte si balíčky s informáciami o dátumom trvanlivosti / vloženie atd ...
· Pokiaľ možno, všetky zmrazené potraviny prenášajte z obchodu v chladiacej taške a čo najrýchlejšie
ich vložte do mrazničky.
Zamrazovanie čerstvých potravín
Zamrazujte iba čerstvé ovocie v 100% kvalite. Aby sa zachovala čo najlepšiu chuť, farba i výživová
hodnota, odporúčame všetku zeleninu pred zmrazením ľahko z blanšírovať.
Baklažán, papriky, cukety ani špargľa blanšírovanie nepotrebujú.
POZNÁMKA: Potraviny, ktoré sa chystáte mraziť, držte mimo už zamrazené suroviny.

111
DO986BFK
www.domo-elektro.be
SK
· Nasledujúce potraviny sú vhodné na zmrazenie: cukrárske výrobky, ryby, mäso, hydina, ovocie,
zelenina, syry, maslo, zvyšky varených jedál, polievky, dusená mäsa atď ...
· Nasledujúce potraviny nie sú vhodné na zmrazenie: Druhy zeleniny, ktoré sa konzumujú surové (ako
napr. Ľadový šalát, reďkev, hrozno, celé jablká, hrušky, broskyne), varené vajcia natvrdo, jogurt,
majonéza, smotana, atď …
Balenie potravín na zmrazenie
Aby potraviny v mrazničke nestrácali chuť a nevysychali, musia byť zabalené.
1. Potraviny vložte do obalu.
2. Vytlačte čo najviac prebytočného vzduchu.
3. Obal uzavrite.
4. Balíček popíšte dátumom spotreby / vloženie.
Do čoho najlepšie baliť:
Plastová potravinová fólia, vrecká do mrazničky, alobal, nádoby vhodnej do mrazničky.
Odporúčaná doba uchovanie v mrazničke
Nižšie spomínané časy sú orientačné a závisia od typu potraviny. Jedlo všeobecne môže byť v mrazničke
1-12 mesiacov (pri teplote pod -18 ° C)
Druh potraviny Doba
Slanina, dusené mäso so zeleninou, mlieko 1 mesiac
Chlieb, zmrzlina, párky, koláče, predvarené mäkkýše, tučné ryby 2 mesiaca
Málo tučné ryby, hlboko zmrazené mäkkýše, pizza, muny 3 mesiaca
Šunka, sušienky, hovädzie / baranie kotlety, naporciované hydinu 4 mesiaca
Maslo, zelenina (blanšírovaná), vajcia a žĺtky, varený rak, mleté mäso (surové),
bravčové (surové)
6 mesiaca
Ovocie (sušené, syrup), vaječné bielky, hovädzie (surové), celé kurča, baranie (sur-
ové), ovocné koláče
12 mesiaca
POZOR: Ak zmrazujú čerstvé potraviny s označeným dátumom spotreby, musí sa zamraziť pred týmto
dátumom. Skontrolujte, či potraviny už neboli raz zamrazené, lebo každé jedlo sa smie zamrazovať iba
raz.
VÝPADOK PRÚDU
Výpadok prúdu je prevažne kratšia ako 1-2 hodiny, na takto krátky čas sa nedeje nič zlé, nižšia teplota sa
v uzavretej chladničke udrží. Nesmie sa však otvárať dvere chladničky a zbytočne vetrať. Počas dlhšieho
výpadku prúdu môžete do chladničky vkladať väčšie množstvo ľadu, ktoré vnútorný priestor čiastočne
ochladí.
Ak je výpadok kratší ako 15 hodín, tak by malo všetko zamrazené jedlo vydržať a udržať si svoju kvalitu.
Ak už nejaké potraviny kompletne sa rozpustili, nikdy ich nezmrazujte späť.

112
DO986BFK
SK
ČISTENIE A ÚDRŽBA
Nikdy na čistenie nepoužívajte drsné ani agresívne čistiace prostriedky.
1. Pred čistením prístroj vypnite a vypojte z elektrickej zásuvky.
2. Počas čistenia chladničku vyprázdnite a potraviny nechajte na chladnom mieste.
3. Prístroj čistite (utierajte) jemnou handričkou, ktorá povrch nezničí.
4. Tesnenie vo dverách stačí čistiť len čistou vodou, pred ďalším spustením musí byť tesnenie dokonale
suché.
5. Po vyčistení musí byť prístroj suchý, následne ho zapojte do elektrickej siete, zapnite a nastavte
požadovanú teplotu.
6. Po vyčistení a zapnutí už môžete vložiť jedlo späť do chladničky.
RIEŠENIE MOŽNÝCH PROBLÉMOV
Problém Možná príčina Riešenie
Prístroj nefunguje. · Zástrčka nie je dostatočne
zapojená do siete.
· Sú vypnuté ističa alebo hlavné
posjitka.
· Závada vo vašej el. sieti.
· Znovu a dôkladne zástrčku
zapojte.
· Skontrolujte ističe aj poistku.
· Kontaktujte miestneho
elektrikára.
Podivný zápach. · Potraviny v chladničke sú
pokazené.
· Vyčistite vnútro chladničky.
Dvere sa úplne
nezatvoria.
· Chladnička alebo mraznička sú
príliš plné.
· Prístroj nie je vyrovnaný.
· Uistite sa, že jedlo alebo nápoje
nebráni v zatváraní dverí.
· Prispôsobte nastaviteľné nohy.
Nezvyčajné zvuky. · Prístroj nestojí v rovine.
· Prístroj sa opiera o stenu alebo
iný prístroj (vibrácie).
· Vyrovnajte pomocou
nas tavi teľn ých n ožič iek.
· Prístroj zľahka odtiahnite, aby
sa ničoho nedotýkal.
· Zavolajte opravára, nech všetko
skontroluje.
Hučiace alebo bublajúce
zvuk.
· Kompresor sa spúšťa / pracuje.
· Chladiaci plyn cirkuluje v
spotrebiči.
· To je normálne.
Bočná strana prístroja je
teplá.
· Na tejto strane je odpadové
hadice skondenzovanej vody.
· Ak áno, je tá situácia normálna.

113
DO986BFK
www.domo-elektro.be
SK
OHĽAD NA ŽIVOTNÉ PROSTREDIE
Symbol na prístroji alebo na jeho obale znamená, že s týmto výrobkom nie je
možné nakladať ako s domovým odpadom, ale musí byť odovzdaný na miestach
určených na zber a likvidáciu elektrických a elektronických zariadení. Dodržaním
tohto odporúčania chránite životné prostredie a zdravie spoluobčanov.
Viac informácií o možnostiach likvidácie nebezpečného odpadu obdržíte na
obecných alebo mestských úradoch, zberných dvoroch alebo v predajni, kde ste
prístroj zakúpili.
Obalové materiály sú recyklovateľné, nakladajte s nimi podľa predpisov pre
životné prostredie.

114
DO986BFK

115
DO986BFK
www.domo-elektro.be

LINEA 2000 BV - Dompel 9 - 2200 Herentals - Belgium - Tel: +32 14 21 71 91 - Fax: +32 14 21 54 63
BESTEL
de originele
Domo-accessoires
en -onderdelen
online via:
of scan hier:
COMMANDEZ
d’authentiques
accessoires et
pièces Domo en
ligne sur:
ou scannez ici:
BESTELLEN SIE
die Domo
Original-Zubehör
und -Ersatzteile
online über:
oder hier scannen:
ORDER
the original
Domo
accessories and
parts online at:
or scan here:
webshop.domo-elektro.be
Webshop
-
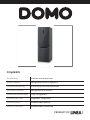 1
1
-
 2
2
-
 3
3
-
 4
4
-
 5
5
-
 6
6
-
 7
7
-
 8
8
-
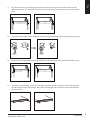 9
9
-
 10
10
-
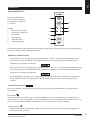 11
11
-
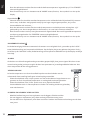 12
12
-
 13
13
-
 14
14
-
 15
15
-
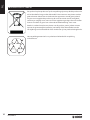 16
16
-
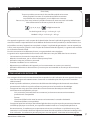 17
17
-
 18
18
-
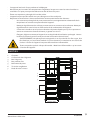 19
19
-
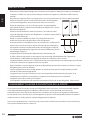 20
20
-
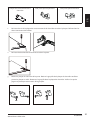 21
21
-
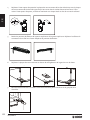 22
22
-
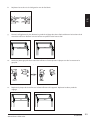 23
23
-
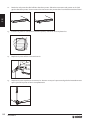 24
24
-
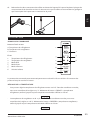 25
25
-
 26
26
-
 27
27
-
 28
28
-
 29
29
-
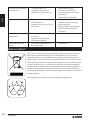 30
30
-
 31
31
-
 32
32
-
 33
33
-
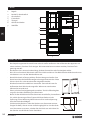 34
34
-
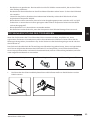 35
35
-
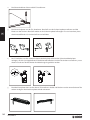 36
36
-
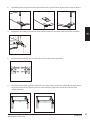 37
37
-
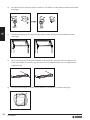 38
38
-
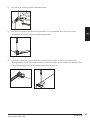 39
39
-
 40
40
-
 41
41
-
 42
42
-
 43
43
-
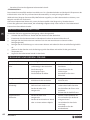 44
44
-
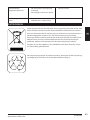 45
45
-
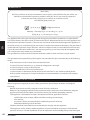 46
46
-
 47
47
-
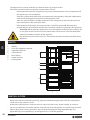 48
48
-
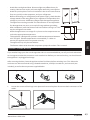 49
49
-
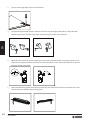 50
50
-
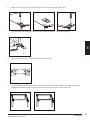 51
51
-
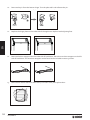 52
52
-
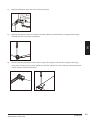 53
53
-
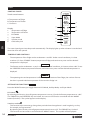 54
54
-
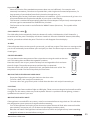 55
55
-
 56
56
-
 57
57
-
 58
58
-
 59
59
-
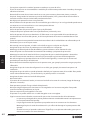 60
60
-
 61
61
-
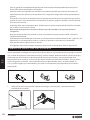 62
62
-
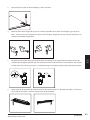 63
63
-
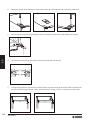 64
64
-
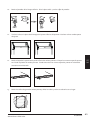 65
65
-
 66
66
-
 67
67
-
 68
68
-
 69
69
-
 70
70
-
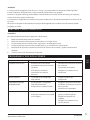 71
71
-
 72
72
-
 73
73
-
 74
74
-
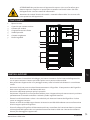 75
75
-
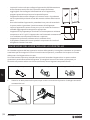 76
76
-
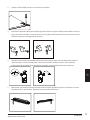 77
77
-
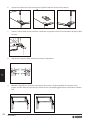 78
78
-
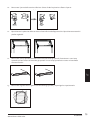 79
79
-
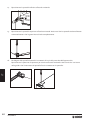 80
80
-
 81
81
-
 82
82
-
 83
83
-
 84
84
-
 85
85
-
 86
86
-
 87
87
-
 88
88
-
 89
89
-
 90
90
-
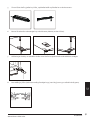 91
91
-
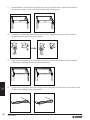 92
92
-
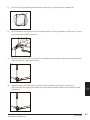 93
93
-
 94
94
-
 95
95
-
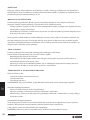 96
96
-
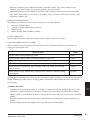 97
97
-
 98
98
-
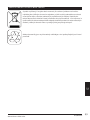 99
99
-
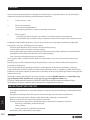 100
100
-
 101
101
-
 102
102
-
 103
103
-
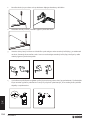 104
104
-
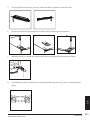 105
105
-
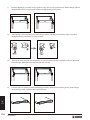 106
106
-
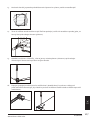 107
107
-
 108
108
-
 109
109
-
 110
110
-
 111
111
-
 112
112
-
 113
113
-
 114
114
-
 115
115
-
 116
116


Domo DO986BFK DO987BFK El manual del propietario
- Categoría
- Frigoríficos-congeladores
- Tipo
- El manual del propietario
en otros idiomas
- français: Domo DO986BFK DO987BFK Le manuel du propriétaire
- italiano: Domo DO986BFK DO987BFK Manuale del proprietario
- English: Domo DO986BFK DO987BFK Owner's manual
- Deutsch: Domo DO986BFK DO987BFK Bedienungsanleitung
- Nederlands: Domo DO986BFK DO987BFK de handleiding
- slovenčina: Domo DO986BFK DO987BFK Návod na obsluhu
Artículos relacionados
-
Domo DO990TDK El manual del propietario
-
Domo DO991K Instrucciones de operación
-
-
-
-
-
-
-
Linea DO926BFK El manual del propietario
-