
PRODUCT OF
DO927BFK
Handleiding Koelkast en diepvries
Mode d’emploi Frigo et congélateur
Gebrauchsanleitung Kühlschrank und Gefrierschrank
Instruction booklet Refridgerator and freezer
Manual de instrucciones congelador

Lees aandachtig alle instructies - bewaar deze handleiding voor latere raadpleging.
Lisez attentivement les instructions - gardez le mode d’emploi pour utilisation ultérieur.
Lesen Sie genau die Anweisungen - bewahren Sie die Gebrauchsanleitung für spätere
heranziehung.
Read all instructions carefully - save this instruction manual for future reference.
Lea detenidamente todas las instrucciones - Conserve este manual para futura referencia.
budoucího nahlédnutí.
budúceho nahliadnutie.
NL Nederlands 3
FR Français 14
DE Deutsch 25
EN English 36
ES Espagnol 46
CZ 56
SK 66
La página se está cargando...
La página se está cargando...
La página se está cargando...
La página se está cargando...
La página se está cargando...
La página se está cargando...
La página se está cargando...
La página se está cargando...
La página se está cargando...
La página se está cargando...
La página se está cargando...
La página se está cargando...
La página se está cargando...
La página se está cargando...
La página se está cargando...
La página se está cargando...
La página se está cargando...
La página se está cargando...
La página se está cargando...
La página se está cargando...
La página se está cargando...
La página se está cargando...
La página se está cargando...
La página se está cargando...
La página se está cargando...
La página se está cargando...
La página se está cargando...
La página se está cargando...
La página se está cargando...
La página se está cargando...
La página se está cargando...
La página se está cargando...
La página se está cargando...
La página se está cargando...
La página se está cargando...
La página se está cargando...
La página se está cargando...
La página se está cargando...
La página se está cargando...
La página se está cargando...
La página se está cargando...
La página se está cargando...
La página se está cargando...

46
DO927BFK
ES
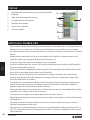
GARANTIA
Este aparato tiene un periodo de garantía de 2 años a partir de la fecha de compra. Durante
directamente asignables a errores del material y fabricación. Cuando se detecten este tipo de
automáticamente en los siguientes casos:
·
·
alta.
·
·
·
aparato.
·

47
DO927BFK
www.domo-elektro.be
ES
INSTRUCCIONES DE SEGURIDAD
LEA TODAS LAS INSTRUCCIONES ANTES DEL USO.
·
del aparato con un paño seco. El interior puede limpiarlo con un paño suave y húmedo.
· Este aparato está diseñado para ser utilizado en un entorno doméstico y en entornos
similares como:
·
·
· En las habitaciones de hoteles y moteles y otros entornos con un carácter residencial
· En los cuartos de huéspedes o similares
· Este aparato está diseñado para ser utilizado por niños a partir de 16 años de edad y
instruidos inicialmente en la utilización segura del aparato y los posibles peligros.
·
aparato.
·
tengan más de 16 años de edad y sean supervisados. Mantenga el aparato y el cordón
eléctrico fuera del alcance de niños menores de 16 años.
·
realizan tareas de mantenimiento o al sustituir piezas.
·
funcionamiento de la unidad o si están dañados. Lleve el aparato al distribuidor autorizado
más cercano centro para la inspección y reparación.
· Atención: el aparato no puede ser utilizado con un temporizador externo o un mando a
distancia separado.
·
aparato esté dañado. Lleve el aparato al departamento de DOMO o a su representante
·
es usado por o cerca de niños.
· El aparato debe estar conectado a tierra. El fabricante no se hace responsable de los daños
causados por no utilizar una conexión a tierra.
·
la electricidad de su casa.
·
· No desplace el aparato mientras lo utiliza.
·

48
DO927BFK
ES
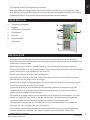
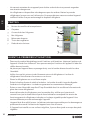
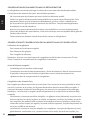
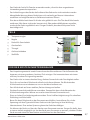
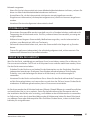
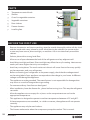
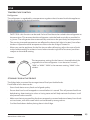
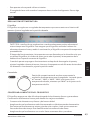
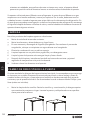
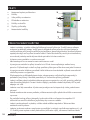
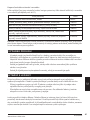
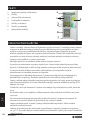
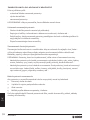
PIEZAS
1. Regulador de temperatura con sección de bombilla
2. Estantes
3.
4. Compartimento de verduras
5. Estantes de la puerta
6.
7.
ANTES DEL PRIMER USO
·
del aparato con un paño seco. El interior puede limpiarlo con un paño suave y húmedo.
·
del sol.
·
·
·
El calor aumentará el consumo.
· Evite un grado de humedad demasiado elevado. Demasiada humedad ambiental causará
·
tensión puede dañar el aparato.
·
aparato y retire el enchufe de la toma de corriente.
· El aparato debe estar conectado a tierra. El fabricante no se hace responsable de los daños
causados por no utilizar una conexión a tierra.
·
·
el refrigerante.
·
alcance la temperatura adecuada.
· Este aparato se ha diseñado para funcionar a una temperaturas ambiente de entre 16°C y
correctamente.
6
1
2
3
4
5
7

49
DO927BFK
www.domo-elektro.be
ES
· Este aparato solo se puede utilizar en interior.
· El congelador hace ruido cuando el compresor hace circular el refrigerante. Esto es algo
normal.
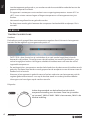
USO
REGULACIÓN DE TEMPERATURA
Frigoríco
· FAST COOL: esta función se puede activar cuando se almacenan muchos alimentos al
preestablecida.
·
·
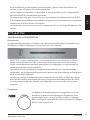
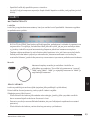
Congelador
Detrás del compartimento de verduras se encuentra la
temperatura más fría.
CONSERVAR ALIMENTOS EN EL FRIGORÍFICO
· Conserve solo alimentos muy frescos y de buena calidad.
·
frescos durante más tiempo. Esto también evita la transferencia de olores.
·

50
DO927BFK
ES
verse afectados por un fuerte olor.
·
CONGELACIÓN Y CONSERVACIÓN DE ALIMENTOS EN EL CONGELADOR
Utilice el congelador
· Para conservar alimentos congelados.
· Para fabricar cubitos de hielo.
· Para congelar alimentos.
Compra de productos congelados
· El envase no puede encontrarse dañado.
· Consuma antes de la fecha de caducidad.
·
rápidamente en el congelador.
Congelación de alimentos frescos
·
·
Conservación de productos congelados
1. Introduzca los alimentos en el envase.
2. Extraiga todo el aire.
3. Cierre el envase.
4.
recipientes aptos para el congelador.

51
DO927BFK
www.domo-elektro.be
ES
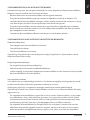
Tiempo de conservación en el congelador recomendado para los productos congelados
Este tiempo puede variar según el tipo de alimento. Los alimentos congelados se pueden
conservar entre 1 y 12 meses (a un mínimo de -18°C).
Alimento Tiempo de
conservación
1 mes
2 meses
3 meses
troceadas
4 meses
6 meses
12 meses
No olvidar:
APAGÓN
· La mayoría de los apagones duran entre 1 y 2 horas y no suelen alterar la temperatura del
·
· Los alimentos congelados se mantienen en buenas condiciones si el fallo de alimentación
no dura más de 15 horas.
·
DESPLAZAR SU APARATO
La presión en el sistema de refrigeración se debe estabilizar antes de volver a encenderlo.
· Apague el aparato y retire el enchufe de la toma de corriente. Retire todos los
·
· Desplace el aparato e instálelo. Si el dispositivo se mantuvo posicionado sobre un lado

52
DO927BFK
ES
ponerse en posición vertical durante al menos 10 minutos antes de encender el aparato.
cuidado al mover o instalar el aparato para evitar daños en los elementos de refrigeración. En
aparato durante algunos minutos.
LIMPIEZA
No utilice productos de limpieza agresivos o disolventes.
1. Retire el enchufe de la toma de corriente.
2. Retire los alimentos y almacénelos en un lugar fresco.
3.
4.
5.
6.
7.
regulador de temperatura en la posición deseada.
8. Vuelva a colocar los alimentos en el aparato.
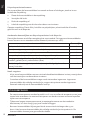
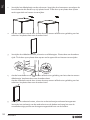
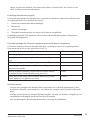
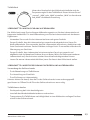
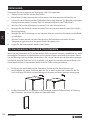
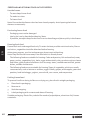
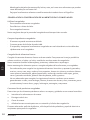
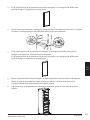
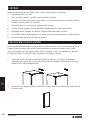
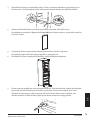
CAMBIO DE DIRECCIÓN DE LA PUERTA
llave (ambos no incluidos).
1.
suave para evitar arañazos.
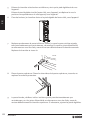
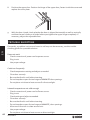
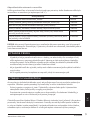
3. Take off the middle hinge by removing
the screws. Lift the lower door and place
it on a padded surface to prevent it from
scratching.
Remove the screws’ covers and place
them to the opposite side.
Swap the position of the plastic tube and
hole cover on top of the lower door.
Remove the door block, screw and plastic
tube under the lower door and move
them to the opposite side. You may
need to replace the door block to fit the
opposite side.
unscrew
Reversing the Door Swing
Tools required: Philips style screwdriver / Flat bladed screwdriver / Hexagonal spanner
1. Take off the hinge cover.
2. Remove the the upper hinge. Lift the
upper door and place it on a padded
surface to prevent it from scratching.
Remove the door block, screw and plastic
tube under the upper door and move
them to the opposite side. You may
need to replace the door block to fit the
opposite side.
• Ensure the unit is unplugged and empty.
• All parts removed must be saved to do the reinstallation of the door.
• Do not lay the unit flat as this may damage the coolant system.
• We recommend that 2 people handle the unit during assembly.
• If you want to have the door swing reversed, we recommend that you contact a
qualified technician. You should only try to reverse the door yourself if you believe
that you are qualified to do so.
8
INSTALLATION
LFC60W16_IB_160201_grace.indd 8 1/2/16 10:43 am
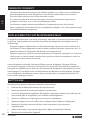
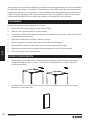
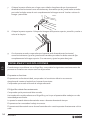

53
DO927BFK
www.domo-elektro.be
ES
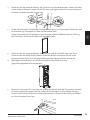
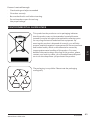
2.
3. Take off the middle hinge by removing
the screws. Lift the lower door and place
it on a padded surface to prevent it from
scratching.
Remove the screws’ covers and place
them to the opposite side.
Swap the position of the plastic tube and
hole cover on top of the lower door.
Remove the door block, screw and plastic
tube under the lower door and move
them to the opposite side. You may
need to replace the door block to fit the
opposite side.
unscrew
Reversing the Door Swing
Tools required: Philips style screwdriver / Flat bladed screwdriver / Hexagonal spanner
1. Take off the hinge cover.
2. Remove the the upper hinge. Lift the
upper door and place it on a padded
surface to prevent it from scratching.
Remove the door block, screw and plastic
tube under the upper door and move
them to the opposite side. You may
need to replace the door block to fit the
opposite side.
• Ensure the unit is unplugged and empty.
• All parts removed must be saved to do the reinstallation of the door.
• Do not lay the unit flat as this may damage the coolant system.
• We recommend that 2 people handle the unit during assembly.
• If you want to have the door swing reversed, we recommend that you contact a
qualified technician. You should only try to reverse the door yourself if you believe
that you are qualified to do so.
8
INSTALLATION
LFC60W16_IB_160201_grace.indd 8 1/2/16 10:43 am
3.
3. Take off the middle hinge by removing
the screws. Lift the lower door and place
it on a padded surface to prevent it from
scratching.
Remove the screws’ covers and place
them to the opposite side.
Swap the position of the plastic tube and
hole cover on top of the lower door.
Remove the door block, screw and plastic
tube under the lower door and move
them to the opposite side. You may
need to replace the door block to fit the
opposite side.
unscrew
Reversing the Door Swing
Tools required: Philips style screwdriver / Flat bladed screwdriver / Hexagonal spanner
1. Take off the hinge cover.
2. Remove the the upper hinge. Lift the
upper door and place it on a padded
surface to prevent it from scratching.
Remove the door block, screw and plastic
tube under the upper door and move
them to the opposite side. You may
need to replace the door block to fit the
opposite side.
• Ensure the unit is unplugged and empty.
• All parts removed must be saved to do the reinstallation of the door.
• Do not lay the unit flat as this may damage the coolant system.
• We recommend that 2 people handle the unit during assembly.
• If you want to have the door swing reversed, we recommend that you contact a
qualified technician. You should only try to reverse the door yourself if you believe
that you are qualified to do so.
8
INSTALLATION
LFC60W16_IB_160201_grace.indd 8 1/2/16 10:43 am
4.
3. Take off the middle hinge by removing
the screws. Lift the lower door and place
it on a padded surface to prevent it from
scratching.
Remove the screws’ covers and place
them to the opposite side.
Swap the position of the plastic tube and
hole cover on top of the lower door.
Remove the door block, screw and plastic
tube under the lower door and move
them to the opposite side. You may
need to replace the door block to fit the
opposite side.
unscrew
Reversing the Door Swing
Tools required: Philips style screwdriver / Flat bladed screwdriver / Hexagonal spanner
1. Take off the hinge cover.
2. Remove the the upper hinge. Lift the
upper door and place it on a padded
surface to prevent it from scratching.
Remove the door block, screw and plastic
tube under the upper door and move
them to the opposite side. You may
need to replace the door block to fit the
opposite side.
• Ensure the unit is unplugged and empty.
• All parts removed must be saved to do the reinstallation of the door.
• Do not lay the unit flat as this may damage the coolant system.
• We recommend that 2 people handle the unit during assembly.
• If you want to have the door swing reversed, we recommend that you contact a
qualified technician. You should only try to reverse the door yourself if you believe
that you are qualified to do so.
8
INSTALLATION
LFC60W16_IB_160201_grace.indd 8 1/2/16 10:43 am
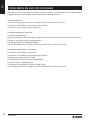
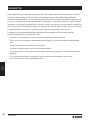
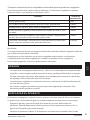
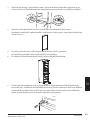
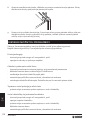
5.
correspondiente en el lado opuesto de la parte inferior.
6.
inferior.
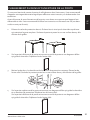
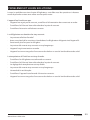
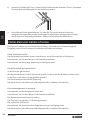
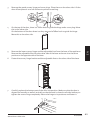
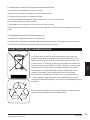
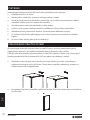
5. Reverse the middle hinge. Screw the
middle hinge onto the opposite side of
the unit.
6. Carefully set the upper door back into
place, inserting in onto the middle hinge.
7. Insert the upper hinge and screw it
tightly to the top of the unit.
Middle hinge
Ensure the lower door is aligned
horizontally and vertically, so that
the seals are closed on all sides
before finally tightening the hinge.
Ensure the upper door is aligned
horizontally and vertically, so that
the seals are closed on all sides
before finally tightening the hinge.
4. Remove the lower screws and lower
hinge from the unit bottom. Reverse the
lower hinge, move and secure it with
the lower screws to the opposite side of
the unit bottom. Carefully set the lower
door back into place, inserting it onto the
lower hinge.
8. Put the hinge cover back.
9
INSTALLATION
LFC60W16_IB_160201_grace.indd 9 1/2/16 10:43 am

54
DO927BFK
ES
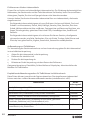
7.
por todos los lados antes de unir completamente la bisagra central. Vuelva a colocar la
bisagra y atorníllela.
5. Reverse the middle hinge. Screw the
middle hinge onto the opposite side of
the unit.
6. Carefully set the upper door back into
place, inserting in onto the middle hinge.
7. Insert the upper hinge and screw it
tightly to the top of the unit.
Middle hinge
Ensure the lower door is aligned
horizontally and vertically, so that
the seals are closed on all sides
before finally tightening the hinge.
Ensure the upper door is aligned
horizontally and vertically, so that
the seals are closed on all sides
before finally tightening the hinge.
4. Remove the lower screws and lower
hinge from the unit bottom. Reverse the
lower hinge, move and secure it with
the lower screws to the opposite side of
the unit bottom. Carefully set the lower
door back into place, inserting it onto the
lower hinge.
8. Put the hinge cover back.
9
INSTALLATION
LFC60W16_IB_160201_grace.indd 9 1/2/16 10:43 am
8.
colocar la chapita.
5. Reverse the middle hinge. Screw the
middle hinge onto the opposite side of
the unit.
6. Carefully set the upper door back into
place, inserting in onto the middle hinge.
7. Insert the upper hinge and screw it
tightly to the top of the unit.
Middle hinge
Ensure the lower door is aligned
horizontally and vertically, so that
the seals are closed on all sides
before finally tightening the hinge.
Ensure the upper door is aligned
horizontally and vertically, so that
the seals are closed on all sides
before finally tightening the hinge.
4. Remove the lower screws and lower
hinge from the unit bottom. Reverse the
lower hinge, move and secure it with
the lower screws to the opposite side of
the unit bottom. Carefully set the lower
door back into place, inserting it onto the
lower hinge.
8. Put the hinge cover back.
9
INSTALLATION
LFC60W16_IB_160201_grace.indd 9 1/2/16 10:43 am
9.
PROBLEMAS Y SUS SOLUCIONES
ponerse en contacto con nuestro servicio de posventa.
El aparato no funciona.
Asegúrese de insertar el enchufe en la toma de corriente.
El frigoríco rebota frecuentemente.
intensidad para enfriarla.
La puerta ha estado abierta demasiadas veces o durante demasiado tiempo.
El aparato está demasiado cerca de una fuente de calor o está expuesto directamente a la luz
solar.

55
DO927BFK
www.domo-elektro.be
ES
La temperatura interior del frigoríco es demasiado alta.
Asegúrese de insertar el enchufe en la toma de corriente.
La puerta ha estado demasiado tiempo abierta o con mucha frecuencia.
El aparato está demasiado cerca de una fuente de calor o está expuesto directamente a la luz
solar.
El congelador no está lo sucientemente frío
La puerta del congelador no se ha cerrado bien.
La puerta del congelador ha estado abierta demasiadas veces o durante demasiado tiempo.
DIRECTRICES MEDIOAMBIENTALES
producto no puede ser tratado como residuo doméstico. Se
causadospor un tratamiento de residuos inadecuado. Para
con la empresa o departamento responsable del servicio de
producto.
manera medioambientalmente responsable.
La página se está cargando...
La página se está cargando...
La página se está cargando...
La página se está cargando...
La página se está cargando...
La página se está cargando...
La página se está cargando...
La página se está cargando...
La página se está cargando...
La página se está cargando...
La página se está cargando...
La página se está cargando...
La página se está cargando...
La página se está cargando...
La página se está cargando...
La página se está cargando...
La página se está cargando...
La página se está cargando...
La página se está cargando...
La página se está cargando...
La página se está cargando...
Transcripción de documentos
DO927BFK Handleiding Koelkast en diepvries Mode d’emploi Frigo et congélateur Gebrauchsanleitung Kühlschrank und Gefrierschrank Instruction booklet Refridgerator and freezer Manual de instrucciones Frigorífico, congelador Návod k použití Kombinovaná chladnička Návod na použitie Kombinovaná chladnička PRODUCT OF Lees aandachtig alle instructies - bewaar deze handleiding voor latere raadpleging. Lisez attentivement les instructions - gardez le mode d’emploi pour utilisation ultérieur. Lesen Sie genau die Anweisungen - bewahren Sie die Gebrauchsanleitung für spätere heranziehung. Read all instructions carefully - save this instruction manual for future reference. Lea detenidamente todas las instrucciones - Conserve este manual para futura referencia. Před použitím si důkladně přečtěte tento manuál - manuál si uschovejte i pro případ budoucího nahlédnutí. Pred použitím si dôkladne prečítajte tento manuál - manuál si uschovajte aj pre prípad budúceho nahliadnutie. NL Nederlands 3 FR Français 14 DE Deutsch 25 EN English 36 ES Espagnol 46 CZ Čeština 56 SK Slovenčina 66 GARANTIA Este aparato tiene un periodo de garantía de 2 años a partir de la fecha de compra. Durante el periodo de garantía, el distribuidor será completamente responsable de los defectos directamente asignables a errores del material y fabricación. Cuando se detecten este tipo de errores, y siempre que se estime necesario, el aparato se sustituirá o reparará. A partir de ese momento, el periodo de garantía de 2 años no volverá a iniciarse, sino que seguirá siendo de 2 años a partir del momento de compra. La garantía se concede sobre la base del recibo de caja. La garantía de los accesorios y componentes sujetos a desgaste es de 6 meses. La garantía y la responsabilidad/imputabilidad del proveedor y el fabricante expiran automáticamente en los siguientes casos: ·· Cuando no se cumplan las instrucciones que aparecen en este manual. ·· En el caso de una conexión inadecuada, por ejemplo, a una tensión eléctrica demasiado alta. ·· En caso de uso incorrecto, brusco o anormal. ·· En caso de insuficiente o incorrecto mantenimiento. ·· Si el consumidor o un tercero no autorizado realizan reparaciones o modificaciones en el aparato. ES ·· Si se usan componentes o accesorios que no están recomendados o que no son suministrados por el proveedor/fabricante. 46 DO927BFK INSTRUCCIONES DE SEGURIDAD LEA TODAS LAS INSTRUCCIONES ANTES DEL USO. ·· Retire todo el material de embalaje, tanto del interior como del exterior. Limpie el exterior del aparato con un paño seco. El interior puede limpiarlo con un paño suave y húmedo. ·· Este aparato está diseñado para ser utilizado en un entorno doméstico y en entornos similares como: ·· En la cocina para el personal de tiendas, oficinas y otros entornos profesionales similares ·· En las fincas ·· En las habitaciones de hoteles y moteles y otros entornos con un carácter residencial ·· En los cuartos de huéspedes o similares ·· Este aparato está diseñado para ser utilizado por niños a partir de 16 años de edad y por personas con discapacidades físicas, sensoriales o mentales, o por personas que no dispongan de suficiente experiencia y conocimientos, a no ser que sean supervisados o instruidos inicialmente en la utilización segura del aparato y los posibles peligros. ·· Los niños deben estar siempre bajo supervisión, para asegurar que no juegan con el aparato. ·· El mantenimiento y la limpieza del aparato no pueden efectuarse por niños, a no ser que tengan más de 16 años de edad y sean supervisados. Mantenga el aparato y el cordón eléctrico fuera del alcance de niños menores de 16 años. ·· No utilice nunca el aparato si el cable o el enchufe están dañados, después de un mal funcionamiento de la unidad o si están dañados. Lleve el aparato al distribuidor autorizado más cercano centro para la inspección y reparación. ES ·· El aparato se debe desconectar de la toma de corriente cuando no se utiliza, cuando se realizan tareas de mantenimiento o al sustituir piezas. ·· Atención: el aparato no puede ser utilizado con un temporizador externo o un mando a distancia separado. ·· No utilice este aparato cuando el cable o el enchufe está dañado, tampoco cuando el aparato esté dañado. Lleve el aparato al departamento de DOMO o a su representante para inspeccionarlo, repararlo o realizar ajustes eléctricos o mecánicos. ·· No deje que el aparato funcione sin supervisión. Se requiere supervisión cuando el aparato es usado por o cerca de niños. ·· El aparato debe estar conectado a tierra. El fabricante no se hace responsable de los daños causados por no utilizar una conexión a tierra. ·· Antes de utilizarlo, compruebe si el voltaje indicado en el aparato corresponde al voltaje de la electricidad de su casa. ·· No utilice este aparato para otros fines que los previstos. ·· No desplace el aparato mientras lo utiliza. ·· Un mal mantenimiento de este aparato puede influir negativamente en su vida útil y podría influir negativamente en la misma y crear una situación peligrosa. www.domo-elektro.be DO927BFK 47 PIEZAS 1. Regulador de temperatura con sección de bombilla 2. Estantes 3. Tapa para la bandeja de verduras 4. Compartimento de verduras 5. Estantes de la puerta 6. Cajón del congelador 7. Patas ajustables 1 2 5 3 4 6 7 ANTES DEL PRIMER USO ·· Retire todo el material de embalaje, tanto del interior como del exterior. Limpie el exterior del aparato con un paño seco. El interior puede limpiarlo con un paño suave y húmedo. ·· No coloque el aparato en un paso estrecho o en un lugar húmedo o que reciba la luz directa del sol. ·· Asegúrese de que pueda circular el aire alrededor del frigorífico. La parte posterior del frigorífico debe estar separada de la pared al menos 10 cm. ES ·· Coloque el frigorífico sobre una superficie firme y nivelada. ·· Evite la luz directa del sol y el calor. La luz solar puede deteriorar el exterior del frigorífico. El calor aumentará el consumo. ·· Evite un grado de humedad demasiado elevado. Demasiada humedad ambiental causará que se forme hielo demasiado rápido en el frigorífico. ·· Antes de conectar el frigorífico a la red eléctrica se debe comprobar que la tensión de la placa de especificaciones del aparato se corresponde con el voltaje de su hogar. Otra tensión puede dañar el aparato. ·· El enchufe es la única forma de desconectar el aparato de la alimentación, asegúrese de que es fácil acceder al mismo. Para desconectar la alimentación al aparato, apague el aparato y retire el enchufe de la toma de corriente. ·· El aparato debe estar conectado a tierra. El fabricante no se hace responsable de los daños causados por no utilizar una conexión a tierra. ·· Para superficies irregulares, las patas delanteras se pueden alinear. ·· Deje el aparato después de la instalación 3 horas antes de encenderlo. Así se puede asentar el refrigerante. ·· Deje que el aparato funcione durante 24 horas sin alimentos hasta que este se enfríe y alcance la temperatura adecuada. 48 ·· Este aparato se ha diseñado para funcionar a una temperaturas ambiente de entre 16°C y 38°C. En una habitación con una temperatura inferior o superior, el aparato no funcionará correctamente. DO927BFK ·· Este aparato solo se puede utilizar en interior. ·· El congelador hace ruido cuando el compresor hace circular el refrigerante. Esto es algo normal. USO REGULACIÓN DE TEMPERATURA Frigorífico El frigorífico se regula con un regulador de temperatura que se encuentra en el interior del aparato. Ajuste el regulador en la posición deseada. ·· FAST COOL: esta función se puede activar cuando se almacenan muchos alimentos al mismo tiempo en el frigorífico. Esto asegura que el frigorífico enfriará al máximo los alimentos durante 2 horas y media. A continuación, el frigorífico recuperará la temperatura preestablecida. ·· Cuando el aparato se ponga en funcionamiento o después de descongelar el aparato, ajuste el regulador durante al menos 2 horas en la temperatura más fría antes de introducir los alimentos. A continuación, ajuste la posición media. ES ·· El tiempo de funcionamiento y la temperatura se ven afectados por la ubicación en la que se utiliza el frigorífico, el número de veces que se abre la puerta y la temperatura de la habitación en la que se encuentra el frigorífico. Congelador Detrás del compartimento de verduras se encuentra la regulación de temperatura para el congelador. La puede ajustar en “normal”, “MIN” o “MAX”. “MIN” es el ajuste con la temperatura más alta, mientras que “MAX” es el ajuste con la temperatura más fría. CONSERVAR ALIMENTOS EN EL FRIGORÍFICO El frigorífico asegura una vida útil más prolongada de los alimentos frescos y perecederos. Conservación de alimentos frescos para obtener los mejores resultados: ·· Conserve solo alimentos muy frescos y de buena calidad. ·· Asegúrese de que los alimentos están bien envasados o cúbralos antes de almacenarlos. Esto evita que los alimentos se sequen, pierdan color o sabor y hará que se conserven frescos durante más tiempo. Esto también evita la transferencia de olores. ·· Asegúrese de que los alimentos con un olor fuerte se envasan bien y se cubren. www.domo-elektro.be DO927BFK 49 Manténgalos alejados de mantequilla, leche y nata, así como otros alimentos que pueden verse afectados por un fuerte olor. ·· Deje que los alimentos calientes se enfríen antes de introducirlos en el frigorífico. CONGELACIÓN Y CONSERVACIÓN DE ALIMENTOS EN EL CONGELADOR Utilice el congelador ·· Para conservar alimentos congelados. ·· Para fabricar cubitos de hielo. ·· Para congelar alimentos. Nota: asegúrese de que la puerta del congelador esté siempre bien cerrada. Compra de productos congelados ·· El envase no puede encontrarse dañado. ·· Consuma antes de la fecha de caducidad. ·· Si es posible, transporte los alimentos congelados en una bolsa térmica e introdúzcalos rápidamente en el congelador. Congelación de alimentos frescos Congele únicamente alimentos frescos en buen estado. Para preservar lo mejor posible los valores nutritivos, el sabor y el color, escalde las verduras antes de congelarlas. No es necesario escaldar las berenjenas, pimientos, calabacines o espárragos. ES Nota: mantenga los alimentos que va a congelar alejados de los alimentos ya congelados. ·· Son adecuados para congelar los siguientes alimentos: bizcochos y repostería, pescado y marisco, carne, caza, aves, verdura, fruta, especias, huevos sin cáscara, productos lácteos como queso o mantequilla, platos preparados y restos de comidas como sopas, guisos, carne y pescado cocinados, platos a base de patatas, suflés y postres. ·· No son adecuados para congelar los siguientes alimentos: verduras que se toman generalmente crudas, como lechuga, rábanos, huevos con cáscara, uvas, manzanas, peras y melocotones, huevos duros, yogur, leche agria, nata agria y mayonesa. Conservación de productos congelados Para evitar que los alimentos pierdan su sabor o se sequen, guárdelos en un envase hermético. 1. Introduzca los alimentos en el envase. 2. Extraiga todo el aire. 3. Cierre el envase. 4. Añada al envase una etiqueta con su contenido y la fecha de congelación. Envases adecuados: película de plástico, rollo de película de polietileno, papel de aluminio o recipientes aptos para el congelador. 50 DO927BFK Tiempo de conservación en el congelador recomendado para los productos congelados Este tiempo puede variar según el tipo de alimento. Los alimentos congelados se pueden conservar entre 1 y 12 meses (a un mínimo de -18°C). Alimento Tiempo de conservación Tocino, guisos, leche 1 mes Pan, helados, salchichas, guisantes, marisco cocido, pescado azul 2 meses Pescado blanco, marisco, pizza, bollos y magdalenas 3 meses Jamón, bizcochos, galletas, carne de ternera y chuletas de cordero, aves troceadas 4 meses Mantequilla, verdura (escaldada), huevo entero y yemas, cangrejos de río cocidos, carne picada (cruda), carne de cerdo (cruda) 6 meses Fruta (seca o en almíbar), clara de huevo, carne de ternera (cruda), pollo entero, carne de cordero (cruda), bizcochos de frutas 12 meses No olvidar: Si congela alimentos frescos que tengan una fecha de caducidad, deberá congelarlos antes de que se alcance esa fecha de caducidad. Asegúrese de que los alimentos no se hayan congelado anteriormente. Los alimentos congelados que se han descongelado por completo no pueden volver a congelarse. APAGÓN ·· La mayoría de los apagones duran entre 1 y 2 horas y no suelen alterar la temperatura del frigorífico. Limite la apertura de la puerta en la mayor medida posible durante un apagón. ES Una vez descongelados, consuma rápidamente los alimentos. ·· Durante un apagón más largo, debe adoptar otras medidas para conservar los alimentos, por ejemplo, colocar hielo seco sobre los alimentos. ·· Los alimentos congelados se mantienen en buenas condiciones si el fallo de alimentación no dura más de 15 horas. ·· No vuelva a congelar los alimentos que se hayan descongelado por completo. Esos alimentos pueden perjudicar su salud. DESPLAZAR SU APARATO Si el aparato se apaga por cualquier motivo, espere 10 minutos antes de volver a encenderlo. La presión en el sistema de refrigeración se debe estabilizar antes de volver a encenderlo. ·· Apague el aparato y retire el enchufe de la toma de corriente. Retire todos los ·· alimentos. También debe retirar todas las partes móviles (estantes, accesorios, etc.) o fijarlos en el frigorífico para evitar choques. ·· Desplace el aparato e instálelo. Si el dispositivo se mantuvo posicionado sobre un lado www.domo-elektro.be DO927BFK 51 mientras se trasladaba, aunque fuera durante un tiempo muy corto, el aparato deberá ponerse en posición vertical durante al menos 10 minutos antes de encender el aparato. Su aparato utiliza isobutano (R600a) como refrigerante. A pesar de que el R600a es un gas respetuoso con el medio ambiente y natural, es explosivo. Por lo tanto, debe tener mucho cuidado al mover o instalar el aparato para evitar daños en los elementos de refrigeración. En el caso de que se produzca una fuga por un daño en los elementos de refrigeración, mantenga el frigorífico alejado de llamas o fuentes de calor y ventile la habitación donde se encuentra el aparato durante algunos minutos. Swing LIMPIEZA tyle screwdriver / Flat bladed screwdriver / Hexagonal spanner No utilice productos de limpieza agresivos o disolventes. ES 1. Retire el enchufe de la toma de corriente. is unplugged and empty. 2. Retire los alimentos y almacénelos en un lugar fresco. ed must3. beEnsaved to do the reinstallation of the door. caso necesario, descongele el frigorífico/congelador. Para acelerar el proceso de congelación, coloque un recipiente con agua caliente en el congelador. unit flat as this may damage the coolant system. 4. Elimine la condensación con un paño o esponja. that 25.people handle the unit during assembly. Limpie el aparato con un paño suave, agua tibia y un detergente suave. ave the6. door swing reversed, Limpie la junta de la puerta solowe con recommend agua limpia y frote athat fondo.you contact a Flat screwdriver Hexagonal spanner 7. should Después deonly la limpieza, introduzca el enchufe en la toma de corriente ajustebelieve el cian.bladed You try/ to reverse the door yourself ifyyou regulador de temperatura en la posición deseada. alified to do so. 8. Vuelva a colocar los alimentos en el aparato. empty. CAMBIO DE DIRECCIÓN DE LA PUERTA to do the reinstallation of the door. yver. damage thetrasladar coolant system. Si quiere las bisagras de la puerta hacia el otro lado, le recomendamos que se ponga en contacto con un taller de reparación autorizado para llevar a cabo el trabajo. Antes de ndle thecambiar unitladuring assembly. dirección de giro, compruebe que el enchufe se ha desconectado de la toma de corriente y que el aparato está vacío. Se recomienda el uso de g reversed, we recommend that you contact a un destornillador Phillips y una llave (ambos no incluidos). nly try to reverse the door yourself if you believe 1. Retire la chapita de los tornillos. Retire los tornillos y, a continuación, la bisagra superior que mantiene la puerta en su lugar. Levante la puerta y colóquela sobre una superficie suave para evitar arañazos. er hinge. Lift the e it on a padded rom scratching. 52 DO927BFK ck, screw and plastic 5. ALLATION 6. ES upper hinge. Lift the place on a padded upperithinge. Lift the 2.scratching. En la parte inferior de la puerta se encuentran un tapón y un manguito de teflón para nt it from place it on a padded guiar la bisagra. Colóquelos en la otra parte. nt it fromscrew scratching. r block, and plastic upper door andand move r block, screw plastic upper hinge. Lift the osite side. You may upper door and move place it onblock a padded the door to fit the osite side. You may nt it from scratching. the door block to fit the r block, screw and plastic pper door and move osite side.3.YouRetire may los pernos centrales, la bisagra y los taponcitos. Colóquela en el otro lado. Levante he door blocklato fit the puerta y colóquela sobre una superficie suave para evitar arañazos. dle hinge by removing he lower and place dle hingedoor by removing urface to prevent from he lower door anditplace urface to prevent it from unscrew ws’ covers and place dle hinge by removing osite side. unscrew ws’ covers and place he lower door and place osite side. on of the plastic tube and urface to prevent it from p of the lower door. on of the plastic tube and 4. En la parte superior de la puerta se encuentran un manguito de teflón para guiar la pr block, of the screw lowerbisagra door. y un and plastictaponcito. Colóquelos en la otra parte. ws’ covers andEnplace la parte inferior de la puerta se encuentran un tapón unscrew y un manguito de teflón para ower door andand move r block, screw plastic osite side. guiar la bisagra. Colóquelos en la otra parte. osite door side. You ower and may move nosite ofdoor the plastic tube and the block to fit the side. You may pthe of door the lower door. block to fit the r block, screw and plastic ower door and move osite side. You may he door block to fit the Retire los pernos inferiores, la bisagra y la pata de ajuste en la parte inferior del aparato. Retire la pata de ajuste del otro lado de la parte inferior y llévela hasta la posición 1/2/16 10:43 am correspondiente en el lado opuesto de la parte inferior. 1/2/16 10:43 am Fije los pernos, la abrazadera de la bisagra y la pata de ajuste al otro lado de la parte move the lower screws and lower inferior. ge from the unit bottom. Reverse the wer hinge, move and secure it with e lower screws to the opposite side of e unit bottom. Carefully set the lower or back into place, inserting it onto the wer hinge. www.domo-elektro.be 1/2/16 10:43 am DO927BFK 53 7. Coloque la puerta inferior en su lugar con cuidado. Asegúrese de que la puerta está alineada tanto horizontal como verticalmente, de manera que las juntas estén cerradas por todos los lados antes de unir completamente la bisagra central. Vuelva a colocar la bisagra y atorníllela. the middle hinge. Screw the e the middle hinge. Screw the hinge onto the opposite side of hinge onto the opposite side of . t. Middle hinge Middle hinge ure the lower door is aligned ure the lower door is aligned zontally and vertically, so that izontally and vertically, so that seals are closed on all sides seals are closed on all sides ore finally tightening the hinge. ore finally tightening the hinge. 8. Coloque la puerta superior. Coloque las bisagras de la puerta superior, atornille y vuelva a colocar la chapita. y set the upper door back into ly set the upper door back into nserting in onto the middle hinge. nserting in onto the middle hinge. he upper hinge and screw it he upper hinge and screw it o the top of the unit. to the top of the unit. ure the upper door is aligned ure the upper door is aligned zontally and vertically, so that izontally and vertically, so that seals are closed on all sides seals are closed on all sides ore finally tightening the hinge. ore finally tightening the hinge. 9. Con la puerta cerrada, compruebe que la puerta está alineada tanto horizontal como verticalmente y que las juntas están cerradas por todos los lados antes de fijar hinge cover back. hinge cover back. completamente la bisagra superior. Si es necesario, ajuste las patas de ajuste. ES PROBLEMAS Y SUS SOLUCIONES Cuando tenga un problema con su frigorífico, compruebe las siguientes cuestiones antes de ponerse en contacto con nuestro servicio de posventa. El aparato no funciona. El aparato no recibe electricidad, compruebe si el suministro eléctrico es correcto. Asegúrese de insertar el enchufe en la toma de corriente. Compruebe que se está utilizando el voltaje adecuado. 9 9 El frigorífico rebota frecuentemente. dd 9 ndd 9 Compruebe que la puerta está bien cerrada. 1/2/16 10:43 am 1/2/16 10:43 am Ha introducido comida caliente en el frigorífico, por lo que el aparato debe trabajar con más intensidad para enfriarla. La puerta ha estado abierta demasiadas veces o durante demasiado tiempo. El aparato se ha conectado al voltaje incorrecto. El aparato está demasiado cerca de una fuente de calor o está expuesto directamente a la luz solar. 54 DO927BFK La temperatura interior del frigorífico es demasiado alta. Compruebe que el frigorífico tiene corriente. Asegúrese de insertar el enchufe en la toma de corriente. El ajuste de temperatura es demasiado bajo. La puerta ha estado demasiado tiempo abierta o con mucha frecuencia. El suministro de aire está bloqueado Compruebe que el aparato se conecta a la tensión correcta El aparato está demasiado cerca de una fuente de calor o está expuesto directamente a la luz solar. El congelador no está lo suficientemente frío La puerta del congelador no se ha cerrado bien. La puerta del congelador ha estado abierta demasiadas veces o durante demasiado tiempo. Compruebe que el aparato está conectado a la tensión correcta. El símbolo en el producto o en el embalaje indica que este producto no puede ser tratado como residuo doméstico. Se debe llevar a un lugar en el que se reciclan equipos eléctricos y electrónicos. Si se asegura de que este producto se desecha correctamente, usted ayudará a evitar posibles consecuencias negativas para las personas y el medio ambiente que serían causadospor un tratamiento de residuos inadecuado. Para obtener información más detallada sobre el reciclaje de este producto, póngase en contacto con su ayuntamiento, o con la empresa o departamento responsable del servicio de recogida de basura doméstica, o con la tienda donde adquirió el producto. ES DIRECTRICES MEDIOAMBIENTALES El material de embalaje es reciclable. Trate el embalaje de una manera medioambientalmente responsable. www.domo-elektro.be DO927BFK 55-
 1
1
-
 2
2
-
 3
3
-
 4
4
-
 5
5
-
 6
6
-
 7
7
-
 8
8
-
 9
9
-
 10
10
-
 11
11
-
 12
12
-
 13
13
-
 14
14
-
 15
15
-
 16
16
-
 17
17
-
 18
18
-
 19
19
-
 20
20
-
 21
21
-
 22
22
-
 23
23
-
 24
24
-
 25
25
-
 26
26
-
 27
27
-
 28
28
-
 29
29
-
 30
30
-
 31
31
-
 32
32
-
 33
33
-
 34
34
-
 35
35
-
 36
36
-
 37
37
-
 38
38
-
 39
39
-
 40
40
-
 41
41
-
 42
42
-
 43
43
-
 44
44
-
 45
45
-
 46
46
-
 47
47
-
 48
48
-
 49
49
-
 50
50
-
 51
51
-
 52
52
-
 53
53
-
 54
54
-
 55
55
-
 56
56
-
 57
57
-
 58
58
-
 59
59
-
 60
60
-
 61
61
-
 62
62
-
 63
63
-
 64
64
-
 65
65
-
 66
66
-
 67
67
-
 68
68
-
 69
69
-
 70
70
-
 71
71
-
 72
72
-
 73
73
-
 74
74
-
 75
75
-
 76
76


en otros idiomas
- français: Domo DO927BFK Le manuel du propriétaire
- English: Domo DO927BFK Owner's manual
- Deutsch: Domo DO927BFK Bedienungsanleitung
- Nederlands: Domo DO927BFK de handleiding
- slovenčina: Domo DO927BFK Návod na obsluhu
- čeština: Domo DO927BFK Návod k obsluze
Artículos relacionados
-
Domo DO989BFK El manual del propietario
-
-
Domo DO935DVK El manual del propietario
-
-
-
Linea DO926BFK El manual del propietario
-
-
-
Domo DO990TDK El manual del propietario
-