
WARNING: Read and understand all instructions.
SAVE THESE INSTRUCTIONS FOR FUTURE REFERENCE.
Flooring Cutters - Instructions
PARTS LIST:
SAFETY WARNINGS
WARNING
• Always wear safety glasses when operating this tool
• Keep cutting blade in the fully closed position when not in
use
• Keep fingers and hands away from blade cutting area
• Periodically check that all hardware remains tight
MAINTENANCE
• Keep cutter clean and store in a dry place when
not in use
• This cutter does not use a sharp blade. It is a blunt blade
meant to rip through flooring planks and will not splinter
flooring. If necessary, square off the edges of blade by using
a sharpening stone.
• Periodically check all assembly to ensure that hardware
remains tight.
ASSEMBLY INSTRUCTIONS:
Tools needed for assembly (not included): 11/16” and 3/8”
wrench
Step 1: Attach handle to the cutting blade with the supplied
screws, washers, and nuts.
Step 2: Attach the blade to the cutter base
• Remove the locknut from the base and slide the bolt out
just enough to release one of the plastic spacers from
the underside of the base.
• Align the blade hole with the bolt and hole in the base.
• Replace the spacer and bolt, tighten locknut.
Step 3: Place the 4 round self-stick felt pads on the bottom
of the base.
OPERATING INSTRUCTIONS
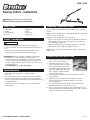
1. Place cutter on the floor making
sure it is on a level surface
2. Mark the plank to be cut and
place it finished side up against
the backstop. Note: Place the
grooved or indented side of the
laminate against the backstop.
The “tongue” side should be
closest to the blade.
3. The V-Support should be used to support the plank
while cutting
4. Begin the cut by holding the flooring firmly with
one hand and cutting approximately ½” into the
flooring material.
5. Proceed using both hands with a smooth powerful
downward motion to complete your cut.
6. Your cut plank will be slight rough. Remember the cut
side will always be placed along the wall to be covered
up by baseboard or finish molding.
CUSTOMER SERVICE: 1-866-435-8665
T0919-11399
10-38 / 10-48
1 Cutter Base
1 Handle
1 Cutting Blade
3 Screws
6 Washers
3 Nuts
4 Felt Pads
1 V-Support
WARNING: Drilling, sawing, sanding or machining
wood products can expose you to wood dust, a
substance known to the State of California to cause
cancer. Avoid inhaling wood dust or use a dust mask
or other safeguards for personal protection. For more
information go to
www.P65Warnings.ca.gov/wood-dust.

ADVERTENCIA: Lea y comprenda todas las instrucciones.
GUARDE ESTAS INSTRUCCIONES PARA USAR COMO
REFERENCIA EN EL FUTURO.
Cortadores de piso - Instrucciones
LISTA DE PARTES:
ADVERTENCIAS DE SEGURIDAD
• Siempre utilice gafas de seguridad cuando esté operando
esta herramienta
• Mantenga la cuchilla de corte en posición de cerrado cuando
no este en uso
• Mantenga los dedos y las manos alejados del área de corte
• Revise periódicamente que todos los elementos de montaje
se mantengan ajustados
MANTENIMIENTO
• Mantenga el cortador limpio y guárdelo en un lugar seco
mientras no lo utilice
• Este cortador no utiliza una cuchilla filuda. Es una cuchilla
sin filo que está hecha para rasgar a través de los tablones
de pisos y no astillará el piso. Si es necesario, retoque los
bordes utilizando una piedra para afilar.
• Revise periódicamente el ensamblaje para asegurar que la
estructura de la herramienta continua ajustada.
INSTRUCCIONES DE MONTAJE:
Herramientas necesarias para el montaje (no están
incluidas): llave de 11/16” (17 mm) y de 3/8” (9.5 mm)
Paso 1:
Adjunte la manija a la cuchilla de corte con los
tornillos, arandelas y turcas proporcionados.
Paso 2:
Adjunte la cuchilla a la base del cortador.
• Remueva la tuerca de seguridad de la base y deslice el
perno hacia fuera lo suficiente para liberar uno de los
espaciadores plásticos de la parte inferior de la base.
• Alineé el hueco de la cuchilla con el perno y el hueco en la
base.
• Reemplace el espaciador y el perno, apriete la tuerca.
Paso 3:
Coloque las 4 almohadillas de fieltro redondas
autoadhesivas en la parte inferior de la base.
INSTRUCCIONES DE OPERACIÓN
1. Coloque el cortador en el piso
asegurándose que este en una
superficie nivelada.
2. Marque el tablón a cortar e
insértelo contra el retenedor
trasero. NOTA: Coloque el
lado ranurado o indentado del
laminado contra el retenedor
trasero. El costado con la “lengüeta” deberá estar más
cerca de la cuchilla.
3. El soporte en ‘’V’’ debe utilizarse para apoyar el tablón
mientras realiza el corte.
4. Comience hacer el corte sosteniendo el laminado
firmemente con una mano y cortando el piso
aproximadamente unos 13 mm (1/2”) .
5. Proceda utilizando ambas manos con un movimiento
hacia abajo con fuerza y sutilmente para completar el
corte.
6. El tablón cortado quedara levemente áspero. Recuerde
que el lado cortado siempre debe colocarse a lo largo
de la pared que será cubierto con zócalos o molduras
para acabados.
T0919-11399
10-38 / 10-48
1 Base del cortador
1 Manija
1 Cuchilla de corte
3 Tornillos
6 Arandelas
3 Turcas
4 Almohadillas de fieltro
1 Soporte en V
ADVERTENCIA: Taladrar, aserrar, lijar y tratar madera
con maquinas podría exponerlo al polvo de madera,
el cual es una substancia conocida por el Estado de
California como causante de cáncer. Evite inhalar el
polvo de madera o utilice una máscara contra polvo
u otros equipos de protección personal. Para más
información vaya a
www.P65Warnings.ca.gov/wood-dust.
ADVERTENCIA
NÚMERO DE SERVICIO AL CLIENTE: 1-866-435-8665
-
 1
1
-
 2
2


en otros idiomas
- English: Brutus 10-48 Operating instructions
Otros documentos
-
Home Decorators Collection HC05 Guía de instalación
-
-
QEP Tools 10-60 Manual de usuario
-
Roberts 10-95 El manual del propietario
-
Roberts 10-64 Guía de instalación
-
-
-
Freeman P13INLC Manual de usuario
-
LifeProof I412211L Guía de instalación
-
Innovations FL50008 Guía de instalación