
Installation and Finishing Guide
What Tools do I Need to Install Moulding?
• UtilityKnife
• WoodFillerandGlue
• Ladder
• SafetyGlasses
• HearingProtection
• Level
• Clamps
• MiterBox,MiterSaw,orCompoundMiterSaw
• FinishingNails,NailSet,andaHammeror
BradNailer
• TapeMeasure
• FramingSquare
• Protractor
• PenandPaper
Hereisthebasiclistoftoolsyouwillneedtoinstallmoulding:
How do I Handle Long Walls?
Sometimesitisnecessarytospanlongerlengthsthanwhatisavailableinyourlocalstore,whenthis
happensyouwillhavetosplicetwolengthsofmouldingtogether.Thistypeofjointiscalledascarf/
splicejoint.Ascarf/splicejointwillallowonepiecetooverlaptheothersectionofmouldingcreating
alongerpieceofmoulding.Thescarf/splicejointcreatesaverticalseaminthenishedinstallation.
Itisrecommendedthatyouplacethescarf/splicejointoverawallstudforadditionalstrength.
Installtherstpieceofmouldingagainstthewallwitha45degreemitercutonendofthemoulding
oppositethecorner.Donotnailwithinthreefeetofthescarf/splicejointatthistime.Measurethenext
pieceofmoulding.Thesecondcutwillbetheoppositeofthemouldingcurrentlyinstalledonthewall.
Oncethesecondcuthasbeenmade,installthemouldingonthewall,placinganaildirectlyintothe
scarf/splice.
How do I Install Moulding?
Installmouldingpiecebypieceworkingaroundtheroom,installingthelongestpiecesrst.Avoid
nailingwithintwotothreeinchesoftheendtoavoidsplitting.Somehardwoodmouldingwillrequire
pre-drillingbeforenailing.Ifyouarehandnailing,besuretouseanailsettosinkthenailheads
slightlybelowthefaceofthemoulding.
How do I Sand Moulding?
Usinganegritsandingspongeor220gritsandpapermountedtoasandingblock,alwayssand
withthegrainofthewood.Coarsergritsofsandpaperorsandingagainstthegrainofthewoodwill
leavenegougesandblemishesinthewood.Averylighttouchisrequiredwhensandingmoulding.
Itisrecommendedthatyousandbetweeneachcoatofprimerorpaint.Thislightsandingwillensure
astrongbondbetweenthecoatsandgiveasmoothernish.
Should I Prime My Moulding?
Itisonlynecessarytoprimesolidpineorunprimedngerjointmoulding.Mostofthemouldingssold
atTheHomeDepotcomewithafactoryappliedprimer.Ifyouarepaintingsolidpinemouldingor
unprimedngerjointmoulding,werecommendprimingwithahighqualityprimer.
How do I Apply Wood Filler or Caulk?
Woodllerorcaulkisusedtollnailholes,repairscratches,dents,andunevenjointsinmiters.
Alwaysuseanon-shrinkingllerorcaulk,followthemanufacturer’sdirectionstoachievethebest
results.Forstainablemouldings,usewoodllerthatcloselymatchesthewoodcolorofyourmoulding.
When Should I Paint or Stain My Moulding?
Stainingorpaintingmouldingbeforeinstallationisalwaysrecommended.Ifyouinstallyourmoulding
andthennishit,protectthesurroundingareasbyusingpainterstape.Remembertoremovethetape
immediatelyafternishingtopreventthetapefromdamagingthewallorsurroundingtrim.Painting
isrecommendedforallpre-primedmoulding.Itisalsoadvisabletousetwocoatsofpaintfor
outstandingdurabilityandappearance.Mouldingswithamorepronouncedwoodgrainorunprimed
surfacesarebettersuitedtostainingorvarnishing.Stainingorvarnishingenhancesthenaturalbeauty
ofthewood.Sometypesofwoodmouldingsuchashemlockorsolidpinecanbestainedtoany
color,whileothertypesofwoodmouldingsuchasoaklendtodarkerstains.
Finishing Recommendations
Wood Species Stain Varnish Paint
Primed Fiberboard
X
Primed Finger Joint
X
Oak
X X
Pine
X X
Hemlock
X X
Raw Finger Joint
X
Maple
X X
Fir
X X
Measure
Outside
Moulding
Inside
Mitre
Outside
Mitre
Figure 2
Figure 1 Figure 1.1
What Type of Moulding do I Need?
Forwindowsanddoorsyoucanusecasing,forceilingsusecrown,foroorsusebase,andforwalls
usechairrailorpanelmould.Youcanchoosefromawidevarietyofoptionstosuitanystyleand
everybudget.Formoretipsonselectingordesigningwithmoulding,pickupacopyofourfree
“MakeanImpressionwithMoulding”orourfreetearpad“HowtoShopforMoulding”.
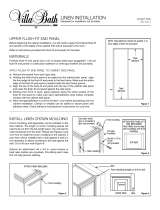
What are the Basic Cuts for Moulding?
Themostbasiccutformouldingisthemiter.Mostmouldingisinstalledwithmiterjointsthatform
a90degreeangle.Therstpieceofmouldingiscutwitha45degreeangle;thesecondpieceof
mouldingisalsocutwitha45degreeformingatight90degreeangle.Inverticalapplications
(typicallycasing)theanglesarecutonthefaceofthemoulding.Inhorizontalapplications
(typicallybase,chairrail,crown)theanglesarecutagainstthefaceofthemoulding.(Figure2)
What is Coping?
Acopeisaninsidecornerwhereonepieceofthemouldingiscutsquareandbuttstightintothe
corner.Theoppositesideisrstcutlikeaninsidemiter.Thenusingacopingsawremovethematerial
fromthemouldingleavingtheprole.(Figure3)Thecopejointwillthentoverthesquarecut
mouldingonthewall.Copingcanbeatimeconsumingprocessbuteasilyaccommodatescorners
thatarenot90degreesandisveryresistanttoshrinkage.
How do I End Moulding Without a Corner?
Ifyouneedtoendmouldingwithoutturningacornerorrunningintoawall,youwillneedtocreate
areturn.Cutthemouldingtolengthnishingthepiecewithamiterangle.Areturncanbecreated
bytakingascrappieceofmouldingandcuttingamiteronendofthescrappiece.Thencutstraight
downfromthefaceofthemoulding,ensuringthebladewillmeettheedgeofthemitercutwhich
formsasmalltriangularpieceofmoulding.Attachthepiecewithcarpenters’woodglueandsecure
thepieceuntilthegluedrieswithmaskingtape.
What Tools do I Need to Finish Moulding?
• PaintorStain
• DropCloths
• Rags
• WoodPutty,CaulkandaCaulkGun
• Brushes
• 220GritSandpaper
Figure 2
Figure 3
Measure
Outside
Moulding
Inside
Mitre
Outside
Mitre
Figure 2
Handy Tip
Usingacompoundmitersawandapneumaticnailgunwillnotonlymaketheinstallationprocess
easier,itwillalsospeedupthetimerequiredforinstallation.Ifyoudon’townorwanttopurchase
thesetools,theycanberentedatTheHomeDepotRentalCenter.
Safety Tip
Alwaysweareye,ear,andrespiratoryprotectionwhendoinganyhomeimprovementproject.
Remembersafetyrst.
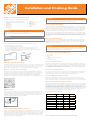
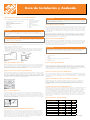
How Much Moulding do I Need?
Todeterminetheamountofmouldingneededforyourprojectfollowthesesteps:
1.Drawaoorplanofyourroom.(Figure1)
2.Measureeachwallandnoteitonyourplan.
3.Alsonotetheplacementandsizeofanydoors,windowsoropeningsintheroom.
Itisalsorecommendedthatyouidentifyeachcornerandtheangle.(Figure1.1)
4.Addallofthewalllengthstogethertogettheamountofmouldingyouneedtopurchase.
Add15%forcuttingmistakesandwaste.
Handy Tip:
Toxslightgapsinoutsidecorners,llthegapswithcarpenters’woodglue,andrubthegap
withthesideofautilityknife.Thiswillcrushthewoodberstollthegap.
Handy Tip:
Ifyouarerighthanded,itiseasiertoinstallmouldingcounter-clockwise.Ifyouarelefthanded,
itiseasiertoinstallmouldingclockwise.Thiswayyoucansupportthemouldingwithyour
un-favoredhandanddrivefastenerswithyourdominanthand.
For more information, visit www.homedepot.com/moulding

Guía de Instalación y Acabado
¿Qué Herramientas Necesito para Instalar Molduras?
• Cuchilloparausogeneral
• Rellenoparademadera,
masillaypegamento
• Escalera
• Gafasdeseguridad
• ProtecciónparalosOídos
• Nivel
• Pinzas
• Cajadeingletes,sierraparacortaringleteso
sierraparaingletes
• Clavosparaacabado,SetdeClavos,yun
martilloounmartilloneumáticoBrad
• Cintamétrica
• Escuadra
• Transportador
• PlumayPapel
Estaeslalistabásicadeherramientasquenecesitaráparainstalarmolduras:
¿Cómo Manejo Paredes Largas?
Avecesesnecesarioabarcartramosmáslargosdeloqueestádisponibleensutiendalocal,cuando
estolesucedatendráquerealizarunajuntaendosmolduras.Estetipodearticulaciónsedenomina
scarf/splicejoint.Unascarf/splicejointpermitiráqueunasolapiezasesolapeconlaotramoldura
creandounapiezamáslargademoldura.Elscarf/splicejointcreaunacosturaverticalenlainsta-
laciónterminada.Serecomiendaquecoloqueelscarf/splicejointsobreunmontantedeparedpara
fuerzaadicional.
Instalelaprimeramolduracontralaparedconuningletede45gradosenelextremodelcorteenel
ladoopuestoalaesquina.Noclavedentrodelostrespiesdelscarf/splicejointenestemomento.
Midalasiguientepiezademoldura.Elsegundocorteseráelopuestodelamolduraactualmente
instaladaenlapared.Unavezqueelsegundocortesehahecho,instalelamolduraenlapared,
colocarunclavodirectamenteenelscarf/splicejoint.
¿Cómo Puedo Instalar Molduras?
Instalelasmolduraspiezaporpiezatrabajandoalrededordeelcuarto,lainstalacióndelaspiezas
máslargaprimeras.Eviteclavarunplazodedosatrespulgadasdelextremoparaevitarrajaduras.
Algunaspiezasdefundicióndemaderarequerirálaperforaciónpreviaantesdeclavar.Siusted
estaclavandoamano,asegúresedeusarunjuegodeclavosparahundirlascabezasdelclavo
ligeramentepordebajodelacaradelamoldura.
¿Cómo Puedo Lijar la Moldura?
Usandounaesponjadelijadegranoolijadegrano220montadoenunbloquedelijar,siempre
conelgranodearenadelamadera.Lijadegranomásgruesoolijarencontradelavetadela
maderadejaráestríasnasymanchasenlamadera.Untoquemuyligeroserequierecuandola
molduraseestalijado.Serecomiendaquelaarenaentrecadacapadeprimeropintura.Estelijado
livianoaseguraraunauniónfuerteentrelascapasyledaráunacabadomásno.
¿Debería de Pintar con Primer Mi Moldura?
SóloesnecesariopintarconprimerelpinomacizoPrimedFingerJoint.Lamayoríadelasmolduras
quesevendenenTheHomeDepotvienenconunPrimeraplicadodefábrica.Siustedestápintando
moldurasdepinomacizooprimadoFingerJoint,lerecomendamoscebadoconunaimprimaciónde
altacalidad.
¿Cómo Puedo Aplicar Relleno para Madera o Masilla?
Maderaomasilladerellenoseutilizapararellenarlosagujerosdelosclavos,lareparaciónde
arañazos,abolladuras,ylasarticulacionesdesigualeseningletes.Siempreuseunrellenosin
encogimientoomasilla,sigalasinstruccionesdelfabricanteparaobtenerlosmejoresresultados.
Paramoldurastingibles,userellenodemaderaquemásseajustealcolordelamaderade
sumoldura.
¿Cuándo Debo Pintar o Teñir Mi Moldura?
Siempreserecomiendateñiropintarlamolduraantesdelainstalación.Siinstalalamoldurayluego
ledalaterminación,protejalasáreascircundantesusandocintadepintores.Recuerderetirarla
cintainmediatamentedespuésdelacabadoparaevitarquelacintadañelaparedosusalrededores.
PintaresrecomendableparatodoslasmoldurasPre-Primed.Tambiénesrecomendableutilizar
doscapasdepinturaparaladurabilidadylaapariencia.Moldurasdemaderacongranosmás
pronunciadososuperciessinprimaseadaptanmejoralaslacasobarnices.Lacaobarnizrealza
labellezanaturaldelamadera.Algunostiposdemadera,comolacicutaopinomacizosepueden
teñiracualquiercolor,mientrasqueotrostiposdemoldeadodemaderacomoelrobleprestana
teñirmasoscuros.
Recomendaciones para el Acabado
Especie de Madera Laca Barniz Pintura
Fibra de madera imprimadas
X
Finger joint imprimadas
X
Roble
X X
Pino
X X
Cicuta
X X
Finger joint común
X
Arce
X X
Abeto
X X
Measure
Outside
Moulding
Inside
Mitre
Outside
Mitre
Figure 2
Figura 1 Figura 1.1
¿Qué Tipo de Moldura Necesito?
ParalasventanasylaspuertassepuedeutilizarCasing,paratechosusodeCrown,parapisosuse
Base,yparalasparedesuseChairRailoPanelMould.Puedeelegirentreunaampliavariedadde
opcionesparacualquierestiloypresupuesto.Paraobtenermásconsejossobrelaselecciónoel
diseñoconpiezasdefundición,recogerunacopiadenuestrolibrogratis“MakeandImpression
withMoulding”olapagina“ComoComprarMolduras”.
¿Cuáles Son los Cortes Básicos para Molduras?
Elcortemásbásicoparamolduraseselinglete.Lamayoríadelasmoldurasseinstalanconingletes
queformanunángulode90grados.Laprimerapiezadelamoldurasecortaconunángulode45
grados,lasegundapiezadelamolduratambiénsecortaconungradode45queformanunángulo
de90gradosalunirse.Enaplicacionesverticales(normalmenteelCasing)losángulossoncortados
enlacaradelamoldura.Enaplicacioneshorizontales(porlogeneralelBase,ChairRail,yCrown)
losángulossecortancontralacaradelamoldura.(Figura2)
¿Qué es el Afrontamiento?
Unfrenteesunaesquinainteriorendondesecortauntrozodelamolduracuadradayqueda
justamenteapretadaenlaesquina.Elladoopuestoeselprimercortecomouningleteinterior.Luego,
utilizaunasierraparaeliminarelmaterialdelamolduradejandosuperl.(Figura3)Lajuntadel
afrontamientoseadaptaráalcortecuadradodelamolduraenlapared.Elafrontamientopuedeser
unprocesoqueconsumetiempo,peroseadaptafácilmentealasesquinasquenosonde90grados
yesmuyresistentealacontracción.
¿Cómo Puedo Terminar Una Moldura Sin Esquina?
Siustednecesitahacerunaterminaciónaunamoldurasinesquinaoquenotermineenunapared,
ustedtendráquecrearunretorno.Cortalamolduraalamedidaparaterminarlapiezaconun
ángulodeinglete.Elretornosepuedecreartomandounpequeñotrozodelamolduraycortarun
ingletealapiezadesobra.Luegocortehaciaabajodelafazdelamoldura,asegurandoquela
hojasereuniráconelbordedelcortedeinglete,locualformaunapequeñapiezatriangularde
moldura.Fijelapiezaconprensasparamaderadecarpinteríayasegurequeelpegamentoenla
piezaseseque,manteniendolaspiezasjuntasconmaskingtape.
¿Qué Herramientas Necesito para Terminar las Molduras?
• Lapinturaolaca
• Paños
• Harapos
• Masillaparamadera,masillayunapistolademasilla
• Pinceles
• PapeldeLija220
Figura 2
Figura 3
Measure
Outside
Moulding
Inside
Mitre
Outside
Mitre
Figure 2
Consejo Útil
Usandounasierraparaingletesyunapistoladeclavosneumáticanosóloharáelprocesode
instalaciónmásfácil,sinoquetambiénaceleraráeltiemponecesarioparalainstalación.Sino
posee,niquierecomprarestasherramientas,sepuedenalquilarenelCentrodeAlquilerdeHome
DepotCenter.
Advertencia de Seguridad
Usesiempreprotecciónparalosojos,oídosyrespiraciónalhacercualquierproyectodemejoras
paraelhogar.Recuerdelaseguridadprimero.
¿Cuánta Moldura Necesito?
Paradeterminarlacantidaddepiezasdemoldurasquenecesitaparasuproyectosigaestospasos:
1.Dibujeunplanodesuhabitación.(Figura1)
2.Midacadaparedytomenotaensuplan.
3.Tambiéntengaencuentalaubicaciónyeltamañodetodaslaspuertas,ventanasoaberturasen
lahabitación.Tambiénserecomiendaqueidentiquecadaesquinaysuángulo.(Figura1.1)
4.Añadatodaslaslongitudesdelaparedparaobtenerlacantidaddepiezasdefundiciónque
ustednecesitacomprar.Añada15%paraerroresylosresiduos.
Consejo Útil
Parasolucionarlasdecienciaslevesenlasesquinasexteriores,llenarlosvacíosconpegamento
demaderadecarpintería,yfroteladiferenciaconelladodeuncuchillo.Estoharáquelasbras
quebradasdemaderallenenlabrecha.
Consejo Útil
Siustedesdiestro,esmásfácildeinstalarpiezasdefundiciónalaizquierda.Siustedeszurdo,
esmásfácilparainstalarmoldurasdesdeelladoderecho.Deestamaneraustedpuedeapoyar
lamolduraconlamanosinfavorecidaseimpulsarlossujetadoresconsumanodominante.
Para obtener más información, visite www.homedepot.com/moulding

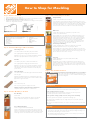
How to Shop for Moulding
Step 1 – Measure Your Room
Handy Tip
Quick Tips Box
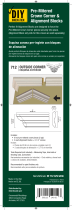
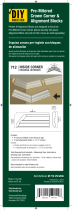
Want to avoid tricky miter cuts?
Check out the selection of mitered corner blocks in the Decorative moulding section
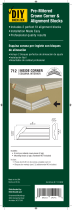
Need to quickly replace door casing?
Check out the numerous styles of pre-mitered door casing sets in the Door Shop section.
You can find a pre-mitered set to match or enhance any décor.
Need to purchase a large quantity of crown, casing, or base moulding?
Check out the great selection of propacks. A great value for that large job.
Some casing profiles are available in pre-cut 7’ lengths and in pre-cut 7’ propacks, perfect for
installing around doors.
Make sure there is a UPC/barcode label on your cut piece of moulding, it will save you time at the
cash register.
Measure
Outside
Moulding
Inside
Mitre
Outside
Mitre
Figure 2
Measure
Outside
Moulding
Inside
Mitre
Outside
Mitre
Figure 2
Step 2 – Determine What Type of Wood You Want
Figure 1 Figure 1.1
Step 4 – Only Cut What You Need
• Utility Knife
• Wood Filler and Glue
• Ladder
• Safety Glasses
• Hearing Protection
• Level
• Clamps
• Miter Box, Miter Saw, or Compound Miter Saw
• Finishing Nails, Nail Set, and a Hammer or
Brad Nailer
• Tape Measure
• Framing Square
• Protractor
• Pen and Paper
Here is the basic list of tools you will need to install moulding:
• Draw a floor plan of your room. (Figure 1)
• Measure each wall and note the measurements on your plan. It is recommended to note the
placement and size of any doors, windows, or openings in the room.
• Also identify the angle of each corner. (Figure 1.1)
• Add all of the wall lengths together to get the total amount of moulding you need to purchase.
Add 15% for cutting mistakes and waste.
Step 3 – Find Your Moulding on the Aisle
Using the measurement plan you brought from home, cut your moulding to
the rough length you need. Remember to add 15% to the measurements
for miter corners and possible cutting mistakes. For detailed instructions
on how to draw a room plan, see our free installation and finishing guide
found on the moulding aisle.
Primed Finger Joint
Color: Various shades of white with a pale yellow substrate
Grain: Lightweight with a straight grain and uniform texture
Application: Very easy to work, cuts and accepts adhesives and nails
with ease. Accepts paint without the need for a primer coat.
Solid Pine
Color: White to pale yellow, sometimes with a reddish tint
Grain: Lightweight with a straight grain and uniform texture
Application: Very easy to work, cuts and accepts adhesives and nails
with ease. Accepts stains and varnish well but would need a primer
coat if painted. Can be stained or varnished to look like many other
species of wood.
Primed Fiberboard
Color: Various shades of white with a light to medium brown substrate
Grain: No grain
Application: Primed fiberboard is free of natural defects and accepts
paint easily with out the need for a primer coat. Not suitable in exterior
applications or high moisture areas.
Oak
Color: Coral to a deep red
Grain: Very heavy grain with a slightly coarse texture
Application: Fairly easy to work, nails must be pre-drilled to ease
installation. Accepts stains and varnish easily, the heavy grain
compliments medium to dark stains for a classical look.
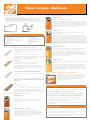
Ceiling Moulding
Contains: Crown, Bed Mould, and Cove Mould
Crown moulding is used as a transition where the wall meets the ceiling. Crown
moulding can be combined with other moulding to create a “build-up”, a decorative
moulding look. Bed mould is also used where the wall meets the ceiling similar to
crown only usually smaller in size. Cove mould can be used in many applications
such as an inside corner where two walls meet or where walls meet ceilings.
Wall & Trim
Contains: Base Cap, Base Shoe, Chair Rail, Ply Cap, Inside Corner,
Outside Corner, and Panel Mould
These mouldings are used to enhance the look of traditional mouldings or cover
small imperfections in rooms. Base shoe is used to cover the transition between
flooring materials and base moulding, base cap is used to enhance square base
moulding around walls or staircases. Chair rail is used to add detail or divide a
room horizontally. Ply cap is used to cover the top of wainscot for finished
appearance. Inside and outside corners are used to cover imperfections where
other materials meet or protect the wall from damage. Panel moulds are used
to add interest to walls by creating faux boxes on the wall.
General Purpose Moulding
Contains: Hand Rail, Lattice, Quarter Round, Full Round, Screen Mould,
Shingle Mould, Window Stool, Door Stop, and Square Mould
These mouldings are used for a variety of purposes. Window stool is used at the
bottom of windows to complete the finished look of the trim. Door stops are used to
cover small gaps around doors and to keep the door from swinging in the wrong
direction. Full round is often used as closet pole.
Door Shop
Contains: Pre-Mitered Door Sets, Interior Jambs, Exterior Jambs,
and Brick Mould Sets
Pre-mitered door sets are ready to install without the need for cutting, they are
available in traditional or no-miter designs. One set will cover one side of a door.
Interior and exterior jambs can be used to replace worn or damaged door frames.
Brick mould sets are ready to install without the need for cutting. One set will cover
the exterior side of a door
Step 3 – Find Your Moulding on the Aisle
Floor Moulding
Contains: Base
Base moulding is typically installed where the floor meets the wall.
It comes in various sizes and species to compliment any décor.
Door & Window Moulding
Contains: Casing, Brick Mould, and Back Band
Casing is used for both functional and decorative trims on interior and
exterior doors and windows. Brick mould is used typically used around
exterior doors and windows. Back band is used as an accent around the
outside edge of interior door and window trim to create a bolder look.
Safety Tips
• If possible, have someone assist you in holding your moulding while using the cutting cart.
• If you remove a safety cable, please replace them. This will help moulding from falling out of
the rack and possibly striking you or another customer.
• Be careful when lifting heavy mouldings or propacks, if it is too heavy for you to lift on your
own, ask a Home Depot associate for help.
For more information visit www.homedepot.com/moulding

Cómo Comprar Molduras
Paso 1 – Mida su habitación
Consejo Útil
Sugerencias Rápidas
¿Quieres evitar cortes de inglete complicados?
Visite la selección de los bloques de esquina per-cortados en la sección de molduras decorativas
¿Necesita sustituir rápidamente revestimiento de la puerta?
Visite los numerosos estilos de Set de revestimiento de Puertas Pre-Cortadas en la Tienda. Usted
puede encontrar conjuntos pre-cortados de igual diseño o para mejorar cualquier decoración.
¿Necesita comprar una gran cantidad de crown, casing o moldura de base?
Descubra la gran selección de propacks. Un gran valor para ese trabajo de gran tamaño.
Algunos perfiles de casing están disponibles pre-cortadas a 7 'y en propacks de longitudes pre-corta-
das a 7', ideal para la instalación alrededor de las puertas.
Asegúrese de que haya un código de UPC en su pieza cortada de moldura, que le ahorrará tiempo
en la caja registradora.
Measure
Outside
Moulding
Inside
Mitre
Outside
Mitre
Figure 2
Measure
Outside
Moulding
Inside
Mitre
Outside
Mitre
Figure 2
Paso 2 – Determinar Qué Tipo de Madera Usted Desea
Figura 1 Figura 1.1
Paso 4 – Por Ultimo, Sólo Corte lo que Usted Necesita
• Pluma y Papel
• Cuchillo para uso general
• Relleno para madera y pegamento
• Escalera
• Gafas de seguridad
• Protección para los Oídos
• Nivel
• Pinzas
• Caja de ingletes, sierra para cortar ingletes o
sierra de ingletes
• Clavos para acabados, Set de clavos, y un
martillo o un martillo neumático Brad
• Cinta métrica
• Escuadra
• Transportador
Esta es la lista básica de herramientas que necesitará para instalar las moldu-
• Dibuje un plano de su habitación. (Figura 1)
• Mida cada pared y anote las medidas en su plano. Se recomienda tener en cuenta la
ubicación y el tamaño de todas las puertas, ventanas o aberturas de la habitación.
• También determine el ángulo de cada esquina. (Figura 1.1)
• Sumar todas las longitudes de las paredes para obtener la cantidad total de piezas de fundición
que usted necesita comprar. Añada 15% para los errores de corte y los residuos.
Paso 3 – Encuentra Tu Moldura en el Pasillo
Usando el plan de medida que se traen del hogar, corte la moldura a
la longitud en bruto que necesita. Recuerde que debe añadir 15% de las
medidas para los ángulos de inglete y posibles errores de corte. Para
obtener instrucciones detalladas sobre cómo dibujar un plano de la
habitación, ver nuestra guía de instalación gratis y el acabado se
encuentra en el pasillo de molduras.
Moldura con Uniones Listo para Pintar (Primed Finger Joint)
Color: Distintas tonalidades de blanco con un sustrato de color
amarillo pálido
Grano: Peso liviano con una fibra recta y uniforme textura
Aplicación: Muy fácil de trabajar, cortes y acepta adhesivos y clavos con
facilidad. with ease. Accepts paint without the need for a primer coat.
Acepta pintura sin la necesidad de una capa de primer.
Pino Macizo
Color: Blanco a amarillo pálido, a veces con un tinte rojizo
Grano: Peso liviano con una fibra recta y uniforme textura
Aplicación: Muy fácil de trabajar, cortes y acepta adhesivos y las uñas con
facilidad. Acepta las lacas y barnices bien, pero necesitaría una capa de
primer si se pintan. Puede ser teñido o barnizado para parecerse a otras
especies de madera.
Moldura de Fibra Lista para Pintar (Primed Fiberboard)
Color: Distintas tonalidades de blanco con un leve a mediano sustrato
marrón
Grano: Sin grano
Aplicación: Moldura de fibra lista para pintar (Primed fiberboard) está libre
de defectos naturales y acepta pintura fácilmente sin la necesidad de una
capa de primer. No es adecuado para aplicaciones exteriores o zonas de
alta humedad.
Roble
Color: Coral a un rojo profundo
Grano: Grano muy difícil, con una textura ligeramente gruesa
Aplicación: Bastante fácil de trabajar, los clavos deben ser pre-perforados
para facilitar la instalación. Acepta fácilmente las lacas y barnices, el
grano pesado complementa teñidos medianos a oscuros para una mirada
clásica.
Moldura de Techo
Contiene: Crown, Bed Mould, y Cove Mould
Moldura de crown se utiliza como una transición donde la pared se une al techo.
Moldura de crown se pueden combinar con otras molduras, para crear un "buildt up,"
una mirada de moldura decorativa. Bed Mould también se utiliza done la pared se
encuentra con el techo similar a el crown pero por lo general de menor tamaño. Cove
Mould se puede utilizar en muchas aplicaciones como la esquina interior donde dos
paredes se unen o donde las paredes se unen al techo.
Paredes y Trim
Contiene: Base Cap, Base Shoe, Chair Rail, Ply Caps, Angulo Interno, Angulo
Externo, y Panel Mould
Estas molduras se utilizan para mejorar el aspecto de molduras tradicionales o cubrir
pequeñas imperfecciones en las habitaciones. Base Show se utiliza para cubrir la
transición entre los materiales del suelo y la moldura de la base, Base Cap se utiliza
para mejorar la moldura cuadrada alrededor de las paredes o escaleras. Chair Rail
se utiliza para añadir detalles o dividir una habitación en posición horizontal. Ply
Cap se utiliza para cubrir la parte superior del zócalo para darle una apariencia de
acabado. Esquinas internas y externas se utilizan para cubrir imperfecciones donde
otros materiales se unen o para proteger la pared de los daños. Panel Mould se
utilizan para agregar interés a las paredes mediante la creación de cajas de imitación
en la pared.
Moldura de Uso General
Contiene: Hand Rail, Lattice, Ronda de Cuartos, Ronda Completa, Screen Mould,
Molde de Teja, Repisa de Ventana, Para Puerta, y Molde Cuadrado
Estas molduras se utilizan para una variedad de propósitos. Repisa de Ventana se
utiliza en la parte inferior de las ventanas para completar el aspecto acabado de la
guarnición. En la Puerta se utilizan para cubrir las lagunas pequeñas alrededor de
puertas y mantener el vaivén de la puerta en dirección correcta. Ronda Completa se
usa generalmente como poste para armario.
Tienda de Puertas
Contiene: Set de Puertas Pre-Cortadas, Jambs de Interior, Jambs de Exterior, y Brick
Mould Sets
Set de revestimiento de Puertas Pre-Cortadas están listos para ser instalados sin la
necesidad de cortar, están disponibles en diseños tradicionales o sin inglete. Un
conjunto abarcará un lado de una puerta. Jambas de interior y exterior se puede
utilizar para reemplazar marcos de puerta desgastados o dañados. Brick Mould Sets
están listos para ser instalados sin la necesidad de corte. Un conjunto cubrirá el lado
exterior de una puerta.
Paso 3 – Encuentra Tu Moldura en el Pasillo
Moldura para Piso
Contiene: Base
Moldura de base se suele instalar donde el piso y la pared se unen.
Viene en varios tamaños y especies para complementar cualquier
decoración.
Moldura para Puertas y Ventanas
Contiene: Casing, Brick Mould, y la banda Back Band
Casing es utilizado para trabajos de función o decorativos en las
puertas y ventanas interiores y exteriores. Brick Mould es generalmente
utilizado alrededor de puertas y ventanas exteriores. Back band se
utiliza como un acento en todo el borde exterior del interior de la puerta
y ventana para crear un look más audaz.
Consejos de seguridad
• Si es posible, consiga que alguien le ayude con el corte de su moldura, mientras use el carro
de corte.
• Si quita un cable de seguridad, favor de volverlas a poner. Esto ayudará a que la moldura no
se caiga de la parrilla y posiblemente le de a usted o a otro cliente.
• Tenga cuidado al levantar molduras o pro-packs pesados, si es demasiado pesado para usted,
hable con un asociado de Home Depot para obtener ayuda.
Para obtener más información, visite www.homedepot.com/moulding
-
 1
1
-
 2
2
-
 3
3
-
 4
4


en otros idiomas
- English: Weaber 74014 Installation guide
Otros documentos
-
Unbranded 1540-8FTMDF Guía de instalación
-
 Ornamental Mouldings M 712 I/S WHW Guía de instalación
-
 Ornamental Mouldings M 712 I/S WHW Guía de instalación
-
 Ornamental Mouldings M 1631 O/S WHW Guía de instalación
-
Ornamental Mouldings M 1631 I/S WHW Guía de instalación
-
 Ornamental Mouldings 712BLKKIT WHW Guía de instalación
-
 C&C Wood Products 888-4842 Guía de instalación
-
 VILLA BATH by RSI LVS18LU-JAV Guía de instalación
-
Genesis GMDB1215LF Manual de usuario
-
Focal Point 23035 Guía de instalación


