La página se está cargando...

Dynaudio A/S, 8660 Skanderborg, Denmark
Sales & Marketing: Dynaudio International GmbH, Ohepark 2, 21224 Rosengarten, Germany, Phone: +49 4108 - 41 80 - 0
www.dynaudio.com
© Dynaudio International GmbH, Xeo Owners Manual 1111, Item No. 4552612. All text and image copyrights reserved. Subject to change without notice.
Owners Manual Xeo
All there is.

All Apple products are trademarks of Apple Inc.
All Sony products are trademarks of Sony Electronics Inc.
All Sonos products are trademarks of Sonos Inc.
Logitech Squeezebox is a trademark of Logitech Inc.
Subject to change without notice.
Please note that the latest version of this manual is available on www.dynaudio.com/xeo

3
EN
DE
FR
IT
ES
PT
RU
ZH
JA
KO
4 ,PSRUWDQW6DIHW\,QVWUXFWLRQV
5 ([DPSOHV%HLVSLHOH([HPSOHV(VHPSL(MHPSORV([HPSORV̶͗͏͓͌͗͢√√꾽겑
13 (QJOLVK
23 'HXWVFK
33 )UDQ©DLV
43 ,WDOLDQR
53 (VSD³RO
63 3RUWXJX¬V
73 ̷͚͑͘͘͏͐
83₼㠖
93 㡴㦻崭
103 뼑霢꽩
113 6SHFLᚏFDWLRQV7HFKQLVFKH'DWHQ&DUDFW«ULVWLTXHV6SHFLᚏFKH
(VSHFLᚏFDFLRQHV(VSHFLᚏFD©·HV͇͇͙͗͑͌͗͜͏͙͘͏͑͏屓㫋Ⅴ㱧ꩡ꽆

4 Dynaudio
Important Safety Instructions
Read these instructions.1.
Keep these instructions.2.
Heed all warnings.3.
Follow all instructions.4.
Do not use this apparatus near water.5.
Clean only with dry cloth.6.
Do not block any ventilation openings. Install in accordance with the manufacturer‘s instructions.7.
Do not install near any heat sources such as radiators, heat registers, stoves, or other apparatus (including amplifiers) that produce heat.8.
Do not defeat the safety purpose of the polarized or grounding-type plug. A polarized plug has two blades with one wider than the other. 9.
A grounding type plug has two blades and a third grounding prong. The wide blade or the third prong are provided for your safety. If the
provided plug does not fit into your outlet, consult an electrician for replacement of the obsolete outlet.
Protect the power cord from being walked on or pinched particularly at plugs, convenience receptacles, and the point where they exit from 10.
the apparatus.
Only use attachments/accessories specified by the manufacturer.11.
Use only with the cart, stand, tripod, bracket, or table specified by the manufacturer, or sold with the apparatus. When a cart is used use 12.
caution when moving the cart/apparatus combination to avoid injury from tip-over.
Unplug this apparatus during lightning storms or when unused for long periods of time.13.
Refer all servicing to qualified service personnel. Servicing is required when the apparatus has been damaged in any way, such as power 14.
supply cord or plug is damaged, liquid has been spilled or objects have fallen into the apparatus, the apparatus has been exposed to rain
or moisture, does not operate normally, or has been dropped.
WARNING: To reduce the risk of fire or electric shock, this apparatus should not be exposed to rain or moisture and objects filled with 15.
liquids, such as vases, should not be placed on this apparatus.
To completely disconnect this equipment from the mains, disconnect the power supply cord plug from the receptacle.16.
The mains plug of the power supply cord shall remain readily operable.17.
WARNING
RISK OF ELECTRIC SHOCK! DO NOT OPEN!
To reduce the risk of electric shock, do not remove the back panel and do not expose the apparatus to rain or moisture.
No user serviceable parts inside. Refer servicing to qualified personnel.

5
EN
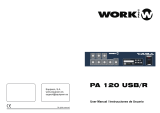
Below are a few examples of how to position and connect the transmitter and
loudspeakers. Please feel free to contact your Dynaudio Xeo distributor if you
have any questions or problems. Also read the instructions for safety and opera-
tion from page 13 onwards.
DE
Nachfolgend finden Sie einige Beispiele zum Platzieren und Anschließen von
Transmitter und Lautsprechern. Bei Fragen und Problemen können Sie sich
gerne an Ihren Dynaudio Xeo Fachhändler wenden. Lesen Sie bitte auch die
Hinweise zur Sicherheit und zur Bedienung ab Seite 23.
FR
Aux pages suivantes, vous trouverez quelques exemples de placements et de
raccordements pour le transmetteur et les haut-parleurs. Pour toute question ou
tout problème, vous pouvez vous adresser à votre distributeur Dynaudio Xeo.
Veuillez également lire les consignes concernant la sécurité et la commande à
partir de la page 33.
IT
Di seguito sono riportati alcuni esempi per posizionare e collegare il trasmettito-
re e gli altoparlanti. In caso di domande e problemi potete rivolgervi al rivendi-
tore specializzato Dynaudio Xeo. Leggere attentamente anche le avvertenze di
sicurezza e d‘impiego a pagina 43.
ES
A continuación encontrará algunos ejemplos para colocar y conectar el transmi-
sor y los altavoces. En caso de dudas y problemas, puede dirigirse a su distri-
buidor especializado Dynaudio Xeo. Lea también las indicaciones de seguridad
y manejo que figuran a partir de la página 53.
P5
A seguir podem há alguns exemplos para o posicionamento e a conexão de
transmissores e autofalantes. Se houver dúvidas ou problemas, entre em
contato com seu revendedor Dynaudio Xeo. Leia também as indicações para
segurança e para o controle, a partir da página 63.
RU
Ниже Вы найдете несколько примеров размещения и подключения пре-
образователей и акустических колонок. В случае вопросов и проблем Вы
можете без колебаний обращаться к своему дилеру фирмы Dynaudio Xeo.
Просьба также прочитать указания по безопасности и управлению, начиная
со страницы 73.
ZH
㌷♾⦷ⅴₚ␔⹈₼㩴㔍Ⓙ↯戢⣷✛㓻⭿⣷㛕㟍扭㘴䤓K⸭√ᇭⰑ㦘䠠桽᧨
庆椞㢅㖎;HR䔈儵兞枏⟕勣侊ᇭ㷳⮥᧨庆梔床䶻欄⚝䤓⸘⏷✛㝜⇫㽷㎞
ℚ欈ᇭ
JA
ⅴₚቒᇬእዐኖኼአኜዙቋኖዙኈዙት揜函ርቫቖ㘴倩ሼቮቂቤቑ㡈㽤ቑ√
ቊሼᇭ役⟞ቧ⟞櫛ሯሥቮ⫃⚗ቒᇬር㺦憌'\QDXGLR;HRቑ弸⮁ㄦሷ抲俰ሲቃ
ሸሧᇭቡቂᇬዙንሮቬቑ⸘⏷ርቫቖ╤⇫栱ሼቮ崻㢝ብ崼ቶቊሲቃሸሧᇭ
KO
껹ꅍ꾅뱭ꅑ걙ꖭ뫥꿵걙뻱뢙넍낹렍陥뇊ꗄ꾥陥ꗞꙊ꾅鲵뼑ꐼ閵덵넍꾽閵뇑
겑鷍꽩넽걪鱽鲙霶鞽뼑ꩡ뼢넩驍ꓭ뇑閵넽鱉陲끥꽭뇑麕덵뾹덵'\QDXGLR
;HR볅ꎙ뇅냱ꈑ꾥ꄲ뼍겑韥ꗉꅂ鱽鲙鿅뼑뵍넩덵넩뼍넍껽놹ꗄ녆鶎덵
렝냹넲꽩ꚩ겢겑꿙
Examples, Beispiele, Exemples, Esempi, Ejemplos, Exemplos,
Примеры, √, √, 꾽겑

6 Dynaudio
RIGHT
ROOM 1
Input 1
Transmitter A
LEFT
ROOM 1
ROOM
POWER
LEFT
MONO
RIGHT
1
2
3
AC 100V-230V ˜ 50/60Hz
OFFON
RL
USB In
PC/MAC
Sound Card
5V DC
500mA
Digital In
Line InAux In
1
2
3
A
B
C
PowerId
Id A
On Off
Transmitter
Input
123
ABC
Volume
ROOM
POWER
LEFT
MONO
RIGHT
1
2
3
AC 100V-230V ˜ 50/60Hz
OFFON

7
Input 1, 2
Transmitter A
On Off
Transmitter
Input
123
ABC
Volume
RIGHT
ROOM 1
LEFT
ROOM 1
Id A
ROOM
POWER
LEFT
MONO
RIGHT
1
2
3
AC 100V-230V ˜ 50/60Hz
OFFON
RL
USB In
PC/MAC
Sound Card
5V DC
500mA
Digital In
Line InAux In
1
2
3
A
B
C
PowerId
ROOM
POWER
LEFT
MONO
RIGHT
1
2
3
AC 100V-230V ˜ 50/60Hz
OFFON

8 Dynaudio
RIGHT
ROOM 2
Input 1
Transmitter A
LEFT
ROOM 2
ROOM
POWER
LEFT
MONO
RIGHT
1
2
3
AC 100V-230V ˜ 50/60Hz
OFFON
On Off
Transmitter
Input
123
ABC
Volume
Input 1
Transmitter A
On Off
Transmitter
Input
123
ABC
Volume
RIGHT
ROOM 1
LEFT
ROOM 1
ROOM
POWER
LEFT
MONO
RIGHT
1
2
3
AC 100V-230V ˜ 50/60Hz
OFFON
RL
USB In
PC/MAC
Sound Card
5V DC
500mA
Digital In
Line InAux In
1
2
3
A
B
C
PowerId
Id A
ROOM
POWER
LEFT
MONO
RIGHT
1
2
3
AC 100V-230V ˜ 50/60Hz
OFFON
ROOM
POWER
LEFT
MONO
RIGHT
1
2
3
AC 100V-230V ˜ 50/60Hz
OFFON

9
MONO
ROOM 3
MONO
ROOM 2
Input 3
Transmitter A
On Off
Transmitter
Input
123
ABC
Volume
Input 3
Transmitter A
On Off
Transmitter
Input
123
ABC
Volume
RIGHT
ROOM 1
LEFT
ROOM 1
ROOM
POWER
LEFT
MONO
RIGHT
1
2
3
AC 100V-230V ˜ 50/60Hz
OFFON
Id A
ROOM
POWER
LEFT
MONO
RIGHT
1
2
3
AC 100V-230V ˜ 50/60Hz
OFFON
RL
USB In
PC/MAC
Sound Card
5V DC
500mA
Digital In
Line InAux In
1
2
3
A
B
C
PowerId
ROOM
POWER
LEFT
MONO
RIGHT
1
2
3
AC 100V-230V ˜ 50/60Hz
OFFON
ROOM
POWER
LEFT
MONO
RIGHT
1
2
3
AC 100V-230V ˜ 50/60Hz
OFFON

10 Dynaudio
LEFT
ROOM 2
RIGHT
ROOM 2
Input 1
Transmitter A
Input 1
Transmitter A
On Off
Transmitter
Input
123
ABC
Volume
On Off
Transmitter
Input
123
ABC
Volume
RIGHT
ROOM 1
LEFT
ROOM 1
ROOM
POWER
LEFT
MONO
RIGHT
1
2
3
AC 100V-230V ˜ 50/60Hz
OFFON
Id A
ROOM
POWER
LEFT
MONO
RIGHT
1
2
3
AC 100V-230V ˜ 50/60Hz
OFFON
ROOM
POWER
LEFT
MONO
RIGHT
1
2
3
AC 100V-230V ˜ 50/60Hz
OFFON
ROOM
POWER
LEFT
MONO
RIGHT
1
2
3
AC 100V-230V ˜ 50/60Hz
OFFON
RL
USB In
PC/MAC
Sound Card
5V DC
500mA
Digital In
Line InAux In
1
2
3
A
B
C
PowerId

11
LEFT
ROOM 2
RIGHT
ROOM 2
LEFT
ROOM 3
RIGHT
ROOM 3
ROOM
POWER
LEFT
MONO
RIGHT
1
2
3
AC 100V-230V ˜ 50/60Hz
OFFON
Input 1, 2, 3
Transmitter A
Input 1, 2, 3
Transmitter A
Input 1, 2, 3
Transmitter A
On Off
Transmitter
Input
123
ABC
Volume
On Off
Transmitter
Input
123
ABC
VolumeOn Off
Transmitter
Input
123
ABC
Volume
RIGHT
ROOM 1
LEFT
ROOM 1
ROOM
POWER
LEFT
MONO
RIGHT
1
2
3
AC 100V-230V ˜ 50/60Hz
OFFON
Id A
ROOM
POWER
LEFT
MONO
RIGHT
1
2
3
AC 100V-230V ˜ 50/60Hz
OFFON
ROOM
POWER
LEFT
MONO
RIGHT
1
2
3
AC 100V-230V ˜ 50/60Hz
OFFON
ROOM
POWER
LEFT
MONO
RIGHT
1
2
3
AC 100V-230V ˜ 50/60Hz
OFFON
ROOM
POWER
LEFT
MONO
RIGHT
1
2
3
AC 100V-230V ˜ 50/60Hz
OFFON
RL
USB In
PC/MAC
Sound Card
5V DC
500mA
Digital In
Line InAux In
1
2
3
A
B
C
PowerId

12 Dynaudio
RL
USB In
PC/MAC
Sound Card
5V DC
500mA
Digital In
Line InAux In
1
2
3
A
B
C
PowerId
MONO
ROOM 1
MONO
ROOM 1
MONO
ROOM 1
MONO
ROOM 1
MONO
ROOM 1
MONO
ROOM 1
ROOM
POWER
LEFT
MONO
RIGHT
1
2
3
AC 100V-230V ˜ 50/60Hz
OFFON
ROOM
POWER
LEFT
MONO
RIGHT
1
2
3
AC 100V-230V ˜ 50/60Hz
OFFON
ROOM
POWER
LEFT
MONO
RIGHT
1
2
3
AC 100V-230V ˜ 50/60Hz
OFFON
ROOM
POWER
LEFT
MONO
RIGHT
1
2
3
AC 100V-230V ˜ 50/60Hz
OFFON
ROOM
POWER
LEFT
MONO
RIGHT
1
2
3
AC 100V-230V ˜ 50/60Hz
OFFON
ROOM
POWER
LEFT
MONO
RIGHT
1
2
3
AC 100V-230V ˜ 50/60Hz
OFFON
Input 1, 3
Transmitter A
On Off
Transmitter
Input
123
ABC
Volume
Id A

13
EN
Unpacking
After unpacking, make sure the system is complete and check the
device and all accessories for transport damage. Transport damage
may be expected if the packaging is severely harmed. Do not attempt
to commission a damaged device. If the contents are incomplete or
damaged, please contact your Dynaudio Xeo distributor. Distributor
addresses can be found in the Internet at www.dynaudio.com.
Packaging material
The packaging has been designed so that it may be reused if it was not
damaged during transport. Do not throw away the packaging and use the
original packaging for all further transport.
Disposal
Disposal of Old Electrical & Electronic Equipment (Applicable in
European countries with separate collection systems)
This symbol on the product or on its packaging indicates
that this product shall not be treated as household waste.
Instead it shall be handed over to the applicable collection
point for the recycling of electrical and electronic
equipment. By ensuring this product is disposed of
correctly, you will help prevent potential negative
consequences for the environment and human health,
which could otherwise be caused by inappropriate waste
handling of this product. The recycling of materials will help to conserve
natural resources. For more detailed information about recycling of this
product, please contact your local city office, your household waste
disposal service or the shop where you purchased the product.
Thank you
for choosing Dynaudio Xeo.
Xeo combines the latest wireless technology with impressive sound quality
and makes listening to music truly comfortable and easy.
The next few pages contain important information on connecting the
system and tips for the best installation locations to ensure perfect function
and the best-possible sound quality.
We hope you enjoy listening to your music.
Dynaudio

14 Dynaudio
Scope of delivery
Xeo 3 loudspeakers
2 Xeo loudspeakers•
1 Xeo remote control•
2 Xeo loudspeaker cloth covers•
2 Xeo loudspeaker power cables •
1 Xeo owner’s manual•
Xeo 5 loudspeakers
2 Xeo loudspeakers•
1 Xeo remote control•
2 Xeo loudspeaker cloth covers•
2 Xeo loudspeaker power cables •
1 Xeo owner’s manual•
Xeo transmitter
1 Xeo transmitter•
1 Xeo transmitter power supply unit with micro USB cable •
1 Xeo stereo analog cable (RCA – RCA) •
1 Xeo stereo analog cable (jack 3.5 mm – 3.5 mm) •
1 Xeo optical digital cable (Toslink – Toslink) •
1 Xeo USB cable (USB – mini USB) •
1 Xeo owner’s manual•

15
EN
Loudspeakers
WARNING: Dangerous electrical voltage
If the loudspeakers are connected to the mains voltage, a dangerous
electrical voltage is present inside the speakers.
Never open the loudspeaker housing. ►
Do not operate defective loudspeakers and disconnect defective ►
loudspeakers from the mains voltage. Please contact your Dynaudio
Xeo distributor if you have any problems. Distributor addresses can be
found in the Internet at www.dynaudio.com.
Use the supplied power cable to connect the loudspeakers to the ►
mains voltage. Make sure that the power supply cable is not damaged;
exchange it for a new one if it has been damaged.
Transmitter power supply unit
WARNING: Dangerous electrical voltage
If no USB source is connected, the transmitter will be provided with current
via the delivered power supply unit.
Only use the delivered power supply unit. ►
Make sure that the power supply cable for the power supply unit is not ►
damaged. Exchange the power supply unit for a new one if it has been
damaged.
Safety information

16 Dynaudio
Connection and operation
This section describes the connections and control elements for the Xeo components. Examples on
various options, such as where to locate the transmitter and loudspeakers and which signal sources
can be connected, can be found starting on page 5. If the variant you need is not included or if you
have problems with connection and commissioning, please contact your Dynaudio Xeo distributor.
Distributor addresses can be found in the Internet at www.dynaudio.com.
Note: Depending on the product package purchased by you, it is possible that your package may not
contain all of the described components.
Remote control
The Xeo remote control can be used to turn the loudspeakers on and off, change the volume, and
select a transmitter and its connected signal sources. If the loudspeakers are being operated in stereo
mode (right/left), commands will always apply to both of the loudspeakers.
Control elements
On/Off On/off switch
Switches the selected loudspeaker on and off.
Mute
Mutes the selected loudspeaker.
Volume Volume
+ = Up
– = Down
Input
1 / 2 / 3
Signal source selection
Selects one of three signal sources from the active transmitter.
Transmitter
A / B / C
Transmitter selection
Selects one of three transmitter channels.
On Off
Transmitter
Input
123
ABC
Volume

17
EN
Transmitter
Signal sources such as tuners, receivers, CD players, TVs, streaming clients, network players, MP3
players, or computers are connected to the transmitter. Signals are sent via radio from the transmitter
to the loudspeakers where they are then played back.
Connections and control elements
Aux in Input for cable with stereo jack
Connect devices here that have an output for the stereo jack (3.5 mm).
Line in Input for cable with RCA plug (cinch)
Connect devices here that have an output for the RCA plug.
Note: If a device is connected in parallel at Aux in, only that device will be played
back.
Digital in Input for optical digital cable
Connect devices here that have an optical digital output (Toslink).
USB in Input for USB cable
Connect your computer’s USB output here. The transmitter will then work as a sound
card.
ID Transmitter ID
One of three transmitter channels can be selected and operated via the remote
control. To do this, select the appropriate ID (A, B, or C).
Power Connection for power supply unit
Connect the delivered power supply unit here.
Do not use a different power supply unit!
Note: If you connect the transmitter via a USB cable to a computer (that is switched
on), you do not need a power supply unit.
RL
USB In
PC/MAC
Sound Card
5V DC
500mA
Digital In
Line InAux In
1
2
3
A
B
C
PowerId

18 Dynaudio
Connection
Using the supplied USB cable and power supply unit, connect the transmitter to the power supply ►
at the POWER input.
Note: If you connect the transmitter via a USB cable to a computer (that is switched on), you do not
need an additional power supply unit.
Connect the signal source to one of the inputs. Only use the supplied cable for this. The following ►
connection options are available:
Your signal source Signal source
output
Transmitter input Cable Notes
Notebook, MAC™, PC USB* 3: USB in USB – mini USB * The transmitter works as a sound
card.
Optical 2: Digital in Toslink – Toslink
Line out 1: Line in RCA – RCA
Headphones 1: Aux in Jack 3.5 mm – 3.5 mm
iPod™, iPad™, iPhone™,
Walkman™ and other portable
devices
Headphones 1: Aux in Jack 3.5 mm – 3.5 mm –
Docking station Line out 1: Line in RCA – RCA * If available
Optical* 2: Digital in Toslink – Toslink
Network client Line out 1: Line in RCA – RCA * If available
Optical* 2: Digital in Toslink – Toslink
Sonos, Logitech, Squeezebox,
and similar devices
Line out 1: Line in RCA – RCA * If available
Optical* 2: Digital in Toslink – Toslink
Apple Airplay™:
Airport Express
Optical 2: Digital in Toslink – Toslink –
Jack 3.5 mm 1: Aux in Jack 3.5 mm – 3.5 mm
Apple Airplay™:
Receiver, amplifier
Line out 1: Line in RCA – RCA –
Optical 2: Digital in Toslink – Toslink

19
EN
Your signal source Signal source
output
Transmitter input Cable Notes
Hard disk, network player Line out 1: Line in RCA – RCA * If available
Optical* 2: Digital in Toslink – Toslink
Analog radio, digital radio Line out 1: Line in RCA – RCA * If available
Optical* 2: Digital in Toslink – Toslink
CD player Line out 1: Line in RCA – RCA * If available
Optical* 2: Digital in Toslink – Toslink
Analog record player Line out* 1: Line in RCA – RCA * On phono preamplifier
Television Headphones 1: Aux in Jack 3.5 mm – 3.5 mm Select one of the two variants.
Line out 1: Line in RCA – RCA
Stereo preamplifier Pre-out, main out 1: Line in RCA – RCA –
Stereo power amplifier Tape out 1: Line in RCA – RCA * Disconnect bridge
Pre-out, main out* 1: Line in RCA – RCA
Second pre-out 1: Line in RCA – RCA
Subwoofer Analog stereo output 1: Line in RCA – RCA –
AV receiver, AV processor Optical 2: Digital in Toslink – Toslink –
Pre-out, main out 1: Line in RCA – RCA

20 Dynaudio
Loudspeakers
The active Xeo 3 and Xeo 5 loudspeakers have an integrated amplifier and can be controlled with
the Xeo remote control. The loudspeakers can be switched between stereo and mono mode using a
switch on the rear.
Description of connections and control elements
Left
Mono
Right
Operating mode
Left = Switch position for the left loudspeaker in stereo•
Mono = Switch position if only using one loudspeaker•
Right = Switch position for the right loudspeaker in stereo•
1
2
3
Room selection
Speakers in different rooms can be controlled separately via the remote control.
POWER Power switch
ON = The loudspeaker is on. The loudspeaker can be activated and deactivated •
via the remote control. If the loudspeaker is activated and there is no signal, it will
switch to standby mode.
OFF = The loudspeaker is completely off.•
Mains socket
To connect the loudspeaker to the mains voltage.
Cloth cover
The cloth cover has been designed so it does not influence the sound dispersion of the loudspeaker. It
may, however, be removed if needed.
To do this, pull the cloth cover towards you and off of the housing. ►
ROOM
POWER
LEFT
MONO
RIGHT
1
2
3
AC 100V-230V ˜ 50/60Hz
OFFON

21
EN
Connection
Position the loudspeaker in the desired location.1.
Connect the loudspeaker to the mains voltage using the power cable.2.
In stereo mode: 3.
Select - Left operating mode for the left loudspeaker.
Select - Right operating mode for the right loudspeaker.
In mono: Select Mono operating mode.
Select room 4. 1, 2, or 3. In stereo, select the same room setting for the right and left loudspeakers.
Loudspeakers with different room settings can be controlled separately via the remote control.
Operation
Switch the loudspeaker on using the power switch on the rear.1.
To activate the loudspeaker: Point the remote control at the loudspeaker and press 2. ON.
If there is no input signal, the loudspeaker will go into standby mode after a certain period. ▼
To reactivate it, press ON.
T
o deactivate the loudspeaker: Point the remote control at the loudspeaker and press 3. OFF.
The loudspeaker will go into standby mode. If you would like to completely switch off the ▼
loudspeaker, the POWER switch on the rear must be turned to OFF. However
, the loudspeaker
can then no longer be activated via the remote control.
To select a transmitter: Press TRANSMITTER 4. A, B, or C.
You do not need to make a selection if you are only using one transmitter (e.g. A). If you have ▼
accidentally selected another transmitter, select transmitter A again.
To select a signal source: Press INPUT 5. 1, 2, or 3.
The selected signal source will be played back. ▼

22 Dynaudio
Interruptions, clicking noises, or other audible interference when playing
music is usually not caused by the radio transmission in the Xeo system.
Often other external causes influence the transmission quality.
Below are a few tips for improving transmission quality:
Position all radio transmitters and receivers away from each other. 1.
WLAN devices, radio receivers, and radio systems may influence
each other if they are too close together. Test out various locations for
each device.
Switch off the automatic search function in WLAN devices. WLAN 2.
devices and other radio systems permanently scan for available
frequencies, thus constantly sending signals that could disrupt other
radio systems. This automatic search function can usually be switched
off.
Always avoid walls if possible. Xeo technology radio signals can, of 3.
course, transmit through walls. However, walls may consist of very
different materials, such as wood fiberboard, stone, or even steel.
The walls may also contain complex cable installations for electrics,
phones, TVs, and radios, as well as water pipes and air shafts.
These can divert radio signals. This is why you should test different
locations for the transmitter and favor the most direct radio path to the
loudspeaker.
Do not operate any powerful electrical devices near the transmitter. 4.
Some electrical devices generate strong electromagnetic fields that
could disrupt radio systems.
You can ask your Dynaudio Xeo distributor for assistance at any time or
contact the Dynaudio helpline at info@dynaudio.com.
Malfunctions

23
DE
Auspacken
Prüfen Sie nach dem Auspacken den Inhalt auf Vollständigkeit und
untersuchen Sie das Gerät sowie alle Zubehörteile auf Transportschäden.
Transportschäden sind besonders dann zu vermuten, wenn die
Verpackung schon deutlich beschädigt ist. Versuchen Sie nicht,
ein beschädigtes Gerät in Betrieb zu nehmen. Setzen Sie sich bei
unvollständigem oder beschädigtem Inhalt bitte mit Ihrem Dynaudio Xeo
Fachhändler in Verbindung. Adressen finden Sie im Internet unter
www.dynaudio.com.
Verpackungsmaterial
Die Verpackung ist so konstruiert, dass sie wieder verwendet werden
kann, wenn sie bei einem vorherigen Transport nicht beschädigt wurde.
Werfen Sie daher die Verpackung nicht weg und verwenden Sie die
Originalverpackung bei allen weiteren Transporten.
Entsorgung
Entsorgung von gebrauchten elektrischen und elektronischen
Geräten (Anzuwenden in den europäischen Ländern mit einem
separaten Sammelsystem für diese Geräte)
Das Symbol auf dem Produkt oder seiner Verpackung
weist darauf hin, dass dieses Produkt nicht als normaler
Haushaltsabfall zu behandeln ist, sondern an einer
Annahmestelle für das Recycling von elektrischen und
elektronischen Geräten abgegeben werden muss. Durch
Ihren Beitrag zum korrekten Entsorgen dieses Produkts
schützen Sie die Umwelt und die Gesundheit Ihrer
Mitmenschen. Umwelt und Gesundheit werden durch
falsches Entsorgen gefährdet. Materialrecycling hilft den Verbrauch von
Rohstoffen zu verringern. Weitere Informationen über das Recycling
dieses Produkts erhalten Sie von Ihrer Gemeinde, den kommunalen
Entsorgungsbetrieben oder dem Geschäft, in dem Sie das Produkt gekauft
haben.
Vielen Dank,
dass Sie sich für Dynaudio Xeo entschieden haben.
Xeo verbindet modernste Wireless-Technologie mit beeindruckender
Klangqualität und macht das Musik hören so komfortabel und einfach wie
möglich.
Um eine problemlose Funktion und die bestmögliche Klangqualität zu
erzielen, finden Sie auf den folgenden Seiten wichtige Hinweise zum
Anschließen und Tipps zur besten Aufstellung.
Wir wünschen Ihnen viel Spaß beim Musik hören,
Dynaudio

24 Dynaudio
Lieferumfang
Xeo 3 Lautsprecher
2 Xeo Lautsprecher•
1 Xeo Fernbedienung•
2 Xeo Lautsprecher Stoffabdeckungen•
2 Xeo Lautsprecher Netzkabel •
1 Xeo Bedienungsanleitung•
Xeo 5 Lautsprecher
2 Xeo Lautsprecher•
1 Xeo Fernbedienung•
2 Xeo Lautsprecher Stoffabdeckungen•
2 Xeo Lautsprecher Netzkabel •
1 Xeo Bedienungsanleitung•
Xeo Transmitter
1 Xeo Transmitter•
1 Xeo Transmitter Steckernetzteil mit Micro-USB-Kabel •
1 Xeo Stereo Analogkabel (RCA – RCA) •
1 Xeo Stereo Analogkabel (Klinke 3,5 mm – 3,5 mm) •
1 Xeo optisches Digitalkabel (Toslink – Toslink) •
1 Xeo USB-Kabel (USB – Mini USB) •
1 Xeo Bedienungsanleitung•

25
DE
Lautsprecher
WARNUNG: Gefährliche elektrische Spannung
Sind die Lautsprecher mit der Netzspannung verbunden, liegt im Innern
der Lautsprecher eine gefährliche elektrische Spannung an.
Öffnen Sie niemals das Gehäuse der Lautsprecher. ►
Betreiben Sie keinen defekten Lautsprecher und trennen Sie einen ►
defekten Lautsprecher von der Netzspannung. Setzen Sie sich bei
Problemen mit Ihrem Dynaudio Xeo Fachhändler in Verbindung.
Adressen finden Sie im Internet unter www.dynaudio.com.
Verwenden Sie zum Anschluss der Lautsprecher an die Netzspannung ►
das mitgelieferte Netzkabel. Achten Sie darauf, dass das Netzkabel
nicht beschädigt wird und tauschen Sie es gegen ein neues aus, wenn
es beschädigt wurde.
Transmitter-Netzteil
WARNUNG: Gefährliche elektrische Spannung
Sofern keine USB-Quelle angeschlossen ist, wird der Transmitter über das
mitgelieferte Netzteil mit Strom versorgt.
Verwenden Sie nur das mitgelieferte Netzteil. ►
Achten Sie darauf, dass das Netzkabel am Netzteil nicht beschädigt ►
wird. Tauschen Sie das Netzteil gegen ein neues aus, wenn es
beschädigt wurde.
Sicherheitshinweise

26 Dynaudio
Anschluss und Bedienung
Dieser Abschnitt beschreibt die Anschlüsse und Bedienelemente der Xeo Komponenten. Beispiele
zu den zahlreichen Möglichkeiten, wie Sie Transmitter und Lautsprecher platzieren und welche
Signalquellen Sie anschließen können, finden Sie ab Seite 5. Sollte die von Ihnen gewünschte
Variante nicht dabei sein oder wenn Sie Probleme mit Anschluss und Inbetriebnahme haben, wenden
Sie sich bitte an Ihren Dynaudio Xeo Fachhändler. Adressen hierzu finden Sie im Internet unter
www.dynaudio.com.
Hinweis: Abhängig von dem von Ihnen erworbenen Produktpaket sind unter Umständen nicht alle
Komponenten in Ihrem Paket enthalten.
Fernbedienung
Über die Xeo Fernbedienung können Sie die Lautsprecher ein- und ausschalten, die Lautstärke
regeln, sowie einen Transmitter und die daran angeschlossenen Signalquellen auswählen. Werden
Lautsprecher in der Betriebsart Stereo (Rechts/Links) betrieben, so wirken sich die Befehle immer auf
beide Lautsprecher gleichermaßen aus.
Bedienelemente
On / Off Ein-/Aus-Schalter
Schaltet den ausgewählten Lautsprecher ein und aus.
Stummschaltung
Schaltet den gewählten Lautsprecher stumm.
Volume Lautstärke
+ = lauter
– = leiser
Input
1 / 2 / 3
Auswahl der Signalquelle
Wählt eine von drei Signalquellen des aktiven Transmitters aus.
Transmitter
A / B / C
Auswahl des Transmitters
Wählt einen von drei Transmitter-Kanälen aus.
On Off
Transmitter
Input
123
ABC
Volume

27
DE
Transmitter
Am Transmitter werden die Signalquellen wie Tuner, Receiver, CD-Player, TV, Streaming Client,
Netzwerkspieler, MP3-Player oder Computer angeschlossen. Über Funk werden die Signale vom
Transmitter zu den Lautsprechern übertragen und dort wiedergegeben.
Anschlüsse und Bedienelemente
Aux In Eingang für Kabel mit Klinkenstecker
Schließen Sie hier Geräte an, die einen Ausgang für Klinkenstecker (3,5 mm) haben.
Line In Eingang für Kabel mit RCA-Stecker (Cinch)
Schließen Sie hier Geräte an, die einen Ausgang für RCA-Stecker haben.
Hinweis: Ist parallel ein Gerät an Aux In angeschlossen, so wird nur das an Aux In
angeschlossene Gerät wiedergegeben.
Digital In Eingang für optische Digitalkabel
Schließen Sie hier Geräte an, die einen optischen Digitalausgang (Toslink) haben.
USB In Eingang für USB-Kabel
Schließen Sie hier den USB-Ausgang Ihres Computers an. Der Transmitter arbeitet
in diesem Fall wie eine Soundkarte.
Id Transmitter-Kennung
Sie können einen von drei Transmitter-Kanäle auswählen und über die
Fernbedienung steuern. Wählen Sie hierzu die entsprechende Id A, B oder C.
Power Anschluss für Netzteil
Schließen Sie hier das mitgelieferte Netzteil an.
Verwenden Sie kein anderes Netzteil!
Hinweis: Wenn Sie den Transmitter über ein USB-Kabel mit einem (eingeschalteten)
Computer verbinden, benötigen Sie kein Netzteil.
RL
USB In
PC/MAC
Sound Card
5V DC
500mA
Digital In
Line InAux In
1
2
3
A
B
C
PowerId

28 Dynaudio
Anschließen
Verbinden Sie den Transmitter am Eingang ► POWER über das mitgelieferte USB-Netzkabel und
das Steckernetzteil mit der Netzspannung.
Hinweis: Wenn Sie den Transmitter über ein USB-Kabel mit einem (eingeschalteten) Computer
verbinden, benötigen Sie keinen zusätzlichen Netzanschluss.
Schließen Sie die Signalquelle an einem der Eingänge an. Verwenden Sie hierzu die mitgelieferten ►
Kabel. Folgende Anschlussmöglichkeiten stehen zur Verfügung.
Ihre Signalquelle Ausgang
Signalquelle
Eingang
Transmitter
Kabel Hinweise
Notebook, MAC™, PC USB* 3: USB In USB – Mini USB * Der Transmitter arbeitet als
Soundkarte.
Optisch 2: Digital In Toslink – Toslink
Line Out 1: Line In RCA – RCA
Kopfhörer 1: Aux In Klinke 3,5 mm – 3,5 mm
iPod™, iPad™, iPhone™,
Walkman™ und andere tragbare
Geräte
Kopfhörer 1: Aux In Klinke 3,5 mm – 3,5 mm –
Dockingstation Line Out 1: Line In RCA – RCA * Falls verfügbar
Optisch* 2: Digital In Toslink – Toslink
Netzwerk Client Line Out 1: Line In RCA – RCA * Falls verfügbar
Optisch* 2: Digital In Toslink – Toslink
Sonos, Logitech, Squeezebox
und ähnliche Geräte
Line Out 1: Line In RCA – RCA * Falls verfügbar
Optisch* 2: Digital In Toslink – Toslink
Apple Airplay™:
Airport Express
Optisch 2: Digital In Toslink – Toslink –
Klinke 3,5 mm 1: Aux In Klinke 3,5 mm – 3,5 mm
Apple Airplay™:
Receiver, Verstärker
Line Out 1: Line In RCA – RCA –
Optisch 2: Digital In Toslink – Toslink

29
DE
Ihre Signalquelle Ausgang
Signalquelle
Eingang
Transmitter
Kabel Hinweise
Festplatte, Netzwerk-Spieler Line Out 1: Line In RCA – RCA * Falls verfügbar
Optisch* 2: Digital In Toslink – Toslink
Analoges Radio, Digitalradio Line Out 1: Line In RCA – RCA * Falls verfügbar
Optisch* 2: Digital In Toslink – Toslink
CD-Player Line Out 1: Line In RCA – RCA * Falls verfügbar
Optisch* 2: Digital In Toslink – Toslink
Analoger Plattenspieler Line Out* 1: Line In RCA – RCA * Am Phono-Vorverstärker
Fernseher Kopfhörer 1: Aux In Klinke 3,5 mm – 3,5 mm Eine von beiden Varianten wählen.
Line Out 1: Line In RCA – RCA
Stereo-Vorverstärker Pre-Out, Main-Out 1: Line In RCA – RCA –
Stereo-Vollverstärker Tape-Out 1: Line In RCA – RCA * Brücke auftrennen
Pre-Out, Main-Out* 1: Line In RCA – RCA
Zweiter Pre-Out 1: Line In RCA – RCA
Subwoofer Analoger
Stereoausgang
1: Line In RCA – RCA –
AV-Receiver, AV-Prozessor Optisch 2: Digital In Toslink – Toslink –
Pre-Out, Main-Out 1: Line In RCA – RCA

30 Dynaudio
Lautsprecher
Die aktiven Lautsprecher Xeo 3 und Xeo 5 haben einen integrierten Verstärker und können mit der
Xeo Fernbedienung gesteuert werden. Über einen Wahlschalter an der Rückseite lassen sich die
Lautsprecher als Stereopaar oder einzeln im Monobetrieb verwenden.
Beschreibung der Anschlüsse und Bedienelemente
Left
Mono
Right
Betriebsart
Left = Schalterstellung für linken Lautsprecher bei Stereobetrieb•
Mono = Schalterstellung bei Verwendung von nur einem Lautsprecher•
Right = Schalterstellung für rechten Lautsprecher bei Stereobetrieb•
1
2
3
Raumauswahl
Verschiedenen Räumen zugewiesene Lautsprecher können über die Fernbedienung
getrennt gesteuert werden.
POWER Netzschalter
ON = Der Lautsprecher ist eingeschaltet. Über die Fernbedienung kann der •
Lautsprecher aktiviert und deaktiviert werden. Ist der Lautsprecher aktiviert und
liegt kein Signal an, schaltet er in den Standby-Modus.
OFF = Der Lautsprecher ist komplett ausgeschaltet.•
Netzbuchse
Zum Anschluss des Lautsprechers an die Netzspannung.
Stoffabdeckung
Die Stoffabdeckung wurde so konstruiert, dass sie das Abstrahlverhalten der Lautsprecher nicht
beeinflusst. Falls gewünscht, können Sie jedoch die Stoffabdeckung abnehmen.
Ziehen Sie hierzu die Stoffabdeckung nach vorne vom Gehäuse ab. ►
ROOM
POWER
LEFT
MONO
RIGHT
1
2
3
AC 100V-230V ˜ 50/60Hz
OFFON

31
DE
Anschließen
Platzieren Sie den Lautsprecher am gewünschten Ort.1.
Verbinden Sie den Lautsprecher über das Netzkabel mit der Netzspannung.2.
Bei Stereobetrieb: 3.
Wählen Sie die Betriebsart - Links für den linken Lautsprecher.
Wählen Sie die Betriebsart - Rechts für den rechten Lautsprecher.
Bei Monobetrieb: Wählen Sie die Betriebsart Mono.
Wählen Sie Raum 4. 1, 2 oder 3. Bei Stereobetrieb wählen Sie für rechten und linken Lautsprecher
die gleiche Raumeinstellung. Lautsprecher mit unterschiedlichen Raumeinstellungen können
getrennt über die Fernbedienung gesteuert werden.
Bedienen
Schalten Sie den Lautsprecher am Netzschalter auf der Rückseite ein.1.
Um den Lautsprecher zu aktivieren: Zeigen Sie mit der Fernbedienung auf den Lautsprecher und 2.
drücken Sie auf ON.
Ohne Eingangssignal geht der Lautsprecher nach einer gewissen Zeit in den Standby-Modus. ▼
Drücken Sie auf ON, wenn Sie ihn wieder aktivieren wollen.
Um einen Lautsprecher zu deaktivieren: Zeigen Sie mit der Fernbedienung auf den Lautsprecher 3.
und drücken Sie auf OFF.
Hierdurch geht der Lautsprecher in den Standby-Modus. W
ollen Sie einen Lautsprecher ▼
ganz ausschalten, müssen den POWER-Schalter auf der Rückseite auf OFF stellen. Der
Lautsprecher kann dann aber nicht mehr über die Fernbedienung aktiviert werden.
Um einen Transmitter auszuwählen: Drücken Sie TRANSMITTER 4. A, B oder C.
Wenn Sie nur einen Transmitter verwenden (z.B. A), brauchen Sie nichts auswählen. ▼
Sollten Sie versehentlich einen anderen Transmitter ausgewählt haben, wählen Sie wieder
T
ransmitter A.
Um eine Signalquelle auszuwählen: Drücken Sie INPUT 5. 1, 2 oder 3.
Die gewählte Signalquelle wird wiedergegeben. ▼

32 Dynaudio
Aussetzer, Klickgeräusche oder andere hörbare Störungen bei der
Musikwiedergabe werden in den meisten Fällen nicht durch die
Funkübertragung des Xeo Systems verursacht. Häufig beeinträchtigen
andere externe Gründe die Übertragungsqualität.
Nachfolgend einige Tipps zur Verbesserung der Übertragungsqualität:
Platzieren Sie alle Funksender und -empfänger voneinander getrennt. 1.
WLAN-Geräte, Radioempfänger und Funksysteme können sich
gegenseitig beeinflussen, wenn sie zu eng beieinander stehen. Testen
Sie verschiedene Plätze für jedes Gerät.
Schalten Sie bei WLAN-Geräten die automatische Suche aus. 2.
WLAN-Geräte und andere Funksysteme tasten permanent das
Umfeld nach verfügbaren Frequenzen ab und senden hierzu ständig
Signale, die andere Funksysteme stören können. Diese automatische
Suchfunktion kann in der Regel abgeschaltet werden.
Vermeiden Sie wann immer möglich Wände. Selbstverständlich kann 3.
die Xeo Technologie Funksignale durch Wände senden. Wände
können jedoch sehr unterschiedlich aus Holzfaserplatten, Stein oder
gar Stahl bestehen. Zudem können komplexe Kabelinstallationen für
Strom, Telefon, TV und Radio sowie Wasserrohre und Luftschächte
enthalten sein. Hierdurch kann ein Funksignal abgelenkt werden.
Testen Sie daher verschiedene Aufstellorte für den Transmitter und
bevorzugen Sie eine möglichst direkte Funkstrecke zum Lautsprecher.
Betreiben Sie keine starken Elektrogeräte in der Nähe 4.
des Transmitters. Einige Elektrogeräte erzeugen starke
elektromagnetische Felder, die Funksysteme stören können.
Sie können jederzeit auch Ihren Dynaudio Xeo Fachhändler um Rat fragen
oder die Dynaudio Helpline unter info@dynaudio.com kontaktieren.
Wenn etwas nicht funktioniert

33
FR
Déballage
Une fois le matériel déballé, vérifiez qu’il ne manque aucun élément et
inspectez l’appareil quant à d’éventuels dégâts dus au transport. Un
emballage manifestement endommagé laisse fortement présumer des
dégâts dus au transport. Ne tentez pas de mettre un appareil endommagé
en service. Si le contenu est incomplet ou endommagé, veuillez contacter
votre distributeur Dynaudio Xeo. Vous trouverez les adresses sur notre
site Internet www.dynaudio.com.
Matériaux d’emballage
L’emballage est conçu de manière à pouvoir être réutilisé, dans la
mesure où il n’a pas été endommagé lors d’un précédent transport. Par
conséquent, ne jetez pas cet emballage original et utilisez-le pour tous les
autres transports.
Élimination
Traitement des appareils électriques et électroniques en fin de vie
(Applicable dans les pays européens disposant de systèmes de
collecte sélective)
Ce symbole, apposé sur le produit ou sur son emballage,
indique que ce produit ne doit pas être traité avec les
déchets ménagers. Il doit être remis à un point de collecte
approprié pour le recyclage des équipements électriques
et électroniques. En s’assurant que ce produit est bien
mis au rebut de manière appropriée, vous aiderez à
prévenir les conséquences négatives potentielles pour
l’environnement et la santé humaine. Le recyclage des
matériaux aidera à conserver les ressources naturelles. Pour toute
information supplémentaire au sujet du recyclage de ce produit, vous
pouvez contacter votre municipalité, votre déchetterie ou le magasin où
vous avez achète le produit.
Merci
d’avoir opté pour un produit Xeo de marque Dynaudio.
Xeo allie une technologie sans fil de pointe à une sonorité de qualité
impressionnante et rend l’écoute de musique simple et confortable.
Pour un fonctionnement irréprochable et une sonorité optimale, vous
trouverez aux pages suivantes des consignes importantes concernant le
raccordement ainsi que des conseils pour une meilleure disposition.
Nous vous souhaitons une agréable écoute,
Dynaudio

34 Dynaudio
Matériel livré
Haut-parleur Xeo 3
2 haut-parleurs Xeo•
1 télécommande Xeo•
2 revêtements en tissu pour haut-parleurs Xeo•
2 câbles secteur • pour haut-parleurs Xeo
1 mode d’emploi Xeo•
Haut-parleur Xeo 5
2 haut-parleurs Xeo•
1 télécommande Xeo•
2 revêtements en tissu pour haut-parleurs Xeo•
2 câbles secteur • pour haut-parleurs Xeo
1 mode d’emploi Xeo•
Transmetteur Xeo
1 transmetteur Xeo•
1 bloc d’alimentation pour transmetteur Xeo avec câble micro USB •
1 câble analogique stéréo Xeo (RCA – RCA) •
1 câble analogique stéréo Xeo (jack 3,5 mm – 3,5 mm) •
1 câble optique numérique Xeo (Toslink – Toslink) •
1 câble USB Xeo (USB – Mini USB) •
1 mode d’emploi Xeo•

35
FR
Haut-parleurs
AVERTISSEMENT : tension électrique dangereuse
Lorsque les haut-parleurs sont reliés à la tension secteur, une tension
électrique dangereuse est présente à l’intérieur des haut-parleurs.
N’ouvrez jamais le caisson des haut-parleurs. ►
Ne faites jamais fonctionner un haut-parleur défectueux et débranchez ►
toujours un haut-parleur défectueux de la tension secteur. En cas de
problème, veuillez contacter votre distributeur Dynaudio Xeo. Vous
trouverez les adresses sur notre site Internet www.dynaudio.com.
Pour le raccordement des haut-parleurs à la tension secteur, utilisez ►
le câble secteur fourni. Veillez à ce que le câble secteur ne soit pas
endommagé et, le cas échéant, remplacez-le par un nouveau câble.
Bloc d’alimentation du transmetteur
AVERTISSEMENT : tension électrique dangereuse
Si aucune source USB n’est raccordée, le transmetteur est alimenté en
électricité par le bloc d’alimentation fourni.
Utilisez uniquement le bloc d’alimentation fourni. ►
Veillez à ce que le câble secteur du bloc d’alimentation ne soit pas ►
endommagé. Le cas échéant, remplacez le bloc d’alimentation par un
nouveau bloc.
Consignes de sécurité

36 Dynaudio
Raccordement et commande
Ce chapitre décrit les raccordements et éléments de commande des composants Xeo. A partir de
la page 5, vous trouverez de nombreux exemples concernant le placement du transmetteur et des
haut-parleurs ou encore le raccordement des sources de signaux possibles. Si la variante souhaitée
n’en fait pas partie ou si vous rencontrez des problèmes pour le raccordement et la mise en service,
veuillez vous adresser à votre distributeur Dynaudio Xeo. Pour ce faire, vous trouverez les adresses
sur notre site Internet www.dynaudio.com.
Remarque : en fonction du pack produit acheté, votre pack ne comprendra pas nécessairement tous
les composants.
Télécommande
La télécommande Xeo vous permet d’allumer et d’éteindre les haut-parleurs, de régler le volume et de
sélectionner un transmetteur ainsi que les sources de signaux y étant raccordées. Si les haut-parleurs
fonctionnent en mode stéréo (droite / gauche), les ordres télécommandés sont exécutés de manière
égale pour les deux haut-parleurs.
Eléments de commande
ON / OFF Boutons Marche / Arrêt
Allume et éteint le haut-parleur sélectionné.
Sourdine
Met le haut-parleur sélectionné en sourdine.
VOLUME Volume
+ = Monte le volume
– = Baisse le volume
Input
1 / 2 / 3
Sélection de la source de signaux
Sélectionne l’une des trois sources de signaux du transmetteur activé.
Transmitter
A / B / C
Sélection du transmetteur
Sélectionne l’un des trois canaux de transmission.
On Off
Transmitter
Input
123
ABC
Volume

37
FR
Transmetteur
Les sources de signaux tels que radio, récepteur, lecteur CD, télévision, client streaming, jeu en
réseau, lecteur MP3 ou ordinateur sont raccordées au transmetteur. Ces signaux sont transmis par
radio du transmetteur aux haut-parleurs et reproduits par ces derniers.
Raccordements et éléments de commande
Aux In Entrée pour câbles avec connecteurs jack
Raccordez ici les appareils disposant d’une sortie pour connecteurs jack (3,5 mm).
Line In Entrée pour câbles avec connecteur RCA (cinch)
Raccordez ici les appareils disposant d’une sortie pour connecteurs RCA.
Remarque : si un appareil est raccordé à la prise Aux In en parallèle, seul le son de
l’appareil raccordé à la prise Aux In sera reproduit.
Digital In Entrée pour câbles optiques numériques
Raccordez ici les appareils disposant d’une sortie optique numérique (Toslink).
USB In Entrée pour câbles USB
Raccordez ici la sortie USB de votre ordinateur. Dans ce cas, le transmetteur
fonctionne à titre de carte son.
Id Identifiant du transmetteur
Vous pouvez sélectionner l’un des trois canaux de transmission et le commander
à l’aide de la télécommande. Pour cela, choisissez l’identifiant A, B ou C
correspondant.
Power Raccord pour le bloc d’alimentation
Raccordez ici le bloc d’alimentation fourni.
N’utilisez aucun autre bloc d’alimentation !
Remarque : si vous reliez le transmetteur à un ordinateur (allumé) par câble USB,
aucun bloc d’alimentation n’est nécessaire.
RL
USB In
PC/MAC
Sound Card
5V DC
500mA
Digital In
Line InAux In
1
2
3
A
B
C
PowerId

38 Dynaudio
Raccordement
Reliez le transmetteur à l’entrée ► POWER à l’aide du câble secteur USB fourni et le bloc
d’alimentation à la tension secteur.
Remarque : si vous reliez le transmetteur à un ordinateur (allumé) par câble USB, aucune connexion
secteur supplémentaire n’est nécessaire.
Raccordez la source de signaux à l’une des entrées. Pour cela, utilisez le câble fourni. Les ►
raccordements suivants sont possibles.
Votre source de signaux Sortie source de
signaux
Entrée
transmetteur
Câble Remarques
Notebook, MAC™, PC USB* 3 : USB In USB – Mini USB * Le transmetteur fonctionne à titre
de carte son.
Optique 2 : Digital In Toslink – Toslink
Line Out 1 : Line In RCA – RCA
Ecouteurs 1 : Aux In Jack 3,5 mm – 3,5 mm
iPod™, iPad™, iPhone™,
Walkman™ et autres appareils
portatifs
Ecouteurs 1 : Aux In Jack 3,5 mm – 3,5 mm –
Station d’accueil Line Out 1 : Line In RCA – RCA * Si disponible
Optique* 2 : Digital In Toslink – Toslink
Client réseau Line Out 1 : Line In RCA – RCA * Si disponible
Optique* 2 : Digital In Toslink – Toslink
Sonos, Logitech, Squeezebox et
appareils similaires
Line Out 1 : Line In RCA – RCA * Si disponible
Optique* 2 : Digital In Toslink – Toslink
Airplay™ Applle :
Airport Express
Optique 2 : Digital In Toslink – Toslink –
Jack 3,5 mm 1 : Aux In Jack 3,5 mm – 3,5 mm
Airplay™ Apple :
récepteur, amplificateur
Line Out 1 : Line In RCA – RCA –
Optique 2 : Digital In Toslink – Toslink

39
FR
Votre source de signaux Sortie source de
signaux
Entrée
transmetteur
Câble Remarques
Disque dur, jeu en réseau Line Out 1 : Line In RCA – RCA * Si disponible
Optique* 2 : Digital In Toslink – Toslink
Radio analogique, radio
numérique
Line Out 1 : Line In RCA – RCA * Si disponible
Optique* 2 : Digital In Toslink – Toslink
Lecteur CD Line Out 1 : Line In RCA – RCA * Si disponible
Optique* 2 : Digital In Toslink – Toslink
Tourne-disque analogique Line Out* 1 : Line In RCA – RCA * Sur le préamplificateur phono
Téléviseur Ecouteurs 1 : Aux In Jack 3,5 mm – 3,5 mm Sélectionner l’une des deux
possibilités.
Line Out 1 : Line In RCA – RCA
Préamplificateur stéréo Pre-Out, Main-Out 1 : Line In RCA – RCA –
Amplificateur intégré stéréo Tape-Out 1 : Line In RCA – RCA * Retirez le pontage
Pre-Out, Main-Out* 1 : Line In RCA – RCA
Second Pre-Out 1 : Line In RCA – RCA
Subwoofer Sortie stéréo
analogique
1 : Line In RCA – RCA –
Récepteur AV, processeur AV Optique 2 : Digital In Toslink – Toslink –
Pre-Out, Main-Out 1 : Line In RCA – RCA

40 Dynaudio
Haut-parleurs
Les haut-parleurs actifs Xeo 3 et Xeo 5 disposent d’un amplificateur intégré et peuvent être
commandés par la télécommande Xeo. Un interrupteur sélecteur situé à l’arrière permet d’utiliser les
haut-parleurs ensemble en mode stéréo ou séparément en mode mono.
Description des raccordements et éléments de commande
Left
Mono
Right
Mode de fonctionnement
Left = Position de l’interrupteur pour haut-parleur gauche en mode stéréo•
Mono = Position de l’interrupteur pour utilisation d’un seul haut-parleur•
Right = Position de l’interrupteur pour haut-parleur droit en mode stéréo•
1
2
3
Sélection de la pièce
Des haut-parleurs affectés à différentes pièces peuvent être commandés
séparément à l’aide de la télécommande.
POWER Interrupteur réseau
ON = Le haut-parleur est allumé. Il peut être activé et désactivé à l’aide de la •
télécommande. Si le haut-parleur est activé mais ne reçoit aucun signal, il passe
en mode veille.
OFF = Le haut-parleur est entièrement éteint.•
Douille réseau
Pour le raccordement du haut-parleur à la tension secteur.
Revêtement en tissu
Le revêtement en tissu a été conçu de manière à ne pas influencer la diffusion des haut-parleurs.
Néanmoins, vous pouvez retirer le revêtement en tissu si vous le souhaitez.
Pour cela, retirez le revêtement en tissu du caisson en le tirant vers l’avant. ►
ROOM
POWER
LEFT
MONO
RIGHT
1
2
3
AC 100V-230V ˜ 50/60Hz
OFFON

41
FR
Raccordement
Placez le haut-parleur à l’endroit souhaité.1.
Reliez le haut-parleur à la tension secteur à l’aide du câble secteur.2.
En mode stéréo :3.
Sélectionnez le mode de fonctionnement - Left pour le haut-parleur gauche.
Sélectionnez le mode de fonctionnement - Right pour le haut-parleur droit.
En mode mono : sélectionnez le mode de fonctionnement Mono.
Choisissez la pièce 4. 1, 2 ou 3. En mode stéréo, procédez aux mêmes réglages de la pièce pour les
haut-parleurs gauche et droit. Des haut-parleurs dont les réglages de la pièce diffèrent peuvent
être commandés séparément à l’aide de la télécommande.
Commande
Allumez le haut-parleur à l’aide de l’interrupteur secteur situé à l’arrière.1.
Pour activer le haut-parleur : pointez la télécommande sur le haut-parleur, puis appuyez sur 2. ON.
Sans signal d’entrée, le haut-parleur passe en mode veille après un certain temps. Lorsque ▼
vous souhaitez le réactiver, appuyez sur ON.
Pour désactiver le haut-parleur : pointez la télécommande sur le haut-parleur, puis appuyez sur 3.
OFF.
Le haut-parleur passe en mode veille. Si vous souhaitez éteindre un haut-parleur entièrement, ▼
vous devez placer l’interrupteur POWER situé à l’arrière sur OFF.
Toutefois, il n’est plus
possible d’activer le haut-parleur à l’aide de la télécommande.
Pour sélectionner un transmetteur : appuyez sur TRANSMITTER 4. A, B ou C.
Si vous n’utilisez qu’un seul transmetteur (par exemple A), aucune sélection n’est nécessaire. ▼
Si vous avez sélectionné un autre transmetteur par inadvertance, choisissez de nouveau le
transmetteur A.
Pour sélectionner une source de signaux : appuyez sur INPUT
5. 1, 2 ou 3.
La source de signaux choisie est reproduite. ▼

42 Dynaudio
Dans la plupart des cas, les temps d’arrêt, cliquetis ou autres défauts
audibles lors de la lecture de la musique ne sont pas causés par la
transmission radio du système Xeo. Bien souvent, d’autres raisons
altèrent la qualité de transmission.
Quelques conseils pour améliorer la qualité de transmission :
Placez tous les émetteurs et récepteurs radio en les séparant les 1.
uns des autres. Les appareils wifi, transistors radio et systèmes radio
peuvent s’influencer mutuellement lorsqu’ils sont trop proches les uns
des autres. Testez différents emplacements pour chaque appareil.
Si vous utilisez des appareils wifi, éteignez la recherche automatique. 2.
Les appareils wifi et autres systèmes radio sondent en permanence
l’espace environnant à la recherche de fréquences disponibles et
envoient à cette fin des signaux constants susceptibles de perturber
d’autres systèmes radio. En règle générale, cette fonction de
recherche automatique peut être désactivée.
Evitez autant que possible les murs. Il va de soi que la technologie 3.
Xeo envoie des signaux radio à travers les murs. Cependant, les
murs peuvent être composés de matériaux différents, tels que
l’aggloméré, la pierre ou encore l’acier. De plus, ils peuvent contenir
des installations câblées complexes pour l’électricité, le téléphone,
la télévision et la radio ainsi que tuyauterie et canaux d’aération.
Ces facteurs peuvent dévier un signal radio. Par conséquent, testez
différents emplacements pour le transmetteur et préférez la distance
radio la plus directe possible au haut-parleur.
A proximité du transmetteur, n’actionnez aucun appareil électrique 4.
puissant. Certains appareils électriques génèrent de puissants
champs magnétiques susceptibles de perturber les systèmes radio.
Demandez également conseil à votre distributeur Dynaudio Xeo ou
contactez le support technique sur info@dynaudio.com.
En cas de dysfonctionnement

43
IT
Disimballo
Dopo il disimballo controllare che il contenuto sia completo e che
l'apparecchio e tutti i componenti non presentino danni di trasporto.
Tali danni sono da presupporre se l'imballaggio è già chiaramente
danneggiato. Non cercare di mettere in funzione un apparecchio
danneggiato. Se il contenuto è incompleto o danneggiato contattare
il rivenditore specializzato Dynaudio Xeo. Gli indirizzi sono riportati in
Internet all'indirizzo www.dynaudio.com.
Materiale da imballaggio
L'imballaggio è concepito per essere riutilizzato, a meno che non sia
stato danneggiato durante un trasporto precedente. Non gettare quindi
l'imballaggio originale ed utilizzarlo per tutti i trasporti successivi.
Disposizione
Trattamento del dispositivo elettrico od elettronico (Applicabile in
tutti I paesi dell‘Unione Europea che utilizzano un sistema di raccolta
differenziata)
Questo simbolo sul prodotto o sulla confezione indica che
il prodotto non deve essere riposto in un punto di raccolta
adibito a rifiuti domestici. Deve invece essere trattato nel
punto di raccolta appropriato per il riciclo di apparecchi
elettrici ed elettronici. Assicurandovi che questo prodotto
sia smaltito correttamente, contribuirete a prevenire
potenziali conseguenze negative per l‘ambiente e per la
salute che potrebbero altrimenti essere causate dal uno
smaltimento inadeguato. Il riciclaggio dei materiali aiuta a conservare le
risorse naturali. Per informazioni più dettagliate circa il riciclaggio di questo
prodotto, potete contattare il vostro ufficio comunale, il servizio locale di
smaltimento rifiuti oppure il negozio dove l‘avete acquistato.
Grazie
per avere scelto Dynaudio Xeo.
Xeo unisce la tecnologia wireless più moderna ad una formidabile qualità
del suono per ascoltare musica nel modo più semplice e confortevole
possibile.
Per un perfetto funzionamento e per ottenere la migliore qualità del suono
Vi preghiamo di seguire le importanti indicazioni per il collegamento ed i
consigli per la migliore installazione riportati alle pagine seguenti.
Vi auguriamo buon divertimento nell'ascolto musicale,
Dynaudio

44 Dynaudio
Fornitura
Altoparlanti Xeo 3
2 altoparlanti Xeo•
1 telecomando Xeo•
2 rivestimenti in stoffa per altoparlanti Xeo•
2 cavi di rete per altoparlanti Xeo •
1 istruzioni per l'uso Xeo•
Altoparlanti Xeo 5
2 altoparlanti Xeo•
1 telecomando Xeo•
2 rivestimenti in stoffa per altoparlanti Xeo•
2 cavi di rete per altoparlanti Xeo •
1 istruzioni per l'uso Xeo•
Trasmettitore Xeo
1 trasmettitore Xeo•
1 alimentatore di rete per trasmettitore Xeo con cavo micro USB •
1 cavo analogico Xeo stereo (RCA – RCA) •
1 cavo analogico Xeo stereo (jack 3,5 mm – 3,5 mm) •
1 cavo digitale ottico Xeo (Toslink – Toslink) •
1 cavo USB Xeo (USB – Mini USB) •
1 istruzioni per l'uso Xeo•

45
IT
Altoparlanti
AVVERTENZA: Tensione elettrica pericolosa
Se gli altoparlanti sono collegati alla rete, al loro interno è presente una
tensione elettrica pericolosa.
Non aprire mai la cassa dell'altoparlante. ►
Non azionare un altoparlante difettoso e scollegarlo sempre ►
dalla tensione di rete. In caso di problemi contattare il rivenditore
specializzato Dynaudio Xeo. Gli indirizzi sono riportati in Internet
all'indirizzo www.dynaudio.com.
Per collegare l'altoparlante alla tensione di rete utilizzare il cavo ►
di rete fornito in dotazione. Fare attenzione che il cavo non venga
danneggiato e, in caso contrario, sostituirlo con uno nuovo.
Alimentatore del trasmettitore
AVVERTENZA: Tensione elettrica pericolosa
Se non è collegata alcuna fonte USB, il trasmettitore viene alimentato da
corrente tramite l'alimentatore fornito in dotazione.
Utilizzare esclusivamente l'alimentatore fornito in dotazione. ►
Fare attenzione che il cavo di rete sull'alimentatore non venga ►
danneggiato. Se l'alimentatore è stato danneggiato, sostituirlo con uno
nuovo.
Istruzioni di sicurezza

46 Dynaudio
Collegamento e comando
Questo capitolo descrive gli attacchi e gli elementi di comando dei componenti Xeo. Per conoscere le
numerose possibilità di collocamento di trasmettitori e altoparlanti e per sapere quali fonti di segnale
possono essere collegate, leggere da pagina 5. Se le varianti desiderate non sono elencate o in caso
di problemi di collegamento e messa in funzione, rivolgersi al rivenditore specializzato Dynaudio Xeo.
Gli indirizzi sono riportati in Internet all'indirizzo www.dynaudio.com.
Nota: In base al pacchetto prodotti acquistato, è possibile che non tutti i componenti descritti siano
compresi nella confezione.
Telecomando
Con il telecomando Xeo si possono spegnere e accendere gli altoparlanti, regolare il volume e
selezionare un trasmettitore con le relative fonti di segnale collegate. Se gli altoparlanti sono azionati
in modalità Stereo (destra/sinistra), i comandi interessano allo stesso entrambi gli altoparlanti.
Elementi di comando
On / Off Tasto di accensione/spegnimento
Accende e spegne l'altoparlante selezionato.
Tasto Muto
Disattiva la funzione audio dell'altoparlante selezionato.
Volume Volume
+ = più alto
– = più basso
Input
1 / 2 / 3
Selezione della fonte di segnale
Seleziona una delle tre fonti di segnale del trasmettitore attivo.
Transmitter
A / B / C
Selezione del trasmettitore
Seleziona uno dei tre canali del trasmettitore.
On Off
Transmitter
Input
123
ABC
Volume

47
IT
Trasmettitore
Al trasmettitore vengono collegate le fonti di segnale come tuner, receiver, CD player, TV, streaming
client, network player, MP3 player o computer. I segnali vengono trasmessi via radio dal trasmettitore
agli altoparlanti e qui riprodotti.
Attacchi ed elementi di comando
Aux In Ingresso per cavo con connettore jack
Collegare qui gli apparecchi che hanno un uscita per connettore jack (3,5 mm).
Line In Ingresso per cavo con connettore RCA (Cinch)
Collegare qui gli apparecchi che hanno un uscita per connettore RCA.
Nota: Se un apparecchio è collegato parallelamente a Aux In, verrà riprodotto solo
questo apparecchio.
Digital In Ingresso per cavo digitale ottico
Collegare qui gli apparecchi che hanno un uscita ottica digitale (Toslink).
USB In Ingresso per cavo USB
Collegare qui l'uscita USB del proprio computer. Il trasmettitore in questo caso
agisce come una scheda audio.
Id Identificazione trasmettitore
È possibile selezionare e comandare uno dei tre canali del trasmettitore tramite il
telecomando. Selezionare al proposito l'Id corrispondente A, B o C.
Power Attacco per alimentatore
Collegare qui l'alimentatore fornito in dotazione.
Non utilizzare nessun altro alimentatore!
Nota: Se il trasmettitore viene collegato ad un computer (acceso) tramite un cavo
USB non è necessario un alimentatore.
RL
USB In
PC/MAC
Sound Card
5V DC
500mA
Digital In
Line InAux In
1
2
3
A
B
C
PowerId

48 Dynaudio
Collegamento
Collegare il trasmettitore all'ingresso ► POWER tramite il cavo di rete USB fornito in dotazione e
l'alimentatore alla tensione di rete.
Nota: Se il trasmettitore viene collegato ad un computer (acceso) tramite un cavo USB non è
necessario un ulteriore collegamento alla rete.
Collegare la fonte di segnale ad uno degli ingressi, utilizzando il cavo fornito in dotazione. Sono a ►
disposizione le seguenti possibilità di collegamento.
Fonte di segnale Uscita fonte di
segnale
Ingresso
trasmettitore
Cavo Note
Notebook, MAC™, PC USB* 3: USB In USB – Mini USB * Il trasmettitore agisce come una
scheda audio.
Ottica 2: Digital In Toslink – Toslink
Line Out 1: Line In RCA – RCA
Cuffie 1: Aux In Jack 3,5 mm – 3,5 mm
iPod™, iPad™, iPhone™,
Walkman™ e altri apparecchi
portatili
Cuffie 1: Aux In Jack 3,5 mm – 3,5 mm –
Docking station Line Out 1: Line In RCA – RCA * Se disponibile
Ottica* 2: Digital In Toslink – Toslink
Netzwork Client Line Out 1: Line In RCA – RCA * Se disponibile
Ottica* 2: Digital In Toslink – Toslink
Sonos, Logitech, Squeezebox e
apparecchi simili
Line Out 1: Line In RCA – RCA * Se disponibile
Ottica* 2: Digital In Toslink – Toslink
Apple Airplay™:
Airport Express
Ottica 2: Digital In Toslink – Toslink –
Jack 3,5 mm 1: Aux In Jack 3,5 mm – 3,5 mm
Apple Airplay™:
receiver, amplificatore
Line Out 1: Line In RCA – RCA –
Ottica 2: Digital In Toslink – Toslink

49
IT
Fonte di segnale Uscita fonte di
segnale
Ingresso
trasmettitore
Cavo Note
Disco rigido, network player Line Out 1: Line In RCA – RCA * Se disponibile
Ottica* 2: Digital In Toslink – Toslink
Radio analogica, radio digitale Line Out 1: Line In RCA – RCA * Se disponibile
Ottica* 2: Digital In Toslink – Toslink
CD player Line Out 1: Line In RCA – RCA * Se disponibile
Ottica* 2: Digital In Toslink – Toslink
Giradischi analogico Line Out* 1: Line In RCA – RCA * Al preamplificatore phono
Televisore Cuffie 1: Aux In Jack 3,5 mm – 3,5 mm Scegliere una delle due varianti.
Line Out 1: Line In RCA – RCA
Preamplificatore stereo Pre-Out, Main-Out 1: Line In RCA – RCA –
Amplificatore integrato stereo Tape-Out 1: Line In RCA – RCA * Tagliare il ponticello
Pre-Out, Main-Out* 1: Line In RCA – RCA
Secondo Pre-Out 1: Line In RCA – RCA
Subwoofer Uscita stereo
analogica
1: Line In RCA – RCA –
AV receiver, processore AV Ottica 2: Digital In Toslink – Toslink –
Pre-Out, Main-Out 1: Line In RCA – RCA

50 Dynaudio
Altoparlanti
Gli altoparlanti attivi Xeo 3 e Xeo 5 hanno un amplificatore integrato e possono essere comandati con
il telecomando Xeo. Tramite un selettore collocato sul retro, gli altoparlanti possono essere utilizzati
come coppia stereo o singolarmente in modalità mono.
Descrizione degli attacchi e degli elementi di comando
Left
Mono
Right
Modalità operativa
Left = posizione del selettore per l'altoparlante sinistro in modalità stereo•
Mono = posizione del selettore per l'utilizzo di un solo altoparlante•
Right = posizione del selettore per l'altoparlante destro in modalità stereo•
1
2
3
Selezione della stanza
Gli altoparlanti assegnati a stanze diverse possono essere comandati
separatamente con il telecomando.
POWER Interruttore di rete
ON = l'altoparlante è acceso e può essere attivato e disattivato con il telecomando. •
Se l'altoparlante è attivo e non è presente alcun segnale, passa alla modalità
standby.
OFF = l'altoparlante è completamente spento.•
Presa di rete
Per il collegamento dell'altoparlante alla tensione di rete.
Rivestimento in stoffa
Il rivestimento in stoffa è stato concepito in modo tale da non influenzare la diffusione del suono
dell'altoparlante. Se lo si desidera può essere però rimosso.
Tirare in avanti il rivestimento in stoffa, staccandolo dalla cassa. ►
ROOM
POWER
LEFT
MONO
RIGHT
1
2
3
AC 100V-230V ˜ 50/60Hz
OFFON

51
IT
Collegamento
Posizionare l'altoparlante nel posto desiderato.1.
Collegare l'altoparlante alla tensione di rete tramite l'apposito cavo.2.
In modalità stereo: 3.
Selezionare la modalità operativa - Left per l'altoparlante sinistro.
Selezionare la modalità operativa - Right per l'altoparlante destro.
In modalità mono: selezionare la modalità operativa Mono.
Selezionare la stanza 4. 1, 2 o 3. Nella modalità stereo scegliere la stessa stanza per l'altoparlante
destro e sinistro. Altoparlanti posizionati in stanze diverse possono essere comandati
separatamente con il telecomando.
Comando
Accendere l'altoparlante utilizzando l'interruttore di rete sul retro.1.
Per attivare l'altoparlante: puntare il telecomando verso l'altoparlante e premere 2. ON.
Senza segnale d'ingresso l'altoparlante, trascorso un determinato periodo di tempo, passa alla ▼
modalità standby. Premere ON se si desidera riattivarlo.
Per disattivare un altoparlante: puntare il telecomando verso l'altoparlante e premere 3. OFF.
In questo modo l'altoparlante passa alla modalità standby. Se si desidera spegnere ▼
completamente l'altoparlante è necessario portare l'interruttore POWER sul retro su OFF.
L'altoparlante non può però più essere attivato con il telecomando.
Per selezionare un trasmettitore: premere
TRANSMITTER 4. A, B o C.
Se si utilizza un solo trasmettitore (p. es. A) non è necessario selezionare niente. Se è stato ▼
scelto inavvertitamente un altro trasmettitore, selezionare di nuovo il trasmettitore A.
Per selezionare una fonte di segnale: premere INPUT
5. 1, 2 o 3.
Viene riprodotta la fonte di segnale selezionata. ▼

52 Dynaudio
Segnali intermittenti, clic o altri disturbi udibili durante la riproduzione di
musica, nella maggior parte dei casi non sono provocati dalla trasmissione
radio del sistema Xeo. Spesso sono altri motivi ad influenzare la qualità di
trasmissione.
Di seguito sono riportati alcuni consigli per migliorare la qualità della
trasmissione:
Posizionare separatamente tutti i radiotrasmettitori e i radioricevitori. 1.
Apparecchi WLAN, radioricevitori e sistemi radio possono influenzarsi
reciprocamente se sono posizionati troppo vicini. Testare per ogni
apparecchio posizioni diverse.
Disattivare la ricerca automatica degli apparecchi WLAN. Gli 2.
apparecchi WLAN e altri sistemi radio sondano permanentemente
la zona circostante alla ricerca di frequenze disponibili e inviano
continuamente segnali che possono disturbare altri sistemi radio.
Questa funzione automatica di solito può essere disattivata.
Evitare se possibile le pareti. Naturalmente la tecnologia Xeo può 3.
inviare segnali radio anche attraverso le pareti. Le pareti possono però
essere molto diverse: in pannelli di masonite, in pietra o addirittura in
acciaio. Inoltre possono contenere complesse installazioni di cavi per
corrente, telefono, TV e radio nonché tubature per l'acqua e prese
d'aria che possono deviare un segnale radio. Provare quindi diversi
luoghi d'installazione per il trasmettitore, prediligendo possibilmente
un tratto di trasmissione radio diretto all'altoparlante.
Non azionare nessun elettrodomestico potente nelle vicinanze 4.
del trasmettitore. Alcuni elettrodomestici generano forti campi
elettromagnetici che possono disturbare i sistemi radio.
Potete consigliarvi in qualsiasi momento con il rivenditore specializzato
Dynaudio Xeo oppure contattare la helpline di Dynaudio sotto info@
dynaudio.com.
Se qualcosa non funziona

53
ES
Desembalaje
Después de desembalar el producto, compruebe si el contenido está
completo y examine el aparato y todos los accesorios para ver si
presentan daños causados por el transporte. Es bastante previsible que
haya daños causados por el transporte si el embalaje presenta daños muy
evidentes. No intente poner en marcha un aparato dañado. En caso de
que el contenido esté incompleto o dañado, póngase en contacto con su
distribuidor especializado Dynaudio Xeo. Encontrará las direcciones en
Internet en www.dynaudio.com.
Material de embalaje
El embalaje está diseñado para poder reutilizarse si no ha sufrido daños
en un transporte anterior. Así pues, no se deshaga del embalaje original y
utilícelo en otros transportes.
Disposición
Tratamiento de los equipos eléctricos y electrónicos al final de su
vida útil (Aplicable en aises europeos con sistemas de recogida
selectiva de residuos)
Este símbolo en su equipo o su embalaje indica que el
presente producto no puede ser tratado como residuos
domésticos normales, si no que deben entregarse en el
correspondiente punto de recogida de equipos eléctricos
y electrónicos. Asegurándose de que este producto es
desechado correctamente, Usted está ayudando a
prevenir las consecuencias negativas para el medio
ambiente y la salud humana que podrían derivarse de la
incorrecta manipulación de este producto. El reciclaje de materiales ayuda
a conservar los recursos naturales. Para recibir infonnación detallada
sobre el reciclaje de este producto, por favor, contacte con su
ayuntamiento, su punto de recogida más cercano o el distribuidor donde
adquirió el producto.
¡Muchas gracias!
Le agradecemos que se haya decidido por Dynaudio Xeo.
Xeo aúna la tecnología inalámbrica más moderna con una impresionante
calidad de sonido; permite escuchar música de la forma más cómoda y
sencilla posible.
Para conseguir un funcionamiento sin problemas y una calidad de
sonido inmejorable, en las siguientes páginas encontrará indicaciones
importantes sobre la conexión y consejos para el mejor emplazamiento.
Le deseamos que se divierta escuchando música,
Dynaudio

54 Dynaudio
Volumen de suministro
Altavoces Xeo 3
2 altavoces Xeo•
1 mando a distancia Xeo•
2 cubiertas de tela para altavoces Xeo•
2 cables eléctricos para altavoces Xeo •
1 manual de instrucciones de uso Xeo•
Altavoces Xeo 5
2 altavoces Xeo•
1 mando a distancia Xeo•
2 cubiertas de tela para altavoces Xeo•
2 cables eléctricos para altavoces Xeo •
1 manual de instrucciones de uso Xeo•
Transmisor Xeo
1 transmisor Xeo•
1 fuente de alimentación enchufable para transmisor Xeo con cable micro USB •
1 cable analógico estéreo Xeo (RCA – RCA) •
1 cable analógico estéreo Xeo (jack 3,5 mm – 3,5 mm) •
1 cable digital óptico Xeo (Toslink – Toslink) •
1 cable USB Xeo (USB – mini USB) •
1 manual de instrucciones de uso Xeo•

55
ES
Altavoces
ADVERTENCIA: tensión eléctrica peligrosa
Si los altavoces están conectados a la tensión de red, en su interior hay
una tensión eléctrica peligrosa.
Nunca abra la caja de los altavoces. ►
Nunca utilice un altavoz averiado y desconéctelo siempre de la tensión ►
de red. En caso de problemas, póngase en contacto con su distribuidor
especializado Dynaudio Xeo. Encontrará las direcciones en Internet en
www.dynaudio.com.
Para conectar los altavoces a la tensión de red, utilice el cable ►
eléctrico suministrado. Preste atención a que el cable eléctrico no sufra
daños y sustitúyalo por uno nuevo si está dañado.
Fuente de alimentación del transmisor
ADVERTENCIA: tensión eléctrica peligrosa
Siempre que no esté conectada una fuente USB, el transmisor recibirá
corriente a través de la fuente de alimentación suministrada.
Utilice exclusivamente la fuente de alimentación suministrada. ►
Preste atención a que el cable eléctrico de la fuente de alimentación ►
no sufra daños. Sustituya la fuente por una nueva si está dañada.
Indicaciones de seguridad

56 Dynaudio
Conexión y manejo
Este apartado describe las conexiones y los elementos de mando de los componentes Xeo. A
partir de la página 5 encontrará ejemplos de las numerosas opciones para situar el transmisor y los
altavoces y las fuentes de señal que se pueden conectar. Si la variante que desea no se encuentra
allí o si tiene problemas con la conexión y la puesta en marcha, diríjase a su distribuidor especializado
Dynaudio Xeo. Encontrará las direcciones en Internet en www.dynaudio.com.
Nota: en función del paquete de productos que haya adquirido, en determinadas circunstancias
puede ocurrir que el paquete no contenga todos los componentes.
Mando a distancia
Con el mando a distancia Xeo, puede conectar y desconectar los altavoces, regular el volumen y
seleccionar un transmisor y las fuentes de señal conectadas a él. Si los altavoces se utilizan en el
modo estéreo (derecha/izquierda), las órdenes tendrán efecto siempre en los dos altavoces por igual.
Elementos de mando
On / Off Interruptor de conexión y desconexión
Conecta y desconecta el altavoz seleccionado.
Desactivación del sonido
Desactiva el sonido del altavoz seleccionado.
Volume Volumen
+ = más alto
– = más bajo
Input
1 / 2 / 3
Selección de la fuente de señal
Selecciona una de las tres fuentes de señal del transmisor activo.
Transmitter
A / B / C
Selección del transmisor
Selecciona uno de los tres canales del transmisor.
On Off
Transmitter
Input
123
ABC
Volume

57
ES
Transmisor
En el transmisor se conectan las fuentes de señal como el sintonizador de radio, el receptor, el
reproductor de CD, el televisor, el cliente de streaming, el reproductor de audio y vídeo por Internet,
el reproductor MP3 o el ordenador. Las señales se transmiten inalámbricamente del transmisor a los
altavoces y se reproducen allí.
Conexiones y elementos de mando
Aux In Entrada para cables con conector jack
Conecte aquí los aparatos que tengan una salida para conectores jack (3,5 mm).
Line In Entrada para cables con conector RCA (Cinch)
Conecte aquí los aparatos que tengan una salida para conectores RCA.
Nota: si un aparato está conectado al mismo tiempo a Aux In, solamente se
reproducirá el aparato conectado a Aux In.
Digital In Entrada para cables digitales ópticos
Conecte aquí los aparatos que tengan una salida digital óptica (Toslink).
USB In Entrada para cables USB
Conecte aquí la salida USB de su ordenador. El transmisor funcionará en este caso
como una tarjeta de sonido.
Id Identificador del transmisor
Puede elegir uno de los tres canales del transmisor y controlarlo con el mando a
distancia. Para ello elija el Id correspondiente A, B o C.
Power Conexión de la fuente de alimentación
Conecte aquí la fuente de alimentación suministrada.
No utilice ninguna otra fuente de alimentación.
Nota: si conecta el transmisor a un ordenador (encendido) por medio de un cable
USB, no necesitará la fuente de alimentación.
RL
USB In
PC/MAC
Sound Card
5V DC
500mA
Digital In
Line InAux In
1
2
3
A
B
C
PowerId

58 Dynaudio
Conexión
Conecte el transmisor a la tensión de red enchufando en la entrada ► POWER el cable eléctrico
USB suministrado y la fuente de alimentación.
Nota: si conecta el transmisor a un ordenador (encendido) por medio de un cable USB, no necesitará
ninguna otra conexión de red.
Conecte la fuente de señal a una de las entradas. Utilice para ello los cables suministrados. Están ►
disponibles las siguientes opciones de conexión.
Su fuente de señal Salida fuente de
señal
Entrada
transmisor
Cable Notas
Notebook, MAC™, ordenador USB* 3: USB In USB – mini USB * El transmisor funciona como una
tarjeta de sonido.
Óptica 2: Digital In Toslink – Toslink
Line Out 1: Line In RCA – RCA
Auriculares 1: Aux In Jack 3,5 mm – 3,5 mm
iPod™, iPad™, iPhone™,
Walkman™ y otros aparatos
portátiles
Auriculares 1: Aux In Jack 3,5 mm – 3,5 mm –
Base de acoplamiento Line Out 1: Line In RCA – RCA * Si está disponible
Óptica* 2: Digital In Toslink – Toslink
Cliente de red Line Out 1: Line In RCA – RCA * Si está disponible
Óptica* 2: Digital In Toslink – Toslink
Sonos, Logitech, Squeezebox y
aparatos similares
Line Out 1: Line In RCA – RCA * Si está disponible
Óptica* 2: Digital In Toslink – Toslink
Apple Airplay™:
Airport Express
Óptica 2: Digital In Toslink – Toslink –
Jack 3,5 mm 1: Aux In Jack 3,5 mm – 3,5 mm
Apple Airplay™:
receptores, amplificadores
Line Out 1: Line In RCA – RCA –
Óptica 2: Digital In Toslink – Toslink

59
ES
Su fuente de señal Salida fuente de
señal
Entrada
transmisor
Cable Notas
Disco duro, reproductor de
audio y vídeo por Internet
Line Out 1: Line In RCA – RCA * Si está disponible
Óptica* 2: Digital In Toslink – Toslink
Radio analógica, radio digital Line Out 1: Line In RCA – RCA * Si está disponible
Óptica* 2: Digital In Toslink – Toslink
Reproductor de CD Line Out 1: Line In RCA – RCA * Si está disponible
Óptica* 2: Digital In Toslink – Toslink
Tocadiscos analógico Line Out* 1: Line In RCA – RCA * En el preamplificador del
tocadiscos
Televisor Auriculares 1: Aux In Jack 3,5 mm – 3,5 mm Elegir una de las dos variantes.
Line Out 1: Line In RCA – RCA
Preamplificador estéreo Pre-Out, Main-Out 1: Line In RCA – RCA –
Amplificador completo estéreo Tape-Out 1: Line In RCA – RCA * Deshacer el puente
Pre-Out, Main-Out* 1: Line In RCA – RCA
Segunda Pre-Out 1: Line In RCA – RCA
Amplificador de subgraves
(subwoofer)
Salida estéreo
analógica
1: Line In RCA – RCA –
Receptor AV, procesador AV Óptica 2: Digital In Toslink – Toslink –
Pre-Out, Main-Out 1: Line In RCA – RCA

60 Dynaudio
Altavoces
Los altavoces activos Xeo 3 y Xeo 5 tienen un amplificador integrado y pueden controlarse con el
mando a distancia Xeo. Con un selector situado en la parte trasera, los altavoces pueden utilizarse
por parejas estéreo o individualmente en modo mono.
Descripción de las conexiones y de los elementos de mando
Left
Mono
Right
Modo
Left = posición del selector para el altavoz izquierdo en modo estéreo•
Mono = posición del selector al utilizar solamente un altavoz•
Right = posición del selector para el altavoz derecho en modo estéreo•
1
2
3
Selección de sala
Los altavoces asignados a distintas salas pueden controlarse por separado con el
mando a distancia.
POWER Interruptor eléctrico
ON = el altavoz está conectado. Con el mando a distancia se puede activar y •
desactivar el altavoz. Si el altavoz está activado y no hay señal, pasa al modo de
espera.
OFF = el altavoz está desconectado por completo.•
Casquillo de red
Para conectar el altavoz a la tensión de red.
Cubierta de tela
La cubierta de tela se ha diseñado de tal manera que no influya sobre el comportamiento de radiación
de los altavoces. No obstante, puede retirar esta cubierta si lo desea.
Para ello, tire de la cubierta de tela hacia delante para extraerla de la caja. ►
ROOM
POWER
LEFT
MONO
RIGHT
1
2
3
AC 100V-230V ˜ 50/60Hz
OFFON

61
ES
Conexión
Coloque el altavoz en el lugar deseado.1.
Conecte el altavoz a la tensión de red con el cable eléctrico.2.
Modo estéreo: 3.
Seleccione el modo - Left para el altavoz izquierdo.
Seleccione el modo - Right para el altavoz derecho.
Modo mono: seleccione el modo Mono.
Elija la sala 4. 1, 2 o 3. En modo estéreo, elija el mismo ajuste de sala para el altavoz izquierdo y
el derecho. Los altavoces con diferentes ajustes de sala pueden controlarse por separado con el
mando a distancia.
Manejo
Conecte el altavoz con el interruptor eléctrico de la parte trasera.1.
Para activar el altavoz: con el mando a distancia, apunte hacia el altavoz y pulse 2. ON.
Si no hay señal de entrada, el altavoz pasa al modo de espera una vez transcurrido cierto ▼
tiempo. Pulse ON cuando desee reactivarlo.
Para desactivar un altavoz: con el mando a distancia, apunte hacia el altavoz y pulse 3. OFF.
De esta manera, el altavoz pasa al modo de espera. Si desea desconectar por completo un ▼
altavoz, deberá colocar el interruptor POWER de la parte trasera en la posición OFF. En ese
caso, el altavoz ya no podrá activarse con el mando a distancia.
Para seleccionar un transmisor: pulse
TRANSMITTER 4. A, B o C.
Si solamente utiliza un transmisor (p. ej. A), no necesitará seleccionar nada. Si ha seleccionado ▼
otro transmisor por error, vuelva a seleccionar Transmitter A.
Para seleccionar una fuente de señal: pulse INPUT
5. 1, 2 o 3.
Se reproduce la fuente de señal. ▼

62 Dynaudio
Los fallos, los chasquidos y otras perturbaciones audibles durante
la reproducción de la música no están causados por la transmisión
inalámbrica del sistema Xeo en la mayoría de los casos. A menudo son
otras causas externas las que perjudican la calidad de la transmisión.
A continuación le presentamos una serie de consejos para mejorar la
calidad de la transmisión:
Coloque todos los emisores y receptores inalámbricos separados 1.
entre sí. Los aparatos WLAN, receptores de radio y sistemas
inalámbricos pueden influirse entre sí si están muy cerca. Pruebe
diferentes lugares para cada aparato.
Desconecte la búsqueda automática de los aparatos WLAN. Los 2.
aparatos WLAN y otros sistemas inalámbricos realizan permanentes
exploraciones en el entorno para encontrar las frecuencias
disponibles, con lo que envían señales constantemente que pueden
interferir en otros sistemas inalámbricos. En general, esta función de
búsqueda automática puede desconectarse.
Evite las paredes siempre que sea posible. La tecnología Xeo 3.
puede transmitir, naturalmente, señales inalámbricas a través de las
paredes. Sin embargo, las paredes pueden tener composiciones
muy distintas: tableros de fibras de madera, piedra o incluso acero.
Además puede haber instalaciones complejas de cables para la
electricidad, el teléfono, la televisión y la radio, y tuberías de agua y
conductos de aire. Todo esto puede perturbar una señal inalámbrica.
En consecuencia, pruebe distintos lugares de emplazamiento para el
transmisor e intente que el tramo inalámbrico hasta el altavoz sea lo
más directo posible.
No utilice aparatos eléctricos potentes cerca del transmisor. Algunos 4.
aparatos eléctricos generan campos electromagnéticos intensos que
pueden perturbar los sistemas inalámbricos.
Puede pedir consejo en cualquier momento también a su distribuidor
especializado Dynaudio Xeo o ponerse en contacto con la atención al
cliente de Dynaudio escribiendo a info@dynaudio.com.
Si algo no funciona

63
PT
Retirar da embalagem
Após retirar da embalagem, verifique se o conteúdo está completo e
examine o aparelho e os acessórios para ver se há qualquer dano devido
ao transporte. Danos devidos ao transporte geralmente ocorrem quando
a embalagem estiver claramente danificada. Não tente ligar um aparelho
danificado. Ao detectar que o conteúdo está incompleto ou danificado,
entre em contato com seu revendedor autorizado Dynaudio Xeo. Os
endereços para contato podem ser encontrados na Internet em www.
dynaudio.com.
Material da embalagem
O material da embalagem foi concebido para poder ser reutilizado,
caso ele não esteja danificado por processos anteriores de transporte.
Não jogue fora a embalagem original e utilize-a sempre que precisar
transportar futuramente o aparelho.
Disposição
Tratamento de Equipamentos Eléctricos e Electrônicos no final da
sua vida útil (Aplicável em países Europeus com sistemas de recolha
independentes)
Este símbolo no produto ou na sua embalagem indica
que este não deve ser tratado como resíduo doméstico.
Ao invés, será colocado no ponto de recolha destinado à
reciclagem de equipamento eléctrico e electrônico.
Assegurandose que este produto é despejado
correctamente, você irá prevenir potenciais
conseqüências negativas para o meio ambiente bem
como para a saúde humana, que de outra forma
poderiam ocorrer pela manipulação imprópria deste produto. A reciclagem
dos materiais contribuirá para a conservação dos recursos naturais. Para
obter mais informação detalhada sobre a reciclagem deste produto, por
favor contacte o município acentos onde reside, os serviços de recolha de
resíduos da sua área ou a loja onde o produto foi adquirido.
Muito obrigado
por você ter escolhido o Dynaudio Xeo.
O Xeo alia a mais moderna tecnologia wireless com uma qualidade de
som impressionante e faz com que ouvir música seja o mais simples e
confortável possível.
Para obter um funcionamento perfeito e a melhor qualidade de som,
podem ser encontradas nas próximas páginas importantes indicações
para a conexão e dicas para a melhor instalação.
Desejamos a você muita diversão ao ouvir música,
Dynaudio

64 Dynaudio
Conteúdo
Autofalante Xeo 3
2 autofalantes Xeo•
1 controle remoto Xeo•
2 capas de tecido para autofalantes Xeo•
2 cabos de energia para autofalantes Xeo •
1 manual de instruções Xeo•
Autofalante Xeo 5
2 autofalantes Xeo•
1 controle remoto Xeo•
2 capas de tecido para autofalantes Xeo •
2 cabos de energia para autofalantes Xeo •
1 manual de instruções Xeo•
Transmissor Xeo
1 transmissor Xeo•
1 conector de alimentação para transmissor Xeo com cabo micro USB •
1 cabo analógico estéreo Xeo (RCA – RCA) •
1 cabo analógico estéreo Xeo (tomada 3,5 mm – 3,5 mm) •
1 cabo digital ótico Xeo (Toslink – Toslink) •
1 cabo USB Xeo (USB – mini USB) •
1 manual de instruções Xeo•

65
PT
Autofalante
ADVERTÊNCIA: tensão elétrica perigosa
Sempre que os autofalantes estiverem ligados à rede elétrica, existirá
dentro deles uma tensão elétrica perigosa.
Nunca abra o compartimento dos autofalantes. ►
Se os autofalantes estiverem com defeito, não utilize-os e desconecte- ►
os da rede elétrica. Se houver algum problema, entre em contato com
seu revendedor autorizado Dynaudio Xeo. Os endereços para contato
podem ser encontrados na Internet em www.dynaudio.com.
Utilize apenas o cabo de energia fornecido junto com o autofalante ►
para conectá-lo à rede elétrica. Esteja atento à presença de danos
no cabo de energia e substitua-o por um cabo novo se ele estiver
danificado.
Fonte de alimentação do transmissor
ADVERTÊNCIA: tensão elétrica perigosa
Se não houver nenhuma fonte USB conectada, o transmissor será
alimentado com corrente através da fonte de alimentação fornecida.
Utilize apenas a fonte de alimentação fornecida. ►
Esteja atento para que o cabo de energia e a fonte de alimentação não ►
estejam danificados. Substitua a fonte de alimentação se ela estiver
danificada.
Indicações de segurança

66 Dynaudio
Conexão e funcionamento
Esta seção descreve as conexões e os elementos de controle dos componentes Xeo. Exemplos
das diversas possibilidades de posicionar o transmissor e os autofalantes e de quais fontes de sinal
podem ser conectadas, são fornecidos a partir da página 5. Se for desejada uma variação não
indicada ou se houver problemas na conexão e colocação em funcionamento, entre em contato com
seu revendedor autorizado Dynaudio Xeo. Endereços de revendedores podem ser encontrados na
Internet em www.dynaudio.com.
Indicação: dependendo do pacote de produtos adquirido, é possível que nem todos os componentes
estejam incluídos em seu pacote.
Controle remoto
Através do controle remoto Xeo é possível ligar e desligar os autofalantes, regular o volume do som
e selecionar um transmissor e as fontes de sinal conectadas a ele. Caso os autofalantes estejam no
modo de funcionamento estéreo (direita/esquerda), os comandos serão aplicados sempre da mesma
maneira em ambos os autofalantes.
Elementos de controle
On / Off Ligar/Desligar
Liga e desliga o autofalante selecionado.
Mute
Desliga o som do autofalante selecionado.
Volume Ajusta o volume do som
+ = mais alto
– = mais baixo
Input
1 / 2 / 3
Seleção da fonte de sinal
Seleciona uma das três fontes de sinal do transmissor ativo.
Transmitter
A / B / C
Seleção do transmissor
Seleciona um dos três canais do transmissor.
On Off
Transmitter
Input
123
ABC
Volume

67
PT
Transmissor
No transmissor são conectadas fontes de sinal, sintonizador, receptor, CD player, televisão, Streaming
Client, Network player, MP3 player ou computador. Através de sinal de rádio, os sinais do transmissor
serão transmitidos aos autofalantes e reproduzidos.
Conexões e elementos de controle
Aux In Entrada para cabo com conector de tomada
Conecte aqui aparelhos que tenham saída para o conector de tomada (3,5 mm).
Line In Entrada para cabo com conector RCA (Cinch)
Conecte aqui aparelhos que tenham saída para um conector RCA.
Indicação: se um aparelho em Aux In estiver conectado paralelamente, então
apenas o aparelho conectado em Aux In será reproduzido.
Digital In Entrada para cabo ótico digital
Conecte aqui aparelhos que tenham saída digital ótica (Toslink).
USB In Entrada para cabo USB
Conecte aqui a saída USB de seu computador. Neste caso, o transmissor funciona
como uma placa de som.
Id Identificação do transmissor
Um dos três canais de transmissão pode ser selecionado e controlado através do
controle remoto. Para isto, selecione o Id correspondente A, B ou C.
Power Conexão para fonte de alimentação
Conecte aqui a fonte de alimentação fornecida.
Não utilize outras fontes de alimentação!
Indicação: ao ligar o transmissor através de um cabo USB a um computador
(ligado), não é necessária qualquer fonte de alimentação.
RL
USB In
PC/MAC
Sound Card
5V DC
500mA
Digital In
Line InAux In
1
2
3
A
B
C
PowerId

68 Dynaudio
Conectar
Ligue o transmissor na entrada ► POWER através do cabo de energia USB fornecido e o conector
de alimentação à rede elétrica.
Indicação: ao ligar o transmissor através de um cabo USB a um computador (ligado), não é
necessária qualquer conexão de rede adicional.
Conecte a fonte de sinal em uma entrada. Para isto, utilize o cabo fornecido. Estão disponíveis as ►
seguintes possibilidades de conexão.
Sua fonte de sinal Saída da fonte de
sinal
Entrada do
transmissor
Cabo Indicações
Notebook, MAC™, PC USB* 3: USB In USB – Mini USB * O transmissor funciona como
placa de som.
Ótico 2: Digital In Toslink – Toslink
Line Out 1: Line In RCA – RCA
Fones de ouvido 1: Aux In Tomada 3,5 mm – 3,5 mm
iPod™, iPad™, iPhone™,
Walkman™ e outros aparelhos
portáteis
Fones de ouvido 1: Aux In Tomada 3,5 mm – 3,5 mm –
Estação base (docking station) Line Out 1: Line In RCA – RCA * Caso disponível
Ótico* 2: Digital In Toslink – Toslink
Network Client Line Out 1: Line In RCA – RCA * Caso disponível
Ótico* 2: Digital In Toslink – Toslink
Sonos, Logitech, Squeezebox e
aparelhos semelhantes
Line Out 1: Line In RCA – RCA * Caso disponível
Ótico* 2: Digital In Toslink – Toslink
Apple Airplay™:
Airport Express
Ótico 2: Digital In Toslink – Toslink –
Tomada 3,5 mm 1: Aux In Tomada 3,5 mm – 3,5 mm
Apple Airplay™:
Receptor, amplificador
Line Out 1: Line In RCA – RCA –
Ótico 2: Digital In Toslink – Toslink

69
PT
Sua fonte de sinal Saída da fonte de
sinal
Entrada do
transmissor
Cabo Indicações
Disco rígido, Network player Line Out 1: Line In RCA – RCA * Caso disponível
Ótico* 2: Digital In Toslink – Toslink
Rádio analógico, rádio digital Line Out 1: Line In RCA – RCA * Caso disponível
Ótico* 2: Digital In Toslink – Toslink
CD-Player Line Out 1: Line In RCA – RCA * Caso disponível
Ótico* 2: Digital In Toslink – Toslink
Aparelho de som analógico Line Out* 1: Line In RCA – RCA * No pré-amplificador phono
Televisão Fones de ouvido 1: Aux In Tomada 3,5 mm – 3,5 mm Selecione uma das duas variações
Line Out 1: Line In RCA – RCA
Pré-amplificador estéreo Pre-Out, Main-Out 1: Line In RCA – RCA –
Amplificador integrado estéreo Tape-Out 1: Line In RCA – RCA * Separar pontes
Pre-Out, Main-Out* 1: Line In RCA – RCA
Segundo Pre-Out 1: Line In RCA – RCA
Subwoofer Saída análógica
estéreo
1: Line In RCA – RCA –
Receptor AV, processador AV Ótico 2: Digital In Toslink – Toslink –
Pre-Out, Main-Out 1: Line In RCA – RCA

70 Dynaudio
Autofalante
Os autofalantes ativos Xeo 3 e Xeo 5 têm um amplificador integrado e podem ser controlados com
o controle remoto Xeo. Através de uma chave seletora na parte traseira, os autofalantes podem ser
utilizados como par estéreo ou separadamente em funcionamento mono.
Descrição das conexões e elementos de controle
Left
Mono
Right
Modo de funcionamento
Left = definição para autofalante esquerdo em modo de funcionamento estéreo•
Mono = definição para utilização de apenas um autofalante•
Right = definição para autofalante direito em modo de funcionamento estéreo•
1
2
3
Seleção de ambiente
Autofalantes colocados em ambientes diferentes podem ser controlados
separadamente através do controle remoto.
POWER Interruptor de energia
ON = o autofalante está ligado. Através do controle remoto, o autofalante pode ser •
ativado e desativado. Se o autofalante estiver ativado e não houver qualquer sinal,
ele comuta para o modo Standby.
OFF = o autofalante está completamente desligado.•
Tomada de rede
Para a conexão do autofalante à rede elétrica.
Cobertura de tecido
A cobertura de tecido foi concebida para que a radiação acústica não influencie o autofalante. Porém,
se for desejado, a cobertura de tecido pode ser retirada.
Para fazer isto, puxe para frente a cobertura de tecido do compartimento. ►
ROOM
POWER
LEFT
MONO
RIGHT
1
2
3
AC 100V-230V ˜ 50/60Hz
OFFON

71
PT
Conectar
Posicione os autofalantes no local desejado.1.
Ligue os autofalantes à rede elétrica através do cabo de energia.2.
Para funcionamento estéreo: 3.
Selecione o modo de funcionamento - Left para o autofalante esquerdo.
Selecione o modo de funcionamento - Right para o autofalante direito.
Para funcionamento mono: Selecione o modo de funcionamento Mono.
Selecione o ambiente 4. 1, 2 ou 3. Para o modo de funcionamento estéreo, selecione o mesmo
ambiente para os autofalantes direito e esquerdo. Os autofalantes em ambientes diferentes podem
ser controlados separadamente pelo controle remoto.
Funcionamento
Ligue os autofalantes pelo interruptor de energia na parte traseira.1.
Para ativar os autofalantes: aponte com o controle remoto para a direção do autofalante e 2.
pressione ON.
Se não houver sinal de entrada, o autofalante entra após algum tempo no modo Standby. ▼
Pressione ON, para ativar novamente o autofalante.
Para desativar um autofalante: aponte com o controle remoto para a direção do autofalante e 3.
pressione OFF.
Isto fará com que o autofalante entre em modo Standby
. Se você desejar desligar totalmente ▼
o autofalante, o interruptor POWER na parte traseira deve ser colocado na posição OFF. Mas,
assim, o interruptor não poderá mais ser ativado por controle remoto.
Para selecionar um transmissor, pressione TRANSMITTER 4. A, B ou C.
Se for utilizado apenas um transmissor (por ex. A), não será necessário selecionar. Se for ▼
selecionado outro transmissor por engano, selecione novamente o transmissor A.
Para selecionar uma fonte de sinal. Pressione INPUT
5. 1, 2 ou 3.
A fonte de sinal selecionada será reproduzida. ▼

72 Dynaudio
Interrupções, ruídos de cliques ou outras falhas audíveis durante a
reprodução de músicas geralmente não são causadas pela transmissão
de rádio do sistema Xeo. Frequentemente são outras razões externas que
prejudicam a qualidade da transmissão.
A seguir há algumas dicas para melhorar a qualidade da transmissão:
Posicione todos os transmissores de rádio e receptores 1.
separadamente uns dos outros. Aparelhos WLAN, receptores e
sistemas de rádio podem causar interferências uns nos outros, caso
estejam muito próximos. Teste locais diferentes para cada aparelho.
Desligue a procura automática em aparelhos WLAN. Aparelhos 2.
WLAN e outros sistemas de rádio procuram permanentemente no
ambiente frequências disponíveis enviando constantemente sinais
que podem causar interferências em outros sistemas de rádio. Esta
função automática de busca geralmente pode ser desligada.
Sempre que possível, evite paredes. Naturalmente a tecnologia Xeo 3.
de sinais de rádio transmite sinais através de paredes. Porém, as
paredes podem ser compostas de diversos materiais, como placas de
fibras de madeira, pedra ou até mesmo aço. Além disto, elas podem
conter complexas instalações de cabos de corrente elétrica, telefone,
TV e rádio, bem como tubulações de água ou gás. Todos estes
fatores podem desviar sinais de rádio. Portanto, teste diferentes locais
para o transmissor e escolha espaços livres até o autofalante.
Não utilize aparelhos eletrônicos perto do transmissor. Alguns 4.
aparelhos elétricos criam fortes campos eletromagnéticos que podem
causar interferência no sistema.
Se precisar de conselhos ou tiver dúvidas, entre em contato com seu
revendedor Dynaudio Xeo ou com a Dynaudio Helpline em info@
dynaudio.com.
Se algo não funcionar

73
RU
̷͇͖͇͕͉͇͑͑͘
̶͕͇͖͇͕͉͒͌͗͑͑͘͘͏͖͕͉͙͕͍͗͌͗ͣ͌͋͌͗͘͏͓͕͔͇͕͓͖͙͔͕͙͌͑͒͌͑ͣ͘͏
͕͓͕͙͗͘͏͙͚͙͕͙͉͕͇͙͇͍͉͖͌͗͐͑͌͌͗͘͘͘͏͔͇͍͔͕͙͋͒͌͘͏͔͇͕͙͚͙͙͉͘͘͏͌
͖͕͉͍͔͗͌͋͌͏͉͙͉͐͒͌͋͘͘͏͙͇͔͖͕͙͌͗͗͘͏͕͉͗͑͏̶͕͉͍͔͗͌͋͌͏͉͙͉ͦ͒͌͋͘͘͏͌
͙͇͔͖͕͙͗͗͘͏͕͉͗͑͏͔͇͏͈͕͉͕͙͔͒͌͌͌͗ͦ͌͒͘͢͏͚͖͇͕͉͇͚͍͉͔͕͑͑͌ͦ
̴͖͕͉͍͔͇͖͙͇͙͉͇͙͖͕͉͍͔͔͕͚͙͕͙͉͕̩͗͌͋͌͌͐͌ͣ͑͒ͥͣ͗͌͋͌͌͗͐͘͘͘͢͞
͚͇͔͕͓͖͙͔͕͕͒͌͌͑͒͌͑͊͘͞͏͒͏͖͕͉͍͔͔͕͕͕͍͗͌͋͌͊͋͌͗͘͏͓͕͕͖͕͈͇͊͗ͣ͘
͕͈͇͇͙͉͕͓͚͗ͣͦ͑͌͋͘͘͠͏͚͒͌͗͛͏͓͗͢'\QDXGLR;HŖ͇͓͕͍͔͕͋͗͌͘
͔͇͙͐͏͉̯͔͙͔͙͔͇͇͙͌͗͌͌͐͌͘ZZZG\QDXGLRFRP
̺͖͇͕͉͕͔͓͇͙͑͐͌͗͢͞͏͇͒
̺͖͇͕͉͇͉͖͕͔͔͇͙͇͑͑͒͌͑͢͏͓͕͈͇͎͕͓͙͕͗͌͒͘͞͏͕͔͇͔͈͇͌͒͢
͖͕͉͍͔͇͉͕͉͓͖͚͙͇͔͖͕͙͗͌͋͌͗͌ͦ͗͌͋͋͌͐͗͗͘͢͠͏͕͉͗͑͏͓͕͍͔͕͌͌
͏̶͖͕͎͕͉͇͙͖͕͉͙͕͔͕͕͙͕͓͚͔͉͈͇͉͇͙͕͒ͣͣ͗ͤ͌͗͐͌͗͘͘͢͢͏͊͏͔͇͔͚͒ͣͥ
͚͖͇͕͉͚͑͑͏͏͖͕͎͚͙͉͖͕͚͒ͣ͐͌͌͌͋͒ͦ͌͒͌͋ͥ͘͘͘͜͠͏͙͇͔͖͕͙͗͗͘͜͏͕͉͕͗͑
̸͖͇͘͏͈͕
͙͕̩͗͌͢͟͞͏͒͏͉͈͇͙͗ͣ͢'\QDXGLR;HR
;HR͕͈͌͋͡͏͔͙͇͓͚͕͉͓͔͔͚͈͖͕͉͕͔͚͙͔͕͕ͦ͌ͥ͗͌͌ͥ͌͗͋ͥ͌͒͊͘͘͘͜͏ͥ͏
͉͖͇͙͇͙͉͕͎͉͚͇͔͌͒ͦͥ͌͌͑͌͘͞͠͞͞͏͈͇͕͇͓͚͖͕͚ͦ͒͊͋͗ͦ͌͗͒͘͟͞͏͉͇͔͏͌
͓͚͎͑͢͏͙͇͔͕͉͘͏͙͓͇ͦ͑͘͘͏͓͇͔͕͕͓͕͙͔͓͒ͣ͑͛͗͢͏͖͕͙͓͗͘͢
̫͕͈͖͔͒ͦ͌͌͌͘͞͏͈͎͕͙͇͎͔͕͇͈͕͙ͦ͌͑͐͗͢͏͕͖͙͏͓͇͔͕͕͇͙͉͇͒ͣ͊͑͌͘͞
͎͉͚͇͔͞͏͖͕ͦ͗͞͏͙͇͙͔͇͚͐͌͒͌͋ͥ͘͠͏͙͇͔͗͘͜͏͇͉͇͍͔͚͇͎͇͔͌͑͜͢͝͏͖͕ͦ
͖͕͔͋͑͒ͥ͌͞͏ͥ͏͕͉͙͖͕͔͇͌͘͢͏͈͕͈͇͕͖͒͌͌͒͊͗͏͙͔͕͚͙͇͔͕͉ͦ͐͑͌͘
̳͕͙͢͜͏͓͙͕͈͖͕͚͗͒͘͢͟͞͏͉͇͔͏͓͚͎͌͑͢͏͕͙͇͉͕̩͇͓͋͒ͦ͒͘
͚͕͉͕͙͉͋͒ͣ͘͏͌
'\QDXGLR

74 Dynaudio
̱͕͓͖͙͖͕͙͇͉͒͌͑͑͘͏
̧͚͙͑͘͏͇͌͑ͦ͘͘͞͏͙͓͇͌͘;HR
̧͚͙͑͘͏͌͑͘͞͏͕͕͔͌͑͒͑͏;HRವ
̶͚͙͒ͣ͋͏͙͇͔͘͝͏͕͔͔͕͕͚͖͇͉͔͊͗͒͌͏ͦ;HRವ
̹͙͌͑͘͏͔͇͚͙͒ͣ͌͌͒͋͒ͦ͑͘͢͜͢͞͏͌͑͘͞͏͕͕͔͕͑͒͑͜;HRವ
̸͙͉͇͈͌͌͌͑͌͒͢͏͇͚͙͋͒ͦ͑͘͏͌͑͘͞͏͕͕͔͕͑͒͑͜;HRವ
̷͚͕͉͕͙͉͕͖͕͖͚͇͙͇͑͋ͤ͑͒͘͘͝͏͏;HRವ
̧͚͙͑͘͏͇͌͑ͦ͘͘͞͏͙͓͇͌͘;HR
̧͚͙͑͘͏͌͑͘͞͏͕͕͔͌͑͒͑͏;HRವ
̶͚͙͒ͣ͋͏͙͇͔͘͝͏͕͔͔͕͕͚͖͇͉͔͊͗͒͌͏ͦ;HRವ
̹͙͌͑͘͏͔͇͚͙͒ͣ͌͌͒͋͒ͦ͑͘͢͜͢͞͏͌͑͘͞͏͕͕͔͕͑͒͑͜;HRವ
̸͙͉͇͈͌͌͌͑͌͒͢͏͇͚͙͋͒ͦ͑͘͏͌͑͘͞͏͕͕͔͕͑͒͑͜;HRವ
̷͚͕͉͕͙͉͕͖͕͖͚͇͙͇͑͋ͤ͑͒͘͘͝͏͏;HRವ
̶͕͈͇͎͕͉͇͙͗͌͗͌͒ͣ;HR
̶͕͈͇͎͕͉͇͙͗͌͗͌͒ͣ;HRವ
̸͙͉͕͇͇͖͙͖͕͈͇͎͕͉͇͙͌͌͐͋͌͗͗͌͗͌͒ͦ;HR͇͈͓͑͌͒͌͘0LFUR86%ವ
̧͔͇͕͕͉͇͈͒͊͐͑͌͒ͣ͢;HR6WHUHR5&$ದ5&$ವ
̧͔͇͕͕͉͇͈͒͊͐͑͌͒ͣ͢;HR6WHUHR͙͕͔͑͏͙͉͕͇͎͓͓͓͐͗͌͐͗͌͟͢͡ದ͓͓ವ
̵͖͙͏͌͑͘͞͏͐͝͏͕͉͕͇͈͛͗͐͑͌͒ͣ;HR7RVOLQNದ7RVOLQNವ
86%͇͈͑͌͒ͣ;HR86%ದ0LQL86%ವ
̷͚͕͉͕͙͉͕͖͕͖͚͇͙͇͑͋ͤ͑͒͘͘͝͏͏;HRವ

75
RU
̧͚͙͑͘͏͇͌͑ͦ͘͘͞͏͙͓͇͌͘
̶̷̶̷̴̬̫̺̬̭̫̬̯̬͕͖͇͔͕͙͌ͤ͒͌͑͗͘͏͕͌͑͌͘͞
͔͇͖͍͔͗ͦ͌͏͌
̬͒͘͏͇͚͙͑͘͏͇͌͑ͦ͘͘͞͏͙͓͇͖͕͔͇͙͌͋͑͒ͥ͌͑͌͘͘͞͏͙͕͖ͤ͒͌͑͗͏͙͇͔͏ͦ
͉͔͚͙͗͏͘͏͙͓͉͕͎͔͌͘͢͏͇͙͕͖͇͔͕͙͑͌͌ͤ͒͌͑͗͘͏͕͔͇͖͍͔͌͑͌͗ͦ͌͘͞͏͌
̮͇͖͇͙͕͙͉͇͙͕͖͚͇͚͙͗͌͌ͦ͑͗ͣ͑͗͑͘͘͘͢͠͏͕͌͑͐͘͘͞͏͙͓͌͘͢►
̴͌͏͖͕͎͚͙͔͒ͣ͐͌͌͘͏͖͇͉͔͚͇͚͙͗ͥ͑͘͘͏͚͌͑ͥ͘͘͞͏͙͓͚͌͘͏͕͙͑͒ͥ͞͏͙͌►
͕͙͙͌͌͌͘͏͙͕͖ͤ͒͌͑͗͏͙͇͔͏̩͚͇͔͖͕͇͕͖͕͈͇ͦ͒͌͌͒͋͑͗ͣ͘͘͞
͕͈͇͇͙͉͕͓͚͗ͣͦ͑͌͋͘͘͠͏͚͒͌͗͛͏͓͗͢'\QDXGLR;HŖ͇͓͕͍͔͕͋͗͌͘
͔͇͙͐͏͉̯͔͙͔͙͔͇͇͙͌͗͌͌͐͌͘ZZZG\QDXGLRFRP
̫͖͕͔͒ͦ͋͑͒ͥ͌͞͏͇͚͙ͦ͑͘͏͌͑͘͞͏͕͕͔͕͙͑͒͑͑͌͘͜͏͙͕͖ͤ͒͌͑͗͏͙͇͔͏ͦ►
͏͖͕͎͚͙͖͕͙͇͉͓͉͕͓͖͙͙͉͕͇͈͒ͣ͐͌͒ͦ͌͐͑͒͌͑͌͌͌͐͑͌͒ͣ͘͘͘͢
̶͕͉͙͙͉͕͇͈͔͇͕͙͚͙͙͉͗͌͗ͣ͌͌͌͐͑͌͒ͣ͘͘͘͏͖͕͉͍͔͌͗͌͋͌͏͐͏͌͒͘͏
͇͈͖͕͉͍͔͎͇͓͔͑͌͒ͣ͗͌͋͌͌͏͙͕͔͕͉͓͌͌͊͢
̸͙͉͕͇͇͖͙͖͕͈͇͎͕͉͇͙͌͌͐͋͌͗͗͌͗͌͒ͦ
̶̷̶̷̴̬̫̺̬̭̫̬̯̬͕͖͇͔͕͙͌ͤ͒͌͑͗͘͏͕͌͑͌͘͞
͔͇͖͍͔͗ͦ͌͏͌
̬͒͘͏͔͖͕͔͌͋͑͒ͥ͌͞86%͏͙͕͔͘͞͏͖͕͈͇͎͕͉͇͙͎͇͖͑͗͌͗͌͒ͣ͏͙͉͇͙͌ͦ͘͢
͙͕͕͓͎͖͕͙͇͉͓͉͕͓͖͙͙͉͕͇͇͖͙͑͌͗͌͒ͦ͌͐͑͒͌͑͌͌͌͐͋͌͗͘͘͢͞
̯͖͕͎͚͙͙͕͕͖͕͙͇͉͓͉͕͓͖͙͙͉͕͇͇͖͙͒ͣ͐͌͒ͣ͑͒ͦ͌͐͑͒͌͑͌͌͌͐͋͌͗͘͘͘͢►
̶͕͉͙͙͉͕͇͈͙͉͕͕͇͇͖͙͇͔͇͕͙͚͙͙͉͗͌͗ͣ͌͌͌͐͑͌͒ͣ͌͌͊͋͌͗͘͘͘͘͏͌►
͖͕͉͍͔͗͌͋͌͏̬͐͒͘͏͇͈͖͕͉͍͔͎͇͓͔͑͌͒ͣ͗͌͋͌͌͏͙͙͉͕͇͇͖͙͌͌͌͐͋͌͗͘
͔͕͉͓͢
̺͇͎͇͔͑͏͖͕͈͎͕͖͇͔͕͙ͦ͌͘͘͏

76 Dynaudio
̶͕͔͋͑͒ͥ͌͞͏͌͏͚͖͇͉͔͗͒͌͏͌
̩͇͔͔͕͓͇͎͕͖͋͗͋͌͒͌͏͉͇͙͕ͥͦ͌͋͘͘͘͢͏͔͔͌͏ͦ͏͓͔͙͚͖͇͉͔ͤ͒͌͌͗͒͌͢͏͕͓͖͕͔͔͙͕͉ͦ͑͌;HR̴͇͞͏͔͇ͦ
͕͙͇͔͗͘͘͏̩͔͇͙͖͐͋͌͌͗͢͢͝͏͓͓͔͕͕͌͗͊͢͞͏͔͔͉͕͎͓͕͍͔͕͙̬͒͌͌͐͒͘͘͘͢͜͏͔͚͍͔̩͇͓͉͇͐͗͢͏͇͔͙
͕͙͚͙͙͉͚͙͌͘͘͏͒͏͚̩͇͉͕͎͔͘͏͑͒͏͖͕͈͓͖͕͔͗͒͌͋͑͒ͥ͌͘͢͞͏͓͌͏͖͚͕͓͖͕͈͇͕͈͇͇͙͑͗ͣ͗ͣͦ͑͘͘͘͠
͉͕͓͚͌͋͘͏͚͒͌͗͛͏͓͗͢'\QDXGLR;HŖ͇͓͕͍͔͕͔͇͙͋͗͌͐͘͏͉̯͔͙͔͙͔͇͇͙͌͗͌͌͐͌͘
ZZZG\QDXGLRFRP
̺͇͎͇͔͑͏̴͎͇͉͌͌͏͘͏͓͕͕͙͖͗͏͕͈͙͔͔͕͕̩͇͓͗͌͌͊͏͕͓͖͙͇͑͒͌͑͘͏͙͓͉͔͕͙͕͚͇͉͌͌͑͗͒ͦ͘͘͢͢͜͜͞
͕͓͖͙͈͚͚͙͕͍͇͙͔͉͕͓͖͕͔͔͙͑͒͌͑͌͋͋͌͗ͣͦ͌͌͑͌͘͘͘͢
̶͚͙͒ͣ͋͏͙͇͔͘͝͏͕͔͔͕͕͚͖͇͉͔͊͗͒͌͏ͦ
̶͗͏͖͕͓͕͠͏͖͚͙͇͒ͣ͋͏͙͇͔͘͝͏͕͔͔͕͕͚͖͇͉͔͊͗͒͌͏ͦ;HR͓͕͍͔͕͉͇͙͑͒ͥͣ͞͏͉͇͙͑͒ͥͣ͢͞
͇͚͙͑͘͏͚͌͑ͥ͘͘͞͏͙͓͚͚͌͗͌͊͒͘͏͕͉͇͙͕͓͕͙͇͙͇͍͉͈͗ͣ͊͗͑ͣ͑͌͘͢͏͇͙͖͕͈͇͎͕͉͇͙͗ͣ͗͌͗͌͒ͣ͏
͖͕͔͔͔͓͚͋͑͒ͥ͌͌͑͌͢͞͏͙͕͔͘͞͏͑͏͘͏͔͇͕͉̬͊͒͒͘͏͇͚͙͑͘͏͇͌͑ͦ͘͘͞͏͙͓͇͇͈͕͙͇͙͉͍͌͗͌͗͌͘͏͓͌
͙͕͖͇͉͇͉͇͙͕͉͕͓͇͔͉͇͕͌͗͌͗ͦ͒͌ͦ͌͑͋͌͊͋͋͘͘͘͢͏͔͇͕͉͕͉͕͎͙͉͚͙͔͇͕͈͕͕͔͑͋͌͐ͥ͌͑͒͑͘͏
͓͔͙͚͖͇͉͔̈́͒͌͌͗͒͌͢͏ͦ
2Q2ᚎ ̩͇͙͉͉͑͒ͥ͌͒ͣ͑͒͑͒͢͢͞
̩͇͙͑͒ͥ͌͞͏͉͇͙͉͈͇͔͔͚͇͚͙͑͒ͥ͌͗ͥ͑͘͢͢͞͏͚͕͕͔͚͌͑ͥ͑͒͑͘͞
̵͙͔͑͒ͥ͌͞͏͎͉͚͇͌͑
̵͙͇͙͎͉͚͉͈͇͔͔͕͇͚͙͑͒ͥ͌͑͗͐͑͘͢͞͏͕͕͕͔͌͑͐͑͒͑͘͞͏
9ROXPH
̪͕͓͕͙͗͑ͣ͘
͕͓͊͗͌͞
ದ ͙͏͌͟
,QSXW
̩͈͕͗͢͏͙͕͔͘͞͏͇͑͘͏͔͇͇͊͒
̩͈͢͏͇͙͕͗͌͋͏͔͏͎͙͗͌͜͏͙͕͔͘͞͏͕͉͑͘͏͔͇͇͇͙͊͒͑͏͉͔͕͕͖͕͈͇͎͕͉͇͙͊͗͌͗͌͒ͦ
7UDQVPLWWHU
$%&
̩͈͕͖͕͈͇͎͕͉͇͙͗͗͌͗͌͒ͦ͢
̩͈͢͏͇͙͕͗͌͋͏͔͏͎͙͇͔͇͕͉͖͕͈͇͎͕͉͇͙͗͌͑͒͗͌͗͌͒ͦ͜
On Off
Transmitter
Input
123
ABC
Volume

77
RU
̶͕͈͇͎͕͉͇͙͗͌͗͌͒ͣ
̱͖͕͈͇͎͕͉͇͙͖͕͇͙͙͇͗͌͗͌͒ͥ͋͑͒ͥͥͦ͑͘͞͏͌͏͙͕͔͘͞͏͑͏͘͏͔͇͕͉͇͙͔͊͒͑͑ͥ͌͗͗͌͘͏͉͌͗
͖͕͗͏͉͇͙͕͓͖͇͙͊͗͌͒ͣ͑͑͋͢͏͕͉̹̩͑͘6WUHDPLQJ&OLHQW͙͉͕͖͕͌͌͐͗͘͏͉͇͙͊͗͌͒ͣ͢03͖͒͌͐͌͗͏͒͏
̶͕͓͖͙͕͙͉͕͓͇͑ͣͥ͌͗͗͌͋͗͋͘͘͏͕͉͕͔͒͘͏͔͇͖͇͙͕͙͖͕͈͇͎͕͉͇͙͉͇͚͙͊͒͌͗͌͋ͥͦ͗͌͗͌͒ͦ͑͘͘͢͏͚͌͑ͥ͘͞
͘͏͙͓͚͌͘͏͉͕͖͕͗͘͏͎͉͕͙͉͋ͦͦ͘͘͏͙͓͌͌͘
̸͕͌͋͏͔͔͌͏ͦ͏͓͔͙͚͖͇͉͔ͤ͒͌͌͗͒͌͢͏ͦ
$X[,Q ̩͕͇͈͙͕͔͋͋͒ͦ͑͌͒ͦ͑͘͜͏͓͙͉͓͇͎͓͕͓͗͌͗͌͟͢͢͡
̸͚͍͒͏͙͖͕͔͋͒ͦ͋͑͒ͥ͌͞͏͚͙͕͙͉͕͙͕ͦ͗͐͑͗͌͘͘͢͏͓͙͉͕͙͕͔͌ͥ͋͑͘͢͜͏͓͙͉͓͗͌͟͢͢
͇͎͓͕͓͓͓͗͌͡
/LQH,Q
̩͕͇͈͋͋͒ͦ͑͌͒ͦ͘͜5&$͙͕͓͌͑͌͗͟&LQFK
̸͚͍͒͏͙͖͕͔͋͒ͦ͋͑͒ͥ͌͞͏͚͙͕͙͉͕͙͕ͦ͗͐͑͗͌͘͘͢͏͓͙͉͕͌ͥ͋͘͢͜5&$͙͕͓͌͑͌͗͟
̺͇͎͇͔͑͏̬͌͒͘͏͖͇͇͔͕͖͕͔͕͚͙͕͙͉͕͗͒͒͌͒ͣ͋͑͒ͥ͌͗͐͑͘͘͞$X[,Q͉͕͖͕͗͘͏͎͉͕͋͏͙ͦ͘
͙͕͕͚͙͕͙͉͕͖͕͔͔͕͒ͣ͑͗͐͋͑͒ͥ͌͌͑͘͘͞$X[,Q
'LJLWDO,Q
̩͕͕͖͙͋͋͒ͦ͜͏͕͕͌͑͊͘͞͝͏͕͉͕͕͇͈͛͗͊͑͌͒ͦ
̸͚͍͒͏͙͖͕͔͋͒ͦ͋͑͒ͥ͌͞͏͚͙͕͙͉͕͙͕ͦ͗͐͑͗͌͘͘͢͏͓͙͕͖͙͌ͥ͏͌͑͘͞͏͐͝͏͕͉͕͛͗͐
͉͕͋͢͜7RVOLQN
86%,Q
̩͕͋͋͒ͦ͜86%͇͈͑͌͒ͦ
̸͚͍͒͏͙͖͕͔͋͒ͦ͋͑͒ͥ͌͞͏ͦ86%͖͕͙͇̩͇͕͕͓͖͙͇̩͙͕͓͚͇͗͌͊͑ͣͥ͌͗ͤ͒͌͘͟͞
͖͕͈͇͎͕͉͇͙͉͖͕͔͙͚͔͗͌͗͌͒ͣ͒ͦ͌͛͑͢͝͏͏͎͉͚͕͉͕͇͙͑͐͑͗͢
,G
̯͔͙͋͌͏͛͏͇͑͝͏͖͕͈͇͎͕͉͇͙ͦ͗͌͗͌͒ͦ
̩͓͕͍͙͉͈͇͙͕͌͌͗ͣ͋͢͢͏͔͏͎͙͇͔͇͕͉͖͕͈͇͎͕͉͇͙͗͌͑͒͗͌͗͌͒ͦ͜͏͚͖͇͉͙͗͒ͦͣ
͏͓͖͕͙͉͕͓͖͚͙͇͗͌͋͒ͣ͋͘͘͏͙͇͔͘͝͏͕͔͔͕͕͚͖͇͉͔͊͗͒͌͏̫͙͕͕͉͈ͦ͒ͦͤ͊͌͗͢͏͙͌
͕͕͙͉͙͙͉͚͌ͥ͘͘͠͏͐͏͔͙͋͌͏͛͏͇͙͕͑͗,G$%͏͒͏&
3RZHU
̶͕͔͋͑͒ͥ͌͞͏͙͉͕͕͇͇͖͙͇͌͋͒ͦ͌͌͊͋͌͗͘
̸͚͍͒͏͙͖͕͔͋͒ͦ͋͑͒ͥ͌͞͏͖͕͙͇͉͓͕͕͉͕͓͖͙͙͉͕͕͇͇͖͙͇ͦ͒ͦ͌͊͑͒͌͑͌͌͌͊͋͌͗͘͘
̮͇͖͇͙͗͌͌ͦ͘͠͏͖͕͎͕͉͇͙͇͕͒ͣͣ͑͑͐͒͘͏͈͕͚͕͙͉͕͇͇͖͙͋͗͊͐͌͌͐͋͌͗͘
̺͇͎͇͔͑͏̬͌͒͘͏̩͕͌͋͘͢͏͔͙͖͕͈͇͎͕͉͇͙͖͕͙͉͕͓ͦ͌͌͗͌͗͌͒ͣ͗͌͋͘͘86%͇͈͑͌͒ͦ͘
͉͔͔͓͕͓͖͙͕͓͙͉͕͇͇͖͙͔͙͈͚͙͑͒ͥ͌͑ͣͥ͌͗͌͌͐͋͌͗͌͗͌͌ͦ͘͘͢͞
RL
USB In
PC/MAC
Sound Card
5V DC
500mA
Digital In
Line InAux In
1
2
3
A
B
C
PowerId

78 Dynaudio
̶͕͔͋͑͒ͥ͌͞͏͌
̶͗͏͖͕͓͕͠͏͖͕͙͇͉͓͕͕͉͕͓͖͙͙͉͕͕͒ͦ͌͊͑͒͌͑͌͌͌͊͘͘86%͇͈͑͌͒ͦ͏͙͉͕͕͇͇͖͙͇͌͌͊͋͌͗͘►
͕͌͋͘͏͔͏͙͉͕͖͕͈͇͎͕͉͇͙͌͋͗͌͗͌͒ͦ͜
32:(5͙͙͕͖͌ͣͥͤ͒͌͑͗͘͘͏͙͇͔͏ͦ
̺͇͎͇͔͑͏̬͌͒͘͏̩͕͌͋͘͢͏͔͙͖͕͈͇͎͕͉͇͙͖͕͙͉͕͓ͦ͌͌͗͌͗͌͒ͣ͗͌͋͘͘86%͇͈͉͔͔͓͑͌͒ͦ͑͒ͥ͌͘͢͞
͕͓͖͙͕͓͕͖͕͔͑ͣͥ͌͗͋͒͏͙͔͕͖͕͔͌͒ͣ͌͋͑͒ͥ͌͞͏͙͌͑͌͘͏͙͕͖ͤ͒͌͑͗͏͙͇͔͏͔͙͈͚͙ͦ͌͗͌͌ͦ͘
̶͕͋͑͒ͥ͞͏͙͌͏͙͕͔͘͞͏͑͘͏͔͇͕͉͕͔͕͓͚͊͒͑͋͏͎͉͕͕͉̯͖͕͎͚͙͙͕͕͖͕͙͇͉͓͉͋͒ͣ͐͌͋͒ͦͤ͊͒ͦ͌͐͘͘͜͢►
̶͕͓͖͙͇͈͇͇͙͚͑͒͌͑͌͑͌͒ͣ͗͌͋͒͊ͥͦ͒͌͋ͥ͘͘͠͏͉͕͎͓͕͍͔͕͙͌͘͏͖͕͔͋͑͒ͥ͌͞͏ͦ
̩͇͟͏͙͕͔͘͞͏͑͘͏͔͇͇͊͒ ̩͕͋͢͜͏͙͕͔͘͞͏͇͑
͘͏͔͇͇͊͒
̩͕͋͢͜
͖͕͈͇͎͕͉͇͙͗͌͗͌͒ͦ
̱͇͈͌͒ͣ ̺͇͎͇͔͑͏ͦ
̴͕͚͙͈͚͑0$&റ̶̱ 86% 86%,Q 86%ದ0LQL86% ̶͕͈͇͎͕͉͇͙͇͈͕͙͇͙͉͗͌͗͌͒ͣ͗͌
͇͙͉͎͉͚͕͉͕͇͙͑͌͌͑͐͑͗͘͢͞
̵͖͙͏͌͑͘͞͏͐ 'LJLWDO,Q 7RVOLQNದ7RVOLQN
/LQH2XW /LQH,Q 5&$ದ5&$
̴͇͚͔͟͏͑͏ $X[,Q ̹͕͔͑͏͙͉͕͇͎͓͐͗͌͐͗͌͟͢͡
͓͓ದ͓͓
L3RGറ͖͇͔͙͒͌͟͢L3DGറ
͓͇͙͕͔͗͛͘͢L3KRQHറ
͖͒͌͐͌͗͢:DONPDQറ͏͚͋͗͊͏͌
͖͕͙͇͙͗͏͉͔͚͙͕͙͉͇͌͗͐͘͘͢
̴͇͚͔͟͏͑͏ $X[,Q ̹͕͔͑͏͙͉͕͇͎͓͐͗͌͐͗͌͟͢͡
͓͓ದ͓͓
ದ
̸͙͕͉͕͔͇͙͇͔͑ͦ͘͢͞͝͏ͦ /LQH2XW /LQH,Q 5&$ದ5&$ ̬͒͘͏͏͓͙͌͌ͦ͘
̵͖͙͏͌͑͘͞͏͐ 'LJLWDO,Q 7RVOLQNದ7RVOLQN
̸͙͉͕͌͌͐͑͒͏͔͙͌ /LQH2XW /LQH,Q 5&$ದ5&$ ̬͒͘͏͏͓͙͌͌ͦ͘
̵͖͙͏͌͑͘͞͏͐ 'LJLWDO,Q 7RVOLQNದ7RVOLQN
6RQRV/RJLWHFK6TXHH]HER[͏
͇͔͇͕͒͊͏͔͚͙͕͙͉͇͌͗͐͘͘͢͞
/LQH2XW /LQH,Q 5&$ದ5&$ ̬͒͘͏͏͓͙͌͌ͦ͘
̵͖͙͏͌͑͘͞͏͐ 'LJLWDO,Q 7RVOLQNದ7RVOLQN
$SSOH$LUSOD\റ
$LUSRUW([SUHVV
̵͖͙͏͌͑͘͞͏͐ 'LJLWDO,Q 7RVOLQNದ7RVOLQN ದ
̹͕͔͑͏͙͉͕͐͗͌͐͟͢
͇͎͓͓͓͗͌͡
$X[,Q ̹͕͔͑͏͙͉͕͇͎͓͐͗͌͐͗͌͟͢͡
͓͓ದ͓͓

79
RU
̩͇͟͏͙͕͔͘͞͏͑͘͏͔͇͇͊͒ ̩͕͋͢͜͏͙͕͔͘͞͏͇͑
͘͏͔͇͇͊͒
̩͕͋͢͜
͖͕͈͇͎͕͉͇͙͗͌͗͌͒ͦ
̱͇͈͌͒ͣ ̺͇͎͇͔͑͏ͦ
$SSOH$LUSOD\റ
͗͌͘͏͉͚͌͗͘͏͒͏͙͌͒ͣ
/LQH2XW /LQH,Q 5&$ದ5&$ ದ
̵͖͙͏͌͑͘͞͏͐ 'LJLWDO,Q 7RVOLQNದ7RVOLQN
̳͚͙͒ͣ͏͓͌͋͏͔͖͐͐͒͌͐͌͗͢
͙͉͕͖͕͌͌͐͗͘͏͉͇͙͊͗͌͒ͣ͢
/LQH2XW /LQH,Q 5&$ದ5&$ ̬͒͘͏͏͓͙͌͌ͦ͘
̵͖͙͏͌͑͘͞͏͐ 'LJLWDO,Q 7RVOLQNದ7RVOLQN
̧͔͇͕͕͉͕͇͒͊͌͗͋͏͕͝͏͕͉͕͛͗͌
͇͗͋͏͕
/LQH2XW /LQH,Q 5&$ದ5&$ ̬͒͘͏͏͓͙͌͌ͦ͘
̵͖͙͏͌͑͘͞͏͐ 'LJLWDO,Q 7RVOLQNದ7RVOLQN
̶͕͗͏͉͇͙͕͓͖͇͙͊͗͌͒ͣ͑͑͋͢͏͕͉͑͘ /LQH2XW /LQH,Q 5&$ದ5&$ ̬͒͘͏͏͓͙͌͌ͦ͘
̵͖͙͏͌͑͘͞͏͐ 'LJLWDO,Q 7RVOLQNದ7RVOLQN
̧͔͇͕͕͉͖͕͒͊͐͗͢͏͉͇͙͊͗͌͒ͣ͢ /LQH2XW /LQH,Q 5&$ದ5&$ ̴͇͎͉͚͕͉͕͓͖͚͑͗͌͋͘͏͒͏͙͌͒͌
̹͉͌͒͌͏͎͕͗ ̴͇͚͔͟͏͑͏ $X[,Q ̹͕͔͑͏͙͉͕͇͎͓͐͗͌͐͗͌͟͢͡
͓͓ದ͓͓
̩͈͌͗͢͏͙͕͌͋͏͔͏͎͉͚͋͜
͉͇͗͏͇͔͙͕͉
/LQH2XW /LQH,Q 5&$ದ5&$
̸͙͕͖͚͌͗͌͗͌͋͘͏͒͏͙͌͒ͣ 3UH2XW0DLQ2XW /LQH,Q 5&$ದ5&$ ದ
̶͕͔͙͕͚͒͐͌͗͌͘͘͢͏͒͏͙͌͒ͣ 7DSH2XW /LQH,Q 5&$ದ5&$ ̷͇͎͌͋͡͏͔͔͌͏͖͓͌͌͗͌͑͢͞͏
3UH2XW0DLQ2XW /LQH,Q 5&$ದ5&$
̩͙͕͕͗͐3UH2XW /LQH,Q 5&$ದ5&$
̸͇͈͉͚͛͌͗ ̧͔͇͕͕͉͒͊͐͢
͙͕͕͔͌͗͌͛͘͏͌͑͘͞͏͐
͉͕͋͢͜
/LQH,Q 5&$ದ5&$ ದ
$9͗͌͘͏͉͌͗$9͖͕͕͗͌͗͘͘͝ ̵͖͙͏͌͑͘͞͏͐ 'LJLWDO,Q 7RVOLQNದ7RVOLQNದ
3UH2XW0DLQ2XW /LQH,Q 5&$ದ5&$

80 Dynaudio
̧͚͙͑͘͏͇͌͑ͦ͘͘͞͏͙͓͇͌͘
̧͙͑͏͉͔͇͚͙͌͑͘͢͏͌͑͘͞͏͌͘͏͙͓͌͘͢;HR͏;HR͏͓͙͉͙͕͔͔͚͌ͥ͗͌͐͘͘͢͏͒͏͙͌͒ͣ͏͓͏͓͕͍͔͕
͚͖͇͉͙͖͗͒ͦͣ͗͏͖͕͓͕͠͏͖͚͙͇͒ͣ͋͏͙͇͔͘͝͏͕͔͔͕͕͚͖͇͉͔͊͗͒͌͏ͦ;HR̶͕͙͉͕͓͙͕͔͕͕͗͌͋͌͒͌͑͗͊͘͘͘
͖͇͙͔͇͎͇͔͙͕͕͔͇͚͙͌͗͌͑͒ͥ͌͒ͦ͋͌͐͗͌͑͘͘͞͏͌͑͘͞͏͕͕͔͌͑͒͑͏͓͕͍͔͕͏͖͕͎͕͉͇͙͉͇͙͉͒ͣͣ͑͌͌͘͘͞
͙͕͕͔͌͗͌͛͘͏͕͖͇͌͑͐͗͘͢͞͏͒͏͇͎͔͕͉͓͕͔͕͕͔͗͋͌͒ͣ͛͏͕͓͍͌͑͗͌͘͞͏͓͌
̵͖͏͇͔͘͏͕͌͌͋͘͏͔͔͌͏͐͏͓͔͙͕͉͚͖͇͉͔ͤ͒͌͌͗͒͌͏ͦ
/HIW
0RQR
5LJKW
̷͍͌͏͓͇͈͕͙͗͢
/HIW ͖͕͕͍͔͒͌͏͖͇͙͉͕͇͚͙͌͌͗͌͑͒ͥ͌͒ͦ͋͒ͦ͒͌͐͑͘͞͏͕͕͕͔͌͑͐͑͒͑͘͞͏͖͗͏ವ
͙͕͕͔͌͗͌͛͘͏͕͓͍͌͑͗͌͘͞͏͓͌
0RQR ͖͕͕͍͔͒͌͏͖͇͙͖͌͌͗͌͑͒ͥ͌͒ͦ͗͞͏͏͖͕͎͕͉͇͔͒ͣ͘͏͏͙͕͕͕͔͕͒ͣ͑͋͐ವ
͇͚͙͑͘͏͕͕͕͔͌͑͐͑͒͑͘͞͏
5LJKW ͖͕͕͍͔͒͌͏͖͇͙͖͇͉͕͇͚͙͌͌͗͌͑͒ͥ͌͒ͦ͋͒ͦ͗͐͑͘͞͏͕͕͕͔͌͑͐͑͒͑͘͞͏͖͗͏ವ
͙͕͕͔͌͗͌͛͘͏͕͓͍͌͑͗͌͘͞͏͓͌
̩͈͕͎͕͔͗͢͢
̧͚͙͑͘͏͌͑͘͞͏͓͏͕͕͔͇͓͑͒͑͏͖͔͇͎͔͇͔͔͓͗͌͋͌͢͞͏͇͎͔͎͕͔͓͕͍͔͕͋͒ͦ͗͢͜
͏͔͋͏͉͏͚͇͔͕͚͖͇͉͙͖͋͒ͣ͗͒ͦͣ͗͏͖͕͓͕͠͏͖͚͙͇͒ͣ͋͏͙͇͔͘͝͏͕͔͔͕͕͚͖͇͉͔͊͗͒͌͏ͦ
32:(5
̸͙͉͕͇͇͖͙͌͌͐͋͌͗
21 ̧͚͙͑͘͏͇͌͑ͦ͘͘͞͏̶͙͓͇͉͔͇͌͑͒ͥ͌͗͘͞͏͖͕͓͕͠͏͖͚͙͇͒ͣ͋͏͙͇͔͘͝͏͕͔͔͕͕͊ವ
͚͖͇͉͔͗͒͌͏͇͚͙ͦ͑͘͏͚͌͑ͥ͘͘͞͏͙͓͚͓͕͍͔͕͇͙͌͑͘͏͉͏͕͉͇͙͗ͣ͏͒͏͇͙͋͌͑͏͉͏͕͉͇͙͗ͣ
̬͒͘͏͇͚͙͑͘͏͇͌͑ͦ͘͘͞͏͙͓͇͇͙͌͑͘͏͉͏͕͉͇͔͇͔͕͗͘͏͔͇͕͙͚͙͙͉͚͙͊͒͌͘͘͘͏͙͓͇͌͘
͖͇͙͔͇͍͌͗͌͑͒ͥ͌ͦ͗͌͘͞͏͓͕͍͏͇͔͋͏ͦ
2)) ̧͚͙͑͘͏͇͌͑ͦ͘͘͞͏͙͓͇͖͕͔͕͙͉͔͇͌͒ͣͥ͑͒ͥ͌͘͘͢͞ವ
̪͔͎͕͖͕͔͌͋͋͒ͦ͋͑͒ͥ͌͞͏͖ͦ͏͙͇͔͏ͦ
̫͖͕͔͒ͦ͋͑͒ͥ͌͞͏͇͚͙ͦ͑͘͏͕͌͑͐͘͘͞͏͙͓͙͌͑͌͘͘͢͏͙͕͖ͤ͒͌͑͗͏͙͇͔͏ͦ
̹͙͌͑͘͏͔͕͒ͣ͐͌͒͢͜͞
̹͙͌͑͘͏͔͕͉͖͕͔͔͙͇͒ͣ͐͌͒͒͌͑͢͜͢͞͏͓͕͈͇͎͕͓͙͕͕͔͔͉͗͌͒͞͏͙͔͇͇͇͙ͦ͌͗͑͌͗͜͏͙͘͏͚͑͏͎͚͔͒͌͞͏ͦ
͇͚͙͑͘͏͕͕͕͔͌͑͐͑͒͑͘͞͏̵͔͇͕͖͋͑͗͏͔͕͈͕͌͋͜͏͓͕͙͘͏̩͓͕͍͙͔͙͙͙͌͌ͦͣ͌͑͘͘͢͏͔͕͒ͣ͐͌͒͢͜͞
̫͙͕͕͙͔͒ͦͤ͊ͦ͘͏͙͙͙͌͌͑͘͏͔͕͕͖͚͇͉͖͒ͣ͐͌͒͑͗͌͗͌͋͘͘͢͜͞►
ROOM
POWER
LEFT
MONO
RIGHT
1
2
3
AC 100V-230V ˜ 50/60Hz
OFFON

81
RU
̶͕͔͋͑͒ͥ͌͞͏͌
̺͙͇͔͕͉͘͏͙͇͚͙͌͑͘͏͚͌͑ͥ͘͘͞͏͙͓͚͉͔͚͍͔͕͓͓͙͌͌͌͘͘
̶͕͋͑͒ͥ͞͏͙͇͚͙͌͑͘͏͌͑͘͞͏͕͕͔͌͑͒͑͏͙͑͌͘͏͙͕͖ͤ͒͌͑͗͏͙͇͔͏ͦ͏͖͕͎͚͖͕͙͇͉͓͉͒ͣͦ͒ͦ͌͐͘͘͢
͕͓͖͙͙͉͕͇͈͑͒͌͑͌͌͌͐͑͌͒ͣ͘
̶͗͏͙͕͕͔͌͗͌͛͘͏͕͓͍͌͑͗͌͘͞͏͓͌
̩͈͌͗͢͏͙͍͌͗͌͏͓͇͈͕͙͗͢-
/HIW͉͕͕͕͔͋͒ͦ͒͌͐͑͒͑͏
̩͈͌͗͢͏͙͍͌͗͌͏͓͇͈͕͙͗͢-
5LJKW͖͇͉͕͕͕͔͋͒ͦ͗͐͑͒͑͏
̶͗͏͓͕͔͕͕͔͛͏͕͓͍͌͑͗͌͘͞͏͓͉͈͌͌͗͢͏͙͍͌͗͌͏͓͇͈͕͙͗͢
̳RQR
̩͈͌͗͢͏͙͎͕͔͚͌
͏͒͏̶͗͏͙͕͕͔͌͗͌͛͘͏͕͓͍͌͑͗͌͘͞͏͓͉͈͌͌͗͢͏͙͖͇͉͕͌͋͒ͦ͗͐͏͉͕͒͌͐
͕͕͔͑͒͑͏͕͔͚͋͏̧͙͚͍͎͕͔͚͚͙͌͑͘͏͌͑͘͞͏͓͏͕͕͔͇͓͑͒͑͏͔͇͙͕͔͔͓͗͌͘͢͏͔͇͇͎͔͎͕͔͓͕͍͔͕͗͌͢͢
͏͔͋͏͉͏͚͇͔͕͚͖͇͉͙͖͋͒ͣ͗͒ͦͣ͗͏͖͕͓͕͠͏͖͚͙͇͒ͣ͋͏͙͇͔͘͝͏͕͔͔͕͕͚͖͇͉͔͊͗͒͌͏ͦ
̺͖͇͉͔͗͒͌͏͌
̩͑͒ͥ͞͏͙͇͚͙͌͑͘͏͚͕͕͔͚͖͌͑ͥ͑͒͑͗͘͞͏͖͕͓͕͠͏͉͇͙͖͑͒ͥ͌͒ͦ͢͞͏͙͇͔͏͔͇͎͇͔͙͕͕͔ͦ͋͌͐͗͌͘
͙͕͈͇͙̾͑͢͏͉͏͕͉͇͙͕͕͔͚͔͇͖͇͉͙͖͚͙͗ͣ͑͒͑͗ͣ͌͒ͣ͋͏͙͇͔͘͝͏͕͔͔͕͕͚͖͇͉͔͊͗͒͌͏͔͇͕͕͔͚ͦ͑͒͑͏
͔͇͍͓͏͙͌21
̨͎͉͕͔͕͕͌͋͊͘͜͏͔͇͇͇͚͙͊͒͑͘͏͇͌͑ͦ͘͘͞͏͙͓͇͎͕͖͔͔͕͉͓͖͇͙͌͌͗͌͗͌͋͌͒͌͌͗͌ͦ͌͗͌͑͒ͥ͌ͦ͘͘͞͞ ▼
͔͇͍͗͌͏͓͕͍͏͇͔͋͏̬ͦ͒͘͏̩͕͙͢͜͏͙͇͙͌͑͏͉͏͕͉͇͙͗ͣ͘͏͙͓͚͔͕͉͇͔͇͍͓͌͘͘͏͙͔͇͌
21
͙͕͈͇͙̾͋͌͑͢͏͉͏̴͕͉͇͙͕͕͔͚͇͖͇͉͙͖͚͙͗ͣ͑͒͑͗ͣ͌͒ͣ͋͏͙͇͔͘͝͏͕͔͔͕͕͚͖͇͉͔͊͗͒͌͏͔͇͕͕͔͚ͦ͑͒͑͏
͔͇͍͓͏͙͌2))
̹͇͑͏͓͕͈͇͎͕͓͇͚͙͗͑͘͏͇͕͕͔͇͎͕͖͔͔͕͉͓͖͇͙͔͇͌͑ͦ͑͒͑͌͗͌͗͌͋͌͒͌͌͗͌ͦ͌͗͌͑͒ͥ͌ͦ͘͘͞͞͞ ▼
͍͗͌͏͓͕͍͏͇͔͋͏̬ͦ͒͘͏̩͕͙͢͜͏͙͉͌͑͒ͥ͢͞͏͙͕͔͚͕͕͔͚͖͕͔͕͙͚͙͇͔͕͉ͣ͋͑͒͑͒ͣͥ͘͘͏͙͌
͉͇͙͑͒ͥ͌͒ͣ͢͞32:(5͔͇͎͇͔͙͔͉͖͕͕͍͔͋͌͐͌͑͌͒͌͘͏͌
2))̶͕͙͕͕͕͕͔͚͚͍͒͌ͤ͊͑͒͑͌͘
͔͎͇͙͌͒ͣͦ͑͏͉͏͕͉͇͙͖͗ͣ͗͏͖͕͓͕͠͏͖͚͙͇͒ͣ͋͏͙͇͔͘͝͏͕͔͔͕͕͚͖͇͉͔͊͗͒͌͏ͦ
͙͕͈͉͈͇͙͖͕͈͇͎͕͉͇͙͔͇͍͓̾͗ͣ͗͌͗͌͒ͣ͢͢͏͙͌75$160,77(5
$%͏͒͏&
̬͒͘͏̩͢͏͖͕͎͚͙͙͕͕͕͒ͣ͌͌͒ͣ͑͋͘͏͔͖͕͈͇͎͕͉͇͙͔͇͖͗͌͗͌͒ͣ͗͏̧͓͔͌͗͏͕͉͈͌͊͢͞͏͇͙͗ͣ ▼
͔͙͈͚͙̬͌͗͌͌ͦ͒͘͘͏̩͕͢͟͏͈͕͔͕͉͈͇͗͒͢͞͏͚͕͖͕͈͇͎͕͉͇͙͉͈͋͗͊͐͗͌͗͌͒ͣ͌͗͢͏͙͔͕͉͇͌͘
͖͕͈͇͎͕͉͇͙͗͌͗͌͒ͣ$
͙͕͈͉͈͇͙̾͗ͣ͢͢͏͙͕͔͘͞͏͑͘͏͔͇͇͔͇͍͓͊͒͏͙͌,1387
͏͒͏
̩͕͖͕͗͘͏͎͉͕͋͏͙͉͈͇͔͔ͦ͗͐͘͢͢͏͙͕͔͘͞͏͑͘͏͔͇͇͊͒ ▼

82 Dynaudio
̬͒͘͏͙͕͒͞͏͈͕͔͇͈͕͙͇͙͌͗͌
̶͉͇͔͗͌͗͢͏͎͉͚͇ͦ͑͌͒͑͠͞͏͏͒͏͚͋͗͊͏͌͒͘͢͟͏͓͖͕͓͌͌͢͜͏͖͗͏
͉͕͖͕͗͘͏͎͉͔͌͋͌͏͏͓͚͎͑͢͏͉͈͕͒ͣ͟͏͔͙͉͚͇͉͔͉͎͇͔͌͒͌͌ͦ͘͘͘͘͢͞
͇͗͋͏͕͖͇͌͗͌͋͌͐͘͞͏͙͓̼͕̱͇͙͉͕͖͇͌͌͌͌͗͌͋͘͘͢͞͞͏͇͚͚͇͙͌͋͌ͦ͘͜͟͞͠
͖͕͚͋͗͊͏͓͉͔͔͌͟͏͓͖͗͏͞͏͔͇͓
̴͏͍͇͔͔͕͙͕͕͉͙͖͕͚͚͔͌͋͌͑͗͌͌͒͌͘͢͢͢͟͞͏͇͙͉͇͖͇ͥ͑͌͌͗͌͋͘͞͞͏
̷͇͎͓͇͙͉͇͌͐͌͌͗͋͘͠͏͕͖͇͙͌͗͌͋͞͏͑͏͏͖͗͏͓͔͌͏͑͏͕͙͔͕͚͋͌͒ͣ͋͗͊
͕͙͚͇̺͙͕͙͉͇͈͖͕͉͕͔͕͕͕͕͙͔͕͕͋͗͊͗͐͌͗͋͊͑͗͊͘͘͘͘͘͏͔͙͔͙͇͌͗͌
͇͗͋͏͕͖͗͏͓͔͌͏͑͏͏͇͗͋͏͕͘͏͙͓͓͕͚͙͕͇͎͉͇͙͉͎͇͌͊͑ͣ͘͢͢͏͓͔͕͌
͉͒͏͔ͦ͏͌͌͒͘͏͕͔͏͇͖͕͕͍͔͗͒͌͒͘͘͢͏͕͓͈͑͒͟͏͎͕̯͖͙͇͙͑͐͌͋͒ͦ͘͢
͇͍͕͕͚͙͕͙͉͇͇͎͔͓͙͇͑͋͊͗͐͗͌͌͘͘͘͢
̩͚͇͚͙͕͙͉͈͖͕͉͕͔͕͕͕͕͙͔͕͕͒͌͗͐͌͗͋͊͑͗͊͘͘͘͘͘͘͞͏͔͙͔͙͇͌͗͌
͕͙͑͒ͥ͞͏͙͇͉͙͕͓͇͙͌͏͌͑͘͞͏͖͕͐͏̺͙͕͙͉͇͈͖͕͉͕͔͕͕͑͗͐͌͗͋͊͘͘͘͘
͕͕͙͔͕͕͑͗͊͘͘͏͔͙͔͙͇͌͗͌͏͚͋͗͊͏͇͌͗͋͏͕͘͏͙͓͖͕͙͕͔͔͕͌ͦ͘͘͢
͇͔͑͘͏͚͙͕͚͍͇͖͕͙͇͔͙͉͕͔͇͔͇͗ͥ͑͗ͥ͌͌͗͗͒͘͘͠͏͞͏͇͙͕͙͌͘͞͏͋͒ͦ
͙͕͕͔͖͉͔͕͖͕͇͙ͤ͊͌͗͌͗͒ͥ͘͘͢͢͏͔͇͕͙͕͓͕͚͙͕͎͇͉͇͙͊͒͑͗͌͊͋ͣ͘͢͢
͖͕͓͌͜͏͚͋͗͊͏͓͇͗͋͏͕͘͏͙͓͇͓̱͇͖͇͉͌͑͗͘͏͕͙͚͚͔͒ͤ͛͑͝͏ͥ
͇͉͙͕͓͇͙͏͕͕͖͕͌͑͊͘͞͏͇͓͕͍͔͕͕͙͇͙͑͑͒ͥͣ͘͞
̩͇͕͇͉͕͎͓͕͍͔͕͌͊͋͑͊͋͘͏̷͎͈͇͙͙͔͇͎͚͓͙͌͊͐͌͌͌͌ͦ͘͘
͙͔͕͕͌͒͊͜͏̼͕͖͕͎͉͕͙͖͇͉͇͙͇ͦ͌͒ͦ͌͌͗͌͋ͣ͗͋͏͕͘͏͔͇͎͊͒͌͗͌͢͞
̵͙͔͔͇͕͙͔͓͕͚͙͈͙͕͔͇͎͔͓͌͋͑͌͊ͣ͌ͣ͗͘͘͢͢͢͢͞͏͏͕͙͕͙ͦͣ͘͘͏͎
͉͔͕͉͕͕͔͋͗͌͌͒͑͘͏͙͖͒͘͢͜͏͙͇͓͔͑ͦ͏͒͏͇͍͋͌͏͎͙͇͒͘͏̱͕͓͗͌
͙͕͕͉͙͔͇͕͍͇͙͕͓͖͔͇͈͔͖͕͇͊͌͋͌͗ͦ͑͒͌͑͌͑͌͒ͣ͌͗͑͒͋͑͘͘͘͘͜͢͢͏
͙͕͖͋͒ͦͤ͒͌͑͗͏͙͇͔͏͙͕͔͇͙͉ͦ͌͒͌͛͌͒͌͏͔͋͌͏ͦ͏͇͗͋͏͕͇͙͇͍͑͌
͙͚͈͉͕͕͔͇͈͍͔͗͋͌͘͢͏ͦ͏͉͔͙͌͏͒ͦ͝͏͕͔͔͇͙̩͎͚͙͇͙͌͗͌͒ͣ͌͢͟͜͢
͇͗͋͏͕͘͏̶͔͇͓͕͍͙͕͙͕͔͙͕͙͕͓͚͖͕͉͙͊͒͌͑͒ͦͣͦͤ͗͌͗ͣ͌͋͒ͦ͘
͖͕͈͇͎͕͉͇͙͇͎͔͓͙͇͚͙͇͔͕͉͗͌͗͌͒ͦ͗͌͌͑͘͘͢͏͏͖͕͉͕͎͓͕͍͔͕͙͘͏
͕͈͖͙͖͓͕͖͚͙͇͌͌ͣ͌͗ͦ͐ͣ͗͋͘͞͏͕͘͏͔͇͇͕͕͔͊͒͑͑͒͑͌
̴͌͏͖͕͎͚͙͉͈͒ͣ͐͌͒͘͏͎͏͖͕͈͇͎͕͉͇͙͓͕͔͗͌͗͌͒ͦ͌͢͠
͙͕͖ͤ͒͌͑͗͗͏̴͈͕͕͙͕͙͕͖͗͌͑͗͌ͤ͒͌͑͗͗͢͢͏͈͕͔͗͊͌͌͗͢͏͚͙͗ͥ
͘͏͔͙͕͓͇͔͒ͣ͌ͤ͒͌͑͗͊͢͏͙͔͖͕͕͙͕͓͕͚͙͕͎͇͉͇͙͌͒ͦ͑͗͌͊͋ͣ͘͢͢
͖͕͓͌͜͏͇͗͋͏͕͘͏͙͓͇͓͌͘
̩͓͕͍͙͉͈͕͉͓͖͕͕͔͚͙͌͌͒ͥ͌͗͌ͦ͗͑͒ͣ͘͢͏͕͉͇͙͚̩͇͕͗ͣͦ͌͊͋͘͟͏͇͒͌͗
͛͏͓͗͢'\QDXGLR;HR͏͒͏͖͕͕͊͗ͦ͌͐͒͞͏͔͏͏͛͏͓͗͢'\QDXGLR͖͕
͇͚͋͗͌͘LQIR#G\QDXGLRFRP

83
ZH
⚾▔孔
⚾▔孔⚝᧨庆㩴䦚▔孔␔䓸❐㢾⚵⸛㠃ㄅ㭏㩴幍♙㓏㦘棓ↅ㢾⚵ⷧ⦷扟
戢㗮⧞ᇭⰑ▔孔⒉䘿㢝㣍㗮⧞᧨⒨㨐㦘♾厌抯㒟扟戢㗮⧞ᇭ庆▎⺬幤∎䞷♦
㗮幍ᇭⰑ▔孔␔䤓䓸❐ₜ⸛㠃㒥㗮⧞᧨庆㖎;HR䔈儵兞枏⟕勣侊ᇭ
庆⦷ZZZG\QDXGLRFRPₙ㩴幱兞枏⟕⦿⧏ᇭ
▔孔㧟㠨
Ⱁ⦷⃚ⓜ䤓扟戢抣₼▔孔㦹♠䞮㗮⧞᧨⒨年▔孔♾摜⮜∎䞷ᇭ⥯㷳᧨庆▎₱
㆒年▔孔ㄅ⦷␅Ⅵ扟戢₼∎䞷☮▔孔㧟㠨ᇭ
幩㖩㎮庱᧨
㌷折䞷㖎⏻⚇䤓;HR侊⒦ℶ❐ᇭ
;HR侊⒦ℶ❐⺕㦏㠿㡯兎㔏㦾ⅳⅉ◿廰䂀Ⓤ䤓⸛初檂德娜⇢᧨⅝㷳常
動⚻檂⃟♧㈦㦃丏◤ᇬ㦃℺♦ᇭ
ℕ⸭䘿⚓┮厌㷲デ扟嫛₣才Ⓙ㨐∂檂德嫷䘿᧨㌷♾⦷⚝兼欄₼㩴㔍Ⓙ㦘␂
幍扭㘴䤓摜尐㽷㎞ℚ欈♙㦏∂⸘孔㡈㽤䤓⺞㔏ぶᇭ
䯬㌷⦷動⚻檂⃟㢅噆㈦㡯䴆⃟怲᧨
㖎

84 Dynaudio
∪徶喒⦃
;HR㓻⭿⣷
₹;HR㓻⭿⣷ವ
₹;HR拴㘶⣷ವ
₹;HR㓻⭿⣷䥥⯦ವ
㫈;HR㓻⭿⣷䟄䄟兎ವ
;HR∎䞷広㢝ವ
;HR㓻⭿⣷
₹;HR㓻⭿⣷ವ
₹;HR拴㘶⣷ವ
₹;HR㓻⭿⣷䥥⯦ವ
㫈;HR㓻⭿⣷䟄䄟兎ವ
;HR∎䞷広㢝ವ
;HR↯戢⣷
₹;HR↯戢⣷ವ
㫈;HR↯戢⣷㈽⨚86%䟄䄟兎ವ
㫈;HR䵚⇢⭿㲰㕮檂欠兎5&$ದ5&$ವ
㫈;HR䵚⇢⭿㲰㕮檂欠兎᧤PP㘴♲ದPP㘴♲᧥ವ
㫈;HR㟿ⷦ⏘儳檂欠兎᧤⏘儳↯戢兎᧥ವ
㫈;HR86%扭㘴兎᧤86%ದ㈽⨚86%᧥ವ
;HR∎䞷広㢝ವ

85
ZH
㓻⭿⣷
巵⛙᧶☀棸䟄☚
Ⱁ㓻⭿⣷䟄䄟䦇扭᧨⒨㓻⭿⣷␔捷ⷧ⦷☀棸䟄☚ᇭ
⒖▎㓢㓻⭿⣷乀⇢ᇭ►
庆▎∎䞷㗮⧞䤓㓻⭿⣷᧨Ⱁ侊㗮⧞㓻⭿⣷權⒖㠼䟄䄟ᇭⰑ㦘䠠桽᧨庆►
㖎;HR䔈儵兞枏⟕勣侊ᇭ♾抩扖ZZZG\QDXGLRFRP几䵨㩴幱兞枏
⟕⦿⧏ᇭ
庆∎䞷椞㧉棓抐䤓䟄䄟兎扭㘴㓻⭿⣷䟄䄟ᇭ㽷㎞᧨䫽≬䟄䄟兎⸛Ⰼ㡯►
㗮᧨Ⱁ㦘㗮⧞᧨庆♙㢅㦃㗱㠿䤓䟄䄟兎ᇭ
↯戢⣷䟄䄟ↅ
巵⛙᧶☀棸䟄☚
Ⱁ㦹扭㘴86%䟄䄟幍᧨⒨榏∎䞷椞㧉棓抐䤓䟄䄟兎↯戢⣷∪䟄ᇭ
⅔⏐幇∎䞷椞㧉棓抐䤓䟄䄟ↅᇭ►
㽷㎞᧨䫽≬䟄䄟兎⸛Ⰼ㡯㗮᧨Ⱁ㦘㗮⧞᧨庆♙㢅㦃㗱㠿䤓䟄䄟兎ᇭ►
⸘⏷㙟䯉

86 Dynaudio
扭㘴㝜⇫
㦻唑⅚兜;HR侊⒦ℶ❐兓ↅ䤓扭㘴♙㝜⇫⏒ↅᇭ䶻欄⃚⚝⒦ℕ⮶摞⸭√᧨␅₼▔㕻Ⱁ⇤㛕㟍↯戢
⣷✛㓻⭿⣷ⅴ♙♾扭㘴⇤䱜≰⚆䄟䷘ᇭⰑ㨫㌷゛㦪㩴幱䤓⨚⚆㦹⒦⒉㒥⦷扭㘴✛庒幤㢅拖Ⓙ桽欧᧨庆
㖎;HR䔈儵兞枏⟕勣侊ᇭ♾抩扖ZZZG\QDXGLRFRP几䵨㩴幱兞枏⟕⦿⧏ᇭ
㙟䯉᧶展㌷帱徼䤓ℶ❐⯦孔᧨年⯦孔₼♾厌㦹▔⚺㓏㦘兓ↅᇭ
拴㘶⣷
∎䞷;HR拴㘶⣷␂㓻⭿⣷ᇬ庒唑檂摞♙折㕸♿↯戢⣷✛㓏扭㘴䤓≰⚆䄟ᇭⰑ⦷䵚⇢⭿㲰㆞᧤⚂⭿
拢ふ⭿拢᧥ₚ扪嫛㝜⇫᧨⒨拴㘶⣷≰⚆⺕⚛㢅㈀❜ふ⚂₳₹㓻⭿⣷ᇭ
㘶Ⓟ⏒ↅ
2Q2ᚎ ␂
㓢✛␂桼㓏折㓻⭿⣷ᇭ
槨檂
㓻⭿⣷庒咂槨檂ᇭ
9ROXPH
檂摞
⬭⮶
ದ ⺞
,QSXW
≰⚆䄟折㕸
折㕸₹㦘㟗↯戢⣷䤓≰⚆䄟᧤␀ₘ₹᧥
7UDQVPLWWHU
$%&
↯戢⣷折㕸
折㕸₹↯戢⣷抩拢᧤␀ₘ₹᧥
On Off
Transmitter
Input
123
ABC
Volume

87
ZH
↯戢⣷
⦷↯戢⣷ₙ扭㘴㦘Ⱁ庒檂⣷ᇬ㘴㟅⣷ᇬ&'㜼㟍⣷ᇬ䟄展ᇬ㿐ⴡ⇢⸱㓆䵾ᇬ几八㜼㟍⣷ᇬ03㜼㟍⣷㒥
帰並㧉䷘≰⚆䄟ᇭ≰⚆抩扖㡯兎䟄㽱⅝↯戢⣷↯咂㓻⭿⣷ㄅ扪嫛㜼㟍ᇭ
㘴♲㘶Ⓟ⏒ↅ
$X[,Q 戢⏴㙡ⷣ᧨㙡㘴揜㦘㙡⯃䤓檂欠兎
扭㘴揜㦘㹺伂戢⒉㙡⯃䤓幍ᇭ
/LQH,Q
戢⏴㙡ⷣ᧨㙡㘴揜㦘5&$㙡⯃&LQFK䤓檂欠兎
扭㘴揜㦘5&$戢⒉㙡⯃䤓幍ᇭ
㙟䯉᧶Ⱁ⚛㢅㦘幍扭㘴咂$X[,Q䵾♲᧨⒨⅔㜼㟍年䵾♲ₙ扭㘴䤓幍ᇭ
'LJLWDO,Q
戢⏴㙡ⷣ᧨扭㘴㟿ⷦ⏘儳檂欠兎
扭㘴揜㦘㟿ⷦ⏘儳戢⒉䵾7RVOLQN䤓幍ᇭ
86%,Q
戢⏴㙡ⷣ᧨扭㘴86%兎冕
扭㘴帰並㧉86%戢⒉䵾ᇭ扨䱜㍔⑄ₚ᧨↯戢⣷䤓┮厌䷘⚛ℝ⭿◰ᇭ
,G
↯戢⣷㪖幕
㌷♾折㕸₹↯戢⣷抩拢᧤␀ₘ₹᧥ㄅ抩扖拴㘶⣷㘶Ⓟᇭ㷳᧨庆折䞷䦇ㄣ㪖幕䶵
$ᇬ%㒥&ᇭ
3RZHU
䟄䄟㘴♲
扭㘴椞㧉棓抐䤓䟄䄟兎ᇭ
庆▎∎䞷␅Ⅵ䟄䄟兎
㙟䯉᧶Ⱁ↯戢⣷抩扖86%扭㘴兎♿䟄厠᧤め⚾┷᧥䦇扭᧨⒨㡯榏⮥㘴䟄䄟ᇭ
RL
USB In
PC/MAC
Sound Card
5V DC
500mA
Digital In
Line InAux In
1
2
3
A
B
C
PowerId

88 Dynaudio
扭㘴
抩扖椞㧉棓抐䤓86%兎冕⺕䟄䄟兎扭㘴咂↯戢⣷䤓► 32:(5戢⏴䵾ㄅ⺕䟄䄟㙡⯃扭㘴Ⓙ䟄䄟ᇭ
㙟䯉᧶Ⱁ↯戢⣷抩扖86%扭㘴兎♿䟄厠᧤め⚾┷᧥䦇扭᧨⒨㡯榏⮥㘴䟄䄟ᇭ
∎䞷椞㧉棓抐䤓兎冕⺕≰⚆䄟扭㘴咂␅₼恾戢⏴䵾ᇭₚ⒦扭㘴㡈㆞♾∪折㕸ᇭ►
≰⚆䄟 ≰⚆䄟戢⒉䵾 ↯戢⣷戢⏴䵾 兎冕 㙟䯉
䶣帿㦻䟄厠ᇬ0$&റᇬ3& 86% 86%,Q 86%ದ㈽⨚86% ↯戢⣷┮厌䷘⚛ℝ⭿◰ᇭ
⏘儳 'LJLWDO,Q 7RVOLQNದ7RVOLQN
/LQH2XW /LQH,Q 5&$ದ5&$
勂㧉 $X[,Q PP㘴♲ದPP㘴♲
L3RGL3RGറᇬL3DGറᇬL3KRQHറᇬ
:DONPDQറ✛␅Ⅵ≎㛉幍
勂㧉 $X[,Q PP㘴♲ದPP㘴♲ ದ
㓸⻤⧭䵨 /LQH2XW /LQH,Q 5&$ದ5&$ Ⱁ㦘㉔尐᧨♾㙟∪
⏘儳 'LJLWDO,Q 7RVOLQNದ7RVOLQN
几八⸱㓆䵾 /LQH2XW /LQH,Q 5&$ದ5&$ Ⱁ㦘㉔尐᧨♾㙟∪
⏘儳 'LJLWDO,Q 7RVOLQNದ7RVOLQN
6RQRVᇬ/RJLWHFKᇬ6TXHH]HER[
✛伊⇋幍
/LQH2XW /LQH,Q 5&$ದ5&$ Ⱁ㦘㉔尐᧨♾㙟∪
⏘儳 'LJLWDO,Q 7RVOLQNದ7RVOLQN
$SSOH$LUSOD\റ
$LUSRUW([SUHVV
⏘儳 'LJLWDO,Q 7RVOLQNದ7RVOLQN ದ
PP㘴♲ $X[,Q PP㘴♲ದPP㘴♲
$SSOH$LUSOD\റ
㘴㟅⣷ᇬ㟍⮶⣷
/LQH2XW /LQH,Q 5&$ದ5&$ ದ
⏘儳 'LJLWDO,Q 7RVOLQNದ7RVOLQN
䫻䥧ᇬ几八㜼㟍⣷ /LQH2XW /LQH,Q 5&$ದ5&$ Ⱁ㦘㉔尐᧨♾㙟∪
⏘儳 'LJLWDO,Q 7RVOLQNದ7RVOLQN
㲰㕮㟅檂㧉ᇬ㟿ⷦ㟅檂㧉 /LQH2XW /LQH,Q 5&$ದ5&$ Ⱁ㦘㉔尐᧨♾㙟∪
⏘儳 'LJLWDO,Q 7RVOLQNದ7RVOLQN

89
ZH
≰⚆䄟 ≰⚆䄟戢⒉䵾 ↯戢⣷戢⏴䵾 兎冕 㙟䯉
&'㜼㟍⣷ /LQH2XW /LQH,Q 5&$ದ5&$ Ⱁ㦘㉔尐᧨♾㙟∪
⏘儳 'LJLWDO,Q 7RVOLQNದ7RVOLQN
㲰㕮䟄⟀㧉 /LQH2XW /LQH,Q 5&$ದ5&$ ⇜ℝ⟀㧉ⓜ函㟍⮶⣷ₙ
䟄展㧉 勂㧉 $X[,Q PP㘴♲ದPP㘴♲ ₳䱜⨚⚆♾∪折㕸ᇭ
/LQH2XW /LQH,Q 5&$ದ5&$
䵚⇢⭿ⓜ函㟍⮶⣷ ⓜ儶戢⒉ᇬ戢⒉ /LQH,Q 5&$ದ5&$ ದ
䵚⇢⭿⚗ㄅ㆞㟍⮶⣷ 檂㧉戢⒉ /LQH,Q 5&$ದ5&$ 㕕㫴
ⓜ儶戢⒉ᇬ戢⒉ /LQH,Q 5&$ದ5&$
䶻ℛ₹ⓜ儶戢⒉ /LQH,Q 5&$ದ5&$
⇝檂䌽 㲰㕮䵚⇢⭿戢⒉ /LQH,Q 5&$ದ5&$ ದ
檂展欠㘴㟅⣷ᇬ檂展欠⮓䚕⣷ ⏘儳 'LJLWDO,Q 7RVOLQNದ7RVOLQN ದ
ⓜ儶戢⒉ᇬ戢⒉ /LQH,Q 5&$ದ5&$

90 Dynaudio
㓻⭿⣷
;HR✛;HR㦘䄟檂乀␔函楕㒟㟍⮶⣷᧨ㄅ♾∎䞷;HR拴㘶⣷㘶Ⓟᇭ抩扖檂乀⚝捷䤓折㕸␂᧨♾
⦷䵚⇢⭿㲰㆞◤⭿拢㲰㆞⃚梃扪嫛⒖㗱ᇭ
㘴♲✛㘶Ⓟ⏒ↅ広㢝
/HIW
0RQR
5LJKW
ぴ⇫㲰㆞
/HIW 䵚⇢⭿㲰㆞ₚふ㓻⭿⣷␂⇜函ವ
0RQR ⅔∎䞷₹㓻⭿⣷䤓␂⇜函ವ
5LJKW 䵚⇢⭿㲰㆞ₚ⚂㓻⭿⣷␂⇜函ವ
䴉梃折㕸
ₜ⚛䴉梃䤓㓻⭿⣷♾∎䞷拴㘶⣷⒕Ⓔ扪嫛㘶Ⓟᇭ
32:(5
䟄䄟␂
21 㓻⭿⣷め㘴抩ᇭ♾∎䞷拴㘶⣷⚾䞷㒥䰐䞷㓻⭿⣷ᇭⰑ㓻⭿⣷⚾䞷⇕㡯≰⚆᧨⺕ವ
⒖㗱咂㈔㧉㲰㆞ᇭ
2)) 㓻⭿⣷⸛⏷㠼ᇭವ
䟄䄟㙡ㄶ
䞷ℝ⺕㓻⭿⣷扭㘴咂䟄䄟
䥥⯦
∎䞷䥥⯦ₜ↩㈀❜㓻⭿⣷䤓♜⺓㊶厌ᇭⰑ㦘榏尐⃮♾♥ₚ䥥⯦ᇭ
庆⺕䥥⯦⅝乀⇢ₙ⚠ⓜ㕘ₚᇭ►
ROOM
POWER
LEFT
MONO
RIGHT
1
2
3
AC 100V-230V ˜ 50/60Hz
OFFON

91
ZH
扭㘴
㓻⭿⣷㛕㟍咂㓏榏⇜函ᇭ
抩扖䟄䄟兎⺕㓻⭿⣷㘴䟄ᇭ
䵚⇢⭿㲰㆞᧶
折㕸-
/HIWふ㓻⭿⣷ぴ⇫㲰㆞ᇭ
折㕸-
5LJKW⚂㓻⭿⣷ぴ⇫㲰㆞ᇭ
◤⭿拢㲰㆞᧶折㕸
0RQRぴ⇫㲰㆞ᇭ
折㕸䴉梃
ᇬ㒥ᇭ䵚⇢⭿ぴ⇫㲰㆞ₚ᧨ふᇬ⚂㓻⭿⣷♹♾折㕸⚛㫆䤓䴉梃幍函ᇭサ㦘ₜ⚛䴉梃幍
函䤓㓻⭿⣷♾∎䞷拴㘶⣷⒕Ⓔ扪嫛㘶Ⓟᇭ
㝜⇫
㓢㓻⭿⣷卛槱䤓䟄䄟␂ᇭ
⚾䞷㓻⭿⣷᧶⺕拴㘶⣷㖖⚠㓻⭿⣷ㄅ构ₚ㖘枽
21ᇭ
Ⱁ㡯戢⏴≰⚆᧨㹄㢅梃⚝㓻⭿⣷扪⏴㈔㧉䕅㊐ᇭ␜㶰⚾㓻⭿⣷᧨庆㖘ₚ㖘枽 ▼
21ᇭ
䰐䞷㓻⭿⣷᧶⺕拴㘶⣷㖖⚠㓻⭿⣷ㄅ构ₚ㖘枽
2))ᇭ
㓻⭿⣷扪⏴㈔㧉䕅㊐ᇭⰑ榏⸛⏷㠼㓻⭿⣷᧨⦷卛槱⺕32:(5␂㕷咂 ▼
2))⇜函ᇭ⃚⚝᧨㡯
㽤␜∎䞷拴㘶⣷⚾㓻⭿⣷ᇭ
折㕸↯戢⣷᧶庆㖘ₚ㖘枽75$160,77(5
$ᇬ%㒥&ᇭ
Ⱁ♹∎䞷₹↯戢⣷᧤√Ⱁ᧶7UDQVPLWWHU$᧥᧨⒨㡯榏折㕸ᇭⰑₜ⺞㉒折㕸␅Ⅵ↯戢⣷᧨庆␜㶰 ▼
折㕸↯戢⣷$ᇭ
折㕸≰⚆䄟ᇭ庆㖘ₚ㖘枽,1387
ᇬ㒥ᇭ
㜼㟍㓏折≰⚆䄟ᇭ ▼

92 Dynaudio
Ⱁ㩟K┮厌ₜ㷲デ
⮶⮩㟿㍔⑄ₚ᧨㜼㟍檂⃟㢅⒉䘿䤓㸊㧉ᇬ✣⤢⭿㒥␅Ⅵ㟔椫⭿檂ㄅ槭䟀;HR
侊兮㡯兎↯戢抯㒟ᇭ抩デ㢾⮥捷⥯侯㈀❜↯戢德摞ᇭ
ₚ槱⅚兜䞷ℝ㟈⠓↯戢德摞䤓K⺞䴜桷᧶
㓏㦘㡯兎♠⺓⣷✛㘴㟅⣷ㄣ⒕㛕㟍ᇭⰑ:/$1幍ᇬ㟅檂㧉✛㡯兎
侊兮⇜函㛕㟍⮹扠᧨⒨↩䦇℡㓿ᇭ庆⺈幍䤓ₜ⚛⇜函扪嫛㿚幤ᇭ
庆␂桼:/$1幍䤓呹┷㚫侱┮厌ᇭ:/$1幍✛␅Ⅵ㡯兎䟄侊兮↩
⦷⸩喒⦃␔ₜ㠼㘱㿚♾䞷欠䘖᧨ㄅ㖐兼⚠⮥♠抐≰⚆᧨㷳≰⚆↩⺈␅
Ⅵ㡯兎幍抯㒟㓿ᇭ抩デ㍔⑄ₚㄣ␂桼呹┷㚫侱┮厌ᇭ
庆⻌摞挎⏜⬨⭐棊椣ᇭ∎䞷;HR㔏㦾䤓㡯兎≰⚆夌♾䴎択⬨⭐᧨⇕⬨
⭐㧟德♾厌⚺㦘㊶厌⸛⏷ₜ⚛䤓㦷德儳冃㨎ᇬ䪂㧟䞩咂朱㧟ᇭ㷳⮥᧨执
♾厌⚺㦘䞷ℝ䟄㿐ᇬ䟄幬ᇬ䟄展✛㟅檂㧉䤓⮜㧑兎冕⸘孔♙㻃丰✛抩歝
丰拢ᇭ扨K㧟㠨⧖♾⺋咃㡯兎≰⚆♠䞮兤⺓ᇭ⥯㷳᧨庆⺬幤⺕↯戢⣷㛕
㟍咂ₜ⚛⇜函᧨ㄅ⻌♾厌㓻⭿⣷折㕸䦃㘴㡯兎◉梃ᇭ
庆▎⦷↯戢⣷棓扠∎䞷㇉䟄幍ᇭ㩟K䟄幍↩ℶ䞮㇉䟄䭐⧉㓿
㡯兎侊兮ᇭ
㌷♾椞㢅⚠㖎;HR䔈儵兞枏⟕✷幱㒥抩扖LQIR#G\QDXGLRFRP₼䤓㦜┰
䍼兎㖎♥㈦勣侊ᇭ

93
JA
栚㭀
栚㭀㈛ᇬኔኖኣኽሯ⸛⏷ቊሥቮሶቋት䭉崜ሺᇬ㳮⣷ቋሼቜቑⅧ⻭❐懇
抐₼ቑ䫃㚜ሯቍሧሮ䭉崜ሺሲቃሸሧᇭኮአዙንሯ⮶ሰሲ䫃㚜ሺሧ
ቮ⫃⚗ᇬ懇抐₼ቑ䫃㚜ሯ℗㎂ቊሰቡሼᇭ䫃㚜ሺቂ㳮⣷ት峵拚慱ሺቫሩቋ
ሺቍሧቊሲቃሸሧᇭ␔⹈䓸ሯₜ⸛⏷ሮ䫃㚜ሺሧቮ⫃⚗ᇬ'\QDXGLR;HR
ቑ弸⮁ㄦሷ抲俰ሲቃሸሧᇭ弸⮁ㄦቑ⇞㓏ቒᇬኃኄኳኒኁእ
᧤ZZZG\QDXGLRFRP᧥岧憘ሸቯሧቡሼᇭ
㭀▔㧟
ኮአዙንቒᇬ懇抐₼䫃㚜ሺሧቍሧ⫃⚗ᇬ␜∎䞷ሼቮሶቋሯቊሰቡ
ሼᇭኮአዙንት㗷ቍሧቊᇬ⅙㈛ቑ懇抐ቒ⏒ቑኮአዙንት∎䞷ሺ
ሲቃሸሧᇭ
'\QDXGLR;HRት指ቶቊሧቂቃሰሥቭ
ሯቋሩሷሹሧቡሺቂᇭ
'\QDXGLR;HRት指ቶቊሧቂቃሰሥቭሯቋሩሷሹሧቡሺቂᇭ
;HRቒᇬ㦏㠿ቑዌኁዉኖ㔏嫢ት◿廰䤓ቍ檂役ቋ俓ቢ⚗ቲሾᇬ檂㰌曠彭
ት䦮㉺拸ቊ⹈㢢ሺቡሼᇭ
㶰ቑ㟿ዙንቒᇬ⸛䜶ቍ㳮厌ቋሥቭ㈦ቮ㦏浧ቑ檂役ት䭉≬ሼቮቂቤቑᇬ
ኔኖኣኽቛቑ㘴倩栱ሼቮ摜尐㍔⫀ቋ㦏拸ቍ岼函⫃㓏ቑኯዐእሯ岧憘ሸ
ቯሧቡሼᇭ
檂㰌曠彭ትር㰌ሺቢሲቃሸሧᇭ
'\QDXGLR

94 Dynaudio
⒉嘆ቑ乓⦁
;HRኖዙኈዙ
;HRኖዙኈዙವ
;HRነዐ[ವ
;HRኖዙኈዙをኈክዙ[ವ
;HRኖዙኈዙ榊䄟ዙኳወ[ವ
;HRኇዙኧዙኗኻከዂቿወ[ವ
;HRኖዙኈዙ
;HRኖዙኈዙವ
;HRነዐ[ವ
;HRኖዙኈዙをኈክዙ[ವ
;HRኖዙኈዙ榊䄟ዙኳወ[ವ
;HRኇዙኧዙኗኻከዂቿወ[ವ
;HRእዐኖኼአኜዙ
;HRእዐኖኼአኜዙ[ವ
PLFUR86%ዙኳወⅧሰ;HRእዐኖኼአኜዙ榊䄟ዃከአእ[ವ
;HRኖኣዉኇቿኧዊኍዙኳወ᧤5&$ದ5&$᧥[ವ
;HRኖኣዉኇቿኧዊኍዙኳወ᧤PPದPP᧥[ವ
;HR⏘ⷵኤንኜወዙኳወ᧤7RVOLQNದ7RVOLQN᧥[ವ
;HR86%ዙኳወ᧤86%ದPLQL86%᧥[ವ
;HRኇዙኧዙኗኻከዂቿወ[ವ

95
JA
ኖዙኈዙ
巵⛙᧶☀椉ቍ榊⦶
ኖዙኈዙሯ榊䄟榊⦶㘴倩ሸቯሧቮ⫃⚗ᇬ☀椉ቍ榊⦶ሯኖዙኈዙቑ
␔捷ⷧ⦷ሺቡሼᇭ
倅⺍ኖዙኈዙቑኬኃንዐኍት栚ሮቍሧቊሲቃሸሧᇭ►
㶯棴ቑሥቮኖዙኈዙት∎䞷ሺቍሧቊᇬ㶯棴ቑሥቮኖዙኈዙት榊䄟►
榊⦶ሮቬ㔫ሧሲቃሸሧᇭ⇤ቬሮቑ⟞櫛ሯሥቮ⫃⚗ቒᇬ'\QDXGLR;HR
ቑ弸⮁ㄦሷ抲俰ሲቃሸሧᇭ弸⮁ㄦቑ⇞㓏ቒᇬኃኄኳኒኁእ᧤ZZZ
G\QDXGLRFRP᧥岧憘ሸቯሧቡሼᇭ
⚛㭀ቑ榊䄟ዙኳወት∎䞷ሺᇬኖዙኈዙት榊䄟榊⦶㘴倩ሺቡ►
ሼᇭ榊䄟ዙኳወሯ䫃㚜ሺሧቍሧሶቋት䭉崜ሺሲቃሸሧᇭ䫃㚜ሺ
ሧቮ⫃⚗ቒᇬ㠿ሺሧብቑቋℳ㙪ሺሲቃሸሧᇭ
እዐኖኼአኜዙ榊䄟ዃከአእ
巵⛙᧶☀椉ቍ榊⦶
86%ኚዙኖሯ㘴倩ሸቯሧቍሧ⫃⚗ᇬእዐኖኼአኜዙቒᇬ⚛㭀ቑ榊䄟
ዃከአእት⅚ሺ榊㿐ሯ∪俵ሸቯቡሼᇭ
⚛㭀ቑ榊䄟ዃከአእቑቢ∎䞷ቊሰቡሼᇭ►
榊䄟䞷ቑ榊䄟ዙኳወሯ䫃㚜ሺሧቍሧሶቋት䭉崜ሺቡሼᇭ䫃㚜ሺ►
ሧቮ⫃⚗ቒᇬ榊䄟ዃከአእት㠿ሺሧብቑቋℳ㙪ሺቡሼᇭ
⸘⏷㍔⫀

96 Dynaudio
㘴倩ርቫቖ╤⇫
ሶቑኘኌኔዄዐቊቒᇬ;HRቑነዐኺዙኪዐእቑ㘴倩ቋⓅ㈰尐侯ቇሧ岧憘ሺሧቡሼᇭእዐኖኼ
አኜዙቧኖዙኈዙቑ岼函⫃㓏ቧቌቑ≰⚆䄟ሯ㘴倩ቊሰቮሮቍቌᇬሸቡሹቡቍኇኴኔዄዐቇሧቑ
√ሯዙንሮቬ㙁憘ሸቯሧቡሼᇭ㉔尐ቍ√ሯ⚺ቡቯሧቍሧ⫃⚗ᇬቡቂቒ㘴倩ቧ峵拚慱ቑ⟞櫛ሯ
ሥቮ⫃⚗ቒᇬ'\QDXGLR;HRቑ弸⮁ㄦሷ抲俰ሲቃሸሧᇭ弸⮁ㄦቑ⇞㓏ቒᇬኃኄኳኒኁእ
᧤ZZZG\QDXGLRFRP᧥岧憘ሸቯሧቡሼᇭ
㽷㎞᧶律⏴ሺቂ完❐ቑኮአዙንቫቭᇬₙ岧ቑሼቜቑነዐኺዙኪዐእሯ⚺ቡቯሧቍሧ⫃⚗ሯ
ሥቭቡሼᇭ
ነዐ
;HRቑነዐቒᇬኖዙኈዙቑኇዐኇኲቑ⒖ቭ㦎ራᇬ檂摞ቑ⮘㦃ᇬእዐኖኼአኜዙርቫቖ㘴倩ሸ
ቯቂ≰⚆䄟ቑ指㔭∎䞷ቊሰቡሼᇭኖዙኈዙሯኖኣዉኇዙኦ᧤⚂ふ᧥ቊ╤⇫ሺሧቮ⫃⚗ᇬነ
ኻዐኦቒ㉔ሽ₰㡈ቑኖዙኈዙ拸䞷ሸቯቡሼᇭ
Ⓟ㈰尐侯
2Q2ᚎ ኇዐኇኲኖኁአኞ
指㔭ሺቂኖዙኈዙቑኇዐኇኲት⒖ቭ㦎ራቡሼᇭ
ኼዂዙእ
指㔭ሺቂኖዙኈዙትኼዂዙእሺቡሼᇭ
9ROXPH
檂摞
ቿአኴ
ದ ኝኃዐ
,QSXW
≰⚆䄟ቑ指㔭
ቿኌኣኀኳቍእዐኖኼአኜዙሮቬቑቇቑ≰⚆䄟ቑቇት指㔭ሺቡሼᇭ
7UDQVPLWWHU
$%&
እዐኖኼአኜዙቑ指㔭
ቇቑእዐኖኼአኜዙቑኞዀዐኪወሮቬቇት指㔭ሺሲቃሸሧᇭ
On Off
Transmitter
Input
123
ABC
Volume

97
JA
እዐኖኼአኜዙ
ኞዂዙኧዙᇬዉኔዙክዙᇬ&'ኴዉዙዙᇬኣዉኰᇬኖእዙኼዐኍኌኁቿዐእᇬኪአእዌዙኌኴ
ዉዙዙᇬ03᧯ኴዉዙዙᇬቡቂቒነዐዂዙኜዙቍቌቑ≰⚆䄟ሯእዐኖኼአኜዙ㘴倩ሸቯቡ
ሼᇭ≰⚆ቒእዐኖኼአኜዙሮቬ䎰偩ቊኖዙኈዙ抐≰ሸቯᇬ㶰≰⚆ቒ␜䞮ሸቯቡሼᇭ
㘴倩ቋⓅ㈰尐侯
$X[LQ ኖኣዉኇንዀአኌⅧሰዙኳወ䞷⏴┪
ኖኣዉኇንዀአኌ᧤PP᧥䞷⒉┪ቑሥቮ㳮⣷ትሶሶ㘴倩ሺቡሼᇭ
/LQHLQ
5&$ኴኍ᧤FLQFK᧥ቑሥቮዙኳወ䞷⏴┪
5&$ኴኍ䞷⒉┪ቑሥቮ㳮⣷ትሶሶ㘴倩ሺቡሼᇭ
㽷㎞᧶㳮⣷ሯ₵嫛㘴倩ቊ⮥捷⏴┪㘴倩ሸቯሧቮ⫃⚗ᇬቀቑ㳮⣷ቑቢሯ␜䞮ሸቯ
ቡሼᇭ
'LJLWDOLQ
⏘ⷵኤንኜወዙኳወ䞷⏴┪
⏘ⷵኤንኜወ⒉┪᧤7RVOLQN᧥ት㖐ቇ㳮⣷ት㘴倩ሺቡሼᇭ
86%,Q
86%ዙኳወ䞷⏴┪
ነዐዂዙኜዙቑ86%⒉┪ትሶሶ㘴倩ሺቡሼᇭእዐኖኼአኜዙቒ㶰ኒኃዐኦ
ኈዙኦቋሺ╤⇫ሺቡሼᇭ
,'
እዐኖኼአኜዙ,'
ቇቑእዐኖኼአኜዙኞዀኪወቑቇሯᇬነዐት⅚ሺ指㔭ርቫቖ㝜⇫ቊሰቡ
ሼᇭሶቯት嫛ቍሩቒᇬ拸⒖ቍ,'᧤
$᧨%᧨&᧥ት指㔭ሺቡሼᇭ
3RZHU
榊䄟ዃከአእ䞷㘴倩
⚛㭀ቑ榊䄟ዃከአእትሶሶ㘴倩ሺቡሼᇭ
⒴ቑ榊䄟ዃከአእት∎䞷ሺቍሧቊሲቃሸሧᇭ
㽷㎞᧶86%ዙኳወት⅚ሺᇬእዐኖኼአኜዙትኖኁአኞቑ⏴ቆቂነዐዂዙኜ
ዙ㘴倩ሺቂቬᇬ榊䄟ዃከአእቒ㉔尐ሥቭቡሾቶᇭ
RL
USB In
PC/MAC
Sound Card
5V DC
500mA
Digital In
Line InAux In
1
2
3
A
B
C
PowerId

98 Dynaudio
㘴倩
⚛㭀ቑ86'ዙኳወቋ榊䄟ዃከአእት∎䞷ሺᇬእዐኖኼአኜዙት榊䄟ቑ► 榊┪⏴┪㘴倩ሺቡ
ሼᇭ
㽷㎞᧶86%ዙኳወት⅚ሺᇬእዐኖኼአኜዙትኖኁአኞቑ⏴ቆቂነዐዂዙኜዙ㘴倩ሺቂቬᇬ
抌┯ቑ榊䄟ዃከአእቒ㉔尐ሥቭቡሾቶᇭ
⏴┪ቑቇ≰⚆䄟ት㘴倩ሺቡሼᇭሶቯቒ⚛㭀ቑዙኳወቑቢት∎䞷ሺሲቃሸሧᇭⅴₚቑ㘴►
倩ኇኴኔዄዐሯⒸ䞷♾厌ቊሼᇭ
≰⚆䄟 ≰⚆䄟ቑ⒉┪ እዐኖኼአኜዙ
ቑ⏴┪
ዙኳወ ኾ
ካዙእ3&ᇬ0$&റᇬ3& 86% 86%LQ 86%ದPLQL86% እዐኖኼአኜዙቒኒኃዐኦኈዙ
ኦቋሺ╤⇫ሺቡሼᇭ
⏘ⷵ 'LJLWDOLQ 7RVOLQNದ7RVOLQN
/LQHRXW /LQHLQ 5&$ದ5&$
ኵአኦኲኆዐ $X[LQ ንዀአኌPPದPP
L3RGറL3DGറL3KRQHറ
:DONPDQറርቫቖቀቑⅥቑ㛉ゾ
㳮⣷
ኵአኦኲኆዐ $X[LQ ንዀአኌPPದPP ದ
ኦአኊዐኍኖኣዙኔዄ /LQHRXW /LQHLQ 5&$ದ5&$ Ⓒ䞷♾厌ቍ⫃⚗
⏘ⷵ 'LJLWDOLQ 7RVOLQNದ7RVOLQN
ኪአእዌዙኌኌኁቿዐእ /LQHRXW /LQHLQ 5&$ದ5&$ Ⓒ䞷♾厌ቍ⫃⚗
⏘ⷵ 'LJLWDOLQ 7RVOLQNದ7RVOLQN
6RQRVᇬ/RJLWHFKᇬ6TXHH]HER[ᇬ
ርቫቖ櫭⇋ቑ㳮⣷
/LQHRXW /LQHLQ 5&$ದ5&$ Ⓒ䞷♾厌ቍ⫃⚗
⏘ⷵ 'LJLWDOLQ 7RVOLQNದ7RVOLQN
$SSOH$LUSOD\റ
$LUSRUW([SUHVV
⏘ⷵ 'LJLWDOLQ 7RVOLQNದ7RVOLQN ದ
ንዀአኌPP $X[LQ ንዀአኌPPದPP
$SSOH$LUSOD\റ᧶
ዉኔዙክዙᇬቿዐኴ
/LQHRXW /LQHLQ 5&$ದ5&$ ದ
⏘ⷵ 'LJLWDOLQ 7RVOLQNದ7RVOLQN

99
JA
≰⚆䄟 ≰⚆䄟ቑ⒉┪ እዐኖኼአኜዙ
ቑ⏴┪
ዙኳወ ኾ
ኬዙኦኤኀኖኌᇬኪአእዌዙኌኴ
ዉዙዙ
/LQHRXW /LQHLQ 5&$ದ5&$ Ⓒ䞷♾厌ቍ⫃⚗
⏘ⷵ 'LJLWDOLQ 7RVOLQNದ7RVOLQN
ቿኧዊኍንኇᇬኤንኜወንኇ /LQHRXW /LQHLQ 5&$ದ5&$ Ⓒ䞷♾厌ቍ⫃⚗
⏘ⷵ 'LJLWDOLQ 7RVOLQNದ7RVOLQN
&'ኴዉዙዙ /LQHRXW /LQHLQ 5&$ದ5&$ Ⓒ䞷♾厌ቍ⫃⚗
⏘ⷵ 'LJLWDOLQ 7RVOLQNದ7RVOLQN
ቿኧዊኍዉነዙኦኴዉዙዙ /LQHRXW /LQHLQ 5&$ದ5&$ ኲኆካኴቿዐኴₙ
ኣዉኰ ኵአኦኲኆዐ $X[LQ ንዀአኌPPದPP ቇቑኇኴኔዄዐሮቬቇት指㔭ሺ
ቡሼᇭ
/LQHRXW /LQHLQ 5&$ದ5&$
ኖኣዉኇኴቿዐኴ 3UHRXWPDLQRXW /LQHLQ 5&$ದ5&$ ದ
ኖኣዉኇኮዌዙቿዐኴ 7DSHRXW /LQHLQ 5&$ದ5&$ ኳአንቑ㘴倩屲棳
3UHRXWPDLQRXW /LQHLQ 5&$ದ5&$
䶻SUHRXW /LQHLQ 5&$ದ5&$
ኒኳኃዙኲቾዙ ቿኧዊኍኖኣዉኇ
⒉┪
/LQHLQ 5&$ದ5&$ ದ
$9ዉኔዙክዙᇬ$9ኴዊኘአኒ ⏘ⷵ 'LJLWDOLQ 7RVOLQNದ7RVOLQN ದ
3UHRXWPDLQRXW /LQHLQ 5&$ದ5&$

100 Dynaudio
ኖዙኈዙ
ቿኌኣኀኳ;HRርቫቖ;HRኖዙኈዙቒᇬ倀⚗ሸቯቂቿዐኴት⌨ራርቭᇬ;HRቑነዐቊⓅ㈰
ቊሰቡሼᇭኖዙኈዙቒᇬ㈛捷ቑኖኁአኞቫቭኖኣዉኇቋካዙኦ栢ቊ⒖ቭ㦎ራቮሶቋሯቊሰቡ
ሼᇭ
㘴倩ቋⓅ㈰尐侯ቑ崻㢝
/HIW
0RQR
5LJKW
╤⇫ዙኦ
/HIW᧹ኖኣዉኇቊቑふቑኖዙኈዙቑ⇜函ት⒖ቭ㦎ራቡሼವ
0RQR᧹ቇቑኖዙኈዙቑቢት∎䞷ሼቮ⫃⚗ᇬ⇜函ት⒖ቭ㦎ራቡሼವ
5LJKW᧹ኖኣዉኇቊቑ⚂ቑኖዙኈዙቑ⇜函ት⒖ቭ㦎ራቡሼವ
捷⻚ቑ指㔭
ሸቡሹቡቍ捷⻚ቑኖዙኈዙትነዐቊ⊚⒴Ⓟ㈰ሼቮሶቋሯቊሰቡሼᇭ
32:(5
榊䄟ኖኁአኞ
21᧹ኖዙኈዙቑ榊䄟ሯ⏴ቭቡሼᇭኖዙኈዙቒᇬነዐቫቆቑቢቿኌኣವ
ኀኳ▥ርቫቖ槭ቿኌኣኀኳ▥ቊሰቡሼᇭኖዙኈዙሯቿኌኣኀኳቊᇬ≰⚆ሯቍሧ
⫃⚗ᇬኖኜዐክኁዙኦ⒖ቭ㦎ቲቭቡሼᇭ
2))᧹ኖዙኈዙቒ⸛⏷榊䄟ኇኲቍቭቡሼᇭವ
榊䄟ኚአእ
榊䄟榊⦶ኖዙኈዙት㘴倩ሼቮ㡈㽤ᇭ
をኈክዙ
をኈክዙቒᇬኖዙኈዙቑ檂㽱⒕㟲㈀檎ትራቍሧቫሩ岼岗ሸቯሧቡሼᇭቂቃሺᇬ㉔尐ቍ⫃⚗
ቒᇬ棳♊ሼቮሶቋሯቊሰቡሼᇭ
棳♊ሼቮቒᇬをኈክዙት呹⒕⚠ሮቆㆤሰᇬኬኃንዐኍሮቬ♥ቭ⮥ሺቡሼᇭ►
ROOM
POWER
LEFT
MONO
RIGHT
1
2
3
AC 100V-230V ˜ 50/60Hz
OFFON

101
JA
㘴倩
ኖዙኈዙት゛㦪ቑ⫃㓏揜函ሺቡሼᇭ
榊䄟ዙኳወት∎䞷ሺᇬ榊䄟榊⦶ኖዙኈዙት㘴倩ሺቡሼᇭ
ኖኣዉኇዙኦቑ⫃⚗᧶
/HIW- ቑኖዙኈዙቑ╤⇫ዙኦት指㔭ሺቡሼᇭ
5LJKW- ቑኖዙኈዙቑ╤⇫ዙኦት指㔭ሺቡሼᇭ
ካዙኦቑ⫃⚗᧶╤⇫
0RQRኦት指㔭ሺቡሼᇭ
捷⻚
᧨᧨ቡቂቒሮቬ指㔭ሺቡሼᇭ
ኖኣዉኇቊቒᇬ⚂ቋふቑኖዙኈዙቊ⚛ሻ捷⻚ቑ岼⸩ት指㔭ሺቡሼᇭሸቡሹቡቍ捷⻚ቑ岼⸩ቑሥ
ቮኖዙኈዙትነዐቫቭ⊚⒴丰䚕ሼቮሶቋሯቊሰቡሼᇭ
㝜⇫
㈛捷ቑ榊䄟ኖኁአኞት∎䞷ሺᇬኖዙኈዙቑ榊䄟ትኇዐሺቡሼᇭ
ኖዙኈዙትቿኌኣኀኳሼቮ㡈㽤᧶ነዐትኖዙኈዙ⚠ሴ
21ት㕋ሺቡሼᇭ
⏴┪≰⚆ሯቍሧ⫃⚗ᇬኖዙኈዙቒ⸩㣑栢㈛ᇬኖኜዐክኁዙኦ⏴ቭቡሼᇭ ▼
␜ㄵቿኌኣኀኳሼቮቒᇬ
21ት㕋ሺቡሼᇭ
ኖዙኈዙት槭ቿኌኣኀኳ▥ሼቮ㡈㽤᧶ነዐትኖዙኈዙ⚠ሴ
2))ት㕋ሺቡሼᇭ
ኖዙኈዙቒኖኜዐክኁዙኦ⏴ቭቡሼᇭኖዙኈዙት⸛⏷ኇኲሺቂሧ⫃⚗ቒᇬ㈛捷ቑ ▼
32:(5ኖኁአኞት
2))ሼቮ㉔尐ሯሥቭቡሼᇭቂቃሺቀቑ㈛ᇬኖዙኈዙትነዐቫቭ
ቿኌኣኀኳሼቮሶቋቒቊሰቍሲቍቭቡሼᇭ
እዐኖኼአኜዙት指㔭ሼቮ㡈㽤᧶75$160,77(5
$᧨%᧨ቡቂቒ&ት㕋ሺቡሼᇭ
ቇቑእዐኖኼአኜዙ᧤$ቍቌ᧥ቑቢት∎䞷ሼቮ⫃⚗ᇬ指㔭ት嫛ሩ㉔尐ቒሥቭቡሾቶᇭ崳ቆ ▼
⒴ቑእዐኖኼአኜዙት指㔭ሺቂ⫃⚗ᇬ␜ㄵእዐኖኼአኜዙ$ት指㔭ሺቡሼᇭ
≰⚆䄟ት指㔭ሼቮቒᇬ,1387
᧨ቡቂቒት㕋ሺቡሼᇭ
指㔭ሸቯቂ≰⚆䄟ሯ␜䞮ሸቯቡሼᇭ ▼

102 Dynaudio
檂㰌␜䞮₼ቑ₼㠼ᇬኌአኌካኁኗᇬቡቂቒቀቑⅥቑ檂⭿ቑ䂘ቒᇬ抩デ
;HRኔኖኣኽቑ䎰偩↬抐ሯ☮⥯ቊቒሥቭቡሾቶᇭⅥቑ⮥捷ቑ☮⥯ሯ↬抐❐
役㈀檎ትራቮሶቋሯቫሲሥቭቡሼᇭ
ⅴₚቒᇬ↬抐❐役ት㟈⠓ሼቮቂቤቑኯዐእቊሼᇭ
ሼቜቑ䎰偩እዐኖኼአኜዙቋዉኔዙክዙትር℡ሧ楱ሺ揜函ሺ
ቡሼᇭ:/$1㳮⣷ᇬ䎰偩ዉኔዙክዙᇬርቫቖ䎰偩ኔኖኣኽቒᇬ扠ሼሱ
ቮቋ䦇℡䂘ሼቮ⫃⚗ሯሥቭቡሼᇭ⚓㳮⣷ቇሧሸቡሹቡቍ⫃㓏
ትር峵ሺሲቃሸሧᇭ
:/$1㳮⣷ቑ呹╤㮫侱㳮厌ትኇኲሺቡሼᇭ:/$1㳮⣷ቋቀቑⅥቑ䎰
偩ኔኖኣኽቒⒸ䞷♾厌ቍ⛷㽱㟿ሯቍሧሮデኖኊዀዐሺሧቡሼᇭቀ
ቑቂቤᇬቀቑⅥቑ䎰偩ኔኖኣኽትⰷ⹂ሼቮ♾厌㊶ቑሥቮ≰⚆ትデ䤉
≰ሺሧቡሼᇭሶቑ呹╤㮫侱㳮厌ቒ抩デኖኁአኞኇኲቊሰቡሼᇭ
♾厌ቍ⫃⚗ቒᇬデ⭐ት挎ሴቡሼᇭብቄተቶ;HR㔏嫢ቑ䎰偩≰⚆ቒ⭐
ት抩ቭቡሼᇭሺሮሺᇬ⭐ቒ㦷役僙值㨎ᇬ䪂ᇬቡቂቒ斋擓ቍቌቑሸቡ
ሹቡቍ䓸役ሯ⚺ቡቯሧቡሼᇭ⭐ቒቡቂᇬ榊㺦岼⌨ᇬ榊崀ᇬኣዉ
ኰᇬንኇቑቂቤቑ宖楠ቍዙኳወ岼函ᇬርቫቖ抐㻃丰ቧ抩欷ⷣሯ⚺
ቡቯሧቮ⫃⚗ሯሥቭቡሼᇭሶቯቬቒ䎰偩≰⚆ትቀቬሼ♾厌㊶ሯሥቭ
ቡሼᇭሶቑቂቤᇬሸቡሹቡቍእዐኖኼአኜዙቑ岼函⫃㓏ት峵ሺᇬ䎰
偩ሯኖዙኈዙ䦃㘴⻙ሲ⫃㓏ት指㉔尐ሯሥቭቡሼᇭ
እዐኖኼአኜዙቑ扠ሲቊ㇆┪ቍ榊㺦孔函ት㝜⇫ሺቍሧቊሲቃሸሧᇭ
榊㺦㳮⣷ቑ₼ቒ䎰偩ኔኖኣኽት䂆℀ሸሾቮ㇆┪ቍ䭐⫃ት䞮ቢ⒉ሼብ
ቑሯሥቭቡሼᇭ
'\QDXGLR;HRቑ弸⮁ㄦᇬ椞㣑㞾㚃ት㻑ቤቂቭᇬLQIR#G\QDXGLRFRPሮ
ቬ'\QDXGLRቑኵወኴኁዐ⟞ሧ⚗ቲሾቮሶቋሯቊሰቡሼᇭ
崳╤⇫

103
KO
闑ꚾ
뇑븽냹闑ꚾ뼑쁹겑걙묑霡ꫦ넩꿹놹뼑덵쀊넭뼍隕끩ꭖ닆ꭅꩶ鷍덵鱉
껿꼍鱉덵韥韥꿵ꑝ麕ꜵꭂ븽냹뇅阵뼍겢겑꿙붡녚넩겡뼍陁삱ꭅ鷍꽩
넽鲙ꐩ끩ꭖ닆ꭅꩶ넍閵鱚ꫦ넩넽걪鱽鲙ꭅꩶ鷑韥韥鱉ꩡ끞뼍덵
ꍽ겢겑꿙驩끞ꓱ넩ꜽ꿹놹뼍阥驍ꭅꩶ鷑陲끥꾅鱉뾹덵'\QDXGLR
;HR볅ꎙ뇅냱ꈑ꾥ꄲ뼍겢겑꿙볅ꎙ뇅늱ꭁ鱉ZZZG\QDXGLRFRP꾅
쀊넭뼍겙ꯍ넽걪鱽鲙
붡녚녡
붡녚녡鱉끩ꭖ닆꾅삱ꭅ鷍덵껿냵陲끥녡ꩡ끞넩閵鱚뼍鵹ꈒ黉녅넭鷍꽩
넽걪鱽鲙붡녚녡ꌱꍡ덵ꍽ겑隕뽚쁹꾅끩ꗍ넩뻹끉뼑陲끥꾅鲙겑
ꩡ끞뼍鵹ꈒ뼍겢겑꿙
'\QDXGLR;HRꌱ몒뼩늱ꬉ
闅ꩡ뼞鱽鲙
;HR鱉뜑겕ꓩ韥ꯕ隱ꂥ꽩驑ꩡ끩麑븽덽넍陥뼞냹뭪뼩갲隕뵭껽뼑
넁껺闅ꩶ냹ꚩ녚뼞鱽鲙
넩꽩덵鱉驩끞꾅鱉꿹꙲뼑韥鱚隱뜑ꩶ넍ꩡ끩麑븽덽냹ꚩ덒뼍韥낹뼑
겑걙묑꾥陥뇊ꚩꗄ뜑넍렍낹렍꾅鲵뼑벶넩붡뼝鷍꽩넽걪鱽鲙
'\QDXGLRꈑꐀ덹넁껺냹덅韥겑韥ꗉꅂ鱽鲙
'\QDXGLR

104 Dynaudio
驩끞ꓱ
;HR걙뻱뢙
;HR걙뻱뢙鲵ವ
;HRꍡꑝ뢝闑ವ
;HR걙뻱뢙뙑뢙闑ವ
;HR걙뻱뢙놹낅뢵넩Ꟊ闑ವ
;HRꩡ끞ꐺ闑ವ
;HR걙뻱뢙
;HR걙뻱뢙鲵ವ
;HRꍡꑝ뢝闑ವ
;HR걙뻱뢙뙑뢙闑ವ
;HR걙뻱뢙놹낅뢵넩Ꟊ闑ವ
;HRꩡ끞ꐺꜵವ
;HR뱭ꅑ걙ꖭ뫥
;HR뱭ꅑ걙ꖭ뫥闑ವ
;HR뱭ꅑ걙ꖭ뫥놹낅險鞾녚렍闑ꍽ넩먡ꈑ86%뢵넩Ꟊ붡뼝ವ
;HR걙묁ꆽ꿙껹驕ꈑ鞭뢵넩Ꟊ闑5&$ದ5&$ವ
;HR걙묁ꆽ꿙껹驕ꈑ鞭뢵넩Ꟊ闑녢PPದPPವ
;HR集黉덵뫭뢵넩Ꟊ闑7RVOLQNದ7RVOLQNವ
;HR86%뢵넩Ꟊ闑86%ದPLQL86%ವ
;HRꩡ끞ꐺꜵವ

105
KO
걙뻱뢙
陲隕놹꼊낹뾍
걙뻱뢙閵놹낅꾅꾥陥鷍꽩넽鱉陲끥걙뻱뢙驩ꜵ꾅낹뾍ꯍ늵넍놹꼊넩
눩녡뼞鱽鲙
놽鲵걙뻱뢙뼍끥뎊냹꾩덵ꍽ겢겑꿙►
陥뼝넩넽鱉걙뻱뢙鱉ꩡ끞뼍덵ꍽ겑隕놹낅꾥陥냹뗝鲝뼍겢겑꿙►
ꓭ뇑閵넽鱉陲끥꾅鱉뾹덵'\QDXGLR;HR볅ꎙ뇅냱ꈑ꾥ꄲ뼍겢겑꿙
볅ꎙ뇅늱ꭁ鱉ZZZG\QDXGLRFRP꾅쀊넭뼍겙ꯍ넽걪鱽鲙
걙뻱뢙ꌱ놹낅꾅꾥陥뼕鼁鱉뼝颍뇑險鷍鱉놹낅뢵넩Ꟊ냹►
ꩡ끞뼍겢겑꿙놹낅險鞾뢵넩Ꟊ넩ꭅꩶ鷍덵껿꼍鱉덵쀊넭뼍겢겑꿙
ꭅꩶ넩넽鱉陲끥꾅鱉ꩽ뢵넩Ꟊꈑ霅뙩뼍겢겑꿙
뱭ꅑ걙ꖭ뫥놹낅險鞾녚렍
陲隕놹꼊낹뾍
86%놹낅넩꾥陥鷍꽩넽덵껿냹陲끥뼝颍뇑險鷍鱉놹낅險鞾녚렍ꌱ
뭪뼩뱭ꅑ걙ꖭ뫥꾅놹ꌍ閵險鞾鷞鱽鲙
뼝颍뇑險鷍鱉놹낅險鞾녚렍ꎁ냹ꩡ끞뼍겢겑꿙►
놹낅險鞾녚렍넍놹낅險鞾뢵넩Ꟊ넩ꭅꩶ鷍덵껿꼍鱉덵쀊넭뼍겢겑꿙►
ꭅꩶ넩넽냹陲끥ꩽ놹낅險鞾녚렍ꈑ霅뙩뼍겢겑꿙
껽놹뇊ꚩ

106 Dynaudio
꾥陥ꗄ녆鶎
ꚭꫮꬍ냵;HR霡ꫦ븽넍꾥陥ꗄ눥녆ꜵ꾅鲵뼩ꐺ뼞鱽鲙뱭ꅑ걙ꖭ뫥꿵걙뻱뢙넍낹렍꾥陥
閵鱚뼑겕뿭낅麦鲙꽆뼑꿪ꬍ꾅鲵뼑꾽겑鱉뵍넩덵넩뼍꾅쀊넭뼍겙ꯍ넽걪鱽鲙뻹끉뼑霡ꫦ
냕뿊넩붡뼝鷍꽩넽덵껿阥驍꾥陥ꗄ녆鶎꾅ꓭ뇑閵넽鱉陲끥꾅鱉뾹덵'\QDXGLR;HR볅ꎙ뇅냱ꈑ
꾥ꄲ뼍겢겑꿙볅ꎙ뇅늱ꭁ鱉ZZZG\QDXGLRFRP꾅쀊넭뼍겙ꯍ넽걪鱽鲙
뗭隕霡넺뼍겕뇑븽볝멙덵꾅黥ꄱꐺ鷑霡ꫦ븽닆넱ꜵ閵뼩鲮볝멙덵꾅붡뼝鷍꽩넽덵껿냹ꯍ
넽걪鱽鲙
ꍡꑝ뢝
걙뻱뢙ꌱ룑隕騁鼁넁ꅾ냹눥놽뼕鼁뱭ꅑ걙ꖭ뫥ꗄ鞭꾥陥겕뿭낅냹몒뼕鼁;HRꍡꑝ뢝냹
ꩡ끞뼍겙ꯍ넽걪鱽鲙걙뻱뢙ꌱ걙묁ꆽ꿙ꑝ麑뉁끥ꈑ녆鶎닆넩ꄱꐩꍡꑝ뢝ꐺꇮ냵뼢ꩶ걙뻱뢙
꽆둲ꑝ鸅꾅놶끞鷞鱽鲙
눥녆ꜵ
2Q2ᚎ 2Q2ᚎ걙낹렍
몒鷑걙뻱뢙ꌱ룑隕騊鱽鲙
넁ꭁ阥
몒鷑걙뻱뢙넍ꭁꍡꌱꭁ阥뼞鱽鲙
9ROXPH
넁ꅾ
魇넹
ದ 驣띙
,QSXW
겕뿭낅몒
쀑ꫦ쀉鷑뱭ꅑ걙ꖭ뫥ꈑꜵ뫥넍겕뿭낅闑닆뼍驍ꌱ몒뼞鱽鲙
7UDQVPLWWHU
$%&
뱭ꅑ걙ꖭ뫥몒
뱭ꅑ걙ꖭ뫥뗹髅闑닆뼍驍ꌱ몒뼞鱽鲙
On Off
Transmitter
Input
123
ABC
Volume

107
KO
뱭ꅑ걙ꖭ뫥
뱑骽ꍡ겑&'뻁ꆽ넩꽩79걙뱭ꍡꗂ먩ꄱ넩꽭뱭髙뱭낁먡뻁ꆽ넩꽩03뻁ꆽ넩꽩뢩뺝뫥麦넍
겕뿭낅넩뱭ꅑ걙ꖭ뫥꾅꾥陥鷞鱽鲙겕뿭鱉뱭ꅑ걙ꖭ뫥꾅걙뻱뢙ꈑꓩ놹ꭖ鷍꽩녡ꪒ鷞鱽鲙
꾥陥ꗄ눥녆ꜵ
$X[LQ 걙묁ꆽ꿙녢뢵넩Ꟊ넺ꇚ鲝녅
걙묁ꆽ꿙녢PP끞띑ꇚ鲝녅閵넽鱉韥韥ꌱ꾡韥꾅꾥陥뼞鱽鲙
/LQHLQ
5&$뻁ꆡ鞭&LQFK뢵넩Ꟊ넺ꇚ鲝녅
5&$뻁ꆡ鞭끞띑ꇚ鲝녅閵넽鱉韥韥ꌱ꾡韥꾅꾥陥뼞鱽鲙
뗭隕ꚩ눥넺ꇚ鲝녅꾅韥韥閵Ꚇꇡ꾥陥鷍꽩넽鱉陲끥뼩鲮韥韥ꎁ녡ꪒ鷞鱽鲙
'LJLWDOLQ
集黉덵뫭뢵넩Ꟊ넺ꇚ鲝녅
集黉덵뫭띑ꇚ7RVOLQN鲝녅閵넽鱉韥韥ꌱ꾡韥꾅꾥陥뼞鱽鲙
86%LQ
86%뢵넩Ꟊ넺ꇚ鲝녅
뢩뺝뫥86%띑ꇚ鲝녅ꌱ꾡韥꾅꾥陥뼞鱽鲙넩陲끥뱭ꅑ걙ꖭ뫥鱉ꩡ끩麑렩麑
꾢뼕냹뼍陁鷞鱽鲙
,'
뱭ꅑ걙ꖭ뫥,'
ꍡꑝ뢝냱ꈑ뱭ꅑ걙ꖭ뫥뗹髅闑닆뼍驍ꌱ몒뼍隕녆鶎뼕ꯍ넽걪鱽鲙넩ꌱ
낹뼩鱉놶놽뼑,'$%鿅鱉&ꌱ몒뼍겢겑꿙
3RZHU
놹낅險鞾녚렍꾥陥鲝녅
뼝颍뇑險鷍鱉놹낅險鞾녚렍ꌱ꾡韥꾅꾥陥뼞鱽鲙
鲙ꌭ놹낅險鞾녚렍ꌱꩡ끞뼍덵ꍽ겢겑꿙
뗭隕86%뢵넩Ꟊꈑ뱭ꅑ걙ꖭ뫥ꌱ뢩뺝뫥룑뇭넽鱉꾅꾥陥뼑陲끥꾅鱉놹낅險鞾
녚렍閵뻹끉뼍덵껿걪鱽鲙
RL
USB In
PC/MAC
Sound Card
5V DC
500mA
Digital In
Line InAux In
1
2
3
A
B
C
PowerId

108 Dynaudio
꾥陥
뼝颍뇑險鷍鱉86%뢵넩Ꟊꗄ놹낅險鞾녚렍ꌱꩡ끞뼩뱭ꅑ걙ꖭ뫥ꌱ놹낅險鞾녚렍넍► 놹낅넺ꇚ
鲝녅꾅꾥陥뼞鱽鲙
뗭隕86%뢵넩Ꟊꈑ뱭ꅑ걙ꖭ뫥ꌱ뢩뺝뫥룑뇭넽鱉꾅꾥陥뼑陲끥꾅鱉ꙹ鵹넍놹낅險鞾녚렍閵
뻹끉뼍덵껿걪鱽鲙
겕뿭낅냹넺ꇚ鲝녅닆뼍驍꾅꾥陥뼞鱽鲙뼝颍뇑險鷍鱉뢵넩Ꟊꎁ냹ꩡ끞뼍겢겑꿙鲙넁隱闎냵►
꾥陥꿪ꬍ냹넩끞뼍겙ꯍ넽걪鱽鲙
겕뿭낅 겕뿭낅띑ꇚ鲝녅 뱭ꅑ걙ꖭ뫥넺ꇚ
鲝녅
뢵넩Ꟊ 뗭隕
鬭뱭Ꜷ0$&റ3& 86% 86%LQ 86%ದPLQL86% 뱭ꅑ걙ꖭ뫥閵ꩡ끩麑렩麑꾢뼕냹
뼞鱽鲙
꿪벥뢡 'LJLWDOLQ 7RVOLQNದ7RVOLQN
/LQHRXW /LQHLQ 5&$ದ5&$
뾙麑붥 $X[LQ 녢PPದPP
L3RGറL3DGറL3KRQHറ
:DONPDQറꗄ韥멵샩鲵끞韥韥
뾙麑붥 $X[LQ 녢PPದPP ದ
鵹멮걙묁넩ꬍ /LQHRXW /LQHLQ 5&$ದ5&$ 넩끞閵鱚뼑陲끥
꿪벥뢡 'LJLWDOLQ 7RVOLQNದ7RVOLQN
髙뱭낁먡먩ꄱ넩꽭뱭 /LQHRXW /LQHLQ 5&$ದ5&$ 넩끞閵鱚뼑陲끥
꿪벥뢡 'LJLWDOLQ 7RVOLQNದ7RVOLQN
6RQRV/RJLWHFK6TXHH]HER[ꗄ
냕ꩡ韥韥
/LQHRXW /LQHLQ 5&$ದ5&$ 넩끞閵鱚뼑陲끥
꿪벥뢡 'LJLWDOLQ 7RVOLQNದ7RVOLQN
$SSOH$LUSOD\റ
$LUSRUW([SUHVV
꿪벥뢡 'LJLWDOLQ 7RVOLQNದ7RVOLQN ದ
녢PP $X[LQ 녢PPದPP
$SSOH$LUSOD\റ
ꍡ겑꼥뺹
/LQHRXW /LQHLQ 5&$ದ5&$ ದ
꿪벥뢡 'LJLWDOLQ 7RVOLQNದ7RVOLQN

109
KO
겕뿭낅 겕뿭낅띑ꇚ鲝녅 뱭ꅑ걙ꖭ뫥넺ꇚ
鲝녅
뢵넩Ꟊ 뗭隕
뼍麑黉걙먡髙뱭낁먡뻁ꆽ넩꽩 /LQHRXW /LQHLQ 5&$ದ5&$ 넩끞閵鱚뼑陲끥
꿪벥뢡 'LJLWDOLQ 7RVOLQNದ7RVOLQN
껹驕ꈑ鞭黉덵뫭ꄱ黉꿙 /LQHRXW /LQHLQ 5&$ದ5&$ 넩끞閵鱚뼑陲끥
꿪벥뢡 'LJLWDOLQ 7RVOLQNದ7RVOLQN
&'뻁ꆽ넩꽩 /LQHRXW /LQHLQ 5&$ದ5&$ 넩끞閵鱚뼑陲끥
꿪벥뢡 'LJLWDOLQ 7RVOLQNದ7RVOLQN
껹驕ꈑ鞭ꆽ뤉麑뻁ꆽ넩꽩 /LQHRXW /LQHLQ 5&$ದ5&$ 붡鬭뺹ꍡ꼥뺹
묉ꆽꟹ놹 뾙麑붥 $X[LQ 녢PPದPP 鸅閵덵꿪ꬍ닆뼍驍ꌱ몒뼞鱽鲙
/LQHRXW /LQHLQ 5&$ದ5&$
걙묁ꆽ꿙뺹ꍡ꼥뺹 3UHRXWPDLQRXW /LQHLQ 5&$ದ5&$ ದ
걙묁ꆽ꿙볁낁꼥뺹 7DSHRXW /LQHLQ 5&$ದ5&$ ꟁꍡ덵ꜹꍡ
3UHRXWPDLQRXW /LQHLQ 5&$ದ5&$
鸅뎭SUHRXW /LQHLQ 5&$ದ5&$
ꟁ끥봱 껹驕ꈑ鞭걙묁ꆽ꿙
띑ꇚ
/LQHLQ 5&$ದ5&$ ದ
$9ꍡ겑$9뺹ꈑꫭ 꿪벥뢡 'LJLWDOLQ 7RVOLQNದ7RVOLQN ದ
3UHRXWPDLQRXW /LQHLQ 5&$ದ5&$

110 Dynaudio
걙뻱뢙
;HRꗄ;HR걙뻱뢙꾅鱉넭벥꼥뺹閵넽냱ꐥ;HRꍡꑝ뢝냱ꈑ눥녆閵鱚뼞鱽鲙걙뻱뢙鱉쁹ꐩ넍
걙낹렍ꌱ넩끞뼩걙묁ꆽ꿙ꗄꑝ鬭ꑝ麑ꌱ놹쀍뼕ꯍ넽걪鱽鲙
꾥陥ꗄ눥녆ꜵꐺ
/HIW
0RQR
5LJKW
녆鶎ꑝ麑
/HIW 걙묁ꆽ꿙ꑝ麑겑뉁럖걙뻱뢙꾅鲵뼑걙낹렍낹렍ವ
0RQR 걙뻱뢙뼍驍ꎁ냹ꩡ끞뼍鱉陲끥걙낹렍낹렍ವ
5LJKW 걙묁ꆽ꿙ꑝ麑겑끥럖걙뻱뢙꾅鲵뼑걙낹렍낹렍ವ
ꗞ몒
ꍡꑝ뢝냱ꈑꈑ鲙ꌭꗞ꾅넽鱉걙뻱뢙ꌱ黥ꈑ黥ꈑ눥녆뼕ꯍ넽걪鱽鲙
32:(5
놹낅걙낹렍
21 걙뻱뢙閵룑뇭넽걪鱽鲙ꍡꑝ뢝냱ꈑ걙뻱뢙쀑ꫦ쀉ꗄ쀑ꫦ쀉뼩뇑閵ವ
閵鱚뼞鱽鲙걙뻱뢙閵쀑ꫦ쀉鷑ꩶ몑꾅겕뿭閵꽻鱉陲끥鲵韥ꑝ麑ꈑ
놹쀍鷞鱽鲙
2)) 걙뻱뢙閵꿹놹섽顱뇭넽걪鱽鲙ವ
ꐉ넭ꭁ룈
걙뻱뢙ꌱ놹낅꾅꾥陥뼞鱽鲙
뙑뢙
뙑뢙鱉걙뻱뢙넍ꩡ끩麑쀊ꩥ꾅꾶뽚냹늱덵껿鵹ꈒ黉녅넭鷍꽩넽걪鱽鲙鞭ꆡ驍뻹끉뼍鲙ꐩ
뢙ꌱ뇑阥뼕ꯍ넽걪鱽鲙
뙑뢙ꌱ뇑阥뼍ꇙꐩ뢙ꌱ꼓냱ꈑ鲮陝뼍끥뎊꾅Ꙍ陝驺鱽鲙►
ROOM
POWER
LEFT
MONO
RIGHT
1
2
3
AC 100V-230V ˜ 50/60Hz
OFFON

111
KO
꾥陥
걙뻱뢙ꌱ낅뼍鱉낹렍꾅魈걪鱽鲙
놹낅뢵넩Ꟊ냹넩끞뼩걙뻱뢙ꌱ놹낅꾅꾥陥뼞鱽鲙
걙묁ꆽ꿙ꑝ麑
뉁럖걙뻱뢙꾅鲵뼩-
/HIW녆鶎ꑝ麑ꌱ몒뼞鱽鲙
끥럖걙뻱뢙꾅鲵뼩-
5LJKW녆鶎ꑝ麑ꌱ몒뼞鱽鲙
ꑝ鬭ꑝ麑
0RQR녆鶎ꑝ麑ꌱ몒뼞鱽鲙
ꗞ
鿅鱉냹몒뼞鱽鲙걙묁ꆽ꿙ꑝ麑꾅鱉끥럖ꗄ뉁럖걙뻱뢙꾅鲵뼩鶎넱뼑ꗞ뇊냹
몒뼞鱽鲙ꍡꑝ뢝냱ꈑꈑ鲙ꌭꗞ뇊냹闋鱉걙뻱뢙ꌱ黥ꈑ黥ꈑ눥녆뼕ꯍ넽걪鱽鲙
녆鶎
쁹ꐩ넍놹낅걙낹렍ꌱ넩끞뼩걙뻱뢙ꌱ룢鱽鲙
걙뻱뢙쀑ꫦ쀉ꍡꑝ뢝냹걙뻱뢙둲냱ꈑ뽚뼍隕
21냹鮹ꌺ鱽鲙
넺ꇚ겕뿭閵꽻鲙ꐩ걙뻱뢙鱉넱뇊겑閹넩덵驑쁹鲵韥ꑝ麑ꈑ麙꽩闆鱽鲙 ▼
鲙겑쀑ꫦ쀉뼍ꇙꐩ
21냹鮹ꌺ鱽鲙
걙뻱뢙쀑ꫦ쀉뼩뇑ꍡꑝ뢝냹걙뻱뢙둲냱ꈑ뽚뼍隕
2))ꌱ鮹ꌺ鱽鲙
걙뻱뢙閵鲵韥ꑝ麑ꈑ麙꽩闆鱽鲙걙뻱뢙ꌱ꿹놹섽駹ꇙꐩ쁹ꐩ넍32:(5걙낹렍ꌱ ▼
2))ꈑ
놹쀍뼩꼱뼞鱽鲙鞭ꆡ驍넩ꆼ陁뼕陲끥ꍡꑝ뢝냱ꈑ걙뻱뢙ꌱ쀑ꫦ쀉뼕ꯍ꽻陁鷞鱽鲙
뱭ꅑ걙ꖭ뫥몒75$160,77(5
$%鿅鱉&ꌱ鮹ꌺ鱽鲙
뱭ꅑ걙ꖭ뫥뼍驍꾽ꌱ麙꽩$ꎁ냹ꩡ끞뼍鱉陲끥몒뼕뻹끉閵꽻걪鱽鲙겙ꯍꈑ鲙ꌭ ▼
뱭ꅑ걙ꖭ뫥ꌱ몒뼽鲙ꐩ鲙겑뱭ꅑ걙ꖭ뫥$ꌱ몒뼍겢겑꿙
겕뿭낅몒,1387
鿅鱉냹鮹ꌺ鱽鲙
몒鷑겕뿭낅넩녡ꪒ鷞鱽鲙 ▼

112 Dynaudio
넱ꗍ놶냱ꈑ;HQR겑걙묑넍ꓩ놹ꭖ냱ꈑ넭뼩넁껺녡ꪒ닆녡ꪒ닆鲝
黭頂阥ꍡ鱉녖넁鿅鱉韥멵넁뽚녚꼕閵ꗑꪒ뼍鱉陲끥鱉阥넍꽻걪鱽鲙
섉섽鲙ꌭ뀭ꜵ놶낅넭넩놹ꭖ븽덽꾅꾶뽚냹닂鱽鲙
껹ꅍ鱉놹ꭖ븽덽넍뽚ꩶ냹낹뼑ꐼ閵덵벶넺鱽鲙
ꑝ麕ꓩ뱭ꅑ걙ꖭ뫥꿵ꍡ겑鱉ꈑ齝꽩덹隨꾅魈걪鱽鲙:/$1
녚렍ꓩꍡ겑ꗄꓩ겑걙묑냵骽ꓩ閵頁넩꾅낹렍뼍鱉陲끥
ꈑ꾶뽚냹늱陁鷞鱽鲙閶閶넍녚렍꾅鲵뼩鲙꽆뼑낹렍ꌱ겑뾍뼩
ꚩ겢겑꿙
:/$1녚렍넍녅鶎阵ꩾ韥鱚냹騊鱽鲙:/$1녚렍ꗄ韥멵ꓩ
겑걙묑냵閵끞늱볁ꯍ꾅鲵뼩덵ꭂ놶걙롉냹ꯍ뼾뼍ꐥ黥ꄱ
駿넹꽻넩겕뿭ꌱꚩ驩鲙ꌭꓩ겑걙묑꾅녚꼕ꌱ냕ꗑ뼕ꯍ넽걪鱽鲙
넩녅鶎阵ꩾ韥鱚냵넱ꗍ놶냱ꈑ騁ꯍ넽鵹ꈒ鷍꽩넽걪鱽鲙
閵鱚뼍鲙ꐩ꙲냹뻱뼍겢겑꿙ꓱꈕ;HR韥ꯕ넍ꓩ겕뿭鱉꙲냹
뭪隱뼩놹ꭖ넩閵鱚뼞鱽鲙鞭ꆡ驍꙲냵ꑞ녡녡겡덵꽩鱉뙕녡
麦넍鲙꽆뼑녡ꊁꈑ넩ꊝ꽩뎆鱽鲙鿅뼑꙲꾅鱉놹녅뇑븽놹쀉韥
79ꄱ黉꿙ꌱ낹뼑ꚪ녖뼑뢵넩Ꟊꟹ꿵ꯍ鵹隵ꗄ뭪빂險閹넩
붡뼝鷍꽩넽걪鱽鲙넩鱉ꓩ겕뿭ꌱ霅ꄵ뼕ꯍ넽걪鱽鲙넩ꆥ넩냕ꈑ
뱭ꅑ걙ꖭ뫥꾅鲵뼩鲙꽆뼑낹렍ꌱ겑뾍뼍隕걙뻱뢙꾅閵녚덶뇆놶냱ꈑ
ꓩ겕뿭ꌱ놹ꭖ뼕ꯍ넽鱉陲ꈑꌱ뗳鱉阸넩뻹끉뼞鱽鲙
뱭ꅑ걙ꖭ뫥鞱뙍꾅闊ꇚ뼑놹韥녚렍ꌱ녆鶎뼍덵ꍽ겢겑꿙넱ꜵ
놹韥녚렍鱉ꓩ겑걙묑꾅녚꼕ꌱ냕ꗑ뼕ꯍ넽鱉闊뼑놹녅韥녚냹
ꗑꪒ겑멪鱽鲙
鵹끵넩뻹끉뼑陲끥꽭뇑麕덵뾹덵'\QDXGLR;HR볅ꎙ뇅꾅鵹끵냹
끉뙢뼍겑阥驍'\QDXGLR隕闒덵낅꫱뫥LQIR#G\QDXGLRFRPꈑ
꾥ꄲ뼍겢겑꿙
隕녚

113
Specifications, Technische Daten, Caractéristiques, Specifiche,
Especificaciones, Especificações, характеристики, 屓㫋, Ⅴ㱧, ꩡ꽆
(The specifications are only available in English.)
Loudspeakers Xeo 3 Xeo 5
Frequency response 48 Hz – 22 kHz 36 Hz – 22 kHz
Power consumption 4 – 76 W 4 – 76 W
Power consumption standby 0.6 W (network active) 0.6 W (network active)
Power rating Woofer: 50 W, Tweeter: 50 W Woofer: 50 W, Tweeter: 50 W
Dimensions (W x H x L) 170 x 281 x 246/262 mm 170 x 922 x 260/275 mm
Weight 6.4 kg 16.7 kg
Power supply 100 – 230 V 100 – 230 V
Transmitter
Transmitter signal frequency 2.4 GHz
Wireless signal resolution / sample rate 16 bit / 48 kHz
Frequency response 20 Hz – 22 kHz
Typical input voltage RCA: 1 V
rms
, Minijack: 250 mV
rms
Input impedance RCA: 11.4 kΩ, Minijack: 8.2 kΩ
Dimensions (W x H x L) 120 x 32 x 90 mm
Weight 0.148 kg
Power supply Adaptor: 100 – 240 V
Micro USB: 5 V / min. 500 mA

114 Dynaudio
Reminding
This device complies with Part 15 of the FCC Rules. Operation is subject
to the following two conditions: (1) this device may not cause harmful
interference, and (2) this device must accept any interference received,
including interference that may cause undesired operation.
Le présent appareil est conforme aux CNR d‘Industrie Canada
applicables aux appareils radio exempts de licence. L‘exploitation est
autorisée aux deux conditions suivantes : (1) l‘appareil ne doit pas
produire de brouillage, et (2) l‘utilisateur de l‘appareil doit accepter tout
brouillage radioélectrique subi, même si le brouillage est susceptible d‘en
compromettre le fonctionnement.
Changes or modifications not expressly approved by the party responsible
for compliance could void the user‘s authority to operate the equipment.
This equipment has been tested and found to comply with the limits for
a Class B digital device, pursuant to part 15 of the FCC Rules. These
limits are designed to provide reasonable protection against harmful
interference in a residential installation. This equipment generates uses
and can radiate radio frequency energy and, if not installed and used in
accordance with the instructions, may cause harmful interference to radio
communications. However, there is no guarantee that interference will
not occur in a particular installation. If this equipment does cause harmful
interference to radio or television reception, which can be determined by
turning the equipment off and on, the user is encouraged to try to correct
the interference by one or more of the following measures:
Reorient or relocate the receiving antenna.•
Increase the separation between the equipment and receiver.•
Connect the equipment into an outlet on a circuit different from that to •
which the receiver is connected.
Consult the dealer or an experienced radio/TV technician for help.•
Under Industry Canada regulations, this radio transmitter may only operate
using an antenna of a type and maximum (or lesser) gain approved for
the transmitter by Industry Canada. To reduce potential radio interference
to other users, the antenna type and its gain should be so chosen that
the equivalent isotropically radiated power (e.i.r.p.) is not more than that
necessary for successful communication.
Conformément à la réglementation d‘Industrie Canada, le présent
émetteur radio peut fonctionner avec une antenne d‘un type et d‘un gain
maximal (ou inférieur) approuvé pour l‘émetteur par Industrie Canada.
Dans le but de réduire les risques de brouillage radioélectrique à l‘intention
des autres utilisateurs, il faut choisir le type d‘antenne et son gain de sorte
que la puissance isotrope rayonnée équivalente (p.i.r.e.) ne dépasse pas
l‘intensité nécessaire à l‘établissement d‘une communication satisfaisante.
MPE Reminding
To satisfy FCC RF exposure requirements, a separation distance of 20
cm or more should be maintained between the antenna of this device and
persons during device operation.
To ensure compliance, operations at closer than this distance is not
recommended.
Les antennes installées doivent être situées de facon à ce que la
population ne puisse y être exposée à une distance de moin de 20 cm.
Installer les antennes de facon à ce que le personnel ne puisse approcher
à 20 cm ou moins de la position centrale de l’ antenne.
La FCC des États-Unis stipule que cet appareil doit être en tout temps
éloigné d’au moins 20 cm des personnes pendant son functionnement.

115
IC NOTICE
This device complies with Industry Canada licence-exempt RSS
standard(s). Operation is subject to the following two conditions: (1) this
device may not cause interference, and (2) this device must accept any
interference, including interference that may cause undesired operation of
the device.
Le présent appareil est conforme aux CNR d‘Industrie Canada
applicables aux appareils radio exempts de licence. L‘exploitation est
autorisée aux deux conditions suivantes : (1) l‘appareil ne doit pas
produire de brouillage, et (2) l‘utilisateur de l‘appareil doit accepter tout
brouillage radioélectrique subi, même si le brouillage est susceptible d‘en
compromettre le fonctionnement.

Dynaudio A/S, 8660 Skanderborg, Denmark
Sales & Marketing: Dynaudio International GmbH, Ohepark 2, 21224 Rosengarten, Germany, Phone: +49 4108 - 41 80 - 0
www.dynaudio.com
© Dynaudio International GmbH, Xeo Owners Manual 1111, Item No. 4552612. All text and image copyrights reserved. Subject to change without notice.
All there is.
1/116