Venta LW73 Manual de usuario
- Categoría
- Humidificadores
- Tipo
- Manual de usuario

VENTA AEROSTYLE LUFTWÄSCHER
LW73 WIFI / LW74 WIFI
DE BEDIENUNGSANLEITUNG
EN OPERATING MANUAL
FR MODE D‘EMPLOI
NL GEBRUIKSAANWIJZING
IT ISTRUZIONI PER L’USO
ES MANUAL DE INSTRUCCIONES
PL INSTRUKCJA OBSŁUGI
CZ NÁVOD KOBSLUZE
SK NÁVOD NA OBSLUHU
HU KEZELÉSI ÚTMUTATÓ
RO INSTRUCȚIUNI DE UTILIZARE
LV LIETOŠANAS INSTRUKCIJA
RU РУКОВОДСТВО ПО
ЭКСПЛУАТАЦИИ
JP 取扱説明書

VEREINFACHTE
EU-KONFORMITÄTS-
ERKLÄRUNG
Hiermit erklärt Venta-Luftwäscher GmbH, dass die Funkanlagentypen
LW73 WiFi / LW74 WiFi der Richtlinie 2014/53/EU entsprechen. Der vollständige
Text der EU-Konformitäts erklärung ist unter folgender Internetadresse verfügbar:
www.venta-air.com/service/bedienungsanleitungen/
SIMPLIFIED EU DECLARATION
OF CONFORMITY
Herewith, Venta-Luftwäscher GmbH declares that the radio equipments
LW73 WiFi / LW74 WiFi comply with Directive 2014/53/EU. The full text of the EU
Declaration of Conformity is available at the Internet address:
www.venta-air.com/en_de/service/manuals/
Venta-Luftwäscher GmbH
Weltestr. 5, 88250 Weingarten, Germany,
Tel. +49 751 5008 0, www.venta-air.com

03DE
SEHR GEEHRTER KUNDE,
mit dem Venta AeroStyle Luftwäscher LW73 WiFi und LW74 WiFi haben Sie ein
leistungsstarkes Premiumprodukt erworben. Der AeroStyle unterstützt die gesunde
Luftfeuchtigkeit sowie die natürliche Reduzierung von Schadstoffen in der Luft. Die
Venta App ermöglicht die Steuerung und Kontrolle des LW73 WiFi / LW74 WiFi auch
von unterwegs.
So funktioniert das Venta Prinzip
Die Raumluft wird über einen Lüfter in den mit Wasser befüllten Luftwäscher gelei-
tet, in dem ausgeklügelt angeordnete Plattenstapel rotieren. Über deren Flächen wird
hygienisch sauberes Wasser in den Raum verdunstet. Gleichzeitig werden auf den
Platten Schadstoffe wie Staub oder Pollen festgehalten, im Wasser abgewaschen
und im Luftwäscher gesammelt.
VIELEN DANK!
Wir sind überzeugt, dass der Venta Luftwäscher Ihre Erwartungen übertreffen wird,
und wünschen Ihnen viel Freude damit.
Bitte registrieren Sie Ihr Venta-Gerät:
www.venta-air.com/Service/Produktregistrierung/
Bitte lesen Sie diese Bedienungsanleitung vollständig durch, be-
wahren Sie sie zur späteren Verwendung auf und beachten Sie alle
Sicherheitshinweise sowie die bestimmungsgemäße Verwendung.
Die aktuellste Version der Bedienungsanleitung finden Sie auf
unserer Website www.venta-air.com
DE
AT
CH
Sicherheitshinweise 04
Liefer umfang 07
Symbole 07
Bestimmungsgemässe Verwendung 07
Übersicht 08
Vor der ersten Benutzung 08
Inbetriebnahme 09
Konfiguration & Venta App 10
WiFi / Bluetooth 11
Anzeigen, Funktionen & Einstellungen 12
Reinigung & Pflege 14
Reinigung vom Geräte-Oberteil 16
Zubehör 16
Technische Daten 17
Recycling & Entsorgung 18
Garantie 18
Datenschutz 18
Was ist, wenn …? 19
Venta-Service-Team 20
INHALT

04 DE
• Dieses Gerät ist für den Gebrauch durch Kinder ab 8 Jahren
und Personen mit eingeschränkten körperlichen, sensori-
schen oder mentalen Fähigkeiten oder mit mangelhafter
Erfahrung und Kenntnissen geeignet, sofern sie beaufsich-
tigt werden oder hinsichtlich der sicheren Verwendung des
Gerätes unterwiesen wurden und die bestehenden Gefahren
verstanden haben.
• Bedienungsanleitung vor Inbetriebnahme vollständig durch-
lesen und zum späteren Nachschlagen gut aufbewahren.
• Das Gerät ist kein Spielzeug für Kinder.
• Reinigung und Benutzerpflege darf nicht von Kindern unter
8 Jahren bzw. ohne Aufsicht durchgeführt werden.
• Das Gerät und dessen Netzanschlussleitung von Kindern
unter 8 Jahren fernhalten.
• Unsachgemäße Verwendung kann das Gerät beschädigen
und Körperverletzungen verursachen.
• Das Gerät nur an geeignete Netzsteckdosen anschließen –
Netzspannung gemäß den Typenschildangaben am Gerät.
• Dieses Gerät darf nur mit folgender Netzanschlussleitung
betrieben werden: Kaltgerätestecker mit Kleeblattkupplung
IEC 320 C5.
• Das Gerät nie in Betrieb nehmen, wenn die Netzanschluss-
leitung beschädigt ist.
• Ziehen Sie vor jedem Reinigungs- oder Wartungseingriff
sowie zum Umstellen oder Transportieren des Gerätes den
Netzstecker aus der Steckdose.
! SICHERHEITSHINWEISE

05DE
• Das Gerät nie in Betrieb nehmen, wenn dieses herunterge-
fallen ist oder auf eine andere Art beschädigt wurde.
• Reparaturen an Elektrogeräten dürfen nur von Fachkräften
durchgeführt werden. Durch unsachgemäße Reparaturen
können erhebliche Gefahren für den Benutzer entstehen.
• Setzen Sie sich keinesfalls auf das Gerät und legen Sie kei-
ne Gegenstände darauf.
• Stecken Sie keine Fremdgegenstände in das Gerät.
• Geräte-Oberteil nie in Wasser oder andere Flüssigkeiten
tauchen.
• Das Gerät nie überfüllen.
• Das Gerät nie mit vollem Behälter transportieren oder
kippen.
• Niemals den Netzstecker an der Netzanschlussleitung oder
mit nassen Händen aus der Steckdose ziehen.
• Das Gerät darf nur in komplett zusammengebautem Zu-
stand in Betrieb genommen werden.
• Das Gerät nur auf eine ebene, trockene Fläche stellen.
• Das Gerät so aufstellen, dass es nicht umgestoßen werden
kann und dass niemand über das Gerät oder die Netzan-
schlussleitung stolpern kann.
• Halten Sie folgende Mindestabstände zu Gegenständen und
Wänden:

06 DE
• Maximale Aufstellungshöhe: 2000 Meter
• Niemals die Lüftungsschlitze abdecken oder blockieren, um
eine Überhitzung/Beschädigung des Gerätes zu verhindern.
• Eine dauerhafte relative Raumluftfeuchte von mehr als
-
schen Organismen ermöglichen.
• Ein direktes Austreten von Wasser aus dem Gerät, in Form
von Tropfen, Dampf, Nebel oder Kalkniederschlag ist auf-
grund seiner Beschaffenheit und der Kaltverdunstungstech-
nologie bei sachgemäßer Verwendung nicht möglich.
• Das Gerät darf nur mit dem dafür vorgesehenen Original-
Venta-Zubehör betrieben werden. Es dürfen keine Duftöle
oder andere Zusätze verwendet werden. Für Schäden durch
Duftöle oder fremde Zusätze übernimmt Venta-Luftwäscher
GmbH keine Gewähr.
• Sofern das Gerät mehrere Tage nicht verwendet, aus-
geschaltet oder für einen längeren Zeitraum eingelagert
wird, ist die Wasserwanne vollständig zu entleeren, von
Schmutzrückständen zu reinigen und zu trocknen, um einer
Geruchsentwicklung oder der Entwicklung biologischer
Organismen in ruhendem Wasser bzw. Wasserrückständen
zu verhindern.
• Ziehen Sie den Netzstecker aus der Steckdose, wenn Sie
das Gerät nicht gebrauchen.

07DE
LIEFER UMFANG
1 × Venta Luftwäscher
1 × Hygienedisk (vormontiert)
1 × WiFi/WLAN Modul (vormontiert)
1 × Bedienungsanleitung
Falls Teile fehlen oder beschädigt sind, wenden Sie sich bitte an das Venta-Service-
Team oder an Ihren lokalen Händler.
SYMBOLE
! Sicherheitshinweise: Aufmerksam lesen und befolgen, um Personen- und
Sachschäden zu vermeiden.
i Ergänzende Informationen
Hilfreiche Tipps
BESTIMMUNGSGEMÄSSE
VERWENDUNG
Dieses Venta-Gerät ist ein Haushaltsgerät zur Unterstützung guter Raumluftqualität
in Wohn-, Büro- und Aufenthaltsräumen.
Jegliche anderweitige Verwendung oder Veränderung des Geräts wird als unsachge-
mäße Verwendung betrachtet. Der Hersteller haftet nicht für Schäden oder Verlet-
zungen infolge einer unsachgemäßen Verwendung.
Ein nicht bestimmungsgemäßer Gebrauch kann Gesundheit und Leben gefährden.
Dazu zählt der Einsatz unter folgenden Bedingungen:
• In Räumen mit explosionsgefährdeten und/oder aggressiven Atmosphären
• In Räumen mit hoher Lösemittelkonzentration
• In der Nähe von Schwimmbädern oder nassen Geländen
• Im Freien

08 DE
ÜBERSICHT
LW73 WiFi / LW74 WiFi
1
6
4
5
3
2
1 Geräte-Oberteil (Technikeinheit)
2 Netzanschlussleitung
3 Verdunstereinheit (inkl. Hygienedisk ,
Antriebszahnrad, Plattenstapel)
4 Herausnehmbare Wasserwanne
5 Geräte-Unterteil
6 Abnehmbare Blende für
Venta WiFi/WLAN Modul
VOR DER ERSTEN BENUTZUNG
• Gerät auspacken und aufstellen.
• Geräte-Oberteil 1 abnehmen.
• Verdunstereinheit 3 aus Wasserwanne 4 entnehmen.

09DE
INBETRIEBNAHME
1
Wasserwanne im Geräte-Unterteil mit
frischem Leitungswasser (ca. 9 Liter)
bis maximal zur Hälfte befüllen.
Verdunstereinheit B in Wasserwanne
des Geräte-Unterteils A einlegen und
Geräte-Oberteil C seitenrichtig auf
Geräte-Unterteil A setzen.
Netzstecker D an Stromnetz anschließen
und Gerät durch kurzes Berühren auf
Power-Taste einschalten.
i Nur wenn das Gerät am Strom-
netz angeschlossen ist, leuchtet
die Power-Taste zum Ein- und
Ausschalten des Gerätes.
2 3
C
B
D
A
220-240V
50/60Hz

10 DE
KONFIGURATION & VENTA APP
1. Bluetooth am Venta-Gerät aktivieren
Dazu muss im Display des LW73 WiFi bzw. LW74 WiFi
das Symbol dauerhaft blinken.
i
Durch Berühren des Anzeige- und Bedienfeldes
„WiFi / Bluetooth“ kann zwischen WiFi/Bluetooth
AUS, Bluetooth EIN und WiFi EIN hin und her
geschaltet werden.
Das „WiFi / Bluetooth“ Anzeige- und Bedienfeld ist schwarz, wenn WiFi/Blue-
tooth ausgeschaltet ist. Durch Berühren dieses schwarzen Feldes wird Blue-
tooth aktiviert.
2. Bluetooth sowie WLAN am Smartphone bzw. Tablet aktivieren
Vergewissern Sie sich, dass Ihr Smartphone bzw. Tablet mit Ihrem Heim-WLAN-
Netzwerk verbunden ist.
3. VENTA App herunterladen bzw. installieren und öffnen
Mit der kostenlosen Venta App können Sie
Ihren AeroStyle LW73 WiFi / LW74 WiFi
ganz leicht fernsteuern sowie erweiterte
Gerätefunktionen nutzen und kontrollieren.
Bitte melden Sie sich im Menü an
bzw. registrieren Sie sich, sobald die
VENTA App heruntergeladen ist.
i Nur mit abgeschlossener Registrierung können Sie Ihren AeroStyle
LW73 WiFi / LW74 WiFi auch von unterwegs, wo immer Sie gerade sind,
steuern und kontrollieren.
4. WiFi über VENTA App einrichten
Mithilfe der Suchfunktion + werden automatisch alle lokalen Venta-Geräte gefun-
den. Wählen Sie nun Ihr Gerät mit Bluetooth-Symbol aus. Geben Sie anschließend
bei SSID den Namen Ihres WLAN-Netzwerkes sowie das dazugehörige Passwort
ein und wählen Sie SPEICHERN. Sie sind nun mit Ihrem Venta-Gerät verbunden und
können es kontrollieren sowie steuern.
i Smartphone/Tablet und LW73 WiFi /LW74 WiFi müssen sich während des
gesamten Vorgangs in unmittelbarer Nähe zueinander sowie im selben WLAN-
Netzwerk befinden.
Treten während der WiFi-Einrichtung Probleme auf, lesen Sie bitte den Ab-
schnitt „Was ist, wenn keine WiFi-Verbindung hergestellt werden kann?“.
Weitere Informationen unter www.venta-air.com/Service/WiFi-Control-App/

11DE
WIFI / BLUETOOTH
Anzeige Funktion & Einstellung am Display des LW73 WiFi/LW74 WiFi
Leuchtet
Blinkt langsam
Blinkt schnell
Blinkt schnell
WiFi- oder Bluetooth-Verbindung EIN bzw. aktiviert.
WiFi-Verbindung zum Venta-Server im Web wurde
hergestellt.
WiFi-Verbindung mit lokalem Netzwerk wurde hergestellt.
WiFi-Verbindung ist getrennt oder wartet auf
WiFi-Verbindung.
Wartet auf Bluetooth-Verbindung oder Verbindung ist
getrennt.
WiFi- und Bluetooth-Verbindung AUS bzw. deaktiviert.
i
Keine WiFi-/Bluetooth-Anzeige. (Das Anzeigefeld ist
schwarz.)
WiFi- sowie Bluetooth-Modul senden und empfangen keine
Daten und sind mit keinem Netzwerk oder Gerät verbunden.
WiFi-/Bluetooth-Verbindung aus- und einschalten bzw.
(de)aktivieren: Durch Berühren des WiFi/Bluetooth-Bedien-
felds kann zwischen WiFi/Bluetooth AUS, Bluetooth EIN und
WiFi EIN hin und her geschaltet werden.
i
Im Stand-by-Betrieb kann nur zwischen WiFi/Bluetooth
AUS und WiFi EIN hin und her geschaltet werden.
Um die ausgeschaltete WiFi-/Bluetooth-Verbindung
wieder einzuschalten bzw. zu aktivieren, einfach das
schwarze Anzeige-/Bedienfeld berühren.
WiFi / Bluetooth

12 DE
Anzeige Funktion
1Drehzahl-
stufe
Geschwindigkeit 1 - 2 - 3 - 4 anzeigen.
i
Die Drehzahlstufen werden als Ringsegmente dargestellt. Mit höherer
Drehzahlstufe verstärkt sich im Uhrzeigersinn das nächste Ringseg-
ment. Beginnend mit Stufe 1 als schmales Ringsegement unten bis Stufe 4 als
stärkstes Ringsegment rechts. In der Abbildung ist Stufe 4 dargestellt.
2humidity Luftfeuchtigkeit
3 und Drehzahlstufe durch kurzes Berühren einstellen: reduziert und
erhöht die Geschwindigkeit.
4Nachtmodus durch kurzes Berühren ein- bzw. ausschalten.
EIN: Gerät dimmt die Displaybeleuchtung, reduziert die Drehzahl-
stufe auf 1 und schaltet das LED-Band 8 aus.
i
Drehzahlstufe 1 ist manuell mit + oder - Taste 3 veränderbar. Automa-
tikbetrieb 6 ist nicht möglich. LED-Band 8 ist nicht einschaltbar.
AUS: Helle Displaybeleuchtung, eingeschaltetes LED-Band 8 und
Gerät läuft mit eingestellter Drehzahlstufe 1 - 4.
LED-Band 8 schaltet nicht ein, wenn es zuvor separat ausgeschaltet
wurde. Durch Berühren und ca. 3 Sek. Halten der Nachtmodus-Taste 4
kann es wieder eingeschaltet werden.
5Gerät ein- bzw. ausschalten durch kurzes Berühren der
Power-Taste.
i Nur wenn das Gerät am Stromnetz angeschlossen ist, leuchtet die
Power-Taste zum Ein- und Ausschalten des Gerätes.
ANZEIGEN, FUNKTIONEN
& EINSTELLUNGEN
8
2
3
4
5
1
3
6
7

13DE
6Automatik-Betrieb durch kurzes Berühren ein- bzw. ausschalten.
EIN: Anzeige im Display blinkt kontinuierlich und Gerät regelt
automatisch die Drehzahlstufen je nach Luftfeuchtigkeit im
Raum.
i
Beim Einschalten des Automatik-Betriebes erscheint in Anzeige
zweimal blinkend, anschließend wieder die gemessene Luftfeuchtigkeit
im Raum.
AUS: Anzeige im Display leuchtet kontinuierlich und Gerät
läuft mit eingestellter Drehzahlstufe 1 - 4.
Gewünschte Luftfeuchtigkeit 30 - 70 % einstellen:
-Taste 6 berühren und ca. 3 Sek. halten bis Anzeige humidity
2 blinkt. Mit - oder + Taste 3 die gewünschte Luftfeuchtigkeit (in
-Taste 6 erneut berühren und ca. 3 Sek. halten bis Blinken in
Anzeige humidity 2 erlischt und wieder die gemessene Luft-
feuchtigkeit im Raum angezeigt wird.
Bitte vergewissern Sie sich, dass der Automatik-Betrieb einge-
schaltet ist: Anzeige im Display blinkt kontinuierlich!
7 WiFi- oder Bluetooth-Verbindung durch kurzes Berühren
aus- und einschalten. Eine genaue Beschreibung finden Sie im
Abschnitt „WiFi / Bluetooth“
8LED-Band Kontinuierliches Leuchten signalisiert den Gerätebetrieb.
Kontinuierliches Blinken signalisiert die automatische Geräte-
abschaltung bei Wassermangel.
i Das LED-Band 8 kann im Gerätebetrieb durch Berühren und 3 Sek.
Halten der Nachtmodus-Taste 4 separat aus- und eingeschaltet werden.
Mit der kostenlosen App von Venta können Sie den Farbton Ihrer Wahl
aussuchen.

14 DE
REINIGUNG & PFLEGE
! Achtung! Sicherstellen, dass bei allen Maßnahmen das Gerät ausgeschaltet
und das Steckernetzteil aus der Steckdose gezogen ist!
Anzeige Maßnahmen
9WATER Geräte-Oberteil abnehmen. Wasserwanne im Geräte-Unterteil
mit frischem Leitungswasser bis maximal zur Hälfte befüllen.
Geräte-Oberteil auf Geräte-Unterteil setzen und Gerät wieder in
Betrieb nehmen.
i Sobald zu wenig Wasser in der Wasserwanne ist, schaltet das Gerät
automatisch ab, das LED-Licht 8 blinkt kontinuierlich und im Display
erscheint die WATER-Anzeige. In Anzeige humidity 2 blinken zwei
Striche und die Raumluftfeuchtigkeit wird nicht angezeigt.
Um die Raumluft kontinuierlich zu befeuchten und Schadstoffe in der
nachzufüllen
10 SERVICE Geräte-Oberteil abnehmen. Restwasser aus Wasserwanne lee-
ren. Wasserwanne und Verdunstereinheit gründlich abspülen.
Wasserwanne im Geräte-Unterteil mit frischem Leitungswasser
bis maximal zur Hälfte befüllen. Gerät wieder montieren und in
Betrieb nehmen. SERVICE-Anzeige 10 im Display berühren und
ca. 3 Sek. halten bis sie erlischt.
i Für einen einwandfrei hygienischen Dauerbetrieb erinnert die
SERVICE-Anzeige alle 14 Tage (auch im Standby-Betrieb), diese
Maßnahme durchzuführen.
912 11 10

15DE
11 CLEANING Geräte-Oberteil abnehmen. Restwasser aus Wasserwanne
Venta-Reiniger hinzugeben. Gerät montieren und ca. 2 Stunden
in kleiner Stufe laufen lassen. Empfehlung: Während dieses
Reinigungsvorganges bitte lüften, um mögliche Gerüche zu ver-
meiden, die bei sehr starker Verschmutzung entstehen können.
Anschließend Geräte-Oberteil abnehmen und verschmutztes
Wasser ausleeren. Wasserwanne und Verdunstereinheit gründ-
lich abspülen. Wasserwanne im Geräte-Unterteil mit frischem
Leitungswasser bis maximal zur Hälfte füllen, Gerät montieren
und in Betrieb nehmen. CLEANING-Anzeige 11 im Display be-
rühren und ca. 3 Sek. halten bis sie erlischt.
i Alle 6 Monate (bei 24-Stunden-Dauerbetrieb) erinnert die CLEANING-
Anzeige, diese Maßnahme durchzuführen.
12 DISK 1. Geräte-Oberteil abnehmen und Verdunstereinheit aus
Wasser wanne entnehmen.
A
abB
C
2. Haltearme a und b vor-
sichtig von Achse lösen
und Träger A von Ver-
dunsterwalze entfernen.
3. Verschluss-
kappe B drehen
und abnehmen.
4. Hygienedisk C
entnehmen und
erneuern.
5. Gerät wieder montieren und in Betrieb nehmen.
6. DISK-Anzeige 12 im Display berühren und ca. 3 Sek. halten
bis sie erlischt
i
Die Nutzungsdauer der Hygienedisk beträgt ca. 4 Monate (bei 24-h
Dauerbetrieb). Die Nutzungsdauer hängt von der Wasserhärte,
Wasserqualität, tägliche Verdunstungsleistung und Betriebsstunden-
zahl ab. Alle 4 Monate (bei 24-Stunden-Dauerbetrieb) erinnert die
DISK-Anzeige, diese Maßnahme durchzuführen.
Im Rahmen des Venta ReNew Recycling-Programms kann die
Hygiene-disk zurückgeschickt werden (siehe RECYCLING &
ENTSORGUNG).

16 DE
Die Pflegemaßnahmen SERVICE, CLEANING und DISK können immer bei Bedarf
durchgeführt werden, auch wenn sie nicht angezeigt werden. Im Anschluss einfach
die jeweilige RESET-Funktion durchführen, indem Sie: Power-Taste berühren
und ca. 4 Sek. halten bis sie blinkt und SERVICE, CLEANING sowie DISK im Display
angezeigt werden. Nun die Maßnahmen, die durchgeführt wurden, berühren und ca.
3 Sek. halten bis sie erlöschen. Anschließend blinkende Power-Taste berühren und
ca. 4 Sek. halten bis sie kontinuierlich leuchtet. Die nächsten Erinnerungen für die
durchgeführten Maßnahmen werden nun wieder turnusmäßig angezeigt.
Sämtliche Rückstände in Wasserwanne und an Verdunstereinheit (weiß, grün-
gelbliche oder braune Ablagerungen bzw. Verfärbungen) beeinträchtigen NICHT die
Funktion des Gerätes.
REINIGUNG VOM
GERÄTE-OBERTEIL
! Achtung! Sicherstellen, dass das Gerät ausgeschaltet und der Netzstecker aus
der Steckdose gezogen ist!
Das Geräte-Oberteil mit einem trockenen Tuch/Reinigungspinsel oder einem leicht
angefeuchteten Tuch reinigen!
! Das Geräte-Oberteil darf nicht unter fließendem Wasser gereinigt werden!
Das Display nur mit einem trockenen Tuch oder einem Display-Reinigungstuch
reinigen!
! Das Display darf nicht nass bzw. zu feucht gereinigt werden!
ZUBEHÖR
• Venta-Hygienedisk für einen einwandfrei hygienischen Dauerbetrieb
• Venta-Reiniger zur halbjährlichen Reinigung
Zusätzliches AeroStlye Zubehör Online erhältlich
DE
www.venta-air.com
AT
www.venta-air.com
CH
www.venta-air.com

17DE
TECHNISCHE DATEN
Modell AeroStyle LW73 WiFi AeroStyle LW74 WiFi
Farben Signalweiß / Signalschwarz
Raumgrößeneignung
LED Statusanzeige Blaues Lichtband
Interaktives Touchdisplay Serienmäßig
App Steuerung WiFi / WLAN-Modul
Messsensoren Luftfeuchtigkeit
Wasserhygiene Serienmäßig
Leistungsstufen 4 + Automatik
Geräuschentwicklung (Stufe 1–4) 24 / 36 / 44 / 50 dB(A) 27 / 35 / 41 / 47 dB(A)
Stromverbrauch (Stufe 1–4) 7 / 9 / 13 / 18 Watt 11 / 14 / 17 / 24 Watt
Netzspannung 220-240 V / 50/60 Hz
Wasserinhalt (Max.) 9 Liter
Abmessungen
Gewicht 10,5 kg
WLAN-Frequenzbereich 2,4 GHz
WLAN-Sendeleistung maximal 20 dBm
Änderungen und Irrtümer vorbehalten

18 DE
RECYCLING & ENTSORGUNG
Das Verpackungsmaterial ist wiederverwertbar. Die Verpackung bitte um-
weltgerecht entsorgen und der Wertstoffsammlung zuführen.
Das Gerät darf nicht im normalen Hausmüll entsorgt werden! Es muss an einer
ausgewiesenen Sammelstelle für Recycling von elektrischen und elektroni-
schen Geräten entsorgt werden (WEEE). Bitte benutzen Sie die Ihnen zur Verfü-
gung stehenden lokalen Rückgabe- und Sammelsysteme. Damit leisten Sie
einen wertvollen Beitrag zum Umweltschutz und für die menschliche Gesundheit. Für
weitere Informationen wenden Sie sich bitte an die örtlichen Behörden.
KOSTENLOSES Venta Hygienedisk Recycling-Programm für den Schutz der Umwelt
Die original Venta Hygienedisk kann im Rahmen des Venta ReNew Recycling-Pro-
Venta Hygienedisk können Sie Ihren Beitrag zum Erhalt der Ressourcen unserer Erde
leisten und Sie erhalten außerdem Ihren persönlichen Venta ReNew Umweltbonus,
den Sie bei Ihrer nächsten Venta Hygienedisk Bestellung bei Venta Luftwäscher GmbH
einlösen können. Nähere Informationen erhalten Sie über unser Venta-Service Team.
HINWEIS: Das Venta ReNew Recycling Program ist auf den Verkauf und Versand
innerhalb von Deutschland beschränkt. Unsere Venta Gesellschaften in anderen
Ländern geben Ihnen gern Informationen zu Ihren lokalen/länderspezifischen Pro-
grammen. Wird in Ihrem Land kein ReNew Recycling-Programm angeboten, kann die
Hygienedisk einfach über den Hausmüll entsorgt werden.
GARANTIE
Aufgrund der hohen Qualität garantiert die Venta Luftwäscher GmbH für die Dauer
von zwei Jahren ab Kaufdatum, dass dieses Produkt bei sachgemäßer Verwendung
keine Defekte aufweist. Sollte doch einmal ein Material- oder Verarbeitungsfehler
auftreten, wenden Sie sich bitte an das Venta-Service-Team oder Ihren Händler.
Zudem gelten die allgemeinen Garantiebedingungen von Venta: www.venta-air.com
DATENSCHUTZ
Ihre Daten werden durch Venta Luftwäscher GmbH vertraulich behandelt. Wenn
sich Ihre persönlichen Daten ändern oder Sie Fragen zu unserem Umgang mit Ihren
Daten haben, wenden Sie sich bitte an den Venta Kundendienst:
DE
+49 751 5008 88, www.venta-air.com
AT
+43 5572 202 539, www.venta-air.com
CH
+41 41 781 15 15, www.venta-air.com
Weitere Informationen zum Thema Datenschutz finden Sie in unseren Datenschutz-
richtlinien unter www.venta-air.com

19DE
WAS IST, WENN …?
! Achtung! Vor Durchführung einer der nachfolgenden Maßnahmen sicher-
stellen, dass das Gerät ausgeschaltet und der Netzstecker aus der Steckdose
gezogen ist!
… im Display nicht die Power-Taste zum Einschalten des Gerätes erscheint?
Bitte überprüfen, ob der Netzstecker am Stromnetz angeschlossen ist.
… im Display Water angezeigt wird, obwohl Wasser in der Wasserwanne ist?
Bitte überprüfen, ob genügend Wasser in der Wasserwanne ist und/oder ob das
Geräte-Oberteil seitenrichtig auf dem Geräte-Unterteil sitzt.
i Maßnahme: Geräte-Oberteil abnehmen. Wasserwanne im Geräte-Unterteil mit
Leitungswasser bis zur Hälfte befüllen. Geräte-Oberteil seitenrichtig auf
Geräte-Unterteil setzen und Gerät wieder in Betrieb nehmen.
... beim Berühren des Displays „weiße Felder“ im Hintergrund sichtbar sind?
In trockenen Räumen können durch elektrostatische Aufladungen weiße Felder im
Hintergrund des Displays sichtbar sein, die weder die Funktion noch die Bedienbar-
keit des Gerätes beeinträchtigen und keinen Defekt darstellen.
... das LED-Band nicht leuchtet, obwohl das Gerät in Betrieb ist?
Bitte überprüfen, ob das LED-Band separat ausgeschaltet wurde. Durch Berühren
und ca. 3 Sek. Halten der Nachtmodus-Taste direkt am Gerät oder mit der Venta
App kann das LED-Band wieder eingeschaltet werden.
i Im Nachtmodus kann das LED-Band nicht eingeschaltet werden.
... das LED-Band eigenständig gelb leuchtet?
Währenddessen findet automatisch eine Firmware-Aktualisierung statt.
... keine WiFi-Verbindung hergestellt werden kann?
Bitte überprüfen Sie, dass
• Sie ein 2,4-GHz- oder ein gemischtes 2,4-/5-GHz-Netzwerk verwenden, da das
WiFi/WLAN Modul im Gerät kein 5-GHz-Netzwerk unterstützt.
• Ihr Router 802.11b/g/n unterstützt.
• in Ihrem Smartphone bzw.Tablet iOS ab Version 11.0 bzw. Android ab Version 8.0
installiert ist.
Aktualisieren Sie gegebenenfalls das Betriebssystem Ihres Smartphones bzw.
Tablets.

20 DE
... sich im Geräte-Display weder WiFi noch Bluetooth einschalten lassen?
Bitte überprüfen, ob das WiFi/WLAN Modul fest im Geräte-Gehäuse eingesteckt ist.
i Maßnahme: Blende A an Gehäuse-Rückseite des Gerätes entfernen und
korrekten Sitz des WiFi/WLAN Moduls B überprüfen.
AAB
Beide Verriegelungs-
laschen nach oben ziehen.
Blende nach vorn klappen
und nach unten entfernen.
Modul B muss fest in Ge-
häuse eingesteckt sein.
A
A
A
Anschließend Blende A wieder montieren, so dass beide Verriegelungslaschen
hörbar einrasten.
VENTA-SERVICE-TEAM
Sie benötigen weitere Informationen rund um das Venta-Gerät, möchten sich beraten
lassen oder Zubehör bestellen? Kein Problem: Unser Venta-Service-Team ist für Sie
da! Rufen Sie direkt an oder besuchen Sie die Venta Website.
DE
+49 751 5008 88, www.venta-air.com
AT
+43 5572 202 539, www.venta-air.com
CH
+41 41 781 15 15, www.venta-air.com

21EN
DEAR CUSTOMER,
With the Venta AeroStyle Airwasher LW73 or LW74, you have purchased a high-per-
forming premium product. The AeroStyle promotes healthy humidity and naturally
reduces harmful substances in the air.
Here’s how the Venta principle works
A fan directs the ambient air into the water-filled Airwasher, where it travels through
specially arrayed disk stacks. Hygienically clean air evaporates from their surfaces
into the room. Simultaneously, the stacks trap harmful substances such as dust or
pollen, which are then washed off in the water and collected in the Airwasher.
THANK YOU!
We are confident that the Venta Airwasher will exceed your expectations, and we
hope you enjoy it.
Please register your Venta:
www.venta-air.com/en_de/Service/Product-registration/
Please read this operating manual in its entirety, keep it for later reference and note
all safety instructions as well as instructions for the proper use of the device.
The most current version of the operating manual can be found on
our website at www.venta-air.com
CONTENTS
Safety instructions 22
Scope of delivery 24
Symbols 24
Intended use 24
Overview 25
Before first use 25
Putting into operation 26
Configuration & Venta app 27
WiFi / Bluetooth 28
Displays, functions & settings 29
Cleaning & maintenance 31
Cleaning the upper housing 33
Accessories 33
Technical data 34
Recycling and disposal 35
Warranty 35
About your privacy 35
What to do if ... 36
Venta service team 37

22 EN
! SAFETY INSTRUCTIONS
• This appliance is not suitable for use by children over the age of 8 years and
people with restricted physical, sensory, or mental capacities or lack of experience
and knowledge unless they are supervised or have received instructions on the
use of the appliance and understand the existing hazards.
• Read the operating instructions completely before putting the appliance into oper-
ation and keep them for later reference.
• The appliance is not a toy for children.
• Cleaning and user maintenance may not be performed by children under the age
of 8 years or without supervision.
• Keep the appliance and its power cable out of the reach of children under the age
of 8 years.
• Improper use can damage the appliance and cause physical injuries.
• Plug the appliance into suitable power outlets only – the mains voltage must cor-
respond to the nameplate data on the appliance.
• Only use the appliance with the following power cable: low-heat device socket with
IEC 320 C5 cloverleaf connector.
• Never use the appliance if it has a damaged power cable.
• Disconnect the power plug before every cleaning or maintenance operation and
before transportation of the appliance.
• Never use the Airwasher if it has been dropped or damaged in any other way.
• Electrical appliances should only be repaired by professional specialists. Amateur
repairs could result in considerable danger to the user.
• Do not sit on the appliance and do not place any objects on it.
• Do not put any foreign objects into the appliance.
• Do not immerse the upper housing in water or any other liquid.
• Never overfill the Airwasher.
• Never transport or overbalance the Airwasher with a filled lower housing.
• Never disconnect the power plug by pulling on the cable or with wet hands.
• The Airwasher should only be operated when it is completely assembled.
• Place the Airwasher on a stable surface which is flat and dry.

23EN
• Set up the appliance so that it cannot be knocked over, and so that no one can trip
over it or the cable.
• Leave at least the following distances to other objects and walls:
•
• Never cover or block the vents to prevent overheating/damage to the appliance.
•
enable the formation of biological organisms.
• The design of the appliance and the cold evaporation technology make it impossi-
ble for water to leak directly from the Airwasher in the form of droplets, vapor, mist
or lime deposits, providing you use it correctly.
• Only operate the appliance with original Venta accessories designed for the
purpose. Do not use aromatic oils or other additives. Venta-Luftwäscher GmbH
accepts no liability for damage due to aromatic oils or other unsuitable additives.
• If you do not use the Airwasher for several days or put it into storage for a longer
period, empty the water tray completely, clean it and dry thoroughly to prevent
odors or biological organisms from developing in standing water or water residues.
• Disconnect the power plug from the power supply outlet when the appliance is not
in use.

24 EN
SCOPE OF DELIVERY
1 × Venta Airwasher
1 × Hygiene disk (pre-assembled)
1 × WiFi/WLAN module (pre-assembled)
1 × operating manual
If parts are missing or damaged, please contact the VENTA service team or your
local dealer.
SYMBOLS
! Safety instructions: Read and adhere to these instructions carefully, in order to
avoid personal and material damages.
i Supplementary information
Helpful tips
INTENDED USE
The Venta Airwasher is a domestic appliance for moistening and cleansing the air in
homes, offices and leisure facilities. The appliance is not suitable for outdoor areas.
Any other use or modification of the appliance is considered to be improper
use. The manufacturer is not liable for any damage or injuries resulting from
improper use.
Using the appliance for something other than the intended purpose can endanger
health and lives. This includes use under the following conditions:
• in rooms or locations where there is risk of explosion and/or where there is an
aggressive atmosphere.
• in rooms where there is a high concentration of solvents.
• in the vicinity of swimming pools or other wet areas.
• In the outdoors.

25EN
OVERVIEW
LW73 WiFi / LW74 WiFi
1
6
4
5
3
2
1 Upper housing (technical unit)
2 Power cable
3 Evaporation unit (incl. hygiene disk,
drive wheel, disk stacks)
4 Removable water tray
5 Lower housing
6 Removable cover for Venta WiFi/
WLAN module
BEFORE FIRST USE
• Unpack the appliance and set it up.
• Remove upper housing 1.
• Remove evaporation unit 3 from water tray 4

26 EN
PUTTING INTO OPERATION
1
Fill water tray in lower housing with fresh
tap water (approx. 9 litres) until it is no
more than half full.
Place evaporation unit B into the water
tray of the lower housing A and place
upper housing C onto lower housing A,
making sure it is the right way round.
Plug power plug D into a mains socket
and switch appliance on by tapping the
Power button .
i The Power button for switching
the appliance on and off only
lights up when the appliance is
plugged in.
2 3
C
B
D
A
220-240V
50/60Hz

27EN
CONFIGURATION & VENTA APP
1. Activate Bluetooth on the Venta device
To do this, the symbol must be continuously flas-
hing on the display of the LW73 WiFi or LW74 WiFi.
i By touching the „WiFi / Bluetooth“ display and
control panel, you can choose between WiFi/
Bluetooth OFF, Bluetooth ON and WiFi ON.
The „WiFi / Bluetooth“ display and control panel
is black when WiFi/Bluetooth is switched off. Touching this black box activates
Bluetooth.
2. Enable Bluetooth an WiFi on your phone or tablet
Make sure that your smartphone or tablet is connected to your home WLAN
network.
3. Download or install and open the
VENTA app
The free Venta app gives you easy
remote control of your AeroStyle LW73
/ LW74. You can also use it for extended
functions.
Please log in to the symbol menu or register once the Venta App has been down-
loaded and opened.
i Only with completed registration you can use and control your AeroStyle
LW73/74 also from on the road, wherever you are.
4. Set up the WiFi function using the VENTA app
The + search function automatically finds all local Venta devices. Now select your
device with the Bluetooth icon. Then enter the name of your wireless network and
the password for SSID and select SAVE. You are now connected to your Venta device
and can monitor and control it.
i During the entire procedure, the smartphone/tablet and the LW73 WiFi /
LW74 WiFi must be in close proximity to each other and must be on the same
WiFi network.
If problems occur during the setup process, read the information in the
section “What to do if WiFi connection is not possible“.
You will find further information at
www.venta-air.com/Service/WiFi-Control-App/

28 EN
WIFI / BLUETOOTH
WiFi / Bluetooth
Display Functions & settings on the display of the
LW73 WiFi / LW74 WiFi
Lights up
Flashes slowly
Flashes rapidly
Flashes rapidly
WiFi or Bluetooth connection ON / enabled.
WiFi connection to the Venta server established.
WiFi connection to the local network established.
WiFi connection disabled or waiting for WiFi connection.
Waiting for Bluetooth connection or connection is disabled.
WiFi and Bluetooth connection OFF / disabled.
i No WiFi/Bluetooth symbol. (The display area is black.)
WiFi and Bluetooth modules are not transmitting or
receiving data and are not connected to a network or
appliance.
Switch WiFi/Bluetooth connection on and off, or respec-
tively, (de)activate: Tap the WiFi/Bluetooth button to switch
between WiFi/Bluetooth OFF, Bluetooth ON and WiFi ON.
i
In standby mode you can only switch between WiFi/
Bluetooth OFF and WiFi ON.
To re-activate the WiFi/Bluetooth connection after
switching off, simply tap the black button area on the
display.

29EN
Display Function
1Speed Displays speed levels 1 - 2 - 3 - 4.
iThe speeds are represented in the form of ring segments. At a higher
speed, the next ring segment in a clockwise direction becomes
thicker. This starts with Level 1 as a thin ring segment at the bottom and
progresses to Level 4 with the thickest ring segment on the right. The
illustration shows Level 4.
2Humidity Displays ambient humidity
3 and Set the speed by tapping: reduces and increases the
speed.
4Tap to switch sleep mode on or off.
ON: Appliance dims the display illumination, reduces the speed
to 1 and switches off LED strip 8.
iYou can change the speed 1 manually using button 3 with + or -.
Automatic operation 6 is not possible. LED strip 8 can not be switched on.
OFF: Display lit up, LED strip 8 switched on and appliance
operates at selected speed 1 - 4.
LED strip 8 does not switch on if it has been separately switched off
previously. Touch and hold the sleep mode button 4 for approx. 3
seconds to switch it on again.
5Switch the appliance off or on by tapping the power button.
i The Power button for switching on or off only lights up when the
appliance is plugged in.
DISPLAYS, FUNCTIONS
& SETTINGS
2
3
4
5
1
3
6
8
7

30 EN
6Switch automatic mode on or off by tapping the button.
ON: Indicator on display flashes continuously and appliance
automatically adjusts the speed to the ambient humidity.
i
When you switch on automatic mode, the humidity indicator 2
the measured ambient humidity again.
OFF: Indicator on display lights up continuously and appli-
ance operates at selected speed 1 - 4.
Set desired humidity to 30 - 70 %:
Touch -button 6 and hold for approx. 3 seconds until humidi-
ty indicator 2 flashes. Set the humidity you want using button 3
Touch -button 6 again and hold for approx. 3 seconds until
humidity indicator 2 stops flashing and again indicates the
measured ambient humidity.
Please ensure that automatic mode is switched on. The indica-
tor on the display flashes continuously.
7 Switch WiFi or Bluetooth on and off by touching briefly. For a
precise description, see section “WiFi / Bluetooth”
8LED strip Continuous illumination signals that the appliance is
operating.
Continuous flashing signals that the appliance has
automatically switched off due to lack of water.
iYou can separately switch the LED strip 8 on and off during operation
by touching the sleep mode button 4 and holding for 3 seconds.
With the free Venta app, you can choose the colour you want.

31EN
CLEANING & MAINTENANCE
! Attention! Ensure that the device is switched off during any measures and
the power plug is disconnected from the mains socket.
Display Measures
9WATER Remove upper housing. Fill water tray in lower housing with tap
water until it is no more than half full. Place upper housing onto
lower housing and switch appliance on again.
i As soon as there is not enough water in the water tray, the appliance
switches off automatically, LED 8 flashes continuously, and the
WATER indicator appears on the display. In the humidity indicator 2,
two dashes flash and the ambient humidity is not displayed.
In order to continuously humidify the ambient air and reduce harmful
water daily.
10 SERVICE Remove upper housing. Empty the residual water out of the
water tray. Rinse out water tray and evaporation unit thorough-
ly. Fill water tray in lower housing with tap water until it is no
more than half full. Reassemble appliance and switch it on.
Touch SERVICE indicator 10 on the display and hold for approx.
3 seconds until it goes out.
i For perfectly hygienic constant operation, the SERVICE indicator
reminds you to carry out servicing every 14 days (also in standby
mode).
912 11 10

32 EN
11 CLEANING Remove upper housing. Empty residual water from water
tray, fill with tap water until it is no more than half full and
it run for approx. 2 hours at low speed. We recommend that
you ventilate the room during this washing procedure to avoid
any odors which can occur if the appliance is very dirty. Then
remove upper housing and empty out dirty water. Rinse out
water tray and evaporation unit thoroughly. Fill water tray in
lower housing with tap water until it is no more than half full,
re-assemble appliance, and switch it on. Touch CLEANING
indicator 11 on the display and hold for approx. 3 seconds until
it goes out.
iEvery 6 months (in case of 24-hour constant operation), the
CLEANING indicator reminds you to carry out this action
12 DISK 1. Remove upper housing and take evaporation unit out of the
water tray.
A
abB
C
2. Carefully release
holding arms a and
b from the axle and
remove bracket A from
evaporation roller.
3. Unscrew cap
B and remove it.
4. Remove
hygiene disk C
and replace it.
5. Re-assemble the appliance and switch it on.
6. Touch DISK indicator 11 on the display and hold it for approx.
3 seconds until it goes out
i
The service life of the hygiene disk is approx. 4 months (in the case
of 24-hour constant operation). The service life depends on the
water hardness, water quality, daily evaporation performance and
number of operating hours. The DISK indicator reminds you to carry
out this action every 4 months (in the case of 24-hour constant
operation).
You can use the Venta ReNew recycling program to return the
hygiene disk to us (see RECYCLING & DISPOSAL).

33EN
You can carry out care actions 10, 11 and 12 at any time, even if they are not indi-
cated on the display. When you are finished, simply activate the RESET function for
CLEANING, DISK, SERVICE: Touch the Power button and hold for approx. 4 sec-
onds until it flashes and SERVICE, CLEANING and DISK appear on the display. Now
touch the actions you have performed and hold for approx. 3 seconds until they go
out. Finally, touch the flashing Power button and hold for approx. 4 seconds until
it lights up constantly. The next reminders for the actions performed will be indicat-
ed at the normal intervals.
Any residues in the water tray and on the evaporation unit (white, greenish-yellow or
brown deposits/discoloration) do NOT impair the function of the appliance.
CLEANING THE UPPER
HOUSING
! Attention! Ensure that the device is switched off during any measures and the
power plug is disconnected from the mains socket.
Clean the upper housing with a dry cloth/cleaning brush or a slightly damp cloth.
! Do not clean the upper housing under running water!
Only clean the display with a dry cloth or a display cleaning cloth.
! Do not clean the display with a wet or too-damp cloth!
ACCESSORIES
• Venta hygiene disk for perfectly hygienic constant operation
• Venta cleaner for six-monthly cleaning
Additional AeroStyle accessories available online:
DE www.venta-air.com

34 EN
TECHNICAL DATA
Model AeroStyle LW73 WiFi AeroStyle LW74 WiFi
Colors Signal white / Signal black
Suitable for room size
LED status display blue light strip
Interactive touch display Standard
App control WiFi/WLAN module
Measurement sensors Humidity
Water hygiene Standard
Performance levels 4 + automatic
Noise emission (Speeds 1–4) 24 / 36 / 44 / 50 dB(A) 27 / 35 / 41 / 47 dB(A)
Power consumption (Speeds 1–4) 7 / 9 / 13 / 18 Watt 11 / 14 / 17 / 24 Watt
Mains voltage
Water capacity (max.) 9 liters
Dimensions (L x W x H)
Weight 10,5 kg
WLAN frequency range 2.4 GHz
WLAN transmission power Maximum 20 dBm
May be subject to change/error

35EN
RECYCLING AND DISPOSAL
The packaging material is re-usable. Please dispose of the packaging
in an environmentally friendly way and bring it to a collection centre for
recyclable materials.
The device may not be disposed of in normal household waste! It must be
disposed of at a selected collection point for the recycling of electric and
electronic devices (WEEE). Please use the local return and collecting
systems that are available to you. By doing so, you are making a valuable
contribution to environmental protection and human health. For additional informa-
tion, please contact the local authorities.
FREE Venta hygiene disk recycling program helps the environment
The Venta ReNew recycling program means original Venta hygiene disks can be
help conserve our planet’s resources. You also receive your personal Venta ReNew
eco-bonus which you can redeem with your next order for hygiene disks from Venta
Luftwäscher GmbH. Our service team will be happy to give you more information.
NOTE: The Venta ReNew recycling program is limited to sales and shipping within
Germany. Our Venta companies in other countries will be happy to give you informa-
tion about their local/national programs. If no ReNew recycling program is available
in your country, simply dispose of the hygiene disk in household waste.
WARRANTY
Due to the high quality of the product, the Venta-Luftwäscher GmbH guarantees
that this product when used properly will not be defective for a duration of two years
from the purchase date. If a material or processing error should occur anyway,
please contact the VENTA service team or your dealer. Venta’s general warranty
conditions also apply: www.venta-air.com
ABOUT YOUR PRIVACY
Your information will be held by Venta Luftwäscher GmbH for marketing and ser-
vicing purposes. If your personal details change, if you change your mind about any
of your marketing preferences or if you have any queries about how we use your in-
formation, please let us know by contacting Venta Luftwäscher GmbH, Weltestraße
5, 88250 Weingarten, Germany or by calling the VentaCare Customer Service:
+49 751 5008 88. Or you can email us at service@venta-luftwaescher.de
For more information on how we protect your privacy, please see our privacy
policy on www.venta-air.com

36 EN
WHAT TO DO IF ...
! Ensure that the device is switched off during any measures and the power
plug is disconnected from the mains socket.
… the Power button for switching the appliance on does not appear on the
display?
Please check whether the appliance is plugged in to the mains.
… “Water” is indicated on the display although there is water in the water tray?
Please check that there is enough water in the water tray and/or that the upper hous-
ing is on the lower housing the right way round.
iAction: Remove upper housing. Fill water tray in lower housing with tap water
until it is no more than half full. Place upper housing onto the lower housing,
ensuring it is the right way round, and switch the appliance on again.
... white spots show up in the background when you touch the display?
In dry rooms, electrostatic charging can cause white areas to appear in the back-
ground on the display. These do not affect the functioning or ability to control the
appliance and do not constitute a defect.
... LED strip does not light up although the appliance is in operation?
Check whether the LED strip has been switched off separately. Touch the sleep
mode button on the appliance and hold for approx. 3 seconds to switch the LED strip
on again. You can also use the Venta app for this function.
i The LED strip can not be switched on in sleep mode.
... the LED strip flashes yellow?
This indicates that an automatic firmware update is taking place.
... WiFi connection is not possible?
Please check that:
• you are using a 2.4-GHz or a combined 2.4/5-GHz network. This is important be-
cause the WiFi/WLAN module in the appliance does not support 5-GHz networks.
• your router supports 802.11b/g/n.
• iOS version 11.0 or higher or Android version 8.0 or higher is installed in your
phone or tablet.
If necessary, update the operating system of your phone or tablet.

37EN
... you can’t switch on WiFi or Bluetooth on the display of your appliance?
Please check that the WiFi/WLAN module is firmly plugged in inside the housing of
your appliance.
i Procedure: Remove cover A on the back of the appliance, check that WiFi/
WLAN module B is correctly installed.
AAB
Pull both locking tabs up. Tilt the cover towards you
and pull down to remove.
Module B must be firmly
plugged in inside the hous-
ing.
A
A
A
Then re-fit cover A. You should hear the two locking tabs snap into place.
VENTA SERVICE TEAM
Do you need additional information about the Venta Airwasher or do you want to
order accessories? No problem: the VENTA service team will take care of it! Call the
team directly or visit the Venta website.
DE
+49 751 5008 88, www.venta-air.com

38 FR
CHER CLIENT,
En acquérant l’Airwasher AeroStyle Venta LW73 WiFi et LW 74 WiFi, vous avez opté
pour un produit haut de gamme très performant. L’AeroStyle favorise une humidité
saine de l’air et la réduction naturelle de polluants se trouvant dans l’air. L‘appli Venta
permet de commander et de contrôler le LW73 WiFi/LW74 WiFi, même quand vous
n‘êtes pas chez vous.
Le principe Venta fonctionne comme suit
L’air ambiant est conduit, via un ventilateur, vers l’Airwasher rempli d’eau dans lequel
tourne une pile de disques ingénieusement disposée. Via les surfaces des disques,
de l’eau hygiénique et propre s’évapore dans la pièce. En même temps, la pile fixe les
polluants comme la poussière ou les pollens qui sont lavés dans l’eau et collectés
dans l’Airwasher.
MERCI BEAUCOUP !
Nous sommes convaincus que l‘Airwasher Venta dépassera vos attentes et nous
vous en souhaitons une bonne utilisation.
Enregistrez votre produit Venta:
CH
www.venta-air.com/fr_ch/Service/Enregistrement-de-produit/
NL www.venta-air.com/fr_nl/Service/Enregistrement-de-produit/
Veuillez lire ce mode d‘emploi dans son intégralité, le conserver pour
pouvoir vous y reporter ultérieurement et respecter toutes les consig-
nes de sécurité ainsi que l‘usage auquel il est destiné.
Vous trouverez la dernière version du mode d‘emploi sur notre site Internet
www.venta-air.com
TABLE DES MATIÈRES
CH
NL
Consignes de sécurité 39
Contenu de la livraison 41
Symboles 41
Utilisation conforme 41
Aperçu 42
Avant la première utilisation 42
Mise en service 43
Configuration & appli Venta 44
WiFi / Bluetooth 45
Affichages, fonctions et réglages 46
Nettoyage & entretien 48
Nettoyage de la partie supérieure de
l‘appareil 50
Accessoires 50
Caractéristiques techniques 51
Recyclage et élimination 52
Garantie 52
Vie privée 52
Que faire si…? 53

39FR
! CONSIGNES DE SÉCURITÉ
• Cet appareil n’est pas destiné à être utilisé par des enfants âgés de 8 ans et plus et
par des personnes dont les capacités physiques, sensorielles ou mentales sont
diminuées ou ne disposant pas de l’expérience et de la connaissance nécessaires, à
moins qu’elles ne soient supervisées ou que des instructions pour une utilisation sûre
de l’appareil ne leur aient été fournies et qu‘elles n’aient compris les dangers existants.
• Lire le mode d’emploi intégralement avant la mise en service et le conserver en
lieu sûr pour toute consultation ultérieure.
• Cet appareil n’est pas un jouet pour enfants.
• Le nettoyage et l‘entretien ne doivent pas être effectués par des enfants âgés de
moins de 8 ans ou bien en l’absence de supervision.
• Tenir l’appareil et son câble de raccordement hors de portée des enfants âgés de
• Une utilisation non conforme est susceptible d’endommager l’appareil et de provo-
quer des blessures corporelles.
• Raccorder l’appareil uniquement à des prises courant appropriées – tension du
réseau conformément aux indications sur la plaque signalétique de l’appareil.
•
avec connecteur en feuille de trèfle CEI 320 C5.
• Ne jamais utiliser l’appareil si le câble de raccordement est endommagé.
• Avant toute intervention de nettoyage ou de maintenance ainsi que pour déplacer
ou transporter l’appareil, débrancher la fiche de la prise.
• Ne jamais utiliser l’Airwasher si ce dernier a chuté ou s’il a été endommagé de
toute autre façon.
• Les réparations d’appareils électriques doivent être effectuées uniquement par
des spécialistes. Toute réparation non conforme peut entraîner des risques consi-
dérables pour l’utilisateur.
• Ne s’asseoir en aucun cas sur l’appareil et ne poser aucun objet dessus.
• Ne pas insérer de corps étranger dans l’appareil.
• Ne jamais immerger la partie supérieure de l‘appareil dans l’eau ou dans tout autre
liquide.
• Ne jamais remplir trop l’Airwasher.
• Ne jamais transporter ou basculer l’Airwasher avec la cuve remplie.

40 FR
• Ne jamais retirer la fiche de la prise en tirant sur le câble de raccordement ou avec
des mains humides.
• L’Airwasher doit être mis en marche uniquement s’il est entièrement assemblé.
• Poser l’Airwasher uniquement sur une surface plane et sèche.
• Installer l’appareil de sorte à ce que personne ne puisse trébucher sur le câble ou
sur l’appareil ou le renverser.
•
• L‘altitude d‘installation maximale : 2000 mètres.
• Ne jamais recouvrir ou bloquer les fentes d’aération afin d’empêcher toute
surchauffe ou tout endommagement de l’appareil.
•
entraîner la formation d’organismes biologiques.
• Une fuite directe d’eau de l’Airwasher, sous la forme de gouttes, de vapeur, de
brouillard ou de dépôts de calcaire n’est pas possible, lors d’une utilisation confor-
me, en raison de sa construction et de la technologie de l’évaporation à froid.
• L’appareil ne doit être utilisé qu’avec les accessoires Venta d’origine prévus à cet
effet. Des huiles parfumées ou d’autres additifs ne doivent pas être utilisés. Venta-
Luftwäscher GmbH décline toute responsabilité pour les dommages dus aux
huiles parfumées ou aux additifs tiers.
• Dans la mesure où l’Airwasher est éteint, non utilisés pendant quelques jours ou
stocké pendant une période prolongée, le bac à eau doit être vidé dans son intég-
ralité, nettoyé de ses résidus de salissures et séché afin d’empêcher la formation
d’odeurs ou le développement d’organismes biologiques dans de l’eau immobile
ou de l’eau résiduelle.
• Débrancher la fiche de la prise lorsque vous n’utilisez pas l’appareil.

41FR
CONTENU DE LA LIVRAISON
1 × Airwasher Venta
1 × disque hygiénique (prémonté)
1 × module WiFi/WLAN (prémonté)
1 × mode d’emploi
En cas de pièces manquantes ou endommagées, veuillez contacter l’équipe du SAV
VENTA ou votre revendeur local.
SYMBOLES
! Consignes de sécurité : lire attentivement et suivre les instructions pour éviter
les blessures corporelles et les dommages matériels.
i Renseignements complémentaires
Conseils utiles
UTILISATION CONFORME
l‘Airwasher Venta est un appareil ménager destiné à humidifier et purifier l’air des
bureaux, pièces de séjour et d’habitation. Toute autre utilisation ou toute modifi-
cation de l’appareil est considérée comme utilisation non conforme. Le fabricant
décline toute responsabilité en cas de dommages ou de blessures résultant d’une
utilisation non conforme.
Un emploi non conforme peut entraîner un risque pour la santé et la vie. Ceci inclut
l’utilisation dans les conditions suivantes :
• dans des pièces à atmosphères explosives et/ou agressives.
• dans des pièces à concentration en solvant élevée.
• à proximité de piscines ou de terrains humides.
• pour une utilisation en extérieur.

42 FR
APERÇU
LW 73 WiFi / LW 74 WiFi
1
6
4
5
3
2
1 Partie supérieure de l’appareil (unité
technique)
2 Fiche d’alimentation
3 Unité de vaporisation (disque hygi-
énique, roue dentée motrice, pile de
disques incl.)
4 Bac à eau amovible
5 Partie inférieure de l’appareil
6 Panneau décrochable pour le module
Venta WiFi/WLAN
AVANT LA PREMIÈRE
UTILISATION
• Déballer l‘appareil et l‘installer.
• 1 de l’appareil.
• 34

43FR
MISE EN SERVICE
1
Remplir le bac à eau situé dans la
partie inférieure de l’appareil avec de
maximum jusqu‘à la moitié.
B dans
le bac à eau de la partie inférieure de
-
C de l’appareil sur le bon côté de la
A de l’appareil.
D sur
le secteur et allumer l‘appareil en
appuyant brièvement sur le bouton
marche/arrêt .
i Le bouton marche/arrêt de
l‘appareil ne s‘allume que
lorsque l‘appareil est branché sur
le secteur.
2 3
C
B
D
A
220-240V
50/60Hz

44 FR
CONFIGURATION & APPLI VENTA
1. Activer le Bluetooth sur l‘appareil Venta
De plus, sur l’écran du LW73 WiFi resp. du LW74 WiFi
le symbole doit clignoter en permanence.
i En touchant l‘écran et le panneau de contrôle
„WiFi / Bluetooth“, vous pouvez choisir entre
WiFi/Bluetooth OFF, Bluetooth ON et WiFi ON.
L‘écran et le panneau de contrôle „WiFi / Blue-
tooth“ sont noirs lorsque le WiFi / Bluetooth est désactivé. En touchant cette
boîte noire, on active le Bluetooth.
2. Activer le Bluetooth et WiFi sur le smartphone ou la tablette
Assurez-vous que votre smartphone ou votre tablette est connecté au réseau sans
fil de votre domicile.
3. Télécharger, resp. installer l’appli VENTA et l’ouvrir
L’appli Venta gratuite vous permet de
commander à distance votre AeroStyle
LW73 / LW74 très facilement ainsi que
d’utiliser et de contrôler les fonctions
étendues de l’appareil.
Veuillez vous connecter dans le menu
ou vous enregistrer dès que l‘application VENTA est téléchargée et ouverte.
i Vous ne pouvez diriger et contrôler votre AeroStyle LW73/74 qu‘après vous
être inscrit sur la route, où que vous soyez.
4. Configurer le WiFi via l’appli VENTA
La fonction de recherche + permet de trouver automatiquement tous les appareils
Venta locaux. Sélectionnez maintenant votre appareil avec l‘icône Bluetooth. Saisis-
sez ensuite le nom de votre réseau sans fil et le mot de passe correspondant sous
SSID et sélectionnez SAVE. Vous êtes maintenant connecté à votre appareil Venta et
pouvez le surveiller et le contrôler.
i Les smartphones/tablettes et le LW73 WiFi /LW74 WiFi doivent être, pendant
l’intégralité du processus, à proximité immédiate les uns des autres ainsi que
se trouver dans le même réseau WLAN.
Si, pendant la configuration du WiFi, des problèmes apparaissent, alors lisez le
Vous trouverez des renseignements complémentaires sous
www.venta-air.com/Service/WiFi-Control-App/

45FR
WIFI / BLUETOOTH
WiFi / Bluetooth
Affichage Fonctions & réglages sur l’écran du LW 73 WiFi / LW 74 WiFi
S’allume
Clignote
lentement
Clignote vite
Clignote vite
La connexion WiFi ou Bluetooth est sur MARCHE ou activée.
La connexion WiFi au serveur de Venta sur le Web a été
établie.
La connexion WiFi au réseau local a été établie.
La connexion WiFi est coupée ou attend la connexion WiFi.
En attente de la connexion Bluetooth ou la connexion est
coupée
La connexion WiFi et Bluetooth est sur ARRÊT ou
désactivée.
i
Aucun affichage WiFi/Bluetooth. (La zone d’affichage
est noire.)
Le module WiFi ainsi que le module Bluetooth n’envoient et
ne reçoivent aucune donnée et ne sont connectés à aucun
réseau, ni appareil.
Allumer et éteindre, resp. (dés)activer la connexion WiFi/
Bluetooth: en appuyant sur le tableau de contrôle du WiFi/
Bluetooth, il est possible de basculer entre WiFi/Bluetooth
ARRÊT, Bluetooth MARCHE et WiFi MARCHE.
i
En mode veille, il est uniquement possible de basculer
entre WiFi/Bluetooth ARRÊT et WiFi MARCHE.
Pour allumer, resp. activer, à nouveau la connexion
WiFi-/Bluetooth éteinte, appuyer simplement sur la
zone d’affichage/le tableau de contrôle noir.

46 FR
Affichage Fonction
1Niveau de
vitesse
Affichage de la vitesse 1 - 2 - 3 - 4.
iLes niveaux de vitesse sont représentés par des segments circulaires.
En choisissant une vitesse supérieure, le prochain segment circulaire
s’épaissit dans le sens des aiguilles d’une montre. Cela commence par le
2Humidity Affichage de l’humidité
3 et réduit et
augmente la vitesse.
4Activer et désactiver le mode nuit en appuyant brièvement.
ACTiVÉ : l‘appareil atténue l‘éclairage de l‘écran et réduit le
8.
i
DÉSACTIVÉ :8
est activée et l‘appareil fonctionne à une vitesse réglée aux
8 ne s’allume pas si elle a été éteinte séparément
4
AFFICHAGES, FONCTIONS
ET RÉGLAGES
2
3
4
5
1
3
6
8
7

47FR
5Allumer ou éteindre l’appareil en appuyant brièvement sur le
bouton marche/arrêt.
i Le bouton marche/arrêt de l‘appareil ne s‘allume que lorsque l‘appareil
est branché sur le secteur.
6Activer et désactiver le mode automatique en appuyant
brièvement.
ACTiVÉ : l’affichage clignote en continu sur l‘écran et
l‘appareil règle automatiquement les niveaux de vitesse en
fonction de l‘humidité de la pièce.
i
Lorsque le mode automatique est activé, l‘humidité souhaitée
deux fois, suivie de l‘humidité mesurée dans la pièce.
DÉSACTIVÉ : s‘allume en permanence sur l’écran et
l‘appareil fonctionne à une vitesse réglée entre 1 et 4.
Régler l‘humidité de l‘air souhaitée sur 30 - 70 %:
Appuyer sur la 6 et la maintenir enfoncée pendant
2 clignote.
3 - ou + pour régler l‘humidité souhaitée (par
Appuyer à nouveau sur la 6 et la maintenir enfoncée
-
2 s’éteigne et que l’humidité mesurée dans la pièce s’affiche.
Veuillez vous assurer que le mode automatique est allumé :
l’affichage sur l’écran clignote en continu !
7 Allumer et éteindre la connexion WiFi/Bluetooth en appuyant
brièvement. Vous trouverez une description précise dans le
8Bande
de LED
Un allumage en continu signale que l’appareil est en service.
Un clignotement en continu signale l’arrêt automatique de
l’appareil en cas de manque d’eau.
i8 peut être activée et désactivée séparément,
lorsque l’appareil est en service, en appuyant sur le bouton mode
4 et en le maintenant enfoncé pendant 3 sec.
Avec l’appli gratuite de Venta, vous pouvez choisir la teinte de votre
choix.

48 FR
NETTOYAGE & ENTRETIEN
! Attention ! S’assurer, pour toutes les mesures, que le bloc d‘alimentation est
débranché de la prise de courant !
Affichage Mesures
9WATER Retirer la partie supérieure de l’appareil. Remplir, au maximum
jusqu’à la moitié, le bac à eau situé dans la partie inférieure de
l’appareil avec de l‘eau fraîche du robinet. Placer la partie supé-
rieure sur la partie inférieure et remettre l‘appareil en service.
i Dès qu‘il y a trop peu d‘eau dans le bac à eau, l‘appareil s’éteint
8 clignote en continu et l’affichage WATER
2, deux tirets
clignotent et l‘humidité de la pièce ne s’affiche pas.
Afin d‘humidifier l’air ambiant en continu et de réduire les substances
faire l’appoint d’eau tous les jours.
10 SERVICE Retirer la partie supérieure de l’appareil. Vider l’eau résiduelle
du bac à eau. Laver minutieusement le bac à eau et l’unité de
vaporisation. Remplir, au maximum jusqu’à la moitié, le bac à
eau situé dans la partie inférieure de l’appareil avec de l‘eau
fraîche du robinet. Remonter l’appareil et le mettre en service.
10 sur l’écran et maintenir
i
(même en mode veille).
912 11 10

49FR
11 CLEANING Retirer la partie supérieure de l’appareil. Vider l’eau résiduelle se
trouvant dans le bac à eau, remplir avec de l’eau fraîche du robinet
-
-
la pièce pour éviter de possibles odeurs qui peuvent se former en
cas de fortes salissures. Ensuite, retirer la partie supérieure de
l’appareil et vider l’eau sale. Laver minutieusement le bac à eau et
l’unité de vaporisation. Remplir, au maximum jusqu’à la moitié, le
bac à eau situé dans la partie inférieure de l’appareil avec de l‘eau
11 CLEANING sur l’écran
i
12 DISK 1. Retirer la partie supérieure de l’appareil et enlever l’unité de
vaporisation du bac à eau.
A
abB
C
2. Détacher prudem-
ment de l’axe les bras de
de vaporisation.
3. Tourner le
retirer-le.
4. Retirer
le disque
remplacer-le.
5. Remonter l’appareil et le mettre en service.
6. 11 sur l’écran et maintenir
i
fonction de la dureté de l’eau, de la qualité de l’eau, de l’intensité
quotidienne d’évaporation et du nombre d’heures de service.
Dans le cadre du programme de recyclage Venta ReNew, il est pos-
sible de renvoyer le disque hygiénique (voir Recyclage et Élimination).

50 FR
besoin même si elles ne s’affichent pas. Ensuite, exécuter simplement la fonction
arrêt
SERVICE, CLEANING ainsi que DISK s’affichent sur l’écran. Maintenant, appuyer sur
qu’elles disparaissent. Ensuite, appuyer sur le bouton marche/arrêt clignotant et
Tous les résidus présents dans le bac à eau et sur l’unité de vaporisation (dépôts ou déco-
lorations blancs, verts-jaunes ou bruns) n‘altèrent PAS le fonctionnement de l‘appareil.
NETTOYAGE DE LA PARTIE
SUPÉRIEURE DE L‘APPAREIL
! Attention ! S‘assurer que l‘appareil est éteint et que le bloc d‘alimentation est
débranché de la prise de courant !
Nettoyer la partie supérieure de l’appareil avec un chiffon/un pinceau de nettoyage
! La partie supérieure de l’appareil ne doit pas être nettoyée sous l’eau
courante!
! Lors du nettoyage, l’écran ne doit pas être mouillé ou trop humidifié!
ACCESSOIRES
• Disque hygiénique Venta pour un fonctionnement hygiénique, parfait en continu
• Nettoyant Venta pour le nettoyage une fois par semestre
Accessoires AeroStyle supplémentaires disponibles en ligne
CH +41 41 781 15 15, www.venta-air.com
NL +31 418 541 343, www.venta-air.com

51FR
CARACTÉRISTIQUES
TECHNIQUES
Modèle AeroStyle LW73 WiFi AeroStyle LW74 WiFi
Couleurs blanc de sécurité / noir de sécurité
Taille de la surface adaptée
Affichage d’état de LED Bande lumineuse bleue
Écran tactile interactif en série
Commande appli module WiFi / WLAN
Capteurs de mesure humidité de l‘air
Hygiène de l’eau en série
Niveaux de performance 4 + mode automatique
Niveau sonore (niveau 1–4) 24 / 36 / 44 / 50 dB(A) 27 / 35 / 41 / 47 dB(A)
Consommation d’énergie
(niveau 1–4) 7 / 9 / 13 / 18 watts 11 / 14 / 17 / 24 watts
Tension du réseau
Quantité de remplissage (max.) 9 litres
Dimensions
Poids 10,5 kg
Gamme de fréquence WLAN 2,4 GHz
Puissance d‘émission WLAN max. 20 dBm
Sous réserve de modifications et d’erreurs

52 FR
RECYCLAGE ET ÉLIMINATION
Le matériel d’emballage est recyclable. Veuillez éliminer les emballages
dans le respect de l’environnement et les renvoyer à la collecte de recyclage.
L’appareil ne doit pas être jeté avec les ordures ménagères ! Il doit être élimi-
né dans un point de collecte désigné pour le recyclage des équipements
électriques et électroniques (DEEE). Veuillez utiliser les systèmes locaux de
retour et de collecte à votre disposition. Vous apportez ainsi une contribu-
tion précieuse à la protection de l’environnement et de la santé humaine. Pour de
plus amples informations, veuillez contacter les autorités locales.
Programme de recyclage Venta GRATUIT du disque hygiénique pour protéger
l’environnement
Dans le cadre du programme de recyclage Venta ReNew, le disque hygiénique d’origine
Venta peut être entièrement recyclé. En renvoyant le disque hygiénique Venta usagé, vous
pouvez contribuer à préserver les ressources de notre planète et vous recevrez, en outre,
votre bonus écologique personnel Venta ReNew que vous pourrez utiliser lors de votre
prochaine commande de disque hygiénique Venta auprès de Venta-Luftwäscher GmbH.
Vous obtiendrez de plus amples informations auprès de notre équipe de service Venta.
REMARQUE: le programme de recyclage Venta ReNew est limité à la vente et l’envoi
en Allemagne. Nos sociétés Venta situées dans d’autres pays vous donneront volon-
tiers des informations sur vos programmes locaux/nationaux spécifiques. Si aucun
programme de recyclage ReNew n’est proposé dans votre pays, le disque hygiénique
peut être simplement éliminé avec les ordures ménagères.
GARANTIE
En raison de la grande qualité du produit, Venta-Luftwäscher GmbH garantit pour
une période de deux ans à compter de la date d‘achat que ce produit est exempt de
défauts s‘il est utilisé correctement. Dans le cas improbable où un défaut de matériau
ou de fabrication se produirait, veuillez contacter l‘équipe de service VENTA ou votre
revendeur. En outre, les conditions générales de garantie de Venta s‘appliquent :
www.venta-air.com
VIE PRIVÉE
En cas de changement de vos données personnelles ou de vos préférences commer-
ciales ou si vous avez des questions à poser sur notre utilisation des informations
vous concernant, veuillez nous en informer en contactant
CH
Venta-Luftwäscher AG, Bösch 65, CH-6331 Hünenberg, 041 781 15 15,
service@venta-luftwaescher.ch

53FR
NL
Venta Benelux BV., Van Heemstraweg Oost 8, NL-5301KE Zaltbommel,
0418 54 13 43, info@venta.nl
Pour plus de renseignements concernant notre protection de votre vie privée,
veuillez consulter notre politique de protection sur www.venta-air.com
QUE FAIRE SI…?
! Avant de réaliser l’une des mesures suivantes, s’assurer que le bloc
d‘alimentation est débranché de la prise de courant !
… la touche de marche/arrêt pour allumer l’appareil n’apparaît pas sur l’écran?
Veuillez vérifier que la fiche secteur est branchée dans le réseau électrique.
… l’écran affiche Water bien qu’il y ait de l’eau dans le bac à eau?
Veuillez vérifier qu’il y a assez d’eau dans le bac à eau et/ou la partie supérieure est
bien placée sur le bon côté de la partie inférieure de l’appareil.
iMesure: retirer la partie supérieure de l’appareil. Remplir, au maximum jusqu’à
la moitié, le bac à eau situé dans la partie inférieure de l’appareil avec de l‘eau
du robinet. Placer la partie supérieure sur le bon côté de la partie inférieure et
remettre l‘appareil en service.
... des « taches blanches » apparaissent en arrière-plan en appuyant sur l’écran ?
Dans des pièces sèches, des taches blanches peuvent apparaître dans l’arrière-plan
de l’écran. Elles sont dues aux charges électrostatiques qui ne portent atteinte ni
au fonctionnement, ni à la facilité d’utilisation de l’appareil et ne constituent aucun
défaut.
... la bande de LED ne s’allume pas bien que l’appareil soit en service?
Veuillez vérifier si la bande de LED a été désactivée séparément. En appuyant et en
maintenant la touche mode nuit enfoncée pendant env. 3 sec.directement sur l’appa-
reil ou avec l’appli Venta, la bande de LED peut être réactivée.
i En mode nuit, la bande de LED ne peut pas être activée.
... la bande de LED clignote en jaune de manière autonome ?
Pendant ce temps, une actualisation du logiciel d’exploitation a lieu
automatiquement.
... il est impossible d’établir une connexion WiFi ?
Veuillez vérifier que
• vous utilisez un réseau 2,4-GHz ou un réseau mixte 2,4-/5-GHz puisque le module
WiFi/WLAN de l’appareil ne soutient pas de réseau 5-GHz.

54 FR
• Votre routeur soutient 802.11b/g/n.
• Dans votre smartphone ou bien tablette, iOS à partir de la version 11.0, resp. An-
droid à partir de la version 8.0, est installé.
Le cas échéant, actualiser le système d’exploitation de votre smartphone ou
bien tablette.
... sur l’écran de l’appareil, il n’est pas possible d’allumer ni le WiFi ni le
Bluetooth ?
Veuillez contrôler si le module WIFI/WLAN est fermement inséré dans le boîtier de
l’appareil.
i Mesure : retirer le panneau A situé au dos du boîtier de l’appareil et contrôler
le placement correct du module B du WiFi/WLAN.
AAB
Tirer les deux languettes
de verrouillage vers le
haut.
Rabattre le panneau vers
l’avant et le retirer par le
bas.
Le module B doit être
fermement inséré dans le
boîtier.
A
A
A
Ensuite, remonter le panneau A, de telle sorte que les deux languettes de verrouillage
s’enclenchent de manière audible.
ÉQUIPE DE SERVICE VENTA
Vous avez besoin d’informations complémentaires sur l’Airwasher Venta ou vous
souhaitez commander des accessoires ? Aucun problème : L’équipe de service VEN-
TA s’occupe de vous ! Appelez directement ou consultez le site Web de Venta.
CH +41 41 781 15 15, www.venta-air.com
NL +31 418 541 343, www.venta-air.com

55NL
GE ACHTE KL ANT,
met de Venta AeroStyle Airwasher LW73 en LW74 heeft u een krachtig premiumpro-
duct aangeschaft. De AeroStyle ondersteunt een gezonde luchtvochtigheid en de
natuurlijke vermindering van schadelijke stoffen in de lucht.
Zo werkt het Venta-principe
De ruimtelucht wordt via een ventilator in de met water gevulde Airwasher geleid,
waarin spitsvondig geplaatste stapels schijven roteren. Via de oppervlakken van
deze schijven wordt hygiënisch schoon water in de ruimte verdampt. Tegelijkertijd
worden schadelijke stoffen als stof of pollen op de schijven vastgehouden, in het
water afgewassen en in de Airwasher verzameld.
HARTELIJK DANK!
wij zijn ervan overtuigd dat de Venta Airwasher uw verwachtingen zal overtreffen en
wensen u veel plezier met dit product.
Registreer uw Venta product:
www.venta-air.com/nl_nl/Service/Productregistratie/
Wij adviseren u de handleiding volledig door te lezen en te bewaren om eventueel
later te kunnen raadplegen. Neem alle veiligheidsinstructies in acht en let op het
juiste gebruik.
Bezoek onze website www.venta-air.com voor de nieuwste versie van deze gebruik-
saanwijzing.
INHOUD
Veiligheidsinstructies 56
Omvang van de levering 58
Symbolen 58
Gebruik volgens de voorschriften 58
Overzicht 59
Vóór het eerste gebruik 59
Ingebruikname 60
Configuratie en Venta-app 61
Wifi / bluetooth 62
Display, functies en instellingen 63
Reiniging en onderhoud 65
Reinigen van het bovendeel 67
Toebehoren 67
Technische gegevens 68
Recycling en afvoer 69
Garantie 69
Privacy beleid 69
Wat is er aan de hand wanneer … 70

56 NL
! VEILIGHEIDSINSTRUCTIES
• Dit apparaat is geschikt voor gebruik door kinderen vanaf 8 jaar en personen met
beperkte lichamelijke, sensorische of mentale capaciteiten of met een gebrekkige erva-
ring en kennis, wanneer zij onder toezicht staan of met betrekking tot een veilig gebruik
van het apparaat werden geïnstrueerd en de bestaande gevaren hebben begrepen.
• Lees de gebruiksaanwijzing vóór ingebruikname volledig door en bewaar deze
zorgvuldig om later opnieuw te kunnen raadplegen.
• Het apparaat is geen speelgoed voor kinderen.
• Reiniging en onderhoud door de gebruiker mogen niet worden uitgevoerd door
kinderen jonger dan 8 jaar of zonder toezicht.
• Houd het apparaat en het aansluitsnoer uit de buurt van kinderen jonger dan 8 jaar.
• Een ondeskundig gebruik kan het apparaat beschadigen en verwondingen veroorzaken.
• Sluit het apparaat alleen aan op geschikte stopcontacten – netspanning volgens
de gegevens op het typeplaatje van het apparaat.
• Dit apparaat mag alleen worden gebruikt met het volgende aansluitsnoer:
IEC-stekker met Mickey Mouse-koppeling IEC 320 C5.
• Neem het apparaat nooit in gebruik wanneer het aansluitsnoer beschadigd is.
• Trek de stekker uit het stopcontact alvorens reinigings- of onderhoudswerkzaam-
heden uit te voeren en ook wanneer het apparaat wordt verplaatst of getranspor-
teerd.
• Neem de Airwasher nooit in gebruik wanneer deze is gevallen of op een andere
manier werd beschadigd.
• Reparaties aan elektrische apparaten mogen alleen worden uitgevoerd door
erkende elektriciens. Door onvakkundig uitgevoerde reparaties kunnen aanzienlijke
gevaren voor de gebruiker ontstaan.
• Ga in geen geval op het apparaat zitten en leg er geen voorwerpen op.
• Steek geen vreemde voorwerpen in het apparaat.
• De bovenkant van het apparaat nooit in water of andere vloeistoffen dompelen.
• De Airwasher nooit te vol vullen.
• De Airwasher niet vervoeren of kantelen met een volle waterbak.
• Trek de stekker nooit aan het aansluitsnoer en ook niet met natte handen uit het
stopcontact.

57NL
• De Airwasher mag alleen in compleet gemonteerde toestand in gebruik worden
genomen.
• Plaats de Airwasher alleen op een vlakke, droge ondergrond.
• Zet het apparaat zodanig neer, dat het niet kan worden omgestoten en dat er nie-
mand over het apparaat of over het aansluitsnoer kan struikelen.
• Neem de volgende minimumafstanden tot voorwerpen en wanden in acht:
- Aan de voor- en bovenkant: 50 cm
• Werkt tot op een hoogte van maximaal: 2000 meter.
• Blokkeer de ventilatiesleuf niet en dek deze ook niet af, om oververhitting/bescha-
diging van het apparaat te voorkomen.
•
name in de winter, kan de vorming van biologische organismen mogelijk maken.
• Het direct vrijkomen van water uit de Airwasher in de vorm van druppels, stoom,
nevel of kalkneerslag is vanwege de kwaliteit en de koudeverdampingstechnologie
bij juist gebruik niet mogelijk.
• Het apparaat mag alleen worden gebruikt met het daarvoor bestemde originele
Venta-toebehoren. Er mogen geen geuroliën of andere toevoegingen worden
gebruikt. Voor schades door geuroliën of vreemde toevoegingen is Venta-Luftwä-
scher GmbH niet aansprakelijk.
• Wanneer de Airwasher meerdere dagen niet wordt gebruikt, wordt uitgeschakeld
of gedurende een langere periode wordt opgeborgen, moet de waterbak volledig
worden geleegd, moeten vuilresten worden verwijderd en moet de waterbak droog
worden gemaakt, om geurontwikkeling of de ontwikkeling van biologische organis-
men in stilstaand water of waterresten te voorkomen.
• Trek de stekker uit het stopcontact wanneer u het apparaat niet gebruikt.

58 NL
OMVANG VAN DE LEVERING
1 × Venta Airwasher
1 × Hygiënedisk (voor gemonteerd)
1 × wifi-module (voorgemonteerd)
1 × Handleiding
Wanneer er onderdelen ontbreken of beschadigd zijn kunt u contact
opnemen met het VENTA Serviceteam of uw plaatselijke vertegenwoordiger.
SYMBOLEN
! Veiligheidsinstructies: aandachtig lezen en in acht nemen om letsel en materië-
le schade te voorkomen.
i Aanvullende informatie
Handige tips
GEBRUIK VOLGENS DE
VOORSCHRIFTEN
De Venta Airwasher is een huishoudelijk apparaat voor de bevochtiging en reiniging
van lucht in de slaapkamer, woonkamer, in kantoor of in recreatieruimten. Het ap-
paraat is niet voor buitengebruik. Elk ander gebruik of verandering van het apparaat
wordt beschouwd als ongeoorloofd. De fabrikant is niet aansprakelijk voor schades
of letsel als gevolg van ondeskundig gebruik.
Ongeoorloofd gebruik kan de gezondheid in gevaar brengen. Daartoe behoort gebruik
onder de volgende omstandigheden:
• In ruimten met een explosiegevaarlijke en/of agressieve atmosfeer.
• In ruimten met een hoge oplosmiddelconcentratie.
• In de buurt van zwembaden of natte terreinen.
• Buitenshuis

59NL
OVERZICHT
LW73 WiFi / LW74 WiFi
1
6
4
5
3
2
1 Bovenste deel (techniekeenheid)
2 Aansluitsnoer
3 Verdampereenheid (incl. hygiënedisk,
aandrijftandwiel, stapel schijven)
4 Uitneembare waterbak
5 Onderste deel
6 Afneembare kap voor Venta wifi-
module
VÓÓR HET EERSTE GEBRUIK
• Pak het apparaat uit en zet het neer.
• Verwijder het bovenste deel 1.
• Neem de verdampereenheid 3 uit de waterbak 4.

60 NL
INGEBRUIKNAME
1
Vul de waterbak in het onderste deel van
het apparaat met vers leidingwater (ca. 9
liter), maximaal tot de helft.
Leg de verdampereenheid B in de
waterbak van het onderste deel A en
plaats het bovenste deel C met de juis-
te kant op het onderste deel A.
Steek de stekker D in het stopcontact en
schakel het apparaat in door de Power-
toets kort aan te raken.
i Alleen wanneer het apparaat op
het stroomnet is aangesloten
brandt de Power-toets , om het
apparaat in en uit te schakelen.
2 3
C
B
D
A
220-240V
50/60Hz

61NL
CONFIGURATIE EN VENTA-APP
1. Activeer Bluetooth op het Venta-apparaat
Hiervoor moet het symbool op het display van de
LW73 WiFi resp. LW74 WiFi continu knipperen.
i Door het display en het bedieningspaneel „Wifi /
Bluetooth“ aan te raken, kunt u schakelen tussen
Wifi / Bluetooth UIT, Bluetooth AAN en Wifi AAN
kunnen heen en weer worden geschakeld.
Het „Wifi / Bluetooth“ -display en bedieningspaneel is zwart bij Wifi / Blue-
tooth is uitgeschakeld. Als u dit zwarte veld aanraakt, wordt de Bluetooth
geactiveerh.
2. Bluetooth en Wifi op smartphone of tablet activeren
Zorg ervoor dat uw smartphone of tablet is verbonden met uw wifi-thuisnetwerk.
3. VENTA-app downloaden resp. installeren
en openen
Met de gratis Venta-app kunt u uw AeroStyle
LW73 / LW74 heel eenvoudig op afstand bestu-
ren en geavanceerde apparaatfuncties gebrui-
ken en controleren.
Log in op het menu en registreer zodra de VENTA-app gedownload en geopend is.
i U kunt uw AeroStyle LW73 / 74 pas gebruiken nadat de registratie is voltooid.
Ook wanneer u onderweg bent, waar u ook bent, kunt u het apparaat bedienen
en controleren.
4. Wifi via de VENTA-app instellen
Met behulp van de zoekfunctie + worden alle lokale Venta-apparaten automatisch
gevonden. Selecteer nu uw apparaat met het Bluetooth-symbool. Voer vervolgens
SSID in Voer de naam van uw Wifi-netwerk en het bijbehorende wachtwoord in en
selecteer en selecteer opslaan. U bent nu verbonden met uw Venta-apparaat en kunt
het apparaat controleren en bedienen.
i Smartphone/tablet en de LW73 WiFi / LW74 WiFi moeten zich tijdens het gehele
Wanneer zich tijdens het instellen van de wifi problemen voordoen, dient u het
gedeelte “Wat is er aan de hand, wanneer er geen wifi-verbinding tot stand kan
worden gebracht” door te lezen.
Meer informatie op www.venta-air.com/Service/WiFi-Control-App/

62 NL
WIFI / BLUETOOTH
WiFi / Bluetooth
Weergave Functie en instelling op het display van de LW73 WiFi /
LW74 WiFi
Brandt
Knippert langzaam
Knippert snel
Knippert snel
WiFi- of Bluetooth-verbinding AAN resp. geactiveerd.
Wifi-verbinding met de Venta-server op internet werd tot
stand gebracht.
Wifi-verbinding met het lokale netwerk werd tot stand
gebracht.
Wifi-verbinding is onderbroken of wacht op wi-
fi-verbinding.
Wacht op Bluetooth-verbinding of verbinding is
onderbroken.
WiFi- en Bluetooth-verbinding UIT resp. gedeactiveerd.
i
Geen wifi-/Bluetooth-weergave. (Het weergaveveld
is zwart.)
Wifi- en Bluetooth-module zenden en ontvangen geen
gegevens en zijn niet verbonden met een netwerk of
apparaat.
Wifi-/Bluetooth-verbinding inschakelen of
de(activeren): Door het wifi/Bluetooth-bedieningsveld
aan te raken, kan tussen wifi/Bluetooth UIT, Bluetooth
AAN en wifi AAN heen en weer worden geschakeld.
i
In de stand-bymodus kan alleen tussen wifi/
Bluetooth UIT en wifi AAN heen en weer worden
geschakeld.
Om de uitgeschakelde wifi-/Bluetooth-verbinding
weer in te schakelen of te activeren, hoeft u alleen
het zwarte weergave-/bedieningsveld maar aan te
raken.

63NL
Weergave Functie
1Ventilator-
standen
Snelheid 1 - 2 - 3 - 4 weergeven.
iDe ventilatorstanden worden weergegeven als ringsegmenten. Bij een
hogere ventilatorstand verschijnt een volgend dikker ringsegment met
de wijzers van de klok mee. Beginnend met stand 1 als smal ringsegment
onderaan tot en met stand 4 als dikste ringsegment rechts. Op de afbeelding
wordt stand 4 weergegeven.
2humidity Luchtvochtigheid
3 en Ventilatorstand instellen door kort aan te raken: verlaagt en
verhoogt de snelheid.
4Nachtmodus in- en uitschakelen door kort aan te raken.
AAN: Apparaat dimt de displayverlichting, verlaagt de ventila-
torstand naar 1 en schakelt de LED-ring 8 uit.
iVentilatorstand 1 kan met de hand met de toetsen + of - 3 worden
veranderd. De automatische modus 6 is niet mogelijk. De LED-ring 8
kan niet worden ingeschakeld.
UIT: Heldere displayverlichting, ingeschakelde LED-ring 8 en het
apparaat draait met ingestelde ventilatorstand 1 - 4.
De LED-ring 8 wordt niet ingeschakeld, wanneer deze eerder apart
werd uitgeschakeld. Door de nachtmodus-toets 4 ca. 3 sec. aanger-
aakt te houden kan deze weer worden ingeschakeld.
DISPLAY, FUNCTIES EN
INSTELLINGEN
8
2
3
4
5
1
3
6
7

64 NL
5Apparaat in- of uitschakelen door de Power-toets kort aan te
raken.
i Alleen wanneer het apparaat op het stroomnet is aangesloten, brandt
de Power-toets, om het apparaat in en uit te schakelen.
6Automatisch modus in- of uitschakelen door kort aan te raken.
AAN: De weergave op het display knippert continu en het
apparaat regelt de ventilatorstanden automatisch al naargelang
de luchtvochtigheid in de ruimte.
i
Bij het inschakelen van de automatische modus verschijnt de gewens-
het display humidity 2, daarna weer de gemeten luchtvochtigheid in
de ruimte.
UIT: De weergave op het display brandt continu en het ap-
paraat draait met de ingestelde ventilatorstand 1 - 4.
Gewenste luchtvochtigheid 30 - 70 % instellen:
-Raak toets 6 gedurende ca. 3 sec. aan totdat de weergave
humidity 2 knippert. Stel de gewenste luchtvochtigheid (in stap-
-Raak toets 6 opnieuw ca. 3 sec. aan totdat de weergave in
humidity 2 niet meer knippert en de gemeten luchtvochtigheid
in de ruimte weer wordt weergeven.
Zorg ervoor dat de automatische modus ingeschakeld is:
weergave op het display knippert continu!
7 Wifi- of Bluetooth-verbinding uit- en inschakelen door kort aan
te raken. Een nauwkeurige beschrijving vindt u in het hoofdstuk
“Wifi / Bluetooth”
8LED-ring Continu branden geeft aan het apparaat in gebruik is.
Continu knipperen geeft aan dat het apparaat automatisch
wordt uitgeschakeld bij watertekort.
iDe LED-ring 8 kan tijdens de werking van het apparaat door het 3 sec.
aanraken van de nachtmodus-toets 4 apart worden uit- en
ingeschakeld worden.
Met de gratis app van Venta kunt u de tint van uw keuze uitzoeken.

65NL
REINIGING EN ONDERHOUD
! Let op! Zorg ervoor dat het apparaat bij alle handelingen is uitgeschakeld en
dat de stekkervoeding uit het stopcontact is getrokken!
Weergave Maatregelen
9WATER Verwijder het bovenste deel van het apparaat. Vul de waterbak
in het onderste deel van het apparaat met vers leidingwater,
maximaal tot de helft. Plaats het bovenste deel op het onderste
deel en neem het apparaat weer in gebruik.
i Zodra er te weinig water in de waterbak zit, wordt het apparaat
automatisch uitgeschakeld, het LED-lampje 8 knippert continu en op
het display verschijnt de WATER-weergave. Bij de weergave humidity
2 knipperen twee streepjes en de luchtvochtigheid in de ruimte wordt
niet weergegeven.
Om de lucht in de ruimte continu te bevochtigen en schadelijke stof-
dag water bij te vullen.
10 SERVICE Verwijder het bovenste deel van het apparaat. Giet restwater uit
de waterbak weg. Spoel de waterbak en de verdampereenheid
grondig af. Vul de waterbak in het onderste deel van het appa-
raat met vers leidingwater, maximaal tot de helft. Monteer het
apparaat weer en neem het in gebruik. Raak de SERVICE-weer-
gave 10 op het display ca. 3 sec. aan totdat deze dooft.
i Voor een vlekkeloze hygiënische continuwerking waarschuwt de
SERVICE-weergave elke 14 dagen (ook in de stand-bymodus) om
deze handeling uit te voeren.
912 11 10

66 NL
11 CLEANING Verwijder het bovenste deel van het apparaat. Giet restwater uit
de waterbak weg, vul vers leidingwater bij tot de helft en voeg
2 uur op een lage stand draaien. Advies: Tijdens dit reinigings-
proces dient de ruimte te worden geventileerd om eventuele ge-
uren te voorkomen, die bij zeer sterke vervuiling kunnen ontsta-
an. Verwijder vervolgens het bovenste deel en giet het vervuilde
water weg. Spoel de waterbak en de verdampereenheid grondig
af. Vul de waterbak in het onderste deel van het apparaat met
vers leidingwater, maximaal tot de helft, monteer het apparaat
en neem het weer in gebruik. Raak de CLEANING-weergave 11
op het display ca. 3 sec. aan totdat deze dooft.
iElke 6 maanden (bij 24 uur continuwerking) waarschuwt de CLEA-
NING-weergave deze handeling uit te voeren.
12 DISK 1. Verwijder het bovenste deel en neem de verdampereenheid
uit de waterbak.
A
abB
C
2. Maak de bevestigings-
armen a en b voorzichtig
los van de as en ver-
wijder drager A van de
verdamperrol.
3. Draai het
afsluitkapje B en
verwijder het.
4. Verwijder
hygiënedisk C en
vernieuw deze.
5. Monteer het apparaat weer en neem het in gebruik.
6. Raak de DISK-weergave 11 op het display ca. 3 sec. aan
totdat de deze dooft.
i
De gebruiksduur van de hygiënedisk bedraagt ca. 4 maanden (bij 24
uur continuwerking). De gebruiksduur hangt af van de hardheid en
kwaliteit van het water, de dagelijkse verdampingscapaciteit en het
aantal gebruiksuren. Elke 4 maanden (bij 24 uur continuwerking)
waarschuwt de DISK-weergave deze handeling uit te voeren.
In het kader van het Venta ReNew-recyclingprogramma kan de
hygiënedisk worden teruggestuurd (zie RECYCLING EN AFVOER).

67NL
De onderhoudshandelingen 10, 11 en 12 kunnen altijd indien nodig worden uitge-
voerd, ook al worden ze niet weergegeven. Daarna eenvoudig de RESET-functie voor
CLEANING, DISK, SERVICE uitvoeren: Raak de Power-toets ca. 4 sec. aan totdat
deze knippert en SERVICE, CLEANING en DISK op het display worden weergegeven.
Alleen de handelingen die werden uitgevoerd ca. 3 sec. aanraken totdat deze doven.
Vervolgens de knipperende Power-toets ca. 4 sec. aanraken totdat deze continu
brandt. De volgende waarschuwingen voor de uitgevoerde handelingen worden dan
weer volgens schema weergegeven.
Alle resten in de waterbak en op de verdampereenheid (witte, groen/gelige of bruine
afzettingen of verkleuringen) hebben GEEN nadelige invloed op de functie van het
apparaat.
REINIGEN VAN HET
BOVENDEEL
! Let op! Zorg ervoor dat het apparaat bij alle handelingen is uitgeschakeld en
dat de stekkervoeding uit het stopcontact is getrokken!
Reinig het bovenste deel met een droge doek/kwast of een licht vochtige doek!
! Het bovenste deel van het apparaat mag niet onder stromend water worden
gereinigd!
Reinig het display alleen met een droge doek of een displayreinigingsdoek!
! Het display mag niet nat of te vochtig worden gereinigd!
TOEBEHOREN
• Venta-hygiënedisk voor een vlekkeloze hygiënische continuwerking
• Venta-reiniger voor de halfjaarlijkse reiniging
Extra AeroStlye-toebehoren online verkrijgbaar
NL +31 418 541 343, www.venta-air.com

68 NL
TECHNISCHE GEGEVENS
Model AeroStyle LW73 WiFi AeroStyle LW74 WiFi
Kleuren signaalwit/signaalzwart
Geschikt voor ruimteafmetingen
LED-statusweergave Blauwe lichtlijst
Interactief touchdisplay Standaard
App-besturing Wifi-module
Meetsensoren Luchtvochtigheid
Waterhygiëne Standaard
Vermogensstanden 4 + mode automatisch
Geluidsontwikkeling (stand 1-4) 24 / 36 / 44 / 50 dB(A) 27 / 35 / 41 / 47 dB(A)
Stroomverbruik (stand 1–4) 7 / 9 / 13 / 18 watt 11 / 14 / 17 / 24 watt
Netspanning
Capaciteit (max.) 9 liter
Afmetingen
Gewicht 10,5 kg
Wifi-frequentiebereik 2,4 GHz
Wifi-zendvermogen Maximaal 20 dBm
Wijzigingen en fouten voorbehouden

69NL
RECYCLING EN AFVOER
Het verpakkingsmateriaal kan hergebruikt worden. De verpakking s.v.p.
volgens milieuvoorschrift afvoeren resp. inleveren voor recycling.
Het apparaat mag niet met huishoudelijk afval worden afgevoerd! Het
apparaat moet op een inzamellocatie voor de recycling van elektrische
apparatuur worden ingeleverd (WEEE). Maak hiervoor gebruik van de beschik-
bare plaatselijke recycling- en inzameldiensten. Hiermee levert u een waarde-
volle bijdrage aan de bescherming van het milieu en de algemene gezondheid. Voor
verdere informatie kunt u contact opnemen met de plaatselijke autoriteiten.
GRATIS Venta-hygiënedisk-recyclingprogramma ter bescherming van het milieu
De originele Venta-hygiënedisk kan in het kader van het Venta ReNew-recyclingpro-
te sturen, kunt u een bijdrage leveren aan het behoud van de hulpbronnen van onze
aarde, en u ontvangt bovendien uw persoonlijke Venta ReNew-milieubonus, die u bij
uw volgende bestelling van de Venta-hygiënedisk bij Venta Luftwäscher GmbH kunt
inwisselen. Meer informatie krijgt u via ons Venta-serviceteam.
AANWIJZING: Het Venta ReNew-recyclingprogramma is beperkt tot verkoop en
verzending binnen Duitsland. Onze Venta-maatschappijen in andere landen geven u
graag informatie over uw lokale/landspecifieke programma‘s. Wanneer in uw land
geen ReNew-recyclingprogramma wordt aangeboden, kan de hygiënedisk via het
huishoudelijk afval worden afgevoerd.
GARANTIE
Op grond van de hoge kwaliteit garandeert Venta Benelux B.V. voor de duur van
twee jaar na de aanschafdatum dat dit product bij correct gebruik geen gebreken
vertoont. Wanneer er desondanks een materiaal- of fabricagefout bestaat, verzo-
eken wij u om contact op te nemen met het VENTA Serviceteam of uw verkoper.
Daarnaast gelden de algemene garantievoorwaarden van Venta: www.venta-air.com
PRIVACY BELEID
Uw gegevens worden zeer vertrouwelijk door Venta Benelux B.V. en haar geautoriseer-
de partners behandelt. vertrouwelijk. Als uw persoonlijke gegevens wijzigen of u vragen
heeft, neem dan contact op met onze Venta klantenservice, die kunt u bereiken onder
+31 418 54 13 43 of als alternatief kunt u een mail sturen aan info@venta.nl
Voor meer informatie over de bescherming van persoonsgegevens kijk op onze
site: privacy beleid op www.venta-air.com

70 NL
WAT IS ER AAN DE HAND
WANNEER …
! Zorg ervoor dat het apparaat bij alle handelingen is uitgeschakeld en dat de
stekkervoeding uit het stopcontact is getrokken!
… op het display niet de Power-toets verschijnt om het apparaat in te schakelen?
Controleer of de stekker in het stopcontact zit.
… op het display WATER wordt weergegeven, hoewel er water in de waterbak zit?
Controleer of er voldoende water in de waterbak zit en/of het bovenste deel van het
apparaat met de juiste kant op het onderste deel is geplaatst.
iHandeling: Verwijder het bovenste deel van het apparaat. Vul de waterbak in
het onderste deel van het apparaat met leidingwater, maximaal tot de helft.
Plaats het bovenste deel van het apparaat met de juiste kant op het onderste deel en
neem het apparaat weer in gebruik.
... er bij het aanraken van het display “witte velden” op de achtergrond zichtbaar zijn?
In droge ruimten kunnen door elektrostatische opladingen witte velden op de achter-
grond van het display zichtbaar zijn, die noch de functie noch de bedienbaarheid van
het apparaat belemmeren en geen mankement vormen.
... de LED-ring niet brandt, hoewel het apparaat in gebruik is?
Controleer of de LED-ring apart werd uitgeschakeld. Door het ca. 3 sec. aangeraakt
houden van de nachtmodus-toets direct op het apparaat of met de Venta-app, kan
de LED-ring weer worden ingeschakeld.
i In de nachtmodus kan de LED-ring niet worden ingeschakeld.
... de LED-ring zelfstandig geel knippert?
Ondertussen wordt de firmware automatisch bijgewerkt.
... er geen wifi-verbinding tot stand kan worden gebracht?
Controleer of
• U gebruikmaakt van een 2,4GHz- of gemengd 2,4-/5GHz-netwerk, omdat de wi-
fi-module in het apparaat geen 5GHz-netwerk ondersteunt.
• Uw router 802.11b/g/n ondersteunt.
• In uw smartphone of tablet, iOS vanaf versie 11.0 of Android vanaf versie 8.0 is
geïnstalleerd.
Werk indien nodig het besturingssysteem van uw smartphone of tablet bij.

71NL
... op het apparaatdisplay noch wifi noch Bluetooth kan worden
ingeschakeld?
Controleer of de wifi-module correct in de behuizing van het apparaat is gestoken.
i Oplossing: Kap A aan de achterkant van de behuizing van het apparaat
verwijderen en correcte bevestiging van de wifi-module B controleren.
AAB
Beide vergrendelingsnok-
jes naar boven trekken.
Kap naar voren klappen en
naar beneden toe verwij-
deren.
Module B moet correct in
de behuizing zijn gesto-
ken.
A
A
A
Vervolgens kap a weer monteren, zodat beide vergrendelingsnokjes hoorbaar vast-
klikken.
VENTA SERVICETEAM
Heeft u verdere informatie nodig over de Venta Airwasher of wilt u accessoires
bestellen? Geen probleem: het VENTA Serviceteam staat voor u klaar! Neem telefo-
nisch contact op, bezoek de Venta website of stuur ons een e-mail.
NL +31 418 541 343, www.venta-air.com, Info@venta.nl

72 IT
EGREGIO CLIENTE,
acquistando il Lavaaria Venta AeroStyle LW73 o LW74 ha scelto un prodotto premi-
um dalle prestazioni ottime. AeroStyle contribuisce a garantire un’umidità dell’aria
salubre e a ridurre in modo naturale le sostanze nocive nell’aria.
Il principio di funzionamento di Venta
Un ventilatore convoglia l’aria dei locali nel Lavaaria contenente acqua, all’interno del
quale ruotano delle batterie di dischi disposte secondo un ordine sofisticato. Attra-
verso le superfici dei dischi l’acqua pulita evapora in modo igienico nell’ambiente.
Allo stesso tempo i dischi trattengono sostanze nocive quali polvere o polline che
vengono lavate via dall’acqua e raccolte nel lavaaria.
GRAZIE PER AVERCI SCELTO!
siamo certi che il lavaaria Venta supererà le Sue aspettative, e Le auguriamo tanta
soddisfazione nel suo uso.
Si prega di registrarsi di prodotto Venta:
www.venta-air.com/it_ch/Servizio/Registrazione-del-prodotto/
Legga per intero le presenti istruzioni per l‘uso, le conservi per un utilizzo futuro e
osservi le avvertenze di sicurezza e le indicazioni per un impiego conforme ivi speci-
ficate.
La versione più aggiornata delle istruzioni per l‘uso è consultabile sul nostro sito web
www.venta-air.com
SOMMARIO
Avvertenze di sicurezza 73
Contenuto della confezione 75
Simboli 75
Uso conforme 75
Panoramica 76
Indicazioni preventive al primo utilizzo 76
Primo utilizzo 77
Configurazione e applicazione Venta 78
WiFi / Bluetooth 79
Indicatori, funzioni e impostazioni 80
Pulizia e cura dell‘apparecchio 82
Pulizia della parte superiore
dell‘apparecchio 84
Accessori 84
Dati tecnici 85
Riciclaggio e smaltimento 86
Garanzia 86
Privacy 87
Cosa fare se ...? 87

73IT
! AVVERTENZE DI SICUREZZA
• Questo apparecchio è idoneo all‘uso da parte di bambini con un‘età minima di 8
anni e da parte di persone con capacità fisiche, sensoriali o mentali limitate oppu-
re in possesso di poca esperienza e di conoscenze in materia ridotte, sempre che
essi/esse vengano supervisionati o che siano stati istruiti in merito al suo utilizzo
e che abbiano compreso i possibili pericoli.
• Leggere per intero le istruzioni per l‘uso prima di mettere in funzione l‘apparecchio
e conservarle in buone condizioni per una eventuale consultazione futura.
• L‘apparecchio non è un giocattolo per bambini.
• La pulizia e la cura da parte dell‘utilizzatore non deve essere eseguita da bambini
di età inferiore agli 8 anni o senza supervisione.
• Tenere l’apparecchio e l’alimentatore lontano dai bambini di età inferiore agli 8
anni.
• Un uso improprio può danneggiare l‘apparecchio e causare lesioni corporee.
• Collegare l‘apparecchio solamente a prese di corrente idonee – Fare attenzione
che la tensione di rete corrisponda a quella riportata sulla targhetta di omologa-
zione applicata all‘apparecchio.
• Questo apparecchio può essere usato solo con i seguenti alimentatori: spina elet-
trica con connettore tripolare IEC 320 C5.
• Non accendere mai l’apparecchio se il cavo di alimentazione è danneggiato.
• Prima di ogni intervento di pulizia o di manutenzione e per spostare o trasportare
l’apparecchio, estrarre la spina elettrica dalla presa di corrente.
• Non mettere mai in funzione il Lavaaria dopo che è caduto per terra o se è stato
danneggiato in altra maniera.
• Le riparazioni di apparecchi elettrici devono essere eseguite solamente da per-
sone qualificate. Delle riparazioni non eseguite a regola d‘arte possono generare
notevoli pericoli per l‘utilizzatore.
• Non sedersi assolutamente sull‘apparecchio e non appoggiarvi sopra degli
oggetti.
• Non infilare oggetti estranei nell‘apparecchio.
• Non immergere mai la parte superiore dell’apparecchio nell’acqua o in altri liquidi.
• Non riempire mai troppo il Lavaaria.
• Non trasportare mai né ribaltare il Lavaaria con il contenitore pieno.

74 IT
• Non staccare mai la spina dalla presa di corrente tirandola per il cavo o con le
mani bagnate.
• Il Lavaaria deve essere messo in funzione solamente se completamente montato.
• Appoggiare il Lavaaria solo su di una superficie piana ed asciutta.
• Posizionare l’apparecchio in maniera tale che non possa essere ribaltato e che
nessuno possa inciampare nell’apparecchio o nel cavo.
• Mantenere le seguenti distanze minime dagli oggetti e dalle pareti:
• Altitudine massima: 2000 metri
• Non coprire mai né bloccare le fessure di ventilazione, al fine di evitare un surri-
scaldamento/danneggiamento dell‘apparecchio.
• -
tutto in inverno, la formazione di organismi biologici.
• In virtù delle caratteristiche dell’apparecchio e della tecnologia di evaporazione a
freddo, è impossibile che dal lavaaria, se usato correttamente, fuoriesca diretta-
mente acqua sotto forma di gocce, vapore, nebbiolina o precipitazione di calcare.
• L’apparecchio può essere utilizzato solo con gli appositi accessori originali
Venta. Non usare l’apparecchio in combinazione con oli aromatici o altri additivi.
Venta-Luftwäscher GmbH non si assume alcuna responsabilità per danni causati
da oli aromatici o altri additivi.
• Se il Lavaaria non viene utilizzato per diversi giorni oppure se rimane spento o
viene immagazzinato per un lungo periodo di tempo, la vaschetta dell’acqua
deve essere svuotata completamente, pulita dai residui di sporcizia e asciugata
per impedire la formazione di odori o di organismi biologici nell’acqua ferma o la
formazione di residui d’acqua.
• Staccare la spina dalla presa quando non si usa l’apparecchio.

75IT
CONTENUTO DELLA
CONFEZIONE
1 × Lavaaria Venta
1 × disco igiennizzante (preinstallata)
1 × modulo WiFi/WLAN (preinstallato)
1 × istruzioni per l‘uso
In caso di assenza di alcuni degli elementi indicati, si prega di rivolgersi al servizio di
assistenza VENTA o al proprio rivenditore locale.
SIMBOLI
! Avvertenze di sicurezza Leggere e rispettare attentamente le seguenti avver-
tenze per evitare danni a persone e cose.
i Informazioni complementari
Consigli utili
USO CONFORME
Il Lavaaria Venta è un elettrodomestico per l‘umidificazione e la depurazione dell‘aria
per ambienti abitativi, di lavoro e di soggiorno. L‘apparecchio non è idoneo all‘uso
esterno.
Qualsiasi altro uso o modifica all‘apparecchio sono da considerarsi uso non consen-
tito. Il produttore non risponde per danni o per lesioni causati da un uso improprio.
Un uso non consentito può mettere in pericolo la salute e la vita delle persone. Fra
tale tipo di uso si conta:
• in locali con atmosfere a rischio di esplosione e/o con atmosfera aggressiva.
• in ambienti con elevata concentrazione di solventi.
• in prossimità di piscine o di terreni bagnati.

76 IT
PANORAMICA
LW73 WiFi / LW74 WiFi
1
6
4
5
3
2
1 Parte superiore dell’apparecchio
(unità tecnica)
2 Cavo di alimentazione
3 Unità di evaporazione (incl. disco
igienizzante, ruota dentata di trasmis-
sione, batteria di dischi)
4 Vaschetta dell’acqua estraibile
5 Parte inferiore dell’apparecchio
6 Sportellino rimovibile per modulo
WiFi/WLAN Venta
INDICAZIONI PREVENTIVE AL
PRIMO UTILIZZO
• Disimballare e posizionare l’apparecchio.
• Rimuovere la parte superiore dell’apparecchio 1.
• Togliere l’unità di evaporazione 3 dalla vaschetta dell’acqua 4.

77IT
PRIMO UTILIZZO
1
Riempire la vaschetta dell’acqua nella
parte inferiore dell’apparecchio con
acqua corrente (ca. 9 litri) fino alla metà
dell’unità di evaporazione.
Inserire l’unità di evaporazione B nella
vaschetta dell’acqua della parte inferi-
ore dell’apparecchio A e posizionare la
parte superiore dell’apparecchio C sulla
parte inferiore A dal lato corretto.
Allacciare la spina D alla rete elettrica
e accendere l’apparecchio toccando
brevemente il pulsante Power .
i l pulsante Power per
l’accensione e lo spegnimento
dell’apparecchio si accende solo
dopo che l’apparecchio è stato
collegato alla rete elettrica.
2 3
C
B
D
A
220-240V
50/60Hz

78 IT
CONFIGURAZIONE E
APPLICAZIONE VENTA
1. Attivare il Bluetooth sul dispositivo Venta
Sul display dell’LW73 WiFi o dell’LW74 WiFi deve
lampeggiare continuamente il simbolo .
i Toccando il display e il pannello di controllo
“WiFi / Bluetooth” è possibile scegliere tra WiFi/
Bluetooth OFF, Bluetooth ON e WiFi ON.
Il display e il pannello di controllo “WiFi /
Bluetooth” sono neri quando WiFi/Bluetooth è spento. Toccando questa
scatola nera si attiva il Bluetooth.
2. Attivazione Bluetooth e WiFi su smartphone o tablet
Assicurati che il tuo smartphone o tablet sia connesso alla rete wireless di casa.
3. Download, installazione e apertura dell’applicazione VENTA
Con l’applicazione gratuita di Venta
è possibile comandare a distanza
l’AeroStyle LW73/LW74 nonché usa-
re e controllare le funzioni avanzate
dell’apparecchio.
Effettuare il login nel menu o regist-
rarsi non appena l’App VENTA viene scaricata e aperta.
i Solo con la registrazione completata è possibile utilizzare il vostro AeroStyle
LW73/74 anche dalla strada, ovunque tu sia, sterzare e controllare.
4. Configurazione del WiFi tramite l’applicazione VENTA
La funzione di ricerca + trova automaticamente tutti i dispositivi Venta locali. Ora
selezionate il vostro dispositivo con l’icona Bluetooth. Inserite quindi il nome della
vostra rete wireless e la password corrispondente sotto SSID e selezionate SALVA.
Ora siete collegati al vostro apparecchio Venta e potete monitorarlo e controllarlo.
i Durante la procedura lo smartphone / il tablet e l’LW73 WiFi / l’LW74 WiFi
devono essere vicini e collegati alla stessa rete WLAN.
In caso di problemi durante la configurazione della connessione WiFi leggere il
paragrafo “Cosa fare se è impossibile stabilire una connessione WiFi?”.
Per ulteriori informazioni consultare la pagina
www.venta-air.com/Service/WiFi-Control-App/

79IT
WIFI / BLUETOOTH
WiFi / Bluetooth
Indicazione Funzione e impostazione sul display di
LW73 WiFi / LW74 WiFi
Accesa
Lampeggia
lentamente
Lampeggia
rapidamente
Lampeggia
rapidamente
Connessione WiFi o Bluetooth ON (attiva).
Connessione WiFi con il server di Venta nel web stabilita.
Connessione WiFi con la rete locale stabilita.
Connessione WiFi interrotta o in attesa di una connessione
WiFi.
In attesa di una connessione Bluetooth oppure connessione
interrotta.
Connessione WiFi o Bluetooth OFF (disattivata).
i
Indicazione WiFi/Bluetooth assente (il campo di
visualizzazione è nero).
Il modulo WiFi e quello Bluetooth non inviano né ricevono
dati e non sono collegati alla rete o all’apparecchio.
Accensione/spegnimento e attivazione/disattivazione
collegamento WiFi/Bluetooth: toccando il campo di coman-
do WiFi/Bluetooth è possibile cambiare tra WiFi/Bluetooth
OFF, Bluetooth ON e WiFi ON.
i
Nella modalità standby è possibile cambiare solo tra
WiFi/Bluetooth OFF e WiFi ON.
Per riattivare la connessione WiFi/Bluetooth disattiva-
ta toccare il campo di visualizzazione/comando nero.

80 IT
Indicatore Funzioni
1Livello di giri Indica la velocità 1 - 2 - 3 - 4.
iI livelli di giri sono rappresentati sotto forma di segmenti di un
cerchio. All’aumentare del livello di giri aumenta lo spessore del
segmento successivo del cerchio in senso orario. Al livello 1 corrisponde il
segmento più sottile in basso e al livello 4 il segmento più spesso a destra.
Nell’immagine è raffigurato il livello 4.
2humidity Mostra l’umidità dell’aria
3 e Imposta il livello di giri se toccato brevemente:
riduce e aumenta la velocità.
4Attiva e disattiva la modalità notte se toccato brevemente.
ON: l’apparecchio regola l’intensità di illuminazione del display,
riduce il numero di giri al livello 1 e spegne la striscia LED 8.
iÈ possibile modificare manualmente il livello di giri 1 tramite il
pulsante + o - 3. La modalità Auto 6 non è attivabile. Non è possibile
accendere la striscia LED 8.
OFF: il display si illumina in maniera vivida, la striscia LED 8 è
accesa e l’apparecchio funziona con il livello di giri impostato
1 - 4.
La striscia LED 8 non si accende se precedentemente è stata spenta
separatamente. Premendo e tenendo premuto per circa 3 sec. il
pulsante della modalità notte 4 è possibile riaccenderla.
INDICATORI, FUNZIONI
E IMPOSTAZIONI
2
3
4
5
1
3
6
8
7

81IT
5Pulsante Power per accendere e spegnere l’apparecchio se
toccato brevemente.
i Il pulsante Power per l’accensione e lo spegnimento dell’apparecchio
si accende solo se l’apparecchio è collegato alla rete elettrica.
6Attivazione e disattivazione della modalità Auto se toccato
brevemente.
ON: l’indicazione sul display lampeggia continuamente e
l’apparecchio regola automaticamente i livelli di giri a seconda
dell’umidità dell’aria ambiente.
i
Attivando la modalità Auto viene visualizzato nell’area dell’indicazione
humidity 2 il grado di umidità dell’aria desiderato (valore predefinito
dell’aria rilevato.
OFF: l’indicazione sul display rimane accesa e l’apparecchio
funziona con il livello di giri impostato 1 - 4.
Impostazione dell’umidità dell’aria desiderata 30 - 70 %:
-Premere e tenere premuto il pulsante 6 per circa 3 sec. fin-
ché l’indicazione humidity 2 non lampeggia. Con il pulsante - o
-Premere e tenere premuto di nuovo per circa 3 sec. il pul-
sante 6 finché l’indicazione humidity 2 smette di lampeggiare e
viene visualizzata di nuovo l’umidità dell’aria ambiente rilevata.
Accertarsi che la modalità Auto sia attivata: l’indicazione sul
7 Accensione e spegnimento del collegamento WiFi o Bluetooth
toccando brevemente. Per una descrizione dettagliata consulta-
re il paragrafo “WiFi/Bluetooth”
8Striscia LED La luce accesa fissa indica che l’apparecchio è in funzione.
La luce lampeggiante continua indica lo spegnimento automa-
tico dell’apparecchio per mancanza d’acqua.
i Durante il funzionamento dell’apparecchio è possibile accendere
e spegnere separatamente la striscia LED 8 tenendo premuto per
3 sec. il pulsante 4 della modalità notte.
Con l’applicazione gratuita di Venta potete scegliere la tonalità di colore
che preferite.

82 IT
PULIZIA E CURA
DELL‘APPARECCHIO
! Attenzione! Assicurarsi che durante tutte le operazioni l‘apparecchio sia
spento e l‘alimentatore a spina sia staccato dalla presa!
Indicatore Operazioni
9WATER Rimuovere la parte superiore dell’apparecchio. Riempire la
vaschetta dell’acqua nella parte inferiore dell’apparecchio con
acqua corrente al massimo fino alla metà. Riassemblare la parte
superiore e quella inferiore e rimettere in funzione l’apparecchio.
i Non appena l’apparecchio rileva un volume d’acqua insufficiente nella
vaschetta dell’acqua, l’apparecchio si spegne automaticamente, il
LED 8 lampeggia continuamente e sul display viene visualizzata l’indicazio-
ne WATER. Nell’area dell’indicazione humidity 2 lampeggiano due trattini e
non viene visualizzato alcun valore dell’umidità dell’aria ambiente.
Per conseguire un’umidificazione continua dell’aria dei locali e ridurre
aggiungere acqua tutti i giorni.
10 SERVICE Rimuovere la parte superiore dell’apparecchio. Eliminare l’ac-
qua residua dalla vaschetta dell’acqua. Lavare accuratamente
la vaschetta dell’acqua e l’unità di evaporazione. Riempire la
vaschetta dell’acqua nella parte inferiore dell’apparecchio con
acqua corrente al massimo fino alla metà. Rimontare e riaccen-
dere l’apparecchio. Premere e tenere premuta per circa 3 sec.
l’indicazione SERVICE 10 sul display.
i Per garantire un esercizio igienico continuo ineccepibile, l’indicazione
SERVICE ricorda di effettuare questa operazione ogni 14 giorni
(anche in modalità Standby).
912 11 10

83IT
11 CLEANING Rimuovere la parte superiore dell’apparecchio. Eliminare l’acqua
residua dalla vaschetta dell’acqua, versare acqua corrente fino
l’apparecchio e farlo funzionare per circa 2 ore a un livello di giri
basso. Consiglio: durante la pulizia aerare l’ambiente per evitare
la formazione di odori in caso di un alto grado di sporcizia. Ri-
muovere quindi la parte superiore dell’apparecchio e rimuovere
l’acqua sporca. Lavare accuratamente la vaschetta dell’acqua
e l’unità di evaporazione. Riempire la vaschetta dell’acqua nella
parte inferiore dell’apparecchio con acqua corrente al massimo
fino alla metà, montare l’apparecchio e accenderlo. Premere e
tenere premuta per circa 3 sec. l’indicazione CLEANING 11 sul
display finché non si spegne.
iOgni 6 mesi (con funzionamento continuo 24 ore su 24) l’indicazione
CLEANING ricorda di effettuare questa operazione.
12 DISK 1. Rimuovere la parte superiore dell’apparecchio e togliere l’uni-
tà di evaporazione dalla vaschetta dell’acqua.
A
abB
C
2. Staccare con cautela
i bracci di supporto a e
b dall’asse e rimuovere il
sostegno A dal rullo.
3. Svitare
e togliere il
cappuccio B.
4. Rimuovere e
sostituire il disco
igienizzante C.
5. Rimontare e riaccendere l’apparecchio.
6. Toccare l’indicazione DISK 11 sul display per circa 3 sec.
finché non si spegne.
i
Il disco igienizzante ha una vita utile di circa 4 mesi (con funziona-
mento continuo 24 ore su 24). La vita utile dipende dalla durezza
dell’acqua e dalla qualità dell’acqua, dalla capacità di evaporazione
giornaliera e dal numero di ore di esercizio. Ogni 4 mesi (con
funzionamento continuo 24 ore su 24) l’indicazione DISK ricorda di
effettuare questa operazione.
Grazie al programma di riciclaggio Venta ReNew è possibile rinviare
a Venta il disco igienizzante (vedi RICICLAGGIO E SMALTIMENTO).

84 IT
Gli interventi 10, 11 e 12 per la cura dell’apparecchio possono essere eseguiti ogni
qualvolta sia necessario, anche se non sono visualizzati sul display. Al termine di
suddetti interventi eseguire la funzione RESET per CLEANING, DISK e SERVICE:
premere e tenere premuto il pulsante Power per circa 4 sec. finché lampeggia e
sul display vengono visualizzate le indicazioni SERVICE, CLEANING e DISK. A questo
punto toccare le indicazioni relative agli interventi che sono state eseguiti per circa
3 sec. finché non si spengono. Quindi premere e tenere premuto per circa 4 sec. il
pulsante Power lampeggiante finché non diventa fisso. Il promemoria successivo
relativo a ciascuno degli interventi eseguiti sarà visualizzato di nuovo a intervalli
regolari.
I residui nella vaschetta dell’acqua e sull’unità di evaporazione (macchie e depositi bian-
chi, verdi giallastri o marroni) NON pregiudicano il funzionamento dell’apparecchio.
PULIZIA DELLA PARTE SUPE-
RIORE DELL‘APPARECCHIO
! Attenzione! Assicurarsi che durante tutte le operazioni l‘apparecchio sia spen-
to e l‘alimentatore a spina sia staccato dalla presa!
Pulire la parte superiore dell’apparecchio con un panno/pennello asciutto o con un
panno leggermente umido!
! Non lavare la parte superiore dell’apparecchio sotto l’acqua corrente!
Pulire il display solo con un panno asciutto o con un panno apposito per display!
! Non pulire il display con panni bagnati o troppo umidi!
ACCESSORI
• Disco igienizzante Venta per un esercizio continuo igienico e ineccepibile
• Detergente Venta per la pulizia semestrale
Altri accessori per AeroStyle disponibili online
CH www.venta-air.com

85IT
DATI TECNICI
Modello AeroStyle LW73 WiFi AeroStyle LW74 WiFi
Colori bianco segnale / nero segnale
Dimensione locale
Indicazione di stato LED Banda luminosa blu
Display touch interattivo di serie
Controllo tramite app modulo WiFi / WLAN
Sensori di misura umidità dell’aria
Igienizzante acqua di serie
Livelli di potenza 4 + Auto
Rumorosità (livelli 1-4) 24 / 36 / 44 / 50 dB(A) 27 / 35 / 41 / 47 dB(A)
Consumo di energia (livelli 1-4) 7 / 9 / 13 / 18 watt 11 / 14 / 17 / 24 watt
Tensione di rete
Contenuto d’acqua (max) 9 litri
Dimensioni
Peso 10,5 kg
Range di frequenza WLAN 2,4 GHz
Potenza di trasmissione WLAN max 20 dBm
Salvo modifiche ed errori

86 IT
RICICLAGGIO E SMALTIMENTO
Il materiale di imballaggio è riutilizzabile. Smaltire la confezione nel rispetto
dell’ambiente, consegnandola al centro di raccolta dei materiali riciclabili.
Non smaltire l’apparecchio gettandolo nei comuni rifiuti domestici! Il suo
smaltimento deve avvenire a cura di un apposito centro per la raccolta e il
riciclaggio di apparecchiature elettriche ed elettroniche (RAEE). Si prega di
avvalersi a tal fine dei sistemi di riconsegna e raccolta disponibili sul
territorio. Tale pratica contribuisce in modo prezioso alla tutela dell’ambiente e alla
salute delle persone. Per ulteriori informazioni rivolgersi agli enti preposti locali.
Programma GRATUITO Venta di riciclaggio del disco igienizzante per la tutela
dell’ambiente
igienizzante originale di Venta. Rinviando il disco igenizzante usato di Venta potrete
contribuire alla tutela delle risorse del nostro pianeta e ricevere inoltre un buono
personale Venta ReNew che potrete utilizzare per il vostro prossimo ordine di un di-
sco igienizzante Venta presso Venta Luftwäscher GmbH. Per maggiori informazioni
contattare il team dell’assistenza di Venta.
NOTA: il programma di riciclaggio Venta ReNew è limitato alla vendita e alla spe-
dizione all’interno della Germania. Le nostre società in altri paesi potranno fornire
informazioni sui programmi specifici nella vostra regione o nel vostro paese. Se nel
vostro paese non è attivo il programma di riciclaggio ReNew, potete smaltire il disco
igienizzante nei rifiuti domestici.
GARANZIA
L‘eccellente qualità del prodotto consente a Venta Luftwäscher GmbH di fornire
una garanzia di due anni dalla data di acquisto, assicurando l‘assenza di difetti in
presenza di un utilizzo appropriato. Laddove tuttavia dovessero occasionalmente
presentarsi difetti nei materiali o nella lavorazione, si prega di rivolgersi al servizio di
assistenza VENTA o al proprio rivenditore. Si applicano inoltre in tali casi le condizio-
ni generali di garanzia Venta, consultabili all‘indirizzo: www.venta-air.com

87IT
PRIVACY
I Suoi dati vengono trattati dalla Venta Luftwäscher in maniera riservata. Se i Suoi
dati personali dovessero subire modifiche o in caso di quesiti su come elaboriamo
i Suoi dati, si rivolga al servizio di assistenza clienti Venta:
CH +41 41 781 15 15, www.venta-air.com
Per maggiori informazioni sul tema Privacy può consultare le nostre direttive sulla
privacy al sito www.venta-air.com
COSA FARE SE ...?
! Assicurarsi che durante tutte le operazioni l‘apparecchio sia spento
e l‘alimentatore a spina sia staccato dalla presa!
… sul display non è visualizzato il pulsante Power per l’accensione e lo
spegnimento dell’apparecchio?
Accertarsi che la spina sia collegata alla rete elettrica.
… sul display appare la scritta WATER nonostante sia presente acqua nella
vaschetta dell’acqua?
Verificare che ci sia acqua a sufficienza nella vaschetta dell’acqua e/o che la parte
superiore dell’apparecchio sia posizionata dal lato corretto sulla parte inferiore
dell’apparecchio.
iIntervento: rimuovere la parte superiore dell’apparecchio. Riempire di acqua
corrente la vaschetta dell’acqua nella parte inferiore dell’apparecchio al
massimo fino alla metà. Posizionare la parte superiore dell’apparecchio dal lato
corretto sulla parte inferiore e riaccendere l’apparecchio.
... gli indicatori del display sono azionati con un tocco troppo deciso?
Questa circostanza può causare “ammaccature” visibili, che tuttavia non indicano un
difetto qualitativo: esse scompaiono non appena si smette di esercitare pressione.
... la striscia LED non si accende nonostante l’apparecchio sia in funzione?
Controllare se la striscia LED è stata spenta separatamente. Premendo e tenendo premu-
to per circa 3 sec. il pulsante della modalità notte è possibile riaccendere la striscia LED.
i Nella modalità notte non è possibile accendere la striscia LED.
... la striscia LED è gialla e lampeggia?
La striscia LED gialla lampeggiante indica che è in corso un aggiornamento
automatico del firmware.

88 IT
... non è possibile stabilire una connessione WiFi?
Verificare che
• la rete utilizzata sia una rete a 2,4 GHz o una rete mista a 2,4/5 GHz (il modulo
WiFi/WLAN nell’apparecchio non supporta le reti a 5 GHz).
• il router supporti 802.11b/g/n,
• nello smartphone o tablet sia installato iOS a partire dalla versione 11.0 o Android
a partire dalla versione 8.0,
Se necessario, aggiornare il sistema operativo dello smartphone o del tablet.
... dal display dell’apparecchio non è possibile attivare né il WiFi né il
Bluetooth ?
Verificare che il modulo WiFi/WLAN sia inserito correttamente nell’alloggiamento
dell’apparecchio.
i Intervento: rimuovere lo sportellino A sul retro dell’apparecchio e verificare
che il modulo WiFi/WLAN B sia inserito correttamente.
AAB
Spingere verso l’alto le due
linguette di bloccaggio.
Aprire lo sportellino verso
l’alto e rimuoverlo tirando
verso il basso.
Il modulo B deve essere
inserito correttamente
nell’alloggiamento.
A
A
A
Rimontare lo sportellino A facendo scattare le due linguette di bloccaggio..
SERVIZIO DI ASSISTENZA VENTA
Necessita di ulteriori informazioni sui lavaaria Venta o desidera ordinare degli ac-
cessori? Nessun problema! Il servizio di assistenza VENTA sarà lieto di aiutarla! Può
contattarlo direttamente o visitare il sito web Venta.
CH +41 41 781 15 15, www.venta-air.com

89ES
ESTIMADO CLIENTE:
Con el humidificador y purificador AeroStyle LW73 WiFi / LW74 WiFi de Venta ha
adquirido un producto prémium de alto rendimiento. AeroStyle propicia una
humedad ambiental saludable y ayuda a reducir los contaminantes del aire de forma
natural. La aplicación Venta, además, le permite consultar y controlar el LW73 WiFi /
LW74 WiFi desde cualquier lugar, aunque esté fuera de casa.
Principio de funcionamiento de Venta
El aire de la habitación es conducido a través de un ventilador al interior del hu-
midificador y purificador de aire. En el depósito de agua hay un bloque de placas
circulares de estudiado diseño, que se encuentra en constante rotación. Desde la su-
perficie de estas placas se evapora agua higienizada, que se incorpora entonces al
aire de la estancia. Al mismo tiempo, estas placas retienen agentes contaminantes
como partículas de polvo o polen, las lavan en el agua y las colectan en el humidifi-
cador y purificador de aire.
¡MUCHAS GRACIAS!
Estamos convencidos de que este humidificador y purificador de aire de Venta supe-
rará sus expectativas y le será de gran utilidad.
Le rogamos que registre su aparato de Venta en:
https://www.venta-air.com/en_de/Service/Product-registration/
Lea totalmente las instrucciones de manejo, consérvelas bien para su posterior con-
sulta y observe el uso debido y todas las indicaciones de seguridad.
Encontrará la última versión de las instrucciones de manejo en
nuestra página web www.venta-air.com
ÍNDICE DE CONTENIDO
Indicaciones de seguridad 90
Volumen de suministro 92
Símbolos 92
Uso debido 92
Vista general 93
Antes del primer uso 93
Puesta en marcha 94
Configuración y aplicación Venta 95
WiFi / Bluetooth 96
Indicadores, funciones y ajustes 97
Limpieza y cuidado 99
Limpieza de la parte
superior del aparato 101
Accesorios 101
Datos técnicos 102
Reciclaje y eliminación 103
Garantía 103
Protección de datos 103
¿Qué pasa si… 104
Equipo de servicio de Venta 105

90 ES
• Este aparato puede ser utilizado por niños mayores de 8 años y por personas con
una capacidad limitada desde el punto de vista físico, sensorial o mental, o bien
que carezcan de experiencia y/o de los conocimientos correspondientes, siempre
que haya una persona responsable de su seguridad que se encargue de su vigilan-
cia e instrucción en el modo de empleo del aparato.
• Lea totalmente las instrucciones de manejo antes de la puesta en marcha y con-
sérvelas bien para su posterior consulta.
• El aparato no es un juguete para niños.
• Los niños menores de 8 años —o mayores de esta edad pero sin vigilancia— no
deben realizar la limpieza ni el cuidado del aparato.
• Mantenga el aparato y su cable de red fuera del alcance de niños menores de 8
años.
• Un uso indebido puede dañar el aparato y causar lesiones
a personas.
• Conecte el aparato únicamente a tomas de corriente adecuadas; la tensión de red
debe coincidir con los datos de la placa de características del aparato.
• Este aparato solo se debe utilizar con la siguiente conexión de red: enchufe IEC
320 C5 con adaptador de hoja de
trébol.
• No ponga en marcha el aparato bajo ningún concepto si el cable de red está
dañado.
• Desenchufe el conector de red de la toma de corriente
antes de cada operación de limpieza o mantenimiento,
así como para mover o transportar el aparato.
• No ponga en marcha el aparato si se ha caído o ha sufrido daños de algún otro
modo.
• Las reparaciones de aparatos eléctricos solo deben ser efectuadas por profesio-
nales. Una reparación inadecuada puede ser una fuente de peligros considerables
para el usuario.
• No se siente nunca encima del aparato ni lo utilice para depositar objetos.
• No introduzca objetos extraños en el aparato.
• No sumerja la parte superior del aparato en agua u otro líquido.
! INDICACIONES DE
SEGURIDAD

91ES
• No sobrecargue el aparato.
• No transporte ni vuelque el aparato con el depósito lleno.
• No desenchufe el conector de red de la toma de corriente tirando del cable ni con
las manos mojadas.
• El aparato solo debe ponerse en marcha si está completamente montado.
• Coloque el aparato sobre una superficie plana y seca.
• Coloque el aparato de forma que nadie pueda volcarlo sin querer o tropezar con el
aparato o el cable de red.
• Mantenga las siguientes distancias mínimas con respecto
a otros objetos o a las paredes:
• Altitud de montaje máxima: 2000 metros
• No cubra ni bloquee las ranuras de ventilación, con el fin de evitar que el aparato
se sobrecaliente o sufra daños.
• Si la humedad relativa del aire interior se mantiene permanentemente por encima
• Si el aparato se utiliza correctamente no pueden producirse fugas directas de
agua —ya sea en forma de gotas, vapor, neblina o precipitaciones de cal—, debido
a la configuración del mismo y a la tecnología de evaporación en frío.
• El aparato solo puede utilizarse con los accesorios originales de Venta previstos.
No se deben utilizar aceites aromáticos ni demás aditivos. Venta-Luftwäscher
GmbH no acepta responsabilidad alguna por daños provocados por aceites aro-
máticos o aditivos ajenos.
• Si no va a utilizar el aparato durante varios días, o si lo va
a tener desconectado o guardado durante bastante tiempo, vacíe por completo el
depósito de agua, elimine los restos de suciedad y séquelo, para prevenir de este
modo la formación de olores o la proliferación de microorganismos en el agua
estancada o en los residuos presentes en la misma.
• Desenchufe el conector de red de la toma de corriente cuando no utilice el
aparato.

92 ES
VOLUMEN DE SUMINISTRO
1 humidificador y purificador de aire de Venta
1 disco higiénico (premontado)
1 módulo WiFi/WLAN (premontado)
1 manual de instrucciones
Si faltaran piezas o estuvieran dañadas, póngase en contacto con el equipo de
servicio de Venta o con su distribuidor local.
SÍMBOLOS
! Indicaciones de seguridad: léalas atentamente y cúmplalas en su totalidad
para prevenir daños personales y materiales.
i Información complementaria
Consejos útiles
USO DEBIDO
Este aparato de Venta es un electrodoméstico que ayuda a conseguir una buena
calidad del aire interior en viviendas, oficinas y salas de espera.
Cualquier uso distinto o modificación del aparato se considera un uso indebido.
El fabricante no se hace responsable de los daños o lesiones ocasionadas por un
uso indebido.
Un uso indebido puede poner en peligro la salud y la vida. Esto incluye el uso en las
condiciones siguientes:
• En recintos con atmósferas potencialmente explosivas y/o agresivas
• En recintos con una elevada concentración de disolventes
• Cerca de piscinas o terrenos húmedos
• Al aire libre

93ES
VISTA GENERAL
LW73 WiFi / LW74 WiFi
1
6
4
5
3
2
1 Parte superior del aparato
(unidad técnica)
2 Cable de red
3 Unidad de evaporación (incl. disco
higiénico, engranaje de accionamien-
to, bloque de placas circulares)
4 Depósito de agua extraíble
5 Parte inferior del aparato
6 Tapa extraíble para el módulo
WiFi/WLAN de Venta
ANTES DEL PRIMER USO
• Desempaquete el aparato y colóquelo sobre una superficie segura.
• Retire la parte superior del aparato 1.
• Extraiga la unidad de evaporación 3 del depósito de agua 4.

94 ES
PUESTA EN MARCHA
1
Llene el depósito de agua de la parte
inferior del aparato con agua del grifo
fresca (aprox. 9 litros), como máximo
hasta la mitad.
Inserte la unidad de evaporación B en
el depósito de agua de la parte inferior
del aparato A. Seguidamente, coloque
la parte superior C sobre la parte infe-
rior A asegurándose de hacerlo por el
lado correcto.
Conecte el conector de red D a la red
eléctrica y ponga en marcha el aparato
tocando brevemente la tecla de encen-
dido .
i La tecla de encendido para
conectar y desconectar el aparato
solo se ilumina si el aparato está
enchufado a la corriente.
2 3
C
B
D
A

95ES
CONFIGURACIÓN
Y APLICACIÓN VENTA
1. Active el Bluetooth en el teléfono móvil o la tableta
El LW73 WiFi y el LW74 WiFi tienen activado el Bluetooth
mediante el símbolo intermitente de forma continua.
i
Tocando el campo de visualización y mando
“WiFi/Bluetooth” puede conmutar entre WiFi/
Bluetooth OFF, Bluetooth ON y WiFi ON.
El campo de visualización y mando “WiFi/Bluetooth” está apagado cuando el WiFi/
Bluetooth está desactivado. Tocando el campo apagado se activa el Bluetooth.
2. Active Bluetooth y WLAN en el teléfono móvil o la tableta
Asegúrese de que su teléfono móvil o tableta estén conectados con la red WLAN de
su casa.
3. Descargue la aplicación VENTA, instálela y ábrala
La aplicación Venta gratuita le permite
controlar a distancia su AeroStyle LW73
WiFi / LW74 WiFi con toda facilidad, y
utilizar y gestionar las funciones amplia-
das de su aparato..
Dese de alta en el menú o regístrese
en cuanto haya descargado la aplicación Venta.
i Es imprescindible completar el proceso de registro para poder gestionar y con-
trolar su AeroStyle LW73 WiFi/LW74 WiFi a distancia desde cualquier lugar.
4. Configure el WiFi con la aplicación VENTA
La función de búsqueda + localiza automáticamente todos los aparatos de Venta
que se encuentran en las proximidades. Una vez detectados, seleccione su aparato
con símbolo Bluetooth. A continuación, introduzca en SSID el nombre de su red
WLAN y la correspondiente contraseña y seleccione GUARDAR. Su aparato de Venta
se conecta a la red, y ya puede controlarlo y gestionarlo.
i El teléfono móvil o la tableta y el aparato LW73 WiFi /LW74 WiFi deben en-
contrarse muy cerca el uno del otro y deben estar conectados a la misma red
WLAN durante todo el proceso.
Si surge algún problema durante la configuración del WiFi, consulte el aparta-
do “¿Qué pasa si no se puede establecer la conexión WiFi?”.
Encontrará más información en www.venta-air.com/Service/WiFi-Control-App/

96 ES
WIFI / BLUETOOTH
WiFi / Bluetooth
Indicador Función y ajuste en la pantalla del LW73 WiFi/LW74 WiFi
Iluminado
Parpadea despacio
Parpadea deprisa
Parpadea
deprisa
Conexión WiFi o Bluetooth ON (activada).
Se ha establecido la conexión WiFi con el servidor de
Venta online.
Se ha establecido la conexión WiFi con la red local.
La conexión WiFi no se ha establecido todavía o se ha
interrumpido.
La conexión Bluetooth no se ha establecido todavía o se
ha interrumpido.
Conexión WiFi y Bluetooth OFF (desactivada).
i
No aparecen los indicadores de WiFi/Bluetooth.
(El campo de visualización está apagado).
Los módulos de WiFi y Bluetooth no envían ni reciben
datos y no están conectados con ninguna red o aparato.
Para conectar/desconectar o activar/desactivar la
conexión WiFi/Bluetooth: tocando el campo de mando
de WiFi/Bluetooth puede conmutar entre WiFi/Bluetooth
OFF, Bluetooth ON y WiFi ON.
i
En el modo de reposo solo se puede conmutar
entre WiFi/Bluetooth OFF y WiFi ON.
Si la conexión WiFi/Bluetooth está desconectada
y quiere volver a conectarla o activarla, solo tiene
que tocar el campo de visualización y mando que
se encuentra apagado.

97ES
Indicador Función
1Nivel de
velocidad
Muestra la velocidad 1 - 2 - 3 - 4.
i
Los niveles de velocidad se representan con un círculo dividido en
varios segmentos. Si se sube de nivel, el siguiente segmento en sentido
horario se vuelve más grueso. La velocidad mínima es el nivel 1, el segmento
más delgado situado en la base, y la máxima corresponde al nivel 4, el
segmento más grueso situado a la derecha. En la ilustración se muestra el
aspecto del círculo cuando está activado el nivel 4.
2humidity Indica la humedad del aire
3 y Ajuste del nivel de velocidad por pulsación breve: reduce la
velocidad y la aumenta.
4Modo nocturno: se activa o desactiva tocándolo brevemente.
ACTIVADO: el aparato atenúa la iluminación de la pantalla,
reduce el nivel de velocidad al 1 y desconecta la banda luminosa
LED 8.
i El nivel de velocidad 1 puede modificarse manualmente con las teclas
3, + o -. No es posible el funcionamiento en modo automático 6. No
puede conectarse la banda luminosa 8.
DESACTIVADO: iluminación clara de la pantalla, banda luminosa
LED 8 conectada; el aparato funciona a la velocidad ajustada
1 – 4.
La banda luminosa LED 8 no se conecta si antes había sido desco-
nectada expresamente. Puede volverse a activar el modo nocturno
tocando y manteniendo pulsada la correspondiente tecla 4 durante
aprox. 3 segundos.
INDICADORES, FUNCIONES
Y AJUSTES
2
3
4
5
1
3
6
8
7

98 ES
5Conexión y desconexión del aparato por pulsación breve de la
tecla de encendido.
i La tecla de encendido para conectar y desconectar el aparato solo se
ilumina si el aparato está enchufado a la corriente.
6Modo automático: se activa o desactiva tocándolo brevemente.
ACTIVADO: el símbolo parpadea continuamente en la pan-
talla; el aparato regula de forma automática los niveles de veloci-
dad en función de la humedad del aire en el ambiente.
i
Cuando se activa el modo automático, en el indicador humidity 2
que parpadea dos veces, y a continuación vuelve a mostrarse la
humedad del aire medida en el ambiente.
DESACTIVADO: el símbolo está permanentemente encendido
y el aparato funciona con la velocidad ajustada 1 – 4.
Ajuste de la humedad deseada al 30 – 70 %:
Toque la tecla 6 y manténgala pulsada durante aprox.
3 segundos, hasta que el indicador humidity 2 parpadee. Ajuste
la humedad deseada con las teclas 3 de - o + (en incrementos
Vuelva a tocar la tecla 6 y manténgala pulsada durante aprox.
3 segundos, hasta que se apague el parpadeo del indicador
humidity 2 y se muestre de nuevo la humedad medida en el
ambiente.
Asegúrese de que el modo automático esté conectado: el
símbolo debe parpadear continuamente en la pantalla.
7 Conexión y desconexión de WiFi o Bluetooth: toque breve-
mente el símbolo correspondiente. Encontrará una descripción
detallada en el apartado “WiFi / Bluetooth”.
8Banda
luminosa
LED
Iluminación fija: el aparato está en funcionamiento.
Parpadeo continuo: el aparato se ha desconectado automática-
mente por falta de agua.
i La banda luminosa 8 se puede conectar y desconectar durante el
funcionamiento del aparato tocando la tecla de modo nocturno 4
y manteniéndola pulsada durante 3 segundos.
La aplicación gratuita de Venta le permite elegir el color que prefiera.

99ES
LIMPIEZA Y CUIDADO
! ¡Atención! Asegúrese de que durante todas las medidas el aparato esté apa-
gado y de que el conector de red no esté enchufado en la toma de corriente.
Indicador Medidas
9WATER Retire la parte superior del aparato. Llene con agua del grifo
fresca el depósito de agua de la parte inferior del aparato,
como máximo hasta la mitad. Coloque la parte superior sobre
la parte inferior y vuelva a poner en marcha el aparato.
i En cuanto se detecta un nivel de agua insuficiente en el depósito,
el aparato se desconecta automáticamente, la banda luminosa 8
parpadea continuamente y aparece el indicador WATER en la
pantalla. En el indicador humidity 2 parpadean dos rayitas y ya no se
muestra la humedad del ambiente.
Para humedecer el aire ambiental de forma continuada y reducir
recomendamos rellenar el agua a diario.
10 SERVICE Retire la parte superior del aparato. Vacíe el agua que quede en
el depósito. Enjuague a fondo el depósito y la unidad de evapo-
ración. Llene con agua del grifo fresca el depósito de agua de la
parte inferior del aparato, como máximo hasta la mitad. Vuelva
a montar el aparato y póngalo en marcha. Toque el indicador
SERVICE 10 de la pantalla y manténgalo pulsado durante 3
segundos hasta que se apague.
i Para garantizar un funcionamiento perfectamente higiénico en
régimen continuo, el indicador SERVICE recuerda cada 14 días que
debe efectuarse esta medida, aunque el aparato se encuentre en
modo de reposo.
912 11 10

100 ES
11 CLEANING Retire la parte superior del aparato. Vacíe el agua que quede
en el depósito, llénelo con agua del grifo fresca (como máximo
aparato y hágalo funcionar a nivel bajo durante aprox. 2 horas.
Le aconsejamos ventilar bien la estancia durante el proceso de
limpieza, para evitar olores desagradables en caso de que el
aparato esté muy sucio. A continuación, retire la parte superior
del aparato y vacíe el agua sucia. Enjuague a fondo el depósito
y la unidad de evaporación. Llene con agua del grifo fresca el
depósito de agua de la parte inferior del aparato (como máximo
hasta la mitad), monte el aparato y póngalo en marcha. Toque
el indicador CLEANING 11 de la pantalla y manténgalo pulsado
durante 3 segundos hasta que se apague.
i Cada 6 meses (partiendo de un funcionamiento continuo las 24 h), la
indicación CLEANING recuerda la necesidad de llevar a cabo esta medida.
12 DISK 1. Retire la parte superior del aparato y extraiga la unidad de
evaporación del depósito de agua.
A
abB
C
2. Suelte con cuidado los
brazos de sujeción a y b
del eje y retire el soporte A
del rodillo de evaporación.
3. Gire el tapón
de cierre B
y quítelo.
4. Saque el disco
higiénico C y
sustitúyalo.
5. Vuelva a montar el aparato y póngalo en marcha.
6. Toque el indicador DISK 11 de la pantalla y manténgalo
pulsado durante 3 segundos hasta que se apague.
i
La vida útil del disco higiénico es de aprox. 4 meses (si está en
funcionamiento continuo las 24 h). Su durabilidad depende del grado
de dureza y la calidad del agua, así como del rendimiento diario de
evaporación y las horas de funcionamiento. Cada 4 meses
(partiendo de un funcionamiento continuo las 24 h), el indicador
DISK recuerda la necesidad de llevar a cabo esta medida.
El programa de reciclaje ReNew de Venta le permite devolver el disco
higiénico tras su uso (véase RECICLAJE Y ELIMINACIÓN).

101ES
Las medidas SERVICE, CLEANING y DISK pueden realizarse siempre que sea
necesario, aunque no se hayan encendido los indicadores correspondientes. Una
vez concluida la medida en cuestión, ejecute la respectiva función de RESET tocan-
do la tecla de encendido y manteniéndola pulsada durante aprox. 4 segundos
hasta que parpadee y se muestren los indicadores SERVICE, CLEANING y DISK en
la pantalla. Entonces, toque la medida que haya realizado y manténgala pulsada
durante aprox. 3 segundos hasta que se apague. A continuación, toque la tecla de
encendido , que está parpadeando, y manténgala pulsada durante aprox. 4 segun-
dos hasta que la luz quede fija. A partir de entonces, el recordatorio correspondiente
a la medida realizada volverá a aparecer tras el plazo preestablecido.
Los residuos que pueda haber en el depósito de agua y en la unidad de evaporación
(sedimentos o decoloraciones blancas, marrones o de color verde-amarillento) NO
menoscaban el funcionamiento del aparato.
LIMPIEZA DE LA PARTE
SUPERIOR DEL APARATO
! ¡Atención! Asegúrese de que el aparato esté apagado y de que el conector de
red esté desenchufado de la toma de corriente.
Limpie la parte superior del aparato con un paño o pincel de limpieza seco, o bien
con un paño ligeramente húmedo.
! ¡No lave la parte superior del aparato bajo el chorro directo de agua!
La pantalla solo debe limpiarse con un paño seco o con una toallita de limpieza
especial para pantallas.
! ¡No limpie la pantalla con paños mojados o demasiado húmedos!
ACCESORIOS
• Disco higiénico de Venta para un perfecto funcionamiento higiénico en régimen
continuo
• Limpiador Venta para la limpieza semestral
Más accesorios para AeroStyle disponibles online
DE
www.venta-air.com

102 ES
DATOS TÉCNICOS
Modelo AeroStyle LW73 WiFi AeroStyle LW74 WiFi
Colores Blanco intenso / negro intenso
Para espacios de
Indicador LED de estado Banda luminosa azul
Pantalla táctil interactiva De serie
Control por aplicación Módulo WiFi / WLAN
Sensores de medición Humedad del aire
Higienización del agua De serie
Niveles de potencia 4 + automático
Emisiones acústicas (niveles 1–4) 24 / 36 / 44 / 50 dB(A) 27 / 35 / 41 / 47 dB(A)
Consumo eléctrico (niveles 1–4) 7 / 9 / 13 / 18 vatios 11 / 14 / 17 / 24 vatios
Tensión de red 220–240 V / 50/60 Hz
Capacidad de agua (máx.) 9 litros
Medidas (long. x anch. x alt.)
Peso 10,5 kg
Rango de frecuencias WLAN 2,4 GHz
Potencia de emisión WLAN
Sujeto a modificaciones y posibles errores

103ES
RECICLAJE Y ELIMINACIÓN
El material de embalaje puede volver a emplearse. El embalaje debe
eliminarse de forma respetuosa con el medio ambiente y entregarse a los
puntos de recolección de materiales reciclables.
El aparato no debe eliminarse con los residuos domésticos usuales. Debe
eliminarse en un lugar de recogida y reciclado de aparatos eléctricos y
electrónicos conforme a la Directiva WEEE. Use siempre los sistemas de entre-
ga y de recogida locales que estén a su disposición. De este modo contribuye
de forma valiosa a la protección del medio ambiente y la salud de las personas. Para
más información, póngase en contacto con las autoridades locales.
Programa de reciclaje GRATUITO de discos higiénicos de Venta para proteger
el medio ambiente
útil, no solo tiene ocasión de contribuir a preservar los recursos naturales, sino que
además obtendrá un bono ecológico personal ReNew que podrá canjear la próxima
vez que pida un disco higiénico a Venta-Luftwäscher GmbH. Si desea información más
detallada, consulte al equipo de servicio de Venta.
NOTA: el programa de reciclaje ReNew de Venta solo abarca ventas y envíos dentro
de Alemania. Fuera de Alemania, las filiales de Venta le informarán con mucho gusto
sobre los programas locales o nacionales disponibles en su país. Si en su país no se
ofrece el programa de reciclaje ReNew, puede eliminar el disco higiénico junto con
los residuos domésticos.
GARANTÍA
En Venta-Luftwäscher GmbH estamos convencidos de la gran calidad de nuestros pro-
ductos, y por ello garantizamos durante dos años a partir de la fecha de compra que
este producto no presenta defectos si se emplea debidamente. Si a pesar de todo se
produjera un fallo relacionado con el material o el acabado, póngase en contacto con el
equipo de servicio de Venta o con su distribuidor. Asimismo, son válidas las condicio-
nes de garantía generales de Venta: www.venta-air.com/service/garantie/
PROTECCIÓN DE DATOS
Venta-Luftwäscher GmbH trata sus datos de forma confidencial. Si se ha produ-
cido algún cambio en sus datos personales o si tiene preguntas sobre el uso que
hacemos de los mismos, le rogamos que se dirija al servicio de atención al cliente
de Venta: +49 751 5008 88, www.venta-air.com
Encontrará más información sobre temas de protección de datos en nuestra política
de privacidad, que puede consultar en www.venta-air.com

104 ES
¿QUÉ PASA SI…
! ¡Atención! Antes de realizar alguna de las medidas mencionadas a continua-
ción, asegúrese de que el aparato esté apagado y de que el conector de red
esté desenchufado de la toma de corriente.
… en la pantalla no aparece la tecla de encendido para conectar el aparato?
Compruebe si el conector de red está conectado a la red eléctrica.
… la pantalla indica WATER aunque hay agua en el depósito?
Compruebe si hay agua suficiente en el depósito y/o si la parte superior del aparato
está bien montada sobre la parte inferior, por el lado correcto.
i Medida: Retire la parte superior del aparato. Llene con agua del grifo el depósi-
to de agua de la parte inferior del aparato, como máximo hasta la mitad.
Coloque la parte superior sobre la parte inferior, asegurándose de que lo hace por el
lado correcto, y vuelva a poner en marcha el aparato.
… al tocar la pantalla se ven zonas blancas en el fondo?
En estancias secas pueden aparecer zonas blancas en el fondo de la pantalla a
causa de la carga electrostática del ambiente. Esto no afecta el funcionamiento ni el
manejo del aparato, y no es síntoma de fallo alguno.
… la banda luminosa no se enciende aunque el aparato está en marcha?
Compruebe si se ha desconectado expresamente la banda luminosa. Tocando
la tecla de modo nocturno del aparato y manteniéndola pulsada durante aprox.
3 segundos puede conectarse nuevamente la banda luminosa. También es posible
hacerlo a través de la aplicación Venta.
i En el modo nocturno no se puede conectar la banda luminosa.
… la banda luminosa se ilumina por sí sola en amarillo?
Esto significa que se está ejecutando una actualización automática del firmware.
… no se puede establecer la conexión WiFi?
Compruebe si…
• La red que utiliza es de 2,4 GHz o se trata de una red mixta de 2,4/5 GHz, porque
el módulo WiFi/WLAN del aparato no es compatible con redes de 5 GHz.
• Su router es compatible con 802.11b/g/n.
• Su teléfono móvil o tableta tiene instalado el sistema iOS a partir de la versión 11.0
o Android a partir de la versión 8.0.
Si es preciso, actualice el sistema operativo de su teléfono móvil o tableta.

105ES
… no se puede conectar el WiFi ni el Bluetooth en la pantalla del aparato?
Cerciórese de que el módulo WiFi/WLAN esté correctamente insertado en la carca-
sa del aparato.
i Medida: Retire la tapa A del dorso de la carcasa y compruebe si el módulo
WiFi/WLAN B está bien colocado.
AAB
Tire hacia arriba de ambas
pestañas de enclava-
miento.
Despliegue la tapa hacia
delante y retírela tirando
de ella hacia abajo.
El módulo B tiene que es-
tar firmemente insertado
en la carcasa.
A
A
A
Seguidamente cierre la tapa A hasta que ambas pestañas de enclavamiento encas-
tren de forma perceptible.
EQUIPO DE SERVICIO DE VENTA
¿Necesita más información sobre este aparato de Venta? ¿Desea un asesoramiento
más exhaustivo? ¿Quiere pedir accesorios? Ningún problema: el equipo de servicio
de Venta estará encantado en atenderle. Llámenos directamente o visítenos en la
página web de Venta.
DE
+49 751 5008 88, www.venta-air.com

106 PL
SZANOWNY KLIENCIE,
Zasada funkcjonowania urządzeń Venta
pakiet dysków. Z ich powierzchni oczyszczone, higieniczne powietrze jest wprowa-
-
https://www.venta-air.com/en_de/Service/Product-registration/
-
www.venta-air.com
Symbole 109
Informacje podstawowe 110
Uruchomienie 111
Wi-fi / bluetooth 113
Akcesoria 118
Dane techniczne 119
Gwarancja 120
Ochrona danych 120
Serwis Venta 122

107PL
•
-
-
•
-
•
•
•
• -
• -
•
•
•
-
nia.
• -
wiek inny sposób.
• -
•
jakichkolwiek przedmiotów.
!

108 PL
•
•
cieczy.
•
•
•
•
•
•
•
•
• -
•
•
•
przez olejki eteryczne lub inne nieoryginalne dodatki.
•
-
-
pobiec powstawaniu nieprzyjemnych zapachów lub rozwojowi mikroorganizmów
•

109PL
1 × airwasher Venta
1 × dysk higieniczny (zamontowany fabrycznie)
1 ×
1 ×
SYMBOLE
!
i Informacje dodatkowe
Pomocne wskazówki
-
niezgodne
•
•
•
•

110 PL
INFORMACJE PODSTAWOWE
LW73 WiFi / LW74 WiFi
1
6
4
5
3
2
1
techniczna)
2
3 -
4
5
6
Venta wi-fi/WLAN
•
•
•

111PL
URUCHOMIENIE
1
-
nia AB-
CA.
D do gniazda zasilania
-
lania
i Przycisk zasilania -
2 3
C
B
D
A

112 PL
KONFIGURACJA
1. Aktywowanie bluetooth na smartfonie lub tablecie
LW74 WiFi symbol
i
takiego czarnego panelu.
2. Aktywowanie bluetooth iwi-fi na smartfonie lub tablecie
3. Pobranie lub instalacja iuruchomienie aplikacji VENTA
-
niem AeroStyle LW73 WiFi / LW74 WiFi,
.
i
4. Konfiguracja wi-fi zużyciem aplikacji VENTA
Funkcja wyszukiwania + pozwala na automatyczne znalezienie wszystkich lokal-
i
-
wane do tej samej sieci wi-fi.
-
Dodatkowe informacje na stronie www.venta-air.com/Service/WiFi-Control-App/

113PL
WI-FI / BLUETOOTH
WiFi / Bluetooth
Wyświetlacz Funkcje iustawienia na wyświetlaczu modułu
LW73 WiFi/LW74 WiFi
świeci
miga powoli
miga szybko
miga szybko
wi-fi lub bluetooth jest włączone lub aktywne.
przerwane.
wi-fibluetoothwyłączone lub dezakty-
wowane.
i
Wyłączenie iwłączenie bądź aktywacja/dezaktywacja
połączenia wi-fi iBluetooth:
i

114 PL
Wyświetlacz Funkcja
1
obrotowa
prędkość 1 - 2 - 3 - 4.
i
poziom 4 jako najgrubszy segment po prawej. Ilustracja przedstawia 4.
2humidity Wskazuje wilgotność powietrza
3 i -
cie:
4Tryb nocny
WŁ:
8.
i
WYŁ:-
8-
8-
trybu nocnego 4
2
3
4
5
1
3
6
8
7

115PL
5Włączanie iwyłączanie urządzenia
przycisku zasilania.
i-
zasilania.
6Tryb automatyczny-
WŁ: stale miga-
i
WYŁ: -
Ustawianie pożądanej wilgotności 30 – 70 %:
6
2
3
(– lub +).
6
2
7 wi-fi lub Bluetooth przez
„Wi-fi/Bluetooth“
8 Ciągłe światło
Stałe miganie
spowodowane brakiem wody.
i8
4
przez 3 sek.

116 PL
! Uwaga!
Wyświetlacz Czynności
9WATER
-
i-
8-
2
-
-
10 SERVICE -
10 na
i
912 11 10

117PL
11 CLEANING -
-
-
-
-
11
i
12 DISK 1.
parowania.
A
abB
C
2.
-
rowywacza.
3.
4.
-
5.
6. 11
i
-
-

118 PL
-
-
-
dzenia.
CZYSZCZENIE GÓRNEJ
! Uwaga! -
! Górnej części urządzenia nie należy myć pod bieżącą wodą!
-
czenia ekranów!
! Wyświetlacza nie można czyścić na mokro, ani zbyt wilgotnym materiałem!
AKCESORIA
•
•
www.venta-air.com

119PL
DANE TECHNICZNE
Model AeroStyle LW73 WiFi AeroStyle LW74 WiFi
Kolory
Zalecany do pomieszczeń
Wskaźnik statusu LED
Interaktywny panel dotykowy
Sterowanie za pomocą aplikacji
Czujniki pomiarowe
Higiena wody
Poziomy mocy 4 + tryb automatyczny
Emisja hałasu (poziomy 1–4) 24 / 36 / 44 / 50 dB(A) 27 / 35 / 41 / 47 dB(A)
Zużycie energii elektrycznej
(poziomy 1–4)
Napięcie zasilania
Pojemność zbiornika zwodą (maks.) 9 litrów
Wymiary
Masa
Zakres częstotliwości WLAN
Moc nadajnika WLAN

120 PL
-
odpadów do recyklingu.
Nie
DARMOWY program recyklingu dysków higienicznych Venta wcelu ochrony
środowiska
UWAGA:
GWARANCJA
stronie: www.venta-air.com/en_de/service/warranty/
OCHRONA DANYCH
Venta Luftwäscher GmbH traktuje dane klientów poufnie. W razie zmiany danych
osobowych lub potrzeby uzyskania dodatkowych informacji na temat przechowy-
Venta:
+49 751 5008 88, www.venta-air.com

121PL
! Uwaga!
… na wyświetlaczu nie pojawia się przycisk zasilania , umożliwiający włączenie
urządzenia?
… na wyświetlaczu zapala się wskaźnik Water, mimo iż wzbiorniku znajduje się
woda?
-
iDziałanie:
... podczas dotykania wyświetlacza widoczne są wtle „białe pola“?
-
-
... taśma LED nie świeci się, mimo że urządzenie pracuje?
i
... taśma LED świeci niezależnie żółtym światłem?
systemowego.
... nie można nawiązać połączenia wi-fi?
• -
•

122 PL
•
W razie potrzeby zaktualizuj system operacyjny swojego smartfonu lub
tabletu.
... na wyświetlaczu nie można włączyć wi-fi ani bluetooth ?
-
dzenia.
i Działanie:
AAB
A
A
A
zaczepów pokrywy.
SERWIS VENTA
Venta. +49 751 5008 88, www.venta-air.com

123CZ
Jak funguje princip Venta
-
www.venta-air.com/Service/Produktregistrierung/
www.venta-air.com.
Rozsah dodávky 126
Symboly 126
Uvedení do provozu 128
Wi-Fi/Bluetooth 130
Technické údaje 136
Záruka 137
Servisní tým Venta 139
OBSAH

124 CZ
•
•
•
•
•
•
• -
•
•
•
•
poškození.
•
•
•
•
•
•
•
!

125CZ
•
•
•
zakopnout.
•
•
•
•
•
•
•
•

126 CZ
ROZSAH DODÁVKY
1×
1×
1×
1×
nebo na místního prodejce.
SYMBOLY
!
i
vrozporu
•
•
•
• ve venkovním prostoru.

127CZ
1
6
4
5
3
2
1
jednotka)
2
3 -
kého disku, hnacího ozubeného kola
4
5
6 Odnímatelný panel pro Wi-Fi/WLAN
modul Venta
•
•
•

128 CZ
UVEDENÍ DO PROVOZU
1
-
AB
A správným
C.
D
.
i
2 3
C
B
D
A

129CZ
APLIKACE VENTA
1. Aktivace funkce Bluetooth na přístroji Venta
.
i „Wi-Fi/
-
cí Wi-Fi/Bluetooth, zapnutou funkcí Bluetooth
2. Aktivace funkcí Bluetooth aWLAN na mobilu, resp. tabletu
3. Stažení, resp. instalace aotevření mobilní aplikace VENTA
nebo se
zaregistrujte.
i
4. Nastavení Wi-Fi prostřednictvím mobilní aplikace VENTA
i
Další informace najdete na adrese
www.venta-air.com/Service/WiFi-Control-App/

130 CZ
WI-FI/BLUETOOTH
Indikace Funkce anastavení na displeji přístroje LW73WiFi/ LW74WiFi
svítí
pomalu bliká
rychle bliká
rychle bliká
ZapnutéWi-Fi nebo Bluetooth.
VypnutéWi-FiBluetooth.
i
Vypnutí azapnutí, resp. (de)aktivace připojení přes Wi-Fi/
Bluetooth:
-
i
Wi-Fi.
-
-
dací pole.
Wi-Fi/Bluetooth

131CZ
Indikace Funkce
1
Indikace rychlosti
i
2humidity Indikace vlhkosti vzduchu
3
zvyšuje rychlost.
4Zapnutí, resp. vypnutí nočního režimu krátkým stisknutím.
ZAPNUTO:
8.
i
VYPNUTO:8-
8
4
5Zapnutí, resp. vypnutí přístroje
i
8
2
3
4
5
1
3
6
7

132 CZ
6Zapnutí, resp. vypnutí automatického provozu krátkým
stisknutím.
ZAPNUTÍ: Indikátor na displeji nepřetržitě bliká
i
VYPNUTO: Indikátor
Nastavení požadované vlhkosti vzduchu vrozsahu 30–70%:
6
23
6-
2
7 Wi-Fi nebo Bluetooth
připojení
8 Nepřerušované svícení
Nepřetržité blikání
nedostatku vody.
i8
4
podle své volby.

133CZ
! Pozor!
Indikace Opatření
9WATER
-
i
8
2
den.
10 SERVICE
10 na displeji, dokud nezmizí.
i
912 11 10

134 CZ
11 CLEANING
-
-
11 na displeji, dokud
nezmizí.
i
12 DISK 1.
A
abB
C
2.
3. -
ho.
4.-
5.
6.12 na displeji,
dokud nezmizí.
i

135CZ
, dokud
se znovu zobrazí ve stanovených intervalech.
! Pozor!
!
Horní část přístroje se nesmí čistit pod tekoucí vodou!
! Displej se nesmí čistit mokrou, resp. příliš vlhkou utěrkou!
•
•

136 CZ
TECHNICKÉ ÚDAJE
Model AeroStyle LW73WiFi AeroStyle LW74WiFi
Barvy
Vhodnost pro velikost místnosti
LED indikátor stavu
Interaktivní dotykový displej Sériová výbava
Ovládání pomocí mobilní aplikace Wi-Fi/WLAN modul
Měřicí senzory Vlhkost vzduchu
Vodní hygiena Sériová výbava
Stupně výkonu
Hlučnost
Spotřeba energie
Síťové napětí
Objem vody (max.)
Rozměry
Hmotnost
Frekvenční pásmo WLAN
Vysílací výkon WLAN

137CZ
nesmí
BEZPLATNÝ program recyklace hygienického disku Venta pro ochranu životního
prostředí
UPOZORNĚNÍ:
-
ZÁRUKA
-
-
DE
+49 751 5008 88, www.venta-air.com

138 CZ
! Pozor!
…se na displeji nezobrazí vypínač pro zapnutí přístroje?
…se na displeji zobrazuje indikace WATER, přestože je ve vaničce voda?
i Opatření:
...jsou při stisknutí displeje na pozadí vidět „bílá pole“?
-
...nesvítí LED lišta, přestože je přístroj vprovozu?
-
aplikace Venta.
i
...LED lišta sama svítí žlutě?
Probíhá automatická aktualizace firmwaru.
...nelze navázat Wi-Fi připojení?
•
•
• máte na mobilu, resp. tabletu nainstalovaný systém iOS od verze 11.0, resp.
Android od verze 8.0.

139CZ
...na displeji přístroje nejde zapnout ani Wi-Fi
, ani Bluetooth ?
i Opatření:
AAB
A
A
A
SERVISNÍ TÝM VENTA
-
DE
+49 751 5008 88, www.venta-air.com

140 SK
a kontrolu LW73 WiFi / LW74 WiFi aj po ceste.
Takto funguje princíp Venta
ktorej rotujú sofistikovane usporiadané zväzky diskov. Cez ich plochy sa do miest-
vzduchu.
www.venta-air.com/Service/Produktregistrierung/
Najaktuálnejšiu verziu návodu na obsluhu nájdete na našej webovej stránke
www.venta-air.com
Rozsah dodávky 143
Symboly 143
Uvedenie do prevádzky 145
Konfigurácia a aplikácia Venta 146
WiFi / Bluetooth 147
Indikácie, funkcie a nastavenia 148
Príslušenstvo 152
Technické údaje 153
Recyklácia a likvidácia 154
Záruka 154
Ochrana údajov 154
Servisný tím Venta 156
OBSAH

141SK
• -
-
• -
•
•
resp. deti bez dozoru.
•
prívodu.
•
•
údajov na typovom štítku.
•
•
•
•
•
•
•
•
•
•
•
rukami.
!
UPOZORNENIA

142 SK
•
•
• -
•
• Maximálna nadmorská výška miesta inštalácie: 2000 metrov
• Nikdy nezakrývajte ani neblokujte vetracie štrbiny, aby ste zabránili prehriatiu/po-
•
•
-
• -
•
aby sa v stojatej vode, resp. zvyškoch vody, zabránilo vzniku zápachu alebo vzniku
biologických organizmov.
•

143SK
ROZSAH DODÁVKY
1 ×
1 × hygienický disk (predmontovaný)
1 × modul WiFi/WLAN (predmontovaný)
1 × návod na obsluhu
miestneho predajcu.
SYMBOLY
!
predišli poraneniam a vecným škodám.
i
v rozpore
•
•
• V blízkosti plavární alebo mokrých plôch
•

144 SK
LW73 WiFi / LW74 WiFi
1
6
4
5
3
2
1
jednotka)
2
3 Odparovacia jednotka (vrátane hygie-
nického disku, hnacieho ozubeného
kolesa, zväzku diskov)
4
5
6
WiFi/WLAN
•
•
•

145SK
UVEDENIE DO PREVÁDZKY
1
maximálne do polovice.
B do va-
AC
správnou stranu na dolný diel spotre-
A.
D k elektrickej
-
.
i na zapnutie a
sieti.
2 3
C
B
D
A
220–240 V
50/60 Hz

146 SK
KONFIGURÁCIA A APLIKÁCIA
VENTA
1. Aktivácia Bluetooth na spotrebiči Venta
Na displeji LW73 WiFi, resp. LW74 WiFi, musí k tomu
.
i
WiFi/Bluetooth VYP, Bluetooth ZAP a WiFi ZAP.
Bluetooth aktivuje.
2. Aktivácia Bluetooth a WLAN na smartfóne, resp. tablete
3. Stiahnutie, resp. inštalácia a otvorenie aplikácie VENTA
VENTA sa prihláste v menu , resp. sa
zaregistrujte.
i
4. Nastavenie WiFi cez aplikáciu VENTA
+
-
i
Ďalšie informácie nájdete na www.venta-air.com/Service/WiFi-Control-App/

147SK
WIFI / BLUETOOTH
Indikácia Funkcia a nastavenie na displeji LW73 WiFi/LW74 WiFi
Svieti
Bliká pomaly
Bliká rýchlo
Bliká rýchlo
Pripojenie cez WiFi alebo Bluetooth je zapnuté, resp. aktivované.
Pripojenie cez WiFi k serveru Venta na webe bolo vytvorené.
Pripojenie cez WiFi k lokálnej sieti bolo vytvorené.
Pripojenie cez WiFi alebo Bluetooth je vypnuté, resp.
deaktivované.
i
Vypnutie a zapnutie, resp. (de)aktivácia pripojenia cez WiFi/
Bluetooth:
a WiFi ZAP.
i
len medzi WiFi/Bluetooth VYP a WiFi ZAP.
Na opätovné zapnutie, resp. aktiváciu pripojenia cez
WiFi / Bluetooth

148 SK
Indikácia Funkcia
1
Indikácia rýchlosti 1 - 2 - 3 - 4.
i
2humidity Indikácia vlhkosti vzduchu
3 a zvýši
4Nočný režim
ZAP:
na 1 a vypne LED pásik 8.
i
VYP: jasné podsvietenie displeja, zapnutý LED pásik 8 a
LED pásik 8-
4 na cca 3 sekundy sa dá
5Zapnutie, resp. vypnutie spotrebiča
i
INDIKÁCIE, FUNKCIE
A NASTAVENIA
8
2
3
4
5
1
3
6
7

149SK
6Automatický chod
ZAP: indikácia na displeji bliká nepretržite
miestnosti.
i
Pri zapnutí automatického chodu dvakrát zabliká v indikácii humidity 2
VYP: indikácia
Nastavenie požadovanej vlhkosti vzduchu 30 – 70 %:
6-
23 nastavte
6
nezhasne indikácia humidity 2 a znova sa nezobrazí nameraná
na disple-
7 Vypite a zapnite pripojenie cez WiFi alebo Bluetooth krátkym
8LED pásik Nepretržité svetlo
Nepretržité blikanie
pri nedostatku vody.
i LED pásik 8
4
chcete.

150 SK
! Pozor!
Indikácia Opatrenia
9WATER
-
i
vypne, LED svetlo 8
WATER. V indikácii humidity 2
miestnosti sa nezobrazuje.
10 SERVICE
displeji na indikáciu SERVICE 10
kým nezhasne.
i
aby ste vykonali toto opatrenie.
912 11 10

151SK
11 CLEANING
-
-
-
-
káciu CLEANING 11
i
indikácia CLEANING pripomenie, aby ste vykonali toto opatrenie.
12 DISK 1.
A
abB
C
2.
3. -
nímte uzáver B.
4. Vyberte hy-
gienický disk C
nový.
5.
6. 12
sekundy, kým nezhasne
i
prevádzke) vám indikácia DISK pripomenie, aby ste vykonali toto
opatrenie.

152 SK
-
alebo hnedé usadeniny, resp. sfarbenia) NEMAJÚ negatívny vplyv na fungovanie
! Pozor!
!
Horný diel spotrebiča sa nesmie čistiť pod tečúcou vodou!
! Displej sa nesmie čistiť na mokro, resp. príliš na vlhko!
•
•
DE
www.venta-air.com

153SK
TECHNICKÉ ÚDAJE
Model AeroStyle LW73 WiFi AeroStyle LW74 WiFi
Farby
Vhodnosť pre veľkosť miestnosti
LED indikátor stavu Modrý svetelný pásik
Interaktívny dotykový displej Sériovo
Ovládanie aplikáciou Modul WiFi / WLAN
Meracie snímače
Hygiena vody Sériovo
Výkonové stupne 4 + automatika
Vznik hluku 24 / 36 / 44 / 50 dB(A) 27 / 35 / 41 / 47 dB(A)
Spotreba prúdu 7 / 9 / 13 / 18 wattov 11 / 14 / 17 / 24 wattov
Sieťové napätie 220 – 240 V / 50/60 Hz
Objem vody (max.) 9 litrov
Rozmery
Hmotnosť 10,5 kg
Frekvenčný rozsah WLAN 2,4 GHz
Vysielací výkon WLAN maximálne 20 dBm
Zmeny a omyly vyhradené

154 SK
RECYKLÁCIA A LIKVIDÁCIA
zberne druhotných surovín.
nesmie
BEZPLATNÝ recyklačný program Venta hygienického disku na ochranu životného
prostredia
-
poskytne náš servisný tím Venta.
UPOZORNENIE: -
-
nú informácie o vašich lokálnych programoch/programoch špecifických pre danú
ZÁRUKA
OCHRANA ÚDAJOV
-
nia vaše osobné údaje alebo máte otázky o tom, ako nakladáme s vašimi údajmi,
DE
+49 751 5008 88, www.venta-air.com
-
ných údajov na adrese www.venta-air.com

155SK
! Pozor!
… sa na displeji nezobrazí tlačidlo Power na zapnutie spotrebiča?
… sa na displeji zobrazí Water, hoci vo vaničke na vodu je voda?
-
i Opatrenie:
prevádzky.
... pri ťuknutí na displej sú v pozadí viditeľné „biele polia“?
-
... LED pásik nesvieti, hoci je spotrebič v prevádzke?
i
... LED pásik svieti nezávisle nažlto?
Medzitým automaticky prebieha aktualizácia firmvéru.
... nie je možné vytvoriť pripojenie WiFi?
•
•
•
Android od verzie 8.0.

156 SK
... sa na displeji spotrebiča nedá zapnúť WiFi ani Bluetooth ?
i Opatrenie:
a skontrolujte správne nasadenie modulu WiFi/WLAN B.
AAB
Potiahnite obidve príchyt-
ky nahor.
Kryt sklopte dopredu a
A
A
A
SERVISNÝ TÍM VENTA
Zavolajte nám priamo alebo navštívte webovú stránku Venta.
DE
+49 751 5008 88, www.venta-air.com

157HU
KEDVES VÁSÁRLÓ!
-
A Venta elv
-
rik a káros anyagokat, például a port és a polleneket, belemossák azokat a vízbe, így
KÖSZÖNJÜK!
jobban teljesít. Használja egészséggel!
Kérjük, regisztrálja Venta készülékét:
www.venta-air.com/Service/Produktregistrierung/
Kérjük, vegye figyelembe az összes biztonsági tudnivalót, valamint a rendeltetéssze-
A kezelési útmutató naprakész változata a www.venta-air.com címen
Biztonsági tudnivalók 158
Szállítási terjedelem 160
Szimbólumok 160
Áttekintés 161
Üzembe helyezés 162
Konfigurálás és a Venta
mobilalkalmazás 163
WiFi / Bluetooth 164
Kijelzések, funkciók és beállítások 165
Tisztítás és ápolás 167
Tartozékok 169
Újrahasznosítás és hulladékkezelés 171
Garancia 171
Adatvédelem 171
Mit tegyek, ha …? 172
A Venta ügyfélszolgálata 173
TARTALOM

158 HU
•
szellemi képességekkel, vagy elégséges tapasztalattal és ismeretekkel nem
vagy elmagyarázzák nekik a készülék biztonságos használatának módját, és
megértették a fennálló veszélyeket.
•
• A készülék nem játékszer.
•
•
•
sérülésekhez vezethet.
• A készüléket kizárólag egy erre alkalmas hálózati csatlakozóaljzathoz csatla-
koztassa, amelynek feszültsége megegyezik a készülék adattábláján megadott
értékkel.
•
lóhere alakú csatlakozódugó.
• Sérült tápkábellel tilos üzembe helyezni a készüléket.
•
• A készüléket tilos üzembe helyezni, ha leesett vagy más módon megsérült.
• Elektromos készülékeken kizárólag szakemberek végezhetnek javításokat. A
• Ne üljön rá a készülékre és ne helyezzen rá tárgyakat.
• Ne dugjon idegen tárgyakat a készülékbe.
•
• Ne töltse túl a készüléket.
• A készüléket teli tartállyal szállítani vagy megbillenteni tilos.
• A hálózati csatlakozódugót tilos a tápkábelnél fogva, illetve vizes kézzel kihúzni a
fali aljzatból.
! BIZTONSÁGI TUDNIVALÓK

159HU
• A készüléket csak teljesen összeszerelt állapotban szabad üzembe helyezni.
• A készüléket kizárólag vízszintes és száraz felületen állítsa fel.
• A készüléket úgy állítsa fel, hogy ne lehessen feldönteni, és senki se botolhasson
meg a készülékben vagy a tápkábelben.
•
•
• A készülék túlhevülésének/károsodásának elkerülése érdekében tilos letakarni
• -
• A készülék kialakításának és az abban használt hidegpárologtatási technológiának
• A készüléket kizárólag az ahhoz tervezett eredeti Venta tartozékokkal
szabad üzemeltetni. Illóolajokat vagy más adalékanyagokat használni tilos.
adalékanyagok által okozott károkért.
• Amennyiben több napig nem használja, több napra kikapcsolja vagy hosszabb
-
• Ha nem használja a készüléket, húzza ki a hálózati csatlakozódugót a fali aljzatból.

160 HU
SZÁLLÍTÁSI TERJEDELEM
1 × Venta légmosó
1 ×
1 ×
1 × kezelési útmutató
Ha egyes alkotóelemek hiányoznak vagy sérültek, forduljon a Venta ügyfélszolgálatá-
hoz vagy a helyi forgalmazóhoz.
SZIMBÓLUMOK
! Biztonsági tudnivalók: A személyi sérülések és anyagi károk elkerülése
i
Hasznos tanácsok
HASZNÁLAT
megteremtéséhez lakó-, iroda- és szociális helyiségekben.
-
károkért vagy sérülésekért.
A nem
• helyiségek robbanásveszélyes és/vagy maró hatású légkörrel
•
• úszómedencék vagy vizes területek közelében
• a szabad ég alatt

161HU
ÁTTEKINTÉS
LW73 WiFi / LW74 WiFi
1
6
4
5
3
2
1
2 Tápkábel
3 Párologtató egység (higiénés korong-
gal, hajtó fogaskerékkel, korongkö-
teggel)
4
5 Készülék alsó része
6
számára
• Csomagolja ki a készüléket, és állítsa fel.
•
•

162 HU
ÜZEMBE HELYEZÉS
1
maximum a feléig.
Helyezze a párologtató egységet B a
A-
szét C
alsó részére A.
Csatlakoztassa a hálózati csatlakozódu-
gót D, majd kapcsolja be a készüléket a
Power gomb rövid megérintésével.
i A készülék be- és kikapcsolására
szolgáló Power gomb csak ak-
kor világít, ha a készülék csatlakoz-
tatva van az áramhálózatra.
2 3
C
B
D
A

163HU
KONFIGURÁLÁS ÉS A VENTA
MOBILALKALMAZÁS
1. A Bluetooth bekapcsolása a Venta készüléken
folyamatosan villognia kell a szimbólumnak.
i A -
szöri megérintésével válthat át a WiFi/Bluetooth
KI, Bluetooth BE és WiFi BE állapotok között.
A WiFi / Bluetooth akkor van kikapcsolva, ha
megérintésével kapcsolhatja be.
2. A Bluetooth, illetve WLAN bekapcsolása az okostelefonon vagy táblagépen
WLAN-hálózatra.
3. A VENTA mobilalkalmazás letöltése, telepítése és megnyitása
Az ingyenes Venta mobilalkalmazás
WiFi készülékét, valamint használhatja a
Jelentkezzen be a menüben, illetve
regisztráljon, miután letöltötte a VENTA mobilalkalmazást.
i AeroStyle LW73 WiFi / LW74 WiFi készülékét csak a regisztráció lezárását
4. A WiFi beállítása a VENTA mobilalkalmazás segítségével
A +-
majd koppintson a SAVE gombra. Ezzel csatlakozott Venta készülékéhez, így azt
i Az okostelefonnak/táblagépnek és az LW73 WiFi /LW74 WiFi készüléknek a
teljes folyamat alatt egymás közvetlen közelében kell lennie, illetve ugyanarra a
WLAN-hálózatra kell csatlakoznia.
Ha problémái akadnak a WiFi beállításával kapcsolatban, kérjük, olvassa el a
További információk a
www.venta-air.com/Service/WiFi-Control-App/weboldalon találhatók

164 HU
WIFI / BLUETOOTH
Kijelzés Funkció és beállítás az LW73 WiFi/LW74 WiFi kijelzőjén
Világít
Lassan villog
Gyorsan villog
Gyorsan villog
WiFi- vagy Bluetooth kapcsolat BE, illetve aktiválva.
WiFi-kapcsolat az internetes Venta szerverrel.
WiFi-kapcsolat a helyi hálózattal.
WiFi-kapcsolat megszakítva vagy várakozás a
WiFi-kapcsolat létrejöttére.
Várakozás a Bluetooth kapcsolatra vagy kapcsolat
megszakítva.
WiFi- és Bluetooth kapcsolat KI, illetve deaktiválva.
i
A WiFi- és a Bluetooth modul nem küld és nem fogad adato-
kat, nem csatlakozik egy hálózathoz vagy készülékhez sem.
WiFi-/Bluetooth kapcsolat ki- és bekapcsolása, illetve
(de)aktiválása:
többszöri megérintésével válthat át a WiFi/Bluetooth KI,
Bluetooth BE és WiFi BE állapotok között.
i
Készenléti üzemmódban csak a WiFi/Bluetooth KI és a
WiFi BE állapotok között válthat át.
A kikapcsolt WiFi-/Bluetooth kapcsolat újbóli bekap-
csolásához, illetve aktiválásához csak érintse meg a
WiFi / Bluetooth

165HU
Kijelzés Funkció
1Fordulat-
szám-
fokozat
Az 1. / 2. / 3. / 4. sebesség megjelenítése.
i
Minél nagyobb a fordulatszám-fokozat, annál vastagabb az óramutató
-
mens jelzi. Az ábrán a 4. fokozat van beállítva.
2humidity A helyiséglevegő páratartalmának
3 és A fordulatszám-fokozatot rövid érintéssel állíthatja be: A meg-
érintése csökkenti, míg a megérintése növeli a sebességet.
4Az éjszakai mód be-, illetve kikapcsolása rövid érintéssel.
BE:-
latszám-fokozatot, és kikapcsolja a LED-szalagot 8.
i
Az 1. fordulatszám-fokozat manuálisan módosítható a + vagy a
- gombbal 3. Az automata üzem 6 beállítása nem lehetséges. A
LED-szalag 8 nem kapcsolható be.
KI:8 be van
kapcsolva, és a készülék a beállított 1–4. fordulatszámmal jár.
A LED-szalag 8
az éjszakai mód gomb 4
nyomva tartásával újra bekapcsolható.
KIJELZÉSEK, FUNKCIÓK ÉS
BEÁLLÍTÁSOK
8
2
3
4
5
1
3
6
7

166 HU
5A készülék be-, illetve kikapcsolása a Power gomb rövid
megérintésével.
i A készülék be- és kikapcsolására szolgáló Power gomb csak akkor
világít, ha a készülék csatlakoztatva van az áramhálózatra.
6Az automata üzem be-, illetve kikapcsolása rövid érintéssel.
BE: kijelzés folyamatosan villog, és a készülék
-
za fordulatszám-fokozatokat.
i
Az automata üzem bekapcsolásakor a humidity kijelzésnél 2 kétszer
KI: kijelzés folyamatosan világít, és a készülék
a beállított 1–4. fordulatszámmal jár.
30–70%-os kívánt páratartalom beállítása:
Érintse meg a gombot 6-
percig, amíg villogni nem kezd a humidity kijelzés 2. Állítsa be a
kívánt páratartalmat a - vagy a + gombbal 3
Érintse meg újból a gombot 6-
2 villogása,
kijelzés folyamatosan villog!
7 Kapcsolja ki és be a WiFi- vagy Bluetooth kapcsolatot a
8LED-szalag A folyamatos világítás járó gépet jelez.
A folyamatos villogás a készülék automatikus lekapcsolását
jelzi vízhiány miatt.
i Járó készülék esetén a LED-szalag 8 az éjszakai mód gomb 4
és bekapcsolható.
választhat ki.

167HU
TISZTÍTÁS ÉS ÁPOLÁS
! Figyelem! Gondoskodjon róla, hogy a készülék minden intézkedésnél ki
legyen kapcsolva és a hálózati adapter ki legyen húzva a fali aljzatból!
Kijelzés Intézkedések
9WATER
majd helyezze üzembe a készüléket.
i-
san lekapcsol, a LED-szalag 8 folyamatosan villog, és a WATER
2 két vonal
naponta feltölteni vízzel a készüléket
10 SERVICE
egységet. Töltse fel friss csapvízzel a készülék alsó részében
kijelzést 10
i A SERVICE kijelzés a kifogástalanul higiénikus folyamatos üzem
érdekében 14 naponta emlékezteti (készenléti üzemmódban is) az
intézkedés elvégzésére.
912 11 10

168 HU
11 CLEANING
-
a párologtató egységet. Töltse fel friss csapvízzel a készülék
CLEANING kijelzést 11-
i
üzem esetén) az intézkedés elvégzésére.
12 DISK 1.
A
abB
C
2. Óvatosan oldja ki az a
-
a tartót A a párologtató
3. Forgassa el
a zárósapkát B,
majd vegye le.
4. Vegye ki a higi-
énés korongot C,
és cserélje ki.
5. Szerelje össze a készüléket, majd helyezze üzembe.
6. 12, és tartsa
i
esetén) az intézkedés elvégzésére.
A Venta ReNew újrahasznosítási program keretében visszaküldheti a
használt higiénés korongot (lásd: ÚJRAHASZNOSÍTÁS ÉS
HULLADÉKKEZELÉS).

169HU
A SERVICE, CLEANING és DISK ápolási intézkedéseket szükség szerint, bármikor
csak hajtsa végre a mindenkori RESET funkciót a Power gomb megérintésével és
villogó Power gombot
körülbelül egy év múlva jelennek meg ismét.
TISZTÍTÁSA
! Figyelem! Gondoskodjon róla, hogy a készülék ki legyen kapcsolva és a
meg!
!
A készülék felső részét tilos folyó víz alatt tisztítani!
! A kijelzőt tilos vízzel, illetve túl nedvesen tisztítani!
TARTOZÉKOK
• Venta higiénés korong a kifogástalanul higiénikus folyamatos üzemhez
• Venta tisztítószer a féléves tisztításhoz
DE
www.venta-air.com

170 HU
Modell AeroStyle LW73 WiFi AeroStyle LW74 WiFi
Színek szignálfehér / szignálfekete
Helyiségméret
LED-es állapotjelző kék fényszalag
Interaktív érintőkijelző az alapfelszereltség része
Appon keresztüli vezérlés WiFi- / WLAN-modul
Mérőérzékelők páratartalom
Vízhigiénia az alapfelszereltség része
Teljesítményfokozatok 4 + automata
Zajkibocsátás (1–4. fokozat) 24 / 36 / 44 / 50 dB(A) 27 / 35 / 41 / 47 dB(A)
Áramfogyasztás (1–4. fokozat) 7 / 9 / 13 / 18 watt 11 / 14 / 17 / 24 watt
Hálózati feszültség
Víztérfogat (max.) 9 liter
Méretek
Súly 10,5 kg
WLAN frekvenciatartománya 2,4 GHz
WLAN adóteljesítménye
Módosítások és tévedések joga fenntartva

171HU
ÚJRAHASZNOSÍTÁS ÉS
HULLADÉKKEZELÉS
A csomagolóanyag újrahasznosítható. Kérjük, a csomagolást környezetkí-
A készüléket tilos a normál kommunális hulladékba dobni! Azt egy elektro-
-
lyen kell leadni (WEEE). Kérjük, éljen a rendelkezésére álló helyi visszavételi
a helyi hatóságokhoz.
INGYENES újrahasznosítási program Venta higiénés korongok számára a
környezet védelme érdekében
A Venta ReNew újrahasznosítási program keretében az eredeti Venta higiénés ko-
személyre szóló Venta ReNew környezetvédelmi kuponnal is megjutalmazzuk,
amelyet a Venta higiénés korongok megrendelésekor válthat be a Venta-Luftwäscher
GmbH vállalatnál. További információkért forduljon a Venta ügyfélszolgálatához.
MEGJEGYZÉS: A Venta ReNew újrahasznosítási program a Németországon belüli
-
vállalatok szívesen adnak tájékoztatást a hasonló helyi/országos programokról. Ha
-
nális hulladékba dobja a higiénés korongokat.
GARANCIA
-
meg a készülék. Amennyiben mégis anyag- vagy gyártási hibát észlelne, forduljon a
Venta ügyfélszolgálatához vagy a helyi forgalmazóhoz. Ezen kívül a Venta általános
jótállási feltételei érvényesek: www.venta-air.com
ADATVÉDELEM
A Venta-Luftwäscher GmbH bizalmasan kezeli az adatait. Ha módosítani szeretné
személyes adatait, vagy kérdései vannak adatainak általunk való kezelésével kapcso-
latban, kérjük, forduljon a Venta ügyfélszolgálatához:
DE
+49 751 5008 88, www.venta-air.com
Az adatvédelemmel kapcsolatos további információkat a www.venta-air.com
weboldalon található adatvédelmi irányelveink tartalmazzák.

172 HU
MIT TEGYEK, HA …?
! Figyelem!
készülék ki legyen kapcsolva és a hálózati csatlakozódugó ki legyen húzva a
fali aljzatból!
… nem jelenik meg a készülék bekapcsolására szolgáló Power gomb a
kijelzőn?
… a kijelzőn a WATER kijelzés jelenik meg, pedig van víz a vízteknőben?
i Intézkedés:
-
... a kijelző megérintésekor „fehér foltok” jelennek meg a háttérben?
... nem világít a LED-szalag, pedig jár a készülék?
nyomva tartásával vagy a Venta mobilalkalmazással kapcsolható be újra.
i Éjszakai módban a LED-szalag nem kapcsolható be.
... a LED-szalag magától sárgán világít?
... ha nem sikerült WiFi-kapcsolatot létrehozni?
• 2,4 GHz-es vagy 2,4/5 GHz-es vegyes hálózatot használ-e, mivel a készülékben
• routere támogatja-e a 802.11b/g/n WiFi-szabványt.
• okostelefonjára, illetve táblagépére 11.0 verziószámú vagy újabb iOS, illetve 8.0
verziószámú vagy újabb Android operációs rendszer van-e telepítve.
Adott esetben frissítse okostelefonja, illetve táblagépe operációs rendszerét.

173HU
... sem a WiFi
, sem a Bluetooth nem kapcsolható be a készülék kijelzőjén?
házában.
i Intézkedés: Távolítsa el a betétet A a készülék házának hátoldalán, majd
AAB
Húzza felfelé a két
majd vegye ki lefelé.
kell csatlakoznia a házban.
A
A
A
-
re kell pattannia.
A VENTA ÜGYFÉLSZOLGÁLATA
További információkra van szüksége a Venta készülékével kapcsolatban, tanácsot
szeretne kérni vagy tartozékokat rendelne? Semmi gond: A Venta ügyfélszolgálata
Önért dolgozik! Hívjon fel minket vagy látogasson el a weboldalunkra.
DE
+49 751 5008 88, www.venta-air.com

174 RO
STIMATE CLIENT,
-
Principiul Venta funcționează în felul următor
-
-
https://www.venta-air.com/en_de/Service/Product-registration/
-
nostru web: www.venta-air.com
Pachetul de livrare 177
Simboluri 177
Privire de ansamblu 178
Înainte de prima utilizare 178
WiFi / Bluetooth 181
superioare a aparatului 186
Accesorii 186
Date tehnice 187
Echipa de service a firmei Venta 190

175RO
•
•
mai târziu.
•
•
•
•
corporale.
•
•
de aparat rece cu cuplaj tip trifoi IEC 320 C5.
•
•
sau transportarea aparatului,
•
• -
pentru utilizator.
•
•
•
!

176 RO
•
•
•
•
•
•
•
•
•
•
poate permite formarea organismelor biologice.
• -
• Aparatul poate fi operat numai cu accesoriile originale
-
•
•

177RO
PACHETUL DE LIVRARE
1 × umidificator de aer Venta
1 × disc igienic (premontat)
1 × modul WiFi/WLAN (premontat)
1 ×
a firmei Venta sau comerciantului local.
SIMBOLURI
!
i
Sfaturi utile
UTILIZAREA CONFORM
-
-
Utilizarea neconformă
•
•
•
• În aer liber

178 RO
PRIVIRE DE ANSAMBLU
LW73 WiFi / LW74 WiFi
1
6
4
5
3
2
1
2
3 Unitate de vaporizare (incl. disc
4
5
6
WiFi/WLAN Venta
ÎNAINTE DE PRIMA UTILIZARE
•
•
•

179RO
1
B în
-
tului A
a aparatului C
A.
D
scurt tasta Power.
i Tasta Power pentru pornirea
numai atunci când aparatul este
2 3
C
B
D
A
220–240 V
50/60 Hz

180 RO
1. Activarea Bluetooth la smartphone resp. tabletă
Pentru aceasta, pe display-ul LW73 WiFi resp. LW74
.
i
„WiFi/Bluetooth” se poate comuta între WiFi/
PORNIT.
-
2. Activarea Bluetooth și WLAN la smartphone resp. tabletă
3. Configurarea WiFi prin
aplicația VENTA
-
nul smartphone-ului resp. tabletei dvs.
meniul
i
4. Configurarea WiFi prin aplicația VENTA
+
-
i
Informații suplimentare sub www.venta-air.com/Service/WiFi-Control-App/

181RO
WIFI / BLUETOOTH
WiFi / Bluetooth
Afișaj Funcționarea și setarea pe display-ul
LW73 WiFi/LW74 WiFi
Se aprinde
Se aprinde
intermitent încet
Se aprinde
intermitent rapid
Se aprinde
intermitent rapid
Conexiunea WiFi sau Bluetooth este PORNITĂ resp.
Internet.
conexiunea WiFi.
Conexiunea WiFi sau Bluetooth este OPRITĂ resp.
i
este negru.)
Oprirea și pornirea resp. (dez)activarea conexiunii
WiFi/Bluetooth:
WiFi/Bluetooth se poate comuta între WiFi/Bluetooth
i
În regimul Stand-by se poate comuta numai între
Pentru repornirea resp. reactivarea conexiunii WiFi/
-

182 RO
Afișaj Funcție
1Treapta de
viteza 1 - 2 - 3 - 4.
i
2humidity
(umiditate)
umiditatea aerului
3 reduce, iar tasta
4modul Noapte
PORNIT: Aparatul reduce luminozitatea de pe display, reduce
8.
i
sau -. Regimul automat 6 nu este disponibil. Banda cu LED-uri 8 nu poate
OPRIT:
8
1 – 4.
Banda cu LED-uri 8
4 este
2
3
4
5
1
3
6
8
7

183RO
5Porniți resp. opriți aparatul
Power.
i
6modul Automat
atingere.
PORNIT: de pe display luminează intermitent, iar
i
OPRIT:
Setarea umidității dorite a aerului, 30 – 70 %:
6
2. Cu tasta -
sau + 3
6
2
-
de pe display se aprinde intermitent continuu!
7 conexiunea WiFi sau Bluetooth printr-o
Bluetooth“
8Banda cu
LED-uri
Aprinderea continuă
Aprinderea intermitentă continuă
i Banda cu LED-uri 8
4.

184 RO
! Atenție!
Afișaj Măsuri
9WATER -
i
8 se aprinde
humidity 2
-
10 SERVICE
10
stinge.
i
912 11 10

185RO
11 CLEANING
-
-
CLEANING 11
i
12 DISK 1.
A
abB
C
2.
de pe ax, iar suportul A
ruloul de vaporizare.
3. Capacul de
închidere B se
4.
igienic C.
5.
6. 11
i
-

186 RO
-
SUPERIOARE A APARATULUI
! Atenție!
! Este interzisă curățarea părții superioare a aparatului sub jet de apă!
display-uri!
! Este interzisă curățarea udă resp. prea umedă a display-ului!
ACCESORII
•
•
Online sunt disponibile accesorii suplimentare AeroStlye
www.venta-air.com

187RO
DATE TEHNICE
Model AeroStyle LW73 WiFi AeroStyle LW74 WiFi
Culori Alb de semnalizare / negru de semnalizare
Dimensiunea potrivită a camerei
Afișajul de stare cu LED-uri
Ecran tactil interactiv Serial
Aplicația comenzii Modul WiFi / WLAN
Senzori de măsurare Umiditatea aerului
Igiena apei Serial
Trepte de putere 4 + automat
Zgomotul generat (treapta 1–4) 24 / 36 / 44 / 50 dB(A) 27 / 35 / 41 / 47 dB(A)
Consumul de energie electrică
(treapta 1–4) 7 / 9 / 13 / 18 Watt 11 / 14 / 17 / 24 Watt
Tensiunea de rețea 220–240 V / 50/60 Hz
Conținutul de apă (max.)
Dimensiuni
Greutate 10,5 kg
Intervalul de frecvență WLAN 2,4 GHz
Puterea de emisie WLAN maxim 20 dBm

188 RO
-
Aparatul nu
Program de reciclare GRATUITĂ a discurilor igienice Venta pentru protecția mediului
INDICAȚIE:
atunci discul igienic poate fi eliminat simplu prin gunoiul menajer.
-
-
www.venta-air.com/en_de/service/warranty/
+49 751 5008 88, www.venta-air.com

189RO
ÎN CARE …?
! Atenție!
… pe display nu apare tasta Power pentru pornirea aparatului?
… pe display se afișează Water, deși există apă în cada pentru apă?
i Măsura:
… la atingerea display-ului sunt vizibile „câmpuri albe“ în fundal?
… banda cu LED-uri nu se aprinde cu toate că aparatul este în funcțiune?
i
... banda cu LED-uri se aprinde independent galben?
… nu poate fi realizată nicio conexiune WiFi?
•
•
• pe smartphone-ul resp. tableta dvs. este instalat sistemul de operare iOS începând
cu versiunea 11.0 resp. Android începând cu versiunea 8.0.

190 RO
tabletei dvs.
… pe display-ul aparatelor nu se poate porni WiFi sau Bluetooth?
i Măsură:
AAB
Ambele eclise de blocare
se trag în sus.
jos.
A
A
A
perceptibil.
ECHIPA DE SERVICE
A FIRMEI VENTA
pagina web a firmei Venta.
+49 751 5008 88, www.venta-air.com

191LV
-
Venta darbības princips
PALDIES!
https://www.venta-air.com/en_de/Service/Product-registration/
SATURS
Simboli 194
WiFi / Bluetooth 198
Piederumi 203
Tehniskie raksturlielumi 204
Garantija 205
Venta servisa komanda 207

192 LV
•
-
• -
•
•
•
•
• -
• -
•
• -
•
•
•
•
•
•
•
•
!

193LV
•
•
• -
•
•
•
•
•
• -
izmantošana.
• -
•

194 LV
1 ×
1 ×
1 ×
1 × lietošanas instrukcija
SIMBOLI
! -
i
-
neatbilstoši
•
•
•
•

195LV
LW73 WiFi / LW74 WiFi
1
6
4
5
3
2
1
bloks)
2
3 -
4
5
6
•
•
•

196 LV
1
B
A
C
A
D elektro-
-
.
i
2 3
C
B
D
A

197LV
LIETOTNE
1. Bluetooth funkcijas aktivēšana viedtālrunī vai
planšetdatorā
.
i
-
funkcija.
2. Bluetooth, kā arī WLAN funkcijas aktivizēšana viedtālrunī vai planšetdatorā
3. VENTA lietotnes lejupielāde vai instalēšana un atvēršana
Izmantojot bezmaksas Venta lietotni,
-
un
i
4. WiFi iestatīšana VENTA lietotnē
+
i
Papildu informācija atrodama vietnē www.venta-air.com/Service/WiFi-Control-App/

198 LV
WIFI / BLUETOOTH
WiFi / Bluetooth
Rādījums LW73 WiFi/LW74 WiFi displeja darbība un iestatījums
izgaismots
lēni mirgo
ātri mirgo
ātri mirgo
IeslēgtsWiFi vai Bluetooth savienojums.
IzslēgtsWiFi vai Bluetooth savienojums.
i
WiFi/Bluetooth savienojuma izslēgšana un ieslēgšana, kā
arī (de-)aktivizēšana:
i
-

199LV
Rādījums Funkcijas
1
Attēlo rotācijas ātrumu 1 - 2 - 3 - 4.
i
2humidity Telpas gaisa mitruma līmeņa
3 un
to palielina.
4Nakts režīma
IESLĒGTS:
8.
i
IZSLĒGTS:
8
8
4
2
3
4
5
1
3
6
8
7

200 LV
5Ierīces ieslēgšana un izslēgšana, viegli pieskaroties barošanas
i
6Automātiskā režīma ieslēgšana un izslēgšana, viegli pieskaro-
IESLĒGŠANA:bez pārtraukuma mirgo un
i
IZSLĒGTS
Vēlamā gaisa mitruma līmeņa 30 – 70% iestatīšana:
6 un paturiet to apm. 3 sek. nospies-
23 iesta-
6 un paturiet to apm. 3 sekun-
2 nodziest un atkal tiek
7 izslēdziet WiFi vai Bluetooth
8Gaismas
Pastāvīgs izgaismojums
Pastāvīga mirgošana-
i8
4.

201LV
! Uzmanību!
un barošanas adapters ir atvienots no kontaktligzdas!
Rādījums Darbība
9WATER
i
8 mirgo bez
humidity 2
10 SERVICE -
-
SERVICE 10
i
912 11 10

202 LV
11 CLEANING
-
-
-
11 un
i
12 DISK 1.
A
abB
C
2.
-
3. Pagrieziet
4.
-
nisko disku C.
5.
6.11-
i
-

203LV
-
un 4 sek. paturiet to no-
! Uzmanību! -
ta no kontaktligzdas!
-
! Ierīces augšējo korpusu nedrīkst mazgāt tekošā ūdenī!
! Displeju nedrīkst tīrīt ar slapju vai pārāk mitru lupatiņu!
PIEDERUMI
•
•
www.venta-air.com

204 LV
TEHNISKIE RAKSTURLIELUMI
Modelis AeroStyle LW73 WiFi AeroStyle LW74 WiFi
Krāsas
Piemērotība telpas lielumam
Gaismas diožu statusa rādījums Zila gaismas josla
Interaktīvais skārienjutīgais
displejs
Lietotnes vadība WiFi / WLAN modulis
Mērīšanas sensori Gaisa mitrums
Ūdens higiēna
Jaudas pakāpes
Trokšņu veidošanās
Strāvas patēriņš
Tīkla spriegums
Ūdens tilpums (maks.)
Izmēri
Svars
WLAN frekvenču josla
WLAN signālu sūtīšanas jauda

205LV
-
nedrīkst
BEZMAKSAS Venta higiēniskā diska atkārtotas pārstrādes programma apkārtējās
vides aizsardzībai
IEVĒRĪBAI!
-
GARANTIJA
Venta klientu apkalpošanas centru: +49 751 5008 88, www.venta-air.com

206 LV
! Uzmanību!
… displejā neparādās barošanas taustiņš ierīces ieslēgšanai?
… displejā tiek attēlots rādījums WATER, lai gan ūdens tvertnē vēl ir ūdens?
i Darbība:
… pieskaroties displejam, fonā ir redzami „baltas krāsas laukumi“?
… nedeg gaismas diožu josla, lai gan ierīce ir ieslēgta?
i
… gaismas diožu josla mirgo dzeltenā krāsā?
… nav iespējams izveidot WiFi savienojumu?
•
•
•
-

207LV
… ierīces displejā nav iespējams ieslēgt ne WiFi
, ne arī Bluetooth ?
i Darbība:
AAB
pavelciet uz augšu.
A
A
A
VENTA SERVISA KOMANDA
-
+49 751 5008 88, www.venta-air.com

208 RU
-
Принцип работы Venta
-
WiFi / Bluetooth 215

209RU
!
•
•
•
•
•
•
•
•
•
•
•
•
•

210 RU
•
•
•
•
•
•
•
•
•
•
•
•
•
-
•
•

211RU
1 ×
1 ×
1 ×
1 ×
! -
-
i
-
-
•
•
• -
•

212 RU
LW73 WiFi / LW74 WiFi
1
6
4
5
3
2
1
2
3
4
5
6
•
• 1.
• 34.

213RU
1
В
А
С
D
.
i
2 3
C
B
D
A

214 RU
1. Активируйте Bluetooth на устройстве Venta
i
2. Включите Bluetooth и WiFi на своем телефоне или планшете
3. Загрузите/ установите и откройте
приложение VENTA
-
i
4. Настройте функцию WiFi с помощью приложения VENTA
+
i
-
Более подробную информацию вы найдете на сайте www.venta.ru

215RU
WIFI / BLUETOOTH
WiFi / Bluetooth
Индикатор Функции и настройки на дисплее LW73 WiFI/ LW74 WiFI
Загорается
Медленно мигает
Быстро мигает
Быстро мигает
WiFiBluetooth включено / доступно.
WiFi Bluetooth отключено / недоступно.
i
Включение и выключение WiFi-подключения/
Bluetooth или (де)активация:
i

216 RU
Индикатор Функция
1 скорость работы вентилятора 1-2-3-4
i
2 влажность-
3
4Ночной режим
ВКЛ:
8.
i
ВЫКЛ: -
8
8
4
2
3
4
5
1
3
6
8
7

217RU
5Кнопка ВКЛ/ВЫКЛ
i
6Автоматический режим. ВКЛ: постоянно
мигает
-
i
-
ВЫКЛ:
-
Установка желаемой влажности воздуха 30 - 70 %:
6
2
3
6 -
2
-
7 WiFiBluetooth
8LED-
Непрерывная подсветка
Непрерывное мигание подсветки
i8
4

218 RU
! Внимание!
Индикатор Действия
9WATER
-
i
8
-
2
-
-
10 SERVICE
SERVICE 10
i
-
912 11 10

219RU
11 CLEANING -
-
-
-
-
11
i
12 DISK 1.
A
abB
C
2.
-
3.
4.
5.
6.
i
-

220 RU
-
-
! Внимание!
-
! Не промывайте верхнюю часть прибора под проточной водой.
! Не протирайте дисплей влажной или сильно влажной тканью!
•
•

221RU
Модель AeroStyle LW73 WiFi AeroStyle LW74 WiFi
Цвета
На площадь помещения
LED-индикатор состояния
Интерактивный сенсорный
дисплей
Управление через приложение
Измерительный датчик
Гигиена воды
Режимы работы
Уровень шума
Энергопотребление
Напряжение в сети
Объем заливаемой воды
Размеры
Вес
Диапазон частот WLAN
Мощность передачи WLAN

222 RU
-
-
-
ХРАНЕНИЕ
-
ПРАВИЛА ТРАНСПОРТИРОВКИ
ДАТА ИЗГОТОВЛЕНИЯ
-
-

223RU
! Убедитесь, что прибор выключен во время любых манипуляций, а
вилка провода питания отсоединена от розетки!
... Индикатор ВКЛ/ВЫКЛ для включения прибора не отображается на
дисплее?
... Индикатор WATER отображается на дисплее, несмотря на то, что в под-
доне есть вода?
iДействие:
-
… При нажатии на кнопки дисплея на его фоне появились белые пятна?
-
... LED-полоска не загорается, хотя прибор включен?
-
i
... Светодиодная полоска мигает желтым цветом?
... Не получается подключиться к WiFi?
• -

224 RU
•
•
... Вы не можете включить WiFi или Bluetooth на дисплее вашего
устройства?
i Что делать:-
AAB
A
A
A
-

225JP
お客様各位
この た び は ベン タ 高 性 能 プ レミ アム 製 品 AeroStyleエアウォッシャー LW73およびLW74をお
買い上げいただき誠にありがとうございます。AeroStyleは湿度を健康なレベルに保ち、空
気の汚れを自然に除去する機器です。
ベンタの原理は以下のように機能します:
室内の空気はファンを通じ、水の入ったエアウォッシャーに導かれます。ここでは微 妙に配
列 さ れ たプ レ ートスタックが 水 中 で 回 転 する よう になってい ま す。このプ レ ートスタック表 面
を通じて清潔な水が気体となって室内に送り込まれます。同時に埃や花粉などはプレート
にキャッチされ、水で洗われてからエアウォッシャーで収集されます。
お買い上げありがとうございます!
ベンタ エアウォッシャーなら、お客様のご期待を十分に満たすものと確信しています。当製
品 を 使 って より 快 適 な 毎 日 を お 過 ご し く だ さ い 。
本取扱説明書を注意深くお読みになり、後日必要となる場合に備え保管してください。適切
な使い方ならびに安全に関する注意事項を気を付けてお読みください。
取 扱 説 明 書 の 最 新 バ ー ジ ョ ン は 、弊 社 ウ ェ ブ サ イト
www.venta-air.comで ご 覧 い た だ け ま す。
目次
安全に関する注 意事項 226
梱包内容 228
記号 228
使用目的 228
各部名称 229
初めての 使 用の前に 2 2 9
使用開始 230
コン フィギュレ ーションと Ventaアプリ 231
WiFi / Bluetooth 232
表 示 、機 能 お よ び 設 定 2 3 3
洗浄およびケア 235
機器上部の洗浄 237
付属品 237
テクニカルデータ 23 8
リ サイクル お よ び 廃 棄 2 3 9
保証 239
データ保護 240
こんなときには...? 240
ベ ン タ・サ ー ビ ス チ ー ム 2 4 2

226 JP
! 安全に関する注 意事項
• 本機器を8歳以上の子どもならびに 身体的感覚的精神的能力に障害のある方、
もしくは、経 験および知識が十分でない成人が使用する場合は、
監督のもと、または 機器の安全な使用と起こり得る危険について指導した上で、
使用させてください。
• 取扱説明書は始動前に熟読し 後に必要となる場合に備え保管してください。
• 本 機 器は子どもの 玩 具では ありません。
• 洗浄およびユーザーによるケアは8歳以下の子どもが 監督なしで行ってはなりません。
• 当機器および電源ケーブルは、八歳以下のお子様の手の届かないようにしてください。
• 使用目的以外の使用を行った場合、機器が損傷したり
怪我をしたりする可能性があります。
• 機 器 は 適 切 な コン セントにの み 接 続 してくだ さい 。電 圧 は、
型式銘板に記されています。
• 当機 器は以下に示す電源ケーブルだけでしか使 用しないでください:メガネ型コネクタ付
電 源 アダ プタプ ラグ IEC 320 C5
• 電 源 ケーブルが 損 傷して いる 場 合 には 、当 機 器 を決して 運 転し な いでくださ い 。
• 清掃またはメンテナンスの前、または移動 搬 送の前には、必ず機 器の電源ケーブルをコ
ンセン トから抜いてください。
• 電気機 器の修 理は、専門家のみが 行ってください。不適切に修理を行うと、ユーザーが
重大な 危険を被る可能性があります。
• 機器の上に絶対腰 掛けないでください。また、機器の上に物を置かないでください。
• 機器に異物を挿入しないでください。
• 機器上部を水やその他の液体に浸さないでください。
• エアウォッシャーの最大充填 量を超えて充填しないでください。
• エアウォッシャーの容器が満杯の状態で運搬したり、倒したりしないでくださ い。
• コンセントから抜く際は、電 源アダプタのケーブルを引っ張ったり、濡れた手で
• ったりしないでください。
• 電 源 アダ プタプラグ は 決してケーブル を 摑 んで 引 いたり、濡 れ た 手でコン セントに 触 れて
抜こうとしたりしないでください。
• エアウォッシャーは平らで濡 れてい ない(湿ってい ない)場所に置いてください。

227JP
• 機器を設置する際は、倒れにくい場所、機器やケーブルに機器は、なにかがぶつかった
り、誰かが機器やケーブルにつまづいたりすることがないように 設置してください。
• 物体や壁から以下の最低距離を保ってください:
- 機器の前と上:50 cm
- 機器の左右:20 cm
- 機器後ろ:5 cm
• 最大設置高さ:2000 メートル
エアウォッシャーを覆ったりブロックしたりしないでください。
• 機器の過熱や損傷につながります。
• ことに冬の季節に、室内の相対湿度が継続して60%以上になると微生物の繁殖が起こり
や すくな りま す。
• 当製 品は 、品 質の良さと気化 式テクノロジー の採 用 により、使 用目 的に 適った 方法 でご 利
用になれば、水滴、蒸気、霧または石灰分の堆積(水垢)などとなって水が直接エアウォ
ッシャーから排出されることはありません。
• 当機 器の運転には専用のベンタ付属品しか使わないでください。また、決してアロマオイ
ルやその他の添加剤を使わないでください。アロマオイルやその他の添加剤を用いたこ
とによる損害に対し、Venta-Luftwäscher GmbHはいっさい責任を負わないものです。
• 何日かにわたってエアウォッシャーを使わず、スイッチオフする場合、または長 期にわたり
保管する場合には、必ず水タンクを完 全に空にし、汚れをきれいに清掃して乾かし、残っ
た水から悪臭が発 生したり微生物が繁殖したりすることがないよう防いでください。
• 当機器をご使用にならない場合には、電源ケーブルをコンセントから抜いてください。

228 JP
梱包内容
ベンタ エアウォッシャー1台
1 × 衛 生 デ ィ ス ク( 設 置 済 )
1 × W i F i / ワ イ フ ァ イ モ ジ ュ ー ル( 設 置 済 )
取扱説明書1部
内容に不足がある、または損傷している場合は、ベンタ・サービスチームまたは該当地域の
販売店にお問い合わせください。
記号
! 安 全 に 関 す る 注 意 事 項 :
人身または物品の事故や損傷を防ぐため、注意深くお読みください。
i 補足情報
役 に 立 つヒント
使用目的
ベンタ エア ウォッシャー は 、住 宅・オ フィス・ラ ウン ジ などの 加 湿 と 空 気 清 浄 を 行 う 家 電 製
品 で す。本 機 器 は 野 外 で の 使 用 に は 適 し て い ま せ ん 。
いかなる使用目的以外の使用、または機器の変更は不適切な使用とみなされます。
そのような不適切な使用の結果起きた損害または怪我などに対してはメーカーは責任を負
いません。
機器の適切でない使用は健康を害し、生命を危険にさらす可能性もあります。
適切でない使用としては以下のような使用条件が挙げられます:
• 爆発の危険性がある、および/また刺激性の強い物質のある室内環境で使用
• 溶媒濃度が高い室内環境での使用。
• プール 付 近、または 濡 れ たエリア で の 使 用 。
• 野 外で の 使 用

229JP
各部名称
LW73 WiFi / LW74 WiFi
1
6
4
5
3
2
1 機 器 上 部( テ ク ニ カ ル ユ ニ ッ ト )
2 電 源 アダ プタ
3 加 湿 ユ ニ ッ ト( 衛 生 デ ィ ス ク 、歯 付 駆 動 ホ
イ ー ル 、プ レ ー ト ス タ ッ ク )
4 取 外しので きる水タンク
5 機器下部
6 Venta WiFi/ワイファイモジュール用
開 き 口( 取 り 外 し 可 能 )
初めての 使 用の前に
• 器具を梱包から取り出し、設置します。
• 機 器 上 部 1 を 取 り 外 し ま す。
• 水タンク 4か ら加 湿 ユ ニット 3を 取り出し ま す。

230 JP
使用開始
1
機器下 部にある水タンクに新 鮮な 水道水を
半 分 の 高 さ( 最 大 、約 9リ ッ ト ル )ま で 充 填
しま す。
加 湿 ユ ニット Bを機器下部Aの水タンクの
中に入れ、機器上部Cを正しい向きで機 器
下部Aの上にセットします。
電源プラグ Dを コ ン セ ン ト に 繋 ぎ 、機 器 の 電
源 ス イッ チ に 軽 く 触 れ て ス イッ チ オ ン に
してく だ さ い 。
i 機 器が 電 源にしっかり 繋 が って い
る 場 合 に し か 電 源 ス イッ チ の オ ン/オ
フはできません。
2 3
C
B
D
A

231JP
コン フィギュレ ー ションと
VENTAアプリ
1. Venta機器のBluetoothをアクティブ化する
これにはLW73 WiFiまたはLW74 WiFiの ディス プ レ イ で シ
ンボル が 持 続して点 滅して いることが 必 要で す。
i WiFi / Bluetoothの表示·操作パネルに触れる
と、WiFi/Bluetooth OFF, Bluetooth ONそして Wifi
ONと 切 り 替 える こ と が で き ま す。
WiFi / Bluetooth の表示·操作パネルは、Wifi /
Bluetoothのスイッチが入っていなければ、黒いままです。この黒いエリアに触れると
Bluetoothが アク ティブ 化 さ れ ま す
2. ス マートフォン ま た は タ ブレ ット の BluetoothおよびWiFiをアクティブ化する
お 手 元 の スマートフォン ま た は タ ブ レ ットが ご 自 宅 の WiFiネットワ ー クと 接 続 して い る ことを
確 認してくだ さ い 。
3. VENTAアプリを通じてWiFiを設定する
Ventaの 無 料アプリを使うと、AeroStyle LW73
WiFi / LW74 WiFiを 簡 単 に リ モ ー ト 操 作 し 、機 器
の拡張機能を利用して制御することができます。
Ventaのア プ リをダ ウン ロードして 開 い たらすぐ に
メニュー で ロ グイン ま た は 登 録 してくだ さ い 。
i 登 録 を完 了して 初 めて AeroStyle LW73/74を外出先などどこからでも制御·コントロ
ールで き る よう に な り ま す。
4. WiFi über VENTA App einrichten
検索機能 + を 使 う と 、自 動 的 に 周 囲 の Venta製 デバ イス が 見 つ か り ま す。
Bluetoothシンボルの付いているご自分の機器を選択してください。それからSSIDでそちら
のWiFiネットワークの名前とそのパスワードを記入し、保存を選 択します。これでお手元のス
マートフォン ま た は タ ブ レ ットが Venta機器と接続され、これを制御したりコントロールする
こと が で き ま す。.
i ス マ ー ト フ ォ ン / タ ブ レ ッ ト と LW73 WiFi /LW74 WiFiはそのプロセスの間互いに近く
に 置 い て あ る こ と 、そ し て 同 じ WiFiネットワークと接続されていることが大切です。
WiFiの設定の際に問題が生じた場合には、「WiFiが 接 続 で き な い 場 合 に は 」の 項 目
をお読みください。
その他詳しい情報は以下をご覧ください:
www.venta-air.com/Service/WiFi-Control-App/

232 JP
WIFI / BLUETOOTH
WiFi / Bluetooth
表示 LW73 / LW74 のディスプレイ機能と設定
点灯
ゆっくり点 滅
速く点滅
速く点滅
WiFiまたはBluetooth接続がONまたはアクティブ化されていま
す。
イン ター ネット の VentaのサーバーにWiFi接 続さ れました。
ロ ーカ ルネットワ ー クと WiFi接 続さ れました。
WiFi接続が切れたかまたはWiFi接 続 待 機 中 で す。
Bluetooth 接続待機中か、または接続が切れています。
WiFiおよびBluetooth接続がOFFか 非 アク ティブ で す。
i
WiFi / Bluetooth表示がない (表示エリアが黒いまま)
WiFiおよびBluetoothモジュールが何のデータも送信・受信せず、
どのネットワークや機器とも接続されていません。
WiFi / Bluetooth接続のスイッチオンまたは(非)アクティブ
化:WiFi/Bluetooth の 操 作パネルに触れると、WiFi/Bluetooth
OFF、Bluetooth ONおよびWiFi ONを切り替えることができま
す。
i
スタンバイモードで は WiFi/Bluetooth OFFとWiFi ONしか
切り替えることはできません。
ス イ ッ チ オ フ さ れ た WiFi/Bluetooth接 続 を 再 び ス イッ チ オ ン ま た は ア ク
ティブ化するには、黒い表示 / 操作パネルにただ触れてください。

233JP
表示 機能
1回転 数レ
ベル
回転数 1 - 2 - 3 - 4 を表示します。
i回転数レベルはリング型のセグメントで表 示されます。回転数レベルを高くす
るごとに、時計回りにセグメントのラインが太くなっていきます。レベル1でリ
ング 下の細いラインから始まり、レベル4でリング右側の一 番太いラインになりま
す。図 で は レ ベ ル 4 が 表 示 さ れ て い ま す。
2humidity
(湿度)
室内の湿度を表示 (0~)
3 と 回転 数レ ベルを軽いタッチで設 定:プラスマイナスで回 転 数を高くした
り 低 くし たりし ま す。
4夜 間 モードを 軽くタッチしてオン・オフします。
ON: 機器のディスプレイが暗くなり回転数レベルが1になり、LEDスト
リップライト 8が消えます。
i回転数レベル 1はボタン 3の + または - を手で押して変えることができま
す。自動運転モード 6はできません。LEDストリップライト8はスイッチオンで
きません。
OFF:ディス プ レ イ 表 示 は 明 る く、LEDス ト リップ ラ イト 8が 点 灯 、機 器
は設 定回転 数レベル1~4の間で運転します。
LEDス ト リ ップ ラ イ ト 8は、その前に個別にスイッチオフした場合には点灯し
ません。夜間モードボタン 4を 約 3 秒 間 押 し 続 け る と 、ま た ス イッ チ オ ン で き
ま す。
5電源スイッチに軽く触れて、機器のスイッチをオン・オフします。
i機 器 が 電 源 に し っ か り 繋 が って い る 場 合 に し か 電 源 ス イッ チ の ス イッ チ オ ン/
オフはできません。
表 示 、機 能 お よ び 設 定
2
3
4
5
1
3
6
8
7

234 JP
6自 動 運 転 モ ー ド に 軽 く 触 れ て オ ン・オ フ し ま す。
ON:ディスプレイの表示が継続して点滅し、機器は自動的に室内の湿
度 に 合 わ せ 回 転 数 レ ベ ル を 調 節 し ま す。
i 自動運転モードのスイッチを入れると、表示humidity(湿度)2に設定された
湿 度( デ フ ォ ル ト は )が 2度点滅し、それから測定された室内湿度が表示
さ れ ま す。
OFF:ディスプレイの表示が継続的に点灯し、機器は設定回転数レベル
1~4で運転します。
ご希望の湿度を30~70%で設定する:
ボタン 6を約3秒間押し続けると 表示humidity(湿度)2が点滅し始
め ま す。ボ タ ン 3の - または + を 押 し て 、ご 希 望 の 湿 度( 刻みで設
定 可 )を 設 定 し ま す 。
ボタン 6に再び触れて約 3秒間押し続けると、表示humidity(湿度)2
の点滅が消え、再び測定した室内湿度が表示されます。
自動運転モードでは以下の点にご注意ください:
7 軽く手を触 れて、WiFiおよびBluetooth接続を スイッ チ オ ン ま た は オ フ
してくださ い。詳し い 説 明に 関しては「WiFi / Bluetooth」の 項 を 参 照
してく だ さ い 。
8LEDストリッ
プ ラ イト
継続点灯は運転中を意味します。
継続点滅は、水量不足のため自動停止されたことを意味します。
iLEDス ト リ ップ ラ イ ト 8は 運 転 中 、夜 間 モ ー ド ボ タ ン 4を別個に約3秒間押し
続 け る こ と で 、ス イッ チ オ ン・オ フ で き ま す 。
Ventaの無料アプリで、お好みのLEDラ イトカ ラ ー を お 選 び い た だ け ま す。

235JP
洗浄およびケア
! 注 意 ! どの 措 置を行う際にも、機 器がオフになっていること、および
電 源 アダ プタがコン セントか ら抜 か れて いることを 確 認してくだ さい!
表示 措置
9WATER (水) 機器上部を取り外します。機器下部にある水タンクに新鮮な水道水
を、半分の高さ(最 大)まで充填します。機器上部を機器下部にセッ
ト し 、運 転 を 再 開 し ま す。
i 水タンク内の水が少なくなりすぎると機器は自動的にスイッチオフし、LED
ランプ 8が 持 続 し て 点 滅 し 、デ ィ ス プ レ イ に WATER( 水 )と 表 示 さ れ ま す 。
表示humidity(湿度)2で2本 の 線 が 点 滅 し 、室 内 の 湿 度 が 表 示 さ れ ま せ
ん。
室内の空気を持続して加湿し、空気内の汚れ(ま で の 粒 子 )を 清 浄 す
るには、毎日水を充填することを推奨します。
10 SERVICE
(サービス)
機 器 上 部 を 取 り 外 し ま す。水 タ ン ク に 残 って い る 水 を 捨 て ま す。水 タ
ンクと加湿ユニットを丁寧にすすいで洗浄します。機器下部にある水
タンクに新鮮な水道水を、半分の高さ(最大)まで充填します。機器
を ま た 元 通 り 組 み 立 て て 運 転 を 再 開 し ま す。
ディス プ レ イの SERVICE( サ ー ビ ス )表 示 10に 触 れ 、約 3秒間押し
続けると表示が消えます。
i 支障のない持続した運転を行うため、SERVICE( サ ー ビ ス )表 示 は 14日間
おきに(スタンバイモードでも)このメンテナンス措 置を実行するようリマ
インドし ま す。
912 11 10

236 JP
11 CLEANING
(清掃)
機器上部を取り外します。水タンクに残っている水を捨てて空にし、
新鮮な水道水を半分の高さ(最大)のところまで充填してからVenta
クリーナーを入れます。機器をまた元のように組み立て、約2時
間低レベルで運転してください。推奨:この清掃プロセスでは、汚れ
がひどいと悪臭が出る場合がありますので、できるだけ窓を開けて実
行してください。それから機 器の上部を取り外し、汚れた水を捨てま
す。水 タ ンクと 加 湿 ユ ニット を 丁 寧 に す す い で 洗 浄 し ま す。機 器 下 部 に
ある水タンクに新鮮な水道水を半分の高さ(最大)まで充填し、機器
を組み立てて運転を開始してください。 ディスプレイのCLEANING(
清 掃 )表 示 11に触れ約3秒間押し続けると、表示が消えます。
i6か 月 ご と に( 24時間持続運転の場合)CLEANING表 示 が 出 て 、こ の 措 置 を
実 行 するようリマインドしま す。
12 DISK 1. 機器上部を取り外し、水タンクから加湿ユニットを取り出します。
A
abB
C
2. アーム a と b を軸から
慎 重 に 外 し 、ビ ー ム Aを加
湿ドラムから外します。
3. キ ャ ップ B を回
して 外 し ま す。
4. 衛 生 ディス ク C
を取り出して 交 換
しま す。
5. 機 器 を ま た 元 通 り 組 み 立 て て 運 転 を 再 開 し ま す。
6. ディス プ レ イの DISK( デ ィス ク )表 示 11に 触 れ 、約 3秒間押し続け
ると、表示が消えます。
i
衛 生 デ ィ ス ク の 寿 命 は 約 4か 月( 24時間持続運転の場合)です。寿命の長さ
は水の硬度、水質、毎日の加湿遂行量、そして運転時間によって異なりま
す。4か 月 ご と に( 24時間持続運転の場合)このDISK( デ ィ ス ク )表 示 が 出
て、この 措 置を 実 行するようリマインドしま す。
ベンタReNewリサイクリングプログラムでは衛生ディスクを回収に送り返
すことが 可能 です(リサイクリングおよび 廃棄の項を参 照のこと)。

237JP
お手入れ措置10、11および12は、表示が出なくても必要に応じて行うことができます。
措 置 が 終了したら最 後に CLEANING、DISK、SERVICEのリ セ ット 機 能 を 実 行 してく
だ さ い :電 源 ス イッ チ に 触 れ て 点 滅 す る ま で 約 4秒間押し続けてください。そうすると
SERVICE、CLEANING、DISKがディスプレイに表示されます。実行したい措置だけに触れ
て 、そ れ が 消 え る ま で 約 3秒押し続けてください。最後に点 滅する電源スイッチに触れ、それ
が 持 続して点 灯 するま で 約 4秒間押し続けてください。実行する措 置の次回のリマインド通
知 は ま た 定 期 的 に 表 示 さ れ ま す。
水タンクや加湿ユニットについた残留物(白色、黄緑色、茶色の沈殿物または変色したも
の)はどれも機器の機能に影 響を与えることはありません。
機器上部の洗浄
! 注 意 ! どの 措 置を行う際にも、機 器がオフになっていること、および
電 源 アダ プタがコン セントか ら抜 か れて いることを 確 認してくだ さい!
機器上部を乾いた布/清掃用ブラシかまたは軽く湿らせた布で清掃してください。
! 機器上部は決して流水で洗浄しないでください。
ディス プ レ イ は 乾 い た 布 か ディス プ レ イ 用 クリ ーニ ン グク ロ ス で しか 清 掃 し な い で く だ さ
い。
! ディスプレイは決して濡れた布や湿らせた布で拭かないでください。
付属品
• 持続運転で衛生状 態を保つためのベンタ衛生ディスク
• 半年ごとの清掃にベンタクリーナー
その他のAeroStyle付属品はオンラインでお求めいただけます。

238 JP
テクニカルデータ
モデル AeroStyle LW73 WiFi AeroStyle LW74 WiFi
カラー ホ ワ イト/ブ ラ ッ ク
適用床面積 最大 最大
LED ステータス表示 ストリップライト・ブルー
タッチ ディスプレ イ 標準装備
アプリ制御 W i F i モジュール
測定センサー 湿度
水衛生管理 標準装備
回転数レベル 4 + 自動
騒音(レベル1~4)24 / 36 / 44 / 50 dB(A) 27 / 35 / 41 / 47 dB(A)
消費電力(レベル1~4)7 / 9 / 13 / 18 W 11 / 14 / 17 / 24 W
供給電圧
水量(最大)
寸法(縦横高さ)
重量 10.5 kg
無線LAN周波数帯 2.4 GHz
無線LAN送信電力最大 20 dBm
仕様 変 更がなされているおよび誤りが含まれている場 合があります

239JP
リ サイクル お よ び 廃 棄
梱包材はリサイクル可能です。 梱包材は
環境に配慮して廃棄し、リサイクル素材は適切に分別処理してください。
本 機 器 は通 常 の 家 庭ご みとして廃 棄しては い けません!本 機 器 は 指 定 さ れたリサ
イクル電気機器の回収施設に送られ電気機器として廃棄されなければなりません
(WEEE)。地 域のリサイクル・回 収施 設をご 利用ください。
これにより環 境を保 護し、人々の 健 康にも貢 献することになります。リサイクルと
廃棄に関する詳細は、当該当局にお問い合わせください。
環境保護のため無料のベンタ衛生ディスク・リサイクリングプログラムをご利用ください
オリジナルのベンタ衛生ディスクはベンタが提供しているReNewリ サ イクリ ン グ プ ロ グ ラム
によりリサイクリングが 可能です。使 用済のベンタ衛生ディスクを返却してくださるこ
とで、地球の資源を守る運動に貢献できるだけでなく、お客様はベンタのReNew環 境 ボー
ナスポイントが獲得できます。次にベンタ衛生ディスクをご注文なさる場合には、このポイン
トをVenta Luftwäscher GmbHで割引券としてお使いください。詳しい情報はベンタのサ
ービ スチームに お 問い 合 わせください 。
注 意 :ベ ン タ の ReNewリサイクリングプログラムはドイツ国内の販売・発送に限定されてい
ます。ドイツ国外の事情に関しては、それぞれの国のベンタ社が、お客様のお住いの地方・
国で提供されているプログラムについての情報を喜んで提供いたしますので、お問い合わせ
く だ さ い 。お 住 い の 国 で ReNewリサイクリングプログラムが提供されていない場合には、
衛 生ディスクは 家 庭 用ご みとして 廃 棄してくださ い 。
保証
Venta-Luftwäscher GmbHでは全製品の質の高さを誇っており、適切にご使用になる場合
には、ご購入日から2年間の製品保証を行っております。
しかしながら、万が一材料や製造過程でエラーが生じました場合には、
ベンタのサービスチームまたはご購入された販売店にご連絡ください。
保 証に関してはベンタの一 般 保証 条 件が 適 用されます:
www.venta-air.com

240 JP
データ保護
お客 様のデータは Venta Luftwäscher GmbHが守秘義務を徹底して取り扱います。ご自分
の個人情報を変更なさりたい場合、またはわが社のお客様の個人情報の取り扱いに関しご
質問がある場合には、Ventaの下記の顧 客サービスまでご 連絡ください。
DE
+49 751 5008 88, www.venta-air.com
データ保護に関する詳しい情報は、 www.venta-air.comで当社のプライバシーポリシーを
ご 覧ください 。
こんなときには...?
! どの措置を行う際にも、機器がオフになっていること、および
電源アダプタがコンセントから抜かれていることを確認してください!
...ディスプレイに機器のオン/オフのための電源スイッチが表示されない
電 源 アダ プタがコン セントにしっか り接 続さ れて いるか、確 認してくだ さい 。
水タンクに水がまだあるのにディスプレイにWATER( 水 )と 表 示 さ れ る
水タンクに水が十分充填されているか、そして/または機器上部が 機 器下部の上に正しく取
り 付 け ら れ て い る か 、確 認 し てく だ さ い 。
i 措置:機器上部を取り外します。機器下部にある水タンクに新鮮な水道水を、半分の
高さ(最大)まで充 填します。機 器上部を正しい方向で機 器下 部にセットし、運転を再
開し ま す。
... ディスプレイの表示を強く押し過ぎると?
そうすると「押した跡」がはっきりと見える場 合があります。これは品質に影響を及ぼすこ
とはありません。圧力がかからなくなると「 跡」は見えなくなります。
... 機器が運転中なのにLEDストリップライトが点 灯しない
LEDストリップライトが別個にスイッチオフされているかどうか、確認してください。夜間モー
ドボタンに 触 れて約 3 秒 間 押し 続けると、LEDス ト リ ップ ラ イ ト が ま た ス イッ チ オ ン で き ま す。
i 夜 間モ ードで は LEDス ト リ ップ ラ イト は ス イッ チ オ ン で き ま せ ん 。
... LEDストリップライトが何もしないのに黄 色に点 滅するが?
この間 、ファームウェアアップ デートが 自動 的に 行わ れてい ます。

241JP
...WiFiが接続できない場合には?
以 下 の こ とを 確 認 してく だ さ い :
• 2.4-GHzまたは2.4 / 5 GHz周 波 数 帯( ミ ッ ク ス )を 利 用 し て い る こ と 。当 WiFi/ワイファイ
モジュールは5 GHzには対応していません。
• お客 様 のル ーターが 802.11b/g/n に対 応して い ること。
• お 客 様 の ス マートフォン ま た は タ ブ レット に iOSで は バージョン が 11.0以 上もしくはアンド
ロ イド で は バ ージョン 8.0以 上 が インストール されてい ること。
必 要 に 応 じ お 手 元 の ス マートフォン ま た は タ ブ レット の OSを アップ デ ー ト してく だ さ
い。
... 機器のディスプレイでWiFi 、Bluetooth のどちらもスイッチオンできないが?
WiFi/ワイファイモジュールがしっかり機器ハウジングの中に挿入されているか、確認してく
ださい。
i 対 処 :機器のハウジング 裏側の開き口Aを取り外し、WiFi/ワイファイモジュール Bがしっかり指定の位
置 に 挿 入 さ れ て い る か 確 認 してく だ さ い 。
AAB
ロッキングラッチを両方とも
上 部 へ 引 き 上 げ ま す。
開き口を前に開き上げてか
ら 下 に 引 き 、取 り 外 し ま す 。 モジュール Bはしっかりハウ
ジングの中に挿入されている
ことが必要です。
A
A
A
それから開き口Aをまた取り付け、両方のロッキングラッチがカチッというまで押して嵌め
ま す。

242 JP
ベ ン タ・サ ー ビ ス チ ー ム
ベンタ エアウォッシャーに関する詳 細 情 報が 必 要である場 合、またはアクセ サリーを注 文
さ れ た い 場 合 は 、ご 遠 慮 な く お 問 い 合 わ せ く だ さ い :ベ ン タ・サ ー ビ ス チ ー ム が 、お 客 様 の
ご 要望にお 答えいたします!
お電話またはベンタ・ウェブサイトにてご連絡ください。
DE
+49 751 5008 88, www.venta-air.com


Art.-Nr. 3400490 ©2021/08_V01
GERMANY
Venta-Luftwäscher GmbH
Weltestraße 5
88250 Weingarten
Tel.:+49 751 50 08 0
Fax: +49 751 50 08 20
info@venta-air.com
www.venta-air.com
BENELUX
Venta Benelux B.V.
Van Heemstraweg Oost 8
5301 KE Zaltbommel
Niederlande
Tel.:+31 4 18 54 13 43
info-nl@venta-air.com
www.venta-air.com
SWITZERLAND
Venta-Luftwäscher AG
Bösch 65
6331 Hünenberg
Schweiz
Tel.:+41 41 781 15 15
Fax: +41 41 781 15 50
info-ch@venta-air.com
www.venta-air.com
USA
Venta Air Technologies Inc.
US Headquarters
1005 N Commons Dr
Aurora, IL 60504
United States of America
Tel.:+1-888-333-8218
Fax: +1-224-567-8349
info-us@venta-air.com
www.venta-air.com
AUSTRIA
Stromayer Elektro
Service GmbH
Strohmayergasse 8
1060 Wien
Österreich
Tel.:+43 1 5961706
office@stromayer.at
CHILE
Venta Air Technologies Inc.
US Headquarters
300 North Elizabeth Street
Suite 220 B
Chicago, Il 60607
United States of America
Tel.: +1-888-333-8218
Fax: +1-224-567-8349
info@venta-usa.com
www.venta-air.com
CZECH REPUBLIC
LetMeRepair GmbH
Fichtestrasse 1a
02625 Bautzen
service-cz@venta-air.com
www.letmerepair.com
FINLAND
Suomen Allergiakauppa
Länsiportintie 14
13430 HÄMEENLINNA
Finnland
Tel.:+358400855000
myynti@allergiakauppa.fi
www.allergiakauppa.fi
FRANCE
LetMeRepair GmbH
Fichtestrasse 1a
02625 Bautzen
service-fr@venta-air.com
www.letmerepair.com
HUNGARY
LetMeRepair GmbH
Fichtestrasse 1a
02625 Bautzen
service-hu@venta-air.com
www.letmerepair.com
ITALY
LetMeRepair GmbH
Fichtestrasse 1a
02625 Bautzen
service-it@venta-air.com
www.letmerepair.com
JAPAN
Address Service Co., Ltd.
17-9, Shinoda, Togane-shi,
Chiba, 283-0013 Japan
Tel.: 0120-407-554
venta_support@adservice.
co.jp
LATVIA / LITHUANIA
SIA „BALTIJAS
TIRDZNIECĪBAS
UZŅĒMUMS”
Dārzaugļu iela 1-201,
Riga LV-1012, Latvia
Tel.:+371 67790720
MALAYSIA / SINGAPORE /
PHILLIPINES / VIETNAM
GA MAKMUR SDN BHD
No. 27, Jalan PP 11/4,
Alam Perdana Industrial
Park, Taman Putra
Perdana, 47130 Puchong,
Selangor, Malaysia
Tel.:+603-8322 6628
Fax: +603-8322 6066
info@gasales.com.my
MONGOLIA
AERIS LLC
SUITE 316, Barilga
Architecture Building,
Chinggis Avenue, Oron
Suuts Street, 2nd horoo,
Khan-Uul district, Ulaan-
baatar, Mongolia 17032
Tel.:+976-99101185,
+976-99096696
www.aeris.mn
PORTUGAL
LetMeRepair GmbH
Fichtestrasse 1a
02625 Bautzen
service-pt@venta-air.com
www.letmerepair.com
RUSSIA
Venta Russia TSK IMPORT
(offizieller Importeur)
124683, Moskau,
Seleno grad, 1505, Raum III
Russland
Tel.:+7 499 733 10 10
Fax: +7 499 733 10 10
venta@venta.ru
SCOTLAND, UK
LetMeRepair UK Ltd
1 Langlands Court
Kelvin South Business
Park, East Kilbride, G75
0YB, Scotland, UK
Tel.: +44 (0) 1355 241 222
service-uk@venta-air.com
Fax +44 1355 246575
SLOVAKIA
LetMeRepair GmbH
Fichtestrasse 1a
02625 Bautzen
service-sk@venta-air.com
www.letmerepair.com
SPAIN
LetMeRepair GmbH
Fichtestrasse 1a
02625 Bautzen
service-es@venta-air.com
www.letmerepair.com
SOUTH AFRICA
EUROCARE Wellness
5 Star Business Park,
Unit 2, Persimmon Close,
Honeydew, Johannesburg
Südafrika
Tel.:+27 11 888 3255
Fax: +27 11 888 9874
info@eurocarewellness.
co.za
SOUTH KOREA
VENTA KOREA CO., LTD.
3/F., Seojin Bldg., 754,
Seolleung-ro, Gangnam-
Gu, Seoul 135-948, Korea
Tel.:+82 22 03 40 114
Fax: +82 22 03 40 119
UKRAINE
Venta-Centre Ukrein
Schlichtera, 11
Kharkov, Ukraine
Tel.:+38 057 752 72 72
Fax: +38 057 768 01 57
venta@venta.com.ua
SERVICE AND SUPPORT
SERVICE AND SUPPORT
www.venta-air.com/Service/Service-Support/
VENTA WORLD WIDE
www.venta-air.com/en_de/Venta-worldwide/
-
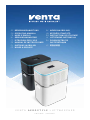 1
1
-
 2
2
-
 3
3
-
 4
4
-
 5
5
-
 6
6
-
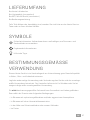 7
7
-
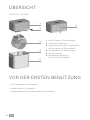 8
8
-
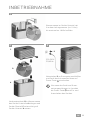 9
9
-
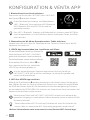 10
10
-
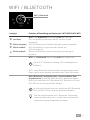 11
11
-
 12
12
-
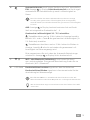 13
13
-
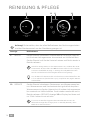 14
14
-
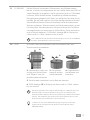 15
15
-
 16
16
-
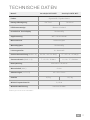 17
17
-
 18
18
-
 19
19
-
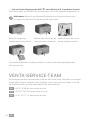 20
20
-
 21
21
-
 22
22
-
 23
23
-
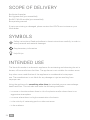 24
24
-
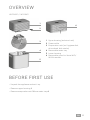 25
25
-
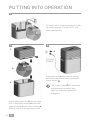 26
26
-
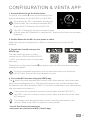 27
27
-
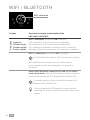 28
28
-
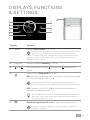 29
29
-
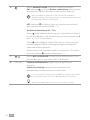 30
30
-
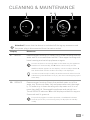 31
31
-
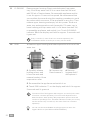 32
32
-
 33
33
-
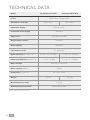 34
34
-
 35
35
-
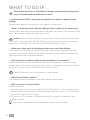 36
36
-
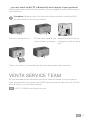 37
37
-
 38
38
-
 39
39
-
 40
40
-
 41
41
-
 42
42
-
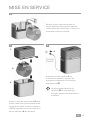 43
43
-
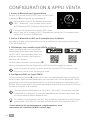 44
44
-
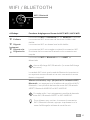 45
45
-
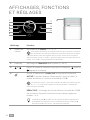 46
46
-
 47
47
-
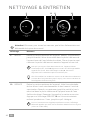 48
48
-
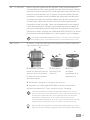 49
49
-
 50
50
-
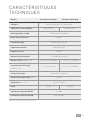 51
51
-
 52
52
-
 53
53
-
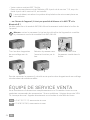 54
54
-
 55
55
-
 56
56
-
 57
57
-
 58
58
-
 59
59
-
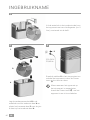 60
60
-
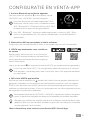 61
61
-
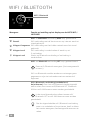 62
62
-
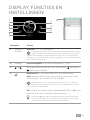 63
63
-
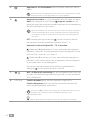 64
64
-
 65
65
-
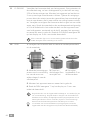 66
66
-
 67
67
-
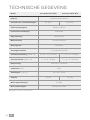 68
68
-
 69
69
-
 70
70
-
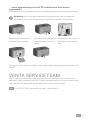 71
71
-
 72
72
-
 73
73
-
 74
74
-
 75
75
-
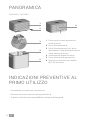 76
76
-
 77
77
-
 78
78
-
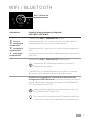 79
79
-
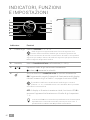 80
80
-
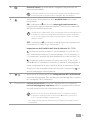 81
81
-
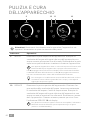 82
82
-
 83
83
-
 84
84
-
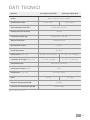 85
85
-
 86
86
-
 87
87
-
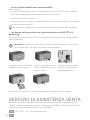 88
88
-
 89
89
-
 90
90
-
 91
91
-
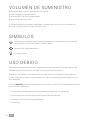 92
92
-
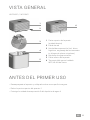 93
93
-
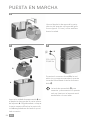 94
94
-
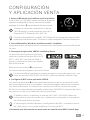 95
95
-
 96
96
-
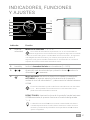 97
97
-
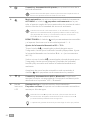 98
98
-
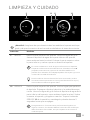 99
99
-
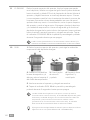 100
100
-
 101
101
-
 102
102
-
 103
103
-
 104
104
-
 105
105
-
 106
106
-
 107
107
-
 108
108
-
 109
109
-
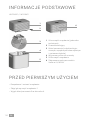 110
110
-
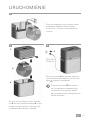 111
111
-
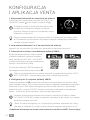 112
112
-
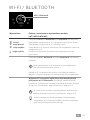 113
113
-
 114
114
-
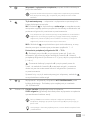 115
115
-
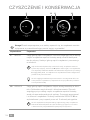 116
116
-
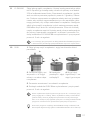 117
117
-
 118
118
-
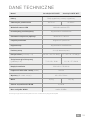 119
119
-
 120
120
-
 121
121
-
 122
122
-
 123
123
-
 124
124
-
 125
125
-
 126
126
-
 127
127
-
 128
128
-
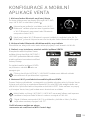 129
129
-
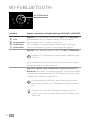 130
130
-
 131
131
-
 132
132
-
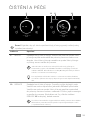 133
133
-
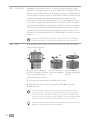 134
134
-
 135
135
-
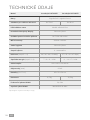 136
136
-
 137
137
-
 138
138
-
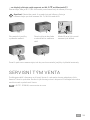 139
139
-
 140
140
-
 141
141
-
 142
142
-
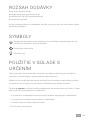 143
143
-
 144
144
-
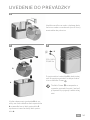 145
145
-
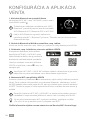 146
146
-
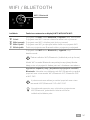 147
147
-
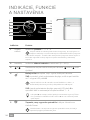 148
148
-
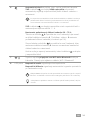 149
149
-
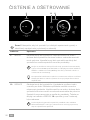 150
150
-
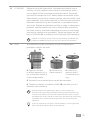 151
151
-
 152
152
-
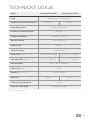 153
153
-
 154
154
-
 155
155
-
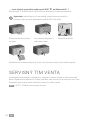 156
156
-
 157
157
-
 158
158
-
 159
159
-
 160
160
-
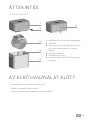 161
161
-
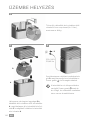 162
162
-
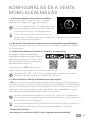 163
163
-
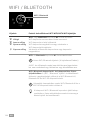 164
164
-
 165
165
-
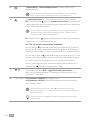 166
166
-
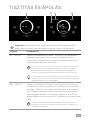 167
167
-
 168
168
-
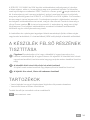 169
169
-
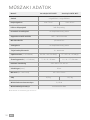 170
170
-
 171
171
-
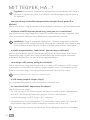 172
172
-
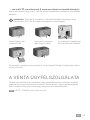 173
173
-
 174
174
-
 175
175
-
 176
176
-
 177
177
-
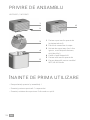 178
178
-
 179
179
-
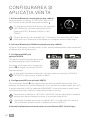 180
180
-
 181
181
-
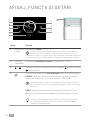 182
182
-
 183
183
-
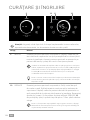 184
184
-
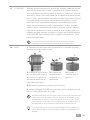 185
185
-
 186
186
-
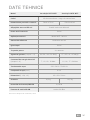 187
187
-
 188
188
-
 189
189
-
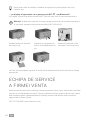 190
190
-
 191
191
-
 192
192
-
 193
193
-
 194
194
-
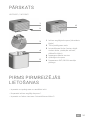 195
195
-
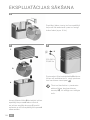 196
196
-
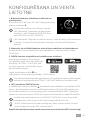 197
197
-
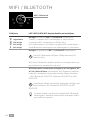 198
198
-
 199
199
-
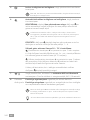 200
200
-
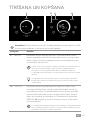 201
201
-
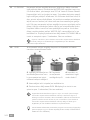 202
202
-
 203
203
-
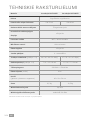 204
204
-
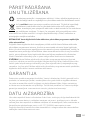 205
205
-
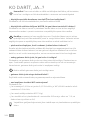 206
206
-
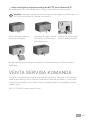 207
207
-
 208
208
-
 209
209
-
 210
210
-
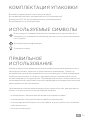 211
211
-
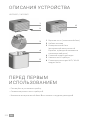 212
212
-
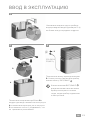 213
213
-
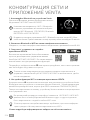 214
214
-
 215
215
-
 216
216
-
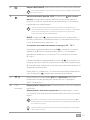 217
217
-
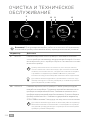 218
218
-
 219
219
-
 220
220
-
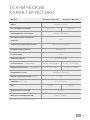 221
221
-
 222
222
-
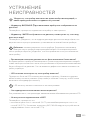 223
223
-
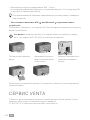 224
224
-
 225
225
-
 226
226
-
 227
227
-
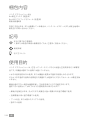 228
228
-
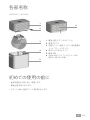 229
229
-
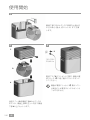 230
230
-
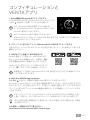 231
231
-
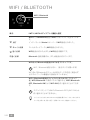 232
232
-
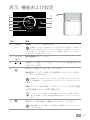 233
233
-
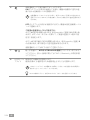 234
234
-
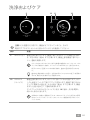 235
235
-
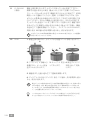 236
236
-
 237
237
-
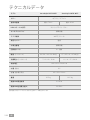 238
238
-
 239
239
-
 240
240
-
 241
241
-
 242
242
-
 243
243
-
 244
244


Venta LW73 Manual de usuario
- Categoría
- Humidificadores
- Tipo
- Manual de usuario
en otros idiomas
- français: Venta LW73 Manuel utilisateur
- italiano: Venta LW73 Manuale utente
- slovenčina: Venta LW73 Používateľská príručka
- polski: Venta LW73 Instrukcja obsługi
- 日本語: Venta LW73 ユーザーマニュアル
- română: Venta LW73 Manual de utilizare
Artículos relacionados
Otros documentos
-
Stadler Form Robert Instrucciones de operación
-
-
Duux North El manual del propietario
-
Wilfa George El manual del propietario
-
Polaroid TVSAND El manual del propietario
-
-
Boneco AOS E2241 El manual del propietario
-
-
PEAQ PDR 370BT-B El manual del propietario