Margaritaville Frozen Concoction Maker DM 1000 Manual de usuario
- Categoría
- Batidoras
- Tipo
- Manual de usuario
Este manual también es adecuado para

The Navigator

The Navigator


Frozen Concoction
Maker
™
-2-
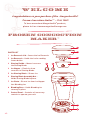
W e l c o m e
Congratulations on your purchase of the Margaritaville®
Frozen Concoction Maker™ – DM 1000!
To learn more about Margaritaville
®
products,
please visit us at www.margaritavillecargo.com.
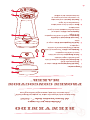
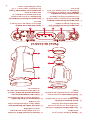
– Covers the Ice Reservoir.
– Holds the ice for making
frozen drinks.
– Moves ice across
the Shaving Blade.
– Feeds ice from
reservoir to Shaving Blade.
– Shaves ice.
–
Holds Shaving Blade in place.
– Directs ice from Ice Hopper
into Blending Jar.
– Holds Blending Jar
securely in place.
– Contains all necessary
controls to operate your unit.

Frozen Concoction
Maker
™
-2-
B i e n v e n i d o
¡Felicitaciones por la compra
del Frozen Concoction Maker™ – DM100!
Para obtener más información sobre los productos Margaritaville
®
,
visite nuestro sitio web, www.margaritavillecargo.com
Componentes
cubre el
Recipiente para Hielo
contiene el hielo
para realizar tragos helados.
Arrastra el hielo
hasta la cuchilla raspadora.
Transporta el hielo
desde el Recipiente hasta la cuchilla
raspadora.
raspa el
hielo.
sujeta la cuchilla raspadora
en su lugar.
conduce el
hielo desde el embudo hasta la jarra
mezcladora.
sujeta la jarra mezcladora
rmemente en su lugar.
contiene todos
los controles necesarios para el
funcionamiento de la unidad.

Ready
-3-
sella la jarra
mezcladora.
realizada
con vidrio muy resistente y con una
capacidad máxima de 36 onzas.
sella la jarra mezcladora
y la base.
genera mayor
poder de funcionamiento para mezclar
tragos.
Enciende y apaga la unidad.
Se utiliza para seleccionar el
ciclo automático Raspar y Mezclar.
titila cuando la unidad está
enchufada, en señal de que está lista
para usar.
Muestra el estado del ciclo Raspar y
Mezclar.
Se utiliza para operar
en forma manual el raspador y el
mezclador de hielo.
Se utiliza para seleccionar 1, 2 ó 3
tragos helados de12 onzas.
diseñada
con una amplia base para proveer
mayor estabilidad.
libera el Recipiente para hielo
de la unidad.
contiene el exceso de hielo derretido.
cubre el
área de almacenamiento del cable de
alimentación.

Ready
– Seals the blending jar.
– Made from
heavy-duty glass, has maximum
capacity of 36 oz.
– Seals
the blending jar and blending base.
– Creates forward
action when blending drinks.
– Designed with wide
base for stability.
–
Releases ice reservoir from unit.
– Contains melted
ice excess.
– Covers power
cord storage area.
– Turns
your unit on and off.
– Used
to select automatic Shave ’n Blend cycle.
– Blinks when
unit is plugged in to indicate ready
for use.
– Shows
status of Shave ’n Blend cycle.
–
Used to manually operate ice shaver
and blender.
– used
to select 1, 2 or 3 twelve oz. frozen drinks.
-3-

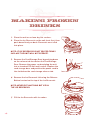
1. Place the unit on a clean dry at surface.
2. Place the Ice Reservoir on the unit front rst, then
push down rmly on back. Reservoir must click
into place.
3. Remove the Cord Storage Door by pushing down
on the release tab located on the Cord Storage
Door. Remove the power cord and plug the unit
into a standard 120 Volt wall socket. Replace the
cord storage door and position the power cord in
the slot below the cord storage release tab.
4. Remove the Ice Reservoir Lid using the Release
Button located on the top of the Ice Reservoir.
5. Fill the Ice Reservoir with ice cubes.
-4-
Making frozen
drinks

1. Sitúe la unidad sobre una supercie plana limpia y seca.
2. Primero coloque el contenedor en la parte delantera
de la unidad, luego presione rmemente hacia atrás.
El contenedor debe encajarse en su lugar.
3. Presione en la lengüeta de salida ubicada en la
Puerta del compartimento para retirar la Puerta del
compartimento para Almacenamiento del Cable.
Retire el cable de alimentación y enchufe la unidad
a un tomacorriente Standard de 120 voltios.
Vuelva a colocar la puerta del compartimento para
almacenamiento del cable e introduzca el cable
de alimentación en la ranura ubicada debajo de la
lengüeta de salida.
4. Retire la tapa del Recipiente para Hielo utilizando
el Botón de Salida situado sobre el Recipiente para
Hielo.
5. Llene el Recipiente para Hielo hasta el tope con
cubos de hielo.
-4-
Cómo hacer
tragos helados

6. Coloque nuevamente la Tapa del Recipiente para Hielo y
ciérrela rmemente
7. Levante y retire la Jarra Mezcladora de Vidrio. El conducto
para hielo posee un resorte y puede empujarse hacia arriba.
8. Retire la Tapa de la Jarra Mezcladora.
9. Vierta una cantidad apropiada de ingredientes líquidos
en la Jarra Mezcladora según la cantidad de tragos que
se prepararán (1, 2 ó 3). Las marcas indicadoras sobre la
Jarra Mezcladora de vidrio indican la cantidad de líquido
que se requiere para 1, 2 ó 3 tragos helados.
10. Coloque la Tapa de la Jarra Mezcladora y sitúe
nuevamente la Jarra Mezcladora de Vidrio en la
Base; para ello, presione hacia arriba el Conducto
para Hielo con la Jarra Mezcladora de Vidrio y luego
colóquela nuevamente en la Base.
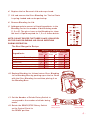
11. Seleccione la Cantidad de Tragos en el
Interruptor Giratorio según la cantidad
de tragos que se prepararán.
12. Gire el Interruptor Giratorio de
READY/STOP hasta la posición
READY en el Panel de Control.
-5 -
OZ.
Re
a
dy
S
to
p
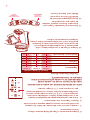
1 Drink 2 Drinks 3 Drinks
oz ml oz ml oz ml
Margaritaville
®
Gold Tequila 1 30 2 60 3 90
Triple Sec
1
⁄4 7.5
1
⁄2 15
3
⁄4 22.5
Lime Juice
1
⁄2 15 1 30 1
1
⁄2 45
Orange Juice
1
⁄2 15 1 30 1
1
⁄2 45
Margaritaville
®
Margarita Mix 1 30 2 60 3 90
Ingredients
The Best Margarita Recipe
Amount (12 uid oz drink)

6. Replace the Ice Reservoir Lid and snap closed.
7. Lift and remove the Glass Blending Jar. The Ice Chute
is spring-loaded and can be pushed up.
8. Remove Blending Jar Lid.
9. Add appropriate amount of liquid ingredients to the
Blending Jar for the number of drinks being made
(1, 2 or 3). The glass icons on the Blending Jar show
the level of liquid required for 1, 2 or 3 frozen drinks.
10. Replace Blending Jar Lid and return Glass Blending
Jar to Blending Base by pushing up on the Ice Chute
with the Glass Blending Jar and then placing it on
the Blending Base.
11. Set the Number of Drinks Rotary Switch to
correspond to the number of drinks being
made.
12. Rotate the READY/STOP Rotary Switch
on the Control Panel to
the READY position.
-5 -
OZ.
Re
a
dy
S
to
p
Number of Drinks
Rotary Switch
Ingredients
The Best Margarita Recipe
Amount (12 uid oz drink)
1 Drink 2 Drinks 3 Drinks
oz ml oz ml oz ml
Margaritaville
®
Gold Tequila 1 30 2 60 3 90
Triple Sec
1
⁄4 7.5
1
⁄2 15
3
⁄4 22.5
Lime Juice
1
⁄2 15 1 30 1
1
⁄2 45
Orange Juice
1
⁄2 15 1 30 1
1
⁄2 45
Margaritaville
®
Margarita Mix 1 30 2 60 3 90
READY/STOP
Rotary Switch

-6-
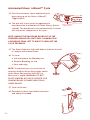
13. Start the automatic shave and blend cycle
by pushing up on the Shave ’n Blend™
Toggle Switch.
14. The unit will shave ice for the appropriate
time (based on the Number of Drinks Rotary Switch
setting). The blender will start automatically. The unit
will stop at the completion of the cycle.
15. The Power Indicator Light will blink to indicate the unit
is ready to make more drinks.
16. To serve:
a. Lift and remove the Blending Jar.
b. Remove Blending Jar Lid.
c. Pour and enjoy.
To remove excess ice from the ice
reservoir hold the Shave Only toggle switch
in the Shave Only position until the Ice
Reservoir is empty. WARNING: DO NOT
PLACE FINGERS IN THE ICE HOPPER. THE
SHAVING BLADE IS SHARP AND COULD
CAUSE INJURY.
17. Turn off the unit.
18. Periodically check the Ice Melt reservoir
and empty as needed.
Re
a
d
y
Shave ’n Blend™
Toggle Switch

-6-
13. Pulse el Interruptor de Palanca para
Raspar y Mezclar a n de encender el ciclo
automático correspondiente.
14. La unidad raspará hielo durante el tiempo apropiado
(de acuerdo con la selección del Interruptor Giratorio
para Cantidad de Tragos) La licuadora comenzará a
funcionar en forma automática. La unidad se detendrá
al nalizar el ciclo.
15. La Luz Indicadora de Encendido se encenderá en
forma intermitente para indicar que la unidad está
lista para realizar más tragos.
16. Para servir:
a. Levante y retire la Jarra Mezcladora de
Vidrio.
b. Retire la Tapa de la Jarra Mezcladora.
c. Sirva y disfrute.
Para retirar el exceso de hielo del
recipiente para hielo, mantenga presionado el
interruptor de palanca Solo Raspar en la posición
Solo Raspar hasta que se vacíe el Recipiente para
Hielo. ADVERTENCIA: NO COLOQUE LOS DEDOS
EN EL EMBUDO PARA HIELO YA QUE LA CUCHILLA
RASPADORA ES FILOSA Y PUEDE PROVOCAR HERIDAS.
17. Apague la unidad.
18. Controle en forma periódica el contenedor para Hielo
Derretido y vacíelo si es necesario.
Re
a
d
y

Re
a
d
y
-7 -
Mantenga presionado el Interruptor de Palanca
para “Sólo Mezclar/Sólo Raspar” en la posición
Sólo Raspar para agregar más hielo en la Jarra
Mezcladora.
Para dejar de agregar hielo, suelte el interruptor
de Palanca.
Para mezclar el trago con el hielo recién agregado,
mantenga presionado el Interruptor de Palanca
para Solo Mezclar/Solo Raspar en la posición Solo
Mezclar hasta obtener la consistencia deseada.
Para nalizar el proceso de mezcla, suelte el
interruptor de Palanca.
Mantenga presionado el Interruptor de Palanca
Sólo Mezclar/Sólo Raspar en la posición Sólo
Mezclar hasta obtener la consistencia deseada.
Para nalizar el proceso de mezcla, suelte el
interruptor de Palanca.

-7 -
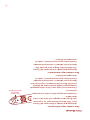
a. Hold the “Blend Only/Shave Only” Toggle Switch
in the Shave Only position to add more ice to the
Blending Jar.
b. To stop adding ice, release the toggle switch.
c. To mix the newly added ice into the drink, hold
the Blend Only/Shave Only Toggle Switch in the
blend only position until the desired consistency is
achieved. To stop the blending release the toggle
switch.
a. Hold the Blend Only/Shave Only Toggle Switch in the
Blend Only position until the desired consistency is
achieved.
b. To stop blending release the toggle switch.
Re
a
d
y
Blend Only/
Shave Only
Toggle Switch

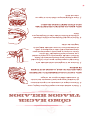
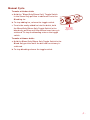
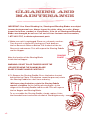
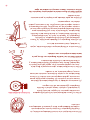
1. Make sure unit is unplugged. Place on a clean dry surface.
Turn the unit so the back is facing you. Push down on
the Ice Reservoir Release Button. Lift the back of the Ice
Reservoir and remove. This will expose the Shaving Paddle
and Ice Hopper.
Note the location of the Shaving Blade
inside the Ice Hopper.
2. To Remove the Shaving Paddle: Press the button located
behind the Ice Chute. If the button cannot be pressed, rotate
the Shaving Paddle for a half turn and retry.
(to the left) by placing ngers in the
ridges of the Shaving Paddle and unscrew. This will expose
the Ice Hopper and Shaving Blade.
To re-assemble the Shaving Paddle, simply replace it into
the threaded insert and rotate clockwise. Hand tighten only.
-8-
Cleaning and
Maintenance

1. Asegúrese de que la unidad esté desenchufada.
Colóquela en una supercie limpia y seca. Gire la
unidad hasta colocar la parte trasera frente a UD.
Presione el Botón de Salida del Recipiente para Hielo.
Levante la parte trasera del Recipiente para Hielo y
retírelo. Esta acción dejará a la vista las
Paletas Raspadoras y el Embudo para Hielo.
Observe que la Cuchilla Raspadora se encuentra
dentro del Embudo para Hielo.
2. Cómo retirar el dispositivo de raspado: presione el
botón que se encuentra detrás del conducto para hielo.
Si no puede presionar el botón, gire el dispositivo para
hielo media vuelta e inténtelo nuevamente.
Mientras presiona el botón, coloque los dedos en el
surco del dispositivo y gírelo en el sentido opuesto a las
agujas del reloj (hacia la izquierda) para desenroscarlo.
Para volver a armar el dispositivo de raspado,
simplemente encástrelo el oricio roscado y gire
en el sentido de las agujas del reloj. Sólo ajuste
manualmente.
-8-
Limpieza y
Mantenimiento
CUCHILLA
RASPADORA

3. Esta acción dejará a la vista el Embudo para Hielo y la
Cuchilla Raspadora. Presione los dos sujetadores de
salida del Embudo para Hielo y levante el embudo para
retirarlo.
4. Gire la Tuerca de Montaje de la Cuchilla Raspadora
en sentido opuesto a las agujas del reloj (hacia
la izquierda) y retírela. Luego retire la Cuchilla
Raspadora y guárdela en un sitio seguro.
5. Levante con cuidado la Jarra Mezcladora de Vidrio en
forma vertical y retírela. El Conducto para Hielo posee
un resorte y puede empujarse hacia arriba. Si la Jarra
Mezcladora no se retira fácilmente, muévala en forma
suave y luego levántela, no la sacuda.
6. Gire la Jarra Mezcladora y desenrosque la Base de la
Jarra en sentido opuesto a las agujas del reloj (hacia la
izquierda). Retire con cuidado la Cuchilla Mezcladora, y
el Aro de Goma de la Cuchilla Mezcladora.
7. Para retirar el Recipiente para Hielo Derretido, sujete
la unidad y tire rmemente del asa.
8. La Paleta Raspadora, el Embudo para Hielo, la Tuerca
de Montaje de la Cuchilla Raspadora, la Cuchilla
Raspadora, la Tapa de la Jarra, la Jarra Mezcladora,
la Cuchilla Mezcladora, el Aro de Goma de la Cuchilla
Mezcladora, la Base de la Jarra y el Recipiente para
Hielo Derretido pueden lavarse en forma segura en el
estante superior de su lavavajillas. Utilice solamente el
estante superior del lavavajillas. De lo contrario, podría
dañar los componentes.
9. Utilice un paño húmedo para limpiar la parte exterior
de la unidad.
-9-
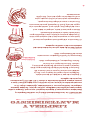
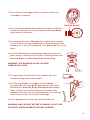
CUCHILLA RASPADORA

3. Press the two Ice Hopper release catches and lift the
Ice Hopper to remove.
4. Turn the Shaving Blade Assembly Nut counter clockwise
(to the left) and remove, then remove the Shaving Blade
and store in a safe place.
5. Carefully lift the Glass Blending Jar straight up to remove.
The Ice Chute is spring-loaded and can be pushed up. If the
Bending Jar is not easily removed, rock gently and lift. Do not
twist.
6. Turn the Blending Jar upside down and unscrew the Jar
Base counter clockwise (to the left). Carefully remove the
Blending Blade, and Blending Blade Sealing Ring.
7. To remove the Ice Melt Reservoir hold the unit still
and pull straight out on the handle.
8. The Shaving Paddle, Ice Hopper, Shaving Blade
Assembly Nut, Shaving Blade, Blending Jar Lid, Glass
Blending Jar, Blending Blade, Blending Blade Sealing
Ring, Jar Base and Ice Melt Reservoir can be safely
washed in the top rack of your dishwasher. Use only top
rack. Failure to do so will result in damage.
9. Use a damp cloth to clean the outside of the unit.
-9-

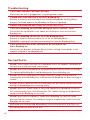
Check that the unit is plugged into a working power outlet.
Remove it from the unit and check that the Blending Blade Sealing Ring is
properly installed and that the Blending Jar Base is tightened.
Empty the Ice Melt Reservoir.
Check that the liquid level is not above the three glass icons on the Glass
Bending Jar.
Remove it from the unit and check for ice on the Blending Base.
WARNING: unplug the unit before removing ice from the Blending Base.
Check that the Number of Drinks Rotary Switch setting corresponds to the
amount of liquid in the Blending Jar.
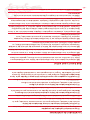
Place ngers into the Glass Blending Jar or Ice Hopper. The blades in
this unit are sharp and could cause injury.
place Glass Blending Jar onto Blending Base while motor is running.
The spinning Blending Base could damage the Glass Blending Jar.
twist Glass Blending Jar when removing. Simply lift and remove.
Twisting the Glass Blending Jar could loosen the Blending Jar Base causing it
to leak.
put hot liquid into the Glass Blending Jar. Hot liquids could be ejected
during the blending process causing injury.
place ice, frozen foods or very cold liquids into a Blending Jar which
has come directly from a hot dishwasher. The sudden change in temperature
could cause the Blending Jar to crack.
place very hot liquids or foods into a Blending Jar that has come
directly from the freezer. The sudden change in temperature could cause the
Blending Jar to crack.
Follow the Cleaning and Maintenance instructions prior to your rst use.
unplug the unit when not in use.
-10-

verique que la unidad esté enchufada en un tomacorriente que funcione..
retírela de la unidad y verique que esté correctamente instalada y que la
Base de la Jarra de Vidrio esté bien ajustada.
vacíe el Recipiente para Hielo Derretido.
verique que el nivel del líquido no se encuentre por encima de la
marca indicadora tres en la Jarra Mezcladora de Vidrio.
retírela de la unidad y verique la existencia de hielo en la Base.
ADVERTENCIA: desenchufe la unidad antes de retirar el hielo de la Base.
verique que la selección en el Interruptor Giratorio
para la Cantidad de Tragos se corresponda con la cantidad de líquido en la
Jarra Mezcladora.
coloque los dedos en la Jarra Mezcladora de Vidrio o en el Embudo para
Hielo. Las cuchillas en este electrodoméstico son losas y pueden ocasionar
lesiones.
coloque la Jarra Mezcladora de Vidrio sobre la Base si el motor está en
funcionamiento. El giro de la Base puede dañar la Jarra Mezcladora de Vidrio.
tuerza la Jarra Mezcladora de Vidrio al momento de retirarla de la unidad.
Solamente levántela y retírela. Al torcer la Jarra Mezcladora de Vidrio, se
puede aojar la Base y esto ocasionaría ltraciones.
coloque líquido caliente en la Jarra Mezcladora de Vidrio. Se pueden
expulsar los líquidos calientes durante el proceso de mezclado y esto
ocasionaría lesiones.
coloque hielo, alimentos congelados o líquidos demasiado fríos en la Jarra
Mezcladora si la jarra está caliente por haber salido recién del lavavajillas.
Cualquier cambio brusco de temperatura puede agrietar la Jarra Mezcladora.
coloque líquidos demasiado calientes o alimentos en la Jarra Mezcladora
si recién se retira del congelador. Cualquier cambio brusco de temperatura
puede agrietar la Jarra Mezcladora.
las instrucciones de Limpieza y Mantenimiento antes de usarla por
primera vez.
la unidad cuando no la utilice.
-10-

-11-
Sunbeam Products, Inc, con licencia de Jarden Consumer Solutions o en Canadá,
Sunbeam Corporation (Canadá) Limited con licencia de Jarden Consumer Solutions
(conjuntamente “Sunbeam”) garantiza que, durante el período de un año a partir de la
fecha de compra, este producto se encuentra sin defectos del material y de fabricación.
Sunbeam, a su opción, reparará o reemplazará este producto o cualquier componente que
se encuentre defectuoso durante el período de garantía. El reemplazo se realizará con
un producto o componente nuevo o reparado. Si el producto ya no está disponible, se lo
reemplazará con un producto similar o de igual o mayor valor. Esta garantía es exclusiva
de Sunbeam.
Esta garantía es válida únicamente para el comprador original a partir de la fecha inicial
de la compra minorista y no es transferible. Conserve el recibo original de la venta.
Se requerirá una prueba de la compra al momento de la ejecución de la garantía. Los
agentes de negocio Sunbeam, los centros de servicio o las tiendas minoristas que venden
productos Sunbeam no tienen derecho a alterar, modicar o cambiar en alguna forma los
términos y las condiciones de esta garantía.
Esta garantía no cubre el desgaste ocasionado por el uso normal de las partes o daños
consecuencia de: uso negligente o indebido del producto, utilización en un voltaje o
corriente inadecuada, uso contrario a las instrucciones de funcionamiento, desmontaje,
reparación o alteración por parte de cualquier otro agente que no sea Sunbeam o centro
de servicio no autorizado. Además, esta garantía tampoco cubre: casos de fuerza mayor,
tales como incendios, inundaciones, huracanes y tornados.
Sunbeam no se responsabiliza por ningún daño incidental o consiguiente a causa de
cualquier trasgresión de la garantía o condición expresa, implícita o estatutaria.
Con excepción del alcance prohibido por las leyes pertinentes, cualquier garantía o
condición implícita de comercialización o adaptabilidad para un determinado propósito se
encuentra limitada a la duración de la garantía antes mencionada.
Sunbeam desconoce cualquier otra garantía, condiciones o declaraciones, expresas,
implícitas, estatutarias u otrora.
Sunbeam no se responsabiliza por daños de cualquier índole a causa de la compra, uso,
uso incorrecto o incapacidad de uso del producto, lo que incluye daños o pérdidas de
ganancia incidentales, especiales, consiguientes o similares; por daños ocasionados
por cualquier agravio, inclusive negligencia o negligencia grave, o faltas cometidas por
Sunbeam, sus agentes o empleados o por cualquier otro incumplimiento del contrato,
fundamental u otrora, o por cualquier reclamo contra el comprador por parte de terceros.
Algunas provincias, estados o jurisdicciones no permiten la exclusión o limitación de
daños o restricciones incidentales o consiguientes basándose en la duración de una
garantía implícita; por lo tanto, algunas de las limitaciones o exclusiones mencionadas
pueden no ser aplicables en todos los casos.
Esta garantía otorga derechos legales especícos; además podrían aplicarse otros
derechos que varían según la provincia, el estado o la jurisdicción.
Si tiene alguna pregunta con respecto a esta garantía o desea obtener el servicio de
garantía, comuníquese con el número 1-877-689-2737 y se le brindará la dirección de un
centro de servicio conveniente.
En los Estados Unidos, esta garantía está respaldada por Sunbeam Products, Inc. ubicado
en Boca Ratón, Florida 33431.

-11-
Sunbeam Products, Inc, d/b/a Jarden Consumer Solutions or if in Canada, Sunbeam
Corporation (Canada) Limited d/b/a Jarden Consumer Solutions (collectively “Sunbeam”)
warrants that for a period of one year from the date of purchase, this product will be free
from defects in material and workmanship. Sunbeam, at its option, will repair or replace
this product or any component of the product found to be defective during the warranty
period. Replacement will be made with a new or remanufactured product or component.
If the product is no longer available, replacement may be made with a similar product of
equal or greater value. This is your exclusive warranty.
This warranty is valid for the original retail purchaser from the date of initial retail
purchase and is not transferable. Keep the original sales receipt. Proof of purchase is
required to obtain warranty performance. Sunbeam dealers, service centers, or retail
stores selling Sunbeam products do not have the right to alter, modify or any way change
the terms and conditions of this warranty.
This warranty does not cover normal wear of parts or damage resulting from any of the
following: negligent use or misuse of the product, use on improper voltage or current, use
contrary to the operating instructions, disassembly, repair or alteration by anyone other
than Sunbeam or an authorized Sunbeam service center. Further, the warranty does not
cover: Acts of God, such as re, ood, hurricanes and tornadoes.
Sunbeam shall not be liable for any incidental or consequential damages caused by the
breach of any express, implied or statutory warranty or condition.
Except to the extent prohibited by applicable law, any implied warranty or condition of
merchantability or tness for a particular purpose is limited in duration to the duration of
the above warranty.
Sunbeam disclaims all other warranties, conditions or representations, express, implied,
statutory or otherwise.
Sunbeam shall not be liable for any damages of any kind resulting from the purchase, use
or misuse of, or inability to use the product including incidental, special, consequential
or similar damages or loss of prots, or for any breach of contract, fundamental or
otherwise, or for any claim brought against purchaser by any other party.
Some provinces, states or jurisdictions do not allow the exclusion or limitation of
incidental or consequential damages or limitations on how long an implied warranty lasts,
so the above limitations or exclusion may not apply to you.
This warranty gives you specic legal rights, and you may also have other rights that vary
from province to province, state to state or jurisdiction to jurisdiction.
If you have any question regarding this warranty or would like to obtain warranty service,
please call 1- 877-689-2737 and a convenient service center address will be provided
to you.
In the U.S.A., this warranty is offered by Sunbeam Products, Inc. located in Boca Raton,
Florida 33431.

DO NOT RETURN THIS PRODUCT TO THE PLACE OF PURCHASE
For product questions:
Sunbeam consumer services
U.S.A. 1-877-689-2737
www.margaritavillecargo.com
©2006 Sunbeam Products, Inc., d/b/a Jarden Consumer Solutions.
All rights reserved.
Margaritaville
®
is a registered trademark of Margaritaville
®
.
Printed in China P. N. 119141

NO DEVUELVA ESTE PRODUCTO AL LUGAR DE COMPRA.
Para preguntas acerca del producto:
Servicio al consumidor de Sunbeam EE.UU 877-689-2737
www.margaritavillecargo.com
© 2006 Sunbeam Products, Inc, con licencia de Jarden Consumer Solutions.
Todos los derechos reservados.
Margaritaville
®
es una marca registrada de Margaritaville
®
.
Impreso en China P.N. 119141
-
 1
1
-
 2
2
-
 3
3
-
 4
4
-
 5
5
-
 6
6
-
 7
7
-
 8
8
-
 9
9
-
 10
10
-
 11
11
-
 12
12
-
 13
13
-
 14
14
-
 15
15
-
 16
16
-
 17
17
-
 18
18
-
 19
19
-
 20
20
-
 21
21
-
 22
22
-
 23
23
-
 24
24
-
 25
25
-
 26
26
-
 27
27
-
 28
28


Margaritaville Frozen Concoction Maker DM 1000 Manual de usuario
- Categoría
- Batidoras
- Tipo
- Manual de usuario
- Este manual también es adecuado para
