
© KORG Italy 2022-23. All rights reserved PART NUMBER: MAN0010152 (M8)
Address
KORG ITALY SpA
Via Cagiata, 85
60027 Osimo (AN)
Italy
Web
www.korg.com
Pa5X|ProfessionalArranger
QUICK GUIDE PRISE EN
MAIN SCHNELLSTART
GUIDA RAPIDA GUÍA
RÁPIDA 快速入门指南
Pa5X
MAN0010152 M8


ENGLISH

Important safety instructions
▪Read these instructions.
▪Keep these instructions.
▪Heed all warnings.
▪Follow all instructions.
▪Do not use this apparatus near water.
▪Clean only with dry cloth.
▪Do not block any ventilation openings. Install
in accordance with the manufacturer’s in-
structions.
▪Do not install near any heat sources such as
radiators, heat registers, stoves, or other ap-
paratus (including amplifiers) that produce
heat.
▪Do not defeat the safety purpose of the po-
larized or grounding-type plug. A polarized
plug has two blades with one wider than the
other. A grounding type plug has two blades
and a third grounding prong. The wide blade
or the third prong are provided for your safe-
ty. If the provided plug does not fit into your
outlet, consult an electrician for replacement
of the obsolete outlet.
▪Protect the power cord from being walked on
or pinched particularly at plugs, convenience
receptacles, and the point where they exit
from the apparatus.
▪Only use attachments/accessories specified
by the manufacturer.
▪Use only with the cart, stand, tripod, bracket,
or table specified by the manufacturer, or
sold with the apparatus. When a cart is used,
use caution when moving the cart/apparatus
combination to avoid injury from tip-over.
▪Unplug this apparatus during lightning
storms or when unused for long periods of
time.
▪Refer all servicing to qualified service per-
sonnel. Servicing is required when the appa-
ratus has been damaged in any way, such as
power-supply cord or plug is damaged, liquid
has been spilled or objects have fallen into
the apparatus, the apparatus has been ex-
posed to rain or moisture, does not operate
normally, or has been dropped.
▪WARNING – This apparatus shall be connect-
ed to a mains socket outlet with a protective
earthing connection.
▪Turning off the standby switch does not com-
pletely isolate this product from the power
line, so remove the plug from the socket if
not using it for extended periods of time,
or before cleaning. Please ensure that the
mains plug or appliance coupler remains
readily accessible.
▪Mains powered apparatus shall not be ex-
posed to dripping or splashing and that no
objects filled with liquids, such as vases, shall
be placed on the apparatus.
▪Install this product near the wall socket and
keep the power plug easily accessible.
▪Do not install this equipment in a confined
space such as a box for the conveyance or
similar unit.
▪No naked flame sources, such as lighted can-
dles, should be placed on the apparatus.

WARNING – Do not ingest bat-
tery, chemical burn hazard. This
product contains a coin/button
cell battery.
If the coin/button cell battery is swallowed
it can cause severe internal burns in just 2
hours and can lead to death.
Keep new and used batteries away from chil-
dren. If the battery compartment does not
close securely, stop using the product and
keep it away from children.
If you think the battery may have been swal-
lowed or placed inside any part of the body
seek immediate medical attention.
▪WARNING – Date/time Lithium button cell
battery inside. Danger of explosion if the
battery is incorrectly replaced. Replace only
with the same or equivalent type. The inter-
nal date/time Lithium button cell battery is
user replaceable.
▪Do not expose batteries to excessive heat,
such as direct sunshine, fire or the like.
▪Dispose of used batteries according to the
battery manufacturer’s instructions.
The lightning flash with arrowhead symbol
within an equilateral triangle, is intended
to alert the user to the presence of uninsu-
lated “dangerous voltage” within the prod-
uct’s enclosure that may be of sufficient
magnitude to constitute a risk of electric
shock to persons.
The exclamation point within an equilateral
triangle is intended to alert the user to the
presence of important operating and main-
tenance (servicing) instructions in the lit-
erature accompanying the product.

Other notices
Automatic power-off
To avoid wasting power, Pa5X will by default au-
tomatically enter standby mode after two hours
of non-active use (playing, pressing buttons or
using the touch-screen). Please save your data
(Keyboard Sets, Styles, Songs, and so on) before
taking a prolonged pause.
Data handling
Data in memory may sometimes be lost due to
incorrect user action. Be sure to save important
data to the internal memory or to an external
USB device. KORG will not be responsible for
damages caused by data loss.
Display handling
Be very careful not to force the display when tilt-
ing it. Fully lower the display before carrying the
instrument. Also, be very careful not to apply
too much pressure on the display while carrying
the instrument, or it might break.
Cleaning
If the exterior becomes dirty, wipe it with a
clean, dry cloth. Do not use liquid cleaners such
as benzene or thinner, or cleaning compounds
or flammable polishes.
Use a soft cotton cloth to clean the display.
Some materials, such as paper towels, could
cause scratches and damage it. Computer wipes
are also suggested, provided they are specifi-
cally designed for LCD screens.
Do not spray any liquid on the LCD screen direct-
ly. Always apply the solution to your cloth first,
then clean the screen.
Wooden sides
The instrument’s sides are made of natural
wood, whose characteristics vary from piece to
piece. The more it is used, the more beautiful
it will become. If you notice any irregularities,
these are to be considered unique intrinsic char-
acteristics, which further enhance its natural
origin.
Example screens
Some pages of the manuals show snapshots of
the screen along with an explanation of func-
tions and operations. All sound, style, song or
parameter names, as well as shown values, are
merely examples and may not always match the
actual display you are working on.
Trademarks
Mac and iOS are registered trademarks of Apple,
Inc. Android is a trademark of Google Inc. MS-DOS
and Windows are registered trademarks of
Microsoft Corporation. Waves MaxxAudio® is a
trademark of Waves Audio Ltd. All other trade-
marks or registered trademarks are the prop-
erty of their respective holders.
Open source notice
Portions of this product’s software are copy-
right ©2007 “The FreeType Project” (www.
freetype.org). All rights reserved.
Disclaimer
The information contained in this manual have
been carefully revised and checked through.
Due to our constant efforts to improve our prod-
ucts, the specifications might differ to those
in the manual. KORG is not responsible for any
differences found between the specifications
and the contents of the instruction manual – all
specifications being subject to change without
prior notice.
Liability
KORG products are manufactured under strict
specifications and voltages required by each
country. These products are warranted by the
KORG distributor only in each country. Any
KORG product not sold with a warranty card or
carrying a serial number disqualifies the prod-
uct sold from the manufacturer’s/distributor’s
warranty and liability. This requirement is for
your own protection and safety.
Service and user’s assistance
For service, please contact your nearest
Authorized KORG Service Center. For more in-
formation on KORG products, and to find soft-
ware and accessories for your keyboard, please
contact your local Authorized KORG distributor.
For up-to-date information, please point your
web browser to our web site (www.korg.com).
Keep your instrument up-to-date
Your instrument can be constantly updated
as new versions of the operating system are
released by KORG. You can download the op-
erating system from our web site (www.korg.
com/us/support/download/). Please, read the
instructions supplied with the operating system.

Welcome to Pa5X! |5
English
Introduction
Welcome to Pa5X!
Many thanks, and congratulations on purchasing the KORG Pa5X Professional
Arranger! We’re sure it’ll give you countless hours of enjoyment making great
music at home or on a stage.
Pa5X is an elegant and powerful music production workstation. It is easy to use,
with a clear user interface, based on the reclinable color touch screen, and the
illuminated buttons on the control panel showing color-coded functions. The nat-
urally responsive 88-note piano-like hammer-action keyboard, and the 76- and
61-note semi-weighted keyboards, are designed for a completely authentic feel
and full control of expression.
Robust and reliable, Pa5X is excellent as a live instrument, but it is also a pow-
erful creative tool in studio, helping you in writing songs or soundtracks, while
generating a produced sound that makes the perfect demo or ready-to-use me-
dia music.
The onboard sounds, based on our EDS-X (Enhanced Definition Synthesis-
eXpanded) sound engine, range from ultra-realistic acoustic instruments, to
electric vintage keyboards, to synth classics, with the addition of fantasy sounds
and special effects for media and cinema production. We also included instru-
ments from various ages and cultures, leaving ample room for your own expan-
sions.
Pa5X is easy to control, via the KORG’s DNC (Defined Nuance Control) system,
allowing the performer to accurately and expressively introduce the most subtle
nuances and sound articulation. Faders, switches, real and virtual matrices of
realtime controls, a joystick and a ribbon controller, allow for immediate access
to all the parameters of the sound.
The sounds are processed by an elaborate chain of effects, including final ef-
fects for each of the Players and for the Keyboard Sounds. The final mastering
effects on the audio outputs, making the instrument’s sound ‘blended’ and ‘pro-
duced’, are the result of KORG’s long term cooperation with Waves Audio, the
world reference in studio mastering effects.
To listen with the best audio quality, even at the lowest volume for rehearsing
at night, you can add the optional KORG PaAS Amplification System, which has
been specifically designed to connect directly to Pa5X.

6| Introduction
The optional modern, stylish dedicated ST-SV1-BK stand makes the instrument
a solid statement on stage, and a stylish piece of modern furniture in your living
room.
Pa5X’s included KORG XDS Crossfade Dual Sequencer/Player can be used to
freely preload and mix Styles and Songs. You can also create your own Styles,
and record your own MIDI and MP3 Songs. Automatic harmonization, the chord
sequencer, a sophisticated chord recognition engine, can create the rich ar-
rangement of a competent pop or jazz player.
With both Songs and Styles you can show lyrics and chords in the internal or an
external display, and you can convert any MIDI Song track into a readable score.
Markers allow for jumping back to a passage you wish to repeat, for example in a
piece you are studying or rehearsing, or for repeating a section live.
You can record a MIDI Song using a full-featured Sequencer. Even easier, just
record what you sing and play (including MP3 Songs) as an MP3 file, and listen
to it anywhere you like.
Song and Style can be saved into the onboard SongBook, whose database-like
entries are easy to synchronize with external score readers on a tablet. You can
therefore use a digital music book to control your Pa5X.
Microphone and guitar can be connected to the dedicated audio inputs, and pro-
cessed with the excellent onboard effects. Our long experience in vocal harmo-
nies and guitar effects is entirely included here. And the Vocal Remover will let
you sing along with any MP3 Song.
There is more, much more, and we invite you to explore Pa5X in depth. Pa5X is
the most evocative, powerful, easy-to-use complete Professional Arranger ever
produced. Enjoy your musical life with the new Pa5X!

Before starting to play… |7
English
Before starting to play…
What’s in the box
After you get your Pa5X, please check that all the listed items are included in
the package. If any of them is missing, please contact your KORG dealer imme-
diately.
> Pa5X
> Music stand
> AC power cable
> Quick Guide
> Pa5X-88 only: Safety felts for the ST-SV1-BK stand
What you can download
Point your web browser to our web site (www.korg.com/us/support/download/),
to download the most up-to-date software, the full User Manual, an easier
Performance Guide, the video tutorials, a MIDI driver.
What you can add
After having purchased Pa5X, you might want to add these other fine options:
> The elegant KORG ST-SV1-BK keyboard stand, recommended for safety and
comfort, perfectly matching your arranger design.
CAUTION: The Pa5X Professional Arranger is intended for use only with the
KORG ST-SV1-BK stand. Use with another stand may result in instability and
cause injury.
> The PaAS Amplification System, adding a three-way amplification system, a
pair of integrated speakers and a bass-reflex box.
> One of the sturdy pedals and footswitches from the KORG catalogue.

8| Introduction
Making a safety copy of your data
In case you like to customize your musical resources, we suggest you do frequent
backups of your data. Press the FILE button to go to the File page, select the
Internal group, select the All folder, and choose the Save command from the page
menu (on the top right corner). Then save the data into an external storage device.
Restoring a safety copy
To restore a backup of User data, reload the backup data. If it is an external
device, connect the backup storage device. Press the FILE button to go to the
File page, select the Drives group and then the external storage device. Select
the folder where you backed up your data, and choose the Load command from
the page menu (on the top right corner). Then load the data into the internal
memory. If you like, you can only reload some individual elements.
Restoring the original factory data
In case you want to restore the original factory data, use the Factory Restore
command you can find in the File > Menu > Factory Restore page.
WARNING: This operation will overwrite all the User data!
Loading the Operating System
Your Pa5X can be constantly updated as new versions of the operating system
are released. You can download the most up-to-date operating system from our
web site (www.korg.com/us/support/download/). Please, read the instructions
supplied with the operating system.
You can see which version of the operating system is installed in your Pa5X by
going to the File pages, and choosing the System Info command from the page
menu.
HINT: Be sure your Pa5X always includes the latest version of the operating
system. This may contain new features and bug fixes.
WARNING: Do not install an OS other than the official OS supplied by KORG for
the Pa5X. Trying to install an OS created for different models or downloaded
from unofficial web sites may cause data loss and permanent damage to the
instrument. KORG is not responsible for any damage caused by improper instal-
lation of the OS.

The front panel |9
English
Overview of the
instrument
The front panel
The front panel is where you can find the instrument’s controls.
Music stand
A music stand is included with your Pa5X.
PaAS amplification system
You can install the (optional) PaAS amplification system. When installed, control
the output volume of the speakers via the MASTER VOLUME slider.
The speakers are automatically deactivated when connecting the headphones.
You can also manually deactivate them by deselecting the Speakers checkbox in
the Settings > Audio/Video > MP3/Speakers page.
Headphones connector
Connect a pair of headphones to this output. You can use headphones with an
impedance of 16-200 Ohms (50 Ohms suggested).
Keyboard
Use the keyboard to play notes and chords. Depending on the status of the SPLIT
indicator, the keyboard may be joint or split between different sounds.

10| Overview of the instrument
KeyboardHeadphones
Guide for the music stand and
PaAS amplification system

The control panel |11
English
The control panel
The control panel is the part of the front panel where you can find the instru-
ment’s controls.
Display
Sliders and
switches area
Styles, Pads and
Markers area
Players area Sounds area
Navigation area The Matrix
Tempo area
Display
Use this touchscreen display to interact with the instrument. The display can be
tilted for optimal visualization. There are controls around the display, to help you
select the various elements.

12| Overview of the instrument
Navigation area
Use these controls to go through the menus, pages and parameters, and change
the value of the selected parameter .
Sounds area
Sounds are what you can play on the keyboard. Here you can choose Sound sets
saved as Keyboard Sets in a dedicated library.
Styles, Pads and Markers area
Styles supply the automatic accompaniment with a virtual band. Markers allow
jumping to saved points in the MIDI Song. You can play Sounds (selected via the
Keyboard Sets) and Pads along with the Styles and Songs.

The control panel |13
English
Players area
Styles and Songs can be played back by the two onboard Players. You can assign
different elements to each Player, to have another Style or Song ready to play at
the end of the current one. You can mix the two Players with the X-FADER.
SongBook area
The SongBook is a database of ‘songs’, called SongBook Entries. Each of them is
a snapshot of the current situation, including the selected Style, Song, Keyboard
Set, Pads, Chord Sequences and Mic and Guitar effects. You can quickly access
all the songs in the SongBook (Book), or selected lists of songs (Set Lists).
Tempo area
Use these buttons to control the Tempo of the Styles and the Songs. You can
turn a metronome click on or off by pressing the CONTROL > SWITCH #9 button
while in STYLE/SONG mode, and practice with the metronome

14| Overview of the instrument
The Matrix
You can use this programmable matrix of big, easy accessible keys to trigger
Pads and mute Tracks.
USB connector
Use this socket (that will appear as HOST-F) to connect an USB memory device,
like an USB pendrive, or other musical instruments to be used as controllers. xxx
You can also use it to attach a small USB lamp and illuminate the control panel
or the music stand. Please note that two other ports are on the back of the in-
strument.

The rear panel |15
English
The rear panel
The rear panel is where you can find the various connections.
Guide for the music stand and
PaAS amplification system
Connectors Power connector
Audio inputs
Use these connectors to connect a microphone, a guitar or another musical in-
strument. The handy STEREO minijack can be used to directly connect the audio
output of a media player, a smartphone or a tablet.
Audio outputs
Use the LEFT/RIGHT sockets to send the stereo audio signal to a mixer, a PA
system, a set of powered monitors, or your hi-fi system. Four separate audio
outputs (1-4) are also available.

16| Overview of the instrument
Pedal connectors
Use the DAMPER connector to connect a damper pedal, and the ASSIGNABLE
connectors to connect two continuous and/or footswitch pedals.
MIDI ports
Use these ports to connect Pa5X to external controllers (master keyboard, MIDI
guitar, wind controller, MIDI accordion, MIDI pedalboard…), to a series of expand-
ers, or to a computer with a MIDI interface.
Battery and microSD slot
This opening contains the clock battery and the microSD card slot.

The rear panel |17
English
USB ports
Use these sockets to connect your Pa5X to a personal computer or a tablet
(DEVICE) or to connect up to two USB memory device, like an USB pendrive,
or another musical instrument to be used as a controller (HOST1-R, HOST2-R).
Another HOST socket (HOST-F) is available on the front panel.
Video out
Connect Pa5X to a TV or video monitor, to read lyrics and chords on a bigger
display.
Power connector
Use this socket to plug in the supplied IEC power cable.

18| Overview of the instrument
Plug the other end of the cable to an AC power outlet. Be sure to use a compat-
ible plug. Never force the plug into the socket!
WARNING: Connect the plug to an AC socket of matching voltage! Please read
the safety information at the beginning of this manual.

Connecting the pedals |19
English
Setting up the pedals and
the audio connections
Connecting the pedals
Connecting the damper pedal
Use the PEDAL > DAMPER connector to connect a damper pedal, like the (op-
tional) KORG PS-1, PS-3 or DS-1H. The DS-1H pedal supports all the nuances of
half-pedaling on some acoustic piano sounds. You can experiment how it works
by gradually pressing it down, and gradually releasing it, while playing the
Concert Grand Sound.
If you need to change the pedal’s polarity and calibrate it, go to the Settings >
Controllers > Foot page.
Connecting a pedal and/or footswitch
Use the PEDAL > ASSIGNABLE connectors to connect one or two footswitch
pedals like the (optional) KORG PS-1, PS-3 or DS-1H, and/or one or two continuous
pedals like the (optional) KORG XVP-20 Volume pedal or the EXP-2 Expression
pedal.
By default, these connectors will work as a Master Volume and a Keyboard
Expression continuous pedal. If you want to change the assigned functions, or
you need to change the pedal’s polarity and calibrate it, go to the Settings >
Controllers > Foot page.

20| Setting up the pedals and the audio connections
What if the pedals do not behave correctly?
If needed, you might have to calibrate the pedals to use their full range of values,
without any ‘dead spot’. Also, this procedure allows to choose a pedal’s polarity,
in case you are using a pedal working in reverse.
1 Go to the Settings > Controllers > Foot page.
2 Touch the Calibration button in the area of the pedal to calibrate, to make
the Pedal/Footswitch Calibration dialog appear.
3 Fully press the pedal down, and while continuing to press touch the top
(highlighted) button to confirm the maximum value.

Connecting the pedals |21
English
4 When the following dialog appears, release the pedal.
5 Touch the lower (now highlighted) button in the display to confirm the mini-
mum value. Check if the pedal is working properly. In case it isn’t, repeat the
procedure.
6 Press the EXIT button to return to the previous page.

22| Powering up
Powering up
Turning the instrument on
Connecting the power cable
Plug the supplied power cable into the POWER socket on the back of the instru-
ment, and the cable plug into a wall power socket.
When the cable is connected, the instrument is in standby.
WARNING: When the instrument is in standby, it is still connected to the power
line. Accessing the inside of the instrument can be dangerous. To completely dis-
connect the instrument from the power, unplug the power plug from the power
socket on the wall.
Turning the power on or off
> Turn the instrument on
> Press the POWER ( ) button to turn the instrument on (that is, ‘exit from
standby’). After you turn the instrument on, wait for the welcome screen to dis-
appear, then the Main page will be shown in the display.
> Turn the instrument off (standby)
> Keep the POWER ( ) button pressed for about two seconds, then release it
when the screen appears dimmed. The shutdown procedure will begin and last
for a few seconds. Please do not disconnect the power cable during this proce-
dure.

Tilting the display |23
English
Tilting the display
For optimal visibility under any seating position, the display’s tilt angle can be
adjusted.
Lifting the display
1 Press the UNLOCK button to unlatch the display.
2 Keep the UNLOCK button pressed, and lift the display.
3 Open the safety bracket by detaching it from the top back of the display.

24| Powering up
4 While still keeping the UNLOCK button pressed, adjust the tilt angle, and fix
the bracket to one of the stops in the bottom of the display housing.
CAUTION: Do not apply excessive pressure, or you risk to break it!
5 Release the UNLOCK button to fix the display to the current position.

Tilting the display |25
English
Closing the display
1 Keep the UNLOCK button pressed, and lift the display.
2 Lift the safety bracket, and put it back to the closed position.
3 Still keeping the UNLOCK button pressed, accompany the display down to
its housing.
4 Release the UNLOCK button, and gently press the center of the top border
of the display to lock it in the initial position.

26| Powering up
Adjusting the display brightness
The display brightness can be adjusted to match the ambient’s light.
> Keep the SHIFT and MENU buttons pressed, and use the DIAL to adjust the
display brightness.
You can also adjust the display (and the strip display) brightness in the Settings
> General Controls > Interface page.

Listening to the Demo Songs |27
English
Listening to the Demo Songs
You can listen to some songs we prepared, to let you understand what this in-
strument can do.
> Access the Demo mode
> Press the DEMO buttons together.
> Listen to all the Demo Songs
> After accessing the Demo mode, do not press any button. All the Demo
Songs will be played back.
> Choose a single Demo Song
> Touch one of the options on the display, then choose one of the Demo Songs.
> Exit from the Demo mode
> Press either of the DEMO buttons.

28| Choosing and playing the musical resources
Choosing and playing the
musical resources
Opening a Select window
When you press the STYLE, SONG, or one of the KEYBOARD SET LIBRARY but-
tons, the corresponding Select window appears.
The Select window can also be opened by touching the name of the correspond-
ing element (Style, Song, Keyboard Set, Mic or Guitar Preset…) in the display.
Touch to choose a Style or Song
Touch to choose a Keyboard Set

Opening a Select window |29
English
For example, this is the Select window when browsing for a Keyboard Set:
TypeGroups Selected Keyboard Set
PagesCurrent
directory
Upper level (folders
corresponding to Categories)
Lower level (individual
elements)
If you are lost while browsing though the data, you can return to the folder con-
taining the selected element by touching the Locate ( ) button.
You can always exit from this window by pressing the EXIT button, or by touch-
ing the Exit command in the top left corner of the display.
You can play a Style or a Song with either Player 1 or Player 2. Therefore, if you
want, you can assign a Style or Song to each of the players, and have the other
player be ready for the next musical selection. You can also mix Styles and Songs
with the different Players.
You can choose which Player has the focus by moving the X-FADER, or by press-
ing the corresponding PLAY/STOP ( ) button when both Players are stopped.

30| Choosing and playing the musical resources
Choosing your preferred Keyboard Set
Choosing the ‘My Setting’ Keyboard Set
> Press the MY SETTING button to choose your preferred sounds.
The My Setting Keyboard Set
My Setting is a special Keyboard Set, where you can save your preferred set-
tings for things like Keyboard sounds, effects, control sliders and switches, the
assignable switches. This Keyboard Set is automatically chosen when the in-
strument is turned on, and will automatically configure the instrument for you.
You can save here your preferred Keyboard Set. Keep the MY SETTING button
pressed for about one second, until the Save dialog appears, then touch the
Save button to confirm saving to memory.

Playing and controlling the sound |31
English
Playing and controlling the sound
Playing the keyboard
The instrument’s keyboard is like a piano keyboard. Just play it!
With some Sounds, you can press the keys while they are down, and the sound
might vary (for example, you might hear more vibrato).
Using the pedals
Pedals do different things depending on how they are programmed. The Damper
pedal is just that – a damper pedal, sustaining notes until you release the pedal.
An Assignable pedal (or footswitch) may change depending on how it is pro-
grammed in the Settings > Controllers > Foot page.
Using the control sliders and switches
Depending on the selected mode, the CONTROL sliders and switches can control
different things, like volume levels of the different sounds, the organ drawbars
or some assignable functions. How they work is shown by the strip display under
the sliders.
Using the assignable switches
Depending on the chosen Keyboard Set and the assigned functions, these con-
trollers can do different things. With the DNC Sounds, the switches can either
‘book’ a function, that will be triggered while playing, or enable (or disable) it by
pressing the button to ‘toggle’ it. In other cases, these switches can ‘toggle’ or
‘trigger’ the assigned function.

32| Choosing and playing the musical resources
Using the Matrix
The Matrix of programmable buttons can be used to trigger Pads and mute
Tracks. Touch one or more of them to select the desired function. If they are on/
off switches, touch them again to turn them off.
The color of the switches may change, depending on the assigned function and
the selected Player.
Using the joystick
Moving the joystick left of right usually changes the Sound’s pitch. Moving it
forward usually add modulation, but this depends on the selected sounds. With
the electro-mechanical organs, pushing the joystick forward changes the rotary
speaker’s speed. What it does when pulled back depends on the selected Sounds.
Just experiment!
Using the ribbon controller
Sweeping left of right on the ribbon controller usually changes the brilliance of
the sounds and/or the pitch, but how it works depends on the selected sounds.

Starting and stopping the Styles |33
English
Starting and stopping the Styles
You can manually start and stop the automatic accompaniment, by using the
controls in the PLAYER 1 or PLAYER 2 section.
Stop/
Go to Start
Play/Stop
> Set the right mix
> Move the X-FADER fully toward the Player you want to listen to. Move it fully
to the left for Player 1, to the right for Player 2.
> Move it to an intermediate position to mix the two Players.
> Start the accompaniment
1 Press the PLAY/STOP ( ) button.
2 Play some chords with your left hand, while playing a melody with your right
hand.
While the accompaniment is playing, please note the various indicators in the
display.
Recognized chord
Tempo Current measure
Beat indicator
In Play: Remaining measures
In Stop: Total pattern length
With a Style Variation: Loop
Selected Style Element
File path

34| Choosing and playing the musical resources
> Stop the accompaniment
> Press the PLAY/STOP ( ) button again.
> As an alternative, you can presse the STOP/GO TO START () button.
> Start and stop both Players at the same time
You can start both Players at the same time, to mix them with the X-FADER while
playing.
> Keep the SHIFT button pressed, and press any of the two PLAY/STOP
() buttons to start both Players at the same time.
> Keep the SHIFT button pressed, and press any of the two the PLAY/STOP
() buttons to stop both Players at the same time.

Starting, stopping and controlling the Songs |35
English
Starting, stopping and controlling the
Songs
You can manually start and stop the Songs, by using the controls in the PLAYER 1
or PLAYER 2 section.
Stop/
Go to Start
Play/Stop
> Set the right mix
> Move the X-FADER fully toward the Player you want to listen to. Move it fully
to the left for Player 1, to the right for Player 2.
> Move it to an intermediate position to mix the two Players.
> Start the Player
> Press the PLAY/STOP () button.
While the Song is playing, please note the various indicators in the display.
With a MIDI Song:
Tempo
Current markerFile path
Current
measure
Beat indicator
Meter (Time Signature)
In Play: Remaining measures
In Stop: Total song length
Fast Reverse / Fast Forward controls

36| Choosing and playing the musical resources
With an MP3 Song:
File path
Tempo variation Elapsed time Fast Rewind/Fast
Forward controls
In Play: Remaining time
In Stop: Total song length
> Fast Forward the Song
> Touch the FAST FORWARD ( ) button once to jump to the next measure
(MIDI Song) or to the next second (MP3 Song).
> Keep touching the FAST FORWARD ( ) button to scroll the Song continu-
ously. Release it when you have reached the desired position.
> Rewind the Song
> Touch the FAST REWIND ( ) button once to jump to the previous measure
(MIDI Song) or to the previous second (MP3 Song).
> Keep touching the FAST REWIND ( ) button to scroll the Song continu-
ously. Release it when you have reached the desired position.
> Pause and resume playback
> Press the PLAY/STOP () button to stop the Song at the current position.
The button’s indicator will turn off.
> Press the PLAY/STOP () button again to resume playback. The indicator
will turn on again.
> Stop the Player and return to the beginning of the Song
> Press the STOP/GO TO START () button to stop the Player and move to
the beginning of the Song. The button’s indicator will turn off.

Starting, stopping and controlling the Songs |37
English
> Start and stop both Players at the same time
You can start both Players at the same time, to mix them with the X-FADER while
playing.
> Keep the SHIFT button pressed, and press any of the two PLAY/STOP
() buttons to start both Players at the same time.
> Keep the SHIFT button pressed, and press any of the two the PLAY/STOP
() buttons to stop both Players at the same time.

IMPORTANT NOTICE TO CONSUMERS
This product has been manufactured accord-
ing to strict specifications and voltage re-
quirements that are applicable in the country
in which it is intended that this product should
be used. If you have purchased this product
via the internet, through mail order, and/or
via a telephone sale, you must verify that this
product is intended to be used in the country
in which you reside.
WARNING: Use of this product in any country
other than that for which it is intended could
be dangerous and could invalidate the manu-
facturer’s or distributor’s warranty.
Please also retain your receipt as proof of pur-
chase otherwise your product may be disquali-
fied from the manufacturer’s or distributor’s
warranty.
NOTICE REGARDING DISPOSAL (EU ONLY)
If this symbol is shown on the product,
manual, battery, or package, you must
dispose of it in the correct manner to
avoid harm to human health or dam-
age to the environment. Contact your
local administrative body for details on
the correct disposal method. If the bat-
tery contains heavy metals in excess
of the regulated amount, a chemical symbol is
displayed below the symbol on the battery or
battery package.
In case of electromagnetic radiations a tem-
porary deterioration of the quality of audio
performances may occur. A deterioration that
might arise can be a sound signal emitted.
This will stop when the electromagnetic dis-
turbance ceases.
THE FCC REGULATION WARNING (FOR USA)
This equipment has been tested and found
to comply with the limits for a Class B digital
device, pursuant to Part 15 of the FCC Rules.
These limits are designed to provide reason-
able protection against harmful interference
in a residential installation. This equipment
generates, uses, and can radiate radio fre-
quency energy and, if not installed and used in
accordance with the instructions, may cause
harmful interference to radio communica-
tions. However, there is no guarantee that in-
terference will not occur in a particular instal-
lation. If this equipment does cause harmful
interference to radio or television reception,
which can be determined by turning the equip-
ment off and on, the user is encouraged to try
to correct the interference by one or more of
the following measures:
• Reorient or relocate the receiving antenna.
• Increase the separation between the equip-
ment and receiver.
• Connect the equipment into an outlet on a
circuit different from that to which the receiv-
er is connected.
• Consult the dealer or an experienced radio/
TV technician for help.
If items such as cables are included with this
equipment, you must use those included
items.
Unauthorized changes or modification to this
system can void the user’s authority to oper-
ate this equipment.
DECLARATION OF CONFORMITY (FOR USA)
Responsible Party: KORG USA INC.
Address: 316 SOUTH SERVICE ROAD, MELVILLE
Telephone: 1-631-390-6500
Equipment Type: Professional Arranger
Model: Pa5X
This device complies with Part 15 of FCC Rules.
Operation is subject to the following two condi-
tions: (1) This device may not cause harmful in-
terference, and (2) this device must accept any
interference received, including interference
that may cause undesired operation.

FRANÇAIS

Consignes importantes de sécurité
▪Veuillez lire ces consignes.
▪Conservez ces consignes.
▪Tenez compte de tous les avertissements.
▪Suivez toutes les instructions.
▪N’utilisez pas ce produit à proximité d’eau.
▪Nettoyez le produit avec un chiffon sec uni-
quement.
▪N’obstruez aucun orifice d’aération. Installez
le produit conformément aux consignes du
fabricant.
▪Ne l’installez pas à proximité de sources de
chaleur comme des radiateurs, des bouches
d’air chaud, des poêles ou d’autres appareils
générateurs de chaleur (amplificateurs com-
pris).
▪Ne supprimez pas la sécurité offerte par la
fiche polarisée ou dotée d’une broche de
terre. Une fiche polarisée dispose de deux
lames dont une plus large que l’autre. Une
fiche avec broche de terre dispose de deux
lames (ou broches) et d’une broche de terre.
La lame plus large ou la troisième broche est
conçue pour votre sécurité. Si la fiche four-
nie ne s’adapte pas à votre prise de courant,
consultez un électricien pour faire remplacer
cette ancienne prise.
▪Protégez le cordon d’alimentation pour évi-
ter qu’il ne soit piétiné ou abîmé notamment
au niveau des fiches, des rallonges et au
point de connexion du produit.
▪Utilisez exclusivement des fixations ou acces-
soires spécifiés par le fabricant.
▪Utilisez cet appareil exclusivement avec un
chariot, stand, pied, support ou table du type
spécifié par le constructeur ou livré avec
l’appareil. Si vous utilisez un chariot, soyez
prudent lors de son déplacement afin d’évi-
ter que le produit ne bascule et ne blesse
quelqu’un.
▪Débranchez cet appareil en cas d’orage ou
s’il doit rester inutilisé durant une période
assez longue.
▪Pour tout dépannage ou entretien, veuillez
consulter un service ou un technicien quali-
fié. Il est impératif de faire appel à un tech-
nicien qualifié si l’appareil a été endommagé
d’une quelconque façon, notamment, si le
cordon d’alimentation ou la fiche est endom-
magée, si du liquide s’est renversé ou si des
objets sont tombés dans l’appareil, si l’appa-
reil a été exposé à la pluie ou à l’humidité, s’il
ne fonctionne plus normalement ou s’il est
tombé.
▪AVERTISSEMENT – Ce produit doit être
branché à une prise secteur disposant d’une
connexion de sécurité à la terre.
▪L’interrupteur n’isole pas complètement le
produit de la source de courant. Débranchez
donc la fiche de la prise secteur si le produit
doit rester inutilisé durant un certain temps
ou avant de le nettoyer. Veillez à mainte-
nir un accès facile à la prise secteur ou au
connecteur de l’appareil.
▪Un produit branché au secteur ne peut pas
être exposé à des gouttes ou des éclabous-
sures. Ne placez aucun conteneur de liquide
(vase, verre) sur le produit.
▪Installez ce produit à proximité de la prise de
courant en laissant un accès facile à la prise
d’alimentation.
▪N’installez pas ce produit dans un espace
confiné comme un flightcase ou autre
meuble de ce type.
▪Ne placez pas de flamme nue (bougie etc.)
sur cet appareil.

AVERTISSEMENT – La pile ne
peut pas être ingérée: il y a
risque de brûlures par produits
chimiques. Ce produit contient
une pile bouton.
L’ingestion de la pile bouton peut provoquer
de très graves brûlures internes en 2 heures
à peine pouvant entraîner le décès de la per-
sonne.
Conservez les piles neuves et usées hors de
portée des enfants. Si le compartiment à piles
ne ferme pas convenablement, cessez d’utili-
ser le produit et conservez-le hors de portée
des enfants.
Si vous pensez qu’une pile a pu être ingérée
ou insérée dans des orifices corporels, consul-
tez immédiatement un médecin.
▪AVERTISSEMENT – Ce produit contient une
pile bouton au lithium pour la date/l’heure. Il
y a risque d’explosion si la pile est mal rem-
placée. Elle doit être remplacée par une bat-
terie du même type. La pile bouton au lithium
pour la date/l’heure peut être remplacée par
l’utilisateur.
▪N’exposez pas les piles à une chaleur exces-
sive (rayons directs du soleil, feu etc.).
▪Mettez les piles usées au rebut conformé-
ment aux instructions données par le fabri-
cant.
Le symbole d’éclair dans un triangle équi-
latéral est destiné à avertir l’utilisateur de
la présence d’une tension dangereuse non
isolée au sein du produit. Cette tension est
suffisante pour constituer un risque d’élec-
trocution.
Le point d’exclamation dans un triangle
équilatéral avertit l’utilisateur de la pré-
sence d’importantes consignes de mani-
pulation ou d’entretien dans la documenta-
tion accompagnant ce produit.

Autres remarques
Coupure d’alimentation automatique
Pour économiser l’énergie, le Pa5X se met auto-
matiquement hors tension (en veille) après deux
heures d’inactivité (ni jeu, ni pression sur un
bouton ou sur l’écran tactile). Sauvegardez donc
vos données (Keyboard Sets, Styles, morceaux
etc.) avant de faire une pause prolongée.
Gestion des données
Les données sauvegardées peuvent parfois être
perdues suite à une erreur de manipulation.
Sauvegardez donc vos données importantes
en mémoire interne ou sur un dispositif USB
externe. KORG décline toute responsabilité pour
des dommages résultant de la perte de données.
Maniement de l’écran
Veillez à ne pas forcer sur l’écran quand vous
l’inclinez. Abaissez complètement l’écran avant
de transporter l’instrument. Lorsque vous
transportez l’instrument, évitez d’exercer une
pression excessive sur l’écran car il peut casser.
Entretien
Nettoyez le boîtier de l’instrument avec un chif-
fon propre et sec. Ne vous servez pas d’agents
de nettoyage liquides tels que du benzène ou du
diluant, ni de nettoyants inflammables.
Nettoyez l’écran avec un chiffon en coton doux.
Certaines textures comme les mouchoirs en
papier risquent de le griffer et de l’endomma-
ger. Vous pouvez également utiliser des chiffons
pour ordinateur à condition qu’ils soient spécifi-
quement conçus pour écrans LCD.
Ne vaporisez aucun liquide directement sur
l’écran LCD. Appliquez toujours la solution sur le
chiffon puis nettoyez l’écran.
Flancs en bois
Les flancs de l’instrument sont en bois naturel
dont les caractéristiques varient d’une pièce à
l’autre. Ils se patinent et embellissent avec le
temps. Toute irrégularité fait partie des caracté-
ristiques intrinsèques du panneau en bois et est
due à son origine naturelle.
Saisies d’écran
Certaines pages des manuels contiennent des
saisies d’écran pour illustrer les descriptions des
fonctions et des opérations. Les noms de sons,
de Styles, de morceaux ou de paramètres ainsi
que les réglages sont donnés à titre d’exemple et
peuvent différer de ce que vous voyez à l’écran.
Marques commerciales
Mac et iOS sont des marques déposées de Apple,
Inc. Android est une marque commerciale de
Google Inc. MS-DOS et Windows sont des
marques déposées de Microsoft Corporation.
Waves MaxxAudio® est une marque commer-
ciale de Waves Audio Ltd. Les autres marques
commerciales ou déposées sont la propriété de
leur détenteur respectif.
Notice ‘Open Source’
Des parties du logiciel de ce produit sont sous
copyright ©2007 “The FreeType Project” (www.
freetype.org). Tous droits réservés.
Rejet de responsabilité
Les informations fournies dans ce mode d’emploi
ont été soigneusement relues et vérifiées. Notre
quête permanente d’amélioration de nos pro-
duits peut cependant entraîner des différences
entre les caractéristiques du produit et celles
figurant dans le mode d’emploi. KORG décline
toute responsabilité pour toute différence entre
les caractéristiques du produit et le contenu du
mode d’emploi. Les caractéristiques sont sus-
ceptibles d’être modifiées sans avis préalable.
Responsabilité
Les produits KORG sont fabriqués conformé-
ment aux caractéristiques strictes et aux tension
en vigueur dans chaque pays. Ces produits ne
sont garantis par le distributeur KORG que dans
le pays pour lequel ils sont fabriqués. Tout pro-
duit KORG vendu sans carte de garantie ou sans
numéro de série ne bénéficie pas de la garantie
et n’engage pas la responsabilité du fabricant/
du distributeur. Cette clause est mise en œuvre
pour votre propre protection et sécurité.
Service après-vente et assistance à l’utilisateur
Pour tout entretien, veuillez contacter le service
après-vente KORG agréé le plus proche. Si vous
souhaitez plus d’informations sur les produits
KORG ou pour savoir où trouver les logiciels et
accessoires pour votre instrument, adressez-vous
à votre distributeur KORG agréé. Pour obtenir
les informations les plus récentes, veuillez vous
rendre sur notre site web (www.korg.com).
Gardez votre instrument à jour
Votre instrument peut être mis à jour avec les
nouvelles versions du système d’exploitation
proposées par KORG. Vous pouvez téléchar-
ger le système d’exploitation de notre site web
(www.korg.com/us/support/download/). Veuil-
lez lire les instructions accompagnant le sys-
tème d’exploitation.

Bienvenue au Pa5X! | 5
Français
Introduction
Bienvenue au Pa5X!
Merci et félicitations pour votre acquisition de l’arrangeur professionnel KORG
Pa5X. Nous sommes certains qu’il vous donnera d’innombrables heures d’in-
tense plaisir musical chez vous ou sur scène.
Le Pa5X est une station de production musicale aussi puissante qu’élégante. Il
est simple à utiliser grâce à une interface utilisateur claire, exploitant un écran
tactile couleur inclinable et des boutons éclairés indiquant les fonctions choi-
sies par des codes couleurs. Le clavier à 88 touches et mécanisme à marteaux
offrant la réponse naturelle d’un piano ainsi que les claviers à 76 et 61 touches
semi-lestées restituent des sensations authentiques et assurent une maîtrise
parfaite de l’expression.
Robuste et fiable, le Pa5X est un excellent instrument de scène mais également
un puissant outil de création musicale en studio: non content de vous aider à
composer des morceaux ou des bandes sons, il produit un résultat fini à la per-
fection pour démo ou musique multimédia prête à l’emploi.
Notre moteur de son EDS-X (Enhanced Definition Synthesis-eXpanded) repro-
duit des sons ultra réalistes d’instruments acoustiques, de claviers électriques
vintage et de synthés de légende. A ceux-ci s’ajoutent des sons et des effets spé-
ciaux pour productions multimédia et films. Vous y trouverez également des ins-
truments de différentes époques et cultures ainsi que la place nécessaire pour
vos propres ajouts.
Le Pa5X est facile à jouer grâce au système Pa5X KORG (DNC) qui permet au
musicien d’introduire de subtiles nuances et articulations sonores d’une grande
expressivité. Des faders, des commutateurs, des matrices réelle et virtuelle de
contrôleurs en temps réel, un joystick et un contrôleur à ruban offrent un accès
immédiat à tous les paramètres du son.
Les sons sont traités par une chaîne sophistiquée d’effets dont des effets de
traitement final pour chacun des lecteurs et pour les sons du clavier. Les effets
de masterisation peaufinant la production des sorties audio sont le fruit d’une
longue collaboration entre KORG et Waves Audio, la référence en matière d’ef-
fets de masterisation de studio.

6 | Introduction
Pour bénéficier d’une qualité audio optimale, même à bas volume lorsque vous
jouez la nuit, vous pouvez y ajouter le système d’amplification optionnel KORG
PaAS qui a été spécialement conçu pour être branché directement au Pa5X.
L’élégant pied dédié ST-SV1-BK est disponible en option: il accentue la présence
de l’instrument sur scène et ajoute une note stylée et contemporaine à votre
salon.
Le double séquenceur/lecteur à chassé-croisé KORG XDS du Pa5X permet de
précharger et de mixer des Styles et des morceaux. Vous pouvez aussi créer vos
propres Styles (accompagnements) et enregistrer vos morceaux MIDI et MP3.
L’harmonisation automatique, le séquenceur d’accords et un moteur sophistiqué
de reconnaissance d’accords permettent de créer un arrangement riche, digne
d’un excellent musicien pop ou jazz.
Pour les morceaux (Songs) comme pour les Styles, vous pouvez afficher les
paroles et les accords sur l’écran interne ou sur un écran externe. Vous pouvez
aussi convertir une piste d’un morceau MIDI en partition lisible. Les marqueurs
(Markers) vous permettent de retourner au début d’un passage que vous souhai-
tez répéter, que ce soit pour l’étudier ou le rejouer sur scène.
Vous pouvez enregistrer un morceau MIDI soit avec un séquenceur à part
entière. Plus simple encore: enregistrez ce que vous jouez et chantez (et même
des morceaux MP3) sous forme de fichier MP3 et écoutez-le où vous le voulez.
Les morceaux et les Styles peuvent être sauvegardés dans le SongBook, une
base de données dont les entrées sont faciles à synchroniser avec des lecteurs
de partition externes sur tablette. Cela vous permet d’utiliser des partitions
numériques pour piloter le Pa5X.
Les entrées audio dédiées pour la voix et la guitare permettent de traiter ces
signaux avec les excellents effets internes. Ils proposent les fruits de notre longue
expérience en matière d’harmonies vocales et d’effets de guitare. La fonction
“Vocal Remover” vous permet de chanter vous-même sur des morceaux MP3.
Pour découvrir tout le reste, nous vous invitons à explorer le Pa5X en profon-
deur. Le Pa5X est l’arrangeur professionnel le plus évocateur, le plus puissant,
le plus simple à utiliser et le plus complet jamais produit. Profitez à fond de la
musique avec votre nouveau Pa5X!

Avant de commencer… | 7
Français
Avant de commencer…
Contenu du carton
Veuillez vérifier que les éléments suivants sont inclus dans le carton de votre
Pa5X. Si l’un d’eux manque, contactez immédiatement votre revendeur KORG.
> Pa5X
> Pupitre
> Câble d’alimentation CA
> Guide de prise en main
> Pa5X-88 uniquement: Feutres de sécurité pour le pied ST-SV1-BK
Téléchargements
Rendez-vous sur notre site web (www.korg.com/us/support/download/) et télé-
chargez la version la plus récente du logiciel, le manuel complet, les manuels
vidéo et un pilote MIDI.
Options
Après l’achat du Pa5X, vous pouvez y ajouter les options suivantes:
> L’élégant pied de clavier KORG ST-SV1-BK, recommandé pour votre sécurité
et votre confort, parfaitement adapté à votre clavier arrangeur.
ATTENTION: L’arrangeur professionnel Pa5X ne peut être utilisé qu’avec le pied
KORG ST-SV1-BK. L’utilisation d’un autre pied risque d’engendrer de l’instabilité
et de blesser quelqu’un.
> Le système de haut-parleurs PaAS ajoutant une amplification à trois voies
comptant deux haut-parleurs intégrés et un caisson bass reflex.
> Une des pédales (commutateurs) robustes du catalogue KORG.
Archiver vos données
Si vous aimez personnaliser vos ressources musicales, nous vous suggérons de
faire de fréquentes sauvegardes de vos données. Appuyez sur le bouton FILE
pour afficher la page File, sélectionnez le groupe Internal puis le dossier All et
choisissez la commande Save dans le menu de page. Archivez ensuite les don-
nées sur un dispositif de stockage externe.

8 | Introduction
Récupérer une copie de secours (archive)
Pour récupérer des données utilisateur archivées, chargez l’archive voulue. Si
elle se trouve sur un dispositif externe, branchez-le. Appuyez sur le bouton FILE
pour afficher la page File, sélectionnez le groupe Drives puis le dispositif de
stockage externe. Sélectionnez le dossier où vous avez archivé vos données et
choisissez la commande Load dans le menu de page. Chargez ensuite les don-
nées en mémoire interne. Notez que vous pouvez ne charger que certains élé-
ments individuels.
Rétablir les données d’usine originales
Si vous voulez rétablir les données d’usine originales, utilisez la commande Fac-
tory Restore de la page File > Menu > Factory Restore.
AVERTISSEMENT: Cette opération écrase toutes les données utilisateur!
Charger le système d’exploitation
Votre Pa5X peut être mis à jour avec les nouvelles versions du système d’exploi-
tation. Vous pouvez télécharger le système d’exploitation le plus récent de notre
site web (www.korg.com/us/support/download/). Veuillez lire les instructions
accompagnant le système d’exploitation.
Pour connaître la version du système d’exploitation de votre Pa5X, affichez la
page “File”. Choisissez la commande System Info dans le menu de page.
ASTUCE: Veillez à toujours utiliser la version la plus récente du système d’ex-
ploitation du Pa5X. Elle peut contenir de nouvelles fonctionnalités et corriger
d’éventuels problèmes.
AVERTISSEMENT: Installez uniquement un système d’exploitation officiel
fourni par KORG pour le Pa5X. Si vous utilisez un système d’exploitation destiné
à un autre modèle ou issu de sites web non officiels, vous risquez de perdre vos
données et d’endommager irrémédiablement votre instrument. KORG décline
toute responsabilité pour des dommages dus à l’installation incorrecte du sys-
tème d’exploitation.

Façade | 9
Français
Aperçu de l’instrument
Façade
La façade abrite les commandes de l’instrument.
Pupitre
Votre Pa5X est livré avec un pupitre.
Système d’amplification PaAS
Le système d’amplification PaAS est disponible en option. S’il est installé, vous
pouvez régler le volume des haut-parleurs avec le curseur MASTER VOLUME.
Quand vous branchez un casque, les haut-parleurs sont automatiquement
désactivés. Vous pouvez aussi les désactiver manuellement en désélectionnant
la case Speakers à la page Settings > Audio/Video > MP3/Speakers.
Prise pour casque
Branchez un casque à cette sortie. Utilisez un casque ayant une impédance de
16~200Ω (50Ω de préférence).
Clavier
Utilisez le clavier pour jouer des notes et des accords. Le témoin SPLIT indique
si le clavier est partagé entre différents sons ou non.

10 | Aperçu de l’instrument
ClavierCasque
Guide pour pupitre et système
d’amplification PaAS

Panneau de commandes | 11
Français
Panneau de commandes
Le panneau de commandes de l’instrument permet de l’exploiter.
Ecran
Curseurs et
commutateurs
Zone de Styles, pads et
marqueurs
Lecteurs Sons
Navigation Matrice
Tempo
Ecran
Touchez l’écran tactile pour interagir avec l’instrument. L’écran peut être incliné
pour une lisibilité optimale. Des contrôleurs situés autour de l’écran permettent
de sélectionner divers éléments.

12 | Aperçu de l’instrument
Zone de navigation
Ces contrôleurs permettent de naviguer dans les menus, les pages et les para-
mètres ainsi que de changer le réglage du paramètre sélectionné.
Zone de sons
Les sons correspondent à ce que vous entendez quand vous jouez sur le clavier.
Vous pouvez sélectionner des séries de sons sauvegardées sous forme de “Key-
board Sets” dans une bibliothèque dédiée.
Zone de Styles, pads et marqueurs
Les Styles fournissent un accompagnement automatique avec un groupe virtuel.
Les marqueurs permettent de sauter à des points mémorisés dans le morceau
MIDI. Vous pouvez accompagner les Styles et les morceaux en jouant sur le cla-
vier (avec des sons sélectionnés avec les Keyboard Sets) ou sur les pads.

Panneau de commandes | 13
Français
Zone des lecteurs
Les deux lecteurs internes peuvent reproduire des morceaux et des Styles. Vous
pouvez assigner différents éléments à chaque lecteur pour pouvoir lancer direc-
tement un autre Style ou morceau à la fin de celui en cours. Vous pouvez mixer
les deux lecteurs avec le X-FADER.
Zone SongBook
Le SongBook est une base de données de “morceaux” appelés entrées Song-
Book. Chacun d’eux est un snapshot de la situation en cours, comprenant le
Style, le morceau, le Keyboard Set, les pads, les suites d’accords et les effets
pour la voix et la guitare. Vous pouvez accéder rapidement à tous les morceaux
du SongBook (Book) ou à des listes de morceaux (Set Lists).
Zone Tempo
Ces boutons permettent de régler le tempo des Styles et des morceaux. Vous
pouvez activer/couper un métronome d’une pression sur le bouton CONTROL >
SWITCH 9 en mode STYLE/SONG et vous exercer à jouer avec un métronome.

14 | Aperçu de l’instrument
Matrice
Vous pouvez utiliser cette matrice programmable constituée de grands boutons
facilement accessibles pour déclencher des éléments et des fonctions.
Prise USB
Utilisez cette prise (HOST-F) pour brancher un support de mémoire USB comme
une clé USB ou d’autres instruments de musique utilisés comme contrôleurs.
Vous pouvez aussi vous en servir pour brancher une petite lampe USB et éclairer
la façade ou le pupitre. Notez qu’il y a encore deux autres prises à l’arrière de
l’instrument.

Panneau arrière | 15
Français
Panneau arrière
Le panneau arrière permet d’effectuer diverses connexions.
Guide pour pupitre et système
d’amplification PaAS
Prises Prise d’alimentation
Entrées audio
Utilisez ces prises pour brancher un microphone, une guitare ou un autre instru-
ment. Le mini-jack STEREO permet de brancher directement la sortie audio d’un
lecteur multimédia, d’un smartphone ou d’une tablette.
Sorties audio
Utilisez les prises LEFT/RIGHT pour transmettre le signal stéréo à une console
de mixage ou de sonorisation, à des enceintes actives ou à votre chaîne hifi.
Quatre sorties audio distinctes (1~4) sont également disponibles.

16 | Aperçu de l’instrument
Prises pour pédales
Utilisez la prise DAMPER pour brancher une pédale de maintien (sustain) et les
prises ASSIGNABLE pour brancher deux pédales continues et/ou commutateurs
au pied.
Prises MIDI
Ces prises MIDI permettent de relier le Pa5X à des contrôleurs externes (clavier
maître, guitare MIDI, contrôleur à vent, accordéon MIDI, pédalier MIDI…), à une
série d’expandeurs ou à un ordinateur avec interface MIDI.
Compartiment à pile et microSD
Ce compartiment contient la pile de l’horloge et la carte microSD.

Panneau arrière | 17
Français
Prises USB
Utilisez ces prises pour brancher le Pa5X à un ordinateur ou une tablette
(DEVICE), ou pour brancher jusqu’à deux supports de mémoire USB comme une
clé USB, voire un autre instrument de musique servant de contrôleur (HOST1-R,
HOST2-R). Une autre prise HOST (HOST-F) est disponible en façade.
Sortie vidéo
Branchez le Pa5X à un écran TV ou vidéo pour afficher les paroles et les accords
sur grand écran.
Prise d’alimentation
Branchez le câble d’alimentation IEC fourni à cette prise.

18 | Aperçu de l’instrument
Branchez l’autre extrémité du câble à une prise secteur. Veillez à utiliser une
fiche compatible. Ne forcez jamais une fiche dans une prise!
AVERTISSEMENT: Branchez la fiche à une prise secteur ayant une tension adé-
quate! Veuillez lire les informations relatives à la sécurité au début de ce manuel.

Connexion de pédales | 19
Français
Configuration des pédales
et connexions audio
Connexion de pédales
Connexion de la pédale de maintien
La prise PEDAL > DAMPER peut accueillir une pédale de maintien (sustain)
comme la KORG PS-1, PS-3 ou DS-1H. La pédale DS-1H détecte toutes les nuances
de jeu de pédale restituées avec certains sons de piano acoustique. Vous pouvez
tester son fonctionnement en la pressant progressivement puis en la relâchant
progressivement tout en jouant avec le son Concert Grand.
Pour la calibrer ou changer sa polarité, affichez la page “Settings > Controllers
> Foot”.
Connexion d’une pédale continue et/ou commutateur
Les prises PEDAL > ASSIGNABLE permettent de brancher une ou deux pédales
commutateurs (en option) comme la KORG PS-1, PS-3 ou DS-1H, et/ou une ou
deux pédales continues (en option) comme la pédale de volume KORG XVP-20
ou la pédale d’expression EXP-2.
Par défaut, ces prises sont assignées à des pédales d’expression, avec les fonc-
tions Master Volume et Keyboard Expression. Si vous voulez les calibrer, chan-
ger ses polarités ou les fonctions qui leur sont assignées, affichez la page “Set-
tings > Controllers > Foot”.

20 | Configuration des pédales et connexions audio
Que faire si une pédale ne fonctionne pas correctement?
Il peut être nécessaire de calibrer les pédales pour exploiter toute leur course
sans “points morts”. Cette procédure permet aussi de choisir la polarité de la
pédale au cas où vous utiliseriez une pédale à polarité inversée.
1 Affichez la page Settings > Controllers > Foot.
2 Touchez le bouton Calibration de la pédale à calibrer pour afficher la fenêtre
Pedal/Footswitch Calibration.
3 Enfoncez complètement la pédale et, en la maintenant enfoncée, touchez le
bouton haut (éclairé) pour confirmer qu’elle transmet la valeur maximum.

Connexion de pédales | 21
Français
4 Quand la fenêtre suivante apparaît, relâchez la pédale.
5 Touchez le bouton bas (éclairé à son tour) pour confirmer la valeur mini-
mum. Vérifiez si la pédale fonctionne correctement. Si ce n’est pas le cas, recom-
mencez cette procédure.
6 Appuyez sur le bouton EXIT pour retourner à la page précédente.

22 | Mise sous tension
Mise sous tension
Mise sous tension de l’instrument
Connexion du câble d’alimentation
Branchez le câble d’alimentation fourni à la prise POWER en face arrière ainsi
qu’à une prise secteur.
Quand le câble est branché, l’instrument est en veille.
AVERTISSEMENT: Quand l’instrument est en veille, il reste branché au réseau
électrique. Ne l’ouvrez jamais dans cet état car il y a risque d’électrocution. Pour
déconnecter complètement l’instrument du réseau électrique, débranchez le
câble d’alimentation de la prise secteur.
Mise sous/hors tension
> Mise sous tension de l’instrument
> Appuyez sur le bouton POWER ( ) () pour mettre l’instrument sous tension
(c.-à-d. l’allumer et quitter le mode de veille). Après la mise sous tension, atten-
dez que la page d’accueil disparaisse et que la page principale s’affiche.
> Mise hors tension (en veille) de l’instrument
> Maintenez le bouton d’alimentation POWER ( ) enfoncé environ 2 secondes
et relâchez-le quand l’écran s’assombrit. La procédure d’extinction démarre: elle
dure quelques secondes. Ne débranchez pas le câble d’alimentation durant cette
procédure.

Incliner l’écran | 23
Français
Incliner l’écran
Pour une visibilité optimale dans n’importe quelle position assise, vous pouvez
régler l’inclinaison de l’écran.
Soulever l’écran
1 Appuyez sur le bouton UNLOCK pour déverrouiller l’écran.
2 Maintenez le bouton UNLOCK enfoncé et soulevez l’écran.
3 Déployez la béquille de sécurité en la détachant de la partie haute de l’ar-
rière de l’écran.

24 | Mise sous tension
4 Tout en maintenant le bouton UNLOCK enfoncé, réglez l’inclinaison de
l’écran et fixez la béquille dans l’une des séries d’encoches pratiquées dans le
logement de l’écran.
ATTENTION: N’exercez pas de pression excessive: cela risquerait de l’endom-
mager!
5 Relâchez le bouton UNLOCK pour bloquer l’écran dans la position choisie.

Incliner l’écran | 25
Français
Abaisser l’écran
1 Maintenez le bouton UNLOCK enfoncé et soulevez l’écran.
2 Soulevez la béquille de sécurité et rabattez-la.
3 Maintenez toujours le bouton UNLOCK enfoncé et abaissez l’écran dans son
logement.
4 Relâchez le bouton UNLOCK et appuyez doucement sur le centre du bord
supérieur de l’écran pour le verrouiller en position initiale.

26 | Mise sous tension
Régler la luminosité de l’écran
Vous pouvez régler la luminosité en fonction de la lumière ambiante.
> Maintenez les boutons SHIFT et MENU enfoncés et actionnez la molette pour
régler la luminosité de l’écran.
Vous pouvez aussi régler la luminosité de l’écran (et des affichages de com-
mande) à la page Settings > General Controls > Interface.

Ecouter des morceaux de démonstration | 27
Français
Ecouter des morceaux de
démonstration
Vous pouvez écouter quelques morceaux de démonstration pour découvrir les
possibilités de cet instrument.
> Passer en mode Demo
> Appuyez simultanément sur les boutons DEMO.
> Ecouter tous les morceaux de démonstration
> Après le passage en mode Demo, n’actionnez aucun bouton. La reproduction
de tous les morceaux de démonstration démarre.
> Choisir un morceau de démonstration
> Touchez une des options à l’écran, puis choisissez un des morceaux de
démonstration.
> Quitter le mode Demo
> Appuyez sur un des boutons DEMO.

28 | Choisir et écouter les ressources musicales
Choisir et écouter les
ressources musicales
Ouvrir une fenêtre de sélection
Avec une pression sur le bouton STYLE, SONG ou un des boutons KEYBOARD
SET LIBRARY, vous ouvrez la fenêtre de sélection correspondante.
La fenêtre de sélection peut aussi être ouverte en touchant le nom de l’élé-
ment correspondant (Style, morceau, Keyboard Set, voix, preset de guitare etc.)
à l’écran.
Touchez pour choisir un Style ou un morceau
Touchez pour choisir un Keyboard Set

Ouvrir une fenêtre de sélection | 29
Français
A titre d’exemple, la fenêtre de sélection suivante permet de sélectionner un
Keyboard Set:
TypeGroupes Keyboard Set selectionné
PagesRépertoire
actuel
Niveau supérieur (dossiers
correspondant aux catégories)
Niveau inférieur
(éléments individuels)
Vous pouvez toujours quitter cette fenêtre d’une pression sur le bouton EXIT ou
en touchant la commande Exit dans le coin supérieur gauche de l’écran.
Vous pouvez écouter un Style ou un morceau avec le lecteur 1 ou 2. Vous pouvez
donc assigner un Style ou un morceau à chaque lecteur pour assurer un enchaî-
nement fluide de la musique. Vous pouvez aussi mixer les Styles et les morceaux
des deux lecteurs.
Vous pouvez choisir le lecteur qui a la main en déplaçant le X-FADER ou en
appuyant sur le bouton PLAY/STOP ( ) voulu si les deux lecteurs sont à l’arrêt.

30 | Choisir et écouter les ressources musicales
Choisir votre série de sons favorite
Choisir le Keyboard Set ‘My Setting’
> Appuyez sur le bouton MY SETTING pour choisir vos sons favoris.
Keyboard Set ‘My Setting’
My Setting est un Keyboard Set (série de sons) spécial dans lequel vous pouvez
sauvegarder vos réglages initiaux favoris pour les sons de clavier, les effets, les
commutateurs et curseurs de contrôle, les commutateurs assignables etc. Ce
Keyboard Set est automatiquement sélectionné lors de la mise sous tension de
l’instrument et configure l’instrument à votre place.
Vous pouvez sauvegarder ici votre Keyboard Set favori. Maintenez le bou-
ton MY SETTING enfoncé durant environ 1 seconde jusqu’à ce que la fenêtre
de dialogue Save apparaisse puis touchez le bouton Save pour confirmer la
mémorisation.

Utiliser et piloter des sons | 31
Français
Utiliser et piloter des sons
Jouer sur le clavier
Le clavier de l’instrument est comme un clavier de piano: il suffit de jouer dessus!
Avec certains sons, une pression supplémentaire sur les touches modifie le son
(en accentuant le vibrato, par exemple).
Utiliser les pédales
Les pédales jouent différents rôles selon leur programmation. La pédale Damper
(forte) maintient les notes jusqu’à ce que vous la relâchiez. Une pédale (ou un
commutateur au pied) ASSIGNABLE dépend de la programmation effectuée à la
page Settings > Controllers > Foot.
Réglages avec les curseurs et commutateurs
Selon le mode choisi, les curseurs CONTROL peuvent avoir différentes fonctions
(réglage des niveaux de différents sons, tirettes harmoniques d’un orgue ou
autres fonctions assignables). Leur fonctionnement est indiqué sur l’affichage
sous les curseurs.
Utiliser les commutateurs assignables
Selon le Keyboard Set choisi et les fonctions assignées, ces commutateurs
peuvent fonctionner différemment. Avec les sons DNC, les commutateurs
peuvent soit “réserver” une fonction qui sera déclenchée durant le jeu, soit l’ac-
tiver et la couper en alternance. Dans d’autres cas, ces commutateurs peuvent
activer et couper alternativement la fonction assignée ou la déclencher.

32 | Choisir et écouter les ressources musicales
Utiliser la matrice
La matrice de boutons programmables peut avoir différentes fonctions (déclen-
chements de pads, activation/coupure de piste). Touchez-en un ou plusieurs
pour activer la fonction voulue. S’ils agissent comme boutons on/off, touchez-les
de nouveau pour les couper.
La couleur des boutons peut changer selon la fonction assignée et le lecteur
sélectionné.
Utiliser le joystick
Actionner le joystick vers la gauche ou la droite change généralement la hauteur
du son. Le pousser vers l’avant déclenche souvent de la modulation mais cela
dépend des sons sélectionnés. Avec les orgues électromécaniques, le fait de
pousser le joystick vers l’avant change la vitesse des haut-parleurs rotatifs. Son
effet quand il est tiré vers l’arrière dépend du son sélectionné. Essayez!
Utiliser le ruban
Un glissement sur le ruban vers la gauche ou la droite change généralement le
timbre des sons et/ou leur hauteur mais l’effet varie selon le son choisi.

Lancer et arrêter des Styles | 33
Français
Lancer et arrêter des Styles
Vous pouvez lancer et arrêter manuellement l’accompagnement automatique en
utilisant les commandes de la section PLAYER 1 ou PLAYER 2.
Stop/
Go to Start
Play/Stop
> Régler le mixage
> Vérifiez que le X-FADER est à fond du côté du lecteur que vous voulez écou-
ter. Glissez-le à fond à gauche pour Player 1 et à fond à droite pour Player 2.
> Amenez-le à une position intermédiaire pour mélanger les deux lecteurs.
> Lancer l’accompagnement
1 Appuyez sur le bouton PLAY/STOP ( ).
2 Jouez des accords de la main gauche et la mélodie de la main droite.
Durant la reproduction du Style, notez les diverses indications à l’écran.
Accord reconnu
Tempo Mesure actuelle
Indication de temps
En lecture: Mesures résiduelles
A l’arrêt: Longueur totale du pattern
Avec une variation de Style: Boucle
Elément de style sélectionné
Hiérarchie
> Arrêter l’accompagnement
> Appuyez à nouveau sur le bouton PLAY/STOP ( ).
> Vous pouvez aussi appuyer sur le bouton STOP/GO TO START ().

34 | Choisir et écouter les ressources musicales
> Lancer les deux lecteurs simultanément
Vous pouvez lancer les deux lecteurs simultanément et les mélanger avec le
X-FADER durant la lecture.
> Maintenez le bouton SHIFT enfoncé et appuyez sur un des deux boutons
PLAY/STOP () pour lancer les deux lecteurs simultanément.
> Maintenez le bouton SHIFT enfoncé et appuyez sur un des deux boutons
PLAY/STOP () pour arrêter les deux lecteurs simultanément.

Lancer, arrêter et piloter les morceaux | 35
Français
Lancer, arrêter et piloter les morceaux
Vous pouvez lancer et arrêter manuellement les morceaux en utilisant les com-
mandes de la section PLAYER 1 ou PLAYER 2.
Stop/
Go to Start
Play/Stop
> Régler le mixage
> Vérifiez que le X-FADER est à fond du côté du lecteur que vous voulez écou-
ter. Glissez-le à fond à gauche pour Player 1 et à fond à droite pour Player 2.
> Amenez-le à une position intermédiaire pour mélanger les deux lecteurs.
> Lancer le lecteur
> Appuyez sur le bouton PLAY ().
Durant la reproduction du morceau, notez les diverses indications à l’écran.
Morceau MIDI:
Tempo
Marqueur sélectionnéHiérarchie
Mesure
actuelle
Indication de
temps
Métrique
En lecture: Mesures
résiduelles
A l’arrêt: Longueur totale du
morceau
Recul/avance rapide

36 | Choisir et écouter les ressources musicales
Morceau MP3:
Hiérarchie
Variation de
tempo
Temps écoulé Recul/avance
rapide
En lecture: Temps résiduel
A l’arrêt: Longueur totale du
morceau
> Avance rapide dans le morceau
> Appuyez une fois sur le bouton FAST FORWARD ( ) pour sauter à la mesure
suivante (morceau MIDI) ou à la seconde (morceau MP3) suivante.
> Maintenez le bouton FAST FORWARD ( ) enfoncé pour faire défiler le mor-
ceau en continu. Relâchez-le quand vous avez atteint la position voulue.
> Recul dans le morceau
> Appuyez une fois sur le bouton FAST REWIND ( ) pour sauter à la mesure
(morceau MIDI) ou à la seconde (morceau MP3) précédente.
> Maintenez le bouton FAST REWIND ( ) enfoncé pour faire défiler le mor-
ceau en continu. Relâchez-le quand vous avez atteint la position voulue.
> Pause et reprise de la lecture
> Pour arrêter le morceau à la position actuelle, appuyez sur PLAY/STOP (
). Le témoin du bouton s’éteint.
> Pour reprendre la reproduction, appuyez de nouveau sur le bouton PLAY/
STOP (). Son témoin se rallume.
> Arrêt du lecteur et retour au début du morceau
> Appuyez sur le bouton STOP/GO TO START () pour arrêter le lecteur et
retourner au début du morceau. Le témoin du bouton s’éteint.

Lancer, arrêter et piloter les morceaux | 37
Français
> Lancer les deux lecteurs simultanément
Vous pouvez lancer les deux lecteurs simultanément et les mélanger avec le
X-FADER durant la lecture.
> Maintenez le bouton SHIFT enfoncé et appuyez sur un des deux boutons
PLAY/STOP () pour lancer les deux lecteurs simultanément.
> Maintenez le bouton SHIFT enfoncé et appuyez sur un des deux boutons
PLAY/STOP () pour arrêter les deux lecteurs simultanément.

REMARQUE IMPORTANTE À L’ATTENTION
DES CONSOMMATEURS
Ce produit a été fabriqué selon des spécifi-
cations et des caractéristiques de tension
strictes en vigueur dans le pays dans lequel
il est censé être utilisé. Si vous avez acheté
ce produit par internet, par vente par corres-
pondance et/ou par vente téléphonique, assu-
rez-vous que ce produit est conçu pour fonc-
tionner dans le pays où vous résidez.
AVERTISSEMENT: L’utilisation de ce produit
dans tout autre pays que celui pour lequel il
est conçu peut être dangereuse et peut entraî-
ner l’annulation de la garantie du fabricant ou
du distributeur.
Conservez également votre reçu comme
preuve d’achat pour pouvoir bénéficier de la
garantie du fabricant ou du distributeur.
Remarque concernant la mise au rebut (pour
l’UE uniquement)
Si ce symbole apparaît sur le produit,
le manuel, la batterie (les piles) ou
l’emballage, vous devez mettre le pro-
duit au rebut de façon appropriée pour
éviter de nuire à la santé humaine ou
à l’environnement. Contactez les auto-
rités locales pour connaître la procé-
dure adéquate de mise au rebut. Si la
teneur en métaux lourds de la batterie excède
la limite autorisée, un symbole chimique est
ajouté sous le pictogramme représentant une
poubelle à roulettes barrée figurant sur la bat-
terie ou son emballage.
En cas de radiations électromagnétiques,
la qualité audio peut être temporairement
dégradée. Cette dégradation peut, par
exemple, générer un signal sonore. Celui-ci
s’arrête dès que les interférences électroma-
gnétiques cessent.
RÉGLEMENTATION FCC (pour les U.S.A.
uniquement)
This equipment has been tested and found
to comply with the limits for a Class B digital
device, pursuant to Part 15 of the FCC Rules.
These limits are designed to provide reaso-
nable protection against harmful interference
in a residential installation. This equipment
generates, uses, and can radiate radio fre-
quency energy and, if not installed and used in
accordance with the instructions, may cause
harmful interference to radio communica-
tions. However, there is no guarantee that
interference will not occur in a particular ins-
tallation. If this equipment does cause harmful
interference to radio or television reception,
which can be determined by turning the equip-
ment off and on, the user is encouraged to try
to correct the interference by one or more of
the following measures:
• Reorient or relocate the receiving antenna.
• Increase the separation between the equip-
ment and receiver.
• Connect the equipment into an outlet on a
circuit different from that to which the recei-
ver is connected.
• Consult the dealer or an experienced radio/
TV technician for help.
If items such as cables are included with this
equipment, you must use those included
items.
Unauthorized changes or modification to this
system can void the user’s authority to ope-
rate this equipment.
DÉCLARATION DE CONFORMITÉ (ÉTATS-UNIS)
Responsible Party: KORG USA INC.
Address: 316 SOUTH SERVICE ROAD, MEL-
VILLE
Telephone: 1-631-390-6500
Equipment Type: Professional Arranger
Model: Pa5X
This device complies with Part 15 of FCC
Rules. Operation is subject to the following
two conditions: (1) This device may not cause
harmful interference, and (2) this device must
accept any interference received, including
interference that may cause undesired ope-
ration.

DEUTSCH
Dieser Schnellstart ist für alle Pa5X-Modelle gültig inkl. Pa5X MUSIKANT.
Bei den Pa5X MUSIKANT-Modellen sind einige Begriffe auf der Bedienoberfläche in deutscher Sprache
geschrieben. Ebenfalls weichen Sound-, Keyboard Set- und Style-Namen sowie deren Ordner von den
Bezeichnungen der internationalen Modelle ab.
Da der Schnellstart das internationale Pa5X beschreibt, kommt es in dieser Anleitung zu geringen
Abweichungen der Bezeichnungen. Die Verständlichkeit dieser Anleitung sollte dadurch jedoch nicht
beeinträchtigt sein.

Wichtige Sicherheitshinweise
▪Lesen Sie sich diese Hinweise durch.
▪Bewahren Sie diese Hinweise auf.
▪Befolgen Sie alle Warnungen.
▪Führen Sie alle Anweisungen aus.
▪Verwenden Sie das Instrument niemals in der
Nähe von Wasser.
▪Reinigen Sie es nur mit einem trockenen
Tuch.
▪Versperren Sie niemals die Lüftungsschlitze.
Stellen Sie das Gerät nur den Herstelleran-
weisungen entsprechend auf.
▪Stellen Sie das Instrument niemals in die
Nähe von Wärmequellen wie Heizkörper,
Öfen bzw. Geräte (darunter auch Verstärker),
die ausgesprochen heiß werden.
▪Versuchen Sie niemals, die Erdung des
Netzkabels zu umgehen. Ein polarisierter
(englischer) Stecker weist zwei unterschied-
lich breite Stifte auf. Ein geerdeter Stecker
ist hingegen mit drei Stiften versehen. Der
Erdungsstift dient Ihrer Sicherheit. Wenn der
beiliegende Stecker nicht in Ihre Steckdose
passt, bitten Sie einen Elektriker, diese zu
ersetzen.
▪Sorgen Sie dafür, dass das Netzkabel nicht
gequetscht wird und dass man nicht darüber
stolpern kann.
▪Verwenden Sie nur Halter und Ständer, die
ausdrücklich vom Hersteller empfohlen wer-
den.
▪Verwenden Sie nur Wagen, Ständer, Halte-
rungen usw., die vom Hersteller vertrieben
oder empfohlen werden. Bei Verwendung
eines Wagens ist darauf zu achten, dass er
während des Transports nicht umkippt.
▪Lösen Sie im Falle eines Gewitters oder wenn
das Instrument längere Zeit nicht verwendet
werden soll, den Netzanschluss.
▪Überlassen Sie alle Wartungsarbeiten einem
qualifizierten und befugten Techniker. Das ist
z.B. notwendig, wenn das Instrument Schä-
den aufweist (z.B. beschädigtes Netzkabel,
Eintritt von Flüssigkeit oder Fremdkörpern,
wenn das Instrument im Regen gestanden
hat), sich nicht erwartungsgemäß verhält
oder hingefallen ist.
▪WARNUNG – Dieses Gerät darf nur an eine
geerdete Steckdose angeschlossen werden.
▪Selbst wenn Sie das Instrument ausschalten,
ist es weiterhin mit dem Stromnetz verbun-
den. Es kann daher nicht schaden, den Net-
zanschluss zu lösen, wenn Sie es längere Zeit
nicht verwenden bzw. es reinigen möchten.
Wählen Sie immer eine Steckdose, die Sie
problemlos erreichen können.
▪Ein netzgespeistes Instrument darf niemals
Regen- oder Wassertropfen ausgesetzt wer-
den. Außerdem darf man keine Flüssigkeits-
behälter wie Vasen usw. auf das Instrument
stellen.
▪Stellen Sie das Instrument nach Möglichkeit
in die Nähe der Steckdose und sorgen Sie
dafür, dass man letztere problemlos erreicht.
▪Während des Betriebs darf sich das Instru-
ment niemals in einem teilweise oder voll-
ständig geschlossenen Flightcase, Rack o.ä.
befinden.
▪Stellen Sie niemals offene Feuerherde wie
Kerzen, Feuerzeuge usw. auf dieses Gerät.

WARNUNG – Verschlucken Sie
niemals die Batterie – es besteht
chemische Verbrennungsgefahr.
Dieses Instrument enthält eine
Knopfbatterie.
Das Verschlucken der Knopfbat-
terie kann innerhalb von 2 Stunden ernste
Verbrennungen verursachen, die zum Tod
führen können.
Bewahren Sie Knopfbatterien niemals in
Reichweite von Kleinkindern auf. Wenn sich
das Batteriefach nicht komplett schließen
lässt, dürfen Sie das Gerät nicht verwenden.
Verhindern Sie außerdem, dass kleine Kinder
damit spielen können.
Wenn Sie vermuten, dass ein Kind die Knopf-
batterie verschluckt haben könnte, wenden
Sie sich bitte sofort an einen Arzt.
▪WARNUNG – Dieses Gerät enthält eine Lit-
hium-Knopfbatterie für die Pufferung des
Datums und der Uhrzeit. Bei unsachgemä-
ßem Einlegen der Batterie besteht Explosi-
onsgefahr. Legen Sie immer den gleichen Typ
ein. Die Lithium-Knopfbatterie für die Puffe-
rung des Datums und der Uhrzeit darf vom
Anwender selbst ausgewechselt werden.
▪Setzen Sie Batterien niemals starker Hitze,
direkter Sonneneinstrahlung, Feuer usw.
aus.
▪Bitte entsorgen Sie verbrauchte Batterien
immer den Anweisungen des Herstellers ent-
sprechend.
Der Blitz in einem gleichwinkligen Drei-
eck bedeutet, dass das Gerät nicht-iso-
lierte Spannungen erzeugt, die einen
Stromschlag verursachen können.
Das Ausrufezeichen in einem gleichwink-
ligen Dreieck soll Anwender auf wichtige
Bedienhinweise aufmerksam machen, die
in der beiliegenden Dokumentation enthal-
ten sind.

Andere Hinweise
Energiesparfunktion
Im Hinblick auf einen energieschonenden
Betrieb schaltet sich das Pa5X bei Nichtver-
wendung (wenn man nicht spielt, keinen Taster
drückt oder das Display berührt) nach 2 Stunden
automatisch aus. Bitte speichern Sie alle wichti-
gen Daten (Keyboard Sets, Styles, Songs usw.),
bevor Sie eine längere Pause einlegen.
Handhabung von Daten
Die intern gespeicherten Daten können bei fal-
scher Bedienung gelöscht werden. Speichern
Sie alle wichtigen Einstellungen daher intern
oder auf einem externen USB-Datenträger.
KORG haftet nicht für Schäden, die auf den Ver-
lust von Daten zurückzuführen sind.
Umgang mit dem Display
Versuchen Sie das Display niemals mit Gewalt
zu verstellen. Senken Sie das Display vor dem
Transport des Instruments komplett ab. Üben
Sie beim Transport keinen starken Druck auf das
Display aus, um es nicht zu beschädigen.
Reinigung
Schmutz usw. darf nur mit einem trockenen Tuch
entfernt werden. Verwenden Sie niemals flüssige
Reinigungsmittel wie Waschbenzin, Verdünner,
Lösungsmittel oder brennbare Poliermittel.
Säubern Sie das Display mit einem weichen Baum-
wolltuch. Bedenken Sie, dass Papiertücher usw.
das Display verkratzen könnten. Auch Reinigungs-
tücher für Computer dürfen verwendet werden,
sofern sie für LCD-Bildschirme geeignet sind.
Sprühen Sie niemals Flüssigkeiten auf das
LC-Display. Befeuchten Sie –wenn nötig– ein
Tuch und wischen Sie damit den Bildschirm ab.
Seitenteile aus Holz
Die Seitenteile sind aus Naturholz gefertigt un d
sehen deshalb eventuell leicht unterschiedlich
aus. Je öfter man das Instrument spielt, desto
schöner wird es. Bitten erwarten Sie jedoch
nicht, dass sich das Holz an beiden Seiten exakt
gleich entwickelt.
Beispielhafte Display-Darstellungen
Bestimmte Seiten dieser Bedienungsanleitung
enthalten Abbildungen von Display-Seiten und
den dort befindlichen Funktionen. Alle Klang-,
Style, Song- und Parameternamen sowie die
abgebildeten Werte sind lediglich als Beispiele
zu verstehen und entsprechen nicht immer den
tatsächlichen Gegebenheiten.
Warenzeichen
Mac und iOS sind eingetragene Warenzeichen der
Apple, Inc. Android ist ein Warenzeichen der Goo-
gle Inc. MS-DOS und Windows sind eingetragene
Warenzeichen der Microsoft Corporation. Waves
MaxxAudio® ist ein Warenzeichen der Waves
Audio Ltd. Alle anderen erwähnten Firmen- und
Produktnamen sind Warenzeichen oder eingetra-
gene Warenzeichen der betreffenden Eigentümer.
‘Open Source’-Hinweis
Bestimmte Teile der in diesem Gerät verwende-
ten Software sind ©2007 „The FreeType Project“
(www.freetype.org). Alle Rechte vorbehalten.
Haftungsausschluss
Die in dieser Bedienungsanleitung erwähnten
Informationen wurden mehrmals überprüft. Da
wir unsere Produkte aber fortwährend weiterent-
wickeln, stimmen eventuell nicht alle technischen
Daten mit den hier erwähnten Angaben überein.
KORG haftet nicht für Unterschiede zwischen der
Produktbestückung und der beiliegenden Doku-
mentation. Änderungen der technischen Daten blei-
ben jederzeit ohne Vorankündigung vorbehalten.
Haftung
KORG-Produkte werden unter strengen Aufla-
gen für die Netzspannung im Auslieferungsland
hergestellt. Eine Garantie auf diese Produkte
wird daher nur vom KORG-Vertrieb des jeweili-
gen Landes gewährt. KORG-Produkte, die ohne
eine solche Garantie verkauft werden bzw. keine
Seriennummer aufweisen, sind von der Her-
steller- und Vertriebsgarantie ausgeschlossen.
Diese Auflage dient Ihrer eigenen Sicherheit.
Wartung und Kundendienst
Überlassen Sie alle Reparaturarbeiten grund-
sätzlich einer von KORG anerkannten Kunden-
dienststelle. Ausführliche Informationen über
KORG-Produkte sowie Software und Zubehör für
Ihr Instrument bekommen Sie beim KORG-Händ-
ler in Ihrer Nähe. Aktuelle Informationen finden
Sie auf unserer Webpage (www.korg.com).
Halten Sie Ihr Instrument auf dem neuesten Stand
Das Betriebssystem dieses Instruments kann
mit neueren (von KORG freigegebenen) Versio-
nen aktualisiert werden. Neue Systemversionen
finden Sie auf unserer Website (www.korg.com/
us/support/download/). Hinweise zum Laden
des neuen Betriebssystems werden gemeinsam
mit den Daten ins Netz gestellt.

Willkommen zum Pa5X! | 5
Deutsch
Vorweg
Willkommen zum Pa5X!
Vielen Dank für Ihre Entscheidung zu einem KORG Pa5X Professional Arranger.
Wir hoffen, Sie haben viel Spaß an diesem Instrument und können es sowohl
daheim als auch live zu Ihrer vollsten Zufriedenheit einsetzen.
Das Pa5X ist eine ebenso schicke wie leistungsfähige Produktions-Workstation.
Dank einer klaren Bedienerführung im neigbaren Farb-Display und der beleuch-
teten Taster mit farbkodierten Funktionszuordnungen im Bedienfeld lässt es sich
ausgesprochen intuitiv bedienen. Die 88er-Tastatur mit klavierähnlicher Ham-
mermechanik bzw. die leicht gewichtete 76er- oder 61er-Tastatur sorgen für eine
ebenso authentische wie expressive Ansprache.
Das Pa5X ist zudem so robust und zuverlässig, dass es sich bedenkenlos für den
Bühneneinsatz eignet. Natürlich macht es auch im Studio eine gute Figur, wo es
Ihnen beim Komponieren neuer Songs und Filmmusiken hilft. Die Klangqualität
ist jedenfalls für alle Anwendungen über jeden Zweifel erhaben.
Die enthaltenen Sounds beruhen auf unserer EDS-X-Klangerzeugung (Enhan-
ced Definition Synthesis-eXpanded) und umfassen außer realistischen Akus-
tik-Klängen auch elektrische Vintage-Keyboards, Synthi-Klassiker sowie neuar-
tige Sounds und Klangeffekte für Multimedia- und Filmproduktionen. Die Klang-
farben decken mehrere Jahrhunderte und Kulturen ab und können bei Bedarf
erweitert werden.
Das Pa5X lässt sich dank KORGs DNC-System (Defined Nuance Control) intui-
tiv steuern und erlaubt es Musikern, feinste Nuancen und Artikulationen in ihr
Spiel einzubauen. Die Fader, Taster sowie die echten und virtuellen Matrizen von
Echtzeit-Beeinflussungen, ein Joystick und ein Ribbon-Controller bieten direk-
ten Zugriff auf zahlreiche Klangparameter.
Die Klangfarben können mit einer üppigen Effektkette bearbeitet werden. Sowohl
die Player- als auch die Keyboard-Sounds lassen sich mit „Final“-Effekten bear-
beiten. Die „Master“-Effekte unmittelbar vor den Audio-Ausgängen geben den
Sounds den letzten Schliff. Das ist in erster Linie der langjährigen Zusammenar-
beit der KORG-Ingenieure mit Waves Audio –der Studio-Referenz schlechthin für
professionelle Effekte– zu verdanken.

6 | Vorweg
Um die überragende Klangqualität auch bei niedrigem Pegel zu genießen, soll-
ten Sie die Anschaffung eines KORG PaAS Verstärkungssystem in Erwägung zie-
hen, das direkt an das Pa5X angeschlossen werden kann.
Das optionale ST-SV1-BK Stativ verleiht dem Instrument sowohl auf der Bühne
als auch daheim einen geschmackvollen Look.
Der KORG XDS Crossfade Dual Sequencer/Player des Pa5X erlaubt das Laden
und Mischen von sowohl Styles als auch Songs. Ferner können Sie eigene Styles
erstellen und Ihre Kreationen als MIDI- oder MP3-Songs aufzeichnen. Die Har-
monieautomatik, der Akkordsequenzer sowie eine ausgeklügelte Akkorderken-
nung geben Ihren Pop- und Jazz-Darbietungen einen professionellen Anstrich
bei minimalem Aufwand.
Bei der Verwendung von Songs und Styles können die Liedtexte auf dem inter-
nen Display oder einem externen Monitor angezeigt werden. Ausgewählte Parts
eines MIDI-Songs lassen sich als Partitur anzeigen. Marker erlauben das Sprin-
gen zu Song-Passagen, die Sie wiederholen möchten – beispielsweise beim Ein-
studieren von neuem Repertoire oder für Situationen, in denen bestimmte Song-
Teile nicht oft genug wiederholt werden können.
Selbstverständlich können Sie Ihr Spiel auch aufzeichnen: Der interne Sequen-
zer zeichnet bei Bedarf sogar die automatische Begleitung auf. Um Ihre Musik
mit anderen zu teilen, empfehlen wir die Aufnahme aller Parts (inklusive MP3-
Songs) im MP3-Format, weil man sich diese Dateien überall anhören kann.
Songs und Styles lassen sich im so genannten „SongBook“ speichern, d.h. einer
Datenbank, deren Einträge sehr leicht mit Partitur-Lesern auf einem Tablet syn-
chronisiert werden können. Das erlaubt die Steuerung des Pa5X mit einem digi-
talen Notenheft.
Es gibt Audio-Eingänge für ein Mikrofon und eine Gitarre, deren Signale eben-
falls mit Effekten bearbeitet werden können. Dieses Instrument beruht auf unse-
rer langjährigen Erfahrung mit Gesangsharmonien und Gitarreneffekten. Die
Stimmenausblendung erlaubt sogar das Singen zu einem fertig produzierten
MP3-Song.
Das Pa5X bietet noch zahlreiche weitere große und kleine Details, die Sie unbe-
dingt entdecken müssen. Spätestens dann werden Sie zugeben, dass das Pa5X
ein rundum gelungenes Arranger-Keyboard ist. Wir wünschen Ihnen viel Spaß
mit Ihrem Pa5X!

Bevor Sie anfangen zu spielen… | 7
Deutsch
Bevor Sie anfangen zu spielen…
Lieferumfang
Zum Lieferumfang des Pa5X gehören folgende Dinge. Bitte überprüfen Sie
zunächst, ob Sie alles bekommen haben. Falls etwas fehlt, wenden Sie sich bitte
umgehend an Ihren KORG-Händler.
> Pa5X
> Notenpult
> Netzkabel
> Schnellstart-Anleitung
> Nur Pa5X-88: Schutzfilzen für das ST-SV1-BK Stativ
Inhalte zum Herunterladen
Surfen Sie zu unserer Website (www.korg.com/us/support/download/), wenn Sie
sich die aktuelle Software, eine umfassende Anleitung, Video-Tutorials und/oder
einen MIDI-Treiber herunterladen möchten.
Praktisches Sonderzubehör
Für das Pa5X ist auch praktisches Zubehör erhältlich:
> Ein eleganter KORG ST-SV1-BK Ständer, der perfekt zum Design des Instru-
ments passt und diesem einen sicheren Halt bietet.
VORSICHT: Der Pa5X Professional Arranger sollte bei Bedarf nur auf ein KORG
ST-SV1-BK Stativ gestellt werden. Die Verwendung anderer Stative kann zu Sta-
bilitätsproblemen und Verletzungen führen.
> Das optionale Lautsprechersystem PaAS enthält drei Verstärker, zwei Laut-
sprecher und eine Bassreflex-Box.
> Ein robustes und livetaugliches Pedal von KORG.
Sicherheitskopie Ihrer Daten
Falls Sie Ihre Musik-Ressourcen oft abwandeln, sollten Sie die Daten regelmäßig
archivieren. Drücken Sie den FILE-Taster, um die Seite „File“ aufzurufen. Wählen
Sie die „Internal“-Gruppe, den „All“-Ordner und den „Save“-Befehl im Seiten-
menü. Sichern Sie die Daten anschließend auf einem externen Datenträger.

8 | Vorweg
Laden einer Sicherheitskopie
Um zuvor archivierte Daten wiederherzustellen, müssen Sie eine Backup-Da-
tei laden. Wenn sie sich auf einem externen Gerät befinden, müssen Sie dieses
zuerst anschließen. Drücken Sie den FILE-Taster, um die Seite „File“ aufzurufen.
Wählen Sie die „Drives“-Gruppe und zuletzt den Datenträger. Wählen Sie den
Ordner, wo Sie die Daten archiviert haben und anschließend den „Load“-Befehl
im Seitenmenü. Laden Sie die Daten schließlich in den internen Speicher. Bei
Bedarf können auch nur bestimmte Aspekte der archivierten Datei geladen wer-
den.
Wiederherstellen der Werksdaten
Mit dem Befehl „Factory Restore“ auf der Seite „File > Menu > Factory Restore“
können Sie bei Bedarf wieder die ab Werk im Instrument enthaltenen Daten
laden.
WARNUNG: Mit diesem Befehl überschreiben Sie alle Anwenderdaten!
Laden des Betriebssystems
Das Betriebssystem des Pa5X kann mit neueren Versionen aktualisiert werden.
Neue Systemversionen finden Sie unter www.korg.com/us/support/download/.
Hinweise zum Laden des neuen Betriebssystems werden gemeinsam mit den
Daten ins Netz gestellt.
Um zu erfahren, welche Systemversion Ihr Pa5X enthält, müssen Sie zu einer
„File“-Seite springen und im Seitenmenü den „System Info“-Befehl wählen.
Tipp: Prinzipiell sollte das Pa5X immer mit der aktuellen Systemversion verwen-
det werden. Dann sind Sie sicher, dass alle bekannten Bugs bereits behoben wur-
den.
WARNUNG: Installieren Sie ausschließlich Betriebssysteme, die KORG offiziell
für das Pa5X zur Verfügung stellt. Die Verwendung von Betriebssystemen für
andere Modelle bzw. von zweifelhaften Webpages könnte zu Datenverlusten und
schweren Schäden führen. KORG haftet nicht für Schäden, die sich aus der Ins-
tallation nicht ausdrücklich empfohlener Betriebssysteme ergeben.

Frontplatte | 9
Deutsch
Vorstellung des
Instruments
Frontplatte
Die Frontplatt enthält die Bedienelemente.
Notenpult
Zum Lieferumfang des Pa5X gehört ein Notenpult.
PaAS Lautsprecherleiste
Die optionale Lautsprecherleiste PaAS können Sie selbst installieren. Die Laut-
stärke der Lautsprecher wird mit dem MASTER VOLUME-Regler eingestellt.
Wenn Sie einen Kopfhörer anschließen, werden die Lautsprecher automatisch
stummgeschaltet. Bei Bedarf können Sie sie aber auch mit dem „Speakers“-Käst-
chen der Seite „Settings > Audio/Video > MP3/Speakers“ deaktivieren.
Kopfhörerbuchse
An diese Buchse können Sie einen Stereo-Kopfhörer anschließen. Der Kopfhörer
muss eine Impedanz von 16~200Ω haben (idealerweise 50Ω).
Tastatur
Auf der Tastatur spielt man Noten und Akkorde. Je nach dem Status der SPLIT-Di-
ode kann man mit der linken und rechten Hand unterschiedliche Klangfarben
ansteuern.

10 | Vorstellung des Instruments
TastaturKopfhörer
Aufhängung für das Notenpult und
PaAS-Verstärkersystem

Bedienfeld | 11
Deutsch
Bedienfeld
Das Bedienfeld enthält die Regler und Taster für die Bedienung des Instruments.
Display
Fader- und
Tastersektion
Styles, Pads und Marker Player-Sektion Klangfarbenanwahl
Navigationsbereich Die Matrix
Temposektion
Display
Das berührungsempfindliche Display zeigt alle für die Bedienung wichtigen
Informationen an. Im Sinne einer optimalen Leserlichkeit kann das Display ange-
hoben werden. Mit den Bedienelementen in Display-Nähe können bestimmte Ele-
mente gewählt werden.

12 | Vorstellung des Instruments
Navigationsbereich
Mit diesen Bedienelementen können Sie Menüs, Display-Seiten und Parameter
aufrufen sowie den angewählten Parameter editieren.
Klangfarbenanwahl
Die Klangfarben können über die Tastatur gespielt werden. Hier wählen Sie eine
Klangfarbengruppe (ein sog. „Keyboard Set“) mit der gewünschten Klangfarbe.
Styles, Pads und Marker
Mit „Styles“ sind die automatischen Begleitungen gemeint. Die Marker erlauben
das Springen zu den gewünschten Stellen innerhalb eines MIDI-Songs. Während
der Style- oder Song-Wiedergabe können Sie sowohl auf der Tastatur als auch
mit den PAD-Tastern spielen.

Bedienfeld | 13
Deutsch
Player-Sektion
Die beiden Player dienen zum Abspielen von Styles und Songs. Den Playern kön-
nen unterschiedliche Elemente zugordnet werden, damit der neue Style bzw.
Song gleich im Anschluss startbereit ist. Mit dem X-FADER kann man die Aus-
gabe der beiden Player mischen.
SongBook-Sektion
Das „SongBook“ ist eine Datenbank mit SongBook-Einträgen. Jeder Eintrag
umfasst Einstellungen für den Style, Song, das Keyboard Set, die PADs, Akkord-
sequenzen sowie Stimmen- und Gitarreneffekte. Alle „Songs“ des SongBook
(Book) sowie zuvor ausgewählte Songs (Set List) sind direkt im Zugriff.
Temposektion
Mit diesen Bedienelementen stellen Sie das Tempo der Style-Begleitung und der
Songs ein. Mit dem CONTROL > SWITCH 9-Taster kann das Metronom ein-/aus-
geschaltet werden. Es steht im STYLE/SONG-Modus zur Verfügung.

14 | Vorstellung des Instruments
Die Matrix
Die programmierbare Tastermatrix erlaubt das Triggern von Elementen und
Aktivieren von Funktionen (PADs, Aktivierung/Stummschalten von Spuren).
USB-Anschluss
An diesen Port (intern heißt er HOST-F) kann ein USB-Datenträger wie ein Spei-
cherstick (USB) oder ein anderes Instrument, das als Controller fungieren soll,
angeschlossen werden. Alternativ kann ein USB-Strahler für die Beleuchtung
des Bedienfeldes oder der Noten angeschlossen werden. Auf der Rückseite des
Instruments gibt es noch zwei weitere Ports.

Rückseite | 15
Deutsch
Rückseite
Auf der Rückseite befinden sich die Anschlussbuchsen des Instruments.
Aufhängung für das Notenpult und
PaAS-Verstärkersystem
Anschlüsse Netzanschluss
Audio-Eingänge
Hier können Sie ein Mikrofon, eine Gitarre oder ein anderes Instrument anschlie-
ßen. An die praktische STEREO-Miniklinkenbuchse kann ein Player, ein Smart-
phone oder ein Smartphone/Tablet angeschlossen werden.
Audio-Ausgänge
Verbinden Sie diese LEFT/RIGHT Audio-Ausgänge mit einem Mischpult, Beschal-
lungssystem, Aktivboxen, oder der Stereoanlage. Zusätzlich stehen 4 separate
Audio-Ausgänge (1~4) zur Verfügung.

16 | Vorstellung des Instruments
Pedalbuchsen
An die DAMPER-Buchse kann ein Dämpferpedal angeschlossen werden. Die
ASSIGNABLE-Buchsen sind für zwei Schwellpedalen und/oder Fußtaster
gedacht.
MIDI-Anschlüsse
Über seine MIDI-Buchsen kann das Pa5X mit externen Steuerquellen (Master-
keyboard, MIDI-Gitarre, MIDI-Blasinstrument, MIDI-Akkordeons usw.), Klanger-
zeugern und einem Computer mit MIDI-Schnittstellen verbunden werden.
Batterie- und microSD-Fach
Hier haben Sie Zugriff auf die Uhr-Pufferbatterie und den microSD-Karten-
schacht.

Rückseite | 17
Deutsch
USB-Ports
Diese Ports erlauben die Verbindung Ihres Pa5X mit einem Computer oder Tablet
(DEVICE) bzw. das Anschließen von USB-Datenträgern, z.B. Speichersticks oder
ein anderes Instrument, das als Controller fungieren soll (HOST1-R, HOST2-R).
Auf der Vorderseite gibt es einen weiteren HOST-Port (HOST-F).
Video-Ausgang
Über diese Buchse kann das Pa5X zwecks Anzeige der Liedtexte und Akkorde an
einen Fernseher oder Monitor angeschlossen werden.
Netzanschluss
Schließen Sie hier das im Lieferumfang enthaltene IEC-Netzkabel an.

18 | Vorstellung des Instruments
Verbinden Sie das andere Kabelende mit einer geeigneten Steckdose. Eventuell
benötigen Sie einen anderen Netzstecker. Schieben Sie den Stecker niemals mit
Gewalt in eine Steckdose!
WARNUNG: Schließen Sie den Stecker an eine Steckdose mit der richtigen
Spannung an! Bitte lesen Sie sich zunächst die Vorsichtsmaßnahmen ganz vorne
durch.

Anschließen der Pedale | 19
Deutsch
Anschließen der Pedale
und Herstellen der
Audioverbindungen
Anschließen der Pedale
Anschließen des Dämpferpedals
Schließen Sie ein (optionales) Dämpferpedal wie das KORG PS-1, PS-3 oder DS-1H
an die PEDAL > DAMPER-Buchse an. Bei bestimmten Flügelklangfarben arbeitet
das DS-1H-Pedal stufenlos. Nach Anwahl der „Concert Grand“-Klangfarbe kön-
nen Sie die Haltedauer z.B. mit Hilfe der Pedalposition dosieren.
Auf der Seite „Settings > Controllers > Foot“ kann man die Polarität des Pedals
ändern und das Pedal kalibrieren.
Anschließen eines Pedals und/oder Fußtasters
An die PEDAL > ASSIGNABLE-Buchse kann ein/zwei optionaler Fußtaster wie
der KORG PS-1-, PS-3 oder DS-1H, und/oder ein/zwei optionales KORG XVP-20
Volumen- oder EXP-2 Expression-Pedal angeschlossen werden.
Standardmäßig fungieren diese Buchsen als Master Volume- und Keyboard
Expression-Kontinuierliches Pedal. Auf der Seite „Settings > Controllers > Foot“
kann man die Funktion wählen, die Polarität der Pedale ändern und der Pedale
kalibrieren.

20 | Anschließen der Pedale und Herstellen der Audioverbindungen
Was tun, wenn die Pedale nicht funktionieren?
Eventuell müssen die Pedale nach einer Weile „kalibriert“ werden, wenn ihr
Regelweg plötzlich eingeschränkt zu sein scheint. Für Fußtaster kann man hier
bei Bedarf eine andere Polarität wählen.
1 Gehen Sie zur Seite „Settings > Controllers > Foot“.
2 Drücken Sie [Calibration] im Bereich des Pedals, das Sie kalibrieren möch-
ten, um das „Pedal/Footswitch Calibration“-Dialogfenster aufzurufen.
3 Drücken Sie das Pedal komplett hinunter und betätigen Sie den oberen (hel-
leren) Button, um zu bestätigen, dass die Spielhilfe den Höchstwert sendet.

Anschließen der Pedale | 21
Deutsch
4 Wenn folgende Meldung erscheint, dürfen Sie das Pedal freigeben/hochklap-
pen.
5 Drücken Sie den unteren Button (der jetzt heller dargestellt wird), um zu
bestätigen, dass die Spielhilfe den Mindestwert sendet. Überprüfen Sie, ob sich
das Pedal jetzt erwartungsgemäß verhält. Wenn nicht, müssen Sie diesen Vor-
gang noch einmal wiederholen.
6 Drücken Sie den EXIT-Taster, um zur vorigen Seite zurückzukehren.

22 | Einschalten
Einschalten
Einschalten des Instruments
Anschließen des Netzkabels
Verbinden Sie das beiliegende Netzkabel mit der POWER-Buchse auf der Rück-
seite und schließen Sie das andere Ende an eine Steckdose an.
Nach Anschließen des Kabels befindet sich das Instrument im Bereitschaftsbe-
trieb.
WARNUNG: Wenn sich das Instrument im Standby-Betrieb (Bereitschaft) befin-
det, steht es weiterhin unter Strom. Öffnen Sie es niemals in diesem Zustand,
weil sonst Stromschlaggefahr besteht. Um die Stromzufuhr komplett zu unter-
brechen, müssen Sie den Netzstecker aus der Steckdose ziehen.
Ein- und Ausschalten
> Einschalten des Instruments
> Drücken Sie den POWER-Taster ( ), um das Instrument einzuschalten (d.h.
den Bereitschaftsbetrieb zu verlassen). Warten Sie nach dem Einschalten, bis
die Begrüßungsmeldung und danach die Hauptseite angezeigt werden.
> Ausschalten des Instruments (Wahl des Bereitschaftsbetriebs)
> Halten Sie den POWER-Taster ( ) ungefähr zwei Sekunden gedrückt und
geben Sie ihn frei, wenn das Display dunkler wird. Das System wird herunter-
gefahren. Das dauert ein paar Sekunden. Lösen Sie in diesem Stadium nie-
mals die Verbindung mit der Steckdose.

Neigen des Displays | 23
Deutsch
Neigen des Displays
Das Display kann bei Bedarf angehoben (oder abgesenkt) werden.
Anheben des Displays
1 Drücken Sie den UNLOCK-Taster, um das Display zu entriegeln.
2 Halten Sie den UNLOCK-Taster gedrückt, während Sie das Display anheben.
3 Öffnen Sie die Stütze, indem Sie sie von der Rückseite des Displays herun-
terklappen.

24 | Einschalten
4 Halten Sie UNLOCK gedrückt, während Sie die gewünschte Neigung einstel-
len. Verankern Sie die Stütze in einer der Kerben innerhalb des Display-Fachs.
VORSICHT: Gehen Sie behutsam vor, um keinen Schaden anzurichten!
5 Geben Sie den UNLOCK-Taster frei, um das Display in der aktuellen Position
zu halten.

Neigen des Displays | 25
Deutsch
Absenken des Displays
1 Halten Sie den UNLOCK-Taster gedrückt, während Sie das Display anheben.
2 Klappen Sie die Stütze hinter dem Display hoch.
3 Halten Sie den UNLOCK-Taster gedrückt, während Sie das Display langsam
absenken.
4 Geben Sie den UNLOCK-Taster frei und drücken Sie behutsam in der Mitte
auf den oberen Display-Rand, um das Display zu verriegeln.

26 | Einschalten
Einstellen der Display-Helligkeit
Bei bestimmten Lichtverhältnissen muss eventuell die Display-Helligkeit geän-
dert werden.
> Halten Sie den SHIFT- und MENU-Taster gedrückt, während Sie mit dem
DATENRAD die Helligkeit ändern.
Die Helligkeit des Displays (und des Display-Streifens) kann auch auf der Seite
„Settings > General Controls > Interface“ geändert werden.

Anhören der Demosongs | 27
Deutsch
Anhören der Demosongs
Das Instrument enthält ab Werk ein paar Demosongs, die seine wichtigsten Funk-
tionen veranschaulichen.
> Aufrufen des Demo-Modus’
> Drücken Sie DEMO gleichzeitig.
> Anhören der Demosongs
> Drücken Sie nach Aufrufen des Demo-Modus’ keinen Taster. Alle Demosongs
werden der Reihe nach abgespielt.
> Anwahl eines bestimmten Demosongs
> Drücken Sie eine angezeigte Option, und wählen Sie anschließend den
gewünschten Demosong.
> Verlassen des Demo-Modus’
> Drücken Sie einen der beiden DEMO-Taster.

28 | Anwahl und Einsatz der Musik-Ressourcen
Anwahl und Einsatz der
Musik-Ressourcen
Öffnen eines Anwahlfensters
Wenn Sie STYLE, SONG oder einen der KEYBOARD SET LIBRARY-Taster drü-
cken, erscheint das zugehörige Anwahlfenster.
Das Anwahlfenster kann man auch aufrufen, indem man den Namen eines Ele-
ments (Style, Song, Keyboard Set, Stimmen- oder Gitarreneffekt usw.) im Display
drückt.
Drücken, um einen Style oder Song zu wählen
Drücken, um ein Keyboard Set zu wählen

Öffnen eines Anwahlfensters | 29
Deutsch
Nachstehend sehen Sie beispielsweise das Anwahlfenster für Keyboard Sets:
TypGruppen Ausgewähltes Keyboard Set
SeitenOffene
Verzeichnis
Obere Ebene
(Kategorie-Ordner)
Untere Ebene
(Einzelelemente)
Um das Fenster wieder zu verlassen, drücken Sie entweder den EXIT-Taster oder
den [Exit]-Befehl oben links im Display.
Styles und Songs können wahlweise mit Player 1 oder 2 abgespielt werden. Das
erlaubt das Zuordnen eines Styles (oder Songs) zum einen und eines weiteren
zum anderen Player für schnelle Übergänge. Außerdem können Sie zwischen
den Styles oder Songs der beiden Player hin und her blenden.
Schieben Sie den X-FADER zum Player, der jeweils lauter sein soll. Mit dem
PLAY/STOP ( )-Taster kann man die Player starten und anhalten.

30 | Anwahl und Einsatz der Musik-Ressourcen
Anwahl von Keyboard Sets
Aufrufen des ‘My Setting’-Keyboard Sets
> Drücken Sie den MY SETTING-Taster, um Ihre bevorzugten Klangfarben zu
verwenden.
Über das ‘My Setting’-Keyboard Set
„My Setting“ ist ein spezielles Keyboard Set, in dem man folgende Aspekte
sichern kann: Klangfarben der Tastaturparts, Effekte sowie die Funktionen der
Regler und definierbaren Taster. Dieses Keyboard Set wird beim Einschalten
automatisch aufgerufen. Nutzen Sie es, um dafür zu sorgen, dass das Instru-
ment sofort Ihre bevorzugten Einstellungen lädt.
Hier kann Ihr bevorzugtes Keyboard Set gespeichert werden. Halten Sie
den MY SETTING-Taster ±1 Sekunde gedrückt, bis das „Save“-Dialogfenster
erscheint und drücken Sie dann den [Save]-Button, um den Speicherbefehl zu
bestätigen.

Spielen und Beeinflussen der Klangfarben | 31
Deutsch
Spielen und Beeinflussen der
Klangfarben
Spielen auf der Tastatur
Die Tastatur dieses Instruments ähnelt jener eines Klaviers. Spielen Sie doch mal
ein paar Noten!
Bei bestimmten Klangfarben ändert sich ein Aspekt (z.B. die Vibrato-Intensität),
wenn man eine angeschlagene Taste noch weiter hinunterdrückt.
Verwendung der Pedale
Es können mehrere Pedale für unterschiedliche Zwecke eingesetzt werden. Das
Dämpferpedal dient zum Halten der gespielten Noten, bis man es wieder freigibt.
Die Funktion der definierbaren Pedale (bzw. Fußtasters) kann man auf der Seite
„Settings > Controllers > Foot“ wählen.
Arbeiten mit den Fadern und Tastern
Auch die Funktion der CONTROL-Fader kann festgelegt werden: Man kann damit
die Lautstärke, die Mischung der einzelnen Sounds und noch weitere Aspekte
beeinflussen. Der Display-Streifen unter den Fadern zeigt jeweils ihre Funktionen
an.
Verwendung der definierbaren Taster
Die Funktion dieser Spielhilfen richtet sich nach dem jeweils gewählten Keyboard
Set und den zugeordneten Funktionen. Im Falle der DNC-Sounds erlauben die
Taster das „Festlegen“ einer Funktion, die beim Spielen ausgelöst wird bzw.
das Aktivieren/Deaktivieren von Funktionen. In anderen Fällen dienen sie zum
Umschalten oder zum Starten einer Funktion.

32 | Anwahl und Einsatz der Musik-Ressourcen
Verwendung der Matrix
Die programmierbare Tastermatrix kann flexibel belegt werden (Spielen von
PADs, Aktivieren/Stummschalten von Spuren). Drücken Sie einen Taster, um die
zugeordnete Funktion auszulösen. Handelt es sich um eine An/Aus-Funktion,
müssen Sie ihn erneut drücken, um die Funktion wieder zu deaktivieren.
Die Tasterfarbe richtet sich nach der zugeordneten Funktion und dem gewählten
Player.
Verwendung des Joysticks
Wenn man den Joystick nach links oder rechts schiebt, ändert sich in der Regel
die Tonhöhe der gespielten Noten. Schieben Sie ihn zur Rückseite des Instru-
ments, um die Noten mit Modulation zu versehen (das funktioniert nicht bei allen
Klangfarben). Im Falle der Orgelsimulationen ändert man mit dieser Vorwärts-
bewegung die Drehgeschwindigkeit der Lautsprecher (Rotary-Effekt). Man kann
den Joystick auch zu sich hin ziehen. Was dann passiert, richtet sich nach der
gewählten Klangfarbe. Experimentieren Sie einfach!
Verwendung des Ribbon-Controllers
Wenn man einen Finger von links nach rechts auf dem Ribbon schiebt, ändert
sich in der Regel die Klangfarbe und/oder die Tonhöhe. Das genaue Verhalten
richtet sich jedoch nach dem gewählten Klang.

Starten und Anhalten eines Styles | 33
Deutsch
Starten und Anhalten eines Styles
Die Begleitautomatik kann mit den Tastern in der PLAYER 1- oder PLAYER
2-Sektion bedient werden.
Stop/
Go to Start
Play/Stop
> Einstellen der Abmischung
> Schieben Sie den X-FADER komplett zum Player, den Sie hören möchten.
Schieben Sie ihn ganz nach links für Player 1 bzw. ganz nach rechts für Player
2.
> Schieben Sie ihn in die Mitte, um beide Player gleichzeitig zu hören.
> Starten der Begleitung
1 Drücken Sie den PLAY/STOP ( )-Taster.
2 Spielen Sie mit der linken Hand ein paar Akkorde und mit der rechten Hand
eine Melodie.
Behalten Sie während der Style-Wiedergabe das Display im Auge.
Erkannter Akkord
Tempo Aktueller Takt
Taktschlagangabe
Während der Wiedergabe: Verbleibende
Takte
Wiedergabe angehalten: Pattern-Länge
Für eine Style-Variation: Schleife
Gewähltes Style-Element
Dateipfad

34 | Anwahl und Einsatz der Musik-Ressourcen
> Anhalten der Begleitung
> Drücken Sie den PLAY/STOP ( )-Taster erneut.
> Alternativ hierzu können Sie den STOP/GO TO START ()-Taster betätigen.
> Simultanes Starten bzw. Anhalten beider Player
Bei Bedarf können beide Player gleichzeitig gestartet und dann mit dem X-FA-
DER „gemischt“ werden.
> Halten Sie den SHIFT-Taster gedrückt, während Sie einen der beiden PLAY/
STOP ()-Taster drücken, um beide Player gleichzeitig zu starten.
> Halten Sie den SHIFT-Taster gedrückt, während Sie einen der beiden PLAY/
STOP ()-Taster betätigen, um beide Player wieder anzuhalten.

Starten, Anhalten und Steuern von Songs | 35
Deutsch
Starten, Anhalten und Steuern von
Songs
Die Songs können mit den Tastern in der PLAYER 1- oder PLAYER 2-Sektion
bedient werden.
Stop/
Go to Start
Play/Stop
> Einstellen der Abmischung
> Schieben Sie den X-FADER komplett zum Player, den Sie hören möchten.
Schieben Sie ihn ganz nach links für Player 1 bzw. ganz nach rechts für Player
2.
> Schieben Sie ihn in die Mitte, um beide Player gleichzeitig zu hören.
> Starten des Players
> Drücken Sie den PLAY ()-Taster.
Behalten Sie während der Song-Wiedergabe das Display im Auge.
Im Falle eines MIDI-Songs:
Tempo
Aktueller MarkerDateipfad
Aktueller Takt Taktschlagangabe
Meter (Taktart)
Während der Wiedergabe:
Verbleibende Takte
Wiedergabe angehalten:
Gesamtlänge des Songs
Zurück-/Vorspulen

36 | Anwahl und Einsatz der Musik-Ressourcen
Im Falle eines MP3-Songs:
Dateipfad
Tempovariation Verstrichene Zeit Zurück-/
Vorspulen
Während der Wiedergabe:
Verbleibende Zeit
Wiedergabe angehalten: Gesamt-
länge des Songs
> Vorspulen
> Drücken Sie den FAST FORWARD ( )-Taster ein Mal, um zum nächsten Takt
(MIDI-Song) bzw. zur nächsten Sekunde (MP3-Song) zu springen.
> Halten Sie den FAST FORWARD ( )-Taster gedrückt, um schneller zu einer
weiter entfernten Position zu springen. Geben Sie ihn frei, sobald Sie die
gewünschte Position erreichen.
> Zurückspulen
> Drücken Sie den FAST REWIND ( )-Taster (MP3) ein Mal, um zum vorigen
Takt (MIDI-Song) bzw. zur vorangehenden Sekunde (MP3-Song) zu springen.
> Halten Sie den FAST REWIND ( )-Taster gedrückt, um schneller zu einer
weiter entfernten Position zu springen. Geben Sie ihn frei, sobald Sie die
gewünschte Position erreichen.
> Unterbrechen und Fortsetzen der Wiedergabe
> Drücken Sie den PLAY/STOP ()-Taster, um die Wiedergabe an der aktuel-
len Position anzuhalten. Die Tasterdiode erlischt.
> Drücken Sie den PLAY/STOP ()-Taster erneut, um die Wiedergabe fortzu-
setzen. Seine Diode leuchtet wieder.
> Anhalten des Players und Rückkehr zum Song-Beginn
> Drücken Sie den STOP/GO TO START ()-Taster, um die Wiedergabe anzu-
halten und zum Song-Beginn zu springen. Die Tasterdiode erlischt.

Starten, Anhalten und Steuern von Songs | 37
Deutsch
> Simultanes Starten bzw. Anhalten beider Player
Bei Bedarf können beide Player gleichzeitig gestartet und dann mit dem X-FA-
DER „gemischt“ werden.
> Halten Sie den SHIFT-Taster gedrückt, während Sie einen der beiden PLAY/
STOP ()-Taster drücken, um beide Player gleichzeitig zu starten.
> Halten Sie den SHIFT-Taster gedrückt, während Sie einen der beiden PLAY/
STOP ()-Taster betätigen, um beide Player wieder anzuhalten.

WICHTIGER HINWEIS FÜR ANWENDER
Dieses Instrument wurde unter strenger
Beachtung der Vorgaben und Spannungsan-
forderungen im jeweiligen Auslieferungsland
hergestellt. Wenn Sie das Instrument über das
Internet, per Postversand und/oder telefoni-
scher Bestellung erworben haben, müssen Sie
überprüfen, ob es für die Verwendung am Ein-
satzort geeignet ist.
WARNUNG: Die Verwendung dieses Instru-
ments in einem anderen Land als dem, für wel-
ches es bestimmt ist, kann gefährlich sein und
die Garantie des Herstellers oder Vertriebs
hinfällig werden lassen.
Bitte bewahren Sie die Quittung als Kaufbeleg
auf, da das Produkt sonst von der Garantie des
Herstellers oder Vertriebs ausgeschlossen
werden kann.
HINWEIS ZUR ENTSORGUNG (nur für die EU)
Dieses Symbol auf dem Gerät selbst,
in der Bedienungsanleitung, auf der
Batterie oder der Verpackung bedeu-
tet, dass das Produkt den örtlichen
Bestimmungen entsprechend entsorgt
werden muss, um weder die Umwelt,
noch die Gesundheit zu belasten. Bitte
erkundigen Sie sich bei der zuständi-
gen Stelle nach den in Ihrer Gegend geltenden
Entsorgungsvorschriften. Wenn die Batterie
mehr Schwermetall enthält als erlaubt, befin-
det sich unter der durchgestrichenen Müll-
tonne auf der Batterie oder ihrer Verpackung
ein Chemiesymbol.
Elektromagnetischer Strahlungen können
sich nachteilig auf die Audiowiedergabe aus-
wirken. In bestimmten Fällen führt dies zur
Ausgabe eines unerwünschten Signals. Diese
Phänomen verschwindet jedoch, sobald die
elektromagnetischen Störung behoben wird.
WARNUNG DER ‘FCC’-VERORDNUNG (für die
USA)
This equipment has been tested and found
to comply with the limits for a Class B digital
device, pursuant to Part 15 of the FCC Rules.
These limits are designed to provide reason-
able protection against harmful interference
in a residential installation. This equipment
generates, uses, and can radiate radio fre-
quency energy and, if not installed and used
in accordance with the instructions, may
cause harmful interference to radio com-
munications. However, there is no guarantee
that interference will not occur in a particu-
lar installation. If this equipment does cause
harmful interference to radio or television
reception, which can be determined by turning
the equipment off and on, the user is encour-
aged to try to correct the interference by one
or more of the following measures:
• Reorient or relocate the receiving antenna.
• Increase the separation between the equip-
ment and receiver.
• Connect the equipment into an outlet on a
circuit different from that to which the recei-
ver is connected.
• Consult the dealer or an experienced radio/
TV technician for help.
If items such as cables are included with this
equipment, you must use those included
items.
Unauthorized changes or modification to this
system can void the user’s authority to ope-
rate this equipment.
KONFORMITÄTSERKLÄRUNG (für die USA)
Responsible Party: KORG USA INC.
Address: 316 SOUTH SERVICE ROAD, MEL-
VILLE
Telephone: 1-631-390-6500
Equipment Type: Professional Arranger
Model: Pa5X
This device complies with Part 15 of FCC Rules.
Operation is subject to the following two con-
ditions: (1) This device may not cause harmful
interference, and (2) this device must accept
any interference received, including interfer-
ence that may cause undesired operation.

ITALIANO

Avvertenze importanti sulla sicurezza
▪Leggete le istruzioni.
▪Conservate le istruzioni.
▪Rispettate tutte le avvertenze.
▪Seguite scrupolosamente le istruzioni.
▪Non utilizzate il prodotto vicino all’acqua.
▪Per la pulizia, usate esclusivamente un panno
asciutto.
▪Evitate di ostruire le prese di ventilazione.
Installate il prodotto seguendo le indicazioni
fornite dal produttore.
▪Non collocate il prodotto in prossimità di
fonti di calore, ad esempio radiatori, termo-
convettori, stufe, o qualsiasi altro apparato
(compresi gli amplificatori) in grado di gene-
rare calore.
▪Non modificate la spina (polarizzata o con
polo di messa a terra), la cui integrità è ga-
ranzia di sicurezza. Una spina polarizzata ha
una lama più larga dell’altra. Una spina con
messa a terra ha due poli di conduzione e uno
di messa a terra. La lama più larga e il terzo
polo sono dispositivi di sicurezza. Se la spina
fornita con il prodotto non entra nella pre-
sa di corrente, rivolgetevi ad un elettricista
qualificato per sostituire la presa di corrente
obsoleta.
▪Evitate che si calpesti o si pieghi eccessiva-
mente il cavo di alimentazione, soprattutto
in prossimità dello strumento o della presa
di corrente.
▪Utilizzate esclusivamente gli accessori e le
opzioni consigliati dal produttore.
▪Usate solo carrelli, supporti, treppiedi o staf-
fe consigliati dal produttore o venduti insie-
me al prodotto. Fate particolare attenzione
nell’uso dei carrelli, per evitare incidenti e
danni fisici a cose e/o persone durante gli
spostamenti.
▪Scollegate lo strumento dalla presa di cor-
rente durante i temporali, o nel caso non ne
sia previso l'uso per un lungo periodo.
▪Per qualsiasi tipo di riparazione rivolgetevi
a personale specializzato. È richiesto un in-
tervento tecnico quando il prodotto subisce
qualsiasi danno, ad esempio se è stato dan-
neggiato il cavo di alimentazione o la spina,
se del liquido o degli oggetti sono finiti all'in-
terno dell'unità, se lo strumento è rimasto
sotto la pioggia o in un ambiente estrema-
mente umido, e in ogni caso in cui lo stru-
mento non funzioni normalmente o sia stato
fatto cadere.
▪ATTENZIONE – Questo apparecchio deve es-
sere collegato ad una presa di corrente dota-
ta di messa a terra.
▪Lo spegnimento dello strumento lo mette in
standby ma non lo isola dalla rete elettrica,
per cui è consigliabile staccare la spina dalla
presa di corrente se si prevede di non usarlo
per un lungo periodo, o prima di pulirlo. La
presa di corrente e il connettore di alimenta-
zione dello strumento devono rimanere sem-
pre facili da raggiungere.
▪Evitate qualsiasi contatto tra i dispositivi
elettrici e l’acqua o altri tipi di liquido; non
collocate recipienti contenenti liquidi sopra o
nelle immediate vicinanze dell'unità.
▪Installate il prodotto vicino ad una presa di
corrente, e assicuratevi che la spina sia sem-
pre facile da raggiungere.
▪Non fate funzionare il prodotto in uno spazio
ristretto, ad esempio una scatola da imbal-
laggio o simili.
▪Non collocate sul prodotto fiamme libere, ad
esempio candele accese.

ATTENZIONE - Rischio di ustione
chimica: non ingerite la batteria!
Questo prodotto contiene una
batteria a bottone.
L’ingerimento di questo tipo di batteria può
causare gravissime ustioni interne in circa
due ore, e provocare la morte.
Tenete le batterie nuove e usate lontano dal-
la portata dei bambini. Se il comparto batte-
rie non si chiude bene, smettete di usare lo
strumento e tenetelo lontano dalla portata
dei bambini.
Se pensate che la batteria possa essere stata
ingerita o finita in qualche modo all'interno
del corpo, contattate immediatamente un
medico.
▪ATTENZIONE – Questo prodotto contiene
una batteria al litio per la funzione di orolo-
gio/calendario. La batteria può esplodere se
sostituita in modo non corretto. Sostituite
la batteria esclusivamente con una batteria
identica o equivalente. La batteria al litio in-
terna per la funzione di orologio/calendario
può essere sostituita dall’utente.
▪Non esponete le batterie a calore eccessivo,
ad esempio luce solare diretta, fiamme libere
o altre fonti di calore.
▪Smaltite le batterie usate secondo le indica-
zioni fornite dal produttore.
Il simbolo del fulmine che termina con una
freccia racchiuso in un triangolo equilatero
avverte che all’interno del prodotto sono
presenti elementi non isolati ‘con tensione
elettrica pericolosa', di intensità sufficiente
a causare una scossa elettrica.
Il simbolo del punto esclamativo racchiu-
so in un triangolo equilatero avverte della
presenza di importanti istruzioni relative
all'uso e alla manutenzione di questo pro-
dotto nella documentazione fornita con il
prodotto stesso.

Altre avvertenze
Spegnimento automatico
Per evitare sprechi di energia, Pa5X entrerà au-
tomaticamente in modalità standby dopo due
ore di funzionamento senza attività (suonare,
pressione dei pulsanti od uso del touch-screen).
Vi preghiamo di salvare tutti i dati modificati
(Keyboard Set, Style, Song, o altro) prima di una
pausa prolungata.
Gestione dei dati
I dati in memoria potrebbero andar persi in caso
di uso non corretto. Salvate i dati importanti nel-
la memoria interna o in un dispositivo di memo-
ria USB. KORG non si assume alcuna responsabi-
lità per danni causati dalla perdita di dati.
Uso del display
Fate molta attenzione a non forzare il display
quando lo inclinate. Abbassate completamente
il display prima di spostare lo strumento. Per
evitare di romperlo, fate inoltre molta attenzio-
ne a non premere troppo sul display durante il
trasporto dello strumento.
Pulizia
Se la superficie esterna si sporca, pulitela con
un panno pulito e asciutto. Non utilizzate deter-
genti liquidi contenenti benzene o diluenti, né
detergenti o lucidanti infiammabili.
Pulite la parte esterna dello strumento con un
panno di cotone morbido. Alcuni materiali, come
gli asciugamani di carta, potrebbero graffiare e
danneggiare la superficie. È possibile adoperare
prodotti per la pulizia dei computer, purché siano
concepiti appositamente per l’uso su schermi LCD.
Fianchi in vero legno
I fianchi dello strumento sono in vero legno, il cui
aspetto può variare a seconda del modello. Con
l’uso, il legno diventa sempre più bello e prezio-
so. Le irregolarità che potreste notare sono una
caratteristica intrinsecna del materiale, che ne
enfatizza l’origine naturale.
Schermate di esempio
Alcune pagine dei manuali mostrano immagini
dello schermo, insieme alla spiegazione di fun-
zioni e procedure. I nomi dei Sound, degli Style,
delle Song e dei parametri, così come i valori
mostrati, sono semplici esempi, e non sempre
corrispondono alla schermata reale su cui si sta
lavorando.
Marchi registrati
Mac e iOS sono marchi registrati di Apple, Inc.
Android è un marchio di Google Inc. MS-DOS e
Windows sono marchi registrati di Microsoft
Corporation. Waves MaxxAudio® è un marchio
registrato di Waves Audio Ltd. Tutti gli altri mar-
chi e marchi registrati sono proprietà dei rispet-
tivi titolari.
Avvertenza sull'open source
Alcune parti di software di questo prodotto sono
protette da copyright ©2007 “The FreeType
Project” (www.freetype.org). Tutti i diritti riservati.
Clausola esonerativa
Le informazioni contenute in questo manuale
sono state attentamente riviste e controllate.
Dato il nostro costante impegno a migliorare i
nostri prodotti, le specifiche potrebbero differi-
re da quelle contenute nel manuale. KORG non si
assume responsabilità per eventuali differenze
tra le specifiche e il contenuto del manuale di
istruzioni – le specifiche sono soggette a cam-
biamento senza preavviso.
Responsabilità
I prodotti KORG sono realizzati in accordo alle
più severe specifiche e ai requisiti elettrici pre-
visti dalle normative di ciascun paese. Questi
prodotti sono garantiti esclusivamente dal di-
stributore KORG del paese in cui sono stati ven-
duti. Qualsiasi prodotto KORG venduto senza
certificato di garanzia o senza numero di serie
non è coperto da garanzia e non rientra nella re-
sponsabilità del produttore/distributore. Questa
norma è a tutela dei vostri diritti e della vostra
sicurezza.
Riparazioni e supporto
Per riparazioni, contattate il più vicino centro
di assistenza autorizzato KORG. Per maggiori
informazioni sui prodotti KORG, e per trovare
software e accessori compatibili con il vostro
strumento, contattate il più vicino distributore
autorizzato KORG. Per informazioni aggiornate,
visitate il nostro sito web (www.korg.com).
Tenete lo strumento aggiornato
Il vostro strumento può essere aggiornato quan-
do KORG rilascia una nuova versione del sistema
operativo. Potete scaricare la versione più ag-
giornata del sistema operativo dal nostro sito
web (www.korg.com/us/support/download/).
Leggete attentamente le istruzioni fornite con il
sistema operativo.

Benvenuti in Pa5X! |5
Italiano
Introduzione
Benvenuti in Pa5X!
Grazie, e congratulazioni per avere acquistato l’Arranger Professionale KORG
Pa5X! Siamo certi che questo strumento vi farà vivere lunghi anni di grande mu-
sica, a casa come sul palco.
Pa5X è una workstation musicale potente ed elegante. È facile da usare, con la
sua chiara interfaccia utente basata su un touch screen a colori reclinabile e su
pulsanti del pannello di controllo illuminati, che permettono di individuare con
grande facilità le varie funzioni identificate da un codice colore. Sia la tastiera
pesata tipo pianoforte del modello ad 88 note, che quella semi-pesata dei mo-
delli a 76 o 61 note, hanno una risposta molto naturale. Sono state concepite per
musicisti di qualsiasi livello, dal principiante al pianista più esigente, e assicurano
un grande feeling e una grande espressività.
Solido e affidabile, Pa5X è un ottimo strumento live, ma si rivela anche un grande
strumento da studio, dove offre un valido aiuto creativo nella composizione di
canzoni o colonne sonore, e dove il suo suono ‘prodotto’ rende già perfetta la
demo o la musica per il video.
I suoni incorporati, basati sul nostro motore di sintesi EDS-X (Enhanced Definition
Synthesis-eXpanded), spaziano da strumenti acustici ultrarealistici, a tastiere
elettroniche vintage, a synth classici, con l’aggiunta di suoni fantasy e di effet-
ti speciali perfettamente adatti alla produzione di musica per video e cinema.
Abbiamo incluso anche strumenti provenienti da epoche e culture diverse, la-
sciando inoltre ampio spazio ad eventuali espansioni personali.
Pa5X è facile da controllare, grazie al sistema DNC (Defined Nuance Control) di
KORG, che permette di intervenire con finezza e musicalità sulle sfumature più
sottili del suono e sulla scelta delle tecniche esecutive. Cursori, pulsanti, matrici
di controlli in tempo reale fisici e virtuali, un joystick e un ribbon controller, dan-
no un accesso immediato a tutti i parametri del suono.
I suoni sono processati da una sofisticata catena di effetti, che comprende effetti
finali per ciascuno dei Player e per i suoni di tastiera. Gli effetti finali di mastering
sulle uscite audio, che rendono il suono dello strumento ‘omogeneo’ e ‘prodotto’,
sono il risultato della collaborazione di lunga data di KORG con Waves Audio,
riferimento assoluto per gli effetti di mastering da studio.

6| Introduzione
Per la massima qualità di ascolto, magari anche ad un volume molto basso per
lo studio a tarda sera, è possibile aggiungere il sistema opzionale KORG PaAS
Amplification System, appositamente progettato per il collegamento a Pa5X.
Il moderno ed elegante supporto opzionale ST-SV1-BK rende lo strumento una
presenza importante sul palco, e un elegante elemento d’arredo in soggiorno.
Pa5X include il sistema KORG XDS (Crossfade Dual Sequencer/Player), che per-
mette di precaricare e mixare liberamente Style e Song. È inoltre possibile crea-
re i propri Style e registrare le proprie Song MIDI ed MP3. L’armonizzazione auto-
matica, il sequencer di accordi, un sofisticato motore di riconoscimento accordi,
permettono di creare arrangiamenti degni di un esperto performer pop o jazz.
Con le Song e gli Style è possibile mostrare testi e accordi nel display interno o
su un monitor esterno, ed è possibile convertire qualsiasi traccia di Song MIDI in
uno spartito leggibile su display. I Marker permettono di tornare indietro ad un
punto definito, ad esempio un passaggio di un brano che si sta studiando o pro-
vando, o semplicemente per ripetere una sezione durante il live.
Potrete registrare una Song MIDI con il completo sequencer integrato. Ancora
più facile, basta registrare quello che si canta e si suona dal vivo (comprese le
Song MP3) in un nuovo file MP3, che si può riascoltare dovunque.
Le Song e gli Style possono essere salvati nel SongBook integrato, i cui elementi
(organizzati come in un database) possono essere facilmente sincronizzati con
un lettore di spartiti esterno su tablet. Potete quindi usare una app di spartiti
digitali per controllare il vostro Pa5X.
Microfono e chitarra possono essere collegati agli ingressi audio dedicati, ed
elaborati con gli eccellenti effetti incorporati. Pa5X porta con sé tutta la nostra
lunga esperienza nella realizzazione di armonizzatori per la voce e di effetti per
chitarra. E il Vocal Remover vi permetterà cantare insieme a qualsiasi Song MP3.
Naturalmente c’è molto di più, e vi invitiamo ad esplorare tutte le funzioni di
Pa5X. Pa5X è l’Arranger Professionale più creativo, potente, e facile da usare
mai prodotto. E quindi, buon divertimento con il vostro nuovo Pa5X!

Prima di iniziare a suonare… |7
Italiano
Prima di iniziare a suonare…
Cosa c’è nella scatola
Una volta ricevuto il vostro Pa5X, controllate che nell’imballo si trovino tutti gli
oggetti elencati di seguito. Se dovesse mancarne qualcuno, vi preghiamo di con-
tattare immediatamente il rivenditore KORG.
> Pa5X
> Leggio
> Cavo di alimentazione AC
> Guida rapida
> Solo Pa5X-88: Feltri di protezione per lo stand ST-SV1-BK
Cosa si può scaricare dal nostro sito
Dal nostro sito web (www.korg.com/us/support/download/) potete scaricare il
software più aggiornato, il manuale completo, i manuali video, il driver MIDI.
Cosa si può aggiungere
Una volta acquistato Pa5X, potreste voler aggiungere queste utili opzioni:
> L’elegante supporto per tastiere KORG ST-SV1-BK, raccomandato per sicu-
rezza e praticità, e perfettamente in linea con il design del vostro arranger.
ATTENZIONE: L’Arranger Professionale Pa5X va usato esclusivamente con il
supporto KORG ST-SV1-BK. L’uso con un supporto diverso può rendere lo stru-
mento instabile, e provocare danni alle persone.
> Il sistema di amplificazione PaAS, che aggiunge a Pa5X un sistema di ampli-
ficazione a tre vie, una coppia di altoparlanti integrati e un sistema bass-reflex.
> Uno dei robusti pedali e interruttori a pedale del catalogo KORG.

8| Introduzione
Eseguire una copia di sicurezza dei propri dati
Nel caso le risorse musicali vengano modificate, è consigliabile eseguire fre-
quenti copie di sicurezza (backup) dei dati User. Premete il pulsante FILE per
passare alla pagina File, selezionate il gruppo Internal, selezionate la cartella All,
e scegliete il comando Save dal menu di pagina (in alto a destra). Infine salvate i
dati in un dispositivo di memoria esterno.
Ripristinare una copia di sicurezza
Per ripristinare i dati User, ricaricate i dati salvati come copia di sicurezza
(backup). Se i dati si trovano in un dispositivo esterno, collegate il dispositivo
di backup. Premere il pulsante FILE per passare alla pagina File, selezionate il
gruppo Drives e poi il dispositivo di memoria esterno. Selezionate la cartella in
cui è stato eseguito il backup dei dati e scegliere il comando Load dal menu di
pagina (in alto a destra). Infine caricate i dati nella memoria interna. Se lo prefe-
rite, ricaricate solo alcuni elementi.
Ripristinare i dati di fabbrica originali
Se volete ripristinare i dati originali di fabbrica, usate il comando Factory
Restore, che potete trovare nella pagina File > Menu> Factory Restore.
ATTENZIONE: Questa operazione sovrascrive tutti i dati User!
Caricare il sistema operativo
Pa5X può essere aggiornato quando vengono rilasciate nuove versioni del siste-
ma operativo. Potete scaricare la versione più aggiornata del sistema operativo
dal nostro sito web (www.korg.com/us/support/download/). Leggete attenta-
mente le istruzioni fornite con il sistema operativo stesso.
Per verificare la versione del sistema operativo installata nel vostro Pa5X, anda-
te alla pagina File, e scegliete il comando System Info dal menu di pagina.
SUGGERIMENTO: Assicuratevi che Pa5X includa sempre la versione più recente
del sistema operativo. La nuova versione può contenere nuove funzioni e corre-
zioni di errori.
ATTENZIONE: Non installate un sistema operativo diverso da quello ufficiale for-
nito da KORG per Pa5X. L’installazione di un sistema operativo creato per model-
li diversi o scaricati da siti web non ufficiali può causare perdita di dati e danni
permanenti allo strumento. KORG non si assume alcuna responsabilità per danni
causati dall’installazione non corretta del sistema operativo.

Pannello frontale |9
Italiano
Panoramica sullo
strumento
Pannello frontale
Il pannello frontale contiene i controlli dello strumento.
Leggio
Il leggio è fornito di serie con Pa5X.
Sistema di amplificazione PaAS
È possibile installare il sistema di amplificazione (opzionale) PaAS. Se installato,
controllate il volume degli altoparlanti tramite il cursore MASTER VOLUME.
Gli altoparlanti vengono automaticamente disattivati quando si collegano le
cuffie. È inoltre possibile disattivarli manualmente deselezionando la casella di
spunta Speakers nella pagina Settings > Audio/Video> MP3/Speaker.
Connettore cuffie
Collegate le cuffie a questo connettore. È possibile utilizzare cuffie con impeden-
za di 16-200 Ohm (50 Ohm consigliati).
Tastiera
Usate la tastiera per suonare note e accordi. A seconda dello stato dell’indicato-
re SPLIT, la tastiera può essere unita o divisa tra suoni diversi.

10| Panoramica sullo strumento
TastieraCuffie
Guida per il leggio e il sistema di
amplificazione PaAS

Pannello di controllo |11
Italiano
Pannello di controllo
Il pannello di controllo è la parte del pannello frontale in cui si trovano i controlli
dello strumento.
Display
Area cursori e
pulsanti
Area di Style, Pad
e Marker
Area dei
Player Area dei Sound
Controlli di
navigazione La Matrix
Controlli di Tempo
Display
Usate lo schermo touchscreen per interagire con lo strumento. Il display può
venir inclinato per avere un angolo di visualizzazione ottimale. I controlli attorno
al display consentono di selezionare i vari elementi della schermata.

12| Panoramica sullo strumento
Controlli di navigazione
Usate questi controlli per navigare tra i menu, le pagine e i parametri, e per mo-
dificare il valore del parametro selezionato.
Area dei Sound
Nella lingua di Pa5X, i Sound sono i suoni che vengono suonati sulla tastiera. In
questa sezione si possono scegliere le combinazioni di Sound salvate sotto for-
ma di Keyboard Set nella libreria dedicata.
Area di Style, Pad e Marker
Gli Style creano l’accompagnamento automatico con una band virtuale. I Marker
permettono di passare all’istante a determinati punti salvati nel brano MIDI.
Potete suonare i Sound (selezionati tramite i Keyboard Set) e i Pad insieme a
Style e Song.

Pannello di controllo |13
Italiano
Area dei Player
I due Player incorporati permettono di suonare Style e Song. È possibile asse-
gnare elementi diversi a ogni Player, per avere uno Style o una Song pronta
a suonare al termine dello Style o della Song attuale. È possibile mixare i due
Player con l’X-FADER.
Area del SongBook
Il SongBook è un database di ‘song’, ognuna delle quali definite ‘SongBook Entry’.
Ognuna di esse costituisce un’istantanea della situazione attuale, che compren-
de Style, Song, Keyboard Set, Pad, Chord Sequence ed effetti per voce e chitar-
ra. È possibile accedere rapidamente a tutte le song contenute nel SongBook
(Book) o a liste separate di song (Set List).
Controlli di Tempo
Usate questi pulsanti per controllare il Tempo degli Style e delle Song. È possibile
attivare o disattivare il click del metronomo premendo il pulsante CONTROL >
SWITCH #9 mentre ci si trova in modalità STYLE/SONG, e ascoltare il metrono-
mo mentre si prova un pezzo.

14| Panoramica sullo strumento
La Matrix
È possibile usare questa matrice programmabile di tasti (grandi e facili da ‘colpi-
re’) per richiamare elementi musicali e funzioni (Pad, Track Play/Mute).
Connettore USB
Usate questa presa (che apparirà come HOST-F nel display) per collegare un di-
spositivo di memoria USB, ad esempio una pendrive USB, oppure altri strumenti
musicali da utilizzare come controller. È possibile usare questa presa anche per
collegare una piccola lampada USB, per illuminare il pannello di controllo o il
leggio. Due altre prese USB si trovano sul retro dello strumento.

Pannello posteriore |15
Italiano
Pannello posteriore
Il pannello posteriore contiene la maggior parte delle connessioni.
Guida per il leggio e il sistema di
amplificazione PaAS
Connettori Connettore di alimentazione
Ingressi audio
Usate questi connettori per collegare un microfono, una chitarra o qualsiasi altro
strumento musicale. Il pratico minijack STEREO può essere utilizzato per colle-
gare direttamente l’uscita audio di un lettore multimediale, di uno smartphone
o di un tablet.
Uscite audio
Usate le prese LEFT e RIGHT per inviare un segnale audio stereo ad un mixer, un
sistema di amplificazione, una serie di monitor amplificati, o ad un sistema hi-fi.
Sono disponibili anche quattro uscite audio separate (1-4).

16| Panoramica sullo strumento
Connettori per i pedali
Usate il connettore DAMPER per collegare un pedale damper, e i connettori
ASSIGNABLE per collegare uno o due pedali di tipo continuo (volume o expres-
sion) e/o uno o due interruttori a pedale (footswitch).
Porte MIDI
Usate queste porte per collegare Pa5X a controller esterni (tastiera master, chi-
tarra MIDI, controller a fiato, fisarmonica MIDI, pedaliera MIDI…), ad una serie di
expander, o ad un computer dotato di interfaccia MIDI.
Batteria e slot microSD
Questo vano contiene la batteria dell’orologio e lo slot per schede microSD.

Pannello posteriore |17
Italiano
Porte USB
Usate queste prese per collegare Pa5X ad un personal computer o ad un tablet
(DEVICE) o per collegare fino a due dispositivi di memoria USB, quali una pen-
drive USB, oppure un altro strumento musicale da utilizzare come controller
(HOST1-R, HOST2-R). Un’altra presa HOST (HOST-F) è presente nel pannello
frontale.
Uscita video
Collegate Pa5X ad un televisore o ad un monitor esterno, per leggere testi e
accordi su uno schermo più grande.
Connettore di alimentazione
Usate questa presa per collegare il cavo di alimentazione IEC fornito di serie.

18| Panoramica sullo strumento
Collegate l’altra estremità del cavo ad una presa di corrente standard. Assicuratevi
di star utilizzando una spina compatibile. Mai forzare la spina nella presa!
ATTENZIONE: Collegate la spina ad una presa di corrente del giusto voltaggio!
Vi preghiamo di leggere attentamente le precauzioni contenute all’inizio di que-
sto manuale.

Collegare i pedali |19
Italiano
Configurare i pedali e le
connessioni audio
Collegare i pedali
Collegare il pedale damper
Usate il connettore PEDAL > DAMPER per collegare un pedale damper, ad esem-
pio uno dei modelli (opzionali) KORG PS-1, PS-3 o DS-1H. Il pedale DS-1H consente,
con alcuni suoni di pianoforte acustico, di avere tutte le sfumature del mezzo-pe-
dale. Potete sperimentarne il funzionamento premendolo gradualmente, e poi
rilasciandolo gradualmente, mentre state suonando con il Sound Concert Grand.
Per sapere come cambiare la polarità del pedale e calibrarlo, andate alla pagina
Settings > Controllers> Foot.
Collegamento di un pedale continuo e/o di un footswitch
Usate i connettori PEDAL > ASSIGNABLE per collegare uno o due interruttori a
pedale (footswitch) come il modello (opzionale) KORG PS-1, PS-3 o DS-1H, oppure
uno o due pedali di tipo continuo come il modello (opzionale) KORG XVP-20 (pe-
dale di Volume) o EXP-2 (pedale di Expression).
Per impostazione predefinita, questi connettori funzionano come pedali di
Master Volume e Keyboard Expression. Se desiderate cambiare la funzione as-
segnata, o se volete cambiare la polarità dei pedali e calibrarli, andate alla pagi-
na Settings > Controllers> Foot.

20| Configurare i pedali e le connessioni audio
E se i pedali non funzionano correttamente?
Se necessario, ricalibrate i pedali, in modo da poter sfruttare interamente la loro
escursione, senza nessun ‘punto morto’. Inoltre, nel caso il pedale funzionasse al
contrario, questa procedura consente di cambiarne la polarità.
1 Andate alla pagina Settings > Controllers> Foot.
2 Toccate il pulsante Calibration nell’area corrisondente al pedale da ricalibra-
re, in modo da far apparire la finestra di dialogo Pedal/Footswitch Calibration.
3 Premete il pedale a fondo e, mentre continuate a tenerlo premuto, toccate il
pulsante superiore (evidenziato) per confermare il valore massimo.

Collegare i pedali |21
Italiano
4 Quando compare la successiva finestra di dialogo, rilasciate il pedale.
5 Toccare il pulsante inferiore (ora evidenziato) nel display per confermare il
valore minimo. Verificate che il pedale stia funzionando correttamente. Nel caso
non stesse funzionando bene, ripetete la procedura.
6 Premete il pulsante EXIT per tornare alla pagina precedente.

22| Accensione
Accensione
Accendere lo strumento
Collegare il cavo di alimentazione
Collegate il cavo di alimentazione fornito di serie al ricettacolo di alimentazione
POWER che si trova nel pannello posteriore dello strumento, e collegate l’altra
estremità alla presa a muro.
Una volta collegato il cavo di alimentazione, lo strumento è in standby.
ATTENZIONE: Quando lo strumento è in standby, è ancora collegato all’alimen-
tazione. Accedere all’interno dello strumento può essere pericoloso. Per scol-
legare completamente lo strumento dall’alimentazione, staccate la spina dalla
presa di corrente.
Accensione e spegnimento
> Accendete lo strumento.
> Tenete premuto il tasto POWER ( ) per accendere lo strumento (cioè, per
farlo ‘uscire dallo standby’). Dopo avere acceso lo strumento, attendete la scom-
parsa della schermata di benvenuto; a questo punto apparirà la pagina principale
(Main).
> Spegnete lo strumento (standby)
> Tenere premuto il pulsante POWER ( ) per circa due secondi, e rilasciatelo
non appena diminuisce la luminosità dello schermo. La procedura di spegnie-
mento dura alcuni secondi. Vi preghiamo di non scollegare il cavo di alimentazio-
ne durante questa procedura.

Inclinare il display |23
Italiano
Inclinare il display
Per garantire la migliore visibilità in qualsiasi posizione, magari anche da seduti,
è possibile regolare l’inclinazione del display.
Regolare l’inclinazione del display
1 Premete il pulsante UNLOCK per sbloccare il display.
2 Tenete premuto il pulsante UNLOCK e sollevate il display.
3 Aprite la staffa di sicurezza separandola dalla parte superiore del display.

24| Accensione
4 Mentre continuate a tenere premuto il pulsante UNLOCK, regolate l’inclina-
zione del display, poi fissate la staffa ad uno dei fermi che si trovano sul fondo
all’alloggiamento del display.
ATTENZIONE: Non forzate il display o la staffa, o c’è il rischio di romperli!
5 Rilasciare il pulsante UNLOCK per fissare il display alla posizione corrente.

Inclinare il display |25
Italiano
Chiudere il display
1 Tenete premuto il pulsante UNLOCK e sollevate il display.
2 Sollevate la staffa di sicurezza, e richiudetela sul retro del display.
3 Mentre continuate a tenere premuto il pulsante UNLOCK, accompagnate il
display nel suo alloggiamento.
4 Rilasciate il pulsante UNLOCK e premete delicatamente il centro del bordo
superiore del display per bloccarlo in posizione chiusa.

26| Accensione
Regolare la luminosità del display
La luminosità del display può essere regolata, per adattarla alla luce ambiente.
> Tenete premuti i pulsanti SHIFT e MENU e usate il DIAL per regolare la lumi-
nosità del display.
È inoltre possibile regolare la luminosità del display (e dello strip-display) nella
pagina Settings > General Controls > Interface.

Ascoltare i brani dimostrativi |27
Italiano
Ascoltare i brani dimostrativi
Potete ascoltare alcuni brani dimostrativi, che abbiamo preparato per farvi capi-
re cosa può fare questo strumento.
> Accedete alla modalità Demo
> Premete insieme i pulsanti DEMO.
> Ascoltare tutti i brani dimostrativi
> Dopo essere entrati in modalità Demo, non premete nessun pulsante. Tutti i
brani dimostrativi verranno eseguiti in successione.
> Selezionare un singolo brano dimostrativo
> Toccate una delle opzioni che appaiono nel display, poi scegliete uno dei
brani dimostrativi.
> Uscire dalla modalità Demo
> Premete uno dei pulsanti DEMO.

28| Scegliere e suonare le risorse musicali
Scegliere e suonare le
risorse musicali
Aprire una finestra di selezione
Quando si preme il pulsante STYLE, SONG o uno dei pulsanti della sezione
KEYBOARD SET LIBRARY, compare la corrispondente finestra di selezione.
La finestra di selezione può essere aperta anche toccando il nome dell’elemento
corrispondente (Style, Song, Keyboard Set, Mic o Guitar Preset…) nel display.
Toccate per scegliere uno Style o una Song
Toccate per scegliere una Keyboard Set

Aprire una finestra di selezione |29
Italiano
Per esempio, questa è la finestra di selezione che appare quando si cerca una
Keyboard Set:
TipoGruppi Keyboard Set selezionata
PagineDirectory
corrente
Livello superiore (cartelle
corrispondenti alle categorie)
Livello inferiore
(singoli elementi)
È sempre possibile uscire da questa finestra premendo il pulsante EXIT, oppure
toccando il comando Exit che appare nell’angolo in alto a sinistra del display.
È possibile suonare uno Style o una Song sia con il Player 1 che con il Player 2. È quin-
di possibile assegnare uno Style o una Song ad ognuno dei due Player, con l’altro
Player pronto a partire al termine dello Style o della Song attualmente in esecuzione
nel Player selezionato. È inoltre possibile mixare Style e Song tra i due Player.
È possibile scegliere uno dei Player muovendo il cursore X-FADER, oppure pre-
mendo il corrispondente pulsante PLAY/STOP ( ) quando entrambi i Player
sono fermi.

30| Scegliere e suonare le risorse musicali
Scegliere la Keyboard Set preferita
Scegliere la Keyboard Set ‘My Setting’
> Premete il pulsante MY SETTING per scegliere i propri suoni preferiti.
La Keyboard Set My Setting
La My Setting è una Keyboard Set speciale, in cui è possibile salvare le im-
postazioni preferite per i suoni di tastiera, gli effetti, la programmazione dei
cursori e dei tasti della sezione CONTROL, i pulsanti assegnabili della sezione
ASSIGNABLE SWITCH. Questa Keyboard Set viene selezionata automatica-
mente all’accensione, e configura automaticamente lo strumento.
Vi si può salvare la Keyboard Set preferita. Tenete premuto il pulsante MY
SETTING per circa un secondo, finché non compare la finestra di dialogo Save;
a questo punto toccate il pulsante Save per confermare il salvataggio in me-
moria.

Suonare e controllare il suono |31
Italiano
Suonare e controllare il suono
Suonare sulla tastiera
La tastiera dello strumento è come quella del pianoforte. Semplicemente, quindi
– suonateci sopra!
Con alcuni suoni è possibile premere più forte i tasti mentre sono già premuti, e il
suono potrebbe variare (ad esempio, si potrebbe sentire un vibrato più intenso).
Usare i pedali
I pedali si comportano in maniera diversa a seconda della loro programmazione.
Il pedale Damper ha una funzione fissa (corrispondente al pedale del ‘forte’ o di
‘risonanza’ del pianoforte), e tiene le note finché è tenuto premuto. Un pedale
Assignable (di tipo continuo o footswitch) si comporta in maniera diversa a se-
conda di come è programmato nella pagina Settings > Controllers > Foot.
Usare i cursori e i tasti della sezione Control
A seconda della modalità selezionata, i cursori e i pulsanti della sezione CONTROL
possono svolgere diversi compiti, ad esempio controllare il volume dei suoni, la
posizione dei drawbar dell’organo, o richiamare funzioni assegnabili. Il loro fun-
zionamento è mostrato nello strip-display posto sotto i cursori.
Usare i pulsanti assegnabili
A seconda del tipo di Keyboard Set selezionato e delle funzioni assegnate, questi
controlli possono svolgere diversi compiti. Con i suoni DNC, i pulsanti possono
‘prenotare’ una funzione che si attiverà quando si suona, oppure possono attiva-
re (o disattivare) una funzione premendo un pulsante usato come ‘interruttore’.
In altri casi, questi pulsanti possono ‘alternare’ funzioni diverse, o ‘richiamare’ la
funzione assegnata.

32| Scegliere e suonare le risorse musicali
Usare la Matrix
La matrice di tasti programmabili può svolgere diversi compiti (avviare Pad, met-
tere le tracce in play o in mute). Toccate uno o più tasti per selezionare la funzio-
ne desiderata. Se si tratta di interruttori, toccateli nuovamente per disattivare la
funzione assegnata.
Il colore dei tasti può cambiare, a seconda della funzione assegnata e del Player
selezionato.
Usare il joystick
Muovendo il joystick verso sinistra o verso destra, normalmente cambia l’altezza
del suono. Muoverlo in avanti normalmente attiva la modulazione, ma questo di-
pende dal suono selezionato. Negli organi elettro-meccanici, spingendo il joysti-
ck in avanti è possibile modificare la velocità del rotary speaker. Tirarlo indietro
attiva una funzione che dipende dal tipo di suono selezionato. Il nostro consiglio
è… sperimentate!
Usare il ribbon controller
Se si fa scorrere il dito verso sinistra o verso destra sul ribbon controller, in ge-
nere è possibile modificare la brillantezza del suono e/o la sua intonazione; la
programmazione dipende però dal tipo di suono selezionato.

Avviare e fermare gli Style |33
Italiano
Avviare e fermare gli Style
Potete avviare o fermare manualmente l’accompagnamento automatico, usando
i controlli della sezione PLAYER 1 o PLAYER 2.
Stop/
Go to Start
Play/Stop
> Bilanciate i Player
> Portate completamente il cursore X-FADER verso il Player che desidera-
te ascoltare. Portatelo completamente a sinistra per il Player 1, a destra per il
Player 2.
> Portatelo su una posizione intermedia per mixare i due Player.
> Avviate l’accompagnamento
1 Premete il pulsante PLAY/STOP ( ) .
2 Suonate alcuni accordi con la mano sinistra, e suonate una melodia con la
mano destra.
Mentre l’accompagnamento sta suonando, osservate le indicazioni fornite dal
display.
Accordo riconosciuto
Tempo Misura corrente
Indicatore beat corrente
In Play: Misure rimanenti
In Stop: Lunghezza totale del pattern
Con una Style Variation: Loop
Style Element selezionato
Percorso del file

34| Scegliere e suonare le risorse musicali
> Fermate l’accompagnamento
> Premete di nuovo il pulsante PLAY/STOP ( ) .
> In alternativa, potete premere il pulsante STOP/GO TO START ().
> Avviare e fermare insieme entrambi i Player
È possibile avviare insieme entrambi i Player, e poi mixarli con il cursore X-FADER.
> Tenete premuto il pulsante SHIFT e premete uno qualsiasi dei due pulsanti
PLAY/STOP() per avviare insieme i due Player.
> Tenete premuto il pulsante SHIFT e premete uno qualsiasi dei due pulsanti
PLAY/STOP () per fermare insieme i due Player.

Avviare, fermare e controllare le Song |35
Italiano
Avviare, fermare e controllare le Song
È possibile avviare e fermare manualmente le Song, usando i controlli della se-
zione PLAYER 1 o PLAYER 2.
Stop/
Go to Start
Play/Stop
> Bilanciate i Player
> Portate completamente il cursore X-FADER verso il Player che desidera-
te ascoltare. Portatelo completamente a sinistra per il Player 1, a destra per il
Player 2.
> Portatelo su una posizione intermedia per mixare i due Player.
> Avviate il Player
> Premete il pulsante PLAY/STOP ().
Mentre il brano sta suonando, osservate le indicazioni che appaiono nel display.
Con una Song MIDI:
Tempo
Marker correntePercorso del file
Misura
corrente
Indicatore beat
corrente
Metro (Time Signature)
In Play: Misure rimanenti
In Stop: Lunghezza totale
del brano
Controlli di Fast Reverse / Fast Forward

36| Scegliere e suonare le risorse musicali
Con una Song MP3:
Percorso del file
Variazione
del Tempo
Tempo
trascorso
Controlli di Fast Rewind /
Fast Forward
In Play: Tempo rimanente
In Stop: Lunghezza totale del
brano
> Avanzamento veloce del brano
> Toccate il pulsante FAST FORWARD ( ) una volta per saltare alla misura
successiva (Song MIDI) o al prossimo secondo (Song MP3).
> Continuate a toccare il pulsante FAST FORWARD ( ) per far scorrere con-
tinuamente il brano in avanti. Rilasciate il pulsante una volta raggiunta la posi-
zione desiderata.
> Riavvolgimento del brano
> Toccate il pulsante FAST REWIND ( ) una volta per saltare alla misura
precedente (Song MIDI) o al secondo precedente (Song MP3).
> Continuate a toccare il pulsante FAST REWIND ( ) per far scorrere conti-
nuamente il brano all’indietro. Rilasciate il pulsante una volta raggiunta la posi-
zione desiderata.
> Mettete in pausa e riavviate la riproduzione
> Premete il pulsante PLAY/STOP () per fermare il brano alla posizione
corrente. L’indicatore del pulsante si spegne.
> Premete nuovamente il pulsante PLAY/STOP () per riavviare la riprodu-
zione. L’indicatore si accende nuovamente.
> Fermate il Player e tornate all’inizio del brano
> Premete il pulsante STOP/GO TO START () per fermare il Player e tornare
all’inizio del brano. L’indicatore del pulsante si spegne.

Avviare, fermare e controllare le Song |37
Italiano
> Avviare e fermare insieme entrambi i Player
È possibile avviare insieme entrambi i Player, e poi mixarli con il cursore X-FADER.
> Tenete premuto il pulsante SHIFT e premete uno qualsiasi dei due pulsanti
PLAY/STOP() per avviare insieme i due Player.
> Tenete premuto il pulsante SHIFT e premere uno qualsiasi dei due pulsanti
PLAY/STOP () per fermare entrambi i Player.

AVVERTENZE PER IL CONSUMATORE
Questo prodotto è stato fabbricato seguen-
do rigorosamente le specifiche e i requisiti
elettrici del paese in cui dovrebbe essere uti-
lizzato. Se avete acquistato questo prodotto
via internet, tramite ordine postale o vendita
telefonica, siete tenuti ad accertare la sua
conformità alle norme di sicurezza previste
nel vostro paese di residenza.
ATTENZIONE: L’uso di questo prodotto in pae-
si diversi da quello a cui è destinato potrebbe
rivelarsi pericoloso, e invalidare la garanzia
offerta dal produttore o dal distributore.
Vi preghiamo inoltre di conservate lo scon-
trino o la ricevuta come prova dell’avvenuto
acquisto. In mancanza di questi documenti il
prodotto potrebbe non essere coperto dalla
garanzia offerta dal produttore o dal distribu-
tore.
AVVERTENZE SULLO SMALTIMENTO DEI
RIFIUTI (SOLO UE)
Se sul prodotto, nel manuale, sulla
batteria o la confezione sono presenti
i simboli indicati a lato, occorre smalti-
re il prodotto come rifiuto speciale per
evitare danni all’ambiente e problemi
alla salute. Contattate le autorità del
vostro comune di residenza per i det-
tagli sul corretto smaltimento del pro-
dotto. Se la batteria contiene metalli pesanti
in quantità superiore a quanto stabilito dalla
normativa, sotto questo simbolo posto sulla
batteria o sulla sua confezione appare un sim-
bolo chimico.
In caso di radiazioni elettromagnetiche la qua-
lità dell’audio potrebbe venire momentanea-
mente degradata. Un tipico disturbo di questo
genere è un segnale sonoro intermittente. Il
disturbo sparisce non appena cessa l’interfe-
renza elettromagnetica.
AVVERTENZA SULLA NORMATIVA FCC
(SOLO USA)
Questo dispositivo è stato testato e trova-
to conforme ai limiti previsti per i dispositivi
digitali di Classe B, in base a quanto stabilito
dalla parte 15 della normativa FCC. Tali limiti
sono stati stabiliti per fornire un ragionevole
grado di protezione contro le interferenze no-
cive in ambito residenziale. Questo dispositivo
genera, utilizza e può emettere frequenze ra-
dio e, se non installato secondo le istruzioni,
può interferire con le comunicazioni via radio.
Tuttavia, non vi è alcuna garanzia che tali in-
terferenze non si verifichino anche seguendo
le istruzioni. Se ciò dovesse accadere, il che
può essere verificato spegnendo e riaccen-
dendo il dispositivo, l’utente è invitato a tenta-
re una o più di una delle seguenti misure:
• Riorientare l’antenna ricevente.
• Incrementare la distanza tra il dispositivo e
l’apparato ricevente.
• Collegare il dispositivo a una presa di corren-
te diversa da quella a cui è connessa l’unità
ricevente.
• Consultare il rivenditore o un tecnico specia-
lizzato in TV/radio.
Utilizzate esclusivamente i cavi eventualmen-
te inclusi con il prodotto.
Qualsiasi modifica non autorizzata apportata
al prodotto può invalidare i diritti d’uso dell’ac-
quirente.
DICHIARAZIONE DI CONFORMITÀ
(SOLO USA)
Responsabile: KORG USA INC.
Indirizzo: 316 SOUTH SERVICE ROAD, MELVILLE
Telefono: 1-631-390-6500
Tipo di dispositivo: Arranger Professionale
Modello: Pa5X
Questo dispositivo è compatibile con la Sezione
15 della Normativa FCC. L’uso è soggetto alle
due condizioni seguenti: (1) questo dispositivo
non deve causare interferenze nocive, e (2)
questo dispositivo deve essere in grado di tol-
lerare qualsiasi interferenza ricevuta, compre-
se le interferenze che potrebbero essere causa
di malfunzionamenti.

ESPAÑOL

Instrucciones de seguridad importantes
▪Lea estas instrucciones.
▪Guarde estas instrucciones.
▪Observe todas las advertencias.
▪Siga todas las instrucciones.
▪No utilice este aparato cerca del agua.
▪Limpie solamente con un paño limpio y seco.
▪No bloquee las aberturas de ventilación.
Instale de acuerdo con las instrucciones del
fabricante.
▪No instale cerca de ninguna fuente de calor
tal como radiadores, calefactores, estufas u
otros aparatos (incluyendo amplificadores)
que produzcan calor.
▪No anule el propósito de seguridad del en-
chufe polarizado o con toma de tierra. Un en-
chufe polarizado tiene dos patillas, una más
ancha que la otra. Un enchufe de tipo cone-
xión a tierra tiene dos patillas y una tercera
clavija de conexión a tierra. La patilla ancha
o la tercera patilla se proporciona para su
seguridad. Si el enchufe proporcionado no
encaja en su toma de corriente, consulte a
un electricista para el reemplazo del enchufe
obsoleto.
▪Proteja el cable de alimentación para evitar
que sea pisado o aplastado, especialmente
en los enchufes, receptáculos y el punto don-
de sale del aparato.
▪Utilice únicamente accesorios especificados
por el fabricante.
▪Use solamente con el carro, soporte, trípode,
repisa o mesa especificado por el fabricante,
o vendido con el aparato. Cuando se utiliza
un carro, tenga cuidado al mover la combina-
ción carro/aparato para evitar lesiones por
vuelco.
▪Desenchufe el aparato durante tormentas
eléctricas o cuando no se use durante largos
períodos de tiempo.
▪Acuda a un Servicio Oficial con personal
de servicio calificado. Se requiere servicio
cuando el aparato ha sido dañado de cual-
quier manera, como cable de alimentación o
enchufe dañados, se ha derramado líquido o
han caído objetos dentro del aparato, el apa-
rato ha sido expuesto a lluvia o humedad, no
funciona normalmente, o se ha caído.
▪ADVERTENCIA: este aparato debe ser conec-
tado a un enchufe con una toma de tierra de
protección.
▪El apagar el interruptor de alimentación no
aísla este producto completamente de la
alimentación así que retire el enchufe de la
toma si no va a usarlo durante períodos pro-
longados de tiempo, o antes de limpiarlo.
Asegúrese de que el enchufe de red sigue
siendo accesible.
▪No exponga este aparato eléctrico a goteos
ni salpicaduras y evite que entren objetos o
líquidos, no coloque decoraciones tales como
floreros sobre el aparato.
▪Instale este producto cerca de la toma de red
de la pared y mantenga el enchufe fácilmente
accesible.
▪No instale este equipo en un espacio cerrado
como una caja para el transporte o unidad
similar.
▪No deben colocarse sobre el aparato fuentes
de llama, como velas encendidas.

ADVERTENCIA: No ingerir la
batería, peligro de quemaduras
químicas. Este producto contie-
ne una pila de botón.
Si se ingiere la pila de botón se pueden cau-
sar graves quemaduras internas en sólo 2
horas y puede conducir a la muerte.
Mantenga las pilas nuevas y usadas, alejadas
de los niños. Si el compartimiento de bate-
ría no se cierra firmemente, deje de usar el
producto y manténgalo alejado de los niños.
Si cree que la batería puede haber sido tra-
gada o que esté dentro de cualquier parte del
cuerpo, busque atención médica inmediata.
▪ADVERTENCIA: Existe una pila de botón de
litio para la fecha y hora en el interior. Peligro
de explosión si la batería se reemplaza inco-
rrectamente. Reemplace sólo con el mismo
tipo o equivalente. La batería de fecha y hora
interna de litio es reemplazable por el usua-
rio.
▪No exponga las baterías a calor excesivo,
como la luz directa del sol, fuego o similares.
▪Deseche las baterías usadas según las ins-
trucciones del fabricante de la batería.
El símbolo del rayo significa que existen
voltajes peligrosos sin aislar en el interior
de la unidad, que pueden ser de magnitud
suficiente para constituir un riesgo de elec-
trocución para las personas.
El signo de admiración indica al usuario que
existen instrucciones de funcionamiento y
mantenimiento importantes en el manual
que acompaña al producto.

Otros avisos
Apagado automático
Para evitar el gasto energético, Pa5X por defec-
to entrará en espera automáticamente después
de dos horas sin uso activo (tocar, usar boto-
nes o usar la pantalla táctil). Guarde sus datos
(Keyboard Sets, estilos, canciones, etc.) antes
de tomar una pausa prolongada.
Mantenimiento de los Datos
Los datos en memoria pueden perderse, en oca-
siones, debido a acciones incorrectas por parte
del usuario. Asegúrese siempre de guardar los
datos importantes en la memoria interna o en un
dispositivo USB. Korg no será responsable de los
daños y perjuicios que se puedan producir como
resultado de pérdidas de datos.
Manipulación de la pantalla
Tenga mucho cuidado de no forzar la panta-
lla cuando la incline. Baje completamente la
pantalla antes de transportar el instrumento.
También, tenga cuidado de no ejercer demasia-
da presión sobre ella mientras transporta el ins-
trumento, ya que se podría romper.
Limpieza
Si el exterior se ensucia, limpie con un paño lim-
pio y seco. No use líquido limpiador como disol-
vente, ni compuestos o inflamables.
Utilice un paño suave de algodón para limpiar
la pantalla. Algunos materiales, tales como toa-
llas de papel, podrían causar rayones y dañar-
la. También se sugieren toallitas de ordenador,
siempre que estén diseñadas específicamente
para pantallas LCD.
No rocíe ningún líquido en la pantalla LCD direc-
tamente. Aplique siempre la solución primero en
su paño y, a continuación, limpie la pantalla.
Laterales de madera
Éstos están hechos de madera natural, cuyas ca-
racterísticas varían de una pieza a otra. Cuanto
más se usen, más hermosos serán. Si observa
alguna irregularidad, éstas deben considerarse
características intrínsecas únicas, que mejoran
aún más su origen natural.
Pantallas de ejemplo
Algunas páginas de los manuales muestran re-
producciones de pantallas junto con una expli-
cación de las funciones y operación. Todos los
nombres de sonidos, Parámetros, y valores son
meramente ejemplos, y no tienen por qué coinci-
dir con la pantalla real en la que esté trabajando.
Marcas Registradas
Mac y iOS son marcas registradas de Apple
Computer, Inc. Android es una marca registrada
de Google Inc. MS DOS y Windows son marcas
registradas de Microsoft Corporation. Waves
MaxxAudio® es una marca registrada de Waves
Audio Ltd. Todas las demás marcas registradas
o marcas comerciales son propiedad de sus res-
pectivos propietarios.
Aviso de código abierto
Partes de software de este producto son copyri-
ght ©2007 “The FreeType Project” (www.freety-
pe.org). Todos los derechos reservados.
Aviso
La información contenida en este manual ha sido
cuidadosamente revisada y comprobada. Debido
a nuestros constantes esfuerzos para mejorar
nuestros productos, las especificaciones pueden
diferir a las del manual. Korg no es responsable
de eventuales diferencias encontradas entre las
especificaciones y el contenido del manual de
instrucciones - todas las especificaciones están
sujetas a cambios sin previo aviso.
Responsabilidad
Los productos KORG son fabricados bajo estric-
tas especificaciones y voltajes requeridos por
cada país. Estos productos están garantizados
por el distribuidor de KORG sólo en cada país.
Cualquier producto KORG que haya sido vendi-
do sin una tarjeta de garantía o sin un número
de serie lo descalifica para gozar de la garantía
y responsabilidad del fabricante / distribuidor.
Este requisito es para su propia protección y
seguridad.
Servicio Postventa y asistencia
Para el servicio, póngase en contacto con su cen-
tro autorizado de servicio KORG más cercano. Para
obtener más información sobre productos KORG y
buscar software y accesorios para su teclado, pón-
gase en contacto con su distribuidor autorizado
KORG. Para obtener información actualizada, por
favor visite nuestro web site (www.korg.com).
Mantenga su teclado actualizado
El instrumento puede ser actualizado constante-
mente ya que se lanzan nuevas versiones del sis-
tema operativo de KORG. Puede descargar el sis-
tema operativo de nuestra web (www.korg.com/
us/support/download/). Por favor, lea las instruc-
ciones proporcionadas con el sistema operativo.

¡Bienvenido a Pa5X! |5
Español
Introducción
¡Bienvenido a Pa5X!
¡Muchas gracias y enhorabuena por la compra de KORG Pa5X Professional
Arranger! Estamos seguros de que disfrutará mucho tocando fantástica música
en el hogar o en el escenario.
Pa5X es un workstation de producción musical elegante y potente. Es fácil de
usar, con una interfaz de usuario clara, basada en la pantalla táctil a color recli-
nable y los botones iluminados en el panel de control que muestran funciones
codificadas por colores. El teclado de acción contrapesada de 88 notas con ca-
pacidad de respuesta natural, y los teclados semi-contrapesados de 76 y 61 no-
tas, están diseñados para una sensación completamente auténtica y un control
total de la expresión.
Robusto y fiable, Pa5X es excelente como instrumento en vivo, pero también es
una poderosa herramienta creativa en el estudio, ayudándole a componer can-
ciones o bandas sonoras, mientras genera un sonido producido que es perfecto
para una demo o la música multimedia.
Los sonidos, basados en nuestro motor de sonido EDS-X (Enhanced Definition
Synthesis-eXpanded), van desde instrumentos acústicos ultrarrealistas hasta
teclados eléctricos vintage y clásicos de sintetizador, con la adición de sonidos
adicionales y efectos especiales para la producción multimedia y cine. También
incluimos instrumentos de varias épocas y culturas, dejando un amplio espacio
para sus propias expansiones.
Pa5X es fácil de controlar, a través del sistema DNC (Defined Nuance Control) de
KORG, lo que permite al intérprete introducir de manera precisa y expresiva los
matices más sutiles y articulación del sonido. Deslizantes, conmutadores, matri-
ces virtuales de controles en tiempo real, un joystick y un controlador de cinta,
permiten el acceso inmediato a todos los parámetros del sonido.
Los sonidos son procesados mediante una elaborada cadena de efectos, inclu-
yendo efectos finales para cada uno de los reproductores y para los sonidos del
teclado. Los efectos finales de masterización en las salidas de audio, hacen que
el sonido del instrumento sea “mezclado” y “producido”, son el resultado de la
duradera colaboración de KORG con Waves Audio, la referencia mundial en efec-
tos de masterización de estudio.

6| Introducción
Para escuchar con la mejor calidad de audio, incluso al volumen más bajo para
ensayar por la noche, puede agregar el sistema de amplificación KORG PaAS
opcional, que ha sido diseñado específicamente para conectarse directamente
a Pa5X.
El moderno y elegante soporte ST-SV1-BK opcional hace que el instrumento ten-
ga una sólida presencia en el escenario y una elegante pieza de mobiliario mo-
derno en su sala de estar.
El Secuenciador/Reproductor dual KORG XDS Crossfade de Pa5X se puede usar
para precargar y mezclar libremente Estilos y Canciones. También puede crear
sus propios Estilos y grabar sus propias Canciones MIDI y MP3. La armonización
automática, el secuenciador de acordes y un sofisticado motor de reconocimien-
to de acordes, pueden crear el completo arreglo de un experimentado músico
de pop o jazz.
Con Canciones y Estilos, puede mostrar letras y acordes en la pantalla interna
o externa, y puede convertir cualquier pista de canción MIDI en una partitura
legible. Los marcadores permiten saltar de nuevo a un pasaje que desee repetir,
por ejemplo, en una pieza que está estudiando o ensayando, o para repetir una
sección en vivo.
Puede grabar una canción MIDI usando un secuenciador con todas las funcio-
nes. Aún más fácil, simplemente grabe lo que canta y reproduce (incluidas las
canciones MP3) como un archivo MP3 y escúchelo en cualquier lugar que desee.
La Canción y el Estilo se pueden guardar en el SongBook integrado, cuyas entra-
das, similares a una base de datos, son fáciles de sincronizar con lectores exter-
nos de partitura en una tablet. Por lo tanto, puede usar un repertorio de música
digital para controlar su Pa5X.
La voz y la guitarra se pueden conectar a las entradas de audio dedicadas y
procesarse con los excelentes efectos integrados. Nuestra larga experiencia
en armonías vocales y efectos de guitarra está completamente presente. Y el
Eliminador Vocal le permitirá cantar junto con cualquier Canción MP3.
Hay más, mucho más, y le invitamos a explorar Pa5X en profundidad. Pa5X es
el interactivo profesional más completo, evocador, potente y fácil de usar jamás
producido. ¡Disfrute de su vida musical con el nuevo Pa5X!

Antes de empezar a tocar… |7
Español
Antes de empezar a tocar…
Contenido de la caja
Después de recibir su Pa5X, compruebe que todos los elementos siguientes es-
tán incluidos en el embalaje. Si falta alguno de los siguientes elementos, llame a
su distribuidor Korg inmediatamente.
> Pa5X
> Atril de partituras
> Cable de alimentación AC
> Guía Rápida
> Pa5X-88 solamente: Fieltros de seguridad para el soporte ST-SV1-BK
Lo que puede descargar
Accede a nuestro sitio web (www.korg.com/us/support/download/), desde tu
navegador y podrás descargar actualizaciones de software, manual completo,
vídeo manual y un controlador MIDI.
Lo que puede agregar
Después de haber comprado Pa5X, tal vez quiera añadir estas otras opciones
:
> El elegante KORG ST-SV1 BK soporte de teclado, recomendado para la segu-
ridad y confort, que va perfectamente con el diseño de su interactivo.
PRECAUCIÓN: El Pa5X Professional Arranger está diseñado para su uso solo
con el soporte KORG ST-SV1-BK. El uso con otro soporte puede provocar inesta-
bilidad y causar lesiones
> El sistema de amplificación PaAS, que añade un sistema de amplificación de
tres vías, un par de altavoces integrados y una caja bass-reflex.
> Uno de los resistentes pedales o conmutadores de pedal del catálogo de
KORG.

8| Introducción
Hacer una copia de seguridad de sus datos
En caso de que desee personalizar sus recursos musicales, le sugerimos que
realice copias de seguridad frecuentes de sus datos. Presione el botón FILE para
ir a la página FILE, seleccione el grupo Internal, seleccione la carpeta All y elija
el comando Save en el menú de página. A continuación, guarde los datos en un
dispositivo de almacenamiento externo.
Restaurar una copia de seguridad
Para restaurar una copia de seguridad de los datos del usuario, vuelva a cargar
los datos de la copia de seguridad. Si se trata de un dispositivo externo, conec-
te el dispositivo de almacenamiento de copia de seguridad. Presione el botón
FILE para ir a la página FILE, seleccione el grupo Drives y, a continuación, el
dispositivo de almacenamiento externo. Seleccione la carpeta donde ha hecho la
copia de seguridad de los datos y elija el comando Load en el menú de página. A
continuación, cargue los datos en la memoria interna. Si lo desea, puede cargar
solamente algunos elementos individuales.
Restaurar los datos originales de fábrica
En caso de que desee restaurar los datos originales de fábrica, utilice el comando
Factory Restore que puede encontrar en la página File > Menu > Factory Restore.
ADVERTENCIA: ¡Esta operación sobrescribirá todos los datos del usuario!
Cargar el sistema operativo
Su Pa5X se puede actualizar constantemente a medida que se lanzan nuevas
versiones del sistema operativo. Puede descargar el sistema operativo más ac-
tualizado desde nuestro sitio web (www.korg.com/us/support/download/). Por
favor, lea las instrucciones suministradas con el sistema operativo.
Puede ver qué versión del sistema operativo está instalada en su Pa5X yendo a
las páginas File y eligiendo el comando System Info en el menú de página.
SUGERENCIA: Asegúrese de que su Pa5X siempre incluya la última versión del
sistema operativo. Ya que puede contener nuevas características y correcciones
de errores.
ADVERTENCIA: No instale un sistema operativo que no sea el sistema operativo
oficial suministrado por KORG para el Pa5X. Intentar instalar un sistema ope-
rativo creado para diferentes modelos o descargado de sitios web no oficiales
puede causar pérdida de datos y daños permanentes al instrumento. KORG no es
responsable de ningún daño causado por una instalación incorrecta del sistema
operativo.

Panel frontal |9
Español
Descripción del
instrumento
Panel frontal
El panel frontal es donde puede encontrar los controles del instrumento.
Atril de partituras
Un atril viene estándar con su Pa5X.
PaAS sistema de amplificación
Puede instalar el sistema de amplificación PaAS (opcional). Una vez instalado,
controle el volumen de los altavoces mediante el botón MASTER VOLUME.
Los altavoces se desactivarán automáticamente al conectar los auriculares.
Manualmente se pueden desactivar mediante el parámetro Speakers en la pági-
na Settings > Audio/Video > MP3/Speakers.
Conector de auriculares
Conecte un par de auriculares a esta salida. Puede utilizar los auriculares con
una impedancia de 16-200 ohmios (50 ohmios sugeridos).
Teclado
Utilice el teclado para tocar notas y acordes. Según el indicador de SPLIT el te-
clado puede ser conjunto o dividido entre diferentes sonidos.

10| Descripción del instrumento
TecladoAuriculares
Guía para el atril y sistema de
amplificación PaAS

Panel de control |11
Español
Panel de control
El panel de control es la parte del panel frontal donde puede encontrar los con-
troles del instrumento.
Pantalla
Área de
deslizantes
Área de Estilos, Pads
y Marcadores
Área de Reproductor Área de sonidos
Área Navegación La Matriz
Área de Tempo
Pantalla
Utilice esta pantalla táctil para interactuar con el instrumento. La pantalla se
puede inclinar para una óptima visualización. Hay controles a su alrededor, para
ayudarle a seleccionar los distintos elementos.

12| Descripción del instrumento
Área de navegación
Utilice estos controles para ir a los menús, páginas y parámetros y cambiar el
valor del parámetro seleccionado.
Área de sonidos
Los Sonidos son lo que puede tocar en el teclado. Aquí puede elegir conjuntos
de sonidos guardados como conjuntos de teclado (Keyboard Sets) en una librería
dedicada.
Área de Estilos, Pads y Marcadores
Los Estilos suministran el acompañamiento automático con una banda virtual.
Los marcadores permiten ir a puntos guardados en la canción MIDI. Puede tocar
Sonidos (seleccionados con Keyboard Sets) y Pads junto con Estilos y canciones.

Panel de control |13
Español
Área de los Reproductores
Las Canciones y Estilos pueden ser reproducidas con los dos Reproductores.
Puede asignar diferentes elementos a cada reproductor, para tener otro Estilo o
Canción lista para reproducir al final de la actual. Puede mezclar los dos repro-
ductores con el X-FADER.
Área SongBook
El SongBook es una base de datos de ‘canciones’, llamadas entradas SongBook.
Cada una de ellas es una instantánea de la situación actual, incluyendo el estilo,
la canción, el teclado, los pads, las secuencias de acorde y los efectos de voz y
guitarra seleccionados. Puede acceder rápidamente a todas las canciones del
Cancionero (SongBook) o a las listas seleccionadas de canciones (Set Lists).
Área de Tempo
Utilice estos controles para practicar controlar el Tempo de los Estilos y las
Canciones. Puede activar o desactivar un metrónomo presionando el botón
CONTROL > SWITCH #9 mientras está en modo STYLE/SONG, y practicar con
el metrónomo.

14| Descripción del instrumento
La Matriz
Puede utilizar esta matriz programable de teclas grandes y de fácil acceso para
activar elementos y funciones (Pads, Track Play/Mute).
USB conector
Use este conector para conectar un dispositivo de almacenamiento USB, como
un pendrive (aparecerá como HOST-F) u otros instrumentos musicales como
controladores. También se puede utilizar para conectar una pequeña lámpara
USB e iluminar el panel de control o el atril. Tenga en cuenta que otros dos puer-
tos están en la parte posterior del instrumento.

El Panel posterior |15
Español
El Panel posterior
El panel posterior es donde puede encontrar las distintas conexiones.
Guía para el atril y sistema de
amplificación PaAS
Conectores Conector de alimentación
Entradas de Audio
Utilice estos conectores para conectar un micrófono, guitarra u otro instrumen-
to musical. El minijack STEREO puede utilizarse para conectar directamente la
salida de audio de un reproductor multimedia, un smartphone o una tablet.
Salidas de Audio
Utilice estos conectores LEFT/RIGHT para enviar la señal de audio a un mezcla-
dor, un sistema de megafonía, un conjunto de monitores o su sistema de alta
fidelidad. Cuatro salidas de audio separadas (1-4) también están disponibles.

16| Descripción del instrumento
Conectores de Pedal
Utilice el conector DAMPER para conectar un pedal damper y los conectores
ASSIGNABLE para conectar uno o dos pedales conmutador y/o continuo.
Puertos MIDI
Utilice estos conectores para conectar su Pa5X a controladores externos (te-
clado maestro, guitarra MIDI, controlador de viento, acordeón MIDI, pedalera
MIDI...), a una serie de expansores, o a un ordenador con interfaz MIDI.
Batería y Ranura para microSD
Esta apertura contiene la batería del reloj y la ranura para tarjeta microSD.

El Panel posterior |17
Español
Puertos USB
Utilice estos conectores para conectar su Pa5X a un ordenador (DEVICE) o para
conectar un dispositivo de memoria USB, como un pendrive USB (HOST-1R,
HOST-2R). Otro HOST (HOST-F) está disponible en el panel frontal.
Video out
Puede conectar Pa5X a un TV o monitor de vídeo para mostrar las letras y acor-
des.
Conector de alimentación
Conecte aquí el cable de alimentación IEC suministrado.

18| Descripción del instrumento
Conecte el otro extremo del cable a una toma de corriente de CA. Asegúrese de
usar un enchufe compatible. ¡Nunca fuerce el enchufe en la toma!
AVISO: ¡Conecte el enchufe a una toma de CA de voltaje correcto! Por favor, lea
la información de seguridad al principio de este manual.

Conectar los pedales |19
Español
Configuración de los
pedales y conexiones
de audio
Conectar los pedales
Conectar el pedal Damper
Utilice el conector PEDAL > DAMPER para conectar un pedal damper, como el
(opcional) KORG PS1, PS3 o DS1H. El pedal DS1H es compatible con todos los ma-
tices de medio pedal en algunos sonidos de Piano de cola. Puede experimentar
cómo funciona presionando gradualmente hacia abajo, y soltando poco a poco,
tocando uno de los sonidos Concert Grand.
Si necesita cambiar la polaridad del Pedal y calibrarlo, vaya a la página Settings
> Controllers > Foot.
Conexión de un pedal y/o conmutador de pedal
Utilice los conectores PEDAL > ASSIGNABLE para conectar uno o dos pedales
conmutadores como el (opcional) KORG PS1, PS3 o DS1H, y/o uno o dos pedales
continuos como el pedal continuo KORG XVP-20, o el pedal de expresión EXP-2
(opcionales).
De forma predeterminada, estos conectores funcionan como dos pedales de ex-
presión, con las funciones asignadas Master Volume y Keyboard Expression. Si
desea cambiar las funciones asignadas, o si necesita cambiar la polaridad de los
pedales y calibrarlos, vaya a la página Settings > Controllers > Foot.

20| Configuración de los pedales y conexiones de audio
¿Y si los pedales no se comportan correctamente?
Si es necesario puede que necesite calibrar los pedales para usar el rango com-
pleto, sin ‘puntos muertos’. Este procedimiento también permite elegir la polari-
dad del pedal si éste funciona al revés.
1 Vaya a la página Settings > Controllers > Foot.
2 Toque Calibration en la sección que desee calibrar, para que aparezca el
cuadro de diálogo Pedal/Footswitch Calibration.
3 Pulse el pedal a su máximo valor, y mientras está pulsado toque el botón top
(resaltado) en la pantalla para confirmar el máximo valor.

Conectar los pedales |21
Español
4 Cuando aparezca el siguiente diálogo, suelte el pedal.
5 Toque el botón lower (resaltado) en la pantalla para confirmar el mínimo
valor. Compruebe el funcionamiento del pedal. Si no funciona bien repita el pro-
cedimiento.
6 Pulse el botón EXIT para volver a la página anterior.

22| Encendido
Encendido
Encender el instrumento
Conexión de la alimentación
Enchufe el cable de alimentación suministrado al enchufe POWER en la parte
posterior del instrumento, y el cable a un enchufe de pared.
Cuando se conecta el cable, el instrumento está en Standby.
AVISO: Cuando el instrumento está en modo de espera, todavía está conectado
a la línea de alimentación. Acceder al interior puede ser peligroso. Para desco-
nectar completamente el instrumento de la alimentación, desenchufe la toma de
corriente en la pared.
Encender o apagar
> Encender el instrumento
> Pulse el botón POWER ( ) para encender el instrumento (es decir, ‘para que
salga de espera’). Después de encender el instrumento, una pantalla de bienve-
nida aparecerá durante unos segundos, luego aparecerá en la pantalla la Página
principal.
> Apagar el instrumento (en espera)
> Mantenga el botón POWER ( ) presionado durante aproximadamente un
segundo y suéltelo cuando la pantalla aparezca atenuada. El procedimiento de
apagado comenzará y durará unos pocos segundos. Por favor, no desconecte el
cable de alimentación durante este procedimiento.

Inclinación de la pantalla |23
Español
Inclinación de la pantalla
Para una visibilidad óptima en cualquier posición del asiento, puede ajustarse el
ángulo de inclinación de la pantalla.
Levantar la pantalla
1 Presione el botón UNLOCK para desbloquear la pantalla.
2 Mantenga pulsado el botón UNLOCK y levante la pantalla.
3 Abra el soporte de seguridad separándolo de la parte superior posterior de
la pantalla.

24| Encendido
4 Mantenga pulsado el botón UNLOCK, ajuste el ángulo de inclinación y fije el
soporte a uno de los topes en la parte inferior de la carcasa de la pantalla.
PRECAUCIÓN: ¡No aplique una presión excesiva, o corre el riesgo de romperla!
5 Suelte el botón UNLOCK para fijar la pantalla a la posición actual.

Inclinación de la pantalla |25
Español
Cerrar la pantalla
1 Mantenga pulsado el botón UNLOCK y levante la pantalla.
2 Levante el soporte de seguridad y vuelva a colocarlo en la posición cerrada.
3 Manteniendo presionado el botón UNLOCK, acompañe la pantalla hasta de-
jarla en su carcasa.
4 Suelte el botón UNLOCK y presione suavemente el centro del borde superior
de la pantalla para bloquearla en la posición inicial.

26| Encendido
Ajuste del Brillo de la pantalla
El Brillo se puede ajustar para que se adapte a la luz ambiental.
> Mantenga pulsado los botones SHIFT y MENU y utilice el DIAL para ajustar
el brillo de la pantalla.
También puede ajustar el brillo de la pantalla (y la pantalla auxiliar) en la página
Settings > General Controls > Interface.

Escuchar las canciones Demo |27
Español
Escuchar las canciones Demo
Puede escuchar algunas canciones que hemos preparado, para demostrar lo
que este instrumento puede hacer.
> Para entrar en Modo Demo
> Pulse simultáneamente los botones DEMO.
> Escuche todas las canciones Demo
> Desde el Modo Demo si no presiona ningún otro botón, todas las canciones
de demostración se reproducirán.
> Escuchar una canción Demo específica
> Toque una de las opciones disponibles en la pantalla (canciones Songs, soni-
dos Sounds, estilos Styles) y elija una canción Demo.
> Salir del modo Demo
> Pulse cualquiera de los botones DEMO.

28| Elegir y tocar recursos musicales
Elegir y tocar recursos
musicales
Abrir una ventana de selección
Cuando presiona uno de los botones STYLE, SONG o KEYBOARD SET aparece
la ventana de selección correspondiente.
La ventana Selección también se puede abrir tocando el nombre del elemento
correspondiente (Estilo, Canción, Teclado, Preset de Voz o Guitarra...) en la pan-
talla.
Toque para elegir un Estilo o Canción
Toque para elegir un Keyboard Set

Abrir una ventana de selección |29
Español
Por ejemplo, esta es la ventana de Selección cuando se busca un Keyboard Set:
TipoGrupos Keyboard Set seleccionado
PáginasCarpeta
abierta
Nivel superior (carpetas
corresponden a Categorías)
Nivel inferior
(elementos individuales)
Siempre puede salir de esta ventana pulsando el botón EXIT, o tocando el co-
mando Exit en la esquina superior izquierda de la pantalla.
Puede reproducir un Estilo o una Canción con el reproductor 1 o el reproductor
2. Por lo tanto, si lo desea, puede asignar un estilo o canción a cada uno de los
reproductores y hacer que el otro reproductor esté listo para la próxima se-
lección musical. También puede mezclar estilos y canciones con los diferentes
reproductores.
Puede elegir qué jugador tiene el enfoque moviendo el X-FADER, o presionando
el botón PLAY/STOP ( ) correspondiente cuando ambos reproductores están
detenidos.

30| Elegir y tocar recursos musicales
Elegir su conjunto de Sonidos preferido
Elegir el conjunto de teclado ‘My Setting’
> Presione el botón MY SETTING para elegir sus sonidos y ajustes preferidos.
El Conjunto de Teclado My Setting
My Setting es un conjunto de teclado (Keyboard Set) especial, donde pue-
de guardar su configuración preferida para cosas como Sonidos de teclado,
Efectos, transposición, conmutadores asignables y deslizantes. Este conjunto
de teclado se selecciona automáticamente al encender el instrumento y confi-
gurará automáticamente el instrumento para usted.
Puede guardar su conjunto de teclado (Keyboard Set) preferido. Mantenga pul-
sado el botón MY SETTING durante aproximadamente un segundo, hasta que
aparezca el cuadro de diálogo Save, luego toque el botón Save para confirmar
el guardado en memoria.

Tocar y controlar los Sonidos |31
Español
Tocar y controlar los Sonidos
Tocar el teclado
El Teclado del instrumento es como un teclado de piano. ¡Hay que tocarlo!
Con algunos de los sonidos, puede presionar las teclas pulsadas, y el sonido pue-
de variar (por ejemplo, podría oír más vibrato).
Usando los pedales
Los Pedales hacen diferentes cosas según estén programados. El pedal Damper
es sólo eso – un pedal Damper, que mantiene las notas hasta que suelte el pedal.
Un pedal Assignable (o conmutador de pedal) puede cambiar dependiendo de
cómo esté programado en la página Settings > Controllers > Foot.
Usando los deslizantes y conmutadores de control
Dependiendo del modo elegido, los deslizantes CONTROL pueden controlar di-
ferentes cosas, como los niveles de volumen de los sonidos, las barras de armó-
nicos de órgano o algunas funciones asignables. Su funcionamiento se muestra
en la parte inferior de dichos deslizantes.
Usando los interruptores asignables
Dependiendo del conjunto de teclado elegido y funciones asignadas, estos con-
troladores pueden hacer cosas diferentes. Con sonidos DNC los interruptores
pueden o ‘asignar’ una función, que se activará durante la interpretación, o habi-
litar (o deshabilitar) pulsando el botón para ‘conmutarlo’. En otros casos pueden
‘conmutar‘ o ‘disparar‘ la función asignada.

32| Elegir y tocar recursos musicales
Usando la Matriz
La matriz de botones programables puede hacer varias cosas diferentes (activar
pads, reproducir o parar pistas). Toque uno o más de ellos para seleccionar la
función deseada. Si están encendidos, tóquelos de nuevo para apagarlos.
El color de los interruptores puede cambiar, dependiendo de la función asignada
y del reproductor seleccionado.
Usando el joystick
Moviendo el joystick a la izquierda de la derecha generalmente cambia el tono
del Sonido. Avanzar generalmente desencadena modulación, pero esto depende
de los sonidos seleccionados. Con los órganos electromecánicos, empujando el
joystick hacia delante cambia velocidad de altavoz rotatorio. Lo que hace al tirar
hacia atrás depende de los sonidos seleccionados. ¡Experimente!
Usando el controlador de cinta ribbon
Moviendo a la izquierda y derecha en el controlador de cinta (ribbon) general-
mente cambia el brillo y/o el tono de los sonidos, pero su funcionamiento depen-
de de los Sonidos seleccionados.

Iniciar y parar los Estilos |33
Español
Iniciar y parar los Estilos
Puede iniciar y detener manualmente el acompañamiento automático, utilizando
los controles de la sección PLAYER 1 o PLAYER 2.
Parar/
Ir Inicio
Iniciar/
Parar
> Establecer la mezcla adecuada
> Mueva el X-FADER completamente hacia el reproductor que quiere escu-
char. Mueva completamente a la izquierda para el reproductor 1, a la derecha
para el reproductor 2.
> Muévalo a una posición intermedia para mezclar los dos reproductores.
> Iniciar el acompañamiento
1 Pulse el botón PLAY/STOP ( ).
2 Toque algunos acordes con la mano izquierda, mientras toca una melodía
con la derecha.
Mientras se está reproduciendo la canción, vea los indicadores en la pantalla.
Acorde reconocido
Tempo Compás actual
Indicador tiempo
Reproducción: compases restantes
Parado: Longitud Total del patrón
Con variación de estilo: bucle
Elemento de estilo seleccionado
Ruta de archivo

34| Elegir y tocar recursos musicales
> Parar el acompañamiento
> Pulse el botón PLAY/STOP ( ) nuevamente.
> Como alternativa, puede presionar el botón STOP/GO TO START ().
> Iniciar y parar ambos reproductores al mismo tiempo
Puede iniciar ambos reproductores al mismo tiempo, para mezclarlos con el
X-FADER mientras toca.
> Mantenga pulsado el botón SHIFT y pulse cualquiera de los dos botones
PLAY/STOP () para comenzar ambos reproductores al mismo tiempo.
> Mantenga pulsado el botón SHIFT y pulse cualquiera de los dos botones
PLAY/STOP () para parar ambos reproductores al mismo tiempo.

Iniciar, parar y controlar las Canciones |35
Español
Iniciar, parar y controlar las Canciones
Puede iniciar y detener manualmente las canciones, utilizando los controles de
la sección PLAYER 1 o PLAYER 2.
Parar/
Ir Inicio
Iniciar/
Parar
> Establecer la mezcla adecuada
> Mueva el X-FADER completamente hacia el reproductor que quiere escu-
char. Mueva completamente a la izquierda para el reproductor 1, a la derecha
para el reproductor 2.
> Muévalo a una posición intermedia para mezclar los dos reproductores.
> Iniciar el Reproductor
> Pulse el botón PLAY ().
Mientras se está reproduciendo la canción, vea los indicadores en la pantalla.
Con una canción MIDI:
Tempo
Marcador actualRuta de archivo
Compás actual Indicador tiempo
Compás (Tipo de compás)
Reproducción: compases
restantes
Parado: Longitud Total Canción
Controles avance rápido / Rebobinado

36| Elegir y tocar recursos musicales
Con una canción MP3:
Ruta de archivo
Variación Tempo Tiempo transcurrido Controles avance
rápido / Rebobinado
Reproducción: tiempo restante
Parado: Longitud Total Canción
> Avance Rápido de la canción
> Toque el botón FAST FORWARD ( ) una vez para saltar al siguiente com-
pás (canción MIDI) o al segundo siguiente (canción MP3.
> Mantenga presionado FAST FORWARD ( ) para desplazarse continuamen-
te la por canción. Suéltelo cuando haya alcanzado la posición deseada.
> Rebobinar la canción
> Pulse el botón FAST REWIND ( ) una vez para saltar al compás anterior
(canción MIDI) o al segundo anterior (canción MP3).
> Mantenga presionado el botón FAST REWIND ( ) para desplazarse conti-
nuamente por la canción. Suéltelo cuando haya alcanzado la posición deseada.
> Pausar y reanudar la reproducción
> Pulse el botón PLAY/STOP () para detener la canción en la posición ac-
tual. El Indicador del botón se apagará.
> Pulse el botón PLAY/STOP () otra vez para reanudar la reproducción. El
indicador se encenderá nuevamente.
> Detener el reproductor y volver al principio de la canción
> Pulse el botón STOP/GO TO START () para detener el reproductor y volver
al principio de la canción. El Indicador del botón se apagará.

Iniciar, parar y controlar las Canciones |37
Español
> Iniciar y parar ambos reproductores al mismo tiempo
Puede iniciar ambos reproductores al mismo tiempo, para mezclarlos con el
X-FADER mientras toca.
> Mantenga pulsado el botón SHIFT y pulse cualquiera de los dos botones
PLAY/STOP () para comenzar ambos reproductores al mismo tiempo.
> Mantenga pulsado el botón SHIFT y pulse cualquiera de los dos botones
PLAY/STOP () para parar ambos reproductores al mismo tiempo.

AVISO IMPORTANTE A LOS CONSUMIDORES
Este producto ha sido fabricado de acuerdo
a estrictas especificaciones y requerimientos
de voltaje aplicables en el país en el cual este
producto está destinado a ser utilizado. Si ha
adquirido este producto vía internet, a través
de correo, y/o venta telefónica, debe verificar
que este producto está destinado para ser uti-
lizado en el país en que usted reside.
ADVERTENCIA: El uso de este producto en
cualquier país distinto de aquel para el cual
está destinado podría ser peligroso y podría
invalidar la garantía del fabricante o distribui-
dor.
Por favor conserve su recibo como compro-
bante de compra ya que de lo contrario su pro-
ducto podría quedar fuera de la garantía del
fabricante o del distribuidor.
AVISO RECICLAJE (UNIÓN EUROPEA
SOLAMENTE)
Si aparece este símbolo en el manual,
batería o paquete, para reducir los da-
ños al medio ambiente, al final de su
vida útil, este producto no debe ser
tirado a la basura normal. Debe ser
llevado a un centro de reciclado apro-
piado de acuerdo con las directivas eu-
ropeas que sean aplicables. Si la bate-
ría contiene metales pesados que excedan lo
regulado, un símbolo químico aparece debajo
del símbolo en la batería o en el paquete de
batería.
En caso de radiaciones electromagnéticas
puede ocurrir un deterioro temporal de la ca-
lidad de prestaciones de audio. Un deterioro
que pudiera surgir puede ser una señal de so-
nido emitida. Esto cesará cuando cese la per-
turbación electromagnética.
AVISO REGULACIÓN FCC (PARA USA)
Este equipo ha sido probado y cumple con los
límites para un dispositivo digital de clase B,
parte 15 de las reglas de FCC. Estos límites
están diseñados para proporcionar una pro-
tección razonable contra interferencias per-
judiciales en una instalación residencial. Este
equipo genera, utiliza y puede irradiar energía
de radiofrecuencia y, si no se instala y utiliza
de acuerdo con las instrucciones, puede cau-
sar interferencia perjudicial a comunicaciones
de radio. Sin embargo, no hay ninguna garan-
tía de que no ocurrirá interferencia en una ins-
talación en particular. Si este equipo causa in-
terferencia dañina a la radio y televisión, que
puede determinarse apagando y encendiendo
el equipo, se recomienda al usuario que inten-
te corregir la interferencia con una o más de
las siguientes medidas:
• Reorientar o reubicar la antena receptora.
• Aumente la separación entre el equipo y el
receptor.
• Conecte el equipo a una toma de corriente
en un circuito distinto al que está conectado
el receptor.
• Consulte al distribuidor o técnico experimen-
tado de radio/TV.
Si hay elementos como cables incluidos con
este equipo, debe incluir dichos elementos.
Los cambios no autorizados o modificación en
este sistema pueden anular la autoridad del
usuario para operar este equipo.
DECLARACIÓN DE CONFORMIDAD
(PARA USA)
Parte Responsable: KORG USA INC.
Dirección: 316 SOUTH SERVICE ROAD,
MELVILLE
Teléfono: 1-631-390-6500
Tipo de Equipo: Professional Arranger
Modelo: Pa5X
Este aparato cumple Part 15 de FCC Rules.
Operación y está sujeto a estas dos condicio-
nes: (1) Este aparato no puede causar interfe-
rencia dañina, y (2) este aparado debe aceptar
cualquier interferencia recibida, incluyendo
interferencia que pueda causar un funciona-
miento no deseado.

中文

重要安全说明
▪▪请阅读本说明。
▪▪保存好这些说明。
▪▪注意所有警告。
▪▪按照说明操作。
▪▪不要在潮湿的地方使用该设备。
▪▪只能用干布清洁。
▪▪不要阻塞任何通风口。按照制造商的说明进行
安装。
▪▪不要安装在热源附近,如散热器、电热器、火炉
或产生热量的其他设备(包括功放)。
▪▪为保证安全,不要破坏极化或接地插头。极化
插头有两个叶片,其中一个比另一个更宽。接地
型插头有两片,还有一个接地端子。宽的一片叶
片或第三个端子为您提供安全保护。如果提供
的插头不能插入插口,请找电工来替换旧的插
口。
▪▪避免电源线被踩踏或者掰弯,特别是插头连接
插口处以及设备的起点处。
▪▪仅使用制造商指定的附件/配件。
▪▪只使用由制造商指定或与设备搭配出售的推
车、支架、三脚架、设备支架或桌子。使用推车
时 ,请 小 心 移 动 推 车 / 设 备 组 合 ,以 避 免 因 倾 翻
而受伤。
▪▪在闪电暴雨或者长时间不使用时,请拔掉设备
插头。
▪▪所有维修均请由专业维修人员进行。当设备受
到任何损坏,如电源线或插头损坏、液体溅入
或物体落入设备中、设备遭受雨淋或受潮、无
法正常工作或曾摔落时,需要进行维修。
▪▪警告 – 该设备应连接到带有保护接地连接的电
源插口。
▪▪关闭待机开关并不能将本产品与电源线完全隔
离,因此如果长时间不使用或在清洁前将插头
从插口中拔出。请确保电源插头或设备接头随
时可用。
▪▪供电设备不能暴露在滴水或溅水处,并且不能
将装有液体的物体(如花瓶等)放置在设备上。
▪▪将本产品安装在壁式插口附近,并保持电源插
头随时可用。
▪▪请勿将此设备安装在狭窄的空间内,例如运输
工具箱或类似装置。
▪▪不要将明火火源(如点燃的蜡烛)放置在设备
上。

警告 – 请勿吞食电池,有化学灼伤
危险。本产品包含纽扣电池。
如果吞食硬币/纽扣电池,它会在 2
小时内造成严重的内部灼伤,并可
能导致死亡。
将新电池和用过的电池放在儿童无法接触到的
地方。如果电池仓没有关紧,请停止使用产品并
将其放置在远离儿童的地方。
如果您认为电池可能已被吞下或放入身体的任
何 部 位 ,请 立 即 就 医 。
▪▪警告 – 内部有日期/时间锂纽扣电池。如果电池
更换不当,有爆炸的危险。仅可替换为相同或
等效的类型。内部日期/时间锂纽扣电池可由用
户更换。
▪▪不要将电池暴露在过热的环境中,例如阳光直
射 、火 源 等 。
▪▪根据电池制造商的说明处理用过的电池。
等边三角形内带有箭头的闪电符号旨在提醒
用户注意产品外壳内存在未绝缘的“危险电
压”,其强度可能足以对人员构成电击危险。
等边三角形内的感叹号旨在提醒用户注意产
品随附的文献中存在重要的操作和维护(维
修 )说 明 。
本产品满足以下标准要求:
GB 4943.1-2022
《音视频、信息技术和通信技术设备 第1部分:安全要求》
电磁兼容试验
GB/T 9254.1-2021
《信息技术设备、多媒体设备和接收机电磁兼容 第1部分:发射
要求》
GB17625.1-2012
《电磁兼容限值谐波电流发射限值(设备每相输入电流≤16A)》
Updated for v1.2

其他通知
自动关机
为节省电量,Pa5X默认会在闲置两小时(无任何播
放、按下按钮或使用触摸屏动作)后自动进入待机
模式。请在长时间暂停之前保存您的数据(键盘设
置 、伴 奏 、歌 曲 等 )。
数据处理
由于用户操作不正确,内存中的数据有时可能会丢
失。请务必将重要数据保存到内部存储器或外部
USB 设备中。KORG对因数据丢失造成的损失不承
担任何责任。
显示处理
倾斜显示器时要非常小心,不要强行用力。搬运乐
器前,将显示屏完全降下。此外,在搬运乐器时,请
务必小心不要对显示屏施加过大的压力,否则它可
能会破裂。
清洁
如果外表变脏,请用干净的干布擦拭。请勿使用苯
或稀释剂等液体清洁剂或易燃的抛光剂。
使 用 柔 软 的 棉 布 清 洁 显 示 屏 。某 些 材 料( 例 如 纸
巾)可能会划伤并损坏屏幕。还建议使用电脑擦拭
布,前提是它们是专为 LCD 屏幕设计的。
请勿直接在 LCD 屏幕上喷洒任何液体。始终先将
溶 液 涂 抹 在 布 上 ,然 后 清 洁 屏 幕 。
木制侧面板
键盘的侧面板采用天然木材制成,每台键盘的花纹
都独一无二。使用的越多,它就会变得越漂亮。如
果您发现面板有任何不规整的地方,其实这都是源
自于天然木材的独特魅力点。
示例屏幕
手册的某些页面显示屏幕快照以及功能和操作说
明。所有音色、伴奏、歌曲或参数名称以及显示的
值都只是示例,可能并不总是与您正在处理的实际
显示相匹配。
商标
Mac和iOS是Apple, Inc的注册商标。Android是
Google Inc的商标。MS-DOS和Windows是Micro-
soft Corporation的注册商标。 Waves MaxxAu-
dio® 是 Waves Audio Ltd 的商标。所有其他商标或
注册商标均为其各自所有者的财产。
开源通知
本产品的部分软件版权属于 ©2007 “The Free-
Type Project” (www.freetype.org) 。保 留 所 有 权
利。
免责声明
本手册中包含的信息已经过仔细修订和检查。由于
我们不断努力改进产品,因此规格可能与手册中的
有所不同。KORG对规格与使用说明书内容之间的
任何差异不承担责任—所有规格如有更改,恕不另
行通知。
责任
KORG产品是严格按照每个国家/地区要求的规格
和电压制造的。KORG代理商仅负责对相应国家/
地区的产品提供保修。任何未随保修卡一起出售或
未带有序列号的KORG产品,一经售出将失去制造
商/分销商的保修资格。此要求是为了您自己的保
护和安全。
服务和用户协助
如需服务,请联系离您最近的KORG授权服务中
心。有关KORG产品的更多信息以及用于键盘的软
件 和 附 件 ,请 与 当 地 的 K O R G 授 权 分 销 商 联 系 。如
需最新信息,请使用您的网络浏览器访问我们的网
站(www.korg.com)。
使您的乐器保持最新状态
KORG会随着操作系统的新版本不断更新您的乐
器 。您 可 以 从 我 们 的 网 站.korg.com/us/support/
download/下载操作系统。请阅读操作系统随附的
说明。

欢迎使用 Pa5X! | 5
中文
介绍
欢迎使用 Pa5X!
非常感谢并祝贺您购买 KORG Pa5X 专业编曲键盘!我们相信它会给您带来无数小
时的享受,并帮助您在家中或在舞台上创造出美妙的音乐。
Pa5X 是一款优雅而强大的音频工作站。它易于使用,具有清晰的用户界面,采用可
倾斜的彩色触摸屏,在控制面板上显示以不同颜色区分的功能发光按钮。采用自然
响应的88-键钢琴式锤击键盘以及76- 和61-键半配重键盘,提供完全真实的手感和
全面的情绪控制。
Pa5X 坚固可靠,作为现场乐器非常出色,但它同时也是录音室中强大的创意工具,
可帮助您编写歌曲或配乐,制作完美演示或随手拈来的音色媒体音乐。
内置音色基于我们的 EDS-X (Enhanced Denition Synthesis-eXpanded) 音色引
擎,范围从超逼真的原声乐器到电子老式键盘、经典合成器等等,为媒体和电影制作
添加梦幻音效和特殊效果。我们还集成了来自不同时代和文化的乐器,为您自己的
扩展留出充足的空间。
Pa5X 易于控制,通过 KORG 的 DNC (Dened Nuance Control) 系统,使演奏者能够
准确而富有表现力地展现最微妙的细微差别和音色清晰度。推子、开关、实时控制
的真实和虚拟矩阵、操纵杆和功能区控制器,能够立即调节音色的所有参数。
音色由精心设计的效果链处理,包括每个播放器和键盘音色的最终效果。音频输
出还有最终母带效果,令乐器的音色听上去“融合”和“专业”,这是KORG与Waves
Audio长期合作的结果,工作室母带制作的全球标准。
为了获得最佳音频质量,即使在夜间排练时使用最低音量,您也可以添加可选的
KORG PaAS 放大系统,该系统专为直接连接到 Pa5X 而设计。
可选的现代时尚专用 ST-SV1-BK 支架使该乐器成为舞台上最抢眼的存在,也是您客
厅中时尚的现代家具。
Pa5X 包含的 KORG XDS 交叉淡入淡出双音序器/播放器可用于自由预加载和混合不
同伴奏和歌曲。您还可以创建自己的伴奏并录制自己的 MIDI 和 MP3 歌曲。自动和
声、和弦音序器、一套复杂的和弦识别引擎,可以创建出一组成熟的流行或爵士乐的
丰富编排。
在使用歌曲和伴奏时,您可以在内部或外部显示器中显示歌词和和弦,并且可以将任
何 MIDI 歌曲轨道转换为可读的乐谱。标记允许跳回到您想要重复的段落,例如在您
正在学习或排练的作品中,或现场重复一个段落。

6 | 介绍
您可以使用功能齐全的音序器录制 MIDI 歌曲。更简单的是,只需将您唱歌和播放的
内容(包括 MP3 歌曲)录制为 MP3 文件,然后在您喜欢的任何地方收听即可。
歌曲和伴奏可以保存到板载 SongBook 中,类似于数据库的条目,很容易与平板电
脑上的外部乐谱阅读器同步。因此,您可以使用数字曲谱来控制您的 Pa5X。
话筒和吉他可以连接到专用的音频输入并使用出色的内置效果进行处理。我们在人
声和声和吉他效果方面的长期经验让您如虎添翼。人声消除器可让您直接将任何
MP3 歌曲变成无人声伴奏。
还有更多、更多,我们邀请您深入探索 Pa5X。Pa5X 是有史以来最令人回味、功能强
大、易于使用的完整专业编曲键盘。用全新的Pa5X享受您的音乐生活!

开始演奏之前… | 7
中文
开始演奏之前…
盒子里装了什么
在您收到 Pa5X 后,请检查包装中是否包含所有列出的物品。如果缺少其中任何内
容,请立即联系您的 KORG 经销商。
▪>Pa5X
▪>乐谱架
▪>交流电源线
▪>快速指南
▪>安全毛毡(仅限Pa5X-88,用在ST-SV1 BK架子上)
您可以下载的内容
用您的网络浏览器访问我们的网站 (www.korg.com/us/support/download/) ,以 下
载最新的软件、完整手册、视频手册和 MIDI 驱动程序。
您可以添加什么
购买Pa5X之后,您可能想添加以下其他不错的配件:
▪>优雅的KORG ST-SV1-BK键盘架,安全舒适,与您的编曲键盘完美匹配。
注意: Pa5X 专业编曲键盘仅适用 KORG ST-SV1-BK 支架。使用其他支架可能会导致
不稳定并造成损害。
▪>PaAS放大系统,增加了三路放大系统、一对集成扬声器和一个低音反射箱。
▪>KORG 产品中坚固的踏板和脚踏开关之一。
制作数据的安全副本
如果您想自定义您的音乐资源,我们建议您经常备份您的数据。 按FILE按钮进入
File页 面 ,选 择 Internal组 ,选 择 All 文件夹并从 页面菜单▪中选择▪Save▪命令。然 后 将
数据保存到外部存储设备中。

8 | 介绍
恢复安全副本
要恢复用户数据的备份,请重新加载备份数据。 如果是在外部设备上,请连接备份
存 储 设 备 。按 FILE按钮进入File页 面 ,选 择 Drives组,然后选择外部存储设备。 选择
您备份数据的文件夹,然后从 页面菜单▪中选择 Load 命令。然后将数据加载到内部
存储器中。如果您愿意,您可以只重新加载一些单独的元素。
恢复原厂数据
如果要恢复原始出厂数据,请使用 第 File▪>▪Menu▪>▪Factory▪Restore 页的 Factory▪
Restore 命令。
警告: 此操作将覆盖所有用户数据!
加载操作系统
您的 Pa5X 可以随着操作系统的新版本发布而不断更新。 您可以从我们的网站
(www.korg.com/us/support/download/) 下载最新的操作系统。请阅读操作系统
随附的说明。
要查看 Pa5X 现在安装的操作系统版本,可以进入 File 页面选择 页面菜单▪ 的 Sys-
tem▪Info 命令。
提示: 确保您的 Pa5X 始终包含最新版本的操作系统。这可能包含新功能和错误修
复。
警告: 请勿安装 KORG 为Pa5X 提供的官方操作系统以外的操作系统。尝试安装为
不同型号创建或从非官方网站下载的操作系统可能会导致数据丢失和乐器永久性损
坏。KORG 不对操作系统安装不当造成的任何损害负责。

前面板 | 9
中文
乐器概述
前面板
前面板是您可以找到乐器控件的地方。
乐谱架
Pa5X附带一个乐谱架。
PaAS 放大系统
您可以安装(可选)PaAS 放大系统。安装后,通过 MASTER▪VOLUME 滑块控制扬声
器的输出音量。
连接耳机时,扬声器会自动关闭。您还可以通过取消选择 Settings▪>▪Audio/Video▪>▪
MP3/Speakers 页面中的 Speakers 复选框来手动停用它们。
耳机接口
将一副耳机连接到此输出。您可以使用阻抗16~200Ω(建议使用50Ω)的耳机。
键盘
使用键盘弹奏音符和和弦。 根据SPLIT指示灯的状态,键盘可以是整体或拆分成不
同的音色。

10 | 乐器概述
键盘耳机
乐谱架和 PaAS 放大系统指南

控制面板 | 11
中文
控制面板
控制面板是前面板的一部分,您可以在其中找到乐器的控件。
显示
滑块和开关区
样式、打击垫和标记区 播放器区 音色区
导航区 矩阵
节奏区
显示
使用此触摸屏显示器与乐器进行交互。显示器可以倾斜以获得最佳可视化效果。显
示屏周围有控件,可帮助您选择各种元素。

12 | 乐器概述
导航区
使用这些控件可以浏览菜单、页面和参数并更改所选参数的值。
音色区
音色是您可以在键盘上弹奏出来的内容。在这里,您可以选择在专用库中保存为“
键盘组”的音色组。
样式、打击垫和标记区
伴奏提供带有虚拟乐队的自动伴奏。标记可以跳转到MIDI歌曲中保存的点。您可以
播放音色(通过键盘设置选择)和打击垫以及伴奏和歌曲。
播放器区
两个板载播放器可以播放伴奏和歌曲。您可以为每个播放器分配不同的元素,以便
在当前播放器的结尾准备播放另一种伴奏或歌曲。您可以使用 X-FADER 混合两个播
放器。

控制面板 | 13
中文
SongBook区
SongBook 是一个“歌曲”数据库,称为 SongBook 条目。它们中的每一个都是当前
情况的快照,包括所选的伴奏、歌曲、键盘设置、打击垫、和弦序列以及音色和吉他效
果。您可以快速访问SongBook(Book)中的所有歌曲或歌曲选择列表(Set List)。
节奏区
使用这些按钮控制伴奏和歌曲的速度。 您可以按 CONTROL▪ >▪ SWITCH▪ 9 按钮在
STYLE/SONG 模式下打开或关闭节拍器,跟着节拍器练习。
矩阵
这个大型可编程矩阵采用易于访问的按键组成,用于触发各种元素和功能(打击垫、
音 轨 播 放 / 静 音 )。

14 | 乐器概述
USB接头
使 用 此 接 口( 将 显 示 为 HOST-F)连接 USB 存储设备,例如 USB 随身碟或其他用作
控制器的乐器。 xxx 您还可以使用它来连接一个小型 USB 灯来了亮控制面板或乐
谱架。 请注意,乐器背面还有两个端口。

后面板 | 15
中文
后面板
后面板是您可以找到各种连接的地方。
乐谱架和 PaAS 放大系统指南
接头 电源线接头
音频输入
使用这些接口连接话筒、吉他或其他乐器。 方便的 STEREO 迷您插孔可用于直接连
接音频输出媒体播放器、智能手机或平板电脑。
音频输出
使用 LEFT/RIGHT 插孔将立体音色频信号发送到调音台、PA 系统、一组有源监听器
或您的高保真系统。 还提供四个独立的音频输出 (1~4)。

16 | 乐器概述
踏板接头
使用DAMPER接头连接制音踏板,ASSIGNABLE 接头用于连接连续踏板和/或脚踏
开关。
MIDI 端口
使用这些端口将 Pa5X 连接到外部控制器(主键盘、MIDI 吉他、风控制器、MIDI 手风
琴、MIDI 踏板等)、一系列扩展器或带有 MIDI 接口的电脑。
电池和 microSD 插槽
这个开口包含时钟电池和 microSD 卡槽。

后面板 | 17
中文
USB 端口
使用这些端口将您的 Pa5X 连接到个人电脑或平板电脑 (DEVICE) 或最多连接两个
USB 存储设备,例如 USB 随身碟或其他用作控制器的乐器 (HOST1-R, HOST2-R)。
另一个 HOST 插 口( HOST-F)在 前 面 板 上 可 用 。
视频输出
将 Pa5X 连接到电视或视频监视器,以在更大的显示屏上阅读歌词与和弦。
电源线接头
此插口插入随附的 IEC 电源线。

18 | 乐器概述
将电缆的另一端插入交流电源插口。请务必使用兼容的插头。切勿强行将插头插入
插口!
警告: 将插头连接到匹配电压的交流插口!请阅读本手册开头的安全信息。

连接踏板 | 19
中文
设置踏板和音频连接
连接踏板
连接制音踏板
使用 PEDAL▪>▪DAMPER 接头连接一个制音踏板,例如(可选)KORG PS-1, PS-3 或
DS-1H。 DS-1H 踏板支持某些原声钢琴音色的所有半踏板变化。您可以在播放 Con-
cert▪Grand 音色的同时,通过逐渐踩下并逐渐释放踏板来试验它的工作原理。
如果您需要更改踏板的极性并进行校准,请进入Settings▪ >▪ Controllers▪ >▪ Foot页
面。
连接踏板和/或脚踏开关
PEDAL▪>▪ASSIGNABLE接口可以连接到脚踏开关踏板,如(可选)KORG PS-1, PS-3
或DS-1H或连续变化踏板,和/或(可选)KORG XVP-20音量踏板或EXP-2表情踏板。
默认情况下,这些连接器将用作 Master▪Volume 和 Keyboard▪Expression 踏板。
如果您想更改分配的功能或需要更改踏板的极性并进行校准,请进入Settings▪ >▪
Controllers▪>▪Foot页面。

20 | 设置踏板和音频连接
如果踏板动作不正确怎么办?
如果需要,您可能需要校准踏板以使用它们的全部值范围,没有任何“死点”。此外,
此程序允许选择踏板的极性,以防您使用反向工作的踏板。
1▪ 进入 Settings▪>▪Controllers▪>▪Foot 页面。
2▪ 触摸踏板区域的Calibration按钮进行校准,使Pedal/Footswitch▪ Calibration
对话框出现。
3▪ 完全踩下踏板并在继续按下的同时触摸上部( 突 出 显 示 )按 钮 以 确 认 最 大 值 。

连接踏板 | 21
中文
4▪ 当出现以下对话框时,松开踏板。
5▪ 触摸显示屏中的下部(现在突出显示)按钮以确认最小值。检查踏板是否工作正
常。如果不是,请重复该过程。
6▪ 按EXIT按钮返回上一页。

22 | 通电
通电
打开乐器
连接电源线
将随附的电源线插入乐器背面的 POWER 插口和电缆插头插入墙上的电源插口。
连 接 电 缆 后 ,乐 器 处 于 待 机 状 态 。
警告: 当乐器处于待机状态时,它仍然连接到电源线。触摸乐器内部可能很危险。要
完全断开乐器的电源,请从墙上的电源插口拔下电源插头。
打开或关闭电源
▪▪>打开乐器
▪>按POWER ()按钮打开乐器(即“退出待机”)。打开乐器后,等待欢迎屏幕消
失,然后显示屏上将显示主页面。
▪▪>关闭乐器(待机)
▪>按住 POWER ( ) 按钮约两秒钟,然后当屏幕变暗时松开它。关机程序将开始并
持续几秒钟。请不要在此过程中断开电源线。

倾斜显示器 | 23
中文
倾斜显示器
为了在任何座位下都能获得最佳可见度,可以调整显示器的倾斜角度。
抬起显示器
1▪ 按 UNLOCK 按钮解锁显示屏。
2▪ 按住 UNLOCK 按钮并抬起显示屏。
3▪ 将安全支架从显示器的顶部背面拆下,打开它。

24 | 通电
4▪ 在保持 UNLOCK 按钮按下的同时,调整倾斜角度并固定支架到显示器外壳底部
的一个挡块。
注意: 不要施加过大的压力,否则您可能会破坏它!
5▪ 松开UNLOCK按 钮 ,将 显 示 固 定 到 当 前 位 置 。

倾斜显示器 | 25
中文
关闭显示屏
1▪ 按住 UNLOCK 按钮并抬起显示屏。
2▪ 提起安全支架并将其放回关闭位置。
3▪ 仍然按住 UNLOCK 按钮,将显示器一直放在外壳上。
4▪ 松开 UNLOCK 按钮,然后轻轻按下顶部边框的中心显示锁定在初始位置。

26 | 通电
调整显示亮度
可以调整显示亮度以匹配环境光。
▪>按住 SHIFT 和 MENU 按钮并使用 DIAL 调节显示亮度。
您还可以在Settings▪>▪General▪Controls▪>▪Interface页面中调整显示(和彩色条显
示 )亮 度 。

听示范歌曲 | 27
中文
听示范歌曲
您可以听听我们准备的一些歌曲,让您了解这个乐器的作用。
▪▪>进入Demo模式
▪>同时按下 DEMO 按钮。
▪▪>聆听所有示范歌曲
▪>进入Demo模式后,不要按任何按钮。将播放所有示范歌曲。
▪▪>选择一首示范歌曲
▪>触摸显示屏上的选项之一 (Songs, Sounds, Styles) ,然 后 选 择 其中一首示范歌
曲。
▪▪>退出▪Demo▪模式
▪>按 DEMO 按钮之一。

28 | 选择和播放音乐资源
选择和播放音乐资源
打开选择窗口
当您按下 STYLE, SONG或KEYBOARD▪ SET▪ LIBRARY之 一 按 钮 ,对 应 的 选择窗口出
现。
选择窗口也可以通过触摸对应的名称打开元素(伴奏、歌曲、键盘设置、音色或吉他
预 设 等 )。
轻触选择一种伴奏或歌曲
轻触以选择键盘组

打开选择窗口 | 29
中文
例如这是浏览键盘组时的选择 窗口:
类型组 选定的键盘组
页面当前目录上层(分类对应的文件夹)
下层(单个元素)
您可以随时通过按 EXIT 按钮或触摸显示屏左上角的Exit 命令。
您可以使用播放器 1 或播放器 2 播放伴奏或歌曲。 因此,如果您愿意,您可以为每
个演奏者分配一个伴奏或歌曲,并让另一个演奏者为下一个音乐选择做好准备。您
还可以与不同的播放器混合伴奏和歌曲。
您可以通过移动 X-FADER 来选择哪个播放器具有焦点或当两个播放器都停止时按
相应的 PLAY/STOP() 按钮。

30 | 选择和播放音乐资源
选择您喜欢的键盘组
选择‘My Setting’键盘组
▪>按 MY▪SETTING 按钮选择您喜欢的音色。
‘My Setting’ 键盘组
My▪ Setting▪ 是一个特殊的键盘组,您可以在其中保存您喜欢的键盘音色、效果、
控制滑块和开关(可分配的开关)等设置。该键盘组在乐器打开时自动选择,并会
自动为您配置乐器。
您可以在这里写下您喜欢的键盘组。按住 MY▪SETTING 按 钮 约 一 秒 钟 ,直 到 Save
对话框出现,然后触摸Save 按钮以确认保存到内存。

播放和控制音色 | 31
中文
播放和控制音色
弹奏键盘
本乐器的键盘就跟钢琴键盘一样。直接上手弹奏吧!
对于某些音色,您可以在按下琴键后再往下按,此时音色可能会有所变化(例如您可
能会听到更多颤音)。
使用踏板
踏板根据其编程方式实现不同的功能。制音踏板就是这样 – 制音踏板,在您松开踏
板之前一直保持音符延音。可分配踏板(或脚踏开关)可能会根据 Settings▪ >▪ Con-
trollers▪>▪Foot 页面中的编程方式而改变.
使用控制滑块和开关
根据选择的模式,CONTROL 滑块和开关可以控制不同的内容,例如不同音色的音
量、风琴拉杆或一些可分配的功能。它们的工作方式由滑块下方的条状显示显示。
使用可分配的开关
根据选择的键盘设置和分配的功能,这些控件可以实现不同的功能。使用 DNC 音
色,开关可以“预定”播放时触发的功能,或者通过按下按钮“切换”来启用(或禁
用 )。在 其 他 情 况 下 ,这 些 开 关 可 以“ 切 换 ”或“ 触 发 ”分 配 的 功 能 。

32 | 选择和播放音乐资源
使用矩阵
可编程按钮矩阵可以实现多种不同的功能(触发打击垫、音轨播放/静音)。触摸其
中一个或多个以选择所需的功能。如果它们是开/关开关,请再次触摸它们以将其关
闭。
开关的颜色可能会发生变化,具体取决于分配的功能和选定的播放器。
使用操纵杆
左右移动操纵杆通常会改变音色的音高。向前移动通常会添加调制音效,但这取决
于 所 选 的 音 色 。对 于 机 械 电 风 琴 ,向 前 推 动 操 纵 杆 会 改 变 旋 转 扬 声 器 的 速 度 。拉 回
时的效果取决于所选的音色。尽情实验吧!
使用功能区控件
在功能区控件上从左到右扫动通常会改变音色的亮度和/或音高,但它的作用方式取
决于所选的音色。

开始和停止伴奏 | 33
中文
开始和停止伴奏
您可以使用PLAYER▪1 或 PLAYER▪2 部分中的控件手动启动和停止自动伴奏。
Stop/
Go to Start
Play/Stop
▪▪>设置正确的混音
▪>将 X-FADER 完全移向您想听的播放器。 播放器 1 将其完全移至左侧,播放器 2
将其移至右侧。
▪>将其移动到中间位置以混合两个播放器。
▪▪>开始伴奏
1▪ 按PLAY/STOP ( ) 按钮。
2▪ 用左手演奏一些和弦,同时用右手演奏旋律。
在播放伴奏时,请注意显示屏中的各种指示。
识别和弦
速度 当前小节
节拍指示器
播放时:剩余小节
停止时:模式总长度
伴奏变化:循环
选定的伴奏元素
文件路径
▪▪>停止伴奏
▪>再次按 PLAY/STOP▪( ) 按钮。
▪>或 者 ,您 可 以 按 下 STOP/GO▪TO▪START▪( ) 按钮。

34 | 选择和播放音乐资源
▪▪>同时启动和停止两个播放器
您可以同时启动两个播放器,演奏时将它们与 X-FADER 混合。
▪>按住SHIFT按钮并按下两个中的任意一个PLAY/STOP▪ () 按钮同时启动两个
播放器。
▪>按住 SHIFT 按钮并按下 PLAY/STOP▪() 两个按钮中的任意一个按钮同时停止
两个播放器。

开始、停止和控制歌曲 | 35
中文
开始、停止和控制歌曲
您可以使用 PLAYER▪1 或 PLAYER▪2 部分中的控件手动开始和停止歌曲。
Stop/
Go to Start
Play/Stop
▪▪>设置正确的混音
▪>将 X-FADER 完全移向您想听的播放器。播放器 1 将其完全移至左侧,播放器 2 将
其移至右侧。
▪>将其移动到中间位置以混合两个播放器。
▪▪>启动播放器
▪>按PLAY▪() 按钮。
播放歌曲时,请注意显示屏中的各种指示。
使用 MIDI 歌曲:
速度
当前标记文件路径
当前小节 节拍指示器
节 拍( 拍 号 )
播放时:剩余小节
停止时:歌曲总长度
快退/快进控制

36 | 选择和播放音乐资源
使用 MP3 歌曲:
文件路径
节奏变化 已用时间 快退/快进控制 播放时:剩余时间
停止时:歌曲总长度
▪▪>快进歌曲
▪>触摸 FAST FORWARD ( ) 按钮一次可跳到下一小节(MIDI 歌曲)或下一秒(MP3
歌 曲 )。
▪>持续触摸 FAST▪FORWARD▪( ) 按钮可连续滚动歌曲。到达所需位置后松开。
▪▪>倒带歌曲
▪>触摸 FAST REWIND ( ) 按钮一次可跳至上一小节(MIDI 歌曲)或前一秒(MP3
歌 曲 )。
▪>继续接触 FAST▪REWIND▪(▪ ▪) 按钮可连续滚动歌曲。到达所需位置后松开。
▪▪>暂停和恢复播放
▪>按 PLAY/STOP▪( ) 按钮在当前位置停止歌曲。按钮的指示灯将关闭。
▪>按 PLAY/STOP▪( ) 按钮恢复播放。指示灯将再次亮起。
▪▪>停止播放器并返回到歌曲的开头
▪>按 STOP/GO▪TO▪START▪( ) 按钮停止播放器并移至歌曲的开头。按钮的指示灯
将关闭。

开始、停止和控制歌曲 | 37
中文
▪▪>同时启动和停止两个播放器
您可以同时启动两个播放器,演奏时将它们与 X-FADER 混合。
▪>按住SHIFT按钮并按下两个中的任意一个PLAY/STOP▪ () 按钮同时启动两个
播放器。
▪>按住 SHIFT 按钮,然后按下 PLAY/STOP▪ () 两个按钮中的任意一个按钮同时
停止两个播放器。

给消费者的重要通知
本产品是按照适用于预期使用本产品的国家/地
区的严格规范和电压要求制造的。如果您通过互
联网、邮购和/或电话销售购买了本产品,您必须
确认本产品旨在在您居住的国家/地区使用。
警告:在指定国家以外的任何国家/地区使用本
产品可能存在危险,并可能使制造商或分销商的
保修失效。
还请保留您的收据作为购买凭证,否则您的产品
可能无法享受制造商或经销商的保修服务。
关于处置的通知(仅限欧盟)
如果此符号显示在产品、手册、电池
或包装上,您必须以正确的方式处置
它,以避免危害人体健康或破坏环境。
有 关 正 确 处 置 方 法 的 详 细 信 息 ,请 联
系您当地的行政机构。如果电池含有
超过规定量的重金属,电池或电池包
装上的符号下方会显示化学符号。
在电磁辐射的情况下,音频性能的质量可能会暂
时下降。可能出现的恶化可以是发出音色信号。
当电磁干扰停止时,这将停止。
FCC▪法规警告(针对美国)
This equipment has been tested and found
to comply with the limits for a Class B digital
device, pursuant to Part 15 of the FCC Rules.
These limits are designed to provide reason-
able protection against harmful interference in
a residential installation. This equipment gen-
erates, uses, and can radiate radio frequency
energy and, if not installed and used in accor-
dance with the instructions, may cause harm-
ful interference to radio communications.
However, there is no guarantee that interfer-
ence will not occur in a particular installation.
If this equipment does cause harmful interfer-
ence to radio or television reception, which
can be determined by turning the equipment
o and on, the user is encouraged to try to cor-
rect the interference by one or more of the fol-
lowing measures:
• Reorient or relocate the receiving antenna.
• Increase the separation between the equip-
ment and receiver.
• Connect the equipment into an outlet on a
circuit dierent from that to which the receiver
is connected.
• Consult the dealer or an experienced radio/
TV technician for help.
If items such as cables are included with this
equipment, you must use those included
items.
Unauthorized changes or modication to this
system can void the user’s authority to oper-
ate this equipment.
符合性声明(美国)
Responsible Party: KORG USA INC.
Address: 316 SOUTH SERVICE ROAD, MELVILLE
Telephone: 1-631-390-6500
Equipment Type: Professional Arranger
Model: Pa5X
This device complies with Part 15 of FCC Rules.
Operation is subject to the following two con-
ditions: (1) This device may not cause harmful
interference, and (2) this device must accept
any interference received, including interfer-
ence that may cause undesired operation.


© KORG Italy 2022-23. All rights reserved PART NUMBER: MAN0010152 (M8)
Address
KORG ITALY SpA
Via Cagiata, 85
60027 Osimo (AN)
Italy
Web
www.korg.com
Pa5X|ProfessionalArranger
QUICK GUIDE PRISE EN
MAIN SCHNELLSTART
GUIDA RAPIDA GUÍA
RÁPIDA 快速入门指南
Pa5X
MAN0010152 M8
-
 1
1
-
 2
2
-
 3
3
-
 4
4
-
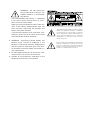 5
5
-
 6
6
-
 7
7
-
 8
8
-
 9
9
-
 10
10
-
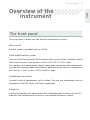 11
11
-
 12
12
-
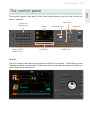 13
13
-
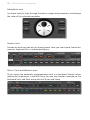 14
14
-
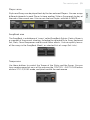 15
15
-
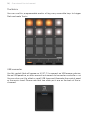 16
16
-
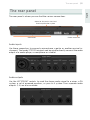 17
17
-
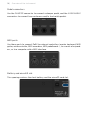 18
18
-
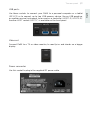 19
19
-
 20
20
-
 21
21
-
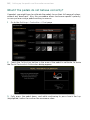 22
22
-
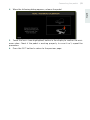 23
23
-
 24
24
-
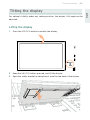 25
25
-
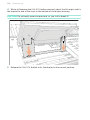 26
26
-
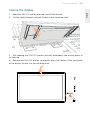 27
27
-
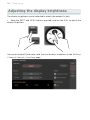 28
28
-
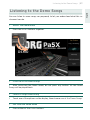 29
29
-
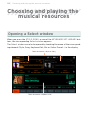 30
30
-
 31
31
-
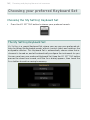 32
32
-
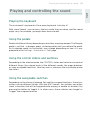 33
33
-
 34
34
-
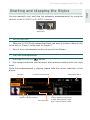 35
35
-
 36
36
-
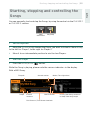 37
37
-
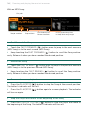 38
38
-
 39
39
-
 40
40
-
 41
41
-
 42
42
-
 43
43
-
 44
44
-
 45
45
-
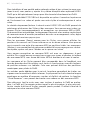 46
46
-
 47
47
-
 48
48
-
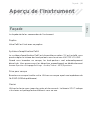 49
49
-
 50
50
-
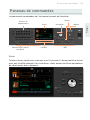 51
51
-
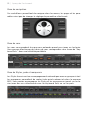 52
52
-
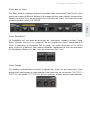 53
53
-
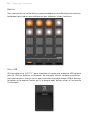 54
54
-
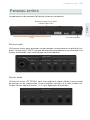 55
55
-
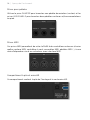 56
56
-
 57
57
-
 58
58
-
 59
59
-
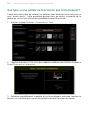 60
60
-
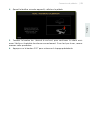 61
61
-
 62
62
-
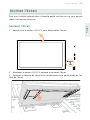 63
63
-
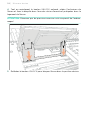 64
64
-
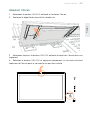 65
65
-
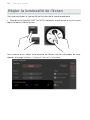 66
66
-
 67
67
-
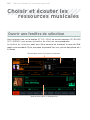 68
68
-
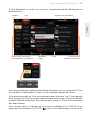 69
69
-
 70
70
-
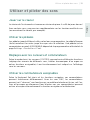 71
71
-
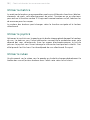 72
72
-
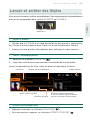 73
73
-
 74
74
-
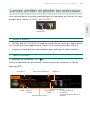 75
75
-
 76
76
-
 77
77
-
 78
78
-
 79
79
-
 80
80
-
 81
81
-
 82
82
-
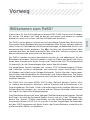 83
83
-
 84
84
-
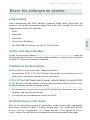 85
85
-
 86
86
-
 87
87
-
 88
88
-
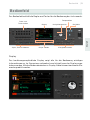 89
89
-
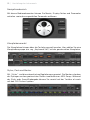 90
90
-
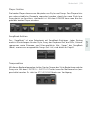 91
91
-
 92
92
-
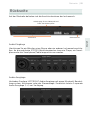 93
93
-
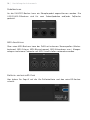 94
94
-
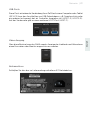 95
95
-
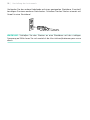 96
96
-
 97
97
-
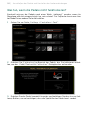 98
98
-
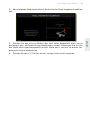 99
99
-
 100
100
-
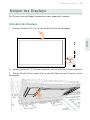 101
101
-
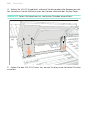 102
102
-
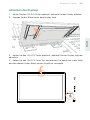 103
103
-
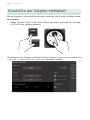 104
104
-
 105
105
-
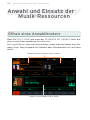 106
106
-
 107
107
-
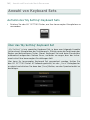 108
108
-
 109
109
-
 110
110
-
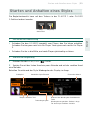 111
111
-
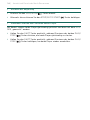 112
112
-
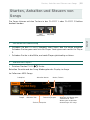 113
113
-
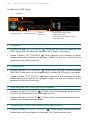 114
114
-
 115
115
-
 116
116
-
 117
117
-
 118
118
-
 119
119
-
 120
120
-
 121
121
-
 122
122
-
 123
123
-
 124
124
-
 125
125
-
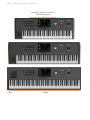 126
126
-
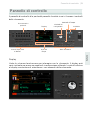 127
127
-
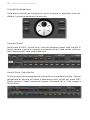 128
128
-
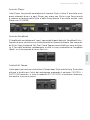 129
129
-
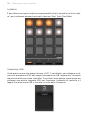 130
130
-
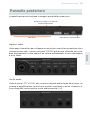 131
131
-
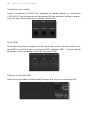 132
132
-
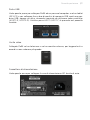 133
133
-
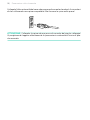 134
134
-
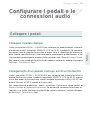 135
135
-
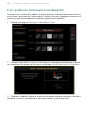 136
136
-
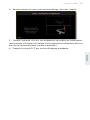 137
137
-
 138
138
-
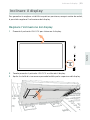 139
139
-
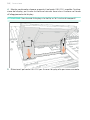 140
140
-
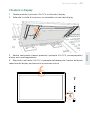 141
141
-
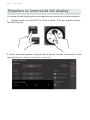 142
142
-
 143
143
-
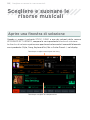 144
144
-
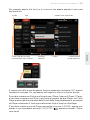 145
145
-
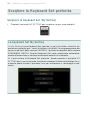 146
146
-
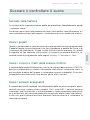 147
147
-
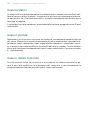 148
148
-
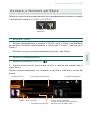 149
149
-
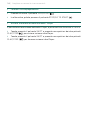 150
150
-
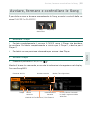 151
151
-
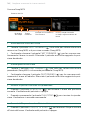 152
152
-
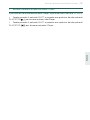 153
153
-
 154
154
-
 155
155
-
 156
156
-
 157
157
-
 158
158
-
 159
159
-
 160
160
-
 161
161
-
 162
162
-
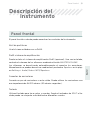 163
163
-
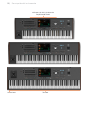 164
164
-
 165
165
-
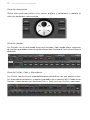 166
166
-
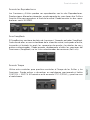 167
167
-
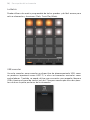 168
168
-
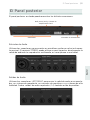 169
169
-
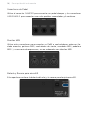 170
170
-
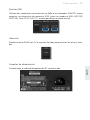 171
171
-
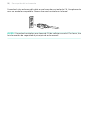 172
172
-
 173
173
-
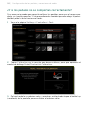 174
174
-
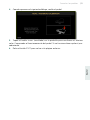 175
175
-
 176
176
-
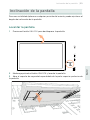 177
177
-
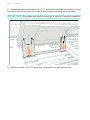 178
178
-
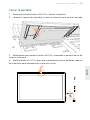 179
179
-
 180
180
-
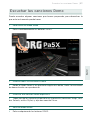 181
181
-
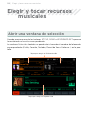 182
182
-
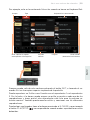 183
183
-
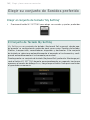 184
184
-
 185
185
-
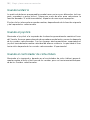 186
186
-
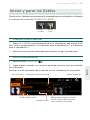 187
187
-
 188
188
-
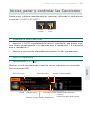 189
189
-
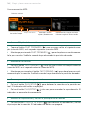 190
190
-
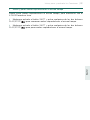 191
191
-
 192
192
-
 193
193
-
 194
194
-
 195
195
-
 196
196
-
 197
197
-
 198
198
-
 199
199
-
 200
200
-
 201
201
-
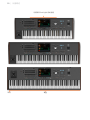 202
202
-
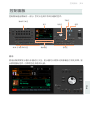 203
203
-
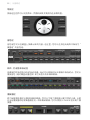 204
204
-
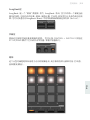 205
205
-
 206
206
-
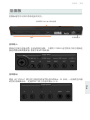 207
207
-
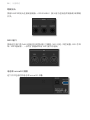 208
208
-
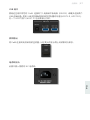 209
209
-
 210
210
-
 211
211
-
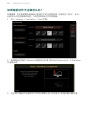 212
212
-
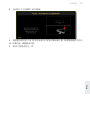 213
213
-
 214
214
-
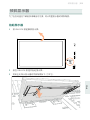 215
215
-
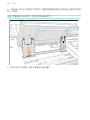 216
216
-
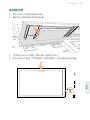 217
217
-
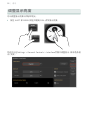 218
218
-
 219
219
-
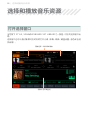 220
220
-
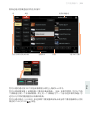 221
221
-
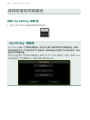 222
222
-
 223
223
-
 224
224
-
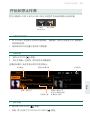 225
225
-
 226
226
-
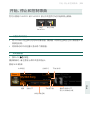 227
227
-
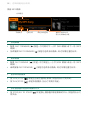 228
228
-
 229
229
-
 230
230
-
 231
231
-
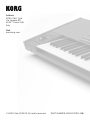 232
232


en otros idiomas
- français: Korg Pa5X Guide de démarrage rapide
- italiano: Korg Pa5X Guida Rapida
- English: Korg Pa5X Quick start guide
- Deutsch: Korg Pa5X Schnellstartanleitung