
Gaming Speakers
USER GUIDE
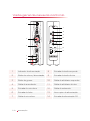
English Português do Brasil
Deutsch
Pусский
Français Polski
Français Canadien Čeština
Italiano Magyar
Español
繁體中文
Português
简体中文

Disclaimer
All pictures in this documentation are example images only. The images may vary depending on the product and software
version. Information presented in this documentation has been carefully checked for reliability; however, no responsibility is
assumed for inaccuracies. Information contained in this manual is subject to change without notice.
Copyright and Trademark Information
© 2015 by AVerMedia Technologies, Inc. All rights reserved.
No part of this publication, in whole or in part, may be reproduced, transmitted, transcribed, altered or translated into any
language in any form by any means without the written permission of AVerMedia Technologies, Inc. Product specifications
and information contained in this manual are subject to change without notice, and do not represent a commitment on the
part of AVerMedia Technologies, Inc. For the latest information on our products, visit www.avermedia.com.
AVerMedia, Ballista™ and Unity™ are trademarks of AVerMedia Technologies, Inc.
Headquarters
Address No.135, Jian 1st Rd., Zhonghe Dist., New Taipei City 23585, Taiwan
Website www.avermedia.com
Support www.avermedia.com/support
Telephone +886-2-2226-3630
免責聲明
此文件所有的圖示僅供參考,圖示內容可能因產品與軟體版本不同而有所更動。本文內的所有資訊皆已經過詳細確
認,但並無法保證完全準確無誤。本文件之內容如有修改,恕不另行通知。
版權聲明
© 2015 圓剛科技股份有限公司版權所有。
未經事先取得圓剛科技股份有限公司之書面同意,禁止以任何形式或方式 (電子、機械、影印、錄製,或其它形式)
重製或傳送本文件之全部或部分內容。圓剛科技股份有限公司保留變更、修改、改善、提升其產品及本文件內容的權
利,而無通知任何人或組織的義務。請造訪 www.avermedia.com 以取得本公司產品的最新資訊。
AVerMedia、Ballista™ 與 Unity™ 為圓剛科技股份有限公司的商標。
國際總部
地址 23585 新北市中和區建一路 135 號
網址 www.avermedia.com
支援
www.avermedia.com/support
電話 +886-2-2226-3630
Edition: 1.1
Date: 09/16/2015
版本:1.1
日期:2015/09/16

03
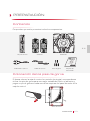
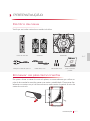
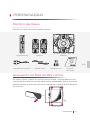
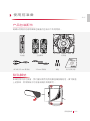
PREPARATION
PREPARATION
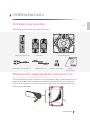
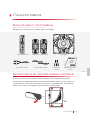
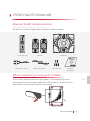
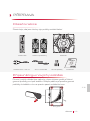
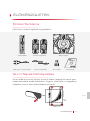
Inside The Box
Check that all these items are included.
Subwoofer
RCA to 3.5 mm Cable
EN
Attaching The Rubber Feet
If you want to lay the Control Box flat, we recommend using the supplied
Rubber Feet for better stability. Peel off the tape and attach a Rubber Foot
to each corner on the Right Panel of the Control Box.
Info Packet
SatellitesControl Box
3.5 mm Audio Cable
Right Panel
Rubber Feet

04
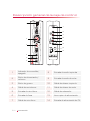
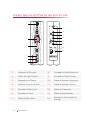
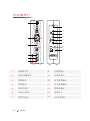
PREPARATION
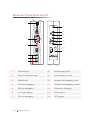
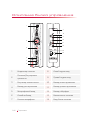
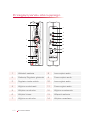
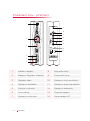
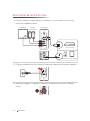
Control Box Overview
1 Power Indicator 8 Left Audio Input
2 Power/Volume Knob 9 Right Audio Input
3 Bass Knob 10 Left Satellite Output
4 Headphone Output 11 Right Satellite Output
5 Microphone Input 12 Subwoofer Output
6 Line Input 13 Power Switch
7 Microphone Output 14 AC Power Input
1
6
7
8
9
5
2
3
4
10
11
12
13
14

05
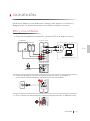
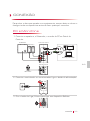
CONNECTION
1
2
3
4
5
4
LINE OUT
EN
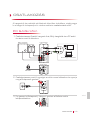
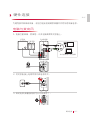
Desktop/Notebook
Microphone
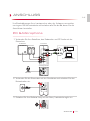
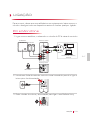
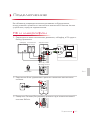
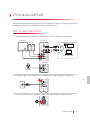
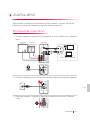
CONNECTION
To prevent damage to your speakers or equipment, always turn down the
volume and power off all devices before making any connections.
PC & Microphone
Front Panel
Subwoofer
Satellites
Back Panel
Connect your Satellites, Subwoofer, and PC audio to the Control Box.1.
Connect the Control Box to a wall outlet and turn on the Power Switch.2.
Turn the Power/Volume Knob to turn on your Ballista Unity.3.

06
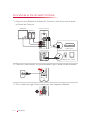
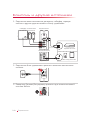
CONNECTION
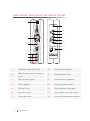
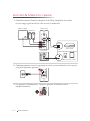
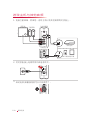
Console & Other Sources
1
2
3
4
5
AUDIO
OUT
A V MULTI
OUT
Connect your Satellites, Subwoofer, game console and other audio 1.
sources to the Control Box.
Connect the Control Box to a wall outlet and turn on the Power Switch.2.
Turn the Power/Volume Knob to turn on your Ballista Unity.3.
Gaming Console
MP3 Player/Tablet
Subwoofer
Satellites
(Not Included)
Back Panel
Front Panel

07
ERSTE SCHRITTE
ERSTE SCHRITTE
Paketinhalt
Vergewissern Sie sich, dass alle diese Elemente beiliegen.
Subwoofer
RCA- an 3,5-mm-Kabel
Gummifüße befestigen
Wenn Sie die Steuerbox flach hinstellen möchten, empfehlen wir, dass Sie
die beiliegende Füße für die bessere Stabilität verwenden. Lösen Sie den
Klebstreifen und befestigen Sie je einen Gummifuß am rechten Panel der
Steuerbox.
Infopaket
SatellitenSteuerbox
3,5-mm-Kabel
Rechtes Panel
Gummifüße
DE

08
ERSTE SCHRITTE
Steuerbox-Übersicht
1 Netzanzeige 8 Audioeingang links
2 Netz/Lautstärkeregler 9 Audioeingang rechts
3 Bass-Knopf 10 Lautsprecherausgang, links
4 Kopfhörerausgang 11 Lautsprecherausgang, rechts
5 Mikrofonausgang 12 Subwoofer-Ausgang
6 Leitungseingang 13 Netzschalter
7 Mikrofonausgang 14 AC-Eingang
1
6
7
8
9
5
2
3
4
10
11
12
13
14

09
ANSCHLUSS
1
2
3
4
5
4
LINE OUT
Desktop/Notebook
Mikrofon
ANSCHLUSS
Um Beschädigungen Ihrer Lautsprecher oder der Anlage zu vermeiden,
verringern Sie die Lautstärke und schalten alle Geräte ab, bevor Sie die
Anschlüsse herstellen.
PC & Microphone
Vordere Blende
Subwoofer
Satelliten
Rückseite
Verbinden Sie Ihre Satelliten, den Subwoofer und PC-Audio mit der 1.
Steuerbox.
Verbinden Sie die Steuerbox mit der Steckdose und schalten Sie den 2.
Netzschalter ein.
Schalten Sie Ihre Ballista Unity mit der Netz/Lautstärkeregler ein.3.
DE

10
ANSCHLUSS
Konsole & Andere Quellen
1
2
3
4
5
AUDIO
OUT
A V MULTI
OUT
Verbinden Sie Ihre Satelliten, den Subwoofer, Spielekonsole und andere 1.
Audioquellen mit der Steuerbox.
Verbinden Sie die Steuerbox mit der Steckdose und schalten Sie den 2.
Netzschalter ein.
Schalten Sie Ihre Ballista Unity mit der Netz/Lautstärkeregler ein.3.
Spielekonsole
MP3 Player/Tablet
Subwoofer
Satelliten
(Nicht inklusive)
Rückseite
Vordere Blende

11
PRÉPARATION
PRÉPARATION
Contenu de la boîte
Vérifiez la présence de tous ces éléments.
Caisson de graves
Câble RCA à jack de 3,5 mm
FR
Placement des pieds en caoutchouc
Si vous souhaitez poser le boîtier de commande à plat, vous obtiendrez un
appui plus stable avec les pieds en caoutchouc qui sont fournis. Enlevez
le film de protection et collez un pied à chaque coin du panneau droit du
boîtier de commande.
Paquet
d’informations
SatellitesBoîtier de commande
Câble de 3,5 mm
Panneau droit
Pieds en caoutchouc

12
PRÉPARATION
Le boîtier de commande en bref
1 Indicateur marche/arrêt 8 Entrée audio gauche
2
Mollette du volume/marche/
arrêt
9 Entrée audio droite
3 Mollette des gaves 10 Sortie enceinte gauche
4 Sortie casque 11 Sortie enceinte droite
5 Entrée micro 12 Sortie caisson de graves
6 Entrée de ligne 13 Interrupteur marche/arrêt
7 Sortie de micro 14 Entrée d’alimentation secteur
1
6
7
8
9
5
2
3
4
10
11
12
13
14

13
BRANCHEMENT
1
2
3
4
5
4
LINE OUT
FR
Ordinateur
Micro
BRANCHEMENT
Pour éviter d’endommager les haut-parleurs ou le matériel, il convient de
toujours baisser le volume et éteindre tous les appareils avant d’effectuer
tout branchement.
Ordinateur et micro
Panneau avant
Caisson de graves
Satellites
Panneau arrière
Raccordez les satellites, le caisson de graves et le son de l’ordinateur 1.
au boîtier de commande.
Branchez le boîtier de commande sur une prise secteur et allumez 2.
l'appareil à l'aide du interrupteur marche/arrêt.
Tournez le mollette du volume/marche/arrêt/ pour allumer votre 3.
Ballista Unity.

14
BRANCHEMENT
Console et autres sources
1
2
3
4
5
AUDIO
OUT
A V MULTI
OUT
Raccordez les satellites, le caisson de graves, la console de jeu et les 1.
autres sources audio au boîtier de commande.
Branchez le boîtier de commande sur une prise secteur et allumez 2.
l'appareil à l'aide du interrupteur marche/arrêt.
Tournez le mollette du volume/marche/arrêt/ pour allumer votre 3.
Ballista Unity.
Console de jeu
Lecteur MP3/Tablette
Caisson de graves
Satellites
(Non fourni)
Panneau arrière
Panneau avant

15
PRÉPARATION
PRÉPARATION
À l'intérieur de la boîte
Vérifier que toutes ces pièces sont incluses.
Caisson de graves
Câble RCA à 3,5 mm
Fixation des pieds en caoutchouc
Si vous voulez mettre la boîte de contrôle à plat, nous vous recommandons
d'utiliser les pieds en caoutchouc fournis pour une meilleure stabilité.
Décoller la bande adhésive et coller un pied en caoutchouc à chaque coin
sur le panneau de droite de la boîte de contrôle.
Trousse
d'informations
Haut-parleurs satellitesBoîte de contrôle
Câble de 3,5 mm
Panneau droit
Pieds en
caoutchouc
CF

16
PRÉPARATION
Aperçu du boîtier de contrôle
1 Indicateur d'alimentation 8 Entrée audio gauche
2
Bouton de volume/
d'alimentation
9 Entrée audio droite
3 Bouton des graves 10 Sortie haut-parleur gauche
4 Sortie de casque d'écoute 11 Sortie haut-parleur droit
5 Entrée de microphone 12 Sortie caisson de graves
6 Entrée de ligne 13 Interrupteur d'alimentation
7 Sortie microphone 14 Entrée d'alimentation secteur
1
6
7
8
9
5
2
3
4
10
11
12
13
14

17
CONNEXION
CF
1
2
3
4
5
4
LINE OUT
Ordinateur de bureau/
Ultra-portable
Microphone
CONNEXION
Pour éviter d'endommager vos haut-parleurs ou votre équipement, toujours
baisser le volume et éteindre tous les dispositifs avant d'effectuer ces
connexions.
Microphone et PC
Panneau avant
Caisson
de graves
Haut-parleurs
satellites
Panneau arrière
Brancher vos haut-parleurs satellites, le caisson de graves, et l'audio PC 1.
sur le boîtier de contrôle.
Brancher le boîtier de contrôle à une prise secteur et mettre en marche.2.
Utiliser le bouton de volume/d'alimentation pour mettre en marche le 3.
Ballista Unity.

18
CONNEXION
Console et autres sources
1
2
3
4
5
AUDIO
OUT
A V MULTI
OUT
Brancher vos haut-parleurs satellites, le caisson de graves, la console 1.
de jeu et les autres sources audio sur le boîtier de contrôle.
Brancher le boîtier de contrôle à une prise secteur et mettre en marche.2.
Utiliser le bouton de volume/d'alimentation pour mettre en marche le 3.
Ballista Unity.
Console de jeu
Lecteur MP3/Tablette
Caisson
de graves
Haut-parleurs
satellites
(Non inclus)
Panneau arrière
Panneau avant

19
PREPARAZIONE
Subwoofer
Cavo da RCA a 3.5 mm
IT
Fissaggio dei piedini in gomma
Qualora si desideri appoggiare in piano la Scatola di Controllo, consigliamo
di usare i Piedini in gomma forniti in dotazione al fine di garantire una
migliore stabilità. Togliere il nastro e fissare un Piedino in gomma su ogni
angolo sul pannello destro della Scatola di controllo.
Confezione con
informazioni
SatellitiScatola di controllo
Cavo da 3.5 mm
Pannello destro
Piedini in gomma
PREPARAZIONE
All'interno della confezione
Controllare che tutti gli articoli siano forniti in dotazione.

20
PREPARAZIONE
Panoramica della scatola di controllo
1 Indicatore di alimentazione 8 Ingresso audio sinistro
2
Manopola volume/
alimentazione
9 Ingresso audio destro
3 Manopola bassi 10 Uscita altoparlante sinistra
4 Uscita cuffia 11 Uscita altoparlante destra
5 Ingresso microfono 12 Uscita Subwoofer
6 Ingresso di linea 13 Interruttore di alimentazione
7 Uscita microfono 14 Ingresso di alimentazione CA
1
6
7
8
9
5
2
3
4
10
11
12
13
14

21
COLLEGAMENTO
1
2
3
4
5
4
LINE OUT
IT
Fisso/Computer portatile
Microfono
COLLEGAMENTO
Al fine di evitare danni agli altoparlanti o alla strumentazione, abbassare
sempre il volume e spegnere tutti i dispositivi prima di eseguire eventuali
collegamenti.
PC & Microfono
Pannello anteriore
Subwoofer
Satelliti
Pannello posteriore
Collegare i Satelliti, il Subwoofer, e l'audio del PC alla Scatola di controllo.1.
Collegare la Scatola di controllo a una presa a parete e accendere 2.
l'interruttore di alimentazione.
Ruotare il manopola volume/alimentazione per accendere il proprio 3.
dispositivo Ballista Unity.

22
COLLEGAMENTO
Console & Altre sorgenti
1
2
3
4
5
AUDIO
OUT
A V MULTI
OUT
Collegare i Satelliti, il Subwoofer, la console di gioco e altre sorgenti 1.
audio alla Scatola di controllo.
Collegare la Scatola di controllo a una presa a parete e accendere 2.
l'interruttore di alimentazione.
Ruotare il manopola volume/alimentazione per accendere il proprio 3.
dispositivo Ballista Unity.
Console di gioco
Lettore MP3/Tablet
Subwoofer
Satelliti
(Non fornito in
dotazione)
Pannello posteriore
Pannello anteriore

23
PREPARACIÓN
PREPARACIÓN
Contenido
Compruebe que estén presentes todos los componentes.
Subwoofer
Cable RCA a 3,5 mm
Colocación de los pies de goma
Si desea colocar la caja de control en posición horizontal, recomendamos
utilizar los pies de goma para una mayor estabilidad. Retire el adhesivo y
pegue un pie de goma en cada una de las esquinas del panel derecho de la
caja de control.
Paquete de
información
SatélitesCaja de control
Cable de 3,5 mm
Panel derecho
Pies de goma
ES

24
PREPARACIÓN
Descripción general de la caja de control
1
Indicador de encendido/
apagado
8 Entrada de audio izquierda
2
Botón de alimentación/
volumen
9 Entrada de audio derecha
3 Botón de graves 10 Salida de altavoz izquierdo
4 Salida de auriculares 11 Salida de altavoz derecho
5 Entrada de micrófono 12 Salida de subwoofer
6 Entrada de línea 13 Interruptor de alimentación
7 Salida de micrófono 14 Entrada de alimentación de CA
1
6
7
8
9
5
2
3
4
10
11
12
13
14

25
CONEXIÓN
ES
1
2
3
4
5
4
LINE OUT
Ordenador de
sobremesa/portátil
Micrófono
CONEXIÓN
Para evitar daños en sus altavoces o equipo, baje siempre el volumen y
apague todos los dispositivos antes de realizar cualquier conexión.
PC y micrófono
Panel delantero
Subwoofer
Satélites
Panel trasero
Conecte sus satélites, subwoofer y audio de PC a la caja de control.1.
Conecte la caja de control a una toma de corriente y coloque el 2.
interruptor de alimentación en la posición de encendido.
Gire el botón de 3. alimentación/volumen para encender el Ballista Unity.

26
CONEXIÓN
Consola y otras fuentes
1
2
3
4
5
AUDIO
OUT
A V MULTI
OUT
Conecte sus satélites, subwoofer, consola de juego y otras fuentes de 1.
audio a la caja de control.
Conecte la caja de control a una toma de corriente y coloque el 2.
interruptor de alimentación en la posición de encendido.
Gire el botón de 3. alimentación/volumen para encender el Ballista Unity.
Consola de juego
Reproductor de
MP3/Tableta
Subwoofer
Satélites
(No incluido)
Panel trasero
Panel delantero

27
PREPARAÇÃO
Subwoofer
RCA para cabo de 3,5 mm
Encaixar os pés de borracha
Se quiser deixar a caixa de controlo plana, recomendamos que utilize os
pés de borracha fornecidos para uma maior estabilidade. Remova a fita
adesiva e encaixe um pé de borracha em cada canto do painel direito da
caixa de controlo.
Informação do
pacote
SatélitesCaixa de controlo
Cabo de 3,5 mm
Painel direito
Pés de borracha
PREPARAÇÃO
Dentro da caixa
Verifique se todos estes itens estão incluídos.
PT

28
PREPARAÇÃO
Vista geral da caixa de controlo
1 Indicador de alimentação 8 Entrada de áudio esquerda
2 Botão do volume/alimentação 9 Entrada de áudio direita
3 Botão de graves 10 Saída do altifalante esquerda
4 Saída do auscultador 11 Saída do altifalante direita
5 Entrada do microfone 12 Saída do subwoofer
6 Entrada de linha 13 Interruptor de alimentação
7 Saída do microfone 14 Entrada da alimentação CA
1
6
7
8
9
5
2
3
4
10
11
12
13
14

29
LIGAÇÃO
1
2
3
4
5
4
LINE OUT
Ambiente de trabalho/
Portátil
Microfone
LIGAÇÃO
Para prevenir danos aos seus altifalantes ou equipamento, baixe sempre o
volume e desligue todos os dispositivos antes de realizar qualquer ligação.
PC e Microfone
Painel frontal
Subwoofer
Satélites
Painel traseiro
Ligue os seus satélites, o subwoofer e o áudio do PC à caixa de controlo.1.
Introduza a ficha da caixa de controlo numa tomada de parede e ligue o 2.
interruptor de alimentação.
Rode o botão do volume/alimentação para ligar o seu Ballista Unity.3.
PT

30
LIGAÇÃO
Consola e outras fontes
1
2
3
4
5
AUDIO
OUT
A V MULTI
OUT
Ligue os seus satélites, o subwoofer, a consola de jogo e outras fontes 1.
de áudio à caixa de controlo.
Introduza a ficha da caixa de controlo numa tomada de parede e ligue o 2.
interruptor de alimentação.
Rode o botão do volume/alimentação para ligar o seu Ballista Unity.3.
Consola de jogo
Leitor de MP3/Tablet
Subwoofer
Satélites
(Não Incluído)
Painel traseiro
Painel frontal

31
PREPARAÇÃO
PREPARAÇÃO
Dentro da Caixa
Cheque se todos estes itens estão inclusos.
Subwoofer
Cabo RCA para P2 3.5mm
Anexando os Pés de Borracha
Se quiser utilizar o painel de controle na horizontal, recomendamos o uso
dos pés de borracha fornecidos para melhor estabilidade. Retire a película
adesiva e anexe o pé de borracha em cada canto no painel direito da caixa
de controle.
Pacote de
Informações
SpeakersPainel de Controle
Cabo P2 3.5mm
Painel direito
Pés de Borracha
BP

32
PREPARAÇÃO
Visão Geral do Painel de Controle
1 Indicador de Energia 8 Entrada de Áudio Esquerda
2 Botão de Liga/Volume 9 Entrada de Áudio Direita
3 Regulador de Graves 10 Saída do Speaker Esquerdo
4 Saída de Fone de Ouvido 11 Saída do Speaker Direito
5 Entrada de Microfone 12 Saída do Subwoofer
6 Entrada de Linha 13 Botão de alimentação
7 Saída de Microfone 14
Entrada do Alimentador de
Energia
1
6
7
8
9
5
2
3
4
10
11
12
13
14

33
CONEXÃO
BP
1
2
3
4
5
4
LINE OUT
Desktop/Notebook
Microfone
CONEXÃO
Para evitar o dano aos speakers ou equipamento, sempre baixe o volume e
desligue todos os dispositivos antes de fazer quaisquer conexões.
PC e Microfone
Painel Frontal
Subwoofer
Speakers
Painel Traseiro
Conecte os speakers, o Subwoofer, e o audio do PC ao Painel de 1.
Controle.
Conecte o controlador em uma tomada e ligue o botão de alimentação.2.
Gire o botão de Liga/Volume para ligar seu dispositivo Ballista.3.

34
CONEXÃO
Console e Outras Fontes
1
2
3
4
5
AUDIO
OUT
A V MULTI
OUT
Conecte seus Speakers, Subwoofer, Console e outras fontes de audio 1.
no Painel de Controle
Conecte o controlador em uma tomada e ligue o botão de alimentação.2.
Gire o botão de Liga/Volume para ligar seu dispositivo Ballista.3.
Vídeo Game
MP3 Player/Tablet
Subwoofer
Speakers
(Not Included)
Painel Traseiro
Painel Frontal

35
Подготовка
Подготовка
Комплект поставки
Проверьте наличие всех элементов в поставке.
Сабвуфер
3.5 мм RCA кабель
Крепление резиновых ножек
Если вы хотите расположить блок управления в горизонтальной
плоскости, мы рекомендуем использовать резиновые ножки, для его
устойчивости. Отклейте защитную полоску и прикрепите резиновые
ножки по углам на правой стороне блока управления.
Информационный
буклет
Сателлитные динамикиБлок управления
3.5 мм аудио кабель
Правая боковая панель
Резиновые
ножки
RU

36
Подготовка
Описание блока управления
1
Индикатор питания
8
Левый аудио вход
2
Питание/Регулировка
громкости
9
Правый аудио вход
3
Регулятор низких частот
10
Выход левого динамика
4
Выход для наушников
11
Выход правого динамика
5
Микрофонный вход
12
Выход сабвуфера
6
Линейный вход
13
Выключатель питания
7
Разъем микрофона
14
Вход блока питания
1
6
7
8
9
5
2
3
4
10
11
12
13
14

37
Подключение
1
2
3
4
5
4
LINE OUT
Стационарный ПК / Ноутбук
Микрофон
Подключение
Во избежание повреждения ваших динамиков и оборудования,
всегда снижайте громкость и желательно выключайте питание на всех
устройствах, перед их подключением.
ПК и микрофон
Передняя панель
Сабвуфер
Сателлитные
динамики
Задняя панель
Подсоедините ваши сателлитные динамики, сабвуфер, и ПК аудио к 1.
блоку управления.
Подключите блок управления к розетке и включите выключатель 2.
питания.
Поверните Питание/Регулировку громкости для включения вашей 3.
системы Ballista.
RU

38
Подключение
Консоль и другие источники
1
2
3
4
5
AUDIO
OUT
A V MULTI
OUT
Подключите ваши сателлитные динамики, сабвуфер, игровую 1.
консоль и другие аудио источники к блоку управления.
Подключите блок управления к розетке и включите выключатель 2.
питания.
Поверните Питание/Регулировку громкости для включения вашей 3.
системы Ballista.
Игровая консоль
MP3 плеер/планшет
Сабвуфер
Сателлитные
динамики
(Опционально)
Задняя панель
Передняя панель

39
PRZYGOTOWANIE
PRZYGOTOWANIE
Zawartość opakowania
Sprawdź czy masz przygotowane wszystkie części zestawu.
Subwoofer
Kabel RCA - 3,5mm
Mocowanie gumowych nóżek
Jeśli chcesz położyć panel sterujący płasko, rekomendujemy użycie
gumowych nóżek dla lepszej stabilności. Odklej taśmę i przyłóż nóżki w
narożnikach prawej ścianki panelu sterowania.
Książeczka
użytkownika
GłośnikiPanel sterujący
Kabel audio 3,5mm
Prawa ścianka
Gumowe nóżki
PL

40
PRZYGOTOWANIE
Przegląd panelu sterującego
1 Wskaźnik zasilania 8 Lewe wejście audio
2 Zasilania/Regulator głośności 9 Prawe wejście audio
3 Regulator tonów niskich 10 Lewe wyjście audio
4 Wyjście na słuchawki 11 Prawe wyjście audio
5 Wejście na mikrofon 12 Wyjście na subwoofer
6 Wejście liniowe 13 Włącznik zasilania
7 Wyjście na mikrofon 14 Wejście na zasilanie
1
6
7
8
9
5
2
3
4
10
11
12
13
14

41
PODŁĄCZENIE
1
2
3
4
5
4
LINE OUT
Desktop/Laptop
Mikrofon
PODŁĄCZENIE
Aby zapobiec uszkodzeniu głośników lub sprzętu, należy zmniejszyć głośność
i wyłączać zasilanie urządzeń przed ich połączeniem.
PC oraz mikrofon
Panel przedni
Subwoofer
Głośniki
Panel tylni
Podłącz głośniki, subwoofer oraz audio z PC do panelu sterowania.1.
Podłącz panel sterowania do źródła prądu i włącz 2. włącznik zasilania.
Przekręć zasilania/regulator głośności, aby włączyć Ballista Unity.3.
PL

42
PODŁĄCZENIE
Konsola i inne źródła
1
2
3
4
5
AUDIO
OUT
A V MULTI
OUT
Podłącz satelity, subwoofer, konsolę i inne źródła dźwięku do panelu 1.
sterowania.
Podłącz panel sterowania do źródła prądu i włącz 2. włącznik zasilania.
Przekręć zasilania/regulator głośności, aby włączyć Ballista Unity.3.
Konsola
MP3/Tablet
Subwoofer
Głośniki
(Nie dodany)
Panel tylni
Panel przedni

43
PŘÍPRAVA
PŘÍPRAVA
Obsah krabice
Zkontrolujte, zda jsou všechny tyto položky součástí balení.
Subwoofer
Redukce RCA --> 3.5 mm
Připevnění gumových podložek
Chcete-li položit ovládací box naplocho, doporučujeme použít přiložené
gumové podložky pro lepší stabilitu. Odlepte pásku a připevněte gumové
podložky do každého rohu na pravém panelu ovládacího boxu.
Info balíček
Satelitní reproduktoryOvládací box
3.5 mm audio kabel
Pravý panel
Gumové podložky
CS

44
PŘÍPRAVA
Ovládací box - přehled
1 Indikátor napájení 8 Levý audio vstup
2 Napájení/Regulátor hlasitosti 9 Pravý audio vstup
3 Regulátor basů 10 Výstup pro levý reproduktor
4 Výstup pro sluchátka 11 Výstup pro pravý reproduktor
5 Vstup pro mikrofon 12 Výstup pro subwoofer
6 Line-in vstup 13 Přepínač napájení
7 Výstup pro mikorofon 14 Vstup napájení AC
1
6
7
8
9
5
2
3
4
10
11
12
13
14

45
ZAPOJENÍ
1
2
3
4
5
4
LINE OUT
stolní počítač/notebook
mikrofon
ZAPOJENÍ
Aby nedošlo k poškození reproduktorů nebo vybavení, ztlumte vždy před
jakýmkoliv připojením hlasitost a vypněte všechna zařízení.
Počítač & mikrofon
přední panel
subwoofer
satelitní
reproduktory
zadní panel
Připojte satelitní reproduktory, subwoofer a zvuk počítače do ovládacího 1.
boxu.
Připojte ovládací box do elektrické zásuvky a zapněte přepínač napájení.2.
Otáčejte napájení/regulátor hlasitosti spustíte své zařízení "Ballista 3.
Unity".
CS

46
ZAPOJENÍ
Konzole & jiné zdroje
1
2
3
4
5
AUDIO
OUT
A V MULTI
OUT
Připojte satelitní reproduktory, subwoofer, herní konzoli a jiné zdroje 1.
zvuku do ovládacího boxu.
Připojte ovládací box do elektrické zásuvky a zapněte přepínač napájení.2.
Otáčejte napájení/regulátor hlasitosti spustíte své zařízení "Ballista 3.
Unity".
herní konzole
MP3 přehrávač/tablet
subwoofer
satelitní
reproduktory
(není součástí)
zadní panel
přední panel

47
ELŐKÉSZÜLETEK
ELŐKÉSZÜLETEK
Doboz Tartalma
Ellenőrizze, minden kiegészítő megtalálható-e.
Mély hangláda
RCA- 3,5mm Jack átalakító
Gumi Talpak Felhelyezése
Ha az oldalára szeretné fektetni a vezérlő dobozt, javasoljuk a kapott gumi
talpak használatát a jobb stabilitásért. Vegye le a védőfóliát, és ragassza a
talpakat a vezérlő doboz jobb oldalának sarkaihoz.
Info csomag
Szatelit hangszórókVezérlő doboz
3,5mm audió kábel
Jobb panel
Gumi talpak
HU

48
ELŐKÉSZÜLETEK
Vezérlő Doboz Bemutatása
1 Üzem indikátor 8 Bal audió bemenet
2 Bekapcsoló/Hangerő gomb 9 Jobb audió bemenet
3 Mély hang állító 10 Bal hangszóró kimenet
4 Fejhallgató kimenet 11 Jobb hangszóró kimenet
5 Mikrofon bemenet 12 Mély hangláda kimenet
6 Vonal bemenet 13 Bekapcsoló gombot
7 Mikrofon kimenet 14 Táp bemenet
1
6
7
8
9
5
2
3
4
10
11
12
13
14

49
CSATLAKOZÁS
1
2
3
4
5
4
LINE OUT
Számítógép/Notebook
Mikrofon
CSATLAKOZÁS
A hangszórók és eszközök sérülésének elkerülése érdekében, mindig vegye
le a hangerőt és kapcsoljon ki minden eszközt a csatlakoztatás előtt.
PC & Mikrofon
Első panel
Mély hangláda
Szatelitek
Hátsó panel
Csatlakoztassa a Szatelit hangszórókat, Mély hangládát és a PC audió 1.
forrást a vezérlő dobozhoz.
Csatlakoztassa a vezérlő egységet az elektromos hálózathoz és nyomja 2.
meg a Bekapcsoló gombot.
Forgassa el a Bekapcsoló/Hangerő gombot a Ballista eszköz 3.
bekapcsolásához.
HU

50
CSATLAKOZÁS
Konzol & Más Források
1
2
3
4
5
AUDIO
OUT
A V MULTI
OUT
Csatlakoztassa a Szatelit hangszórókat, Mély hangládát és a játék 1.
konzolt vagy egyéb audió forrást a vezérlő dobozhoz.
Csatlakoztassa a vezérlő egységet az elektromos hálózathoz és nyomja 2.
meg a Bekapcsoló gombot.
Forgassa el a Bekapcsoló/Hangerő gombot a Ballista eszköz 3.
bekapcsolásához.
Játék konzol
MP3 lejátszó/Tablet
Mély hangláda
Szatelitek
(nem tartozék)
Hátsó panel
Első panel

51
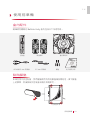
使用前準備
使用前準備
盒內配件
請確認您購買的 Ballista Unity 盒內包含以下所有物品。
重低音喇叭
RCA 轉 3.5 mm 音源線
黏貼腳墊
如果您想平放控制盒,我們建議使用內附的腳墊增加穩定性。撕下腳墊
上的膠帶,然後黏貼於控制盒右側的四角即可。
用戶資訊手冊
衛星喇叭
控制盒
3.5 mm 音源線
控制盒右側
腳墊
TC

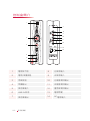
52
使用前準備
控制盒簡介
1
電源指示燈
8
左音源輸入
2
電源/音量旋鈕
9
右音源輸入
3
低音旋鈕
10
左衛星喇叭輸出
4
耳機輸出
11
右衛星喇叭輸出
5
麥克風輸入
12
重低音喇叭輸出
6 LINE IN
音源
13
電源開關
7
麥克風輸出
14 AC
電源輸入
1
6
7
8
9
5
2
3
4
10
11
12
13
14

53
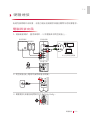
硬體連接
TC
1
2
3
4
5
4
LINE OUT
桌上型/筆記型電腦
麥克風
硬體連接
為避免損壞喇叭或設備,在進行連接前請調低音量並關閉所有設備電源。
電腦與麥克風
控制盒正面
重低音喇叭
衛星喇叭
控制盒背面
連接衛星喇叭、重低音喇叭、以及電腦音源到控制盒上。1.
將控制盒接上電源然後開啟電源開關。2.
轉動電源/音量旋鈕開啟您的 Ballista Unity。3.

54
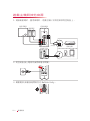
硬體連接
遊戲主機與其他音源
1
2
3
4
5
AUDIO
OUT
A V MULTI
OUT
連接衛星喇叭、重低音喇叭、遊戲主機以及其他音源到控制盒上。1.
將控制盒接上電源然後開啟電源開關。2.
轉動電源/音量旋鈕開啟您的 Ballista Unity。3.
遊戲主機
MP3 播放器/平板
重低音喇叭
衛星喇叭
(未提供)
控制盒背面
控制盒正面

55
使用前准备
使用前准备
产品包装配件
请确认您购买的游戏音箱包装盒内包含以下所有物品。
低音炮
RCA 转 3.5 mm 音频线
黏贴脚垫
如果您想平放功放盒,我们建议使用内附的脚垫增加稳定性。撕下脚垫
上的胶带,然后黏贴于功放盒右侧的四角即可。
用户资讯手册
卫星音箱
功放盒
3.5 mm 音频线
功放盒右侧
脚垫
SC

56
使用前准备
功放盒简介
1
电源指示灯
8
左音频输入
2
电源/音量旋钮
9
右音频输入
3
低音旋钮
10
左卫星箱输出
4
耳机输出
11
右卫星箱输出
5
麦克风输入
12
低音炮输出
6 LINE IN
音频
13
电源开关
7
麦克风输出
14
AC 电源输入
1
6
7
8
9
5
2
3
4
10
11
12
13
14

57
硬件连接
1
2
3
4
5
4
LINE OUT
台式电脑/笔记本型电脑
麦克风
硬件连接
为避免损坏音箱或设备,在进行连接前请调低音量并关闭所有设备电源。
电脑与麦克风
功放盒正面
低音炮
卫星音箱
功放盒背面
连接卫星音箱、低音炮、以及电脑音频到功放盒上。1.
将功放盒接上电源然后开启电源开关。2.
转动
3.
电源/音量旋钮就可以开始使用了。
SC

58
硬件连接
游戏主机与其他音频
1
2
3
4
5
AUDIO
OUT
A V MULTI
OUT
连接卫星音箱、低音炮、游戏主机以及其他音频到功放盒上。1.
将功放盒接上电源然后开启电源开关。2.
转动
3.
电源/音量旋钮就可以开始使用了。
游戏主机
MP3 播放器/平板
低音炮
卫星音箱
(未提供)
功放盒背面
功放盒正面

Important Safety Instructions
Read these instructions.1.
Keep these instructions.2.
Follow all instructions.3.
Heed all warnings.4.
Do not use the apparatus on uneven or unstable surfaces.5.
Do not use this apparatus in a wet environment or near water.6.
The apparatus shall not be exposed to dripping or splashing and that no objects filled with 7.
liquids, such as vases, shall be placed on the apparatus.
Unplug the apparatus before cleaning. Clean only with a dry cloth.8.
Use in a well ventilated environment. Do not block any ventilation openings.9.
Use the apparatus within the specified temperature range.10.
Use power sources within the specified voltage range.11.
Do not place heavy objects on the apparatus.12.
Do not install near heat sources such as radiators or stoves.13.
Do not defeat the safety purposes of the polarized or grounding-type plug. 14.
Protect the power cord from being walked on or pinched, particularly where the cord connects 15.
with plugs or adapters.
The MAINS plug is used as the disconnect device, the disconnect device shall remain readily 16.
operable.
Only use the attachments and accessories specified by the manufacturer.17.
Unplug this apparatus during lightning storms or when unused for prolonged periods of time.18.
Do not modify or disassemble the apparatus in any way.19.
Refer all servicing to qualified personnel.20.
Do not dispose the apparatus as general household waste. Dispose in accordance with local 21.
environmental laws.
Product Name/Model: Gaming Speakers/GS310

60
重要安全說明
仔細閱讀這些說明。
1.
妥善保存這些說明。
2.
遵守所有的指示。
3.
注意所有的警告。
4.
請勿將本產品安裝於不平穩的表面。
5.
請勿在潮濕或靠近水的地方使用本產品。
6.
本產品不能被水滴到或濺到,也請勿將裝有水的容器如花瓶放置於本產品上。
7.
清潔前請拔除電源。僅使用乾布清潔。
8.
請於通風的環境使用本產品。請勿堵住通風口。
9.
請於規格溫度範圍內使用本產品。
10.
請使用額定電壓範圍內的電源。
11.
請勿放置重物於本產品上。
12.
請勿安裝於熱源附近如暖器或火爐旁。
13.
請勿破壞極性或接地插頭的安全防護設計。
14.
請保護電源線,勿使其被踩踏或碾壓,特別是與插頭或變壓器的連接處。
15.
本產品電源插頭作為斷電開關,需維持能夠隨時插拔的狀態。
16.
僅使用製造商指定的配件及零件。
17.
打雷或長時間不使用時請拔除電源。
18.
請勿以任何方式改造或拆解本產品。
19.
如需維修請洽合格維修人員。
20.
請勿當作家庭垃圾任意丟棄。請遵從當地環境法規妥善處理。
21.
產品名稱/型號: 喇叭/
GS310

61

Gaming Speakers
USER GUIDE
-
 1
1
-
 2
2
-
 3
3
-
 4
4
-
 5
5
-
 6
6
-
 7
7
-
 8
8
-
 9
9
-
 10
10
-
 11
11
-
 12
12
-
 13
13
-
 14
14
-
 15
15
-
 16
16
-
 17
17
-
 18
18
-
 19
19
-
 20
20
-
 21
21
-
 22
22
-
 23
23
-
 24
24
-
 25
25
-
 26
26
-
 27
27
-
 28
28
-
 29
29
-
 30
30
-
 31
31
-
 32
32
-
 33
33
-
 34
34
-
 35
35
-
 36
36
-
 37
37
-
 38
38
-
 39
39
-
 40
40
-
 41
41
-
 42
42
-
 43
43
-
 44
44
-
 45
45
-
 46
46
-
 47
47
-
 48
48
-
 49
49
-
 50
50
-
 51
51
-
 52
52
-
 53
53
-
 54
54
-
 55
55
-
 56
56
-
 57
57
-
 58
58
-
 59
59
-
 60
60
-
 61
61
-
 62
62


en otros idiomas
- français: Avermedia GS310 Manuel utilisateur
- português: Avermedia GS310 Manual do usuário
Artículos relacionados
Otros documentos
-
Hercules XPS 101 Manual de usuario
-
Bigben Unity Tab El manual del propietario
-
 Magnat Audio MULTIMEDIA 2100 DIGITAL El manual del propietario
-
 Magnat Audio 2.1 El manual del propietario
-
Monitor Audio Silver W-12 El manual del propietario
-
ANT BHS 1200 Manual de usuario
-
Corsair CA-SP211 El manual del propietario
-
Monitor Audio Silver W12 Manual de usuario
-
Roland CM110 Manual de usuario
-
Altec Lansing VS4121 Manual de usuario

