
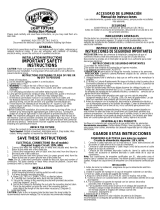
LIGHT FIXTURE
Instruction Manual
Please read carefully and save these instructions, as you may need
them at a later date.
SAFETY
WARNING: RISK OF ELECTRIC SHOCK
Disconnect the electrical supply circuit before installing light fixture
GENERAL
All electrical connections must be in accordance with local codes,
ordinances or national electrical codes. If you are unfamiliar with
methods of installing electrical wiring, secure the services of a
qualified electrician.
INSTALLATION INSTRUCTIONS
IMPORTANT SAFETY
INSTRUCTIONS
CAUTION: Make sure power is turned off at the electrical panel box
before beginning your installation. turning power off at wall switch is
not sufficient to prevent electrical shock.
INSTRUCTIONS PERTAINING TO RISK OF
FIRE OR INJURY TO PERSONS
1. Read all instructions.
2. Do not install this lighting system in wet location.
3. Lighted lamp is HOT!
4. WARNING- To reduce the risk of fire or injury to person:
CAUTION-Hot surface. Keep away from curtains and other
combustible materials.
5. Turn off/unplug and allow to cool before replacing bulb (lamp)
6. Lamp get hot quickly! Do not touch lamp, Hot lamp lens, guard
or enclosure at any time. use a soft cloth. Oil from skin may
damage lamp.
7. CAUTION-To reduce the risk of fire, use only GU10 shielded
and G9 lamps.
8. All electrical connections must be in accordance with local
codes and the National Electrical Code. If you are unfamiliar with
methods of installing electrical wiring, secure the services of a
qualified licensed electrician.
9. These fixtures are intended to be mounted to a 4" square x 2 -
1/8" deep metal octagon outlet box. The box must be directly
supported by the building structure.
10. Before starting the installation, disconnect the power by turning
off the circuit breaker or by removing the appropriate Fuse at the
fuse box. Turning the power off using the light switch is not
sufficient to prevent electrical shock.
Note: The important safeguards and instructions appearing in this
manual are not meant to cover all possible conditions and situations
that may occur. It must be understood that common sense, caution
and care are factors that cannot be built into any product. These
factors must be supplied by the person(s)caring for, installing and
operating the fixture.
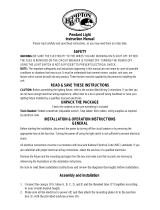
UNPACK THE FIXTURE
Check the contents to be sure everything is included.
Tools Needed: Slotted screwdriver, Adjustable wrench, Step
ladder, Wire cutters, Wiring supplies as required by electrical code.
SAVE THESE INSTRUCTIONS
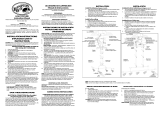
ELECTRICAL CONNECTIONS (for all models)
Required Supply Circuit: 120V, 60Hz
Connect the white wire(s) from the fixture to the white wire of the
supply circuit. Connect the black wire(s) from the fixture to the black
wire of the supply circuit. Connect the green or bare copper wire to
the ground wire of the supply circuit. Use UL/CSA listed wire
connectors suitable for the size type, and number of conductors. No
loose strands or loose wires should be present. Secure wire
connectors with UL/CSA listed electrical tape.
ACCESORIO DE ILUMINACIÓN
Manual de instrucciones
Lea cuidadosamente y guarde estas instrucciones, porque puede
necesitarlas más adelante.
SEGURIDAD
ADVERTENCIA: RIESGO DE DESCARGA ELÉCTRICA
Antes de instalar el accesorio de iluminación, desconecte el circuito
de la red de suministro eléctrico.
INDICACIONES GENERALES
Efectúe todas las conexiones eléctricas de acuerdo con las
reglamentaciones municipales y nacionales vigentes. Si usted no está
familiarizado con los métodos de instalación del cableado eléctrico,
contrate los servicios de un perito electricista habilitado.
INSTRUCCIONES DE INSTALACIÓN
INSTRUCCIONES DE SEGURIDAD
IMPORTANTES
PRECAUCIÓN: Antes de comenzar la instalación, asegúrese de que
el suministro eléctrico esté desconectado en la caja del circuito
eléctrico. desconectar la energía en el interruptor de pared no es
suficiente para evitar descargas eléctricas.
INSTRUCCIONES DE SEGURIDAD IMPORTANTES
1. Lea todas las instrucciones.
2. No instale este sistema de iluminación en lugares mojados.
3. ¡La lámpara encendida está CALIENTE!
4. ADVERTENCIA – para reducir el riesgo de incendio, lesiones a
las personas:
PRECAUCIÓN: Superficie caliente,Mantener alejada de las
cortinas y otros materiales inflamables.
5. Apague/desenchufe el artefacto y deje que se enfríe antes de
reemplazar la bombilla.
6. ¡El Bulbo Se Calienta Rápidamente! No toque el bulbo, el cristal,
la protección o la envuelta calientes en ningún momento. Use un
paño blando. La grasitud de la piel puede dañar el bulbo.
7. PRECAUCIÓN:Para reducir el riesgo de incendio.Use este
accesorio sólo con una bombilla halógena GU10 protegido y G9.
8. Todas las instalaciones eléctricas deben observar los códigos
locales y el Código de Electricidad Nacional de EE.UU. Si usted
no está familiarizado con los métodos de instalación del cableado
eléctrico, contrate los servicios de un perito electricista habilitado.
9. Estos accesorios están previstos para usar con una caja de
empalme octogonal metálica de 4 x 2 1/8 pulg. (100 x 54 mm)
de profundidad. La caja debe ser soportada directamente por la
estructura del edificio.
10. Antes de empezar con la instalación, desconecte la
alimentación eléctrica con el interruptor general o los fusibles de
entrada. Cortar la alimentación al circuito solamente con la llave
de luz, no es suficiente para prevenir una electrocución.
Nota: Las importantes recomendaciones e instrucciones
proporcionadas en este manual no abarcan todas las condiciones
y/o situaciones posibles que pudieran presentarse. Se sobreentiende
que el sentido común, la precaución y la atención al trabajo no son
parte de ningún producto. Son factores que debe tener en cuenta
quien ejecute la instalación, cuide y opere el accesorio.
DESEMBALAJE DEL PRODUCTO
Verifique el contenido para asegurarse de que estén todos los
elementos.
Herramientas necesarias: Destornillador Phillips, llave ajustable,
escalera, pinza para cortar cables, elementos de cableado requeridos
por el código de electricidad.
GUARDE ESTAS INSTRUCCIONES
CONEXIONES ELÉCTRICAS (para todos los modelos)
Circuito de alimentación requerido: 120 V, 60 Hz
Conecte el o los cables blancos del accesorio al cable blanco del
circuito de alimentación. Conecte el o los cables negros del accesorio
al cable negro del circuito de alimentación. Conecte el conductor
verde o de cobre desnudo al cable de tierra del circuito de
alimentación. Use capuchones de empalme certificados por UL/CSA,
adecuados para el tamaño, tipo y cantidad de conductores. No deben
quedar conductores o cables sueltos. Asegure los capuchones de
empalme con cinta aisladora certificada por UL/CSA.

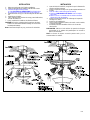
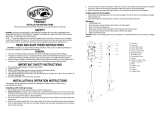
INSTALLATION
1. Make sure main power is OFF before installation.
2. Install mounting bracket to existing outlet box with screws.
3. Pull wires through mounting bracket.
A. Make ELECTRICAL CONNECTIONS as directed above.
B. Carefully tuck connected wires back into the outlet box.
4. Install the fixture canopy on to the mounting bracket stem with
nut.
5. Install the two G9 bulbs.
6. Then, install the glass shade to the canopy, attach with washer,
and the decorative nut.
7. Lastly, install the GU10 bulbs to the directional fixtures.
CAUTION: Refer to the re-lamping label located near the lamp
holder for recommended maximum wattage. Do not exceed
recommended wattage.
Note: Some fixture shapes may vary, not shown for all models.
INSTALACIÓN
1. Antes de iniciar la instalación, asegúrese de que la alimentación
eléctrica esté desconectada.
2. Instale el soporte de montaje en la caja de empalme existente con
tornillos.
3. Pase los cables a través del soporte de montaje.
A. Haga las CONEXIONES ELÉCTRICAS como se explica
más arriba.
B.Vuelva a colocar con cuidado todos los cables conectados
adentro de la caja de empalme.
4. Instale el rosetón del accesorio en el vástago del soporte de
montaje con la tuerca.
5. Instale las dos bombillas G9.
6. Luego, instale la pantalla de vidrio en el rosetón, con la arandela,
y la tuerca decorativa.
7. Finalmente, instale las bombillas GU10 en los accesorios
direccionales.
PRECAUCIÓN: Observe el valor máximo de potencia de lámpara
recomendado en la etiqueta del portalámpara. No exceda la
potencia recomendada.
Nota: Las formas de algunos accesorios pueden variar y no se
muestran todos los modelos.
702B
Transcripción de documentos
ACCESORIO DE ILUMINACIÓN Manual de instrucciones Lea cuidadosamente y guarde estas instrucciones, porque puede necesitarlas más adelante. SEGURIDAD LIGHT FIXTURE Instruction Manual Please read carefully and save these instructions, as you may need them at a later date. SAFETY WARNING: RISK OF ELECTRIC SHOCK Disconnect the electrical supply circuit before installing light fixture GENERAL All electrical connections must be in accordance with local codes, ordinances or national electrical codes. If you are unfamiliar with methods of installing electrical wiring, secure the services of a qualified electrician. INSTALLATION INSTRUCTIONS IMPORTANT SAFETY INSTRUCTIONS CAUTION: Make sure power is turned off at the electrical panel box before beginning your installation. turning power off at wall switch is not sufficient to prevent electrical shock. 1. 2. 3. 4. INSTRUCTIONS PERTAINING TO RISK OF FIRE OR INJURY TO PERSONS Read all instructions. Do not install this lighting system in wet location. Lighted lamp is HOT! WARNING- To reduce the risk of fire or injury to person: CAUTION-Hot surface. Keep away from curtains and other combustible materials. 5. Turn off/unplug and allow to cool before replacing bulb (lamp) 6. Lamp get hot quickly! Do not touch lamp, Hot lamp lens, guard or enclosure at any time. use a soft cloth. Oil from skin may damage lamp. 7. CAUTION-To reduce the risk of fire, use only GU10 shielded and G9 lamps. 8. All electrical connections must be in accordance with local codes and the National Electrical Code. If you are unfamiliar with methods of installing electrical wiring, secure the services of a qualified licensed electrician. 9. These fixtures are intended to be mounted to a 4" square x 2 1/8" deep metal octagon outlet box. The box must be directly supported by the building structure. 10. Before starting the installation, disconnect the power by turning off the circuit breaker or by removing the appropriate Fuse at the fuse box. Turning the power off using the light switch is not sufficient to prevent electrical shock. Note: The important safeguards and instructions appearing in this manual are not meant to cover all possible conditions and situations that may occur. It must be understood that common sense, caution and care are factors that cannot be built into any product. These factors must be supplied by the person(s)caring for, installing and operating the fixture. UNPACK THE FIXTURE Check the contents to be sure everything is included. Tools Needed: Slotted screwdriver, Adjustable wrench, Step ladder, Wire cutters, Wiring supplies as required by electrical code. SAVE THESE INSTRUCTIONS ELECTRICAL CONNECTIONS (for all models) Required Supply Circuit: 120V, 60Hz Connect the white wire(s) from the fixture to the white wire of the supply circuit. Connect the black wire(s) from the fixture to the black wire of the supply circuit. Connect the green or bare copper wire to the ground wire of the supply circuit. Use UL/CSA listed wire connectors suitable for the size type, and number of conductors. No loose strands or loose wires should be present. Secure wire connectors with UL/CSA listed electrical tape. ADVERTENCIA: RIESGO DE DESCARGA ELÉCTRICA Antes de instalar el accesorio de iluminación, desconecte el circuito de la red de suministro eléctrico. INDICACIONES GENERALES Efectúe todas las conexiones eléctricas de acuerdo con las reglamentaciones municipales y nacionales vigentes. Si usted no está familiarizado con los métodos de instalación del cableado eléctrico, contrate los servicios de un perito electricista habilitado. INSTRUCCIONES DE INSTALACIÓN INSTRUCCIONES DE SEGURIDAD IMPORTANTES PRECAUCIÓN: Antes de comenzar la instalación, asegúrese de que el suministro eléctrico esté desconectado en la caja del circuito eléctrico. desconectar la energía en el interruptor de pared no es suficiente para evitar descargas eléctricas. 1. 2. 3. 4. INSTRUCCIONES DE SEGURIDAD IMPORTANTES Lea todas las instrucciones. No instale este sistema de iluminación en lugares mojados. ¡La lámpara encendida está CALIENTE! ADVERTENCIA – para reducir el riesgo de incendio, lesiones a las personas: PRECAUCIÓN: Superficie caliente,Mantener alejada de las cortinas y otros materiales inflamables. 5. Apague/desenchufe el artefacto y deje que se enfríe antes de reemplazar la bombilla. 6. ¡El Bulbo Se Calienta Rápidamente! No toque el bulbo, el cristal, la protección o la envuelta calientes en ningún momento. Use un paño blando. La grasitud de la piel puede dañar el bulbo. 7. PRECAUCIÓN:Para reducir el riesgo de incendio.Use este accesorio sólo con una bombilla halógena GU10 protegido y G9. 8. Todas las instalaciones eléctricas deben observar los códigos locales y el Código de Electricidad Nacional de EE.UU. Si usted no está familiarizado con los métodos de instalación del cableado eléctrico, contrate los servicios de un perito electricista habilitado. 9. Estos accesorios están previstos para usar con una caja de empalme octogonal metálica de 4 x 2 1/8 pulg. (100 x 54 mm) de profundidad. La caja debe ser soportada directamente por la estructura del edificio. 10. Antes de empezar con la instalación, desconecte la alimentación eléctrica con el interruptor general o los fusibles de entrada. Cortar la alimentación al circuito solamente con la llave de luz, no es suficiente para prevenir una electrocución. Nota: Las importantes recomendaciones e instrucciones proporcionadas en este manual no abarcan todas las condiciones y/o situaciones posibles que pudieran presentarse. Se sobreentiende que el sentido común, la precaución y la atención al trabajo no son parte de ningún producto. Son factores que debe tener en cuenta quien ejecute la instalación, cuide y opere el accesorio. DESEMBALAJE DEL PRODUCTO Verifique el contenido para asegurarse de que estén todos los elementos. Herramientas necesarias: Destornillador Phillips, llave ajustable, escalera, pinza para cortar cables, elementos de cableado requeridos por el código de electricidad. GUARDE ESTAS INSTRUCCIONES CONEXIONES ELÉCTRICAS (para todos los modelos) Circuito de alimentación requerido: 120 V, 60 Hz Conecte el o los cables blancos del accesorio al cable blanco del circuito de alimentación. Conecte el o los cables negros del accesorio al cable negro del circuito de alimentación. Conecte el conductor verde o de cobre desnudo al cable de tierra del circuito de alimentación. Use capuchones de empalme certificados por UL/CSA, adecuados para el tamaño, tipo y cantidad de conductores. No deben quedar conductores o cables sueltos. Asegure los capuchones de empalme con cinta aisladora certificada por UL/CSA. INSTALLATION 1. 2. 3. 4. 5. 6. 7. Make sure main power is OFF before installation. Install mounting bracket to existing outlet box with screws. Pull wires through mounting bracket. A. Make ELECTRICAL CONNECTIONS as directed above. B. Carefully tuck connected wires back into the outlet box. Install the fixture canopy on to the mounting bracket stem with nut. Install the two G9 bulbs. Then, install the glass shade to the canopy, attach with washer, and the decorative nut. Lastly, install the GU10 bulbs to the directional fixtures. CAUTION: Refer to the re-lamping label located near the lamp holder for recommended maximum wattage. Do not exceed recommended wattage. Note: Some fixture shapes may vary, not shown for all models. INSTALACIÓN 1. 2. 3. 4. 5. 6. 7. Antes de iniciar la instalación, asegúrese de que la alimentación eléctrica esté desconectada. Instale el soporte de montaje en la caja de empalme existente con tornillos. Pase los cables a través del soporte de montaje. A. Haga las CONEXIONES ELÉCTRICAS como se explica más arriba. B.Vuelva a colocar con cuidado todos los cables conectados adentro de la caja de empalme. Instale el rosetón del accesorio en el vástago del soporte de montaje con la tuerca. Instale las dos bombillas G9. Luego, instale la pantalla de vidrio en el rosetón, con la arandela, y la tuerca decorativa. Finalmente, instale las bombillas GU10 en los accesorios direccionales. PRECAUCIÓN: Observe el valor máximo de potencia de lámpara recomendado en la etiqueta del portalámpara. No exceda la potencia recomendada. Nota: Las formas de algunos accesorios pueden variar y no se muestran todos los modelos. 702B-
 1
1
-
 2
2


Hampton Bay EC9062ABZ Guía del usuario
- Categoría
- Focos
- Tipo
- Guía del usuario
en otros idiomas
- English: Hampton Bay EC9062ABZ User guide
Artículos relacionados
-
 Hampton Bay EC3412WAL Instrucciones de operación
-
 Hampton Bay ES3414WAL Guía del usuario
-
 Hampton Bay EC7201IO Guía del usuario
-
 Hampton Bay EC9085SBA Guía del usuario
-
 Hampton Bay EC0730ABZ Guía del usuario
-
 Hampton Bay ES0090WAL Guía del usuario
-
 Hampton Bay ES0746BN Guía del usuario
-
 Hampton Bay EC9066ABZ Guía del usuario
-
 Hampton Bay ES729BAX Guía del usuario
-
 Hampton Bay EC9083SBA Guía del usuario


