GE GTD42EASJWW El manual del propietario

Categoría
Lavadoras secadoras
Tipo
El manual del propietario
Owner’s Manual
Dryers
Safety Instructions ........ 24
Operating Instructions
Control Panel ................. 4, 5
Control Settings .................. 5
Features ......................... 6
Loading and Using
the Dryer ........................6
Reversing the Door ............... 7
Venting the Dryer ................8
Troubleshooting Tips .... 9, 10
Consumer Support
Consumer Support .............. 12
Warranty ....................... 11
GEAppliances.com
Write the model and serial
numbers here:
Model # ________________
Serial # _________________
You can find them on a label
on the front of the dryer behind
the door.
234D2431P002
49-90543-1 04-15 GE Printed in Mexico
2
IMPORTANT SAFETY INFORMATION.
READ ALL INSTRUCTIONS BEFORE USING.
This is the safety alert symbol. This symbol alerts you to potential hazards that can kill you or hurt you and others.
All safety messages will follow the safety alert symbol and the word “DANGER”, “WARNING”, or “CAUTION”. These
words are defined as:
Indicates a hazardous situation which, if not avoided, will result in death or serious injury.
Indicates a hazardous situation which, if not avoided, could result in death or serious injury.
Indicates a hazardous situation which, if not avoided, could result in minor or moderate injury.
DANGER
WARNING
CAUTION
IMPORTANT SAFETY INSTRUCTIONS
To reduce the risk of fire, explosion, electric shock, or injury to persons when using your appliance, follow
basic precautions, including the following:
Read all instructions before using the appliance.
DO NOT dry articles that have been previously cleaned in, washed in, soaked in or spotted with gasoline, dry-cleaning
solvents, or other flammable or explosive substances, as they give off vapors that could ignite or explode.
DO NOT place items exposed to cooking oils in your dryer. Items contaminated with cooking oils may contribute to a
chemical reaction that could cause a load to catch fire.
DO NOT allow children to play on or in this appliance. Close supervision of children is necessary when this appliance
is used near children. Before the appliance is removed from service or discarded, remove the door to the drying
compartment.
DO NOT reach into the appliance if the drum is moving.
DO NOT install or store this appliance where it will be exposed to the weather.
DO NOT tamper with controls,
repair or replace any part of this appliance or attempt any servicing unless specifically
recommended in the user maintenance instructions or in published user repair instructions that you understand and
have the skills to carry out.
DO NOT use fabric softeners or products to eliminate static unless recommended by the manufacturer of the fabric
softener or product.
DO NOT use heat to dry articles containing foam rubber or similarly textured rubber-like materials.
Clean lint screen before or after each load. DO NOT operate the dryer without the lint filter in place.
Do not store combustible materials, gasoline or other flammable liquids near the dryer.
Keep area around the exhaust
opening and adjacent surrounding areas free from the accumulation of lint, dust and dirt. Keep dryer area clear and free
from items that would obstruct the flow of combustion and ventilation air.
The interior of the appliance and exhaust duct should be cleaned periodically by qualified service personnel.
Unplug the appliance or turn off the circuit breaker before servicing. Pressing the Power or Start/Pause button DOES NOT
disconnect power.
DO NOT operate this appliance if it is damaged, malfunctioning, partially disassembled, or has missing or broken parts,
including a damaged cord or plug.
DO NOT spray any type of aerosol into, on or near dryer at any time. Do not use any type of spray cleaner when cleaning dryer
interior. Hazardous fumes or electrical shock could occur
.
See “Electrical Connection” located in the Installation Instructions for grounding instructions.
SAVE THESE INSTRUCTIONS
WARNING
3
GEAppliances.com
ADDITIONAL GAS DRYER WARNINGS
For your safety, the information in this manual must be followed to minimize the risk of fire or explosion
or to prevent damage, personal injury, or death.
- DO NOT store or use gasoline or other flammable vapors and liquids in the vicinity of this or any other appliance.
- WHAT TO DO IF YOU SMELL GAS:
 '2127WU\WROLJKWDQ\DSSOLDQFH
 '2127WRXFKDQ\HOHFWULFDOVZLWFK'2127XVHDQ\SKRQHLQ\RXUEXLOGLQJ
 &OHDUWKHURRPEXLOGLQJRUDUHDRIDQ\RFFXSDQWV
 ,PPHGLDWHO\FDOO\RXUJDVVXSSOLHUIURPDQHLJKERU·VSKRQH)ROORZWKHJDVVXSSOLHU·VLQVWUXFWLRQV
 ,I\RXFDQQRWUHDFK\RXUJDVVXSSOLHUFDOOWKHILUHGHSDUWPHQW
- ,QVWDOODWLRQDQGVHUYLFHPXVWEHSHUIRUPHGE\DTXDOLILHGLQVWDOOHUVHUYLFHDJHQF\RUWKHJDVVXSSOLHU
WARNING
State of California Proposition 65 Warnings:
The California Safe Drinking Water and Toxic Enforcement Act requires the governor of California to publish a list of substances
known to the state to cause cancer, birth defects or other reproductive harm and requires businesses to warn of potential
exposure to such substances.
This product contains one or more chemicals known to the State of California to cause cancer, birth defects
or other reproductive harm.
Gas appliances can cause low-level exposure to some of these substances, including benzene, carbon monoxide, formaldehyde
and soot, caused primarily by the incomplete combustion of natural gas or LP fuels. Exposure to these substances can be
minimized by properly venting the dryer to the outdoors.
SAVE THESE INSTRUCTIONS
WARNING
Throughout this manual, features and appearance may vary from your model.
4
About the dryer control panel.
To reduce the risk of fire, electric shock, or injury to persons, read the IMPORTANT SAFETY INSTRUCTIONS before
operating this appliance.
WARNING!
WARNING
WARNING
Explosion Hazard
Fire Hazard
Keep flammable materials and vapors, such as gasoline,
away from dryer.
DO NOT dry anything that has ever had anything flammable
on it (even after washing).
Failure to do so can result in death, explosion, or fire.
No washer can completely remove oil.
Do not dry anything that has ever had any type of oil on it
(including cooking oils).
Items containing foam, rubber, or plastic must be dried on a
clothesline or by using an air dry cycle.
Failure to follow these instructions can result in death or fire.
D B EA C
B EA C
GEAppliances.com
IMPORTANT: Clean the lint filter each time you use the dryer.
Temperature
(Not all features are on all models)
Cottons For regular to heavy cottons.
Regular
Casuals For synthetics, blends, delicates and items labeled permanent press.
Medium
Delicates On some models. For delicates, synthetics and items labeled tumble dry low.
Low
Air Fluff For fluffing items without heat. Use the Time Dry cycle.
No Heat
Drying Cycles (Not all features are on all models)
Cottons For cottons and most linens. For most loads, select Optimum Dry (on some models).
Casuals For wrinkle-free, permanent press and delicate items, and knits.
Delicates For delicate items, special-care fabrics and knits.
Time Dry Set the Cycle Selector at the desired drying time.
Dewrinkle For removing wrinkles from items that are clean and dry or that are very lightly damp.
Quick Fluff For freshening or fluffing up already dry clothing, fabrics, linens and pillows. Use with Air Fluff No Heat.
Provides 10 minutes of no heat tumbling.
Sensor cycles automatically determine fabric dryness. Select Less Dry if you want your clothes slightly damp at the end of the
drying cycle. Select More Dry if you want them to feel drier.
Timed cycles run for a selected time.
Start³&ORVHWKHGU\HUGRRU6HOHFWStart. Opening the door during operation will stop the dryer.
To restart the dryer, close the door and select Start to complete the cycle.
A
B
C
NOTE: Drying times will vary according to the type of heat used (Electric, Natural or LP gas), size of load, types of fabrics,
wetness of clothes and condition of exhaust ducts.
Extended Tumble Option (on some models)
Use this option to minimize the wrinkles in clothes. It provides approximately 15 minutes of no-heat tumbling after the clothes
are dry.
This option can only be used with the Cottons and Casuals/Easy Care cycles.
If you are using the cycle Signal knob and you select the Extended Tumble option, a signal will sound at the end of the drying
time and several times during the Extended Tumble cycle. This will remind you that it is time to remove the clothes.
If Extended Tumble is not on, the dryer will stop once the timer reaches the Extended Tumble mark on the cycle dial.
Cycle Signal Option (on some models)
This signal will sound just before the end of the cycle to remind you to remove the clothes. On some models, the signal sound
level cannot be adjusted.
If you selected the Extended Tumble option, the signal will sound at the end of the drying time and will sound several times
during the Extended Tumble cycle. This will remind you that it is time to remove the clothes.
NOTE:
Remove garments promptly at the sound of the signal. Place clothes on hangers so wrinkles won’t set in.
Use the cycle Signal especially when drying fabrics like polyester knits and permanent press. These fabrics should
be removed so wrinkles won’t set in.
Automatic Cycle Signal (on some models)
At the end of each cycle, there is approximately 15 minutes of no-heat tumbling after the laundry is dry. A reminder signal will
sound periodically during this time to remind you to remove the laundry.
D
E
5
The alloy steel used to make the dryer drum provides
the highest reliability available in a GE dryer.
If the dryer drum should be scratched or dented
during normal use, the drum will not rust or corrode.
These surface blemishes will not affect the function or
durability of the drum.
Drum Lamp (on some models)
Before replacing the light bulb, be sure to unplug
the dryer power cord or disconnect the dryer at the
household distribution panel by removing the fuse or
switching off the circuit breaker.
Reach above dryer
opening from inside the drum.
Remove the
bulb and replace with the same size bulb.
Drying Rack (on some models)
A handy drying rack may be used for drying delicate
items such as washable sweaters.
Hook the rack over the lint filter so the rack extends
into the dryer drum.
NOTE:
The drying rack must be used with the Time Dry
cycle.
Do not use this drying rack when there
are other clothes in the dryer.
About the dryer features.
6
Sorting and Loading Hints
As a general rule, if clothes are sorted properly for the
washer, they are sorted properly for the dryer.
Do not add fabric softener sheets once the load has
become warm. They may cause fabric softener stains.
Bounce
®
Fabric Conditioner Dryer Sheets have been
approved for use in all GE Dryers when used in
accordance with the manufacturer’s instructions.
Do not overload. This wastes energy and causes
wrinkling.
Do not dry the following items: fiberglass items,
woolens, rubber-coated items, plastics, items with
plastic trim and foam-filled items.
The Exterior: Wipe or dust any spills or washing
compounds with a damp cloth. Dryer control
panel and finishes may be damaged by some laundry
pretreatment soil and stain remover products. Apply
these products away from the dryer. The fabric may
then be washed and dried normally. Damage to your
dryer caused by these products is not covered by
your warranty.
The Lint Filter: Clean the lint filter before each
use. Moisten your fingers and reach into the filter
opening. Run your fingers
across the filter. Have a
qualified
technician vacuum the lint from the dryer
once a year.
Stainless Steel: To clean stainless steel surfaces,
use a damp cloth with a mild, non-abrasive cleaner
suitable for stainless steel surfaces. Remove the
cleaner residue, and then dry with a clean cloth.
Dryer Interior and Duct: The interior of the
appliance and exhaust duct should be cleaned once
a year by qualified service personnel.
The Exhaust Duct: Inspect and clean the exhaust
ducting at least once a year to prevent clogging.
A partially clogged exhaust can lengthen the
drying time.
Follow these steps:
1
Turn off electrical supply by disconnecting the
plug from the wall socket.
2
Disconnect the duct from the dryer.
3
Vacuum the duct with the hose attachment and
reconnect the duct.
The Exhaust Hood: Check from the outside that the
flaps of the hood move freely when operating. Make
sure that there is not wildlife (birds, insects, etc.) nesting
inside the duct or hood.
Care and Cleaning of the Dryer
Alloy Steel Drum (on some models)
Loading and using the dryer.
Always follow the fabric manufacturer’s care label when laundering.
About reversing the door.
GEAppliances.com
Reversing the Door
Tools needed:
Standard #2 Tape-tipped
Phillips screwdriver putty knife
1
Open the door and remove the filler plugs opposite the
hinges. With the door completely open, remove the bottom
screw from each hinge on the dryer face. Insert these
screws about half way into the TOP holes, for each hinge,
on the opposite side (where you removed the filler plugs).
Apply firm pressure to get the screw started in new holes.
2
Loosen top screw from each hinge on the dryer face half
way. With one hand holding the top of the door and the
other hand holding the bottom, remove the door from the
dryer by lifting it UP and OUT.
3
Remove the blind plate from the hinge side of the dryer by
removing its two screws. Remove the strike plate from the
opposite side of the dryer by removing its two screws.
Reinstall the plates, on the opposite sides, using two screws
in each plate.
4
Rotate the door 180°. Insert it on the opposite side of the
opening by moving the door IN and DOWN until the top
hinge and the bottom hinge are resting on the top screws
inserted in step 1.
5
Remove the remaining screws from the side of the opening
from which the door was removed. With these screws,
secure each hinge at the bottom. Tighten the two top screws
of each hinge. Reinsert the plastic plugs on the side from
which the door was removed.
INSTALL AND TIGHTEN BOTTOM
SCREWS AND TIGHTEN TOP
SCREWS
INSERT PLUGS
INTO HOLES ON
OPPOSITE SIDE
REMOVE BOTTOM SCREW FROM EACH HINGE
AND INSTALL HALF WAY INTO EACH TOP OF
OPPOSITE HINGE HOLES
REMOVE 4 PLUGS AND KEEP
FOR INSERTION INTO
THE OPPOSITE SIDE
LOOSEN EACH TOP HINGE
SCREW HALF WAY AND LIFT
THE DOOR UP AND OFF
FRONT PANEL
SWITCH
STRIKE
PLATE
BLIND
PLATE
ROTATE DOOR 180º AND HANG
IT ON TOP HINGE SCREWS
7
For the best drying performance, the dryer needs to be properly vented. The dryer will use more energy
and run longer if it is not vented to the below specifications. Carefully follow the details on Exhausting in
the Installation Instructions.
Use only rigid metal 4” diameter ductwork inside the dryer cabinet. Use only rigid metal or UL listed
flexible metal 4” diameter ductwork for exhausting to the outside.
Do not use plastic or other combustible ductwork.
Use the shortest length possible.
Do not crush or collapse.
Avoid resting the duct on sharp objects.
Venting must conform to local building codes.
Venting the Dryer
Correct
Venting
Incorrect
Venting
About venting the dryer.
8
- Fire Hazard
WARNING
This dryer MUST be exhausted to the outdoors.
Use only 4” rigid metal ducting for the home exhaust duct.
Use only 4” rigid metal or UL-listed dryer transition duct to connect the dryer
to the home exhaust.
DO NOT use a plastic vent.
DO NOT exhaust into a chimney, kitchen exhaust, gas vent, wall, ceiling,
attic, crawl space, or concealed space of a building.
DO NOT install a screen in or over the exhaust duct.
DO NOT use duct longer than specified in the exhaust length table.
Failure to follow these instructions can result in death or fire.
Problem Possible Causes What To Do
Dryer doesn’t start Dryer is unplugged  0DNHVXUHWKHGU\HUSOXJLVSXVKHGFRPSOHWHO\LQWR
the outlet.
Fuse is blown/circuit breaker   &KHFNWKHKRXVHIXVHFLUFXLWEUHDNHUER[DQGUHSODFH
is tripped fuse or reset breaker. NOTE: Most electric dryers use
IXVHVEUHDNHUV
Dryer doesn’t heat Fuse is blown/circuit breaker is  &KHFNWKHKRXVHIXVHFLUFXLWEUHDNHUER[DQGUHSODFH
WULSSHGWKHGU\HUPD\WXPEOH both fuses or reset both breakers. Your dryer may tumble
but not heat if only one fuse is blown or one breaker tripped.
Gas service is off  0DNHVXUHJDVVKXWRIIDWGU\HUDQGPDLQVKXWRIIDUH
fully open.
Dryer shakes or Some shaking/noise is normal.  0RYHGU\HUWRDQHYHQIORRUVSDFHRUDGMXVWOHYHOLQJOHJV
makes noise Dryer may be sitting unevenly as necessary until even.
Greasy spots on clothes Improper use of fabric softener  )ROORZGLUHFWLRQVRQIDEULFVRIWHQHUSDFNDJH
Drying dirty items with  8VH\RXUGU\HUWRGU\RQO\FOHDQLWHPV'LUW\LWHPVFDQ
clean ones stain clean items and the dryer.
Clothes were not  6RPHWLPHVVWDLQVZKLFKFDQQRWEHVHHQZKHQWKH
completely clean clothes are wet appear after drying. Use proper washing
procedures before drying.
Lint on clothes Lint filter is full  &OHDQOLQWVFUHHQEHIRUHHDFKORDG
Improper sorting  6RUWOLQWSURGXFHUVOLNHFKHQLOOHIURPOLQWFROOHFWRUV
(like corduroy).
Static electricity can attract lint  6HHVXJJHVWLRQVLQWKLVVHFWLRQXQGHUStatic occurs.
Overloading  6HSDUDWHODUJHORDGVLQWRVPDOOHURQHV
3DSHUWLVVXHHWFOHIWLQSRFNHWV  (PSW\DOOSRFNHWVEHIRUHODXQGHULQJFORWKHV
Static occurs No fabric softener was used  7U\DIDEULFVRIWHQHU
 %RXQFH
®
Fabric Conditioner Dryer Sheets have been
approved for use in all GE Dryers when used in
accordance with the manufacturer’s instructions.
Overdrying  7U\DIDEULFVRIWHQHU
 $GMXVWVHWWLQJWRLess Dry or Damp Dry.
6\QWKHWLFVSHUPDQHQWSUHVV  7U\DIDEULFVRIWHQHU
and blends can cause static
Inconsistent Type of heat  $XWRPDWLFGU\LQJWLPHVZLOOYDU\DFFRUGLQJWRWKHW\SH
drying times of heat used (electric, natural or LP gas), size of load,
types of fabrics, wetness of clothes and condition of
exhaust ducts.
Troubleshooting Tips
Save time and money! Review the charts on the following pages, or visit
GEAppliances.com. You may not need to call for service.
Before you call for service…
GEAppliances.com
9
Problem Possible Causes What To Do
Clothes take too long Improper sorting 6HSDUDWHKHDY\LWHPVIURPOLJKWZHLJKWLWHPVJHQHUDOO\
to dry a well-sorted washer load is a well-sorted dryer load).
Large loads of heavy fabrics  /DUJHKHDY\IDEULFVFRQWDLQPRUHPRLVWXUHDQGWDNH
(like beach towels) longer to dry. Separate large, heavy fabrics into smaller
loads to speed drying time.
Controls improperly set 0DWFKFRQWUROVHWWLQJVWRWKHORDG\RXDUHGU\LQJ
Lint filter is full &OHDQOLQWILOWHUEHIRUHHYHU\ORDG
Improper or obstructed &KHFNLQVWDOODWLRQLQVWUXFWLRQVIRUSURSHU
ducting GXFWLQJYHQWLQJ
0DNHVXUHGXFWLQJLVFOHDQIUHHRINLQNVDQG
unobstructed.
&KHFNWRVHHLIRXWVLGHZDOOGDPSHURSHUDWHVHDVLO\
&KHFNWKH,QVWDOODWLRQ,QVWUXFWLRQVWRPDNHVXUHWKH
dryer venting is correct.
Blown fuses or tripped 5HSODFHIXVHVRUUHVHWFLUFXLWEUHDNHUV6LQFHPRVWGU\HUV
circuit breaker XVHIXVHVEUHDNHUVPDNHVXUHERWKDUHRSHUDWLQJ
Overloading/combining loads 'RQRWSXWPRUHWKDQRQHZDVKHUORDGLQWKHGU\HU
at a time.
Underloading ,I\RXDUHGU\LQJRQO\RQHRUWZRLWHPVDGGDIHZLWHPV
to ensure proper tumbling.
Clothes are wrinkled Overdrying 6HOHFWDVKRUWHUGU\LQJWLPH
5HPRYHLWHPVZKLOHWKH\VWLOOKROGDVOLJKWDPRXQWRI
moisture. Select a Less Dry or Damp Dry setting.
Letting items sit in dryer 5HPRYHLWHPVZKHQF\FOHHQGVDQGIROGRUKDQJ
after cycle ends immediately.
Overloading 6HSDUDWHODUJHORDGVLQWRVPDOOHURQHV
Clothes shrink Some fabrics will naturally shrink 7RDYRLGVKULQNDJHIROORZJDUPHQWFDUHODEHOVH[DFWO\
when washed. Others can be
VDIHO\ZDVKHGEXWZLOOVKULQN
6RPHLWHPVPD\EHSUHVVHGEDFNLQWRVKDSHDIWHUGU\LQJ
in the dryer
,I\RXDUHFRQFHUQHGDERXWVKULQNDJHLQDSDUWLFXODU
item, do not machine wash or tumble dry it.
Before you call for service…
10
For The Period Of: GE Will Replace:
One Year Any part of the dryer which fails due to a defect in materials or workmanship. During this
From the date of the limited one-year warranty, GE will also provide, free of charge, all labor and related service costs
original purchase to replace the defective part.
What GE Will Not Cover:
Service trips to your home to teach you how to
use the product.
,PSURSHULQVWDOODWLRQGHOLYHU\RUPDLQWHQDQFH
)DLOXUHRIWKHSURGXFWLILWLVDEXVHGPLVXVHGRU
used for other than the intended purpose or used
commercially.
Replacement of the light bulb.
3URGXFWVZKLFKDUHQRWGHIHFWLYHRUEURNHQRUZKLFK
DUHZRUNLQJDVGHVFULEHGLQWKH2ZQHU·V0DQXDO
Replacement of house fuses or resetting of circuit
breakers.
'DPDJHWRWKHSURGXFWFDXVHGE\DFFLGHQWILUHIORRGV
or acts of God.
Incidental or consequential damage caused by possible
defects with this appliance.
Defects or damage due to operation in freezing
temperatures.
Damage caused after delivery.
Product not accessible to provide required service.
This warranty is extended to the original purchaser and any succeeding owner for products purchased
for home use within the USA. If the product is located in an area where service by a GE Authorized Servicer is not
available, you may be responsible for a trip charge or you may be required to bring the product to an Authorized
GE Service location. In Alaska, the warranty excludes the cost of shipping or service calls to your home.
Some states do not allow the exclusion or limitation of incidental or consequential damages. This warranty
gives you specific legal rights, and you may also have other rights which vary from state to state. To know
what your legal rights are, consult your local or state consumer affairs office or your state’s Attorney General.
Warrantor: General Electric Company. Louisville, KY 40225
All warranty service provided by our Factory Service Centers,
or an authorized Customer Care
®
technician. To schedule service,
on-line, 24 hours a day, visit us at GEAppliances.com, or call 800.
GE.CARES (800.432.2737). Please have serial number and model
number available when calling for service.
Staple your receipt here.
Proof of the original purchase
date is needed to obtain
support under the warranty.
GE Dryer Warranty.
GEAppliances.com
(;&/86,212),03/,(':$55$17,(6³<RXUVROHDQGH[FOXVLYHUHPHG\LVSURGXFWUHSDLUDVSURYLGHGLQWKLV/LPLWHG
Warranty. Any implied warranties, including the implied warranties of merchantability or fitness for a particular
purpose, are limited to one year or the shortest period allowed by law.
11
GE Appliances Website GEAppliances.com
Have a question or need assistance with your appliance? Try the GE Appliances Website 24 hours a day,
any day of the year! For greater convenience and faster service, you can now download Owner’s Manuals,
order parts or even schedule service on-line.
Schedule Service GEAppliances.com
Expert GE repair service is only one step away from your door. Get on-line and schedule your service
at your convenience 24 hours any day of the year! Or call 800.GE.CARES (800.432.2737) during normal business
hours.
Real Life Design Studio GEAppliances.com
*(VXSSRUWVWKH8QLYHUVDO'HVLJQFRQFHSW³SURGXFWVVHUYLFHVDQGHQYLURQPHQWVWKDWFDQEHXVHGE\
people of all ages, sizes and capabilities. We recognize the need to design for a wide range of physical and
mental abilities and impairments. For details of GE’s Universal Design applications, including kitchen design
ideas for people with disabilities, check out our Website today. For the hearing impaired, please call 800.TDD.
GEAC (800.833.4322).
Extended Warranties GEAppliances.com
Purchase a GE extended warranty and learn about special discounts that are available while your warranty
is still in effect. You can purchase it on-line anytime, or call 800.626.2224 during normal business hours.
GE Consumer Home Services will still be there after your warranty expires.
Parts and Accessories GEAppliances.com
Individuals qualified to service their own appliances can have parts or accessories sent directly to their homes
(VISA, MasterCard and Discover cards are accepted). Order on-line today, 24 hours every day or
by phone at 800.626.2002 during normal business hours.
Instructions contained in this manual cover procedures to be performed by any user. Other servicing
generally should be referred to qualified service personnel. Caution must be exercised, since improper
servicing may cause unsafe operation.
Contact Us GEAppliances.com
If you are not satisfied with the service you receive from GE, contact us on our Website with all the details
including your phone number, or write to: General Manager, Customer Relations
GE Appliances, Appliance Park
Louisville, KY 40225
Register Your Appliance GEAppliances.com
5HJLVWHU\RXUQHZDSSOLDQFHRQOLQH³DW\RXUFRQYHQLHQFHTimely product registration will allow for enhanced
communication and prompt service under the terms of your warranty, should the need arise.
You may also mail in the pre-printed registration card included in the packing material.
Consumer Support.
12
Manual del
propietario
Secadoras
Instrucciones de seguridad ........ 24
Instrucciones de operación
Ajustes de control ....................... 7
Cómo cambiar la puerta .................. 9
Cómo cargar y usar la secadora .......10, 11
Funciones ............................... 8
Tablero de control
de la secadora ......................... 5, 6
Ventilación de la secadora .............. 11
Solución a problemas
comunes ......................... 12, 13
Soporte al consumidor
Garantía ............................... 15
Soporte al consumidor .................. 16
GEAppliances.com
Escriba los números del
modelo y de serie aquí:
No. de modelo _________
No. de serie ___________
Estos números se encuentran
en una etiqueta en la parte
frontal de la secadora, detrás
de la puerta.
234D2431P002
49-90543-1 04-15 GE Impreso en Mexico
2
INFORMACIÓN DE SEGURIDAD IMPORTANTE.
LEA TODAS LAS INSTRUCCIONES ANTES DE USAR.
Éste es el símbolo de alerta de seguridad. El mismo alerta sobre potenciales riesgos que le pueden producir la muerte
o lesiones tanto a usted como a otras personas. Todos los mensajes de seguridad estarán a continuación del símbolo
de alerta de seguridad y con la palabra “PELIGRO”, “ADVERTENCIA” o “PRECAUCIÓN”. Estas palabras se definen como:
Indica una situación de riesgo que, si no se evita, producirá la muerte o lesiones graves.
Indica una situación de riesgo que, si no se evita, podría producir la muerte o lesiones graves.
Indica una situación de riesgo que, si no se evita, podría resultar en lesiones menores o moderadas.
PELIGRO
ADVERTENCIA
PRECAUCIÓN
INSTRUCCIONES IMPORTANTES DE SEGURIDAD
Para reducir el riesgo de incendio, explosión, descargas eléctricas o lesiones sobre las personas al usar su
electrodoméstico, siga las precauciones básicas, incluyendo lo siguiente:
Lea todas las instrucciones antes de usar este electrodoméstico.
NO seque prendas que en forma previa hayan sido secadas, lavadas, penetradas o manchadas con gasolina, solventes de
limpieza en seco, u otras sustancias inflamables o explosivas, ya que despiden vapores que se podrían encender o explotar
.
NO coloque prendas expuestas a aceites de cocción en su secadora. Las prendas contaminadas con aceites de cocción
podrán contribuir a una reacción química que podría hacer que una carga de ropa se prenda fuego
.
NO permita que los niños jueguen sobre o dentro de este electrodoméstico. Cuando el electrodoméstico se use cerca de
niños, será necesario supervisarlos de cerca
.
Antes de que este electrodoméstico quede fuera de uso o se descarte, retire la
puerta del compartimiento de secado
.
NO introduzca las manos en la secadora cuando el tambor se encuentre en movimiento
.
NO instale ni guarde este electrodoméstico donde quede expuesto a los factores climáticos
.
NO manipule indebidamente los controles,
reparar ni reemplazar cualquier parte del electrodoméstico o realizar cualquier
otro trabajo técnico, a menos que esto sea específicamente recomendado en las instrucciones de mantenimiento
del usuario o en instrucciones publicadas sobre reparaciones del usuario, que entienda y para las cuales posea las
destrezas necesarias.
NO utilice suavizantes de tela ni productos para eliminar la estática, a menos que esto sea recomendado por el fabricante del
suavizante de tela u otro producto
.
NO utilice calor para secar artículos que contengan gomaespuma o materiales de goma con textura similar.
Limpie la rejilla para pelusas antes o después de cada carga
.
NO utilice la secadora si el filtro de pelusas no se encuentra
colocado
.
No guarde materiales combustibles, gasolina u otros líquidos inflamables cerca de la secadora.
Evite la acumulación
de pelusa, polvo o tierra alrededor del área de la apertura de ventilación y áreas adyacentes. Mantenga el área de la
secadora despejada y libre de objetos que puedan obstruir el flujo del aire de la ventilación y combustión.
La parte interior del electrodoméstico y el conducto de ventilación se deberán limpiar periódicamente por personal calificado
del servicio técnico
.
Desenchufe el electrodoméstico o apague el disyuntor antes de realizar el servicio técnico. Presionar el botón Power
(Encendido) o Start/Pause (Inicio/Pausa) NO desconecta el encendido
.
NO utilice este electrodoméstico si se encuentra dañado, funcionando mal, parcialmente desensamblado, o si tiene partes
faltantes o rotas, incluyendo un cable o enchufe dañado
.
NO rocíe ningún tipo de aerosol dentro, sobre ni cerca de la secadora en ningún momento. No use ningún tipo de limpiador
en espray para limpiar el interior de la secadora. Se podrán producir vapores o una descarga eléctrica.
Para acceder a las instrucciones de conexión a tierra, lea los “Conexión Eléctrica” ubicados en las Instrucciones de Instalación
.
GUARDE ESTAS INSTRUCCIONES
ADVERTENCIA
3
GEAppliances.com
ADVERTENCIAS ADICIONALES SOBRE LA SECADORA A GAS
Para su seguridad, siga las instrucciones de este manual a fin de minimizar riesgos de incendio o
explosión, o para evitar daños, lesiones personales o la muerte.
- NO guarde ni use gasolina u otros vapores y líquidos inflamables cerca de éste ni de otros electrodomésticos.
- QUÉ DEBE HACER SI HUELE GAS:
 12LQWHQWHLOXPLQDUQLQJ~QHOHFWURGRPpVWLFR
 12WRTXHQLQJ~QLQWHUUXSWRUHOpFWULFR12XVHWHOpIRQRVHQVXHGLILFLR
 +DJDTXHVHUHWLUHQORVRFXSDQWHVGHODVDODHGLILFLRRiUHD
 'HLQPHGLDWROODPHDVXSURYHHGRUGHJDVGHVGHHOWHOpIRQRGHXQYHFLQR6LJDODVLQVWUXFFLRQHVGHOSURYHHGRUGHJDV
 6LQRVHSXHGHFRPXQLFDUFRQVXSURYHHGRUGHJDVOODPHDOGHSDUWDPHQWRGHERPEHURV
- /DLQVWDODFLyQ\ODVUHSDUDFLRQHVGHEHUiQVHUUHDOL]DGDVSRUXQLQVWDODGRUFDOLILFDGRDJHQFLDGHVHUYLFLRVRHOSURYHHGRUGHJDV
GUARDE ESTAS INSTRUCCIONES
Advertencias de la Proposición 65 del Estado de California:
La Ley sobre Agua Potable Inocua y Tratamiento de Residuos Tóxicos de California (California Safe Drinking Water and
Toxic Enforcement Act) solicita al Gobernador de California que publique una lista de sustancias que el estado reconoce
que producen cáncer, defectos de nacimiento u otros daños reproductivos y solicita a las empresas que adviertan sobre la
posible exposición a tales sustancias.
Este producto contiene uno o más químicos que el Estado de California entiende que producen cáncer,
defectos en el nacimiento u otros daños reproductivos.
Los electrodomésticos a gas puedan causar una exposición de bajo nivel a algunas de estas sustancias, incluyendo
benceno, monóxido de carbono, formaldehido y hollín, ocasionado principalmente por la combustión incompleta de
gas natural o combustibles de LP. La exposición a estas sustancias puede ser minimizada ventilando correctamente la
secadora hacia el exterior.
ADVERTENCIA
ADVERTENCIA
Puede ubicar su número de modelo en la etiqueta de la parte frontal de la secadora, detrás de la puerta. A lo largo de este
manual, las funciones y la apariencia podrían ser diferentes a su modelo.
4
Panel de control de la secadora.
Para reducir el riesgo de incendios, descargas eléctricas o heridas, lea las INSTRUCCIONES IMPORTANTES DE
SEGURIDAD antes de utilizar este electrodoméstico.
¡ADVERTENCIA!
Riesgo de Explosión
Riesgo de Incendio
Mantenga cualquier material y vapores inflamables, tales como
gasolina, alejados de la secadora.
NO seque nada que alguna vez haya tenido algo inflamable en
éste (incluso luego de lavar).
Si no se cumple con esto, se podrá producir muerte, explosión
o incendio.
Ninguna lavadora puede eliminar el aceite por completo.
No seque nada que alguna vez haya tenido algún tipo de
aceite (incluyendo aceites de cocina).
Las prendas con gomaespuma, goma, o plástico deberán ser secadas
en un tendedero o utilizando un ciclo de Air Dry (Secado con Aire).
Si no se siguen estas instrucciones se podrá producir la
muerte o un incendio.
WARNING
WARNING
ADVERTENCIA
ADVERTENCIA
D B EA C
B EA C
NOTA: los tiempos de secado variarán de acuerdo al tipo de calor utilizado (eléctrico, natural o gas LP), volumen de carga,
tipo de telas, nivel de humedad de la ropa y estado de los conductos de escape.
Temperatura (No todas las características están en todos los modelos)
Cottons (Algodones) Para telas de algodón de normales a pesadas.
(Regular)
Casuals (Casuals)/ Para telas sintéticas, tejidos de mezcla y artículos etiquetados como de
Medium (Medio) permanent press (planchado permanente).
Delicates (Prendas En algunos modelos. Para artículos delicados, de tela sintética y
Delicadas) Low (Bajo) etiquetados como tumble dry low (centrifugado de secado lento).
Air Fluff (Esponjado) Para esponjar artículos sin utilizar calor. Use el ciclo de Time Dry
No Heat (Sin Calor) (Secado Cronometrado).
Los ciclos automáticos detectan automáticamente el nivel de sequedad de las telas. Seleccione Less Dry (Menos Seco) si desea
que sus prendas permanezcan levemente húmedas al final del ciclo de secado. Seleccione More Dry (Más Seco) si desea que
tengan un tacto más seco.
Los ciclos cronometrados se ejecutan durante un período determinado de tiempo.
Ciclos de secado (No todas las características están en todos los modelos)
Cottons Para telas de algodón y la mayoría de las telas de hilo. Para la mayoría
(Algodones) de las cargas, seleccione Optimum Dry (Secado Óptimo) (en algunos modelos).
Casuals (Casuals) Para artículos que no se arrugan, planchado permanente y delicados, así como artículos tejidos.
Delicates Para artículos delicados, telas de cuidado especial y tejidas.
(Prendas Delicadas)
Time Dry Programe el Cycle Selector (Selector de ciclo) al tiempo de secado deseado.
(Secado Cronometrado)
Dewrinkle Para eliminar las arrugas de los artículos que están limpios y secos o que
(Eliminación de Arrugas) están levemente húmedos.
Air Fluff Para esponjar o refrescar prendas, telas, telas de hilo y almohadas que ya se encuentran secas.
(Esponjado con aire) Use la opción de Air Fluff No Heat (Esponjado Sin Calor). Proporciona 10 minutos de
centrifugado sin calor.
Inicio³&LHUUHODSXHUWDGHODVHFDGRUD6HOHFFLRQHStart (Iniciar). Abrir la puerta durante la operación detendrá la secadora.
Para reiniciar la secadora, cierre la puerta y seleccione Start (Iniciar) para completar el ciclo.
GEAppliances.com
IMPORTANTE: limpie el filtro de pelusa cada vez que utilice la secadora.
Opción de Secado prolongado
(en algunos modelos)
Utilice esta opción para minimizar las arrugas en la ropa. Provee 15 minutos aproximadamente de centrifugado sin calor
después de que la ropa esté seca.
Esta opción puede utilizarse únicamente con los ciclos Cottons (Algodones) e Casuals.
Si está utilizando la perilla cycle 6LJQDO6H³$OGH&LFOR y selecciona la opción Extended Tumble (secado prolongado),
se escuchará una señal sonora al final del plazo de secado y varias veces durante el ciclo Extended Tumble (secado
prolongado). Esta le recordará que es momento de retirarlas prendas.
Si la opción Extended Tumble (secado prolongado) no está encendida, la secadora se detendrá cuando el cronómetro llegue
a la marca Extended Tumble (secado prolongado) en el dial de ciclo.
Cycle Signal Option (on some models)
Esta señal sonará justo antes de la finalización del ciclo para recordarle que retire las prendas. En algunos modelos, no se
puede regular el nivel de señal sonora.
Si seleccionó la opción Extended Tumble (secado prolongado), sonará la señal sonora al finalizar el tiempo de secado y sonará
varias veces durante el ciclo Extended Tumble (secado prolongado). Esto le recordará que es momento de retirar las prendas.
NOTA:
Retire las prendas oportunamente al momento de la señal sonora. Coloque las prendas en colgadores de modo que no
se produzcan arrugas.
Utilice cycle Signal (Señal de ciclo) especialmente cuando seque telas como tejidos de punto de poliéster y prendas de
planchado permanente. Estas telas deben retirarse para no se produzcan arrugas.
Señal automática de ciclo (en algunos modelos)
Al finalizar cada ciclo, se dispone de aproximadamente 15 min. de centrifugado sin calor después de que la colada esté seca.
Se emitirá una señal recordatoria de manera periódica durante este lapso para recordarle que retire la colada.
D
E
A
B
C
5
El tambor giratorio de acero de aleación (en algunos modelos)
El acero aleación usado para construir el tambor
giratorio de la secadora proporciona la alta
confiabilidad en una secadora GE. Aunque se
abolle o raye el tambor de la secadora durante
el uso normal, no se oxidará ni corroerá. Estas
imperfecciones de la superficie no afectarán el
funcionamiento o durabilidad del tambor.
Bombilla del tambor giratorio (en algunos modelos)
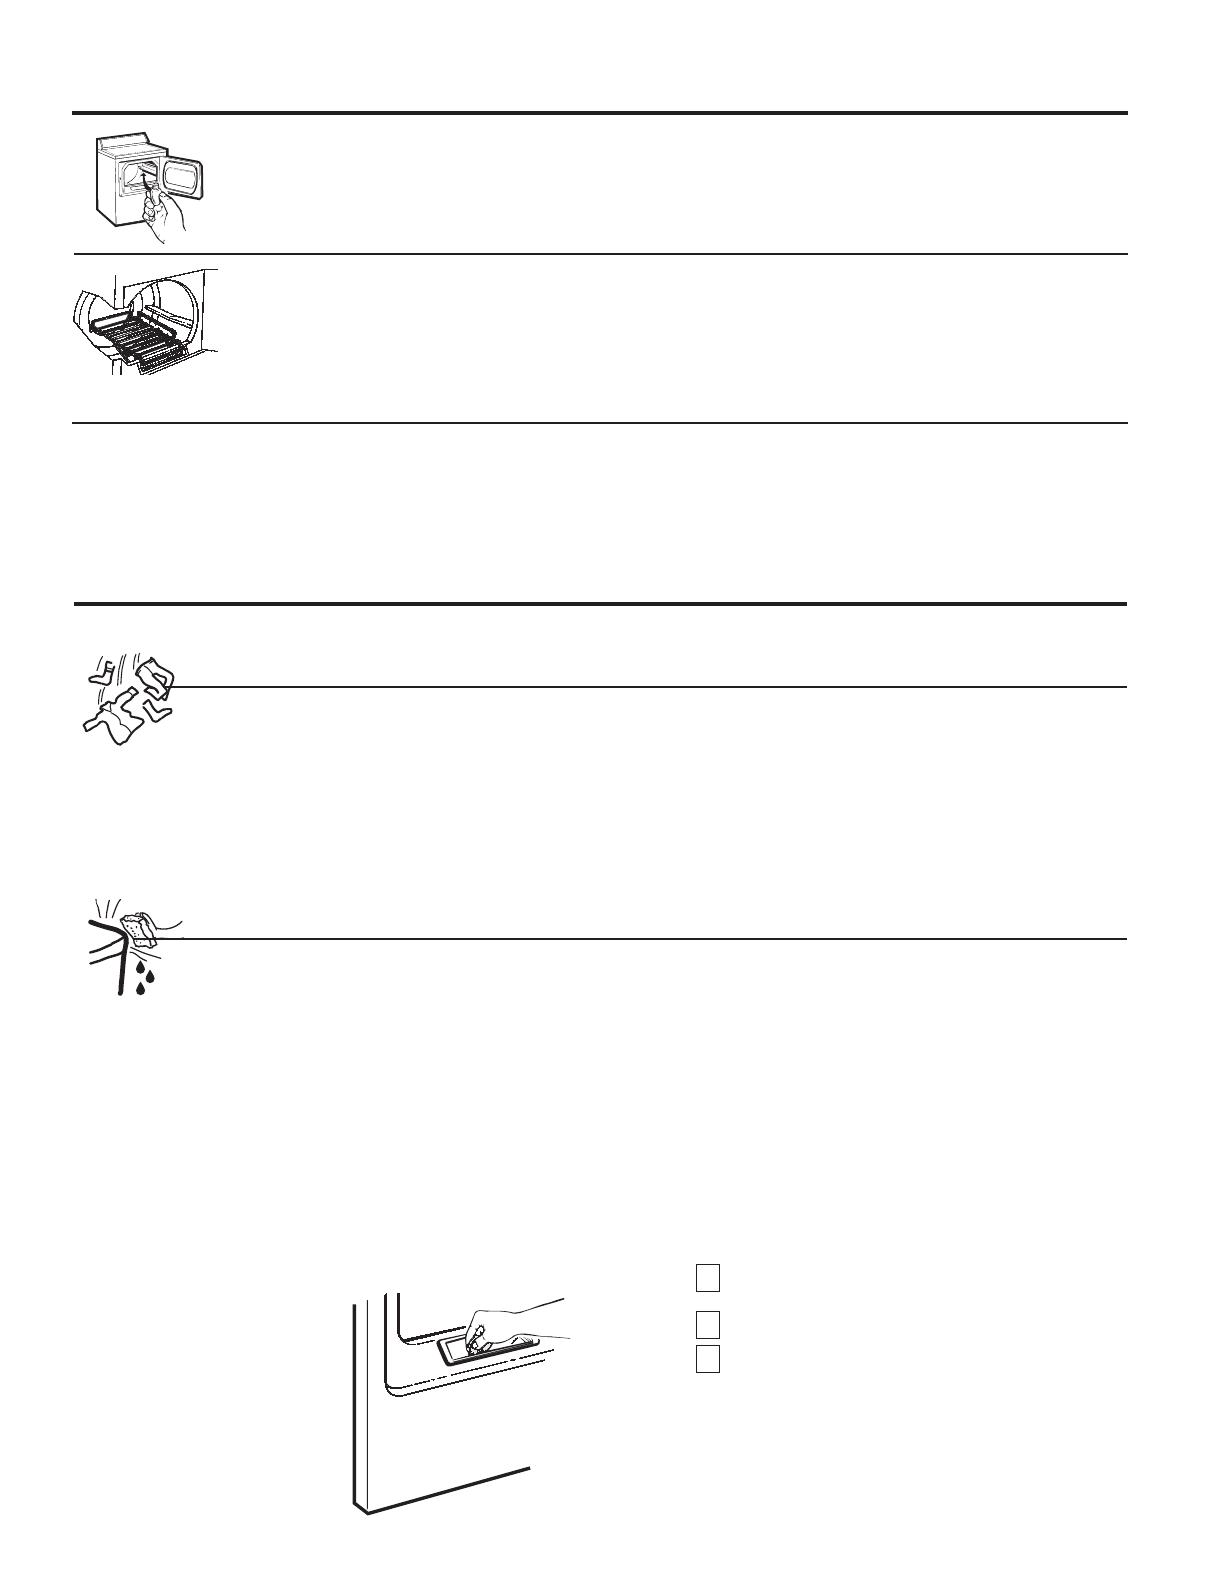
Antes de reemplazar la bombilla del tambor
giratorio, asegúrese de desconectar la secadora del
tomacorriente o de desconectar la secadora del panel
de distribución de su casa removiendo el fusible o
interrumpiendo el circuito eléctrico. Meta la mano por
encima de la apertura de la secadora desde el interior
del tambor. Quite la bombilla y reemplácela con una
del mismo tamaño.
Rejilla de secado (en algunos modelos)
La rejilla de secado se puede usar para secar artículos
delicados tales como suéteres lavables.
Enganche la rejilla sobre el filtro de la pelusa de forma
tal que la rejilla se extienda en el tambor giratorio de
la secadora.
NOTA:
La rejilla de la secadora solamente se debe usar
con los ciclos Secado Con Tiempo.
No use esta rejilla cuando esté secando otra ropa
en la secadora.
Información sobre los funciones.
6
Ideas para la clasificación y carga de la ropa
Como regla general, si la ropa es clasificada
apropiadamente para la lavadora, estará clasificada
apropiadamente para la secadora.
No agregue toallitas suavizantes una vez la ropa se haya
calentado. Esto podría causar que la ropa se manche.
Las toallitas suavizantes acondicionadoras Bounce
®
se han aprobado para usarse con todas las secadoras
GE de acuerdo con las instrucciones del fabricante.
No sobrecargue. Esto desperdicia energía y causa
arrugas.
No seque los siguientes artículos: artículos de fibra
de vidrio, prendas de lana que no sean lavables,
artículos con recubrimientos de goma, plásticos,
artículos con bordes plásticos o rellenos de espuma.
El exterior: Pásele un trapo y elimine el polvo o
cualquier derrame de productos de lavandería con
un trapo húmedo. Los productos de tratamiento para
quitar mugre y manchas podrían dañar el tablero
de control de la secadora y afectar su apariencia.
Aplique estos productos a cierta distancia de la
secadora. Luego las telas podrán lavarse y secarse
normalmente. Los daños causados a la secadora por
estos productos no están cubiertos bajo su garantía.
Filtro de pelusa: limpie el filtro de pelusa antes de
cada uso. Humedezca sus dedos y métalos por la
ranura del filtro. Pase sus dedos por el filtro. Pida a un
técnico calificado que aspire la pelusa de la secadora
una vez al año.
El acero inoxidable: Para limpiar las superficies
de acero inoxidable, use un trapo húmedo con
zun limpiador suave, no abrasivo apropiado para
superficies de acero inoxidable. Remueva el residuo
del limpiador y luego seque con un trapo limpio.
Interior y conducto de la secadora: Un técnico
calificado debe limpiar la parte interna del aparato y
del conducto de salida una vez por año.
El conducto de escape: inspeccione y limpie el
conducto de escape al menos una vez al año para
prevenir taponamientos. Un escape parcialmente
taponado podría prolongar el periodo de secado.
Siga estos pasos:
1
Corte el suministro eléctrico desconectando el
enchufe del tomacorriente de pared.
2
Desconecte el conducto de la secadora.
3
Aspire el conducto con la conexión de manguera
y vuelva a conectar el conducto.
La salida de escape: desde el exterior, revise que las
lengüetas de la cubierta se muevan libremente al
estar en funcionamiento. Asegúrese de que ningún
animal (pájaros, insectos, etc.) haya hecho su nido en
el interior del conducto o en la salida de escape.
Cuidado y limpieza de la secadora
Cómo cargar y usar la secadora.
Siempre siga las instrucciones del fabricante de la ropa cuando lave.
Acerca de cambiar el sentido de apertura de la puerta.
GEAppliances.com
Cómo cambiar el sentido de apertura de la puerta
Herramientas necesarias:
Destornillador de estrella Espátula de masilla
nº. 2 estándar n cubierta de cinta en la punta
1
Abra la puerta y remueva los tapones del lado opuesto a las
bisagras. Con la puerta completamente abierta, remueva el
tornillo inferior de cada bisagra en la cara de la secadora.
Inserte los tornillos hasta la mitad en los agujeros
SUPERIORES, para cada bisagra, en el lado opuesto (de
donde usted removió los tapones). Aplique presión firme
para que los tornillos abran.
2
Afloje hasta la mitad el tornillo superior de cada bisagra
de la cara de la secadora. Con una mano sosteniendo la
parte superior de la puerta y con la otra mano sosteniendo
la parte inferior, remueva la puerta de la secadora
LEVANTÁNDOLA y HALÁNDOLA.
3
Remueva la placa que se encuentra del lado de las bisagras
removiendo los dos tornillos, remueva la placa con seguro
que se encuentra del lado opuesto removiendo los dos
tornillos. Vuelva a ensamblar la placa y la placa con seguro
invirtiendo ambas partes y utilizando los tornillos que se
removieron previamente.
4
Gire la puerta 180º. Inserte la puerta en el lado opuesto de la
apertura poniendo la puerta hacia ADENTRO y hacia ABAJO
hasta que la bisagra superior y la inferior estén sobre los
tornillos superiores insertados en el Paso 1.
5
Remueva los tornillos restantes del lado de la apertura del
que la puerta se removió. Con estos tornillos, asegure las
bisagras en la parte inferior. Apriete los dos tornillos
superiores de cada bisagra. Reinserte los tapones en el
lado de donde la puerta se removió.
Atornille y apriete los tornillos
inferiores de cada bisagra y al
final apriete tornillos superiores.
Ensamble los 4
tapones en los
orificios del lado
opuesto
Desatornillar los tornillos inferiores de cada bisagra
y atornillarlos en el lado opuesto en el orificio
superior de cada bisagra solo la mitad del tornillo.
Retire los 4 tapones de
los agujeros e instálelos
en los agujeros del lado
opuesto
Retire la puerta levantándola
y jalándola hacia lado
opuesto de las bisagras,
desatornille los tornillos
que quedaron.
Gire la puerta 180° y apóyela sobre los
tornillos superiores de cada bisagra
FRONT PANEL
SWITCH
STRIKE
PLATE
BLIND
PLATE
INTERCAMBIAR
PLACA
CON
SEGURO
PANEL
FRONTAL
PLACA
7
Para obtener el mejor desempeño, la secadora necesita tener una ventilación adecuada. La secadora
consumirá más energía y tendrá que funcionar durante un tiempo más prolongado si no cuenta con
ventilación de acuerdo a las especificaciones indicadas más abajo. Siga cuidadosamente los detalles
sobre Escape indicados en las Instrucciones de instalación.
Utilice únicamente ducto de metal rígido de 4ļ de diámetro en el interior del gabinete de la secadora. Utilice
únicamente ducto de metal rígido o ducto flexible de metal de 4” de diámetro con aprobación UL para
ducto de ventilación hacia el exterior.
No utilice plástico u otra red de conductos de material combustible.
Use la longitud más corta posible.
No aplaste ni pliegue.
Evite descansar el conducto sobre objetos filosos.
La ventilación debe complir con los códigos de construcción locales.
Ventilación de la secadora
Ventilación
adecuada
Ventilación
inadecuada
Acerca de ventilación de la secadora.
8
ADVERTENCIA
- Riesgo de incendio
Esta secadora DEBE tener una ventilación al exterior.
Use sólo un conducto de metal rígido de 4” para la ventilación de salida doméstico.
Use sólo un conducto de transición de la secadora de metal rígido de 4” o de
la lista de UL para conectar la secadora a la salida del hogar.
NO use una ventilación del plástico.
NO use la salida de una chimenea, la salida de la cocina, ventilación de gas, pared,
cielo raso, ático, espacio de rastreo, o espacio escondido de una edificación.
NO instale una pantalla en o sobre el conducto de salida.
NO use un conducto más largo que aquél especificado en la tabla de longitud
de salida.
Si no se siguen estas instrucciones se podrá producir la muerte o un incendio.
Problema Causas probables Qué hacer
La secadora no arranca La secadora está desenchufada  $VHJ~UHVHGHTXHHOHQFKXIHHVWpFRPSOHWDPHQWH
introducido en el tomacorriente.
Fusible quemado/cortacircuitos  5HYLVHODFDMDGHIXVLEOHVFRUWDFLUFXLWRV\UHHPSODFHHO
desconectado fusible o reconecte el cortacircuitos. NOTA: la mayoría de
VHFDGRUDVHOpFWULFDVXVDQGRVIXVLEOHVFRUWDFLUFXLWRV
La secadora no calienta Fusible quemado/cortacircuitos  5HYLVHODFDMDGHIXVLEOHVFRUWDFLUFXLWRV\UHHPSODFHambos
GHVFRQHFWDGRHVSRVLEOHTXH fusibles o reconecte ambos cortacircuitos. Su secadora
la secadora gire pero no caliente podría girar si se ha quemado únicamente un fusible o
se ha desconectado un solo cortacircuitos.
Se ha cortado el suministro de gas  $VHJ~UHVHGHTXHODYiOYXODGHFLHUUHHQODVHFDGRUD\OD
válvula maestra estén completamente abiertas.
La secadora tiembla Un poco de temblor/ruido es  &RORTXHODVHFDGRUDHQXQOXJDUFRQSLVRQLYHODGRRDMXVWH
o produce ruido normal. La secadora podría estar las patas niveladoras como sea necesario hasta que estén
desnivelada niveladas.
Manchas de grasa Uso inapropiado de suavizante  6LJDODVLQVWUXFFLRQHVHQHOHQYDVHGHOVXDYL]DQWHGHWHODV
en las prendas de telas
Secado de artículos sucios  8WLOLFHVXVHFDGRUDSDUDVHFDU~QLFDPHQWHDUWtFXORV
con limpios limpios. Los artículos sucios pueden manchar los artículos
limpios y la secadora.
Las prendas no están  $OJXQDVPDQFKDVTXHQRVHSXHGHQYHUFXDQGRODV
completamente limpias prendas están mojadas aparecen después del secado.
Utilice procedimientos apropiados de lavado antes del
secado.
Pelusa en las prendas El filtro de pelusa está lleno  /LPSLHHOILOWURDQWHVGHFDGDFDUJD
Clasificación incorrecta  &ODVLILTXHODVSUHQGDVTXHSURGXFHQSHOXVDFRPROD
felpilla) de las que juntan pelusa (como la pana).
La electricidad estática puede  &RQVXOWHODVVXJHUHQFLDVHQHVWDVHFFLyQEDMREstática.
atraer pelusa
Carga excesiva  6HSDUHODVFDUJDVPiVJUDQGHVHQJUXSRVGHPHQRU
tamaño.
3DSHOSDxXHORVGHSDSHOHWF  9DFtHWRGRVORVEROVLOORVDQWHVGHODYDUODVSUHQGDV
olvidados en los bolsillos
Se produce estática 1RVHXWLOL]yQLQJ~QWLSRGH  ,QWHQWHXWLOL]DUXQVXDYL]DQWHGHWHODV
suavizante de telas
 %RXQFH
®
Fabric Conditioner Dryer Sheets (Suavizante
de telas en láminas para secadora de Bounce) ha sido
aprobado para ser usado en Secadoras GE siempre y
cuando se usen de acuerdo con las instrucciones del
fabricante.
Secado excesivo  ,QWHQWHXWLOL]DUXQVXDYL]DQWHGHWHODV
 3URJUDPHHODMXVWHDLess Dry (Menos Seco)
o Damp Dry (Secado Húmedo).
6LQWpWLFRVSODQFKDGRSHUPDQHQWH  ,QWHQWHXWLOL]DUXQVXDYL]DQWHGHWHODV
y tejidos de mezcla pueden causar
estática
Períodos de secado Tipo de calor  /RVSHUtRGRVGHVHFDGRDXWRPiWLFRSXHGHQYDULDUVHJ~Q
diferentes el tipo de calor utilizado (eléctrico, gas natural o LP), tamaño
de la carga, tipos de telas, humedad de las prendas y el
estado de los conductos de escape.
Solución de problemas
¡Ahorre tiempo y dinero! Revise las tablas en las páginas siguientes o
visítenos a GEAppliances.com. Tal vez no necesite llamar al servicio técnico.
Antes de llamar para solicitar servicio…
GEAppliances.com
9
Problema Causas probables Qué hacer
Secar las prendas toma Clasificación de carga inadecuada6HSDUHORVDUWtFXORVSHVDGRVGHORVOLYLDQRVJHQHUDOPHQWH
demasiado tiempo una carga de lavado bien clasificada es una carga de
secado bien clasificada).
Cargas grandes de telas pesadas /DVWHODVJUDQGHV\SHVDGDVFRQWLHQHQPiVKXPHGDG\
(como toallas de playa) tardan más tiempo en secar. Separe las telas grandes y
pesadas en cargas de menor tamaño para agilizar el plazo
de secado.
Los controles no están &RRUGLQHORVDMXVWHVGHFRQWUROFRQODFDUJDTXHHVWi
programados correctamente secando.
El filtro de pelusa está lleno /LPSLHHOILOWURGHSHOXVDDQWHVGHFDGDFDUJD
Conductos inadecuados 5HYLVHODVLQVWUXFFLRQHVGHLQVWDODFLyQSDUDVLVWHPDVGH
u obstruidos FRQGXFWRVYHQWLODFLyQFRUUHFWRV
$VHJ~UHVHGHTXHORVFRQGXFWRVHVWpQOLPSLRVOLEUHVGH
deformaciones y sin obstrucciones.
&RPSUXHEHTXHYHQWDQLWDDOH[WHULRUVHDEUD\FLHUUHFRQ
facilidad.
5HYLVHODV,QVWUXFFLRQHVGHLQVWDODFLyQSDUDDVHJXUDUTXH
el sistema de ventilación de la secadora sea correcto.
Fusibles quemados/ 5HHPSODFHORVIXVLEOHVRUHFRQHFWHORVFRUWDFLUFXLWRV
cortacircuitos desconectado <DTXHODPD\RUtDGHVHFDGRUDVXWLOL]DQIXVLEOHV
cortacircuitos, asegúrese de que ambos
se encuentren funcionando.
Carga excesiva/ 1RFRORTXHPiVGHXQDFDUJDGHODODYDGRUDHQOD
combinación de cargas secadora al mismo tiempo.
Carga reducida 6LHVWiVHFDQGRVyORXQRRGRVDUWtFXORVDxDGDYDULRV
artículos para asegurar un centrifugado apropiado.
Las prendas están Secado excesivo 6HOHFFLRQHXQWLHPSRGHVHFDGRPiVFRUWR
arrugadas
5HWLUHORVDUWtFXORVFXDQGRD~QHVWpQXQSRFRK~PHGRV
Ajuste el programa a Less Dry (Menos Seco) o Damp Dry
(Secado Húmedo).
Dejar que los artículos 5HWLUHORVDUWtFXORVFXDQGRILQDOLFHHOFLFOR\GREOHR
permanezcan en la secadora cuélguelos inmediatamente.
después de que haya terminado
el ciclo
Carga excesiva 6HSDUHODVFDUJDVJUDQGHVHQFDUJDVPiVSHTXHxDV
Las prendas se encogen Algunas telas se encogen de 3DUDHYLWDUTXHVHHQFRMDQODVSUHQGDVVLJDORLQGLFDGR
manera natural cuando se lavan. en las etiquetas de las mismas cuidadosamente.
Otras pueden lavarse sin
$OJXQRVDUWtFXORVSXHGHQSODQFKDUVHQXHYDPHQWHDVX
SUREOHPDVSHURVHHQFRJHUiQ
forma original después de secarlos.
en la secadora
6LWLHQHGXGDVVREUHODSRVLELOLGDGGHHQFRJLPLHQWRGHXQ
artículo en particular, no lo lave a máquina ni seque con
centrifugado.
10
Antes de llamar para solicitar servicio…
11
Por el período de: GE reemplazará:
Un año Cualquier parte de la secadora que falle debido a defectos en los materiales o en la fabricación.
De la fecha de la Durante este garantía limitada de un año, GE también proporcionará, sin costo alguno, toda la
compra original mano de obra y servicios relacionados con el reemplazo de las partes defectuosas.
Lo que no está cubierto:
Viajes del personal de servicio a su casa para
HQVHxDUOHFyPRXVDUVXSURGXFWR
,QVWDODFLyQHQWUHJDRPDQWHQLPLHQWRLQDSURSLDGD
)DOODVGHOSURGXFWRVLHVPDOWUDWDGRPDOXVDGRR
usado para un propósito diferente del que se creó
o si es usado para usos comerciales.
Reemplazo de la bombilla.
3URGXFWRVTXHQRVHDQGHIHFWXRVRVQLHVWpQGDxDGRV
RTXHIXQFLRQHQVHJ~QHO0DQXDOGHOSURSLHWDULR
Cambio de los fusibles de su casa o reajuste del
circuito de interruptores.
'DxRVDOSURGXFWRFDXVDGRVSRUDFFLGHQWHV
LQFHQGLRVLQXQGDFLRQHVRDFWRVGHODQDWXUDOH]D
'DxRVLPSUHYLVWRVUHVXOWDQWHVFDXVDGRVSRUSRVLEOHV
defectos con este electrodoméstico.
'HIHFWRVRGDxRVGHELGRDODSXHVWDHQIXQFLRQDPLHQWR
en temperaturas de congelamiento.
'DxRVFDXVDGRVGHVSXpVGHOHQYtR
Producto no accesible para facilitar el servicio requerido.
Todo el servicio de garantía es proporcionado por los Centros
de servicio de factoría o por un Técnico de Servicio (Customer
Care
®
) autorizado. Para planificar servicio en internet,
24 horas al día, visítenos a GEAppliances.com o llame a 800.
GE.CARES (800.432.2737). Cuando llame para solicitar servicio,
por favor tenga a mano el número de serie y el número de
modelo.
Engrape su recibo aquí. Se
necesita un comprobante de
fecha de compra para obtener
servicio bajo la garantía.
Garantía de secadora GE.
GEAppliances.com
Esta garantía se extiende al comprador original y cualquier comprador posterior de productos comprados para uso
residencial dentro de Estados Unidos. Si el producto está situado en un área que no dispone de servicio por parte
de un proveedor de servicio autorizado de GE, podría tener que hacerse cargo de los costes de envío o bien
podría solicitársele que lleve el producto a un centro de servicio de GE autorizado para realizar la reparación.
En Alaska, la garantía excluye el costo de envío o las visitas de servicio a su casa.
Algunos estados no permiten la exclusión o las limitaciones de daños incidentales o consecuenciales. Esta garantía
da derechos legales específicos, y usted podría tener otros derechos que variarán de estado a estado. Para saber cuáles
son sus derechos legales, consulte a la oficina de asuntos del consumidor local o la oficina del Attorney General en su
localidad.
Garante: General Electric Company. Louisville, KY 40225
(;&/86,Ï1'(*$5$17Ë$6,03/Ë&,7$6³6X~QLFR\H[FOXVLYRGHUHFKRHVODUHSDUDFLyQGHOSURGXFWR
tal y como se indica en esta Garantía limitada. Cualquier garantía implícita, incluyendo las garantías
implícitas de comerciabilidad o adecuación para un fin determinado, están limitadas a un año o el
período de tiempo más breve permitido por la ley.
12
Soporte al consumidor.
Real Life Design Studio (Estudio de diseño para la vida real)
*(DSR\DHOFRQFHSWRGH'LVHxR8QLYHUVDO³SURGXFWRVVHUYLFLRV\DPELHQWHVTXHSXHGHQXVDUJHQWHGHWRGDV
las edades, tamaños y capacidades. Reconocemos la necesidad de diseñar para una gran gama de habilidades
y dificultades físicas y mentales. Para más detalles cobre las aplicaciones de GE Diseño Universal, incluyendo
ideas de diseño para la cocina para personas con discapacidades, mire nuestra página Web hoy mismo. Para
personas con dificultades auditivas, favor de llamar al 800.TDD.GEAC (800.833.4322).
Página Web de GE Appliances GEAppliances.com
¿Tiene alguna pregunta sobre su electrodoméstico? ¡Pruebe la página Web de GE Appliances 24 horas
al día, cualquier día del año! Para mayor conveniencia y servicio más rápido, ya puede descargar los Manuales
de los Propietarios, pedir piezas o incluso hacer una cita en línea para que vengan a realizar una reparación.
Solicite una reparación GEAppliances.com
El servicio de expertos GE está a tan sólo un paso de su puerta. Visite la página Web y solicite
su reparación en línea cuando usted prefiera 24 horas al día, cualquier día del año! O llame al 800.GE.CARES
(800.432.2737) durante horas normales de oficina para solicitar su reparación.
Garantías ampliadas GEAppliances.com
Compre una garantía ampliada y obtenga detalles sobre descuentos especiales disponibles mientras su garantía
está aún activa. Puede comprarla en línea en cualquier momento, o llamar al (800.626.2224) durante horas
normales de oficina. GE Consumer Home Services estará aún ahí cuando su garantía termine.
Piezas y accesorios GEAppliances.com
Aquellos individuos con la calificación necesaria para reparar sus propios electrodomésticos pueden pedir que
se les manden las piezas o accesorios directamente a sus hogares (aceptamos las tarjetas VISA, MasterCard y
Discover). Haga su pedido en línea hoy, 24 horas cada día o llamar por teléfono al 800.626.2002 durante horas
normales de oficina.
Las instrucciones descritas en este manual cubren los procedimientos a seguir por cualquier usuario.
Cualquier otra reparación debería, por regla general, referirse a personal calificado autorizado. Debe
ejercerse precaución ya que las reparaciones incorrectas pueden causar condiciones de funcionamiento
inseguras.
Póngase en contacto con nosotros GEAppliances.com
Si no está satisfecho con el servicio que recibe de GE, póngase en contacto con nosotros en nuestra página
Web indicando todos los detalles así como su número de teléfono o escríbanos a:
General Manager, Customer Relations
GE Appliances, Appliance Park
Louisville, KY 40225
Registre su electrodoméstico GEAppliances.com
£5HJLVWUHVXQXHYRHOHFWURGRPpVWLFRHQOtQHD³FXDQGRXVWHGSUHILHUD El registrar su producto a tiempo le
proporcionará, si surgiera la necesidad, una mejor comunicación y un servicio más rápido bajo los términos de
su garantía. También puede enviar su tarjeta de registro pre-impresa que se incluye en el material de embalaje.
GEAppliances.com
  • Page 1 1
  • Page 2 2
  • Page 3 3
  • Page 4 4
  • Page 5 5
  • Page 6 6
  • Page 7 7
  • Page 8 8
  • Page 9 9
  • Page 10 10
  • Page 11 11
  • Page 12 12
  • Page 13 13
  • Page 14 14
  • Page 15 15
  • Page 16 16
  • Page 17 17
  • Page 18 18
  • Page 19 19
  • Page 20 20
  • Page 21 21
  • Page 22 22
  • Page 23 23
  • Page 24 24

GE GTD42EASJWW El manual del propietario

Categoría
Lavadoras secadoras
Tipo
El manual del propietario

En otros idiomas