
P/NO : MMBB0077808
ISSUE 1.0
PRINTED IN KOREA

Teléfono GPRS
MANUAL DE USUARIO
MODELO: G5300
T•E•L•É•F•O•N•O•G•P•R•S•T•E•L•É•F•O•N•O•G•P•R•S
Por favor, lea este manual cuidadosamente
antes de utilizar su teléfono.
Consérvelo para su futura consulta.
ESPAÑOL
ENGLISH

Teléfono GPRS
MANUAL DE USUARIO
MODELO: G5300
Por favor, lea este manual cuidadosamente
antes de utilizar su teléfono.
Consérvelo para su futura consulta.
ESPAÑOL


ESPAÑOL
3
G5300 Teléfono
El G5300 presenta un magnífico acabado que
proporciona a su usuario un agradable tacto y
gran practicidad.

Para su Seguridad
ESPAÑOL
4
Todos los transmisores de radio conllevan cierto riesgo de interferencia con
los productos electrónicos que puedan encontrarse en las proximidades.
Los teléfonos GSM deben de apagarse en todo
momento cuando usted se encuentre a bordo de un
avión.
No encienda su teléfono cerca de gasolineras,
depósitos de combustible, plantas químicas o cuando
se lleven a cabo trabajos con explosivos.
Apague su teléfono en todas aquellas zonas en las que
le sea requerido por alguna clase de regulación
especial. Como ejemplo, téngase en cuenta que los
teléfonos móviles no pueden ser utilizados en
hospitales dado que pueden verse afectados aparatos
como marcapasos o audífonos.
Aunque en menor medida, los teléfonos móviles
también pueden interferir en televisores, receptores de
radio, ordenadores, etc.
No lleve el teléfono en la mano mientras conduce
vehículos.
No desmonte ni el teléfono ni la batería.
Mantenga el teléfono en un lugar seguro, fuera del
alcance los niños, dado que contiene componentes
pequeños desmontables que pueden suponer peligro
de atragantamiento.

ESPAÑOL
5
No toque el cargador de la batería con las manos
húmedas.
Por favor, tenga en cuenta que:
Deberá deshacerse de las baterías inservibles
conforme a la legislación al respecto.
Utilice solamente accesorios ORIGINALES para evitar
dañar su teléfono.
Es posible que las llamadas de emergencia no estén
disponibles en todas las redes celulares. De ahí que
deba evitar depender sólo de la comunicación a través
de su móvil en ocasiones importantes tales como las
emergencias médicas.
Información importante
Este Manual de Usuario contiene información importante para
conocer el funcionamiento y utilización de este teléfono. Por
favor, lea detenidamente toda la información para lograr un
rendimiento óptimo e impedir cualquier daño o uso indebido del
aparato. Cualquier cambio o modificación que no haya sido
aprobada expresamente en este Manual, puede invalidar el
Certificado de Garantía del equipo.
Por su seguridad, utilice SOLAMENTE baterías y
cargadores ORIGINALES.

ESPAÑOL
6
Visión general
Accesorios
............................................................................
10
Partes del teléfono
..............................................................
12
• Frontal del teléfono
............................................................
12
• Parte posterior del teléfono
................................................
13
Descripción de teclado
.......................................................
14
• Teclas Alfanuméricas
.........................................................
16
Información de pantalla
Información de pantalla
......................................................
17
• Iconos en pantalla
..............................................................
17
Primeros pasos
Instalación
...........................................................................
19
• Colocación de la tarjeta SIM
..............................................
19
• Colocación de la Batería
....................................................
20
• Carga de la Batería
............................................................
21
• Desconexión del Cargador
................................................
22
Secuencia de Encendido
....................................................
23
• Primeros pasos con el teléfono
..........................................
23
• Apagado del teléfono
.........................................................
23
Códigos de Acesso
.............................................................
24
• Código PIN (4 a 8 dígitos)
..................................................
24
• Código PIN2 (4 a 8 dígitos)
................................................
24
• Código PUK (4 a 8 dígitos)
................................................
24
• Cósigo PUK2 (4 a 8 dígitos)
..............................................
25
• Código de Seguridad (4 a 8 dígitos)
..................................
25
Índice

ESPAÑOL
7
Acceso a un menú
Agenda de teléfonos
...........................................................
26
Árbol de menús
..................................................................
27
Mensajes [Menú 1]
..............................................................
29
• Escribir [Menú 1-1]
.............................................................
29
• Buzón de entrada [Menú 1-2]
............................................
34
• Buzón de salida [Menú 1-3]
................................................
35
• Servicios información [Menú 1-4]
.......................................
36
• Mensajes de voz [Menú 1-5]
..............................................
38
• Tarjeta personal [Menú 1-6]
..............................................
39
• Plantillas [Menú 1-7]
..........................................................
39
• Informes de entrega [Menú 1-8]
.........................................
40
• Configuración [Menú 1-9]
...................................................
40
• Estado de la memoria [Menú 1-0]
...................................... 41
Registro de llamadas [Menú 2]
............................................
42
• Llamadas perdidas [Menú 2-1]
..........................................
42
• Llamadas recibidas [Menú 2-2]
..........................................
42
• Llamadas realizadas [Menú 2-3]
........................................
42
• Lista de todas las llamadas [Menú 2-4]
..............................
42
• Eliminar llamadas recientes [Menú 2-5]
.............................
42
• Coste de llamadas [Menú 2-6]
...........................................
43
• Información GPRS [Menú 2-7]
........................................... 46
Perfiles [Menú 3]
.................................................................
47
• Solo vibración [Menú 3-1]
..................................................
47
• Silencio [Menú 3-2]
............................................................
47
• General [Menú 3-3]
............................................................
48
• Fuerte [Menú 3-4]
..............................................................
48
• Auricular [Menú 3-5]
...........................................................
48
• Coche [Menú 3-6]
..............................................................
49

ESPAÑOL
8
Configuración [Menú 4]
......................................................
51
• Alarma [Menú 4-1]
.............................................................
51
• Fecha y Hora [Menú 4-2]
...................................................
52
• Configuración del teléfono [Menú 4-3]
...............................
53
• Configuración de llamadas [Menú 4-4]
..............................
55
• Configuración de Seguridad [Menú 4-5]
............................
57
• Configuración de red [Menú 4-6]
.......................................
61
• Recuperar valores de fábrica [Menú 4-7] ........................... 61
Desvíos [Menú 5]
.................................................................
62
• Todas las llamadas de voz [Menú 5-1]
..............................
62
• Si ocupado [Menú 5-2]
.......................................................
62
• Si no responde [Menú 5-3]
.................................................
62
• Si no localizable [Menú 5-4]
...............................................
62
• Todas las llamadas de datos [Menú 5-5]
...........................
62
• Todas las llamadas de fax [Menú 5-6] ............................... 63
• Cancelar todo [Menú 5-7]
..................................................
64
Agenda [Menú 6]
.................................................................
65
• Agenda [Menú 6-1]
............................................................
65
• Agenda de teléfonos [Menú 6-2]
........................................
68
Accesorios y juegos [Menú 7]
..........................................
77
• Mi carpeta [Menú 7-1]
.........................................................
77
• Juegos [Menú 7-2]
..............................................................
77
• Compositor de melodías [Menú 7-3]
..................................
78
• Editor de Gráficos [Menú 7-4]
............................................
79
• Conversor de Unidades [Menú 7-5]
...................................
80
• Calculadora [Menú 7-6]
......................................................
81
• Reloj Mundial [Menú 7-7]
...................................................
81

ESPAÑOL
9
Servicios Wap [Menú 8]
......................................................
82
• Inicio [Menú 8-1]
................................................................
82
• Favoritos [Menú 8-2]
..........................................................
82
• Mensajes de Red [Menú 8-3]
.............................................
82
• Perfiles [Menú 8-4]
............................................................
83
• Ir a URL [Menú 8-5]
...........................................................
85
• Configuración de Memoria Caché [Menú 8-6]
...................
86
• Certificados de Seguridad [Menú 8-7]
...............................
86
• Reinicializar perfiles [Menú 8-8] ......................................... 86
Menú On-line de Internet
....................................................
87
Funciones adicionales
Como usar la llamadas de Datos y Fax
.............................
88
• Envío de llamadas de datos y fax
......................................
88
• Recepción de llamadas de datos o fax
..............................
88
Menú durante llamadas
......................................................
90
1. Durante una llamada
........................................................
90
2. Llamadas en Multiconferencia
..........................................
93
Cuidado y Mantenimiento
..................................................
96
Datos Técnicos
....................................................................
98

Accesorios
Visión general
ESPAÑOL
10
Por favor, compruebe que tiene todos los componentes mostrados.
Teléfono
Cargador de
Viaje
Manos Libres Portátil
Manual de
Usuario
Batería Estándar
Kit de Datos/CD
Tarjeta(s) de
Garantía

Visión general
ESPAÑOL
11
<Accesorios opcionales>
Cargador de Mechero
Kit Manos Libres
Correa

ESPAÑOL
12
Partes del teléfono
Visión general
Frontal del teléfono
1 Auricular
2 Visor de la pantalla
3 Tecla inteligente
izquierda
4 Teclas de navegación
por el Menú
5 Tecla de envio
6 Tecla asterisco
7 Tecla inteligente
derecha
8 Teclas
APAGADO/ENCENDIDO
9 Teclas numéricas
10 Tecla almohadilla
11 Micrófono
12 Conector para auricular
13 Tecla acceso WAP/
Tecla borrado

Visión general
ESPAÑOL
13
Parte posterior del teléfono
1 Batería
2 Conector para cable /
Conector para el cargador de la batería /
Conector para equipo manos libres de coche
3 Conectores de la batería
4 Alojamiento para tarjeta SIM
5 Orificio para correa de mano
6 Cierre de seguridad de la batería
7 Conector para auricular
6
5
7
4
3
2
1

ESPAÑOL
14
Descripción de teclado
Visión general
Los siguientes términos muestran los componentes básicos del
teléfono.
Descripción del teclado
Tecla Descripción
Tecla inteligente izquierda/
Tecla inteligente derecha
Estas teclas realizan la función indicada por el texto
que aparece en pantalla justo encima de cada una de
ellas.
Tecla inteligente para conexión a servicios WAP
Se utiliza para la conexión a los servicios WAP
directamente mediante la presión de esta tecla. Se
utiliza para el borrado de caracteres alfanuméricos.
Teclas de navegación
Se utiliza para la navegación por los directorios de
nombres, número de teléfonos, menús u opciones de
configuración.
Se utiliza para acceder al menú de Mensajes
directamente.
Se puede utilizar para desplazarse entre nombres y
números de teléfono.
Tecla de envío
Usted puede marcar un número de teléfono y
contestar una llamada. Si usted presiona esta tecla sin
marcar ningún número, su teléfono le mostrará el
número marcado más recientemente.

ESPAÑOL
15
Visión general
Tecla Descripción
Teclas alfanuméricas
Estas teclas se utilizan para marcar números en el
modo de espera o para introducir números y letras en
el modo edición. Cuando presiona estas teclas de
forma prolongada:
• 1 se utiliza para llamar a su buzón de voz.
• 0 para llamadas internacionales.
• De 2 a 9 para marcación rápida.
Se usa para cambiar el modo de vibración cuando se
mantiene presionada durante un cierto tiempo.
Se usa para llamar mediante la voz cuando se
mantiene presionada durante un cierto tiempo. Esta
tecla se utiliza también como tecla de conexión cuando
se conecta el auricular.
Tecla de Encendido / Apagado
Se usa para finalizar o rechazar llamadas. Esta tecla
se usa también como Tecla de Encendido si se
mantiene pulsada durante varios segundos.

ESPAÑOL
16
Teclas Alfanuméricas
La lista de caracteres relacionados con el teclado alfabético y
numérico se muestra a continuación en la siguiente tabla.
Tecla Descripción
. , ' ? ! - & 1
A B C 2 Ä À Á Â Ã Æ Ç a b c ä à á â ã ç
D E F 3 È É Ë Ê d e f è é ë ê
G H I 4 Î Ï Ì Í g h i î ï ì í
J K L 5 j k l
M N O 6 Ö Ô Ò Ó Ø Ñ m n o ö ô ò ó ø ñ
P Q R S 7 p q r s
T U V 8 Ü Ù Û Ú t u v ü ù û ú
W X Y Z 9 w x y z
0 [espacio]
Descripción de teclado
Visión general

ESPAÑOL
17
Información de pantalla
Información de pantalla
La pantalla muestra diversos iconos. A continuación se describe
cada uno de los que puede encontrar en su teléfono.
Iconos en pantalla
Icono/Indicador
Descripción
Indica la potencia de la señal de red.
Llamada en curso.
Puede ser utilizado el servicio GPRS.
Muestra que usted está utilizando una red ajena
mediante el servicio de Itinerancia.
En llamadas salientes, indica que línea (1 ó 2) está
en uso (si está subscrito al Servicio de Dos Líneas).
La alarma ha sido ajustada y está activa.
Indica el estado de carga de la batería.
Ha recibido un mensaje de texto.
Ha recibido un mensaje de voz.
Ha recibido un correo electrónico.
Puede ver su calendario.
Todas las señales de audio han sido
desconectadas.
Perfil General activado.
Perfil Fuerte activado.
Perfil Silencio activado.

ESPAÑOL
18
Icono Descripción
Mensajes
Registro de llamadas
Perfiles
Configuración
Desvíos
Planificador
Accesorios
Internet
Servicios SIM
Iconos del Menú Principal
Icon/Indicador
Descripción
Perfil Auricular activado.
Perfil Coche activado.
Puede desviar una llamada.
Puede utilizar el servicio de mensajes Push sobre
WAP
Información de pantalla
Información de pantalla

ESPAÑOL
19
Instalación
Primeros pasos
Colocación de la tarjeta SIM
Localice el alojamiento de la tarjeta SIM en la parte posterior del
teléfono. Siga los siguientes pasos para instalar la tarjeta SIM.
1. Quite la batería si está colocada.
2. Deslice la tarjeta SIM en la ranura,
bajo los soportes plateados, con los
conectores dorados hacia abajo y la
esquina recortada hacia la derecha.
3. Si necesita retirar la tarjeta SIM,
presione cuidadosamente la parte
anterior de la misma con el pulgar,
y luego deslícela con suavidad
fuera de su alojamiento.
Advertencia
• Antes de la colocación inicial compruebe que el teléfono
esté apagado y la batería desconectada.
• Los contactos de la tarjeta SIM pueden ser fácilmente
dañados por los arañazos. Ponga por tanto especial
atención en su manejo e instalación. Siga las instrucciones
suministradas con la tarjeta SIM.
➊

ESPAÑOL
20
➋
1. Coloque la batería en la parte
posterior del teléfono.
2. Presionela hasta que oiga un clic.
Colocación de la Batería
Instalación
Primeros pasos

ESPAÑOL
21
Carga de la Batería
Para conectar el cargador de viaje al teléfono, debe tener instalada
la batería.
1. Conecte uno de los extremos del
cargador de viaje en la parte inferior
del teléfono.
➌
Primeros pasos
2. Conecte el otro extremo del cargador
de viaje a una toma de corriente.
Utilice solo el cargador incluido en el
embalaje del teléfono.
Atención
• No fuerce el conector pues se podrían dañar el teléfono o el
propio cargador.

Primeros pasos
ESPAÑOL
22
Desconexión del Cargador
Desconecte el cargador de viaje del
teléfono presionando los botones
laterales.
➍
Nota
• La batería suministrada con el teléfono debe ser cargada
totalmente antes de usar el teléfono.
• No retire la batería ni la tarjeta SIM mientras el teléfono esté
cargando.
• El mensaje “Batería cargando” se mostrará en la pantalla
durante la carga. Cuando la batería esté totalmente
descargada, se encenderá la luz de fondo sin mostrar
mensaje alguno.
• La barras en movimiento que aparecen en pantalla durante
la carga se pararán cuando la batería esté totalmente
cargada.
Instalación

ESPAÑOL
23
Secuencia de Encendido
Primeros pasos
Primeros pasos con el teléfono
1. Mantenga presionada la tecla E
hasta que escuche un tono.
2. Dependiendo de la configuración
de la opción Solicitud de PIN,
tendra que introducir el código PIN
o no.
3. Si su teléfono se conecta a una
red, el nombre de esta será
mostrado en pantalla en breves
instantes.
Apagado del teléfono
En el modo de espera, mantenga presionada la tecla E hasta que
escuche un tono.
➊
➋

Puede usar los códigos de acceso descritos en esta sección para
evitar una utilización no autorizada de su teléfono. Los códigos de
acceso (excepto el PUK y el PUK2) pueden ser cambiados mediante
el uso del menú [Menú 4-5-6].
Código PIN (4 a 8 dígitos)
El código PIN (Número de Identificación Personal) protege su tarjeta
SIM de usos no autorizados.
El código PIN se suministra normalmente junto con la tarjeta SIM.
Cuando el código PIN está Habilitado, su teléfono le pedirá este
código PIN cada vez que sea encendido.
Al contrario, cuando el código PIN está Deshabilitado, al encender
su teléfono se conectará directamente a la red (si ésta está
presente) sin pedir el código PIN.
Código PIN2 (4 a 8 dígitos)
El código PIN2, suministrado con algunas tarjetas SIM, es requerido
para acceder a determinadas funciones como el Coste de Llamadas
o los Números de Marcación Fija. Estas funciones estarán
disponibles solo si la tarjeta SIM las soporta.
Código PUK (4 a 8 dígitos)
El código PUK (Código Personal de Desbloqueo) es requerido para
cambiar un código PIN bloqueado.
El código PUK puede ser suministrado junto con la tarjeta SIM.
En caso contrario, contacte con su proveedor local de servicio para
pedirlo. Si pierde el código, contacte también con éste.
ESPAÑOL
24
Códigos de Acesso
Primeros pasos

Primeros pasos
ESPAÑOL
25
Cósigo PUK2 (4 a 8 dígitos)
El código PUK2, suministrado con algunas tarjetas SIM, es
requerido para cambiar un código PIN2 bloqueado. Si pierde el
código, contacte con su proveedor local de servicio para pedirlo.
Código de Seguridad (4 a 8 dígitos)
El código de seguridad protege su teléfono contra el uso no
autorizado del mismo. Normalmente se suministra con el teléfono.
Este código es requerido para borrar todas las entradas del teléfono
y para activar el menú “Restablecer Valores de Fábrica”. El Número
de Seguridad por defecto es “0000”. Puede cambiarlo en el menú
Seguridad.

Para seleccionar un menú en la
agenda, presione [Nombr.] en el modo
de espera y desplácese a la opción
deseada.
ESPAÑOL
26
Agenda de teléfonos
Acceso a un menú
Name Description
1 Buscar Permite buscar un nombre o número
determinados.
2 Añadir nueva Permite añadir nuevos números y nombres.
3 Marc. rápida Permite asignar hasta 8 posiciones de
memoria a números de la agenda para
marcarlos mediante una sola pulsación
(teclas numéricas del 2 al 9).
4 Lista de voz Permite ver una lista de los números de
teléfono que tienen una etiqueta de voz
asociada.
5 Grupos
Permite ver una lista de grupos.
usuarios
6 Copiar todo Permite copiar entradas de la agenda desde
la memoria del teléfono a la tarjeta SIM y
viceversa.
7 Borrar todos Permite borrar todos los datos de la agenda
tanto de la memoria del teléfono como de la
tarjeta SIM.
8 Configuración Permite configurar la memoria y buscar por
nombre, número o una variable determinada.
9 Información Permite comprobar el estado de la memoria,
lo números SDN (Números de Marcación de
Servicio) y el número propio.
Nombre Descripción

ESPAÑOL
27
Árbol de Menús
Acceso a un menú
1 Mensajes
1 Escribir
2 Buzón entrada
3 Buzón salida
4 Servicio info.
5 Buzón de voz
6 Tarjeta personal
7 Plantilla
8 Informe de estado
9 Configuración
0 Estado mem.
2 Registro de llamadas
1 Llam. perd.
2 Llam. recibidas
3 Llam. enviadas
4 Lista de todas las llamadas
5 Borr. últ. llam.
6 Coste llamad.
7 Info GPRS
3 Perfiles
1 Sólo vibrac.
2 Silencio
3 General
4 Fuerte
5 Auriculares
6 Coche
4 Configuración
1 Alarma
2 Fecha y Hora
3 Confg. telf.
4 Conf. llamadas
5 Conf. seguridad
6 Config. red
7 ¿Recuperar valores por
defecto?

ESPAÑOL
28
5 Desvíos
1 Todas llam.
2 Comunicando
3 No responde
4 Ilocalizable
5 Llamad. datos
6 Llamadas fax
7 Cancel. todas
6 Planificador
1 Planificador
2 Agenda
7 Accesorios
1 Mis documentos
2 Juegos
3 Compositor melodías
4 Editor gráfico
5 Conver. unidad
6 Calculadora
7 Reloj mundial
8 Internet
1 Inicio
2 Favoritos
3 Mens. Push
4 Perfiles
5 Ir a URL
6 Confg. caché
7 Certif. seg.
8 Rest. perfil
9 Servicios SIM
Este menú depende de la
tarjeta SIM y de los servicios
de red.
Árbol de Menús
Acceso a un menú

ESPAÑOL
29
Este menú incluye funciones relacionadas con SMS (servicios de
mensajes cortos), buzón de voz y mensajes de servicio de red.
Escribir [Menú 1-1]
Puede escribir y editar mensajes de hasta 918 caracteres. Además,
puede comprobar el número de caracteres.
1. Entre en el menú Mensajes pulsando [Selec.].
2. Si desea escribir un mensaje nuevo, seleccione Escribir en el
menú.
3. Introduzca el mensaje mediante el texto eZi. Para ampliar
detalles, consulte texto eZi (Página 32).
4. Cuando escriba un mensaje, la tecla > será cambiada a
símbolo.
5. Cuando termine de escribir el mensaje, pulse [Opcs.]. Aparecerá
el siguiente menú de opciones.
Enviar
Envía el mensaje de texto.
1. Si desea enviar el mensaje de texto, introduzca el número al que
lo va a mandar.
2. El teléfono preguntará el número al que desea enviar el mensaje.
3. Después de enviarlo, el teléfono preguntará si desea almacenar
el mensaje.
Mensajes [Menú 1]
Acceso al Menú

Guardar
El teléfono preguntará si desea almacenar el mensaje.
Usar plant.
Una plantilla es un mensaje predefinido. Puede añadir una plantilla
de la lista al mensaje que desea editar.
Usar tarjeta
Los elementos de la tarjeta de visita son nombre, móvil, oficina y
memo. Puede adjuntar una tarjeta de visita al mensaje.
Función EMS
Puede incluir imágenes (incluso animaciones) y sonidos en los
mensajes que envíe. Pulse la tecla [Opción] para acceder al menú
correspondiente e insertarlos
• Símbolo
• Imagen
• Animación
• Sonido
Español
30
Mensajes [Menú 1]
Acceso al Menú
Advertencia
• Puede encontrar los contenidos recibidos de otro usuario
en Mi carpeta [Menú 7- 1]

Añad. dicc.
• Añadir
Si añade una palabra que use a menudo, podrá introducirla
mediante la pulsación de una sola tecla para cada carácter.
1. Acceda al menú.
2. Desplácese hasta Añad. dicc. y pulse [Selec.].
3. Introduzca una palabra y pulse [Añadir].
• Listar dicc.
Puede ver la lista de palabras que ya ha añadido al diccionario.
1. Acceda al menú.
2. Desplácese hasta Listar dicc. y pulse [Selec.].
3. Puede comprobar la lista de palabras.
4. Si desea borrar una palabra pulse [Borrar].
5. Si desea borrar todas las palabras de la lista, seleccione Borrar
todos al final de la lista mediante la pulsación de [Selec.].
ESPAÑOL
31
Acceso al Menú

ESPAÑOL
32
Textos eZi
El texto eZi permite escribir fácil y rápidamente. Puede obtener
el carácter deseado mediante la pulsación una sola vez de las
teclas que contienen dicho carácter. Es útil para componer
palabras y frases. Si pulsa la tecla # durante unos
segundos, puede cambiar el idioma. El teléfono soporta cuatro
modos de entrada de caracteres: Modo eZi, Modo numérico,
Modo mayúsculas y Modo minúsculas. Si desea cambiar el
modo, pulse la tecla #.
• Como usar el modo eZi
Para introducir un carácter en modo texto eZi pulse cada
tecla una sola vez para el carácter que desee.
Por ejemplo, para escribir Campos en modo eZi;
Mensajes [Menú 1]
Acceso al Menú

ESPAÑOL
33
• Como usar el modo numérico
Para introducir un número en modo
numérico, presione la tecla del número que
aparece en el teclado.
• Como usar el modo mayúsculas
Para introducir una letra mayúscula,
presione la tecla del carácter que aparece
en el teclado.
• Como usar el modo minúsculas
Para introducir una letra minúscula,
presione la tecla del carácter que aparece
en el teclado.
Advertencia
• Si desea eliminar un carácter, presione la tecla C
en cada uno de los modos.
Acceso al Menú

ESPAÑOL
34
Buzón entrada [Menú 1-2]
Cuando recibe un mensaje de texto, su teléfono muestra el símbolo
y guarda el mensaje en la lista de mensajes entrantes. Desplácese
hasta el mensaje deseado mediante U y D Además, podrá ver al
final de la lista la opción Borrar todos para borrar todos los
mensajes recibidos. Mientras lee el mensaje, puede pulsar [Opcs.]
para acceder a las opciones disponibles.
Responder
Puede responder a la persona que envío el mensaje.
Reenviar
Puede enviar el mensaje seleccionado a otra persona.
Borrar
El mensaje seleccionado es borrado.
Usar número
Si el mensaje seleccionado contiene un número de teléfono, puede
extraerlo y guardarlo en la agenda. También puede llamar a ese
número.
Guardar anexo
Puede guardar ficheros anexos como símbolos, dibujos,
animaciones y sonidos.
Responder
Puede llamar a la persona que envió el mensaje automáticamente.
Mensajes [Menú 1]
Acceso al Menú

ESPAÑOL
35
Buzón salida [Menú 1-3]
Cuando acceda a este menú, podrá ver los mensajes contenidos.
Desplácese hasta el mensaje deseado mediante U , D y
presione < para verlo. Si desea salir del Buzón de salida pulse
>.
Además, podrá ver al final de la lista la opción Borrar todos para
borrar todos los mensajes contenidos en este menú.
Después de leer el mensaje, pulse [Opcs.] para acceder a los
siguientes submenús.
Reenviar
Puede enviar el mensaje seleccionado a otra persona.
Borrar
El mensaje seleccionado es borrado.
Usar número
Si el mensaje seleccionado contiene un número de teléfono, puede
extraerlo y guardarlo en la agenda. También puede llamar a ese
número.
Acceso al Menú

ESPAÑOL
36
Servicio info. [Menú 1-4]
(Depende de la red y de la suscripción)
Los mensajes de Difusión de Celda (CB Messages) son mensajes
de texto enviados por la red a los usuarios de teléfonos GSM.
Proporcionan información general como predicciones
meteorológicas o noticias sobre tráfico, taxis, farmacias o bolsa.
Cada tipo de información tiene un número, por lo que puede llamar a
su proveedor de servicio. Cuando recibe un mensaje CB, puedo
leerlo de la siguiente manera:
Leer
1. Cuando recibe un mensaje CB, será mostrado en pantalla. Puede
leer el mensaje desplazándose por él mediante U o D .
2. Después de leer el mensaje, pulse E para volver al modo de
espera. Además, puede guardarlo hasta que llegué otro mensaje.
Recepción CB
• Sí
Si selecciona este menú, su teléfono recibirá mensajes CB.
• No
Si selecciona este menú, su teléfono no recibirá mensajes CB.
Mensajes [Menú 1]
Acceso al Menú

ESPAÑOL
37
Alerta
• Sí
Si selecciona este menú, su teléfono le avisará cuando llegue un
mensaje CB.
• No
Si selecciona este menú, su teléfono no le avisará cuando llegue
un mensaje CB.
Idioma
Puede seleccionar el idioma que desee. En tal caso, su teléfono
recibirá los mensajes CB en el idioma seleccionado.
Asunto (Depende de la Red y de la suscripción)
• Añadir
Si selecciona este menú, añadirá una categoría de mensajes CB
en la memoria del teléfono.
• Ver lista
Si selecciona este menú, puede ver la categoría de los mensajes
CB. Si pulsa [Opcs.], podrá editarla y borrarla.
• Lista activa
Puede seleccionar la categoría de mensajes CB en la lista activa
mediante [Selec.].
Acceso al Menú

ESPAÑOL
38
Buzón de voz [Menú 1-5]
Puede escuchar sus mensajes de voz y obtener el número del
centro de buzón de voz.
Llam. buzón voz
Puede llamar al centro de buzón de voz si desea oír sus mensajesde
voz.
Núm. Buzón
Puede obtener el número de buzón de voz si esta función es
soportada por el proveedor de servicios de red. Cuando llega un
mensaje de voz, el símbolo correspondiente será mostrado en
pantalla. Por favor, compruebe con su proveedor de servicios de red
los detalles del servicio para poder configurar el teléfono de acuerdo
con estos.
1. Pulse la tecla 1durante varios segundos en el modo de
espera.
2. Puede comprobar los siguientes submenús.
• Inicio
Número marcado en la red doméstica para escuchar el buzón de
voz.
• Otros
Número marcado desde otras redes para escuchar el buzón de
voz.
Mensajes [Menú 1]
Acceso al Menú

ESPAÑOL
39
Tarjeta personal [Menú 1-6]
Puede editar su tarjeta de visita. Los datos de la tarjeta de visita
pueden ser nombre, números de móvil, oficina y fax y dirección de
correo electrónico.
• Editar : Puede editar una tarjeta de visita.
• Borrar : Puede borrar una tarjeta de visita.
Plantilla [Menú 1-7]
Puede editar mensajes predefinidos. Puede acceder a 11 mensajes
predefinidos en la lista. Puede grabar 6 plantillas antes de editarlas.
Pero puede modificarlas si lo desea. El resto aparecerá como
<vacío>.
• Editar : Puede editar la plantilla.
• Borrar : Puede borrar la plantilla.
Acceso al Menú

ESPAÑOL
40
Informe de estado [Menú 1-8]
Puede leer y eliminar mensajes de entrega.
Configuración [Menú 1-9]
Tipo mensaje
Texto, Voz, Fax, Búsq. nac., X.400, E-mail, ERMES
Normalmente, el tipo de mensaje está por defecto en modo Texto.
Puede convertir ese texto en formatos alternativos que sean
compatibles con el dispositivo que recibirá el mensaje. Contacte con
su proveedor de servicio para comprobar la disponibilidad de esta
función.
Per. validez
Este servicio de red permite definir durante cuanto tiempo deben ser
almacenados los mensajes de texto en el centro de mensajes
mientra éste intenta enviarlos.
Informe de estado
Si selecciona Sí en este menú podrá comprobar si sus mensajes
han sido enviados correctamente o no.
¿Pago por resp.?
Cuando haya enviado un mensaje, permite a la persona a la que
envió el mensaje responder al mismo pero siéndole el coste de éste
facturado a usted.
Mensajes [Menú 1]
Acceso al Menú

ESPAÑOL
41
Centro SMS
Si desea enviar el mensaje de texto, puede acceder a la dirección
del centro de mensajes SMS a través de este menú.
Papel
Puede elegir el fondo que desea mientras escribe un mensaje.
Estado mem. [Menú 1-0]
Si selecciona este menú, el teléfono mostrará la memoria usada y la
disponible. El total de memoria es la suma de las memorias de la
tarjeta SIM y del teléfono.
Acceso al Menú

ESPAÑOL
42
Llam. perd. [Menú 2-1]
Este menú muestra las llamadas perdidas más recientes. En este
menú puede guardar estos números, llamar a ellos o ver la fecha y
hora de las llamadas, así como escribir mensajes.
Llam. recibidas [Menú 2-2]
Puede comprobar las llamadas recibidas recientes. En este menú
puede guardar estos números, llamar a ellos o ver la fecha y hora de
las llamadas, así como escribir mensajes.
Llam. enviadas [Menú 2-3]
Puede comprobar las llamadas realizadas recientes. En este menú
puede guardar estos números, llamar a ellos o ver la fecha y hora de
las llamadas, así como escribir mensajes.
Lista de todas las llamadas [Menú 2-4]
Puede guardar el número de teléfono y comprobar el día y la hora
de cada llamada. Además, puede devolver la llamada al número que
desee así como enviarle un mensaje.
Borr. últ. llam. [Menú 2-5]
Puede borrar el registro de todas las llamadas.
Registro de llamadas [Menú 2]
Acceso al Menú

ESPAÑOL
43
Acceso al Menú.
Coste llamad. [Menú 2-6]
Dentro de estos submenús podrá ver la duración y el coste de las
llamadas.
Duración llam.
Esta función permite ver la duración de la Última llam, de Todas
llam. voz, de las Llam. recibidas y de las Llam. enviadas en horas,
minutos y segundos. También puede reinicializar todos los
contadores.
1. Pulse [Menú] en el modo de espera.
2. Pulse 2 para acceder directamente o use U y D para
acceder al Registro de llamadas.
3. Desplácese hasta Duración llam. y pulse [Selec.].
Coste llamadas
Esta función le permite comprobar el coste de la última llamada, de
todas las llamadas, el coste restante y el reinicio de todos los costes.
Para esto último, necesita el código PIN2.
1. Pulse [Menú] en el modo de espera.
2. Pulse 2 para acceso directo o use U y D para entrar en el
Registro de llamadas.
3.
Desplácese hasta Coste llamadas y pulse [Selec.] para acceder.
Existen cuatro submenús:
Última llam., Todas llam., Crédito y
Borrar todos.

ESPAÑOL
44
Config. coste [Depende la tarjeta SIM]
• Establ. tarifa
Puede determinar el tipo de moneda y el precio unitario. Contacte
con sus proveedores de servicio para obtener los precios unitarios
de facturación. Para seleccionar la moneda o la unidad, necesita el
código PIN2.
1. Pulse [Menú] en el modo de espera.
2. Pulse 2 para acceder directamente o use U y D para
entrar en el Registro de llamadas.
3. Desplácese hasta Config. coste y pulse [Selec.] para acceder.
4. Selecciones Establ. tarifa.
• Def. crédito
Este servicio de red permite limitar los costes de sus llamadas
mediante la selección de unidades de facturación. Si selecciona
Leer, los números de unidades restantes serán mostrados. Si
selecciona Cambiar, podrá cambiar su límite de coste.
1. Pulse [Menú] en el modo de espera.
2. Pulse 2 para acceder directamente o use U y D para
entrar en el Registro de llamadas.
3. Desplácese hasta Config. coste y pulse [Selec.] para acceder.
4. Seleccione Def. crédito.
Advertencia
•
Este servicio de red permite ver automáticamente el coste
real de la última llamada. Si selecciona Si en el menú Mostr.
auto, podrá ver el ultimo coste cuando finalice la llamada.
Registro de llamadas [Menú 2]
Acceso al Menú

ESPAÑOL
45
• Mostr. auto
Este servicio de red permite ver automáticamente el coste de la
última llamada. Si selecciona Sí en el menú Mostr. auto, podrá ver
el ultimo coste cuando finalice la llamada.
1. Pulse [Menú] en el modo de espera.
2. Pulse 2 para acceder directamente o use U y D para
entrar en el Registro de llamadas.
3. Desplácese hasta Config. coste y pulse [Selec.] para acceder.
4. Seleccione Mostr. auto.
Advertencia
• Cuando se hayan consumido todas las unidades, no se
podrán realizar llamadas excepto si son de emergencia.
Dependiendo de su tarjeta SIM, necesitará el código PIN2
para determinar un coste de llamadas.
Acceso al Menú.

Info GPRS [Menú 2-7]
Usted puede comprobar el volumen de datos transferidos a través
de la Red mediante el sistema GPRS. De la misma manera podrá
comprobar el tiempo que ha permanecido conectado.
Duración llam.
Usted puede comprobar la duración de su conexión GPRS. De la
misma manera puede resetear los contadores de llamadas.
• Última llam.
• Todas llam.
• Restablecer
Volum. datos
Usted puede comprobar el volumen de datos transferidos.
• Enviado
• Recibidas
• Todos
• Borrar todos
ESPAÑOL
46
Registro de llamadas [Menú 2]
Acceso al Menú

ESPAÑOL
47
Perfiles [Menú 3]
Acceso al Menú
En este menú puede ajustar y personalizar los tonos del teléfono
para diferentes eventos, situaciones y grupos de usuarios.
Sólo vibrac. [Menú 3-1]
• Habilitar : Puede activar el perfil Vibración si necesita el modo
de vibración.
Silencio [Menú 3-2]
• Habilitar : Puede activar el perfil Silencio si está en un lugar
silencioso.
• Cambiar : Puede cambiar los valores de este perfil.
Advertencia
• Cuando su teléfono esté conectado a un equipo Manos
Libres de Coche, se activará de forma automática el perfil
Coche, y cuando esté conectado a un Manos Libres
Portátil, se activará de forma automática el perfil Auricular,
de tal forma que cada submenú asociado se mostrará de
automáticamente.

ESPAÑOL
48
General [Menú 3-3]
• Habilitar : Puede activar el perfil General para un uso habitual
del teléfono.
• Cambiar : Puede cambiar los valores de este submenú.
Fuerte [Menú 3-4]
• Habilitar : Puede activar el perfil Fuerte si está en un lugar
ruidoso.
• Cambiar : Puede cambiar los valores de perfil de este
submenú.
Auriculares [Menú 3-5]
• Habilitar : Puede activar el perfil Auricular cuando conecte un
manos libres portátil.
• Cambiar : Puede cambiar los valores de este perfil.
Perfiles [Menú 3]
Acceso al Menú

ESPAÑOL
49
Coche [Menú 3-6]
• Habilitar : Puede activar el perfil Coche cuando conecte un kit
manos libres para coche.
• Cambiar : Puede cambiar los valores de este perfil.
Grupo de Submenús dentro de Perfiles [Menú 3-x-x]
El menú Perfiles contiene los siguientes submenús.
Avis. entrada
Permite determinar el tipo de alerta para las llamadas entrantes.
Timbre llam.
Permite definir el tipo de melodía de timbre o tono para las llamadas
entrantes para un entorno determinado.
Vol. timbre
Permite definir el volumen del timbre para las llamadas entrantes
para un entorno determinado.
Alerta mens.
Permite activar uno de los siguientes tipos de aviso cuando se
recibe un mensaje: Aviso, Vibrador o Sin aviso.
Tecla volumen
Permite determinar el volumen del sonido al pulsar las teclas para
un entorno determinado.
Acceso al Menú

ESPAÑOL
50
Responder auto.
Permite que se responda de manera automática. Por favor, observe
que solo los perfiles Coche y Auricular disponen de esta opción.
• Deshabilitar
El teléfono no responderá automáticamente a las llamadas
entrantes.
• Tras 5 seg.
Después de 5 segundos, el teléfono responderá automáticamente.
• Tras 10 seg.
Después de 10 segundos, el teléfono responderá
automáticamente.
Advertencia
•
Si conecta el kit manos libres al teléfono, no podrá activar la
vibración contemplada en los menús Alerta de entrada y
Alerta de mensajes. Por lo tanto, en el menú Coche podrá
ver los siguientes submenús:
- Avis. entrada : Timbre, Silencio
- Alerta mens. : Aviso, Sin aviso
Perfiles [Menú 3]
Acceso al Menú

ESPAÑOL
51
Configuración [Menú 4]
Acceso al Menú
Usted puede configurar los siguientes menús según sus
preferencias y necesidades.
Alarma [Menú 4-1]
Dentro de este menú puede configurar la alarma del teléfono para
que le avise cuando lo necesite.
Habilitar
Puede ajustar la hora y minuto a la que la alarma debe sonar.
1. Entre en el menú.
2. Seleccione Habilitar pulsando [Selec.], y después defina la hora
a la que desee que la alarma le avise.
3. Pulse [Aceptar].
4. Seleccione el periodo de repetición : Una vez, Diaria,
Semanal o Mensual.
5. Si selecciona Alarma con teléfono apagado, la alarma sonará a la
hora seleccionada incluso aunque el teléfono esté apagado.
Deshabilitar
Puede cancelar la configuración que hubiera establecido para la
alarma.
1. Acceda al menú.
2. Seleccione Deshabilitar pulsando [Selec.].
3. Se mostrará el mensaje Deshabilitar si está había sido activada
previamente.
4. Si desea cancelarla, pulse [Sí]. Si no, pulse [No].

ESPAÑOL
52
Fecha y Hora [Menú 4-2]
Fecha
• Fecha
En este menú, puede ajustar la fecha del teléfono.
1. Acceda al menú.
2. Seleccione Fecha pulsando [Selec.].
3. Introduzca el valor que desee para la fecha.
4. Pulse [Aceptar].
• Formato fecha
Puede determinar el Formato de fecha en este menú.
Hora
El teléfono tiene su propio reloj. En este menú puede ajustar la hora
y seleccionar el formato de presentación de la misma: 12 ó 24 horas.
1. Acceda al menú.
2. Desplácese hasta Hora pulsando [Selec.].
• Hora:
En este menú puede ajustar la hora.
1. Seleccione Hora pulsando [Selec.].
2. Introduzca el valor que desee para la hora.
3. Seleccione el formato de hora AM/PM que desee mediante la
pulsación larga de las teclas U o D.
4. Pulse [Aceptar].
Configuración [Menú 4]
Acceso al Menú

ESPAÑOL
53
• Formato hora:
Puede definir el formato de hora entre 12 ó 24 horas.
1. Desplácese hasta Formato hora pulsando [Selec.].
2. Seleccione 12 ó 24 horas pulsando [Selec.].
Confg. telf. [Menú 4-3]
Puede definir los ajustes que desee para el teléfono. Desplácese
hasta el menú Cong. telf. y pulse [Selec.].
Pantalla
• Salvapant.
Una imagen aparecerá en la pantalla en el modo de espera si no
se realiza ninguna acción con el teléfono en 20 segundos.
• Llamada
Puede configurar alguna clase de dibujo animado que aparecerá
mientras realiza una llamada.
• Papel tapiz
Puede seleccionar un dibujo de fondo mientras el teléfono se
encuentra en modo de espera.
• Saludo
Este menú permite definir un mensaje que será presentado
durante unos instantes en pantalla cuando se enciende el teléfono.
• Texto pant.
Si elige SI, el menú le permitirá seleccionar el tipo de pantalla en
modo de espera.
El texto que usted defina se mostrará en pantalla. Si selecciona
este elemento, su teléfono le pedirá que edite el mensaje.
• Nombre de red
Si lo activa, podrá seleccionar si el nombre de la red es
mostrado.
Acceso al Menú

• Luz fondo
Puede determinar la duración de la luz de fondo que aparece cada
vez que pulsa una tecla.
• Contr. pant.
Puede ajustar el brillo de la pantalla deseado
mediante U o D.
Puerto serie
• FAX
Puede configurar la velocidad del puerto serie hasta 19.200 bps
para conectar el equipo aun PC o FAX.
• Otros
Puede ajustar la velocidad del puerto serie hasta 115.200 bps para
poder utilizar programas de PC mediante GPRS o llamadas de
datos.
Idioma
Puede seleccionar el idioma de será mostrado en el teléfono.
ESPAÑOL
54
Contr. pant.
Configuración [Menú 4]
Acceso al Menú

ESPAÑOL
55
Conf. llamadas [Menú 4-4]
Puede ajustar el menú relativo a llamadas pulsando [Selec.] en el
menú Configuración.
Cualq. tecla
• Sí
Si selecciona esta opción, podrá contestar a una llamada entrante
pulsando cualquier tecla excepto E.
• No
Si selecciona esta opción, podrá contestar a una llamada entrante
con solo abrir la tapa S.
Enviar número
(dependiente de la red y la suscripción)
• Sí
Si selecciona esta opción, puede enviar su número de teléfono a la
otra persona. Esto quiere decir que su número de teléfono será
mostrado en la pantalla de la persona a la que llame.
•No
Si selecciona esta opción, no podrá enviar su número de teléfono.
Nota
• Como usar un Manos libres portátil:
Cuando esté usando un manos libres portátil (auricular),
para responder una llamada mediante el botón de
respuesta del mismo deberá mantener éste pulsado
durante unos segundos.
Acceso al Menú

ESPAÑOL
56
Llam. espera
(dependiente de la red)
Si este servicio está habilitado, podrá responder a una llamada
entrante en espera.
• Habilitar
Permite activar el servicio correspondiente.
• Deshabilitar
Permite desactivar el servicio correspondiente.
• Estado
Comprobación del estado del servicio.
Aviso minuto
Si selecciona Sí, puede comprobar la duración de una llamada
mediante tonos de aviso cada minuto durante la llamada.
Rellam. auto
• Sí
Cuando esta función está activada, el teléfono realizará hasta 10
intentos de conexión de la llamada.
• No
El teléfono no realizará ningún reintento de conexión de la llamada.
Configuración [Menú 4]
Acceso al Menú

ESPAÑOL
57
Selec. línea
Esta función solo será útil si el Servicio de Línea Alternativa está
disponible. Entonces, estarán registrados dos números de teléfono
independientes para el teléfono. Esta función le proporciona la
posibilidad de seleccionar el número de teléfono activo en cada
momento. Si esta función está disponible por su proveedor de red, el
siguiente menú estará disponible:
• Línea 1 : Define la Línea 1 como número de teléfono en uso.
• Línea 2 : Define la Línea 2 como número de teléfono en uso.
Conf. seguridad [Menú 4-5]
Código PIN
En este menú, podrá definir que el teléfono le pida el código PIN de
su tarjeta SIM cuando se enciente el teléfono. Si esta función está
activada, se le pedirá que introduzca el código PIN.
1. Pulse [Menú] en modo de espera.
2. Pulse 4 para acceder directamente o use U y D para
entrar en Configuración.
3. Desplácese hasta el menú Conf. seguridad.
4. Seleccione código PIN mediante la pulsación de [Selec.].
5. Podrá ver los siguientes submenús.
• Habilitar : Habilita la petición del código PIN.
• Deshabilitar : Deshabilita la petición del código PIN.
Acceso al Menú

ESPAÑOL
58
Bloq. teléf.
Puede utilizar el bloqueo de teléfono para impedir el uso no
autorizado de su teléfono. Cuando encienda su teléfono, éste le
pedirá que introduzca el código de seguridad siempre que este esté
habilitado. Si define el bloqueo de teléfono como “Automático”, el
teléfono le pedirá que lo introduzca sólo cuando cambie de tarjeta
SIM.
• Habilitar
• Deshabilitar
• Automático
Bloq. auto
Cuando active el Bloqueo automático del teclado, éste se bloqueará
automáticamente cuando no se realice ninguna acción en 25
segundos.
• Habilitar
• Deshabilitar
Nota
• Si desea bloquear el teclado manualmente, acceda al menú
Principal y pulse *.
• Si desea desbloquear el teclado, pulse la tecla <
[desbloquear] y a continuación presione *. Pero si había
activado el Bloqueo automático del teclado anteriormente,
el teclado se bloqueará automáticamente después de 25
segundos.
Configuración [Menú 4]
Acceso al Menú

ESPAÑOL
59
Restr. llam.
El servicio de Restricción de llamadas evita que el teléfono realice o
reciba determinados tipos de llamadas. Esta función requiere la
clave de Restricción de llamadas. Puede ver los siguientes
submenús.
• Todas realiz.:
Restringe todas las llamadas salientes.
• Sal. intern.:
Restringe todas las llamadas salientes internacionales.
• Sal. int. itin.:
Restringe todas las llamadas salientes internacionales excepto a la
red propia.
• Todas entran.:
Restringe todas las llamadas entrantes.
• Entr. en itin.:
Restringe todas las llamadas entrantes cuando se está en
itinerancia (roaming).
• Cancelar todas:
Cancela todas las restricciones.
• Camb. contr.:
Puede cambiar la clave de Restricción de llamadas.
Acceso al Menú

ESPAÑOL
60
Marc. Fija (depende del tipo de tarjeta SIM)
Puede restringir las llamadas salientes a determinados números.
Los números están protegidos por el código PIN2.
1. Pulse [Menú] en el modo de espera.
2. Pulse 4 para acceder directamente o pulse U y D para
entrar en Configuración.
3. Desplácese hasta el menú Conf. seguridad.
4. Seleccione código PIN mediante [Selec.].
5. Si el código PIN2 es correcto, podrá ver los siguientes submenús.
• Activ. : Puede restringir las llamadas salientes a
determinados números de teléfono.
• Desac. : Puede llamar sin ningún tipo de restricción.
• Lista núm. : Puede ver la lista de números guardada como
Números de Marcación Fija.
Camb. código
Puede cambiar los códigos de acceso :
Código PIN, Código PIN2 y Código segur.
1. Pulse [Menú] en el modo de espera.
2. Pulse 4 para acceder directamente o pulse U y D para
entrar en Configuración.
3. Desplácese hasta el menú Conf. seguridad.
4. Seleccione Camb. código mediante [Selec.].
5. Si desea cambiar uno de PIN/PIN2/Código de seguridad,
introduzca el código original y pulse [Aceptar].
6. Introduzca el nuevo PIN/PIN2/ Código de seguridad y verifíquelo.
Configuración [Menú 4]
Acceso al Menú

ESPAÑOL
61
Config. red [Menú 4-6]
Puede seleccionar la red en la que estará registrado de manera
manual o automática. Normalmente, la selección de la red será
automática.
Automático
El teléfono seleccionará automáticamente la red que esté disponible
en su área.
Manual
El teléfono buscará la lista de redes disponibles y la mostrará.
Entonces, podrá seleccionar la que prefiera usar si dispone de un
acuerdo de itinerancia (roaming) con su operador de red local.
Preferidas
Puede establecer una lista de redes preferidas en las que el teléfono
debe intentar registrarse en primer lugar, antes de intentarlo en
otras. Esta lista es creada a partir de la lista de redes conocidas
predefinidas en el teléfono.
Def. usuar.
Puede añadir o eliminar redes de la lista predefinida. Ésta puede
incluso contemplar nuevas redes cuyos códigos no sean conocidos
por el teléfono. Para hacer esto, seleccione y después introduzca el
código de red, el código de país y el nombre de la red.
¿Recuperar valores por defecto? [Menú 4-7]
Puede devolver el teléfono a la configuración por defecto con la que
salió de fábrica mediante la selección de la opción Restablecer
Valores de Fábrica/Configuración y su confirmación posterior.
Acceso al Menú

ESPAÑOL
62
Desvíos [Menú 5]
Acceso al Menú
(dependiente de la red y la suscripción)
El desvío de llamadas le permite desviar llamadas entrantes de voz,
fax y datos a otro número. Para ampliar información, contacte con su
proveedor de servicio.
Todas llam. [Menú 5-1]
Desviar todas las llamadas de voz incondicionalmente.
Comunicando [Menú 5-2]
Desvía las llamadas cuando hay una en curso.
No responde [Menú 5-3]
Desvía las llamadas cuando no responde.
Ilocalizable [Menú 5-4]
Desvía las llamadas cuando el teléfono está apagado o sin
cobertura.
Llamad. datos [Menú 5-5]
Desvía a un número con una conexión a ordenador
incondicionalmente.

Español
63
Acceso al Menú
(dependiente de la red y la suscripción)
Llamadas fax [Menú 5-6]
Desvía a un número con una conexión a fax incondicionalmente.
Los submenús [Menú 5-x-x]
Los menús de Desvío de llamadas disponen de los
siguientes submenús.
Habilitar
Activa el servicio correspondiente.
• Otro número
Define el número al que desviar.
• Favorito
Muestra una lista con 5 números de desvío.
• Buzón de voz
Reenvía al centro de mensajes. Esta función no está disponible en
los menús Llamad. datos y Llamadas fax.
Nota
• Puede elegir el número deseado en el menú Favorito.

ESPAÑOL
64
Deshabilitar
Desactiva el servicio correspondiente.
Estado
Comprueba el estado del servicio correspondiente.
Cancel. todas [Menú 5-7]
Cancela todos los servicios de desvío.
Desvíos [Menú 5]
Acceso al Menú
(dependiente de la red y la suscripción)

ESPAÑOL
65
Planificador [Menú 6]
Acceso al Menú
Planificador [Menú 6-1]
Cuando acceda a este menú se mostrará un calendario. En la parte
alta de la pantalla hay secciones para la fecha e iconos. Cuando
cambie la fecha, el calendario se actualizará de acuerdo a ésta. Se
utilizará un cursor cuadrado para localizar un cierto día. Cuando
exista un acontecimiento dentro de un día, este aparecerá marcado
con un símbolo de subrayado. Esta función sirve para recordarle sus
acontecimientos y citas. El teléfono hará sonar un tono de alarma
para cada evento si usted así lo desea. Puede cambiar el día, el
mes y el año.
Añadir nueva
Puede editar hasta 30 caracteres. Puede tomar una nota. Puede
escoger los siguientes tipos de notas. Puede tomar hasta 20 notas.
• Plan
Introduzca el asunto, la hora del acontecimiento, la frecuencia de
repetición y la hora de la alarma pulsando [Selec.].
Tecla Descripción Tecla Descripción
Anual
Mensual
Si pulsa estas teclas
brevemente, podrá ajustar la
alarma diaria. Si las pulsa
por un periodo largo, podrá
hacerlo semanalmente.

ESPAÑOL
66
• Repetir
- Una vez : no habrá repetición.
- Diaria : repetición diaria durante 5 días.
- Semanal : repetición semanal durante 5 semanas.
- Mensual : repetición mensual durante 5 meses.
- Anual : repetición anual durante 5 años.
• ¿Hora alarma?
- Hora precisa : alarma en el momento preciso del
acontecimiento.
-
10 min. antes
: alarma 10 minutos antes del momento
preciso del acontecimiento.
-
30 min. antes
: alarma 30 minutos antes del momento
preciso del acontecimiento.
- 1 hora antes : alarma 1 hora antes del momento preciso
del acontecimiento.
- 1 día antes : alarma 1 día antes del momento preciso del
acontecimiento.
• Memoria
1. Seleccione Añadir nueva pulsando [Selec.].
2. Desplácese hasta Memoria.
3. Pulse [Selec.].
4. Introduzca el recordatorio y pulse [Selec.].
Planificador [Menú 6]
Acceso al Menú

ESPAÑOL
67
Ver día
Muestra la nota del día elegido. Use U y D para desplazarse
entre la lista de notas. Si asoció una alarma a la nota, un reloj de
alarma será mostrado. Pulse [Opcs.] para borrar o editar la nota
seleccionada.
• Opcs.
- Editar
Puede editar asunto, hora, hora de repetición y hora de aviso,
presionando [Selec.].
- Borrar
Puede eliminar la anotación.
Ver todas
Muestra las notas presentes de todos los días. Use U y D para
desplazarse entre la lista de notas. Pulsando [Opcs.] podrá acceder
al mismo menú que en “Ver día”.
Borrar último
Puede borrar el último acontecimiento que se le haya notificado.
Borrar todas
Puede borrar todas las notas.
Acceso al Menú

ESPAÑOL
68
Agenda [Menú 6-2]
Buscar
(Llamar a números de la Agenda)
1. Inicie primero la Agenda, presionando [Nombr.] en modo de
espera.
2. Busque presionando [Selec.] y aplique el número deseado.
3. Dependiendo de la configuración del Menú Buscar por, puede
que no aparezca el siguiente submenú.
• Nombre
• Número
4. Puede buscar sus contactos por nombre o número.
5. Seleccione [Buscar].
6. Puede comprobar los números y nombres presionando [Lista].
7. Si lo desea, puede editar, borrar o copiar una entrada, o añadir
otra, o asignar una etiqueta de voz a una mediante la selección
de [Opcs.]. Se mostrará el siguiente menú.
• Editar : Permite editar el nombre, el número, el correo
electrónico y el fax presionando [Aceptar].
• Borrar : Permite borrar una entrada.
• Escribir : Puede escribir un mensaje.
• Copiar : Permite copiar una entrada de la SIM al
teléfono y viceversa.
• Llamar : Puede llamar a la entrada seleccionada.
Planificador [Menú 6]
Acceso al Menú

ESPAÑOL
69
• Voz : Puede asignar una etiqueta de voz a una
entrada o cambiarla si ya estaba presente.
• Núm. principal : Número principal: puede seleccionar uno
entre móvil, casa u oficina según sea su
preferencia. El número principal será
mostrado en primer lugar.
Añadir nueva
Puede añadir una nueva entrada en la agenda mediante esta
función. La capacidad de la memoria del teléfono es de 200
entradas. La capacidad de memoria de la tarjeta SIM depende del
proveedor de servicio. También puede guardar 20 caracteres del
nombre en la memoria del teléfono. La tarjeta SIM también permite
guardar una serie de caracteres, pero el número de estos dependerá
de las características de la tarjeta.
1. Abra la agenda mediante la pulsación de la tecla [Nombr.] en el
modo de espera.
2. Desplácese hasta Añadir nueva y presione [Selec.] para
acceder.
3. Selecione en qué memoria desea guardar la entrada nueva:
SIM o Teléfono.
• SIM : Puede añadir un nombre y un número para la entrada.
a. Escriba el nombre deseado.
b. Presione [Aceptar], entonces podrá introducir un
número.
c. Presione [Aceptar].
d. Si desea añadir una etiqueta de voz pulse [Sí].
Acceso al Menú

ESPAÑOL
70
• Teléfono : Puede añadir un nombre, un número de móvil, casa,
oficina o fax y una dirección de correo electrónico.
a. Puede elegir entre número de móvil, casa u
oficina, presionando [Selec.].
b. Escriba el nombre deseado.
c. Escriba el número seguido de móvil, casa, u
oficina, presionando [Sig.] para cada paso,
[Borrar] para cancelar y C para grabar o salir
del menú.
d. Si desea añadir una etiqueta de voz pulse [Sí].
Debe decir una palabra en 2 segundos y el teléfono le pedirá que la
diga de nuevo para asegurar la precisión del reconocimiento de voz.
Después de que el reconocimiento de voz haya concluido, la voz
será asignada automáticamente.
Nota
• La voz sólo puede ser asignada al teléfono principal que
haya definido. Por ejemplo, si cambia el número principal la
etiqueta de voz será automáticamente asignada al número
cambiado.
•
Puede añadir una etiqueta de voz a un número en la SIM. La
etiqueta puede ser eliminada quitando o cambiando la tarjeta
SIM. La etiqueta de voz asignada a un número de teléfono
de la SIM puede ser asignada a otro número de teléfono
cuando cambia la SIM. ¿Por qué?, porque la tarjeta SIM no
contiene información sobre la etiqueta de voz.
Planificador [Menú 6]
Acceso al Menú

ESPAÑOL
71
Marc. rápida
Puede asociar cualquiera de las teclas del 2 al 9 con una entrada de
la lista de nombres. Puede llamar directamente pulsando esa tecla
durante 2-3 segundos.
1. Abra la agenda primero mediante la pulsación de [Nombr.] en
modo de espera.
2. Desplácese hasta Marc. rápida y presione [Selec.] para acceder
a este menú.
3. Se mostrará la lista de Números de Marcación Rápida.
4. Si desea añadir un Número de Marcación Rápida, seleccione
<Vacío>. Entonces, puede buscar el nombre en la agenda.
5. Si selecciona un número asignado a marcación rápida, podrá ver
los siguientes submenús.
• Cambiar : Puede cambiar la asignación del número de
marcación rápida.
• Cancel. : Puede borrar el número de marcación rápida
asignado.
Acceso al Menú

ESPAÑOL
72
Lista de voz
Puede ver los números de teléfono que tienen una etiqueta de voz
asignada. Puede también llamar directamente mediante [Enviar].
Tras seleccionar un número de teléfono mediante U y D
presione [Opcs.], podrá ver los siguientes submenús.
• Reproducir : Puede reproducir la voz asignada al número de
teléfono.
• Cambiar : Puede cambiar la voz asignada al número de
teléfono.
• Borrar : Puede borrar la voz asignada al número de teléfono.
• Llamar : Puede llamar si selecciona este menú.
Grupos usuarios
Puede incluir hasta 20 miembros para cada grupo. Puede tener
hasta 7 grupos distintos.
1. Pulse [Nombr.] para acceder a la agenda en modo de espera.
2. Desplácese hasta Grupos usuarios y pulse [Selec.] para entrar
en este menú.
3. La lista de grupos será mostrada: Familia, Amigos, Compañero,
VIP, Grupo 1, Grupo 2 y Otros.
4. Seleccione el nombre del Grupo que desea gestionar mediante
[Selec.].
5. Se mostrarán los submenús siguientes.
Planificador [Menú 6]
Acceso al Menú

ESPAÑOL
73
• Lista miembros
- Puede ver la lista de números en Grupos.
- Puede seleccionar el miembro deseado mediante [Opcs.] y
entonces habilitar submenús como Editar, Borrar, Escribir,
Copiar, Voz o Núm. principal.
• Timbre grupo
Puede asignar una melodía de timbre a un grupo.
• Anim. grupo llam.
Puede asignar un icono a un grupo.
• Añada miemb.
Puede cambiar y editar el nombre de un Grupo.
1. Desplácese por el menú hasta Añada miemb., y luego
presione [Selec.] para grabarlo.
2. El número de miembros de un Grupo no puede exceder de
20. De lo contrario se mostrará un mensaje de error.
3. Presione [Aceptar] para añadir un miembro.
• Borrar miembro
Puede borrar un contacto grabado en la Agenda.
• Renombrar
Puede cambiar el nombre del Grupo.
Acceso al Menú

ESPAÑOL
74
Copiar todos
Puede copiar/mover entradas de la tarjeta SIM a la memoria del
teléfono y viceversa.
1. Abra la agenda primero mediante la pulsación de [Nombr.] en el
modo de espera.
2. Desplácese hasta Copiar todos y presione [Selec.] para acceder
a este menú.
3. Los siguientes submenús serán mostrados.
• SIM a teléf. : Puede copiar la entrada de la tarjeta SIM a la
memoria del teléfono.
• Teléf. a SIM : Puede copiar la entrada de la memoria del
teléfono a la tarjeta SIM.
Borrar todos
Puede borrar todas las entradas de la SIM o del Teléfono y las
etiquetas de Voz. Esta función requiere el código de seguridad.
1.
Pulse [Nombr.] para acceder a la agenda desde en modo de
espera.
2. Desplácese hasta Borrar todos y pulse [Selec.].
3. Seleccione la memoria que desee borrar: SIM, teléfono o Voz.
4. Se le pedirá el Código de Seguridad.
5. Pulse [Aceptar] o pulse [Volver] para cancelar.
Planificador [Menú 6]
Acceso al Menú

ESPAÑOL
75
Configuración
Puede seleccionar la memoria preferida que incluye Variable, SIM o
Teléfono y la búsqueda preferida que incluye Variable, Nombre y
Número.
1. Abra la agenda primero mediante la pulsación de [Nombr.] en
modo de espera.
2. Desplácese hasta Configuración y pulse [Selec.].
3. Aparecerán los siguientes submenús.
• Config. memoria
1. Desplácese hasta la opción resaltada Config. memoria, y
pulse [Selec.].
2. Los siguientes tres submenús serán mostrados:
- Variable : Si selecciona Variable, el teléfono le preguntará
dónde almacenar las entradas que añada en la
Agenda.
- SIM : Si selecciona SIM, el teléfono guardará las
entradas directamente en la SIM sin hacer
ninguna pregunta.
- Teléfono: Si selecciona Teléfono, el teléfono guardará las
entradas directamente en su memoria sin hacer
ninguna pregunta.
• Buscar por
1. Desplácese hasta Buscar por y pulse [Selec.] para acceder.
2. Los siguientes tres submenús serán mostrados.
- Variable: Si selecciona Variable, el teléfono le preguntará
cómo buscar las entradas.
- Nombre : Si selecciona Nombre, el teléfono busca las
entradas por nombre.
- Número : Si selecciona Número, el teléfono busca las
entradas por número.
Acceso al Menú

ESPAÑOL
76
Información
Nº marc. serv. (Número de Llamada de Servicio)
Utilice esta función para acceder a una lista de servicios ofrecidos
por su operador de red (si está habilitado en la tarjeta SIM).
1. Abra la agenda primero mediante la pulsación de [Nombr.] en
modo de espera.
2. Desplácese hasta Nº marc. serv. y pulse [Selec.] para acceder.
3. Se mostrarán los nombres de los servicios disponibles.
4. Use U y D para seleccionar un servicio. Pulse [Enviar].
Estado mem.
Esta función permite comprobar cuantas
entradas libres o usadas hay en la agenda del
teléfono.
1. Abra la agenda primero mediante la pulsación
de [Nombr.] en el modo de espera.
Seleccione Información pulsando [Selec.].
2. Desplácese hasta Estado mem. y pulse
[Selec.] para acceder a este menú.
Número propio (dependiente de la SIM)
Puede comprobar su propio número en la tarjeta SIM.
Planificador [Menú 6]
Acceso al Menú

ESPAÑOL
77
Accesorios [Menú 7]
Acceso al Menú
Mis documentos [Menú 7-1]
Todos los contenidos descargador a través de M-service o EMS,
como tonos, imágenes, etc. están disponibles en el menú Mi
carpeta.
En este menú puede ver los contenidos, editar su nombre y, si lo
desea, definirlos como papel tapiz o tonos de timbre.
Los tonos de timbre polifónicos descargados deben ser activados en
este menú para que estén disponibles en la lista de tonos del menú
Perfiles. Se puede activar un tono cada vez.
Nota
Puede editar sonidos e imágenes en el Compositor de
melodías [Menú 7- 3] y en el Editor gráfico [Menú 7- 4]
respectivamente. También puede anexar estos objetos a un
mensaje EMS según se describe en el capítulo Escribir SMS
[Menú 1- 1].

ESPAÑOL
78
Juegos [Menú 7-2]
Su teléfono dispone de divertidos juegos para su distracción.
Accesorios [Menú 7]
Acceso al Menú
Nota
Las teclas de Control son diferentes para cada juego, pero
cada uno dispone de pantallas de ayuda en la tecla de control
principal. Otras teclas de control comunes son mostradas a
continuación.
[Teclas de Función Comunes]
•
< [Tecla multifunción 1] :
Empezar Juego
• C [CLR] : Pausa
• > [Tecla multifunción 2] : Atrás
•
E [Fin] : Salir
• 0 ~ 9 : Control de Nivel.
• U , D
[arriba, abajo]
: Control de volumen
• * [Tecla asterisco] : Movimiento hacia la izquierda
• # [Tecla almohadilla] : Movimiento hacia la derecha.

ESPAÑOL
79
Compositor melodías [Menú 7-3]
Puede componer los sonidos de timbres que desee. Cuando utilice
esta función, se mostrará el sonido que haya estado utilizando con
anterioridad.
Para grabar un nuevo tono o editar alguno de los ya existentes:
1. Grabe las notas musicales deseadas. ( 1 ~ 7 : CDEFGAB)
2. Para ajustar los caracteres de las notas, haga lo siguiente:
• Duración : 8 acorta y 9 alarga la duración
de la nota o del silencio.
• Reposo : 0 introduce un silencio o pausa de la misma
duración que la nota previa.
• Octava : * configura la octava para la nota siguiente.
• Nota aguda : # agudiza la nota.
• Borrar : C borra cada nota.
Ejemplo: 28# fi 8#d1
Editor gráfico [Menú 7-4]
Puede editar gráficos o dibujos a partir de una imagen ya existente,
de la forma que desee.
1. Para editar, elija el dibujo deseado.
2. Para ajustar el dibujo, proceda de la siguiente manera:
• Cambio de modo :
Conmute entre el modo estático y el de movimiento.
• Dibujar y Borrar :
Conmute entre dibujar y borrar.
Acceso al Menú

ESPAÑOL
80
3. Para ayuda, presione 0 de forma prolongada.
Conver. unidad [Menú 7-5]
Esta función permite convertir una unidad de
medida determinada en otra que desee. Hay
cuatro tipos que pueden ser convertidas a otras
unidades: Longitud, Area, Peso y Volumen.
1. Puede seleccionar una de las cuatro
pulsando [Sig.].
2. Seleccione la unidad que desea convertir
mediante U y D .
3. Puede alternar entre actual y convertir pulsando durante un
tiempo U y D .
4. Puede introducir el primer número tras los decimales pulsando
#.
5. Puede borrar el primer número pulsando C.
6. Pulse E si desea finalizar el proceso de conversión de valor.
Accesorios [Menú 7]
Acceso al Menú
Nota
En el modo de edición, el ajuste por defecto es de dibujo en
movimiento.
Con la tecla * , usted puede moverse más rápido entre
cada punto.

ESPAÑOL
81
Calculadora [Menú 7-6]
Contiene funciones estándar como Sumar, Restar, Multiplicar y
Dividir, (+, –, *, ÷).
1. Introduzca los números mediante las teclas numéricas.
2. Presione la tecla U una vez para Sumar, y de forma prolongada
para Multiplicar. Presione D una vez para Restar y de forma
prolongada para Dividir.
3. Presione la tecla * para introducir un número primo y #
para introducir un número negativo.
4. Puede ver el resultado pulsando la tecla [Resul.].
5. Si desea continuar el proceso, repita los pasos.
6. Puede borrar los números o el signo que desee, presionando
C .
7. Presione la tecla
E si desea finalizar el proceso de cálculo.
Reloj mundial [Menú 7-7]
Puede ver la hora de varias ciudades del mundo.
Cuando pulse U o D brevemente, podrá ver ciudades
pertenecientes a diferentes husos horarios, y cuando pulse durante
cierto tiempo U o D, podrá ver todas las ciudades de un mismo
huso. Para seleccionar el país que desee, pulse [Conf.].
Acceso al Menú

ESPAÑOL
82
Su teléfono soporta servicios basados en el Protocolo de
Aplicaciones Inalámbricas (WAP). Podrá acceder a una serie de
servicios WAP que soporte su red. Estos servicios pueden incluir
información como noticias, previsiones meteorológicas u horarios de
vuelo.
Inicio [Menú 8-1]
Puede conectar con la página principal que esté configurada en el
perfil activo.
Favoritos [Menú 8-2]
Cuando acceda a este menú, podrá ver sus Favoritos.
Entonces, pulse < para acceder a las opciones disponibles o >
para salir.
• Conectar : Conectar con el Favorito seleccionado.
• Añadir nuevo : Permite añadir un Favorito nuevo manualmente.
• Editar : Permite editar el nombre y la dirección del Favorito
seleccionado.
• Borrar : Borra el Favorito seleccionado de la lista.
Mens. Push [Menú 8-3]
Puede recibir mensajes relacionados con WAP que incluyan una
URL, de modo que pueda conectar con ésta directamente.
Buzón entrada
Puede leer o borrar los mensajes de red.
Recibir
Puede recibir los mensajes de red.
Internet [Menú 8]
Acceso al Menú

ESPAÑOL
83
Acceso al Menú
Perfiles [Menú 8-4]
Puede determinar hasta 5 perfiles y activar uno de ellos. Desplácese
hasta el perfil deseado y pulse <para acceder a las opciones
disponibles.
• Activar
Puede activar el perfil seleccionado.
• Configuración
Puede editar y cambiar la configuración WAP del perfil
seleccionado.
- Inicio
Esta opción le permite introducir la dirección (URL) de la página
que desea usar como principal. No necesita escribir “http://”
delante de cada URL dado que el navegador WAP lo añadirá
automáticamente.
- Mostrar imág
Puede seleccionar si las imágenes contenidas en cada página
WAP son mostradas en pantalla o no.
- Tipo conexión
Las opciones disponibles son Continua o Temporal y dependen
de la pasarela de acceso (gateway).
Continuado
Es un mecanismo con confirmación de entrega; genera mucho
tráfico en la red.
Temporal
Servicio sin confirmación.

ESPAÑOL
84
- Config. seg.
Las opciones son Activ. y Desac., y dependen de la pasarela de
acceso utilizada.
- Info pasarela
La mayoría de las pasarelas WAP no necesitan Identidad de
Usuario ni Clave de Acceso. Si su pasarela las necesita para
conectar con ella, su operador de red deberá suministrárselas y
usted las deberá configurar correctamente para navegar por un
sitio WAP.
- Portadora
Datos
GPRS
- Config.datos
Estos valores de configuración deben ser suministrados por su
operador de red.
Dirección IP : Introduzca la dirección IP de la pasarela WAP
que utilice para el acceso.
Marcar núm. : Introduzca el número de teléfono al que hay que
llamar para acceder a su pasarela WAP.
Tipo llamada : Selecciona el tipo de llamada de datos, Analógica
o Digital (RDSI).
Vel. llamada : Velocidad de la conexión.
Id. usuario : Identidad de usuario requerida para llamar al
servidor (NO a la pasarela WAP).
Contraseña : Clave de Acceso requerida para llamar al servidor
(y NO a la pasarela WAP) y que le identifica.
Internet [Menú 8]
Acceso al Menú

ESPAÑOL
85
- Config. GPRS
La configuración GPRS solo estará disponible cuando elija esa
modalidad de servidor.
- Lím. tiempo
Puede programar periodos de desconexión desde 30sec, hasta
300sec. si no se produce ni transmisión ni recepción de datos,
para que el servicio no continúe activo.
• Renombrar
Edite el nombre del perfil.
• Serv. e-mail
Guarde la dirección (URL) del servidor de correo electrónico
(e-mail) que utilice con mayor frecuencia.
- Conectar
Conecta con el servidor de correo electrónico que haya
configurado.
- Editar dirección
Edite la URL del servidor de correo electrónico.
Ir a URL [Menú 8-5]
Puede conectar directamente con el sitio que desee. Necesita
introducir la URL específica con la que desee conectar directamente.
Acceso al Menú

ESPAÑOL
86
Confg. caché [Menú 8-6]
Puede eliminar los contenidos de la memoria caché y cambiar el
modo de comprobación de la misma.
Borrar caché
Los contenidos de la caché serán eliminados.
Compr. caché
Puede cambiar la frecuencia de comprobación de la memoria caché.
• Siempre
La caché siempre será comprobada cuando una URL sea cargada
o se navegue por ella.
• Sólo inicio
La caché sólo será comprobada al abrir el navegador WAP.
• Desac.
La memoria caché nunca será comprobada.
Certif. seg. [Menú 8-7]
Muestra una lista de los certificados disponibles.
Rest. perfil [Menú 8-8]
Puede reiniciar la configuración de los perfiles actuales a los valores
de fábrica por defecto.
Internet [Menú 8]
Acceso al Menú

ESPAÑOL
87
Si está conectado, podrá ver los siguientes menús.
❏ Inicio
Igual que el [Menú 8-1].
❏ Recargar
Recarga la página en la que se encuentre.
❏ Favoritos
Igual que el [Menú 8-2].
❏ Guardar fav.
Guarda la URL actual como un Favorito. También puede editar el
nombre del Favorito.
❏ Ir a URL
Igual que [Menú 8-5].
❏ Conf. e-mail
Conecta con el servidor de correo electrónico que haya
configurado.
❏ Serv. e-mail
Guarda la URL actual como servidor de correo electrónico.
❏ Guardar Imagen
Grabar una imagen descargada de la Red.
Menú On-line de Internet
Acceso al Menú

ESPAÑOL
88
Para poder hacer uso de los servicios de datos y/o fax, necesita una
aplicación o programa de comunicaciones de datos y/o fax.
Antes de usar estas funciones, necesitará conectar su teléfono con
un ordenador o asegurarse que su teléfono está conectado a un
dispositivo compatible.
Envío de llamadas de datos y fax
1. Conecte su ordenador al teléfono.
2. Tras abrir el programa de comunicaciones, realice una llamada y
transmita datos o fax.
3. Después de esa transmisión, puede finalizar la llamada
simplemente cerrando su aplicación de comunicaciones,
pulsando [Fin] o cerrando la tapa.
Recepción de llamadas de datos o fax
Si dispone de números diferentes para las llamadas de voz, datos y
fax, su teléfono reconocerá el tipo de llamada.
Recepción de llamadas de datos o fax – Números
separados (Multi-numbers)
Al usar el servicio de datos o fax, la pantalla muestra el tipo de
llamada que se está recibiendo.
Para recibir una llamada de datos o fax:
1. Conecte su ordenador al teléfono.
2. Después de abrir el programa de comunicaciones, acepte una
llamada y reciba la llamada de datos o fax (si no ha sido
respondida automáticamente).
3. Tras la recepción, puede finalizar la llamada simplemente
cerrando su aplicación de comunicaciones, pulsando [Fin] o
cerrando la tapa.
Como usar la llamadas de Datos y Fax
Funciones adicionales

ESPAÑOL
89
Funciones adicionales
Recepción de llamadas de datos o fax – Número único
Si dispone de una tarjeta SIM que no soporte números de voz, datos
y fax separados, el teléfono no reconoce el tipo de llamada entrante.
Para usar el servicio de datos o fax, asegúrese que desea recibir
una llamada en modo datos o fax. Antes de recibirla, deberá
configurar el teléfono para una de la siguientes opciones en el
submenú de modo de llamada (Configuración ➝ Conf. llamadas ➝
Próx. entr.).
Para recibir un llamada de datos o fax.
1. Pulse [Menú] en el modo de espera.
2. Seleccione el tipo de llamada deseada (Voz, Datos o Fax) y pulse
[Selec.].
3. Conecte su ordenador al teléfono.
4. Después de abrir el programa de comunicaciones, acepte una
llamada y reciba los datos o el fax (si la llamada no ha sido
respondida automáticamente).
5. Tras la recepción, puede finalizar la llamada simplemente
cerrando su aplicación de comunicaciones, pulsando [Fin] o
cerrando la carpeta.
Una vez que haya configurado el teléfono para recibir un tipo
específico de llamadas, permanecerá así hasta que lo cambie.
PC Sync
PC Sync es un programa para intercambiar datos entre el
teléfono y un ordenador a través de un cable. Por lo tanto, si
desea usar esta función necesita el kit apropiado que existe
como accesorio. Para obtener más detalles sobre su
utilización, consulte el fichero de Ayuda de PC Sync en el CD
de PC Sync.

ESPAÑOL
90
Durante una llamada estarán disponibles los siguientes menús que
no aparecen en el modo de espera.
1 Durante una llamada
1-1 Poner llamada en espera
Puede poner una llamada en espera o recuperarla simplemente
mediante la tecla [Enviar].
Cuando una llamada es realizada o contestada, pulse [Enviar] para
ponerla en espera.
Cuando una llamada está retenida, pulse [Enviar] para hacerla
activa.
1-2 Haciendo una segunda llamada
Puede recuperar un número de la agenda para realizar una segunda
llamada.
Pulse [Nombr.] y seleccione Buscar.
Para guardar el número marcado en la agenda durante la llamada,
pulse [Nombr.] y seleccione Añadir nueva.
1-3 Alternando entre dos llamadas
Para cambiar de una llamada a otra, seleccione [Opcs.] y luego
seleccione Alternar o pulse la tecla [Enviar].
Puede retener la llamada activa mediante las flechas arriba/abajo.
Si desea finalizar una de las llamadas, active la llamada deseada y
pulse [Fin].
Menú durante llamadas
Funciones adicionales

ESPAÑOL
91
Funciones adicionales
1-4 Respondiendo una llamada entrante
Para responder una llamada entrante, simplemente pulse la tecla
[Enviar].
El teléfono permite también avisar de una llamada cuando ya hay
otra activa.
Esto se realiza mediante un tono que suena por el auricular;
además, la pantalla muestra que la segunda llamada está en
espera.
Si la llamada en espera está presente, puede retener la primera
llamada y responder a la segunda mediante [Enviar] o
seleccionando la tecla [Responer].
Puede finalizar la actual y responder a la llamada en espera
mediante la tecla [Menú] y luego Finalizar y Responder.
1-5 Rechazando un llamada entrante
Puede rechazar un llamada entrante sin necesidad de aceptarla
simplemente pulsando la tecla [Fin].
Cuando haya una llamada activa, puede rechazar una segunda
llamada mediante la tecla [Menú] y seleccionando Multiconferencia /
Finalizar y Responder o pulsando la tecla [Fin].
1-6 Controlando el volumen durante una llamada
Puede controlar el volumen durante una llamada pulsando [Opcs.] y
seleccionando Volumen.

1-7 Silenciando el Micrófono
Puede silenciar el micrófono durante una llamada pulsando la tecla
[Opcs.] y seleccionando Silencio.
El teléfono puede volver a su funcionamiento normal pulsando [No
sil.].
Cuando el teléfono esté silenciado, la persona en el otro extremo no
podrá oirle, pero usted si podrá escucharla.
1-8 Activando los tonos DTMF durante una llamada
Para activar los tonos DTMF durante una llamada, por ejemplo, para
permitir que su teléfono haga uso de una centralita automática,
seleccione [Opcs.] y luego DTMF On.
Los tonos DTMF se pueden desactivar de la misma manera.
1-9 Accediendo al Menú Principal
Las opciones principales de Mensajes y Servicios SIM pueden ser
utilizadas desde el menú Durante una llamada mediante la tecla
[Opcs.] y luego Mensajes o Menú Principal.
El menú Servicios SIM sólo estará disponible si su tarjeta SIM
soporta los Servicios SIM Tool kit.
ESPAÑOL
92
Menú durante llamadas
Funciones adicionales

ESPAÑOL
93
Funciones adicionales
2 Llamadas en Multiconferencia
El servicio de multiconferencia proporciona la capacidad de
mantener conversaciones simultáneas con más de una persona
siempre que su operador de red soporte esta particularidad.
Una llamada de multiconferencia puede ser establecida solo cuando
tenga una llamada activa y otra retenida, habiendo respondido ya a
ambas.
Una vez que una llamada de multiconferencia está activa, otras
llamadas pueden ser añadidas, desconectadas o apartadas (esto
significa que no participan en la multiconferencia pero aún están
conectadas con usted) por la persona que estableció la
multiconferencia.
Estas opciones están disponibles desde el menú Durante una
llamada y aparecen en Sección.
El número máximo de personas que pueden estar conectadas en
una llamada de multiconferencia es cinco. Una vez iniciada por
usted esa llamada, usted llevará el control de la misma y será el
único que podrá añadir llamadas a la misma.
2-1 Haciendo una segunda llamada
Puede realizar una segunda llamada cuando tenga una activa ya.
Para hacer esto, introduzca el segundo número y pulse [Enviar].
Cuando haya activado la segunda llamada, la primera quedará
automáticamente retenida. Puede alternar entre ambas llamadas
seleccionando [Opcs.] y luego Alternar.
2-2 Configurando una Llamada en Multiconferencia
Puede conectar una llamada retenida a la actual que está activa
para formar una llamada de multiconferencia mediante la selección
de [Opcs.] y luego Multiconferencia / Unir todas.

ESPAÑOL
94
2-3 Reteniendo una Llamada en Multiconferencia
Para retener un llamada de multiconferencia, seleccione [Opcs.] y
luego Multiconferencia / Retener todas.
2-4 Activar la Llamada en Multiconferencia Retenida
Para activar una llamada de multiconferencia retenida, seleccione
[Opcs.] y luego Multiconferencia / Unir todas.
2-5 Añadiendo llamadas a una Llamada en
Multiconferencia
Para añadir una llamada activa a la llamada de multiconferencia
retenida, seleccione [Opcs.] y luego Multiconferencia / Unir todas.
2-6 Mostrar las personas conectadas en una Llamada en
Multiconferencia
Para desplazarse en la pantalla del teléfono por los números de las
llamadas conectadas, pulse las teclas U y D.
2-7 Reteniendo a un miembro de una Llamada en
Multiconferencia
Para retener a una determinada persona de las que estaban
conectadas (cuyo número esté siendo mostrado en pantalla) en una
llamada de multiconferencia retenida, seleccione [Opcs.] y luego
Multiconferencia / Excluir.
Menú durante llamadas
Funciones adicionales

ESPAÑOL
95
Funciones adicionales
2-8 Una llamada privada dentro de una Llamada en
Multiconferencia
Para mantener una conversación privada con otra persona dentro de
una llamada en multiconferencia, muestre el número de la persona
con la que desee hablar en la pantalla, seleccione [Opcs.] y luego
Multiconferencia / Privada para retener al resto de llamadas.
2-9 Finalizando una Llamada en Multiconferencia
El miembro actualmente presentado en pantalla de una llamada en
multiconferencia puede ser desconectado mediante la tecla [Fin].
Para finalizar una llamada en multiconferencia, pulse [Opcs.] y luego
Multiconferencia/Fin.
Sleccionando la tecla [Opcs.] y luego Multiconferencia / Finalizar
todas, desconectará todas las llamadas activas y retenidas.
2-10 Transferencia de Llamadas Explícita (ECT)
Si tiene una llamada retenida y a otra activa, puede conectar ambas
llamadas entre si y luego abandonar la llamada.
Esto se hace mediante la selección de la opción Multiconferencia /
Transferir en el menú Durante un llamada.

ESPAÑOL
96
Cuando utilice este teléfono, debe seguir siempre las siguientes
precauciones de seguridad:
• No toque el cargador con las manos mojadas.
• No desmonte el teléfono ni ninguno de sus accesorios o
componentes (llévelos a un servicio técnico cualificado cuando
sea necesario repararlos o revisarlos).
• Mantenga el equipo alejado de aparatos eléctricos como
televisores, radios u ordenadores personales.
• Mantenga el equipo alejado de fuentes de calor como
radiadores u hornos.
• Evite que el teléfono se caiga.
• No someta la unidad a golpes o vibraciones.
• La superficie del teléfono puede ser dañada si se cubre con
fundas de vinilo o material sintético.
• Use un trapo suave y seco para limpiar el exterior del teléfono
(no utilice disolventes como benceno o alcohol).
• No someta el teléfono a ambientes con exceso de humo o
polvo.
• No mantenga el teléfono cerca de tarjetas de crédito o
cupones de viaje; la información de las bandas magnéticas de
estos podría verse afectada.
• No toque la pantalla con objetos punzantes para evitar
dañarla.
• No exponga el teléfono a líquidos o humedad.
• Use los accesorios como el manos libres portátil con cuidado.
No toque la antena innecesariamente.
Cuidado y Mantenimiento

ESPAÑOL
97
■ Cuidado de la Batería
• No necesita dejar que se descargue totalmente la batería
antes de volver a cargarla. A diferencia de otros sistemas de
batería, no existe efecto memoria que pudiera comprometer
las prestaciones de la misma.
• Utilice solo baterías y cargadores LG. Los cargadores LG
están diseñados para preservar la vida de la batería.
• No desmonte ni cortocircuite la batería.
• Mantenga limpios los contactos metálicos de la batería.
• Sustituya la batería cuando esta no proporcione unas
prestaciones aceptables. La batería puede ser recargada
cientos de veces hasta que necesite ser cambiada.
• Recargue la batería si no ha sido usada durante largo tiempo
para tratar de asegurar su correcto estado.
• No exponga el cargador de batería a la luz directa del sol ni lo
use en condiciones de alta humedad, como en un lavabo.
• No deje la batería en lugares fríos o calientes para evitar que
se deteriore.
• La información y especificaciones contenidas en este menú
están sujetas a cambios sin notificación previa.
• Los accesorios pueden ser diferentes según el país o área;
por favor, consulte con su compañía de servicio local en
caso de duda.

ESPAÑOL
98
General
Nombre del Producto : G5300
Sistema : GSM 900 / DCS 1800
Temperaturas Ambiente
Máxima : +55°C
Mínima : -10°C
Datos Técnicos

ESPAÑOL
99

ESPAÑOL
100
MEMO

GPRS Phone
USER’S MANUAL
MODEL: G5300
Please read this manual carefully
before operating your set.
Retain it for future reference.
ENGLISH


ENGLISH
3
G5300 Phone
G5300 has a polished style which provides users
with a better feel and more convenience.

For Your Safety
ENGLISH
4
All radio transmitters carry risks of interference with electronics in
close proximity.
GSM Phones must be switched off at all times in an
aircraft.
Do not activate near petrol stations, fuel depots,
chemical plants or blasting operations.
Switch off the phone in any area where you are
required by special regulations. For example, the
phone is not allowed to be used in hospital because
pacemakers and hearing aids can be affected.
Minor interference may affect TVs, radios, PCs, etc.
Do not hold the phone in your hand while driving.
Do not dismantle phone or battery.
Keep the phone in a safe place out of children’s reach
since it contains the detachable small parts and create
a choking hazard.

ENGLISH
5
Do not touch the charger with wet hands.
Please note:
Unusable batteries should be disposed of in
accordance with relevant legislation.
Only use ORIGINAL accessories to avoid damage to
your phone.
Emergency call may not be available under all cellular
networks. Therefore, you should never depend solely
on the phone for essential communications such as
medical emergencies.
Important Information
This user’s guide contains important information on the use and
operation of this phone. Please read all the information carefully
for optimal performance and to prevent any damage to or misuse
of the phone. Any changes or modifications not expressly
approved in this user’s guide could void your warranty for this
equipment.
For your safety, use ONLY specified ORIGINAL
batteries and chargers.

ENGLISH
6
Overview
Accessories
..........................................................................
10
Part of the Phone
................................................................
12
• Front of the Phone
..............................................................
12
• Rear of the Phone
...............................................................
13
Key Description
...................................................................
14
• Alphanumeric Keys
.............................................................
16
Display Information
Display Information
.............................................................
17
• On-Screen Icons
.................................................................
17
Getting Started
Installation
............................................................................
19
• Inserting the SIM Card
........................................................
19
• Installing the Battery
...........................................................
20
• Charging the Battery
...........................................................
21
• Disconnecting the charger
..................................................
22
Powering On Sequence
.......................................................
23
• To get started with the phone
.............................................
23
• To turn off the phone
...........................................................
23
Access Codes
.......................................................................
24
• PIN code (4 to 8 digits)
......................................................
24
• PIN2 code (4 to 8 digits)
....................................................
24
• PUK code (4 to 8 digits)
.....................................................
24
• PUK2 code (4 to 8 digits)
...................................................
25
• Security code (4 to 8 digits)
...............................................
25
Contents

ENGLISH
7
Accessing the Menu
Phonebook
...........................................................................
26
Menu Tree
............................................................................
27
Messages [Menu 1]
.............................................................
29
• Write message [Menu 1-1]
..................................................
29
• Inbox [Menu 1-2]
................................................................
34
• Outbox [Menu 1-3]
..............................................................
35
• Info service [Menu 1-4]
......................................................
36
• Voice mail [Menu 1-5]
........................................................
38
• Namecard [Menu 1-6]
........................................................
39
• Templates [Menu 1-7]
........................................................
39
• Delivery reports [Menu 1-8]
................................................
40
• Settings [Menu 1-9]
............................................................
40
• Memory status [Menu 1-0]
................................................. 41
Call Register [Menu 2]
..........................................................
42
• Missed calls [Menu 2-1]
......................................................
42
• Received calls [Menu 2-2]
..................................................
42
• Dialled calls [Menu 2-3]
.......................................................
42
• All calls list [Menu 2-4]
.........................................................
42
• Delete recent calls [Menu 2-5]
............................................
42
• Call charge [Menu 2-6]
........................................................
43
• GPRS information [Menu 2-7]
............................................. 46
Profiles [Menu 3]
..................................................................
47
• Vibrate only [Menu 3-1]
.......................................................
47
• Quiet [Menu 3-2]
.................................................................
47
• General [Menu 3-3]
............................................................
48
• Loud [Menu 3-4]
.................................................................
48
• Headset [Menu 3-5]
...........................................................
48
• Car [Menu 3-6]
...................................................................
49

ENGLISH
8
Settings [Menu 4]
................................................................
51
• Alarm clock [Menu 4-1]
......................................................
51
• Date & time [Menu 4-2]
......................................................
52
• Phone settings [Menu 4-3]
.................................................
53
• Call settings [Menu 4-4]
.....................................................
55
• Security settings [Menu 4-5]
..............................................
57
• Network settings [Menu 4-6]
..............................................
61
• Reset setting [Menu 4-7] .................................................... 61
Call Divert [Menu 5]
.............................................................
62
• All voice calls [Menu 5-1]
...................................................
62
• If busy [Menu 5-2]
..............................................................
62
• If no reply [Menu 5-3]
.........................................................
62
• If out of reach [Menu 5-4]
...................................................
62
• All data calls [Menu 5-5]
.....................................................
62
• All fax calls [Menu 5-6] ....................................................... 63
• Cancel all [Menu 5-7]
.........................................................
64
Organizer [Menu 6]
..............................................................
65
• Scheduler [Menu 6-1]
.........................................................
65
• Phone book [Menu 6-2]
......................................................
68
Fun & Tools [Menu 7]
...........................................................
77
• My folder [Menu 7-1]
...........................................................
77
• Game [Menu 7-2]
................................................................
78
• Melody composer [Menu 7-3]
.............................................
79
• Graphic editor [Menu 7-4]
...................................................
79
• Unit converter [Menu 7-5]
..................................................
80
• Calculator [Menu 7-6]
..........................................................
81
• World time [Menu 7-7]
........................................................
81

ENGLISH
9
WAP services [Menu 8]
........................................................
82
• Home [Menu 8-1]
...............................................................
82
• Bookmarks [Menu 8-2]
.......................................................
82
• Push messages [menu 8-3]
...............................................
82
• Profiles [Menu 8-4]
............................................................
83
• Go to URL [Menu 8-5]
........................................................
85
• Cache settings [Menu 8-6]
.................................................
86
• Security certifications [Menu 8-7]
.......................................
86
• Reset profiles [Menu 8-8] ................................................... 86
Internet On-line menu
..........................................................
87
Additional Functions
How to Use Data and Fax call
............................................
88
• Sending Data or Fax Calls
.................................................
88
• Receiving Data or Fax Calls
..............................................
88
In call Menu
..........................................................................
90
1. During a call
.....................................................................
90
2. Multiparty or Conference Calls
.........................................
93
Care and Maintenance
........................................................
96
Technical Data
.....................................................................
98

Accessories
Overview
ENGLISH
10
Check to make sure that you have all the parts shown below.
Handset
Travel Adapter
Portable Handsfree
User’s manual
Standard Battery
Data Kit/CD
Card(s)

Overview
ENGLISH
11
<Optional Accessories>
Cigar Lighter Adapter
Handsfree Kit
Neckstrap
• Information and specification in this menu is subject to
change without prior notice.
• Accessories may be different in different regions; please
check with our regional service company or agent for further
enquiries.

ENGLISH
12
Part of the Phone
Overview
Front of the Phone
1 Earpiece
2 Display Screen
3 Soft Left Key
4 Navigation Keys
5 Send Key
6 Star Key
7 Soft Right Key
8 END/PWR keys
9 Numeric Keys
10 Hash Key
11 Microphone
12 Ear Microphone
Connector
13 WAP Hotkey/
Clear key

Overview
ENGLISH
13
Rear of the Phone
1 Battery
2 Cable Connector/
Battery Charging Connector/
Hands-Free Car kit Connector
3 Battery Terminals
4 SIM Card Socket
5 Handstrap Hole
6 Battery Lock
7 Ear Microphone Connector
6
5
7
4
3
2
1

ENGLISH
14
Key Description
Overview
The following shows key components of the phone.
Keypad Description
Key Description
Soft Left Key / Soft Right Key
Each of these keys performs the function indicated
by the text on the display immediately above it.
WAP Hotkey / Clear key
Used to connect to WAP directly by pressing this key.
Used to delete character(s).
Navigation Keys
Used to scroll through name, phone numbers, menus
or setting options.
Used to enter Message menu directly.
Used to scroll through names, phone numbers.
Send Key
You can dial a phone number and answer a call.
If you press this key without entering a number,
your phone shows the most recently dialed number.
Numeric Keys
These keys are used mainly to dial in standby mode
and enter numbers or characters in editing mode.
When you press these keys for a long time.
• Used to call your voicemail box by 1 .
• Used to call for international call by 0 .
• Used to call Speed dials by from 2 to 9.

ENGLISH
15
Overview
Key Description
Used to enter the vibration mode by pressing this key
for a long time.
Used to call by voice dial with long pressing this key.
This key is also used as Ear mic. hook key when
connecting Ear mic.
END/PWR Key
Used to end or reject a call. This key is also used as
Power Key. Pressing and holding this key for a few
seconds.

ENGLISH
16
Alphanumeric Keys
The alphabet and numerical keypad mapping relation are listed as
the following table.
Key Description
. , ' ? ! - & 1
A B C 2 Ä À Á Â Ã Æ Ç a b c ä à á â ã ç
D E F 3 È É Ë Ê d e f è é ë ê
G H I 4 Î Ï Ì Í g h i î ï ì í
J K L 5 j k l
M N O 6 Ö Ô Ò Ó Ø Ñ m n o ö ô ò ó ø ñ
P Q R S 7 p q r s
T U V 8 Ü Ù Û Ú t u v ü ù û ú
W X Y Z 9 w x y z
0 [Space Key]
Key Description
Overview

ENGLISH
17
Display Information
Display Information
The screen displays several icons the following describe each of
them you may see on the phone.
On-Screen Icons
Icon/Indicator
Description
Tells you the strength of the network signal.
Call is connected.
You can use GPRS service.
Shows that you are using a roaming service.
Line 1/2 is in use for outgoing calls – If you
subscribe to the Two Line Service.
The alarm has been set and is on.
Tells you the status of the battery.
You have received a text message.
You have received a voice message.
You have received an E-mail.
You can view your schedule.
All audible signals are turned off.
General menu in profile.
Loud menu in profile.
Quiet menu in profile.

Display Information
Display Information
ENGLISH
18
Icon Description
Messages
Call Register
Profiles
Settings
Call Divert
Organizer
Fun & Tools
Wap services
SIM Service
Top Menu Icons
Icon/Indicator
Description
Headset menu in profile.
Car menu in profile.
You can divert a call.
You can use Push message service through WAP.

ENGLISH
19
Installation
Getting Started
Inserting the SIM Card
Locate the SIM card socket in the back of the phone.
Follow the steps below to install the SIM card.
1. Remove the battery if attached.
2. Slide the SIM card into the slot,
under the silvery holders, with the
golden connectors facing down and
the cut corner to the right.
3. If you need to remove the SIM card,
press the upper part of SIM card
with the thumb, then carefully slide
it out of the SIM card slot.
Notice
• Before installing always make sure that the phone is
switched off and remove the battery.
• The metal contact of the SIM card can be easily damaged
by scratches. Pay special attention to the SIM card when
you handle and install. Follow the instructions supplied with
the SIM card.
➊

ENGLISH
20
Installation
Getting Started
➋
1. Place the battery on the back of the
phone.
2. Push it until you hear a click.
Installing the Battery

ENGLISH
21
Charging the Battery
To connect the travel adapter to the phone, you must have installed
the battery.
1. Insert one end of the travel adapter
into the bottom of the phone.
➌
Getting Started
2. Connect the other end of the travel
adapter to an AC wall outlet.
Use only the included packing charger.
Warning
• Do not force the connector as this may damage the phone
and/or the travel adapter.

Getting Started
ENGLISH
22
Disconnecting the charger
Disconnect the travel adapter from the
phone by pressing its side buttons.
➍
Notice
• The battery delivered with your phone has to be fully
charged before using it.
• Do not remove your battery or the SIM card while charging.
• “Battery Charging” is displayed on the screen after
connecting the travel adapter. Only if the battery is totally
empty, Back light is on without displaying “Battery
Charging”.
• The moving bars of battery icon will stop after charging
completely.
Installation

ENGLISH
23
Powering On Sequence
Getting Started
To get started with the phone
1. Press and hold E key until you
hear a tone.
2. Depending on setting PIN code
request, you can enter PIN code or
not.
3. If your phone connects to a
network, the network name will be
displayed shortly.
To turn off the phone
In standby mode, press and hold E key until you hear a tone.
➊
➋

You can use the access codes described in this section to avoid
unauthorised use of your phone. The access codes (except PUK1
and PUK2 codes) can be changed by using [Menu 4-5-6].
PIN code (4 to 8 digits)
The PIN (Personal Identification Number) code protects your SIM
card against unauthorised use. The PIN code is usually supplied with
the SIM card. When PIN code request is set Enable, your phone
will request the PIN code every time it is switched on. On the
contrary, when PIN code request is set Disable, your phone
connects to the network directly without the request PIN code.
PIN2 code (4 to 8 digits)
The PIN2 code, supplied with some SIM cards, is required to access
some functions such as Advice of call charge, Fixed Dial number.
These functions are only available if supported by your SIM card.
PUK code (4 to 8 digits)
The PUK(PIN Unblocking Key) code is required to change a blocked
PIN code. The PUK code may be supplied with the SIM card. If not,
contact your local service provider for the code. If you lose the code,
also contact your service provider.
ENGLISH
24
Access Codes
Getting Started

Getting Started
ENGLISH
25
PUK2 code (4 to 8 digits)
The PUK2 code, supplied with some SIM cards, is required to
change a blocked PIN2 code. If you lose the code, also contact your
service provider.
Security code (4 to 8 digits)
The security code protects the unauthorised use of your phone. It is
usually supplied with the phone. This code is required to delete all
phone entries and to activate “Reset settings” menu. The default
number is “0000”.

To select a menu in phonebook, press
[Names] in standby mode and then
scroll to a desired item.
ENGLISH
26
Phonebook
Accessing the Menu
Name Description
1 Search Allows you to search for a specific name,
number.
2 Add new Allows you to add new names and numbers.
3 Speed dials Allows you to assign up to 8 ( 2 - 9 )
one-touch dial allocations.
4 Voice list Allows you to list phone numbers which is
attached voice.
5 Caller groups Allows you to show group list.
6 Copy all Allows you to copy entries from your Phone
memory to SIM card or from SIM card to
Phone memory.
7 Delete all Allows you to erase all the data in either your
phonebook or the SIM card to the phone
memory.
8 Settings Allows you to set the memory and to search
item by Variable, name and number.
9 Information Allows you to check the status of memory,
SDN (Service Dial Number), and Own
number list.
Name Description

ENGLISH
27
Menu Tree
Accessing the Menu
1 Messages
1 Write message
2 Inbox
3 Outbox
4 Info service
5 Voice mail
6 Namecard
7 Templates
8 Delivery reports
9 Settings
0 Memory status
2 Call Register
1 Missed calls
2 Received calls
3 Dialled calls
4 All calls list
5 Delete recent calls
6 Call charge
7 GPRS information
3 Profiles
1 Vibrate only
2 Quiet
3 General
4 Loud
5 Headset
6Car
4 Settings
1 Alarm clock
2 Date & time
3 Phone settings
4 Call settings
5 Security settings
6 Network settings
7 Reset setting

ENGLISH
28
5 Call Divert
1 All voice calls
2 If busy
3 If no reply
4 If out of reach
5 All data calls
6 All fax calls
7 Cancel all
6 Organizer
1 Scheduler
2 Phone book
7 Fun & Tools
1 My folder
2 Game
3 Melody composer
4 Graphic editor
5 Unit converter
6 Calculator
7 World time
8 WAP services
1 Home
2 Bookmarks
3 Push messages
4 Profiles
5 Go to URL
6 Cache settings
7 Security certifications
8 Reset profiles
9 SIM Service
This menu depends on SIM
and the network services.
Menu Tree
Accessing the Menu

ENGLISH
29
This menu includes functions related to SMS (Short Message
Service), voice mail, as well as the network’s service messages.
Write message [Menu 1-1]
You can write and edit text message up to 918 characters. Also, you
can check the number of characters.
1. Enter the Messages menu by pressing [Select].
2. If you want to write a new message, select Write message in the
menu.
3. Input the message by using eZi text. For details, see eZi text
(Page 32).
4. When you write the message, > key will be changed to attach.
5. When you finish writing your message, press [Options].
Then following option menu will be displayed.
Send
Sends the text message.
1. If you want to send the text message, enter the number you want.
2. Your phone asks you to enter the number that you want to send it
to.
3. After sending it, your phone asks whether you will store the edited
message.
Messages [Menu 1]
Accessing the Menu

Save
Your phone asks whether you will save the edited message.
Use template
The template is pre-defined message. You can add the template of
the list to the message when you edit it.
Use namecard
The items of the name card are a name, mobile, office, fax, and
email. You can add a namecard to the message.
EMS function
Pictures (including animations) and sounds can be inserted in
sending messages. Press [Option] key to insert, then following menu
will be displayed.
• Symbol
• Picture
• Animation
• Sound
ENGLISH
30
Note
• You can find received contents from other sender in My
folder [Menu 7-1].
Messages [Menu 1]
Accessing the Menu

Dictionary
• Add new
If you add a word you use often, you can input it by pressing a key
once for each character.
1. Enter the menu.
2. Scroll to highlight Add new, and then press [Select].
3. Input a word, and then press [Add].
• List dictionary
You can view the list you already saved words in a dictionary.
1. Enter the menu.
2. Scroll to highlight List dictionary, and then press [Select].
3. You can check the word list.
4. If you want to delete a word, press [Delete].
5. If you want to delete all words in a list, select Delete all at the
bottom of the list by pressing [Select].
ENGLISH
31
Accessing the Menu

ENGLISH
32
eZi-Text
The eZi text allows you to type easily and quickly. If you just
press a key marked a character on the keypad, you can get a
character you want. It is useful to make a word and a sentence.
If you press # key, you can change the type of language.
Also, the phone supports four modes: eZi Mode, Numeric
mode, Capital mode, and Small mode. If you want to change
mode, press # key.
• How to Use in eZi mode
To input a character in eZi text mode, you just press each key
once for a character you want.
For example, to write Girl in eZi mode;
Messages [Menu 1]
Accessing the Menu

ENGLISH
33
• How to use in Numeric mode
To input a number in Numeric mode, you
press a number key displayed on the
keypad.
• How to use in Capital mode
To input Capital letter, you press a
character key displayed on the keypad.
• How to use in Small mode
To input Small letter, you press a character
key displayed on the keypad.
Note
• If you want to delete a character, press C key in
each mode.
Accessing the Menu

ENGLISH
34
Inbox [Menu 1-2]
When you receive a text message, your phone shows the symbol
and stores it in the incoming message lists. Scroll to the desired
message by using U , D . In addition, you can see Delete all for
deleting all incoming messages at the bottom of the list. While
reading the message, press [Options] to access the available
options.
Reply
You can reply to the sender by message.
Forward
You can forward the selected message to the other party.
Delete
The selected message is deleted.
Get number
If the selected message has the phone number, you can extract and
save it in a phonebook. Also, you can call by this number.
Save attachments
You can save the attachment file such as symbol, picture, animation,
and sound.
Return call
You can call back to the sender who sent the message
automatically.
Messages [Menu 1]
Accessing the Menu

ENGLISH
35
Outbox [Menu 1-3]
When you enter this menu, you can see the outgoing call list. Scroll
to the desired message by using U , D and press < to see the
message. And if you want to exit Outbox menu, press >.
In addition, you can see Delete all for deleting all outgoing
messages at the bottom of the list.
While reading message, press [Options] to access the following
submenus.
Forward
You can forward the selected message to the other party.
Delete
The selected message is deleted.
Get number
If the selected message has the phone number, you can extract and
save it in a phonebook. Also, you can call by this number.
Accessing the Menu

ENGLISH
36
Info service [Menu 1-4]
(Dependent to network and subscription)
Cell Broadcast messages (CB Message) are text messages by the
network to GSM phone users. They provide general information such
as weather reports, traffic news, taxis, pharmacies, and stock prices.
Each type of information has the number; therefore, you can contact
service provider. When you receive CB message, you can read it
following sequence:
Read
1. When you receive CB message, it will be displayed on the
screen. You can read the message by scrolling U , D .
2. After reading the message, press E to return to the standby
mode. In addition, you can save it until another message is
reached.
Receive
• Yes
If you select this menu, your phone will receive the Cell Broadcast
message.
• No
If you select this menu, your phone will not receive the Cell
Broadcast message any more.
Messages [Menu 1]
Accessing the Menu

ENGLISH
37
Alert
• Yes
If you select this menu, your phone will beep when Cell broadcast
message is received.
• No
If you select this menu, your phone will not beep despite Cell
broadcast message is received.
Languages
You can select the language you want. Then your phone will receive
the cell broadcast message in your chosen language.
Topics (Dependent to network and subscription)
• Add new
If you select this menu, you will add the CB message category in
Phone memory with its nickname.
• View list
If you select this menu, you can see CB message category which
you added. If you press [Option], you can edit and delete CB
message category which you added.
• Active list
You can select the CB message category in active list by pressing
[Select].
Accessing the Menu

ENGLISH
38
Voice mail [Menu 1-5]
You can listen to your voice message(s) and get the voicemail centre
number.
Listen to voice mail
You can call voicemail centre if you want to listen to voice message.
Voice mail centre
You can get the voicemail if this feature is supported by the network
service provider. When new voicemail is arrived, the symbol will be
displayed on the screen. Please check with your network service
provider for details of their service in order to configure the handset
accordingly.
1. Press key for 1 a long time in standby mode.
2. You can check the following submenus.
• Home
The number dialed on the home network to listen to voicemail.
• Roam
The number dialed when other networks to listen to voicemail.
Messages [Menu 1]
Accessing the Menu

ENGLISH
39
Namecard [Menu 1-6]
It’s for editing the namecard. The items of the namecard are a name,
mobile, office, fax, and email.
• Edit : You can edit a namecard.
• Delete : You can delete a namecard.
Templates [Menu 1-7]
It’s for editing pre-defined messages. You can see 11 pre-defined
messages in the list. You can save 6 templates before you edit.
But you can change them. The others are <empty>.
• Edit : You can edit a template.
• Reset : You can delete the template.
Accessing the Menu

ENGLISH
40
Delivery reports [Menu 1-8]
You can read and delete delivery report messages.
Settings [Menu 1-9]
Message types
Text, Voice, Fax, Natl. paging, X.400, E-mail, ERMES
Usually, the type of message is set to Text. You can convert your
text into alternative formats, which are suitable for the device that will
be received the message. Contact your service provider for the
availability of this function.
Validity period
This network service allows you to set how long your text messages
will be stored at the message center while attempts are made to
deliver them to you.
Delivery report
If you set Yes in this menu, you can check whether your message is
sent successfully or not.
Messages [Menu 1]
Accessing the Menu

ENGLISH
41
Pay for reply?
When a message is sent, it allows the person to whom you sent the
message to reply and charges the cost of the reply to your telephone
bill.
SMS centre
If you want to send the text message, you can get the address of
SMS centre through this menu.
Paper
You can choose one of papers you want while writing messages.
Memory status [Menu 1-0]
If you select this menu, the phone shows an used memory and total
amount of memory. The total memory is the sum of SIM and Phone
memory.
Accessing the Menu

ENGLISH
42
Missed calls [Menu 2-1]
This menu shows recently missed numbers. You can call by this
number, also save and view date and time this menu as well as
writing messages.
Received calls [Menu 2-2]
This menu shows recently received numbers. You can call by this
number, also save and view date and time, as well as writing
messages.
Dialled calls [Menu 2-3]
This menu shows recently dialed numbers. You can call by this
number, also save and view date and time, as well as writing
messages.
All calls list [Menu 2-4]
You can save the phone number and check the date and time for a
call. Moreover, you can call back to the other party, as well as writing
messages.
Delete recent calls [Menu 2-5]
You can delete the all call records.
Call Register [Menu 2]
Accessing the Menu

ENGLISH
43
Accessing the Menu
Call charge [Menu 2-6]
Within these submenus, you can view the duration and the call cost
of your calls.
Call duration
This function allows you to view the duration of your Last Call, All
Calls, Received calls and Dialled calls in hours, minutes and
seconds. You can also reset the call timers.
1. Press [Menu] in standby mode.
2. Press 2 for direct access or use U and D to enter Call
register.
3. Scroll to highlight Call charge then Call duration and press
[Select].
Show call costs
This function allows you to check the cost of your last call, all calls,
remaining and reset the costs. To reset the cost, you need the PIN2
code.
1. Press [Menu] in standby mode.
2. Press 2 for direct access or use U and D to enter Call
register.
3.
Scroll to highlight Call
charge
then Show call costs and press
[Select] to enter.
The following 4 submenus : Last call, All calls, Remaining cost
and Reset all.

ENGLISH
44
Settings [SIM Dependent]
• Set tariff
You can set the currency type and the unit price. Contact your
services providers to obtain charging unit prices. To select the
currency or unit in this menu, you need the PIN2 code.
1. Press [Menu] in standby mode.
2. Press 2 for direct access or Use U and D to enter Call
register.
3. Scroll to highlight Settings and Press [Select] to enter.
4. Select Set tariff.
• Set credit
This network service allows you to limit the costs of your calls by
selected charging units. If you select Read, the number of
remaining unit is shown. If you select Change, you can change
your charge limit.
1. Press [Menu] in a standby mode.
2. Press 2 for direct access or use U and D to enter Call
register.
3. Scroll to highlight Settings and press [Select] to enter.
4. Select Set credit.
Note
•
The actual call cost may be different depending on network
features, billing, and tax.
Call Register [Menu 2]
Accessing the Menu

ENGLISH
45
• Auto display
This network service allows you to see automatically cost of your
last call. If you select Yes in Auto display menu, you can see the
last cost when the call is released.
1. Press [Menu] in standby mode.
2. Press 2 for direct access or use U and D to enter Call
register.
3. Scroll to highlight Settings and press [Select] to enter.
4. Select Auto display.
Note
• When all units have been used, no calls can be made
except emergency calls. Depending on SIM card, you need
the PIN2 code to set a call cost limit.
Accessing the Menu

GPRS information [Menu 2-7]
You can check the amount of data transferred over the network
through GPRS. In addition, you can also view how much time you
are online.
Call duration
You can check the duration of GPRS call. You can also reset the call
timers.
• Last call
• All calls
• Reset
Data volume
You can check the data volume.
• Sent
• Received
• All
• Reset all
ENGLISH
46
Call Register [Menu 2]
Accessing the Menu

ENGLISH
47
Profiles [Menu 3]
Accessing the Menu
In this menu, you can adjust and customize the phone tones for
different events, environments and caller’s group.
Vibrate only [Menu 3-1]
• Activate : You can adjust the profile as Vibration if you need
vibration mode.
Quiet [Menu 3-2]
• Activate : You can adjust the profile as Quiet if you are in quiet
place.
• Personalise: You can change the values of Profile submenus.
Note
• When your phone is connected to the Handsfree kit, it’ll be
automatically set to the Car profiles menu and when your
phone is connected to the Earmic, it’ll be automatically set
to Headset profiles menu then each submenu related to
them will be displayed automatically.

ENGLISH
48
General [Menu 3-3]
• Activate : You can adjust the profile as General.
• Personalise: You can change the values of Profile submenus.
Loud [Menu 3-4]
• Activate : You can adjust the profile as Loud if you are in a
noisy environment.
• Personalise: You can change the values of Profile submenus.
Headset [Menu 3-5]
• Activate : You can adjust the Profiles as Headset when you put
on a headset.
• Personalise: You can change the values of Profile submenus.
Profiles [Menu 3]
Accessing the Menu

ENGLISH
49
Car [Menu 3-6]
• Activate : You can adjust the Profiles as Car when you activate
Handsfree Kit.
• Personalise: You can change the values of Profile submenus.
A Group of Profiles submenus [Menu 3-x-x]
Profiles menu have the submenus as shown below.
Incoming alert type
Allows to alert for the incoming call for adjusting environment.
Ring tone
Allows to set the ringing tone for adjusting environment.
Ring volume
Allows to set the ring volume for adjusting environment.
Message alert type
Allows to alert when receiving a message for adjusting environment:
Ring once, Vibrate, Silent.
Keypad volume
Allows to set the keypad volume for adjusting environment.
Accessing the Menu

ENGLISH
50
Auto answer
Allows to set to answer automatically for adjusting environment.
Please note that only Car and Headset has this sub menu so that
you can activate this function.
• Off
Even though your phone is ringing, your phone will not answer
automatically.
• After 5 secs
After 5 seconds your phone will answer automatically.
• After 10 secs
After 10 seconds your phone will answer automatically.
Note
•
If you set the Handsfree kit to the phone, you can’t activate
the vibration related with Incoming alert or Message alert
menu. Therefore, in Handsfree menu, you can view the
following submenus;
- Incoming alert : Ring, Silent
- Message alert : Ring Once, Silent
Profiles [Menu 3]
Accessing the Menu

ENGLISH
51
Settings [Menu 4]
Accessing the Menu
You can set the following menus for your convenience and
preferences.
Alarm clock [Menu 4-1]
You can set the phone to alarm at a specified within this menu.
On
You can set the time (Hour and Minute) for raising the alarm.
1. Enter the menu.
2. Select On by pressing [Select], and then enter the alarm time you
want.
3. Press [OK].
4. Select the repeat period: Once, Daily, Weekly, and Monthly.
5. If you set Yes in Power off alarm, the alarm signal sounds at the
time you set even if the phone is turned off.
Off
You can cancel setting the alarm time.
1. Enter the menu.
2. Select Off by pressing [Select].
3. Clear alarm message is displayed.
4. If you want to cancel, press [Yes]. If not, press [No].

ENGLISH
52
Date & time [Menu 4-2]
Date
• Set date
In this menu, you can set the date of your phone.
1. Enter the menu.
2. Select Set date by pressing [Select].
3. Enter the number you want to set the date.
4. Press [OK].
• Date format
You can set the Date format in this menu.
Time
The phone has its own clock. In this menu you can set the time and
select between the 12-hour or 24-hour time formats.
1. Enter the menu.
2. Scroll to highlight Time by pressing [Select].
• Set time:
You can set time of your phone in this menu.
1. Select Set time by pressing [Select].
2. Enter the number you want to set the time.
3. Select the AM/PM you want to set the time format by long
pressing U , D key.
4. Press [OK].
Settings [Menu 4]
Accessing the Menu

ENGLISH
53
• Time format:
Your can select time format between 12-hour or 24-hour.
1. Scroll to highlight Time format by pressing [Select].
2. Select 12 hour or 24 hour you want by pressing [Select].
Phone settings [Menu 4-3]
You can set the phone figures you want. Scroll to highlight Phone
settings menu, and then press [Select].
Display settings
• Screen saver
If you don’t activate any function for 20 seconds, the picture will be
displayed in a standby mode.
• Call
You can set the animation as making a call.
• Wallpaper
You can select background picture in a standby mode.
• Welcome note
You can set the displayed message as turning on a phone.
• Greeting note
If you select yes, this menu allows you select the standby display.
In text mode, you can edit the text.
Accessing the Menu

• Network name
If you select On, you can set network name displayed on the phone
as you want.
• Backlight
You can set the light-up duration you want whenever you press a
key.
• LCD contrast
You can set the brightness of LCD you want by
pressing U , D .
Serial port
• FAX
You can set the rate of serial port to 19200bps for using the
application between PC and fax.
• GPRS & Data
You can set the rate of serial port to 115200bps for using PC
application for GPRS call and Data call.
Languages
You can select the language will be displayed.
ENGLISH
54
LCD contrast
Settings [Menu 4]
Accessing the Menu

ENGLISH
55
Call settings [Menu 4-4]
You can set the menu relevant to a call by pressing [Select] in
Setting menu.
Anykey answer
• On
If you select this menu, you can receive a call by pressing any key
except E key.
• Off
If you select this menu, you can receive an incoming call by only
pressing S key.
Send my number
(network and subscription dependent)
• On
If you select this, you can send your phone number to the other
party. That is, your phone number will be displayed on receiver’s
phone.
• Off
If you select this, you can’t send your phone number.
Note
• How to use Handfree portable:
If you want to use the handsfree portable(earphone), please
press the button # for a long time after inserting it to the
connector when incoming a call.
Accessing the Menu

ENGLISH
56
Call waiting
(network dependent)
If this service is Enable, you can accept a waiting (incoming) call.
• On
Activating the corresponding service.
• Off
Deactivating the corresponding service.
• View status
Checking the Status of the service.
Minute minder
If you select On, you can check the call duration by beep sound
every minute during a call.
Auto redial
• On
When this function is set on, your phone will make up to 10
attempts for a call after not connecting.
• Off
Your phone will not make any attempts to connect the call after not
connecting.
Settings [Menu 4]
Accessing the Menu

ENGLISH
57
Select line
This function is only used if Alternate line service supported by the
Service Provider. Two independent phone numbers are registered
for the phone. This function provides you with the selection the
currently used phone number. If this function is supported by your
service provider, the following menu will be displayed.
• Line 1 : Select Line 1 as the current phone number.
• Line 2 : Select Line 2 as the current phone number.
Security settings [Menu 4-5]
PIN code request
In this menu, you can set the phone to ask for the PIN code of your
SIM card when the phone is switched on. If this function is activated,
you’ll be requested to enter the PIN code.
1. Press [Menu] in standby mode.
2. Press 4 key for direct access or use U and D to enter
Settings.
3. Scroll to highlight Security settings menu.
4. Select PIN code request by pressing [Select].
5. You can view the following submenus.
• On : Enable PIN code request.
• Off : Disable PIN code request.
Accessing the Menu

ENGLISH
58
Phone lock
You can use security code to avoid unauthorized use of your phone.
When you switch on your phone, your phone will request security
code always if you set phone lock to “On”. If you set phone lock to
“Automatic”, your phone will request security code only when you
change your SIM card.
• On
• Off
• Automatic
Automatic key lock
When you enable Automatic key lock, keypad will be lock
automatically on an idle screen after 25 seconds without any key
requesting.
• On
• Off
Note
• If you want to lock your phone keypad manually, enter Top
menu and press * key.
• If you want to unlock your phone keypad, press <
[unlock] key and then press * key. But if you enabled
Automatic key lock before, your phone keypad will be
unlock and then after 25 seconds the keypad will be lock up
again automatically.
Settings [Menu 4]
Accessing the Menu

ENGLISH
59
Call barring
The Call barring service prevents your phone from making or
receiving certain category of calls. This function requires the call
barring password. You can view the following submenus.
• All outgoing :
The barring service of all outgoing calls.
• International :
The barring service of all outgoing international calls.
• International except home :
The barring service of all international outgoing calls except home
network.
• All incoming :
The barring service of all incoming calls.
• Incoming when abroad :
The barring service of all incoming calls when abroad.
• Cancel all :
You can cancel all barring service.
• Change passwd :
You can change the password for Call Barring Service.
Accessing the Menu

ENGLISH
60
Fixed dial number (SIM dependent)
You can restrict your outgoing calls to selected phone number. The
numbers are protected by your PIN2 code.
1. Press [Menu] in standby mode.
2. Press 4 key for direct access or use U and D to enter
Settings.
3. Scroll to highlight Security settings menu.
4. Select Fixed dial number by pressing [Select].
5. If the PIN 2 code is correct, you can view the following submenus.
• Activate : You can restrict your outgoing calls to selected
phone number.
• Cancel : You can call without restricting phone number.
• Number list : You can view the number list saved as Fixed dial
number.
Change codes
You can change the access codes : PIN, PIN2, Security code.
1. Press [Menu] in standby mode.
2. Press 4 for direct access or use U and D to enter
Settings.
3. Scroll to highlight Security settings menu.
4. Select Change codes by pressing [Select].
5. If you want to change the PIN/PIN2/Security code, input your
original code, and then press [OK].
6. Input new PIN/PIN2/Security code, and verify them.
Settings [Menu 4]
Accessing the Menu

ENGLISH
61
Network settings [Menu 4-6]
You can select the network which you will be registered either
automatically or manually. Usually, the selection of the network used
by the handset is automatic.
Automatic
The phone automatically selects network which is available in the
area.
Manual
The phone will find the list of available networks and show you them.
Then you can select the network which you want to use if this
network has a roaming agreement with your home network operator.
Preferred
You can set a list of preferred networks the handset should attempt
to register with first, before attempting to register to any other
networks. This list is created from the handset’s predefined list of
known networks.
User define
You can add entries or delete new ones from the network list. This
can even include new networks whose network codes are not known
to the handset. To do this, select and then enter the network code,
country code and network name.
Reset setting [Menu 4-7]
You can set the handset to the default configuration by selecting this
menu. In addition, you need Security code to activate this function.
Accessing the Menu

ENGLISH
62
Call Divert [Menu 5]
Accessing the Menu
(network and subscription dependent)
The Call divert service allows to divert incoming voice calls, fax calls,
and data calls to another number. For details, contact your service
provider.
All voice calls [Menu 5-1]
Diverts voice calls unconditionally.
If busy [Menu 5-2]
Diverts voice calls when the phone is in progress.
If no reply [Menu 5-3]
Diverts voice calls which you do not answer.
If out of reach [Menu 5-4]
Diverts voice calls when the phone is switched off or out of range.
All data calls [Menu 5-5]
Diverts to a number with a PC connection unconditionally.

ENGLISH
63
Accessing the Menu
(network and subscription dependent)
All fax calls [Menu 5-6]
Diverts to a number with a fax connection unconditionally.
The submenus [Menu 5-x-x]
Call Divert menus have the submenus as shown below.
Activate
Activating the corresponding service.
• To other number
Inputs the number for diverting.
• To favorite number
You can check 5 diverted numbers.
• To voicemail
Forwards to message center. This function doesn’t include All data
calls and All fax calls menus.
Note
•
You can select the number you want in Favorite menu.

ENGLISH
64
Cancel
Deactivating the corresponding service.
View status
Checking the Status of the corresponding service.
Cancel all [Menu 5-7]
Cancels all call divert service.
Call Divert [Menu 5]
Accessing the Menu
(network and subscription dependent)

ENGLISH
65
Organizer [Menu 6]
Accessing the Menu
Scheduler [Menu 6-1]
On top of the screen there are sections for date and icons.
Whenever you change the date, the calendar will be updated
according to the date. And square cursor will be used to locate the
certain day. If you see under bar on the calendar, it means that there
is a schedule that day. This function helps to remind you of your
schedule and memo. The phone will sound an alarm tone if you set
this for the note.
For changing the day, month, and year.
Add new
You can edit maximum 30 characters. You can take a note. You can
choose the following types of note. You can make up to maximum 20
notes.
• Schedule
Input the subject, the schedule time, the repeat time, alarm time by
pressing [Select].
Key Description
Key Description
Yearly
Monthly
If you press these keys shortly,
you can set the alarm daily.
In case of pressing for a long
time, you can set it weekly.

ENGLISH
66
• Repeat
- Once : no repeat.
- Daily : repeat schedule daily for 5 days.
- Weekly : repeat schedule weekly for 5 weeks.
- Monthly : repeat schedule monthly for 5 months.
- Yearly : repeat schedule yearly for 5 years.
• Alarm time
- On time : alarm on time you set already.
- 10 min before : alarm before 10 minutes from the schedule
you set already.
- 30 min before : alarm before 30 minutes from the schedule
you set already.
- 1 hour before : alarm before 1 hour from the schedule you
set already.
- 1 day before : alarm before 1 day from the schedule you
set already.
• Memo
1. Select Add New by pressing [Select].
2. Scroll to highlight Memo.
3. Press [Select].
4. Input the memo and then press [Select].
Organizer [Menu 6]
Accessing the Menu

ENGLISH
67
View day
Shows the note for the chosen day. Use U , D to browse through
the note lists. If you set alarm for the note, Alarm watch is displayed.
Press [Options] to delete, edit the note you selected.
• Options
- Edit
You can edit the subject, time, the repeat time and alarm time by
pressing [Select].
- Delete
You can delete the note.
View all
Shows the notes that are set for all days. Use U , D to browse
through the note lists. You can use the same menu as “View date”
by pressing [Options].
Delete past
You can delete for the last schedule already is notified you.
Delete all
You can delete for the all note(s).
Accessing the Menu

ENGLISH
68
Phone book [Menu 6-2]
Search
(Calling from phonebook)
1. Open the phonebook first by pressing [Names] in a standby
mode.
2. Search by Pressing [Select] to enter.
3. Depending on setting Search by, the below menu may not
appear.
• Name
• Number
4. You can find an entry by name and number.
5. Select [Search].
6. You can check the names and numbers by pressing [List].
7. If you want to edit, delete, copy an entry, or to add the voice to
one, select [Options]. The below menu will be displayed.
• Edit : You can edit the name, number, E-mail, and fax
by pressing [OK].
• Delete : You can delete an entry.
•
Write message
: You can write message.
• Copy : You can copy an entry from SIM to phone or
from phone to SIM.
• Call : You can call thru the chosen entry.
• Voice : You can add the voice to the entry or change
the voice tag.
Organizer [Menu 6]
Accessing the Menu

ENGLISH
69
• Main number : You can select the one out of mobile, home,
office that you often use. The main number will
be displayed first, if you set this.
Add new
You can add phonebook entry by using this function.
Phone memory capacity is 200 entries. SIM card memory capacity
depends on the service provider.
You can also save 20 characters of name in the Phone memory, and
you can save characters in the SIM card. The number of character is
SIM dependent feature.
1. Open the phonebook first by pressing [Names] in standby mode.
2. Scroll to highlight Add new, and press [Select] to enter.
3. Select the memory you want to save: SIM or Phone.
• SIM : You can add name and number for entry.
a. Write a name to add.
b. Press [OK], then you can input a number.
c. Press [OK].
d. If you want to add the voice, press [Yes].
• Phone : You can add name, mobile, home, office, fax no. and
E-mail address.
a. You can select among mobile, home and office by
pressing [select].
b. Write a name to add.
c. Enter the numbers following as mobile, home, office
by pressing [Next] for next step [Clear] for cancel
and C for saving or exit.
d. If you want to add the voice, press [Yes].
Accessing the Menu

ENGLISH
70
You should speak a word within 2 seconds, and the phone asks you
to speak it again to ensure the accuracy of voice recognition. After
voice recognition has finished, Voice is attached automatically.
Note
• The voice can only be attached to main number which you
set. For example, If you change main number voice will be
automatically attached changed number.
•
You can add voice tag to phone number in SIM card.
The voice tag can be erased removing or changing SIM card.
And voice tag attached to phone number in SIM card may be
attached to another phone number when you changed SIM
card. Why? The answer is that SIM card doesn’t contain
information about voice tag.
Organizer [Menu 6]
Accessing the Menu

ENGLISH
71
Speed dials
You can associate any of the keys 2 to 9 with a Name list entry.
You can call directly by pressing this key for 2-3 seconds.
1. Open the phonebook first by pressing [Names] in a standby
mode.
2. Scroll to Speed dials, then press [Select] to enter this menu.
3. Every Speed dials will be displayed.
4. If you want to add Speed dials, select <Empty>. Then, you can
search the name in phonebook.
5. If you select allocated name by Speed dials, you can view
following the submenus.
• Change : You can change the allocation of Speed dials
number.
• Cancel : You can cancel the allocated Speed dials number.
Accessing the Menu

ENGLISH
72
Voice list
You can see all phone numbers which contain voice. You can also
call directly by pressing [Send]. After selecting phone number by
using U and D press [Options], you can see following the
submenus.
• Play : You can play voice which is attached to phone number.
• Change : You can change voice which is attached to phone
number.
• Delete : You can delete voice which is attached to phone number.
• Call : You can call by selecting this menu.
Caller groups
You can list up to 20 members per one group. There are 7 groups
you can make lists to.
1. Press [Names] to enter into the phonebook in standby mode.
2. Scroll to Caller groups item then press [Select] to enter this
menu.
3. Every Group list will be displayed.: Family, Friend, Colleague,
VIP, Group1, Group2 and Others.
4. Select Group name that you want to manage by pressing [Select].
Organizer [Menu 6]
Accessing the Menu

ENGLISH
73
5. Then submenus below will be displayed.
• View member
- You can view the number list in Caller groups.
- You can select the member you want by pressing [Options]
then you can enable the submenu such as Edit, Delete, Write
message, Copy, Voice and Main number.
• Group ring tone
You can set the ring tone depending on Group.
• Group animation
You can set the animation for each group.
• Add member
You can add the member in Caller groups.
1. Scroll to highlight Add member, and then press [Select] to
enter.
2. The group member souldn’t be exceeded 20. Otherwise, the
error message will be displayed.
3. Press [OK] to add member.
• Delete member
You can delete the member already saved in phonebook.
• Rename
You can change group name.
Accessing the Menu

ENGLISH
74
Copy all
You can copy/move entries from SIM card memory to Phone
memory or from Phone memory to SIM card memory.
1. Open the phonebook first by pressing [Names] in standby mode.
2. Scroll to Copy all, then press [Select] to enter this menu.
3. Then submenus below will be displayed.
• SIM to Phone : You can copy the entry from SIM Card to Phone
memory.
• Phone to SIM : You can copy the entry from Phone memory to
SIM Card.
Delete all
You can delete all entries in SIM, Phone, and Voice. This function
requires Security code.
1.
Press [Names] to enter into the phonebook in standby mode.
2. Scroll to Delete all, then press [Select].
3. Then select a memory to erase: SIM, Phone, Voice.
4. And then you will be requested to enter Security code.
5. Press [OK] or, press [Back] to cancel.
Organizer [Menu 6]
Accessing the Menu

ENGLISH
75
Settings
You can set preferred memory which includes Variable, SIM or
Phone and preferred search which includes Variable, Name and
Number.
1. Open the phonebook first by pressing [Names] in a standby
mode.
2. Scroll to Settings, then Press [Select] to enter.
3. Then submenus below will be displayed.
• Set memory
1. Scroll to highlight Set memory, then press [Select] to enter.
2. The three submenus are displayed.
- Variable : If you select Variable, the phone asks you
where to store whenever you add entries in
Phonebook.
- SIM : If you select SIM, the phone stores entries to
SIM directly without asking you where to store.
- Phone : If you select Phone, the phone stores entries to
Phone directly without asking you where to
store.
• Search by
1. Scroll to highlight Search by,then press [Select] to enter.
2. The three submenus are displayed.
- Variable : If you select Variable, the phone asks you how
to search the entries.
- Name : If you select Name, the phone searches entries
by name.
- Number : If you select Number, the phone searches
entries by number.
Accessing the Menu

ENGLISH
76
Information
Service dial number
Use this function to access a particular list of services provided by
your network operator (if supported by the SIM card).
1. Open the phonebook first by pressing [Names] in a standby
mode.
2. Scroll to Service dial number, then press [Select] to enter.
3. The names of the available services will be shown.
4. Use U and D to select a service. Press [Send].
Memory status
This feature allows you to see how many free
and in-use are in your phonebook.
1. Open the phonebook first by pressing
[Names] in standby mode. Select Information
by pressing [Select].
2. Scroll to Memory status, then press [Select]
to enter this menu.
Own number (SIM dependent)
You can check your own number in SIM card.
Organizer [Menu 6]
Accessing the Menu

ENGLISH
77
Fun & Tools [Menu 7]
Accessing the Menu
My folder [Menu 7-1]
All the contents downloaded through M-service or EMS such as
images,ringtones and etc, are available in the My folder menu.
In this menu you can check the contents, edit their name and,
eventually, set them as wallpapers or ringtones.
Downloaded polyphonic ringtones must be activated in this menu in
order to make them available in the audio profiles ringtones list.
You can activate just one downloaded ringtone at once.
Note
You can edit EMS sounds and images respectively in the
Melody composer [Menu 7-3] and Graphic editor [Menu 7-4].
You can also attach this objects in an EMS message as
described in the Write SMS chapter [Menu 1-1].

ENGLISH
78
Game [Menu 7-2]
The phone offers you enjoyable games to play with.
Fun & Tools [Menu 7]
Accessing the Menu
Note
The Control keys are different for each game. But each game
has screens to explain the main control key (see key info.).
Other common control keys are below.
[Common Key Function]
• < [Soft 1 Key] :
Start game, and Ok key
• C [CLR] : Pause
•
> [Soft 2 Key] : Back
•
E [END] : Exit
• 0 ~ 9 : Stage and level control.
• U , D
[Up,down key]
: Volume control
• * [Star key] : Navigation to the left
• # [Sharp key] : Navigation to the right

ENGLISH
79
Melody composer [Menu 7-3]
You can compose ringing sounds as you want.
When you enter this function, the tone that you created previously is
displayed. To enter a new or edit an existing tone:
1. Enter the desired notes. ( 1 ~ 7 : CDEFGAB)
2. To adjust the characters of the note, do as follows:
• Duration : 8 shortens and 9 lengthens the duration
of the note or rest.
• Rest : 0 inserts a rest of the same duration as
the previous note.
• Octave : * sets the octave for new notes.
• Sharp note : # makes the note sharp.
• Clear : C deletes each note.
e.g) 28# fi 8#d1
Graphic editor [Menu 7-4]
You can edit picture or graphic from an existing image file as you
want.
1. To edit, choose the desired picture.
2. To adjust the picture, do as follows :
• Mode change :
Toggle between play mode and move mode.
• Drawing and Erasing :
Toggle between drawing and erasing.
3. For help, press 0 for a long time.
Accessing the Menu

ENGLISH
80
Unit converter [Menu 7-5]
This converts any measurement into a unit you
want. There are 4 types that can be converted
into units: Length, Area, Weight, and Volume.
1. You can select one of four unit types by
pressing [Next] key.
2. Select the unit you want to convert by
pressing U and D .
3. You can toggle between Current and Convert by long pressing
U and D .
4. You can input the prime number after the decimal place by
pressing #.
5. You can delete the number you want by pressing C.
6. Press
E key or [Back] key if you want to end the process for
converting the value.
Length
Fun & Tools [Menu 7]
Accessing the Menu
Note
In edit mode, default is set in move mode and drawing.
With a * , you can move fast between pixels.

ENGLISH
81
Calculator [Menu 7-6]
This contains the standard functions such as +, –, *, ÷ : Add,
Subtract, Multiply, Divide.
1. Input the numbers by pressing numeric keys.
2. Press U key once for Add and long press for Multiply. Press
D key once for Subtract and long press for divide.
3. Press * key to input Prime number and # key to input
Negative number.
4. You can view the result by pressing [Result] key.
5. If you want to continue the calculation, repeat the process.
6. You can delete the number or sign you want by pressing C .
7. Press
E key if you want to end the calculation process.
World time [Menu 7-7]
You can view the time for each city around the world.
when you press U , D shortly, you can view the city belonged to
the different time zone and when you press U , D long, you can
view the all of city on the same time zone.
If you want to select the country you want, press [set] key.
Accessing the Menu

ENGLISH
82
Your phone supports services based on Wireless Application
Protocol (WAP). You can access services supported by your
network. The services menu allows you to get the information such
as news, weather reports, and flight times.
Home [Menu 8-1]
You can connect to the configured homepage of the activated profile.
Bookmarks [Menu 8-2]
When you enter this menu, you can see the bookmarks. Then press
< button to access available option, or press > to exit it.
• Connect : Connect to selected bookmark.
• Add new : Add a new bookmark manually.
• Edit : Edit the title and the address of the selected bookmark.
• Delete : Delete the selected bookmark from the bookmark list.
Push messages [menu 8-3]
You can receive messages related with WAP which is included URL.
So you can connect to indicated URL directly.
Inbox
You can read or delete the push messages.
Setting
You can set push the messages.
WAP services [Menu 8]
Accessing the Menu

ENGLISH
83
Accessing the Menu
Profiles [Menu 8-4]
You can make up to 5 profiles and activate only one of them. Scroll
to the desired profile and press < to access available options.
• Activate
You can activate the selected profile.
• Settings
You can edit and change WAP settings of the selected profile.
- Homepage
This setting allows you to enter the address (URL) of the site you
want to use as homepage. You do not need to type “http://” in
front of each URL as the WAP Browser will automatically add it.
- Display image
You can select whether images on WAP cards are displayed or
not.
- Conn. type
The options for connection type are Continuous or Temporary
and depend on the gateway.
Temporary
A non-confirmed (connectionless) service.
Continuous
A confirmed delivery mechanism but generates more network
traffic.

ENGLISH
84
- Conn. security
The options are On and Off depend on the gateway you are
using.
- Gateway information
Most of WAP gateways do not require a User ID and Password.
If your gateway need them to connect to it, then your network
should provide them, and you must set them up correctly before
trying to browse a WAP site.
- Bearer
Data
GPRS
- Data settings
These values of setting are provided by yours network.
IP address : Enter the IP address of the WAP gateway you are
using to access.
Dial number : Enter the telephone number to dial to access your
WAP gateway.
Call type : Select the type of data call.: Analogue or ISDN
(Digital).
Call speed : The speed of your data connection.
User ID : The user identity for your dial-up server (and NOT
the WAP gateway).
Password : The password required by your dial-up server
(and NOT the WAP gateway) to identify you.
WAP services [Menu 8]
Accessing the Menu

ENGLISH
85
- GPRS settings
The service settings are only available when GPRS is chosen as
a bearer service.
- Linger timer
You can input timeout periods between 30sec, and 300sec. if any
data wasn’t input or transferred, the service will be unavailable.
• Rename
Edit the Profile Name.
• E-mail server
Save the URL of the E-mail server that you frequently use.
- Connect
Connect to the E-mail server that you configured.
- Edit address
Edit the URL of the E-mail server.
Go to URL [Menu 8-5]
You can directly connect to the site that you want. You need to enter
the specific URL that you want to directly connect.
Accessing the Menu

ENGLISH
86
Cache settings [Menu 8-6]
You can remove the contents of Cache memory and change the
Cache check mode.
Clear cache
The contents of Cache memory will be removed.
Check cache
You can change the time for checking the Cache memory.
• Always
The cache is always checked whenever URL is loaded or
navigated.
• Start only
The cache is only checked when the WAP is started.
• Off
The cache is never checked.
Security certifications [Menu 8-7]
A list of the available certificates is shown.
Reset profiles [Menu 8-8]
You can reset all the current settings of profiles to the factory default.
WAP services [Menu 8]
Accessing the Menu

ENGLISH
87
If you are on line, you can see the following menus.
❏ Home
This is the same as [Menu 8-1].
❏ Reload
This reloads the current page.
❏ Bookmarks
This is the same as [Menu 8-2].
❏ Save as bookmarks
Save the current URL as a bookmark. You can also edit the
bookmark title.
❏ Go to URL
Same as [Menu 8-5].
❏ Go to e-mail server
Connect to the E-mail server that you configured.
❏ Set as e-mail server
Save the current URL as an E-mail server.
❏ Save image
Save the browsed image.
Internet On-line menu
Accessing the Menu

ENGLISH
88
To be able to data or fax service, you need the communicate
software such as a data or a fax program. Before using these
functions, you need to connect your phone to a computer or make
sure that your phone is in connection with a compatible device.
Sending Data or Fax Calls
1. Connect your computer to the phone.
2. After starting the communicate software, make a call and transmit
a data or fax.
3. After the data or fax transmission, you can end the call by just
ending of the communicate software, pressing [End].
Receiving Data or Fax Calls
If you have separate numbers for voice, data and fax calls, your
phone recognizes the type of call.
Receiving Data or Fax Calls– Separate numbers
(Multi-numbers)
To use a data or a fax service, the display shows which type of call
you are receiving.
To receive a data or fax call.
1. Connect your computer to the phone.
2. After starting the communicate software, accept a call and receive
a data or fax (if it is not answered automatically).
3. After the data or fax reception, you can end the call by just ending
of the communicate software, pressing [End].
How to Use Data and Fax call
Additional Functions

ENGLISH
89
Additional Functions
Receiving Data or Fax Calls– Single number
If you have a SIM card that does not support separate voice, data
and fax numbers, the phone does not recognize the type of incoming
call.
To use a data or a fax service, make sure that you want to receive a
data or fax call mode. You first have to set the phone to one of these
options in the call mode (Settings ➝ Call Setting ➝ Next Incoming)
sub menu.
To receive a data or fax call.
1. Press [Menu] in standby mode.
2. Select the call type you want (Voice, Data or Fax) and press
[Select].
3. Connect your computer to the phone.
4. After starting the communicate software, accept a call and receive
a data or fax (if it is not answered automatically).
5. After the data or fax reception, you can end the call by just ending
of the communicate software, pressing [End].
Once you have set your phone for a specific incoming call, it remains
set until you change it.
PC Sync
PC Sync is a program for data exchange PC & Phone by data
cable. Therefore, if you want to use this function, you have to
buy accessory kit. About more detail for using guide refers to
PC Sync Help file on the PC Sync CD.

ENGLISH
90
During a call, the following menus will be displayed, not in a standby
mode.
1 During a call
1-1 Putting a Call on Hold
You can place a call on hold or retrieve by just pressing the [Send]
key. When a call is made or answered, press the [Send] key to place
it on hold. When a call is held, press the [Send] key to make it active.
1-2 Making a Second Call
You can get a dial number from phonebook to make a second call.
Press [Names] key then select Search. To save the dial number into
phonebook during call, press [Names] key then select Add new.
1-3 Swapping Between Two Calls
To switch between two calls, select the [Options] key, then select
Swap or just press [Send] key.
You can make one of two calls focused by pressing up/down arrow
key. If you want to end one of two calls, make the call you want to
end focused, then press [End] key when the call you want to end is
focused.
In call Menu
Additional Functions

ENGLISH
91
Additional Functions
1-4 Answering an Incoming Call
To answer an incoming call, simply press the [Send] key.
The handset is also able to warn you of an incoming call while you
are already in a call. A tone sounds in the earpiece, and the display
will show that a second call is waiting.
If Call Waiting is on, you can put the first call on hold and answer the
second, by pressing [Send] or by selecting the [Answer] key.
You can end the current call and answer the waiting call by selecting
the [Menu] key, then End & Answer.
1-5 Rejecting an Incoming Call
You can reject an incoming call without answering by simply
pressing the [End] key.
When in a call you can reject an incoming call (1st call) by pressing
the [Menu] key and selecting Multiparty/End and Answer or by
pressing [End] key.
1-6 Controlling the volume during a call
You can control the volume during a call by pressing [Options] key
and selecting Volume followed by U or D .

1-7 Muting the Microphone
You can mute the microphone during a call by pressing the [Options]
key then selecting Mute. The handset can be unmuted by pressing
the [Unmute].
When the handset is muted, the caller cannot hear you, but you can
still hear them.
1-8 Switching DTMF Tones on During a Call
To turn DTMF tones on during a call, for example, to allow your
handset to make use of an automated switchboard, select the
[Options] key, then DTMF On. DTMF tones can be turned off the
same way.
1-9 Calling up the messages or SIM Tool Kit
The Messages and SIM Tool kit main menu options can be reached
from the in-call menu by selecting the [Options] key, then Messages
or SIM Tool Kit (Screen name depends on the network operator’s
SIM). SIM Tool kit menu is shown only when SIM in the handset
supports SIM Tool kit service.
ENGLISH
92
In call Menu
Additional Functions

ENGLISH
93
Additional Functions
2 Multiparty or Conference Calls
The multiparty or conference service provides you with the ability to
have a simultaneous conversation with more than one caller, if your
network service provider supports this feature.
A multiparty call can only be set up when you have one active call
and one call on hold, both calls having been answered. Once a
multiparty call is set up, calls may be added, disconnected or
separated (that is, removed from the multiparty call but still
connected to you) by the person who set up the multiparty call.
These options are all available from the in-call menu and are listed in
Section.
The maximum callers in a multiparty call is five. Once started, you
are in control of the multiparty call, and only you can add calls to the
multiparty call.
2-1 Making a Second Call
You can make a second call while you are already in a call. To do
this, enter the second number and press [Send]. When you get
second call the first call is automatically put on hold. You can swap
between calls by selecting the [Options] key then Swap.
2-2 Setting up a Multiparty Call
You can connect a call on hold to the currently active call to form a
multiparty call by selecting the [Options] key then Multiparty/Join
all.

ENGLISH
94
2-3 Putting the Multiparty Call on Hold
To put a multiparty call on hold, select the [Options] key then
Multiparty/Hold all.
2-4 De-activate the Multiparty Call on Hold
To de-activate a multiparty call on hold, select the [Options] key then
Multiparty/Join all.
2-5 Adding Calls to the Multiparty Call
To join an active call to the held multiparty call, select the [Options]
key then Multiparty/Join all.
2-6 Displaying Callers in a Multiparty Call
To scroll through the numbers of the callers who make up a
multiparty call on the handset screen, press U and D keys.
2-7 Putting a Member of a Multiparty Call on Hold
To place one selected caller (whose number is currently displayed
on-screen) of a multiparty call on hold, select the [Options] key then
Multiparty/Exclude.
2-8 A Private Call in a Multiparty Call
To have a private call with one caller of a multiparty call, display the
number of the caller you wish to talk to on the screen, then select the
[Options] key and Multiparty/Private to put all the other callers on
hold.
In call Menu
Additional Functions

ENGLISH
95
Additional Functions
2-9 Ending a Multiparty Call
The currently displayed caller of a multiparty call can be
disconnected by pressing the [End] key. To end a multiparty call,
press the [Options] key then select Multiparty/End multiparty.
Selecting the [Options] key then Multiparty/End all, will end all the
active and held calls.
2-10 Explicit Call Transfer (ECT)
If you have one caller on hold and another active call, you may
connect one call party to another call party and then leave the call.
This is done by selecting the Multiparty/Transfer option from the in-
call menu.

ENGLISH
96
When using this unit, basic safety precautions as below should
be always followed.
• Do not touch the adapter with wet hands.
• Do not disassemble this unit. (Take it to a qualified service
technician when repair work is required.).
• Away from electrical appliance such as a TV, radio or personal
computer.
• The unit should be situated from heat sources such as radiators or
cookers.
• Do not drop.
• Do not subject this unit to mechanical vibration or shock.
• The coating of the phone may be damaged if covered with wrap or
vinyl wrapper.
• Use dry cloth to clean the exterior of the unit. (Do not use solvent
such as benzene, thinner or alcohol.)
• Do not subject this unit to excessive smoke or dust.
• Do not keep the phone next to credit cards or transport tickets; it
can be affected the information on the magnetic strips.
• Do not tap the screen with a sharp object; otherwise, it may
damage the phone.
• Do not expose the phone to liquid or moisture.
• Use the accessories like an earphone cautiously. Do not touch the
antenna unnecessarily.
Care and Maintenance

ENGLISH
97
■ Caring for the Battery
• You do not need to completely discharge the battery before
recharging. Unlike other battery systems, there is no memory
effect that could compromise the battery’s performance.
• Use only LG batteries and chargers. LG chargers are designed
to maximize the battery life.
• Do not disassemble or short-circuit the battery pack.
• Keep the metal contacts of the battery pack clean.
• Replace the battery when it no longer provides acceptable
performance. The battery pack may be recharged hundreds of
times until it needs replacing.
• Recharge the battery if it has not been used for a long time to
maximize usability.
• Do not expose the battery charger to direct sunlight or use it in
high humidity, such as the bathroom.
• Do not leave the battery in hot or cold places, this may
deteriorate the battery performance.

ENGLISH
98
General
Product Name : G5300
System : GSM 900/DCS 1800
Ambient Temperatures
Max : +55°C
Min : -10°C
Technical Data

ENGLISH
99

ENGLISH
100
Memo
-
 1
1
-
 2
2
-
 3
3
-
 4
4
-
 5
5
-
 6
6
-
 7
7
-
 8
8
-
 9
9
-
 10
10
-
 11
11
-
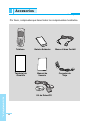 12
12
-
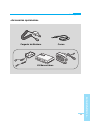 13
13
-
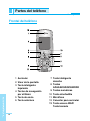 14
14
-
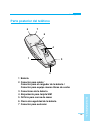 15
15
-
 16
16
-
 17
17
-
 18
18
-
 19
19
-
 20
20
-
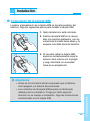 21
21
-
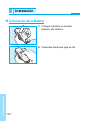 22
22
-
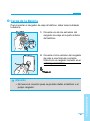 23
23
-
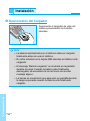 24
24
-
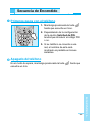 25
25
-
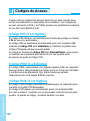 26
26
-
 27
27
-
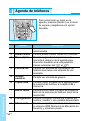 28
28
-
 29
29
-
 30
30
-
 31
31
-
 32
32
-
 33
33
-
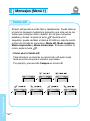 34
34
-
 35
35
-
 36
36
-
 37
37
-
 38
38
-
 39
39
-
 40
40
-
 41
41
-
 42
42
-
 43
43
-
 44
44
-
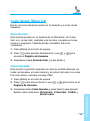 45
45
-
 46
46
-
 47
47
-
 48
48
-
 49
49
-
 50
50
-
 51
51
-
 52
52
-
 53
53
-
 54
54
-
 55
55
-
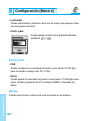 56
56
-
 57
57
-
 58
58
-
 59
59
-
 60
60
-
 61
61
-
 62
62
-
 63
63
-
 64
64
-
 65
65
-
 66
66
-
 67
67
-
 68
68
-
 69
69
-
 70
70
-
 71
71
-
 72
72
-
 73
73
-
 74
74
-
 75
75
-
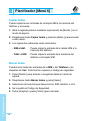 76
76
-
 77
77
-
 78
78
-
 79
79
-
 80
80
-
 81
81
-
 82
82
-
 83
83
-
 84
84
-
 85
85
-
 86
86
-
 87
87
-
 88
88
-
 89
89
-
 90
90
-
 91
91
-
 92
92
-
 93
93
-
 94
94
-
 95
95
-
 96
96
-
 97
97
-
 98
98
-
 99
99
-
 100
100
-
 101
101
-
 102
102
-
 103
103
-
 104
104
-
 105
105
-
 106
106
-
 107
107
-
 108
108
-
 109
109
-
 110
110
-
 111
111
-
 112
112
-
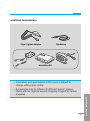 113
113
-
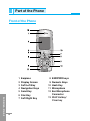 114
114
-
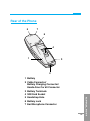 115
115
-
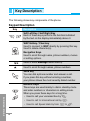 116
116
-
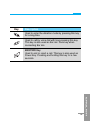 117
117
-
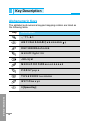 118
118
-
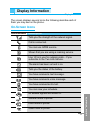 119
119
-
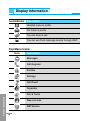 120
120
-
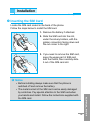 121
121
-
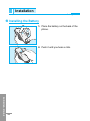 122
122
-
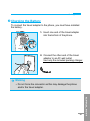 123
123
-
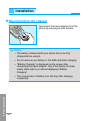 124
124
-
 125
125
-
 126
126
-
 127
127
-
 128
128
-
 129
129
-
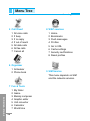 130
130
-
 131
131
-
 132
132
-
 133
133
-
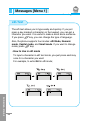 134
134
-
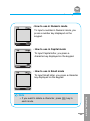 135
135
-
 136
136
-
 137
137
-
 138
138
-
 139
139
-
 140
140
-
 141
141
-
 142
142
-
 143
143
-
 144
144
-
 145
145
-
 146
146
-
 147
147
-
 148
148
-
 149
149
-
 150
150
-
 151
151
-
 152
152
-
 153
153
-
 154
154
-
 155
155
-
 156
156
-
 157
157
-
 158
158
-
 159
159
-
 160
160
-
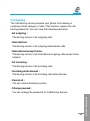 161
161
-
 162
162
-
 163
163
-
 164
164
-
 165
165
-
 166
166
-
 167
167
-
 168
168
-
 169
169
-
 170
170
-
 171
171
-
 172
172
-
 173
173
-
 174
174
-
 175
175
-
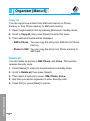 176
176
-
 177
177
-
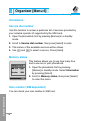 178
178
-
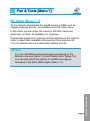 179
179
-
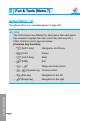 180
180
-
 181
181
-
 182
182
-
 183
183
-
 184
184
-
 185
185
-
 186
186
-
 187
187
-
 188
188
-
 189
189
-
 190
190
-
 191
191
-
 192
192
-
 193
193
-
 194
194
-
 195
195
-
 196
196
-
 197
197
-
 198
198
-
 199
199
-
 200
200
-
 201
201
-
 202
202


en otros idiomas
- English: LG G5300 User manual
Artículos relacionados
-
LG Série W3000.THABL Manual de usuario
-
LG G1500S El manual del propietario
-
LG Série C3100.WINWR Manual de usuario
-
LG Série KG240 El manual del propietario
-
-
LG C3100 Manual de usuario
-
LG G4010 El manual del propietario
-
LG MG120a El manual del propietario
-
LG L3100.CZESV Manual de usuario
-
LG G4050.TCLUB El manual del propietario