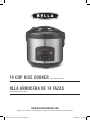
Bella 14 Cup Rice Cooker, Stainless Steel El manual del propietario
- Categoría
- Pequeños electrodomésticos de cocina
- Tipo
- El manual del propietario
Este manual también es adecuado para

WWW.BE LLAHOUSEWARES.COM
Register your product and get support • Registrar y obtener asistencia de su producto
14 CUP RICE COOKER Instruction Manual
OLLA ARROCERA DE 14 TAZAS
Manual de instrucciones
17235 14 cup SS rice cooker_IM_V2.indd 117235 14 cup SS rice cooker_IM_V2.indd 1 2020-07-27 2:10 PM2020-07-27 2:10 PM

THANK YOU
for your purchase
BellaLifestyle
BellaLife
for special announcements and trendy recipes!
REGISTER
AND SIGN UP
Rate, review or ask us a question.
TELL US WHAT
YOU THINK!
GO TO
:
bellahousewares.com
#myBELLAlife
17235 14 cup SS rice cooker_IM_V2.indd 217235 14 cup SS rice cooker_IM_V2.indd 2 2020-07-27 2:10 PM2020-07-27 2:10 PM

1
Table of Contents
Important Safeguards ...............................................................................................................................2-3
Additional Important Safeguards ........................................................................................................... 3-4
Notes on the Plug .........................................................................................................................................4
Notes on the Cord.........................................................................................................................................4
Plasticizer Warning ....................................................................................................................................... 4
Electric Power................................................................................................................................................4
Getting to know your 14 Cup Rice Cooker ................................................................................................5
Before Using for the First Time ..................................................................................................................5
Operating Instructions ................................................................................................................................. 6
Inner pot water measurement lines ........................................................................................................... 7
Rice Cooking Charts ..................................................................................................................................... 7
Rice Cooking Hints For Best Results .......................................................................................................... 8
About Rice .....................................................................................................................................................8
User Maintenance Instructions ...................................................................................................................9
Care & Cleaning Instructions ......................................................................................................................9
Storing instructions ......................................................................................................................................9
Warranty ......................................................................................................................................................10
Índice
Medidas de seguridad importantes .................................................................................................... 11-12
Otras medidas de seguridad importantes ..............................................................................................12
Notas sobre el enchufe .............................................................................................................................. 13
Notas sobre el cable ...................................................................................................................................13
Advertencia sobre los plasticantes ........................................................................................................13
Corriente eléctrica ......................................................................................................................................13
Conozca su olla para arroz ........................................................................................................................14
Antes de utilizar por primera vez .............................................................................................................14
Instrucciones de funcionamiento .............................................................................................................15
Líneas de medida de agua de la cacerola interna ..................................................................................16
Grácos de cocción de arroz.....................................................................................................................16
Consejos para obtener mejores resultados ............................................................................................ 17
Acerca del arroz .................................................................................................................................................
17
Instrucciones de mantenimiento para el usuario .................................................................................18
Instrucciones de cuidado y limpieza ........................................................................................................18
Instrucciones de almacenamiento ...........................................................................................................18
Garantía........................................................................................................................................................19
17235 14 cup SS rice cooker_IM_V2.indd 117235 14 cup SS rice cooker_IM_V2.indd 1 2020-07-27 2:10 PM2020-07-27 2:10 PM

2
IMPORTANT SAFEGUARDS
When using electrical appliances, basic safety precautions should always be
followed including the following:
1. Read all instructions.
2. Do not touch hot surfaces. Use handles or knobs.
3. To protect against electrical shock, do not immerse cord, plugsor base unit in
water or other liquid.
4. This appliance is not intended for use by persons (including children) with
reduced physical, sensory or mental capabilities,
or lack of experience and knowledge, unless they have been given
supervision or instruction concerning use of the appliance
by a person responsible for their safety.
5. Close supervision is necessary when any appliance is used byor near
children.
6. Unplug from outlet when not in use and before cleaning. Allow to cool before
cleaning or storing this appliance.
7. Do not operate the appliance with a damaged cord or plug or after the
appliance malfunctions or has been damaged in any manner. Contact
Consumer Service for examination, repair or adjustment.
8. The use of accessory attachments not recommended by the appliance
manufacturer may cause injuries.
9. Do not use outdoor, this is for household only.
10. Do not let cord hang over edge of table or counter, or touch hot surfaces.
11. Do not place on or near a hot gas or electric burner, or in a heated oven.
12. Extreme caution must be used when moving an appliance containing hot oil
or other hot liquids. To protect against damage
or electric shock, do not cook in the base unit. Cook only in the removable
cooking pot provided.
13. To disconnect, remove the plug from the wall outlet.
14. Never yank the cord to disconnect the appliance from the outlet, it could
damage the cord. Instead, grasp the plug and pull
to disconnect.
15. Do not use appliance for other than intended use.
16. Do not use aluminum cover or cooking pot if dented or worn.
WARNING: Never deep-fry or pressure-fry in the Rice Cooker, regardless of
whether the lid is on or off. THIS IS DANGEROUS,
AND CAN CAUSE A FIRE AND SERIOUS DAMAGE.
17. Use only on a level dry and heat-resistant countertop.
18. WARNING: Spilled food can cause serious burns. Keep appliance and cord
away from children. Never drape cord over edge
of counter, never use outlet below counter, and never use with an extension
cord.
19. Use only with a 120V AC power outlet.
20. Always unplug from the base of the wall outlet.Never pull on the cord.
21. The rice cooker should be operated on a separate electrical circuit from
other operating appliances. If the electric circuit is overloaded with other
appliances, this appliance may not operate properly.
22. Always make sure the outside of the inner pot is dry prior to use.If the inner
pot is returned to cooker when wet,it may damage
or cause the product to malfunction.
17235 14 cup SS rice cooker_IM_V2.indd 217235 14 cup SS rice cooker_IM_V2.indd 2 2020-07-27 2:10 PM2020-07-27 2:10 PM

3
23. The rice should not be left in the rice cooker with the “keep warm” function
on for more than 3 hours.
24. To prevent damage or deformation , do not use the inner pot on a stovetop or
burner.
25. To reduce the risk of electric shock , cook only in the removable container
provided..
SAVE THESE INSTRUCTIONS
FOR HOUSEHOLD USE ONLY
ADDITIONAL IMPORTANT
SAFEGUARDS
CAUTION HOT SURFACES: This appliance generates heat and escaping steam
during use. Proper precautions must be taken to prevent the risk of burns, res, or
other injury to persons or damage to property.
1. A person who has not read and understood all operating and safety
instructions is not qualied to operate this appliance.
All users of this appliance must read and understand this instruction manual
before operating or cleaning this appliance.
2. If this appliance falls or accidentally becomes immersed in water, unplug it
from the wall outlet immediately. Do not reach into
the water!
3. Unplug from outlet when not in use and before cleaning. To avoid electric
shock, never immerse or rinse this appliance in water
or any other liquid.
4. When using this appliance, provide adequate air space above and on all sides
for air circulation. Do not operate this appliance while
it is touching or near curtains, wall coverings, clothing, dishtowels or other
ammable materials.
5. Do not place this Rice Cooker directly under kitchen wall cabinets when in
use, as it produces steam. Avoid reaching over the steam valve while in use.
6. To reduce the risk of re, do not leave this appliance unattended during use.
7. If this appliance begins to malfunction during use, please immediately unplug
the cord. Do not use or attempt to repair
the malfunctioning appliance.
8. Do not use this appliance in an unstable position.
9. To avoid burns, stay clear of the steam vent during cooking.
10. Never use the cooking pot on a gas or electric cooktop or on an open ame.
11. Do not leave the plastic rice paddle or rice measuring cup in thecooking pot
while the Rice Cooker is in use.
12. Open lid carefully to avoid scalding, and allow water to drip intoRice Cooker.
13. To reduce the risk of electric shock, cook only in the cooking pot. Do not pour
liquid directly into the Rice Cooker body.
14. Do not use while standing in a damp area.
15. Never use sharp objects inside the cooking pot as this will damage the non-
stick coating.
16. Do not cover or block the valves.
17235 14 cup SS rice cooker_IM_V2.indd 317235 14 cup SS rice cooker_IM_V2.indd 3 2020-07-27 2:10 PM2020-07-27 2:10 PM

4
17. Do not touch the pot or lid except for the handle immediately after use.
Whenever the product is in use, only touch the handle,
do not touch the pot or lid.
18. To avoid burns, allow the food to cool before tasting. The temperature of the
food gets considerably hotter than with
conventional cooking.
19. Do not touch hot surfaces. Use oven gloves or a cloth when opening the lid
or handling hot containers as hot steam will escape.
20. Do not move the appliance while in use.
Notes on the Plug
This appliance has a grounded 3-prong plug. Connect to a properly grounded
outlet only. If the plug does not t fully into the outlet, contact a qualied
electrician. Do not attempt to modify the plug in any way.
Notes on the Cord
The provided short power-supply cord (or detachable power-supply cord) should
be used to reduce the risk resulting from becoming
entangled in or tripping over a longer cord. Do not use an extension cord with
this product.
Plasticizer Warning
CAUTION: To prevent Plasticizers from migrating to the nish of the counter
top or table top or other furniture, place NON-PLASTIC coasters or place mats
between the appliance and the nish of the counter top or table top. Failure to
do so may cause the nish to darken; permanent blemishes may occur or
stains can appear.
Electric Power
If the electrical circuit is overloaded with other appliances, your appliance may not
operate properly. It should be operated on a separate electrical circuit from other
appliances.
17235 14 cup SS rice cooker_IM_V2.indd 417235 14 cup SS rice cooker_IM_V2.indd 4 2020-07-27 2:10 PM2020-07-27 2:10 PM

5
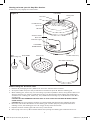
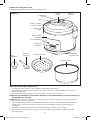
Getting to know your 14 Cup Rice Cooker
Product may vary slightly from illustrations.
Before Using for the First Time
1. Remove all packaging and any labels from the outer stainless steel surfaces.
2. Grasp the handle and press the push button to unlock lid. Open lid. Remove cooking pot.
3. Wash cooking pot, steam tray, rice measuring cup and rice paddle in warm, soapy water. Never use
abrasive cleansers or scouring pads because they can damage the nish of both the cooking pot
and base unit. Cooking pot, steam tray, rice paddle and measuring cup are dishwasher safe. Rinse
and dry well.
CAUTION: DO NOT IMMERSE THE BASE UNIT OF THE 14 CUP RICE COOKER IN WATER OR ANY
OTHER LIQUID!
CAUTION: Never place liquid in the base unit. Place liquid and food into the cooking pot only.
4. Be careful not to dent the bottom of the cooking pot. To work properly and produce thebest
cooking results, the cooking pot must t snugly on top of the thermostat.
5. Replace the clean cooking pot and steam tray. Close the lid.
6. Never plug in the 14 Cup Rice Cooker without rst placing the cooking pot inside the base unit.
Non-Stick Cooking Pot
Stainless Steel
Base Unit
Lid Cover
Lid
Lid Handle
Steam Vent
Push Button to
Open Lid
Lid Lock
COOK/KEEP
WARM Switch
Indicator Lights
Figure 1
Rice
Measuring Cup
Rice Paddle Steam Tray
Condensation tray
17235 14 cup SS rice cooker_IM_V2.indd 517235 14 cup SS rice cooker_IM_V2.indd 5 2020-07-27 2:10 PM2020-07-27 2:10 PM

6
Operating Instructions
1. Insert the clean and dry cooking pot into the Rice Cooker’s base unit. Rotate it slightly to make sure
that it is seated on the heating plate.
NOTE: Make sure to always wipe down the outer surface of the cooking pot. If the cooking pot is wet
when placed into the base unit of the Rice Cooker, a cracking noise may be heard while the unit
heats. Keep the outer surface dry to prevent damage to the inner workings of the appliance.
CAUTION: DO NOT allow loose grains of rice or other food particles fall into the bottom of the base
unit.
2. Using the measuring cup provided, measure out the desired amount of rice. One full, level cup
of uncooked rice will yield 2.5 cups of cooked rice. The measuring cup provided adheres to rice
industry standards 6 oz. (180 ml) and is not equal to one U.S. cup 8.11 oz. (240 ml).
3. Rinse rice in a separate container until the water becomes relatively clear; drain.
4. Place rinsed rice in the inner pot.
5. Using the measuring cup provided add the appropriate amount of water. See the “Cooking Guide”
for suggested rice/water ratios.
NOTE: To add an extra dimension of avor to rice, try substituting a favorite variety of meat or
vegetable broth or stock.
The ratio of broth/stock to rice will be the same as water to rice.
6. Making sure that the exterior of the inner pot is clean, dry and free of debris; set the inner pot into
the rice cooker. Place the lid securely into place on top of the rice cooker and plug the power cord
into a wall outlet.
7. To begin cooking, press the cook switch. The cooking mode indicator light will illuminate.
8. Once cooking is completed, the 14 Cup Rice Cooker will automatically advance to KEEP WARM
Mode.
WARNING: Use caution when opening lid. Steam escapes as soon as the lid is opened. Never place
your face or hands over the
14 Cup Rice Cooker when opening the lid. Always use oven mitts when handling the hot cooking
pot.
NOTE: For softer rice, allow rice to soak for 10-20 minutes prior to cooking.
9. Once the rice has nished cooking, open the lid and use the rice paddle to stir the rice. This will
release excess moisture and give the rice a ufer texture. Then, replace the lid and allow the
unit to remain on “Keep-Warm” mode for 5-10 minutes. This will ensure optimal rice texture and
moisture level.
10. To turn off the rice cooker, unplug the power cord from the electrical outlet.
WARNING: The rice cooker will remain on “Keep-Warm” until it is unplugged from the power outlet. It
is not recommended to leave rice on “Keep-Warm” mode for more than 3 hours.
NOTE: To avoid a loss of steam and prevent longer cooking times, do not open the lid at any point
during the cooking process.
17235 14 cup SS rice cooker_IM_V2.indd 617235 14 cup SS rice cooker_IM_V2.indd 6 2020-07-27 2:10 PM2020-07-27 2:10 PM

7
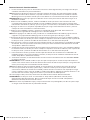
Inner Pot Water Measurement Lines
• The water lines in the inner pot may be used to measure the correct amount of water for rice. Be
sure to add the desired amount
of rice rst. Then ll the inner pot with water to the corresponding line in the inner pot (i.e. 2 cups of
uncooked rice would be lled to line 2 in the inner pot). This is a quick and easy method to achieve
perfect rice results.
• The inner pot water lines are intended for white rice only. Due to the extra layers of bran on whole
grain brown rice, it requires more water.See the “Cooking Guide” for suggested rice/water ratios
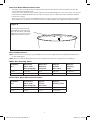
Rice Cooking Charts
NOTE: Use the rice measuring cup (provided) to measure rice. Add water to the designated water line
on the cooking pot.
NOTE: Raw rice and water/liquid volume may be adjusted to taste on subsequent rice cookings.
White Rice Cooking Chart
Uncooked
Rice
White Rice
Water with
Measuring Cup
White Rice
Waterline
Inside Pot
Approx.
Cooked
Rice Yield
Approx.
Cooking
Time
2 cups 2 1/2 cups Line 2 5-6 cups 18-20 mins
3 cups 3 1/2 cups Line 3 7-8 cups 20-25 mins
Brown Rice Water Measurement Table:
Uncooked
Rice
Brown Rice
Water with
Measuring Cup
Approx.
Cooked
Rice Yield
Approx.
Cooking Time
2 cup 1 1/2 cups 2 1/2 cups 28-33 mins
3 cups 3 cups 5 cups 32-37 mins
Figure 2
Use the rice measuring cup
provided to measure 6level
cups of rice. Rinse, if desired.
Add raw rice to the inner pot.
Add water to the 6-cup line
17235 14 cup SS rice cooker_IM_V2.indd 717235 14 cup SS rice cooker_IM_V2.indd 7 2020-07-27 2:10 PM2020-07-27 2:10 PM

8
Rice Cooking Hints For Best Results
• If your cooked rice is dry or hard/chewy when the Rice Cooker advances to WARM, additional water
and cooking time will soften the rice. Depending on how dry your rice is, add 1/2 to 1 cup of water
and stir through.
• When the 14 Cup Rice Cooker advances to WARM, open thelid and stir the rice to check the
consistency. If cooked rice is soggy, close the lid and continue to WARM setting for 10 to 30 minutes
as needed. Stir periodically to release excess moisture.
• When a recipe calls for salt, use kosher salt. It has no impurities or additives and dissolves easily.
Increase the recipe quantity to 1-1/2 times more kosher salt than table salt.
• Stocks, broths, and bullion can be used in place of water to add avor and improve texture when
cooking rice.
• Do not leave cooked rice in the 14 Cup Rice Cooker on WARM mode for more than 3hours.
• When cooking wild rice, add 25% to 50% more water to cook thoroughly. Followpackageinstructions
• Your 14 Cup Rice Cooker is the perfect appliance to cook quinoa effortlessly! Add twice as much
water or cooking liquid as raw quinoa to the cooking pot.
About Rice
Courtesy of the USA Rice Federations
For recipes and rice information visit the USA Rice Federation online at: www.usarice.com/consumer.
The following are the commonly available varieties of rice and their characteristics:
Long Grain Rice
This rice has a long, slender kernel three to four times longer than its width. Due to its starch composition,
cooked grains are more separate, light and uffy compared to medium or short grain rice. The majority of
white rice is enriched to restore nutrients lost during processing. Great for entrees and side dishes – rice
bowls, stir-fries, salads and pilafs.
Medium Grain Rice
When compared to long grain rice, medium grain rice has a shorter, wider kernel that is two to three
times longer than its width. Cooked grains are more moist and tender than long grain, and have a greater
tendency to cling together. Great for entrees, sushi, risotto and rice puddings.
Short Grain Rice
Short grain rice has a short, plump almost round kernel. Cooked grains are soft and cling together, yet
remain separate and are somewhat chewy, with a slight springiness to the bite. Great for sushi, Asian
dishes and desserts.
Brown Rice
Brown rice is a 100% whole grain food that ts the U.S. Dietary Guidelines for Americans recommendation
to increase daily intake of whole grains. Brown rice contains the nutrient- dense bran and inner germ layer
where many benecial compounds are found. Brown rice is available in short, medium and long grain
varieties and can be used interchangeably with enriched white rice.
Wild Rice
Wild rice is an aquatic grass grown in Minnesota and California and is a frequent addition to long grain
rice pilafs and rice mixes. Its unique avor, texture and rich dark color provide a delicious accent to rice
dishes. Wild rice also makes a wonderful stufng for poultry when cooked with broth and mixed with your
favorite dried fruits.Air Frying Chart
17235 14 cup SS rice cooker_IM_V2.indd 817235 14 cup SS rice cooker_IM_V2.indd 8 2020-07-27 2:10 PM2020-07-27 2:10 PM

9
User Maintenance Instructions
This appliance requires little maintenance. It contains no user serviceable parts. Do not try to repair it
yourself. Any servicing requiring disassembly other than cleaning, must be performed by a qualied
appliance repair technician.
1. Be careful not to dent the cooking pot, especially the bottom of it. To work properly and produce the
best cooking results, the cooking pot must t snugly on top of the thermostat.
2. DO NOT let loose grains of rice or other food particles fall into the bottom of the base unit because
they might prevent the thermostat from tting tightly against the bottom of the cooking pot and
cause inadequate cooking.
3. Use the plastic rice paddle or a wooden spoon to stir and remove food from the cooking pot. NEVER
use any metal utensils.
4. Never use abrasive cleansers or scouring pads because they can damage the nish of both the
cooking pot and base unit.
5. Never pour liquid into the base unit or immerse it in water.
Care And Cleaning Instructions
CAUTION: NEVER IMMERSE THE 14 Cup Rice Cooker BODY ORCORD IN WATER OR OTHER LIQUID.
PLEASE NOTE: It is normal to have a brown ‘rice crust’ coating the bottom layer of the cooking pot when
the rice has nished cooking and steaming.
1. Unplug the 14 Cup Rice Cooker from the wall outlet. Allow the unit to cool before cleaning or
storing.
2. Clean the 14 Cup Rice Cooker after every use. NEVER immerse the base unit or power cord in water.
3. After cooking rice, some rice cooking liquid may pool under the lid at the top of the unit around the
cooking pot. This is normal.
Use a paper towel or kitchen cloth to clean after every use. Use a small brush or cotton swab if
necessary.
4. Check and empty condensation tray as needed.
5. Fill the cooking pot with warm water and allow to soak. Wash steam tray, cooking pot, rice
measuring cup and rice paddle in warm, soapy water.
6. Rinse and dry well.
7. The cooking pot, steam tray, rice paddle, rice measuring cup, are top rack dishwasher safe.
8. Wipe the 14 Cup Rice Cooker base unit with a soft, slightly damp cloth or sponge
Storing instructions
1. Make sure all parts are clean and dry before storing.
2. Store cooking pot and steam tray inside the 14 Cup Rice Cooker, lid locked. Store unit its box or
in a clean, dry place.
3. Never store 14 Cup Rice Cooker while it is hot or wet.
4. Never wrap cord tightly around the appliance; keep it loosely coiled.
17235 14 cup SS rice cooker_IM_V2.indd 917235 14 cup SS rice cooker_IM_V2.indd 9 2020-07-27 2:10 PM2020-07-27 2:10 PM

Limited TWO-YEAR Warranty
SENSIO Inc. hereby warrants that for a period of TWO YEARS from the date
of purchase, this product will be free from mechanical defects in material and
workmanship, and for 90 days in respect to non-mechanical parts. At its sole
discretion, SENSIO Inc. will either repair or replace the product found to be
defective, or issue a refund on the product during the warranty period.
The warranty is only valid for the original retail purchaser from the date of initial
retail purchase and is not transferable. Keep the original sales receipt, as proof
of purchase is required to obtain warranty validation. Retail stores selling this
product do not have the right to alter, modify, or in any way revise the terms and
conditions of the warranty.
EXCLUSIONS:
The warranty does not cover normal wear of parts or damage resulting from
any of the following: negligent use of the product, use of improper voltage or
current, improper routine maintenance, use contrary to the operating instructions,
disassembly, repair, or alteration by anyone other than qualied SENSIO Inc.
personnel. Also, the warranty does not cover Acts of God such as re, oods,
hurricanes, or tornadoes.
SENSIO Inc. shall not be liable for any incidental or consequential damages
caused by the breach of any express or implied warranty. Apart from the extent
prohibited by applicable law, any implied warranty of merchantability or tness
for a particular purpose is limited in time to the duration of the warranty. Some
states, provinces or jurisdictions do not allow the exclusion or limitation of
incidental or consequential damages, or limitations on how long an implied
warranty lasts, and therefore, the above exclusions or limitations may not apply to
you. The warranty covers specic legal rights which may vary by state, province
and/or jurisdiction.
HOW TO OBTAIN WARRANTY SERVICE:
You must contact Customer Service at our toll-free number: 1-866-832-4843.
A Customer Service Representative will attempt to resolve warranty issues
over the phone. If the Customer Service Representative is unable to resolve the
problem, you will be provided with a case number and asked to return the product
to SENSIO Inc. Attach a tag to the product that includes: your name, address,
daytime contact telephone number, case number, and description of the problem.
Also, include a copy of the original sales receipt. Carefully package the tagged
product with the sales receipt, and send it (with shipping and insurance prepaid)
to SENSIO Inc.’s address. SENSIO Inc. shall bear no responsibility or liability for
the returned product while in transit to SENSIO Inc.’s Customer Service Center.
10
17235 14 cup SS rice cooker_IM_V2.indd 1017235 14 cup SS rice cooker_IM_V2.indd 10 2020-07-27 2:10 PM2020-07-27 2:10 PM

11
MEDIDAS DE SEGURIDAD
IMPORTANTES
Al utilizar electrodomésticos, siempre deben cumplirse las precauciones de
seguridad básicas, incluidas las siguientes:
1. LEA TODAS LAS INSTRUCCIONES. Es necesario que haya una supervisión
estricta cuando el electrodoméstico sea utilizado por niños o cerca de ellos.
2. El cable de este electrodoméstico solo debe enchufarse en un tomacorriente
de 120 V CA.
3. Para protegerse contra una descarga eléctrica, no sumerja el cable, el enchufe
o la unidad de cocción en agua ni otros líquidos.
4. No toque las supercies calientes. Utilice las asas.
5. Este electrodoméstico no debe ser utilizado por personas (incluidos niños)
con capacidades físicas, sensoriales o mentales reducidas, o con falta de
experiencia y conocimientos, a menos que una persona responsable de su
seguridad les haya brindado supervisión o instrucciones sobre el uso de los
electrodomésticos.
6. Es necesario que haya una supervisión estricta cuando el electrodoméstico
sea utilizado por niños o cerca de ellos.
7. Desenchufe el electrodoméstico del tomacorriente cuando no lo utilice y antes
de limpiarlo. Deje enfriar el electrodoméstico antes de limpiarlo o guardarlo.
8. Nunca tire del cable para desconectar la unidad de cocción del tomacorriente.
Más bien, agarre el enchufe y jale para desconectarlo.
9. No ponga en funcionamiento ningún electrodoméstico si el cable se encuentra
dañado. No use este electrodoméstico si no funciona bien, si se cayó o se
ha dañado de algún modo. A n de evitar el riesgo de descarga eléctrica,
nunca intente reparar la parrilla para 2 hamburguesas usted mismo. Lleve el
electrodoméstico a un técnico calicado para que lo examine, lo repare o le
haga ajustes eléctricos o mecánicos.
10. El uso de accesorios o aditamentos no recomendados por el fabricante puede
provocar incendios, descargas eléctricas o lesiones físicas.
11. No utilice el electrodoméstico al aire libre o con nes comerciales.
12. No permita que el cable cuelgue del borde de la mesa o encimera ni que entre
en contacto con supercies calientes.
13. No lo coloque sobre un quemador a gas o eléctrico, o cerca de este, ni dentro
de un horno caliente.
14. Utilícelo solamente sobre una supercie plana resistente al calor.
15. Sea extremadamente precavido cuando mueva electrodomésticos que
contengan alimentos, agua, aceite u otros líquidos calientes.
16. Para desconectar, retire el enchufe del tomacorriente.
17. ¡ADVERTENCIA! SIEMPRE DESENCHUFE LA UNIDAD CUANDO TERMINE
DE COCINAR. De lo contrario, la parrilla para 2 hamburguesas continuará
calentando hasta que se desenchufe la unidad.
18. PRECAUCIÓN. SUPERFICIES CALIENTES: Este electrodoméstico genera calor
mientras está en funcionamiento. Se deben tomar las medidas de precaución
adecuadas para evitar el riesgo de quemaduras, incendios u otros tipos de
lesiones físicas y daños materiales.
17235 14 cup SS rice cooker_IM_V2.indd 1117235 14 cup SS rice cooker_IM_V2.indd 11 2020-07-27 2:10 PM2020-07-27 2:10 PM

12
19. Cuando utilice este electrodoméstico, permita que haya una buena ventilación
por encima y a los lados de la unidad para que circule el aire. No permita
que el electrodoméstico entre en contacto con cortinas, recubrimientos
de pared, ropa, paños de cocina u otros materiales inamables mientras
está en funcionamiento.
21. No utilice el electrodoméstico con nes que no sean para los
que fue diseñado.
GUARDE ESTAS
INSTRUCCIONES
SOLO PARA USO DOMÉSTICO
OTRAS MEDIDAS DE
SEGURIDAD IMPORTANTES
PRECAUCIÓN. SUPERFICIES CALIENTES: Este electrodoméstico genera calor y
libera vapor mientras está en funcionamiento. Se deben tomar las medidas de
precaución adecuadas para evitar el riesgo de quemaduras, incendios u otros
tipos de lesiones físicas o daños materiales.
PRECAUCIÓN: Este electrodoméstico se calienta durante su funcionamiento y
retiene calor durante un tiempo luego de desenchufarse. Siempre use manoplas
cuando manipula materiales calientes y deje enfriar las piezas de metal antes de
lavarlas. No coloque ningún elemento sobre el electrodoméstico mientras está en
funcionamiento o caliente.
1. Todos los usuarios de este electrodoméstico deben leer y comprender
este manual de instrucciones antes de poner en funcionamiento o limpiar
la unidad.
2. Si el electrodoméstico comienza a funcionar mal mientras está en
uso, desenchufe el cable de inmediato. No utilice ni intente reparar el
electrodoméstico si funciona mal.
3. No descuide el electrodoméstico mientras está en funcionamiento.
4. El electrodoméstico solo debe utilizarse cerrado.
17235 14 cup SS rice cooker_IM_V2.indd 1217235 14 cup SS rice cooker_IM_V2.indd 12 2020-07-27 2:10 PM2020-07-27 2:10 PM

13
Notas sobre el enchufe
Este electrodoméstico cuenta con un enchufe polarizado (una pata es más ancha
que la otra). Para reducir el riesgo de descarga eléctrica, este enchufe encaja
de una sola manera en un tomacorriente polarizado. Si el enchufe no encaja
bien en el tomacorriente, delo vuelta. Si aun así no encaja, comuníquese con
un electricista calicado. No realice ningún tipo de modicación al enchufe.
Notas sobre el cable
A. Se debe usar el cable de alimentación corto provisto (o un cable eléctrico
desmontable) para reducir el riesgo de enredarse o tropezarse con un
cable más largo.
B. Existen cables de alimentación desmontables más largos o prolongadores
y pueden usarse si se hace con precaución.
C. Si se utiliza un cable de alimentación desmontable más largo o un
prolongador:
1. La clasicación eléctrica indicada en el cable o en el prolongador deberá
ser al menos tan alta como la clasicación eléctrica del electrodoméstico.
2. Si el electrodoméstico cuenta con conexión a tierra, el prolongador
deberá tener un enchufe de 3 patas con conexión a tierra.
3. El cable más largo deberá estar dispuesto de manera que no cuelgue
de la encimera o de la mesa, ya que puede ser jalado por niños o
cualquier persona puede tropezarse de forma accidental.
Advertencia sobre los plasticantes
PRECAUCIÓN: A n de evitar que los plasticantes se adhieran al acabado de la
encimera, la mesa u otro mueble, coloque un posafuentes o salvamanteles que
NO SEA DE PLÁSTICO entre el electrodoméstico y el acabado de la supercie de
la encimera o mesa. Si no se hace esto, es posible que el acabado se oscurezca,
se formen marcas permanentes o aparezcan manchas.
Corriente eléctrica
Si el circuito eléctrico está sobrecargado con otros artefactos, es posible que el
electrodoméstico no funcione correctamente. El electrodoméstico debe funcionar
en un circuito eléctrico separado de otros artefactos.
17235 14 cup SS rice cooker_IM_V2.indd 1317235 14 cup SS rice cooker_IM_V2.indd 13 2020-07-27 2:10 PM2020-07-27 2:10 PM

14
Conozca su olla para arroz
El producto puede diferir levemente de las ilustraciones
Antes de utilizar por primera vez
1. Lea todas las instrucciones y las medidas de seguridad importantes.
2. Quite todos los materiales de empaque y asegúrese de que ha recibido todos los artículos en
buenas condiciones.
3. Rompa las bolsas de plástico, ya que representan un riesgo para los niños.
ATENCIÓN: NO SUMERGIR EL DISPOSITIVO BASE DE LA OLLA ARROCERA DE 14 TAZAS EN AGUA NI
EN NINGÚN OTRO LÍQUIDO.
ATENCIÓN: Nunca colocar líquidos en el dispositivo base. Colocar líquidos y alimentos únicamente
dentro de la cacerola de cocción.
4. Tener cuidado de no abollar el fondo de la cacerola de cocción. Para funcionar adecuadamente
y obtener los mejores resultados, la cacerola de cocción debe estar bien ajustada sobre el
termostato.
5. Reemplazar la cacerola de cocción y la bandeja de vapor limpias. Cerrar la tapa.
6. No enchufar la Olla Arrocera de 14 tazas sin antes colocar la cacerola de cocción dentro del
dispositivo base.
Cacerola interna
Base de acero
inoxidable
Cubierta de
la tapa
Tapa
Asa de
la tapa
Válvula
de vapor
Botón a presión
para abrir la tapa
Bloqueo de
la tapa
Interruptor
de cocción
Luces indicadoras
Figura 1
Taza
medidora
Cuchara
para arroz
Bandeja de vapor
Bandeja de
condensación
17235 14 cup SS rice cooker_IM_V2.indd 1417235 14 cup SS rice cooker_IM_V2.indd 14 2020-07-27 2:10 PM2020-07-27 2:10 PM

15
Instrucciones de funcionamiento
1. Inserte la olla limpia y seca en la base de la arrocera. Gírela ligeramente para asegurarse de que
esté bien asentada en la placa calefactora.
NOTA: Asegúrese de limpiar siempre la supercie exterior de la olla. Si la olla está mojada cuando
se coloca en la base de la arrocera, se puede escuchar un crujido mientras la unidad se calienta.
Mantenga seca la supercie exterior para evitar daños en el funcionamiento interno del aparato.
PRECAUCIÓN: NO permita que granos sueltos de arroz u otras partículas de alimentos caigan en el
fondo de la unidad.
1. Utilice la taza medidora provista, mida la cantidad de arroz que desee. Una taza llena de arroz
no cocido rinde 2 tazas de arroz cocido. La taza medidora provista cumple con las normas de la
industria de arroz de 6 oz (180 ml), que no es igual a una taza de 8,11 oz (240 ml) de Estados Unidos.
2. Enjuague el arroz en un recipiente separado hasta que el agua esté relativamente clara y escurra.
Coloque el arroz escurrido en la cacerola interna.
3. Utilice la taza medidora provista y agregue la cantidad de agua adecuada. Para conocer las
proporciones sugeridas de arroz/agua, vea la “Guía de cocción”.
NOTA: Para agregar más sabor al arroz, pruebe con su variedad favorita de caldo o jugo de carne o
vegetales. La proporción de caldo/jugo con el arroz será igual que la de agua y arroz.
4. Asegúrese de que la parte exterior de la cacerola interna esté limpia, seca y sin suciedad y coloque
la cacerola interna en la olla para arroz. Coloque la tapa de manera rme sobre la parte superior de
la olla para arroz y enchufe el cable de alimentación en un tomacorriente de pared.
5. Para comenzar a cocinar, presione el interruptor de cocción. Se encenderá la luz indicadora de modo
de cocción. Una vez que naliza la cocción, la olla para arroz cambiará automáticamente al modo
“Keep Warm” (Mantener caliente).
6. Asegúrese de que la parte exterior de la cacerola interna esté limpia, seca y sin suciedad y coloque
la cacerola interna en la olla para arroz. Coloque la tapa de manera rme sobre la parte superior de
la olla para arroz y enchufe el cable de alimentación en un tomacorriente de pared.
7. Para comenzar a cocinar, presione el interruptor de cocción. Se encenderá la luz indicadora de
modo de cocción. Una vez que naliza la cocción, la olla para arroz cambiará automáticamente al
modo “Keep Warm” (Mantener caliente).
8. Al nalizar la cocción, la Olla Arrocera de 14 tazas avanza automáticamente al modo KEEP WARM
(mantener caliente).
ADVERTENCIA: Tener cuidado al abrir la tapa. El vapor escapa apenas se abre la tapa. No colocar el
rostro ni las manos encima de la Olla Arrocera de 14 tazas al abrir la tapa. Siempre usar guantes de
cocina para manipular la cacerola de cocción caliente.
NOTA: Para obtener arroz más blando, déjelo en remojo durante 10 a 20 minutos antes de cocinar.
9. Una vez que nalizó la cocción, quite la tapa y utilice la cuchara para arroz para revolverlo. De
esta manera, liberará el exceso de humedad y le dará al arroz una textura más esponjosa. Luego,
vuelva a colocar la tapa y deje la unidad en modo “Keep-Warm” (Mantener caliente) durante 5 a 10
minutos. De esta manera, asegurará la textura y el nivel de humedad óptimos.
10. Para apagar la olla para arroz, desenchufe el cable de alimentación del tomacorriente.
ADVERTENCIA: La olla para arroz se mantendrá en “Keep Warm” (Mantener caliente) hasta
desenchufarla del tomacorriente. No se recomienda dejar el arroz en modo “Keep-Warm”
(Mantener caliente) durante más de 3 horas.
NOTA: Para evitar la pérdida de vapor y tiempos de cocción más prolongados, no abra ni quite la tapa
en ningún momento durante el proceso de cocción.
17235 14 cup SS rice cooker_IM_V2.indd 1517235 14 cup SS rice cooker_IM_V2.indd 15 2020-07-27 2:10 PM2020-07-27 2:10 PM

16
Líneas de medida de agua de la cacerola interna
• Las líneas de agua de la cacerola interna se podrán utilizar para medir la cantidad correcta de agua
para el arroz. Primero, asegúrese de agregar la cantidad de arroz deseada. Luego llene la cacerola
interna con agua hasta la línea correspondiente en la cacerola interna (es decir, 2 tazas de arroz no
cocido debería llegar hasta la línea 2 en la cacerola interna). Este es un método rápido y sencillo
para obtener resultados perfectos del arroz.
• Las líneas de agua de la cacerola interna están diseñadas solo para arroz blanco. Debido a las capas
adicionales de trigo sobre el arroz integral, necesitará más agua. Para conocer las proporciones
sugeridas de arroz/agua, vea la “Guía de cocción”
Grácos de cocción de arroz
NOTA: Use la taza medidora de arroz (provista) para medir el arroz. Agregue agua a la línea designada
en la olla.
NOTA: El arroz crudo y el volumen de agua / líquido pueden ajustarse al gusto en las siguientes
cocciones de arroz.
Tabla de cocción de arroz blanco
Arroz no
cocido
Agua para arroz
con la taza
medidora
Línea de agua
para arroz
blanco dentro
de la cacerola
Rendimiento
aproximado del
arroz cocido
Tiempo de
cocción
aproximado
2 tazas 2 tazas y media Linea 2 5-6 tazas 18 a 20 minutos
3 tazas 3 tazas y media Linea 3 7-8 tazas 20 a 25 minutos
Tabla de medición de agua de arroz integral:
Arroz no
cocido
Agua para arroz
con la taza
medidora
Rendimiento
aproximado del
arroz cocido
Tiempo de
cocción
aproximado
2 tazas 2 tazas y media 2 1/2 cups 28 a 33 minutos
3 tazas 3 tazas y media 5 tazas 32 a 37 minutos
Use la taza medidora de arroz
provista para medir 6 tazas de
arroz. Enjuague, si lo desea.
Agregue arroz crudo a la olla
interior. Agregue agua hasta
la línea de 6 tazas.
Figura 2
17235 14 cup SS rice cooker_IM_V2.indd 1617235 14 cup SS rice cooker_IM_V2.indd 16 2020-07-27 2:10 PM2020-07-27 2:10 PM

17
Consejos para obtener mejores resultados
• Si el arroz está seco o duro/gomoso cuando la olla para arroz cambia a modo “Keep Warm”
(Mantener caliente), coloque más agua o cocine más tiempo para ablandar el arroz. Según la
sequedad del arroz, agregue media a 1 taza de agua y revuelva. Cierre la tapa y presione el
interruptor de energía.
• Cuando la olla para arroz cambia al modo “Keep Warm” (Mantener caliente), abra la tapa y revuelva
el arroz para vericar la consistencia. Repita según fuera necesario hasta que el arroz esté blando
y húmedo. El arroz está demasiado húmedo/pastoso después de la cocción. Si el arroz está
demasiado húmedo o pastoso cuando la olla para arroz cambia al modo “Keep-Warm” (Mantener
caliente), utilice la cuchara para arroz para revolverlo. De esta manera, redistribuirá la parte inferior
(la más húmeda) del arroz y liberará el exceso de humedad. Cierre la tapa y deje la olla en modo
“Keep-Warm” (Mantener caliente) durante 10 a 30 minutos según fuera necesario, abra la tapa y
revuelva periódicamente para liberar el exceso de humedad.
• Cuando necesite usar sal, utilice sal kósher. No tiene impurezas ni aditivos y se disuelve fácilmente.
Necesitará un medio más de sal kósher en comparación con la sal de mesa.
• Podrá utilizar caldo o jugo en lugar de agua para agregar sabor y mejorar la textura al cocinar el arroz.
• No se recomienda dejar el arroz en modo “Keep-Warm” (Mantener caliente) durante más de 3 horas.
Acerca del arroz
Cortesía de la Federación de Arroz de Estados Unidos.
Para obtener recetas e información sobre el arroz, visite el sitio web de la Federación de Arroz de Estados
Unidos en www.usarice.com/consumer. A continuación, se describen las variedades más comunes de
arroz y sus características:
Arroz de grano largo
Este arroz tiene un grano largo y delgado tres o cuatro veces más largo que su ancho. Debido a su
composición con almidón, los granos cocidos son más separados, livianos y esponjosos comparados con
el arroz de grano corto o mediano. La mayor parte del arroz blanco está enriquecido para devolver los
nutrientes perdidos durante el procesamiento. Ideal para entradas y acompañamientos: tazones de arroz,
salteados, ensaladas y pilaf.
Arroz de grano medio
Comparado con el arroz de grano largo, el arroz de grano medio tiene un grano más ancho, siendo dos
a tres veces más largos que su ancho. Los granos cocidos son más húmedos y tiernos que los granos
largos, y tienen mayor tendencia a pegarse. Ideal para entradas, sushi, risotto y budines de arroz.
Arroz de grano corto
El arroz de grano corto tiene un grano corto, gordo, casi redondo. Los granos cocidos son blandos y se
pegan, pero se mantienen separados y son algo gomosos, con una ligera elasticidad al morder. Ideal para
sushi, postres y platos asiáticos.
Arroz integral
El arroz integral es un alimento de grano que es un 100 % integral y que cumple con las Pautas de
Alimentación de Estados Unidos recomendadas para los estadounidenses a n de aumentar la ingesta
diaria de granos integrales. El arroz integral contiene trigo con gran cantidad de nutrientes y una capa
interna de germen de trigo donde se encuentran muchos componentes beneciosos. El arroz integral
se presenta en variedades de grano corto, medio y largo, y se puede utilizar como el arroz blanco
enriquecido.
Arroz salvaje
El arroz salvaje es pasto acuático que se cultiva en Minnesota y California y frecuentemente se agrega a
las mezclas de arroz y pilafs de arroz de grano largo. Su sabor, textura y color oscuro único proporcionan
un delicioso toque a los platos con arroz. El arroz salvaje es además un relleno ideal para carne de ave al
cocinarlo con caldo y mezclarlo con sus frutas secas favoritas.
17235 14 cup SS rice cooker_IM_V2.indd 1717235 14 cup SS rice cooker_IM_V2.indd 17 2020-07-27 2:10 PM2020-07-27 2:10 PM

18
Instrucciones de mantenimiento para el usuario
Este electrodoméstico requiere poco mantenimiento. No contiene piezas que puedan ser reparadas por
el usuario. No intente reparar la unidad usted mismo. Cualquier mantenimiento, aparte de la limpieza,
para el que sea necesario desarmar el aparato, debe ser realizado por un técnico autorizado para reparar
electrodomésticos.
1. Tener cuidado de no abollar la cacerola de cocción, en especial su fondo. Para funcionar
adecuadamente y obtener los mejores resultados, la cacerola de cocción debe estar bien ajustada
sobre el termostato.
2. NO PERMITIR que granos de arroz u otras partículas de alimentos caigan en el fondo del dispositivo
base, ya que podrían evitar que el termostato ajuste bien contra el fondo de la cacerola de cocción
y causar una cocción inadecuada.
3. Usar la cuchara para arroz de plástico o una de madera para mezclar o retirar los alimentos de la
cacerola de cocción. NUNCA usar utensilios metálicos.
4. Nunca usar limpiadores abrasivos o estropajos, ya que pueden dañar el acabado de la cacerola de
cocción y del dispositivo base.
5. Nunca verter líquidos dentro del dispositivo base o sumergirlo en agua.
Instrucciones de cuidado y limpieza
ATENCIÓN: NUNCA SUMERGIR LA Olla Arrocera de 14 tazas NI SU CABLE EN AGUA NI CUALQUIER
OTRO LÍQUIDO.
RECUERDE: Es normal que una “corteza de arroz” tostada cubra el fondo de la cacerola de cocción cuando
el arroz se haya cocido y esté humeante.
1. Desenchufar la Olla Arrocera de 14 tazas del tomacorriente. Esperar a que el dispositivo se enfríe
antes de limpiarlo o guardarlo.
2. Limpiar la Olla Arrocera de 14 tazas luego de cada uso. NUNCA sumergir el dispositivo base ni el
cable de alimentación en agua.
3. Luego de cocer arroz, puede quedar algo del líquido de cocción bajo la tapa, en la parte superior
del dispositivo, alrededor de la cacerola de cocción. Esto es normal. Limpiar con una toalla de papel
o un paño de cocina luego de cada uso. Usar un cepillo pequeño o un hisopo de algodón si fuera
necesario.
4. Vericar y vaciar la bandeja de condensación de ser necesario.
5. Llenar la cacerola de cocción con agua tibia y dejar en remojo. Lavar la bandeja de vapor, la
cacerola de cocción, la taza medidora de arroz y la cuchara para arroz con agua tibia jabonosa.
6. Enjuagar y secar bien.
7. La cacerola de cocción, la bandeja de vapor, la cuchara para arroz y la taza medidora de arroz se
pueden colocar en el estante superior del lavavajillas.
8. Limpiar el dispositivo base de la Olla Arrocera de 14 tazas con un paño suave o una esponja
ligeramente húmedos.
Instrucciones de almacenamiento
1. Asegurarse de que todas las piezas estén limpias y secas antes de guardarlas.
2. Almacenar la cacerola de cocción y la bandeja de vapor dentro de la Olla Arrocera de 14 tazas, con
la tapa trabada. Guardar el dispositivo en su caja o en un lugar limpio y seco.
3. Nunca guardar la Olla Arrocera de 14 tazas si está caliente o mojada.
4. Nunca enrollar el cable con rmeza alrededor del electrodoméstico. Enrollar el cable sin ajustar.
17235 14 cup SS rice cooker_IM_V2.indd 1817235 14 cup SS rice cooker_IM_V2.indd 18 2020-07-27 2:10 PM2020-07-27 2:10 PM

Garantía limitada de DOS AÑOS
Mediante la presente, SENSIO Inc. garantiza que, durante el plazo de DOS AÑOS
a partir de la fecha de compra, este producto no presentará defectos mecánicos
en el material ni en la mano de obra, y durante 90 días, no los presentará en las
piezas no mecánicas. A su entera discreción, SENSIO Inc. reparará o reemplazará
el producto que resulte defectuoso, o emitirá un reembolso por el producto
durante el plazo de garantía.
Esta garantía es válida únicamente para el comprador minorista original a partir
de la fecha de compra minorista inicial y no es transferible. Conserve el recibo de
compra original, ya que se exige una prueba de compra para obtener la validación
de la garantía. Las tiendas minoristas no tienen derecho a alterar, modicar ni
corregir de ninguna manera los términos y condiciones de la garantía.
EXCLUSIONES:
La garantía no cubre el desgaste normal de las piezas ni el daño ocasionado
por cualquiera de las siguientes causas: uso negligente del producto, uso de
un voltaje o corriente incorrectos, mantenimiento de rutina inadecuado, uso
contrario al de las instrucciones de funcionamiento, desarmado, reparación o
alteración a cargo de personas que no sean miembros del personal calicado
de SENSIO Inc. Asimismo, la garantía no cubre actos de la naturaleza, como
incendios, inundaciones, huracanes o tornados.
SENSIO Inc. no asumirá responsabilidad por daños incidentales o resultantes
ocasionados por la violación de cualquier garantía expresa o implícita. Salvo en
la medida en que lo prohíban las leyes aplicables, cualquier garantía implícita de
comerciabilidad o aptitud para un propósito particular se limita temporalmente
a la duración de la garantía. Algunos estados, provincias o jurisdicciones no
permiten la exclusión ni la limitación de daños incidentales o resultantes, o
limitaciones sobre la duración de una garantía implícita y, por lo tanto, es posible
que las exclusiones o limitaciones mencionadas no le correspondan. La garantía
cubre derechos legales especícos que pueden variar de un estado, una provincia
o una jurisdicción a otros.
CÓMO OBTENER EL SERVICIO DE GARANTÍA:
Debe comunicarse con el Servicio de atención al cliente a nuestro número
telefónico gratuito: 1-866-832-4843. Un representante del Servicio de atención
al cliente intentará resolver los problemas referidos a la garantía por teléfono.
Si este no puede resolver el problema, le proporcionarán un número de caso
y le solicitarán que devuelva el producto a SENSIO Inc. Adhiera una etiqueta
al producto que incluya: su nombre, dirección, número telefónico de contacto
durante el día, número de caso y descripción del problema. Además, incluya
una copia del recibo de compra original. Envuelva cuidadosamente el producto
etiquetado con el recibo de compra, y envíelo (con el envío y el seguro
prepagados) a la dirección de SENSIO Inc. SENSIO Inc. no asumirá obligación ni
responsabilidad alguna por el producto devuelto que esté en el trayecto hacia el
Centro de servicio al cliente de SENSIO Inc.
19
17235 14 cup SS rice cooker_IM_V2.indd 1917235 14 cup SS rice cooker_IM_V2.indd 19 2020-07-27 2:10 PM2020-07-27 2:10 PM

GRACIAS
por su compra
BellaLifestyle
BellaLife
para recibir anuncios especiales y recetas
de moda!
REGISTRARSE
VISITE
:
bellahousewares.com
Reseñas, comentarios o hacernos
alguna pregunta
¡CUÉNTENOS LO
QUE PIENSA!
#myBELLAlife
17235 14 cup SS rice cooker_IM_V2.indd 2017235 14 cup SS rice cooker_IM_V2.indd 20 2020-07-27 2:10 PM2020-07-27 2:10 PM

17235 14 cup SS rice cooker_IM_V2.indd 2117235 14 cup SS rice cooker_IM_V2.indd 21 2020-07-27 2:10 PM2020-07-27 2:10 PM

Sensio Inc.
New York, NY 10016/USA
For customer service questions or comments
Dudas o comentarios contactar el departamento de servicio al cliente
1-866-832-4843 / [email protected]
17235 v2
17235 14 cup SS rice cooker_IM_V2.indd 2217235 14 cup SS rice cooker_IM_V2.indd 22 2020-07-27 2:10 PM2020-07-27 2:10 PM
-
 1
1
-
 2
2
-
 3
3
-
 4
4
-
 5
5
-
 6
6
-
 7
7
-
 8
8
-
 9
9
-
 10
10
-
 11
11
-
 12
12
-
 13
13
-
 14
14
-
 15
15
-
 16
16
-
 17
17
-
 18
18
-
 19
19
-
 20
20
-
 21
21
-
 22
22
-
 23
23
-
 24
24


Bella 14 Cup Rice Cooker, Stainless Steel El manual del propietario
- Categoría
- Pequeños electrodomésticos de cocina
- Tipo
- El manual del propietario
- Este manual también es adecuado para
en otros idiomas
Artículos relacionados
Otros documentos
-
Zojirushi NS-WXC10/18 El manual del propietario
-
Aroma ARC-928S Manual de usuario
-
-
-
-
-
-