DSR INC-2405A El manual del propietario
- Categoría
- Cargadores de bateria
- Tipo
- El manual del propietario
Este manual también es adecuado para

0099000904-01
PLEASE SAVE THIS OWNERS MANUAL AND READ BEFORE EACH USE.
This manual will explain how to use the battery charger safely and effectively.
Please read and follow these instructions and precautions carefully.
POR FAVOR CONSERVE ESTE MANUAL DEL USUARIO Y LEALO ANTES
DE CADA USO. En este manual le explica cómo utilizar el cargador de batería
de manera segura y conable. Por favor, lea y siga las siguientes instrucciones
y precauciones.
MODEL / MODELO:
INC-2405A
Battery Charger
Cargador de Baterías
OWNERS MANUAL / MANUAL DEL USUARIO

• 2 •
IMPORTANT: READ AND SAVE THIS SAFETY AND INSTRUCTION MANUAL.
1. IMPORTANT SAFETY INSTRUCTIONS
WARNING: This battery charger is to be used for charging 24 volt batteries only. Use of
this charger on other batteries could lead to severe property damage or personal injury.
1.1 SAVE THESE INSTRUCTIONS – The INC-2405A offers a wide range of features to
accommodate the needs for home or light commercial use. This manual will show you
how to use your charger safely and effectively. Please read, understand and follow
these instructions and precautions carefully, as this manual contains important safety
and operating instructions.
1.2 Do not expose charger to rain or snow.
1.3 Use only recommended attachments. Use of an attachment not recommended or sold
by Schumacher
®
Electric Corporation may result in a risk of re, electric shock or injury
to persons.
1.4 To reduce the risk of damage to electric plug or cord, pull by the plug rather than the cord
when disconnecting the charger.
1.5 An extension cord should not be used unless absolutely necessary. Use of an improper
extension cord could result in a risk of re and electric shock. If an extension cord must
be used, make sure:
• That the pins on the plug of the extension cord are the same number, size and shape
as those of the plug on the charger.
• That the extension cord is properly wired and in good electrical condition.
• That the wire size is large enough for the AC ampere rating of the charger as specied
in the table in section 8.
1.6 Do not operate the charger with a damaged cord or plug; take it to a qualied service person.
1.7 Do not operate the charger if it has received a sharp blow, been dropped or otherwise
damaged in any way; take it to a qualied service person.
1.8 Do not disassemble the charger; take it to a qualied service person when service or repair
is required. Incorrect reassembly may result in a risk of re or electric shock.
1.9 To reduce the risk of electric shock, unplug the charger from the outlet before attempting
any maintenance or cleaning. Simply turning off the controls will not reduce this risk.
WARNING – RISK OF EXPLOSIVE GASES.
WORKING IN THE VICINITY OF A LEAD-ACID BATTERY IS DANGEROUS. BATTERIES
GENERATE EXPLOSIVE GASES DURING NORMAL BATTERY OPERATION. FOR THIS
REASON, IT IS OF UTMOST IMPORTANCE THAT YOU FOLLOW THE INSTRUCTIONS
EACH TIME YOU USE THE CHARGER.
TO REDUCE THE RISK OF BATTERY EXPLOSION, FOLLOW THESE INSTRUCTIONS
AND THOSE PUBLISHED BY THE BATTERY MANUFACTURER AND THE
MANUFACTURER OF ANY EQUIPMENT YOU INTEND TO USE IN THE VICINITY OF
THE BATTERY. REVIEW THE CAUTIONARY MARKINGS ON THESE PRODUCTS AND
ON THE ENGINE.
2. PERSONAL PRECAUTIONS
2.1 Consider having someone close enough by to come to your aid when you work near a
lead-acid battery.
2.2 Have plenty of fresh water and soap nearby in case battery acid contacts your skin,
clothing or eyes.
2.3 Wear complete eye and body protection, including safety goggles and protective clothing.
Avoid touching your eyes while working near the battery.
2.4 If battery acid contacts your skin or clothing, wash immediately with soap and water. If
acid enters your eye, immediately ood the eye with cold running water for at least 10
minutes and get medical attention right away.
2.5 NEVER smoke or allow a spark or ame in the vicinity of a battery or engine.
2.6 Be extra cautious to reduce the risk of dropping a metal tool onto the battery. It might
spark or short-circuit the battery or other electrical part that may cause an explosion.

• 3 •
2.7 Remove personal metal items such as rings, bracelets, necklaces and watches when
working with a lead-acid battery. A lead-acid battery can produce a short-circuit current
high enough to weld a ring or the like to metal, causing a severe burn.
2.8 Use this charger for charging a LEAD-ACID battery only. It is not intended to supply
power to a low voltage electrical system. Do not use this battery charger for charging dry-
cell batteries that are commonly used with home appliances. These batteries may burst
and cause injury to persons and damage to property.
2.9 NEVER charge a frozen battery.
2.10 NEVER overcharge a battery.
3. PREPARING TO CHARGE
3.1 If it is necessary to remove the battery from the vehicle to charge it, always remove
the grounded terminal rst. Make sure all of the accessories in the vehicle are off, to
prevent arcing.
3.2 Be sure the area around the battery is well ventilated while the battery is being charged.
3.3 Clean the battery terminals before charging the battery. During cleaning, keep airborne
corrosion from coming into contact with your eyes, nose and mouth. Use baking soda and
water to neutralize battery acid and help eliminate airborne corrosion. Do not touch your
eyes, nose or mouth.
3.4 Add distilled water to each cell until the battery acid reaches the level specied by the battery
manufacturer. Do not overll. For a battery without removable cell caps, such as valve
regulated lead-acid-batteries, carefully follow the manufacturer’s recharging instructions.
3.5 Read, understand and follow all instructions for the charger, battery, vehicle and any
equipment used near the battery and charger. Study all of the battery manufacturer’s
specic precautions while charging and recommended rates of charge.
3.6 Determine the voltage of the battery by referring to the vehicle owner’s manual and make
sure that the output voltage selector switch is set to the correct voltage. If the charger has
an adjustable charge rate, charge the battery in the lowest rate rst.
3.7 Make sure that the charger cable clips make tight connections.
4. CHARGER LOCATION
4.1 Locate the charger as far away from the battery as the DC cables permit.
4.2 Never place the charger directly above the battery being charged; gases from the battery
will corrode and damage the charger.
4.3 Do not set the battery on top of the charger.
4.4 Never allow battery acid to drip onto the charger when reading the electrolyte specic
gravity or lling the battery.
4.5 Do not operate the charger in a closed-in area or restrict the ventilation in any way.
5. DC CONNECTION PRECAUTIONS
5.1 Connect and disconnect the DC output clips only after turning the charger off and
removing the AC plug from the electrical outlet. Never allow the clips to touch each other.
5.2 Attach the clips to the battery and chassis, as indicated in steps 6.5, 6.6 and 7.2 through 7.4.
6. FOLLOW THESE STEPS WHEN BATTERY IS INSTALLED IN VEHICLE.
WARNING: A SPARK NEAR THE BATTERY MAY CAUSE A BATTERY EXPLOSION.
TO REDUCE THE RISK OF A SPARK NEAR THE BATTERY:
6.1 Position the AC and DC cables to reduce the risk of damage by the hood, door and
moving or hot engine parts.
6.2 Stay clear of fan blades, belts, pulleys and other parts that can cause injury.
6.3 Check the polarity of the battery posts. The POSITIVE (POS, P, +) battery post usually
has a larger diameter then the NEGATIVE (NEG, N, -) post.
6.4 Determine which post of the battery is grounded (connected) to the chassis. If the
negative post is grounded to the chassis (as in most vehicles), see step 6.5. If the positive
post is grounded to the chassis, see step 6.6.

• 4 •
6.5 For a negative-grounded vehicle, connect the POSITIVE (RED) clip from the battery
charger to the POSITIVE (POS, P, +) ungrounded post of the battery. Connect the
NEGATIVE (BLACK) clip to the vehicle chassis or engine block away from the battery. Do
not connect the clip to the carburetor, fuel lines or sheet-metal body parts. Connect to a
heavy gauge metal part of the frame or engine block.
6.6 For a positive-grounded vehicle, connect the NEGATIVE (BLACK) clip from the battery
charger to the NEGATIVE (NEG, N, -) ungrounded post of the battery. Connect the
POSITIVE (RED) clip to the vehicle chassis or engine block away from the battery. Do
not connect the clip to the carburetor, fuel lines or sheet-metal body parts. Connect to a
heavy gauge metal part of the frame or engine block.
6.7 When disconnecting the charger, turn all switches to off, disconnect the AC cord, remove
the clip from the vehicle chassis and then remove the clip from the battery terminal.
6.8 See CALCULATING CHARGE TIME for length of charge information.
7. FOLLOW THESE STEPS WHEN BATTERY IS OUTSIDE VEHICLE
WARNING: A SPARK NEAR THE BATTERY MAY CAUSE A BATTERY EXPLOSION.
TO REDUCE THE RISK OF A SPARK NEAR THE BATTERY:
7.1 Check the polarity of the battery posts. The POSITIVE (POS, P, +) battery post usually
has a larger diameter than the NEGATIVE (NEG, N, -) post.
7.2 Attach at least a 24-inch long 6-gauge (AWG) insulated battery cable to the NEGATIVE
(NEG, N, -) battery post.
7.3 Connect the POSITIVE (RED) charger clip to the POSITIVE (POS, P, +) post of the battery.
7.4 Position yourself and the free end of the cable you previously attached to the NEGATIVE
(NEG, N, -) battery post as far away from the battery as possible – then connect the
NEGATIVE (BLACK) charger clip to the free end of the cable.
7.5 Do not face the battery when making the nal connection.
7.6 When disconnecting the charger, always do so in the reverse order of the connecting
procedure and break the rst connection while as far away from the battery as practical.
7.7 A marine (boat) battery must be removed and charged on shore. To charge it onboard
requires equipment specially designed for marine use.
8. BATTERY CHARGING - AC CONNECTIONS
8.1 This battery charger is for use on nominal 100 - 240 volt circuits.
DANGER – Never alter AC cord or plug provided – if it does not t the outlet, have proper
outlet installed by a qualied electrician. Improper connection can result in a risk of an
electric shock.
8.2 Recommended minimum AWG size for extension cords for battery chargers:
AC input rating, amperes* AWG size of cord / length of cord, feet (m)
At least But less than
25
(7.6)
50
(15.2)
100
(30.5)
150
(45.6)
0 2 18 18 18 16
2 3 18 18 16 14
3 4 18 18 16 14
4 5 18 18 14 12
5 6 18 16 14 12
6 8 18 16 12 10
8 10 18 14 12 10
10 12 16 14 10 8
12 14 16 12 10 8
14 16 16 12 10 8
16 18 14 12 8 8
18 20 14 12 8 6
*If the input rating of a charger is given in watts rather than in amperes, the corresponding
ampere rating is to be determined by dividing the wattage rating by the voltage rating.
For example: 1250 watts/125 volts = 10 amperes

• 5 •
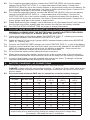
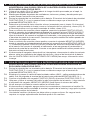
8.3 Grounding methods
Grounding Methods
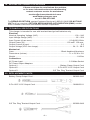
9. ASSEMBLY INSTRUCTIONS
No assembly required.
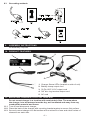
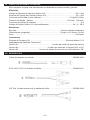
10. PRODUCT FEATURES
1. Charger Status LEDs (located on side of unit)
2. Battery clamp output cord
3. 30 Pin XLR 3-12C output cord
4. 3/8˝ dia. ring terminal output cord
5. AC cord
1
2
3
4
5
11. MOUNTING CHARGER TO A FLAT SURFACE
Do not mount charger in a location with restricted air ow. The area where
the charger is to be fastened must be dry, well ventilated and away from any
combustible material and fumes.
11.1 Turn off and disconnect charger.
11.2 Place the back of the charger with mounting bracket against a secure, at surface.
11.3 Securely mount charger to a at surface with a minimum of one and a half inches of
clearance on each side.

• 6 •
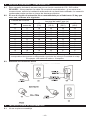
12. CONTROL PANEL
12.1 POWER ON (red) LED – The red POWER ON LED lights up when the charger is
plugged in and receiving AC power.
12.2 CHARGING STATUS (yellow and green) LED – The CHARGING STATUS LED glows yellow
when the charger is charging and green when the battery is charged and in maintain mode.
LED Color/Flash Pattern Explanation
Red On AC Power Present
Yellow On Charging
Green On Charge Complete
13. OPERATING INSTRUCTIONS
WARNING: Failure to follow instructions may cause damage or an explosion.
Read the entire instruction manual before use.
13.1 Make sure that the charger is unplugged from the AC outlet.
13.2 Connect one of the three optional output cables to the charger output connector.
13.3 Connect the other end of the output cable to the battery.
13.4 Plug the charger into the AC outlet. The POWER ON (red) LED will glow to show that AC
power is present. Then the green and yellow LED will blink once as a self-test to make
sure that the LED is operating properly.
13.5 After three seconds, the CHARGING (yellow) LED will glow to show that charging has
begun. If none of the LEDs glow, or if the CHARGING (yellow) LED does not glow, refer
to the troubleshooting section. Charge time may vary from less than one hour to 12 hours.
13.6 When charging is complete, the CHARGED (green) LED will glow and the charger will
automatically go into maintain mode. If desired, the charger can now be unplugged from
the AC outlet.
NOTE: If the battery has not reached at least 18-volts after ve minutes of charging or at
least 24-volts after four hours of charging, the charger will abort the charging process and
turn the yellow LED off.
14. CALCULATING CHARGE TIME
To determine the time needed to fully charge your battery, you must rst determine the
battery’s charge level with a hydrometer or electronic Percent-of-Charge Tester. The
following table will help you convert hydrometer readings to percent of charge values.
Specic Gravity Percent of Charge
Percent of Charge Needed
1.265 100% 0%
1.225 75% 25%
1.155 25% 75%
1.120 0% 100%
When the percent of charge and the Amp Hour (AH) rating of your battery is known, you
can calculate the approximate time needed to bring your battery to a full charge.

• 7 •
To convert Reserve Capacity to Amp Hours, divide Reserve Capacity by 2, and add 16:
Example:
Amp Hour Rating = Reserve Capacity + 16
2
NOTE: The Reserve Capacity can be obtained from the battery specication sheet or the
owner’s manual.
To calculate the time needed for a charge:
1. Find the percent of charge needed (a battery at 50 percent charge that will be
charged to 100 percent needs another 50 percent (.5).
2. Multiply the Amp Hour Rating by the charge needed (.5) and divide by the charger
setting (5 amps).
3. Multiply the results by 1.25, and you will have the total time needed, in hours,
to bring the battery to a full charge.
4. Add an additional hour for a deep-cycle battery.
Example:
Amp Hour Rating x % of charge needed x 1.25 = hours of charge
Charger Setting
100 (AH Rating) x .50 (charge needed) x 1.25 = 12.5 hours
5 (Charger Setting)
100 x .50 x 1.25 = 12.5
5
A 100-Ampere Hour Battery must charge for 12 ½ hours when using the above example.
15. MAINTENANCE INSTRUCTIONS
15.1 Before performing maintenance, unplug and disconnect battery charger (see sections 6.7
and 7.6).
15.2 After use, unplug charger and use a dry cloth to wipe all battery corrosion and other dirt
or oil from terminals, cords, and the charger case.
15.3 Have any cracked or frayed cables replaced by an authorized service person.
15.4 Servicing does not require opening the unit, as there are no user-serviceable parts.
16. STORAGE INSTRUCTIONS
16.1 Store charger unplugged, in an upright position. Cord will still conduct electricity until it is
unplugged from the outlet.
16.2 Store inside, in a dry, cool place (unless you’re using an on-board Marine Charger).
16.3 Do not store clips on handle, clipped together, on or around metal, or clipped to cables.
17. TROUBLESHOOTING
LED GUIDE/PROBLEM POSSIBLE CAUSE SOLUTION
The charger is plugged in but
the POWER ON (red) LED is
not lit.
No power at the AC receptacle.
Poor electrical connection.
The battery charger is not
functioning properly.
Check for open fuse or circuit
breaker supplying AC outlet.
Check power cord and
extension cord for loose
tting plug.
Have battery checked.
The battery is connected and
the POWER ON (red) LED
is on, but the CHARGING
(yellow) LED is not lit and
charger is not charging.
Battery connectors are not
making a good connection.
The battery is bad.
The battery charger is not
functioning properly.
Check for poor connection
at battery. Make sure
connecting points are clean.
Have the battery checked by
a qualied service person.
Have battery checked.

• 8 •
18. BEFORE RETURNING FOR REPAIRS
If these solutions do not eliminate the problem,
or for more information about troubleshooting,
contact customer service for assistance:
www.batterychargers.com
or call 1-800-621-5485
For REPAIR OR RETURN, contact Customer Service at 1-800-621-5485. DO NOT SHIP
UNIT until you receive a RETURN MERCHANDISE AUTHORIZATION (RMA) number
from Customer Service at Schumacher Electric Corporation.
19. TECHNICAL SPECIFICATIONS
This charger is intended for use with lead-acid and gel-cell batteries only.
Electrical
Nominal Operating Voltage (VAC) .................................................................... 100 – 240
Input Voltage Range (VAC) ................................................................................. 85 – 264
Input Current (A rsm max) .......................................................................2.9 @ 85V 60Hz
Output Power (W) .............................................................................. 120 nom. 130 max.
Output Current (A max) ................................................................................................ 5.0
Output Voltage (VDC nom./range) ................................................................ 24 / 2 – 29.5
Mechanical
Case ......................................................................................... Black Anodized Aluminum
Dimensions (inches) ..............................................................................7 L x 5½ W x 2 H
Weight ...................................................................................................................1.80 lbs
Connections
AC Power Input ...................................................................................... C13 Male Socket
DC Power Output Adapters:
Option #1 ...............................................................................Battery Clamp Output Cord
Option #2 .......................................................................... 3-Pin XLR 3-12C Output Cord
Option #3 .................................................................3/8˝ Dia. Ring Terminal Output Cord
20. REPLACEMENT PARTS
Battery Clamp Output Cord ........................................................................... 3899001840
3-Pin XLR 3-12C Output Cord .......................................................................3899002111
3/8˝ Dia. Ring Terminal Output Cord ............................................................. 2299001949

• 9 •
21. LIMITED WARRANTY
SCHUMACHER ELECTRIC CORPORATION, 801 BUSINESS CENTER DRIVE, MOUNT
PROSPECT, IL 60056-2179, MAKES THIS LIMITED WARRANTY TO THE ORIGINAL
RETAIL PURCHASER OF THIS PRODUCT. THIS LIMITED WARRANTY IS NOT
TRANSFERABLE OR ASSIGNABLE.
Schumacher Electric Corporation (the “Manufacturer”) warrants this battery charger for
one (1) year from the date of purchase at retail against defective material or workmanship
that may occur under normal use and care. If your unit is not free from defective material
or workmanship, Manufacturer’s obligation under this warranty is solely to repair or replace
your product with a new or reconditioned unit at the option of the Manufacturer. It is the
obligation of the purchaser to forward the unit, along with proof of purchase and mailing
charges prepaid to the Manufacturer or its authorized representatives in order for repair or
replacement to occur.
Manufacturer does not provide any warranty for any accessories used with this product
that are not manufactured by Schumacher Electric Corporation and approved for use
with this product. This Limited Warranty is void if the product is misused, subjected to
careless handling, repaired, or modied by anyone other than Manufacturer or if this unit
is resold through an unauthorized retailer.
Manufacturer makes no other warranties, including, but not limited to, express, implied or
statutory warranties, including without limitation, any implied warranty of merchantability
or implied warranty of tness for a particular purpose. Further, Manufacturer shall not be
liable for any incidental, special or consequential damage claims incurred by purchasers,
users or others associated with this product, including, but not limited to, lost prots,
revenues, anticipated sales, business opportunities, goodwill, business interruption
and any other injury or damage. Any and all such warranties, other than the limited
warranty included herein, are hereby expressly disclaimed and excluded. Some states
do not allow the exclusion or limitation of incidental or consequential damages or length
of implied warranty, so the above limitations or exclusions may not apply to you. This
warranty gives you specic legal rights and it is possible you may have other rights which
vary from this warranty.
THIS LIMITED WARRANTY IS THE ONLY EXPRESS LIMITED WARRANTY AND
THE MANUFACTURER NEITHER ASSUMES OR AUTHORIZES ANYONE TO
ASSUME OR MAKE ANY OTHER OBLIGATION TOWARDS THE PRODUCT
OTHER THAN THIS WARRANTY.
Schumacher
®
and the Schumacher logo are registered trademarks
of Schumacher Electric Corporation.

• 10 •
IMPORTANTE: LEA Y CONSERVE ESTE MANUAL DE INSTRUCCIONES Y SEGURIDAD.
1. INSTRUCCIONES DE SEGURIDAD IMPORTANTES
ADVERTENCIA: Este cargador de baterías es para cargar únicamente las baterías de 24
voltios. El uso de este cargador en otras baterías podría resultar en daños severos a la
propiedad o lesiones personales.
1.1 CONSERVE ESTAS INSTRUCCIONES – Este manual contiene instrucciones operativas
y de seguridad importantes para el cargador de baterías Modelo INC-2405A.
1.2 PRECAUCION: De acuerdo a la Proposición 65 del California, este producto contiene
químicos que de acuerdo al Estado de California son causantes de cáncer, defectos de
nacimiento u otro daño reproductor.
1.3 No exponga el cargador a lluvia ni a nieve.
1.4 El uso de un accesorio no recomendado o vendido por el fabricante del cargador de
baterías podría ocasionar riesgo de incendio, descarga eléctrica o lesión a las personas.
1.5 Para reducir el riesgo de peligro del enchufe y cable eléctricos, cuando desconecte el
cargador, tire del enchufe y no del cable.
1.6 No se debería utilizar un alargue a menos que sea absolutamente necesario. El uso
indebido del alargue podría ocasionar riesgo de incendio y descarga eléctrica. Si debe
utilizar un alargue, asegúrese de que:
• La cantidad, tamaño y la forma de los bornes del enchufe del alargue coincidan con los
del enchufe del cargador;
• El alargue esté adecuadamente conectado y en buena condición eléctrica.
• El tamaño del cable sea lo sucientemente largo para el amperaje de CA del cargador,
según lo especicado en la Tabla 8.2.
1.7 No manipule el cargador si tiene el cable o el enchufe dañados – reemplácelos de inmediato.
1.8 No manipule el cargador si ha recibido un golpe fuerte, se ha caído o dañado de
cualquier modo; llévelo a un técnico calicado.
1.9 No desarme el cargador, llévelo a un reparador calicado cuando sea necesario algún
tipo de servicio técnico o reparación. El reensamblado incorrecto podría ocasionar riesgo
de descarga eléctrica o incendio.
1.10 Para reducir el riesgo de descarga eléctrica, desenchufe el cargador del tomacorriente
antes de intentar realizar alguna actividad de mantenimiento o limpieza. Los controles de
apagado no reducirán este riesgo.
ADVERTENCIA – RIESGO DE GASES EXPLOSIVOS.
ES PELIGROSO TRABAJAR CERCA DE UNA BATERÍA DE PLOMO Y ÁCIDO. LAS
BATERÍAS GENERAN GASES EXPLOSIVOS DURANTE SU FUNCIONAMIENTO
NORMAL. POR ESO, ES DE SUMA IMPORTANCIA QUE SIGA LAS INSTRUCCIONES
CADA VEZ QUE UTILICE EL CARGADOR.
PARA REDUCIR EL RIESGO DE EXPLOSIÓN DE LA BATERÍA, SIGA ESTAS
INSTRUCCIONES ADEMÁS DE LAS PUBLICADAS POR EL FABRICANTE DE
CUALQUIER EQUIPO QUE QUIERA USAR CERCA DE LA BATERÍA. REVISE LAS
MARCAS DE PRECAUCIÓN DE ESTOS PRODUCTOS Y DEL MOTOR.
2. PRECAUCIONES PERSONALES
2.1 Considere tener a alguien que lo acompañe para asistirlo cuando trabaje cerca de una
batería de plomo y ácido.
2.2 Tenga a mano mucha agua fresca y jabón en caso de que la piel, la ropa o los ojos
entren en contacto con el ácido de la batería.
2.3 Use protección total para ojos y ropa. Evite tocarse los ojos mientras trabaja cerca de la
batería.
2.4 Si el ácido de la batería entra en contacto con la piel o la ropa, lave de inmediato con
agua y jabón. Si el ácido entra en los ojos, deje que éstos se llenen de agua fría corriente
al menos 10 minutos y consiga atención médica inmediata.
2.5 NUNCA fume ni permita que haya chispas o llamas cerca de la batería o del motor.

• 11 •
2.6 Sea extremadamente cauteloso para reducir el riesgo de dejar caer una herramienta
metálica en la batería, ya que podría echar chispas o causar un cortocircuito en la batería
o en otra parte eléctrica que pudiera ocasionar una explosión.
2.7 Retire los artículos metálicos personales como anillos, pulseras, collares y relojes cuando
trabaje con una batería de plomo y ácido, dado que ésta puede ocasionar una corriente
de cortocircuito lo sucientemente alta como para soldar al metal algún anillo u otro
artículo, y provocar así una quemadura grave.
2.8 Use el cargador para cargar una batería de PLOMO Y ÁCIDO, exclusivamente, ya
que no está diseñado para suministrar energía a un sistema eléctrico de bajo voltaje.
No utilice el cargador de batería para cargar baterías secas, comúnmente utilizadas
en artefactos domésticos. Estas baterías podrían explotar y ocasionar una lesión en
personas y un daño en los bienes.
2.9 NUNCA cargue una batería congelada.
2.10 NUNCA cargue demasiado una batería.
3. PREPARACIÓN DE LA CARGA
3.1 Si es necesario quitar la batería del vehículo para cargarla, siempre retire el terminal a
tierra de la batería primero. Asegúrese de que todos los accesorios dentro del vehículo
estén apagados para evitar causar un arco.
3.2 Asegúrese de que el área que rodea la batería esté bien ventilada durante la carga.
3.3 Limpie los terminales de la batería antes de cargarla.Durante la limpieza, evite que la
corrosión transportada por el aire entre en contacto con sus ojos, nariz o boca. Use
bicarbonato de sodio y agua para neutralizar los ácidos de la batería y eliminar la
corrosión transportada por el aire. No se toque los ojos, nariz o boca.
3.4 Agregue agua destilada en cada celda hasta que el ácido de la batería alcance el nivel
especicado por el fabricante. Evite que se rebase. En el caso de una batería sin capas
de celda desmontables, como las baterías de plomo y ácido reguladas por una válvula,
siga atentamente las instrucciones de recarga del fabricante.
3.5 Verique que las pinzas de los cables del cargador estén en conexión rme.
3.6 Determine el voltaje de la batería teniendo en cuenta el manual del propietario del
automóvil y asegúrese de que el interruptor del selector de voltaje de salida está puesto
en el voltaje correcto. Si el cargador tiene un índice de carga ajustable, primero cargue la
batería en el índice más bajo.
3.7 Verique que las pinzas de los cables del cargador estén en conexión rme.
4. UBICACIÓN DEL CARGADOR
4.1 Ubique el cargador lo más alejado posible de la batería en la medida que los cables de
CC se lo permitan.
4.2 Nunca deposite el cargador directamente sobre la batería que se está cargando; los
gases de la batería corroerán y dañarán el cargador.
4.3 Nunca permita que el ácido de la batería gotee sobre el cargador cuando esté leyendo el
peso especíco electrolítico o llenando de la batería.
4.4 No maneje el cargador en un área cerrada o con poca ventilación.
4.5 No coloque una batería sobre el cargador.
5. PRECAUCIONES DE LA CONEXIÓN CC
5.1 Conecte y desconecte los sujetadores de salida de corriente CC sólo luego de apagar
los interruptores del cargador (posición “off”) y retirar el cable CA del enchufe eléctrico.
Nunca deje que los sujetadores se toquen entre ellos.
5.2 Coloque los sujetadores a la batería y chasis, según lo indicado en 6.5, 6.6, y 7.2 hasta 7.4.

• 12 •
6. SIGA ESTOS PASOS AL INSTALAR UNA BATERÍA EN EL VEHÍCULO.
ADVERTENCIA: UNA CHISPA CERCA DE LA BATERÍA PODRÍA PROVOCAR UNA
EXPLOSIÓN. PARA EVITAR ESTO:
6.1 Coloque los cables CA y CC para reducir el riesgo de daño provocado por el capó, la
puerta o una parte móvil del motor.
6.2 Manténgase alejado de paletas de ventiladores, cinturones, poleas y demás partes que
puedan causar una lesión a las personas.
6.3 Revise la polaridad de los terminales de la batería. El terminal de la batería de polaridad
POSITIVA (POS, P, +) por lo general tiene un diámetro mayor que el terminal de
polaridad NEGATIVA (NEG, N,–).
6.4 Determine qué terminal tiene conexión a tierra (conectado) con el chasis. Si el terminal
negativo está conectado al chasis (como en la mayoría de los vehículos), véase (6.5). Si
el terminal positivo es el que está conectado al chasis, véase (6.6).
6.5 Para un vehículo de conexión a tierra negativa, conecte el sujetador POSITIVO (ROJO)
desde el cargador de la batería hacia el terminal sin conexión a tierra POSITIVO (POS, P,
+). Conecte el sujetador NEGATIVO (NEGRO) al chasis del vehículo o bloque del motor,
lejos de la batería. No conecte el sujetador al carburador, a las mangueras de combustible
o planchas de metal de la carrocería. Conecte a una parte metálica del calibre pesado de
la estructura o bloque del motor.
6.6 Para un vehículo de conexión a tierra positiva, conecte el sujetador NEGATIVO (NEGRO)
desde el cargador de la batería hacia el terminal sin conexión a tierra NEGATIVO (NEG, N,
–). Conecte el sujetador POSITIVO (ROJO) al chasis de vehículo o bloque del motor, lejos
de la batería. No conecte el sujetador al carburador, a las mangueras de combustible o
planchas de metal de la carrocería. Conecte a una parte metálica del calibre pesado de la
estructura o bloque del motor.
6.7 Al desconectar el cargador, desenchufe los interruptores, desconecte el cable de corriente
alterna, retire los sujetadores del chasis del vehículo y luego el del terminal de la batería.
6.8 Vea las CARTA PARA CALCULAR TIEMPO DE CARGA para mayor información sobre
la carga.
7. SIGA ESTOS PASOS CUANDO LA BATERÍA ESTÉ AFUERA DEL VEHÍCULO.
ADVERTENCIA: UNA CHISPA CERCA DE LA BATERÍA PODRÍA PROVOCAR SU
EXPLOSIÓN. PARA EVITAR ESTO:
7.1 Revise la polaridad de los terminales de la batería. El terminal de la batería de polaridad
POSITIVA (POS, P, +) por lo general tiene un diámetro mayor que el terminal de
polaridad NEGATIVA (NEG, N,–).
7.2 Añada por lo menos un cable de batería aislado calibre (AWG – calibre estadounidense de
cable) 4 de 24 pulgadas al terminal de la batería con polaridad NEGATIVA (NEG, N, -).
7.3 Conecte el sujetador del cargador POSITIVO (ROJO) al terminal POSITIVO (POS, P, +).
7.4 Ubíquese y libere el extremo del cable lo más lejos posible de la batería – luego conecte
el sujetador del cargador NEGATIVO (NEGRO) para liberar el extremo del cable.
7.5 No se acerque a la batería cuando realice la conexión nal.
7.6 Al desconectar el cargador, apague todos los conmutadores, desconecte el cordón CA,
quite la pinza del cable conectado al terminal negativo de la batería y luego quite la pinza
del terminal positivo de la batería.
7.7 Una batería marítimo (de barco) se debe retirar y cargar en tierra. Su carga a bordo
requiere un equipo especialmente diseñado para el uso marítimo.

• 13 •
8. BATERÍA CARGANDO - CONEXIONES AC
8.1 Este cargador de batería es para usar en un circuito nominal de 100 - 240 voltios.
PELIGRO – Nunca cambie un cable CA o enchufe suministrados – si no entra en el
tomacorriente, solicite la instalación adecuada de un electricista calicado. La conexión
inadecuada puede resultar en riesgo de descarga eléctrica.
8.2 El uso de cordón de extensión no es recomendado por el fabricante. Si hay que
usar uno, reérase a lo siguiente:
Entrada de corriente *
Medida del cable segun la AWG
Longitud del cable, pies (m)
De
A no
menos de
25
(7.6)
50
(15.2)
100
(30.5)
150
(45.6)
0 2 18 18 18 16
2 3 18 18 16 14
3 4 18 18 16 14
4 5 18 18 14 12
5 6 18 16 14 12
6 8 18 16 12 10
8 10 18 14 12 10
10 12 16 14 10 8
12 14 16 12 10 8
14 16 16 12 10 8
16 18 14 12 8 8
18 20 14 12 8 6
*
Si la cantidad de entrada de un cargador es dada en vatios en vez de amperios, la medida
correspondiente de amperios es determinada si se dividen los vatios por la cantidad de voltaje.
Por ejemplo: 1250 vatios/125 voltios = 10 amperios
8.3 Métodos de conexion a tierra
9. INSTRUCCIONES DE ENSAMBLAJE
9.1 No se requiere ensamblaje

• 14 •
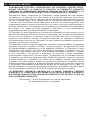
10. CARACTERÍSTICAS DEL PRODUCTO
1. LEDs de estado del cargador
(en el lado de la unidad)
2. Batería cable de sujeción de salida
3. 30 Pin XLR 3-12C cable de salida
4. 3/8˝ dia. anillo terminal de salida del cordón
5. Cable de CA
1
2
3
4
5
11. MONTAJE DEL CARGADOR SOBRE UNA SUPERFICIE PLANA
No monte el cargador en un sitio con ujo restringido de aire. El área donde se va
a asegurar el cargador tiene que ser seca, bien ventilada y alejada de todo material
combustible y de humos.
11.1 Apague y desconecte el cargador.
11.2 Coloque la parte posterior del cargador con la ménsula de montaje contra una supercie
segura y plana.
11.3 Monte el cargador en forma segura sobre una supercie plana con mínimo de pulgada y
media de espacio libre en cada lado.
12. PANEL DE CONTROL
12.1 DEL “POWER ON” (rojo). El DEL “POWER ON” se enciende cuando el cargador está
enchufado y recibe potencia CA.
12.2 DEL ‘CHARGING STATUS” (amarillo y verde) – El DEL “CHARGING STATUS” brilla
en amarillo cuando el cargador está cargando y en verde cuando la batería está cargada
y en modo de mantenimiento.
Color del LED /Pauta Intermitente Explicación
Rojo encendido Presente de la corriente ALTERNA
Amarillo encendido Cargando
Verde encendido Carga completa

• 15 •
13. INSTRUCCIONES DE OPERACIÓN
ADVERTENCIA: La falta de seguir las instrucciones puede causar daños o explosión.
Lea el manual al de instrucciones entero antes de usar el cargador.
13.1 Asegúrese de que el cargador esté desenchufado del tomacorriente CA.
13.2 Conecte unos de los tres cables opcionales al conector de salida del cargador.
13.3 Conecte el otro extremo del cable de salida a la batería.
13.4 Enchufe el cargador en el tomacorriente CA. El DEL “POWER ON” (rojo) brilla para
mostrar que está presente la potencia CA. Luego el DEL verde y amarillo se destella una
vez como auto-prueba de asegurar que el DEL funcione debidamente.
13.5 Después de tres segundos, el DEL “CHARGING.” (amarillo) brilla para mostrar que la
carga ha comenzado. Si no brilla ninguno de los DEL o si el DEL “CHARGING” (amarillo)
no brilla, reérase al guía de solución de problemas. El tiempo de cargar puede variar
entre menos de una hora y 12 horas.
13.6 Cuando se ha completado la carga, el DEL “CHARGED” (verde) brilla y el cargador au-
tomáticamente entre en modo de mantenimiento. Si se desea, se puede ahora desen-
chufar el cargador del tomacorriente CA.
NOTA: Si la batería no ha alcanzado por lo menos 18-voltios después de cinco minutos
de cargar o por lo menos 24-voltios después de cuatro horas de cargar, el cargador se
hará abortar el proceso de cargar y apagar el DEL amarillo.
14. CÁLCULO DE TIEMPO DE CARGA
Para determinar el tiempo necesario para cargar totalmente su batería, primero hay que
determinar el nivel de carga de la batería con un hidrómetro o un Probador de Porcentaje
de Carga electrónico. La tabla a continuación será de ayuda en convertir las lecturas del
hidrómetro en valores de porcentaje de carga.
Gravedad Especíca Porcentaje de Carga
Porcentaje de Carga
Necesario
1.265 100% 0%
1.225 75% 25%
1.155 25% 75%
1.120 0% 100%
Cuando ya se conocen el porcentaje de carga y la nómina de Amperio-Hora (AH) de su batería,
se puede calcular el tiempo aproximado necesario para llevar su batería hasta plena carga.
Para convertir Capacidad de Reserva en Amperios-Hora, divida Capacidad de Reserva
por 2, y añada 16:
Ejemplo:
Nómina de Amperios-Hora = Capacidad de Reserva + 16
2
NOTA: La Capacidad de Reserva se puede obtener de la hoja de especicación de la
batería o del manual del dueño.
Para calcular el tiempo necesario para una carga:
1. Encuentre el porcentaje de carga necesario (una batería a carga del 50 por ciento
que se cargará hasta el 100 por ciento necesita otro 50 por ciento (.5).
2. Multiplique la Nómina de Amperios-Hora por la carga necesaria (.5) y divida por la
jación del cargador (5 amperios).
3. Multiplique los resultados por 1.25 y tendrá el tiempo total necesario, en horas, para
traer la batería hasta plena carga.
4. Añada una hora adicional para batería de ciclo profundo.
Ejemplo:
Nómina de Amperios-Hora x % de carga necesario x 1.25 = horas de carg
Fijación del Cargador
100 (Nómina AH) x .50 (carga necesaria) x 1.25 = 12.5 horas
5 (Fijación del Cargador)
100 x .50 x 1.25 = 12.5
5
Una Batería de 100 Amperios-Hora tiene que cargarse por 12 ½ horas al usar el ejemplo arriba.

• 16 •
15. INSTRUCCIONES DE MANTENIMIENTO
15.1 Antes de efectuar mantenimiento, desenchufe y desconecte el cargador de baterías (vea
secciones 6.7 y 7.6)
15.2 Después de usar, desenchufar y limpie toda corrosión de la batería y otra suciedad o
aceite de los terminales, cordones y el estuche del cargador, con un trapo seco.
15.3 No se requiere abrir la unidad para servicio, ya que no hay piezas que el usuario puede
atender.
16. INSTRUCCIONES DE ALMACENAJE
16.1 Guarde el cargador desenchufado, en posición recta. El cordón seguirá conduciendo
electricidad hasta no quedar desenchufado del tomacorriente.
16.2 Guarde el cargador adentro, en un sitio seco y fresco (a no ser que esté usando un Car-
gador Marino a bordo.
16.3 No guarde las pinzas sobre el asa, conectadas entre sobre o alrededor de metal, o
conectadas a los cables.
17. SOLUCIÓN DE PROBLEMAS
PROBLEMA CAUSA POSIBLE SOLUCION
El cargador está enchufado
pero el DEL “POWER ON”
(rojo) no está encendido.
No hay potencia en el
receptáculo CA .
Mala conexión eléctrica.
El cargador de baterías no
funciona debidamente.
Vea si está abierto el fusible
o disyuntor que provee al
tomacorriente CA.
Revise los cordones de
potencia y extensión para
enchufe ojo.
Haga examinar la batería.
La batería está conectada
y el DEL “POWER ON”
(rojo) brilla, pero el DEL
“CHARGING” (amarillo) no
brilla y el cargador no está
cargando.
Los conectores de la batería
no hacen buena conexión.
La batería es defectuosa.
El cargador de baterías no
funciona debidamente.
Busque si hay mala conexión
en la batería. Asegúrese de
que las puntas de conexión
estén limpias.
Haga que una persona de
servicio calicada revise la
batería.
Haga examinar la batería.
18. ANTES DE DEVOLVER A REPARACIONES
Si estas soluciones no eliminan el problema o si desea obtener
más información sobre la solución de problemas,
póngase en contacto con el departamento de servicio al cliente
para recibir asistencia:
www.batterychargers.com
o llame 1-800-621-5485
Para REPARACIÓN O DEVOLUCIÓN, comuníquese con Servicios al Cliente al
1-800-621-5485. NO ENVÍE LA UNIDAD hasta que usted reciba AUTORIZACIÓN
DE DEVOLUCIÓN DE MERCANCÍA (RMA) de Servicios al Cliente de Schumacher
Electric Corporation.

• 17 •
19. ESPECIFICACIONES TÉCNICAS
Este cargador es para usar únicamente con baterías tipo plomo-acido y gel-cell.
Eléctricas
Voltaje de Operación Nominal (Voltios CA) ...................................................... 100 – 240
Alcance del Voltaje de Entrada (Voltios CA) ....................................................... 85 – 264
Corriente de Entrada (A rsm máxima) ....................................................2.9 @ 85V 60Hz
Potencia de Salida (Vatios) ............................................................... 120 nom. 130 max.
Corriente de Salida (A máxima) ................................................................................... 5.0
Voltaje de Salida (Voltios CC nominal/alcance) ............................................ 24 / 2 – 29.5
Mecánicas
Estuche ...................................................................................Aluminio Negro Anodizado
Dimensiones (pulgadas) ...................................................... 7 Largo x 5½ Ancho x 2 Alto
Peso ..................................................................................................................1,80 libras
Conexiones
Entrada de Potencia CA ....................................................................Enchufe Macho C13
Adaptadores de Salida de Potencia CC:
Opción #1 ............................................................... Cordón de salida de pinza de batería
Opción #2 ....................................................... Cordón de salida de 3 clavijas XLR 3-12C
Opción #3 ........................................Cordón de salida de terminal de anillo diámetro 3/8˝
20. REPUESTOS
Cable de tenazas con salida ......................................................................... 3899001840
3-Pin XLR 3-12C Cuerda de la salida ............................................................3899002111
3/8˝ Dia. Cuerda terminal de la salida del anillo ........................................... 2299001949

• 18 •
21. GARANTÍA LIMITADA
SCHUMACHER ELECTRIC CORPORATION, 801 BUSINESS CENTER DRIVE,
MOUNT PROSPECT, IL 60056-2179, REALIZA LA PRESENTE GARANTÍA
LIMITADA AL COMPRADOR MINORISTA ORIGINAL DE ESTE PRODUCTO. LA
PRESENTE GARANTÍA LIMITADA NO PUEDE TRANSFERIRSE NI CEDERSE.
Schumacher Electric Corporation (el “Fabricante”) otorga garantía por este cargador
de batería por un plazo de un (1) año a partir de la fecha de compra por menor por la
existencia de cualquier material o de mano de obra defectuosos que pudieran surgir por
su uso y cuidado normal. Si su unidad cuenta con material defectuoso o defectos de
mano de obra, la obligación de los Fabricantes, conforme a la presente garantía, será
simplemente reparar o sustituir el producto por uno nuevo o por una unidad reparada, a
elección del fabricante. Es obligación del comprador enviar la unidad con comprobante
de compra y los gastos de envío prepagos al fabricante o a sus representantes
autorizados para que ésta se pueda reparar o reemplazar.
El Fabricante no presta garantía por lo accesorios utilizados con este producto que no
sean los fabricados por Schumacher Electric Corporation y que no estén aprobados para
su uso con este producto. La presente Garantía Limitada será nula si el producto se
utiliza en forma errónea, se trata de manera inadecuada, es reparado o modicado
por personas que nos sean el Fabricante o si esta unidad es revendida a través de un
vendedor minorista no autorizado.
El Fabricante no realiza ninguna otra garantía, incluidas, a título enunciativo, las garantías
expresas, implícitas o legales, incluidas, a modo de ejemplo, las garantías implícitas
de comerciabilidad o adecuación a un n especíco. Asimismo, el Fabricante no será
responsable ante reclamos por daños accidentales, especiales ni directos en los que
incurran los compradores, usuarios u otras personas asociadas al producto, incluidas,
a título enunciativo, los ingresos y ganancias no percibidos, ventas anticipadas,
oportunidades comerciales, el buen nombre, la interrupción de la actividad comercial
o cualquier otro daño que haya provocado. Todas las garantías, excepto la garantía
limitada incluida en el presente, por medio de la presente, quedan expresamente
anuladas y excluidas. Algunos estados no permiten la exclusión ni la limitación de los
daños accidentales ni directos o el plazo de garantía implícita, por lo que las limitaciones
o exclusiones mencionadas anteriormente podrían no corresponder con su caso. La
presente garantía le otorga derechos legales especícos y es probable que usted cuente
con otros derechos que podrían diferir de los incluidos en la presente garantía.
LA PRESENTE GARANTÍA LIMITADA ES LA ÚNICA GARANTÍA LIMITADA
EXPRESA Y EL FABRICANTE NO ASUME NI AUTORIZA A NADIE A ASUMIR O
A ADQUIRIR NINGUNA OTRA OBLIGACIÓN RESPECTO DEL PRODUCTO QUE NO
SEA LA PRESENTE GARANTÍA.
Schumacher
®
y el logo Schumacher son marcas registradas
de Schumacher Electric Corporation.

• 19 •
¡AHORRE EN EL ENVÍO! ¡ACTIVE SU GARANTÍA EN LÍNEA-LA FORMA MAS RÁPIDA Y FÁCIL!
Visite nuestra página en www.batterychargers.com para registrar su producto en línea.
(¿No tiene acceso al internet? Llene la tarjeta de garantía y envíela.)
WARRANTY CARD / TARJETA DE GARANTÍA
SAVE ON POSTAGE! ACTIVATE YOUR WARRANTY ONLINE – THE QUICK AND EASY WAY!
Go to www.batterychargers.com to register your product online.
(No internet access? Send in the completed warranty card.)
1 YEAR LIMITED
WARRANTY PROGRAM
REGISTRATION
MODEL: _____________________DESCRIPTION: ________________________
This is the only express limited warranty, and the manufacturer neither assumes
nor authorizes anyone to assume or make any other obligation. There is no other
warranty, other than what is described in the product owner’s manual.
The warranty card should be submitted within 30 days of purchase. The customer
must keep the ORIGINAL receipt because it will be required for any warranty claims.
This warranty is not transferable. Send warranty card only.
DO NOT SEND UNIT TO THIS ADDRESS FOR REPAIR.
Mail this card to: Schumacher Electric Corporation
801 Business Center Drive
Mount Prospect, IL 60056-2179
Name ______________________________________________________________
Street Address _______________________________________________________
City ________________________________State _________ Zip Code _________
Phone _____________________Email ___________________________________
Store Name Where Purchased ___________________ Date of Purchase _________
Store Location ____________________ UPC Number ________________________
Serial Number ______________________________________ (SEE PRODUCT)
For faster warranty activation, go to www.batterychargers.com to register your product online.
PROGRAMA DE REGISTRO
DE UN AÑO DE GARANTÍA
LIMITADA
MODELO: ____________________DESCRIPCIÓN: ________________________
Esta es la única garantía limitada expresa, y el productor no autoriza ni otorga
a alguien a realizar alguna otra obligación. No existe ninguna otra garantía
más que la descrita en el manual del dueño.
La tarjeta de garantía debe enviarse durante los primeros 30 días después de la
compra. El cliente debe mantener el recibo de compra ORIGINAL como
comprobante, el cual le otorga todo derecho a cualquier reclamo de garantía.
Esta garantía no es transferible. Envie tarjeta de garantía solamente.
NO ENVÍE LA UNIDAD A ESTA DIRECCIÓN PARA SU REPARACIÓN.
Enviar esta tarjeta a: Schumacher Electric Corporation
801 Business Center Drive
Mount Prospect, IL 60056-2179
Nombre ____________________________________________________________
Dirección ___________________________________________________________
Ciudad __________________________Estado ____________ C.P. _____________
Tel: ________________________ Correo electrónico _________________________
Nombre de la Tienda donde se Compró ____________ Fecha de compra _________
Localización de la Tienda ____________ Numero de Serie ____________________
Código de barras ___________________________ (CONSULTE EL PRODUCTO)
Para una activación más rápida, visite nuestra página de internet en www.batterychargers.com
-
 1
1
-
 2
2
-
 3
3
-
 4
4
-
 5
5
-
 6
6
-
 7
7
-
 8
8
-
 9
9
-
 10
10
-
 11
11
-
 12
12
-
 13
13
-
 14
14
-
 15
15
-
 16
16
-
 17
17
-
 18
18
-
 19
19


DSR INC-2405A El manual del propietario
- Categoría
- Cargadores de bateria
- Tipo
- El manual del propietario
- Este manual también es adecuado para
en otros idiomas
- English: DSR INC-2405A Owner's manual
Artículos relacionados
Otros documentos
-
Schumacher SC-600A Manual de usuario
-
-
Schumacher Electric 00-99-000906/0109 Manual de usuario
-
Schumacher Electric INC-812A Manual de usuario
-
-
-
Schumacher Electric SpeedCharge SC-10030A Manual de usuario
-
Schumacher Electric SC-8020A El manual del propietario
-
-