John Deere AC-G3200i Manual de usuario
- Categoría
- Generadores de poder
- Tipo
- Manual de usuario
Este manual también es adecuado para

Operator’s Manual 1
AC-G3200i
AC-G4300i
Generator

2 Operator’s Manual
Introduction
THANK YOU for purchasing a John Deere product.
READ THIS MANUAL carefully to learn how to operate
and service your machine correctly. Failure to do so could
result in personal injury or equipment damage. This manual
and safety signs on your machine may also be available in
other languages. (See your John Deere dealer to order.)
THIS MANUAL SHOULD BE CONSIDERED a permanent
part of your machine and should remain with the machine
when you sell it.
MEASUREMENTS in this manual are given in both
metric and customary U.S. unit equivalents. Use only
correct replacement parts and fasteners. Metric and inch
fasteners may require a specic metric or inch wrench.
RIGHT HAND AND LEFT HAND sides are determined by
facing the control panel end of the machine.
The SERIAL NUMBER is located in the Specication or
Identication Numbers section. Accurately record all the
numbers to help in tracing the machine should it be stolen.
Your dealer also needs these numbers when you order
parts. File the identication numbers in a secure place
off the machine.
WARRANTY is provided from your John Deere dealer for
customers who operate and maintain their equipment as
described in this manual. The warranty is explained on
the warranty certicate shown in this manual.
This warranty provides you the assurance that your
dealer will back products where defects appear within
the warranty period. Should the equipment be abused,
or modied to change its performance beyond the original
factory specications, the warranty will become void.
Warning: This product contains lead, a
chemical known to the State of California
to cause birth defects or other reproductive
harm.
Wash your hands after handling this product.

Operator’s Manual 3
Introduction
NOTICE
FEDERAL EMISSION COMPONENT DEFECT WARRANTY and CALIFORNIA EMISSION CONTROL WARRANTY
are applicable to only those engines / generators complied with EPA (Environmental Protection Agency) and CARB
(California Air Resources Board) emission regulations in the U.S.A.
NOTICE
To the engines / generators exported to and used in the countries other than the U.S.A., warranty service shall be
performed by the distributor in each country in accordance with the standard Robin engine / generator warranty policy
as applicable.
AIR INDEX
To show compliance with California emission regulations, a hang tag has been provided displaying the Air Index level
and durability period of this engine.
The Air Index level denes how clean an engine’s exhaust is over a period of time. A bar graph scaled from “0” (most
clean) to “10” (least clean) is used to show an engine’s Air Index level. A lower Air Index level represents cleaner
exhaust from an engine.
The period of time (in hours) that the Air Index level is measured is known as the durability period. Depending on the
size of the engine, a selection of time periods can be used to measure the Air Index level (see below).
Descriptive Term Applicable to Emissions Durability Period
Moderate: 50 hours (engine from 0 to 80 cc)
125 hours (engine greater than 80 cc)
Intermediate: 125 hours (engine from 0 to 80 cc)
250 hours (engine greater than 80 cc)
Extended: 300 hours (engine from 0 to 80 cc)
500 hours (engine greater than 80 cc)
Notice: This hang tag must remain on the engine or piece of equipment, and only be removed by the ultimate purchaser
before operation.

4 Operator’s Manual
Introduction
FEDERAL EMISSIONS COMPONENT DEFECT WARRANTY
EMISSIONS COMPONENT DEFECT WARRANTY COVERAGE -- This emission warranty is applicable in all States, except the state of
California.
Fuji Heavy Industries Ltd. and Robin America Inc., Wood Dale Illinois, (herein “ROBIN AMERICA”) warrant(s) to the initial retail purchaser and each
subsequent owner, that this Non-road engine (herein “engine”) has been designed, built, and equipped to conform at the time of initial sale to all
applicable regulations of the U.S.
Environmental Protection Agency (EPA), and that the engine is free of defects in materials and workmanship which would cause this engine to fail
to conform with EPA regulations during its warranty period.
For the components listed under PARTS COVERED, the service dealer authorized by ROBIN AMERICA will, at no cost to you, make the necessary
diagnosis, repair, or replacement necessary to ensure that the engine complies with applicable U.S. EPA regulations.
EMISSIONS COMPONENT DEFECT WARRANTY PERIOD
The warranty period for this engine begins on the date of sale to the
initial purchaser and continues for a period of two years.
PARTS COVERED
Listed below are the parts covered by the Emission Components
Defect Warranty. Some of the parts listed below may require scheduled
maintenance and are warranted up to the rst scheduled replacement
point for that part.
1. Fuel Metering System
a. Carburetor and internal parts (and / or pressure regulator or fuel
injection system).
b. Air / fuel ratio feedback and control system, if applicable.
c. Cold start enrichment system, if applicable.
d. Regulator assembly (gasoline fuel, if applicable).
2. Air Induction System
a. Intake manifold, if applicable.
b. Air lter.
3. Ignition System
a. Spark plugs.
b. Magneto or electronic ignition system.
c. Spark advance / retard system, if applicable.
4. Exhaust manifold, if applicable.
5. Miscellaneous items used in above systems.
a. Electronic controls, if applicable.
b. Hoses, belts, connectors, and assemblies.
c. Filter lock assembly (gaseous fuel, if applicable).
OBTAINING WARRANTY SERVICE
To obtain warranty service, take your engine to the nearest authorized
ROBIN AMERICA. Bring your sales receipts indicating date of purchase
for this engine. The service dealer authorized by ROBIN AMERICA
will perform the necessary repairs or adjustments within a reasonable
amount of time and furnish you with a copy of the repair order. All parts
and accessories replaced under this warranty become the property of
ROBIN AMERICA.
WHAT IS NOT COVERED
Conditions resulting from tampering, misuse, improper adjustment
(unless they were made by the service dealer authorized by ROBIN
AMERICA during a warranty repair), alteration, accident, failure to use
the recommended fuel and oil, or not performing required maintenance
services.
The replacement parts used for required maintenance services.
Consequential damages such as loss of time, inconvenience, loss of
use of the engine or equipment, etc.
Diagnosis and inspection charges that do not result in warranty-eligible
service being performed.
Any non-authorized replacement part, or malfunction of authorized
parts due to use of non-authorized parts.
OWNER’S WARRANTY RESPONSIBILITIES
As the engine owner, you are responsible for the performance of the
required maintenance listed in your owner’s manual. ROBIN AMERICA
recommends that you retain all receipts covering maintenance on
your engine, but ROBIN AMERICA cannot deny warranty solely for
the lack of receipts or for your failure to ensure the performance of all
scheduled maintenance.
As the engine owner, you should however be aware that ROBIN
AMERICA may deny warranty coverage if your engine or a part has
failed due to abuse, neglect, improper maintenance or unapproved
modications.
You are responsible for the presenting your engine to the nearest service
dealer authorized by ROBIN AMERICA when a problem exists.
If you have any questions regarding your warranty rights and
responsibilities, you should contact the ROBIN AMERICA customer
service department at 1-630-350-8200 for the information.
THINGS YOU SHOULD KNOW ABOUT THE EMISSION
CONTROL SYSTEM WARRANTY MAINTENANCE AND
REPAIRS
You are responsible for the proper maintenance of the engine. You
should keep all receipts and maintenance records covering the
performance of regular maintenance in the event questions arise.
These receipts and maintenance records should be transferred to each
subsequent owner of the engine. ROBIN AMERICA reserves the right to
deny warranty coverage if the engine has not been properly maintained.
Warranty claims will not be denied, however, solely because of the lack
of required maintenance or failure to keep maintenance records.
MAINTENANCE, REPLACEMENT OR REPAIR OF EMISSION
CONTROL DEVICES AND SYSTEMS MAY BE PERFORMED BY ANY
REPAIR ESTABLISHMENT OR INDIVIDUAL;
HOWEVER, WARRANTY REPAIRS MUST BE PERFORMED BY
A SERVICE DEALER AUTHORIZED BY ROBIN AMERICA. THE
USE OF PARTS THAT ARE NOT EQUIVALENT IN PERFORMANCE
AND DURABILITY TO AUTHORIZED PARTS MAY IMPAIR THE
EFFECTIVENESS OF THE EMISSION CONTROL SYSTEM AND MAY
HAVE A BEARING ON THE OUTCOME OF A WARRANTY CLAIM.
If other than the parts authorized by ROBIN AMERICA are used for
maintenance replacements or for the repair of components affecting
emission control, you should assure yourself that such parts are
warranted by their manufacturer to be equivalent to the parts authorized
by ROBIN AMERICA in their performance and durability.
HOW TO MAKE A CLAIM
All repair qualifying under this limited warranty must be performed by
a service dealer authorized by ROBIN AMERICA. In the event that
any emission-related part is found to be defective during the warranty
period, you shall notify ROBIN AMERICA customer service department
at 1-630-350-8200 and you will be advised of the appropriate warranty
service dealer or service providers where the warranty repair can be
performed.

Operator’s Manual 5
Introduction
CALIFORNIA EMISSION CONTROL WARRANTY STATEMENT
YOUR WARRANTY RIGHTS AND OBLIGATIONS
The California Air Resources Board and Fuji Heavy Industries Ltd. (herein “FUJI”) are pleased to explain the emission control system warranty on
your 2004 and later Small Off-Road engine (herein “engine”). In California, new engine must be designed, built and equipped to meet the State’s
stringent anti-smog standards. FUJI must warrant the emission control system on your engine for the periods of time described below, provided
there has been no abuse, neglect or improper maintenance of your engine. Your emission control system may include parts such as the carburetor
or fuel-injection system, and the ignition system. Also included may be hoses, belts, connectors and other emission-related assemblies. Where a
warrantable condition exists, ROBIN AMERICA will repair your engine at no cost to you including diagnosis, parts and labor.
MANUFACTURER’S WARRANTY COVERAGE:
The 2004 and later engines are warranted for two (2) years. If any emission related part on your engine is defective, the part will be repaired or
replaced by ROBIN AMERICA.
OWNER’S WARRANTY RESPONSIBILITIES:
- As the engine owner, you are responsible for the performance of the required maintenance listed in your Owner’s Manual. ROBIN AMERICA
recommends that you retain all receipts covering maintenance on your engine, but FUJI cannot deny warranty solely for the lack of receipts or
for your failure to ensure the performance of all scheduled maintenance.
- As the engine owner, you should however, be aware that FUJI may deny you warranty coverage if your engine or a part has failed due to abuse,
neglect, improper maintenance or unapproved modications.
- Your are responsible for presenting your engine to a service dealer or warranty station authorized by ROBIN AMERICA Inc. 940 Lively Blvd.,
Wood Dale, IL 60191 (herein ROBIN AMERICA) as soon as a problem exists. The warranty repairs should be completed in a reasonable amount
of time, not to exceed 30 days.
If you have any questions regarding your warranty rights and responsibilities, you should contact Robin America Inc. Customer Service Department
at 1-630-350-8200.
LIMITED WARRANTY
on Emission Control Systems
- California Only -
FUJI warrants to the owner of the 2004 and later engine that the engine (1) has been designed, built and equipped so as to conform at the time of
manufacture with the applicable regulations of the California Air Resources Board, and (2) is free from defects in materials and workmanship that
could cause it to fail to conform with those regulations as may be applicable in the terms and conditions stated below.
A. COMMENCEMENT DATE
The warranty period begins on the date the engine is delivered to a
rst retail purchaser.
B. LENGTH OF COVERAGE
FUJI warrants to a rst retail purchaser and each subsequent purchaser
that the engine is free from defects in materials and workmanship that
cause the failure of a warranted emission-related part for a period of
two (2) years after the date of delivery to the rst retail purchaser.
C. WHAT IS COVERED
1. REPAIR OR REPLACEMENT PARTS
Repairs and replacement of any warranted part will be performed at
no charge to you by an authorized service dealer or a warranty
station. You may contact the Robin America Inc. Customer Service
Department at 1-630-350-8200 to obtain the name of the nearest
appropriate location where your warranty repairs are performed.
2. WARRANTY PERIOD
This warranty continues for a period of two (2) years and applies
only to the repair, replacement or adjustment of the component
parts that are not scheduled for replacement as required
maintenance. Further, component parts which are scheduled only
for regular inspection to the effect of “repair or replace as
necessary” are warranty for the warranty period. Any warranted
part which is scheduled for replacement as required
maintenance is warranted for the period of time up to the rst
scheduled replacement point for that part.
3. DIAGNOSIS
You will not be charged for diagnostic labor that leads to the
determination that a warranted part is defective, if the diagnostic
work is performed at an authorized service dealer or warranty
station.
4. DAMAGES
If a warranted part failed causing damage to the engine
components, consult an warranty station.
D. WHAT IS NOT COVERED
1. This limited warranty does not cover any part which malfunctions,
fails or is damaged due to failure to follow the maintenance and
operating instructions set forth in the 2004 and later Owner’s Manual
including:
a. Improper maintenance of any warranted parts.
b. Improper installation, adjustment or repair of the engine or of
any warranted part unless performed by an authorized service
dealer.
c. Failure to follow recommendations on fuel use contained in the
2004 and later Owner’s Manual.
d. Repairs performed outside of the authorized warranty service
dealers.
e. Use of parts which are not authorized by FUJI.
2. Add-on or modied parts.
This warranty does not cover any part that malfunctions, fails or is
damaged due to alterations by changing, adding to or removing
parts from the engine.
3. Expenses incurred by processing warranty-claims.
FUJI, any authorized service dealer and warranty station
shall not be liable for any loss of use of the engine, for any
alternative usage, for any damage to goods, loss of time or
inconvenience.
E. HOW TO FILE A CLAIM
All repairs qualifying under this Limited Warranty must be performed
by a dealer who sold you the engine or warranty station authorized by
ROBIN AMERICA. In the event that any emission-related part is found
to be defective during the warranty period, you must notify the Robin
America Inc. Customer Service Department at 1-630-350-8200 and
you will be advised of the appropriate warranty service facilities where
the warranty repair is to be performed.

6 Operator’s Manual
Introduction
F. WHERE TO OBTAIN WARRANTY SERVICE
It is recommended that warranty service be performed by the authorized
dealer who sold you the engine, although warranty service will be
performed by any authorized service dealers or warranty stations
anywhere in the United States.
When warranty repair is needed, the engine must be brought to an
authorized service dealer or warranty station’s place of business during
normal business hours. In all cases, a reasonable time, not to exceed
30 days, must be allowed for the warranty repair to be completed after
the engine is received by the authorized service dealer or warranty
station.
G. MAINTENANCE, REPLACEMENT AND REPAIR OF
EMISSION-RELATED PARTS
Only warranted engine replacement parts approved by FUJI should
be used in the performance of any warranty maintenance or repairs
on emission-related parts. If other than authorized parts are used for
maintenance, replacement or repair of components affecting emission
control, you should assure yourself that such parts are warranted by
their manufacturer to be equivalent to authorized parts in performance
and durability. FUJI, however, assumes no liability under this warranty
with respect to parts other than authorized parts. The use of non-
authorized replacement parts does not invalidate the warranty on
other components unless the non-authorized parts cause damage to
warranted parts.
H. PARTS COVERED UNDER THE CALIFORNIA EMISSIONS
WARRANTY
1. Fuel Metering System
a. Carburetor and internal parts (and / or pressure regulator or fuel,
injection system).
b. Air / fuel ratio feedback and control system, if applicable.
c. Cold start enrichment system, if applicable.
d. Regulator assembly (gaseous fuel, if applicable).
2. Air Induction System
a. Intake manifold, if applicable.
b. Air lter.
3. Ignition System
a. Spark Plug.
b. Magneto or electronic ignition system.
c. Spark advance / retard system, if applicable.
4. Exhaust manifold, if applicable.
5. Miscellaneous items used in above systems.
a. Electronic controls, if applicable.
b. Hoses, belts, connectors, and assemblies.
c. Filter lock assembly (gaseous fuel, if applicable).
I. MAINTENANCE STATEMENTS
It is your responsibility to have all scheduled inspection and maintenance services performed at the times recommended in the 2005 and later
Owner’s Manual and to retain proof that inspection and maintenance services are performed at the times when recommended. FUJI will not deny
a warranty claim solely because you have no record of maintenance; however, FUJI may deny a warranty claim if your failure to perform required
maintenance resulted in the failure of warranted part. The proof which you maintain should be given to each subsequent owner of the engine. You are
responsible for performing the scheduled maintenance described below based on the procedures specied in the 2005 and later Owner’s Manual.
The scheduled maintenance below is based on a normal engine operating schedule.
PROCEDURE: INTERVAL:
1. Change engine oil. 1. Initial 20 hours and every 100 hours afterward.
2. Clean air cleaner (element). 2. Every 50 hours.
3. Replace air cleaner element. 3. Every 200 hours.
4. Clean and adjust spark plug and electrodes. 4. Every 200 hours.
NOTE: More frequent maintenance may be necessary under dusty, dirty or severe conditions.

Operator’s Manual 7
Contents
Page
Safety ........................................................................ 8
Safety Signs ........................................................... 15
Controls ................................................................. 17
Preparing the Generator ........................................ 20
Operation ................................................................ 26
Troubleshooting ..................................................... 33
Service .................................................................... 34
Transporting ............................................................. 38
Storage .................................................................... 39
Specications ......................................................... 40
Wire Diagram ........................................................... 41
Warranty .............................................................42-44
Notes ........................................................................ 45
All information, illustrations and specications in this manual are based
on the latest information available at the time of publication. The right is
reserved to make changes at any time without notice.

8 Operator’s Manual
W
A
R
N
I
N
G
W
A
R
N
I
N
G
S
I
N
T
H
E
M
A
N
U
A
L
S
.
W
A
R
N
I
N
G
S
I
N
T
HE
M
A
N
U
A
L
S
.
C
A
U
T
I
O
N
O
C
A
U
T
I
O
N
S
I
N
O
T
H
E
M
A
N
U
A
L
S
O
C
A
U
T
I
O
N
S
I
N
O
T
H
E
M
A
N
U
A
L
S
O
C
A
U
T
I
O
N
S
I
N
O
T
H
E
M
A
N
U
A
L
S
O
C
A
U
T
I
O
N
S
I
N
O
T
H
E
M
A
N
U
A
L
S
Safety
RECOGNIZE SAFETY INFORMATION
This is the safety alert symbol. When you see this symbol
on your machine or in this manual, be alert to the potential
for personal injury.
Follow recommended precautions and safe operating
practices.
UNDERSTAND SIGNAL WORDS
A signal word--DANGER, WARNING or CAUTION--is used
with the safety-alert symbol. DANGER identies the most
serious hazards.
DANGER or WARNING safety signs are located near
specific hazards. General precautions are listed on
CAUTION safety signs. CAUTION also calls attention to
safety messages in this manual.
FOLLOW SAFETY INSTRUCTIONS
Carefully read all safety messages in this manual and
safety signs on your machine. Keep safety signs in good
condition. Replace missing or damaged safety signs. Be
sure new equipment components and repair parts include
the current safety signs. Replacement safety signs are
available from your John Deere dealer.
Learn how to operate the machine and how to use controls
properly. Do not let anyone operate without instruction.
Keep your machine in proper working condition.
Unauthorized modications to the machine may impair the
function and/or safety and affect machine life.
If you do not understand any part of this manual and need
assistance, contact your John Deere dealer.

Operator’s Manual 9
CARBON MONOXIDE - POISONOUS GAS
Use generator outdoors, away from open windows, vents, or
doors. Keep generator at least 1 meter (3 feet) away from any
structure or building during use.
Generator exhaust contains carbon monoxide - a poisonous
gas that can kill you. You CAN NOT smell or see this gas.
Never use a generator in enclosed or partially-enclosed spaces.
Generators can produce high levels of carbon monoxide very
quickly. When you use a portable generator, remember that you
cannot smell or see carbon monoxide. Even if you can’t smell
exhaust fumes, you may still be exposed to carbon monoxide.
If you start to feel sick, dizzy, or weak while using a generator, get
to fresh air RIGHT AWAY. DO NOT DELAY. The carbon monoxide
from generators can rapidly lead to full incapacitation and death.
If you experience serious symptoms, get medical attention
immediately. Inform medical staff that carbon monoxide poisoning
is suspected. If you experienced symptoms while indoors, have
someone call the re department to determine when it is safe to
re-enter the building.
NEVER operate the generator in an explosive atmosphere, near
combustible materials or where ventilation is not sufcient to carry
away exhaust fumes. Exhaust fumes can cause serious injury
or death.
NEVER use a generator indoors, including in homes, garages,
basements, crawl spaces, and other enclosed or partially-enclosed
areas, even with ventilation. Opening doors and windows or using
fans will not prevent carbon monoxide build-up in the home.
Follow the instructions that come with your generator. Locate the
unit outdoors and away from doors, windows, and vents that could
allow the carbon monoxide gas to come indoors.
ONLY run generator outdoors and away from air intakes.
NEVER run generator inside homes, garages, sheds, or other
semi-enclosed spaces. These spaces can trap poisonous gases
EVEN IF you run a fan or open doors and windows.
If you start to feel sick, dizzy, or weak while using the generator,
shut if off and get fresh air RIGHT AWAY. See a doctor. You may
have carbon monoxide poisoning.
Install battery-operated carbon monoxide alarms or plug-in carbon
monoxide alarms with battery back-up in your home, according to
the manufacturer’s installation instructions. The carbon monoxide
alarms should be certied to the requirements of the latest safety
standards for carbon monoxide alarms. (UL 2034, IAS 6-96, or
CSA 6.19.01).
Test your carbon monoxide alarm frequently and replace dead
batteries.

10 Operator’s Manual
SAFETY WARNING WHEN REFUELING
Gasoline is extremely ammable and its vapors can explode if
ignited.
Observe all safety regulations for the safe handling of fuel. Handle
fuel in safety containers. If the container does not have a spout, use
a funnel.
Do not overll the fuel tank, leave room for the fuel to expand.
Do not rell fuel tank while the engine is running. Before refueling
the generator, turn it off and let it cool down. Gasoline spilled on hot
engine parts could ignite.
Fill the tank only on an area of bare ground. While fueling the tank,
keep heat, sparks and open ame away. Carefully clean up any
spilled fuel before starting engine.
Always ll fuel tank in an area with plenty of ventilation to avoid
inhaling dangerous fumes.
NEVER store fuel for your generator in the home. Gasoline, propane,
kerosene, and other ammable liquids should be stored outside of living
areas in properly-labeled, non-glass safety containers. Do not store
them near a fuel-burning appliance, such as a natural gas water heater
in a garage. If the fuel is spilled or the container is not sealed properly,
invisible vapors from the fuel can travel along the ground and can be
ignited by the appliance’s pilot light or by arcs from electric switches
in the appliance.
GROUND FAULT CIRCUIT INTERRUPTER PROTECTION
These generators are equipped with a GFCI (Ground Fault Circuit
Interrupters) 120V duplex receptacles for protection against the hazards
of electrical shock from defective attachments such as, tools, cords,
and cables.
WARNING: The GFCI may not function unless the
ge nerat or is pr ope rl y g round ed. Foll ow
the correct procedure specified in the section
labeled “GROUNDING INSTRUCTIONS”.
A GFCI is a device that interrupts electricity from either the utility or
generator by means of a special type of circuit breaker if a fault current
ow to the ground occurs.
A GFCI can be used only with generators that have the neutral wire
internally bonded to the frame, and the frame properly grounded to the
earth. A GFCI will not work on generators that do not have the neutral
wire bonded to the frame, or on generators which have not been properly
grounded. All John Deere generators have internally bonded ground
wires. A GFCI will not work if the unit is not properly grounded.
A GFCI may be required by OSHA regulations, the National Electric
Code and/or local and federal codes when operating a generator.
For additional protections against shock hazards due to defective
equipment attached to the twist-lock receptacles, consider the use of
a GFCI on each of these receptacles as well.
GFCI and GFCI protected cord sets and cables may be purchased from
local electrical supply houses.

Operator’s Manual 11
ELECTRICAL HAZARDS
This product must be grounded. If it should malfunction or breakdown,
grounding provides a path of least resistance for electric current to
reduce the risk of electric shock.
DANGER - IMPROPER CONNECTION OF THE EQUIPMENT-
GROUNDING CONDUCTOR CAN RESULT IN A RISK OF
ELECTROCUTION. CHECK WITH A QUALIFIED
ELECTRICIAN OR SERVICE PERSON IF YOU ARE IN
DOUBT AS TO WHETHER THE UNIT IS PROPERLY
GROUNDED.
This generator is equipped with a grounding terminal for your
protection. Always complete the ground path from the generator to an
external ground source as instructed in the section labeled “Grounding
Instructions” in the Preparation section of this manual.
The generator is a potential source of electrical shock if not kept dry.
Keep the generator dry and do not use in rain or wet conditions. To
protect from moisture, operate it on a dry surface under an open,
canopy-like structure. Dry your hands if wet before touching the
generator.
Plug appliances directly into the generator. Or, use a heavy duty,
outdoor-rated extension cord that is rated (in watts or amps) at least
equal to the sum of the connected appliance loads. Check that the
entire cord is free of cuts or tears and that the plug has all three prongs,
especially a grounding pin.
NEVER try to power the house wiring by plugging the generator into
a wall outlet, a practice known as “back feeding”. This is an extremely
dangerous practice that presents an electrocution risk to utility workers
and neighbors served by the same utility transformer. It also bypasses
some of the built-in household circuit protection devices.
If you must connect the generator to the house wiring to power
appliances, have a qualied electrician install the appropriate equipment
in accordance with local electrical codes. Or, check with your utility
company to see if it can install an appropriate power transfer switch.
For power outages, permanently installed stationary generators are
better suited for providing backup power to the home. Even a properly
connected portable generator can become overloaded. This may result
in overheating or stressing the generator components, possibly leading
to a generator failure.

12 Operator’s Manual
IMPORTANT SAFETY INSTRUCTIONS
WARNING: To reduce the risk of injury, read this operator’s
manual completely before using. When using this product, the
following basic precautions should always be followed:
1. Read all the instructions before using the product.
2. Do not enclose the generator nor cover it with a
box. The generator has a built-in forced air cooling
system, and may become overheated if it is enclosed.
If generator has been covered to protect if from the
weather during non use, be sure to remove it and keep it
well away from the area during generator use.
3. Operate the generator on a level surface. It is not
necessary to prepare a special foundation for the
generator. However, the generator will vibrate on an
irregular surface, so choose a level place without surface
irregularities.
If the generator is tilted or moved during operation, fuel
may spill and/or the generator may tip over, causing a
hazardous situation.
Proper lubrication cannot be expected if the generator
is operated on a steep incline or slope. In such a case,
piston seizure may occur even if the oil is above the
upper level.
4. Pay attention to the wiring or extension cords from the
generator to the connected device. If the wire is under
the generator or in contact with a vibrating part, it may
break and possibly cause a re, generator burnout, or
electric shock hazard. Replace damaged or worn cords
immediately.
5. Do not operate in rain, in wet or damp conditions, or
with wet hands. The operator may suffer severe electric
shock if the generator is wet due to rain or snow.
6. If wet, wipe and dry it well before starting. Do not pour
water directly over the generator, nor wash it with water.
7. Be extremely careful that all necessary electrical
grounding procedures are followed during each and
every use. Failure to do so can be fatal.
8. NEVER try to power the house wiring by plugging the
generator into a wall outlet, a practice known as “back
feeding”. This is an extremely dangerous practice that
presents an electrocution risk to utility workers and
neighbors served by the same utility transformer. It
also bypasses some of the built-in household circuit
protection devices.
If you must connect the generator to the house wiring to
power appliances, have a qualied electrician install the
appropriate equipment in accordance with local electrical
codes. Or, check with your utility company to see if it can
install an appropriate power transfer switch.
9. No smoking while charging a battery. The battery emits
ammable hydrogen gas, which can explode if exposed
to electric arcing or open ame. Keep the area well-
ventilated and keep open ames / sparks away when
charging a battery.
W
A
R
N
I
N
G
W
A
R
N
I
N
G
S
I
N
T
H
E
M
A
N
U
A
L
S
.
W
A
R
N
I
N
G
S
I
N
T
H
E
M
A
N
U
A
L
S
.
C
A
U
T
I
O
N
O
C
A
U
T
I
O
N
S
I
N
O
T
H
E
M
A
N
U
A
L
S
O
C
A
U
T
I
O
N
S
I
N
O
T
H
E
M
A
N
U
A
L
S
O
C
A
U
T
I
O
N
S
I
N
O
T
H
E
M
A
N
U
A
L
S
O
C
A
U
T
I
O
N
S
I
N
O
T
H
E
M
A
N
U
A
L
S

Operator’s Manual 13
IMPORTANT SAFETY INSTRUCTIONS
10. Engine becomes extremely hot during and for some time
after operation. Keep combustible materials well away
from generator area. Be very careful not to touch any
parts of the hot engine especially the mufer area or
serious burns may result.
11. Keep children and all bystanders at a safe distance from
work area.
12. It is absolutely essential that you know the safe and
proper use of the power tool or appliance that you intend
to use. All operators must read, understand and follow
the tool / appliance owners manual. Tool and appliance
applications and limitations must be understood. Follow
all directions given on labels and warnings. Keep all
instruction manuals and literature in a safe place for
future reference.
13. Use only “LISTED” extension cords. When a tool or
appliance is used outdoors, use only extension cords
marked “For Outdoor Use”. Extension cords, when not in
use should be stored in a dry and well ventilated area.
14. Always switch off generator’s AC circuit breaker and
disconnect tools or appliances when not in use, before
servicing, adjusting, or installing accessories and
attachments.
15. Make sure the engine is stopped before starting any
maintenance, servicing or repair.
NOTE: Make sure maintenance and repair of the generator
set are performed by properly trained personnel only.
SAVE THESE INSTRUCTIONS
W
A
R
N
I
N
G
W
A
R
N
I
N
G
S
I
N
T
H
E
M
A
N
U
A
L
S
.
W
A
R
N
I
N
G
S
I
N
T
H
E
M
A
N
U
A
L
S
.
C
A
U
T
I
O
N
O
C
A
U
T
I
O
N
S
I
N
O
T
H
E
M
A
N
U
A
L
S
O
C
A
U
T
I
O
N
S
I
N
O
T
H
E
M
A
N
U
A
L
S
O
C
A
U
T
I
O
N
S
I
N
O
T
H
E
M
A
N
U
A
L
S
O
C
A
U
T
I
O
N
S
I
N
O
T
H
E
M
A
N
U
A
L
S

14 Operator’s Manual
WEAR PROTECTIVE CLOTHING
Wear close fitting clothing and safety equipment
appropriate to the job.
Wear a suitable hearing protective device such as
earmuffs or earplugs to protect against objectionable or
uncomfortable loud noises.
Operating equipment safely requires the full attention of
the operator. Do not wear radio or music headphones while
operating machine.
INSPECT GENERATOR
Be sure all covers, guards and shields are tight and in
place.
Locate all operating controls and safety labels.
Inspect power cord for damage before using. There is a
hazard of electrical shock from crushing, cutting or heat
damage.
PREPARE FOR EMERGENCIES
Keep a rst aid kit and re extinguisher handy.
Keep emergency numbers for doctors, ambulance service,
hospital and re department near your telephone.
Be prepared if a re starts.
SERVICE GENERATOR SAFELY
Before servicing the generator, disconnect all equipment
and allow unit to cool down.
Service generator in a clean dry at area.
Make sure the engine is stopped before starting any
maintenance servicing or repair.

Operator’s Manual 15
Read the operator's instruction manual.
Stay clear of the hot surface.
Exhaust gas is poisonous.
Do not operate in an unventilated room.
Stop the engine before refueling.
Fire, open light and smoking
prohibited.
Caution, risk of electric shock.
Do not connect the generator to
the commercial power lines.
HOT, avoid touching the hot areas.
Engine oil
ON
(power and Engine)
Add oil
Battery charging
condition
OFF
(power and Engine)
Alternating current
Direct current
Plus ;
positive polarity
Minus ;
negative polarity
OUT-position of a
bistable push control
IN-position of a
bistable push control
Protective earth
(ground)
Fuse
Choke ;
cold starting aid
Engine start
(Electric start)
Engine stop
Diesel fuel
Fast
Slow
P r
Rated power (kW)
COP
Continuous power
COS
r
Rated power factor
f r
Rated frequency (Hz)
U r
Rated voltage (V)
I r
Rated current (A)
H max
Maximum site altitude
above sea-level (m)
T max
Maximum ambient
temperature ( )
m Mass (kg)
Run
Stop
SAFETY SIGNS
In accordance with the European requirements (eec Directives), the specied symbols as shown in the following table
are used for the products and this instructions manual.

16 Operator’s Manual
SAFETY SIGNS
Location: Control Panel
Location: Gas Tank
Location: Gas Tank

Operator’s Manual 17
Controls
CONTROLS
A-- Control Panel
B-- Fuel Tank
C-- Fuel Gauge
D-- Side Panel (R)
E-- Oil Drain Plug
F-- Recoil Starter (Handle)
G-- Brake
H-- Tank Cap
M-- Battery
N-- Oil Gauge
O-- Side Panel (L)
P-- Exhaust Outlet
I-- Frame
J-- Spark Plug Cap
K-- Air Cleaner
L-- Fuel Strainer
H
P
O
MN
K LJ
I
A
B C
D
F
E
G

Controls
18 Operator’s Manual
CONTROLS
ENGINE SWITCH: (Fig. 1)
The engine switch is designed for easy operation with the
interlocking mechanism between the fuel valve and the
choke.
AC RECEPTACLES: (Fig. 2)
AC electric power is available through these receptacles.
- Two 20A receptacles
- One 30A receptacle
Use a grounding type plugs as shown on page 28.
WARNING: DO NOT PUT FOREIGN OBJECTS
INTO THE PLUG RECEPTACLE.
DC TERMINALS: (Fig. 3-A)
The DC terminals are used only for charging 12 volt batteries.
It provides up to 12V-8.3A (100W) of maximum power.
- Red is positive (+) terminal.
- Black is negative (-) terminal.
DC CIRCUIT BREAKER: (Fig. 3-B)
DC circuit breaker shuts off electric current when the current
exceeds its limit or a malfunction occurs in the connected
appliance.
Check for excessive current consumption or defects in the
appliance. After making sure everything is in order, push
the button to the “ON” position.
CAUTION: IF CIRCUIT BREAKER CONTINUES
TO TRIP, CHECK APPLIANCE FOR DEFECT.
IF GENERATOR IS MALFUNCTIONING,
SEE YOUR AUTHORIZED JOHN DEERE
SERVICE CENTER OR DEALER.
NEVER INTERFERE WITH THE OPERATION
OF THE CIRCUIT BREAKER KNOB OR
KEEP PUSHING IT IN THE “ON”
POSITION.
GROUND TERMINAL: (Fig. 4)
Terminal for grounding the generator.
RECOIL STARTER: (Fig. 5-A)
Pull this handle to start the generator.
SIDE COVER: (Fig. 5-B)
To access the following items for servicing, take the
applicable side cover out by removing the screw with a
screwdriver.
LH-Side Cover - Oil Level Gauge, Air Cleaner,
Spark Plug, Battery, etc.
RH-Side Cover - Oil Drain Plug, etc.
(Recoil Side)
ENGINE SWITCHES
CHOKE To start the engine, turn the
knob to the position. (Choke
valve is closed.)
RUN Keep the knob in this
position after the engine
starts. (The engine can be
started with the knob at the
position when the engine is
warm.
STOP To stop the engine, return
the knob to the position.
(The fuel cock is closed as
well.)
(Fig. 1)
(Fig. 2)
(Fig. 3)
(Fig. 4)
(Fig. 5)
STOP
RUN
CHOKE
A
B
AB

Controls
Operator’s Manual 19
CONTROLS
MULTI MONITOR: (Fig. 6)
LED Screen: (A)
Operation hour, voltage and frequency are indicated in turn
by means of depressing the LED screen changeover switch.
In addition, “O_Lod” (overload) will be indicated when the
generator is in the overload condition or appliances(s) will
be out of order.
In this case, stop the engine immediately and check the
appliance and/or generator for overloading. After the check
and remedy, restarting the engine will resume displaying in
the normal manner.
Oil Sensor Lamp: (B)
When the level of the engine oil falls below the prescribed
value, the alarm lamp lights up and the engine stops
automatically. When the engine stops due to oil shortage, it
can not be started anymore even by pulling the recoil starter
(just the alarm lamp ickers). In such a case, replenish
engine oil. See “Pre-Operation; Engine Oil” on page 21.
Auto Power Save Lamp: (C)
Lamp (green) is turned on while auto-power saving function
is activated.
Auto Power Save Switch: (D)
When depressing the switch, auto-power saving function is
activated. The engine speed is reduced automatically when
no load is applied, while the engine speed is automatically
increased when the load is applied.
When using DC power, turn the auto-power saving switch
off.
LED Screen Changeover Lamp: (E)
When depressing this switch, indication in LED screen is
changed over in turns:
operation hour voltage frequency operation hour
When starting the engine, operation hour is indicated in
LED screen at rst.
Frequency Lamp: (F)
Lamp (red) is turned on when changing over into frequency
indication in the LED screen.
Voltage Lamp: (G)
Lamp (red) is turned on when changing over into voltage
indication in the LED screen.
Operation Hour Lamp: (H)
Lamp (red) is turned on when changing over into operation
hour indication in the LED screen.
(Fig. 6)
Hours
MULTI MONITOR
V
Hz
AUTO
P-SAVE
A
B C D E
GH
F
MULTI MONITOR

20 Operator’s Manual
Preparing the Generator
GROUNDING INSTRUCTIONS
This product must be grounded. If it should malfunction or
breakdown, grounding provides a path of least resistance for
electric current to reduce the risk of electric shock.
DANGER - IMPROPER CONNECTION OF THE
EQUIPMENT-GROUNDING CONDUCTOR CAN
RESULT IN A RISK OF ELECTROCUTION.
CHECK WITH A QUALIFIED ELECTRICIAN OR
SERVICE PERSON IF YOU ARE IN DOUBT AS
TO WHETHER THE UNIT IS PROPERLY
GROUNDED.
The ground terminal on the frame must always be used to
connect the generator to a suitable ground source. The ground
path should be made with #8 size wire. Connect the grounding
wire securely to the ground terminal. Connect the other end of
the wire securely to a suitable ground source. (Fig. 1)
The National Electric Code contains several practical ways in
which to establish a good ground source. Examples given below
illustrate a few of the ways in which a good ground source may
be established.
A metal underground water pipe in direct contact with the earth
for at least 10 feet can be used as a grounding source. If an pipe
is unavailable, an 8 foot length of pipe or rod may be used as the
ground source. The pipe should be 3/4 inch trade size or larger
and the outer surface must be noncorrosive. If a steel or iron rod
is used it should be at least 5/8 inch diameter and if a nonferrous
rod is used it should be at least 1/2 inch diameter and be listed
as material for grounding. Drive the rod or pipe to a depth of 8
feet. If a rock bottom is encountered less than 4 feet down, bury
the rod or pipe in a trench. All electrical tools and appliances
operated from this generator, must be properly grounded by use
of a third wire or be “Double Insulated”.
It is recommended to:
1. Use electrical devices with 3 prong power cords.
2. Use an extension cord with a 3 hole receptacle and a 3
prong plug at the opposite ends to ensure continuity of
the ground protection from the generator to appliance.
We strongly recommend that all applicable federal, state and
local regulations relating to grounding specications be checked
and followed.
LINE TRANSFER SWITCH
If this generator is used for standby service, it must have
a transfer switch between the utility power service and the
generator. The transfer switch not only prevents the utility
power form feeding into the generator, but is also prevents the
generator form feeding out into the utility company’s lines. This
is intended to protect the serviceman who may be working on
a damaged line.
THIS INSTALLATION MUST BE DONE BY A LICENSED
ELECTRICIAN AND ALL LOCAL CODES MUST BE
FOLLOWED.
(Fig. 1)
Grounding Rod

Preparing the Generator
Operator’s Manual 21
PRE-OPERATION
ENGINE OIL:
Before checking or relling oil, be sure generator is located on
stable and level surface with engine stopped.
1. Remove oil dipstick and check the engine oil level. (Fig. 2)
2. If oil level is below the lower level line, rell with suitable
oil to upper level line. Do not screw in the oil dipstick when
checking oil level. (Fig. 3)
3. Change oil if contaminated. (See “Maintenance Schedule;
Changing Engine Oil” page 36)
Oil Capacity:
AC-G3200i ......................... 20.5 oz. / 0.6 qt. / 0.6 liters
AC-G4300i ......................... 33.3 oz. / 1.0 qt. / 1.0 liters
Recommended engine oil:
John Deere PLUS-4
®
oil is the preferred oil to use. If John
Deere PLUS-4
®
oil is not available, use 4-stroke automotive
detergent oil of API service class SE or higher grade (SG, SH
or SJ is recommended). If single viscosity oil is used, select
the appropriate viscosity for the average temperature in your
area. (Fig. 4)
(Fig. 2)
(Fig. 3)
(Fig. 4)
Engine Oil Dipstick

Preparing the Generator
22 Operator’s Manual
PRE-OPERATION
FUELING:
WARNING: WARNING: EXPLOSIVE FUEL! GASOLINE IS
EXTREMELY FLAMMABLE AND ITS VAPORS CAN
EXPLODE IF IGNITED.
DO NOT REFUEL WHILE SMOKING OR NEAR OPEN
FLAME OR OTHER SUCH POTENTIAL FIRE
HAZARDS.
STORE GASOLINE ONLY IN APPROVED
CONTAINERS, IN WELL VENTILATED,
UNOCCUPIED BUILDINGS AND AWAY FROM
SPARKS OR FLAMES.
DO NOT FILL THE FUEL TANK WHILE THE
ENGINE IS HOT OR RUNNING, SINCE SPILLED
FUEL COULD IGNITE IF IT COMES IN CONTACT
WITH HOT PARTS OR SPARKS FROM IGNITION.
DO NOT START THE ENGINE NEAR SPILLED
FUEL.
NEVER USE GASOLINE AS A CLEANING AGENT.
WARNING: DO NOT OVERFILL THE FUEL TANK, LEAVE
ROOM FOR THE FUEL TO EXPAND.
1. If fuel level is low, rell with unleaded automotive gasoline.
2. Check fuel gauge while lling. (Fig. 5)
3. Be sure to use the fuel lter screen on the fuel lter neck. (Fig. 6)
Fuel Tank Capacity:
AC-G3200i ...................... 2.9 gal. / 10.8 liters
AC-G4300i ...................... 3.4 gal. / 12.8 liters
4. When using the generator for the rst time or stopping due to the
fuel running out, pull the recoil handle several times after lling the
tank.
WARNING: MAKE SURE YOU REVIEW EACH WARNING
IN ORDER TO PREVENT FIRE HAZARD.
DO NOT REFILL TANK WHILE ENGINE IS RUNNING
OR HOT.
BEFORE FILLING FUEL, TURN THE ENGINE
SWITCH TO “ “ (STOP) POSITION.
BE CAREFUL NOT TO ADMIT DUST, DIRT, WATER
OR OTHER FOREIGN OBJECTS INTO FUEL.
WIPE OFF SPILT FUEL THOROUGHLY BEFORE
STARTING ENGINE.
KEEP OPEN FLAMES AWAY.
(Fig. 5)
(Fig. 6)
Empty
Full

Preparing the Generator
Operator’s Manual 23
PRE-OPERATION
FUELING (continued):
General Recommendations
• Purchase gasoline in small quantities and store in clean,
approved containers.
• To minimize gum deposits in your fuel system and to
insure easy starting, do not use gasoline left over from
the previous season.
• Do not add oil to the gasoline.
Fuel Type
• For best results use only clean, fresh, unleaded gasoline
with a pump sticker octane rating of 87 or higher.
• Unleaded gasoline is recommended as it leaves less
combustion chamber deposits.
GASOLINE/ALCOHOL BLENDS:
Gasohol (up to 10% ethyl alcohol, 90% unleaded gasoline by
volume) is approved, as a fuel. Other gasoline/alcohol blends
are not approved.
GASOLINE/ETHER BLENDS:
Methyl Tertiary Butyl Ether (MTBE) and unleaded gasoline
blends (up to a maximum of 15% MTBE by volume) are approved
as a fuel. Other gasoline/ether blends are not approved.

Preparing the Generator
24 Operator’s Manual
PRE-OPERATION
BATTERY INSTALLATION:
1. Attach terminals to a lead-acid battery already charged.
Mount the battery onto the position as specied below, with
its terminals facing inward.
2. Insert each long bolt through the specied hole, its tip pointing
outward.
3. Put the supporting arm on the long bolts and tighten with
the buttery nuts. (Push the lead-acid battery all the way
inward.)
4. Arrange the wiring so that it won’t be damaged by possible
vibration caused by the engine.
5. Only after checking that the engine’s starter key in the “OFF”
position, securely connect the red cable, to the positive (+)
terminal. And then connect the other cable to the negative (-)
terminal.
Red Cable: to the (+) terminal
Black Cable: to the (-) terminal
RECOMMENDED BATTERY
LEAD-ACID BATTERY
AC-G3200i AC-G4300i
USA SW7L-BS SW12AL-A
CANADA SWC7L-BS SWC12AL-A
CAUTION: ENGINE DAMAGE WILL OCCUR IF THE TERMINAL CONNECTIONS
ARE CONNECTED IN THE INCORRECT MANNER.
RED CABLE
RED
CABLE
5
LESS THAN
131 mm [5.2 in.] (AC-G3200i)
162 mm [6.4 in.] (AC-G4300i)
LESS THAN
114 mm [4.5 in.] (AC-G3200i)
136 mm [5.4 in.] (AC-G4300i)
LESS THAN
71 mm [2.8 in.] (AC-G3200i)
82 mm [3.2 in.] (AC-G4300i)
1
2
3
4
5
1
6
2
3
4
Battery Base
Flange Bolt
Screw
Accessory parts
Battery Band
Bolt and Nut
6 Battery cover

Preparing the Generator
Operator’s Manual 25
PRE-OPERATION
CHECK COMPONENT PARTS:
Check following items before starting engine:
1. Fuel leakage from fuel hose, etc.
2. Bolts and nuts for looseness.
3. Components for damage or breakage.
4. Generator not resting on or against any adjacent wiring.
CHECK GENERATOR SURROUNDINGS:
When listening to the radio near the generator, the radio sound may
be disturbed on account of the radio wave condition and the radio
performance.
Make sure you review each warning in order to prevent fire
hazard.
WARNING: KEEP AREA CLEAR OF FLAMMABLES OR
OTHER HAZARDOUS MATERIALS.
KEEP GENERATOR AT LEAST 3 FEET (1 METER) AWAY
FROM BUILDINGS OR OTHER STRUCTURES.
ONLY OPERATE GENERATOR IN A DRY, WELL VENTILATED
AREA.
KEEP EXHAUST PIPE CLEAR OF FOREIGN OBJECTS.
KEEP GENERATOR AWAY FROM OPEN FLAME.
NO SMOKING!
KEEP GEN ERATOR O N A STABLE AN D LE VEL
SURFACE.
DO NOT BLOCK GENERATOR AIR VENTS WITH PAPER OR
OTHER MATERIAL.

26 Operator’s Manual
OPERATION
Recoil Start
CAUTION: CHECK THE OIL LEVEL BEFORE EACH
OPERATION AS OUTLINED ON PAGE 21.
WHEN STARTING THE ENGINE WITH THE RECOIL
START, SET THE KEY SWITCH AT THE “ I “ (ON)
POSITION BEFORE PULLING THE STARTER
HANDLE.
NOTE: Read Operator’s Manual carefully before operating this unit.
Always be sure to place the generator on a level surface, locking
the wheel with the brake and/or blocking the wheels. (Fig. 7)
1. Make sure all appliances are disconnected from the
generator.
2. Turn engine switch to the “ “ (CHOKE) position (Fig. 8).
(When the engine is warm or temperature is high, start engine
with the switch at “ “ (RUN) position).
CAUTION: DO NOT CONNECT APPLIANCES WITH
DEFECTIVE LINES AND/OR PLUGS.
BE SURE APPLIANCES ARE NOT CONNECTED
TO GENERATOR WHEN STARTING UP.
STARTING THE GENERATOR WITH AN
APPLIANCE CONNECTED COULD RESULT IN
DAMAGE TO THE GENERATOR AND/OR
APPLIANCE AND PERSONAL INJURY.
3. Pull the recoil starter handle slowly until passing the compression
point (resistance will be felt), then return the handle to its original
position and pull briskly. (Fig. 9)
4. After starting, allow the recoil starter handle to return to its original
position with the handle still in your hand.
NOTE: If the engine fails to start after several attempts, repeat
the starting procedures mentioned above with the engine
switch placed at “ “ (RUN) position.
5. After 20 to 30 seconds of warm-up is completed, turn the engine
switch to “ “ (RUN) position. (Fig. 10)
6. Check to make sure the generator voltage is operating at normal
levels by changing over the LED screen in the multi monitor into
the “V” indication. Normal level is approximately 120V.
NOTE: Please contact an authorized John Deere Dealer if the
multi monitor is off during the proper operation.
7. Test the GFCI receptacle on the unit. Push the test button. The
reset button should pop out and there should be no power at
the receptacle. Apply a test load or lamp to each receptacle to
verify. IF THE RESET BUTTON DOES NOT POP OUT, DO
NOT USE THE RECEPTACLE. SEE DEALER FOR SERVICE
IMMEDIATELY.
8. If GFCI receptacle tests correctly, rmly push the reset button
to restore power. A distinctive click should be heard or felt when
this is complete. IF THE RECEPTACLE DOES NOT RESET
PROPERLY, DO NOT USE THE RECEPTACLE. SEE DEALER
FOR SERVICE IMMEDIATELY.
9. Loads can now be applied to unit.
Operation
(Fig. 8)
(Fig. 10)
(Fig. 9)
(Fig. 7)
Brake
Unlock
Lock
STOP
RUN
CHOKE
Recoil Starter Handle
Pull Briskly
STOP
RUN
CHOKE

Operating the Generator
Operator’s Manual 27
OPERATION
Electric Start
CAUTION: CHECK THE OIL LEVEL BEFORE EACH
OPERATION AS OUTLINED ON PAGE 21.
NOTE: Read Operator’s Manual carefully before operating this
unit. Always be sure to place the generator on a level surface,
locking the wheel with the brake and/or blocking the wheels.
(Fig. 7)
1. Make sure all appliances are disconnected from the
generator.
2. Turn engine switch to the “ “ (CHOKE) position (Fig. 8).
(When the engine is warm or temperature is high, start engine
with the switch at “ “ (RUN) position).
3. Insert the key into the key switch and turn it clockwise to the
“ I “ (ON) position to start the engine. Then turn the key further
to the “ “ (START) position. The engine will started by the
starting motor.
CAUTION: DO NOT CONNECT APPLIANCES WITH
DEFECTIVE LINES AND/OR PLUGS.
BE SURE APPLIANCES ARE NOT CONNECTED
TO GENERATOR WHEN STARTING UP.
STARTING THE GENERATOR WITH AN
APPLIANCE CONNECTED COULD RESULT IN
DAMAGE TO THE GENERATOR AND/OR
APPLIANCE AND PERSONAL INJURY.
DO NOT TURN THE STARTING MOTOR OVER 5
SECONDS CONTINUOUSLY. IF THE ENGINE FAILS
TO START, RETURN THE KEY TO THE “ I “ (ON)
POSITION AND WAIT ABOUT 10 SECONDS THEN
START AGAIN.
DO NOT TURN THE KEY SWITCH TO THE “ “ (START)
POSITION WHEN THE ENGINE IS RUNNING TO
PREVENT DAMAGE OF STARTING MOTOR.
4. After 20 to 30 seconds of warm-up is completed, turn the engine
switch to “ “ (RUN) position. (Fig. 10)
5. Check to make sure the generator voltage is operating at normal
levels by changing over the LED screen in the multi monitor into
the “V” indication. Normal level is approximately 120V.
NOTE: Please contact an authorized John Deere Dealer if the
multi monitor is off during the proper operation.
6. Test the GFCI receptacle on the unit. Push the test button. The
reset button should pop out and there should be no power at
the receptacle. Apply a test load or lamp to each receptacle to
verify. IF THE RESET BUTTON DOES NOT POP OUT, DO
NOT USE THE RECEPTACLE. SEE DEALER FOR SERVICE
IMMEDIATELY.
7. If GFCI receptacle tests correctly, rmly push the reset button
to restore power. A distinctive click should be heard or felt when
this is complete. IF THE RECEPTACLE DOES NOT RESET
PROPERLY, DO NOT USE THE RECEPTACLE. SEE DEALER
FOR SERVICE IMMEDIATELY.
8. Loads can now be applied to unit.

Operating the Generator
28 Operator’s Manual
OPERATION
USING ELECTRIC POWER:
WARNING: MAKE SURE THAT THE APPLIANCE IS
SWITCHED OFF BEFORE CONNECTING IT TO
THE GENERATOR.
DO NOT MOVE THE GENERATOR WHILE IT IS
RUNNING.
BE SURE TO GROUND THE GENERATOR.
FAILURE TO GROUND UNIT MAY LEAD TO
ELECTRICAL SHOCK.
AC APPLICATION:
1. Make sure the voltage indicated in the LED screen is the
normal level (approx. 120V).
NOTE: This generator is thoroughly tested and adjusted in
the factory. If the generator does not produce the specied
voltage, consult your nearest authorized John Deere
Dealer
2. Turn off the switch(es) of the electrical appliance(s) before
connecting to the generator.
3. Insert the plug(s) of the electrical appliance(s) into the
receptacle. (Fig. 11)
• Using Table 1, check the amperage of the receptacles used
and be sure not to take a current exceeding the specied
amperage.
• Be sure that the total wattage of all connected appliances
does not exceed the rated output of the generator, see
specications on page 30.
WARNING: TO TAKE POWER OUT FROM THE TWIST
LOCK RECEPTACLE, INSERT THE PLUG INTO
THE RECEPTACLE, AND TURN IT CLOCKWISE
TO THE LOCK POSITION.
BE SURE TO GROUND THE GENERATOR IF THE
C ON NE CTED EL EC TR IC AL D EV IC E I S
GROUNDED.
DO NOT PUT FOREIGN OBJECTS INTO THE PLUG
RECEPTACLE.
NOTE: When the “O_Lod” (overload) is indicated in the
LED screen, AC output is cut off on the grounds that
the generator operation is in overload condition or
appliance(s) will be out of order.
Stop the generator immediately, check the appliance
and/or generator for overloading, and have repaired as
necessary by an authorized John Deere Dealer.
4. Turn on the switch of the appliance.
Table 1
(Fig. 11)
Style Ampere Receptacle AC
plug
Description
Up to
20A
NEMA
5-20R
NEMA
5-20P
GFCI (Ground
Fault Circuit
Interrupter)
Receptacle,
duplex
Up to
30A
NEMA
5-30R
NEMA
5-30P
Locking
Receptacle
AC-G3200i
AC-G4300i
Multi Monitor
Multi Monitor
Engine Switch
Ground Terminal
DC Terminals
AC Receptacles (20A)
Key Switch
DC Circuit Breaker
AC Circuit Breaker
Engine Switch
Ground Terminal
DC Terminals
Key Switch
DC Circuit Breaker
AC Circuit Breaker
AC Receptacles (30A)
AC Receptacles (20A) AC Receptacles (30A)
CONTROL PANELS

Operating the Generator
Operator’s Manual 29
(Fig. 13)
(Fig. 12)
OPERATION
DC APPLICATION:
The DC terminal is used only for charging 12 volt batteries. It
provides up to 12V - 8.3A (100W) of maximum power. (Fig. 12)
CONNECTION OF CABLE:
Connect positive terminal (red) on generator to positive (+) terminal
on battery.
Connect negative terminal (black) on generator to negative (-)
terminal on battery.
SAFETY PRECAUTIONS WHILE CHARGING:
WARNING: AN EXPLOSIVE HYDROGEN GAS IS
DISCHARGED THROUGH VENT HOLES IN
THE BATTERY DURING THE CHARGING
PROCESS. DO NOT ALLOW SPARK OR
OPEN FLAME AROUND THE GENERATOR
OR BATTERY DURING THE CHARGING
PROCESS.
ELECTROLYTE FLUID CAN BURN EYES
AND CLOTHING. BE EXTREMELY CAREFUL
TO AVOID CONTACT. IF INJURED, WASH
THE A FFE CTE D AR EA I MME DIATELY
WITH LARGE QUANTITIES OF WATER AND
CONSULT A DOCTOR FOR TREATMENT.
When charging a large capacity battery or totally discharged
battery, excessive current may force the DC breaker to turn off.
In such cases, use a battery charger to charge a large battery
with AC output.
Battery defects may cause the DC breaker to trip. Check the
battery before resetting the DC breaker.
STOPPING THE GENERATOR:
1. Turn off the power switch of the electric equipment and unplug
the cord from receptacle of the generator.
2. Allow the engine about 3 minutes to cool down at no load before
stopping.
3. Turn the engine switch to the position “ “ (STOP).
(Fig. 13)
4. Turn the key switch to the “O” (STOP) position.
OIL SENSOR:
The oil sensor detects the fall in oil level in the crankcase and
automatically stops the engine when the oil level falls below a
predetermined level.
When the engine has stopped automatically, turn off the generator,
and check the oil level. Rell engine oil to the upper level as
instructed on page 21 and restart the engine.
If the engine dose not start by usual starting procedures, check
the oil level.
CAUTION: DO NOT REMOVE OIL SENSOR PROBE
WHEN REFILLING WITH OIL.
REMOVE OIL FILLER CAP ON THE OPPOSITE
SIDE OF CARBURETOR.
Negative Terminal
(Black)
Positive Terminal
(Red)
STOP
RUN
CHOKE

Operating the Generator
30 Operator’s Manual
Applications Applicable Wattage (W) 60 Hz
AC-G3200i AC-G4300i
Incandescent Lamp, Heater approx. 2800 approx. 3800
Fluorescent Lamp, Electric Tool approx. 1400 approx. 1900
Mercury Lamp approx. 1000 approx. 1600
Compressor Pump approx. 600 approx. 800
OPERATION
WATTAGE INFORMATION:
Some appliances need a “surge” of energy when starting. This means
that the amount of electrical power needed to start the appliance may
exceed the amount needed to maintain its use.
Electrical appliances and tools normally come with a label indicating
voltage, cycles / Hz, amperage (amps) and electrical power needed to
run the appliance or tool.
Check with your nearest dealer or service center with questions
regarding power surge of certain appliances or power tools.
• Electrical loads such as incandescent lamps and hot plates require
the same wattage to start as is needed to maintain use.
• Loads such as uorescent lamps require 1.2 to 2 times the indicated
wattage during start-up.
• Loads for mercury lamps require 2 to 3 times the indicated wattage
during start-up.
• Electrical motors require a large starting current. Power requirements
depend on the type of motor and its use. Once enough “surge” is
attained to start the motor, the appliance will require only 30% to 50%
of the wattage to continue running.
• Most electrical tools require 1.2 to 3 times their wattage for running
under load during use. For example, a 5000 watt generator can power
a 1800 to 4000 watt electrical tool.
• Loads such as submersible pumps and air compressors require a
very large force to start. They need 3 to 5 times the normal running
wattage in order to start. For example, a 5000 watt generator would
only be able to drive a 1000 to 7000 watt pump.
NOTE: The following wattage chart is general guide only. Refer to your
specic appliance for correct wattage.
To determine the total wattage required to run a particular electrical
appliance or tool, multiply the voltage gure of the appliance / tool by
the amperage (amps) gure of same. The voltage and amperage (amps)
information can be found on a name plate which is normally attached
to electrical appliances and tools.
CAUTION: IF AN ELECTRIC MOTOR FAILS TO START OR
REACH RUNNING SPEED, TURN OFF THE
APPLIANCE OR TOOL IMMEDIATELY TO AVOID
EQUIPMENT DAMAGE. ALWAYS CHECK THE
REQUIREMENTS OF THE TOOL OR APPLIANCE
BEING USED COMPARED TO THE RATED OUTPUT
OF THE GENERATOR.

Operating the Generator
Operator’s Manual 31
OPERATION
CABLE SIZE:
When a long electric extension cord is used to connect an appliance or
tool to the generator, a certain amount of voltage drop or loss occurs in
the extension cord which reduces the effective voltage available for the
appliance or tool. The chart below has been prepared to illustrate the
approximate voltage loss when an extension cord of 300 feet (approx.
100 meters) is used to connect an appliance or tool to the generator.
Norminal
Cross
Section
A.W.G. Allowable
Current
No. of strands /
strands dia.
Resistance Current Amp.
mm
2
No. A No./mm /100m 1.0 A 3.0 A 5.0 A 8.0 A 10.0 A 12.0 A 15.0 A
0.75 18 7 30/0.18 2.477 2.5 V 8.0 V 12.5 V - - - -
1.27 16 12 50/0.16 1.486 1.5 V 5.0 V 7.5 V 12.0 V 15.0 V 18.0 V -
2.00 14 17 37/0.26 0.952 1.0 V 3.0 V 5.0 V 8.0 V 10.0 V 12.0 V 15.0 V
3.50 12 - 10 23 45/0.32 0.517 - 1.5 V 2.5 V 4.0 V 5.0 V 6.5 V 7.5 V
5.50 10 - 8 35 70/0.32 0.332 - 1.0 V 2.0 V 2.5 V 3.5 V 4.0 V 5.0 V
Voltage Drop

Operating the Generator
32 Operator’s Manual
OPERATION
SPARK ARRESTER:
In a dry or wooded area, it is recommended to use the product with a
spark arrester. Some areas require the use of a spark arrester. Please
check your local laws and regulations before operating your product.
The spark arrester must be cleaned regularly to keep it functioning as
designed.
A clogged spark arrester :
• Prevents the ow of exhaust gas
• Reduces engine output
• Increases fuel consumption
• Makes starting difcult
CAUTION: IF THE ENGINE HAS BEEN RUNNING, THE
M U FFL E R A N D T HE S PA RK ARR E S T E R
WILL BE VERY HOT. ALLOW THE MUFFLER TO COOL
BEFORE CLEANING THE SPARK ARRESTER.
How to remove the spark arrester (Fig. 14):
1. Remove the ange bolts from the mufer cover and remove the
mufer cover.
2. Remove the special screw from the spark arrester and remove the
spark arrester from the mufer.
Clean the spark arrester screen (Fig. 15):
1. Use a brush to remove carbon deposits from the spark arrester screen.
Be careful to avoid damaging the screen.
2. The spark arrester must be free of breaks and holes. Replace the
spark arrester if it is damaged.
3. Install the spark arrester, and mufer protector in the reverse order
of disassembly.
(Fig. 15)
SPARK
ARRESTER
SCREEN
MUFFLER
TAIL SCREEN
TAIL SCREEN COVER
SCREW
NUT
SPARK ARRESTER SCREEN
(Fig. 14)

Operator’s Manual 33
Troubleshooting
When generator engine fails to start after several attempts, or if no electricity is available at the output socket, check
the following chart. If your generator still fails to start or generate electricity, contact your nearest John Deere dealer or
service shop for further information or corrective procedures.
Symptom Problem Solution
Engine will not start. Check if engine switch is off. Turn engine switch to the “ “
(CHOKE) position.
Fuel Tank empty. Fill tank making sure not to overll.
Check to make sure generator is not If connected, turn off the power switch
connected to an appliance. on the connected appliance and
unplug.
Check spark plug for loose spark If loose, push spark plug cap back
plug cap. into place.
Check spark plug for contamination. Remove spark plug and clean
electrode.
Check engine oil level. If the engine oil level is low, add oil
per “Pre-Operation; Engine Oil” on
page 21.
Generator has no output. Check if the “O_Lod”, overload, Stop the engine and check the
is indicated in the Multi Monitor. appliance and/or generator for
overloading.
Check if the DC circuit breaker is Depress the circuit breaker into
turned off. ON position, after making sure the
charging current level is proper and
the battery is in the normal condition.
Check AC receptacle and DC terminals Secure connection if necessary.
for loose connection.
Check to see if engine starting was Turn off switch on the appliance, and
attempted with appliances already disconnect cable form receptacle.
connected to generator. Reconnect after generator has been
started properly.

34 Operator’s Manual
Service
MAINTENANCE SCHEDULE
CAUTION: MAKE SURE THE ENGINE IS STOPPED
BEFORE STARTING ANY MAINTENANCE,
SERVICING OR REPAIR.
NOTE: It is recommended to use ear protection when performing
operation, maintenance and repair of the generator.
Maintenance, replacement or repair of the emission control devices and
systems must be performed by an authorized John Deere Service Center
or Dealer.
DAILY INSPECTION:
Before running the generator, check the following service items:
• Safe surroundings.
• Leakage of gasoline and engine oil.
• Clean engine oil.
• AC receptacle and DC terminal for damage.
• Enough gasoline.
• Excessive vibration, noise.
• Loose or broken bolts, nuts or shields.
• Clean air element.
PERIODIC MAINTENANCE:
Periodic maintenance is vital to safe and efcient operation of your
generator.
Check the Periodic Maintenance Table for periodic maintenance
intervals.
NOTE: REPLACEMENT, REPAIR AND ADJUSTMENT OF THESE
COMPONENTS MUST BE PERFORMED BY AN AUTHORIZED
JOHN DEERE SERVICE CENTER OR DEALER.
The emission control system consists of the following parts:
• Carburetor and internal parts
• Cold start enrichment system, if applicable
• Intake manifold, if applicable
• Air cleaner element
• Spark plug
• Magneto or electronic ignition system
• Spark advance / retard system, if applicable
• Exhaust manifold, if applicable
• Hoses, belts, connectors, and assemblies

Operator’s Manual 35
MAINTENANCE SCHEDULE
PERIODIC MAINTENANCE TABLE:
The maintenance schedule indicated in the table is based on the normal generator operation. Should the
generator be operated in extremely dusty condition or in heavier loading condition, the maintenance intervals
must be shortened depending on the contamination of oil, clogging of lter elements, wear of parts, and so on.
Service
* NOTE: Initial oil change should be performed after the rst twenty (20) hours of operation. Thereafter, change oil every
hundred (100) hours. Before changing oil, check for a suitable way to dispose of old oil. Your local zoning or
environmental regulations will give you more detailed instructions on proper disposal.
**NOTE: As to the procedures for these items, contact your authorized John Deere Service Dealer.
(Initial)
Maintenance Items Every 8
hours (Daily)
Every 20
hours
Every 50
hours (Weekly)
Every 100
hours
Every 200
hours (Monthly)
Every 500
hours
Every 1000
hours
Clean generator and
check bolts and nuts.
•
Check and rell
engine oil.
•
AC receptacles •
DC terminal •
Engine switch •
Check Multi Monitor •
Clean air element. •
Clean spark plug. •
Change engine oil. * • •
Spark arrester •
Replace air element. •
Clean fuel lter. •
Clean and adjust spark
plug and electrodes.
•
Replace spark plug. •
Remove carbon from
cylinder head. **
•
Check and adjust valve
clearance. **
•
Clean and adjust
carburetor. **
•
Overhaul engine ** •
Rotor •
Stator •
Replace engine mount •
Replace fuel lines Yearly
(Rell daily up to upper level)

36 Operator’s Manual
Service
MAINTENANCE SCHEDULE
CHANGING ENGINE OIL:
Change oil after the rst 20 hours of operation. Thereafter it
should be changed every 100 hours.
1. Drain oil by removing the drain plug and the oil ller cap
while the engine is warm. (Fig. 16)
2. Reinstall the drain plug and ll the engine with oil until it
reaches the upper level on the oil ller cap.
NOTE: John Deere PLUS-4
®
oil is the preferred oil to use. If
John Deere PLUS-4
®
oil is not available, use 4-stroke
automotive detergent oil of API service class SE or
higher grade (SG, SH or SJ is recommended). If
contaminated or deteriorated oil is used or the quantity
of the engine oil is not sufcient, the engine damage
will result and its life will be greatly shortened.
3. Dispose of used oil according to local zoning or
environmental regulations.
SERVICING THE AIR CLEANER:
Maintaining an air cleaner in proper condition is very
important. Dirt induced through improperly installed,
improperly serviced or inadequate elements damages and
wears out engines. Always keep the element clean.
1. Unhook the cover and remove the cleaner element. (Fig.
17)
2. Urethane foam: Wash the element with fresh water.
Squeeze out the water then dry the element. (Do not
twist.)
CLEANING AND GAPPING SPARK PLUG:
If the plug is contaminated with carbon, remove the carbon
using a plug cleaner or wire brush. (Fig. 18)
Adjust the electrode gap to 0.6 to 0.7 mm (0.024 to
0.028 in). (Fig. 19)
Recommended Spark Plug:
Spark Plug ................. NGK BR-6HS
RL86C Champion
(Fig. 16)
(Fig. 17)
(Fig. 18)
0.024 - 0.028 in
(Fig. 19)
Oil Drain Plug
Spark Plug
Plug Wrench
Spark Plug Cap

Operator’s Manual 37
Service
MAINTENANCE SCHEDULE
CLEANING FUEL STRAINER:
Dirt and water in the fuel are removed by the fuel strainer.
1. Remove the strainer cup and throw away water and dirt.
(Fig. 20)
2. Clean the screen and strainer cup with gasoline.
3. Tightly fasten the cup to main body, making sure to avoid
fuel leak.
PERIODIC OPERATION AND INSPECTION:
When furnishing the generator as emergency electric power
source, periodic operation and inspection are needed.
Fuel (gasoline) and engine oil will be deteriorated with time,
and this causes the engine to be difcult to start and as
results improper engine operation and failure.
CAUTION: SINCE THE FUEL (GASOLINE) WILL
BE D ETERI OR AT ED WITH T IME,
REPLACE FUEL (GASOLINE) WITH
FRESH FUEL PERIODICALLY; ONCE
E V E RY T H R E E ( 3 ) M O N T H S I S
RECOMMENDED.
1. Check the fuel (gasoline), engine oil and air cleaner.
2. Start engine.
3. With appliance such as lighting activated, run the engine
for over ten minutes.
4. Check the following items:
• Engine running properly.
• Adequate output and the indicator lamp turned on
properly.
• Then engine switch normally operated.
• No leakage of engine oil and fuel (gasoline).
(Fig. 20)

38 Operator’s Manual
TRANSPORTING
When transporting the generator, make sure that the fuel
(gasoline) should be drained from the tank.
WARNING: TO PREVENT FUEL SPILLAGE DUE TO
THE VIBRATION AND IMPACT, NEVER
TRANSPORT THE GENERATOR WITH
FUEL (GASOLINE) IN THE TANK.
SECURE THE TANK CAP.
TO AVOID THE RISK OF THE GASOLINE
FLAMMABILITY, NEVER LEAVE THE
GENERATOR IN AN AREA EXPOSED TO
D I R E C T S U N L I G H T O R H I G H
TEMPERATURES FOR A LONG TIME.
KEEP THE FUEL (GASOLINE) IN THE
EXCLUSIVE GASOLINE STORAGE TANK
M A D E B Y S T E E L W H E N
TRANSPORTING.
1. Turn the engine switch to the “ “ (STOP) position.
2. Drain the fuel from the tank.
3. Tighten the tank cap.
CAUTION: DO NOT PLACE ANY HEAVY OBJECTS “
ON THE GENERATOR.
SELECT AND PLACE THE GENERATOR IN
THE PROPER POSITION OF THE
TRANSPORT VEHICLE SO THAT THE
GENERATOR WILL NOT MOVE OR FALL
DOWN. SECURE THE GENERATOR WITH
ROPES IF NECESSARY.
Transporting

Service
Operator’s Manual 39
PREPARATION FOR STORAGE
The following procedures should be followed prior to
storage of your generator for periods of 6 months or
longer.
1. Drain fuel from fuel tank carefully by disconnecting the
fuel line. Gasoline left in the fuel tank will eventually
deteriorate making engine-starting difcult.
2. Remove the drain screw of the carburetor. (Fig. 21)
3. Change engine oil.
4. Check for loose bolts and screws, tighten them if
necessary.
5. Clean generator thoroughly with clean cloth. NEVER
USE WATER TO CLEAN GENERATOR!
6. Pull recoil starter handle until resistance is felt, leaving
handle in that position.
7. Store generator in a well ventilated, low humidity
area.
Storage
(Fig. 21)
Drain Screw

40 Operator’s Manual
Specications
RECORD SERIAL NUMBER
Write you model number, machine serial number (see
serial number tag in illustration) and date of purchase in the
spaces provided below. Your dealer needs this information
when ordering parts.
Model No. ______________________________________________
Machine Serial No. _______________________________________
Date of Purchase ________________________________________
(To be lled in by purchaser)
ITEM SPECIFICATION
AC-G3200i AC-G4300i
ALTERNATOR ............................................................... Multipole, Revolving Field, Magnet type
AC Output
Frequency ................................................................... 60 Hz 60 Hz
Rated Output............................................................... 2,800 W 3,800 W
Rated voltage .............................................................. AC 120V AC 120V
Rated Amperage ......................................................... 23.3 A 31.7 A
Rated power factor...................................................... 1.0 1.0
DC output
Rated output ............................................................... 100W (Battery Charge Only)
Rated voltage .............................................................. 12V 12V
Rated current .............................................................. 8.3 A 8.3 A
Insulation Class ............................................................. B B
Insulation Endurance .................................................... 1,250V for 1 minute
Insulation Resistance .................................................... 10MΩ and higher at 500V
Exciting System ............................................................ Revolving eld of permanent magnet.
ENGINE ......................................................................... Forced air-cooled, 4-cycle, Single Cylinder, OHC Gasoline
Model ........................................................................... EX21 EX27
Displacement ............................................................... 12.87 cu. in. (211 mL) 16.17 cu. in. (265 mL)
Max. output RPM / kW ................................................. 3,600 / 4.8 3,600 / 6.3
Cont. output RPM / kW ................................................ 3,600 / 3.7 3,600 / 5.1
Fuel .............................................................................. Automotive Unleaded Gasoline
Fuel tank capacity (gal./L) ............................................ 2.84 / 10.8 3.37 / 12.8
Starting system ............................................................ Electric and Recoil starter
GROUND SYSTEM ....................................................... Neutral Ground
DIMENSION:
Length: ......................................................................... 21.1 in (537 mm) 22.8 in (580 mm)
Width: ......................................................................... 18.9 in (482 mm) 20.8 in (527 mm)
Height: ......................................................................... 22.9 in (583 mm) 24.3 in (618 mm)
DRY WEIGHT ................................................................ 130 lb. (59kg) 163 lb. (74kg)
VALVE CLEARANCE
(Intake & Exhaust) (in / mm) ........................................ 0.0039 0.0012 / 0.1 0.03
Note: Adjust the valve clearance while the engine is cold.
PROD No. / SER No. (Label)

Operator’s Manual 41
Wire Diagram
AC-G3200i / AC-G4300i (60Hz-120V)
M
RELAY
Key switch
M-
L.IG
B
M+
ST
R
Org
R
R
R
W
Blk
W
W
W
W
R
R R
R
R
R
W
W
W
Blu
W
W
Grn/Y
W
W
W
Org
Org
Blu
R
W
Blu
R
Blu
Blu
Blu
Blu
Y
Blk
Blk
Brn
Earth
(ground)
terminal
Brn
Brn
Grn/Y
Grn/Y
Grn/Y
Grn/Y
Grn/Y
Grn/Y
INV&E/G C/U
Engine
switch
Fuse10A
Battery
Starting
motor
Diode
rectifier
Stepping motor
MONITOR C/U
CONTROL PANEL
GENERATOR
ENGINE
Main coil
Sub coil 2
Sub coil 1
DC
winding
Oil level
sensor
Spark
plug
DC output
terminal
Brn
Grn
Grn
Gry
Pur
Blk : Black
Wiring color cord
Blk/W : Black/White
Blu : Blue
LBlu : Light blue
Brn : Brown
Brn/W : Brown/White
Grn : Green
Grn/W : Green/White
Org : Orange
Gry : Gray
R : Red
W : White
Y : Yellow
Grn/Y : Green/Yellow
W/Blk : White/Black
Pur : Purple
Ignition coil
Gry
Org
Brn
Brn
Gry
DC circuit breaker
AC
receptacle
AC
receptacle
AC circuit
breaker
AC circuit
breaker
AC circuit
breaker
Earth plate
Blk
R
Regulator
Org
Y
Y
Grn/Y

42 Operator’s Manual
Warranty
STATEMENT OF WARRANTY
The John Deere warrants all parts, (except those referred to below), of your new generator
to be free from defects in materials and workmanship during the following periods:
For Two (2) Years from the date of original purchase.
Defective parts not subject to normal wear and tear will be repaired or replaced at our
option during the warranty period. In any event, reimbursement is limited to the purchase
price paid.
EXCLUSIONS
1. Engine/Motor and Generator are covered under separate warranty by its respective
manufacturer and is subject to the terms set forth therein.
2. This warranty does not cover parts damaged due to normal wear, misapplication, misuse,
operation at other than recommended . Failure to follow recommended operating and
maintenance procedures also voids warranty.
3. The use of other than genuine manufacturer repair parts will void warranty.
4. Parts returned, prepaid to our factory or to an Authorized John Deere Service Center
will be inspected and replaced free of charge if found to be defective and subject
to warranty. There are no warranties which extend beyond the description of the
face hereof. Under no circumstances shall the manufacturer bear any responsibility
for loss of use of the unit, loss of time or rental, inconvenience, commercial loss or
consequential damages.
For Service or Warranty Consideration, contact
Mi-T-M
®
Corporation, 8650 Enterprise Drive, Peosta, IA 52068
1-877-JD-KLEEN / (1-877-535-5336) Fax 563-556-1235
Monday - Friday 8:00 a.m. - 5:00 p.m. CST

Warranty
Operator’s Manual 43
CALIFORNIA EMISSIONS CONTROL WARRANTY STATEMENT
YOUR WARRANTY RIGHTS AND OBLIGATIONS
The California Air Resources Board and John Deere are pleased to explain the emissions control system warranty on
your small off-road engine (SORE). In California, new SOREs must be designed, built and equipped to meet the State’s
stringent anti-smog standards. John Deere must warrant the emissions control system on your SOREs for the periods
of time listed below provided there has been no abuse, neglect or improper maintenance of your SOREs.
Your emissions control system may include parts such as the carburetor or fuel-injection system, fuel lines and the
ignition system. Also included may be hoses, clamps , connectors and other associated components.
Where a warrantable condition exist, John Deere will repair your small off-road engine at no cost to you including
diagnosis, parts and labor.
MANUFACTURER’S WARRANTY COVERAGE:
This emissions control system is warranted for two years. If any emissions-related part on your engine is defective, the
part will be repaired or replaced by John Deere.
OWNER’S WARRANTY RESPONSIBILITIES:
-As the SORE owner, you are responsible for performance of the required maintenance listed in your owner’s manual.
John Deere recommends that you retain all receipts covering maintenance on your SORE , but John Deere cannot
deny warranty solely for the lack of receipts.
-As the SORE owner, you should however be aware that John Deere may deny you warranty coverage if your SORE
or a part has failed due to abuse, neglect, or improper maintenance or unapproved modications.
-You are responsible for presenting your SORE to distribution center or service center authorized by John Deere -
Mi-T-M Corporation, 8650 Enterprise Drive, Peosta, IA 52068 (herein John Deere) as soon as the problem exists. The
warranty repairs should be completed in a reasonable amount of time, not to exceed 30 days.
If you have a question regarding your warranty coverage, you should contact John Deere Customer Service Department
at 1-877-JD-KLEEN / (1-877-535-5336).

Warranty
44 Operator’s Manual
GENERAL EMISSIONS WARRANTY COVERAGE
- California Only -
John Deere warrants to the ultimate purchaser and each subsequent purchaser that the SORE (1) has been designed,
built and equipped so as to conform with all applicable regulations; and (2) is free from defects in materials and
workmanship that cause the failure of a warranted part to conform with those regulations as may be applicable to the
terms and conditions stated below.
(a) The warranty period begins on the date the engine is delivered to an ultimate purchaser or rst placed into service.
The warranty period is two years.
(b) Subject to certain conditions and exclusions as stated below, the warranty on emissions related parts is as
follows:
(1) Any warranted part that is not scheduled for replacement as required maintenance in your owner’s manual is
warranted for the warranty period stated above. If the part fails during the period of warranty coverage, the
part will be repaired or replaced by John Deere according to subsection (4) below. Any such part repaired or
replaced under warranty will be warranted for the remainder of the period.
(2) Any warranted part that is scheduled only for regular inspection in your owner’s manual is warranted for the
warranty period stated above. Any such part repaired or replaced under warranty will be warranted for the
remaining warranty period.
(3) Any warranted part that is scheduled for replacement as required maintenance in your owner’s manual is
warranted for the period of time before the rst scheduled replacement date for that part. If the part fails before
the rst scheduled replacement, the part will be repaired or replaced by John Deere according to subsection (4)
below. Any such part repaired or replaced under warranty will be warranted for the remainder of the period
prior to the rst scheduled replacement point for the part.
(4) Repair or replacement of any warranted part under the warranty provisions herein must be performed at a
warranty station at no charge to the owner.
(5) Notwithstanding the provisions herein, warranty services or repair will be provided at all of our distribution
centers that are franchised to service the subject engines.
(6) The owner must not be charged for diagnostic labor that leads to the determination that a warranted part is
in fact defective, provided that such diagnostic work is performed at a warranty station.
(7) John Deere is liable for damages to other engine components proximity caused by a failure under warranty of any
warranted part.
(8) Throughout the engine warranty period stated above, John Deere will maintain a supply of warranted parts sufcient
to meet the expected demand for such parts.
(9) Any replacement part may be used in the performance of any warranty maintenance or repairs and must
be provided without charge to the owner. Such use will not reduce the warranty obligations of John Deere.
(10) Add-on or modied parts that are not exempted by the Air Resources Board may not be used. The use of any
non-exempted add-on or modied parts by the ultimate purchaser will be grounds for disallowing a warranty
claims. John Deere will not be liable to warrant failures of warranted parts caused by the use of a non-exempted
add-on or modied part.
(c) WARRANTED PARTS:
The repair or replacement of any warranted part otherwise eligible for warranty coverage may be excluded
from such warranty coverage if John Deere demonstrates that the engine has been abused, neglected, or
improperly maintained, and that such abuse , neglect ,or improper maintenance was the direct cause of the
need for repair or replacement of the part. That notwithstanding, any adjustment of a component that has
a factory installed, and properly operating, adjustment limiting device is still eligible for warranty coverage.
The following emissions warranty parts list are covered.
(1) Fuel Metering System/
(A) Carburetor and internal parts (and/or pressure regulator or fuel injection system)./
(B) Air/fuel ratio feedback and control system, if applicable./
(C) Cold start enrichment system, if applicable./
(D) Regulator assy (gaseous fuel, if applicable)
(2) Air Induction System/
(A) Intake manifold, if applicable/
(B) Air lter.
(3) Ignition System/
(A) Spark plugs. /
(B) Magneto or electronic ignition system. /
(C) Spark advance/retard system, if applicable.
(4) Exhaust manifold, if applicable
(5) Evaporation System /
(A) Fuel line /
(B) Fuel line ttings

Guide d’utilisation 45
Notes

46 Guide d’utilisation
Introduction
LIRE CE MANUEL ATTENTIVEMENT AFIN
Le
AVERTISSEMENT: Ce produit contient
du plomb, un produit chimique qui est
connu par l'état de Californie comme
étant la cause de cancer et de
malformations congénitales ou autres
effets nocifs de reproduction.
Laver vos mains après avoir manipulé ce produit.

Guide d’utilisation 47
Introduction
AVIS
AVIS
INDICE D’AIR
Terme descriptif Applicable à la période de durabilité d’émissions

Guide d’utilisation
Introduction
GARANTIE COMPOSANT D’ÉMISSIONS FÉDÉRALES DÉFECTUEUX
COUVERTURE DE LA GARANTIE COMPOSANT D’ÉMISSIONS DÉFECTUEUX
PÉRIODE DE GARANTIE COMPOSANTS D’ÉMISSIONS
DÉFECTUEUX
PIÈCES COUVERTES
COMMENT OBTENIR LE SERVICE DE GARANTIE
CE QUI N’EST PAS COUVERT
RESPONSABILITÉS DU PROPRIÉTAIRE VIS À VIS DE LA
GARANTIE
de
CHOSES A CONNAÎTRE CONCERNANT LA GARANTIE
L’ENTRETIEN ET LES RÉPARATIONS DU SYSTÈME DE
CONTRÔLE D’ÉMISSIONS
sont
COMMENT FAIRE UNE RÉCLAMATION

Guide d’utilisation 49
Introduction
DÉCLARATION DE GARANTIE CONTRÔLE D’ÉMISSIONS POUR LA CALIFORNIE
VOS DROITS ET OBLIGATIONS DE GARANTIE
FUJI
FUJI
COUVERTURE DE LA GARANTIE DU FABRICANT:
RESPONSABILITÉS DU PROPRIÉTAIRE VIS À VIS DE LA GARANTIE:
FUJI
FUJI
GARANTIE LIMITÉE
Sur les systèmes de contrôle d’émissions
-La Californie seulement-
FUJI
A. DATE DE COMMENCEMENT
B. DURÉE DE LA COUVERTURE
FUJI
C. CE QUI EST COUVERT
D. CE QUI N’EST PAS COUVERT
FUJI
E. COMMENT FAIRE UNE RÉCLAMATION

Guide d’utilisation
Introduction
F. OÙ OBTENIR LE SERVICE DE GARANTIE
G. L’ENTRETIEN, LE REMPLACEMENT ET LA RÉPARATION
DES PIÈCES RELATIVE AUX ÉMISSIONS.
H. PIÈCES COUVERTES SOUS LA GARANTIE D’ÉMISSIONS
POUR LA CALIFORNIE
I. DÉCLARATIONS D’ENTRETIEN
NOTE: Un entretien plus fréquent sera peut être nécessaire dans des conditions poussiéreuses, sales ou rigoureuses.

Guide d’utilisation
Table des matières
Toutes les informations, illustrations et caractéristiques contenues
dans la présente publication sont à jour au moment de la publication,
le constructeur se réservant le droit d’apporter sans notication toute
modication jugée appropriée.
Page
Sécurité
Symboles de sécurité 59
Commandes
Préparation du groupe électrogène 64
Fonctionnement
Dépannage 77
Entretien
Transporte
Remisage
Caractéristiques
Diagramme du câblage
Garantie
Note

Guide d’utilisation
W
A
R
N
I
N
G
W
A
R
N
I
N
G
S
I
N
T
H
E
M
A
N
U
A
L
S
.
W
A
R
N
I
N
G
S
I
N
T
HE
M
A
N
U
A
L
S
.
C
A
U
T
I
O
N
O
C
A
U
T
I
O
N
S
I
N
O
T
H
E
M
A
N
U
A
L
S
O
C
A
U
T
I
O
N
S
I
N
O
T
H
E
M
A
N
U
A
L
S
O
C
A
U
T
I
O
N
S
I
N
O
T
H
E
M
A
N
U
A
L
S
O
C
A
U
T
I
O
N
S
I
N
O
T
H
E
M
A
N
U
A
L
S
Sécurité
RE C O NNA I TRE LES S YMB O LES DE
SÉCURITÉ
COMPRENDRE LES MOTS D’ALERTE
RESPECTER LES CONSEILS DE SÉCURITÉ
DANGER
AVERTISSEMENT
ATTENTION

Guide d’utilisation
OXYDE DE CARBONE – GAZ TOXIQUE
Utiliser le groupe électrogène dehors, loin de fenêtres ouvertes,
de conduits d’aération, ou de portes.
Le gaz d’échappement du groupe électrogène contient de
l’oxyde de carbone – un gaz toxique qui peut vous tuer. Vous
NE POUVEZ PAS sentir ou voir ce gaz.
Les gaz d’échappement peuvent être la cause de blessures
graves ou de mort.

54 Guide d’utilisation
CONSIGNES DE SÉCURITÉ LORS DU RAVITAILLEMENT
EN CARBURANT
PROTECTION PAR DISJONCTEUR DIFFÉRENTIEL
AVERTISSEMENT : LE DISJONCTEUR DIFFÉRENTIEL RISQUE DE
NE PAS FONCTIONNER SI LE GROUPE ÉLECTROGÈNE
N’EST PAS CORRECTEMENT RELIÉ À LA TERRE.
RES PE CT ER L A M ÉTH OD E C ORR EC TE D E
RACCORDEMENT À LA TERRE QUI EST SPECIFIÉE
DANS LA PARTIE INTITULÉE “INSTRUCTIONS DE MISE
À LA TERRE.”

Guide d’utilisation 55
RISQUES ÉLECTRIQUES
DANGER - UN BRANCHEMENT INCORRECT DU CON-
DUCTEUR DE MISE À LA TERRE DE L’ÉQUIPEMENT
PEUT ENTRAÎNER DES RISQUES D’ÉLECTROCUTION.
VÉRIFIER AVEC UN DÉPANNEUR OU UN ÉLECTRICIEN
QUALIFIÉ EN CAS DE DOUTES CONCERNANT LA MISE
À LA TERRE.

56 Guide d’utilisation
W
A
R
N
I
N
G
W
A
R
N
I
N
G
S
I
N
T
H
E
M
A
N
U
A
L
S
.
W
A
R
N
I
N
G
S
I
N
T
H
E
M
A
N
U
A
L
S
.
C
A
U
T
I
O
N
O
C
A
U
T
I
O
N
S
I
N
O
T
H
E
M
A
N
U
A
L
S
O
C
A
U
T
I
O
N
S
I
N
O
T
H
E
M
A
N
U
A
L
S
O
C
A
U
T
I
O
N
S
I
N
O
T
H
E
M
A
N
U
A
L
S
O
C
A
U
T
I
O
N
S
I
N
O
T
H
E
M
A
N
U
A
L
S
CONSEILS DE SÉCURITÉ IMPORTANTS

Guide d’utilisation 57
W
A
R
N
I
N
G
W
A
R
N
I
N
G
S
I
N
T
H
E
M
A
N
U
A
L
S
.
W
A
R
N
I
N
G
S
I
N
T
H
E
M
A
N
U
A
L
S
.
C
A
U
T
I
O
N
O
C
A
U
T
I
O
N
S
I
N
O
T
H
E
M
A
N
U
A
L
S
O
C
A
U
T
I
O
N
S
I
N
O
T
H
E
M
A
N
U
A
L
S
O
C
A
U
T
I
O
N
S
I
N
O
T
H
E
M
A
N
U
A
L
S
O
C
A
U
T
I
O
N
S
I
N
O
T
H
E
M
A
N
U
A
L
S
CONSEILS DE SÉCURITÉ IMPORTANTS
NOTE: S’assurer que l’entretien et la réparation du groupe
électrogène sont exécutés seulement par un personnel
bien qualié.
CONSERVER CES INSTRUCTIONS

Guide d’utilisation
PORTER DES VÊTEMENTS DE PROTECTION
INSPECTER LE GROUPE ÉLECTROGÈNE
PRÉPARATION POUR LES URGENCES
FA I R E L’ E N T R E T I E N D U G R O U P E
ÉLECTROGÈNE EN TOUTE SÉCURITÉ

Guide d’utilisation 59
Lire le manuel d'instructions de l'opérateur.
Se tenir à l'écart de la surface chaude.
Les gaz d'échappement sont toxiques.
Ne pas faire fonctionner dans une pièce
non-ventilée.
Arrêter le moteur avant le ravitaillement
en carburant.
Feu, flammes nues et fumer sont
interdits.
Attention, risque de choc électrique.
Ne pas relier le groupe électrogène aux
lignes du réseau public/commercial.
CHAUD, éviter de toucher les surfaces
chaudes.
Huile Moteur
Marche
(Courant et Moteur)
Ajouter huile
Condition de la batterie
en cours de charge
Arrêt
(Courant et Moteur)
Courant alternatif
Courant continu
Plus;
Polarité positive
Moins;
Polarité négative
Position sortie (OUT)
d'une commande poussoir
bistable
Position enclenchée (IN)
d'une commande poussoir
bistable
Protection par terre
(Terre)
Fusible
Starter; aide au
démarrage à froid
Démarrage du moteur
(Démarrage électrique)
Arrêt du moteur
Carburant diesel
Rapide
Lent
P r
Puissance Nominale (kW)
COP
Puissance en continu
COS
r
Coefficient de puissance nominale
f r
Fréquence Nominale (Hz)
U r
Tension nominale (V)
I r
Intensité nominale (A)
H max
altitude maximum du site
au-dessus du niveau de
la mer (m)
T max
Température ambiante
maximum ( )
m Masse (kg)
Marche
Arrêt
ÉTIQUETTES DE SÉCURITÉ

Guide d’utilisation
ÉTIQUETTES DE SÉCURITÉ

Guide d’utilisation
Commandes
COMMANDES
A-- Tableau de commande
B-- Réservoir de carburant
C-- Jauge de carburant
D-- Panneau Latéral (R)
E-- Bouchon de vidange d’huile
F-- Démarreur à recul (Poignée)
G-- Taquet
H-- Bouchon de réservoir
J-- Batterie
K-- Indicateur de niveau de l’huile
L-- Panneau latéral (L)
M-- Orice d’échappement
I-- Armature
J-- Capuchon de bougie d’allumage
K-- Filtre à air
L-- Tamis de carburant
H
P
O
MN
K LJ
I
A
B C
D
F
E
G

Commandes
Guide d’utilisation
COMMANDES
AVERTISSEMENT : NE PAS METTRE DE CORPS
ÉTRANGER DANS LA PRISE FEMELLE.
ATTENTION : SI LE DISJONCTEUR CONTINUE
D E S A U T E R , S ’ A S S U R E R Q U E
L’APPAREIL N’EST PAS DÉFECTUEUX.
S I L E G R O U P E É L E C T R O G È N E
FON C TI O NN E M AL, V O IR V O TRE
CONCESSIONNAIRE OU CENTRE DE
RÉPARATION AGRÉE JOHN DEERE.
IL NE FAUT JAMAIS INTERFÉRER AVEC
LE FONCT IONN EMENT DU TÉTON
DU DISJONCTEUR OU LE POUSSER DE
MANIÈRE RÉPÉTÉE EN POSITION ARMÉE
(ON).
LANCEUR À
COMMANDES DU MOTEUR
VOLET D’AIR
MARCHE
ARRÊT
ARRÊT
MARCHE
VOLET D’AIR
A
B
AB

Commandes
Guide d’utilisation
Hours
MULTI MONITOR
V
Hz
AUTO
P-SAVE
A
B C D E
GH
F
MULTI-MONITEUR
COMMANDES
A

64 Guide d’utilisation
Préparation du groupe électrogène
INSTRUCTIONS DE MISE À LA TERRE
DANGER - UN BRANCHEMENT INCORRECT DU
CONDUCTEUR DE MISE À LA TERRE DE
L’ÉQUIPEMENT PEUT ENTRAÎNER DES RISQUES
D’ÉLECTROCUTION. VÉRIFIER AVEC UN
DÉPANNEUR OU UN ÉLECTRICIEN QUALIFIÉ EN CAS
DE DOUTES CONCERNANT LA MISE À LA TERRE.
COMMUTATEUR DE TRANSFERT INVERSEUR DE
SOURCE
CETTE INSTALLATION DOIT ÊTRE EFFECTUÉE PAR UN
ÉLECTRICIEN LICENCIÉ EN RESPECTANT OBLIGATOIREMENT
LES CODES LOCAUX.
Tige de mise à la terre

Préparation du groupe électrogène
Guide d’utilisation 65
AVANT LE DÉMARRAGE
Huile de moteur recommandée:

Préparation du groupe électrogène
66 Guide d’utilisation
AVANT LE DÉMARRAGE
AVERTISSEMENT: CARBURANT EXPLOSIF!! L’ESSENCE
EST EXTRÊMEMENT INFLAMMABLE ET SES
VAPEURS PEUVENT EXPLOSER SI ELLES
S’ENFLAMMENT.
NE PAS RÉAPPROVISIONNER EN CARBURAN TOUT
EN FUMANT OU NE PAS S’APPROCHER DE LA
FLAMME NUE OU D’AUTRES EMPLACEMENTS À
RISQUE POTENTIEL D’INCENDIE.
IL NE FAUT ENTREPOSER L’ESSENCE QUE DANS
DES CONTENEURS HOMOLOGUÉS, DANS DES
BÂTIMENTS BIEN AÉRÉS, NON OCCUPÉS ET À
L’ÉCART DES ÉTINCELLES ET DES FLAMMES.
NE PAS REMPLIR LE RÉSERVOIR DE
CARBURANT LORSQUE LE MOTEUR EST
CHAUD OU EN MARCHE CAR L’ESSENCE
RENVERSÉE PEUT S’ENFLAMMER SI ELLE
ENTRE EN CONTACT AVEC LES
PARTIES CHAUDES OU LES ÉTINCELLES
PROVENANT DE L’ALLUMAGE. NE PAS METTRE
LE MOTEUR EN MARCHE PRÈS DE CARBURANT
QUI A ÉTÉ RENVERSÉ.
NE JAMAIS UTILISER D’ESSENCE COMME
PRODUIT DE NETTOYAGE.
AVERTISSEMENT: NE PAS TROP REMPLIR LE RÉSERVOIR
DE CARBURANT, LAISSER TOUJOURS DE LA
PLACE POUR QUE LE CARBURANT SE DILATE.
AVERTISSEMENT: REVOIR CHAQUE AVERTISSEMENT
AFIN D’ÉVITER LES RISQUES D’INCENDIE.
NE PAS RAVITAILLER EN CARBURANT LORSQUE
LE MOTEUR MARCHE OU EST CHAUD.
AVANT DE RAVITAILLER EN CARBURANT, PLACER
LA COMMANDE DU MOTEUR À LA POSITION “ ”
(ARRÊT).
FAIRE ATTENTION À NE PAS LAISSER ENTRER DE
POUSSIÈRE, SALETÉ, EAU OU AUTRES CORPS
ÉTRANGERS DANS LE CARBURANT.
ESSUYER BIEN TOUT CARBURANT RENVERSÉ
AVANT DE DÉMARRER LE MOTEUR.
SE TENIR À L’ÉCART DE FLAMMES NUES.
Vide
Complètement

Préparation du groupe électrogène
Guide d’utilisation 67
AVANT LE DÉMARRAGE
Recommandations générales
Type d’essence

Préparation du groupe électrogène
Guide d’utilisation
AVANT LE DÉMARRAGE
ATTENTION: SI LE BRANCHEMENT EST EFFECTUÉ DE FAÇON INCORRECTE,
LE MOTEUR SERA ENDOMMAGÉ.
CÂBLE
ROUGE
5
MOINS DE
131 mm [5.2 in.] (AC-G3200i)
162 mm [6.4 in.] (AC-G4300i)
MOINS DE
114 mm [4.5 in.] (AC-G3200i)
136 mm [5.4 in.] (AC-G4300i)
MOINS DE
71 mm [2.8 in.] (AC-G3200i)
82 mm [3.2 in.] (AC-G4300i)
1
2
3
4
5
1
6
2
3
4
Base de la batterie
Boulon à bride
Vis
Accessoires
Bande de la batterie
Boulon et écrou
6 Couvercle de batterie
CÂBLE
ROUGE
BATTERIE RECOMMANDÉE
i i

Préparation du groupe électrogène
Guide d’utilisation 69
AVANT LE DÉMARRAGE
Vérier les points suivants avant de démarrer le moteur:
Revoir chaque avertissement afin d’éviter les risques
d’incendie.
AVERTISSEMENT : MAINTENIR LA ZONE DE TRAVAIL
LIBRE DE TOUTE SUBSTANCE INFLAMMABLE OU
D’AUTRE MATÉRIAU DANGEREUX.
MAINTENIR LE GROUPE À UNE DISTANCE D’AU MOINS
3 PIEDS (1 MÈTRE) DE TOUT BÂTIMENT OU AUTRES
STRUCTURES.
NE SE SERVIR DU GROUPE QUE DANS UN ENDROIT
SEC ET BIEN VENTILÉ.
MAINTENIR LE TUYAU D’ÉCHAPPEMENT LIBRE DE
TOUT CORPS ÉTRANGER.
TENIR LE GROUPE À L’ÉCART DE FLAMMES NUES. NE
FUMER PAS !
MAINTENIR LE GROUPE SUR UNE SURFACE STABLE
ET PLANE.
NE PAS BLOQUER LES CONDUITS D’AIR DU GROUPE
AVEC DU PAPIER OU AUTRE MATIÈRE.

Guide d’utilisation
FONCTIONNEMENT
Démarrage avec lançeur à rappel
ATTENTION : VÉRIFIER LE NIVEAU D’HUILE AVANT
T O U T E U T I L I S AT I O N E N S U I VA N T L E S
INSTRUCTIONS À LA PAGE 61.
LORSQUE L’ON MET LE MOTEUR EN MARCHE AU
MOYEN DU DÉMARREUR À RECUL, RÉGLER
L’INTERRUPTEUR PRINCIPAL À LA POSITION “ I “
(MARCHE), PUIS TIRER LA POIGNÉE DU
DÉMARREUR.
NOTE: Lire soigneusement le manuel de l’utilisateur avant de
se servir de l’appareil. S’assurer de toujours placer le
groupe électrogène sur une surface à niveau, en bloquant
la roue avec un taquet et/ou en calant les roues. (Fig. 7)
ATTENTION: NE PAS BRANCHER D’APPAREILS DONT
L E S F I L S E T / O U L E S P R I S E S S O N T
DÉFECTUEUX.
S’ASSURER QUE LES APPAREILS NE SONT PAS
BRANCHÉS AU GROUPE LORS DU DÉMARRAGE.
LE FAIT DE DÉMARRER LE GROUPE AVEC UN
APPAREIL BRANCHÉ PEUT ENDOMMAGER LE
GROUPE ET/OU L’APPAREIL ET ÊTRE LA CAUSE
DE BLESSURES PERSONNELLES.
NOTE: Si le moteur ne démarre pas après plusieurs tentatives,
répéter les procédures de démarrage citées ci-dessus avec la
commande du moteur en position de « » (MARCHE).
NOTE: S’entretenir avec un concessionnaire John Deere agrée si
le multi-moniteur fournie n’est pas allumé pendant utilisation.
Fonctionnement
Taquet
Débloquer
Bloquer
ARRÊT
MARCHE
DÉMARRAGE
Tirer vivement
Poignée du lanceur à rappel
ARRÊT
MARCHE
DÉMARRAGE

Guide d’utilisation
Utilisation du groupe électrogène
FONCTIONNEMENT
Démarrage avec lançeur à rappel
ATTENTION: VÉRIFIER LE NIVEAU D’HUILE AVANT
TOUTE UTILISATION EN SUIVANT LES INSTRUCTIONS À
LA PAGE 61.
LO RS QUE L’ ON M ET LE M OT EUR E N MARCH E
AU MOYEN DU DÉMARREUR À RECUL, RÉGLER
L’INTERRUPTEUR PRINCIPAL À LA POSITION “ I “
(MARCHE), PUIS TIRER LA POIGNÉE DU
DÉMARREUR.
NOTE: Lire soigneusement le manuel de l’utilisateur avant de
se servir de l’appareil. S’assurer de toujours placer le
groupe électrogène sur une surface à niveau, en bloquant
la roue avec un taquet et/ou en calant les roues. (Fig. 7)
I
ATTENTION: NE PAS BRANCHER D’APPAREILS DONT
LES FILS ET/OU LES PRISES SONT DÉFECTUEUX.
S’ASSURER QUE LES APPAREILS NE SONT PAS
BRANCHÉS AU GROUPE LORS DU DÉMARRAGE. LE
FAIT DE DÉMARRER LE GROUPE AVEC UN APPAREIL
BRANCHÉ PEUT ENDOMMAGER LE GROUPE ET/OU
L’APPAREIL ET ÊTRE LA CAUSE DE BLESSURES
PERSONNELLES.
NE PAS FAIRE MARCHER LE MOTEUR DE DÉMARRAGE
PENDANT PLUS DE 5 SECONDES SANS INTERRUPTION.
SI LE MOTEUR NE DÉMARRE PAS, REMETTRE LA CLEF
À LA POSITION “ “ (MARCHE) ET ATTENDRE ENVIRON
10 SECONDES, PUIS DÉMARRER DE NOUVEAU.
NE PAS RÉGLER L’INTERRUPTEUR PRINCIPAL À LA
POSITION “ “ (DÉMARRAGE) QUAND LE MOTEUR
TOURNE POUR ÉVITER TOUS DOMMAGES AU MOTEUR
DE DÉMARRAGE.
NOTE: S’entretenir avec un concessionnaire John Deere agrée si le multi-
moniteur fournie n’est pas allumé pendant utilisation.

Guide d’utilisation
Utilisation du groupe électrogène
FONCTIONNEMENT
AVERTISSEMENT : S’ASSURER QUE L’APPAREIL
EST ÉTEINT AVANT DE LE BRANCHER AU
GROUPE ÉLECTROGÈNE.
NE PAS DÉPLACER LE GROUPE PENDANT QU’IL
FONCTIONNE.
S’ASSURER QUE LE GROUPE EST RELIÉ À
LA TERRE. IL Y A RISQUE DE CHOC
ÉLECTRIQUE SI L’APPAREIL N’EST PAS RELIÉ
À LA TERRE.
NOTE: Ce groupe électrogène est complètement testé et réglé
à l’usine. Si le groupe électrogène ne produit pas la
tension indiquée, consultez le fournisseur ou le service
JOHN DEERE le plus proche.
•
AVERTISSEMENT : POUR FOURNIR L’ALIMENTATION
À PARTIR DE LA PRISE DE BLOCAGE À
TORSION, INSÉRER LA FICHE DANS LA PRISE,
ET LA TOURNER DANS LE SENS DES AIGUILLES
D’UNE MONTRE À LA POSITION DE BLOCAGE.
N E P A S O U B L I E R D E R E L I E R L E
GROUPE ÉLECTROGÈNE À LA TERRE SI
L’APPAREIL ÉLECTRIQUE BRANCHÉ EST RELIÉ
À LA TERRE.
NE PAS METTRE DE CORPS ÉTRANGERS DANS
LE PRISE DE LA PRISE.
NOTE: Quand “O_Lod” (surcharge) est indiqué à l’afchage LE,
la sortie C.A. est débranchée car l’opération du groupe
électrogène se trouve en surcharge ou les appareils
électriques seront en panne.
Arrêter le groupe électrogène immédiatement, vérier
que l’appareil et/ou le groupe électrogène ne sont
pas surchargés, et faire réparer si nécessaire par un
concessionnaire John Deere agrée.
PANNEAU DE COMMANDE
NEMA
NEMA
GFCI
NEMA
NEMA
AC-G3200i
AC-G4300i
Multi-Moniteur
Interrupeur
du Moteur
Borne de mise
à la masse
Bornes C.C.
Prises à C.A. (20A)
Interrupteur
Principal
Disjoncteur C.C.
Disjoncteur C.A.
Prises à C.A. (30A)
Multi-Moniteur
Interrupeur
du Moteur
Borne de mise
à la masse
Bornes C.C.
Prises à C.A. (20A)
Interrupteur
Principal
Disjoncteur C.C.
Disjoncteur C.A.
Prises à C.A. (30A)

Guide d’utilisation
Utilisation du groupe électrogène
FONCTIONNEMENT
AVER TI SS EM EN T: UN G AZ D’HYDROG ÈN E
EXPLOSIBLE EST DÉCHARGÉ PAR LES TROUS
D’AÉRATION DE LA BATTERIE PENDANT
LE PROCESSUS DE CHARGE. MAINTENIR
LE GROUPE ÉLECTROGÈNE ET LA BATTERIE
À L’ÉCART D’ÉTINCELLE OU DE FLAMMES
NUES PENDANT LE PROC ESSUS DE
CHARGE.
LE FLUIDE ÉLECTROLYTE PEUT BRÛLER LES
YEUX ET LES HABITS. FAIRE TRÈS
ATTENTION À ÉVITER TOUT CONTACT. SI
BLESSÉ, LAVER IMMÉDIATEMENT LA
ZONE ATTEINTE AVEC DE GRANDE QUANTITÉ
D’EAU ET CONSULTER UN DOCTEUR POUR
DES SOINS MÉDICAUX.
ATTENTION : NE PAS RETIRER LA SONDE DÉTECTRICE
D’HUILE LORS DU RAVITAILLEMENT EN HUILE.
RETIRER LE BOUCHON DE REMPLISSAGE D’HUILE
DU COTÉ OPPOSÉ AU CARBURATEUR.
Borne négative
(NOIRE)
Borne positive
(ROUGE)
ARRÊT
MARCHE
DÉMARRAGE

74 Guide d’utilisation
Utilisation du groupe électrogène
FONCTIONNEMENT
NOTE: Le tableau de puissance en Watts suivant n’est qu’un guide général. Se
référer à votre appareil spécique pour la puissance en Watts correcte.
ATTENTION : SI UN MOTEUR ÉLECTRIQUE NE RÉUSSIT PAS
À DÉMARRER OU À ATTEINDRE SON RÉGIME NORMAL DE
FONCTIONNEMENT, METTRE IMMÉDIATMENT L’APPAREIL OU
L’OUTIL À L’ARRÊT AFIN D’ÉVITER D’ENDOMMAGER
L’ÉQUIPEMENT. VÉRIFIER TOUJOURS LES BESOINS DE
L’OUTIL OU DE L’APPAREIL QUE VOUS UTILISEZ COMPARÉ À
LA PUISANCE NOMINALE DU GROUPE ÉLECTROGÈNE.

Guide d’utilisation 75
Utilisation du groupe électrogène
FONCTIONNEMENT
Coupe
Nominale
A.W.G. Courant
Admissible
Nombre de to-
rons / diamètre
de torons
Résistance Ampère courant
N A N
7
Chute de tension

76 Guide d’utilisation
Utilisation du groupe électrogène
ÉCRAN DE
L'INTERCEPTEUR
D'ÉTINCELLE
SILENCIEUX
FILTREDEQUEUE
COUVERCLE DEFILTRE DE QUEUE
VIS
ÉCROU
FONCTIONNEMENT
ATTENTION : LE SILENCIEUX ET LE PARE-ÉTINCELLES
SERONT TRÈS CHAUD SI LE MOTEUR A FONCTIONNÉ.
LAISSER LE SILENCIEUX REFROIDIR AVANT DE
NETTOYER LE PARE-ÉTINCELLES.

Guide d’utilisation 77
Quand le groupe électrogène ne démarre pas après plusieurs essais ou si de l’électricité n’est pas disponible à la prise
de sortie, se référer au tableau suivant. Si votre groupe électrogène n’arrive toujours pas à démarrer ou à produire
de l’électricité, contacter votre concessionnaire ou centre de réparation John Deere le plus proche pour plus de
renseignements ou pour les procédures de réparation à suivre.
Symptôme Problème Solution
Le moteur ne démarre pas.
Pas de courant en sortie
du groupe électrogène.
Dépannage

Guide d’utilisation
PROGRAMME D’ENTRETIEN
ATTENTION: S’ASSURER QUE LE MOTEUR EST BIEN ARRÊTÉ
AVANT DE COMMENCER TOUS TRAVAUX DE SERVICE,
D’ENTRETIEN OU DE RÉPARATION.
NOTE: Nous recommandons d’utiliser une protecteur acoustique quand on
exécute l’opération, l’entretien et la réparation du groupe
électrogène.
•
•
•
•
NOTE : LE rEmpLacEmENT, La réparaTiON ET LE régLagE dE
cEs piècEs dOivENT êTrE EffEcTués par uN cENTrE dE
sErvicE après-vENTrE Ou uN cONcEssiONNairE JOhN
dEErE agréE.
Entretien

Guide d’utilisation 79
PROGRAMME D’ENTRETIEN
* NOTE: La vidange d’huile initiale doit être exécutée après les premières vingt (20) heures de service. Par la suite,
changer l’huile toutes les cent (100) heures. Avant de changer l’huile, trouver une façon convenable de se
débarrasser de l’huile usée. Vos réglementations de zonage locales ou de l’environnement vous donneront des
instructions plus détaillées à ce propos.
**NOTE: Contacter votre concessionnaire John Deere agrée pour la procédure à suivre pour ces opérations
d’entretien.
s
Toutes les
Toutes les
Toutes les
•
•
•
•
•
•
•
•
• •
•
•
•
•
•
•
•
•
•
•
•
•
d’essence

Guide d’utilisation
PROGRAMME D’ENTRETIEN
NOTE: L’huile John Deere PLUS-4 est l’huile recommandée.
Si de l’huile John Deere PLUS-4 n’est pas disponible,
utiliser de l’huile automobile détergente 4-temps de
classication API SE ou plus élevée (SG, SH ou
SJ recommandées). Si de l’huile contaminée ou
détériorée est utilisée ou si la quantité d’huile n’est
pas sufsante, des dégâts au moteur en résulteront
et la durée de vie du moteur sera considérablement
réduite.
0.024 - 0.028 in
Bouchon de vidange d'huile
Bougie
d'allumage
Clé de bougie
Capuchon de bougie d'allumage

Guide d’utilisation
PROGRAMME D’ENTRETIEN
ATTENTION: PUISQUE LE CARBURANT
(ESSENCE) SERA DÉTÉRIORÉ
AVEC LE TEMPS, REMPLACER LE
CARBURANT (ESSENCE) AVEC UN
CARBURANT FRAIS PÉRIODIQUEMENT;
UN CHANGEMENT UNE FOIS TOUS
L E S T R O I S ( 3 ) M O I S E S T
RECOMMANDÉ.

Guide d’utilisation
TRANSPORTE
AVERTISSEMENT: POUR EMPÊCHER TOUT
DÉBORDEMENT DE CARBURANT DÛ À
LA VIBRATION ET À L’IMPACT, NE
JAMAIS TRANSPORTER LE
GÉNÉRATEUR AVEC DU CARBURANT
(ESSENCE) REMPLI DANS LE
RÉSERVOIR.
FIXER FERMEMENT LE CAPUCHON DU
RÉSERVOIR.
P O U R É V I T E R T O U T R I S Q U E
D’INFLAMMABILITÉ D’ESSENCE, NE
JAMAIS LAISSER LE GÉNÉRATEUR
DANS UN ENDROIT EXPOSÉ À LA
LUMIÈRE DIRECTE DU SOLEIL OU AUX
TEMPÉRATURES ÉLEVÉES PENDANT
LONGTEMPS.
C O N S E R V E R L E C A R B U R A N T
(ESSENCE) DANS UN RÉSERVOIR DE
S T O C K A G E E X C L U S I F P O U R
ESSENCE FAIT EN ACIER LORS DU
TRANSPORT.
ATTENTION: NE PLACER AUCUN OBJET LOURD
S U R L E G É N É R A T E U R
CHOISIR ET PLACER LE GÉNÉRATEUR
E N P O S I T I O N A P P R O P R I É E D U
V É H I C U L E D E T R A N S P O R T D E
SORTE QUE LE GÉNÉRATEUR NE SOIT
PAS ABAISSÉ OU NE TOMBE PAS
FIXER LE GÉNÉRATEUR AVEC UNE
CORDE SI NÉCESSAIRE.
Transporte

Entretien
Guide d’utilisation
PRÉPARATION POUR REMISAGE
NE JAMAIS UTILISER D’EAU POUR
NETTOYER LE GROUPE !
Remisage
Vis de drain

Guide d’utilisation
Caractéristiques
NOTER LE NUMÉRO DE SÉRIE
ARTICLE CARACTÉRISTIQUES
AC-G3200i AC-G4300i
ALTERNATEUR
N
N
Note: Régler le jeu de soupape quand le moteur est froid.
Nº. DE PROD. / Nº. DE SÉR.
(Étiquette)

Guide d’utilisation
AC-G3200i / AC-G4300i (60Hz-120V)
M
RELAIS
Interrupteur
principal
M-
L.IG
B
M+
ST
R
Org
R
R
R
W
Blk
W
W
W
W
R
R R
R
R
R
W
W
W
Blu
W
W
Grn/Y
W
W
W
Org
Org
Blu
R
W
Blu
R
Blu
Blu
Blu
Blu
Y
Blk
Blk
Brn
Borne
(masse)
de terre
Brn
Brn
Grn/Y
Grn/Y
Grn/Y
Grn/Y
Grn/Y
Grn/Y
INV&E/G C/U
Interrupteur
du moteur
Fusible10A
Batterie
Moteur de
démarrage
Redresseur
à diode
Moteur à
progression
MONITOR C/U
TABLEAU DE COMMANDE
GROUPE ÉLECTROGÈNE
MOTEUR
Bobine
Principale
Enroulement
secondiare
2
Enroulement
secondiare
1
Bobinage
C.C.
Capteur de
niveau d'huile
Bougie
Borne de sortie C.C.
Brn
Grn
Grn
Gry
Pur
Blk : Noir
Couleur de câblage
Blk/W : Noir/Blanc
Blu : Bleu
LBlu : Bleu
Brn : Marron
Brn/W : Marron/Blanc
Grn : Vert
Grn/W : Vert/Blanc
Org : Orange
Gry : Gris
R : Rouge
W : Blanc
Y : Jaune
Grn/Y : Vert/Jaune
W/Blk : Blanc/Noir
Pur : Pourpre
Bobine d'allumage
Gry
Org
Brn
Brn
Gry
Disjoncteur C.C.
AC
receptacle
AC
receptacle
Disjoncteur
C.A.
Disjoncteur
C.A.
Disjoncteur
C.A.
Plaque de
mise á la
masse
Blk
R
Régulateur
Org
Y
Y
Grn/Y
clair
Diagramme du câblage

Guide d’utilisation
Garantie
CONDITIONS DE LA GARANTIE
PIECES EXCLUES DE LA GARANTIE

Guide d’utilisation
Garantie
DÉCLARATION DE GARANTIE CONTRÔLE D’ÉMISSIONS POUR LA CALIFORNIE
VOS DROITS ET OBLIGATIONS DE GARANTIE
COUVERTURE DE LA GARANTIE DU FABRICANT :
RESPONSABILITÉS DU PROPRIÉTAIRE VIS À VIS DE LA GARANTIE:
-
COUVERTURE DE GARANTIE GÉNÉRALE DES SYSTÈMES D’ÉMISSIONS
-La Californie Seulement-

Guide d’utilisation
Garantie

Guide d’utilisation
Garantie
Note

90 Manual del Operador
Introducción
Gracias para comprando este John Deere producto.
Lea este manual con cuidado para aprender como operar
y heacerie servicao su máquina correcto. Falla resultaría
en lesiones personales o daño a equipo. Este el manual
y muestras de seguridad en su máquina pueden también
estar disponibles en otras idiomas. (véase a su distribuidor
de John Deere para ordenar)
Este manual debe considerar una parte permanente de su
máquina y debe quedar con máquina cuando venderla.
Medidas en este manual se dan en sistema métrico y en
equivalentes de unidades de Estado Unidos. Use sólo
partes y cierres de reemplazar correctos. Cierres métricos
y pulgadas necesitarian un tirón especial de métrico o
pulgada.
Lados de mano derecha y mano izquierda se determinan
de que da al n de máquina.
El número de serie está situada en sección de
especicaciones o números de identicación. Escriba
correcta todos números para ayndaría en encontrar la
máquina si sea robado. Su concesionario también necesite
estos números cuando ordenaría partes. Ponga números
de identicación en lugar seguro atuera de máquina.
Garantía provece de concesionario John Deere para
quien opere y mantenga su equipo como describido en
este manual. Este manual está explicado en certicado
de garantía que se vea en este manual.
Esta garantía provece la seguridad que su concesionario
John Deere daría garantia de productos donde defectos
aparecen durante tiempo de garantia. Debe abusar al
equipo o cambios para modicar la función atrás de
especicaciones de fabrica la garantia será vació.
ADVERTENCIA: Este producto tiene
plomo, una sustancia química conocida
al Estado de California a causar cáncer
y defectos de nacimiento u otro daño
reproductivo.
Lávese las manos despues de usar este producto.

Manual del Operador 91
Introducción
AVISO
GARANTÍA FEDERAL DE DEFECTO DE COMPONENTE DE EMISIÓN Y GARANTÍA DE CALIFORNIA DE CONTROL
DE EMISIÓN son aplicables a sólo esos motores/generadores que deben cumplir con EPA (Agencia de Protección
Ambiental) y CARB (Consejo de Recursos Aires de California)regulaciones de emisión en Los E.E.U.U.
AVISO
Para motores / generadores que están exportados y usados en otros países de E.E.U.U., servicio garantía hará de
distribuidor en cada país en acuerdo con policia de garantía de estánder de motor/generador de Robin
como aplicable.
ÍNDICE DE AIRE
Para mostrar conformidad con regulaciones de emisiones de California, una etiqueta ha proveido que mostrando
nivel de Índice de Aire y tiempo durable de este motor.
El nivel de Índice de Aire signica como limpiado el exhausto de un motor después de tiempo. Una gráca de barra
que está escalado de “0” (más limpie) a “10” (menos limpie) se usa para mostrar el nivel de Índice de Aire en motor.
Un nivel de Índice de Aire más bajo representar exhausto más limpie de un motor.
Un nivel de Índice de Aire más bajo representar exhausto más limpie de un motor.
Palabra Descriptiva Aplicado al Período de Durabilidad de Emisiones
Moderado: 50 horas (motor de 0 a 80 cc)
125 horas (motor más de 80 cc)
Intermedio : 125 horas (motor de 0 a 80 cc)
250 horas (motor más de 80 cc)
Prolongado: 300 horas (motor de 80 cc)
500 horas (motor más de 80 cc)
ADVISO: Esta etiqueta tiene que quedar en motor o pieza de equipo, y sólo quitar de comprador último antes de
operación.

92 Manual del Operador
Introducción
GARANTÍA FEDERAL DE DEFECTO DE COMPONENTE DE EMISIÓN
COBERTURA DE GARANTÍA DE DEFECTO DE COMPONENTE DE EMISIÓN -- Esta garantía de emisión es aplicado en todos
Estados, con excepción del estado de California.
Garantía(s) de Fuji Heave Industries Ltd. y Robin America Inc., Wood Dale Illinois, (en esto “ROBIN AMERICA”) a comprador de vender inicial y
cada dueño posterior, que este motor de no carretera aquí “motor” ha diseñado, construido, y equipado para ajustar al tiempo de vende inicial a
todas regulaciones aplicadas de los E.E.U.U.
Agencia de Protección Ambiental (EPA), y que el motor es libre de defectos en materiales y trabajo que causaría falla de ajustar de este motor a
las regulaciones de EPA durante su período de garantía.
Para los componentes que listado debajo de Partes Coberturas, el comerciante del servicio autorizado por ROBIN AMERICA hará, a no cuesta de
Ud., diagnóstico necesario, repare, o reemplace necesario para asegurar que el motor cumplir con regulaciones aplicadas de EPA de E.E.U.U.
PERÍODO DE GARANTÍA DE DEFECTO DE COMPONENTE
DE EMISION
Este período de garantía para este motor empieza en la fecha de vende
a comprador inicial y continua por un período de dos años.
PARTES COBERTURAS
Dén abajo son las partes coberturas de Garantía de Defectos de
Componentes de Emisión. Algunas partes abajo pueden requerir
mantenimiento planicado y tienen garantía al primer punto de
reemplace planicada de esta parte.
1. Sistema de Mediendo Combustible
a. Partes interior y carburador ( y / o regulador de presión o sistema
de inyeción de combustible)
b. Retroalimentación de proporción de aire / combustible y sistema
de control, si aplicable.
c. Sistema de encendido frío, si aplicable
d. Asamblea regular (combustible de gasolina, si aplicable).
2. Sistema de Indución de Aire
a. Colector de entrada, si aplicable.
b. Filtro de aire.
3. Sistema de Ignición
a. Bujías.
b. Magneto o sistema eléctrica de ignición.
c. Avance de Chispa / sistema retarda, si aplicable.
4. Colector de Exhausto, si aplicable.
5. Artículos varios han usados en sistemas arribas.
a. Controles eléctricos, si aplicable.
b. Mangueras, cinturones, conectadores, y asambleas.
c. Asamblea de cerradura del ltro (combustible de gas, si
aplicable).
OBTENIENDO EL SERVICIO DE LA GARANTÍA
Para obtener el servicio de garantía, tome su motor al más cerca
authorizado ROBIN AMERICA. Traiga recetas de vendes que indicar
la fecha de comprar para este motor. El comericante del servicio
authoriado de ROBIN AMERICA hará repares necesarios o ajustados
de un período del tiempo bueno y darle una copia del orden de repare.
Todas partes y accesorios que tener reparar de esta garantía quedarse
propiedad de ROBIN AMERICA.
NO SON COBERTURAS
Condiciones que son resultar de alterando, mal uso, ajustados malos (a
menos que hicieron de comericante del servicio authorizado de ROBIN
AMERICA durante un repare de garantía), alteración, accidente, falla
de usar combustible y aceite recommendado, o no haciendo servicios
requeridos de mantenimiento.
Las partes de reemplace que son usados para servicios requeridos
de mantenimiento.
Daño consiguiente como perdido del tiempo, inconveniencia, perdido
de uso del motor o equipo, etc.
Diagnóstico y precios de inspeción que no resultará en servicio que
cobertura de garantía.
Alguna parte de reemplace que no son autorizado o mal función de
partes autorizadas porque el uso de una parte no autorizada.
RESPONSIBILIDADES DE GARANTIA DE DUEÑOS
Como el dueño del motor, Ud. es responsable para hacer el
mantenimiento requerido como dar en su manual de dueño. Es
recommendado de ROBIN AMERICA que mantener todas receteas de
mantenimiento en su motor, pero ROBIN AMERICA no puede negar
garantía sólamente para falla de recetas o falla de haciendo todo
mantenimiento planicado.
Como el dueño del motor, debe saber que ROBIN AMERICA puede
negar cobertura de garantía si el motor o parte ha fallado porque
de abuso, neglecto, mantenimiento incorecto o modicaciones sin
aprobación.
Ud. es responsable para presentando su motor al más cerca
comericante de servicio autorizado de ROBIN AMERICA cuando
existir un problema.
Si tiene algunas preguntas de su derechos de la garantía y
responsibilidades, debe contactar el departamento del servicio de
ROBIN AMERICA a 1-630-350-8200 para la información.
COSAS DEBE SABER SOBRE MANTENIMIENTO Y
REPARES DEL GARANTIA DE SISTEMA DE CONTROL
DE EMISIONES.
Es responsable para mantenimiento corecto del motor. Debe mantener
todas recetas y documentos de mantenimiento regualar en el evento de
hay preguntas. Estas recetas y documentos del mantenimiento debe
cambiar a cada dueño del motor. ROBIN AMERICA reserva el derecho
para negar cobertura de garantía si el motor no tenía mantenimiento
corecto. Armaciones de garantía no negarán solamente de falla
de mantenimiento requerido o falla de mantener documentos de
mantenimiento.
CONSERVACIÓN, REEMPLAZO, O REPARACIONES DE
DISPOSITIVOS DE CONTROL DE EMISION Y SISTEMAS PUEDEN
SER PREFORMADOS POR CUALQUIER ESTABLECIMIENTO
DE REPARACIONES O INDIVIDUO; SIN EMBARGO, LAS
REPARACIONES DE LA GARANTIA TIENEN QUE PREFORMAR POR
UN COMERCIANTE DE SERVICIO DE ROBIN AMERICA. EL USO
DE PARTES QUE NO SON EQUIVALENTES EN EL DESEMPENO
Y DURABILIDAD A PARTES AUTORIZADAS PUEDE DANAR LA
EFICACIA DEL SISTEMA DE CONTROL DE LA EMISION Y PUEDE
TENER UNA RAZON DEL RESULTADO DE UNA AFIRMACION DE
GARANTIA.
Si otras de las partes autorizadas por ROBIN AMERICA son usados
para reemplazos de mantenimiento o para repare de componentes
affectando control de emisión, debe asegurarse que partes como estas
no tienen garantía de fabricante para ser partes equivalentes de partes
autorizadas de ROBIN AMERICA en función y durabilidad.
COMO HACER UNA AFIRMACION
Todas reparaciones qualicando de esta garantía tienen que hacer
de un comerciante de servicio autorizado do ROBIN AMERICA. En el
evento que alguna parte de emision sea defecta durante el período de
garantía, debe noticar departamento de servicio de ROBIN AMERICA
a 1-630-350-8200 y tendré aviso del comerciante de servicio corecto o
fuente de servicio donde repare de garantía puede hacer.

Manual del Operador 93
Introducción
DECLARACIÓN DE GARANTIA DE CONTROL DE EMISIONES DE CALIFORNIA
SUS DERECHOS DE GARANTIA Y OBLIGACIONES
El Consejo de los Recursos Aéreos de California y Fuji Heavy Industries Ltd. (en esto “FUJI”) se complace para explicar la garantía de sistema de
control de emision en su 2004 y más tarde el motor Pequeno y Todoterreno. En California, el motor nuevo se debe diseñar, construido, equipado
para alcanzar los estandares rigurosos de la anti niebla espesa con humo del Estado. ROBIN AMERICA debe justicar el sistema del control de
la emision en su motor por los espacios de tiempo descritos abajo, porporcionado no ha habido abuso, descuido, ni la conservación impropia de
su motor.
COBERTURA GARANTIA DE FABRICANTE:
Los motores de 2004 y más viejos tienen garantía por dos (2) años. Si alga parte de emisión en su motor es defecto, la parte reparará o reemplazará
de ROBIN AMERICA.
OWNER’S WARRANTY RESPONSIBILITIES:
- Como el dueño del motor, Ud. es responsable para hacer el mantenimiento requerido como dar en su manual de dueño. Es recommendado
de John Deere que mantener todas receteas de mantenimiento en su motor, pero John Deere no puede negar garantía sólamente para falla de
recetas o falla de haciendo todo mantenimiento planicado.
- Como el dueño del motor, debe saber que John Deere puede negar cobertura de garantía si el motor o parte ha fallado porque de abuso, neglecto,
mantenimiento incorecto o modicaciones sin aprobación.
- Si tiene algunas preguntas de su derechos de la garantía y responsibilidades, debe contactar el departamento del servicio de ROBIN AMERICA
Inc. 940 Lively Blvd., Wood Dale, IL 60191 (en esto ROBIN AMERICA) tan pronto como un problema existe. Reparaciones de garantía deben
terminar en la cantidad de tiempo razonable, no excede 30 días.
Si tiene algunas preguntas de su derechos de la garantía y responsibilidades, debe contactar el departamento del servicio de ROBIN AMERICA
a 1-630-350-8200.
GARANTIA LIMITADA
en Sistemas de Control de Emisión
-Sólo en California-
Garantía(s) de FUJI a dueño del motor de 2004 y mós viejos años que este motor (1)ha diseñado, construido, y equipado para ajustar al
tiempo de vende inicial a todas regulaciones aplicadas de Consejo de Recursos de Aire en California, y (2) es libre de defectos en materiales
y trabajo que puede causarlo a falla de ajustar con estas regulaciones como son aplicables a las condiciones abajas.
A. FECHA DE INICIO
El período de garantía empieza en la fecha que el motor entregó a
comprador inicial.
B. DURACION DE COBERTURA
Garantía(s) de John Deere a comprador de vender inicial y cada dueño
posterior, que este motor es libre de defectos en materiales y trabajo
que causar falla a partes de garantia de emisión por un período de dos
(2) años despues de feacha de entregar a primer comprador.
C. SON COBERTURAS
1. PARTES DE REPARACION O REEMPLAZO
Reparaciones o reemplazo de alga parte de garantía hará a no
cuesta a dueño de un comerciante de servicio autorizado o
estaciónde garantía. Puede contactar Departamento de Servicio de
ROBIN AMERICA Inc. a 1-630-350-8200 para obtener el
nombre de posición más cerca donde hacer las reparaciones de
garantía.
2. PERIODO DE GARANTIA
Esta garantía continúa por un período de dos (2) años y aplica sólo
a la reparación, el reemplazo o el ajuste de las partes del
componente que no se planican para el reemplazo la
conservación como requerida. Aún más, las partes del componente
que se planican sólo para inspección regular al efecto de “la
reparación o reemplazan como sea necesario” son la garantía para
el período de la garantía. Alguna parte justicada que se planica
para el reemplazo la conservación como requerida se justica para
el espacio de tiempo hasta el primer punto planicado del
reemplazo para esa parte.
3. DIAGNOSTICO
Usted no será cargado para el trabajo diagnóstico que lleva a la
determinación que una parte justicada es defectuoso, si el trabajo
diagnóstico se realiza en un comerciante autorizado del servicio o
la estación de la garantía.
4. DAÑOS
Si una parte justicada falló causando el daño a los componentes
del motor, consulta una estación de la garantía.
D. NO SE CUBRE
1. Esta garantía limitada no cubre ninguna parte que falla, falla o es
dañada debido al fracaso para seguir la conservación y las
instrucciones operadoras exponen en el 2004 y manual luego de
dueños que incluyendo:
a. El mantenimiento impropia de alguna parte justicada.
b. La instalación impropia, el ajuste o la reparación del motor o de
alguna parte justicada a menos que realizado por un comerciante
autorizado del servicio.
c. La falla para seguir las recomendaciones en el uso del combustible
contuvieron en el 2004 y manual de dueños más viejo.
d. Las reparaciones realizaron fuera de los comerciantes autorizados
del servicio de la garantía.
e. Uso de las partes que no son autorizadas por FUJI.
2. Componente adicional o partes modicadas.
Esta garantía no cubre ninguna parte que falla, falla o es dañada
debido a modicaciones cambiando, añadir a o quitar las partes del
motor.
3. Los gastos contraídos procesando los reclamos de la garantía.
John Deere, un comerciante autorizado del servicio y la garantía
estacionan no será responsable de ninguna pérdida del uso del
motor, para ningún uso alterativo, para ningún daño a bienes, la
pérdida de tiempo, ni del inconveniente.
E. COMO HACER UNA AFIRMACION
Todas reparaciones qualicando de esta garantía tienen que hacer
de un comerciante de servicio autorizado do ROBIN AMERICA. En el
evento que alguna parte de emision sea defecta durante el período de
garantía, debe noticar departamento de servicio de ROBIN AMERICA
Inc. a 1-630-350-8200 y tendré aviso del comerciante de servicio
corecto o fuente de servicio donde repare de garantía puede hacer.

94 Manual del Operador
Introducción
F. DONDE OBTENER EL SERVICIO DE LA GARANTIA
Se recomienda que el servicio de la garantía sea realizado por el
comerciante autorizado que vendió usted el motor, aunque el servicio
de la garantía fuera realizado por comerciantes autorizados del servicio
o estaciones de garantía dondequiera en los Estados Unidos.
Cuándo reparación de garantía se necesita, el motor debe ser traído a
un comerciante autorizado del servicio o la ocina de la estación de la
garantía durante horas de ocina normales. En todos casos, un tiempo
razonable, no excede 30 días, tiene que permitar para la reparación de
la garantía para ser completada después que el motor es recibido por
el comerciante autorizado del servicio o estación de garantía
G. EL MANTENIMIENTO, EL REEMPLAZO Y LA REPARACION
DE PARTES RELACIONADAS A EMISION.
El reemplazo sólo justicado del partes aprobado por John Deere
debe ser utilizado en el desempeño de cualquier mantenimiento de
la garantía o reparaciones en partes emisión-relacionados. Si de otra
manera que las partes autorizadas se utilizan para la mantenimiento,
el reemplazo o la reparación de los componentes que afectan el control
de la emisión, usted debe asegurarse que tales partes son justicadas
por su fabricante para ser el equivalente a partes autorizadas en el
desempeño y durablity. FUJI, sin embargo, no asume liablity bajo esta
garantía con repect a partes de otra manera que partes autorizadas.
El uso de partes no-autorizados de reemplazo no invalida la garantía
en otros componentes a menos que las partes no-autorizados causen
el daño a partes justicadas.
H. PARTES SE CUBRE DE GARANTIA DE EMISIONES EN
CALIFORNIA
1. Sistema de Mediendo Combustible
a. Partes interior y carburador ( y / o regulador de presión o sistema
de inyeción de combustible)
b. Retroalimentación de proporción de aire / combustible y sistema
de control, si aplicable.
c. Sistema de encendido frío, si aplicable.
d. Asamblea regular (combustible de gasolina, si aplicable).
2. Sistema de Indución de Aire
a. Colector de entrada, si aplicable.
b. Filtro de aire.
3. Sistema de Ignición
a. Bujías.
b. Magneto o sistema eléctrica de ignición.
c. Avance de Chispa / sistema retarda, si aplicable.
4. Colector de Exhausto, si aplicable.
5. Artículos varios han usados en sistemas arribas.
a. Controles eléctricos, si aplicable.
b. Mangueras, cinturones, conectadores, y asambleas.
c. Asamblea de cerradura del ltro (combustible de gas, si
aplicable).
I. DECLARACIONES de CONSERVACION
Es su responsabilidad toda para tener planicado los servicios de la inspección y la conservación realizados en los tiempos recomendados en
el 2004 y manual más viejo y para retener la prueba eses servicios de la inspección y la conservación se realizan en los tiempos cuando
recomendado. FUJI no negará un reclamo de la garantía únicamente porque usted no tiene registro de la conservación; sin embargo, FUJI puede
negar un reclamo de la garantía si su falla de realizar la conservación requerida tuvo como resultado en falla de la parte
justicada. La prueba que Ud. mantiene debe dar a cada dueño subsiguiente del motor. Usted es responsable de realizar la conservación
planicada describió debajo de basado en los procedimientos especicados en el 2004 y manual más viejo. El mantenimiento
planicado abajo en un motor normal que opera el horario.
PROCEDIMIENTO: INTERVALES:
1. Cambie aceite de motor. 1. Inicial 20 horas y cada 100 horas despues.
2. Limpie limpiador de aire (elemento). 2. Cada 50 horas.
3. Reemplace elemento limpiador de aire. 3. Cada 200 horas.
4. Limpie y ajuste buijía y electrodos. 4. Cada 200 horas.
NOTA: Mantenimiento de más frecuencia puede ser necesario porque de condiciones severo, sucio, o de polvo.

Manual del Operador 95
Materias
Toda información, ilustraciónes, y especicaciones en este manual se
basa en información lo último que disponible al tiempo de publicación. Se
reserva el dercho de efectuar combios sin previo aviso.
Pagiña
Seguridad 96
Mandos 103
Preparación la generador 108
Operación 114
Localización de fallas 121
Servicio 122
Transporte 126
Almacenamiento 127
Especicaciónes 128
Diagrama de alambre 129
Garantia 130
Nota 131

96 Manual del Operador
W
A
R
N
I
N
G
W
A
R
N
I
N
G
S
I
N
T
H
E
M
A
N
U
A
L
S
.
W
A
R
N
I
N
G
S
I
N
T
H
E
M
A
N
U
A
L
S
.
C
A
U
T
I
O
N
O
C
A
U
T
I
O
N
S
I
N
O
T
H
E
M
A
N
U
A
L
S
O
C
AU
T
I
O
N
S
I
N
O
T
H
E
M
A
N
U
A
L
S
O
C
A
U
T
I
O
N
S
I
N
O
T
H
E
M
A
N
U
A
L
S
O
C
A
U
T
I
O
N
S
I
N
O
T
H
E
M
A
N
U
A
L
S
Seguridad
RECONOZCA INFORMACIÓN DE
SEGURIDAD
Este es el símbolo de alerta de seguridad. Cuando mire
este símbolo en la máquina o manual, sea alerta de
posibilidad o potencia de graves personales.
Siga precauciones recomendables y prácticas de
operación.
COMPRENDA PALABRAS DE ALERTAS
Una palabra de alerta -- Peligro, Advertencia, Precaución
-- se usa con el símbolo de alerta de seguridad. Peligro
indica la situación más seria.
Señales de seguridad como PELIGRO y ADVERTENCIA
está situada cerca de riesgos especícos. Precauciones
generales están en una lista en las señales de seguridad
precaución a mensajes de seguridad en este manual.
SIGA LAS INSTRUCCIÓNES DE SEGURIDAD
Lea con ciudado todos mensajes de seguridad en este
manual y en las señales de seguridad en máquina.
Mantengase señales de seguridad en condición bueno.
Reemplace desaparecidos o señales de seguridad con
daño. Asegurese que componentes nuevos de equipo
y partes de reparación incluir las señales de seguridad
último. Señales de seguridad para reemplace son
disponibles de su concesario.
Aprenda como operar la máquina y como usar los
mandos correcta. No permita nadie para operar sin
instrucciones.
Mantengase la máquina en condición corecta para
trabajar. Modicaciónes con no autorizado a la máquina
pueden afectar la función y/o seguridad y afecta la vida
de máquina.
Si usted no entiende cualquier parte de este manual y no
necesita ayuda, entre en contacto con a su distribuidor.
PELIGRO
ADVERTENCIA
PRECAUCION

Manual del Operador 97
MONÓXIDO DE CARBONO- GAS VENENOSO
Use generador en aire libre, afuera de ventanas abiertas, tiros,
o puertas.
Exhausto de generador contiene monóxido de carbono- un gas
venenoso que puede matarle. No puede oler o ver este gas.
Nunca use generador en espacios cerrados o parcialamente
cerrados. Generadores puede producir neveles altas de monóxido
de carbono muy rápido. Cuando use un generador portable,
recuerde que no puede oler o ver monóxido de carbono. Aunque
si no pueda oler gases de exhausto, puede exponerle a monóxido
de carbono.
Si empieza sentir enfermo, mareo, o débil cuando usando
generador, vaya adentro PRONTO. NO RETRASE. Monóxido
de carbono de generardores puede llevar rápidamente a todo
incapacitado y muerte.
Si tenga síntomas serias, tenga atención medica immediamente .
Diga empleados medicos que sospechar de venenoso de monóxido
de carbono. Si tenga síntomas mientras adentro diga alguien llamar
el departamento de fuegos para determinar cuando seguro para
entrar otra vez el edicio.
NUNCA opere generador en atmósfera explosivo, cerca materias
combustibles o donde ventilación no es suciente para llevar gases
de exhausto afuera. Gases de exhausto puede causar lesiones
graves o muerte.
NUNCA use generador adentro, incluyendo en casas, garajes,
sótanos, espacios pequeños, y otras áreas cerradas o parcialamente
cerradas, aunque con ventilación. Abriendo puertas y ventanas
o usando ventiladores no prevenir acumulación de monóxido de
carbono en casas.
Siga las instrucciones que viene con su generador. Encuentre
unidad de aire libre y afuera de puertas, ventanas, y tiros que puede
permitar gas de monóxido de carbono para entrar adentro.
Instale alarmasde monóxido de carbono que operados de bateria
o alarmas de monóxido de carbono enchufadas con seguridad
de batería en su casa según las instrucciones de instalación de
fabricante. Las alarmas de monóxido de carbono deben tener
certicación de requisitos de calidades de seguridad últimos para
alarmas de monóxido de carbono. (UL 2034, IAS 6-96 o CSA
6.19.01).
Examine su alarma de monóxido de carbono frecuentemente y
reemplace baterías muertas.

98 Manual del Operador
INSTRUCCIONES DE SEGURIDAD DE LLENDADO DE
COMBUSTIBLE
Gasolina es amable extremo y sus vapores pueden explotar si
inamar.
Observe todas regulaciones de seguridad para manejando seguro de
combustible. Maneje combustible en envases de seguridad. Si envase
no tiene pico, use un embudo.
No sobrellene el tanque de combustible, mantenga espacio para
expansión de combustible.
No rellene tanque de combustible mientras el motor está funcionando.
Antes de rellenando generador, doble apagado y permite enfriarse.
Gasolina que derramada en partes del motor puede inamar.
Llene el tanque solamente en una área de tierra pelada. Mientras
llenando el tanque, mantenga calor, chispas, y llamas abiertas afuera.
Con cuidado limpie todo combustible derramado antes de empezando
el motor.
Siempre llene tanque de combustible en una área con mucha
ventilación para evite inhalando gases peligrosos.
NUNCA mantenga combustible para su generado e la casa. Gasolina,
propano, kerosene, y otros liquidos amables deben mantener afuera de
áreas de viviendo en envases seguros sin vidrio y calicados correctos.
No los mantenga cerca de aparato de ardiente de combustible como
calentador de gas natural en un garaje. Si combustible derrame o
envase no cerrado correcto, vapores invisibles de lata de combustible
viaja adelante de la tierra y pueden inamar del piloto de aparato o de
arcos de interruptores eléctricos en aparato.
DISYUNTOR DE FALLA A TIERRA
Estos generadores están equipados con receptáculos de 120VCA con
disyuntores de falla a tierra. Esta es una medida de protección contra
el peligro de electrocución por accidentes o fallas de herramientas,
cordones y cables.
AD VERTE NC IA: PAR A Q UE EL GF CI FU NCION E
CORRECTAMENTE, ES NECESARIO QUE EL
GENERADOR TENGA LA TOMA A TIERRA ADECUADA.
SIGA LOS PROCEDIMIENTOS CORRECTOS PARA LA
T O M A A T I E R R A Q U E S E D E TA L L A N A
CONTINUACIÓN.
Un GFCI es un aparato que interrumpir electricidad de cualquiera la
utilitada o generador por un típico especial de corte circuito si hay una
falla de corriente de ujo a la tierra.
Un GGCI puede usar sólo con generadores que tienen alambre neutro
adherido interior a armazón y armazón conecta a tierra correcta. Un
GFCI no opere en generadores que no tienen alambre neutro adheridido
a armazón o en generadores que no conectar a tierra correctos. Todos
generadores de John Deere tienen alambres de tierra adheridos
internamente.
Un GFCI puede requerir de regulaciones de OSHA, Códigos de Eléctrico
Nacional y Códigos local y federal cuando operando un generador.
Para más protecciones en contra de riesgos de descarga debido al
equipo defectivo sujectar a recipientes de cerrado rosca, considere
también el uso de un GFCI en cada recipientes.
Los GFCI y series de cordones protejidos y cables pueden comprar de
casas locales de suministro eléctrico.

Manual del Operador 99
RIESGOS DE ELECTRICOS
Este producto tiene que tener la toma a tierra. Si lo debe fallar o
funcionar mal la toma a tierra proveer un camino de resistencia mínima
para corriente eléctrico para reducir el riesgo de descarga eléctrica.
PELIGRO-CONECCIÓN INCORRECTA DE EQUIPO-
CONDUCTOR DE TIERRA PUEDE RESULTAR EN RIESGO
DE ELECTROCUCIÓN. HABLE CON UN ELECTRICISTA
CALIFICADO O REPRESENTANTE DE SERVICIO SI TENGA
DUDA SOBRE QUE LA UNIDAD TIENE LA TOMA A TIERRA
CORRECTA.
Este generador tiene una terminal de tierra para su protección. Siempre
completar el camino de tierra del generador a un fuente de tierra exterior
como enseñar en la sección se llama “ Instrucciones de Toma a Tierra”
en la sección de Preparación en este manual.
El generador es un fuente potencial de descarga de eléctrico si no
mantenga seco. Mantenga el generador seco y no use en lluvia o
condiciones mojados. Para porteger de humedad, opere en supercie
seco abajo de una estructura abierta y como un dosel. Seque sus
manos si mojados antes de tocando el generador.
Riesgo de descarga eléctrica si opere este generador con GFCI de falla
(Interrupor de circuito de Falla tierra Integrado) Examine GFCI antes
de cada uso, vea Instrucciones de Operando para más información. Si
GFCI falla el exam, NO USE su generador. Contacte su concesionario
de John Deere.
Tape aparatos directamente entre el generador. O, use extensión
muy resistente que tiene indice de aire libre y tiene indice (en vatios
o amperios) por lo menos igual a la suma de las cargas de aparatos
conectadas. Revise que todo cordón sea libre de cortos, roturas, y
que la tapa tiene todos los tres dientes, especialamente un perno de
tierra
NUNCA trate dar potencia a instalación de casa como tapando el
generador entre un tomacorriente del muro, una práctica se llama
“alimentando atraso.” Esta práctica es muy peligroso que presentar
un riesgo de electrocución a trabajadores de utilidad y algunos
vecinos que tienen servicio del mismo transformador de utilidad. Esta
también circunvala aglunos aparatos de protección de circuito que son
empotrados en la casa.
Si tiene que conectar el generador a la instalación de casa a aparatos
de potencia, tiene un electricista calicado instala el equipo apropriado
de acuerdo con códigos de électrico locales. O revise con su companía
de utilidad para preguntar sobre instalación de un interruptor apropriado
de tranferir de potencia.
Para apagados de potencia, generadores estacionarios que instalados
permanente son mejores para manteniendo potencia respalda a
la casa. Hasta un generador portable que conecte correcto puede
sobrecargar. Este puede resultar en recalentando o recalcando los
componentes de generador, con la posibilidad de empezar a falla del
generador.

100 Manual del Operador
W
A
R
N
I
N
G
W
A
R
N
I
N
G
S
I
N
T
H
E
M
A
N
U
A
L
S
.
W
A
R
N
I
N
G
S
I
N
T
H
E
M
A
N
U
A
L
S
.
C
A
U
T
I
O
N
O
C
A
U
T
I
O
N
S
I
N
O
T
H
E
M
A
N
U
A
L
S
O
C
A
U
T
I
O
N
S
I
N
O
T
H
E
M
A
N
U
A
L
S
O
C
A
U
T
I
O
N
S
I
N
O
T
H
E
M
A
N
U
A
L
S
O
C
A
U
T
I
O
N
S
I
N
O
T
H
E
M
A
N
U
A
L
S
ADVERTENCIAS IMPORTANTES DE SEGURIDAD
ADVERTENCIA: Para reducir el riesgo de lesiones, lea este
manual de operador completamente. Cuando usando
este producto, seguir siempre las precauciones basicas
consiguentes:
1. Lea todas instrucciones antes de usando este producto.
2. No encierre el generador ni lo tape con una caja. El
generador tiene sistema de enfriar incorporado y puede
recalentarse si sea cerrado. Si generador sea tapado para
protegir de tiempo durante no usando, asegúrese que
quitando y mantenga lejos de área durante uso de generador.
3. Opere el generador en supercie nivel. No es necesario
para preparar un fundamento especial para generador. Sin
embargo el generador vibrará en supercie irregular, entonces
escoger un lugar nivel sin irregulares de supercie.
Si generador está inclinado o movió durante operación,
combustible puede derramar y / o el generador puede caer
que causaría situación peligroso.
No expecta lubricación correcto si opere generador inclinación
empinado o cuesta. En esta caso, conscación de pistón
puede ocurrir aunque si el aceite está arriba de nivel más alto.
4. Presta attención al alambre o cordones de extensión de
generador al aparato connectado. Si alambre está debajo o
en contacto con partes vibrantes, puede romper y causaría
un fuego, agotamiento de generador, riesgo de descarga
de eléctrica. Reemplace cordones con daño o viejo
inmediatamente.
5. No opere en la lluvia o en condiciones mojados o con
manos mojados. Operador puede sufrir descarga eléctrica si
generador esté mojado debido a lluvia o nieve.
6. Si mojado, lo limpia y seca antes de empezando. No ponga
agua directamente sobre generador ni lo limpia con agua.
7. Ten cuidado extremo que seguir procedimientos necesarios
de tierra eléctrico durante cada y todos usos. Falla para
hacer puede sería mortal.
8. NUNCA trata dar potencia al alambre de casa como tapando
el generador a salida de muro, una practica se llama
“alimentando retraso.” Esta practica es muy peligrosa que
presentar un riesgo de electrocución a trabajadores de utilidad
y vecinos que tienen servicio del mismo transformador.
También eludirlo algunos aparatos incorporados de proteción
de circuitos de casas.
Si tiene que conectar el generador al alambre de casa para
dar potencia a aparatos, un electricista qualicado instalará
equipo apropriado con acuerdo con códigos locales de
eléctrico. O revisa con su compania de utilidad para puede
instalar interruptor apropriado de cambio de potencia.
9. No fume mientras cargando una batería. La batería emitir
gases amables de hidrógeno que puede explorar si exponer
a arco eléctrico o llama abierta. Mantenga el área con
ventilación buena y mantenga llamas abiertas/chispas afuera
cuando cargando una batería.

Manual del Operador 101
W
A
R
N
I
N
G
W
A
R
N
I
N
G
S
I
N
T
H
E
M
A
N
U
A
L
S
.
W
A
R
N
I
N
G
S
I
N
T
H
E
M
A
N
U
A
L
S
.
C
A
U
T
I
O
N
O
C
A
U
T
I
O
N
S
I
N
O
T
H
E
M
A
N
U
A
L
S
O
C
A
U
T
I
O
N
S
I
N
O
T
H
E
M
A
N
U
A
L
S
O
C
A
U
T
I
O
N
S
I
N
O
T
H
E
M
A
N
U
A
L
S
O
C
A
U
T
I
O
N
S
I
N
O
T
H
E
M
A
N
U
A
L
S
ADVERTENCIAS IMPORTANTES DE SEGURIDAD
10. El motor será caliente durante y por tiempo después de
operación. Mantenga materias combustibles lejos de área
de generador. Ten cuidado que no toca alga parte de motor
caliente especialmente área de moee o puede resultaría
en quemaduras serias.
11. Mantenga niños y otros transeúntes a una distancia segura
de área de trabajo.
12. Es esencial que sabe el uso seguro y correcto de
herramientas o aparatos que usará. Todos operadores
tienen que leer, comprender, y seguir el manual de dueños
de aparatos de herramientas. Tiene que comprender las
aplicaciones y limitaciones de herramientas y aparatos. Siga
todas instrucciones que dan en etiquetas y advertencias.
Mantenga manuales de instrucciones y literatura en lugares
seguros para referencia de futuro.
13. Sólo use cordones de extensión de “Lista.” Cuando usa una
herramienta o aparato en aire libre, sólo use cordones de
extensión que tienen la marca de “Para Uso en Aire Libre.”
Mantenga cordones de extensión en áreas secas y con
ventilación buena cuando no los usando.
14. No olvide apagar siempre el disyuntor del circuito de CA y
desconecte herramientas o aparatos cuando no usando,
antes de servicio, ajustando, o instalando accesorios.
15. Asegúrese de que el motor esté parado antes de comenzar
cualquier tarea de mantenimiento, servicio técnico o
reparación.
NOTA : Asegúrese de que el mantenimiento y las reparaciones
del generador sean realizados sólo por personal cualicado y
con experiencia.
¡GUARDE ESTAS INSTRUCCIONES!

102 Manual del Operador
USE ROPA PROTECTORA
Use ropa medida cerca y equipo de seguridad apropiado
al trabajo.
Use devise protector de oído como orejeras o tapón para
el oído para protectar en contra de ruidos inaceptables
y altos.
Operando equipo de seguridad necesita toda atención de
operador. No use auriculares de radio o música mientras
operando máquina.
INSPECCIONES GENERADOR
Asegúrese que todas tapas, guardias, y escudos son ajustados
y en posición.
Encuentre todos controles operando y etiguetas de
seguridad.
Inspeccione cordón eléctrico para daño antes de usando.
Hay un riesgo de electrocución de aplastante, cortando, o
daño de calor.
PREPARE PARA EMERGENCIAS
Mantenga primeros auxilios y extinguidor cerca.
Mantenga números de emergencia para doctores, servicio
de ambulancia, hospital, y departamento de fuego cerca de
telefono.
Sea preparado si un fuego empiece.
SERVICIO CON CIUDADO GENERADOR
Apague la unidad, desconéctela de la red eléctrica, y permita
que la unidad se enfrié antes de repararla.
Preste servicio en un área limpie, seca y planca.
Asegúrese que el motor paró antes de empezando algo
servicio de mantenimiento o reparación.

Manual del Operador 103
Lea manual de instrucciones de operador.
Mantenga lejos de superficies calientes.
Gases de exhausto son venenosos.
No opere en cuartos sin ventilación.
Pare el motor antes de rellenando.
Fuego, ligero abierto, y fumando son
prohibidos.
Precaución, riesgo de descarga eléctrica
No conecte el generador a líneas
comerciales de potencia.
CALIENTE, no toca los superficies calores.
Aceite de Motor
ON
(potencia y motor)
Agregue aceite
Condición de cargando
la batería
OFF
(potencia y motor)
Corriente alternativo
Corriente directo
Más;
polaridad positiva
Menos;
polaridad negativa
Afuera- posición de
control biestable de
empuje
Adentro - poscion de control
de biestable de empuje
Tierra Protegida
(tierra)
Fusible
Choke ;
ayuda de empezando
de fría
Arranque de motor
(arranque eléctrico)
Pare del motor
Combustible diesel
Rapído
Despacio
P r
Poder Valorado (kW)
COP
Poder continuo
COS
r
Factor valorado de poder
f r
Frecuencia valorada (Hz)
U r
Voltaje valorado (v)
I r
Corriente valorada (A)
H max
La alttitud máxima del lugar
sobre nivel del mar (m)
T max
Temperatura máxima de
ambiente
m Masa (kg)
Funcione
Pare
SEÑALES DE SEGURIDAD
De acuerdo con requisitos europeos ( eec directivos), los símbolos especicados como mostrado en la mesa siguiente
se uso para los productos y este manual de instrucciones.

104 Manual del Operador
SEÑALES DE SEGURIDAD
Posición: Panel de control
Posición: Tanque de combustible
Posición: Tanque de combustible

Manual del Operador 105
Mandos
MANDOS
H
P
O
MN
K LJ
I
A
B C
D
F
E
G
A-- Panel de control
B-- Tanque del combustible
C-- Indicador de combustible
D-- Panel Lateral (R)
E-- Tapón de drenaje de aceite
F-- Arranque de tretroceso (Palanca)
G-- Tope
H-- Tapa del tanque
M-- Batería
N-- Indicador de aceite
O-- Panel lateral (L)
P-- Salida de aire
I-- Bastidor
J-- Tapa de la bujía
K-- Filtro de aire
L-- Colador de combustible

Mandos
106 Manual del Operador
MANDOS
INTERRUPTOR DE MOTOR: (Fig. 1)
El interruptor de motor es deseñado para operación fácil con
mecanicismo de entrelazarse entre válvula de combustible
y choke.
RECPTÁCULO DE AC: (Fig. 2)
La energía eléctrica de AC está disponsible por este
receptaculo.
- Dos receptáculos de CA (20A)
- Uno receptáculos de CA (30A)
Use un tipo de tapón de tierra como mostrado en página
112.
ADVERTENCIA: NO PONGA OBJECTOS
EXTRANJEROS EN EL RECEPTACULO
DE TAPON.
DC TERMINALS: (Fig. 3-A)
El terminal de CC se utiliza para cargar baterías de 12 voltios.
Proporciona una potencia máxima de 12V-8,3A (100W).
-Rojo es terminal positiva (+)
-Negro es terminal negativa (-)
CHISPERO DE DC: (Fig. 3-B)
Los chisperos de DC apagar la corriente eléctrica cuando
la corriente excede su límite o falla ocurrir en aparatos que
están conectados.
Revisa para consumo excesivo de corriente o defectos en
aparatos. Después de asegúrese que todo está en orden,
empuje el botón a posición
de ‘ON’.
PRECAUCIÓN: SI RUPTURA DE CIRCUITO
CONTINUA TROPEZAR, REVISE APARATO
PARADEFECTOS. SI GENERADOR
F A L L A , V E A S U C E N T R O D E
REPARACIONES AUTORIZADO DE JOHN
DEERRE O EL COMERCIANTE.
NUNCA INTERVENGA CON OPERACION
DE LA PERILLA DE RUPTURA DE
CIRCUITO NI MANTENGA EMPUJANDO
EN POSICION DE “ON”.
TERMINAL DE TIERRA: (Fig. 4)
Terminal para conectar a tierra de generador.
ARRANQUE RETROCESO: (Fig. 5-A)
Tire esta manivela para empezar el generador.
CUBIERTA DEL LADO: (Fig. 5-B)
Para conseguir acceso a los artículos siguientes para
atender, toma afuera la cubierta aplicable del lado como
quitando el tornillo con un destornillador.
Cubierta del lado izquierdo ---- Medidor del nivel de
aceite, ltro de aire, bujía,
batería, etc.
Cubierta del lado derecho ---- Tornillo de drenaje de
(Lado Del Retroceso) aceite, etc.
INTERRUPTORES DEL MOTOR
ESTRANGULADOR Para empezar el motor, gire la
perilla a la posición (válvula de
choke se cierra).
FUNCIONE Mantenga la perilla en esta
posición después de comenzar
el motor. (El motor se puede
empezar con la perilla en la
posición cuando motor está
tibio.)
PARAR Para parar el motor, vuelva la
perilla a la posición. (La manivela
del combustible se cierra
también.)
(Fig. 1)
(Fig. 2)
(Fig. 3)
(Fig. 4)
(Fig. 5)
PARADA
MARCHA
ESTRANGULADOR
A
B
AB

Mandos
Manual del Operador 107
MANDOS
MONITOR MÚLTIPLE: (Fig. 5)
Visualizador LE: (A)
Indica alternadamente las horas de funcionamiento, la tensión
y la frecuencia mediante la presión del selector de visualización
LE. Adicionalmente, indicará “O_Lod” (sobrecarga) cuando el
generador este el estado de sobrecarga o el (los) aparato(s)
conectado(s) estén averiado(s).
En este caso, pare inmediatamente el motor y compruebe el
aparato y/o el generador para ver si hay sobrecarga.
Después de la comprobación y de haberlo solucionado,
al volver a poner en marcha el motor se reanudará la
visualización de la forma normal.
Sensor de lámpara de aceite: (B)
Cuando el nivel del aceite caer debajo del valor prescrito, la
lámpara de la alarma ilumina y el motor para automáticamente.
Cuando el motor para debido de falla del aceite, no puede ser
comenzado más incluso tirando del arrancador del retroceso
(apenas la luz de alarma parpadea). En tal caso, abastezca
de nuevo aceite del motor. Vea la “Pre- Operación; Aceite
del Motor” en página 105.
Lámpara de ahorro de energía automático: (C)
La lámpara (verde) se enciende cuando se activa la función
automática de ahorro de energía.
Interruptor de autosalvar de potencia: (D)
Cuando se presiona este interruptor, se activa la función
automática de ahorro de energía. De motor reducir
automáticamente cuando no carga está aplicado, mientras
la velocidad de motor aumentar automáticamente cuando la
carga está aplicado.
Cuando usando potencia de DC, dobla interruptor en posición
de “ OFF”.
Selector de visualización LE: (E)
Cuando se presiona este selector, la indicación del
visualizador LE cambia por turnos;
Horas de funcionamiento tensión frecuencia horas de
funcionamiento.
Cuando se pone en marcha el motor, primero se indican las
horas de funcionamiento en el visualizador LE.
Lámpara de la frecuencia: (F)
La lámpara (rojo) se enciende cuando se cambia a la
indicación de la frecuencia en el visualizador LE.
Lámpara de la tensión: (G)
La lámpara (rojo) se enciende cuando se cambia a la
indicación de la tensión en el visualizador LE.
Lámpara de horas de funcionamiento: (H)
La lámpara (rojo) se enciende cuando se cambia a la
indicación de horas de funcionamiento en el visualizador
LE.
(Fig. 5)
Hours
MULTI MONITOR
V
Hz
AUTO
P-SAVE
A
B C D E
GH
F
MONITOR MÚLTIPLE

108 Manual del Operador
Preparando la Generador
INSTRUCCIONES DE CONEXION A TIERRA
Este producto se debe conectar a tierra. Si debe malfunción o
avería, la conexión a tierra da una caminata de menos resistencia
para corriente eléctrica reducir el riesgo de descarga eléctrica.
PELIGRO- LA CONEXION IMPROPIA DEL EQUIPO-
CONDUCTOR DE TIERRA PUEDE RESULTAR EN
RIESGO DE ELECTROCUCION. VERIFIQUE CON UNA
PERSONA CALIFICADA DE ELECTRICISTA O SERVI
CIO SI UD. ES DUDOSO QUE LA UNIDAD SE
CONECTE DE TIERRA APROPIADAMENTE.
La terminal de tierra en el marco siempre debe ser los usos de
conectar el generador a una fuente correcta de tierra. El sendero
de tierra debe hacer con un #8 alambre del tamaño. Conecte
alambre de tierra seguramente a terminal de tierra. Conecte
el otro n del alambre seguramente a una fuente correcta de
tierra. (Fig. 1)
El Código Eléctrico Nacional contiene varias maneras prácticas
en las que establecer una fuenete buena de tierra. Los ejemplos
dados debajo de ilustra algunos de las maneras en las que una
fuente buena de tierra se puede establecer.
Un caño de agua del metro del metal en contacto directo con la
tierra por lo menos de 10 pies se pueden uso como una fuente
de tierra. Si un caño está indisponible se puede usar un tubo
o barra de 8 pies para la fuente de tierra. El caño debe ser ¾
pulgada de tamaño del comercio o más grande y la supercie
exterior debe ser noncorrosivo. Si una barra de acero hierro
lo se utiliza debe ser por lo menos 5/8 pulgada de diámetro y
si una barra no ferrosa lo se utiliza debe ser por lo menos ½
pulgada de diámetro y es listado como material para conectar a
tierra. Maneje la barra o caño a una profundidad de 8 pies. Si
un fondo se encuentra menos de 4 pies hacia abajo, entierran
la barra o caño en una zanja. Todos instrumentos y aparatos
eléctricos operados de este generador deben ser conectar a
tierra apropriadamente por el uso de un tercer alambre o son
“Aislado Doble.”
Es recomendado a :
1. Use aparatos eléctricos con cordones eléctricos de tres
puntas.
2. Use cordon de extensión con receptáculo de 3 hoyos y tapón
de 3 puntas a nes opuestos para asegurar continuado de
proteción de tierra del generador a aparato.
Es recomendado fuerte de nosotros que todo aplicalbe
federal, el estado, y las regulaciones locales que relacionan
a especicaciones a conectar a tierra sean vericadas y son
seguidas.
INTERRUPTOR DE TRANSFERENCIA DE LINEA
Si este generador se utiliza para el servicio de reserva,
debe tener un interruptor de la transferencia entre el servicio
del poder de la utilidad y el generador. El interruptor de la
transferencia no sólo previene la forma del poder de utilidad
que alimenta en el generador, pero previene también la forma
del generador que alimenta fuera en las líneas de empresa de
servicio público. Este se piensa proteger los empleados de
servicio que puede estar trabajando en la línea dañada.
ESTA INSTALACION DEBE HACER POR UN
ELECTRICISTA LICENCIADO O TODOS CODIGOS
LOCALES DEBEN SEGUIR.
(Fig. 1)
Poner a tierra rod

Preparando la Generador
Manual del Operador 109
(Fig. 4)
PRE-OPERACION
ACEITE DE MOTOR:
Antes de revisando o rellenando aceite, asegúrese que
generador se localizado en supercie nivel y estable con el
motor parando.
1. Quite varilla del aceite y revisa nivel del aceite de motor
(Fig. 2)
2. Si nivel del aceite esté debajo de línea a nivel bajo, rellena
con aceite apropiado a línea a nivel arriba. No atornilla
en la varilla de aceite cuando revisando nivel del aceite.
(Fig. 3)
3. Camibe aceite si contaminado. (Vea el “Horario de
Mantenimiento; Camibiando Aceite de Motor” página 120)
Capacidad del aceite:
AC-G3200i......................... 0,6 litros / 20,5 onzas
AC-G4300i......................... 1,0 litros / 33,3 onzas
Aceite de motor que es recomendado:
John Deere Plus-4 aceite es el aceite preferido de usar. Si John
Deere Plus-4 no es disponible, use aceite 4-golpe automática
de detergente de clase servicio de API o grado más alto (SG,
SH, o SJ es recomendado) Si sólo aceite de viscosidad se
uso, escoja la viscosidad apropiada para temperatura media
en su área. (Fig. 4)
(Fig. 2)
(Fig. 3)
(Fig. 4)
Marca Arriba
Límite de Operando
Marca Baja
Varilla de
Aceite de Motor

Preparando la Generador
110 Manual del Operador
PRE-OPERACION
ALIMENTANDO:
ADV ERTENCIA: ¡COMBUSTIBLE EXP LOTA BLE!
GASOLINA ES MUY INFLAMABLE Y SUS
V A P O R E S P U E D E N E X P L O R A R S I
ENCENDIERON.
NO REABASTEZCA DE COMBUSTIBLE EL
GENERADOR MIENTRAS FUMA, CERCA DE UNA
LLAMA ABIERTA O DE OTROS MATERIALES QUE
PUEDAN PROVOCAR UN INCENDIO.
M A N T E N G A G A S O L I N A S O L O E N
CONTENDORES APROBARON EN EDIFICIOS
DESOCUPADOS DE BUEN VENTILACION Y
AFUERA DE CHISPAS O LLAMAS.
NO RELLENE EL TANQUE DE COMBUSTIBLE
MIENTRAS EL MOTOR ESTA CALIENTE O
OPERANDO, DESDE QUE EL COMBUSTIBLE
ROCIADO PODRIA ENCENDER SI ES
CONTACTO CON PARTES O CHISPAS CALIENTES
DE LA IGNICION. NO ARRANQUE EL MOTOR
CERCA DE ROCIADOS DE COMBUSTIBLE.
NUNCA USE GASOLINA COMO UNA AGENTE DE
LIMPIANDO.
ADVERTENCIA: NO SOBRELLENE EL TANQUE,
MANTENGA ESPACIO PARA EXPANSION
DE COMBUSTIBLE.
1. Si nivel de combustible sea bajo, rellene con gasolina automativa sin
plomo.
2. Compruebe la galga de combustible mientras que llena. (Fig. 5)
3. Asegúrese que usar pantalla de ltro de combustible en cuello de
ltro de combustible. (Fig. 6)
Capacidad de combustible del tanque:
AC-G3200i ...................... 10,8 litros / 2,9 gal
AC-G4300i ...................... 12,8 litros / 3,4 gal
4. Cuando usando el generador por el primer tiempo o parando debido
de nada más combustible, tire la manivela de retroceso muchas veces
después de llenando del tanque del combustible.
ADVERTENCIA: ASEGURESE PARA REVISAR CADA
ADVERTENCIA PARA PREVENIR RIESGO DE
FUEGO.
NO RELLENE EL TANQUE CUANDO EL MOTOR
FUNCIONANDO O CALIENTE.
ANTES DE LLENANDO COMBUSTIBLE, DOBLA
INTERRUPTOR DE MOTOR A POSICION DE
“ “ (PARE).
TEN CUIDADO PARA NO QUITAR POLVO, TIERRA,
Y AGUA O OTROS OBJECTOS EXTRANJEROS EN
EL COMBUSTIBLE.
LIMPIE ALGUN COMBUSTIBLE ROCIADO ANTES
DE EMPEZANDO EL MOTOR.
MANTENGA AFUERA LAS LLAMAS ABIERTAS.
(Fig. 5)
(Fig. 6)
Empty
Full

Preparando la Generador
Manual del Operador 111
PRE-OPERACION
ALIMENTANDO (siguente):
Recomendaciones Generales
• Compre gasolina en cantidades pequenas y mantenga en
contenedores aprobados y limpios.
• Para minimizar los depósitos de goma en su sistema del
combustible y para asegurar un empiece fácil, no use gasolina
de estación pasada.
• No agregue aceite a la gasolina.
Tipo de Combustible
• Para resultas mejores use sóla gasolina limpia, fresca, y sin
plomo y con octano de bomba que valora de 87 o más alto.
• Es recomendado que usar gasolina sin plomo porque dejar
menos depósitos de recámara de combustión.
MEZCLAS DE GASOLINA / ALCOHOL:
Gasohol ( a 10% alcohol de etilo, 90% gasolina sin plomo de
volumen) se aprueba como un combustible. Otras mezclas de
gasolina / alcohol no se aprueban.
MEZCLAS DE GASOLINA / ETER:
Mezclas de metilo éter terciario de Butilo y Gasolina sin
plomo ( a máxima de 15% MTBE de volumen) se apruebe
como combustible. Otras mezclas de gasolina y éter no se
aprueben.

Preparando la Generador
112 Manual del Operador
PRE-OPERACION
INSTALACIÓN DE LA BATERÍA:
1. Conecte los terminales a una batería de plomo-ácido que ya
esté cargada. Monte la batería en la posición especicada
abajo, con sus terminales encarados hacia dentro.
2. Inserte cara perno largo por el oricio especicado, con su
punto orientada hacia fuera.
3. Ponga el brazo de soporte sobre los pernos largos y apriételos
con las tuercas de mariposa. (Empuje la batería de plomo-
ácido completamente hacia dentro.)
4. Disponga los cables de modo que no puedan dañarse por
las posibles vibraciones causadas por el motor.
5. Sólo después de haber comprobado que la llave de arranque
del motor está en la posición “OFF”, conecte con seguridad
el cable rojo al terminal positivo (+). Luego, conecte el otro
cable terminal negativo (-).
Cable rojo : al terminal positivo (+)
Cable negro : al terminal negativo (-)
PRECAUCIÓN: SI SE REALIZA LA CONEXIÓN INCORRECTAMENTE, ES
POSIBLE QUE SE AVERÍE EL MOTOR.
CABLE
ROJO
CABLE
ROJO
5
MENOS DE
131 mm [5.2 in.] (AC-G3200i)
162 mm [6.4 in.] (AC-G4300i)
MENOS DE
114 mm [4.5 in.] (AC-G3200i)
136 mm [5.4 in.] (AC-G4300i)
MENOS DE
71 mm [2.8 in.] (AC-G3200i)
82 mm [3.2 in.] (AC-G4300i)
1
2
3
4
5
1
6
2
3
4
Base de la batería
Perno de brida
Tornillo
Partes accesorias
Banda de la batería
Perno y tuerca
6 Cubierta de la batería
BATERÍA RECOMENDADA
BATERÍA DE PLOMO-ÁCIDO
AC-G3200i AC-G4300i
los E.E.U.U. SW7L-BS SW12AL-A
CANADÁ SWC7L-BS SWC12AL-A

Preparando la Generador
Manual del Operador 113
PRE-OPERACION
REVISE PARTES DE COMPONENTE:
Revise los artículos siguentes antes de empezando el moto:
1. Escape de combustible de manguera de combustible, etc.
2. Tornillos y tuercas para aojado.
3. Componentes para daño y roturas.
4. Generador no descansando o en contra de alga alambre
adyacente
REVISE ALREDEDORES DE GENERADOR:
Cuando escuchando a radio cerca de generador, el sonido de radio
puede perturbar porque de condición de olas de radio y función de
radio.
Asegúrese que revisar cada advertencia para prevenir riesgo
de fuego.
ADVERTENCIA: MANTENGA AREA LIMPIE DE MATERIALES
INFLAMABLES Y DE RIESGO.
MANTENGA GENERADOR MAS DE 3 PIES (1 METRO)
AFUERA DE EDIFICIOS O OTRAS ESTRUCTURAS.
SOLO OPERE GENERADOR EN AREAS SECAS Y CON
BUEN VENTIACION.
MANTENGA CANO DE ESCAPE VACIA DE OBJECTOS
EXTRANJEROS.
MANTENGA GENERADOR FUERA DE LLAMAS
ABIERTAS. ¡NO FUME!
MANTENGA GENERADOR EN SUPERFICIE ESTABLE Y
NIVEL.
NO BLOQUEA RESPIRADEROS DE GENERADOR CON
PAPEL NI OTRA MATERIAL.

114 Manual del Operador
OPERACIÓN
Arranque de Retroceso
PRECAUCIÓN REVISE EL NIVEL DEL ACEITE ANTES DE
CADA OPERACIONCOMO MOSTRADO EN
PAGINA 109.
CUANDO ARRANQUE EL MOTOR CON EL
ARRANCADOR DE RETROCESO, PONGA EL
INTERRUPTOR DE LA LLAVE EN LA POSICIÓN
“ I “ (MARCHA) Y TIRE DE LA EMPUÑADURA
DEL ARRANCADOR.
NOTA: Lea manual de operador antes de operar esta unidad.
Asegúrese siempre de poner el generador sobre una
supercie nivelada, bloqueando la rueda con el tope
y/o poniendo tacos en las ruedas. (Fig. 7)
1. Asegúrese que todos aparatos son desconectados de
generador.
2. Dobla interruptor de motor a posición de “ “ estrangulador
(Fig. 8) (Cuando motor esté tibio o temperaturas sea
altas, empiece motor con interruptor a posición de “ “
(Funcione).
PRECAUCIÓN: NO CONECTE APARATOS CON LINEAS O
TAPONES DEFECTOS.
ASEGURESE QUE APARATOS NO SON CONECTOS
A GENERADOR CUANDO EMPEZANDO.
EMPEZANDO EL GENERADOR CON APARATO
CONECTADO PUEDE RESULTAR EN DANO A
GENERADOR Y / O APARATO Y LESIONES
PERSONALES.
3. Tire manivela de empezar de retroceso, despacio hasta
pasar punta de compresión (resistencia será sentía),
entonces volver a manivela a su posición original y tire fuerte.
(Fig. 9)
4. Después de empezando, permite la manivela de empezar
de retroceso a volver a posición original con manivela en su
mano.
NOTA: So el motor falla a empezar después de muhas tentativas,
repita los procedimientos de empezar que mencionado
arriba con interruptor de motor esté en posición de “ “
FUNCIONE.
5. Después de 20 o 30 segundos de calentarse, dobla interruptor
de motor a posición de “ “ FUNCIONE. (Fig. 10)
6. Si cambia la visualizador LE del monitor múltiple a la indicación
de “tensión”, asegúrese de que la tensión este en el nivel normal
(aprox. 120 V).
NOTA: Consulte por favor con un comerciante autorizado de John
Deere si la monitor múltiple está apagado durante la operación
apropiada.
7. Examine recipiente de GFCI en la unidad. Empuje el botón
de exam. El botón de colocar debe saltar y no debe tener
potencia al recipiente. Aplique una carga de examinar o luz a
cada recipiente para vericar. SI BOTÓN DE COLOCAR NO
SALTE, NO USE LOS RECIPIENTES. VEA CONCESIONARIO
PARA SERVICIO INMEDIATAMENTE.
8. Si recipientes examine correcto, empuje el botón de colocar
para restablecer potencia. Debe oír o sentir un taconazo
distincto cuando este es completo. SI RECIPIENTES NO
COLOCAR CORRECTO, NO USE RECIPIENTES. VEA
CONCESIONARIO.
9. Ahora cargas pueden aplicar a la unidad.
Operación
(Fig. 8)
(Fig. 10)
(Fig. 9)
(Fig. 7)
TOPE
DESBLOQUEO
BLOQUEO
PARADA
MARCHA
ESTRANGULADOR
Manivela de
Arranque de
Retroceso
Tire con Fuerza
PARADA
MARCHA
ESTRANGULADOR

Operando la Generador
Manual del Operador 115
OPERACIÓN
Comienzo Eléctrico
PRECAUCIÓN REVISE EL NIVEL DEL ACEITE ANTES DE
CADA OPERACIONCOMO MOSTRADO EN
PAGINA 105.
NOTA: Lea manual de operador antes de operar esta unidad.
Asegúrese siempre de poner el generador sobre una
supercie nivelada, bloqueando la rueda con el tope
y/o poniendo tacos en las ruedas. (Fig. 7)
1. Asegúrese que todos aparatos son desconectados de
generador.
2. Dobla interruptor de motor a posición de “ “ estrangulador
(Fig. 8) (Cuando motor esté tibio o temperaturas sea
altas, empiece motor con interruptor a posición de “ “
(Funcione).
3. Inserte la llave en el interruptor de la llave y gírela hacia la
derecha a la posición “ I “(MARCHA) para poner en marcha el
motor. Luego, gire más la llave a la posición “ “ (ARRANQUE)
El motor de arranque pondrá en marcha el motor.
PRECAUCIÓN: NO CONECTE APARATOS CON LINEAS O
TAPONES DEFECTOS.
ASEGURESE QUE APARATOS NO SON CONECTOS
A GENERADOR CUANDO EMPEZANDO.
EMPEZANDO EL GENERADOR CON APARATO
CONECTADO PUEDE RESULTAR EN DANO A
GENERADOR Y / O APARATO Y LESIONES
PERSONALES.
NO VIRE EL MOTOR DE ARRANQUE MÁS DE 5
SEGUNDOS SEGUIDOS. SI EL MOTOR NO SE PONE
EN MARCHA, COLOQUE DE NUEVO LA LLAVE EN
LA POSICIÓN “ I “ (MARCHA) Y ESPERE UNOS 10
SEGUNDOS ANTES DE VOLVER A INTENTAR LA
PUESTA EN MARCHA.
NO GIRE EL INTERRUPTOR DE LA LLAVE A LA
POSICIÓN “ “ (ARRANQUE) CUANDO EL MOTOR
ESTÉ EN MARCHA PARA EVITAR DALOS EN EL
MOTOR DE ARRANQUE.
4. Después de 20 o 30 segundos de calentarse, dobla interruptor
de motor a posición de “ “ FUNCIONE. (Fig. 10)
5. Si cambia la visualizador LE del monitor múltiple a la indicación
de “tensión”, asegúrese de que la tensión este en el nivel normal
(aprox. 120 V).
NOTA: Consulte por favor con un comerciante autorizado de John
Deere si la monitor múltiple está apagado durante la operación
apropiada.
6. Examine recipiente de GFCI en la unidad. Empuje el botón
de exam. El botón de colocar debe saltar y no debe tener
potencia al recipiente. Aplique una carga de examinar o luz a
cada recipiente para vericar. SI BOTÓN DE COLOCAR NO
SALTE, NO USE LOS RECIPIENTES. VEA CONCESIONARIO
PARA SERVICIO INMEDIATAMENTE.
7. Si recipientes examine correcto, empuje el botón de colocar
para restablecer potencia. Debe oír o sentir un taconazo
distincto cuando este es completo. SI RECIPIENTES NO
COLOCAR CORRECTO, NO USE RECIPIENTES. VEA
CONCESIONARIO.
8. Ahora cargas pueden aplicar a la unidad.

Operando la Generador
116 Manual del Operador
OPERACIÓN
USANDO ENERGIA ELECTRICA:
ADVERTENCIA- ASEGURESE QUE APARATO ES
DESCONECTADO ANTES DE CONECTARLO
AL GENERADOR.
NO MUEVA EL GENERADOR MIENTRAS
FUNCIONARLO.
ASEGURESE CONECTAR A TIERRA EL
GENERADOR. FALLA DE CONECTANDO A
TIERRA LA UNIDAD PUEDE RESULTAR EN
DESCARGA ELECTRICA.
APLICACION DE AC:
1. Asegúrese de que la tensión indicada en el visualizador
LE sea del nivel normal (aprox. 120 V).
NOTA: Este generador ha sido completamente probado y
ajustado en fábrica. Si el generador no produce la
tensión especicada, consulte al concesionario Robin
o taller de servicio que le quede más cercano.
2. Apague interruptor(es) de aparatos eléctricos antes de
conectando el generador.
3. Inserte los tapones de aparatos eléctricos entre receptáculo.
(Fig. 11)
• Usando Tabla 1, revise tapon de aparato para compatilidad
con receptáculo de generador.
• Asegúrese que vataje total de aparatos conectados no es
más de salida valorador de generador, vea especicaciones
en página 114.
ADVERTENCIA: PARA OBTENER LA ALIMENTACIÓN
DEL RECEPTÁCULO CON BLOQUEO DE
GIRO, INSERTE LA CLAVIJA EN EL
RECEPTÁCULO Y GÍRELO HACIA LA
DERECHA A LA POSICIÓN DE BLOQUEO.
A S E G U R E S E Q U E C O N E C TA R A
TIERRA EL GENERADOR SI APARATO
CONECTADO Y ELECTRICO ES CONECTAR A
TIERRA.
NO COLOQUE OBJETOS EXTRAÑOS EN
EL RECEPTÁCULO DE LA CLAVIJA.
NOTA: Cuando el visualizador LE indique “O_Lod” (sobrecarga)
se corta la salida de CA porque se asume que el
generador funciona en el estado de sobrecarga o que
el (los) aparato(s) conectado(s) están averiado(s).
Pare el generador inmediatamente, revise el aparato
y / o generador para sobrecargando y repare como
necesario por un comerciante authorizado de John
Deere.
4. Arranque el interruptor del aparato.
Tabla 1
PANEL DE CONTROL
(Fig. 11)
Tipo Amperaje Recep
áculo Clavija
de CA
Descripción
Hasta
20A
NEMA
5-20R
NEMA
5-20P
Receptáculo
del interruptor
del circuito
de falla a tierra
(GFCI),dúplex
Hasta
30A
NEMA
5-30R
NEMA
5-30P
Receptáculo
con bloqueo
AC-G3200i
AC-G4300i
Monitor múltiple
Interruptor
de la llave
Terminal de tierra
Terminales de CC
Receptáculos de CA (20A)
Interruptor
del motor
Disyuntor de
circuito de CC
Disyuntor de
circuito de CA
Receptáculos de CA (30A)
Monitor múltiple
Interruptor
de la llave
Terminal de tierra
Terminales de CC
Receptáculos de CA (20A)
Interruptor
del motor
Disyuntor de
circuito de CC
Disyuntor de
circuito de CA
Receptáculos de CA (30A)

Operando la Generador
Manual del Operador 117
OPERACIÓN
APLICACION DE DC:
Terminal de DC sea usado sólo para cargando baterías de 12
voltios. Proveerlo a 12 V – 8.3A (100W) de potencia máxima.
(Fig. 12)
CONEXION DE CABLE:
Conecte terminal (roja) positiva en generador a terminal (+) positiva
en batería.
Conecte terminal (negra) negativa en generador a terminal (-)
negativa en batería.
PRECAUCIONES DE SEGURIDAD CUANDO CARGANDO:
ADVERTENCIA: UN GAS EXPLOSIVO DEL HIDROGENO
SE DESCARGA POR BATERIA DE
HOYOS DE RESPIRADOR DURANTE PROCESO
DE CARGAR. NO PERMITA LA CHISPA NI
LLAMAS ABIERTAS ALREDEDOR DEL
GENERADOR NI LA BATERIA DURANTE EL
PROCESO DE CARGAR.
LIQUIDO DEL ELECTROLITO PUEDE QUEMAR
OJOS Y ROPA. SEA MUY CUIDADOSO Y
EVITE CONTACTO. SI HERIDO, LAVA EL AREA
AFECTADA INMEDIATAMENTE CON
CANTIDADES GRANDES DE AGUA Y CONSULTE
UN MEDICO PARA TRATAMIENTO.
Cuando cargando una batería de grande capacidad o batería
totalment descargada, corriente excessivo puede forzar la ruptura
de DC a apagar. En estos casos, utilice un cargador de batería
para cargar una batería grande con salida de CA.
Defectos de batería causaría tropezar de ruptura de DC. Revise
la batería antes de reponer la ruptura de DC.
PARANDO EL GENERADOR:
1. Apague interruptor de potencia de equipo eléctrico y quite cordon
del receptáculo del generador
2. Permite sobre 3 minutos para enfriar de motor y no cargue antes
de parar.
3. Dobla interrputor de motor a posición de “ “ PARAR (Fig.
13)
4. Gire el interruptor de la lave a la posición ” O “ (PARADA).
SENSOR DEL ACEITE:
El sensor del aceite detecta la caída en nivel del aceite en cigüeñal
y para automáticamente el motor cuando el nivel del aceite cae
debajo de un nivel predeterminado.
Cuando el motor para automáticamente, apague el generador y
revise el nivel del aceite. Rellene aceite de motor a nivel arriba con
instruido en página 105 y vuele a encender el motor.
Si el motor no empezar como usando procedimientos normales,
revise nivel del aceite.
PRECAUCIÓN: NO QUITE SONDA DE SENSOR DEL ACEITE
CUANDO RELLENANDO CON ACEITE.
QUITE CUBIERTA DE LLENAR EN LADO OPUESTO
DE CARBURADOR.
(Fig. 13)
(Fig. 12)
Negative Terminal
(Black)
Positive Terminal
(Red)
STOP
RUN
CHOKE

Operando la Generador
118 Manual del Operador
OPERACIÓN
INFORMACION DE VOLTAJE:
Algunos aparatos necesitan una “oleada” de energía cuando empezando.
Este signica que la cantidad del poder eléctrico necestiado para
empezar el aparato puede exceder la cantidad necesito para mantener
su uso.
Aparatos eléctricos y herramientas vienen normalmente con un etiqueta
que indica voltio, ciclos/Hz, amperios, y potencia eléctrica que
necesitar para operar el aparato o herramienta.
Verique con comerciante más cerca o centro de servicio con preguntas
de oleadas de energía de aparatos especicos o herramientas.
• Caragas eléctricas como lámparas incandescentes y platos calientes
requieren el mismo voltage para empezar es necesitado como mantener
el uso.
• Cargas como lámparas uorescentes requieren 1,2 o 2 veces el voltaje
indicado durante arranque.
• Cargas de lámparas de mercurio requieren 2 o 3 veces el voltaje indicado
durante arranque.
• Motores eléctricos requieren corriente grande de empezando. Requisitos
del poder dependen del tipo del motor y su uso. Una vez que suciente
“oleada” se alacanza para empezar el motor, el aparato requerirá sólo
30 % a 50 % de voltaje para seguir operando.
• La mayoría de herramientas elécticas requieren 1,2 a 3 veces su voltaje
para operando abajo de carga durante uso. Por ejemplo, un generador
de 5000 vatios puede hacer funcionar una máquina eléctrica de 1800 a
4000 vatios.
• Cargas como bombas sumegidos y compresores de aire requieren una
fuerza grande para empezar. Necesitan 3 a 5 veces voltaje operado
normal para empezar. Por ejemplo, un generador de 5000 vatios sólo
podrá impulsar una bomba de 1000 a 1700 vatios.
NOTA: El gráco siguiente del voltaje es una guía general sólo. Reérase
a su aparato especíco para el voltaje correcto.
Para determinar el voltaje total que requirió a operar un aparato o
herramienta, multiplique la gura de voltaje de aparato / herramienta
por gura de amperaje se pueden encontrar en el plato de nombre que es
conectado normalmente a aparatos y herramientas eléctricas.
PRECAUCIÓN: SI MOTOR ELECTRICO FALLA ARRANCAR O
ALCANZAR VELOCIDAD DE OPERANDO, APAQUE EL
APARATO O HERRAMIENTA INMEDIATAMENTE PARA
EVITAR DAÑO AL EQUIPO. SIEMPRE REVISAR
REQUISITOS DEL APARATO O HERRAMIENTA QUE
USANDO EN COMPARACION DE VALORADA DE SALIDA
DEL GENERADOR.
Aplicaciones Voltaje Aplicable (W) 60 Hz
AC-G3200i AC-G4300i
Lámpara incandescente, calentadora aprox. 2800 aprox. 3800
Lámpara uorescente, Herramienta eléctrica aprox. 1400 aprox. 1900
Lámpara de mercurio aprox. 1000 aprox. 1600
Bomba de Compresor aprox. 600 aprox. 800

Operando la Generador
Manual del Operador 119
OPERACIÓN
TAMANO DE CABLE:
Cuando usar un largo cordon de extensión para conectar aparato o
herramienta al generador, una cantidad especíca de caída de voltaje o
pérdida ocurre en cordon de extensión que reducir el efectivo de voltaje
disponible para el aparato o herramienta. El gráco debajo ha
preparado para ilustrar la pérdida aproximada del voltaje cuando un
cordon de extensión de 300 piese (100 metros) se usado para conectar
un aparato o herramienta al generador.
Nominal
transversal
sección
A.W.G. Permisible
corriente
N° de hilos /
diám hilos
Resistencia Tensión de corriente
mm
2
No. A No./mm /100m 1,0 A 3,0 A 5,0 A 8,0 A 10,0 A 12,0 A 15,0 A
0,75 18 7 30/0,18 2,477 2,5 V 8,0 V 12,5 V - - - -
1,27 16 12 50/0,16 1,486 1,5 V 5,0 V 7,5 V 12,0 V 15,0 V 18,0 V -
2,00 14 17 37/0,26 0,952 1,0 V 3,0 V 5,0 V 8,0 V 10,0 V 12,0 V 15,0 V
3,50 12 - 10 23 45/0,32 0,517 - 1,5 V 2,5 V 4,0 V 5,0 V 6,5 V 7,5 V
5,50 10 - 8 35 70/0,32 0,332 - 1,0 V 2,0 V 2,5 V 3,5 V 4,0 V 5,0 V
Caída de voltaje

Operando la Generador
120 Manual del Operador
OPERACIÓN
ARRESTADOR DE CHISPA:
Es recomendado usar el producto con arrestador de chispa en
áreas secas o con muchos arboles. Algunas áreas requieren el
uso de arrestador de chispa. Verique por favor con leyes locales y
regulaciones antes de operando su producto.
El arrestador de chispa debe ser limpiado regularmente para mantenerlo
y para puede funcionando como diseñado.
Arrestador de chispa atascado:
• Prevenir el ujo de gases de exhausto
• Reducir salida de motor
• Aumentar consumo de combustible
• Causar dicultad de arranque
PRECAUCIÓN: SI MOTOR HA OPERANDO, EL MOEFLE Y
ARRESTADOR DE CHISPA SERAN MUY CALIENTES.
PERMITA EL MOEFLE TIEMPO PARA ENFRIARSE
ANTES DE LIMPIANDO ARRESTADOR DE CHISPA.
Como quitar el arrestador de chispa (Fig. 14):
1. Quite tornillos de reborde de cubierta de moee y quite cubierta de
moee.
2. Quite atornillo especial de arrestador de chispa y quite el arrestador
de chispa del moee.
Limpie Pantalla de Arrestador de Chispa (Fig. 15):
1. Use una cepilla para quitar depósitos de carbón de pantalla de
arrestador de chispa. Ten cuidado que no da daño a pantalla.
2. Arrestador de chispa debe ser libre de fracturas y hoyas. Reemplace
arrestador de chispa si tiene daño.
3. Instale arrestador de chispa y protector de moee en orden inversa
del desasamblea.
(Fig. 15)
REJILLA DEL
PARACHISPAS
SILENCIADOR
REJILLA TRASERA
CUBIERTADE LA REJILLATRASERA
TORNILLO
TUERCA
REJILLA DEL PARACHISPAS
(Fig. 14)

Manual del Operador 121
Cuando el motor de generador falla de empezar después de varias tentativas o si ninguna electricidad está
disponsible en enchufe de salida, verique el gráco siguiente. Si su generador falla todavía empezar o engendrar
electricidad, contacte su más cerca comerciante de John Deere o tienda de servicio para información adicional o
procedimientos correctivos.
Localización de Fallas
Síntoma Problema Soluciones
El motor no arranque. Revise si interruptor de motor está Dobla interruptor del motor a posición
apagado. “ “ de estrangulador.
Tanque de combustible está vacío. Llene tanque peron no rellenar tanque.
Revise para asegurar que generador Si conectado, apague interruptor
no está conectado a un aparato. de potencia en aparatos conectados y
desconectar.
Revise tapón de chispa para Si sueltos, empuje cubierta
cubiertas sueltas de bujía. de bujía en lugar.
Revise bujía para contaminación. Quite bujía y limpie electode.
Revise nivel del aceite de motor. Si nivel del aceite de motor está
baja, agregue aceite como “Pre-
Operación; Aceite de Motor” en página
101.
Generador no tiene salida. Compruebe si el monitor múltiple Pare el motor y compruebe el aparato
muestra “O Lod” (sobrecarga). y/o el generador para ver si hay
sobrecarga.
Compruebe que el disyuntor de Presione el disyuntor de circuito a la
CC esté apagado. posición de encendido (ON), después
de haberse asegurado que el nivel de
la corriente de carga sea adecuado y
que la batería está en estado normal.
Compruebe que no estén sueltas las Apriételas en caso necesario.
conexiones del receptáculo de CA y
de los terminales de CC.
Verique si se intentó arrancar el motor Apague el interruptor del aparato y con
aparatos ya conectados a él. desconecte el cable del receptáculo
Vuelva a conectarlo una vez que el
generador haya arrancado
correctamente.

122 Manual del Operador
MANTENIMIENTO DEL GENERADOR
Mantenimiento, reemplazo, o reparación de los dispositivos del control
de la emisión y sistemas deben ser preformados por un centro de
reparaciones autorizado de John Deere o el comerciante.
INSPECCION DIARIA:
Antes de operando generador, revise los artículos de servicios
siguientes:
• Alrededores seguros
• Escape de gasolina y aceite de motor.
• Suciente aceite limpio.
• Receptáculos de AC y terminales de DC para daño.
• Nivel de gasolina
• Vibración excesiva y sonido.
• Tornillos, tuercas, o protectoras sueltas o rompidos.
• Elemento de aire limpiado.
MANTENIMIENTO PERIODICA:
Mantenimiento periódica es esencial para operación segura y eciente
de su generador.
Verique la Tabla de Mantenimiento Periódica para intervalos de
mantenimiento.
NOTA: REEMPLAZO, REPARACION, Y AJUSTADO DE ESTES
COMPONENTES DEBE SER PREFORMADOS DE CENTRO
DE REPARACIONES AUTORIZADO DE JOHN DEERE O EL
COMERCIANTE.
La sistema de control de emisión consiste de las partes siguientes:
• carburador y partes internas
• sistema fría de enriquecimiento de encender, si aplicable
• colector de entrada , si aplicable
• elemento de limpiador de aire
• bujía
• magneto o sistema electrónico
• avance de chispa / sistema tarde , si aplicable
• colector de exhausto, si aplicable
• mangueras, cinturones, conectadores, y asambleas
Servicio

Servicio
Manual del Operador 123
MANTENIMIENTO DEL GENERADOR
TABLA DE MANTENIMIENTO PERIODICA:
El horario de mantenimiento indicado en tabla se basa en operación normal del generador. Debe el generador sea
operado en la condición muy polvorienta o en la carga más pesada la condición, los intervalos de mantenimiento se
deben acortar dependiendo de la contaminación del aceite, elementos atascadgo de ltro, el uso de partes y más.
* NOTA: El cambio de aceite intial se debe preformar después de las primaras veinte (20) horas de operación. Después
cambia el aceite cada cien (100) horas. Antes de cambiar el aceite, revise para una manera conveniente
dehacerse aceite viejo. Sus regulaciones locales y ambientes le darán más información y instrucciones de
disposición apropriada.
**NOTA: Con los procedimientos estos artículos, contacte su comerciante autorizado de John Deere.
( initial)
Artículo de
Mantenimientos
Cada 8 horas
(Diaria)
Cada 20
horas
Cada 50 horas
(semanal)
Cada 100
horas
Cada 200 horas
(mensual)
Cada 500
horas
Cada 1000
horas
Limpie generador y revise
atornillos y tuercas
•
Revise y Rellene aceite
de motor.
•
Receptáculos de AC. •
Terminal de DC •
Interruptor de Motor •
Compruebe el monitor
múltiple
•
Limpie elemento de aire
limpie
•
Limpie bujía •
Cambie aceite de motor * • •
Arrestador de chispa •
Reemplace elemento
de aire
•
Limpie ltro de
combustible
•
Limpie y ajuste bujía y
electrodos
•
Reemplace bujía. •
Quite carbón de cabeza
de cilandro. **
•
Revise y ajuste espacio
de válvula. **
•
Limpie y ajuste el
carburador. **
•
Arregle motor. ** •
Rotor •
Stator •
Reemplace el monte de
motor.
•
Reemplace línas de
combustible.
Anual
(Rellene diariamente a nivel arriba)

Servicio
124 Manual del Operador
MANTENIMIENTO DEL GENERADOR
CAMBIANDO ACEITE DE MOTOR:
Cambie aceite después de las primaras veinte (20) horas
de operación. Después debe cambiar cada 100 horas.
1. Vacie aceite como quitando tapón de vaciar y cubierta
del ltro de aceite mientras el motor está caliente. (Fig.
16)
2. Reinstale tapón de vaciar y llene el motor con aceite
hasta esté en nivel arriba en cubierta de ltro del
aceite.
NOTA: John Deere Plus – 4 es el aceite preferido de
usar. Si John Deere Plus-4 no es disponible, use
aceite 4-golpe automática de detergente de clase
de servicio de API o grado más alto (SG, SH o SJ
es recomendado). Si aceite contaminado o viejo
fue usado o cantidad de aceite no es suciente, el
daño de motor resultaría y su vida cortará.
3. Dehágase aceite usado según regulaciones locales y
ambientes.
ATENDIENDO EL LIMPIADOR DE AIRE:
Mantenga de limpiador de aire en condiciones correctos
es muy importante. Polvo que entrar de elementos
instalados incorrectos o atendido incorrecto puede danar
y llevar los motores. Siempre mantenga el elemento
limpie.
1. Desconecte la cubierta y quite elemento de limpie. (Fig.
17)
2. Espuma de urethane: Limpie el elemento con agua
fresco. Apriete fuera agua y luego seca el elemento.
(No tuerza).
LIMPIANDO Y ESPACIANDO BUJIA:
Si tapón es contaminado con carbón, quite carbón usando
un limpiador de tapón o cepilla de alambre. (Fig. 18)
Ajuste espacio de electrod a 0.6 a 0.7 mm (0.024 a 0.028
pulgadas). (Fig. 19)
Bujía Recomendado:
Bujía -------------------NGK BR-6HS
RL86C Campeón
(Fig. 16)
(Fig. 17)
(Fig. 18)
0.024 - 0.028 in
(Fig. 19)
TAPÓN DE DRENAJE DE ACEITE
BUJÍA
LLAVE DE BUJÍAS
TAPA DE LA BUJÍA

Servicio
Manual del Operador 125
MANTENIMIENTO DEL GENERADOR
LIMPIEZA DEL COLADOR DE COMBUSTIBLE:
El colador de combustible extrae la suciedad y el agua
del combustible.
1. Extraiga la taza del colador y tire el agua y la suciedad.
(Fig. 20)
2. Limpie la rejilla y la taza del colador con gasolina.
3. Apriete con seguridad la taza al cuerpo principal,
ase gurá ndos e d e q ue no qu eden fu gas de
combustible.
OPERACIÓN E INSPECCIÓN PERIÓDICAS:
Cuando instale el generador como fuente de alimentación
eléctrica de emergencia, deberá realizar la operación e
inspección periódicas.
El combustible (gasolina) y el aceite de motor se deterioran
con el tiempo, lo cual produce dicultades para arrancar
el motor, un funcionamiento inadecuado del motor, y
averías.
PRECAUCIÓN: PUESTO QUE EL COMBUSTIBLE
(GASOLINA) SE DETERIORA CON EL
TIEMPO, CAMBIE PERIÓDICAMENTE
EL COMBUSTIBLE (GASOLINA) POR
OTRO NUEV O; SE RECOMIENDA
CAMBIARLO UNA VEZ CADA TRES (3)
MESES.
PRECAUCIÓN
1. Compruebe el combustible (gasolina), el aceite de motor
y el ltro de aire.
2. Arranque el motor.
3. Con el aparato, como puedan ser unas luces, conectado,
deje en marcha el motor durante más de 10 minutos.
4. Compruebe los elementos siguientes:
• Funcionamiento adecuado del motor.
• Salida adecuada y encendido correcto de la lámpara
indicadora.
• El interruptor del motor funciona con normalidad.
• No hay fugas de aceite de motor ni de combustible
(gasolina)
(Fig. 20)

126 Manual del Operador
Transporte
TRANSPORTE
Cuando transporte el generador, asegúrese de haber
drenado el combustible (gasolina) del depósito.
ADVERTENCIA: PARA EVITAR QUE SE DERRAME
EL COMBUSTIBLE DEBIDO A LAS
V I B R A C I O N E S Y G O L P E S , N O
TRANSPORTE NUNCA EL GENERADOR
CON COMBUSTIBLE (GASOLINA) EN EL
DEPÓSITO.
CIERRE CON SEGURIDAD LA TAPA DEL
DEPÓSITO.
PARA EVITAR EL PELIGRO QUE SUPONE
LA INFLAMABILIDAD DE LA GASOLINA,
NO DEJE NUNCA EL GENERADOR EN UN
LUGAR EXPUESTO A LA LUZ DIRECTA
DEL SOL NI CON ALTASTEMPERATURAS
DURANTE MUCHO TIEMPO.
CUANDO LO TRANSPORTE, CONSERVE
EL COMBUSTIBLE (GASOLINA) EN EL
DEPÓSITO DE ALMACENAJE HECHO DE
ACERO.
1. Gire el interruptor del motor a la posición “ “
(PARADA).
2. Drene el combustible del depósito.
3. Cierre la tapa del depósito.
PRECAUCIÓN: NO PONGA NINGÚN OBJETO
PESADO SOBRE EL GENERADOR.
SELECCIONE Y COLOQUE EL
GENERADOR EN LA POSICIÓN
ADECUADA DEL VEHÍCULO DE
TRANSPORTE DE MODO QUE EL
GENERADOR NO PUEDA MOVERSE
NI CAERSE. ATE EL GENERADOR CON
CUERDAS SI ES NECESARIO.

Servicio
Manual del Operador 127
ALMACENAMIENTO DE GENERADOR
Los procedimientos siguientes deben seguir antes de
almacenamiento de generador de tiempos de 6 meses
o más.
1. Vacie combustible de tanque de combustible con
cuidado como desconectando la línea de combustible.
Gasolina dejada en tanque de comestible deterirará y
se haciendo arrranque de motor difícil.
2. Quite tornillo de vaciar de carburador. (Fig. 21)
3. Cambie aceite de motor.
4. Revise atornillos sueltos y tornillos, apretenlos si
necesario.
5. Limpie generador en total con ropa limpia. ¡NUNCA
USE AGUA PARA LIMPIAR GENERADOR!
6. Tire empezar retroceso hasta sentía resistancia,
saliendo manivela en esta posición.
7. Mantenga generador en área de buena ventilación y
humedad baja.
Almacenamiento
(Fig. 21)

128 Manual del Operador
Especicaciónes
ANOTE NÚMERO SERIE
Escriba número de modelo, numero serie de máquina (vea etiqueta
de número serie (A) en ilustración y fecha de compra en espacios
abajo. Su concesario necesita esta información cuando ordenando
partes.
Num. de modelo _________________________________________
Num. serie de máquina ___________________________________
Fecha de compra ________________________________________
(llene de comprador)
ARTICLE CARACTÉRISTIQUES
AC-G3200i AC-G4300i
ALTERNADOR ............................................................... Tipo de magneto de campo rotativo de polaridades múltiples
Salida de C.A.
Frecuencia ........................................................................ 60 Hz 60 Hz
Salida nominal ..................................................................2,800 W 3,800 W
Tensión nominal ................................................................AC 120V AC 120V
Corriente nominal ............................................................. 23,3 A 31,7 A
Factor de potencia ............................................................ 1.0 1.0
Salida de C.C.
Salida nominal ..................................................................100 W (sólo carga de baterías)
Tensión nominal ............................................................... 12 V 12 V
Corriente nominal ............................................................. 8,3 A 8,3 A
Clase de aislamiento ........................................................ B B
Duración de aislamiento ................................................... 1,250V durante 1 minuto
Resistencia de aislamiento ............................................... 10 MΩ y más a 500 V
Sistema de excitación .......................................................Compo rotativo de imán permanente
MOTOR .............................................................................. Motor de gasolina del tipo de cilindros en cabeza (OHC),
monocilíndrico, 4 tiempos, enfriado por aire forzado
Modelo .............................................................................. EX21 EX27
Desplazamiento ................................................................ 12,87 cu. in. (211 mL) 16,17 cu. in. (265 mL)
Salida máxima kW / rpm ...................................................4,8 / 3,600 6,3 / 3,600
Salida continua kW / rpm .................................................3,7 / 3,600 5,1 / 3,600
Combustible ........................................................................Gasolina automotor sin plomo
Capacidad de aceite de motor (L/gal.) ................................10,8 / 2,84 12,8 / 3,37
Sistema de arranque .......................................................... Arranque eléctrico / Retroceso
SISTEMA DE TIERRA ........................................................ Tierra al neutro
DIMENSIONES:
Longitud .............................................................................. 537 mm (21,1 in) 580 mm (22,8 in)
Profundidad ........................................................................482 mm (18,9 in) 527 mm (20,8 in)
Altura ..................................................................................583 mm (22,9 in) 618 mm (24,3 in)
PESO EN SECO .................................................................59kg (130 lb) 74kg (163 lb)
JUEGO DE LA VÁLVULA
(admisión y escape) (in/mm) ............................................ 0.0039 0.0012 / 0.1 0.03
Nota: Ajuste el juego de la válvula mientras el motor esté frío.
Nº. DE PROD. / Nº. DE SÉR.
(Étiquette)

Manual del Operador 129
Diagrama de alambre
AC-G3200i / AC-G4300i (60Hz-120V)
M
RELÉ
Interruptor
de la llave
M-
L.IG
B
M+
ST
R
Org
R
R
R
W
Blk
W
W
W
W
R
R R
R
R
R
W
W
W
Blu
W
W
Grn/Y
W
W
W
Org
Org
Blu
R
W
Blu
R
Blu
Blu
Blu
Blu
Y
Blk
Blk
Brn
Terminal de
tierra (masa)
Brn
Brn
Grn/Y
Grn/Y
Grn/Y
Grn/Y
Grn/Y
Grn/Y
INV&E/G C/U
Interruptor
del motor
Fusible10A
Batería
Sistema de
arranque
Rectificador de
diodos
Motor de
incremento
gradual
MONITOR C/U
PANEL DE CONTROL
GENERADOR
MOTOR
Bobina
principal
Bobina
secundaria 1
Bobina
secundaria 2
Devanado
de CC
Sensor de
nivel de
aceite
Bujía
Terminal de
salida de CC
Brn
Grn
Grn
Gry
Pur
Blk : Negro
Color del cable
Blk/W : Negro/Blanco
Blu : Azul
LBlu : Azul claro
Brn : Marrón
Brn/W : Marrón/Blanco
Grn : Verde
Grn/W : Verde/Blanco
Org : Naranja
Gry : Gris
R : Rojo
W : Blanco
Y : Amarillo
Grn/Y : Verde/Amarillo
W/Blk : Blanco/Negro
Pur : Morado
Bobina de encendido
Gry
Org
Brn
Brn
Gry
Disyuntor de circuito de CC
Receptáculos
de CA
Receptáculos
de CA
Disyuntor
de circuito
de CA
Disyuntor
de circuito
de CA
Disyuntor
de circuito
de CA
Placa de la
tierra
Blk
R
Regulador
Org
Y
Y
Grn/Y

130 Manual del Operador
DECLARACIÓN DE GARANTÍA
John Deere garantiza que todas las piezas (excepto aquellas a las que se hace referencia
abajo), de su nueva generador libres de defectos en materiales y mano de obra durante
los periodos siguientes:
Por dos (2) año a partir de la fecha original de compra.
Las piezas defectuosas que no están sujetas a deterioro causado por el uso serán
reparadas o reemplazadas a nuestra opción durante el periodo de garantía. En todo caso,
el reembolso está limitado al precio de compra pagado.
EXCLUSIONES
1. El motor está cubierto bajo una garantía por separado que su respectivo fabricante
ofrece y queda sujeto a los términos establecidos en dicha garantía.
2. Esta garantía no cubre las piezas que son dañadas debido al desgaste normal,
aplicación incorrecta, uso erroneo, operación en otro que recomendado. La falta
de seguir funcionar recomendado y los procedimientos de mantenimiento anular la
garantía también.
3. El uso de otras piezas de reparación genuinas del fabricante anulará la garantía.
4. Las piezas vueltas, pagado por adelantado a nuestra fábrica o a un centro de
servicio autorizado de John Deere serán examinadas y reemplacen gratuitamente si
estan encontradas para ser defectuosas y conforme a garantía. No hay garantías
que extienden más de la descripción de la cara de esto. Debajo de ningunas
circunstancias el fabricante tendrá algo responsibilidad de perdida de uso de la unidad,
la perdida de tiempo o de alquiler, la inconveniencia, la perdida comercial o los daños
consecuentes.
PARA SERVICIO O CONSIDERACION DE LA GARANTIA CONSULTE CON:
Mi-T-M
®
Corporation/8650 Enterprise Drive, Box 50/Peosta, IA 52068-0050
Telefono: 1-877-JD-KLEEN / (1-877-535-5336) Fax: 563-556-1235
Lunes - Viernes 8:00 a.m. - 5:00 p.m. CST
Garantía

Manual del Operador 131
Nota

132 Manual del Operador
#37-0861-E/F/S-010406 Manufactured for Deere & Company
Moline, Illinois 61265
Generator Operator’s Manual
-
 1
1
-
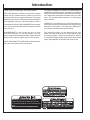 2
2
-
 3
3
-
 4
4
-
 5
5
-
 6
6
-
 7
7
-
 8
8
-
 9
9
-
 10
10
-
 11
11
-
 12
12
-
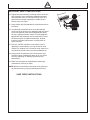 13
13
-
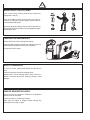 14
14
-
 15
15
-
 16
16
-
 17
17
-
 18
18
-
 19
19
-
 20
20
-
 21
21
-
 22
22
-
 23
23
-
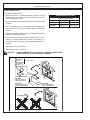 24
24
-
 25
25
-
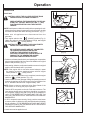 26
26
-
 27
27
-
 28
28
-
 29
29
-
 30
30
-
 31
31
-
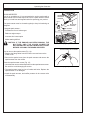 32
32
-
 33
33
-
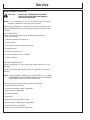 34
34
-
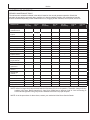 35
35
-
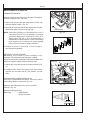 36
36
-
 37
37
-
 38
38
-
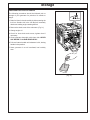 39
39
-
 40
40
-
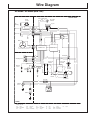 41
41
-
 42
42
-
 43
43
-
 44
44
-
 45
45
-
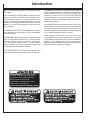 46
46
-
 47
47
-
 48
48
-
 49
49
-
 50
50
-
 51
51
-
 52
52
-
 53
53
-
 54
54
-
 55
55
-
 56
56
-
 57
57
-
 58
58
-
 59
59
-
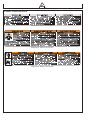 60
60
-
 61
61
-
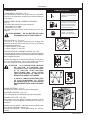 62
62
-
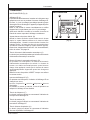 63
63
-
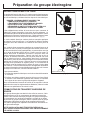 64
64
-
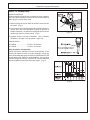 65
65
-
 66
66
-
 67
67
-
 68
68
-
 69
69
-
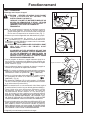 70
70
-
 71
71
-
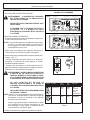 72
72
-
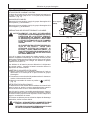 73
73
-
 74
74
-
 75
75
-
 76
76
-
 77
77
-
 78
78
-
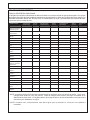 79
79
-
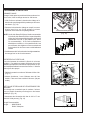 80
80
-
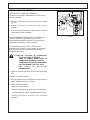 81
81
-
 82
82
-
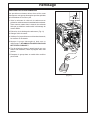 83
83
-
 84
84
-
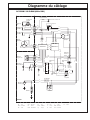 85
85
-
 86
86
-
 87
87
-
 88
88
-
 89
89
-
 90
90
-
 91
91
-
 92
92
-
 93
93
-
 94
94
-
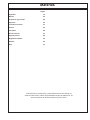 95
95
-
 96
96
-
 97
97
-
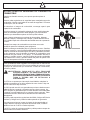 98
98
-
 99
99
-
 100
100
-
 101
101
-
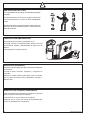 102
102
-
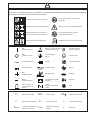 103
103
-
 104
104
-
 105
105
-
 106
106
-
 107
107
-
 108
108
-
 109
109
-
 110
110
-
 111
111
-
 112
112
-
 113
113
-
 114
114
-
 115
115
-
 116
116
-
 117
117
-
 118
118
-
 119
119
-
 120
120
-
 121
121
-
 122
122
-
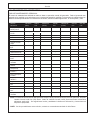 123
123
-
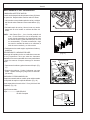 124
124
-
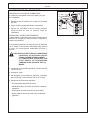 125
125
-
 126
126
-
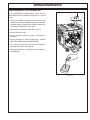 127
127
-
 128
128
-
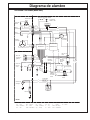 129
129
-
 130
130
-
 131
131
-
 132
132


John Deere AC-G3200i Manual de usuario
- Categoría
- Generadores de poder
- Tipo
- Manual de usuario
- Este manual también es adecuado para
en otros idiomas
- français: John Deere AC-G3200i Manuel utilisateur
- English: John Deere AC-G3200i User manual
Artículos relacionados

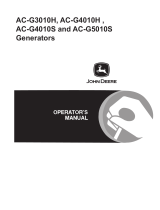


Otros documentos
-
Echo EG-3500 Manual de usuario
-
-
-
 Mi-T-M 1100 Watt Generator El manual del propietario
-
Homelite ut905011 Manual de usuario
-
Homelite ut902211 Manual de usuario
-
-
-
-
