Zanussi ZWI1105 Manual de usuario
- Categoría
- Lavadoras
- Tipo
- Manual de usuario

EN
User manual 2
EL
Οδηγίες Χρήσης 24
ES
Manual de instrucciones 52
Washing Machine
Πλυντήριο ρούχων
Lavadora
ZWI 1105

Contents
Safety information _ _ _ _ _ _ _ _ _ _ _ _ _ _ _ _ _ _ 2
Product description _ _ _ _ _ _ _ _ _ _ _ _ _ _ _ _ _ 4
Control panel _ _ _ _ _ _ _ _ _ _ _ _ _ _ _ _ _ _ _ _ 4
Washing Programmes _ _ _ _ _ _ _ _ _ _ _ _ _ _ _ _ 7
Helpful hints and tips _ _ _ _ _ _ _ _ _ _ _ _ _ _ _ _ 9
First use _ _ _ _ _ _ _ _ _ _ _ _ _ _ _ _ _ _ _ _ _ _ 10
Daily use _ _ _ _ _ _ _ _ _ _ _ _ _ _ _ _ _ _ _ _ _ 11
Care and cleaning _ _ _ _ _ _ _ _ _ _ _ _ _ _ _ _ _ 13
What to do if… _ _ _ _ _ _ _ _ _ _ _ _ _ _ _ _ _ _ 15
Technical data _ _ _ _ _ _ _ _ _ _ _ _ _ _ _ _ _ _ _ 18
Consumption values _ _ _ _ _ _ _ _ _ _ _ _ _ _ _ _ 18
Installation _ _ _ _ _ _ _ _ _ _ _ _ _ _ _ _ _ _ _ _ 18
Building in _ _ _ _ _ _ _ _ _ _ _ _ _ _ _ _ _ _ _ _ 20
Environmental concerns _ _ _ _ _ _ _ _ _ _ _ _ _ _ 22
Subject to change without notice.
Safety information
Important! Read carefully & keep for future reference.
• The safety of Your appliance complies with the industry
standards and with legal requirements on the safety of
appliances. However, as manufacturers, we feel it is
our duty to provide the following safety notes.
• It is most important that this instruction book should
be retained with the appliance for future reference.
Should the appliance be sold or transferred to another
owner, or should you move house and leave the appli-
ance, always ensure that the book is supplied with the
appliance in order that the new owner can get to know
the functioning of the appliance and the relevant warn-
ings.
• You MUST read them carefully before installing or us-
ing the appliance.
• Before first starting up, check the appliance for any
damage incurred during transport. Never connect up a
damaged appliance . If parts are damaged, contact your
supplier.
• If the appliance is delivered in the winter months when
there are minus temperatures. Store it at room temper-
ature for 24 hours before using for the first time.
General safety
• It is dangerous to alter the specifications or attempt to
modify this product in any way.
• During high temperature wash programmes the door
glass may get hot. Do not touch it!
• Make sure that small pets and children do not climb
into the drum. To avoid this, please check into the
drum before using.
• Any objects such as coins, safety pins, nails, screws,
stones or any other hard, sharp material can cause ex-
tensive damage and must not be placed into the ma-
chine.
• Only use the advised quantities of fabric softener and
detergent. Damage to the fabric can ensue if you over-
fill. Refer to the manufacturer’s recommendations of
quantities.
• Wash small items such as socks, laces, washable belts
etc in a washing bag or pillow case as it is possible for
such items to slip down between the tub and the inner
drum.
• Do not use your washing machine to wash articles with
whalebones, material without hems or torn material.
• Always unplug the appliance and turn off the water
supply after use, cleaning and maintenance.
• Under no circumstances should you attempt to repair
the machine yourself. Repairs carried out by inexper-
ienced people may cause injury or serious malfunc-
tioning. Contact your local Service Centre. Always in-
sist on genuine spare parts.
Installation
• This appliance is heavy. Care should be taken when
moving it.
• When unpacking the appliance, check that it is not
damaged. If in doubt, do not use it and contact the
Service Centre.
• All packing and transit bolts must be removed before
use. Serious damage can occur to the product and to
property if this is not adhered to. See relevant section
in the user manual.
• After having installed the appliance, check that it is not
standing on the inlet and drain hose and the worktop is
not pressing the electrical supply cable against the
wall.
2
www.zanussi.com

• If the machine is situated on a carpeted floor, please
adjust the feet in order to allow air to circulate freely
under the appliance.
• Always be sure, that there is no water leakage from ho-
ses and their connections after the installation.
• If the appliance is installed in a location subject to
frost, please read the “dangers of freezing” chapter.
• Any plumbing work required to install this appliance
should be carried out by a qualified plumber or compe-
tent person.
• Any electrical work required to install this appliance
should be carried out by a qualified electrician or com-
petent person.
Use
• This appliance is designed for domestic use. It must
not be used for purposes other than those for which it
was designed.
• Only wash fabrics which are designed to be machine
washed. Follow the instructions on each garment label.
• Do not overload the appliance. See the Washing Pro-
gramme Table.
• Before washing, ensure that all pockets are empty and
buttons and zips are fastened. Avoid washing frayed or
torn articles and treat stains such as paint, ink, rust,
and grass before washing. Underwired bras must NOT
be machine washed.
• Garments which have been in contact with volatile pe-
troleum products should not be machine washed. If
volatile cleaning fluids are used, care should be taken
to ensure that the fluid is removed from the garment
before placing in the machine.
• Never pull the power supply cable to remove the plug
from the socket; always take hold of the plug itself.
• Never use the appliance if the power supply cable, the
control panel, the working surface or the base are dam-
aged so that the inside of the washing machine is ac-
cessible.
Child safety
• This appliance is not intended for use by person (in-
cluding children) with reduced physical sensory or
mental capabilities or lack of experience and knowl-
edge unless they have been given supervision or in-
struction concerning use of the appliance by a person
responsible for their safety.
• Children should be supervised to ensure that they do
not play with the appliance.
• The packaging components (e.g. plastic film, polystyr-
ene) can be dangerous to children - danger of suffoca-
tion! Keep them out of children’s reach
• Keep all detergents in a safe place out of children’s
reach.
• Make sure that children or pets do not climb into the
drum. To prevent children and pets becoming trapped
inside the drum this machine incorporates a special
feature.
To activate this device, ro-
tate the button (without
pressing it) inside the
door clockwise until the
groove is horizontal. If
necessary use a coin.
To disable this device and
restore the possibility of
closing the door, rotate the
button anti-clockwise until
the groove is vertical.
3
www.zanussi.com

Product description
1
Detergent dispenser drawer
2
Control panel
3
Door opening handle
4
Rating plate
5
Drain pump
6
Adjustable feet
1 2
3
4
5
6
Detergent dispenser drawer
Compartment for detergent used for prewash and soak
phase or for stain remover used during the stain action
phase (if available). The prewash and soak detergent is
added at the beginning of the wash programme. The stain
remover is added during the stain action phase.
Compartment for powder or liquid detergent used for
main wash. If using liquid detergent pour it just before
starting the programme.
Compartment for liquid additives (fabric softener,
starch).
Follow the product manufacturer’s recommendations on
quantities to use and do not exceed the «MAX» mark in the
detergent dispenser drawer. Any fabric softener or starch-
ing additives must be poured into the compartment before
starting the wash programme.
Control panel
Below is a picture of the control panel. It shows the programme selector dial as well as the buttons and pilot lights.
These are presented by relevant numbers on the following pages.
4
www.zanussi.com

1 2 3 4 5 6
B
C
A
7
1
Programme selector dial
2
SPIN reduction button
3
OPTIONS button
4
EXTRA RINSE button
5
START/PAUSE button
6
DELAY START button
7
Indicator pilot lights
Table of symbols
Programme selector dial
Cottons Wool (Handwash)
Economy programme Delicates
Cold wash Rinses
Synthetics Drain
Easy Iron Spin
Buttons Lights
Spin Rinse Hold
Options Prewash
Extra Rinse Super Quick
Start/Pause
Delay start
Phase lights
/
Prewashing or Washing
+
Rinsing or spinning
End
5
www.zanussi.com

Programme selector dial, spin speed button and available options
Programme Selector Dial
It allows you to switch the appliance on/off and/or to se-
lect a programme.
Available options:
Spin
By pressing this button you can change the spin speed of
the selected programme or to select Rinse Hold option.
Rinse hold
By selecting this function the water of the last rinse is not
emptied out to prevent the fabrics from creasing. Before
opening the door it will be necessary to empty out the wa-
ter. To empty out the water, please read the paragraph «At
the end of the programme».
Prewash
By selecting this option the machine performs a prewash
cycle before the main wash phase. The washing time will
be prolonged. This option is recommended for heavily
soiled laundry.
Super Quick
Short cycle for lightly soiled items or for laundry which
needs only freshening up. We recommend you to reduce
the fabrics loading.
Extra Rinse
This appliance is designed to save energy. If it necessary
to rinse the laundry using an extra quantity of water (extra
rinse), select this option. Some additional rinses will be
performed. This option is recommended for people who
are allergic to detergents, and in areas where the water is
very soft.
Start Pause
This button allows you to start or to interrupt the selected
programme.
Delay Start
The start of the programme can be delayed by 3, 6 or 9
hours by means of this button.
Indicator pilot light (7)
B
C
A
When selecting a washing programme both lights A and
B illuminate.
After having pressed the button 5 the only light corre-
sponding to the running phase stays on. The machine
starts working and the door is locked.
The light C illuminates at the end of the washing cycle.
After a few minutes the door can be opened.
If the draining programme is selected any light
will illuminate.
6
www.zanussi.com

Washing Programmes
Programme
Maximum and Minimum Temperature
Cycle Description
Maximum Spin Speed
Maximum Fabrics Load
Type of Laundry
Options
Detergent
Compartment
COTTONS
90° - 60°
Main wash - Rinses
Maximum spin speed at 1000 rpm
Max. load 6 kg - Reduced load 3 kg
1)
White cotton (heavily or normally soiled items).
SPIN REDUCTION
RINSE HOLD
PREWASH
2)
SUPER QUICK
EXTRA RINSE
COTTON + ECO
60°
Main wash - Rinses
Maximum spin speed at 1000 rpm
Max. load 6 kg
STANDARD PROGRAMME for the Energy Label consumption values.
White or fast colour cotton (normally or slightly soiled items).
This programme can be selected for slightly or normally soiled cotton
items. The temperature will decrease and the washing time will be ex-
tended. This allows to obtain a good washing efficiency by saving en-
ergy.
SPIN REDUCTION
RINSE HOLD
PREWASH
2)
EXTRA RINSE
COTTONS
60° - 40° - 30° - Cold
Main wash - Rinses
Maximum spin speed at 1000 rpm
Max. load 6 kg - Reduced load 3 kg
1)
White and coloured cotton (normally soiled items).
SPIN REDUCTION
RINSE HOLD
PREWASH
2)
SUPER QUICK
EXTRA RINSE
COTTON + ECO
40°
Main wash - Rinses
Maximum spin speed at 1000 rpm
Max. load 6 kg
STANDARD PROGRAMME for the Energy Label consumption values.
White or non fast colour cotton (normally or slightly soiled items).
This programme can be selected for slightly or normally soiled cotton
items. The temperature will decrease and the washing time will be ex-
tended. This allows to obtain a good washing efficiency by saving en-
ergy.
SPIN REDUCTION
RINSE HOLD
PREWASH
2)
EXTRA RINSE
7
www.zanussi.com

Programme
Maximum and Minimum Temperature
Cycle Description
Maximum Spin Speed
Maximum Fabrics Load
Type of Laundry
Options
Detergent
Compartment
SYNTHETICS
60° - 40° - 30° - Cold
Main wash - Rinses
Maximum spin speed at 900 rpm
Max. load 3 kg - Reduced load 1.5 kg
1)
Synthetic or mixed fabrics: underwear, coloured garments, non-shrink
shirts, blouses.
SPIN REDUCTION
RINSE HOLD
PREWASH
2)
SUPER QUICK
EXTRA RINSE
EASY IRON
40°
Main wash - Rinses
Maximum spin speed at 900 rpm
Max. load 1 kg
Synthetic or mixed fabrics
Selecting this programme the laundry is gently washed and spun to
avoid any creasing. In this way ironing is easier. Furthermore the ma-
chine will perform additional rinses.
SPIN REDUCTION
RINSE HOLD
PREWASH
2)
EXTRA RINSE
DELICATES
40° - 30° - Cold
Main wash - Rinses
Maximum spin speed 700 rpm
Max. load kg 3 - Reduced load kg 1.5
1)
Delicate fabrics: acrylics, viscose, polyester.
SPIN REDUCTION
RINSE HOLD
PREWASH
2)
SUPER QUICK
EXTRA RINSE
WOOL/HANDWASH
30° - Cold
Main wash - Rinses
Maximum spin speed at 1000 rpm
Max. load 2 kg
Washing programme for machine washable wool as well as for hand
washable woollens and delicate fabrics. Note: A single or bulky item
may cause imbalance. If the appliance doesn’t perform the final spin
phase, add more items, redistribute the load manually and then select
the spinning programme.
SPIN REDUCTION
RINSE HOLD
RINSE
Rinse
Maximum spin speed at 1000 rpm
Max. load 6 kg
With this programme it is possible to rinse and spin cotton garments
which have been washed by hand. The spin speed can be reduced.
SPIN REDUCTION
RINSE HOLD
EXTRA RINSE
8
www.zanussi.com

Programme
Maximum and Minimum Temperature
Cycle Description
Maximum Spin Speed
Maximum Fabrics Load
Type of Laundry
Options
Detergent
Compartment
DRAIN
Draining of water
Max. load 6 kg
For emptying out the water of the last rinse in programmes with the
Rinse Hold option set.
SPIN
Drain and long spin
Maximum spin speed at 1000 rpm
Max. load 6 kg
Separate spin for hand washed cotton garments and after programmes
with the Rinse Hold option selected. You can choose the spin speed
by pressing the relevant button to adapt it to the fabrics to be spun.
SPIN REDUCTION
O = OFF
For cancelling the programme which is running or to switch the machine off .
1) If you select the Super Quick option by pressing button 3, we recommend that you reduce the maximum load as indicated. Full
loading is possible however with somewhat reduced cleaning results.
2) If using liquid detergents, a programme without PREWASH must be selected.
Helpful hints and tips
Sorting out the laundry
Follow the wash code symbols on each garment label and
the manufacturer’s washing instructions. Sort the laundry
as follows: whites, coloureds, synthetics, delicates, wool-
lens.
Before loading the laundry
Never wash whites and coloureds together. Whites may
lose their whiteness in the wash.
New coloured items may run in the first wash; they should
therefore be washed separately the first time.
Button up pillowcases, close zip fasteners, hooks and
poppers. Tie any belts or long tapes.
Remove persistent stains before washing.
Rub particularly soiled areas with a special detergent or
detergent paste.
Treat curtains with special care. Remove hooks or tie them
up in a bag or net.
Removing stains
Stubborn stains may not be removed by just water and de-
tergent. It is therefore advisable to treat them prior to
washing.
Blood: treat fresh stains with cold water. For dried stains,
soak overnight in water with a special detergent then rub
in the soap and water.
Oil based paint: moisten with benzine stain remover, lay
the garment on a soft cloth and dab the stain; treat several
times.
Dried grease stains: moisten with turpentine, lay the gar-
ment on a soft surface and dab the stain with the fingertips
and a cotton cloth.
Rust: oxalic acid dissolved in hot water or a rust removing
product used cold. Be careful with rust stains which are
not recent since the cellulose structure will already have
been damaged and the fabric tends to hole.
Mould stains: treat with bleach, rinse well (whites and fast
coloureds only).
9
www.zanussi.com

Grass: soap lightly and treat with bleach (whites and fast
coloureds only).
Ball point pen and glue: moisten with acetone
1)
, lay the
garment on a soft cloth and dab the stain.
Lipstick: moisten with acetone as above, then treat stains
with methylated spirits. Treat any residual marks with
bleach.
Red wine: soak in water and detergent, rinse and treat with
acetic or citric acid, then rinse. Treat any residual marks
with bleach.
Ink: depending on the type of ink, moisten the fabric first
with acetone
1)
, then with acetic acid; treat any residual
marks on white fabrics with bleach and then rinse thor-
oughly.
Tar stains: first treat with stain remover, methylated spirits
or benzine, then rub with detergent paste.
Detergents and additives
Good washing results also depend on the choice of deter-
gent and use of the correct quantities to avoid waste and
protect the environment.
Although biodegradable, detergents contain substances
which, in large quantities, can upset the delicate balance
of nature.
The choice of detergent will depend on the type of fabric
(delicates, woollens, cottons, etc.), the colour, washing
temperature and degree of soiling.
All commonly available washing machine detergents may
be used in this appliance:
• powder detergents for all types of fabric
• powder detergents for delicate fabrics (60°C max) and
woollens
• liquid detergents, preferably for low temperature wash
programmes (60°C max) for all types of fabric, or spe-
cial for woollens only.
The detergent and any additives must be placed in the ap-
propriate compartments of the dispenser drawer before
starting the wash programme.
If using liquid detergents, a programme without prewash
must be selected.
Your appliance incorporates a recirculation system which
allows an optimal use of the concentrated detergent.
Follow the product manufacturer’s recommendations on
quantities to use and do not exceed the «MAX» mark in
the detergent dispenser drawer.
Quantity of detergent to be used
The type and quantity of detergent will depend on the type
of fabric, load size, degree of soiling and hardness of the
water used.
Follow the product manufacturers’ instructions on quanti-
ties to use.
Use less detergent if:
• you are washing a small load
• the laundry is lightly soiled
• large amounts of foam form during washing.
Degrees of water hardness
Water hardness is classified in so-called “degrees” of
hardness. Information on hardness of the water in your
area can be obtained from the relevant water supply com-
pany, or from your local authority. If the water hardness
degree is medium or high we suggest you to add a water
softener following always the manufacturer’s instructions.
When the degree of hardness is soft, readjust the quantity
of the detergent.
First use
• Ensure that the electrical and water connections
comply with the installation instructions.
• Remove the polystyrene block and any material
from the drum.
• Pour 2 litres of water into the main wash com-
partment
of the detergent drawer in order to
activate the ECO valve. Then run a cotton cycle at
the highest temperature without any laundry in
the machine, to remove any manufacturing resi-
due from the drum and tub. Pour 1/2 a measure
of detergent into the main wash compartment and
start the machine.
1) do not use acetone on artificial silk
10
www.zanussi.com

Daily use
Load the laundry
Open the door by carefully
pulling the door handle
outwards. Place the laun-
dry in the drum, one item
at a time, shaking them
out as much as possible.
Close the door.
Make sure that no laundry
stays between the seal and
the door. There is a risk of
water leakage or damage
to the laundry.
Measure out the detergent and the fabric softener
Pull out the dispenser drawer until it stops. Measure
out the amount of detergent required, pour it into the
main wash compartment
or in the appropriate com-
partment if the selected programme/option it requires
(see more details in "Detergent dispenser drawer").
If required, pour fabric softener into the compartment
marked
(the amount used must not exceed the
«MAX» mark in the drawer). Close the drawer gently.
Select the required programme by turning the
programme selector dial (1)
Turn the programme selector dial to the required pro-
gramme. The washing machine will automatically select
the maximum spin value provided for the programme you
have chosen. You can change this value by pressing the
corresponding button. The green pilot light of the button 5
starts to flash.
The selector dial can be turned either clockwise or coun-
terclockwise. Turn to position
to reset programme/
Switching the machine off.
At the end of the programme the selector dial must be
turned to position
, to switch the machine off.
Caution! If you turn the programme selector dial to
another programme when the machine is working,
the red pilot light of button 5 will blink 3 times to indicate
a wrong selection. The machine will not perform the new
selected programme.
Select the spin speed or Rinse Hold option by
pressing button 2
The relevant light will light up.
When selecting a programme, the light corresponding to
the maximum speed allowed for that programme will illu-
minate.
Select the available options by pressing buttons 3
and 4
Depending on the programme, different functions can be
combined. These must be selected after choosing the de-
sired programme and before starting the programme.
When these buttons are pressed, the corresponding pilot
lights illuminate. When they are pressed again, the pilot
lights go out. If an incorrect option is selected, the inte-
grated red pilot light of the button 5 flashes for 3 times.
For the compatibility among the washing pro-
grammes and the options see chapter «Washing
Programmes».
Select the Delay Start by pressing button 6
Before you start the programme, if you wish to delay the
start, press the button 6 repeatedly, to select the desired
delay. The relevant light illuminates.
You must select this option after you have set the pro-
gramme and before you start the programme.
You can cancel or modify the delay time at any moment,
before you press button 5.
Selecting the delayed start:
1. Select the programme and the required options.
2. Select the delay start by pressing the button 6.
3. Press button 5:
11
www.zanussi.com

– the machine starts its hourly countdown.
– The programme will start after the selected delay
has expired.
Cancelling the delayed start after having started the pro-
gramme:
1. Set the washing machine to PAUSE by pressing but-
ton 5.
2. Press button 6 once, the light relevant to the selected
delay goes off
3. Press button 5 again to start the programme.
The Delay Start can not be selected with DRAIN pro-
gramme.
Important! The selected delay can be changed only after
selecting the washing programme again.
The door will be locked throughout the delay time. If you
need to open the door, you must set the machine to
PAUSE (by pressing the button 5) and then wait a few
minutes. After you have closed the door, press the button
5 again.
Start the programme by pressing button 5
To start the selected programme, press the button 5, the
corresponding green pilot light stops blinking. The pilot
light corresponding to the running phase illuminates. The
appliance starts operating and the door is locked.
To interrupt a programme which is running, press the but-
ton 5: the corresponding green pilot light starts blinking.
To restart the programme from the point at which it was
interrupted, press the button 5 again. If you have chosen a
delayed start, the machine will begin the countdown.
If an incorrect option is selected, the red pilot light of the
button 5 blinks 3 times.
Interrupting a programme
Press the button 5 to interrupt a programme which is run-
ning, the corresponding green pilot light starts blinking.
Press the button again to restart the programme.
Cancelling a programme
Turn the selector dial to to cancel a programme which
is running. Now you can select a new programme.
Opening the door
After the programme has started the door is locked. If, for
any reason, you need to open it, set firstly the machine to
PAUSE by pressing the button 5. After a few minutes it
will be possible to open the door.
If the door remains locked, this means that the machine is
already heating or that the water level is too high. In any
case, do not try to force the door!
If you cannot open the door but you need to open it you
have to switch the machine off by turning the selector dial
to
. After a few minutes the door can be opened (pay
attention to the water level and temperature!).
After closing the door, it is necessary to select the pro-
gramme and options again and to press button 5.
At the end of the programme
The machine stops automatically. The light of button 5
and the light corresponding to the just finished washing
phase go off.
The light C illuminates. After a few minutes the door can
be opened.
If you have set a programme or an option that ends with
water left in the tub, the light C illuminates. The door re-
mains locked to indicate that the water must be emptied
out before opening the door. During this time, the drum
continues to run at regular intervals until the water drain-
ing.
Follow the below instructions to empty out the water:
1.
Turn the programme selector dial to
.
2. Set the draining or spinning programme.
3. If needed, reduce the spin speed, .
4. Press button 5.
At the end of the programme, the door can be now
opened. Turn the programme selector dial to
to switch
the machine off.
Remove the laundry from the drum and carefully check
that the drum is empty. If you do not intend to carry out
another wash, close the water tap. Leave the door open to
prevent the formation of mildew and unpleasant smells.
Stand by: once the programme has finished after a
few minutes the energy saving system is enabled
with the pilot lights switched on. By pressing any button
the appliance will come out of the energy saving status.
12
www.zanussi.com

Care and cleaning
Warning! You must DISCONNECT the appliance
from the electricity supply, before you can carry out
any cleaning or maintenance work.
Descaling
The water we use normally contains lime. It is a good idea
to periodically use a water softening powder in the ma-
chine. Do this separately from any laundry washing, and
according to the softening powder manufacturer's instruc-
tions. This will help to prevent the formation of lime de-
posits.
External cleaning
Clean the exterior cabinet of the appliance with soap and
water only, and then dry thoroughly.
Cleaning the dispenser drawer
The washing powder and additive dispenser drawer
should be cleaned regularly.
Remove the drawer by
pressing the catch down-
wards and by pulling it
out. Flush it out under a
tap, to remove any traces
of accumulated powder.
To aid cleaning, the top
part of the additive com-
partment should be re-
moved.
Cleaning the drawer recess
Having removed the draw-
er, use a small brush to
clean the recess, ensuring
that all washing powder
residue is removed from
the upper and lower part of
the recess.
Replace the drawer and run the rinse programme with-
out any clothes in the drum.
Cleaning the pump
The pump should be inspected regularly and particularly
if:
• the appliance does not empty and/or spin;
• the appliance makes an unusual noise during draining
due to objects such as safety pins, coins etc. blocking
the pump;
• a problem with water draining is detected (see chapter
“What to do if...” for more details).
Warning! Before opening the pump door, switch the
appliance off and remove the mains plug from the
socket.
Proceed as follows:
• Unplug the appliance.
• If it is necessary, wait until the water has cooled down.
Place a container close to
the pump (A) to collect
any spillage.
Pull out the emergency
emptying hose (B), place it
in the container and re-
move its cap.
When no more water comes out, unscrew the pump
cover by turning it anti-clockwise and remove the filter.
Use pliers, if necessary. Always keep a rag nearby to
dry up any water spillage when removing the cover.
Clean the filter under a tap, to remove any traces of fluff.
13
www.zanussi.com

Remove foreign bodies
and fluff from the filter seat
and from the pump impel-
ler.
Check carefully whether
the pump impeller rotates
(it rotates jerkily). If it
doesn’t rotate, please con-
tact your Service Centre.
Put the cap back on the
emergency emptying hose
and place the latter back in
its seat.
Replace the filter into the
pump by inserting it cor-
rectly into the special
guides. Screw the pump
cover firmly by turning it
clockwise.
Caution! When the appliance is in use and
depending on the programme selected there can be
hot water in the pump.
Never remove the pump cover during a wash cycle, always
wait until the appliance has finished the cycle, and is
empty. When refitting the pump cover, ensure it is
securely re-tightened so as to stop leaks and young
children being able to remove it.
Cleaning the water inlet filters
Important! If the appliance doesn't fill, takes long to fill
with water, the starting button blinks yellow or the display
(if available) shows the relevant alarm (see chapter "What
to do if..." for more details), check if the water inlet filters
are blocked .
To clean the water inlet filters:
• Turn off the water tap.
• Unscrew the hose from
the tap.
• Clean the filter in the
hose with a stiff brush.
• Screw the hose back onto the tap. Make sure the
connection is tight.
• Unscrew the hose from the machine. Keep a rag
nearby because some water may flow.
• Clean the filter in the valve with a stiff brush or with
the piece of cloth.
35°
45°
• Screw the hose back to the machine and make sure
the connection is tight.
• Turn on the water tap.
Frost precaution
If the machine is exposed to temperatures below 0°C, cer-
tain precautions should be taken.
• Turn off the water tap.
• Unscrew the inlet hose.
• Place the end of the emergency emptying hose and that
of the inlet hose in a bowl placed on the floor and let
water drain out.
• Screw the water inlet hose back on and reposition the
emergency emptying hose after having put the cap on
again.
• When you intend to start the machine up again, make
sure that the room temperature is above 0°C.
Emergency emptying out
If the water is not discharged, proceed as follows to empty
out the machine:
• pull out the plug from the power socket;
• close the water tap;
14
www.zanussi.com

• if necessary, wait until the water has cooled down;
• open the pump door;
• place a bowl on the floor and place the end of the
emergency emptying hose into the bowl. Remove its
cap. The water should drain by gravity into the bowl.
When the bowl is full, put the cap back on the hose.
Empty the bowl. Repeat the procedure until water stops
flowing out;
• clean the pump if necessary as previously described;
• replace the emergency emptying hose in its seat after
having plugged it;
• screw the pump cover again and close the door.
Important! Every time you drain the water through the
emergency emptying hose you must pour 2 litres of water
into the main wash compartment of the detergent drawer
and then run the drain programme. This will activate the
ECO Valve device avoiding that part of the detergent
remains unused at next washing.
What to do if…
Certain problems are due to lack of simple maintenance or
oversights, which can be solved easily without calling out
an engineer. Before contacting your local Service Centre,
please carry out the checks listed below.
During machine operation it is possible that the red pilot
light of button 5 blinks to indicate that the machine is not
working.
It is possible to recognize the fault machine by the number
of button 5 light flashes. If the number of flashes is differ-
ent from the ones indicated below, this is related to a fault
that you can not solve. In this case, contact your local
Service Centre.
Press simultaneously the buttons 4 and 5 for a few sec-
onds. The red button 5 light will flash for a short time as
described (the green flash is not to be considered) :
• 4 flashes = «The washing machine does not start», fol-
low the corresponding suggestions in «Possible
cause/Solutions» box and restart the programme.
• 1 flash = «The machine does not fill», follow the corre-
sponding suggestions in «Possible cause/Solutions»
box and restart the programme.
• 2 flashes = «The machine does not empty and/or does
not spin», follow the corresponding suggestions in
«Possible cause/Solutions» box and restart the pro-
gramme.
Once the problem has been eliminated, press the button 5
to restart the programme. If after all checks, the problem
persists, contact your local Service Centre.
Problem Possible cause/Solution
The washing machine does not start:
The door has not been closed (the button 5 red light blinks).
• Close the door firmly.
The plug is not properly inserted in the power socket.
• Insert the plug into the power socket.
There is no power at the socket.
• Please check your domestic electrical installation.
The main fuse has blown.
• Replace the fuse.
The programme selector dial is not correctly positioned and the button 5 has
not been pressed.
• Please turn the selector dial and press the button 5 again.
The delay start has been selected.
• If the laundry are to be washed immediately, cancel the delay start.
15
www.zanussi.com

Problem Possible cause/Solution
The machine does not fill:
The water tap is closed (the button 5 red light blinks).
• Open the water tap.
The inlet hose is squashed or kinked (the button 5 red light blinks).
• Check the inlet hose connection.
The filter in the inlet hose or the inlet valve filter are blocked (the button 5 red
light blinks).
• Clean the water inlet filters. (See "Cleaning the water inlet filters" for more
details).
The door is not properly closed (the button 5 red light blinks).
• Close the door firmly.
The machine does not empty and/or
does not spin:
The drain hose is squashed or kinked (the button 5 red light blinks).
• Check the drain hose connection.
The drain filter is clogged (the button 5 red light blinks).
• Clean the drain filter.
An option or a programme that ends with the water still in the tub or a that
eliminates all the spinning phases has been selected.
• Select the draining or spinning programme.
The laundry is not evenly distributed in the drum.
• Redistribute the laundry.
There is water on the floor:
Too much detergent or unsuitable detergent (creates too much foam) has been
used.
• Reduce the detergent quantity or use another one.
Check whether there are any leaks from one of the inlet hose fittings. It is not
always easy to see this as the water runs down the hose; check to see if it is
damp.
• Check the water inlet hose connection.
The drain or inlet hose is damaged.
• Replace it with a new one.
The cap on the emergency emptying hose has not been replaced or the filter
has not been properly screwed in after cleaning action.
• Refit the cap on the emergency emptying hose or screw the filter fully in.
Unsatisfactory washing results:
Too little detergent or unsuitable detergent has been used.
• Increase the detergent quantity or use another one.
Stubborn stains have not been treated prior to washing.
• Use commercial products to treat the stubborn stains.
The correct temperature was not selected.
• Check if you have selected the correct temperature.
Excessive laundry load.
• Reduce the laundry load.
16
www.zanussi.com

Problem Possible cause/Solution
The door will not open:
The programme is still running.
• Wait the end of washing cycle.
The door lock has not been released.
• Wait a few minutes before opening the door.
There is water in the drum.
• Select drain or spin programme to empty out the water.
The machine vibrates is noisy:
The transit bolts and packing have not been removed.
• Check the correct installation of the appliance.
The support feet have not been adjusted
• Check the correct levelling of the appliance.
The laundry is not evenly distributed in the drum.
• Redistribute the laundry.
Maybe there is very little laundry in the drum.
• Load more laundry.
Spinning starts late or the machine
does not spin:
The electronic unbalance detection device has cut in because the laundry is
not evenly distributed in the drum. The laundry is redistributed by reverse rota-
tion of the drum. This may happen several times before the unbalance disap-
pears and normal spinning can resume. If, after 10 minutes, the laundry is still
not evenly distributed in the drum, the machine will not spin. In this case, re-
distribute the load manually and select the spin programme.
• Redistribute the laundry.
The load is too small.
• Add more items, redistribute the load manually and then select the spinning
programme.
The machine makes an unusual
noise:
The machine is fitted with a type of motor which makes an unusual noise com-
pared with other traditional motors. This new motor ensures a softer start and
more even distribution of the laundry in the drum when spinning, as well as
increased stability of the machine.
No water is visible in the drum:
Machines based on modern technology operate very economically using very
little water without affecting performance.
If you are unable to identify or solve the problem, contact
our service centre. Before telephoning, make a note of the
model, serial number and purchase date of your machine:
the Service Centre will require this information.
Mod. ... ... ...
Prod. No. ... ... ...
Ser. No. ... ... ...
Mod
.
.
.
. ..
.
...
Prod. N
o.
... ...
.
.
S
e
r
.
No
.
... ... ...
17
www.zanussi.com

Technical data
Dimensions Width
Height
Depth
60 cm
85 cm
54 cm
Electrical connection
Voltage - Overall power - Fuse
Information on the electrical connection is given on the rating plate, on the
inner edge of the appliance door.
Water supply pressure Minimum
Maximum
0,05 MPa
0,8 MPa
Maximum Load Cotton 6 kg
Spin Speed Maximum 1000 rpm
Consumption values
Programme Energy consumption
(KWh)
1)
Water consumption
(litre)
1)
Programme duration
(Minutes)
1)
White Cottons 90 °C 2.0 61 140
Cottons 60 °C 1.35 58 125
Cottons 40 °C 0.75 58 120
Synthetics 40 °C 0.9 50 90
Delicates 40 °C 0.55 58 70
Wool/ Handwash 30 °C 0.25 58 60
1) The consumption information shown in this chart is indicative. It can vary depending on the quantity and the type of laundry, on the
temperature of the water supply and on the ambient temperature.
Standard programmes for the Energy Label consumption
values
The cotton 60 °C economy and cotton 40 °C economy are
the standard cotton programmes for normally soiled cot-
ton laundry. They are suitable to clean normally soiled
cotton laundry and they are the most efficient programmes
in terms of combined energy and water consumption for
washing that type of cotton laundry.
They agree with EN60456.
The actual water temperature may differ from the de-
clared cycle temperature.
Installation
Unpacking
All transit bolts and packing must be removed before us-
ing the appliance.
You are advised to keep all transit devices so that they can
be refitted if the machine ever has to be transported again.
18
www.zanussi.com

After removing all the
packaging, carefully lay
machine on it's back to re-
move the polystyrene base
from the bottom.
Remove the power supply
cable and the hoses from
the hose holders on the
rear of the appliance.
Unscrew the three bolts
with the supplied spanner.
Slide out the relevant plas-
tic spacers.
Fill the smaller upper hole and the two large ones with
the corresponding plastic plug caps supplied in the bag
containing the instruction booklet.
Positioning
Install the machine on a flat hard floor. Make sure that air
circulation around the machine is not impeded by carpets,
rugs etc. Check that the machine does not touch the wall
or other kitchen units.
Level the washing ma-
chine by raising or lower-
ing the feet. The feet may
be tight to adjust as they
incorporate a self locking
nut, but the machine
MUST be level and stable.
If necessary, check the
setting with a spirit level.
Any necessary adjustment
can be made with a span-
ner.
Accurate levelling prevents vibration, noise and displace-
ment of the machine during operation.
Caution! Never place cardboard, wood or similar
materials under the machine to compensate for any
unevenness in the floor. After having levelled the
appliance, tighten the lock nuts.
Raising the appliance
Suspended wooden floors are particularly susceptible to
vibration.
To help prevent vibration we recommend you place a wa-
terproof wood panel, at least 15 mm thick under the appli-
ance, secured to at least 2 floor beams with screws, the
wood panel must extend beyond the front feet.
If possible install the appliance in one of the corners of
the room, where the floor is more stable.
Water inlet
Warning! This appliance must be connected to a
cold water supply
Caution! Before connecting up the appliance to new
pipework or to pipework that has not been used for
some time, run off a reasonable amount of water to flush
out any debris that may have collected
Caution! Do not use the hose from your previous
appliance to connect to water supply.
19
www.zanussi.com

Connect the hose to a tap
with a 3/4” thread. Always
use the hose supplied with
the appliance.
35°
45°
The other end of the inlet hose which connects to the
appliance can be turned as showed in the picture.
Do not place the inlet hose downwards. Angle the hose
to the left or right depending on the position of your
water tap. Set the hose correctly by loosening the ring
nut. After positioning the inlet hose, be sure to tighten
the ring nut again to prevent leaks.
Caution! The inlet hose must not be lengthened. If it
is too short and you do not wish to move the tap,
you will have to purchase a new, longer hose specially
designed for this type of use.
Water drainage
The end of the drain hose can be positioned in three ways:
Hooked over the edge of a
sink using the plastic hose
guide supplied with the
machine.
In this case, make sure the end cannot come unhooked
when the machine is emptying. This could be done by
tying it to the tap with a piece of string or attaching it to
the wall.
In a sink drain pipe branch. This branch must be above
the trap so that the bend is at least 60 cm above the
ground.
Directly into a drain pipe at a height of not less than 60
cm and not more than 90 cm. The end of the drain hose
must always be ventilated, i.e. the inside diameter of the
drain pipe must be larger than the outside diameter of
the drain hose. The drain hose must not be kinked.
Building in
This appliance has been designed to be built into the
kitchen furniture. The recess should have the dimensions
shown in picture A.
20
www.zanussi.com

A
600
596 555
170
75
176,5
416
100
60
818
min.
820
min.
560
When installing the appliance into the kitchen furniture
ensure, if possible, the hoses are placed in either of the
two recesses on the back of the appliance.
This will help to prevent the hoses from becoming
kinked or trapped.
B
1
2
3
7
5
6
4
8
Caution! Do not remove the screw 8 !
Preparation and assembly of the door
The machine is originally prearranged for the assembly
of a door opening from right to left.
In this case it is sufficient to screw in the hinges (1) and
the counter-magnet (6) provided with the appliance, at
the right level (Fig. B).
C
16-22
595-598
22±1,5
416
B
C
35 Ø 12,5-14 depth
• a) Door
The dimensions of the door should be:
- width 595-598 mm
- thickness 16-22 mm
The height (C-Fig. C) depends on the height of the ad-
jacent furniture's base.
• b) Hinges
To mount the hinges it is necessary to drill two holes
(dia. 35 mm, depth 12.5-14 mm depending on the
depth of door furniture) on the inner side of the door.
The distance between the holes hobs fixing centres
must be 416 mm.
The distance (B) from upper edge of the door to the
centre of the hole depends on the adjacent furniture's
dimensions.
The required dimensions are given in the picture C.
The hinges will be fixed to the door by means of screws
for wood (2-Fig. B) supplied with the appliance.
• c) Mounting the door
Fix the hinges (1) to the machine by means of the M
5x15 screws (3-Fig. B). The hinges can be adjusted to
compensate for possible uneven thickness of the door.
To align the door perfectly it is necessary to loosen the
screw (3-Fig. B), adjust the door and tighten the screw
again.
21
www.zanussi.com

D
4
6
8
Caution! Do not remove the screw 8 !
d) Counter-magnet (6)
The appliance is prearranged for a magnetic closure of
the door.
To enable a correct operation of this device, it is neces-
sary to screw the counter-magnet (6) (steel disk + rub-
ber ring) into the inner side of the door. Its position
must correspond to the magnet (4) on the appliance
(see picture D).
E
1
2
3
7
5
6
4
8
Caution! Do not remove the screw 8 !
If the door has to be opened from left to right, invert the
position of the plates (7), the magnet (4) and the plate
(5) (Fig. B and E). Mount the counter-magnet (6) and
the hinges (1) as previously described.
Environmental concerns
The symbol on the product or on its packaging
indicates that this product may not be treated as
household waste. Instead it should be taken to the
appropriate collection point for the recycling of electrical
and electronic equipment. By ensuring this product is
disposed of correctly, you will help prevent potential
negative consequences for the environment and human
health, which could otherwise be caused by inappropriate
waste handling of this product. For more detailed
information about recycling of this product, please contact
your local council, your household waste disposal service
or the shop where you purchased the product.
Packaging materials
The materials marked with the symbol are recyclable.
>PE<=polyethylene
>PS<=polystyrene
>PP<=polypropylene
This means that they can be recycled by disposing of
them properly in appropriate collection containers.
Ecological hints
To save water, energy and to help protect the environment,
we recommend that you follow these tips:
• Normally soiled laundry may be washed without pre-
washing in order to save detergent, water and time (the
environment is protected too!).
• The machine works more economically if it is fully loa-
ded.
• With adequate pre-treatment, stains and limited soiling
can be removed; the laundry can then be washed at a
lower temperature.
22
www.zanussi.com

• Measure out detergent according to the water hard-
ness, the degree of soiling and the quantity of laundry
being washed.
23
www.zanussi.com

Περιεχόμενα
Πληροφορίες ασφαλείας _ _ _ _ _ _ _ _ _ 24
Περιγραφή προϊόντος _ _ _ _ _ _ _ _ _ _ 26
Πίνακας χειριστηρίων _ _ _ _ _ _ _ _ _ _ 27
Προγράμματα πλύσης _ _ _ _ _ _ _ _ _ _ 29
Χρήσιμες συμβουλές _ _ _ _ _ _ _ _ _ _ _ 33
Πρώτη χρήση _ _ _ _ _ _ _ _ _ _ _ _ _ _ 35
Καθημερινή χρήση _ _ _ _ _ _ _ _ _ _ _ _ 35
Φροντίδα και καθάρισμα _ _ _ _ _ _ _ _ _ 38
Τι να κάνετε αν... _ _ _ _ _ _ _ _ _ _ _ _ _ 41
Τεχνικά χαρακτηριστικά _ _ _ _ _ _ _ _ _ 45
Τιμές κατανάλωσης _ _ _ _ _ _ _ _ _ _ _ 45
Εγκατάσταση _ _ _ _ _ _ _ _ _ _ _ _ _ _ _ 46
Εντοιχισμός _ _ _ _ _ _ _ _ _ _ _ _ _ _ _ 48
Περιβαλλοντικά θέματα _ _ _ _ _ _ _ _ _ _ 51
Υπόκειται αε αλλαγές χωρίς προειδποίηση.
Πληροφορίες ασφαλείας
ΣΗΜΑΝΤΙΚΟ Διαβάστε προσεχτικά και
φυλάξτε για μελλοντική αναφορά.
• Η ασφάλεια της Συσκευής σας συμμορφώ-
νεται με τα πρότυπα της βιομηχανίας και με
τις νομικές απαιτήσεις περί ασφαλείας συ-
σκευών. Ωστόσο, ως κατασκευαστές, θεω-
ρούμε καθήκον μας να σας παρέχουμε τις
παρακάτω σημειώσεις ασφαλείας.
• Είναι πολύ σημαντικό να φυλάσσετε το πα-
ρόν
εγχειρίδιο οδηγιών μαζί με τη συσκευή
για μελλοντική αναφορά. Σε περίπτωση
που η συσκευή μεταπωληθεί ή μεταβιβα-
στεί σε άλλο άτομο, ή αν μετακομίσετε και
αφήσετε τη συσκευή, θα πρέπει να εξα-
σφαλίζετε ότι το εγχειρίδιο συνοδεύει πά-
ντα τη συσκευή, προκειμένου ο νέος κάτο-
χος να εξοικειωθεί με τη λειτουργία της
και
τις σχετικές προφυλάξεις.
• ΠΡΕΠΕΙ να τις διαβάσετε προσεκτικά πριν
την εγκατάσταση ή χρήση της συσκευής.
• Πριν από την πρώτη εκκίνηση, ελέγξτε τη
συσκευή για τυχόν ζημιές από τη μεταφο-
ρά. Ποτέ μη συνδέσετε μία συσκευή με
βλάβη. Εάν κάποιο εξάρτημα έχει υποστεί
ζημιά, επικοινωνήστε με τον πωλητή.
• Εάν η συσκευή παραδόθηκε
κατά τους χει-
μερινούς μήνες με θερμοκρασίες υπό το
μηδέν. Αποθηκεύστε την σε θερμοκρασία
δωματίου για 24 ώρες προτού τη χρησιμο-
ποιήσετε για πρώτη φορά.
Γενική ασφάλεια
• Είναι επικίνδυνο να τροποποιήσετε τα τε-
χνικά στοιχεία ή να προσπαθήσετε να τρο-
ποποιήσετε το προϊόν αυτό κατά οποιον-
δήποτε τρόπο.
• Κατά τη διάρκεια των προγραμμάτων πλύ-
σης σε υψηλή θερμοκρασία, το γυαλί της
πόρτας ενδέχεται να θερμανθεί. Μην το αγ-
γίζετε!
• Βεβαιωθείτε ότι μικρά κατοικίδια δεν μπαί-
νουν στον κάδο. Για να αποφύγετε κάτι τέ-
τοιο, ελέγχετε τον κάδο πριν τη χρήση.
• Αντικείμενα όπως κέρματα, παραμάνες,
καρφιά, βίδες, πέτρες ή άλλα σκληρά, αι-
χμηρά αντικείμενα, μπορούν να προκαλέ-
σουν εκτεταμένη ζημιά και δεν πρέπει να
τοποθετούνται μέσα στο πλυντήριο.
• Χρησιμοποιείτε μόνο τις ενδεδειγμένες πο-
σότητες μαλακτικού και απορρυπαντικού.
Σε περίπτωση χρήσης υπερβολικής ποσό-
τητας υπάρχει κίνδυνος καταστροφής των
υφασμάτων. Ανατρέξτε στις συστάσεις πο
-
σοτήτων του παρασκευαστή.
• Πλένετε μικρά αντικείμενα όπως κάλτσες,
δαντέλες, ζώνες που πλένονται στο πλυ-
ντήριο, κλπ., σε ένα σάκο πλυσίματος ή μια
μαξιλαροθήκη, επειδή είναι πιθανό τέτοια
αντικείμενα να γλιστρήσουν εκτός κάδου.
• Μη χρησιμοποιείτε το πλυντήριό σας για το
πλύσιμο ρούχων με μπανέλες, ρούχων χω-
ρίς στρίφωμα ή σκισμένων ρούχων.
•
Αποσυνδέετε πάντα τη συσκευή από την
πρίζα και κλείνετε την παροχή νερού μετά
τη χρήση, κατά τον καθαρισμό και τη συν-
τήρηση.
• Σε καμία περίπτωση δε θα πρέπει να προ-
σπαθήσετε να επισκευάσετε οι ίδιοι το μη-
24
www.zanussi.com

χάνημα. Επισκευές που πραγματοποιού-
νται από ανειδίκευτα άτομα μπορεί να προ-
καλέσουν τραυματισμούς ή σοβαρές δυ-
σλειτουργίες. Επικοινωνήστε με το Κέντρο
Σέρβις της περιοχής σας. Επιμένετε πάντα
σε γνήσια ανταλλακτικά.
Εγκατάσταση
• Η συσκευή αυτή είναι βαριά. Θα πρέπει να
δίνετε προσοχή κατά τη μεταφορά της.
• Βγάζοντας τη συσκευή από τη συσκευασία
της, βεβαιωθείτε ότι δεν παρουσιάζει φθο-
ρές. Εάν έχετε αμφιβολίες, μην τη χρησιμο-
ποιήσετε και επικοινωνήστε με το Κέντρο
Σέρβις.
• Πριν από τη χρήση πρέπει να αφαιρούνται
όλα τα υλικά συσκευασίας
και οι πείροι με-
ταφοράς. Σε αντίθετη περίπτωση μπορεί
να προκληθεί σοβαρή ζημιά στο προϊόν και
στην περιουσία σας. Ανατρέξτε στην αντί-
στοιχη ενότητα του εγχειριδίου χρήστη.
• Αφού εγκαταστήσετε τη συσκευή, επιβε-
βαιώστε ότι δεν "πατάει" το σωλήνα παρο-
χής ή αποστράγγισης και ότι ο πάγκος δεν
πιέζει το καλώδιο τροφοδοσίας πάνω
στον
τοίχο.
• Εάν το μηχάνημα έχει τοποθετηθεί επάνω
σε μοκέτα, ρυθμίστε κατάλληλα τα ποδαρά-
κια ώστε να εξασφαλίζεται η ελεύθερη κυ-
κλοφορία του αέρα κάτω από τη συσκευή.
• Να βεβαιώνεστε πάντοτε ότι δεν υπάρχει
καμιά διαρροή νερού από τους σωλήνες
και τις συνδέσεις τους μετά την εγκατάστα-
ση.
• Εάν η συσκευή
εγκατασταθεί σε κάποια θέ-
ση που κινδυνεύει από παγετό, διαβάστε
το κεφάλαιο "κίνδυνοι από τον παγετό".
• Οι υδραυλικές εργασίες που απαιτούνται
για την εγκατάσταση της παρούσας συ-
σκευής θα πρέπει να εκτελούνται από
επαγγελματία υδραυλικό ή άλλο κατάλληλα
καταρτισμένο άτομο.
• Οι ηλεκτρολογικές εργασίες που απαιτού-
νται για την εγκατάσταση της παρούσας
συσκευής
θα πρέπει να εκτελούνται από
επαγγελματία ηλεκτρολόγο ή άλλο κατάλ-
ληλα καταρτισμένο άτομο.
Χρήση
• Η παρούσα συσκευή έχει σχεδιαστεί για οι-
κιακή χρήση. Η χρήση της για άλλους σκο-
πούς πέραν αυτών για τους οποίους σχε-
διάστηκε δεν επιτρέπεται.
• Πλύνετε μόνο τα υφάσματα που μπορούν
να πλυθούν στο πλυντήριο. Ακολουθήστε
τις οδηγίες στην ετικέτα κάθε ρούχου.
• Μην υπερφορτώνετε τη συσκευή. Δείτε τον
Πίνακα Προγραμμάτων Πλύσης
.
• Πριν από την πλύση, επιβεβαιώστε ότι
όλες οι τσέπες είναι άδειες και όλα τα κου-
μπιά και τα φερμουάρ είναι κουμπωμένα.
Αποφύγετε το πλύσιμο ξεφτισμένων ή σκι-
σμένων ρούχων και καθαρίζετε λεκέδες
όπως μπογιά, μελάνι, σκουριά και γρασίδι,
πριν το πλύσιμο. Τα σουτιέν με μπανέλες
ΔΕΝ πρέπει να πλένονται στο πλυντήριο.
• Ρούχα που έχουν έρθει σε επαφή με πτητι-
κά προϊόντα που βασίζονται στο πετρέλαιο
δε θα πρέπει να πλένονται στο πλυντήριο.
Εάν χρησιμοποιηθούν πτητικά υγρά καθα-
ρισμού, θα πρέπει να δοθεί προσοχή ώστε
να εξασφαλιστεί η απομάκρυνση του υγρού
από τα ρούχα πριν από την τοποθέτησή
τους στο πλυντήριο.
• Ποτέ μην τραβάτε
το καλώδιο τροφοδοσίας
για να βγάλετε το φις από την πρίζα. Πά-
ντοτε να τραβάτε το ίδιο το φις.
• Ποτέ μη χρησιμοποιείτε τη συσκευή εάν το
καλώδιο τροφοδοσίας, ο πίνακας ελέγχου,
η επιφάνεια εργασίας ή η βάση έχουν πά-
θει κάποια ζημιά, ώστε να είναι δυνατή η
πρόσβαση στο εσωτερικό του
πλυντηρίου.
Ασφάλεια για τα παιδιά
• Η συσκευή αυτή δεν προορίζεται για χρήση
από άτομα (συμπεριλαμβανομένων των
παιδιών) με μειωμένες σωματικές, αισθητη-
ριακές ή πνευματικές ικανότητες ή έλλειψη
εμπειρίας και γνώσης, εκτός εάν επιβλέπο-
νται ή έχουν λάβει οδηγίες σχετικά με τη
χρήση της συσκευής από άτομο υπεύθυνο
για την ασφάλειά τους.
• Τα παιδιά πρέπει να εποπτεύονται, ώστε
να
διασφαλίζεται ότι δεν παίζουν με τη συ-
σκευή.
25
www.zanussi.com

• Τα υλικά της συσκευασίας (π.χ. πλαστική
μεμβράνη, πολυστυρένιο) ενδέχεται να εί-
ναι επικίνδυνα για τα παιδιά – υπάρχει κίν-
δυνος ασφυξίας! Φυλάξτε τα μακριά από τα
παιδιά.
• Φυλάσσετε όλα τα απορρυπαντικά σε
ασφαλές μέρος, μακριά από τα παιδιά.
• Βεβαιωθείτε ότι τα παιδιά ή τα κατοικίδια
δεν μπαίνουν μέσα στον κάδο. Για
την
αποτροπή της παγίδευσης παιδιών και κα-
τοικίδιων ζώων στο εσωτερικό του κάδου,
το πλυντήριο αυτό διαθέτει μία ειδική διάτα-
ξη.
Για να ενεργοποιή-
σετε αυτή τη διάτα-
ξη, στρέψτε προς τα
δεξιά το κουμπί που
υπάρχει στο εσωτε-
ρικό της πόρτας
(χωρίς να το πιέσε-
τε), μέχρι η σχισμή
να βρίσκεται σε ορι-
ζόντια θέση. Εάν εί-
ναι απαραίτητο, χρη-
σιμοποιήστε ένα νό-
μισμα.
Για να απενεργο-
ποιήσετε αυτή τη
διάταξη και να επα-
ναφέρετε τη δυνατό-
τητα να κλείνει η
πόρτα, στρέψτε
προς τα αριστερά το
κουμπί μέχρι η σχι-
σμή να βρίσκεται
στην κατακόρυφη
θέση.
Περιγραφή προϊόντος
1
Συρτάρι απορρυπαντικού
2
Πίνακας ελέγχου
3
Λαβή ανοίγματος πόρτας
4
Πλακέτα τεχνικών στοιχείων
5
Αντλία αδειάσματος
6
Ρυθμιζόμενα πόδια
1 2
3
4
5
6
26
www.zanussi.com

Συρτάρι απορρυπαντικού
Θήκη για απορρυπαντικό ή προϊόν αφαίρε-
σης λεκέδων που χρησιμοποιείται για τη φάση
πρόπλυσης ή επεξεργασίας του λεκέ(εάν δια-
τίθεται). Το απορρυπαντικό πρόπλυσης και
μουλιάσματος προστίθεται στην αρχή του
προγράμματος πλύσης. Το προϊόν για την
αφαίρεση λεκέδων προστίθεται κατά τη φάση
επεξεργασίας του λεκέ.
Θήκη για απορρυπαντικό σε σκόνη ή υγρή
μορφή που χρησιμοποιείται για την κύρια πλύ-
ση. Εάν χρησιμοποιείτε απορρυπαντικό σε
υγρή μορφή ρίξτε το ακριβώς πριν την έναρ-
ξη του προγράμματος.
Θήκη για υγρά προσθετικά (μαλακτικό,
κόλλα).
Όσον αφορά τη δοσολογία των προσθετικών,
ακολουθήστε τις οδηγίες του κατασκευαστή
και μην υπερβαίνετε το όριο της θήκης με την
ένδειξη "ΜΑΧ". Τα προσθετικά υγρά μαλακτι-
κά προϊόντα ή προϊόντα κολλαρίσματος πρέ-
πει να τοποθετούνται στη θήκη πριν από την
εκκίνηση του προγράμματος.
Πίνακας χειριστηρίων
Ακολουθεί μια απεικόνιση του χειριστηρίου. Εμφανίζεται ο διακόπτης επιλογής προγράμ-
ματος, καθώς και τα πλήκτρα και οι ενδεικτικές λυχνίες. Στις σελίδες που ακολουθούν, τα
στοιχεία αυτά παρουσιάζονται με τους αντίστοιχους αριθμούς.
1 2 3 4 5 6
B
C
A
7
1
Διακόπτης επιλογής προγράμματος
2
Πλήκτρο μείωσης ΤΑΧΥΤΗΤΑΣ ΣΤΥΨΙ-
ΜΑΤΟΣ
3
Πλήκτρο ΕΠΙΛΟΓΩΝ
4
Πλήκτρο ΕΠΙΠΛΕΟΝ ΞΕΒΓΑΛΜΑΤΟΣ
5
Πλήκτρο ΕΝΑΡΞΗΣ/ΠΑΥΣΗΣ
6
Πλήκτρο ΚΑΘΥΣΤΕΡΗΣΗΣ ΕΝΑΡΞΗΣ
27
www.zanussi.com

7
Ενδεικτικές λυχνίες
Πίνακας συμβόλων
Διακόπτης επιλογής προγράμματος
Βαμβακερά Μάλλινα (πλύσιμο στο χέρι)
Οικονομικό πρόγραμμα Ευαίσθητα
Κρύα πλύση Ξεβγάλματα
Συνθετικά Άδειασμα
Εύκολο σιδέρωμα Στύψιμο
Πλήκτρα Ενδεικτικές λυχνίες
Στύψιμο Ξέβγαλμα χωρίς άδειασμα νερού
Επιλογές Πρόπλυση
Επιπλέον ξέβγαλμα Πολύ σύντομο
Έναρξη/Παύση
Καθυστέρηση έναρξης
Λυχνίες φάσης
/
Πρόπλυση ή Πλύση
+
Ξέβγαλμα ή στύψιμο
Τέλος
Διακόπτης επιλογής προγράμματος, πλήκτρο επιλογής
ταχύτητας στυψίματος και διαθέσιμες επιλογές
Διακόπτης επιλογής προγράμματος
Ο διακόπτης επιλογής προγραμμάτων σας
επιτρέπει να επιλέξετε ένα πρόγραμμα και/ή
να ενεργοποιήσετε ή να απενεργοποιήσετε το
πλυντήριο.
Διαθέσιμες επιλογές:
Στύψιμο
Πατώντας αυτό το πλήκτρο μπορείτε να αλ-
λάξετε την ταχύτητα στυψίματος του επιλεγ-
μένου προγράμματος ή να διαλέξετε την επι-
λογή Ακύρωση ξεβγάλματος.
Ξέβγαλμα χωρίς άδειασμα νερού
Επιλέγοντας αυτή τη δυνατότητα, το νερό
από το τελευταίο ξέβγαλμα παραμένει στον
κάδο, έτσι ώστε να μη ζαρώσουν τα υφάσμα-
τα. Πριν ανοίξετε την πόρτα, θα χρειαστεί να
αδειάσετε το νερό. Για να αδειάσετε το νερό,
ανατρέξτε στην παράγραφο «Στο τέλος του
προγράμματος».
Πρόπλυση
Το πρόγραμμα εκτελεί ένα κύκλο πρόπλυσης
πριν από την κύρια πλύση. Ο χρόνος πλύσης
θα παραταθεί. Η επιλογή αυτή συνιστάται για
πολύ λερωμένα ρούχα.
28
www.zanussi.com

ΠΟΛΥ ΓΡΗΓΟΡΟ
Σύντομος κύκλος για λίγο βρώμικα ρούχα ή
για ρούχα που χρειάζονται μόνο φρεσκάρι-
σμα. Συνιστούμε να μειώσετε το φορτίο των
ρούχων.
Επιπλέον ξέβγαλμα
Η παρούσα συσκευή έχει σχεδιαστεί για να
εξοικονομεί νερό. Αν είναι απαραίτητο να ξε-
πλύνετε τα ρούχα χρησιμοποιώντας επιπλέον
ποσότητα νερού (επιπλέον ξέβγαλμα), δια-
λέξτε αυτήν την επιλογή. Το πλυντήριο εκτε-
λεί κάποια πρόσθετα ξεβγάλματα. Αυτή η επι-
λογή συνιστάται για τους αλλεργικούς στα
απορρυπαντικά και στις περιοχές όπου το νε-
ρό
είναι πολύ μαλακό.
Έναρξη/Παύση
Αυτό το πλήκτρο να ξεκινήσει το νέο πρό-
γραμμα ή να διακόψετε το πρόγραμμα.
Καθυστέρηση έναρξης
Η έναρξη του προγράμματος μπορεί να καθυ-
στερήσει κατά 3, 6 ή 9 ώρες με τη χρήση αυ-
τού του πλήκτρου.
Ενδεικτική λυχνία (7)
B
C
A
Όταν επιλέγετε ένα πρόγραμμα πλύσης,
ανάβουν και οι δύο λυχνίες A και B.
Αφού πατήσετε το πλήκτρο 5, η μόνη λυ-
χνία που παραμένει αναμμένη είναι αυτή
που αντιστοιχεί στη φάση που εκτελείται.
Αρχίζει η λειτουργία της συσκευής και η
πόρτα κλειδώνει.
Η λυχνία C ανάβει στο τέλος του κύκλου
πλύσης. Μετά
από μερικά λεπτά, μπορείτε
να ανοίξετε την πόρτα.
Εάν έχει επιλεγεί το πρόγραμμα αδειά-
σματος, ανάβει οποιαδήποτε λυχνία.
Προγράμματα πλύσης
Πρόγραμμα
Μέγιστη και ελάχιστη θερμοκρασία
Περιγραφή κύκλου
Μέγιστη ταχύτητα στυψίματος
Μέγιστο φορτίο ρούχων
Τύπος ρούχων
Επιλογές
Θήκη
απορρυπα-
ντικού
ΒΑΜΒΑΚΕΡΑ
90° - 60°
Κύρια πλύση - Ξεβγάλματα
Μέγιστη ταχύτητα στυψίματος 1000 στροφές/λεπτό
Μέγ. φορτίο 6 kg - Μειωμένο φορτίο 3 kg
1)
Λευκά βαμβακερά (πολύ ή κανονικά λερωμένα).
ΜΕΙΩΣΗ ΤΑΧΥΤΗ-
ΤΑΣ ΣΤΥΨΙΜΑΤΟΣ
ΞΕΒΓΑΛΜΑ ΧΩΡΙΣ
ΑΔΕΙΑΣΜΑ ΝΕΡΟΥ
ΠΡΟΠΛΥΣΗ
2)
ΠΟΛΥ ΣΥΝΤΟΜΟ
ΕΠΙΠΛΕΟΝ ΞΕΒ-
ΓΑΛΜΑ
29
www.zanussi.com

Πρόγραμμα
Μέγιστη και ελάχιστη θερμοκρασία
Περιγραφή κύκλου
Μέγιστη ταχύτητα στυψίματος
Μέγιστο φορτίο ρούχων
Τύπος ρούχων
Επιλογές
Θήκη
απορρυπα-
ντικού
ΒΑΜΒΑΚΕΡΑ + ΟΙΚΟΝΟΜΙΚΟ
60°
Κύρια πλύση - Ξεβγάλματα
Μέγιστη ταχύτητα στυψίματος 1000 στροφές/λεπτό
Μέγ. φορτίο 6 kg
ΤΥΠΙΚΟ ΠΡΟΓΡΑΜΜΑ για τις τιμές κατανάλωσης
της ετικέτας ενεργειακής κατανάλωσης.
Λευκά ή χρωματιστά βαμβακερά που δεν ξεβάφουν
(κανονικά ή ελαφρώς λερωμένα).
Το πρόγραμμα αυτό μπορεί να επιλεγεί για ελαφρώς ή
κανονικά λερωμένα βαμβακερά ρούχα. Η θερμοκρασία
μειώνεται και ο χρόνος πλύσης παρατείνεται. Αυτό
επι-
τρέπει ένα καλό αποτέλεσμα πλύσης με εξοικονόμηση
ενέργειας.
ΜΕΙΩΣΗ ΤΑΧΥΤΗ-
ΤΑΣ ΣΤΥΨΙΜΑΤΟΣ
ΞΕΒΓΑΛΜΑ ΧΩΡΙΣ
ΑΔΕΙΑΣΜΑ ΝΕΡΟΥ
ΠΡΟΠΛΥΣΗ
2)
ΕΠΙΠΛΕΟΝ ΞΕΒ-
ΓΑΛΜΑ
ΒΑΜΒΑΚΕΡΑ
60° - 40° - 30° - Κρύο
Κύρια πλύση - Ξεβγάλματα
Μέγιστη ταχύτητα στυψίματος 1000 στροφές/λεπτό
Μέγ. φορτίο 6 kg - Μειωμένο φορτίο 3 kg
1)
Λευκά και χρωματιστά βαμβακερά (κανονικά λερω-
μένα ρούχα).
ΜΕΙΩΣΗ ΤΑΧΥΤΗ-
ΤΑΣ ΣΤΥΨΙΜΑΤΟΣ
ΞΕΒΓΑΛΜΑ ΧΩΡΙΣ
ΑΔΕΙΑΣΜΑ ΝΕΡΟΥ
ΠΡΟΠΛΥΣΗ
2)
ΠΟΛΥ ΣΥΝΤΟΜΟ
ΕΠΙΠΛΕΟΝ ΞΕΒ-
ΓΑΛΜΑ
ΒΑΜΒΑΚΕΡΑ + ΟΙΚΟΝΟΜΙΚΟ
40°
Κύρια πλύση - Ξεβγάλματα
Μέγιστη ταχύτητα στυψίματος 1000 στροφές/λεπτό
Μέγ. φορτίο 6 kg
ΤΥΠΙΚΟ ΠΡΟΓΡΑΜΜΑ για τις τιμές κατανάλωσης
της ετικέτας ενεργειακής κατανάλωσης.
Λευκά ή χρωματιστά βαμβακερά που ξεβάφουν (κα-
νονικά ή ελαφρώς λερωμένα).
Το πρόγραμμα αυτό μπορεί να επιλεγεί για ελαφρώς ή
κανονικά λερωμένα βαμβακερά ρούχα. Η θερμοκρασία
μειώνεται και ο χρόνος πλύσης παρατείνεται. Αυτό
επι-
τρέπει ένα καλό αποτέλεσμα πλύσης με εξοικονόμηση
ενέργειας.
ΜΕΙΩΣΗ ΤΑΧΥΤΗ-
ΤΑΣ ΣΤΥΨΙΜΑΤΟΣ
ΞΕΒΓΑΛΜΑ ΧΩΡΙΣ
ΑΔΕΙΑΣΜΑ ΝΕΡΟΥ
ΠΡΟΠΛΥΣΗ
2)
ΕΠΙΠΛΕΟΝ ΞΕΒ-
ΓΑΛΜΑ
30
www.zanussi.com

Πρόγραμμα
Μέγιστη και ελάχιστη θερμοκρασία
Περιγραφή κύκλου
Μέγιστη ταχύτητα στυψίματος
Μέγιστο φορτίο ρούχων
Τύπος ρούχων
Επιλογές
Θήκη
απορρυπα-
ντικού
ΣΥΝΘΕΤΙΚΑ
60° - 40° - 30° - Κρύο
Κύρια πλύση - Ξεβγάλματα
Μέγιστη ταχύτητα στυψίματος 900 στροφές/λεπτό
Μέγ. φορτίο 3 kg - Μειωμένο φορτίο 1.5 kg
1)
Συνθετικά ή ανάμεικτα υφάσματα: εσώρουχα, χρω-
ματιστά, πουκάμισα που δεν μαζεύουν, μπλούζες.
ΜΕΙΩΣΗ ΤΑΧΥΤΗ-
ΤΑΣ ΣΤΥΨΙΜΑΤΟΣ
ΞΕΒΓΑΛΜΑ ΧΩΡΙΣ
ΑΔΕΙΑΣΜΑ ΝΕΡΟΥ
ΠΡΟΠΛΥΣΗ
2)
ΠΟΛΥ ΣΥΝΤΟΜΟ
ΕΠΙΠΛΕΟΝ ΞΕΒ-
ΓΑΛΜΑ
ΕΥΚΟΛΟ ΣΙΔΕΡΩΜΑ
40°
Κύρια πλύση - Ξεβγάλματα
Μέγιστη ταχύτητα στυψίματος 900 στροφές/λεπτό
Μέγ. φορτίο 1 kg
Συνθετικά ή ανάμεικτα υφάσματα
Επιλέγοντας αυτό το πρόγραμμα, τα ρούχα πλένονται
και στύβονται απαλά για να αποφευχθεί το ζάρωμα. Με
τον τρόπο αυτό, το σιδέρωμα είναι πιο εύκολο. Επι-
πλέον, η συσκευή θα εκτελέσει πρόσθετα ξεβγάλματα.
ΜΕΙΩΣΗ ΤΑΧΥΤΗ-
ΤΑΣ ΣΤΥΨΙΜΑΤΟΣ
ΞΕΒΓΑΛΜΑ ΧΩΡΙΣ
ΑΔΕΙΑΣΜΑ ΝΕΡΟΥ
ΠΡΟΠΛΥΣΗ
2)
ΕΠΙΠΛΕΟΝ ΞΕΒ-
ΓΑΛΜΑ
ΕΥΑΙΣΘΗΤΑ
40° - 30° - Κρύο
Κύρια πλύση - Ξεβγάλματα
Μέγιστη ταχύτητα στυψίματος 700 στροφές/λεπτό
Μέγ. φορτίο 3 kg - Μειωμένο φορτίο 1.5 kg
1)
Ευαίσθητα ρούχα: ακρυλικά, βισκόζη, πολυεστέρας.
ΜΕΙΩΣΗ ΤΑΧΥΤΗ-
ΤΑΣ ΣΤΥΨΙΜΑΤΟΣ
ΞΕΒΓΑΛΜΑ ΧΩΡΙΣ
ΑΔΕΙΑΣΜΑ ΝΕΡΟΥ
ΠΡΟΠΛΥΣΗ
2)
ΠΟΛΥ ΣΥΝΤΟΜΟ
ΕΠΙΠΛΕΟΝ ΞΕΒ-
ΓΑΛΜΑ
31
www.zanussi.com

Πρόγραμμα
Μέγιστη και ελάχιστη θερμοκρασία
Περιγραφή κύκλου
Μέγιστη ταχύτητα στυψίματος
Μέγιστο φορτίο ρούχων
Τύπος ρούχων
Επιλογές
Θήκη
απορρυπα-
ντικού
ΜΑΛΛΙΝΑ/ΠΛΥΣΙΜΟ ΣΤΟ ΧΕΡΙ
30° - Κρύο
Κύρια πλύση - Ξεβγάλματα
Μέγιστη ταχύτητα στυψίματος 1000 στροφές/λεπτό
Μέγ. φορτίο 2 kg
Πρόγραμμα πλύσης για μάλλινα που πλένονται στο
πλυντήριο, για μάλλινα που πλένονται στο χέρι, καθώς
και για ευαίσθητα υφάσματα. Σημείωση: Εάν τοποθε-
τήσετε στον κάδο ένα μεμονωμένο ή ογκώδες ρούχο,
μπορεί να προκληθεί ανισορροπία. Αν η συσκευή δεν
πραγματοποιήσει την τελική φάση
του στυψίματος,
προσθέστε περισσότερα ρούχα, κατανείμετε ξανά τα
ρούχα στον κάδο και στη συνέχεια επιλέξτε το πρό-
γραμμα στυψίματος.
ΜΕΙΩΣΗ ΤΑΧΥΤΗ-
ΤΑΣ ΣΤΥΨΙΜΑΤΟΣ
ΞΕΒΓΑΛΜΑ ΧΩΡΙΣ
ΑΔΕΙΑΣΜΑ ΝΕΡΟΥ
ΞΕΒΓΑΛΜΑ
Ξέβγαλμα
Μέγιστη ταχύτητα στυψίματος 1000 στροφές/λεπτό
Μέγ. φορτίο 6 kg
Το πρόγραμμα αυτό μπορεί να χρησιμοποιηθεί για ξέβ-
γαλμα και στύψιμο βαμβακερών ρούχων που πλύθη-
καν στο χέρι. Η ταχύτητα στυψίματος μπορεί να μειω-
θεί.
ΜΕΙΩΣΗ ΤΑΧΥΤΗ-
ΤΑΣ ΣΤΥΨΙΜΑΤΟΣ
ΞΕΒΓΑΛΜΑ ΧΩΡΙΣ
ΑΔΕΙΑΣΜΑ ΝΕΡΟΥ
ΕΠΙΠΛΕΟΝ ΞΕΒ-
ΓΑΛΜΑ
ΑΔΕΙΑΣΜΑ
Άδειασμα νερού
Μέγ. φορτίο 6 kg
Για το άδειασμα του νερού του τελευταίου ξεβγάλματος
σε προγράμματα στα οποία έχει επιλεγεί η λειτουργία
Ξέβγαλμα χωρίς άδειασμα νερού.
ΣΤΥΨΙΜΟ
Άδειασμα και παρατεταμένο στύψιμο
Μέγιστη ταχύτητα στυψίματος 1000 στροφές/λεπτό
Μέγ. φορτίο 6 kg
Ξεχωριστό στύψιμο για βαμβακερά ρούχα που πλένο-
νται στο χέρι και μετά από προγράμματα με επιλεγμένη
τη λειτουργία Ξέβγαλμα χωρίς άδειασμα νερού. Μπο-
ρείτε να επιλέξετε την ταχύτητα στυψίματος πατώντας
το αντίστοιχο πλήκτρο, ανάλογα με το είδος των ρού-
χων για στύψιμο
.
ΜΕΙΩΣΗ ΤΑΧΥΤΗ-
ΤΑΣ ΣΤΥΨΙΜΑΤΟΣ
32
www.zanussi.com

Πρόγραμμα
Μέγιστη και ελάχιστη θερμοκρασία
Περιγραφή κύκλου
Μέγιστη ταχύτητα στυψίματος
Μέγιστο φορτίο ρούχων
Τύπος ρούχων
Επιλογές
Θήκη
απορρυπα-
ντικού
O = ΑΠΕΝΕΡΓΟΠΟΙΗΣΗ
Για ακύρωση του ήδη εκτελούμενου προγράμματος πλύσης ή για απενεργοποίηση της συ-
σκευής.
1) Αν επιλέξετε τη λειτουργία Πολύ σύντομο, πατώντας το πλήκτρο 3, σας συνιστούμε να μειώσετε το
μέγιστο φορτίο όπως υποδεικνύεται. Μπορείτε να γεμίσετε πλήρως το πλυντήριο, αλλά τα
αποτελέσματα της πλύσης θα είναι λιγότερο ικανοποιητικά.
2) Αν χρησιμοποιείτε απορρυπαντικό σε υγρή μορφή, πρέπει να επιλέξετε πρόγραμμα χωρίς ΠΡΟΠΛΥΣΗ.
Χρήσιμες συμβουλές
Διαχωρισμός των ρούχων
Ακολουθείτε τα σύμβολα που υπάρχουν στις
ετικέτες των ρούχων και τις οδηγίες πλύσης
που παρέχονται από τον κατασκευαστή. Χω-
ρίζετε τα ρούχα ως εξής: λευκά, χρωματιστά,
συνθετικά, ευαίσθητα, μάλλινα.
Πριν από τη φόρτωση των ρούχων
στο πλυντήριο
Μην πλένετε ποτέ μαζί λευκά και χρωματιστά.
Τα λευκά ρούχα μπορεί να γαριάσουν με το
πλύσιμο.
Τα καινούργια χρωματιστά μπορεί να ξεβά-
ψουν στο πρώτο πλύσιμο. Σας συνιστούμε
να τα πλένετε χωριστά την πρώτη φορά.
Κουμπώνετε τις μαξιλαροθήκες, τα φερ-
μουάρ, τις κόπιτσες και τα κουμπιά. Δένετε τις
ζώνες ή τις μακριές
κορδέλες.
Αφαιρείτε τους επίμονους λεκέδες πριν από
το πλύσιμο.
Τρίβετε τα πολύ λερωμένα σημεία με ειδικό
απορρυπαντικό ή απορρυπαντικό σε μορφή
πάστας.
Οι κουρτίνες απαιτούν ιδιαίτερη προσοχή.
Αφαιρείτε τα γαντζάκια από τις κουρτίνες ή
δένετέ τα σε ένα σάκο ή δίχτυ.
Αφαίρεση λεκέδων
Οι επίμονοι λεκέδες ίσως δεν αφαιρεθούν με
σκέτο νερό και απορρυπαντικό. Επομένως,
συνιστάται η αφαίρεσή τους πριν από την
πλύση.
Αίμα: όταν ο λεκές είναι ακόμα νωπός, μπο-
ρείτε να τον πλύνετε με κρύο νερό. Εάν έχει
στεγνώσει, αφήστε το ρούχο να μουλιάσει σε
ειδικό απορρυπαντικό για όλη τη νύχτα και
στη συνέχεια τρίψτε το με νερό και σαπούνι.
Λαδομπογιά: εμποτίστε το λεκέ με
προϊόν
αφαίρεσης λεκέδων που περιέχει βενζίνη,
απλώστε το ρούχο επάνω σε ένα μαλακό πα-
νί και τρίψτε ταμποναριστά αρκετές φορές.
Στεγνοί λεκέδες από λίπη: εμποτίστε το λε-
κέ με νέφτι, απλώστε το ρούχο επάνω σε μια
μαλακή επιφάνεια και τρίψτε ταμποναριστά το
λεκέ με τις άκρες των δακτύλων σας και ένα
βαμβακερό
πανί.
Σκουριά: χρησιμοποιήστε οξαλικό οξύ διαλυ-
μένο σε ζεστό νερό ή προϊόν κατά της σκου-
ριάς που χρησιμοποιείται με κρύο νερό. Να
είστε προσεκτικοί με τους στεγνούς λεκέδες
από σκουριά, καθώς η δομή της κυτταρίνης
θα έχει ήδη καταστραφεί και το ύφασμα μπο-
ρεί να τρυπήσει.
Λεκέδες από μούχλα: πλύνετε με
λευκαντι-
κό και ξεπλύνετε καλά (μόνο για λευκά και
χρωματιστά που δεν ξεβάφουν).
Γρασίδι: σαπουνίστε ελαφρά και πλύνετε με
λευκαντικό (μόνο για λευκά και χρωματιστά
που δεν ξεβάφουν).
Στυλό διαρκείας και κόλλα: εμποτίστε με
ασετόν
2)
, απλώστε το ρούχο πάνω σε ένα
2) μη χρησιμοποιήσετε ασετόν σε ρεγιόν
33
www.zanussi.com

μαλακό πανί και τρίψτε ταμποναριστά το λε-
κέ.
Κραγιόν: εμποτίστε το λεκέ με ασετόν όπως
παραπάνω και στη συνέχεια καθαρίστε το λε-
κέ με οινόπνευμα. Χρησιμοποιήστε λευκαντι-
κό για να καθαρίσετε τυχόν υπολείμματα λε-
κέδων.
Κόκκινο κρασί: αφήστε το ρούχο να μουλιά-
σει σε νερό και απορρυπαντικό, ξεπλύνετε με
οξικό ή
κιτρικό οξύ και στη συνέχεια ξεπλύνε-
τε. Χρησιμοποιήστε λευκαντικό για να καθαρί-
σετε τυχόν υπολείμματα λεκέδων.
Μελάνι: ανάλογα με τον τύπο του μελανιού,
εμποτίστε το ύφασμα αρχικά με ασετόν
2)
και
στη συνέχεια με οξικό οξύ. Για να αφαιρέσετε
τυχόν υπολείμματα λεκέδων σε λευκά υφά-
σματα, χρησιμοποιήστε λευκαντικό και κατό-
πιν ξεπλύνετε καλά.
Λεκέδες από πίσσα: χρησιμοποιήστε αρχι-
κά ειδικό προϊόν αφαίρεσης λεκέδων, οινό-
πνευμα ή βενζίνη και στη συνέχεια τρίψτε το
λεκέ με απορρυπαντικό σε μορφή πάστας.
Απορρυπαντικά και προσθετικά
πλύσης
Τα αποτελέσματα της πλύσης εξαρτώνται με-
ταξύ άλλων, από την επιλογή του απορρυπα-
ντικού και τη χρήση της σωστής δοσολογίας,
ώστε να αποφεύγεται η σπατάλη και να προ-
στατεύεται το περιβάλλον.
Παρόλο που είναι βιοδιασπώμενα, τα απορ-
ρυπαντικά περιέχουν ουσίες οι οποίες, σε με-
γάλες ποσότητες, ενδέχεται να διαταράξουν
την εύθραυστη
οικολογική ισορροπία.
Η επιλογή απορρυπαντικού εξαρτάται από
τον τύπο των υφασμάτων (ευαίσθητα, μάλλι-
να, βαμβακερά κ.λπ.), το χρώμα, τη θερμο-
κρασία πλύσης και το πόσο λερωμένα είναι
τα ρούχα.
Στη συγκεκριμένη συσκευή, μπορείτε να χρη-
σιμοποιήσετε όλα τα κοινά απορρυπαντικά
πλυντηρίου που διατίθενται στο εμπόριο:
• απορρυπαντικά σε σκόνη για κάθε τύπο
υφάσματος
• απορρυπαντικά σε σκόνη για ευαίσθητα
(μέγ. θερμοκρασία 60°C) και μάλλινα
• απορρυπαντικά σε υγρή μορφή, κατά προ-
τίμηση για προγράμματα πλύσης σε χαμη-
λή θερμοκρασία (μέγ. θερμοκρασία 60°C),
για κάθε τύπο υφάσματος ή ειδικά μόνο για
μάλλινα.
Το απορρυπαντικό και τυχόν προσθετικά
πλύσης πρέπει να προστίθενται στις κατάλ-
ληλες θήκες του συρταριού απορρυπαντικού
πριν από την έναρξη του προγράμματος πλύ-
σης.
Αν χρησιμοποιείτε απορρυπαντικό σε υγρή
μορφή, πρέπει να επιλέξετε πρόγραμμα χω-
ρίς πρόπλυση.
Η συσκευή διαθέτει
σύστημα ανακυκλοφο-
ρίας, το οποίο επιτρέπει τη βέλτιστη χρήση
του συμπυκνωμένου απορρυπαντικού.
Όσον αφορά στη δοσολογία των προσθετι-
κών πλύσης, ακολουθήστε τις οδηγίες του κα-
τασκευαστή και μην υπερβαίνετε το όριο
στο συρτάρι της θήκης απορρυπαντικού
με την ένδειξη «ΜΑΧ».
Ποσότητα απορρυπαντικού που
πρέπει να χρησιμοποιείται
Το είδος και η ποσότητα του απορρυπαντι-
κού εξαρτώνται από τον τύπο των υφασμά-
των, την ποσότητα των ρούχων, το πόσο λε-
ρωμένα είναι τα ρούχα και τη σκληρότητα του
νερού.
Όσον αφορά στη δοσολογία, ακολουθήστε τις
οδηγίες του παρασκευαστή.
Χρησιμοποιείτε μικρότερη ποσότητα απορρυ-
παντικού στις παρακάτω περιπτώσεις:
• αν πρόκειται να
πλύνετε λίγα ρούχα
• αν τα ρούχα είναι ελαφρώς λερωμένα
• αν δημιουργείται μεγάλη ποσότητα αφρού
κατά τη διάρκεια της πλύσης.
Βαθμός σκληρότητας του νερού
Η σκληρότητα του νερού διακρίνεται σε «βαθ-
μούς». Πληροφορίες σχετικά με τη σκληρότη-
τα του νερού στην περιοχή σας μπορείτε να
λάβετε από την αρμόδια εταιρεία ύδρευσης ή
τους τοπικούς φορείς. Αν ο βαθμός σκληρό-
τητας του νερού είναι μεσαίος ή υψηλός, προ-
τείνουμε να προσθέσετε αποσκληρυντή νε-
ρού, ακολουθώντας πάντα τις
οδηγίες του κα-
τασκευαστή. Όταν ο βαθμός σκληρότητας εί-
ναι χαμηλός (μαλακό νερό), προσαρμόστε
κατάλληλα την ποσότητα του απορρυπαντι-
κού.
34
www.zanussi.com

Πρώτη χρήση
• Βεβαιωθείτε ότι οι ηλεκτρικές και
υδραυλικές συνδέσεις είναι σύμφωνες
με τις οδηγίες εγκατάστασης.
• Αφαιρέστε το κάλυμμα πολυστυρολίου
και κάθε άλλο υλικό από τον κάδο.
• Ρίξτε 2 λίτρα νερό στη θήκη κύριας
πλύσης
του συρταριού απορρυπα-
ντικού, προκειμένου να ενεργοποιηθεί
η βαλβίδα εξοικονόμησης ενέργειας
(βαλβίδα ECO). Στη συνέχεια, εκτελέ-
στε ένα κύκλο για βαμβακερά στην
υψηλότερη θερμοκρασία, χωρίς ρούχα
στη συσκευή, ώστε να απομακρυν-
θούν τυχόν υπολείμματα της κατα-
σκευαστικής διαδικασίας από τον κά-
δο. Προσθέστε 1/2 μεζούρα απορρυ-
παντικό στη θήκη κύριας πλύσης και
ξεκινήστε τη συσκευή.
Καθημερινή χρήση
Φόρτωση των ρούχων
Ανοίξτε την πόρτα
τραβώντας προσε-
κτικά προς τα έξω τη
λαβή της πόρτας.
Τοποθετήστε τα
ρούχα στον κάδο,
ένα ρούχο τη φορά,
τινάζοντάς τα όσο
πιο πολύ μπορείτε.
Κλείστε την πόρτα.
Βεβαιωθείτε ότι δεν
έχουν παραμείνει
ρούχα ανάμεσα στη
στεγανοποίηση και
την πόρτα. Υπάρχει
κίνδυνος διαρροής
νερού ή πρόκλησης
ζημιάς στα ρούχα.
Μετρήστε το απορρυπαντικό και το
μαλακτικό
Τραβήξτε προς τα έξω το συρτάρι του
απορρυπαντικού μέχρι να σταματήσει. Με-
τρήστε την απαιτούμενη ποσότητα απορρυ-
παντικού, ρίξτε τη στη θήκη κύριας πλύσης
ή στην κατάλληλη θήκη που χρειάζεται
από το επιλεγμένο πρόγραμμα ή την επιλο-
γή (για περισσότερες λεπτομέρειες, ανα-
τρέξτε στην παράγραφο "Συρτάρι απορρυ-
παντικού").
Εάν θέλετε, ρίξτε μαλακτικό στη θήκη με το
σύμβολο
(η ποσότητα που θα χρησιμο-
ποιήσετε δεν πρέπει να υπερβαίνει το ση-
μάδι "MAX" της θήκης). Κλείστε προσεκτικά
το συρτάρι.
Επιλέξτε το απαιτούμενο πρόγραμμα
με το διακόπτη επιλογής
προγράμματος (1)
Στρέψτε το διακόπτη επιλογής προγράμματος
στο επιθυμητό πρόγραμμα. Το πλυντήριο θα
επιλέξει αυτόματα τη μέγιστη τιμή στυψίματος
που παρέχεται για το πρόγραμμα που επιλέ-
ξατε. Μπορείτε να αλλάξετε αυτή την τιμή πιέ-
ζοντας το αντίστοιχο πλήκτρο. Η πράσινη
ενδεικτική λυχνία του πλήκτρου 5 αρχίζει να
αναβοσβήνει.
Ο διακόπτης επιλογής μπορεί να στραφεί είτε
δεξιόστροφα
είτε αριστερόστροφα. Στρέψτε
τον στη θέση
για να εκτελέσετε επαναφο-
ρά του προγράμματος ή για να απενεργο-
ποιήσετε τη συσκευή.
35
www.zanussi.com

Στο τέλος του προγράμματος, πρέπει να
στρέψετε το διακόπτη επιλογής στη θέση
, για να απενεργοποιήσετε τη συσκευή.
ΠΡΟΣΟΧΗ Αν στρέψετε το διακόπτη
επιλογής προγράμματος σε άλλο
πρόγραμμα ενώ λειτουργεί η συσκευή, η
κόκκινη ενδεικτική λυχνία του πλήκτρου 5 θα
αναβοσβήσει 3 φορές για να υποδηλώσει τη
λανθασμένη επιλογή. Η συσκευή δεν θα
εκτελέσει το νέο πρόγραμμα που επιλέχθηκε.
Επιλέξτε την ταχύτητα στυψίματος ή
την επιλογή Ξέβγαλμα χωρίς
άδειασμα νερού, πατώντας το
πλήκτρο 2
Ανάβει η αντίστοιχη λυχνία.
Όταν επιλέγετε ένα πρόγραμμα, ανάβει η λυ-
χνία που αντιστοιχεί στη μέγιστη ταχύτητα
που επιτρέπεται για το συγκεκριμένο πρό-
γραμμα.
Καθορίστε τις διαθέσιμες επιλογές με
τα πλήκτρα 3 και 4
Ανάλογα με το πρόγραμμα που έχετε επιλέ-
ξει, μπορείτε να συνδυάσετε διάφορες λει-
τουργίες. Αυτές οι λειτουργίες πρέπει να επι-
λεγούν, αφού πρώτα έχετε επιλέξει το επιθυ-
μητό πρόγραμμα και πριν από την έναρξη
του προγράμματος.
Πατώντας αυτά τα πλήκτρα, ανάβουν οι αντί-
στοιχες ενδεικτικές λυχνίες. Πατώντας τα άλ-
λη μια
φορά, οι αντίστοιχες λυχνίες σβήνουν.
Σε περίπτωση λανθασμένης επιλογής, ανα-
βοσβήνει 3 φορές η ενσωματωμένη κόκκινη
ενδεικτική λυχνία του πλήκτρου 5.
Για τη συμβατότητα μεταξύ των προ-
γραμμάτων πλύσης και των επιλογών,
δείτε το κεφάλαιο «Προγράμματα πλύσης».
Επιλέξτε την καθυστέρηση έναρξης,
πατώντας το πλήκτρο 6
Προτού ξεκινήσετε το πρόγραμμα, αν θέλετε
να καθυστερήσετε την έναρξη, πατήστε επα-
νειλημμένα το πλήκτρο 6, για να επιλέξετε την
επιθυμητή καθυστέρηση. Ανάβει η αντίστοιχη
λυχνία.
Πρέπει να προβείτε σε αυτή την επιλογή,
αφού έχετε ορίσει πρόγραμμα και προτού ξε-
κινήσετε το πρόγραμμα.
Μπορείτε να αλλάξετε ή να ακυρώσετε το
χρόνο καθυστέρησης όποτε θέλετε, προτού
πατήσετε το πλήκτρο 5.
Επιλογή της καθυστέρησης έναρξης:
1. Επιλέξτε το πρόγραμμα και τις απαιτού-
μενες επιλογές.
2. Πατήστε το πλήκτρο 6 για να
επιλέξετε
την καθυστέρηση έναρξης.
3. Πατήστε το πλήκτρο 5:
– η συσκευή ξεκινά την αντίστροφη μέ-
τρηση των ωρών.
– Το πρόγραμμα θα ξεκινήσει μόλις πα-
ρέλθει ο επιλεγμένος χρόνος καθυστέ-
ρησης.
Ακύρωση της καθυστέρησης έναρξης μετά
την έναρξη του προγράμματος:
1. Επιλέξτε την κατάσταση ΠΑΥΣΗΣ, πατώ-
ντας το πλήκτρο 5.
2. Πατήστε μία
φορά το πλήκτρο 6 για να
σβήσει η ενδεικτική λυχνία που αντιστοι-
χεί στην επιλεγμένη καθυστέρηση
3. Πατήστε ξανά το πλήκτρο 5 για να ξεκι-
νήσει το πρόγραμμα.
Η καθυστέρηση έναρξης δεν μπορεί να επι-
λεγεί με το πρόγραμμα ΑΔΕΙΑΣΜΑ.
ΣΗΜΑΝΤΙΚΟ Μπορείτε να αλλάξετε την
επιλεγμένη καθυστέρηση έναρξης, μόνο
αφού επιλέξετε και πάλι
το πρόγραμμα
πλύσης.
Η πόρτα θα είναι ασφαλισμένη καθ' όλη τη
διάρκεια του χρόνου καθυστέρησης. Αν
χρειαστεί να ανοίξετε την πόρτα, πρέπει να
επιλέξετε την κατάσταση ΠΑΥΣΗΣ (με το
πλήκτρο 5) και, στη συνέχεια, να περιμένετε
μερικά λεπτά. Αφού κλείσετε την πόρτα,
πατήστε ξανά το πλήκτρο 5.
Ξεκινήστε το πρόγραμμα, πατώντας
το πλήκτρο 5
Για να ξεκινήσει το επιλεγμένο πρόγραμμα,
πατήστε το πλήκτρο 5. Η αντίστοιχη πράσινη
ενδεικτική λυχνία σταματά να αναβοσβήνει.
Ανάβει η ενδεικτική λυχνία που αντιστοιχεί
36
www.zanussi.com

στην φάση που εκτελείται. Ξεκινάει η λειτουρ-
γία της συσκευής και η πόρτα κλειδώνει.
Για να διακόψετε το πρόγραμμα που εκτελεί-
ται, πατήστε το πλήκτρο 5: η αντίστοιχη πρά-
σινη ενδεικτική λυχνία αρχίζει να αναβοσβή-
νει.
Για επανεκκίνηση του προγράμματος από το
σημείο στο οποίο διακόπηκε, πατήστε ξανά
το πλήκτρο 5. Εάν
έχετε επιλέξει την καθυ-
στερημένη έναρξη, η συσκευή ξεκινά την αντί-
στροφη μέτρηση.
Σε περίπτωση λανθασμένης επιλογής, ανα-
βοσβήνει 3 φορές η κόκκινη ενδεικτική λυ-
χνία του πλήκτρου 5.
Διακοπή ενός προγράμματος
Πατήστε το πλήκτρο 5 για να διακόψετε το
πρόγραμμα που εκτελείται, ενώ η αντίστοιχη
πράσινη ενδεικτική λυχνία αρχίζει να αναβο-
σβήνει.
Πατήστε ξανά το πλήκτρο για την επανεκκί-
νηση του προγράμματος.
Ακύρωση προγράμματος
Γυρίστε το διακόπτη επιλογής στο για ακύ-
ρωση ενός προγράμματος που εκτελείται.
Τώρα μπορείτε να επιλέξετε νέο πρόγραμμα.
Άνοιγμα της πόρτας
Μόλις ξεκινήσει το πρόγραμμα, η πόρτα κλει-
δώνει. Εάν, για οποιονδήποτε λόγο, απαιτεί-
ται να ανοίξετε την πόρτα, θέστε πρώτα σε
ΠΑΥΣΗ τη συσκευή, πατώντας το πλήκτρο 5.
Μετά από μερικά λεπτά, μπορείτε να ανοίξετε
την πόρτα.
Εάν η πόρτα παραμένει κλειδωμένη, αυτό
σημαίνει ότι το πλυντήριο ήδη θερμαίνει το
νερό ή ότι
η στάθμη του νερού βρίσκεται πο-
λύ ψηλά. Σε κάθε περίπτωση, μην επιχειρή-
σετε να ασκήσετε δύναμη για να ανοίξετε την
πόρτα!
Αν πρέπει να ανοίξετε την πόρτα, αλλά δεν
μπορείτε, πρέπει να απενεργοποιήσετε τη
συσκευή, στρέφοντας το διακόπτη επιλογής
στη θέση . Μετά από μερικά λεπτά, μπο-
ρείτε να ανοίξετε την πόρτα (προσοχή στη
στάθμη και τη θερμοκρασία του νερού!).
Αφού κλείσετε την πόρτα, πρέπει να επιλέξε-
τε ξανά το πρόγραμμα και τις επιλογές και να
πατήσετε το πλήκτρο 5.
Στο τέλος του προγράμματος
Η συσκευή σταματά αυτόματα. Η λυχνία του
πλήκτρου 5 και η λυχνία που αντιστοιχεί στη
φάση πλύσης που μόλις ολοκληρώθηκε σβή-
νουν.
Ανάβει η λυχνία C. Μετά από μερικά λεπτά,
μπορείτε να ανοίξετε την πόρτα.
Αν έχετε επιλέξει ένα πρόγραμμα ή μια λει-
τουργία που ολοκληρώνεται με παραμονή νε-
ρού στον κάδο
, ανάβει η λυχνία C. Η πόρτα
παραμένει ασφαλισμένη, ως ένδειξη ότι πρέ-
πει να αδειάσει το νερό πριν ανοίξετε την
πόρτα. Σε αυτό το διάστημα, ο κάδος συνεχί-
ζει να λειτουργεί σε τακτά χρονικά διαστήμα-
τα, μέχρι το άδειασμα του νερού.
Ακολουθήστε τις παρακάτω οδηγίες για να
αδειάσετε το νερό:
1. Στρέψτε
το διακόπτη επιλογής προγράμ-
ματος στη θέση
.
2. Επιλέξτε το πρόγραμμα αδειάσματος ή
στυψίματος.
3. Αν απαιτείται, μειώστε την ταχύτητα στυ-
ψίματος.
4. Πατήστε το πλήκτρο 5.
Στο τέλος του προγράμματος, μπορείτε
πλέον να ανοίξετε την πόρτα. Στρέψτε το δια-
κόπτη επιλογής προγράμματος στη θέση
για να απενεργοποιήσετε τη συσκευή.
Αφαιρέστε τα ρούχα από τον κάδο και ελέγξτε
προσεκτικά ότι ο κάδος είναι άδειος. Αν δεν
σκοπεύετε να πραγματοποιήσετε άλλη πλύ-
ση, κλείστε τη βρύση παροχής νερού. Αφήστε
την πόρτα ανοιχτή, για να αποφύγετε το σχη-
ματισμό μυκήτων και δυσάρεστων οσμών.
Αναμονή: αφού ολοκληρωθεί το πρό-
γραμμα, και μετά από μερικά λεπτά,
ενεργοποιείται το σύστημα εξοικονόμησης
ενέργειας με τις ενδεικτικές λυχνίες αναμμέ-
νες. Πατώντας οποιοδήποτε πλήκτρο, η συ-
σκευή εξέρχεται από την κατάσταση εξοικο-
νόμησης ενέργειας.
37
www.zanussi.com

Φροντίδα και καθάρισμα
ΠΡΟΕΙΔΟΠΟΙΗΣΗ Πρέπει να
ΑΠΟΣΥΝΔΕΣΕΤΕ τη συσκευή από την
ηλεκτρική παροχή, προτού εκτελέσετε
οποιαδήποτε εργασία καθαρισμού ή
συντήρησης.
Αφαίρεση αλάτων από τη συσκευή
Το νερό που χρησιμοποιούμε περιέχει συν-
ήθως άλατα. Είναι σκόπιμο να χρησιμοποιείτε
περιοδικά στη συσκευή μια σκόνη αποσκλή-
ρυνσης νερού. Χρησιμοποιήστε την ξεχωρι-
στά από το πλύσιμο των ρούχων και σύμφω-
να με τις οδηγίες του κατασκευαστή της σκό-
νης αποσκλήρυνσης. Με αυτό τον τρόπο θα
αποτραπεί ο σχηματισμός επικαθίσεων αλά-
των
.
Εξωτερικό καθάρισμα
Καθαρίστε το εξωτερικό περίβλημα της συ-
σκευής μόνο με σαπούνι και νερό και στη
συνέχεια στεγνώστε το προσεκτικά.
Καθάρισμα του συρταριού
απορρυπαντικού
Το συρτάρι σκόνης απορρυπαντικού και προ-
σθετικού θα πρέπει να καθαρίζεται τακτικά.
Αφαιρέστε το συρτά-
ρι πιέζοντας προς τα
κάτω την αρπάγη και
τραβώντας το προς
τα έξω. Ξεπλύντε το
κάτω από τη βρύση
για να απομακρύνετε
τυχόν υπολείμματα
συσσωρευμένης
σκόνης.
Για να το καθαρίσετε
καλύτερα, θα πρέπει
να αφαιρέσετε το
επάνω μέρος της
θήκης προσθετικού.
Καθάρισμα της υποδοχής συρταριού
Αφού αφαιρέσετε το
συρτάρι, καθαρίστε
την υποδοχή με μια
μικρή βούρτσα και
απομακρύνετε προ-
σεκτικά κάθε υπό-
λειμμα σκόνης
απορρυπαντικού
από το επάνω και
κάτω μέρος της υπο-
δοχής.
Τοποθετήστε και πάλι το συρτάρι και εκτε-
λέστε το πρόγραμμα ξεβγάλματος χωρίς
ρούχα στον κάδο.
Καθαρισμός της αντλίας
Η αντλία πρέπει να επιθεωρείται τακτικά, ειδι-
κά εάν:
• η συσκευή δεν αδειάζει ή/και δεν στύβει,
• η συσκευή κάνει ένα περίεργο θόρυβο ενώ
αδειάζει το νερό, λόγω αντικειμένων όπως
παραμάνες, κέρματα κ.λπ. που φράζουν
την αντλία,
• εντοπίζεται κάποιο πρόβλημα που έχει να
κάνει με το άδειασμα του νερού (ανατρέξτε
στο
κεφάλαιο «Τι να κάνετε αν...» για λε-
πτομέρειες).
ΠΡΟΕΙΔΟΠΟΙΗΣΗ Πριν ανοίξετε το
πορτάκι της αντλίας, απενεργοποιήστε
τη συσκευή και αποσυνδέστε το φις
τροφοδοσίας από την πρίζα.
Ακολουθήστε την παρακάτω διαδικασία:
• Αποσυνδέστε τη συσκευή από την πρίζα.
• Αν είναι απαραίτητο, περιμένετε μέχρι να
κρυώσει το νερό.
38
www.zanussi.com

Τοποθετήστε ένα
δοχείο κοντά στην
αντλία (A) για τη
συλλογή του νερού
που τυχόν τρέξει.
Τραβήξτε προς τα
έξω το σωλήνα
αδειάσματος (B), το-
ποθετήστε τον στο
δοχείο και αφαιρέστε
το πώμα του.
Όταν σταματήσει να τρέχει νερό, ξεβιδώστε
το πώμα της αντλίας στρέφοντάς το προς
τα αριστερά και αφαιρέστε το φίλτρο. Χρη-
σιμοποιήστε μια πένσα, αν χρειάζεται. Να
έχετε πάντα πρόχειρο ένα πανί για να
σκουπίσετε το νερό που τυχόν τρέξει κατά
την αφαίρεση του πώματος.
Καθαρίστε το φίλτρο με νερό βρύσης, για
να απομακρύνετε τυχόν
υπολείμματα από
χνούδι.
Αφαιρέστε τα ξένα
αντικείμενα και το
χνούδι από την έδρα
του φίλτρου και από
τη φτερωτή της αν-
τλίας.
Ελέγξτε προσεκτικά
αν περιστρέφεται η
φτερωτή της αντλίας
(περιστρέφεται από-
τομα). Εάν δεν περι-
στρέφονται, επικοι-
νωνήστε με το τοπι-
κό κέντρο σέρβις.
Ξαναβάλτε το πώμα
στο σωλήνα αδειά-
σματος νερού και το-
ποθετήστε το σωλή-
να στη θέση του.
Τοποθετήστε ξανά
το φίλτρο στην αν-
τλία, εισαγάγοντάς
το σωστά μέσα
στους ειδικούς οδη-
γούς. Βιδώστε το κά-
λυμμα της αντλίας
καλά, στρέφοντάς το
προς τα δεξιά.
ΠΡΟΣΟΧΗ Όταν χρησιμοποιείται η
συσκευή και ανάλογα με το επιλεγμένο
πρόγραμμα
, μπορεί να έχει παραμείνει καυτό
νερό στην αντλία.
Μην αφαιρείτε ποτέ το κάλυμμα της αντλίας
κατά τη διάρκεια του κύκλου πλύσης.
Περιμένετε πάντα μέχρι η συσκευή να έχει
ολοκληρώσει τον κύκλο πλύσης και να έχει
αδειάσει το νερό. Όταν τοποθετείτε ξανά το
κάλυμμα της αντλίας, να το σφίγγετε καλά,
για την αποτροπή τυχόν
διαρροών ή
αφαίρεσής του από μικρά παιδιά.
Καθάρισμα του φίλτρου παροχής
νερού
ΣΗΜΑΝΤΙΚΟ Εάν η συσκευή δε γεμίζει,
χρειάζεται μεγάλο χρονικό διάστημα ώστε να
γεμίσει με νερό, το πλήκτρο έναρξης
αναβοσβήνει με κίτρινο χρώμα ή εάν η οθόνη
(εάν υπάρχει) εμφανίζει την αντίστοιχη
ειδοποίηση (ανατρέξτε στο κεφάλαιο "Τι να
κάνετε αν.." για περισσότερες λεπτομέρειες),
ελέγξτε εάν έχουν αποφραχθεί τα φίλτρα
παροχής νερού.
Για να καθαρίσετε
τα φίλτρα παροχής νερού:
39
www.zanussi.com

• Κλείστε τη βρύση
του νερού.
• Ξεβιδώστε το σω-
λήνα από τη βρύ-
ση.
• Καθαρίστε το φίλ-
τρο μέσα στο σω-
λήνα με μια σκλη-
ρή βούρτσα.
• Ξαναβιδώστε το σωλήνα στη βρύση. Βε-
βαιωθείτε ότι η σύνδεση είναι σφικτή.
• Ξεβιδώστε το σωλήνα παροχής νερού
από τη συσκευή. Έχετε κοντά ένα πανί,
γιατί μπορεί να τρέξει νερό.
• Καθαρίστε το φίλτρο της βαλβίδας με μια
σκληρή βούρτσα ή με ένα πανί.
35°
45°
• Ξαναβιδώστε το σωλήνα στη συσκευή
και βεβαιωθείτε πως έχετε σφίξει τη σύν-
δεση.
• Ανοίξτε τη βρύση νερού.
Προστασία από τον πάγο
Εάν η συσκευή εκτίθεται σε θερμοκρασίες χα-
μηλότερες από 0°C, θα πρέπει να παίρνετε
κάποιες προφυλάξεις.
• Κλείστε τη βρύση του νερού.
• Ξεβιδώστε τη σύνδεση του σωλήνα παρο-
χής νερού.
• Τοποθετήστε το άκρο από το σωληνάκι
αδειάσματος, όπως και το άκρο του σωλή-
να παροχής, σε μια λεκανίτσα τοποθετημέ-
νη στο πάτωμα και αδειάστε το νερό.
• Ξαναβιδώστε το σωλήνα παροχής νερού
και βάλτε ξανά στη θέση του το σωληνάκι
αδειάσματος αφού ξανακλείσετε το άκρο
του με το αντίστοιχο πώμα.
• Όταν σκοπεύετε
να χρησιμοποιήσετε ξανά
τη συσκευή, βεβαιωθείτε ότι η θερμοκρασία
περιβάλλοντος είναι άνω των 0°C.
Άδειασμα νερού σε περίπτωση
έκτακτης ανάγκης
Εάν η συσκευή εν αδειάζει το νερό, ακολου-
θήστε τις παρακάτω οδηγίες για να αδειάσετε
το νερό από τον κάδο:
• Βγάλτε το φις από την πρίζα
• Κλείστε τη βρύση του νερού
• Εάν είναι απαραίτητο, περιμένετε μέχρι να
κρυώσει το νερό
• Ανοίξτε το πορτάκι της αντλίας
• Βάλτε μια λεκανίτσα στο πάτωμα και
τοπο-
θετήστε το άκρο από το σωληνάκι αδειά-
σματος νερού μέσα στη λεκανίτσα. Βγάλτε
το πώμα του. Το νερό λόγω βαρύτητας θα
αδειάσει στη λεκάνη. Όταν η λεκανίτσα γε-
μίσει, βάλτε πάλι το πώμα στο σωληνάκι.
Αδειάστε τη λεκανίτσα. Επαναλάβετε τη
διαδικασία μέχρι το νερό να σταματήσει να
τρέχει
• Καθαρίστε την αντλία, εάν
είναι απαραίτη-
το, όπως περιγράφηκε προηγουμένως
• Ξαναβάλτε το σωληνάκι αδειάσματος νε-
ρού στη θέση του αφού του έχετε βάλει το
πώμα,
• Βιδώστε ξανά το καπάκι της αντλίας και
κλείστε το πορτάκι
ΣΗΜΑΝΤΙΚΟ Κάθε φορά που αδειάζει το
νερό από το σωλήνα αδειάσματος, πρέπει να
προσθέτετε 2 λίτρα νερό στη θήκη κύριας
πλύσης στη θήκη
απορρυπαντικού και στη
συνέχεια να επιλέγετε πρόγραμμα
αδειάσματος. Με τον τρόπο αυτό, θα
ενεργοποιηθεί η Βαλβίδα ECO ώστε να μην
παραμείνει μη χρησιμοποιημένο
απορρυπαντικό κατά την επόμενη πλύση.
40
www.zanussi.com

Τι να κάνετε αν...
Ορισμένα προβλήματα οφείλονται στην πα-
ράλειψη απλών εργασιών συντήρησης ή σε
απροσεξίες, και μπορούν να επιλύονται εύκο-
λα χωρίς να χρειαστεί να καλέσετε τεχνικό.
Πριν επικοινωνήσετε με το κέντρο σέρβις της
περιοχής σας, πραγματοποιήστε τους παρα-
κάτω ελέγχους.
Κατά τη διάρκεια λειτουργίας της συσκευής,
είναι πιθανόν να αναβοσβήσει η κόκκινη εν-
δεικτική
λυχνία του πλήκτρου 5, υποδεικνύο-
ντας ότι η συσκευή δεν λειτουργεί.
Μπορείτε να αναγνωρίσετε το πρόβλημα της
συσκευής από το πόσες φορές αναβοσβήνει
η λυχνία του πλήκτρου 5. Αν οι φορές που
αναβοσβήνει είναι διαφορετικές από αυτές
που αναφέρονται παρακάτω, αυτό σχετίζεται
με σφάλμα το οποίο δεν μπορείτε να επιλύσε-
τε εσείς. Σε
αυτή την περίπτωση, επικοινωνή-
στε με το κέντρο σέρβις της περιοχής σας.
Πατήστε ταυτόχρονα το πλήκτρο 4 και το
πλήκτρο 5 για μερικά δευτερόλεπτα. Η κόκκι-
νη λυχνία του πλήκτρου 5 θα αναβοσβήνει
για λίγο όπως περιγράφεται (η πράσινη λυ-
χνία δεν πρέπει να λαμβάνεται υπόψη) :
• 4 φορές = «Το πλυντήριο ρούχων δεν
ξεκινά», ακολουθήστε τις αντίστοιχες προ-
τάσεις του πλαισίου «Πιθανή αιτία/Αντιμε-
τώπιση» και εκκινήστε ξανά το πρόγραμμα.
• 1 φορά = «Το πλυντήριο δεν γεμίζει»,
ακολουθήστε τις αντίστοιχες προτάσεις του
πλαισίου «Πιθανή αιτία/Αντιμετώπιση» και
εκκινήστε ξανά το πρόγραμμα.
• 2 φορές = «Το πλυντήριο δεν αδειάζει ή/
και δεν στύβει», ακολουθήστε τις αντίστοι-
χες προτάσεις του πλαισίου «Πιθανή αιτία/
Αντιμετώπιση» και εκκινήστε ξανά το πρό-
γραμμα.
Αφού αντιμετωπιστεί το πρόβλημα, πατήστε
το πλήκτρο 5 για επανεκκίνηση του προγράμ-
ματος. Εάν, παρά τον έλεγχο που κάνατε, το
πρόβλημα παραμένει
, επικοινωνήστε με το
κέντρο σέρβις της περιοχής σας.
Πρόβλημα Πιθανή αιτία/Αντιμετώπιση
Το πλυντήριο ρούχων δεν
ξεκινά:
Η πόρτα δεν έχει κλείσει (αναβοσβήνει η κόκκινη λυχνία του
πλήκτρου 5).
• Κλείστε καλά την πόρτα.
Το φις δεν είναι σωστά συνδεδεμένο στην πρίζα ρεύματος.
• Εισαγάγετε το φις στην πρίζα ρεύματος.
Η πρίζα δεν έχει ρεύμα.
• Ελέγξτε την οικιακή ηλεκτρολογική εγκατάσταση.
Έχει καεί η κεντρική ασφάλεια του σπιτιού.
• Αντικαταστήστε
την ασφάλεια.
Ο διακόπτης επιλογής προγράμματος δεν είναι ρυθμισμένος
στη σωστή θέση και το πλήκτρο 5 δεν έχει πατηθεί.
• Στρέψτε το διακόπτη επιλογής και πατήστε πάλι το πλήκ-
τρο 5.
Έχετε επιλέξει την καθυστέρηση έναρξης.
• Εάν θέλετε τα ρούχα να πλυθούν αμέσως, ακυρώστε την
καθυστέρηση έναρξης.
41
www.zanussi.com

Πρόβλημα Πιθανή αιτία/Αντιμετώπιση
Η συσκευή δεν γεμίζει:
Η βρύση νερού είναι κλειστή (αναβοσβήνει η κόκκινη λυχνία
του πλήκτρου 5).
• Ανοίξτε τη βρύση παροχής νερού.
Ο σωλήνας παροχής έχει πατηθεί ή τσακίσει (αναβοσβήνει η
κόκκινη λυχνία του πλήκτρου 5).
• Ελέγξτε τη σύνδεση του σωλήνα παροχής νερού.
Το φίλτρο στο σωλήνα παροχής ή το φίλτρο της βαλβίδας πα-
ροχής είναι
φραγμένο (αναβοσβήνει η κόκκινη λυχνία του
πλήκτρου 5).
• Καθαρίστε τα φίλτρα παροχής νερού. (Ανατρέξτε στην ενό-
τητα «Καθαρισμός των φίλτρων παροχής νερού» για πε-
ρισσότερες λεπτομέρειες).
Η πόρτα δεν έχει κλείσει σωστά (αναβοσβήνει η κόκκινη λυ-
χνία του πλήκτρου 5).
• Κλείστε καλά την πόρτα.
Η συσκευή δεν αδειάζει το
νερό ή/και δεν στύβει:
Ο σωλήνας αδειάσματος έχει πατηθεί ή τσακίσει (αναβοσβή-
νει η κόκκινη λυχνία του πλήκτρου 5).
• Ελέγξτε τη σύνδεση του σωλήνα αδειάσματος.
Το φίλτρο αδειάσματος είναι φραγμένο (αναβοσβήνει η κόκκι-
νη λυχνία του πλήκτρου 5).
• Καθαρίστε το φίλτρο αδειάσματος.
Έχει επιλεγεί μια λειτουργία ή ένα πρόγραμμα που ολοκλη-
ρώνεται με το
νερό στον κάδο ή που ακυρώνει όλες τις φάσεις
στυψίματος.
• Επιλέξτε το πρόγραμμα αδειάσματος ή στυψίματος.
Το φορτίο ρούχων δεν είναι ομοιόμορφα κατανεμημένο στον
κάδο.
• Κάνετε καλύτερη κατανομή των ρούχων.
42
www.zanussi.com

Πρόβλημα Πιθανή αιτία/Αντιμετώπιση
Υπάρχει νερό στο δάπε-
δο:
Έχετε χρησιμοποιήσει υπερβολικά μεγάλη ποσότητα απορ-
ρυπαντικού ή ακατάλληλο απορρυπαντικό (δημιουργεί πολύ
αφρό).
• Μειώστε την ποσότητα απορρυπαντικού ή χρησιμοποιήστε
κάποιο άλλο.
Ελέγξτε μήπως υπάρχουν διαρροές από κάποιο δακτύλιο
στεγανοποίησης του σωλήνα παροχής. Καθότι αυτό δεν είναι
πάντα εύκολο να το διαπιστώσετε με το νερό να τρέχει από το
σωλήνα, ελέγξτε εάν ο δακτύλιος
είναι υγρός.
• Ελέγξτε τη σύνδεση του σωλήνα παροχής νερού.
Ο σωλήνας αδειάσματος ή ο σωλήνας παροχής έχουν υπο-
στεί ζημιά.
• Αντικαταστήστε τον με έναν καινούργιο.
Το πώμα στο σωλήνα αδειάσματος του νερού δεν έχει επανα-
τοποθετηθεί ή το φίλτρο δεν βιδώθηκε σωστά μετά τον καθα-
ρισμό.
• Επανατοποθετήστε το πώμα
στο σωλήνα αδειάσματος ή
βιδώστε πλήρως το φίλτρο.
Τα αποτελέσματα της πλύ-
σης δεν είναι ικανοποιητι-
κά:
Έχετε χρησιμοποιήσει πολύ λίγο απορρυπαντικό ή ακατάλλη-
λο απορρυπαντικό.
• Αυξήστε την ποσότητα απορρυπαντικού ή χρησιμοποιήστε
κάποιο άλλο.
Δεν καθαρίστηκαν οι επίμονοι λεκέδες πριν από την πλύση.
• Χρησιμοποιήστε προϊόντα του εμπορίου για το καθάρισμα
των επίμονων λεκέδων.
Δεν επιλέξατε τη σωστή θερμοκρασία.
• Βεβαιωθείτε ότι έχετε επιλέξει τη σωστή θερμοκρασία.
Υπερβολικό φορτίο
στον κάδο.
• Μειώστε τον όγκο του φορτίου.
Δεν ανοίγει η πόρτα:
Το πρόγραμμα βρίσκεται ακόμα σε εξέλιξη.
• Περιμένετε μέχρι το τέλος του κύκλου πλύσης.
Η πόρτα δεν έχει απασφαλίσει ακόμα.
• Περιμένετε λίγα λεπτά πριν ανοίξετε την πόρτα.
Υπάρχει νερό στον κάδο.
• Επιλέξτε το πρόγραμμα αδειάσματος ή στυψίματος για να
αδειάσετε το νερό.
43
www.zanussi.com

Πρόβλημα Πιθανή αιτία/Αντιμετώπιση
Η συσκευή δονείται με θό-
ρυβο:
Δεν έχουν αφαιρεθεί τα μπουλόνια μεταφοράς και τα υλικά
συσκευασίας.
• Ελέγξτε εάν η συσκευή είναι εγκατεστημένη σωστά.
Δεν έχουν ρυθμιστεί τα πόδια στήριξης
• Ελέγξτε εάν η συσκευή είναι οριζοντιωμένη σωστά.
Το φορτίο ρούχων δεν είναι ομοιόμορφα κατανεμημένο στον
κάδο.
• Κάνετε καλύτερη κατανομή των ρούχων.
Ίσως υπάρχουν πολύ λίγα ρούχα μέσα στον
κάδο.
• Τοποθετήστε περισσότερα ρούχα.
Το στύψιμο ξεκινά με κα-
θυστέρηση ή η συσκευή
δεν στύβει καθόλου:
Έχει ενεργοποιηθεί το ηλεκτρονικό σύστημα ελέγχου εξισορ-
ρόπησης, καθότι το φορτίο ρούχων δεν είναι ομοιόμορφα κα-
τανεμημένο στον κάδο. Το φορτίο ρούχων ανακατανέμεται με
αντίστροφη περιστροφή του κάδου. Αυτό ενδέχεται να συμβεί
αρκετές φορές μέχρι να αποκατασταθεί η ισορροπία και να
ξεκινήσει το κανονικό στύψιμο. Εάν, μετά από 10 λεπτά, το
φορτίο ρούχων δεν
έχει ακόμα κατανεμηθεί ομοιόμορφα στον
κάδο, η συσκευή δεν θα ξεκινήσει τη φάση στυψίματος. Στην
περίπτωση αυτή, κατανείμετε ξανά τα ρούχα στον κάδο με το
χέρι και επιλέξτε το πρόγραμμα στυψίματος.
• Κάνετε καλύτερη κατανομή των ρούχων.
Το φορτίο είναι πολύ μικρό.
• Προσθέστε περισσότερα ρούχα, κατανείμετε ξανά τα ρούχα
στον κάδο με
το χέρι και, στη συνέχεια, επιλέξτε το πρό-
γραμμα στυψίματος.
Η συσκευή κάνει έναν
ασυνήθιστο θόρυβο:
Η συσκευή διαθέτει ένα τύπο μοτέρ που κάνει ασυνήθιστο θό-
ρυβο σε σύγκριση με άλλα παραδοσιακά μοτέρ. Το νέο μοτέρ
διασφαλίζει πιο ήπια εκκίνηση και περισσότερο ομοιόμορφη
κατανομή των ρούχων στον κάδο κατά το στύψιμο, όπως επί-
σης και αυξημένη σταθερότητα της συσκευής.
Δεν φαίνεται να υπάρχει
νερό μέσα στον κάδο:
Οι συσκευές νέας τεχνολογίας λειτουργούν πολύ οικονομικά,
χρησιμοποιώντας πολύ λίγο νερό και χωρίς να επηρεάζεται η
απόδοσή τους.
Εάν δεν μπορείτε να εντοπίσετε ή να λύσετε
το πρόβλημα, απευθυνθείτε στο κέντρο σέρ-
βις της εταιρίας μας. Πριν τηλεφωνήσετε, ση-
μειώστε το μοντέλο, τον αριθμό σειράς και
την ημερομηνία αγοράς της συσκευής σας,
καθώς: το Κέντρο Σέρβις θα σας ζητήσει αυ-
τά τα στοιχεία.
Mod. ... ... ...
Prod. No. ... ... ...
Ser. No. ... ... ...
Mo
d
. ..
. ...
...
Prod. N
o
.
... ... ..
S
e
r
.
No
.
... ... ...
44
www.zanussi.com

Τεχνικά χαρακτηριστικά
Διαστάσεις Πλάτος
Ύψος
Βάθος
60 εκατοστά
85 εκατοστά
54 εκατοστά
Ηλεκτρικές συνδέσεις
Τάση - Συνολική ισχύς -
Ασφάλεια
Πληροφορίες για την ηλεκτρική παροχή δίνονται στην πλακέ-
τα ονομαστικών τιμών στο εσωτερικό άκρο της πόρτας της
συσκευής.
Πίεση παροχής νερού Ελάχιστη
Μέγιστη
0,05 MPa
0,8 MPa
Μέγιστο φορτίο Βαμβακερά 6 κιλά
Ταχύτητα στυψίματος Μέγιστη 1000 Στροφές ανά λεπτό
Τιμές κατανάλωσης
Πρόγραμμα Κατανάλωση
ενέργειας (kWh)
1)
Κατανάλωση νε-
ρού (λίτρα)
1)
Διάρκεια προ-
γράμματος (λε-
πτά)
1)
Λευκά βαμβακερά 90°C 2.0 61 140
Βαμβακερά 60°C 1.35 58 125
Βαμβακερά 40°C 0.75 58 120
Συνθετικά 40°C 0.9 50 90
Ευαίσθητα 40°C 0.55 58 70
Μάλλινα / Πλύσιμο στο χέρι
30°C
0.25 58 60
1) Τα στοιχεία κατανάλωσης που περιέχει αυτός ο πίνακας είναι ενδεικτικά. Η πραγματική κατανάλωση
μπορεί να διαφέρει ανάλογα με την ποσότητα και τον τύπο των ρούχων, τη θερμοκρασία του νερού και
τη θερμοκρασία περιβάλλοντος.
Τυπικά προγράμματα για τις τιμές κατανά-
λωσης της ετικέτας ενεργειακής κατανά-
λωσης
Τα προγράμματα Βαμβακερά 60°C οικονομι-
κό και Βαμβακερά 40°C οικονομικό είναι τα
τυπικά προγράμματα βαμβακερών για κανο-
νικά λερωμένα βαμβακερά ρούχα. Είναι κα-
τάλληλα για τον καθαρισμό κανονικά λερωμέ-
νων βαμβακερών ρούχων και είναι τα πιο
αποδοτικά προγράμματα όσον αφορά το
συνδυασμό κατανάλωσης ενέργειας και νε-
ρού για το πλύσιμο αυτού του είδους βαμβα-
κερών ρούχων.
Συμμορφώνονται με το πρότυπο EN60456.
Η πραγματική θερμοκρασία του νερού
μπορεί να διαφέρει από την αναφερόμε-
νη θερμοκρασία για τον κύκλο.
45
www.zanussi.com

Εγκατάσταση
Αποσυσκευασία
Πριν από τη χρήση της συσκευής, πρέπει να
αφαιρεθούν όλα τα υλικά συσκευασίας και τα
μπουλόνια μεταφοράς.
Συνιστάται να φυλάξετε όλες τις προστατευτι-
κές διατάξεις, ώστε να τις χρησιμοποιήσετε
σε μελλοντική μεταφορά της συσκευής.
Αφού αφαιρέσετε
όλα τα υλικά συ-
σκευασίας, ακου-
μπήστε προσεκτικά
τη συσκευή στη ρά-
χη της για να αφαι-
ρέσετε τη βάση από
πολυστυρόλιο.
Αφαιρέστε το καλώ-
διο τροφοδοσίας και
τους σωλήνες από
τα άγκιστρα των σω-
λήνων στο πίσω μέ-
ρος της συσκευής.
Ξεβιδώστε τα τρία
μπουλόνια με το
κλειδί που παρέχε-
ται.
Σύρετε και αφαιρέ-
στε τους αντίστοι-
χους πλαστικούς
αποστάτες.
Κλείστε τη μικρότερη άνω οπή και τις δύο
μεγάλες με τις αντίστοιχες πλαστικές τάπες
που παρέχονται στην πλαστική συσκευασία
με το φυλλάδιο οδηγιών.
Τοποθέτηση
Τοποθετήστε τη συσκευή σε σταθερό και επί-
πεδο δάπεδο. Βεβαιωθείτε ότι δεν παρεμπο-
δίζεται η κυκλοφορία αέρα γύρω από τη συ-
σκευή από μοκέτες, χαλιά κ.λπ. και ότι η συ-
σκευή δεν ακουμπά στον τοίχο ή σε άλλες οι-
κιακές συσκευές ή έπιπλα.
Οριζοντιώστε το
πλυντήριο ρούχων,
ανεβάζοντας ή κατε-
βάζοντας τα πόδια.
Τα πόδια ενδέχεται
να είναι κάπως σφι-
χτά στη ρύθμισή
τους καθώς διαθέ-
τουν ένα αυτοασφα-
λιζόμενο παξιμάδι,
ωστόσο το πλυντή-
ριο ΠΡΕΠΕΙ να είναι
οριζόντιο και σταθε-
ρό. Εάν απαιτείται,
ελέγξτε την οριζο-
ντίωση με ένα αλφά-
δι.
46
www.zanussi.com

Κάθε απαραίτητη
ρύθμιση μπορεί να
γίνει με ένα κλειδί.
Η ακριβής οριζοντίωση αποτρέπει τις δονή-
σεις, το θόρυβο και τη μετατόπιση του πλυ-
ντηρίου κατά τη λειτουργία του.
ΠΡΟΣΟΧΗ Μην τοποθετείτε ποτέ
χαρτόνι, ξύλο ή παρόμοια υλικά κάτω
από το πλυντήριο για να αντισταθμίσετε το
ανισόπεδο του δαπέδου. Αφού έχετε
τοποθετήσει το πλυντήριο σε
απόλυτα
οριζόντια θέση, σφίξτε τα παξιμάδια
ασφάλισης.
Ανύψωση της συσκευής
Τα αναρτημένα ξύλινα δάπεδα είναι ιδιαίτερα
επιρρεπή σε δονήσεις.
Ως συμβολή στην αποτροπή δονήσεων, συν-
ιστάται η τοποθέτηση ενός υδατοστεγούς ξύ-
λινου πλαισίου, πάχους τουλάχιστον 15 mm,
κάτω από τη συσκευή, στερεωμένο σε τουλά-
χιστον 2 δοκούς του δαπέδου με βίδες, και το
οποίο να εκτείνεται απαραίτητα πέρα από τα
μπροστινά πόδια.
Αν είναι εφικτό,
εγκαταστήστε τη συσκευή σε
μία από τις γωνίες του δωματίου, όπου το δά-
πεδο είναι πιο σταθερό.
Παροχή νερού
ΠΡΟΕΙΔΟΠΟΙΗΣΗ Αυτή η συσκευή
πρέπει να συνδεθεί με παροχή κρύου
νερού
ΠΡΟΣΟΧΗ Εάν η σύνδεση
πραγματοποιηθεί με νέες σωληνώσεις ή
με σωληνώσεις που δεν έχουν
χρησιμοποιηθεί για αρκετό καιρό, συνιστάται
να τρέξει κάποια ποσότητα νερού για να
απομακρυνθούν οποιαδήποτε υπολείμματα
έχουν συγκεντρωθεί στους σωλήνες
ΠΡΟΣΟΧΗ Μη χρησιμοποιήσετε το
σωλήνα από την παλιά σας συσκευή για
τη σύνδεση της τροφοδοσίας νερού.
Συνδέστε το σωλήνα
σε βρύση με σπεί-
ρωμα 3/4". Χρησιμο-
ποιείτε πάντα τον
παρεχόμενο με τη
συσκευή σωλήνα.
35°
45°
Το άλλο άκρο του σωλήνα παροχής που
συνδέεται με τη συσκευή μπορεί να είναι
στραμμένο όπως απεικονίζεται στην εικόνα.
Μην τοποθετείτε το σωλήνα παροχής
προς τα κάτω. Γυρίστε το σωλήνα προς τα
αριστερά ή τα δεξιά ανάλογα με τη θέση της
βρύσης. Ρυθμίστε το σωλήνα σωστά χαλα-
ρώνοντας το παξιμάδι δακτυλίου. Αφού το
-
ποθετήσετε το σωλήνα παροχής, βεβαιω-
θείτε ότι σφίξατε το παξιμάδι δακτυλίου ξα-
νά για την αποφυγή διαρροών.
ΠΡΟΣΟΧΗ Ο σωλήνας παροχής δεν
είναι δυνατόν να επιμηκυνθεί. Εάν είναι
κοντός και δεν επιθυμείτε να μετακινήσετε τη
βρύση, θα πρέπει να αγοράσετε έναν ενιαίο,
πιο επιμήκη σωλήνα, ειδικά κατασκευασμένο
για αυτή τη χρήση.
Άδειασμα νερού
Η καμπύλη του σωλήνα αποχέτευσης μπορεί
να τοποθετηθεί με τρεις διαφορετικούς τρό-
πους:
47
www.zanussi.com

Στο χείλος του νι-
πτήρα, χρησιμο-
ποιώντας τον πλα-
στικό αγκώνα που
παρέχεται μαζί με
το πλυντήριο
Στην περίπτωση αυτή, βεβαιωθείτε ότι ο
σωλήνας δεν μπορεί να απαγκιστρωθεί
από την άκρη του νιπτήρα, όταν το πλυντή-
ριο αδειάζει το νερό. Μπορείτε να τον στε-
ρεώσετε δένοντάς τον στη βρύση ή τον τοί-
χο.
Σε μια διακλάδωση της αποχέτευσης
του νιπτήρα. Η διακλάδωση πρέπει να
βρίσκεται πάνω από το σιφόνι, κατά τέτοιο
τρόπο ώστε η καμπύλη του σωλήνα να βρί-
σκεται τουλάχιστον 60 εκατοστά πάνω από
το πάτωμα.
Απευθείας σε έναν αγωγό αποχέτευσης
σε ύψος όχι μικρότερο από 60 cm και όχι
μεγαλύτερο από 90 cm Το άκρο του σωλή-
να εξόδου πρέπει
πάντοτε να αερίζεται,
δηλ. η εσωτερική διάμετρος του αγωγού θα
πρέπει να είναι μεγαλύτερη από την εξωτε-
ρική διάμετρο του σωλήνα εξόδου. Ο σωλή-
νας αποχέτευσης δεν πρέπει να είναι τσακι-
σμένος.
Εντοιχισμός
Η συσκευή αυτή έχει σχεδιαστεί για εντοιχι-
σμό στην επίπλωση της κουζίνας. Η εσοχή
θα πρέπει να έχει τις διαστάσεις που φαίνο-
νται στην απεικόνιση Α.
A
600
596 555
170
75
176,5
416
100
60
818
min.
820
min.
560
48
www.zanussi.com

Όταν ενσωματώνετε τη συσκευή στα ντου-
λάπια της κουζίνας, διασφαλίστε, αν είναι
εφικτό, ότι οι σωλήνες τοποθετούνται σε μία
από τις εσοχές στο πίσω μέρος της συ-
σκευής.
Αυτό συμβάλλει στο να αποτρέπεται η συ-
στροφή ή ο εγκλωβισμός των σωλήνων.
B
1
2
3
7
5
6
4
8
ΠΡΟΣΟΧΗ Μην αφαιρείτε τη βίδα 8 !
Προετοιμασία και συναρμολόγηση της
πόρτας
Η συσκευή είναι κατασκευασμένη για συν-
αρμολόγηση της πόρτας ώστε να ανοίγει
από τα δεξιά προς τα αριστερά.
Στην περίπτωση αυτή, είναι αρκετό να βι-
δωθούν οι μεντεσέδες (1) και ο κόντρα μα-
γνήτης (6) που παρέχονται με τη συσκευή
στο σωστό επίπεδο (Σχ. B).
C
16-22
595-598
22±1,5
416
B
C
35 Ø 12,5-14 depth
49
www.zanussi.com

• α) Πόρτα
Οι διαστάσεις της πόρτας πρέπει να είναι:
- πλάτος 595 έως 598 mm
- πάχος 16 έως 22 mm
Το ύψος (C-Σχ. C) εξαρτάται από το ύψος
της βάσης της προσκείμενης επίπλωσης.
• β) Μεντεσέδες
Για την τοποθέτηση των μεντεσέδων απαι-
τείται να ανοιχθούν δύο οπές (διάμ. 35 mm,
βάθος 12,5 έως 14 mm ανάλογα με το βά-
θος της πόρτας επίπλωσης) στην
εσωτερι-
κή πλευρά της πόρτας. Η απόσταση μεταξύ
των κέντρων των οπών στερέωσης πρέπει
να είναι 416 mm.
Η απόσταση (B) από το επάνω άκρο της
πόρτας μέχρι το κέντρο της οπής εξαρτάται
από τις διαστάσεις της προσκείμενης επί-
πλωσης.
Οι απαιτούμενες διαστάσεις παρέχονται στο
σχ. C.
Οι μεντεσέδες στερεώνονται στην πόρτα με
ξυλόβιδες (2-Σχ. B) που
παρέχονται με τη
συσκευή.
• γ) Τοποθέτηση της πόρτας
Στερεώστε τους μεντεσέδες (1) στη συ-
σκευή με τις βίδες M 5x15 (3-Σχ. B). Οι με-
ντεσέδες ρυθμίζονται για να αντισταθμίσουν
τυχόν ανομοιόμορφο πάχος της πόρτας.
Για να ευθυγραμμιστεί απόλυτα η πόρτα,
πρέπει να χαλαρώσετε τη βίδα (3-Σχ. B), να
ρυθμίσετε την πόρτα και να σφίξετε ξανά
τη
βίδα.
D
4
6
8
ΠΡΟΣΟΧΗ Μην αφαιρείτε τη βίδα 8 !
δ) Κόντρα μαγνήτης (6)
Η συσκευή είναι κατασκευασμένη για μα-
γνητικό κλείσιμο της πόρτας.
Για να επιτραπεί η λειτουργία αυτής της συ-
σκευής, πρέπει να βιδωθεί ο κόντρα μαγνή-
της (6) (χαλύβδινος δίσκος + ελαστικός δα-
κτύλιος) στην εσωτερική πλευρά της πόρ-
τας. Η θέση του πρέπει να αντιστοιχεί στο
μαγνήτη (4) του πλυντηρίου (βλ.
σχ. D).
E
1
2
3
7
5
6
4
8
ΠΡΟΣΟΧΗ Μην αφαιρείτε τη βίδα 8 !
50
www.zanussi.com

Εάν η πόρτα πρέπει να ανοίγει από αριστε-
ρά προς τα δεξιά, αναστρέψτε τη θέση των
ελασμάτων (7), του μαγνήτη (4) και του ελά-
σματος (5) (Σχ. B και E). Τοποθετήστε τον
κόντρα μαγνήτη (6) και τους μεντεσέδες (1)
όπως περιγράφηκε προηγουμένως.
Περιβαλλοντικά θέματα
Το σύµβολο στο προϊόν ή επάνω στη
συσκευασία του υποδεικνύει ότι δεν πρέπει
να µ εταχειρίζεστε το προϊόν αυτό ως οικιακό
απόρριµµα . Αντιθέτως θα πρέπει να
παραδίδεται στο κατάλληλο σηµείο συλλογής
για την ανακύκλωση ηλεκτρικού και
ηλεκτρονικού εξοπλισµού. Εξασφαλίζοντας
ότι το προϊόν αυτό διατίθεται σωστά,
συµβάλλετε στην αποτροπή ενδεχόµενων
αρνητικών συνεπειών για
το περιβάλλον και
την ανθρώπινη υγεία, οι οποίες θα
µπορούσαν διαφορετικά να προκληθούν από
ακατάλληλο χειρισµό απόρριψης του
προϊόντος αυτού. Για λεπτοµερέστερες
πληροφορίες σχετικά µε την ανακύκλωση του
προϊόντος αυτού, επικοινωνήστε µε το
δηµαρχείο της περιοχής σας, την τοπική σας
υπηρεσία αποκοµιδής οικιακών
απορριµµάτων ή µε το κατάστηµα όπου
αγοράσατε το προϊόν.
Υλικά συσκευασίας
Τα υλικά που φέρουν το σύμβολο είναι
ανακυκλώσιμα.
>PE<=πολυαιθυλένιο
>PS<=πολυστυρόλιο
>PP<=πολυπροπυλένιο
Αυτό σημαίνει ότι μπορούν να ανακυκλωθούν
μετά τη σωστή τους απόρριψη σε κατάλληλα
δοχεία συλλογής.
Οικολογικές συμβουλές
Για να εξοικονομήσετε νερό, ενέργεια και για
να συμβάλλετε στην προστασία του περιβάλ-
λοντος, ακολουθήστε τις εξής συμβουλές:
• Τα φυσιολογικά λερωμένα ρούχα μπορούν
να πλυθούν χωρίς πρόπλυση ώστε να
εξοικονομήσετε απορρυπαντικό, νερό και
χρόνο (επίσης, έτσι προστατεύεται και το
περιβάλλον!).
• Το πλυντήριο λειτουργεί πιο οικονομικά
όταν έχετε γεμίσει πλήρως τον κάδο.
• Με
κατάλληλη προεργασία, είναι δυνατή η
αφαίρεση λεκέδων και ενός μέρους της
βρωμιάς, ώστε να μπορούν να πλυθούν τα
ρούχα στη συνέχεια σε χαμηλότερη θερμο-
κρασία.
• Χρησιμοποιήστε την κατάλληλη ποσότητα
απορρυπαντικού σύμφωνα με τη σκληρό-
τητα του νερού, την ποσότητα των ρούχων
για πλύσιμο και το πόσο λερωμένα είναι.
51
www.zanussi.com

Índice de materias
Información sobre seguridad _ _ _ _ _ _ _ _ _ _ _ _ 52
Descripción del producto _ _ _ _ _ _ _ _ _ _ _ _ _ _ 54
Panel de mandos _ _ _ _ _ _ _ _ _ _ _ _ _ _ _ _ _ 54
Programas de lavado _ _ _ _ _ _ _ _ _ _ _ _ _ _ _ _ 57
Consejos útiles _ _ _ _ _ _ _ _ _ _ _ _ _ _ _ _ _ _ 60
Primer uso _ _ _ _ _ _ _ _ _ _ _ _ _ _ _ _ _ _ _ _ 61
Uso diario _ _ _ _ _ _ _ _ _ _ _ _ _ _ _ _ _ _ _ _ _ 61
Mantenimiento y limpieza _ _ _ _ _ _ _ _ _ _ _ _ _ 63
Qué hacer si… _ _ _ _ _ _ _ _ _ _ _ _ _ _ _ _ _ _ 66
Datos técnicos _ _ _ _ _ _ _ _ _ _ _ _ _ _ _ _ _ _ _ 68
Valores de consumo _ _ _ _ _ _ _ _ _ _ _ _ _ _ _ _ 69
Instalación _ _ _ _ _ _ _ _ _ _ _ _ _ _ _ _ _ _ _ _ _ 69
Empotrado _ _ _ _ _ _ _ _ _ _ _ _ _ _ _ _ _ _ _ _ _ 71
Aspectos medioambientales _ _ _ _ _ _ _ _ _ _ _ _ 74
Salvo modificaciones.
Información sobre seguridad
Importante Lea las instrucciones atentamente y téngalas a
mano para consultarlas en caso necesario.
• La seguridad de su aparato cumple las normas indus-
triales y los requisitos legales sobre seguridad de los
electrodomésticos. No obstante, como fabricantes, nos
sentimos en la obligación de facilitar las siguientes ad-
vertencias de seguridad.
• Es muy importante que conserve este manual junto con
la lavadora para consultas futuras. Si vende o transfiere
el electrodoméstico a otro propietario, o bien cambia
de domicilio y deja la lavadora en su interior, asegúre-
se siempre de que el nuevo propietario recibe el elec-
trodoméstico junto con el manual de instrucciones pa-
ra que pueda aprender cómo funciona y conozca las
advertencias pertinentes.
• Es IMPRESCINDIBLE leerlas con atención antes de
instalar o utilizar el electrodoméstico.
• Antes de poner en marcha el aparato por primera vez,
compruebe que no presenta daños ocasionados duran-
te el transporte. No conecte nunca un aparato que pre-
sente daños. Contacte con su proveedor si éste tiene
componentes dañados.
• Si el electrodoméstico se suministra en invierno, esta-
ción en la que se dan temperaturas bajo cero. Almacé-
nelo a temperatura ambiente durante 24 horas antes de
utilizarlo por primera vez.
Seguridad general
• Resulta peligroso alterar las especificaciones o intentar
modificar este producto de alguna manera.
• El cristal de la puerta se puede calentar durante el uso
de programas de lavado a alta temperatura. ¡No lo to-
que!
• Impida el acceso de los niños y animales domésticos
al interior del tambor. Para evitarlo, compruebe el inte-
rior del tambor antes de utilizar el aparato.
• Cualquier objeto como, por ejemplo, monedas, imper-
dibles, clavos, tornillos, piedras o cualquier otro mate-
rial duro y afilado puede provocar daños considerables
y no se debe introducir en la máquina.
• Utilice sólo las cantidades de detergente y suavizante
recomendadas. Los tejidos pueden dañarse si se so-
brecarga la lavadora. Siga las recomendaciones del fa-
bricante acerca de las cantidades.
• Lave las prendas pequeñas, como calcetines, lazos,
cinturones, etc., en una bolsa de lavado o en una funda
de almohada para evitar que se introduzcan entre la cu-
ba y el tambor interno.
• No utilice la lavadora para lavar prendas con aros, sin
dobladillos o desgarradas.
• Desenchufe siempre el electrodoméstico y cierre el su-
ministro de agua después del uso, la limpieza o el
mantenimiento del mismo.
• Bajo ninguna circunstancia debe intentar reparar la
máquina por su cuenta. Si las reparaciones las llevan a
cabo personas sin experiencia, esto puede causar le-
siones o un fallo de funcionamiento grave. Póngase en
contacto con su centro de servicio técnico local. Insista
siempre en que los repuestos sean originales.
Instalación
• Este aparato es pesado. Por tanto, se debe tener cuida-
do al transportarlo.
• Al desembalar el aparato, compruebe que no esté da-
ñado. Si tiene alguna duda, no lo utilice y póngase en
contacto con el centro de servicio técnico.
52
www.zanussi.com

• Todos los pasadores del embalaje y transporte se de-
ben retirar antes del uso. De lo contrario, se pueden
producir daños graves en el producto y daños materia-
les. Véase el apartado correspondiente en el manual de
usuario.
• Una vez instalada la lavadora, asegúrese de que ésta
no descansa sobre la manguera de entrada ni la de de-
sagüe, así como de que la encimera no está presionan-
do el cable de alimentación eléctrica contra la pared.
• Si la máquina está situada sobre un suelo enmoqueta-
do, ajuste las patas para que pueda circular libremente
el aire por debajo del aparato.
• Una vez realizada la instalación, asegúrese de que no
existen fugas de agua procedentes de las mangueras y
sus conexiones.
• Si el electrodoméstico se instala en un lugar sometido
a heladas, consulte el capítulo "Riesgos de helada".
• Los trabajos de fontanería necesarios para instalar el
electrodoméstico deberán correr a cargo de un fonta-
nero o técnico especializado.
• Cualquier trabajo eléctrico que sea necesario para ins-
talar este aparato lo debe llevar a cabo un electricista
cualificado o una persona competente.
Uso
• Este aparato se ha diseñado para uso doméstico. No se
debe utilizar para otros propósitos diferentes a los pre-
vistos.
• Lave solamente las prendas que estén diseñadas para
lavarse a máquina. Consulte las instrucciones en la eti-
queta de la prenda.
• No sobrecargue el aparato. Consulte la tabla de pro-
gramas de lavado.
• Antes del lavado, asegúrese de que todos los bolsillos
de las prendas están vacíos y de que todos los botones
y cremalleras están abrochados. Evite lavar prendas
deshilachadas o desgarradas y trate previamente las
manchas de pintura, tinta, óxido y grasa. Los sujetado-
res con aros NO deben lavarse a máquina.
• Las prendas que han estado en contacto con productos
de petróleo volátil no deben lavarse a máquina. Si se
utilizan líquidos de limpieza volátiles, se debe prestar
atención a eliminar el líquido de la prenda antes de in-
troducirla en la máquina.
• No tire del cable de corriente eléctrica para desenchu-
far el electrodoméstico; sujete siempre el cable por el
enchufe.
• No utilice nunca la lavadora si el cable de corriente
eléctrica, el panel de mandos, o la superficie de trabajo
o la base están dañados y se puede acceder al interior
de la lavadora.
Seguridad de los niños
• Este electrodoméstico no está destinado a personas
(incluidos niños) con funciones físicas o sensoriales
reducidas o con experiencia y conocimiento insuficien-
tes, a menos que una persona responsable de su segu-
ridad les supervise o les instruya en el uso del electro-
doméstico
• Se debe vigilar a los niños para asegurarse de que no
jueguen con el aparato
• Los componentes del embalaje (por ejemplo, la pelícu-
la de plástico o el poliestireno) pueden ser peligrosos
para los niños - ¡peligro de asfixia! Manténgalos fuera
del alcance de los niños
• Mantenga todos los detergentes en un lugar seguro
fuera del alcance de los niños.
• Impida el acceso de los niños y los animales domésti-
cos al interior del tambor. La máquina incorpora un
dispositivo especial para evitar que los niños y los ani-
males domésticos queden atrapados en el interior del
tambor.
Para activar este dispositi-
vo, gire el botón (sin pre-
sionarlo) del interior de la
puerta hacia la derecha
hasta que la ranura esté en
posición horizontal. Si es
necesario, utilice una mo-
neda.
Para desactivar el disposi-
tivo y permitir el cierre de
la puerta, gire el botón ha-
cia la izquierda hasta que
la ranura se sitúe en posi-
ción vertical.
53
www.zanussi.com

Descripción del producto
1
Depósito dosificador de detergente
2
Panel de mandos
3
Palanca de apertura de la puerta
4
Placa de datos técnicos
5
Filtro
6
Patas ajustables
1 2
3
4
5
6
Depósito dosificador de detergente
Compartimento del detergente utilizado en la fase de
prelavado y remojo o del quitamanchas utilizado durante la
fase de acción antimanchas (si está disponible). El deter-
gente de prelavado y remojo se deposita al principio del
programa de lavado. El quitamanchas se deposita durante
la fase de acción antimanchas.
Compartimento del detergente líquido o en polvo utili-
zado en el lavado principal. Si se utiliza detergente líquido,
viértalo justo antes de iniciar el programa.
Compartimento para aditivos líquidos (suavizante, al-
midón)
Siga las instrucciones del fabricante del producto en cuan-
to a cantidades y no permita que el detergente supere la
marca "MAX" que hay en el depósito dosificador. El suavi-
zante o el almidón se deben depositar en el compartimento
antes de iniciar el programa de lavado.
Panel de mandos
En la siguiente figura se muestran los elementos del panel de control con el selector de programas, así como los
botones y los pilotos indicadores. Aparecen representados por números en las páginas siguientes.
54
www.zanussi.com

1 2 3 4 5 6
B
C
A
7
1
Selector de programas
2
Tecla de reducción del CENTRIFUGADO
3
Tecla OPCIONES
4
Tecla ACLARADO EXTRA
5
Tecla INICIO/PAUSA
6
Tecla INICIO DIFERIDO
7
Indicadores luminosos
Tabla de símbolos
Selector de programas
Algodón Lana (lavado a mano)
Programa Eco Delicados
Lavado en frío Aclarados
Sintéticos Descarga
Plancha Fácil Centrifugado
Teclas Los pilotos
Centrifugado Agua en la cuba
Opciones Prelavado
Aclarado extra Súper rápido
Inicio/Pausa
Inicio diferido
Indicadores de fase
/
Prelavado o lavado
+
Aclarado o centrifugado
Fin de programa
55
www.zanussi.com

Selector de programas, tecla de velocidad de centrifugado y opciones disponibles
Selector de programas
Permite conectar/desconectar el aparato y/o seleccionar
un programa.
Opciones disponibles:
Centrifugado
Si presiona este botón puede modificar la velocidad de
centrifugado del programa seleccionado o seleccionar la
opción Agua en la cuba.
Agua en cuba
Al seleccionar esta opción, el agua del último aclarado no
se descarga con el fin de impedir que los tejidos se arru-
guen Es necesario vaciar el agua antes de abrir la puerta.
Para descargar el agua, consulte el apartado "Al final del
programa".
Prelavado
Cuando se selecciona esta opción, la máquina realiza un
ciclo de prelavado antes de la fase de lavado principal. El
tiempo de lavado se prolongará. Esta opción se recomien-
da para prendas muy sucias.
Super rápido
Ciclo corto para prendas poco sucias que sólo necesitan
un retoque. Se recomienda reducir la carga de prendas.
AquaCare
Esta lavadora se ha diseñado para funcionar con poco
consumo de energía. Seleccione esta opción si es necesa-
rio aclarar la ropa utilizando una cantidad adicional de
agua (aclarado adicional). Se realizarán algunos aclarados
adicionales. Se recomienda esta opción para personas
alérgicas al detergente y en zonas en las que el agua es
muy blanda.
Inicio/Pausa
Este botón permite iniciar o interrumpir el programa se-
leccionado.
Inicio diferido
El inicio del programa se puede retrasar 3, 6 ó 9 horas
con este botón.
Indicador luminoso (7)
B
C
A
Cuando se selecciona un programa de lavado, los pilo-
tos AB y se encienden.
Cuando se pulsa la tecla 5, sólo permanece encendido
el piloto de la fase de funcionamiento. La máquina em-
pieza a funcionar y la puerta se bloquea.
El piloto C se enciende al final del ciclo de lavado.
Transcurridos unos minutos podrá abrir la puerta.
Si ha seleccionado el programa de descarga, se
encenderá cualquier piloto.
56
www.zanussi.com

Programas de lavado
Programa
Temperaturas máxima y mínima
Descripción del ciclo
Velocidad de centrifugado máxima
Carga máxima
Tipo de prenda
Opciones
Compartimento
de detergente
ALGODÓN
90° - 60°
Lavado principal - Aclarados
Velocidad de centrifugado máx. 1000 rpm
Carga máxima 6 kg - Carga reducida 3 kg
1)
Algodón blanco (prendas con suciedad normal o muy sucias).
REDUCCIÓN DEL CEN-
TRIFUGADO
AGUA EN LA CUBA
PRELAVADO
2)
SUPER RÁPIDO
ACLARADO EXTRA
ALGODÓN ECONOMICO
60°
Lavado principal - Aclarados
Velocidad de centrifugado máx. 1000 rpm
Carga máxima 6 kg
PROGRAMA ESTÁNDAR para los valores de consumo de etiqueta
energética.
Algodón blanco y de colores resistentes (prendas poco sucias o con
suciedad normal)
Este programa puede seleccionarse para prendas de algodón poco su-
cias o con suciedad normal. La temperatura disminuirá y se ampliará
el tiempo de lavado. Esto permite obtener buenos resultados de lavado
ahorrando energía.
REDUCCIÓN DEL CEN-
TRIFUGADO
AGUA EN LA CUBA
PRELAVADO
2)
ACLARADO EXTRA
ALGODÓN
60° - 40° - 30° - Frío
Lavado principal - Aclarados
Velocidad de centrifugado máx. 1000 rpm
Carga máxima 6 kg - Carga reducida 3 kg
1)
Algodón blanco y de color (suciedad normal).
REDUCCIÓN DEL CEN-
TRIFUGADO
AGUA EN LA CUBA
PRELAVADO
2)
SUPER RÁPIDO
ACLARADO EXTRA
57
www.zanussi.com

Programa
Temperaturas máxima y mínima
Descripción del ciclo
Velocidad de centrifugado máxima
Carga máxima
Tipo de prenda
Opciones
Compartimento
de detergente
ALGODÓN ECONOMICO
40°
Lavado principal - Aclarados
Velocidad de centrifugado máx. 1000 rpm
Carga máxima 6 kg
PROGRAMA ESTÁNDAR para los valores de consumo de etiqueta
energética.
Algodón blanco o de colores no resistentes (prendas poco sucias o
con suciedad normal).
Este programa puede seleccionarse para prendas de algodón poco su-
cias o con suciedad normal. La temperatura disminuirá y se ampliará
el tiempo de lavado. Esto permite obtener buenos resultados de lavado
ahorrando energía.
REDUCCIÓN DEL CEN-
TRIFUGADO
AGUA EN LA CUBA
PRELAVADO
2)
ACLARADO EXTRA
SINTÉTICOS
60° - 40° - 30° - Frío
Lavado principal - Aclarados
Velocidad de centrifugado máx. 900 rpm
Carga máxima 3 kg - Carga reducida 1.5 kg
1)
Tejidos sintéticos o mezclas: ropa interior, prendas de color, camisas
que no encogen, blusas.
REDUCCIÓN DEL CEN-
TRIFUGADO
AGUA EN LA CUBA
PRELAVADO
2)
SUPER RÁPIDO
ACLARADO EXTRA
PLANCHADO FÁCIL
40°
Lavado principal - Aclarados
Velocidad de centrifugado máx. 900 rpm
Carga máxima 1 kg
Tejidos sintéticos o mezclas
Cuando se selecciona este botón, se aplican ciclos de lavado y centri-
fugado suaves para evitar que la ropa se arrugue. De este modo, se
facilita el planchado. Además, la máquina realiza aclarados adiciona-
les.
REDUCCIÓN DEL CEN-
TRIFUGADO
AGUA EN LA CUBA
PRELAVADO
2)
ACLARADO EXTRA
DELICADOS
40° - 30° - Frío
Lavado principal - Aclarados
Velocidad de centrifugado máx. 700 rpm
Carga máxima 3 kg - Carga reducida 1.5
1)
kg
Tejidos delicados: acrílicos, viscosa, poliéster.
REDUCCIÓN DEL CEN-
TRIFUGADO
AGUA EN LA CUBA
PRELAVADO
2)
SUPER RÁPIDO
ACLARADO EXTRA
58
www.zanussi.com

Programa
Temperaturas máxima y mínima
Descripción del ciclo
Velocidad de centrifugado máxima
Carga máxima
Tipo de prenda
Opciones
Compartimento
de detergente
LANA/LAVADO A MANO
30° - Frío
Lavado principal - Aclarados
Velocidad de centrifugado máx. 1000 rpm
Carga máxima 2 kg
Programa de lavado para lana lavable a máquina, así como lanas de
lavado a mano y tejidos delicados. Nota: Una prenda suelta o muy vo-
luminosa puede causar desequilibrio. Si el aparato no realiza la fase
de centrifugado final, añada más prendas, redistribuya la carga ma-
nualmente y, a continuación, seleccione el programa de centrifugado.
REDUCCIÓN DEL CEN-
TRIFUGADO
AGUA EN LA CUBA
ACLARADO
Aclarado
Velocidad de centrifugado máx. 1000 rpm
Carga máxima 6 kg
Este programa permite aclarar y centrifugar prendas de algodón lava-
das a mano. Se puede reducir la velocidad de centrifugado.
REDUCCIÓN DEL CEN-
TRIFUGADO
AGUA EN LA CUBA
ACLARADO EXTRA
DESCARGA
Descarga del agua de lavado
Carga máxima 6 kg
Para vaciar el agua del último aclarado en programas con la opción
Agua en la cuba seleccionada.
CENTRIFUGADO
Descarga y centrifugado largo
Velocidad de centrifugado máx. 1000 rpm
Carga máxima 6 kg
Centrifugado independiente para prendas lavadas a mano y después
de programas con la opción Agua en la cuba. Puede elegir la veloci-
dad de centrifugado pulsando la tecla correspondiente para adaptarla
al tejido que se va a centrifugar.
REDUCCIÓN DEL CEN-
TRIFUGADO
O = APAGADO
Permite cancelar el programa en marcha o apagar el aparato.
1) Si ha seleccionado la opción Super rápido con la tecla 3, se recomienda reducir la carga máxima como se indica. Puede utilizarse la
carga completa, aunque con resultados de limpieza ligeramente inferiores.
2) Si utiliza detergente líquido, debe seleccionar un programa sin PRELAVADO.
59
www.zanussi.com

Consejos útiles
Clasificación de la colada
Consulte los símbolos de lavado que aparecen en la eti-
queta de la prenda y siga las instrucciones de lavado del
fabricante. La ropa se debe clasificar de la siguiente ma-
nera: ropa blanca, ropa de color, ropa sintética, prendas
delicadas y prendas de lana.
Antes de cargar la colada
Separe la ropa blanca de la ropa de color y lávela por se-
parado. Las prendas blancas pueden perder su “blancura”
al lavarlas.
Las prendas nuevas de color pueden desteñirse en el pri-
mer lavado, por lo que se deben lavar por separado la pri-
mera vez.
Abotone las fundas de almohada y cierre las cremalleras,
ganchos, broches, etc. Ate las correas o cintas largas.
Quite las manchas difíciles antes de lavar la ropa
Frote las zonas particularmente sucias con un detergente
especial o en pasta.
Tenga cuidado con las cortinas. Lávelas sin los ganchos o
dentro de una bolsa o malla
Eliminar la suciedad
A veces no basta con agua y detergente para quitar las
manchas difíciles. En esos casos es aconsejable aplicar
un tratamiento antes de lavar las prendas.
Sangre:ponga en remojo las manchas recientes de sangre
en agua fría. Si la sangre está seca, debe dejar la prenda a
remojo en agua con un detergente especial durante la no-
che y luego frotar con agua y jabón.
Pintura al óleo: humedezca la mancha con un quitaman-
chas a base de disolvente, extienda la prenda sobre un
paño suave y quite la mancha; repita varias veces el trata-
miento.
Grasa seca: humedezca la mancha con aguarrás, extienda
la prenda sobre una superficie suave y quite la mancha
con la yema de los dedos y un trapo de algodón.
Óxido: utilice ácido oxálico disuelto en agua caliente o un
quitamanchas para óxido en frío Tenga cuidado con las
manchas de óxido que no sean recientes, ya que la es-
tructura de la celulosa se habrá dañado y el tejido tenderá
a perforarse.
Moho: utilice lejía y aclare bien (prendas blancas y de co-
lores sólidos solamente).
Hierba: utilice un poco de jabón y aplique lejía (prendas
blancas y de colores sólidos solamente).
Tinta y pegamento: humedezca con acetona
3)
, extienda la
prenda sobre un paño suave y quite la mancha.
Pintalabios: humedezca con acetona, como en el caso an-
terior, y luego quite la mancha con alcohol desnaturaliza-
do. Utilice lejía para eliminar las marcas que puedan que-
dar.
Vino tinto: ponga la prenda a remojo en agua y detergen-
te, aclare, aplique ácido acético o cítrico y vuelva a acla-
rar. Utilice lejía para eliminar las marcas que puedan que-
dar.
Tinta: dependiendo del tipo de tinta, primero humedezca
con acetona y después con ácido acético
3)
; aplique lejía si
quedan marcas en las prendas blancas y, seguidamente,
enjuáguelas bien.
Alquitrán:primero aplique un quitamanchas, alcohol des-
naturalizado o disolvente y luego frote la mancha con un
detergente en pasta.
Detergentes y aditivos
El resultado del lavado también depende de la elección
del detergente y de las cantidades adecuadas, que permi-
tan proteger el entorno y evitar vertidos.
Aunque son biodegradables, los detergentes contienen
sustancias que, en grandes cantidades, pueden alterar el
delicado equilibrio de la naturaleza.
La elección del detergente depende del tipo de tejido (de-
licado, lana, algodón, etc.), del color, de la temperatura de
lavado y del grado de suciedad.
En este aparato pueden utilizarse todos los detergentes de
lavadora de uso habitual:
• detergente en polvo para todo tipo de prendas
• detergente en polvo para prendas delicadas (60°C
máx.) y lana
• detergente líquido para todo tipo de tejidos o especial
para lana, preferiblemente para programas de lavado a
baja temperatura (60°C máx.)
El detergente y los aditivos deben introducirse en los
compartimentos correspondientes del depósito dosifica-
dor antes de poner en marcha el programa de lavado
Si se utiliza detergente líquido, debe seleccionar un pro-
grama sin prelavado
La lavadora incorpora un sistema de recirculación que ga-
rantiza un aprovechamiento óptimo del detergente con-
centrado
3) no utilice acetona en seda artificial
60
www.zanussi.com

Siga las instrucciones del fabricante del producto en
cuanto a cantidades y no permita que el detergente supere
la marca «MAX» que hay en el depósito dosificador.
Cantidad de detergente que se debe utilizar
El tipo y la cantidad de detergente dependen del tipo de
tejido que se va a lavar, así como de la carga, del grado
de suciedad y de la dureza del agua.
Siga las instrucciones del fabricante del producto en lo
referente a la cantidad de detergente que se debe utilizar
Use menos detergente en los casos siguientes:
• si la lavadora tiene poca carga
• si la ropa no está muy sucia
• si se forma mucha espuma durante el lavado
Grado de dureza del agua
La dureza del agua se clasifica en "grados". Para obtener
información sobre la dureza del agua local, puede consul-
tar a la compañía encargada del suministro o a la admi-
nistración local. Si el agua tiene un grado de dureza me-
dio o alto, se recomienda añadir un descalcificante de
agua de acuerdo con las instrucciones del fabricante del
mismo. Cuando el agua sea blanda, bastará con ajustar la
dosis de detergente.
Primer uso
• Compruebe que las conexiones eléctricas y de
agua cumplen las instrucciones de instalación.
• Saque el bloque de poliestireno y cualquier otro
material del tambor.
• Vierta 2 litros de agua en el compartimento de la-
vado principal
del depósito de detergente pa-
ra activar el sistema ECO valve. A continuación,
ponga en marcha un programa de algodón a la
temperatura máxima sin introducir prendas en la
máquina, pues así eliminará cualquier residuo de
fabricación del tambor y la cuba. Vierta la mitad
de una dosis de detergente en el compartimento
de lavado principal y ponga en marcha la máqui-
na.
Uso diario
Cargue la ropa
Abra la puerta tirando cui-
dadosamente de la palan-
ca de la puerta hacia fuera.
Sacuda la ropa cuanto
pueda e introdúzcala en el
tambor prenda por prenda.
Cierre la puerta.
Asegúrese de que no que-
dan prendas enganchadas
entre la puerta y el cierre.
Podría provocar fugas de
agua y dañar la colada.
Mida la dosis de detergente y suavizante
Tire del depósito dosificador hasta el tope. Mida la do-
sis de detergente necesaria y viértala en el comparti-
mento de lavado principal
o en el compartimento
correspondiente al programa/opción seleccionados
(consulte los detalles en "Depósito del dosificador").
Si es necesario, añada suavizante en el compartimiento
que lleva el símbolo
(la cantidad utilizada no debe
rebasar la marca "MAX" del depósito). Cierre el depósi-
to suavemente
61
www.zanussi.com

Seleccione el programa que desee con el selector de
programas (1)
Gire el selector hasta el programa que desee. La lavadora
seleccionará automáticamente el valor máximo de centri-
fugado del programa elegido. Puede modificar la veloci-
dad de centrifugado presionando el botón correspondien-
te. El piloto verde del botón 5 empieza a parpadear.
El selector de programas puede girarse hacia la derecha y
hacia la izquierda. Gírelo hasta la posición
para reini-
ciar el programa/apagar la lavadora.
Al final del programa, el selector debe situarse en la posi-
ción
para apagar la lavadora.
Precaución Si gira el selector hasta otro programa
mientras la lavadora está funcionando, el piloto rojo
del botón 5 parpadeará 3 veces para indicar que se ha
realizado una selección incorrecta. La máquina no pondrá
en marcha el nuevo programa seleccionado.
Seleccione la opción de velocidad de centrifugado o
Agua en cuba con la tecla 2.
Se enciende el piloto correspondiente.
Al seleccionar un programa, se enciende el piloto corres-
pondiente a la máxima velocidad permitida para ese pro-
grama
Seleccione las opciones disponibles con los
botones 3 y 4
Existe la posibilidad de combinar distintas funciones se-
gún el programa. Estas funciones deben seleccionarse
después de elegir el programa y antes de iniciarlo.
Al presionar estos botones se encienden los pilotos co-
rrespondientes. Si se vuelven a presionar, los pilotos se
apagan. Si se selecciona una opción incorrecta, el piloto
rojo del botón 5 parpadea 3 veces.
Consulte la compatibilidad de los programas de la-
vado con las opciones en el capítulo "Programas de
lavado".
Selección del inicio retardado con la tecla 6
Antes de empezar el programa, si desea retrasar el inicio,
pulse la tecla 6 repetidamente para seleccionar el tiempo
de retraso deseado. Se enciende el piloto correspondien-
te.
Esta opción debe seleccionarse después de elegir el pro-
grama y antes de iniciarlo.
Es posible cancelar o modificar el tiempo de retraso en
cualquier momento antes de pulsar la tecla 5.
Selección del inicio diferido:
1. Seleccione el programa y las opciones necesarias.
2. Seleccione el inicio diferido con la tecla 6.
3. Pulse la tecla 5:
– la lavadora inicia la cuenta atrás horaria.
– El programa se inicia una vez finalizado el tiempo
de retraso seleccionado.
Cancelación del inicio diferido después de iniciar el pro-
grama:
1. Active la función PAUSA de la lavadora con la tecla
5.
2. Pulse la tecla 6 una vez; el piloto correspondiente al
intervalo seleccionado se apaga.
3. Pulse la tecla 5 para iniciar de nuevo el programa.
El inicio diferido no puede seleccionarse junto con el pro-
grama DESCARGA.
Importante El intervalo de retraso seleccionado sólo se
podrá modificar una vez que se haya vuelto a seleccionar
el programa de lavado.
La puerta permanecerá bloqueada el tiempo que dure el
intervalo. Si necesita abrir la puerta, debe poner la
lavadora en PAUSA (presionando la tecla 5) y luego
esperar unos minutos. Una vez haya cerrado la puerta,
vuelva a presionar la tecla 5.
Para iniciar el programa, presione el botón 5
Para iniciar el programa seleccionado, presione el botón
5. El piloto verde correspondiente deja de parpadear y se
enciende el piloto de la fase de funcionamiento. La má-
quina se pone en funcionamiento y la puerta se bloquea.
Para interrumpir un programa en curso, presione el botón
5; el piloto verde correspondiente empieza a parpadear.
Para reiniciar el programa a partir del momento en que se
interrumpió, presione de nuevo el botón 5 de nuevo. Si ha
seleccionado un inicio diferido, la lavadora comienza la
cuenta atrás.
Cuando se selecciona una opción incorrecta, el piloto rojo
del botón 5 parpadea 3 veces.
Interrupción de un programa
Presione el botón 5 para interrumpir el programa en mar-
cha; el piloto verde correspondiente empieza a parpadear.
Vuelva a presionar el botón para reiniciar el programa.
Cancelación de un programa
Gire el selector de programas hasta para cancelar un
programa en marcha. Después puede seleccionar otro
programa.
62
www.zanussi.com

Apertura de la puerta
La puerta se bloquea una vez que el programa se inicia. Si
necesita abrirla por cualquier motivo, póngala primero en
PAUSA presionando el botón 5. Transcurridos unos mi-
nutos podrá abrir la puerta.
Si la puerta permanece bloqueada quiere decir que la má-
quina ya está en fase de calentamiento o el nivel de agua
es demasiado alto. No fuerce nunca la puerta.
Si no puede abrir la puerta pero necesita hacerlo, apague
la máquina girando el selector hasta la posición O. Trans-
curridos unos minutos podrá abrir la puerta (preste aten-
ción al nivel del agua y a la temperatura).
Cuando cierre la puerta, tendrá que volver a seleccionar el
programa y las opciones, y presionar el botón 5.
Al final del programa
El aparato se para automáticamente. El piloto del botón 5
y el piloto de la fase de lavado recién finalizada se apagan.
El piloto se enciende. Transcurridos unos minutos podrá
abrir la puerta.
Si ha seleccionado un programa o una opción que finaliza
con agua en la cuba, el indicador C C se ilumina. La puer-
ta permanece cerrada para indicar que es necesario vaciar
el agua antes de abrirla. Durante este periodo de tiempo,
el tambor sigue funcionando a intervalos regulares hasta
que se drena el agua.
Siga las instrucciones que se indican a continuación para
vaciar el agua:
1.
Gire el selector de programas hasta la posición
.
2. Seleccione el programa de descarga o de centrifuga-
do.
3. Si fuera necesario, reduzca la velocidad de centrifu-
gado.
4. Pulse la tecla 5.
Al final del programa se puede abrir la puerta. Gire el se-
lector de programas hasta
para apagar la máquina.
Retire las prendas del tambor y cerciórese de que el tam-
bor queda vacío. Si no va a realizar otro lavado, cierre la
toma del agua. Deje la puerta abierta para evitar la apari-
ción de moho y olores desagradables.
Espera: una vez finalizado el programa y transcurri-
dos unos minutos, se activa el sistema de ahorro
energético con el piloto encendido. Presione cualquier
tecla para desactivar el sistema de ahorro de energía del
aparato.
Mantenimiento y limpieza
Advertencia Es preciso DESCONECTAR el aparato
de la red eléctrica antes de realizar cualquier tarea
de limpieza o mantenimiento.
Desincrustación
El agua corriente que utilizamos suele contener cal. Se re-
comienda utilizar un producto en polvo de descalcifica-
ción del agua en la lavadora periódicamente. Realice esta
tarea con independencia de cualquier ciclo de lavado y de
acuerdo con las instrucciones del fabricante del producto
descalcificador. Esto ayudará a prevenir la formación de
depósitos de cal.
Limpieza del exterior
Limpie la carcasa exterior del electrodoméstico con agua
y jabón únicamente y, a continuación, séquelo completa-
mente.
Limpieza de la cubeta de detergente
La cubeta del detergente y de los aditivos de lavado debe
limpiarse con regularidad.
Retire la cubeta presionan-
do el tope hacia abajo y ti-
rando hacia fuera. Enjuá-
guela bajo el grifo para
eliminar los restos de de-
tergente acumulados.
Para facilitar la limpieza,
extraiga la parte superior
del compartimento de adi-
tivos.
63
www.zanussi.com

Limpieza del hueco de la cubeta
Después de extraer la cu-
beta, utilice un cepillo pe-
queño para limpiar el hue-
co, asegurándose de eli-
minar todos los residuos
de detergente en polvo de
la parte superior e inferior
del hueco.
Vuelva a colocar la cubeta y ponga en marcha el pro-
grama de aclarado sin colada en el tambor.
Limpieza de la bomba
El filtro debe inspeccionarse con regularidad, especial-
mente en caso de que
• el aparato no desagüe o no centrifugue;
• el aparato presente un ruido extraño durante la descar-
ga porque haya objetos, como imperdibles, monedas,
etc., que obstruyan el filtro;
• se detecte un problema con el desagüe del agua (con-
sulte el capítulo “Qué hacer si...” para obtener más in-
formación).
Advertencia Antes de abrir la puerta del filtro,
apague el aparato y desenchúfelo de la toma de
corriente.
Proceda de la siguiente manera:
• Desconecte el enchufe de la toma de corriente.
• Si es necesario, espere hasta que el agua se enfríe.
Coloque un recipiente cer-
ca del filtro (A) para reco-
ger el líquido que pueda
derramarse.
Extraiga la manguera de
desagüe de emergencia
(B), colóquela en el conte-
nedor y retire el tapón.
Cuando deje de salir agua, desenrosque la tapa del fil-
tro girándola hacia la izquierda y retire el filtro. Utilice
alicates si fuera necesario. Tenga siempre a mano un
trapo para secar el agua que se derrame al extraer la ta-
pa.
Limpie el filtro bajo el grifo para eliminar los restos de
pelusas.
Retire los cuerpos extra-
ños y limpie las pelusas
del filtro y del rotor.
Asegúrese de que el rotor
del filtro gira (gira con sa-
cudidas). Si no gira, pón-
gase en contacto con el
servicio técnico.
Tapone de nuevo la man-
guera de desagüe de
emergencia y coloque la
manguera en su sitio.
Vuelva a colocar el filtro
en la bomba insertándolo
correctamente en las guías
especiales. Enrosque la ta-
pa de la bomba firmemen-
te girándola hacia la dere-
cha.
Precaución Cuando la lavadora está en marcha,
dependiendo del programa seleccionado, puede
haber agua caliente en el filtro.
Nunca extraiga la tapa del filtro durante un ciclo de
lavado; espere siempre a que la lavadora haya terminado
el ciclo y esté vacía. Al volver a colocar la tapa del filtro,
asegúrese de apretarla firmemente para impedir que se
produzcan fugas y que los niños puedan sacarla.
64
www.zanussi.com

Limpieza de los filtros de entrada de agua
Importante Si el aparato no se llena de agua, tarda mucho
en llenarse, la tecla de inicio parpadea en color amarillo o
la pantalla (si la hay) muestra la alarma correspondiente
(consulte el capítulo “Qué hacer si...” para obtener más
información), compruebe si los filtros de entrada de agua
están bloqueados.
Para limpiar los filtros de entrada de agua:
• Cierre la toma de agua.
• Desenrosque la man-
guera de la toma de
agua.
• Limpie el filtro de la
manguera con un cepi-
llo rígido.
• Vuelva a enroscar la manguera en la toma de agua.
Compruebe que la conexión esté bien ajustada.
• Desenrosque la manguera de la máquina. Procure
tener un paño a mano porque puede salir algo de
agua.
• Limpie el filtro en la válvula con un cepillo rígido o
con un trozo de tela.
35°
45°
• Vuelva a enroscar la manguera en la máquina y
compruebe que la conexión esté bien ajustada.
• Abra la toma de agua.
Precauciones contra la congelación
Si la lavadora se expone a temperaturas inferiores a 0 °C,
es necesario tomar una serie de precauciones.
• Cierre la toma de agua.
• Desconecte la manguera de entrada.
• Coloque el extremo de la manguera de descarga de
emergencia y el extremo de la manguera de entrada de
agua en un recipiente depositado en el suelo y deje
que salga el agua.
• Vuelva a acoplar la manguera de entrada de agua y co-
loque la manguera de descarga de emergencia en su
lugar después de taponarla.
• Para volver a poner en marcha la lavadora, asegúrese
de que la temperatura ambiente es superior a 0 °C.
Descarga de emergencia
Si la lavadora no descarga, proceda de la siguiente mane-
ra para vaciarla:
• desconecte la clavija de la toma de corriente;
• cierre la toma de agua;
• si es necesario, espere a que el agua se enfríe;
• abra la puerta del filtro;
• coloque un recipiente en el suelo e introduzca el extre-
mo de la manguera de descarga de emergencia en él.
Quite el tapón de la manguera. El agua debería dirigir-
se al recipiente por acción de la gravedad. Cuando el
recipiente se llene, vuelva a tapar la manguera. Vacíe el
recipiente. Repita el procedimiento hasta que deje de
salir agua;
• si es necesario, limpie el filtro como se ha descrito an-
teriormente;
• vuelva a colocar la manguera de descarga de emergen-
cia en su lugar una vez que la haya taponado;
• Encaje de nuevo la tapa del filtro y cierre la puerta.
Importante Cada vez que se vacía el agua a través de la
manguera de descarga de emergencia, es preciso
introducir 2 litros de agua en el compartimento de lavado
principal de la cubeta de detergente y, a continuación,
poner en marcha el programa de descarga. De este modo
se activará el dispositivo ECO Valve y se evita que quede
sin utilizar parte del detergente en el siguiente lavado.
65
www.zanussi.com

Qué hacer si…
Algunos problemas, que pueden deberse sencillamente a
falta de mantenimiento o a descuidos, pueden resolverse
sin necesidad de llamar al servicio técnico. Antes de po-
nerse en contacto con el centro de servicio técnico local,
realice las comprobaciones indicadas en la lista siguiente.
Durante el funcionamiento de la máquina es posible que
el piloto rojo de la tecla 5 parpadee para indicar que la
lavadora no funciona.
Es posible reconocer el fallo de la lavadora por el número
de parpadeos de la tecla 5. Si el número de parpadeos es
distinto de los que se indican a continuación, se trata de
una avería que usted no puede solucionar. En este caso,
póngase en contacto con el centro de servicio técnico.
Pulse simultáneamente los botones 4 y 5 durante unos
segundos. El piloto rojo de la tecla5 parpadeará durante
un corto espacio de tiempo como se describe a continua-
ción (no tenga en cuenta el piloto verde):
• 4 parpadeos = " La lavadora no se pone en marcha",
siga las sugerencias correspondientes de la sección
"Causa y soluciones posibles" y reinicie el programa.
• 1 parpadeo = " La lavadora no se llena", siga las suge-
rencias correspondientes de la sección "Causa y solu-
ciones posibles" y reinicie el programa.
• 2 parpadeos = " La lavadora no se vacía o no centrifu-
ga", siga las sugerencias correspondientes de la sec-
ción "Causa y soluciones posibles" y reinicie el pro-
grama.
Cuando haya solucionado el problema, pulse la tecla 5
para iniciar de nuevo el programa. Si no consigue resol-
ver el problema después de realizar todas las comproba-
ciones pertinentes, póngase en contacto con el centro de
servicio técnico
Problema Causa y soluciones posibles
La lavadora no se pone en marcha
La puerta no está cerrada (el piloto rojo de la tecla 5 parpadea).
• Cierre firmemente la puerta.
El enchufe no está correctamente insertado en la toma de corriente.
• Inserte el enchufe en la toma.
No hay tensión en la toma de corriente.
• Compruebe la instalación eléctrica doméstica.
El fusible principal se ha quemado.
• Cambie el fusible.
El selector de programas no está en la posición correcta y la tecla 5 no se ha
pulsado.
• Gire el selector de programas y presione la tecla 5 de nuevo.
Se ha presionado la tecla de inicio diferido.
• Si el lavado se va a realizar de inmediato, cancele el inicio diferido.
La lavadora no se llena de agua:
La toma de agua está cerrada (el piloto rojo de la tecla 5 parpadea).
• Abra el grifo.
La manguera de entrada de agua está doblada o torcida (el piloto rojo de la
tecla 5 parpadea).
• Compruebe la conexión de la manguera de entrada de agua.
El filtro de la toma de entrada o el filtro de la válvula de entrada están obstrui-
dos (el piloto rojo de la tecla 5 parpadea).
• Limpie los filtros de los tubos de entrada del agua. (Consulte la sección
"Limpieza de los filtros de entrada de agua").
La puerta no está cerrada correctamente (el piloto rojo de la tecla 5 parpadea).
• Cierre firmemente la puerta.
66
www.zanussi.com

Problema Causa y soluciones posibles
La máquina no desagua, no centrifu-
ga o no hace ninguna de las dos co-
sas:
La manguera de desagüe está doblada o torcida (el piloto rojo de la tecla 5
parpadea).
• Compruebe la conexión de la manguera de desagüe.
El filtro de descarga está obstruido (el piloto rojo de la tecla 5 parpadea).
• Limpie el filtro de descarga.
Se ha seleccionado una opción o programa que finaliza con agua dentro de la
cuba o que elimina todas las fases de centrifugado.
• Seleccione el programa de descarga o de centrifugado.
Las prendas no están uniformemente distribuidas en el tambor.
• Vuelva a distribuir las prendas.
Hay agua en el suelo.
Se ha utilizado demasiado detergente o un detergente inadecuado (que produ-
ce demasiada espuma).
• Reduzca la cantidad de detergente o utilice otro.
Compruebe si hay fugas en alguno de los racores de la manguera de entrada
de agua. No siempre resulta fácil detectar las fugas, ya que el agua desciende
por la manguera; compruebe que el racor no está mojado.
• Compruebe la conexión de la manguera de entrada de agua.
La manguera de desagüe o de entrada está dañada.
• Sustitúyala por una nueva
El tapón de la manguera de desagüe de emergencia no se ha vuelto a colocar o
el filtro no se ha enroscado adecuadamente después de la operación de lim-
pieza.
• Vuelva a colocar el tapón en la manguera de desagüe de emergencia o en-
rosque el filtro hasta el tope.
Los resultados del lavado no son
satisfactorios:
Se ha utilizado poco detergente o un detergente inadecuado.
• Aumente la cantidad de detergente o utilice otro.
No se han tratado las manchas difíciles antes de lavar la ropa.
• Emplee productos comerciales para tratar las manchas difíciles.
No se ha seleccionado la temperatura adecuada.
• Compruebe si ha seleccionado la temperatura correcta.
Se han metido demasiadas prendas en la lavadora.
• Reduzca la carga.
La puerta no se abre:
El programa todavía no ha terminado.
• Espere hasta que finalice el ciclo de lavado.
No se ha desbloqueado el cierre de la puerta.
• Espere unos minutos antes de abrir la puerta.
Hay agua en el tambor.
• Seleccione el programa de descarga o centrifugado para vaciar el agua.
67
www.zanussi.com

Problema Causa y soluciones posibles
El aparato vibra o hace mucho ruido:
No se han quitado los pasadores ni el material de embalaje utilizados para
transportarla.
• Compruebe la correcta instalación del electrodoméstico.
No se han ajustado las patas.
• Compruebe que el aparato está correctamente nivelado.
Las prendas no están uniformemente distribuidas en el tambor.
• Vuelva a distribuir las prendas.
Es posible que haya muy pocas prendas en el tambor.
• Introduzca más prendas.
El centrifugado se retrasa o la má-
quina no centrifuga:
El dispositivo que detecta desequilibrios en la carga ha interrumpido el proce-
so debido a que las prendas no están uniformemente distribuidas en el tam-
bor. La ropa se redistribuye mediante la rotación inversa del tambor. Es posi-
ble que el tambor gire varias veces antes de que deje de detectarse el proble-
ma y se reanude el ciclo de centrifugado normal. Si la carga no se distribuye
de manera uniforme transcurridos 10 minutos, la lavadora no centrifuga. En
este caso, es necesario redistribuirla de forma manual y seleccionar el progra-
ma de centrifugado.
• Vuelva a distribuir las prendas.
La carga es insuficiente.
• Añada más prendas, redistribuya la carga de forma manual y seleccione el
programa de centrifugado.
La lavadora emite un ruido extraño:
La lavadora incorpora un tipo de motor que emite un ruido extraño comparado
con el de otros motores tradicionales. Este nuevo motor garantiza un inicio
más suave e incluso una mejor distribución de las prendas en el tambor du-
rante el centrifugado, así como una mayor estabilidad de la lavadora.
No se ve agua en la lavadora:
Las lavadoras de tecnología moderna están diseñadas para economizar y em-
plean muy poca agua, sin que ello afecte al rendimiento.
Si no puede identificar o resolver el problema, póngase
en contacto con nuestro centro de servicio técnico. Antes
de llamar al centro, anote el modelo, el número de serie y
la fecha en que adquirió la lavadora; el centro de servicio
técnico le pedirá esta información.
Mod. ... ... ...
Prod. No. ... ... ...
Ser. No. ... ... ...
Mo
d
. ..
. ...
...
Pro
d. N
o
.
... ... ..
S
e
r. No
.
... ... ...
Datos técnicos
Medidas Ancho
Alto
Largo
60 cm
85 cm
54 cm
68
www.zanussi.com

Conexión eléctrica
Voltaje - Alimentación general - Fusi-
ble
Los datos de la conexión eléctrica se indican en la placa de datos técnicos, en
el borde interno de la puerta de la lavadora.
Presión del suministro de agua Mínima
Máxima
0,05 MPa
0,8 MPa
Carga máxima Algodón 6 kg
Velocidad de centrifugado Máxima 1000 rpm
Valores de consumo
Programa Consumo energético
(KWh)
1)
Consumo de agua (li-
tros)
1)
Duración del programa
(minutos)
1)
Algodón blanco 90 °C 2.0 61 140
Algodón 60 °C 1.35 58 125
Algodón 40 °C 0.75 58 120
Sintéticos 40 °C 0.9 50 90
Delicados 40 °C 0.55 58 70
Lana/ Lavado a mano 30 °C 0.25 58 60
1) La información sobre consumo que se muestra en este gráfico es puramente indicativa. Puede variar en función de la cantidad y el
tipo de colada, de la temperatura del suministro de agua y de la temperatura ambiente.
Programas estándar para los valores de consumo de eti-
queta energética
Algodón ECO 60 °C y 40 °C son programas para algodón
estándar para prendas de algodón con suciedad normal.
Son adecuados para lavar colada de algodón de suciedad
normal y son los programas más eficaces en cuanto a
consumo de agua y energía para el lavado de ese tipo de
prendas de algodón.
Cumplen la norma EN60456.
La temperatura real del agua puede variar respecto a
la temperatura declarada del ciclo.
Instalación
Desembalaje
Es preciso retirar todo el material de embalaje y los pasa-
dores antes de utilizar la lavadora.
Se aconseja guardar todo este material para usarlo de
nuevo en caso de que sea necesario transportar el apara-
to.
69
www.zanussi.com

Después de retirar todo el
material de embalaje, apo-
ye con cuidado la lavadora
sobre su parte trasera para
extraer la base de poliesti-
reno de la parte inferior.
Retire el cable de alimen-
tación y los soportes de
las mangueras de la parte
trasera de la máquina.
Suelte los tres pernos con
la llave suministrada.
Deslice los separadores
de plástico para quitarlos.
Tape el orificio superior más pequeño y los dos más
grandes con los tapones de plástico incluidos en la
bolsa con el manual de instrucciones.
Colocación
Instale la máquina en el suelo sobre una superficie plana
y rígida. Asegúrese de que el aire circula correctamente
alrededor de la lavadora aunque haya moqueta, alfombras,
etc. Compruebe que la máquina no toca la pared ni otros
muebles o elementos.
Nivele la lavadora subien-
do o bajando las patas.
Puede que resulte difícil
ajustar las patas, ya que
incorporan una tuerca de
seguridad, pero DEBEN
estar niveladas y estables.
Si es necesario, comprue-
be el ajuste con un nivel
de burbuja.
Los ajustes necesarios
pueden realizarse con una
llave.
Un nivelado correcto evita las vibraciones, el ruido y el
desplazamiento del aparato durante el funcionamiento.
Precaución No coloque cartón, madera ni otros
materiales similares bajo la máquina para
compensar los desniveles del suelo. Apriete las tuercas de
seguridad cuando haya terminado de nivelar el aparato.
Levantar el aparato
Los suelos de madera suspendidos son especialmente
susceptibles a las vibraciones.
Para ayudar a evitar las vibraciones, se recomienda colo-
car un panel de madera resistente al agua, de al menos 15
mm de grosor bajo el aparato y fijado a al menos 2 vigas
del piso con tornillos; el panel de madera debe estar por
delante de las patas delanteras.
Si es posible, coloque el aparato en uno de los rincones
de la habitación donde el suelo sea más estable.
Entrada de agua
Advertencia Este aparato debe conectarse a un
suministro de agua fría
Precaución Antes de conectar la lavadora a tubos
nuevos o a tubos que no se hayan utilizado durante
algún tiempo, deje correr bastante agua para eliminar los
restos que puedan haberse acumulado en los tubos.
Precaución No utilice la manguera de su lavadora
anterior para conectar el suministro de agua.
70
www.zanussi.com

Conecte el tubo a una to-
ma de agua mediante una
rosca de 3/4 pulgadas.
Debe utilizar siempre el
tubo suministrado con el
aparato.
35°
45°
El otro extremo de la manguera, que se conecta a la la-
vadora, puede girarse como se indica.
No coloque la manguera de entrada hacia abajo. Sitúelo
a la izquierda o a la derecha en función de la posición
de la toma de agua. Afloje la tuerca anular para colocar
el tubo correctamente. Después de situar el tubo, vuelva
a apretar la contratuerca para evitar fugas de agua.
Precaución Con la manguera de entrada de agua no
se pueden emplear prolongaciones. Si es
demasiado corta y no desea mover la toma de agua,
tendrá que adquirir una manguera más larga
especialmente diseñada para estos casos.
Desagüe
El extremo de la manguera de desagüe se puede instalar
de tres maneras distintas:
Sujeto por encima del bor-
de de un fregadero me-
diante el codo de plástico
suministrado con la lava-
dora.
En tal caso, asegúrese de que el extremo del tubo no se
desenganche cuando la lavadora esté desaguando. Para
evitarlo, puede fijarlo a la toma de agua con una brida o
sujetarlo a la pared.
En un empalme de derivación para descarga en el fre-
gadero. El empalme debe estar encima de la toma para
que haya 60 cm como mínimo entre el codo y el suelo.
Directamente en un tubo de desagüe a una altura supe-
rior 60 cm e inferior a 90 cm. El extremo de la mangue-
ra de desagüe debe estar siempre ventilado, lo que sig-
nifica que el diámetro interno del tubo de desagüe debe
ser mayor que el diámetro externo de la manguera. El
tubo de descarga no debe estar retorcido.
Empotrado
Este aparato está diseñado para integrarse en los muebles
de cocina. El hueco de instalación debe tener las dimen-
siones que se indican en la figura A.
71
www.zanussi.com

A
600
596 555
170
75
176,5
416
100
60
818
min.
820
min.
560
Cuando instale el aparato en muebles de cocina, asegú-
rese, en la medida de lo posible, que los tubos se colo-
can en cualquiera de los dos huecos traseros del apara-
to.
De esta forma ayudará a evitar que los tubos se tuerzan
o aplasten.
B
1
2
3
7
5
6
4
8
Precaución No quite el tornillo 8.
Preparación y montaje de la puerta
La lavadora viene preparada para que la puerta pueda
abrirse de derecha a izquierda.
En ese caso, basta con atornillar las bisagras (1) y el
contraimán (6) que se suministran con el aparato a la
altura adecuada (fig. B).
C
16-22
595-598
22±1,5
416
B
C
35 Ø 12,5-14 depth
72
www.zanussi.com

• a) Puerta
La puerta debe tener las siguientes medidas:
- Anchura 595 - 598 mm
- Grosor 16 - 22 mm
La altura (C - Fig. C) depende de la distancia vertical de
la base del mueble adyacente.
• b) Bisagras
Para poner las bisagras es preciso taladrar dos orificios
(diámetro de 35 mm, fondo 12,5 - 14 mm dependiendo
del fondo del mueble) por el lado interno de la puerta.
La distancia entre los centros de ambos orificios debe
ser de 416 mm.
La distancia (B) entre el borde superior de la puerta y el
centro del orificio depende de las medidas del mueble
adyacente.
En la figura C se indican las medidas necesarias.
Las bisagras se fijan a la puerta con los tornillos para
madera (2 - fig. B) que se suministran con el aparato.
• c) Montaje de la puerta
Utilice 15 tornillos M5 para fijar las bisagras (1) a la
máquina (3 - Fig. B). Las bisagras se pueden ajustar
para compensar cualquier posible variación de grosor
de la puerta.
Para alinear bien la puerta es preciso aflojar el tornillo
(3 - fig. B), ajustar la puerta y apretar de nuevo el torni-
llo.
D
4
6
8
Precaución No quite el tornillo 8.
d) Contraimán (6)
El aparato está preparado para llevar un cierre magnéti-
co instalado en la puerta.
Para que este dispositivo funcione correctamente hay
que atornillar el contraimán (6) (disco de acero con ani-
llo de goma) por el lado interno de la puerta. La posi-
ción del contraimán debe coincidir con la del imán (4)
del aparato (consulte la figura D).
E
1
2
3
7
5
6
4
8
Precaución No quite el tornillo 8.
Si la puerta se va a abrir de izquierda a derecha, invierta
la posición de las placas (7), el imán (4) y el tope de
goma (5) (fig. B y E). Monte el contraimán (6) y las bi-
sagras (1) como se ha descrito anteriormente.
73
www.zanussi.com

Aspectos medioambientales
El símbolo que aparece en el aparato o en su embalaje,
indica que este producto no se puede tratar como un
residuo normal del hogar. Se deberá entregar, sin coste
para el poseedor, bien al distribuidor, en el acto de la
compra de un nuevo producto similar al que se deshecha,
bien a un punto municipal de recolección selectiva de
equipos eléctricos y electrónicos para su reciclaje. Al
asegurarse de que este producto se desecha
correctamente, usted ayudará a evitar posibles
consecuencias negativas para el medio ambiente y la
salud pública, lo cual podría ocurrir si este producto no
se gestionara de forma adecuada. Para obtener
información más detallada sobre el reciclaje de este
producto, póngase en contacto con el Ayuntamiento de su
Municipio, ó con la tienda donde lo compró.
Materiales de embalaje
Los materiales marcados con el símbolo son recicla-
bles.
>PE<=polietileno
>PS<=poliestireno
>PP<=polipropileno
Esto significa que se pueden reciclar si se desechan co-
rrectamente en los contenedores específicos.
Consejos ecológicos
A continuación ofrecemos algunos consejos para ahorrar
agua y energía y ayudar a proteger el medio ambiente:
• La ropa que no esté demasiado sucia se puede lavar
con un programa que no incluya prelavado a fin de
ahorrar detergente, agua y tiempo (y proteger el medio
ambiente).
• El lavado resulta más económico si la lavadora se llena
por completo.
• Con un tratamiento previo adecuado es posible elimi-
nar manchas y suciedad moderada, de manera que la
ropa se pueda lavar a menos temperatura.
• Dosifique el detergente en función de la dureza del
agua, el grado de suciedad y la cantidad de ropa que
se va a lavar.
74
www.zanussi.com

75

www.zanussi.com/shop
132964011-A-442011
-
 1
1
-
 2
2
-
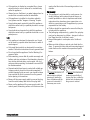 3
3
-
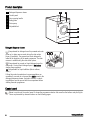 4
4
-
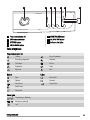 5
5
-
 6
6
-
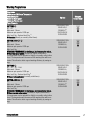 7
7
-
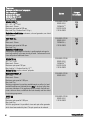 8
8
-
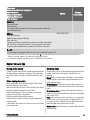 9
9
-
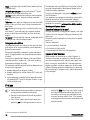 10
10
-
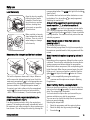 11
11
-
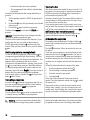 12
12
-
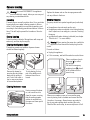 13
13
-
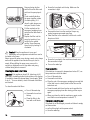 14
14
-
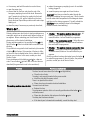 15
15
-
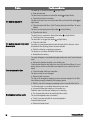 16
16
-
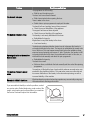 17
17
-
 18
18
-
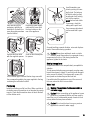 19
19
-
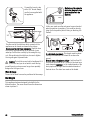 20
20
-
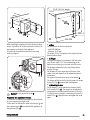 21
21
-
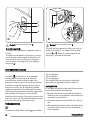 22
22
-
 23
23
-
 24
24
-
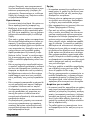 25
25
-
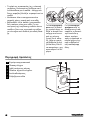 26
26
-
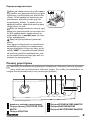 27
27
-
 28
28
-
 29
29
-
 30
30
-
 31
31
-
 32
32
-
 33
33
-
 34
34
-
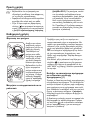 35
35
-
 36
36
-
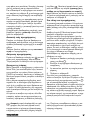 37
37
-
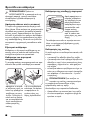 38
38
-
 39
39
-
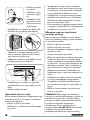 40
40
-
 41
41
-
 42
42
-
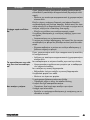 43
43
-
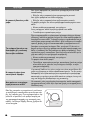 44
44
-
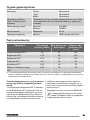 45
45
-
 46
46
-
 47
47
-
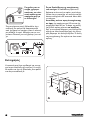 48
48
-
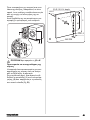 49
49
-
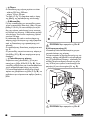 50
50
-
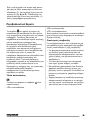 51
51
-
 52
52
-
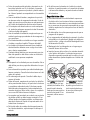 53
53
-
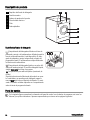 54
54
-
 55
55
-
 56
56
-
 57
57
-
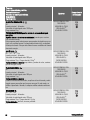 58
58
-
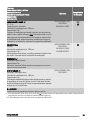 59
59
-
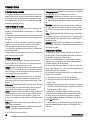 60
60
-
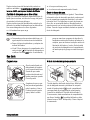 61
61
-
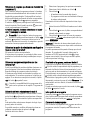 62
62
-
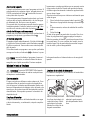 63
63
-
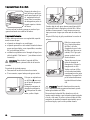 64
64
-
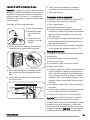 65
65
-
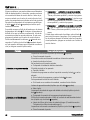 66
66
-
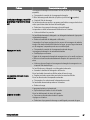 67
67
-
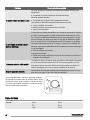 68
68
-
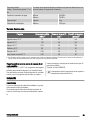 69
69
-
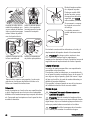 70
70
-
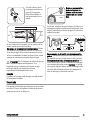 71
71
-
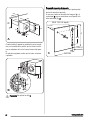 72
72
-
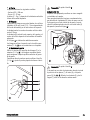 73
73
-
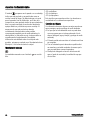 74
74
-
 75
75
-
 76
76


Zanussi ZWI1105 Manual de usuario
- Categoría
- Lavadoras
- Tipo
- Manual de usuario
en otros idiomas
- English: Zanussi ZWI1105 User manual