Chicco TRIO FOR ME KIT FOR CAR El manual del propietario
- Categoría
- Asientos de carro
- Tipo
- El manual del propietario
Este manual también es adecuado para

KIT TRIO CAR
•ISTRUZIONI D’USO
•MODE D’EMPLOI
•BEDIENUNGSANLEITUNG
•INSTRUCTIONS FOR USE
•INSTRUCCIONES DE USO
•INSTRUÇÕES PARA A UTILIZAÇÃO
•GEBRUIKSAANWIJZINGEN
•Ο∆ΗΓΙΕΣ ΧΡΗΣΗΣ
•BRUGSANVISNING
•KÄYTTÖOHJEET
•NÁVOD K POUŽITÍ
•BRUKSANVISNING
•ANVÄNDNINGSINSTRUKTIONER
•INSTRUKCJE SPOSOBU UŻYCIA
•HASZNÁLATI UTASÍTÁS
•UPUTE ZA UPORABU
•ИНСТРУКЦИЯ
•NÁVOD NA POUŽITIE
•NAVODILA ZA UPORABO
•KULLANIM ÖNERILERI
•INSTRUCŢIUNI DE
UTILIZARE

2
1
3
5
4
6
2
OK
NO! NO!
NO!
OK
OK
NO!
1 2

3
CLACK!
NO! OK
OK
OK
7
9
11
13
8
10
12
14

4
NO!
OK
15
17
19
21
16
18
20
22

5
1
2
23
25
28
24
26
29
30 31
27
La página se está cargando...
La página se está cargando...
La página se está cargando...
La página se está cargando...
La página se está cargando...
La página se está cargando...
La página se está cargando...

13
Join the two belt ends so that the belt adheres to the child’s waist
without being too tight (Fig. 26).
HOW TO REMOVE THE CHILD FROM THE CARRYCOT
Unfasten the padded lap belt of the carrycot by pulling the strap
with the red sticker (Fig. 27).
HOW TO UNFASTEN THE CARRYCOT FROM THE CAR
SEAT
Perform the following operations on both carrycot sides.
Unfasten the carrycot buckle by pulling the red tab of the buckle
outwards and pushing the buckle upwards (Fig. 28), so as to re-
lease the carrycot from the car belt. The buckle remains fastened
to the car belt.
WARNING! Never use the car safety belt to fasten a passenger,
without fi rst removing the KIT TRIO CAR buckle: it could be dan-
gerous!
To remove the buckle from the car safety belt, loosen the belt
eyelet (Fig. 29) and turn the red pin so as to release it (Fig. 30).
HOW TO FIT THE CARRYCOT IN THE CAR: AFTER THE
FIRST TIME
To fi t the carrycot back to the seat, when the two buckles are
already fastened to the car safety belts, perform the following
operations.
Check that the two car belts are fastened.
To fasten the buckles to the carrycot, read the instructions con-
tained in the paragraph “HOW TO FIT KIT TRIO CAR TO THE CAR-
RYCOT - Buckles for the car safety belt”.
Pull the car safety belt towards the retractor, while pressing the
carrycot against the seat, in order to fi t it properly (Fig. 21).
WARNING! Check that the carrycot adheres to the seat.
WARNING! Check that the belts are properly tightened (Fig. 22).
HOW TO REMOVE KIT TRIO CAR FROM THE
CARRYCOT
When you no longer wish to use the carrycot in the car, or if you
wish to use it outside the car, KIT TRIO CAR can be removed as
follows.
Lap belt
Unfasten the belt by pulling the strap with the red sticker (Fig.
23).
Unthread the strap fi rst from the left-hand slot by pulling it
downwards and then from the right-hand one by pulling it up-
ward (Fig. 31).
Buckles for the car seat belts
Pull the red tab of the buckle outwards and push the buckle up-
wards (Fig. 28)
HOW TO CLEAN THE PRODUCT
Belt and buckles must be cleaned only by hand, using a damp
cloth. Use only water; do not use either solvents or any other
detergents.
WARNING! Periodically check all carrycot and KIT TRIO CAR
components to make sure that no part is damaged or severely
worn.
WARNING:
READ BEFORE LEAVING ON A CAR TRIP
• These instructions must be carefully kept in their special com-
partment, from which they can be easily retrieved.
• The product must be fi tted exactly as described in the instruc-
tions provided.
• Never fi t the product with a two-point safety belt.
• Fit the product only to car seats that are properly secured to
the car chassis facing forward.
• Any foldable, collapsible, or revolving car seats should be
properly secured. Ensure also that there are no loose objects
in the car - especially at the back: in case of a knock or sudden
braking, they might otherwise hit into the passengers injur-
ing them.
• When installing the product to the vehicle ensure that mov-
able seats or the car doors do not interfere with it. Make sure
that no part of the car seat is caught in the car doors or rubs
against cutting edges.
• Check that the car safety belt is always correctly tightened
and not twisted or otherwise incorrectly positioned.
• Do not use the product if some of its parts are broken or miss-
ing.
• Do not interpose anything, e.g. pillows or blankets, between
the car seat, or place between the child seat and the carrycot,
or between the carrycot and the child.
• Do not place any heavy objects on the product.
• Always ensure that all passengers in the car wear safety belts
for their own safety and because, while travelling, they could
knock against the child.
• Keep the plastic bags away from the child to prevent the risk
of suffocation.
• Regularly check the product for signs of wear or damage. In
case of damage, do not use the product and keep it out of
reach of children.
• When the child is not in the car, the carrycot must remain fi t-
ted in place or it should be stored in the trunk.
• ARTSANA declines all responsibility for the incorrect use of
this product.
Please contact Artsana’s Customer Service for further informa-
tion and to order any replacement parts:
Postal address: ARTSANA SPA
Servizio Clienti
Via Saldarini Catelli n.1
22070 Grandate COMO - ITALY
Telephone: (0039) 031 382000
E-mail: [email protected]
Web site: www.chicco.com

14
K T C
COMPONENTES:
1. Cinturón abdominal
2. Hebillas de enganche cinturón de seguridad
MUY IMPORTANTE:
LEER CON LA MÁXIMA ATENCIÓN
• Leer atentamente estas instrucciones antes de utilizar el pro-
ducto.
• ESTE PRODUCTO SE PUEDE INSTALAR Y UTILIZAR EXCLUSIVA-
MENTE CON UN CAPAZO MARCA CHICCO.
• ESTE PRODUCTO SE PUEDE INSTALAR Y UTILIZAR EXCLUSIVA-
MENTE CON LOS MODELOS DE CAPAZO EQUIPADOS PARA
LA INSTALACIÓN DEL KIT: COMPROBAR SI EL MANUAL DE
INSTRUCCIONES DE SU CAPAZO INDICA QUE EL MISMO ES
IDÓNEO PARA LA INSTALACIÓN DEL “KIT TRÍO CAR”
• Para el montaje y la instalación del producto, seguir exactamen-
te las instrucciones. Evitar que alguien utilice el producto sin
haber leído previamente este folleto.
• Conservar este manual junto con el producto.
• Ningún producto de seguridad para auto puede garantizar la
total seguridad del niño en caso de accidente; sin embargo, la
utilización de este producto reduce el riesgo de heridas graves o
muerte del pequeño.
• Utilizar el producto en forma no correcta puede aumentar el
riesgo para el niño y no sólo en caso de accidente sino también
en otras situaciones.
• Si por cualquier motivo el producto presentara daños, defor-
maciones o desgaste excesivo, reemplazar de inmediato: podría
haber perdido las características de seguridad originales.
• No modifi car o incorporar partes adicionales al producto sin la
expresa aprobación del fabricante. No usar partes de recambio
o componentes no originales.
• Bajo ningún concepto se debe dejar al niño en el capazo sin vi-
gilancia.
• No dejar el capazo apoyado en el asiento sin enganchar: podría
golpear y herir a los pasajeros.
• Si el automóvil ha quedado expuesto a los rayos del sol por un
tiempo prolongado, verifi car cuidadosamente el estado del ca-
pazo y de todos sus componentes: esperar a que se enfríe antes
de colocar nuevamente al bebé ya que podría quemarse.
• Después de un accidente, aunque sea leve, el capazo y el KIT
TRÍO CAR podrían haber sufrido daños no perceptibles a simple
vista: por lo tanto, se deben sustituir.
• No utilizar productos de seguridad para auto de segunda mano;
su estructura podría haber sufrido daños no perceptibles a sim-
ple vista pero que pueden comprometer la seguridad del pro-
ducto.
• La sociedad ARTSANA declina toda responsabilidad por el uso
impropio del producto
AVISO IMPORTANTE
1. Éste es un dispositivo de retención para niños “Universal”,
homologado de acuerdo al Reglamento N°44, enmiendas serie
04. Es apto para su uso general en vehículos y es compatible
con la mayoría, pero no todos, los modelos de asientos de los
vehículos.
2. La perfecta compatibilidad se obtiene cuando el fabricante
del vehículo declara expresamente en el manual que ha sido
prevista la instalación de dispositivos de retención “Universa-
les” para niños cuya edad está comprendida dentro del rango
considerado.
3. Éste dispositivo de retención ha sido clasifi cado como
“Universal” según los más severos criterios de homologación
respecto de los modelos precedentes que no cuentan con la
presente indicación.
4. Apto únicamente para su uso en vehículos que posean cintu-
rón de seguridad de 3 puntos de sistema estático o con enrolla-
do, homologado de acuerdo con el Reglamento UN/ECE N°16
u otro estándar equivalente.
5. Ante la duda, consultar al fabricante del dispositivo de suje-
ción o al establecimiento donde lo adquirió.
INSTRUCCIONES DE USO
El KIT TRÍO CAR es un componente que permite instalar los ca-
pazos Chicco equipados al efecto (ver el manual del capazo) en
el automóvil, para transportar al bebé en forma correcta en sus
primeros meses de vida.
Es un producto homologado como “Grupo 0”, para el transporte
de niños de 0 hasta 10 kg de peso, de acuerdo con la norma euro-
pea ECE R44/04, es decir, hasta los 6 meses de edad.
Después de aplicar el KIT TRÍO CAR al capazo, éste puede ser ins-
talado en el asiento del coche.
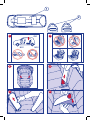
REQUISITOS DEL ASIENTO
Para poder instalar el capazo en el asiento, éste deberá tener los
siguientes requisitos:
- estar siempre en la dirección de marcha (Fig. 1);
- tratarse de un asiento posterior y con al menos 2 cinturones
de seguridad de 3 puntos (Fig. 2), homologados según norma
UNI/ECE 16, u otra norma equivalente.
MONTAJE DEL KIT TRÍO CAR EN EL CAPAZO
Si el KIT TRÍO CAR se compró separado del capazo, seguir las si-
guientes instrucciones para su montaje, antes de colocar el ca-
pazo en el coche.
Cinturón abdominal
Insertar el cinturón abdominal en los orifi cios de la base del ca-
pazo (Fig. 3).
Doblar el lado con la marca roja de tal forma que el Velcro quede
en el interior, insertar en el orifi cio de la derecha (Fig. 4) y extraer
por el de la izquierda (Fig. 5).
Cerrar el cinturón colocando el lado con la marca roja encima del
otro lado (Fig. 6).
CUIDADO: Verifi car que el cinturón no esté retorcido (Fig. 7).
Hebillas del cinturón de seguridad
Para enganchar las dos hebillas en los pernos del capazo (Fig. 8),
insertarlas, cada una en su perno, ejerciendo una suave presión
(Fig. 9) y luego tirar la hebilla hacia abajo hasta escuchar el “click”
de enganche (Fig. 10).
CUIDADO: ¡No montar las hebillas al revés! (Fig. 11).
Ahora el capazo está listo para ser instalado en el automóvil.
COMO INSTALAR EL CAPAZO POR PRIMERA VEZ
Para instalar el capazo en el asiento posterior, situar el capa-
zo en el medio del asiento y enganchar con los cinturones de
seguridad de los asientos laterales (Fig. 12). Si el asiento pos-
terior tiene un cinturón de seguridad de 3 puntos también en
su parte central, el capazo se puede instalar sobre un lado, para
que ocupe el asiento lateral y el central, enganchando con los
cinturones de los dos asientos (Fig. 13).
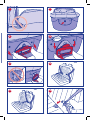
1. Extraer y enganchar los dos cinturones en las respectivas hebi-
llas del asiento (Fig. 14).
2. Reclinar completamente el respaldo del capazo, como indica
el manual de uso.
¡ATENCIÓN: Por razones de seguridad, en el automóvil se reco-
mienda no utilizar nunca el capazo con el respaldo levantado!.
3. Si las hebillas del capazo estuviesen forradas, quitar el forro
(Fig. 15).
4. Colocar el capazo a lo largo del asiento (Fig. 16) para que adhie-
ra perfectamente al mismo.
5. Efectuar por ambos lados las siguientes operaciones:
- con el cinturón de seguridad formar un ojal (Fig. 17);
- agarrar la hebilla del capazo y girar hacia afuera la barra roja de
la hebilla (Fig. 18).
Insertar en la hebilla el ojal creado con el cinturón (Fig. 19) y lue-
I
E

15
go girar la barra roja en la posición inicial para que quede bien
insertada dentro del ojal (Fig 20).
Tirar el cinturón de seguridad hacia el enrollador, empujando el
capazo contra el asiento para que quede bien anclado (Fig. 21).
CUIDADO: Verifi car que el capazo adhiera perfectamente al
asiento.
CUIDADO: Verifi car que las correas queden bien tensas (Fig. 22).
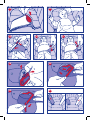
POSICIONAMIENTO DEL NIÑO
Para soltar el cinturón abdominal, tirar de la banda con el botón
rojo (Fig. 23).
Recostar al bebé en el capazo (Fig. 24).
Pasar la banda derecha del cinturón sobre la cintura del bebé y
luego la izquierda (Fig. 25).
Unir los dos terminales para que el cinturón adhiera bien a la cin-
tura del bebé, pero sin apretar demasiado (Fig. 26).
PARA SACAR AL NIÑO
Desabrochar el cinturón abdominal acolchado del capazo, tiran-
do de la banda con el botón rojo (Fig. 27).
DESENGANCHAR EL CAPAZO DEL ASIENTO
Efectuar en ambos lados del capazo las siguientes operaciones:
Desenganchar la hebilla del capazo tirando hacia afuera la len-
güeta roja de la hebilla y empujando la misma hacia arriba (Fig.
28) para soltar el capazo. La hebilla quedará aplicada al cinturón
de seguridad del coche.
¡ATENCIÓN! No volver a utilizar el cinturón de seguridad para
pasajeros sin haber quitado la hebilla del KIT TRÍO CAR: ¡podría
resultar peligrosa!
Para quitar la hebilla del cinturón de seguridad, afl ojar el ojal (Fig.
29) y girar el perno rojo para soltarla (Fig. 30).
INSTALACIÓN DEL CAPAZO EN EL AUTOMÓVIL
(DESPUÉS DE LA PRIMERA VEZ)
Para volver a instalar el capazo en el asiento, una vez que las he-
billas ya estén fi jadas en los dos cinturones de seguridad, efectuar
las siguientes operaciones:
Verifi car que los dos cinturones estén enganchados.
Para ajustar las hebillas al capazo, ver las instrucciones, “MON-
TAJE DEL KIT TRÍO CAR AL CAPAZO - Hebillas para cinturón de
seguridad auto”.
Tirar del cinturón de seguridad del coche hacia el enrollador, em-
pujando el capazo contra el asiento para que quede bien anclado
(Fig. 21).
CUIDADO: Verifi car que el capazo adhiera perfectamente al
asiento.
CUIDADO: Verifi car que las correas queden bien tensas (Fig. 22).
DESMONTAJE DEL KIT TRÍO CAR
Cuando ya no se utilice el capazo en el automóvil, o cuando se
utilice simplemente fuera de éste, el KIT TRÍO CAR se puede qui-
tar efectuando las operaciones siguientes:
Cinturón abdominal
Abrir el cinturón tirando de la banda con el botón rojo (Fig. 23).
Sacar antes la correa del orifi cio sobre el lado izquierdo, deslizán-
dola por la parte de abajo y luego del orifi cio de la derecha, por
arriba (Fig. 31).
Hebillas cinturón de seguridad auto
Tirar la lengüeta roja de la hebilla hacia afuera y empujar la hebi-
lla hacia arriba (Fig. 28).
LIMPIEZA DEL PRODUCTO
El cinturón y las hebillas se lavan únicamente a mano, utilizan-
do un paño humedecido con agua. No usar disolventes u otros
detergentes.
CUIDADO: Verifi car periódicamente la estructura del capazo y los
componentes del KIT TRÍO CAR para comprobar si alguna de sus
partes resulta dañada o excesivamente desgastada.
ADVERTENCIAS:
LEER ANTES DE EMPRENDER EL VIAJE
• Conservar estas instrucciones junto con el producto para fu-
turas consultas.
• El producto se debe instalar exclusivamente siguiendo las ins-
trucciones proporcionadas.
• No enganchar nunca el producto si el cinturón de seguridad
del automóvil es sólo de dos puntos.
• Instalar este producto únicamente sobre asientos correcta-
mente fi jados a la estructura del automóvil y mirando en la
dirección de marcha.
• No dejar asientos de tipo plegable, con ruedas u otros, ni
tampoco objetos o cosas sueltas en la bandeja posterior del
automóvil: en caso de accidente o de un frenazo repentino,
podrían herir a los pasajeros.
• Instalar el producto en una posición que evite interferencias
entre éste y un asiento móvil o la puerta. Evitar también que
una parte cualquiera del producto quede pillada con las puer-
tas o roce contra puntas cortantes.
• Controlar siempre la correcta colocación del cinturón de segu-
ridad, que esté bien estirado y que no esté retorcido.
• No utilizar el producto si algunas de sus partes faltan o resul-
tan dañadas.
• No utilizar complementos como almohadones, mantas etc.
entre el capazo y el asiento del automóvil o entre el capazo
y el niño.
• No apoyar objetos pesados sobre el capazo.
• Verifi car que todos los pasajeros usen el cinturón de seguri-
dad, por su propia seguridad y también porque durante el viaje
podrían colisionar con el niño.
• Mantener las bolsas de plástico lejos del alcance de los niños
para prevenir riesgos de asfi xia.
• Verifi car periódicamente el estado de desgaste del producto y
eventuales roturas. Si estuviera dañado, no volver a utilizar el
producto y dejarlo fuera del alcance de los niños.
• Cuando el niño no está a bordo, el capazo tiene que estar en-
ganchado o guardado en el maletero.
• La sociedad ARTSANA declina toda responsabilidad por el uso
impropio del producto.
Para más información, contactar con el Servicio de Atención al
cliente de Chicco Española
correo: CHICCO ESPAÑOLA, S.A.
C/ Industrias, 10
28923 ALCORCÓN (MADRID)
Teléfono atención al consumidor: 902 11 70 93
página web: www.chicco.es
La página se está cargando...
La página se está cargando...
La página se está cargando...
La página se está cargando...
La página se está cargando...
La página se está cargando...
La página se está cargando...
La página se está cargando...
La página se está cargando...
La página se está cargando...
La página se está cargando...
La página se está cargando...
La página se está cargando...

29
Sett sammen de to klaffene slik at beltet sitter inntil livet på bar-
net, uten å stramme for mye (Fig. 26).
TA UT BARNET
Åpne det vatterte mavebeltet på barnevognkurven ved å dra i
båndet med det røde merket (Fig. 27).
AVHEKTING AV BARNEVOGNKURVEN FRA SETET
Utfør følgende operasjoner på begge sidene på barnevognkur-
ven.
Hekt opp spennen på kurven ved å dra i den røde tungen på spen-
nen utover og skyv spennen oppover (Fig. 28), slik at kurven blir
løsgjort fra beltet. Spennen forblir festet til bilbeltet.
ADVARSEL! Bruk aldri bilbeltet for å spenne fast en passasjer uten
å ha tatt spennen på KIT TRIO CAR av bilbeltet: det kan være far-
lig!
Løsne løkken på beltet (Fig. 29) og vri den røde tappen slik at den
blir løsgjort (Fig. 30) for å ta spennen av beltet.
FESTING AV BARNEVOGNKURVEN I BIL: ETTER DEN
FØRSTE GANGEN
For å hekte barnevognkurven på setet på nytt når de to spennene
er festet til de to bilbeltene må følgende operasjoner utføres.
Kontroller at de to bilbeltene er hektet fast.
For å feste spennene til kurven, les instruksjonene i paragraf
“MONTERING AV KIT TRIO CAR PÅ BARNEVOGNKURVEN -
Spenner for bilbelte”.
Dra bilbeltet mot opprulleren, ved å trykke kurven mot setet sånn
at den festes godt (Fig. 21).
ADVARSEL! Kontroller at kurven sitter godt mot setet.
ADVARSEL! Kontroller at beltene er godt spent (Fig. 22).
DEMONTERING AV KIT TRIO CAR FRA
BARNEVOGNKURVEN
Når det er slutt på perioden for bruk av barnevognkurven i bilen,
eller for å bruke den uten bil, kan KIT TRIO CAR demonteres ved
å utføre følgende operasjoner.
Mavebelte
Åpne beltet ved å dra i båndet med det røde merket (Fig. 23).
Dra ut båndet først fra den venstre sprekken nedenfra, siden fra
den til høyre ovenfra Fig. 31).
Spenner for bilbelte
Dra i den røde tungen på spennen utad og skyv spennen oppover
(Fig. 28).
RENGJØRING AV PRODUKTET
Rengjør beltet og spennene kun for hånd ved å bruke en klut fuk-
tet med vann. Bruk ikke løsningsmidler eller andre vaskemidler.
ADVARSEL! Kontroller periodisk alle deler på barnevognkurven
og KIT TRIO CAR, og forsikre deg om at ingen del er skadet eller
mye slitt.
ADVARSLER: MÅ LESES FØR REISEN
• Disse instruksjonene må oppbevares nøye sammen med pro-
duktet og være lett tilgjengelige.
• Produktet må installeres ved å følge instruksjonene som følger
med.
• Sett aldri fast produktet ved å bruke bilbelte med bare to fes-
tepunkter.
• Installer produktet kun på seter korrekt festet til bilstrukturen
og som peker fremover i bilen.
• Fest godt bilseter som kan bøyes, legges ned eller svinges og
forsikre deg om at gjenstander som er transportert i bilen er
godt fastsatt, særskilt i bakhyllen: i tilfelle ulykke eller brå-
bremsing, kan de støte til passasjerene og skade dem.
• Installer produktet slik at man unngår at et rørlig sete eller
at bildøren kan innvirke på det. Unngå at ingen deler av pro-
duktet blir sittende fast i bildører, eller gnisser mot skarpe
kanter.
• Kontroller alltid at bilbeltet er korrekt spent, at det ikke er
vridd eller i ukorrekt posisjon.
• Ikke bruk produktet hvis noen deler skulle vise seg være skadet
eller forsvunnet.
• Ikke sett noen gjenstand (puter, tepper, osv.) mellom bilsetet
og kurven, eller mellom barnevognkurven og barnet.
• Ikke legg tunge gjenstander på produktet.
• Forsikre seg om at alle passasjerene i bilen bruker sikkerhets-
belte, for sin egen sikkerhet, men også fordi de kan støte bar-
net under reisen.
• Hold plastposer langt fra barnet for å unngå risiko for kveling.
• Kontroller regelmessig slitasjetilstanden på produktet og om
det fi nnes eventuelle brudd. Bruk ikke produktet mer i tilfelle
skader, men hold det utenfor rekkevidde for barn.
• Når man ikke transporterer barnet, må barnevognkurven være
fastsatt eller legges i bagasjerommet.
• Firma ARTSANA frasier seg alt ansvar ved uegnet bruk av pro-
duktet.
For nærmere opplysninger og ved forespørsler om reservedeler,
sett deg i forbindelse med Artsana kundeservice:
post: ARTSANA SPA
Kundeservice
Via Saldarini Catelli. n.1
22070 Grandate COMO - ITALY
telefon: (0039) 031 382000
e-mail: [email protected]
adresse: www.chicco.com
La página se está cargando...
La página se está cargando...
La página se está cargando...
La página se está cargando...
La página se está cargando...
La página se está cargando...
La página se está cargando...
La página se está cargando...
La página se está cargando...
La página se está cargando...
La página se está cargando...
La página se está cargando...
La página se está cargando...
La página se está cargando...
La página se está cargando...
La página se está cargando...
La página se está cargando...
La página se está cargando...

Cod. 69603 06/03 46 062058 100 000
50386.L.4
ARTSANA S.p.A. - Via Saldarini Catelli, 1 - 22070 Grandate (CO) - Italy
Tel. (+39) 031 382 111 - Fax (+39) 031 382 400 - www.chicco.com
Transcripción de documentos
KIT TRIO CAR •ISTRUZIONI D’USO •MODE D’EMPLOI •BEDIENUNGSANLEITUNG •INSTRUCTIONS FOR USE •INSTRUCCIONES DE USO •INSTRUÇÕES PARA A UTILIZAÇÃO •GEBRUIKSAANWIJZINGEN •Ο∆ΗΓΙΕΣ ΧΡΗΣΗΣ •BRUGSANVISNING •KÄYTTÖOHJEET •NÁVOD K POUŽITÍ •BRUKSANVISNING •ANVÄNDNINGSINSTRUKTIONER •INSTRUKCJE SPOSOBU UŻYCIA •HASZNÁLATI UTASÍTÁS •UPUTE ZA UPORABU •ИНСТРУКЦИЯ •NÁVOD NA POUŽITIE •NAVODILA ZA UPORABO •KULLANIM ÖNERILERI •INSTRUCŢIUNI DE UTILIZARE 1 2 1 2 OK NO! NO! 3 4 5 6 2 NO! NO! OK OK 7 8 9 10 K! CLAC 11 12 NO! 13 OK OK 14 3 OK 15 16 17 18 19 20 21 22 NO! OK 4 23 24 25 28 26 27 29 2 1 30 31 5 braking, they might otherwise hit into the passengers injuring them. • When installing the product to the vehicle ensure that movable seats or the car doors do not interfere with it. Make sure that no part of the car seat is caught in the car doors or rubs against cutting edges. • Check that the car safety belt is always correctly tightened and not twisted or otherwise incorrectly positioned. • Do not use the product if some of its parts are broken or missing. • Do not interpose anything, e.g. pillows or blankets, between the car seat, or place between the child seat and the carrycot, or between the carrycot and the child. • Do not place any heavy objects on the product. • Always ensure that all passengers in the car wear safety belts for their own safety and because, while travelling, they could knock against the child. • Keep the plastic bags away from the child to prevent the risk of suffocation. • Regularly check the product for signs of wear or damage. In case of damage, do not use the product and keep it out of reach of children. • When the child is not in the car, the carrycot must remain fitted in place or it should be stored in the trunk. • ARTSANA declines all responsibility for the incorrect use of this product. Join the two belt ends so that the belt adheres to the child’s waist without being too tight (Fig. 26). HOW TO REMOVE THE CHILD FROM THE CARRYCOT Unfasten the padded lap belt of the carrycot by pulling the strap with the red sticker (Fig. 27). HOW TO UNFASTEN THE CARRYCOT FROM THE CAR SEAT Perform the following operations on both carrycot sides. Unfasten the carrycot buckle by pulling the red tab of the buckle outwards and pushing the buckle upwards (Fig. 28), so as to release the carrycot from the car belt. The buckle remains fastened to the car belt. WARNING! Never use the car safety belt to fasten a passenger, without first removing the KIT TRIO CAR buckle: it could be dangerous! To remove the buckle from the car safety belt, loosen the belt eyelet (Fig. 29) and turn the red pin so as to release it (Fig. 30). HOW TO FIT THE CARRYCOT IN THE CAR: AFTER THE FIRST TIME To fit the carrycot back to the seat, when the two buckles are already fastened to the car safety belts, perform the following operations. Check that the two car belts are fastened. To fasten the buckles to the carrycot, read the instructions contained in the paragraph “HOW TO FIT KIT TRIO CAR TO THE CARRYCOT - Buckles for the car safety belt”. Pull the car safety belt towards the retractor, while pressing the carrycot against the seat, in order to fit it properly (Fig. 21). WARNING! Check that the carrycot adheres to the seat. WARNING! Check that the belts are properly tightened (Fig. 22). HOW TO REMOVE KIT TRIO CAR FROM THE CARRYCOT When you no longer wish to use the carrycot in the car, or if you wish to use it outside the car, KIT TRIO CAR can be removed as follows. Lap belt Unfasten the belt by pulling the strap with the red sticker (Fig. 23). Unthread the strap first from the left-hand slot by pulling it downwards and then from the right-hand one by pulling it upward (Fig. 31). Buckles for the car seat belts Pull the red tab of the buckle outwards and push the buckle upwards (Fig. 28) HOW TO CLEAN THE PRODUCT Belt and buckles must be cleaned only by hand, using a damp cloth. Use only water; do not use either solvents or any other detergents. WARNING! Periodically check all carrycot and KIT TRIO CAR components to make sure that no part is damaged or severely worn. WARNING: READ BEFORE LEAVING ON A CAR TRIP • These instructions must be carefully kept in their special compartment, from which they can be easily retrieved. • The product must be fitted exactly as described in the instructions provided. • Never fit the product with a two-point safety belt. • Fit the product only to car seats that are properly secured to the car chassis facing forward. • Any foldable, collapsible, or revolving car seats should be properly secured. Ensure also that there are no loose objects in the car - especially at the back: in case of a knock or sudden Please contact Artsana’s Customer Service for further information and to order any replacement parts: 13 Postal address: ARTSANA SPA Servizio Clienti Via Saldarini Catelli n.1 22070 Grandate COMO - ITALY Telephone: (0039) 031 382000 E-mail: [email protected] Web site: www.chicco.com EI KIT TRIO CAR do, homologado de acuerdo con el Reglamento UN/ECE N°16 u otro estándar equivalente. 5. Ante la duda, consultar al fabricante del dispositivo de sujeción o al establecimiento donde lo adquirió. COMPONENTES: 1. Cinturón abdominal 2. Hebillas de enganche cinturón de seguridad INSTRUCCIONES DE USO El KIT TRÍO CAR es un componente que permite instalar los capazos Chicco equipados al efecto (ver el manual del capazo) en el automóvil, para transportar al bebé en forma correcta en sus primeros meses de vida. Es un producto homologado como “Grupo 0”, para el transporte de niños de 0 hasta 10 kg de peso, de acuerdo con la norma europea ECE R44/04, es decir, hasta los 6 meses de edad. Después de aplicar el KIT TRÍO CAR al capazo, éste puede ser instalado en el asiento del coche. MUY IMPORTANTE: LEER CON LA MÁXIMA ATENCIÓN • Leer atentamente estas instrucciones antes de utilizar el producto. • ESTE PRODUCTO SE PUEDE INSTALAR Y UTILIZAR EXCLUSIVAMENTE CON UN CAPAZO MARCA CHICCO. • ESTE PRODUCTO SE PUEDE INSTALAR Y UTILIZAR EXCLUSIVAMENTE CON LOS MODELOS DE CAPAZO EQUIPADOS PARA LA INSTALACIÓN DEL KIT: COMPROBAR SI EL MANUAL DE INSTRUCCIONES DE SU CAPAZO INDICA QUE EL MISMO ES IDÓNEO PARA LA INSTALACIÓN DEL “KIT TRÍO CAR” • Para el montaje y la instalación del producto, seguir exactamente las instrucciones. Evitar que alguien utilice el producto sin haber leído previamente este folleto. • Conservar este manual junto con el producto. • Ningún producto de seguridad para auto puede garantizar la total seguridad del niño en caso de accidente; sin embargo, la utilización de este producto reduce el riesgo de heridas graves o muerte del pequeño. • Utilizar el producto en forma no correcta puede aumentar el riesgo para el niño y no sólo en caso de accidente sino también en otras situaciones. • Si por cualquier motivo el producto presentara daños, deformaciones o desgaste excesivo, reemplazar de inmediato: podría haber perdido las características de seguridad originales. • No modificar o incorporar partes adicionales al producto sin la expresa aprobación del fabricante. No usar partes de recambio o componentes no originales. • Bajo ningún concepto se debe dejar al niño en el capazo sin vigilancia. • No dejar el capazo apoyado en el asiento sin enganchar: podría golpear y herir a los pasajeros. • Si el automóvil ha quedado expuesto a los rayos del sol por un tiempo prolongado, verificar cuidadosamente el estado del capazo y de todos sus componentes: esperar a que se enfríe antes de colocar nuevamente al bebé ya que podría quemarse. • Después de un accidente, aunque sea leve, el capazo y el KIT TRÍO CAR podrían haber sufrido daños no perceptibles a simple vista: por lo tanto, se deben sustituir. • No utilizar productos de seguridad para auto de segunda mano; su estructura podría haber sufrido daños no perceptibles a simple vista pero que pueden comprometer la seguridad del producto. • La sociedad ARTSANA declina toda responsabilidad por el uso impropio del producto REQUISITOS DEL ASIENTO Para poder instalar el capazo en el asiento, éste deberá tener los siguientes requisitos: - estar siempre en la dirección de marcha (Fig. 1); - tratarse de un asiento posterior y con al menos 2 cinturones de seguridad de 3 puntos (Fig. 2), homologados según norma UNI/ECE 16, u otra norma equivalente. MONTAJE DEL KIT TRÍO CAR EN EL CAPAZO Si el KIT TRÍO CAR se compró separado del capazo, seguir las siguientes instrucciones para su montaje, antes de colocar el capazo en el coche. Cinturón abdominal Insertar el cinturón abdominal en los orificios de la base del capazo (Fig. 3). Doblar el lado con la marca roja de tal forma que el Velcro quede en el interior, insertar en el orificio de la derecha (Fig. 4) y extraer por el de la izquierda (Fig. 5). Cerrar el cinturón colocando el lado con la marca roja encima del otro lado (Fig. 6). CUIDADO: Verificar que el cinturón no esté retorcido (Fig. 7). Hebillas del cinturón de seguridad Para enganchar las dos hebillas en los pernos del capazo (Fig. 8), insertarlas, cada una en su perno, ejerciendo una suave presión (Fig. 9) y luego tirar la hebilla hacia abajo hasta escuchar el “click” de enganche (Fig. 10). CUIDADO: ¡No montar las hebillas al revés! (Fig. 11). Ahora el capazo está listo para ser instalado en el automóvil. AVISO IMPORTANTE 1. Éste es un dispositivo de retención para niños “Universal”, homologado de acuerdo al Reglamento N°44, enmiendas serie 04. Es apto para su uso general en vehículos y es compatible con la mayoría, pero no todos, los modelos de asientos de los vehículos. 2. La perfecta compatibilidad se obtiene cuando el fabricante del vehículo declara expresamente en el manual que ha sido prevista la instalación de dispositivos de retención “Universales” para niños cuya edad está comprendida dentro del rango considerado. 3. Éste dispositivo de retención ha sido clasificado como “Universal” según los más severos criterios de homologación respecto de los modelos precedentes que no cuentan con la presente indicación. 4. Apto únicamente para su uso en vehículos que posean cinturón de seguridad de 3 puntos de sistema estático o con enrolla14 COMO INSTALAR EL CAPAZO POR PRIMERA VEZ Para instalar el capazo en el asiento posterior, situar el capazo en el medio del asiento y enganchar con los cinturones de seguridad de los asientos laterales (Fig. 12). Si el asiento posterior tiene un cinturón de seguridad de 3 puntos también en su parte central, el capazo se puede instalar sobre un lado, para que ocupe el asiento lateral y el central, enganchando con los cinturones de los dos asientos (Fig. 13). 1. Extraer y enganchar los dos cinturones en las respectivas hebillas del asiento (Fig. 14). 2. Reclinar completamente el respaldo del capazo, como indica el manual de uso. ¡ATENCIÓN: Por razones de seguridad, en el automóvil se recomienda no utilizar nunca el capazo con el respaldo levantado!. 3. Si las hebillas del capazo estuviesen forradas, quitar el forro (Fig. 15). 4. Colocar el capazo a lo largo del asiento (Fig. 16) para que adhiera perfectamente al mismo. 5. Efectuar por ambos lados las siguientes operaciones: - con el cinturón de seguridad formar un ojal (Fig. 17); - agarrar la hebilla del capazo y girar hacia afuera la barra roja de la hebilla (Fig. 18). Insertar en la hebilla el ojal creado con el cinturón (Fig. 19) y lue- go girar la barra roja en la posición inicial para que quede bien insertada dentro del ojal (Fig 20). Tirar el cinturón de seguridad hacia el enrollador, empujando el capazo contra el asiento para que quede bien anclado (Fig. 21). CUIDADO: Verificar que el capazo adhiera perfectamente al asiento. CUIDADO: Verificar que las correas queden bien tensas (Fig. 22). ADVERTENCIAS: LEER ANTES DE EMPRENDER EL VIAJE • Conservar estas instrucciones junto con el producto para futuras consultas. • El producto se debe instalar exclusivamente siguiendo las instrucciones proporcionadas. • No enganchar nunca el producto si el cinturón de seguridad del automóvil es sólo de dos puntos. • Instalar este producto únicamente sobre asientos correctamente fijados a la estructura del automóvil y mirando en la dirección de marcha. • No dejar asientos de tipo plegable, con ruedas u otros, ni tampoco objetos o cosas sueltas en la bandeja posterior del automóvil: en caso de accidente o de un frenazo repentino, podrían herir a los pasajeros. • Instalar el producto en una posición que evite interferencias entre éste y un asiento móvil o la puerta. Evitar también que una parte cualquiera del producto quede pillada con las puertas o roce contra puntas cortantes. • Controlar siempre la correcta colocación del cinturón de seguridad, que esté bien estirado y que no esté retorcido. • No utilizar el producto si algunas de sus partes faltan o resultan dañadas. • No utilizar complementos como almohadones, mantas etc. entre el capazo y el asiento del automóvil o entre el capazo y el niño. • No apoyar objetos pesados sobre el capazo. • Verificar que todos los pasajeros usen el cinturón de seguridad, por su propia seguridad y también porque durante el viaje podrían colisionar con el niño. • Mantener las bolsas de plástico lejos del alcance de los niños para prevenir riesgos de asfixia. • Verificar periódicamente el estado de desgaste del producto y eventuales roturas. Si estuviera dañado, no volver a utilizar el producto y dejarlo fuera del alcance de los niños. • Cuando el niño no está a bordo, el capazo tiene que estar enganchado o guardado en el maletero. • La sociedad ARTSANA declina toda responsabilidad por el uso impropio del producto. POSICIONAMIENTO DEL NIÑO Para soltar el cinturón abdominal, tirar de la banda con el botón rojo (Fig. 23). Recostar al bebé en el capazo (Fig. 24). Pasar la banda derecha del cinturón sobre la cintura del bebé y luego la izquierda (Fig. 25). Unir los dos terminales para que el cinturón adhiera bien a la cintura del bebé, pero sin apretar demasiado (Fig. 26). PARA SACAR AL NIÑO Desabrochar el cinturón abdominal acolchado del capazo, tirando de la banda con el botón rojo (Fig. 27). DESENGANCHAR EL CAPAZO DEL ASIENTO Efectuar en ambos lados del capazo las siguientes operaciones: Desenganchar la hebilla del capazo tirando hacia afuera la lengüeta roja de la hebilla y empujando la misma hacia arriba (Fig. 28) para soltar el capazo. La hebilla quedará aplicada al cinturón de seguridad del coche. ¡ATENCIÓN! No volver a utilizar el cinturón de seguridad para pasajeros sin haber quitado la hebilla del KIT TRÍO CAR: ¡podría resultar peligrosa! Para quitar la hebilla del cinturón de seguridad, aflojar el ojal (Fig. 29) y girar el perno rojo para soltarla (Fig. 30). INSTALACIÓN DEL CAPAZO EN EL AUTOMÓVIL (DESPUÉS DE LA PRIMERA VEZ) Para volver a instalar el capazo en el asiento, una vez que las hebillas ya estén fijadas en los dos cinturones de seguridad, efectuar las siguientes operaciones: Verificar que los dos cinturones estén enganchados. Para ajustar las hebillas al capazo, ver las instrucciones, “MONTAJE DEL KIT TRÍO CAR AL CAPAZO - Hebillas para cinturón de seguridad auto”. Tirar del cinturón de seguridad del coche hacia el enrollador, empujando el capazo contra el asiento para que quede bien anclado (Fig. 21). CUIDADO: Verificar que el capazo adhiera perfectamente al asiento. CUIDADO: Verificar que las correas queden bien tensas (Fig. 22). DESMONTAJE DEL KIT TRÍO CAR Cuando ya no se utilice el capazo en el automóvil, o cuando se utilice simplemente fuera de éste, el KIT TRÍO CAR se puede quitar efectuando las operaciones siguientes: Cinturón abdominal Abrir el cinturón tirando de la banda con el botón rojo (Fig. 23). Sacar antes la correa del orificio sobre el lado izquierdo, deslizándola por la parte de abajo y luego del orificio de la derecha, por arriba (Fig. 31). Hebillas cinturón de seguridad auto Tirar la lengüeta roja de la hebilla hacia afuera y empujar la hebilla hacia arriba (Fig. 28). LIMPIEZA DEL PRODUCTO El cinturón y las hebillas se lavan únicamente a mano, utilizando un paño humedecido con agua. No usar disolventes u otros detergentes. CUIDADO: Verificar periódicamente la estructura del capazo y los componentes del KIT TRÍO CAR para comprobar si alguna de sus partes resulta dañada o excesivamente desgastada. Para más información, contactar con el Servicio de Atención al cliente de Chicco Española 15 correo: CHICCO ESPAÑOLA, S.A. C/ Industrias, 10 28923 ALCORCÓN (MADRID) Teléfono atención al consumidor: 902 11 70 93 página web: www.chicco.es Sett sammen de to klaffene slik at beltet sitter inntil livet på barnet, uten å stramme for mye (Fig. 26). vridd eller i ukorrekt posisjon. • Ikke bruk produktet hvis noen deler skulle vise seg være skadet eller forsvunnet. • Ikke sett noen gjenstand (puter, tepper, osv.) mellom bilsetet og kurven, eller mellom barnevognkurven og barnet. • Ikke legg tunge gjenstander på produktet. • Forsikre seg om at alle passasjerene i bilen bruker sikkerhetsbelte, for sin egen sikkerhet, men også fordi de kan støte barnet under reisen. • Hold plastposer langt fra barnet for å unngå risiko for kveling. • Kontroller regelmessig slitasjetilstanden på produktet og om det finnes eventuelle brudd. Bruk ikke produktet mer i tilfelle skader, men hold det utenfor rekkevidde for barn. • Når man ikke transporterer barnet, må barnevognkurven være fastsatt eller legges i bagasjerommet. • Firma ARTSANA frasier seg alt ansvar ved uegnet bruk av produktet. TA UT BARNET Åpne det vatterte mavebeltet på barnevognkurven ved å dra i båndet med det røde merket (Fig. 27). AVHEKTING AV BARNEVOGNKURVEN FRA SETET Utfør følgende operasjoner på begge sidene på barnevognkurven. Hekt opp spennen på kurven ved å dra i den røde tungen på spennen utover og skyv spennen oppover (Fig. 28), slik at kurven blir løsgjort fra beltet. Spennen forblir festet til bilbeltet. ADVARSEL! Bruk aldri bilbeltet for å spenne fast en passasjer uten å ha tatt spennen på KIT TRIO CAR av bilbeltet: det kan være farlig! Løsne løkken på beltet (Fig. 29) og vri den røde tappen slik at den blir løsgjort (Fig. 30) for å ta spennen av beltet. FESTING AV BARNEVOGNKURVEN I BIL: ETTER DEN FØRSTE GANGEN For å hekte barnevognkurven på setet på nytt når de to spennene er festet til de to bilbeltene må følgende operasjoner utføres. Kontroller at de to bilbeltene er hektet fast. For å feste spennene til kurven, les instruksjonene i paragraf “MONTERING AV KIT TRIO CAR PÅ BARNEVOGNKURVEN Spenner for bilbelte”. Dra bilbeltet mot opprulleren, ved å trykke kurven mot setet sånn at den festes godt (Fig. 21). ADVARSEL! Kontroller at kurven sitter godt mot setet. ADVARSEL! Kontroller at beltene er godt spent (Fig. 22). DEMONTERING AV KIT TRIO CAR FRA BARNEVOGNKURVEN Når det er slutt på perioden for bruk av barnevognkurven i bilen, eller for å bruke den uten bil, kan KIT TRIO CAR demonteres ved å utføre følgende operasjoner. Mavebelte Åpne beltet ved å dra i båndet med det røde merket (Fig. 23). Dra ut båndet først fra den venstre sprekken nedenfra, siden fra den til høyre ovenfra Fig. 31). Spenner for bilbelte Dra i den røde tungen på spennen utad og skyv spennen oppover (Fig. 28). RENGJØRING AV PRODUKTET Rengjør beltet og spennene kun for hånd ved å bruke en klut fuktet med vann. Bruk ikke løsningsmidler eller andre vaskemidler. ADVARSEL! Kontroller periodisk alle deler på barnevognkurven og KIT TRIO CAR, og forsikre deg om at ingen del er skadet eller mye slitt. ADVARSLER: MÅ LESES FØR REISEN • Disse instruksjonene må oppbevares nøye sammen med produktet og være lett tilgjengelige. • Produktet må installeres ved å følge instruksjonene som følger med. • Sett aldri fast produktet ved å bruke bilbelte med bare to festepunkter. • Installer produktet kun på seter korrekt festet til bilstrukturen og som peker fremover i bilen. • Fest godt bilseter som kan bøyes, legges ned eller svinges og forsikre deg om at gjenstander som er transportert i bilen er godt fastsatt, særskilt i bakhyllen: i tilfelle ulykke eller bråbremsing, kan de støte til passasjerene og skade dem. • Installer produktet slik at man unngår at et rørlig sete eller at bildøren kan innvirke på det. Unngå at ingen deler av produktet blir sittende fast i bildører, eller gnisser mot skarpe kanter. • Kontroller alltid at bilbeltet er korrekt spent, at det ikke er For nærmere opplysninger og ved forespørsler om reservedeler, sett deg i forbindelse med Artsana kundeservice: 29 post: ARTSANA SPA Kundeservice Via Saldarini Catelli. n.1 22070 Grandate COMO - ITALY telefon: (0039) 031 382000 e-mail: [email protected] adresse: www.chicco.com 50386.L.4 46 062058 100 000 06/03 Cod. 69603 ARTSANA S.p.A. - Via Saldarini Catelli, 1 - 22070 Grandate (CO) - Italy Tel. (+39) 031 382 111 - Fax (+39) 031 382 400 - www.chicco.com-
 1
1
-
 2
2
-
 3
3
-
 4
4
-
 5
5
-
 6
6
-
 7
7
-
 8
8
-
 9
9
-
 10
10
-
 11
11
-
 12
12
-
 13
13
-
 14
14
-
 15
15
-
 16
16
-
 17
17
-
 18
18
-
 19
19
-
 20
20
-
 21
21
-
 22
22
-
 23
23
-
 24
24
-
 25
25
-
 26
26
-
 27
27
-
 28
28
-
 29
29
-
 30
30
-
 31
31
-
 32
32
-
 33
33
-
 34
34
-
 35
35
-
 36
36
-
 37
37
-
 38
38
-
 39
39
-
 40
40
-
 41
41
-
 42
42
-
 43
43
-
 44
44
-
 45
45
-
 46
46
-
 47
47
-
 48
48


Chicco TRIO FOR ME KIT FOR CAR El manual del propietario
- Categoría
- Asientos de carro
- Tipo
- El manual del propietario
- Este manual también es adecuado para
en otros idiomas
- français: Chicco TRIO FOR ME KIT FOR CAR Le manuel du propriétaire
- italiano: Chicco TRIO FOR ME KIT FOR CAR Manuale del proprietario
- English: Chicco TRIO FOR ME KIT FOR CAR Owner's manual
- Deutsch: Chicco TRIO FOR ME KIT FOR CAR Bedienungsanleitung
- русский: Chicco TRIO FOR ME KIT FOR CAR Инструкция по применению
- Nederlands: Chicco TRIO FOR ME KIT FOR CAR de handleiding
- português: Chicco TRIO FOR ME KIT FOR CAR Manual do proprietário
- slovenčina: Chicco TRIO FOR ME KIT FOR CAR Návod na obsluhu
- dansk: Chicco TRIO FOR ME KIT FOR CAR Brugervejledning
- polski: Chicco TRIO FOR ME KIT FOR CAR Instrukcja obsługi
- čeština: Chicco TRIO FOR ME KIT FOR CAR Návod k obsluze
- svenska: Chicco TRIO FOR ME KIT FOR CAR Bruksanvisning
- Türkçe: Chicco TRIO FOR ME KIT FOR CAR El kitabı
- suomi: Chicco TRIO FOR ME KIT FOR CAR Omistajan opas
- română: Chicco TRIO FOR ME KIT FOR CAR Manualul proprietarului