VILLA BATH by RSI LVC18D-WHT Guía de instalación
- Tipo
- Guía de instalación

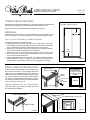
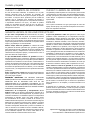
APPLY FLUSH-FIT END PANEL TO CABINET SIDE PANEL
a) Remove the backer from each tape strip.
b) Holding the flush-fit end panel at an angle from the cabinet side panel, align
the front edge of the flush-fit end panel to the face frame. Make sure the entire
edge of the flush-fit end panel is seated inside the face frame groove.
c) Align the top of the flush-fit end panel with the top of the cabinet side panel
and press the flush-fit end panel against the side panel.
d) Working from front to back, apply pressure along the entire surface of the
flush-fit end panel to make sure each tape/adhesive strip makes complete
contact with the cabinet side panel.
e) Allow the tape/adhesive to cure for at least 1 hour before proceeding with the
cabinet installation. Clamps or weights can be added to secure panel until
adhesive dries. Check adhesive manufacturer’s instructions for cure time.
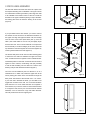
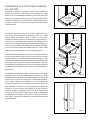
INSTALL LINEN CROWN MOULDING
Crown moulding, sold separately, can be installed on the
linen cabinet. The length of crown moulding pieces will
need to be cut from the full-length piece. You will need to
miter the pieces to fit the linen. Please see Figures 2 and
3 on how to install the crown moulding to the cabinet. If
your linen will be installed with a side against a wall it is
not necessary to attach moulding to the side against the
wall. Cut to fit your wall (Figure 4).
Options for attachment: #6 x 3/4 in. wood screws or
brad nails (neither are provided). Pre-drilling pilot holes
first will help prevent splitting.
Figure 3
Side moulding
Left side
moulding
Use #8 x 7/8 in.
screw
(not provided)
Use either white
glue or carpenter’s
glue (not provided)
Front moulding
ATTACH RIGHT AND LEFT
SIDE MOULDINGS
Note: Make sure to align
side mouldings with front
moulding.
TOP VIEW
Figure 4
Wall
Front moulding straight cut to fit to wall
Cabinet
Wall
FRONT VIEW
Figure 2
Front moulding
ATTACH FRONT MOULDING
UPPER FLUSH-FIT END PANEL
Before beginning the cabinet installation, you will need to apply the finished flush-fit
end panels to the side(s) of the cabinet that will be exposed to the room.
Refer to Instructions provided with flush-fit end panels for the base.
MATERIALS
Finished flush-fit end panel and a roll of double-sided tape (suggested 1 roll per
flush-fit end panel) or construction adhesive or white glue (neither are provided).
Figure 1
NOTE: Tape/adhesive should be applied ¼ in.
from edges of flush-fit end panel.
Tape/
adhesive
Tape/
adhesive
U180175A
Rev. 09-14
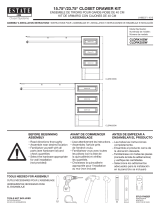
LINEN INSTALLATION
Hardware for installation not included.

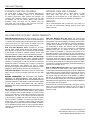
2-PIECE LINEN ASSEMBLY
The linen with drawers and linen with doors are 2-piece units
that require assembly prior to installation. The upper unit has
four attachment brackets (provided in parts bag) that need
to be installed at the bottom interior of the unit. Install the
brackets on the upper unit before placing on top of the base.
Pre-drilling pilot holes will ease the seating of the screws
(Figure 5).
If you purchased a linen with drawers, you need to remove
the drawers to have access to the attachment brackets on
the upper unit. Align the upper and lower units, first making
sure the front of the linens (face frame) line up, then the
sides. (The overall width of one unit may be slightly larger
than the other unit. This is normal and does not compromise
the functionality or structural integrity of the units.) Once the
top and bottom units are aligned, secure the two together by
screwing the brackets to the base (Figure 6).
The flush-fit end panel comes with one side moulding piece
to install over the seam line between the upper and lower
units. If a side of the linen is against a wall or cabinet DO NOT
install these pieces on that side. If a side of the linen IS NOT
against a wall or cabinet, use finishing nails (not provided)
to nail the side moulding over the seam line. Three to four
finishing nails per side should be sufficient (Figure 7).
Your linen can be installed as part of a cabinet run, or as a
standalone unit. In either case, fasten the upper linen to the
wall by drilling pilot holes at the stud location through the
back panel. Then fasten to the wall with #12 x 3 in. screws.
If your linen sits in between the studs, you will need to use
toggle bolts to fasten to the wall. It is not recommended to
place the linen in a corner where the back is not against a
wall. However, if your linen is used in a corner where the back
is not against a wall, secure your unit with furniture restraint
hardware, such as wall anchor rings and cable restraints.
This will prevent the linen from toppling over.
Upper Unit
Side Panel
of Base Unit
Brackets
Bottom Panel
of Upper Unit
Drawer openings
(front)
Figure 5
Brackets
Bottom Panel
of Upper Unit
Figure 6
Figure 7

EXTERIOR CARE AND CLEANING
For normal spills, a damp cloth is sufficient. Remember to
dry the surface immediately. Lemon oil is recommended
for cleaning wood doors. Most furniture care products, not
containing wax, petroleum solvents or silicone can be used
for polishing. Do not use caustic agents and/or abrasive
scrubbers. Nicks and dings can be repaired using the
color sticks. Fill in the scratch or nick using the color stick.
A Clear Coat spray may be applied if desired.
INTERIOR CARE AND CLEANING
Cabinets can be cleaned with a damp sponge or cloth
using soapy water. Do not use any type of abrasive
scrubbers. Do not let liquids stay on the surfaces for a long
period of time. The surface is water resistant, not waterproof.
MIRRORS
Use a water-dampened cloth to clean the mirror frame. For
the mirror, use ammonia-free cleaning products. Avoid using
abrasive cleaners.
Customer Service and Parts Department
Voice: (800) 221-3051 • Fax: (714) 449-2208
Email: [email protected]
RSI HOME PRODUCTS, INC. LIMITED WARRANTY
What This Warranty Covers: RSI Home Products, Inc. (“RSI”)
warrants its parts and products to be free of substantial defects
in materials and workmanship from the original date of purchase
under normal home use. This warranty is offered only to the
original consumer purchaser and may not be transferred.
How Long The Warranty Lasts: Coverage for all vanity
cabinets, fixed vanities, drawer banks, bath storage cabinets,
linen cabinets, wall hutches, fillers, and toe kicks last for the life
of the product. Coverage for medicine cabinets, mirrors, and
accessories lasts for 5 years from the original date of purchase.
What RSI Home Products Will Do Under The Warranty:
During the warranty period, RSI, at it’s option, will repair or replace
any part or product that proves to have substantial defects in
materials or workmanship, or RSI will provide an equivalent
replacement product. In keeping with our policy of continuous
product improvement, RSI reserves the right to change
specifications in design and materials without notice and with no
obligation to retrofit products we previously manufactured.
How State Law Applies: This warranty gives you specific legal
rights, and you may also have other rights that vary from state
to state.
IMPLIED WARRANTIES: RSI DISCLAIMS ANY IMPLIED
WARRANTY OF MERCHANTABILITY, AND THERE ARE NO
WARRANTIES THAT EXTEND BEYOND THE DESCRIPTIONS ON
THE FACE HEREOF. TO THE EXTENT THAT SUCH DISCLAIMER
IS NOT VALID UNDER APPLICABLE LAW, ANY IMPLIED
WARRANTY SHALL BE COEXTENSIVE IN DURATION WITH THIS
WARRANTY.
Wood, Aging and Printing Limitations: Because of the varying
natural characteristics of wood and the effects of aging, product
shown in displays and/or printed materials will not be an exact
match to new cabinetry you will receive. Depending on the wood
characteristics, the age of the sample and the environment
of the showroom, samples will show some degree of variation
from new product. In addition, you should not expect all doors,
drawer fronts, trim or moulding to match exactly in either finish
or grain. Variation in wood is normal and unavoidable. In addition,
it is not possible to exactly match our colors in printed materials.
Therefore, you should view the actual samples when making your
color selection.
What This Warranty Does Not Cover: This warranty does
not cover any problems or damage which result from improper
transportation, improper installation, mishandling, misuse, abuse,
neglect, abnormal use, commercial use, improper maintenance,
non-RSI repairs, accidents, or acts of God, such as hurricanes,
fire, earthquakes or floods. This warranty and any applicable
implied warranties do not cover incidental or consequential
damages arising from any defects in the product, such as
labor charges for installation or removal of the product or any
associated products. This warranty does not cover defects or
damages caused by normal wear & tear, alterations, environmental
conditions, humidity absorption, or mold. In addition, variations in
wood grain, finish color, aging or other natural wood and stain
characteristics are not considered defects and are not covered by
this warranty. Some states do not allow the exclusion or limitation
of incidental or consequential damages, so the above limitation or
exclusion may not apply to you.
How To Obtain Warranty Services: If you need replacement
parts or would like to make warranty claim, please contact our
Customer Service Representative by mail, e-mail, fax, or telephone
at the address or phone numbers listed on this page. All warranty
claims must include the model number of the product, copy of
the original receipt and the nature of the problem. In addition,
RSI may at its discretion require inspection of the installation
site or authorize the prepaid return of the claimed defective part.
Merchandise not pre-approved for return will not be accepted and
the associated claim not accepted.
If upon inspection you find our product has a damaged or missing
part, it may not be necessary to return the unit to the store of
purchase. Please contact RSI Customer Service to obtain a
replacement part.
Care and Cleaning

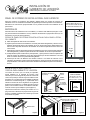
APLIQUE EL PANEL DE EXTREMO DE INSTALACIÓN AL RAS AL PANEL LATERAL
DEL GABINETE
a) Retire el respaldo de cada tira de cinta adhesiva.
b) Sujete el panel de extremo de instalación al ras del panel lateral del gabinete y alinee el marco
delantero del panel de extremo de instalación al ras con la estructura frontal. Asegúrese de que
todo el marco del panel de extremo de instalación al ras esté encajado dentro de la ranura del
marco frontal.
c) Alinee la parte superior del panel de extremo de instalación al ras con la parte superior del panel
lateral del gabinete y presione el panel de extremo de instalación al ras contra el panel lateral.
d) Trabaje desde la parte frontal hacia la parte posterior y ejerza presión en toda la superficie del
panel de extremo de instalación al ras para asegurarse de que las tiras adhesivas o de cinta
estén en contacto total con el panel lateral del gabinete.
e) Permita que la cinta o el adhesivo cure durante al menos 1 hora antes de continuar con la
instalación del gabinete. Pueden agregarse abrazaderas o pesos para fijar el panel hasta que se
seque el adhesivo. Consulte las instrucciones del fabricante del adhesivo para conocer el tiempo
de cura.
INSTALACIÓN DE MOLDURAS DE
CORONA PARA GABINETE DE LENCERÍA
La moldura de corona, que se vende por separado,
puede instalarse en el gabinete de lencería. Será
necesario que corte el largo de las piezas de moldura de
corona de la pieza que tiene el largo total. Deberá cortar
las piezas con un inglete para que se adapten al gabinete
de lencería. Consulte las figuras 2 y 3 para saber cómo
instalar la moldura de corona al gabinete. Si el gabinete
de lencería se instalará con un lateral apoyado contra la
pared, no es necesario colocar una moldura en ese lado.
Corte de manera que se adapte a la pared (figura 4).
Opciones de accesorios: tornillos para madera # 6 x ¾
pulg o clavos sin cabeza (no se proporcionan ninguno de
los dos). Si taladra previamente los orificios guía, evitará
la formación de grietas.
Figura 3
Moldura
lateral
Moldura
izquierda
Use tornillos
8 x 7/8 pulg
(no se incluyen)
Use pegamento blanco o
pegamento de carpintería
(no provisto).
Moldura
frontal
FIJE LAS MOLDURAS LATERALES
DERECHA Y IZQUIERDA
Nota: Asegúrese de alinear
las molduras laterales con las
molduras frontales. moulding.
VISTA
SUPERIOR
Figura 4
Pared
Corte recto de la moldura frontal
para ajustarse a la pared
Gabinete
Pared
VISTA FRONTAL
Figura 2
Moldura frontal
FIJE LA MOLDURA FRONTAL
PANEL DE EXTREMO DE INSTALACIÓNAL RAS SUPERIOR
Antes de comenzar la instalación del gabinete, deberá aplicar los paneles de extremo de
instalación al ras con acabado a los laterales del gabinete que estarán expuestos en la habitación.
Remítase a las instrucciones proporcionadas con los paneles de extremo de instalación al ras
para la base.
MATERIALES
Panel de extremo de instalación al ras con acabado y un rollo de cinta doble faz (se sugiere 1 rollo
por panel de extremo de instalación al ras) o adhesivo de fabricación o pegamento blanco (no se
proporciona ninguno de estos productos).
Figura 1
NOTA: La cinta de pintor o el
adhesivo deben aplicarse a un
6,35 mm de los bordes del panel
de extremo de instalación al ras.
La cinta
de pintor
o el
adhesivo
La cinta
de pintor
o el
adhesivo
INSTALACIÓN DE
GABINETE DE LENCERÍA
Aditamentos para la instalación no incluidos.

ENSAMBLAJE DE 2 PIEZAS PARA GABINETE
DE LENCERÍA
El gabinete de lencería con gavetas y puertas es una unidad de 2
piezas que requiere de un ensamble previo a la instalación. La unidad
superior tiene cuatro abrazaderas de fijación (provistas en la bolsa de
las piezas) que deben instalarse en la parte interna inferior de la unidad.
Instale las abrazaderas en la unidad superior antes de colocarla sobre
la base. La presencia de orificios guía facilitará la colocación de los
tornillos (figura 5).
Si compró un gabinete de lencería con gavetas, debe retirarlas para
tener acceso a las abrazaderas de fijación que están en la unidad
superior. Alinee las unidades superior e inferior; en primer lugar,
asegúrese de alinear la parte frontal del gabinete (marco frontal) y, a
continuación, los laterales. (El ancho total de una unidad puede ser
ligeramente más grande que el de la otra unidad. Esto es habitual y no
afecta a la funcionalidad ni a la integridad estructural de las unidades).
Una vez que estén alineadas las unidades superior e inferior, fíjelas
entre sí a la base atornillándolas con las abrazaderas (figura 6).
El panel de extremo de instalación al ras viene con una pieza de moldura
de un lado para instalar sobre la línea de unión entre las unidades
superior e inferior. Si un lado del gabinete de lencería se apoya contra
una pared, NO instale estas piezas en ese lado. Si un lado del gabinete
de lencería NO se apoya contra la pared ni otro gabinete, use clavos
para acabado (no se proporcionan) para fijar la moldura lateral sobre la
línea de unión. Es suficiente con tres a cuatro clavos para acabado por
lado (figura 7).
El gabinete de lencería puede instalarse como parte de una hilera de
gabinetes o como una unidad independiente. En cualquier caso, ajuste
el gabinete de lencería superior a la pared mediante la perforación de
orificios guía en el lugar del montante por medio del panel posterior.
Luego, fíjelo a la pared con los tornillos # 12 x 3 pulg. Si el gabinete
de lencería se apoya entre los montantes, deberá usar tornillos de
fiador para fijarlo a la pared. No se recomienda colocar el gabinete de
lencería en un rincón donde la parte posterior no se apoye contra la
pared. No obstante, si el gabinete se usa en un rincón donde la parte
posterior no se apoya contra la pared, fije la unidad con aditamentos
de contención para muebles, como anillos de anclas de expansión
para pared y contenciones de cables. Esto evitará que el gabinete de
lencería tambalee.
Unidad superior
Panel lateral
de la unidad
de base
Abrazaderas
Panel inferior
de la unidad
superior
Aberturas para la
gaveta (anverso)
Figura 5
Panel inferior
de la unidad
superior
Figura 6
Figura 7
Abrazaderas

CUIDADO Y LIMPIEZA DEL EXTERIOR
En caso de derrames habituales, es suficiente con un paño
húmedo. Recuerde secar la superficie de inmediato. Se
recomienda usar aceite de limón para la limpieza de puertas
de madera. La mayoría de los productos para el cuidado de
muebles, que no contengan vera, solventes de petróleo ni
silicona, pueden usarse para pulir. No use productos cáusticos
ni limpiadores abrasivos. Las rayas y los daños se pueden
reparar con los palillos de color. Llene la raya o el daño con
el palillo de color. Si lo desea, puede aplicar un revestimiento
transparente en aerosol.
CUIDADO Y LIMPIEZA DEL INTERIOR
Los gabinetes pueden limpiarse con una esponja o paño húmedo
y agua jabonosa. No utilice ningún tipo de limpiadores abrasivos.
No deje que líquidos permanezcan sobre la superficie durante
mucho tiempo. La superficie es resistente al agua, pero no es
impermeable.
ESPEJOS
Use un paño humedecido con agua para limpiar el marco del
espejo. Para el espejo, use productos de limpieza sin amoníaco.
Evite usar limpiadores abrasivos.
Departamento de Servicio al Cliente y Piezas de Repuesto
Voz: (800) 221-3051 • Fax: (714) 449-2208
Correo electrónico: villabathcs@rsihomeproducts.com
GARANTÍA LIMITADA DE RSI HOME PRODUCTS, INC.
Lo que cubre esta garantía: RSI Home Products, Inc.(“RSI”)
garantiza que ninguna de sus piezas ni productos presentará
defectos importantes de fabricación en el material ni la mano
de obra con el uso doméstico normal desde la fecha de compra
original. Esta garantía se ofrece únicamente al comprador/cliente
original y es posible que no sea transferible.
Cuánto tiempo durará la garantía: La cobertura de todos
los gabinetes de tocador, gabinetes fijos, gaveteros, gabinetes
para almacenaje de baño, gabinetes de lencería, estantes altos
para pared, rellenos y rodapiés dura la vida útil del producto. La
cobertura de los botiquines, espejos y accesorios dura 5 años a
partir de la fecha de compra original.
Lo que hará RSI Home Products en garantía: Durante el
periodo de garantía, RSI, a su discreción, reparará o reemplazará
cualquier pieza o producto que se compruebe que tiene defectos
importantes en el material o la mano de obra, o RSI brindará un
producto de reemplazo equivalente. RSI, quien respeta la política
de mejora continua para sus productos, se reserva el derecho
de cambiar las especificaciones en el diseño y en los materiales
sin previo aviso y sin obligación de renovar productos fabricados
previamente.
Cómo se aplica la ley estatal: Esta garantía le otorga derechos
legales específicos, pero podría tener también otros derechos
que varían según el estado.
GARANTÍAS IMPLÍCITAS: RSI RECHAZA CUALQUIER
GARANTÍA IMPLÍCITA DE COMERCIABILIDAD, Y NO EXISTEN
GARANTÍAS QUE SE EXTIENDAN MÁS ALLÁ DE LAS
DESCRIPCIONES EN EL PRESENTE DOCUMENTO. EN LA
MEDIDA EN QUE DICHA EXENCIÓN NO SEA VÁLIDA BAJO LA
LEY VIGENTE, TODA GARANTÍA IMPLÍCITA TENDRÁ LA MISMA
VIGENCIA QUE ESTA GARANTÍA.
Limitaciones de la impresión y envejecimiento de la
madera: Debido a las diversas características naturales de la
madera y a los efectos del envejecimiento, el producto que se
muestra en exhibición o en materiales impresos no corresponderá
exactamente al gabinete nuevo que usted recibirá. Según
las características de la madera, la edad de la muestra y el
ambiente del área de exposición, las muestras mostrarán algunas
diferencias con respecto al producto nuevo. Además, no espere
que todas las puertas, partes frontales de gavetas, rebordes o
molduras correspondan exactamente ya sea en el acabado o la
veta. La variación en la madera es normal e inevitable. Además,
no es posible hacer corresponder exactamente nuestros colores
en los materiales impresos. Por lo tanto, usted debe ver las
muestras reales al momento de seleccionar el color.
Lo que esta garantía no cubre: Esta garantía no cubre ningún
problema ni daño ocasionado por la manipulación incorrecta,
uso indebido, maltrato, negligencia, uso irregular, uso comercial,
mantenimiento inadecuado, reparaciones que no sea de RSI,
accidentes o desastres naturales, como huracanes, incendios,
terremotos o inundaciones. Esta garantía y toda garantía implícita
aplicable no cubren daños accidentales o resultantes que surjan
debido a defectos en el producto, como cargos de mano de
obra por la instalación o el retiro del producto o de los productos
asociados. La garantía no cubre defectos o daños causados por
el uso y el desgaste normales, las modificaciones, las condiciones
ambientales, la absorción de la humedad o el moho. Además,
las variaciones en la veta de la madera, el color del acabado, el
envejecimiento u otras características naturales del teñido y de la
madera no se consideran defectos y no se encuentran cubiertos
por esta garantía. Algunos estados no permiten la exclusión ni la
limitación de los daños accidentales o resultantes, de modo que
la exclusión o limitación anterior puede no aplicarse en su caso.
Cómo obtener el servicio de garantía: Si necesita piezas de
repuesto o desearía realizar un reclamo de garantía, comuníquese
con nuestro representante de Servicio al Cliente mediante correo
electrónico, fax o teléfono a la dirección o los números telefónicos
que se indican en esta página. Todos los reclamos de garantía
deben incluir el número de modelo del producto, una copia del
recibo original y la descripción del problema. Además, RSI puede,
a su discreción, solicitar una inspección del lugar de la instalación
o autorizar la devolución prepagada de la pieza defectuosa por la
que se reclama. La mercancía que no cuente con la aprobación
para la devolución no se aceptará y el reclamo asociado no se
aceptará.
Si después de la inspección, usted descubre que nuestro
producto tiene una pieza dañada o le falta una pieza, es posible
que no sea necesario devolver la unidad a la tienda donde se hizo
la compra. Póngase en contacto con el Servicio al Cliente de RSI
para obtener una pieza de repuesto.
Cuidado y limpieza
-
 1
1
-
 2
2
-
 3
3
-
 4
4
-
 5
5
-
 6
6


VILLA BATH by RSI LVC18D-WHT Guía de instalación
- Tipo
- Guía de instalación
en otros idiomas
Artículos relacionados


Otros documentos
-
Weaber 74086 Guía de instalación
-
Alex Direct 0W265-20096C Guía de instalación
-
 Hampton Bay KW3624-SW Guía de instalación
-
Unbranded 1540-8FTMDF Guía de instalación
-
Focal Point 23125RK20X20 Guía de instalación
-
-
 ESTATE by RSI CLDRK25SW Guía de instalación
-
 Hampton Bay KAREP-DV Guía de instalación
-
Home Decorators Collection 19EVSDB36 Guía de instalación
-
Estate ESBDD24SSW Guía de instalación


