Focal Point 23125RK20X20 Guía de instalación
- Tipo
- Guía de instalación

g. 5
g. 2
g. 1
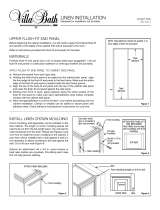
Gently remove the corner clip from the corner moulding mate by sliding it
down through the open end of the channel. Holding the large at side of
the corner clip tight to the ceiling and rmly against the wall, screw it into
the wall through the center of the slots (see gure 1). Repeat at all corners.
Do not install the crown or corner moulding mates yet.
IT IS IMPORTANT TO READ AND FOLLOW ALL INSTRUCTIONS CAREFULLY.
GENERAL Paint (optional) your crown moulding and the decorative accessories PRIOR to installation using a
high quality latex or oil based paint. DO NOT use lacquer. After installation, caulk along the ceiling and in the
joints as needed to ll any gaps.
TOOLS NEEDED safety glasses, cordless drill; hand or table saw; tape measure; painters tape; step ladder;
caulk and caulk gun (recommended).
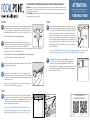
1.
Moulding Mates
TM
are designed to snap OVER the crown. Tap the
decorative corners onto the corner clips installed in step 1 and the
connectors to the clips installed in steps 2 & 3 (see gure 5). If the
Moulding Mates
TM
do not t tightly over the moulding at rst, sand or le
the back of the Moulding Mates
TM
at the interference point until it ts
evenly at all points of contact.
7.
Start the moulding installation approximately 1/4” from the corner clip
installed in step one. Begin by placing the bottom bedding edge of the
crown at to the wall slightly below the clips (see gure 4), with the top
angled slightly toward you. Slide the crown upward until the bottom
groove on the moulding back engages the bottom of the clip. This may
require a couple of attempts. You may gently tap the moulding at each clip
location beginning at the end closest to the corner clip and working your
way toward the end of the piece, to fully engage both the top and bottom
moulding grooves. Proceed around the room securing the crown to the
clips as described above.
pro tip: Use the included “test” piece to get a feel for securing the crown to the clips, prior to using
your nished mouldings. Also, you may not hear “click” with each clip/groove engagement.
6.
Install the next Quick Clip
TM
approximately 8” from the corner component
installed in step 1. (see gure 2)
3.
Repeat this process approximately every 10” to 12” until all the clips are
installed. You do not need to measure precisely for each clip. It is sucient
to “eyeball” 10” to 12” which makes the installation process quick. You may
end up with extra clips.
pro tip: Use a piece of painter’s tape a few inches below each clip to
mark its location – this will help during step 6!
4.
Measure from each corner to locate the mid-point of each wall (or on a
longer wall to locate all of the points at which the moulding will join with
a connector piece). Mark each location with a pencil, and install a
Quick Clip
TM
: hold the clip tight to the ceiling and screw it to the wall (being careful not to over tighten)
through the pilot hole with provided drywall screw.
Do not install the connector pieces yet - Moulding Mates
TM
to be installed in step 7.
pro tip: If your drill has a clutch, use setting number 3.
2.
SCREW.
correct
g. 3b
g. 5b
Measure from the edge of the corner component tab installed in step 1
(see gure 1) to the closest edge of the Quick Clip
TM
mounted in the center,
or where your moulding will join on a wall (step 2), and subtract 1/2” from
this measurement to determine the length of the crown (see gure 3a).
Measure each wall as variation is likely.
pro tip: If you are using the Dentil prole adjust your cut lines on
both ends of the crown to give you the maximum distance possible
from the edge of the moulding to the closest “tooth” (see gure 3b)
5.
TRIM.
SNAP.
SCAN QR CODES FOR
VIDEO DEMONSTRATIONS
g. 4
1/4”
g. 3a
Step 6. Step 7.
ATTENTION:
If you are have installation questions
please contact our oce at
1-800-662-5550

g. 5
g. 2
g. 1
Suavemente quite la abrazadera del Moulding Mate de esquina deslizándolo
hacia abajo a través del extremo abierto del canal. Manteniendo el lado plano
grande de la esquina apretada rmemente contra la pared y el techo, atorníllelo
en la pared a través del centro de las ranuras (ver gura 1). Repita en todas las
esquinas.
No instale la corona o Moulding Mate de esquina todavía
ES IMPORTANTE LEER Y SEGUIR CUIDADOSAMENTE TODAS LAS INSTRUCCIONES.
GENERAL Pintar (opcional) la moldura y los accesorios decorativos ANTES de la instalación con pintura de alta calidad de
latex o base de aceite. No use laca. Después de la instalación, aplique masilla a lo largo del techo y en las juntas según
sea necesario para llenar los vacíos.
HERREMIENTAS NECESARIAS pintura y pincel (opcional); Taladro inalámbrico; Sierra de mano o inglete; cinta métrica;
cinta de pintor; escalera de mano; Calafatee y pistola de calafateo (recomendado), lentes de seguridad.
1.
Moulding Mates
TM
están diseñados para encajar sobre la corona. Presione
las esquinas de la moldura decorativas en los clips de esquina instalados
en el paso 1 y los conectores los clips instalación en los pasos 2 y 3 (ver
gura 5). Si los Moulding Mates
TM
no encajan rmemente sobre la
moldura, hay que lijar o limar primero la parte posterior del Moulding
Mates
TM
en el punto de interferencia hasta que quede uniformemente en
todos los puntos de contacto.
7.
Iniciar la instalación de la moldura aproximadamente 1/4" del clip de la esquina
instalado en el paso uno. Comience por colocar la parte inferior del borde de la
corona plana en la pared ligeramente por debajo de los clips (ver gura 4), con la
parte superior en ángulo ligeramente hacia usted. Deslice la corona hacia arriba
hasta que encaje en la ranura de la parte inferior de la moldura detrás la parte
inferior del clip. Esto puede requerir un par de intentos. Puede golpear
suavemente la moldura en cada clip comenzando por el extremo más cercano a
la abrazadera de la esquina y su camino hacia el nal de la pieza, para enganchar
completamente la parte superior e inferior surcos de moldeo. Continúe alrededor
de la sala, asegurando la corona de los clips como se describió anteriormente.
Sugerencia: Utilice la pieza “test” incluido para tener una idea como asegurar la corona a los ganchos antes
de usar las molduras actuales. Además, no siempre se puede escuchar el "asegura" cuando encaja en cada
clip/surco.
6.
Instale el segundo Quick Clip
TM
aproximadamente 8" desde el componente de
esquina instalado en el paso 1. (ver gura 2)
3.
Repita este proceso aproximadamente cada 10" a 12" hasta que se instalen todos
los clips. No necesita medir precisamente para cada clip. Es suciente estimar 10”
to 12” lo que hace el proceso de instalación rápida. Es posible que le sobren clips.
Sugerencia: Use un pedazo de cinta de pintor unas pocas pulgadas por
debajo de cada clip para marcar su lugar – esto ayudará durante el paso 6!
4.
Medir de cada esquina para ubicar el punto medio de cada pared (o en la pared
más larga para localizar todos los puntos en que se unirán la moldura con una
pieza de conector). Marcar cada lugar con un lápiz e instalar un Quick Clip
TM
:
Sujete el clip rmemente al techo y atornillar a la pared (no apretar en exceso) a
traves del oricio piloto con el tornillo drywall proporcionado.
No instale piezas de conector todavia - Moulding Mates
TM
seran instalados en el paso 7.
Sugerencia: Si su taladro tiene un embrague, usar ajuste número 3.
2.
ATORNILLAR.
correcto
g. 3b
g. 5b
Mida desde el borde de la pestaña del componente de esquina instalada en el
paso 1 (Figura 1 de la ref) hasta el borde más cercano de la Quick Clip
TM
montado
en el centro, o donde la moldura se une en la pared (paso 2) así como restar 1/2"
de esta medida para determinar la longitud de la corona (ver gura 3a). Medir
cada pared porque es posible que existan variaciones.
Sugerencia: Si usted está usando el dentículo perl ajustar sus líneas de
corte en ambos extremos de la corona para darle la distancia máxima
posible desde el borde de la moldura al “diente” más cercano (ver gura 3b).
5.
MOLDURA.
CHASQUIDO.
ESCANEA EL CÓDIGO QR PARA
DEMONSTRACIONES DE VÍDEO
g. 4
1/4”
g. 3a
Step 6. Step 7.
ATTENTION:
If you are have installation questions
please contact our oce at
1-800-662-5550
-
 1
1
-
 2
2