REFRIGERATOR END PANEL KIT & BRIDGE CABINET
KIT DE PANEL DE EXTREMO PARA REFRIGERADOR Y GABINETE DE UNIÓN
Your Refrigerator End Panel Kit is made to be paired with our deep bridge cabinets (sold separately),
and these instructions will provide direction on installing both, together, to give your refrigerator a
built-in appearance. To that end, these bridge cabinets/end panels are the same depth as standard
base cabinets. Our End Panel can be used for the right or left side of a refrigerator, it is interchangeable.
The End Panel Kit will cover one side; if a second side of the refrigerator needs to be covered, please
purchase an additional End Panel Kit.
This End Panel Kit and overhead bridge cabinet (sold separately) should be installed by an experienced
cabinet installer. This guide is not intended to be a substitute for installation experience. The below
instructions assume efforts will be made, before beginning, to identify problem areas where the oor/
wall may not be level. Installation can be done by one person, but is easiest with two people. NOTE:
• End panel and Bridge Cabinet DO NOT form a stand-alone cabinet
• End Panel must be securely anchored to cabinet above and surrounding walls/oor
• Because of 24" depth, Bridge Cabinet must be attached with 3 points of contact – back wall
studs, side wall and cabinets on both sides
Tu kit del panel de extremo del refrigerador está hecho para combinar con nuestros gabinetes de unión profundos (que se
venden por separado) y estas instrucciones proveen orientación sobre la instalación de conjunto para dar a tu refrigerador
la apariencia de empotrado. A este n, los gabinetes de unión/paneles de extremo tienen la misma profundidad que los
gabinetes de base estándar. Nuestro panel de extremo puede usarse a la derecha o a la izquierda del refrigerador; puede
intercambiarse. El kit de panel de extremo cubrirá un lado; si un segundo lado del refrigerador necesita cubrirse, compra
un kit adicional de panel de extremo.
Este kit de panel de extremo y el gabinete de unión encimero (se vende por separado) deben instalarse por un profesional
experimentado. Esta guía no está elaborada para sustituir la experiencia en la instalación. Las instrucciones más abajo
presuponen que, antes de comenzar, se hagan esfuerzos para identicar las áreas con problemas donde el piso y la pared no
estén nivelados. La instalación puede hacerse por una persona, pero es más fácil con dos. NOTA: El panel de extremo para
refrigerador tiene que anclarse con seguridad al gabinete de unión encimero y a los gabinetes/paredes adyacentes;
EL PANEL DE EXTREMO Y EL GABINETE DE UNIÓN NO ESTÁN CONCEBIDOS PARA FORMAR UN GABINETE
INDEPENDIENTE. Acerca de los gabinetes de unión profundos de 61 cm: Este gabinete tiene estar anclado por la
parte posterior a las vigas de la pared debido a su profundidad y peso - siempre ja a las paredes y gabinetes en
ambos lados además de a las vigas de la pared. Nunca cuelgues el gabinete por sí mismo. El gabinete puede caerse
si no se ja bien.
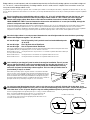
The Refrigerator End Panel Kit comes with the following and provides 3 height options, 84", 90" or 96"
(see step 2, below). The contents of the kit are:
El kit de panel de extremo para refrigerador viene con los siguientes paneles en 3 opciones de altura: 213.4 cm, 228.6 cm o
243.8 cm (ver paso 2 más abajo). El kit contiene:
INSTALLATION INSTRUCTIONS • INSTRUCCIONES PARA LA INSTALACION
U180413/1216
Rerigerator End Panel Kit
Model Number:
Número de modelo del kit
de panel de extremo para
Número de:
KAREP
Deep Bridge Cabinets
(not included)
Model Number(s):
Gabinetes de unión
profundo
Número(s) de modelo:
Número(s) de:
KW361224
KW361824
KW362424
Purchase
One Size
Compra
Un tamaño
END PANEL ASSEMBLY
84" TALL W/24 BRIDGE
Bridge cabinet
sold separately
in 3 heights
El gabinete de
unión se vende
por separado
en tres alturas
distintas
84"H panel (1 pc)
use by itself for 84" overall height
Panel de 213.4 cm de altura (1 pieza)
usar por sí mismo para altura total
de 213.4 cm
12"H panel (1 pc)
use with 84" End Panel for 96" overall height
Panel de 30.5 cm de altura (1 pieza)
usar por sí mismo para panel de extremo de 213.4
cm y altura total de 243.8 cm
6"H panel (1 pc)
use with 84" End Panel for 90" overall height
Panel de 15.2 cm de altura (1 pieza)
usar por sí mismo para panel de extremo de 213.4
cm y altura total de 228.6 cm
Decorative molding (1 pc)
Moldura decorativa (1 pieza)
Mending plates (4)
with 8 screws
Placas de unión (4)
con 8 tornillos
READ THESE INSTRUCTIONS COMPLETELY PRIOR TO BEGINNING THE INSTALLATION.
Lee todas las instrucciones antes de comenzar la instalación.
TIP: Whenever drilling into a cabinet frame, back panel, wall cleat, etc., it is recommended to
pre-drill a pilot hole rst to help prevent splitting.
CONSEJO: Siempre que se taladre en un armazón de gabinete, panel posterior, listón de pared, etc., se recomienda
pretaladrar un oricio piloto para evitar astilladuras.

3
Bridge cabinets are sold separately and are intended to be paired with the End Panel Kit; bridge cabinets are available in heights of
12", 18" or 23.5", and are sold separately. Our bridge cabinets are 36" in width, and 24" in depth. These instructions assume you
have purchased the bridge cabinet as well.
Los gabinetes de unión se venden por separado, están concebidos para combinar con el kit de panel de extremo y disponibles en alturas de 30.5 cm, 45.7 cm y
59.7 cm. Nuestros gabinetes de unión tienen 91.4 cm de ancho y 61 cm de profundidad. Estas instrucciones dan por sentado que también compraste el gabinete
de unión.
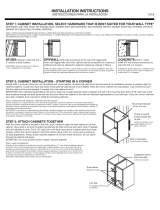
Start by installing your overhead bridge cabinet; it will be 12", 18" or 24" in height. Measure from the oor up, and
create a height measurement on the wall for your bridge cabinet- about 72". This is where you want to align the
bottom of the bridge cabinet. Note: Refer to wall cabinet installation instructions included with bridge. NEVER
HANG CABINET BY ITSELF. Level and mount the cabinet to the wall with #10 x 3" screws (not included), through the
cabinet's back panel frame. Shim the cabinet if needed.
Comienza instalando el gabinete de unión encimero; tendrá una altura de 30.5 cm, 45.7 cm o 61 cm. Mide desde el piso hacia arriba y ja una medida
de altura en la pared para el gabinete de unión - unos 183 cm. Aquí es donde alinearás la parte inferior del gabinete de unión. Nota: Consulta las
instrucciones de instalación de gabinetes de pared incluidas con el gabinete de unión. Nunca cuelgue gabinete por sí mismo. Nivela y monta el gabinete
a la pared con tornillos núm. 10 x 3 plg (no incluidos) a través del armazón del panel posterior. Si es necesario, nivela el gabinete con cuñas.
Once the bridge cabinet is securely mounted, determine the overall height needed to cover the side of your bridge
cabinet and refrigerator together: 84", 90" or 96":
84" overall height: Use 84"H panel by itself -you don’t need enclosed additional panels
(6" & 12"H)
90" overall height: Use 6"H panel with 84" End Panel
96" overall height: Use 12"H panel with 84" End Panel
Una vez que el gabinete de unión esté instalado de manera segura, determina la altura total necesaria para cubrir el lado
de tu gabinete de unión y el refrigerador juntos. 213.4 cm, 228.6 cm o 243.8 cm:
Altura total de 213.4 cm: Usa un panel de 213.4 cm por sí mismo - no necesitas los paneles adicionales incluidos (de
15.2 cm y 30.5 cm de altura).
Altura total de 228.6 cm: Usa un panel de 15.2 cm de altura con un panel de extremo de 213.4 cm
Altura total de 243.8 cm: Usa un panel de 30.5 cm de altura con un panel de extremo de 213.4 cm
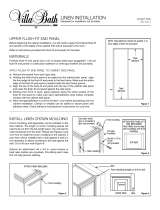
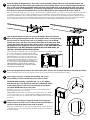
Look carefully at your long (84") panel to orient it correctly for installation. There is just one
correct side that should be used to face inward/outward. Use the side with (largest) ¾" of
ledge depth, and be sure it faces inward. This will provide the needed depth to securely
anchor the end panel and the bridge cabinet together. This is the side you’ll afx cleats to
(not included), in step 5, as shown
.
Revisa bien el panel largo (213.4 cm) para orientarlo correctamente al instalar.
Sólo hay un lado correcto que debe usarse de frente hacia adentro/afuera. Usa
el lado con la (mayor) profundidad de saliente de 1.9 cm y asegura que esté de
frente hacia adentro. Esto ofrecerá la profundidad necesaria para anclar juntos
de manera segura el panel de extremo y el gabinete de unión. Este es el lado en
que jarás los listones (no incluidos) en el paso 5, como se muestra.
Lay your long panel down (protecting the surface so it does not get scratched), nished side facing down. If you
need additional height added to the 84" panel, use the enclosed mending plates and screws, and join the long panel
with either the 6" or the 12" panel. Skip this step with adding additional panels if you only need 84" of height.
Acuesta el panel (protegiendo la supercie para que no se raye) con el lado acabado hacia
abajo. Si necesitas añadir altura al panel de 213.4 cm, usa las placas de
unión y tornillos incluidos; une el panel largo con el panel de 15.2 cm o
con el de 30.5 cm. Ignora este paso de agregar paneles adicionales si sólo
necesitas una altura de 213.4 cm.
1
2
ATTACH END PANEL TO END 12" PANEL FILLER
ATTACH END PANEL TO END 12" PANEL FILLER
For 90" H or 96" H only
4
ROTATION SETTING:
30 LEFT
15 DOWN
ORTHOGRAPHIC
3/4"
1/4"
ROTATION SETTING:
30 LEFT
15 DOWN
ORTHOGRAPHIC
Cleat
Listón
This
side
faces
inward

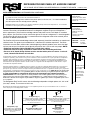
Before installing the long panel (84", 90" or 96"), next to the bridge cabinet, add cleats. This will help keep the end
panel straight along its entire length, preventing bowing and instability. Cleats can be created from plywood. Ensure
they are the correct depth/length/width. While still on the ground, add cleats to the joined panel /back of 84" panel
by itself, to create an assembled piece. To install the long end panel, check beforehand that the oor and wall are
level. Place the end panel into position. Also check the dimensions of your refrigerator to ensure a good t.
Antes de instalar el panel largo (213.4 cm, 228.6 cm o 243.8 cm) próximo al gabinete de unión, coloca listones. Esto ayudará a que el panel de extremo
se mantenga recto a todo lo largo, evitando cualquier inclinación e inestabilidad. Los listones pueden elaborarse con plywood. Asegúrate de que
tengan la profundidad, largo y ancho adecuados. Mientras todavía está en el suelo, añade listones al panel unido/parte posterior del panel de 213.4
cm por sí mismo, para crear una pieza ensamblada. Para instalar el panel de extremo largo, comprueba antes que el piso y la pared estén nivelados.
Coloca el gabinete de extremo en posición. Verica también las dimensiones del refrigerador para garantizar un ajuste adecuado.
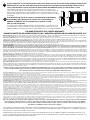
Now install the whole assembly. To connect the bridge cabinet with the end
panel, start by going through the inside of the bridge cabinet, screwing through
the face frame (of cabinet) in the front (2 1/2" phillips screws, not included),
through the cleats, and all the way into the wood edge of the long panel. Drill
screws through the side panel of the cabinet as well, anchoring through the
plywood piece to the long panel. Do this in the back, as well. BE CAREFUL NOT
TO SCREW ALL THE WAY THROUGH THE SIDES OF YOUR END PANEL, AS
THIS WILL BE VISIBLE AFTER INSTALLATION!
Ahora instala todo el ensamblaje. Para conectar el gabinete de unión con el panel de extremo, comienza
por el interior del gabinete atornillando (tornillos Phillips
de 2 1/2 plg, no incluidos) a través del armazón frontal (del
gabinete) del frente y de los listones hasta el interior del
borde de madera del panel largo. Inserta también tornillos
a través del panel lateral del gabinete, anclándolo a través
de la pieza de plywood al panel largo. Haz también esto
en la parte posterior. ¡TEN CUIDADO DE NO ATORNILLAR
COMPLETAMENTE A TRAVÉS DE LOS LATERALES
DEL PANEL DE EXTREMO, PUES ESTO SERÁ VISIBLE
DESPUÉS DE LA INSTALACIÓN
Secure the long panel to the oor in the front and the back. Use a screw to anchor the front of the panel to the oor.
Asegura el panel largo al piso en las partes frontal y posterior. Usa un tornillo para anclar la parte frontal del panel al piso.
Then, using L brackets, as shown (not included), and screws
(not included), secure the panel to the back wall, as shown.
CAUTION: When installing a panel that has a 6" or 12" addition,
both the long (84") and short panels need to be individually afxed
to the bridge cabinet, to the frame. Even though the two panels
are joined, NEVER afx just the 84" panel.
Enseguida usa soportes en L (no incluidos) y tornillos (no incluidos) para asegurar el
panel a la pared posterior, como se muestra.
PRECAUCIÓN: Al instalar un panel que tiene un panel adicional de 15.2 cm o de 30.5
cm, tanto el panel largo como el corto deben jarse individualmente al gabinete de
unión y al marco. Aunque los dos paneles estén unidos, NUNCA jes tan solo el panel
de 213.4 cm.
Repeat this in several places along the inside of the long panel,
using L brackets and #10 x 2 1/2" cabinet screws (not included) to
anchor the back of the panel to the studs in the wall.
Repite esto en varios lugares a lo largo del interior del panel largo, usando soportes en
L y tornillos núm. 10 x 2 1/2 plg (no incluidos) para anclar la parte posterior del panel a
las vigas de la pared.
6
7
8
9
A
A
5
Step 8
Step 7

Each installer must evaluate the specic characteristics of the particular wall on which the cabinets are to be installed to ensure the proper fastening solution
is used and the product is fastened safely and securely. This may require hardware or fastening methods which are different from, or in addition to, this general
outline. RSI does not warrant the installation of this product.
Cada instalador tiene que evaluar las características especícas de la pared especíca en que se instalarán los gabinetes para garantizar que la solución de
sujeción sea apropiada y que el producto quede sujeto segura y rmemente. Esto podría requerir herrajes o métodos de sujeción diferentes o adicionales a los
descritos aquí. RSI no garantiza la instalación de este producto.
If you've added a 6" or 12" panel to the 84" panel, you'll need to use the use the décorative molding included in your
End Panel Kit to cover the seam (side seam, back to front) where your End Panel and the bridge cabinet meet, to
create a nished look. If you're using the 84" panel without the additional panels, you will not have a seam.
Si has añadido un panel de 15.2 cm o de 30.5 cm al panel de 213.4 cm, necesitarás usar la
moldura decorativa incluida en el kit de panel de extremo para cubrir la unión (unión lateral, de la
parte posterior a la frontal) donde se juntan el gabinete de unión y el panel de extremo, para dar
la apariencia de acabado. Si estás usando el panel de 213.4 cm sin paneles adicionales, no habrá
unión alguna.
If desired, nish the top of the cabinet & end panel with crown molding
(not included), sold separately. Part numbers for crown molding are
KAMC4X or KAMC5X, and are available where cabinets are sold.
Now, just add refrigerator!
Si lo deseas, termina la parte superior del gabinete y el panel de extremo con moldura de corona
(no incluida), que se vende por separado. Los números de piezas de las molduras de corona son
KAMC4X o KAMC5X; están disponibles donde se vendan gabinetes. Ahora, ¡sólo añade el refrigerador!
11
10
ROTATION SETTING:
10 RIGHT
5 DOWN
ORTO
RSI HOME PRODUCTS, INC. LIMITED WARRANTY
GARANTIE LIMITÉE DE RSI HOME PRODUCTS, INC./ GARANTÍA LIMITADA DE RSI HOME PRODUCTS, INC.
What This Warranty Covers: RSI Home Products, Inc. ("RSI") warrants its parts and products to be free of substantial defects in materials and workmanship from the original date of
purchase under normal home use. This warranty is offered only to the original consumer purchaser and may not be transferred.
How Long The Warranty Lasts: Coverage for nished kitchen cabinets, vanity cabinets, and vanity tops lasts for the life of the product. Coverage for vanity cabinet combos, medicine
cabinets, mirrors, light bars and bath storage cabinets lasts for 5 years from the original date of purchase. Coverage for unnished kitchen cabinets lasts 1 year.
What RSI Home Products Will Do Under The Warranty: During the warranty period, RSI, at its option, will repair or replace any part or product that proves to have substantial defects
in materials or workmanship, or RSI will provide an equivalent replacement product. In keeping with our policy of continuous product improvement, RSI reserves the right to change
specications in design and materials without notice and with no obligation to retrot products we previously manufactured.
How State Law Applies: This warranty gives you specic legal rights, and you may also have other rights that vary from state to state.
IMPLIED WARRANTIES: RSI DISCLAIMS ANY IMPLIED WARRANTY OF MERCHANTABILITY, AND THERE ARE NO WARRANTIES THAT EXTEND BEYOND THE DESCRIPTIONS ON THE FACE
HEREOF. TO THE EXTENT THAT SUCH DISCLAIMER IS NOT VALID UNDER APPLICABLE LAW, ANY IMPLIED WARRANTY SHALL BE COEXTENSIVE IN DURATION WITH THIS WARRANTY.
Wood, Cultured Marble and Solid Surface Technology Characterisics, Aging and Printing Limitations: Because of the varying natural characteristics of wood and the effects of
aging, product shown in displays and/or printed materials may not be an exact match to new cabinetry you will receive. Depending on wood characterisics, the age of a sample and the
environment of the showroom, samples will show some degree of variation from new product. In addition, you should not expect all doors, drawer fronts, trim or molding to match exactly in
either nish or grain. Variation in wood, cultured marble and solid surface technology material is normal and unavoidable. In addition, it is not possible to exactly match our colors in printed
materials. Therefore, you should view the actual samples when making your color selection.
What This Warranty Does Not Cover: This warranty does not cover any problems or damage which result from improper transportation, improper installation, mishandling, misuse,
abuse, neglect, abnormal use, commercial use, improper maintenance, non-RSI repairs, accidents, or acts of God, such as hurricanes, re, earthquakes or oods. This warranty and any
applicable implied warranties do not cover incidental or consequential damages arising from any defects in the product, such as labor charges for installation or removal of the product or
any associated products. This warranty does not cover defects or damage caused by normal wear & tear, alterations, environmental conditions, humidity absorption, or mold. In addition,
variations in wood grain, nish color, aging or other natural wood and stain characteristics are not considered defects and are not covered by this warranty. Some states do not allow the
exclusion or limitation of incidental or consequential damages, so the above limitation or exclusion may not apply to you.
How to Obtain Warranty Service: If you need replacement parts or would like to make a warranty claim, please contact our Customer Service Representative by mail, email, fax or
telephone at the address or phone numbers listed on this page. All warranty claims must include the model number of the product, copy of the original receipt and the nature of the problem.
In addition, RSI may at its discretion require inspection of the installation site or authorize the prepaid return of the claimed defective part. Merchandise not pre-approved for return will not
be accepted and the associated claim not accepted.
Products should be examined for defects prior to installation. This warranty also does not cover labor charges for installation or removal of the product
or any associated products. If upon inspection you nd our product has a damaged or missing part, it may not be necessary to return the unit to the
store of purchase. Please contact RSI customer service to possibly obtain a replacement part.
Qué Cubre la Garantía: RSI Home Products, Inc. ("RSI") garantiza que sus piezas y productos no tendrán defectos signicativos de materiales o fabricación a partir de la fecha original de compra, bajo condiciones de
uso doméstico normal. Esta garantía se ofrece sólo al consumidor original y no puede transferirse.
Cuánto Dura la Garantía: La cobertura para gabinetes de cocina acabados, gabinetes de tocador y mostradores de tocador, comprende la vida útil del producto. La cobertura para los kits combinados de gabinete para
tocador, botiquines de medicinas, espejos, barras de luces, y gabinetes de baño dura 5 años desde la fecha original de compra. La cobertura para gabinetes de cocina sin acabado es de 1 año.
Que hará RSI Home Productos Bajo la Garantía: Durante el período de garantía RSI, a su discreción, reparará o reemplazará cualquier parte o producto que muestre cualquier defecto signicativo de materiales o
fabricación, o RSI lo reemplazará con un producto equivalente. De acuerdo con lo establecido en nuestra política de mejora continua del producto, RSI se reserva el derecho de cambiar las especicaciones de diseño
y materiales sin previo aviso y sin ninguna obligación de renovar los productos fabricados previamente.
Cómo Repercuten las Leyes Estatales: Esta garantía le otorga derechos legales especícos y es posible que también goce de otros derechos que varían de un estado a otro.
GARANTÍAS IMPLÍCITAS: RSI SE EXIME DE CUALQUIER GARANTÍA IMPLÍCITA DE COMERCIABILIDAD; NO EXISTEN OTRAS GARANTÍAS MÁS ALLÁ DE LAS AQUÍ DESCRITAS. EN CASO DE QUE ESTA EXENCIÓN
DE RESPONSABILIDAD NO TENGA VALIDEZ EN VIRTUD DE LAS LEYES APLICABLES, CUALQUIER GARANTÍA IMPLÍCITA TENDRÁ LA MISMA DURACIÓN QUE LA PRESENTE GARANTÍA.
Características y Envejecimiento de la Madera, el Mármol Cultivado y Materiales de Tecnología de Supercie Sólida, y Limitaciones de los Materiales Impresos: Debido a las características variables naturales
de la madera y a los efectos del envejecimiento, el producto mostrado en la exhibición y/o en los materiales impresos puede no coincidir exactamente con los gabinetes nuevos que usted recibirá. Dependiendo de las
características de la madera, la edad de la muestra y las condiciones ambientales de la sala de exhibición, las muestras variarán en cierto grado, del producto nuevo. Adicionalmente, usted no deberá esperar que todas
las puertas, caras de los cajones, acabados o molduras tengan acabados o vetas idénticos. Las variaciones en la madera, el mármol cultivado y el material de tecnología de supercie sólida son normales e inevitables.
Además, es imposible reproducir nuestros colores en el material impreso. Por consiguiente, usted debe ver las muestras reales al elegir su color.
Lo Que esta Garantía No Cubre: Esta garantía no cubre ningún problema o daño como resultado de la transportación inadecuada, instalación inapropiada, manipulación incorrecta, uso incorrecto, abuso, negligencia,
uso indebido, uso comercial, mantenimiento inadecuado, reparaciones no autorizadas por RSI, huracanes, incendio, terremotos o inundaciones. Esta garantía y cualquier otra garantía implícita correspondiente, no
cubre daños incidentales o secundarios resultado de cualquier defecto en el producto, tales como cargos por mano de obra por la instalación o retiro del producto o de cualquier producto relacionado. Esta garantía
no cubre defectos ni daños causados por uso y desgaste normales, alteraciones, condiciones ambientales, absorción de la humedad, o moho. Adicionalmente, las variaciones en la veta de la madera, el color del
acabado, el envejecimiento u otras características de la madera o el tinte no se considerarán defectos y no están cubiertos por esta garantía. Algunos estados no permiten la exclusión o limitación de daños incidentales
o secundarios, por lo que las limitaciones o exclusiones anteriores podrían no aplicarse en su caso.
Cómo Recibir Servicio de Garantía: Si necesita piezas de reemplazo o le gustaría hacer una reclamación de garantía, por favor contacte a nuestro Representante de Atención al Cliente por email, fax o teléfono, por
medio de la dirección o el número de teléfono provistos en esta página. Todas las reclamaciones de garantía deben incluir el número de modelo del producto, copia del recibo original y la naturaleza del problema.
Además RSI podrá, a su discreción, requerir una inspección del sitio de la instalación o autorizar la devolución prepagada de la pieza defectuosa por la cual se hace la reclamación. No se aceptará ninguna mercancía
cuya devolución no haya sido previamente aprobada ni ninguna reclamación relacionada con tal mercancía.
Antes de la instalación, los productos deben examinarse en busca de defectos. Esta garantía tampoco cubre los cargos por mano de obra relacionados
con la instalación o retiro del producto o productos relacionados. Si al inspeccionar el producto usted encuentra que falta una pieza o que alguna de
ellas está dañada, puede que no sea necesario devolver la unidad a la tienda donde la compró. Por favor contacte a atención al cliente de RSI para
determinar la posibilidad de obtener una pieza de reemplazo.
Decorative molding
-
 1
1
-
 2
2
-
 3
3
-
 4
4