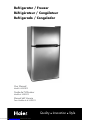
Haier HNDE03VSBJ El manual del propietario
- Categoría
- Frigoríficos-congeladores
- Tipo
- El manual del propietario
Este manual también es adecuado para


SAFETY PRECAUTIONS
WARNING: Read all of the instructions before using this appliance.
When using this appliance, always exercise basic safety
precautions, including the following:
NOTE: If the refrigerator/freezer has been placed in a horizontal or
tilted position for any period of time wait 24 hours before
plugging the unit in.
1) Use this appliance only for its intended purpose as described in this use
and care guide.
2) This
refrigerator/freezer must be properly installed in accordance with
the installation instructions before it is used. See grounding instructions
in the installation section.
3) This
refrigerator/freezer should not be recessed or built-in an enclosed
cabinet. It is designed for freestanding installation only.
4) Never unplug your
refrigerator/freezer by pulling on the power cord.
Always grasp the plug firmly and pull straight out from the outlet.
5) Repair or replace immediately, all electric service cords that have
become frayed or otherwise damaged. Do not use a cord that shows
cracks or abrasion damage along its length, the plug or the connector
end.
6) If your old
refrigerator/freezer is not being used, we recommend that
you remove the doors. This will reduce the possibility of danger to
children.
7)
WARNING: After your refrigerator/freezer is in operation, do not
touch the cold surfaces in the freezer compartment,
particularly when hands are damp or wet. Skin may
adhere to these extremely cold surfaces.
8) Do not refreeze foods, which have been thawed completely. The United
States Department of Agriculture in Home and Garden Bulletin No. 69
reads: "…You may safely refreeze frozen foods that have thawed if
they still contain ice crystals or if they are still cold-below 40°F".
"…Thawed ground meats, poultry, or fish that have any off-odor or
offcolor should not be refrozen and should not be eaten. Thawed ice
cream should be discarded. If the odor or color of any food is poor or
questionable, discard it. The food may be dangerous to eat."
1
Downloaded from www.Manualslib.com manuals search engine

2
"…Even partial thawing and re-freezing reduce the eating quality of
foods, particularly fruits, vegetables, and prepared foods. The eating
quality of red meats is affected less than that of many other foods. Use
refrozen foods as soon as possible, to save as much of they’re
eating quality as you can."
9) Do not use any electrical device or any sharp instrument in defrosting
your refrigerator.
10) Unplug your
refrigerator/freezer before cleaning or before making any
repairs.
Note: If for any reason this product requires service, we strongly
recommend that a certified technician perform service.
11) Do not operate your refrigerator in the presence of explosive fumes.
SAVE THESE INSTRUCTIONS
DANGER
Risk of child entrapment. Before you throw away your old
refrigerator or freezer, take off the doors. Leave the shelves
in place so that children may not easily climb inside.
English
Staple your receipt to your manual.
You will need it to obtain warranty service.
Thank you for purchasing our Haier
product. This easy-to-use manual
will guide you in getting the best
use of your appliance.
Remember to record the model and
serial number. They are on a label
in back of the appliances.
Model number
Serial number
Date of purchase
Downloaded from www.Manualslib.com manuals search engine

English
TABLE OF CONTENTS
Safety Precautions ........................................................................ 1
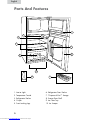
Parts And Features ....................................................................... 3
Installation Instructions ................................................................ 4
Unpacking Your Refrigerator ............................................................... 4
Leveling Your Refrigerator ................................................................... 4
Proper Air Circulation ......................................................................... 4
Electrical Requirements ....................................................................... 4
Door Alignment ................................................................................. 5
Reversing the Door ............................................................................. 5
Refrigerator Features and Use .................................................... 7
General Features ............................................................................... 7
Refrigerator Interior Shelves ................................................................. 7
Using Dispense-A-Can
™
..................................................................... 7
Crisper ............................................................................................. 7
Defrosting Your Refrigerator ................................................................ 8
Food Storage Information .................................................................. 8
Normal Operating Sounds .................................................................. 9
Proper Refrigerator Care and Cleaning ...................................... 9
Cleaning and Maintenance ................................................................. 9
Light Bulb Replacement ..................................................................... 10
Power Interruptions ........................................................................... 10
Vacations and Moving Care .............................................................. 10
Troubleshooting ..........................................................................11
Warranty .....................................................................................13
Downloaded from www.Manualslib.com manuals search engine


4
English
Installing Your Refrigerator
Unpacking Your Refrigerator
1. Remove all packaging material. This includes the foam base and all adhesive
tape holding the refrigerator accessories inside and outside.
2. Inspect and remove any remains of packing, tape or printed materials before
powering on the refrigerator.
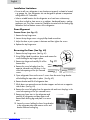
Leveling Your Refrigerator
• Your refrigerator has two leveling legs which are located in the front bottom
corners of your refrigerator. After properly placing your
refrigerator in its final position, you can level your refrigerator.
• Leveling legs can be adjusted by turning them counterclockwise to raise your
refrigerator or by turning them clockwise to lower your refrigerator. The
refrigerator door will close easier when the leveling legs are extended.
Proper Air Circulation
• To ensure your refrigerator works at the maximum efficiency it was designed for,
you should install it in a location where there is proper air circulation, plumbing
and electrical connections.
• The following are recommended clearances around the refrigerator:
Sides……………3/4" (19mm)
Top....................2" (50mm)
Back..................2" (50mm)
WARNING: ELECTRICAL REQUIREMENT - SHOCK HAZARD
Electrical Requirement
• Make sure there is a suitable power outlet (120 volts, 15 amps outlet) with proper
grounding to power the refrigerator.
• Avoid the use of three prong adapters or cutting off the third grounding prong
in order to accommodate a two prong outlet. This is a dangerous practice since
it provides no effective grounding for the refrigerator and may result in shock
hazard.
WARNING: USE OF EXTENSION CORDS- POTENTIAL SAFETY
HAZARD
Use of Extension Cords
• Avoid the use of an extension cord because of potential safety hazards under
certain conditions. If it is necessary to use an extension cord, use only a 3-wire
extension cord that has a 3-blade grounding plug and a 3-slot outlet that will
accept the plug. The marked rating of the extension cord must be equal to or
greater than the electrical rating of the appliance. DO NOT USE EXTENSION
CORD LONGER THAN 12 FT.
Downloaded from www.Manualslib.com manuals search engine

Installation Limitations
• Do not install your refrigerator in any location not properly insulated or heated,
e.g. garage, etc. Your refrigerator was not designed to operate in temperature
settings below 55˚ Fahrenheit.
• Select a suitable location for the refrigerator on a hard even surface away
from direct sunlight or heat source, e.g. radiators, baseboard heaters, cooking
appliances, etc. Any floor unevenness should be corrected with the leveling legs
located on the front bottom corners of the refrigerator.
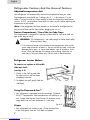
Door Alignment
Freezer Door: (see fig. #1)
1. Remove the top hinge cover.
2. Loosen the top hinge screws using a phillips head screwdriver.
3. Adjust the door or put a spacer in between and then tighten the screws.
4. Replace the top hinge cover.
Reversing the Door (See Fig. #4)
1. Remove the top hinge cover. (See Fig. #1)
2. Using Phillips Head Screwdriver, loosen and remove the
screws holding the top hinge in place.
3. Remove top hinge and carefully lift off the
freezer door.
4. Remove the screw hole plugs from the
opposite side and insert the plugs in the
screw hole openings of the just removed
screws.
5. Open refrigerator Door and unscrew 2 screws from the center hinge bracket
while holding the open door in place. (See Fig. #2)
6. Remove bracket and lift off refrigerator door
7. While doors are removed unscrew the door stoppers and reinsert on opposite
side of door. (See Fig. #3)
8. Remove the screw hole plugs from the opposite side and insert the plugs in the
screw hole openings of the just removed screws.
9. Remove any loose items in the refrigerator and
carefully tilt refrigerator and lean against wall.
Remove both leveling legs and place in a secure
area.
10. Loosen the screws holding the lower hinge bracket
to the refrigerator door and remove screws and
bracket. Remove leveling leg
1
0
2
3
4
5
6
7
5
English
Fig. #1
Fig. #2
Downloaded from www.Manualslib.com manuals search engine

6
English
11. Remove screws from the other side and insert
in the previously removed screw holes. Remove
leveling leg.
12. Remove door pin by turning counter clockwise
and reinsert to the underside of the bracket and
tighten.
13. Align bracket and insert (2) remaining screws
into the holes provided . Tighten all the way.
Replace leveling legs and place refrigerator in
upright position.
14. Replace washers and cap over pin. Align hole in
the refrigerator door with the door pin and gently
push down until firm.
15. Insert pin from center hinge bracket into
refrigerator door hole and align center hinge
bracket holes to the screw holes in the cabinet.
16. Insert 2 screws and tighten.
17. Place washers on the center hinge bracket pin
and align the freezer door holes and insert into pin.
18. Replace screws on the top hinge cover, align door and tighten screws.
19. Replace top hinge cover.
Fig. #3
Fig. #4
Hole Plugs
Door Axis
Hole Cover
Hole Plugs
Tall Leg Tall Leg
Screws
Screws
Short Leg
Bottom
Hinge
Middle
Hinge
Downloaded from www.Manualslib.com manuals search engine

7
English
Refrigerator Features And Use General Features
Adjustable temperature dial:
Your refrigerator will automatically maintain the temperature level you select.
The temperature control dial has 7 settings plus 0. 1 is the warmest. 7 is the
coldest. Turning the dial to 0 Stops cooling in both the refrigeration and freezer
sections. At first, set the dial to 4 and allow 24 hours to pass before adjusting the
temperature to your needs.
(Note: If the refrigerator has been placed in a horizontal or tilted position for
any period of time wait 24 hours before plugging the unit in.)
Freezer Compartment / Use of the Ice Cube Trays
This compartment is designed for making ice cubes and for short-term food stor-
age (a few days at most).
WARNING: This compartment is not cold enough to freeze foods safely
for more than 5 days.
• If ice cube tray freezes to the bottom of the compartment, pour a little
warm water around it to loosen it. Do not use boiling water, which can
damage plastic parts, or sharp metal objects such as a knife or screw-
driver, which can damage the cooling system tubing. Wash the ice
cube tray in lukewarm water only. Do not wash in the dishwasher.
Refrigerator Interior Shelves
To remove or replace a full-width
slide-out shelf:
(see fig. # 5)
1. Gently tilt the shelf up and slide
forward until the shelf has been
completely removed.
2. To replace the shelf, gently slide the
shelf back.
Using the Dispense-A-Can™
• Your refrigerator is equipped with the convenient “Dispense-
A-Can™” compartment. Each compartment will hold up to six
cans. Simply load the cans from the top. To dispense a can,
simply draw one out from the bottom. It is that easy.
Crisper
• Your refrigerator has a clear crisper. Grasp the top of the
crisper and gently slide our. Push back to replace.
fig. # 5
fig. # 6
Downloaded from www.Manualslib.com manuals search engine

English
8
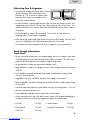
Defrosting Your Refrigerator
• For maximum energy efficiency, defrost freezer
section whenever frost accumulates to a
thickness of 1/4" or more on freezer walls.
Note that frost tends to accumulate more
during the summer months.
• To defrost freezer, remove food and ice cube tray from the freezer section. Turn
temperature control dial to OFF position. Defrosting may take a few hours. To
speed up defrost time, keep the door open and place a bowl of warm water in
the freezer.
• During the defrost, water will accumulate. Use a towel to wipe off excess
dripping water. Do not leave unattended.
• After defrosting, empty and wipe down the interior of the freezer. You may now
reset your refrigerator to the desired temperature and return food.
• Your freezer has been equipped with an ice scraper for your convenience.
Food Storage Information
Fresh Food
• When storing fresh food that is not prepackaged, be sure to wrap or store food
in airtight and moisture proof material unless otherwise noted. This will ensure
proper shelf life and prevent the transfer of odors and tastes.
• Wipe containers before storing to avoid needless spills.
• Eggs should be stored in an upright position in their original carton to maximize
shelf life.
• Fruit should be washed and dried, then stored in sealed plastic bags before
storing in the refrigerator.
• Vegetables with skins should be stored in plastic bags or containers.
• Leafy vegetables should be washed and drained and then stored in plastic bags
or containers.
• Hot food should be allowed to cool before storing in the refrigeration. This will
prevent unnecessary energy use.
• Fresh seafood should be used the same day as purchased.
• When storing meats in the fresh food section, keep in the original packaging or
rewrap as necessary. Follow the suggestions below for safe storage:
• Chicken 1-2 Days
• Ground Beef 1-2 Days
• Cold Cuts 3-5 Days
• Steaks/Roasts 3-5 Days
• Smoked/Cured Meats 7-10 Days
Downloaded from www.Manualslib.com manuals search engine

9
English
Frozen Food
• Proper freezer storage requires correct packaging. All foods must be in
packages, which do not allow the flow of air or moisture in, or out. Improper
storage will result in odor and taste transfer and will result in the drying out of
the improperly packaged food.
• Follow package or container instructions for proper storage.
• Packaging Recommendations:
Plastic containers with air tight lids
Heavy duty aluminum foil
Plastic wrap made from saran film
Self-sealing plastic bags
• Do not refreeze defrosted/thawed foods.
• It is recommended that the freezing date be marked on the packaging.
Normal Operating Sounds You May Hear
• Boiling water, gurgling sounds or slight vibrations that are the result of
the refrigerant circulating through the cooling coils.
• The thermostat control will click when it cycles on and off.
Proper Refrigerator Care and Cleaning
Cleaning and Maintenance
WARNING: To avoid electric shock, always unplug your
refrigerator before cleaning. Ignoring this warning
may result in death or injury.
CAUTION: Before using cleaning products, always read and
follow manufacturer’s instructions and warnings to
avoid personal injury or product damage.
General: Prepare a cleaning solution of 3-4 tablespoons of baking soda
mixed with warm water. Use sponge or soft cloth, dampened
with the cleaning solution, to wipe down your refrigerator.
• Rinse with clean warm water and dry with a soft cloth.
• Do not use harsh chemicals, abrasives, ammonia, chlorine
bleach, concentrated detergents, solvents or metal scouring
pads. Some of these chemicals may dissolve, damage and/or
discolor your refrigerator.
Door Gaskets: Clean door gaskets every three months according to general
instructions. Gaskets must be kept clean and pliable to assure a
proper seal
• Petroleum jelly applied lightly on the hinge side of gaskets will
keep the gasket pliable and ensure a good seal.
Downloaded from www.Manualslib.com manuals search engine

10
English
Light Bulb Replacement
1. Switch off power to refrigerator.
2. Gently pull out the clear cover
3. Replace with same type light bulb rated at 10 watts.
4 . Push the clear cover back into place.
Power Interruptions
• Occasionally there may be power interruptions due to thunderstorms or
other causes. Remove the power cord from AC outlet when a power outage
occurs. When power has been restored, replug power cord to AC outlet.
If outage is for a prolonged period, inspect and discard spoiled or thawed
food in freezer and refrigerator. Clean refrigerator before reusing.
WARNING: IF OUTAGE IS FOR A PROLONGED PERIOD, INSPECT
AND DISCARD SPOILED OR THAWED FOOD IN
FREEZER AND REFRIGERATOR. CLEAN REFRIGERATOR
BEFORE REUSING.
Vacation and Moving Care
• For long vacations or absences, empty food from refrigerator and
freezer, move the temperature DIAL to the OFF position and clean the
refrigerator and door gaskets according to "General cleaning" section.
Prop doors open, so air can circulate inside.When moving always move
the refrigerator vertically. Do not move with the unit lying down. Possible
damage to the sealed system could occur.
Downloaded from www.Manualslib.com manuals search engine

Refrigerator does not operate:
• Check if thermostat control is not in the “0” position.
• Check if refrigerator is plugged in.
• Check if there is power at the AC outlet, by checking the circuit breaker.
Food temperature appears too warm:
• Frequent door openings.
• Allow time for recently added warm food to reach fresh food temperature.
• Check gaskets for proper seal.
• Adjust temperature control to colder setting.
Food temperature is too cold:
• If temperature control setting is too cold, adjust to a warmer setting and allow
several hours for temperature to adjust.
Refrigerator runs too frequently:
• This may be normal to maintain constant temperature during high temperature
and humid days.
• Doors may have been opened frequently or for an extended period of time.
• Check gasket for proper seal.
• Check to see if doors are completely closed.
Moisture build up on interior or exterior of the refrigerator:
• This is normal during high humidity periods.
• Prolonged or frequent door openings.
• Check door gaskets for proper seal.
Refrigerator has an odor:
• Interior needs cleaning.
• Foods improperly wrapped or sealed are giving off odors.
Refrigerator door does not shut properly:
• Level the refrigerator.
• Re-align refrigerator door.
• Check for blockages, e.g. food containers, crisper cover,shelves, bins, etc.
11
English
Troubleshooting
Downloaded from www.Manualslib.com manuals search engine

12
English
Popping or cracking sound when the compressor comes on:
• Check to ensure the refrigerator is level.
• The floor may be uneven or weak. The refrigerator rocks on the floor when it is
moved slightly. Be sure the floor can adequately support the refrigerator. Level the
refrigerator by putting wood or metal shims under part of the refrigerator.
• The refrigerator is touching the wall. re-level the refrigerator and move it from the
wall. See the “Installing Your Refrigerator” section.
Refrigerator light does not work
• Check power supply.
• Tighen bulb in socket.
• Replace burned out bulb.
Downloaded from www.Manualslib.com manuals search engine

English
Limited Warranty
13
What is covered and for how long?
This warranty covers all defects in workmanship
or materials for a period of:
12 months for labor (Carry-in Only)
12 months for parts (functional parts only)
5 years for sealed system
The warranty commences on the date of item
purchase. Customer shall provide Haier with
proof of the date of purchase, brand, model
and serial number for verification prior to any
warranty service being provided.
EXCEPTIONS:
Commercial or Rental Use warranty
90 days for labor
90 days for parts
No other warranty applies
What is covered/Not covered?
1. The mechanical and electrical parts of the
appliance which serve the functional purpose
of this appliance are covered for a period of
12 months. This includes all parts except finish
and trim.
2. Manufacturing defects to the components of
the sealed system (e.g. hermetic compressor,
condenser and evaporator) are covered for a
period of 5 years from the date of purchase.
Any damages to such components caused
by mechanical abuse, improper handling or
shipping will not be covered.
3. The limited warranty does not cover any credit
or refund for any loss or injury caused by the
product or defects to the product including
but not limited to incidental or consequential
damages.
What will be done?
1. Any mechanical or electrical part that proves
to be defective in normal usage during the
specified warranty period will be repaired or
replaced at Haier’s discretion.
If it is determined that repair is not appropriate
or replacement part is unavailable for repair,
Haier will exchange the product with a
refurbished or new product the same or similar
to the original at its discretion.
2. There will be no charge to the purchaser for
functional replacement parts and labor on
any covered items during the initial 12-month
period. Beyond this period, only components
of the sealed system are covered, labor is
not provided and must be paid for by the
customer.
3. To have your product serviced, please contact
Haier customer service 1-877-337-3639.
THIS WARRANTY COVERS APPLIANCES
WITHIN THE CONTINENTAL UNITED STATES,
PUERTO RICO AND CANADA. IT DOES NOT
COVER THE FOLLOWING:
Damages from improper installation.
Damages incurred during shipping.
Defects other than manufacturing.
Damage from misuse, abuse, accident, alteration,
lack of proper care and maintenance or incorrect
current or voltage.
Damage from other than household use.
Damage from service by other than an authorized
dealer or service center.
Decorative trims or replaceable light bulbs.
Transportation and shipping.
Labor (after the initial 12 months).
Credit or Refund for products over 30 days past
date of purchase
Food loss for food spoiled as a direct result of
mechanical failure of the product or of any delay
in providing service, repair, replacement.
This limited warranty doesn’t apply to refurbished
product or unit purchased as/like new or second-
hand.
THIS LIMITED WARRANTY IS GIVEN IN LIEU
OF ALL OTHER WARRANTIES, EXPRESSED
OR INCLUDING THE WARRANTIES OF
MERCHANTABILITY AND FITNESS FOR A
PARTICULAR PURPOSE
The remedy provided in this warranty is exclusive
and is granted in lieu of all other remedies.
This warranty does not cover incidental or
consequential damages, so the above limitations
may not apply to you. Some states do not allow
limitations on how long an implied warranty lasts,
so the above limitations may not apply to you.
This warranty gives you specific legal rights, and
you may have other rights, which vary from state
to state.
Haier America
New York, NY 10018
Downloaded from www.Manualslib.com manuals search engine

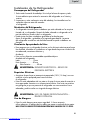
ADVERTENCIA: Lea todas las instrucciones antes de utilizar este
aparato. Cuando utilice este aparato, siempre
ejerza las precauciones de seguridad básicas,
incluyendo las siguientes:
NOTA: Si el refrigerador se ha ubicado en una posición horizontal o
inclinada durante cualquier lapso de tiempo, espere 24 horas
antes de enchufar la unidad.
1) Utilice este aparato exclusivamente para su uso especificado, según
se describe en esta guía de uso y cuidados.
2) Este refrigerador debe ser adecuadamente instalado siguiendo las
instrucciones de instalación antes de utilizarse. Observe las instruc-
ciones para conectarlo a tierra en la sección de instalación.
3) Este refrigerador no debe de ser empotrado o colocado dentro de un
gabinete de cocina. Ha sido diseñado exclusivamente para ser insta-
lado por separado.
4) Nunca desconecte su refrigerador tirando del cordón eléctrico. Sujete
siempre la clavija firmemente y retírela del contacto evitando torcerla.
5) Repare o reemplace inmediatamente cualquier cordón eléctrico que
muestre raspaduras o daños. No utilice ningún cordón que muestre
señales de abrasión o grietas en su extensión, clavija o terminal de
conexión.
6) Si su antiguo refrigerador no está siendo utilizado, recomendamos
quitarle las puertas. Ello reducirá los riesgos de accidentes infantiles.
7)
ADVERTENCIA: Una vez que su refrigerador se encuentre
operando, no toque las superficies frías en el compartimento del
congelador, especialmente si sus manos se encuentran húmedas
o mojadas. Su piel puede adherirse a estas superficies extrema-
damente frías.
8) No congele alimentos que hayan sido previamente descongelados en
su totalidad. El Departamento de Agricultura de los Estados Unidos,
en su Boletín de Casa y Jardín No. 69 indica que "…Usted puede
volver a congelar, sin correr ningún riesgo, aquellos alimentos conge-
lados que hayan sido descongelados y que aún contengan cristales
de hielo o que aún se encuentren fríos con una temperatura por deba-
jo de los 4.5° C (40°F)".
"…Carnes molidas, aves, o pescados, descongelados que despidan
olor extraño o muestren decoloración no deben volver a congelarse
y no deben consumirse. El helado descongelado debe desecharse. Si
el olor o color de cierto alimento es deficiente o cuestionable, deséch-
elo. Tal alimento podría resultar peligroso si lo ingiriese."
1
Español
REGLAS GENERALES DE SEGURIDAD
Downloaded from www.Manualslib.com manuals search engine

2
"…Incluso el descongelar parcialmente y volver a congelar los ali
mentos disminuye su calidad de consumo, especialmente si se trata
de frutas, verduras y alimentos preparados. La calidad de consumo
de las carnes rojas es menormente afectada en comparación a la de
muchos otros alimentos. Utilice los alimentos que hayan vuelto a
congelarse lo más pronto posible para evitar que sufran mayor dete
rioro en su calidad de consumo."
9) No emplee ningún aparato eléctrico o instrumento punzocortante
para descongelar su refrigerador.
10) Desconecte su refrigerador antes de limpiarlo o antes de hacer
cualquier reparación.Note: If for any reason this product requires
service, we strongly recommend that a certify technician perform
service.
11) No opere su refrigerador en la presencia de gases explosivos.
GUARDE ESTAS
INSTRUCCIONES
PELIGRO
Existe el riesgo de que los niños puedan quedar atrapados-
dentro. Antes de tirar su refrigerador o congelador, quite las
puertas. Deje los anaqueles en su lugar para que los niños
no puedan entrar fácilmente en el interior.
Español
Agrafer le ticket de caisse au guide. Il devra être présenté pour tout
service après-vente sous garantie.
Downloaded from www.Manualslib.com manuals search engine

Español
ÍNDICE
Reglas Generales de Seguridad .................................................. 1
Piezas y Características ................................................................ 3
Instalcíon de su Refirgerador ...................................................... 4
Desempaque del Refrigerador ............................................................. 4
Nivelacíon del Refrigerador ................................................................ 4
Circulación Apropiadado del Aire ....................................................... 4
Requisitos Eléctricos ........................................................................... 4
Alineacion de la Puerta ...................................................................... 5
Reversing the Door ............................................................................. 5
Uso u Funciones del Refrigerador ............................................... 7
Dial de Temperatura Ajustable ............................................................. 7
Uso del "Dispense-A-Can" ................................................................... 7
Cajon Para Verduras y Frutas .............................................................. 7
Como D escongelar su Refrigerador ..................................................... 8
Alimentos Frescos .............................................................................. 9
Cuidados y Limpieza Asecuada ................................................ 10
Verificacion de Problemas ........................................................12
Garantia Limitado ....................................................................... 13
Downloaded from www.Manualslib.com manuals search engine

3
Español
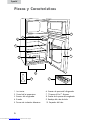
Piezas y Características
1. Luz interior
2. Control de la temperatura
3. Estantes del refrigerador
4. Rizador
5. Piernas de nivelación delanteras
6. Estantes de puerta del refrigerador
7. "Dispense-A-Can
™
" Almacen
8. Estante de la puerta del congelador
9. Bandeja del cubo de hielo
10. Raspador del hielo
910
1
2
7
8
4
6
3
5
Downloaded from www.Manualslib.com manuals search engine

4
Español
Instalación de Su Refrigerador
Desempaque del Refrigerador
1. Retire todo el material de embalaje. Esto incluye la base de espuma y toda
la cinta adhesiva que sostiene los accesorios del refrigerador en el interior y
exterior.
2. Inspeccione y retire cualesquier restos del embalaje, la cinta adhesiva o los
materiales impresos antes de encender
el refrigerador.
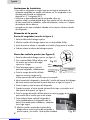
Nivelación del Refrigerador
• Su refrigerador tiene dos patas niveladoras que están ubicadas en las esquinas
frontales de su refrigerador. Después de haber colocado su refrigerador en la
posición definitiva, puede nivelar su refrigerador.
• Puede ajustar las patas niveladoras girándolas a la derecha para
elevar el refrigerador y girándolas a la izquierda para bajarlo. La puerta
del refrigerador cerrará con más facilidad cuando las patas niveladoras son
elevadas.
Circulación Apropiadado del Aire
• Para asegurar que su refrigerador funcione con la eficiencia máxima para la que
fue diseñado, éste debe ser instalado en un lugar donde haya una circulación de
aire adecuada, conexiones eléctricas y
de tubería.
• Estas son las distancias recomendadas que deben dejarse
alrededor del refrigerador:
Lados..........................19 mm
Parte Superior..............50 mm
Parte Posterior..............50 mm
ADVERTENCIA: REQUISITOS ELÉCTRICOS – RIESGO DE
DESCARGA ELÉCTRICA
Requisitos Eléctricos
• Asegúrese de que haya un tomacorriente apropiado (120 V, 15 Amp.) con una
conexión a tierra apropiada para hacer funcionar
el refrigerador.
• Evite el uso de adaptadores de tres patas o el cortar la tercer pata de conexión a
tierra para poder conectar en un tomacorriente bifásico. Esto sería una práctica
muy peligrosa ya que no proveería al refrigerador con una conexión a tierra
adecuada y podría resultar un riesgo de descarga eléctrica.
ADVERTENCIA: USO DE CABLES DE PROLONGACIÓN –
PELIGRO POTENCIAL
Uso de Alargues
• Evite el uso de alargues para mayor seguridad. Si fuese necesario
utilice solamente un alargue de tres cables que posea un enchuefe de tres patas.
NO UTILICE CABLES DE PROLOGACIÓN MÁS LARGOS DE 12 PIES.
Downloaded from www.Manualslib.com manuals search engine

5
Español
Limitaciones de Instalación
• No instale su refrigerador en ningún lugar que no tenga el aislamiento o la
calefacción apropiada, por ejemplo una cochera, etc. Su refrigerador no fue
diseñado para funcionar en temperaturas
abajo de los 12° Centígrados (55°F).
• Seleccione un lugar adecuado para el refrigerador sobre una
superficie sólida y nivelada alejado de los rayos directos del sol o de una fuente
de calor como la de los radiadores, rejillas de calefacción, estufas, etc. Cualquier
desnivelación del piso debe ser
corregido con las patas niveladoras ubicadas en las esquinas inferiores frontales
del refrigerador.
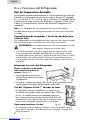
Alineación de la puerta
Puerta del congelador (consulte la figura 1)
1. Retire la cubierta de la bisagra superior.
2. Afloje los tornillos de la bisagra superior con un destornillador Phillips.
3. Ajuste la puerta o coloque un separador en el medio y luego ajuste los tornillos.
4. Vuelva a colocar la cubierta de la bisagra superior.
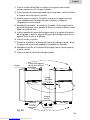
Cómo dar vuelta la puerta (ver figura 4)
1. Retire la cubierta de la bisagra superior. (ver figura 1)
2. Con un destornillador Phillips afloje y quite
los tornillos que sostienen la bisagra
superior en su lugar.
3. Quite la bisagra superior y quite la
puerta del congelador cuidadosamente.
4. Quite los tarugos de tornillos del lado
opuesto e inserte los tarugos en los
orificios para tornillos de los tornillos que se han quitado.
5. Abra la puerta del refrigerador y desatornille 2 tornillos del soporte de la bisagra
del centro mientras que mantiene la puerta abierta en su lugar. (ver figura 2)
6. Quite el soporte y quite la puerta del refrigerador.
7. Cuando las puertas se hayan quitado, desatornille los topes y reinsértelos en el
lado opuesto de la puerta. (ver figura 3)
8. Quite los tarugos de tornillos del lado opuesto e inserte los tarugos en los orificios
para tornillos de los tornillos que se han quitado.
9. Quite cualquier objeto suelto del refrigerador e
incline cuidadosamente el refrigerador sobre la
pared. Quite ambas patas niveladoras y colóquelas
en un lugar seguro.
10. Afloje los tornillos sosteniendo el soporte de la
bisagra inferior contra la puerta del refrigerador y
quite el soporte y los tornillos. Quite la pata niveladora
1
0
2
3
4
5
6
7
Fig. #1
Fig. #2
Downloaded from www.Manualslib.com manuals search engine

6
Español
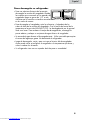
11. Quite los tornillos del otro lado e insértelos en los agujeros para tornillos
quitados previamente. Quite la pata niveladora.
12. Quite el pasador de la puerta girándolo hacia la izquierda y vuelva a colocarlo
en la parte inferior del soporte y ajústelo.
13. Alinee el soporte e inserte los (2) tornillos restantes en los agujeros provistos.
Ajuste completamente. Reemplace las patas niveladoras y coloque el
refrigerador en posición vertical.
14. Reemplace las arandelas y el casquillo en el pasador. Alinee el agujero de la
puerta del refrigerador con el pasador de la puerta y empuje suavemente hacia
abajo hasta que esté firme.
15. Inserte el pasador del soporte de la bisagra central en el agujero de la puerta
del refrigerador y alinee los agujeros del soporte de la bisagra central con los
agujeros de los tornillos en el gabinete.
16. Inserte 2 tornillos y ajústelos.
17. Coloque las arandelas en el pasador del soporte de la bisagra central y alinee
los agujeros de la puerta del congelador insertándolas en el pasador.
18. Reemplace los tornillos en la cubierta de la bisagra superior, alinee la puerta y
ajuste los tornillos.
19. Vuelva a colocar la cubierta de la bisagra superior.
Fig. #4
Tarugos
Cubierta del agujero
del eje de la puerta
Tarugos
Pata alta Pata alta
Tornillos
Tornillos
Pata corta
Bisagra
inferior
Bisagra
del medio
Downloaded from www.Manualslib.com manuals search engine

7
Español
Uso y Funciónes del Refrigerador
Dial de Temperatura Ajustable
Su refrigerador mantendrá automáticamente el nivel de temperatura que seleccione.
El dial de control de temperatura tiene 7 ajustes además del ajuste "0" (apagado).
El 1 es el más tibio. El 7 es el más frío. El girar el dial hasta "0" (apagado), detiene
el enfriamiento en ambas secciones del refrigerador y congelador. Primero, ajuste
el dial a 4 y permita que pasen 24 horas antes de ajustar la temperatura a sus
necesidades.
Nota: Si el refrigerador ha sido colocado en una posición horizontal o
inclinada durante algún periodo de tiempo, espere 24 horas antes de enchufar
la unidad.
Compartimiento de congelador / Uso de las bandejas para
cubos de hielo
Este compartimiento está diseñando para hacer cubos de hielo y para el almace-
namiento de alimentos a corto plazo (unos pocos días como mucho).
ADVERTENCIA: Este compartimiento no está lo suficientemente frío como
para congelar alimentos por más de 5 días.
• Si la bandeja de cubos de hielo se pega al piso del compartimiento, vierta
un poco de agua tibia alrededor para aflojarla. No utilice agua hirviendo,
que puede dañar piezas plásticas; u objetos de metal filosos como un cuchillo
o destornillador, que pueden dañar la tubería del sistema de enfriamiento.
Lave la bandeja de cubos de hielo en agua tibia solamente. No la lave en el
lavavajillas.
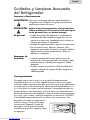
Entrepaños Interiores del Refrigerador
Quitar o substituir un de ancho
total resbala-hacia fuera el
estante: (Vea fig. # 1)
1. Levante ligeramente el entrepaño y
deslícelo hacia el frente hasta sacarlo
completamente.
2. Para volver a colocar el entrepaño, seleccione la ubicación deseada y deslice
cuidadosamente el entrepaño hasta que quede enganchado.
Uso del “Dispense A-Can™” Servidor de Latas
• El refrigerador puede venir equipado con un dispositivo muy
conveniente para guardar envases de hojalata o latas, “Dispense
A-Can
™
Los compartimientos tienen capacidad para unas 4
latas. Simplemente coloque las latas por la parte de arriba del
compartimiento. Para sacar una lata, sólo es necesario remover
la que está en el fondo del compartimiento. Es así de fácil.
Cajón para verduras y frutas
• Su refrigerador tiene un cajón para verduras y frutas transparente. Tome la
parte superior del cajón y deslícelo hacia fuera suavemente. Empújelo para
volver a colocarlo.
fig. # 5
fig. # 6
Downloaded from www.Manualslib.com manuals search engine

8
Español
Cómo descongelar su refrigerador
• Para una máxima eficiencia de la energía,
descongele la sección del congelador cuando
la escarcha que se acumule en las paredes del
congelador tenga un grosor de 1/4” o más.
Advierta que la escarcha se tiende a acumular
en los meses de verano.
• Para descongelar el congelador, quite los alimentos y la bandeja de los
cubos de hielo de la sección del congelador. Gire la perilla de control de la
temperatura a la posición APAGADO (OFF). La descongelación por lo general
lleva unas horas. Para acelerar el tiempo de descongelación, mantenga la
puerta abierta y coloque un recipiente de agua tibia en el congelador.
• Se acumulará agua durante el descongelamiento. Utilice una toalla para quitar
el exceso del agua que gotea. No desatienda el refrigerador.
• Luego de descongelar, vacíe y pase un trapo al interior del descongelador.
Ahora puede volver a configurar el congelador a la temperatura que desee y
volver a colocar los alimentos.
• Su refrigerador viene con un raspador de hielo para su comodidad.
Downloaded from www.Manualslib.com manuals search engine

9
Español
Ruidos de Operación Normales
que Pueda Escuchar
• Agua hirviendo, ruidos gorgoteantes o ligeras vibraciones que son el resultado
del gas refrigerante circulando a través del serpentín de enfriamiento.
• La commande de thermostat cliquettera quand elle fait un cycle en marche et en
parar.
Información sobre el Almacenamiento de Alimentos
Alimentos Frescos
• Cuando almacene alimentos frescos que no estén preempacados, asegúrese
de envolver o almacenar los alimentos en un material hermético y a prueba de
humedad a menos que se indique de otra manera. Esto asegurará la vida útil de
los entrepaños y prevendrá la contaminación de olores y sabores.
• Limpie los contenedores antes de almacenarlos para evitar
derrames innecesarios.
• Los huevos deben ser almacenados en su caja original para aumentar la vida útil
del entrepaño.
• Las frutas deben ser lavadas y secadas y luego almacenadas en el cajón para
frutas y verduras en el ajuste de baja humedad para mantener su frescura. Si
no tiene cajones con control de humedad, coloque las frutas en bolsas plásticas
selladas antes de almacenarlas en el cajón.
• Los vegetales con piel deben ser almacenadas en bolsas o contenedores de
plástico y luego ser almacenadas en el cajón para frutas y verduras con un ajuste
de baja humedad.
• Los vegetales frondosos deben ser lavados y escurridos y luego almacenados en
bolsas o contenedores de plástico en el cajón para frutas y verduras con un ajuste
de alta humedad.
• Debe esperar a que los alimentos calientes se enfríen antes de almacenarlos en el
refrigerador. Esto prevendrá el uso innecesario de energía.
• Los mariscos frescos deben ser usados el mismo día que se compren.
• Cuando almacene carnes en la sección de alimentos frescos, manténgala
en el paquete original o vuélvala a empacar conforme sea necesario. Siga las
sugerencias de abajo para un almacenamiento seguro:
• Pollo 1-2 Días
• Carne Molida de Res 1-2 Días
• Carnes Frías 3-5 Días
• Bistecs/Asados 3-5 Días
• Carnes Ahumadas/Curadas 7-10 Días
Downloaded from www.Manualslib.com manuals search engine

Descongele cada vez que la escarc h a en la pared del compartimento del
congelador alcance 3,3 mm (1/8 de pulgada) de espesor. Nunca utilice ningún
instrumento metálico o punzoc o rtante para retirar la escarcha, ya que podría dañar
los canales tubul a res de enfriamiento (Un tubo de enfriamiento perforado pro v o c
a r á serios daños a la unidad y anulará la garantía). Recomendamos emplear una
espátula de plástico. Para descongelar, retire los al mentos y la charola para cubos
de hielo del compartimento del congelador. Coloque la charola recolectora de goteo
en su lugar, y gire el selector y control de temperatura a la posición de "APAGADO".
El descongelamientogeneralmente se lleva a cabo en unas cuantas horas. Para
descongelar más rápido, mantenga la puert
a abiert y coloque un recipiente con agua
tibia dentro del refrigerador. Después de
descongelar, vierta el agua de la charola
recolectora de goteo en el fregaderoy l-ávela
con agua tibia.
Descongelamiento
Español
10
Cuidados y Limpieza Asecuada
del Refrigerador
Limpieza y Mantenimiento
ADVERTENCIA: Para evitar una descarga eléctrica siempre desenchufe su
refrigerador antes de limpiarlo. El ignorar esta advertencia
puede causar esiones o la muerte.
PRECAUCIÓN: Before using cleaning products, always read and
follow manufacturer’s instructions and warnings to
avoid personal injury or product damage.
En general: • Prepare una solución de limpieza de 3-4 cucharadas de
bicarbonato de sodio mezclado con agua tibia. Use una
esponja o un trapo suave, humedecidos con la solución de
limpieza, para limpiar su refrigerador.
• Enjuague con agua limpia tibia y seque con un trapo suave.
• No use químicos fuertes, abrasivos, amoniaco, cloro,
detergentes concentrados, disolventes o estropajos metálicos.
Algunos de estos químicos pueden disolver, dañar y/o
decolorar su refrigerador.
Empaques de
la puerta: • Limpie los empaques de la puerta cada tres meses de
acuerdo a las instrucciones generales. Los empaques deben
mantenerse limpios y flexibles para asegurar un sellado
apropiado.
• El aplicar un poco de vaselina en el lado articulado de los
empaques mantendrá el empaque flexible y asegurará un
sellado apropiado.
Downloaded from www.Manualslib.com manuals search engine

Español
11
Interrupciones de Energía
• Pueden ocurrir ocasionalmente interrupciones de energía debido a
tormentas eléctricas u otras causas. Desenchufe el cable eléctrico del
tomacorriente de corriente alterna cuando ocurra una interrupción en el sistema
eléctrico. Cuando la electricidad haya regresado, vuelva a conectar el cable
eléctrico a un tomacorriente de corriente alterna. Si ocurre una interrupción en
el sistema eléctrico durante un periodo prolongado, inspeccione y deseche los
alimentos descongelados o echados a perder en el refrigerador o congelador.
Limpie el refrigerador antes de volver a usarlo.
ATTENTION: SI EL CORTE SE PRODUCE DURANTE UN PERÍODO
PROLONGADO, INSPECCIONE Y DESCARTE LOS
ALIMENTOS QUE SE ECHARON A PERDER O
SE DESCONGELARON EN EL CONGELADOR Y
REFRIGERADOR. LIMPIE EL REFRIGERADOR ANTES DE
USARLO NUEVAMENTE.
Vacaciones y Mudanza
• Durante ausencias largas o vacaciones, vacíe la comida del
refrigerador y congelador, coloque el dial de temperatura a la posición de OFF
(apagado) y limpie el refrigerador y los empaques de la puerta de acuerdo a
la sección de “Limpieza general”. Mantenga las puertas abiertas para que el
aire pueda circular en el interior. Al mudarse, siempre traslade el refrigerador
verticalmente. No lo traslade con la unidad colocada horizontalmente. Pudiera
ocurrir un posible daño el sistema sellado.
Consejos para ahorrar energía
• El refrigerador debe ubicarse en la zona más fresca de la habitación, lejos de
artefactos que generen calor o conductos de calefacción, y lejos de la luz directa
del sol.
• Deje que los alimentos calientes se enfríen antes de guardarlos en el refrigerador.
Cuando se carga el refrigerador en exceso, el compresor debe funcionar más
tiempo y por lo tanto se aumenta el consumo de energía. Los alimentos que se
refrigeran demasiado lentamente pueden perder la calidad o echarse a perder.
• Asegúrese de envolver correctamente los alimentos y de secar los recipientes
antes de colocarlos en el refrigerador.
• Los estantes metálicos no deben revestirse con papel aluminio, papel encerado o
toallas de papel. Los revestimientos interfieren en la circulación del aire frío, lo
que hace que el refrigerador sea menos eficiente.
• Organice los alimentos de manera tal que se reduzcan la cantidad de veces que
se abre la puerta y las búsquedas prolongadas. Quite tantos elementos como
sean necesarios de una vez y cierre la puerta con la mayor rapidez posible.
Downloaded from www.Manualslib.com manuals search engine

Verificación de Problemas
El Refrigerador no Funciona:
• Revise que el control del termostato no esté en la posición de “0” (apagado).
• Revise que el refrigerador esté conectado.
• Revise que haya corriente eléctrica en el tomacorriente de corriente alterna,
revisando el interruptor de circuito.
La temperatura de los alimentos parece estar demasiado
tibia:
• Apertura constante de la puerta.
• Dele tiempo a los alimentos tibios para que puedan alcanzar una
temperatura fresca.
• Revise que los empaques estén bien sellados.
• Ajuste el control de temperatura al ajuste más frío.
La temperatura de los alimentos es demasiado fría:
• Si el ajuste del control de temperatura es muy frío, ajústelo a una
temperatura más cálida y permita que pasen varias horas hasta que la
temperatura se ajuste.
El refrigerador se enciende frecuentemente:
• Esto puede ser normal para mantener una temperatura constante durante
temperaturas altas y días húmedos.
• Las puertas pudieron haberse abierto frecuentemente o durante un
largo periodo de tiempo.
• Revise que el empaque esté bien sellado.
• Revise que las puertas estén completamente cerradas.
Acumulación de humedad en el interior o exterior del
refrigerador:
• Esto es normal durante periodos de alta humedad.
• Apertura constante o prolongada de la puerta.
• Revise que los empaques de la puerta estén bien sellados.
El refrigerador despide un olor:
• Necesita limpiar el interior.
• Los alimentos envueltos o sellados inadecuadamente están
despidiendo los olores.
La luz del refrigerador no funciona:
• Nivele el refrigerador.
• Vuelva a alinear la puerta del refrigerador/congelador.
• Revise que no haya obstrucciones como contenedores de alimentos, la cubierta
del cajón para frutas y verduras, entrepaños,
recipientes, etc.
Español
12
Downloaded from www.Manualslib.com manuals search engine

Garantía Limitado
Español
13
¿Qué está cubierto y por cuánto tiempo?
Esta garantía cubre cualquier defecto en la
manufactura o empleo de materiales por un
plazo de:
12 meses de mano de obra (llevar-en
solamente)
12 meses en componentes
5 años en el sistema sellado
La garantía comienza en la fecha de
compra del artículo, y la factura original
de compra debe presentarse al centro de
servicio autorizado para poder efectuar
cualquier reparación que esté bajo
garantía.
EXCEPCIONES: Garantía por Uso
Comercial o Bajo Arrendamiento
90 meses en mano de obra (únicamente en
taller)
90 días en componentes
Ninguna otra garantía es válida
¿Qué está cubierto?
1. Los componentes mecánicos y eléctricos
que cumplen con alguna función de este
aparato durante un plazo de 12 meses.
Esto incluye cualquier componente con
excepción de acabados y molduras.
2. Los componentes del sistema sellado,
como por ejemplo: compresor hermético,
condensador, y evaporador, por defectos
de manufactura durante un plazo de 5 años
a partir de la fecha de compra. Cualesquier
daños a tales componentes causados por
abuso mecánico o manejo o transportación
inadecuada no serán cubiertos.
3. La garantía limitada no cubre ningún
crédito o reembolso para ninguna
pérdida o lesión causada por el producto
o los defectos al producto que incluye
sino no limitada a los daños fortuitos o
consecuentes.
¿Qué se hará?
1. Repararemos o reemplazaremos, a
discreción nuestra, cualquier componente
mecánico o eléctrico que se muestre
defectuoso por uso normal durante el plazo
así especificado.
2. No habrá cargos para el comprador por
las partes y la mano de obra en cualesquier
artículos cubiertos durante el periodo inicial
de 12-meses. Al término de este periodo
solo las partes son cubiertas en la garantía
restante. La mano de obra no está provista
y debe ser cubierta por el cliente.
3. Localice su centro de servicio autorizado
más cercano. Para conocer el nombre
del centro de servicio más próximo a su
domicilio, por favor llame al
1-877-337-3639 (Válido solo en E.U.A).
ESTA GARANTIA CUBRE APARATOS
DENTRO DEL TERRITORIO CONTINENTAL
DE LOS ESTADOS UNIDOS, PUERTO RICO
Y CANADÁ.
Daños por instalación inadecuada.
Daños por transportación.
Defectos que no sean por manufactura.
Daños por negligencia, abuso, accidente,
alteraci-ón, falta de cuidado adecuado y
de mantenimiento, o conexión a tensión
eléctrica incorrecta.
Daños que no sean por uso doméstico.
Daños por servicio que no sea
proporcionado a través de un distribuidor
o centro de servicio autorizado. Molduras
decorativas o focos reemplazables. Envío y
transportación.
Mano de obra (después de los primeros 12
meses).
ESTA GARANTIA LIMITADA ES PROVISTA
EN SUSTITUCION A CUALQUIER OTRA
GARANTIA EXPRESADA O QUE IMPLIQUE
LAS GARANTIAS MERCANTILES SUJETAS A
CIERTO PROPOSITO.
El amparo provisto por esta garantía es de
uso exclusivo y se otorga en sustitución a
cualquier otro amparo.
Esta garantía no cubre daños incidentales
o sus derivados, por lo que las anteriores
restricciones pueden serle ajenas. En ciertos
estados no se permiten restricciones en lo
que se refiere a la duración implícita de
una garantía, por lo que las anteriores
restricciones pueden serle ajenas.
Esta garantía le otorga ciertos derechos
legales y es posible que usted goce de otros
derechos, los cuales varían de estado a
estado.
Haier America
New York, NY 10018
Downloaded from www.Manualslib.com manuals search engine

120V~60Hz
Made in China
Fabriqué en Chine
Hecho en China
HNDE03VS
Issued: August 2009
©2009 Haier America Trading, LLC. All Rights Reserved. 101070 0709
IMPORTANT
Do Not Return This Product To The Store
If you have a problem with this product, please contact the "Haier Customer
Satisfaction Center" at 1-877-337-3639.
DATED PROOF OF PURCHASE REQUIRED FOR WARRANTY SERVICE
IMPORTANT
Ne pas Réexpédier ce Produit au Magasin
Pour tout problème concernant ce produit, veuillez contacter le service des
consommateurs ‘Haier Customer Satisfaction Center’ au 1-877-337-3639.
UNE PREUVE D’ACHAT DATEE EST REQUISE POUR BENEFICIER DE LA GARANTIE.
IMPORTANTE
No regrese este producto a la tienda
Si tiene algún problema con este producto, por favor contacte el "Centro de Servicio al
Consumidor de Haier" al 1-877-337-3639 (Válido solo en E.U.A).
NECESITA UNA PRUEBA DE COMPRA FECHADA PARA EL SERVICIO DE LA GARANTIA
Downloaded from www.Manualslib.com manuals search engine
-
 1
1
-
 2
2
-
 3
3
-
 4
4
-
 5
5
-
 6
6
-
 7
7
-
 8
8
-
 9
9
-
 10
10
-
 11
11
-
 12
12
-
 13
13
-
 14
14
-
 15
15
-
 16
16
-
 17
17
-
 18
18
-
 19
19
-
 20
20
-
 21
21
-
 22
22
-
 23
23
-
 24
24
-
 25
25
-
 26
26
-
 27
27
-
 28
28
-
 29
29
-
 30
30


Haier HNDE03VSBJ El manual del propietario
- Categoría
- Frigoríficos-congeladores
- Tipo
- El manual del propietario
- Este manual también es adecuado para
en otros idiomas
- English: Haier HNDE03VSBJ Owner's manual
Artículos relacionados
-
Haier BCE46B El manual del propietario
-
-
Haier HNSE045BB El manual del propietario
-
-
-
-
-
Haier HNDE03VS Manual de usuario
-
-