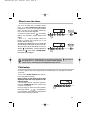
Groupe Brandt DOV399XE1 El manual del propietario
- Tipo
- El manual del propietario

Le guide d’utilisation de votre four
Using your oven
Bedienungsanleitung Ihres Backofens
Gebruiksaanwijzing van uw oven
Betjeningsvejledning til ovnen
Instrucciones de uso de su horno
O
guia de utilização do seu forno
DOV399*
FR
GB
DE
NL
DK
ES
PT
99627782_ML_A.qxd 25/03/03 16:38 Page 1

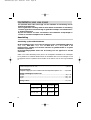
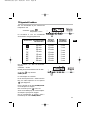
Sommaire
2
Edito p.3
Comment se présente votre four ? p.4
Accessoires p.5
Réservoir p.5
Comment installer votre four ?
Raccordement p.6
Dimensions utiles pour encastrer votre four p.7
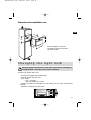
Comment changer l’ampoule ? p.7
Comment utiliser votre four ?
Comment mettre à l’heure votre four ? p.8
Comment faire une cuisson immédiate ? p.9
Visualiser le niveau d’eau p.10
Arrêt en cours et en fin de cuisson p.10
Comment faire une cuisson différée ? p.11 à 12
Comment utiliser la minuterie ? p.13
Comment utiliser la sécurité enfant ? p.13
Comment mettre en veille votre afficheur ? p.14
Description des fonctions p.15
Que faire en cas d’anomalies de fonctionnement ? p.16
Qui contacter? p.17
Tout au long de la notice,
vous signale les consignes de sécurité,
vous signale les conseils et les astuces
99627782_ML_A.qxd 25/03/03 16:38 Page 2
La página se está cargando...

START
STOP
75
95
55
60
80
85
90
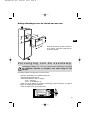
4
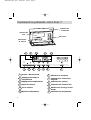
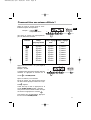
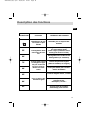
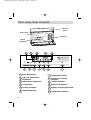
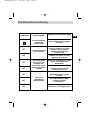
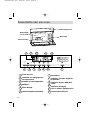
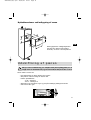
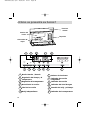
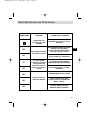
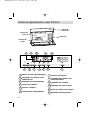
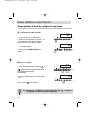
Comment se présente votre four ?
Bouton : Marche/Arrêt
Réglages des temps et
températures
Réglages des températures
Durée de cuisson
Fin de cuisson
Minuteur indépendant
1
2
3
4
5
6
1
3
2
4
5
6
7
7
Sélecteur de fonctions
Indicateur de cuisson des
surgelés
Indicateur de cuisson
Indicateur de niveau d’eau
Afficheur de l’horloge et des
temps
Indicateur de température
Bandeau de
commande
Réservoir
Intérieur du
four
Générateur
de vapeur
8
10
9
11
12
8
10
9
11
12
99627782_ML_A.qxd 25/03/03 16:38 Page 4
La página se está cargando...
La página se está cargando...
La página se está cargando...

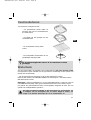
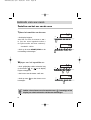
8
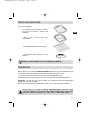
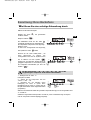
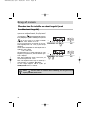
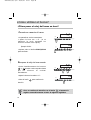
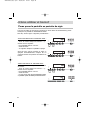
Remise à l’heure de l’horloge
• Appuyez simultanément sur les touches
et pendant quelques secondes
jusqu’à faire clignoter l’affichage.
• Ajustez le réglage de l’heure avec les
touches + ou -.
• Appuyez sur la touche pour valider.
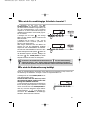
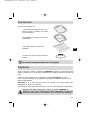
Comment mettre à l'heure votre four ?
S’il n’y a pas de validation par la touche , l’enregistrement
est automatique au bout de quelques secondes.
START
STOP
Comment utiliser votre four ?
START
STOP
START
STOP
START
STOP
A la mise sous tension
• L’afficheur clignote.
• Réglez l’heure en appuyant sur les
touches + ou - (le maintien du doigt
sur la touche permet d’obtenir un
défilement rapide)
Exemple:12h30.
• Appuyez sur la touche START/STOP
pour valider.
99627782_ML_A.qxd 25/03/03 16:39 Page 8
La página se está cargando...
La página se está cargando...

75
95
55
60
80
85
90
START
STOP
11
FR
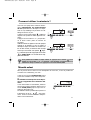
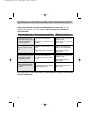
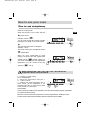
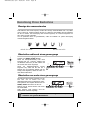
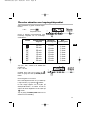
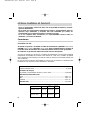
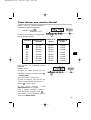
Réglez le mode de cuisson choisi et éven-
tuellement ajustez la température.
Exemple : position
température 100°C
Une durée de cuisson est préprogrammée
pour les différentes fonctions.
Cuisson
Temps
préprogrammé
Temps réglage
mini
Temps réglage
maxi
55°
60°
75°
80°
85°
90°
95°
25 min
30 min
30 min
15 min
15 min
15 min
20 min
30 min
10 min
10 min
10 min
10 min
10 min
10 min
10 min
10 min
1 heure
1 heure
1 heure
1 heure
1 heure
1 heure
1 heure
1 heure
75
95
55
60
80
85
90
START
STOP
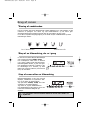
Appuyez sur les touches + ou
- pour régler le
temps souhaité.
Exemple : 45 min
L’enregistrement de la durée ajustée doit être
confirmer en appuyant de nouveau sur la
touche ou START/STOP
.
Après ces actions, le four chauffe.
En fin de cuisson, une série de bips sonores
est émise durant quelques minutes et le sym-
bole clignote.
L’arrêt des bips se fait en appuyant sur la
touche START/STOP pendant 1 seconde.
Vous pouvez à tout moment modifier le temps
de cuisson en appuyant sur la touche
Pour annuler votre programmation, appuyez 2
fois sur la touche START/STOP.
Comment faire une cuisson différée ?
99627782_ML_A.qxd 25/03/03 16:39 Page 11
La página se está cargando...
La página se está cargando...

14
75
95
55
60
80
85
90
START
STOP
75
95
55
60
80
85
90
START
STOP
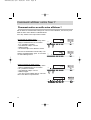
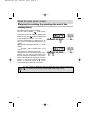
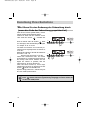
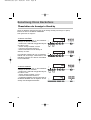
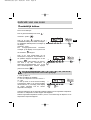
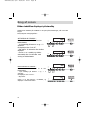
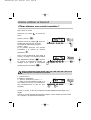
Comment mettre en veille votre afficheur ?
Afin de limiter la consommation d’énergie de votre four hors utilisation, vous avez la possi-
bilité de mettre votre afficheur en MODE VEILLE.
Pour cela, veuillez suivre la procédure suivante
ACTIVATION DU MODE VEILLE :
- Votre four doit être en mode affichage heure.
- Appuyez simultanément sur les touches
+ et
-
pendant 5 secondes.
- Votre afficheur indique “Lcd off”
- Relâchez l’appui.
- 30 secondes après votre afficheur s’éteint.
Votre four est maintenant en mode veille, il s’é-
teindra automatiquement après 30 secondes
en mode affichage heure.
DESACTIVATION DU MODE VEILLE :
- Votre four doit être en mode affichage heure.
- Appuyez simultanément sur les touches
+ et
-
pendant 5 secondes.
- Votre afficheur indique “Lcd on”.
- Relâchez l’appui.
- Vous êtes sorti du MODE VEILLE, votre affi-
cheur reste allumé en permanence.
75
95
55
60
80
85
90
START
STOP
75
95
55
60
80
85
90
START
STOP
Comment utiliser votre four ?
99627782_ML_A.qxd 25/03/03 16:39 Page 14

15
FR
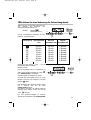
FONCTIONS
CUISSON
EXEMPLES DE CUISSON
55°
60°
75°
80°
85°
90°
95°
Utilisable pour la majorité des
aliments
Décongélation de filets de pois-
son avant d’être panés.
Fruits rouges qui doivent rester
froids (pour tartes et coulis)
Décongélation de viandes avant
d’être grillées (ex: saucisses)
Cuisson de poissons fragiles
(filets de sardines, de rougets)
Fruits juste tièdes pour consom-
mation immédiate
Poissons fragiles entiers / truites
Oeufs cocotte; bonne tenue des
tomates farcies.
Ramequins, crèmes...
Terrines, foies de volailles.
Réchauffage plats cuisinés
Température de cuis-
son vapeur la plus
utilisée
Décongélation lente
sans risque de cuis-
son
La chair reste nacrée,
le collagène n’appa-
raît pas. Toutes les
saveurs, textures,
odeurs sont resti-
tuées
Pour la cuisson des
aliments fragiles
Description des fonctions
99627782_ML_A.qxd 25/03/03 16:39 Page 15
La página se está cargando...
La página se está cargando...

List of contents
18
Editorial p.19
Your oven, how it works p.20
Oven accessories p.21
Reservoir p.21
How to install your oven
Connecting up p.22
Dimensions for installation use p.23
Changing the light bulb p.23
How to use your oven
How to set the clock p.24
How to cook straightaway p.25
Checking the water level p.26
Stopping during or at the end of the cooking period p.26
Delaying the cooking p.27 to 28
How to use the timer p.29
Using the child safety p.29
Putting your display on standby mode p.30
Description des fonctions p.31
Troubleshooting p.32
How to contact us p.33
Throughout this manual,
indicates safety recommendations,
indicates advice to help you make the best
use of your oven
99627782_ML_A.qxd 25/03/03 16:39 Page 18
La página se está cargando...

START
STOP
75
95
55
60
80
85
90
20
Your oven, how it works
Start/Stop button
Time and temperature
adjustment
Temperature adjustment
Cooking time
Cooking complete
Independent timer
1
2
3
4
5
6
1
32
4
5
6
7
7
Programme selector
Frozen food cooking
indicator
Cooking indicator
Water level indicator
Display clock/program times
Temperature indicator
Indicator
panel
Reservoir
Oven cavity
Steam
generator
8
10
9
11
12
8
10
9
11
12
99627782_ML_A.qxd 25/03/03 16:39 Page 20
La página se está cargando...
La página se está cargando...

23
GB
Dimensions for installation use
Place the appliance in the hole.
The appliance must be horizontal.
Check this position
380
560
50
386,5
20
595
405
544
378
550
The bulb is by the far right corner.
- Turn the cover slightly anti-clockwise (left)
- Unscrew the bulb the same way.
- Type of bulb:
- 15 W - 220/240 V
- Type E14 suitable up to 300ºC
- Change the bulb and reassemble the unit making sure the seals are positioned
correctly.
- Switch the oven back on at the mains.
Changing the light bulb
Warning! Switch off the power at the main switch before attempting to
change the bulb. Leave the oven to cool if necessary.
99627782_ML_A.qxd 25/03/03 16:39 Page 23
La página se está cargando...
La página se está cargando...
La página se está cargando...

27
GB
75
95
55
60
80
85
90
START
STOP
Adjust the chosen cooking method and, if
need be, alter the temperature.
E.g.: position
temperature 100°C
Cooking times are already programmed in for
the different features.
Cook at
Pre-programmed
temperature
Min. temperatu-
re adjustment
Max.
temperature
55°
60°
75°
80°
85°
90°
95°
25 mins
30 mins
30 mins
15 mins
15 mins
15 mins
20 mins
30 mins
10 mins
10 mins
10 mins
10 mins
10 mins
10 mins
10 mins
10 mins
1 hour
1 hour
1 hour
1 hour
1 hour
1 hour
1 hour
1 hour
75
95
55
60
80
85
90
START
STOP
Press the buttons + or - to set the chosen
time.
E.g. : 45 mins
Confirm the altered time by pressing again on
the button or START/STOP
.
The oven will then heat up.
When cooking is over you will hear a series of
beeps that will last several minutes and the
symbol will blink.
You can stop the bleeps by pressing the
START/STOP control for a second.
Cooking times can be checked or changed
whenever you wish, simply by pressing the
control.
To cancel the programme press twice on
START/STOP.
Delaying the cooking
99627782_ML_A.qxd 25/03/03 16:39 Page 27
La página se está cargando...
La página se está cargando...

30
75
95
55
60
80
85
90
START
STOP
75
95
55
60
80
85
90
START
STOP
Putting your display on standby mode
To reduce your oven's power consumption to a minimum when it is not in use, you can
put your readout system in STANDBY MODE.
To carry out this operation, proceed as follows:
GOING INTO STANDBY MODE:
- Your oven must be in normal time readout mode.
- Press both the + and - controls for five
seconds at the same time.
- The display reads “Lcd off”.
- Take your fingers off the two controls.
- 30 seconds later your readout will switch off.
Your oven is now in standby mode; whenever
you are in the normal time readout mode, it will
turn off automatically after 30 seconds.
COMING OUT OF STANDBY MODE:
- Your oven must be in the normal time
readout mode.
- Press both the + and - controls for five
seconds at the same time.
- The display reads “Lcd on”.
- Take your fingers off the two controls.
- You are now out of the STANDBY MODE; the
readout is now permanently lit.
75
95
55
60
80
85
90
START
STOP
75
95
55
60
80
85
90
START
STOP
How to use your oven
99627782_ML_A.qxd 25/03/03 16:40 Page 30
La página se está cargando...
La página se está cargando...

33
GB
Copy here the details that are on your oven manufacturer's plate:
How to contact us
MADE IN FRANCE
220 - 240V ~ 50 Hz
BRANDT APPLIANCES SAS
7 rue Henri Becquerel
92500 RUEIL MALMAISON
De Dietrich
99627782_ML_A.qxd 25/03/03 16:40 Page 33

Inhalt
34
Vorwort s.35
Wie ist Ihr Backofen aufgebaut s.36
Zubehör s.37
Wasserbehälter s.37
Backofeninstallation
Anschluss s.38
Nützliche Maße für den Einbau Ihres Backofens s.39
Auswechseln einer Lampe s.39
Benutzung Ihres Backofens
Stellen der Uhr des Backofens s.40
Wie führen Sie eine sofortige Zubereitung durch s.41
Anzeige des Wasserstandes s.42
Stop während bzw. am Ende des Garvorgangs s.42
Wie führen Sie eine Änderung der Zubereitung durch s.43 - 44
Wie wird die unabhängige Schaltuhr benutzt s.45
Wie wird die Kindersicherung betätigt s.45
Umschalten der Anzeige in Stand-by s.46
Funktionsbeschreibung s.47
Was bei Betriebsanomalien tun s.48
Kontaktaufnahme s.49
In der Gebrauchsanweisung
geben Ihnen die Zeichen,
Sicherheitshinweise und,
Ratschläge und Tips.
99627782_ML_A.qxd 25/03/03 16:40 Page 34
La página se está cargando...

START
STOP
75
95
55
60
80
85
90
36
Wie ist Ihr Backofen aufgebaut
Knopf An / Aus
Einstellung der Zeitangaben
und Temperaturen
Temperatureinstellungen
Gardauer
Ende der Gardauer
Unabhängiger Zeitschalter
1
2
3
4
5
6
1
3
2
4
5
6
7
7
Funktionswählschalter
Garanzeige für
Tiefkühlprodukte
Leistungsanzeige
Wasserstandsanzeige
Anzeigefeld der Uhr und der
Zeitangaben
Temperaturanzeiger
Aufbau der
Bedienblende
Wasserbehälter
Backofen
innen
Dampfgenerator
8
10
9
11
12
8
10
9
11
12
99627782_ML_A.qxd 25/03/03 16:40 Page 36
La página se está cargando...
La página se está cargando...

39
DE
Nützliche Maße für den Einbau Ihres Backofens
Positionieren Sie das Gerät in dem
Hohlraum.
Das Gerät muß horizontal aufgestellt
sein. Kontrollieren Sie diese Stellung.
380
560
50
386,5
20
595
405
544
378
550
Die Glühlampe befindet sich hinten rechts in der Backröhre.
- Drehen Sie die Glasabdeckung um eine Vierteldrehung links herum.
- Drehen Sie die Glühlampe ebenfalls links herum heraus.
- Technische Daten der Glühlampe:
- 15 W - 220/240 V
- 300°C - Sockel E 14
- Wechseln Sie die Glühlampe aus, montieren Sie die Glasabdeckung und achten Sie
dabei auf die richtige Positionierung der Dichtungen.
- Schließen Sie Ihren Dampfgarer wieder ans Stromnetz an.
Auswechseln einer Lampe
Vor jedem Eingriff in die Glühlampe den Ofen abschalten, um jeglichen
Spannungsstoß zu vermeiden und ggf. den Ofen abkühlen lassen.
99627782_ML_A.qxd 25/03/03 16:40 Page 39
La página se está cargando...
La página se está cargando...
La página se está cargando...

75
95
55
60
80
85
90
START
STOP
43
DE
Stellen Sie den gewünschten Garmodus ein
und nehmen Sie eventuell eine
Temperatur-Feineinstellung vor.
Beispiel: Position
Temperatur 100°C
Für die verschiedenen Funktionen ist eine
Gardauer vorprogrammiert.
Garvorgang
Vorprogrammierte
Zeit
Kürzeste
einstellbare Zeit
Längste
einstellbare Zeit
55°
60°
75°
80°
85°
90°
95°
25 min.
30 min.
30 min.
15 min.
15 min.
15 min.
20 min.
30 min.
10 min.
10 min.
10 min.
10 min.
10 min.
10 min.
10 min.
10 min.
1 Stunde
1 Stunde
1 Stunde
1 Stunde
1 Stunde
1 Stunde
1 Stunde
1 Stunde
75
95
55
60
80
85
90
START
STOP
Drücken Sie die Tasten + bzw. -, um die
gewünschte Zeit einzustellen.
Beispiel: 45 min.
Um die eingestellte Dauer zu registrieren, ist
diese durch erneutes Drücken der Taste
bzw. START/STOP zu bestätigen.
Danach beginnt der Backofen zu heizen.
Am Ende des Garvorgangs ertönt für einige
Minuten eine Serie von Pieptönen, und das
Symbol blinkt.
Das Abschalten der Pieptöne erfolgt, indem
Sie 1 Sekunde lang auf die Taste
START/STOP drücken.
Sie können das Ende der Garzeit jederzeit
abfragen oder ändern, indem Sie auf die
Taste drücken.
Um Ihre Programmeingabe zu löschen,
drücken Sie zweimal die Taste START/STOP.
Wie führen Sie eine Änderung der Zubereitung durch
99627782_ML_A.qxd 25/03/03 16:40 Page 43
La página se está cargando...
La página se está cargando...

46
75
95
55
60
80
85
90
START
STOP
75
95
55
60
80
85
90
START
STOP
Umschalten der Anzeige in Stand-by
Wenn der Backofen nicht benutzt wird, ist die Anzeige unnötig. Um Energie zu sparen,
können Sie diese in STAND-BY VERSETZEN.
Dazu gehen Sie wie folgt vor:
STAND-BY AUSLÖSEN :
- Der Backofen muss sich in der Betriebsart
"Anzeige der Uhrzeit" befinden.
- Drücken Sie 5 Sekunden lang gleichzeitig auf
die Tasten +und -.
- Auf der Anzeige erscheint "Lcd off"
- Lassen Sie die beiden Tasten los.
- Nach 30 Sekunden wird die Anzeige in
Stand-by ver-setzt.
Der Backofen befindet sich nun im Stand-by-
Betrieb und die Anzeige verschwindet in der
Betriebsart "Anzeige der Uhrzeit" automatisch
nach 30 Sekunden.
STAND-BY BEENDEN:
- Der Backofen muss sich in der Betriebsart
"Anzeige der Uhrzeit" befinden.
- Drücken Sie 5 Sekunden lang gleichzeitig auf
die Tasten +und -.
- Auf der Anzeige erscheint "Lcd on".
- Lassen Sie die beiden Tasten los.
- Der Backofen befindet sich nun nicht mehr im
STAND-BY-BETRIEB und die Angaben auf der
Anzeige sind durchgehend sichtbar..
75
95
55
60
80
85
90
START
STOP
75
95
55
60
80
85
90
START
STOP
Benutzung Ihres Backofens
99627782_ML_A.qxd 25/03/03 16:40 Page 46
La página se está cargando...
La página se está cargando...

49
DE
Notieren Sie hier die auf dem Geräteschild Ihrer Abzugshaube stehenden Angaben:
K
ontaktaufnahme
MADE IN FRANCE
220 - 240V ~ 50 Hz
BRANDT APPLIANCES SAS
7 rue Henri Becquerel
92500 RUEIL MALMAISON
De Dietrich
99627782_ML_A.qxd 25/03/03 16:40 Page 49

Inhoud
50
Inleiding p.51
Presentatie van uw oven p.52
Oventoebehoren p.53
Watertank p.53
Installatie van uw oven
Aansluiting p.54
Nuttige afmetingen voor de inbouw van uw oven p.55
Vervanging van de ovenlamp p.55
Gebruik van uw oven
Instellen van het uur van de oven p.56
Onmiddellijk bakken p.57
Stand van het waterpeil p.58
Stoppen tijdens of op het einde van de stoomcyclus p.58
Uitgesteld bakken p.59 - 60
Gebruik van de schakelklok p.61
Kinderbeveiliging p.62
Hoe zet ik de display in stand-by p.63
Beschrijving van de bakfuncties p.64
Problemen en oplossingen p.65
Contactpersoon p.65
In deze gebruikshandleiding
geeft symbol
veiligheidsaanwijzingen en symbool,
tips en praktische richtlijnen aan
99627782_ML_A.qxd 25/03/03 16:40 Page 50
La página se está cargando...

START
STOP
75
95
55
60
80
85
90
52
Presentatie van uw oven
Toets Aan/uit
Instellen van tijdsgegevens
en temperatuur
Instellen van de temperatuur
Bakduur
Einde baktijd
Onafhankelijke schakelklok
1
2
3
4
5
6
1
32
4
5
6
7
7
Keuzeknop
Indicator "stomen diepvries-
produkten"
Indicator stomen AAN/UIT-
toets
Indicator waterpeil
Uur en andere tijdsgegevens
Temperatuurindicator
Bedieningspaneel
Watertank
Binnenzijde
van de oven
Stoomelement
8
10
9
11
12
8
10
9
11
12
99627782_ML_A.qxd 25/03/03 16:40 Page 52
La página se está cargando...
La página se está cargando...

55
NL
Nuttige afmetingen voor de inbouw van uw oven
Plaats de stoomoven perfect horizontaal
in de ovennis. Controleer nauwkeurig de
horizontale ligging.
380
560
50
386,5
20
595
405
544
378
550
Het lampje bevindt zich achteraan in de stoomoven.
- Draai het vensterkapje een kwartslag naar links.
- Draai het lampje naar links los.
- Technische kenmerken van het lampje :
- 15 W - 220/240 V
- 300°C - schroeffitting E 14
- Plaats een nieuw lampje en draai het vensterkapje opnieuw dicht (let erop dat de
voegen de lampfitting goed afdichten).
- Steek de stekker terug in het stopcontact.
Vervanging van de ovenlamp
Trek altijd de stekker van uw oven uit alvorens de ovenlamp te vervangen
om elektrische schokken te vermijden. Laat indien nodig de oven
afkoelen.
99627782_ML_A.qxd 25/03/03 16:40 Page 55

56
Wijzigen van het ingestelde uur
• Druk gelijktijdig enkele sekonden lang
op de toetsen en tot de display
begint te knipperen.
• Pas het uur met de toetsen + of - aan.
• Druk op toets om het nieuwe uur te
bevestigen.
Instellen van het uur van de oven
Indien u het nieuwe uur niet met de toets , bevestigt, zal de
display na enkele sekonden zelf het uur bevestigen.
START
STOP
Gebruik van uw oven
START
STOP
START
STOP
START
STOP
Tijdens het aansluiten van de oven
• De display knippert.
•Stel het uur met de toetsen + en -
in (hou de toets ingedrukt indien u
de cijfers sneller wil doen vorderen).
Voorbeeld : 12u30.
• Druk op de toets START/STOP om de
uurinstelling te bevestigen.
99627782_ML_A.qxd 25/03/03 16:40 Page 56
La página se está cargando...
La página se está cargando...

75
95
55
60
80
85
90
START
STOP
59
NL
Kies een stoomstand en pas eventueel de
temperatuur aan.
Voorbeeld : positie
temperatuur 100°C
De stoomduur is voor de verschillende
stoomstanden voorgeprogrammeerd.
Stoomstand
Voorgeprogrammee
rde stoomduur
Minimaal
instelbare
stoomduur
Maximaal
instelbare
stoomduur
55°
60°
75°
80°
85°
90°
95°
25 min
30 min
30 min
15 min
15 min
15 min
20 min
30 min
10 min
10 min
10 min
10 min
10 min
10 min
10 min
10 min
1 uur
1 uur
1 uur
1 uur
1 uur
1 uur
1 uur
1 uur
75
95
55
60
80
85
90
START
STOP
Met de toetsen + en - kan u de stoomduur
wijzigen.
Voorbeeld : 45 min
Bevestig de nieuwe stoomduur met een druk
op de toets of op de toets
START/STOP.
De oven begint nu te werken.
Na de stoomcyclus hoort u enkele minuten
lang een reeks bieptonen en het symbool
gaat knipperen.
Druk 1 sekonde op de toets START/STOP
om de bieptoon te stoppen.
Met een druk op toets kan u het
einde van de baktijd op elk moment tijdens
de bakcyclus oproepen of wijzigen.
Om de programmatie te stoppen, drukt u
tweemaal op de toets START/STOP.
Uitgesteld bakken
99627782_ML_A.qxd 25/03/03 16:41 Page 59
La página se está cargando...
La página se está cargando...

62
75
95
55
60
80
85
90
START
STOP
75
95
55
60
80
85
90
START
STOP
Hoe zet ik de display in stand-by
Om het energieverbruik van uw oven bij niet-gebruik van de oven minimaal te houden,
kan u de display in STAND-BY (waakstand) zetten.
Werkwijze :
ACTIVEREN VAN DE FUNCTIE "STANDBY" :
- Op uw oven staat het uur vermeld.
- Druk gelijktijdig 5 sekonden lang op de
toetsen + en -.
- Op de display verschijnt de vermelding "Lcd off"
- Laat de toets los.
- 30 sekonden later gaat uw display uit.
Uw oven staat nu in stand-by. De stand-by-
functie wordt 30 sekonden nadat u de functie
heeft geactiveerd automatisch ingeschakeld.
UITSCHAKELEN VAN DE FUNCTIE "STANDBY :
- Op uw oven gaat u nu opnieuw het uur
oproepen.
- Druk gelijktijdig 5 sekonden lang op de
toetsen + en -.
- Op de display verschijnt de vermelding "Lcd on"
- Laat de toets los.
- U heeft nu de STAND-BY-FUNCTIE
uitgeschakeld. Alle gegevens verschijnen
opnieuw op de display.
75
95
55
60
80
85
90
START
STOP
75
95
55
60
80
85
90
START
STOP
Gebruik van uw oven
99627782_ML_A.qxd 25/03/03 16:41 Page 62

63
NL
STAND
STOOMWIJZE
VOORBEELDEN
55°
60°
75°
80°
85°
90°
95°
Geschikt voor de meeste
gerechten.
Ontdooien van visfilets alvorens
ze te paneren. Rood fruit dat
koud dient te blijven (voor
taarten en coulis).
Ontdooien van vlees voor de grill
(bv. worsten).
Stomen van onvaste vis (filets
van sardines, rode poon).
Fruit dat net warm genoeg wordt
om het meteen te consumeren.
Volledige onvaste vissen / forel.
Kippe-eieren, gevulde tomaten,
kaasgebakjes, crèmes...
Terrines, gevogeltepastei.
Opwarmen van klaargemaakte
gerechten.
Aanbevolen stoom-
temperatuur
Langzaam ontdooien
zonder koken
De vis blijft glanzend.
Geen vorming van
collageenschuim.
Smaak, vorm en geur
blijven behouden.
Stomen van fragiele
voedingswaren.
Beschrijving van de bakfuncties
99627782_ML_A.qxd 25/03/03 16:41 Page 63

Problemen en oplossingen
U twijfelt over de goede werking van uw oven. Dit betekent niet automatisch
dat er een defect is.
Controleer in elk geval eerst de volgende punten :
Probleem
Mogelijke oorzaken Oplossingen
Controleer de elektrische
voeding (zekering van uw
installatie).
Contacteer de Servicedienst.
Elektrische voeding is defect.
Elektronische kaart is defect.
Er De Dietrich geen
enkel lampje.
Het lampje "lege water-
tank" knippert tijdens
het stomen terwijl de
watertank vol is.
Watertank is niet goed in de
oven geplaatst.
Detectiesysteem is defect.
Controleer of de watertank
goed op de ovenbodem is
geplaatst
Contacteer de Servicedienst.
Waterlek of stoomlek ter
hoogte van de ovendeur
tijdens het stomen.
De ovendeur is niet goed
gesloten.
De afdichtingsvoeg van de
oven is defect.
Controleer of de watertank
goed op de ovenbodem is
geplaatst.
Contacteer de Servicedienst.
Onderbroken "ronkend
geluid" tijdens het
stomen.
Werking van de water
toevoerpomp.
Dit is normaal tijdens de
werking van de oven.
64
Mochten de problemen toch blijven, contacteer onmiddellijk onze servicedienst.
99627782_ML_A.qxd 25/03/03 16:41 Page 64

65
NL
Noteer hieronder de gegevens van het identificatieplaatje van uw oven :
C
ontactpersoon
MADE IN FRANCE
220 - 240V ~ 50 Hz
BRANDT APPLIANCES SAS
7 rue Henri Becquerel
92500 RUEIL MALMAISON
De Dietrich
99627782_ML_A.qxd 25/03/03 16:41 Page 65

Indholdsfortegnelse
66
Indledning s.67
Betjeningspane s.68
Tilbehør s.69
Vandbeholder s.69
Installation af ovnen
Tilslutning s.70
Nyttedimensioner ved indbygning af ovnen s.71
Udskiftning af pæren s.71
Brug af ovnen
Indstilling af ovnens ur s.72
Hvordan laver De øjeblikkelig bagning/stegning ? s.73
Visning af vandstanden s.74
Stop af en tilberedning, der er i gang s.74
Stop af ovnen efter en tilberedning s.75 - 76
Brug af timeren? s.77
Børnesikring s.77
Sådan indstilles displayet på standby s.78
Beskrivelse af ovnfunktionerne s.79
Fejlfinding s.80
Kontaktoplysninger s.81
I betjeningsvejledningen
angiver,
sikkerhedsanvisninger,
gode råd og vejledning
99627782_ML_A.qxd 25/03/03 16:41 Page 66
La página se está cargando...

START
STOP
75
95
55
60
80
85
90
68
Betjeningspane
Tænd/sluk-knap
Indstilling af tilberedning-
stid og temperatur
Temperaturindstilling
Stege-/bagetid
Sluttidspunkt
Selvstændig timerfunktion
1
2
3
4
5
6
1
32
4
5
6
7
7
Funktionsvælger
Indikator for tilberedning af
frosne madrette
Indikator for tilberedning
Vandstand
Visning af ur og
tilberedningstider
Temperaturindikator
Betjeningspanel
Vandbeholder
Indvendigt i
ovnen
Fordamper
8
10
9
11
12
8
10
9
11
12
99627782_ML_A.qxd 25/03/03 16:41 Page 68
La página se está cargando...
La página se está cargando...

71
DK
Nyttedimensioner ved indbygning af ovnen
Anbring apparatet i indbygningsnichen.
Det skal være placeret helt vandret.
Kontroller, at ovnen er korrekt placeret.
380
560
50
386,5
20
595
405
544
378
550
Pæren sidder i ovnens loft.
- Drej lampeglasset en kvart omgang mod venstre
- Skru pæren i samme retning for at løsne den.
- Pærens specifikationer:
- 15 W - 220/240 V
- 300°C - Fatning E 14
- Skift pæren ud, sæt glasset i igen og pas på at anbringe pakningerne korrekt.
- Sæt ovnens stik i igen.
Udskiftning af pæren
Afbryd ovnens nettilslutning, før arbejdet med pæren påbegyndes, for at
undgå risiko for elektrisk stød, og lad ovnen afkøle helt, hvis den er varm.
99627782_ML_A.qxd 25/03/03 16:41 Page 71

72
B Nulstilling af uret
• Tryk samtidigt på tasterne og i
nogle sekunder for at få displayet til at
blinke.
• Indstil uret med tasterne + og -.
• Tryk på tasten for at godkende val-
get.
Indstilling af ovnens ur
Hvis De ikke godkender valget med tasten , gemmes
indstillingen automatisk efter et par sekunder.
START
STOP
Brug af ovnen
START
STOP
START
STOP
START
STOP
A Når ovnen tændes
• Displayet blinker.
• Indstil uret ved at trykke på tasterne +
eller - (hold tasten inde for hurtig skift
af visning).
Eksempel: Kl. 12.30.
• Tryk på tasten START/STOP for at
godkende valget.
99627782_ML_A.qxd 25/03/03 16:41 Page 72
La página se está cargando...
La página se está cargando...

75
95
55
60
80
85
90
START
STOP
75
DK
Vælg ovnfunktion og juster eventuel tempe-
raturen.
f.eks : position
temperatur 100°C
Ovnen er allerede forprogrammeret med
forskellige bagetider for de forskellige
ovnfunktioner.
Grader
Forprogrammeret
bagetid
Minimum
justeringstid
Max.
justeringstid
55°
60°
75°
80°
85°
90°
95°
25 min
30 min
30 min
15 min
15 min
15 min
20 min
30 min
10 min
10 min
10 min
10 min
10 min
10 min
10 min
10 min
1 time
1 time
1 time
1 time
1 time
1 time
1 time
1 time
75
95
55
60
80
85
90
START
STOP
Tryk på + eller - tasten for at indstille den
ønskede tid.
f.eks :. 45 min.
Godkend Deres valg ved at trykke på
tasten én gang mere eller på START/STOP-
tasten.
Ovnen begynder nu at varme.
Efter endt bagetid kommer der en række bip
i nogle minutter, og symbolet blinker.
De kan stoppe bippene ved at trykke på
START/STOP-tasten i et sekund. De kan til
enhver tid ændre bagetiden ved at trykke på
tasten.
Tryk to gange på START/STOP-tasten for at
annullere Deres indstilling.
Hvordan udsætter man bagningstidspunktet
99627782_ML_A.qxd 25/03/03 16:41 Page 75
La página se está cargando...

77
• Tryk på tasten START/STOP indtil De
hører en lang biplyd.
Slip ikke tasten, før biplyden er ophørt,
og en nøgle vises på displayet.
• Følg samme fremgangsmåde for at låse
betjeningsanordningerne op.
Tryk på tasten START/STOP indtil De
hører en lang biplyd. Slip ikke tasten, før
biplyden er ophørt, og nøglen
ikke længere vises på displayet.
Kun minuturet virker stadig.
START
STOP
Børnesikring
Det er muligt, de kan når som helst ændre den resterende tid ved at trykke på
tasten og indstille med tasterne + og -, når som helst at annullere
programmeringen ved at indstille tiden på 0.00 og trykke på tasten e START/STOP.
Ovnen er udstyret med et elektronisk
minutur, som bruges til nedtælling af den
indstillede tid. Minuturets indstillinger
vises i så fald i stedet for visning af det
aktuelle klokkeslæt.
• Tryk på tasten med et timeglas
.
Displayet blinker, og symbolet for time-
glasset vises og blinker.
• Tryk på tasterne + og - indtil den
ønskede tilberedningstid vises (højst 59
min. og 50 sek.).
Displayet holder op med at blinke efter et
par sekunder, og minuturet begynder
nedtællingen med intervaller på ét sekund. Når
den indstillede tid er gået, udsen der
timeren en række biplyde, og symbolet
blinker.
Tryk på tasten eller START/STOP i
1 sekund for at standse biplydene.
Herefter vises uret igen på displayet.
Brug af timeren
Ovnens betjeningsanordninger kan låses for at undgå, at ovnen utilsigtet
tændes. Børnesikringen aktiveres på følgende måde:
75
95
55
60
80
85
90
START
STOP
75
95
55
60
80
85
90
S
TA RT
STOP
DK
99627782_ML_A.qxd 25/03/03 16:41 Page 77

78
75
95
55
60
80
85
90
START
STOP
75
95
55
60
80
85
90
START
STOP
Sådan indstilles displayet på standby
Displayet kan indstilles på STANDBY for at spare på strømforbruget, når ovnen ikke
bruges.
Benyt følgende fremgangsmåde :
AKTIVERING AF STANDBY :
Ovnen skal være indstillet til at vise
klokkeslættet.
- Tryk samtidigt på tasterne + og - i 5
sekunder.
På displayet vises "Lcd off".
- Slip tasten. 30 sekunder efter slukker
displayet
- Ovnen er nu i standby og slukker
automatisk efter 30 sekunder med
visning af klokkeslættet.
DEAKTIVERING AF STANDBY :
Ovnen skal være indstillet til at vise
klokkeslættet.
- Tryk samtidigt på tasterne + og - i 5
sekunder.
På displayet vises "Lcd on".
- Slip tasten.
Ovnen er nu ikke længere i STANDBY, og
displayet er tændt hele tiden.
75
95
55
60
80
85
90
START
STOP
75
95
55
60
80
85
90
START
STOP
Brug af ovnen
99627782_ML_A.qxd 25/03/03 16:41 Page 78

79
DK
FUNKTIONER
BAGNING
EKSEMPLER
55°
60°
75°
80°
85°
90°
95°
Kan bruges til de fleste madvarer
Optøning af fiskefilet'er inden
panering.
Røde bær der skal blive ved med
at være kolde (til tærter
og frugtsaucer)
Optøning af kød inden stegning
(f.eks. pølser)
Stegning af sarte/skrøbelige fisk
(sardinfilet'er, mullefilet'er, osv)
Lun frugt beregnet til at spise
med det samme
Hele sarte/skrøbelige fisk
(ørreder)
Æg i kokotter, farserede
tomater, varme buddinger og
soufflér
Terriner og postejer, fjerkrælever,
opvarmning af færdigretter
Den mest brugte
temperatur til
dampstegning
Langsom optøning
uden risiko for
bagning/stegning
Fiskekødet bliver ved
med at være
perlemorsagtigt, og
kollagenen ses ikke.
Fiskens saft, kraft,
duft og struktur
bevares
Til bagning og
stegning af
sarte/skrøbelige
madvarer
Beskrivelse af ovnfunktionerne
99627782_ML_A.qxd 25/03/03 16:41 Page 79

Fejlfinding
Hvis De er i tvivl om, hvor vidt ovnen fungerer korrekt, betyder det ikke
nødvendigvis, at der er tale om en driftsfejl.
Kontroller under alle omstændig-he-
der nedenstående punkter:
Konstateret fejl
Mulig årsag Afhjælpning
Kontroller strømforsynin-
gen (installationens
sikring).
Tilkald serviceafdelingen.
Fejl ved ovnens strømforsy-
ning.
Det elektroniske kort virker
ikke.
Ingen knapper lyser.
Alarmknappen for tom
beholder blinker, men
beholderen er fuld, og
ovnen kører.
Vandbeholderen sidder ikke
rigtigt.
Detekteringssystemet er
defekt.
Kontroller, at vandbeholde-
ren sidder korrekt.
Tilkald serviceafdelingen.
Der løber vand eller
damp ud ved ovndøren
under tilberedning.
Ovndøren er ikke korrekt
lukket.
Tætningslisten i ovndøren er
defekt.
Kontroller, at vandbeholde-
ren sidder korrekt.
Tilkald serviceafdelingen.
Der høres en
brummelyd under
tilberedning med damp.
Vandforsyningspumpen er i
drift.
Det er helt normalt.
80
Kontakt øjeblikkeligt serviceafdelingen, hvis De ikke kan afhjælpe funktionsforstyr-
relsen.
99627782_ML_A.qxd 25/03/03 16:41 Page 80

DK
81
K
ontaktoplysninger
Skriv oplysningerne fra ovnens typeskilt herunder:
MADE IN FRANCE
220 - 240V ~ 50 Hz
BRANDT APPLIANCES SAS
7 rue Henri Becquerel
92500 RUEIL MALMAISON
De Dietrich
99627782_ML_A.qxd 25/03/03 16:41 Page 81

Índice
82
Introducción p.83
¿Cómo se presenta su horno? p.84
Accesorios p.85
Depósito p.85
¿Cómo instalar el horno?
Conexiones p.86
Dimensiones útiles para encastrar el horno p.87
Cómo se cambia la lámpara p.87
¿Cómo utilizar el horno?
¿Cómo poner el reloj del horno en hora? p.88
¿Cómo se realiza una cocción inmediata? p.89
Visualizar el nivel de agua p.90
Parada en curso de cocción y parada al final de la cocción p.90
¿Cómo efectuar una cocción diferida? p.91 - 92
¿Cómo utilizar el reloj minutero ? p.93
¿Cómo se utiliza la seguridad para niños? p.93
¿Como poner la pantalla en posición de vigía? p.94
Descripción de las funciones p.95
¿Qué hacer si observa anomalías en el funcionamiento? p.96
¿A quién llamar? p.97
A lo largo del manual,
le señala las consignas de seguridad,
le señala los consejos y las astucias
99627782_ML_A.qxd 25/03/03 16:41 Page 82

ES
83
Estimado cliente,
Acaba de comprar un horno DE DIETRICH y queremos darle las gracias
por ello.
Nuestros equipos de investigación han diseñado para usted una nueva
generación de aparatos que por su calidad, su diseño y su desarrollo
tecnológico los convierten en productos excepcionales, poniendo de
manifiesto toda su maestría.
Su nuevo horno DE DIETRICH, de líneas modernas y refinadas, se integra
con armonía en su cocina y combina perfectamente el dominio t
ecnológico, los resultados de cocción y el lujo estético.
También encontrará en la gama de productos DE DIETRICH una amplia
gama de placas, campanas extractoras, lavavajillas y frigoríficos i
ntegrables, que podrá coordinar con su nuevo horno DE DIETRICH.
Por supuesto, nuestro servicio al consumidor, siempre con el objetivo de
satisfacer lo mejor posible sus exigencias para con nuestros productos,
está a su disposición y a su escucha para responder a todas sus
preguntas o sugerencias.
Gracias a estos "nuevos objetos de valor" que nos sirven de punto de
referencia en nuestras vidas diarias, DE DIETRICH, referencia de la
excelencia, constituye una invitación a un nuevo arte de vivir.
La Marca DE DIETRICH.
Introducción
99627782_ML_A.qxd 25/03/03 16:41 Page 83

START
STOP
75
95
55
60
80
85
90
84
¿Cómo se presenta su horno?
Botón: Marcha / Parada
Regulación del tiempo y la
temperatura
Regulación de la temperatura
Duración de la cocción
Final de la cocción
Reloj independiente
1
2
3
4
5
6
1
3
2
4
5
6
7
7
Selector de funciones
Indicador de cocción
congelados
Indicador de cocción
Indicador del nivel de agua
Pantalla del reloj y el tiempo
Indicador de la temperatura
Panel de
mando
Depósito
Interior del
horno
Generador de
vapor
8
10
9
11
12
8
10
9
11
12
99627782_ML_A.qxd 25/03/03 16:41 Page 84

ES
85
Accesorios
Las cazuelas se pueden limpiar en el lavavajillas.
Su horno está equipado con:
- una bandeja perforada para que los ele-
mentos no estén en contacto con el agua
de la condensación,
- una bandeja para recuperar el agua de la
condensación.
- una parrilla soporte móvil de acero
inoxidable,
- un difusor de vapor móvil que permite la
limpieza.
Antes de comenzar a cocinar, se debe llenar SIEMPRE el depósito con agua hasta el nivel
máximo. (El ruido que se oye al agitar el depósito vacío se debe al sistema de detección de
nivel).
- Para ello, retirar el depósito de su alojamiento y llenarlo únicamente con agua.
Volver a colocar el depósito en su alojamiento, encajándolo A FONDO, hasta que note el
PASO DE UNA MUESCA.
Importante : Si el agua del grifo fuera muy calcárea, se aconseja utilizar agua
embotellada no calcárea y no gaseosa.
Se desaconseja utilizar agua desmineralizada, ya que no es adecuada para la alimentación.
Depósito
Después de cada utilización, retirar y vaciar SIEMPRE el
depósito, para evitar que el agua quede estancada, y secar los
restos de agua que se encuentren en el soporte del depósito.
99627782_ML_A.qxd 25/03/03 16:41 Page 85

86
¿Cómo instalar el horno?
Tensión durante el funcionamiento .............................................220-240 V ~ 50 Hz
Potencia total del horno .............................................................................2,03 kW
Consumo de energía
-de subida y mantenimiento durante 1 hora a 100°C ................................0,90 kWh
Dimensiones útiles del horno
Largo .....................................................................................................38,5 cm
Alto.........................................................................................................18,2 cm
Profundo ................................................................................................33,5 cm
Volumen útil ....................................... ................................................23,5 litros
Al ser un especialista, usted es el único con la capacidad de instalar y conectar
aparatos De Dietrich.
Es la razón por la que nuestra garantía sirve única y exclusivamente para los
aparatos cuya instalación y conexión han sido realizadas por usted, de
conformidad con las disposiciones de los decretos en vigor.
Si no se respetan tales condiciones, la responsabilidad recaerá sobre el
instalador y no sobre De Dietrich.
Conexiones
Conexión a la red
Al instalar el aparato o al cambiar el cable de alimentación ( H05 RR-F 3x1,5 mm2,
H05 RN-F 3x1,5 mm2 o H05 VV-F 3x1,5 mm2) afloje completamente el tornillo de
conexión antes de introducir los conductores dentro de los bornes apropiados.
El conductor de protección debe estar unido al borne del aparato.
Si quiere un enchufe fijo, coloque en el conducto de alimentación, un interruptor omnipolar
Respetando una distancia de contacto como mínimo de 3 mm. De lo contrario el aparato
debe colocarse de tal manera que la ficha de toma de corriente sea accesible cuando éste
esté encastrado.
No nos hacemos en absoluto responsables en caso de que se produzca un accidente como
resultado de una conexión en tierra inexistente o incorrecta.
Sección Calibre del
Sector Conexión mínima dispositivo
de cable de protección
220-240V~ 50Hz 1 Ph + N 3x1,5 mm2 16 A
400V 3N~ 50Hz 1 Ph + N 3x1,5 mm2 16 A
99627782_ML_A.qxd 25/03/03 16:41 Page 86

87
ES
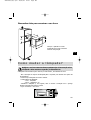
Dimensiones útiles para encastrar el horno
Coloque el aparato en su hueco.
El aparato deberá estar horizontal.
Controle esta posición.
380
560
50
386,5
20
595
405
544
378
550
La bombilla se encuentra al fondo a la derecha, en la cavidad del horno.
- Gire el ojo de buey de un cuarto de vuelta hacia la izquierda
- Destornille la bombilla en el mismo sentido.
- Características de la bombilla :
- 15 W - 220/240 V
- 300°C - zócalo E 14
- Cambie la bombilla y después vuelva a colocar el tapabombillas, teniendo cuidado que
las juntas estén en buena posición.
- Enchufe de nuevo el horno.
Cómo se cambia la lámpara
Desconecte el horno antes de realizar cualquier intervención con la bom-
billa y si fuere necesario deje que el aparato se enfríe.
99627782_ML_A.qxd 25/03/03 16:41 Page 87

88
Para poner el reloj a la hora correcta
• Pulse simultáneamente los botones
y durante varios segundos hasta
que los números se vuelvan
intermitentes.
• Ajuste la hora con las teclas + ó -.
• Pulse el botón para confirmar la
elección.
¿C
ómo poner el reloj del horno en hora?
Si no se confirma la elección con el botón , el aparato lo
registra automáticamente al cabo de algunos segundos.
START
STOP
¿Cómo utilizar el horno?
START
STOP
START
STOP
START
STOP
Cuando se conecte el horno
• La pantalla se vuelve intermitente.
• Ajuste la hora con + ó - (si se
mantiene la tecla apretada los
números desfilan más rápido).
Ejemplo:12h30.
• Apriete sobre el botón START/STOP
para confirmar.
99627782_ML_A.qxd 25/03/03 16:41 Page 88

89
1 - Pulse la tecla °C.
El símbolo °C parpadeará.
2 - Ajústelo pulsando las teclas + ó -.
3 - Grabe su elección pulsando la tecla °C (si
no la validara con la tecla °C la grabación se
hará automáticamente al cabo de unos
segundos).
¿
Cómo efectuar una cocción inmediata ?
¿Cómo utilizar el horno?
75
95
55
60
80
85
90
START
STOP
75
95
55
60
80
85
90
START
STOP
75
95
55
60
80
85
90
START
STOP
1/3
2
ES
Elija el modo de cocción.
Seleccione con la tecla , la función que
desee :
Ejemplo: posición " ".
Pulsando la tecla sin soltarla podrá ver
desfilar todas las funciones de cocción
Se visualiza la temperatura propuesta :
ejemplo : 100°C.
En la pantalla aparecerá una duración
predefinida y el símbolo de duración
parpadeará. .
Pulse la tecla START/STOP para iniciar la
cocción y el tiempo y los símbolos quedarán
fijos, animándose el símbolo " " Su horno
se propone la temperatura utilizada, sin
embargo puede ajustar la temperatura
(únicamente para la posición " ").
Durante su cocción, el valor de la temperatura elegida parpadeará hasta llegar a la T°
elegida.
Cuando ya se haya alcanzado la temperatura elegida, el horno emitirá una señal sonora
de 3 segundos y la temperatura quedará fija.
Para los valores de cocción de 55° /60° /75° /80° /85° /90° /95°, no es
posible ajustar la temperatura propuesta.
99627782_ML_A.qxd 25/03/03 16:42 Page 89

90
Si faltara agua en el transcurso de la cocción, aparecerá la indicación "depósito vacío",
parpadeará y emitirá una señal sonora. Abra la puerta, rellene el depósito y vuelva a cerrar
la puerta. La cocción continuará normalmente sin necesidad de ninguna otra intervención.
Para garantizar una cocción óptima, es preferible llenar el depósito al máximo antes de
empezar a cocinar.
RECIPIENTE LLENO
RECIPIENTE VACIO
Al final de la cocción, la pantalla indicará
0:00, se detendrán las indicaciones de
cocción y el horno emitirá una señal sonora
discontinua.
Para detener esta señal sonora, hay que
pulsar START/STOP y abrir la
puerta. Retire la bandeja y vacíe el depósito.
Si no se efectúa esta última acción, se
seguirá viendo la indicación del nivel de
agua.
Con el fin de garantizar una buena fiabilidad del horno, el ventilador
continuará funcionando durante un cierto tiempo.
75
95
55
60
80
85
90
START
STOP
75
95
55
60
80
85
90
START
STOP
Puede detener la cocción en cualquier
momento, pulsando START/STOP.
Si la generación de vapor no ha comenzado
aún (unos 1 minuto), el horno se parará
inmediatamente, desaparecerá el tiempo de
cocción y volverá a aparecer la hora.
Si la generación de vapor ya ha comenzado,
el tiempo pasará a 3 minutos y comenzará
una cuenta atrás para que pueda salir el
vapor y el horno esté seco antes de abrirlo.
V
isualización del nivel de agua
Parada en curso de cocción
Parada al final de la cocción
¿Cómo utilizar el horno?
99627782_ML_A.qxd 25/03/03 16:42 Page 90

91
75
95
55
60
80
85
90
START
STOP
ES
Regule el modo de cocción elegido y si es
necesario ajuste la temperatura.
Ejemplo: posición
temperatura 100°C
Existe una duración programada para las
distintas funciones.
Cocción
Tiempo
programado
Tiempo
ajustado
mínimo
Tiempo
ajustado
máximo
55°
60°
75°
80°
85°
90°
95°
25 min
30 min
30 min
15 min
15 min
15 min
20 min
30 min
10 min
10 min
10 min
10 min
10 min
10 min
10 min
10 min
1 hora
1 hora
1 hora
1 hora
1 hora
1 hora
1 hora
1 hora
75
95
55
60
80
85
90
START
STOP
Pulse las teclas + ó - para regular el tiempo
que desee.
Ejemplo: 45 min
Se graba la duración ajustada pulsando la
tecla o START/STOP.
Una vez hecho esto, el horno comienza a
calentar.
Al final de la cocción, se emitirá una serie de
señales sonoras durante unos minutos y
aparecerá el símbolo parpadeando.
Para parar la señal sonora, hay que pulsar la
tecla START/STOP durante 1 segundo.
Puede modificar en todo momento el tiempo
de cocción pulsando la tecla .
Para anular la programación, pulse 2 veces la
tecla START/STOP.
¿Cómo efectuar una cocción diferida?
99627782_ML_A.qxd 25/03/03 16:42 Page 91

92
¿Cómo utilizar el horno?
Cuando haya seleccionado el tiempo de cocción y
el tiempo de cocción y el símbolo de duración de
la cocción parpadeen :
Pulse la tecla "Final de cocción" , y la hora de
final de cocción aparecerá parpadeando en la
pantalla junto con el símbolo indicando que
puede comenzar el ajuste. Ejemplo: son las
12:30.
Usted ha programado una duración de cocción
de 30 min. La hora de final de cocción que
aparecerá será 13:00.
Ajuste la hora de final de la cocción pulsando las
teclas + ó -.
Ejemplo: final de cocción 14:00.
Una vez programada la hora de final de la
cocción, volverá a aparecer la hora en la
pantalla.
Una vez hecho esto, el horno comenzará a
calentar a una hora diferida para que la cocción
finalice a las 14:00.
Cuando la cocción esté terminada, se emitirá
una señal sonora durante unos minutos y el
símbolo parpadeará. La señal sonora se
detiene pulsando la tecla START/STOP durante
un segundo.
En cualquier momento puede consultar o modificar el final de la cocción pulsando
la tecla . Si desea anular la programación, puede hacerlo pulsando la tecla
START/STOP.
¿C
ómo efectuar una cocción diferida (hora de
finalización elegida)?
75
95
55
60
80
85
90
START
STOP
75
95
55
60
80
85
90
START
STOP
99627782_ML_A.qxd 25/03/03 16:42 Page 92

93
• Pulse el botón START/STOP hasta que oiga
una señal sonora larga.
Suelte el botón cuando haya acabado de
oír la señal más larga y verá que una llave
aparece en la pantalla.
• Para desbloquear los mandos, realice de
nuevo la misma operación.Pulse el botón
START/STOP hasta oír una señal sonora de lar-
ga duración.
Suelte el botón cuando haya acabado de oír la
señal más larga y verá que la llave
desaparece en la pantalla.
La función "Contador de minutos independien-
te" es la única que sigue funcionando.
START
STOP
¿
Cómo se utiliza la seguridad para niños?
Usted puede, en todo momento: En todo momento se puede modificar el tiempo que
queda apretando sobre la tecla y ajustando con las teclas + ó -. Anular la
programación volviendo a poner el tiempo en 0:00 y pulsando la tecla START/STOP.
El horno está dotado de un contador de
minutos independiente lo que le permite ir
descontando los minutos. En ese caso, esta
pantalla es prioritaria sobre la visualización de
la hora del día.
• Apriete sobre la tecla reloj de arena . La
pantalla se vuelve intermitente y el símbolo
reloj de arena aparece y también se vuelve
intermitente.
• Apriete sobre las teclas + ó - hasta que vea
aparecer el tiempo deseado (máximo 59 minu-
tos y 50 segundos).
Al cabo de varios segundos la pantalla cesa de
ponerse intermitente y el contador de minutos se
pone en marcha. El contador descuenta el tiempo
segundo tras segundo. Cuando se haya alcanzado el
tiempo deseado, el contador emite un sonido que le
avisa que el símbolo se ha vuelto intermitente.
Para callar el sonido, basta con apretar sobre la tecla
o pulsar el botón START/STOP. En ese
momento, la hora vuelve a aparecer en la pantalla.
¿Cómo utilizar el reloj minutero ?
Si no desea que el horno se ponga en marcha de manera intempestiva, puede bloquear los
mandos. Para ello:
75
95
55
60
80
85
90
START
STOP
75
95
55
60
80
85
90
START
STOP
ES
99627782_ML_A.qxd 25/03/03 16:42 Page 93

94
75
95
55
60
80
85
90
START
STOP
75
95
55
60
80
85
90
START
STOP
Como poner la pantalla en posición de vigía
Con el fin de limitar el consumo de energía de su horno fuera de funcionamiento, puede
usted poner la pantalla en POSICION DE VIGIA.
Para ello, sírvase seguir el siguiente procedimiento :
PUESTA EN MARCHA DE LA POSICION VIGIA :
- El horno debe estar con la indicación de la hora.
- Pulse al mismo tiempo los botones + y -
durante unos 5 segundos.
- En la pantalla aparece "Lcd off".
- Suelte el botón.
- 30 segundos después su pantalla se apaga.
Ahora el horno está en posición de vigía, se
apagará automáticamente después de 30
segundos volverá a la posición de indicación de
la hora.
DESACTIVACION DE LA POSICION VIGIA :
- Su horno debe estar en posición de indicación
de la hora.
- Pulse al mismo tiempo los botones + y -
durante unos 5 segundos.
- En la pantalla aparece "Lcd on".
- Suelte el botón.
- De este modo deja usted la POSICION VIGIA;
su pantalla queda encendida permanentemente.
75
95
55
60
80
85
90
START
STOP
75
95
55
60
80
85
90
START
STOP
¿Cómo utilizar el horno?
99627782_ML_A.qxd 25/03/03 16:42 Page 94

95
ES
FUNCIONES
COCCIÓN
EJEMPLOS DE COCCIÓN
55°
60°
75°
80°
85°
90°
95°
Utilizable con la mayoría de los
alimentos
Descongelación de filetes de pescado
antes de ser empanados.
Frutos rojos que deben quedar
fríos (para tartas y coulís)
Descongelación de carnes antes
de ser asadas (ej.: salchichas)
Cocción de pescados frágiles
(filetes de sardinas o de salmonetes)
Frutas tibias para su consumo
inmediato.
Pescados frágiles enteros / truchas
Huevos pasados por agua,
tomates rellenos. Pastelillos de
queso, cremas…
Terrinas, hígados de pollo.
Recalentar platos preparados
Temperatura de
cocción vapor más
utilizada
Descongelación lenta
sin riesgo de cocción
La carne queda
nacarada y el coláge-
no no aparece. Se
conservan todos los
sabores, texturas y
olores
Para la cocción de
alimentos frágiles
Descripción de las funciones
99627782_ML_A.qxd 25/03/03 16:42 Page 95

¿Qué hacer si observa anomalías en el
funcionamiento?
Si se tiene una duda sobre el funcionamiento correcto del horno, esto no
significa que haya forzosamente una avería.
En cualquier caso, compruebe los
siguientes puntos:
Constata que…
Las causas posibles Que es lo que hay
que hacer
Comprobar la alimentación
(el fusible de su
instalación).
Llamar al Servicio
Posventa.
Fallo de alimentación del
horno.
Tarjeta electrónica e
stropeada.
No se enciende ningún
piloto.
La detección del nivel
vacío parpadea a pesar
de que el depósito está
lleno en el transcurso de
la cocción.
Depósito mal colocado.
Fallo en el sistema de
detección.
Comprobar que el depósito
está encajado a fondo.
Llamar al Servicio
Posventa.
Fuga de agua o de vapor
por la puerta durante la
cocción
La puerta está mal cerrada.
La junta de la puerta es de-
fectuosa.
Comprobar que el depósito
está encajado a fondo.
Llamar al Servicio
Posventa.
"Ronroneo" intermiten-
tedurante la cocción a
vapor.
Funcionamiento de la bomba
de alimentación de agua.
OK, funcionamiento normal
del horno.
96
En cualquier caso, si su intervención no es suficiente, llame sin dilación al Servicio
Posventa.
99627782_ML_A.qxd 25/03/03 16:42 Page 96

97
ES
Marque aquí las indicaciones que figuran en la placa de características de su horno:
¿A quién llamar?
MADE IN FRANCE
220 - 240V ~ 50 Hz
BRANDT APPLIANCES SAS
7 rue Henri Becquerel
92500 RUEIL MALMAISON
De Dietrich
99627782_ML_A.qxd 25/03/03 16:42 Page 97

Sumário
98
Editorial p.99
Como se apresenta o seu forno? p.100
Acessórios p.101
Depósito p.101
Como instalar o seu forno?
Ligação p.102
Dimensões úteis para encastrar o seu forno p.103
Como mudar a lâmpada p.103
Como utilizar o seu forno?
Como ajustar a hora do relógio do seu forno p.104
Como efectuar uma cozedura imediata ? p.105
Visualização do nível de água p.106
Paragem durante a cozedura p.106
Como efectuar uma cozedura diferida? p.107 - 108
Como utilizar o temporizador ? p.109
Como utilizar o dispositivo de segurança para crianças? p.109
Como pôr o mostrador luminoso do forno em modo económico? p.110
Descrição das funções. p.111
Que fazer em caso de anomalias de funcionamento? p.112
Quem contactar? p.112
Ao longo do folheto,
assina-lhe as instruções de segurança,
assinala-lhe os conselhos e as astúcias
99627782_ML_A.qxd 25/03/03 16:42 Page 98
La página se está cargando...

START
STOP
75
95
55
60
80
85
90
100
Como se apresenta o seu forno?
Botão: On/Off (Ligar/Desligar)
Regulação dos tempos e das
temperaturas
Regulação das temperaturas
Tempo de cozedura
Final de cozedura
Temporizador independente
1
2
3
4
5
6
1
32
4
5
6
7
7
Selector de funções
Indicador de cozedura dos
ultracongelados
Indicador de cozedura
²
Indicador de nível de água
Visor do relógio e dos tempos
Indicador de temperatura
Painel de
comandos
Depósito
Interior do
forno
Gerador de
vapor
8
10
9
11
12
8
10
9
11
12
99627782_ML_A.qxd 25/03/03 16:42 Page 100
La página se está cargando...
La página se está cargando...

103
PT
Dimensões úteis para encastrar o seu forno
Coloque o aparelho no nicho.
O aparelho deve ficar horizontal.
Controle esta posição.
380
560
50
386,5
20
595
405
544
378
550
A lâmpada está situada na parte traseira, no lado direito, da cavidade do forno.
- Gire a armação de suporte da lâmpada para a esquerda, até efectuar um quarto da
circunferência.
- Desenrosque a lâmpada no mesmo sentido.
- Características da lâmpada :
- 15 W - 220/240 V
- 300°C - casquilho E 14
- Substitua a lâmpada e, em seguida, volte a montar a armação com o postigo
fazendo coincidir bem todas as juntas.
- Ligue novamente o seu forno.
Como mudar a lâmpada?
Desligue o seu forno antes de efectuar qualquer tipo de intervenção sobre
a lâmpada e deixe arrefecer o aparelho, se necessário for.
99627782_ML_A.qxd 25/03/03 16:42 Page 103

104
Ajustar o relógio
• Prima simultaneamente as teclas e
durante alguns segundos até que a
hora indicada acenda por
intermitência.
• Ajuste a regulação da hora com as teclas
+ ou -.
Prima a tecla para validar.
Como ajustar a hora do relógio do seu forno
Se não houver validação por intermédio da tecla , o registo é
automático no final de alguns segundos.
START
STOP
Como utilizar o seu forno?
START
STOP
START
STOP
START
STOP
A a colocação sob tensão
• o visor acende por intermitência.
• Ajuste a hora premindo as teclas + ou
- (se mantiver a pressão do dedo na
tecla pode obter um desfile rápido).
Exemplo:12h30.
• Prima a tecla START/STOP para
validar.
99627782_ML_A.qxd 25/03/03 16:42 Page 104
La página se está cargando...
La página se está cargando...

75
95
55
60
80
85
90
START
STOP
107
PT
Regule o modo de cozedura escolhido e
eventualmente defina a temperatura.
Exemplo: posição
temperatura 100°C
Um tempo de cozedura é pré-programado
para as diferentes funções.
Cozedura
Tempo pré-pro-
gramado
Definição de
Tempo
Definição de
Tempo
55°
60°
75°
80°
85°
90°
95°
25 min
30 min
30 min
15 min
15 min
15 min
20 min
30 min
10 min
10 min
10 min
10 min
10 min
10 min
10 min
10 min
1 hora
1 hora
1 hora
1 hora
1 hora
1 hora
1 hora
1 hora
75
95
55
60
80
85
90
START
STOP
Prima as teclas + ou - para definir o tempo
pretendido.
Exemplo: 45 min
O registo do tempo definido deve ser
confirmado, premindo novamente a tecla
ou START/STOP
.
Após estas acções, o forno aquece.
No final da cozedura, uma série de bips
sonoros é emitida durante uns minutos e o
símbolo começa a piscar.
Os bips param, premindo a tecla
START/STOP durante 1 segundo.
Pode, a qualquer momento, modificar o
tempo de cozedura, premindo a tecla
.
Para cancelar a sua programação, prima 2
vezes a tecla START/STOP.
Como efectuar uma cozedura diferida?
99627782_ML_A.qxd 25/03/03 16:42 Page 107
La página se está cargando...
La página se está cargando...

110
75
95
55
60
80
85
90
START
STOP
75
95
55
60
80
85
90
START
STOP
Como pôr o mostrador luminoso do forno em modo económico?
Para reduzir o consumo de energia do seu forno fora do tempo de utilização, tem a possi-
bilidade de pôr o mostrador luminoso em MODO ECONÓMICO.
Para este efeito, siga o seguinte procedimento:
ACTIVAÇÃO DO MODO ECONÓMICO :
-O seu forno deve estar em modo de
visualização das horas
- Exerça uma pressão, simultaneamente, sobre
as teclas + e - durante cerca de 5 segundos.
- O mostrador luminoso indica "Lcd off".
- Largue as teclas.
- Passados 30 segundos o mostrador apaga-se.
O seu forno está presentemente em modo
económico, ele apaga-se automaticamente 30
segundos após a selecção do modo de
visualização das horas.
DESACTIVAÇÃO DO MODO ECONÓMICO :
- O seu forno deve estar em modo de
visualização das horas.
- Exerça uma pressão, simultaneamente, sobre
as teclas + e - durante cerca de 5 segundos.
- O mostrador luminoso indica "Lcd on".
- Largue as teclas.
-O forno saiu do MODO ECONÓMICO, o
mostrador mantém-se aceso em permanência.
75
95
55
60
80
85
90
START
STOP
75
95
55
60
80
85
90
START
STOP
Como utilizar o seu forno?
99627782_ML_A.qxd 25/03/03 16:42 Page 110
La página se está cargando...

112
Que fazer em caso de anomalias de
funcionamento?
O seu forno apresenta defeitos de funcionamento, isto não significa obriga-
toriamente que esteja avariado.. Seja qual for o problema, verifique os
pontos seguintes:
Você constata que...
As causas possíveis O que deve fazer?
Verificar a alimentação
(fusível da instalação
eléctrica).
Recorrer ao Serviço.
Pós-vendas.
Problema de alimentação do
Forno.
Carta electrónica caduca.
Nenhum indicador
luminoso se acende.
A detecção de nível vazio
pisca enquanto que o
reservatório está cheio
durante a cozedura.
Depósito foi posicionado
incorrectamente.
Sistema de detecção com
problemas.
Verificar se o depósito foi
introduzido até ao fundo.
Recorrer a um serviço
Pós-venda.
Fuga de água ou de
vapor a nível da porta
durante a cozedura.
A porta está mal fechada.
A junta da porta apresenta
um defeito.
Verificar se o depósito foi
introduzido até ao fundo.
Recorrer ao Serviço Pós-
vendas.
É emitido um "ronrom"
intermitente durante a
cozedura a vapor.
Funcionamento da bomba de
alimentação de água.
RAS, funcionamento
normal do forno.
Se a sua intervenção não for suficiente para resolver estes problemas, contacte
imediatamente o Serviço de Assistência Pós-Venda.
Inscreva em baixo as indicações incluídas na placa de características do seu
exaustor:
Quem contactar?
MADE IN FRANCE
220 - 240V ~ 50 Hz
BRANDT APPLIANCES SAS
7 rue Henri Becquerel
92500 RUEIL MALMAISON
De Dietrich
99627782 03/03
99627782_ML_A.qxd 25/03/03 16:42 Page 112
-
 1
1
-
 2
2
-
 3
3
-
 4
4
-
 5
5
-
 6
6
-
 7
7
-
 8
8
-
 9
9
-
 10
10
-
 11
11
-
 12
12
-
 13
13
-
 14
14
-
 15
15
-
 16
16
-
 17
17
-
 18
18
-
 19
19
-
 20
20
-
 21
21
-
 22
22
-
 23
23
-
 24
24
-
 25
25
-
 26
26
-
 27
27
-
 28
28
-
 29
29
-
 30
30
-
 31
31
-
 32
32
-
 33
33
-
 34
34
-
 35
35
-
 36
36
-
 37
37
-
 38
38
-
 39
39
-
 40
40
-
 41
41
-
 42
42
-
 43
43
-
 44
44
-
 45
45
-
 46
46
-
 47
47
-
 48
48
-
 49
49
-
 50
50
-
 51
51
-
 52
52
-
 53
53
-
 54
54
-
 55
55
-
 56
56
-
 57
57
-
 58
58
-
 59
59
-
 60
60
-
 61
61
-
 62
62
-
 63
63
-
 64
64
-
 65
65
-
 66
66
-
 67
67
-
 68
68
-
 69
69
-
 70
70
-
 71
71
-
 72
72
-
 73
73
-
 74
74
-
 75
75
-
 76
76
-
 77
77
-
 78
78
-
 79
79
-
 80
80
-
 81
81
-
 82
82
-
 83
83
-
 84
84
-
 85
85
-
 86
86
-
 87
87
-
 88
88
-
 89
89
-
 90
90
-
 91
91
-
 92
92
-
 93
93
-
 94
94
-
 95
95
-
 96
96
-
 97
97
-
 98
98
-
 99
99
-
 100
100
-
 101
101
-
 102
102
-
 103
103
-
 104
104
-
 105
105
-
 106
106
-
 107
107
-
 108
108
-
 109
109
-
 110
110
-
 111
111
-
 112
112


Groupe Brandt DOV399XE1 El manual del propietario
- Tipo
- El manual del propietario
en otros idiomas
- français: Groupe Brandt DOV399XE1 Le manuel du propriétaire
- English: Groupe Brandt DOV399XE1 Owner's manual
- Deutsch: Groupe Brandt DOV399XE1 Bedienungsanleitung
- Nederlands: Groupe Brandt DOV399XE1 de handleiding
- português: Groupe Brandt DOV399XE1 Manual do proprietário
- dansk: Groupe Brandt DOV399XE1 Brugervejledning
Artículos relacionados
-
Groupe Brandt DOD448XA1 El manual del propietario
-
-
Groupe Brandt HB3635E2 El manual del propietario
-
-
-
Groupe Brandt UMP404E1 El manual del propietario
-
-
-
-