
Owners Manual
Manual del Propietario
®
ROOM AIR CONDITIONER
ACONDICIONADOR DE AIRE DE VENTANA
Model, Modelo 580.75100
Seam, Roebuck and Co., Hoffman Estates, IL 60179 U.S.A
www.sea_com

TABLE OF CONTENTS ........................2
WARRANTY ..............................................2
SAFETY .....................................................3
Important Safety Instructions...................... 3
ELECTRICAL REQUIREMENTS .......4
INSTALLATION ........................................5
Installation Requirements ......................... 5
Installation ................................................ 6
How to Install ............................................ 6
Removal fromW_ndow................................. 7
OPERATION ............................................. 8
How and Why ........................................... 8
Normal Sounds ........................................ 8
Capacityand RunningTime..................... 8
Features.................................................. 9
Using theAir Conditioner........................ 9
ControlPanel.......................................... 10
Remote Control ...................................... 11
MAINTENANCE ..................................... 12
Air Filter Cleaning................................... 12
Air Conditioner Cleaning ........................ 12
HowtoRemovetheFrontGrille.................. 12
HowtoReplacetheFrontGrille.................. 12
TROUBLESHOOTING ......................... 13
Before Calling for Service ...................... 13
ESPA_OL ................................................ 15
MASTER PROTECTION
AGREEMENTS ......................................31
SERVICE NUMBERS ............BackCover
FULL ONE YEAR WARRANTY ON
ROOM AIR CONDITIONER
For one year fromthe date of purchase,when this
air conditioneris operated and maintained for
normal room coolingaccording to the instructions
in this owner'smanual, Sears will repairthis air
conditioner, free ofcharge, ifdefective in materialor
workmanship.
FULL FIVE-YEAR WARRANTY ON
SEALED REFRIGERATION SYSTEM
For five years from the date of purchase, when this
air conditioner is operated and maintained for
normalroom coolingaccordingto the instructions
inthis owner's manual, Sears will repair the sealed
refrigerationsystem (consistingof refrigerant,
connectingtubing,and compressor), free of charge,
if dofective in material or workmanship.
WARRANTY SERVICE IS AVAILABLE BY
CONTACTING SEARS SERVICE AT
1-800-4-MY-HOME e.
Warranty coverage applies only to air conditioners
used for non-commercial, private household
purposes.
This warranty appliesonly while this productis in
use in the United States.
This warrantygives you specificlegal dghts, and
you may also have other dght which vary from state
to state.
Sears, Roebuck and Co., DI817WA,
Hoffman Estates, IL 60179 U.S.A.
-2-

IMPORTANT SAFETY INSTRUCTIONS
The safety instructionsbelow willtellyou how to use your room air conditionerto avoid harmto yourselfor
damage to your ROOM AIR CONDITIONER.
V_FORYOURSAFETY
Do not store or use gasoline or other flammable
vapors and liquidsin the vicinityofthis or any other
appliance. Read productlabels forflammabilityand
other wamings.
PREVENT ACCIDENTS
To reduce the riskof fire, electricalshock, or injury
to persons when usingyour air conditioner,follow
basic precautions,includingthe following:
• Be sure the electricalservice isadequate for the
model you have chosen.
• Ifthe air conditioner isto be installed ina window,
you willprobablywant toclean bothsides ofthe
glass first.Ifthe window is a triple-tracktype witha
screen panel included, you may want to remove
the screen completely before installation.
• Be sure the air conditionerhas been securely and
correctlyinstalledaccording to the separate
installationinstructionsprovidedwith this manual.
Save this manual and installation instructionsfor
possiblefuture use in removing or reinstallingthis
unit.
• Use gloveswhen handlingthe airconditioner.
Be carefulto avoid cutsfrom sharp metal finson
front and rear coils.
ELECTRICAL INFORMATION
The complete electrical rating of your new room air
conditioner is stated onthe sadal plate. Refer to the
rating when checkingthe electdcal requirements.
• Be sure the airconditioneris propedygrounded.
To minimize shock and fire hazards, proper
groundingisimportant. The power cord is
equipped with athree-prong groundingplugfor
protectionagainst shookhazards.
• Your air conditionermust be plugged intoa
properly groundedwall receptacle. If the wall
receptacle you intend to use is not adequately
grounded or protectedby a time delay fuse or
circuit breaker, have a qualifiedelactdcian install
the proper receptacle.
• Do not runair conditionerwitha protective
covering.This could resultin mechanical damage
within the sir conditioner.
• Do not use an extension cord or an adapter
plug.
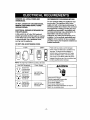
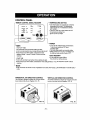
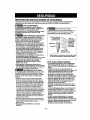
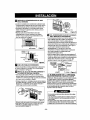
_ Avoid fire hazard or electdc shook.
Do not use an extension cord or an adapter plug.
Do not remove any prongfromthe power cord.
plug_
Reset _'_
Test
cord
--3-prong
grounding
type wall
receptacle
ENERGY SAVING IDEAS
• The capacity of the room air conditionermust fit
the room size forefficientand satisfactory
operation.
• Install the roomair conditioner on the shady side
ofyour home. A window that faces north is best
because it isshaded most of the day.
• Do not blockair conditionerflow insidewith blinds,
curtains, or furniture,or outsidewithshrubs,
enclosures,or other buildings.
• Close the floorand wall registersand the fireplace
damper so coolairdoes not escape upthe
chimneyor intothe ductwork.
• Keep blindsand drapes in other windowsclosed
dudngthe sunniest part of the day.
• Clean the airfilter as recommended in the
MAINTENANCE section ofthis manual.
• Proper insulationand weather strippinginyour
home will help keep warm airout and coolair in.
• F-xtemalhouseshading withtrees, plantsor
awnings will helpreduce the air conditioner'swork
load.
• Operate heat producingappliances such as
ranges,washers, dryers,and dishwashers dudng
the coolest part of the day.
/
-3-

OBSERVE ALL LOCAL CODES AND
ORDINANCES.
DO NOT, UNDER ANY CIRCUMSTANCES,
REMOVE THE POWER SUPPLY CORD
GROUND PRONG.
ELECTRICAL GROUND IS REQUIRED ON
THIS APPLIANCE.
A 250-volt 60 Hz, AC only, 20A fused and
propedy groundedelectricalsupply is required.
A time delay fuse or time delay circuitbreaker
is recommended. Use a dedicatedcircuit,
serving onlythis appliance.
DO NOT USE AN EXTENSION CORD.
RECOMMENDED GROUNDING METHOD
Foryour personalsafety, thisappliance must
be grounded. This appliancehas a power
supplycordwith a 3-pronggroundingplug.To
minimizepossibleshock hazard, the cordmust
be plugged intoa matinggroundingtype wall
receptacleand groundedin accordance with
the National ElectricalCede (ANSI/NFPA 70)
latest edition and all localcedes and
ordinances. Ifa matingwall receptacle isnot
available, it isthe personalresponsibilityand
obligationofthe customerto have a properly
grounded3-prongwall receptacleinstalledby a
qualified electrician.
115V-
230V~
!
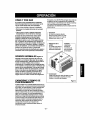
Powercordmay includeacurrentinterrupter
device.A testandresetbutton isprovidedonthe
plugcase.Thedeviceshouldbe testedona
pedodicbasisbyfirst pressingtheTEST button
andthentheRESETbutton.IftheTESTbutton
doesnottriporiftheRESETbuttonwillnotstay
engaged,discontinueuseoftheair conditionerand
contactaqualifiedservicetechnician.
NOTE: The shapemaybe differentaccordingtoitsmodel.
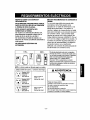
Use Wall Receptacle Power Supply
©
@
©
Standard 125V,
3-wire grounding
receptaclerated
15A,125V AC
Standa_250V,
3-wiregrounding
rece_acle mud
15A,25OVAC
Use 15 AMP. time
delay fuse or 15 AMP.
circuitbreaker.
Standard 250V,
3-wire grounding Use 20 AMP, time
receDtacle rated delay fuse or 20 AMP.
20A, 250V AC circuitbreaker.
AWARNING
ElectricalShockHazard
Plugintoa grounded3 prongoutlet.
Donotremovegroundprong.
Donotuseanadapter.
Donotuseanextensioncord.
Failuretofollowtheseinstructionscanresultin
death,fire,orelectdcalshock.
-4-

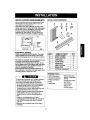
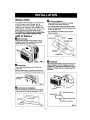
INSTALLATION REQUIREMENTS
Yourairconditionerwillinstallintostandarddoublehung
windowswithactua]clearopeningwidthsof22 to36
inches(559mmto914mm)(FIG. 1).
Lower sash must open sufficientlytoallow a clear
vertical opening of 13 inches (331mm). Side Iouvem
and the rear ofthe air conditionermust have clear
air space toallow enough airflowthrough the
condenser for heat removal. The rear of the unit
must be outdoors, notinside a buildingor garage.
I 1_3,, _nE_ i_ Sash
13" min. Inner sill Winder
' • SilEx_
Interiorwall ",J....... Io° FIG. 1
ELECTRICAL SERVICE
Check your available electricalservice. The power
supplyavailable must be the same as that shown
on the unitnameplate (foundonrightsideofcabinet).
All models are equipped witha 3-prong serviceplug
to provide proper serviceand safe positive
grounding. Do not change plugin any way. Do not
use an adapter plug. If yourpresent wall outletdoes
not matchyour plug, call a qualifiedelectricianto
make the necessary correcttons.
SAVE CARTON and this OWNER'S MANUAL for
future reference. The carton isthe pest way to store
unitdudng winter or when not in use.
To avoidrisk ofpersonalinjury,propertydamage,
or productdamagedue totheweightofthis
device andsharpedgesthat may beexposed:
•Air conditionerscovered inthis manualposean
excessiveweight hazard.Twoor morepeople
are neededto move and installthe unit.
To preventinjuryor strain,useproper liftingand
carryingtechniqueswhenmovingunit.
Carefullyinspectlocationwhereair conditioner
will be installed.Be sure itwillsupportthe
weight ofthe unitoveran extendedperiodof
time.
Handleair conditionerwith care.Wear
protectivegloveswheneverliftingor carryingthe
unit.AVOIDthe sharpmetalfins offront and
rearcoils.
Makesureair conditionerdoes notfall dudng
installation.
INSTALLATION HARDWARE
S
ITEM NAME OF PARTS Q"I'Y
A SHORT SCREW 11
B WOOD SCREW 5
C L BRACKET 3
D FOAM STRIP 1
E FOAM SEAL 1
F SIDE CURTAIN 2
G DRAIN PIPE 1
H SUPPORT BRACKET 1
REQUIREDTOOLS:
• Tight Fiffing gloves
• Standard screwddver
• Phillipsscrewddver
• Pliers
• Sharp knife
• 3/8-inch open end
wrench or adjustable
wrench
• 1/4-inch hex socket
and ratchet
• Tape measure
• Electhc ddll
• 1/4-inch ddllbit
/
-5-

INSTALLATION
Pick a locationwhichwill allowyou to blow the cold
air into the area you want. Windows used for
installation must be strong enough to support the
weight of the airconditioner, Good installation with
special attention to the proper position of the unit will
lessen the chance that service will be needed.
Ifair onndiaomr b blocked bya st_m_window _m,_.,
see stap 9 on page7 beforebeginning_oinstafl.
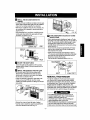
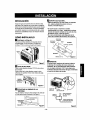
HOW TO INSTALL
_IsIDE CURTAINS
Insert the side curtainsintothe guidesof the air
conditioner.Fasten the curtainsto the unitwith
screws (ITEM A), as shown in FIG. 2.
ITEM A FIG. 2
_'_ FOAM STRIP
Cutthe adhesive-backedfoamstrip (ITEMD)to the
windowwidth.
Removethe backingfrom the foam stripandattachthe
foamstrip tothe undersideof the bottomwindow.(FIG. 3)
L_ ATTACH L BRACKET
• Use screws(ITEM A) toinstall the L brackets
on the outer sill as shown. See Fig. 5.
• The bracket helpsto hold unitsecurely in place.
Be sure to place bracket edge flush against back
of inner sill. See FIG. 5.
• If air conditioneris blocked by stormwindow
frame, see step 9.
INNERSILL
OUTERSILL [TEMA INSIDE
OUTSIDE
L BRACKET
FIG. 5
1=_'_DRAINAGE
First,be sure to insertthe drain pipeinto base pan
beforeinstallation.The airconditioner must be
installedwith a slighttilt(I/4") downward for proper
drainage of excess condensed water throughthe
drainpipe.
(ITEM D)
FIG. 3
_1 LOCATING UNIT IN WINDOW
Open the window and mark center linewith pencil
on the center of the inner sill,as shown in FIG. 4.
INNER SILL
ROOMSIDE
DRAINCAP
DRAINPIPE
_J_BASE PANREAR
DRAIN_BASE PANBOTTOM
"_H_////////////_
FIG. 6
-6-

r_ INSTALLTHE AIRCONDITIONERIN THE
WINDOW
• Carefullyliftthe airconditionerand slideit intothe open
window.Makesurethebot_mguideoftheaircondifJoner
drops intothe notchescreatedby theL brackets.
• Whenthe air conditionerdrops intothe L brackets,the
air conditionerwill be canteredin windowopeningas
shown inFIG.7.
•Wnile steadyingthe airconditioner,carefullybring the
windowsash downbehindthe upperguideof the air
conditioner,as shownin FIG.8.
I \ I FIG.7
CENTERLINE
W1RDOW FRAME
UPPERGIJEDE _,._STRIP
-i
ABOUT 1/4"
BD °_I
GUIDE
LBRACKETI _ FIG. 8
f_ SECURETHE GUIDEPANELS
Extendthe guidepanels(ITEM F)tofill thewindow
openingusing4 screws(ITEMB) tosecure them,as
shownin FIG.9.
IL_ INSTALLTHE FOAMSEAL AND SASH LOCK
• Cutthe foamseal(ITEME) tothewindowwidth.
Stuffthe foamsealbetweenthe lowerand upper
windowsashto preventairandinsectsfrom getting
intothe room,as showninFIG.9.
• FastentheremainingL bracketoneithersideofthe
windowusingscrew(ITEMA). SeeFIG.9 inset.
Installingthisbracketpreventsunitfallingfromwindow
beingraised
LBRA_
FOAMSEAL
(ITEME)
ITEMI
FIG. 9
• Removethe screwon lower fight sideof cabinet.
• Use thisscrewto attachthe supportbracket(ITEMH)
tothe innerwindow sillasshown Fig.10.
-ITEM B
}
FIG. 10
_IF AIRCONDITIONERIS BLOCKED BYSTORM
WINDOWFRAME
• Ifstormwindowpresentsinterference,fastena 2"wide
woodstriptothe innerwindowsillacrossthefullwidthof
thesill.Thewoodstripshouldbe thickenoughtoraise
theheightofthewindowsillsothattheunitcanbe
installedwithoutinterferencefrom thethestormwindow
frame.See FIG.11.
Topofwoodstripshouldbeapproximately3/4"higher
thanthestormwindowframeto helpcondensationto
drainproperlytothe outside.
• Installa secondwoodstrip(approximately6"longby
1_/2"wideandsamethicknessasfirst strip)inthecenter
oftheoutersinflush againstthe backoftheinnersill.
ScrewtheL bracketsintothisstdp.
ThiswillraisetheL bracketasshownin FIG. 11.
WOOD STRIP MOUNTED
ON TOP OF TNNER
--..,
INNER
SILL
1" MAX
INDOW _
LBI_C_r FRAME
WOOD S_IP
FOR LBRACKET O_ERsILL
_t,ms FIG, 11
REMOVALFROM WINDOW
Turntheairconditioneroff,anddisconnectthepower
cord.RemovetheL bracketandthescrewsinstalled
throughthetopandbottomofthesidepanels,andsave
forreinstallationlater.Closethesidepanels.Keepinga
firmgriponthe airconditioner,raisethesash,and
carefullytiltthe airconditionerawayfromyou,to drainany
condensatewater.Lifttheairconditionerfromthewindow
andremovethefoam sealfrom betweenthewindows.
•Airconditionerscoveredinthismanualposean
excessiveweighthazard.Twoor morepeopleare
neededtomoveandinstalltheunit.
Topreventinjuryorstrain,useproperliftingand
carryingtechniqueswhenmovingunit.
• Whenhandlingtheairconditioner,becarefultoavoid
cutsfromsharpmetalfinsonfrontandrearcoils.
•Makesureairconditionerdoesnotfallduringremoval.
-7-

HOW AND WHY
Your roomair conditionerprovidesthe following
functionsto make hot weather livingmore
comfortable:
• Cools and circulatesroom air.
• Lowers humidityby removing excess moisture.
• Filtersoutsummer'0medust, dirt, and some
airbome impurities.
The air conditioner performsthese functions by
drawing roomair through a filter whichtrapsdust
and dirtparticles. The air then passes over a
coolingceil which refrigeratesthe air and removes
excess moisture. The same air isthen retumed to
the room- cooler, drier, and cleaner. Moisture
removed from the room air iscarried tothe outside
and evaporated.
Your air condi_oner isdesigned tobe easy to
operate and to provide plentyofcoolingpower.
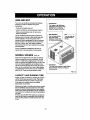
NORMAL SOUNDS FIG.12
Aside fromthe regular fan motorand compressor
soundscoming from your air conditioner,you will
once in a while hear a pingingsound. This is the
result ofmoisture being pickedupfrom the air in the
room and thrown against the air conditioner's fan.
This isnormal and should notbe cause forconcom.
Also, do not be alarmed if youhear a slighthissing
or gurglingsound coming from your air conditioner
after itis off.These are normal coolant noises.
CAPACITY AND RUNNING TIME
Proper unitsize is importantin decidingthe desired
comfortforthe area youwant to cool.The proper
size isdetermined by the number of square feat
in the area to be cooled, indoorand outdoor
temperature and humidity.
Whenever the heat or humidity load is above normal
the air conditioner must run longerand moreoften
tokeep the desiredtemperature you have selected,
Under heavy heat load conditionsthe air conditioner
may need to run constantlyto keep the temperature
you want.
At times usingthe MED FAN settingto circulatethe
room air may make it comfortable even though the
air is not being cooled. This will decrease your cost
ofuse.
i ompressor
The modem high efficiency
compressormay have a high
pitchedhum or pulsating
noisethat cycleson and off.
-- Unit Vibration
The unitmay vibrate
and make noise
because of poorwall
You may hear dropletsof water hitting
the condenser causing a pingingor
clickingsound.
Fan
You may hear air
movement from
the fan.
FIG. 12
-8-

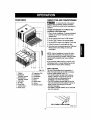
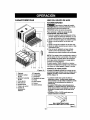
FEATURES
1 15 6 5 4 32714
9 8 11 1210 13 16
FIG. 13
1. Cabinet
2. Vertical Air
Direction Louvers
3. Horizontal Air
Direction Louvers
4. Inlet Grille
5. Air Filter
6. Front Gdlle
7. Conb'olPanel
8. Power Cord
9. EvaporatorCoil
10. Condenser
11. Compressor
12. Base pan
13. Brace
14. Upper Guide
15. Curtain
16. Remote Control
USING THE AIR CONDITIONER
To reduce the dsk of fire,electric
shook,or injuryto persons, read the important
SAFETY instructionssection beforeoperating this
appliance
To begin operating the air conditioner after
installation, follow these steps:
1. Plug in the air conditioner.(To prevent electrical
hazards, do notuse an extension cordor an
adapter plug.)
2. Set the exhaust ventto the CLOSE position.
3. Set the TEMP Controltothe coolestsetting.
4. Set the MODE controlat the highestCOOL level.
5. Adjustthe louvers for comfortableair flow.
6. Once the room has cooled, adjustthe TEMP and
Mode Control to the setting youfind most
comfortable.
NOTE : Ifthe airconditioneris tumod off, wait 3
minutesbefore restarting.This allowspressure
insidethe compressor to equalize. Failure to wait 3
minutesbefore restartingmay cause inefficient
operation.
If you move the TEMP Control toa warmer, then
immediately backtoa cooler setting,the unitwill
shutoff.Wait 3 minutes before restarting.
VENT CONTROL
The Vent Control allowsthe airconditionerto
either recimulate inside air (CLOSE) orexhaust
air to the outside (OPEN). (FIG. 14)
• The CLOSE position is usedwhen maximum
coolingis desired. Itmay also be usedfor air
recirculationwithoutcoolingwhen the air
conditioner isset in the FAN position.
• The OPEN positionremoves stale airfrom the
roomand exhausts ittothe outside. Freshair is
drawn intothe roomthrough your home's
normal air passages.
• The OPEN or CLOSE position can be used with
any mode selection.
PULL OPEN I PUSH CLOSE
FIG. 14
-9-

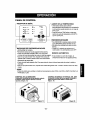
CONTROLPANEL
REMOTE CONTROL SIGNAL RECEIVER
ITIMER
- TEMPERATURE SETTING
•Usethese buttonsto automaticallycontrolthe
temperatureof the room.The temperature
can be set to oneofa temperature between
64°Fto 82°F.
•Push theTEMP up or downbuttonsto shift
the temperature settingfrom
82°FIt,.76°F•70°F •64°F
- SHUT-OFFTIME
,,You willusuallyuse shut-offtime while yousleep.
• IfunitisnJnning,Usetimertosetnumberofhoursuntilshut-off.
• EverytimeyoupushTimerbutton,itadvancesthe Timer
settingas follows:1Hour• 3Hours• 6 Hours1_10Hours
maximum.
"To tam the airconditionerON, pushthisbutton.
Toturnthe airconditionerOFF,push
thebuttonagain.
•This buttontakes priorityoveranyotherbutton.
•Whenyoufirstturnit on,the airconditioneris on
the HighcoolmodeandtheTemp.at70°F.
AUTO RESTART
• Intheeventofa powerfailure,
theunitwillrunattheprevious.
- STARTTIME
• ifunitisoff, Usetimerto setnumberofhoursbeforeunitstarts.
• EverytimeyoupushTimerbutton,itadvancesthe Timersettingas follows:1Hour• 3Hours• 6 Hours• 10Hours
maximum.
MODE
• Pushthis buttontoshiftthe modeofoperationfromCOOL-HI• COOL-LOW•FAN ONLY-HI• FANONLY-
LOW.
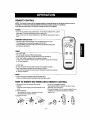
HORIZONTAL AIR DIRECTION CONTROL
Thehorizontalairdirectionis adjustedbymovingthevertical
louversrightandleftwithyourfingertips.(FIG.15)
VERTICAL AIR DIRECTION CONTROL
Theverticalairdirectionisadiustadbymovingthe horizontal
louversupanddownwithyourfingertips.(FIG.16)
FIG. 15
FIG. 16
-10-

REMOTE CONTROL
NOTE: The Remote Control will not operate properly ifstrong lightshines onthe sensor window ofthe Air
Conditioner or ifthere are obstacles between the Remote Control and the Air Conditioner.
Every timeyou push button,you will hear a beep fromthe Air Conditioner.
POWER
•Toturnthe airconditionerON, pushthisbutton.ToturntheairconditionerOFF, pushthe
buttonagain.Thisbuttontakespdorityoveranyotherbutton.
Whenyoufirstturnit on,theairconditionerisonthe HighcoolmodeandtheTempat
70°F
TEMPERATURE SETTING
•Usethesebuttonsto automaticallycontrolthe temperatureoftheroom.
Thetemperaturecan beset withina rangeof 64°Fto 82°F.
• Push the TEMP up or down buttons to shift the temperature setting from
82°F• 76°F• 70°F• 64°F
TIMER
- SHUT-OFFTIME
•You willusually useshut-offtimewhile you sleep.
• Ifunit isrunning, UseTimertoset the numberof hoursuntil shut-off.
• PushTimer buttonsto advancethe Timersettingasfollows:
1Hour(1Hour-2Hours)• 3 Hours(3Hours-5Hours)• 6Hours(6Hours-9Hours)
• 10Hours maximum.
-START TIME
• Ifunit isoff, Usethe Timertosetthe numberof hoursbeforeunitstarts.
• PushTimer buttonsto advancethe Timersettingasfollows :
1Hour(1Hour-2Hours)l, 3 Hours(3Hours-5Hours)• 6Hours(6 Hours-9Hours)
• 10Hours maximum.
MODE
• Push this button to shiftthe mode of operation from:
COOL-HI • COOL-LOW • FAN ONLY-HI • FAN ONLY-LOW.
HOW TO INSERT BA'I-rERIES INTO REMOTE CONTROL
1. Removethe coverfrom the back ofthe remote
controller.
• Openthe coveraccordingtothe arrow directionon the
cover.
2. Inserttwobatteries.
• Be surethat the (+) and(-) directionsarecorrect.
• Be surethat both batteriesare new.
3. Re-attachthe cover.
• Do notuse rechargeablebatteries.
Such batteriesdifferfrom standarddrycells in shape,
dimensions,and performance.
• Removethe batteriesfrom the remotecontrollerifthe air
conditioneris notgoingto be usedfor anextended
lengthof time.
/
-11 -

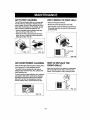
AIR FILTER CLEANING
The Air Filtorwill become dirtyas it removes dust
fromthe inside air. It should be washed at least
every 2 weeks. If the Air Filter remainsfull ofdust,
the air flow willdecrease and the coolingcapacity
willbe reduced, possiblydamaging the unit.
• Pullthe inletgrilleforward,grasping both tabs,
then pullout the air filter.(FIG. 17)
• Wash the Air Filter under the faucet withwarm
water. Be sure to shake off all the water before
replacing the filter. (FIG.18)
FIG . 17
HOWTOREMOVETHEFRONTGRILLE
• Open the inlet grilledownward.
• Remove the screwsecuring the Front Gdlle.
• Push the grille upfrom the bottom and pullthe top
ofthe grilleaway from the case to liftthe top tabs
outof their slots.
\
Inlet Grille
FIG. 20
AIR CONDITIONER CLEANING
Clean the front grilleand inlet gdlle bywipingwith a
cloth dampened in a mild detergentsolution.
The cabinet may be washed with mildsoap or
detergent and lukewarmwater, then polishedv_th
liquidappliance wax.
To ensure continued peak efficiency, the condenser
coils(outdoor side at the unit)should be checked
periodicallyand cleaned ifthey become clogged
with soot or dirtfrom the atmosphere, Brush or
vacuum extedor coils to remove debris fromfins.
FIG. 19
HOW TO REPLACE THE
FRONT GRILLE
Attachthe fi'ontgrille to the cabinet by inser_ngthe
tabson the grilleintothe slots on the front ofthe
cabinet. Push the grille in untilitsnaps intoplace,
ii _ FIG. 21
- 12-

BEFORE CALLING FOR SERVICE
Check the following list to be sure a service call is really necessary. A quick reference to this manual may
help you avoid an unneeded sentice cell.
THE AIR CONDITIONER WILL NOT OPERATE.
Check if...
Wallplug disconnected
Housefuseblownorcircuitbreakertripped
MODE selectoris OFFpositJon
Unitwasturnedoffandthenontooquicl_
TEMP Control set warmerthanroomtemperature
The current interrupter device is triped
Then,,.
Pushplug firmlyintowallouttsL
Replacefusewithtimedelaytypeorresetcircuitbreaker.
TurnMODEselectortothedesiredCOOLsetitng.
Turnunitoffandwait3 minutesbeforerestarting.
Tum TEMP Controlclockwisetoacoolerset_ng(highernumber)
Press the RESET button located on the power cordplug
Ifthe RESET button will not stay engaged, discontinue use of the air
conditionerand contact a qualified service technician
AIR FROM UNIT DOES NOT FEEL COLD ENOUGH.
Check If... Then...
MODE selectorin LOWCOOLposition
TEMP Control set toowarm(lower number)
Roomtemperaturebelow70°F (21°C).
Temperaturesensingtubetouchingevaporator coil,
locatedbehindfrontgitlle
Turnselectorto HiGHCOOL position
TurnTEMP Controlclockwisetoa coolersetting
Coolingmay notoccuruntilroomtemperaturerisesabove70°F (21°C)
Straightentubeawayfromevaporatorcoil
THE AIR CONDITIONER COOLING, BUT ROOM IS TOO WARM - ICE FORMING ON COOLING COIL BEHIND FRONT GRILLE.
Check If... Then...
Outdoor temperaturebelow 70°F(21°C) To defrostthe coil,setselector to FANposiben "rrren,turnTEMP control
counterclockwiseto awarmer setting,
Airfiltermaybe dirty CleanfilterRefertoMaintenancesectionofowner'smanual To defrost,
set selectorto FANposition
TEMP Controlset toocoldfor night-itrnecooling, To defrost_e ceil,setselectortoa FANposition.1ben,s_theMODE
controlatFANposi_onor'HighCool"wi_theTEMPcontroltoawarmerpos_on
"&IEAIRCONDmONERCOOLING,BUTROOMISTOOWARM.
Check If.,.
Dirtyairfiiter- airrestricted
TEMP Control set toowarm.
Frontof unitis blockedby drapes,blinds,furniture,
etc AirdistdbL_Onisrestitcted
Doors,windows,regisfem,etc open Cold airescapes
Unitrecently turnedonin hotroom
CleanairfiltenReferto Maintenancesec_onofowner'smanual
Turn TEMP controlcitx:kwiseto acoolerset_ng(highernumber)
Clearblockagein frontofunit
Closedoom,windows,re_isfers,etc
Allowaddil_nalitmetoremovestoredheatfromwalls,ceilng,floor,andfumitore
THE AIR CONDmONER TURNS ON AND OFF RAPIDLY.
Check If... Then...
I° detemperatureisextmmatybet" ISetMODEonHIGHspeedtobringairpaslcoolingcoilsfasfer. I
NOISE WHEN UNIT IS COOLING.
Check if.,, Than...
I Scondoftonhifitogwator- florathemoistoreremovalsystem This isOormalwhenhumidityis highClocedoors,windows,andregisturs
Windowvibrallan- poor installafion. J Refertoins_la_on instrucfionsorcheckwi_ installer, t
WATER DRIPPING INSIDE ROOM WHEN UNIT IS COOLING,
Check If... Then..,
J _e aircenditioneris improperlyinstelled J "nitaircenditionerslighfiyto theoutsidetoallowwaterdrainage Referto
I
icetalla_oninstru_onsor check_ installer. I
WATER DRIPPING OUTSIDE WHEN UNIT IS COOLING.
Check if... Than...
The unitisremovinglargequanti_esof moisturefrom humidroom. j Thisis normalduringexcessivelyhumiddays. I
/
-13-

-14-

INDICE DE MATERIAS ............................. 15
GARANTiA ................................................ 15
SEGURID'AD.............................................. 16
ImpoYcantesinstruccionesdeseguridad 16
REQUERIMIENTOS ELECTRICOS .........17
INSTALACI_N ........................................... 18
Requerimientos para instalaci6n.......... 48
Installaci6n............................................ 19
C6mo instalarlo..................................... 19
La eliminacionde la ventana................. 20
OPERACnN .............................................. 21
Cbmo y porqu6 .................................... 21
Sonidos normales.................................. 21
Capacidad y tiempo de funcionamiento .--21
Caracterfsticas ..................................... 22
Uso del equipode aire acondicionado.-22
Panel de control.................................... 23
Control remoto...................................... 24
MANTENIMIENTO .................................... 25
Limpiezadel filtrodel aire...................... 25
Limpiezadelequipodeaireacondicionado..-25
COmosacar la rejillafrontal ................... 25
Cdmo a reemplaza el grilleanterior......25
CORRECCION DE FALLAS ......................26
AntesdeUamarparaservtcio...................... 26
ACUERDOS DE PROTECCI(_N
ESPECIALIZADA ...................................... 31
PARA PEDIR SERVICIO .......CubiertaTrasera
GARANTJA DE UN ANO POR EL
EQUIPO DE A!RE ACONDICIONADO
DE HABITACION
Durante unatio completo a partir de la fecha de
compra, si este equipo de aim acondicionadorecibe
mantenimiento y se utiliza para el enfriamiento
normalde habitacibnseg0n las instrucciones
indicadasen este manual del propietario, Seam
reparar_ gratuitamente este equipo de aire
acondidonado, sitiene alg,',ndefecto en materiales
o fabricacibn.
GARANTI'ATOTAL DE CINCO A_IOS
POR EL SISTEMA DE REFRIGERACION
HERMI'--TICAMENTE SELLADO
Durante cincoai_osa partirde la fecha de compra,
si este equipo de aim acondicionadorecibe
mantenimiento y se utiliza para el enfriamiento
normal de habitaci(_nseg0n las instrucciones
indicadas en este manual del propietario,Sears
repamr_ gratuitamente el sist_ma de refligeracibn
herm_,camentesellado(queconsisteenelagente
refdgerante,lostubosdeconexi6ny elcomprssor),
sitienealg0ndefectoenmat_rialesofabricacibn.
EL SERVlCIO DE GARAN'I'IA ES
DISPONIBLE CONTACTANDO AL SERVIClO
SEARS AL 1-800.4-MY-HOME °
La protecciondegamntt'acubre unicamente a los
equiposde airs acondicionadousados para uso
domesticoy no pare uso comercial.
Esta gamnt_as61otiene vaiidez mientras el producto
se este usando en los Estados Unidos.
Esta garant a_leda derechos legales espec_'ficosy
usted puede tener otrosderechos que yah'an de
estado en estado.
Sears, Roebuck and Co., D/817WA,
Hoffman Estates, IL 60179 U.S.A.
/
-15-

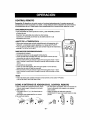
IMPORTANTES INSTRUCClONES DE SEGURIDAD
Las siguientesinstruccionesde seguridad le indicardnc6mo usar suequipo de aim acondicionado de
habitaci6n para evitar da_os para usted mismoy para su EQUIPO DE AIRE ACONDICIONADO.
POR SU SEGURIDAD
No aimacene ni use gasolinau otros vaporesy
liquidosinflamables corca de dste o cualquierotto
electrodomdstico. Lea las etiquetas de los
productospara ver sicontienen advedencias sobre
el cardcter inflamablede losmismos y otras
advertencias.
PARA PREVENIR ACClDENTES
Para reducir el riesgo de incendios, descargas
el_r_:tricaso lesiones personales al usar suequipo
de aim acondicionado,tome las precauciones
bdsicas, entre las que estdn las siguientes:
• Aseg,',resede que laaiimentaci6n el6ctdca sea la
apropiada pare el modelo que usted ha elegido.
• Si el equipo de aire acondicionado debe instalarse
an una ventana, a ust_d probablemante le
conviene limpiar primeroambos lados delvidrio.
Si la ventana es del _po de tres paneles con un
panel incluidode pantalla, ie convienesacar la
ventana completamente antes de la instalaci6n.
• Aseg,',resede que el equipo de aire
acondicionadoha side instalado correctamente y
con seguridad segt_nse sefiala an las
iostruccionesseparadas de instalacibnqua vienen
en este manual. Conserve este manual y las
instruccionesde instalacibnpara usados
posiblementaen el futuro al sacar o volver a
instalaresta unidad.
• Utiliceguantes al manejar el equipo de aim
acondicionedo,t_nga cuidado para evitar cortadas
con las afiladas aletas metdlicas que se hallan en
losserpentines fmntaies y posteriores,
INFORMACI(_N ELECTRICA
En la placa de serie del fabdcante se indica cudles
lacapacidadel_,ctricanominalcompletadesu nuevo
equipode aire acondicionadopara habitaci6n.Consulte
estaplata cuandovayaaverfficarlos requerimientos
el_tricos.
•Aseg_rese deque elequipode aireacondicionado
tenga unaconexi6ncorrectaa tierra.Para reduciral
minimo los nesgosde descargaseldctricaseicoendio,
es importanteconectarel equipacorrectarnentea tierra.
Elcord6nde alimentaci6nel6ctrP_,aestd equipadocon
unenchufedetres espigascon conexi6na tierrapara
protegerlecontra desgosde descargasel6ctricas.
• Suequipa deaire acondicionadodebe enchufarseen
unatoma de corrientede paredquetenga unaconexion
correctaa tierra.Si la tomade corrientede paredque
ustedpiensausarcoestd conectadacorrectamentea
tierrao noestd protegidacon un fusibledeacoi6n
retardadao con un interruptordecircuito,hagaque un
electricistacalificadole instalelatoma decorrientede
paredenformacorrecta.
•No pongaa funcionarel equipode aireacondicionado
con unacubiertaprotectoraexteriorencima.Esto podria
coasionardaSosmecdnicosdentrodelaire
acondicionado.
• Nouse uncable de extensi6nni unenchufe
adaptador.
_ Evitelospeligrosdeincendiosy
descargaselectricas.Nouseuncablede extensiSnniun
enchufeadaptador.No elimineningunadelasespigas
delenchufedelcordSndealimentaci6nel_ctr_ca.
Toma de corriente
de pared con I _ Cable de
conexi6n a lJerra. I _ aiimentaci6n
\ I \_ _ -con clavija
- dotadade
.epong_ ] _ conexibna
IL"_Y_ I\_ _ tierrade3
Pmeba_ _ terminales.
IIII Terminal de
_LI conexibna tierra.
J
I
Bajo ningunacimunstancia corte, quiteo evita
el uso de laconexi6n a tierra de esta clavija.
IDEAS PARA AHORRAR ENERG|A
•La capacidad del equipo de aim acondicionedo
debe corresponder ai tamaSo de la habitaci6n
para el funcionamientoeficiente y satJsfactedodel
equipo.
• Instale el equipo de aire acondicionadode
habitacibnen el ladosombreado de su hogar. Una
vantana oriantada hacia el nortees la mejor
porque tiene sombre la mayor parte dald|a.
• No bloquae el aparato de aire acondicionado
tapdndotocon parsianas, cortJnas,muebles o en
el exterior conarbustos, recintosu otrosedificios.
• Cierre el reguladorde tirede la chimenea, las
rejillasde calefacci6n del pisoy la pared, de tal
modoque el aim frfo no se escape ni por la
chimenea ni por los conductos.
• Mantenga las parsianas y las cortinasde otras
vantanas cerrades durante la parte m_s soleada
deldia.
• Limpieel flltro del aire como se recomienda en la
secci6n "MANTENIMIENTO" de este manual.
• El aislamiento correctoylas juntas herm6ticas en
puertasy ventanas en su hogar le ayudardn a
mantener el aire caliente afuera y el aire frfo
adentro.
• AI darie sombre extemamente a la casa con
drboles, plantaso toldosayuderd a reducirla
carga de trabajo del equipo deaire acondicionade.
• Opere los aparatos que producen calor como,por
ejemplo, homos, lavedoras, secadoras y
lavaplatos durantela parte mdsfria del dfa.
-16-

RESPETE TODOS LOS C6DIGOS Y
REGLAMENTOS.
BAJO NINGUNA ClRCUNSTANClA CORTE,
QUITE O EVITE EL USO DE LA CONEXl6N
A TIERRA DE ESTA CLAVIJA.
ESTE APARATO NECESlTA SER
CONECTADO A TIERRA.
Se requiere una alimentaci6neldctdcaCA,
adecuadamente conectada a tierracon un
fusible de 20 A, de 60 Hz y de 250 V.
Se recomiendaun fusible de retardo o un
disyuntorde circuitoque alimente solamente a
este aparato.
NO USE CABLE ELECTRICO DE
EXTENSI(_N.
METODO RECOMENDADO DE CONEXI6N A
TIERRA
Per su propia seguridadeste aparato debe
conectarse a tierra. Este aparato viene
equipadocon un cable de alimentaciony una
clavijadetres terminales. Para reduciral
m&ximoel peligro de chequeel_ctrico,el cable
debe estarconectadoa unaconexi6nde pared
con conexi6na tierra, y esta conexi6ndebe
hacersede acuerdocon la L_ltimaediciondel
C6digo EldctricoNacional(ANSI/NFPA 70), asf
come con losc6digosy reglamentoslocales. Si
no existeunaconexi6n de paredadecuada, el
clientetiene la responsabilidady la obligaci6n
de mandarinstalar,con unelectricista
calificado,una conexi6nde pared adecuadade
tresterminalescon conexi6na tierra.
115V-
230V~
@
Elcabledealimentaci6npuedeincluirundispositivo
interrupterdecordente.Lacarcasadelenchufecuenta
conunbot6ndepruebayotrodereinicio.Eldispositivo
debecomprobarseperi6dicamentepresionando
primeroelbot6nTESTydespuesRESET.
Sielbot6nTESTnosedesconectaesielboton
RESETnopermaneceactive,suspendaelusedelaire
acondicionadoyp6ngaseencontactoconuntdcnico
deservicioeualificado.
NOTA:La formapuedeserdiferentesegdnsumodelo.
Utilieeelenehufedelapared Consumede Energfa
©
©
@
Standard 125V,
enchufe de 3
Uneas de
15A, 125V AC
Standard 125V,
enchufe de 3
L|neas de
15A, 125V AC
Utiliceun fusiblede
15AMP.o un
Interrupterde t5AMP.
Standard 250V,
enchufe de 3 Utiliceun fusiblede
Uneas de 20AMP.o un
20A, 250V AC Interrupterde2OAMP.
A ADVERTENCIA
Peligrodechequeel6ctrico
Conecteenunaconexi6ndeparedde3 terminales
Noquitelaterminaldeconexi6natierra
Nouseadap_.dores
Nousecableel_ctrieodeextensi6n
Sinosesiguenestasinstrucciones,puedeocasionarse
lamuerte,unincendioo unchequeel6ctrico.
-17-

REQUERIMIENTOS PARA
INSTALACION
SUequipadeairsacondicionadoseiastalaraanventanas
est_ndardedeblepanelconanehosdeaberturalibrade559mm
a914mm(22a36pulgadas).(Figure1)
ElmarcoinfadordebeabdrseIosuficientepareperrnitiruna
aberturaverticallibrade331mm(13pulgadas).Lasrejillas
desviadoraslateralesy laparteposteriordelequipodeairs
acondieianadodebentenerunespaciolibradeairsparepermitir
suficienteflujodeairsatrav_sdelcendensadorpareas{eliminar
el ealor.Lapartsposteriordelaunidaddebequedaralairslibrs,
nodentrodeunedificioo garaje.
Figura I
SERVICIOELECTRICO
Compruebecu:_lesla alimentaci6nelectdcaqueIlegaasu
domicilio.Laalimentaci6nelectricadisponibledebeserla misma
quesemuestraeelaplacedelfabricantedelaunidad(quase
halleenelladeizquierdodelgabinetedecordentealtema).
Todoslosmcdelosestdnequipsdosconunenchufedetins
espigasparesurninistrarunservieiocorrectoyunaconexi6na
tisrrsssguray positive.Nocambieel enchufedeningunafarina.
Nouseunenchufeadaptador.Sisutomadecorrientedepared
actualnopuedeusarseconelenchufedslequipo,Ilamea un
electdcistacalificadoparequeefect_elascorrecoiones
nacesades.
CONSERVELACAJAyesteMANUALDELPROPIETARIOpare
quale sirracomarefersncieenelfuture.Lacajaeslameier
maneradeconservar]aunidadduranteel inviemoo cuandono
estdenusa.
IF!_I _o]
Pareevitarel nasgode hendaspersonales,daSosen
los bienes,odaSoen el produetodebeset expuestoel
agudezdelos hordesy el pesoaptodelaparato:
Elairs acondicionadodelquesehablaen este
manualafirma peligrode pesoexcesivo.
Dos omas personasserequiereparamovere instalar
la unidad.Pareevitarheridasoagotamlento,use
tecnicasapropiadasparelevnt_ry moverla unidad.
•Cuidadosamenteinspeccioneeilugardondeel airs
acondicionadoserepuesto.Aseguresequeel lugar
sostengael pesodela unidadsobrsunperiodode
tiempoprolongado.
Mantengasuairs acondicionadoconcuidado.Use
guantesproteetorescuandolevanteomuevala
unidad.EVITE1asaletasfiiosasde metalenel
serpentindelantemy de atras.
•Aseguresequael airs acondicionadonose caiga
dursntela instalacion.
INSTALACION PIEZAS DE MONTAJE
TIP0 NOMBREDELASPIEZAS CANTIDAD
A TORNILLOCaRTe 11
B TORNILLOMEDIANO 5
C SUPPORTENL 3
D BANDAADHESIVA 1
E BANDADELMARCO 1
F PANELDEGU[A 2
G TUBa DEDRENAJE 1
H SOSTENGAPAR_NTESIS 1
HERRAMIENTASREQUERIDAS
• Guantes apretados
• Destornillador normal
• DestornilladorPhillips
• Pinsas
• Cuchillo filoso
• Llaveinglesa o Ilave
abiertade 3/8"
• Llavehexagonal de cuba
y trinquete de 1/4 de
pulgada
• Cinta para medir
•Taladro electrico
•Broca de taladro de 1/4"
-18-

INSTALACION
Escoja unlugarque lepermitaIlevarel aim frio al &rea
quedesea. LaBventanas quese usenpara lainstalaci6n
deben tenerla resistenciasuficienteparasoporiar el peso
del equipode aireacondicionado.Unabuena instalaci6n
con atenci6nespecial ala eorrectaposici6n dela unidad
disminuir_la probabifidadde queseanecesarioefectuar
reparaciones.
COMO INSTALARLO
U CORTINAS LATERALES
InsertelaBcortinas lateralesen labguias de]aire
acondicionado. Fije las cortinas a la unidad con
tornillos (TIPO A), comb se muestra en Figura 2.
TIPOA Figura 2
_FAJA DE SELLANTE
Cortelacinta senadoraadhesiva (TIPOD)a la anchura
de laventana.
Quite eldorsode lacinta selladoray pequela cinta
selladoraala superficieinferiorde ia ventanade abajo.
Vea la Figura3.
BANDA
(TIPO D)
Figura 3
[] COLOCAR LA UNIDAD EN LA
VENTANA
Abra laventanay marquela lineacentralenelcentrodel
alf izarinteriorcomose muestraenla Figura4.
ANTEPECH_
INTERIOR
jr
TABURETE
Figura 4
L_I SOPORTE DE RJACI(_N L
• Utilice tomillos("rlPOA) para instalarlossoportes
en L sot)rela plataforma exteriorcomo se
muestra. Consulte Figura 5.
• El soporte ayuda a mantener la unidad
correctamente en su lugar. Aseg_rese de colocar
el borde del soporte nivelado con la partade atr'&s
del alfeizar interior.Vease la Figura5.
• Si el aire acondicionadoest&bloqueado pot el
marco de laventana de tormenta, yea el paso 9.
DESCANSO
IN*nERIOR
DESCANSO
TIPO A
EXTERIOR INTERIOR
LINEA DEL CENTRO
EXTERIOR
M_NSULA EN L
Figura 5
_'IDRENAJ E
En primer lugar, asegt_msede insertar la tubeda
de drenaje enla bandeja de la base antes de la
instalacibn.El aire acondicionado debe instaJarse
con una ligera inclinacion(1/4") hacia abajo para
el drenaje adecuado del exceso de agua condensada
a travdsde la tuberia de drenaje.
FUYAU
DRENAJE D'EVACUATION
PARTEPOSTERIOR
TUBO DE DEL RECIPIENTE
DRENAJE DE BASE
PARTE INFERIOR DEL
_ASE
Flgura 6
-19-

_J INSTALE EL ACONDICIONADOR DE AIRE
EN LA VENTANA
• Levanteconcuidadoelaireacondicionadoy desicelohasta
la ventanaabierta Aseg[_resede quela gufainferiordelaire
acondicionadopasaperlas muescasde lossoportasen L
• AIencajaren del seporteL, e]acondicionadorde aire
estar_eentradoen laaberturadela ventana,comese
rnuestraen la Figure7
• Mientrassujeta el acondicionadorde aire,baje
cuidadosarnenteelmarcocorredizode laventana
detr&sde la guia superiordelacondicionadordeaire,
comese rnuestraenla Figura8
I "-, I
Llneacentral Figura 7
BORDE DE L_ VENTANA
I/ ill ,a,,,,.
SUPPORT EN L I _
Figura 8
_--_FIJE LOS PANELES CORREDIZOS
Extiendalos panelescorredizospareltenar laaberturade
la ventana,usandolos 4tomillos (TIPOB) parefijarios
oornosemuestraen laFigure9
_J INSTALEEL SELLODE VENTANACORREDIZAY
EL SEGURODEVENTANA CORREDIZA
• Cortelajuntadeespuma(TIPOE) ala anchurade la
ventanaMetala juntadeespumaentreelmarcoinferior
y superiorde laventanaparaevitarque entreairee insectos
en la sale,comesemuestraen Figura9
• Coloqueel soporteen Lrestanteenunode losdosladesde
laventanautilizandeuntornillo(TIPOA) Consulteel detalle
de Figura9 Lainstalacio'nde estesoporteevitaquela
unidadcaigaeuandoselevantalaventana
[HIJ Im7-'Ie]_e]
MARCO
Figura 9
• Retireeltornillode la parteinferiorderechadela carcasa
•Utiliceestetomillopareincorporarel soportedeapoyo
(TIPOH)ala platatcrmainteriordela ventana,
comese muestraenFigura10
I_lSl ELACONDICIONADORDEAIREESTABLOQUEADO
PORELMARCODELACONTRAVENTANA
• Silacontraventanainterfierefijeunlist6ndemaderade2' de
anchoalalfdizarinteriordelavantana,queatraviesela
anchuratotaldelalt_izarEllist6ndernaderadebeset
sufieientementegruesoparelevantarlaalturadelalf_izardela
ventanadetalmar,eraquelaunidadpuedaserinstaLadasinla
interferenciadelmarcodelacontraventanaVealaFigure11
Lapartasuperiordellist6ndernaderadebeser
aproximadamente3/4"m_saltoqueelmarcodela
centraventanaoellist6ndemadera(fueradelacase)pare
queelvaporemanadodelaunidadpuededrenar
adecuadamentehaciaelexterior
•Instaleunsegundelist6ndemadera(deaprcximadamente6'
delargoy 1"deanchoy delmismogrosordelprimerlisten)en
elcentredelalfdizarexteriorniveladoconlaparteposteriordel
alf_izarinteriorAtornillelossoportesL entrelafaja Esto
levantar_elsoporteLcornosemuestraenlaFigura11
1- MAX
FRANJA DE MADERA _ 3/4-PULG
MONTADA SOBRE _ _1 I DE SEPARACION
L_pARTESUPERIOR1_2J_//tL.=I
DEL DESCANSO
ANTEpECH O HQJA DOBL_
INTERIOR
ANTEpECHO
LAELIMINACI( NDE LAVENTANA
Apagueelaireacondicionadoy desenchufeel cablede
alimentaci6nRetireel soporteen Ly lostornillosinstalados
enlapartesuperiore inferiorde lospaneleslateralesy
gu_rdelosparelaposteriorreinstalaci6nCierrelos paneles
latarales Sujetandofirmementeel aireaccodicionado,
levanteel marcoeinclineconcuidadoel aireacondioicoado
haciaafueraparedrenartodaelaguecondensadaLevanta
el aireacondicionadodela ventanay retirelajuntade
espurcadeentre lasventanas
•Elaireacondicionadodelquasehablaaneatamanualafirmapeligro
depesoexcesivo
DosomaspersonasserequiereparamovereinstalartaunidadPare
evitarheddasoagotamlentousetecnicasapropiadasparelevntary
moverlaunidad
•AImanejarleunidad,tengacuidadopareevitarcortarseconlasalertas
met_icasafiladasqueest_onlosserpentinesfron_ypoatedor.
•Aseguresequeelaimacon_cionadonosecaigadurantelainstalacion.
- 20 -

C0MOYPORQUE
Su equipo de aim acondicionadode habitacibn
brindalas siguientesfunciones para hacer que la
vida en climas c_.lidossea m_.sconfortable:
• Enfda y hace circularel aire por la habitacion
• Disminuye la humedad eliminando la humedad
excesiva.
• Filtra el polvo,el sucio y algunas impurezas
transportadas en el aim del ctimaveraniego.
El equipo de aim acondicionado realiza estas
funcioneshaciendo pasar el aire del rnedio
ambiente a travelsde unfiltroque atrapa las
particulas de polvoy sucio. Elaire pasa entonces
por un serpentin de enffiamientoque refrigera el
aim y eliminael exceso de humedad. El mismoaire
regresa entonces al enfriador, secadory limpiador
del aire delambiente. La humedad extrafda del aim
ambiente es Ilevada al exterior y evaporada.
Su aim acondicionado est&diseSadopara operar y
suministraruna enorme potencia de enfriamiento.
SONIDOS NORMALES Figura 12
Ademas de los sonidosregulares del motordel
ventilador y el compresor que salen de su equipo
de aim acondicionado,usted escuchar'&de vez en
cuando un sonido me_lico. Este sonido es
produddo por la humedad que es recogida del aim
en el ambiente yes lanzada contra el ventiladordel
equipo de aire acondicionado. Esto es algo normal
que no debe ser mo_vo de preocupacion.De igual
modo, no se alarme si ustedescucha un ligero
sonido de silbidoo borboteo provenientede su
equipo de aire acondicionadodespues que Io
apaga. Estosson ruidosnormales del refrigerante.
CAPACIDAD Y TIEMPO DE
FUNCIONAMIENTO
/,Jdecidircu_ddebeserlacomodidaddeseadaparaelbreaque
ustedquiereenfriar,esimportantedeterminareltama'_ocorrecto
delaunidad.Unaunidadpequenanotendralacapacidadpara
enfriar,dejandolaareacalurosa.EltamaSoadecuadoes
determinadoporel nlJmerodemetroscuadradosquetieneel
_reaquesedeseaenfnar,asicomoporlaternperaturainteriory
exteriory porlahumedad.Unaunidadde--do grandesi
enlfia,peronodeshurnedece,dejandolaareafriayhumeda.
Siemprequelacargat_rmicadelventiladorest6porencimade
Ionormal,elequipodeaireacondicionadodebefundonarm_s
tJempopararnantenerlatemperaturadeseadaqueustedha
seleccionado.Bajocondicionesdeunacargat_rmicamuy
pesada,puedesernecesarioqueelequipodeaire
acondicionadofuncioneconstantementepararnantenerla
temperaturadeseada.
Enocasiones,elusodeMEDFANparahacercircularelairepor
lahabitaci6nhacequeelambienteseam_ confortab_eaun
cuandoelequiponoest_enfnandoelaire.Mientrasm_ tiempo
y conmayorfrecuenciafuncJoneelequipodeaire
acondicionado,robselecb_cidadconsumir_y mayoresse_n k_
costosdesuuso.
i ompresor
El modemocompresorde gran
eficienciapuedeproducirunruido
agudode murmuU0o unruid0de
pulsaci6nquevieney seva.
--Vibraciones de la
unidad
Launidad puedevibrary
hacerruidodebidoa la
deficienteconstrucci6n
Ventilador --
Ustedpuede
escucharel
movimientodel
aireproveniente
delventilador
Ustedpuedeescuchargotasdeaguaque caen
sobreel condensadorcausandounsonido
met&licoounsonidode chasquido.
Rgura12
i
-21 -

CARACTERiSTICAS
15 6 5 4 3 2 714
9 8
1. Gabinete
2. Deflectorve_cal
de aire
3. Deflector hodzontal
de aim
4. Toma de aira
5. Filtrodel aim
6. Parrilla frontal
7. Tablero de control
8. Corden de
alimentacibn
eldctrica
11 1210 13 16
Figura 13
9. Evaporader
10. Condensedor
11. Compresor
12. Recipiente de base
13. Puntal
14. Gula superior
15. Co,ha
16. Control remoto
USO DEL EQUIPO DE AIRE
ACONDICIONADO
Para reducirel ries9o de incendio,
descargas el_ctrica o lesiones personales,lea las
IMPORTANTES INSTRUCCIONES DE
SEGURIDAD antes de operar este aparato.
Pera comenzar a utilizar el equipo de aim
acondicionado, siga estos pesos:
1. Enchufeel equipo de aire acondicionado.(Pare
prevenir riesgos de descargas eldctdoss,no use
un cable de extensibnni un enchufe adaptador.)
2. Ajuste el extractorde aire en la posicibnCLOSE.
3. Ajuste el controlde MODE al mas alto nivel
fresco.
4. Ajuste el control del ventilador al robs altonivel.
5. Ajuste las rejillasdesviadoras para Iograrun ltujo
confortablede aim.
6, Una vez que la habitacibnse haya enfdado,
ajuste el control de temperatura TEMPa la
graduacibn que usted considere m&sconfortable.
NOTA: Si seapaga el aire acondicionado,espere 3
minutosantes de volver a encendedo. Esto permite
que se estabilico la presibndentrodel compresor.
Si no sigue estas instrucelones,el equipo podria
funcionarcon poca eflciencia.
Si usted mueve el TEMP el controla un warmer,
entonces inmediatamente espalda a una colocacibn
mas fresca, la unidad apagard. Espere3 minutes.
CONTROL DE VENTILAClON
[] controlde ver_lacibnpermiteque elequipode aira
acond'_ionadehaga reelrcularel aim en el interiorde la
habltaci6n(CLOSE) o saqueel aimhacia elexterior
(OPEN). (Rgura 14)
• La posidbnCLOSE sirvecuandese deseaun
enffiamientom_(imo. Tambi_npuedeusemepare
hacerreelrcularel airesinenfdarlahabitacibncuando
elequipodeaim acondidonadose ajustaen la
posid6nFAN.
• La posicibnOPEN _ ai aim estancadode la
habitaci6ny Ioexpulsahaciafuera.[] sire frescose
llevadohaciaelinteriorde lahabitack_a trav6sde
lospasajesnormalesde aim que se hallanenlos
hogares.
• La posicionOPEN o CLOSE puedeusarsecon
cualquierselecci6nde venltlador.
PULL OPEN/ PUSH CLOSE
(TIRARPARAABRIR/ EMPUJARPARACERRAR)
Rgura14
- 22 -

PANEL DECONTROL
- RECEPTOR DE SENAL
f Hr WARMER
IB* COOL . HI _ '10
COOL- LOW _ 6
FAN
_ ON_ HI m 3
FAN
m ON_ _ LOW I "I
-- ------e_ TEMP
IMARCADOR DE ENCENDIDOIAPAGADO
- OPERACION DE PARADA:
• Normalmente utilizer_lahore de apegado mientres duenna.
• Cuandola unidadest_encendida,utiliceTimerpara ajustar
AJUSTE DE LA TEMPERATURA
• Utiliceestosbotonesparacontrolar
autom_ticamente la temperatura de la habitaci6n.
Latemperatura puede ajustarse en un rangode
64°F a 82°F.
• Pulse los botonesTEMP arribao abajo para
cambiar elajuste de temperatura entre 82°F •
76°F • 70°F • 64°F.
ENECNDIDO/APAGADO
•Para ENCENDERelsistemapresioneel botdn,
y para APAGARLOpresioneelbot_n otravez.
• Estebot6ntieneprioridadsobretodoslos otros
botones.
•CuandoUd. Ioenciendepor primeravez,el
sistemaestden ely letemperaturaes de 70°F.
REINICIO AUTOM._TICO.
eln_merode horastranscurridaslas cualesla unidadse apagar_;..Si se produce un corte de energia, la
• Cadavez quepulsaelbot6nTimer,elajusteTimeravanzadee unidad funcionara con los ajustes previos.
siguientemodo:l Hora•3 Horas•6 Horas•10 Horasm&ximo.
-OPERACt6N DE]NICIACI6N:
• Cuandola unidadest_apagada,utiliceTimerparaajustarelndmerodehorastranscurridaslascualeslaunidadse
encender_.
• Cadavez quepulsaelbot6nTimer,elajusteTimeravanzadelsiguientemodo: 1Hora• 3 Horas• 6 Horas• 10Horas
rnaximo
- MODE
•PulseestebotonparacarnbiarelmododefuncionamientoentreCOOL-HI• COOL-LOW• FANONLY-HI
• FANONLY-LOW.
CONTROL DE LA DIRECCION
La direccibnhorizontaldel aim es ajustada rotando
la palanca vertical haeiala derecha o hacia la
izquierda. (Figura. 15)
CONTROL DE DIRECCii N VERTICAL DEL AIRE
La direccibnvertical del aire se ajusta moviendola
rejillahorizontal hacia delante o hacia atnLs.
(Figura. 16)
Figura 15 Figura 16
- 23 -

CONTROL REMOTO
Precauci6n: El dispositiovode controlremote nofuncionara adecuadamente sila ventana sensora del
acondicionadorde aire es expuesta a luz fuerte, o si hay obst_culosentre el dispositivode controlremoto y
el acondicionadorde aire, Cuando opere el aire acondicionadocon el controlremoto, deber_ oir un pito,
ENECNDIDO/APAGADO
• ParaENCENDERelsistemapresioneelbot6n,y pareAPAGARLOpresione
el botonotravez.
Estebot6ntieneprioridadsobretodoslosotrosbotones.
CuandoUd. Ioenciendeper primeravez,el sistemaest_ en ely la
temperaturaesde 70°F.
AJUSTE DE LA TEMPERATURA
• Utilice estos botones para controlarautomdticamente la temperature de la I(
habitaci6n. La temperatura puede ajustarse en un rangode 64°F a82°F. I/
• Pulse los botones TEMP arriba o abajo para cambiar el ajuste de temperatura _/I t_]VTEUP&
entre 82°F _" 76°F • 70°F" 64°E _._
Ill
OPERAC ONDEPARAOA: /
Normalmenteutilizar_,la horade apagadomientrasduerma. /|_ "huE. .ODE
• Cuandola unidadeste encendida,utiliceTimer paraajustarelnL_merode horas _ _
transcurddaslas cualesla unidadseapagar_..
• Pulse los bolonesTimerpara avanzarel ajusteTimerdelsiguiente modo:1 Hora(1
Hora-2Horas)• 3 Horas(3Horas-5Horas}• 6 Horas(6 Horas-9Horas)• 10Horas
m_ximo.
- OPERACIONDE INIC[ACION: _ r_ _
• Cuando la unidadest_apagada,utiliceTimerparaajustar eln_merode horas
transcurridaslas cualeslaunidadse eneender_.
• PulselosbotonesTimer paraavanzarelajusteTimerdelsiguiente rnodo:1Hora(1
Hora-2Horas)• 3 Horas(3Horas-5Horas)• 6 Horas(6 Horas-9Horas)• 10Horas
m_.ximo.
MODE
• Pulseestebot6nparecambiarel modedefuncionamientoentreCOOL-HI•COOL-
LOW• FANONLY-HI• FANONLY-LOW.
COMO A BATERIAS DE ADICION EN EL CONTROL REMOTO
1. Quite la cubiertade la espalda del director remoto.
• Abra la eubierta seg_n la direcci6nde la flecha.
2. Meta a bater'as,
• Est_ seguro que el (+) y (-) las direcciones son
correctas.
• Est_seguroque arnbas bater'lasson nuevas.
3. Re-conectela cubierta.
• No utilicebateris recargables, dstas son diferentes de
forma, de dimensi6n y uso respecto s las baterras
secas usuales.
• Seque las bateriasdel telemandocuandoel
acondicionadornovaya a ser usadoduranteun largo
- 24 -

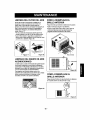
LIMPIEZA DEL FILTRO DEL AIRE
El filtro delaireseir_.ensuciandoa medidaqueva
atrapandoel polvoprovenientedelsire interior.Es
preciselavarel filtro delaireal menoseadados
semanas.Si el filtrodel aire permaneceItenode polvo,el
flujode airedisminuir_,y se reducir_,la capacidadde
enfdamientodelequipo,con posibles daSosparsla
unidad.(Figura 17)
• Tirede [a rejillade entradahaciadelanteagarrando
ambaslengLietasy tiredelfiltro delairehastasacarlo.
•Laveel filtrodelsire enaguatibia a.AsegL_resede
eliminartodael agua sacudiendoelfiltro antesde velvet
aponedoen suposici6n.(Figura 18)
Figura 17
LIMPIEZA DEL EQUIPO DE AIRE
ACONDICIONADO
Lareiillafrontaly la rejillsdeentradadelsirepuadenlavarse
conunpaF1ohurnedecidoenunasoluci_ndedetergente
suave.(Figura19)El gabinetepuedelavarsecon unjab6no
detergentesuavey aguatibia,seguidamentepuedapulirse
concoraI(quidaespecialparselectrodom_sticos.
Parsasegurarunaeficienciam_ximacontinua,los
serpentinesdelcondensador(ladedeenfrentedela unidad)
debenrevisarseperi6dicamentay limpisrsesiestdn
obstruidosconhollfnoconsuciodele atmSsfera.
Figura 19
COMO A REEMPLAZA EL
GRILLE ANTERIOR
•Saqueeltornilloquemanfienela rejillafrontalenposici6n.
•Quiteeltornilloque asegurale rejadelsntera.
•Empujelarejillahaciaarribadeabajoyjalela partede
arribade larejillalejosdela baseparalevantarlas
lenguetasdearribahaciaafueradelas ranuras.
\
Rejilladeentrada
lafrontal
gura 20
COMO A REEMPLAZA EL
GRILLE ANTERIOR
Pegue elpanelfrontala laoaia insertandolosfijadores
en el panel adentro los del panelde la caja.
/
- 25 -

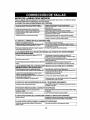
ANTES DE LLAMAR PARA SERVIClO
Cheque la siguiente lista para asegurarse si en realidad es necesario Ilarnar para servicio. Una referencia rapids, a
este manual puede evitar una Ilamada para servicio innecesada.
EL EQUIPO DE AIRE ACONDIClONADO NO FUNClONA.
Elenchufenoest_c_ enlatomadecordentedebored.
Elfusibleest_quemadeoelinterruptordecircuitosehadzsborade.
Elselectordelven_c_ MODEest_en_aposiel&ndeOFF.
Launibodseapag6ysevolvi5aencenderbomasiader_pido.
Elcon_ldetemboraturaTEMPseajust6m_scaiidequela
temperaturaambiente.
Eldispositivointenuptordecordentees_ desc_.
Conecteelenchufe_rmeme_teenlatomadec_nte depared.
Reemplaceelfusibledebodeconunfusibledeacci6nretarbodeoreajusteel
interruptordedrcuito.
P_ga elselectorenlaposisidedeCOOL
AbogJelaunibodyespere3minutosantesdevelvetaencendede.
Gireelcontroldetemperatureenelser_bodelasagujasdelrelojhastauna
graduasidem_sfrfa(numeromasafro).
PtesioneelbotdeRESETsi_uadeenelenchufedelca_edealimentadde
SielbotdeRESETr_ parmaneceac_vo,susbondeelusedelaimacondtsionabo
yp6r_aseencontactoconunt_nleodeseivido_alificabo.
EL AIRE DE LA UNIDAD NO SALE BASTANTE FR|O.
Elselectoraunabosle_ rr'_sLOWCOOL.
Bco_ delempera_aT_P seaiust6de_ c_ (numemrn_ I_o}.
La_mboraturaarnblentees_pordebajodeles70°F(21°C)
Eltubosensordetemperatureest_tocandoel se*lbonUrtevaporador
quee_ sRuabodetr_ delfiltrodelaim.
Gireelselectora unaposici6nHIGHCOOL
Gireelcontroldetemperatureenelsentidode1asagujasdelrelojpare
Nopueboproducirseelenfriamientohastaque latemperaturaambientes_ba
)orendrnaboles70°F(21_C).
Endereceel tuboak_ndelodelserbontinevaporador.
ELAIREACONDIClONADOENF"F_.,PEROLAHABffACI_SESlB_EDB_SIADOCAUDA;SEFORMAHIF.LOENELSERP.ENTJNDEENFPJAMIENTO
DE'ITU_SDELPANELDECORAT1VOFRONTAL
Latempera_Jraarnl_,erreenelex_riores_potdebojode_ 70°F(21°C).
Elflltrodelaimpuedeestarsu_o.
Elcontroldetemboratumseajus_dernasiadofr_ boraelenlriam_nto
nodumo.
ParedescongelarelserbominIleveelseledorale posicideFAN.
Segu_damente,gireelco_trddetemboraturaTEMPenelsenf_dedelasagujas
delrek_paraIlevadehastaunagraduaddem_sc_lide.
Limpieelf_Izo.Consultelaseccide"Mantenimlento_.Paradescongelar,I_veel
selectoralaposiddeFAN.
Parabosco_gelarelserbontin,IleveelselectoralaposiddeFAN.
Seguibomenteajusteelcon_l detemperaturaaunaboelctdem_sc_lida.
ELAIREACONDICIO_DOENFRIA,PEROLAHABITACK_NSESIENTEDEMASIADOCAUDA;NOSEFORMAHIELOENELSERPEN31NDE
ENFI_AMIENTODETRASDELPANEL_CO_rlVO FRONTAL.
ElfilbodelaJreeeld_do conIoquesemslzin_elflujodelelre.
[]controldetemperafumTEMPsegrade6e_posiddedem_deocalida.
Lebortefrontaldelaunidadestablo_Jeaboparcorbnas,per_as,
mueElesetc.querestdepanladL_ibuddedelaim.
Lespaerlas,venlanas,rejHl_sde_efaccide,et_tera,est_ aeleriascon
Ioquesepermiteele.s,capedelaire_o.
Leumdadacabodeencenderseenunahaeltaodecellente.
Limpieelliltmdelelre.Consultelasecade"Manlenimiento'.
GJreelconlreldet_mboraturaenelsen_dedelasagujasdelmlejparaIlevadoa
unagradeadbom_ fda.(N_merort_salto)
BimineelbloqueoenfTentedelaunidad.
Cierrelasboers, ventanas,rejillasdecelefacdde,etdelera.
Permitaquetrans_Jrraunbocorr_sdeliempoparaelimlearel"caleralmacenade"
enlasboredes,ellecho,elpisoy losmuebles.
ELEQUIPODEAIREACONDICIONADOSEAPAGAY SE ENCIENDER/_.PIDAMENTE.
I Latembo__raextederesex_'emadamenteceliente" I AjusteelMODOenI_vel°ddadALTAPamhacerqueelalrepaseborLabc_naIdere_gemsidem_sr'-_pide.
SE ESCUCHAN RUlDOS CUANDO LA UNIDAD EST._ ENFRIANDO.
ElsenidedelveniJladeral_ocar contraelaguadelsislemade Estoesnormelcuanbolahumebodesalta.Clerrelaspuerias,ventanasyrejillas
eliminaddedehumebod, deca]efacdde.
Lealasins_ucclenesdemstaladdeoccnsulteelinela_dor,
EL AGUA GOTEA DENTRO DE LA HABITACI(_N CUANDO LA UNIDAD ESTA ENFRIANDO.
IInstal 'ddeinadecuada" I si' p°de le elL== de o,:o,=lt,,si
EL AGUA GOTEA AFUERA CUANDO LA UNIDAD EST'. ENFRIANDO.
I Leunibodeelae_ayenbograndescarl_dadesdehumedaddema IEstoesalgoncrmalderanlelosdiasexcesr_Enenteh_medes.
bobitaddeh_meda.
- 26 -

/
- 27 o

m28_

m291

o30m

Master Protection Agreements
Congratulations on making a smart purchase.
Your new Kenmore° productis designed and
manufactured for years of dependable operation.
But like all products,it may require preventive
maintenance or repair from time to time.
That's when having a Master ProtectionAgreement
can cave you money and aggravation.
Purchase a Maser ProtectionAgreement now and
protect youreefffrom unexpected hassle and
expense.
The Master ProtectionAgreement also helps extend
the lifeof your new product. Here's what's included
in the Agreement:
[] Expert service by our 12,000 professional
repair specialists
[] Unlimited service and no charge for partsand
laboron all covered repairs
[_i "No-tamon" guarantee - replacement of your
covered productiffouror more productfailures
occurwithin twelve months
]Product replacement ifyour covered product
can't be fixed
[_ Annual Preventive Maintenance Check at your
request - noextra charge
]Fast help by phone - phone supportfrom a
Sears technicianon productsrequiringin-home
repair, plusconvenient repairscheduling
_ Power surge protection against electrical
damage due to power fluctuations
[] Rental reimbursement ifrepair of your covered
producttakes longer than promised
Once you purchase the Agreement, a simplephone
call isall that ittakes for you to scheduleservice.
You can call anytime day or night,or schedulea
service appointmentonline.
Seers has over 12,000 professionalrepair
specialists,who have access to over 4.5 million
quality partsand accessories. That'sthe kindof
professionalismyou can count on to help prolong
the life of your new purchasefor years to come.
Purchase your Master ProtectionAgreement today!
Some limitations and exclusions apply.
For prices and additional information call
1-800-827-6655.
Sears Installation Service
For Sears professional installation of home
appliances, garage door openers, water
heaters, and other major home items, in the
U.S.A. call 1-800-4-MY-HOME D
Acuerdos de Protecci6n Especializada
iEnhorabuena! Ha rea/izado una compra inte/igente.
Su nuevo aparato Kenmore® est_ldise5ado y fabrieado
para ofresefle aSos de buen funcionamiento,
Sin embargo, al igual que todos los productos, puede
precisar un mantenimiento preventivo o incluso alguna
reparaci6n de vez en cuando. En esas ocasiones, un
Master Protection Agreement puede ayuderle a ahorrar
dinero e inconvenientes.
Adquiere un Maser Protection Agreement ahora, y
prot6jase a si mismo de molestias y gastos inesperados.
El Master Protection Agreement le ayudar_ tambi_n a
prolongar ia vida de su nuevo aparato. Los siguientes
servieios est_n incluidos:
[] Servicio experto per parte de cualquiera de
nuestros 12.000 tbcnicosprofesionales especialistas
de Sears.
[] Prestacibn de servicios sin limitaciones y sin
cargarle las piezas o la mane de obra en todas las
reparaciones cubiertas per el aeuerdo.
[] Garantia seria de sustitucibn de las piezas del
producto cubierto per el acuerdo, si cuatm o rods
piezas se mostrasen defectuosas en un periodo de
doce meses.
[] Sustitucibn del producto per otto nuevo, si el
defectuoso no pudiese repararse.
[] Control de mantenimiento anual preventive,
siempre que Io desee y sin gasto adicional alguno.
[] Asistencia telefbnica inmediata de un tecnico
espeeialista en productosque ban de set reparados a
domicilio, ademds de una programaci6n adecuada de
la reparaei6n.
[] Protecci6n contra subidas de tensibn que
provoquen daSos el6ctricos debidos alas
fluctuaciones en el suministro.
[] Reintegro del alquiler si la reparaci6n del producto
Ileva mds tiempo del promtetido
Una vez que haya adquiridoel Agreement, no necesitara
masque una simple Ilamada para solicitarel servicio de
su aparato. Ademds, podra hacerle en cualquier memento
de[ dia o de la noche, o solicitaruna cita para prestaci6n
de servicios online.
Sears cuenta con mds de 12.000 tecnicos prctesionales
especialistas en reparaciones, con acceso a rods de 4,5
millones de piezas de sustituci6n y accesorios de calidad.
€:ste ser_ el tipo de profesionalidad y servicie con el que
podrd eentar para prolongar la vida de su nuevo producto
por muchos afios, iAdquiera hoy mismo su Master
Protection Agreement!
Se aplicar_n algunas limitaciones y
restricciones.
Si desea hacer alguna consulte sobre los
preclos u otra informaci&n adicional, le rogamos
Ilame al tel_fono 1-800-827-6655.
Servicios de Instalaci6n Sears
Para so/icitar servicios de instalaci6n profesionales
de Sears de electrcdomdstices, mandos de apertura
de puertas de garajes, calentadores de agua y otros
aparatos en los Estados Unidos, puede Ilamar a
1-800-4-MY-HOME ®
-31 °

Your Home
aj ppli .......
For repair- in your home-of all m or brand a ances,
ip .......lawn and garden equ ment, or heating and cooling systems,
no matter who made it, no matter who sold it!
For the replacement parts, accessories and
owner's manuals that you need to do-it-yourself.
For Sears professional installation of home appliances
and items like garage door openers and water heaters. .....
1-800-4 MY HOME ® (1-800-4694663)m m
ytJ ight (U Ca ) ......Call an me, day or n S A and nada ......
ww_N.sears .com www.sears.ca ......
Our Home ......
ip
For repair of carry-in items like vacuums, lawn equ ment,
and electronics, call or go on-line for the location of your nearest
Sears Parts & Repair Center.
1-800-488-1222 ililiiii
Call anytime, day or night (U .S.A. only) .......
ww_N.sear_.com _;_
_,,,,_"_ To purchase a protection agreement(U S A ) ,,,,"_
.......... or maintenance agreement(Canada) on a product serviced by Sears: .......
_,,:,,,_:_'_.... 1-800-827-6655 (us A) 1-800 -361-6665 (Canada) ii!iiiil
....... i!!ii!il
..... !!iiiiii
......... Para pedir servicio de reparacibn Au Canada pour service en fi'an_ais:
i_!ili!
......... a domieAlio y para ordenar piez_s: 1-800 LE FOYER _ .........
....... 1-_88-_U HOGNt_ (18oo533-6937) ........
..... (1 888 784-6427) ....
www.sears.ca .........
iii!i_i_i!ili}ili[!iii;i!i!i
® Registered Trademark I TMTrademark / s_ SeP,_e Mark of Sears, Roebuck and Co.
® Mama Regis_ada I TMMama de F_bdca I s_ Mama de Servicio de Sears, Roebuck and Co.
McMarque de commerce ! MOMarque ddpoc_e de Sears, Roebuck and Co. O Sears, Roebuck and Co.
Part No,: 3828A21008B
-
 1
1
-
 2
2
-
 3
3
-
 4
4
-
 5
5
-
 6
6
-
 7
7
-
 8
8
-
 9
9
-
 10
10
-
 11
11
-
 12
12
-
 13
13
-
 14
14
-
 15
15
-
 16
16
-
 17
17
-
 18
18
-
 19
19
-
 20
20
-
 21
21
-
 22
22
-
 23
23
-
 24
24
-
 25
25
-
 26
26
-
 27
27
-
 28
28
-
 29
29
-
 30
30
-
 31
31
-
 32
32


Kenmore 580.75100 El manual del propietario
- Tipo
- El manual del propietario
- Este manual también es adecuado para
en otros idiomas
- English: Kenmore 580.75100 Owner's manual
Artículos relacionados
-
Kenmore 580.74259 El manual del propietario
-
-
Kenmore 580.74053 El manual del propietario
-
-
-
Kenmore 580.73089300 El manual del propietario
-
-
-
-