
User manual
M A N U E L D ' U T I L I S A T I O N
G E B R U I K S A A N W I J Z I N G
G E B R A U C H S A N W E I S U N G
M A N U A L E D I I S T R U Z I O N I
M A N U A L D E I N S T R U C C I O N E S
I N S T R U K C J A O B S
Ł
U G I
N Á V O D K O B S L U Z E
Falcon

Instrukcje dla wyspecjalizowanego
All rights reserved, including translation.
Tous droits réservés, y compris la traduction.
Alle rechten, inclusief vertaling, voorbehouden.
Alle Rechte, auch an der Übersetzung, vorbehalten.
Tutti i diritti riservati (anche sulla traduzione).
Todos los derechos reservados, incluidos los de la
traducción.
Wszelkie prawa zastrzeżone, łącznie z tłumaczeniem.
Všechna práva vyhrazena, včetně překladu.
EN
Instructions for specialist dealer
This instruction manual is part and parcel of the
product and must accompany every product
sold.
Version: A, 2022-11
FR
Instructions pour les distributeurs
Ce manuel d'instructions fait partie du produit et
doit accompagner chaque produit vendu.
Version : A, 2022-11
NL
Instructies voor de vakhandelaar
Deze handleiding is deel van het product en
dient bij iedere product te worden geleverd.
Versie: A, 2022-11
DE
Hinweise für den Fachhändler
Diese Gebrauchsanweisung ist Bestand-teil des
Produkts und ist bei jeder Produkts
auszuhändigen.
Version: A, 2022-11
IT
Istruzioni per il rivenditore
Il presente Manuale di istruzioni è parte
integrante del prodotto e deve essere fornito
assieme alla prodotto.
Versione: A, 2022-11
ES
Instrucciones destinadas a los distribuidores
especializados
El presente manual de instrucciones es parte
integrante del producto y se debe adjuntar a
todas las producto que se vendan.
Versión: A, 2022-11
PL
sprzedawcy
Niniejsza instrukcja obsługi jest nieodłączną
częścią produktu i musi być dołączona do
każdego sprzedawanego produktu.
Wersja: A, 2022-11
CS
Pokyny pro specializovaného prodejce
Tento návod k obsluze je součástí dodávky a
musí být součástí každého prodaného
produktu.
Verze: A, 2022-11
Basic UDI: 5415174FalconDQ
Multi version: A, 2022-11

Language index
English
Français
Nederlands
Deutch
Italiano
Español
Polski
Czech
User manual
Manuel d'utilisation
Gebruiksaanwijzing
Bedienungshandbuch
Manuale di istruzioni
Manual de instrucciones
Instrukcja obsługi
Návod k obsluze

This page is intentionally left blank

Falcon
2022-11
Contents
1
EN
NL
Contents
Contents ..................................................................................................................... 1
Preface........................................................................................................................ 2
1 Your product .................................................................................................. 3
2 Before use ..................................................................................................... 4
2.1 Intended use ................................................................................................. 4
2.2 General safety instructions ............................................................................ 4
3 Using the patient hoist ................................................................................. 5
3.1 Operating the lift ............................................................................................ 5
3.2 Slings ............................................................................................................ 7
3.3 Battery and charging ..................................................................................... 9
3.4 Emergency .................................................................................................. 10
4 Installation and adjustment........................................................................ 11
4.1 Delivery ....................................................................................................... 11
4.2 Assembly or dismantling ............................................................................. 11
5 Maintenance ................................................................................................ 13
5.1 Time of maintenance ................................................................................... 13
5.2 Shipping and storage .................................................................................. 14
5.3 Cleaning ...................................................................................................... 14
5.4 Disinfection ................................................................................................. 14
5.5 Inspection .................................................................................................... 15
5.6 Expected lifespan ........................................................................................ 15
5.7 Reuse .......................................................................................................... 15
5.8 End of use ................................................................................................... 15
6 Troubleshooting .......................................................................................... 16
7 Technical specifications ............................................................................. 17

Falcon
2022-11
Preface
2
EN
NL
Preface
Congratulations! You are now owner of a Vermeiren patient hoist!
This product is made by qualified and committed personnel. It is designed and produced
according to high quality standards, guarded by Vermeiren.
Thank you for your trust in the products of Vermeiren. To support you on the use of this patient
hoist and its operating options, this manual is offered. Please read it carefully; it will help you to
get familiar with the operation, capabilities and limitations of your product.
If you still have questions after reading this manual, do not hesitate to contact your specialist
dealer. He/she will be glad to help you.
Important note
To ensure your safety and to prolong the lifetime of your product, please take good care of it and
have it checked and serviced on a regular basis.
This manual reflects the latest product developments. Vermeiren has the right to implement
changes to this type of product without any obligation to adapt or replace similar products
previously delivered.
Pictures of the product are used to clarify the instructions in this manual. Details of the depicted
product may deviate from your product.
Information available
On our website http://www.vermeiren.com/ you will always find the most recent version of the
information in this manual. Please consult this website regularly for possible updates.
Visually impaired people can download the electronic version of this manual and have it read out
by means of a text-to-speech software application.
This user manual
For user and specialist dealer
Service manual
For specialist dealer
EC declaration of conformity

Falcon
2022-11
Your product
3
EN
NL
1 Your product
1. Cantilever arm
2. Spreader bar
3. Motor
4. Chassis
5. Roller
6. Control box
7. Handle for pushing
8. Manual operation
9. Emergency stop
10. Pole
11. Chassis expansion pedal
12. Caster with brake
1
2
9
10
8
7
4
6
5
11
3
12

Falcon
2022-11
Before use
4
EN
NL
2 Before use
2.1 Intended use
In this paragraph a brief description of the intended use of your patient hoist is given. Additionally,
relevant warnings are added to the instructions in the other paragraphs. In this way we would like
to make you aware of the possible misuse that may appear.
• Indications and contraindications: This patient hoist is meant to be operated by an attendant to
transfer sitting patients between e.g. wheelchairs, nursing beds and bathrooms. The patient
hoist is designed and produced to be a transport/transfer aid for elderly persons or persons
who suffer from paralysis, limb loss or defects, stiff or damaged joints, cardiovascular problems,
cachexia, … .
• This patient hoist is suitable for indoor use.
• This patient hoist is designed and produced solely to transport/transfer one (1) person with a
maximum weight according to the specifications in §7. It is not designed for transportation of
goods or objects, nor for any use other than previously described.
• Only use accessories and spare parts approved by Vermeiren.
• Please read all technical details and limits of your patient hoist in chapter 7.
• The warranty on this product is based on normal use and maintenance as described in this
manual. Damage to your product caused by improper use or lack of maintenance will cause
the warranty to lapse.
2.2 General safety instructions
Risk of injuries and/or damage
Please read and follow the instructions in this manual. Otherwise you may get injured or your
patient hoist may get damaged.
Keep the following general warnings in mind during use:
• The patient hoist must only be operated by qualified staff who have been instructed or trained
in its specific application.
• Do not exceed the maximum load for the patient hoist. This will shut down the control box.
• In case of different user weights for patient hoist and slings, always observe the lowest user
weight.
• An attendant needs to be present during the lifting operation.
• Be aware that some parts of the patient hoist may get very hot or cold due to ambient
temperature, solar radiation or heating devices. Be careful when touching.
• The patient hoist has been tested for electromagnetic compatibility and complies with the
standard. Nevertheless, sources of electromagnetic fields may influence the performance of
the patient hoist, such as the fields of mobile phones, power generators or high-power energy
sources. On the other hand, the electronics of the patient hoist can affect other electronic
appliances too.
• Only use the patient hoist on flat surfaces where all castors touch the ground and where there
is sufficient contact to operate the patient hoist safely. Do not take obstacles with the patient
hoist while transferring a patient.
• Do not use the patient hoist in wet or humid environments.
• Alterations or substitutions should not be made to the patient hoist securement points or to
structural and frame parts or components without consulting the manufacturer.
• Make sure that your hands, clothes, belts, buckles or jewellery don’t get caught by wheels or
other moving parts during use.
• Be careful with sources of ignition such as lit cigarettes as they may set the sling alight.
In case a serious incident has occurred involving your product, notify Vermeiren or your specialist
dealer as well as the competent authority in your country.
CAUTION

Falcon
2022-11
Using the patient hoist
5
EN
NL
3 Using the patient hoist
3.1 Operating the lift
Risk of injuries and/or damage
• When using the lift, make sure that there is sufficient room around and above it, as the
adjustment movements could otherwise lead to damage or injury.
• Always be aware of the lifting arm to avoid injury.
• Only slings that have been designed and approved for the patients must be used (see usage
instructions for the various slings). Use of any other slings is at your own risk.
• Only use the handles to push/pull the patient hoist, no other components.
Please observe the technical information according to which the patient hoists may be operated.
The patient hoist must only be operated by authorised staff who have been trained in its use and
operation.
3.1.1 Altering the chassis width
To get the lift around a wheelchair or other seating
furniture, or to increase the stability of the lift in the
standing position, the separation of the chassis legs
can be increased.
Stand behind the assembled lift and take hold of the
handles for pushing the patient hoist (on the left and
right, next to the control box). Press the lever at the
bottom of the chassis (left or right) down with your foot,
and the separation of the legs of the chassis can be
increased or decreased.
3.1.2 Parking brakes
Secure the two casters at the back of the chassis by
pressing the caster brake plates down gently to their end
stops with the tip of your foot. To release the brake, push
the brake plate gently back up again with the front of
your foot until the casters are free.
3.1.3 Raising and lowering the cantilever arm
The manual control allows the cantilever arm to be adjusted smoothly to any
point.
= Raise the cantilever arm
= Lower the cantilever arm
When using the lift function until the end of the hoist motor, the limit switch is
activated by electronics (security function). Use the lifting function only in the
middle of the adjustment range.
CAUTION
1
2
1
2

Falcon
2022-11
Using the patient hoist
6
EN
NL
3.1.4 Lowering button
If the manual operation mechanism should be damaged, it is possible
to lower the cantilever arm from the control box.
The arm moves down for as long as the button (3) on the control box
panel is pressed.
3.1.5 Moving the patient hoist
Risk of injuries
• Be careful passing through restricted passages (e.g.
doors).
1. Stand behind the patient hoist and grasp the
handles (left and right, next to the control box) with
both hands.
2. Make sure that both back caster brakes have been
released.
3. Push the patient hoist slowly into the desired
position.
When it is not loaded, we advise you to pull the patient
hoist backwards, which makes it easier to get round any
obstacles (door frames, corners of rooms or furniture).
3.1.6 Turn the patient hoist around his axle
Risk of injuries
• Be careful there are no people or objects in the
swing range of the patient hoist.
• Turn the patient hoist carefully and slowly around
his axle, so that the patient cannot swing out.
1. Open the legs of the patient hoist to give more
stability.
2. Activate the brakes.
3. Place the patient in the patient hoist with the
appropriate sling. (refer to sling manual for
instructions of placing the patient in the hoist).
4. Lift the patient from the ground, chair, bed, ... .
5. Loosen both brakes of the rear wheels.
6. Stand behind the patient hoist and grasp the
handgrips (left and right next to the control box)
with both hands.
7. Now turn the patient hoist carefully, slowly around
on the same place. Be careful you do not touch any objects with the legs of the patient hoist.
8. When you are turned in the good position, you can lift the patient down.
CAUTION
CAUTION
3

Falcon
2022-11
Using the patient hoist
7
EN
NL
3.2 Slings
Risk of injuries
• Only use appropriate slings for the patients.
• Do not use damaged slings.
• Read the full slings manual first.
• Only use compatible slings approved by Vermeiren.
The patient hoist must only be used with slings designed for the Vermeiren Falcon patient hoists
(for 4-point speader bar).
The applicability and instructions for use for the specific slings should be followed, see the
separate manual.
3.2.1 Attaching to the spreader bar of the patient hoists
The slings shall be attached by the mounting straps. These mounting straps shall be suspended
on the spreader bar of the patient hoist.
The mounting straps of the slings have 4 loops in different colors.
Mounting strap sling
Spreader bar of the patient hoists
With these loops it is possible to lift the patient in different positions. These positions depends
on the length and weight of the person.
CAUTION
Hooks for
mounting strap
Black
Yellow
Red
Green

Falcon
2022-11
Using the patient hoist
8
EN
NL
Shoulders
Legs
Head
(only by comfort
sling)
Green
Green
Green
Red
Red
Red
Yellow
Yellow
Yellow
Black
Black
Black
The legrests can be attached on the patient hoist according different methods.
• Crossed legrests
This is the most used method to attach the sling. The attachment of the sling with crossed
legrests shall be according to the instructions below:
1. Put the mounting strap of the legrest through the loop of the other legrest.
2. Attach the mounting straps of the legrests on the spreader bar of the patient hoist.
• Crossed under both thighs
L CAUTION: Risk of falling - By a patient with amputated legs increases the
risk of falling because the patient loose easy his balance.
This method can be used for lifting a patient with amputated legs. The attachment of the
sling crossed under both thighs shall be according to the instructions below:
1. Cross the mounting strap of the legrest under the thighs.
2. Attach the mounting straps of the legrests on the spreader bar of the patient hoist.

Falcon
2022-11
Using the patient hoist
9
EN
NL
• Each legrest separately on the spreader bar
L CAUTION: Risk of falling- This method increases the chance of sliding out the
sling.
Attaching each legrest separately on the spreader bar can be used for patient with sensitive
genitals. The attachment of the sling with this method shall be according instructions below:
1. Put the legrest around each leg separately, but not crossed.
2. Attach the mounting straps of the legrests on the spreader bar of the patient hoist.
3.2.2 Position of spreader bar
The spreader bar must always be perpendicular to the body of the patient. The left figure is the
good method. The right figure is the wrong way.
3.3 Battery and charging
3.3.1 Battery charger
Primary voltage
100 - 240VAC / 50/60 Hz
Safeguards
Protected against reverse polarisation, electrical surges
and extreme temperature
Ambient temperature
0 to +40°C
Length of mains lead
2.0 m
Ambient storage temperature
-15° to +50°C
Relative storage humidity
max. 95% (non-condensing)
Conformity
tested in accordance with IEC 60601-1
3.3.2 Charging the batteries
Use only the control box with included battery charger.
We recommend that you should regularly recharge the batteries in order to ensure that the hoist
remains usable and to extend the lifespan of the batteries. The control box will give a warning
sound to tell you when the battery charge is low.
First use
First, insert the supply cable with the connector side into the appropriate connector on the control
box. The plug side of the supply cable must be insert in the socket outlet. The loading time is
about 24 hours.
Recharging
L WARNING: Risk of injury – Do not use the lift when the supply cable is connected in
the socket outlet.
When the battery is running low, only the left LED will light green. Once the battery level gets
very low, the LED will light red and a beeping sound can be heard every 2 seconds.

Falcon
2022-11
Using the patient hoist
10
EN
NL
The battery is fully charged once all LEDs are fully green.
After the recharging process is completed, you should always remove the mains plug from the
socket first and then remove the connector plug from the control box.
Do not use the lift while it is being recharged!
If the batteries are not used for a significant period, they discharge slowly by themselves (deep
discharge). It then becomes impossible to recharge them. You should therefore recharge the
batteries at least once a month even if they are not being used.
3.4 Emergency
In cases for emergency the emergency stop and the function for lowering in an emergency must
be used.
3.4.1 Emergency stop
In emergencies, and during assembly and disassembly, the
emergency stop is activated by pressing the red button on the
control box.
Push the button and turn in the direction of the arrows. If the
button is fully pressed to the back turn back in the opposite
direction of the arrows.
The emergency stop is deactivated by turning the red button in
the direction of the arrows.
3.4.2 Emergency lowering
L WARNING: Risk of injury – Adjust the manual emergency
lowering for the weight of the patient.
Emergency lowering if the power fails or the batteries are empty can be
done by turning the red button at the upper end of the motor.
Please note that the manual emergency lowering is only possible when the
patient is sitting in the patient hoist.

Falcon
2022-11
Installation and adjustment
11
EN
NL
4 Installation and adjustment
The patient hoist is delivered fully assembled by your specialist dealer.
The instructions in this chapter are for the specialist dealer.
To find a service facility or specialist dealer near you, contact the nearest Vermeiren facility.
L WARNING: Risk of unsafe limitations - Use only the limitations described in this
manual.
4.1 Delivery
The Vermeiren Falcon patient hoist shall be delivered with:
• chassis including 4 casters (2 with brakes)
• pole, including handles for pushing
• cantilever arm and spreader bar
• control box (incl. 2 accumulator batteries and manual operation)
• battery charger
• motor
• instruction manual
Before use check if everything is included and that no products are damaged (example by
transport, ...).
Please note that the basic configuration may vary from one European country to another. Please
contact the specialist dealer in your country for more information.
4.2 Assembly or dismantling
4.2.1 Unpacking
L WARNING: Risk of injury - After unpacking and before further assembly, always first
confirm that the emergency stop (the red pushbutton on the control box) is pressed in.
The patient hoist packaging has been selected to provide the best possible protection during
transport.
1. Take all parts of the patient hoist out of the box and check
that all the items have been delivered and that the individual
parts do not have any visible defects. If there is any damage,
please contact your sales office.
2. Before assembly, put on the caster brakes to make sure that
the lift cannot be moved unintentionally. Push the caster
brake plate down gently to its end stop with the front of your
foot. To release the brake, push the brake plate gently back
up again with the front of your foot until the caster is free.

Falcon
2022-11
Installation and adjustment
12
EN
NL
4.2.2 Assembly
L WARNING: Risk of clamping - Take care that no body parts and wires
get trapped, crushed or cut during assembly.
1. Insert the vertical pole into the lower frame and tighten the lever securely.
2. Place the motor in its attachments on the vertical pole and the hoist arm
(4) and secure into place with the pins.
3. For first use: Mount the control box to the vertical pole by tightening the
two bolts.
4.2.3 Dismantling
L WARNING: Risk of clamping - Take care that no body parts and wires
get trapped, crushed or cut during dismantling.
L WARNING: Risk of injury - Check the emergency stop (red
pushbutton on the control box) is activated, to avoid unintentional
adjustment movements.
1. Secure the two casters at the back of the chassis by pressing the caster
brake plates down gently to their end stops with the tip of your foot. To
release the brake, push the brake plate gently back up again with the
front of your foot until the casters are free.
2. Release the motor from the hoist arm and vertical pole by removing the
pins (4).
3. Remove the lever and take the vertical pole out of the lower frame.
4
3
4
3

Falcon
2022-11
Maintenance
13
EN
NL
5 Maintenance
5.1 Time of maintenance
Risk of injuries and damage
Repairs and replacements may only be undertaken by trained persons and only genuine
replacement parts of Vermeiren should be used (see the maintenance manual).
The last page of this manual contains a registration form for the specialist dealer to record
each service.
The service frequency depends on the frequency and intensity of use. Contact your dealer to
agree to a common timetable for inspection/maintenance/repair.
For the maintenance manual, refer to the Vermeiren website: www.vermeiren.com.
Before each use
Inspect the following points:
• All parts: present and undamaged or unworn.
• All parts: clean, see §5.3.
• Condition of frame parts: no deformation, instability, weakness or loose connections.
• Brakes: no visible damage and/or dirt.
• Control box, manual control, battery charger, relevant cables: no damage such as wires that
have become frayed, broken or exposed. Check that the electrical adjustment of the
cantilever arm is working properly, using the manual control.
• Battery status: charge the battery when necessary, see §3.3.
Approx. every 8 weeks
Depending on the frequency of use, check the following:
• Lubrication of the joints of the cantilever arm
• Condition of the casters
• Whether there is any visible damage to the casing of the control box, battery, battery
charger and the manual controls
• Whether the cables are fit for use
• Recharge the battery
Approx. every 6 months or for every new user
Depending on the frequency of use check the following:
• Cleanliness
• General condition
• That the battery charger is working
• Casters are working
If the resistance to rotation is too great, clean the casters. If this is insufficient, please consult
your dealer.
Yearly or more often
Have the patient hoist inspected and serviced by your specialist dealer, at least once a year, or
more often. The minimum maintenance frequency depends on use and should therefore be
commonly agreed upon with your specialist dealer.
CAUTION

Falcon
2022-11
Maintenance
14
EN
NL
5.2 Shipping and storage
• Shipping and storage should happen according to the technical specifications in §7. Make
sure that the patient hoist is stored dry.
• Prevent cables from being crushed or bent with kinks.
• Disconnect the patient hoist from the socket.
• Provide sufficient covering or packaging to protect the patient hoist against rust and foreign
bodies. (e.g. salt water, sea air, sand, dust).
• Store all removed parts together in one place (or mark them if necessary) to avoid mixing up
with other products when re-assembling (e.g. the charger).
• Make sure no objects are stored on or against the patient hoist and its components to prevent
damage.
5.3 Cleaning
Risk of damage by moisture
• Never use a hose or high-pressure cleaner.
• Use a mild commercial detergent to remove stubborn dirt.
• Stains can be removed by using a sponge or a soft brush.
• Do not use strong cleaning liquids like solvents, nor use hard brushes.
5.3.1 Plastic parts
Clean plastic parts of your patient hoist with commercial plastic cleaners. Read the specific
product information and only use a soft brush or soft sponge.
5.3.2 Coating
The high quality of the surface layer guarantees optimal protection against corrosion. If the outer
coat is damaged by scratching or in some other way, get your specialist dealer to repair the
affected surface.
When cleaning, only use warm water and normal household detergents and soft brushes and
cloths. Ensure that no wetness gets into the tubes.
5.3.3 Electronics casing
L WARNING: Risk of injury - The emergency stop must be activated before maintenance
work, so that no unintentional adjustment movements can be made.
Wipe the control box, motor casing and manual controls down with a cloth moistened by a few
drops of a commercial domestic cleaner. Do not use abrasives or sharp-edged polishing
equipment like a metal scrubber or brush, as these can scratch the surface of the manual control
and destroy its water repelling property.
Regularly check the plug connectors for corrosion or damage, as these could affect the functional
integrity of the electronics.
The manufacturer will not accept liability for damages caused by insufficient maintenance.
5.4 Disinfection
L WARNING: Dangerous Products - The use of disinfectants is restricted to authorized
personnel.
All parts of the patient hoist can be treated by scrubbing with a commercial disinfectant. Follow
the instructions on the disinfectant.
Washing instructions for slings can be found in the slings manual and on the label of each sling.
CAUTION

Falcon
2022-11
Maintenance
15
EN
NL
5.5 Inspection
In principle we recommend one inspection every year, and a minimum of one before usage is
resumed. All of the following checks must be performed and documented by authorized
persons:
• Check the cabling (in particular for crushing, wear, cuts, visible parts of the insulation of
the inner wires, visible metal wire cores, kinks, bulges, colour changes of the outer sleeve,
brittle spots, and safe positioning so that mechanical effects such as being cut or crushed
are not probable).
• Visual inspection of the frame parts to check for plastic deformation and/or wear and tear
(frame, motor suspension, cantilever arm, spreader bar).
• Visually check for damage to the paintwork (danger of corrosion).
• Visual inspection of all casings for damage; screws must be tight.
• Verify the amount of grease on the metal joints of movable parts
• Visually check all plastic parts for cracks and brittle spots
• Review the control box + included charger residual discharge current (A) based on
VDE 0702
• Review the control box + included charger insulation resistance (MO) based on VDE 0702
• Functional test of the cantilever arm (lubrication of the joint parts, range of adjustability,
deformation, wear and tear)
• Check the functioning of the hoist drives (during a test drive → noises, speed, free running,
etc.), if necessary: Measure the performance, first with no load and then with the nominal
load ("SWL"), to investigate the wear and tear of the motors by comparing the values for
the electric current against the values when it was delivered.
• Functional test of the emergency stop
• Functional test of the emergency lowering
• Completeness of the delivery condition, instruction manual available?
Checking measurements may only be carried out by skilled persons trained on the patient hoist
at least and at least under the supervision of an electrician who knows the checking instruments
and processes. Only an electrician can release the patient hoist for use after making the
measurements and carrying out the servicing.
The service must only be signed off in the maintenance plan if a minimum of all the above-
mentioned aspects have been checked.
5.6 Expected lifespan
The average lifespan of the patient hoist is 8 years. Depending on the frequency of use, storage,
maintenance, servicing and cleaning, the lifespan of the patient hoist will increase or decrease.
5.7 Reuse
Before each reuse, have the patient hoist disinfected, inspected and serviced according to the
instructions in this chapter.
5.8 End of use
At end of life, you need to dispose of the patient hoist according to the local environmental
legislation. The best way to do so, is to disassemble the patient hoist to facilitate the transport of
recyclable parts.

Falcon
2022-11
Troubleshooting
16
EN
NL
6 Troubleshooting
Table 1: Troubleshooting
Problem
Cause of problem
Problem solving
Noisy sound of the moving
parts (example: cantilever
arm).
Lubrication is necessary.
Lubricate the moving parts.
(Do not lubricate the actuator!)
Actuator makes an unusual
sound.
The actuator is damaged.
Replace the actuator or contact
your specialist dealer.
Patient hoist does not lift
anymore.
1. Electric actuator is damaged.
2. The user weight is too high
(overload LED on manual
control lights up).
3. Manual control or actuator are
not connected.
4. Battery not connected or not
connected properly to control
box.
5. Battery too low.
6. Emergency stop is activated.
1. Replace the actuator.
2. Use a patient hoist with higher
maximum user weight.
3. Check connections. If
necessary connect manual
control or actuator.
4. Check battery is installed or
the connection of the battery.
5. Charge the batteries or
replace.
6. Deactivate the emergency
stop.
Lowering the patient in case
of emergency does not
work.
There is required a minimum
weight load to lower the patient.
If the patient weight is too low pull
down slightly on the cantilever
arms or adjust the lowering speed.
Battery cannot be charged
1. Batteries not fitted correctly to
control box.
2. Mains cable defect.
3. Batteries are defected.
4. Control box with included
charger is defected
5. Battery charger is defected
1. Check batteries are connected
to the control box.
2. Change mains cable.
3. Replace battery.
4. Replace control box with
included charger.
5. Replace new battery charger.

Falcon
2022-11
Technical specifications
17
EN
NL
7 Technical specifications
700
Forward direction

Falcon
2022-11
Technical specifications
18
EN
NL
Table 2: Technical specifications
Brand
Vermeiren
Type
Patient hoist
Model
Falcon
Description
Measurement
in drawing
Dimensions
Lowest CAP position*
l
509 mm
Highest CAP position*
k
1609 mm
Lifting range (range of heights)
m
1100 mm
Leg length
1042 mm
Total length
1158 mm
Minimum leg separation
r
506 mm
Maximum leg separation
q
970 mm
Leg height / Frame height
n1
n2
149 mm
112,5 mm
Overall width (closed), external dimension
565 mm
Overall width (opened), castors forwards
p
1026 mm
Folded length
1236 mm
Folded height
294 mm
Folded width
565 mm
Min. distance between wall / CSP* (maximum
reach)
w3
36 mm
Min. distance between wall / CSP* (minimum
height)
w2
263,5 mm
Min. distance between wall / CSP* (maximum
height)
w1
65 mm
Turning circle
1188 mm
Total weight
35 kg
Weight of chassis
16,5 kg
Weight of control box + battery
3 kg
Weight of upper frame (cantilever arm /
spreader bar + motor + control box)
18,5 kg
Maximum load
130 kg
Ground clearance
15,5 mm
Maximum reach at 600 mm
a
557 mm
Maximum reach from support
b
557 mm
Reach from support at separation 700 mm
c
323 mm
Power outlet
24V max. 250 VA
Operating temperature
+5 to +40°C
Relative humidity
20% to 80% at 30°C, non-condensing
Noise level
< 54 dB(A)
Control box
TiMOTION TC20
Battery
Not applicable

Falcon
2022-11
Technical specifications
19
EN
NL
Brand
Vermeiren
Type
Patient hoist
Model
Falcon
Description
Measurement
in drawing
Dimensions
Manual control
TiMOTION TH10
Motor
TiMOTION TA23
Control box protection class
IP54
Battery protection class
Not applicable
Manual control protection class
IP54
Motor protection class
IP54
Insulation class
II - Type B
Periodic operation
max. 10%, or 2 min. continuous
operation/18 min. pauses
Battery capacity
2.9 Ah
Emergency stop
Yes
Manual lowering in emergency
yes
Electrical lowering in emergency
No
We reserve the right to introduce technical changes. Measurement tolerance ± 15 mm / 1,5 kg / 1,5°
1 = Highest position, 2 = Maximum reach, 3 = Lowest position
* CSP = Central suspension point


Falcon
2022-11
Table des matières
1
EN
FR
NL
Table des matières
Table des matières..................................................................................................... 1
Avant-propos ............................................................................................................. 2
1 Votre produit .................................................................................................. 3
2 Avant l'utilisation .......................................................................................... 4
2.1 Usage prévu .................................................................................................. 4
2.2 Instructions générales de sécurité................................................................. 4
3 Utilisation du lève-personne ........................................................................ 6
3.1 Utilisation du lève-personne .......................................................................... 6
3.2 Sangles ......................................................................................................... 8
3.3 Batterie et charge ........................................................................................ 10
3.4 Urgence ...................................................................................................... 11
4 Montage et réglage ..................................................................................... 12
4.1 Livraison ...................................................................................................... 12
4.2 Montage ou démontage .............................................................................. 12
5 Maintenance ................................................................................................ 14
5.1 L'entretien ................................................................................................... 14
5.2 Expédition et stockage ................................................................................ 15
5.3 Nettoyage .................................................................................................... 15
5.4 Désinfection ................................................................................................ 16
5.5 Inspection .................................................................................................... 16
5.6 Durée de vie attendue ................................................................................. 16
5.7 Réutilisation ................................................................................................ 17
5.8 Mise au rebut .............................................................................................. 17
6 Résolution des problèmes ......................................................................... 18
7 Spécifications techniques .......................................................................... 19

Falcon
2022-11
Avant-propos
2
EN
FR
NL
Avant-propos
Félicitations ! Vous êtes à présent propriétaire d'un lève-personne Vermeiren !
Ce produit a été fabriqué par un personnel qualifié et responsable. Il est conçu et produit
conformément aux normes de qualité élevées appliquées par Vermeiren.
Merci de la confiance que vous accordez aux produits de Vermeiren. Ce manuel est destiné à
vous aider dans l’utilisation de ce lève-personne et de ses options de fonctionnement. Veuillez le
lire attentivement. Vous pourrez ainsi vous familiariser avec le fonctionnement, les capacités et
les limites de votre produit.
Si vous avez encore des questions après la lecture de ce manuel, n’hésitez pas à prendre contact
avec votre revendeur spécialisé. Il vous aidera volontiers.
Remarque importante
Pour assurer votre sécurité et prolonger la durée de vie de votre produit, prenez-en grand soin,
et faites-le contrôler et entretenir régulièrement.
Ce manuel est le reflet des derniers développements du produit. Vermeiren a le droit d’apporter
des modifications à ce type de produit sans être tenu d'adapter ou de remplacer des produits
similaires fournis précédemment.
Les images sont fournies afin de clarifier les instructions de ce manuel. Les détails du produit
illustré peuvent diverger de votre produit.
Informations disponibles
Sur notre site http://www.vermeiren.com/, vous trouverez toujours la version la plus récente des
informations suivantes. Veuillez consulter régulièrement ce site Internet pour connaître les
éventuelles mises à jour.
Les personnes malvoyantes peuvent télécharger la version électronique de ce manuel et la lire
au moyen d'une application de texte-parole.
Ce manuel d'utilisation
Pour l'utilisateur et le revendeur spécialisé
Manuel d'entretien
Pour le revendeur spécialisé
Déclaration de conformité CE

Falcon
2022-11
Votre produit
3
EN
FR
NL
1 Votre produit
1. Potence
2. Fourche d'écartement
3. Moteur
4. Châssis
5. Roue
6. Boîtier de commande
7. Poignée
8. Commande manuelle
9. Arrêt d'urgence
10. Mât
11. Pédale d'écartement du
châssis
12. Roue avec frein
1
2
9
10
8
7
4
6
5
11
3
12

Falcon
2022-11
Avant l'utilisation
4
EN
FR
NL
2 Avant l'utilisation
2.1 Usage prévu
Ce paragraphe vous donne une brève description de l'usage prévu de votre lève-personne. Des
avertissements pertinents ont également été ajoutés aux instructions dans les autres
paragraphes. Nous aimerions ainsi attirer votre attention sur un usage inapproprié éventuel qui
pourrait survenir.
• Ce lève-personne est destiné à être utilisé par un assistant pour transférer des patients assis
entre, par exemple, des fauteuils roulants, des lits de soins et des salles de bains. Le lève-
personne est conçu et fabriqué pour être une aide au transport/transfert pour les personnes
âgées ou les personnes souffrant de paralysie, de perte ou de déficience d'un membre,
d'articulations raides ou endommagées, de problèmes cardiovasculaires, de cachexie, ... .
• Ce lève-personne convient à un usage à l'intérieur.
• Ce lève-personne est conçu et fabriqué uniquement pour le transport d'une (1) personne d'un
poids maximum conforme aux spécifications du §7. Il n'est pas destiné au transport de
marchandises ou d'objets, ni à tout autre usage que celui décrit précédemment.
• Utilisez uniquement des accessoires et des pièces de rechange approuvés par Vermeiren.
• Consultez également les détails techniques et les limites de votre lève-personne au §7.
• La garantie sur ce produit est basée sur une utilisation et un entretien normaux, tels que décrits
dans le présent manuel. Les dommages à votre produit dus à un usage inapproprié ou à un
manque d’entretien auront pour effet d’annuler la garantie.
2.2 Instructions générales de sécurité
Risque de blessures ou de dommages
Veuillez lire et suivre les instructions stipulées dans le présent manuel d'utilisation. Autrement,
vous pourriez vous blesser ou votre lève-personne pourrait être endommagé.
Tenez compte des avertissements généraux suivants pendant l’emploi :
• Seules des personnes autorisées, formées à l'utilisation et au fonctionnement du lève-
personne, peuvent le manipuler.
• Ne dépassez pas la charge maximale du lève-personne. Le boîtier de commande s'arrêtera
alors.
• En cas de poids d'utilisateur différents pour le lève-personne et les harnais, toujours respecter
le poids d'utilisateur le plus faible.
• La présence d'un accompagnateur est nécessaire pendant l'opération de levage.
• N'oubliez pas que certaines parties de votre lève-personne peuvent devenir très chaudes ou
très froides en fonction de la température ambiante, des rayons du soleil ou de dispositifs de
chauffage. Faites donc attention lorsque vous les touchez.
• Votre lève-personne a subi un test de conformité électromagnétique et est conforme à cette
norme. Les sources de champ magnétique, comme les téléphones mobiles, les générateurs
électriques ou de sources d'énergie à haute puissance, peuvent cependant influencer la
performance de votre lève-personne. L’électronique de votre lève-personne peut à son tour
également affecter d’autres appareils électroniques
• N'utilisez le lève-personne que sur des surfaces planes où toutes les roulettes touchent le sol
et où le contact est suffisant pour faire fonctionner le lève-personne en toute sécurité. Ne
prenez pas d'obstacles avec le lève-personne pendant le transfert d'un patient.
• N'utilisez pas le lève-personne dans un environnement humide ou mouillé.
• Ne réalisez pas de modifications ou de remplacements aux points d'attache du lève-personne
ou aux composants ou éléments du châssis et structurels sans consulter le fabricant.
• Assurez-vous que vos mains, vêtements, ceintures, boucles ou bijoux ne puissent pas se
coincer dans les roues ou dans d'autres parties mobiles pendant l’utilisation.
ATTENTION

Falcon
2022-11
Avant l'utilisation
5
EN
FR
NL
• Soyez prudent avec le feu, en particulier avec les cigarettes incandescentes ; en effet, les
sangles risquent de s'enflammer.
En cas d'incident grave impliquant votre produit, informez Vermeiren ou votre revendeur
spécialisé ainsi que l'autorité compétente de votre pays.

Falcon
2022-11
Utilisation du lève-personne
6
EN
FR
NL
3 Utilisation du lève-personne
3.1 Utilisation du lève-personne
Risques de blessures ou de dommages
• Veillez lors de l'utilisation du lève-personne à disposer d'un espace suffisant à côté et au-
dessus du lève-personne pour éviter tout dommage ou blessure lors de l'utilisation des
fonctions de réglage.
• Faites toujours attention à la position du bras de levage afin de ne pas blesser le patient.
• N'utilisez que des sangles prévus et homologués pour le lève-personne (voir le mode d'emploi
des différents sangles). L'utilisation d'autres sangles se fait à vos risques et périls.
• N'utilisez que les poignées pour pousser/tirer le lève-personne, aucun autre composant.
Respectez les caractéristiques techniques liées à l'utilisation du lève-personne. Seules des
personnes autorisées, formées à l'utilisation et au fonctionnement du lève-personne, peuvent le
manipuler.
3.1.1 Ecartement du chassis
Il est possible d'augmenter l'écartement du châssis pour
entourer un fauteuil roulant ou un autre siège avec le
lève-personne, mais aussi pour améliorer la stabilité du
lève-personne.
En vous tenant derrière le lève-personne une fois celui-
ci monté et saisissez les poignées de poussée du lève-
personne (à gauche et à droite à côté du boîtier de
commande). Appuyez avec le pied légèrement vers le
bas sur la bascule sur le châssis inférieur (droite ou
gauche) pour pouvoir augmenter ou réduire l'écartement
des bras du châssis.
3.1.2 Freins de stationnement
Bloquez les deux roues à l'arrière du châssis en
appuyant légèrement de la pointe du pied sur la patte
du frein des roues en l’enfonçant vers le bas jusqu’à ce
qu’elles soient bloquées. Pour desserrer les freins,
appuyez de la pointe du pied sur la pédale de frein vers
le haut jusqu’à ce que les roues soient libérées.
3.1.3 Soulevement / abaissement de la potence
La commande manuelle permet de régler progressivement la potence.
= Soulever la potence
= Abaisser la potence
Lorsque la fonction de levage est utilisée jusqu'à l'extrémité du moteur du
palan, l'interrupteur de fin de course est activé par le système électronique
(fonction de sécurité). N'utilisez la fonction de levage qu'au centre de la plage
de réglage.
AVERTISSEMENT
1
2
1
2

Falcon
2022-11
Utilisation du lève-personne
7
EN
FR
NL
3.1.4 Bouton d'abaissement
En cas de dommage sur la commande manuelle, il est possible
d'abaisser la potence depuis le boîtier de commande.
La potence descend tant qu'une pression est exercée sur le bouton
de commande (3).
3.1.5 Déplacement du lève-personne
Risques de blessures
• Soyez prudent lorsque vous franchissez des
passages étroits (portes, par exemple).
1. Placez-vous derrière le lève-personne, en tenant à
deux mains les poignées (gauche et droite, à côté du
boîtier de commande).
2. Vérifiez que les deux freins des roues arrière soient
desserrés.
3. Poussez lentement le lève-personne dans la position
souhaitée.
Lorsque le lève-personne n'est pas chargé, nous
recommandons de le tirer en marche arrière afin de
pouvoir plus facilement éviter des obstacles (tels que
des chambranles de portes, angles de pièces ou
meubles).
3.1.6 Pivoter le lève-personne sur son axe
Risques de blessures
• Veiller à ce qu'aucun personne ou objet ne se
trouve dans la zone de basculement du lève-
personne.
• Pivotez le lève-personne prudemment et
doucement sur son axe de façon à ce que le patient
ne puisse pas basculer.
1. Ecartez les jambes du patient pour donner plus de
stabilité.
2. Actionnez les freins.
3. Placez le patient dans la sangle appropriée (se
référer au manuel des sangles pour les instructions
sur comment placer le patient dans la sangle).
4. Soulevez le patient du sol, de la chaise, du lit...
5. Relevez les deux freins des roues arrières.
6. Placez-vous derrière le lève-personne, en tenant à
deux mains les barres du poussoir (gauche et droite, à côté du boîtier de commande).
7. Maintenant tournez le lève-personne prudemment, doucement sur son axe. Faites attention à
ne toucher aucun objet avec les pieds du lève-personne.
8. Quand vous êtes arrivés dans la bonne position, vous pouvez descendre le patient.
AVERTISSEMENT
AVERTISSEMENT
3

Falcon
2022-11
Utilisation du lève-personne
8
EN
FR
NL
3.2 Sangles
Risques de blessures
• Veillez à utiliser les sangles adaptée au patient.
• N'utilisez pas de sangles endommagée.
• Lisez d'abord le manuel complet des sangles.
• Utilisez uniquement des sangles compatibles approuvés par Vermeiren.
Le lève-personne doit être strictement utilisé avec les sangles conçues pour les équipements
Vermeiren Falcon (pour une fourche d'écartement 4 points).
L'applicabilité et les instructions d'utilisation des sangles spécifiques doivent être suivies, voir le
manuel séparé.
3.2.1 Fixation sur la barre de suspension du lève-personnes
Les système d'assise sont fixées à la barre de suspension par des sangles d'attaches. Ces
sangles d'attaches sont suspendues à la barre.
Les sangles d'attaches des système d'assise sont munies de quatre boucles de couleurs
différentes.
Sangle d'attache de système d'assise
Barre de suspension du lève-personnes
Ces boucles permettent de lever le patient dans différentes positions. Le choix des boucles est
fonction de la taille et du poids du patient.
AVERTISSEMENT
Crochet
sangle d'attache
Noir
Jaune
Rouge
Vert

Falcon
2022-11
Utilisation du lève-personne
9
EN
FR
NL
Épaules
Jambes
Tête
(système d'assise de
comfort uniquement)
Vert
Vert
Vert
Rouge
Rouge
Rouge
Jaune
Jaune
Jaune
Noir
Noir
Noir
Les appui-jambes peuvent être fixés de différentes manières sur le lève-personne.
• Appui-jambes croisés
Il s'agit du mode de fixation le plus courant. La fixation avec appui-jambes croisés
s'effectue comme suit :
1. Faites passer le sangle d'attache d'un appui-jambe par la boucle du second.
2. Fixez les sangles attaches des appui-jambes sur la barre de suspension du lève-
personnes.
• Croisé sous les deux cuisses
L ATTENTION : Risque de chute - Les patient amputés des jambes présentent
un risque accrû de chute par manque d'équilibre.
Cette méthode convient pour soulever un patient amputé des jambes. La fixation de la
système d'assise croisée sous les deux cuisses s'effectue comme suit :
1. Croisez les sangles attaches des appui-jambes sous les cuisses.
2. Fixez les sangles attaches des appui-jambes sur la barre de suspension du lève-
personnes.

Falcon
2022-11
Utilisation du lève-personne
10
EN
FR
NL
• Appui-jambes séparés sur la barre de suspension
L ATTENTION : Risque de chute- Cette méthode accroît les risques de glissement
hors de la système d'assise.
Ce mode de fixation, appui-jambes séparés sur la barre de suspension, est indiqué pour
les patients aux parties génitales sensibles. Il s'effectue comme suit :
1. Placez les appui-jambes séparément autour de chaque jambe, sans les croiser.
2. Fixez les sangles attaches des appui-jambes sur la barre de suspension du lève-
personnes.
3.2.2 Position de la barre de suspension
La barre de suspension doit toujours être perpendiculaire au corps du patient. Se conformer à
l'illustration de gauche. L'illustration de droite ne convient pas.
3.3 Batterie et charge
3.3.1 Chargeur de batterie
Tension primaire
100 - 240V CA / 50/60 Hz
Systèmes de sécurité
protection contre les inversions de polarité, les
surtensions et la température
Température environnante
0° à +40°C
Longueur du câble de raccordement
2,0 m
Température environnante pour le stockage
-15°C à +50°C
Humidité relative pour le stockage
Max. 95 % (sans condensation)
Conformité
contrôlé d'après IEC 60601-1
3.3.2 Chargement des batteries
N'utilisez que le boîtier de commande à chargeur de batterie intégré.
Nous vous invitons à recharger régulièrement les batteries afin de maintenir le lève-personne en
état de fonctionnement et de bénéficier de la durée de vie optimale des batteries. Le boîtier de
commande émet un signal sonore dès que la charge de la batterie est faible.
Mise en service
Raccordez tout d'abord le connecteur du cordon d'alimentation au connecteur correspondant sur
le boîtier de commande. Branchez ensuite la prise du cordon d'alimentation sur la prise de
courant. La durée de chargement est d'environ 24 heures.
Recharge
L AVERTISSEMENT : Risque de blessures – N'utilisez pas le lève-personne lorsque le
cordon d'alimentation est branché sur la prise de courant.
Lorsque la batterie est faible, seule la DEL de gauche s'allume en vert. Lorsque le niveau de la
batterie devient très faible, la DEL s'allume en rouge et un bip sonore se fait entendre toutes les
2 secondes.

Falcon
2022-11
Utilisation du lève-personne
11
EN
FR
NL
La batterie est complètement chargée lorsque toutes les DEL sont entièrement vertes.
Une fois la batterie rechargée, débranchez toujours le cordon de la prise de courant avant de le
détacher du boîtier de commande.
Aucune utilisation du lève-personne pendant le chargement !
Toute batterie inutilisée pendant une période prolongée se décharge progressivement (décharge
complète). Il devient alors impossible de la recharger avec le chargeur de batterie. Nous vous
invitons donc à recharger les batteries au moins une fois par mois, même si vous ne devez pas
vous en servir.
3.4 Urgence
En cas d'urgence, utilisez le bouton d'urgence ainsi que la fonction d'abaissement d'urgence.
3.4.1 Arrêt d'urgence
En cas d'urgence ainsi que lors du montage et du démontage,
vous pouvez activer l'arrêt d'urgence en actionnant le bouton
rouge du boîtier de commande.
Appuyez sur le bouton et tournez-le dans le sens des flèches. Si
le bouton est complètement enfoncé vers l'arrière, tournez dans
le sens inverse des flèches.
Pour désactiver l'arrêt d'urgence, faites tourner le bouton rouge
dans la direction des flèches.
3.4.2 Abaissement manuel d'urgence
L AVERTISSEMENT : Risque de blessures – Le dispositif
d'abaissement manuel d'urgence doit être réglé selon le poids du
patient.
L'abaissement d'urgence, par exemple en cas de coupure d'alimentation
ou de batterie déchargée, s'effectue au moyen du bouton rouge en haut
du moteur.
Veuillez noter que l'abaissement manuel d'urgence n'est possible que si le
patient est assis dans le lève-personne.

Falcon
2022-11
Montage et réglage
12
EN
FR
NL
4 Montage et réglage
Le lève-personne est livré entièrement monté par votre revendeur spécialisé.
Les instructions décrites dans ce chapitre sont destinées aux revendeurs.
Pour trouver un service d'entretien ou un revendeur spécialisé près de chez vous, contactez
l'établissement Vermeiren le plus proche.
L AVERTISSEMENT : Risque de limitations dangereuses - N'utiliser que les
limitations décrites dans ce mode d’emploi.
4.1 Livraison
Le lève-personne Falcon de Vermeiren est livré avec :
• un châssis incluant 4 roulettes (dont 2 avec frein)
• Mât avec étrier coulissant
• Potence et fourche d'écartement
• Boîtier de commande (avec deux batteries et commande manuelle) et moteur de réglage
• Chargeur de batterie
• Moteur
• Mode d’emploi
Vérifiez que vous êtes en possession de tous ces éléments et qu'aucun n'a été endommagé (en
particulier durant le transport).
Veuillez noter que la configuration de base pour l'Europe peut varier d'un pays à l'autre. Votre
revendeur spécialisé local pourra vous fournir toutes précisions utiles.
4.2 Montage ou démontage
4.2.1 Deballage
L AVERTISSEMENT : Risque de blessures - Une fois l'équipement déballé et avant de
procéder à son assemblage, vérifiez que le bouton d'arrêt d'urgence (bouton rouge du
boîtier de commande) est enfoncé.
L'emballage du lève-personne a été choisi pour garantir une protection optimale pendant le
transport.
1. Retirez toutes les pièces du lève-personne du carton et
contrôlez que tous les éléments soient présents et si des
pièces présentent un défaut visible. En cas de dommage,
veuillez vous adresser à votre revendeur.
2. Avant l'installation, empêchez tout déplacement involontaire
du lève-personne en actionnant les roues avec freins.
Appuyez légèrement de la pointe du pied sur la patte du frein
des roues en l’abaissant jusqu’à ce qu’elles soient bloquées.
Pour desserrer les freins, soulevez de la pointe du pied la
patte du frein vers le haut jusqu’à ce que les roues soient
libérées.

Falcon
2022-11
Montage et réglage
13
EN
FR
NL
4.2.2 Assemblage
L AVERTISSEMENT : Risque de pincement - Veillez à ne pas vous
pincer ou couper, ni pincer, écraser ou couper des fils lors du
montage.
1. Insérez le mât vertical dans le cadre inférieur et serrez bien le levier.
2. Placez le moteur dans ses fixations sur le mât vertical et le bras du palan
(4) et fixez-le en place avec les goupilles.
3. Pour la première utilisation : Montez le boîtier de commande sur le mât
vertical en serrant les deux boulons.
4.2.3 Démontage
L AVERTISSEMENT : Risque de pincement - Veillez à ne pas vous
pincer ou couper, ni pincer, écraser ou couper des fils lors du
démontage.
L AVERTISSEMENT : Risque de blessures - Vérifiez que l'arrêt
d'urgence (bouton rouge du boîtier de commande) est activé afin
d'éviter tout réglage intempestif.
1. Bloquez les deux roues à l'arrière du châssis en appuyant légèrement de
la pointe du pied sur la patte du frein des roues en l’abaissement jusqu’à
ce qu’elles soient bloquées. Pour desserrer les freins, soulever de la
pointe du pied sur la pédale de frein vers le haut jusqu’à ce que les roues
soient libérées.
2. Libérez le moteur du bras de levage et du mât vertical en retirant les
goupilles (4).
3. Retirez le levier et sortez le poteau vertical du cadre inférieur.
4
3
4
3

Falcon
2022-11
Maintenance
14
EN
FR
NL
5 Maintenance
5.1 L'entretien
Risque de dommages corporels et matériels
Les réparations et les remplacements ne peuvent être réalisés que par des personnes formées,
et seules des pièces de remplacement d'origine de Vermeiren peuvent être utilisées.
La dernière page de ce manuel contient un formulaire d’enregistrement pour permettre au
revendeur spécialisé de consigner chaque service.
La fréquence d'entretien dépend de la fréquence et de l'intensité de l'utilisation. Prenez contact
avec votre commerçant pour convenir d'un rendez-vous pour une inspection/un entretien/une
réparation.
Pour le manuel d'entretien, consultez le site web de Vermeiren : www.vermeiren.com.
Avant chaque utilisation
Inspectez les points suivants :
• Toutes les pièces : présentes, non endommagées et non usées.
• Toutes les pièces : propres, cf. §5.3.
• État des éléments du châssis : pas de déformation, d'instabilité, de faiblesse ou de
raccordements lâches.
• Freins : aucun dommage visible et/ou saleté.
• Boîtier de commande, commande manuelle, chargeur de batterie, câbles correspondants :
aucun dommage tel que des fils effilochés, cassés ou exposés. Vérifiez que le réglage
électrique du bras en porte-à-faux fonctionne correctement à l'aide de la commande
manuelle.
• État de la batterie : chargez la batterie si nécessaire, cf. §3.3
Environ toutes les 8 semaines
En fonction de la fréquence d’utilisation, contrôlez les éléments suivants :
• Lubrification des articulations de la potence
• État des roues
• Des dommages sont-ils visibles sur le boîtier de commande, batterie, chargeur de la batterie
(si disponible) ou sur la commande manuelle ?
• État des câbles pose-t-il problème pour le transport ?
• Rechargez la batterie;
Environ tous les 6 mois ou pour chaque nouvel utilisateur
En fonction de la fréquence d’utilisation, contrôlez les éléments suivants :
• Propreté
• État général
• Fonctionnement du chargeur de la batterie
• Fonctionnement des roues
En cas de résistance trop importante au roulement, les roues seront nettoyées ; si cela s’avère
insuffisant, nous vous prions de vous adresser à votre revendeur.
Chaque année ou plus souvent
Faites inspecter et entretenir votre lève-personne par votre revendeur spécialisé au moins une
fois par an, ou plus. La fréquence d’entretien minimale dépend de l’usage et doit être déterminée
de commun accord avec votre revendeur spécialisé.
ATTENTION

Falcon
2022-11
Maintenance
15
EN
FR
NL
5.2 Expédition et stockage
• L’expédition et le stockage du lève-personne doivent être réalisés conformément aux
caractéristiques techniques §7. Assurez-vous que le lève-personne est entreposé
correctement.
• Vérifiez que les câblages ne soient pas écrasés ou pliés.
• Débranchez le câble secteur du lève-personne de la prise courant.
• Utilisez suffisamment de protections ou emballages pour mettre le fauteuil roulant à l'abri de la
rouille et des corps étrangers (Par exemple eau salée, air salin, sable, poussière).
• Stockez toutes les pièces retirées ensemble, au même endroit (ou repérez-les si nécessaire)
pour éviter de les mélanger avec d'autres produits lors du remontage (par exemple le
chargeur).
• Tous les composants doivent être stockés sans la moindre charge (ne pas déposer d'objets
trop lourds sur les éléments du lève-personne, ne rien coincer...).
5.3 Nettoyage
Risque de dommages dus à l'humidité
• N'utilisez jamais un tuyau ou un nettoyeur à haute pression pour nettoyer le fauteuil roulant.
• Utilisez un détergent doux vendu dans le commerce pour enlever les taches rebelles.
• Vous pouvez utiliser une éponge ou une brosse douce pour éliminer les taches.
• N'utilisez pas de produits de nettoyage agressifs tels que des solvants ni de brosses à poils
durs.
5.3.1 Pièces en plastique
Nettoyez les parties en plastique de votre lève-personne à l'aide d'un produit nettoyant ordinaire
pour le plastique. Lisez les informations produit et n'utilisez qu'une brosse souple ou une éponge
non abrasive.
5.3.2 Enduit
La grande qualité de la couche de surface garantit une protection optimale contre la corrosion. Si
la couche externe est endommagée par une rayure ou autre, faites réparer la surface concernée
par votre distributeur.
Pour le nettoyage, utilisez exclusivement de l'eau chaude et des détergents domestiques
normaux avec des brosses ou tissus doux. Veillez à ne pas faire entrer d'humidité dans les tubes.
5.3.3 Boitier electronique
L AVERTISSEMENT : Risque de blessure – Actionnez l’arrêt d’urgence avant les travaux
d’entretien pour éviter des déplacements involontaires.
Vous devez nettoyer le boîtier de commande, le boîtier du moteur et la commande manuelle
uniquement avec un chiffon humide imprégné d’un peu de produit de nettoyage ménager que l’on
trouve dans le commerce. N’utilisez pas de produits abrasifs ou d’ustensiles à arêtes vives
(éponge métallique, brosse, etc.), car ceux-ci risquent de griffer la surface de la commande et
d’enlever la protection contre les éclaboussures.
Contrôlez régulièrement que les fiches de raccordement ne soient pas corrodées ou
endommagées, car cela risque de nuire au bon fonctionnement de l’électronique.
Le fabricant décline toute responsabilité pour les dégâts causés par un entretien insuffisant.
ATTENTION

Falcon
2022-11
Maintenance
16
EN
FR
NL
5.4 Désinfection
L AVERTISSEMENT : produits dangereux, l'utilisation de désinfectants est réservée au
personnel autorisé.
Toutes les pièces du lève-personne peuvent être traitées en les frottant avec un désinfectant
commercial. Suivez les instructions figurant sur le désinfectant.
Les instructions de lavage des harnais se trouvent dans le manuel des harnais et sur l'étiquette
de chaque harnais.
5.5 Inspection
En principe, nous recommandons une inspection chaque année, et au minimum une avant la
remise en service. Cette inspection doit être réalisée seulement par des personnes autorisées.
Tous les contrôles suivants doivent être réalisés et documentés par des personnes autorisées :
• Vérifiez l'état des câbles (pincement, usure, coupures, fils dénudés, parties métalliques
apparentes, nœuds ouverts, renflements, décolorations de la gaine, zones cassantes) ainsi
que leur disposition afin de limiter les risques d'altération d'ordre mécanique (coupure ou
écrasement).
• Vérifiez le cadre et en particulier les éventuels signes de déformation, d'usure et/ou de
déchirures des éléments en plastique (cadre, suspension du moteur, potence, étrier
d'expansion).
• Contrôle visuel des dégâts à la peinture (risque de corrosion).
• Vérifiez l'état de tous les boîtiers dont les vis doivent être parfaitement serrées.
• Vérification de la lubrification des joints métalliques des pièces mobiles.
• Contrôlez visuellement l'absence de fissures et de points de rupture sur toutes les pièces en
plastique.
• Vérifiez le courant de décharge résiduelle (A) du boîtier de commande (chargeur compris) basé
sur la norme VDE 0702.
• Vérifiez la résistance d'isolement (MO) du boîtier de commande (chargeur compris) basé sur
la norme VDE 0702.
• Contrôle du fonctionnement de la potence (lubrification des articulations, plage de réglage,
déformation, usure par sollicitation).
• Vérifiez le fonctionnement des dispositifs de levage (en effectuant des tests de vérification →
du bruit, de la vitesse, de la course, etc.), ainsi que, si nécessaire : mesurez les performances,
d'abord sans charge puis avec la charge nominale ("SWL"), afin de détecter tout signe d'usure
du moteur en comparant les valeurs de courant électrique obtenues avec les valeurs de
référence lors de la livraison.
• Contrôle de fonctionnement de l'arrêt d'urgence.
• Contrôle de fonctionnement de l'abaissement d'urgence.
• Fourniture de l'ensemble des pièces, manuel d'instructions disponible?
Les mesures de contrôle ne peuvent être effectuées que par des personnes qui ont au moins
suivi une formation sur le produit et auxquelles des électriciens qualifiés ont dispensé une
formation sur les outils et procédures de contrôle à mettre en œuvre. L’autorisation d’utiliser le
lève-personne après des mesures de contrôle ou un entretien ne peut être délivrée que par un
électricien qualifié.
L'entretien ne doit être validé dans le plan de maintenance que si au minimum tous les éléments
indiqués ci-dessus ont été contrôlés.
5.6 Durée de vie attendue
La durée de vie moyenne du lève-personne est de 8 ans. Selon la fréquence d'utilisation, le
stockage, la maintenance, l’entretien et le nettoyage, la durée de vie de votre lève-personne
augmentera ou diminuera.

Falcon
2022-11
Maintenance
17
EN
FR
NL
5.7 Réutilisation
Avant chaque réutilisation par une autre personne, faites désinfecter, inspecter et entretenir le
lève-personne conformément aux instructions de ce chapitre.
5.8 Mise au rebut
À la fin de sa durée de vie, votre lève-personne doit être éliminé conformément à la législation
environnementale locale. Il est recommandé de démonter le lève-personne afin de faciliter le
transport des matériaux recyclables.

Falcon
2022-11
Résolution des problèmes
18
EN
FR
NL
6 Résolution des problèmes
Tableau 1 : Résolution des problèmes
Problème
Cause du problème
Solution du problème
Bruit au niveau de pièces
mobiles (exemple :
potence).
Lubrification insuffisante.
Lubrifiez les pièces mobiles
(ne lubrifiez pas l'actionneur !)
L'actionneur produit un son
inhabituel.
L'actionneur est endommagé.
Remplacez l'actionneur ou contactez
votre revendeur spécialisé.
Le lève-personne ne
soulève plus.
1. L'actionneur électrique
est endommagé.
2. Le patient est trop lourd
(Le DEL de surcharge sur
la commande manuelle
s'allume).
3. La commande manuelle
ou l'actionneur n'est pas
connecté.
4. La batterie n'est pas
connectée ou elle est mal
connectée au boîtier de
commande.
5. La batterie est
déchargée.
6. Le bouton d'arrêt
d'urgence est activé.
1. Remplacez l'actionneur.
2. Utilisez un lève-personne adapté
au poids du patient.
3. Vérifiez les connexions.
Connectez si nécessaire la
commande manuelle ou
l'actionneur.
4. Vérifiez que la batterie soit
installée et connectée.
5. Rechargez ou remplacez la
batterie.
6. Désactivez le bouton d'arrêt
d'urgence.
Le dispositif d'abaissement
manuel en cas d'urgence ne
fonctionne pas.
L'abaissement d'urgence n'est
possible qu'en présence d'un
poids minimal.
Si le patient est trop léger, tirez
légèrement sur le bras de levage ou
réglez la vitesse d'abaissement.
La batterie ne parvient pas à
se recharger.
1. La batterie est mal
installée dans le boîtier
de commande.
2. Câble d'alimentation
défectueux.
3. Batterie défectueuse.
4. Chargeur intégré du
boîtier de commande ou
chargeur de la batterie
défectueux.
1. Vérifiez la connexion de la
batterie au boîtier de
commande.
2. Remplacez le cordon
d'alimentation.
3. Remplacez la batterie.
4. Remplacez par un nouveau, le
chargeur intégré du boîtier de
commande ou le chargeur de
la batterie.

Falcon
2022-11
Spécifications techniques
19
EN
FR
NL
7 Spécifications techniques
Avant direction
700
Forward direction

Falcon
2022-11
Spécifications techniques
20
EN
FR
NL
Tableau 1 : Spécifications techniques
Marque
Vermeiren
Type
Lève-personne
Modèle
Falcon
Description
Cote sur le
schéma
Dimensions
Position la plus profonde du PAC*
l
509 mm
Hauteur maximale du PAC*
k
1609 mm
Plage de levage (portée en hauteur)
m
1100 mm
Côté
1042 mm
Longueur totale
1158 mm
Écart minimal du bras
r
506 mm
Écart maximal du bras
q
970 mm
Hauteur du bras / hauteur de châssis
n
149 mm
112,5 mm
Largeur totale (fermé), cote extérieure
565 mm
Largeur totale (ouvert), roues avant
p
1026 mm
Longueur plié
1236 mm
Hauteur plié
294 mm
Largeur plié
565 mm
Distance minimale entre paroi et PAC* (portée
maximale)
w3
36 mm
Distance minimale entre paroi et PAC* (hauteur
minimale)
w2
263,5 mm
Distance minimale entre paroi et PAC* (hauteur
maximale)
w1
65 mm
Rayon de braquage
1188 mm
Poids total
35 kg
Poids du châssis
16,5 kg
Poids du boîtier de commande + batterie
3 kg
Poids du cadre supérieur (bras cantilever / barre
d'écartement + moteur + boîtier de commande)
18,5 kg
Charge maximale
130 kg
Garde au sol
15,5 mm
Portée maximale à 600 mm
a
557 mm
Portée maximale à partir du pied
b
557 mm
Portée à partir du pied avec écart de 700 mm
c
323 mm
Sortie de tension
24V max. 250 VA
Température de fonctionnement
+5° à +40°C
Humidité de l'air
20 à 80 % à 30°C – sans condensation
Niveau acoustique
< 54 dB (A)
Boîtier de commande
TiMOTION TC20
Batterie
Ne s'applique pas

Falcon
2022-11
Spécifications techniques
21
EN
FR
NL
Marque
Vermeiren
Type
Lève-personne
Modèle
Falcon
Description
Cote sur le
schéma
Dimensions
Commande manuelle
TiMOTION TH10
Moteur
TiMOTION TA23
Classe de protection du boîtier de commande
IP54
Classe de protection de la batterie
Ne s'applique pas
Classe de protection de la commande manuelle
IP54
Classe de protection du moteur
IP54
Classe d'isolation
II - Type B
Utilisation périodique
Max. 10%, ou 2 minutes d’utilisation pour 18
minutes de pause
Capacité des batteries
2.9 Ah
Arrêt d'urgence
Oui
Abaissement manuel d'urgence
Oui
Abaissement manuel électrique
Non
Nous nous réservons le droit d'apporter des modifications. Tolérance de mesure +/- 15 mm / 1,5kg / 1,5°
1 = Position la plus haute, 2 = Portée maximale, 3 = Position la plus basse
* PAC = Point d’ancrage central


Falcon
2022-11
Inhoudsopgave
1
NL
Inhoudsopgave
Inhoudsopgave .......................................................................................................... 1
Voorwoord .................................................................................................................. 2
1 Uw product .................................................................................................... 3
2 Voor gebruik .................................................................................................. 4
2.1 Beoogd gebruik ............................................................................................. 4
2.2 Algemene veiligheidsmaatregelen ................................................................ 4
3 De patiëntenlift gebruiken ............................................................................ 5
3.1 Bediening van de lift ...................................................................................... 5
3.2 Tilbanden ...................................................................................................... 7
3.3 Batterij en laden ............................................................................................ 9
3.4 Noodgeval ................................................................................................... 10
4 Montage en afstelling ................................................................................. 11
4.1 Levering ...................................................................................................... 11
4.2 Montage of demontage ............................................................................... 11
5 Onderhoud .................................................................................................. 13
5.1 Tijdstippen voor onderhoud ......................................................................... 13
5.2 Verpakking en opslag .................................................................................. 14
5.3 Schoonmaak ............................................................................................... 14
5.4 Desinfecteren .............................................................................................. 15
5.5 Inspectie ...................................................................................................... 15
5.6 Verwachte levensduur ................................................................................. 15
5.7 Hergebruik .................................................................................................. 16
5.8 Beëindiging van gebruik .............................................................................. 16
6 Probleemoplossing ..................................................................................... 17
7 Technische specificaties ............................................................................ 18

Falcon
2022-10
Voorwoord
2
NL
Voorwoord
Proficiat! U bent eigenaar van een Vermeiren-patiëntenlift!
Dit product werd vervaardigd door gekwalificeerd en toegewijd personeel. Het werd ontworpen
en geproduceerd volgens hoge kwaliteitsnormen, bewaakt door Vermeiren.
Bedankt voor uw vertrouwen in de producten van Vermeiren. Om u te ondersteunen bij het
gebruik van deze patiëntenlift en zijn bedieningsmogelijkheden, bieden we u deze handleiding
aan. Lees deze informatie zorgvuldig door: het zal u helpen om vertrouwd te raken met de
besturing, mogelijkheden en beperkingen van uw patiëntenlift.
Indien u na het lezen van deze handleiding nog vragen heeft, aarzel dan niet om contact op te
nemen met uw vakhandelaar. Hij/Zij zal u met plezier verder helpen.
Belangrijke opmerking
Om uw veiligheid te garanderen, en om de levensduur van uw product te verlengen, raden we u
aan om er goed zorg voor te dragen en om regelmatig nazicht en onderhoud te laten uitvoeren.
Deze handleiding houdt rekening met de recentste productontwikkelingen. De Firma Vermeiren
behoudt zich het recht voor om wijzigingen aan dit type product door te voeren zonder verplicht
te zijn om voordien geleverde producten aan te passen of te vervangen.
Afbeeldingen van het product worden gebruikt om de instructies in deze handleiding te
verduidelijken. Details van het afgebeelde product kunnen afwijken van uw aangekochte product.
Beschikbare informatie
Op onze website http://www.vermeiren.com/ kan u steeds de meest recente versie terugvinden
van de informatie in deze handleiding. Contacteer deze website regelmatig voor mogelijke
updates.
Mensen met een visuele beperking kunnen de elektronische versie van deze handleiding
downloaden en laten voorlezen door een tekst-naar-spraak programma.
Deze gebruiksaanwijzing
Voor de gebruiker en vakhandelaar
Onderhoudshandleiding
Voor de vakhandelaar
EC-conformiteitsverklaring

Falcon
2022-11
Uw product
3
NL
1 Uw product
1. Hefarm
2. Tiljuk
3. Motor
4. Onderstel
5. Wiel
6. Controle box
7. Duwbeugel
8. Handbediening
9. Noodstopknop
10. Mast
11. Pedaal voor spreiding
onderstel
12. Zwenkwiel met rem
1
2
9
10
8
7
4
6
5
11
3
12

Falcon
2022-10
Voor gebruik
4
NL
2 Voor gebruik
2.1 Beoogd gebruik
In dit hoofdstuk wordt kort beschreven wat het beoogde gebruik van uw patiëntenlift inhoudt.
Bijkomende relevante waarschuwingen worden gegeven bij de instructies in andere
hoofdstukken. Op deze manier proberen we u te waarschuwen voor mogelijk verkeerd gebruik.
• Indicaties en contra-indicaties: Deze patiëntenlift is bedoeld om te worden bediend door een
verzorger om zittende patiënten te verplaatsen tussen bijv. rolstoelen, verpleegbedden en
badkamers. De tillift is ontworpen en geproduceerd als transport- en transfermiddel voor
bejaarden of personen die lijden aan verlamming, verlies of beschadiging van ledematen, stijve
of beschadigde gewrichten, cardiovasculaire problemen, cachexie, … .
• Deze patiëntenlift is geschikt voor binnengebruik.
• Deze patiëntenlift is uitsluitend ontworpen voor het vervoer/transfer van één (1) persoon met
een maximumgewicht zoals gespecifieerd in §7. Het is niet bedoeld om goederen of objecten
te vervoeren, noch voor enig ander gebruik dan hiervoor beschreven.
• Gebruik enkel accessoires en reserveonderdelen die werden goedgekeurd door Vermeiren.
• Lees eerst alle technische details en limieten van uw patiëntenlift in hoofdstuk 7.
• De garantie op dit product is gebaseerd op normaal gebruik en onderhoud zoals beschreven
in deze handleiding. De garantie vervalt bij schade die werd veroorzaakt door verkeerd gebruik
of gebrek aan onderhoud.
2.2 Algemene veiligheidsmaatregelen
Gevaar voor letsel en/of beschadiging
Lees de instructies in deze handleiding en volg ze nauwkeurig op. Zo niet, kan dit leiden tot
lichamelijk letsel of beschadiging aan uw patiëntenlift.
Houd rekening met de volgende algemene waarschuwingen tijdens het gebruik:
• De patiëntenlift mag alleen worden gebruikt en bediend door geautoriseerde personen die zijn
opgeleid voor het gebruik van de lift.
• Overschrijd de maximaal toegestane belasting van de patiëntenlift niet, hierdoor wordt de
besturingskast uitgeschakeld.
• Indien de patiëntenlift en tilbanden verschillende gebruikersgewichten hebben, houd dan altijd
het laagste gebruikersgewicht aan.
• Tijdens het tillen dient altijd een begeleider aanwezig te zijn.
• Houd er rekening mee dat sommige onderdelen van uw rolstoel zeer warm of koud kunnen
worden door omgevingstemperatuur, de zon of verwarmingstoestellen. Wees daarom
voorzichtig bij het aanraken.
• Uw rolstoel werd getest op elektromagnetische compatibiliteit en voldoet aan de standaard.
Toch kunnen elektromagnetische velden de prestatie van uw patiëntenlift beïnvloeden,
bijvoorbeeld bij gsm's, stroomgeneratoren of energiebronnen met hoog vermogen. De
elektronica van uw rolstoel kan echter ook andere elektrische apparaten beïnvloeden.
• Gebruik de patiëntenlift enkel op vlakke oppervlakken waarbij alle zwenkwielen de grond
raken, en waarbij voldoende contact met de grond mogelijk is voor veilig gebruik van de
patiëntenlift. Neem geen obstakels met de lift tijdens de transfer van een patiënt.
• Er mogen geen aanpassingen of veranderingen gemaakt worden aan de beveiligingspunten
of structurele onderdelen van de patiëntenlift zonder de producent te contacteren.
• Houd tijdens gebruik uw vingers, gespen, kledij en juwelen uit de buurt van de wielen of
bewegende onderdelen.
• Let op met brandende voorwerpen, zoals sigaretten. De tilbanden kunnen vlam vatten.
Indien zich een ernstig incident heeft voorgedaan met uw product, breng dan Vermeiren of uw
gespecialiseerde dealer op de hoogte, evenals de bevoegde autoriteit in uw land.
VOORZICHTIG

Falcon
2022-11
De patiëntenlift gebruiken
5
NL
3 De patiëntenlift gebruiken
3.1 Bediening van de lift
Gevaar voor letsel en/of beschadiging
• Let erop dat bij gebruik van de lift voldoende ruimte naast en boven de lift is, anders kan de
beweging van de verstelfuncties schade of letsel veroorzaken.
• Let altijd op de hijsarm om letsel te voorkomen.
• Er mogen alleen tilbanden worden gebruikt die vrijgegeven en geschikt zijn voor patiëntenliften
(zie handleiding van desbetreffende tilbanden). Het gebruik van andere tilbanden gebeurt op
eigen risico.
• Gebruik enkel de duwbeugels om de patiëntenlift te verplaatsen, geen andere componenten.
Neem de technische gegevens in acht waaronder de patiëntenlift mag worden gebruikt. De
patiëntenlift mag alleen worden bediend door geautoriseerde personen die zijn opgeleid voor het
gebruik van de lift.
3.1.1 Spreiding onderstel
Om met de lift een rolstoel of andere zitmogelijkheden
te omsluiten, maar ook om de stabiliteit van de lift te
verhogen, kunt u de afstand tussen de onderstelpoten
vergroten.
Ga achter de gemonteerde lift staan en houd de
duwbeugels van de patiëntenlift vast (aan de linker- en
rechterkant, naast de controlebox). Druk met een voet
het pedaal van het onderstel (links of rechts) zachtjes
naar beneden; de afstand tussen de onderstelpoten
wordt hiermee groter of kleiner.
3.1.2 Parkeerremmen
Vergrendel de twee wielen aan de achterzijde van het
onderstel door met de voet het rempedaal van de wielen
zachtjes omlaag te drukken tot de wielen blokkeren. Om
de rem los te maken drukt u met de voet het rempedaal
weer zachtjes naar boven totdat de wielen worden
vrijgegeven.
3.1.3 Hefarm omhoog brengen / neerlaten
Via de handbediening kan de hefarm traploos worden versteld.
= Hefarm omhoog brengen
= Hefarm neerlaten
Bij het gebruik van de liftfunctie tot aan het uiteinde van de liftmotor wordt de
limietschakelaar via elektronica geactiveerd (beveiligingsfunctie). Benut de
liftfunctie alleen in het midden van het verstelbereik.
VOORZICHTIG
1
2
1
2

Falcon
2022-10
De patiëntenlift gebruiken
6
NL
3.1.4 Neerlaatknop
Mocht de handbediening beschadigd zijn, dan kan de hefarm vanuit de
controle box worden neergelaten.
De hefarm beweegt naar beneden zolang op de knop (3) van het
bedieningspaneel op de controle box wordt gedrukt.
3.1.5 Verplaatsen van de patiëntenlift
Gevaar voor letsel
• Wees voorzichtig wanneer u langs beperkte
doorgangen gaat (bijv. deuren).
1. Ga achter de patiëntenlift staan en grijp de
duwbeugels (links en rechts, naast de controle
box) met beide handen vast.
2. Controleer of beide remmen van de achterste
wielen los zijn.
3. Schuif de patiëntenlift langzaam in de gewenste
stand.
In onbelaste toestand kunt u de patiëntenlift het beste
achterwaarts rijden zodat hindernissen (bijvoorbeeld
deurkozijnen, kamerhoeken of meubilair) gemakkelijker
kunnen worden omzeild.
3.1.6 De patiëntenlift rond zijn as draaien
Gevaar voor letsel
• Zorg ervoor dat er zich geen personen of
voorwerpen binnen het draaibereik van de
patiëntenlift bevinden.
• Draai de patiëntenlift voorzichtig en traag rond zijn
as zodat de patiënt niet naar buiten geslingerd kan
worden.
1. Open de benen van de patiëntenlift om meer
stabiliteit te geven.
2. Activeer de remmen.
3. Plaats de patiënt in de patiëntenlift met de
geschikte tilband (verwijs naar de handleiding van
de tilbanden voor de instructies hoe de patiënt in
de patiëntenlift te plaatsen).
4. Hef de patiënt van de grond, stoel, bed, ....
5. Maak beide remmen van de achterwielen los.
6. Ga achter de patiëntenlift staan en grijp de duwbeugels (links en rechts, naast de
controlebox) met beide handen vast.
7. Draai nu de patiëntenlift voorzichtig, traag rond op dezelfde plaats. Zorg ervoor dat u geen
voorwerpen raakt met de benen van de patiëntenlift.
8. Wanneer u in de goede positie bent rondgedraaid, kan u de patiënt terug neerlaten.
VOORZICHTIG
VOORZICHTIG
3

Falcon
2022-11
De patiëntenlift gebruiken
7
NL
3.2 Tilbanden
Gevaar voor letsel
• Gebruik alleen geschikte tilbanden voor de patiënten.
• Gebruik geen beschadigde tilbanden.
• Lees eerst de volledige handleiding van de tilbanden.
• Gebruik enkel tilbanden die door Vermeiren zijn goedgekeurd.
De patiëntenlift mag alleen worden gebruikt met tilbanden die zijn ontworpen voor de Vermeiren
Falcon patiëntenlift (voor een 4-punts tiljuk).
De toepasbaarheid en gebruiksinstructies voor de specifieke tilbanden moeten worden
opgevolgd, zie de aparte handleiding.
3.2.1 Bevestiging aan het tiljuk van de patiëntenlift
De bevestiging van de tilband gebeurt via de bevestigingsriemen. Deze bevestigingsriemen
worden aan het tiljuk van de patiëntenlift opgehangen.
De bevestigingsriemen van de tilband zijn voorzien van 4 lussen in verschillende kleuren.
Bevestigingsriem tilband
Tiljuk van de patiëntenlift
Via de lussen is het mogelijk om de patiënt in verschillende posities te tillen.
Deze posities zijn afhankelijk van de lengte en gewicht van de persoon.
VOORZICHTIG
Haken voor
bevestigingsriem
Zwart
Geel
Rood
Groen

Falcon
2022-10
De patiëntenlift gebruiken
8
NL
Schouders
Benen
Hoofd
(enkel bij comfort
tilband)
Groen
Groen
Groen
Rood
Rood
Rood
Geel
Geel
Geel
Zwart
Zwart
Zwart
De beensteunen kunnen op verschillende manieren bevestigd worden aan de patiëntenlift.
• Gekruiste beensteunen
Dit is de meest gebruikte manier voor het aanbrengen van de tilband. Het aanbrengen van
de tilband met gekruiste beensteunen kan met onderstaande instructies:
1. Steek de bevestingsriem van één beensteun door de lus van de andere beensteun.
2. Hang de bevestingsriemen van de beensteunen vast aan het tiljuk van de
patiëntenlift.
• Kruiselings onder beide dijen
L VOORZICHTIG: Kans op vallen- Bij een patiënt met geamputeerde benen
verhoogt de kans op vallen doordat de patiënt gemakkelijker zijn evenwicht verliest.
Deze manier kan gebruikt worden bij het tillen van een patiënt met geamputeerde benen.
Het aanbrengen van de tilband met kruiselings onder beide dijen kan met onderstaande
instructies:
1. Maak met de bevestingsriemen van de beensteunen een kruis onder de dijen.
2. Hang de bevestingsriemen van de beensteunen vast aan het tiljuk van de
patiëntenlift.

Falcon
2022-11
De patiëntenlift gebruiken
9
NL
• Elke beensteun afzonderlijk bevestigd aan het tiljuk
L VOORZICHTIG: Kans op vallen- Deze manier verhoogt de kans om uit de
tilband te glijden.
Bij patiënten met een gevoelige schaamstreek kan elke beensteun afzonderlijk bevestigd
worden aan het tiljuk. Het aanbrengen van de tilband via deze methode kan met
onderstaande instructies:
1. Doe de beensteunen rond elk been afzonderlijk, maar niet kruiselings.
2. Hang de bevestingsriemen van de beensteunen vast aan het tiljuk van de
patiëntenlift.
3.2.2 Positie van het tiljuk
Het tiljuk moet altijd haaks staan op het lichaam van de patiënt. De goede manier is aangeduid
in de linkse figuur. De rechtse figuur is zoals het niet hoort.
3.3 Batterij en laden
3.3.1 Batterijlader
Primaire spanning
100 - 240V AC / 50/60 Hz
Beveiligingen
Beschermd tegen ompoling, overspanning en te hoge temperatuur
Omgevingstemperatuur
0°C tot +40°C
Lengte aansluitsnoer
2,0 m
Omgevingstemperatuur bij opslag
-15° tot +50°C
Relatieve luchtvochtigheid bij opslag
max. 95% (niet condenseren)
Conformiteit
getest volgens IEC 60601-1
3.3.2 De batterijen opladen
Gebruik de controle box met de interne batterijlader.
We raden u aan om de batterijen regelmatig opnieuw op te laden om ervoor te zorgen dat de lift
bruikbaar blijft en om de levensduur van de batterijen te verlengen. De controlebox geeft een
waarschuwingssignaal om u te laten weten dat de batterij bijna leeg is.
Inbedrijfstelling
Steek eerst de stroomkabel met de plug in de juiste aansluiting van de controlebox. De stekker
van de voedingskabel moet in het stopcontact worden gestoken.
Opnieuw opladen
L WAARSCHUWING: Risico op letsel – Gebruik de lift niet als de stroomkabel in het
stopcontact zit.
Wanneer de batterij bijna leeg is, brandt alleen de linker LED groen. Zodra het batterijniveau zeer
laag wordt, zal de LED rood oplichten en is er om de 2 seconden een piepend geluid te horen.

Falcon
2022-10
De patiëntenlift gebruiken
10
NL
De batterij is volledig opgeladen zodra alle LED’s volledig groen zijn.
Nadat het oplaadproces is voltooid, moet u altijd eerst de stekker uit het stopcontact halen en dan
de plug uit de controle box.
Gebruik de lift niet terwijl deze wordt opgeladen!
Als de batterijen voor een lange periode niet worden gebruikt, ontladen ze langzaam zichzelf
(volledige ontlading). Zo wordt het onmogelijk om ze opnieuw op te laden. U moet de batterijen
daarom minstens 1 keer per maand opnieuw opladen, ook al worden ze niet gebruikt.
3.4 Noodgeval
In noodgevallen moeten de noodstopknop en de functie voor het omlaag brengen van de patiënt
worden gebruikt.
3.4.1 Noodstopknop
In noodgevallen, en tijdens montage en demontage, wordt de
noodrem geactiveerd door op de rode knop op de controle box te
drukken.
Druk op de knop en draai in de richting van de pijlen. Als de knop
volledig naar achteren is gedrukt, draai dan terug in de
tegenovergestelde richting van de pijlen.
De noodstopknop wordt uitgeschakeld door de rode knop in de
richting van de pijltjes te draaien.
3.4.2 Neerlaten in noodsituaties
L WAARSCHUWING: Risico op letsel - Stel het handmatig verlagen
bij noodgevallen af op het gewicht.
Het omlaag brengen bij noodgevallen kan, als de stroom uitvalt of de
batterijen leeg zijn, worden uitgevoerd met behulp van de rode knop aan
het bovenste uiteinde van de motor.
Let op dat de handmatige functie voor omlaag brengen bij noodgevallen
alleen mogelijk is als de patiënt in de patiëntenlift zit.

Falcon
2022-11
Montage en afstelling
11
NL
4 Montage en afstelling
De patiëntenlift wordt door de vakhandelaar volledig gemonteerd afgeleverd.
De in dit hoofdstuk beschreven instructies zijn bestemd voor de vakhandelaar.
Om een servicepunt of vakhandelaar in uw buurt te vinden, neemt u contact op met de
dichtstbijzijnde Vermeiren faciliteit.
L WAARSCHUWING: Risico bij onveilige instellingen - Gebruik enkel de instellingen
beschreven in deze handleiding.
4.1 Levering
De Vermeiren Falcon-patiëntenlift wordt geleverd met:
• Onderstel inclusief 4 zwenkwielen (2 met remmen)
• Mast, inclusief duwbeugel
• Hefarm en tiljuk
• Controle box (incl. 2 x accubatterij en handbediening) en verstelmotor
• Batterijlader
• Motor
• Handleiding
Controleer vóór gebruik of alles is meegeleverd en er geen producten zijn beschadigd (tijdens het
transport bijvoorbeeld...).
Denk eraan dat de basis configuratie kan variëren in de verschillende Europese landen. Neem
voor meer informatie contact op met de vakhandelaar in uw land.
4.2 Montage of demontage
4.2.1 Uitpakken
L WAARSCHUWING: Risico op letsel - Na het uitpakken voordat u verder monteert,
controleert u altijd eerst of de noodstopknop (de rode drukknop op de controlebox) is
ingedrukt.
De verpakking van de patiëntenlift is zo gekozen dat optimale bescherming tijdens transport is
gegarandeerd.
1. Haal alle onderdelen van de patiëntenlift uit de verpakking
en controleer of de levering compleet is en of afzonderlijke
delen zichtbare schade vertonen. Bij beschadigingen neemt
u contact op met de vakhandelaar.
2. Vergrendel voor de montage de lift tegen ongewenste
bewegingen door alle remwielen vast te zetten. Druk met de
voet de remplaat van de wielen zachtjes omlaag totdat het
wiel blokkeert. Om de rem los te maken drukt u met de voet
de remplaat weer zachtjes naar boven totdat het wiel wordt
vrijgegeven.

Falcon
2022-10
Montage en afstelling
12
NL
4.2.2 Montage
L WAARSCHUWING: Risico op klemmen - Let erop dat er geen
lichaamsdelen of bedrading vast komen te zitten, of worden
platgedrukt tijdens de montage.
1. Plaats de verticale mast in het onderste frame en draai de hendel goed
vast.
2. Plaats de motor in zijn bevestigingen op de verticale mast en de hefarm
(4) en zet deze vast met de pennen.
3. Voor het eerste gebruik: Monteer de controle box aan de verticale mast
door de twee bouten aan te draaien.
4.2.3 Demontage
L WAARSCHUWING: Risico op klemmen - Let erop dat er geen
lichaamsdelen of bedrading vast komen te zitten, of worden
platgedrukt tijdens de demontage.
L WAARSCHUWING: Risico op letsel - Controleer of de noodstopknop
(rode drukknop op de controlebox) is ingeschakeld, om onbedoelde
bewegingen tijdens het afstellen te voorkomen.
1. Vergrendel de twee wielen aan de achterzijde van het onderstel door met
de voet de rempedaal van de wielen zachtjes omlaag te drukken tot de
wielen blokkeren. Om de rem los te maken drukt u met de voet de
rempedaal weer zachtjes naar boven totdat de wielen worden
vrijgegeven.
2. Maak de motor los van de hefarm en de verticale mast door de pennen
(4) te verwijderen.
3. Verwijder de hendel en neem de verticale paal uit het onderste frame.
4
3
4
3

Falcon
2022-11
Onderhoud
13
NL
5 Onderhoud
5.1 Tijdstippen voor onderhoud
Gevaar voor letsel of beschadiging
Reparaties en vervangingen mogen enkel uitgevoerd worden door opgeleid personeel, en enkel
originele onderdelen van Vermeiren mogen hierbij gebruikt worden.
De laatste pagina van deze handleiding bevat een registratieformulier, bedoeld voor de
vakhandelaar om ieder onderhoud te registeren.
De onderhoudsfrequentie hangt af van de frequentie en intensiteit van gebruik. Neem contact op
met uw vakhandelaar om een tijdschema vast te leggen voor nazicht/onderhoud/reparatie.
Voor de onderhoudshandleiding kan u onze website raadplegen: www.vermeiren.com.
Voor ieder gebruik
Kijk de volgende punten na:
• Alle onderdelen: aanwezig en niet beschadigd of versleten.
• Alle onderdelen: schoon, zie §5.3.
• Staat van de frameonderdelen: geen vervorming, instabiliteit, zwakte of losse verbindingen.
• Remmen: geen zichtbare schade en/of vuil.
• Controlebox, manuele bediening, batterijlader, relevante kabels: geen schade zoals
gerafelde, gebroken of blootliggende draden. Controleer of de elektrische verstelling van de
hefarm goed werkt met behulp van de bediening.
• Batterijstatus: laad de batterij op indien nodig, zie §3.3.
Ongeveer om de 8 weken
Afhankelijk van de regelmaat waarmee u het product gebruikt, dient u de volgende punten te
controleren:
• Smering van de scharnierverbindingen van de hefarm
• Toestand van de wielen
• Is er zichtbare schade aan de behuizing van de besturingskast, batterij, batterijlader (indien
beschikbaar) en de handbediening?
• Toestand van de kabels veilig voor transport?
• De batterij opnieuw opladen
Ongeveer elke 6 maanden of voor elke nieuwe gebruiker
Afhankelijk van de regelmaat waarmee u het product gebruikt, dient u de volgende punten te
controleren:
• Netheid
• Algemene toestand
• Werking van de batterijlader
• Werking van de wielen
Bij een te grote rolweerstand dienen de lagers van de wielen te worden gereinigd. Wanneer dit
niet volstaat, neemt u contact op met de vakhandelaar.
Jaarlijks of vaker
Laat uw patiëntenlift nakijken en onderhouden door uw vakhandelaar, ten minste één keer per
jaar of vaker. De minimale onderhoudsfrequentie is afhankelijk van het gebruik en moet daarom
besproken worden met uw vakhandelaar.
VOORZICHTIG

Falcon
2022-10
Onderhoud
14
NL
5.2 Verpakking en opslag
Om de patiëntenlift te verpakken of te bewaren dienen volgende instructies te worden gevolgd:
• Transport en opslag van de patiëntenlift moet gebeuren volgens de specificaties in §7.
Bewaar de patiëntenlift droog.
• Controleer kabels op knellen en plooien.
• Trek het stroomsnoer van de patiëntenlift uit het stopcontact.
• Beschermen door voldoende afdekking of verpakking tegen roest en binnendringen van
vreemde voorwerpen (bijv. zout water, zeelucht, zand, stof).
• Alle gedemonteerde onderdelen duidelijk opslaan (eventueel labelen), opdat bij het
monteren achteraf geen verwarring met andere producten mogelijk is (bv. de lader).
• Zorg dat er geen voorwerpen op of tegen de lift en zijn onderdelen liggen om schade te
voorkomen.
5.3 Schoonmaak
Gevaar voor beschadiging door vocht
• Gebruik nooit een tuinslang of hogedrukreiniger om de rolstoel schoon te maken.
• Bij hardnekkige vlekken kunt u gebruik maken van een gangbaar fijnwasmiddel.
• Vlekken kunt u verwijderen met een sponsje of een zachte borstel.
• Gebruik geen agressieve reinigingsmiddelen zoals oplosmiddelen en gebruik ook geen
harde borstels.
5.3.1 Kunststof onderdelen
Reinig de kunststofonderdelen van uw patiëntenlift met een gangbaar reinigingsmiddel voor
kunststof. Lees de specifieke productinformatie en gebruik alleen een zachte borstel of zachte
spons.
5.3.2 Coatings
Door de hoogwaardige oppervlaktebehandeling is een optimale corrosiebescherming
gegarandeerd. Wanneer de buitenste coating door krassen e.d. is beschadigd, laat u deze door
uw vakhandelaar repareren.
Voor het schoonmaken gebruikt u alleen warm water en algemeen verkrijgbare huishoudelijke
reinigingsmiddelen, evenals zachte borstels en doeken. Let op dat er geen vocht in de buizen
komt.
5.3.3 Elektronicabehuizing
L WAARSCHUWING: Kans op letsel – Voor iedere onderhoudsbeurt moet de
noodstopknop worden bediend omdat anders ongewenste verstelbewegingen kunnen
optreden.
Poets de besturingskast, motorbehuizing en handbediening met een doek die lichtjes is
bevochtigd met een paar druppels allesreiniger. Gebruik geen schuurmiddelen of scherpe
schoonmaakproducten, zoals een metaalspons of -borstel. Deze krassen immers het oppervlak
van de handbediening en tasten de spatwaterbescherming aan.
Controleer regelmatig de aansluitingen op corrosie of beschadiging, omdat daardoor de goede
werking van de elektronica nadelig wordt beïnvloed.
De fabrikant kan niet aansprakelijk worden gesteld voor schade als gevolg van onzorgvuldige
verzorging.
WAARSCHUWING

Falcon
2022-11
Onderhoud
15
NL
5.4 Desinfecteren
L WAARSCHUWING: Gevaarlijke producten - Het gebruik van desinfecteermiddelen is
voorbehouden aan bevoegd vakpersoneel.
Alle onderdelen van de patiëntenlift kunnen worden behandeld met een commercieel
desinfectiemiddel. Volg de instructies op de desinfectant.
Wasinstructies voor tilbanden kan u vinden in de handleiding van de tilbanden en op het label van
iedere tilband.
5.5 Inspectie
In principe adviseren wij een jaarlijkse inspectie en in ieder geval voor ieder nieuw gebruik. Deze
inspectie mag uitsluitend door bevoegde personen worden uitgevoerd. De volgende controles
dienen minstens te worden uitgevoerd en gedocumenteerd door geautoriseerde personen:
• Controleer de bekabeling (met name op platdrukken, slijtage, scheuren, zichtbare onderdelen
van de isolatie van de binnenste bedrading, zichtbare metalen draadkernen, knikken,
bollingen, kleurwijzigingen van de buitenste hoes, broze plekken, en veilige plaatsing zodat
mechanische defecten zoals platgedrukte of afgebroken onderdelen niet waarschijnlijk zijn.
• Visuele inspectie van de frameonderdelen om te controleren op vervorming van de kunststof
onderdelen en/of slijtage (frame, motorophanging, hefarm, verlengsteun).
• Visuele controle op beschadiging van de verf (gevaar op corrosie).
• Visuele inspectie van alle behuizingen op beschadiging; schroeven moeten goed zijn
aangedraaid.
• Controleer de hoeveelheid smering op de metalen verbindingsstukken van de beweegbare
onderdelen.
• Visuele controle van alle kunststof onderdelen op scheuren en breekbare punten.
• Controleer de besturingskast (inclusief oplader) op restontladingsstroom (A) op basis van
VDE 0702.
• Controleer de besturingskast (inclusief oplader) op isolatieweerstand (MO) op basis van
VDE 0702.
• Functionele test van de hefarm (smering van de verbindingsonderdelen, afstelbaarheidsbereik,
vervorming, slijtage).
• Controleer de werking van de motoraandrijvingen (tijdens een testrit → geluid, snelheid,
soepelheid, etc.). Indien nodig: meten van het vermogen, eerst zonder last, daarna met de
nominale last (“SWL”) om zo eventuele slijtage van de motoren te kunnen onderzoeken door
de waarden van de elektrische stroom te vergelijken met de waarden bij levering.
• Functionele test van de noodstopknop.
• Functionele test van de functie voor het omlaag brengen bij noodgevallen.
• Volledige levering, gebruiksaanwijzing aanwezig?
Meetcontroles mogen uitsluitend worden uitgevoerd door personen die minstens voor het product
zijn opgeleid en die minstens door een geschoold elektricien zijn onderwezen over de te
gebruiken controlemiddelen en controleprocedures. Alleen een geschoold elektricien mag de
patiëntenlift na de meetcontroles of het onderhoud vrijgeven voor gebruik.
Laat het onderhoud alleen in het onderhoudsplan opnemen wanneer minstens de hierboven
vermelde aspecten zijn gecontroleerd.
5.6 Verwachte levensduur
De patiëntenlift is ontworpen voor een gemiddelde levensduur van 8 jaar. De levensduur zal
toenemen of afnemen afhankelijk van de gebruiksfrequentie, opslag, onderhoud, nazicht en
schoonmaak.

Falcon
2022-10
Onderhoud
16
NL
5.7 Hergebruik
Voor ieder hergebruik dient de patiëntenlift te worden onderhouden, gedesinfecteerd en
geïnspecteerd volgens de aanwijzingen in dit hoofdstuk.
5.8 Beëindiging van gebruik
Op het einde van de levensduur dient u de patiëntenlift te vernietigen volgens de lokale
milieuwetgeving. De beste manier om dit te doen, is de lift te demonteren om het vervoer van de
recycleerbare onderdelen te vergemakkelijken.

Falcon
2022-11
Probleemoplossing
17
NL
6 Probleemoplossing
Tabel 1: Technische specificaties
Probleem
Oorzaak van probleem
Probleem oplossen
Ongebruikelijk geluid van de
bewegende onderdelen
(bijvoorbeeld: hefarm)
Smering is vereist.
Smeer de bewegende onderdelen.
(Smeer de aandrijving niet!)
Aandrijving maakt
ongebruikelijk geluid.
De aandrijving is beschadigd.
Vervang de aandrijving of neem
contact op met uw vakhandelaar.
De patiëntenlift gaat niet
meer omhoog.
1. De elektrische
aandrijving is
beschadigd.
2. Het gewicht van de
gebruiker is te hoog
(overbelastings-LED op
handbediening brandt).
3. Handbediening of
aandrijving zijn niet
aangesloten.
4. Batterij niet aangesloten
of niet juist aangesloten
op de besturingskast.
5. Batterij is ontladen.
6. Noodstopknop is
ingeschakeld.
1. Vervang de aandrijving.
2. Gebruik een patiëntenlift met een
hoger maximaal
gebruikersgewicht.
3. Controleer de aansluitingen. Sluit
indien nodig de handbediening of
aandrijving aan.
4. Controleer of de batterij of de
aansluiting van de batterij is
geplaatst.
5. Laad de batterijen op of
verwissel ze.
6. Schakel de noodstopknop uit.
Het omlaag brengen van de
patiënt in een noodgeval
werkt niet.
Er is een vereist minimaal
gewicht om de patiënt omlaag
te brengen nodig.
Als het gewicht van de patiënt te laag
is, trekt u zacht aan de hefarm of stelt
u de verlaagsnelheid af.
Batterij kan niet worden
opgeladen
1. Batterijen zijn niet juist op
de besturingskast
bevestigd.
2. Stroomkabel defect.
3. Batterijen zijn defect.
4. Besturingskast met
ingebouwde oplader of
de batterijlader is defect.
1. Controleer of de batterijen op
de besturingskast zijn
aangesloten.
2. Verwissel de stroomkabel.
3. Verwissel de batterij.
4. Verwissel de besturingskast
met ingebouwde oplader of de
batterijlader.

Falcon
2022-10
Technische specificaties
18
NL
7 Technische specificaties
700
Voorwaartse richting

Falcon
2022-11
Technische specificaties
19
NL
Tabel 2: Technische specificaties
Merk
Vermeiren
Type
Patiëntenlift
Model
Falcon
Omschrijving
Afmetingen in
tekening
Afmetingen
Laagste positie COP*
l
509 mm
Maximale hoogte COP*
k
1609 mm
Tilbereik (hoogtebereik)
m
1100 mm
Pootlengte
1042 mm
Totale lengte
1158 mm
Minimale afstand poten
r
506 mm
Maximale afstand poten
q
970 mm
Poothoogte / Chassishoogte
n1
n2
149 mm
112,5 mm
Totale breedte (gesloten), buitenafmeting
565 mm
Totale breedte (geopend), wielen voorwaarts
p
1026 mm
Lengte opgevouwen
1236 mm
Hoogte opgevouwen
294 mm
Breedte opgevouwen
565 mm
Min. Afstand tussen muur / COP* (maximaal
bereik)
w3
36 mm
Min. Afstand tussen muur / COP* (minimum
hoogte)
w2
263,5 mm
Min. Afstand tussen muur / COP* (grootste
hoogte)
w1
65 mm
Draaicirkel
1188 mm
Totaal gewicht
35 kg
Gewicht van chassis
16,5 kg
Gewicht van de controle box + batterij
3 kg
Gewicht bovenframe (hefarm/tiljuk + motor +
controle box)
18,5 kg
Maximale belasting
130 kg
Vrije hoogte, ten minste
15,5 mm
Maximaal bereik bij 600 mm
a
557 mm
Maximaal bereik vanaf drager
b
557 mm
Bereik vanaf drager met afstand van 700 mm
c
323 mm
Spanningsuitgang
24V max. 250 VA
Bedrijfstemperatuur
+5°C tot +40°C
Relatieve luchtvochtigheid
20% tot 80% bij 30°C, niet condenserend
Geluidsdruk
< 54 dB(A)
Controle box
TiMOTION TC20
Batterij
Niet van toepassing

Falcon
2022-10
Technische specificaties
20
NL
Merk
Vermeiren
Type
Patiëntenlift
Model
Falcon
Omschrijving
Afmetingen in
tekening
Afmetingen
Handbediening
TiMOTION TH10
Motor
TiMOTION TA23
Beschermingsklasse controle box
IP54
Batterij beveiligingsklasse
Niet van toepassing
Beschermingsklasse handbediening
IP54
Beschermingsklasse motor
IP54
Isolatieklasse
II - Type B
Periodiek bedrijf
max. 10%, of 2 min. continubedrijf /18 min.
pauze
Batterijcapaciteit
2,9 Ah
Noodstopknop
Ja
Handmatige noodneerlating
Ja
Elektrische noodneerlating
Nee
We behouden ons het recht voor om technische wijzigingen te introduceren.
Meettolerantie, +/- 15 mm / 1,5kg / 1,5°
1 = Hoogste positie, 2 = Maximaal bereik, 3 = Laagste positie
* COP = Centraal ophangingspunt

Falcon
2022-11
Inhalt
1
EN
NL
DE
Inhalt
Inhalt ........................................................................................................................ 1
Vorwort ....................................................................................................................... 2
1 Ihr Produkt ..................................................................................................... 3
2 Vor der Benutzung ........................................................................................ 4
2.1 Bestimmungsgemäße Verwendung .............................................................. 4
2.2 Allgemeine Sicherheitshinweise .................................................................... 4
3 Benutzung des Patientenlifters ................................................................... 6
3.1 Bedienung des lifters ..................................................................................... 6
3.2 Sitzsystem ..................................................................................................... 8
3.3 Batterie und Aufladen .................................................................................. 10
3.4 Notfall .......................................................................................................... 11
4 Zusammenbau und Einstellung ................................................................. 12
4.1 Lieferumfang ............................................................................................... 12
4.2 Montage und Demontage ............................................................................ 12
5 Wartung ....................................................................................................... 14
5.1 Wartungstermine ......................................................................................... 14
5.2 Verpackung und Lagerung .......................................................................... 14
5.3 Reinigung .................................................................................................... 15
5.4 Desinfektion ................................................................................................ 16
5.5 Inspektion .................................................................................................... 16
5.6 Voraussichtliche Nutzungsdauer ................................................................. 16
5.7 Wiedereinsatz ............................................................................................. 17
5.8 Nutzungsende ............................................................................................. 17
6 Störungsbeseitigung .................................................................................. 18
7 Technische Daten ....................................................................................... 19

Falcon
2022-11
Vorwort
2
EN
NL
DE
Vorwort
Herzlichen Glückwunsch! Sie sind nun Besitzer eines Vermeiren-Patientenlifters!
Dieses Produkt wurde von versierten und engagierten Mitarbeitern gefertigt. Dieses Produkt
entspricht hinsichtlich Konstruktion und Fertigung den hohen Qualitätsstandards von Vermeiren.
Vielen Dank für Ihr Vertrauen in Produkte von Vermeiren. Dieses Handbuch soll Ihnen bei der
Benutzung dieses Patientenlifters und seiner Bedienmöglichkeiten helfen. Lesen Sie es daher
bitte aufmerksam durch, um sich mit der Bedienung, den Fähigkeiten und Beschränkungen Ihres
Produkts vertraut zu machen.
Sollten Sie nach der Lektüre dieses Handbuchs noch Fragen haben, können Sie sich jederzeit
an Ihren Fachhändler wenden. Er wird Ihnen gerne in dieser Angelegenheit weiterhelfen.
Wichtiger Hinweis
Um Ihre Sicherheit zu gewährleisten und die Nutzungsdauer Ihres Produkts zu verlängern, sollten
Sie es gut behandeln und regelmäßig überprüfen und/oder warten lassen.
Dieses Handbuch enthält die neuesten Produktentwicklungen. Vermeiren behält sich das Recht
vor, Veränderungen an dieser Art von Produkt vorzunehmen, ohne eine Verpflichtung
einzugehen, ähnliche bereits ausgelieferte Produkte anzupassen oder auszutauschen.
Abbildungen des Produkts dienen zur Verdeutlichung der Anweisungen in diesem Handbuch.
Das gezeigte Produkt kann in Details von Ihrem Produkt abweichen.
Verfügbare Informationen
Auf unserer Webseite http://www.vermeiren.com/ finden Sie stets die aktuellste Version der in
diesem Handbuch beschriebenen Informationen. Informieren Sie sich bitte regelmäßig auf dieser
Website nach eventuell verfügbaren Aktualisierungen.
Sehbehinderte Menschen können sich die elektronische Version dieses Handbuchs
herunterladen und mit Hilfe einer Sprachsyntheselösung („Text-to-Speech-Software“) vorlesen
lassen.
Dieses Benutzerhandbuch
Für Benutzer und Fachhändler
Servicehandbuch
Für Fachhändler
EG-Konformitätserklärung

Falcon
2022-11
Ihr Produkt
3
EN
NL
DE
1 Ihr Produkt
1. Ausleger
2. Spreizbügel
3. Motor
4. Fahrgestell
5. Laufrolle
6. Kontrollbox
7. Schiebegriff
8. Handbedienung
9. Not-Stopp
10. Mast
11. Pedal Fahrgestellspreizung
12. Laufrolle mit Bremse
1
2
9
10
8
7
4
6
5
11
3
12

Falcon
2022-11
Vor der Benutzung
4
EN
NL
DE
2 Vor der Benutzung
2.1 Bestimmungsgemäße Verwendung
Dieser Abschnitt enthält eine kurze Beschreibung der vorgesehenen Benutzung Ihres
Patientenlifters. Darüber hinaus enthalten die Anweisungen in den anderen Abschnitten
zusätzliche Warnhinweise. Auf diese Weise wollen wir Sie auf die Möglichkeit einer
unsachgemäßen Benutzung hinweisen.
• Indikationen und Kontraindikationen: Dieser Patientenlifter ist für die Bedienung durch eine
Pflegekraft vorgesehen, um sitzende Patienten z.B. zwischen Rollstühlen, Pflegebetten und
Badezimmern zu transferieren. Der Patientenlifter ist als Transport-/Transferhilfe für ältere
Personen oder Personen mit Lähmungen, Gliedmaßenverlust oder -defekten, steifen oder
beschädigten Gelenken, Herz-Kreislauf-Problemen, Kachexie, ... konzipiert und hergestellt
• Dieser Patientenlifter ist für den Innenbereich geeignet.
• Er ist ausschließlich dafür konzipiert und gefertigt, eine (1) Person mit einem Gewicht mit einem
Maximalgewicht gemäß den Angaben in §7 zu transportieren. Er ist nicht dafür vorgesehen,
Sachen oder Objekte zu transportieren oder zu anderen Zwecken als zuvor beschrieben
benutzt zu werden.
• Verwenden Sie ausschließlich von Vermeiren genehmigte Zubehör- oder Ersatzteile.
• Sehen Sie sich auch die technischen Daten und die Einschränkungen Ihres Patientenlifters in
Abschnitt 7 an.
• Die Garantie für dieses Produkt beruht auf dessen normaler Benutzung und Wartung wie in
diesem Handbuch beschrieben. Schäden an Ihrem Produkt, die auf unsachgemäße Benutzung
oder mangelnde Wartung zurückzuführen sind, führen zum Erlöschen der Garantie.
2.2 Allgemeine Sicherheitshinweise
Gefahr von Personen- und/oder Sachschäden
Bitte lesen und befolgen Sie die Anweisungen in dieser Bedienungsanleitung, da andernfalls
Verletzungsgefahr besteht oder Ihr Patientenlifter beschädigt werden könnte.
Beachten Sie bei der Benutzung die folgenden allgemeinen Warnhinweise:
• Die Nutzung und der Betrieb des Patientenlifters ist nu durch autorisierte Personen
durchzuführen, die auf die Nutzung des Lifters geschult worden sind.
• Überschreiten Sie nicht die Höchstlast für den Patientenlifter. Dies führt zur Abschaltung des
Steuergeräts.
• Bei unterschiedlichen Benutzergewichten für Patientenlifter und Hebegurte ist immer das
niedrigste Benutzergewicht zu beachten.
• Während des Hebevorgangs muss eine Begleitperson anwesend sein.
• Benutzen Sie Ihren Rollstuhl nicht, wenn Sie unter dem Einfluss von Alkohol, Medikamenten
oder anderen Substanzen stehen, die Ihre Fahrtüchtigkeit beeinträchtigen könnten.
• Beachten Sie, dass einige Komponenten Ihres Patientenlifters durch Einflüsse wie
Umgebungstemperatur, Sonneneinstrahlung oder Heizvorrichtungen sehr heiß oder kalt
werden können. Seien Sie daher vorsichtig beim Berühren.
• Ihr Patientenlifter wurde auf elektromagnetische Verträglichkeit geprüft und erfüllt die
entsprechende Norm. Dennoch können Quellen elektromagnetischer Felder wie Mobiltelefone,
Stromgeneratoren oder Energiequellen mit hoher Leistung die Leistung Ihres Patientenlifters
beeinträchtigen. Andererseits kann auch die Elektronik Ihres Patientenlifters Einfluss auf
andere elektronische Geräte haben.
• Benutzen Sie den Patientenlifter nur auf ebenen Flächen, so dass sich alle Laufrollen auf dem
Boden befinden und ausreichend Kontakt für einen sicheren Betrieb des Patientenlifters
haben. Nehmen Sie während des Transfers eines Pflegebedürftigen keine Hindernisse mit
dem Patientenlifter.
VORSICHT

Falcon
2022-11
Vor der Benutzung
5
EN
NL
DE
• Verwenden Sie den Patientenlifter nicht in nassen oder feuchten Umgebungen.
• Ohne vorherige Rücksprache mit dem Hersteller sollten Fixierungspunkte oder Struktur- und
Rahmenteile oder -komponenten des Patientenlifters weder verändert noch ersetzt werden.
• Achten Sie während des Betriebs darauf, dass Finger, Kleidung, Gürtel, Schnallen oder
Schmuck nicht von den Rädern oder anderen beweglichen Teilen erfasst werden.
• Vorsicht beim Umgang mit Feuer, insbesondere brennenden Zigaretten; die Sitzsysteme
könnten sich entzünden.
Sollte sich ein schwerwiegender Zwischenfall mit Ihrem Produkt ereignet haben, benachrichtigen
Sie Vermeiren oder Ihren Fachhändler sowie die zuständige Behörde in Ihrem Land.

Falcon
2022-11
Benutzung des Patientenlifters
6
EN
NL
DE
3 Benutzung des Patientenlifters
3.1 Bedienung des lifters
Gefahr von Personen- und/oder Sachschäden
• Achten Sie darauf, dass bei Nutzung des Lifters ausreichend Platz seitlich und oberhalb des
Lifters vorhanden ist, da sonst bei Bewegen der Verstellfunktionen Schäden oder Verletzungen
auftreten können.
• Achten Sie stets auf den Ausleger, um Verletzungen zu vermeiden.
• Es sind nur Sitzsysteme zu verwenden, die für den Patientenlifter freigegeben und vorgesehen
sind (siehe Gebrauchsanweisung der jeweiligen Sitzsysteme). Die Nutzung anderer
Sitzsysteme geschieht auf eigene Gefahr.
• Verwenden Sie nur die Griffe zum Schieben/Ziehen des Patientenlifters, keine anderen
Komponenten.
Beachten Sie die technischen Angaben unter denen der Patientenlifter betrieben werden darf.
Die Bedienung des Patientenlifters darf nur von autorisierten Personen durchgeführt werden, die
auf die Nutzung und den Betrieb geschult worden sind.
3.1.1 Spreizung Fahrgestell
Um mit dem Lifter einen Rollstuhl oder andere
Sitzmöglichkeiten zu umschließen, aber auch um die
Standsicherheit des Lifters zu erhöhen, lässt sich der
Abstand der Fahrgestellschenkel vergrößern.
Stellen Sie sich hinter den aufgebauten Lifter und
ergreifen Sie die Schiebegriffe des Patientenlifters (links
und rechts neben der Kontrollbox). Drücken Sie mit
einem Fuß leicht die Wippe am unteren Fahrgestell
(links oder rechts) leicht nach unten und der Abstand der
Schenkel des Fahrgestells lässt sich vergrößern oder
verkleinern.
3.1.2 Feststellbremsen
Sichern Sie die zwei Laufrollen am hinteren Ende des
Fahrgestells, indem Sie mit der Fußspitze leicht die Bremspedale
der Laufrollen nach unten drücken, bis diese arretieren. Um die
Bremse zu lösen, drücken Sie mit der Fußspitze die
Bremspedale wieder leicht nach oben, bis die Laufrollen
freigegeben werden.
3.1.3 Ausleger anheben / absenken
Über die Handbedienung lässt sich der Ausleger stufenlos verstellen.
= Ausleger anheben
= Ausleger absenken
Bei Nutzung des Hubfunktion bis an den Endanschlag des Hubmotors wird
die Endabschaltung der Elektronik aktiviert (Sicherheitsfunktion). Nutzen Sie
daher die Hubfunktion nur im mittlerem Vertsellbereich.
WARNUNG
1
2
1
2

Falcon
2022-11
Benutzung des Patientenlifters
7
EN
NL
DE
3.1.1 Taste zum Absenken
Sollte ein Schaden an der Handbedienung vorliegen, kann der
Ausleger von der Kontrollbox aus herabgelassen werden.
Der Ausleger fährt solange nach unten, wie der Knopf (3) am
Bedienfeld der Kontrollbox gedrückt wird.
3.1.2 Bewegen des Patientenlifters
Verletzungsgefahr
• Seien Sie in engen Durchgängen vorsichtig (z. B.
Türen).
1. Stellen Sie sich hinter den Patientenlifter und
ergreifen Sie die Griffe (links und rechts neben der
Kontrollbox) mit beiden Händen.
2. Stellen Sie sicher, dass beide Bremsen der
hinteren Laufrollen gelöst sind.
3. Schieben Sie den Patientenlifter langsam in die
gewünschte Position.
In unbelastetem Zustand empfehlen wir, dass Sie den
Patientenlifter rückwärts fahren, damit Hindernisse (wie
z.B. Türzargen, Zimmerecken oder Möbelstücke)
leichter umfahren werden können.
3.1.3 Drehen des Lifters auf der Stelle
Verletzungsgefahr
• Achten Sie darauf, dass keine Personen oder
Gegenstände im Schwenkbereich des Lifters sind.
• Drehen Sie den Patientenlift vorsichtig und
langsam auf der Stelle, damit den Patienten nicht
ins Schwingen gerät.
1. Spreizen Sie die Fahrbeine des Lifters für mehr
Stabilität.
2. Aktivieren Sie die Bremsen.
3. Benutzen Sie nur ein für den Patienten
geeignetes Liftertuch (befolgen Sie die Hinweise
zur Platzierung des Patienten in Liftertüchern in
der Gebrauchsanweisung für Liftertücher).
4. Heben des Patienten vom Boden, Stuhl, Bett, ... .
5. Lösen Sie beide Bremsen der hinteren Laufrollen.
6. Stellen Sie sich hinter den Patientenlifter und
ergreifen Sie die Griffe (links und rechts neben der Kontrollbox) mit beiden Händen.
7. Nun drehen Sie den Patientenlift vorsichtig und langsam auf der Stelle. Achten Sie darauf,
dass Sie mit den Farhbeinen gegen keine Gegenstände Stoßen.
8. Haben Sie die gewünschte Position erreicht, können Sie den Patienten im Lift herablassen.
WARNUNG
WARNUNG
3

Falcon
2022-11
Benutzung des Patientenlifters
8
EN
NL
DE
3.2 Sitzsystem
Verletzungsgefahr
• Verwenden Sie nur für den Patienten geeignete Sitzsysteme.
• Verwenden Sie keine beschädigten Sitzsystem.
• Lesen Sie zuerst das vollständige Handbuch für Hebegurte.
• Verwenden Sie nur kompatible, von Vermeiren zugelassene Hebegurte.
Der Patientenlifter darf nur mit Hebegurten verwendet werden, die für die Falcon-Patientenlifter
von Vermeiren (für 4-Punkt-Hebebügel) vorgesehen sind.
Die Anwendbarkeit und die Gebrauchsanweisungen für die spezifischen Hebegurte müssen
beachtet werden, siehe das separate Handbuch.
3.2.1 Anbringen an den Spreizbügel
Die Patientensitzsysteme werden mithilfe der montageband befestigt. Die Montageband werden
in den Spreizbügel des Patientenlifts eingehängt. Die Montageband der Patientensitzsysteme
verfügen über vier Schlaufen in verschiedenen Farben.
Montageband Patientensitzsysteme
Spreizbügel des Patientenliftsystems
Mit diesen Schlaufen kann der Patient in verschiedene Positionen gehoben werden. Die
möglichen Positionen hängen von der Größe und dem Gewicht des Patienten ab.
WARNUNG
Haken für
Montageband
Schwarz
Gelb
Rot
Grün

Falcon
2022-11
Benutzung des Patientenlifters
9
EN
NL
DE
Schultern
Beine
Kopf
(nur beim Comfort-
Patientensitzsysteme)
Grün
Grün
Grün
Rot
Rot
Rot
Gelb
Gelb
Gelb
Schwarz
Schwarz
Schwarz
Die Beinstützen können auf verschiedene Arten am Patientenlift angebracht werden.
• Gekreuzte Beinstützen
Dies ist die am häufigsten verwendete Methode zur Patientensitzsysteme befestigung. Bei
gekreuzten Beinstützen muss die Befestigung des Patientensitzsysteme gemäß der
folgenden Anweisungen erfolgen:
1. Das Montageband der Beinstütze durch die Schlaufe der anderen Beinstütze
führen.
2. Die Montagebänder der Beinstützen am Spreizbügel des Patientenlifts befestigen.
• Gekreuzt unter beiden Oberschenkeln
L VORSICHT: Gefahr des Herausfallens - Bei einem Patienten mit
Beinamputationen besteht ein erhöhtes Risiko, dass der Patient die Balance verliert
und aus den Gurten fällt.
Zum Heben von Patienten mit Beinamputationen kann die folgende Methode verwendet
werden. Die Befestigung der unter den Oberschenkeln gekreuzten Patientensitzsysteme
muss gemäß der folgenden Anweisungen erfolgen:

Falcon
2022-11
Benutzung des Patientenlifters
10
EN
NL
DE
1. Kreuzen Sie das Montageband der Beinstütze unter den Oberschenkeln.
2. Die Montagebänder der Beinstützen am Spreizbügel des Patientenlifts befestigen.
• Jede Beinstütze separat am Spreizbügel
L VORSICHT: Gefahr des Herausfallens– Diese Methode erhöht die Gefahr, dass
der Patient aus dem Patientensitzsysteme herausrutscht.
Bei Patienten mit empfindlichen Genitalien können die Beinstützen einzeln am
Spreizbügel befestigt werden. Die Befestigung des Patientensitzsysteme mit dieser
Methode muss gemäß der folgenden Anweisungen erfolgen:
1. Die Beinstützen separat um ein Bein legen, aber nicht kreuzen.
2. Die Montagebänder der Beinstützen am Spreizbügel des Patientenlifts befestigen.
3.2.2 Position des Spreizbügels
Der Spreizbügel muss stets senkrecht zum Körper des Patienten stehen. Die linke Abbildung
zeigt die richtige Stellung. Die rechte Abbildung zeigt die falsche Stellung.
3.3 Batterie und Aufladen
3.3.1 Ladegerät
Primäre Spannung
100 - 240VAC / 50/60 Hz
Schutzvorrichtungen
verpolsicher, überspannungs- und temperaturgesichert
Umgebungstemperatur
0°C bis +40°C
Länge Anschlussleitung
2,0 m
Umgebungstemperatur Lagerung
-15°C bis +50°C
Relative Luftfeuchtigkeit Lagerung
max. 95% (nicht kondensierend)
Konformität
geprüft nach IEC 60601-1
3.3.2 Laden der Batterien
Verwenden Sie nur die Kontrollbox mit integriertem Batterieladegerät.
Wir empfehlen Ihnen, die eingebauten Batterien der Kontrollbox regelmäßig zu beladen, um die
Einsatzfähigkeit des Lifters zu gewährleisten und die Lebensdauer der Batterien lange aufrecht
zu halten. Die Kontrollbox weist mit einem Warnton darauf hin, dass der Ladezustand der Batterie
niedrig ist.
Inbetriebnahme
Stecken Sie zuerst das Ladekabel in den dafür vorgesehenen Anschluss der Kontrollbox. Danach
stecken Sie das Netzteil in die Steckdose. Die Ladezeit beträgt ca. 24 Stunden.
Erneutes aufladen
L WARNUNG: Verletzungsgefahr – Der Lifter darf nicht verwendet werden, wenn das
Ladekabel mit der Steckdose verbunden ist.

Falcon
2022-11
Benutzung des Patientenlifters
11
EN
NL
DE
Wenn die Batterie fast leer ist, leuchtet nur die linke LED grün. Wenn der Batteriestand sehr
niedrig ist, leuchtet die LED rot und alle 2 Sekunden ist ein Piepton zu hören.
Der Akku ist vollständig geladen, wenn alle LEDs vollständig grün leuchten.
Ziehen Sie nach Beendigung des Ladevorgangs immer zuerst den Netzstecker aus der
Steckdose und erst dann denn Anschlussstecker aus der Kontrollbox.
Keine Nutzung des Lifters während des Ladebetriebs.
Wenn die Batterien längere Zeit nicht genutzt werden, entladen sich diese langsam selbstständig
(Tiefentladung). Ein Aufladen mit dem mitgelieferten Ladegerät ist dann nicht mehr möglich.
Laden Sie auch bei Nichtbenutzung der Batterien diese mindestens einmal im Monat auf.
3.4 Notfall
In Notfallsituationen muss der Notstopp und die Notabsenkungsfunktion verwendet werden.
3.4.1 Not-stopp
Bei Notfällen und während der Montage und Demontage muss
der Notstopp durch Drücken des roten Knopf an der Kontrollbox
aktiviert werden.
Drücken Sie auf den Knopf und drehen Sie ihn in Richtung der
Pfeile. Wenn der Knopf ganz nach hinten gedrückt ist, drehen Sie
ihn in die entgegengesetzte Richtung der Pfeile zurück.
Der Notstopp wird deaktiviert, indem der rote Knopf in
Pfeilrichtung gedreht wird.
3.4.2 Manuelle Notabsenkung
L WARNUNG: Verletzungsgefahr - Passen Sie die manuelle
Notabsenkung an das Körpergewicht des Patienten an.
Die Notabsenkung kann bei Stromausfall oder entleerter Batterie über den
roten Taster am oberen Ende des Motors betätigt werden.
Beachten Sie, dass die manuelle Notabsenkung nur möglich ist, wenn der
Patient im Patientenlifter sitzt.

Falcon
2022-11
Zusammenbau und Einstellung
12
EN
NL
DE
4 Zusammenbau und Einstellung
Der Patientenlifter wird komplett montiert von Ihrem Fachhändler geliefert.
Die Anweisungen in diesem Kapitel richten sich an den Fachhändler.
Wenden Sie sich an die nächste Vermeiren-Vertretung, um eine Serviceeinrichtung oder einen
Fachhändler in Ihrer Nähe zu finden.
L WARNUNG: Gefahr nicht sicherer Einstellungen – Verwenden Sie nur die in dieser
Anleitung beschriebenen Einstellungen.
4.1 Lieferumfang
Der Lieferumfang des Vermeiren Falcon Patientenlifters umfasst:
• Fahrgestell mit vier Laufrollen (davon zwei bremsbar)
• Mast mit Schiebegriffen
• Ausleger und Spreizbügel
• Kontrollbox (inkl. 2 x Akku-Batterie und Handbedienung)
• Ladegerät
• Verstellmotor
• Gebrauchsanweisung
Prüfen Sie vor der Verwendung, ob alle aufgeführten Artikel in der Lieferung enthalten und nicht
beschädigt sind (beispielsweise durch den Transport).
4.2 Montage und Demontage
4.2.1 Auspacken
L WARNUNG: Verletzungsgefahr - Kontrollieren Sie vor dem Auspacken und der
Montage immer zuerst, dass der Not-stopp (roter Druckknopf an der Kontrollbox)
eingedrückt ist.
Die Verpackung der Patientenlifter wurde daraufhin gewählt, um einen optimalen Schutz während
des Transportes zu gewährleisten.
1. Ziehen Sie alle Teile des Patientenlifters aus dem Karton und
überprüfen Sie die Vollständigkeit der Lieferung und ob
einzelne Teile sichtbare Mängel aufweisen. Bei
Beschädigungen wenden Sie sich bitte an Ihre
Vertriebsniederlassung.
2. Sichern Sie vor dem Aufbau den Lifter vor ungewollten
Bewegungen, indem Sie alle Bremsrollen betätigen.
Drücken Sie mit der Fußspitze leicht die Bremsplatte der
Laufrollen nach unten, bis diese arretieren. Um die Bremse
zu lösen, drücken Sie mit der Fußspitze die Bremspedale
wieder leicht nach oben, bis die Laufroll freigegeben sind.

Falcon
2022-11
Zusammenbau und Einstellung
13
EN
NL
DE
4.2.2 Montage
L WARNUNG: Klemmgefahr - Achten Sie bei der Montage darauf, dass
Sie sich nicht verletzen und keine Drähte eingeklemmt, gequetscht oder
durchtrennt werden.
1. Setzen Sie den Vertikalmast in den unteren Rahmen ein und ziehen Sie
den Hebel fest an.
2. Setzen Sie den Motor in seine Befestigungen am Vertikalmast und am
Hebearm (4) ein und sichern Sie ihn mit den Stiften.
3. Für den ersten Einsatz: Befestigen Sie den Schaltkasten am
Vertikalmast, indem Sie die beiden Schrauben anziehen
4.2.3 Demontage
L WARNUNG: Klemmgefahr - Achten Sie bei der Demontage darauf,
dass Sie sich nicht verletzen und keine Drähte eingeklemmt, gequetscht
oder durchtrennt werden.
L WARNUNG: Verletzungsgefahr - Stellen Sie sicher, dass der Not-
stopp (roter Druckknopf an der Kontrollbox) aktiviert ist, um
unbeabsichtigte Verstellbewegungen zu vermeiden.
1. Sichern Sie die zwei Laufrollen am hinteren Ende des Fahrgestells,
indem Sie mit der Fußspitze leicht die Bremspedale der Laufrollen nach
unten drücken, bis diese arretieren. Um die Bremse zu lösen, drücken
Sie mit der Fußspitze die Bremspedale wieder leicht nach oben, bis die
Laufrollen freigegeben werden.
2. Lösen Sie den Motor vom Hubarm und vom Vertikalmast, indem Sie die
Stifte (4) entfernen.
3. Entfernen Sie den Hebel und nehmen Sie den Vertikalmast aus dem
unteren Rahmen.
4
3
4
3

Falcon
2022-11
Wartung
14
EN
NL
DE
5 Wartung
5.1 Wartungstermine
Gefahr von Personen- oder Sachschäden
Reparaturen und Erneuerungen dürfen nur von geschultem Personal und mit Original-
Ersatzteilen von Vermeiren durchgeführt werden.
Auf der letzten Seite dieses Handbuchs befindet sich ein Registrierungsformular, auf dem
der Fachhändler jeden Service dokumentieren kann.
Die Wartungshäufigkeit hängt von der Häufigkeit und Intensität der Nutzung ab. Wenden Sie sich
an Ihren Händler, um einen allgemeinen Zeitplan für Inspektion/Wartung/Reparatur zu
vereinbaren.
Bezüglich des Wartungshandbuchs besuchen Sie die Vermeiren-Website: www.vermeiren.com.
Vor jeder Benutzung
Kontrollieren Sie folgende Punkte:
• Alle Teile: vorhanden und nicht beschädigt oder verschlissen.
• Alle Teile: sauber (siehe Abschnitt 5.3)
• Zustand der Rahmenteile: keine Deformation, Instabilität, Schwachstelle oder lose
Verbindungen
• Bremsen: keine sichtbaren Schäden und/oder Verschmutzungen.
• Schaltkasten, Handbedienung, Batterieladegerät, relevante Kabel: keine Schäden wie
ausgefranste, gebrochene oder freiliegende Drähte. Prüfen Sie, ob die elektrische
Verstellung des Kragarms über die Handbedienung einwandfrei funktioniert.
• Akkustatus: laden Sie den Akku ggf. auf (siehe Abschnitt 3.3)
Ca. Alle 8 wochen
Abhängig von der Gebrauchshäufigkeit überprüfen folgendes:
• Fettung der Gelenkverbindungen am Ausleger
• Zustand der Laufrollen
• Sind Gehäuseschäden an der Kontrollbox, Batterie, Ladegerät (sofern vorhanden) und der
Handbedienung sichtbar?
• Zustand der Kabel verkehrssicher?
• Laden Sie die Batterie auf.
Ca. Alle 6 monate oder für jeden neuen benutzer
Abhängig von der Gebrauchshäufigkeit überprüfen Sie bitte folgende Dinge:
• Sauberkeit
• Allgemeinzustand
• Funktionsfähigkeit des Ladegeräts
• Funktion der Laufrollen
Bei zu großem Rollwiderstand sind die Laufrollen zu säubern. Wenn dies nicht ausreicht, wenden
Sie sich bitte an Ihren Fachhändler.
Jährlich oder häufiger
Lassen Sie den Patientenlifter mindestens einmal pro Jahr oder häufiger von Ihrem Fachhändler
inspizieren und warten. Die minimale Wartungshäufigkeit ist von der Benutzung abhängig und
sollte daher zusammen mit Ihrem Fachhändler abgesprochen werden.
5.2 Verpackung und Lagerung
• Versand und Aufbewahrung des Patientenlifters sollten gemäß den technischen
Spezifikationen in §7 erfolgen. Achten Sie darauf, dass der Patientenlifter an einem trockenen
Ort aufbewahrt wird.
VORSICHT

Falcon
2022-11
Wartung
15
EN
NL
DE
• Verkabelungen auf Quetsch- und Knicksicherheit prüfen.
• Trennen Sie den Patientenlifter von der Steckdose.
• Achten Sie darauf, den Patientenlifter ausreichend abzudecken oder zu verpacken, um ihn vor
Rost und Fremdkörpern zu schützen (z. B. Salzwasser, Seeluft, Sand, Staub).
• Alle abgebauten Teile zusammen an einem Ort lagern (ggf. kennzeichnen), damit bei
Wiederaufbau keine Verwechslung mit anderen Produkten auftreten kann (z. B. der
Ladegerät).
• Achten Sie beim Aufbewahren des Patientenlifters darauf, dass keine anderen Gegenstände
auf dem Patientenlifter und seinen Komponenten abgelegt oder daran gelehnt werden, um
Schäden zu vermeiden.
5.3 Reinigung
Beschädigungsgefahr durch Feuchtigkeit
• Benutzen Sie keinesfalls einen Wasserschlauch oder Hochdruckreiniger.
• Bei hartnäckiger Verschmutzung können die Bezüge mit einem milden handelsüblichen
Reinigungsmittel gereinigt werden.
• Flecken können mit einem Schwamm oder mit einer weichen Bürste entfernt werden.
• Verwenden Sie keine aggressiven Reinigungsmittel, z. B. Lösungsmittel, oder harte
Bürsten.
5.3.1 Kunststoffteile
Reinigen Sie alle Kunststoffteile Ihres Patientenlifters mit einem handelsüblichen
Kunststoffreiniger. Lesen Sie die spezifischen Produktinformationen und verwenden Sie nur eine
weiche Bürste oder einen weichen Schwamm.
5.3.2 Lackierung
Durch die hochwertige Lackierung wird ein optimaler Korrosionsschutz gewährleistet. Falls die
Lackierung durch Kratzer oder ähnliches beschädigt wird, sollten Sie einen Fachhändler
aufsuchen, um die betroffene Oberfläche instand setzen zu lassen.
Verwenden Sie zur Reinigung der Lackierung nur warmes Wasser und handelsübliche
Haushaltsreiniger mit einer weichen Bürste und ein Tuch. Achten Sie darauf, dass kein Wasser
in die Rohre eintritt.
5.3.3 Elektronikgehäuse
L WARNUNG: Verletzungsgefahr – Vor Wartungsarbeiten ist der Not-Stopp zu betätigen,
da sonst ungewollte Verstellbewegungen auftreten können.
Die Kontrollbox, Motorgehäuse und Handbedienung sollten Sie nur mit einem angefeuchteten
Tuch wischen, auf das ein wenig handelsüblicher Haushaltsreiniger gegeben werden kann.
Verwenden Sie keine Scheuermittel oder scharfkantige Putzutensilien (Metallschwamm, Bürste
etc.), da diese die Oberfläche der Bedieneinheit verkratzen und den Spritzwasserschutz
aufheben können.
Überprüfen Sie regelmäßig, ob die Steckverbindungen korrodiert oder beschädigt sind, da die
Funktionstauglichkeit der Elektronik beeinflusst werden kann.
Für Schäden durch mangelnde Pflege, haftet der Hersteller nicht.
VORSICHT

Falcon
2022-11
Wartung
16
EN
NL
DE
5.4 Desinfektion
L WARNUNG: Schädliche Produkte - Desinfektionsmittel dürfen nur von autorisiertem
Personal eingesetzt werden.
Alle Teile des Patientenlifters können mit einem handelsüblichen Desinfektionsmittel abgerieben
werden. Befolgen Sie die Anweisungen auf dem Desinfektionsmittel.
Waschanweisungen für Hebegurte finden Sie im Handbuch für Hebegurte und auf dem Etikett
jedes Hebegurts.
5.5 Inspektion
Grundsätzlich empfehlen wir jährliche Inspektionen, mindestens jedoch vor jedem Wiedereinsatz.
Die folgenden Prüfungen müssen von autorisierten Personen durchgeführt und dokumentiert
werden:
• Überprüfen Sie die Verkabelung (besonders zu achten ist auf Quetschungen, Abrieb, Schnitte,
sichtbare Teile der Isolierung der inneren Drähte, sichtbare Metalldrahtkerne, Knicke,
Ausbeulungen, Farbveränderungen der äußeren Hülle, spröde Stellen und auf die sichere
Verlegung, sodass mechanische Effekte wie Schnitte oder Quetschungen unwahrscheinlich
sind.)
• Sichtprüfung der Rahmenteile auf plastische Verformung und/oder Verschleiß (Rahmen,
Motoraufhängung, Ausleger, Spreizbügel)
• Sichtprüfung der Lackierung auf Schäden (Korrosionsgefahr).
• Sichtprüfung aller Gehäuse auf Schäden; Schrauben müssen festgezogen sein.
• Prüfung der Menge des Schmiermittels bei metallisch geführten beweglichen Teilen.
• Sichtprüfung aller Kunststoffteile auf Risse und spröde Stellen.
• Messprüfung des Ersatzableitstroms der Kontrollbox (einschließlich Ladegerät) A) nach
VDE 0702.
• Messprüfung des Isolationswiderstands der Kontrollbox (einschließlich Ladegerät) A) nach
VDE 0702.
• Funktionsprüfung des Auslegers (Fettung an Gelenkteilen, Verstellbereich, Verformung,
Abnutzung und Beschädigung).
• Funktionsprüfung der Antriebe des Lifters (Prüfungen durchführen während einer Testfahrt →
Geräusche, Geschwindigkeit, Leichtlauf, usw.) Falls erforderlich: Messen der
Leistungsaufnahme zuerst ohne Last, dann mit der Nennlast (SWL), um evtl. Verschleiß der
Motoren über die Stromaufnahme ermitteln zu können und Vergleich mit den Werten bei
Auslieferung.
• Funktionsprüfung von Notstopp.
• Funktionsprüfung von Notabsenkung.
• Vollständigkeit des Auslieferungszustands, Gebrauchsanweisung vorhanden?
Messprüfungen dürfen nur von Personen durchgeführt werden, die mindestens auf den Lifter
geschult worden sind und mindestens durch eine Elektrofachkraft auf die zu verwendenden
Prüfmittel und Prüfverfahren eingewiesen worden sind. Die Freigabe zum Einsatz des
Patientenlifters nach erfolgten Messprüfungen oder Wartungsmaßnahmen unterliegt lediglich
einer Elektrofachkraft.
Lassen Sie sich den Wartungsdienst nur dann im Wartungsplan unterzeichnen, wenn mindestens
die oben genannten Punkte überprüft wurden.
5.6 Voraussichtliche Nutzungsdauer
Die durchschnittliche Nutzungsdauer Ihres Patientenlifters beträgt 8 Jahre. Je nach
Nutzungshäufigkeit, Lagerung, Wartung, Pflege und Reinigung kann die Nutzungsdauer Ihres
Patientenlifters länger oder kürzer sein.

Falcon
2022-11
Wartung
17
EN
NL
DE
5.7 Wiedereinsatz
Lassen Sie den Patientenlifter vor der Wiedereinsatz durch eine andere Person desinfizieren,
inspizieren und entsprechend den Anweisungen in diesem Kapitel warten.
5.8 Nutzungsende
Am Ende seiner Nutzungsdauer muss Ihr Patientenlifter gemäß den geltenden
Umweltvorschriften entsorgt werden. Dazu wird er im besten Fall zerlegt, um den Transport
wiederverwertbarer Teile zu erleichtern.

Falcon
2022-11
Störungsbeseitigung
18
EN
NL
DE
6 Störungsbeseitigung
Tabelle 1: Störungsbeseitigung
Störung
Ursache der Störung
Beseitigung der Störung
Lautes Geräusch von den
beweglichen Teilen
(Beispiel: Ausleger)
Eine Fettung ist erforderlich.
Fetten Sie die beweglichen Teile.
(Fetten Sie nicht den
Verstellmotor!)
Verstellmotor erzeugt ein
ungewöhnliches Geräusch.
Der Verstellmotor ist
beschädigt.
Tauschen Sie den Verstellmotor aus
oder wenden Sie sich an Ihren
Fachhändler.
Patientenlifter kann nicht
mehr angehoben werden.
1. Der elektrische
Verstellmotor ist
beschädigt.
2. Das Gewicht des
Patienten ist zu hoch
(Überlast-LED an der
Handsteuerung leuchtet
auf).
3. Die Handbedienung bzw.
der Verstellmotor ist nicht
angeschlossen.
4. Die Batterie ist nicht bzw.
nicht einwandfrei mit der
Kontrollbox verbunden.
5. Der Batteriestand ist zu
niedrig.
6. Der Notstopp ist aktiviert.
1. Tauschen Sie den Verstellmotor
aus.
2. Verwenden Sie einen
Patientenlifter mit einem höheren
maximal zulässigen
Patientengewicht.
3. Überprüfen Sie die Anschlüsse.
Schließen Sie gegebenenfalls
die Handbedienung bzw. den
Verstellmotor an.
4. Prüfen Sie, ob die Batterie
eingesetzt ist bzw. ob die
Batterie angeschlossen ist.
5. Laden Sie die Batterien auf bzw.
tauschen Sie sie aus.
6. Deaktivieren Sie den Notstopp.
Das Absenken des
Patienten in
Notfallsituationen
funktioniert nicht.
Es besteht ein
Mindestgewichtsbelastung,
um den Patienten absenken
zu können.
Falls das Gewicht des Patienten zu
gering ist, ziehen Sie leicht am
Ausleger oder passen Sie die
Absenkgeschwindigkeit an.
Batterien können nicht
aufgeladen werden.
1. Die Batterien sind nicht
korrekt in der Kontrollbox
eingesetzt.
2. Das Netzkabel ist defekt.
3. Die Batterien sind defekt.
4. Die Kontrollbox mit
integriertem Ladegerät
oder Ladegerät ist defekt.
1. Prüfen Sie, ob die Batterien mit
der Kontrollbox verbunden
sind.
2. Tauschen Sie das Netzkabel
aus.
3. Tauschen Sie die Batterie aus.
4. Tauschen Sie die Kontrollbox
mit integriertem Ladegerät
oder Ladegerät aus.

Falcon
2022-11
Technische Daten
19
EN
NL
DE
7 Technische Daten
700
Vorwärtsrichtung

Falcon
2022-11
Technische Daten
20
EN
NL
DE
Tabelle 1: Technische Daten
Produktname
Vermeiren
Typ
Patientenlifter
Modell
Falcon
Beschreibung
Maße in
Zeichnung
Abmessungen
Tiefste Position ZAP*
l
509 mm
Maximale Höhe ZAP*
k
1609 mm
Hebebereich (Höhenreichweite)
m
1100 mm
Schenkellänge
1042 mm
Gesamtlänge
1158 mm
Mindestabstand Schenkel
r
506 mm
Maximaler Abstand Schenkel
q
970 mm
Schenkelhöhe / Höhe des Fahrgestells
n
149 mm
112,5 mm
Gesamtbreite (geschlossen), Außenmaß
565 mm
Gesamtbreite (geöffnet), Laufrollen vorne
p
1026 mm
Länge zusammengeklappt
1236 mm
Höhe zusammengeklappt
294 mm
Breite zusammengeklappt
565 mm
Min. Abstand Wand/ZAP* (geringste Höhe)
w3
36 mm
Min. Abstand Wand/ZAP* (Höchstreichweite)
w2
263,5 mm
Min. Abstand Wand/ZAP* (größte Höhe)
w1
65 mm
Wendekreis
1188 mm
Gesamtgewicht
35 kg
Gewicht von Fahrgestell
16,5 kg
Gewicht der Kontrollbox + Batterie
3 kg
Gewicht des oberen Rahmens (Auslegerarm /
Spreizstange + Motor + Kontrollbox)
18,5 kg
Höchslast
130 kg
Bodenfreiheit
15,5 mm
Maximale Reichweite bei 600 mm
a
557 mm
Maximale Reichweite ab Träger
b
557 mm
Reichweite ab Träger mit Abstand von 700 mm
c
323 mm
Spannungsausgang
24V max. 250 VA
Betriebstemperatur
+5 bis +40°C
Relative Luftfeuchtigkeit
20% bis 80% bei 30°C, nicht kondensierend
Schalldruck
< 54 dB(A)
Kontrollbox
TiMOTION TC20
Batterie
Nicht zutreffend
Handsteuerung
TiMOTION TH10
Motor
TiMOTION TA23

Falcon
2022-11
Technische Daten
21
EN
NL
DE
Produktname
Vermeiren
Typ
Patientenlifter
Modell
Falcon
Beschreibung
Maße in
Zeichnung
Abmessungen
Schutzklasse Kontrollbox
IP54
Schutzklasse Batterie
Nicht zutreffend
Schutzklasse Handsteuerung
IP54
Schutzklasse Motor
IP54
Isolierklasse
II - Type B
Periodischer Betrieb
max. 10%, oder 2 Min. Dauerbetrieb / 18 min.
Pause
Batteriekapazität
2.9 Ah
Not-stopp
Ja
Manuelle Notabsenkung
Ja
Elektrische Notabsenkung
Nein
Technische Änderungen vorbehalten. Maßtoleranz +/- 15 mm / 1,5 kg / 1,5°
1 = Höchste Position, 2 = Maximale Reichweite, 3 = Niedrigste Position
* ZAP = Zentraler Anschlagpunkt


Falcon
2022-11
Indice
1
EN
NL
IT
Indice
Indice ........................................................................................................................ 1
Premessa.................................................................................................................... 2
1 Il prodotto ...................................................................................................... 3
2 Prima dell’uso ............................................................................................... 4
2.1 Uso previsto .................................................................................................. 4
2.2 Istruzioni generali di sicurezza ...................................................................... 4
3 Utilizzo del sollevatore ................................................................................. 6
3.1 Uso del sollevatore........................................................................................ 6
3.2 Sistema di seduta.......................................................................................... 8
3.3 Batteria e ricarica ........................................................................................ 10
3.4 Emergenza .................................................................................................. 11
4 Installazione e regolazione ....................................................................... 12
4.1 Consegna .................................................................................................... 12
4.2 Montaggio o smontaggio ............................................................................. 12
5 Manutenzione .............................................................................................. 14
5.1 Intervalli di manutenzione ........................................................................... 14
5.2 Spedizione e magazzinaggio ...................................................................... 15
5.3 Pulizia ......................................................................................................... 15
5.4 Disinfezione ................................................................................................ 16
5.5 Controllo ...................................................................................................... 16
5.6 Durata prevista ............................................................................................ 17
5.7 Utilizzi successivi ........................................................................................ 17
5.8 Fine vita ...................................................................................................... 17
6 Soluzione dei problemi di funzionamento ................................................ 18
7 Specifiche tecniche .................................................................................... 19

Falcon
2022-11
Premessa
2
EN
NL
IT
Premessa
Congratulazioni! Ora possiede un sollevatore Vermeiren!
Questo prodotto è realizzato da personale qualificato e competente. Esso è progettato e prodotto
secondo gli elevati standard di qualità garantiti da Vermeiren.
Grazie per la fiducia accordata ai prodotti Vermeiren. Questo manuale viene fornito come
supporto per l’uso di questo sollevatore e delle sue opzioni operative. Leggerlo attentamente, in
quanto aiuta a familiarizzarsi con il funzionamento, le prestazioni e le limitazioni del prodotto.
Per eventuali ulteriori domande successive alla lettura di questo manuale, rivolgersi al proprio
rivenditore specializzato, che sarà lieto di fornire un supporto sull’argomento.
Nota importante
Per garantire la propria sicurezza e prolungare la durata del prodotto, trattarlo con cura e farlo
controllare e/o sottoporlo a manutenzione con regolarità.
Questo manuale rispecchia gli sviluppi più recenti del prodotto. Vermeiren si riserva il diritto di
introdurre modifiche di questo tipo di prodotto senza alcun obbligo di adattare o sostituire i prodotti
analoghi consegnati in precedenza.
Le immagini vengono utilizzate per chiarire le istruzioni contenute nel manuale. I dettagli del
prodotto raffigurato possono essere diversi da quelli del prodotto in uso.
Informazioni disponibili
Sul sito Web di Vermeiren, all’indirizzo http://www.vermeiren.com/ è sempre disponibile la
versione più recente delle informazioni indicate di seguito. Visitare con regolarità tale sito per
verificare l’esistenza di eventuali aggiornamenti.
Le persone ipovedenti possono scaricare la versione elettronica di questo manuale e farlo leggere
da un software applicativo di sintesi vocale.
Questo manuale utente
Per l'utente e il rivenditore specializzato
Manuale di assistenza
Per il rivenditore specializzato
Dichiarazione di conformità CE

Falcon
2022-11
Il prodotto
3
EN
NL
IT
1 Il prodotto
1. Traversa
2. Bilancino
3. Motore
4. Telaio
5. Ruota
6. Centralina
7. Impugnatura di
spostamento
8. Comando manuale
9. Arresto di emergenza
10. Asta
11. Pedale spaziatura telaio
12. Ruota con freno
1
2
9
10
8
7
4
6
5
11
3
12

Falcon
2022-11
Prima dell’uso
4
EN
NL
IT
2 Prima dell’uso
2.1 Uso previsto
Questo paragrafo fornisce una breve descrizione dell’uso previsto del sollevatore. Gli altri
paragrafi aggiungono inoltre alle istruzioni ulteriori avvertenze di rilievo. Vermeiren desidera in tal
modo portare all’attenzione dell’utente gli eventuali usi errati che possono presentarsi.
• Indicazioni e controindicazioni: Questo sollevatore deve essere azionato da un assistente per
trasferire pazienti seduti, ad esempio, tra sedie a rotelle, letti di cura e bagni. Il sollevatore è
stato progettato e prodotto come ausilio per il trasporto/trasferimento di persone anziane o che
soffrono di paralisi, perdita o difetti degli arti, articolazioni rigide o danneggiate, problemi
cardiovascolari, cachessia, ... .
• Questa carrozzina è adatta per l'uso al coperto.
• Questo sollevatore è progettato e prodotto esclusivamente per il trasporto/trasferimento di una
(1) persona con un peso massimo conforme alle specifiche di cui al §7. Essa non è viceversa
progettata per il trasporto di merci od oggetti, né per qualunque uso diverso da quello descritto
in precedenza.
• Utilizzare esclusivamente accessori e ricambi approvati da Vermeiren.
• Leggere tutte le informazioni tecniche di dettaglio e le limitazioni del sollevatore, riportate nel
capitolo 7.
• La garanzia del prodotto presuppone un uso e una manutenzione normali del medesimo, come
descritti in questo manuale. I danni al prodotto dovuti a uso improprio o manutenzione carente
causano la decadenza della garanzia.
2.2 Istruzioni generali di sicurezza
Rischio di lesioni e/o danni
Leggere e osservare le istruzioni contenute in questo manuale. In caso contrario, è possibile
ferirsi o danneggiare il sollevatore.
Durante l’uso, tenere presenti le seguenti avvertenze generali:
• L'uso ed il funzionamento del sollevatore è pensato solo per le persone autorizzate che sono
state istruite sull'uso del dispositivo stesso.
• Non superare il carico massimo previsto per il sollevatore. In caso contrario, la centralina di
controllo si spegnerà.
• In caso di peso diverso dell'utente per il sollevatore e il sistema di seduta, rispettare sempre il
peso dell'utente più basso.
• Durante l'operazione di sollevamento è necessaria la presenza di un addetto.
• Tenere presente che alcune parti del sollevatore possono diventare molto calde o fredde a
causa della temperatura ambiente, della radiazione solare o dei dispositivi di riscaldamento.
Fare attenzione quando si toccano.
• Il sollevatore è stato sottoposto a prove di compatibilità elettromagnetica ed è conforme alla
relativa norma. Le fonti di campi elettromagnetici, come quelli di telefoni cellulari, generatori di
corrente o fonti energetiche di grande potenza, possono tuttavia influire sulle prestazioni del
sollevatore. L’elettronica del sollevatore può d’altro canto influire su altri apparati elettronici.
• Utilizzare il sollevatore solo su superfici piane dove tutte le rotelle toccano il suolo e dove c'è
un contatto sufficiente per far funzionare il sollevatore in sicurezza. Non superare ostacoli con
il sollevatore durante il trasferimento del paziente.
• Non utilizzare il sollevatore in ambienti umidi o bagnati.
• Consultare il produttore prima di modificare o sostituire i punti di assicurazione della stessa,
oppure componenti o parti della sua struttura o del suo telaio.
ATTENZIONE

Falcon
2022-11
Prima dell’uso
5
EN
NL
IT
• Prestare attenzione al fuoco, soprattutto alle sigarette accese, perché i sistemi di seduta sono
infiammabili.
Nel caso in cui si sia verificato un grave incidente con il vostro prodotto, informate Vermeiren o il
vostro rivenditore specializzato e l'autorità competente del vostro paese.

Falcon
2022-11
Utilizzo del sollevatore
6
EN
NL
IT
3 Utilizzo del sollevatore
3.1 Uso del sollevatore
Rischio di lesioni e/o danni
• Verificare che durante l'uso del sollevatore ci sia sufficiente spazio ai lati e al di sopra dello
stesso, poiché in caso contrario si potrebbero verificare danni o lesioni delle funzioni
d'impostazione durante il movimento.
• Per evitare lesioni, tenere sempre sotto controllo il braccio del sollevatore.
• Si devono utilizzare solo sistemi di seduta pensati ed approvati per il sollevatore (vedere
istruzioni per l'uso dei relativi sistemi di seduta). L'uso di altri sistemi di seduta è a proprio
rischio e pericolo.
• Per spostare il sollevatore, utilizzare solo le impugnature per la spinta e nessun altro
componente.
Osservare i dati tecnici secondo cui è possibile utilizzare il sollevatore. Il sollevatore deve essere
utilizzato solo da persone autorizzate che hanno ricevuto una formazione sull'uso dello stesso.
3.1.1 Spaziatura telaio
Per poter utilizzare una sedia a rotelle o altri dispositivi
simili con il sollevatore, ma anche per aumentare la
sicurezza d'uso del sollevatore, è possibile aumentare la
distanza tra le gambe del telaio.
Posizionarsi dietro il sollevatore assemblato, afferrare le
impugnature per la spinta del sollevatore (a destra e a
sinistra della centralina). Premere leggermente con un
piede la leva sul telaio inferiore (a destra o a sinistra)
verso il basso per aumentare o ridurre la distanza delle
gambe del telaio.
3.1.2 Freno di stazionamento
Fissare le due ruote sull'estremità posteriore del telaio
premendo leggermente con la punta del piede il pedale del
freno della ruota verso il basso finché non si blocca. Per
sbloccare il freno, premere leggermente con la punta del
piede ancora sul pedale del freno verso l'alto finché le ruote
non si sbloccano.
3.1.3 Sollevare e abbassare la traversa
Con il comando manuale è possibile regolare la traversa in qualsiasi
posizione.
= Sollevare traversa
= Abbassare traversa
Durante l'uso della funzione di sollevamento fino all'estremità del motore del
sollevatore, l'interruttore di limite è attivato dall'elettronica (funzione di
sicurezza). Utilizzare la funzione di sollevamento solo al centro dell'intervallo
di regolazione.
AVVERTENZA
1
2
1
2

Falcon
2022-11
Utilizzo del sollevatore
7
EN
NL
IT
3.1.1 Pulsante di abbassamento
Se si dovesse verificare un danno al comando manuale, è possibile
abbassare la traversa dalla centralina.
La traversa si abbassa finché viene premuto il pulsante (3) sul
pannello di comando della centralina.
3.1.2 Spostamento del sollevamalati
Rischio di lesioni
• Prestare attenzione durante il passaggio in spazi
ristretti (ad esempio, porte).
1. Posizionarsi dietro il sollevatore e afferrare le
impugnature (a destra e a sinistra, accanto alla
centralina) con entrambe le mani.
2. Accertarsi che entrambi i freni delle ruote posteriori
siano sbloccati.
3. Spostare lentamente il sollevatore nella posizione
desiderata.
A sollevatore scarico, consigliamo di spostarlo indietro
affinché sia possibile superare più facilmente gli ostacoli
(ad es. telai di porte, angoli di stanze o arredamenti).
3.1.3 Girare il sollevatore intorno al suo asse
Rischio di lesioni
• Prestare attenzione durante il passaggio in spazi
ristretti (ad esempio, porte).
• Per spostare il sollevatore, utilizzare solo le
impugnature per la spinta e nessun altro
componente.
1. Aprire le gambe del sollevatore per garantire una
maggiore stabilità.
2. Attivare i freni.
3. Posizionare il paziente nel sollevatore con
l'imbragatura appropriata. (consultare il manuale
dell'imbragatura per le istruzioni sul
posizionamento del paziente nel sollevatore).
4. Sollevare il paziente da terra, da una sedia, da un
letto, ... .
5. Allentare entrambi i freni delle ruote posteriori.
6. Posizionarsi dietro il sollevatore e afferrare con
entrambe le mani le impugnature (a sinistra e a destra, accanto alla centralina di controllo).
7. Ora girate con cautela e lentamente il sollevatore per pazienti nello stesso punto. Fare
attenzione a non toccare alcun oggetto con le gambe del sollevatore.
8. Una volta girato in posizione corretta, è possibile sollevare il paziente.
AVVERTENZA
AVVERTENZA
3

Falcon
2022-11
Utilizzo del sollevatore
8
EN
NL
IT
3.2 Sistema di seduta
Rischio di lesioni
• Utilizzare solo le imbracature appropriate per i pazienti.
• Non utilizzare imbracature danneggiate.
• Leggere prima il manuale completo delle imbragature.
• Utilizzare solo imbragature compatibili approvate da Vermeiren
Il sollevamalati deve essere utilizzato solo con imbracature progettate per sollevatori Falcon
Vermeiren (per bilancini a 4 punti).
Le indicazioni d'uso sono presenti nelle istruzioni d'uso dei relativi sistemi di seduta, vedere il
manuale separato.
3.2.1 Collegamento alla barra di sollevamento degli argani paziente
Le sistema di seduta vengono collegate attraverso le cinghie di fissaggio. Queste cinghie di
fissaggio verranno sospese sulla barra di sollevamento dell'argano paziente.
Le cinghie di fissaggio delle sistema di seduta hanno 4 lacci di colori diversi.
Cinghia di fissaggio dell sistema di seduta
Barra di sollevamento degli argani paziente
Con questi lacci è possibile sollevare il paziente in posizioni diverse. Queste posizioni dipendono
dall'altezza e peso della persona.
AVVERTENZA
Ganci per
la cinghia di
fissaggio
Nero
Giallo
Rosso
Verde

Falcon
2022-11
Utilizzo del sollevatore
9
EN
NL
IT
Spalle
Gambe
Testa
(soltanto con le sistema di
seduta comfort)
Verde
Verde
Verde
Rosso
Rosso
Rosso
Giallo
Giallo
Giallo
Nero
Nero
Nero
I poggiagambe possono essere collegati all'argano paziente secondo metodi diversi.
• Poggiagambe incrociati
Questo è il metodo più usato per collegare la cinghia. Collegare le sistema di seduta con i
poggiapiedi incrociati secondo le istruzioni seguenti:
1. Inserire la cinghia di fissaggio del poggiagambe nel laccio dell'altro poggiagambe.
2. Collegare le cinghie di fissaggio dei poggiagambe sulla barra di sollevamento
dell'argano paziente.
• Incrociato sotto entrambe le coscie
L ATTENZIONE: Rischio di caduta - Con un paziente con gambe amputate
aumenta il rischio di caduta perché il paziente perde facilmente l'equilibrio.
È possibile utilizzare questo metodo per sollevare un paziente con gambe amputate.
Collegare le sistema di seduta incrociata sotto entrambe le cosce secondo le istruzioni
seguenti:
1. Incrociare le cinghie di fissaggio del poggiagambe sotto le cosce.

Falcon
2022-11
Utilizzo del sollevatore
10
EN
NL
IT
2. Collegare le cinghie di fissaggio dei poggiagambe sulla barra di sollevamento
dell'argano paziente.
• Ogni poggiagambe separatamente sulla barra di sollevamento
L ATTENZIONE: Rischio di caduta- Questo metodo aumenta la possibilità di
scivolare fuori dall sistema di seduta.
È possibile collegare ogni poggiagambe separatamente sulla barra di sollevamento per
pazienti con genitali sensibili. Collegare le sistema di seduta con questo metodo secondo
le istruzioni seguenti:
1. Porre il poggiagambe intorno a ogni gamba separatamente, ma non incrociato.
2. Collegare le cinghie di fissaggio dei poggiagambe sulla barra di sollevamento
dell'argano paziente.
3.2.2 Posizionamento della barra di sollevamento
La barra di sollevamento deve essere sempre perpendicolare al corpo del paziente. La figura a
sinistra è il metodo giusto. La figura a destra è il modo sbagliato.
3.3 Batteria e ricarica
3.3.1 Caricabatterie
Tensione primaria
100 - 240 V CA / 50/60 Hz
Dispositivi di protezione
protetto da errori di polarità, sovratensione e surriscaldamento
Temperatura ambiente
da 0 °C a +40 °C
Lunghezza cavo di collegamento
2,0 m
Temperatura ambientale per la conservazione
da -15° C a +50° C
Umidità relativa per la conservazione
max. 95% (senza condensazione)
Dichiarazione di conformità
verificato ai sensi della direttiva IEC 60601-1
3.3.2 Carica della batteria
Utilizzare solo la centralina del dispositivo con il caricabatterie incluso.
È consigliabile ricaricare regolarmente le batterie, per garantire la continuità di utilizzo del
sollevatore ed estendere la vita utile delle batterie. La centralina indicherà con un segnale
acustico quando il livello di carica delle batteria è bassa.
Primo utilizzo
Inserire il connettore del cavo di alimentazione nell'apposito connettore della centralina. La spina
del cavo di alimentazione deve essere inserita nella presa di corrente. Il tempo di ricarica è di
circa 24 ore.

Falcon
2022-11
Utilizzo del sollevatore
11
EN
NL
IT
Ricarica
L AVVERTENZA: rischio di lesioni. Non utilizzare il sollevatore quando il cavo di
alimentazione è collegato alla presa di corrente.
Quando la batteria si sta scaricando, solo il LED di sinistra si accende in verde. Quando il livello
della batteria diventa molto basso, il LED si illumina di rosso e si sente un segnale acustico ogni
2 secondi.
La batteria è completamente carica quando tutti i LED sono completamente verdi.
Al termine della carica è sempre consigliabile rimuovere prima la spina di alimentazione dalla
presa di corrente e successivamente il connettore dalla centralina.
Non utilizzare il sollevatore durante la carica!
Se le batterie non vengono utilizzate per un lungo periodo di tempo, si scaricano lentamente
(completamente) e non possono più essere ricaricate con il caricabatterie in dotazione. È
pertanto consigliabile ricaricare le batterie almeno una volta al mese, anche se non vengono
utilizzate.
3.4 Emergenza
In casi di emergenza, è necessario utilizzare l'arresto di emergenza e la funzionalità di
abbassamento di emergenza.
3.4.1 Arresto di emergenza
In caso di emergenza e durante il montaggio e lo smontaggio, è
possibile attivare l'arresto di emergenza premendo il pulsante
rosso a destra presente sulla centralina.
L'arresto di emergenza viene disattivato ruotando il pulsante
rosso nella direzione delle frecce.
3.4.2 Abbassamento di emergenza manuale
L AVVERTENZA: rischio di lesioni. L'abbassamento di emergenza manuale deve essere
adeguato al peso del paziente.
In caso di assenza di alimentazione o di batterie scariche, l'abbassamento
di emergenza può essere effettuato premendo il pulsante rosso posto
all'estremità superiore del motore.
Si noti che l'abbassamento di emergenza manuale è possibile solo se il
paziente è seduto sul sollevatore.

Falcon
2022-11
Installazione e regolazione
12
EN
NL
IT
4 Installazione e regolazione
Il sollevatore viene consegnato completamente assemblato dal rivenditore specializzato.
Le istruzioni contenute nel presente capitolo sono destinate al rivenditore.
Per individuare il centro assistenza o il rivenditore specializzato più vicino, contattare il centro
Vermeiren.
L AVVERTENZA: Pericolo di limiti non sicuri – Utilizzare solo i limiti descritti nel presente
manuale.
4.1 Consegna
Il sollevatore Falcon Vermeiren può essere consegnato con:
• telaio comprensivo di 4 ruote (di cui due con freni)
• asta con impugnatura per la spinta
• traversa e bilancino
• centralina (compr. 2x accumulatore e comando manuale)
• caricabatterie
• motore
• manuale di istruzioni
Prima dell'uso, controllare che tutti i componenti siano inclusi e che non siano stati danneggiati,
ad esempio durante il trasporto.
Si noti che nei vari paesi europei la dotazione di base potrebbe essere diversa. Per ulteriori
informazioni, rivolgersi al rivenditore nel proprio paese.
4.2 Montaggio o smontaggio
4.2.1 Disimballaggio
L AVVERTENZA: rischio di lesioni. Dopo il disimballaggio e prima del montaggio,
verificare sempre che l'arresto di emergenza (il pulsante rosso sulla centralina)
sia premuto.
L'imballaggio del sollevatore è stato scelto per garantire una sicurezza ottimale durante il
trasporto.
1. Estrarre tutte le parti del sollevatore dal cartone e verificare
che la spedizione sia completa e i singoli componenti non
presentino difetti visibili. In caso di danni, rivolgersi al proprio
rivenditore.
2. Prima dell'installazione assicurare il sollevatore da
movimenti involontari azionando tutti i freni. Premere
leggermente con la punta del piede la piastra frenante verso
il basso fino a bloccarla. Per sbloccare il freno, premere
leggermente con la punta del piede ancora sulla piastra
frenante verso l'alto finché la ruota non si sblocca.

Falcon
2022-11
Installazione e regolazione
13
EN
NL
IT
4.2.2 Montaggio
L AVVERTENZA: rischio di intrappolamento. Verificare che durante il
montaggio nessuna parte del corpo o nessun cavo venga incastrato
o schiacciato.
1. Inserire l'asta verticale nel telaio inferiore e serrare saldamente la leva.
2. Posizionare il motore nei suoi attacchi sull’ asta verticale e sul braccio
del paranco (4) e fissarlo in posizione con i perni.
3. Per il primo utilizzo: Montare la centralina di comando sull’ asta
verticale stringendo i due bulloni.
4.2.3 Smontaggio
L AVVERTENZA: rischio di intrappolamento. Verificare che durante lo
smontaggio nessuna parte del corpo o nessun cavo venga
incastrato o schiacciato.
L AVVERTENZA: rischio di lesioni. Verificare che l'arresto di
emergenza (pulsante rosso sulla centralina) sia attivato, per evitare
spostamenti involontari.
1. Fissare le due ruote sull'estremità posteriore del telaio premendo
leggermente con la punta del piede il pedale del freno della ruota verso
il basso finché non si blocca. Per sbloccare il freno, premere
leggermente con la punta del piede ancora sul pedale del freno verso
l'alto finché le ruote non si sbloccano.
2. Sganciare il motore dal braccio di sollevamento e dall' asta verticale
rimuovendo i perni (4).
3. Rimuovere la leva ed estrarre l'asta verticale dal telaio inferiore.
4
3
4
3

Falcon
2022-11
Manutenzione
14
EN
NL
IT
5 Manutenzione
5.1 Intervalli di manutenzione
Rischio di lesioni e danni
Riparazioni e sostituzioni devono essere eseguite esclusivamente da personale con un’opportuna
formazione e utilizzando unicamente ricambi originali Vermeiren.
L’ultima pagina di questo manuale contiene un modulo di registrazione che consente ai
rivenditori specializzati di registrare ogni intervento di assistenza.
La frequenza dell'assistenza dipende dalla frequenza e dall’intensità dell’uso. Concordare con il
proprio rivenditore un calendario comune per le attività di ispezione / manutenzione / riparazione.
Per il manuale di manutenzione, fare riferimento al sito Web di Vermeiren all’indirizzo
www.vermeiren.com.
Prima di ciascun utilizzo
Verificare i seguenti punti:
• Tutti i componenti: presenza, integrità e assenza di usura.
• Tutti i componenti: pulizia, vedere il § 5.3.
• Condizioni dei componenti del telaio: assenza di deformazioni, instabilità, punti deboli o
raccordi allentati.
• Freni: nessun danno visibile e/o sporcizia.
• Scatola di comando, comando manuale, caricabatteria e relativi cavi: nessun danno, ad
esempio fili sfilacciati, rotti o esposti. Controllare che la regolazione elettrica del braccio a
sbalzo funzioni correttamente, utilizzando il comando manuale.
• Stato delle batterie: ricarica secondo necessità, vedere il § 3.3.
8 settimane circa
In funzione della frequenza d’uso, verificare quanto segue:
• Lubrificazione dei raccordi articolati della trasversa
• Stato delle ruote
• Sono visibili danni all'alloggiamento della centralina, batterie, caricabatterie (se disponibile)
e del comando manuale?
• Stato del cavo idoneo all'uso
• Ricaricare la batteria
Ogni sei mesi o per ogni nuovo paziente
In funzione della frequenza d’uso, verificare quanto segue:
• Pulizia
• Stato generale
• Controllo del funzionamento del caricabatteria.
• Funzionamento delle ruote
Se le ruote oppongono eccessiva resistenza è necessario pulirle. Se questa operazione non
consente di risolvere il problema, consultare il rivenditore specializzato.
Annualmente o con maggiore frequenza
Almeno una volta all’anno, o con maggiore frequenza, richiedere al proprio rivenditore
specializzato un intervento di ispezione e manutenzione del sollevatore. La frequenza minima di
manutenzione dipende dall’uso, e deve pertanto essere concordata con il proprio rivenditore
specializzato.
ATTENZIONE

Falcon
2022-11
Manutenzione
15
EN
NL
IT
5.2 Spedizione e magazzinaggio
• La spedizione e il magazzinaggio del sollevatore devono avvenire come indicato nelle
specifiche tecniche riportate nel §7. Avere cura di immagazzinare il sollevatore in un luogo
asciutto.
• Evitare che i cavi siano schiacciati o piegati.
• Scollegare il solleva ammalati dalla presa.
• Fornire copertura o imballaggio adeguato per proteggere il sollevatore da ruggine e oggetti
estranei (ad esempio, acqua salata, aria salmastra, sabbia, polvere).
• Conservare insieme tutte le parti rimosse, o contrassegnarle se necessario, per evitare di
confonderle con altri prodotti al momento del montaggio (Ad esempio, il caricabatterie).
• Assicurarsi che non vengano riposti oggetti sopra o contro il sollevatore per pazienti e i suoi
componenti per evitare danni.
5.3 Pulizia
Rischio di danni da umidità
• Non pulire il sollevatore con manichette o pulitrici ad alta pressione.
• Per rimuovere lo sporco più resistente, utilizzare un detergente delicato disponibile in
commercio.
• Eliminare le macchie con una spugna o una spazzola morbida.
• Non utilizzare detergenti aggressivi, ad esempio solventi, né spazzole dure.
5.3.1 Componenti in plastica
Per pulire tutte le parti in plastica del sollevatore, utilizzare detergenti per plastica disponibili in
commercio. Attenersi alle istruzioni che accompagnano il detergente e utilizzare solo spazzole o
spugne morbide.
5.3.2 Rivestimento
La qualità elevata del trattamento superficiale garantisce una protezione ottimale contro la
corrosione. Se il rivestimento esterno è danneggiato da rigature o in altri modi, far riparare la
superficie dal rivenditore.
Durante la pulizia, utilizzare solo acqua tiepida e detergenti per uso domestico, con spazzole e
panni morbidi. Non far entrare umidità all'interno dei tubi.
5.3.3 Alloggiamento elettronica
L AVVERTENZA: Rischio di lesione – Prima di eseguire operazioni di manutenzione,
attivare l'arresto di emergenza, in caso contrario potrebbero verificarsi movimenti
involontari.
Per pulire la centralina, l'alloggiamento del motore ed il comando manuale utilizzare
esclusivamente un panno umido imbevuto con un po' di detergente per uso domestico. Non
utilizzare prodotti o utensili di pulizia abrasivi (spugnette metalliche, spazzole etc.) onde evitare
di rigare la superficie dell'unità di comando compromettendo la protezione contro gli spruzzi.
Verificare regolarmente che i connettori non siano corrosi o danneggiati onde evitare che il
funzionamento dell'elettronica ne risenta.
La casa costruttrice declina qualsiasi responsabilità per danni derivanti da carenze nella cura del
prodotto.
ATTENZIONE

Falcon
2022-11
Manutenzione
16
EN
NL
IT
5.4 Disinfezione
L AVVERTENZA: prodotti pericolosi. L'utilizzo di disinfettanti è limitato al personale
autorizzato.
Tutte le parti del sollevatore possono essere trattate con un disinfettante commerciale. Seguire
le istruzioni del disinfettante.
Le istruzioni per il lavaggio delle imbragature sono riportate nel manuale delle imbragature e
sull'etichetta di ogni imbragatura.
5.5 Controllo
Inizialmente è preferibile un controllo all'anno e almeno uno prima della ripresa dell'utilizzo.
Eseguire tutti i controlli indicati di seguito accompagnati da documentazione compilata da
personale autorizzato:
• Verifica dei cablaggi (in particolare: schiacciamenti, abrasioni, tagli, isolamento visibile dei
conduttori, conduttori metallici visibili, pieghe, gobbe, cambiamenti di colore della guaina
esterna, infragilimenti, spostamento sicuro in modo che l'azione di schiacciamento o tagli e gli
altri stress meccanici siano improbabili).
• Esame visivo delle deformazioni plastiche e/o dell'usura dei componenti del telaio (telaio,
sospensione del motore, traversa, bilancino).
• Controllo visivo per escludere danni alla verniciatura (rischio di corrosione).
• Esame visivo dei danni agli involucri, le viti devono essere serrate.
• Verifica della quantità di grasso sulle giunzioni metalliche delle parti mobili.
• Esame visivo delle fessure e della fragilità di tutti le parti in plastica.
• Verifica della corrente di dispersione della scatola di controllo (compreso il caricabatterie) (A)
in base alla norma VDE 0702.
• Verifica della resistenza d'isolamento della scatola di controllo (compreso il caricabatterie)
(MO) in base alla norma VDE 0702.
• Test funzionale della traversa (lubrificazione dei raccordi, zona di regolazione, deformazione,
usura).
• Verifica del funzionamento dei motori del sollevatore (con marcia di prova → rumorosità,
velocità, marcia regolare, e così via). Se necessario: misurazione delle prestazioni, dapprima
senza carico, poi al carico nominale ("SWL"), per valutare l’usura dei motori confrontando i
valori dell’assorbimento di corrente con i dati tecnici forniti al momento della consegna del
prodotto.
• Test funzionale dell'arresto di emergenza.
• Test funzionale dell'abbassamento di emergenza.
• Verifica della completezza della condizione di consegna e della disponibilità del manuale di
istruzioni.
Le misurazioni devono essere eseguite da personale specializzato nel settore dei presìdi per
disabili e da elettricisti specializzati in strumenti e procedimenti di controllo. L'autorizzazione
all'uso del sollevatore dopo i controlli e le manutenzioni è di competenza dell'elettricista. La
manutenzione deve essere eseguita solo da personale autorizzato e documentata come da
programma.
Gli interventi di manutenzione, se sono stati controllati almeno gli aspetti menzionati, devono
essere riportati nella scheda del piano di manutenzione.

Falcon
2022-11
Manutenzione
17
EN
NL
IT
5.6 Durata prevista
Il sollevatore è costruito in modo da permettere una durata media di vita di 8 anni. Tale valore
aumenta o diminuisce a seconda della frequenza di utilizzo, dello stoccaggio, della
manutenzione, dell'assistenza e della pulizia.
5.7 Utilizzi successivi
Prima di ogni utilizzo successivo, fare disinfettare, ispezionare e sottoporre a manutenzione il
sollevatore secondo le istruzioni di questo capitolo.
5.8 Fine vita
A fine vita, occorre smaltire il sollevatore conformemente alla legislazione ambientale locale. Il
modo migliore per farlo consiste nello smontare il sollevatore per agevolare il trasporto dei
componenti riciclabili.

Falcon
2022-11
Soluzione dei problemi di funzionamento
18
EN
NL
IT
6 Soluzione dei problemi di funzionamento
Tabella 1: Soluzione dei problemi di funzionamento
Problema
Causa del problema
Risoluzione del problema
Rumore provocato dalle parti
mobili (ad esempio la
traversa).
Necessaria la lubrificazione.
Lubrificare le parti mobili.
(Non lubrificare il motore di
azionamento!)
Il motore di azionamento
produce un rumore insolito.
Motore di azionamento
danneggiato.
Sostituire il motore di
azionamento o contattare il
rivenditore.
Il sollevatore non solleva più.
1. Motore di azionamento
elettrico danneggiato.
2. Peso del paziente eccessivo (Il
LED di sovraccarico sul
comando manuale si accende).
3. Controllo manuale o motore di
azionamento non collegato.
4. Batteria non collegata, o
collegata in modo non
corretto, alla centralina.
5. Batteria scarica.
6. Arresto di emergenza attivato.
1. Sostituire il motore di
azionamento.
2. Utilizzare un sollevatore
con un peso massimo per i
pazienti più elevato.
3. Controllare i collegamenti.
Se necessario collegare il
controllo manuale o il
motore di azionamento.
4. Verificare che la batteria sia
presente e installata in
modo corretto.
5. Caricare le batterie o
sostituirle.
6. Disattivare l'arresto di
emergenza.
L'abbassamento di
emergenza del paziente non
funziona.
È previsto un peso di carico minimo
per l'abbassamento del paziente.
Se il peso del paziente è troppo
limitato, abbassare leggermente
la traversa o regolare la velocità
di abbassamento.
Impossibile ricaricare la
batteria
1. Batteria non posizionata
correttamente nella centralina.
2. Cavo di alimentazione
difettoso.
3. Batterie difettose.
4. Scatola di controllo con
caricabatterie incluso o
caricabatterie difettosa.
1. Verificare che le batterie
siano collegate alla
centralina.
2. Sostituire il cavo di
alimentazione.
3. Sostituire le batterie.
4. Sostituire la centralina
con caricabatterie incluso
o caricabatterie.

Falcon
2022-11
Specifiche tecniche
19
EN
NL
IT
7 Specifiche tecniche
700
Direzione avanti

Falcon
2022-11
Specifiche tecniche
20
EN
NL
IT
Tabella 2: Specifiche tecniche
Marchio
Vermeiren
Tipo
Sollevatore di pazienti
Modello
Falcon
Descrizione
Misurazione
nel disegno
Dimensioni
Posizione più bassa ZAP*
l
509 mm
Altezza massima ZAP*
k
1609 mm
Area di sollevamento (portata in altezza)
m
1100 mm
Lunghezza gamba
1042 mm
Lunghezza totale
1158 mm
Distanza minima gambe
r
506 mm
Distanza massima gambe
q
970 mm
Altezza gamba / altezza telaio
n
149 mm
112,5 mm
Larghezza totale (chiuso), ingombro
565 mm
Larghezza totale (aperto), ruote anteriori
p
1026 mm
Lunghezza ripiegata
1236 mm
Altezza ripiegata
294 mm
Larghezza ripiegata
565 mm
Distanza minima tra parete / CSP* (portata
massima)
w3
36 mm
Distanza minima tra parete / CSP* (altezza
minima)
w2
263,5 mm
Distanza minima tra parete / ZAP* (altezza
massima)
w1
65 mm
Raggio di curva
1188 mm
Peso complessivo
35 kg
Peso telaio
16,5 kg
Peso della centralina di controllo + batteria
3 kg
Peso del telaio superiore (braccio a sbalzo /
barra divaricatrice + motore + centralina)
18,5 kg
Carico massimo
130 kg
Distanza dal suolo
15,5 mm
Portata massima a 600 mm
a
557 mm
Portata massima dalla trave
b
557 mm
Portata dalla traversa con distanza di 700 mm
c
323 mm
Tensione in uscita
24V max. 250 VA
Temperatura d'esercizio
+5 °C fino a +40°C
Umidità relativa
da 20% a 80% a 30°C, senza produzione di
condensa
Pressione acustica
< 54 dB (A)
Centralina
TiMOTION TC20
Batteria
Non applicabile

Falcon
2022-11
Specifiche tecniche
21
EN
NL
IT
Marchio
Vermeiren
Tipo
Sollevatore di pazienti
Modello
Falcon
Descrizione
Misurazione
nel disegno
Dimensioni
Comanda manuale
TiMOTION TH10
Motore
TiMOTION TA23
Classe di protezione centralina
IP54
Classe di protezione batteria
Non applicabile
Classe di protezione comando manuale
IP54
Classe di protezione motore
IP54
Classe di isolamento
II - Tipo B
Funzionamento periodico
max. 10% o 2 min. funzionamento continuo/18
min. pausa
Capacità delle batteria
2.9 Ah
Arresto di emergenza
Sì
Abbassamento di emergenza manuale
Sì
Abbassamento elettrico di emergenza
No
I dati tecnici sono soggetti a modifiche. Tolleranza +/- 15 mm / 1,5 kg / 1,5°
1 = Posizione più alta, 2 = Portata massima, 3 = Posizione più bassa
* ZAP = punto di sollevamento centrale


EN
NL
ES
Falcon
2022-11
Índice
1
Índice
Índice ........................................................................................................................ 1
Introducción ............................................................................................................... 2
1 Su producto ................................................................................................... 3
2 Antes de su uso ............................................................................................ 4
2.1 Uso previsto .................................................................................................. 4
2.2 Instrucciones generales de seguridad ........................................................... 4
3 Utilizar el elevador ........................................................................................ 6
3.1 Manejo del elevador ...................................................................................... 6
3.2 Sistema de asiento........................................................................................ 8
3.3 Batería y carga ............................................................................................ 10
3.4 Emergencia ................................................................................................. 11
4 Instalación y ajuste ..................................................................................... 12
4.1 Entrega ....................................................................................................... 12
4.2 Montaje o desmontaje ................................................................................. 12
5 Mantenimiento............................................................................................. 14
5.1 Tiempo de mantenimiento ........................................................................... 14
5.2 Envío y almacenamiento ............................................................................. 15
5.3 Limpieza ...................................................................................................... 15
5.4 Desinfección ............................................................................................... 15
5.5 Inspección ................................................................................................... 16
5.6 Vida útil prevista .......................................................................................... 16
5.7 Reutilizar ..................................................................................................... 16
5.8 Fin de vida útil ............................................................................................. 17
6 Solución de averías .................................................................................... 18
7 Especificaciones técnicas ......................................................................... 19

EN
NL
ES
Falcon
2022-11
Introducción
2
Introducción
¡Felicidades! Es usted el propietario de un elevador Vermeiren.
Este producto ha sido fabricado por personal experto y cualificado. Se ha diseñado y fabricado
según los más altos estándares de calidad implementados por Vermeiren.
Le agradecemos su confianza en los productos Vermeiren. Le ofrecemos este manual para
ayudarle en la utilización de su elevador y sus opciones de manejo. Léalo detenidamente. Le
ayudará a familiarizarse con el manejo, las capacidades y limitaciones de su producto.
Si todavía tiene alguna duda después de leer este manual, contacte con su distribuidor
especializado, estará encantado de ayudarle.
Nota importante
Para garantizar su seguridad y prolongar la vida útil de su producto, cuídelo bien y asegúrese de
realizar revisiones y mantenimientos de manera regular.
Este manual refleja los desarrollos más recientes del producto. Vermeiren se reserva el derecho
a implementar cambios en este tipo de producto sin que ello suponga obligación alguna de
adaptar o cambiar productos similares previamente entregados.
Las imágenes del producto están presentes para clarificar las instrucciones contenidas en este
manual. Los detalles del producto mostrado pueden variar con su producto.
Información disponible
En nuestro sitio web http://www.vermeiren.com/ siempre encontrará la versión más reciente de
la información en este manual. Consulte este sitio web de manera regular para estar al tanto de
posibles actualizaciones.
Las personas con discapacidad visual pueden descargarse la versión electrónica del manual y
utilizar un software de síntesis de voz para poder oír su contenido.
Este manual de usuario
Para el usuario y el distribuidor especializado
Manual de mantenimiento
Para el distribuidor especializado
Declaración CE de conformidad

EN
NL
ES
Falcon
2022-11
Su producto
3
1 Su producto
1. Brazo basculante
2. Percha extensible
3. Motor
4. Chasis
5. Rueda
6. Panel de control
7. Asa de empuje
8. Manejo manual
9. Parada de emergencia
10. Mástil
11. Pedal apertura del chasis
12. Rueda con freno
1
2
9
10
8
7
4
6
5
11
3
12

EN
NL
ES
Falcon
2022-11
Antes de su uso
4
2 Antes de su uso
2.1 Uso previsto
Este párrafo describe brevemente el uso previsto del elevador. También se incluyen avisos
pertinentes a las instrucciones en otros párrafos. De esta manera se pretende avisar al usuario
de un eventual mal uso del elevador.
• Indicaciones y contraindicaciones: Este elevador está pensado para que lo maneje un
asistente para trasladar a pacientes sentados entre, por ejemplo, sillas de ruedas, camas de
enfermería y baños. El elevador está diseñado y fabricado para ser una ayuda de
transporte/transferencia para personas mayores o personas que sufren parálisis, pérdida o
defectos de las extremidades, rigidez o daños en las articulaciones, problemas
cardiovasculares, caquexia, ...
• Este elevador es apto para su uso en interiores.
• Este elevador está diseñado y fabricado exclusivamente para transportar a una (1) persona
con un peso máximo según las especificaciones en §7. No está diseñada para transportar
mercancías u objetos, o para otros usos que no sean los descritos anteriormente.
• Utilizar sólo accesorios y piezas de repuesto aprobadas por Vermeiren.
• Consulte todos los datos técnicos y las limitaciones del elevador en el capítulo 7.
• La garantía de este producto se basa en el uso y mantenimiento normales descritos en este
manual. La garantía se invalida si el producto sufre cualquier daño causado por un uso
indebido o falta de mantenimiento.
2.2 Instrucciones generales de seguridad
Riesgo de lesiones y daños
Lea y siga las instrucciones contenidas en este manual. De no seguirlas, puede acabar
lesionándose a sí mismo, o acabar rompiendo el elevador.
Tener en cuenta las siguientes advertencias durante su utilización:
• El elevador sólo debe ser manejado por personal cualificado que haya sido instruido o formado
en su aplicación específica.
• No supere la carga máxima del elevador de pacientes. Esto desconectará la caja de control.
• En caso de que haya diferentes pesos de usuario para el elevador y el sistema de asiento,
observe siempre el peso más bajo del usuario.
• Es necesario que un asistente esté presente durante la operación de elevación.
• Tener en cuenta que ciertas partes del elevador pueden llegar a calentarse o enfriarse
demasiado a causa de la temperatura ambiente, la luz del sol o equipos de calefacción. Tener
siempre cuidado al tocar el elevador.
• Se han realizado pruebas sobre la compatibilidad electromagnética del elevador, y cumple con
los estándares. Aun así, es posible que un campo electromagnético influya en el
funcionamiento del elevador, como los campos de teléfonos móviles, generadores eléctricos,
o fuentes de alimentación de alta potencia. Por otro lado, los componentes electrónicos del
elevador también pueden afectar a otros aparatos eléctricos.
• Utilice el elevador únicamente en superficies planas en las que todas las ruedas toquen el
suelo y en las que haya suficiente contacto para manejar el elevador con seguridad. No tome
obstáculos con el elevador mientras transfiere a un paciente.
• No utilice el elevador en entornos húmedos o mojados.
• No realizar alteraciones o sustituciones a los puntos de sujeción o a piezas o componentes
del bastidor o estructurales sin antes consultar al fabricante del elevador.
• Asegurarse de que manos, ropa, cinturones, hebillas o joyas no queden atrapados por las
ruedas u otras piezas móviles durante su uso.
• Tenga cuidado con las fuentes de ignición, como los cigarrillos encendidos, ya que pueden
incendiar el sistema de asiento.
PRECAUCIÓN

EN
NL
ES
Falcon
2022-11
Antes de su uso
5
En caso de que se produzca un incidente grave con su producto, notifique a Vermeiren o a su
distribuidor especializado, así como a la autoridad competente de su país.

EN
NL
ES
Falcon
2022-11
Utilizar el elevador
6
3 Utilizar el elevador
3.1 Manejo del elevador
Riesgo de lesiones y daños
• Tenga en cuenta que, para usar el elevador, debe tener suficiente espacio a los lados del
elevador y sobre éste, ya que de lo contrario, al moverse las funciones de ajuste pueden
causar daños o lesiones.
• Vigile siempre el brazo de elevación para evitar lesiones.
• Sólo se pueden emplear sistemas de asiento aprobados y previstos para el elevador de
pacientes (véanse las instrucciones de uso de los sistemas de asiento correspondientes). Si
usa otros sistemas de asiento, será por su propio riesgo.
• Utilice únicamente los asideros para empujar/tirar de la grúa de paciente, ningún otro
componente.
Tenga en cuenta las especificaciones técnicas por las que se debe regir el elevador de pacientes.
El manejo del elevador de pacientes se debe encomendar exclusivamente a personas
autorizadas formadas en su uso y manejo.
3.1.1 Extensión del chasis
Para conectar al elevador una silla de ruedas u otro
elemento de asiento, así como para elevar la estabilidad
del elevador, se puede incrementar la distancia del
brazo del chasis.
Sitúese detrás del elevador montado y sujete los
asideros de empuje del elevador de pacientes (a
izquierda y derecha, junto a la caja de control). Con un
pie, presione ligeramente el pulsador basculante
situado en la parte inferior del chasis (izquierda o
derecha) y podrá aumentar o reducir la distancia del
brazo del chasis.
3.1.2 Frenos de estacionamiento
Fije las dos ruedas posteriores del chasis presionando
ligeramente hacia abajo los pedales de freno con la punta del
pie hasta que queden encastrados. Para soltar los frenos,
vuelva a presionar ligeramente los pedales con la punta del
pie hacia arriba hasta que las ruedas queden libres.
3.1.3 Subir y bajar el brazo basculante
El control manual permite ajustar gradualmente el brazo basculante en
cualquier punto.
= Levantar la brazo basculante
= Bajar la brazo basculante
Al usar la función de elevación hasta el extremo del motor elevador, el sistema
electrónico activa el interruptor limitador (función de seguridad). Emplee la
función de elevación únicamente en el centro del rango de ajuste.
PRECAUCIÓN
1
2
1
2

EN
NL
ES
Falcon
2022-11
Utilizar el elevador
7
3.1.4 Botón de bajada
Si se produjera un daño en el mando manual, la pluma se puede bajar
usando el panel de control.
La pluma baja mientras se mantenga pulsado el botón del panel de
mando.
3.1.5 Mover el elevador de pacientes
Riesgo de lesiones
• Tenga cuidado al pasar por lugares estrechos (p. ej.
puertas).
1. Sitúese detrás del elevador de pacientes y sujete
los asideros (a izquierda y derecha, junto a la caja
de control) con las dos manos.
2. Asegúrese de que los dos frenos de las ruedas
traseras estén sueltos.
3. Desplace lentamente el elevador de pacientes
hasta la posición deseada.
Si no lleva carga, recomendamos que mueva el
elevador de pacientes hacia atrás, para superar los
obstáculos (como umbrales, esquinas o muebles) con
mayor facilidad.
3.1.6 Gire el elevador alrededor de su eje
Riesgo de lesiones
• Tenga cuidado de que no haya personas u objetos
en el rango de oscilación del elevador.
• Gire el elevador con cuidado y lentamente alrededor
de su eje, para que el paciente no pueda salirse.
1. Abra las patas del elevador para darle más
estabilidad.
2. Active los frenos.
3. Coloque al paciente en el elevador con el sistema
de asiento adecuado. (consulte el manual del
sistema de asiento para ver las instrucciones de
colocación del paciente en el elevador).
4. Eleve al paciente desde el suelo, la silla, la cama,...
5. Afloje los dos frenos de las ruedas traseras.
6. Colóquese detrás del elevador y agarre con ambas
manos los asideros (izquierda y derecha junto a la
caja de control).
7. Ahora gire el elevador con cuidado, lentamente alrededor del mismo lugar. Tenga cuidado
de no tocar ningún objeto con las patas del elevador.
8. Cuando esté girado en la posición buena, puede levantar al paciente.
PRECAUCIÓN
PRECAUCIÓN
3

EN
NL
ES
Falcon
2022-11
Utilizar el elevador
8
3.2 Sistema de asiento
Riesgo de lesiones
• Use solo arneses adecuados para los pacientes.
• No utilice arneses dañados.
• Lea primero el manual completo de los sistemas de asiento.
• Utilice únicamente arneses compatibles aprobados por Vermeiren.
El elevador de pacientes solo se debe usar con arneses diseñados para los elevadores de
pacientes Vermeiren Falcon (para percha extensible de 4 puntos).
Debe seguirse la aplicabilidad y las instrucciones de uso de los arneses específicos, véase el
manual separado.
3.2.1 Fijación a la barra esplegadora del elevador de pacientes
El sistema de asiento debe fijarse a través de las correas de montaje. Las correas de montaje
quedarán suspendidas de la barra esplegadora del elevador de pacientes.
Las correas de montaje del sistema de asiento tienen cuatro ojales de diferentes colores.
Correa de montaje del sistema de asiento
Barra esplegadora del elevador de pacientes
Gracias a los ojales, es posible levantar al paciente en diferentes posiciones, las cuales
dependen de la altura y el peso de la persona.
PRECAUCIÓN
Ganchos para
la correa de
montaje
Negro
Amarillo
Rojo
Verde

EN
NL
ES
Falcon
2022-11
Utilizar el elevador
9
Hombros
Piernas
Cabeza
(solo con el sistema
de asiento comfort)
Verde
Verde
Verde
Rojo
Rojo
Rojo
Amarillo
Amarillo
Amarillo
Negro
Negro
Negro
Existen varios métodos para fijar los reposapiernas al elevador de pacientes.
• Reposapiernas cruzados
Este es el método más utilizado para fijar el sistema de asiento. Siga las instrucciones que
se indican a continuación para fijar los reposapiernas al sistema de asiento con el
procedimiento cruzado:
1. Pase la correa de montaje de uno de los reposapiernas por el ojal del otro
reposapiernas
2. Fije las correas de montaje de los reposapiernas a la barra esplegadora del
elevador de pacientes .
• Cruzados bajo ambos muslos
L ATENCIÓN: Riesgo de caída. Los pacientes con las piernas amputadas tienen
más probabilidades de caerse debido a que pueden perder el equilibrio con más
facilidad.
Este método puede utilizarse para levantar a pacientes con las piernas amputadas. Siga
las instrucciones que se indican a continuación para fijar el sistema de asiento con el
procedimiento cruzado bajo ambos muslos:

EN
NL
ES
Falcon
2022-11
Utilizar el elevador
10
1. Cruce las correas de montaje de los reposapiernas por debajo de los muslos.
2. Fije las correas de montaje de los reposapiernas a la barra esplegadora del
elevador de pacientes.
• Fijación de los reposapiernas por separado a la barra esplegadora
L ATENCIÓN: Riesgo de caída. Este método aumenta las probabilidades de
deslizarse del sistema de asiento.
La fijación por separado de cada reposapiernas a la barra esplegadora puede utilizarse
con pacientes que tengan problemas en los genitales. Siga las instrucciones que se
indican a continuación para fijar el sistema de asiento con este método:
1. Coloque las piernas en los reposapiernas, primero una y luego la otra, pero no las
cruce.
2. Fije las correas de montaje de los reposapiernas a la barra esplegadora del
elevador de pacientes.
3.2.2 Posición de la barra esplegadora
La barra esplegadora debe estar siempre perpendicular al cuerpo del paciente. La figura
izquierda es el método correcto. La figura derecha muestra la orientación equivocada.
3.3 Batería y carga
3.3.1 Cargador de baterías
Voltaje primario
100 - 240 V CA / 50/60 Hz
Protecciones
Protegido contra polarización inversa, sobrecargas
eléctricas y temperatura extrema
Temperatura ambiente
de 0 °C a +40°C
Longitud cable de conexión
2,0 m
Temperatura ambiente de almacenamiento
-15 °C a +50°C
Humedad relativa de almacenamiento
máx. 95% (sin condensación)
Conformidad
comprobada según IEC 60601-1
3.3.2 Carga de las baterías
Use solo la caja de control con el cargador de batería incluido.
Se recomienda recargar las baterías regularmente para asegurarse de que el elevador siga
operativo y para ampliar la vida útil de las baterías. La caja de control emitirá un sonido de
advertencia para indicarle que la batería está baja.
Primer uso
Inserte primero el cable de alimentación por el lado del conector en el conector adecuado de la
caja de control. El lado del enchufe del cable de alimentación se debe insertar en la toma de
pared. La carga dura unas 24 horas.

EN
NL
ES
Falcon
2022-11
Utilizar el elevador
11
Recarga
L ADVERTENCIA: Riesgo de lesiones: no utilice el elevador con el cable de alimentación
conectado a la toma de pared.
Cuando la batería se está agotando, sólo el LED izquierdo se iluminará en verde. Cuando el nivel
de la batería sea muy bajo, el LED se iluminará en rojo y se escuchará un pitido cada 2 segundos.
La batería está completamente cargada cuando todos los LEDs están completamente verdes.
Una vez finalizado el proceso de recarga, debe desconectar siempre en primer lugar el cable de
alimentación de la toma de pared y luego el enchufe del conector de la caja de control.
No utilice el elevador mientras se está recargando.
Si las baterías no se usan durante un período considerable de tiempo, se descargan solas
lentamente (descarga profunda). En estos casos, es imposible recargarlas con el cargador de
baterías suministrado. Por tanto, es necesario recargarlas como mínimo una vez al mes aunque
no se utilicen.
Consulte las instrucciones de uso en el manual del usuario de los sistemas de asiento
correspondientes.
3.4 Emergencia
En casos de emergencia, se deben usar la parada de emergencia y la función de bajada de
emergencia.
3.4.1 Parada de emergencia
En caso de emergencia y durante el montaje y desmontaje, la
parada de emergencia se activa presionando el botón rojo de la
caja de control.
el botón y gire en la dirección de las flechas. Si el botón está
completamente presionado hacia atrás, gire en la dirección
opuesta a las flechas.
La parada de emergencia se desactiva girando el botón rojo en
la dirección de las flechas.
3.4.2 Bajada de emergencia manual
L ADVERTENCIA: Riesgo de lesiones: ajuste la bajada de
emergencia manual para el peso del paciente.
En caso de corte del suministro eléctrico o cuando las baterías estén vacías,
la bajada de emergencia se puede realizar por medio del tirador rojo del
extremo superior del motor.
Tenga en cuenta que la bajada de emergencia manual solo es posible
cuando el paciente está sentado en el elevador de pacientes.

EN
NL
ES
Falcon
2022-11
Instalación y ajuste
12
4 Instalación y ajuste
El elevador se entrega completamente montado por su distribuidor especializado.
Este capítulo contiene instrucciones destinadas a los distribuidores especializados.
Para encontrar un centro de servicio o un distribuidor especializado cerca de usted, póngase en
contacto con el centro Vermeiren más próximo.
L ADVERTENCIA: Riesgo por cotos peligrosos – Utilice únicamente los cotos indicados
en este manual.
4.1 Entrega
El elevador de pacientes Vermeiren Falcon se entrega con:
• chasis y 4 ruedas (2 con frenos)
• poste con asideros de empuje
• brazo basculante y percha extensible
• panel de control (incl. 2 pilas recargables y mando manual)
• cargador de baterías
• motor
• manual de instrucciones
Antes de utilizarlo, compruebe que ha recibido todo el material y que no ha sufrido ningún daño
(por culpa del transporte u otro motivo).
Tenga en cuenta que la configuración básica puede variar de un país de Europa a otro. Póngase
en contacto con el distribuidor especializado de su país para obtener más información.
4.2 Montaje o desmontaje
4.2.1 Desembalaje
L ADVERTENCIA: Riesgo de lesiones: después de desembalar y antes de continuar con
el montaje, compruebe siempre que el botón de parada de emergencia (pulsador rojo
de la caja de control) esté presionado.
El embalaje del elevador de pacientes se ha seleccionado para garantizar una protección óptima
durante el transporte.
1. Saque todas las piezas del elevador de pacientes de la caja y
compruebe que están todos los elementos y que ninguna
pieza presente defectos visibles. Si detecta daños, diríjase a
su sucursal distribuidora.
2. Antes de montar el elevador, active los frenos de las ruedas
para que no se mueva inesperadamente. Presione
ligeramente con la punta del pie sobre la placa de freno de las
ruedas hacia abajo, hasta que se bloqueen. Para soltar el
freno, vuelva a presionar ligeramente con la punta del pie
hacia arriba hasta que las ruedas queden libres.

EN
NL
ES
Falcon
2022-11
Instalación y ajuste
13
4.2.2 Montaje
L ADVERTENCIA: Riesgo de aplastamiento: tenga cuidado de no
atrapar, aplastar ni cortar ninguna parte del cuerpo o cable durante
el montaje.
1. Inserte el mástil vertical en el bastidor inferior y apriete bien la palanca.
2. Coloque el motor en sus fijaciones en el mástil vertical y en el brazo de
elevación (4) y fíjelo en su sitio con los pasadores.
3. Para el primer uso: Monte la caja de control en el mástil vertical
apretando los dos pernos
4.2.3 Desmontaje
L ADVERTENCIA: Riesgo de aplastamiento: tenga cuidado de no
atrapar, aplastar ni cortar ninguna parte del cuerpo o cable durante
el desmontaje.
L ADVERTENCIA: Riesgo de lesiones: compruebe que el botón de
parada de emergencia (pulsador rojo de la caja de control) esté
activado para evitar movimientos de ajuste accidentales.
1. Fije las dos ruedas posteriores del chasis presionando ligeramente hacia
abajo los pedales de freno con la punta del pie hasta que queden
encastrados. Para soltar los frenos, vuelva a presionar ligeramente los
pedales con la punta del pie hacia arriba hasta que las ruedas queden
libres.
2. Suelte el motor del brazo de elevación y del mástil vertical retirando los
pasadores (4).
3. Retire la palanca y saque el mástil vertical del bastidor inferior.
4
3
4
3

EN
NL
ES
Falcon
2022-11
Mantenimiento
14
5 Mantenimiento
5.1 Tiempo de mantenimiento
Riesgo de lesiones y daños
Cualquier reparación o cambios sólo pueden llevarse a cabo por personal debidamente
cualificado y sólo pueden utilizarse piezas de recambio Vermeiren originales (véase el manual
de mantenimiento).
La última página de este manual contiene un formulario de registro para que el distribuidor
especializado pueda registrar cada mantenimiento.
La frecuencia de los mantenimientos depende de la frecuencia e intensidad de uso. Póngase en
contacto con su distribuidor para acordar un horario común para realizar inspecciones,
mantenimientos y reparaciones.
Para consultar el manual de mantenimiento, visitar el sitio web de Vermeiren:
www.vermeiren.com.
Antes de cada uso
Inspeccionar los siguientes aspectos:
• Todas las piezas: presentes, sin daños ni desgastes.
• Todas las piezas: limpias, véase el §5.3
• Estado de las piezas del bastidor: sin deformaciones, inestabilidad, debilidad o conexiones
sueltas
• Frenos: sin daños visibles y/o suciedad. Elimine la suciedad, ya que podría perjudicar el
movimiento y el agarre de las ruedas. Si una rueda está dañada, acuda a un taller
autorizado para su reparación.
• Caja de control, mando manual, cargador de baterías, cables correspondientes: no hay
daños como cables deshilachados, rotos o expuestos. Compruebe que el ajuste eléctrico
del brazo en voladizo funciona correctamente, utilizando el control manual.
• Estado de la batería: recargar la batería cuando sea necesario, véase el §3.3.
Aprox. Cada 8 semanas
En función de la frecuencia de uso, compruebe los siguientes puntos:
• Lubricación de las uniones articuladas en la pluma
• Estado de las ruedas
• Si hay algún daño visible en la carcasa, en la caja de control, en el cargador de baterías (si
está disponible) o en el mando.
• ¿El estado de los cables es seguro para circular?
• recargar la batería
Aprox. Cada 6 meses o para cada nuevo usuario
En función de la frecuencia de uso, compruebe los siguientes puntos:
• Limpieza
• Estado general
• Que funcione el cargador
• Función de las ruedas
En caso de resistencia excesiva al rodar, limpie las ruedas. Si no basta para arreglar el problema,
póngase en contacto con su distribuidor especializado.
Anualmente o más regularmente
El elevador debe pasar por inspección y mantenimiento realizados por el distribuidor
especializado por lo menos una vez al año, o más a menudo. La frecuencia mínima de
mantenimiento depende del uso y debe, por tanto, acordarse mutuamente con el distribuidor
especializado.
PRECAUCIÓN

EN
NL
ES
Falcon
2022-11
Mantenimiento
15
5.2 Envío y almacenamiento
• El transporte y almacenamiento debe llevarse a cabo según las especificaciones técnicas en
§7. Asegurarse de que el elevador esté almacenado en un lugar seco.
• Evite que los cables se aplasten o se doblen con torceduras.
• Desconecte el elevador de pacientes de la toma de salida.
• Recubra y embale adecuadamente l'elevador de pacientes para protegerla del óxido y de
cuerpos extraños. (p. ej. agua salada, aire del mar, arena, polvo, etc.).
• Almacene todas las partes desmontadas juntas en el mismo sitio (o identifíquelas si es
necesario) para evitar mezclarlas con otros productos al volver a montar la silla (p. ej. cargador
de baterías).
• Segúrese de que no hay objetos almacenados sobre o contra el elevador y sus componentes
para evitar daños.
5.3 Limpieza
Riesgo de daños por humedad
• No utilizar nunca una manguera o un limpiador a alta presión.
• Utilice un detergente comercial suave para retirar la suciedad rebelde.
• Las manchas se pueden eliminar con una esponja o un cepillo suave.
• No emplee líquidos agresivos de limpieza, como disolventes. Tampoco debe usar cepillos
duros.
5.3.1 Piezas de plástico
Limpie las piezas de plástico de su elevador de pacientes con limpiadores de plástico
comerciales. Lea la información específica del producto y use solo un cepillo o una esponja
suave.
5.3.2 Recubrimiento
La alta calidad de los acabados de las superficies garantiza una protección óptima contra la
corrosión. Si el revestimiento exterior presenta arañazos u otros daños, pida a su distribuidor
especializado que repare la superficie afectada.
Durante la limpieza, utilice solo agua tibia y productos de limpieza normales, cepillos y paños
suaves. Asegúrese de que no entra humedad en los tubos.
5.3.3 Carcasa de electrónica
L ADVERTENCIA: Riesgo de lesiones – Antes de realizar trabajos de mantenimiento, se
debe activar la parada de emergencia, ya que de lo contrario se pueden producir
desplazamientos inesperados.
El panel de control, la carcasa del motor y el mando manual se deberán limpiar únicamente con
un paño húmedo con un poco de limpiador doméstico. No utilice materiales de pulimento ni
utensilios de limpieza con bordes cortantes (esponja de metal, cepillos, etc.), ya que la superficie
el mando del operador se puede rayar, dañándose así la protección contra las salpicaduras.
Compruebe regularmente que las conexiones insertables no estén corroídas ni dañadas, puesto
que esto puede mermar la funcionalidad de la electrónica.
El fabricante no asume ningún tipo de responsabilidad por la falta de cuidados.
5.4 Desinfección
L ADVERTENCIA: Productos peligrosos: el uso de desinfectantes está restringido al
personal autorizado.
PRECAUCIÓN

EN
NL
ES
Falcon
2022-11
Mantenimiento
16
Todas las partes de l'elevador de pacientes se pueden limpiar frotando con un desinfectante
comercial. Siga las instrucciones del desinfectante.
Las instrucciones de lavado de los arneses se encuentran en el manual del arnés y en la etiqueta
de cada arnés.
5.5 Inspección
En principio recomendamos una inspección anual y, una como mínimo, cuando finaliza el uso.
Todas las verificaciones que se indican a continuación deben ser realizadas y documentadas por
personal autorizado:
• Compruebe el cableado (especialmente, verifique la ausencia de aplastamientos, desgastes
o cortes en las partes visibles del aislamiento de los hilos, núcleos metálicos visibles, pliegues,
cambios de color de la capa exterior, secciones frágiles, así como la correcta posición para
evitar efectos mecánicos como cortes o aplastamientos).
• Inspeccione visualmente el estado de las partes del bastidor para detectar posibles
deformaciones y/o desgastes del plástico (bastidor, suspensión del motor, brazo basculante,
abrazadera de ampliación).
• Verifique visualmente el estado de la pintura (peligro de corrosión).
• Inspeccione visualmente todas las carcasas para detectar posibles daños o tornillos sueltos.
• Verifique la cantidad de grasa en las juntas metálicas de las partes móviles.
• Verifique visualmente la ausencia de roturas y puntos frágiles en todas las piezas de plástico.
• Revise la corriente de descarga residual de la caja de control (incluido el cargador) (A) según
VDE 0702.
• Revise la resistencia de aislamiento de la caja de control (incluido el cargador) (MO) según
VDE 0702.
• Compruebe que el brazo basculante funcione (lubricación de las piezas de unión, rango de
ajuste, deformación y desgaste).
• Compruebe el funcionamiento de los elementos de circulación (en un recorrido de prueba →
ruidos, velocidad, desplazamiento libre, etc.), si es necesario: mida el rendimiento, primero sin
carga y después con la carga nominal ("SWL"), para estudiar el desgaste y la abrasión de los
motores comparando los valores de la corriente eléctrica con los valores en el momento de la
entrega.
• Prueba de funcionamiento de la parada de emergencia.
• Prueba de funcionamiento de la bajada de emergencia.
• ¿Se han suministrado todos los componentes? ¿Dispone de manual de instrucciones?
Las pruebas de medición sólo pueden ser realizadas por personas que dispongan de una
formación relacionada con el elevador y que hayan sido instruidas por un electricista sobre los
medios y procedimientos de prueba que se deben utilizar. La autorización para usar el elevador
de pacientes ruedas después de realizadas las pruebas de medición o las medidas de
mantenimiento sólo puede ser otorgada por un electricista.
Solo deberá firmar el plan de mantenimiento una vez se hayan verificado todos los aspectos
mencionados anteriormente como mínimo.
5.6 Vida útil prevista
La vida útil media del elevador es de 8 años. La vida útil aumentará o disminuirá dependiendo
de la frecuencia de uso, las circunstancias de conducción y el mantenimiento.
5.7 Reutilizar
Antes de reutilizar el elevador por otra persona, desinfectarla, inspeccionarla y hacer que pase
por un mantenimiento según las instrucciones de este capítulo.

EN
NL
ES
Falcon
2022-11
Mantenimiento
17
5.8 Fin de vida útil
Al final de la vida útil, deberá desechar el elevador siguiendo las leyes medioambientales de su
localidad. Para transportar materiales reciclables del elevador de manera más cómoda, se
recomienda que se desmonte primero.

EN
NL
ES
Falcon
2022-11
Solución de averías
18
6 Solución de averías
Tabla 1: Solución de averías
Problema
Causa del problema
Solución del problema
Ruido en las partes móviles
(por ejemplo, en el brazo
basculante).
Lubricación necesaria.
Engrase las partes móviles.
(No engrase el accionador).
El accionador hace un ruido
extraño.
El accionador está dañado.
Sustituya el accionador o póngase en
contacto con el distribuidor
especializado.
El elevador de pacientes no
se eleva.
1. El accionador eléctrico
está dañado.
2. El peso del usuario es
demasiado elevado (El
LED de sobrecarga en el
control manual se
enciende).
3. El control manual o el
accionador no está
conectado.
4. La batería no está
conectada o está mal
conectada a la caja de
control.
5. Batería demasiado baja.
6. Parada de emergencia
activada.
1. Sustituya el accionador.
2. Utilice el elevador de pacientes
con un peso de usuario máximo
más elevado.
3. Revise las conexiones. En caso
necesario, conecte el control
manual o accionador.
4. Verifique que la batería esté
instalada o compruebe la
conexión de la batería.
5. Cargue o sustituya las baterías.
6. Desactive la parada de
emergencia.
La bajada de paciente en
caso de emergencia no
funciona.
Para bajar el paciente es
necesaria una carga de peso
mínima.
Si el peso del paciente es demasiado
bajo, tire ligeramente por los brazos
basculantes o ajuste la velocidad de
bajada.
No se puede cargar la
batería.
1. Las baterías no están
bien insertadas en la caja
de control.
2. Cable de alimentación
defectuoso.
3. Baterías defectuosas.
4. Defecto en la caja de
control con cargador
incluido o cargador.
1. Revise que las baterías estén
conectadas a la caja de
control.
2. Cambie el cable de
alimentación.
3. Sustituya la batería.
4. Sustituya la caja de control con
cargador incluido o cargador.

EN
NL
ES
Falcon
2022-11
Especificaciones técnicas
19
7 Especificaciones técnicas
700
Dirección de avance

EN
NL
ES
Falcon
2022-11
Especificaciones técnicas
20
Tabla 2: Especificaciones técnicas
Marca
Vermeiren
Tipo
Elevador de pacientes
Modelo
Falcon
Description
Dimensiones
en el plano
Dimensions
Posición más baja ZAP*
l
509 mm
Altura máxima ZAP*
k
1609 mm
Rango de elevación (altura alcanzada)
m
1100 mm
Longitud del brazo
1042 mm
Longitud total
1158 mm
Distancia mínima brazo
r
506 mm
Distancia máxima brazo
q
970 mm
Altura de las patas / altura del chasis
n
149 mm
112,5 mm
Anchura total (cerrado), dimensiones
exteriores
565 mm
Anchura total (abierto), ruedas delanteras
p
1026 mm
Longitud plegada
1236 mm
Altura plegada
294 mm
Anchura plegada
565 mm
Distancia mín. entre la pared / CSP* (alcance
máximo)
w3
36 mm
Distancia mín. entre la pared / CSP* (altura
mínima)
w2
263,5 mm
Distancia mín. entre la pared / ZAP* (altura
máxima)
w1
65 mm
Radio de giro
1188 mm
Peso total
35 kg
Peso del chasis
16,5 kg
Peso de la caja de control + batería
3 kg
Peso del bastidor superior (brazo en voladizo
/ barra de separación + motor + caja de
control)
18,5 kg
Carga máxima
130 kg
Altura libre al suelo
15,5 mm
Alcance máximo a 600 mm
a
557 mm
Anchura máxima desde el soporte
b
557 mm
Anchura máxima desde el soporte con una
distancia de 700 mm
c
323 mm
Salida de tensión
24V máx. 250 VA
Temperatura de servicio
de +5°C a +40°C
Humedad relativa
del 20% al 80% a 30 °C – sin condensación
Nivel de ruido
< 54 dB (A)

EN
NL
ES
Falcon
2022-11
Especificaciones técnicas
21
Marca
Vermeiren
Tipo
Elevador de pacientes
Modelo
Falcon
Description
Dimensiones
en el plano
Dimensions
Panel de control
TiMOTION TC20
Batería
No aplicable
Control manual
TiMOTION TH10
Motor
TiMOTION TA23
Clase de protección del panel de control
IP54
Clase de protección de la batería
No aplicable
Clase de protección del control manual
IP54
Clase de protección del motor
IP54
Clase de aislamiento
II - Tipo B
Modo periódico
máx. 10% o 2 min. de servicio
ininterrumpido/18 min. pausa
Capacidad de la batería
2.9 Ah
Parada de emergencia
Sí
Bajada manual de emergencia
Sí
Bajada eléctrica de emergencia
No
Derechos de modificación reservados. Tolerancia de la medida +/- 15 mm/ 1,5 kg
1 = posición superior, 2 = alcance máximo, 3 = posición inferior
* ZAP = Tope central


Falcon
2022-11
Spis treści
1
EN
NL
PL
Spis treści
Spis treści .................................................................................................................. 1
Wstęp ........................................................................................................................ 2
1 Państwa produkt ........................................................................................... 3
2 Przed użyciem ............................................................................................... 4
2.1 Przewidziane zastosowanie .......................................................................... 4
2.2 Ogólne instrukcje bezpieczeństwa ................................................................ 4
3 Użytkowanie podnośnika pacjenta .............................................................. 6
3.1 Obsługa podnośnika pacjenta ....................................................................... 6
3.2 Siedzisko ....................................................................................................... 8
3.3 Akumulator i ładowanie ............................................................................... 10
3.4 Nagłe przypadki .......................................................................................... 11
4 Montaż i regulacja ....................................................................................... 13
4.1 Dostawa ...................................................................................................... 13
4.2 Montaż lub demontaż .................................................................................. 13
5 Konserwacja ................................................................................................ 15
5.1 Czas konserwacji ........................................................................................ 15
5.2 Wysyłka I Przechowywanie ......................................................................... 15
5.3 Czyszczenie ................................................................................................ 16
5.4 Dezynfekcja ................................................................................................ 16
5.5 Kontrola ....................................................................................................... 17
5.6 Przewidywany okres użytkowania ............................................................... 17
5.7 Ponowne użycie .......................................................................................... 17
5.8 Koniec użytkowania .................................................................................... 17
6 Diagnozowanie i rozwiązywanie problemów ............................................ 18
7 Parametry techniczne ................................................................................. 19

Falcon
2022-11
Wstęp
2
EN
NL
PL
Wstęp
Gratulacje! Zostałeś właścicielem podnośnika pacjenta Vermeiren!
Produkt ten został wykonany przez wykwalifikowany i zaangażowany personel. Zaprojektowano
i wyprodukowano go zgodnie z wysokimi standardami jakości, jakich przestrzega Vermeiren.
Dziękujemy za zaufanie firmie Vermeiren i jej produktom. Niniejsza instrukcja pomoże
właścicielowi w eksploatacji podnośnika pacjenta i korzystaniu z jego opcji. Prosimy o uważne
przeczytanie instrukcji obsługi. Pozwoli ona na zapoznanie się z działaniem, możliwościami i
ograniczeniami produktu.
W razie pytań, które nie zostały omówione w instrukcji, prosimy o kontakt z Państwa
wyspecjalizowanym sprzedawcą. Sprzedawca chętnie służy pomocą w tym zakresie.
Ważna uwaga
Aby zapewnić bezpieczeństwo i wydłużyć okres użytkowania produktu, prosimy o dbanie o niego
oraz regularne dokonywanie przeglądów i serwisowanie.
Instrukcja obejmuje najnowsze rozwiązania zastosowane w produkcie. Firma Vermeiren ma
prawo do wprowadzania zmian w produktach tego typu bez obowiązku adaptowania lub wymiany
podobnych, poprzednio dostarczonych produktów.
Ilustracje stanowią dodatkowe objaśnienia do niniejszej instrukcji. Szczegóły przedstawionego
produktu mogą różnić się od Państwa produktu.
Dostępne informacje
W naszej witrynie internetowej http://www.vermeiren.com/ our website
http://www.vermeiren.com/ zawsze można znaleźć najnowszą wersję następujących informacji.
Prosimy regularnie odwiedzać witrynę, ponieważ możemy w niej zamieszczać zaktualizowane
informacje.
Osoby niewidome lub niedowidzące mogą pobrać elektroniczną wersję niniejszej instrukcji i
odsłuchać ją w aplikacji syntezatora mowy.
Niniejsza instrukcja użytkownika
Dla użytkownika i wyspecjalizowanego sprzedawcy
Instrukcja serwisowa
Dla wyspecjalizowanego sprzedawcy
Deklaracja zgodności WE

Falcon
2022-11
Państwa produkt
3
EN
NL
PL
1 Państwa produkt
1. Wysięgnik
2. Orczyk
3. Silnik
4. Podstawa jezdna
5. Kółko jezdne
6. Skrzynka kontrolna
7. Uchwyt do przesuwania
8. Panel obsługi ręcznej
9. Przycisk zatrzymania
awaryjnego
10. Słup
11. Pedał rozszerzenia
podstawy jezdnej
12. Kółko jezdne z hamulcem
1
2
9
10
8
7
4
6
5
11
3
12

Falcon
2022-11
Przed użyciem
4
EN
NL
PL
2 Przed użyciem
2.1 Przewidziane zastosowanie
W niniejszej sekcji przedstawiono krótki opis przewidzianego zastosowania podnośnika pacjenta.
W pozostałych sekcjach instrukcje zostały opatrzone istotnymi ostrzeżeniami. W ten sposób
chcemy zwrócić uwagę użytkowników na możliwość nieprawidłowej eksploatacji produktu.
• Wskazania i przeciwwskazania: Podnośnik pacjenta jest przeznaczony do obsługi przez osobę
towarzyszącą w celu przenoszenia pacjentów siedzących, np. pomiędzy wózkami inwalidzkimi,
łóżkami pielęgnacyjnymi i łazienkami. Podnośnik pacjenta został zaprojektowany i
wyprodukowany jako pomoc w transporcie/przenoszeniu osób starszych lub osób, które cierpią
na paraliż, utratę lub ubytki kończyn, sztywne lub uszkodzone stawy, problemy z układem
krążenia, wyniszczenie organizmu, ... .
• Ten podnośnik pacjenta jest przeznaczony do użytku w pomieszczeniach i na zewnątrz.
• Ten podnośnik pacjenta jest zaprojektowany i produkowany do transportu wyłącznie jednej (1)
osoby ważącej maksymalnie zgodnie z zaleceniami podanymi w §7. Nie jest przeznaczony do
transportu towarów, przedmiotów ani innego wykorzystania niż wcześniej opisane.
• Używać wyłącznie akcesoriów i części zapasowych zatwierdzonych przez Vermeiren.
• Należy się zapoznać ze wszystkimi danymi technicznymi i ograniczeniami podnośnika
pacjenta, które wskazano w rozdziale 7.
• Gwarancja na produkt jest udzielona przy założeniu normalnego użytkowania i konserwacji,
opisanych w niniejszej instrukcji. Uszkodzenie produktu spowodowane nieprawidłową
eksploatacją lub brakiem konserwacji spowoduje unieważnienie gwarancji.
2.2 Ogólne instrukcje bezpieczeństwa
Ryzyko obrażeń i/lub uszkodzeń
Należy przeczytać zalecenia podane w niniejszej instrukcji i postępować zgodnie z nimi.
Niestosowanie się do tych zaleceń może spowodować uraz lub uszkodzenie podnośnika
pacjenta.
Podczas eksploatacji należy pamiętać o następujących ogólnych ostrzeżeniach:
• Podnośnik pacjenta może być obsługiwany wyłącznie przez wykwalifikowany personel, który
został poinstruowany lub przeszkolony w zakresie konkretnego zastosowania.
• Nie wolno przekraczać maksymalnego obciążenia podnośnika pacjenta. Spowoduje to
wyłączenie skrzynki sterowniczej.
• W przypadku różnej wagi użytkownika podnośnika pacjenta i zawiesi zawsze należy
przestrzegać najniższej wagi użytkownika.
• Podczas podnoszenia musi być obecna osoba towarzysząca.
• Należy pamiętać, że niektóre części podnośnika pacjenta mogą stać się bardzo gorące lub
zimne ze względu na temperaturę otoczenia, promieniowanie słoneczne lub urządzenia
grzewcze itp. Należy zachować ostrożność podczas ich dotykania.
• Podnośnik pacjenta został przetestowany pod kątem kompatybilności elektromagnetycznej.
Zgodność z normą została potwierdzona. Niemniej jednak, źródła pól elektromagnetycznych,
takie jak telefony komórkowe, agregaty prądotwórcze i źródła energii wielkiej mocy mogą
zakłócić działanie podnośnika pacjenta. Z drugiej strony, układy elektroniczne podnośnika
pacjenta mogą zakłócić działanie innych urządzeń elektronicznych.
• Podnośnika pacjenta należy używać wyłącznie na płaskich powierzchniach, gdzie wszystkie
kółka dotykają podłoża i gdzie jest wystarczający kontakt, aby bezpiecznie obsługiwać
podnośnik pacjenta. Podczas przenoszenia pacjenta nie należy pokonywać przeszkód za
pomocą podnośnika pacjenta.
• Nie używać podnośnika pacjenta w środowisku mokrym lub wilgotnym.
• Bez konsultacji z producentem nie wolno w żaden sposób modyfikować ani wymieniać
punktów bezpieczeństwa podnośnika pacjenta, części i elementów konstrukcyjnych i ramy.
PRZESTROGA

Falcon
2022-11
Przed użyciem
5
EN
NL
PL
• Zwracać uwagę, aby ręce, ubrania, pasy, klamry ani biżuteria nie zostały podczas eksploatacji
pochwycone przez koła ani inne ruchome części.
• Należy uważać na źródła zapłonu, takie jak zapalone papierosy, ponieważ mogą one
spowodować zapalenie się zawiesia.
W przypadku wystąpienia poważnego incydentu z udziałem produktu, należy powiadomić firmę
Vermeiren lub specjalistycznego sprzedawcę, jak również właściwe władze w swoim kraju.

Falcon
2022-11
Użytkowanie podnośnika pacjenta
6
EN
NL
PL
3 Użytkowanie podnośnika pacjenta
3.1 Obsługa podnośnika pacjenta
Ryzyko urazów i/lub uszkodzeń
• Podczas korzystania z podnośnika należy upewnić się, że wokół i nad nim jest wystarczająco
dużo miejsca, ponieważ w przeciwnym razie ruchy regulacyjne mogą doprowadzić do
uszkodzeń lub obrażeń.
• Aby uniknąć obrażeń, należy zawsze zwracać uwagę na ramię podnoszące.
• Należy używać wyłącznie zawiesi zaprojektowanych i zatwierdzonych dla pacjentów (patrz
instrukcje użytkowania różnych zawiesi). Korzystanie z innych zawiesi odbywa się na własne
ryzyko.
• Do pchania/ciągnięcia podnośnika pacjenta należy używać wyłącznie uchwytów, nie wolno
używać innych elementów.
Podczas obsługi podnośnika pacjenta należy uwzględnić dane techniczne. Podnośnik może być
obsługiwany wyłącznie przez upoważniony do tego personel, który został przeszkolony w
zakresie jego użytkowania i obsługi.
3.1.1 Poszerzanie podstawy jezdnej
Istnieje możliwość zwiększenia rozstawu ramion
jezdnych, dzięki czemu pacjent może siedzieć na wózku
lub na innym sprzęcie, a podnośnik jest bardziej stabilny.
Należy stanąć za zmontowanym w pełni podnośnikiem i
złapać za uchwyty do prowadzenia podnośnika (po lewej
i prawej stronie, obok skrzynki sterującej). Naciśnij lekko
w dół stopą wspornik znajdujący się w dolnej części
podstawy jezdnej (z lewej lub z prawej strony). Rozstaw
ramion podstawy jezdnej można teraz w łatwy sposób
zmniejszyć lub zwiększyć.
3.1.2 Hamulce postojowe
Zabezpiecz dwa kółka jezdne znajdujące się na tylnym
końcu podstawy jezdnej, naciskając lekko w dół stopą
pedał hamulca kółek jezdnych aż do momentu ich
zablokowania. Aby zwolnić hamulec, naciskaj stopą
pedał hamulca lekko w górę, aż do momentu
odblokowania kółek jezdnych.
OSTRZEŻENIE

Falcon
2022-11
Użytkowanie podnośnika pacjenta
7
EN
NL
PL
3.1.3 Podnoszenie i obniżanie ramienia wspornika
Możliwość ustawiania ręcznego pozwala łatwo ustawić ramię wspornika w
dowolnym miejscu.
= Podnoszenie wysięgnika
= Obniżanie wysięgnika
W przypadku użycia podnośnika aż do końca przy silniku podnośnika,
zostanie elektronicznie aktywowany wyłącznik krańcowy (funkcja
zabezpieczająca). Podnoszenie należy wykonywać tylko na środkowych
parametrach zakresu regulacji.
3.1.4 Przycisk opuszczania
W przypadku uszkodzenia panelu obsługi ręcznej wysięgnik można
obniżyć za pomocą skrzynki kontrolnej.
Wysięgnik będzie przesuwał się w dół tak długo, jak długo będzie
naciśnięty przycisk znajdujący w polu obsługi skrzynki kontrolnej.
3.1.5 Przesuwanie podnośnika
Ryzyko przytrzaśnięcia
• Zachowaj ostrożność podczas przejazdu przez ograniczone przestrzenie (np. drzwi).
Należy stanąć za podnośnikiem i złapać obiema rękami
za uchwyty (lewy i prawy, obok skrzynki sterującej).
1. Upewnij się, że oba hamulce tylnych kół
jezdnych są zwolnione.
2. Przesuwaj podnośnik pacjenta powoli do
żądanej pozycji.
Jeśli na podnośniku nie jest przewożony pacjent,
można prowadzić podnośnik do tyłu. Pozwoli to na
łatwe omijanie przeszkód (np. ościeżnic drzwiowych,
rogów w pokojach lub mebli).
OSTRZEŻENIE
1
2
3
1
2

Falcon
2022-11
Użytkowanie podnośnika pacjenta
8
EN
NL
PL
3.1.6 Obracanie podnośnika pacjenta wokół własnej osi
Ryzyko obrażeń
• Należy uważać, aby w zasięgu obrotu podnośnika pacjenta nie znajdowały się żadne osoby
ani przedmioty.
• Ostrożnie i powoli obróć podnośnik pacjenta wokół jego osi, tak aby pacjent nie mógł się
wychylić.
1. Otwórz nogi podnośnika pacjenta, aby zapewnić
mu większą stabilność.
2. Uruchomić hamulce.
3. Umieścić pacjenta w podnośniku pacjenta za
pomocą odpowiedniego zawiesia. (instrukcje
dotyczące umieszczania pacjenta w dźwigu
znajdują się w instrukcji obsługi zawiesia).
4. Podnieś pacjenta z ziemi, krzesła, łóżka, ... .
5. Poluzować oba hamulce kół tylnych.
6. Stanąć za podnośnikiem pacjenta i chwycić obiema
rękami uchwyty (lewy i prawy obok skrzynki
sterowniczej).
7. eraz ostrożnie i powoli obróć podnośnik pacjenta w
tym samym miejscu. Uważaj, aby nie dotknąć
żadnych przedmiotów nogami podnośnika
pacjenta.
8. Po obróceniu w prawidłowej pozycji można
podnieść pacjenta w dół.
3.2 Siedzisko
Ryzyko obrażeń
• Należy używać Falcon wyłącznie odpowiednich dla pacjentów pasów nośnych.
• Nie należy używać uszkodzonych pasów nośnych.
• Najpierw przeczytaj pełną instrukcję obsługi pasów.
• Używaj wyłącznie kompatybilnych zawiesi zatwierdzonych przez firmę Vermeiren.
Z podnośnikiem osobowym należy używać wyłącznie pasów nośnych zaprojektowanych
specjalnie do podnośników Falcon firmy Vermeiren (mającymi czteropunktowe orczyki).
Wskazówki dotyczące zastosowania znajdują się w instrukcjach obsługi siedzisk.
3.2.1 Mocowanie na poprzeczce podnośnika
Pasy nośne należy umocować przy użyciu pasków mocujących. Paski mocujące należy
zawiesić na poprzeczce podnośnika.
Paski mocujące pasów nośnych są zakończone 4 pętlami w różnych kolorach.
OSTRZEŻENIE
OSTRZEŻENIE

Falcon
2022-11
Użytkowanie podnośnika pacjenta
9
EN
NL
PL
Pasek mocujący
Poprzeczka podnośnika
Pętle umożliwiają podnoszenie pacjenta w różnych pozycjach. Pozycje są uzależnione od
wzrostu i wagi pacjenta.
Ramiona
Nogi
Głowa
(tylko w pasach
nośnych Comfort)
Zielona
Zielona
Zielona
Czerwona
Czerwona
Czerwona
Żółta
Żółta
Żółta
Czarna
Czarna
Czarna
Haki na
pasek mocujący
Czarna
Żółta
Czerwona
Zielona

Falcon
2022-11
Użytkowanie podnośnika pacjenta
10
EN
NL
PL
Pasy siedziska mogą zostać umocowane do podnośnika na jeden z kilku sposobów.
• Skrzyżowane pasy siedziska
Jest to najczęstszy sposób mocowania pasa nośnego. Aby umocować pas nośny ze
skrzyżowanymi pasami siedziska, należy:
1. Przełożyć pasek mocujący pasa siedziska przez pętlę drugiego pasa siedziska.
2. Umocować paski mocujące pasów siedziska do poprzeczki podnośnika.
• Skrzyżowane pod obydwoma udami
L PRZESTROGA: Ryzyko upadku – Pacjenci po amputacji nóg są bardziej
zagrożeni wypadnięciem, ponieważ mogą z łatwością utracić równowagę.
Tę metodę można stosować podczas podnoszenia pacjenta po amputacji nóg. Aby
umocować pas nośny z pasami siedziska skrzyżowanymi pod obydwoma udami, należy:
1. Skrzyżować pasek mocujący pasa siedziska pod udami.
2. Umocować paski mocujące pasów siedziska do poprzeczki podnośnika.
• Każdy z pasów siedziska oddzielnie na poprzeczce
L PRZESTROGA: Ryzyko upadku– Ta metoda zwiększa ryzyko wysunięcia się
pacjenta z pasa nośnego.
Mocowanie każdego z pasów siedziska oddzielnie do poprzeczki może być odpowiednie
w przypadku pacjentów z wrażliwymi genitaliami. Aby umocować pas nośny tym
sposobem, należy:
1. Owinąć pasy siedziska wokół każdej z nóg oddzielnie, a nie skrzyżowane.
2. Umocować paski mocujące pasów siedziska do poprzeczki podnośnika.
3.2.2 Pozycja poprzeczki
Poprzeczka musi być zawsze ułożona prostopadle do ciała pacjenta. Rysunek po lewej stronie
przedstawia prawidłowy sposób. Rysunek po prawej stronie przedstawia nieprawidłowy sposób.
3.3 Akumulator i ładowanie
3.3.1 Ładowarka akumulatorów
Napięcie pierwotne
100 - 240VAC / 50/60 Hz
Zabezpieczenia
Zabezpieczono przed polaryzacją zaporową,
wyładowaniami elektrycznymi i skrajnymi temperaturami
Dopuszczalna temperatura otoczenia
od 0 °C do +40°C
Długość przewodu przyłączeniowego
2,0 m
Dopuszczalna temperatura przechowywania
od -15 °C do +50°C
Dopuszczalna wilgotność względna przechowywania
maks. 95% (bez efektu kondensacji)
Zgodność
sprawdzone wg IEC 60601-1

Falcon
2022-11
Użytkowanie podnośnika pacjenta
11
EN
NL
PL
3.3.2 Ładowanie akumulatorów
Należy korzystać wyłącznie ze skrzynki sterującej podnośnika z dołączoną ładowarką.
Zalecamy regularne ładowanie akumulatorów, aby zapewnić ciągłość użytkowania podnośnika
oraz wydłużyć żywotność akumulatorów. Skrzynka sterująca wyda informacyjny dźwięk
ostrzegawczy, kiedy poziom naładowania akumulatora będzie niski.
Pierwsze użycie
W pierwszej kolejności należy podłączyć kabel zasilający od strony złącza do odpowiedniego
złącza skrzynki sterującej. Od strony wtyczki kabel zasilający należy podłączyć do gniazdka. Czas
ładowania wynosi ok. 24 godziny.
Ponowne ładowanie
L OSTRZEŻENIE: Ryzyko urazu – nie należy korzystać z podnośnika, kiedy kabel
zasilający jest podłączony do gniazdka.
Gdy bateria jest na wyczerpaniu, tylko lewa dioda LED będzie świecić na zielono. Gdy poziom
baterii będzie bardzo niski, dioda LED zaświeci się na czerwono i co 2 sekundy będzie słychać
sygnał dźwiękowy.
Akumulator jest w pełni naładowany, gdy wszystkie diody LED są w pełni zielone.
Kiedy proces ładowania się zakończy, należy zawsze najpierw wyłączyć główną wtyczkę z
gniazdka, a następnie odłączyć złącze od skrzynki sterującej.
Nie należy korzystać z podnośnika w trakcie ładowania!
Jeżeli akumulatory nie są używane przez dłuższy okres, ulegają powolnemu samoczynnemu
rozładowaniu (nadmierne rozładowanie). Doładowanie ich za pomocą dołączonej do podnośnika
ładowarki akumulatorów staje się wtedy niemożliwe. Należy zatem ładować akumulatory
przynajmniej raz na miesiąc, nawet jeśli nie są używane.
3.4 Nagłe przypadki
W razie nagłego przypadku należy użyć przycisku awaryjnego oraz funkcji obniżania w razie
wypadku.
3.4.1 Przycisk awaryjny
W razie nagłych wypadków oraz w trakcie montażu i demontażu,
należy aktywować przycisk awaryjny, przyciskając czerwony
przycisk na skrzynce sterującej.
Przycisk awaryjny dezaktywuje się przekręcając czerwony
przycisk zgodnie z kierunkiem jaki wskazują strzałki.

Falcon
2022-11
Użytkowanie podnośnika pacjenta
12
EN
NL
PL
3.4.2 Ręczne obniżanie awaryjne
L OSTRZEŻENIE: Ryzyko urazu – należy dostosować funkcję
obniżania awaryjnego do wagi pacjenta.
Obniżenie awaryjne w przypadku braku zasilania lub rozładowania się
akumulatora może być dokonane za pomocą czerwonego przycisku
znajdującego się w górnej części silnika.
Należy pamiętać, że ręczne obniżanie awaryjne jest możliwe wyłącznie
jeśli pacjent siedzi w podnośniku.

Falcon
2022-11
Montaż i regulacja
13
EN
NL
PL
4 Montaż i regulacja
Podnośnik pacjenta jest dostarczany w pełni zmontowany przez specjalistycznego sprzedawcę.
Instrukcje zawarte w niniejszym rozdziale są przeznaczone dla wyspecjalizowanego
sprzedawcy.
Aby uzyskać informację o odpowiednim punkcie serwisowym lub wyspecjalizowanym
sprzedawcy, skontaktuj się z najbliższym przedstawicielem firmy Vermeiren.
L OSTRZEŻENIE: Istnieje ryzyko stosowania groźnych dla bezpieczeństwa zakresów -
Należy używać wyłącznie zakresów opisanych w niniejszej instrukcji.
4.1 Dostawa
Dostarczany podnośnik Falcon firmy Vermeiren będzie zawierał:
• podwozie wyposażone w 4 kółka (w tym 2 z hamulcami)
• słupek z uchwytami do prowadzenia podnośnika
• wysięgnik i orczyk
• skrzynka kontrolna z 2 akumulatorami i panelem obsługi ręcznej
• ładowarka akumulatorów
• silnik
• instrukcję obsługi
Przed użyciem należy się upewnić, że produkt zawiera wszystkie elementy oraz że żaden z
elementów nie uległ uszkodzeniu (np. podczas transportu).
Należy pamiętać, że podstawowa konfiguracja może się różnić w zależności od danego kraju
europejskiego. Aby uzyskać więcej informacji, należy skontaktować się z wyspecjalizowanym
sprzedawcą w swoim kraju.
4.2 Montaż lub demontaż
4.2.1 Rozpakowywanie
L OSTRZEŻENIE: Ryzyko urazu – po rozpakowaniu i przed dalszym montażem, zawsze
należy w pierwszej kolejności upewnić się, że przycisk awaryjny (czerwony przycisk na
skrzynce sterującej) został wciśnięty.
Opakowanie podnośnika pacjenta wybrano pod kątem zapewnienia optymalnej ochrony podczas
transportu.
1. Wyciągnij wszystkie części podnośnika pacjenta z kartonu i
sprawdź kompletność dostawy oraz to, czy poszczególne
części nie posiadają widocznych usterek. W przypadku
uszkodzeń zwróć się do lokalnej filii dystrybucyjnej.
2. Przed montażem zabezpiecz podnośnik pacjenta przed
niezamierzonym ruchem za pomocą wszystkich rolek
hamujących. W tym celu naciskaj stopą płytkę hamulcową
kółek jezdnych lekko w dół, do momentu ich zablokowania.
Aby zwolnić hamulec, naciskaj stopą płytkę hamulcową
lekko w górę, do momentu odblokowania kółka jezdnego.

Falcon
2022-11
Montaż i regulacja
14
EN
NL
PL
4.2.2 Montaż
L OSTRZEŻENIE: Ryzyko przytrzaśnięcia – należy uważać, aby żadna
część ciała ani przewód nie zostały przytrzaśnięte, zmiażdżone lub
przecięte w trakcie montażu.
1. Włożyć pionowy słupek do dolnej ramy i mocno dokręcić dźwignię.
2. Umieścić silnik w jego mocowaniach na słupie pionowym i ramieniu
dźwigu (4) i zabezpieczyć na miejscu za pomocą kołków.
3. Do pierwszego użycia: Zamontować skrzynkę sterowniczą do słupa
pionowego, dokręcając dwie śruby.
4.2.3 Demontaż
L OSTRZEŻENIE: Ryzyko przytrzaśnięcia – należy uważać, aby żadna
część ciała ani przewód nie zostały przytrzaśnięte, zmiażdżone lub
przecięte w trakcie demontażu.
L OSTRZEŻENIE: Ryzyko urazu – należy upewnić się, że przycisk
awaryjny (czerwony przycisk na skrzynce sterującej) jest aktywny, aby
zapobiec nieprzewidzianym ruchom.
1. Zabezpiecz dwa kółka jezdne znajdujące się na tylnym końcu podstawy
jezdnej, naciskając lekko w dół stopą pedał hamulca kółek jezdnych aż do
momentu ich zablokowania. Aby zwolnić hamulec, naciskaj stopą pedał
hamulca lekko w górę, aż do momentu odblokowania kółek jezdnych.
2. Zwolnić silnik z ramienia dźwigu i słupa pionowego poprzez usunięcie
sworzni (4).
3. Zdjąć dźwignię i wyjąć słup pionowy z dolnej ramy.
4
3
4
3

Falcon
2022-11
Konserwacja
15
EN
NL
PL
5 Konserwacja
5.1 Czas konserwacji
Ryzyko obrażeń i uszkodzeń
Naprawy i wymiana części mogą być przeprowadzane tylko przez przeszkolone osoby i należy
korzystać z oryginalnych części zamiennych Vermeiren.
Na ostatniej stronie instrukcji znajduje się formularz dla wyspecjalizowanego sprzedawcy,
służący do odnotowywania wszystkich czynności serwisowych.
Częstotliwość serwisu zależy od częstotliwości i intensywności użytkowania. Skontaktować się
ze sprzedawcą, aby uzgodnić harmonogram kontroli/konserwacji/napraw.
Instrukcję konserwacji można znaleźć w witrynie Vermeiren: www.vermeiren.com.
Przed każdym użyciem
Sprawdzić następujące punkty:
• Wszystkie części: obecne, nieuszkodzone i niezużyte.
• Wszystkie części: czyste, patrz §5.3
• Stan części ramy: brak odkształceń, niestabilności, osłabień, poluzowanych połączeń
• Hamulce: brak widocznych uszkodzeń i/lub zabrudzeń.
• Skrzynka kontrolna, sterowanie ręczne, ładowarka akumulatorów, odpowiednie kable:
nieuszkodzone, np. żadne przewody nie są przetarte, przerwane lub pozbawione izolacji.
Na panelu obsługi ręcznej sprawdź działanie elektrycznej regulacji wysięgnika.
• Stan akumulatora: naładować akumulator w razie potrzeby, patrz §3.3
Co 8 tygodni
W zależności od częstotliwości użytkowania, należy sprawdzać:
• Stopień nasmarowania złączy przegubowych wysięgnika,
• Stan kółek jezdnych,
• Czy widoczne są uszkodzenia obudowy skrzynki kontrolnej, akumulator, ładowarka
akumulatorów (jeśli dostępne) i panelu obsługi ręcznej,
• Czy kable są technicznie sprawne.
• Należy regularnie ładować akumulator
Co 6 miesięcy lub dla każdego nowego użytkownika
W zależności od częstotliwości użytkowania, należy sprawdzać:
• Czystość,
• Stan ogólny
• Należy sprawdzić, czy ładowarka akumulatorów jest sprawna
• Pracę kółek jezdnych.
Jeśli opór toczenia jest zbyt duży, oczyść kółka jezdne. Jeżeli nie przyniesie to efektu, skontaktuj
się ze sprzedawcą.
Co roku lub częściej
Zlecać kontrolę i serwis podnośnika pacjenta wyspecjalizowanemu sprzedawcy raz w roku lub
częściej. Minimalna częstotliwość czynności konserwacyjnych zależy od natężenia eksploatacji.
Dlatego należy ją uzgodnić z wyspecjalizowanym sprzedawcą.
5.2 Wysyłka I Przechowywanie
• Transport i przechowywanie powinny się odbywać zgodnie z parametrami technicznymi w §7.
Upewnij się, że podnośnik pacjenta jest przechowywany w stanie suchym.
• Sprawdź, czy kable nie są narażone na zgniecenia i załamania.
• Należy odłączyć źródło zasilania.
PRZESTROGA

Falcon
2022-11
Konserwacja
16
EN
NL
PL
• Zapewnić odpowiednie przykrycie lub opakowanie chroniące podnośnik pacjenta przed rdzą i
ciałami obcymi. (np. słoną wodą, morskim powietrzem, piaskiem, pyłem).
• Należy przechowywać wszystkie zdemontowane części razem w jednym miejscu (lub w razie
potrzeby oznaczyć je), aby uniknąć pomieszania z częściami innych produktów podczas
ponownego montażu (np. ładowarka).
• Przechowywane elementy muszą być wolne od nacisku (nie umieszczać ciężkich części na
podnośnik, nie wciskać pomiędzy inne obiekty ...).
5.3 Czyszczenie
Ryzyko uszkodzenia przez wilgoć.
• Nigdy nie używać strumienia wody z węża ani myjki wysokociśnieniowej.
• Do usuwania opornych zabrudzeń używać delikatnych, dostępnych w sprzedaży
detergentów.
• Plamy można usunąć gąbką lub delikatną szczotką.
• Nie wolno używać silnych płynów czyszczących, takich jak rozpuszczalniki, ani twardych
szczotek.
5.3.1 Części z tworzyw sztucznych
Części z tworzyw sztucznych podnośnika pacjenta należy czyścić dostępnymi w sprzedaży
środkami czyszczącymi do tworzyw sztucznych. Należy zapoznać się ze szczegółowymi
informacjami o produkcie i używać wyłącznie delikatnej szczoteczki lub delikatnej gąbki.
5.3.2 Powłoka ochronna
Wysoka jakość warstwy wierzchniej zapewnia optymalną ochronę przed korozją. W przypadku
uszkodzenia warstwy wierzchniej poprzez zadrapanie lub w inny sposób należy zlecić
wyspecjalizowanemu sprzedawcy naprawę powierzchni.
Podczas czyszczenia używać wyłącznie ciepłej wody i zwykłych detergentów domowych oraz
miękkich szczotek i szmatek. Upewnić się, że wilgoć nie przedostaje się do wnętrza rurek.
5.3.3 Obudowa układu elektronicznego
L OSTRZEŻENIE: Ryzyko urazu – Przed wykonaniem prac konserwacyjnych należy nacisnąć
przycisk zatrzymania awaryjnego, aby uniknąć niezamierzonego przesunięcia.
Skrzynkę kontrolną, obudowę silnika i panel obsługi ręcznej należy wycierać tylko zwilżoną
ściereczką z odrobiną środka czyszczącego stosowanego w gospodarstwach domowych i
dostępnego w handlu. Nie należy stosować środków do polerowania ani ostrych narzędzi (gąbek
metalowych, szczotek itp.), ponieważ mogą one zarysować powierzchnię i usunąć ochronę przed
pryskającą wodą.
Regularnie sprawdzać, czy połączenia wtykowe nie są skorodowane lub uszkodzone, gdyż może
to wpływać na funkcjonowanie układu elektronicznego.
Producent nie ponosi odpowiedzialności za szkody powstałe w wyniku nieprawidłowej
pielęgnacji.
5.4 Dezynfekcja
L OSTRZEŻENIE: Produkty niebezpieczne – środki dezynfekujące może stosować wyłącznie
upoważniony do tego personel.
Wszystkie elementy podnośnika pacjenta można wyczyścić środkiem dezynfekującym.
Wszystkie elementy podnośnika pacjenta można wyczyścić środkiem Dezynfekującym
przeznaczonym do użytku domowego
PRZESTROGA

Falcon
2022-11
Konserwacja
17
EN
NL
PL
5.5 Kontrola
Zwykle zalecane jest dokonanie jednego przeglądu rocznie i co najmniej jednego przed
wznowieniem użytkowania. Wszystkie poniższe kontrole muszą zostać przeprowadzone i
udokumentowane przez upoważnione do tego osoby:
• Kontrola okablowania (szczególnie pod kątem wgnieceń, widocznego zużycia, nacięć,
widocznych części izolacji przewodów wewnętrznych, widocznych rdzeni metalowych
przewodów, supłów, wybrzuszeń, zmian w kolorze zewnętrznej osłony izolacyjnej, łamliwych
miejsc i bezpiecznego rozmieszczenia, aby nie było możliwości pojawienia się usterek
mechanicznych, takich jak przecięcie czy zmiażdżenie).
• Kontrola wzrokowa części ramy, aby sprawdzić czy nie pojawiły się deformacje plastiku i/lub
oznaki zużycia (rama, zawieszenie silnika, ramię wspornika, wspornik rozszerzający).
• Kontrola wzrokowa pod kątem uszkodzeń powierzchni malowanej (zagrożenie korozją).
• Kontrola wzrokowa każdej osłony i obudowy pod kątem uszkodzeń. Śruby powinny być dobrze
wkręcone.
• kontrola nasmarowania połączeń metalowych w częściach ruchomych;
• Wzrokowa kontrola części z tworzywa sztucznego pod kątem pęknięć i kruchości.
• Przegląd skrzynki sterującej (w tym ładowarki) pod kątem szczątkowego prądu wyładowczego
(A) na podstawie VDE 0702.
• Przegląd skrzynki sterującej (w tym ładowarki) pod kątem odporności izolacji na przebicia (MO)
na podstawie VDE 0702.
• Test działania ramienia wspornika (nasmarowanie łączeń, zakres regulacji, deformacje,
zużycie eksploatacyjne).
• Kontrola funkcjonowania napędów podnośnika (w trakcie jazdy próbnej → hałasy, prędkość,
swobodne działanie itp.), w razie potrzeby: Kontrola działania, najpierw bez obciążenia, a
następnie przy obciążeniu znamionowym (bezpieczne obciążenie robocze), w celu
sprawdzenia silników pod kątem zużycia lub zniszczenia poprzez porównanie wartości prądu
elektrycznego z wartościami uzyskanymi w chwili dostarczenia podnośnika.
• Test działania przycisku awaryjnego.
• Test działania obniżania awaryjnego.
• Kompletność dostarczanego zestawu, dostępność instrukcji obsługi.
Kontrole pomiarowe mogą przeprowadzać wyłącznie osoby, które zostały przeszkolone w
zakresie badań wózków inwalidzkich i poinstruowane przez elektryka na temat stosowanych
środków i procedur kontrolnych. Zezwolenie na użytkowanie podnośnika pacjenta po
przeprowadzonych kontrolach pomiarowych lub pracach konserwacyjnych może być udzielone
jedynie przez elektryka.
Serwisowanie wolno zatwierdzić w planie konserwacji wyłącznie, jeśli kontrola objęła co najmniej
wszystkie z powyższych czynności.
5.6 Przewidywany okres użytkowania
Podnośnik pacjenta jest zaprojektowany tak, aby jego średnia długość życia wynosiła 8 lat. Ten
czas może być dłuższy lub krótszy w zależności od częstotliwości użytkowania, przechowywania,
konserwacji, przeglądów i czyszczenia.
5.7 Ponowne użycie
Przed każdym ponownym użyciem podnośnik należy zdezynfekować, skontrolować i poddać
konserwacji zgodnie z instrukcjami w tym rozdziale.
5.8 Koniec użytkowania
Po zakończeniu użytkowania podnośnik pacjenta należy poddać utylizacji zgodnie z lokalnie
obowiązującymi przepisami w zakresie ochrony środowiska. Najlepszym sposobem, aby to
zrobić, jest demontaż podnośnika pacjenta w celu ułatwienia transportu części nadających się do
przetworzenia.

Falcon
2022-11
Diagnozowanie i rozwiązywanie problemów
18
EN
NL
PL
6 Diagnozowanie i rozwiązywanie problemów
Tabela 1: Diagnozowanie i rozwiązywanie problemów
Problem
Przyczyna problemu
Rozwiązywanie problemów
Hałaśliwe dźwięki części
ruchomych (np.: ramienia
wspornika).
Konieczne jest nasmarowanie.
Należy nasmarować części ruchome.
(Nie należy smarować siłownika!)
Siłownik wydaje
niecodzienny dźwięk.
Siłownik jest uszkodzony.
Należy wymienić siłownik lub
skontaktować się z
wyspecjalizowanym sprzedawcą.
Podnośnik nie podnosi się.
1. Siłownik elektryczny jest
uszkodzony.
2. Waga pacjenta jest zbyt
wysoka (Zapala się dioda
LED przeciążenia na
ręcznym sterowaniu).
3. Sterowanie ręcznie lub
siłownik nie są
podłączone.
4. Akumulator nie jest
podłączony do skrzynki
sterującej lub jest
podłączony
nieprawidłowo.
5. Zbyt niski poziom
naładowania
akumulatora.
6. Przycisk awaryjny jest
aktywny.
1. Należy wymienić siłownik.
2. Należy użyć podnośnika
dopuszczającego wyższą wagę
maksymalną pacjenta.
3. Należy sprawdzić połączenia. W
razie potrzeby należy podłączyć
sterowanie ręczne lub siłownik.
4. Należy sprawdzić, czy
zainstalowano akumulator lub
połączenie akumulatora.
5. Należy naładować lub wymienić
akumulator.
6. Należy dezaktywować przycisk
awaryjny.
Awaryjne obniżanie pacjenta
nie działa.
Aby obniżyć pacjenta,
wymagana jest minimalne
obciążenie podnośnika.
Jeśli waga pacjenta jest zbyt niska, aby
go obniżyć, należy nieznacznie
obniżyć ramię wspornika lub
wyregulować prędkość opuszczania.
Nie można naładować
akumulatora
1. Akumulator nie jest
odpowiednio dopasowany
do skrzynki sterującej.
2. Uszkodzenie kabla
głównej sieci zasilającej.
3. Akumulator jest wadliwy.
4. Skrzynka sterująca wraz z
ładowarką lub ładowarką
jest wadliwa.
1. Należy sprawdzić, czy
akumulator jest podłączony do
skrzynki sterującej.
2. Należy wymienić kabel głównej
sieci zasilającej.
3. Należy wymienić akumulator.
4. Należy wymienić skrzynkę
sterującą wraz z ładowarką lub
ładowarką.

Falcon
2022-11
Parametry techniczne
19
EN
NL
PL
7 Parametry techniczne
700
Do przodu

Falcon
2022-11
Parametry techniczne
20
EN
NL
PL
Tabela 2: Parametry techniczne
Marka
Vermeiren
Typ
Podnośnik pacjenta
Model
Falcon
Opis
Wymiary na
rysunku
Specyfikacje
Najniższa pozycja centralnego punktu
ograniczenia ruchu*
l
509 mm
Maksymalna pozycja centralnego punktu
ograniczenia ruchu*
k
1609 mm
Zakres podnoszenia (zakres wysokości)
m
1100 mm
Długość ramienia
1042 mm
Długość całkowita
1158 mm
Minimalny rozstaw ramion
r
506 mm
Maksymalny rozstaw ramion
q
970 mm
Wysokość kolumny / Wysokość ramy
n1
n2
149 mm
112,5 mm
Szerokość całkowita (pozycja złożona),
wymiar zewnętrzny
565 mm
Szerokość całkowita (pozycja rozłożona),
kółka jezdne z przodu
p
1026 mm
Długość po złożeniu
1236 mm
Wysokość po złożeniu
294 mm
Szerokość po złożeniu
565 mm
Min. odległość pomiędzy ścianą / CSP*
(zasięg maksymalny)
w3
36 mm
Min. odległość pomiędzy ścianą / CSP*
(wysokość minimalna)
w2
263,5 mm
Min. odległość pomiędzy ścianą / CPOR*
(wysokość maksymalna)
w1
65 mm
Koło skrętu
1188 mm
Waga całkowita
35 kg
Waga podwozia
16,5 kg
Waga skrzynki sterującej + akumulatora
3 kg
Waga górnej ramy (ramię wysięgnikowe /
belka rozporowa + silnik + skrzynka sterująca)
18,5 kg
Maksymalne obciążenie
130 kg
Prześwit
15,5 mm
Zasięg maksymalny przy 600 mm
a
557 mm
Maksymalny zakres od słupa nośnego
b
557 mm
Zakres od słupa nośnego z odstępem 700
mm
c
323 mm
Wyjście napięcia
24V maks. 250 VA
Temperatura użytkowa
od +5 ℃ do +40°C
Wilgotność powietrza
od 20% do 80% przy 30°C – brak kondensacji

Falcon
2022-11
Parametry techniczne
21
EN
NL
PL
Marka
Vermeiren
Typ
Podnośnik pacjenta
Model
Falcon
Opis
Wymiary na
rysunku
Specyfikacje
Poziom hałasu
< 54 dB(A)
Skrzynka kontrolna
TiMOTION TC20
Akumulator
Nie dotyczy
Sterowanie ręczne
TiMOTION TH10
silnik
TiMOTION TA23
Klasa ochronności skrzynki kontrolnej
IP54
Klasa zabezpieczeń akumulatora
Nie dotyczy
Klasa ochronności panelu sterowania
ręcznego
IP54
Klasa ochronności silnika
IP54
Klasa izolacji
II – typ B
Praca okresowa
maks. 10% lub 2 minuty pracy ciągłej/18 min.
przerwy
Pojemność akumulatora
2.9 Ah
Przycisk awaryjny
Tak
Ręczne obniżenie awaryjne
Tak
Elektryczne obniżenie awaryjne
Nie
Producent zastrzega sobie prawo do wprowadzania zmian parametrów technicznych. Tolerancja pomiaru
+/– 15 mm / 1,5 kg, 1.5°
1 = maksymalna pozycja, 2 = maksymalny zakres, 3 = najniższa pozycja
* CPOR = centralny punkt ograniczenia ruchu


Falcon
2022-11
Obsah
1
EN
NL
PL
CS
Obsah
Obsah ........................................................................................................................ 1
Úvod ........................................................................................................................ 2
1 Tento výrobek ................................................................................................ 3
2 Před použitím ................................................................................................ 4
2.1 Určené použití ............................................................................................... 4
2.2 Obecné bezpečnostní pokyny ....................................................................... 4
3 Použití pacientského zvedáku ..................................................................... 6
3.1 Obsluha zvedáku .......................................................................................... 6
3.2 Závěsy .......................................................................................................... 8
3.3 Baterie a nabíjení ........................................................................................ 10
3.4 Nouzová situace.......................................................................................... 11
4 Instalace a seřízení ..................................................................................... 12
4.1 Dodávka ...................................................................................................... 12
4.2 Montáž nebo demontáž ............................................................................... 12
5 Údržba/servis .............................................................................................. 14
5.1 Interval údržby/servisu ................................................................................ 14
5.2 Přeprava a skladování ................................................................................ 15
5.3 Čištění ......................................................................................................... 15
5.4 Dezinfekce .................................................................................................. 15
5.5 Kontrola ....................................................................................................... 16
5.6 Životnost výrobku ........................................................................................ 16
5.7 Znovupoužití výrobku .................................................................................. 16
5.8 Likvidace výrobku........................................................................................ 16
6 Řešení problémů ......................................................................................... 17
7 Technické údaje .......................................................................................... 18

Falcon
2022-11
Úvod
2
EN
NL
PL
CS
Úvod
Blahopřejeme! Nyní jste vlastníkem pacientského zvedáku Vermeiren!
Tento výrobek byl vyroben pečlivými pracovníky s kvalifikací. Navíc byl navržen a vyroben podle
vysokých standardů kvality, nad nimiž dohlíží společnost Vermeiren.
Děkujeme za vaši důvěru ve výrobky společnosti Vermeiren. Tento návod slouží k tomu, aby vám
pomáhal s použitím tohoto pacientského zvedáku a jeho provozních možností. Řádně si jej
přečtěte; pomůže vám seznámit se s provozem, schopnostmi a omezeními tohoto výrobku.
Budete-li mít po přečtení tohoto návodu nějaké dotazy, obraťte se na svého odborného prodejce.
Rád vám pomůže.
Důležitá poznámka
Aby byla zajištěna vaše bezpečnost a prodloužena životnost tohoto výrobku, věnujte mu řádnou
péči a nechávejte jej pravidelně kontrolovat a opravovat.
Tento návod odráží nejnovější vývoj výrobku. Společnost Vermeiren má právo provádět změny
tohoto typu výrobku, aniž by byla povinna upravit nebo nahradit podobné výrobky, které již byly
dodány.
Obrázky výrobku slouží k objasnění pokynů v tomto návodu. Detaily znázorněného výrobku se
mohou od daného výrobku lišit.
Dostupné informace
Nejnovější verzi informací tohoto návodu vždy naleznete na našich webových stránkách
http://www.vermeiren.com/. Tyto webové stránky pravidelně navštěvujte pro případné
aktualizace.
Osoby se zhoršeným zrakem si mohou stáhnout elektronickou verzi tohoto návodu a nechat si ji
číst pomocí softwarové aplikace převádějící text na řeč.
Tento návod k obsluze
Pro uživatele a odborného prodejce
Servisní příručka
Pro odborného prodejce
Prohlášení o shodě (ES)

Falcon
2022-11
Tento výrobek
3
EN
NL
PL
CS
1 Tento výrobek
1. Konzolové rameno
2. Rozpěrná tyč
3. Motor
4. Podvozek
5. Kolečko
6. Ovládací skříňka
7. Rukojeť pro tlačení
8. Ruční ovládání
9. Nouzové zastavení
10. Nosná tyč
11. Pedál k expanzi podvozku
12. Otočné kolečko s brzdou
1
2
9
10
8
7
4
6
5
11
3
12

Falcon
2022-11
Před použitím
4
EN
NL
PL
CS
2 Před použitím
2.1 Určené použití
V tomto odstavci je uveden stručný popis zamýšleného použití tohoto pacientského zvedáku.
Dále jsou k pokynům v dalších odstavcích přidána příslušná varování. Tímto způsobem chceme
upozornit na případné chybné použití, k němuž může dojít.
• Indikace a kontraindikace: Tento pacientský zvedák obsluhuje ošetřovatel a je určen pro
přemístění sedících pacientů, např. mezi invalidními vozíky, ošetřovatelskými lůžky a
koupelnami. Pacientský zvedák je navržen a vyroben jako transportní/překládací pomůcka pro
seniory nebo osoby, které trpí ochrnutím, ztrátou či vadami končetin, ztuhlými nebo
poškozenými klouby, kardiovaskulárními problémy, kachexií atd.
• Tento pacientský zvedák je vhodný pro použití v interiéru.
• Tento pacientský zvedák je zkonstruován a vyroben výhradně pro přepravu/přemisťování jedné
(1) osoby o maximální hmotnosti podle konfigurace údajů v odst. §7. Není konstruován pro
přepravu zboží či předmětů ani pro jakýkoli jiný účel, než je popsán výše.
• Používejte pouze příslušenství a náhradní díly schválené společností Vermeiren.
• Přečtěte si všechny technické detaily a omezení tohoto pacientského zvedáku v kapitole 7.
• Záruka na tento výrobek je založena na běžném použití a údržbě, jak je to popsáno v tomto
návodu. V případě poškození výrobku způsobeného nesprávným použitím či absencí údržby
tato záruka zanikne.
2.2 Obecné bezpečnostní pokyny
Riziko zranění anebo poškození
Přečtěte si pokyny v tomto návodu a postupujte podle nich. Jinak může dojít ke zranění nebo
k poškození pacientského zvedáku.
Při použití mějte na paměti následující obecná upozornění:
• Pacientský zvedák smí obsluhovat pouze kvalifikovaný personál, který byl poučen nebo
vyškolen v jeho konkrétním použití.
• Nepřekračujte max. povolenou nosnost pacientského zvedáku. Jinak se vypne ovládací
skříňka.
• V případě odlišné nosnosti pacientského zvedáku a závěsu vždy dodržujte nejnižší
uživatelskou hmotnost.
• Při operaci zvedání musí být u zvedáku přítomna obsluha.
• Upozornění: určité části pacientského zvedáku mohou být velmi teplé nebo studené vlivem
okolní teploty, slunečního záření či topných těles. Při dotýkání buďte opatrní.
• Pacientský zvedák byl testován na elektromagnetickou kompatibilitu a danému standardu
vyhovuje. Nicméně činnost pacientského zvedáku mohou narušovat zdroje
elektromagnetických polí, jako jsou mobilní telefony, elektrogenerátory či jiné vysoce výkonné
zdroje energie. Naopak elektronika pacientského zvedáku může negativně ovlivňovat jiná
elektronická zařízení.
• Pacientský zvedák používejte pouze na povrchu, kde se mohou dotýkat země všechna
kolečka, a kde je dostatečný kontakt pro bezpečnou obsluhu pacientského zvedáku. Při
přemisťování pacienta pomocí pacientského zvedáku s ním nepřejíždějte přes překážky.
• Pacientský zvedák nepoužívejte ve vlhkém nebo mokrém prostředí.
• Na zajišťovacích bodech nebo konstrukčních či rámových dílech nebo součástech
pacientského zvedáku nesmějí být prováděny úpravy ani výměny, aniž by došlo ke konzultaci
s výrobcem.
• Zajistěte, aby během použití nedošlo k zachycení rukou, oděvů, pásků, přezek či šperků
v kolech nebo jiných pohyblivých součástech.
POZOR

Falcon
2022-11
Před použitím
5
EN
NL
PL
CS
• Dbejte zvýšené opatrnosti u zdrojů vznícení, jako jsou hořící cigarety, protože mohou zapálit
závěs.
Dojde-li k vážné nehodě týkající se tohoto výrobku, informujte spol. Vermeiren nebo svého
odborného prodejce a také příslušný úřad ve vaší zemi.

Falcon
2022-11
Použití pacientského zvedáku
6
EN
NL
PL
CS
3 Použití pacientského zvedáku
3.1 Obsluha zvedáku
Riziko zranění anebo poškození
• Při používání zvedáku ověřte, že je kolem něj a nad ním dostatek prostoru, protože v opačném
případě by seřizovací pohyby mohly způsobit poškození či zranění.
• Vždy dávejte pozor na zvedací rameno, abyste se nezranili.
• Musejí být používány pouze závěsy, které byly navrženy a schváleny pro pacienty (viz návody
k použití různých závěsů). Použití jakýchkoli jiných závěsů je na vlastní riziko.
• K tlačení/tažení pacientského zvedáku slouží pouze rukojeti, nikoli jiné součásti.
Dodržujte technické informace, podle kterých lze pacientské zvedáky obsluhovat. Pacientský
zvedák smí obsluhovat pouze kvalifikovaný personál, který byl vyškolen v jeho použití a provozu.
3.1.1 Změna šířky podvozku
Aby se zvedák dostal okolo invalidního vozíku či jiného
sedacího nábytku, nebo aby se zvýšila stabilita zvedáku
ve stojící poloze, lze zvětšit vzdálenost mezi nohami
podvozku.
Postavte se za sestavený zvedák a uchopte rukojeti pro
tlačení pacientského zvedáku (vlevo a vpravo vedle
ovládací skříně). Nožním stisknutím pedálu v dolní části
podvozku (levého či pravého) směrem dolů lze
vzdálenost noh podvozku zvětšit nebo zmenšit.
3.1.2 Parkovací brzdy
Zajistěte dvě kolečka v zadní části podvozku tím, že
špičkou nohy jemně zatlačíte brzdové destičky koleček
dolů až na koncové dorazy. Chcete-li brzdy uvolnit,
zatlačte brzdové destičky špičkou nohy znovu jemně
nahoru, dokud nejsou kolečka uvolněná.
3.1.3 Zvedání a spouštění konzolového ramene
Ruční ovládání umožňuje plynulé nastavení konzolového ramene do
jakéhokoli bodu.
= Zvedání konzolového ramene
= Spouštění konzolového ramene
Při použití funkce zvednutí až do konce dráhy zvedacího motoru zaktivuje
elektronika koncový spínač (bezpečnostní funkce). Funkci zvednutí
používejte pouze uprostřed rozsahu seřízení.
Umístěte ruční ovládání na horní trubku rukojetí pro přemístění pacientského
zvedáku. Tato poloha je nejergonomičtější.
POZOR
1
2
1
2

Falcon
2022-11
Použití pacientského zvedáku
7
EN
NL
PL
CS
3.1.4 Tlačítko snižování
Dojde-li k poškození mechanismu ručního ovládání, je možné snížit
konzolové rameno z ovládací skříňky.
Rameno se pohybuje dolů, dokud je stisknuté tlačítko (3) na panelu
ovládací skříňky.
3.1.5 Přemístění pacientského zvedáku
Riziko zranění
• Dbejte zvýšené opatrnosti při pohybu v úzkých
místech (např. dveře).
1. Postavte se za pacientský zvedák a oběma rukama
uchopte rukojeti (levou a pravou, vedle ovládací
skříňky).
2. Ověřte, že byly uvolněny obě brzdy zadních
koleček.
3. Pomalu tlačte pacientský zvedák do požadované
polohy.
Není-li pacientský zvedák zatížen, doporučujeme jej
táhnout pozadu. To usnadňuje objíždění překážek (rámů
dveří, rohů místnosti nebo nábytku).
3.1.6 Otočte pacientský zvedák kolem jeho osy
Riziko zranění
• Dbejte na to, aby v dosahu pacientského zvedáku nebyly žádné osoby ani předměty.
• Pomalu a opatrně otáčejte pacientský zvedák kolem jeho osy, aby pacient nemohl vypadnout.
1. Rozevřete nohy pacientského zvedáku, aby měl
větší stabilitu.
2. Zaktivujte brzdy.
3. Umístěte pacienta do pacientského zvedáku
pomocí příslušného závěsu. (Pokyny k umístění
pacienta do zvedáku viz návod k závěsu.)
4. Zvedněte pacienta ze země, židle, postele atd .
5. Uvolněte obě brzdy zadních koleček.
6. Postavte se za pacientský zvedák a oběma
rukama uchopte rukojeti (levou a pravou vedle
ovládací skříňky).
7. Nyní pomalu a opatrně otočte pacientský zvedák
na stejném místě. Dávejte pozor, abyste se nohy
pacientského zvedáku nedotkly žádných
předmětů.
8. Když jste otočeni v dobré poloze, můžete
pacienta snížit dolů.
POZOR
POZOR
3

Falcon
2022-11
Použití pacientského zvedáku
8
EN
NL
PL
CS
3.2 Závěsy
Riziko zranění
• Používejte pouze závěsy vhodné pro pacienty.
• Nepoužívejte poškozené závěsy.
• Nejprve si přečtěte celý návod k obsluze závěsů.
• Používejte pouze kompatibilní závěsy schválené společností Vermeiren.
Pacientský zvedák se smí používat pouze se závěsy navrženými pro pacientské zvedáky Falcon
spol. Vermeiren (pro 4bodovou rozpěrnou tyč).
Pro konkrétní závěsy se musejí dodržovat podmínky vhodnosti a návod k obsluze, viz samostatný
návod.
3.2.1 Upevnění k rozpěrné tyči pacientských zvedáků
Závěsy se upevňují pomocí montážních popruhů. Tyto montážní popruhy musejí být zavěšeny na
rozpěrné tyči pacientského zvedáku.
Montážní popruhy závěsů mají 4 smyčky v různých barvách.
Závěs s montážním popruhem
Rozpěrná tyč pacientských zvedáků
Pomocí těchto smyček lze pacienta zvedat v různých polohách. Tyto polohy závisejí na výšce a
hmotnosti dané osoby.
POZOR
Háčky pro
montážní popruh
Čern
á
Žlutá
Čer
ven
á
Zelen
á

Falcon
2022-11
Použití pacientského zvedáku
9
EN
NL
PL
CS
Ramena
Nohy
Hlava
(pouze komfortní
závěs)
Zelená
Zelená
Zelená
Červená
Červená
Červená
Žlutá
Žlutá
Žlutá
Černá
Černá
Černá
Opěrky nohou lze na pacientský zvedák upevnit různými způsoby.
• Zkřížení opěrek nohou
Jde o nejpoužívanější způsob upevnění závěsu. Upevnění závěsu se zkřížením opěrek
nohou se provádí podle níže uvedených pokynů:
1. Montážní popruh opěrky nohou provlékněte smyčkou druhé opěrky nohou.
2. Upevněte montážní popruhy opěrek nohou na rozpěrnou tyč pacientského
zvedáku.
• Zkřížení pod oběma stehny
L POZOR: Nebezpečí pádu – U pacienta s amputací nohou je zvýšené
nebezpečí pádu, protože pacient ztrácí snadno rovnováhu.
Tuto metodu lze používat pro zvedání pacienta s amputací nohou. Upevnění závěsu se
zkřížením pod oběma stehny se provádí podle níže uvedených pokynů:
1. Zkřižte upevňovací popruh opěrky nohou pod stehny.
2. Upevněte montážní popruhy opěrek nohou na rozpěrnou tyč pacientského
zvedáku.

Falcon
2022-11
Použití pacientského zvedáku
10
EN
NL
PL
CS
• Každá opěrka nohou odděleně na rozpěrné tyči
L POZOR: Nebezpečí pádu – Tato metoda zvyšuje riziko vyklouznutí závěsu.
U pacientů s citlivými genitáliemi lze použít upevnění každé opěrky nohou odděleně na
rozpěrnou tyč. Upevnění závěsu touto metody se provádí podle níže uvedených pokynů:
1. Opěrku nohou dejte okolo každé nohy zvlášť, ale bez zkřížení.
2. Upevněte montážní popruhy opěrek nohou na rozpěrnou tyč pacientského zvedáku.
3.2.2 Poloha rozpěrné tyče
Rozpěrná tyč musí být vždy kolmo k tělu pacienta. Na obr. vlevo je dobrá metoda. Na obr.
vpravo je chybný způsob.
3.3 Baterie a nabíjení
3.3.1 Nabíječka baterií
Primární napětí
100 – 240 V~ / 50/60 Hz
Ochranné prvky
Chráněno proti obrácené polarizaci, elektrickým
přepětím a extrémním teplotám
Teplota okolí
0 až +40 °C
Délka napájecího kabelu
2,0 m
Skladovací teplota
-15 až +50 °C
Skladovací relativní vlhkost vzduchu
max. 95 % (nekondenzující)
Shoda
testována podle normy IEC 60601-1
3.3.2 Nabíjení baterií
Používejte pouze ovládací skříňku s dodanou nabíječkou baterií.
Doporučujeme pravidelně dobíjet baterie pro zajištění, že zvedák bude stále použitelný, a
k prodloužení životnosti baterií. Ovládací skříňka upozorní na nízké nabití baterie zvukovým
signálem.
První použití
Nejprve zapojte napájecí kabel konektorovou stranou do příslušného konektoru na ovládací
skříňce. Zástrčková strana napájecího kabelu musí být zapojena do zásuvky. Nabíjení potrvá
přibližně 24 hodin.
Dobíjení
L VAROVÁNÍ: Riziko zranění – Nepoužívejte zvedák, je-li napájecí kabel zapojen do zásuvky
el. sítě.
Když se baterie vybíjí, svítí zeleně pouze levá LED dioda. Jakmile se úroveň nabití baterie velmi
sníží, LED dioda se rozsvítí červeně a každé 2 sekundy se ozve pípnutí.
Baterie je plně nabitá, jakmile všechny kontrolky LED svítí plně zeleně.
Po dokončení dobíjení vždy nejprve vytáhněte zástrčku síťového kabelu ze zásuvky. Až potom
odpojte zástrčku konektoru od ovládací skříňky.

Falcon
2022-11
Použití pacientského zvedáku
11
EN
NL
PL
CS
Během dobíjení zvedák nepoužívejte!
Nejsou-li baterie delší dobu používány, dojde k jejich samovolnému pomalému vybíjení
(hloubkovému vybíjení). Pak už je nebude možné dobíjet. Proto byste měli baterie dobíjet alespoň
jednou za měsíc, i když nejsou používány.
3.4 Nouzová situace
V nouzových situacích se musí použít nouzové zastavení a funkce pro snížení v nouzové situaci.
3.4.1 Nouzové zastavení zvedáku
V nouzových situacích a při montáži či demontáži lze nouzové
zastavení aktivovat stisknutím červeného tlačítka na ovládací
skříňce.
Stiskněte tlačítko a otočte jej ve směru šipek. Je-li tlačítko zcela
stisknuto dozadu, otočte jej zpět v opačném směru, než ukazují
šipky.
Nouzové zastavení se deaktivuje otočením červeného tlačítka ve
směru šipek.
3.4.2 Nouzové snížení zvedáku
L VAROVÁNÍ: Riziko zranění – Seřizujte ruční nouzové snížení
podle hmotnosti pacienta.
Nouzové spuštění při výpadku proudu nebo vybití baterií lze provést
pomocí otočením červeného tlačítka na horním konci motoru.
Upozornění: ruční nouzové snížení je možné pouze v případě, že pacient
sedí v pacientském zvedáku.

Falcon
2022-11
Instalace a seřízení
12
EN
NL
PL
CS
4 Instalace a seřízení
Pacientský zvedák je dodáván kompletně sestavený odborným prodejcem.
Pokyny v této kapitole jsou určeny pro odborné prodejce.
Chcete-li najít servisní středisko či odborného prodejce ve svém okolí, kontaktujte nejbližší
pobočku společnosti Vermeiren.
L VAROVÁNÍ: Riziko nebezpečných omezení – Používejte pouze omezení uvedená
v tomto návodu.
4.1 Dodávka
Balení pacientského zvedáku Vermeiren Falcon obsahuje:
• podvozek včetně 4 koleček (2 s brzdami),
• tyč včetně rukojetí pro tlačení,
• konzolové rameno a rozpěrnou tyč,
• ovládací skříňku (včetně 2 akumulátorových baterií a ručního ovládání),
• nabíječku baterií,
• motor,
• návod k obsluze.
Před použitím ověřte, je-li balení kompletní a že nejsou poškozeny součásti (např. kvůli přepravě
apod.).
Poznámka: základní konfigurace se může lišit v závislosti na zemi dodávky v Evropě. Další
informace vám poskytne odborný prodejce ve vaší zemi.
4.2 Montáž nebo demontáž
4.2.1 Vybalení výrobku
L VAROVÁNÍ: Riziko zranění – Po vybalení a před další montáží vždy nejprve ověřte, že
je stisknuté nouzové zastavení (červené tlačítko na ovládací skříňce).
Balení pacientského zvedáku bylo zvoleno tak, aby poskytovalo nejlepší možnou ochranu během
přepravy.
1. Vyjměte všechny části pacientského zvedáku z obalu a
zkontrolujte, že byly dodány všechny položky a zda
jednotlivé díly nemají jakékoli viditelné vady. Existuje-li
jakékoli poškození, obraťte se na svého prodejce.
2. Před sestavením zaktivujte brzdy koleček pro zajištění, že
zvedák nelze neúmyslně posunout. Špičkou nohy zatlačte
brzdové destičky koleček jemně dolů až na doraz. Chcete-li
brzdy uvolnit, zatlačte brzdové destičky špičkou nohy znovu
jemně nahoru, dokud nejsou kolečka uvolněná.

Falcon
2022-11
Instalace a seřízení
13
EN
NL
PL
CS
4.2.2 Sestavení
L VAROVÁNÍ: Nebezpečí sevření – Během sestavení dbejte na to, aby
se neskříply, nerozdrtily ani nepřeřízly žádné části těla a vodiče.
1. Zasuňte svislou tyč do spodního rámu a pevně utáhněte páčku (3).
2. Umístěte motor do jeho nástavců na svislé tyči a rameni zvedáku (4) a
zajistěte jej na místě pomocí kolíků.
3. Pro první použití: Namontujte ovládací skříňku na svislou tyč utažením
dvou šroubů.
4.2.3 Demontáž
L VAROVÁNÍ: Nebezpečí sevření – Při demontáži dbejte na to, aby se
neskříply, nerozdrtily ani nepřeřízly žádné části těla a vodiče.
L VAROVÁNÍ: Riziko zranění – Ověřte, že je zaktivováno nouzové
zastavení (červené tlačítko na ovládací skříňce), aby nedošlo
k nechtěným pohybům nastavení.
1. Zajistěte dvě kolečka v zadní části podvozku tím, že špičkou nohy jemně
zatlačíte brzdové destičky koleček dolů až na koncové dorazy. Chcete-li
brzdy uvolnit, zatlačte brzdové destičky špičkou nohy znovu jemně
nahoru, dokud nejsou kolečka uvolněná.
2. Uvolněte motor z ramene kladkostroje a svislé tyče odstraněním kolíků
(4).
3. Odstraňte páku (3) a vyjměte svislou tyč ze spodního rámu.
4
3
4
3

Falcon
2022-11
Údržba/servis
14
EN
NL
PL
CS
5 Údržba/servis
5.1 Interval údržby/servisu
Riziko zranění a poškození
Opravy a výměny smějí provádět pouze vyškolené osoby. Přitom je třeba používat pouze
originální náhradní díly společnosti Vermeiren (viz návod k údržbě).
Poslední stránka tohoto návodu obsahuje registrační formulář pro odborného prodejce,
který zapíše každý servis.
Servisní intervaly závisejí na intenzitě a frekvenci používání. Požádejte svého prodejce o
společnou dohodu na rozvrhu kontrol/údržby/servisu/oprav.
Návod k údržbě viz webové stránky společnosti Vermeiren: www.vermeiren.com.
Před každým použitím
Zkontrolujte následující body:
• Všechny díly: přítomné a nepoškozené nebo neopotřebené.
• Všechny díly: čisté, viz odst 5.3.
• Stav součástí rámu: žádná deformace, nestabilita, zeslabení nebo uvolněné spoje.
• Brzdy: bez viditelného poškození anebo nečistot. Odstraňte všechny nečistoty, neboť
mohou zhoršit pohyb a přilnavost koleček.
• Ovládací skříňka, ruční ovládání, nabíječka baterií, příslušné kabely: žádné poškození, jako
jsou roztřepené, zlomené či odkryté vodiče. Pomocí ručního ovládání ověřte, že elektrické
seřízení konzolového ramene funguje správně.
• Stav baterie: v případě potřeby nabijte baterii, viz odst. 3.3.
Přibl. každých 8 týdnů
V závislosti na frekvenci používání zkontrolujte následující:
• Mazání spojů konzolového ramene
• Stav koleček
• Existuje-li jakékoli viditelné poškození krytu ovládací skříňky, baterie, nabíječky baterií a
ručního ovládání
• Jsou-li kabely vhodné k použití
• Dobijte baterii
Přibl. každých 6 měsíců nebo pro každého nového uživatele
V závislosti na frekvenci používání zkontrolujte následující:
• Čistota
• Celkový stav
• Je-li funkční nabíječka baterií
• Kolečka se otáčejí
Je-li odpor při otáčení příliš velký, vyčistěte kolečka. Pokud to nestačí, obraťte se na svého
prodejce.
Ročně nebo častěji
Alespoň jednou ročně nebo častěji nechte pacientský zvedák u odborného prodejce ke kontrole
a provedení servisu. Minimální četnost údržby závisí na používání, a proto by měla být společně
dohodnuta s vaším odborným prodejcem.
POZOR

Falcon
2022-11
Údržba/servis
15
EN
NL
PL
CS
5.2 Přeprava a skladování
• Přeprava a skladování musejí probíhat v souladu s technickými údaji v odst. 7. Ověřte, že je
pacientský zvedák skladován v suchu.
• Zabraňte skřípnutí nebo ostrému ohnutí kabelů.
• Odpojte pacientský zvedák ze zásuvky.
• Poskytněte dostatečný kryt či obal, který chrání pacientský zvedák před korozí a cizími tělesy.
(např. slaná voda, mořský vzduch, písek, prach.)
• Všechny odebrané díly (např. nabíječku) skladujte společně na jednom místě (případně je
označte), aby se při znovusestavení nesmíchaly s jinými výrobky.
• Aby se pacientský zvedák nepoškodil, zajistěte, aby na něm nebyly uloženy ani o něj opřeny
žádné předměty.
5.3 Čištění
Riziko poškození vlhkostí
• Nikdy nepoužívejte hadici ani vysokotlaký čistič.
• K odstranění odolnějších nečistot použijte mírný komerční detergent.
• Skvrny lze odstranit pomocí houby či měkkého kartáče.
• Nepoužívejte tvrdé kartáče ani silné čisticí kapaliny, jako jsou rozpouštědla.
5.3.1 Plastové díly
Plastové díly pacientského zvedáku čistěte běžnými čisticími prostředky na plasty. Přečtěte si
informace o daném výrobku a používejte pouze měkký kartáč či měkkou houbu.
5.3.2 Povrchová vrstva
Vysoká kvalita povrchové vrstvy zaručuje optimální ochranu proti korozi. Je-li vnější vrstva
poškozena poškrábáním nebo jiným způsobem, požádejte odborného prodejce o opravu
poškozeného povrchu.
Při čištění používejte pouze teplou vodu a běžné čisticí prostředky do domácnosti, měkké kartáče
a hadříky. Zajistěte, aby se do hadic nedostala vlhkost.
5.3.3 Kryt elektroniky
L VAROVÁNÍ: Riziko zranění – Před údržbou musí být zaktivováno nouzové zastavení,
aby nemohlo dojít k nechtěným pohybům nastavení.
Otřete ovládací skříňku, kryt motoru a prvky ručního ovládací hadříkem navlhčeným několika
kapkami běžného čisticího prostředku do domácnosti. Nepoužívejte abrazivní prostředky ani
lešticí nástroje s ostrými hranami, jako jsou kovové drátěnky či kartáče, protože mohou poškrábat
povrch ručního ovládání a zničit jeho schopnost odpuzovat vodu.
Pravidelně kontrolujte konektory, zda nejsou zkorodované nebo poškozené, protože by to mohlo
narušit funkčnost elektroniky.
Výrobce nenese žádnou odpovědnost za škody způsobené nedostatečnou údržbou.
5.4 Dezinfekce
L VAROVÁNÍ: Nebezpečné výrobky – Použití dezinfekčních prostředků je vyhrazeno
pouze oprávněným pracovníkům.
Všechny díly pacientského zvedáku lze ošetřit vydrhnutím běžným dezinfekčním prostředkem.
Postupujte podle pokynů k dezinfekčnímu prostředku.
Pokyny pro praní závěsů viz návod k závěsům a štítek na každém závěsu.
UPOZORNĚNÍ

Falcon
2022-11
Údržba/servis
16
EN
NL
PL
CS
5.5 Kontrola
V zásadě doporučujeme jednu každoroční kontrolu a minimálně jednu před obnovením
používání. Oprávněné osoby musejí provádět a dokumentovat všechny následující kontroly:
• Kontrola kabeláže (zejména zda není rozdrcená, opotřebená či naříznutá, zda nejsou vidět
části izolace vnitřních vodičů nebo kovové žíly vodičů, zalomení, vyboulení, barevné
změny vnějšího pláště, křehká místa a zda je bezpečně umístěná, aby nedošlo
k mechanickým poškozením, jako je naříznutí či rozdrcení).
• Vizuální kontrola částí rámu (rám, zavěšení motoru, konzolové rameno, rozpěrná tyč), zda
nedošlo k plastické deformaci anebo opotřebení.
• Vizuální kontrola, zda není poškozen nátěr/lak (nebezpečí koroze).
• Vizuální kontrola všech krytů, nejsou-li poškozené; šrouby musejí být řádně dotažené.
• Ověření množství maziva na kovových spojích pohyblivých dílů
• Vizuální kontrola všech plastových dílů na praskliny a křehká místa
• Kontrola zbytkového vybíjecího proudu (A) podle normy VDE 0702 ovládací skříňky +
přiložené nabíječky
• Kontrola izolačního odporu (MΩ) podle normy VDE 0702 ovládací skříňky + přiložené
nabíječky
• Funkční zkouška konzolového ramene (mazání spojovacích dílů, rozsahu seřízení,
deformace, opotřebení).
• V případě potřeby kontrola funkčnosti pohonů zvedáku (během zkušební jízdy → hlučnost,
rychlost, volnoběh atd.): Změření výkonu, nejprve bez zátěže a pak se jmenovitou zátěží
(„SWL“), pro přezkoumání opotřebení motorů pomocí porovnání hodnot elektrického
proudu s hodnotami při dodávce zvedáku.
• Zkouška funkčnosti nouzového zastavení
• Zkouška funkčnosti nouzového snížení
• Kompletnost stavu dodávky, návod k obsluze k dispozici?
Kontroly měření smějí provádět pouze kvalifikované osoby vyškolené pro práci s pacientským
zvedákem, a to alespoň pod dohledem elektrotechnika, který zná měřicí přístroje a postupy. Po
provedení měření a servisu může pacientský zvedák autorizovat k provozu pouze elektrotechnik.
Servis smí být v plánu údržby autorizován pouze v případě, že došlo ke kontrole minimálně všech
výše uvedených aspektů.
5.6 Životnost výrobku
Průměrná životnost pacientského zvedáku je 8 let. V závislosti na frekvenci používání,
skladování, údržby, servisu a čištění se životnost pacientského zvedáku prodlouží nebo zkrátí.
5.7 Znovupoužití výrobku
Před každým dalším použitím nechte pacientský zvedák dezinfikovat, zkontrolovat a provést
servis podle pokynů v této kapitole.
5.8 Likvidace výrobku
Po skončení životnosti musí být pacientský zvedák zlikvidován podle místní legislativy pro životní
prostředí. Nejlepším způsobem likvidace je rozebrání pacientského zvedáku pro usnadnění
přepravy recyklovatelných součástí.

Falcon
2022-11
Řešení problémů
17
EN
NL
PL
CS
6 Řešení problémů
Tabulka 1: Řešení problémů
Problém
Příčina problému
Řešení problému
Hlučnost pohyblivých dílů
(např. konzolového
ramene).
Je nutné mazání.
Namažte pohyblivé díly.
(Pohon nemažte!)
Pohon vydává neobvyklý
zvuk.
Pohon je poškozený.
Vyměňte pohon, nebo se obraťte
na odborného prodejce.
Pacientský zvedák již
nezvedá.
1. Elektrický pohon je
poškozený.
2. Pacient má příliš velkou
hmotnost (Na ručním ovládání
se rozsvítí kontrolka přetížení)
3. Není připojen pohon nebo
ruční ovládání.
4. K ovládací skříňce není
připojená baterie, nebo není
zapojená správně.
5. Baterie je téměř vybitá.
6. Je zaktivováno nouzové
zastavení.
1. Vyměňte pohon.
2. Použijte pacientský zvedák
s vyšší maximální hmotností
uživatele.
3. Zkontrolujte zapojení.
V případě potřeby připojte
pohon či ruční ovládání.
4. Ověřte, že je nainstalovaná
baterie nebo je-li správně
zapojená.
5. Nabijte baterie nebo je
vyměňte.
6. Deaktivujte nouzové
zastavení.
Snížení pacienta v případě
nouze nefunguje.
Pro snížení pacienta je nutné
zatížení minimální hmotností.
Je-li hmotnost pacienta příliš
malá, mírně táhněte dolů na
konzolová ramena nebo upravte
rychlost snížení.
Baterii nelze nabíjet
1. Baterie nejsou správně
připojeny k ovládací skříňce.
2. Závada síťového kabelu.
3. Jsou defektní baterie.
4. Je defektní ovládací skříňka
s dodanou nabíječkou.
5. Je defektní nabíječka baterií
1. Ověřte, že jsou baterie
připojeny k ovládací skříňce.
2. Vyměňte síťový kabel.
3. Vyměňte baterii.
4. Vyměňte ovládací skříňku
s dodanou nabíječkou.
5. Vyměňte nabíječku baterií.

Falcon
2022-11
Technické údaje
18
EN
NL
PL
CS
7 Technické údaje
700
Směr dopředu

Falcon
2022-11
Technické údaje
19
EN
NL
PL
CS
Tabulka 2: Technické údaje
Značka
Vermeiren
Typ
Pacientský zvedák
Model
Falcon
Popis
Míra ve
výkresu
Rozměry
Nejnižší poloha CAP*
l
509 mm
Nejvyšší poloha CAP*
k
1609 mm
Rozsah zvedání (rozsah výšek)
m
1100 mm
Délka nohou
1042 mm
Délka celkem
1158 mm
Minimální oddělení nohou
r
506 mm
Maximální oddělení nohou
q
970 mm
Výška nohou / výška rámu
n
149 mm
112,5 mm
Celková šířka (zavřená), vnější rozměr
565 mm
Celková šířka (otevřená), kolečka dopředu
p
1026 mm
Složená délka
1236 mm
Složená výška
294 mm
Složená šířka
565 mm
Min. vzdálenost mezi zdí / CSP* (maximální
dosah)
w3
36 mm
Min. vzdálenost mezi zdí / CSP* (minimální
výška)
w2
263,5 mm
Min. vzdálenost mezi zdí / CSP* (maximální
výška)
w1
65 mm
Kruh otáčení
1188 mm
Celková hmotnost
35 kg
Hmotnost podvozku
16,5 kg
Hmotnost ovládací skříňky + baterie
3 kg
Hmotnost horního rámu (konzolové rameno /
rozpěrná tyč + motor + ovládací skříňka)
18,5 kg
Maximální zatížení
130 kg
Světlá výška
15,5 mm
Maximální dosah při 600 mm
a
557 mm
Maximální dosah od podpěry
b
557 mm
Dosah od podpěry při oddělení 700 mm
c
323 mm
Napájecí zásuvka
24V , max. 250 V~
Provozní teplota
+5 až +40 °C
Relativní vlhkost vzduchu
20 až 80 % při 30 °C, nekondenzující
Úroveň hluku
< 54 dB(A)
Ovládací skříňka
TiMOTION TC20
Baterie
Netýká se

Falcon
2022-11
Technické údaje
20
EN
NL
PL
CS
Značka
Vermeiren
Typ
Pacientský zvedák
Model
Falcon
Popis
Míra ve
výkresu
Rozměry
Ruční ovládání
TiMOTION TH10
Motor
TiMOTION TA23
Stupeň krytí ovládací skříňky
IP54
Stupeň krytí baterie
Netýká se
Stupeň krytí ručního ovládání
IP54
Stupeň krytí motoru
IP54
Třída izolace
II – typ B
Pravidelný provoz
max. 10 %, nebo 2 min. souvislého
provozu/18 min. přestávky
Kapacita baterie
2,9 Ah
Nouzové zastavení
Ano
Ruční snížení v případě nouze
Ano
Elektrické snížení v případě nouze
Ne
Vyhrazujeme si právo na zavádění technických změn. Tolerance měření ±15 mm / 1,5 kg
1 = Nejvyšší poloha, 2 = Maximální dosah, 3 = Nejnižší poloha
* CSP = Central suspension point (střední závěsný bod)

Service registration form
Service registration form
This product (name): ……………………………………..
was inspected (I), serviced (S), repaired (R) or disinfected (D):
By (stamp):
Kind of work: I / S / R / D
Date:
By (stamp):
Kind of work: I / S / R / D
Date:
By (stamp):
Kind of work: I / S / R / D
Date:
By (stamp):
Kind of work: I / S / R / D
Date:
By (stamp):
Kind of work: I / S / R / D
Date:
By (stamp):
Kind of work: I / S / R / D
Date:
By (stamp):
Kind of work: I / S / R / D
Date:
By (stamp):
Kind of work: I / S / R / D
Date:
By (stamp):
Kind of work: I / S / R / D
Date:
By (stamp):
Kind of work: I / S / R / D
Date:
By (stamp):
Kind of work: I / S / R / D
Date:
By (stamp):
Kind of work: I / S / R / D
Date:
By (stamp):
Kind of work: I / S / R / D
Date:
By (stamp):
Kind of work: I / S / R / D
Date:
By (stamp):
Kind of work: I / S / R / D
Date:

-
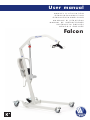 1
1
-
 2
2
-
 3
3
-
 4
4
-
 5
5
-
 6
6
-
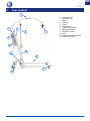 7
7
-
 8
8
-
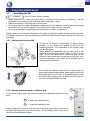 9
9
-
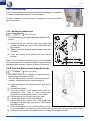 10
10
-
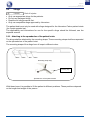 11
11
-
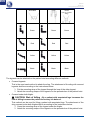 12
12
-
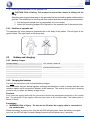 13
13
-
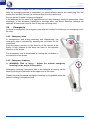 14
14
-
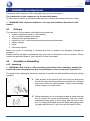 15
15
-
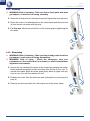 16
16
-
 17
17
-
 18
18
-
 19
19
-
 20
20
-
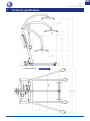 21
21
-
 22
22
-
 23
23
-
 24
24
-
 25
25
-
 26
26
-
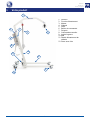 27
27
-
 28
28
-
 29
29
-
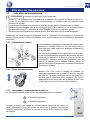 30
30
-
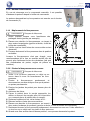 31
31
-
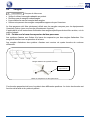 32
32
-
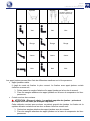 33
33
-
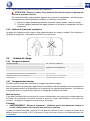 34
34
-
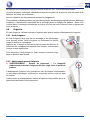 35
35
-
 36
36
-
 37
37
-
 38
38
-
 39
39
-
 40
40
-
 41
41
-
 42
42
-
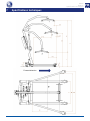 43
43
-
 44
44
-
 45
45
-
 46
46
-
 47
47
-
 48
48
-
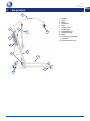 49
49
-
 50
50
-
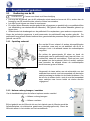 51
51
-
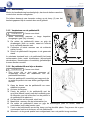 52
52
-
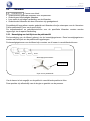 53
53
-
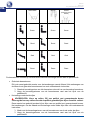 54
54
-
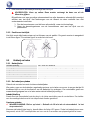 55
55
-
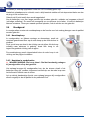 56
56
-
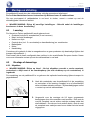 57
57
-
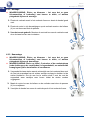 58
58
-
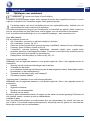 59
59
-
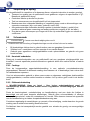 60
60
-
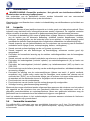 61
61
-
 62
62
-
 63
63
-
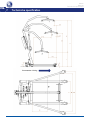 64
64
-
 65
65
-
 66
66
-
 67
67
-
 68
68
-
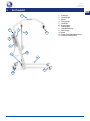 69
69
-
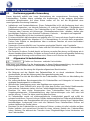 70
70
-
 71
71
-
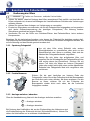 72
72
-
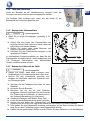 73
73
-
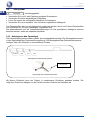 74
74
-
 75
75
-
 76
76
-
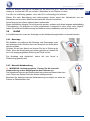 77
77
-
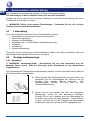 78
78
-
 79
79
-
 80
80
-
 81
81
-
 82
82
-
 83
83
-
 84
84
-
 85
85
-
 86
86
-
 87
87
-
 88
88
-
 89
89
-
 90
90
-
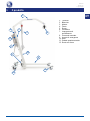 91
91
-
 92
92
-
 93
93
-
 94
94
-
 95
95
-
 96
96
-
 97
97
-
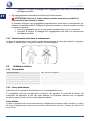 98
98
-
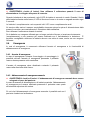 99
99
-
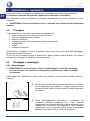 100
100
-
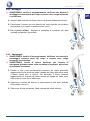 101
101
-
 102
102
-
 103
103
-
 104
104
-
 105
105
-
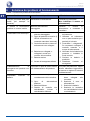 106
106
-
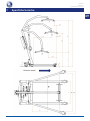 107
107
-
 108
108
-
 109
109
-
 110
110
-
 111
111
-
 112
112
-
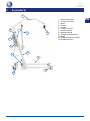 113
113
-
 114
114
-
 115
115
-
 116
116
-
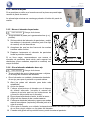 117
117
-
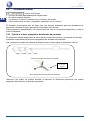 118
118
-
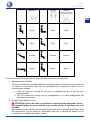 119
119
-
 120
120
-
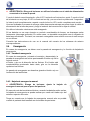 121
121
-
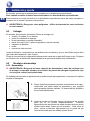 122
122
-
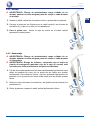 123
123
-
 124
124
-
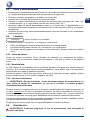 125
125
-
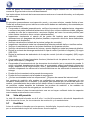 126
126
-
 127
127
-
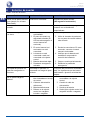 128
128
-
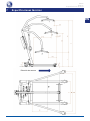 129
129
-
 130
130
-
 131
131
-
 132
132
-
 133
133
-
 134
134
-
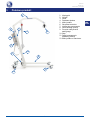 135
135
-
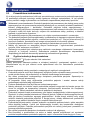 136
136
-
 137
137
-
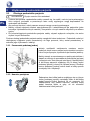 138
138
-
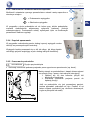 139
139
-
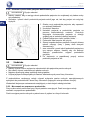 140
140
-
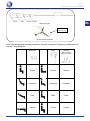 141
141
-
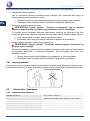 142
142
-
 143
143
-
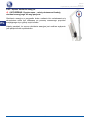 144
144
-
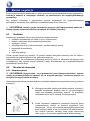 145
145
-
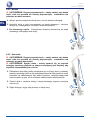 146
146
-
 147
147
-
 148
148
-
 149
149
-
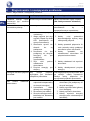 150
150
-
 151
151
-
 152
152
-
 153
153
-
 154
154
-
 155
155
-
 156
156
-
 157
157
-
 158
158
-
 159
159
-
 160
160
-
 161
161
-
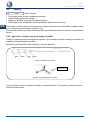 162
162
-
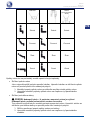 163
163
-
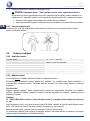 164
164
-
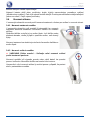 165
165
-
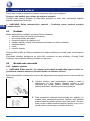 166
166
-
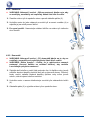 167
167
-
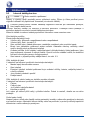 168
168
-
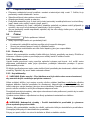 169
169
-
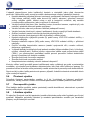 170
170
-
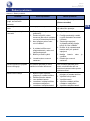 171
171
-
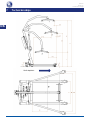 172
172
-
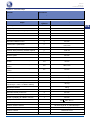 173
173
-
 174
174
-
 175
175
-
 176
176


En otros idiomas
- français: Falcon W202333 Manuel utilisateur
- italiano: Falcon W202333 Manuale utente
- Deutsch: Falcon W202333 Benutzerhandbuch
- Nederlands: Falcon W202333 Handleiding
- slovenčina: Falcon W202333 Používateľská príručka
- polski: Falcon W202333 Instrukcja obsługi
Otros documentos
-
Vermeiren Albatros II Manual de usuario
-
Invacare Jasmine Manual de usuario
-
-
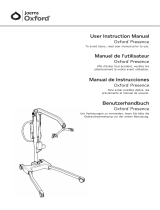 Joerns Oxford® N33092 Instrucciones de operación
-
 Joerns Oxford® F27178 Instrucciones de operación
-
-
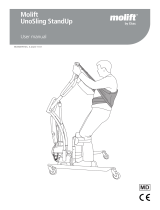 Molift UnoSling StandUp Manual de usuario
-
 Oxford R04446 Instrucciones de operación
-
 Joerns Oxford® M78287 Instrucciones de operación


