KNOVA KN 7415-02 El manual del propietario
- Tipo
- El manual del propietario

KN 7415-02
Extendable base
engine hoist
2
Pluma hidráulica base extensible
TONS / TONELADAS

IMPORTANT
Please read these instructions carefully.
NOTE: The safe operational requirements, warnings and cautions.
1. FORWARD
This engine crane is intended to be used to remove, install and
transport in the lowered position, rated capacity automotive and
light truck engines and engine assemblies. It must be used with
appropriately rated engine leveler, sling and/or chains which are
NOT INCLUDED. After removing, immediately transfer the load
to an appropriately rated work station such as an engine stand.
1. To raise the Extension Boom, close the Release Valve on the
Hydraulic Ram. Then, pump the Handle until the Extension
Boom reaches the desired height.
2. To extend the length of the Extension Boom, remove bolt and
nut. Pull out on the Extension Boom until the desired extension
hole in the Boom aligns with the hole in the Extension Boom.
Then re-insert the bolt through the holes in the Boom and
Extension Boom, and lock the bolt in place with the nut.
3. WARNING! Do not exceed the maximum lifting capacities of
this tool. Exceeding the maximum lifting capacities could
cause personal injury and/or property damage. The longer
the Extension Boom is extended, the lower the lifting capacity
of this Shop Crane.
4. Position the Shop Crane so that the Hook is directly above
the object you wish to lift.
5. WARNING! Stay clear of the Shop Crane. Never go under an
object being lifted by the Crane. It is possible for the Hook to
slip, causing an object to fall, possibly resulting in serious
injury and/or property damage. Always monitor the object
being lifted so it does not rock back and forth.
6. Open the Release Valve slightly to lower the Hook. Attach
the Hook to the object you are lifting, and make sure the
Safety Latch on the Hook is fully closed. Then close the
Release Valve, and pump the Handle to raise the object.
Carefully move the Shop Crane to the location where you
wish to lower the object, i.e., an engine stand, proper support,
oor surface, etc. Then lower the object by opening the
Release Valve slightly.
7. Once the object is fully lowered, disconnect the Hook from
the object. Then store the Shop Crane (unfolded or folded)
in a clean, dry, safe location out of reach of children and other
unauthorized people.
1. Check all of the mounting hardware before each use and
make sure it is secure before using the Shop Crane.
2. Make sure the Hook & Chain are clean of dirt, grease,
or debris.
3. If the Jack is not performing to satisfaction, there may be air
in the hydraulic system. To purge the system of air, follow
these instructions.
a. Make sure the Ram is completely lowered.
b. Remove the Oil Fill Plug and top off with Hydraulic Fluid.
c. Raise the Ram to maximum height.
d. Loosen the Release Valve and push the Ram all the way
down.
e. Top off with Hydraulic Fluid and replace the plug. Repeat
if necessary.
4. To clean, use a damp cloth and a mild detergent. Do not use
solvents or other ammable agents.
5. If lifting performance of the Shop Crane begins to diminish,
check the hydraulic oil level in the Oil Tank. If necessary, top
off the Oil Tank with hydraulic oil.
Capacity 500 - 2,000 kg.
Lifting height 2,380 mm.
Height of crane 1,450 mm.
Length of height 1,550 mm.
G.W. 58 - 95 kg.
N.W. 56 - 93 kg.
Packing size 1# 1,310 x 840 x 90 mm.
2# 1,320 x 300 x 160 mm.
2. MAIN SPECIFICATIONS
3. SAFETY INSTRUCTIONS
1. Keep work area clean.
2. Observe work area conditions.
3. Keep children away.
4. Store idle equipment.
5. Use the right tool for the job.
6. Dress properly.
7. Use eye protection.
8. Do not overreach.
9. Maintain tools with care.
10. Stay alert.
11. Check for damaged parts.
12. Replacement parts and accessories.
13. Do not operate tool if under the inuence
of alcohol or drugs.
14. Never exceed the maximum lifting capacity.
Beware of Dynamic Loading!
15. Maintenance.
16. Not to be used for aircraft purposes.
17. Do not attempt to move the Crane when under load.
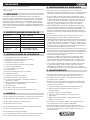
To Attach The Large Casters To The Rear Of The Base:
To Attach The Small Casters To The Front Of The Base:
To Attach The Large Casters To The Legs:
To Attach The Legs To The Base:
To Attach The Support Post And Support Braces To The Base:
To Attach The Boom To The Support Post:
To Attach The Boom Extension To The Boom:
To Attach The Chain/Hook Assembly To The Boom Extension:
To Attach The Hydraulic Ram To The Support Post And Boom:
4.
ASSEMBLY
5. OPERATION INSTRUCTION
6. MAINTENANCE

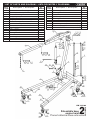
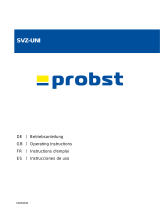
LIST OF PARTS AND DIAGRAM / LISTA DE PARTES Y DIAGRAMA
18 Washers / Arandelas 6
19 Screws / Tornillos 6
20 Nuts / Tuercas 2
21 Washers / Arandelas 2
22 Screws / Tornillos 2
23 Nuts / Tuercas 16
24 Screws / Tornillos 16
25
Extension Leg (short) / Pata de extensión (corta)
2
26
Extension Leg (long) / Pata de extensión (larga)
2
27 Lock screws / Tornillos de bloqueo 2
Part no.
No. de parte.
Part no.
No. de parte.
Qty.
Cantidad Qty.
Cantidad
Description / Descripción
1 Chain and hook / Cadena y gancho 1
2
Extension boom / Amplicador de extensión
1
3 Boom / Brazo de pluma 1
4 Long ram jack / Gato hidráulico 1
5 Support post / Poste de soporte 1
6 Support brace / Soportes de apoyo 2
7 Base / Base 1
8 Lock screws / Tornillos de bloqueo 2
9 Caster wheels / Rueditas 6
10 Handle / Manija 1
11 Nut / Tuerca 1
12 Washer / Arandela 1
13 Screw / Tornillo 1
14 Nut / Tuerca 1
15 Washer / Arandela 1
16 Screw / Tornillo 1
17 Nuts / Tuercas 6
Description / Descripción
Extendable base
engine hoist
2
Pluma hidráulica base extensible
TONS / TONELADAS
KN 7415-02

IMPORTANTE
Lea estas instrucciones cuidadosamente..
NOTA: Los requisitos operacionales de seguridad, advertencias
y precauciones
1. ADELANTE
Esta Pluma hidráulica está diseñada para ser utilizada para
remover, instalar y transportar en la posición baja, motores de
capacidad nominal para autos y camiones livianos y ensambles
de motores. Debe usarse con un nivelador del motor con una
clasicación adecuada, eslingas y / o cadenas que NO ESTÁN
INCLUIDAS. Después de retirarlo, transera inmediatamente la
carga a una estación de trabajo de clasicación adecuada, como
un soporte de motor.
1. Para elevar el brazo de extensión, cierre la válvula de
liberación en la plataforma hidráulica. Luego, bombee la manija
hasta que la pluma de extensión alcance la altura deseada.
2. Para extender la longitud de la pluma de extensión, retire
el perno y la tuerca. Tire de la pluma de extensión hasta que
el oricio de extensión deseado en la pluma se alinee con el
oricio de la pluma de extensión. Luego vuelva a insertar el
perno a través de los agujeros en la pluma y la pluma de
extensión, y asegure el perno en su lugar con la tuerca.
3. ¡ADVERTENCIA! No exceda las capacidades de elevación
máximas de esta herramienta. Exceder las capacidades de
elevación máximas podría causar lesiones personales y / o
daños a la propiedad. Cuanto más se extienda la extensión
del brazo, menor será la capacidad de elevación de esta grúa
hidráulica.
4. Coloque la grúa hidráulica de modo que el gancho esté
directamente encima del objeto que desea levantar.
5. ¡ADVERTENCIA! Manténgase alejado de la Pluma. Nunca se
meta debajo de un objeto que la grúa levanta. Es posible que
el Gancho se deslice, causando la caída de un objeto, lo que
puede ocasionar lesiones graves y / o daños a la propiedad.
Siempre controle el objeto que se está levantando para que
no se balancee hacia adelante y hacia atrás.
6. Abra ligeramente la válvula de liberación para bajar el gancho.
Sujete el gancho al objeto que está levantando y asegúrese
de que el cierre de seguridad del gancho esté completamente
cerrado. Luego cierre la válvula de liberación y bombee la
manija para levantar el objeto.
Mueva con cuidado la grúa de taller a la ubicación donde
desea bajar el objeto, es decir, una plataforma del motor,
soporte adecuado, supercie del piso, etc. A continuación,
baje el objeto abriendo la válvula de liberación ligeramente.
7. Una vez que el objeto esté totalmente bajado, desconecte
el gancho del objeto. Luego guarde la grúa de la tienda
(desplegada o doblada) en un lugar limpio, seco y seguro,
fuera del alcance de los niños y otras personas no autorizadas.
1. Verique todo el aparato de montaje antes de cada uso y
asegúrese de que esté seguro antes de usar la pluma.
2. Asegúrese de que el gancho y la cadena estén limpios de
suciedad, grasa o residuos.
3. Si el gato no está funcionando a satisfacción, puede haber
aire en el sistema hidráulico. Para purgar el sistema de aire,
siga estas instrucciones.
a. Asegúrate de que el pistón esté completamente bajo.
b. Retire el tapón de llenado de aceite y cubra con
líquido hidráulico.
c. Levante el pistón a la altura máxima.
d. Aoje la válvula de liberación y empuje el pistón
hacia abajo.
e. Rellene con uido hidráulico y reemplace el tapón.
Repita si es necesario.
4. Para limpiar, use un paño húmedo y un detergente suave.
No use solventes u otros agentes inamables.
5. Si el rendimiento de elevación de la pluma comienza a
disminuir, verique el nivel de aceite hidráulico en el tanque
de aceite. Si es necesario, cubra el tanque de aceite con
aceite hidráulico.
Capacidad 500 - 2,000 kg.
Altura de elevación 2,380 mm.
Altura de la grúa 1,450 mm.
Longitud de la altura 1,550 mm.
Peso bruto 58 - 95 kg.
Peso neto 56 - 93 kg.
Tamaño del 1# 1,310 x 840 x 90 mm.
embalaje 2# 1,320 x 300 x 160 mm.
2. ESPECIFICACIONES PRINCIPALES
3. INSTRUCCIONES DE SEGURIDAD
1. Mantenga limpia el área de trabajo..
2. Observe las condiciones del área de trabajo.
3. Mantenga a los niños alejados.
4. Almacene el equipo inactivo.
5. Use la herramienta adecuada para el trabajo.
6. Vístase apropiadamente.
7. Usa protección para los ojos.
8. No te excedas.
9. Sostenga las herramientas con cuidado.
10. Manténgase alerta.
11. Verique si hay partes dañadas.
12. Remplace las partes y accesorios.
13. No opere la herramienta si está bajo la inuencia
de alcohol o drogas.
14. Nunca exceda la capacidad de elevación máxima.
¡Cuidado con la carga dinámica!
15. Mantenimiento.
16. No debe usarse para aeronaves.
17. No intente mover la grúa cuando esté bajo carga..
Unir las ruedas giratorias grandes a la parte trasera de la base:
Unir las pequeñas ruedas giratorias al frente de la base:
Unir las ruedas giratoria a las extensiones:
Unir las extensiones a la base:
Unir el poste de soporte y los soportes de soporte a la base:
Unir el brazo al poste de soporte:
Unir la extensión de la pluma al brazo:
Unir el ensamblaje de cadena / gancho a la extensión de pluma:
Unir la rampa hidráulica a la columna de soporte y la pluma:
4.
ARMADO
5. INSTRUCIONES DE OPERACION
6. MANTENIMIENTO
www.knova.com.mx
-
 1
1
-
 2
2
-
 3
3
-
 4
4


KNOVA KN 7415-02 El manual del propietario
- Tipo
- El manual del propietario
en otros idiomas
- English: KNOVA KN 7415-02 Owner's manual
Otros documentos
-
Pittsburgh Automotive Item 60388 El manual del propietario
-
Harbor Freight Tools 2 ton Capacity Foldable Shop Crane Manual de usuario
-
Facom DL.1GP Manual de usuario
-
-
 probst SVZ-UNI Manual de usuario
-
USAG 1953 A Manual de usuario
-
-
 probst FTZ-MAXI-25 Manual de usuario
-
Sunex Tools 5222 El manual del propietario

