
Congratulations on the purchase of your new ladies
Total Grooming System. For maximum satisfaction when
using this quality product, please take a minute to read
the following operating and care instructions. Thank
you for choosing Conair, the #1 brand in personal care
appliances.
IMPORTANT SAFETY
INSTRUCTIONS
When using an electrical appliance, basic precau-
tions should always be taken, including the fol-
lowing:
READ ALL INSTRUCTIONS
BEFORE USING
DANGER– To reduce the risk of death
or serious injury from electrical shock:
1. Do not place or store appliance where the
stand can fall or be pulled into a tub or sink. Do
not place or drop charging stand into water or
other liquid.
2. Except when charging, always unplug this
appliance from the electrical outlet immediately
after using.
3. Always turn this appliance off before
cleaning.
4. Do not reach for an appliance that has fallen
into water.
WARNING– To reduce the risk of
burns, fire, electrical shock, or injury to per-
sons:
1. This appliance should not be used by, on, or near
children or individuals with certain disabilities.
2. Use this appliance only for its intended use as
described in this manual. Do not use attachments
not recommended by the manufacturer.
3. Never operate this appliance if it has a dam-
aged cord or plug, if it is not working properly, if it
has been dropped or damaged, or if the stand has
been dropped into water. Return the appliance to
a service center for examination and repair.
4. Keep the cord away from heated surfaces.
5. Never drop or insert any object into any open-
ing.
6. Do not use outdoors or operate where aerosol
(spray) products are being used or where oxygen
is being administered.
7. Do not use this appliance with damaged or broken
foils, as injury may occur.
8. Always attach plug to appliance first, then to
outlet. To disconnect turn all controls to off position
before removing plug from outlet.
Shaver voltage: This appliance comes with an
adapter that can be used on an alternating
current (120V AC only).
SAVE THESE
INSTRUCTIONS
WARNING
1. Women whose skin is sensitive to cosmetics or
easily irritated by shaving, or who suffer from a skin
allergy, should test one section of the leg or arm
before using the shaver.
2. The foils are thin and precisely finished
pieces. Do not press hard against the foils,
or drop foils. A warped or distorted foil will
produce poor shaving results. Also a dam-
aged foil may cause skin injury. A damaged
foil should be replaced immediately.
3. When cleaning, use cold or warm water. Do not
use hot water, sea water, or cleaners, as they can
cause damage to the waterproof seals.
4. Do not leave the entire unit submerged in water
for a long period of time.
5. To prevent possible damage to the foils and the
cutter, women who use underarm deodorant must
thoroughly clean and air-dry the foil and cutter after
each use. Failure to do this may result in corrosion
6. Keep out of reach of children.
The Conair
®
Personal Beauty Groomer gives you
today’s complete shaving and trimming all in one. It
has three interchangeable heads that are specially
designed to work quickly and leave you perfectly
groomed all over.
OPERATING
INSTRUCTIONS
HOW TO CHARGE
1. Make sure the on/off switch is in the
OFF
position
2. Plug the Adapter into a 120V outlet
3. Place the rechargeable handle on the base on
the charging contacts
4. The charging indicator light should go on,
indicating that the unit is being charged
5. Before the first use, or if the device has not
been used for a long time, be sure to charge the
unit for 16 hours.
CHANGING THE HEADS
Before changing the heads, be sure that the
on/off switch is in the OFF position.
To remove the shaver head, gently twist counter
clockwise and gently pull
the head up and away from
the handle (see Fig. 1).
Be careful not to push
against or hold on to the
foil. It is delicate and may
be easily damaged.
To install the Bikini or the
eyebrow trimmer head,
reverse the removal
process. Position the
head and gently twist
clockwise until the
attachment snaps into
place (see Fig. 2).
To remove the bikini or the eyebrow trimmer,
follow the same process for removing the shaver
head.
USING THE SHAVER
The shaver head is designed to provide a clean,
close shave to your legs, arms, and underarms.
Take care with the foil as it is very sensitive and
easily damaged. Always inspect it for damage
before you use it.
Never use a foil that is damaged, as this can result
in injury. Make sure your skin is clean and dry
before use. Do not use any lotions or oils before
shaving.
SHAVING
NOTE: if you are switching to an electric shaver
for the first time, it will take 12 uses for your
skin and hair to adjust to this new method of
removing hair. Do not evaluate performance
until you have allowed your skin and hair to
adjust.
1. Be sure the unit is fully charged
2. Attach the shaver head as describe in “Changing
The Heads” section
3. Move the power switch to the ON position
4. Hold the shaving foil against the skin moving the
shaver gently against the direction of hair growth
5. Don’t push too hard against the skin as this will
cause irritation and may damage the foil
6. As your skin may be sensitive after shaving, test
your moisturizer on a small patch of skin and wait
to see if irritation occurs
7. Cleaning: After each use you will need to clean
the shaver head to ensure continued performance
8. Move the power on/off switch to the OFF position.
9. Remove the shaver head from the handle
10. Remove the foil head
assembly from the shaver
head by pushing on the two
side buttons and pulling the
foil away from the head (see
Fig. 3).
11. Using the supplied cleaning brush, gently brush
the hair away from the cutter. Blow the hair off the
foil, do not use the brush on the foil, it will cause
damage.
12. The head may also be rinsed under water. Be
sure to allow both to dry before using.
To maintain the best cutting performance, be sure
to replace the foil head and cutter every six months
of regular use. Contact Conair Customer Service to
order the replacement parts
TRIMMING
1. Be sure the unit is fully charged
2. Attach the trimming head as described in
“Changing the Heads” section
3. To fully remove hair or to outline the bikini
area, use the trimmer without the attachment
comb
4. When removing hair, gently move the blades
against the direction of growth.
5. To outline, place the blades perpendicular to
the skin surface and apply the blades to the edge
of the hair. Use the blades to create the desired
outline.
6. For the cleanest finish, follow up with the foil
shaver
7. For cutting hair without completely removing it,
attach the 5-position comb to the head. Place the
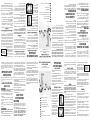
GETTING TO KNOW YOUR PERSONAL
BEAUTY GROOMER
Fig. 1
Fig. 2
Full size, shaver head
Bikini trimmer head
Eyebrow trimmer head
2-position eyebrow comb
5-position attachment comb
Oil
Cleaning brush
Stand
Charging adapter (not pictured)
9
8
7
6
5
4
3
2
1
2
4
3
5
8
7
6
1
Rechargeable Unit
(charge for 16 hours prior to first use)
Fig. 3
Gracias por escoger el conjunto de belleza personal
de Conair. Para resultados óptimos, siempre lea las
instrucciones de uso y de mantenimiento que se
encuentran a continuación. Nuevamente, gracias por
escoger a Conair, el Número 1 en aparatos de cuidado
personal.
MEDIDAS DE SEGURIDAD
IMPORTANTES
Cuando se usen aparatos eléctricos, siempre se
deben tomar precauciones básicas de seguridad,
entre las cuales las siguientes:
LEA TODAS LAS
INSTRUCCIONES ANTES
DE USARLO
PELIGRO– Para reducir el riesgo de
muerte o herida por descarga:
1. No coloque ni guarde el aparato donde pueda
caer o ser empujado a una bañera o un lavabo. No
coloque la base de recarga ni la deje caer al agua
u otro líquido.
2. Desconecte el aparato inmediatamente después
de usarlo, excepto cuando lo quiera cargar.
3. Siempre desconecte este aparato antes de
limpiarlo.
4. No trate de alcanzar el aparato si caiga al agua.
ADVERTENCIA– Para reducir
el riesgo de quemaduras, electrocución,
incendio o lesiones personales:
1. Este aparato no debería ser usado por, sobre o cerca
de niños o personas con alguna discapacidad.
2. Use este aparato únicamente con el propósito para
el cual fue diseñado y tal como se describe en este
manual. Sólo use accesorios recomendados por el
fabricante.
3. Nunca utilice el aparato si el cable o la clavija están
dañados, si no funciona correctamente, si ha caído,
si está dañado o si ha caído al agua. Llévelo a un
centro de servicio autorizado para que lo examinen y
lo reparen.
4. Mantenga el cable alejado de superficies calientes.
5. Nunca deje caer ni inserte un objeto en ninguna de
las aberturas.
6. No lo utilice en exteriores, ni donde se estén
usando productos en aerosol (spray) o donde se esté
administrando oxígeno.
7. No use este aparato con una hoja de afeitar rota.
Esto podría provocar una herida.
8. Siempre conecte el cable a la base antes de
conectarlo al tomacorriente. Para desconectar el
aparato, coloque todos los ajustes en la posición de
apagado “OFF” y desenchufe el cable.
Voltaje: Este aparato incluye un adaptador que
puede usarse en corriente alterna de 120V (60Hz)
únicamente.
GUARDE ESTAS
INSTRUCCIONES
ADVERTENCIA
1. Si su piel es sensitiva a los productos cosméticos
o se inflama fácilmente cuando se rasura, o si usted
sufre de alguna alergia cutánea, debería hacer una
prueba sobre una parte pequeña de la pierna o del
brazo antes de usar el aparato.
2. La hoja de afeitar es muy fina y precisa.
No la apriete mucho sobre la piel ni la deje
caer. Una hoja lastimada o deformada podría
provocar una herida y impedirá el buen fun-
cionamiento de su aparato. Reemplace la hoja
defectuosa inmediatamente.
3. Use agua fría o tibia para limpiar el aparato. No
use agua caliente, agua salina o limpiadores. Esto
podría dañar los sellos impermeables del aparato.
4. No mantenga el aparato debajo del agua durante
un periodo prolongado.
5. Si usa desodorante en las axilas, lave bien y deje
secar la hoja y la cuchilla al aire libre después de
cada uso para evitar que los filos internos se oxiden
6. Manténgalo fuera del alcance de los niños.
El conjunto de cuidado personal de Conair tiene todo
lo que usted necesita para tener un cuerpo hermoso.
Tiene tres cabezas intercambiables, especialmente
diseñadas para trabajar rápidamente y con precisión
en cualquier área de su cuerpo.
INSTRUCCIONES DE
OPERACIÓN
CÓMO CARGAR EL APARATO
1. Asegúrese que el aparato esté apagado (“OFF”).
2. Conecte el adaptador a base.
3. Enchufe el adaptador en un tomacorriente
de 120V.
4. Coloque el aparato en la base, sobre los polos de
carga. El indicador luminoso de carga se encenderá
para indicar que el aparato se está cargando.
5. Cargue el aparato durante 16 horas antes de
usarlo por primera vez o si no lo ha usado en
mucho tiempo.
CÓMO CAMBIAR LAS CABEZAS
Asegúrese que el aparato esté apagado (“OFF”)
antes de cambiar las cabezas.
Para sacar la cabeza de la rasuradora, gírela
ligeramente en el sentido
antihorario y jálela hacia
arriba (Fig. 1).
Tenga cuidado de no apre-
tar la hoja. Es muy delicada
y se puede lastimar fácil-
mente.
Para instalar la cortadora
para las cejas o la cor-
tadora para el bikini,
instale el cabezal sobre
el aparato y gírelo lig-
eramente en el sentido
horario para encajarlo
(Fig. 2).
Para remover la cortadora para las cejas o la
cortadora para el bikini, gírela ligeramente en el
sentido antihorario y jálela hacia arriba
CÓMO USAR LA RASURADORA
La rasuradora fue diseñada para rasurar sus
piernas, sus brazos y sus axilas. La hoja de afeitar
es muy delicada y se puede lastimar fácilmente.
Úsela con sumo cuidado e inspecciónela antes
de cada uso.
No use el aparato si la hoja está lastimada porque
podría provocar una herida. Siempre tenga la piel
limpia y seca. No aplique ninguna crema, loción o
aceite antes de rasurarse.
RASURADO
Nota: si no está acostumbrada a usar rasu-
radora eléctrica ahora, necesitará un tiempo
para acostumbrar su piel y su vello a este
nuevo método. No juzgue el aparato antes de
haberlo usado 12 veces.
1. Asegúrese que el aparato esté completamente
cargado.
2. Coloque la cabeza de la rasuradora, como se
indicó en la sección “Cómo cambiar las cabezas”.
3. Encienda el aparato (“ON”).
4. Coloque la hoja de afeitar contra la piel y mueva
la rasuradora lentamente en la dirección opuesta
al crecimiento del vello.
5. No presione mucho. Esto podría provocar irrita-
ciones y lastimar la hoja.
6. Su piel puede ser sensible después del rasura-
do. Prueba loción hidratante en una pequeña zona
para asegurarse que no provoque irritaciones.
7. Limpieza: Para un desempeño óptimo, limpie el
aparato después de cada uso.
8. Apague el aparato (“OFF”).
9. Saque la cabeza de la rasuradora.
10. Oprima los botones
ubicados en ambos lados de
la cabeza y jale la hoja hacia
arriba para desenganchar el
conjunto de cuchillas (Fig.3).
11. Limpie las cuchillas con
el cepillo de limpieza provisto. Sople sobre la hoja
para eliminar los recortes de pelo. No limpie la hoja
con el cepillo de limpieza porque podría lastimarla.
12. También puede enjuagar la cabeza debajo del
agua. Permita que la cabeza y las cuchillas sequen
al aire libre antes de volver a usar la rasuradora.
Para lograr un desempeño óptimo, cambie las
cuchillas y la hoja cada seis meses. Llame al Centro
de Servicio de Conair al 1-800-3-CONAIR para
pedir partes de repuesto.
CÓMO USAR LA CORTADORA PARA
EL BIKINI
1. Asegúrese que el aparato esté completamente
cargado.
2. Coloque la cabeza de la cortadora, como se
indicó en la sección “Cómo cambiar las cabezas”.
3. Para rasurar o delinear la área del bikini, use la
cortadora sin guía.
4. Rasúrese cuidadosamente, moviendo la cor-
tadora en la dirección opuesta al crecimiento del
vello.
5. Para delinear, coloque las cuchillas en forma
perpendicular a la piel contra los vellos, y déle la
forma deseada.
6. Termine usando la rasuradora para un acabado
más neto.
7. Para acortar los vellos sin rasurarlos, use la cor-
tadora con el guía con 5 posiciones. Para sujetar el
guía, ensártelo sobre las cuchillas primero, luego
oprima la parte trasera hasta sujetarlo.
FAMILIARÍCESE CON SU CONJUNTO
DE CUIDADO PERSONAL
Fig. 1
Fig. 2
Rasuradora
Cortadora para el bikini
Cortadora para las cejas
Guía con 2 posiciones para acortar las cejas
Guía con 5 posiciones para acortar el vello
Aceite lubricante
Cepillo de limpieza
Base
Adaptador de carga (no enseñado)
9
8
7
6
5
4
3
2
1
2
4
3
5
8
7
6
1
Unidad recargable
(cargue el aparato durante 16 horas antes de
usarlo por primera vez)
Fig. 3
OPRIMA
AQUÍ
OPRIMA
AQUÍ


 1
1
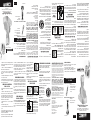 2
2


Conair LT7R Manual de usuario
Conair SHV1 Manual de usuario
Conair LWD5R Manual de usuario
Conair SHV1000 Manual de usuario
Philips QG3398/15 Manual de usuario
 CONAIR MAN PG7500 Manual de usuario
Silvercrest SPS 1.5 A1 Mini Trimmer Manual de usuario
Panasonic ES2291D Instrucciones de operación
Remington WPG-150 Manual de usuario
