LG Electronics DLEX7700VE Manual de usuario
- Categoría
- Secadoras de ropa eléctricas
- Tipo
- Manual de usuario
Este manual también es adecuado para

OWNER’S MANUAL
DRYER
Please read this owner’s manual thoroughly before operating and
keep it handy for reference at all times.
MFL67731038
www.lg.com
ENGLISH ESPAÑOL
DLEX7700*E DLGX7701*E

2
TABLE OF CONTENTS
TABLE OF CONTENTS
3
IMPORTANT SAFETY INSTRUCTIONS
3 WHAT TO DO IF YOU SMELL GAS
4 BASIC SAFETY PRECAUTIONS
4 CALIFORNIA SAFE DRINKING WATER AND
TOXIC ENFORCEMENT ACT
5 GROUNDING INSTRUCTIONS
5 SAFETY INSTRUCTIONS FOR
INSTALLATION
7 SAFETY INSTRUCTIONS FOR CONNECTING
ELECTRICITY
8
PRODUCT FEATURES
9
INTRODUCING YOUR DRYER
9 Parts and Accessories
9 Two-Way Reversible Door
10 Control Panel Features
11 Display
12
INSTALLATION INSTRUCTIONS
12 Preview Installation Order
13 Installation Location Requirements
13 Clearances
14 Leveling the Dryer
15 Reversing the Door
21 Installing the Side Vent Kit
22 Venting the Dryer
24 Connecting the Inlet Hose
25 Connecting Gas Dryers
27 Connecting Electric Dryers
32 Special Requirements for Manufactured or
Mobile Homes
32 Final Installation Check
33 Installation Test (Duct Check)
35
HOW TO USE
35 Operating the Dryer
36 Sorting Loads
36 Loading the Dryer
36 Check the Lint Filter Before Every Load
36 Using the Lid
37 Using the LG EasyLoad™
38 Cycle Guide
39 Cycle Settings and Options
39 Special Functions
40 Custom Program
41 Steam Functions
42 Steam Cycle Guide
43 Tag On
44 Using Tag On with Applications
50
MAINTENANCE
50 Regular Cleaning
51
TROUBLESHOOTING
51 Before Calling for Service
54
SPECIFICATIONS
55
USING SMART DIAGNOSIS™
56
WARRANTY

3
ENGLISH
IMPORTANT SAFETY INSTRUCTIONS
READ ALL INSTRUCTIONS BEFORE USE
W
WARNING
For your safety, the information in this manual must be followed to minimize the risk of fire, explosion, or electric
shock, or to prevent property damage, injury to persons, or death.
Your safety and the safety of others is very important.
We have provided many important safety messages in this manual and on your appliance. Always read and obey all
safety messages.
This is the safety alert symbol.
This symbol alerts you to potential hazards that can kill or hurt you and others.
All safety messages will follow the safety alert symbol and either the word DANGER, WARNING, or CAUTION.
These words mean:
W
DANGER
You will be killed or seriously injured if you don’t immediately follow instructions.
W
WARNING
You can be killed or seriously injured if you don’t follow instructions.
W
CAUTION
You may be slightly injured or cause damage to the product if you do not follow instructions.
All safety messages will tell you what the potential hazard is, tell you how to reduce the chance of injury, and tell
you what can happen if the instructions are not followed.
t%POPUJOTUBMMBDMPUIFTESZFSXJUIGMFYJCMFQMBTUJDWFOUJOHNBUFSJBMT*GGMFYJCMFNFUBMGPJMUZQFEVDUJT
JOTUBMMFEJUNVTUCFPGBTQFDJGJDUZQFJEFOUJGJFECZUIFBQQMJBODFNBOVGBDUVSFSBTTVJUBCMFGPSVTFXJUI
DMPUIFTESZFST'MFYJCMFWFOUJOHNBUFSJBMTBSFLOPXOUPDPMMBQTFCFFBTJMZDSVTIFEBOEUSBQMJOU5IFTF
DPOEJUJPOTXJMMPCTUSVDUDMPUIFTESZFSBJSGMPXBOEJODSFBTFUIFSJTLPGGJSF
t%POPUTUPSFPSVTFHBTPMJOFPSPUIFSGMBNNBCMFWBQPSTBOEMJRVJETJOUIFWJDJOJUZPGUIJTBQQMJBODFPSBOZ
PUIFSBQQMJBODFT
t*OTUBMMBUJPOBOETFSWJDFNVTUCFQFSGPSNFECZBRVBMJGJFEJOTUBMMFSTFSWJDFBHFODZPSUIFHBTTVQQMJFS
t*OTUBMMUIFDMPUIFTESZFSBDDPSEJOHUPUIFNBOVGBDUVSFSTJOTUSVDUJPOTBOEMPDBMDPEFT
t4BWFUIFTFJOTUSVDUJPOT
8)"550%0*':064.&--("4
%POPUUSZUPMJHIUBNBUDIPSDJHBSFUUFPSUVSOPOBOZHBTPSFMFDUSJDBMBQQMJBODF
%POPUUPVDIBOZFMFDUSJDBMTXJUDIFT%POPUVTFBOZQIPOFJOZPVSCVJMEJOH
$MFBSUIFSPPNCVJMEJOHPSBSFBPGBMMPDDVQBOUT
*NNFEJBUFMZDBMMZPVSHBTTVQQMJFSGSPNBOFJHICPSTQIPOF'PMMPXUIFHBTTVQQMJFSTJOTUSVDUJPOTDBSFGVMMZ
*GZPVDBOOPUSFBDIZPVSHBTTVQQMJFSDBMMUIFGJSFEFQBSUNFOU
W
WARNING:
This product contains chemicals known to the State of California to cause cancer and birth defects or
other reproductive harm.
Wash hands after handling.
W
IMPORTANT SAFETY INSTRUCTIONS

4
IMPORTANT SAFETY INSTRUCTIONS
READ ALL INSTRUCTIONS BEFORE USE
W
WARNING
For your safety, the information in this manual must be followed to minimize the risk of fire, explosion, or electric
shock, or to prevent property damage, injury to persons, or death.
#"4*$4"'&5:13&$"65*0/4
W
WARNING
To reduce the risk of fire, electric shock, or injury to persons when using this appliance, follow basic precautions,
including the following:
$"-*'03/*"4"'&%3*/,*/(8"5&3"/%509*$&/'03$&.&/5"$5
This act requires the governor of California to publish a list of substances known to the state to cause cancer, birth
defects, or other reproductive harm and requires businesses to warn customers of potential exposure to such
substances.
Gas appliances can cause minor exposure to four of these substances, namely benzene, carbon monoxide,
formaldehyde, and soot, caused primarily by the incomplete combustion of natural gas or LP fuels.
Properly adjusted dryers will minimize incomplete combustion. Exposure to these substances can be minimized
further by properly venting the dryer to the outdoors.
t3FBEBMMJOTUSVDUJPOTCFGPSFVTJOHUIFESZFS
t#FGPSFVTFUIFESZFSNVTUCFQSPQFSMZJOTUBMMFEBT
described in this manual.
t%POPUQMBDFJUFNTFYQPTFEUPDPPLJOHPJMTJOZPVS
dryer. Items contaminated with cooking oils may
contribute to a chemical reaction that could cause a
load to catch fire.
t%POPUESZBSUJDMFTUIBUIBWFCFFOQSFWJPVTMZDMFBOFE
in, washed in, soaked in, or spotted with gasoline, dry-
cleaning solvents, or other flammable or explosive
substances as they give off vapors that could ignite or
explode.
t%POPUSFBDIJOUPUIFESZFSJGUIFESVNPSBOZPUIFS
part is moving.
t%POPUSFQBJSPSSFQMBDFBOZQBSUPGUIFESZFS
or attempt any servicing unless specifically
recommended in this owner’s manual or in published
user-repair instructions that you understand and have
the skills to carry out.
t%POPUUBNQFSXJUIDPOUSPMT
t#FGPSFUIFESZFSJTSFNPWFEGSPNTFSWJDFPSEJTDBSEFE
remove the door to the drying compartment.
t%POPUBMMPXDIJMESFOUPQMBZPOPSJOUIFESZFS$MPTF
supervision of children is necessary when the dryer is
used near children.
t%POPUVTFGBCSJDTPGUFOFSTPSQSPEVDUTUPFMJNJOBUF
static unless recommended by the manufacturer of
the fabric softener or product.
t%POPUVTFIFBUUPESZBSUJDMFTDPOUBJOJOHGPBNSVCCFS
or similarly textured rubber-like materials.
t,FFQBSFBBSPVOEUIFFYIBVTUPQFOJOHBOEBEKBDFOU
surrounding areas free from the accumulation of lint,
dust, and dirt.
t5IFJOUFSJPSPGUIFESZFSBOEFYIBVTUWFOUTIPVMECF
cleaned periodically by qualified service personnel.
t%POPUJOTUBMMPSTUPSFUIFESZFSXIFSFJUXJMMCF
exposed to the weather.
t"MXBZTDIFDLUIFJOTJEFPGUIFESZFSGPSGPSFJHO
objects.
t$MFBOMJOUTDSFFOCFGPSFPSBGUFSFBDIMPBE
t%POPUTUPSFQMBTUJDQBQFSPSDMPUIJOHUIBUNBZ
CVSOPSNFMUPOUPQPGUIFESZFSEVSJOHPQFSBUJPO
t#FDBSFGVMXIFOPQFOJOHBOEDMPTJOHUIFEPPS'JOHFST
and hands can get caught in the door and cause injury
if the door drops forward unexpectedly.
t%POPUQMBDFIFBWZJUFNTPOPSMFBOBHBJOTUUIFUPQ
PGUIFEPPSXIFOJUJTPQFO
t%POPUBUUFNQUUPQVMMUIFIBNQFSEPPSPQFONPSF
UIBOEFHSFFT
t5IFESZFSDPVMEUJQGPSXBSEDBVTJOHJOKVSZPSEBNBHF
t%POPUQMBDFJUFNTPOUIFUPQPGUIFESZFS
IMPORTANT SAFETY INSTRUCTIONS

5
ENGLISH
IMPORTANT SAFETY INSTRUCTIONS
READ ALL INSTRUCTIONS BEFORE USE
W
WARNING
For your safety, the information in this manual must be followed to minimize the risk of fire, explosion, or electric
shock, or to prevent property damage, injury to persons, or death.
(306/%*/(*/4536$5*0/4
W
WARNING
Improper connection of the equipment-grounding conductor can result in a risk of electric shock. Check with a
qualified electrician or service person if you are in doubt that the appliance is properly grounded.
4"'&5:*/4536$5*0/4'03*/45"--"5*0/
W
WARNING
To reduce the risk of fire, electric shock, or injury to persons when using this appliance, follow basic precautions,
including the following:
t1SPQFSMZHSPVOEESZFSUPDPOGPSNXJUIBMM
HPWFSOJOHDPEFTBOEPSEJOBODFT Follow details in
the installation instructions. Electric shock can result if
the dryer is not properly grounded.
t#FGPSFVTFUIFESZFSNVTUCFQSPQFSMZJOTUBMMFE as
described in this manual. Electric shock can result if
the dryer is not properly grounded.
t*OTUBMMBOETUPSFUIFESZFSXIFSFJUXJMMOPUCF
FYQPTFEUPUFNQFSBUVSFTCFMPXGSFF[JOHPS
FYQPTFEUPUIFXFBUIFS
t"MMSFQBJSTBOETFSWJDJOHNVTUCFQFSGPSNFE
CZBOBVUIPSJ[FETFSWJDFSVOMFTTTQFDJGJDBMMZ
SFDPNNFOEFEJOUIJTPXOFSTNBOVBM6TFPOMZ
BVUIPSJ[FEGBDUPSZQBSUTFailure to follow this
warning can cause serious injury, fire, electric shock, or
death.
t5PSFEVDFUIFSJTLPGFMFDUSJDTIPDLEPOPUJOTUBMM
UIFESZFSJOIVNJETQBDFT Failure to follow this
warning can cause serious injury, fire, electric shock, or
death.
t$POOFDUUPBQSPQFSMZSBUFEQSPUFDUFEBOETJ[FE
QPXFSDJSDVJUUPBWPJEFMFDUSJDBMPWFSMPBEImproper
power circuit can melt, creating electric shock and/or
fire hazard.
t3FNPWFBMMQBDLJOHJUFNTBOEEJTQPTFPGBMM
TIJQQJOHNBUFSJBMTQSPQFSMZFailure to do so can
result in death, explosion, fire, or burns.
t1MBDFESZFSBUMFBTUJODIFTBCPWFUIFGMPPSGPS
BHBSBHFJOTUBMMBUJPOFailure to do so can result in
death, explosion, fire, or burns.
t,FFQBMMQBDLBHJOHGSPNDIJMESFO Packaging
material can be dangerous for children. There is a risk
of suffocation.
t%POPUJOTUBMMOFBSBOPUIFSTPVSDFPGIFBUTVDIBT
BTUPWFDPPLJOHPWFO Failure to do so can cause
deform, smoke and fire.
t%POPUQMBDFDBOEMFTTNPLJOHNBUFSJBMTPSPUIFS
GMBNNBCMFTPOUPQPGUIFQSPEVDU Dripping wax,
smoke, or fire can result.
t3FNPWFBMMQSPUFDUJWFWJOZMGJMNGSPNUIFQSPEVDU
Failure to do so can cause product damage, smoke or
fire.
This appliance must be grounded. In the event of
malfunction or breakdown, grounding will reduce
the risk of electric shock by providing a path of least
resistance for electric current. This appliance must be
equipped with a cord having an equipment-grounding
conductor and a grounding plug. The plug must be
plugged into an appropriate outlet that is properly
installed and grounded in accordance with all local
codes and ordinances.
Do not modify the plug provided with the appliance. If
it will not fit the outlet, have a proper outlet installed by
a qualified electrician.
This appliance must be connected to a grounded metal,
permanent wiring system or an equipment-grounding
conductor must be run with the circuit conductors and
connected to the equipment-grounding terminal or
lead on the appliance.
Electric shock can result if the dryer is not properly
grounded.
IMPORTANT SAFETY INSTRUCTIONS

6
IMPORTANT SAFETY INSTRUCTIONS
READ ALL INSTRUCTIONS BEFORE USE
W
WARNING
For your safety, the information in this manual must be followed to minimize the risk of fire, explosion, or electric
shock, or to prevent property damage, injury to persons, or death.
4"'&5:*/4536$5*0/4'03*/45"--"5*0/
W
WARNING
To reduce the risk of injury to persons, follow all industry recommended safety procedures including the use of long
sleeved gloves and safety glasses. Failure to follow all of the safety warnings in this manual could result in property
damage, injury to persons, or death.
Exhaust/Ducting:
t(BTESZFST.645CFFYIBVTUFEUPUIFPVUTJEF
Failure to follow these instructions can result in fire or
death.
t5IFESZFSFYIBVTUTZTUFNNVTUCFFYIBVTUFE
UPUIFPVUTJEFPGUIFEXFMMJOH*GUIFESZFSJTOPU
FYIBVTUFEPVUEPPSTTPNFGJOFMJOUBOEMBSHF
BNPVOUTPGNPJTUVSFXJMMCFFYQFMMFEJOUPUIF
MBVOESZBSFB. An accumulation of lint in any area of
the home can create a health and fire hazard.
t6TFPOMZSJHJETFNJSJHJEPSGMFYJCMFNFUBMJODI
EJBNFUFSEVDUXPSLJOTJEFUIFESZFSDBCJOFUPSGPS
FYIBVTUJOHUPUIFPVUTJEF6TFPGQMBTUJDPSPUIFS
DPNCVTUJCMFEVDUXPSLDBODBVTFBGJSF Punctured
ductwork can cause a fire if it collapses or becomes
otherwise restricted in use or during installation.
t%VDUXPSLJTOPUQSPWJEFEXJUIUIFESZFSBOEZPV
TIPVMEPCUBJOUIFOFDFTTBSZEVDUXPSLMPDBMMZ5IF
FOEDBQTIPVMEIBWFIJOHFEEBNQFSTUPQSFWFOU
CBDLESBGUXIFOUIFESZFSJTOPUJOVTF Failure to
follow these instructions can result in fire or death.
t5IFFYIBVTUEVDUNVTUCFJODIFTDNJO
EJBNFUFSXJUIOPPCTUSVDUJPOT5IFFYIBVTUEVDU
TIPVMECFLFQUBTTIPSUBTQPTTJCMF.BLFTVSF
UPDMFBOBOZPMEEVDUTCFGPSFJOTUBMMJOHZPVSOFX
dryer. Failure to follow these instructions can result in
fire or death.
t3JHJETFNJSJHJEPSGMFYJCMFNFUBMEVDUJOHJT
SFDPNNFOEFEGPSVTFCFUXFFOUIFESZFSBOEUIF
XBMM"MMOPOSJHJENFUBMUSBOTJUJPOEVDUNVTUCF
6-MJTUFE6TFPGPUIFSNBUFSJBMTGPSUSBOTJUJPO
EVDUJOHDPVMEBGGFDUESZJOHUJNF Failure to follow
these instructions can result in fire or death.
t%0/05VTFTIFFUNFUBMTDSFXTPSPUIFSGBTUFOFST
XIJDIFYUFOEJOUPUIFEVDUUIBUDPVMEDBUDIMJOUBOE
SFEVDFUIFFGGJDJFODZPGUIFFYIBVTUTZTUFN Secure
all joints with duct tape. For complete details, follow
the Installation Instructions. Failure to follow these
instructions can result in fire or death.
IMPORTANT SAFETY INSTRUCTIONS

7
ENGLISH
IMPORTANT SAFETY INSTRUCTIONS
READ ALL INSTRUCTIONS BEFORE USE
W
WARNING
For your safety, the information in this manual must be followed to minimize the risk of fire, explosion, or electric
shock, or to prevent property damage, injury to persons, or death.
4"'&5:*/4536$5*0/4'03$0//&$5*/(&-&$53*$*5:
W
WARNING
To reduce the risk of fire, electric shock, or injury to persons when using this appliance, follow basic precautions,
including the following:
4"7&5)&4&*/4536$5*0/4
t%POPUVOEFSBOZDJSDVNTUBODFTDVUPSSFNPWF
UIFHSPVOEQSPOHGSPNUIFQPXFSDPSETo prevent
injury to persons or damage to the dryer, the electrical
power cord must be plugged into a properly grounded
outlet.
t'PSQFSTPOBMTBGFUZUIJTESZFSNVTUCFQSPQFSMZ
HSPVOEFEFailure to do so can result in electric shock
or injury.
t3FGFSUPUIFJOTUBMMBUJPOJOTUSVDUJPOTJOUIJTNBOVBM
GPSTQFDJGJDFMFDUSJDBMSFRVJSFNFOUTGPSZPVSNPEFM
Failure to follow these instructions can create an
electric shock hazard and/or a fire hazard.
t5IJTESZFSNVTUCFQMVHHFEJOUPBQSPQFSMZ
HSPVOEFEPVUMFU&MFDUSJDTIPDLDBOSFTVMUJGUIF
ESZFSJTOPUQSPQFSMZHSPVOEFE)BWFUIFXBMM
PVUMFUBOEDJSDVJUDIFDLFECZBRVBMJGJFEFMFDUSJDJBO
UPNBLFTVSFUIFPVUMFUJTQSPQFSMZHSPVOEFE
Failure to follow these instructions can create an
electric shock hazard and/or a fire hazard.
t5IFESZFSTIPVMEBMXBZTCFQMVHHFEJOUPJUTPXO
JOEJWJEVBMFMFDUSJDBMPVUMFUXIJDIIBTBWPMUBHF
SBUJOHUIBUNBUDIFTUIFSBUJOHQMBUFThis provides
sparkling performance and also prevents overloading
house wiring circuits which could cause a fire hazard
from overheated wires.
t/FWFSVOQMVHZPVSESZFSCZQVMMJOHPOUIFQPXFS
DPSE"MXBZTHSJQQMVHGJSNMZBOEQVMMTUSBJHIUPVU
GSPNUIFPVUMFUThe power cord can be damaged,
resulting in a risk of fire and electric shock.
t3FQBJSPSSFQMBDFJNNFEJBUFMZBMMQPXFSDPSETUIBU
IBWFCFDPNFGSBZFEPSPUIFSXJTFEBNBHFE%POPU
VTFBDPSEUIBUTIPXTDSBDLTPSBCSBTJPOEBNBHF
BMPOHJUTMFOHUIPSBUFJUIFSFOEThe power cord can
melt, creating an electric shock and/or fire hazard.
t8IFOJOTUBMMJOHPSNPWJOHUIFESZFSCFDBSFGVMOPU
UPQJODIDSVTIPSEBNBHFUIFQPXFSDPSEThis will
prevent injury and prevent damage to the dryer from
fire and electric shock.
IMPORTANT SAFETY INSTRUCTIONS

8
PRODUCT FEATURES
EASY-TO-USE CONTROL PANEL
Rotate the cycle selector knob to select the desired dry cycle. Add cycle options or adjust settings with the touch
of a button.
TWO-WAY EASY-ACCESS REVERSIBLE DOOR
The LG EasyLoad™ can be tilted open from the top, hamper-style, allowing you to easily load the dryer without
items falling on the floor. The door still swings open to provide easy access for unloading or loading of bulkier
items. The door hinge can be reversed to adjust for installation location.
STEAM FUNCTIONS
LG’s steam technology allows you to inject fabrics with a swirling jet of hot steam to refresh clothes, reduce static.
Simply select the Steam Fresh™ cycle, you can add a Steam option to selected cycles.
Flow Sense™ DUCT BLOCKAGE SENSING SYSTEM INDICATOR
The Flow Sense™ duct blockage sensing system detects and alerts you to restrictions in the installed household
ductwork that reduce exhaust airflow through the dryer. If you see the alert: Clean or repair the ducts to remove
UIFSFTUSJDUJPOT,FFQZPVSEVDUTDMFBOUPIFMQJODSFBTFFGGJDJFODZBOESFEVDFMPOHESZJOHUJNFTDBVTFECZCMPDLFE
ducts.
Smart Diagnosis™
Should you experience any technical difficulty with your washing machine, it has the capability of transmitting
data by phone to the Customer Information Center. The call center agent records the data transmitted from your
machine and uses it to analyze the issue, providing a fast and effective diagnosis.
Tag On
The Tag On feature works on most smart phones equipped with the NFC function and based on the Android
operating system (OS).
Using the “LG Smart Laundry” application, the Tag On feature will allow you to diagnose your appliance, download
new cycles, and see the status of your appliance by simply touching the smartphone to the Tag On logo of the
appliance.
Protocol P154
Sanitization Performance of
Residential Clothes dryer
C
E
R
T
I
F
I
E
D
D
E
S
I
G
N
PRODUCT FEATURES

9
ENGLISH
INTRODUCING YOUR DRYER
Parts and Accessories
Parts
Control
panel
Leveling
feet
Reversible
door
Lint filter
Terminal
block
access panel
(Electric
models)
Gas
connection
location
(Gas models)
Power cord
location
(Gas
models)
Exhaust
duct
outlet
NOTE
t$POUBDU-($VTUPNFS4FSWJDFBUJO$BOBEBJGBOZBDDFTTPSJFTBSFNJTTJOH
t'PSZPVSTBGFUZBOEGPSFYUFOEFEQSPEVDUMJGFVTFPOMZBVUIPSJ[FEDPNQPOFOUT5IFNBOVGBDUVSFSJTOPU
responsible for product malfunction or accidents caused by the use of separately purchased unauthorized
components or parts.
t5IFJNBHFTJOUIJTPXOFSTNBOVBMNBZCFEJGGFSFOUGSPNUIFBDUVBMDPNQPOFOUTBOEBDDFTTPSJFTXIJDIBSF
subject to change by the manufacturer without prior notice for product improvement purposes.
INTRODUCING YOUR DRYER
Two-Way Reversible Door
Release
Hamper door
The LG EasyLoad™ feature allows you to open the dryer
door from the top, hamper-style, when loading the
dryer to help guide clothes into the drum and prevent
them from falling onto the floor. When unloading the
dryer or loading bulkier items, use the swing door for
easy access to the drum. For more details on using the
EPPSTFFQBHF'PSJOGPSNBUJPOPOSFWFSTJOHUIF
EPPSTXJOHTFFQBHF
Swing door
Side vent kit
(sold separately)
Kit No. 383EEL9001B
Drying rack
*ODMVEFEBDDFTTPSJFT
0QUJPOBMBDDFTTPSJFT
HoseY connector
Accessories

10
Control Panel Features
Following are instructions for starting and using your new dryer. Please refer to specific sections of this manual for
more detailed information.
W
WARNING
To reduce the risk of fire, electric shock, or injury to persons, read this entire manual, including the Important Safety
Instructions, before operating this dryer.
Button %FTDSJQUJPO
1PXFS0O0GG#VUUPO
ü
- Press to turn the dryer On. Press again to turn the dryer Off.
/05& Pressing the On/Off button during a cycle cancels that cycle and any
load settings are lost.
$ZDMF4FMFDUPS,OPC
ü
- Turn this knob to select the desired cycle. Once the desired cycle has been
selected, the standard presets are shown in the display. On Manual Dry cycles,
these settings can be adjusted using the cycle modifier buttons any time
before starting the cycle.
4UBSU1BVTF#VUUPO
ü
-
1SFTTUIJTCVUUPONPSFUIBOTFDPOETIPMEUPTUBSUUIFTFMFDUFEDZDMF*GUIFESZFS
is running, use this button to pause the cycle without losing the current settings.
/05&If you do not press the Start/Pause button to resume a cycle within four
minutes, the dryer turns off automatically.
.PSF5JNF-FTT5JNF#VUUPOT
ü
- To adjust the drying time, use these buttons with Manual Dry, Time Dry, and
Steam Fresh™ cycles, as well as the Reduce Static and TurboSteam™ options.
Press the More Time button to increase the selected manual cycle time by a
minute; press Less Time to decrease the cycle time by a minute.
$ZDMF.PEJGJFS#VUUPOT
ü
- Use these buttons to select the desired cycle settings for the selected cycle.
The current settings are shown in the display. Press the button for that option
to view and select other settings.
0QUJPO#VUUPOT
ü
- The Option buttons allow you to select additional cycle options. Certain
buttons also allow you to activate special functions by pressing and holding
the button for three seconds.
4UFBN'VODUJPOT
ü
-
LG’s steam technology allows you to inject fabrics with a swirling jet of hot steam
to refresh or sanitize clothes, or reduce static. Simply select the Steam Fresh™ or
Steam Sanitary™ cycle. Or you can add a steam option to selected cycles.
Operation
INTRODUCING YOUR DRYER

11
ENGLISH
Display
The display shows the settings, estimated time remaining, options, and status messages for your dryer. When the
dryer is turned on, the light in the display illuminates.
W
WARNING
To reduce the risk of fire, electric shock, or injury to persons, read this entire manual, including the Important Safety
Instructions, before operating this dryer.
Button %FTDSJQUJPO
&TUJNBUFE5JNF3FNBJOJOH
ü
- When the Start/Pause button is pressed, the dryer displays the estimated
(Sensor Dry) or set time (Time Dry) remaining, and begins tumbling.
/05& The cycle time on Sensor Dry cycles may fluctuate as the dryer
recalculates drying time for optimal results
$ZDMF$PNQMFUJPO*OEJDBUPSXJUI$IFDL'JMUFS3FNJOEFS
ü
- This portion of the display shows which stage of the drying cycle is currently
underway (Clean Filter, Drying, or Cooling).
$IJME-PDL*OEJDBUPS
ü
- When Child Lock is set, the Child Lock indicator appears and all buttons are
disabled except the Power button. This prevents children from changing
settings while the dryer is operating
$MFBO'JMUFS3FNJOEFS
ü
- The display shows Clean Filter when the dryer is turned on as a reminder to
check the filter. It turns off when the Start/Pause button is pressed.
$VTUPN1SPHSBN
ü
- If you have a special combination of settings that you use frequently, you can
save these settings as a Custom Program.
'MPX4FOTF%VDU#MPDLBHF4FOTJOH4ZTUFN*OEJDBUPS
ü
- The Flow Sense™ duct blockage sensing system detects and alerts you to
blockages in the ductwork that reduce exhaust flow from the dryer. This
improves operating efficiency and helps minimize service calls, saving you
money.
INTRODUCING YOUR DRYER

12
INSTALLATION INSTRUCTIONS
Preview Installation Order
Checking and choosing the
proper location
Leveling the dryer
Connecting electric dryers
Venting the dryer
Plugging in the power cord
and grounding
Connecting gas dryers
Test run
Installation test
(Refer to page 33.)
Press and hold
120V 240V
INSTALLATION INSTRUCTIONS

13
ENGLISH
Installation Location Requirements
W
WARNING
3FBEBMMJOTUBMMBUJPOJOTUSVDUJPOTDPNQMFUFMZCFGPSFJOTUBMMJOHBOEPQFSBUJOHZPVSESZFSIt is important that
you review this entire manual before installing and using your dryer. Detailed instructions concerning electrical
connections, gas connections, and exhaust requirements are provided on the following pages.
%POPUPQFSBUFZPVSESZFSBUUFNQFSBUVSFTCFMPX¡'¡$"UMPXFSUFNQFSBUVSFTUIFESZFSNJHIUOPUTIVUPGG
at the end of an automatic cycle. This can result in longer drying times. The dryer must not be installed or stored in
an area where it will be exposed to water and/or weather. Check code requirements. Some codes limit, or do not
permit, installation of the dryer in garages, closets, mobile homes or sleeping quarters. Contact your local building
inspector.
Clearances
Installation Spacing For Recessed Area Or Closet Installation
The following spacing dimensions are recommended for this dryer. This dryer has been tested for clearances of
JODIDNPOUIFTJEFTBOESFBS3FDPNNFOEFETQBDJOHTIPVMECFDPOTJEFSFEGPSUIFGPMMPXJOHSFBTPOT
t"MPDBUJPOUIBUBMMPXTGPSQSPQFSFYIBVTUJOTUBMMBUJPO"
gas dryer must be exhausted to the outdoors.
See 7FOUJOHUIFESZFS
t"HSPVOEFEFMFDUSJDBMPVUMFUMPDBUFEXJUIJOGU
DNPGFJUIFSTJEFPGUIFESZFS4FF$POOFDUJOH
FMFDUSJDESZFST
t"TUVSEZGMPPSUPTVQQPSUUIFUPUBMESZFSXFJHIUPG
MCTLH5IFDPNCJOFEXFJHIUPGBDPNQBOJPO
appliance should also be considered.
tNo other fuel-burning appliance can be installed in the
same closet as a dryer.
t"EEJUJPOBMTQBDJOHTIPVMECFDPOTJEFSFEGPSFBTFPG
installation and servicing.
t"EEJUJPOBMDMFBSBODFTNJHIUCFSFRVJSFEGPSXBMMEPPS
and floor moldings.
t"EEJUJPOBMTQBDJOHTIPVMECFDPOTJEFSFEPOBMMTJEFT
of the dryer to reduce noise transfer.
For closet installation, with a door, minimum
ventilation openings in the top and bottom of the
door are required. Louvered doors with equivalent
ventilation openings are acceptable.
t$PNQBOJPOBQQMJBODFTQBDJOHTIPVMEBMTPCF
considered.
NOTE
t'MPPSNVTUCFMFWFMXJUIBNBYJNVNTMPQFPGJODIDNVOEFSFOUJSFESZFS*GUIFTMPQFJTHSFBUFSUIBOJODI
DNJOTUBMMUIF&YUFOEFE%SZFS'FFU,JU$MPUIFTNBZOPUUVNCMFQSPQFSMZBOEBVUPNBUJDTFOTPSDZDMFTNBZ
not operate correctly if the dryer is not level.
t'PSBHBSBHFJOTUBMMBUJPOZPVXJMMOFFEUPQMBDFUIFESZFSBUMFBTUJODIFTDNBCPWFUIFGMPPS*GVTJOHB
QFEFTUBMZPVXJMMOFFEJODIFTDNUPUIFCPUUPNPGUIFESZFS
NOTE
There should be at least a little space around the dryer (or any other appliance) to eliminate the transfer of
vibration from one to the other. An appliance that vibrates too much can make noise or shift against another
appliance, causing paint damage and additional noise.
5
"
**
(12.7 cm)
14
"
max.*
(35.6
cm)
54
(138 cm)
31 29
"
(79.5 cm)
23
"
(58.5 cm)
2
⁄4
"
2
⁄4
"
52
(134 cm)
Closet Door Vent
Requirements
(7.6 cm)
(7.6 cm)
(2.5 cm) (2.5 cm)(73.6 cm)
3
⁄4
"
13
2
⁄4
"
(35.2 cm)
45
1
⁄8
"
(114.6 cm)
INSTALLATION INSTRUCTIONS

14
Clearances (cont.)
Recommended Installation Spacing For Cabinet Installation
tFor cabinet installation with a door, minimum ventilation openings in the top of the cabinet are required.
*Required spacing
**For side or bottom venting,
JODIFTDNDMFBSBODFJTBMMPXFE
Leveling the Dryer
W
WARNING
t5PSFEVDFUIFSJTLPGJOKVSZUPQFSTPOTBEIFSFUPBMM
JOEVTUSZSFDPNNFOEFETBGFUZQSPDFEVSFTJODMVEJOH
UIFVTFPGMPOHTMFFWFEHMPWFTBOETBGFUZHMBTTFT
Failure to follow this warning can cause serious injury
or death.
t5IFBQQMJBODFTBSFIFBWZ5XPPSNPSFQFPQMFBSF
SFRVJSFEXIFOJOTUBMMJOHUIFESZFSFailure to follow
this warning can cause serious injury or death.
To ensure that the dryer provides optimal drying
performance, it must be level. To minimize vibration,
noise, and unwanted movement, the floor must be a
perfectly level, solid surface.
1PTJUJPOUIFESZFSJOUIFGJOBMMPDBUJPO1MBDFBMFWFM
across the top of the dryer.
t"MMGPVSMFWFMJOHGFFUNVTUSFTUTPMJEMZPOUIFGMPPS
Gently push on the top corners of the dryer to make
sure that the dryer does not rock from corner to corner.
If you are installing the dryer on the optional pedestal,
you must use the leveling feet on the pedestal to
level the dryer. The dryer leveling feet should be fully
retracted.
6TFBOBEKVTUBCMFXSFODIUPUVSOUIFMFWFMJOHGFFU
Turn clockwise to raise the dryer or counterclockwise
to lower it. Raise or lower the leveling feet until dryer
is level from side to side and front to back.
Make sure that all four leveling feet are in firm contact
with the floor.
Level
Leveling Feet
NOTE
Adjust the leveling feet only as far as necessary to
level the dryer. Extending the leveling feet more than
necessary can cause the dryer to vibrate.
31
(79.5 cm)
7"* (17.8 cm)
7"* (17.8 cm)
5"*
(12.7 cm)
1"*
(2.5 cm)
29"
(73.6 cm)
1"
(2.5 cm)
1"
(2.5 cm)
2
⁄4
"
INSTALLATION INSTRUCTIONS

15
ENGLISH
#FGPSFZPVCFHJO
The door reversal procedure consists of four main parts:
t3FNPWJOHBOESFJOTUBMMJOHUIFEPPSBOEIJOHFT (steps
BOE
t3FNPWJOHBOESFWFSTJOHDPNQPOFOUTPOUIFESZFS
DBCJOFUTUFQ
t3FNPWJOHBOESFWFSTJOHDPNQPOFOUTPOUIFdoor
DPWFSTUFQTBOE
t3FNPWJOHBOESFWFSTJOHDPNQPOFOUTinside the door
TUFQTUISPVHI
5PPMT3FRVJSFE
t1IJMMJQTTDSFXESJWFS
t-BSHFGMBUCMBEFTDSFXESJWFS (recommended for hinge
screws if they are tight or your Phillips screwdriver is
worn)
t4NBMMGMBUCMBEFTDSFXESJWFS (for lifting out parts)
W
WARNING
t5)&%3:&3%003*47&3:-"3(&"/%)&"7:
'BJMVSFUPGPMMPXUIFJOTUSVDUJPOTCFMPXDBOSFTVMUJO
EBNBHFUPUIFESZFSQSPQFSUZEBNBHFPSQFSTPOBM
JOKVSZ
t5PBWPJEEBNBHFUPUIFESZFSPSUIFEPPSTVQQPSU
UIFEPPSXJUIBTUPPMPSCPYUIBUGJUTVOEFSUIFEPPS
PSIBWFBOBTTJTUBOUTVQQPSUUIFXFJHIUPGUIFEPPS
t"WPJEESPQQJOHUIFEPPSUPBWPJEEBNBHFUPUIF
EPPSPSUIFGMPPS
t6OQMVHUIFESZFSPSUVSOPGGQPXFSBUUIFNBJO
DJSDVJUCSFBLFSCFGPSFCFHJOOJOHEPPSSFWFSTBM
*OTUSVDUJPOT
NOTE
The door reversal procedure for the two-way door
is far more complex than for a conventional dryer
door. It is recommended that you read through these
instructions in their entirety before beginning the
process, in order to gauge whether you prefer to have
the procedure done by a professional installer or
service person.
NOTE
The instructions here are for changing the door swing
from a right to a left side hinge. If the door has been
reversed, and it is necessary to change it back, use
care when following these instructions. Some of
the illustrations and the left/right references will be
reversed, and you will need to read the instructions
carefully.
W
WARNING
#FTVSFUPTVQQPSUUIFXFJHIUPGUIFEPPSCFGPSF
removing the hinge screws.
0QFOUIFEPPSGSPNUIFTJEFTPUIBUUIFIJOHF
TDSFXTBSFBDDFTTJCMF
3FNPWFUIFGPVSIJOHFTDSFXT
While supporting the door, remove the four hinge
screws, two from each hinge. Set the door aside face
down on a protected surface to prevent damage to
the door or the work surface.
3FWFSTFUIFDPNQPOFOUTPOUIFDBCJOFU
a. Use a Phillips screwdriver to remove the two screws
and the latch mechanism on the front panel of the
cabinet.
b. Remove the latch hole cover by gently prying it
up with a flat blade screwdriver, being careful not
to scratch the paint. Install the latch hole cover on
the opposite side, where the latch mechanism was
removed. Install the latch mechanism in the position
from which you removed the latch hole cover, using
the two screws removed in step a.
c. Remove the hinge cover by gently prying it up with
a flat blade screwdriver, being careful not to scratch
UIFQBJOU3PUBUFUIFIJOHFDPWFSEFHSFFTBOE
install it on the opposite side, where the upper hinge
was attached.
Reversing the Door
Two large
screws
Two small
screws
INSTALLATION INSTRUCTIONS
upper
hinge
hinge
cover
latch hole
cover
latch
mechanism
hinge
bracket
hinge

16
INSTALLATION INSTRUCTIONS
d. Reverse the hinge and the hinge bracket at the
bottom of the cabinet. Remove the two screws from
the hinge bracket at bottom right and remove the
hinge bracket.
Remove the lower of the two
screws behind the hinge
bracket. Do NOT remove the
upper screw behind the hinge
bracket. Set the parts aside.
e. Remove the three screws on the
hinge at bottom left. Remove the
hinge and reinstall it on the right
side. The top screw occupies the
hole where you removed the screw
behind the hinge bracket in step d.
f. Install the hinge bracket removed in step d on the
bottom left side, first installing one screw behind the
hinge bracket.
NOTE
Do /05 remove any of the eight screws on the face of
the cabinet (marked with
below). Doing so could
result in damage to the dryer and the need for a
service call to repair the dryer.
ON THE DOOR:
-JGUPGGUIFEPPSDPWFS
With the door laid inside facing up on a protected
TVSGBDFSFNPWFUIFTDSFXTPOUIFJOTJEFPGUIF
door. Carefully lift off the door cover with the help of
a small flat blade screwdriver inserted in the upper
corner (circled below).
W
WARNING
The edges of the door cover may be sharp. Take care
when handling, or wear gloves to avoid injury.
4XJUDIUIFEPPSTUSJLFBOEUIFCMBOLDPWFS
Remove the four screws on the door cover that secure
the door strike and the blank cover.
Switch the door strike and the blank cover, installing
them on the opposite sides from which they were
removed.
Gently pry out the hole plug on the side of the door
cover and install it in the hole on the opposite side.
Set the door cover aside.
Reversing the Door (continued)
upper
hinge
hinge
cover
latch hole
cover
latch
mechanism
hinge
bracket
hinge
twelve screws
long screw
short
screws
blank cover door strike
hole plug
Hole
plug
interlock
button

17
ENGLISH
Reversing the Door (continued)
INSTALLATION INSTRUCTIONS
Inner Structure of Door
(before reversing - right hinge swing)
Top interlock buttons
upper hinge
assembly
upper hinge
pivot
glass
lower
hinge
assembly
lower
hinge
bracket
lower hinge
filler
upper hinge
filler
bumpers
top lock rod
side lock rod
inner lock rods
interlock buttons
inner lock rods
lower hinge filler
lower hinge bracket
side lock rod
Hole plug
top lock rod
lower hinge assembly
3FWFSTFUIFDPNQPOFOUTJOTJEFUIFEPPS
You will now be removing and reversing various components inside the door. See below for a detailed diagram
and identification of the inner structure and parts of the door. (The diagram shows the “before view” of the door,
with the default set-up for a right side hinge swing. After following these instructions, your door should be a
mirror image of the illustration.)
Side Interlock button

18
INSTALLATION INSTRUCTIONS
b. While sliding the lock rod right, lift the right end up
and out of the guides.
3FNPWFUIFVQQFSIJOHFQJWPU
Once the top lock rod has been removed, the
hinge pivot can easily be removed from the hinge
assembly on the upper left and set aside.
3FWFSTFUIFVQQFSIJOHFBTTFNCMZBOEIJOHF
GJMMFS
Lift out the upper hinge filler (on the right) and set it
aside.
Carefully lift the upper hinge assembly (on the left)
out of the outer door frame, using a small flat blade
screwdriver if necessary. Rotate the hinge assembly
EFHSFFTBOEJOTUBMMJUPOUIFVQQFSSJHIUTJEFPG
the outer door. You will need to press firmly to install
the hinge assembly.
5IFIJOHFQJWPUSFNPWFEJOTUFQXJMMCFJOTUBMMFE
later.
Reversing the Door (continued)
interlock buttons
side lock rod
NOTE
%POPUSFNPWFUIFUXPJOOFSMPDLSPETTFFQBHF
located underneath the top lock rod. They do NOT
need to be reversed
upper hinge
assembly
upper hinge
pivot
upper hinge assembly
upper hinge pivot
Spring
-JGUPVUUIFUXPUPQJOUFSMPDLCVUUPOT
Lift out the two grey interlock buttons from the top of
the outer door and set them aside for later use.
-JGUPVUUIFHSFZJOUFSMPDLCVUUPOJOUIFTJEFPGUIF
door.
Make sure to remove the spring with the interlock
button and to keep the two together. Set the interlock
button aside. Do not confuse with interlock buttons
from the top of the outer door.
3FNPWFUIFTJEFMPDLSPE
Remove the side lock rod from
the lower hinge bracket by lifting
the top end of the rod and sliding
it toward the top of the door. The
spring should remain attached to
the lock rod. Set the lock rod aside.
3FNPWFUIFUPQMPDLSPE
a. Slide the lock rod to the right to remove it from the
hinge assembly on the left side.

19
ENGLISH
upper hinge filler
INSTALLATION INSTRUCTIONS
Reversing the Door (continued)
lower hinge assembly
screws
tabs
screw
C3PUBUFUIFMPXFSIJOHFBTTFNCMZEFHSFFTBOE
install it on the right side using the two screws
removed in step a.
c. Flip over the lower hinge bracket and release the
tabs on the back locking the hinge filler to the hinge
bracket.
E3PUBUFUIFIJOHFGJMMFSEFHSFFTBOETOBQJUCBDL
onto the FRONT of the hinge bracket facing in the
opposite direction.
e.
Mount the lower hinge bracket and the filler on the
left side of the door with the screw removed in step a.
*OTUBMMUIFTJEFMPDLSPE
Flip the side lock rod over and install it on the
opposite side. Insert the lower end into the left
hinge and lower the rod into the guides on the door
while compressing the spring inside the recess.
/PXSPUBUFUIFIJOHFGJMMFSEFHSFFTBOEJOTUBMMJU
on the upper left side of the door.
3FJOTUBMMUIFUPQMPDLSPE
3PUBUFUIFUPQMPDLSPESFNPWFEJOTUFQ
degrees end for end from its original position and
reinstall it. The spring should now be to the right of
center, with the spring on the side of the rod facing
the top of the door.
a. Insert the right end of the lock rod into the right
hinge assembly. Make sure the rod is aligned with
the guides in the door panel.
b. Lower the rod into position, sliding it to bypass the
center handle, making sure to align the lock rod
with the guides all the way across the door panel.
When released, the lock rod should slide completely
into the hinge assembly on the right. Slide the
lock rod back and forth to make sure it is correctly
positioned in the guides and slides easily.
3FWFSTFUIFMPXFSIJOHFCSBDLFUBOEIJOHF
BTTFNCMZ
a.
Remove the screw from the lower hinge bracket (on
the right) and lift the hinge bracket out. Set it aside.
Remove the two screws from the lower hinge assembly
on the bottom left and lift the hinge assembly out.

20
INSTALLATION INSTRUCTIONS
Reversing the Door (continued)
interlock
buttons
bumpers
Two large
screws
Two small
screws
Make sure the top of the side lock rod is beside the top
lock rod and the two do not overlap each other, so the
two rods can interact correctly. If they are not aligned
properly, the door will not operate properly.
3FJOTUBMMUIFUPQJOUFSMPDLCVUUPOT
Reinstall the top gray interlock buttons removed in
TUFQPOFPOFBDITJEFPGUIFPVUFSEPPSQBOFM
3FJOTUBMMUIFTJEFJOUFSMPDLCVUUPO
3FJOTUBMMUIFTJEFJOUFSMPDLCVUUPOSFNPWFEJOTUFQ
Center the spring in the compartment and insert the
interlock button on top of it.
3FJOTUBMMUIFEPPSDPWFS
Clean the glass on the door and door cover, if
necessary.
Make sure the three gray interlock buttons are
properly installed and that the top and side lock
rods are properly aligned where they meet. Carefully
lower the door cover into place, aligning the holes in
the cover with the interlock buttons on the top and
side and the bumpers on the bottom. Take care not
to dislodge the lock rods while mounting the door
cover. Once the door cover is in place, secure it with
UIFTDSFXTSFNPWFEJOTUFQ
The ten similar screws go around the top and sides
of the door cover. Make sure to install the two
different screws on the bottom edge, in the locations
marked below
19.
/PXQJDLVQUIFVQQFSIJOHFQJWPUSFNPWFEFBSMJFSBOE
SPUBUFJUEFHSFFT Press in the side interlock button
on the left side and hold it down while you press the hinge
pivot into the hinge assembly on the top right side. If the
door has been reassembled correctly, the lock rod will slide
back easily and lock the pivot in place. The door is now
ready to remount on the opposite side of the dryer.
W
WARNING
#FTVSFUPTVQQPSUUIFXFJHIUPGUIFEPPSCFGPSFJOTUBMMJOH
the hinge screws.
3FJOTUBMMUIFEPPS
While supporting the door, install the four hinge screws
SFNPWFEJOTUFQ5FTUUIFTXJOHPGUIFEPPSUPNBLFTVSF
the hinges and latch are properly aligned and that the
door opens, closes and latches properly in both directions.
If the door doesn’t operate smoothly, remove the door
and then the door cover to check that the lock rods and
interlock buttons are properly mounted and aligned.
The interlock buttons should be oriented correctly and
operating smoothly. The interlock rods should be in the
proper position and should not overlap at the contact
QPJOU4FFTUFQT
If the door is damaged, or if the door does not work after
SFBTTFNCMZDPOUBDUUIFDBMMDFOUFSBU

21
ENGLISH
Installing the Side Vent Kit
W
WARNING
t6TFBIFBWZNFUBMWFOU
t%POPUVTFQMBTUJDPSUIJOGPJMEVDU
t$MFBOPMEEVDUTCFGPSFJOTUBMMJOHUIJTESZFS
t5PSFEVDFUIFSJTLPGJOKVSZUPQFSTPOTBEIFSFUPBMM
JOEVTUSZSFDPNNFOEFETBGFUZQSPDFEVSFTJODMVEJOH
UIFVTFPGMPOHTMFFWFEHMPWFTBOETBGFUZHMBTTFT
tFailure to follow all of the safety warnings in this
manual could result in property damage, injury to
persons, or death.
Your new dryer is shipped to vent to the rear. It can also
be configured to vent to the bottom or side (right-side
venting is not available on gas models).
"OBEBQUFSLJUQBSUOVNCFS&&-#NBZCF
purchased from your LG retailer. This kit contains the
necessary duct components to change the dryer vent
location.
3FNPWFUIFSFBSFYIBVTUEVDUSFUBJOJOHTDSFX1VMM
out the exhaust duct.
015*0/4*%&7&/5*/(
1SFTTUIFUBCTPOUIFLOPDLPVUBOEDBSFGVMMZSFNPWF
the knockout for the desired vent opening (right-
side venting is not available on gas models). Press the
adapter duct onto the blower housing and secure to
the base of the dryer as shown.
Rear
Exhaust Duct
Retaining
Screw
,OPDLPVU
#SBDLFU
Adapter
Duct
1SFBTTFNCMFBJODIDNFMCPXUPUIFOFYU
JODIDNEVDUTFDUJPOBOETFDVSFBMMKPJOUT
XJUIEVDUUBQF#FTVSFUIBUUIFNBMFFOEPGUIFFMCPX
faces AWAY from the dryer. Insert the elbow/duct
assembly through the side opening and press it onto
the adapter duct. Secure it in place with duct tape.
#FTVSFUIBUUIFNBMFFOEPGUIFEVDUQSPUSVEFT
⁄
JODIFTDNUPDPOOFDUUIFSFNBJOJOHEVDUXPSL
Attach the cover plate to the back of the dryer with
the included screw.
015*0/#0550.7&/5*/(
1SFTTUIFBEBQUFSEVDUPOUPUIFCMPXFSIPVTJOHBOE
secure to the base of the dryer as shown.
*OTFSUUIFJODIDNFMCPXUISPVHIUIFSFBS
PQFOJOHBOEQSFTTJUPOUPUIFBEBQUFSEVDU#FTVSF
that the male end of the elbow faces down through
the hole in the bottom of the dryer. Secure it in place
with duct tape. Attach the cover plate to the back of
the dryer with the included screw.
Elbow
Cover
Plate
#SBDLFU
Adapter
Duct
Elbow
Cover
Plate
⁄
”
DN
INSTALLATION INSTRUCTIONS

22
Venting the Dryer
W
WARNING
To reduce the risk of fire, electric shock, or injury to persons when using this appliance, follow basic precautions,
including the following:
INSTALLATION INSTRUCTIONS
t%POPUDSVTIPSDPMMBQTFEVDUXPSL Failure to follow
these instructions can result in fire or death.
t%POPUBMMPXEVDUXPSLUPSFTUPOPSDPOUBDUTIBSQ
PCKFDUT Failure to follow these instructions can result
in fire or death.
t*GDPOOFDUJOHUPFYJTUJOHEVDUXPSLNBLFTVSFJU
JTTVJUBCMFBOEDMFBOCFGPSFJOTUBMMJOHUIFESZFS
Failure to follow these instructions can result in fire or
death.
t7FOUJOHNVTUDPOGPSNUPMPDBMCVJMEJOHDPEFT
Failure to follow these instructions can result in fire or
death.
t(BTESZFST.645FYIBVTUUPUIFPVUEPPST Failure to
follow these instructions can result in fire or death.
t6TFPOMZJODIDNSJHJETFNJSJHJEPS
GMFYJCMFNFUBMEVDUXPSLJOTJEFUIFESZFSDBCJOFU
BOEGPSWFOUJOHPVUTJEF Failure to follow these
instructions can result in fire or death.
t5PSFEVDFUIFSJTLPGGJSFDPNCVTUJPOPS
BDDVNVMBUJPOPGDPNCVTUJCMFHBTFT%0/05
FYIBVTUESZFSBJSJOUPBOFODMPTFEBOEVOWFOUJMBUFE
BSFBTVDIBTBOBUUJDXBMMDFJMJOHDSBXMTQBDF
DIJNOFZHBTWFOUPSDPODFBMFETQBDFPGBCVJMEJOH
Failure to follow these instructions can result in fire or
death.
t5PSFEVDFUIFSJTLPGGJSF%0/05FYIBVTUUIFESZFS
XJUIQMBTUJDPSUIJOGPJMEVDUJOH Failure to follow
these instructions can result in fire or death.
t5IFFYIBVTUEVDUNVTUCFJODIFTDNJO
EJBNFUFSXJUIOPPCTUSVDUJPOT5IFFYIBVTUEVDU
TIPVMECFLFQUBTTIPSUBTQPTTJCMF.BLFTVSF
UPDMFBOBOZPMEEVDUTCFGPSFJOTUBMMJOHZPVSOFX
dryer. Failure to follow these instructions can result in
fire or death.
t3JHJETFNJSJHJEPSGMFYJCMFNFUBMEVDUJOHJT
SFDPNNFOEFEGPSVTFCFUXFFOUIFESZFSBOEUIF
XBMM"MMOPOSJHJENFUBMUSBOTJUJPOEVDUNVTUCF
6-MJTUFE6TFPGPUIFSNBUFSJBMTGPSUSBOTJUJPO
EVDUJOHDPVMEBGGFDUESZJOHUJNF Failure to follow
these instructions can result in fire or death.
t%0/05VTFTIFFUNFUBMTDSFXTPSPUIFSGBTUFOFST
XIJDIFYUFOEJOUPUIFEVDUUIBUDPVMEDBUDIMJOU
BOESFEVDFUIFFGGJDJFODZPGUIFFYIBVTUTZTUFN
4FDVSFBMMKPJOUTXJUIEVDUUBQF Failure to follow
these instructions can result in fire or death.
t%VDUXPSLJTOPUQSPWJEFEXJUIUIFESZFS:PV
TIPVMEPCUBJOUIFOFDFTTBSZEVDUXPSLMPDBMMZ5IF
FOEDBQTIPVMEIBWFIJOHFEEBNQFSTUPQSFWFOU
CBDLESBGUXIFOUIFESZFSJTOPUJOVTF Failure to
follow these instructions can result in fire or death.
t5IFUPUBMMFOHUIPGGMFYJCMFNFUBMEVDUTIBMMOPU
FYDFFEGUN
t*O$BOBEBPOMZUIPTFGPJMUZQFGMFYJCMFEVDUT
JGBOZTQFDJGJDBMMZJEFOUJGJFEGPSVTFXJUIUIF
BQQMJBODFCZUIFNBOVGBDUVSFSTIBMMCFVTFE In the
United States, only those foil-type flexible ducts, if any,
specifically identified for use with the appliance by the
manufacturer and that comply with the Outline for
$MPUIFT%SZFS5SBOTJUJPO%VDU4VCKFDU"TIBMMCF
used.

23
ENGLISH
Venting the Dryer (cont.)
Routing and Connecting Ductwork
*ODPSSFDU7FOUJOH
$PSSFDU7FOUJOH
NOTE
%FEVDUGUNGPSFBDIBEEJUJPOBMFMCPX*UJTOPU
SFDPNNFOEFEUPVTFNPSFUIBOGPVS¡FMCPXT
NOTE
Follow the guidelines below to maximize drying
performance and reduce lint buildup and
condensation in the ductwork.
Ductwork and fittings are NOT included and must be
purchased separately.
t6TFJODIDNEJBNFUFSSJHJETFNJSJHJEPS
flexible metal ductwork.
t5IFFYIBVTUEVDUSVOTIPVMECFBTTIPSUBTQPTTJCMF
t6TFBTGFXFMCPXKPJOUTBTQPTTJCMF
t5IFNBMFFOEPGFBDITFDUJPOPGFYIBVTUEVDUNVTU
point away from the dryer.
t6TFEVDUUBQFPOBMMEVDUKPJOUT
t*OTVMBUFEVDUXPSLUIBUSVOTUISPVHIVOIFBUFEBSFBT
in order to reduce condensation and lint buildup on
duct surfaces.
t*ODPSSFDUPSJOBEFRVBUFFYIBVTUTZTUFNTBSFOPU
covered by the dryer warranty. Failures or poor
performance caused by such exhaust systems will
not be covered by the dryer warranty.
Ductwork
8BMM$BQ5ZQF
/VNCFS0G
¡&MCPXT
.BYJNVN-FOHUI0G
JODI%JBNFUFS
3JHJE.FUBM%VDU
GUN
GUN
GUN
GUN
GUN
GUN
GUN
GUN
GUN
GUN
Recommended
Use only for
short run
installations
INSTALLATION INSTRUCTIONS
/
”
DN
w
DN
w
DN

24
$IFDLUIFSVCCFSTFBMJOUIFJOMFUIPTF5XPSVCCFS
seals are supplied with each inlet hose. They are used
for preventing water leaks. Make sure the connection
to the cold water tap is tight.
$IFDLUIFJOTUBMMBUJPOUZQF
$POOFDUBMMXBUFSTVQQMZIPTFTUJHIUMZCZIBOEBOE
UIFOUJHIUFOBOPUIFSUVSOXJUIQMJFST
8*5)8"4)&38IFODPOOFDUJOHUIFESZFSUPUIF
TBNFGBVDFUBTBXBTIFS
a.
Shut off the cold water tap and remove the washer hose.
b. Connect the short hose to the Y-connector using one
of the rubber seals.
c. Connect the other end of the short hose to the cold
water faucet.
d.
Connect the long dryer hose to one side of theY-connector
and connect the washer hose to the other side.
8*5)0658"4)&3*GUIFESZFSEPFTOPUTIBSFUIF
DPMEXBUFSUBQXJUIBXBTIFS
a. Connect the straight end of the long hose to the cold
water faucet.
Connecting the Inlet Hose
The dryer must be connected to the cold water tap using the new water supply hose. Do not reuse old hoses.
$POOFDUUIFIPTFUPUIFESZFS
t$POOFDUUIFXBUFSTVQQMZIPTFUPUIFESZFSJOMFUWBMWF
UJHIUMZCZIBOEBOEUIFOUJHIUFOBOPUIFSUVSOXJUI
pliers.
Make sure that there are no kinks in the hoses and that
they are not crushed.
5VSOPOUIFDPMEXBUFSGBVDFU
$IFDLGPSMFBLTBUUIF:DPOOFDUPSJGVTFEBOEJOBMM
hoses.
NOTE
t*GBOZMFBLTBSFGPVOETIVUPòUIFXBUFSGBVDFU
remove the hose and check the condition of the
rubber seals.
NOTE
t#FGPSFDPOOFDUJOHUIFXBUFSMJOFUPUIFESZFSøVTI
several gallons of water into a drain or bucket. This will
help prevent foreign particles such as sand and scale
from clogging the dryer inlet valve.
t%POPUPWFSUJHIUFO%BNBHFUPUIFDPVQMJOHDBOSFTVMU
NOTE
t8BUFSTVQQMZQSFTTVSFNVTUCFCFUXFFOQTJBOEQTJoL1B
t%POPUTUSJQPSDSPTTUISFBEXIFODPOOFDUJOHJOMFUIPTFUPUIFWBMWF
t*GUIFXBUFSTVQQMZQSFTTVSFJTNPSFUIBOQTJL1BBQSFTTVSFSFEVDJOHWBMWFNVTUCFJOTUBMMFE
t1FSJPEJDBMMZDIFDLUIFDPOEJUJPOPGUIFIPTFBOESFQMBDFUIFIPTFJGOFDFTTBSZ
t3FQMBDFJOMFUIPTFTBGUFSöWFZFBSTPGVTFUPSFEVDFUIFSJTLPGIPTFGBJMVSF
t3FDPSEIPTFJOTUBMMBUJPOPSSFQMBDFNFOUEBUFTPOUIFIPTFTGPSGVUVSFSFGFSFODF
Hose
connector
Y connector
Rubber
seal
Long
hose
WITH WASHER WITHOUT WASHER
Short
hose
Y connector
INSTALLATION INSTRUCTIONS

25
ENGLISH
Connecting Gas Dryers
W
WARNING
To reduce the risk of fire, electric shock, or injury to persons when using this appliance, follow basic precautions,
including the following:
Electrical requirements for gas models only
W
WARNING
To reduce the risk of fire, electric shock, or injury to persons when using this appliance, follow basic precautions,
including the following:
t%POPUVOEFSBOZDJSDVNTUBODFTDVUPSSFNPWFUIF
UIJSEHSPVOEQSPOHGSPNUIFQPXFSDPSEFailure
to follow this warning can result in fire, explosion, or
death.
t'PSQFSTPOBMTBGFUZUIJTESZFSNVTUCFQSPQFSMZ
HSPVOEFE Failure to follow this warning can result in
fire, explosion, or death.
t5IFQPXFSDPSEPGUIJTESZFSJTFRVJQQFEXJUI
BQSPOHHSPVOEJOHQMVHXIJDINBUFTXJUI
BTUBOEBSEQSPOHHSPVOEJOHXBMMPVUMFUUP
NJOJNJ[FUIFQPTTJCJMJUZPGFMFDUSJDTIPDLIB[BSE
GSPNUIJTBQQMJBODFFailure to follow this warning
can result in fire, explosion, or death.
t5IJTESZFSNVTUCFQMVHHFEJOUPB)[7"$
HSPVOEFEPVUMFUQSPUFDUFECZBBNQFSFGVTF
PSDJSDVJUCSFBLFS Failure to follow this warning can
result in fire, explosion, or death.
t8IFSFBTUBOEBSEQSPOHXBMMPVUMFUJT
FODPVOUFSFEJUJTZPVSQFSTPOBMSFTQPOTJCJMJUZ
BOEPCMJHBUJPOUPIBWFJUSFQMBDFEXJUIBQSPQFSMZ
HSPVOEFEQSPOHXBMMPVUMFU Failure to follow this
warning can result in fire, explosion, or death.
t(BTTVQQMZSFRVJSFNFOUT
"TTIJQQFEGSPNUIFGBDUPSZUIJTESZFSJT
DPOGJHVSFEGPSVTFXJUIOBUVSBMHBT*UDBOCF
DPOWFSUFEGPSVTFXJUI-1-JRVFGJFE1SPQBOFHBT
(BTQSFTTVSFNVTUOPUFYDFFEJODIFTPGXBUFS
DPMVNO
t"RVBMJGJFETFSWJDFPSHBTDPNQBOZUFDIOJDJBONVTU
DPOOFDUUIFESZFSUPUIFHBTTFSWJDF
Failure to do so can result in fire, explosion, or death.
t*TPMBUFUIFESZFSGSPNUIFHBTTVQQMZTZTUFNCZ
DMPTJOHJUTJOEJWJEVBMNBOVBMTIVUPGGWBMWFEVSJOH
BOZQSFTTVSFUFTUJOHPGUIFHBTTVQQMZ Failure to do
so can result in fire, explosion, or death.
t4VQQMZMJOFSFRVJSFNFOUT
:PVSMBVOESZSPPNNVTUIBWFBSJHJEHBT
TVQQMZMJOFUPZPVSESZFS*OUIF6OJUFE4UBUFT
BOJOEJWJEVBMNBOVBMTIVUPGGWBMWF.645CF
JOTUBMMFEXJUIJOBUMFBTUGUNPGUIFESZFS
JOBDDPSEBODFXJUIUIF/BUJPOBM'VFM(BT$PEF
"/4*;PS$BOBEJBOHBTJOTUBMMBUJPODPEF$4"
B149.1. A
1
cľJODI/15QJQFQMVHNVTUCFJOTUBMMFE
Failure to do so can result in fire, explosion, death.
t*GVTJOHBSJHJEQJQFUIFSJHJEQJQFTIPVMECF
JODI*14*GBDDFQUBCMFVOEFSMPDBMDPEFTBOE
PSEJOBODFTBOEXIFOBDDFQUBCMFUPZPVSHBT
TVQQMJFS
3
cľJODIBQQSPWFEUVCJOHNBZCFVTFE
XIFSFMFOHUITBSFMFTTUIBOGUN-BSHFS
UVCJOHTIPVMECFVTFEGPSMFOHUITJOFYDFTTPGGU
N Failure to do so can result in fire, explosion, or
death.
t$POOFDUUIFESZFSUPUIFUZQFPGHBTTIPXOPO
UIFOBNFQMBUFFailure to do so can result in fire,
explosion, or death.
t5PQSFWFOUDPOUBNJOBUJPOPGUIFHBTWBMWF
QVSHFUIFHBTTVQQMZPGBJSBOETFEJNFOUCFGPSF
DPOOFDUJOHUIFHBTTVQQMZUPUIFESZFS#FGPSF
UJHIUFOJOHUIFDPOOFDUJPOCFUXFFOUIFHBTTVQQMZ
BOEUIFESZFSQVSHFSFNBJOJOHBJSVOUJMUIFPEPS
PGHBTJTEFUFDUFE Failure to do so can result in fire,
explosion, or death.
t%0/05VTFBOPQFOGMBNFUPJOTQFDUGPSHBTMFBLT
6TFBOPODPSSPTJWFMFBLEFUFDUJPOGMVJE Failure to
do so can result in fire, explosion, or death.
t6TFPOMZBOFX"("PS$4"DFSUJGJFEHBTTVQQMZ
MJOFXJUIGMFYJCMFTUBJOMFTTTUFFMDPOOFDUPST Failure
to do so can result in fire, explosion, or death.
t4FDVSFMZUJHIUFOBMMHBTDPOOFDUJPOT Failure to do
so can result in fire, explosion, or death.
t%0/05BUUFNQUBOZEJTBTTFNCMZPGUIFESZFS
BOZEJTBTTFNCMZSFRVJSFTUIFBUUFOUJPOBOEUPPMT
PGBOBVUIPSJ[FEBOERVBMJGJFETFSWJDFQFSTPOPS
DPNQBOZ Failure to do so can result in fire, explosion,
or death.
t6TFBQJQFKPJOUDPNQPVOEUIBUJTJOTPMVCMFJO
-JRVFGJFE1FUSPMFVN-1HBTPOBMMQJQFUISFBET
Failure to do so can result in fire, explosion, or death.
INSTALLATION INSTRUCTIONS

26
Connecting Gas Dryers (cont.)
W
WARNING
To reduce the risk of fire, electric shock, or injury
to persons when using this appliance, follow basic
precautions, including the following:
t*OTUBMMBUJPOBOETFSWJDFNVTUCFQFSGPSNFECZ
BRVBMJGJFEJOTUBMMFSTFSWJDFBHFODZPSUIFHBT
TVQQMJFS Failure to do so can result in fire, explosion,
or death.
t6TFPOMZBOFXTUBJOMFTTTUFFMGMFYJCMFDPOOFDUPS
BOEBOFX"("DFSUJGJFEDPOOFDUPS Failure to do so
can result in fire, explosion, or death.
t"HBTTIVUPGGWBMWFNVTUCFJOTUBMMFEXJUIJOGU
NPGUIFESZFSFailure to do so can result in fire,
explosion, or death.
t5IFESZFSJTDPOGJHVSFEGPS/BUVSBM(BTXIFO
TIJQQFEGSPNUIFGBDUPSZ.BLFTVSFUIBUUIFESZFS
JTFRVJQQFEXJUIUIFDPSSFDUCVSOFSPSJGJDFGPSUIF
UZQFPGHBTCFJOHVTFE/BUVSBM(BTPS-JRVFGJFE
1FUSPMFVN Failure to do so can result in fire,
explosion, or death.
t*GOFDFTTBSZUIFDPSSFDUPSJGJDF'PSUIF-1PSJGJDF
LJUPSEFSQBSUOVNCFS&&-%TIPVMECF
JOTUBMMFECZBRVBMJGJFEUFDIOJDJBOBOEUIFDIBOHF
TIPVMECFOPUFEPOUIFESZFS Failure to do so can
result in fire, explosion, or death.
t"MMDPOOFDUJPOTNVTUCFJOBDDPSEBODFXJUIMPDBM
DPEFTBOESFHVMBUJPOT. Failure to do so can result in
fire, explosion, or death.
t(BTESZFST.645FYIBVTUUPUIFPVUEPPST Failure to
do so can result in fire, explosion, or death.
Connecting the gas supply
.BLFTVSFUIBUUIFHBTTVQQMZUPUIFMBVOESZSPPNJT
turned OFF. Confirm that the type of gas available in
your laundry room is appropriate for the dryer. The
dryer is prepared for Natural Gas with a
⁄ - inch NPT
gas connection.
3FNPWFUIFTIJQQJOHDBQGSPNUIFHBTDPOOFDUJPO
BUUIFCBDLPGUIFESZFS#FDBSFGVMOPUUPEBNBHF
the threads of the gas connector when removing the
shipping cap.
$POOFDUUIFESZFSUPZPVSMBVOESZSPPNTHBTTVQQMZ
using a new flexible stainless steel connector with a
⁄
- inch NPT fitting.
4FDVSFMZUJHIUFOBMMDPOOFDUJPOTCFUXFFOUIF
dryer and your laundry room’s gas supply. Turn on
your laundry room’s gas supply and check all pipe
connections (both internal and external) for gas leaks
with a noncorrosive leak-detection fluid.
Electrical connection
High-altitude installations
5IF#56SBUJOHPGUIJTESZFSJT"("DFSUJGJFEGPS
FMFWBUJPOTCFMPXGFFU
If your gas dryer is being installed at an elevation above
GFFUJUNVTUCFEFSBUFECZBRVBMJGJFEUFDIOJDJBO
or gas supplier.
Plug dryer into a 7"$
)[HSPVOEFEQSPOH
outlet.
Gas Supply
Shutoff Valve
w/15(BT
Connection
w/151JQF
Plug
AGA/CSA-Certified
Stainless Steel Flexible
Connector
INSTALLATION INSTRUCTIONS

27
ENGLISH
Connecting Electric Dryers
W
WARNING
To help prevent fire, electric shock, serious injury,
or death, the wiring and grounding must conform
to the latest edition of the National Electrical Code,
"/4*/'1"BOEBMMBQQMJDBCMFMPDBMSFHVMBUJPOT
Please contact a qualified electrician to check your
home’s wiring and fuses to ensure that your home has
adequate electrical power to operate the dryer.
Electrical requirements for electric models only
W
WARNING
To reduce the risk of fire, electric shock, or injury
to persons when using this appliance, follow basic
precautions, including the following:
t5IJTESZFSNVTUCFDPOOFDUFEUPBHSPVOEFE
NFUBMQFSNBOFOUXJSJOHTZTUFNPSBOFRVJQNFOU
HSPVOEJOHDPOEVDUPSNVTUCFSVOXJUIUIFDJSDVJU
DPOEVDUPSTBOEDPOOFDUFEUPUIFFRVJQNFOU
HSPVOEJOHUFSNJOBMPSMFBEPOUIFESZFSFailure to
do so can result in fire, explosion, or death.
t5IFESZFSIBTJUTPXOUFSNJOBMCMPDLUIBUNVTU
CFDPOOFDUFEUPBTFQBSBUF7"$)FSU[
TJOHMFQIBTFDJSDVJUGVTFEBUBNQFSFTUIF
DJSDVJUNVTUCFGVTFEPOCPUITJEFTPGUIFMJOF
&-&$53*$"-4&37*$&'035)&%3:&34)06-%#&
0'5)&."9*.6.3"5&70-5"(&-*45&%0/5)&
/".&1-"5&%0/05$0//&$5%3:&350
0370-5$*3$6*5 Failure to follow these
instructions can result in fire, explosion, or death.
t*GCSBODIDJSDVJUUPESZFSJTGUNPSMFTTJO
MFOHUIVTF6-6OEFSXSJUFST-BCPSBUPSJFTMJTUFE
/P"8(XJSFDPQQFSXJSFPOMZPSBTSFRVJSFE
CZMPDBMDPEFT*GPWFSGUNVTF6-MJTUFE
/P"8(XJSFDPQQFSXJSFPOMZPSBTSFRVJSFE
CZMPDBMDPEFT"MMPXTVGGJDJFOUTMBDLJOXJSJOH
TPESZFSDBOCFNPWFEGSPNJUTOPSNBMMPDBUJPO
XIFOOFDFTTBSZ Failure to do so can result in fire,
explosion, or death.
t5IFQPXFSDPSEQJHUBJMDPOOFDUJPOCFUXFFO
XBMMSFDFQUBDMFBOEESZFSUFSNJOBMCMPDL*4/05
TVQQMJFEXJUIESZFS5ZQFPGQJHUBJMBOEHBVHF
PGXJSFNVTUDPOGPSNUPMPDBMDPEFTBOEXJUI
JOTUSVDUJPOTPOUIFGPMMPXJOHQBHFTFailure to
follow these instructions can result in fire, explosion,
or death.
t"XJSFDPOOFDUJPOJTSFRVJSFEGPSBMMNPCJMFBOE
NBOVGBDUVSFEIPNFJOTUBMMBUJPOTBTXFMMBTBMM
OFXDPOTUSVDUJPOBGUFS+BOVBSZ"XJSF
DPOOFDUJPONVTUCFVTFEXIFSFMPDBMDPEFTEPOPU
QFSNJUHSPVOEJOHUISPVHIUIFOFVUSBMXJSF Failure
to do so can result in fire, explosion, or death.
W
WARNING
To reduce the risk of fire, electric shock, or injury
to persons when using this appliance, follow basic
precautions, including the following:
t%POPUNPEJGZUIFQMVHBOEJOUFSOBMXJSFQSPWJEFE
XJUIUIFESZFS
t5IFESZFSTIPVMECFDPOOFDUFEUPIPMFPVUMFU
t*GJUEPFTOPUGJUUIFPVUMFUBQSPQFSPVUMFUXJMM
OFFEUPCFJOTUBMMFECZBRVBMJGJFEFMFDUSJDJBO
W
WARNING
To reduce the risk of fire, electric shock, or injury
to persons when using this appliance, follow basic
precautions, including the following:
t"OZJOTUBMMBUJPOJOBNBOVGBDUVSFEPSNPCJMF
IPNFNVTUDPNQMZXJUIUIF.BOVGBDUVSFE)PNF
$POTUSVDUJPOBOE4BGFUZ4UBOEBSET5JUMF$'3
1BSUPS4UBOEBSE$"/$4";.)BOE
MPDBMDPEFTBOEPSEJOBODFT
t"XJSFDPOOFDUJPOJTSFRVJSFEGPSBMMNPCJMFBOE
NBOVGBDUVSFEIPNFJOTUBMMBUJPOTBTXFMMBTBMM
OFXDPOTUSVDUJPOBGUFS+BOVBSZ Failure to
do so can result in fire, explosion, or death.
INSTALLATION INSTRUCTIONS

28
Connecting Electric Dryers (cont.)
USA only
W
WARNING
t$POOFDUUIFQPXFSDPSEUPUIFUFSNJOBMCMPDL
$POOFDUFBDIQPXFSDPSEXJSFUPUIFUFSNJOBMCMPDL
TDSFXUIBUIBTUIFTBNFDPMPSFEXJSF'PSFYBNQMF
DPOOFDUUIFCMBDLQPXFSDPSEXJSFUPUIFUFSNJOBM
CMPDLTDSFXXJUIUIFCMBDLXJSF'BJMVSFUPGPMMPX
UIFTFJOTUSVDUJPOTNBZSFTVMUJOBTIPSUPWFSMPBE
fire or death.
t(SPVOEJOHUISPVHIUIFOFVUSBMDPOEVDUPSJT
QSPIJCJUFEGPSOFXCSBODIDJSDVJUJOTUBMMBUJPOT
NPCJMFIPNFTSFDSFBUJPOBMWFIJDMFTBOE
BSFBTXIFSFMPDBMDPEFTQSPIJCJUHSPVOEJOH
UISPVHIUIFOFVUSBMDPOEVDUPS
Four-wire connection for electric dryers:
Power cord
t"XJSFDPOOFDUJPOJTSFRVJSFEGPSBMMNPCJMFBOE
manufactured home installations, as well as all new
DPOTUSVDUJPOBGUFS+BOVBSZ
t"6-MJTUFETUSBJOSFMJFGJTSFRVJSFE
3FNPWFUIFUFSNJOBMCMPDLBDDFTTDPWFSPOUIFVQQFS
back of the dryer. Install a UL-listed strain relief into
the power cord through-hole; then thread a UL-listed,
"7XJSF"8(NJOJNVNDPQQFS
conductor power cord through the strain relief.
t6TFB"76-MJTUFEQPXFSDPSEXJUI
"8(NJOJNVNDPQQFS conductor and closed loop or
forked terminals with upturned ends.
5SBOTGFSUIFESZFSTHSPVOEXJSFGSPNCFIJOEUIF
green ground screw to the center screw of the
terminal block. Attach the two hot leads of the power
cord to the outer terminal block screws. Attach the
white neutral wire to the center terminal block screw.
Attach the power cord ground wire to the green
ground screw. 5*()5&/"--4$3&844&$63&-:.
Reinstall the terminal block access cover.
Hot
#MBDL
Power Cord
Ground Wire
Ground
Screw
White Wire
moved from
Ground Screw
Neutral
(White)
Hot
(Red)
UL-Listed
Strain Relief
UL-Listed
8JSF1PXFS
Cord
Terminal
#MPDL
INSTALLATION INSTRUCTIONS

29
ENGLISH
W
WARNING
t$POOFDUUIFQPXFSDPSEUPUIFUFSNJOBMCMPDL
$POOFDUFBDIQPXFSDPSEXJSFUPUIFUFSNJOBMCMPDL
TDSFXUIBUIBTUIFTBNFDPMPSFEXJSF'PSFYBNQMF
DPOOFDUUIFCMBDLQPXFSDPSEXJSFUPUIFUFSNJOBM
CMPDLTDSFXXJUIUIFCMBDLXJSF
'BJMVSFUPGPMMPXUIFTFJOTUSVDUJPOTNBZSFTVMUJOB
TIPSUPWFSMPBEGJSFPSEFBUI
t(SPVOEJOHUISPVHIUIFOFVUSBMDPOEVDUPSJT
QSPIJCJUFEGPSOFXCSBODIDJSDVJUJOTUBMMBUJPOT
NPCJMFIPNFTSFDSFBUJPOBMWFIJDMFTBOE
BSFBTXIFSFMPDBMDPEFTQSPIJCJUHSPVOEJOH
UISPVHIUIFOFVUSBMDPOEVDUPS
Four-wire connection for electric dryers: Direct wire
t"XJSFDPOOFDUJPOJTSFRVJSFEGPSBMMNPCJMFBOE
manufactured home installations, as well as all new
DPOTUSVDUJPOBGUFS+BOVBSZ
t"6-MJTUFETUSBJOSFMJFGJTSFRVJSFE
3FNPWFJODIFTDNPGUIFPVUFSDPWFSJOHGSPN
UIFXJSF3FNPWFJODIFTPGJOTVMBUJPOGSPNUIF
HSPVOEXJSF$VUPGGBQQSPYJNBUFMZ
⁄
JODIFTDN
GSPNUIFPUIFSUISFFXJSFTBOETUSJQJODIDN
JOTVMBUJPOGSPNFBDIXJSF#FOEUIFFOETPGUIFUISFF
shorter wires into a hook shape.
3FNPWFUIFUFSNJOBMCMPDLBDDFTTDPWFSPOUIFVQQFS
back of the dryer. Install a UL-listed strain relief into
the power cord through-hole; then thread the power
DBCMFQSFQBSFEJO4UFQUISPVHIUIFTUSBJOSFMJFG
Ground Wire
DN
DN
Connecting Electric Dryers (cont.)
USA only
t6TF6-MJTUFEXJSF"8(NJOJNVNDPQQFS
conductor cable.
t"MMPXBUMFBTUGUNMFOHUIUPBMMPXGPSSFNPWBM
and reinstallation of the dryer.
5SBOTGFSUIFESZFSTHSPVOEXJSFGSPNCFIJOEUIF
green ground screw to the center screw of the
terminal block. Attach the two hot leads of the power
cable to the outer terminal block screws. Attach the
white neutral wire to the center terminal block screw.
Attach the power cable ground wire to the green
ground screw. 5*()5&/"--4$3&844&$63&-:.
Reinstall the terminal block access cover.
UL-Listed
Strain Relief
6--JTUFE8JSF
Power Cord
Terminal
#MPDL
Hot
#MBDL
Power Cord
Ground Wire
Ground
Screw
White Wire
moved from
Ground Screw
Neutral
(White)
Hot
(Red)
INSTALLATION INSTRUCTIONS

30
Connecting Electric Dryers (cont.)
USA only
W
WARNING
t$POOFDUUIFQPXFSDPSEUPUIFUFSNJOBMCMPDL
$POOFDUFBDIQPXFSDPSEXJSFUPUIFUFSNJOBM
CMPDLTDSFXUIBUIBTUIFTBNFDPMPSFEXJSF'PS
FYBNQMFDPOOFDUUIFCMBDLQPXFSDPSEXJSFUPUIF
UFSNJOBMCMPDLTDSFXXJUIUIFCMBDLXJSF'BJMVSF
UPGPMMPXUIFTFJOTUSVDUJPOTNBZSFTVMUJOBTIPSU
PWFSMPBEGJSFPSEFBUI
t(SPVOEJOHUISPVHIUIFOFVUSBMDPOEVDUPSJT
QSPIJCJUFEGPSOFXCSBODIDJSDVJUJOTUBMMBUJPOT
NPCJMFIPNFTSFDSFBUJPOBMWFIJDMFTBOE
BSFBTXIFSFMPDBMDPEFTQSPIJCJUHSPVOEJOH
UISPVHIUIFOFVUSBMDPOEVDUPS
Three-wire connection for electric dryers:
Power cord
t"XJSFDPOOFDUJPOJT/05QFSNJUUFEPOOFX
DPOTUSVDUJPOBGUFS+BOVBSZ
t"6-MJTUFETUSBJOSFMJFGJTSFRVJSFE
3FNPWFUIFUFSNJOBMCMPDLBDDFTTDPWFSPOUIF
upper back of the dryer. Install a UL-listed strain relief
into the power cord through-hole; then thread a UL-
listed, "7XJSF"8(NJOJNVN
DPQQFS conductor power cord through the strain
relief.
t6TFB"76-MJTUFEQPXFSDPSEXJUI
"8(NJOJNVNDPQQFS conductor and closed loop or
forked terminals with upturned ends.
"UUBDIUIFUXPIPUMFBETPGUIFQPXFSDPSEUPUIF
outer terminal block screws. Attach the neutral wire to
the center terminal block screw. Connect the external
ground (if required by local codes) to the green
ground screw. 5*()5&/"--4$3&844&$63&-:.
Reinstall the terminal block access cover.
UL-Listed
Strain Relief
UL-Listed
8JSF1PXFS
Cord
Terminal
#MPDL
Ground
Screw
Neutral
(White)
Hot
#MBDL
Hot
(Red)
External Ground
Wire (If required
by local codes)
White Wire
from Dryer
harness
INSTALLATION INSTRUCTIONS

31
ENGLISH
Connecting Electric Dryers (cont.)
USA only
W
WARNING
t$POOFDUUIFQPXFSDPSEUPUIFUFSNJOBMCMPDL
$POOFDUFBDIQPXFSDPSEXJSFUPUIFUFSNJOBMCMPDL
TDSFXUIBUIBTUIFTBNFDPMPSFEXJSF'PSFYBNQMF
DPOOFDUUIFCMBDLQPXFSDPSEXJSFUPUIFUFSNJOBM
CMPDLTDSFXXJUIUIFCMBDLXJSF'BJMVSFUPGPMMPX
UIFTFJOTUSVDUJPOTNBZSFTVMUJOBTIPSUPWFSMPBE
fire or death.
t(SPVOEJOHUISPVHIUIFOFVUSBMDPOEVDUPSJT
QSPIJCJUFEGPSOFXCSBODIDJSDVJUJOTUBMMBUJPOT
NPCJMFIPNFTSFDSFBUJPOBMWFIJDMFTBOE
BSFBTXIFSFMPDBMDPEFTQSPIJCJUHSPVOEJOH
UISPVHIUIFOFVUSBMDPOEVDUPS
Three-wire connection for electric dryers: Direct wire
t"XJSFDPOOFDUJPOJT/05QFSNJUUFEPOOFX
DPOTUSVDUJPOBGUFS+BOVBSZ
t"6-MJTUFETUSBJOSFMJFGJTSFRVJSFE
3FNPWF
cĸJODIFTDNPGUIFPVUFSDPWFSJOHGSPN
UIFXJSF4USJQJODIDNJOTVMBUJPOGSPNFBDI
XJSF#FOEUIFFOETPGUIFUISFFXJSFTJOUPBIPPL
shape.
3FNPWFUIFUFSNJOBMCMPDLBDDFTTDPWFSPOUIFVQQFS
back of the dryer. Install a UL-listed strain relief into
the power cord through-hole; then thread the power
DBCMFQSFQBSFEJO4UFQUISPVHIUIFTUSBJOSFMJFG
t6TF6-MJTUFEXJSF"8(NJOJNVNDPQQFS
conductor cable.
t"MMPXBUMFBTUGUNMFOHUIUPBMMPXGPSSFNPWBM
and reinstallation of the dryer.
"UUBDIUIFUXPIPUMFBETPGUIFQPXFSDPSEUPUIF
outer terminal block screws. Attach the neutral wire to
the center terminal block screw. Connect the external
ground (if required by local codes) to the green
ground screw. 5*()5&/"--4$3&844&$63&-:.
Reinstall the terminal block access cover.
DN
UL-Listed
Strain Relief
6--JTUFE8JSF
Power Cord
Terminal
#MPDL
Ground
Screw
Neutral
(White)
Hot
#MBDL
Hot
(Red)
External Ground
Wire (If required
by local codes)
White Wire
from Dryer
harness
INSTALLATION INSTRUCTIONS

32
Special Requirements for
Manufactured or Mobile Homes
Any installation in a manufactured or mobile home must
comply with the Manufactured Home Construction and
4BGFUZ4UBOEBSET5JUMF$'31BSUPS4UBOEBSE
$"/$4";.)BOEMPDBMDPEFTBOEPSEJOBODFT*G
you are uncertain whether your proposed installation
will comply with these standards, please contact a
service and installation professional for assistance.
t"HBTESZFSNVTUCFQFSNBOFOUMZBUUBDIFEUPUIFGMPPS
t5IFFMFDUSJDBMDPOOFDUJPOGPSBOFMFDUSJDESZFSNVTU
CFBXJSFDPOOFDUJPO.PSFEFUBJMFEJOGPSNBUJPO
concerning the electrical connection is provided in the
section Connecting Electric Dryers.
t5PSFEVDFUIFSJTLPGDPNCVTUJPOBOEGJSFUIFESZFS
must be vented to the outside.
t%0/05WFOUUIFESZFSVOEFSBNBOVGBDUVSFEIPNFPS
mobile home.
t&MFDUSJDESZFSTNBZCFWFOUFEUPUIFPVUTJEFVTJOHUIF
back, left, right, or bottom panel.
t(BTESZFSTNBZCFWFOUFEUPUIFPVUTJEFVTJOHUIF
back, left, or bottom panel. Gas dryers may not be
vented to the outside using the right side panel
because of the burner housing.
t5IFESZFSFYIBVTUEVDUNVTUCFBGGJYFETFDVSFMZUP
the manufactured or mobile home structure, and the
exhaust duct must be made of a material that will resist
fire and combustion.
It is recommended that you use a rigid, semi-rigid, or
flexible metal duct.
t%0/05DPOOFDUUIFESZFSFYIBVTUEVDUUPBOZPUIFS
duct, vent, chimney, or other exhaust duct.
t.BLFTVSFUIFESZFSIBTBEFRVBUFBDDFTTUPPVUTJEF
fresh air to ensure proper operation. The opening for
PVUTJEFGSFTIBJSNVTUCFBUMFBTUJO
DN
).
t*UJTJNQPSUBOUUIBUUIFDMFBSBODFPGUIFEVDUGSPNBOZ
DPNCVTUJCMFDPOTUSVDUJPOCFBUMFBTUJODIFTDN
and when venting the dryer to the outdoors, the dryer
DBOCFJOTUBMMFEXJUIBDMFBSBODFPGJODIDNBU
the sides and back of the dryer.
t1MFBTFCFBXBSFUIBUWFOUJOHNBUFSJBMTBSFOPUTVQQMJFE
with the dryer. You should obtain the venting materials
necessary for proper installation.
Final Installation Check
Once you have completed the installation of the dryer
and it is in its final location, confirm proper operation
with the following tests and Installation Test (Duct
Check) on the following page.
Testing dryer heating
("4.0%&-4
Close the dryer door, press the On/Off button to turn the
dryer on, and start the dryer on a heat setting.
When the dryer starts, the igniter should ignite the main
burner.
&-&$53*$.0%&-4
Close the dryer door, press the On/Off button to turn
the dryer on, and start the dryer on a heat setting. The
exhaust air should be warm after the dryer has been
PQFSBUJOHGPSNJOVUFT
Checking airflow
Effective dryer operation requires proper airflow.
The adequacy of the airflow can be measured by
evaluating the static pressure. Static pressure in the
exhaust duct can be measured with a manometer,
QMBDFEPOUIFFYIBVTUEVDUBQQSPYJNBUFMZGUDN
from the dryer.
4UBUJDQSFTTVSFJOUIFFYIBVTUEVDUTIPVMEOPUFYDFFE
JODIFTDN5IFESZFSTIPVMECFDIFDLFEXIJMFUIF
dryer is running with no load.
Checking levelness
Once the dryer is in its final location, recheck the dryer
to be sure it is level. Make sure it is level front to back
BOETJEFUPTJEFBOEUIBUBMMMFWFMJOHGFFUBSFGJSNMZPO
the floor.
NOTE
If all air is not purged from the gas line, the gas igniter
may turn off before the main burner ignites. If this
happens, the igniter will reattempt gas ignition after
approximately two minutes.
INSTALLATION INSTRUCTIONS

33
ENGLISH
Installation Test (Duct check)
Once you have completed the installation of the dryer,
use this test to make sure the condition of the exhaust
system is adequate for proper operation of the dryer.
This test should be performed to alert you to any serious
problems in the exhaust system of your home.
t:PVSESZFSGFBUVSFT'MPX4FOTF™, an innovative sensing
system that automatically detects blockages and
SFTUSJDUJPOTJOESZFSEVDUXPSL,FFQJOHEVDUXPSLDMFBO
of lint buildup and free of restrictions allows clothes to
dry faster and reduces energy use.
5PBDUJWBUFUIFJOTUBMMBUJPOUFTU
3FNPWFUIFMJUFSBUVSFBOEUIFODMPTFUIFEPPS
Do not load anything in the drum for this test, as in
may affect the accuracy of the results.
"GUFSZPVBSFQSFTTFEPG1PXFSCVUUPOZPVXJMM
QSFTTBOEIPMEUIF5FNQBOE4JHOBMCVUUPOTJO
TFDPOET
This button sequence activates the installation test.
The code
will display if the activation is
successful.
1SFTT4UBSU1BVTFCVUUPO
The dryer will start the test, which will last about
two minutes. The heat will be turned on and the
temperatures in the drum will be measured.
$IFDLUIFEJTQMBZGPSSFTVMUT
During the three minute test cycle, monitor the
Flow Sense™ display on the control panel. If no bars
are displayed, when the cycle ends, the exhaust
system is adequate. If the exhaust system is severely
restricted, the display will show four bars. Other
problems may also be shown with error codes. Refer
to the next page for error code details and solutions.
Four bars indicates that the exhaust system is severely
restricted. Have the system checked immediately, as
performance will be poor.
&OEPGDZDMF
At the end of the test cycle,
will display.
The test cycle will end and the dryer will shut off
automatically after a short delay.
/P#BST0L 'PVS#BST
Restricted
NOTE
The dryer should be cool before starting this test. If
the dryer was warmed up during installation, run the
Air Dry cycle for a few minutes to reduce the interior
temperature.
INSTALLATION INSTRUCTIONS

34
Installation Test (Duct check) (cont.)
t$IFDLUIFFSSPSDPEFCFGPSFZPVDBMMGPSTFSWJDF
t$IFDLUIFEVDUDPOEJUJPO
If the test displays four bars, check the exhaust system
for restrictions and damage. Repair or replace the
exhaust system as needed.
Error Code Possible Causes Solutions
U&
or
U&
t5FNQFSBUVSFTFOTPSGBJMVSF t5VSOPòUIFESZFSBOEDBMMGPS
service.
)4
t)VNJEJUZTFOTPSGBJMVSF t5VSOPòUIFESZFSBOEDBMMGPS
service.
14
or
1'
or
O1
t&MFDUSJDESZFSQPXFSDPSEJTOPU
connected correctly, or house power
supply is incorrect.
t)PVTFGVTFJTCMPXODJSDVJUCSFBLFSIBT
tripped, or power outage has occurred.
t
Check the power supply or the
connection of power cord to the
terminal block. Refer to the
$POOFDUJOHFMFDUSJDESZFST section of this manual
for complete instructions.
t3FTFUDJSDVJUCSFBLFSPSSFQMBDFGVTF%POPUJODSFBTF
the fuse capacity.
If the problem is a circuit overload, have it corrected
CZBRVBMJöFEFMFDUSJDJBO
3FTUSJDUFEPSCMPDLFEBJSGMPX
Avoid long runs or runs with multiple elbows or
bends.
Excess or crushed
transition duct
Too many elbows or
exhaust too long
Check for blockages and lint buildup.
Make sure the ductwork is not crushed or restricted.
Crushed or
damaged
exhaust
Lint buildup
or blockage
NOTE
8IFOUIFESZFSJTöSTUJOTUBMMFEUIJTUFTUTIPVMECF
performed to alert you to any existing problems with
the exhaust duct in your home. However, since the
test performed during normal operation provides
more accurate information on the condition of the
exhaust duct than does the installation test, the
number of bars displayed during the two tests may
not be the same.
Do not interrupt the test cycle, as this could result in
the wrong results.
Even if no bars are displayed during the test cycle,
some restrictions may still be present in the exhaust
system. Refer to the 7FOUJOHUIF%SZFS section of
this manual for complete exhaust system and venting
requirements.
Your dryer features Flow Sense™, an innovative
sensing system that automatically detects blockages
BOESFTUSJDUJPOTJOESZFSEVDUXPSL,FFQJOHEVDUXPSL
clean of lint buildup and free of restrictions allows
clothes to dry faster and reduces energy use.
INSTALLATION INSTRUCTIONS

35
ENGLISH
HOW TO USE
HOW TO USE
Operating the Dryer
5VSO0OUIF%SZFS
Press the Power button to turn on the dryer. The cycle LEDs will illuminate and
BTJHOBMXJMMTPVOEJGUVSOFEPO3FGFSUPQBHF
3
#FHJOUIFDZDMF
Press the Start/Pause button to begin the cycle. The cycle can be paused at any
time either by opening the door or by pressing the Start/Pause button. If the
cycle is not restarted within four minutes, the dryer will shut off and the cycle
settings will be lost.
5
4FMFDUB$ZDMF
Turn the cycle selector knob either direction until the LED for the desired cycle
is on. The preset temperature, dry level, and option settings for that cycle will
CFTIPXO3FGFSUPQBHF%FGBVMUTFUUJOHTGPSUIFTFMFDUFEDZDMFDBOOPXCF
changed if desired. This can be done using the cycle modifier buttons as shown
POQBHF$ZDMFPQUJPOTDBOCFBEEFEVTJOHUIFPQUJPOCVUUPOTBTTIPXOPO
QBHF
4
&OEPG$ZDMF
When the cycle is finished, the chime will sound if it is set. Remove your
clothing from the dryer immediately to reduce wrinkling. If
Wrinkle Care is
selected, the dryer will tumble briefly every few minutes to help prevent
wrinkles from setting in the clothes.
6
$MFBOUIF-JOU'JMUFS
If the lint filter has not already been cleaned, lift out the filter and remove the
lint from the last load. This will help ensure the fastest and most efficient drying
performance.
1
-PBEUIF%SZFS
Load the dryer with the wet laundry from the washer. If the load is extra large,
you may need to divide it into smaller loads for proper performance and fabric
care.
2
Lint
Filter
NOTE
Not all options or modifiers are available on all cycles. A different chime will
sound and the LED will not come on if the selection is not allowed.

36
HOW TO USE
Following are instructions for starting and using your new dryer. Please refer to specific sections of this manual for
more detailed information.
Check the Lint Filter Before Every
Load
Always make sure the lint filter is clean before starting a
new load; a clogged lint filter will increase drying times.
To clean, pull the lint filter straight up and roll any lint
off the filter with your fingers. Do not rinse or wash the
filter to remove lint. Push the lint filter firmly back into
place. See 3FHVMBSDMFBOJOH for more information.
Always ensure the lint filter is properly installed before
running the dryer. Running the dryer with a loose or
missing lint filter will damage the dryer and articles in
the dryer.
Sorting Loads
Fabric care labels
Most articles of clothing feature fabric care labels that
include instructions for proper care.
Grouping similar items
For best results, sort clothes into loads that can be dried
with the same drying cycle.
Different fabrics have different care requirements, and
some fabrics will dry more quickly than others.
Loading the Dryer
W
WARNING
To reduce the risk of fire, electric shock, or injury
to persons when using this appliance, follow basic
precautions, including the following:
t$IFDLBMMQPDLFUTUPNBLFTVSFUIBUUIFZBSF
FNQUZ*UFNTTVDIBTDMJQTQFOTDPJOTBOELFZT
DBOEBNBHFCPUIZPVSESZFSBOEZPVSDMPUIFT
'MBNNBCMFPCKFDUTTVDIBTMJHIUFSTPSNBUDIFT
DPVMEJHOJUFDBVTJOHBGJSF Failure to do so can result
in fire, explosion, or death.
t/FWFSESZDMPUIFTUIBUIBWFCFFOFYQPTFEUPPJM
HBTPMJOFPSPUIFSGMBNNBCMFTVCTUBODFT8BTIJOH
DMPUIFTXJMMOPUDPNQMFUFMZSFNPWFPJMSFTJEVFT
Failure to obey this warning can result in fire, explosion,
or death.
NOTE
Loading tips
t$PNCJOFMBSHFBOETNBMMJUFNTJOBMPBE
t%BNQDMPUIFTXJMMFYQBOEBTUIFZESZ%POPU
overload the dryer; clothes require room to tumble
dry properly.
t$MPTF[JQQFSTIPPLTBOEESBXTUSJOHTUPQSFWFOU
these items from snagging or tangling on other
clothes.
Lint
Filter
Using the Lid
Under the lid are two small storage spaces. Use one
space to store laundry manuals. Use the other space to:
tTUPSFJUFNTSFNPWFEGSPNQPDLFUTXIJMFTPSUJOH
laundry
tTUPSFPEETPDLTVOUJMNBUDIFTBSFGPVOE
tTBGFMZTUPSFQIPOFPSLFZTXIJMFTPSUJOHPSGPMEJOH
laundry on lid
To open the lid, lift it upwards.
NOTE
%POPUBUUFNQUUPMJGUUIFMJEPQFONPSFUIBO
degrees.
Tumble
dry
Dry
Normal
Permanent Press
/
wrinkle resistant
Fabric care labels
Heat
setting
High
Medium
Low
No heat/air
Gentle/
delicate
Do not tumble dry
Do not dry
(used with
do not wash)

37
ENGLISH
Using the LG EasyLoad™
4XJOH%PPS
Use the swing door when unloading, or when loading
bulkier items, for easy access to the drum.
To open the swing door, insert your fingers into the
handle recess on the top of the door on the side
opposite the hinge and pull the door open.
W
WARNING
When the door is opened if you press the three interlock
buttons, door may fall off.
Failure to follow this warning can cause serious injury.
W
WARNING
t%POPUQMBDFIFBWZJUFNTPOPSMFBOBHBJOTUUIFUPQ
PGUIFEPPSXIFOJUJTPQFO
t%POPUBUUFNQUUPQVMMUIFIBNQFSEPPSPQFONPSF
UIBOEFHSFFT
The dryer could tip forward, causing injury or damage.
)BNQFS%PPS
Use the hamper door when loading. It acts as a chute, to
help guide items into the drum and help prevent items
from falling onto the floor. It also comes in handy when
unloading a few small items, helping prevent the rest of
the laundry from being pulled onto the floor.
To open the hamper door, press the release in the
middle of the handle recess on the top of the door and
pull the door forward.
Make sure laundry is fully inserted in the drum before
closing the door.
W
WARNING
t#FDBSFGVMXIFOPQFOJOHBOEDMPTJOHUIFEPPS'JOHFST
and hands can get caught in the door and cause injury
if the door drops forward unexpectedly.
Hamper door
Hamper door latch
HOW TO USE
Interlock
#VUUPOT
Swing door
NOTE
Make sure the hamper door release is completely
closed before using the swing door.
NOTE
Make sure the swing door latch is completely closed
before pressing the hamper door release.

38
Cycle Guide
$ZDMF 'BCSJD5ZQF
%SZ
-FWFM
5FNQFSBUVSF
5JNF
.PSF
5JNF
-FTT
5JNF
8SJOLMF
Care
5VSCP
4UFBN
%BNQ
%SZ
4JHOBM
3FEVDF
4UBUJD
&OFSHZ
4BWFS
Steam
Fresh
TM
Comforter, Shirts,Trousers
(except especially delicate
fabrics)
Off
Mid
High
Adjustable Adjustable
Steam
Sanitary
TM
$PNGPSUFS#FEEJOH
Children’s clothing
Off High
Anti-
#BDUFSJBM
Do not use this cycle
with delicate fabrics.
Very
Dry
High
Small
Load
Only Normal &
Cotton/Towels Fabric
5ZQF.BYMC
Normal Dry
High
Adjustable
#FEEJOH
Comforters,
Pillows, Shirts
Normal Dry
Medium
Adjustable
Heavy
Duty
Jeans,
heavyweight items
Normal Dry
High
Adjustable
Normal
Work clothes,
corduroys, etc.
Normal Dry
Medium
Adjustable
Perm.
Press
Permanent press,
synthetic items
Normal Dry
Low
Adjustable
Towels
Denims, towels,
heavy cottons
Normal Dry
Mid
High
Adjustable
Sportswear
Sports Wear Off -
Delicates
Lingerie, sheets,
blouses
Normal Dry
Low
Adjustable
Speed Dry
For small loads
with short
drying times
Off
High
Adjustable Adjustable
Air Dry
For items that require
heat-free drying such
as plastics or rubber
Off No Heat
Adjustable
HOW TO USE
Sensor dry cycles
Sensor dry cycles utilize LG’s unique dual sensor system
to detect and compare the moisture level in clothes and
in the air and adjust the drying time as needed to ensure
superior results. The dryer automatically sets the dryness
level and temperature at the recommended setting for
each cycle. The estimated time remaining will be shown
in the display.
Downloaded
If you download a cycle using the Tag On feature, it will
be placed in the downloaded cycle position. Choose the
Downloaded cycle to run the downloaded cycle.
Manual dry cycles
Use manual dry cycles to select a specific amount of
drying time and a drying temperature. When a manual
dry cycle is selected, the Estimated Time Remainng
display shows the actual time remaining in your cycle.
You can change the actual time in the cycle by pressing
More Time or Less Time.
$FSUJGJFECZ/4'
NSF International (formerly the National
Sanitation Foundation), certifies that Anti
#BDUFSJBMDZDMFSFEVDFTPGCBDUFSJB
on laundry, and none of bacteria will carry
over onto the next laundry load.
NOTE
To protect your garments not every dryness level,
temperature, or option is available with every cycle.
See the $ZDMF(VJEF for details.
= default setting
= allowable option

39
ENGLISH
HOW TO USE
Special Functions
The option buttons also activate special functions,
including Child Lock, Rack Dry and Drum Light.
Select the option by pressing the option button. Press
and hold the option button for special features marked
with the asterisk (*), such as Child Lock.
* Rack Dry
Use Rack Dry with items, such as wool sweaters, silk, and
lingerie, that should dry flat. Rack Dry can also be used
with items that should not be tumbled dry, such as gym
shoes or stuffed animals.
To install the drying rack:
8JUIUIFESZFSEPPSPQFOTMJEFUIFSBDLJOUPUIFESZFS
drum.
.BLFTVSFJUJTTFBUFEFWFOMZPOUIFFEHFPGUIFJOOFS
door rim and resting flat on the inside of the dryer.
* Child Lock
Use this option to prevent unwanted use of the dryer or to
keep cycle settings from being changed while the dryer is
PQFSBUJOH1SFTTBOEIPMEUIF3FEVDF4UBUJDCVUUPOGPS
seconds to activate or deactivate the Child Lock function.
The Child Lock icon will be shown in the display, and all
controls are disabled except the Power button.
Cycle Settings and Options
Sensor dry cycles have preset settings that are selected
automatically. Manual dry cycles have default settings, but
you may also customize the settings using the cycle modifier
buttons. Press the button for that option to view and select
other settings.
Dry Level
Selects the level of dryness for the cycle. Press the Dry Level
button repeatedly to scroll through available settings.
t5IJTPQUJPOJTPOMZBWBJMBCMFXJUITFOTPSESZDZDMFT
t5IFESZFSXJMMBVUPNBUJDBMMZBEKVTUUIFDZDMFUJNF4FMFDUJOH
More Dry or Very Dry will increase the cycle time, while Less
Dry or Damp Dry will decrease the cycle time.
t6TFB-FTT%SZPS%BNQ%SZTFUUJOHGPSJUFNTUIBUZPVXJTIUP
iron.
Temp. Control
Adjusts the temperature setting from Ultra Low to High.
This allows precise care of your fabrics and garments. Press the
Temp. Control button repeatedly to scroll through available
settings.
Time Dry
"MMPXTZPVUPNBOVBMMZTFMFDUUIFESZJOHUJNFGSPNUP
NJOVUFTJONJOVUFJODSFNFOUT6TFUIJTGPSTNBMMMPBETPSUP
remove wrinkles. Use the More Time/Less Time buttons to add
PSSFEVDFUIFESZJOHUJNFJONJOVUFJODSFNFOUT
Your dryer features several additional cycle options to
customize cycles to meet your individual needs. Certain option
buttons also feature a special function that can be activated by
QSFTTJOHBOEIPMEJOHUIBUPQUJPOCVUUPOGPSTFDPOET
To Add Cycle Options to a Cycle:
5VSOPOUIFESZFSBOEUVSOUIFDZDMFTFMFDUPSLOPCUPTFMFDU
the desired cycle.
6TFUIFDZDMFNPEJGJFSCVUUPOTUPBEKVTUUIFTFUUJOHTGPSUIBU
cycle.
1SFTTUIFDZDMFPQUJPOCVUUPOTGPSUIFPQUJPOTZPVXPVMEMJLF
to add. A confirmation message shows in the display.
1SFTTUIF4UBSU1BVTFCVUUPOUPTUBSUUIFDZDMF5IFESZFS
starts automatically.
Wrinkle Care
Selecting this option will tumble the load periodically for up to
three hours after the selected cycle, or until the door is opened.
This is helpful in preventing wrinkles when you are unable to
remove items from the dryer immediately.
Signal
To turn the Signal off, press the Signal On/Off button. Press
again to turn the Signal back on.
Damp Dry Signal
With this option, the dryer signals when the load is
BQQSPYJNBUFMZESZ5IJTBMMPXTZPVUPSFNPWFGBTUFS
drying lightweight items or items that you would like to iron
or hang while still slightly damp.
NOTE
To protect your garments, not every dryness level,
temperature, or option is available with every cycle.
See the $ZDMF(VJEF for details.
NOTE
NEVER tumble dry a load of clothing with the rack
installed. When the rack is installed, the drum will
rotate as usual, but the rack will not move. Make sure
all articles to be dried remain completely on the rack
and cannot fall off or be pulled off by the turning
ESVN#FTVSFUPSFNPWFUIFSBDLBGUFSVTF
NOTE
Once set, Child Lock remains active until it is manually
deactivated. Child Lock must be turned off to run
another cycle. To deactivate Child Lock, press and
hold the Reduce Static button for three seconds.

40
Special Functions. (cont.)
Energy Saver
This option helps to reduce the energy consumption in
the Normal cycle, depending on the load size.
The drying time will be increased when the Energy
Saver option is selected.
* Drum Light
The drum is equipped with a blue LED that illuminates
when the dryer is turned on. This light automatically
turns off when the door is closed and the cycle starts.
To turn on the light during a cycle, press and hold the
TurboSteam™ button for three seconds. The drum light
will illuminate and then turn off automatically after
four minutes.
Custom Program
If you have a special combination of settings that you
use frequently, you can save these settings as a custom
program..
To save a custom program:
5VSOPOUIFESZFSBOEUVSOUIFDZDMFTFMFDUPSLOPCUP
select the desired cycle.
6TFUIFDZDMFTFUUJOHCVUUPOTUPBEKVTUUIFTFUUJOHT
for that cycle.
1SFTTUIFDZDMFPQUJPOCVUUPOTGPSUIFPQUJPOZPV
would like to add. A confirmation message will be
shown in the display.
1SFTTBOEIPMEUIF$VTUPN1SPHSBNCVUUPOGPSUISFF
seconds.
To recall a custom program:
5VSOPOUIFESZFS
1SFTTUIF$VTUPN1SPHSBNCVUUPO
1SFTTUIF4UBSU1BVTFCVUUPOUPTUBSUUIFDZDMF
NOTE
You may save only one custom program at a time.
Pressing and holding the Custom Program button will
overwrite any previously saved custom program.
HOW TO USE

41
ENGLISH
Using the steam options:
The Reduce Static option injects steam late in the drying
cycle to reduce the static electricity caused by dry fabrics
rubbing together. Change the amount of time for the
cycle by pressing the More Time or Less Time button,
depending on the load (quantity of items). The display
XJMMTIPXUIFSFDPNNFOEFEOVNCFSPGJUFNTTVDIBT
PS
TurboSteam™ helps prevent the overdrying of clothes
by injecting steam during the drying process. The
Steam Shield Function extends the life of clothes.
To add steam to a standard cycle:
5VSOPOUIFESZFSBOEUVSOUIFDZDMFTFMFDUPSLOPCUP
select the desired cycle.
6TFUIFDZDMFTFUUJOHCVUUPOTUPBEKVTUUIFTFUUJOHTGPS
that cycle.
1SFTTUIFTUFBNPQUJPOCVUUPOGPSUIFTUFBNPQUJPO
you would like to add. Then adjust for the load size
using the More Time or Less Time buttons.
1SFTT4UBSU1BVTFUPTUBSUUIFDZDMF
Steam Functions
LG’s new steam technology allows you to inject fabrics
with a swirling jet of hot steam to refresh clothes and
reduce static, or sanitize clothes.
Simply select the Steam Fresh™ cycle or the Steam
Sanitary™ cycle. Or you can add a steam option to
selected cycles.
Using the Steam Fresh
TM
cycle
Steam Fresh™ uses the power of steam alone to quickly
reduce wrinkles and odors in fabrics. It brings new life to
wrinkled clothes that have been stored for an extended
time. Steam Fresh™ can also be used to help reduce
odors and remove the hanger creases in fabrics.
To use the Steam Fresh
TM
cycle:
5VSOPOUIFESZFSBOEUVSOUIFDZDMFTFMFDUPSLOPCUP
select the Steam Fresh ™ cycle.
5PBEEBOPQUJPOGVODUJPOTFMFDU8SJOLMF$BSF
%FQFOEJOHPOUIFMPBERVBOUJUZPGJUFNTTUFBN
time can be changed by pressing the More Time or
Less Time buttons.
1SFTT4UBSU1BVTFCVUUPOUPTUBSUUIFDZDMF
Using the Steam Sanitary
TM
cycle
The new Steam Sanitary
TM
cycle is ideal for sanitizing
non-washable items quickly and easily using the power
of steam alone. This cycle is recommended for use
with cotton and polyester materials. (Do NOT use for
urethane foam, down feathers or delicate items.)
NOTE
t%FQFOEJOHPOUIFMPBETJ[FDIBOHFUIFDZDMFUJNF
by pressing More Time or Less Time. The display
TIPXTPS
4FMFDUGPSVQUPUISFFJUFNT
TFMFDUGPSGPVSPSGJWFJUFNTBOETFMFDU
for a
large load, a bulky item like a blanket, or to remove
hanger creases.
NOTE
t8IFO4FOTPS%SZJTTFMFDUFEXJUIUIF3FEVDF4UBUJD
or Turbo Steam™ option, a Dry level of Less or Damp
cannot be selected.
t5IF3FEVDF4UBUJDPQUJPONBZBMTPCFTFMFDUFE
during Time Dry cycles.
t"GUFSUIF4UFBNPQUJPOJTTFMFDUFEJO5JNF%SZUIF
More Time or Less Time buttons will change the
steam time only.
t"GUFSQSFTTJOH4UBSU1BVTFUIF.PSF5JNFPS-FTT
Time buttons will be disabled.
HOW TO USE

42
Steam Cycle Guide
4UFBN
%FGBVMU
5JNF
5FNQ
$POUSPM
%SZ-FWFM
'BCSJD
4UBUF
'BCSJD5ZQF
.BYJNVN
Amount
4UFBN4BOJUBSZ
5.
NJOVUFT Dry
Comforter
#FEEJOH
4JOHMFFBDI
Children’s
clothing
MCT
4UFBN'SFTI
5.
NJOVUFT
Å
Dry
Comforter 4JOHMFFBDI
Shirts* FBDI
4UFBN0QUJPO
+
3FEVDF
4UBUJD
Follows
Selected
Cycle
Å
Wet
Varies by selected
cycle
MCT
*UFNT
+
5VSCP
4UFBN
Å
Wet
Varies by selected
cycle
MCT
*UFNT
5JNF%SZ
+
3FEVDF
4UBUJD
NJOVUFT
Å
Wet
Varies by selected
cycle
MCT
*UFNT
4IJSUDPUUPOQPMZCMFOE&YDFQUFTQFDJBMMZEFMJDBUFGBCSJDT
t8IFOUIFMJOUGJMUFSPSFYIBVTUEVDUJTDMPHHFETUFBNPQUJPOTXJMMOPUHJWFQSPQFSSFTVMUT
t'PSCFTUSFTVMUTMPBEBSUJDMFTPGTJNJMBSTJ[FBOEGBCSJDUZQF%POPUPWFSMPBE
Steam Functions (cont.)
W
WARNING
t%POPUPQFOUIFESZFSEPPSEVSJOHTUFBNDZDMFT
Failure to follow this warning can cause serious injury
or death.
t%POPUGJMMUIFTUFBNGFFEFSXJUIHBTPMJOFESZ
DMFBOJOHTPMWFOUTPSPUIFSGMBNNBCMFPSFYQMPTJWF
TVCTUBODFTFailure to do so can result in death,
explosion, fire, or burns.
t%POPUUPVDIUIFTUFBNOP[[MFJOUIFESVNEVSJOH
PSBGUFSUIFTUFBNDZDMFFailure to follow this warning
can cause serious injury or death.
NOTE
t8IFO4FOTPS%SZJTTFMFDUFEXJUIUIF3FEVDF4UBUJD
Turbo Steam™ option, a dry level of Less or Damp
cannot be selected.
t5IF3FEVDF4UBUJDPQUJPONBZBMTPCFTFMFDUFE
during Time Dry cycles.
t"GUFSUIFTUFBNPQUJPOJTTFMFDUFEJO5JNF%SZUIF
More Time or Less Time buttons will change the
steam time only.
t"GUFSQSFTTJOH4UBSU1BVTFUIF.PSF5JNFPS-FTT
Time buttons will be disabled.
HOW TO USE

43
ENGLISH
Tag on
- The Tag On function allows you to conveniently use the
LG Smart Diagnosis™ , Cycle Download, Laundry Stats
and Tag On Cycle Set features to communicate with
your appliance right from your own smart phone. To
use the Tag On functions:
%PXOMPBEUIF-(4NBSU-BVOESZ%8"QQUPZPVS
smart phone.
5VSOPOUIF/'$/FBS'JFME$PNNVOJDBUJPOGVODUJPO
in your smart phone.
- The Tag On function can only be used with smart
phones equipped with the NFC function and based on
the Android operating system (OS).
Turning on the Smart Phone’s NFC Function
&OUFSUIF4FUUJOHTNFOVPG
the smart phone and select
Share & Connect under
8*3&-&44/&5803,4
Set NFC and
%JSFDU"OESPJE#FBNUP
ON, and select NFC.
$IFDLUIF6TF3FBEBOE
8SJUF113FDFJWFPQUJPO
HOW TO USE
1
2
NOTE
Depending on the smart phone manufacturer and
Android OS version, the NFC activation process may
differ. Refer to the manual of your smart phone for
details.
Using the Tag On Function
The Tag On icon
Tag On position
Look for the Tag On icon next to the LED
screen on the control panel. This is where you
position your smart phone when using the
Tag On function of the LG Smart Laundry&DW
application.
When you use the Tag On function, position your smart
phone so that the NFC antenna on the back of your
smart phone matches the position of the Tag On icon
on the appliance. If you do not know the position of
your NFC antenna, move your smart phone very slightly
in a circular motion until the application verifies the
connection.
To operate NFC function in this machine requires a
smart phones which have at least a certain level of NFC
recognition function.
#FDBVTFPGUIFDIBSBDUFSJTUJDTPG/'$UIFUSBOTNJTTJPO
can fail :
tJGUIFEJTUBODFJTUPPGBS
tJGUIFQIPOFIBTBNFUBMTUJDLFSPSBUIJDLDBTF
tJGUIFQIPOFEPFTOUTVQQPSU/'$
Press [
] in the LG Smart Laundry&DW app for a
more detailed guide on how to use the Tag On function.

44
5PVDIUIF5BH0OMPHP
- When a Tag On screen
appears (see at right), tap
your smart phone on the Tag
On icon on the right side of
the dryer’s control panel.
- If it isn’t recognized, touch
[
] on the upper right
of the Tag On screen on
your LG Smart Laundry&DW
application to see the
detailed guide. (This might
happen due to the different
NFC antenna positions for
each phone.)
$IFDLUIFEJBHOPTJTSFTVMUT
BOETPMVUJPOT
- It shows the diagnosis results
on the cycles recently used.
Images are for reference only.
The actual LG Smart Laundry&DW application may be
different.
Using Tag On with Applications
Touch the LG appliance’s Tag On logo with your
NFCequipped smart phone to use the LG Smart
Laundry&DW applications: LG Smart Diagnosis, Cycle
Download, Laundry Stats, and Tag on Cycle Set.
Tag On Diagnosis
*OTUBMM-(4NBSU-BVOESZ%8BQQMJDBUJPOPOB
/'$FRVJQQFETNBSUQIPOF
- Install the application from the Play store and run it.
4FMFDU5BH0O
- Select Tag On by using the
top icons or the bottom icons.
4FMFDU5BH0O%JBHOPTJT
HOW TO USE

45
ENGLISH
Call Center
If you receive a diagnosis from either the Tag On
Diagnosis or Smart Diagnosis application that is unclear
or directs you to call the LG Service Center, follow these
instructions:
4FMFDU1SFTTUP$BMM-(4FSWJDF
POUIF4NBSU%JBHOPTJT
3FTVMUTDSFFO
4FMFDUZPVSDPVOUSZ
"HSFFUP5FSNTBOE$POEJUJPOTPGUIF6TFBOE
1SJWBDZ1PMJDZTFMFDUJOH*"DDFQU
&OUFSZPVSQIPOFOVNCFSJOUIFGJFME6TFUIJT
QIPOFOVNCFSXIFOUBMLJOHUPUIF-(DVTUPNFS
TFSWJDFSFQSFTFOUBUJWFUPBMMPXUIFNUPGJOEZPVS
4NBSU%JBHOPTJTEBUB
1SFTTUIF$BMMCVUUPOUP
JOJUJBUFUIFDBMMUP-(T
4VQQPSU$FOUFS
Images are for reference only. The actual LG Smart
Laundry&DW application may be different.
HOW TO USE

46
4FMFDUBDZDMFUPEPXOMPBE
- You can also check the existing
cycles already downloaded.
5PVDIUIF5BH0OMPHP
- When a Tag On screen
appears (see at right), tap
your smart phone on the Tag
On icon on the right side of
the dryer’s control panel.
- If it isn’t recognized, touch
[
] on the upper right
of the Tag On screen on
your LG Smart Laundry&DW
application to see the detailed
guide. (This might happen
due to the different NFC
antenna positions for each
phone.)
5IFOFXDZDMFJTEPXOMPBEFE
TVDDFTTGVMMZ
- Check the cycle at the
Downloaded cycle position
on the control panel.
Images are for reference only. The actual LG Smart
Laundry&DW application may be different.
Tag On Cycles Download
Tag On Cycle Download allows you to download cycles for later
use. The cycle is available at the Downloaded cycle position on
the control panel until another cycle is downloaded.
*OTUBMMUIF-(4NBSU-BVOESZ%8BQQMJDBUJPOPOB
/'$FRVJQQFETNBSUQIPOF
- Install the application from the Play store and run it.
4FMFDU5BH0O
- Select Tag On by using the top
icons or the bottom icons.
4FMFDU5BH0O$ZDMF
%PXOMPBE
5PVDIUIF5BH0OMPHP
- When a Tag On screen appears
(see at right), tap your smart
phone on the Tag On icon on
the right side of the dryer’s
control panel.
- If it isn’t recognized, touch
[
] on the upper right of
the Tag On screen on your
‘LG Smart Laundry&DW’
application to see the detailed
guide. (This might happen due
to the different NFC antenna
positions for each phone.)
HOW TO USE

47
ENGLISH
Laundry Stats
Laundry Stats can monitor the Flow Sense™ result in
case your home exhaust system is clogged.
Laundry Stats can also tell you details of your last ten
cycles.
4FMFDU5BH0OCZVTJOHUIF
UPQJDPOTPSUIFCPUUPN
JDPOT
4FMFDU-BVOESZ4UBUT
5PVDIUIF5BH0OMPHP
- When a Tag On screen
appears (see at right), tap
your smart phone on the Tag
On icon on the right side of
the dryer’s control panel.
-
If the phone isn’t recognized,
touch [ ] on the upper
right of the Tag On screen on
your LG Smart Laundry&DW
application to see the detailed
guide.(This might happen due
to the different NFC antenna
positions for each phone.)
FLOW SENSE
TM
Status
LG’s Flow Sense
TM
duct blockage sensing system detects
and alerts you to restrictions in the installed household
ductwork that reduce exhaust airflow through the dryer.
4FMFDUUIF'-084&/4&
5.
4UBUVTJOUIF-BVOESZ4UBUT
TDSFFO
*GUIFTUBUVTTIPXTZPVS
IPNFFYIBVTUTZTUFNJT
CMPDLFEQSFTTUIF7FOUJOH
5JQTCVUUPO
3FGFSUPQBHFTPGUIJT
NBOVBMGPSNPSFHVJEBODF
POWFOUJOHUIFESZFS
3FGFSUPQBHFTPGUIJT
NBOVBMGPSNPSFJOGPSNBUJPO
SFHBSEJOH'MPX4FOTF
5.
.
Images are for reference only. The actual LG Smart
Laundry&DW application may be different.
HOW TO USE

48
Run Cycle Again
4FMFDUUIF3VO$ZDMF"HBJO
CVUUPO
- The most used cycle or
most recent cycle can be
immediately started by
selecting the Run Cycle Again
button.
5PVDIUIF5BH0OMPHP
When a Tag On screen
appears(shown at right), tap
your smart phone on the Tag
On icon on the right side of
the dryer’s control panel.
- If the phone isn’t recognized,
touch [
] on the upper
right of the Tag On screen on
your LG Smart Laundry&DW
application to see the
detailed guide. (This might
happen due to the different
NFC antenna positions for
each phone.)
$IFDLXIFUIFSESZJOHTUBSUT
XJUIUIFTFMFDUFEDZDMF
- The screen shown at right
appears and drying starts
immediately on the selected
cycle.
Images are for reference only. The actual LG Smart
Laundry&DW application may be different.
HOW TO USE

49
ENGLISH
Tag On Cycle Set
Tag On Cycle Set allows you to automatically adjust the
cycle and settings based on your needs.
4FMFDU5BH0OCZVTJOHUIF
UPQJDPOTPSUIFCPUUPN
JDPOT
4FMFDU5BH0O$ZDMF4FU
5PVDIUIF5BH0OMPHP
- When a Tag On screen
appears(shown at right), tap
your smart phone on the Tag
On icon on the right side of
the dryer’s control panel.
- If the phone isn’t recognized,
touch [
] on the upper
right of the Tag On screen on
your LG Smart Laundry&DW
application to see the
detailed guide. (This might
happen due to the different
NFC antenna positions for
each phone.)
4FMFDUBMBVOESZDBUFHPSZ
CBTFEPOUIFJTTVFZPVXBOU
UIFNBDIJOFUPGPDVTPO
"GUFSTFMFDUJOHUIF
DBUFHPSZBMJTUPGTQFDJGJD
DZDMFTXJMMBQQFBS4FMFDU
UIFDZDMFCBTFEPOZPVS
needs.
8IFOUIF5BH0OTDSFFO
BQQFBSTTIPXOBUSJHIU
tap your smart phone to
UIF5BH0OMPHPPOUIF
SJHIUTJEFPGUIFXBTIFSTPS
ESZFSTDPOUSPMQBOFM
"GUFSUBHHJOHUIFNBDIJOF
XJUIZPVSQIPOFUIFDZDMF
XJMMBVUPNBUJDBMMZTUBSU
7FSJGZUIFDPSSFDUDZDMFBOE
TFUUJOHTXFSFTFMFDUFE
Images are for reference only. The actual LG Smart
Laundry&DW application may be different.
HOW TO USE

50
MAINTENANCE
Regular Cleaning
W
WARNING
To reduce the risk of fire, electric shock, or injury
to persons when using this appliance, follow basic
precautions, including the following:
t6OQMVHUIFESZFSCFGPSFDMFBOJOHUPBWPJEUIFSJTL
PGFMFDUSJDTIPDL Failure to follow this warning can
cause serious injury, fire, electrical shock, or death.
t/FWFSVTFIBSTIDIFNJDBMTBCSBTJWFDMFBOFSTPS
TPMWFOUTUPDMFBOUIFXBTIFSThey will damage the
finish.
t5PQSFWFOUJOKVSZXIJMFDMFBOJOHBOENBJOUBJOJOH
dryer, wear gloves or protective clothing.
Cleaning the Exterior
Proper care of your dryer can extend its life.
The outside of the machine can be cleaned with warm
water and a mild, nonabrasive household detergent.
Immediately wipe off any spills with a soft, damp cloth.
Cleaning the Interior
Wipe around the door opening and seal with a soft,
damp cloth to prevent lint and dust buildup that could
damage the door seal.
Clean the window with a soft cloth dampened with
warm water and a mild, nonabrasive household
detergent; then wipe dry.
The stainless steel drum can be cleaned with a
conventional stainless steel cleaner, used according to
the manufacturer’s specifications.
Never use steel wool or abrasive cleansers; they can
scratch or damage the surface.
Cleaning Around and Under the Dryer
Vacuum lint and dust from around the dryer and
underneath it regularly. Vent ductwork should be
checked for lint buildup and cleaned at least once per
year. If any noticeable reduction in airflow or drying
performance occurs, immediately check ductwork for
obstructions and blockages.
Maintaining Ductwork
Vent ductwork should be checked for lint buildup once
per month and cleaned at least once per year. If any
noticeable reduction in airflow or drying performance
occurs, immediately check ductwork for obstructions
and blockages. Contact a qualified technician or service
provider.
Cleaning the Lint Filter
Always clean the lint from the filter after every cycle.
To clean, open the dryer door and pull the lint filter
straight up. Then:
'PSFWFSZEBZDMFBOJOHSPMMBOZMJOUPGGUIFGJMUFSXJUI
your fingers, or
7BDVVNUIFMJOUGJMUFS
*GUIFMJOUGJMUFSIBTCFDPNFWFSZEJSUZPSDMPHHFEXJUI
fabric softener, wash the lint filter in warm, soapy
water and allow to dry thoroughly before reinstalling.
NOTE
NEVER operate the dryer without the lint filter in
place. NEVER operate the dryer with a wet lint filter.
NOTE
Do not use methylated spirits, solvents, or similar
products.
Never use steel wool or abrasive cleansers; they can
damage the surface.
MAINTENANCE
Lint
Filter

51
ENGLISH
TROUBLESHOOTING
Before Calling For Service
Your dryer is equipped with an automatic error-monitoring system to detect and diagnose problems at an early
stage. If your dryer does not function properly or does not function at all, check the following before you call for
service.
1SPCMFN 1PTTJCMF$BVTFT
4PMVUJPOT
Dryer will not
turn on
t1PXFSDPSEJTOPUQSPQFSMZ
plugged in.
t)PVTFGVTFJTCMPXODJSDVJU
breaker has tripped, or power
outage has occurred.
t.BLFTVSFUIBUUIFQMVHJTQMVHHFETFDVSFMZJOUPB
grounded outlet matching the dryer’s rating plate.
t3FTFUDJSDVJUCSFBLFSPSSFQMBDFGVTF%POPUJODSFBTF
fuse capacity. If the problem is a circuit overload, have it
corrected by a qualified electrician.
Dryer does not
heat
t)PVTFGVTFJTCMPXODJSDVJU
breaker has tripped, or power
outage has occurred.
t(BTTVQQMZPSTFSWJDFUVSOFEPGG
(gas models only).
t3FTFUDJSDVJUCSFBLFSPSSFQMBDFGVTF%POPUJODSFBTF
fuse capacity. If the problem is a circuit overload, have it
corrected by a qualified electrician.
t$POGJSNUIBUUIFIPVTFHBTTIVUPGGBOEUIFESZFSHBT
shutoff are both fully open.
Greasy or dirty
spots
on clothes
t'BCSJDTPGUFOFSVTFEJODPSSFDUMZ
t$MFBOBOEEJSUZDMPUIFTCFJOH
dried together.
t$POGJSNBOEGPMMPXUIFJOTUSVDUJPOTQSPWJEFEXJUIZPVS
fabric softener.
t.BLFTVSFUPVTFZPVSESZFSUPESZPOMZDMFBOJUFNT
because dirty items can soil clean clothes placed in the
same or subsequent loads.
t4UBJOTPOESJFEDMPUIFTBSFBDUVBMMZTUBJOTUIBUXFSFOPU
removed during the washing process.
Make sure that clothes are being completely cleaned
according to the instructions for your washer and
detergent.
Display shows
error
DPEFU&PSU&
t5IFSNJTUPSJTNBMGVODUJPOJOH t5VSOPGGUIFESZFSBOEDBMMGPSTFSWJDF
Lint on clothes t-JOUGJMUFSOPUDMFBOFEQSPQFSMZ
t-BVOESZOPUTPSUFEQSPQFSMZ
t&YDFTTTUBUJDJODMPUIFT
t%SZFSJTPWFSMPBEFE
t5JTTVFQBQFSFUDMFGUJOQPDLFUT
t.BLFTVSFUIFMJOUGJMUFSJTDMFBOFECFGPSFFWFSZMPBE8JUI
some loads that produce high amounts of lint, it may be
necessary to clean the filter during the cycle.
t4PNFGBCSJDTBSFMJOUQSPEVDFSTJFBGV[[ZXIJUFDPUUPO
towel) and should be dried separately from clothes that
are lint trappers (i.e., a pair of black linen pants).
t4FFUIF&YDFTTTUBUJDJODMPUIFTBGUFSESZJOHTFDUJPOCFMPX
t%JWJEFMBSHFSMPBETJOUPTNBMMFSMPBETGPSESZJOH
t$IFDLQPDLFUTUIPSPVHIMZCFGPSFXBTIJOHBOEESZJOH
clothes.
Excess static in
clothes after
drying
t'BCSJDTPGUFOFSOPUVTFEPSVTFE
incorrectly.
t$MPUIFTESJFEUPPMPOH
(overdried).
t%SZJOHTZOUIFUJDTQFSNBOFOU
press, or synthetic blends.
t6TFBGBCSJDTPGUFOFSUPSFEVDFTUBUJDFMFDUSJDJUZDPSSFDUMZ
Do not use fabric softeners or products to eliminate static
unless recommended by the manufacturer of the fabric
softener or product.
t0WFSESZJOHBMPBEPGMBVOESZDBODBVTFBCVJMEVQPGTUBUJD
electricity. Adjust settings and use a shorter drying time,
or use Sensor Dry cycles.
t5IFTFNBUFSJBMTDBODBVTFTUBUJDCVJMEVQ5SZVTJOHBGBCSJD
softener.
Display shows
error
code PS
t1PXFSDPSEDPOOFDUJPOJT
incorrect.
t$IFDLUIFDPOOFDUJPOPGQPXFSDPSEUPUIFUFSNJOBMCMPDL
3FGFSUPQBHFTJOUIJTNBOVBM
Drying time is
not consistent
t)FBUTFUUJOHTMPBETJ[FPS
dampness of clothing is not
consistent.
t5IFESZJOHUJNFGPSBMPBEXJMMWBSZEFQFOEJOHPOUIFIFBU
setting, the type of heat used (electric, natural gas, or LP
gas), the size of the load, the type of fabrics, the wetness
of the clothes, and the condition of the exhaust ducts and
lint filter.
TROUBLESHOOTING

52
Before Calling For Service (cont.)
1SPCMFN 1PTTJCMF$BVTFT
4PMVUJPOT
Clothes take
too long to dry
t-PBEJTOPUQSPQFSMZTPSUFE
t-BSHFMPBEPGIFBWZGBCSJDT
t%SZFSDPOUSPMTBSFOPUTFU
properly.
t-JOUGJMUFSOFFETUPCFDMFBOFE
t&YIBVTUEVDUTCMPDLFEEJSUZPS
duct run is too long.
t)PVTFGVTFJTCMPXODJSDVJU
breaker has tripped, or power
outage has occurred.
t%SZFSJTPWFSMPBEFE
t%SZFSJTVOEFSMPBEFE
t4FQBSBUFIFBWZJUFNTGSPNMJHIUXFJHIUJUFNT-BSHFSBOE
heavier items take longer to dry.
t)FBWZGBCSJDTUBLFMPOHFSUPESZCFDBVTFUIFZUFOEUP
retain more moisture. To help reduce and maintain more
consistent drying times for large and heavy fabrics,
separate these items into smaller loads of a consistent
size.
t6TFUIFBQQSPQSJBUFDPOUSPMTFUUJOHTGPSUIFUZQFPGMPBE
you are drying.
t.BLFTVSFUIFMJOUGJMUFSJTDMFBOFECFGPSFFWFSZMPBE8JUI
some loads that produce high amounts of lint, it may be
necessary to clean the filter during the cycle.
t$POGJSNUIBUUIFFYIBVTUEVDUXPSLJTQSPQFSMZDPOGJHVSFE
and free of debris, lint, and obstructions. Make sure that
outside wall dampers can open properly and are not
blocked, jammed, or damaged.
t3FTFUDJSDVJUCSFBLFSPSSFQMBDFGVTF%POPUJODSFBTF
fuse capacity. If the problem is a circuit overload, have it
corrected by a qualified electrician.
t%JWJEFMBSHFSMPBETJOUPTNBMMFSMPBETGPSESZJOH
t*GZPVBSFESZJOHBWFSZTNBMMMPBEBEEBGFXFYUSBJUFNT
to ensure proper tumbling action.
Clothes are
wrinkled
t$MPUIFTESJFEUPPMPOH
(overdried).
t$MPUIFTMFGUJOESZFSUPPMPOH
after cycle ends.
t0WFSESZJOHBMPBEPGMBVOESZDBOMFBEUPXSJOLMFEDMPUIFT
Try a shorter drying time, and remove items while they
still retain a slight amount of moisture.
t3FNPWFJUFNTGSPNUIFESZFSJNNFEJBUFMZBUUIFFOE
of the cycle. Use the Wrinkle Care option to continue
UVNCMJOHDMPUIFTBUUIFFOEPGUIFDZDMFGPSVQUPIPVST
Clothes are
shrinking
t(BSNFOUDBSFJOTUSVDUJPOTBSF
not being followed.
t5PBWPJETISJOLBHFQMFBTFDBSFGVMMZGPMMPXUIFGBCSJD
care instructions for your garment, because some fabrics
will naturally shrink when washed. Other fabrics can be
washed but will shrink when dried in a dryer. Use a low or
no heat setting.
Water drips
from nozzle
when Steam
Cycle starts
t5IJTJTOPSNBM t5IJTJTTUFBNDPOEFOTBUJPO5IFESJQQJOHXBUFSXJMMTUPQ
after a short time.
Steam does not
generate but
no error
code is shown
t8BUFSMFWFMFSSPS t6OQMVHESZFSBOEDBMMGPSTFSWJDF
Garments still
wrinkled after
Steam Fresh™
t5PPNBOZPSUPPEJGGFSFOUUZQFT
of garments in dryer.
t4NBMMMPBETPGUPJUFNTXPSLCFTU
t-PBEGFXFSHBSNFOUT-PBETJNJMBSUZQFHBSNFOUT
TROUBLESHOOTING

53
ENGLISH
Before Calling For Service (cont.)
1SPCMFN 1PTTJCMF$BVTFT
4PMVUJPOT
There are no
creases left on
garment after
Steam Fresh™
t5IFGVODUJPOPGUIJTDZDMFJTUP
remove wrinkles from fabric.
t6TFBOJSPOUPNBLFDSFBTFT
Garments have
static after
Reduce Static
t5IJTJTOPSNBM t%FQFOETPOJOEJWJEVBMNPJTUVSFMFWFMJOTLJO
Garments are
too damp or
too dry after
Reduce Static
t$PSSFDUESZJOHPQUJPOTOPU
selected.
t4FMFDUMPBEXFJHIUNBOVBMMZCFGPSFTUBSUJOH3FEVDF4UBUJD
option.
Water drips
from door
during Steam
Cycle
t5IJTJTOPSNBM t$POEFOTBUJPOXJMMOPSNBMMZGPSNPOUIFJOTJEFPGUIF
dryer door during steam operation. Some condensation
may drip out the bottom of the door.
Steam is not
visible during
Steam Cycle
t5IJTJTOPSNBM t4UFBNWBQPSJTEJGGJDVMUUPTFFXIFOUIFEPPSJTDMPTFE
However, condensation will normally form on the inside of
the dryer door if the steam system is operating normally.
Cannot see
steam vapor at
the beginning
of cycle
t5IJTJTOPSNBM t4UFBNJTSFMFBTFEBUEJGGFSFOUTUBHFTPGUIFDZDMFGPSFBDI
option.
The display
shows
t.PSF5JNFCVUUPOQSFTTFE t5IJTEJTQMBZJOEJDBUFTUIBUUIFTUFBNPQUJPOIBTCFFOTFU
for a “ ” item such as a comforter.
Press the Less Time button to reduce the indicated load
size.
Odors remain
in clothing after
Steam Fresh™
t4UFBN'SFTIEJEOPUSFNPWF
odor completely.
t'BCSJDTDPOUBJOJOHTUSPOHPEPSTTIPVMECFXBTIFEJOB
normal cycle.
Clean Filter
light is on
during the
drying cycle
t-JOUGJMUFSJTBMNPTUDMPHHFEPS
full.
t1BVTFUIFESZJOHDZDMFBOEDMFBOUIFMJOUGJMUFS
Flow Sense
TM
indicator
shows four
bars during the
drying cycle
t%VDUXPSLJTUPPMPOHPSIBTUPP
many turns/restrictions.
t4JHOJGJDBOUCMPDLBHFPGUIF
ductwork due to lint buildup or
debris.
t5IFBQQMJBODFIBTEFUFDUFEB
restriction in the external dryer
venting.
t*OTUBMMBTIPSUFSPSTUSBJHIUFSEVDUSVO4FFUIF*OTUBMMBUJPO
Instructions.
t%VDUXPSLTIPVMECFDIFDLFEDMFBOFETPPO
Dryer can be used in this condition, but drying times may
be longer.
t*GFYIBVTUSFTUSJDUJPOTBSFTFOTFECZUIF'MPX4FOTF
TM
system, the indicator will remain on for two hours after
the end of the cycle. Opening the door or pressing the
Power button will turn off the display.
TROUBLESHOOTING

54
4UFBN%SZFS.PEFMT%-&9&%-(9&
Description Steam Dryer
Electrical requirements Please refer to the rating label regarding detailed information.
Gas requirements /(JODIFT8$
-1oJODIFT8$(BT.PEFMTPOMZ
Max. water pressure oQTJoL1B
Dimensions w89
/
w%9
/
w
/
” (D with door open)
DN89DN%9DN)DN%XJUIEPPSPQFO
Net weight (BTESZFSMCTLH
&MFDUSJDESZFSMCTLH
Drying capacity
- Normal cycle
- Steam cycle
*&$DVGUMCTLH
*&$DVGUMCTLH
SPECIFICATIONS
SPECIFICATIONS

55
ENGLISH
USING Smart Diagnosis
TM
Audible Diagnosis
Should you experience any problems with your dryer, it has the capability of transmitting data to your Smart Phone
using the LG Smart Laundry Application or via your telephone to the LG call center.
Smart Diagnosis™ cannot be activated unless your dryer is turned on by pressing the Power button. If your dryer is
unable to turn on, then troubleshooting must be done without using Smart Diagnosis™.
Smart Diagnosis™ Using Your
Smart Phone
%PXOMPBEUIF-(4NBSU-BVOESZBQQMJDBUJPOPOZPVS
smart phone.
0QFOUIF-(4NBSU-BVOESZBQQMJDBUJPOPOZPVS
smart phone. Press the right arrow button to advance
to the next screen.
1SFTTUIF3FDPSECVUUPOPOUIFTNBSUQIPOFBOEUIFO
hold the mouth piece of the smart phone near the
Smart Diagnosis™ logo on the dryer.
8JUIUIFQIPOFIFMEJOQMBDFQSFTTBOEIPME5FNQ
button for three seconds.
,FFQUIFQIPOFJOQMBDFVOUJMUIFUPOFUSBOTNJTTJPO
has finished. It takes time on panel displayed.
8IFOUIFSFDPSEJOHJTDPNQMFUFWJFXUIFEJBHOPTJT
by pressing the Next button on the phone.
Smart Diagnosis™ Through the Call
Center
$BMMUIF-(DBMMDFOUFSBU-(64
-($BOBEB
8IFOJOTUSVDUFEUPEPTPCZUIFDBMMDFOUFSBHFOU
hold the mouthpiece of your phone over the Smart
Diagnosis™ logo on the machine. Hold the phone no
more than one inch (but not touching) the machine.
1SFTTBOEIPMEUIF5FNQCVUUPOGPSUISFFTFDPOET
,FFQUIFQIPOFJOQMBDFVOUJMUIFUPOFUSBOTNJTTJPO
has finished. It takes time on panel displayed.
0ODFUIFDPVOUEPXOJTPWFSBOEUIFUPOFTIBWF
stopped, resume your conversation with the call
center agent, who will then be able to assist you in
using the information transmitted for analysis.
NOTE
Smart Diagnosis™ is a troubleshooting feature
designed to assist, not replace, the traditional method
of troubleshooting through service calls. The
effectiveness of this feature depends upon various
factors, including, but not limited to, the reception
of the cellular phone being used for transmission,
any external noise that may be present during the
transmission, and the acoustics of the room where the
machine is located.
Accordingly, LG does not guarantee that Smart
Diagnosis™ would accurately troubleshoot any given
issue.
NOTE
Do not touch any other buttons or icons on the
display screen.
USING SMART DIAGNOSIS™

56
WARRANTY
Your LG Dryer will be will repaired or replaced, at LG’s option, if it proves to be defective in material or workmanship
VOEFSOPSNBMVTFEVSJOHUIFXBSSBOUZQFSJPEi8BSSBOUZ1FSJPEwTFUGPSUICFMPXFòFDUJWFGSPNUIFEBUFi%BUFPG
Purchase”) of original consumer purchase of the product. This warranty is good only to the original purchaser of the
QSPEVDUBOEFòFDUJWFPOMZXIFOVTFEJOUIF6OJUFE4UBUFTJODMVEJOH"MBTLB)BXBJJBOE645FSSJUPSJFT
5)*48"33"/5:*4*/-*&60'"/:05)&38"33"/5:&913&4403*.1-*&%*/$-6%*/(8*5)065-*.*5"
5*0/"/:8"33"/5:0'.&3$)"/5"#*-*5:03'*5/&44'03"1"35*$6-"3163104&505)&&95&/5
"/:*.1-*&%8"33"/5:*43&26*3&%#:-"8*5*4-*.*5&%*/%63"5*0/505)&&913&448"33"/5:
1&3*0%"#07&
/&*5)&35)&."/6'"$563&3/03*5464%*453*#65034)"--#&-*"#-&'03"/:*/$*%&/5"-$0/4&
26&/5*"-*/%*3&$541&$*"-0316/*5*7&%"."(&40'"/:/"563&*/$-6%*/(8*5)065-*.*5"5*0/
-0453&7&/6&403130'*5403"/:05)&3%"."(&8)&5)&3#"4&%*/$0/53"$550350305)&3
8*4&. Some states do not allow the exclusion or limitation of incidental or consequential damages or limitations on
how long an implied warranty lasts, so the above exclusion or limitation may not apply to you. This warranty gives
ZPVTQFDJöDMFHBMSJHIUTBOEZPVNBZBMTPIBWFPUIFSSJHIUTUIBUWBSZGSPNTUBUFUPTUBUF
5)*4-*.*5&%8"33"/5:%0&4/05"11-:50
t4FSWJDFUSJQTUPZPVSIPNFUPEFMJWFSQJDLVQBOEPSJOTUBMMUIFQSPEVDUJOTUSVDUPSSFQMBDFIPVTFGVTFTPSDPSSFDU
wiring, or correction of unauthorized repairs.
t%BNBHFTPSPQFSBUJOHQSPCMFNTUIBUSFTVMUGSPNNJTVTFBCVTFPQFSBUJPOPVUTJEFFOWJSPONFOUBMTQFDJöDBUJPOT
PSDPOUSBSZUPUIFSFRVJSFNFOUTPGQSFDBVUJPOTJOUIF0QFSBUJOH(VJEFBDDJEFOUWFSNJOöSFøPPEJNQSPQFS
JOTUBMMBUJPOBDUTPG(PEVOBVUIPSJ[FENPEJöDBUJPOPSBMUFSBUJPOJODPSSFDUFMFDUSJDBMDVSSFOUPSWPMUBHFPSDPN-
mercial use, or use for other than intended purpose.
The cost of repair or replacement under these excluded circumstances shall be borne by the consumer.
$6450.&3*/'03."5*0/$&/5&3/6.#&34
50$0/5"$5-(&-&$530/*$4#:."*-
LG Customer Information Center
10#PY
+BNFT3FDPSE3PBE
)VOUTWJMMF"MBCBNB
ATTN: CIC
8"33"/5:1&3*0%
-"#030OF:FBSfrom the Date of Purchase.
1"3540OF:FBSfrom the Date of Purchase.
Replacement Units and Repair Parts may be new or
remanufactured.
Replacement Units and Repair Parts are warranted for
the remaining portion of the original unit’s warranty
period.
%SZFSESVNZFBSTMJNJUFEXBSSBOUZ
ZFBSTXBSSBOUZPO%SZFS%SVNJODMVEJOHQBSUTMBCPS
-(&-&$530/*$4*/$
-(%3:&3-*.*5&%8"33"/5:64"
)084&37*$&*4)"/%-&%
*O)PNF4FSWJDF
Please retain dealer’s dated bill of sale or delivery
ticket as evidence of the Date of Purchase for proof of
warranty, and submit a copy of the bill of sale to the
service person at the time warranty service is provided.
1MFBTFDBMMBOEDIPPTFUIF
BQQSPQSJBUFPQUJPOUPMPDBUFZPVSOFBSFTU-(
"VUIPSJ[FE4FSWJDF$FOUFS
Or visit our Web site at: http://www.lgservice.com.
$BMMIPVSTBEBZEBZTQFS
year), and select the appropriate option from the
menu.
0SWJTJUPVS8FCTJUFBUIUUQXXXMHTFSWJDFDPN
5PPCUBJO$VTUPNFS"TTJTUBODF1SPEVDU
*OGPSNBUJPOPS%FBMFSPS"VUIPSJ[FE4FSWJDF
$FOUFSMPDBUJPO
Product Registration Information
.PEFM
4FSJBM/VNCFS
%BUFPG1VSDIBTF
The model and serial number can be located on the
rating plate inside the front door.

MANUAL DE PROPIETARIO
SECADORA
Lea este manual de usuario detenidamente antes de la utilizacion y
guardelo a mano para futuras consultas.
www.lg.com
ESPAÑOL
DLEX7700*E DLGX7701*E

2
TABLA DE CONTENIDOS
3
INSTRUCCIONES IMPORTANTES DE
SEGURIDAD
3 QUÉ HACER SI HUELE GAS
4 PRECAUCIONES BÁSICAS DE SEGURIDAD
4 LEY EJECUTIVA PARA LA SEGURIDAD
DEL AGUA POTABLE Y LOS TÓXICOS DE
CALIFORNIA (CALIFORNIA SAFE DRINKING
WATER AND TOXIC ENFORCEMENT ACT)
5 INSTRUCCIONES DE CONEXIÓN A TIERRA
5 INSTRUCCIONES IMPORTANTES PARA LA
INSTALACIÓN
7 INSTRUCCIONES IMPORTANTES PARA
CONECTAR LA ELECTRICIDAD
8
CARACTERÍSTICAS DEL PRODUCTO
9
LA INTRODUCCIÓN DE LA SECADORA
9 Partes y Accesorios
9 Puerta reversible de doble vía
10 Características del panel de control
11 Pantalla
12
INSTRUCCIONES PARA LA
INSTALACIÓN
12 Vista previa del orden de instalación
13 Requisitos del lugar de instalación
13 Espacios de instalación
14 Nivelación de la secadora
15 Cambio de la dirección de apertura de la
puerta
21 Instalación del kit de ventilación lateral
22 Cónexión del conducto de ventilación de la
secadora
24 Manguera de entrada
25 Conexión de secadoras a gas
27 Cómo conectar las secadoras eléctricas
32 Requisitos especiales para viviendas móviles o
prefabricadas
32 Revisión de instalación final
33 Test de Instalación (Verificación del Conducto)
35
CÓMO USAR
35 Funcionamiento de la secadora
36 Clasificación de cargas
36 Cómo cargar la secadora
36 Revise el filtro de pelusa antes de cada uso
36 Uso de la tapa
37 Uso de la función LG EasyLoad™
38 Guía de ciclos
39 Configuraciones del ciclo y opciones
39 Funciones especiales
40 Programa personalizado
41 Funciones de vapor
42 Guía de ciclo de vapor
43 Tag On
44
Utilizar Tag On con Aplicaciónes
50
MANTENIMIENTO
50 Limpieza regular
51
RESOLUCIÓN DE PROBLEMAS
51 Antes de llamar a mantenimiento
54
ESPECIFICACIONES
55
UTILIZACIÓN DEL SMART
DIAGNOSIS
TM
56
GARANTÍA
TABLA DE CONTENIDOS

3
ESPAÑOL
INSTRUCCIONES IMPORTANTES DE SEGURIDAD
LEA TODAS LA INSTRUCCIONES ANTES DE USAR
W
ADVERTENCIA
Por su seguridad, debe seguir la información indicada en este manual para minimizar el riesgo de incendio o
explosión, descarga eléctrica, o para prevenir daños a la propiedad, lesiones personales o muerte.
Su Seguridad y la de los demás son de suma importancia.
En este manual y en su electrodoméstico figuran muchos mensajes importantes de seguridad. Lea y cumpla
siempre con todos los mensajes de seguridad.
Éste es el símbolo de alerta de seguridad.
El mismo alerta sobre potenciales riesgos de muerte o heridas tanto para usted como para otras personas.
Todos los mensajes de seguridad estarán a continuación del símbolo de alerta de seguridad y con la palabra
PELIGRO, ADVERTENCIA o PRECAUCIÓN.
Estas palabras significan:
W
PELIGRO
Corre riesgo de muerte o de sufrir heridas serias si no sigue las instrucciones inmediatamente.
W
ADVERTENCIA
Corre riesgo de muerte o de sufrir heridas serias si no sigue las instrucciones.
W
PRECA UCIÓN
De no seguir las instrucciones podría sufrir daños leves o causar daños en el producto.
Todos los mensajes de seguridad le indicarán cuál es el riesgo potencial, le dirán cómo reducir las posibilidades de
sufrir heridas y qué puede suceder si no se siguen las instrucciones.
t/PJOTUBMFVOBTFDBEPSBKVOUPBNBUFSJBMFTEFWFOUJMBDJØOQMÈTUJDPTGMFYJCMFT4JTFJOTUBMBVODPOEVDUP
GMFYJCMFNFUÈMJDPEFUJQPMÈNJOBEFNFUBMÏTUFEFCFSÈDVNQMJSMBTFTQFDJGJDBDJPOFTEFUFSNJOBEBTQPS
FMGBCSJDBOUFEFMFMFDUSPEPNÏTUJDPQBSBTVVTPDPOTFDBEPSBT4FTBCFRVFMPTNBUFSJBMFTEFWFOUJMBDJØO
GMFYJCMFTTFDPOUSBFOTFBHSJFUBODPOSBQJEF[ZBUSBQBOQFMVTBT&TUBTDPOEJDJPOFTPCTUSVJSÈOFMGMVKPEFBJSF
de la secadora y aumentarán el riesgo de incendio.
t/PBMNBDFOFPVTFHBTPMJOBOJOJOHÞOPUSPUJQPEFWBQPSFTPMÓRVJEPTJOGMBNBCMFTDFSDBEFFTUF
FMFDUSPEPNÏTUJDPOJEFOJOHÞOPUSPFMFDUSPEPNÏTUJDP
tÁOJDBNFOUFVOUÏDOJDPDBMJGJDBEPEFNBOUFOJNJFOUPBHFODJBEFNBOUFOJNJFOUPPDPNQB×ÓBEFHBTEFCFSÈO
SFBMJ[BSFMNBOUFOJNJFOUPZMBJOTUBMBDJØO
t*OTUBMFMBTFDBEPSBTFHÞOMBTJOTUSVDDJPOFTEFMGBCSJDBOUFZMBTOPSNBUJWBTMPDBMFT
t(VBSEFFTUBTJOTUSVDDJPOFT
26²)"$&34*)6&-&("4
/PJOUFOUFFODFOEFSVODJHBSSJMMPPGØTGPSPOJFODFOEFSOJOHÞOFMFDUSPEPNÏTUJDPBHBTPFMÏDUSJDP
/PUPRVFOJOHÞOJOUFSSVQUPSFMÏDUSJDP/PVTFOJOHÞOUFMÏGPOPFOTVFEJGJDJP
/PQFSNJUBRVFOJOHVOBQFSTPOBTFFODVFOUSFFOMBIBCJUBDJØOFEJGJDJPPÈSFB
-MBNFBTVDPNQB×ÓBEFHBTJONFEJBUBNFOUFEFTEFFMUFMÏGPOPEFVOWFDJOP4JHBMBTJOTUSVDDJPOFTEFTV
DPNQB×ÓBEFHBTBMQJFEFMBMFUSB
4JOPQVFEFDPNVOJDBSTFDPOTVDPNQB×ÓBEFHBTMMBNFBMEFQBSUBNFOUPEFCPNCFSPT
W
ADVERTENCIA:
Este producto contiene químicos conocidos por el Estado de California como causantes de
cáncer y defectos de nacimiento u otros daños reproductivos.
Lávese las manos después de usarlo.
W
INSTRUCCIONES IMPORTANTES DE SEGURIDAD

4
INSTRUCCIONES IMPORTANTES DE SEGURIDAD
LEA TODAS LA INSTRUCCIONES ANTES DE USAR
W
ADVERTENCIA
Por su seguridad, debe seguir la información indicada en este manual para minimizar el riesgo de incendio o
explosión, descarga eléctrica, o para prevenir daños a la propiedad, lesiones personales o muerte.
13&$"6$*0/&4#«4*$"4%&4&(63*%"%
W
ADVERTENCIA
Para minimizar el riesgo de incendio o explosión, descarga eléctrica, o para prevenir lesiones personales cuando use
electrodomésticos, se deben seguir precauciones básicas de seguridad, incluyendo las siguientes:
-&:&+&$65*7"1"3"-"4&(63*%"%%&-"(6"105"#-&:-045»9*$04
%&$"-*'03/*"ŷ$"-*'03/*"4"'&%3*/,*/(8"5&3"/%509*$
&/'03$&.&/5"$5Ÿ
Esta ley requiere que el gobernador de California publique un listado de sustancias conocidas en el estado que
causan cáncer, defectos congénitos u otras lesiones reproductivas, y obliga a los negocios a alertar a los clientes
sobre la posible exposición a tales sustancias. Los electrodomésticos a gas pueden causar exposición leve a cuatro de
estas sustancias, principalmente benceno, monóxido de carbono, formaldehído y hollín, generado principalmente
por la combustión parcial del gas natural o los combustibles LP (petróleo líquido). Las secadoras calibradas
adecuadamente minimizarán la combustión parcial. Para minimizar incluso más la exposición a estas sustancias, se
puede dotar a la secadora de la ventilación adecuada al exterior.
t-FBUPEBTMBTJOTUSVDDJPOFTBOUFTEFVTBSMBTFDBEPSB
t"OUFTEFVTBSMBTFDBEPSBEFCFFTUBSDPSSFDUBNFOUF
instalada como se describe en este manual.
t/PDPMPRVFBSUÓDVMPTRVFIBZBOTJEPFYQVFTUPT
a aceites, incluyendo aceites comestibles, en su
secadora. Los artículos contaminados con aceites
comestibles podrían contribuir a la generación de una
reacción química que podría ocasionar que una carga
se incendie.
t/PTFRVFBSUÓDVMPTRVFIBZBOTJEPMJNQJBEPTMBWBEPT
remojados o salpicados previamente con gasolina,
disolventes de limpieza en seco u otras substancias
inflamables o explosivas, ya que emanan vapores que
podrían encenderse o explotar, incluso después del
lavado.
t/PJOUSPEV[DBMBTNBOPTFOMBTFDBEPSBDVBOEPFM
tambor o las otras partes estén en movimiento.
t/PSFQBSFPSFFNQMBDFOJOHVOBQBSUFEFMBTFDBEPSB
ni intente reparar la misma a menos que esto se
recomiende en forma específica en esta Guía de Uso y
Cuidado o en instrucciones de reparación publicadas
las cuales comprende y sabe aplicar.
t/PBMUFSFMPTDPOUSPMFT
t"OUFTEFQPOFSMBTFDBEPSBGVFSBEFTFSWJDJPPEF
tirarla, quite la puerta para prevenir que los niños se
metan dentro.
t/PEFKFRVFMPTOJ×PTKVFHVFOFOMBTFDBEPSBOJEFOUSP
de ella. Cuando se usa la secadora cerca de los niños,
se necesita una supervisión estricta.
t6TFTVBWJ[BEPSFTEFUFMBPQSPEVDUPTQBSBFMJNJOBS
estática únicamente del modo recomendado por el
fabricante.
t/PVTFDBMPSQBSBTFDBSBSUÓDVMPTRVFDPOUJFOFODBVDIP
espumoso, plásticos o materiales de textura similar al
caucho.
t&WJUFMBBDVNVMBDJØOEFQFMVTBQPMWPPUJFSSB
alrededor del área de la apertura de ventilación y áreas
adyacentes.
t-BQBSUFJOUFSJPSEFMBTFDBEPSBZFMDPOEVDUPEF
ventilación se deberán limpiar periódicamente, y la
misma deberá ser realizada por personal calificado del
servicio.
t/PJOTUBMFOJDPMPRVFFTUBTFDBEPSBFOMVHBSFTEPOEF
pueda estar expuesta a variables climáticas.
t"OUFTEFDBSHBSMBTFDBEPSBTJFNQSFSFWJTFRVFOP
haya objetos extraños en su interior.
t3FUJSFMBQFMVTBEFMGJMUSPBOUFTEFDBEBDBSHB
t/PEFKFQMÈTUJDPTQBQFMPUFMBTRVFQVFEBORVFNBSTF
o fundirse sobre la secadora en funcionamiento.
t5FOHBDVJEBEPBMBCSJSZDFSSBSMBQVFSUB-PTEFEPTZ
las manos podrían quedar enganchados en la puerta
y causar daños si ésta cae hacia delante de forma
inadvertida.
t/PDPMPRVFPCKFUPTQFTBEPTOJTFBQPZFTPCSFMB
QBSUFTVQFSJPSEFMBQVFSUBBCJFSUB
t/PJOUFOUFBCSJSMBQVFSUBEFUJQPDFTUPNÈTEF
grados.
t-BTFDBEPSBQPESÓBWPMDBSTFIBDJBEFMBOUFZDBVTBSMF
lesiones personales o daños materiales.
INSTRUCCIONES IMPORTANTES DE SEGURIDAD

5
ESPAÑOL
INSTRUCCIONES IMPORTANTES DE SEGURIDAD
LEA TODAS LA INSTRUCCIONES ANTES DE USAR
W
ADVERTENCIA
Por su seguridad, debe seguir la información indicada en este manual para minimizar el riesgo de incendio o
explosión, descarga eléctrica, o para prevenir daños a la propiedad, lesiones personales o muerte.
*/4536$$*0/&4%&$0/&9*»/"5*&33"
Este electrodoméstico deberá estar conectado a tierra. En caso de avería o mal funcionamiento, la conexión a tierra
reducirá el riesgo de descargas eléctricas al brindar un camino con una resistencia menor para la corriente eléctrica.
Este electrodoméstico debe estar equipado con un cable con un conductor para la conexión a tierra del equipo y
un enchufe con conexión a tierra. El enchufe deberá estar conectado a una toma de corriente instalada en forma
adecuada y con conexión a tierra de acuerdo con todos los códigos y ordenanzas locales.
W
ADVERTENCIA
6OBDPOFYJØOJOBQSPQJBEBEFMDPOEVDUPSEFDPOFYJØOBUJFSSBEFMFRVJQPQVFEFQSPWPDBSSJFTHPTEF
EFTDBSHBTFMÏDUSJDBTConsulte a un electricista calificado o personal del servicio si tiene dudas de que el
electrodoméstico se encuentre conectado a tierra apropiadamente.
No modifique el enchufe que se entrega con el electrodoméstico. Si no coincide con la toma de corriente, contrate a
un electricista calificado para que instale una toma de corriente en forma adecuada.
Este electrodoméstico debe estar conectado a un sistema de cableado de metal permanente con conexión a tierra
o se debe tender un conducto para la conexión a tierra del equipo con los conductores del circuito y conectado al
terminal de tierra del equipo o al conductor de suministro del electrodoméstico.
Si la secadora no se encuentra adecuadamente conectada a tierra se pueden producir descargas eléctricas.
*/4536$$*0/&4*.1035"/5&41"3"-"*/45"-"$*»/
W
ADVERTENCIA
Para reducir el riesgo de incendio, descargas eléctricas o heridas al usar su electrodoméstico, siga las precauciones
básicas, incluyendo lo siguiente:
t$POFDUFMBTFDBEPSBBEFDVBEBNFOUFBUJFSSBTFHÞO
UPEPTMPTDØEJHPTZMBTSFHVMBDJPOFTWJHFOUFT Siga
los detalles en las instrucciones de instalación. Si la
secadora no se encuentra adecuadamente conectada
a tierra se pueden producir descargas eléctricas.
t"OUFTEFVTBSMBTFDBEPSBEFCFFTUBSDPSSFDUBNFOUF
JOTUBMBEBDPNPTFEFTDSJCFFOFTUFNBOVBM Si la
secadora no se encuentra adecuadamente conectada
a tierra se pueden producir descargas eléctricas.
t*OTUBMFZBMNBDFOFMBTFDBEPSBFOVOMVHBSOP
FYQVFTUPBUFNQFSBUVSBTJOGFSJPSFTBMQVOUPEF
DPOHFMBDJØOOJFYQVFTUPBMBJOUFNQFSJF
t5PEBTMBTSFQBSBDJPOFTZDPOUSPMFTEFCFSÈOTFS
SFBMJ[BEPTQPSVODFOUSPEFTFSWJDJPBVUPSJ[BEP
BNFOPTRVFTFEFOPUSBTSFDPNFOEBDJPOFT
FTQFDÓGJDBTFOFM.BOVBMEFM6TVBSJP6UJMJDFTØMP
QJF[BTEFGÈCSJDBBVUPSJ[BEBT Si no se cumple con
esta advertencia se podrán producir heridas graves,
incendios, descargas eléctricas o muerte.
t$POFMGJOEFSFEVDJSFMSJFTHPEFEFTDBSHBT
FMÏDUSJDBTOPJOTUBMFMBTFDBEPSBFOFTQBDJPT
IÞNFEPTSi no se cumple con esta advertencia se
podrán producir heridas graves, incendios, descargas
eléctricas o muerte.
t$POFDUFVODJSDVJUPFMÏDUSJDPDMBTJGJDBEPQSPUFHJEP
ZBEFDVBEPQBSBFWJUBSTPCSFDBSHBFMÏDUSJDB Un
circuito eléctrico inadecuado se puede fundir, creando
descargas eléctricas y/o riesgo de incendio.
t
.BOUFOHBUPEPTMPTFOWPMUPSJPTBMFKBEPTEFMPT
OJ×PT Los materiales de los envoltorios pueden resultar
peligrosos para los niños. Existe riesgo de asfixia.
t2VJUFUPEPTMPTFMFNFOUPTEFFNCBMBKFZEFTFDIF
BEFDVBEBNFOUFUPEPTMPTNBUFSJBMFTEFFOWÓPSi no
se cumple con esto se podrá producir una explosión,
incendio, quemaduras o muerte.
t$PMPRVFMBTFDBEPSBBVOBMUVSBNÓOJNBEF
QVMHBEBTFODJNBEFMQJTPQBSBVOBJOTUBMBDJØOFO
FMHBSBKF Si no se cumple con esto se podrá producir
una explosión, incendio, quemaduras o muerte.
t
/PMPJOTUBMFDFSDBEFVOFMFNFOUPRVFHFOFSBDBMPS
$PNPVOBFTUVGBIPSOPPDBMFOUBEPS Si no lo hace puede
ocasionar daños en el equipo, humos o un incendio.
t/PDPMPRVFWFMBTPDJHBSSJMMPTTPCSFFMQSPEVDUP Si
no lo hace puede ocasionar daños en el equipo, humos
o un incendio.
t2VJUFMBQFMÓDVMBEFWJOJMPQSPUFDUPSBEFMQSPEVDUP
Si no lo hace puede ocasionar daños en el equipo,
humos o un incendio.
INSTRUCCIONES IMPORTANTES DE SEGURIDAD

6
INSTRUCCIONES IMPORTANTES DE SEGURIDAD
LEA TODAS LA INSTRUCCIONES ANTES DE USAR
W
ADVERTENCIA
Por su seguridad, debe seguir la información indicada en este manual para minimizar el riesgo de incendio o
explosión, descarga eléctrica, o para prevenir daños a la propiedad, lesiones personales o muerte.
*/4536$$*0/&4*.1035"/5&41"3"-"*/45"-"$*»/
W
ADVERTENCIA
Para reducir el riesgo de lesiones personales, cumpla con todos los procedimientos de seguridad recomendados
por la industria, incluyendo el uso de use guantes con mangas largas y gafas de seguridad. En caso de no cumplir
con todas las advertencias de seguridad de este manual se podrán producir daños sobre la propiedad, lesiones
personales o la muerte.
Conducto de escape/Tubería:
t-BTTFDBEPSBTBHBT%&#&/UFOFSVODPOEVDUP
EFWFOUJMBDJØOBMFYUFSJPSSi no se siguen estas
instrucciones se podrá producir incendio o muerte.
t1BSBQSFWFOJSFMJOHSFTPEFHSBOEFTDBOUJEBEFTEF
IVNFEBEZQFMVTBBMBIBCJUBDJØOTFSFDPNJFOEB
FOGÈUJDBNFOUFEPUBSMBTTFDBEPSBTFMÏDUSJDBTEFVO
DPOEVDUPEFWFOUJMBDJØOBMFYUFSJPS La acumulación
de pelusa en cualquier parte de la casa puede crear
riesgos de salud e incendio.
t6TFÞOJDBNFOUFTJTUFNBTEFWFOUJMBDJØOEFNFUBM
SÓHJEPPGMFYJCMFEFQVMHBEBTEFEJÈNFUSPEFOUSP
EFMHBCJOFUFEFMBTFDBEPSBPQBSBWFOUJMBDJØOBM
FYUFSJPS-PTTJTUFNBTEFWFOUJMBDJØOEFQMÈTUJDPV
otro material pueden causar incendios. Los sistemas
de ventilación agujereados pueden causar incendios si
se colapsan o bloquean durante el uso o la instalación.
t/PTFQSPWFFFMTJTUFNBEFWFOUJMBDJØODPOMB
TFDBEPSBFMNJTNPEFCFSÈPCUFOFSTFMPDBMNFOUF
-BUBQBUFSNJOBMEFCFSÈUFOFSSFHVMBEPSFTEFUJSP
DPOCJTBHSBTQBSBQSFWFOJSFMSFUPSOPEFEFTDBSHB
cuando no se usa la secadora. Si no se siguen estas
instrucciones se podrá producir incendio o muerte.
t&MDPOEVDUPEFFTDBQFEFCFSÈUFOFSDN
QVMHEFEJÈNFUSPTJOPCTUSVDDJPOFT&MDPOEVDUP
EFFTDBQFEFCFSÈNBOUFOFSTFMPNÈTDPSUPQPTJCMF
"TFHÞSFTFEFMJNQJBSDVBMRVJFSUJQPEFDPOEVDUP
BOUJHVPBOUFTEFJOTUBMBSTVTFDBEPSBOVFWB Si
no se siguen estas instrucciones se podrá producir
incendio o muerte.
t4FSFDPNJFOEBODPOEVDUPTSÓHJEPTP
TFNJSÓHJEPTQBSBVTBSFOUSFMBTFDBEPSBZMB
QBSFE&OJOTUBMBDJPOFTQBSUJDVMBSFTDVBOEPFT
JNQPTJCMFSFBMJ[BSVOBDPOFYJØOTJHVJFOEPMBT
SFDPNFOEBDJPOFTBOUFTJOEJDBEBTÞOJDBNFOUFTF
QVFEFVUJMJ[BSVODPOEVDUPNFUÈMJDPEFUSBOTJDJØO
BQSPCBEPQPS6-FOUSFMBTFDBEPSBZMBDPOFYJØO
EFQBSFE6TBSFTUFUJQPEFDPOEVDUPBGFDUBSÈFM
tiempo de secado. Si no se siguen estas instrucciones
se podrá producir incendio o muerte.
t/0VUJMJDFUPSOJMMPTEFMÈNJOBEFNFUBMOJPUSP
UJQPEFBTFHVSBEPSFTRVFTFFYUJFOEBOEFOUSP
del conducto y puedan atrapar pelusa y reducir la
FGJDJFODJBEFMTJTUFNBEFFTDBQFAsegure todas las
uniones con cinta adhesiva impermeable. Para más
detalles, siga las Instrucciones de Instalación. Si no se
siguen estas instrucciones se podrá producir incendio
o muerte.
INSTRUCCIONES IMPORTANTES DE SEGURIDAD

7
ESPAÑOL
INSTRUCCIONES IMPORTANTES DE SEGURIDAD
LEA TODAS LA INSTRUCCIONES ANTES DE USAR
W
ADVERTENCIA
Por su seguridad, debe seguir la información indicada en este manual para minimizar el riesgo de incendio o
explosión, descarga eléctrica, o para prevenir daños a la propiedad, lesiones personales o muerte.
*/4536$$*0/&4*.1035"/5&41"3" $0/&$5"3-"&-&$53*$*%"%
W
ADVERTENCIA
Para reducir el riesgo de incendio, descargas eléctricas o heridas al usar su electrodoméstico, siga las precauciones
básicas, incluyendo lo siguiente:
(6"3%&&45"4*/4536$$*0/&4
t#BKPOJOHVOBDJSDVOTUBODJBDPSUFPRVJUFMBUFSDFSB
QBUBQVFTUBBUJFSSBEFMDBCMFFMÏDUSJDPPara evitar
heridas a nivel personal o daños sobre la secadora, el
cable de corriente eléctrica debe estar conectado en
una conexión a tierra en condiciones adecuadas.
t1PSNPUJWPTEFTFHVSJEBEQFSTPOBMFTUF
FMFDUSPEPNÏTUJDPEFCFFTUBSDPOFDUBEPBUJFSSB
adecuadamente. Si esto no se cumple se podrán
producir descargas eléctricas o heridas.
t$POTVMUFMBTJOTUSVDDJPOFTEFJOTUBMBDJØOEFFTUF
NBOVBMQBSBPCUFOFSMPTSFRVJTJUPTFMÏDUSJDPT
FTQFDÓGJDPTEFTVNPEFMP Si estas instrucciones no se
cumplen se podrán producir descargas eléctricas y/o
riesgo de incendio.
t&TUBTFDBEPSBEFCFFTUBSFODIVGBEBBVO
tomacorriente conectado a tierra adecuadamente.
Si la secadora no se encuentra adecuadamente
conectada a tierra se pueden producir descargas
FMÏDUSJDBT$POUSBUFBVOFMFDUSJDJTUBDBMJGJDBEPQBSB
RVFDPOUSPMFFMUPNBDPSSJFOUFZFMDJSDVJUPFMÏDUSJDP
QBSBBTFHVSBSTFRVFFMFODIVGFFTUÈDPSSFDUBNFOUF
conectado a tierra. Si estas instrucciones no se
cumplen se podrán producir descargas eléctricas y/o
riesgo de incendio.
t-BTFDBEPSBTJFNQSFEFCFFTUBSFODIVGBEBBTV
UPNBDPSSJFOUFJOEJWJEVBMDPOMBDMBTJGJDBDJØO
EFUFOTJØODPSSFTQPOEJFOUFBMBQMBDBEFEBUPT
EFTFSWJDJPEsto proporciona el mejor desempeño
y previene a la vez sobrecarga de los circuitos de
cableado del hogar, lo que podría producir un incendio
debido a los cables sobrecalentados.
t/VODBEFTFODIVGFTVTFDBEPSBFNQVKBOEPFMDBCMF
EFDPSSJFOUF4JFNQSFUPNFTVFODIVGFGJSNFNFOUF
ZFNQVKFFMNJTNPIBDJBGVFSBQBSBSFUJSBSMP El
cable de corriente se puede cortar debido a cualquier
movimiento de su parte central, resultando en una
descarga eléctrica.
t3FQBSFPSFFNQMBDFEFJONFEJBUPUPEPTMPTDBCMFT
EFDPSSJFOUFQFMBEPTPDPODVBMRVJFSUJQPEFEB×P
/PVTFVODBCMFDPODPSUBEVSBTPBCSBTJØOTPCSF
TVFYUFOTJØOPFYUSFNPTEste cable de corriente se
puede fundir, creando descargas eléctricas y/o riesgo
de incendio.
t"MJOTUBMBSPDBNCJBSEFMVHBSMBTFDBEPSBFWJUF
UPEPUJQPEFDPSUFTVPUSPTEB×PTFOFMDBCMFEF
corriente. Esto evitará heridas o daños debido a
incendios o descargas eléctricas sobre la secadora.
INSTRUCCIONES IMPORTANTES DE SEGURIDAD

8
CARACTERÍSTICAS DEL PRODUCTO
PANEL DE CONTROL FÁCIL PARA USAR
Gire el mando selector de ciclo para seleccionar el ciclo de secado que desee. Añada opciones de ciclo o ajuste los
valores tocando un botón
PUERTA REVERSIBLE DE FÁCIL ACCESO DE DOBLE VÍA
La puerta de doble LG EasyLoad™ de apertura tipo cesto, se puede abrir desde arriba, permitiéndole cargar
fácilmente la secadora sin que la ropa caiga al suelo. También funciona como puerta batiente, permitiendo así
un fácil acceso para la carga y descarga de prendas más voluminosas. La bisagra de la puerta es reversible para
ajustarse al lugar de instalación.
FUNCIONES DE VAPOR
Seleccione el ciclo Steam Fresh™ o Steam Sanitary™, y la avanzada tecnología de vapor de LG desinfectará o
refrescará la ropa con un torbellino de vapor caliente. Refresque con vapor las prendas que tenía guardadas en
lugar de lavarlas, de esta manera ayudará a extender la vida útil de sus prendas. O bien agregue la opción de
vapor al seleccionar sus ciclos para ayudar a reducir las arrugas y la estática al final de su ciclo de secado.
INDICADOR DEL SISTEMA DE SENSOR DE BLOQUEO DE CONDUCTO Flow Sense™
El sistema de detección de bloqueo de conductos Flow Sense™ detecta y alerta sobre la existencia de
obstrucciones en el sistema de ventilación doméstico instalado que reducen el flujo de ventilación de la secadora.
Si aparece el mensaje de alerta: Limpie o repare los conductos para eliminar las obstrucciones. Mantenga sus
conductos limpios para aumentar la eficiencia de la secadora y reducir largos ciclos de secado causados por
conductos bloqueados.
Smart Diagnosis™
Si experimenta alguna dificultad técnica en su secadora, la misma cuenta con la capacidad de transmitir datos por
teléfono al Centro de Atención al Cliente. El agente del centro de atención registra los datos transmitidos desde su
máquina y los usa para analizar el problema, brindando un diagnóstico rápido y efectivo.
Tag On
La función Tag On es compatible con la mayoría de smartphones que incorporan NFC al comunicarse con su
aparato LG equipado con Tag On.
Con la aplicación “LG Smart Laundry”, la función Tag On le permitirá diagnosticar su aparato, descargar nuevos
ciclos y ver el estado del aparato con solo tocar el logotipo Tag On del aparato con su smartphone.
Protocolo P154
Ejecución de saneamiento de
secadoras residenciales
C
E
R
T
I
F
I
E
D
D
E
S
I
G
N
CARACTERÍSTICAS DEL PRODUCTO

9
ESPAÑOL
LA INTRODUCCIÓN DE LA SECADORA
Partes y Accesorios
Partes
NOTA
t1ØOHBTFFODPOUBDUPDPOFM%FQBSUBNFOUPEFBUFODJØOBMDMJFOUFEF-(FOFMOÞNFSP
FO$BOBEÈTJGBMUBBMHVOPEFMPTBDDFTPSJPT
t1BSBTVTFHVSJEBEZDPOFMGJOEFBNQMJBSMBWJEBÞUJMEFTVMBWBEPSBVUJMJDFTØMPDPNQPOFOUFTBVUPSJ[BEPT&M
fabricante no se hace responsable de los fallos del producto o accidentes causados por la utilización de piezas o
componentes no autorizados.
t-BTJNÈHFOFTEFFTUBHVÓBQVFEFOOPDPJODJEJSDPOMPTDPNQPOFOUFTZBDDFTPSJPTSFBMFTZFTUÈOTVKFUBTB
cambios sin previo aviso para mejoras en el producto.
Panel de
control
Patas
niveladoras
Puerta
reversible
Filtro de
pelusa
Panel de
acceso del
bloque
terminal
(Modelos
eléctricos)
Ubicación de
la toma de
gas (Modelos
a gas)
Ubicación
del cable
eléctrico
(Modelos a
gas)
Salida del
conducto
de escape
Puerta reversible de doble vía
Soltar
Puerta
tipo cesto
La función LG EasyLoad
TM
le permite abrir la puerta de
la secadora desde arriba, tipo cesto, y cargar la ropa en
el tambor evitando que caiga al suelo.
Para la carga y descarga de ropa más voluminosa,
la puerta batiente le permite acceder fácilmente al
tambor. Para obtener más información sobre el uso
EFMBQVFSUBDPOTVMUFMBQÈHJOB1BSBPCUFOFSNÈT
información sobre cómo cambiar la dirección de la
QVFSUBCBUJFOUFDPOTVMUFMBQÈHJOB
Puerta batiente
LA INTRODUCIÓN DE LA SECADORA
Side vent kit
(sold separately)
N.º de kit 383EEL9001B
Secado en parrilla
Accesorios incluidos
Accesorios opcionales
MangueraY conector
Accesorios

10
Características del panel de control
A continuación encontrará instrucciones para comenzar a usar su secadora nueva. Para más información por favor
consulte las secciones específicas de este manual.
W
ADVERTENCIA
Para reducir el riesgo de incendios, descargas eléctricas o heridas, lea este manual en su totalidad, incluyendo las
Instrucciones Importantes de Seguridad, antes de operar la secadora.
Operation
LA INTRODUCIÓN DE LA SECADORA
#PUØO %FTDSJQDJØO
#PUØO%F&ODFOJEJEP"QBHBEP0O0GG
ü
Apriete el botón para encender la secadora. Apriete nuevamente para apagar la secadora.
/05" Apretar el botón de Encendido/Apagado (On/Off) durante un ciclo
cancelará ese ciclo y borrará cualquier ajuste de carga.
1FSJMMB4FMFDUP3B%F$JDJPT
ü
(JSFFTUBQFSJMMBQBSBTFMFDDJPOBSFMDJDMPEFTFBEP6OBWF[RVFTFIBZB
seleccionado el ciclo deseado, los preajustes estándar se mostrarán en la
pantalla. En los ciclos de Secado Manual (Manual Dry) se pueden programar
estos ajustes usando los botones de ajuste de ciclos en cualquier momento
antes de iniciar el ciclo.
#PUØO%F*OJDJP1BVTB4UBSU1BVTF
ü
.BOUFOHBQVMTBEPFTUFCPUØONÈTEFTFHVOEPTQBSBJOJDJBSFMDJDMPTFMFDDJPOBEP
Si la secadora está funcionando, utilice este botón para hacer una Pausa en el ciclo, sin
perder los ajustes actuales.
/05" Si no aprieta el botón Inicio/Pausa Start /Pause para detener un ciclo
FONJOVUPTMBTFDBEPSBTFBQBHBSÈBVUPNÈUJDBNFOUF
#PUPOFT%F.ÈT5JFNQP.FOPT5JFNQP
ü
.PSF5JNF-FTT5JNF
Use estos botones con los ciclos de Secado Manual (Manual Dry), de Secado Temporicado (Time
Dry), y de Steam Fresh™, y con las opciones Reducir Estática (Reduse Static) y Turbo Steam™ para
programar el tiempo de secado. Apriete el botón Más Tiempo (More Time) para aumentar el tiempo
del ciclo manual seleccionado en intervalos de un minuto; apriete Menos Tiempo (Less Time) para
disminuir el tiempo del ciclo en intervalos de un minuto.
#PUPOFT%F"KVTUF%F$JDJPT
ü
6UJMJDFFTUPTCPUPOFTQBSBTFMFDDJPOBSMPTBKVTUFTEFDJDMPEFTFBEPTQBSBFMDJDMP
seleccionado. Los ajustes actuales se muestran en la pantalla. Apriete el botón
para ver esa opción y seleccionar otros ajustes.
#PUPOFT%F0QDJPOFT
ü
-PTCPUPOFTEFPQDJPOFTMFQFSNJUFOTFMFDDJPOBSPQDJPOFTEFDJDMPBEJDJPOBMFT
No todos los ajustes pueden usarse en todos los programas. Consulte la
seccion Guia De Ciclos de este manual.
'VODJPOFTÁUJMFT$PO7BQPS
ü
La nueva tecnología con vapor de LG le permite inyectar a la ropa un chorro de vapor caliente en forma
de remolino, el cual permite refrescar la misma, reducir la estática y. Simplemente seleccione el ciclo
Steam Fresh™
, Steam Sanitary™ o puede agregar la opción VAPOR a ciclos seleccionados. Para obtener
información detallada sobre opciones individuales, lea las siguientes páginas.

11
ESPAÑOL
Pantalla
La pantalla muestra los ajustes, el tiempo restante estimado, las opciones y los mensajes de estado correspondientes
a su secadora. Cuando se gira el secador, la luz en la exhibición iluminará.
W
ADVERTENCIA
Para reducir el riesgo de incendios, descargas eléctricas o heridas, lea este manual en su totalidad, incluyendo las
Instrucciones Importantes de Seguridad, antes de operar la secadora.
#PUØO %FTDSJQDJØO
5JFNQPSFTUBOUFSFTUBOUFFTUJNBEP&TUJNBUFE5JNF3FNBJOJOH
ü
$VBOEPTFQSFTJPOBFMCPUPO*OJDJP1BVTB4UBSU1BVTFMBQBOUBMMBJOEJDBSBFM
tiempo restante estimado para el ciclo de secado seleccionado.
/05" El tiempo de ciclo en los ciclos Secado con Sensor (Sensor Dry) podrian
fluctuar a medida que la secadora vuelve a calcular el tiempo de secado
para obtener resultados optimos.
*OEJDBEPS%F'JOBM[BDJØO%F$JDMP$PO3FDPSEBUP3JP%F$POUSPM%F'JMUSP
ü
&TUBPQDJØOEFMBQBOUBMMBNVFTUSBRVÏFUBQBEFMDJDMPEFTFDBEP
se está llevando a cabo: Limpie Filtro (Clean Filter), Secado(Drying),
Friamiento(Cooling).
*OEJDBEPS%F$FSSBEVSBB1SVFCB%F/J×PT$IJME-PDL
ü
$VBOEPTFIBGJKBEPFMTFHVSPJOGBOUJMBQBSFDFSÈFMJOEJDBEPSEFTFHVSPJOGBOUJM
y se desactivarán todos los botones excepto el botón de Enendido/Apagado
(On/Off). Esto previene que los niños cambien los ajustes mientras la secadora
se encuentra en funcionamiento.
3FDPSEBUPSJP%F-JNQJF'JMUSP$MFBO'JMUFS3FNJOEFS
ü
Ÿ
-BQBOUBMMBNPTUSBSÈ-JNQJF'JMUSP$MFBO'JMUFSDVBOEPTFIBFODFOEJEPMB
secadora como un recordatorio para revisar el filtro. Se apaga cuando se
aprieta el botón Inicio/Pausa (Start/Pause)
1SPHSBNB1FSTPOBMJ[BEP$VTUPN1SPHSBN
ü
4JVTUFEUJFOFVOBDPNCJOBDJØOFTQFDJBMEFDPOGJHVSBDJPOFTRVFVUJMJ[B
con frecuencia, puede guardarlas como Programa Personalizado (Custom
Program)
*OEJDBEPS%FM4JTUFNB%F4FOTPS%F#MPRVFP%F$POEVDUP'MPX4FOTF
ü
&MTJTUFNBEFTFOTPSEFCMPRVFPEFDPOEVDUP'MPX4FOTFEFUFDUBZMPBMFSUB
sobre bloqueos y la tubería, lo cual reduce el flujo de escape de la secadora.
Esto puede mejorar el funcionamiento y ayudar a minimizar el número de
llamadas al servicio técnico, ahorrándole dinero.
LA INTRODUCIÓN DE LA SECADORA

12
INSTRUCCIONES PARA LA INSTALACIÓN
Vista previa del orden de instalación
Comprobación y elección de
la ubicación adecuada
Nivelación de la
secadora
Cómo conectar las
secadoras eléctricas
ventilación de la
secadora
Conexión del enchufe y
la toma de tierra
Conexión de secadoras
a gas
Prueba de
funcionamiento
Test de Instalación
(consulte la página 33)
Pulse y mantenga
120V 240V
INSTRUCCIONES PARA LA INSTALACIÓN

13
ESPAÑOL
Requisitos del lugar de instalación
W
ADVERTENCIA
4JHBMBTJOTUSVDDJPOFTEFGVODJPOBNJFOUPZDVJEBEPJODMVJEBTFOFTUFNBOVBMZDPOTFHVJSÈRVFTVTFDBEPSB
PGSF[DBVOTFSWJDJPGJBCMFZEVSBEFSPEs importante que revise todo este manual antes de instalar y usar su
secadora. Se proporcionan instrucciones detalladas pertinentes a las conexiones eléctricas, de gas y los requisitos de
escape en las siguientes páginas.
/PVUJMJDFMBTFDBEPSBBUFNQFSBUVSBTJOGFSJPSFTB¡$¡'"UFNQFSBUVSBTCBKBTMBTFDBEPSBQVFEFOPBQBHBSTFBM
final de un ciclo automático. Esto puede conllevar a tiempos de secado más largos. La secadora no se debe instalar ni
almacenar en una zona donde pueda estar expuesta al agua o a inclemencias meteorológicas. Compruebe los requi
sitos del código. Algunos códigos limitan, o no permiten, la instalación de la secadora en garajes, muebles cerrados,
caravanas o dormitorios. Contacte con la persona encargada de la inspección de su edificio.
Espacios de instalación
Separación al realizar la instalación en áreas cerradas o empotradas
Para esta secadora, se recomienda dejar las siguientes separaciones. Esta secadora se ha evaluado dejando una
TFQBSBDJØOEFDNQVMHBBNCPTMBEPTZFOMBQBSUFQPTUFSJPS4FSFDPNJFOEBEFKBSFMFTQBDJPSFDPNFOEBEP
por las razones siguientes:
t6OMVHBSRVFQFSNJUBMBJOTUBMBDJØODPSSFDUBEFM
sistema de escape. El secador de gas debe tener una
salida de escape hacia el exterior. Consulte 3FRVJTJUPT
EFWFOUJMBDJØO.
t-BTBMJEBFMÏDUSJDBEFUPNBBUJFSSBEFCFFTUBSB
DNQJFTEFBNCPTMBEPTEFMBTFDBEPSB$POTVMUF
3FRVJTJUPTFMÏDUSJDPT.
t&MTVFMPEFCFTFSGJSNFQBSBTPQPSUBSFMQFTPUPUBMEFMB
TFDBEPSBTJFOEPÏTUFEFLHMCT*HVBMNFOUF
se tendrá en cuenta el peso combinado de un posible
electrodoméstico acoplado.
tNo se puede instalar ningún aparato de combustión
en el mismo compartimento que la secadora.
t4FEFCFEFKBSVOFTQBDJPBEJDJPOBMQBSBGBDJMJUBSMBT
tareas de instalación y mantenimiento.
t-BTTFQBSBDJPOFTBEJDJPOBMFTQVFEFOTFSOFDFTBSJBT
para las molduras del techo, el suelo o la pared.
t*HVBMNFOUFTFEFCFODPOTJEFSBSMBTTFQBSBDJPOFT
a ambos lados de la secadora para reducir la
transmisión de ruido. Al realizar la instalación en un
armario o habitáculo cerrado, debe haber salidas de
ventilación mínimas en la parte superior e inferior del
lugar. También se permiten las puertas apersianadas
con salidas de ventilación equivalentes.
t"EFNÈTEFCFUFOFSTFFODVFOUBFMFTQBDJPSFRVFSJEP
por cualquier otro aparato que se acompañe.
NOTA
t&MTVFMPEFBQPZPEFMBTFDBEPSBEFCFFTUBSOJWFMBEPZOPUFOFSVOBJODMJOBDJØOTVQFSJPSBDNQVMH4J
MBJODMJOBDJØOFTTVQFSJPSBDNQVMHDPMPRVFVODPOKVOUPEFQBUBTEFFYUFOTJØOEFMBTFDBEPSB4JMB
secadora no está nivelada, las prendas no se centrifugarán correctamente y los ciclos de sensor automático
puede que no funcionen como corresponde.
t1BSBMBJOTUBMBDJØOFOVOHBSBKFOFDFTJUBDPMPDBSMBTFDBEPSBBDNQVMHDPNPNÓOJNPEFMTVFMP4JVUJMJ[B
VOQFEFTUBMEFCFEFKBSVOBTFQBSBDJØOEFDNQVMHSFTQFDUPBMBQBSUFJOGFSJPSEFMBTFDBEPSB
NOTA
Al menos se debe dejar un espacio alrededor de la secadora (o de cualquier otro equipo) para eliminar la
transferencia de vibración de uno a otro. Si la vibración es importante, podría desencadenar ruidos o fricción
entre ambos, con el consecuente deterioro de la pintura e incluso, más ruido.
Requisitos de ventilación
de la puerta del armario
(7,6 cm)
(7,6 cm)
5
"
**
(12,7 cm)
14
"
max.*
(35,6
cm)
54
(138 cm)
31 29
"
(79,5 cm)
23
"
(58,5 cm)
2
⁄4
"
2
⁄4
"
52
(134 cm)
(2,5 cm) (2,5 cm)(73,6 cm)
3
⁄4
"
13
2
⁄4
"
(35,2 cm)
45
1
⁄8
"
(114,6 cm)
INSTRUCCIONES PARA LA INSTALACIÓN

14
Espacios de instalación (cont.)
Separación recomendada para la instalación en un habitáculo cerrado
tAl realizar la instalación en un habitáculo cerrado debe haber salidas de ventilación mínimas en la parte superior e
inferior del lugar.
*Espacio requerido
** Para la ventilación lateral e inferior,
TFQFSNJUFVOBTFQBSBDJØOEFDN
QVMH
Nivelación de la secadora
W
ADVERTENCIA
t1BSBSFEVDJSFMSJFTHPEFMFTJPOFTQFSTPOBMFT
cumpla con todos los procedimientos de seguridad
SFDPNFOEBEPTQPSMBJOEVTUSJBJODMVZFOEPFM
VTPEFVTFHVBOUFTDPONBOHBTMBSHBTZHBGBTEF
seguridad. Si no se cumple con esta advertencia se
podrán producir heridas graves o muerte.
t-PTBQBSBUPTTPOQFTBEPT4FOFDFTJUBOEPTPNÈT
QFSTPOBTQBSBMBJOTUBMBDJØOEFMBTFDBEPSBSi no
se cumple con esta advertencia se podrán producir
heridas graves o muerte.
Para asegurar que la secadora brinde un desempeño
óptimo de secado, debe estar nivelada. Para minimizar
la vibración, el ruido y movimiento no deseados, el piso
deberá ser una superficie perfectamente nivelada y
sólida.
$PMPRVFMBTFDBEPSBFOTVVCJDBDJØOGJOBM$PMPRVFVO
nivel sobre la parte superior de la secadora.
t-BTQBUBTOJWFMBEPSBTEFCFSÈOBQPZBSTFGJSNFNFOUFFO
el piso. Empuje suavemente las esquinas superiores de la
secadora para asegurarse de que su secadora no se mece
de esquina a esquina.
Si está instalando la secadora sobre el accesorio de pedestal
opcional, deberá usar las patas niveladoras del pedestal
para nivelarla. Las patas niveladoras de la secadora deberán
estar completamente retraídas.
6TFVOBMMBWFEFUVFSDBTBKVTUBCMFQBSBHJSBSMBTQBUBT
niveladoras. Gire en la dirección de las manecillas del reloj
para levantar la secadora o en dirección contraria para
bajarla. Suba o baje las patas niveladoras hasta que la
secadora esté nivelada de lado a lado y de adelante hacia
atrás.
"TFHÞSFTFEFRVFMBTQBUBTOJWFMBEPSBTTFFODVFOUSBO
haciendo contacto firme con el piso.
Nivelador
Patas niveladoras
NOTA
Fije las patas niveladoras sólo en la medida necesaria
para nivelar la secadora. La extensión de las patas
niveladoras más de lo necesario puede causar
vibración de la secadora.
31
(79,5 cm)
7"* (17,8 cm)
7"* (17,8 cm)
5"*
(12,7 cm)
1"*
(2,5 cm)
29"
(73,6 cm)
1"
(2,5 cm)
1"
(2,5 cm)
2
⁄4
"
INSTRUCCIONES PARA LA INSTALACIÓN

15
ESPAÑOL
INSTRUCCIONES PARA LA INSTALACIÓN
"OUFTEFDPNFO[BS
El procedimiento consiste en cuatro partes principales:
t3FUJSBEBZOVFWBJOTUBMBDJØOEFMBpuerta y las
CJTBHSBTQBTPTZ
t3FUJSBEBFJOWFSTJØOEFMPTDPNQPOFOUFTEFMNVFCMF
EFMBTFDBEPSBQBTP
t3FUJSBEBFJOWFSTJØOEFMPTDPNQPOFOUFTEFMBDVCJFSUB
de la puertaQBTPTZ
t3FUJSBEBFJOWFSTJØOEFMPTDPNQPOFOUFTdel interior
de la puertaQBTPTB
Herramientas necesarias
t%FTUPSOJMMBEPS1IJMMJQT
t%FTUPSOJMMBEPSHSBOEFEFQVOUBQMBOB(recomendado
para los tornillos de las bisagras si están apretados o si
su destornillador Phillips está desgastado)
t%FTUPSOJMMBEPSQFRVF×PEFQVOUBQMBOB(para extraer
piezas)
W
ADVERTENCIA
t-"16&35"%&-"4&$"%03"&4.6:(3"/%&
:1&4"%"/PTFHVJSFTUBTJOTUSVDDJPOFTQPESÓB
DBVTBSEB×PTBMBTFDBEPSBBMBQSPQJFEBEP
lesiones personales.
t1BSBFWJUBSEB×PTFOMBTFDBEPSBPMBQVFSUBTVKFUF
MBQVFSUBDPOVOUBCVSFUFPDBKBRVFBKVTUFEFCBKP
EFMBQVFSUBPQJEBBPUSBQFSTPOBRVFBHVBOUFFM
peso de la puerta.
t/PEFKFDBFSMBQVFSUBQPSRVFQPESÓBEB×BSMB
propia puerta o el suelo.
t%FTFODIVGFMBTFDBEPSBPEFTDPOFDUFFMTVNJOJTUSP
FMÏDUSJDPBOUFTEFJOWFSUJSMBEJSFDDJØOEFBQFSUVSB
de la puerta.
*OTUSVDDJPOFT
NOTA
El procedimiento de inversión de apertura de la puerta
para la puerta de dos direcciones es mucha complejo
que para la puerta de una secadora convencional. Se
recomienda la lectura detallada de estas instrucciones
antes de comenzar el proceso, para que usted pueda
decidir si debería encargar el trabajo a un instalador
profesional o un técnico.
NOTA
Las ilustraciones aquí contenidas sirven para cambiar
la dirección de apertura de una bisagra de lado
derecho a lado izquierdo. Si se ha invertido la puerta
y debe volver a cambiarla de dirección, tenga cuidado
y siga estas instrucciones. Se invertirán algunas de las
ilustraciones y referencias derecha/izquierda, y deberá
leer las instrucciones detenidamente.
W
ADVERTENCIA
Asegúrese de apoyar el peso de la puerta antes de que
soltar los tornillos de la bisagra.
"CSBMBQVFSUBQBSBUFOFSBDDFTPBMPTUPSOJMMPTEF
MBCJTBHSB
"GMPKFMPTDVBUSPUPSOJMMPTEFMBTCJTBHSBT
Con la puerta apoyada, suelte los cuatro tornillos, dos
de cada bisagra. Deje la puerta apoyada boca abajo
sobre una superficie protegida para evitar daños en la
puerta o la superficie de trabajo.
*OWJFSUBMPTDPNQPOFOUFTEFMNVFCMF
a. Utilice un destornillador Phillips para extraer los dos
tornillos y el mecanismo de cierre del panel frontal
del gabinete.
b. Retire la tapa del orificio del pestillo tirando
suavemente de ella hacia arriba con un
destornillador de punta plana y con cuidado de no
rayar la pintura.
Mueva la tapa del orificio del pestillo al lado
opuesto, donde se retiró el mecanismo de cierre.
Instale el mecanismo de cierre en el lugar donde
extrajo la tapa del orificio del pestillo, usando los
dos tornillos extraídos en el paso a.
c. Retire la tapa de la bisagra tirando suavemente de
ella hacia arriba con un destornillador de punta
plana y con cuidado de no rayar la pintura. Gire la
UBQBEFMBCJTBHSBHSBEPTFJOTUÈMFMBFOMBEP
opuesto, donde estaba colocada la bisagra superior.
Cambio de la Dirección de Apertura de la Puerta
Dos
tornillos
grandes
Dos
tornillos
pequeños
Bisagra
superior
Tapa de
bisagras
Tapa de
orificio de
pasador
Mecanismo
de cierre
Soporte
de bisagra
Bisagra

16
INSTRUCCIONES PARA LA INSTALACIÓN
d. Invierta la bisagra y el soporte de la bisagra de la
parte inferior del gabinete. Afloje los dos tornillos
del soporte de la bisagra de la parte inferior derecha
y remueva el soporte de la bisagra. Extraiga el
tornillo inferior de los dos
tornillos situados detrás del
soporte de la bisagra. NO retire
el tornillo superior situado
detrás del soporte de la bisagra.
Separe las piezas a un lado.
e. Suelte los tres tornillos de la bisagra
de la parte inferior izquierda.
Extraiga la bisagra e reinstálela en
el lado derecho. El tornillo superior
ocupa el orificio del que se ha
extraído el tornillo situado detrás
del soporte de la bisagra en el paso d.
f. Instale el soporte de la bisagra retirado en el paso
d en el lado inferior izquierdo, instalando en primer
lugar un tornillo detrás del soporte de la bisagra.
NOTA
NO suelte ninguno de los ocho tornillos del frente del
gabinete (marcados con
abajo). Hacerlo podría
dañar la secadora y necesitar solicitar ayuda a un un
servicio técnico para repararla.
EN LA PUERTA:
-FWBOUFZTFQBSFMBUBQBEFMBQVFSUB
CCon la parte interior de puerta colocada boca arriba
TPCSFVOBTVQFSGJDJFQSPUFHJEBTVFMUFMPTUPSOJMMPT
del interior de la puerta. Separe cuidadosamente la
tapa de la puerta con la ayuda de un destornillador
pequeño de punta plana insertado en la esquina
superior (marcado abajo con un círculo).
W
ADVERTENCIA
Los bordes de la tapa de la puerta pueden ser afilados.
Tenga cuidado al manipularla, o utilice guantes
paraevitarlesiones.
$BNCJFFMDJFSSFEFMBQVFSUBZMBQMBDBDJFHB
Extraiga los cuatro tornillos de la tapa de la puerta
que fijan el cierre y la placa ciega.
Cambie el cierre de la puerta y la placa ciega,
volviendo a instalarlos en los lados opuestos.
Quite con cuidado el tapaagujeros ubicado en la
parte lateral de la cubierta de la puerta e instálelo en
el agujero del lado opuesto.
Deje a un lado la tapa de la puerta.
Cambio de la Dirección de Apertura de la Puerta (Continuación)
bisagra
superior
Tapa de
bisagra
Tapa del
orificio del
pestillo
Mecanismo
de cierre
soporte
de bisagra
Bisagra
doce tornillos
tornillo largo
tornillos
cortos
tapa ciega cierre de la puerta
Tapón de agujero
Tapon
de
agujero
botones de
enclavamiento

17
ESPAÑOL
INSTRUCCIONES PARA LA INSTALACIÓN
Cambio de la Dirección de Apertura de la Puerta (Continuación)
*OWJFSUBMPTDPNQPOFOUFTEFMJOUFSJPSEFMBQVFSUB
Ahora, retirará e invertirá los diferentes componentes del interior de la puerta. Vea abajo un diagrama detallado
y la identificación de la estructura interior y las partes de la puerta. (El diagrama muestra la “vista anterior” de
la puerta, con una colocación por defecto para una apertura de bisagras en el lado derecho. Tras seguir estas
instrucciones, la puerta deberá ser una imagen de espejo de la ilustración.)
Estructura interior de la puerta
(antes de cambiar la apertura - bisagras en lado derecho)
botones de
enclavamiento
placa de bisagra inferior
barra de bloqueo
lateral
barra de bloqueo
superior
Varillas de bloqueo
internas
Soporte de bisagra
inferior
Tapón de agujero
Ensamble de bisagra
inferior
Botones de enclavamiento
conjunto de
bisagra superior
pivote
de bisagra
superior
cristal
conjunto de
bisagra
inferior
soporte de
bisagra inferior
placa de
bisagra
inferior
placa de
bisagra
superior
amortiguadores
barra de bloqueo
superior
barra de bloqueo
lateral
barras de bloqueo interiores
Botón de
interbloqueo lateral

18
INSTRUCCIONES PARA LA INSTALACIÓN
Cambio de la Dirección de Apertura de la Puerta (Continuación)
botones de enclavamiento
barra de
bloqueo lateral
NOTA
No suelte las dos barras de bloqueo interiores (ver
QÈHJOBTJUVBEBTEFCBKPEFMBCBSSBEFCMPRVFP
superior. Son idénticas y NO es necesario invertir su
dirección.
conjunto de
bisagra superior
pivote de
bisagra
superior
conjunto de bisagra superior
pivote de bisagra superior
Resorte
&YUSBJHBMPTEPTCPUPOFTEFFODMBWBNJFOUPHSJTFT
Saque los dos botones de enclavamiento grises de la
parte superior del panel exterior de la puerta y déjelos
a un lado para usarlos más adelante.
-FWBOUFIBDJBBGVFSBFMCPUØOEFJOUFSCMPRVFPHSJT
VCJDBEPFOMBQBSUFMBUFSBMEFMBQVFSUB
Asegúrese de extraer el resorte junto con el botón de
interboqueo y de mantener los dos elementos juntos.
Aparte el botón de interbloqueo. No se confunda con
los botones de interbloqueo ubicados en la parte
superior de la puerta exterior.
3FUJSFMBCBSSBEFCMPRVFPMBUFSBM
Remueva la barra de bloqueo
lateral del soporte de la bisagra
inferior elevando el extremo
superior de la barra y deslizándolo
hacia la parte superior de la puerta.
El resorte debe permanecer
colocado en la barra de bloqueo.
Deje la barra de bloqueo a un lado.
3FUJSFMBCBSSBEFCMPRVFPTVQFSJPS
a. Deslice la barra de bloqueo a la derecha para
retirarla del ensamble de la bisagra del lado
izquierdo.
b. Mientras desliza la barra de bloqueo derecha,
levante el extremo derecho y sepárelo de las guías.
3FUJSFFMQJWPUFEFMBCJTBHSBTVQFSJPS
Tras retirar la barra de bloqueo superior, se puede
quitar fácilmente el pivote del conjunto de bisagra
en la parte superior izquierda y dejarlo a un lado.
*OWJFSUBFMDPOKVOUPEFMBCJTBHSBTVQFSJPSZMB
QMBDBEFMBCSJTBHSB
Levante la placa de la bisagra superior (en la
derecha) y déjela a un lado.
Levante cuidadosamente el conjunto de la bisagra
superior (en la izquierda) del marco de la puerta
exterior utilizando un pequeño destornillador de
cabeza plana, si es necesario. Gire el conjunto de la
CJTBHSBHSBEPTFJOTUÈMFMBFOFMMBEPTVQFSJPS
derecho de la puerta exterior. Deberá apretar con
fuerza para instalar el conjunto de la bisagra.
&MQJWPUFEFMBCJTBHSBSFUJSBEPFOFMQBTPTF
instalará más adelante.

19
ESPAÑOL
INSTRUCCIONES PARA LA INSTALACIÓN
Cambio de la Dirección de Apertura de la Puerta (Continuación)
tornillo
Tornillos
conjunto de bisagra inferior
placa de bisagra superior
C(JSFMBFMFOTBNCMFEFMBCJTBHSBJOGFSJPSHSBEPT
e instálela en el lado derecho utilizando los dos
tornillos removidos en el paso a.
c. Voltee el soporte de la bisagra inferior y suelte las
pestañas que fijan la placa de la bisagra al soporte
de la bisagra.
E(JSFMBQMBDBEFMBCJTBHSBHSBEPTZFODÈKFMBFO
el FRENTE del soporte de la bisagra orientada en la
dirección opuesta.
e.
Monte el soporte de la bisagra inferior y la placa en el
lado izquierdo de la puerta con el tornillo retirado en
el paso a.
*OTUBMFMBCBSSBEFCMPRVFPMBUFSBM
Voltee la barra de bloqueo lateral y vuelva a instalarla en
el lado opuesto. Inserte el extremo inferior en la bisagra
izquierda y baje la barra a las guías de la puerta mientras
comprime el muelle en el interior del hueco.
"IPSBHJSFMBQMBDBEFMBCJTBHSBHSBEPTF
instálela en el lado superior izquierdo de la puerta.
13. 3FJOTUBMFMBCBSSBEFCMPRVFPTVQFSJPS
Gire la barra de bloqueo superior (retirada en el paso
HSBEPTEFFYUSFNPBFYUSFNPEFTEFTVQPTJDJØO
original y vuelva a instalarla. El muelle quedara ahora
a la derecha del centro, con el muelle en el lado de la
barra orientada hacia la parte superior de la puerta.
a.
Inserte el extremo derecho de la barra en el ensamble
de la bisagra derecha. Asegúrese de que la barra
quede colocada con las guías del panel de la puerta.
b.
Baje labarra debloqueo a suposición, deslizándola para
bordear la manija central, y asegurándose de alinear la
barra debloqueo con las guías a lo largo del panel de
la puerta. Cuando la suelte, la barra deberádeslizarse
completamente en el ensamble de labisagra a la derecha.
Verifique que la barra de bloqueo esté correctamente
posicionada en las guías y que se deslice fácilmente.
14. *OWJFSUBFMTPQPSUFEFMBCJTBHSBJOGFSJPSZFM
DPOKVOUPEFMBCJTBHSB
a. Suelte el tornillo del soporte de la bisagra interior (a
la derecha) y retire el soporte de la bisagra. Déjelo
aparte. Suelte los dos tornillos del ensamble de
la bisagra inferior en la parte inferior izquierda y
levante el ensamble de la bisagra hacia afuera.
pestañas

20
INSTRUCCIONES PARA LA INSTALACIÓN
Cambio de la Dirección de Apertura de la Puerta (Continuación)
Dos
tornillos
grandes
Dos
tornillos
pequeños
botones de
enclavamiento
amortiguadores
19.
"IPSBUPNFFMQJWPUFEFMBCJTBHSBTVQFSJPSFYUSBÓEP
BOUFSJPSNFOUFZSØUFMPHSBEPTPresione el botón
de interbloqueo lateral ubicado en el lado izquierdo y
sosténgalo hacia abajo mientras presiona el pivote de
la bisagra dentro del ensamble de la bisagra en el lado
superior derecho. Si la puerta fue bien puesta en su lugar,
la varilla de bloqueo se deslizará a su lugar fácilmente y
trabará el pivote en su lugar. La puerta está ahora lista para
remontarse en el lado opuesto de la secadora.
W
ADVERTENCIA
Asegúrese de apoyar el peso de la puerta antes de que soltar los
tornillos de la bisagra.
3FJOTUBMFMBQVFSUB
Mientras sujeta la puerta, instálela con los cuatro tornillos
EFCJTBHSBSFUJSBEPTFOFMQBTP1SVFCFFMNPWJNJFOUPEF
apertura y cierre de la puerta para asegurarse de que las
bisagras y el pestillo están correctamente alineados y que la
puerta abre, cierra y traba correctamente en ambas direcciones.
Si la puerta no funciona correctamente, retírela y abra la tapa
para comprobar el correcto montaje y alineación de las barras
de bloqueo y los botones de enclavamiento.
Los botones de enclavamiento deben orientarse correctamente
y funcionar con suavidad. Las barras de bloqueo deben estar
en la posición adecuada y no superponerse en el punto de
DPOUBDUP$POTVMUFMPTQBTPT
Si está dañado, o si la puerta no funciona tras el montaje,
póngase en contacto con el centro de asistencia telefónica al
Asegúrese de que la parte superior de la barra de
bloqueo lateral quede junto a la barra de bloqueo
superior y que no se superponga una con otra, para
que ambas puedan interactuar correctamente. Si no se
alinean correctamente, la puerta no funcionará bien.
3FJOTUBMFMPTCPUPOFTEFJOUFSCMPRVFPTVQFSJPSFT
Reinstale los botones grises de interbloqueo
TVQFSJPSFTFYUSBÓEPTFOFMQBTPVOPFODBEBMBEP
del panel de la puerta exterior.
3FJOTUBMFFMCPUØOEFJOUFSCMPRVFPMBUFSBM
Reinstale el botón de interbloqueo lateral extraído
FOFMQBTP$FOUSFFMSFTPSUFFOFMDPNQBSUJNFOUPF
inserte el botón de interbloqueo encima del mismo.
3FJOTUBMFMBUBQBEFMBQVFSUB
Limpie el cristal de la puerta y la tapa, de ser
necesario.
Asegúrese de que los dos botones de enclavamiento
grises estén correctamente instalados y que las barras
de bloqueo laterales estén alineadas en su punto de
unión. Baje con cuidado la cubierta de la puerta a su
lugar, alineando los agujeros de la cubierta con los
botones de interbloqueo de la parte superior y lateral
y con los topes de la parte inferior. Tenga cuidado
de no desplazar las barras de bloqueo durante el
montaje de la tapa de la puerta. Una vez colocada la
UBQBEFMBQVFSUBGÓKFMBDPOMPTUPSOJMMPTSFUJSBEPT
FOFMQBTP-PTEJF[UPSOJMMPTTJNJMBSFTWBOBMSFEFEPS
de la parte superior y laterales de la tapa de la puerta.
Asegúrese de apretar os dos tornillos en el extremo
inferior, en las posiciones indicadas.

21
ESPAÑOL
Instalación del kit de ventilación lateral
W
ADVERTENCIA
t6UJMJDFNBUFSJBMQBSBWFOUJMBDJØOEFNFUBMQFTBEP
t/PVUJMJDFDPOEVDUPTEFQMÈTUJDPPBMVNJOJPEFMHBEP
t-JNQJFMPTDPOEVDUPTBOUJHVPTBOUFTEFJOTUBMBSFTUB
secadora.
t1BSBSFEVDJSFMSJFTHPEFMFTJPOFTQFSTPOBMFT
cumpla con todos los procedimientos de seguridad
SFDPNFOEBEPTQPSMBJOEVTUSJBJODMVZFOEPFMVTPEF
VTFHVBOUFTDPONBOHBTMBSHBTZHBGBTEFTFHVSJEBE
tEn caso de no cumplir con todas las advertencias de
seguridad de este manual se podrán producir daños
sobre la propiedad, lesiones personales o la muerte.
Su secadora está equipada de fábrica para ventilar en la
parte trasera. También puede configurarse para ventilar
en la parte inferior o lateralmente (no está disponible la
ventilación del lado derecho en los modelos a gas).
1VFEFBERVJSJSTFFMLJUBEBQUBEPSOÞNFSPEFQJF[B
&&-#EFTVEJTUSJCVJEPS-(&TUFLJUDPOUJFOFMPT
componentes de conducto necesarios para cambiar la
ubicación de la ventilación de la secadora.
3FUJSFFMUPSOJMMPEFTFHVSJEBEEFMDPOEVDUPEFFTDBQF
trasero. Saque el conducto de escape.
01$*»/7FOUJMBDJØOMBUFSBM
"QSJFUFMBTMFOHàFUBTFOFMEJTQPTJUJWPEFFYQVMTJØO
y retírelo cuidadosamente para obtener la ventilación
adecuada (no está disponible ventilación lateral en los
modelos a gas). Apriete el conducto adaptador en la
carcasa del ventilador y asegure la base de la secadora
como se indica.
Parte trasera Conducto
de escape
Tornillo de
seguridad
Dispositivo de expulsión
Abrazadera
Conducto
adaptador
$POFDUFVODPEPEFQVMHBEBTDNBMB
TJHVJFOUFTFDDJØOEFDPOEVDUPEFQVMHBEBT
cm), y asegure todas las conexiones con cinta
adhesiva impermeable. Asegúrese de que el extremo
macho del codo apunte hacia AFUERA de la secadora.
Inserte el montaje de codo/conducto a través de
la abertura lateral y presiónelo en el conducto
adaptador. Asegúrelo en su lugar con cinta adhesiva
impermeable. Asegúrese de que el extremo macho
EFMDPOEVDUPTPCSFTBMHB
QVMHBEBTDNQBSB
conectar el resto del sistema de ventilación. Conecte
la placa de cubierta a la parte trasera de la secadora
con el tornillo provisto.
01$*»/7FOUJMBDJØOJOGFSJPS
"QSJFUFFMDPOEVDUPBEBQUBEPSFOMBDBSDBTBEFM
ventilador y asegure la base de la secadora como se
indica.
*OTFSUFFMDPEPEFQVMHBEBTDNBUSBWÏTEFMB
abertura trasera y apriételo en el conducto adaptador.
Asegúrese de que el extremo macho y el codo
apunten hacia abajo por el orificio ubicado en la parte
inferior de la secadora. Asegúrelo en su lugar con cinta
adhesiva impermeable. Conecte la placa de cubierta a
la parte trasera de la secadora con el tornillo provisto.
Codo
Placa de
cubierta
Abrazadera
Conducto
adaptador
Codo
Placa de
cubierta
”
DN
INSTRUCCIONES PARA LA INSTALACIÓN

22
Cónexión del conducto de ventilación de la secadora
W
ADVERTENCIA
Para reducir el riesgo de incendio, descargas eléctricas o heridas al usar su electrodoméstico, siga las precauciones
básicas, incluyendo lo siguiente:
t/PBQMBTUFOJEPCMFFMTJTUFNBEFDPOEVDUPSi no se
siguen estas instrucciones se podrá producir incendio
o muerte.
t/PQFSNJUBRVFFMTJTUFNBEFDPOEVDUPTFBTJFOUF
TPCSFPCKFUPTQVOUJBHVEPTOJFOUSFFODPOUBDUP
con los mismos. Si no se siguen estas instrucciones se
podrá producir incendio o muerte.
t4JDPOFDUBBVOTJTUFNBEFDPOEVDUPFYJTUFOUF
BTFHÞSFTFEFRVFTFBBEFDVBEPZEFRVFFTUÏ
limpio antes de instalar la secadora. Si no se siguen
estas instrucciones se podrá producir incendio o
muerte.
t&MTJTUFNBEFWFOUJMBDJØOEFCFTFHVJSMPTDØEJHPT
EFDPOTUSVDDJØO Si no se siguen estas instrucciones
se podrá producir incendio o muerte.
t-BTTFDBEPSBTEFHBT%&#&/WFOUJMBSIBDJBFM
FYUFSJPSSi no se siguen estas instrucciones se podrá
producir incendio o muerte.
tÁOJDBNFOUFVTFVOTJTUFNBEFDPOEVDUPSÓHJEP
ZEFNFUBMGMFYJCMFEFDNQVMHEFOUSP
EFMHBCJOFUFEFMBTFDBEPSBZQBSBWFOUJMBDJØOBM
FYUFSJPS Si no se siguen estas instrucciones se podrá
producir incendio o muerte.
t1BSBSFEVDJSFMSJFTHPEFJODFOEJPDPNCVTUJØOP
BDVNVMBDJØOEFHBTFTDPNCVTUJCMFT/0EFTDBSHVF
el escape de la secadora en un área cerrada o no
WFOUJMBEBUBMDPNPVOEFTWÈOQBSFEDJFMPSBTP
FTQBDJPFOUSFFMDJNJFOUPZMBUJFSSBDIJNFOFB
DPOEVDUPEFHBTPFTQBDJPTPDVMUPTEFVOFEJGJDJP
Si no se siguen estas instrucciones se podrá producir
incendio o muerte.
t1BSBSFEVDJSFMSJFTHPEFJODFOEJP/0EFTDBSHVF
el escape de la secadora usando conductos de
plástico ni de lámina metálica. Si no se siguen estas
instrucciones se podrá producir incendio o muerte.
t&MDPOEVDUPEFFTDBQFEFCFSÈUFOFSDN
QVMHEFEJÈNFUSPTJOPCTUSVDDJPOFT&MDPOEVDUP
EFFTDBQFEFCFSÈNBOUFOFSTFMPNÈTDPSUPQPTJCMF
"TFHÞSFTFEFMJNQJBSDVBMRVJFSUJQPEFDPOEVDUP
BOUJHVPBOUFTEFJOTUBMBSTVTFDBEPSBOVFWB Si
no se siguen estas instrucciones se podrá producir
incendio o muerte.
t4FSFDPNJFOEBODPOEVDUPTSÓHJEPTP
TFNJSÓHJEPTQBSBVTBSFOUSFMBTFDBEPSBZMB
QBSFE&OJOTUBMBDJPOFTQBSUJDVMBSFTDVBOEPFT
JNQPTJCMFSFBMJ[BSVOBDPOFYJØOTJHVJFOEPMBT
SFDPNFOEBDJPOFTBOUFTJOEJDBEBTÞOJDBNFOUFTF
QVFEFVUJMJ[BSVODPOEVDUPNFUÈMJDPEFUSBOTJDJØO
BQSPCBEPQPS6-FOUSFMBTFDBEPSBZMBDPOFYJØO
EFQBSFE6TBSFTUFUJQPEFDPOEVDUPBGFDUBSÈFM
tiempo de secado. Si no se siguen estas instrucciones
se podrá producir incendio o muerte.
t/0VUJMJDFUPSOJMMPTEFMÈNJOBEFNFUBMOJPUSP
UJQPEFBTFHVSBEPSFTRVFTFFYUJFOEBOEFOUSP
del conducto y puedan atrapar pelusa y reducir la
FGJDJFODJBEFMTJTUFNBEFFTDBQF"TFHVSFUPEBTMBT
VOJPOFTDPODJOUBBEIFTJWBJNQFSNFBCMF Si no se
siguen estas instrucciones se podrá producir incendio
o muerte.
t1BSBNBYJNJ[BSMPTSFTVMUBEPTEFGVODJPOBNJFOUP
siga las limitaciones de longitud del conducto
JOEJDBEBTFOFMDVBESPEFBSSJCB Si no se siguen
estas instrucciones se podrá producir incendio o
muerte.
t/PTFQSPWFFFMTJTUFNBEFWFOUJMBDJØODPOMB
TFDBEPSBFMNJTNPEFCFSÈPCUFOFSTFMPDBMNFOUF
-BUBQBUFSNJOBMEFCFSÈUFOFSSFHVMBEPSFTEFUJSP
DPOCJTBHSBTQBSBQSFWFOJSFMSFUPSOPEFEFTDBSHB
cuando no se usa la secadora. Si no se siguen estas
instrucciones se podrá producir incendio o muerte.
t-BMPOHJUVEUPUBMEFMDPOEVDUPNFUÈMJDPGMFYJCMFOP
EFCFSÈTVQFSBSMPTNQJFT
t&O$BOBEÈTØMPTFEFCFSÈOVTBSDPOEVDUPT
GMFYJCMFTEFMÈNJOBEFNFUBMTJTFQSFDJTBTFO
FTQFDÓGJDBNFOUFJEFOUJGJDBEPTQPSFMGBCSJDBOUF
QBSBTVVTPDPOFMFMFDUSPEPNÏTUJDPEn EE.UU., sólo
se deberán usar conductos flexibles de lámina de
metal, si se precisasen, específicamente identificados
por el fabricante para su uso con el electrodoméstico
y que cumplan la “Outline for Clothes Dryer Transition
Duct” (Directriz para conductos de transición de
TFDBEPSBT4VKFUP"
INSTRUCCIONES PARA LA INSTALACIÓN

23
ESPAÑOL
Conexión del conducto de ventilación de la secadora (cont.)
DIRECCIONAMIENTO Y CONEXIÓN DEL SISTEMA DE
CONDUCTO DE ESCAPE
7FOUJMBDJØO%F
&TDBQF*ODPSSFDUB
7FOUJMBDJØO%F&TDBQF$PSSFDUB
NOTA
3FTUFQJFTNQPSDBEBDPEPBEJDJPOBM/PTF
SFDPNJFOEBVTBSNÈTEFDVBUSPDPEPTEF¡
NOTA
Siga las pautas indicadas más abajo para maximizar
el desempeño de secado y reducir la acumulación de
pelusa en el sistema de conducto.
El sistema de conducto y las conexiones NO están
incluidas y deben adquirirse por separado.
t6TFVOTJTUFNBEFDPOEVDUPNFUÈMJDPSÓHJEPP
TFNJSÓHJEPEFDNQVMH
t&MDPOEVDUPEFFTDBQFEFCFSÈUFOEFSTFMPNÈTDPSUP
posible.
t6TFMBNFOPSDBOUJEBEEFDPOFYJPOFTEFDPEPRVF
sea posible.
t&MFYUSFNPNBDIPEFDBEBTFDDJØOEFMDPOEVDUPEF
escape deberá apuntar hacia afuera de la secadora.
t6TFDJOUBBEIFTJWBJNQFSNFBCMFFOUPEBTMBT
conexiones de conducto.
t"ÓTMFFMTJTUFNBEFDPOEVDUPRVFTFUJFOEFBUSBWÏT
de áreas sin calefacción para reducir la condensación
y acumulación de pelusa en las superficies del
conducto.
t-PTTJTUFNBTEFFTDBQFJODPSSFDUPTPJOBEFDVBEPT
no están cubiertos por la garantía de la secadora.
Las averías o un rendimiento escaso debido a dichos
sistemas de escape no estarán cubiertos por la
garantía de la secadora.
Sistema de conducto
5JQP%F5BQB
%F1BSFE
/ÞNFSP%F
Codos
%F¡
-POH.ÈY%F$POEVD
5P.FUÈMJDP'MF9JCMF
%F%JÈNw
QJFTN
QJFTN
QJFTN
QJFTN
QJFTN
QJFTN
QJFTN
QJFTN
QJFTN
QJFTN
Recomendado
Solamente para
el uso en los
instalaciones de
conducto cortos
INSTRUCCIONES PARA LA INSTALACIÓN
/
”
DN
w
DN
w
DN

24
INSTRUCCIONES PARA LA INSTALACIÓN
Compruebe la junta de goma en la manguera de entrada.
Dos juntas de goma se suministran con cada manguera de
entrada. Se utilizan para evitar fugas de agua. Asegúrese
que la conexión al grifo de agua fría está apretada.
$PNQSVFCFFMUJQPEFJOTUBMBDJØO
Conecte todas las mangueras de suministro de agua
GJSNFNFOUFBNBOPZEFTQVÏTBQSJFUFEFPUSBT
WVFMUBTDPOVOBMJDBUF
$0/-"7"%03"DVBOEPTFDPOFDUBMBTFDBEPSBBM
NJTNPHSJGPRVFVOBMBWBEPSB
a.
Cierre el grifo del agua fría y retire la manguera de la lavadora.
b. Conecte la manguera corta al conector Y mediante una
de las mangueras de la lavadora.
c. Conecte la otra extremidad de la manguera corta al grifo
de agua fría.
d.
Conecte la manguera larga de la secadora a un lateral del
conector Y y conecte la manguera de la lavadora al otro lateral.
4*/-"7"%03"TJMBTFDBEPSBOPDPNQBSUFFMHSJGP
EFBHVBGSÓBDPOVOBMBWBEPSB
a. Conecte la extremidad recta de la manguera larga al
grifo de agua fría.
Manguera de entrada
La secadora debe estar conectada al grifo de agua fría usando la manguera de suministro de agua nueva. No utilice la manguera de edad.
$POFDUFMBNBOHVFSBBMBTFDBEPSB
t$POFDUFMBNBOHVFSBEFTVNJOJTUSPEFBHVBBMB
válvula de entrada de la secadora firmemente a mano
ZEFTQVÏTBQSJFUFEFPUSBTWVFMUBTDPOVOBMJDBUF
Asegúrese que la mangueras no están retorcidas y que
no están aplastadas.
"CSBFMHSJGPEFBHVBGSÓB
5. Compruebe si hay fugas en el conector Y (si se utiliza)
y todas las mangueras.
NOTA
t4JTFFODVFOUSBBMHVOBGVHBDJFSSFFMHSJGPEFMBHVB
retire la manguera y compruebe el estado de la
manguera de la arandela de la manguera.
NOTA
t
Antes de conectar la línea de agua a la secadora, enjuage
con varios galones de agua dentro del desague o cubo.
Esto ayudará a evitar que partículas extrañas como la arena
o el sarro atasquen la válvula de entrada de la secadora.
t
No apriete demasiado. El acoplamiento podría resultar dañado.
NOTA
t-BQSFTJØOEFMBHVBEFTVNJOJTUSPEFCFFTUBSFOUSFL1BZL1BBLHGDN
).
t/PQFMFPDSPTTUISFBEMBNBOHVFSBEFFOUSBEBBMBWÈMWVMB
t4J*ONMBQSFTJØOEFTVNJOJTUSPEFBHVBFTNÈTEFL1BVOEJTQPTJUJWPEFEFTDPNQSFTJØOEFCFTFSJOTUBMBEP
t4J$POUSPMBSQFSJØEJDBNFOUFFMFTUBEPEFMBNBOHVFSBZWVFMWBBDPMPDBSMBNBOHVFSBTJFTOFDFTBSJP
t4VTUJUVZBMBTNBOHVFSBTEFFOUSBEBUSBTB×PTEFVTPBöOEFSFEVDJSFMSJFTHPEFGBMMPEFMBNBOHVFSB
t"OPUFMBTGFDIBTEFJOTUBMBDJØOPTVTUJUVDJØOEFMBNBOHVFSBFOMBTNBOHVFSBTQBSBSFGFSFODJBTGVUVSBT
Conector
de la
manguera
Conector Y
Junta de
goma
Manguera
larga
CON LAVADORA SIN LAVADORA
Manguera
corta
Conector Y

25
ESPAÑOL
Conexión de secadoras a gas
W
ADVERTENCIA
Para reducir el riesgo de incendio, descargas eléctricas o heridas al usar su electrodoméstico, siga las precauciones
básicas, incluyendo lo siguiente:
Requisitos eléctricos para modelos a gas únicamente
W
ADVERTENCIA
Para reducir el riesgo de incendio, descargas eléctricas o heridas al usar su electrodoméstico, siga las precauciones
básicas, incluyendo lo siguiente:
t#BKPOJOHVOBDJSDVOTUBODJBDPSUFPRVJUFMBUFSDFSB
QBUBQVFTUBBUJFSSBEFMDBCMFFMÏDUSJDP Si no se
cumple con esto se podrá producir una explosión,
incendio o muerte.
t1PSNPUJWPTEFTFHVSJEBEQFSTPOBMMBTFDBEPSB
EFCFFTUBSDPOFDUBEBBUJFSSBBEFDVBEBNFOUFSi no
se cumple con esto se podrá producir una explosión,
incendio o muerte.
t&MDBCMFFMÏDUSJDPEFFTUBTFDBEPSBFTUÈFRVJQBEP
DPOVOFODIVGFEFQBUBTDPOFYJØOBUJFSSBRVFTF
DPOFDUBBVOUPNBDPSSJFOUFEFQBSFEEFUSFTQBUBTDPO
DPOFYJØOBUJFSSBQBSBNJOJNJ[BSMBQPTJCJMJEBEEF
QFMJHSPEFEFTDBSHBFMÏDUSJDBEFFTUFFMFDUSPEPNÏTUJDP
Si no se cumple con esto se podrá producir una explosión,
incendio o muerte.
t4FEFCFFODIVGBSFTUBTFDBEPSBBVOUPNBDPSSJFOUF
DPOFDUBEPBUJFSSBEF7$")[QSPUFHJEPQPSVO
GVTJCMFPDPSUBDJSDVJUPTEFBNQFSJPT Si no se cumple
con esto se podrá producir una explosión, incendio o
muerte.
t&ODBTPEFEJTQPOFSEFVOUPNBDPSSJFOUFEFQBSFE
FTUÈOEBSEFQBUBTFTTVSFTQPOTBCJMJEBEZ
PCMJHBDJØOQFSTPOBMFTDBNCJBSMPQPSVOPEFQBUBT
conectado a tierra adecuadamente. Si no se cumple con
esto se podrá producir una explosión, incendio o muerte
t3FRVJTJUPTEFTVNJOJTUSPEFHBT
$PNPFOWJBEPEFGÈCSJDBTJDPOGJHVSBMBTFDBEPSBQBSB
VTPDPOHBTOBUVSBM1VFEFDPOWFSUJSTFQBSBVTBSDPO
HBT-1QSPQBOPMÓRVJEP-BQSFTJØOEFHBTOPEFCF
TPCSFQBTBSMBDPMVNOBEFBHVBEFQVMHBEBT
t6OUÏDOJDPDBMJGJDBEPEFNBOUFOJNJFOUPPEFMB
DPNQB×ÓBEFHBTEFCFDPOFDUBSMBTFDBEPSBBM
suministro de gas. Si no se cumple con esto se podrá
producir una explosión, incendio o muerte.
t"ÓTMFMBTFDBEPSBEFMTJTUFNBEFTVNJOJTUSPEFHBT
DFSSBOEPTVWÈMWVMBEFDPSUFJOEJWJEVBMNBOVBM
EVSBOUFDVBMRVJFSUJQPEFQSVFCBEFQSFTJØOEFM
suministro de gas. Si no se cumple con esto se podrá
producir una explosión, incendio o muerte.
t3FRVJTJUPTEFMBMÓOFBEFTVNJOJTUSP4VDVBSUPEF
MBWBEPEFCFUFOFSVOBMÓOFBSÓHJEBEFTVNJOJTUSPEF
HBTQBSBMBTFDBEPSB&OMPT&&66TFEFCFJOTUBMBS
VOBWÈMWVMBEFDPSUFNBOVBMJOEJWJEVBMBVOBEJTUBODJB
EFQPSMPNFOPTQJFTNEFMBTFDBEPSBEF
BDVFSEPDPOFM$ØEJHP/BDJPOBMEF(BT$PNCVTUJCMF
"/4*;4FEFCFJOTUBMBSVOUBQØOEFUVCFSÓBEF
QVMHBEBT/15 Si no se cumple con esto se podrá
producir una explosión, incendio o muerte.
t4JTFVTBUVCFSÓBSÓHJEBMBUVCFSÓBSÓHJEBEFCFSÈTFSEF
QVMHBEBT*144JFTBDFQUBCMFTFHÞOMPTDØEJHPTZ
MBTSFHVMBDJPOFTMPDBMFTZDVBOEPTFBBDFQUBCMFTFHÞO
TVDPNQB×ÓBQSPWFFEPSBEFHBTTFQVFEFVTBSUVCFSÓB
EFQVMHBEBTBQSPCBEBDVBOEPMBTMPOHJUVEFTTFBO
NFOPSFTEFQJFTN4FEFCFVTBSUVCFSÓBNÈT
MBSHBFODBTPEFMPOHJUVEFTRVFFYDFEFOMPTQJFT
N Si no se cumple con esto se podrá producir una
explosión, incendio o muerte.
tConecte la secadora al tipo de gas indicado en la placa
EFMOPNCSF Si no se cumple con esto se podrá producir
una explosión, incendio o muerte.
t1BSBQSFWFOJSMBDPOUBNJOBDJØOEFMBWÈMWVMBEFHBT
purgue el aire y sedimento del suministro de gas antes
de conectar el suministro de gas a la secadora. Antes
EFBKVTUBSMBDPOFYJØOFOUSFFMTVNJOJTUSPEFHBTZ
MBTFDBEPSBQVSHVFFMBJSFIBTUBRVFTFEFUFDUFPMPS
a gas. Si no se cumple con esto se podrá producir una
explosión, incendio o muerte.
t/0VTFVOBMMBNBBCJFSUBQBSBJOTQFDDJPOBSMBTGVHBT
EFHBT6TFVOGMVJEPBOUJDPSSPTJWPQBSBEFUFDDJØOEF
GVHBTSi no se cumple con esto se podrá producir una
explosión, incendio o muerte.
t6UJMJDFÞOJDBNFOUFVOBMÓOFBEFTVNJOJTUSPEFHBT
OVFWBDFSUJGJDBEBQPS"("P$4"DPODPOFDUPSFT
GMFYJCMFTEFBDFSPJOPYJEBCMF Si no se cumple con esto
se podrá producir una explosión, incendio o muerte.
t"KVTUFCJFOUPEBTMBTDPOFYJPOFTEFHBT
Si no se cumple con esto se podrá producir una explosión,
incendio o muerte.
t/0JOUFOUFEFTNPOUBSOJOHÞODPNQPOFOUFEFMB
TFDBEPSBDVBMRVJFSEFTNPOUBKFSFRVJFSFEFMB
BUFODJØOZIFSSBNJFOUBTEFVOUÏDOJDPPDPNQB×ÓBEF
NBOUFOJNJFOUPBVUPSJ[BEPZDBMJGJDBEPSi no se cumple
con esto se podrá producir una explosión, incendio o
muerte.
t6TFVODPNQVFTUPQBSBDPOFYJPOFTEFUVCFSJB
JOTPMVCMFFOHBTEFQFUSPMFPMJRVJEP-1FOUPEBTMBT
SPTDBTEFUVCFSJB Si no se cumple con esto se podra
producir una explosion, incendio o muerte.
INSTRUCCIONES PARA LA INSTALACIÓN

26
Connecting gas dryers (cont.)
W
ADVERTENCIA
Para reducir el riesgo de incendio, descargas eléctricas
o heridas al usar su electrodoméstico, siga las
precauciones básicas, incluyendo lo siguiente:
t-BJOTUBMBDJØOZFMNBOUFOJNJFOUPEFCFO
QSPWFFSTFQPSVOJOTUBMBEPSDBMJGJDBEPBHFODJBEF
NBOUFOJNJFOUPPDPNQB×ÓBEFHBT Si no se cumple
con esto se podrá producir una explosión, incendio o
muerte.
t6TFÞOJDBNFOUFVODPOFDUPSEFBDFSPJOPYJEBCMF
OVFWPZVODPOFDUPSDFSUJGJDBEPQPS"("OVFWP
Si no se cumple con esto se podrá producir una
explosión, incendio o muerte.
t4FEFCFJOTUBMBSVOBWÈMWVMBEFDPSUFEFHBTBVOB
EJTUBODJBNÓOJNBEFQJFTNEFMBTFDBEPSB
Si no se cumple con esto se podrá producir una
explosión, incendio o muerte.
t-BTFDBEPSBFTUÈDPOGJHVSBEBQBSBHBTOBUVSBM
DVBOEPTFFOWÓBEFGÈCSJDB"TFHÞSFTFEFRVF
MBTFDBEPSBFTUÈFRVJQBEBDPOMBCPRVJMMBEF
RVFNBEPSDPSSFDUBQBSBFMUJQPEFHBTRVFTFVTBSÈ
HBTOBUVSBMPQFUSØMFPMÓRVJEP-1 Si no se cumple
con esto se podrá producir una explosión, incendio o
muerte.
t4JFTQSFDJTPTFSÈVOUÏDOJDPDVBMJGJDBEPRVJFO
JOTUBMFMBCPRVJMMBDPSSFDUBQBSBFMLJUEFDPOWFSTJØO
-1DPOOÞNFSPEFQJF[B&&-%TFEFCFSÈ
UPNBSOPUBEFFTUFDBNCJPFOMBTFDBEPSB Si no
se cumple con esto se podrá producir una explosión,
incendio o muerte.
t4FEFCFOSFBMJ[BSUPEBTMBTDPOFYJPOFTTFHÞOMPT
DØEJHPTZMBTSFHVMBDJPOFTMPDBMFTSi no se cumple
con esto se podrá producir una explosión, incendio o
muerte.
t-BTTFDBEPSBTEFHBT%&#&/WFOUJMBSIBDJBFM
FYUFSJPSSi no se cumple con esto se podrá producir
una explosión, incendio o muerte.
Conexión del suministro de gas
"TFHÞSFTFEFRVFFMTVNJOJTUSPEFHBTBMDVBSUPEF
lavado se encuentre APAGADO.Confirme que el
tipo de gas disponible en su cuarto de lavado sea el
adecuado para la secadora. La secadora está lista para
la conexión de gas natural de
⁄ pulgadas NPT.
2VJUFMBUBQBEFFOWÓPEFMBDPOFYJØOEFHBTMPDBMJ[BEB
de la parte trasera de la secadora.Asegúrese de no
dañar la rosca del conector de gas al quitar la tapa de
envío.
$POFDUFMBTFDBEPSBBMTVNJOJTUSPEFHBTEFTVDVBSUP
de lavado usando un conector de acero inoxidable
GMFYJCMFOVFWPDPOVOBDPOFYJØOEFQVMHBEBT/15
"KVTUFCJFOUPEBTMBTDPOFYJPOFTFOUSFMBTFDBEPSBZ
el suministro de gas de su cuarto de lavado. Abra el
suministro de gas de su cuarto de lavado y verifique
que no haya fugas en todas las conexiones de tubería
(tanto interiores como exteriores) usando un fluido
anticorrosivo para detección de fugas.
Conexión eléctrica
Instalaciones en lugares de gran altitud
La clasificación BTU para esta secadora es certificación
"("QBSBFMFWBDJPOFTQPSEFCBKPEFMPTQJFT
4JWBBJOTUBMBSTVTFDBEPSBBNÈTEFQJFTEFCF
ser desclasificada por un técnico calificado o compañía
de gas.
Enchufe la secadora en un
tomacorriente de
7"$)[ de tres patas
conectado a tierra.
Válvula de corte
de suministro
de gas
Conexión de
HBTw/15
Tapón de tubería
EFw/15
Conector flexible
de acero inoxidable
certificado por AGA/CSA
INSTRUCCIONES PARA LA INSTALACIÓN

27
ESPAÑOL
Cómo conectar las secadoras eléctricas
W
ADVERTENCIA
Para ayudar a evitar incendios, descargas eléctricas, heridas
graves o muerte, el cableado e instalación a tierra deben
cumplir con la última edición del Código Eléctrico Nacional,
"/4*/'1"ZUPEBTMBTSFHVMBDJPOFTMPDBMFTBQMJDBCMFT
Por favor comuníquese con un electricista calificado para
que controle el cableado y los fusibles y así asegurar que
su casa posee energía eléctrica adecuada para operar la
secadora.
Requisitos eléctricos únicamente para modelos eléctricos
W
ADVERTENCIA
Para reducir el riesgo de incendio, descargas eléctricas o
heridas al usar su electrodoméstico, siga las precauciones
básicas, incluyendo lo siguiente:
t&TUBTFDBEPSBEFCFFTUBSDPOFDUBEBBVOTJTUFNBEF
DBCMFBEPNFUÈMJDPQFSNBOFOUFDPOFDUBEPBUJFSSBP
TFEFCFUFOEFSVODPOEVDUPSEFDPOFYJØOBUJFSSBEF
FRVJQPDPOMPTDPOEVDUPSFTEFDJSDVJUPZDPOFDUBEPBMB
UFSNJOBMEFDPOFYJØOBUJFSSBEFMFRVJQPPDPOEVDUPSEF
la secadora. Si no se cumple con esto se podrá producir
una explosión, incendio o muerte.
t-BTFDBEPSBUJFOFTVQSPQJPCMPRVFUFSNJOBMFMDVBM
EFCFDPOFDUBSTFBVODJSDVJUPEFVOBTPMBGBTFEF
7$"EF)[QSPUFHJEPDPOGVTJCMFEFBNQFSJPT
FMDJSDVJUPEFCFUFOFSQSPUFDDJØOEFGVTJCMFBBNCPT
UFSNJOBMFTEFMBMÓOFB&MTVNJOJTUSPFMÏDUSJDPEF
MBTFDBEPSBEFCFSBTFSEFMBNÈYJNBDMBTJGJDBUJØO
EFWPMUBHFMJTUBEBFOMBQMBDBEFDBSBDUFSÓTUJDBT/P
DPOFDUFMBTFDBEPSBBVODJSDVJUPEFØ
WPMUJPT Si no se cumple con esto se podrá producir una
explosión, incendio o muerte.
t4JVODJSDVJUPEFSBNBMBMBTFDBEPSBFTEFQJFT
NPNFOPTEFMPOHJUVEVTFBMBNCSFMJTUBEPQPS6-
6OEFSXSJUFST-BCPSBUPSJFT/ÞN"8(ÞOJDBNFOUF
BMBNCSFDPCSFTFHÞOMPSFRVJFSBOMBTMFZFTMPDBMFT
4JFTNÈTMBSHPEFQJFTNVTFBMBNCSFMJTUBEP
QPS6-6OEFSXSJUFST-BCPSBUPSJFT/ÞN"8(
ÞOJDBNFOUFBMBNCSFEFDPCSFPTFHÞOMPSFRVJFSBO
MBTMFZFTMPDBMFT%JTQPOHBEFTVGJDJFOUFEPUBDJØOEF
DBCMFBEPEFNBOFSBEFQPEFSNPWFSMBTFDBEPSBEFTV
VCJDBDJØOOPSNBMDVBOEPTFBOFDFTBSJP Si no se cumple
con esto se podrá producir una explosión, incendio o
muerte.
t/0TFQSPWFFMBDPOFYJØOFOFTQJSBMEFMDBCMFFMÏDUSJDP
FOUSFMBDBKBEFQBSFEZFMCMPRVFUFSNJOBMEFMB
TFDBEPSBDPOMBNJTNB&MUJQPEFDPOFYJØOFOFTQJSBMZ
FMDBMJCSFEFMBMBNCSFEFCFOTFHVJSMPTDØEJHPTMPDBMFT
y las instrucciones indicadas en las siguientes páginas.
Si no se cumple con esto se podrá producir una explosión,
incendio o muerte.
t4FSFRVJFSFVOBDPOFYJØOEFIJMPTFOUPEBTMBT
JOTUBMBDJPOFTEFWJWJFOEBTNØWJMFTZQSFGBCSJDBEBTBTÓ
DPNPFOUPEBTMBTDPOTUSVDDJPOFTOVFWBTQPTUFSJPSFT
BMEFFOFSPEF4FEFCFVTBSVOBDPOFYJØOEF
IJMPTTJMPTDØEJHPTMPDBMFTOPQFSNJUFOMBDPOFYJØOB
UJFSSBVUJMJ[BOEPFMBMBNCSFOFVUSP Si no se cumple con
esto se podrá producir una explosión, incendio o muerte.
W
ADVERTENCIA
Para reducir el riesgo de incendio, descargas eléctricas o
heridas al usar su electrodoméstico, siga las precauciones
básicas, incluyendo lo siguiente:
t/PNPEJGJRVFFMFODIVGFOJFMDBCMFBEPJOUFSOP
GBDJMJUBEPDPOMBTFDBEPSB
t-BTFDBEPSBEFCFSÈDPOFDUBSTFBVOBTBMJEBEFWÓBT
t4JOPTFBEBQUBBMBUPNBEFDPSSJFOUFEFCFSÈ
BTFHVSBSTFEFRVFVOFMFDUSJDJTUBDVBMJGJDBEPJOTUBMF
una adecuada.
Requisitos eléctricos especiales para viviendas móviles
o prefabricadas
W
ADVERTENCIA
Para reducir el riesgo de incendio, descargas eléctricas o
heridas al usar su electrodoméstico, siga las precauciones
básicas, incluyendo lo siguiente:
t$VBMRVJFSJOTUBMBDJØOFOVOBWJWJFOEBNØWJMP
QSFGBCSJDBEBEFCFSFBMJ[BSTFEFDPOGPSNJEBEDPOMPT
&TUÈOEBSFTEFTFHVSJEBEZDPOTUSVDDJØOEFWJWJFOEBT
QSFGBCSJDBEBT5ÓUVMP$'31BSUFPFTUÈOEBS
$"/$4";.)ZDPOMPTDØEJHPTZSFHVMBDJPOFT
locales.
t4FSFRVJFSFVOBDPOFYJØOEFIJMPTFOUPEBTMBT
JOTUBMBDJPOFTEFWJWJFOEBTNØWJMFTZQSFGBCSJDBEBT
BTÓDPNPFOUPEBTMBTDPOTUSVDDJPOFTOVFWBT
posteriores al 1 de enero de 1996. Si no se cumple
con esto se podrá producir una explosión, incendio o
muerte.
INSTRUCCIONES PARA LA INSTALACIÓN

28
INSTRUCCIONES PARA LA INSTALACIÓN
Cómo conectar las secadoras eléctricas (cont.)
SÓLO EE.UU.
W
ADVERTENCIA
t$POFDUFFMDBCMFEFBMJNFOUBDJØOBMBDBKBEF
terminales. Conecte cada uno de los conductores
EFMDBCMFEFBMJNFOUBDJØOBMUPSOJMMPEFMBDBKB
EFUFSNJOBMFTRVFUFOHBFMDPOEVDUPSEFMNJTNP
DPMPS1PSFKFNQMPDPOFDUFFMDPOEVDUPSOFHSP
EFMDBCMFEFBMJNFOUBDJØOBMUPSOJMMPEFMBDBKBEF
UFSNJOBMFTRVFUJFOFFMDPOEVDUPSOFHSP&ODBTPEF
OPTFHVJSFTUBTJOTUSVDDJPOFTTFQPESÓBQSPEVDJSVO
DPSUPDJSDVJUPVOBTPCSFDBSHBJODFOEJPPNVFSUF
t$POUBDUPQPSDPOEVDUPSOFVUSPFTUÈQSPIJCJEPQBSB
OVFWBTJOTUBMBDJPOFTEFDJSDVJUPEFSJWBEP
MBTDBTBTNØWJMFTWFIÓDVMPTSFDSFBDJPOBMFTZ
ÈSFBTEPOEFMPTDØEJHPTQSPIÓCFOVOBDPOFYJØOB
tierra por el conductor neutro.
Conexión de cuatro hilos para secadoras
eléctricas: Cable eléctrico con enchufe
t4FSFRVJFSFVOBDPOFYJØOEFIJMPTFOUPEBTMBT
instalaciones de viviendas móviles y prefabricadas, así
como en todas las construcciones nuevas posteriores
BMEFFOFSPEF
t4FSFRVJFSFVOQSPUFDUPSEFUFOTJØOMJTUBEPQPS6-
2VJUFMBDVCJFSUBEFBDDFTPBMCMPRVFUFSNJOBM
localizado en la parte superior trasera de la secadora.
Instale un protector de tensión listado por UL en el
orificio de pase del cable eléctrico; luego pase un
cable eléctrico conductor de cobre Núm. "8(EF
QPSMPNFOPTIJMPT"7MJTUBEP por UL por
el protector de tensión.
t*OTUBMFVODBCMFFMÏDUSJDPEF"7MJTUBEPQPS
6-DPOVODPOEVDUPSEFDPCSF/ÞN"8( como
mínimo y terminales de bucle cerrado o de horquilla
con extremos doblados hacia arriba.
55SBOTGJFSBFMBMBNCSFEFDPOFYJØOBUJFSSBEFMB
secadora detrás del tornillo de conexión a tierra de
color verde al tornillo central del bloque terminal.
Conecte los dos conductores calientes del cable
eléctrico a los tornillos del bloque terminal exterior.
Conecte el cable neutro de color blanco al tornillo
del bloque terminal central. Conecte el alambre de
conexión a tierra del cable eléctrico al tornillo de
conexión a tierra de color verde.
"+645&#*&/50%04-04503/*--04. Reinstale la
cubierta de acceso del bloque terminal.
Caliente
(negro)
Alambre de
conexión
a tierra del
cable eléctrico
Tornillo de
conexión a
tierra
Cable blanco
movido de
tornillo de
conexión a
tierra
Neutro
(blanco)
Caliente
(rojo)
Protector de tensión
listado por UL
Cable eléctrico
de cuatro hilos
listado por UL
Bloque
terminal

29
ESPAÑOL
W
ADVERTENCIA
t$POFDUFFMDBCMFEFBMJNFOUBDJØOBMBDBKBEF
terminales. Conecte cada uno de los conductores
EFMDBCMFEFBMJNFOUBDJØOBMUPSOJMMPEFMBDBKB
EFUFSNJOBMFTRVFUFOHBFMDPOEVDUPSEFMNJTNP
DPMPS1PSFKFNQMPDPOFDUFFMDPOEVDUPSOFHSP
EFMDBCMFEFBMJNFOUBDJØOBMUPSOJMMPEFMBDBKBEF
UFSNJOBMFTRVFUJFOFFMDPOEVDUPSOFHSP&ODBTPEF
OPTFHVJSFTUBTJOTUSVDDJPOFTTFQPESÓBQSPEVDJSVO
DPSUPDJSDVJUPVOBTPCSFDBSHBJODFOEJPPNVFSUF
t$POUBDUPQPSDPOEVDUPSOFVUSPFTUÈQSPIJCJEP
QBSBOVFWBTJOTUBMBDJPOFTEFDJSDVJUPEFSJWBEP
MBTDBTBTNØWJMFTWFIÓDVMPTSFDSFBDJPOBMFTZ
ÈSFBTEPOEFMPTDØEJHPTQSPIÓCFOVOBDPOFYJØO
a tierra por el conductor neutro.
Conexión de cuatro hilos para secadoras eléctricas:
Conexión directa
t4FSFRVJFSFVOBDPOFYJØOEFIJMPTFOUPEBTMBT
instalaciones de viviendas móviles y prefabricadas, así
como en todas las construcciones nuevas posteriores
BMEFFOFSPEF
t4FSFRVJFSFVOQSPUFDUPSEFUFOTJØOMJTUBEPQPS6-
%FTQFHVFQVMHDNEFMBDVCJFSUBEFMDBCMF
del final. Descubra 5 pulg. de aislamiento del cable de
DPOFYJØOBUJFSSB$PSUFBQSPYJNBEBNFOUFcQVMH
DNEFMPTPUSPTDBCMFTZEFTQFHVFQVMH
cm) del aislamiento del cado uno. Haga los finales de
MPTDBCMFTFOGPSNBEFHBODIP
2VJUFMBDVCJFSUBEFBDDFTPBMCMPRVFUFSNJOBM
localizado en la parte superior trasera de la secadora.
Instale un protector de tensión listado por UL en el
orificio de pase del cable eléctrico; luego pase el cable
FMÏDUSJDPGBCSJDBEPFOFM1BTPQPSFMQSPUFDUPSEF
tensión.
Alambre de
conexión a tierra
5"
DN
DN
Cómo conectar las secadoras eléctricas (cont.)
SÓLO EE.UU.
t*OTUBMFVODBCMFFMÏDUSJDPMJTUBEPQPS6-DPO4
DPOEVDUPSFTEFDPCSF/ÞN"8(DPNPNÓOJNP.
t1SFQBSFVONÓOJNPEFQJFTNEFMPOHJUVEQBSB
poder quitar y reemplazar la secadora.
5SBOTGJFSBFMBMBNCSFEFDPOFYJØOBUJFSSBEFMB
secadora detrás del tornillo de conexión a tierra de
color verde al tornillo central del bloque terminal.
Conecte los dos conductores calientes del cable
eléctrico a los tornillos del bloque terminal exterior.
Conecte el cable neutro de color blanco al tornillo
del bloque terminal central. Conecte el alambre
de conexión a tierra del cable eléctrico al tornillo
de conexión a tierra de color verde. "+645&#*&/
50%04-04503/*--04. Reinstale la cubierta de
acceso del bloque terminal.
Protector de tensión
listado por UL
Cable eléctrico
de cuatro hilos
listado por UL
Bloque
terminal
Caliente
(negro)
Alambre de
conexión
a tierra del
cable eléctrico
Tornillo de
conexión a
tierra
Cable blanco
movido de
tornillo de
conexión a
tierra
Neutro
(blanco)
Caliente
(rojo)
INSTRUCCIONES PARA LA INSTALACIÓN

30
Cómo conectar las secadoras eléctricas (cont.)
SÓLO EE.UU.
W
ADVERTENCIA
t$POFDUFFMDBCMFEFBMJNFOUBDJØOBMBDBKBEF
terminales. Conecte cada uno de los conductores
EFMDBCMFEFBMJNFOUBDJØOBMUPSOJMMPEFMBDBKB
EFUFSNJOBMFTRVFUFOHBFMDPOEVDUPSEFMNJTNP
DPMPS1PSFKFNQMPDPOFDUFFMDPOEVDUPSOFHSP
EFMDBCMFEFBMJNFOUBDJØOBMUPSOJMMPEFMBDBKB
EFUFSNJOBMFTRVFUJFOFFMDPOEVDUPSOFHSP&O
DBTPEFOPTFHVJSFTUBTJOTUSVDDJPOFTTFQPESÓB
QSPEVDJSVODPSUPDJSDVJUPVOBTPCSFDBSHB
incendio o muerte.
t$POUBDUPQPSDPOEVDUPSOFVUSPFTUÈQSPIJCJEP
QBSBOVFWBTJOTUBMBDJPOFTEFDJSDVJUPEFSJWBEP
MBTDBTBTNØWJMFTWFIÓDVMPTSFDSFBDJPOBMFT
ZÈSFBTEPOEFMPTDØEJHPTQSPIÓCFOVOB
DPOFYJØOBUJFSSBQPSFMDPOEVDUPSOFVUSP
Conexión de tres hilos para secadoras
eléctricas: Cable eléctrico con enchufe
t/0TFQFSNJUFVOBDPOFYJØOEFIJMPTFO
DPOTUSVDDJPOFTOVFWBTEFTQVÏTEFMEFFOFSPEF
t4FSFRVJFSFVOQSPUFDUPSEFUFOTJØOMJTUBEPQPS6-
2VJUFMBDVCJFSUBEFBDDFTPBMCMPRVFUFSNJOBM
localizado en la parte superior trasera de la secadora.
Instale un protector de tensión listado por UL en el
orificio de pase del cable eléctrico; luego pase un
cable eléctrico conductor de cobre Núm. "8(EF
QPSMPNFOPTIJMPT"7MJTUBEP por UL
por el protector de tensión.
t*OTUBMFVODBCMFFMÏDUSJDPEF"7MJTUBEPQPS
6-DPOVODPOEVDUPSEFDPCSF/ÞN"8(DPNP
NÓOJNP y terminales de bucle cerrado o de horquilla
con extremos doblados hacia arriba.
$POFDUFMPTEPTDPOEVDUPSFTDBMJFOUFTEFMDBCMF
eléctrico a los tornillos del bloque terminal exterior.
Conecte el cable neutro al tornillo del bloque terminal
central. Conecte la conexión a tierra exterior (de
ser requerido por los códigos locales) al tornillo de
color verde. "+645&#*&/50%04-04503/*--04.
Reinstale la cubierta de acceso del bloque terminal.
Protector de tensión
listado por UL
Cable eléctrico
de tres hilos
listado por UL
Bloque
terminal
Tornillo de
conexión
a tierra
Neutro
(blanco)
Caliente
(negro)
Caliente
(rojo)
Conexión a tierra
exterior (de ser
requerido por los
códigos locales)
Hilo
blanco de
estructura
de secadora
INSTRUCCIONES PARA LA INSTALACIÓN

31
ESPAÑOL
Cómo conectar las secadoras eléctricas (cont.)
SÓLO EE.UU.
W
ADVERTENCIA
t$POFDUFFMDBCMFEFBMJNFOUBDJØOBMBDBKBEF
terminales. Conecte cada uno de los conductores
EFMDBCMFEFBMJNFOUBDJØOBMUPSOJMMPEFMBDBKB
EFUFSNJOBMFTRVFUFOHBFMDPOEVDUPSEFMNJTNP
DPMPS1PSFKFNQMPDPOFDUFFMDPOEVDUPSOFHSP
EFMDBCMFEFBMJNFOUBDJØOBMUPSOJMMPEFMBDBKBEF
UFSNJOBMFTRVFUJFOFFMDPOEVDUPSOFHSP&ODBTPEF
OPTFHVJSFTUBTJOTUSVDDJPOFTTFQPESÓBQSPEVDJSVO
DPSUPDJSDVJUPVOBTPCSFDBSHBJODFOEJPPNVFSUF
t$POUBDUPQPSDPOEVDUPSOFVUSPFTUÈQSPIJCJEP
QBSBOVFWBTJOTUBMBDJPOFTEFDJSDVJUPEFSJWBEP
MBTDBTBTNØWJMFTWFIÓDVMPTSFDSFBDJPOBMFTZ
ÈSFBTEPOEFMPTDØEJHPTQSPIÓCFOVOBDPOFYJØO
a tierra por el conductor neutro.
Conexión de tres hilos para secadoras eléctricas:
Conexión directa
t/0TFQFSNJUFVOBDPOFYJØOEFIJMPTFO
DPOTUSVDDJPOFTOVFWBTEFTQVÏTEFMEFFOFSPEF
t4FSFRVJFSFVOQSPUFDUPSEFUFOTJØOMJTUBEPQPS6-
%FTQFHVF
cĸQVMHDNEFMBDVCJFSUBEFMDBCMF
EFMGJOBM%FTQFHVFQVMHDNEFMBJTMBNJFOUP
EFDBEBBMBNCSF)BHBMPTGJOBMFTEFMPTDBCMFTFO
forma de gancho.
2VJUFMBDVCJFSUBEFBDDFTPBMCMPRVFUFSNJOBM
localizado en la parte superior trasera de la secadora.
Instale un protector de tensión listado por UL en el
orificio de pase del cable eléctrico; luego pase el cable
FMÏDUSJDPGBCSJDBEPFOFM1BTPQPSFMQSPUFDUPSEF
tensión.
t*OTUBMFVODBCMFFMÏDUSJDPMJTUBEPQPS6-DPO3
DPOEVDUPSFTEFDPCSF/ÞN"8(DPNPNÓOJNP.
t1SFQBSFVONÓOJNPEFQJFTNEFMPOHJUVEQBSB
poder quitar y reemplazar la secadora.
$POFDUFMPTEPTDPOEVDUPSFTDBMJFOUFTEFMDBCMF
eléctrico a los tornillos del bloque terminal exterior.
Conecte el cable neutro al tornillo del bloque terminal
central. Conecte la conexión a tierra exterior (de
ser requerido por los códigos locales) al tornillo de
color verde. "+645&#*&/50%04-04503/*--04.
Reinstale la cubierta de acceso del bloque terminal.
DN
Protector de tensión
listado por UL
Cable eléctrico de tres
hilos listado por UL
Bloque
terminal
Tornillo de
conexión
a tierra
Neutro
(blanco)
Caliente
(negro)
Caliente
(rojo)
Conexión a tierra
exterior (de ser
requerido por los
códigos locales)
Hilo
blanco de
estructura
de secadora
INSTRUCCIONES PARA LA INSTALACIÓN

32
Requisitos especiales para viviendas
móviles o prefabricadas
Cualquier instalación en una vivienda móvil o
prefabricada debe realizarse de conformidad con los
Estándares de seguridad y construcción de viviendas
QSFGBCSJDBEBT5ÓUVMP$'31BSUFPFTUÈOEBS$"/
$4";.)ZDPOMPTDØEJHPTZSFHVMBDJPOFTMPDBMFT
Si no está seguro de si la instalación que ha propuesto
cumple con estos estándares, llame a un técnico de
mantenimiento e instalación para obtener ayuda.
t6OBTFDBEPSBEFHBTEFCFSÓBGJKBSTFQFSNBOFOUFNFOUF
sobre el piso.
t-BDPOFYJØOFMÏDUSJDBEFVOBTFDBEPSBFMÏDUSJDBEFCF
TFSVOBDPOFYJØOEFIJMPT4FQSPWFFJOGPSNBDJØO
más detallada pertinente a la conexión eléctrica en la
sección Cómo conectar las secadoras eléctricas.
t1BSBSFEVDJSFMSJFTHPEFDPNCVTUJØOFJODFOEJPTF
debe ventilar la secadora hacia el exterior.
t/0WFOUJMFMBTFDBEPSBEFCBKPEFVOBWJWJFOEBNØWJMP
prefabricada.
t-BTTFDBEPSBTFMÏDUSJDBTEFCFOWFOUJMBSTFIBDJBFM
exterior usando el panel trasero, izquierdo, derecho o
inferior.
t-BTTFDBEPSBTBHBTEFCFOWFOUJMBSTFBMFYUFSJPSVTBOEP
el panel trasero, izquierdo o inferior. Las secadoras a
gas no deben ventilarse hacia el exterior usando el
panel derecho debido a la carcasa del quemador.
t&MDPOEVDUPEFFTDBQFEFMBTFDBEPSBEFCFFTUBS
bien fijado a la estructura de la vivienda móvil o
prefabricada, y el conducto de escape debe estar
fabricado de un material resistente al fuego y la
combustión. Se recomienda el uso de un conducto de
metal rígido o flexible.
t/0DPOFDUFFMDPOEVDUPEFFTDBQFEFMBTFDBEPSBB
ningún otro conducto, respiradero, chimenea ni a
ningún otro tipo de conducto de escape.
t"TFHÞSFTFEFRVFMBTFDBEPSBEJTQPOHBEFBDDFTP
adecuado al aire fresco del exterior para garantizar un
funcionamiento adecuado. La abertura para la toma
EFBJSFGSFTDPFYUFSJPSEFCFTFSEFQPSMPNFOPT
pulgadas
DN
).
t&TJNQPSUBOUFRVFFMFTQBDJPMJCSFEFMDPOEVDUP
con respecto a cualquier material combustible de
DPOTUSVDDJØOTFBEFQPSMPNFOPTQVMHBEBTDN
y que, cuando se ventile la secadora al exterior, se
pueda instalar la secadora dejando un espacio libre de
QVMHBEBDNBMPTMBEPTZMBQBSUFUSBTFSBEFMB
secadora.
t5FOHBFODVFOUBRVFMPTNBUFSJBMFTEFWFOUJMBDJØO
no se proveen con la secadora. Debe obtener los
materiales de ventilación necesarios para una
instalación adecuada.
Revisión de instalación final
Una vez que haya completado la instalación de la
secadora y la misma se encuentre en su ubicación final,
confirme que funcione correctamente realizando las
siguientes pruebas.
Comprobación del calentamiento de la secadora
.0%&-04"("4
Cierre la puerta de la secadora, apriete el interruptor
ON/OFF para encender la secadora, e iniciar la secadora
en un ajuste de calor.Cuando inicia la secadora, el
encendedor deberá encender el quemador principal.
.0%&-04&-²$53*$04
Cierre la puerta de la secadora, apriete el interruptor
ON/OFF para encender la secadora, e iniciar la secadora
en un ajuste de calor. El escape de aire deberá estar
caliente después de que la secadora haya funcionado
EVSBOUFNJOVUPT
Revisión del flujo de aire
El funcionamiento efectivo de la secadora requiere de
un flujo de aire adecuado. La corrección del flujo de aire
puede medirse evaluando la presión estática. La presión
estática del conducto del escape se puede medir con
un manómetro, colocado en el conducto de escape
BQSPYJNBEBNFOUFBQJFTDNEFEJTUBODJBEFMB
secadora. La presión estática del conducto de escape
OPEFCFSÓBFYDFEFSMBTQVMHBEBTDN4FEFCF
revisar la secadora mientras está funcionando sin carga
Revisión del nivelado
Una vez que la secadora se encuentra en su ubicación
final, vuelva a revisar que la misma se encuentre
nivelada. Asegúrese de que esté nivelada de adelante
hacia atrás y de lado a lado, y de que las cuatro patas
niveladoras se encuentren asentadas en el piso
firmemente.
NOTA
Si no se purga todo el aire de la línea de gas, el
encendedor de gas podría apagarse antes de que se
encienda el quemador. Si esto sucede, el encendedor
volverá a intentar encender el gas después de
aproximadamente dos minutos.
INSTRUCCIONES PARA LA INSTALACIÓN

33
ESPAÑOL
NOTA
La secadora deberá estar fría antes de iniciar el test.
4JMBVOJEBETFIBDBMFOUBEPEVSBOUFMBJOTUBMBDJØO
active el sistema Secado Con Aire (Air Dry) durante
unos minutos para reducir la temperatura interior.
Sin Barras:
Corecto
#BSSBT
Restricción
INSTRUCCIONES PARA LA INSTALACIÓN
0CTFSWFMBQBOUBMMBQBSBDPOPDFSFMSFTVMUBEP
Durante el ciclo de prueba de tres minutos, controle
el visualizador del Flow Sense™ en el panel de
control. Si al terminar el test no muestra ninguna
barra, el sistema de evacuación es adecuado.
4JFMTJTUFNBEFFWBDVBDJØOTVGSFSFTUSJDDJPOFT
JNQPSUBOUFTFMJDPOPNPTUSBSÈCBSSBT4JFYJTUFO
otros problemas, estos se le indicarán con códigos
de error. Consulte en la página siguiente el listado de
códigos de error y sus soluciones.
4JMBTCBSSBTFTUÈOFODFOEJEBTFMTJTUFNBEF
evacuación está considerablemente bloqueado. Revise
el sistema de inmediato, ya que de no hacerlo el
funcionamiento será muy deficiente.
5. 'JOEFMDJDMP
Al finalizar el test aparecerá
en la pantalla
de visualización. Una vez haya terminado este ciclo,
la secadora se apagará automáticamente después de
unos momentos.
Test de Instalación
(Verificación del Conducto)
Una vez haya instalado la secadora, haga este test
para asegurarse de que las condiciones del sistema de
evacuación son las adecuadas para el funcionamiento
correcto de la secadora. Este test tiene como objetivo
mostrarle si existe algún problema importante en el
sistema de evacuación de su vivienda.
t&TUBTFDBEPSBDVFOUBDPOFMTJTUFNB'MPX4FOTFVO
sistema innovador que detecta automáticamente los
bloqueos y restricciones en la tubería de la secadora.
Mantener la tubería sin acumulación de pelusa y libre
de restricciones le permitirá secar la ropa más rápido y
reducir el gasto de energía.
"DUJWBSFMUFTUEFJOTUBMBDJØO
3FUJSFMBEPDVNFOUBDJØOZDJFSSFMBQVFSUB No meta
nada en el tambor cuando se disponga a hacer este test
porque podría influir en la precisión de los resultados.
1VMTFNBOUFOHBQVMTBEPTFMCPUØO
&ODFOEJEP1PXFSZMVFHPQVMTFZNBOUFOHB
QVMTBEP5FNQ5FNQZ4QJUJEP4JHOBMNÈTEF
segundos
Esta secuencia de botones activa el test de instalación.
El código BQBSFDFSÈFOMBQBOUBMMBEFWJTVBMJ
zación si la activación se ha realizado con éxito.
1VMTFFMCPUØO*OJDJP1BVTB4UBSU1BVTTF
La secadora iniciará el test, que durará alrededor de
dos minutos. Se encenderá el calor y se medirán las
temperaturas en el tambor.

34
Test de Instalación (Verificación del Conducto) (cont.)
t$PNQSVFCFFMDØEJHPEFFSSPSBOUFTEFMMBNBSBMTFSWJ
cio técnico
t$PNQSVFCFMBTDPOEJDJPOFTEFMDPOEVDUP
4JTFJMVNJOBOMBTCBSSBTUSBTFMUFTUDPNQSVFCFFM
sistema de evacuación en busca de restricciones o
daños. Repare o reemplace el sistema de evacuación
según sea necesario.
Código de error Causas posibles Soluciones
U&
o
U&
t'BMMPEFMTFOTPSEFUFNQFSBUVSB tApague la secadora y llame al servicio técnico.
HS
t'BMMPEFMTFOTPSEFIVNFEBE tApague la secadora y llame al servicio técnico.
PS
o
1'
o
nP
t&MDBCMFEFBMJNFOUBDJØOOPFTUÈ
conectado correctamente o el
suministro eléctrico de la vivienda es
incorrecto.
t4FIBOGVOEJEPMPTGVTJCMFTIBTBMUBEP
el disyuntor o ha habido un apagón.
t
Compruebe el suministro eléctrico o la conexión
del cable de alimentación al enchufe. Consulte la
TFDDJØOi$ØNPDPOFDUBSMBTTFDBEPSBTFMÏDUSJDBTwEF
este manual para las instrucciones completas.
t3FBDUJWFFMEJTZVOUPSPSFFNQMBDFFMGVTJCMF/P
incremente la capacidad del fusible. Si el problema
es una sobrecarga del circuito, solicite los servicios
EFVOFMFDUSJDJTUBDVBMJöDBEP
'MVKPEFBJSFSFTUSJOHJEPPCMPRVFBEP
Evite funcionamientos prolongados o
funcionamientos con múltiples formaciones de
torceduras o codos.
Conducto demasiado
largo o muy torcido
Tubería demasiado larga
o con demasiados codos
Controle los bloqueos y la acumulación de pelusa.
Asegúrese que la tubería no posea cortes ni restricciones.
Tubería
estrangulada
o bloqueada
Acumulación
de pelusa o
bloqueo
NOTA
Cuando recién se instala la secadora, debe realizarse
esta prueba para alertarlo sobre cualquier clase de
problemas con el conducto de extracción de su hogar.
Sin embargo, puesto que la prueba realizada durante
un funcionamiento normal ofrece una información
más precisa sobre el estado del conducto de extrac
ción que la prueba de instalación, la cantidad de
barras visualizadas durante las dos pruebas puede no
ser la misma.
No interrumpa el test, ya que de caso contrario podría
obtener resultados erróneos.
Aunque no se ilumine ninguna barra tras el ciclo de
test, es posible que existan algunas restricciones en el
sistema de evacuación. Consulte la sección Cónexión
del conducto de WFOUJMBDJØOEFMBTFDBEPSB en este
manual para conocer todos los requisitos del sistema
de evacuación y de ventilación.
Esta secadora cuenta con el sistema Flow Sense™, un
sistema innovador que detecta automaticamente los
bloqueos y restricciones en la tuberia de la secadora.
Mantener la tuberia sin acumulacion de pelusa y libre
de restricciones le permitira secar la ropa mas rapido y
reducir el gasto de energia.
INSTRUCCIONES PARA LA INSTALACIÓN

35
ESPAÑOL
CÓMO USAR
Funcionamiento de la secadora
&ODFOEFS-B4FDBEPSB
Presione el botón Encendido/Apagado (Power) para encender la secadora. Si se
enciende, los LEDs de ciclo se iluminarán y se emitirá un aviso sonoro. Consulte
MBQÈHJOB
3
*OJDJBS&M$JDMP
Presione el botón Inicio/Pausa(Start/Pause) para que comience el ciclo. El ciclo
puede ser pausado en cualquier momento abriendo la puerta o presionando el
CPUØO*OJDJP1BVTB4UBSU1BVTF4JOPWVFMWFBJOJDJBSTFFMDJDMPUSBTNJOVUPT
la secadora se apagará y los ajustes del ciclo se perderán.
5
Seleccionar Un Ciclo
Gire el mando del selector de ciclo en cualquier sentido hasta que se ilumine
el LED del ciclo que desee. Se mostrarán los ajustes preestablecidos de
UFNQFSBUVSBOJWFMEFTFDBEPZPQDJØOQBSBFTUFDJDMP$POTVMUFMBQÈHJOB
Los ajustes predeterminados para el ciclo seleccionado podrán cambiarse
ahora si lo desea. Esto puede llevarse a cabo utilizando los botones
NPEJGJDBEPSFTEFDJDMPUBMZDPNPTFNVFTUSBFOMBQÈHJOB-BTPQDJPOFTEF
ciclo pueden añadirse utilizando los botones de opción tal y como se muestra
FOMBQÈHJOB
4
'JO%FM$JDMP
Al finalizar el ciclo, si lo tiene ajustado, oirá un aviso sonoro. Retire
inmediatamente sus prendas de la secadora para reducir las arrugas. Si tiene
TFMFDDJPOBEBMBGVODJØO$VJEBEP%F"SSVHBT8SJOLMF$BSFMBTFDBEPSB
volteará brevemente la carga cada pocos minutos para ayudar a prevenir la
aparición de arrugas en sus prendas.
6
-JNQJBS&M'JMUSP%F1FMVTBT
Si aún no ha limpiado el filtro de pelusas, extráigalo y elimine las pelusas
procedentes de la última carga. Esto le ayudará a asegurar un funcionamiento
más rápido y eficiente de secado.
1
$BSHBS-B4FDBEPSB
Cargue en la secadora la carga húmeda procedente de la lavadora. Si la carga
es muy grande, deberá dividirla en cargas más pequeñas para obtener un buen
rendimiento y proteger los tejidos.
2
Filtro de
pelusa
NOTE
No todas las opciones ni modificadores están disponibles para todos los
ciclos. Se escuchará un sonido diferente y la luz LED no se iluminará si la
selección no está permitida.
CÓMO USAR

36
A continuación encontrará instrucciones para comenzar a usar su secadora nueva. Para más información por favor
consulte las secciones específicas de este manual.
Revise el filtro de pelusa antes de cada uso
Asegúrese siempre de que el filtro de pelusa esté limpio
antes de iniciar una carga nueva; un filtro de pelusa
bloqueado incrementará los tiempos de secado.
Para limpiarlo, tire del filtro de pelusa verticalmente y,
con los dedos, enrolle cualquier pelusa para retirarla del
filtro. No enjuague ni lave el filtro para eliminar la pelusa.
Empuje el filtro de pelusa firmemente en su lugar. Para
informacaión adicional, vea la sección LIMPIEZA REGULAR.
Asegúrese siempre de que el filtro de pelusa esté
instalado adecuadamente antes de poner en
funcionamiento la secadora. Hacer funcionar la secadora
sin el filtro o con un filtro de pelusa suelto podría dañar
la secadora y los artículos en el interior de la misma.
Clasificación de cargas
Etiquetas de mantenimiento de las telas
La mayoría de las prendas de vestir tienen etiquetas
de mantenimiento de las telas para lograr un
mantenimiento adecuado.
Agrupamiento de prendas similares
Para obtener los mejores resultados, clasifique las
prendas en cargas que puedan secarse con el mismo
ciclo de secado.
Los diferentes tipos de telas tienen diferentes requisitos de
cuidado, y algunas telas se secarán más rápido que otras.
Cómo cargar la secadora
W
ADVERTENCIA
Para reducir el riesgo de incendio, descargas eléctricas
o heridas al usar su electrodoméstico, siga las
precauciones básicas, incluyendo lo siguiente:
t
3FWJTFUPEPTMPTCPMTJMMPTQBSBBTFHVSBSTFEFRVF
FTUÏOWBDÓPT-PTBSUÓDVMPTDPNPDMJQTGØTGPSPT
QMVNBTNPOFEBTZMMBWFTQVFEFOEB×BSTVTFDBEPSB
PTVTQSFOEBT-PTPCKFUPTJOGMBNBCMFTUBMFTDPNP
FODFOEFEPSFTPGØTGPSPTQPESÓBOFODFOEFSTFZ
QSPWPDBSVOJODFOEJPSi no se cumple con esto se
podrá producir una explosión, incendio o muerte.
t/VODBTFRVFQSFOEBTRVFIBZBOTJEPFYQVFTUBTB
BDFJUFHBTPMJOBVPUSBTTVCTUBODJBTJOGMBNBCMFT
-BWBSMBTQSFOEBTOPFMJNJOBSÈDPNQMFUBNFOUFMPT
residuos de aceite. Si no se cumple con esto se podrá
producir una explosión, incendio o muerte.
NOTA
Consejos útiles de carga
t$PNCJOFQSFOEBTHSBOEFTZQFRVF×BTFOVOBDBSHB
t-BTQSFOEBTIÞNFEBTTFFYUFOEFSÈONJFOUSBT
se secan. No sobrecargue la secadora; las
prendas necesitan de espacio para girar y secar
adecuadamente.
t$JFSSFMBTDSFNBMMFSBTHBODIPTZDPSEPOFTQBSB
prevenir que estos artículos se enganchen o enreden
en otras prendas.
Secado a
máquina
Seco
Planchado permanente
/
antiarrugas
Normal
Etiquetas de cuidado de las telas
Ajuste
de calor
Alto
Mediano
Bajo
Sin calor/ai
Suave/
delicado
No secar
a máquina
No secar
(utilizado junto
a “no lavar”)
CÓMO USAR
Filtro de
pelusa
Uso de la tapa
Debajo de la tapa hay dos pequeños espacios de
guardado. Utilice uno de ellos para guardar los manuales
de lavado. Utilice el otro espacio para:
t(VBSEBSMPTPCKFUPTRVFSFUJSFEFMPTCPMTJMMPTNJFOUSBT
organiza la colada
t(VBSEBSDBMDFUJOFTTVFMUPTIBTUBFODPOUSBSTVQBSFKB
t(VBSEBSEFNBOFSBTFHVSBTVUFMÏGPOPPMMBWFTNJFOUSBT
organiza o dobla la ropa sobre la tapa
Para abrir la tapa, tire de ella hacia arriba.
NOTA
/PJOUFOUFMFWBOUBSMBUBQBNÈTEFHSBEPT

37
ESPAÑOL
Uso de la función LG EasyLoad™
1VFSUBCBUJFOUF
Utilice la puerta batiente para la descarga o carga de
ropa voluminosa, ya que permite un fácil acceso al
tambor.
Para abrir la puerta batiente, inserte los dedos en el
hueco de la manivela en la parte superior de la puerta,
en el lado opuesto a las bisagras, y tire de la puerta para
abrirla.
W
ADVERTENCIA
Con la puerta abierta, si presiona los dos botones de
enclavamiento, podría caerse la puerta.
Si no se cumple con esta advertencia se podran producir
heridas graves.
W
ADVERTENCIA
t/PDPMPRVFPCKFUPTQFTBEPTOJTFBQPZFTPCSFMB
QBSUFTVQFSJPSEFMBQVFSUBBCJFSUB
t/PJOUFOUFBCSJSMBQVFSUBEFUJQPDFTUPNÈTEF
grados.
La secadora podría volcarse hacia delante y causarle
lesiones personales o daños materiales.
Puerta de tipo cesto
Utilice la puerta de tipo cesto al cargar la secadora. Ésta
actúa como un conducto para ayudarle a colocar la ropa
en el tambor y evitar que las prendas caigan al suelo.
También resulta de utilidad para la descarga de algunas
prendas pequeñas, y evita que el resto de la colada caiga
al suelo
Para abrir la puerta de tipo cesto, presione y suelte en
el centro del hueco de la manivela ubicada en la parte
superior de la puerta y tire de la puerta hacia delante.
Asegúrese de introducir la ropa correctamente en el
tambor antes de cerrar la puerta.
W
ADVERTENCIA
t5FOHBDVJEBEPBMBCSJSZDFSSBSMBQVFSUB-PTEFEPTZ
las manos podrían quedar enganchados en la puerta
y causar daños si ésta cae hacia delante de forma
inadvertida.
CÓMO USAR
Puerta de tipo cesto
Pestillo de la puerta de tipo
cesto
Puerta batiente
NOTA
Asegúrese de que la puerta de tipo cesto esté
completamente cerrada antes de utilizar la puerta
batiente.
NOTA
Asegúrese de que el pestillo de la puerta batiente esté
completamente cerrado antes de presionar para la
apertura de la puerta de tipo cesto.
Botones de
enclavamiento

38
CÓMO USAR
Guía de ciclos
Ciclo 5JQPEFUFMB
/JWFMEF
secado
5FNQFSBUVSB
5JFNQP
.ÈT
UJFNQP
.FOPT
tiempo
Cuidado
de
arrugas
5VSCP
4UFBN
Sonido de
secado
IÞNFEP
3FEVDDJØO
estática
&MBIPSSP
de
FOFSHÓB
Steam
Fresh
TM
Acolchados, camisas,
pantalones (excepto prendas
muy delicadas)
Apagado
Medio Alta
Regulable Regulable
Steam
Sanitary
TM
Acolchados, ropa de
cama, ropa de niños.
Apagado Alta
Anti
Bacterial
No utilizar este ciclo
con prendas delicadas.
Muy Seco Alta
Poca Carga
(Small
Load)
Sólo prendas normales y
de algodón/tipo toallas
NÈYBQSPYLH
Normal seco
Alta
Regulable
Ropa de
cama
(
Bedding)
Acolchados, almohadas,
camisas.
Normal seco
Media
55
Regulable
Secado
Intenso
(Heavy
Duty)
Vaqueros, prendas
pesadas.
Normal seco
Alta
Regulable
Normal
(Normal)
Ropa de trabajo, pana,
etc.
Normal seco
Media
Regulable
Planchado
Perm.
(Perm.
Press)
Prendas sintéticas,
planchado permanente.
Normal seco
Baja
Regulable
Toallas
(Towels)
Prendas vaqueras,
toallas, algodón
resistente.
Normal seco
Medio Alta 55
Regulable
3PQBEF
Portiva
(Sportswear)
Ropa deportiva Apagado
Delicado
(Delicates)
Lencería, sábanas,
blusas
Normal seco
Baja
Regulable
Secado
Rápido
(Speed Dry)
Para poca carga con
tiempos de secado
cortos.
Apagado
Alta
Regulable Regulable
Secado Por
Aire
(Air Dry)
Para prendas que no
precisan calor, por
llevar plástico o goma
Apagado
Sin
Calor
Regulable
Ciclos de secado con sensor (sensor dry)
Los ciclos de secado con sensor utilizan el sistema
exclusivo de sensor doble de LG para detectar y
comparar el nivel de humedad en las prendas y en
el aire, y programar el tiempo de secado del modo
necesario para asegurar resultados superiores. La
secadora ajusta automáticamente el nivel de sequedad
y temperatura del ajuste recomendado para cada ciclo.
El tiempo restante estimado se mostrará en la pantalla.
Descarga
Si ha descargado un ciclo a través de la función Tag
On, el mismo se almacenará en la posición de ciclo
descargado. Escoja el ciclo descargado para ponerlo en
funcionamiento.
Ciclos de secado manual (manual dry)
Use los ciclos de secado manual para seleccionar una
cantidad especifica de tiempo y temperatura de secado.
Cuando se selecciona el ciclo de secado manual, la
pantalla de Tiempo Restane Estimado (Estimated Time
Remaining) muestra el tiempo restante real en su ciclo.
Puede cambiar el tiempo real en el ciclo apretando Más
Tiempo (More Time) o Menos Tiempo (Less Time).
NOTA
Para proteger sus prendas, no todos los niveles,
temperatura u opciones están disponible con cada
ciclo. Consulte la HVÓBEFDJDMPT para los detalles.
$FSUJGJDBEPQPS/4'
La fundación NSF International certifica que
el ciclo Anti Bacterial reduce en un 99,9%
las bacterias del lavado, evitando que éstas
se transmitan en la siguiente carga a lavar.
= configuración por defecto
Å
= opción permisible de

39
ESPAÑOL
CÓMO USAR
Funciones especiales
Los botones de opción también activan las funciones especiales,
JODMVZFOEP4&(630"136&#"%&/*º04$IJME-PDL4&$"%0
&/1"33*--"3BDL%SZZ*-6.*/"$*»/%&-5".#03%SVN
Light).Seleccione la opción deseada presionando el botón.
Al pulsar y mantener presionado el botón se activarán las
características especiales marcadas con el asterisco (*), tales
como Seguro a prueba de niños.
* SECADO EN PARRILLA (Rack Dry)
6TFFMDJDMP4&$"%0&/1"33*--"3BDL%SZDPOBSUÓDVMPT
tales como suéteres de lana, sedas, y lencería, que se deberían
secar en posición horizontal. También se puede usar SECADO
&/1"33*--"3BDL%SZDPOBSUÓDVMPTRVFOPEFCFOTFDBSTF
girando, tales como calzado deportivo o animales de peluche.
Para instalar el estante de secado
.BOUFOJFOEPBCJFSUBMBQVFSUBEFMBTFDBEPSBEFTMJDFFM
estante en el tambor de la secadora.
"TFHÞSFTFEFRVFFTUÏBTFOUBEPVOJGPSNFNFOUFTPCSFFM
borde interior de la puerta y descanse horizontalmente
sobre el interior de la secadora.
* CERRADURA A PRUEBA DE NIÑOS (Child Lock)
Utilice esta opcion para evitar un uso no deseado de la secadora o para evitar
modificaciones en las configuraciones de ciclo mientras la secadora esta
funcionando. Presione y sostenga los botones Reducción Estática (Reduce
4UBUJDBMNJTNPUJFNQPEVSBOUFTFHVOEPTQBSBBDUJWBSPEFTBDUJWBSMB
GVODJPO$FSSBEVSBB1SVFCB%F/J×PT$IJME-PDL&MJDPOPEFCMPRVFPQPESB
verse en la pantalla y todos los controles quedaran desactivados.
Cuando se ha fijado el seguro infantil, aparecerá el indicador de seguro
infantil y se desactivarán todos los botones excepto el botón de Encendido/
Apagado (Power).
Configuraciones del ciclo y opciones
Los ciclos de secado con sensor (sensor dry) tienen ajustes
preprogramados que se seleccionan automaticamente. Los ciclos de
csecado manual (manual dry) tienen ajustes predeterminados, pero
pueden Personalizarse usando los botones de ajustes de ciclos. Apriete
el botón de esa opción para ver y seleccionar otros ajustes.
Nibel De Secado (Dry Level)
Selecciona el nivel de sequedad para el ciclo. Apriete el boton de
Nivel De Secado (Dry Level) varias veces para navegar por los ajustes
disponibles.
t&TUBPQDJPOFTUBEJTQPOJCMFVOJDBNFOUFFOMPTDJDMPTEFTFDBEPDPO
sensor (sensor dry).
t-BTFDBEPSBBKVTUBSBFMUJFNQPEFDJDMPBVUPNBUJDBNFOUF
Al seleccionar Más Seco (More Dry) o Muy Seco (Very Dry) se
incrementara el tiempo del ciclo, mientras que Humedo Seco (Damp
Dry) o Menos Seco (Less Dry) disminuira el tiempo del ciclo.
t6TFVOBKVTUF)VNFEP4FDP%BNQ%SZP.FOPT4FDP-FTT%SZFO
los articulos que desee planchar.
Control Del Temperatura (Temp. Control)
Regula el ajuste de temperatura desde Ultra Bajo (Ultra Low) a Alto
(High). Esto permite el cuidado preciso de sus telas y prendas. Apriete
el boton Control Del Temperatura (Temp. Control) varias veces para
navegar por los ajustes disponibles.
SECADO DE TIEMPO (Time Dry)
-FQFSNJUFTFMFDDJPOBSFMUJFNQPEFTFDBEPNBOVBMNFOUFEFB
NJOVUPTFOJODSFNFOUPTEFNJOVUPT6TFFTUBPQDJPOFODBSHBT
pequenas o para eliminar arrugas. Use los botones de Más Tiempo/
Menos Tiempo (More Time/Less Time) para anadir o reducir el tiempo
EFTFDBEPFOJODSFNFOUPTEFNJOVUP
Su secadora dispone de varias opciones de ciclo adicionales, las cuales
personalizan los ciclos para satisfacer sus necesidades individuales.Ciertos
botones de opción también incorporan una función especial (vea la
siguiente página para obtener mayor información) que puede activarse
BQSFUBOEPZNBOUFOJFOEPBQSFUBEPFTFCPUØOEFPQDJØOQPSTFHVOEPT
Para añadir opciones de ciclo a un ciclo:
&ODJFOEBMBTFDBEPSBZHJSFMBQFSJMMBTFMFDUPSBEFDJDMPTQBSB
seleccionar el ciclo deseado.
6TFMPTCPUPOFTEFQSPHSBNBDJØOEFDJDMPQBSBGJKBSMPTBKVTUFTQBSB
ese ciclo.
"QSJFUFFMMPTCPUØOFTEFPQDJØOEFDJDMPQBSBMBPQDJØORVFEFTFB
añadir. Aparecerá en la pantalla un mensaje de confirmación.
"QSJFUFFMCPUØO*/*$*01"64"45"351"64&QBSBJOJDJBSFMDJDMP-B
secadora iniciará automáticamente.
Cuidado De Arrugas (Wrinkle Care)
Al seleccionar esta opción, hará girar la carga periódicamente por
VOQMB[PEFIBTUBIPSBTEFTQVÏTEFMDJDMPTFMFDDJPOBEPPIBTUB
que se abra la puerta. Esto es de ayuda para prevenir la formación de
arrugas cuando no le sea posible retirar las prendas de la secadora
inmediatamente.
Spitido Encendido/Apagado (Signal On/Off)
Para apagar el pitido, presione el botón. Presione para volver a
encender el pitido.
Sonido De Secado Húmedo (Damp Dry Signal)
Con esta opción, la secadora hará sonar la alarma cuando la carga está
TFDB&TUBGVODJØOMFQFSNJUFSFUJSBSFMMPTBSUÓDVMPTMJWJBOPTRVF
seca(n) rápidamente o que desea planchar o colgar mientras aún se
encuentran húmedos. Presione y sostenga el boton Reducción Estática
3FEVDF4UBUJDEVSBOUFTFHVOEPTQBSBBDUJWBSPEFTBDUJWBS4POJEP
Desecado Húmedo (Damp Dry Signal).
NOTA
Para proteger las prendas, no todos los niveles de secado,
temperatura u opción están disponibles en todos los ciclos. Vea la
(VÓBEFDJDMPT para obtener más detalles.
NOTA
$FSSBEVSBB1SVFCB%F/J×PT$IJME-PDLTFNBOUJFOFEFTQVÏT
del fin del ciclo. Si desea desactivar esta función, presione y
TPTUFOHBTFHVOEPTFMCPUØO
Reducción Estática (Reduce Static)
.
NOTA
NUNCA seque a máquina una carga de ropa con la bandeja
instalada. Cuando la bandeja está instalada, el tambor
girará de manera habitual, pero la bandeja no se moverá.
Asegúrese de que todas las prendas a secar permanezcan
por completo sobre la bandeja y no se caigan o no sean
arrastradas fuera por el tambor en funcionamiento.
Asegúrese de extraer la bandeja luego de su uso.

40
CÓMO USAR
Programa personalizado
Si tiene una combinacion especial de ajustes que usa
con frecuencia, puede guardar estos ajustes a manera
de programa personalizado.
* Para guardar un programa personalizado:
&ODJFOEBMBTFDBEPSBZHJSFMBQFSJMMBTFMFDUPSBEF
ciclos para seleccionar el ciclo deseado.
6TFMPTCPUPOFTEFQSPHSBNBDJØOEFDJDMPQBSBGJKBS
los ajustes para ese ciclo.
"QSJFUFFMMPTCPUØOFTEFPQDJØOEFDJDMPQBSBMB
opción que desea añadir. Aparecerá en la pantalla un
mensaje de confirmación.
"QSJFUFZNBOUFOHBBQSFUBEPFMCPUØO1SPHSBNB
Personalizado (Custom Program).
Para recuperar un programa personalizado:
&ODJFOEBMBTFDBEPSB
"QSJFUFFMCPUØO1SPHSBNB1FSTPOBMJ[BEP$VTUPN
Program).
"QSJFUFFMCPUPO*OJDJP1BVTB4UBSU1BVTFQBSBJOJDJBS
el ciclo.
Funciones especiales (cont.)
DE AHORRO DE ENERGÍA ENERGY SAVER
Esta opción le permite reducir el consumo de energía en
el ciclo Normal, dependiendo del tamaño de la carga.
El tiempo de secado cambiará cuando se seleccione el
ahorro de energía.
DRUM LIGHT ILUMINACIÓN DEL TAMBOR
El tambor está equipado con una luz LED azul que se
ilumina cuando la secador es encendida. La luz de apaga
automáticamente cuando la puerta se cierra y el ciclo
inicia.
Para encender la luz durante el ciclo, presione y
mantenga sostenido el botón de RACK DRY (Extra
enjuague) durante tres segundos. La luz del tambor se
iluminará y luego se apagará automáticamente después
de cuatro minutos.
NOTA
Puede guardar solo un programa personalizado
a la vez. Al apretar y mantener apretado el botón
Programa Personalizado (Custom Program),
reemplazará cualquier programa personalizado que
haya guardado anteriormente.

41
ESPAÑOL
Funciones de vapor
La nueva tecnologia de vapor de LG le permite inyectar
las telas con un chorro giratorio de vapor caliente para
refrescar las prendas, reducir la estatica. Simplemente
seleccione el ciclo Steam Fresh™ o Steam Sanitary™. o
agregue la opción vapor a los ciclos seleccionados.
Cómo usar el ciclo Steam Fresh™
Steam Fresh™ utiliza solo el poder del vapor para
rápidamente reducir arrugas y olores de las telas. Da
nueva vida a las prendas arrugadas que han estado
guardadas por mucho tiempo Steam Fresh™ También
puede usarse para reducir los olores y remover los
pliegues de las perchas en las prendas.
Para usar el ciclo Steam Fresh™:
&ODJFOEBMBTFDBEPSBZHJSFMBQFSJMMBTFMFDUPSBBMDJDMP
4UFBN'SFTI.
1BSBBHSFHBSVOBGVODJPOPQDJPOBMTFMFDDJPOF
$VJEBEP%F"SSVHBT8SJOLMF$BSF
%FQFOEJFOEPEFMBDBSHBDBOUJEBEEFQSFOEBT
puede modificarse el tiempo de vapor presionando
los botones Más Tiempo (More Time) o Menos Tiempo
(Less Time)
1SFTJPOFFMCPUØOEF*OJDJP1BVTB4UBSU1BVTFQBSB
iniciar el ciclo.
Cómo usar el ciclo Steam Sanitary
TM
El nuevo ciclo Steam Sanitary
TM
es idóneo para la
higienización rápida y sencilla de elementos que no
pueden lavarse, utilizando sólo el poder del vapor.
Recomendamos utilizar este ciclo para tejidos de
algodón y poliéster. (NO use para espuma de uretano,
plumas o prendas delicadas).
Cómo usar las opciónes de vapór
La opcíon Reducción Estática (Reduce Static) nyecta
vapor al final del ciclo de secado para reducir la
electricidad estatica producida por la friccion de telas.
Modifique el tiempo del ciclo presionando el botón Más
Tiempo (More Time) o Menos Tiempo (Less Time). La
pantalla muestra la cantidad de prendas recomendadas,
QPSFKFNQMPØ
TurboSteam™ ayuda a prevenir el sobresecado de la
ropa inyectando vapor durante el proceso de secado.
La función Steam Shield extiende la vida útil de las
prendas.
Para agregar vapor a un ciclo estándar:
&ODJFOEBMBTFDBEPSBZHJSFMBQFSJMMBTFMFDUPSBBMDJDMP
deseado.
6UJMJDFMPTCPUPOFTEFDPOGJHVSBDJØOEFDJDMPQBSB
ajustar las configuraciones para ese ciclo.
1SFTJPOFFMCPUØOWBQPSQBSBMBPQDJØORVFMFHVTUBSJB
agregar. Luego ajuste el tamaño de carga utilizando
los botones Más Tiempo (More Time) o Menos Tiempo
(Less Time).
1SFTJPOFFMCPUØOEF*OJDJP1BVTB4UBSU1BVTFQBSB
iniciar el ciclo.
NOTA
t%FQFOEJFOEPEFMUBNB×PEFMBDBSHBQVFEF
modificar el tiempo del ciclo presionando los
botones More Time (Más Tiempo) o Less Time
.FOPT5JFNQP-BQBOUBMMBNVFTUSBP
.
4FMFDDJPOFQBSBUSFTPNFOPTQSFOEBTTFMFDDJPOF
5 para cuatro o cinco prendas; y seleccione
para una carga grande, una prenda voluminosa
como ser una frazada, o para remover los pliegues de
las perchas.
NOTA
t
Cuando se selecciona Secado Con Sensor (Sensor
Dry) con la opcíon Reducción Estática (Reduce Static)
o Turbo Steam™. no puede seleccionarse Nivel De
Secado (Dry Level) de Menos (Less) o Humedo (Damp).
t-BTPQDJPOFT3FEVDDJØO&TUÈUJDB3FEVDF4UBUJD
también pueden seleccionarse durante los ciclos
Tiempo De Secado(Time Dry).
t%FTQVÏTEFTFMFDDJPOBSMBPQDJØO7BQPSFO5JNF
Dry, los botones Más Tiempo (More Time) o Menos
Tiempo (Less Time) TIME cambiarán el tiempo de
vapor ÚNICAMENTE.
t%FTQVFTEFQSFTJPOBS**OJDJP1BVTB4UBSU1BVTFMPT
botones Más Tiempo (More Time) o Menos Tiempo
(Less Time) Time no funcionarán.
CÓMO USAR

42
Guía de ciclo de vapor
7BQPS
5JFNQP
programado
QPSMBGÈCSJDB
Control
temp.
/JWFMEF
Secado
&TUBEP
de tela
5JQPEFUFMB
Cantidad
.ÈY
Steam Sanitary
5.
.JO Seca
Camisas, Ropa de
cama
$BNJTBTDBEB
Ropa de niños
*CT
4UFBN'SFTI
5.
.JO
Å
Seca
Edredón $BNJTBTDBEB
Camisas* 5 cada
0QDJØOEF7BQPS
+
3FEVDDJØO
estática
3FEVDF4UBUJD
Siga el ciclo
Seleccionado
Å
Mojada
Varía según el
ciclo seleccionado
*CT
"35Ó$6-04
5VSCP4UFBN
Å
Mojada
Varía según el
ciclo seleccionado
*CT
"35Ó$6-04
4FDBEP5FNQPSJ[BEP
+
3FEVDDJØO
estática
3FEVDF4UBUJD
.JO
Å
Mojada
Varía según el
ciclo seleccionado
*CT
"35Ó$6-04
$BNJTBNF[DMBEFBMHPEØOQPMJÏTUFS&YDFQUPUFMBTFTQFDJBMNFOUFEFMJDBEBT
t$VBOEPTFUBQBOFMGJMUSPEFQFMVTBTPFMDPOEVDUPEFTBMJEBMBTPQDJPOFTEFWBQPSOPEBSÈOMPTSFTVMUBEPT
adecuados.
t1BSBNFKPSFTSFTVMUBEPTMBTQSFOEBTEFCFOTFSEFUBNB×PTZEFUJQPTEFUFMBTJNJMBSFT/PTPCSFDBSHVFMBTFDBEPSB
Funciones de vapor (cont.)
W
ADVERTENCIA
t/PBCSBMBQVFSUBEFMBTFDBEPSBEVSBOUFDJDMPTEF
WBQPS Si no se cumple con esto se podrá producir una
explosión, incendio, quemaduras o muerte.
t/PMMFOFFMBMJNFOUBEPSEFWBQPSDPOHBTPMJOB
TPMWFOUFTQBSBMJNQJF[BFOTFDPVPUSBTTVTUBODJBT
JOGMBNBCMFTPFYQMPTJWBTSi no se cumple con esto se
podrá producir una explosión, incendio, quemaduras o
muerte.
t/PUPRVFMBCPRVJMMBEFWBQPSEFMUBNCPSEVSBOUF
PEFTQVÏTEFMDJDMPEFWBQPS Si no se cumple con
esta advertencia se podrán producir heridas graves o
muerte.
NOTA
t1VFEFRVFFMWBQPSOPTFBDMBSBNFOUFWJTJCMFEVSBOUFMPT
ciclos de vapor. Esto es normal.
t/PVTFFMDJDMPSteam Fresh™ con elementos como lana,
manta de lana, camperas de cuero, seda, ropa húmeda,
lencería, productos de espuma o mantas eléctricas.
t1BSBNFKPSFTSFTVMUBEPTMBTQSFOEBTEFCFOTFSEFUBNB×PT
y de tipos de tela similares. No sobrecargue la secadora.
t$VBOEPTFUBQBFMGJMUSPDPOEVDUPMBPQDJØOWBQPSQVFEF
no tener resultados óptimos.
t$VBOEPMBGVODJØOWBQPSFTUÈTJFOEPVUJMJ[BEBFMUBNCPS
se detendrá para permitir que el vapor permanezca en el
tambor.
t&MBMJNFOUBEPSEFWBQPSEFCFMMFOBSTFDPOBHVBIBTUBMB
línea MAX. De otro modo, se mostrará un mensaje de Error.
CÓMO USAR

43
ESPAÑOL
Utilizar la Función Tag On
El icono Tag On.
Posición Tag On
Busque el icono Tag On junto a la pantalla LED
del panel de control. Aquí deberá colocar el
smartphone cuando utilice la función Tag On con
la aplicación LG Smart Laundry & DW.
Para utilizar la función Tag On, coloque el smartphone
de modo que la antena NFC de la parte trasera del
smartphone coincida con el icono Tag On del aparato.
Si no conoce la posición de su antena NFC, mueva el
smartphone ligeramente de forma circular hasta que la
aplicación verifique la conexión
Para utilizar la función NFC en esta máquina se necesita
un smartphone con un cierto nivel de función de
reconocimiento de NFC.
Debido a las características de NFC, la transmisión puede
fallar:
tTJMBEJTUBODJBEFUSBOTNJTJØOFTFYDFTJWB
tTJFMUFMÏGPOPUJFOFVOBEIFTJWPNFUÈMJDPPVOBGVOEB
gruesa
tTJFMUFMÏGPOPOPTPQPSUB/'$
Pulse [
] en la aplicación LG Smart Laundry&DW
para acceder a una guía más detallada sobre el uso de la
función Tag On.
Tag On
-BGVODJØO5BH0OMFQFSNJUFVUJMJ[BSDØNPEBNFOUF
las funciones LG Smart Diagnosis™, Descarga de
ciclos, Estadísticas de lavado y Ajuste de ciclo Tag On
para comunicarse con su aparato desde su propio
smartphone. Para utilizar las funciones Tag On:
%FTDBSHVFMBBQMJDBDJØO-(4NBSU-BVOESZ%8BTV
smartphone.
"DUJWFMBGVODJØO/'$$PNVOJDBDJØOEF$BNQP
Cercano) en el smartphone.
La función Tag On solo se puede usar con smartphones
equipados con la función NFC y con sistemas operativos
(SO) Android.
Activación de la función NFC del smartphone
"DDFEBBMNFOÞ"KVTUFTEFM
smartphone y seleccione
Compartir y conectar bajo
INALÁMBRICO Y REDES.
Ponga NFC y Direct/
Android Beam en ON,
y seleccione NFC.
.BSRVF6TBSMFDUVSBZ
FTDSJUVSBSFDJCJS11
NOTA
El proceso de activación de NFC puede variar
dependiendo del fabricante del smartphone y la
versión del SO Android. Para más información,
consulte el manual del smartphone.
CÓMO USAR
1
2

44
5PRVFFMMPHPUJQP5BH0O
$VBOEPBQBSF[DBVOB
pantalla Tag On (como se
muestra a la derecha), ponga
el smartphone sobre el icono
Tag On del lado derecho
del panel de control de la
lavadora.
4JOPFTSFDPOPDJEPUPRVF
[
] en el ángulo superior
derecho de la pantalla Tag
On de la aplicación LG Smart
Laundry&DW para ver una
guía detallada. (Esto puede
ocurrir debido a las diferentes
posiciones de la antena NFC
para cada teléfono.)
$PNQSVFCFMPTSFTVMUBEPT
EFMEJBHOØTUJDPZMBT
soluciones.
.VFTUSBMPTSFTVMUBEPT
diagnósticos de los ciclos
utilizados más recientemente.
Las imágenes solo sirven como referencia. La
aplicación LG Smart Laundry&DW real puede ser
diferente.
Utilizar Tag On con Aplicaciónes
Toque el logotipo Tag On del dispositivo LG con su
teléfono inteligente equipado con NFC para utilizar
las aplicaciones LG Smart Laundry&DW:Diagnóstico
inteligente LG, descarga de ciclos, estadísticas de lavado,
y set de ciclos Tag On.
Diagnóstico Tag On
*OTUBMFMBBQMJDBDJØO-(4NBSU-BVOESZ%8FOVO
TNBSUQIPOFFRVJQBEPDPO/'$
*OTUBMFMBBQMJDBDJØOEFTEFFM1MBZTUPSFZFKFDÞUFMB
4FMFDDJPOF5BH0O
-BGJDIBEFJOJDJPZUPEPTMPT
iconos de la parte inferior de
la pantalla están disponibles
para su uso.
4FMFDDJPOF%JBHOØTUJDP5BH
0O
CÓMO USAR

45
ESPAÑOL
Diagnóstico con el Centro de Asistencia
Si recibe un diagnóstico ya sea de la aplicación de Tag
On Diagnosis (Diagnóstico Tag On) o de Smart Diagnosis
(Diagnóstico Inteligente) que no es claro o que lo
dirige a llamar al Centro de Servicios LG, siga estas
instrucciones:
1. Seleccione Pulse para llamar
BMDFOUSPEFBTJTUFODJBEF-(
en la pantalla de resultados
EFMEJBHOØTUJDPJOUFMJHFOUF
4FMFDDJPOFVOQBÓTZQVMTF"DFQUBS
"DFQUFMPTUÏSNJOPTZDPOEJDJPOFTEFMBQPMÓUJDBEF
VTPZQSJWBDJEBEQVMTBOEPi"DFQUPw
*OUSPEV[DBFOFMDBNQPQBSBFMMPEJTQVFTUP
TVOÞNFSPEFUFMÏGPOP6UJMJDFFTUFOÞNFSPEF
UFMÏGPOPDVBOEPIBCMFDPOFMSFQSFTFOUBOUFEFM
TFSWJDJPBMDMJFOUFEF-(QBSBRVFFMMPTQVFEBO
FODPOUSBSMPTEBUPTEFMEJBHOØTUJDPJOUFMJHFOUF
1VMTFFMCPUØO-MBNBSQBSB
conectarse con el centro de
BTJTUFODJBEF-(
Las imágenes solo sirven como referencia. La
aplicación LG Smart Laundry&DW real puede ser
diferente.
CÓMO USAR

46
5 Seleccione un ciclo para su
descarga.
5BNCJÏOQVFEFDPNQSPCBS
los ciclos existentes ya
descargados.
5PRVFFMMPHPUJQP5BH0O
$VBOEPBQBSF[DBVOB
pantalla Tag On (como se
muestra a la derecha), ponga
el smartphone sobre el icono
Tag On del lado derecho
del panel de control de la
lavadora.
4JOPFTSFDPOPDJEPUPRVF
[
] en el ángulo superior
derecho de la pantalla Tag
On de la aplicación LG Smart
Laundry&DW para ver una
guía detallada. (Esto puede
ocurrir debido a las diferentes
posiciones de la antena NFC
para cada teléfono.)
&MOVFWPDJDMPTFIB
EFTDBSHBEPDPOÏYJUP
$PNQSVFCFFMDJDMPFOMB
posición de ciclo Descargado
del panel de control.
Las imágenes solo sirven como referencia. La
aplicación LG Smart Laundry&DW real puede ser
diferente.
Descarga del Ciclo Tag On
El ciclo está disponible en la posición de ciclo
Descargado (Downloaded) del panel de control hasta
que se descarga otro ciclo.
*OTUBMFMBBQMJDBDJØO-(4NBSU-BVOESZ%8FOVO
TNBSUQIPOFFRVJQBEPDPO/'$
*OTUBMFMBBQMJDBDJØOEFTEFFM1MBZZFKFDÞUFMB
4FMFDDJPOF5BH0O
-BGJDIBEFJOJDJPZUPEPTMPT
iconos de la parte inferior de
la pantalla están disponibles
para su uso.
4FMFDDJPOF%FTDBSHBEF
DJDMPT5BH0O
5PRVFFMMPHPUJQP5BH0O
$VBOEPBQBSF[DBVOB
pantalla Tag On (como se
muestra a la derecha), ponga
el smartphone sobre el icono
Tag On del lado derecho
del panel de control de la
lavadora.
4JOPFTSFDPOPDJEPUPRVF
[
] en el ángulo superior
derecho de la pantalla Tag
On de la aplicación ‘LG Smart
Laundry&DW’ para ver una
guía detallada. (Esto puede
ocurrir debido a las diferentes
posiciones de la antena NFC
para cada teléfono.)
CÓMO USAR

47
ESPAÑOL
Estadísticas de lavado
Estadística de lavado puede monitorear los resultados
de la Detección de Caudal (Flow Sense™) en caso que el
TJTUFNBEFEFTBHàFEFTVWJWJFOEBFTUÏBUBTDBEP
Las estadísticas de lavado también le proporcionan
detalles de los últimos diez ciclos.
4FMFDDJPOF5BH0ODPOMPT
iconos superiores o los
JOGFSJPSFT
4FMFDDJPOF&TUBEÓTUJDBTEF
MBWBEP
5PRVFFMMPHPUJQP5BH0O
$VBOEPBQBSF[DBVOB
pantalla Tag On (como se
muestra a la derecha), ponga
el smartphone sobre el icono
Tag On del lado derecho
del panel de control de la
lavadora.
4JOPFTSFDPOPDJEPUPRVF
[
] en el ángulo superior
derecho de la pantalla Tag
On de la aplicación LG Smart
Laundry&DW para ver una
guía detallada. (Esto puede
ocurrir debido a las diferentes
posiciones de la antena NFC
para cada teléfono.)
El estado de DETECCIÓN DE CAUDAL
.BSRVFQPSGBWPSFMFTUBEP
EF%&5&$$*»/%&$"6%"-
FOMBQBOUBMMBEF&TUBEÓTUJDBT
EFMBWBEP
4JFMFTUBEPNVFTUSBRVF
el sistema de salida de su
WJWJFOEBFTUÈCMPRVFBEP
QVMTFFMCPUØO$POTFKPTEF
WFOUJMBDJØO$POTVMUFFO
MBTQÈHJOBTEFFTUF
NBOVBMNÈTJOGPSNBDJØO
BDFSDBEFMBWFOUJMBDJØOEF
la secadora. Consulte en
MBTQÈHJOBTEFFTUF
NBOVBMNÈTJOGPSNBDJØO
BDFSDBEF'MPX4FOTF
Las imágenes solo sirven como referencia. La
aplicación LG Smart Laundry&DW real puede ser
diferente.
CÓMO USAR

48
Ejecutar Ciclo de Nuevo
4FMFDDJPOFFMCPUØO&KFDVUBS
DJDMPEFOVFWP
&M$JDMP.ÈT6TBEPPFM$JDMP
Más Reciente puede ser
iniciado inmediatamente
seleccionando el botón
Ejecutar Ciclo de nuevo
5PRVFFMMPHPUJQP5BH0O
$VBOEPBQBSF[DBVOB
pantalla Tag On (a la derecha),
ponga el smartphone sobre
el icono Tag On del lado
derecho del panel de control
de la secadora.
4JOPFTSFDPOPDJEPUPRVF
[
] en el ángulo superior
derecho de la pantalla Tag
On de la aplicación LG Smart
Laundry&DW para ver una
guía detallada. (Esto puede
ocurrir debido a las diferentes
posiciones de la antena NFC
para cada teléfono.)
$PNQSVFCFTJTFIBJOJDJBEP
el secado con el ciclo
seleccionado.
"QBSFDFMBQBOUBMMBRVFTF
muestra a continuación
y el secado comienza
inmediatamente en el ciclo
seleccionado.
Las imágenes solo sirven como referencia. La
aplicación LG Smart Laundry&DW real puede ser
diferente.
CÓMO USAR

49
ESPAÑOL
Ajuste de Ciclo Tag On
Ajuste de Ciclo Tag On le permite ajustar
automáticamente el ciclo y su configuración según las
necesidades su ropa.
4FMFDDJPOF5BH0ODPOMPT
iconos superiores o lo iconos
JOGFSJPSFT
4FMFDDJPOF"KVTUFEF$JDMPT
5BH0O
5PRVFFMMPHPUJQP5BH0O
$VBOEPBQBSF[DBVOB
pantalla Tag On (a la derecha),
ponga el smartphone sobre
el icono Tag On del lado
derecho del panel de control
de la secadora.
4JOPOPFTSFDPOPDJEPUPRVF
[
] en el ángulo superior
derecho de la pantalla Tag
On de la aplicación LG Smart
Laundry&DW para ver una
guía detallada. (Esto puede
ocurrir debido a las diferentes
posiciones de la antena NFC
para cada teléfono.)
4FMFDDJPOFVOBDBUFHPSÓBEF
TFDBEPTFHÞOFMQSPCMFNBFO
FMRVFEFTFBRVFTFDFOUSFMB
NÈRVJOB
5SBTTFMFDDJPOBSVOB
DBUFHPSÓBBQBSFDFSÈVOB
MJTUBEFDJDMPTFTQFDÓGJDPT
4FMFDDJPOFFMDJDMPTFHÞO
sus necesidades.
$VBOEPBQBSF[DBVOB
QBOUBMMB5BH0OWFSB
MBEFSFDIBQPOHBFM
TNBSUQIPOFTPCSFFMJDPOP
5BH0OEFMMBEPEFSFDIP
del panel de control de la
MBWBEPSBPTFDBEPSB
5SBTUPDBSMBNÈRVJOB
DPOFMUFMÏGPOPFMDJDMPTF
iniciará automáticamente.
$PNQSVFCFTJTFIBO
seleccionado el ciclo y los
BKVTUFTDPSSFDUPT
Las imágenes solo sirven como referencia. La
aplicación LG Smart Laundry&DW real puede ser
diferente.
CÓMO USAR

50
MANTENIMIENTO
MANTENIMIENTO
Limpieza regular
W
ADVERTENCIA
Para reducir el riesgo de incendio, descargas eléctricas o
heridas al usar su electrodoméstico, siga las precauciones
básicas, incluyendo lo siguiente:
t%FTFODIVGFMBTFDBEPSBBOUFTEFMJNQJBSMBNJTNBQBSB
FWJUBSFMSJFTHPEFEFTDBSHBTFMÏDUSJDBT
Si no se cumple con esta advertencia se podrán producir
heridas graves, incendios, descargas eléctricas o muerte.
t"MMJNQJBSMBTFDBEPSBOVODBVUJMJDFRVÓNJDPTEFDPSUF
MJNQJBEPSFTBCSBTJWPTPTPMWFOUFT
Los mismos dañarán su aspecto.
t1BSBFWJUBSMFTJPOFTGÓTJDBTEVSBOUFFMDVJEBEPZFM
mantenimiento/limpieza, use guantes o prendas protectoras.
Limpieza del exterior
El mantenimiento adecuado de su secadora podría prolongar
su vida útil. El exterior de la unidad puede limpiarse con agua
tibia y un detergente de jabón medio, no abrasivo.
Limpie inmediatamente cualquier clase de fuga, con un trapo
suave y húmedo.
Limpieza del interior
Limpie con un paño alrededor de la abertura y el sello
de la puerta con un paño suave húmedo para prevenir la
acumulación de pelusa y polvo que podrían dañar el sello de la
puerta.
Limpie la ventanilla con un paño suave humedecido con agua
caliente y un detergente suave no abrasivo para el hogar;
luego seque con un paño.
Se puede limpiar el tambor de acero inoxidable con un
limpiador de acero inoxidable convencional, usado según
las especificaciones del fabricante. Nunca use limpiadores
abrasivos ni de lana metálica; pueden raspar o dañar la
superficie.
Limpieza alrededor y debajo de la secadora
Aspire la pelusa y polvo alrededor de la secadora y debajo
de ella con regularidad. Se debe revisar que el sistema de
conductos de ventilación no tenga acumulación de pelusa y
se debe limpiar una vez por año. Si se percibe una reducción
del flujo de aire o desempeño del secado notorios, revise
que el sistema de conductos no esté bloqueado ni tenga
obstrucciones.
Mantenimiento del sistema de conductos
Se debe revisar que el sistema de conductos de ventilación no
tenga acumulación de pelusa y se debe limpiar una vez por
año. Si se percibe una reducción del flujo de aire o desempeño
del secado notorios, revise que el sistema de conductos no
esté bloqueado ni tenga obstrucciones. Llame a un técnico o
proveedor de mantenimiento calificados.
Limpieza del filtro de pelusa
Limpie siempre las pelusas del filtro tras cada ciclo.
Para limpiarlo, tire del filtro de pelusa verticalmente.
Luego:
1BSBVOBMJNQJF[BEJBSJBSFUJSFUPEBTMBTQFMVTBTEFM
filtro con sus dedos, o
-JNQJFFMGJMUSPEFQFMVTBDPOVOBTQJSBEPSP
4JFMGJMUSPEFQFMVTBTTFIBFOTVDJBEPNVDIPPTFIB
obstruido con suavizante de tejido, lávelo en agua
caliente jabonosa y déjelo secar completamente antes
de volverlo a colocar.
NOTA
NUNCA opere la secadora sin haber colocado antes el
filtro de pelusa. NUNCA haga funcionar la secadora
con un filtro de pelusas húmedo.
NOTA
No use alcohol desnaturalizado, disolventes o
productos similares.
Nunca use limpiadores abrasivos o de lana metálica;
pueden dañar la superficie.
Filtro de
pelusa

51
ESPAÑOL
RESOLUCIÓN DE PROBLEMAS
Antes de llamar a mantenimiento
Su secadora está equipada con un sistema de monitoreo de errores automático para la detección y el diagnóstico de
problemas en una etapa temprana. Si su secadora no funciona adecuadamente o no funciona en lo absoluto, revise
lo siguiente antes de llamar a mantenimiento.
1SPCMFNB $BVTBTQPTJCMFT Soluciones
La secadora no
se enciende
t&MDBCMFFMÏDUSJDPOPFTUÈFODIVGBEP
adecuadamente.
t&MGVTJCMFEFMIPHBSFTUÈRVFNBEPFM
cortacircuitos se ha accionado, o ha
ocurrido una interrupción eléctrica.
t"TFHÞSFTFEFRVFFMFODIVGFFTUÏDPOFDUBEPEFNBOFSBTFHVSB
en un tomacorriente con conexión a tierra, que se corresponda
con la placa de clasificación.
t3FBDUJWFFMEJTZVOUPSPDBNCJFFMGVTJCMF/PBVNFOUFMB
capacidad del fusible. Si el problema se debe a una sobrecarga
de circuito, pida a un electricista calificado que solucione el
problema.
La secadora no
calienta
t&MGVTJCMFEFMIPHBSFTUÈRVFNBEPFM
cortacircuitos se ha accionado, o ha
ocurrido una interrupción eléctrica.
t4FIBBQBHBEPFMTVNJOJTUSPP
servicio de gas (solo modelos a gas).
t3FBDUJWFFMEJTZVOUPSPDBNCJFFMGVTJCMF/PBVNFOUFMBDBQBDJEBE
del fusible. Si el problema se debe a una sobrecarga de circuito, pida
a un electricista calificado que solucione el problema.
t$POGJSNFRVFMBWÈMWVMBEFDPSUFEFHBTEFMBWJWJFOEBZMBWÈMWVMBEF
corte de gas de la secadora estén completamente abiertas.
Manchas
de grasa o
suciedad en las
prendas
t4VBWJ[BEPSEFUFMBTVTBEP
incorrectamente.
t1SFOEBTMJNQJBTZTVDJBTTFDBEBT
juntas.
t1SFOEBTMJNQJBTZTVDJBTTFDBEBT
juntas.
t$POGJSNFZTJHBMBTJOTUSVDDJPOFTQSPWJTUBTDPOTVTVBWJ[BEPSEF
telas.
t"TFHÞSFTFEFVTBSTVTFDBEPSBTPMPQBSBTFDBSBSUÓDVMPTMJNQJPT
ya que los artículos sucios pueden ensuciar las prendas limpias
en la misma carga o en las subsiguientes.
t-BTNBODIBTFOSPQBTTFDBTTPOFOSFBMJEBENBODIBTRVFOPTF
eliminaron durante los procesos de lavado. Asegúrese de que
las ropas queden completamente limpias de acuerdo con las
instrucciones de su lavadora y detergente.
La pantalla
muestra los
FSSPSFTU&P
U&
t/PFTUÈGVODJPOBOEPFMDBMFGBDUPS t"QBHVFMBTFDBEPSBZMMBNFBNBOUFOJNJFOUP
Pelusa en las
prendas
t/PTFIBMJNQJBEPDPSSFDUBNFOUFFM
filtro de pelusa.
t1SFOEBTEFMBWBEPOPDMBTJGJDBEBT
adecuadamente.
t&YDFTPEFFTUÈUJDBFOMBTQSFOEBT
t-BTFDBEPSBFTUÈTPCSFDBSHBEB
t1B×VFMPTEFQBQFMQBQFMFTFUD
dejados en los bolsillos.
t"TFHÞSFTFEFMJNQJBSFMGJMUSPEFQFMVTBBOUFTEFDBEBDBSHB$PO
algunas cargas que producen altas cantidades de pelusa, puede
ser necesario limpiar el filtro durante el ciclo.
t"MHVOBTUFMBTQSPEVDFOQFMVTBTQPSFKFNQMPVOBUPBMMBEF
algodón peluda blanca) y deben secarse aparte de las prendas
que atrapan pelusa (por ejemplo: un par de pantalones de lino).
t0CTFSWFFMFYDFTPEFFTUÈUJDBFOMBTQSFOEBTEFTQVÏTEFM
secadora indicado de la sección más abajo.
t%JWJEBMBTDBSHBTHSBOEFTFODBSHBTNÈTQFRVF×BTQBSBSFBMJ[BS
el secado.
t3FWJTFMPTCPMTJMMPTNJOVDJPTBNFOUFBOUFTEFMBWBSZTFDBS
prendas.
Exceso de
estática en
las prendas
después del
secado
t/PTFVTBTVBWJ[BEPSEFUFMBPTF
usa incorrectamente.
t-BTQSFOEBTTFTFDBSPOQPS
demasiado tiempo (excesivamente
secas).
t4FDBEPEFUFMBTTJOUÏUJDBT
planchado permanente o
combinación de materiales
sintéticos.
t6TFVOTVBWJ[BEPSEFUFMBTQBSBSFEVDJSMBFMFDUSJDJEBEFTUÈUJDB
Asegúrese de seguir las instrucciones del fabricante.
t4PCSFDBSHBSVOBDBSHBEFMBWBEPQVFEFDBVTBSMBBDVNVMBDJPO
de electricidad estatica. Programe los ajustes y use un tiempo
de secado menos prolongado; o use los ciclos SECADO CON
SENSOR (SENSOR DRY).
t&TUPTNBUFSJBMFTQVFEFODBVTBSBDVNVMBDJØOEFFTUÈUJDB*OUFOUF
usar un suavizador de telas.
El tiempo de
secado no es
constante
t-PTBKVTUFTEFDBMPSFMUBNB×PEFMB
carga o la humedad de las prendas
no son constantes.
t&MUJFNQPEFTFDBEPQBSBVOBDBSHBWBSJBSÈEFQFOEJFOEPEFM
ajuste de calor, tipo de calor utilizado (eléctrico, natural, o gas
LP), el tamaño de la carga, el tipo de tela, el nivel de humedad de
las prendas y la condición de los conductos de escape y el filtro
de pelusa.
RESOLUCIÓN DE PROBLEMAS

52
Antes de llamar a mantenimiento (cont.)
1SPCMFN 1PTTJCMF$BVTFT
Solutions
Las prendas
tardan
demasiado
tiempo en
secarse
t-BDBSHBOPFTUÈDPSSFDUBNFOUF
clasificada.
t$BSHBHSBOEFEFUFMBTQFTBEBT
t
No se han programado adecuadamente
los controles de la secadora.
t4FOFDFTJUBMJNQJBSFMGJMUSPEF
pelusa.
t-PTDPOEVDUPTEFFTDBQFFTUÈO
bloqueados, sucios o el tendido de
los conductos es demasiado largo.
t&MGVTJCMFEFMIPHBSFTUÈRVFNBEPFM
cortacircuitos se ha accionado, o ha
ocurrido una interrupción eléctrica.
t-BTFDBEPSBFTUÈTPCSFDBSHBEB
t)BZNVZQPDBDBSHBFOMBTFDBEPSB
t4FQBSFMPTBSUÓDVMPTQFTBEPTEFMPTMJWJBOPT-PTBSUÓDVMPTNÈT
grandes y pesados requieren de mayor tiempo de secado.
t-BTUFMBTQFTBEBTSFRVJFSFOEFNBZPSUJFNQPEFTFDBEPZB
que tienden a retener mayor humedad. Para ayudar a reducir y
mantener tiempos de secado más constantes para telas pesadas
y de mayor tamaño, separe estos artículos en cargas más
pequeñas de un tamaño sistemático.
t6TFMPTBKVTUFTEFDPOUSPMBEFDVBEPTQBSBFMUJQPEFDBSHBRVF
esté secando.
t"TFHÞSFTFEFMJNQJBSFMGJMUSPEFQFMVTBBOUFTEFDBEBDBSHB$PO
algunas cargas que producen altas cantidades de pelusa, puede
ser necesario limpiar el filtro durante el ciclo.
t$POGJSNFRVFFMTJTUFNBEFDPOEVDUPEFFTDBQFTFFODVFOUSF
configurado correctamente y no tenga desechos, pelusa
ni obstrucciones. Asegúrese de que los reguladores de tiro
exteriores abran adecuadamente y no estén bloqueados,
atascados ni dañados.
t3FBDUJWFFMEJTZVOUPSPDBNCJFFMGVTJCMF/PBVNFOUFMB
capacidad del fusible. Si el problema se debe a una sobrecarga
de circuito, pida a un electricista calificado que solucione el
problema.
t%JWJEBMBTDBSHBTHSBOEFTFODBSHBTNÈTQFRVF×BTQBSBSFBMJ[BS
el secado.
t4JFTUÈTFDBOEPVOBDBSHBNVZQFRVF×BB×BEBBMHVOPTBSUÓDVMPT
adicionales para asegurar una acción de giro apropiada.
Las prendas
están
arrugadas
t-BTQSFOEBTTFTFDBSPOQPS
demasiado tiempo (excesivamente
secas).
t4FIBOEFKBEPMBTQSFOEBTFOMB
secadora por demasiado tiempo
una vez finalizado el ciclo.
t4FDBSFYDFTJWBNFOUFVOBDBSHBEFMBWBOEFSÓBQVFEFQSPWPDBS
arrugas en las prendas. Intente secar por un período menos
prolongado y retire los artículos mientras aún retienen una
cantidad leve de humedad.
t3FUJSFJONFEJBUBNFOUFUPEPTMPTBSUJDVMPTEFMBTFDBEPSBBMGJOBM
EFMDJDMP6TFMBPQDÓPO$6*%"%0%&"336("48SJOLMF$BSF
para continuar girando las prendas al final de un ciclo, por un
QMB[PNBYJNPEFIPSBT
Las prendas
encogen
t/PTFTJHVFOMBTJOTUSVDDJPOFTEFMB
etiqueta de la prenda.
t1BSBFWJUBSRVFMBTQSFOEBTFODPKBOTJHBDVJEBEPTBNFOUFMBT
instrucciones de cuidado de telas correspondiente a su prenda,
ya que algunas telas encogen naturalmente cuando se lavan.
Otras telas se pueden lavar, pero encogen cuando se secan en
una secadora. Use un ajuste de calor bajo o sin calor.
La pantalla
muestra el
código de error
PS
t&MDBCMFEFBMJNFOUBDJØOFTUÈNBM
conectado.
t$PNQSVFCFMBDPOFYJØOEFMDBCMFEFBMJNFOUBDJØOBMCMPRVFEF
UFSNJOBMFT$POTVMUFMBTQÈHJOBTEFFTUFNBOVBM
Gotea agua de la
boquilla cuando
comienza el ciclo
de vapor
t&TUPFTOPSNBM t&TUPFTDPOEFOTBDJØOEFWBQPS&MBHVBQBSBSÈEFHPUFBSEFTQVÏT
de un tiempo.
RESOLUCIÓN DE PROBLEMAS

53
ESPAÑOL
Antes de llamar a mantenimiento (cont.)
1SPCMFN 1PTTJCMF$BVTFT
Solutions
No se produce
vapor pero no
aparece ningún
código de error
t&SSPSEFOJWFMEFBHVB t%FTFODIVGFMBTFDBEPSBZMMBNFBMTFSWJDJPUÏDOJDP
Las prendas
siguen arrugadas
después del ciclo
Steam Fresh™
t%FNBTJBEBTQSFOEBTPQSFOEBT
muy diferentes en la secadora.
t$BSHBTQFRVF×BTEFBQSFOEBTGVODJPOBONFKPS
t$BSHVFNFOPTQSFOEBT$BSHVFQSFOEBTEFDMBTFTJNJMBS
No quedan
rayas en la ropa
después de
Steam Fresh™
t-BGVODJØOEFFTUFDJDMPFTRVJUBS
las arrugas de las telas.
t6TFVOBQMBODIBQBSBIBDFSMBTSBZBT
Las prendas
tienen estatica
después de
Reducción
estática (Reduce
Static)
t&TUPFTOPSNBM t%FQFOEFEFMOJWFMJOEJWJEVBMEFIVNFEBEEFMBQJFM
Las están muy
húmedas o muy
secas después
de Reducción
estática (Reduce
Static)
t0QDJPOFTDPSSFDUBTEFTFDBEP
no seleccionadas.
t4FMFDDJPOFFMQFTPEFMBDBSHBNBOVBMNFOUFBOUFTEF
comenzar la opcíon Reducción estática (Reduce Static).
Gotea agua de la
puerta durante el
ciclo de vapor
t&TUPFTOPSNBM t/PSNBMNFOUFTFGPSNBDPOEFOTBDJØOFOFMJOUFSJPSEF
la puerta de la secadora durante el funcionamiento de
vapor. Puede gotear la condensación desde el fondo de la
puerta.
No se ve vapor
durante el ciclo
de vapor
t&TUPFTOPSNBM t&TEJGÓDJMWFSFMWBQPSDPOMBQVFSUBDFSSBEB
Sin embargo, la condensación se forma normalmente
en el interior de la puerta de la secadora si el sistema
funciona con normalidad.
No se ve vapor
al comienzo del
ciclo
t&TUPFTOPSNBM t&MWBQPSTFMJCFSBFOEJGFSFOUFTFUBQBTEFMDJDMPQBSBDBEB
opción.
La pantalla
muestra carga
voluminosa
t&MCPUØO.ÈTUJFNQP.PSF
Time) está presionado.
t&TUBQBOUBMMBJOEJDBRVFMBPQDJØOEFWBQPSTFIBBKVTUBEP
para un elemento “ ”, por ejemplo, un edredón. Pulse
el botón Less Time (Menos tiempo) para reducir el tamaño
de carga indicado.
Olores restantes
en la ropa
después de
Steam Fresh™
t4UFBN'SFTIOPFMJNJOØ
completamente el olor.
t-BWFMBTUFMBTRVFDPOUJFOFOMPTPMPSFTFOVODJDMPEF
lavado normal.
RESOLUCIÓN DE PROBLEMAS

54
.PEFMPTEF4UFBN%SZFS%-&9&%-(9&
Descripción Secadora con vapor
Requisitos eléctricos Consulte la placa de clasificación para información en detalles.
Requisitos de gas /(BQVMHBEBT8$
-1BQVMHBEBT8$4PMPNPEFMPTBHBT
Presión máx. de agua _L1B_QTJ
Dimensiones wBODIP9
/
wQSPGVOEJEBE9
/
wBMUP
/
” (D con la puerta
BCJFSUBDNBODIP9DNQSPGVOEJEBE9DNBMUPDN
(con la puerta abierta)
Peso neto 4FDBEPSBTBHBTMCTLH
4FDBEPSBTFMFDUSJDBTMCTLH
Capacidad de secado
$JDMPEFOPSNBM
$JDMPEFWBQPS
*&$QJFTDVCJDPTMCTLH
*&$QJFTDVCJDPTMCTLH
ESPECIFICACIONES
Antes de llamar a mantenimiento (cont.)
1SPCMFN 1PTTJCMF$BVTFT
Solutions
La luz de
Limpie
Filtro(Clean
Filter) esta
encendida
durante el ciclo
de secado
t&MGJMUSPEFQFMVTBFTUÈDBTJ
atascado o lleno.
t1BVTFFMDJDMPEFTFDBEPZMJNQJFFMGJMUSPEFQFMVTB
La luz de Flow
Sense
TM
esta
encendida
durante el ciclo
de secado
t-BUVCFSÓBFTEFNBTJBEP
larga o posee muchos giros/
restricciones.
t#MPRVFPTJHOJGJDBUJWPEFMB
tubería por acumulación de
pelusa o escombros.
t&MFMFDUSPEPNÏTUJDPIB
detectado una obstrucción
en la ventilación externa de la
secadora.
t*OTUBMFVODPOEVDUPNÈTDPSUPPNÈTEFSFDIP-FBMBT
Instrucciones de Instalación.
t-BUVCFSÓBTFEFCFSÈDPOUSPMBSMJNQJBSEFJONFEJBUP
para eliminar la pelusa acumulada y otros bloqueos. La
secadora se puede usar, pero su funcionamiento y eficacia
se verán reducidos de forma importante.
t4JFMTJTUFNB'MPX4FOTF
TM
detecta restricciones de salida,
el indicador permanecerá encendido durante dos horas
tras finalizar el ciclo. Si abre la puerta o pulsa el botón
Encendido/Apagado (Power), se apagará la pantalla.
RESOLUCIÓN DE PROBLEMAS / ESPECIFICACIONES

55
ESPAÑOL
UTILIZACIÓN DEL Smart Diagnosis™
Diagnóstico sonoro
Si tuviera algún problema con su secadora, la misma posee la capacidad de transmitir datos a un teléfono inteligente
utilizando la aplicación Smart Laundry de LG o mediante el teléfono al Centro de atención telefónica de LG.
Smart Diagnosis™ no puede ser activado a menos que su secadora esté encendida pulsando el botón de
Alimentación(Power). Si su secadora no puede encenderse, tendrá que localizar y solucionar los problemas sin
utilizar Smart Diagnosis™.
Smart Diagnosis™ utilizando su
teléfono inteligente
%FTDBSHVFMBBQMJDBDJØO4NBSU-BVOESZEF-(FOTV
teléfono inteligente.
"CSBMBBQMJDBDJØO4NBSU-BVOESZEF-(FOTVUFMÏGPOP
inteligente. Presione el botón flecha hacia la derecha
para avanzar a la siguiente pantalla.
1SFTJPOFFMCPUØO(SBCBDJØOEFMUFMÏGPOPJOUFMJHFOUF
y mantenga la boquilla del teléfono inteligente junto
al logotipo de Smart Diagnosis™ de la secadora.
$POFMUFMÏGPOPFOTVTJUJPQVMTFZNBOUFOHBQVMTBEP
el botón de
Control De La Temperatura(Temp. Control)
durante tres segundos.
5. Mantenga el teléfono en el sitio hasta que la
transmisión del tono haya terminado. Necesita
tiempo en el panel visualizado.
Al finalizar la grabación, vea el resultado del diagnóstico
presionando el botón Siguiente del teléfono.
Smart Diagnosis™ a través del
Centro de atención telefónica
-MBNFBM$FOUSPEFBUFODJØOUFMFGØOJDBEF-(
&MFDUSPOJDTBMUFMÏGPOP-(&&66-(
$BOBEÈ
$VBOEPTFMPJOEJRVFFMBHFOUFEFM$FOUSPEF
atención telefónica, mantenga el micrófono de
su teléfono sobre el logotipo Smart Diagnosis™
del equipo. Sostenga el teléfono a no más de una
QVMHBEBPDNQFSPTJOUPDBSFMFRVJQP
Pulse y mantenga pulsado el botón de Control De La
Temperatura(Temp. Control) durante tres segundos.
.BOUFOHBFMUFMÏGPOPFOFMTJUJPIBTUBRVFMB
transmisión del tono haya terminado. Necesita
tiempo en el panel visualizado.
5. Una vez que la cuenta regresiva haya finalizado y los
tonos se hayan detenido, reanude la conversación
con el agente del Centro de atención telefónica,
que será capaz de ayudarle en la utilización de la
información transmitida para su análisis.
NOTA
“Smart Diagnosis(Diagnóstico Inteligente) es una
función de resolución de problemas diseñada
para asistir, no reemplazar, al método tradicional
de resolución de problemas a través de llamadas
de servicio técnico. La efectividad de esta función
depende de diversos factores, entre los cuales se
incluyen, la recepción del teléfono celular utilizado
para la transmisión, cualquier ruido externo que
pueda presentarse durante la transmisión, y la acústica
de la habitación donde está ubicada la lavadora. Por
lo tanto, LG no garantiza que SmartDiagnosis resuelva
con precisión cualquier cuestión dada.”
NOTA
No toque ningún otro botón ni icono de la pantalla.
UTILIZACIÓN DEL SMART DIAGNOSIS™

56
GARANTÍA
Su secadora LG será reparada o reemplazada, a discreción de LG, si se comprueba que existe un defecto en el material o la mano
de obra bajo condiciones de uso normales, durante el período de garantía (“Período de garantía”) establecido más abajo, vigente
desde la fecha (“Fecha de compra”) de la compra del cliente original de producto. Esta garantía es válida únicamente para el com
QSBEPSPSJHJOBMEFMQSPEVDUPZDVBOEPTFVTBFO&&66JODMVZFOEP"MBTLB)BXBJJZMPTUFSSJUPSJPTEFMPT&&66FYDMVTJWBNFOUF
&45"("3"/5¶"3&&.1-";"$6"-26*&3053"&913&4"0*.1-¶$*5"*/$-6:&/%04*/-*.*5"$*»/
$6"-26*&3("3"/5¶"%&$0.&3$*"-*;"$*»/0"%&$6"$*»/1"3"6/1301»4*50%&5&3.*/"%0
&/-".&%*%"3&26&3*%"103-"-&:$6"-26*&3("3"/5¶"*.1-¶$*5"4&-*.*5"&/467*(&/$*""-
1&3¶0%0%&("3"/5¶"&913&4"*/%*$"%0.«4"33*#"/*&-'"#3*$"/5&/*&-%*453*#6*%03%&-04
&&664&3«/3&410/4"#-&4103%"º04*/$*%&/5"-&4$0/4&$6&/$*"-&4*/%*3&$504&41&$*"-&4
016/*5*704%&$6"-26*&3/"563"-&;"*/$-6:&/%04*/-*.*5"$*»/1²3%*%"%&("/"$*"40
*/(3&4040$6"-26*&3053"$-"4&%&%"º04$0/53"$56"-&4&953"$0/53"$56"-&40%&
$6"-26*&35*10Algunos estados no permiten la exclusión o limitación de daños incidentales o consecuen
ciales o limitación en la duración de una garantía implícita, de modo que la exclusión o limitación indicada
BOUFSJPSNFOUFQPESÓBOPBQMJDBSFOTVDBTP&TUBHBSBOUÓBMFCSJOEBEFSFDIPTMFHBMFTFTQFDÓöDPTZQPESÓBUBNCJÏO
tener otros derechos que varían según el estado.
&45"("3"/5¶"-*.*5"%"/0"1-*$""
t7JBKFTEFNBOUFOJNJFOUPEFTEFTVIPHBSQBSBFOUSFHBSFDFQDJØOZPJOTUBMBDJØOEFMQSPEVDUPJOTUSVDDJØOPSFFN
plazo de fusibles del hogar o cableado adecuado o corrección de reparaciones no autorizadas.
t-PTEB×PTPQSPCMFNBTPQFSBUJWPTRVFSFTVMUFOEFMBOFHMJHFODJBFOFMVTPFMBCVTPFMGVODJPOBNJFOUPGVFSB
EFMBTFTQFDJöDBDJPOFTNFEJPBNCJFOUBMFTPJODPOTJTUFOUFTDPOMPTSFRVJTJUPTEFQSFDBVDJPOFTFTUBCMFDJEPTFO
la Guía de funcionamiento, accidente, insectos, incendio, inundación, instalación inadecuada, casos de fuerza
NBZPSNPEJöDBDJØOPBMUFSBDJØOOPBVUPSJ[BEBDPSSJFOUFPWPMUBKFJODPSSFDUPTPVTPDPNFSDJBMPVTPEJGFSFOUFBM
indicado.
El costo de reparación o reemplazo bajo estas circunstancias excluidas será responsabilidad del cliente.
/Á.&304%&$&/5304*/'03."$*»/%&$-*&/5&
1"3"$0/5"$5"3"-(&-&$530/*$4
103$033&0
G Customer Information Center P. O. Box
+BNFT3FDPSE3PBE
)VOUTWJMMF"MBCBNB"55/$*$
1&3¶0%0%&("3"/5¶"
."/0%&0#3"6OB×P desde la Fecha de compra.
1*&;"46OB×Pdesde la Fecha de compra.
Las unidades de reemplazo y piezas de reparación
podrían ser nuevas o refabricadas.
Las unidades de reemplazo o piezas de reparación están
garantizadas por la porción restante del período de
garantía de la unidad original.
(BSBOUÓBMJNJUBEBEFMUBNCPSEFMBTFDBEPSBQPSB×PT
&MUBNCPSEFMBTFDBEPSBUJFOFVOBHBSBOUÓBEFB×PT
incluidos los componentes y mano de obra.
-(&-&$530/*$4*/$
("3"/5¶"-*.*5"%"%&-"4&$"%03"-(o&&66
$».04&"%.*/*453"&-."/5&/*.*&/50
.BOUFOJNJFOUPFOFMIPHBSi*O)PNFw
Guarde la factura fechada del distribuidor o la boleta
de entrega como evidencia de la Fecha de compra
como prueba para la garantía, y entregue una copia
de la factura al técnico de mantenimiento al momento
que se presta el mantenimiento.
-MBNFBMZFTDPKBMBPQDJØOBEFD
VBEBQBSBVCJDBSBTV$FOUSPEF.BOUFOJNJFOUP
"VUPSJ[BEP-(NÈTDFSDBOP
O visite nuestro sitio Web en: http://www.lgservice.com.
-MBNFBMIPSBTBMEÓBEÓBT
al año),
y seleccione la opción adecuada a partir del menú.
0WJTJUFOVFTUSPTJUJP8FCFOIUUQXXXMHTFSWJDFDPN
1BSBPCUFOFS"TJTUFODJBQBSBFMDMJFOUF
JOGPSNBDJØOEFMQSPEVDUPPNBOUFOJNJFOUPP
EJTUSJCVJEPSBVUPSJ[BEP
IrInformación de registro del producto
.PEFMP
/ÞNFSPEFTFSJF
'FDIBEFDPNQSB
El modelo y número de serie figuran en la placa de
clasificación en la parte interna de la puerta del frente.

57
ESPAÑOL

58

59
ESPAÑOL

1-800-243-0000
USA
1-888-542-2623
CANADA
LG Customer Information Center
Register your product Online!
www.lg.com
-
 1
1
-
 2
2
-
 3
3
-
 4
4
-
 5
5
-
 6
6
-
 7
7
-
 8
8
-
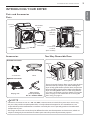 9
9
-
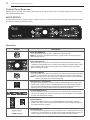 10
10
-
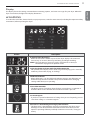 11
11
-
 12
12
-
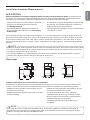 13
13
-
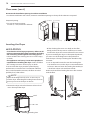 14
14
-
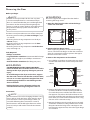 15
15
-
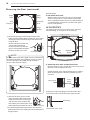 16
16
-
 17
17
-
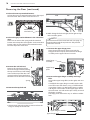 18
18
-
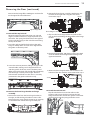 19
19
-
 20
20
-
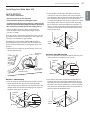 21
21
-
 22
22
-
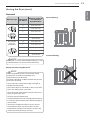 23
23
-
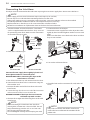 24
24
-
 25
25
-
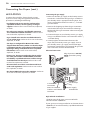 26
26
-
 27
27
-
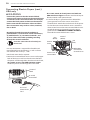 28
28
-
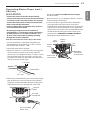 29
29
-
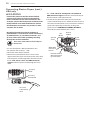 30
30
-
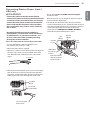 31
31
-
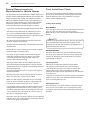 32
32
-
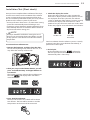 33
33
-
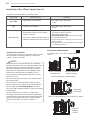 34
34
-
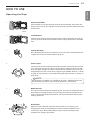 35
35
-
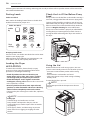 36
36
-
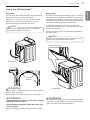 37
37
-
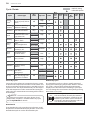 38
38
-
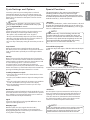 39
39
-
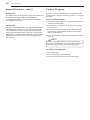 40
40
-
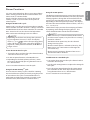 41
41
-
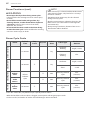 42
42
-
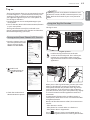 43
43
-
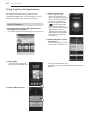 44
44
-
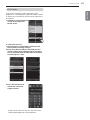 45
45
-
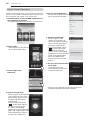 46
46
-
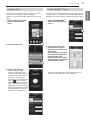 47
47
-
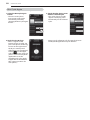 48
48
-
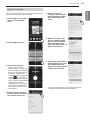 49
49
-
 50
50
-
 51
51
-
 52
52
-
 53
53
-
 54
54
-
 55
55
-
 56
56
-
 57
57
-
 58
58
-
 59
59
-
 60
60
-
 61
61
-
 62
62
-
 63
63
-
 64
64
-
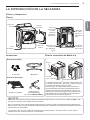 65
65
-
 66
66
-
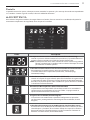 67
67
-
 68
68
-
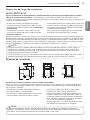 69
69
-
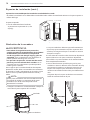 70
70
-
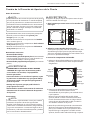 71
71
-
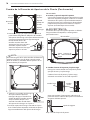 72
72
-
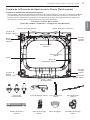 73
73
-
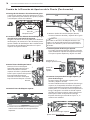 74
74
-
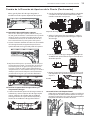 75
75
-
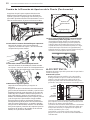 76
76
-
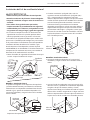 77
77
-
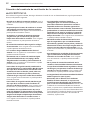 78
78
-
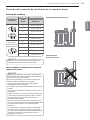 79
79
-
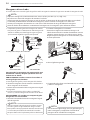 80
80
-
 81
81
-
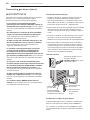 82
82
-
 83
83
-
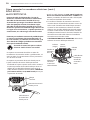 84
84
-
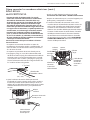 85
85
-
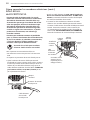 86
86
-
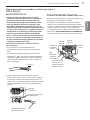 87
87
-
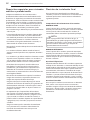 88
88
-
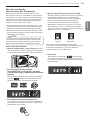 89
89
-
 90
90
-
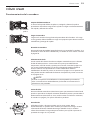 91
91
-
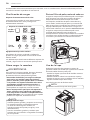 92
92
-
 93
93
-
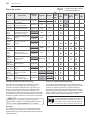 94
94
-
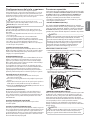 95
95
-
 96
96
-
 97
97
-
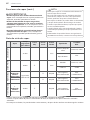 98
98
-
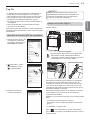 99
99
-
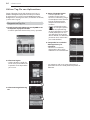 100
100
-
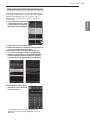 101
101
-
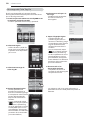 102
102
-
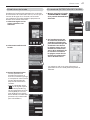 103
103
-
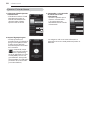 104
104
-
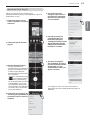 105
105
-
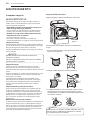 106
106
-
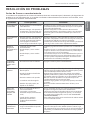 107
107
-
 108
108
-
 109
109
-
 110
110
-
 111
111
-
 112
112
-
 113
113
-
 114
114
-
 115
115
-
 116
116


LG Electronics DLEX7700VE Manual de usuario
- Categoría
- Secadoras de ropa eléctricas
- Tipo
- Manual de usuario
- Este manual también es adecuado para
en otros idiomas
Otros documentos
-
LG 49LH520 Manual de usuario
-
Samsung WA95U3WDP/XAX Manual de usuario
-
Lifetime 90177 El manual del propietario
-
 NORTH STATES 4916 Instructions Manual
-
Best MD6TU Guía de instalación
-
-
American Standard 3275.002 Guía de instalación
-
Cyclo Vac HD Series El manual del propietario
-
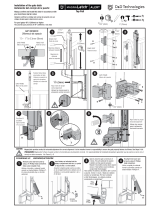 Magnalatch 50062 Guía de instalación

