Infiniton WM-K10IN El manual del propietario
- Categoría
- Lavadoras
- Tipo
- El manual del propietario

■Before using your washing machine,please read this manual carefully
and keep it far future reference.
■This manual shall also be available on www.infiniton.es
■The drawings in this manual are far instruction only,it may be vary from
the model you buy
WM-K10IN
User's manual
Manual de usuario
Manual de usuário

Contents
Products Specification.................................................. 1
Safety Precaution......................................................... 2
lmportant Hints ............................................................. 4
Overview of Washing Machi ne ........................................ 5
lnstall Washing Machine ................................................ 6
Operate Washing Machi ne .............................................. 10
Maintenance ................................................................ 14
Troubleshooting ........................................................... 16
Appendix
..................................................................... 18
Products Fiche ............................................................. 20
PRODUCT REGISTRATION
Thank you for purchasing our INFINITON
product. This easy-to-use manual will guide
you in getting the best use of your washer.
lnside you will find man
y helpful hints on how
to use and maintain your washing machi ne
properly. You'/1 find man y answers to common
problems in the chart oftroubleshooting tips.
Remember to record the model and serial
numbers. They are on the back ofthe unit.

Products Specification
1950W
WM-K10IN
10kg
595*625*850

2
WARNING
To reduce the risk of fire,electric shock,or injury to persons when
using your appliance,follow basic precautions,including the following
Children of less than 3 years should be keep away unless continuously
supervised.
Carpet does not obstruct the opening for washing machine with
ventillation openings in the base.
This appliance is not intended for use by persons(including children)with
reduced physical,sensory or mental capabilities,or lack of experience and
knowledge,unless they have been given supervision
or instruction concerning use of the appliance by a person responsible
for their safety.Children should be supervised to ensure that they do
not play with the appliance.(This warning is not for EUROPEAN market)
The new hose-sets supplied with the washer are to be used and that
old hose-sets should not be reused.
If the power cord is damaged,it must be replaced by the manufacturer,
service agent or similarly qualified persons in order to avoid the hazard.
This appliance can be used by children aged from 8 years and above and
persons with reduced physical,sensory or mental capabilities or lack of
experience and knowledge if they have been given supervision or
instruction concerning use of the appliance in a safe way and understand
the hazards involved.Children shall not play with the appliance.Cleaning
and user maintenance shall not be made by children without supervision.
(This warning is for EUROPEAN market)
Safety Precaution
This appliance is inteded to be used in household and similar applications
such as:
-staff kitchen areas in shops,offices and other working environments;
-farm houses
-by clients in hotels,motels and other residential type environments;
-bed and breakfast type environments;
-areas for communal use in blocks of flats or launderettes.
Take care that power voltage and frequency shall be identical to those
of washing machine.
To ensure your safety,power cord plug must be inserted into an earthed
socket.Check carefully and make sure that your socket is proper and
earthed reliably.
Do not use any socket with rated current less than that of washing
machine.
Do not operate your washer when parts are missed or broken.
Never pull out power plug with wet hands.

3
Safety Precaution
Replace immediately worn power cord,loose plugs/power sockets.
Unplug your washer before cleaning or making any repair.
Please check whether the water inside the drum has been drained before
opening the door.Please do not open the door if there is any water visible.
Glass door may be very hot duing the operation.Keep kids and pets far
away from the washer during the operation.
Make sure that the water and electrical device must be connected by a
qualified technician in accordance with the manufacturer’s instruction
and local safety regulations.
Before operating this machine,all packages and transit bolts must be
removed.Otherwise,the washing machine may be seriously damaged
while washing the clothes.
Flammable and explosive or toxic sovents are forbidden.Gasoline and
alcohol etc.Shall not be used as detergents.Please only select the
detergents suitable for machine washing.
Be careful of scald while the washer drainning hot washing water.
Never unplug your washer by pulling on the supply cord.Always grasp
the plug firmly and pull straight out from the outlet.
If your old appliance is not being used anymore,we recommend that
you remove the door and cut off the supply cord.
Packing materials may be dangerous to the kids.Please keep all packing
materials(plastic bags,foams etc)far away from the kids.
Do not climb up and sit on top cover of the machine.
Pets and kids may climb into the machine.Check the machine before
every operation.
Do not lean against the door of the washer.

The household washing machine isn’t intended to be built-in.
This washing machine is for indoor using only.
Make sure that all pockets are empty.Sharp and rigid items such as
coin,brooch,nail,screw or stone etc.May cause serious damages to
the washer.
Please remember to disconnect water and power supply immediately
after the clothes are washed.
The washing machine shall not be installed in bath room or very wet
rooms as well as in the rooms with explosive or caustic gases.
Before washing the clothes at first time,the washing machine shall be
operaed in one round of the whole procedures without the clothes inside.
Do not repair or replace any part of the washer unless you have been
specifically recommended in the user-repair instructions and you have
the knowledge and skills to make it.
It is forbidden to wash carpets and bras inset with steel wire.
Never refill water by hand during washing.
After the program is completed,please wait for two minutes to open the
door.
When handing the machine,the accumulated water shall be drained out
of the machine firstly.Handle the machine carefully.Never hold each
protruded part on the machine while lifting.Machine door can not be used
as the handle during the conveyance.
The washing machine with single inlet valve only can be connected to the
cold water supply.The washing machine with double inlet valves can be
connected to the hot water and cold water supply.
Important Hints
4

Drain Hose Clips
(Cold)
Inlet Valve
* Only double inlet machine
(Hot)
Inlet Valve
Power Cord
Drain Hose
Transit Bolt(4EA)
Back Cover
Power Plug
SAVE THESE INSTRUCTIONS
THE MACHINE IS HOUSEHOLD USE ONLY
Overview of Washing Machine
5
Control Panel Assembly
Door Assembly
Pump Case Cover
Leg Assembly
(4EA)
Drawer Handle

NOTE
We recommend that your new washer should to installed by a qualified
appliance technician.If you feel that you have the skills to install the
washer,please read the installation instructions carefully before
installing.
You may need to have the following tools to help you in the installation
of your washer:
Tools needed
Scissors
Gloves
Standard Screwdriver
Pliers
Spanner
Unpacking the washing machine
If your washing machine is not double inlet, you do not have the hot inlet hose.
Unpacking your washing machine and check if is there any damage
during the transportation.Also make sure that all the the items(as
shown below) in the attached bag are received. If there is any damage
to the washing machine during the transportation,or any item is
missing or damaged,please contact the local dealer immediately.
Select the location
Before installing the washer,the location characterized as follows shall
be selected:
-Rigid,dry,and level surface(if not level,please make it level with
reference to the following figure’Adjustable Leg’).
-Avoid direct sun light.
-Sufficient ventilation.
-The ambient temperature shall be between 0-40℃.
-The ambient humidity shall be below 95%(When the temperature is
25℃).
-Keep far away from the heat resources such as coal or gas.Make sure
that the washer will not stand on power cord.Do not install the washer
on the carpet floor.
Install Washing Machine
6
(Connect to Hot
water supply)
Hot Inlet Hose
(Used to plug transit
bolt holes)
Drain Hose
Support Bracket
(Used to loop the end
of drain hose)
Hole Cover (4EA)
Inlet Hose
(Connect to cold
water supply)
Spanner
(1.Used to adjust the bottom
of the machine,
2.Remove the transport bolt on
the back of the machine)
*If washing machine is not double inlet, the machine does not have the hot inlet hose.

Install Washing Machine
7
Remove transit bolts
Before using this washing machine,transit bolts must be removed from
the backside of this machine.Please take the following steps to remove
the bolts:
Keep the transit bolts properly for futher use.
1.Loosen the four transit
bolts with a spanner
2.Take each bolt head and pull it through the
wide part of the hole.Repeat for each bolt.
3.Fill the holes with the
supplied plastic covers.
Level the washing machine
Base foot structure
Lock nut
Support foot covered
with rubber
Factory status
Lockingnut close
to bottom of box
Supporting foot close
to locking nut
Support base is close
to the ground
1.When palcing the machine,check whether
the bottom foot is in the factory state.if
not,please restore the bottom foot to the
factory state:the locking
nut is locked tightly on bottom of
the box,and the support foot is locked
tightly on the locking nut:
2.After the machine is placed,press the opposite
corner of the top cover plate of the washing
machine with both hands in turn
and shake it vertically downward
to check whether the supporting
foot is close to the ground and
whether the machine is shaken
3.To ensure that the machine is placed in the right state,
loosen the locking nut according to thedirection shown
in the diagram with the attachedspanner to the appropriate
height until thesupporting footisclosetothegroundand
themachineisfreefromshaking
4.Finally,use the spanner to turn the lock nut back
to thebottom of the box to lock it(you can also
slightly fix the support foot by hand to avoid the
support foot moving again)
Ensure that the supporting
feet do not move again
Note:in order to facilitate installation,the factory stutus of the foot may not be all
locked,please be sure to lock all four feet before adjusting the level!
Install or place the washing machine under the environmental temperature of not
less than 0℃but not outdoors, for it may damage the programming controller.
1.The machine must be perfectly leveled and stabilized when the four
supporting feet are close to the ground. Lower the feet as much as possible
on the basis that the machine is leveled.
2.Improper leveling adjustment may cause loud noise, machine vibrating,
machine displacement and other abnormal phenomena.
3.Air-vent is designed on the bottom of the machine (prevent blockage). Install
the washing machine on solid, smooth and skid-proof ground. Do not place
the washing machine on soft blanket or wooden floor, or various desktops
and stands, in case of unnecessary injury.
CAUTION

30cm
100cm
65cm
Connect the inlet hose
1.Connect the inlet hose to tap and
fasten it anticlockwise.
2.Connect the other end of the inlet hose to the inlet valve at the backside
of the washing machine and fasten the hose tightly clockwise.
when there is a inlet at the back of the machine,it must be connected to
a cold water supply.If there are two inlet valve,one is connected to a
cold water supply and the other is connected to a hot water supply.
Follow the indication of the picture below to complete the connection.
inlet valve for cold water
inlet hose for cold water
inlet hose for hot water with a red side
inlet valve for hot water with a red grid
If there is any leakage with hose after
the connection,then repeat the steps to
connect inlet hose.
Do not bend the hose.
Check for inlet hose connection carefully
before using the washer each time.
Connect the drain hose
The drain hose shall be placed at a
height of 65-100cm above the floor,
otherwise,it can cause poor drainage
You can use the supplied drain hose
support bracket to loop the drain hose
down into the wall,standpipe or laundry
tub.
Take care to ensure all hose connections
are tight.
The end of the drain hose cannot be
immersed in water for the washer to work
properly.
NOTE
NOTE
Install Washing Machine
8

Ensure your machine is installed properly before use.
NOTE
Before washing clothes for the first time, you must run a complete cycle
without clothes. To do this:
1.Connect power source and water.
2.Put a little detergent(about 10g) into the drawer and close it.
3.Press the On/Off button “ ” .
4.Turn the knob to the “Cotton” .
5.5.Press the Start/Pause button “
This will remove any water from the manufacturer’s test run remaining
in the machine.
Connect the power
·
·
·
·
·
·
·
·
As the maximum current through the unit is 10A when
you are using its heating function, please make sure
the power supply system (current, power voltage and
wire) at your home can meet the normal loading
requirements of the electrical appliances.
Please connect the power to a socket which is correctly
installed and properly earthed.
Make sure the power voltage at your plate is same
to that in the machine’s rated voltage.
Power plug must match the socket.
Do not use multi-purpose plug or socket as extension cord.
Do not connect and pull out plug with wet hands.
When pulling out the plug, hold the plug tightlly and then pull it out. Do
not pull power cord forcibly.
If power cord is damaged or has any sign of being broken, special power
cord must be selected or purchased from its manufacturer or service
center for replacement.
WARNING
1.This machine must be earthed properly. If there is any short circuit,
earthing can reduce the danger of electrical shock.
2.Washing machine shall be operated in a circuit separate from other
electrical appliances. Otherwise, power protector may be tripped or
fuse may be burned out.
Install Washing Machine
Operate Washing Machine
9

Put detergent
■
1.Pull out the detergent drawer.
2.Add detergent for main wash into
compartment Ⅱ.
option1:detergent that is solid;
option 2:detergent that is liquid.
3.Add fabric softener into compartment .
4.Please choose suitable type of detergent
for the various washing temperature to get
the best washing effect with less water and
energy consumption.
Operate Washing Machine
Sort clothes
■
NOTE:Make sure that no clothes is caught between the door and the seal.
10
Ⅱ
Please, read this recommendation carefully to avoid the
troubles of washing machine and damages of clothes.
1. Do not put clothes over load the rated capacity.
2. Sort the laundry by colour and by care label. Most
garments have a textile care label in the collar or side
seam.
3. Make sure all the pockets are empty . Foreign objects
(e.g. nails, coins, paper clips, etc.) can cause damage to
garments and components in the machine.
4. Close any zips, fasten hooks, etc. before washing.
5. For clothes to be washed, they should be sorted according
to colour. Dark clothes should not be washed with light
clothes specially.
6. Badly soiled areas, stains, etc. should be pre-treated with
liquid detergent, stain removers, etc.
7. Turn over the clothes wich pill easily and is with woolen
surface before putting them into the machine

On/Off Button
View of control panel
■
Start/Pause Button
Temperatture Button
Cycle Selector
Wash Button
Rinse Button
Speed Button
Delay Button
Function
■
·Start/Pause Button: Press the button once to start a cycle.Press the
button a second time will pause the operating cycle. During a pause,
setting and options can be modified and selected again if it is permit.
Pressing the button again will resume the active cycle.
·On/Off Button: Press once to turn the washing machine on, press again
to turn the washing machine off. If the washing machine power is left on
for longer than 10 minutes without any buttons being touched, the power
automatically turns off.
·Cycle Selector: The knob can be turned in either directuon to choose a
cycle.
Operate Washing Machine
11
(Note: press for three seconds)
·Temperature Button:Use the button to select a water
temperature.Available selections (from cold to max ºC) vary for each
cycle.The targeted setting will blink on the screen during the selection
process.
·Speed Button:Use the button to select a spin speed.Available selections
(from 0 to max rpm)vary for each cycle.The targeted setting will blink on
the screen during the selection process.
·
Delay Button: Press the button repeatedly to cycle through the available
delayed start options (from 3 to 24 hours in one hour increments).
·
Wash Button: Use this button to select a wash time (from 0 to max min).
Available selections vary for each cycle.The targeted setting will appear
on the screen during the selection process.
·
Rinse Button: Use this button to select time for rinsing.Available
selections(from 0 to max timnes)vary for each cycle.The targeted setting
will appear on the screen during the selection process.

Indicators
■
:The indicator will keep on when the door is locked normally, otherwise, it can not
appear.
:When the indicator appears, it means the Delay function has been selected.
■Programe
Operate Washing Machine
12
:When the indicator appears, it means the “Child Lock” function has been selected.
:When the indicator appears, it means the “mute” function has been selected.
·Cotton: You can select this procedure to wash the daily washable clothes. It is
recommended to wash the hard-wearing fabrics, heat-resistant fabrics made of
cotton or linen.
·Quick 15':This procedure is suitable for wasing not very dirty clothesquickly.
·Underwear:This procedure is suitable for wasing
·Shirt: You can select this procedure to wash shirts made of cotton, linen, synthetic
fibers or blended fabrics.
·Jeans:This procedure is quite suitable for jeans or fabrics made of denim.
·Allergy care:The proccedure can quite make clothes rinse to more clean, avoid
the laundry detergent for skin allergy.
·Drum clean: This cycle is specially set in this machine to clean the drum and tube.
It applys 60/90ºC high temperature sterilization to make the drum and tube more
green. When proper amount of chlorine bleaching agent is put in, the barrel
cleaning effect will be better. When you run this program , we suggest not to put
any clothes, you can use this procedure regularly according to the need.
·Spin: This cycle is use to extract water from clothes.
·Rinse+Spin:This cycle is use to clean remaining detergent in clothes and extract
water from clothes.
·Dark colour: You can select this procedure to wash the dark-coloured fabrics
made of cotton and dark easy-care fabrics.
·Down Jacket:The procedure is quite suitable for down jacket.
·Wool: You can select this procedure to wash the wool textiles labeled with
“Machine Wash”. Please select the proper washing temperature according to the
label on the articles to be washed.
·Intensive:You can select this procedure to wash the tough clothes, that need
muchmore strength.
·Bedding: You can select this procedure to wash heavy clothes. It is recommended
to wash jeans, bedding, etc.

Operate Washing Machine
1.Power-off memory: In case of power failure during the cycle, the settings
will be saved, and operation will resume when the power is restored.
2.
Child lock: Press the “Speed” and “Temp.” button simultaneously for 3
seconds can activate or cancel the “Child lock”feature to avoid mis-
operations. When the feature is activated, all buttons cannot be set until the
operation is over or it is canceled.
Parameter
Procedure 9.0kg
--~40
--~40
0~1000
Mix
Cotton
Underwear
Jeans
–0~1000
Quick 15'
Temp. Range
(℃;- -= cold)
Speed Range
(r/min;0=no spin)
Max Load(kg)
--~Max
--~40
Spin 0~1200
0~1000
0~Max
AllergyCare
DownJacket --~40 0~800
0~1000
Shirt
DrumClean 60/Max
0~1200
Rinse+Spin
Dark Colour 0~1000
--~40
0~600
Wool --~40
·
Mix:
You can select this procedure to wash clothes that are different kinds,
except for colors.Dark clothes should not be washed with clothes that are
light especially.
Table of Washing Procedures
■
NOTE
The “standard cotton 60°C/40°C with max speed” programme are the standard
washing programs, and they are suitable to clean normally soiled cotton laundry
and that they are the most efficient programmes in terms of combined energy and
water consumptions for washing that type of cotton laundry, that the actual water
temperature may differ from the declared cycle temperature.
Features
13
4
9
--~40
3
2.5
4
--~60
5
5
Bedding --~60
--~60 0~Max
Intensive
Sports wear 0~800
--~40
-
9
4
4
2.5
9
9
4
6
-
-
-
·Sportswear:Suitable for sports clothes washing
10kg
5
10
2
3.5
5
5
8
-
10
10
3.5
4.5
4.5
10
6
4.5
0~1200
0~1200
0~1000

3.Unbalance protection: When the machine is ready to spin, The washer
may take a few time to balance clothes due to great unbalance. If clothes
is still unbalance in the drum after that, the spinning speed can be slow
down to avoid great vibration. If clothes in drum is too less, the machine
may not to spin due to the unbalance protection, then you should add
more clothes in the machine to make it to spin.
4.Reload:If you want to add clothes in the washer during the procedure,
press the “Start/Pause” button for 3s,when you sound two beeps, it
means the reload feature has been activated. Please wait for the
indicator ‘ ’ disappears then open the door. Press the “Start/Pause”
button to resume the procedure after reload.
Proper maintenance on the washing machine can extend its work life.
WARNING
Before your maintenance starts, please do pull out the power plug or
disconnect power and close the tap.
Clean internal drum
Clean surface
The rusts left inside the drum by the metal articles shall be removed
immediately with chlorine-free detergents. Never use steel wool.
1.If there is any water overflow, use the dry cloth to wipe it off
immediately. No sharp items are allowed to strike the washer.
2.The surface can be cleaned with diluted non-abrasive neutral
detergents when necessary.
Clean the drain pump
1
32
1.Disconnect the washing machine;
2.Open the Pump case cover with a
coin or a key;
3.Unscrew the pump cover anticlockwise,
Always keep a rag nearby to dry
up water when unscrewing the
pump cover;
4.Clean the inner of the pump;
5.Replace the pump
cover and screw it
tightly;
6.Replace the Pump
case cover.
Features
Maintenance
14

Clean Inlet valve filter
The inlet filter shall be cleaned if there is not any or insufficient water in
when the tap is opened.
1.Lower the water pressure:
a.Close the tap.
b.Select any procedure except “Spin”
procedure.
c.Press the button “Start/Pause” and keep
the procedure running for about 40 seconds.
d.Pull out the power plug.
2.Remove the inlet hose from the tap.
3.Use water to wash the filter.
4.Reconnect the inlet hose.
Clean detergent drawer
1.Press down the part ① inside the drawer and take
out the detergent drawer.
2.Lift the clip up and take out
softener cover and wash all
grooves with water.
3.Restore the softener cover
and push the drawer into
positon.
Dispose an easily get frozen washer
If the washer is exposed to temperature below 0°C, certain precaution
should be taken.
1.turn off the tap.
2.Unscrew the inlet hose.
3.Unhook the drain hose from the rear support and position the end of
this hose and that of the inlet hose in a bowl.Run the spin programme.
4.Disconnect the washer.
5.Screw the inlet hose and reposition the drain hose.
1.When the washing machine is reused, make sure the ambient
temperature is above 0°C.
2.If your washing machine is located in the room where it can get frozen
easily, please drain the remaining water inside drain hose and inlet hose
thoroughly.
3.Please contact a technician if your washer is frozen.
Maintenance
15

TROUBLES SOLUTIONS
There is some remaining
water in the machine
The washer does not run
This is normal and is the result of water tests
performed at the factory
Check if the power plug is inserted well.
Check if the tap is opened.
Check if the button “Power” is pressed.
Check if the button “Start/Pause” is pressed.
Check if the delay feature is activated.
Check and fasten inlet hose.
Clean up drain hose and ask a specialized
person to repair it when necessary.
Check if the transit bolts has been removed.
Check if the adjustable legs are adjusted level.
Check if the washer is installed on the solid
and level floor.
Check if there are any barrettes or metal articles inside.
Select a proper procedure.
Add the proper detergent quantity according
to the instructions in detergent package.
Check if the “Child-lock” feature has beenactivate.
Press button “Start/Pause” first then press
other buttons.
Check if clothes in the drum is dispersive enough.
Check if the water is drain out or inflow well.
Check if the max height of the drain hose is lower
than 65cm
Check if the drain hose is immersed.
Water leakage
Abnormal noise and great
vibration
Washing efficiency is not
satisfied
The machine take no answer
after press buttons
Actually running time of
procedures is not
corresponded to the
display time
The washer fills while
draining
16
Troubleshooting

Troubleshooting
17
NOTE
Please refer to the actually purchased model for fault display here.Different models have
different fault displays
The washer fills over
time
Door lock is breakdown
Water drainage over
time
Water is overflowed
The electrical motor is
breakdown
The heater does not
work
There is a temperature
sensor fault
Communication
failures
The procedure running is
not corresponded to the
cycle that the knob points
Inverter Motor failures
Display Meaning Solution
Check if the tap is open.
Check if the water preassure is
too low.
Check if the inlet hose is blocked.
Check if the drain pump is blocked.
Contact a technician if necessary.
Close the door well again.
Check if the clothes are caought
between the door and seal.
Contact a technician if necessary.
Let the machine drain out water
automatically until the water level
is suitable for wash procedure.
Contact a technician if necessary.
Please contact a technician
Please contact a technician
Please contact a technician
Please contact a technician
Please contact a technician
Turn the cycle selector to the
cycle corresponded to the
procedure working on.

18
Fabric Care Lable
Resistant material
Delicate fabric
Item may be washed at 90°C
Item may be washed at 60°C
Item may be washed at 40°C
Item may be washed at 30°C
Item may be hand washed
Dry clean only
Can be bleached in cold water
Do not bleach
Can be ironed at 200°C max
Can be ironed at 150°C max
Can be ironed at 100°C max
Do not iron
Can be dry cleaned using any solvent
Dry clean with perchloride,lighter fuel,
pure alcohol or R113 only
Dry clean with aviation fuel,
pure alcohol or R113 only
Do not dry clean
Dry flat
Can be hung to dry
Dry on clothes hanger
Tumble dry, normal heat
Tumble dry, reduced heat
Do not tumble dry
■
Elecrical Warning
To avoid fire, electrical shock and other accidents, please remember the
following reminding:
-Only the voltage indicated in power label can be used. If you are not
clear of the voltage at home, please contact the local power bureau.
-When you are using the heating function, the maximum current through
the washing machine will reach 10A. Therefore,please make sure the
power supply units(current,voltage and cable) can meet the normal laod
requirements for the machine.
-Protect the power cord properly. Power cord shall be fixed well so that it
will not trip the people or other things and be damaged. Special attention
shall bepaid to the plug location.
-Do not make the wall-mounted socket overloaded or cable extended.
Over loading of the wiring may cause fire or electrical shock. Do not pull
out power plug with wet hand.
-To ensure your safety, power plug shall be inserted into an earthed
socket. Carefully check and ensure that your socket is properly and
reliably earthed.
Appendix

The washer is manufactured by recyclable materials. If you decide to
dispose of this washer,please observe the local waste disposal
regulations.Cut off the power cord so that the washer cannot be
connected to power. Remove the door so that small animals and
children cannot get trapped inside the washer.
Do not exceed the detergent quantities recommended in the detergent
manufactures’ instruction.
Protecting the environment
.Correct Disposal of this Product
This marking indicates that this product should not be disposed
withother household wastes throughout the EU.To prevent possible
harm to the environment or human health from uncontrolled waste
disposal,recycle it responsibly to promote the sustainable reuse of
material resources.To return your used device, please use the return
and collection systems or contact the retailer where the product was
purchased.They can take this product for environmental safe
recycling.
Appendix
19

21
Products Fiche
10.0kg
A+++
Note:
The actual parameters will depend on how the appliance is used, and
maybe different with the parameters in above mentioned table.
P - 0.5ower consumption of offmode: W
Power consumption of left-on mode: W1.0
Airborne acoustical noise (washing): 62dB
Airborne acoustical noise (spinning): 75dB
Note:
The airborne acoustical noise emissions during washing/spining for the
standard 60°C cotton programme at full load.
Standard
Programme Load Energy
consumption Water
consumption Remaining
moisture content Programme
time
Cotton 60°C
Cotton 60°C
Cotton 40°C
10kg
5kg
5kg
0.99kWh
0.86kWh
0.82kWh
53.0L
35.0L
41.0L
305min
271min
268min
51%
49%
52%
The household washing machine is equipped with a power manager system.
The duration of the left-on mode is: 10min
INFINITON
WM-K10IN
Energy consumption 237 kWh per year, based on 220 standard washing cycles
for cotton programmes at 60ºC and 40ºC at full and partial load, and the
consumption of the low-power modes. Actual energy consumption will depend on
how the appliance is used.
Water consumption 12000 litres per year, based on 220 standard washing cycles
for cotton programmes at 60°C and 40°C at full and partial load. Actual water
consumption will depend on how the appliance is used.
Spin-drying efficiency class B on a scale from G (least efficient) to A (most
efficient).
Maximum spin speed: 1400rpm
Consumption values:

■Antes de usar su lavadora, lea este manual detenidamente y consérvelo
como referencia futura.
■Este manual también estará disponible en nuestra web www.infiniton.es
■Los dibujos de este manual son solo instrucciones lejanas, pueden
variar del modelo que compre
WM-K10IN
User's manual
Manual de usuario
Manual de usuário

Contenido
Especificaciones del producto...................................... 1
Precauciones de seguridad........................................ 2
Consejos importantes..................................................... 4
Descripción general de la lavadora........................................... 5
instalar lavadora............ ................................................ 6
Operar lavadora.......................... ............................................... 10
Mantenimiento ................................................................ 14
Solución de problemas...................................................... 16
Apéndice... ..................................................................... 18
Ficha de producto .............................................................. 20

Especificaciones del producto
1950W
WM-K10IN
10kg
595*625*850

2
ADVERTENCIA
Para reducir el riesgo de incendio, descarga eléctrica o lesiones a personas
al usar su electrodoméstico, siga las precauciones básicas, incluidas las
siguientes
Precauciones de seguridad
•Si el cable de alimentación está dañado, debe ser reemplazado por el
fabricante, el agente de servicio o personas calificadas de manera similar
para evitar el peligro.
•Deben usarse los nuevos juegos de mangueras suministrados con la
lavadora y los juegos de mangueras viejos no deben reutilizarse.
•Este electrodoméstico no está diseñado para ser utilizado por personas
(incluidos niños) con capacidades físicas, sensoriales o mentales
reducidas, o falta de experiencia y conocimiento, a menos que hayan
recibido supervisión o instrucciones sobre el uso del electrodoméstico por
parte de una persona responsable de su seguridad. Los niños deben
estar supervisados para asegurarse de que no jueguen con el aparato
(esta advertencia no es para el mercado europeo)
•Este electrodoméstico puede ser utilizado por niños de 8 años en
adelante y personas con capacidades físicas, sensoriales o mentales
reducidas o falta de experiencia y conocimiento si se les ha dado
supervisión o instrucciones sobre el uso del electrodoméstico de manera
segura y que entiendan los peligros. Los niños no deben jugar con el
aparato. La limpieza y el mantenimiento del usuario no deben ser
realizados por niños sin supervisión.
•(Esta advertencia es para el mercado europeo)
•Asegurarse de que la alfombra no obstruye la abertura de la lavadora con
aberturas de ventilación en la base.
•Los niños de menos de 3 años deben mantenerse alejados a menos que
estén continuamente supervisados.
•Este electrodoméstico está diseñado para usarse en aplicaciones
domésticas y similares, como:
- áreas de cocina del personal en tiendas, oficinas y otros entornos de trabajo;
- casas rurales
- por clientes en hoteles, moteles y otros entornos de tipo residencial;
- ambientes tipo cama y desayuno;
- zonas de uso comunitario en bloques de pisos o lavanderías.
•Tenga cuidado de que el voltaje y la frecuencia de alimentación sean
idénticos a los de la lavadora.
•Para garantizar su seguridad, el enchufe del cable de alimentación debe
insertarse en una toma de tierra. Verifique cuidadosamente y asegúrese
de que su toma de corriente sea adecuada y esté conectada a tierra de
manera confiable.
•No use ningún enchufe con corriente nominal menor que la de la
lavadora.
•No opere su lavadora cuando faltan piezas o están rotas.
•Nunca desconecte el enchufe con las manos mojadas.

3
Precauciones de seguridad
•Reemplace el cable de alimentación inmediatamente si está
desgastado, el enchufe está suelto, etc.
•Desenchufe su lavadora antes de limpiarla o hacer cualquier
reparación.
•Verifique si el agua dentro del tambor se ha drenado antes de abrir
la puerta. No abra la puerta si hay agua visible.
•La puerta puede estar muy caliente durante la operación. Mantenga
a los niños y mascotas lejos de la lavadora durante la operación.
•Asegúrese de que el agua y el dispositivo eléctrico deben estar
conectados por un técnico calificado de acuerdo con las
instrucciones del fabricante y las normas de seguridad locales.
•Antes de operar esta máquina, se deben quitar todos los paquetes y
los pernos de tránsito. De lo contrario, la lavadora puede sufrir
daños graves al lavar la ropa.
•Se prohíben los solventes inflamables, explosivos o tóxicos. No se
utilizarán gasolina, alcohol, etc. como detergentes. Seleccione
únicamente los detergentes adecuados para el lavado a máquina.
•Tenga cuidado con las quemaduras mientras la lavadora drena agua
de lavado caliente.
•Nunca desenchufe la lavadora tirando del cable de alimentación.
Sujete siempre el enchufe firmemente y sáquelo directamente de la
toma de corriente.
•Si su viejo electrodoméstico ya no se usa, le recomendamos que
retire la puerta y corte el cable de alimentación.
•Los materiales de embalaje pueden ser peligrosos para los niños.
Mantenga todos los materiales de embalaje (bolsas de plástico,
espumas, etc.) lejos de los niños.
•No suba ni se siente en la cubierta superior de la máquina.
•Las mascotas y los niños pueden subirse a la máquina. Verifique la
máquina antes de cada operación.
•No se apoye contra la puerta de la lavadora.

•La lavadora doméstica no está diseñada para ser empotrada.
•Esta lavadora es solo para uso en interiores.
•Asegúrese de que todos los bolsillos estén vacíos. Los objetos
afilados y rígidos como monedas, broches, clavos, tornillos o
piedras, etc. pueden causar daños graves a la lavadora.
•Recuerde desconectar el agua y la fuente de alimentación
inmediatamente después de lavar la ropa.
•La lavadora no debe instalarse en cuartos de baño o cuartos muy
húmedos, así como en cuartos con gases explosivos o cáusticos.
•Antes de lavar la ropa por primera vez, la lavadora debe funcionar
en un ciclo sin la ropa dentro. No repare ni reemplace ninguna parte
de la lavadora a menos que se le haya recomendado
específicamente en las instrucciones de reparación del usuario y
tenga el conocimiento y las habilidades para hacerlo.
•Está prohibido lavar alfombras y sostenes con alambre de acero.
•Nunca rellene agua a mano durante el lavado.
•Después de completar el programa, espere dos minutos para abrir
la puerta.
•Al entregar la máquina, el agua acumulada se drenará de la
máquina en primer lugar. Maneje la máquina con cuidado. Nunca
sostenga cada parte sobresaliente de la máquina mientras la
levanta. La puerta de la máquina no puede usarse como manija
durante el transporte.
•La lavadora con válvula de entrada única solo se puede conectar al
suministro de agua fría. La lavadora con válvulas de entrada doble
se puede conectar al suministro de agua fría y agua caliente.
Consejos importantes
4

Pinzas de
manguera de
drenaje
(Frío)
Válvula de entrada
(Caliente)
Cálvula de entrada
* Sólo en lavadoras de entrada doble
Cable de alimentación
Manguera de drenaje
Tornillo de tránsito (4EA)
Cubierta trasera
Enchufe
GUARDA ESTAS
INSTRUCCIONES
LA MÁQUINA ES SOLO PARA USO DOMÉSTICO
Descripción general de la lavadora
5
Panel de control (Display)
Puerta
Cubierta del filtro de desagüe
Patas (4EA)
Jabonera

NOTA
Recomendamos que su nueva lavadora la instale un técnico de
electrodomésticos calificado. Si cree que tiene las habilidades para
instalar la lavadora, lea detenidamente las instrucciones de instalación
antes de instalarla.
Herramientas necesarias
Es posible que necesite las siguientes herramientas para ayudarlo en
la instalación de su lavadora:
Tijeras
Guantes
Destornillador estándar
Alicates
Llave
Desembalando la lavadora
Desembale su lavadora y verifique si hay algún daño durante el transporte. También
asegúrese de que se reciban todos los artículos (como se muestra a continuación) en la
bolsa adjunta. Si hay algún daño en la lavadora durante el transporte, o falta algún
artículo o está dañado, comuníquese de inmediato con el distribuidor local.
Si su lavadora no tiene doble entrada, no tiene la manguera de entrada caliente.
- Superficie rígida, seca y nivelada (si no está nivelada, nivele con
referencia a la siguiente figura 'Pata ajustable').
- Evitar la luz solar directa.
- Suficiente ventilación.
- La temperatura ambiente debe estar entre 0-40 ℃.
- La humedad ambiental debe ser inferior al 95% (cuando la
temperatura es de 25 ℃).
- Manténgase alejado de los recursos de calor como el carbón o el
gas. Asegúrese de que la lavadora no se apoye en el cable de
alimentación. No instale la lavadora en el piso de la alfombra.
Instalar lavadora
6
(Conéctese al
suministro de agua
caliente)
Manguera de
entrada caliente
(Se utiliza para tapar
agujeros de perno de
tránsito)
Manguera de drenaje
Soporte de apoyo
(Se utiliza para enrollar
el extremo de la
manguera de drenaje)
Tapa del agujero (4EA)
Manguera de entrada
(Conéctese al
suministro de
agua fría)
Llave
(1.Utilizado para ajustar la parte
inferior de la máquina,
2. Retire el perno de transporte
en la parte posterior de la
máquina)
* Si la lavadora no tiene doble entrada, la máquina no tiene la manguera de entrada caliente.
Seleccione la ubicacion
Antes de instalar la lavadora, se debe seleccionar la ubicación que se
describe a continuación:

Instalar lavadora
7
Retire los pernos de tránsito
Antes de usar esta lavadora, los pernos de tránsito deben retirarse de la parte
trasera de esta máquina. Siga estos pasos para quitar los pernos:
Mantenga los pernos de tránsito adecuadamente para su uso posterior.
1. Afloje los cuatro pernos
de tránsito con una llave
2. Tome la cabeza de cada perno y pásela por la
parte ancha del orificio. Repita para cada perno.
3. Tape los agujeros con las
cubiertas de plástico
suministradas.
Nivelar la lavadora
Estructura base del pie
Tuerca de bloqueo
Pie de apoyo
cubierto con goma
Estado de fábrica
Tuerca de bloqueo
cerca del fondo de la
caja
Pie de apoyo cerca de
la tuerca de bloqueo
La base de soporte
está cerca del suelo.
1. Al colocar la máquina, verifique si el pie
inferior está en el estado de fábrica. Si no,
restablezca el pie inferior al estado de fábrica:
Bloqueado
la tuerca está bloqueada firmemente en la
parte inferior de
la caja, y el pie de apoyo está bloqueado
firmemente en la tuerca de bloqueo:
2. Después de colocar la máquina, presione la esquina
opuesta de la placa de cubierta superior de la lavadora
con ambas manos a la vez
y sacúdelo verticalmente hacia abajo
para comprobar si el apoyo
del pie está cerca del suelo y
si la máquina se mueve
3. Para asegurarse de que la máquina se coloca en el estado
correcto, afloje la tuerca de bloqueo de acuerdo con la
dirección que se muestra
en el diagrama con el marcador adjunto a la altura apropiada
hasta que el pie de apoyo se cierre al suelo y la máquina esté
libre de sacudidas
4. Finalmente, use la llave para girar la contratuerca
hacia la parte inferior de la caja para bloquearla (también
puede fijar ligeramente el pie de soporte con la mano
para evitar que el pie de soporte se mueva nuevamente)
Asegúrese de que los pies de apoyo
no se muevan nuevamente
Nota: para facilitar la instalación, el estado de fábrica del pie puede no estar completamente
bloqueado, ¡asegúrese de bloquear los cuatro pies antes de ajustar el nivel!
Instale o coloque la lavadora a una temperatura ambiente no inferior a 0 ℃ pero
no a la intemperie, ya que puede dañar el controlador de programación.
1. La máquina debe estar perfectamente nivelada y estabilizada cuando las
cuatro patas de apoyo estén cerca del suelo. Baje los pies tanto como sea
posible sobre la base de que la máquina está nivelada.
2. Un ajuste de nivelación incorrecto puede causar ruido fuerte, vibración de
la máquina, desplazamiento de la máquina y otros fenómenos anormales.
3. La ventilación de aire está diseñada en la parte inferior de la máquina (evite
el bloqueo). Instale la lavadora en un suelo sólido, liso y antideslizante. No
coloque la lavadora sobre una manta blanda o piso de madera, o sobre varios
escritorios y soportes, en caso de lesiones innecesarias.
PRECAUCIÓN

30cm
100cm
65cm
Conecte la manguera de entrada
Conecte la manguera de entrada paratocar y
abróchelo en sentido antihorario.
Conecte el otro extremo de la manguera de
entrada a la válvula de entrada en la parte
trasera de la lavadora y apriete la manguera firmemente en el sentido de las
agujas del reloj.
Cuando hay una entrada en la parte posterior de la máquina, debe estar
conectada a un suministro de agua fría. Si hay dos válvulas de entrada, una está
conectada a un suministro de agua fría y la otra está conectada a un suministro de
agua caliente. Siga las indicaciones de la imagen a continuación para completar la
conexión.
válvula de entrada para agua fría
manguera de entrada para agua fría
manguera de entrada para agua caliente con
un lado rojo
válvula de entrada para agua caliente con
rejilla roja
•Si hay alguna fuga con la manguera
después de la conexión, repita los pasos
para conectar la manguera de entrada.
•No doble la manguera.
•Verifique cuidadosamente la conexión de la
manguera de entrada antes de usar la
lavadora cada vez.
Conecte la manguera de drenaje
La manguera de drenaje se colocará a una
altura de 65-100 cm sobre el piso, de lo
contrario, puede causar un drenaje deficiente.
Puede usar el soporte de manguera de drenaje
suministrado para enrollar la manguera de
drenaje en la pared, la tubería vertical o la tina
de lavado.
Tenga cuidado de asegurarse de que todas las
conexiones de la manguera estén apretadas.
El extremo de la manguera de drenaje no puede
sumergirse en agua para que la lavadora
funcione correctamente.
NOTA
NOTA
Instalar lavadora
8

NOTA
Asegúrese de que su máquina esté instalada correctamente antes de
usarla.
Antes de lavar la ropa por primera vez, debe ejecutar un ciclo completo sin ropa.
Para hacer esto:
1. Conecte la fuente de alimentación y el agua.
2. Ponga un poco de detergente (aproximadamente 10 g) en el cajón y ciérrelo.
3. Presione el botón de encendido / apagado " ".
4. Gire la perilla a "Algodón".
5.Presione el botón Inicio / Pausa "
Esto eliminará el agua de prueba del fabricante que queda en la
máquina.
Enchúfela a la corriente
Como la corriente máxima a través de la unidad es 10A cuando
está utilizando su función de calefacción, asegúrese de
El sistema de alimentación (corriente, tensión de alimentación y
cable) en su casa puede cumplir con la carga normal
requisitos de los electrodomésticos.
Conecte la alimentación a una toma que esté correctamente
instalado y debidamente conectado a tierra.
Asegúrese de que el voltaje de alimentación en su placa sea el mismo
que en el voltaje nominal de la máquina.
El enchufe de alimentación debe coincidir con el enchufe.
No utilice enchufes o enchufes alargaderas como cable de extensión.
No conecte y saque el enchufe con las manos mojadas.
Al extraer el enchufe, sosténgalo firmemente y luego extráigalo. No tire
del cable de alimentación a la fuerza.
Si el cable de alimentación está dañado o tiene algún signo de rotura, se
debe seleccionar o comprar un cable de alimentación especial de su
fabricante o centro de servicio para su reemplazo.
ADVERTENCIA
1. Esta máquina debe estar conectada a tierra correctamente. Si hay un
cortocircuito, la conexión a tierra puede reducir el peligro de descarga eléctrica.
2. La lavadora debe funcionar en un circuito separado de otros aparatos
eléctricos. De lo contrario, el protector de energía puede dispararse o el fusible
puede quemarse.
Instalar lavadora
Operar lavadora
9

■Poner detergente
1. Extraiga el cajón de detergente.
2. Agregue detergente para el lavado principal en
el compartimento Ⅱ.
Opción1: detergente que es sólido;
Opción 2: detergente líquido.
3. Agregue suavizante de telas en el
compartimento.
4. Elija el tipo de detergente adecuado para las
diferentes temperaturas de lavado para obtener el
mejor efecto de lavado con menos consumo de
agua y energía.
Operar lavadora
■Clasificar la ropa
NOTA: Asegúrese de que no quede ropa atrapada entre la puerta y el sello.
10
Ⅱ
Lea esta recomendación detenidamente para evitar los
problemas de la lavadora y los daños de la ropa.
1. No sobrecargue de ropa la capacidad nominal.
2. Clasifique la ropa por color y por etiqueta de cuidado. La
mayoría de las prendas tienen una etiqueta de cuidado textil
en el cuello o la costura lateral.
3. Asegúrese de que todos los bolsillos estén vacíos. Los
objetos extraños (por ejemplo, clavos, monedas, clips, etc.)
pueden dañar las prendas y los componentes de la máquina.
4. Cierre las cremalleras, cierre los ganchos, etc. antes de
lavar.
5. Para lavar la ropa, deben clasificarse según el color. La
ropa oscura no debe lavarse con ropa clara especialmente.
6. Las áreas muy sucias, las manchas, etc. deben tratarse
previamente con detergente líquido, quitamanchas, etc.
7. Dé la vuelta a la ropa que se pone fácilmente y que tiene
una superficie de lana antes de ponerla en la máquina.

On/Off
■Vista del panel de control
Start/Pausa
Temperatura
Selector de ciclo
Lavado
Aclarado
Velocidad
Inicio programado
Operar lavadora
11
(Nota: presione durante tres segundos)
■Función
·On/Off: Presione una vez para encender la lavadora, presione nuevamente
·para apagar la lavadora. Si se deja encendida la lavadora durante más de 10
minutos sin tocar ningún botón, se apagará automáticamente.
·
Start/Pausa: Presione el botón una vez para iniciar un ciclo. Presione el
botón por segunda vez para pausar el ciclo de funcionamiento. Durante
una pausa, la configuración y las opciones pueden modificarse y
seleccionarse nuevamente si está permitido. Al presionar el botón
nuevamente se reanudará el ciclo activo.
·Selector de ciclo: La perilla se puede girar en cualquier dirección para elegir
un ciclo.
·
Temperatura:Use el botón para seleccionar la temperatura del agua.
Las selecciones disponibles (desde frío hasta ºC máxima) varían para
cada ciclo. La configuración deseada parpadeará en la pantalla durante
el proceso de selección.
·
Velocidad:Use el botón para seleccionar una velocidad de centrifugado.
Las selecciones disponibles (de 0 a rpm máximas) varían para cada
ciclo. La configuración deseada parpadeará en la pantalla durante el
proceso de selección.
·
Inicio programado: Presione el botón varias veces para recorrer las opciones
de inicio diferido disponibles (de 3 a 24 horas en incrementos de una hora).
·
Lavado: Use este botón para seleccionar un tiempo de lavado (de 0 a max
mín.). Las selecciones disponibles varían para cada ciclo. Aparecerá la
configuración específica en la pantalla durante el proceso de selección.
·
Aclarado: Use este botón para seleccionar el tiempo de aclarado.
·
Las selecciones (de 0 a tiempos máximos) varían para cada ciclo.
·
aparecerá en la pantalla durante el proceso de selección.

■Indicadores
■Programa
Operar lavadora
12
:Significa que se ha seleccionado la función Inicio en diferido.
:Significa que se ha seleccionado la función Bloqueo infantil.
: El indicador se mantendrá encendido cuando la puerta está bloqueada
normalmente, de lo contrario, no puede aparecer.
: significa que se ha seleccionado la función "silencio".
·Algodón: Puede seleccionar este procedimiento para lavar la ropa lavable diaria.
Se recomienda lavar las telas resistentes, telas resistentes al calor hechas de
algodón o lino.
·Rápido 15':Este procedimiento es adecuado para lavar ropa no muy sucia
rápidamente.
·Ropa interior:Este procedimiento es adecuado para lavar
·Camisas: Puede seleccionar este procedimiento para lavar camisas de algodón,
lino, fibras sintéticas o telas mezcladas.
·Vaqueros:Este procedimiento es muy adecuado para vaqueros o telas de mezcla.
·Delicado:El procedimiento no puede hacer que la ropa se enjuague para estar
más limpia, evite el detergente para la ropa para pieles alérgicas.
·Limpieza de tambor: Este ciclo está especialmente configurado en esta máquina
para limpiar el tambor y el tubo. Aplica una esterilización a alta temperatura de 60 /
90ºC para hacer que el tambor y el tubo sean más verdes. Cuando se coloca la
cantidad adecuada de agente blanqueador de cloro, el efecto de limpieza del barril
será mejor. Cuando ejecuta este programa, le sugerimos que no se ponga ropa.
Puede usar este procedimiento regularmente de acuerdo con la necesidad.
·Centrifugado: Este ciclo se usa para extraer agua de la ropa.
·Aclarado + centrifugado:Este ciclo se usa para limpiar el detergente restante en
la ropa y extraer agua de la ropa.
·Colores oscuros: Puede seleccionar este procedimiento para lavar las telas de
color oscuro hechas de algodón y telas oscuras delicadas.
·Abrigo:El procedimiento es bastante adecuado para chaquetas de plumas.
·Lana: Puede seleccionar este procedimiento para lavar los textiles de lana
etiquetados con "Lavado a máquina". Seleccione la temperatura de lavado
adecuada de acuerdo con la etiqueta de los artículos a lavar.
·Intensivo:Puede seleccionar este procedimiento para lavar la ropa resistente, que
necesita mucha más fuerza.
·Ropa de cama: Puede seleccionar este procedimiento para lavar ropa pesada. Se
recomienda lavar vaqueros, ropa de cama, etc.
·Ropa deportiva: adecuada para el lavado de ropa deportiva
·Mezclar: puede seleccionar este procedimiento para lavar ropa de diferentes tipos,
excepto los colores. La ropa oscura no debe lavarse con ropa que sea
especialmente ligera.

Operate Washing Machine
1. Memoria de apagado: en caso de falla de energía durante el ciclo, la configuración
se guardará y la operación se reanudará cuando se restablezca la energía.
2. Bloqueo infantil: presione “Velocidad” y “Temp.” El botón simultáneamente durante
3 segundos puede activar o cancelar la función "Bloqueo infantil" para evitar errores de
funcionamiento. Cuando se activa la función, no se pueden configurar todos los botones
hasta que finalice la operación o se cancele.
Parameter
Procedure 9.0kg
--~40
--~40
0~1000
Mix
ALGODÓN
ROPA INTERIOR
VAQUEROS
–0~1000
RÁPIDO 15'
Temperatura
(℃;- -= cold)
Velocidad
(r/min;0=no spin)
Carga Máx.(kg)
--~Max
--~40
CENTRIFUGADO
0~1200
0~1000
0~Max
DELICADO
ABRIGOS
--~40 0~800
0~1000
CAMISAS
LIMPIEZA TAMBOR
60/Max
0~1200
ACLARADO + CENTRIFUGADO
OSCUROS
0~1000
--~40
0~600
LANA
--~40
Table of Washing Procedures
■
NOTA
El programa “algodón estándar 60 ° C / 40 ° C con velocidad máxima” son los
programas de lavado estándar, y son adecuados para limpiar ropa de algodón con
suciedad normal y son los programas más eficientes en términos de consumo
combinado de energía y agua para el lavado. ese tipo de ropa de algodón, que la
temperatura real del agua puede diferir de la temperatura declarada del ciclo.
Caracteristicas
13
4
9
--~40
3
2.5
4
--~60
5
5
ROPA DE CAMA
--~60
--~60 0~Max
INTENSIVO
DEPORTIVA
0~800
--~40
-
9
4
4
2.5
9
9
4
6
-
-
-
10kg
5
10
2
3.5
5
5
8
-
10
10
3.5
4.5
4.5
10
6
4.5
0~1200
0~1200
0~1000

3. Protección contra el desequilibrio: cuando la máquina está lista para girar, la
lavadora puede tardar unos minutos en equilibrar la ropa debido a un gran
desequilibrio. Si la ropa todavía está desequilibrada en el tambor después de eso,
la velocidad de giro puede reducirse para evitar una gran vibración. Si la ropa en el
tambor es demasiado baja, es posible que la máquina no gire debido a la
protección de desequilibrio, entonces debe agregar más ropa en la máquina para
que gire.
4. Recargar: si desea agregar ropa en la lavadora durante el procedimiento,
presione el botón "Inicio / Pausa" durante 3 segundos, cuando escuche dos pitidos,
significa que la función de recarga se ha activado. Espere a que desaparezca el
indicador " " y luego abra la puerta. Presione el botón "Inicio / Pausa" para
reanudar el procedimiento después de volver a cargar.
El mantenimiento adecuado de la lavadora puede extender su vida útil.
ADVERTENCIA
Antes de que comience el mantenimiento, desconecte el enchufe o desconecte la
alimentación y cierre el grifo.
Limpie internamente el tambor
La oxidación que dejan los artículos metálicos dentro del tambor se eliminará
inmediatamente con detergentes libres de cloro. Nunca use lana de acero.
Limpie la superficie
1. Si hay un desbordamiento de agua, use el paño seco para limpiarlo
inmediatamente. No se permite que objetos afilados golpeen la lavadora.
2. La superficie se puede limpiar con detergentes neutros no abrasivos
diluidos cuando sea necesario.
Limpie la bomba de drenaje.
1
32
1. Desconecte la lavadora;
2. Abra la tapa de la caja de la bomba
con una moneda o una llave;
3. Desenrosque la tapa de la bomba en
sentido contrario a las agujas del reloj.
Mantenga siempre un trapo cerca para
que se seque.
agua al desenroscar el
tapa de la bomba;
4. Limpie el interior de la bomba;
5. Reemplace la bomba
cubrirlo y atornillarlo
herméticamente;
6. Reemplace la bomba
funda protectora.
Caracteristicas
Mantenimiento
14

Limpie el filtro de la válvula de entrada
El filtro de entrada se debe limpiar si no hay agua suficiente o
insuficiente cuando se abre el grifo.
1. Baje la presión del agua:
a. Cierra el grifo.
si. Seleccione cualquier procedimiento excepto el procedimiento
"Girar".
C. Presione el botón "Inicio / Pausa" y mantenga el procedimiento en
funcionamiento durante unos 40 segundos.
re. Saque el enchufe de alimentación.
2. Retire la manguera de entrada del grifo.
3. Use agua para lavar el filtro.
4. Vuelva a conectar la manguera de entrada.
Cajón de detergente limpio
1. Presione hacia abajo la parte ① dentro del cajón
y saque el cajón de detergente.
2. Levante el clip y saque
cubierta de suavizante y lavar todo
surcos con agua.
3. Restaurar la cubierta del suavizante
y empujar el cajón hacia posicion
Deseche la lavadora fácilmente si está congelada
Si la lavadora está expuesta a una temperatura inferior a 0 ° C, se
deben tomar ciertas precauciones.
1. cierre el grifo.
2. Desenrosque la manguera de entrada.
3. Desenganche la manguera de drenaje del soporte trasero y coloque el
extremo de esta manguera y el de la manguera de entrada en un recipiente.
Ejecute el programa de centrifugado.
4. Desconecte la lavadora.
5. Atornille la manguera de entrada y vuelva a colocar la manguera de drenaje.
1. Cuando se reutiliza la lavadora, asegúrese de que la temperatura ambiente
sea superior a 0 ° C.
2. Si su lavadora se encuentra en la habitación donde se puede congelar
fácilmente, drene el agua restante dentro de la manguera de drenaje y la
manguera de entrada a fondo.
3. Comuníquese con un técnico si su lavadora está congelada.
Mantenimiento
15

PROBLEMA SOLUCIÓN
Queda algo de agua en la
máquina.
The washer does not run
Esto es normal y es el resultado de las
pruebas de agua realizadas en la fábrica.
Compruebe si el enchufe de alimentación está bien
insertado. Verifique si el grifo está abierto.
Compruebe funciona el botón "Encendido".
Compruebe funciona el botón "Inicio / Pausa".
Compruebe si la función de retraso está activada.
Verifique y apriete la manguera de entrada.
Limpie la manguera de drenaje y pídale a una persona
especializada que la repare si es necesario.
Compruebe si se han quitado los pernos de tránsito.
Compruebe si las patas ajustables están ajustadas al nivel.
Verifique si la lavadora está instalada en el piso sólido y
nivelado. Compruebe si hay pasadores o artículos
metálicos en el interior.
Seleccione un procedimiento adecuado.
Agregue la cantidad adecuada de detergente de
acuerdo con las instrucciones en el paquete de
detergente.
Compruebe si la función "Bloqueo infantil" se ha
activado. Presione el botón "Inicio / Pausa"
primero y luego presione otros botones.
Compruebe si la ropa en el tambor es lo
suficientemente dispersiva. Compruebe si el agua
se drena o entra bien.
Compruebe si la altura máxima de la manguera de
drenaje es inferior a 65 cm.
Verifique si la manguera de drenaje está sumergida.
Fuga de agua
Ruido anormal y gran
vibración.
La eficiencia de lavado
no está satisfecha
La máquina no responde
después de presionar los
botones
El tiempo de ejecución real
de los procedimientos no se
corresponde con el tiempo
de visualización
La lavadora se llena
mientras drena
16
Solución de problemas

Troubleshooting
17
NOTA
Consulte el modelo realmente comprado para la visualización de fallos aquí. Diferentes
modelos tienen diferentes pantallas de fallos
La lavadora se llena
con el tiempo.
La cerradura de la
puerta se descompone
Drenaje de agua
con el tiempo
El agua se desborda
El motor eléctrico está
averiado.
El calentador no
funciona
Hay un fallo en el
sensor de temperatura
Fallos de comunicación
El procedimiento en
ejecución no se
corresponde con el ciclo
que apunta la perilla
Fallo en el motor inverter
Display Significado Solución
Compruebe si el grifo está abierto.
Compruebe si la presión del agua
es demasiado baja.
Verifique si la manguera de entrada
está bloqueada.
Verifique si la bomba de drenaje está
bloqueada. Póngase en contacto con
un técnico si es necesario.
Cierra bien la puerta de nuevo.
Verifique si la ropa está atrapada
entre la puerta y el sello. Póngase
en contacto con un técnico si es
necesario.
Deje que la máquina drene el agua
automáticamente hasta que el nivel
de agua sea adecuado para el
procedimiento de lavado. Póngase
en contacto con un técnico si es
necesario.
Por favor, póngase en contacto
con un técnico
Por favor, póngase en contacto
con un técnico
Por favor, póngase en contacto
con un técnico
Por favor, póngase en contacto
con un técnico
Por favor, póngase en contacto
con un técnico
Turn the cycle selector to the
cycle corresponded to the
procedure working on.

18
Etiqueta de cuidado de tela
Material resistente
Tela delicada
El artículo se puede lavar a 90 ° C
El artículo se puede lavar a 60 ° C
El artículo se puede lavar a 40 ° C
El artículo se puede lavar a 30 ° C
El artículo se puede lavar a mano,
solo lavar en seco
Se puede blanquear en agua fría.
No usa blanqueador
Se puede planchar a 200 ° C máx.
Se puede planchar a 150 ° C máx.
Se puede planchar a 100 ° C máx.
No planchar
Se puede lavar en seco con cualquier solvente
Lave en seco con percloruro, combustible más ligero, alcohol
puro o solo R113
Limpieza en seco con combustible de aviación,
alcohol puro o solo R113
No lavar en seco
Piso seco
Se puede colgar para secar
Secar en percha
Secadora, calor normal
Secadora, calor reducido
No secar en secadora
■
Advertencia electrica
Para evitar incendios, descargas eléctricas y otros accidentes,
recuerde lo siguiente:
- Solo se puede utilizar el voltaje indicado en la etiqueta de alimentación. Si no
está libre de voltaje en su hogar, comuníquese con la oficina local de energía.
- Cuando utiliza la función de calefacción, la corriente máxima a través de la
lavadora alcanzará los 10A. Por lo tanto, asegúrese de que las unidades de fuente
de alimentación (corriente, voltaje y cable) puedan cumplir con los requisitos
normales de carga para la máquina.
- Proteja el cable de alimentación correctamente. El cable de alimentación se
debe fijar bien para que no se tropiece con las personas u otras cosas y se dañe.
Se prestará especial atención a la ubicación del enchufe.
- No sobrecargue el enchufe montado en la pared ni extienda el cable. La
sobrecarga del cableado puede provocar incendios o descargas eléctricas. No
desconecte el enchufe con las manos mojadas.
- Para garantizar su seguridad, el enchufe de alimentación se debe insertar en
una toma de tierra. Verifique cuidadosamente y asegúrese de que su toma de
corriente esté conectada a tierra de manera adecuada y confiable.
Apéndice

Protegiendo al medio ambiente
La lavadora está fabricada con materiales reciclables. Si decide
deshacerse de esta lavadora, observe las normas locales de eliminación
de desechos. Corte el cable de alimentación para que la lavadora no
pueda conectarse a la alimentación. Retire la puerta para que los animales
pequeños y los niños no puedan quedar atrapados dentro de la lavadora.
No exceda las cantidades de detergente recomendadas en las
instrucciones del fabricante del detergente.
Eliminación correcta de este producto
Esta marca indica que este producto no debe desecharse con otros
desechos domésticos en toda la UE. Para evitar posibles daños al
medio ambiente o la salud humana por la eliminación incontrolada
de desechos, recíclelo responsablemente para promover la
reutilización sostenible de los recursos materiales. Para devolver su
dispositivo usado, utilice los sistemas de devolución y recolección o
comuníquese con el minorista donde compró el producto. Pueden
llevar este producto a un reciclaje seguro para el medio ambiente.
Apéndice
19

21
Ficha de producto
10.0kg
A+++
Nota:
Las emisiones de ruido acústico en el aire durante el lavado / hilado
para el programa de algodón estándar de 60 ° C a plena carga.
Standard
Programme Load Energy
consumption Water
consumption Remaining
moisture content Programme
time
Cotton 60°C
Cotton 60°C
Cotton 40°C
10kg
5kg
5kg
0.99kWh
0.86kWh
0.82kWh
53.0L
35.0L
41.0L
305min
271min
268min
51%
49%
52%
Nota:
Los parámetros reales dependerán de cómo se use el dispositivo y pueden
ser diferentes con los parámetros de la tabla mencionada anteriormente.
La lavadora doméstica está equipada con un sistema de administración de
energía. La duración del modo izquierdo es: 10 minutos
Consumo de energía de -fmode: 0.5W
Consumo de energía del modo izquierdo: 1.0W
Ruido acústico en el aire (lavado): 62dB
Ruido acústico aéreo (giro): 75dB
INFINITON
WM-K10IN
Consumo de energía 237 kWh por año, basado en 220 ciclos de lavado
estándar para programas de algodón a 60ºC y 40ºC a carga completa y parcial,
y el consumo de los modos de baja potencia. El consumo de energía real
dependerá de cómo se use el aparato.
Consumo de agua 12000 litros por año, basado en 220 ciclos de lavado
estándar para programas de algodón a 60 ° C y 40 ° C a carga total y parcial. El
consumo real de agua dependerá de cómo se use el aparato.
Clase de eficiencia de secado por centrifugado B en una escala de G (menos
eficiente) a A (más eficiente).
Velocidad máxima de centrifugado: 1400 rpm
Valores de consumo:

■Before using your washing machine,please read this manual carefully
and keep it far future reference.
■This manual shall also be available on www.infiniton.es
■The drawings in this manual are far instruction only,it may be vary from
the model you buy
WM-K10IN
User's manual
Manual de usuario
Manual de usuário

Contents
Products Specification.................................................. 1
Safety Precaution......................................................... 2
lmportant Hints ............................................................. 4
Overview of Washing Machi ne ........................................ 5
lnstall Washing Machine ................................................ 6
Operate Washing Machi ne .............................................. g
Maintenance ................................................................ 14
Troubleshooting ........................................................... 16
Appendix
..................................................................... 18
Products Fiche ............................................................. 20
PRODUCT REGISTRATION
Thank you for purchasing our INFINITON
product. This easy-to-use manual will guide
you in getting the best use of your washer.
lnside you will find man
y helpful hints on how
to use and maintain your washing machi ne
properly. You'/1 find man y answers to common
problems in the chart oftroubleshooting tips.
Remember to record the model and serial
numbers. They are on the back ofthe unit.

Products Specification
1950W
WM-K10IN
10kg
595*625*850

2
WARNING
To reduce the risk of fire,electric shock,or injury to persons when
using your appliance,follow basic precautions,including the following
Children of less than 3 years should be keep away unless continuously
supervised.
Carpet does not obstruct the opening for washing machine with
ventillation openings in the base.
This appliance is not intended for use by persons(including children)with
reduced physical,sensory or mental capabilities,or lack of experience and
knowledge,unless they have been given supervision
or instruction concerning use of the appliance by a person responsible
for their safety.Children should be supervised to ensure that they do
not play with the appliance.(This warning is not for EUROPEAN market)
The new hose-sets supplied with the washer are to be used and that
old hose-sets should not be reused.
If the power cord is damaged,it must be replaced by the manufacturer,
service agent or similarly qualified persons in order to avoid the hazard.
This appliance can be used by children aged from 8 years and above and
persons with reduced physical,sensory or mental capabilities or lack of
experience and knowledge if they have been given supervision or
instruction concerning use of the appliance in a safe way and understand
the hazards involved.Children shall not play with the appliance.Cleaning
and user maintenance shall not be made by children without supervision.
(This warning is for EUROPEAN market)
Safety Precaution
This appliance is inteded to be used in household and similar applications
such as:
-staff kitchen areas in shops,offices and other working environments;
-farm houses
-by clients in hotels,motels and other residential type environments;
-bed and breakfast type environments;
-areas for communal use in blocks of flats or launderettes.
Take care that power voltage and frequency shall be identical to those
of washing machine.
To ensure your safety,power cord plug must be inserted into an earthed
socket.Check carefully and make sure that your socket is proper and
earthed reliably.
Do not use any socket with rated current less than that of washing
machine.
Do not operate your washer when parts are missed or broken.
Never pull out power plug with wet hands.

3
Safety Precaution
Replace immediately worn power cord,loose plugs/power sockets.
Unplug your washer before cleaning or making any repair.
Please check whether the water inside the drum has been drained before
opening the door.Please do not open the door if there is any water visible.
Glass door may be very hot duing the operation.Keep kids and pets far
away from the washer during the operation.
Make sure that the water and electrical device must be connected by a
qualified technician in accordance with the manufacturer’s instruction
and local safety regulations.
Before operating this machine,all packages and transit bolts must be
removed.Otherwise,the washing machine may be seriously damaged
while washing the clothes.
Flammable and explosive or toxic sovents are forbidden.Gasoline and
alcohol etc.Shall not be used as detergents.Please only select the
detergents suitable for machine washing.
Be careful of scald while the washer drainning hot washing water.
Never unplug your washer by pulling on the supply cord.Always grasp
the plug firmly and pull straight out from the outlet.
If your old appliance is not being used anymore,we recommend that
you remove the door and cut off the supply cord.
Packing materials may be dangerous to the kids.Please keep all packing
materials(plastic bags,foams etc)far away from the kids.
Do not climb up and sit on top cover of the machine.
Pets and kids may climb into the machine.Check the machine before
every operation.
Do not lean against the door of the washer.

The household washing machine isn’t intended to be built-in.
This washing machine is for indoor using only.
Make sure that all pockets are empty.Sharp and rigid items such as
coin,brooch,nail,screw or stone etc.May cause serious damages to
the washer.
Please remember to disconnect water and power supply immediately
after the clothes are washed.
The washing machine shall not be installed in bath room or very wet
rooms as well as in the rooms with explosive or caustic gases.
Before washing the clothes at first time,the washing machine shall be
operaed in one round of the whole procedures without the clothes inside.
Do not repair or replace any part of the washer unless you have been
specifically recommended in the user-repair instructions and you have
the knowledge and skills to make it.
It is forbidden to wash carpets and bras inset with steel wire.
Never refill water by hand during washing.
After the program is completed,please wait for two minutes to open the
door.
When handing the machine,the accumulated water shall be drained out
of the machine firstly.Handle the machine carefully.Never hold each
protruded part on the machine while lifting.Machine door can not be used
as the handle during the conveyance.
The washing machine with single inlet valve only can be connected to the
cold water supply.The washing machine with double inlet valves can be
connected to the hot water and cold water supply.
Important Hints
4

Drain Hose Clips
(Cold)
Inlet Valve
* Only double inlet machine
(Hot)
Inlet Valve
Power Cord
Drain Hose
Transit Bolt(4EA)
Back Cover
Power Plug
SAVE THESE INSTRUCTIONS
THE MACHINE IS HOUSEHOLD USE ONLY
Overview of Washing Machine
5
Control Panel Assembly
Door Assembly
Pump Case Cover
Leg Assembly
(4EA)
Drawer Handle

NOTE
We recommend that your new washer should to installed by a qualified
appliance technician.If you feel that you have the skills to install the
washer,please read the installation instructions carefully before
installing.
You may need to have the following tools to help you in the installation
of your washer:
Tools needed
Scissors
Gloves
Standard Screwdriver
Pliers
Spanner
Unpacking the washing machine
If your washing machine is not double inlet, you do not have the hot inlet hose.
Unpacking your washing machine and check if is there any damage
during the transportation.Also make sure that all the the items(as
shown below) in the attached bag are received. If there is any damage
to the washing machine during the transportation,or any item is
missing or damaged,please contact the local dealer immediately.
Select the location
Before installing the washer,the location characterized as follows shall
be selected:
-Rigid,dry,and level surface(if not level,please make it level with
reference to the following figure’Adjustable Leg’).
-Avoid direct sun light.
-Sufficient ventilation.
-The ambient temperature shall be between 0-40℃.
-The ambient humidity shall be below 95%(When the temperature is
25℃).
-Keep far away from the heat resources such as coal or gas.Make sure
that the washer will not stand on power cord.Do not install the washer
on the carpet floor.
Install Washing Machine
6
(Connect to Hot
water supply)
Hot Inlet Hose
(Used to plug transit
bolt holes)
Drain Hose
Support Bracket
(Used to loop the end
of drain hose)
Hole Cover (4EA)
Inlet Hose
(Connect to cold
water supply)
Spanner
(1.Used to adjust the bottom
of the machine,
2.Remove the transport bolt on
the back of the machine)
*If washing machine is not double inlet, the machine does not have the hot inlet hose.

Install Washing Machine
7
Remove transit bolts
Before using this washing machine,transit bolts must be removed from
the backside of this machine.Please take the following steps to remove
the bolts:
Keep the transit bolts properly for futher use.
1.Loosen the four transit
bolts with a spanner
2.Take each bolt head and pull it through the
wide part of the hole.Repeat for each bolt.
3.Fill the holes with the
supplied plastic covers.
Level the washing machine
Base foot structure
Lock nut
Support foot covered
with rubber
Factory status
Lockingnut close
to bottom of box
Supporting foot close
to locking nut
Support base is close
to the ground
1.When palcing the machine,check whether
the bottom foot is in the factory state.if
not,please restore the bottom foot to the
factory state:the locking
nut is locked tightly on bottom of
the box,and the support foot is locked
tightly on the locking nut:
2.After the machine is placed,press the opposite
corner of the top cover plate of the washing
machine with both hands in turn
and shake it vertically downward
to check whether the supporting
foot is close to the ground and
whether the machine is shaken
3.To ensure that the machine is placed in the right state,
loosen the locking nut according to thedirection shown
in the diagram with the attachedspanner to the appropriate
height until thesupporting footisclosetothegroundand
themachineisfreefromshaking
4.Finally,use the spanner to turn the lock nut back
to thebottom of the box to lock it(you can also
slightly fix the support foot by hand to avoid the
support foot moving again)
Ensure that the supporting
feet do not move again
Note:in order to facilitate installation,the factory stutus of the foot may not be all
locked,please be sure to lock all four feet before adjusting the level!
Install or place the washing machine under the environmental temperature of not
less than 0℃but not outdoors, for it may damage the programming controller.
1.The machine must be perfectly leveled and stabilized when the four
supporting feet are close to the ground. Lower the feet as much as possible
on the basis that the machine is leveled.
2.Improper leveling adjustment may cause loud noise, machine vibrating,
machine displacement and other abnormal phenomena.
3.Air-vent is designed on the bottom of the machine (prevent blockage). Install
the washing machine on solid, smooth and skid-proof ground. Do not place
the washing machine on soft blanket or wooden floor, or various desktops
and stands, in case of unnecessary injury.
CAUTION

30cm
100cm
65cm
Connect the inlet hose
1.Connect the inlet hose to tap and
fasten it anticlockwise.
2.Connect the other end of the inlet hose to the inlet valve at the backside
of the washing machine and fasten the hose tightly clockwise.
when there is a inlet at the back of the machine,it must be connected to
a cold water supply.If there are two inlet valve,one is connected to a
cold water supply and the other is connected to a hot water supply.
Follow the indication of the picture below to complete the connection.
inlet valve for cold water
inlet hose for cold water
inlet hose for hot water with a red side
inlet valve for hot water with a red grid
If there is any leakage with hose after
the connection,then repeat the steps to
connect inlet hose.
Do not bend the hose.
Check for inlet hose connection carefully
before using the washer each time.
Connect the drain hose
The drain hose shall be placed at a
height of 65-100cm above the floor,
otherwise,it can cause poor drainage
You can use the supplied drain hose
support bracket to loop the drain hose
down into the wall,standpipe or laundry
tub.
Take care to ensure all hose connections
are tight.
The end of the drain hose cannot be
immersed in water for the washer to work
properly.
NOTE
NOTE
Install Washing Machine
8

Ensure your machine is installed properly before use.
NOTE
Before washing clothes for the first time, you must run a complete cycle
without clothes. To do this:
1.Connect power source and water.
2.Put a little detergent(about 10g) into the drawer and close it.
3.Press the On/Off button “ ” .
4.Turn the knob to the “Cotton” .
5.5.Press the Start/Pause button “
This will remove any water from the manufacturer’s test run remaining
in the machine.
Connect the power
·
·
·
·
·
·
·
·
As the maximum current through the unit is 10A when
you are using its heating function, please make sure
the power supply system (current, power voltage and
wire) at your home can meet the normal loading
requirements of the electrical appliances.
Please connect the power to a socket which is correctly
installed and properly earthed.
Make sure the power voltage at your plate is same
to that in the machine’s rated voltage.
Power plug must match the socket.
Do not use multi-purpose plug or socket as extension cord.
Do not connect and pull out plug with wet hands.
When pulling out the plug, hold the plug tightlly and then pull it out. Do
not pull power cord forcibly.
If power cord is damaged or has any sign of being broken, special power
cord must be selected or purchased from its manufacturer or service
center for replacement.
WARNING
1.This machine must be earthed properly. If there is any short circuit,
earthing can reduce the danger of electrical shock.
2.Washing machine shall be operated in a circuit separate from other
electrical appliances. Otherwise, power protector may be tripped or
fuse may be burned out.
Install Washing Machine
Operate Washing Machine
9

Put detergent
■
1.Pull out the detergent drawer.
2.Add detergent for main wash into
compartment Ⅱ.
option1:detergent that is solid;
option 2:detergent that is liquid.
3.Add fabric softener into compartment .
4.Please choose suitable type of detergent
for the various washing temperature to get
the best washing effect with less water and
energy consumption.
Operate Washing Machine
Sort clothes
■
NOTE:Make sure that no clothes is caught between the door and the seal.
10
Ⅱ
Please, read this recommendation carefully to avoid the
troubles of washing machine and damages of clothes.
1. Do not put clothes over load the rated capacity.
2. Sort the laundry by colour and by care label. Most
garments have a textile care label in the collar or side
seam.
3. Make sure all the pockets are empty . Foreign objects
(e.g. nails, coins, paper clips, etc.) can cause damage to
garments and components in the machine.
4. Close any zips, fasten hooks, etc. before washing.
5. For clothes to be washed, they should be sorted according
to colour. Dark clothes should not be washed with light
clothes specially.
6. Badly soiled areas, stains, etc. should be pre-treated with
liquid detergent, stain removers, etc.
7. Turn over the clothes wich pill easily and is with woolen
surface before putting them into the machine

On/Off Button
View of control panel
■
Start/Pause Button
Temperatture Button
Cycle Selector
Wash Button
Rinse Button
Speed Button
Delay Button
Function
■
·Start/Pause Button: Press the button once to start a cycle.Press the
button a second time will pause the operating cycle. During a pause,
setting and options can be modified and selected again if it is permit.
Pressing the button again will resume the active cycle.
·On/Off Button: Press once to turn the washing machine on, press again
to turn the washing machine off. If the washing machine power is left on
for longer than 10 minutes without any buttons being touched, the power
automatically turns off.
·Cycle Selector: The knob can be turned in either directuon to choose a
cycle.
Operate Washing Machine
11
(Note: press for three seconds)
·Temperature Button:Use the button to select a water
temperature.Available selections (from cold to max ºC) vary for each
cycle.The targeted setting will blink on the screen during the selection
process.
·Speed Button:Use the button to select a spin speed.Available selections
(from 0 to max rpm)vary for each cycle.The targeted setting will blink on
the screen during the selection process.
·
Delay Button: Press the button repeatedly to cycle through the available
delayed start options (from 3 to 24 hours in one hour increments).
·
Wash Button: Use this button to select a wash time (from 0 to max min).
Available selections vary for each cycle.The targeted setting will appear
on the screen during the selection process.
·
Rinse Button: Use this button to select time for rinsing.Available
selections(from 0 to max timnes)vary for each cycle.The targeted setting
will appear on the screen during the selection process.

Indicators
■
:The indicator will keep on when the door is locked normally, otherwise, it can not
appear.
:When the indicator appears, it means the Delay function has been selected.
■Programe
Operate Washing Machine
12
:When the indicator appears, it means the “Child Lock” function has been selected.
:When the indicator appears, it means the “mute” function has been selected.
·Cotton: You can select this procedure to wash the daily washable clothes. It is
recommended to wash the hard-wearing fabrics, heat-resistant fabrics made of
cotton or linen.
·Quick 15':This procedure is suitable for wasing not very dirty clothesquickly.
·Underwear:This procedure is suitable for wasing
·Shirt: You can select this procedure to wash shirts made of cotton, linen, synthetic
fibers or blended fabrics.
·Jeans:This procedure is quite suitable for jeans or fabrics made of denim.
·Allergy care:The proccedure can quite make clothes rinse to more clean, avoid
the laundry detergent for skin allergy.
·Drum clean: This cycle is specially set in this machine to clean the drum and tube.
It applys 60/90ºC high temperature sterilization to make the drum and tube more
green. When proper amount of chlorine bleaching agent is put in, the barrel
cleaning effect will be better. When you run this program , we suggest not to put
any clothes, you can use this procedure regularly according to the need.
·Spin: This cycle is use to extract water from clothes.
·Rinse+Spin:This cycle is use to clean remaining detergent in clothes and extract
water from clothes.
·Dark colour: You can select this procedure to wash the dark-coloured fabrics
made of cotton and dark easy-care fabrics.
·Down Jacket:The procedure is quite suitable for down jacket.
·Wool: You can select this procedure to wash the wool textiles labeled with
“Machine Wash”. Please select the proper washing temperature according to the
label on the articles to be washed.
·Intensive:You can select this procedure to wash the tough clothes, that need
muchmore strength.
·Bedding: You can select this procedure to wash heavy clothes. It is recommended
to wash jeans, bedding, etc.

Operate Washing Machine
1.Power-off memory: In case of power failure during the cycle, the settings
will be saved, and operation will resume when the power is restored.
2.
Child lock: Press the “Speed” and “Temp.” button simultaneously for 3
seconds can activate or cancel the “Child lock”feature to avoid mis-
operations. When the feature is activated, all buttons cannot be set until the
operation is over or it is canceled.
Parameter
Procedure 9.0kg
--~40
--~40
0~1000
Mix
Cotton
Underwear
Jeans
–0~1000
Quick 15'
Temp. Range
(℃;- -= cold)
Speed Range
(r/min;0=no spin)
Max Load(kg)
--~Max
--~40
Spin 0~1200
0~1000
0~Max
AllergyCare
DownJacket --~40 0~800
0~1000
Shirt
DrumClean 60/Max
0~1200
Rinse+Spin
Dark Colour 0~1000
--~40
0~600
Wool --~40
·
Mix:
You can select this procedure to wash clothes that are different kinds,
except for colors.Dark clothes should not be washed with clothes that are
light especially.
Table of Washing Procedures
■
NOTE
The “standard cotton 60°C/40°C with max speed” programme are the standard
washing programs, and they are suitable to clean normally soiled cotton laundry
and that they are the most efficient programmes in terms of combined energy and
water consumptions for washing that type of cotton laundry, that the actual water
temperature may differ from the declared cycle temperature.
Features
13
4
9
--~40
3
2.5
4
--~60
5
5
Bedding --~60
--~60 0~Max
Intensive
Sports wear 0~800
--~40
-
9
4
4
2.5
9
9
4
6
-
-
-
·Sportswear:Suitable for sports clothes washing
10kg
5
10
2
3.5
5
5
8
-
10
10
3.5
4.5
4.5
10
6
4.5
0~1200
0~1200
0~1000

3.Unbalance protection: When the machine is ready to spin, The washer
may take a few time to balance clothes due to great unbalance. If clothes
is still unbalance in the drum after that, the spinning speed can be slow
down to avoid great vibration. If clothes in drum is too less, the machine
may not to spin due to the unbalance protection, then you should add
more clothes in the machine to make it to spin.
4.Reload:If you want to add clothes in the washer during the procedure,
press the “Start/Pause” button for 3s,when you sound two beeps, it
means the reload feature has been activated. Please wait for the
indicator ‘ ’ disappears then open the door. Press the “Start/Pause”
button to resume the procedure after reload.
Proper maintenance on the washing machine can extend its work life.
WARNING
Before your maintenance starts, please do pull out the power plug or
disconnect power and close the tap.
Clean internal drum
Clean surface
The rusts left inside the drum by the metal articles shall be removed
immediately with chlorine-free detergents. Never use steel wool.
1.If there is any water overflow, use the dry cloth to wipe it off
immediately. No sharp items are allowed to strike the washer.
2.The surface can be cleaned with diluted non-abrasive neutral
detergents when necessary.
Clean the drain pump
1
32
1.Disconnect the washing machine;
2.Open the Pump case cover with a
coin or a key;
3.Unscrew the pump cover anticlockwise,
Always keep a rag nearby to dry
up water when unscrewing the
pump cover;
4.Clean the inner of the pump;
5.Replace the pump
cover and screw it
tightly;
6.Replace the Pump
case cover.
Features
Maintenance
14

Clean Inlet valve filter
The inlet filter shall be cleaned if there is not any or insufficient water in
when the tap is opened.
1.Lower the water pressure:
a.Close the tap.
b.Select any procedure except “Spin”
procedure.
c.Press the button “Start/Pause” and keep
the procedure running for about 40 seconds.
d.Pull out the power plug.
2.Remove the inlet hose from the tap.
3.Use water to wash the filter.
4.Reconnect the inlet hose.
Clean detergent drawer
1.Press down the part ① inside the drawer and take
out the detergent drawer.
2.Lift the clip up and take out
softener cover and wash all
grooves with water.
3.Restore the softener cover
and push the drawer into
positon.
Dispose an easily get frozen washer
If the washer is exposed to temperature below 0°C, certain precaution
should be taken.
1.turn off the tap.
2.Unscrew the inlet hose.
3.Unhook the drain hose from the rear support and position the end of
this hose and that of the inlet hose in a bowl.Run the spin programme.
4.Disconnect the washer.
5.Screw the inlet hose and reposition the drain hose.
1.When the washing machine is reused, make sure the ambient
temperature is above 0°C.
2.If your washing machine is located in the room where it can get frozen
easily, please drain the remaining water inside drain hose and inlet hose
thoroughly.
3.Please contact a technician if your washer is frozen.
Maintenance
15

TROUBLES SOLUTIONS
There is some remaining
water in the machine
The washer does not run
This is normal and is the result of water tests
performed at the factory
Check if the power plug is inserted well.
Check if the tap is opened.
Check if the button “Power” is pressed.
Check if the button “Start/Pause” is pressed.
Check if the delay feature is activated.
Check and fasten inlet hose.
Clean up drain hose and ask a specialized
person to repair it when necessary.
Check if the transit bolts has been removed.
Check if the adjustable legs are adjusted level.
Check if the washer is installed on the solid
and level floor.
Check if there are any barrettes or metal articles inside.
Select a proper procedure.
Add the proper detergent quantity according
to the instructions in detergent package.
Check if the “Child-lock” feature has beenactivate.
Press button “Start/Pause” first then press
other buttons.
Check if clothes in the drum is dispersive enough.
Check if the water is drain out or inflow well.
Check if the max height of the drain hose is lower
than 65cm
Check if the drain hose is immersed.
Water leakage
Abnormal noise and great
vibration
Washing efficiency is not
satisfied
The machine take no answer
after press buttons
Actually running time of
procedures is not
corresponded to the
display time
The washer fills while
draining
16
Troubleshooting

Troubleshooting
17
NOTE
Please refer to the actually purchased model for fault display here.Different models have
different fault displays
The washer fills over
time
Door lock is breakdown
Water drainage over
time
Water is overflowed
The electrical motor is
breakdown
The heater does not
work
There is a temperature
sensor fault
Communication
failures
The procedure running is
not corresponded to the
cycle that the knob points
Inverter Motor failures
Display Meaning Solution
Check if the tap is open.
Check if the water preassure is
too low.
Check if the inlet hose is blocked.
Check if the drain pump is blocked.
Contact a technician if necessary.
Close the door well again.
Check if the clothes are caought
between the door and seal.
Contact a technician if necessary.
Let the machine drain out water
automatically until the water level
is suitable for wash procedure.
Contact a technician if necessary.
Please contact a technician
Please contact a technician
Please contact a technician
Please contact a technician
Please contact a technician
Turn the cycle selector to the
cycle corresponded to the
procedure working on.

18
Fabric Care Lable
Resistant material
Delicate fabric
Item may be washed at 90°C
Item may be washed at 60°C
Item may be washed at 40°C
Item may be washed at 30°C
Item may be hand washed
Dry clean only
Can be bleached in cold water
Do not bleach
Can be ironed at 200°C max
Can be ironed at 150°C max
Can be ironed at 100°C max
Do not iron
Can be dry cleaned using any solvent
Dry clean with perchloride,lighter fuel,
pure alcohol or R113 only
Dry clean with aviation fuel,
pure alcohol or R113 only
Do not dry clean
Dry flat
Can be hung to dry
Dry on clothes hanger
Tumble dry, normal heat
Tumble dry, reduced heat
Do not tumble dry
■
Elecrical Warning
To avoid fire, electrical shock and other accidents, please remember the
following reminding:
-Only the voltage indicated in power label can be used. If you are not
clear of the voltage at home, please contact the local power bureau.
-When you are using the heating function, the maximum current through
the washing machine will reach 10A. Therefore,please make sure the
power supply units(current,voltage and cable) can meet the normal laod
requirements for the machine.
-Protect the power cord properly. Power cord shall be fixed well so that it
will not trip the people or other things and be damaged. Special attention
shall bepaid to the plug location.
-Do not make the wall-mounted socket overloaded or cable extended.
Over loading of the wiring may cause fire or electrical shock. Do not pull
out power plug with wet hand.
-To ensure your safety, power plug shall be inserted into an earthed
socket. Carefully check and ensure that your socket is properly and
reliably earthed.
Appendix

The washer is manufactured by recyclable materials. If you decide to
dispose of this washer,please observe the local waste disposal
regulations.Cut off the power cord so that the washer cannot be
connected to power. Remove the door so that small animals and
children cannot get trapped inside the washer.
Do not exceed the detergent quantities recommended in the detergent
manufactures’ instruction.
Protecting the environment
.Correct Disposal of this Product
This marking indicates that this product should not be disposed
withother household wastes throughout the EU.To prevent possible
harm to the environment or human health from uncontrolled waste
disposal,recycle it responsibly to promote the sustainable reuse of
material resources.To return your used device, please use the return
and collection systems or contact the retailer where the product was
purchased.They can take this product for environmental safe
recycling.
Appendix
19

21
Products Fiche
10.0kg
A+++
Note:
The actual parameters will depend on how the appliance is used, and
maybe different with the parameters in above mentioned table.
P - 0.5ower consumption of offmode: W
Power consumption of left-on mode: W1.0
Airborne acoustical noise (washing): 62dB
Airborne acoustical noise (spinning): 75dB
Note:
The airborne acoustical noise emissions during washing/spining for the
standard 60°C cotton programme at full load.
Standard
Programme Load Energy
consumption Water
consumption Remaining
moisture content Programme
time
Cotton 60°C
Cotton 60°C
Cotton 40°C
10kg
5kg
5kg
0.99kWh
0.86kWh
0.82kWh
53.0L
35.0L
41.0L
305min
271min
268min
51%
49%
52%
The household washing machine is equipped with a power manager system.
The duration of the left-on mode is: 10min
INFINITON
WM-K10IN
Energy consumption 237 kWh per year, based on 220 standard washing cycles
for cotton programmes at 60ºC and 40ºC at full and partial load, and the
consumption of the low-power modes. Actual energy consumption will depend on
how the appliance is used.
Water consumption 12000 litres per year, based on 220 standard washing cycles
for cotton programmes at 60°C and 40°C at full and partial load. Actual water
consumption will depend on how the appliance is used.
Spin-drying efficiency class B on a scale from G (least efficient) to A (most
efficient).
Maximum spin speed: 1400rpm
Consumption values:

By service email:www.tcl.com
8C104-000142
A.1
-
 1
1
-
 2
2
-
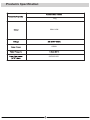 3
3
-
 4
4
-
 5
5
-
 6
6
-
 7
7
-
 8
8
-
 9
9
-
 10
10
-
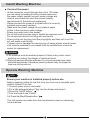 11
11
-
 12
12
-
 13
13
-
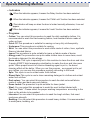 14
14
-
 15
15
-
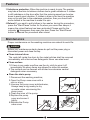 16
16
-
 17
17
-
 18
18
-
 19
19
-
 20
20
-
 21
21
-
 22
22
-
 23
23
-
 24
24
-
 25
25
-
 26
26
-
 27
27
-
 28
28
-
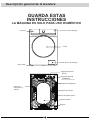 29
29
-
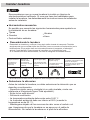 30
30
-
 31
31
-
 32
32
-
 33
33
-
 34
34
-
 35
35
-
 36
36
-
 37
37
-
 38
38
-
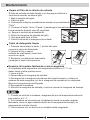 39
39
-
 40
40
-
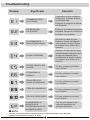 41
41
-
 42
42
-
 43
43
-
 44
44
-
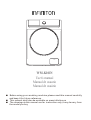 45
45
-
 46
46
-
 47
47
-
 48
48
-
 49
49
-
 50
50
-
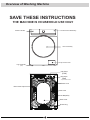 51
51
-
 52
52
-
 53
53
-
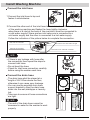 54
54
-
 55
55
-
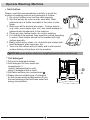 56
56
-
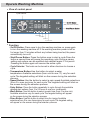 57
57
-
 58
58
-
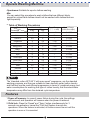 59
59
-
 60
60
-
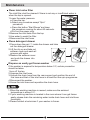 61
61
-
 62
62
-
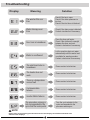 63
63
-
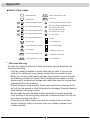 64
64
-
 65
65
-
 66
66
-
 67
67


Infiniton WM-K10IN El manual del propietario
- Categoría
- Lavadoras
- Tipo
- El manual del propietario
En otros idiomas
- English: Infiniton WM-K10IN Owner's manual
Documentos relacionados
Otros documentos
-
Küppersbusch W6810.0W Manual de usuario
-
LG WD1357RD El manual del propietario
-
-
LG WM8100HVA El manual del propietario
-
-
-
-