Graco 17G177 El manual del propietario
- Categoría
- Rociador de pintura
- Tipo
- El manual del propietario

3A5280B
EN, ES
Storage/Priming Tool for
Magnum Airless Sprayers
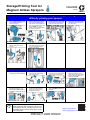
PRIME:
Perform the steps below if you are
experiencing
difficulty priming your sprayer.
1. Turn or lift Prime/Spray valve
to the PRIME position to
relieve pressure.
2. Remove Pump Armor bottle
cap. Insert small fluid tube
into bottom of Storage/Prime
Tool, and thread tool onto the
bottle. NOTE: For best
results, make sure the bottle
is full of Pump Armor.
3. Remove sprayer suction tube.
Insert tool into the inlet and
push up firmly until it stops.
4. Squeeze Pump Armor bottle
until Pump Armor flows into
the drain tube.
5. Remove tool. Replace and
tighten child-proof cap for
storage.
6. Reinstall the sprayer suction
tube. Ensure that the tube is
snug on the inlet and the
clamp is engaged.
STORE: After cleaning your sprayer, perform the steps below when storing.
1. Perform cleaning procedures
found in your Owner’s Manual.
1. Remove Pump Armor bottle
cap. Unscrew Inlet Strainer
from suction tube.
2. Turn or lift Prime/Spray Valve
to relieve pressure and place
drain tube in a waste pail.
3. While holding the suction tube
above the sprayer, pour a
small amount of Pump Armor
into the Suction Tube. Turn
Power Switch ON.
4. When Pump Armor is flushed
through the sprayer, turn
Power Switch OFF. Replace
and tighten child proof cap for
storage.
5. Screw Inlet Strainer back to
suction tube. Ensure that
spray gun and hose stay
attached to sprayer.
6. Turn or lower Prime/Spray
valve to SPRAY position for
storage.
PRO
All Other Models
Important Safety Instructions
Read all warnings and instructions in the sprayer
manual and on the unit, including the power cord.
Be familiar with the controls and the proper usage
of the equipment.
Magnum Storage Tool
http://magnum.graco.com/storagetool

All written and visual data contained in this document reflects the latest product information available at the time of publication.
Graco reserves the right to make changes at any time without notice.
For patent information, see www.graco.com/patents.
Original instructions. This manual contains English/Spanish. MM 3A2154
Graco Headquarters: Minneapolis
International Offices: Belgium, China, Japan, Korea
GRACO INC. AND SUBSIDIARIES • P.O. BOX 1441 • MINNEAPOLIS MN 55440-1441 • USA
Copyright 2017, Graco Inc. All Graco manufacturing locations are registered to ISO 9001.
www.graco.com
Revision B - October 2017
CEBAR:
Si tiene
dificultades para cebar el pulverizador, siga los siguientes paso.
1. Gire o suba la válvula de
cebado/pulverización hasta la
posición CEBAR para liberar la
presión.
2. Retire la tapa de la botella Pump
Armor. Introduzca un pequeño tubo
de fluido en la parte inferior de la
herramienta de almacenamiento/
cebado y enrosque la herramienta
en la botella. NOTA: Para obtener
mejores resultados, asegúrese de
que la botella esté llena de Pump
Armor.
3. Desmonte el tubo de aspiración
del pulverizador. Inserte la
herramienta sobre la entrada y
empuje firmemente hasta que se
detenga.
4. Apriete la botella de Pump Armor
hasta que el Pump Armor fluya
hacia el tubo de drenaje.
5. Desmonte la herramienta.
Sustituya la tapa a prueba
de niños y apriétela para
almacenarlo.
6. Vuelva a colocar el tubo de
succión del pulverizador.
Asegúrese de que el tubo esté
ajustado en la entrada y la
abrazadera esté enganchada.
ALMACENAR: Después de limpiar el pulverizador, siga los siguientes pasos para
almacenarlo.
1. Siga los procedimientos de
limpieza descritos en el Manual
del propietario.
1. Retire la tapa de la botella Pump
Armor. Desenrosque el filtro de
malla de entrada del tubo de
aspiración.
2. Gire o suba la válvula de
cebado/pulverización para liberar
la presión y coloque un tubo de
drenaje en un cubo para residuos.
3. Sosteniendo el tubo de succión
por encima del pulverizador, vierta
una pequeña cantidad de Pump
Armor en el tubo de succión.
Coloque el interruptor de
encendido en la posición ON.
4. Cuando el Pump Armor fluya a
través del pulverizador, coloque el
interruptor de encendido en la
posición OFF. Sustituya la tapa a
prueba de niños y apriétela para
almacenarlo.
5. Vuelva a atornillar el filtro de malla
al tubo de succión. Asegúrese de
que la pistola de pulverización y la
manguera permanezcan
adheridas al pulverizador.
6. Gire o baje la válvula de cebado/
pulverización a la posición
SPRAY para almacenarlo.
PRO
Todos los demás modelos
Instrucciones importantes de seguridad
Lea todas las advertencias e instrucciones en el manual del pulverizador y en
la unidad, incluido el cable de alimentación. Debe estar familiarizado con los
controles y el uso adecuado del equipo.
Herramienta de almacenamiento
Magnum
http://magnum.graco.com/storagetool
-
 1
1
-
 2
2


Graco 17G177 El manual del propietario
- Categoría
- Rociador de pintura
- Tipo
- El manual del propietario
en otros idiomas
- English: Graco 17G177 Owner's manual