
VE800A HDMI Extender Quick Start Guide VE800A Alargador HDMI Guía rápida
Système d'extension HDMI VE800A - Guide de démarrage rapide Estensore HDMI VE800A - Guida rapida
VE800A HDMI-Verlängerung Kurzanleitung Краткое руководство пользователя HDMI-удлинителя VE800A
www.aten.com www.aten.com
www.aten.com www.aten.com
www.aten.com www.aten.com
Package Contents
1 VE800AT HDMI Extender
1 VE800AR HDMI Extender
2 Power Adapters
1 Mounting Kit
1 User Instructions
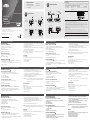
Hardware Review
A
VE800AT / VE800AR Front View
1. Power LED (top cover, VE800AT only)
2. Online/Power LED (top cover, VE800AR only)
3. Power Jack
4. HDMI Input Port (VE800AT)
5. HDMI Output Port (VE800AR)
VE800AT/ VE800AR Rear View
1. TMDS Port (Transition-Minimized Differential Signaling)
2. DDC Port
3. EQ Switch (VE800AR only)
Hardware Installation
B
1. Use an HDMI cable to connect the HDMI output port on the video source device
to the HDMI input port on the VE800AT.
2. Use one Cat 5e cable to connect the TMDS port on the VE800AT to the TMDS
port on the VE800AR.
Presentación del hardware
A
VE800AT / VE800AR – Vista frontal
1. Indicador de alimentación (tapa superior, VE800AT únicamente)
2. Indicador en línea/de alimentación (tapa superior, VE800AR únicamente)
3. Entrada de alimentación
4. Puerto de entrada HDMI (VE800AT)
5. Puerto de salida HDMI (VE800AR)
VE800AT / VE800AR – Vista posterior
1. Puerto TMDS (Transition-Minimized Differential Signaling)
2. Puerto DDC
3. Conmutador EQ (VE800AR únicamente)
Instalar el hardware
B
1. Conecte el puerto de salida HDMI del dispositivo fuente de señal al puerto de
entrada HDMI del VE800AT. Para ello, utilice un cable HDMI.
2. Utilice un cable de Cat. 5e para conectar el puerto TMDS del VE800AT al puerto
TMDS del VE800AR.
Hardware
A
Vista anteriore del VE800AT/VE800AR
1. LED di accensione (coperchio superiore, solo VE800AT)
2. LED di accensione/online (coperchio superiore, solo VE800AR)
3. Presa d’alimentazione
4. Porta d’ingresso HDMI (VE800AT)
5. Porta d’ingresso HDMI (VE800AR)
Vista posteriore del VE800AT/VE800AR
1. Porta TMDS (Transition-Minimized Differential Signaling)
2. Porta DDC
3. Selettore EQ (solo VE800AR)
Installazione dell’hardware
B
1. Utilizzare un cavo HDMI per collegare la porta di uscita HDMI del dispositivo
sorgente video alla porta di ingresso HDMI del VE800AT.
2. Utilizzare un cavo Cat 5e per connettere la porta TMDS del VE800AT alla porta
TMDS del VE800AR.
Обзор оборудования
A
Вид спереди VE800AT/VE800AR
1. Индикатор питания (верхняя крышка, только VE800AT)
2. Индикатор онлайн/питания (верхняя крышка, только VE800AR)
3. Гнездо питания
4. Вход HDMI (VE800AT)
5. Выход HDMI (VE800AR)
Вид сзади VE800AT/VE800AR
1. Порт TMDS (дифференциальная передача сигналов с минимизацией
перепадов уровней)
2. Порт DDC
3. Переключатель EQ (только VE800AR)
Установка оборудования
B
1. Используя кабель HDMI, подключите выход HDMI источника видео к
входу HDMI устройства VE800AT.
2. Используя один кабель Cat 5e, подключите порт TMDS устройства
VE800AT к порту TMDS устройства VE800AR.
Description de l’appareil
A
Vue avant du VE800AT / VE800AR
1. Voyant d'alimentation (cache supérieur, VE800AT seulement)
2. Voyant en ligne/d'alimentation (cache supérieur, VE800AR seulement)
3. Prise d’alimentation
4. Port d’entrée HDMI (VE800AT)
5. Port de sortie HDMI (VE800AR)
Vue arrière du VE800AT / VE800AR
1. Port TMDS (signalisation différentielle à transition minimisée)
2. Port DDC
3. Bouton EQ (VE800AR uniquement)
Installation du matériel
B
1. Utilisez un câble HDMI pour relier le port de sortie HDMI du périphérique
d’affi chage source au port d’entrée HDMI situé sur l’unité VE800AT.
2. Utilisez un câble de catégorie 5e pour connecter le port TMDS de l'unité
VE800AT au port TMDS de l'unité VE800AR.
Hardwareübersicht
A
VE800AT / VE800AR - Vorderseite
1. LED-Betriebsanzeige (obere Abdeckung, nur beim VE800AT)
2. Online-/LED-Betriebsanzeige (obere Abdeckung, nur beim VE800AR)
3. Stromeingangsbuchse
4. HDMI-Eingang (VE800AT)
5. HDMI-Ausgang (VE800AR)
VE800AT / VE800AR - Rückseite
1. TMDS-Port (Transition-Minimized Differential Signaling)
2. DDC-Port
3. EQ-Schalter (nur beim VE800AR)
Hardware installieren
B
1. Verbinden Sie den HDMI-Ausgang der Video-Signalquelle mit dem HDMI-
Eingang des VE800AT. Verwenden Sie dazu ein HDMI-Kabel.
2. Verbinden Sie den TMDS-Port des VE800AT mit dem TMDS-Port des VE800AR.
Verwenden Sie dazu ein Kat. 5e-Kabel.
3. (Optional) Use a second Cat 5e cable to connect the DDC port on the VE800AT
to the DDC port on the VE800AR
4. Use an HDMI cable to connect the HDMI input port on the display device to the
HDMI output on the VE800AR.
5. Using the two power adapters supplied with this package, connect the VE800AT
and the VE800AR to an AC power outlet.
6. Turn on the source and display devices.
Note: For VE800A, a second Cat 5e cable is required only if you need to use EDID
Bypass and HDCP authentication.
Operation
Picture Adjustment
Use the EQ switch to adjust the equalization strength to improve a blinking image.
The values range from 0-7 where:
7: strongest equalization
0: weakest equalization
3. (Opcional) Utilice un segundo cable de Cat. 5e para conectar el puerto DDC del
VE800AT al puerto DDC del VE800AR.
4. Conecte el puerto de entrada HDMI del dispositivo de visualización al puerto de
salida HDMI del VE800AR. Para ello, utilice un cable HDMI.
5. Conecte el VE800AT y el VE800AR a una toma eléctrica mediante los dos
adaptadores de alimentación incluidos.
6. Encienda los dispositivos de visualización y fuente.
Nota: Para el VE800A solo se requiere un segundo cable de Cat. 5e si desea utilizar
las funciones de Bypass EDID y de autenticación HDCP.
Funcionamiento
Ajustar la imagen
Utilice el botón EQ para ajustar el nivel de ecualización con el fi n de mejorar la
calidad de una imagen intermitente.
El rango de valores permitidos comprende del 0 al 7, siendo:
7: mayor compensación
0: menor compensación
3. (Opzionale) Utilizzare un secondo cavo Cat 5e per connettere la porta DDC del
VE800AT alla porta DDC del VE800AR.
4. Utilizzare un cavo HDMI per collegare la porta di ingresso HDMI del dispositivo di
visualizzazione alla porta di uscita HDMI del VE800AR.
5. Utilizzare gli alimentatori in dotazione per connettere il VE800AT e il VE800AR ad
una presa di corrente CA.
6. Accendere i dispositivi sorgente e di visualizzazione.
Nota: per il VE800A è necessario un secondo cavo Cat 5e soltanto se si utilizzano
EDID Bypass e l’autenticazione HDCP.
Funzionamento
Regolazione dell’immagine
Utilizzare il cursore EQ per regolare la potenza di equalizzazione per migliorare
un'immagine che lampeggia.
I valori vanno a 0 a 7, dove:
7: equalizzazione più potente
0: equalizzazione più debole
3. (Дополнительно) Используя второй кабель Cat 5e, чтобы подключите
порт DDC устройства VE800AT к порту DDC устройства VE800AR.
4. Используя кабель HDMI, подключите вход HDMI устройства отображения
к выходу HDMI устройства VE800AR.
5. Используя два адаптера питания из комплекта поставки, подключите
VE800AT и VE800AR к сетевой розетке.
6. Включите источник и устройства отображения.
Примечание. При работе с устройством VE800A второй кабель Cat 5e
подключается только тог
да, когда требуется использование
функции обхода EDID и аутентификации HDCP.
Работа
Настройка изображения
Переключатель EQ используется для задания уровня коррекции, устраняя
проблемы с миганием изображения.
Используется диапазон значений 0-7, где:
7: самый высокий уровень коррекции
0: самый низкий уровень коррекции
3. (Facultatif) Utilisez un second câble de catégorie 5e pour connecter le port DDC
de l'unité locale VE800AT au port DDC de l'unité VE800AR.
4. Utilisez un câble HDMI pour relier le port d’entrée HDMI du périphérique
d’affi chage au port de sortie HDMI situé sur l’unité VE800AR.
5. En utilisant les deux adaptateurs secteur fournis dans l’emballage, branchez les
unités VE800AT et VE800AR sur une prise de courant.
6. Allumez les périphériques d’affi chage et source.
Remarque : pour le système VE800A, il ne faut un second câble de catégorie 5e
que si vous avez besoin d’utiliser le contournement du mode EDID et
l’authentifi cation HDCP.
Fonctionnement
Réglage de l’image
Utilisez le commutateur EQ pour régler le niveau d'égalisation afi n d'améliorer la
qualité d'une image tremblante.
Les valeurs s’étendent de 0 à 7 où :
7 : égalisation la plus forte
0 : égalisation la plus faible
3. (Optional) Verbinden Sie den DDC-Port des VE800AT mit dem DDC-Port des
VE800AR. Verwenden Sie dazu ein zweites Kat. 5e-Kabel.
4. Verbinden Sie den HDMI-Eingang des Video-Anzeigegerätes mit dem HDMI-
Ausgang des VE800AR. Verwenden Sie dazu ein HDMI-Kabel.
5. Verbinden Sie den VE800AT und den VE800AR mithilfe der mitgelieferten
Netzteile mit einer Steckdose.
6. Schalten Sie die Signalquelle und die Anzeigegeräte ein.
Hinweis: Beim VE800A ist ein zweites Kat. 5e-Kabel nur erforderlich, wenn Sie die
EDID-Bypass-Funktion und HDCP-Authentifi zierung verwenden möchten.
Bedienung
Bild einstellen
Mit dem EQ-Schalter können Sie die Verstärkung bzw. Dämpfung justieren, um ein
fl ackerndes Bild zu kompensieren.
Die möglichen Werte laufen von 0 bis 7, wobei gilt:
7: größte Laufzeitfehlerkorrektur
0: kleinste Laufzeitfehlerkorrektur
A
Hardware Review
B
Hardware Installation
Important Notice
Considering environmental protection, ATEN does not provide a fully printed user manual for this product. If the
information contained in the Quick Start Guide is not enough for you to confi gure and operate your product, please
visit our website www.aten.com, and download the full user manual.
Online Registration
http://eservice.aten.com
All information, documentation, fi rmware, software utilities, and specifi cations contained in this package are subject to change
without prior notifi cation by the manufacturer. Please visit our website http://www.aten.com/download/?cid=dds for the most
up-to-date versions.
이 기기는 업무용(A급) 전자파 적합기기로서 판매자 또는 사용자는 이점을 주의하시기 바라며, 가정외의 지역에서 사용하
는 것을 목적으로합니다.
EMC Information
FEDERAL COMMUNICATIONS COMMISSION INTERFERENCE STATEMENT:
This equipment has been tested and found to comply with the limits for a Class A digital device, pursuant to Part 15 of the FCC Rules.
These limits are designed to provide reasonable protection against harmful interference when the equipment is operated in a commercial
environment. This equipment generates, uses, and can radiate radio frequency energy and, if not installed and used in accordance with the
instruction manual, may cause harmful interference to radio communications. Operation of this equipment in a residential area is likely to
cause harmful interference in which case the user will be required to correct the interference at his own expense.
FCC Caution: Any changes or modifi cations not expressly approved by the party responsible for compliance could void the user's authority
to operate this equipment.
CE Warning: This is a class A product. In a domestic environment this product may cause radio interference in which case the user may be
required to take adequate measures.
Suggestion: Shielded twisted pair (STP) cables must be used with the unit to ensure compliance with FCC & CE standards.
This device complies with Part 15 of the FCC Rules. Operation is subject to the following two conditions:(1) this device mat not cause
harmful interference, and(2) this device must accept any interference received, including interference that may cause undesired operation.
The following contains information that relates to China:
© Copyright 2015 ATEN
®
International Co., Ltd.
ATEN and the ATEN logo are trademarks of ATEN International Co., Ltd. All rights reserved. All
other trademarks are the property of their respective owners.
This product is RoHS compliant.
Part No. PAPE-1223-C91G Printing Date: 02/2015
HDMI Extender
Quick Start Guide
VE800A
VE800AT
Rear View
VE800AR
Rear View
VE800AT
Front View
VE800AR
Front View
DDC
TMDS
1 2
3 5
21
3 4
DDC
TMDS
1 2 3
VE800AT Front View VE800AR Front View
VE800AT Rear View
Cat 5e Cable
HDMI Cable
HDMI Cable
VE800AR Rear View
DDCTMDS
DDC
EQ
TMDS
1
5
4
2
3
Technical Phone Support
International:
886-2-86926959
North America:
1-888-999-ATEN Ext: 4988
United Kingdom:
44-8-4481-58923
ATEN VanCryst
™
La página se está cargando...
Transcripción de documentos
Package Contents 1 VE800AT HDMI Extender 1 VE800AR HDMI Extender 2 Power Adapters ATEN A VanCryst™ VE800A HDMI Extender Quick Start Guide © Copyright 2015 ATEN® International Co., Ltd. ATEN and the ATEN logo are trademarks of ATEN International Co., Ltd. All rights reserved. All other trademarks are the property of their respective owners. Important Notice B 1 Mounting Kit 1 User Instructions Online Registration http://eservice.aten.com 1 1 VE800AT Front View 2 HDMI Cable 4 VE800AT Rear View DDC 1 2 Printing Date: 02/2015 VE800A HDMI Extender Quick Start Guide Hardware Review A VE800AT / VE800AR Front View 1. Power LED (top cover, VE800AT only) 2. Online/Power LED (top cover, VE800AR only) 3. Power Jack 4. HDMI Input Port (VE800AT) 5. HDMI Output Port (VE800AR) VE800AT/ VE800AR Rear View 1. TMDS Port (Transition-Minimized Differential Signaling) 2. DDC Port 3. EQ Switch (VE800AR only) Hardware Installation B 1. Use an HDMI cable to connect the HDMI output port on the video source device to the HDMI input port on the VE800AT. 2. Use one Cat 5e cable to connect the TMDS port on the VE800AT to the TMDS port on the VE800AR. 3 5 5 VE800AT Front View VE800AR Front View VE800AT Rear View VE800AR Rear View TMDS TMDS 2 DDC Description de l’appareil A Vue avant du VE800AT / VE800AR 1. Voyant d'alimentation (cache supérieur, VE800AT seulement) 2. Voyant en ligne/d'alimentation (cache supérieur, VE800AR seulement) 3. Prise d’alimentation 4. Port d’entrée HDMI (VE800AT) 5. Port de sortie HDMI (VE800AR) Vue arrière du VE800AT / VE800AR 1. Port TMDS (signalisation différentielle à transition minimisée) 2. Port DDC 3. Bouton EQ (VE800AR uniquement) Installation du matériel B 1. Utilisez un câble HDMI pour relier le port de sortie HDMI du périphérique d’affichage source au port d’entrée HDMI situé sur l’unité VE800AT. 2. Utilisez un câble de catégorie 5e pour connecter le port TMDS de l'unité VE800AT au port TMDS de l'unité VE800AR. A VE800AT / VE800AR - Vorderseite 1. LED-Betriebsanzeige (obere Abdeckung, nur beim VE800AT) 2. Online-/LED-Betriebsanzeige (obere Abdeckung, nur beim VE800AR) 3. Stromeingangsbuchse 4. HDMI-Eingang (VE800AT) 5. HDMI-Ausgang (VE800AR) VE800AT / VE800AR - Rückseite 1. TMDS-Port (Transition-Minimized Differential Signaling) 2. DDC-Port 3. EQ-Schalter (nur beim VE800AR) Hardware installieren B 1. Verbinden Sie den HDMI-Ausgang der Video-Signalquelle mit dem HDMIEingang des VE800AT. Verwenden Sie dazu ein HDMI-Kabel. 2. Verbinden Sie den TMDS-Port des VE800AT mit dem TMDS-Port des VE800AR. Verwenden Sie dazu ein Kat. 5e-Kabel. DDC TMDS DDC EQ 3 Cat 5e Cable 3 All information, documentation, firmware, software utilities, and specifications contained in this package are subject to change without prior notification by the manufacturer. Please visit our website http://www.aten.com/download/?cid=dds for the most up-to-date versions. VE800A Alargador HDMI Guía rápida Presentación del hardware Operation 1. Puerto TMDS (Transition-Minimized Differential Signaling) 2. Puerto DDC 3. Conmutador EQ (VE800AR únicamente) Picture Adjustment Use the EQ switch to adjust the equalization strength to improve a blinking image. The values range from 0-7 where: 7: strongest equalization 0: weakest equalization www.aten.com 3. (Facultatif) Utilisez un second câble de catégorie 5e pour connecter le port DDC de l'unité locale VE800AT au port DDC de l'unité VE800AR. 4. Utilisez un câble HDMI pour relier le port d’entrée HDMI du périphérique d’affichage au port de sortie HDMI situé sur l’unité VE800AR. 5. En utilisant les deux adaptateurs secteur fournis dans l’emballage, branchez les unités VE800AT et VE800AR sur une prise de courant. 6. Allumez les périphériques d’affichage et source. Remarque : pour le système VE800A, il ne faut un second câble de catégorie 5e que si vous avez besoin d’utiliser le contournement du mode EDID et l’authentification HDCP. Fonctionnement Réglage de l’image Utilisez le commutateur EQ pour régler le niveau d'égalisation afin d'améliorer la qualité d'une image tremblante. Les valeurs s’étendent de 0 à 7 où : 7 : égalisation la plus forte 0 : égalisation la plus faible www.aten.com 3. (Optional) Verbinden Sie den DDC-Port des VE800AT mit dem DDC-Port des VE800AR. Verwenden Sie dazu ein zweites Kat. 5e-Kabel. 4. Verbinden Sie den HDMI-Eingang des Video-Anzeigegerätes mit dem HDMIAusgang des VE800AR. Verwenden Sie dazu ein HDMI-Kabel. 5. Verbinden Sie den VE800AT und den VE800AR mithilfe der mitgelieferten Netzteile mit einer Steckdose. 6. Schalten Sie die Signalquelle und die Anzeigegeräte ein. Hinweis: Beim VE800A ist ein zweites Kat. 5e-Kabel nur erforderlich, wenn Sie die EDID-Bypass-Funktion und HDCP-Authentifizierung verwenden möchten. Bedienung Bild einstellen Mit dem EQ-Schalter können Sie die Verstärkung bzw. Dämpfung justieren, um ein flackerndes Bild zu kompensieren. Die möglichen Werte laufen von 0 bis 7, wobei gilt: 7: größte Laufzeitfehlerkorrektur 0: kleinste Laufzeitfehlerkorrektur FEDERAL COMMUNICATIONS COMMISSION INTERFERENCE STATEMENT: This equipment has been tested and found to comply with the limits for a Class A digital device, pursuant to Part 15 of the FCC Rules. These limits are designed to provide reasonable protection against harmful interference when the equipment is operated in a commercial environment. This equipment generates, uses, and can radiate radio frequency energy and, if not installed and used in accordance with the instruction manual, may cause harmful interference to radio communications. Operation of this equipment in a residential area is likely to cause harmful interference in which case the user will be required to correct the interference at his own expense. FCC Caution: Any changes or modifications not expressly approved by the party responsible for compliance could void the user's authority to operate this equipment. CE Warning: This is a class A product. In a domestic environment this product may cause radio interference in which case the user may be required to take adequate measures. Suggestion: Shielded twisted pair (STP) cables must be used with the unit to ensure compliance with FCC & CE standards. This device complies with Part 15 of the FCC Rules. Operation is subject to the following two conditions:(1) this device mat not cause harmful interference, and(2) this device must accept any interference received, including interference that may cause undesired operation. 이 기기는 업무용(A급) 전자파 적합기기로서 판매자 또는 사용자는 이점을 주의하시기 바라며, 가정외의 지역에서 사용하 는 것을 목적으로합니다. 3. (Optional) Use a second Cat 5e cable to connect the DDC port on the VE800AT to the DDC port on the VE800AR 4. Use an HDMI cable to connect the HDMI input port on the display device to the HDMI output on the VE800AR. 5. Using the two power adapters supplied with this package, connect the VE800AT and the VE800AR to an AC power outlet. 6. Turn on the source and display devices. Note: For VE800A, a second Cat 5e cable is required only if you need to use EDID Bypass and HDCP authentication. VE800A HDMI-Verlängerung Kurzanleitung Hardwareübersicht 1 2 www.aten.com Système d'extension HDMI VE800A - Guide de démarrage rapide United Kingdom: 44-8-4481-58923 EMC Information VE800AR Rear View TMDS North America: 1-888-999-ATEN Ext: 4988 HDMI Cable VE800AR Front View 3 Technical Phone Support International: 886-2-86926959 The following contains information that relates to China: 4 Hardware Review This product is RoHS compliant. Part No. PAPE-1223-C91G Considering environmental protection, ATEN does not provide a fully printed user manual for this product. If the information contained in the Quick Start Guide is not enough for you to configure and operate your product, please visit our website www.aten.com, and download the full user manual. Hardware Installation A VE800AT / VE800AR – Vista frontal 1. Indicador de alimentación (tapa superior, VE800AT únicamente) 2. Indicador en línea/de alimentación (tapa superior, VE800AR únicamente) 3. Entrada de alimentación 4. Puerto de entrada HDMI (VE800AT) 5. Puerto de salida HDMI (VE800AR) VE800AT / VE800AR – Vista posterior Instalar el hardware B 1. Conecte el puerto de salida HDMI del dispositivo fuente de señal al puerto de entrada HDMI del VE800AT. Para ello, utilice un cable HDMI. 2. Utilice un cable de Cat. 5e para conectar el puerto TMDS del VE800AT al puerto TMDS del VE800AR. www.aten.com 3. (Opcional) Utilice un segundo cable de Cat. 5e para conectar el puerto DDC del VE800AT al puerto DDC del VE800AR. 4. Conecte el puerto de entrada HDMI del dispositivo de visualización al puerto de salida HDMI del VE800AR. Para ello, utilice un cable HDMI. 5. Conecte el VE800AT y el VE800AR a una toma eléctrica mediante los dos adaptadores de alimentación incluidos. 6. Encienda los dispositivos de visualización y fuente. Nota: Para el VE800A solo se requiere un segundo cable de Cat. 5e si desea utilizar las funciones de Bypass EDID y de autenticación HDCP. Funcionamiento Ajustar la imagen Utilice el botón EQ para ajustar el nivel de ecualización con el fin de mejorar la calidad de una imagen intermitente. El rango de valores permitidos comprende del 0 al 7, siendo: 7: mayor compensación 0: menor compensación Estensore HDMI VE800A - Guida rapida Hardware A Vista anteriore del VE800AT/VE800AR 1. LED di accensione (coperchio superiore, solo VE800AT) 2. LED di accensione/online (coperchio superiore, solo VE800AR) 3. Presa d’alimentazione 4. Porta d’ingresso HDMI (VE800AT) 5. Porta d’ingresso HDMI (VE800AR) Vista posteriore del VE800AT/VE800AR 1. Porta TMDS (Transition-Minimized Differential Signaling) 2. Porta DDC 3. Selettore EQ (solo VE800AR) Installazione dell’hardware B 1. Utilizzare un cavo HDMI per collegare la porta di uscita HDMI del dispositivo sorgente video alla porta di ingresso HDMI del VE800AT. 2. Utilizzare un cavo Cat 5e per connettere la porta TMDS del VE800AT alla porta TMDS del VE800AR. www.aten.com 3. (Opzionale) Utilizzare un secondo cavo Cat 5e per connettere la porta DDC del VE800AT alla porta DDC del VE800AR. 4. Utilizzare un cavo HDMI per collegare la porta di ingresso HDMI del dispositivo di visualizzazione alla porta di uscita HDMI del VE800AR. 5. Utilizzare gli alimentatori in dotazione per connettere il VE800AT e il VE800AR ad una presa di corrente CA. 6. Accendere i dispositivi sorgente e di visualizzazione. Nota: per il VE800A è necessario un secondo cavo Cat 5e soltanto se si utilizzano EDID Bypass e l’autenticazione HDCP. Funzionamento Regolazione dell’immagine Utilizzare il cursore EQ per regolare la potenza di equalizzazione per migliorare un'immagine che lampeggia. I valori vanno a 0 a 7, dove: 7: equalizzazione più potente 0: equalizzazione più debole Краткое руководство пользователя HDMI-удлинителя VE800A Обзор оборудования A Вид спереди VE800AT/VE800AR 1. Индикатор питания (верхняя крышка, только VE800AT) 2. Индикатор онлайн/питания (верхняя крышка, только VE800AR) 3. Гнездо питания 4. Вход HDMI (VE800AT) 5. Выход HDMI (VE800AR) Вид сзади VE800AT/VE800AR 1. Порт TMDS (дифференциальная передача сигналов с минимизацией перепадов уровней) 2. Порт DDC 3. Переключатель EQ (только VE800AR) Установка оборудования B 1. Используя кабель HDMI, подключите выход HDMI источника видео к входу HDMI устройства VE800AT. 2. Используя один кабель Cat 5e, подключите порт TMDS устройства VE800AT к порту TMDS устройства VE800AR. www.aten.com 3. (Дополнительно) Используя второй кабель Cat 5e, чтобы подключите порт DDC устройства VE800AT к порту DDC устройства VE800AR. 4. Используя кабель HDMI, подключите вход HDMI устройства отображения к выходу HDMI устройства VE800AR. 5. Используя два адаптера питания из комплекта поставки, подключите VE800AT и VE800AR к сетевой розетке. 6. Включите источник и устройства отображения. Примечание. При работе с устройством VE800A второй кабель Cat 5e подключается только тогда, когда требуется использование функции обхода EDID и аутентификации HDCP. Работа Настройка изображения Переключатель EQ используется для задания уровня коррекции, устраняя проблемы с миганием изображения. Используется диапазон значений 0-7, где: 7: самый высокий уровень коррекции 0: самый низкий уровень коррекции-
 1
1
-
 2
2


ATEN VE800A Guía de inicio rápido
- Tipo
- Guía de inicio rápido
- Este manual también es adecuado para
en otros idiomas
- français: ATEN VE800A Guide de démarrage rapide
- italiano: ATEN VE800A Guida Rapida
- English: ATEN VE800A Quick start guide
- Deutsch: ATEN VE800A Schnellstartanleitung
- русский: ATEN VE800A Инструкция по началу работы
- português: ATEN VE800A Guia rápido
- 日本語: ATEN VE800A クイックスタートガイド
Artículos relacionados
-
ATEN VB802 Guía de inicio rápido
-
ATEN VE602T Guía de inicio rápido
-
-
-
-
ATEN VS1808T Guía de inicio rápido
-
-
-
ATEN VE806R Guía de inicio rápido
-