Auriol 284995 Operation and Safety Notes
- Categoría
- Estaciones meteorológicas
- Tipo
- Operation and Safety Notes

IAN 284995
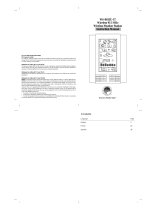
TEMPERATURE STATION /
ESTACIÓN METEOROLÓGICA
TEMPERATURE ST ATION
Operation and Safety Notes
ESTACIÓN METEOROLÓGICA
Instrucciones de utilización y de seguridad

US-EN Operation and Safety Notes Page 3
US-ES Instrucciones de utilización
y de seguridad Página 31

3 US-EN
Description of signal words .................Page 4
Customer service .........................................Page 4
Introduction .....................................................Page 5
Intended use .......................................................Page 5
Description of Parts and Features .....................Page 5
Technical Data ...................................................Page 9
Contents ..............................................................Page 10
Important safety notes ............................Page 10
General safety information................................Page 10
Safety instructions for batteries /
rechargeable batteries............................Page 12
Before initial use ..........................................Page 14
General information ..........................................Page 15
Preparing to use the outdoor sensor .................Page 15
Preparing the temperature station for use ........Page 16
Temperature station ...........................................Page 18
Outdoor sensor ..................................................Page 18
Setting the language / time zone /
time / date manually ..........................................Page 19
Daylight saving time ..........................................Page 21
Setting the alarm ................................................Page 21
Displaying the alarms ........................................Page 22
Switching the alarm on / off ..............................Page 22
Using the snooze button ....................................Page 23
Displaying the temperature ...............................Page 23
Displaying the minimum / maximum values .......Page 23
Displaying the temperature trends ....................Page 24
Battery indicator .................................................Page 24
Replacing the batteries ......................................Page 24
Troubleshooting ...........................................Page 26
Cleaning and Maintenance ..................Page 27
Disposal .............................................................Page 27
Warranty ..........................................................Page 28

4 US-EN
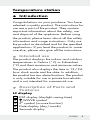
DESCRIPTION OF
SIGNAL WORDS
WARNING indicates a hazardous
situation that, if not avoided, could result
in death or serious injury.
CAUTION indicates a hazardous
situation that, if not avoided, could result
in minor or moderate injury.
NOTICE indicates information considered
important, but not hazard related (e.g.
messages related to property damage).
CUSTOMER SERVICE
Call customer service at
1 (844) 543-5872
Visit the Website Customer Service
Platform at
www.lidl.com / contact-us
Visit a LIDL store for further assistance.
IAN 284995
Please have your
IAN number ready.

5 US-EN
Temperature station
Introduction
Congratulations on your purchase. You have
selected a quality product. The instructions for
use are a part of the product. They contain
important information about the safety, use
and disposal of the appliance. Before using
the product, please learn about all the safety
information and usage instructions. Only use
the product as described and for the specified
applications. If you lend the product to some-
one else, please also give all the instructions.
Intended use
The product displays the indoor and outdoor
temperatures in Celsius (°C) or Fahrenheit
(°F) and their maximum and minimum values.
The product also displays the time in 12 / 24-
hour clock mode and the date. In addition,
the product has two alarm functions. The product
is only suitable for use in private households
and is not intended for commercial use.
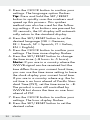
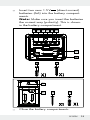
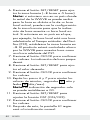
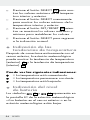
Description of Parts and
Features
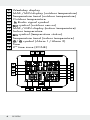
LC display
1
DST display (daylight saving time)
2
WWVB symbol
3
Z
Z
symbol (snooze function)
4
Date display (day / month)
5
Seconds display

6 US-EN
6
Weekday display
7
MAX- / MIN display (outdoor temperature)
8
Temperature trend (outdoor temperature)
9
Outdoor temperature
10
Radio signal symbol
11
symbol (outdoor sensor)
12
MAX- / MIN display (indoor temperature)
13
Indoor temperature
14
symbol (temperature station)
15
Temperature trend (indoor temperature)
16
/ symbol (Alarm 1 / Alarm 2)
17
Time
18
2
nd
time zone (ZONE)
5
4
6
7
21 3
9
15
16
17
18
8
11121314 10

7 US-EN
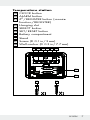
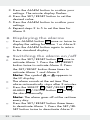
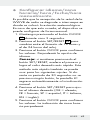
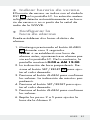
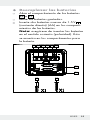
Temperature station
19
CLOCK button
20
ALARM button
21
Z
Z
/ REGISTER button (snooze
function / REGISTER)
22
Hanging slot
23
SELECT button
24
SET / RESET button
25
Battery compartment
26
Stand
27
Screw (D 0.1 in / 3 mm)
28
Wall anchor (D 0.3 in / 7.7 mm)
25
28 27
222119 20 23 24
26

8 US-EN
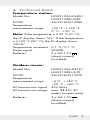
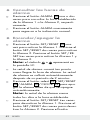
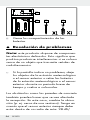
Outdoor sensor
29
Control LED
29
30
Hanging slot
31
Battery compartment
32
Screw (D 0.1 in / 3 mm)
33
Wall anchor (D 0.3 in / 7.7 mm)
30
31 3332

9 US-EN
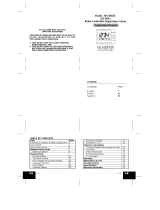
Technical Data
Temperature station:
Model No.: HG02132A-US-RX /
HG02132B-US-RX
FCCID: 2AJ9O-HG2132RX
Temperature
measurement range: +32 °F – +122 °F
0 °C – + 50 °C
Note: If the temperature is ≤32 °F (0 °C),
the LC display shows “LL.L”. If the temperature
is ≥ 122 °F (50 °C), the LC display shows
“HH.H”.
Temperature increment: 0.1 °F / 0.1 °C
Radio signal: WWVB
Batteries: 2 x AA 1.5 V
(direct current)
(installed)
Outdoor sensor:
Model No.: HG02132A-US-TX /
HG02132B-US-TX
FCCID: 2AJ9O-HG2132TX
Temperature
measurement range: –4 °F – +140 °F
–20 °C – +60 °C
HF transmission signal: 433 MHz
HF transmission range: max. 98.4 ft / 30
meters (in open area)
Batteries: 2 x AA 1.5 V
(direct current)
(installed)

10 US-EN
Degree of protection: IPX4 (Splash-
proof) /
suitable for wet
locations
Contents
1 Temperature station
1 Outdoor sensor
4 Batteries AA, 1.5 V (installed)
2 Screws (D 0.1 in / 3 mm)
2 Wall anchors (D 0.3 in / 7.7 mm)
1 Drill template
1 Set of instructions for use
IMPORTANT
SAFETY
NOTES
READ ALL INSTRUCTIONS. KEEP FOR FU-
TURE REFERENCE. INCLUDE ALL DOCU-
MENTATION WHEN PASSING THIS
PRODUCT ON TO OTHERS.
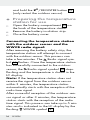
General safety information
Failure to observe
the following warnings can
result in death or serious injuries.
This product may be used by children
8 years and older and individuals with
physical, sensory or cognitive

11 US-EN
impairments or lacking experience and
knowledge when instructed on safe prod-
uct use and they understand the associ-
ated risks. Do not allow children to play
with the product. Never allow children to
clean the product or perform user
maintenance unsupervised.
Changes or modifications to this product
not expressly approved by the party re
-
s
ponsible for compliance could void the
user‘s authority to operate the product.
Note: This product has been tested and
found to comply with the limits for a
Class B digital device, pursuant to part
15 of the FCC Rules. These limits are de-
signed to provide reasonable protection
against harmful interference in a residen-
tial installation. This product generates,
uses and can radiate radio frequency en-
ergy and, if not installed and used in ac-
cordance with the instructions, may cause
harmful interference to radio communica-
tions.
However, there is no guarantee that inter-
ference will not occur in a particular in-
stallation. If this product causes harmful
interference to radio or television recep-
tion, which can be determined by turning
the product off and on, the user is encour-
aged to try and correct the interference
by one or more of the following measures:
• Reorient or relocate the receiving
antenna.

12 US-EN
• Increase the separation between the
product and receiver.
• Connect the product into an outlet on
a circuit different from that to which the
receiver is connected.
• Consult the dealer or an experienced
radio / TV technician for help.
• The RF Exposure Compliance distance
is 0.78 in / 20 mm.
Do not expose the product to an extremely
high electromagnetic field. This may impair
the correct functioning of the product.
Please note that the guarantee does not
cover damage caused by incorrect han-
dling, non-compliance with the operating
instructions or interference with the prod-
uct by unauthorized individuals.
Safety instructions for
batteries /recharge-
able batteries
Failure to observe
the following warnings can result in
death or serious injuries.
DANGER TO LIFE! Keep batteries /
rechargeable batteries out of reach of
children. If accidentally swallowed seek
immediate medical attention.

13 US-EN
DANGER OF EXPLO-
SION! Never recharge
disposable batteries. Do not
short-circuit batteries / rechargeable bat-
teries and / or open them. Overheating,
fire or bursting can be the result.
Never throw batteries / rechargeable
batteries into fire or water.
Do not exert mechanical loads to
batteries / rechargeable batteries.
Risk of leakage of batteries /
rechargeable batteries
Failure to observe
the following warnings can result in
injuries or property damage.
Avoid extreme environmental conditions
and temperatures, which could affect
batteries / rechargeable batteries, e.g.
radiators / direct sunlight.
Avoid contact with the skin, eyes and mu-
cous membranes. In the event of contact
with battery acid, thoroughly flush the
affected area with plenty of clean water
and seek immediate medical attention.
WEAR PROTECTIVE
GLOVES! Leaked or dam-
aged batteries / rechargeable
batteries can cause burns on contact with
the skin. Wear suitable protective
gloves
at all times if such an event occ
urs.

14 US-EN
In the event of a battery leak, immedi-
ately remove the battery from the product
to prevent damage.
Only use the same type of batteries . Do
not mix used and new batteries.
Remove the batteries if the product will
not be used for extended periods.
Risk of product damage
Only use the specified battery type!
Insert batteries according to polarity
marks (+) and (-) on the battery and the
product.
Clean the contacts on the battery and in
the battery compartment before inserting!
Immediately remove drained batteries
from the product.
SAVE THESE
INSTRUCTIONS
Before initial use
First activate the batteries inside the
outdoor sensor, then inside the tem-
perature station.
Note: Before initial use, remove the protec-
tive film from the device display.

15 US-EN
General information
When choosing where to
position the devices, make sure that they
are not exposed to direct sunlight, vibra-
tions, dust, heat, cold or moisture. Do not
place the devices near heat sources, e.g.
radiators, to prevent damage to the de-
vice.
Please ensure that neighboring devices
are not operated at the same frequency
of 433 MHz. These types of devices may
interfere with the radio connection.
Do not place the devices next to or on
metal plates. Otherwise the quality of ra-
dio wave transmission may be reduced.
Radio signal (WWVB):
The WWVB-Signal (time signal transmitter) is
made up of time pulses transmitted from one
of the highest precision clocks in the world
close to Fort Collins, Colorado.
Preparing to use the
outdoor sensor
Remove the battery cover from the back
of the outdoor sensor.
Remove the battery insulation strip.
The outdoor sensor is now ready for use
and the control LED
29
illuminates briefly.
Close the battery cover.
If this does not work, if necessary restart
the temperature station. To do this, press

16 US-EN
and hold the Z
Z
/ REGISTER button
21
(only restart the outdoor sensor).
Preparing the temperature
station for use
Open the battery compartment
25
on
the back of the temperature station.
Remove the battery insulation strip.
Close the battery cover.
Connecting the temperature station
with the outdoor sensor and the
WWVB radio signal:
After removing the battery safety strip, the
temperature station will attempt to connect
with the outdoor sensor. This process can
take a few minutes. The
Radio signal sym-
bol
10
flashes. Once the temperature station
has successfully connected to the outdoor
sensor, the
Radio signal symbol
10
stops
flashing and the temperature is shown in the
LC display.
Note: If the temperature station does not
receive the signal from the outdoor sensor
within 3 minutes, the temperature station
automatically starts with the reception of the
radio time signal.
After successful reception of the outdoor sen-
sor signal or after 3 minutes, the temperature
station starts with the reception of the radio
time signal. This process can take up to 5 min-
utes and is indicated in the LC display by the
flashing
WWVB symbol
2
.

17 US-EN
After successful reception of the WWVB
radio signal, the
WWVB symbol
2
is dis-
played continuously in the LC display.
Note: Do not move the temperature station
while it is receiving the signal. This could oth-
erwise interfere with reception. If synchroni-
zation fails during initial set up, try changing
the location (e.g. place the temperature sta-
tion near a window).
Reception may be considerably reduced by
obstructions (e.g. concrete walls) or sources
of interference (e.g. other electrical devices).
If the reception of the radio signal continues
to be interrupted, you can set the time and
date manually (see “Setting the lan-
guage / time zone / time / date manually”).
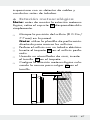
Wall-mounting the temperature sta-
tion and / or the outdoor sensor:
Note: This step requires an electric drill and
a crosshead screwdriver.
DANGER TO LIFE,
RISK OF INJURY AND PROPERTY
DAMAGE! Carefully read the instructions
for use and safety notes for your drill.
DANGER TO LIFE! Be
careful that you do not hit electrical, gas or
water lines when drilling into the wall. If nec-
essary, check the wall with a wall scanner
before drilling.

18 US-EN
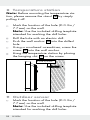
Temperature station
Note: Before mounting the temperature sta-
tion, please remove the stand
26
by simply
pulling it off.
Mark the location of the hole (D 0.3 in /
7.7 mm) on the wall.
Note: Use the included drilling template
intended for marking the drill holes.
Drill the hole with an electric drill.
Push the wall anchor
28
into the drilled
hole.
Using a crosshead screwdriver, screw the
screw
27
into the wall anchor.
Hang the temperature station by placing
the hanging slot
22
on the screw.
0.125in / 0.3mm
0.125 in/3 mm
Outdoor sensor
Mark the location of the hole (D 0.3 in /
7.7 mm) on the wall.
Note: Use the included drilling template
intended for marking the drill holes.

19 US-EN
Drill the hole with an electric drill.
Push the wall anchor
33
into the drilled
hole.
Using a crosshead screwdriver, screw the
screw
32
into the wall anchor.
Hang the outdoor sensor by placing the
hanger
30
on the screw.
0.3in / 8mm
0.3 in/8 mm
Note: Never immerse the outdoor sensor in
water and protect from direct sunlight. Elec-
tronic devices may adversely affect the
wireless signal reception.
Setting the language / time
zone / time / date manually
The reception of WWVB radio signal where
the temperature station has been positioned
may become poor or interrupted. If this hap-
pens you can set the product manually.
1. Press and hold the CLOCK button
19
for
about 3 seconds.
2. Press the SET / RESET button
24
to switch
between 12- and 24-hour clock mode.

20 US-EN
3. Press the CLOCK button to confirm your
settings. The language option flashes.
Tip: Press and hold the SET / RESET
button to quickly scan the numbers and
speed up this process. This quicker
method can also be used for the follow-
ing settings. If no buttons are pressed for
30seconds, the LC display will automati-
cally return to the standard display.
4. Press the SET / RESET button to set the
desired language (GE = German,
FR = French, SP = Spanish, IT = Italian,
EN = English).
5. Press the CLOCK button to confirm your
settings. The time zone display flashes.
6. Press the SET / RESET button to change
the time zone (–8 hours to -5hours).
Note: If you are in a country where the
WWVB-signal can be received but the
time differs from your current local time,
you can use the time zone setting to have
the clock display your current local time.
If you are in a country where e.g. the lo-
cal time is an hour ahead of Pacific Stan-
dard Time (PST), set the time zone to –8.
The product is now still controlled by
WWVB but shows the time as one hour
ahead of PST.
7. Press the CLOCK button to confirm your
settings. The hour display flashes.
8. Press the SET / RESET button to set the
desired value.

21 US-EN
9. Press the CLOCK button to confirm your
settings.
10. Repeat steps 6 and 7 to set the minutes,
seconds
5
, year and date
4
(day / month).
Note: The seconds can only be reset to
00.
11. Press the SET / RESET button to toggle
DST (ON/OFF).
12. Press the CLOCK button to confirm your
settings.
13. The LC display will then return to the
standard display.
Daylight saving time
The DST symbol
1
in the LC display indi-
cates the clock is on daylight saving time.
The temperature station automatically detects
DST from the WWVB radio signal.
Setting the alarm
You can set two different alarm.
1. Press and hold the ALARM button
20
for
about 3 seconds.
Note: If an alarm has already been set,
the LC display will show the time the
alarm was set to. If not, the display shows
0:00 or AM 12:00.
2. The hour display flashes. Press the
SET / RESET button
24
to set the desired
value.

22 US-EN
3. Press the ALARM button to confirm your
settings. The minute display flashes.
4. Press the SET / RESET button to set the
desired value.
5. Press the ALARM button to confirm your
settings.
6. Repeat steps 2 to 5 to set the time for
Alarm 2.
Displaying the alarms
Press ALARM button
20
once or twice to
display the setting for Alarm 1 or Alarm 2.
Press the ALARM button again to return
to the standard display.
Switching the alarm on /off
Press the SET / RESET button
24
once to
activate Alarm 1. Press the SET / RESET
button twice to activate Alarm 2. Press
the SET / RESET button three times to
activate Alarm1 and Alarm 2.
Note: The symbol
or appears in
the LC display.
The alarm sounds at the set time. The
alarm automatically stops after 2minutes.
Press the SELECT
23
/SET / RESET
24
/
ALARM
20
/ CLOCK button
19
to stop
the alarm manually.
Note: The alarm goes off at the set time
every day.
Press the SET / RESET button three times
to deactivate Alarm 1. Press the SET / RE-
SET button twice to deactivate Alarm 2.

23 US-EN
Press the SET / RESET button once to
deactivate Alarm 1 and Alarm 2.
Using the snooze button
Press the Z
Z
/ REGISTER button
21
while
the alarm is going off to snooze the
alarm.
The alarm is silenced and or and
Z
Z
flash.
The alarm sounds again after 5 minutes.
Press the SELECT button
23
to deactivate
the snooze function.
Displaying the
temperature
The LC display shows the indoor temperature
13
and the outdoor temperature
9
.
Press and hold the SELECT button
23
for
3 seconds. The display will flash °F.
Press the SET / RESET button
24
to switch
between the °C (Celsius) and °F (Fahr-
enheit) temperature units.
Press the SELECT button to confirm your
settings.
Displaying the minimum /
maximum values
The temperature station stores the maximum
and minimum values of the outdoor sensor
and of the temperature station itself.

24 US-EN
Press the SELECT button
23
to display the
maximum values of the indoor and out-
door temperature.
Press the SELECT button again to display
the minimum values of the indoor and
outdoor temperature.
Press the SET / RESET button
24
while the
maximum and minimum values are being
displayed to erase the memory.
Press the SELECT button to return to the
standard display.
Displaying the
temperature trends
After successfully connecting with the outdoor
sensor, the temperature station can display
the temperature trend (outdoor)
8
and the
temperature trend (indoor)
15
.
You may see the following displays:
= The temperature is rising.
= The temperature is constant.
= The temperature is falling.
Battery indicator
The
11
and
14
symbols appear in
the temperature station’s LC display if the bat-
teries in the outdoor sensor or the tempera-
ture station are weak.
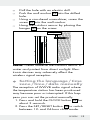
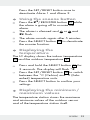
Replacing the batteries
Open the battery compartment
25
or
31
.
Remove the drained batteries.

25 US-EN
Insert two new 1.5 V (direct current)
batteries (AA) into the battery compart-
ments.
Note: Make sure you insert the batteries
the correct way (polarity). This is shown
in the battery compartment.
25
28 27
222119 20 23 24
26
30
31 3332
Close the battery compartments.

26 US-EN
Troubleshooting
Note: This product has delicate electronic
components. This means that if it is placed
near an object that transmits radio signals, it
could cause interference.
If the display indicates a problem, move
such objects away from the temperature
station / outdoor sensor or remove the
batteries for a short while from the tem-
perature station / outdoor sensor and
then replace them.
Obstacles such as concrete walls can also
interfere with reception. In this case, change
the location (e.g. near a window). Please
note, the outdoor sensor should always be
set up within max. 98.4 ft / 30 meters (open
space) from the temperature station. The
specified range is the free-field range and
means that no obstacle should be between
the outdoor sensor and the temperature
station. A “visual contact” between outdoor
sensor and temperature station often im-
proves the transmission.
Cold (outdoor temperatures below 32 °F/
0 °C) can reduce the battery power of the
outdoor sensor and thereby negatively affect
radio transmission.

27 US-EN
Another factor that may cause harmful inter-
ference is dead or weak batteries in the out-
door sensor. Replace them with new ones.
If your temperature station is not working cor-
rectly, briefly remove and reinsert the batteries.
Cleaning and Maintenance
Only clean the outside of the product
using a soft, dry cloth.
Never spray the outdoor sensor, e.g. with
a garden hose. The outdoor sensor is
protected against splashing water from
all directions.
Disposal
Dispose of the packaging through
your local recycling facilities and
in compliance with all federal,
state and local regulations.
b
a
Please note the package markings
regarding waste separation, indicated
by abbreviations (a) and numbers
(b), meaning: 1–7: plastics /
20–22: paper and cardboard /
80–98: composite materials.
Contact your local waste manage-
ment authority for additional infor-
mation on how to dispose of the
used product.

28 US-EN
To help protect the environment, please
dispose of the product properly when it has
reached the end of its useful life, do not throw
in the garbage. Information on collection sites
and their opening hours is available from
your local authority.
Improper disposal of batteries can
damage the environment!
Never throw batteries in the garbage. They
may contain toxic heavy metals and must be
handled as special waste. The chemical sym-
bols of heavy metals are: Cd = cadmium,
Hg = mercury, Pb = lead. Used batteries
should therefore be disposed of through a
local collection point.
Warranty
What does this warranty cover?
The warranty covers:
· Damage, breakage or inoperability due to
defect.
· Damage not accounted for by normal wear
and tear or following the safety and mainte-
nance instructions provided in the user
manual.
What is not covered by the warranty?
The warranty does not cover damage caused
by:

29 US-EN
· Normal wear and tear of the product,
including fragile parts (such as switches,
glass, etc.);
· Improper use or transport;
· Disregarding safety and maintenance
instructions;
· Accidents or acts of nature (e.g. lightning,
fire, water, etc.).
· Tampering with the product (such as
removing cover, unscrewing screws etc.)
What is the period of coverage and
warranty resolution?
The warranty is for 3 years from the date of
purchase. At our discretion, product will
either be refunded or replaced.
What will we not do?
We will not:
· Start a new warranty period upon product
exchange;
· We will not repair product.
How to process the warranty?
We recommend first either:
· Call customer service at 1 (844) 543-5872
· Visit the Website Customer Service Platform
at www.lidl.com / contact-us
· Visit a LIDL store for further assistance

30 US-EN
To ensure the quickest warranty return process,
please have the following available:
· The original sales receipt that includes the
date purchased;
· The product and manual in the original
package;
· A statement of the problem.
What must you do to keep the
warranty in effect?
· Retain the original receipt;
· Follow all product instructions;
· Do not repair or modify the product.
How does state law relate to this
warranty?
Any State Laws that contradict or modify the
warranty listed here to the consumer’s benefit
will be followed.

31 US-ES
Descripción de las palabras
de advertencia .......................................... Página 32
Servicio al cliente .....................................Página 32
Introducción ................................................Página 33
Uso apropiado ...............................................Página 33
Descripción de las piezas y características ...Página 33
Información técnica .......................................Página 37
Alcance de suministro ....................................Página 38
Notas importantes
de seguridad ..............................................Página 38
Información general de seguridad ............... Página 39
Instrucciones de seguridad para
baterías / baterías regargables ....Página 41
Antes del uso inicial
Información general ......................................Página 43
Preparar el sensor exterior para su uso .......Página 44
Preparar la estación meteorológica
para su uso .....................................................Página 44
Estación meteorológica ................................. Página 47
Sensor exterior ............................................... Página 48
Configurar idioma / zona horaria /
hora / fecha / hora manualmente .................Página 49
Indicar horario de verano ............................. Página 51
Configurar la hora de alarma .......................Página 51
Consultar las horas de alarma ......................Página 52
Encender / apagar la alarma ........................Página 52
Usar el botón de snooze ...............................Página 53
Indicación de temperatura ............................ Página 53
Consultar los valores mínimos / máximos ..... Página 53
Indicación de las tendencias
de temperatura ..............................................Página 54
Indicación del nivel de batería .....................Página 54
Reemplazar las baterías ................................Página 55
Resolución de problemas ..................Página 56
Limpieza y mantenimiento ............... Página 57
Eliminación ................................................... Página 58
Garantía ........................................................Página 59

32 US-ES
DESCRIPCIÓN DE LAS
PALABRAS DE ADVERTENCIA
ADVERTENCIA indica una situación
peligrosa, que puede provocar la muerte
o lesiones graves si no se evita.
PRECAUCIÓN
PRECAUCIÓN indica una situación
peligrosa, que puede provocar lesiones
leves o moderadas si no se evita.
AVISO
AVISO indica información que se consi-
dera importante, pero que no implica un
peligro (p. ej. mensajes relacionados con
daños materiales).
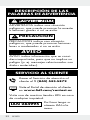
SERVICIO AL CLIENTE
Llame al Servicio de atención al
cliente al 1 (844) 543-5872
Visite el Portal de atención al cliente
en www.lidl.com/contact-us
Visite una de nuestras tiendas LIDL en caso
de cualquier inquietud.
IAN 284995
Por favor tenga su
número IAN a la
mano.

33 US-ES
Estación meteorológica
Introducción
Felicidades por la compra de su nuevo
producto. Usted ha seleccionado un producto
de calidad. Las instrucciones de uso son
parte del producto. Contienen información
importante respecto a la seguridad, el uso
y la eliminación. Antes de usar el producto,
familiarícese con toda la información de se-
guridad y las instrucciones de uso. Utilice la
unidad únicamente como se describe y para
las aplicaciones indicadas. Si traspasa el pro-
ducto a alquien más, por favor asegúrese de
incluir toda la documentación con él.
Uso apropiado
El producto muestra las temperaturas interior
y exterior en grados Celsius (°C) o grados
Fahrenheit (°F) y sus valores máximos y míni-
mos. El producto también muestra la hora en
formato de reloj de 12/24 horas, así como
la fecha. Además, el producto tiene dos fun-
ciones de alarma. El producto está diseñado
solo para uso en un entorno residencial pri-
vado y no para uso comercial.
Descripción de las
piezas y características
Pantalla LC
1
Indicación DST (horario de verano)
2
Símbolo de la WWVB

34 US-ES
3
Símbolo Z
Z
(función de snooze)
4
Indicación de la fecha (día/ mes)
5
Indicación de segundos
6
Indicación de día de la semana
7
Indicación MAX-/MIN (temperatura
exterior)
8
Tendencia de temperatura (temperatura
exterior)
9
Temperatura exterior
10
Símbolo de señal de radio
11
Símbolo (sensor exterior)
12
Indicación de MAX- / MIN temperatura
interior
13
Temperatura interior
14
Símbolo (estación meteorológica)
15
Tendencia de temperatura (temperatura
interior)
16
Símbolo / (Alarma 1 / Alarma 2)
17
Hora
18
2a zona horaria (ZONE)
5
4
6
7
21 3
9
15
16
17
18
8
11121314 10

35 US-ES
Estación meteorológica
19
Botón CLOCK
20
Botón ALARM
21
Botón Z
Z
/ REGISTER (función
snooze/ REGISTER)
22
Ranura para colgar
23
Botón SELECT
24
Botón SET / RESET
25
Compartimiento de las baterías
26
Soporte
27
Tornillo (D 0.1 in / 3 mm)
28
Taquete (D 0.3 in / 7.7 mm)
25
28 27
222119 20 23 24
26

36 US-ES
Sensor exterior
29
LED de control
29
30
Ranura para colgar
31
Compartimiento de las baterías
32
Tornillo (D 0.1 in / 3 mm)
33
Taquete (D 0.3 in / 7.7 mm)
30
31 3332

37 US-ES
Información técnica
Estación meteorológica:
N°. de modelo: HG02132A-US-RX /
HG02132B-US-RX
FCCID: 2AJ9O-HG2132RX
Rango de medición
de temperatura: +32 °F – +122 °F
0 °C – + 50 °C
Nota: si la temperatura es ≤32 °F (0 °C),
la pantalla LC mostrará “LL.L”. Si la tempera-
tura es ≥122 °F (50 °C), la pantalla LC
mostrará “HH.H”.
Intervalo de
temperatura: 0.1 °F / 0.1 °C
Señal de radio: WWVB
Baterías: 2 x AA 1.5 V
(corriente directa)
(preinstaladas)
Sensor exterior:
N°. de modelo: HG02132A-US-TX /
HG02132B-US-TX
FCCID: 2AJ9O-HG2132TX
Rango de medición
de temperatura: –4 °F – +140 °F
–20 °C – +60 °C
Señal de transmisión HF: 433 MHz
Rango de
transmisión HF: máx. 98.4 ft /
30 metros (al aire
libre)

38 US-ES
Baterías: 2 x AA 1.5 V
(corriente directa)
(preinstaladas)
Grado de protección: IPX4 (a prueba de
salpicaduras) /
apto para lugares
húmedos
Alcance de suministro
1 estación meteorológica
1 sensor exterior
4 baterías AA, 1.5 V (preinstaladas)
2 tornillos (D 0.1 in / 3 mm)
2 taquetes (D 0.3 in / 7.7 mm)
1 plantilla de perforación
1 instrucciones de uso
NOTAS
IMPOR-
TANTES DE
SEGURIDAD
LEA TODAS LAS INSTRUCCIONES.
GUARDAR PARA FUTURAS REFERENCIAS.
AL CEDER ESTE PRODUCTO A OTRAS
PERSONAS, ASEGÚRESE DE INCLUIR
TODA SU DOCUMENTACIÓN.

39 US-ES
Información general
de seguridad
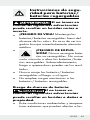
El incumplimiento
de las siguientes advertencias puede
provocar lesiones graves o la muerte.
Este producto puede ser usado por niños
a partir de los 8 años y por personas con
capacidades físicas, sensoriales o menta-
les reducidas o con falta de experiencia
y conocimiento si han sido supervisadas
o instruidas respecto al uso del producto
de una manera segura y entienden los
riesgos involucrados. Los niños no deben
jugar con el producto. La limpieza y el
mantenimiento de uso no deberán ser
realizados por niños sin supervisión.
Los cambios o las modificaciones a este
producto que no sean expresamente
aprobados por la parte responsable del
cumplimiento podrían anular la autori-
dad del usuario a operar el producto.
Nota: Este producto ha sido probado y
cumple con los límites para un dispositivo
digital clase B, de acuerdo con el apar-
tado 15 de las normas de la FCC. Estos
límites están diseñados para proveer pro-
tección razonable contra interferencias
perjudiciales en una instalación residen-
cial. Este producto genera, usa y puede
emitir energía de radio frecuencia y en
caso de no ser instalado y utilizado de
acuerdo a las instrucciones puede causar

40 US-ES
interferencias perjudiciales a las radioco-
municaciones.
Sin embargo, no existe ninguna garantía
de que la interferencia no ocurra en una
instalación en particular. Si este producto
causa interferencia dañina a la recepción
de radi o televisión, la cual puede ser de-
terminada encendiendo y apagando el
producto, se alenta al usuario a intentar
corregir las interferencias siguiendo las
siguientes medidas:
• Oriente o localice de nuevo la antena
receptora.
• Aumente la separación ente el
producto y el receptor.
• Conecte el producto a la toma de co-
rriente en un circuito distinto de aquél
al que esté conectado el receptor.
• Consulte por ayuda a su proveedor o
a algún técnico experto de radio / TV.
• La distancia para cumplir con la ex-
posición a RF es de 0.78 in/20 mm.
No exponga el producto a un campo
electromagnético extremadamente alto.
Esto podría afectar el funcionamiento
correcto del producto.
Por favor, tome en cuenta que la garantía
no cubre daño causado por uso inco-
rrecto, por no seguir las instrucciones o
por el manejo del producto por personas
no autorizadas.

41 US-ES
Instrucciones de segu-
ridad para baterías /
baterías regargables
El no tomar en
cuenta las siguientes advertencias
puede resultar en heridas serias o
muerte.
¡PELIGRO DE VIDA! Mantenga las
baterías / baterías recargables fuera del
alcance de los niños. En caso de ser tra-
gadas busque inmediatamente atención
médica.
¡PELIGRO DE EXPLO-
SIÓN! Nunca recargue bate-
rías no recargables. No cause
corto circcuito o abra las baterías / bate-
rías recargables. Sobrecalentamiento,
fuego o quemaduras pueden ser los resul-
tados.
Nunca arroje las baterías / baterías
recargables al fuego o al agua.
No emplee cargas mecánicas a las
baterías / baterías recargables.
Riesgo de chorreo de batería
El no tomar en
cuenta las siguientes advertencias
puede resultar en heridas o daños a
propiedad.
Evite condiciones ambientales y tempera-
turas extremas que puedan afectar a las

42 US-ES
baterías / baterías recargables, p.ej.
radiadores / luz solar directa.
Evite el contacto con la piel, ojos y mem-
branas mucosas. En caso de contacto con
el ácido de la batería, enjuague intensi-
vamente el área afectada con el chorro
de agua y busque inmediatamente aten-
ción médica.
¡UTILICE GUANTES PRO-
TECTORES! Baterías / bate-
rías recargables chorreadas o
dañadas pueden causar quemaduras al
contacto con la piel. Lleve puestos guan-
tes protectores en todo momento en caso
de que esto ocurra.
En caso de que las baterías / baterías
recargables se chorreen, remuévalas in-
mediatamente del producto para evitar
daños.
Utilice sólo el mismo tipo de bateríass /
baterías recargables. No mezcle baterías /
baterías recargables nuevas con usadas.
Remueva las baterías / baterías recarga-
bles del producto si éste no será usado
por un largo periodo.
Riesgo de daño al producto
¡Utilice sólo el tipo específico de baterías /
baterías recargables!
Inserte las baterías / baterías recargables
de acuerdo con las marcas de polaridad
(+) y (-) en la batería/ batería recargable
y el producto.

43 US-ES
¡Limpie los contactos de la batería / bate-
ría recargable y dentro del compartimiento
para baterías antes de insertarlas!
Remueva inmediatamente del producto
baterías / baterías recargables gastadas.
GUARDE ESTAS
INSTRUCCIONES
Antes del uso inicial
Active las baterías primero en el
sensor exterior y luego dentro de la
estación meteorológica.
Nota: antes de usarlo por primera vez, re-
tire el plástico protector de la pantalla del
dispositivo.
Información general
Cuando elija dónde
colocar los dispositivos, asegúrese de que
no estén expuestos a la luz directa del sol,
vibraciones, polvo, calor, frío o humedad.
No coloque los dispositivos cerca de fuen-
tes de calor, p. ej. radiadores, ya que esto
puede provocar daños en ellos.
Asegúrese de que los dispositivos circun-
dantes no operen a la misma frecuencia
de 433 MHz. Dichos dispositivos pueden
interferir en la conexión de radio.

44 US-ES
No coloque los dispositivos cerca o so-
bre placas de metal. De lo contrario,
puede disminuir la calidad de la transmi-
sión de ondas de radio.
Señal de radio (WWVB):
La señal de la WWVB (transmisor de señal
de tiempo) consiste en pulsos de tiempo emi-
tidos por uno de los relojes más precisos del
mundo en Fort Collins, Colorado.
Preparar el sensor exterior
para su uso
Retire la cubierta del compartimiento de
las baterías de la parte trasera del sen-
sor exterior.
Retire la tira de seguridad de las baterías.
El sensor exterior está listo para operar y
el LED de control
29
se enciende breve-
mente.
Cierre la cubierta del compartimiento de
las baterías.
Si no funciona, reinicie la estación meteo-
rológica de ser necesario. Para hacerlo,
mantenga presionado el botón Z
Z
/ RE-
GISTER
21
(solo reinicie el sensor exterior).
Preparar la estación
meteorológica para su uso
Abra el compartimiento de las baterías
25
en la parte trasera de la estación meteo-
rológica.
Retire la tira de seguridad de las baterías.

45 US-ES
Cierre la cubierta del compartimiento de
las baterías.
Conectar la estación meteorológica
con el sensor exterior y la señal de
radio de la WWVB:
Después de retirar la tira de seguridad de las
baterías, la estación meteorológica intentará
establecer una conexión con el sensor exte-
rior. Este proceso puede tardar algunos
minutos. El símbolo de señal de radio
10
parpadeará. Una vez que la estación meteo-
rológica se haya conectado exitosamente
con el sensor exterior, el símbolo de señal de
radio
10
dejará de parpadear y se mos-
trará la temperatura en la pantalla LC.
Nota: si la estación meteorológica no
recibe la señal del sensor exterior en
3 minutos, la estación meteorológica
iniciará automáticamente con la recepción
de la señal de hora de radio.
Después de recibir exitosamente la señal del
sensor exterior o después de 3 minutos, la
estación meteorológica iniciará con la recep-
ción del a señal de hora de radio. Este pro-
ceso puede tardar hasta 5 minutos y se
indica en la pantalla LC con el símbolo de la
WWVB
2
parpadeando.
Después de recibir exitosamente la señal de
radio de la WWVB, el símbolo de la WWVB
2
se muestra de forma continua en la
pantalla LC.

46 US-ES
Nota: no mueva la estación meteorológica
mientras está recibiendo la señal. De lo con-
trario se puede interferir con la recepción. Si
no es posible hacer la sincronización cuando
la estación meteorológica se configura por
primera vez, intente cambiarla de lugar (p.
ej. coloque la estación meteorológica cerca
de una ventana).
La recepción puede verse afectada conside-
rablemente por obstáculos (p. ej. muros de
concreto) o fuentes de interferencia (p. ej.
otros dispositivos eléctricos).
Sila recepción de la señal de radio sigue siendo
interrumpida, puede ajustar la hora y la fecha
de forma manual (véase “Ajustar idioma / zona
horaria/ hora/fecha manualmente”).
Montar la estación de temperatura
y/o el sensor externo en la pared:
Nota: necesitará un taladro eléctrico y un
atornillador de cruz para este paso.
¡PELIGRO PARA
LA VIDA, RIESGO DE LESIONES Y
DAÑOS MATERIALES! Lea con cuidado
las instrucciones de operación y de seguri-
dad de su taladro.
¡RIESGO DE
MUERTE! Tenga cuidado de no perforar
conductos de electricidad, gas o agua
cuando perfore la pared. De ser necesario,

47 US-ES
inspeccione con un detector de cables y
conductos antes de taladrar.
Estación meteorológica
Nota: antes de montar la estación meteoro-
lógica, retire el soporte
26
desprendiéndolo
simplemente.
Marque la posición del orificio (D 0.3 in /
7.7 mm) en la pared.
Nota: utilice la plantilla de perforación
diseñada para marcar los orificios.
Perfore el orificio con un taladro eléctrico.
Inserte el taquete
28
en el orificio perfo-
rado.
Usando un atornillador de cruz, inserte
el tornillo
27
en el taquete.
Cuelgue la estación meteorológica colo-
cando la ranura para colgar
22
en el
tornillo.
0.125in / 0.3mm
0.125 in/3 mm

48 US-ES
Sensor exterior
Marque la posición del orificio
(D 0.3 in / 7.7 mm) en la pared.
Nota: utilice la plantilla de perforación
diseñada para marcar los orificios.
Perfore el orificio con un taladro eléctrico.
Inserte el taquete
33
en el orificio perfo-
rado.
Usando un atornillador de cruz, inserte
el tornillo
32
en el taquete.
Cuelgue el sensor exterior colocando el
colgador
30
en el tornillo.
0.3in / 8mm
0.3 in/8 mm
Nota: asegúrese de que el sensor exterior
no se sumerja en agua y no esté expuesto a
la luz directa del sol. Los dispositivos eléctri-
cos pueden afectar la recepción de la señal
inalámbrica.

49 US-ES
Configurar idioma/zona
horaria/ hora / fecha/hora
manualmente
Es posible que la recepción de la señal de la
WWVB de radio se degrade o interrumpa en
donde se colocó la estación meteorológica.
En caso de que esto suceda, el dispositivo se
puede configurar de forma manual.
1. Mantenga presionado el botón CLOCK
19
durante unos 3 segundos.
2. Presione el botón SET/RESET
24
para
cambiar entre el formato de 12 horas y
el de 24 horas del reloj.
3. Presione el botón CLOCK para confirmar
los valores. Parpadeará la opción de
idioma.
Consejo: si mantiene presionado el
botón SET / RESET, acelera el proceso y
logra el valor deseado más rápido. Este
método más rápido también se puede
usar para los siguientes ajustes. Si du-
rante un periodo de 30segundos no se
presiona ningún botón, la pantalla LC
regresa automáticamente a la indicación
normal.
4. Presione el botón SET / RESET para ajus-
tar el idioma deseado (GE = alemán,
FR = francés, SP = español, IT = italiano,
EN = inglés).
5. Presione el botón CLOCK para confirmar
los valores. La indicación de zona hora-
ria parpadeará.

50 US-ES
6. Presione el botón SET / RESET para ajus-
tar la zona horaria (–8 horas a -5horas).
Nota: si estuviera uno en un país donde
la señal de la WWVB se puede recibir
pero la hora es distinta a la de su hora
local actual, puede usar la configuración
de la zona horaria para que la indica-
ción de hora muestre su hora local ac-
tual. Si estuviera en un país en el que,
por ejemplo, la hora local está una hora
adelantada al Tiempo estándar del Pací-
fico (PST), establezca la zona horaria en
–8. El producto estará controlado ahora
por la WWVB pero muestra hora como
una hora adelante del PST.
7. Presione el botón CLOCK para confirmar
los valores. La indicación de hora parpa-
deará.
8. Presione el botón SET / RESET para ajus-
tar el valor deseado.
9. Presione el botón CLOCK para confirmar
los valores.
10. Repita los pasos 6 y 7 para ajustar los
valores de minutos, segundos
5
, año y
fecha
4
(día /mes).
Nota: la indicación de segundos solo
se puede restablecer a 00.
11. Presione el botón SET / RESET para
ajustar la función DST (ON/OFF).
12. Presione el botón CLOCK para confirmar
los valores.
13. Después de esto, la pantalla LC regre-
sará a la indicación normal.

51 US-ES
Indicar horario de verano
El horario de verano se indica con el símbolo
DST
1
en la pantalla LC. La estación meteo-
rológica detecta automáticamente si es hora-
rio de verano o no a partir de la señal de
radio de la WWVB.
Configurar la
hora de alarma
Puede establecer dos horas distintas de
alarma.
1. Mantenga presionado el botón ALARM
20
durante unos 3 segundos.
Nota: si se estableció una hora de
alarma antes, aparecerá esa alarma pre-
via en la pantalla LC. De lo contrario, la
pantalla mostrará 0:00 o AM 12:00.
2. La indicación de hora parpadeará. Pre-
sione el botón SET / RESET
24
para ajus-
tar el valor deseado.
3. Presione el botón ALARM para confirmar
los valores. La indicación de minutos par-
padeará.
4. Presione el botón SET / RESET para ajus-
tar el valor deseado.
5. Presione el botón ALARM para confirmar
los valores.
6. Repita los pasos 2 a 5 para ajustar la
hora de la Alarma 2.

52 US-ES
Consultar las horas de
alarma
Presione el botón ALARM
20
una o dos
veces para consultar la hora establecida
de la Alarma 1 o la Alarma 2, respecti-
vamente.
Presione el botón ALARM nuevamente
para regresar a la indicación normal.
Encender/apagar la
alarma
Presione el botón SET / RESET
24
una
vez para activar la Alarma 1. Presione el
botón SET / RESET dos veces para activar
la Alarma 2. Presione el botón SET / RE-
SET tres veces para activar la Alarma1 y
la Alarma 2.
Nota: el símbolo
o aparecerá en
la pantalla LC.
La señal de alarma sonará tan pronto
como llegue la hora de alarma. La señal
de alarma se callará automáticamente
después de un periodo de 2minutos.
Presione el botón select
23
/ SET/ RESET
24
/ ALARM
20
/ CLOCK
19
para apa-
gar la alarma antes de que se apague
automáticamente.
Nota: la señal de la alarma suena
todos los días a la hora establecida.
Presione el botón SET / RESET tres veces
para desactivar la Alarma 1. Presione el
botón SET / RESET dos veces para desac-
tivar la Alarma 2. Presione el botón

53 US-ES
SET / RESET una vez para desactivar la
Alarma 1 y la Alarma 2.
Usar el botón de snooze
Presione el botón Z
Z
/ REGISTER
21
mientras suena la alarma para activar la
función de snooze.
La señal de alarma se calla y se muestra
o y Z
Z
parpadeará.
La señal de alarma suena nuevamente
después de 5 minutos.
Presione el botón SELECT
23
para des-
activar la función snooze.
Indicación de temperatura
La pantalla LC muestra la temperatura interior
13
y la temperatura exterior
9
.
Mantenga presionado el botón SELECT
23
durante 3 segundos. Parpadeará la
indicación de °F.
Presione el botón SET / RESET
24
para
cambiar entre las escalas de temperatura
°C (Celsius) y °F (Fahrenheit).
Presione el botón SELECT para confirmar
los valores.
Consultar los valores
mínimos/máximos
La estación meteorológica almacena los valo-
res máximos y mínimos del sensor exterior y
de la estación meteorológica misma.

54 US-ES
Presione el botón SELECT
23
para mos-
trar los valores máximos de la tempera-
tura interior y exterior.
Presione el botón SELECT nuevamente
para mostrar los valores mínimos de la
temperatura interior y exterior.
Presione el botón SET / RESET
24
mien-
tras se muestran los valores máximos y
mínimos para restablecer los valores.
Presione el botón SELECT para regresar
a la indicación normal.
Indicación de las
tendencias de temperatura
Después de conectarse exitosamente con el
sensor exterior, la estación meteorológica
puede mostrar la tendencia de temperatura
(exterior)
8
y la tendencia de temperatura
(interior)
15
.
Puede ver las siguientes indicaciones:
= La temperatura está aumentando.
= La temperatura permanece constante.
= La temperatura está bajando.
Indicación del nivel
de batería
Los símbolos
11
y
14
aparecerán en
la pantalla LC de la estación meteorológica
si las baterías en el sensor exterior o en la
estación meteorológica están bajas.

55 US-ES
Reemplazar las baterías
Abra el compartimiento de las baterías
25
o
31
.
Retire las baterías gastadas.
Inserte dos baterías nuevas de 1.5 V
(corriente directa) (AA) en los comparti-
mientos de las baterías.
Nota: asegúrese de insertar las baterías
en el sentido correcto (polaridad). Ésta
se muestra en los compartimentos para
la batería.
25
28 27
222119 20 23 24
26

56 US-ES
30
31 3332
Cierre los compartimientos de las
baterías.
Resolución de problemas
Nota: este producto dispone de componen-
tes electrónicos delicados. Esto significa que
podrían producirse interferencias si se coloca
cerca de un objeto que transmite señales de
radiofrecuencia.
Si la pantalla indica un problema, aleje
los objetos de la estación meteorológica
o el sensor exterior o retire las baterías
de la estación meteorológica o el sensor
exterior durante un periodo breve de
tiempo y vuelva a colocarlas.
Los obstáculos como las paredes de concreto
también pueden hacer que se vea afectada
la recepción. En este caso, cambie la ubica-
ción (p. ej. cerca de una ventana). Tenga en
cuenta que el sensor exterior siempre debe
estar dentro de un radio de máx. 98.4ft/

57 US-ES
30 metros (campo abierto) desde la estación
base. El rango especificado es el rango de
campo abierto y significa que no debe haber
obstáculos entre el sensor exterior y la esta-
ción meteorológica. Un “contacto visual”
entre el sensor exterior y la estación meteoro-
lógica suele mejorar la transmisión.
El frío (temperatura exterior debajo de
32 °F/0°C) puede reducir la potencia de la
batería del sensor exterior y, por tanto, afec-
tar negativamente la transmisión de radio.
Otro factor que puede provocar una interfe-
rencia son las baterías agotadas o a punto
de agotarse en el sensor exterior. Reempláce-
las con unas nuevas.
Si su estación meteorológica no funciona
correctamente, retire las baterías durante un
breve momento y vuelva a colocarlas.
Limpieza y mantenimiento
El producto sólo debe ser limpiado por
fuera con un paño suave y seco.
Por ningún motivo rocíe el sensor exterior,
p. ej. con una manguera de jardín.
El sensor exterior está protegido de
salpicaduras de agua desde cualquier
dirección.

58 US-ES
Eliminación
Deshágase del empaque mediante
sus instalaciones de reciclaje loca-
les y de acuerdo con las regula-
ciones federales, estatales y
locales.
b
a
Observe las señales del material
de empaque para la separación
de residuos, los cuales están seña-
lados con abreviaturas (a) y núme-
ros (b) que significan lo siguiente:
1–7: plásticos / 20–22: papel y
tablero de fibra / 80–98: materia-
les mixtos.
Contacte a las autoridades locales
correspondientes para la elimi-
nación de desechos para mayor
información sobre cómo desechar
su producto desgastado.
Para ayudar a proteger el medio ambiente,
elimine el producto adecuadamente al final
de su vida útil, no lo tire en la basura normal.
Puede obtener información de sus autorida-
des locales sobre los puntos de recolección y
horarios de atención.
¡La eliminación inadecuada de
las baterías puede causar daños
ambientales!

59 US-ES
Las baterías no deben ser eliminadas con los
desechos del hogar. Éstas pueden contener
metales pesados tóxicos y requieren ser trata-
das como desechos especiales. Los símbolos
químicos de los metales pesados son: Cd =
Cadmio, HG = Mercurio, Pb = Plomo. Por
esta razón es importante eliminar las baterías
usadas en un punto de recolección local.
Garantía
¿Lo que cubre la presente garantía?
La garantía incluye:
· Daños, quebraduras o incapacidad para
funcionar debido a defectos.
· Daños que no se expliquen por el desgaste
propio del uso o al seguir las instrucciones
de seguridad y mantención incluidas en el
manual para el usuario.
¿Lo que no cubre esta garantía?
La garantía no cubre daños causados por:
· El desgaste propio del uso del producto, in-
cluidas las partes frágiles (como interrupto-
res, piezas de vidrio, etc.).
· Uso o transporte no indicado del producto.
· Desatención a las instrucciones de seguri-
dad y mantención.
· Accidentes o causas de fuerza mayor (e.g.
relámpagos, incendio, inundación, etc.).
· Falsificación o alteración del producto
(retirar la cubierta, tornillos, etc.).

60 US-ES
¿Período de cobertura y resolución
de la garantía?
La garantía es válida por 3 número de años a
partir de la fecha de compra. La empresa,
según lo estime conveniente, devolverá el
dinero o repondrá el producto.
La empresa no:
· Dará inicio a un nuevo período de garantía
al hacerse el cambio del producto.
· Realizará reparación del producto.
¿Cómo se tramita la garantía?
Recomendamos que primero:
· Llame al Servicio de atención al cliente al
1 (844) 543-5872.
· Visite el Portal de atención al cliente en
www.lidl.com/contact-us
· Visite una de nuestras tiendas LIDL en caso
de cualquier inquietud.
A fin de acelerar el trámite de la garantía,
tenga a bien contar con lo siguiente:
· Recibo de venta original que incluya la
fecha de compra.
· Producto y manual en su empaque original.
· Descripción del problema.
¿Qué debe hacer usted para
mantener la garantía vigente?
· Guardar el recibo original.
· Seguir todas las instrucciones para el uso
del producto.

61 US-ES
· No realizar ninguna reparación ni altera-
ción al producto.
¿De qué manera influyen las leyes
estatales con esta garantía?
Se acatará cualquier ley estatal que contra-
diga o modifique la presente garantía en
beneficio del cliente.

IAN 284995
Distributed by / Distribuido por:
Lidl US LLC., Arlington, VA 22202
Model No. / Modelo Núm.:
HG02132A-US / HG02132B-US
(HG02132A-US-RX & HG02132A-US-TX /
HG02132B-US-RX & HG02132B-US-TX)
Version / Versión: 03 / 2017
Made in / Hecho en: China
Last Information Update · Estado de las informaciones:
04 / 2017 · Ident.-No.: HG02132A-US/B-US/
A-US-RX/B-US-RX/A-US-TX/B-US-TX042017-9
-
 1
1
-
 2
2
-
 3
3
-
 4
4
-
 5
5
-
 6
6
-
 7
7
-
 8
8
-
 9
9
-
 10
10
-
 11
11
-
 12
12
-
 13
13
-
 14
14
-
 15
15
-
 16
16
-
 17
17
-
 18
18
-
 19
19
-
 20
20
-
 21
21
-
 22
22
-
 23
23
-
 24
24
-
 25
25
-
 26
26
-
 27
27
-
 28
28
-
 29
29
-
 30
30
-
 31
31
-
 32
32
-
 33
33
-
 34
34
-
 35
35
-
 36
36
-
 37
37
-
 38
38
-
 39
39
-
 40
40
-
 41
41
-
 42
42
-
 43
43
-
 44
44
-
 45
45
-
 46
46
-
 47
47
-
 48
48
-
 49
49
-
 50
50
-
 51
51
-
 52
52
-
 53
53
-
 54
54
-
 55
55
-
 56
56
-
 57
57
-
 58
58
-
 59
59
-
 60
60
-
 61
61
-
 62
62


Auriol 284995 Operation and Safety Notes
- Categoría
- Estaciones meteorológicas
- Tipo
- Operation and Safety Notes
En otros idiomas
- English: Auriol 284995
Documentos relacionados

Otros documentos
-
LA CROSS TECHNOLOGY WS-9037U-IT Manual de usuario
-
 La Crosse Technology WS-9118U Manual de usuario
-
 La Crosse Technology OMO-TX29U Manual de usuario
-
 La Crosse Technology WS-8054U Manual de usuario
-
LA CROSS TECHNOLOGY WS-7017U-IT El manual del propietario
-
 La Crosse Technology WS-7215U Manual de usuario
-
HoMedics EnviraStation DWS-200 Instruction Manual And Warranty Information
-
-
Silvercrest 326419 El manual del propietario
-


