Magnavox 27MDTR20s Manual de usuario
- Categoría
- Reproductores de casete
- Tipo
- Manual de usuario
Este manual también es adecuado para

OWNER’S MANUAL
THANK YOU FOR CHOOSING MAGNAVOX.
N
EED HELP FAST?
R
EAD YOUR QUICK-USE GUIDE AND/OR OWNER’S MANUAL FIRST FOR
QUICK TIPS THAT MAKE USING YOUR
MAGNAVOXPRODUCT MORE ENJOYABLE.
I
FYOU HAVE READ YOUR INSTRUCTIONS AND STILL NEED ASSISTANCE,
YOUMAY ACCESS OUR ONLINE HELP AT WWW
.MAGNAVOX
.COM
OR CALL
1-800-705-2000 WHILE WITH YOUR PRODUCT.
19MDTR20
27MDTR20
C
OLOR TV WITH BUILT-IN VCR
AND DVD PLAYER
T0006UG_6006UG_EN_1.qx3 04.5.12 10:09 AM Page 1

Registering your model with MAGNAVOX makes you eligible for all of the valuable benefits listed below, so
don't miss out. Complete and return your Product Registration Card at once to ensure:
Return your Product Registration Card today
to get the very most from your purchase.
Know these
safety symbols
*Proof of
Purchase
Returning the enclosed card
guarantees that your date of pur-
chase will be on file, so no addi-
tional paperwork will be required
from you to obtain warranty ser-
vice.
*Product Safety
Notification
By registering your product, you'll
receive notification - directly
from the manufacturer - in the
rare case of a product recall or
safety defect.
*Additional
Benefits
of Product
Ownership
Registering your product guaran-
tees that you'll receive all of the
privileges to which you're enti-
tled, including special money-sav-
ing offers.
Visit our World Wide Web Site at http://www.magnavox.com
Congratulations on your purchase,
and welcome to the “family!”
Dear MAGNAVOX product owner:
Thank you for your confidence in MAGNAVOX.
You’ve selected one of the best-built, best-backed
products available today.We’ll do everything in our
power to keep you happy with your purchase for
many years to come.
As a member of the MAGNAVOX “family,” you’re
entitled to protection by one of the most compre-
hensive warranties and outstanding service networks
in the industry.What’s more, your purchase guaran-
tees you’ll receive all the information and special
offers for which you qualify, plus easy access to acces-
sories from our convenient home shopping network.
Most importantly, you can count on our uncompro-
mising commitment to your total satisfaction.
All of this is our way of saying welcome - and thanks
for investing in a MAGNAVOX product.
P.S. To get the most from your MAGNAVOX
purchase, be sure to complete and return your
Product Registration Card at once.
For Customer Use
Enter below the Serial No. which is locat-
ed on the rear of the cabinet. Retain this
information for future
reference.
Model No. ________________________
Serial No. ________________________
This “bolt of lightning” indicates uninsu-
lated material within your unit may
cause an electrical shock. For the safety of
everyone in your household, please do not
remove product covering.
The “exclamation point” calls attention
to features for which you should read
the enclosed literature closely to prevent
operating and maintenance problems.
WARNING: To r educe the risk of fire or
electric shock, this apparatus should not be
exposed to rain or moisture, and objects filled
with liquids, such as vases, should not be
placed on this apparatus.
CAUTION: To prevent electric shock, match
wide blade of plug to wide slot, fully insert.
ATTENTION:Pour éviter les choc élec-
triques, introduire la lame la plus large de la
fiche dans la borne correspondante de la prise
et pousser jusqu’au fond.
t
s
T0006UG_6006UG_EN_1.qx3 04.5.12 10:09 AM Page 2

Safety Precautions
Warning:To prevent fire or shock hazard, do not expose this equipment to rain or moisture.
Federal Communications Commission (FCC) Warning: Any unauthorized changes or
modifications to this equipment void the user’s authority to operate it.
Laser Safety: This unit employs a laser. Only a qualified service person should remove the cover or
attempt to service this device, due to possible eye injury.
CAUTION: USE OF CONTROLS OR ADJUSTMENTS OR PERFORMANCE OF PROCEDURES OTHER
THAN THOSE SPECIFIED HEREIN MAY RESULT IN HAZARDOUS RADIATION EXPOSURE.
CAUTION:VISIBLE AND INVISIBLE LASER RADIATION WHEN OPEN AND INTERLOCK DEFEATED. DO
NOT STARE INTO BEAM.THE BEAM IS LOCATED INSIDE, NEAR THE DECK MECHANISM.
Special Information for Canadian Users: This Class B digital apparatus complies with Canadian
ICES-003. Cet appareil numérique de la classe B est conforme à la norme NMB-003 du Canada.
Radio/TV Interference: This equipment has been tested and found to comply with the limits for a
Class B digital device, pursuant to Part 15 of the FCC Rules.These limits are designed to provide reasonable
protection against harmful interference in a residential installation.This equipment generates, uses, and can
radiate radio frequency energy and, if not installed and used in accordance with the instructions, may cause
harmful interference to radio communications. However, there is no guarantee that interference will not occur
in a particular installation. If this equipment does cause harmful interference to radio or television reception,
which can be determined by turning the equipment off and on, the user is encouraged to try to correct the
interference by one or more of the following measures:
1) Reorient or relocate the receiving antenna.
2) Increase the separation between the equipment and the receiver.
3) Connect the equipment into an outlet on a circuit different from that to which the receiver is connected.
4) Consult the dealer or an experienced radio/TV technician for help.
Copyright Protection: Unauthorized copying, broadcasting, public performance and lending of Discs
are prohibited.This product incorporates copyright protection technology that is protected by method claims
of certain U.S. patents and other intellectual property rights owned by Macrovision Corporation and other
rights owners. Use of this copyright protection technology must be authorized by Macrovision Corporation
and is intended for home and other limited viewing uses only unless otherwise authorized by Macrovision
Corporation. Reverse engineering or disassembly is prohibited.
Note to the Cable TV System Installer: This reminder calls the Cable TV system installer’s
attention to Article 820-40 of the National Electrical Code, which provides guidelines for proper grounding –
in particular, specifying that the cable ground shall be connected to the grounding system of the building, as
close to the point of cable entry as possible.
Declaration of Conformity
Model Number: 19MDTR20
27MDTR20
Trade Name: Magnavox
Responsible Party: Philips Consumer Electronics North America
P. O. B o x 14810
Knoxville,TN 37914-1810
(865) 521-4316
Safety and General Information 3
Manufactured under license from Dolby Laboratories. "Dolby" and the double-D symbol are trademarks of Dolby Laboratories.
Copyright 2004 Magnavox.All rights reserved.
T0006UG_6006UG_EN_1.qx3 04.5.12 10:09 AM Page 3

4 Table of Contents
General Information
Safety and General Information . . . . . . . . . . . . . . . .3
Table of Contents . . . . . . . . . . . . . . . . . . . . . . . . . .4
Introduction . . . . . . . . . . . . . . . . . . . . . . . . . . . . . . .5
Playable Discs and Videotapes . . . . . . . . . . . . . . . . .6
Initial Setup and Use
Before Using the TV/VCR/DVD . . . . . . . . . . . . . . .7
Hooking Up the TV/VCR/DVD . . . . . . . . . . . . . .8-9
Optional Connections . . . . . . . . . . . . . . . . . . . . . .10
Watching TV . . . . . . . . . . . . . . . . . . . . . . . . . . . . .11
Playing a Videotape . . . . . . . . . . . . . . . . . . . . . . . .12
Playing a Disc . . . . . . . . . . . . . . . . . . . . . . . . . . . . .13
Description of Controls
Remote Control Buttons . . . . . . . . . . . . . . . . .14-15
Front Panel . . . . . . . . . . . . . . . . . . . . . . . . . . . . . .16
Rear Panel . . . . . . . . . . . . . . . . . . . . . . . . . . . . . . .17
TV Settings
Menu Language, ResettingTV Channels . . . . . . . . .18
Adding/Deleting Channels . . . . . . . . . . . . . . . . . . .19
Setting the Clock . . . . . . . . . . . . . . . . . . . . . . .20-23
Daylight-Savings Time . . . . . . . . . . . . . . . . . . . . . . .24
Status Displays, Picture Controls . . . . . . . . . . . . . .25
Recording
Videotape Recording . . . . . . . . . . . . . . . . . . . . . . .26
One-Touch Recording . . . . . . . . . . . . . . . . . . . . .27
Timer Recording . . . . . . . . . . . . . . . . . . . . . . .28-31
Timer Recording Auto Return . . . . . . . . . . . . . . .32
Rerecording (Tape Duplication) . . . . . . . . . . . . . . .33
Videotape Features
Repeat Play . . . . . . . . . . . . . . . . . . . . . . . . . . . . . .34
Rental Play . . . . . . . . . . . . . . . . . . . . . . . . . . . . . . .35
Zero Return, Sleep Timer . . . . . . . . . . . . . . . . . . .36
Time Search . . . . . . . . . . . . . . . . . . . . . . . . . . . . .37
Index Search . . . . . . . . . . . . . . . . . . . . . . . . . . . . .38
Videotape Playback Features . . . . . . . . . . . . . . . . .39
Automatic Operation Features . . . . . . . . . . . . . .40
Additional TV Features
Closed Captions . . . . . . . . . . . . . . . . . . . . . . . . . .41
Setting V-Chip . . . . . . . . . . . . . . . . . . . . . . . . .42-47
Multi-Channel Television Sound . . . . . . . . . . . .48-50
Disc Features
DVD Disc Menus,Title Menus . . . . . . . . . . . . . . . .51
Fast Forward/Reverse Search . . . . . . . . . . . . . . . . .52
Title/Chapter Playback, Specific Time Playback . . . .53
Track Play . . . . . . . . . . . . . . . . . . . . . . . . . . . . . . . .54
Paused and Step-by-Step Play,
Resume On . . . . . . . . . . . . . . . . . . . . . . . . . . . . . . .55
Repeat,A-B Repeat . . . . . . . . . . . . . . . . . . . . . . . .56
Markers . . . . . . . . . . . . . . . . . . . . . . . . . . . . . . . . . .57
Subtitles, Camera Angles . . . . . . . . . . . . . . . . . . . .58
Slow Motion, Zoom . . . . . . . . . . . . . . . . . . . . . . . .59
Parental Password . . . . . . . . . . . . . . . . . . . . . . .60-61
Parental Levels . . . . . . . . . . . . . . . . . . . . . . . . .62-63
Audio Language, Stereo Sound . . . . . . . . . . . . . . . .64
Random Play, Programmed Play . . . . . . . . . . . . . . . .65
MP3/JPEG Playback . . . . . . . . . . . . . . . . . . . . . . . .66
MP3/JPEG Displays . . . . . . . . . . . . . . . . . . . . . . . . .67
DVD Setup Features
Language Settings . . . . . . . . . . . . . . . . . . . . . . . .68-69
Display Settings . . . . . . . . . . . . . . . . . . . . . . . . .70-71
Audio Settings . . . . . . . . . . . . . . . . . . . . . . . . . . . . .72
On-Screen Displays . . . . . . . . . . . . . . . . . . . . . . . .73
Black Level,Virtual Surround, Initializing . . . . . . . . .74
Information You May Need
Glossary . . . . . . . . . . . . . . . . . . . . . . . . . . . . . . . .75
Helpful Hints . . . . . . . . . . . . . . . . . . . . . . . . . .76-77
Specifications . . . . . . . . . . . . . . . . . . . . . . . . . . . . .78
Limited Warranty . . . . . . . . . . . . . . . . . . . . . . . . . .79
Index . . . . . . . . . . . . . . . . . . . . . . . . . . . . . . . . . . .80
T0006UG_6006UG_EN_1.qx3 04.5.12 10:09 AM Page 4

Introduction 5
• Automatic Channel Setup
• Automatic Head Cleaner
• Automatic Tracking Adjustment
• Closed Captions
•Daylight-Savings Time
• English, Spanish, or French Setup Menus
•Forward/Reverse Searching; Still
• High Quality (HQ) System
•Index Search
• One-Touch Recording
• Real-Time Videotape Counter
• Rental Play
• Repeat Play
• Sleep Timer
• Time Search
• Timer Recording
•V-Chip (Parental Controls)
• Zero Return
Welcome to your TV/VCR/DVD owner’s manual.
This manual describes the 19MDTR20 and 27MDTR20.These two models are different
in size, but operate identically.The 27MDTR20 is illustrated in this manual.
Features - TV/VCR
• Audio Language choices*
•Bit Rate display
• Camera Angle*
• Dolby Digital Sound*
• Dynamic Range Control
• Fast/Paused/Slow/Step-by-Step Playback
• Markers
• Parental Controls*
•Programmed Play
(Audio CD, MP3, JPEG)
• Random Play
(Audio CD, MP3, JPEG)
• Repeat (A-B, Chapter,Title,Track, Group,
Disc)
• Search (Title/Chapter,Time,Track)
• Subtitles*
• Virtual Surround
• Zoomed Play
* If available on the Disc
DVDDisc Menus...
Some explanations in this manual describe DVD Disc menus. DVD manufacturers set the
menus, which vary among DVDs.All DVDs do not have menus. If the DVD has a menu,
access it by pressing the DISC MENU button on the remote control.
Details are on page 51.
Setup Menus...
Some instructions explain how to use the setup menus of the TV/VCR/DVD.There are
two setup menus: one for the TV/VCR features while the unit is in TV/VCR mode, and
one for the Disc features while the unit is in DVD mode.Access the setup menus by
pressing SETUP on the remote control.
While in TV/VCR mode, you can select only the TV/VCR SETUP menu.
In DVD mode, you can select both the TV/VCR SETUP menu and the SETUP menu for
the unit’s DVD Player. Press the SETUP button once to select the TV/VCR SETUP menu.
Press SETUP twice to get to the DVD Player’s SETUP menu.
Even if you set a DVD feature in the unit’s SETUP menu, it will not be available if the cur-
rent Disc does not include that feature.
Available Disc Features...
All features described in this manual are not available on every Disc. If
the feature is not available on the Disc, you cannot use the TV/VCR/DVD
to make it available.
An “X” will appear in the top right corner of the screen if you try to
access a feature that is not available.
For example, some features are available only during play, while others
are available only if play is stopped. If you cannot access a feature, try
stopping or starting play, then try the feature again.
Features - Discs
T0006UG_6006UG_EN_1.qx3 04.5.12 10:09 AM Page 5

6 Playable Discs and Videotapes
Region Codes
This TV/VCR/DVD has a Region One (1) DVD Player. DVDs must be labeled for ALL
regions or for Region 1 in order to play on the unit.You cannot play DVDs that are
labeled for other regions. Look for the symbols below on your DVDs. If these region sym-
bols do not appear on your DVD, you cannot play the DVD in this TV/VCR/DVD.
The number inside the globe refers to a region of the world. Region 1 represents the
United States, Canada, upper regions of North America, Bermuda, the U.S.Virgin
Islands, and small regions near Australia.
A DVD labelled for a specific region can only play on DVD Players with the same
region code.
Color Systems
DVDs are recorded in different color systems throughout the world.The most com-
mon color systems are NTSC (which is used primarily in the United States and North
America), PAL, and SECAM.
The DVD Player of this unit uses NTSC, so DVDs you play must be recorded in the
NTSC color system.You cannot play DVDs recorded in other formats.The color sys-
tem of the DVD may be listed on the DVD or on the Disc case.
Videotapes
Magnavox recommends you use only videotapes that have the mark. Other
videotapes may have poor picture quality and cause excessive deposits on the video
heads.The warranty may not cover such damage.
The VCR of this TV/VCR/DVD has a High Quality (HQ) system and is compatible
with existing Video Home System (VHS) equipment.
Playable Discs
The DVD Player of this TV/VCR/DVD will play many types of Discs, including Digital Video
Discs (DVDs) and Audio Compact Discs (CDs). It will play MP3 and JPEG files as well.
To play a DVD, make sure it meets the requirements for Region Codes and Color
Systems as described below. Discs that have the following logos will play on the DVD
Player of this TV/VCR/DVD. Finalize CD-R, CD-RW, DVD+R, and DVD+RW Discs
before playing them in the TV/VCR/DVD.
DVD: Prerecorded Digital
Video Discs
Audio CDs
MP3: Digital audio files
recorded on a CD-R or CD-
RW
CD-RW: Compact Disc
Rewritable. CD-RWs can be
recorded on multiple times.
CD-R: Compact Disc
Recordable. CD-Rs can be
recorded on only once.
Video CDs
DVD+R: DVD Recordable.
DVD+Rs can be recorded
on only once.
DVD+RW: DVD Rewritable.
DVD+RWs can be recorded
on multiple times.
Recordable
ReWritable
T0006UG_6006UG_EN_1.qx3 04.5.12 10:09 AM Page 6

Before Using the TV/VCR/DVD 7
1 2
1 2
3
Remote Control Battery Installation
1
Remove the battery compartment lid on the
bottom of the remote control. Slide the lid down and
off. Follow the direction of the arrow on the lid.
2
Place two AA batteries inside the battery com-
partment. Align the
+
and
–
ends as indicated.
3
Replace the battery compartment lid.
Battery Safety
Battery Usage CAUTION - To prevent battery leakage that
may result in bodily injury, property damage, or damage to
the unit:
● Install ALL batteries correctly, with the + and - markings on
the battery aligned as indicated on the unit;
● Do not mix batteries, for example, old with new or carbon
with alkaline; and
● Remove batteries when the unit will not be used for a long
time.
Recording Prevention
Videotapes have record tabs to ensure you do not erase
recordings accidentally.
1
To prevent accidental recording, break off the
tab with a screwdriver.
2
To r ecord again, cover the hole with cellophane
tape.
Using the Remote Control
● Point the remote control at the remote sensor on the
front of the TV/VCR/DVD. Details are on page 16.
● Do not put objects between the remote control and the
TV/VCR/DVD.
TV/VCR/DVD Maintenance
● Remove any light adhesive stick-on notes from the video
cassette before putting the cassette in the TV/VCR/DVD.
Removable labels can jam the TV/VCR/DVD.
● The TV/VCR/DVD requires periodic maintenance to main-
tain its excellent performance.This TV/VCR/DVD has an
internal head cleaning system. However, the video heads
will eventually require cleaning or replacement. Only an
authorized service center should perform this service.
• Your new product, its packaging,
and this manual contain materials
that can be recycled and reused.
Specialized companies can recycle
your product to increase the
amount of reusable materials and
to minimize the amount that
needs to be properly disposed.
Your product uses batteries that
should not be thrown away when
depleted but should be disposed
of as small chemical waste.
Please find out about the local
regulations on disposal of your old
product, batteries, manual, and
packaging when you replace exist-
ing equipment.
Helpful Hint
T0006UG_6006UG_EN_1.qx3 04.5.12 10:09 AM Page 7

8 Hooking Up the TV/VCR/DVD
AUDIO OUT
COAXIAL
ANT.
ANT.
AUDIO OUT
COAXIAL
ANT.
ANT.
IN
OUT
Connect an RF
coaxial cable
(not supplied) to
the OUT Jack
on the Cable
Box/ Satellite
Receiver and to
the ANT(enna)
Jack on the
TV/VCR/DVD.
Connect a Cable TV
signal or an antenna to
the ANT(enna) Jack.
1
Hook up your TV/VCR/DVD using
one of the connections shown.
A
Hooking Up Your TV/VCR/DVD
with a Cable TV Signal or
Outdoor Antenna
Connect the Cable TV
or Satellite signal to the
IN Jack on the Cable
Box/Satellite Receiver.
B
Hooking Up Your TV/VCR/DVD
with a Cable Box/Satellite Receiver
To view any channel, set the TV/VCR/DVD to
the output channel (channel 03 or 04) of the
Cable Box/Satellite Receiver.Then, select chan-
nels at the Cable Box/Satellite Receiver.
Your Cable Box/Satellite Receiver may have Audio and Video Out jacks instead of the single
Antenna Out jack (RF coaxial or 75 ohm) shown here.
If so, connect Audio and Video cables to the Audio/Video Out jacks of the Cable Box/Satellite
Receiver and to the AUDIO/VIDEO In jacks on the front of the TV/VCR/DVD.
Press SELECT on the remote to set the TV/VCR/DVD to AUX, not channel 3 or 4. Select chan-
nels you want to watch or record at the Cable Box/Satellite Receiver as usual, leaving the
TV/VCR/DVD on AUX.
T0006UG_6006UG_EN_1.qx3 04.5.12 10:09 AM Page 8

Hooking Up the TV/VCR/DVD (cont’d) 9
RL
AUDIOVIDEOHEADPHONE
STANDBY-ON
SEARCH
NEXTPREV
PLAY
F.FWDREW
PLAYSTOP
OPEN/CLOSE
REC/OTR
STOP/EJECT
VOLUME
D V D
D V D TV/VCR
SELECT
V C R
CHANNEL
OUT
IN
VIDEO
IN
OUT
3CH
4CH
AUDIO
ANT.
OUT
IN
VIDEO
IN
OUT
3CH
4CH
ANT.
RL
AUDIOVIDEOHEADPHONE
AUDIO
L R
L R
AUDIO/VIDEO In
Jacks on front of
TV/VCR/DVD
AUDIO/VIDEO OUT
Jacks on VCR
(example only)
Connect audio cables to the
AUDIO OUT Jacks on the
VCR and to the red and
white AUDIO In Jacks on the
front of the TV/VCR/DVD.
Connect a Video cable to the
VIDEO OUT Jack on the VCR and
to the yellow VIDEO In Jack on
the front of the TV/VCR/DVD.
2
When all other connections are
complete, plug in the
TV/VCR/DVD’s power cord.
AUDIO OUT
COAXIAL
ANT.
ANT.
Indoor Antenna
(not supplied,
example only)
D
Hooking Up Your TV/VCR/DVD to
Another Video Source
(VCR, DVD Player, Camcorder, etc.)
You may need this connection if you want to
play Discs or tapes on other equipment but
watch them on the TV/VCR/DVD. Press
SELECT on the remote to select AUX at the
TV/VCR/DVD.When you play the materials on
the other equipment, it will show on the
TV/VCR/DVD’s AUX channel. More details are
on page 33.
Audio and video cables are not supplied.
C
Hooking Up Your TV/VCR/DVD
with an Indoor Antenna
To install an indoor antenna or “rabbit ears”
(not supplied), connect the antenna wire to the
ANT(enna) Jack on the back of the
TV/VCR/DVD as shown. Extend the antenna
and adjust its length, direction, and angle for the
clearest picture.
T0006UG_6006UG_EN_1.qx3 04.5.12 10:09 AM Page 9

AUDIO OUT
COAXIAL
ANT.
AUDIO OUT
COAXIAL
10 Optional Connections
• You cannot use a Mini-Disc or
Digital Audio Tape deck to copy
Dolby Digital 5.1 channel sur-
round sound Discs.
• Discs recorded in Dolby Digital
should show this on the Disc or
case. If the Disc is not recorded
in Dolby Digital 5.1 channel sur-
round sound, you will not hear
multi-channel sound even if you
use the Digital Stereo hookup.
Helpful Hints
Digital Stereo Hookups
You can connect the TV/VCR/DVD to a Stereo
that has a Digital Coaxial In jack. Use this
hookup if you want to hear the TV/VCR/DVD
sound through the Stereo instead. Use these
connections for a Dolby Digital-compatible
Stereo or for a Receiver that has a Mini-Disc or
Digital Audio Tape deck.
1
Connect the antenna/Cable TV
signal. Details are on pages eight-nine.
2
Connect a digital audio coaxial
cable (not supplied) to the AUDIO
OUT COAXIAL jack on the
TV/VCR/DVD.
Also connect the cable to the
Stereo’s COAXIAL DIGITAL
AUDIO IN jack.
3
If the Stereo is Dolby Digital-com-
patible, set DOLBY DIGITAL to
ON. If the Stereo is not Dolby Digital-
compatible or if you connected to a
Mini-Disc or Digital Audio Tape Deck,
set DOLBY DIGITAL to OFF. Details are
on page 72.
An incorrect setting causes noise distor-
tion and damages speakers.
To see if your Stereo has Dolby Digital,
look for a Dolby Digital logo on your
Stereo. Or, refer to the Stereo owner’s
manual.
To A UDIO OUT
COAXIAL jack
on TV/VCR/DVD
To Stereo’s COAXIAL
DIGITAL AUDIO IN jack
T0006UG_6006UG_EN_1.qx3 04.5.12 10:09 AM Page 10

Watching TV 11
The unit selects available TV channels automatically when you
connect an Antenna or Cable TV signal to it.To reset TV
channels, see page 18.
If you are using a Cable Box or Satellite Receiver, you do not
need to set channels at the TV/VCR/DVD.
1
Press STANDBY-ON to turn on the TV/VCR/DVD.
2
To watch TV, press the CH. ▲/▼ buttons to
select memorized channels. Memorized channels are
those that appear when you flip through channels. If a
channel is skipped, you still can use the Number but-
tons to select it.This is a non-memorized channel; it
may have weak reception in your area.
To update your memorized and non-memorized chan-
nels, see page 18.
Remember, if you are using a Cable Box/Satellite
Receiver, set the TV/VCR/DVD to channel 3, 4, or
AUX. Change channels at the Cable Box/Satellite
Receiver.
3
Press VOL. ▲/▼ to adjust the volume.
VOLUME 20
PLAY
STOP
ENTER
RECORD
DISC
MENU
RETURNTITLESETUP
A
-
B
REPEATSEARCH MODE
CLEAR
MODE
ANGLESUBTITLEAUDIO
DISPLAY
SPEED C.RESET
STANDBY-ON
PICTURE SELECTSLEEP
CH.
VOL.
MUTE
ZOOM
123
456
789
0 +10
+100
REPEAT
2
3
1
T0006UG_6006UG_EN_1.qx3 04.5.12 10:09 AM Page 11

12 Playing a Videotape
• If the tape you want to play is
already in the TV/VCR/DVD, turn
on the power. Press SELECT to
choose TV/VCR mode (the red
VCR/TV light will be on), then
press PLAY
B
.
• When you play an S-VHS format
tape, you cannot get the high
resolution that would be avail-
able on an S-VHS VCR. Noise
lines (black and white streaks)
may appear in the picture.
• If you press SELECT while play-
ing a videotape, play will stop
and the unit will switch to DVD
mode.This will happen also if
you press PLAY
B
(DVD) or
OPEN/CLOSE
A
(DVD) on the
front of the TV/VCR/DVD during
videotape playback.
Helpful Hints
Follow these steps to simply play a videotape. Videotape play-
back options are on pages 34-40.
1
Insert a videotape in the cassette compart-
ment of the TV/VCR/DVD. The power will come
on. If the tape’s record tab is missing, play should start
automatically.
2
If play does not start automatically, press PLAY
B to start play.
3
Press STOP C to stop play.
4
Press j / h to rewind the tape.
5
When the tape finishes rewinding, press
STOP/EJECT on the front of the TV/VCR/DVD
to remove the tape.
PLAY
STOP
ENTER
RECORD
DISC
MENU
RETURNTITLESETUP
A
-
B
REPEATSEARCH MODE
CLEAR
MODE
ANGLESUBTITLEAUDIO
DISPLAY
SPEED C.RESET
STANDBY-ON
PICTURE SELECTSLEEP
CH.
VOL.
MUTE
ZOOM
123
456
789
0 +10
+100
REPEAT
4
2
3
T0006UG_6006UG_EN_1.qx3 04.5.12 10:09 AM Page 12

Playing a Disc 13
• If you turn off the unit in DVD
mode, when you turn it on again, it
will be in TV/VCR mode.
• An ‘’X” will appear on the screen
when you try to access a feature
that is not available.This is not a
problem with the TV/VCR/DVD.
• If a Disc is dirty or scratched, the
picture may be distorted or play
may stop. Remove the Disc and try
a different one.
• Press OPEN/CLOSE A (DVD) or
PLAY
B
(DVD) on the front of the
TV/VCR/DVD when the power is
off.This turns on the unit in DVD
mode (not TV/VCR mode).
• If a Disc has multiple layers, the
picture may freeze occasionally.
This happens when the first layer
switches to the second layer.This is
not a malfunction.
• Pressing SELECT during Disc play
stops Disc play and switches the
unit to TV/VCR mode. Pressing
PLAY
B
(VCR) on the front of the
unit during Disc play stops Disc
play and starts tape play.
Helpful Hints
Before you begin, turn on the power of other equipment con-
nected to the TV/VCR/DVD. Set a stereo (if applicable) to the
correct sound source or channel. Details are on page 10.
1
Press STANDBY-ON to turn on the
TV/VCR/DVD. The unit will be in TV/VCR mode.The
red VCR/TV light will be on.
2
Press SELECT to put the TV/VCR/DVD in DVD
mode. The green DVD light will appear on the front of
the TV/VCR/DVD.
3
Press OPEN/CLOSE A on the front of the
TV/VCR/DVD to open the Disc tray.
4
Place a Disc into the tray.
Some DVDs are recorded on both sides. Make sure the
label of the side you want to play is facing up.
Or, if the DVD is recorded on only one side, place the
Disc in the tray with the label facing up and the shiny
side facing down.
5
Press PLAY B. The tray will close and play will begin.
If play does not start, press PLAY B again.
Or, you can press OPEN/CLOSE A or press the tray
toward the unit to close the tray.
If a DVD Disc menu appears instead, see page 51.
For MP3 and JPEG details, see page 66.
6
Press STOP C to stop play. If play remains stopped
for five minutes, the DVD screen will dim. If play is
stopped for 20 minutes with no activity at the
TV/VCR/DVD, the unit will turn off.
Remember, only certain Discs will play.
See page six for details.
PLAY
STOP
ENTER
RECORD
DISC
MENU
RETURNTITLESETUP
A
-
B
REPEATSEARCH MODE
CLEAR
MODE
ANGLESUBTITLEAUDIO
DISPLAY
SPEED C.RESET
STANDBY-ON
PICTURE SELECTSLEEP
CH.
VOL.
MUTE
ZOOM
123
456
789
0 +10
+100
REPEAT
1
5
6
2
3
Press OPEN/CLOSE A on
the front of the
TV/VCR/DVD.
4
Insert a Disc.
T0006UG_6006UG_EN_1.qx3 04.5.12 10:09 AM Page 13

14 Remote Control Buttons
PLAY
STOP
ENTER
RECORD
DISC
MENU
RETURNTITLESETUP
A
-
B
REPEATSEARCH MODE
CLEAR
MODE
ANGLESUBTITLEAUDIO
DISPLAY
SPEED C.RESET
STANDBY-ON
PICTURE SELECTSLEEP
CH.
VOL.
MUTE
ZOOM
123
456
789
0 +10
+100
REPEAT
PICTURE Button
Press to access the picture controls.
Details are on page 25.
STANDBY-ON Button
Press to turn on or off the
TV/VCR/DVD.
Number Buttons
TV Mode: Press two digits to
access a specific channel. Press 0
before the number of a single-digit
channel. Details are on page 11.
+100/+10 button: To select channels
100 or higher, press +100/+10, then
the Number buttons of the last two
digits of the channel number.
DVD Mode: Use the Number
buttons to enter a Track or Chapter
number.
+100/+10 button: Press before
entering double-digit numbers. For
example, to select Chapter 16, press
+100/+10, then 1, 6.
k (pause) Button
Press to pause videotape recording.
Press again to resume recording.
Details are on page 26.
Press to pause videotape or DVD
playback. Press repeatedly to
advance the picture one frame at a
time. Details are on pages 39 and 55.
RECORD Button
Press once to start a recording on
videotape. Details are on page 26.
DISPLAY Button
TV/VCR Mode: Press to see the
videotape counter, channel, or time
on the screen. Details are on page 25.
DVD Mode: Press to see the Disc
status on the screen. Details are on
page 73.
TITLE Button
Press to access a DVD’s Title menu
if available. Details are on page 51.
SLEEP Button
Press to set the Sleep Timer. Details
are on page 36.
SELECT Button
Press to choose AUX, TV/VCR or
DVD mode. The corresponding
light will appear on the front of the
TV/VCR/DVD to indicate which
mode is active. Details are on page
16.
PLAY B Button
Press to start playing a Disc or
video cassette. Details are on pages
12-13.
G / g Button
During Disc playback, press briefly
to skip to the next Track or
Chapter. Details are on page 54.
Or, press and hold for two seconds
to search forward during Disc
playback. Details are on page 52.
Press to forward a videotape.
Details are on page 39.
STOP C Button
Press to stop Disc or videotape
playback.
Arrow Buttons
Use the Arrow buttons to select or
adjust menu items.
RETURN Button
Press to go to the previous Setup
menu in DVD or TV/VCR mode.
Press to remove some menus or
displays.
REPEAT Button
Press to play a Disc, Title, Chapter,
or Track repeatedly. Details are on
page 56.
T0006UG_6006UG_EN_1.qx3 04.5.12 10:09 AM Page 14

Remote Control Buttons (cont’d) 15
PLAY
STOP
ENTER
RECORD
DISC
MENU
RETURNTITLESETUP
A
-
B
REPEATSEARCH MODE
CLEAR
MODE
ANGLESUBTITLEAUDIO
DISPLAY
SPEED C.RESET
STANDBY-ON
PICTURE SELECTSLEEP
CH.
VOL.
MUTE
ZOOM
123
456
789
0 +10
+100
REPEAT
ZOOM Button
Press to enlarge the picture during
DVD playback. Details are on page
59.
C.RESET (counter reset)
Button
Press to reset the tape counter to
0:00:00. Details are on page 36.
Press to cancel a timer recording.
Details are on page 31.
SPEED Button
Press to choose a tape recording
speed (SP or SLP). Details are on
page 26.
j / h Button
During Disc play, press briefly to
skip to the beginning of the current
Track/Chapter. Press repeatedly to
skip to previous Tracks/Chapters.
Details are on page 54.
Or, press and hold for two seconds
to search backward during Disc
playback. Details are on page 52.
Press to reverse a videotape. Details
are on page 39.
SETUP Button
Press to access or remove the
TV/VCR/DVD's Setup menu.
CLEAR Button
Press to reset or erase a setting or
wrong information.
MODE Button
Press to play a Program or to start
Random playback. Details are on
page 65.
Press to select a Black Level or
Virtual Surround setting. Details are
on page 74.
SEARCH MODE Button
Press to find a specific time,
Chapter, Track, or Title on a Disc.
Details are on pages 53-54.
Press to set up Markers. Details are
on page 57.
CH. (channel) K/L Buttons
Press to select memorized TV
channels.
Details are on page 11.
VOL. (volume) K/L Buttons
Press to adjust the volume.
MUTE Button
Press to mute or restore the
sound.
DISC MENU Button
Press to access DVD Disc menus.
Details are on page 51.
ENTER Button
Press to accept or change a menu
setting.
REPEAT A-B Button
Press to set a section of a Disc to
play repeatedly. Details are on page
56.
ANGLE Button
Press to change the camera angle
and watch a Disc sequence from a
different perspective. Details are on
page 58.
SUBTITLE Button
Press to select a subtitle language.
Details are on page 58.
AUDIO Button
Press to select an audio language or
sound mode. Details are on page 64.
T0006UG_6006UG_EN_1.qx3 04.5.12 10:09 AM Page 15

16 Front Panel
RL
AUDIOVIDEOHEADPHONE
STANDBY-ON
SEARCH
NEXTPREV
PLAY
F.FWDREW
PLAYSTOP
OPEN/CLOSE
REC/OTR
STOP/EJECT
VOLUME
D V D
D V D VCR/TV
OUTPUT
V C R
CHANNEL
RL
AUDIOVIDEOHEADPHONE
STANDBY-ON
SEARCH
NEXTPREV
PLAY
F.FWDREW
PLAYSTOP
OPEN/CLOSE
REC/OTR
STOP/EJECT
VOLUME
D V D
D V D TV/VCR
SELECT
V C R
CHANNEL
STOP/EJECT C A
Button (VCR)
Press to stop tape playback.
Press while play is stopped
to remove the tape.
F.FWD i Button
(VCR)
Press to fast forward the
tape or to search forward
quickly during playback.
Details are on page 39.
PLAY B Button (VCR)
Press to start tape playback.
Details are on page 12.
VIDEO and AUDIO L/R
(left/right) In jacks
Use audio and video cables
to connect these jacks to
the Audio and Video Out
jacks of a Camcorder, DVD
Player, or VCR. This lets you
watch materials playing on
the other equipment when
you choose AUX at the
TV/VCR/DVD. Details are on
pages nine and 33.
HEADPHONE jack
Connect headphones (not
supplied) here for personal
listening.
Remote Sensor
Receives a signal from your
remote control so you can
operate the TV/VCR/DVD
from a distance.
STANDBY-ON Button
Press to turn the TV/VCR/DVD on or
off. Turn off the TV/VCR/DVD for a
timer recording.
PLAY B Button (DVD)
Press to start Disc playback.
Details are on page 13.
PREV H, NEXTi Buttons
(DVD)
Press to go to a different Chapter or
Track. Details are on page 54.
DVD light (green)
Appears if the TV/VCR/DVD is in DVD
mode.
OUTPUT Button
Press to select AUX, TV/VCR, or DVD
mode. If you switch to TV/VCR mode,
wait about four seconds before
switching back to DVD mode. This
button works the same as the SELECT
button on the remote.
VCR/TV light (red)
Appears if the TV/VCR/DVD is in
TV/VCR mode.
REC/OTR light (red)
This light flashes during recording. It
lights when the TV/VCR/DVD is in
Standby mode (power off) for a timer
recording.
REC/OTR Button (VCR)
Press to start a videotape recording.
Details are on pages 26-27.
REW H Button (VCR)
Press to rewind the tape or to search
backward quickly during playback.
Details are on page 39.
Cassette Compartment
Insert a videotape here.
Disc tray
Insert a Disc here.
CHANNEL K/L Buttons
Press to select TV channels.
Details are on page 11.
OPEN/CLOSE A Button (DVD)
Press to open or close the disc tray.
Details are on page 13.
STOP C Button (DVD)
Press to stop Disc playback.
Details are on page 13.
VOLUME K/L Buttons
Press to adjust the volume.
T0006UG_6006UG_EN_1.qx3 04.5.12 10:09 AM Page 16

Rear Panel 17
AUDIO OUT
COAXIAL
ANT.
ANT. Jack
(Antenna In)
Connect an antenna or Cable TV signal here. This brings TV
channels to the TV/VCR/DVD. If you do not connect an antenna
or Cable TV signal to the TV/VCR/DVD (or connect to a Cable
Box/Satellite Receiver through this jack), you will not receive any
TV channels. Details are on pages eight-nine.
Power Cord
Connect to a standard AC outlet (120V/60Hz).
AUDIO OUT COAXIAL Jack
Connect this jack to a Digital Stereo using a digital audio coaxial
cable (not supplied). Use this connection if the Stereo has Dolby
Digital compatibility and has a Digital Coaxial Audio In jack. You
may also use this connection when connecting the TV/VCR/DVD
to a Mini-Disc or Digital Audio Tape deck. Details are on page 10.
T0006UG_6006UG_EN_1.qx3 04.5.12 10:09 AM Page 17

18 Menu Language, Resetting TV Channels
Menu Language
This affects the language of the TV/VCR/DVD’s setup menus
and on-screen display terms.This does not alter the language
of TV programming, videotapes, Discs, or closed captioning.
1
Press SETUP once so the TV/VCR SETUP
menu appears.
2
Press ▲ or ▼ to select LANGUAGE.
3
Press ENTER repeatedly to select ENGLISH,
ESPANOL, or FRANCAIS. The selected language
will appear inside the [ ].
This will be the language of the TV/VCR/DVD setup
menus in both TV/VCR and DVD modes.
4
Press SETUP to exit the menu.
– TV/VCR SETUP –
TIMER PROGRAMMING
SETTING CLOCK
CHANNEL SET UP
USER'S SET UP
V-CHIP SET UP
LANGUAGE [ENGLISH]
CAPTION [OFF]
ZERO RETURN
TIME SEARCH
INDEX SEARCH
B
Resetting TV Channels
The unit selects available TV channels automatically when you
connect an Antenna or Cable TV signal to it.
● Before you begin, put the TV/VCR/DVD in TV/VCR mode.
Press SELECT so the red VCR/TV light appears on the
front of the TV/VCR/DVD.
1
Press SETUP.
2
Press ▲ or ▼ to select CHANNEL SET UP.
Then, press ENTER.
3
Press ▲ or ▼ to select AUTO CH PROGRAM-
MING. Press ENTER. The TV/VCR/DVD memorizes
available channels.When scanning is complete, the
TV/VCR/DVD will go to the lowest available channel.
Use the CH ▲/▼ buttons to scan memorized chan-
nels.You can select non-memorized channels with the
Number buttons.
– CHANNEL SET UP –
ADD / DELETE CH (CATV)
AUTO CH PROGRAMMING
B
• The TV/VCR/DVD cannot change
channels at the Cable Box or
Satellite Receiver. Set the
TV/VCR/DVD to 3, 4, or AUX.
Change channels at the Cable
Box/Satellite Receiver.
• Channel settings will be saved
even if the power fails.
• If you have Spanish or French
menus and need English, press
SETUP. Press
▲
or
▼
to select
IDIOMA or LANGAGE. Press
ENTER to select ENGLISH. Press
SETUP to remove the menu.
•You cannot reset TV channels
when the unit is in DVD mode.
Helpful Hints
– TV/VCR SETUP –
TIMER PROGRAMMING
SETTING CLOCK
CHANNEL SET UP
USER'S SET UP
V-CHIP SET UP
LANGUAGE [ENGLISH]
CAPTION [OFF]
ZERO RETURN
TIME SEARCH
INDEX SEARCH
B
PLAY
STOP
ENTER
RECORD
DISC
MENU
RETURNTITLESETUP
A
-
B
REPEATSEARCH MODE
CLEAR
MODE
ANGLESUBTITLEAUDIO
DISPLAY
SPEED C.RESET
STANDBY-ON
PICTURE SELECTSLEEP
CH.
VOL.
MUTE
ZOOM
123
456
789
0 +10
+100
REPEAT
2-3
1,4
PLAY
STOP
ENTER
RECORD
DISC
MENU
RETURNTITLESETUP
A
-
B
REPEATSEARCH MODE
CLEAR
DISPLAY
SPEED C.RESET
STANDBY-ON
PICTURE SELECTSLEEP
CH.
VOL.
MUTE
ZOOM
123
456
789
0 +10
+100
REPEAT
2-3
1
T0006UG_6006UG_EN_1.qx3 04.5.12 10:09 AM Page 18

• To confirm that a channel has
been added or deleted, press the
CH. ▲/▼ buttons to see if you
can or cannot select the channel.
Only memorized/added channels
can be selected with CH. ▲/▼.
Use the Number buttons to
select deleted channels.
• If you connected an Antenna to
the TV/VCR/DVD, channels 2-69
will be available to add or delete.
If you connected to Cable TV,
channels 1-125 will be available.
• This function will not operate
when the unit is in DVD mode.
Helpful Hints
Adding/Deleting Channels 19
You can delete TV channels you no longer receive or seldom
watch. Or, you can add more channels if the TV/VCR/DVD
did not memorize all your favorite channels.
● Before you begin, press SELECT to put the
TV/VCR/DVD in TV/VCR mode.The red VCR/TV
light will appear.
1
Press SETUP.
2
Press ▲ or ▼ to select CHANNEL SET UP.
Then, press ENTER.
3
Press ▲ or ▼ to select ADD/DELETE CH. (TV)
or (CATV) will appear beside ADD/DELETE CH.This
indicates whether you connected an Antenna (TV) or
a Cable TV signal (CATV) to the TV/VCR/DVD. Then,
press ENTER. The menu will disappear and a TV
channel will appear.The channel number will appear,
along with ADD/DELETE.
4
Press ▲ or ▼ until the channel you wish to add
or delete appears. You also can use the Number
buttons or the CH. ▲/▼ buttons to choose a channel.
5
Press ENTER to add or delete the channel.
To add a channel, press ENTER so ADD and the chan-
nel number appear in light blue (teal).To delete a
channel, press ENTER so DELETE and the channel
number appear in light red (purple).
To delete another channel, repeat steps 4-5.
6
Press SETUP when you are finished.
ADD / DELETE
08
– CHANNEL SET UP –
ADD / DELETE CH (CATV)
AUTO CH PROGRAMMING
B
– TV/VCR SETUP –
TIMER PROGRAMMING
SETTING CLOCK
CHANNEL SET UP
USER'S SET UP
V-CHIP SET UP
LANGUAGE [ENGLISH]
CAPTION [OFF]
ZERO RETURN
TIME SEARCH
INDEX SEARCH
B
PLAY
STOP
ENTER
RECORD
DISC
MENU
RETURNTITLESETUP
A
-
B
REPEATSEARCH MODE
CLEAR
MODE
ANGLESUBTITLEAUDIO
DISPLAY
SPEED C.RESET
STANDBY-ON
PICTURE SELECTSLEEP
CH.
VOL.
MUTE
ZOOM
123
456
789
0 +10
+100
REPEAT
2-5
1,6
T0006UG_6006UG_EN_1.qx3 04.5.12 10:09 AM Page 19

20 Setting the Clock
• You may have to reset the clock
after a power failure.
Helpful Hint
Manual Clock Setting
You must set the clock before you can do a timer recording.
Set the clock manually.Afterward, use Auto Clock to monitor
the time. Details are on pages 22-23.
If you do not receive a PBS station that carries time signals,
you cannot use Auto Clock. Set AUTO CLOCK to OFF.The
time will remain as you set it manually.
Before you begin ...
● With the power on, press SELECT to put the
TV/VCR/DVD in TV/VCR mode.The red VCR/TV
light will appear.
1
Press SETUP.
2
Press ▲ or ▼ to select SETTING CLOCK.
Then, press ENTER.
3
Press ▲ or ▼ to select MANUAL CLOCK SET.
Then, press ENTER.
4
While the MONTH space is flashing, press ▲ or
▼ until the correct month appears.Then, press
B.
– MANUAL CLOCK SET –
MONTH DAY YEAR
05 / - - - - - - - - -
HOUR MINUTE
- - : - - - -
– SETTING CLOCK –
AUTO CLOCK
AUTO CLOCK CH SEARCH
AUTO CLOCK CH
MANUAL CLOCK SET
D.S.T.
B
[ON]
[02]
[OFF]
– TV/VCR SETUP –
TIMER PROGRAMMING
SETTING CLOCK
CHANNEL SET UP
USER'S SET UP
V-CHIP SET UP
LANGUAGE [ENGLISH]
CAPTION [OFF]
ZERO RETURN
TIME SEARCH
INDEX SEARCH
B
PLAY
STOP
ENTER
RECORD
DISC
MENU
RETURNTITLESETUP
A
-
B
REPEATSEARCH MODE
CLEAR
MODE
ANGLESUBTITLEAUDIO
DISPLAY
SPEED C.RESET
STANDBY-ON
PICTURE SELECTSLEEP
CH.
VOL.
MUTE
ZOOM
123
456
789
0 +10
+100
REPEAT
2-4
1
T0006UG_6006UG_EN_1.qx3 04.5.12 10:09 AM Page 20

• To adjust the clock later, follow
steps 1-3 on page 20.Then press
s or B to select the item you
want to change. Enter the cor-
rect information by pressing ▲
or ▼.Press SETUP when you are
finished.
Helpful Hint
Setting the Clock (cont’d) 21
5
While the DAY space is flashing, press ▲ or ▼
until the correct day appears.Then, press B. An
abbreviation for the selected day of the week will
appear.
6
While the YEAR space is flashing, press ▲ or ▼
until the correct year appears.Then, press B.
7
While the HOUR space and AM or PM are
flashing, press ▲ or ▼ until the correct hour
appears.Then, press B.
8
While the MINUTE space is flashing, press ▲ or
▼ until the correct minute appears.
9
Press SETUP. Although seconds are not displayed,
they begin counting from zero when you press SETUP.
Use this action to synchronize the clock exactly.
Press DISPLAY to see the current time on
the screen. Details are on page 25.
5:40 PM
– MANUAL CLOCK SET –
MONTH DAY YEAR
05 / 07 FRI
2004
HOUR MINUTE
05 : 40 PM
– MANUAL CLOCK SET –
MONTH DAY YEAR
05 / 07 FRI
2004
HOUR MINUTE
05 : - - PM
– MANUAL CLOCK SET –
MONTH DAY YEAR
05 / 07 FRI
2004
HOUR MINUTE
- - : - - - -
– MANUAL CLOCK SET –
MONTH DAY YEAR
05 / 07 - - - - - - -
HOUR MINUTE
- - : - - - -
PLAY
STOP
ENTER
RECORD
DISC
MENU
RETURNTITLESETUP
A
-
B
REPEATSEARCH MODE
CLEAR
MODE
ANGLESUBTITLEAUDIO
DISPLAY
SPEED C.RESET
STANDBY-ON
PICTURE SELECTSLEEP
CH.
VOL.
MUTE
ZOOM
123
456
789
0 +10
+100
REPEAT
5-8
9
T0006UG_6006UG_EN_1.qx3 04.5.12 10:09 AM Page 21

22 Setting the Clock (cont’d)
Auto Clock Setting
You can have the TV/VCR/DVD adjust the clock using your
PBS channel. Once you set the clock manually, the
TV/VCR/DVD will monitor the correct time and date broad-
cast by the PBS station.
Before you begin ...
● Turn on the TV/VCR/DVD power.
● Connect the antenna/Cable TV signal.
Details are on pages eight-nine.
● Turn on the Cable Box/Satellite Receiver (if applicable).
● Set up the TV channels. Details are on pages 18-19.
● Set the clock manually. Details are on pages 20-21.
● Press SELECT to put the TV/VCR/DVD in TV/VCR
mode.The red VCR/TV light will appear.
1
Press SETUP.
2
Press ▲ or ▼ to select SETTING CLOCK.
Press ENTER.
3
With AUTO CLOCK selected, press ENTER so
ON appears beside AUTO CLOCK.
– SETTING CLOCK –
AUTO CLOCK
AUTO CLOCK CH SEARCH
AUTO CLOCK CH
MANUAL CLOCK SET
D.S.T.
B
[ON]
[02]
[OFF]
– TV/VCR SETUP –
TIMER PROGRAMMING
SETTING CLOCK
CHANNEL SET UP
USER'S SET UP
V-CHIP SET UP
LANGUAGE [ENGLISH]
CAPTION [OFF]
ZERO RETURN
TIME SEARCH
INDEX SEARCH
B
PLAY
STOP
ENTER
RECORD
DISC
MENU
RETURNTITLESETUP
A
-
B
REPEATSEARCH MODE
CLEAR
MODE
ANGLESUBTITLEAUDIO
DISPLAY
SPEED C.RESET
STANDBY-ON
PICTURE SELECTSLEEP
CH.
VOL.
MUTE
ZOOM
123
456
789
0 +10
+100
REPEAT
2-3
1
T0006UG_6006UG_EN_1.qx3 04.5.12 10:09 AM Page 22

Setting the Clock (cont’d) 23
4
If you already know your PBS channel number,
skip ahead to step 8. If you do not know the
channel number of your PBS station, press ▼ to
select AUTO CLOCK CH SEARCH.Then press
ENTER.
● The TV/DVD/VCR will search for a channel that
carries a time signal. Channels that carry the time
will appear at the top of the screen. Use one of
these channels when you enter your AUTO
CLOCK CH at step 9.
This may take several minutes.An ‘’_ _” appears in
the lower left corner of the screen when the search
is complete.
5
Press SETUP to remove the AUTO CLOCK
CH SEARCH screen.
6
Press SETUP to access the menu again.
7
Press ▲ or ▼ to select SETTING CLOCK.
Then, press ENTER.
8
Press ▼ to select AUTO CLOCK CH,
then press ENTER.
9
Press { or B until the channel number of your
PBS station appears. Use the channel number
you found at step 4.
10
Press SETUP to remove the menu.
11
Press STANDBY-ON to turn off the
TV/VCR/DVD and let the PBS channel update
the clock.
– SETTING CLOCK –
AUTO CLOCK
AUTO CLOCK CH SEARCH
AUTO CLOCK CH
MANUAL CLOCK SET
D.S.T.
B
[ON]
[08]
[OFF]
– SETTING CLOCK –
AUTO CLOCK
AUTO CLOCK CH SEARCH
AUTO CLOCK CH
MANUAL CLOCK SET
D.S.T.
B
[ON]
[02]
[OFF]
• During the Auto Clock Channel
Search, the picture may be dis-
torted.This is normal.
• If there are no PBS stations avail-
able, set AUTO CLOCK to off. Set
the clock manually.
• If the TV/VCR/DVD is connected
to a Cable Box or Satellite
Receiver, select the local PBS sta-
tion on the Cable Box/Satellite
Receiver. Set the TV/VCR/DVD to
the output channel of the Cable
Box/Satellite Receiver (03, 04, or
AUX).
Helpful Hints
– AUTO CLOCK CH SEARCH –
08 10 13
– –
PLAY
STOP
ENTER
RECORD
DISC
MENU
RETURNTITLESETUP
A
-
B
REPEATSEARCH MODE
CLEAR
MODE
ANGLESUBTITLEAUDIO
DISPLAY
SPEED C.RESET
STANDBY-ON
PICTURE SELECTSLEEP
CH.
VOL.
MUTE
ZOOM
123
456
789
0 +10
+100
REPEAT
4,7-9
5-6,10
11
T0006UG_6006UG_EN_1.qx3 04.5.12 10:09 AM Page 23

24 Daylight-Savings Time
When Daylight-Savings Time (D.S.T.) is ON, the clock will
move forward one hour on the first Sunday in April and move
back one hour on the last Sunday in October.
To turn Daylight-Savings Time ON or OFF, follow the steps
below.
● Before you begin, press SELECT to put the
TV/VCR/DVD in TV/VCR mode.The red VCR/TV
light will appear.
1
Press SETUP.
2
Press ▲ or ▼ to select SETTING CLOCK.
Then, press ENTER.
3
Press ▲ or ▼ to select D.S.T.Then, press
ENTER until ON appears beside D.S.T. Or, press
ENTER so OFF appears beside D.S.T. if you want to
disable this feature.
4
Press SETUP to remove the menu.
– SETTING CLOCK –
AUTO CLOCK
AUTO CLOCK CH SEARCH
AUTO CLOCK CH
MANUAL CLOCK SET
D.S.T.
B
[ON]
[02]
[ON]
– TV/VCR SETUP –
TIMER PROGRAMMING
SETTING CLOCK
CHANNEL SET UP
USER'S SET UP
V-CHIP SET UP
LANGUAGE [ENGLISH]
CAPTION [OFF]
ZERO RETURN
TIME SEARCH
INDEX SEARCH
B
PLAY
STOP
ENTER
RECORD
DISC
MENU
RETURNTITLESETUP
A
-
B
REPEATSEARCH MODE
CLEAR
MODE
ANGLESUBTITLEAUDIO
DISPLAY
SPEED C.RESET
STANDBY-ON
PICTURE SELECTSLEEP
CH.
VOL.
MUTE
ZOOM
123
456
789
0 +10
+100
REPEAT
2-3
1,4
T0006UG_6006UG_EN_1.qx3 04.5.12 10:09 AM Page 24

Status Displays
To see the Videotape Counter, Clock, or Channel number on
the screen in TV/VCR mode, press DISPLAY repeatedly.
The following will occur when Closed Captions are OFF.
1
Press DISPLAY once to see the Videotape
counter. After five seconds, only the counter will
remain on the screen.
2
Press DISPLAY again to see the current time
and TV channel. After five seconds, only the clock
and channel number will remain on the screen.To
clear them, press DISPLAY again.
● When Closed Captions are ON, the status displays will
appear for only five seconds.Then all the information will
clear from the screen. Closed Caption details are on page 41.
5:40 PM
CH 2
STOP
SP
5:40 PM
CH 2
STOP
SP COUNT 0:12:34 COUNT 0:12:39
Status Displays, Picture Controls 25
Picture Controls
Follow these steps to adjust the TV/VCR/DVD’s brightness,
sharpness, tint, color, or contrast.
1
Press PICTURE.
2
Within five seconds, press ▲ or ▼ to select the
picture control you want to adjust.
You can select BRIGHT, SHARPNESS,TINT, COLOR,
or CONTRAST.
3
Within five seconds, press s or B to adjust the
picture control.
• Degaussing: Magnetism from
nearby appliances and speakers
might affect the color of the TV
picture. If this happens, move the
TV/VCR/DVD away from the appli-
ance. If the color is still not correct,
turn off the power for 30 minutes
(for 27MDTR20) or disconnect
the power cord for 30 minutes
(for 19MDTR20). After 30 min-
utes, try using the unit again.
Helpful Hint
PLAY
STOP
ENTER
RECORD
DISC
MENU
RETURNTITLESETUP
A
-
B
REPEATSEARCH MODE
CLEAR
MODE
ANGLESUBTITLEAUDIO
DISPLAY
SPEED C.RESET
STANDBY-ON
PICTURE SELECTSLEEP
CH.
VOL.
MUTE
ZOOM
123
456
789
0 +10
+100
REPEAT
1-2
PLAY
STOP
ENTER
RECORD
DISC
MENU
RETURNTITLESETUP
A
-
B
REPEATSEARCH MODE
CLEAR
MODE
ANGLESUBTITLEAUDIO
DISPLAY
SPEED C.RESET
STANDBY-ON
PICTURE SELECTSLEEP
CH.
VOL.
MUTE
ZOOM
123
456
789
0 +10
+100
REPEAT
2-3
1
sB
BRIGHT to decrease brightness to increase brightness
SHARPNESS to make soft to make clear
TINT to add purple to add green
COLOR to decrease color to brighten color
CONTRAST to decrease contrast to increase contrast
BRIGHT
T0006UG_6006UG_EN_1.qx3 04.5.12 10:09 AM Page 25

26 Videotape Recording
• You cannot record DVD contents
onto a videotape using this unit.
• Recording options are on pages
27-32.
• If you pause a recording for five
minutes, the unit will start
Recording again automatically.
• You can change the tape speed by
pressing the SPEED button while a
recording is in progress. Some dis-
tortion may appear on the tape.
Helpful Hints
1
Place a tape with its record tab intact in the
cassette compartment of the TV/VCR/DVD. The
TV/VCR/DVD power will come on.
If the power is already on and a videotape is in the
unit, make sure the unit is in TV/VCR mode.
Press SELECT so the red VCR/TV light appears on the
front of the unit.
2
Press SPEED until the desired tape speed (SP
or SLP) appears in the bottom left corner of
the screen. See tape speed details below.
3
Press CH. ▲/▼ or the Number buttons to
select the channel you want to record.
You cannot change channels during recording.You can
only record and view one TV channel at a time.
4
Press RECORD once to start recording.
The REC/OTR light will flash on the front of the
TV/VCR/DVD. (If the tape does not have a record tab,
the tape will eject. Insert another tape.)
5
To pause the recording, press k.To resume
recording, press k again or press RECORD.
6
To stop recording, press STOP C .
Cassette type / Playback Time
Tape Speed T160 T120 T60
SP
(Standard Play) 2 hrs.
2 hrs. 1 hr.
40 mins.
LP
(Long Play) 5 hrs.
4 hrs. 2 hrs.
(playback only)
20 mins.
SLP(Super Long Play)
8 hrs. 6 hrs. 3 hrs.
Ta pe Speeds
This chart shows the recording/playback time for three types
of video cassettes (T160,T120, and T60).There are three
playback speeds: SP, LP, and SLP.A tape will play only in the
speed in which it was recorded.When recording, you can
change the tape speed using the SPEED button.You cannot
record in LP speed on this TV/VCR/DVD.
The slower the speed, the more programming you can fit on
the tape. SLP is the slowest speed.
PLAY
STOP
ENTER
RECORD
DISC
MENU
RETURNTITLESETUP
A
-
B
REPEATSEARCH MODE
CLEAR
MODE
ANGLESUBTITLEAUDIO
DISPLAY
SPEED C.RESET
STANDBY-ON
PICTURE SELECTSLEEP
CH.
VOL.
MUTE
ZOOM
123
456
789
0 +10
+100
REPEAT
4-5
5
2
6
3
1
Put a videotape in the
TV/VCR/DVD.
T0006UG_6006UG_EN_1.qx3 04.5.12 10:09 AM Page 26

One-Touch Recording 27
A One-Touch Recording (OTR) is an immediate timed
recording from 30 minutes to eight hours long.
Before you begin ...
● Turn on the TV/VCR/DVD.
● Press SELECT to put the unit in TV/VCR mode.
The red VCR/TV light will appear on the front of the unit.
● Insert a videotape with its erase prevention tab in place.
Details are on page seven. Rewind or fast forward the tape
to the point at which you want to begin recording.
1
Press the Number buttons or CH. ▲/▼to select
the channel you want to record.
Remember, if the TV/VCR/DVD is connected to a
Cable Box/Satellite Receiver, the TV/VCR/DVD must
be on channel 3, 4, or AUX.
Select the channel you want to record at the Cable
Box/Satellite Receiver. Details are on page eight.
2
Press SPEED to select a tape recording speed
(SP or SLP). Details are on page 26.
3
Press REC/OTR on the front of the
TV/VCR/DVD repeatedly to select a recording
length. Recording will start immediately.
Each press of REC/OTR will increase the recording
time by 30 minutes.The maximum recording length is
eight hours.
4
Press STOP C to stop a one-touch recording
before its designated end time. Otherwise,
recording will stop at the time you designated.The
TV/VCR/DVD will turn off when the OTR ends.
OTR (2:30)
SP
PLAY
STOP
ENTER
RECORD
DISC
MENU
RETURNTITLESETUP
A
-
B
REPEATSEARCH MODE
CLEAR
MODE
ANGLESUBTITLEAUDIO
DISPLAY
SPEED C.RESET
STANDBY-ON
PICTURE SELECTSLEEP
CH.
VOL.
MUTE
ZOOM
123
456
789
0 +10
+100
REPEAT
2
4
1
Helpful Hints
• You cannot do an OTR with the
remote control.
• To show the remaining recording
time, press DISPLAY. OTR and the
remaining recording time will
appear briefly in the top left corner
of the screen.
• If the tape ends before the record-
ing’s end time, the TV/VCR/DVD will
stop recording, eject the tape, and
turn itself off.
• An OTR will continue even if you
turn off the TV/VCR/DVD.The red
REC/OTR light will flash on the
front of the TV/VCR/DVD to indi-
cate recording is still in progress.
• To change the recording length
while an OTR is in progress, press
REC/OTR repeatedly.
• You cannot pause an OTR.
• If the preset time for a timer
recording comes up during an OTR,
the OTR has priority.The timer
recording will not take place.
3
Press REC/OTR on the
front of the TV/VCR/DVD.
T0006UG_6006UG_EN_1.qx3 04.5.12 10:09 AM Page 27

28 Timer Recording
Follow the steps below to program the TV/VCR/DVD to
record TV programs while you’re away from home.
The TV/VCR/DVD will record and turn itself off automatically.
You can set a maximum of eight timer recordings.
Before you begin, make sure ...
● The clock is set. If the clock is not set, the MANUAL
CLOCK SET menu will appear. See pages 20-21 to set the
clock.
● Channels are set. Details are on page 18.
● A tape is in the TV/VCR/DVD. Make sure the record tab is
intact. Details are on page seven.
1
Press SETUP. Press ▲ or ▼ to select TIMER
PROGRAMMING, then press ENTER.
2
Press ▲ or ▼ to select a program position.
Then, press B.
3
While CH is selected, press ▲ or ▼ to select
the channel you want to record.Then press B.
If the TV/VCR/DVD is connected to a Cable
Box/Satellite Receiver, the TV/VCR/DVD must be on
channel 3, 4, or AUX.
Set CH as 03, 04, or AUX in the Timer Programming
menu. Choose the channel you want to record at the
Cable Box/Satellite Receiver. Leave the Cable
Box/Satellite Receiver on for the timer recording.
Leave the TV/VCR/DVD set to AUX. (Press SELECT
on the remote to choose AUX at the TV/VCR/DVD.)
Additional details are on page eight.
– TIMER PROGRAMMING –
CH
- -
- -
- -
61
- -
- -
- -
- -
DATE
- - -
- - -
- - -
- - -
- - -
- - -
- - -
- - -
-
-
-
-
-
-
-
-
/
/
/
/
/
/
/
/
- -
- -
- -
- -
- -
- -
- -
- -
BEGIN
-
-
-
-
-
-
-
-
:
:
:
:
:
:
:
:
- -
- -
- -
- -
- -
- -
- -
- -
END
-
-
-
-
-
-
-
-
:
:
:
:
:
:
:
:
- -
- -
- -
- -
- -
- -
- -
- -
B
- -
- -
- -
- -
- -
- -
- -
- -
– TIMER PROGRAMMING –
CH
- -
- -
- -
- -
- -
- -
- -
- -
DATE
- - -
- - -
- - -
- - -
- - -
- - -
- - -
- - -
-
-
-
-
-
-
-
-
/
/
/
/
/
/
/
/
- -
- -
- -
- -
- -
- -
- -
- -
BEGIN
-
-
-
-
-
-
-
-
:
:
:
:
:
:
:
:
- -
- -
- -
- -
- -
- -
- -
- -
END
-
-
-
-
-
-
-
-
:
:
:
:
:
:
:
:
- -
- -
- -
- -
- -
- -
- -
- -
B
- -
- -
- -
- -
- -
- -
- -
- -
– TV/VCR SETUP –
TIMER PROGRAMMING
SETTING CLOCK
CHANNEL SET UP
USER'S SET UP
V-CHIP SET UP
LANGUAGE [ENGLISH]
CAPTION [OFF]
ZERO RETURN
TIME SEARCH
INDEX SEARCH
B
• You cannot access the TIMER
PROGRAMMING menu at step 1
if the clock is not set.The SET-
TING CLOCK menu will appear.
Follow the steps on pages 20-23
to set the clock.
• Enter the information while the
space is flashing.
Helpful Hint
PLAY
STOP
ENTER
RECORD
DISC
MENU
RETURNTITLESETUP
A
-
B
REPEATSEARCH MODE
CLEAR
MODE
ANGLESUBTITLEAUDIO
DISPLAY
SPEED C.RESET
STANDBY-ON
PICTURE SELECTSLEEP
CH.
VOL.
MUTE
ZOOM
123
456
789
0 +10
+100
REPEAT
1-3
1
T0006UG_6006UG_EN_1.qx3 04.5.12 10:09 AM Page 28

4
While DATE is selected, press ▲ or ▼ until the
correct date appears. Recording will happen once.
Or, to record a program at the same time on
the same channel every day, press ▼ until EVRY
DAY appears.
Or, to record a program at the same time on
the same channel every week, press ▼ until
EVRY and a day of the week appear together.
Finally, press B.
5
While BEGIN is selected, press ▲ or ▼ to
select the hour you want recording to begin.
AM or PM will appear with the hour.
Then, press B and press ▲ or ▼ to select the
minute you want recording to start. Press B.
– TIMER PROGRAMMING –
CH
- -
- -
- -
61
- -
- -
- -
- -
DATE
- - -
- - -
- - -
SUN
- - -
- - -
- - -
- - -
-
-
-
7
-
-
-
-
/
/
/
/
/
/
/
/
- -
- -
- -
04
- -
- -
- -
- -
BEGIN
-
-
-
7
-
-
-
-
:
:
:
:
:
:
:
:
- -
- -
- -
30
- -
- -
- -
- -
END
-
-
-
-
-
-
-
-
:
:
:
:
:
:
:
:
- -
- -
- -
- -
- -
- -
- -
- -
B
- -
- -
- -
- -
- -
- -
- -
- -
P
M
— TIMER PROGRAMMING —
CH
- -
- -
- -
61
- -
- -
- -
- -
DATE
- - -
- - -
- - -
- - -
- - -
- - -
- - -
-
-
-
-
-
-
-
/
/
/
/
/
/
/
- -
- -
- -
- -
- -
- -
- -
BEGIN
-
-
-
-
-
-
-
-
:
:
:
:
:
:
:
:
- -
- -
- -
- -
- -
- -
- -
- -
END
-
-
-
-
-
-
-
-
:
:
:
:
:
:
:
:
- -
- -
- -
- -
- -
- -
- -
- -
B
- -
- -
- -
- -
- -
- -
- -
- -
EVRY SUN
– TIMER PROGRAMMING –
CH
- -
- -
- -
61
- -
- -
- -
- -
DATE
- - -
- - -
- - -
- - -
- - -
- - -
- - -
-
-
-
-
-
-
-
/
/
/
/
/
/
/
- -
- -
- -
- -
- -
- -
- -
BEGIN
-
-
-
-
-
-
-
-
:
:
:
:
:
:
:
:
- -
- -
- -
- -
- -
- -
- -
- -
END
-
-
-
-
-
-
-
-
:
:
:
:
:
:
:
:
- -
- -
- -
- -
- -
- -
- -
- -
B
- -
- -
- -
- -
- -
- -
- -
- -
EVRY DAY
– TIMER PROGRAMMING –
CH
- -
- -
- -
61
- -
- -
- -
- -
DATE
- - -
- - -
- - -
SUN
- - -
- - -
- - -
- - -
-
-
-
7
-
-
-
-
/
/
/
/
/
/
/
/
- -
- -
- -
04
- -
- -
- -
- -
BEGIN
-
-
-
-
-
-
-
-
:
:
:
:
:
:
:
:
- -
- -
- -
- -
- -
- -
- -
- -
END
-
-
-
-
-
-
-
-
:
:
:
:
:
:
:
:
- -
- -
- -
- -
- -
- -
- -
- -
B
- -
- -
- -
- -
- -
- -
- -
- -
Timer Recording (cont’d) 29
PLAY
STOP
ENTER
RECORD
DISC
MENU
RETURNTITLESETUP
A
-
B
REPEATSEARCH MODE
CLEAR
MODE
ANGLESUBTITLEAUDIO
DISPLAY
SPEED C.RESET
STANDBY-ON
PICTURE SELECTSLEEP
CH.
VOL.
MUTE
ZOOM
123
456
789
0 +10
+100
REPEAT
4-5
T0006UG_6006UG_EN_1.qx3 04.5.12 10:09 AM Page 29

30 Timer Recording (cont’d)
6
While END is selected, press ▲ or ▼ to select
the hour at which you want recording to stop.
AM or PM will appear with the hour.
Then, press B and press ▲ or ▼ to select the
minute at which you want recording to end.
Press B.
7
Press ▲ or ▼ until the tape speed (SP or SLP)
appears at the right end of the line.
8
Press SETUP to remove the menus.
9
Press STANDBY-ON to turn off the
TV/VCR/DVD and set the timer recording.
The red REC/OTR light will appear on the front of the
TV/VCR/DVD.
You must turn off the TV/VCR/DVD to activate a
timer recording. If the power is not off and you con-
tinue watching TV,TIMER REC STANDBY starts flash-
ing on the screen two minutes before the pro-
grammed start time.Turn off the unit to do the
recording.
– TIMER PROGRAMMING –
CH
- -
- -
- -
61
- -
- -
- -
- -
DATE
- - -
- - -
- - -
SUN
- - -
- - -
- - -
- - -
-
-
-
7
-
-
-
-
/
/
/
/
/
/
/
/
- -
- -
- -
04
- -
- -
- -
- -
BEGIN
-
-
-
7
-
-
-
-
:
:
:
:
:
:
:
:
- -
- -
- -
30
- -
- -
- -
- -
END
-
-
-
8
-
-
-
-
:
:
:
:
:
:
:
:
- -
- -
- -
50
- -
- -
- -
- -
B
- -
- -
- -
SP
- -
- -
- -
- -
P
M
P
M
– TIMER PROGRAMMING –
CH
- -
- -
- -
61
- -
- -
- -
- -
DATE
- - -
- - -
- - -
SUN
- - -
- - -
- - -
- - -
-
-
-
7
-
-
-
-
/
/
/
/
/
/
/
/
- -
- -
- -
04
- -
- -
- -
- -
BEGIN
-
-
-
7
-
-
-
-
:
:
:
:
:
:
:
:
- -
- -
- -
30
- -
- -
- -
- -
END
-
-
-
8
-
-
-
-
:
:
:
:
:
:
:
:
- -
- -
- -
50
- -
- -
- -
- -
B
- -
- -
- -
- -
- -
- -
- -
- -
P
M
P
M
• To correct information while set-
ting the Timer Recording, press
s to go back one step and
select the incorrect information.
Press ▲ or ▼ to enter the cor-
rect information.
• While a timer recording is in
progress, the red REC/OTR light
will flash.
• If a timer recording is set for
hours or days later, you can use
the TV/VCR/DVD until then. Just
be sure to turn off the
TV/VCR/DVD about five minutes
before the recording. Set the
Cable Box/Satellite Receiver if
appropriate.
• If the record tab is missing, the
videotape will eject when you
press STANDBY-ON to turn off
the TV/VCR/DVD. Insert a record-
able tape for the timer recording.
• If the tape ends before the record-
ing is complete, the TV/VCR/DVD
will stop recording immediately
and eject the tape.
Helpful Hints
PLAY
STOP
ENTER
RECORD
DISC
MENU
RETURNTITLESETUP
A
-
B
REPEATSEARCH MODE
CLEAR
MODE
ANGLESUBTITLEAUDIO
DISPLAY
SPEED C.RESET
STANDBY-ON
PICTURE SELECTSLEEP
CH.
VOL.
MUTE
ZOOM
123
456
789
0 +10
+100
REPEAT
6-7
9
8
T0006UG_6006UG_EN_1.qx3 04.5.12 10:09 AM Page 30

Timer Recording (cont’d) 31
Extending a Timer Recording
To make a Timer Recording start and end later than originally scheduled,
follow these steps.
1 With the unit on, press SETUP. Press ▲ or ▼ to select TIMER PRO-
GRAMMING. Press ENTER.
2 Press RECORD, then press ▲ or ▼ to select the desired program.
3 Press RECORD again. Each press of RECORD will shift forward the
beginning/end time by 10 minutes. If the recording is in progress, each
press will shift forward the end time only.
If you adjust the times during recording, the recording speed automati-
cally changes to SLP.
To r estore the original recording times, press k (pause).
4 Press SETUP to remove the menus.
5 If the timer recording is scheduled to start later, press STANDBY-ON
to turn off the TV/VCR/DVD for the recording.
Correcting a Timer Recording
1
With the unit on, press SETUP. Press ▲ or ▼ to select TIMER PRO-
GRAMMING. Press ENTER.
2 Press ▲ or ▼ to select a timer recording, then press B.
3 Press B or s to select the information you want to change.
Press ▲ or ▼ to enter the correct information.
4 Press SETUP to remove the menu.
5 Press STANDBY-ON to turn off the TV/VCR/DVD to set the recording.
Cancelling Timer Recordings
To cancel a timer recording that is in progress:
1 The red REC/OTR light will flash during recording. Press STANDBY-ON
to turn on the TV/VCR/DVD, then press STOP/EJECT CA on the front
of the TV/VCR/DVD.
To cancel a timer recording that has not started:
1 With the unit on, press SETUP.
Press ▲ or ▼ to select TIMER PROGRAMMING. Press ENTER.
2 Press ▲ or ▼ to select a timer recording.
3 Press C.RESET. All the information for the selected recording will
disappear.
4 Press SETUP to remove the menu.
Checking Scheduled Timer Recordings
1
With the unit on, press SETUP.
Press ▲ or ▼ to select TIMER PROGRAMMING.
2 Press ENTER.The program details will appear on the screen.
3 Press SETUP to remove the menu.
T0006UG_6006UG_EN_1.qx3 04.5.12 10:09 AM Page 31

32 Timer Recording Auto Return
Use this feature to rewind the tape to the beginning of a
completed timer recording.
1
Press SETUP.
2
Press ▲ or ▼ to select USER’S SET UP.
Then, press ENTER.
3
Press ▲ or ▼ to select AUTO RETURN.
4
Press ENTER until ON appears beside AUTO
RETURN. To turn off AUTO RETURN, press ENTER
to choose OFF instead.
5
Press SETUP. When AUTO RETURN is ON,
when all the timer recordings are completed, the tape
will rewind to the beginning of the recorded pro-
gram(s).
– USER'S SET UP –
RENTAL
REPEAT PLAY
AUTO RETURN
VCR AUDIO
TV AUDIO
[OFF]
[OFF]
[ON]
[HIFI]
[STEREO]
B
– TV/VCR SETUP –
TIMER PROGRAMMING
SETTING CLOCK
CHANNEL SET UP
USER'S SET UP
V-CHIP SET UP
LANGUAGE [ENGLISH]
CAPTION [OFF]
ZERO RETURN
TIME SEARCH
INDEX SEARCH
B
• If you press STANDBY-ON while
the tape is rewinding, the rewind-
ing will stop.
• If there is a power failure, the
TV/VCR/DVD will retain its mem-
ory for this feature.
Helpful Hints
PLAY
STOP
ENTER
RECORD
DISC
MENU
RETURNTITLESETUP
A
-
B
REPEATSEARCH MODE
CLEAR
MODE
ANGLESUBTITLEAUDIO
DISPLAY
SPEED C.RESET
STANDBY-ON
PICTURE SELECTSLEEP
CH.
VOL.
MUTE
ZOOM
123
456
789
0 +10
+100
REPEAT
2-4
1,5
T0006UG_6006UG_EN_1.qx3 04.5.12 10:09 AM Page 32

Rerecording (Tape Duplication) 33
• Unauthorized recording of copy-
righted television programs,
videotapes, or other materials
may infringe on the rights of
copyright owners and violate
copyright laws.
• Different brands of equipment
may operate differently.
• Make sure all connections are
secure. Otherwise, you may not
record both picture and sound.
•Programs that are copyright
protected may not record clearly.
•You cannot record a DVD onto a
videotape using this
TV/VCR/DVD.
•You can use this connection to
simply view tapes playing on a
camcorder or VCR at the
TV/VCR/DVD. Follow steps 1,2,
and 4 for connections and AUX
setup.Then play the tape on the
camcorder, etc., as usual.
1
Make the connections shown above. Use audio
and video cables (not supplied). Connect the
source unit (VCR or Camcorder) to a power
source after connections are made.
2
The VCR or Camcorder will play your tape. Insert a
prerecorded tape in the source unit. If play
begins, press STOP on the VCR or Camcorder.
3
The TV/VCR/DVD will record your tape. Insert a
blank videotape in the cassette compartment
of the TV/VCR/DVD. Make sure the tape’s record
tab is intact and the TV/VCR/DVD power is on.
4
Point the TV/VCR/DVD remote control at the
TV/VCR/DVD. Press SELECT or CH. o/p until
AUX appears on the screen. The TV/VCR/DVD is
now in Line Input or Auxiliary mode.
5
Press SPEED until the desired tape speed (SP
or SLP) appears in the lower left corner of the
screen.
6
Press PLAY on the VCR or Camcorder and
REC/OTR on your TV/VCR/DVD at the same
time. Videotape copying will begin.
7
To stop copying, press STOP/EJECT C A on the
TV/VCR/DVD, then stop the tape on the VCR
or Camcorder.
RL
AUDIOVIDEOHEADPHONE
OP/EJECT
VIDEO
OUT
L
AUDIO
OUT
R
AUDIO and VIDEO OUT Jacks on source unit
(VCR or Camcorder)
AUDIO and VIDEO In Jacks
on front of TV/VCR/DVD
Audio Cables from
AUDIO OUT to AUDIO In
Video Cable from
VIDEO OUT to VIDEO In
Helpful Hints
T0006UG_6006UG_EN_1.qx3 04.5.12 10:09 AM Page 33

34 Repeat Play
• Repeat Play stays in effect after
you turn off the TV/VCR/DVD.
The TV/VCR/DVD keeps the
Repeat Play setting even if the
power fails.
• If RENTAL is ON, RENTAL PLAY
B
will appear on the screen
instead of REPEAT PLAY
B
.
Details are on page 35.
Helpful Hints
Repeat Play allows you to play a videotape continuously.
ALL REPEAT will repeatedly play the tape from the beginning
to the end. BLANK REPEAT will repeatedly play the tape
from its beginning to the first part that is blank for more
than 10 seconds.
1
Press SETUP.
2
Press ▲ or ▼ to select USER’S SET UP.
Then, press ENTER.
3
Press ▲ or ▼ to select REPEAT PLAY.
4
Press ENTER until ALL or BLANK appears
beside REPEAT PLAY. Or, to cancel REPEAT PLAY,
press ENTER to select OFF.
5
Press SETUP to remove the menu.
6
Press PLAY B to play a videotape. REPEAT
PLAY B will appear on the screen briefly.
– USER'S SET UP –
RENTAL
REPEAT PLAY
AUTO RETURN
VCR AUDIO
TV AUDIO
[OFF]
[ALL]
[OFF]
[HIFI]
[STEREO]
B
– TV/VCR SETUP –
TIMER PROGRAMMING
SETTING CLOCK
CHANNEL SET UP
USER'S SET UP
V-CHIP SET UP
LANGUAGE [ENGLISH]
CAPTION [OFF]
ZERO RETURN
TIME SEARCH
INDEX SEARCH
B
PLAY
STOP
ENTER
RECORD
DISC
MENU
RETURNTITLESETUP
A
-
B
REPEATSEARCH MODE
CLEAR
MODE
ANGLESUBTITLEAUDIO
DISPLAY
SPEED C.RESET
STANDBY-ON
PICTURE SELECTSLEEP
CH.
VOL.
MUTE
ZOOM
123
456
789
0 +10
+100
REPEAT
2-4
1,5
6
T0006UG_6006UG_EN_1.qx3 04.5.12 10:09 AM Page 34

Rental Play 35
This function enables you to improve picture quality when
playing worn cassettes such as rented videotapes.
1
Press SETUP.
2
Press ▲ or ▼ to select USER’S SET UP. Then,
press ENTER.
3
Press ▲ or ▼ to select RENTAL.
Press ENTER until ON appears beside
RENTAL. To turn off RENTAL, press ENTER to
choose OFF.
4
Press SETUP to exit the menu.
5
Press PLAY B to start videotape play. RENTAL
PLAY B will appear briefly on the screen.
– USER'S SET UP –
RENTAL
REPEAT PLAY
AUTO RETURN
VCR AUDIO
TV AUDIO
[ON]
[OFF]
[OFF]
[HIFI]
[STEREO]
B
– TV/VCR SETUP –
TIMER PROGRAMMING
SETTING CLOCK
CHANNEL SET UP
USER'S SET UP
V-CHIP SET UP
LANGUAGE [ENGLISH]
CAPTION [OFF]
ZERO RETURN
TIME SEARCH
INDEX SEARCH
B
• Once you select Rental Playback,
it stays in effect even after you
turn off the TV/VCR/DVD.
• The TV/VCR/DVD will retain the
Rental setting even if the power
fails.
Helpful Hints
PLAY
STOP
ENTER
RECORD
DISC
MENU
RETURNTITLESETUP
A
-
B
REPEATSEARCH MODE
CLEAR
MODE
ANGLESUBTITLEAUDIO
DISPLAY
SPEED C.RESET
STANDBY-ON
PICTURE SELECTSLEEP
CH.
VOL.
MUTE
ZOOM
123
456
789
0 +10
+100
REPEAT
2-3
1,4
5
T0006UG_6006UG_EN_1.qx3 04.5.12 10:09 AM Page 35

36 Zero Return, Sleep Timer
Zero Return
The videotape counter shows the elapsed recording or play-
back time in hours, minutes, and seconds from the point at
which the counter was set to zero.The counter time will not
change on a blank tape or blank portions on a tape.The “–”
before the tape counter indicates the amount of remaining
recording/playing time before the counter reaches zero.
Follow the steps below to reset the tape counter to zero at
a tape location you want to refer to later.
1
Play, rewind, or fast forward the tape to the
location you would like to refer to later.
Press STOP C to stop the tape.
2
Press C.RESET to set the counter to 0:00:00.
3
To r eturn to this same point later, press
SETUP. Press ▲ or ▼ to select ZERO
RETURN.Then, press ENTER.
The tape counter will appear on the screen.When
the tape reaches the point at which you set the
counter to zero, the tape will stop. Press PLAY B to
watch the tape from the designated point.
Sleep Timer
Use the Sleep Timer to program the TV/VCR/DVD to shut
off in a certain amount of time.
1
Press SLEEP until the correct amount of time
appears on the screen with SLEEP. Each press of
SLEEP will increase the time by 30 minutes.You may
set a Sleep Timer of 30, 60, 90, or 120 minutes.
After five seconds, the Sleep Timer information will
disappear from the screen.The TV/VCR/DVD will
turn itself off after the selected amount of time has
passed.
To Cancel the Sleep Timer
Press SLEEP until “SLEEP 0 MINUTE” appears.
•To see how much time remains
before the TV/VCR/DVD turns
itself off, press SLEEP once.The
information will disappear auto-
matically in five seconds.
Helpful Hint
– TV/VCR SETUP –
TIMER PROGRAMMING
SETTING CLOCK
CHANNEL SET UP
USER'S SET UP
V-CHIP SET UP
LANGUAGE [ENGLISH]
CAPTION [OFF]
ZERO RETURN
TIME SEARCH
INDEX SEARCH
B
SLEEP 120 MINUTE
PLAY
STOP
ENTER
RECORD
DISC
MENU
RETURNTITLESETUP
A
-
B
REPEATSEARCH MODE
CLEAR
MODE
ANGLESUBTITLEAUDIO
DISPLAY
SPEED C.RESET
STANDBY-ON
PICTURE SELECTSLEEP
CH.
VOL.
MUTE
ZOOM
123
456
789
0 +10
+100
REPEAT
3
3
2
1
PLAY
STOP
ENTER
RECORD
DISC
MENU
RETURNTITLESETUP
A
-
B
REPEATSEARCH MODE
CLEAR
MODE
ANGLESUBTITLEAUDIO
DISPLAY
SPEED C.RESET
STANDBY-ON
PICTURE SELECTSLEEP
CH.
VOL.
MUTE
ZOOM
123
456
789
0 +10
+100
REPEAT
1
T0006UG_6006UG_EN_1.qx3 04.5.12 10:09 AM Page 36

Time Search 37
Time Search lets you quickly advance the videotape to a posi-
tion simply by entering the amount of playback time you want
to skip.
In the example below,Time Search is set to 2 hours, 50 min-
utes from the present position.
1
Insert a videotape.
2
Press SETUP. Press ▲ or ▼ to select TIME
SEARCH.Then, press ENTER.
3
Press ▲ or ▼ until your desired time appears
beneath TIME SEARCH at the top of the
screen. (Example: 2:50 for 2 hours, 50 minutes)
Each press of ▲ or ▼ increases or decreases the
length of time by 10 minutes.
To cancel the Time Search at this point, press SETUP.
4
Press s or B to rewind or fast forward the
tape the length of time you chose.
The TV/VCR/DVD will rewind or fast forward the
tape the specified amount of time.
The time counts down on the screen as the search
progresses.When 0:00 is reached, the tape will start
playing.
Or, to cancel the time search before it finishes, press
STOP C.
TIME SEARCH
2 : 50
– TV/VCR SETUP –
TIMER PROGRAMMING
SETTING CLOCK
CHANNEL SET UP
USER'S SET UP
V-CHIP SET UP
LANGUAGE [ENGLISH]
CAPTION [OFF]
ZERO RETURN
TIME SEARCH
INDEX SEARCH
B
•A Time Search can be set up to a
maximum of 9 hours 50 minutes
in 10-minute increments.
• Time Search will not operate dur-
ing recording.
Helpful Hints
1
Insert a videotape.
PLAY
STOP
ENTER
RECORD
DISC
MENU
RETURNTITLESETUP
A
-
B
REPEATSEARCH MODE
CLEAR
MODE
ANGLESUBTITLEAUDIO
DISPLAY
SPEED C.RESET
STANDBY-ON
PICTURE SELECTSLEEP
CH.
VOL.
MUTE
ZOOM
123
456
789
0 +10
+100
REPEAT
2-4
2
T0006UG_6006UG_EN_1.qx3 04.5.12 10:09 AM Page 37

This feature lets you quickly rewind or fast forward to the
start of recordings.
● Index Marks are made automatically at the start of all
recordings.They are not made where recording pauses.
The time gap between Index Marks should be greater than
one minute for SP recording and three minutes for SLP
recording.This means recordings should be one (SP) or
three (SLP) minutes long. Otherwise, Index Search may not
find the start of the recording. In some cases, Index Marks at
the beginning of a videotape cannot be detected.
38 Index Search
1
Press SETUP. Press ▲ or ▼ to select INDEX
SEARCH.Then, press ENTER.
2
Press ▲ or ▼ until the number of programs you
want to skip appears beneath INDEX SEARCH.
To cancel an Index Search at this point, press SETUP.
3
Press s or B. The TV/VCR/DVD begins rewinding or
fast forwarding the videotape to the beginning of the
desired program.
4
When the program is reached, play will start.
INDEX SEARCH
0 3
– TV/VCR SETUP –
TIMER PROGRAMMING
SETTING CLOCK
CHANNEL SET UP
USER'S SET UP
V-CHIP SET UP
LANGUAGE [ENGLISH]
CAPTION [OFF]
ZERO RETURN
TIME SEARCH
INDEX SEARCH
B
• Every time an Index Mark (or
recording) is passed, the number
beneath INDEX SEARCH on the
screen decreases by one.
•A videotape must be in the
TV/VCR/DVD for this function to
work.
•You may search up to 20 Index
Marks.
• This function will not operate dur-
ing recording.
•To cancel an Index Search, press
STOP
C
.
• If the end of the tape is reached
during an Index Search, the tape
will rewind to the beginning.The
TV/VCR/DVD will turn off and the
tape will eject.
PLAY
STOP
ENTER
RECORD
DISC
MENU
RETURNTITLESETUP
A
-
B
REPEATSEARCH MODE
CLEAR
MODE
ANGLESUBTITLEAUDIO
DISPLAY
SPEED C.RESET
STANDBY-ON
PICTURE SELECTSLEEP
CH.
VOL.
MUTE
ZOOM
123
456
789
0 +10
+100
REPEAT
1-3
1
Helpful Hints
T0006UG_6006UG_EN_1.qx3 04.5.12 10:09 AM Page 38

Videotape Playback Features 39
Slow Motion
1
Press k (pause) during play to pause the
videotape.Then press i / g to start slow
motion. Sound will be mute during slow motion.
Slow motion will stop automatically after five minutes
to prevent damage to the tape.
2
Press PLAY B to return to normal playback.
Forward and Reverse Searching
(SP/LP/SLP)
1
During videotape play, press and release i /
g or j / h. A fast forward or reverse picture
search will begin.
2
To r eturn to normal play, press PLAY B .
Super High Speed Searching (LP/SLP)
1
During tape play, press i / g or j / h,
then press again. The TV/VCR/DVD will search the
tape in high speed.
Press i / g or j / h repeatedly to switch
between regular and high speed searching.
2
To r eturn to normal play, press PLAY B.
Viewing a Still Picture
1
During tape play, press k (pause).
A still picture will appear on the screen.The picture
advances each time you press k (pause).
After a tape is paused for five minutes, play will stop
automatically.This prevents damage to the tape and
TV/VCR/DVD.
2
If the still picture vibrates vertically, stabilize
the picture by pressing CH. ▲ or ▼.
3
To r elease the still picture and return to nor-
mal play, press PLAY B.
• SP/LP/SLP means this feature will
work with tapes recorded in
Standard Play, Long Play, or
Super Long Play. LP/SLP means
this feature will work with tapes
recorded in Long Play and Super
Long Play.Tape speed details are
on page 26.
• During forward and reverse
searching, horizontal noise bars
will appear on the screen.
PLAY
STOP
ENTER
RECORD
DISC
MENU
RETURNTITLESETUP
A
-
B
REPEATSEARCH MODE
CLEAR
MODE
ANGLESUBTITLEAUDIO
DISPLAY
SPEED C.RESET
POWER PICTURE SELECTSLEEP
CH.
VOL.
MUTE
ZOOM
123
456
789
0 +10
+100
REPEAT
Helpful Hints
T0006UG_6006UG_EN_1.qx3 04.5.12 10:09 AM Page 39

40 Automatic Operation Features
The following videotape features are available.
Automatic Rewind, Eject, Off
When you play, fast forward, or record a videotape to its
end, the TV/VCR/DVD will rewind the tape, stop, turn itself
off, and eject the tape.
If REPEAT PLAY is activated, play will start again instead. Details
are on page 34.
The tape will not rewind automatically after a timer recording
or One-Touch Recording ends.To rewind a tape after timer
recordings, see Auto Return details on page 32.
Automatic Tracking Adjustment
The TV/VCR/DVD automatically adjusts the videotape track-
ing to give you the best possible picture quality.With some
recordings, however, you may get a better picture using the
manual tracking controls (see below).
Manual Tracking
To adjust the tracking manually, press the CHANNEL ▲/▼
buttons on the front of the TV/VCR/DVD or the CH. ▲/▼
buttons on the remote control during playback.
Tracking returns to Automatic Tracking Adjustment when you
insert a tape or press STOP C.
Before
Tracking
Adjustment
After
Tracking
Adjustment
T0006UG_6006UG_EN_1.qx3 04.5.12 10:09 AM Page 40

Closed Captions 41
Follow the steps below to select closed captions for TV pro-
gramming. Not all TV programs and commercials have closed
captions or all types of closed captions (second language,
half-screen text, etc.). If closed captioning is not broadcast,
you cannot receive it.This does not indicate a problem with
the TV/VCR/DVD. Check your TV program listings for shows
with closed captions.
If the TV/VCR/DVD receives poor quality television signals,
the captions may contain errors, or there might be no cap-
tions at all. Some possible causes of poor quality signals are:
● Automobile ignition noise
● Electric motor noise
● Weak signal reception
● Multiplex signal reception (ghosts or screen flutter)
● Playing poorly recorded or worn videotapes.
1
Press SETUP.
Press ▲ or ▼ to select CAPTION.
2
Press ENTER repeatedly to select CAPTION1,
CAPTION2,TEXT1,TEXT2, or OFF.
CAPTION1 displays standard closed captions (what a
character is saying). CAPTION2 displays foreign lan-
guage closed captions (foreign language words show-
ing what a character is saying).
TEXT1 and TEXT2 display half-screen text (such as a
channel guide, schedule, or announcement).
OFF turns off closed captions. Captions will not
appear on the screen.
3
Press SETUP to exit the menu.
– TV/VCR SETUP –
TIMER PROGRAMMING
SETTING CLOCK
CHANNEL SET UP
USER'S SET UP
V-CHIP SET UP
LANGUAGE [ENGLISH]
CAPTION [CAPTION 1]
ZERO RETURN
TIME SEARCH
INDEX SEARCH
B
– TV/VCR SETUP –
TIMER PROGRAMMING
SETTING CLOCK
CHANNEL SET UP
USER'S SET UP
V-CHIP SET UP
LANGUAGE [ENGLISH]
CAPTION [OFF]
ZERO RETURN
TIME SEARCH
INDEX SEARCH
B
• If a black box appears on the
screen, a TEXT mode is selected.
Select CAPTION1,CAPTION2, or
OFF.
• The TV/VCR/DVD retains the
Closed Caption setting if the
power fails.
• Abbreviations, symbols, and other
grammatical shortcuts may be
used in order to keep pace with
the on-screen action.This is not a
problem with the TV/VCR/DVD.
• Changing channels may delay
closed captions for a few seconds.
• Adjusting or muting the volume
may delay closed captions for a
few seconds.
Helpful Hints
PLAY
STOP
ENTER
RECORD
DISC
MENU
RETURNTITLESETUP
A
-
B
REPEATSEARCH MODE
CLEAR
MODE
ANGLESUBTITLEAUDIO
DISPLAY
SPEED C.RESET
STANDBY-ON
PICTURE SELECTSLEEP
CH.
VOL.
MUTE
ZOOM
123
456
789
0 +10
+100
REPEAT
1-2
1,3
T0006UG_6006UG_EN_1.qx3 04.5.12 10:09 AM Page 41

42 Setting V-Chip
TV Rating Explanations
•TV-Y - Appropriate for all chil-
dren
•TV-Y7 - Appropriate for chil-
dren seven and older
•TV-G - General Audience
• TV-PG - Parental Guidance
suggested.
•TV-14 - Unsuitable for children
under 14
•TV-MA - Mature audience only
TV Rating Settings
V-CHIP enables parents to prevent their children from
watching inappropriate material on TV.V-CHIP reads the rat-
ings for programming (except for news and sports programs,
unedited movies on premium cable channels, and Emergency
Broadcast System signals), then denies access to program-
ming if the program’s rating meets the limitations you select.
In this case, a “PROTECTED PROGRAM by ...” message
appears on the TV screen.
If the “PROTECTED...” message appears during your TV
viewing, change to a channel that is not blocked.Then, you
can access the V-CHIP SETUP menu and change the settings
to allow all TV viewing.
Programming may be rated by the Motion Picture
Association of America (MPAA) or according to the
Television Parental Guidelines.To block any inappropriate
programming, set your limits in both MPAA RATING and TV
RATING.
Before you begin, make sure ...
● The TV/VCR/DVD is on.
● The unit is in TV/VCR mode. Press SELECT on the
remote until you see TV channels and see the red
VCR/TV light on the front of the TV/VCR/DVD.
1
Press SETUP. Press ▲ or ▼ to select V-CHIP
SET UP.Then, press ENTER.
2
Press the Number buttons to enter the four-
digit access code. When entering the access code
for the first time or if there has been a power failure,
enter default code 0000. Four Xs will appear instead
of your code.This protects the identity of your code.
3
Press ▲ or ▼ to select TV RATING.
Then, press ENTER.
– TV/VCR SETUP –
TIMER PROGRAMMING
SETTING CLOCK
CHANNEL SET UP
USER'S SET UP
V-CHIP SET UP
LANGUAGE [ENGLISH]
CAPTION [OFF]
ZERO RETURN
TIME SEARCH
INDEX SEARCH
B
ACCESS CODE
– – – –
– V-CHIP SET UP –
TV RATING
MPAA RATING
CHANGE CODE
B
PLAY
STOP
ENTER
RECORD
DISC
MENU
RETURNTITLESETUP
A
-
B
REPEATSEARCH MODE
CLEAR
MODE
ANGLESUBTITLEAUDIO
DISPLAY
SPEED C.RESET
STANDBY-ON
PICTURE SELECTSLEEP
CH.
VOL.
MUTE
ZOOM
123
456
789
0 +10
+100
REPEAT
1,3
1
2
T0006UG_6006UG_EN_1.qx3 04.5.12 10:09 AM Page 42

Setting V-Chip (cont’d) 43
4
Press ▲ or ▼ to select the TV Rating level at
which you want to block viewing, then press
ENTER once. If you press ENTER again, the subrat-
ings for that category will appear.
Details are on pages 44-45.
When you select the rating category and set it to
BLOCK, the higher ratings will turn to BLOCK auto-
matically. Lower ratings will turn to VIEW.
When you set “TV-Y” to VIEW (or BLOCK), all rat-
ings will turn to VIEW (or BLOCK) automatically.
5
Press SETUP to save your settings and remove
the menus.
TV-Y
TV-Y7
TV-G
TV-PG
TV-14
TV-MA
[VIEW]
[VIEW]
[BLOCK]
[BLOCK]
[BLOCK]
[BLOCK]
( )
( )
( )
( )
B
• If you want to disable V-Chip so
you can view all TV programming,
set TV-Y to VIEW.
• The V-CHIP settings will be
retained after a power failure
(except the access code reverts to
0000).
Helpful Hints
PLAY
STOP
ENTER
RECORD
DISC
MENU
RETURNTITLESETUP
A
-
B
REPEATSEARCH MODE
CLEAR
MODE
ANGLESUBTITLEAUDIO
DISPLAY
SPEED C.RESET
STANDBY-ON
PICTURE SELECTSLEEP
CH.
VOL.
MUTE
ZOOM
123
456
789
0 +10
+100
REPEAT
4
5
T0006UG_6006UG_EN_1.qx3 04.5.12 10:09 AM Page 43

44 Setting V-Chip (cont’d)
TV Rating Subratings
When you select TV-Y7,TV-PG,TV-14, or TV-MA, you can
use the subratings to block specific elements of program-
ming, such as language or violence.
1
Press SETUP.
2
Press ▲ or ▼ to select V-CHIP SET UP.
Press ENTER.
3
Press the Number buttons to enter the four-
digit access code. The default code is 0000 (if you
have not set up your own code yet or if there has
been a power failure).
4
Press ▲ or ▼ to select TV RATING.
Press ENTER.
– V-CHIP SET UP –
TV RATING
MPAA RATING
CHANGE CODE
B
ACCESS CODE
– – – –
– TV/VCR SETUP –
TIMER PROGRAMMING
SETTING CLOCK
CHANNEL SET UP
USER'S SET UP
V-CHIP SET UP
LANGUAGE [ENGLISH]
CAPTION [OFF]
ZERO RETURN
TIME SEARCH
INDEX SEARCH
B
PLAY
STOP
ENTER
RECORD
DISC
MENU
RETURNTITLESETUP
A
-
B
REPEATSEARCH MODE
CLEAR
MODE
ANGLESUBTITLEAUDIO
DISPLAY
SPEED C.RESET
STANDBY-ON
PICTURE SELECTSLEEP
CH.
VOL.
MUTE
ZOOM
123
456
789
0 +10
+100
REPEAT
2,4
1
3
T0006UG_6006UG_EN_1.qx3 04.5.12 10:09 AM Page 44

Setting V-Chip (cont’d) 45
•Dialog (D) is not an available
subrating for TV-MA.
•Blocked subratings will appear
beside the rating category in the
TV ratings menu.
•You cannot BLOCK a subrating
(D, L, S, or V) if the main catego-
ry is set to VIEW. However, you
can set a subrating to VIEW even
when the main category is set to
BLOCK.
• Changing the category to BLOCK
or VIEW automatically changes
all its subratings to the same
(BLOCK or VIEW).
Example:
TV-Y7 subratings
5
Press ▲ or L to select the rating you wish to
adjust.Then, press ENTER twice to go to its
subratings.
● When you select TV-Y7:
Press ▲ or ▼ to select FV (Fantasy Violence, violence
that seems realistic to young children).
Then, press ENTER to select BLOCK or VIEW.
● When you select TV-PG,TV-14, or TV-MA:
Press ▲ or ▼ to select “D” (Suggestive Dialog),“L”
(Coarse Language),“S” (Sexual Situation), or “V”
(Violence).Then, press ENTER repeatedly to select
BLOCK or VIEW for each subrating.
To go to the previous menu, press RETURN.
6
Press SETUP to save your settings and remove the
menus.
TV-Y7
FV
[BLOCK]
[BLOCK]
B
PLAY
STOP
ENTER
RECORD
DISC
MENU
RETURNTITLESETUP
A
-
B
REPEATSEARCH MODE
CLEAR
MODE
ANGLESUBTITLEAUDIO
DISPLAY
SPEED C.RESET
STANDBY-ON
PICTURE SELECTSLEEP
CH.
VOL.
MUTE
ZOOM
123
456
789
0 +10
+100
REPEAT
5
6
Helpful Hints
T0006UG_6006UG_EN_1.qx3 04.5.12 10:09 AM Page 45

46 Setting V-Chip (cont’d)
MPAA Rating Settings
You can block TV channel viewing according to the Motion
Picture Association ratings.To do so, follow these steps.
1
Press SETUP.
2
Press ▲ or ▼ to select V-CHIP SET UP.
Then, press ENTER.
3
Press the Number buttons to enter the four-
digit access code. (The default code is 0000 if you
have not set up your own code yet or if the power
has failed.)
4
Press ▲ or ▼ to select MPAA RATING.
Then, press ENTER.
5
Press ▲ or ▼ to select the level at which you
want to block viewing.Then, press ENTER to
select BLOCK or VIEW.
When you Block a category, higher ratings turn to
BLOCK automatically. Lower ratings turn to VIEW.
When you set G to VIEW or BLOCK, all ratings turn
to VIEW or BLOCK automatically.
6
Press SETUP to save your settings and remove
the menus.
G
PG
PG-13
R
NC-17
X
[VIEW]
[VIEW]
[VIEW]
[BLOCK]
[BLOCK]
[BLOCK]
B
– V-CHIP SET UP –
TV RATING
MPAA RATING
CHANGE CODE
B
ACCESS CODE
– – – –
– TV/VCR SETUP –
TIMER PROGRAMMING
SETTING CLOCK
CHANNEL SET UP
USER'S SET UP
V-CHIP SET UP
LANGUAGE [ENGLISH]
CAPTION [OFF]
ZERO RETURN
TIME SEARCH
INDEX SEARCH
B
MPAA Rating Explanations
•G - General Audience
• PG - Parental Guidance suggested.
• PG-13 - Unsuitable for children
under 13
•R - Restricted; under 17 requires
accompanying parent or adult
guardian
• NC-17 - No one under 17 admitted
•X - Mature audience only
•To disable all the MPAA Ratings,
set G to VIEW.
• The V-CHIP settings will be
retained after a power failure
(except the access code reverts to
0000).
PLAY
STOP
ENTER
RECORD
DISC
MENU
RETURNTITLESETUP
A
-
B
REPEATSEARCH MODE
CLEAR
MODE
ANGLESUBTITLEAUDIO
DISPLAY
SPEED C.RESET
STANDBY-ON
PICTURE SELECTSLEEP
CH.
VOL.
MUTE
ZOOM
123
456
789
0 +10
+100
REPEAT
2,
4-5
1,6
3
Helpful Hints
T0006UG_6006UG_EN_1.qx3 04.5.12 10:09 AM Page 46

• If you enter the wrong code in the
CONFIRM CODE space, repeat
step 5. Enter the same new code
exactly in the CONFIRM CODE
space.
• If you unplug the power cord or if
the power fails, the default code
will be active again (0000).
Change your access code again as
necessary.
Helpful Hints
Setting V-Chip (cont’d) 47
Changing the Access Code
Although the default code 0000 is supplied with the
TV/VCR/DVD, you can set your own access code.
1
Press SETUP.
2
Press ▲ or ▼ to select V-CHIP SET UP.
Then, press ENTER.
3
Press the Number buttons to enter the old
access code. When doing this for the first time, use
0000. Four Xs will appear instead of the code to pro-
tect its identity.
4
Press ▲ or ▼ to select CHANGE CODE.
Then, press ENTER.
5
Press the Number buttons to enter your pre-
ferred access code in the NEW CODE space.
Then, enter the same code in the CONFIRM
CODE space. Again, Xs will appear instead of the
code numbers.The access code must have exactly four
digits.
The V-CHIP SET UP screen will reappear.
6
Press SETUP to save your settings and remove
the menus.
NEW CODE
CONFIRM CODE
X X X X
– – – –
– V-CHIP SET UP –
TV RATING
MPAA RATING
CHANGE CODE
B
ACCESS CODE
– – – –
PLAY
STOP
ENTER
RECORD
DISC
MENU
RETURNTITLESETUP
A
-
B
REPEATSEARCH MODE
CLEAR
MODE
ANGLESUBTITLEAUDIO
DISPLAY
SPEED C.RESET
STANDBY-ON
PICTURE SELECTSLEEP
CH.
VOL.
MUTE
ZOOM
123
456
789
0 +10
+100
REPEAT
2,4
1,6
3,5
T0006UG_6006UG_EN_1.qx3 04.5.12 10:09 AM Page 47

48 Multi-Channel Television Sound
1
Press DISPLAY to see the sound status. During
TV viewing, press DISPLAY twice. During tape play,
press DISPLAY once.
When a TV program is broadcast in stereo, STEREO
appears in the top right corner of the screen.When a
TV program is broadcast in second audio, SAP appears
in the top right corner of the screen.When a TV pro-
gram is broadcast both in stereo and second audio,
STEREO and SAP both appear.
Although a program may be broadcast in both stereo
and second audio, you cannot record in both stereo
and second audio at the same time.
During tape play, HIFI will appear in the top left corner
of the screen if VCR AUDIO is set to HIFI. Details are
on page 49. If you play non-HiFi tapes while VCR
AUDIO is set to HIFI, HIFI will disappear from the
screen.The videotape will play in monaural sound.
You must set the TV/VCR/DVD to record in either
STEREO or SAP. Do this by changing the TV AUDIO
setting as described on page 50.
STOP
HIFI
SP COUNT
12:00AM
CH 123
STEREO/SAP
0:00:00
PLAY
STOP
ENTER
RECORD
DISC
MENU
RETURNTITLESETUP
A
-
B
REPEATSEARCH MODE
CLEAR
MODE
ANGLESUBTITLEAUDIO
DISPLAY
SPEED C.RESET
STANDBY-ON
PICTURE SELECTSLEEP
CH.
VOL.
MUTE
ZOOM
123
456
789
0 +10
+100
REPEAT
1
T0006UG_6006UG_EN_1.qx3 04.5.12 10:09 AM Page 48

Multi-Channel Television Sound (cont’d) 49
• Non-HiFi tapes will play in
monaural sound automatically.
• MTS broadcasts automatically
record in HiFi unless you select
SAP before recording. Details are
on page 50.
Helpful Hints
Selecting HiFi or Monaural Sound
You can play videotapes in either High Fidelity (HIFI) or
Monaural (MONO or single-channel) sound.To do so, follow
these steps.
1
Press SETUP.
2
Press ▲ or ▼ to select USER’S SET UP.
Then, press ENTER.
3
Press ▲ or ▼ to select VCR AUDIO.
4
Press ENTER to select MONO or HIFI.
5
Press SETUP to exit the menus.
– USER'S SET UP –
RENTAL
REPEAT PLAY
AUTO RETURN
VCR AUDIO
TV AUDIO
[ON]
[OFF]
[OFF]
[HIFI]
[STEREO]
B
– USER'S SET UP –
RENTAL
REPEAT PLAY
AUTO RETURN
VCR AUDIO
TV AUDIO
[ON]
[OFF]
[OFF]
[HIFI]
[STEREO]
B
– TV/VCR SETUP –
TIMER PROGRAMMING
SETTING CLOCK
CHANNEL SET UP
USER'S SET UP
V-CHIP SET UP
LANGUAGE [ENGLISH]
CAPTION [OFF]
ZERO RETURN
TIME SEARCH
INDEX SEARCH
B
PLAY
STOP
ENTER
RECORD
DISC
MENU
RETURNTITLESETUP
A
-
B
REPEATSEARCH MODE
CLEAR
MODE
ANGLESUBTITLEAUDIO
DISPLAY
SPEED C.RESET
STANDBY-ON
PICTURE SELECTSLEEP
CH.
VOL.
MUTE
ZOOM
123
456
789
0 +10
+100
REPEAT
2-4
1,5
T0006UG_6006UG_EN_1.qx3 04.5.12 10:09 AM Page 49

50 Multi-Channel Television Sound (cont’d)
• If you select second audio when
second audio is not available,
the TV/VCR/DVD will receive and
record normal audio.
Helpful Hint
Setting the TV/VCR/DVD to receive or
record TV programs in Stereo, Second
Audio, or Monaural Sound
Because TV channels can broadcast in Stereo or Second
Audio, set the TV/VCR/DVD to receive and record the chan-
nels in the sound mode you prefer.
1
Press SETUP. Press ▲ or ▼ to select USER’S
SET UP. Then, press ENTER.
2
Press ▲ or ▼ to select TV AUDIO.
3
Press ENTER to select STEREO, SAP (Second
Audio Program),or MONO.
4
Press SETUP to exit the menus.
– USER'S SET UP –
RENTAL
REPEAT PLAY
AUTO RETURN
VCR AUDIO
TV AUDIO
[ON]
[OFF]
[OFF]
[HIFI]
[STEREO]
B
– TV/VCR SETUP –
TIMER PROGRAMMING
SETTING CLOCK
CHANNEL SET UP
USER'S SET UP
V-CHIP SET UP
LANGUAGE [ENGLISH]
CAPTION [OFF]
ZERO RETURN
TIME SEARCH
INDEX SEARCH
B
PLAY
STOP
ENTER
RECORD
DISC
MENU
RETURNTITLESETUP
A
-
B
REPEATSEARCH MODE
CLEAR
MODE
ANGLESUBTITLEAUDIO
DISPLAY
SPEED C.RESET
STANDBY-ON
PICTURE SELECTSLEEP
CH.
VOL.
MUTE
ZOOM
123
456
789
0 +10
+100
REPEAT
1-3
1,4
T0006UG_6006UG_EN_2.qx3 04.5.12 10:09 AM Page 50

Title Menus
Some DVDs have a Title Menu, which lists the Titles available
on the DVD. Use the Title Menu to play a specific Title.
● Before you begin, press SELECT to put the
TV/VCR/DVD in DVD mode. The green DVD light will
appear on the front of the TV/VCR/DVD.
1
Press TITLE. The Title Menu will appear.
If a Title menu is not available, the “X” may appear on
the TV screen. Or, if the DVD only has a main menu
as described above, it may appear when you press
TITLE.
2
Press o, p, s, or B to select a Title, then
press ENTER. Play will begin at the Title you
selected.
• Menus vary among Discs. Follow
the information with the DVD.
• Not all DVDs have Disc or Title
menus.
• Some DVDs may refer to Chapters
as “scenes.” Some DVDs may refer
to the Title Menu as the “scene
index.”
• The TITLE button may not be active
with all DVDs.
DVD Disc Menus,Title Menus 51
Disc Menus
Some DVDs contain menus that describe the contents of the
Disc or allow you to customize Disc playback. For example,
the menu may offer choices for subtitle languages, special
features, or scene selection.
To use the DVD Disc menu and select playback features, fol-
low these steps.
● Before you begin, press SELECT to put the
TV/VCR/DVD in DVD mode. The green DVD light will
appear on the front of the TV/VCR/DVD.
1
Press DISC MENU.
The DVD’s Disc menu will appear.
2
Press o, p, s, or B to select an item, then
press ENTER. Continue this process to set up all
the features you want or to start Disc playback.
PLAY
STOP
ENTER
RECORD
DISC
MENU
RETURNTITLESETUP
A
-
B
REPEATSEARCH MODE
CLEAR
MODE
ANGLESUBTITLEAUDIO
DISPLAY
SPEED C.RESET
STANDBY-ON
PICTURE SELECTSLEEP
CH.
VOL.
MUTE
ZOOM
123
456
789
0 +10
+100
REPEAT
2
1
PLAY
STOP
ENTER
RECORD
DISC
MENU
RETURNTITLESETUP
A
-
B
REPEATSEARCH MODE
CLEAR
MODE
ANGLESUBTITLEAUDIO
DISPLAY
SPEED C.RESET
STANDBY-ON
PICTURE SELECTSLEEP
CH.
VOL.
MUTE
ZOOM
123
456
789
0 +10
+100
REPEAT
2
1
Helpful Hints
T0006UG_6006UG_EN_2.qx3 04.5.12 10:09 AM Page 51

52 Fast Forward/Reverse Search
PLAY
STOP
ENTER
RECORD
DISC
MENU
RETURNTITLESETUP
A
-
B
REPEATSEARCH MODE
CLEAR
MODE
ANGLESUBTITLEAUDIO
DISPLAY
SPEED C.RESET
STANDBY-ON
PICTURE SELECTSLEEP
CH.
VOL.
MUTE
ZOOM
123
456
789
0 +10
+100
REPEAT
2
1
E
1
Example: Playing a DVD in
reverse at twice the normal
playing speed.
● Before you begin, press SELECT to put the
TV/VCR/DVD in DVD mode. The green DVD light will
appear on the front of the TV/VCR/DVD.
1
During playback, press and hold i/g or
j/h for a few seconds. Use i/g for a for-
ward search. Use j/h for a reverse search.
● During DVD playback, pressing i/g or
j/h will forward or reverse the picture at
approximately two, eight, 50, or 100 times the normal
playback speed. The speed may vary depending on
the Disc.
An h 1, h 2, h 3, or h 4 will appear briefly
on the TV screen to indicate fast reverse searching.
An g 1, g 2, g 3, or g 4 will indicate fast
forward searching.
Sound will be mute during searching.
● For Audio CDs, the approximate searching speed is
16 times the normal play speed. An g or h will
appear briefly on the TV screen. Sound will be inter-
mittent during searching on an Audio CD.
● During Video CD play, pressing i/g or
j/h will forward or reverse the picture at
approximately two, eight, or 30 times the normal play
speed. The speed may vary depending on the Disc.
An h 1, h 2, or h3 will appear briefly on the
TV screen to indicate fast reverse searching.
An g 1, g 2, or g 3 will indicate fast forward
searching.
● For MP3, the approximate search speed is eight times
the normal play speed. An g or h will appear
briefly on the TV.
2
Press PLAY B to return to normal playback.
T0006UG_6006UG_EN_2.qx3 04.5.12 10:09 AM Page 52

• When play is stopped, use the
Number buttons to select a Title
for immediate play.
During play, use the Number
buttons to choose a Chapter for
immediate play.
• Title/Chapter playback is not avail-
able with some DVDs.
Title/Chapter Playback, Specific Time Playback 53
Title/Chapter Playback
● Before you begin, press SELECT to put the
TV/VCR/DVD in DVD mode. The green DVD light will
appear on the front of the TV/VCR/DVD.
1
During DVD play, press SEARCH MODE until
CH (for Chapter) or TT (for Title) appears on the TV.
The number of available Titles or Chapters will
appear at the right ( /4, for example).
2
Enter the Title or Chapter number using the
Number buttons. The Title or Chapter will play.
● To select a single-digit Track number when there
are more than 10 tracks, press ENTER to play the
Track.
● If you enter a Track number that is not available on
the Disc, play will not begin (or the current Track
will continue to play).
Specific Time Playback
● Before you begin, press SELECT to put the
TV/VCR/DVD in DVD mode. The green DVD light will
appear on the front of the TV/VCR/DVD.
1
During DVD, Audio CD, or Video CD (without
PBC) play, press SEARCH MODE until the Time
Search display appears.
2
Within 30 seconds, use the Number buttons to
enter the elapsed playing time (of the Track or
Title) at which you want play to begin. Enter the
time in hours, minutes, and seconds. Within a few sec-
onds, play will start at the specified time.
●
Example: 1 hour, 23 minutes, and 30 seconds
1 → 2 → 3 → 3 → 0
● Make sure the time you enter is within the total time
of the current Title or Track. If it is not, the time
space will clear and play will continue at its current
point. The total time available in the current Track or
Title will appear in the Time Search display.
●
If you make a mistake entering the time, press CLEAR
to clear the time area. Enter the correct information
.
PLAY
STOP
ENTER
RECORD
DISC
MENU
RETURNTITLESETUP
A
-
B
REPEATSEARCH MODE
CLEAR
MODE
ANGLESUBTITLEAUDIO
DISPLAY
SPEED C.RESET
STANDBY-ON
PICTURE SELECTSLEEP
CH.
VOL.
MUTE
ZOOM
123
456
789
0 +10
+100
REPEAT
1
2
PLAY
STOP
ENTER
RECORD
DISC
MENU
RETURNTITLESETUP
A
-
B
REPEATSEARCH MODE
CLEAR
MODE
ANGLESUBTITLEAUDIO
DISPLAY
SPEED C.RESET
STANDBY-ON
PICTURE SELECTSLEEP
CH.
VOL.
MUTE
ZOOM
123
456
789
0 +10
+100
REPEAT
1
2
Helpful Hints
TOTAL
1:29:00
_:_ _:_ _
_/4
12 / 174 / 4
T0006UG_6006UG_EN_2.qx3 04.5.12 10:09 AM Page 53

54 Track Play
There are three ways to play a specific Audio CD, Video CD
(without PBC), MP3, or JPEG Track: Use the Number buttons,
the SEARCH MODE button, or i/g and j/h .
● Before you begin, press SELECT to put the
TV/VCR/DVD in DVD mode. The green DVD light will
appear on the front of the TV/VCR/DVD. Make sure a
valid Disc is in the disc tray.
A
Using the Number Buttons
Press the Number buttons to enter a Track number.
Play will start at the selected Track.
For Tracks 10 and above, press the +
1
00/+10 button so the
Search display (TR _ _ /12 - an example of total tracks) appears
on the TV. Press the Number button of the first digit, then press
the Number button of the second digit. For example, to play
Track 26, press +
1
00/+10, then Number 2, then Number 6.
For single-digit Tracks (1-9), press a single Number button.
If you enter a Track number that is not available on the Disc, play
will not begin (or the current Track will continue to play).
B
Using SEARCH MODE
Press SEARCH MODE so the Track Search display
(TR) appears. Within 30 seconds, press the Number
buttons to select the Track number. Play will begin at the
selected Track. For a single-digit Track (1-9), enter a zero first.
For example, to play Track 5, press 0, 5. You do not have to use
the +100/+10 button in Search Mode for Tracks 10 and above.
C
Using i/g and j/E
During play, press i/g to skip the current Track
and move to the next Track.
Press j/h to return to the beginning of the cur-
rent Track or to go to previous Tracks.
• The
H
/
h
and
G
/
g
buttons are not active when play
is stopped.
•You cannot use
G
/
g
to go
from the last Track on the Disc
to the first Track.
PLAY
STOP
ENTER
RECORD
DISC
MENU
RETURNTITLESETUP
A
-
B
REPEATSEARCH MODE
CLEAR
MODE
ANGLESUBTITLEAUDIO
DISPLAY
SPEED C.RESET
STANDBY-ON
PICTURE SELECTSLEEP
CH.
VOL.
MUTE
ZOOM
123
456
789
0 +10
+100
REPEAT
B
A-B
C
Helpful Hints
T0006UG_6006UG_EN_2.qx3 04.5.12 10:09 AM Page 54

Paused and Step-by-Step Play, Resume On 55
Paused and Step-by-Step Play
● Before you begin, press SELECT to put the
TV/VCR/DVD in DVD mode. The green DVD light will
appear on the front of the TV/VCR/DVD.
1
During Disc play, press F (pause).
Play will pause and the sound will be mute.
2
Press k (pause) repeatedly to see a DVD or
Video CD picture advance one frame (or step)
at a time. The sound will remain mute.
Pressing k (pause) repeatedly during Audio CD,
MP3, or JPEG play will have no effect.
3
Press PLAY B to resume play.
Resume On
● Before you begin, press SELECT to put the
TV/VCR/DVD in DVD mode. The green DVD light will
appear on the front of the TV/VCR/DVD.
1
Press STOP C during play. In a few seconds, the
following Resume message will appear on the TV
screen.
2
Press PLAY B. In a few seconds, play will resume
from the point at which it stopped last. However,
opening the disc tray or turning off the TV/VCR/DVD
will cancel the Resume feature. Play will start at the
beginning the next time you insert the Disc.
For MP3, play will resume from the beginning of the
current Track.
To cancel Resume and start playing the Disc from the
beginning, press STOP C a second time while playback
is stopped. The Stop symbol (C) will appear briefly on
the TV screen. Press PLAY B to start playing the Disc
from the beginning.
• Set STILL MODE to FIELD in the
DISPLAY menu if paused images
are blurry. Details are on pages
70-71.
PLAY
STOP
ENTER
RECORD
DISC
MENU
RETURNTITLESETUP
A
-
B
REPEATSEARCH MODE
CLEAR
MODE
ANGLESUBTITLEAUDIO
DISPLAY
SPEED C.RESET
STANDBY-ON
PICTURE SELECTSLEEP
CH.
VOL.
MUTE
ZOOM
123
456
789
0 +10
+100
REPEAT
3
PLAY
STOP
ENTER
RECORD
DISC
MENU
RETURNTITLESETUP
A
-
B
REPEATSEARCH MODE
CLEAR
MODE
ANGLESUBTITLEAUDIO
DISPLAY
SPEED C.RESET
STANDBY-ON
PICTURE SELECTSLEEP
CH.
VOL.
MUTE
ZOOM
123
456
789
0 +10
+100
REPEAT
2
1
1-2
Helpful Hints
Press 'PLAY' to play from here.
To play the beginning,
press 'STOP' first and then 'PLAY'.
T0006UG_6006UG_EN_2.qx3 04.5.12 10:09 AM Page 55

56 Repeat, A-B Repeat
Repeat
● Before you begin, press SELECT to put the
TV/VCR/DVD in DVD mode. The green DVD light will
appear on the front of the TV/VCR/DVD.
1
During play, press REPEAT until the repeat
mode you want appears on the TV.
On a DVD, select CHAPTER,TITLE, or OFF.
On an Audio CD and Video CD (without PBC), select
TRACK,ALL (all Tracks on the Disc), or OFF.With
MP3 or JPEG files, select TRACK, GROUP (all Tracks
in the current folder),ALL, or OFF.
Selecting a new Track, Chapter, or Title will cancel
repeat play.
• Repeat is not available with some
Discs.
• Repeat and A-B Repeat are not
available with all Discs.
• The entire A-B Repeat section must
be within a single Title or Track. If
you do not enter Point B before the
end of the Track or Title is reached,
the end of the Track or Title will
become Point B automatically.
• A-B Repeat is not available with
MP3 Tracks.
• Stopping play will cancel A-B
Repeat.
A-B Repeat
Follow these steps to play a section of a DVD, Audio CD, or
Video CD repeatedly.
1
During Disc play, press REPEAT A-B to set the
starting point (A). If you make a mistake, press
CLEAR. This will erase point A and let you start over.
OFF will appear briefly on the TV screen.
2
Play the Disc to the point at which you want
repeated play to end, then press REPEAT A-B
again. Within a few seconds, the section will begin to
play.The segment will play over and over until you
cancel the A-B Repeat feature.
3
To cancel A-B Repeat Play, press REPEAT A-B
so OFF appears on the TV screen. Regular
play will resume.
A – B
A –
PLAY
STOP
ENTER
RECORD
DISC
MENU
RETURNTITLESETUP
A
-
B
REPEATSEARCH MODE
CLEAR
MODE
ANGLESUBTITLEAUDIO
DISPLAY
SPEED C.RESET
STANDBY-ON
PICTURE SELECTSLEEP
CH.
VOL.
MUTE
ZOOM
123
456
789
0 +10
+100
REPEAT
1
PLAY
STOP
ENTER
RECORD
DISC
MENU
RETURNTITLESETUP
A
-
B
REPEATSEARCH MODE
CLEAR
MODE
ANGLESUBTITLEAUDIO
DISPLAY
SPEED C.RESET
STANDBY-ON
PICTURE SELECTSLEEP
CH.
VOL.
MUTE
ZOOM
123
456
789
0 +10
+100
REPEAT
1-3
Helpful Hints
Example: Repeat a
DVD Chapter
Example: Repeat an
Audio CD or
Video CD Track
T0006UG_6006UG_EN_2.qx3 04.5.12 10:09 AM Page 56

Markers 57
Use Markers to remember your favorite places on a DVD,
Audio CD, or Video CD (without PBC). To set the Markers,
follow these steps.
● Before you begin, press SELECT to put the
TV/VCR/DVD in DVD mode.The green DVD light will
appear on the front of the TV/VCR/DVD.
1
Play the Disc to within 30 seconds prior to the point
at which you want to set the Marker. During play,
press SEARCH MODE until the Markers
appear at the top of the TV screen.
Example: DVD
2
Within 30 seconds, press s or B to select a
Marker (1-10). Make sure _ _ _ _ : _ _ : _ _ appears
beneath the number.
3
Let the Disc play to the point at which you
want to set the Marker (up to 30 seconds
away).
When the Disc reaches the point you want to
remember, press ENTER. The Title or Track num-
ber and its elapsed playing time will appear beneath
the markers.
A checkmark will replace the Marker number.
The Marker display will disappear in about 30 sec-
onds, or press SEARCH MODE again to remove the
Marker display.
4
To r eturn to a Marker during play, press
SEARCH MODE until you see the Markers.
Press s or B to choose the Marker you want,
then press ENTER. Disc play will continue from
the marked point.
• Opening the disc tray, switching
to TV/VCR mode, or turning off
the TV/VCR/DVD will erase all
the Markers.
•To erase a single Marker, press
SEARCH MODE until you see
the Markers. Press
s
or
B
to
select a Marker. Press CLEAR.
Press RETURN to remove the
display.
•To erase all the Markers, press
SEARCH MODE until you see
the Markers. Press
B
to select
AC (All Clear), then press
ENTER. Press SEARCH MODE
or RETURN to remove the dis-
play.
PLAY
STOP
ENTER
RECORD
DISC
MENU
RETURNTITLESETUP
A
-
B
REPEATSEARCH MODE
CLEAR
MODE
ANGLESUBTITLEAUDIO
DISPLAY
SPEED C.RESET
STANDBY-ON
PICTURE SELECTSLEEP
CH.
VOL.
MUTE
ZOOM
123
456
789
0 +10
+100
REPEAT
2-4
1,
3-4
Helpful Hints
Example:Audio CD
or Video CD
Example: DVD
T0006UG_6006UG_EN_2.qx3 04.5.12 10:09 AM Page 57

Camera Angles
Some DVDs contain scenes recorded from different angles.
The camera angle will not change if the DVD does not con-
tain sequences recorded from different perspectives.
● Before you begin, press SELECT to put the
TV/VCR/DVD in DVD mode. The green DVD light will
appear on the front of the TV/VCR/DVD.
1
During DVD play, press ANGLE repeatedly to
select a different angle. The number of available
angles appears at the right of the Angle display. In this
example, eight angles are available ( /8).
58 Subtitles, Camera Angles
Subtitles
You can select a language for DVD subtitles during playback.
You may select only the subtitles that are available on the
DVD.
● Before you begin, press SELECT to put the
TV/VCR/DVD in DVD mode. The green DVD light will
appear on the front of the TV/VCR/DVD.
1
During play, press SUBTITLE repeatedly to
select a subtitle language. The number of avail-
able languages appears at the right of the subtitle dis-
play.
In the example below, six languages are available
( /6).After a few seconds, the subtitles will appear.
Or, press SUBTITLE repeatedly to turn off subtitles.
When no subtitles are available, “NOT AVAILABLE”
appears at the right of the subtitle display.
• With some DVDs, you must select
a subtitle language in the Disc
menu.
• If the desired language does not
appear after pressing SUBTITLE
several times, the Disc does not
have subtitles in that language.
• Opening the disc tray or turning
off the TV/VCR/DVD will cancel
your subtitle setting.
• If the current portion of the Disc
has multiple camera angles,
will appear on the TV screen.
ANGLE ICON must be ON.
Details are on pages 70-71.
PLAY
STOP
ENTER
RECORD
DISC
MENU
RETURNTITLESETUP
A
-
B
REPEATSEARCH MODE
CLEAR
MODE
ANGLESUBTITLEAUDIO
DISPLAY
SPEED C.RESET
STANDBY-ON
PICTURE SELECTSLEEP
CH.
VOL.
MUTE
ZOOM
123
456
789
0 +10
+100
REPEAT
1
PLAY
STOP
ENTER
RECORD
DISC
MENU
RETURNTITLESETUP
A
-
B
REPEATSEARCH MODE
CLEAR
MODE
ANGLESUBTITLEAUDIO
DISPLAY
SPEED C.RESET
STANDBY-ON
PICTURE SELECTSLEEP
CH.
VOL.
MUTE
ZOOM
123
456
789
0 +10
+100
REPEAT
1
Helpful Hints
T0006UG_6006UG_EN_2.qx3 04.5.12 10:09 AM Page 58

Slow Motion
1
Press F (pause) during DVD or Video CD play.
2
Press and hold i/D or H/h for a few
seconds. Slow motion play will begin. Press i/D
or H/h repeatedly to play the DVD forward or
backward at approximately 1/16, 1/8, or 1/2 the nor-
mal speed. Reverse slow motion is not available on a
Video CD.
An 1 (1/16), 2 (1/8), or 3 (1/2) will appear
briefly on the TV screen to indicate slow forward play.
An 1 (1/16), 2 (1/8), or 3 (1/2) will indi-
cate slow reverse play.
3
Press PLAY B to return to normal playback.
Slow Motion, Zoom 59
Zoom
You can enlarge a DVD, Video CD, or JPEG picture to 1.3,
two, or four times larger than normal.
1
Press ZOOM during play. ZOOM1 will
appear on the screen. The picture will be 1.3 times
larger. Press ZOOM again to increase the picture to
twice the regular size. ZOOM2 will appear.
Press ZOOM again to increase the picture to four
times the regular size. ZOOM3 will appear.
2
Press o, p, s, or B to move the zoomed
image up, down, left, or right.
3
To r eturn the picture to its normal size, press
ZOOM repeatedly.
• The sound will be mute during slow
motion play.
• The gray box with an inner blue
box that shows during Zoomed
play is the position guide. To
remove it or show it, press ENTER.
The position of the blue box inside
the gray box indicates the position
of the zoomed image within the
overall picture.
• The x4 zooming is not active with
some Discs. Only x2 zooming is
available for Video CDs and JPEGs.
Zoom x2Zoom x1.3
Zoom x4
ZOOM 1 ZOOM 2 ZOOM 3
Position guide example:
The Zoomed area is in
the top portion of the
overall picture.
PLAY
STOP
ENTER
RECORD
DISC
MENU
RETURNTITLESETUP
A
-
B
REPEATSEARCH MODE
CLEAR
MODE
ANGLESUBTITLEAUDIO
DISPLAY
SPEED C.RESET
STANDBY-ON
PICTURE SELECTSLEEP
CH.
VOL.
MUTE
ZOOM
123
456
789
0 +10
+100
REPEAT
1
3
2
PLAY
STOP
ENTER
RECORD
DISC
MENU
RETURNTITLESETUP
A
-
B
REPEATSEARCH MODE
CLEAR
MODE
ANGLESUBTITLEAUDIO
DISPLAY
SPEED C.RESET
STANDBY-ON
PICTURE SELECTSLEEP
CH.
VOL.
MUTE
ZOOM
123
456
789
0 +10
+100
REPEAT
2
1,3
Helpful Hints
Example: Playing a DVD forward
at half the normal speed.
3
T0006UG_6006UG_EN_2.qx3 04.5.12 10:09 AM Page 59

60 Parental Password
The Parental feature prevents viewing of DVDs that exceed
your rating limits. This feature will not limit viewing if the DVD
is not rated or coded. Check your DVDs and settings before
letting children access the TV/VCR/DVD. Follow these steps to
change your password.
● Before you begin, press SELECT to put the
TV/VCR/DVD in DVD mode. The green DVD light will
appear on the front of the TV/VCR/DVD.
1
Press SETUP twice while play is stopped.
2
Press s or B to select CUSTOM at the top of
the menu, then press ENTER.
3
Presss or B to select (the lock),
then press ENTER.
The first time you set a password, this menu will appear.
Press the Number buttons to enter a four-digit
password. The password will appear on the screen.
Write it down so you don’t forget it.
Press ENTER. You are finished!
Go to step 6 on the next page.
If you have set a password before, this menu will appear.
Press the Number buttons to enter your cur-
rent four-digit password. Asterisks ( * ) will appear
instead of your password. This protects its identity.
PARENTAL
Enter current password.
ENTER
PASSWORD
ENTER
LANGUAGE
AUDIO
SUBTITLE
DISC MENU
ORIGINAL
OFF
ENGLISH
ENTER
QUICK SETUP
TV MODE
DOLBY DIGITAL
4:3 LETTER BOX
ON
ENTER
PLAY
STOP
ENTER
RECORD
DISC
MENU
RETURNTITLESETUP
A
-
B
REPEATSEARCH MODE
CLEAR
MODE
ANGLESUBTITLEAUDIO
DISPLAY
SPEED C.RESET
STANDBY-ON
PICTURE SELECTSLEEP
CH.
VOL.
MUTE
ZOOM
123
456
789
0 +10
+100
REPEAT
2-3
1
3
T0006UG_6006UG_EN_2.qx3 04.5.12 10:09 AM Page 60

4
Press p to select CHANGE, then press ENTER.
5
Press the Number buttons to enter a four-digit
password. The password numbers will appear on the
screen. Write down the password so you will not forget
it. Press ENTER. The previous menu will reappear.
6
Press SETUP to exit the menu.
PARENTAL
PARENTAL LEVEL ALL
CHANGE
ENTER
• The default password is 4737.
If you forget your password,
press Number buttons 4, 7, 3, 7
at step 3. You will be prompted
to enter a new four-digit pass-
word. Use the Number buttons
to enter a new four-digit pass-
word, then press ENTER.
PARENTAL LEVEL will reset to
ALL. Press SETUP to remove the
menu. See pages 62-63 to reset
PARENTAL LEVEL as you desire.
• A power failure will not erase
your password.
Parental Password (cont’d) 61
PLAY
STOP
ENTER
RECORD
DISC
MENU
RETURNTITLESETUP
A
-
B
REPEATSEARCH MODE
CLEAR
MODE
ANGLESUBTITLEAUDIO
DISPLAY
SPEED C.RESET
STANDBY-ON
PICTURE SELECTSLEEP
CH.
VOL.
MUTE
ZOOM
123
456
789
0 +10
+100
REPEAT
4-5
6
5
Helpful Hints
T0006UG_6006UG_EN_2.qx3 04.5.12 10:09 AM Page 61

62 Parental Levels
Follow these steps to set the rating level for your DVDs.
DVDs whose ratings exceed the level you set will not play.
● Before you begin, press SELECT to put the
TV/VCR/DVD in DVD mode. The green DVD light will
appear on the front of the TV/VCR/DVD.
1
Press SETUP twice while play is stopped.
2
Press s or B to select CUSTOM at the top of
the menu, then press ENTER.
3
Press s or B to select (the lock), then press
ENTER.
4
Press the Number buttons to enter your four-
digit password. Asterisks (*) will appear instead of
your password.This protects its identity.
5
Press o or p to select PARENTAL LEVEL,
then press ENTER.
PARENTAL
PARENTAL LEVEL ALL
CHANGE
ENTER
PARENTAL
Enter current password.
ENTER
LANGUAGE
AUDIO
SUBTITLE
DISC MENU
ORIGINAL
OFF
ENGLISH
ENTER
QUICK SETUP
TV MODE
DOLBY DIGITAL
4:3 LETTER BOX
ON
ENTER
• ALL - The Parental feature is
inactive; all discs can play.
•8 - Adult material
•7 - NC-
1
7 - Not appropriate for
children under
1
7
•6 - R - Restricted; parental approval
required for viewers under
1
8.
•4 - PG
1
3 - Unsuitable for children
under
1
3
•3 - PG - Parental Guidance
suggested.
•
1
- G - General Audience;
recommended for all ages.
RATING
EXPLANATIONS
PLAY
STOP
ENTER
RECORD
DISC
MENU
RETURNTITLESETUP
A
-
B
REPEATSEARCH MODE
CLEAR
MODE
ANGLESUBTITLEAUDIO
DISPLAY
SPEED C.RESET
STANDBY-ON
PICTURE SELECTSLEEP
CH.
VOL.
MUTE
ZOOM
123
456
789
0 +10
+100
REPEAT
2-3,
5
1
4
T0006UG_6006UG_EN_2.qx3 04.5.12 10:09 AM Page 62

6
Press o or p to select a level, then press
ENTER. The rating levels continue on two menu
screens. Press o or p repeatedly to move to the
next or previous screen to find the rating level you
want. After making your selection, the previous menu
will appear. The level you selected will appear beside
PARENTAL LEVEL.
7
Press SETUP to exit the menu.
PARENTAL
PARENTAL LEVEL
ALL
8
7 [NC-17]
6 [R]
5
4 [PG13]
3 [PG]
ENTER
• When you try to play a DVD
whose rating exceeds the level you
set, an on-screen message will indi-
cate the DVD cannot play.
Remove the DVD, then set
PARENTAL LEVEL to ALL. Reload
the DVD and begin playback.
Some DVDs may let you enter
your four-digit password to begin
playback. Follow the on-screen
messages as prompted.
• You cannot use the default pass-
word (4737) to play a DVD.
Parental Levels (cont’d) 63
PLAY
STOP
ENTER
RECORD
DISC
MENU
RETURNTITLESETUP
A
-
B
REPEATSEARCH MODE
CLEAR
MODE
ANGLESUBTITLEAUDIO
DISPLAY
SPEED C.RESET
STANDBY-ON
PICTURE SELECTSLEEP
CH.
VOL.
MUTE
ZOOM
123
456
789
0 +10
+100
REPEAT
6
7
Helpful Hints
T0006UG_6006UG_EN_2.qx3 04.5.12 10:09 AM Page 63

64 Audio Language, Stereo Sound
Audio Language
You can select a language for DVDs during play if multiple
languages are available.
● Before you begin, press SELECT to put the
TV/VCR/DVD in DVD mode. The green DVD light will
appear on the front of the TV/VCR/DVD.
1
During DVD play, press AUDIO repeatedly to
choose one of the available languages. The new
audio will be heard. The display will disappear after
about five seconds.
The Audio display may show if the DVD has Dolby
Digital or multi-channel (5.1 CH) sound or show its
sampling rate (48k, for example). The number of
available languages appears after the “ / ” at the right
of the display ( /3, for example).
• If a language is not available after
pressing AUDIO several times, the
DVD does not have that language.
• Some DVDs only let you change
the language in the Disc menu.
• Audio languages may be abbreviat-
ed (such as ENG for English). Or,
three dashes (- - -) may appear
instead of an abbreviation.
•You can adjust Stereo Sound only
when Virtual Surround is OFF.
Details are on page 74.
Stereo Sound
Adjust Stereo Sound to determine whether you will hear the
left channel, the right channel, or both channels (stereo) dur-
ing Audio CD or Video CD playback.
1
Press AUDIO repeatedly during Audio CD or
Video CD play to choose STEREO, L-CH, or R-
CH. The display will disappear in about five seconds.
PLAY
STOP
ENTER
RECORD
DISC
MENU
RETURNTITLESETUP
A
-
B
REPEATSEARCH MODE
CLEAR
MODE
ANGLESUBTITLEAUDIO
DISPLAY
SPEED C.RESET
STANDBY-ON
PICTURE SELECTSLEEP
CH.
VOL.
MUTE
ZOOM
123
456
789
0 +10
+100
REPEAT
1
PLAY
STOP
ENTER
RECORD
DISC
MENU
RETURNTITLESETUP
A
-
B
REPEATSEARCH MODE
CLEAR
MODE
ANGLESUBTITLEAUDIO
DISPLAY
SPEED C.RESET
STANDBY-ON
PICTURE SELECTSLEEP
CH.
VOL.
MUTE
ZOOM
123
456
789
0 +10
+100
REPEAT
1
Helpful Hints
1.ENG Dolby D 3/2.1ch 48k/3
STEREO
Only the right channel is heard.
L-CH
R-CH
Only the left channel is heard.
Both right and left channels
are heard (stereo).
T0006UG_6006UG_EN_2.qx3 04.5.12 10:09 AM Page 64

Programmed Play
You may determine the order in which Audio CD, MP3, or
JPEG Tracks will play. To set a Program, follow these steps.
● Before you begin, press SELECT to put the
TV/VCR/DVD in DVD mode. The green DVD light will
appear on the front of the TV/VCR/DVD.
1
While play is stopped, press MODE until the PRO-
GRAM screen appears.
Audio CD example
2
Press o or p to select a track you want to play,
then press ENTER. Repeat this step until you have
selected all the Tracks you wish to play in the Program.
Press CLEAR to erase the last Track in the Program if
you make an error.
Additional Tracks may be on other screens. Press p or
o to see all the Tracks.
To see Tracks in a Program when there are more than
eight tracks, use i/g
and
j/h to see all the
Tracks.
While an MP3/ JPEG folder is open, press s or B to
go to the previous or next level of Files or Folders.
Press TITLE to return to the first item in the highest
level of Files or Folders.
3
Press PLAY B. The Tracks will play once in the order
you set.Turning off the TV/VCR/DVD or opening the
disc tray will erase the Program. You can start Program
play only while in the PROGRAM screen.
•You cannot use the Number buttons
or SEARCH MODE to select anoth-
er Track while playing a Program.
Press
i
/
g
or
j
/
h
to
select other Tracks in the Program.
•You cannot combine random play
with programmed play.
•You may play a Program or a Track
within a Program repeatedly. During
programmed play, press REPEAT so
ALL (all Tracks in the Program) or
TRACK appears.The entire Program
or the current Track will play over
and over.
•You cannot alter a Program during
play.
•You can start Program play only
while in the PROGRAM screen.
•A Program can have a maximum of
99 Tracks.
•To erase all Tracks in the Program,
select ALL CLEAR at step 2.
Random Play, Programmed Play 65
Random Play
You may play Audio CD, JPEG, or MP3 Tracks in Random
order instead of the order in which they are recorded
(1,2,3...).
● Before you begin, press SELECT to put the
TV/VCR/DVD in DVD mode. The green DVD light will
appear on the front of the TV/VCR/DVD.
1
While play is stopped, press MODE until the
RANDOM screen appears.
Example:Audio CD
2
While the RANDOM screen appears, press
PLAY B. The Tracks will play in random order.After
all the Tracks have played once, play will stop.
PLAY
STOP
ENTER
RECORD
DISC
MENU
RETURNTITLESETUP
A
-
B
REPEATSEARCH MODE
CLEAR
MODE
ANGLESUBTITLEAUDIO
DISPLAY
SPEED C.RESET
VOL.
MUTE
ZOOM
789
0 +10
+100
REPEAT
1
2
PLAY
STOP
ENTER
RECORD
DISC
MENU
RETURNTITLESETUP
A
-
B
REPEATSEARCH MODE
CLEAR
MODE
ANGLESUBTITLEAUDIO
DISPLAY
SPEED C.RESET
STANDBY-ON
PICTURE SELECTSLEEP
CH.
VOL.
MUTE
ZOOM
123
456
789
0 +10
+100
REPEAT
2
1
3
Helpful Hints
ENTER
TOTAL 0:08:40
CD-DA
T0006UG_6006UG_EN_2.qx3 04.5.12 10:09 AM Page 65

66 MP3/JPEG Playback
The DVD Player will play MP3 and JPEG files that you record
and finalize on a CD-RW (Compact Disc-Rewritable) or
CD-R (Compact Disc-Recordable).
These Discs may contain pictures in a JPEG format or audio
Tracks in an MP3 format. For example, you may have photo-
graphic film developed by a retailer that places the pictures
on a CD-R for you. These pictures may be in JPEG format.
Or, you may copy or download MP3 music files from certain
legal Internet sites, then copy those files onto a CD-R or
CD-RW.
You cannot make or record such Discs using the
TV/VCR/DVD. See your computer manual for details on
recording.
Keep these characteristics in mind when making Discs you
intend to play on the DVD Player of the TV/VCR/DVD.
● Record MP3 Tracks at a sampling frequency of 44.1 kHz or
48 kHz. Record in a constant bit rate between 112 kbps
and 320 kbps.
● When recording JPEG Files, the size of the picture should
be between 32 x 32 and 6300 x 5100 dots.
● Before you begin, press SELECT to put the
TV/VCR/DVD in DVD mode. The green DVD light will
appear on the front of the TV/VCR/DVD.
1
When you put a CD-RW or CD-R with MP3 or JPEG
files in the TV/VCR/DVD and press DISC MENU, the
File List will appear on the TV screen. Press o or p
to select a Folder, MP3 Track, or JPEG File.
2
If you choose a Track or File, press PLAY B or
ENTER. Starting with the Track or File you selected,
the Tracks/Files will play in the order they were
recorded, i.e. 1,2,3.
If you select a Folder and press
ENTER
, the
Tracks or Files within that Folder will appear.
Press K or L to select the Track or File you
want, then press
PLAY B
or
ENTER
.
● Press TITLE to return to the first item in the high-
est level of Folders or Files.
● Press { or B to return to previous or next levels.
● During JPEG play, press MODE to choose a transi-
tion mode (Cut In/Out or Fade In/Out). If you
chose Cut In/Out, the images will cut in and out
sharply as play progresses. If you choose Fade
In/Out, then the images fade in and out as play pro-
gresses. Press MODE again to remove the transi-
tion modes.
● During JPEG play, press B or { to rotate a picture
90 degrees clockwise or counter-clockwise.
3
To stop play, press STOP C.
• JPEG images and MP3 Tracks are
known as Files. Groups of Files are
called Folders.
•Folders have the icon.
• MP3 Tracks have the icon.
• JPEG Files have the icon.
•A maximum of 255 Folders can
be recognized. A maximum of 512
Files can be recognized.
•During play, press the Number
buttons to select another Track. Or,
press
i
/
g
or
j
/
h
to
change Tracks.
If a Track is not available,“X” will
appear on the TV screen. Play may
resume at an incorrect Track or
may continue with its current
Trac k.
• Specific Time playback is not pos-
sible with MP3 Tracks.
3
PLAY
STOP
ENTER
RECORD
DISC
MENU
RETURNTITLESETUP
A
-
B
REPEATSEARCH MODE
CLEAR
MODE
ANGLESUBTITLEAUDIO
DISPLAY
SPEED C.RESET
STANDBY-ON
PICTURE SELECTSLEEP
CH.
VOL.
MUTE
ZOOM
123
456
789
0 +10
+100
REPEAT
1-2
2
3
Helpful Hints
T0006UG_6006UG_EN_2.qx3 04.5.12 10:09 AM Page 66

MP3/JPEG Displays 67
You can review MP3 and JPEG Track (File) information dur-
ing playback.
● Before you begin, press SELECT to put the
TV/VCR/DVD in DVD mode. The green DVD light will
appear on the front of the TV/VCR/DVD.
1
Press DISPLAY during play.
The current Track
name will show on the TV screen.
2
Press
DISPLAY
again. The current Track number,
total Tracks available, and elapsed playing time of the
current Track will appear (MP3 only).
The following may appear to indicate Repeat play.
T: The current Track will play repeatedly.
G: Tracks in the current Folder (Group) will play
repeatedly.
A: All Tracks will play repeatedly.
3
Press
DISPLAY
again to remove the display.
• During MP3 playback, the
icon and the current Track name
will appear when you first press
DISPLAY.
• During JPEG play, the icon
and the current File name will
appear when you first press DIS-
PLAY.
3
PLAY
STOP
ENTER
RECORD
DISC
MENU
RETURNTITLESETUP
A
-
B
REPEATSEARCH MODE
CLEAR
MODE
ANGLESUBTITLEAUDIO
DISPLAY
SPEED C.RESET
STANDBY-ON
PICTURE SELECTSLEEP
CH.
VOL.
MUTE
ZOOM
123
456
789
0 +10
+100
REPEAT
1-3
Helpful Hints
TR 2/25 0:01:15
Elapsed playing time
of the current Track
(MP3 only)
TR (Track):
Current Track number
/Total Tracks
T
Current repeat setting
T0006UG_6006UG_EN_2.qx3 04.5.12 10:09 AM Page 67

68 Language Settings
You can use the LANGUAGE settings to select different lan-
guages for the Audio or Subtitles of DVDs, as well as languages
for DVD Disc menus.
● Before you begin, press SELECT to put the TV/VCR/DVD
in DVD mode. The green DVD light will appear on the front
of the TV/VCR/DVD.
1
While play is stopped, press SETUP twice. The
QUICK SETUP screen appears.
2
Press s or B to select CUSTOM at the top of the
menu, then press ENTER.
3
The Language menu ( ) will be selected. Press ENTER.
4
Press
oo
or
pp
to select AUDIO, SUBTITLE, or DISC
MENU.Then, press ENTER. The language options for the
selected item will appear.
LANGUAGE
AUDIO
ORIGINAL
ENGLISH
FRENCH
SPANISH
GERMAN
ITALIAN
SWEDISH
AUDIO:
The DVD’s audio plays
in the selected language.
LANGUAGE
SUBTITLE
OFF
ENGLISH
FRENCH
SPANISH
GERMAN
ITALIAN
SWEDISH
SUBTITLE:
Subtitles appear
in the chosen language.
LANGUAGE
DISC MENU
ENGLISH
FRENCH
SPANISH
GERMAN
ITALIAN
SWEDISH
DUTCH
DISC MENU:
A DVD’s Disc menu
appears in the
chosen language.
ENTER
ENTER
ENTER
LANGUAGE
AUDIO
SUBTITLE
DISC MENU
ORIGINAL
OFF
ENGLISH
ENTER
LANGUAGE
AUDIO
SUBTITLE
DISC MENU
ORIGINAL
OFF
ENGLISH
ENTER
QUICK SETUP
TV MODE
DOLBY DIGITAL
4:3 LETTER BOX
ON
ENTER
• If the DVD’s default settings for
Audio and Subtitle are the same
language, the subtitles may not
show unless you turn them on.
•Use the AUDIO and SUBTITLE
buttons to select Audio and
Subtitles available on the DVD.
Details are on pages 58 and 64.
• If you set AUDIO to ORIGINAL,
the default setting of the DVD
Audio will play.
PLAY
STOP
ENTER
RECORD
DISC
MENU
RETURNTITLESETUP
A
-
B
REPEATSEARCH MODE
CLEAR
MODE
ANGLESUBTITLEAUDIO
DISPLAY
SPEED C.RESET
STANDBY-ON
PICTURE SELECTSLEEP
CH.
VOL.
MUTE
ZOOM
123
456
789
0 +10
+100
REPEAT
2-4
1
Helpful Hints
T0006UG_6006UG_EN_2.qx3 04.5.12 10:09 AM Page 68

Language Settings (cont’d) 69
5
Press o or p to select a language, then press
ENTER. The language lists may continue on multiple
screens. Press o or p to move to the other screens.
● If you select OTHER, press four Number buttons to
enter the code for the language you desire. Use the
Language Codes below. The language or language
code you select will appear in the Language menu
beside AUDIO, SUBTITLE, or DISC MENU.
● You can select other languages for AUDIO, SUBTI-
TLE, and DISC MENU only if the language is available
on the Disc. If the language is not recorded on the
DVD, changing these settings will have no effect.
6
Press SETUP to exit the menu.
LANGUAGE
LANGUAGE CODE
Please enter a 4-digit language code.
ENTER
A-B
Abkhazian 4748
Afar 4747
Afrikaans 4752
Albanian 6563
Amharic 4759
Arabic 4764
Armenian 5471
Assamese 4765
Aymara 4771
Azerbaijani 4772
Bangla 4860
Bashkir 4847
Basque 5167
Bengali 4860
Bhutani 5072
Bihari 4854
Bislama 4855
Breton 4864
Bulgarian 4853
Burmese 5971
Byelorussian 4851
C-E
Cambodian 5759
Catalan 4947
Chinese 7254
Corsican 4961
Croatian 5464
Czech 4965
Danish 5047
Dutch 6058
English 5160
Esperanto 5161
Estonian 5166
F-H
Faroese 5261
Fiji 5256
Finnish 5255
French 5264
Frisian 5271
Gaelic (Scots) 5350
Galician 5358
Georgian 5747
German 5051
Greek 5158
Greenlandic 5758
Guarani 5360
Gujarati 5367
Hausa 5447
Hebrew 5569
Hindi 5455
Hungarian 5467
I-K
Icelandic 5565
Indonesian 5560
Interlingua 5547
Interlingue 5551
Inupiak 5557
Irish 5347
Italian 5566
Japanese 5647
Javanese 5669
Kannada 5760
Kashmiri 5765
Kazakh 5757
Kinyarwanda 6469
Kirghiz 5771
Kirundi 6460
Korean 5761
Kurdish 5767
L-N
Laothian 5861
Latin 5847
Latvian 5868
Lettish 5868
Lingala 5860
Lithuanian 5866
Macedonian 5957
Malagasy 5953
Malay 5965
Malayalam 5958
Maltese 5966
Maori 5955
Marathi 5964
Moldavian 5961
Mongolian 5960
Nauru 6047
Nepali 6051
Norwegian 6061
O-R
Occitan 6149
Oriya 6164
Oromo (Afan)6159
Panjabi 6247
Pashto 6265
Persian 5247
Polish 6258
Portuguese 6266
Pushto 6265
Quechua 6367
Rhaeto-Romance 6459
Romanian 6461
Russian 6467
S
Samoan 6559
Sangho 6553
Sanskrit 6547
Serbian 6564
Serbo-Croatian
6554
Sesotho 6566
Setswana 6660
Shona 6560
Sindhi 6550
Singhalese 6555
Siswat 6565
Slovak 6557
Slovenian 6558
Somali 6561
Spanish 5165
Sundanese 6567
Swahili 6569
Swedish 6568
T
Tagalog 6658
Ta jik 6653
Tamil 6647
Tatar 6666
Telugu 6651
Thai 6654
Tibetan 4861
Tigrinya 6655
Tonga 6661
Tsonga 6665
Turkish 6664
Turkmen 6657
Tw i 6669
U-Z
Ukrainian 6757
Urdu 6764
Uzbek 6772
Vietnamese 6855
Volapuk 6861
Welsh 4971
Wolof 6961
Xhosa 7054
Yiddish 5655
Yoruba 7161
Zulu 7267
Language Codes
PLAY
STOP
ENTER
RECORD
DISC
MENU
RETURNTITLESETUP
A
-
B
REPEATSEARCH MODE
CLEAR
MODE
ANGLESUBTITLEAUDIO
DISPLAY
SPEED C.RESET
STANDBY-ON
PICTURE SELECTSLEEP
CH.
VOL.
MUTE
ZOOM
123
456
789
0 +10
+100
REPEAT
5
6
5
T0006UG_6006UG_EN_2.qx3 04.5.12 10:09 AM Page 69

• Selecting a different TV MODE
setting is only effective if it is
available on the DVD. Check the
DVD Disc menu or case for
details.
•You also can adjust TV MODE in
the QUICK SETUP menu.With
QUICK selected, press ENTER.
TV MODE will be selected, so
press ENTER. Press
o
or
p
to
choose a setting, then press
ENTER. Press SETUP to remove
the menu.
70 Display Settings
You can change the TV Aspect ratio, Still Mode clarity, Angle
Icon availability, and Automatic Power Off features of the
DVD Player in the Display menu.
● Before you begin, press SELECT to put the
TV/VCR/DVD in DVD mode. The green DVD light will
appear on the front of the TV/VCR/DVD.
1
When play is stopped, press SETUP twice. The
QUICK SETUP screen will appear.
2
Press s or B to select CUSTOM at the top of
the menu, then press ENTER.
3
Press s or B to select (DISPLAY), then
press ENTER.
DISPLAY
TV MODE
STILL MODE
ANGLE ICON
AUTO POWER OFF
4:3 LETTER BOX
AUTO
ON
ON
ENTER
LANGUAGE
AUDIO
SUBTITLE
DISC MENU
ORIGINAL
OFF
ENGLISH
ENTER
QUICK SETUP
TV MODE
DOLBY DIGITAL
4:3 LETTER BOX
ON
ENTER
PLAY
STOP
ENTER
RECORD
DISC
MENU
RETURNTITLESETUP
A
-
B
REPEATSEARCH MODE
CLEAR
MODE
ANGLESUBTITLEAUDIO
DISPLAY
SPEED C.RESET
STANDBY-ON
PICTURE SELECTSLEEP
CH.
VOL.
MUTE
ZOOM
123
456
789
0 +10
+100
REPEAT
2-3
1
Helpful Hints
T0006UG_6006UG_EN_2.qx3 04.5.12 10:09 AM Page 70

Display Settings (cont’d) 71
4
Press o or p to select an item, then press
ENTER.
● If you selected TV MODE, press o or p to
select a setting, then press ENTER.
Choose 4:3 LETTER BOX if you want to see the
entire, widened picture with black bars at the top
and bottom of the screen. This looks like the pic-
ture you see when watching movies in a theater.
This setting is possible only if the DVD was record-
ed in the letterbox or widescreen format.
Choose 4:3 PAN & SCAN for a full height picture,
with both sides trimmed. Some companies refer to
this as reformatting the picture to fit your TV
screen and may call it the regular or normal format.
● If you selected STILL MODE, press K or L to
select a setting, then press ENTER.
This function allows you to adjust the quality of a still
image. AUTO is the default setting.
If you select FIELD, still images will be stabilized but
coarse due to the small amount of data.
If you select FRAME, still images will be highly defined
due to the simultaneous output of two fields.
● If you selected ANGLE ICON, press ENTER
repeatedly to turn ANGLE ICON ON or OFF. The
default setting is ON. Choose ON to see the
Angle icon when multiple camera angles are avail-
able during DVD play. Details are on page 58.
Choose OFF to disable the Angle icon.
● If you selected AUTO POWER OFF, press
ENTER repeatedly to set AUTO POWER OFF to
ON or OFF. The default setting is ON. Choose
ON if you want the TV/VCR/DVD to turn off when
there is no activity in DVD mode for 20 minutes.
5
Press SETUP to exit the menus.
DISPLAY
TV MODE
STILL MODE
ANGLE ICON
AUTO POWER OFF
4:3 LETTERBOX
AUTO
ON
ON
ENTER
DISPLAY
TV MODE
STILL MODE
ANGLE ICON
AUTO POWER OFF
4:3 LETTERBOX
AUTO
ON
ON
ENTER
AUTO
FIELD
FRAME
DISPLAY
STILL MODE
ENTER
DISPLAY
TV MODE
4:3 LETTER BOX
4:3 PAN & SCAN
OFF
ON
ON
ENTER
PLAY
STOP
ENTER
RECORD
DISC
MENU
RETURNTITLESETUP
A
-
B
REPEATSEARCH MODE
CLEAR
MODE
ANGLESUBTITLEAUDIO
DISPLAY
SPEED C.RESET
STANDBY-ON
PICTURE SELECTSLEEP
CH.
VOL.
MUTE
ZOOM
123
456
789
0 +10
+100
REPEAT
4
5
TV MODE STILL MODE
ANGLE ICON AUTO POWER OFF
T0006UG_6006UG_EN_2.qx3 04.5.12 10:09 AM Page 71

72 Audio Settings
Change Audio settings based on other equipment you con-
nected to the TV/VCR/DVD or according to your Disc
sound features. These settings only affect the Audio from
the DVD Player of the TV/VCR/DVD.
● Before you begin, press SELECT to put the
TV/VCR/DVD in DVD mode. The green DVD light will
appear on the front of the TV/VCR/DVD.
1
While play is stopped, press SETUP twice. The
QUICK SETUP screen will appear.
2
Press s or B to select CUSTOM at the top of
the menu, then press ENTER.
3
Press s or B to select AUDIO ( ) , then
press ENTER.
4
Press
oo
or
pp
to select DRC, DOLBY DIGI-
TAL, or DOWN SAMPLING, then follow step 5
accordingly.
5
●
If you selected DRC, press ENTER repeatedly to turn
Dynamic Range Control (DRC) ON or OFF. Choosing
ON compresses the range of volume by suppressing
loud sounds and raising low sounds. DRC is available
only on Discs recorded in the Dolby Digital format.
●
If you selected DOWN SAMPLING, press ENTER
repeatedly to choose ON or OFF. ON sets downsam-
pling to 48 kHz. OFF sets downsampling to 96 kHz.
DOWN SAMPLING is available only when the unit is
connected to a Stereo using the AUDIO OUT COAXI-
AL jack.
●
If you selected DOLBY DIGITAL, press ENTER
repeatedly to select ON or OFF. Select ON if you used
the AUDIO OUT COAXIAL jack to connect the
DVD/VCR to a stereo that is Dolby Digital compatible.
Details are on page 15. Otherwise, choose OFF.
6
Press SETUP to exit the menu.
• Dolby Digital sound must be
available on the DVD.
•You can adjust DOLBY DIGITAL
in the QUICK SETUP menu.With
QUICK selected, press ENTER.
Press p to select DOLBY DIGI-
TAL. Press ENTER to choose ON
or OFF. Press SETUP to remove
the menu.
• When you play a Disc that has
copyright protection, downsam-
pling will be at 48 kHz, even if
DOWN SAMPLING is OFF.
PLAY
STOP
ENTER
RECORD
DISC
MENU
RETURNTITLESETUP
A
-
B
REPEATSEARCH MODE
CLEAR
MODE
ANGLESUBTITLEAUDIO
DISPLAY
SPEED C.RESET
STANDBY-ON
PICTURE SELECTSLEEP
CH.
VOL.
MUTE
ZOOM
123
456
789
0 +10
+100
REPEAT
2-5
1,6
Helpful Hints
AUDIO
DRC
ON
DOWN SAMPLING
ON
DOLBY DIGITAL
ON
ENTER
Dolby Digital
AUDIO
DRC
ON
DOWN SAMPLING
ON
DOLBY DIGITAL
ON
ENTER
DRC
AUDIO
DRC
ON
DOWN SAMPLING
ON
DOLBY DIGITAL
ON
ENTER
Down Sampling
QUICK SETUP
TV MODE
DOLBY DIGITAL
4:3 LETTER BOX
ON
ENTER
LANGUAGE
AUDIO
SUBTITLE
DISC MENU
ORIGINAL
OFF
ENGLISH
ENTER
T0006UG_6006UG_EN_2.qx3 04.5.12 10:09 AM Page 72

On-Screen Displays 73
Audio CD and Video CD Display
● Before you begin, press SELECT to put the
TV/VCR/DVD in DVD mode. The green DVD light will
appear on the front of the TV/VCR/DVD.
1
Press DISPLAY repeatedly to see the following
displays during Audio CD or Video CD (with-
out PBC) play.
2
Press DISPLAY repeatedly
or press RETURN to
remove the display.
2
Press DISPLAY repeatedly or press RETURN
to remove the display.
BIT RATE: The amount of audio
and video data currently being read.
C
L0
Layer number, appears
only when playing a
two-layered Disc.
L0: Layer 0 is playing
L1: Layer 1 is playing
Current Repeat setting, if active
C: Chapter repeat
T: Title repeat
A B: A-B repeat
TR 4/12 0:03:21 - 0:02:15
TR (Track):
Current Track number
/ total Tracks
Elapsed playing time
of the current Track;
remaining playing time
of the current Track
ALL 4/12 0:13:45 - 0:45:40
ALL:
Current track number
/ total Tracks
Elapsed playing time
of the current Audio CD;
remaining playing time of
the current Audio CD
T
Current Repeat setting, if active
T: Track repeat
A: All Tracks repeat
A B: A-B repeat
DVD Display
● Before you begin, press SELECT to put the
TV/VCR/DVD in DVD mode. The green DVD light will
appear on the front of the TV/VCR/DVD.
1
Press DISPLAY repeatedly to see the following
displays during DVD play.
CH 7/49 0:01:46 - 0:03:27
CH (Chapter):
Current Chapter number
/ total Chapters
Elapsed playing time
of the current Chapter;
remaining playing time
of the current Chapter
TT 1/2 0:00:00 - 1:23:45
TT (Title):
Current Title number
/ Total Titles
Elapsed playing time of the
current Title; remaining playing
time of the current Title
PLAY
STOP
ENTER
RECORD
DISC
MENU
RETURNTITLESETUP
A
-
B
REPEATSEARCH MODE
CLEAR
MODE
ANGLESUBTITLEAUDIO
DISPLAY
SPEED C.RESET
STANDBY-ON
PICTURE SELECTSLEEP
CH.
VOL.
MUTE
ZOOM
123
456
789
0 +10
+100
REPEAT
1-2
2
PLAY
STOP
ENTER
RECORD
DISC
MENU
RETURNTITLESETUP
A
-
B
REPEATSEARCH MODE
CLEAR
MODE
ANGLESUBTITLEAUDIO
DISPLAY
SPEED C.RESET
STANDBY-ON
PICTURE SELECTSLEEP
CH.
VOL.
MUTE
ZOOM
123
456
789
0 +10
+100
REPEAT
1-2
2
T0006UG_6006UG_EN_2.qx3 04.5.12 10:10 AM Page 73

74 Black Level,Virtual Surround, Initializing
Black Level
Adjust Black Level to brighten the DVD and Video CD picture
during playback.
1
During DVD or Video CD play, press MODE so
the Black Level icon shows on the TV screen.
2
Within 10 seconds, press ENTER repeatedly to
choose ON or OFF. ON brightens the dark parts of
the picture. OFF shows the original picture as recorded.
Virtual Surround
You can enjoy improved stereo sound when you play DVDs,
Audio CDs,Video CDs, or MP3 files recorded in Dolby Digital
or Pulse Code Modulation (PCM). Check the Disc case for
details on availability.
1
During Disc play, press MODE so the Virtual
Surround icon appears on the TV screen.
2
While the Virtual Surround icon appears, press
ENTER to choose 1, 2, or OFF. The default setting
is OFF.The icon will disappear after about 10 seconds.
• Virtual Surround is available only
if
you set Stereo Sound to Stereo.
Details are on page 64.
• Virtual Surround and Black Level
settings will be saved even if the
TV/VCR/DVD is turned off.
PLAY
STOP
ENTER
RECORD
DISC
MENU
RETURNTITLESETUP
A
-
B
REPEATSEARCH MODE
CLEAR
MODE
ANGLESUBTITLEAUDIO
DISPLAY
REPEAT
2
1
Helpful Hint
OFF
OFF
4
Press SETUP to remove the menu.
2
Press s or B to select INIT. (INITIALIZE) at the
top of the menu, then press ENTER.
3
Press
oo
or
pp
to select YES.Then, press ENTER
twice. To cancel, select NO instead.
INITIALIZE
Initialize?
NO
YES
ENTER
INITIALIZE
Initialize?
NO
YES
ENTER
Initializing
You can return all the DVD Player’s Setup menu items (except
for PARENTAL) to their default settings.
● Before you begin, press SELECT to put the
TV/VCR/DVD in DVD mode.The green DVD light will
appear on the front of the unit.
1
While play is stopped, press SETUP twice. The
QUICK SETUP screen appears.
QUICK SETUP
TV MODE
4:3 LETTER BOX
DOLBY DIGITAL ON
ENTER
PLAY
STOP
ENTER
RECORD
DISC
MENU
RETURNTITLESETUP
A
-
B
REPEATSEARCH MODE
CLEAR
MODE
ANGLESUBTITLEAUDIO
DISPLAY
REPEAT
2,3
1,4
PLAY
STOP
ENTER
RECORD
DISC
MENU
RETURNTITLESETUP
A
-
B
REPEATSEARCH MODE
CLEAR
MODE
ANGLESUBTITLEAUDIO
DISPLAY
REPEAT
2
1
T0006UG_6006UG_EN_2.qx3 04.5.12 10:10 AM Page 74

AUDIO In Jacks: red and white jacks on the front of the TV/VCR/DVD
which are used to receive or record audio from another source (VCR,
Camcorder, etc.).
Automatic Channel Setup:
process in which the TV/VCR/DVD memorizes
all available TV channels.Then, when you push the CH. ▲/▼ buttons, you only
scan through channels you receive.
Auxiliar
y (AUX): The channel to which you set your TV/VCR/DVD during
dubbing or when viewing material that is playing on another device that is
connected to the TV/VCR/DVD (for example, a Camcorder or VCR or TV
channels from a Cable Box/Satellite Receiver). Press SELECT to choose AUX
at the TV/VCR/DVD.
Bands:
settings that allow you to tune channels.
• Antenna – VHF (very high frequency; channels 2-13) and UHF (ultra high
frequency; channels 14-69).
• Cable – standard channels can be received without a Cable Box.
Brightness:
adjusting increases or decreases the brightness of the color on
the screen.
CO
AXIAL Digital Audio Out jack: Sends digital audio to a stereo, allow-
ing you to adjust the volume at the stereo.
Color
: adjusting pales or brightens the TV/VCR/DVD picture color.
Dolb
y Digital:A surround sound system that provides 5.1 channel sound as
used in movie theaters. Sound is heard through multiple channels, not just the
right and left as with standard stereo.
Dub
bing: copying a videotape from a separate VCR or camcorder.
HQ:
high quality; a feature in the VCR circuitry which provides enhanced
videotape picture detail through the TV/VCR/DVD.
O
TR: One-Touch Recording; a timed recording that starts immediately and
records for 30 minutes to eight hours, whichever you specify.
Sharpness:
adjusting softens or clarifies the picture on the screen.
T
ape Speeds: how fast the videotape travels during playback or recording.
The faster the tape speed, the better the recording quality will be. Faster
speeds (SP) also use more space on the tape. So, you can put more recording
on a tape if you use a slower tape speed (SLP).
• SP (standard play) – fastest tape speed (recording time for a T120 tape is
approximately two hours); best picture quality.
• LP (long play) – average tape speed; only playback in this speed is available
on this TV/VCR/DVD.
• SLP (super long play) – slowest tape speed (recording time for a T120 tape
is approximately six hours).
Tint
: adjusting changes the tints of the picture from purple to green.
VIDEO In Jack:
yellow jack on the front of the TV/VCR/DVD which is used
to receive or record video from another source (VCR, Camcorder, etc.).
Glossary 75
T0006UG_6006UG_EN_2.qx3 04.5.12 10:10 AM Page 75

76 Helpful Hints
If you are having problems with your product, check this list of problems and possible solutions before
requesting service.You may be able to solve the problem yourself.
Location
For safe operation and satisfactory performance of your TV/VCR/DVD, remember the following:
• Shield it from direct sunlight and keep it away from sources of intense heat.
•Avoid dusty or humid places.
•Avoid places with insufficient ventilation. Do not block the ventilation openings at the top and bottom of
the TV/VCR/DVD. Do not place the TV/VCR/DVD on a carpet, as this will block the ventilation openings.
•Avoid locations subject to strong vibrations.
• Do not place the TV/VCR/DVD near strong magnetic fields.
• Do not move the TV/VCR/DVD from a cold place to a hot place, or vice versa.
Electrical Shock and Fire Hazards
• Do not handle the power cord with wet hands.
• Do not pull the power cord when disconnecting the TV/VCR/DVD from the AC (alternating current)
wall outlet. Grasp it by the plug.
• If you spill water on the TV/VCR/DVD, unplug the power cord immediately and take the TV/VCR/DVD
to an authorized service center.
• Do not put your fingers or objects into the cassette compartment or disc tray.
•Do not place anything on top of the TV/VCR/DVD.
Dew Warning (Moisture Condensation)
• Moisture may condense inside the unit when you move it from a cold place to a warm place, after heat-
ing a cold room, or when the humidity is high.There is no warning that moisture is in your
TV/VCR/DVD. Playing a tape when moisture has accumulated could damage the tape and the
TV/VCR/DVD. If you suspect moisture inside the TV/VCR/DVD, keep the power on (but do not play a
tape) for at least two hours.This will allow the TV/VCR/DVD to dry.
TV/VCR/DVD will not perform a timer recording.
• Set the recording start and stop times correctly. Details are on pages 28-31.
Midnight is 12 a.m. Noon is 12 p.m.
•Make sure the TV/VCR/DVD power is off for the timer recording.
• Set the clock. Details are on pages 20-23.
• Put a videotape in the cassette compartment of the TV/VCR/DVD.The tape must have a record tab.
Details are on page seven.
• If the power fails, timer recordings will be restored when you reset the clock.Timer recordings do not
occur if set to take place during the power failure.
TV/VCR/DVD will not record on a videotape.
•Make sure the videotape has a record tab. Details are on page seven.
•Plug the power cord into an active AC outlet. Details are on page nine.
•Check your hookups. Details are on pages eight-nine.
• Set up the TV channels. Details are on page 18.
•You cannot record DVDs onto a videotape using the TV/VCR/DVD.
Channel reception is poor.
• Check connections, then set up the channels again. Details are on page 18.
TV/VCR/DVD has no power.
• Connect the power plug to an AC (alternating current) outlet completely.
TV/VCR/DVD ejects the tape when you try to start a recording.
•Make sure the tape has a record tab. Details are on page seven.
T0006UG_6006UG_EN_2.qx3 04.5.12 10:10 AM Page 76

Helpful Hints (cont’d) 77
Disc cannot play.
• Insert a playable Disc. Make sure the Disc is labelled for Region 1 or ALL regions and is NTSC compatible.
Details are on page six.
• Place the Disc correctly in the Disc tray. If the Disc is one-sided, place the Disc in the tray with the label facing
up. If the Disc is two-sided, make sure the label of the side you want to play is facing up.
•Clean the Disc. Make sure the Disc is not scratched or warped.
• Cancel the Parental Controls, enter the password, or change the Parental level. Details are on pages 60-63.
TV/VCR/DVD does not have a picture.
•Adjust the antenna or check the Cable TV or satellite signal connection. If using a Cable Box/Satellite Receiver,
set the TV/VCR/DVD to channel 3, 4, or AUX. Details are on pages eight-nine.
• Adjust the picture controls. Details are on page 25.
• Select an active TV channel. Details are on pages 18-19.
•Make sure the Disc is compatible with the DVD Player of the TV/VCR/DVD. Details are on page six.
TV/VCR/DVD has poor sound or no sound.
•Press VOL. K/L to adjust the volume. Press MUTE to restore the volume.
• Check the audio settings for DVD mode. Details are on page 72.
• Check the audio settings of the Disc. For example, you may have selected “soundtrack” playback or an unavail-
able sound setting (such as Dolby Digital) or language. Details are on pages 64, 68-69, and 72. Tr y o t her sound
options provided in the DVD Disc menu.
You cannot choose a DVD feature, such as camera angle or audio or subtitle language.
• The feature must be recorded on the DVD. Not all DVDs contain multiple angles, subtitles, etc. Refer to the
Disc case to see what features are available. If the feature is not available, the “X” may appear in the top right
corner of the screen.
Videotape play is poor or the tape is destroyed.
• Adjust the tracking. Details are on page 40.
• Use the Rental feature. Details are on page 35.
• If moisture has accumulated in the unit, keep the power on for at least two hours, but do not play a tape.
TV/VCR/DVD does not display closed captions for TV programs.
•Make sure closed captioning is available for the program. Refer to the TV listings in your local newspaper.
Remote control does not operate the TV/VCR/DVD.
• Aim the remote control directly at the remote sensor on the front of the TV/VCR/DVD.
Details are on page 16.
• Remove all obstacles between the remote control and the TV/VCR/DVD.
• Inspect and replace the batteries in the remote control. Details are on page seven.
Number buttons will not select channels above 69.
• Enter channel numbers as a two-digit number. If you want to select channels 100 and above, press the
+100/+10 button, then the Number buttons for the last two digits. Details are on page 11.
•If you are using an antenna and do not have Cable TV/Satellite, only channels 2-69 will be available.
You cannot insert a tape into the cassette compartment of the TV/VCR/DVD.
• Insert the tape with the window facing up and the record tab facing you and on the left.
•Make sure a tape isn’t already inside by pressing STOP/EJECT C A on the front of the TV/VCR/DVD.
• Gently push on the center of the tape. Never force a tape into the TV/VCR/DVD.
•If you have set a timer recording and the power is off, the unit will eject the tape if the record tab is missing.
You cannot remove the tape from the TV/VCR/DVD.
•Make sure the power plug is completely connected to an AC (alternating current) outlet.
• If a timer recording is programmed, turn on the TV/VCR/DVD power, then eject the tape. Be sure to insert a
tape and turn off the TV/VCR/DVD power for the timer recording.
• Unplug the TV/VCR/DVD power cord for five minutes.Then, plug in the power cord again, then press STAND-
BY-ON on the TV/VCR/DVD. If the tape does not eject, press STOP/EJECT C A on the TV/VCR/DVD three
to five times. If the tape still does not eject, an authorized servicer may need to remove the tape.
T0006UG_6006UG_EN_2.qx3 04.5.12 10:10 AM Page 77

78 Specifications
Designs and specifications are subject to change without notice and without our legal obligation.
General TV/VCR
19MDTR20
CRT: 19 inch in-line gun
90˚ deflection tube
27MDTR20
CRT: 27 inch in-line gun
110˚ deflection tube
Closed Caption system: §15.119/FCC
Video Heads: Rotary four-head
Tape width: 1/2 inch
Tape speeds
SP 33.40 mm/sec.
LP 16.67 mm/sec.
SLP 11.12 mm/sec.
Tuner channels: 2-69
Cable TV: 1-125
General DVD
Color System: NTSC
Electrical Specifications
Sound output: Two speakers, 1W, 8 ohm
Other Specifications
Terminals
Antenna In: VHF/UHF/Cable TV
75 ohm unbalanced (F-type)
Video In: One RCA connector
Audio L/R In: Two RCA connectors
Headphone: 1/8” stereo (3.5 mm)
Coaxial Digital
Audio Out: One pin jack,
500m Vpp (75 ohm)
Operating
temperature: 41ºF-104ºF (5ºC-40ºC)
Power requirements: AC 120V, 60Hz
19MDTR20:
Power consumption
(Maximum): 90W
Dimensions: Height: 19-11/16” (500 mm)
Width: 23-13/16” (605 mm)
Depth: 18-11/16” (474 mm)
Weight: 48.5 lbs (22 kg)
27MDTR20:
Power consumption
(Maximum): 110W
Dimensions: Height: 25-1/2” (648 mm)
Width: 26-9/16” (675 mm)
Depth: 19-11/16” (500 mm)
Weight: 86 lbs (39 kg)
Accessories: Remote Control with two
AA batteries
Owner’s Manual
Quick-Use Guide
T0006UG_6006UG_EN_2.qx3 04.5.12 10:10 AM Page 78

RENEWED
90 DAY
LIMITED WARRANTY

a-b repeat . . . . . . . . . . . . . . . . . .56
angle button . . . . . . . . . . . . . .15, 58
ant(enna) jack . . . . . . . . . . . .8-9, 17
arrow buttons . . . . . . . . . . . . . . .14
audio button . . . . . . . . . . . . .15, 64
audio cd . . . . . . . . . . . . . . . . . .6, 54
audio in/out jacks . . . . . . . .9, 16, 33
audio out coaxial jack . . . . . .10, 17
audio settings (dvd) . . . . . . . . . . .72
auto return . . . . . . . . . . . . . . . . .32
automatic rewind, eject . . . . . . . .40
auxiliary mode (aux) . . . .8-9, 11,33
batteries . . . . . . . . . . . . . . . . . . . . .7
black level . . . . . . . . . . . . . . . . . .74
brightness . . . . . . . . . . . . . . . . . .25
c.reset button . . . . . . . . . .15, 31,36
camera angle . . . . . . . . . . . . . . . .58
cassette compartment . . . . . . . . .16
channel
above 100 . . . . . . . . . . . . . . . .14
adding/deleting . . . . . . . . . . . .19
setup . . . . . . . . . . . . . . . . . . . .18
o/p buttons . . . . .11, 15-16, 40
chapters . . . . . . . . . . . . . . . . . . . .53
clear button . . . . . . . . . . . . . . . . .15
clock setting . . . . . . . . . . . . . .20-23
closed captions . . . . . . . . . . . . . .41
color . . . . . . . . . . . . . . . . . . . . . .25
connections . . . . . . . . . . . . .8-10, 33
contents, table of . . . . . . . . . . . . . .4
contrast . . . . . . . . . . . . . . . . . . . .25
controls
remote . . . . . . . . . . . . . . . .14-15
tv/vcr/dvd . . . . . . . . . . . . . . . .16
copyright protection . . . . . . . .3, 33
counter . . . . . . . . . . . . . . . . .25, 36
daylight-savings time . . . . . . . . . . .24
disc menu button . . . . . . . . . .15, 51
disc tray . . . . . . . . . . . . . . . . .13, 16
display button . . . . . . . . . .14, 25, 73
display settings . . . . . . . . . . . .70-71
duplication . . . . . . . . . . . . . . . . . .33
dvd light . . . . . . . . . . . . . . . . . . . .16
dvd video . . . . . . . . . . . . . . . . . . . .6
ejecting a tape . . . . . . . . . . . . . . .77
enter button . . . . . . . . . . . . . . . .15
fast forward search . . . . . . . .39, 52
front panel . . . . . . . . . . . . . . . . . .16
glossary . . . . . . . . . . . . . . . . . . . .75
headphone jack . . . . . . . . . . . . . .16
helpful hints . . . . . . . . . . . . . .76-77
hookups . . . . . . . . . . . . . . .8-10, 33
language (dvd) . . . . . . . . . .64, 68-69
language (setup menus) . . . . . . . .18
language settings . . . . . . . . . . .68-69
lp (long play) . . . . . . . . . . . . . .26, 75
menus . . . . . . . . . . . . . . . . .5, 18, 51
mode button . . . . . . . . . .15, 65, 74
mp3 display . . . . . . . . . . . . . . . . .67
mp3 playback . . . . . . . . . . . . . . . .66
mp3 track selection . . . . . . . . . . .66
mts system . . . . . . . . . . . . . . .48-50
mute button . . . . . . . . . . . . . . . .15
number buttons . . . . . . . . . . . . . .14
on-screen status displays . . . .25, 73
one-touch recording . . . . . . . . . .27
open/close button A . . . . . . . . . .16
output button . . . . . . . . . . . . . . .16
parental controls . . . . . . . . . .60-63
password . . . . . . . . . . . . . . . .60-61
(pause) k button . . . .14, 39, 55, 59
picture controls . . . . . . . . . . . . . .25
picture button . . . . . . . . . . . .14, 25
play B button . . . . . . . . . .12-14, 16
playing discs . . . . . . . . . . . . . . . . .13
playing videotapes . . . . . . . . . . . .12
power cord . . . . . . . . . . . . . . .9, 17
programs . . . . . . . . . . . . . . . . . . .65
random playback . . . . . . . . . . . . .65
ratings
mpaa . . . . . . . . . . . . . . . . . . . .46
tv . . . . . . . . . . . . . . . . . . . .42-45
real-time tape counter . . . . . . . . .36
rear panel . . . . . . . . . . . . . . . . . .17
record button . . . . . . . . . . . .14, 26
recording
basic . . . . . . . . . . . . . . . . . . . .26
one-touch . . . . . . . . . . . . . . . .27
timer . . . . . . . . . . . . . . . . .28-31
rec/otr button . . . . . . . . . . . .16, 27
rec/otr light . . . . . . . . . . . . . . . . .16
remote control
buttons . . . . . . . . . . . . . . .14-15
using . . . . . . . . . . . . . . . . . . . . .7
remote sensor . . . . . . . . . . . . . . .16
repeat button . . . . . . . . . . . . .14, 56
repeat a-b button . . . . . . . . . .15, 56
repeat play . . . . . . . . . . . . . . .34, 56
rerecording . . . . . . . . . . . . . . . . .33
resuming play . . . . . . . . . . . . . . . .55
return button . . . . . . . . . . . . . . . .14
reverse searching . . . . . . . . . .39, 52
rf coaxial cable . . . . . . . . . . . . . . . .8
safety precautions . . . . . . . . . . . . .3
search mode button . .15, 53-54, 57
searching . . . . . . . . . . . . . . . .39, 52
second audio program . . . . . .48, 50
select button . . . . . . . . . . . . . . . .14
setup button . . . . . . . . . . . . . .5, 15
sharpness . . . . . . . . . . . . . . . . . . .25
sleep button . . . . . . . . . . . . . .14, 36
sleep timer . . . . . . . . . . . . . . . . . .36
slow motion . . . . . . . . . . . . . .39, 59
slp (super long play) . . . . . . . .26, 75
sp (standard play) . . . . . . . . . .26, 75
specifications . . . . . . . . . . . . . . . .78
speed button . . . . . . . . . . . . .15, 26
standby-on button . . . . . . . . .14, 16
status display . . . . . . . . . . . . .25, 73
stereo broadcast recording . .48-50
still picture . . . . . . . . . . . . . . .39, 55
stop C button . . . . . . . . . . . . . . .14
stop/eject C A button . . . . . .12, 16
subtitle button . . . . . . . . . . . .15, 58
super high speed searching . . . . .39
table of contents . . . . . . . . . . . . . .4
tape duplication . . . . . . . . . . . . . .33
tape eject . . . . . . . . . . . . . . . .16, 77
tape speed . . . . . . . . . . . . . . .26, 75
time search . . . . . . . . . . . . . . . . .37
time setting . . . . . . . . . . . . . . .20-23
timer recording
cancelling . . . . . . . . . . . . . . . . .31
checking . . . . . . . . . . . . . . . . .31
setting . . . . . . . . . . . . . . . .28-30
tint . . . . . . . . . . . . . . . . . . . . . . . .25
title button . . . . . . . . . . . . . . .14, 51
titles . . . . . . . . . . . . . . . . . . . . . . .51
tracking . . . . . . . . . . . . . . . . . . . .40
tracks . . . . . . . . . . . . . . . . . . . . . .54
vcr/tv light . . . . . . . . . . . . . . . . . .16
v-chip setup . . . . . . . . . . . . . .42-47
video in/out jacks . . . . .9, 16-17, 33
virtual surround . . . . . . . . . . . . . .74
volume ▲/▼ buttons . . . . . . .15-16
warranty . . . . . . . . . . . . . . . . . . .79
zero return . . . . . . . . . . . . . . . . .36
zoom button . . . . . . . . . . . . .15, 59
80 Index
IB8491E002
Printed In Malaysia
1EMN20060
T0006UG/T6006UG * * * *
T0006UG_6006UG_EN_2.qx3 04.5.12 10:17 AM Page 80

MANUAL DEL USUARIO
GRACIAS POR HABER ELEGIDO MAGNAVOX.
¿NECESITA AYUDA RÁPIDA?
LEA PRIMERO LA GUÍA DE USO RÁPIDO Y/O EL MANUAL DEL
PROPIETARIO PARA OBTENER CONSEJOS RÁPIDOS QUE LE PERMITIRÁN
DISFRUTAR AÚN MÁS DE SU PRODUCTO MAGNAVOX.
SI YA HA LEÍDO SUS INSTRUCCIONES Y TODAVÍA NECESITA AYUDA,
VISITE NUESTRA DIRECCIÓN
WWW.MAGNAVOX.COM
O LLAME AL 1-800-705-2000 CON SU PRODUCTO JUNTO A USTED.
19MDTR20
27MDTR20
TELEVISIÓN A COLOR
CON REPRODUCTOR DE VCR Y
DVD INCORPORADO
T0006UG_6006UG_SP_1.qx3 04.5.12 10:13 AM Page 1

Visite nuestro sitio en el World Wide Web en http://www.magnavox.com
Al registrar su modelo con MAGNAVOX usted cumplirá con los requisitos para obtener todos los valiosos ben-
eficios que se indican a continuación, ¡no se los pierda! Llene y devuelva su tarjeta de registro del producto
ahora mismo para garantizar:
Devuelva su tarjeta de registro de producto hoy
mismo y obtenga lo mejor de su compra.
Conozca estos
símbolos de seguridad
Este “relámpago” indica material no
aislado dentro de la unidad que puede
causar una descarga eléctrica. Para la
seguridad de todos en su hogar, por favor no
retire la cubierta del producto.
El “signo de exclamación” llama la aten-
ción hacia funciones sobre las que
debería leer con atención en la liter-
atura adjunta para evitar problemas opera-
tivos y de mantenimiento.
ADVERTENCIA Para reducir el riesgo de
incendios o de descarga eléctrica, este apara-
to no se debe exponer a la lluvia ni a la
humedad, y no se le deben colocar encima
objetos llenos de líquido como jarrones.
PRECAUCIÓN: Para evitar descargas eléc-
tricas, haga que la paleta ancha del enchufe
coincida con la ranura ancha e introdúzcala
hasta el fondo.
ATTENTION:Pour éviter les chocs élec-
triques, introduire la lame la plus large de la
fiche dans la borne correspondante de la
prise et pousser jusqu’au fond.
s
t
RIESGO DE CHOQUE ELÉCTRICO
NO ABRIR
Atención: Para reducir el riesgo de choque eléctrico,
no quite la tapa (o el panel posterior).
En su interior no hay piezas que el usuario pueda reparar.
Para servicio dirijase a personel calificado.
*Comprobante de
Compra
*Seguridad del
producto
Notificación
*Beneficios
adicionales de la
propiedad del
producto
t
¡Felicitaciones por su compra
y bienvenido a la “familia”!
Estimado propietario de un
producto MAGNAVOX:
Gracias por su confianza en MAGNAVOX. Usted ha
escogido uno de los productos mejor construidos y
con mejor respaldo disponible hoy en día. Haremos
todo lo que esté a nuestro alcance por mantenerle
satisfecho con su compra durante muchos años.
Como miembro de la “familia” MAGNAVOX, usted
tiene derecho a estar protegido con una de las
garantías más completas y redes de servicio más
sobresalientes de la industria. Lo que es más: su
compra le garantiza que recibirá toda la información
y ofertas especiales a las que tiene derecho, además
de un fácil acceso a los accesorios desde nuestra
cómoda red de compra desde el hogar.
Y lo que es más importante: usted puede confiar en
nuestro irrestricto compromiso con su satisfacción
total.
Todo esto es nuestra manera de decirle bienvenido
y gracias por invertir en un producto MAGNAVOX.
P.S. Con el fin de obtener lo mejor de su
compra MAGNAVOX, asegúrese de
llenar y de devolver inmediatamente su
tarjeta de registro del producto.
La devolución de la tarjeta
incluida garantiza que se archive
la fecha de compra, de modo
que no necesitará más papeleo
para obtener el servicio de
garantía.
Al registrar su producto,
recibirá la notificación (directa-
mente del fabricante) en el
raro caso de un retiro de pro-
ductos o de defectos en la
seguridad.
Registrar su producto garantiza
que recibirá todos los privilegios
a los cuales tiene derecho,
incluyendo las ofertas especiales
para ahorrar dinero.
Sólo para uso del cliente
Escriba a continuación el Nº de serie, el
cual se ubica en la parte posterior del gabi-
nete. Guarde esta información para futura
referencia.
Nº de modelo. ______________________
Nº de serie. ________________________
s
T0006UG_6006UG_SP_1.qx3 04.5.12 10:13 AM Page 2

Precauciones de seguridad
Advertencia: Para evitar riesgos de incendio o descargas elèctricas, no exponga este equipo a la lluvia o a la
humedad.
Advertencia de la Comisión Federal de Comunicaciones (FCC): Todo cambio o
modificación no autorizados a este equipo anula la autoridad del usuario para operarlo.
Seguridad del láser: Esta unidad usa un láser. Sólo una persona de servicio calificado debe retirar la
cubierta o intentar reparar este dispositivo, debido a posibles lesiones oculares.
PRECAUCIÓN: EL USO DE CONTROLES O AJUSTES O LA REALIZACIÓN DE PROCEDIMIENTOS
DIFERENTES A AQUELLOS QUE SE ESPECIFIQUEN AQUÕ PUEDE PROVOCAR UNA PELIGROSA
EXPOSICIÓN A LA RADIACIÓN.
PRECAUCIÓN: RADIACIÓN LÁSER VISIBLE E INVISIBLE CUANDO SE ABRE Y SE ANULA EL INTERLOCK.
NO MIRE FIJAMENTE EL HAZ. EL RAYO SE UBICA ADENTRO, CERCA DE LA PLATINA.
Información especial para usuarios canadienses: Este aparato digital clase B está en con-
formidad con ICES-003 de Canadá. Cet appareil numèrique de la classe B est conforme à la norme NMB-003
du Canada.
Interferencia de radio/TV: Este equipo ha sido probado y se considera que cumple con los límites para dis-
positivos digitales Clase B, según la Parte 15 de las normas de la FCC. Dichos límites se establecen para
brindar una protección razonable contra interferencia dañina en una instalación residencial. Este equipo gen-
era, utiliza y puede irradiar energía de radiofrecuencia y, si no se instala y utiliza de acuerdo con las instruc-
ciones, puede provocar interferencia dañina a las comunicaciones radiales. Sin embargo, no hay ninguna garantía
de que no se produzca interferencia en una instalación determinada. Si este equipo causa interferencia dañina
en la recepción de radio o televisión, lo que se puede determinar apagando y encendiendo el equipo, se le sug-
iere al usuario que trate de corregir la interferencia tomando una o más de las siguientes medidas:
1) Reoriente o reubique la antena receptora.
2) Aumente el espacio de separación entre el equipo y el receptor.
3) Conecte el equipo en un tomacorriente o en un circuito diferente del que estè conectado el receptor.
4) Consulte al distribuidor o a un tècnico en radio/TV con experiencia para obtener ayuda.
Protección del derecho de autor: Se prohíbe la copia, transmisión, ejecución pública y el prèstamo
de discos. Este producto incorpora tecnología para protección del derecho de autor la que está protegida de
acuerdo con la modalidad de quejas de algunas patentes de EE.UU. y otros derechos de propiedad intelectual
de Macrovision Corporation y otros propietarios de derechos. El uso de esta tecnología de protección del
derecho de autor la debe autorizar Macrovision Corporation y fue creada sólo para el uso en el hogar y otros
limitados, a menos que Macrovision Corporation autorice lo contrario. Está prohibido modificar el diseño del
producto o su desmontaje.
Nota para la persona que instale el sistema de televisión por cable: Este recordatorio
llama la atención de la persona que instale el sistema de televisión por cable para que respete el Artículo 820-
40 del Código elèctrico nacional, el que proporciona instrucciones para la apropiada conexión a tierra; en
especial, que la conexión a tierra del cable se debe conectar al sistema de conexión a tierra del edificio, lo más
cerca posible del punto de entrada del cable.
Declaración de conformidad
Número de modelo: 19MDTR20
27MDTR20
Nombre comercial: Magnavox
Parte responsable: Philips Consumer Electronics North America
P. O . B o x 14810
Knoxville,TN 37914-1810
(865) 521-4316
Seguridad e información general 3
Fabricado bajo licencia de Dolby Laboratories.“Dolby” y el símbolo de doble D son marcas registradas de Dolby Laboratories.
Derecho de autor 2004 Magnavox.Todos los derechos reservados.
T0006UG_6006UG_SP_1.qx3 04.5.12 10:13 AM Page 3

4 Tabla de contenidos
Información general
Seguridad e información general . . . . . . . . . . . . . . .3
Tabla de contenidos . . . . . . . . . . . . . . . . . . . . . . . . .4
Introducción . . . . . . . . . . . . . . . . . . . . . . . . . . . . . .5
Discos y cintas de video reproducibles . . . . . . . . . .6
Preparación inicial y uso
Antes de usar el TV/VCR/DVD . . . . . . . . . . . . . . . .7
Conexión del TV/VCR/DVD . . . . . . . . . . . . . . . .8-9
Conexiones opcionales . . . . . . . . . . . . . . . . . . . . .10
Ver TV . . . . . . . . . . . . . . . . . . . . . . . . . . . . . . . . . .11
Reproducción de una cinta de video . . . . . . . . . . .12
Reproducción de un disco . . . . . . . . . . . . . . . . . . .13
Descripción de los controles
Botones del control remoto . . . . . . . . . . . . . .14-15
Panel delantero . . . . . . . . . . . . . . . . . . . . . . . . . . .16
Panel posterior . . . . . . . . . . . . . . . . . . . . . . . . . . .17
Ajustes del TV
Idioma del menú, reajuste de los canales de TV . .18
Agregar/borrar canales . . . . . . . . . . . . . . . . . . . . .19
Ajuste del reloj . . . . . . . . . . . . . . . . . . . . . . . . .20-23
Horario de verano . . . . . . . . . . . . . . . . . . . . . . . .24
Pantallas de estado, Controles de imagen . . . . . . .25
Grabación
Grabación de cintas de video . . . . . . . . . . . . . . . .26
Grabación de un toque . . . . . . . . . . . . . . . . . . . .27
Grabación con temporizador . . . . . . . . . . . . .28-31
Rebobinado automático de grabación
con temporizador . . . . . . . . . . . . . . . . . . . . . . . . .32
Regrabación (duplicado de cintas) . . . . . . . . . . . . .33
Funciones de cinta de video
Repetir . . . . . . . . . . . . . . . . . . . . . . . . . . . . . . . . .34
Cintas play . . . . . . . . . . . . . . . . . . . . . . . . . . . . . . .35
Retorno a cero, apagado programado . . . . . . . . .36
Búsqueda de hora . . . . . . . . . . . . . . . . . . . . . . . .37
Busca hacia índice . . . . . . . . . . . . . . . . . . . . . . . . .38
Funciones de reproducción de cinta de video . . . .39
Funciones de operación automática . . . . . . . . . . .40
Funciones adicionales del TV
Subtítulos encapsulados . . . . . . . . . . . . . . . . . . . .41
Ajuste de V-Chip . . . . . . . . . . . . . . . . . . . . . . .42-47
Sonido de televisión multicanal . . . . . . . . . . . .48-50
Funciones de disco
Menús, menús de título . . . . . . . . . . . . . . . . . . .51
Búsqueda de avance/retroceso rápido . . . . . . . . .52
Reproducción de título/capítulo,
reproducción de hora . . . . . . . . . . . . . . . . . . . . .53
Reproducción de pista . . . . . . . . . . . . . . . . . . . .54
Reproducción pausada y paso a paso,
reanudación activada . . . . . . . . . . . . . . . . . . . . . .55
Repetir, repetir A-B . . . . . . . . . . . . . . . . . . . . . . .56
Marcadores . . . . . . . . . . . . . . . . . . . . . . . . . . . . .57
Subtítulos, ángulos de cámara . . . . . . . . . . . . . . .58
Cámara lenta y zoom . . . . . . . . . . . . . . . . . . . . .59
Código de acceso paterno . . . . . . . . . . . . . . .60-61
Niveles paternos . . . . . . . . . . . . . . . . . . . . . .62-63
Audio, sonido estéreo . . . . . . . . . . . . . . . . . . . . .64
Reproducción aleatoria,
reproducción programada . . . . . . . . . . . . . . . . . .65
Reproducción de MP3/JPEG . . . . . . . . . . . . . . . .66
Pantallas de MP3/JPEG . . . . . . . . . . . . . . . . . . . .67
Funciones de ajuste del DVD
Ajustes de idioma . . . . . . . . . . . . . . . . . . . . .68-69
Ajustes de pantalla . . . . . . . . . . . . . . . . . . . . .70-71
Ajustes de audio . . . . . . . . . . . . . . . . . . . . . . . . .72
Despliegues en pantalla . . . . . . . . . . . . . . . . . . .73
Nivel de negro,Virtual Surround, Inicializar . . . . .74
Información que le puede ser útil
Glosario . . . . . . . . . . . . . . . . . . . . . . . . . . . . . . . . .75
Consejos útiles . . . . . . . . . . . . . . . . . . . . . . . . .76-77
Especificaciones . . . . . . . . . . . . . . . . . . . . . . . . . . .78
Garantía limitada . . . . . . . . . . . . . . . . . . . . . . . . . .79
Índice . . . . . . . . . . . . . . . . . . . . . . . . . . . . . . . . . . .80
T0006UG_6006UG_SP_1.qx3 04.5.12 10:13 AM Page 4

Introducción 5
•Ajuste automático de canal
• Limpiacabezales automático
•Ajuste automático de tracking
• Subtítulos encapsulados
• Horario de verano
• Menús de ajuste en inglés,
español o francés
• Búsqueda de avance/retroceso, detener
•Sistema de alta calidad (HQ)
• Busca hacia índice
• Grabación de un toque
• Contador de cinta de video de tiempo
real
•Cintas play
• Repetir play
• Apagado programado
• Búsqueda de hora
• Grabación con temporizador
•V-Chip (controles paternos)
• Retorno a cero
Bienvenido a su manual de instrucciones del TV/VCR/DVD
Este manual describe los modelos 19MDTR20 y 27MDTR20. Estos dos modelos son
diferentes en tamaño, pero funcionan de forma idéntica. En este manual se muestra el
modelo 27MDTR20.
•Opciones de audio*
• Pantalla de velocidad de transmisión
de bits
• Ángulo de cámara*
• Sonido Dolby digital*
• Control de rango dinámico
• Reproducción rápida/pausada/lenta/paso
a paso Marcadores
• Controles paternos*
• Reproducción programada
(CD de audio, MP3)
•Reproducción aleatoria
(CD de audio, MP3)
• Repetir (A-B, capítulo, título, pista, disco)
• Buscar (título/capítulo, tiempo, pista)
• Subtítulos*
• Virtual Surround
•Reproducción ampliada
* Si se encuentra disponible en el disco
Menús DVD...
Algunas explicaciones que se encuentran en este manual describen los menús del DVD.
Los fabricantes de DVD ajustan los menús, los que varían entre los DVD. No todos los
DVD tienen menús. Si el DVD tiene un menú, acceda a él al presionar el botón DISC
MENU del control remoto. Los detalles se encuentran en la página 51.
Menús de preparación...
Algunas instrucciones explican cómo usar los menús de preparación del TV/VCR/DVD.
Existen dos menús de preparación: uno para las funciones del TV/VCR mientras la unidad
se encuentre en el modo TV/VCR y uno para las funciones de disco mientras la unidad
se encuentre en el modo DVD.Acceda a los menús de preparación al presionar SETUP
en el control remoto. Mientras se encuentre en el modo TV/VCR, sólo puede seleccionar
el menú TV/VCR PREP.
En el modo DVD puede seleccionar el menú TV/VCR PREP. y el menú PREPARACION
para el reproductor de DVD de la unidad. Presione una vez el botón PREPARACION
para seleccionar el menú TV/VCR PREP. Presione dos veces PREPARACION para obten-
er el menú PREPARACION del reproductor de DVD.Aún cuando ajuste una función de
DVD en el menú PREPARACION de la unidad, ésta no estará disponible si el disco actual
no incluye dicha función.
Funciones de disco disponibles...
No todas las funciones que se describen en este manual están disponibles
en todos los discos. En estos casos, no se puede utilizar el TV/VCR/DVD
para que ésta esté disponible.
Aparecerá una “X” en la esquina superior derecha de la pantalla si trata de
acceder a una función que no se encuentre disponible. Por ejemplo, algunas funciones
sólo se encuentran disponibles durante la reproducción, mientras que otras sólo lo están
si se detiene la reproducción. Si no puede acceder a una función, trate de detener o ini-
ciar la reproducción y luego intente usar nuevamente la función.
Funciones: discos
Funciones:TV/VCR
T0006UG_6006UG_SP_1.qx3 04.5.12 10:13 AM Page 5

6 Discos y cintas de video reproducibles
Códigos regionales
Este TV/VCR/DVD tiene un reproductor de DVD Región uno (1). Los DVD deben tener
la etiqueta ALL para todas las regiones o para Región 1 para que se puedan reproducir en
la unidad. No se puede reproducir DVD con etiquetas para otras regiones. Busque los
símbolos debajo de sus DVD. Si estos símbolos de región no aparecen en su DVD, no
puede reproducir el DVD en este TV/VCR/DVD.
El número que aparece dentro del globo representa una región del mundo. La Región
1 representa a los Estados Unidos, Canadá, las regiones superiores de Norteamérica,
Bermudas, las Islas Vírgenes de Estados Unidos y las pequeñas regiones cerca de
Australia. Un DVD que tenga una etiqueta para una región específica sólo se puede
reproducir en reproductores de DVD con el mismo código regional.
Sistemas de color
Los DVD se graban en diferentes sistemas de color alrededor del mundo. Los sis-
temas de color más comunes son NTSC (que se usa principalmente los Estados
Unidos y Norteamérica), PAL y SECAM. El reproductor de DVD de esta unidad usa
NTSC, por lo que los DVD que desee reproducir deben estar grabados en el sistema
de color NTSC. No se pueden reproducir DVD grabados en otros formatos. El sis-
tema de color del DVD puede aparecer en el mismo DVD o en la caja del disco.
Cintas de video
Magnavox le recomienda usar sólo cintas de video que tengan la marca . Es posi-
ble que otras cintas de video tengan una calidad de imagen deficiente y dejen demasi-
ados depósitos en los cabezales del video. Es posible que la garantía no cubra tales
daños. El VCR de este TV/VCR/DVD tiene un sistema de alta calidad (HQ) y es com-
patible con equipos de sistema video para el hogar (VHS).
Discos reproducibles
El reproductor de DVD de este TV/VCR/DVD reproducirá muchos tipos de discos, entre
los que se incluyen Discos de video digital (DVD) y Discos compactos de audio (CD).
Reproducirá también archivos MP3 y JPEG.
Para reproducir un DVD, asegúrese que cumpla con los requisitos de códigos
regionales y sistemas de color como se describe a continuación. Los discos que ten-
gan los siguientes logotipos se reproducirán en el reproductor de DVD de este
TV/VCR/DVD. Finalice los discos CD-R, CD-RW, DVD+R y DVD+RW antes de repro-
ducirlos en el TV/VCR/DVD.
DVD: Discos de video digital
pregrabados
CD de audio
MP3:Archivos de audio
grabados en un CD-R o CD-
RW
CD-RW: Disco compacto
regrabable. Los CD-RW se
pueden grabar varias veces.
CD-R: Disco compacto
grabable. Los CD-R sólo se
pueden grabar una vez.
CD de vídeo
DVD+R: DVD grabable. Los
DVD+R sólo se pueden
grabar una vez.
DVD+RW: DVD regrabable.
Los DVD+RW se pueden
grabar varias veces.
Recordable
ReWritable
T0006UG_6006UG_SP_1.qx3 04.5.12 10:13 AM Page 6

Antes de usar el TV/VCR/DVD 7
1 2
1 2
3
Instalación de baterías del control remoto
1
Saque la tapa del compartimiento de las
baterías en la parte inferior del control remoto.
Deslice la tapa hacia abajo y sáquela. Siga la dirección
de la flecha que se encuentra en la tapa.
2
Coloque dos baterías AA dentro del compar-
timiento de baterías. Alinee los polos
+
y
-
como
se indica.
3
Vuelva a colocar la tapa del compartimiento de
baterías.
Seguridad de las baterías
PRECAUCIÓN sobre el uso de las baterías: para evitar
escapes de las baterías que pueden resultar en lesiones
corporales, daño a la propiedad o a la unidad:
● Instale TODAS las baterías de manera correcta, con los
polos + y - de la batería alineados de la manera que se
indica en la unidad;
● No mezcle baterías, por ejemplo, antiguas con nuevas o de
carbono con alcalinas y
● Retire las baterías cuando no use la unidad por un tiempo
prolongado.
Prevención de grabación
Las cintas de video tienen lengüetas de grabación para asegu-
rarse de no borrar accidentalmente las grabaciones.
1
Para evitar la grabación accidental, rompa la
lengüeta con un destornillador.
2
Para grabar nuevamente, cubra el agujero con
cinta de celofán.
Uso del control remoto
● Apunte el control remoto al sensor remoto que se
encuentra en la parte delantera del TV/VCR/DVD. Los
detalles se encuentran en la página 16.
● No coloque objetos entre el control remoto y el
TV/VCR/DVD.
Mantenimiento del TV/VCR/DVD
● Retire todas las notas adhesivas del videocasete antes de
colocar el casete en el TV/VCR/DVD. Las etiquetas removi-
bles pueden trabar el TV/VCR/DVD.
● El TV/VCR/DVD requiere mantenimiento periódico para
mantener su excelente rendimiento. Este TV/VCR/DVD
tiene un sistema de limpiacabezales interno. Sin embargo,
los cabezales del video requerirán eventualmente que se
limpien o reemplacen. Sólo un centro de servicio autoriza-
do debe realizar este servicio.
• El nuevo producto, su empaque y
su manual contienen materiales
que se pueden reciclar y reutilizar.
Las compañías especializadas
pueden reciclar el producto para
aumentar la cantidad de materi-
ales reutilizables y minimizar la
cantidad que se debe eliminar ade-
cuadamente. Las baterías que use
el producto no se deben tirar cuan-
do se agoten, sino que se deben
eliminar como pequeños desechos
químicos.Averigüe las regulaciones
locales acerca del desecho del pro-
ducto antiguo, las baterías, el man-
ual y el empaque cuando reem-
place el equipo existente.
Consejo útil
T0006UG_6006UG_SP_1.qx3 04.5.12 10:13 AM Page 7

8 Conexión del TV/VCR/DVD
AUDIO OUT
COAXIAL
ANT.
ANT.
AUDIO OUT
COAXIAL
ANT.
ANT.
IN
OUT
Conecte un
cable coaxial RF
(no se incluye) al
enchufe OUT
(salida) de la caja
de cable/recep-
tor satelital y al
enchufe ANT
(antena) del
TV/VCR/DVD.
Conecte una señal de
televisión por cable o antena
al enchufe ANT (antena).
1
Conecte el TV/VCR/DVD usan-
do una de las conexiones que se
muestran.
A
Conexión del TV/VCR/DVD con
una señal de televisión por
cableo antena exterior
Conecte la señal de televisión
por cable o televisión satelital al
enchufe IN (entrada) de la caja
de cable/receptor satelital.
B
Conexión del TV/VCR/DVD
con una caja de cable/receptor
satelital
Para ver cualquier canal, ajuste el
TV/VCR/DVD en el canal de salida
(canal 03 ó 04) de la caja de
cable/receptor satelital. Luego, selec-
cione los canales en la caja de
cable/receptor satelital.
Es posible que la caja de cable/receptor satelital tenga enchufes de salida de audio y video en lugar
de un solo enchufe de salida de antena (coaxial RF o de 75 ohmios) que se muestra aquí.
Si es así, conecte los cables de audio y video a los enchufes de audio/video de la caja de
cable/receptor satelital y a los enchufes de entrada AUDIO/VIDEO que se encuentran en la parte
delantera del TV/VCR/DVD.
Presione SELECT en el control remoto para ajustar el TV/VCR/DVD en AUX, no en canal 3 ó 4.
Seleccione los canales que desee ver o grabar en la caja de cable/receptor satelital de manera nor-
mal y deje el TV/VCR/DVD en AUX.
T0006UG_6006UG_SP_1.qx3 04.5.12 10:13 AM Page 8

Conexión del TV/VCR/DVD (continuación) 9
RL
AUDIOVIDEOHEADPHONE
STANDBY-ON
SEARCH
NEXTPREV
PLAY
F.FWDREW
PLAYSTOP
OPEN/CLOSE
REC/OTR
STOP/EJECT
VOLUME
D V D
D V D TV/VCR
SELECT
V C R
CHANNEL
OUT
IN
VIDEO
IN
OUT
3CH
4CH
AUDIO
ANT.
OUT
IN
VIDEO
IN
OUT
3CH
4CH
ANT.
RL
AUDIOVIDEOHEADPHONE
AUDIO
L R
L R
Enchufes de entrada
AUDIO/VIDEO que se
encuentran en la parte
delantera del TV/VCR/DVD
Enchufes AUDIO/VIDEO OUT
(salida de audio/video) del VCR
(sólo ejemplo)
Conecte los cables de audio
en los enchufes AUDIO OUT
(salida de auto) del VCR y en
los enchufes rojo y blanco
AUDIO que se encuentran en
la parte delantera
del TV/VCR/DVD.
Conecte un cable de video en el
enchufe VIDEO OUT (salida de
video) del VCR y en el enchufe
VIDEO amarillo que se encuentra en
la parte delantera del TV/VCR/DVD.
2
Cuando se completen todas las
otras conexiones, enchufe el cable
de suministro eléctrico del
TV/VCR/DVD.
AUDIO OUT
COAXIAL
ANT.
ANT.
Antena interior
(no se incluye, sólo es
un ejemplo)
D
Conexión del TV/VCR/DVD a otra
fuente de video
(VCR, reproductor de DVD,
camcorder, etc.)
Es posible que necesite esta conexión si desea
reproducir discos o cintas en otro equipo, pero
desea verlas en el TV/VCR/DVD. En el control
remoto presione SELECT para seleccionar AUX
en el TV/VCR/DVD. Cuando reproduzca los
materiales en el otro equipo, se mostrarán en
el canal AUX del TV/VCR/DVD. Se pueden
encontrar más detalles en la página 33.
No se incluyen cables de audio ni de video.
C
Conexión del TV/VCR/DVD
con una antena interior
Para instalar una antena interior o antena en
“V” (no se incluye), conecte el cable de la ante-
na al enchufe ANT (antena) que se encuentra
en la parte posterior del TV/VCR/DVD como
se muestra. Extienda la antena y ajuste su largo,
dirección y ángulo para obtener la imagen más
nítida.
T0006UG_6006UG_SP_1.qx3 04.5.12 10:13 AM Page 9

AUDIO OUT
COAXIAL
ANT.
AUDIO OUT
COAXIAL
10 Conexiones opcionales
• No puede usar un Mini-Disc o
lector de cinta de audio digital
para copiar en sonido Surround
Dolby Digital de 5.
1 canales.
• Los discos grabados en Dolby
Digital deben mostrar esto en el
disco o en la caja. Si el disco no
está grabado en sonido Surround
Dolby Digital de 5.1 canales, no
escuchará sonido multicanal
incluso se usa la conexión
estéreo digital.
Consejos útiles
Conexiones estéreo digitales
Puede conectar el TV/VCR/DVD a un estéreo
que tenga un enchufe de entrada coaxial digital.
Use esta conexión si desea escuchar el sonido
del TV/VCR/DVD a través del estéreo. Use estas
conexiones para un estéreo compatible con
Dolby Digital o para un receptor que tenga Mini-
Disc o un lector de cintas de audio digital.
1
Conecte la antena/señal de
televisión por cable. Los detalles se
encuentran en las páginas ocho y nueve.
2
Conecte un cable coaxial de audio
digital (no se incluye) al enchufe
AUDIO OUT COAXIAL del
TV/VCR/DVD.
Además, conecte el cable al enchufe
COAXIAL DIGITAL AUDIO IN
(entrada de audio digital coaxial) del
estéreo.
3
Si el estéreo es compatible con
Dolby Digital, ajuste DOLBY
DIGITAL en ENC. Si el estéreo no es
compatible con Dolby Digital o si se
encuentra conectado a un Mini-Disc o
lector de cinta de audio digital, ajuste
DOLBY DIGITAL en APDO. Los detalles se
encuentran en la página 72.
Un ajuste incorrecto provoca distorsión
del ruido y daña los altavoces.
Para averiguar si su estéreo tiene Dolby
Digital, busque el logotipo de Dolby
Digital en el estéreo. O consulte el manual
del usuario del estéreo.
Al enchufe
AUDIO OUT
COAXIAL
del TV/VCR/DVD
Al enchufe COAXIAL DIGITAL AUDIO IN
(entrada de audio digital coaxial) del estéreo
T0006UG_6006UG_SP_1.qx3 04.5.12 10:13 AM Page 10

Ver TV 11
Esta unidad selecciona automáticamente los canales de TV
cuando usted la conecta una antena o un receptor de TV por
cable. Para reponer los canales de TV, vea la página 18.
Si está utilizando un receptor de TV por cable o un receptor
de satélite no necesita establecer los canales en el
TV/VCR/DVD.
1
Presione STANDBY-ON para encender el
TV/VCR/DVD.
2
Para ver TV, presione los botones CH. ▲/▼ para
seleccionar los canales memorizados. Loa canales mem-
orizados son aquellos que aparecen cuando navega por
los canales. Si se salta un canal, aún puede usar los
botones de número para seleccionarlo. Este es un canal
no memorizado; puede que tenga una recepción débil en
su área.
Para actualizar sus canales memorizados y no memo-
rizados, vea la página 18.
Recuerde que si usa una caja de cable/receptor satelital,
debe ajustar el TV/VCR/DVD en el canal 3, 4 ó AUX.
Cambie los canales en la caja de cable/receptor satelital.
3
Presione VOL. ▲/▼ para ajustar el volumen.
PLAY
STOP
ENTER
RECORD
DISC
MENU
RETURNTITLESETUP
A
-
B
REPEATSEARCH MODE
CLEAR
MODE
ANGLESUBTITLEAUDIO
DISPLAY
SPEED C.RESET
STANDBY-ON
PICTURE SELECTSLEEP
CH.
VOL.
MUTE
ZOOM
123
456
789
0 +10
+100
REPEAT
1
2
3
VOLUMEN 20
T0006UG_6006UG_SP_1.qx3 04.5.12 10:13 AM Page 11

12 Reproducir una cinta de video
• Si la cinta que desea reproducir ya
se encuentra en el TV/VCR/DVD,
enciéndalo. Presione SELECT o
escoja el modo TV/VCR (se encen-
derá la luz roja del VCR/TV), luego
presione PLAY
B
.
• Cuando se reproduce una cinta de
formato S-VHS, no se puede
obtener la alta resolución que se
obtendría en un S-VHS VCR. Es
posible que aparezcan líneas de
interferencia (rayas negras y blan-
cas) en la imagen.
• Si presiona SELECT mientras
reproduce una cinta de video, la
reproducción se detendrá y la
unidad cambiará al modo DVD.
Esto también sucederá si presiona
PLAY
B
(DVD) u OPEN/CLOSE
A
(DVD) en la parte delantera del
TV/VCR/DVD durante la reproduc-
ción de cintas de video.
Consejos útiles
Siga estos pasos para sólo reproducir una cinta de video. Las
opciones de reproducción de cintas de video se encuentran en las
páginas 34 a 40.
1
Inserte una cinta de video en el compartimien-
to del casete del TV/VCR/DVD. Se encenderá el
equipo. Si falta la lengüeta de grabación de la cinta, la
reproducción debe comenzar automáticamente.
2
Si la reproducción no comienza automática-
mente, presione PLAY B para que comience.
3
Presione STOP C para detener la reproduc-
ción.
4
Presione j / h para rebobinar la cinta.
5
Cuando termine de rebobinar, presione
STOP/EJECT en la parte delantera del
TV/VCR/DVD para retirar la cinta.
PLAY
STOP
ENTER
RECORD
DISC
MENU
RETURNTITLESETUP
A
-
B
REPEATSEARCH MODE
CLEAR
MODE
ANGLESUBTITLEAUDIO
DISPLAY
SPEED C.RESET
STANDBY-ON
PICTURE SELECTSLEEP
CH.
VOL.
MUTE
ZOOM
123
456
789
0 +10
+100
REPEAT
4
2
3
T0006UG_6006UG_SP_1.qx3 04.5.12 10:13 AM Page 12

Reproducción de un disco
1
3
• Si apaga la unidad en el modo DVD,
cuando la encienda nuevamente, se
encontrará en el modo TV/VCR.
•Aparecerá una
‘‘
X” en la pantalla
cuando trate de acceder a una fun-
ción que no se encuentre disponible.
Este no es un problema del
TV/VCR/DVD.
•Si un disco está sucio o rayado, es
posible que se distorsione la imagen
o se detenga la reproducción. Retire
el disco y pruebe con uno diferente.
•Presione OPEN/CLOSE
A (DVD) o
PLAY
B
(DVD) en la parte delantera
del TV/VCR/DVD cuando esté apaga-
do. Esto enciende la unidad en el
modo DVD (no en el modo TV/VCR).
• Si un disco tiene capas múltiples, es
posible que ocasionalmente se con-
gele la imagen. Esto sucede cuando
la primera capa se cambia a la
segunda. Esto no es señal de fun-
cionamiento defectuoso.
• Al presionar SELECT durante la
reproducción del disco, se detiene la
reproducción y cambia la unidad al
modo TV/VCR. Al presionar PLAY
B
(VCR) en la parte delantera de la
unidad durante la reproducción del
disco, se detiene la reproducción del
disco y comienza la reproducción de
la cinta.
Consejos útiles
Antes de comenzar, encienda los otros equipos que estén
conectados al TV/VCR/DVD.Ajuste un estéreo (si se aplica) a
la fuente o canal de sonido correcto. Los detalles se encuentran
en la página 10.
1
Presione STANDBY-ON para encender el
TV/VCR/DVD. La unidad estará en el modo TV/VCR.
Se encenderá la luz roja de VCR/TV.
2
Presione SELECT para poner el TV/VCR/DVD
en el modo DVD. La luz verde de DVD aparecerá en
la parte delantera del TV/VCR/DVD.
3
Presione OPEN/CLOSE A en la parte delantera
del TV/VCR/DVD para abrir la bandeja de discos.
4
Coloque un disco en la bandeja.
Algunos DVD están grabados en ambos lados.
Asegúrese que la etiqueta del lado que desea repro-
ducir apunte hacia arriba.
O si el DVD está grabado en un sólo lado, coloque el
disco en la bandeja con la etiqueta apuntando hacia arri-
ba y la cara brillante hacia abajo.
5
Presione PLAY B. La bandeja se cerrará y comenzará
la reproducción. Si no comienza, presione PLAY B nue-
vamente.
O puede presionar OPEN/CLOSE A o presionar la
bandeja hacia la unidad para cerrar la bandeja. Si en su
lugar aparece un menú del DVD, consulte la página 51.
Para obtener detalles sobre MP3 y JPEG, consulte la
página 66.
6
Presione STOP C para detener la reproducción.
Si la reproducción permanece detenida durante cinco
minutos, se oscurecerá la pantalla del DVD. Si la repro-
ducción estuvo detenida durante 20 minutos sin activi-
dad en el TV/VCR/DVD, se apagará la unidad.
Recuerde, sólo se pueden reproducir
ciertos discos. Consulte la página seis
para los detalles.
PLAY
STOP
ENTER
RECORD
DISC
MENU
RETURNTITLESETUP
DISPLAY
SPEED C.RESET
STANDBY-ON
PICTURE SELECTSLEEP
CH.
VOL.
MUTE
ZOOM
123
456
789
0 +10
+100
1
5
6
2
3
Presione OPEN/CLOSE A en
la parte delantera del
TV/VCR/DVD.
4
Inserte un disco.
T0006UG_6006UG_SP_1.qx3 04.5.12 10:13 AM Page 13

14 Botones del control remoto
PLAY
STOP
ENTER
RECORD
DISC
MENU
RETURNTITLESETUP
A
-
B
REPEATSEARCH MODE
CLEAR
MODE
ANGLESUBTITLEAUDIO
DISPLAY
SPEED C.RESET
STANDBY-ON
PICTURE SELECTSLEEP
CH.
VOL.
MUTE
ZOOM
123
456
789
0 +10
+100
REPEAT
Bóton PICTURE
Presione para acceder a los
controles de imagen. Los detalles se
encuentran en la página 25.
Bóton STANDBY-ON
Presione para encender/apagar el
TV/VCR/DVD.
Botones de número
Modo TV:
Presione dos dígitos para
acceder a un canal específico. Presione 0
antes del número de un canal de un dígito.
Los detalles se encuentran en la página 11.
Modo DVD:
Use los botones de
número para ingresar un número de pista
o de capítulo. Botón +100/+10: Presione
antes de ingresar números de dos dígitos.
Por ejemplo, para seleccionar el capítulo
16, presione +100/+10 y luego 1 y 6.
Bóton k (pausa)
Presione para poner en pausa la
grabación de cintas de video. Presione
nuevamente para reanudar la grabación.
Los detalles se encuentran en la página
26. Presione para poner en pausa la
reproducción de cintas de video o
DVD. Presione repetidamente para
avanzar la imagen de un cuadro a la vez.
Los detalles se encuentran en las páginas
39 y 55.
Bóton RECORD
Presione una vez para iniciar una
grabación en cinta de video.
Los detalles se encuentran en la página 26.
Bóton DISPLAY
Modo TV/VCR: Presione para ver
el contador de la cinta de video, el
canal o la hora en pantalla.
Los detalles se encuentran en la página 25.
Modo DVD: Presione para ver el
estado del disco en pantalla.
Los detalles se encuentran en la página 73.
Bóton TITLE
Presione para acceder al menú
Título de un DVD si se encuentra
disponible.
Los detalles se encuentran en la página 51.
Bóton SLEEP
Presione para ajustar el apagado
programado.
Los detalles se encuentran en la página 36.
Bóton SELECT
Presione para escoger el modo AUX,
TV/VCR o DVD. En la parte delantera
del TV/VCR/DVD aparecerá la luz
respectiva para indicar el modo activo.
Los detalles se encuentran en la página 16.
Bóton PLAY B
Presione para comenzar a reproducir
un disco o un videocasete. Los detalles
se encuentran en las páginas 12 a 13.
Bóton G / g
Durante la reproducción de un disco,
presione brevemente para saltarse a la
pista o al capítulo siguiente. Los detalles
se encuentran en la página 54.
O presione y mantenga presionado por
dos segundos para buscar hacia delante
durante la reproducción del disco. Los
detalles se encuentran en la página 52.
Presione para adelantar una cinta de
video. Los detalles se encuentran en la
página 39.
Bóton STOP C
Presione para detener la reproducción
de un disco o una cinta de video.
Botones de flecha
Use los botones de flecha para
seleccionar o ajustar los elementos
del menú.
Bóton RETURN
Presione para ir al menú de preparación
anterior en el modo DVD o TV/VCR.
Presione para sacar algunos menús o
pantallas.
Bóton REPEAT
Presione para reproducir
repetidamente un disco, título,
capítulo o pista. Los detalles se
encuentran en la página 56.
T0006UG_6006UG_SP_1.qx3 04.5.12 10:13 AM Page 14

Botones del control remoto (continuación) 15
PLAY
STOP
ENTER
RECORD
DISC
MENU
RETURNTITLESETUP
A
-
B
REPEATSEARCH MODE
CLEAR
MODE
ANGLESUBTITLEAUDIO
DISPLAY
SPEED C.RESET
STANDBY-ON
PICTURE SELECTSLEEP
CH.
VOL.
MUTE
ZOOM
123
456
789
0 +10
+100
REPEAT
Bóton ZOOM
Presione para ampliar la imagen
durante la reproducción de DVD.
Los detalles se encuentran en la página 59.
Bóton C.RESET (counter reset)
Presione para reajustar el contador de
cinta en 0:00:00. Los detalles se
encuentran en la página 36. Presione
para cancelar una grabación con
temporizador. Los detalles se encuentran
en la página 31.
Bóton SPEED
Presione para seleccionar la velocidad
de grabación de una cinta (SP o SLP).
Los detalles se encuentran en la página 26.
Bóton j / h
Durante la reproducción de un disco,
presione brevemente para saltarse al
comienzo de la pista/capítulo actual.
Presione repetidamente para saltar a las
pistas/capítulos anteriores. Los detalles se
encuentran en la página 54.
O presione y mantenga presionado
durante dos segundos para buscar hacia
atrás durante la reproducción del disco.
Los detalles se encuentran en la página 52.
Presione para retroceder una cinta de
video.
Los detalles se encuentran en la página 39.
Bóton SETUP
Presione para acceder o sacar el menú
Preparación del TV/VCR/DVD.
Bóton CLEAR
Presione para reajustar o borrar un
ajuste o información equivocada.
Bóton MODE
Presione para reproducir un programa o
para iniciar reproducción aleatoria. Los
detalles se encuentran en la página 65.
Presione para seleccionar un ajuste de
nivel de negro o Virtual Surround. Los
detalles se encuentran en la página 74.
Bóton SEARCH MODE
Presione para buscar un tiempo,
capítulo, pista o título específico en un
disco. Los detalles se encuentran en las
páginas 53 y 54.
Presione para ajustar los marcadores.
Los detalles se encuentran en la página 57.
Botones CH. (channel) K/L
Presione para seleccionar los
canales de TV memorizados.
Los detalles se encuentran en la
página 11.
Botones VOL. (volume) K/L
Presione para desactivar o
restaurar el sonido.
Bótone MUTE
Presione para desactivar o
restaurar el sonido.
Bótone DISC MENU
Presione para acceder a los menús
del DVD. Los detalles se encuentran
en la página 51.
Bóton ENTER
Presione para aceptar o cambiar un
ajuste de menú.
Bóton REPEAT A-B
Presione para ajustar una sección
de un disco y reproducirla
repetidamente. Los detalles se
encuentran en la página 56.
Bóton ANGLE
Presione para cambiar el ángulo de
cámara y ver la secuencia de un
disco desde una perspectiva
diferente. Los detalles se encuentran
en la página 58.
Bóton SUBTITLE
Presione para seleccionar un
idioma para los subtítulos.
Los detalles se encuentran en la
página 58.
Bóton AUDIO
Presione para seleccionar un
idioma de audio o modo de sonido.
Los detalles se encuentran en la
página 64.
T0006UG_6006UG_SP_1.qx3 04.5.12 10:13 AM Page 15

16 Panel delantero
RL
AUDIOVIDEOHEADPHONE
STANDBY-ON
SEARCH
NEXTPREV
PLAY
F.FWDREW
PLAYSTOP
OPEN/CLOSE
REC/OTR
STOP/EJECT
VOLUME
D V D
D V D VCR/TV
OUTPUT
V C R
CHANNEL
RL
AUDIOVIDEOHEADPHONE
STANDBY-ON
SEARCH
NEXTPREV
PLAY
F.FWDREW
PLAYSTOP
OPEN/CLOSE
REC/OTR
STOP/EJECT
VOLUME
D V D
D V D TV/VCR
SELECT
V C R
CHANNEL
Botón STOP/EJECT C A
(VCR)
Presione para detener la
reproducción de la cinta.
Presione mientras la
reproducción está detenida
para sacar la cinta.
Botón F.FWD i (VCR)
Presione para avanzar rápido la
cinta o para buscar rápidamente
hacia adelante durante la
reproducción. Los detalles se
encuentran en la página 39.
Botón PLAY B (VCR)
Presione para iniciar la repro-
ducción de la cinta. Los detalles
se encuentran en la página 12.
Enchufes Entrada de
VIDEO y AUDIO L/R
(izquierdo/derecho)
Use los cables de audio y video
para conectar estos enchufes a
los enchufes Audio y Video Out
de un Camcorder, reproductor
de DVD o VCR. Esto le permite
ver los materiales que se
reproducen en el equipo
cuando escoge AUX en el
TV/VCR/DVD. Los detalles se
encuentran en la
página 33.
Enchufe HEADPHONE
Conecte aquí los auriculares
(no se incluyen) para audición
personal.
Sensor del control remoto
Recibe una señal del control
remoto para que pueda operar
el TV/VCR/DVD a distancia.
Botón STANDBY-ON
Presione para encender o apagar el
TV/VCR/DVD. Apague el TV/VCR/DVD
para realizar una grabación con
temporizador.
Botón PLAY B (VCR)
Presione para iniciar la reproducción de
un disco. Los detalles se encuentran en la
página 13.
Botones PREV H, NEXT i
(DVD)
Presione para ir a un capítulo o una pista
diferente. Los detalles se encuentran en la
página 54.
Luz de DVD (verde)
Aparece si el TV/VCR/DVD se encuentra
en el modo DVD.
Botón OUTPUT
Presione para seleccionar el modo AUX,
TV/VCR o DVD. Si cambia al modo
TV/VCR, espere cerca de cuatro segundos
antes de volver al modo DVD. Este botón
funciona de la misma manera que el botón
SELECT del control remoto.
Luz de VCR/TV (roja)
Aparece si el TV/VCR/DVD se encuentra
en el modo TV/VCR.
Luz de REC/OTR (roja)
Esta luz destella durante la grabación. Se
enciende cuando el TV/VCR/DVD se
encuentra en el modo Standby (apagado)
durante una grabación con temporizador.
Botón REC/OTR (VCR)
Presione para iniciar una grabación de
cinta de video. Los detalles se encuentran
en las páginas
26 y 27.
Botón REW j (VCR)
Presione para rebobinar la cinta o para
buscar rápidamente hacia atrás durante la
reproducción.
Los detalles se encuentran en la página 39.
Compartimiento del casete
Inserte una cinta de video aquí.
Bandeja de discos
Inserte un Disco aquí.
Botones CHANNEL o/ p
Presione para seleccionar los canales
de TV. Los detalles se encuentran en la
página 11.
Botón OPEN/CLOSE A (DVD)
Presione para abrir o cerrar la bandeja
de discos. Los detalles se encuentran
en la página 13.
Botón STOP C (DVD)
Presione para detener la reproducción
de un disco. Los detalles se encuentran
en la página 13.
Botones VOLUME o/ p
Presione para ajustar el volumen.
T0006UG_6006UG_SP_1.qx3 04.5.12 10:13 AM Page 16

Panel posterior 17
AUDIO OUT
COAXIAL
ANT.
Enchufe ANT
(entrada de antena)
Conecte aquí una antena o señal de televisión por cable. Esto trae los
canales al TV/VCR/DVD (o se conecta a una caja de cable/receptor
satelital a través de este enchufe), no recibirá ningún canal de TV.
Los detalles se encuentran en las páginas ocho y nueve.
Cable de suministro eléctrico
Conéctelo a un tomacorriente de CA estándar (120V/60Hz).
Enchufe AUDIO OUT COAXIAL
(Salida de audio digital)
Conecte este enchufe a un estéreo digital usando un cable coaxial de
audio digital (no se incluye). Use esta conexión si el estéreo tiene
compatibilidad Dolby Digital y un enchufe de entrada de audio coaxial
digital. También puede usar esta conexión al conectar el TV/VCR/DVD
a un Mini-Disc o lector de cinta de audio digital. Los detalles se
encuentran en la página 10.
T0006UG_6006UG_SP_1.qx3 04.5.12 10:13 AM Page 17

18 Idioma del menú, reajuste de los canales de TV
Idioma del menú
Esto afecta al idioma de los menús de preparación del
TV/VCR/DVD y a los términos del despliegue en pantalla. No
altera el idioma de la programación del TV, las cinta de video,
los discos o los subtítulos encapsulados.
1
Presione SETUP una vez para que aparezca el
menú TV/VCR PREP.
2
Presione ▲ o ▼ para seleccionar LANGUAGE.
3
Presione ENTER repetidamente para selec-
cionar ENGLISH, ESPAÑOL o FRANÇAIS. El
idioma seleccionado aparecerá dentro de [ ].
Este será el idioma de los menús de preparación del
TV/VCR/DVD en los modos TV/VCR y DVD.
4
Presione SETUP para salir del menú.
Reajuste de los canales de TV
Esta unidad selecciona automáticamente los canales de TV
cuando usted la conecta una antena o un receptor de TV por
cable.
● Antes de comenzar, ponga el TV/VCR/DVD en el modo
TV/VCR.
Presione SELECT para que la luz roja de VCR/TV aparezca
en la parte delantera del TV/VCR/DVD.
1
Presione SETUP.
2
Presione ▲ o ▼ para seleccionar AJUSTE DE
CANAL. Luego, presione ENTER.
3
Presione ▲ o ▼ para seleccionar AUTOPRO-
GRAMACION DE CA. Presione ENTER. El
TV/VCR/DVD memoriza los canales que se encuen-
tren disponibles. Cuando se complete la exploración,
el TV/VCR/DVD irá al canal más bajo que se encuen-
tre disponible. Use los botones CH ▲/▼ para explo-
rar los canales memorizados. Puede seleccionar los
canales no memorizados con los botones de números.
• El TV/VCR/DVD no puede cambiar
los canales en la caja de cable o
el receptor satelital.Ajuste el
TV/VCR/DVD en 3, 4 ó AUX.
Cambie los canales en la caja de
cable/receptor satelital.
• Los ajustes de los canales se
mantienen si falla el suministro
de alimentación.
• Si tiene menús en español o en
francés y necesita el menú en
inglés, pulse SETUP. Presione
▲
o
▼
para seleccionar IDIOMA o
LANGUAGE. Presione ENTER
para seleccionar ENGLISH.
Presione SETUP para sacar el
menú de la pantalla.
• No puede reajustar los canales de
TV cuando la unidad se encuentra
en el modo DVD.
Consejos útiles
— TV/VCR PREP. —
COMO PROGRAMAR
AJUSTE RELOJ
AJUSTE DE CANAL
AJUSTE DE USER
AJUSTE DE V-CHIP
IDIOMA [ENGLISH]
TITULO [OFF]
RETORNO A CERO
BUSQUEDA DE HORA
BUSCA HACIA INDICE
B
PLAY
STOP
ENTER
RECORD
DISC
MENU
RETURNTITLESETUP
A
-
B
REPEATSEARCH MODE
CLEAR
DISPLAY
SPEED C.RESET
STANDBY-ON
PICTURE SELECTSLEEP
CH.
VOL.
MUTE
ZOOM
123
456
789
0 +10
+100
REPEAT
2-3
1,4
PLAY
STOP
ENTER
RECORD
DISC
MENU
RETURNTITLESETUP
DISPLAY
SPEED C.RESET
STANDBY-ON
PICTURE SELECTSLEEP
CH.
VOL.
MUTE
ZOOM
123
456
789
0 +10
+100
2-3
1
– TV/VCR SETUP –
TIMER PROGRAMMING
SETTING CLOCK
CHANNEL SET UP
USER'S SET UP
V-CHIP SET UP
LANGUAGE [ENGLISH]
CAPTION [OFF]
ZERO RETURN
TIME SEARCH
INDEX SEARCH
B
– TV/VCR PREP. –
COMO PROGRAMAR
AJUSTE RELOJ
AJUSTE DE CANAL
AJUSTE DE USER
AJUSTE DE V-CHIP
IDIOMA [ENGLISH]
TITULO [OFF]
RETORNO A CERO
BUSQUEDA DE HORA
BUSCA HACIA INDICE
B
– AJUSTE DE CANAL –
AGREGAR/BORRAR (CATV)
AUTOPROGRAMACION DE CA.
B
T0006UG_6006UG_SP_1.qx3 04.5.12 10:13 AM Page 18

•Para confirmar que se ha agre-
gado o borrado un canal, pre-
sione los botones CH ▲/▼ para
ver si puede seleccionar el canal
o no. Sólo los canales memoriza-
dos/agregados se pueden selec-
cionar con CH.▲/▼.Use los
botones de número para selec-
cionar los canales borrados.
• Si se encuentra conectada una
antena al TV/VCR/DVD, los
canales 2 al 69 estarán
disponibles para agregar o bor-
rar. Si se encuentra conectado a
televisiûn por cable, los canales
1-125 estarán disponibles.
• Esta función no operará cuando
la unidad se encuentre en el
modo DVD.
Consejos útiles
Agregar/borrar canales 19
Puede borrar los canales de TV que ya no reciba o no vea
siempre. O puede agregar más canales si el TV/VCR/DVD no
memorizó todos sus canales favoritos.
● Antes de comenzar, presione SELECT para poner
el TV/VCR/DVD en el modo TV/VCR.Aparecerá la
luz roja de VCR/TV.
1
Presione SETUP.
2
Presione ▲ o ▼ para seleccionar AJUSTE DE
CANAL. Luego, presione ENTER.
3
Presione ▲ o ▼ para seleccionar
AGREGAR/BORRAR aparecerá (TV) o (CATV)
junto a AGREGAR/BORRAR. Esto indica si se encuen-
tra conectado al TV/VCR/DVD por una antena (TV) o
una señal de televisión por cable (CATV). Luego,
presione ENTER. Desaparecerá el menú y aparecerá
un canal de TV.Aparecerá el número del canal junto
con AGREGAR/BORRAR.
4
Presione ▲ o ▼ hasta que aparezca el canal
que desee agregar o borrar. También puede usar
los botones de número o los botones CH ▲/▼ para
escoger un canal.
5
Presione ENTER para agregar o borrar el
canal.
Para agregar un canal, presione ENTER para que
AGREGAR y el número del canal aparezcan en azul
claro (cerceta). Para borrar un canal, presione ENTER
para que BORRAR y el número del canal aparezcan en
rojo claro (púrpura).
Para borrar otro canal, repitas los pasos 4 y 5.
6
Cuando termine presione SETUP.
PLAY
STOP
ENTER
RECORD
DISC
MENU
RETURNTITLESETUP
A
-
B
REPEATSEARCH MODE
CLEAR
MODE
ANGLESUBTITLEAUDIO
DISPLAY
SPEED C.RESET
STANDBY-ON
PICTURE SELECTSLEEP
CH.
VOL.
MUTE
ZOOM
123
456
789
0 +10
+100
REPEAT
2-5
1,6
— TV/VCR PREP. —
COMO PROGRAMAR
AJUSTE RELOJ
AJUSTE DE CANAL
AJUSTE DE USER
AJUSTE DE V-CHIP
IDIOMA [ENGLISH]
TITULO [OFF]
RETORNO A CERO
BUSQUEDA DE HORA
BUSCA HACIA INDICE
B
– AJUSTE DE CANAL –
AGREGAR/BORRAR (CATV)
AUTOPROGRAMACION DE CA.
B
AGREGAR/BORRAR
08
T0006UG_6006UG_SP_1.qx3 04.5.12 10:13 AM Page 19

20 Ajuste del reloj
• Es posible que tenga que reajus-
tar el reloj después de un corte
de corriente.
Consejo útil
Ajuste manual del reloj
Debe ajustar el reloj antes de realizar una grabación con tem-
porizador.Ajuste manualmente el reloj. Después, use Reloj
aut. para monitorear la hora. Los detalles se encuentran en las
páginas 22 y 23.
Si no recibe una estación PBS que transmita señales horarias,
no puede usar Reloj aut.Ajuste RELOJ AUT. en OFF. La hora
permanecerá de la manera que la haya ajustado manualmente.
Antes de comenzar...
● Con el equipo encendido, presione SELECT para
poner el TV/VCR/DVD en el modo TV/VCR.
Aparecerá la luz roja de VCR/TV.
1
Presione SETUP.
2
Presione ▲ o ▼ para seleccionar AJUSTE
RELOJ. Luego, presione ENTER.
3
Presione ▲ o ▼ para seleccionar AJUSTE
MANUAL RELOJ. Luego, presione ENTER.
4
Mientras destelle el espacio MES, presione ▲ o
▼ hasta que aparezca el mes correcto. Luego,
presione B.
PLAY
STOP
ENTER
RECORD
DISC
MENU
RETURNTITLESETUP
A
-
B
REPEATSEARCH MODE
CLEAR
MODE
ANGLESUBTITLEAUDIO
DISPLAY
SPEED C.RESET
STANDBY-ON
PICTURE SELECTSLEEP
CH.
VOL.
MUTE
ZOOM
123
456
789
0 +10
+100
REPEAT
2-4
1
— TV/VCR PREP. —
COMO PROGRAMAR
AJUSTE RELOJ
AJUSTE DE CANAL
AJUSTE DE USER
AJUSTE DE V-CHIP
IDIOMA [ENGLISH]
TITULO [OFF]
RETORNO A CERO
BUSQUEDA DE HORA
BUSCA HACIA INDICE
B
– AJUSTE RELOJ –
RELOJ AUT.
BUSQ. AUTO RELOJ CA.
CAN. RELOJ AUT.
AJUSTE MANUAL RELOJ
HORA VER.
B
[ON]
[02]
[OFF]
– AJUSTE MANUAL RELOJ –
MES DIA AÑO
05 / - - - - - - - - -
HORA MINUTO
- - : - - - -
T0006UG_6006UG_SP_1.qx3 04.5.12 10:13 AM Page 20

•Para ajustar el reloj más tarde,
siga los pasos 1a 3 de la página
20. Luego presione s o B para
seleccionar el elemento que
desea cambiar. Ingrese la infor-
mación correcta al presionar ▲
o ▼. Cuando termine, presione
SETUP.
Consejo útil
Ajuste del reloj (continuación) 21
5
Mientras destelle el espacio DIA, presione ▲ o
▼ hasta que aparezca el día correcto. Luego,
presione B. Aparecerá una abreviatura del día de la
semana seleccionado.
6
Mientras destelle el espacio AÑO, presione ▲ o
▼ hasta que aparezca el año correcto. Luego,
presione B.
7
Mientras destelle el espacio HORA y AM o PM,
presione ▲ o ▼ hasta que aparezca la hora cor-
recta. Luego, presione B.
8
Mientras destelle el espacio MINUTO, presione
▲ o ▼ hasta que aparezca el minuto correcto.
9
Presione SETUP. Aunque no se muestren los segun-
dos, ellos empiezan a contar desde cero cuando pre-
sione SETUP. Use esta acción para sincronizar con
exactitud el reloj.
PLAY
STOP
ENTER
RECORD
DISC
MENU
RETURNTITLESETUP
A
-
B
REPEATSEARCH MODE
CLEAR
MODE
ANGLESUBTITLEAUDIO
DISPLAY
SPEED C.RESET
STANDBY-ON
PICTURE SELECTSLEEP
CH.
VOL.
MUTE
ZOOM
123
456
789
0 +10
+100
REPEAT
5-8
9
– AJUSTE MANUAL RELOJ –
MES DIA AÑO
05 / 07 - - - - - - -
HORA MINUTO
- - : - - - -
– AJUSTE MANUAL RELOJ –
MES DIA AÑO
05 / 07 VIE 2004
HORA MINUTO
- - : - - - -
– AJUSTE MANUAL RELOJ –
MES DIA AÑO
05 / 07 VIE 2004
HORA MINUTO
05 : - - PM
– AJUSTE MANUAL RELOJ –
MES DIA AÑO
05 / 07 VIE 2004
HORA MINUTO
05 : 40 PM
5:40 PM
Presione DISPLAY para ver la hora actual.
Consulte la página 25 para los detalles.
T0006UG_6006UG_SP_1.qx3 04.5.12 10:13 AM Page 21

22 Ajuste del reloj (continuación)
Ajuste automático del reloj
Puede hacer que el TV/VCR/DVD ajuste el reloj usando el
canal PBS. Una vez que ajuste manualmente el reloj, el
TV/VCR/DVD monitoreará la transmisión de la hora y fecha
correcta de la estación PBS.
Antes de comenzar...
● Encienda el TV/VCR/DVD.
● Conecte la antena/señal de televisión por cable.
Los detalles se encuentran en la páginas ocho y nueve.
● Encienda la caja de cable/receptor satelital (si se aplica).
● Ajuste los canales de TV. Los detalles se encuentran en las
páginas 18 y19.
● Ajuste manualmente el reloj. Los detalles se encuentran en las
páginas 20 y 21.
● Presione SELECT para poner el TV/VCR/DVD en el
modo TV/VCR.Aparecerá la luz roja de VCR/TV.
1
Presione SETUP.
2
Presione ▲ o ▼ para seleccionar AJUSTE
RELOJ. Presione ENTER.
3
Después de seleccionar RELOJ AUT., presione
ENTER para que aparezca ON junto a RELOJ
AUT.
PLAY
STOP
ENTER
RECORD
DISC
MENU
RETURNTITLESETUP
A
-
B
REPEATSEARCH MODE
CLEAR
MODE
ANGLESUBTITLEAUDIO
DISPLAY
SPEED C.RESET
STANDBY-ON
PICTURE SELECTSLEEP
CH.
VOL.
MUTE
ZOOM
123
456
789
0 +10
+100
REPEAT
2-3
1
— TV/VCR PREP. —
COMO PROGRAMAR
AJUSTE RELOJ
AJUSTE DE CANAL
AJUSTE DE USER
AJUSTE DE V-CHIP
IDIOMA [ENGLISH]
TITULO [OFF]
RETORNO A CERO
BUSQUEDA DE HORA
BUSCA HACIA INDICE
B
– AJUSTE RELOJ –
RELOJ AUT.
BUSQ. AUTO RELOJ CA.
CAN. RELOJ AUT.
AJUSTE MANUAL RELOJ
HORA VER.
B
[ON]
[02]
[OFF]
T0006UG_6006UG_SP_1.qx3 04.5.12 10:13 AM Page 22

Ajuste del reloj (continuación) 23
4
Si ya sabe el número del canal PBS, continúe
con el paso 8. Si no lo sabe, presione ▼ para
seleccionar BUSQ.AUTO RELOJ CA. Luego,
presione ENTER.
● El TV/DVD/VCR buscará un canal que transmita la
señala horaria. Los canales que transmitan la hora
aparecerán en la parte superior de la pantalla. Use
uno de dichos canales cuando ingrese la BUSQ.
AUTO RELOJ CA. en el paso 9.
Esto puede tardar varios minutos.‘‘_ _” aparecerá
en la esquina inferior izquierda de la pantalla cuando
la búsqueda haya finalizado.
5
Presione SETUP para sacar la pantalla BUSQ.
AUTO RELOJ CA.
6
Presione SETUP para acceder nuevamente al
menú.
7
Presione ▲ o ▼ para seleccionar AJUSTE
RELOJ. Luego, presione ENTER.
8
Presione ▼ para seleccionar CAN. RELOJ AUT.,
luego presione ENTER.
9
Presione { o B hasta que aparezca el número
del canal de la estación PBS. Use el número de
canal que encontró en el paso 4.
10
Presione SETUP para sacar el menú de la pan-
talla.
11
Presione STANDBY-ON para apagar el
TV/VCR/DVD y permitir que el canal PBS actu-
alice el reloj.
• Durante la BUSQ. AUTO RELOJ
CA, la imagen se puede distor-
sionar. Esto es normal.
• Si no existen estaciones PBS
disponibles, ajuste RELOJ AUT. en
OFF Ajuste manualmente el reloj.
• Si el TV/VCR/DVD está conecta-
do a una caja de cable o recep-
tor satelital, seleccione la
estación PBS local en la caja de
cable/receptor satelital.Ajuste el
TV/VCR/DVD en el canal de sali-
da de la caja de cable/receptor
satelital (03, 04 ó AUX).
Consejos útiles
– BUSQ. AUTO RELOJ CA. –
08 10 13
– –
PLAY
STOP
ENTER
RECORD
DISC
MENU
RETURNTITLESETUP
A
-
B
REPEATSEARCH MODE
CLEAR
MODE
ANGLESUBTITLEAUDIO
DISPLAY
SPEED C.RESET
STANDBY-ON
PICTURE SELECTSLEEP
CH.
VOL.
MUTE
ZOOM
123
456
789
0 +10
+100
REPEAT
4,7-9
5-6,10
11
– AJUSTE RELOJ –
RELOJ AUT.
BUSQ. AUTO RELOJ CA.
CAN. RELOJ AUT.
AJUSTE MANUAL RELOJ
HORA VER.
B
[ON]
[02]
[OFF]
– AJUSTE RELOJ –
RELOJ AUT.
BUSQ. AUTO RELOJ CA.
CAN. RELOJ AUT.
AJUSTE MANUAL RELOJ
HORA VER.
B
[ON]
[08]
[OFF]
T0006UG_6006UG_SP_1.qx3 04.5.12 10:13 AM Page 23

24 Horario de verano
Cuando el horario de verano (D.S.T.) esté ON, el reloj se
adelantará una hora el primer domingo de abril y se atrasará
una hora el último domingo de octubre.
Para activar o desactivar el horario de verano, siga estos
pasos.
● Antes de comenzar, presione SELECT para poner
el TV/VCR/DVD en el modo TV/VCR.Aparecerá la
luz roja de VCR/TV.
1
Presione SETUP.
2
Presione ▲ o ▼ para seleccionar AJUSTE
RELOJ. Luego, presione ENTER.
3
Presione ▲ o ▼ para seleccionar HORA VER.
Luego, presione ENTER hasta que ON aparezca
junto a HORA VER. O, presione ENTER para que
OFF aparezca junto a D.S.T. si desea desactivar la fun-
ción.
4
Presione SETUP para sacar el menú de la pan-
talla.
PLAY
STOP
ENTER
RECORD
DISC
MENU
RETURNTITLESETUP
A
-
B
REPEATSEARCH MODE
CLEAR
MODE
ANGLESUBTITLEAUDIO
DISPLAY
SPEED C.RESET
STANDBY-ON
PICTURE SELECTSLEEP
CH.
VOL.
MUTE
ZOOM
123
456
789
0 +10
+100
REPEAT
2-3
1,4
— TV/VCR PREP. —
COMO PROGRAMAR
AJUSTE RELOJ
AJUSTE DE CANAL
AJUSTE DE USER
AJUSTE DE V-CHIP
IDIOMA [ENGLISH]
TITULO [OFF]
RETORNO A CERO
BUSQUEDA DE HORA
BUSCA HACIA INDICE
B
– AJUSTE RELOJ –
RELOJ AUT.
BUSQ. AUTO RELOJ CA.
CAN. RELOJ AUT.
AJUSTE MANUAL RELOJ
HORA VER.
B
[ON]
[02]
[ON]
T0006UG_6006UG_SP_1.qx3 04.5.12 10:13 AM Page 24

Pantallas de estado
Para ver el contador de la cinta de video, el reloj o el número
del canal en la pantalla en el modo TV/VCR, presione DISPLAY
repetidamente.
Lo siguiente ocurrirá cuando los Subtítulos encapsulados estén
desactivados.
1
Presione DISPLAY una vez para ver el contador
de la cinta de video. Después de cinco segundos, sólo
el contador permanecerá en la pantalla.
2
Presione DISPLAY nuevamente para ver la hora
actual y el canal de TV. Después de cinco segundos,
sólo el reloj y el número del canal permanecerán en la
pantalla. Para borrarlos, presione DISPLAY nuevamente.
● Cuando los Subtítulos encapsulados estén activos, las pantallas
de estado sólo aparecerán durante cinco segundos. Luego
toda la información se eliminará de la pantalla. Los detalles de
los Subtítulos encapsulados en encuentran en la página 41.
Pantallas de estado, Controles de imagen 25
Controles de la Imagen
Siga estos pasos para ajustar la claridad, la agudeza, el tinte, el
color o el contraste del TV/VCR/DVD.
1
Presione PICTURE.
2
Dentro de cinco segundos, presione ▲ o ▼ para
seleccionar el control de la imagen que desea
ajustar.
Puede seleccionar CLARIDAD, AGUDEZA, MATIZ,
COLOR, o CONTRASTE.
3
Dentro de cinco segundos, presione s o B para
ajustar el control de la imagen.
• Desmagnetización: El magnet-
ismo de los aparatos y los altavo-
ces cercanos puede afectar el
color de la imagen del TV. Si esto
sucede, mueva el TV/VCR/DVD
lejos del aparato. Si el color aún
no es el correcto, apague el
equipo durante 30 minutos (para
el 27MDTR20) o desconecte el
cable de suministro eléctrico
durante 30 minutes (para el
19MDTR20). Después de 30,
minutos intente usar nuevamente
la unidad.
Consejo útil
PLAY
STOP
ENTER
RECORD
DISC
MENU
RETURNTITLESETUP
A
-
B
REPEATSEARCH MODE
CLEAR
MODE
ANGLESUBTITLEAUDIO
DISPLAY
SPEED C.RESET
STANDBY-ON
PICTURE SELECTSLEEP
CH.
VOL.
MUTE
ZOOM
123
456
789
0 +10
+100
REPEAT
1-2
PLAY
STOP
ENTER
RECORD
DISC
MENU
RETURNTITLESETUP
DISPLAY
SPEED C.RESET
STANDBY-ON
PICTURE SELECTSLEEP
CH.
VOL.
MUTE
ZOOM
123
456
789
0 +10
+100
2-3
1
sB
CLARIDAD para disminuir el brillo para aumentar el brillo
AGUDEZA para hacerla más suave para hacerla más clara
MATIZ
para agregar púrpura para agregar verde
COLOR para disminuir el color para iluminar el color
CONTRASTE para disminuir el contraste para aumentar el contraste
PARAR
SP CONTEO 0:12:34 CONTEO 0:12:39
5:40 PM
CA 2
PARAR
SP
5:40 PM
CA 2
CLARIDAD
T0006UG_6006UG_SP_1.qx3 04.5.12 10:13 AM Page 25

26 Grabación de cintas de video
• No puede grabar contenidos de
DVD en una cinta de video usan-
do esta unidad.
• Las opciones para grabar se
encuentran en las páginas
27 a 32.
• Si pone la grabación en pausa
durante cinco minutos, la unidad
comenzará a grabar nuevamente
en forma automática.
• Puede cambiar la velocidad de
una cinta al presionar el botón
SPEED mientras se encuentra gra-
bando. La cinta puede presentar
distorsiones.
Consejos útiles
1
Coloque una cinta con esta lengüeta de
grabación intacta en el compartimiento del
casete del TV/VCR/DVD. Se encenderá el
TV/VCR/DVD.
Si ya está encendido y en la unidad hay una cinta de
video, asegúrese que la unidad se encuentre en el
modo TV/VCR.
Presione SELECT para que la luz roja de VCR/TV
aparezca en la parte delantera de la unidad.
2
Presione SPEEDhasta que la velocidad de la
cinta deseada (SP o SLP) aparezca en la
esquina inferior izquierda de la pantalla. A contin-
uación, consulte los detalles de la velocidad.
3
Presione CH. ▲/▼ o los botones de números
para seleccionar el canal que desea grabar.
No puede cambiar los canales durante la grabación.
Sólo puede grabar y ver un canal de TV a la vez.
4
Presione RECORD una vez para iniciar una
grabación.
La luz roja de REC/OTR destellará en la parte
delantera del TV/VCR/DVD. (Si la cinta no tiene la
lengüeta de grabación, se expulsará la cinta. Inserte
otra cinta.)
5
Para poner pausa durante la grabación, pre-
sione k.Para reanudar la grabación, presione
k nuevamente o RECORD.
6
Para detener la grabación, presione STOP C .
Tipo de casete / Tiempo de reproducción
Velocidad de la cinta T160 T120 T60
SP(Standard Play) 2 hrs.
2 hrs.
1 hr.
40 min.
LP
(Long Play) 5 hrs.
4 hrs. 2 hrs.
(sólo reproducción) 20 min.
SLP(Super Long Play) 8 hrs. 6 hrs. 3 hrs.
Velocidades de las cintas
Este cuadro muestra el tiempo de grabación/reproducción de
tres tipos de cintas de videos (T160,T120 y T60). Estas son
tres velocidades de reproducción: SP, LP y SLP. Una cinta se
reproducirá sólo en la velocidad que se grabó.Al grabar,
puede cambiar la velocidad de la cinta usando el botón
SPEED. En este TV/VCR/DVD no puede grabar en velocidad
LP.
Mientras menor sea la velocidad, más tiempo tiene para
grabar en la cinta. SLP es la velocidad más lenta.
PLAY
STOP
ENTER
RECORD
DISC
MENU
RETURNTITLESETUP
A
-
B
REPEATSEARCH MODE
CLEAR
MODE
ANGLESUBTITLEAUDIO
DISPLAY
SPEED C.RESET
STANDBY-ON
PICTURE SELECTSLEEP
CH.
VOL.
MUTE
ZOOM
123
456
789
0 +10
+100
REPEAT
4-5
5
2
6
3
1
Introduzca una cinta en el
TV/VCR/DVD.
T0006UG_6006UG_SP_1.qx3 04.5.12 10:13 AM Page 26

Grabación de un toque 27
Una Grabación de un toque (OTR) es una grabación tempo-
rizada inmediata de 30 minutos a ocho horas de duración.
Antes de comenzar...
● Encienda el TV/VCR/DVD.
● Presione SELECT para poner la unidad en el modo
TV/VCR.
La luz roja de VCR/TV aparecerá en la parte delantera de la
unidad.
● Inserte la cinta de video con la lengüeta para evitar graba-
ciones accidentales en su lugar. Los detalles se encuentran en
la página siete. Rebobine o avance rápido la cinta hasta el
punto donde desea comenzar la grabación.
1
Presione los botones de números o CH. ▲/▼
para seleccionar el canal que desea grabar.
Recuerde, si el TV/VCR/DVD está conectado a una
caja de cable/receptor satelital, el TV/VCR/DVD debe
estar en el canal 3, 4 ó AUX.
Seleccione el canal que desea grabar en la caja de
cable/receptor satelital. Los detalles se encuentran en la
página ocho.
2
Presione SPEED para seleccionar la velocidad
de grabación (SP o SLP). Los detalles se encuentran
en la página 26.
3
Presione REC/OTR en la parte delantera del
TV/VCR/DVD repetidamente para seleccionar
el tiempo de grabación. La grabación comen-
zará inmediatamente.
Cada vez que presione REC/OTR aumentará el tiempo
de grabación en 30 minutos. El tiempo de grabación
máximo es de ocho horas.
4
Presione STOP C para parar la grabación de un
toque antes del tiempo designado. De lo con-
trario, la grabación parará en el momento establecido.
EL TV/VCR/DVD se apagará cuando finalice la OTR.
• No puede utilizar el control
remoto para programar OTR.
•Para mostrar el tiempo de
grabación restante, presione DIS-
PLAY. OTR y el tiempo de
grabación restante aparecerán
brevemente en la esquina superi-
or izquierda de la pantalla.
• Si la cinta se acaba antes que
finalice el tiempo de grabación, el
TV/VCR/DVD parará de grabar,
expulsará la cinta y se apagará
automáticamente.
• La OTR continuará incluso si
usted apaga el TV/VCR/DVD. La
luz roja de REC/OTR destellará
en la parte delantera del
TV/VCR/DVD para indicar que la
grabación aún está en curso.
•Para cambiar la duración de la
grabación mientras una OTR
está en curso, presione REC/OTR
repetidamente.
• No se puede poner en pausa
una OTR.
• Si el tiempo predeterminado
para una grabación con tempo-
rizador se produce durante una
grabación de un toque, esta últi-
ma tendrá prioridad, y la
grabación con temporizador se
cancelará.
Consejos útiles
PLAY
STOP
ENTER
RECORD
DISC
MENU
RETURNTITLESETUP
A
-
B
REPEATSEARCH MODE
CLEAR
DISPLAY
SPEED C.RESET
STANDBY-ON
PICTURE SELECTSLEEP
CH.
VOL.
MUTE
ZOOM
123
456
789
0 +10
+100
REPEAT
2
4
1
3
Presione REC/OTR en la
parte delantera de
TV/VCR/DVD.
OTR (2:30)
SP
T0006UG_6006UG_SP_1.qx3 04.5.12 10:13 AM Page 27

28 Grabación con temporizador
Siga estos pasos para programar el TV/VCR/DVD y grabar
programas de TV cuando esté fuera de su hogar.
El TV/VCR/DVD grabará y se apagará automáticamente.
Puede programar un máximo de ocho grabaciones con tem-
porizador.
Antes de comenzar, asegúrese que...
● El reloj esté ajustado. Si no es así, aparecerá el menú
AJUSTE MANUAL RELOJ. Consulte las páginas 20 a 21
para ajustar el reloj.
● Los canales estén ajustados. Los detalles se encuentran en la
página 18.
● Una cinta se encuentre dentro del TV/VCR/DVD.Asegúrese
que la lengüeta de grabación esté intacta. Los detalles se
encuentran en la página siete.
1
Presione SETUP. Presione ▲ o ▼ para selec-
cionar COMO PROGRAMAR, luego presione
ENTER.
2
Presione ▲ o ▼ para seleccionar una posición
para programar. Luego, presione B.
3
Mientras selecciona CA, presione ▲ o ▼ para
seleccionar el canal que desea grabar. Luego
presione B. Si el TV/VCR/DVD está conectado a una
caja de cable/receptor satelital, el TV/VCR/DVD debe
estar en el canal 3, 4 ó AUX.
Ajuste CA como 03, 04 ó AUX en el menú Como
programar. Escoja el canal que desea grabar en la caja
de cable/receptor satelital. Deje encendida la caja de
cable/receptor satelital para grabar con temporizador.
Deje el TV/VCR/DVD ajustado en AUX. (En el control
remoto presione SELECT para escoger AUX en el
TV/VCR/DVD.) Los detalles adicionales se encuentran en
la página ocho.
• No podrá acceder al menú PRO-
GRAMAR en el paso
1 si el reloj
no está ajustado. En su lugar,
aparecerá el menú AJUSTE
RELOJ. Siga los pasos de las
páginas 20-23 para ajustar el
reloj.
• Ingrese la información cuando el
espacio esté destellando.
Consejos útiles
PLAY
STOP
ENTER
RECORD
DISC
MENU
RETURNTITLESETUP
A
-
B
REPEATSEARCH MODE
CLEAR
MODE
ANGLESUBTITLEAUDIO
DISPLAY
SPEED C.RESET
STANDBY-ON
PICTURE SELECTSLEEP
CH.
VOL.
MUTE
ZOOM
123
456
789
0 +10
+100
REPEAT
1-3
1
— TV/VCR PREP. —
COMO PROGRAMAR
AJUSTE RELOJ
AJUSTE DE CANAL
AJUSTE DE USER
AJUSTE DE V-CHIP
IDIOMA [ENGLISH]
TITULO [OFF]
RETORNO A CERO
BUSQUEDA DE HORA
BUSCA HACIA INDICE
B
– COMO PROGRAMAR –
CA
- -
- -
- -
- -
- -
- -
- -
- -
FECHA
- - -
- - -
- - -
- - -
- - -
- - -
- - -
- - -
-
-
-
-
-
-
-
-
/
/
/
/
/
/
/
/
- -
- -
- -
- -
- -
- -
- -
- -
INICIO
-
-
-
-
-
-
-
-
:
:
:
:
:
:
:
:
- -
- -
- -
- -
- -
- -
- -
- -
FINAL
-
-
-
-
-
-
-
-
:
:
:
:
:
:
:
:
- -
- -
- -
- -
- -
- -
- -
- -
B
- -
- -
- -
- -
- -
- -
- -
- -
– COMO PROGRAMAR –
CA
- -
- -
- -
61
- -
- -
- -
- -
FECHA
- - -
- - -
- - -
- - -
- - -
- - -
- - -
- - -
-
-
-
-
-
-
-
-
/
/
/
/
/
/
/
/
- -
- -
- -
- -
- -
- -
- -
- -
INICIO
-
-
-
-
-
-
-
-
:
:
:
:
:
:
:
:
- -
- -
- -
- -
- -
- -
- -
- -
FINAL
-
-
-
-
-
-
-
-
:
:
:
:
:
:
:
:
- -
- -
- -
- -
- -
- -
- -
- -
B
- -
- -
- -
- -
- -
- -
- -
- -
T0006UG_6006UG_SP_1.qx3 04.5.12 10:13 AM Page 28

4
Mientras se selecciona FECHA, presione ▲ o ▼
hasta que aparezca la fecha correcta. Se grabará
sólo una vez.
Para grabar un programa a la misma hora, en
el mismo canal, todos los días de la semana,
presione ▼ hasta que aparezca CADA DIA.
Para grabar un programa a la misma hora, en
el mismo canal, todas las semanas, presione ▼
hasta que aparezcan juntos CADA y un día de
la semana.
Finalmente, presione B.
5
Mientras selecciona INICIO, presione ▲ o ▼
para seleccionar la hora de inicio de la
grabación. Aparecerá AM o PM junto a la hora.
Luego, presione B y presione ▲ o ▼ para selec-
cionar el minuto de inicio de la grabación.
Presione B.
Grabación con temporizador (continuación) 29
PLAY
STOP
ENTER
RECORD
DISC
MENU
RETURNTITLESETUP
A
-
B
REPEATSEARCH MODE
CLEAR
MODE
ANGLESUBTITLEAUDIO
DISPLAY
SPEED C.RESET
STANDBY-ON
PICTURE SELECTSLEEP
CH.
VOL.
MUTE
ZOOM
123
456
789
0 +10
+100
REPEAT
4-5
– COMO PROGRAMAR –
CA
- -
- -
- -
61
- -
- -
- -
- -
FECHA
- - -
- - -
- - -
DOM
- - -
- - -
- - -
- - -
-
-
-
7
-
-
-
-
/
/
/
/
/
/
/
/
- -
- -
- -
04
- -
- -
- -
- -
INICIO
-
-
-
-
-
-
-
-
:
:
:
:
:
:
:
:
- -
- -
- -
- -
- -
- -
- -
- -
FINAL
-
-
-
-
-
-
-
-
:
:
:
:
:
:
:
:
- -
- -
- -
- -
- -
- -
- -
- -
B
- -
- -
- -
- -
- -
- -
- -
- -
– COMO PROGRAMAR –
CA
- -
- -
- -
61
- -
- -
- -
- -
FECHA
- - -
- - -
- - -
- - -
- - -
- - -
- - -
-
-
-
-
-
-
-
/
/
/
/
/
/
/
- -
- -
- -
- -
- -
- -
- -
INICIO
-
-
-
-
-
-
-
-
:
:
:
:
:
:
:
:
- -
- -
- -
- -
- -
- -
- -
- -
FINAL
-
-
-
-
-
-
-
-
:
:
:
:
:
:
:
:
- -
- -
- -
- -
- -
- -
- -
- -
B
- -
- -
- -
- -
- -
- -
- -
- -
CADA DIA
– COMO PROGRAMAR –
CA
- -
- -
- -
61
- -
- -
- -
- -
FECHA
- - -
- - -
- - -
- - -
- - -
- - -
- - -
-
-
-
-
-
-
-
/
/
/
/
/
/
/
- -
- -
- -
- -
- -
- -
- -
INICIO
-
-
-
-
-
-
-
-
:
:
:
:
:
:
:
:
- -
- -
- -
- -
- -
- -
- -
- -
FINAL
-
-
-
-
-
-
-
-
:
:
:
:
:
:
:
:
- -
- -
- -
- -
- -
- -
- -
- -
B
- -
- -
- -
- -
- -
- -
- -
- -
CADA LUN
– COMO PROGRAMAR –
CA
- -
- -
- -
61
- -
- -
- -
- -
FECHA
- - -
- - -
- - -
DOM
- - -
- - -
- - -
- - -
-
-
-
7
-
-
-
-
/
/
/
/
/
/
/
/
- -
- -
- -
04
- -
- -
- -
- -
INICIO
-
-
-
7
-
-
-
-
:
:
:
:
:
:
:
:
- -
- -
- -
30
- -
- -
- -
- -
FINAL
-
-
-
-
-
-
-
-
:
:
:
:
:
:
:
:
- -
- -
- -
- -
- -
- -
- -
- -
B
- -
- -
- -
- -
- -
- -
- -
- -
P
M
T0006UG_6006UG_SP_1.qx3 04.5.12 10:13 AM Page 29

30 Grabación con temporizador (continuación)
6
Mientras selecciona FINAL, presione ▲ o ▼
para seleccionar la hora final de la grabación.
Aparecerá AM o PM junto a la hora.
Luego, presione B y presione ▲ o ▼ para selec-
cionar el minuto final de la grabación. Presione
B.
7
Presione ▲ o ▼ hasta que aparezca la velocidad
de la cinta (SP o SLP) al costado derecho de la
línea.
8
Presione SETUP para sacar los menús de la
pantalla.
9
Presione STANDBY-ON para apagar el
TV/VCR/DVD y ajustar la grabación con tem-
porizador.
La luz roja de REC/OTR aparecerá en la parte
delantera del TV/VCR/DVD.
Debe apagar el TV/VCR/DVD para activar la grabación
con temporizador. Si no está apagado y continúa vien-
do TV, PRG. ESTAR LISTO comenzará a destellar en la
pantalla dos minutos antes de la hora de inicio progra-
mada.Apague la unidad para comenzar la grabación.
•Para corregir la información
mientras ajusta la grabación con
temporizador, presione s para
retroceder un paso y seleccionar
la información incorrecta.
Presione ▲ o ▼ para ingresar la
información correcta.
•Mientras la grabación con tem-
porizador está en curso, destel-
lará la luz roja REC/OTR.
• Si una grabación con tempo-
rizador está ajustada para horas
o días más tarde, puede usar el
TV/VCR/DVD hasta ese
entonces. Sólo asegúrese de apa-
gar el TV/VCR/DVD cinco minu-
tos antes de la grabación. Si es
necesario, ajuste la caja de
cable/receptor satelital.
• Si falta la lengüeta de grabación,
se expulsará la cinta de video
cuando presione STANDBY-ON
para apagar el TV/VCR/DVD.
Inserte una cinta grabable para
la grabación con temporizador.
• Si la cinta se acaba antes que
finalice la grabación, el
TV/VCR/DVD parará de grabar
inmediatamente y expulsará la
cinta.
Consejos útiles
PLAY
STOP
ENTER
RECORD
DISC
MENU
RETURNTITLESETUP
A
-
B
REPEATSEARCH MODE
CLEAR
MODE
ANGLESUBTITLEAUDIO
DISPLAY
SPEED C.RESET
STANDBY-ON
PICTURE SELECTSLEEP
CH.
VOL.
MUTE
ZOOM
123
456
789
0 +10
+100
REPEAT
6-7
9
8
– COMO PROGRAMAR –
CA
- -
- -
- -
61
- -
- -
- -
- -
FECHA
- - -
- - -
- - -
DOM
- - -
- - -
- - -
- - -
-
-
-
7
-
-
-
-
/
/
/
/
/
/
/
/
- -
- -
- -
04
- -
- -
- -
- -
INICIO
-
-
-
7
-
-
-
-
:
:
:
:
:
:
:
:
- -
- -
- -
30
- -
- -
- -
- -
FINAL
-
-
-
8
-
-
-
-
:
:
:
:
:
:
:
:
- -
- -
- -
50
- -
- -
- -
- -
B
- -
- -
- -
- -
- -
- -
- -
- -
P
M
P
M
– COMO PROGRAMAR –
CA
- -
- -
- -
61
- -
- -
- -
- -
FECHA
- - -
- - -
- - -
DOM
- - -
- - -
- - -
- - -
-
-
-
7
-
-
-
-
/
/
/
/
/
/
/
/
- -
- -
- -
04
- -
- -
- -
- -
INICIO
-
-
-
7
-
-
-
-
:
:
:
:
:
:
:
:
- -
- -
- -
30
- -
- -
- -
- -
FINAL
-
-
-
8
-
-
-
-
:
:
:
:
:
:
:
:
- -
- -
- -
50
- -
- -
- -
- -
B
- -
- -
- -
SP
- -
- -
- -
- -
P
M
P
M
T0006UG_6006UG_SP_1.qx3 04.5.12 10:13 AM Page 30

Grabación con temporizador (continuación) 31
Extensión de la grabación con temporizador
Para hacer que la grabación con temporizador se inicie y finalice después
de lo originalmente programado, siga estos pasos.
1 Con la unidad encendida, presione SETUP. Presione ▲ o ▼ para selec-
cionar COMO PROGRAMAR. Presione ENTER.
2 Presione RECORD, luego presione ▲ o ▼ para seleccionar el programa
deseado.
3 Presione nuevamente RECORD. Cada vez que presione RECORD ade-
lantará el tiempo de inicio/término en 10 minutos. Si la grabación está
en curso, cada vez que presione adelantará sólo el tiempo de término.
Si ajusta el horario durante la grabación, la velocidad de grabación
automáticamente cambia a SLP.
Para restaurar el horario de grabación original, presione k (pausa).
4 Presione SETUP para sacar los menús de la pantalla.
5 Si la grabación con temporizador está programada para comenzar más
tarde, presione STANDBY-ON para apagar el TV/VCR/DVD y grabar.
Corrección de la grabación con temporizador
1 Con la unidad encendida, presione SETUP. Presione ▲ o ▼ para selec-
cionar COMO PROGRAMAR. Presione ENTER.
2 Presione ▲ o ▼ para seleccionar la grabación con temporizador, luego
presione B.
3 Presione B o s para seleccionar la información que desea cambiar.
Presione ▲ o ▼ para ingresar la información correcta.
4 Presione SETUP para sacar el menú de la pantalla.
5 Presione STANDBY-ON para apagar el TV/VCR/DVD y ajustar la
grabación.
Cancelación de la grabación con temporizador
Para cancelar una grabación con temporizador que esté en curso:
1 La luz roja de REC/OTR destellará durante la grabación. Presione
STANDBY-ON para apagar el TV/VCR/DVD, luego presione
STOP/EJECT CA en la parte delantera del TV/VCR/DVD.
Para cancelar una grabación con temporizador que no haya
comenzado:
1 Con la unidad encendida, presione SETUP.
Presione ▲ o ▼ para seleccionar COMO PROGRAMAR. Presione
ENTER.
2 Presione ▲ o ▼ para seleccionar una grabación con temporizador.
3 Presione C.RESET.Toda la información de la grabación seleccionada
desaparecerá.
4 Presione SETUP para sacar el menú de la pantalla.
Revisión de las grabaciones con temporizador
programadas
1 Con la unidad encendida, presione SETUP.
Presione ▲ o ▼ para seleccionar COMO PROGRAMAR.
2 Presione ENTER. En la pantalla aparecerán los detalles del programa.
3 Presione SETUP para sacar el menú de la pantalla.
T0006UG_6006UG_SP_1.qx3 04.5.12 10:13 AM Page 31

32 Rebobinado automático de grabación con temporizador
Use esta función para rebobinar la cinta hasta el inicio de una
grabación con temporizador completa.
1
Presione SETUP.
2
Presione ▲ o ▼ para seleccionar AJUSTE DE
USER. Luego, presione ENTER.
3
Presione ▲ o ▼ para seleccionar REBOB.AUT.
4
Presione ENTER hasta que junto a REBOB.
AUT. a parezca ON. Para desactivar REBOB.AUT.,
presione ENTER para escoger OFF.
5
Presione SETUP. Cuando REBOB.AUT. esté en ON,
cuando se hayan completado todas las grabaciones
con temporizador, la cinta se rebobinará hasta el
comienzo de el o los programas grabados.
• Si presiona STANDBY-ON mien-
tras se rebobina la cinta, se
detendrá el proceso.
• Si existiera un corte de corriente,
el TV/VCR/DVD mantendrá esta
función en su memoria.
Consejos útiles
PLAY
STOP
ENTER
RECORD
DISC
MENU
RETURNTITLESETUP
A
-
B
REPEATSEARCH MODE
CLEAR
MODE
ANGLESUBTITLEAUDIO
DISPLAY
SPEED C.RESET
STANDBY-ON
PICTURE SELECTSLEEP
CH.
VOL.
MUTE
ZOOM
123
456
789
0 +10
+100
REPEAT
2-4
1,5
— TV/VCR PREP. —
COMO PROGRAMAR
AJUSTE RELOJ
AJUSTE DE CANAL
AJUSTE DE USER
AJUSTE DE V-CHIP
IDIOMA [ENGLISH]
TITULO [OFF]
RETORNO A CERO
BUSQUEDA DE HORA
BUSCA HACIA INDICE
B
– AJUSTE DE USER –
CINTAS
REPETIR
REBOB. AUT.
SON. VIDSO
SON. TV
[OFF]
[OFF]
[ON]
[HIFI]
[ESTEREO]
B
T0006UG_6006UG_SP_1.qx3 04.5.12 10:13 AM Page 32

Regrabación (duplicado de cintas) 33
• La copia no autorizada de progra-
mas de televisión, cintas de video
u otros materiales protegidos por
derechos de autor puede violar los
derechos de los propietarios y las
leyes de derecho de autor.
• Las marcas diferentes de equipos
pueden funcionar de distinta man-
era.
• Asegúrese que todas las conex-
iones sean seguras. De lo con-
trario, puede que no grabe ni la
imagen ni el sonido.
• Puede ser que los programas que
están protegidos por los derechos
de autor no se graben bien.
• No puede grabar una cinta de
video de un DVD usando este
TV/VCR/DVD.
• Puede usar esta conexión para
simplemente ver cintas reproduci-
das en una camcorder o VCR en
el TV/VCR/DVD. Siga los pasos 1,2
y 4 para conexiones y ajustes
AUX. Luego reproduzca la cinta
en la camcorder, etc., como es
habitual.
1
Realice las conexiones como se muestra más
arriba. Use cables de audio y video (no se
incluyen). Conecte la unidad fuente (VCR o
Camcorder) a una fuente de energía luego que
se realicen las conexiones.
2
El VCR o Camcorder reproducirá la cinta. Inserte
una cinta pregrabada en la unidad fuente. Si
comienza la reproducción, presione STOP en el VCR o
Camcorder.
3
El TV/VCR/DVD grabará la cinta. Inserte una cinta
en blanco en el compartimiento del casete del
TV/VCR/DVD.Asegúrese que la lengüeta de
grabación de la cinta esté intacta y que el
TV/VCR/DVD esté encendido.
4
Apunte el control remoto del TV/VCR/DVD
hacia el TV/VCR/DVD. Presione SELECT o CH.
o/p hasta que en la pantalla aparezca AUX. El
TV/VCR/DVD ahora está en el modo entrada de línea
o auxiliar.
5
Presione SPEED hasta que la velocidad de la
cinta deseada (SP o SLP) aparezca en la
esquina inferior izquierda de la pantalla.
6
Presione al mismo tiempo PLAY en el VCR o
Camcorder y REC/OTR en el TV/VCR/DVD.
Comenzará la grabación de la cinta de video.
7
Para parar la grabación, presione STOP/EJECT
C A en el TV/VCR/DVD, luego pare la cinta en el
VCR o Camcorder.
RL
AUDIOVIDEOHEADPHONE
OP/EJECT
VIDEO
OUT
L
AUDIO
OUT
R
Enchufes AUDIO y VIDEO OUT (salida de audio y
video) de la unidad fuente (VCR o Camcorder)
Tomas de entrada AUDIO y VIDEO en el
panel delantero del TV/VCR/DVD.
Cables de audio de AUDIO
OUT (salida de audio) a
AUDIO In (entrada de audio)
Cable de video de VIDEO OUT
(salida de video) a VIDEO In
(entrada de video)
Consejos útiles
T0006UG_6006UG_SP_1.qx3 04.5.12 10:13 AM Page 33

34 Repetir
• Repetir estará activo incluso si
apaga el TV/VCR/DVD. El
TV/VCR/DVD mantiene el ajuste
Repetir incluso si se corta la cor-
riente.
• Si CINTAS está en ON, CINTAS
PLAY
B
aparecerá en la pan-
talla en lugar de REPETIR
B
.
Los detalles se encuentran en la
página 35.
Consejos útiles
Repetir le permite reproducir una cinta de video en forma
continua.
REPETIR TODO reproducirá repetidamente la cinta desde el
comienzo al final. REPETIR ESPACIO repetirá continuamente
la cinta desde el comienzo hasta la primera parte de ella que
tenga un espacio mayor de 10 segundos.
1
Presione SETUP.
2
Presione ▲ o ▼ para seleccionar AJUSTE DE
USER. Luego, presione ENTER.
3
Presione ▲ o ▼ para seleccionar REPETIR.
4
Presione ENTER hasta que TODO o ESPACIO
aparezca junto a REPETIR. O para cancelar REPE-
TIR, presione ENTER y seleccione OFF.
5
Presione SETUP para sacar el menú de la pan-
talla.
6
Presione PLAY B para reproducir una cinta de
video. REPETIR B aparecerá brevemente en la pan-
talla.
PLAY
STOP
ENTER
RECORD
DISC
MENU
RETURNTITLESETUP
A
-
B
REPEATSEARCH MODE
CLEAR
MODE
ANGLESUBTITLEAUDIO
DISPLAY
SPEED C.RESET
STANDBY-ON
PICTURE SELECTSLEEP
CH.
VOL.
MUTE
ZOOM
123
456
789
0 +10
+100
REPEAT
2-4
1,5
6
— TV/VCR PREP. —
COMO PROGRAMAR
AJUSTE RELOJ
AJUSTE DE CANAL
AJUSTE DE USER
AJUSTE DE V-CHIP
IDIOMA [ENGLISH]
TITULO [OFF]
RETORNO A CERO
BUSQUEDA DE HORA
BUSCA HACIA INDICE
B
– AJUSTE DE USER –
CINTAS
REPETIR
REBOB. AUT.
SON. VIDSO
SON. TV
[OFF]
[TODO]
[OFF]
[HIFI]
[ESTEREO]
B
T0006UG_6006UG_SP_1.qx3 04.5.12 10:13 AM Page 34

Cintas play 35
Esta función permite mejorar la calidad de la imagen cuando
reproduce un casete usado como cintas alquiladas.
1
Presione SETUP.
2
Presione ▲ o ▼ para seleccionar AJUSTE DE
USER. Luego, presione ENTER.
3
Presione ▲ o ▼ para seleccionar CINTAS.
Presione ENTER hasta que ON aparezca junto
a CINTAS. Para desactivar CINTAS, presione
ENTER para escoger OFF.
4
Presione SETUP para salir del menú.
5
Presione PLAY B para comenzar a reproducir
una cinta de video. CINTAS PLAY B aparecerá
brevemente en la pantalla.
• Una vez que haya seleccionado
Cintas play, éste estará activo
incluso si apaga el TV/VCR/DVD.
• El TV/VCR/DVD mantendrá el
ajuste Cintas incluso si se corta
la corriente.
Consejos útiles
PLAY
STOP
ENTER
RECORD
DISC
MENU
RETURNTITLESETUP
A
-
B
REPEATSEARCH MODE
CLEAR
MODE
ANGLESUBTITLEAUDIO
DISPLAY
SPEED C.RESET
STANDBY-ON
PICTURE SELECTSLEEP
CH.
VOL.
MUTE
ZOOM
123
456
789
0 +10
+100
REPEAT
2-3
1,4
5
— TV/VCR PREP. —
COMO PROGRAMAR
AJUSTE RELOJ
AJUSTE DE CANAL
AJUSTE DE USER
AJUSTE DE V-CHIP
IDIOMA [ENGLISH]
TITULO [OFF]
RETORNO A CERO
BUSQUEDA DE HORA
BUSCA HACIA INDICE
B
– AJUSTE DE USER –
CINTAS
REPETIR
REBOB. AUT.
SON. VIDSO
SON. TV
[ON]
[OFF]
[OFF]
[HIFI]
[ESTEREO]
B
T0006UG_6006UG_SP_1.qx3 04.5.12 10:13 AM Page 35

36 Retorno a cero, apagado programado
Retorno a cero
El contador de cinta de video muestra el tiempo de grabación
o reproducción transcurrido en horas, minutos y segundos
desde que el contador se ajustó en cero. El contador de tiem-
po no cambiará en una cinta en blanco o en partes con espa-
cios en la cinta. El “-” antes del contador de cinta indica la can-
tidad de tiempo de grabación/reproducción restante antes que
el contador llegue a cero.
Siga estos pasos para reajustar el contador de cinta en cero
en la parte de ella que desea consultar más tarde.
1
Reproduzca, rebobine o avance rápido la cinta
hasta la parte que desea consultar más tarde.
Presione STOP C para parar la cinta.
2
Presione C.RESET para ajustar el contador en
0:00:00.
3
Para volver a este mismo punto más adelante,
presione SETUP. Presione ▲ o ▼ para selec-
cionar RETORNO A CERO. Luego, presione
ENTER.
El contador de cinta aparecerá en la pantalla. Cuando
la cinta llegue al punto en el cual ajustó el contador
en cero, la cinta se detendrá. Presione PLAY B para
ver la cinta en el punto establecido.
Apagado programado
Use el apagado programado para que el TV/VCR/DVD se
apague después de un tiempo determinado.
1
Presione SLEEP hasta que los minutos desead-
os aparezcan en la pantalla junto a REPOSAR.
Cada vez que presione SLEEP el tiempo aumentará en
30 minutos. Puede ajustar un apagado programado de
30, 60, 90 ó
120 minutos.
Después de cinco segundos, la información de
Apagado programado desaparecerá de la pantalla. El
TV/VCR/DVD se apagará automáticamente luego que
haya transcurrido el tiempo seleccionado.
Para cancelar el apagado programado
Presione SLEEP hasta que aparezca “REPOSAR 0 MINUTO”.
•Para saber cuánto tiempo queda
antes que se apague automática-
mente el TV/VCR/DVD, presione
SLEEP una vez. La información
desaparecerá automáticamente
después de 5 segundos.
Consejo útil
— TV/VCR PREP. —
COMO PROGRAMAR
AJUSTE RELOJ
AJUSTE DE CANAL
AJUSTE DE USER
AJUSTE DE V-CHIP
IDIOMA [ENGLISH]
TITULO [OFF]
RETORNO A CERO
BUSQUEDA DE HORA
BUSCA HACIA INDICE
B
REPOSAR 120 MINUTO
PLAY
STOP
ENTER
RECORD
DISC
MENU
RETURNTITLESETUP
A
-
B
REPEATSEARCH MODE
CLEAR
MODE
ANGLESUBTITLEAUDIO
DISPLAY
SPEED C.RESET
STANDBY-ON
PICTURE SELECTSLEEP
CH.
VOL.
MUTE
ZOOM
123
456
789
0 +10
+100
REPEAT
3
3
2
1
PLAY
STOP
ENTER
RECORD
DISC
MENU
RETURNTITLESETUP
A
-
B
REPEATSEARCH MODE
CLEAR
MODE
ANGLESUBTITLEAUDIO
DISPLAY
SPEED C.RESET
STANDBY-ON
PICTURE SELECTSLEEP
CH.
VOL.
MUTE
ZOOM
123
456
789
0 +10
+100
REPEAT
1
T0006UG_6006UG_SP_1.qx3 04.5.12 10:13 AM Page 36

Búsqueda de hora 37
Búsqueda de hora le permite avanzar la cinta de video a una
posición con sólo ingresar la cantidad de tiempo de reproduc-
ción que desea adelantar. En el siguiente ejemplo, Búsqueda de
hora se ajusta a 2 horas, 50 minutos desde la posición actual.
1
Inserte la cinta de video.
2
Presione SETUP. Presione ▲ o ▼ para selec-
cionar BUSQUEDA DE HORA Luego, presione
ENTER.
3
Presione ▲ o ▼ hasta que el tiempo deseado
aparezca debajo de BUSQUEDA DE HORA en
la parte superior de la pantalla. (Ejemplo: 2:50 para
2 horas, 50 minutos)
Cada vez que presione ▲ o ▼ aumentará o disminuirá
el tiempo en 10 minutos.
Para cancelar en este momento Búsqueda de hora,
presione SETUP.
4
Presione s o B para rebobinar o avanzar rápi-
do la cinta hasta llegar al tiempo deseado.
El TV/VCR/DVD rebobinará o avanzará rápido la cinta
en el tiempo especificado.
El tiempo disminuirá en la pantalla a medida que
avance la búsqueda. Cuando se llegue a 0:00, se
comenzará a reproducir la cinta.
O para cancelar la búsqueda de hora antes que ter-
mine, presione STOP C.
• Se puede ajustar la Búsqueda de
hora hasta un máximo de 9
horas 50 minutos en incrementos
de 10 minutos.
• La búsqueda de hora no fun-
cionará durante la grabación.
Consejos útiles
1
Inserte la cinta de video.
PLAY
STOP
ENTER
RECORD
DISC
MENU
RETURNTITLESETUP
A
-
B
REPEATSEARCH MODE
CLEAR
MODE
ANGLESUBTITLEAUDIO
DISPLAY
SPEED C.RESET
STANDBY-ON
PICTURE SELECTSLEEP
CH.
VOL.
MUTE
ZOOM
123
456
789
0 +10
+100
REPEAT
2-4
2
— TV/VCR PREP. —
COMO PROGRAMAR
AJUSTE RELOJ
AJUSTE DE CANAL
AJUSTE DE USER
AJUSTE DE V-CHIP
IDIOMA [ENGLISH]
TITULO [OFF]
RETORNO A CERO
BUSQUEDA DE HORA
BUSCA HACIA INDICE
B
BUSQUEDA DE HORA
2 : 50
T0006UG_6006UG_SP_1.qx3 04.5.12 10:13 AM Page 37

Esta función le permite rebobinar rápidamente o avanzar rápi-
do hasta el inicio de las grabaciones.
● Los marcadores de índice se marcan automáticamente al
comienzo de todas las grabaciones. No se marcan donde la
grabación hace una pausa. El intervalo de tiempo entre los
marcadores de índice debe ser mayor que un minuto para
grabaciones en velocidad SP y de tres minutos para graba-
ciones en velocidad SLP. Es decir, las grabaciones deben ser
de uno (SP) o tres (SLP) minutos de largo, de lo contrario, la
función Busca hacia índice puede que no encuentre el inicio
de la grabación. En algunos casos, no se pueden detectar los
marcadores de índice al inicio de una cinta de video.
38 Busca hacia índice
1
Presione SETUP. Presione ▲ o ▼ para selec-
cionar BUSCA HACIA INDICE. Luego, presione
ENTER.
2
Presione ▲ o ▼ hasta que el número de progra-
mas que desee saltar aparezcan debajo de
BUSCA HACIA INDICE. Para cancelar en este
momento Busca hacia índice, presione SETUP.
3
Presione s o B. El TV/VCR/DVD comienza a
rebobinar o a avanzar rápido la cinta de video hasta el
inicio del programa deseado.
4
Cuando se ubica el programa, se inicia la reproduc-
ción.
• Cada vez que se pase un mar-
cador de índice (o grabación), el
número que aparece debajo de
BUSCA HACIA INDICE en la pan-
talla disminuirá en uno.
•Para que se pueda realizar esta
función, debe haber una cinta en
el TV/VCR/DVD.
• Puede buscar hasta 20 mar-
cadores de índice.
• La función no se podrá realizar
durante la grabación.
•Para cancelar Busca hacia índice,
presione STOP
C
.
• Si se llega al final de la cinta
durante Busca hacia índice, la
cinta se rebobinará hasta el
comienzo. EL TV/VCR/DVD se apa-
gará y se expulsará la cinta.
PLAY
STOP
ENTER
RECORD
DISC
MENU
RETURNTITLESETUP
A
-
B
REPEATSEARCH MODE
CLEAR
MODE
ANGLESUBTITLEAUDIO
DISPLAY
SPEED C.RESET
STANDBY-ON
PICTURE SELECTSLEEP
CH.
VOL.
MUTE
ZOOM
123
456
789
0 +10
+100
REPEAT
1-3
1
Consejos útiles
— TV/VCR PREP. —
COMO PROGRAMAR
AJUSTE RELOJ
AJUSTE DE CANAL
AJUSTE DE USER
AJUSTE DE V-CHIP
IDIOMA [ENGLISH]
TITULO [OFF]
RETORNO A CERO
BUSQUEDA DE HORA
BUSCA HACIA INDICE
B
BUSCA HACIA INDICE
0 3
T0006UG_6006UG_SP_1.qx3 04.5.12 10:13 AM Page 38

Funciones de reproducción de cinta de video 39
Cámara lenta
1
Presione k (pausa) durante la reproducción
para poner en pausa la cinta de video. Luego
presione i / g para iniciar la reproducción
en cámara lenta. El sonido se desactivará mientras
la reproducción se encuentre en cámara lenta. Para
evitar que la cinta se dañe, la función de cámara lenta
se detendrá automáticamente después de cinco minu-
tos.
2
Presione PLAY B para volver a la reproduc-
ción normal.
Búsqueda de avance y retroceso
(SP/LP/SLP)
1
Durante la reproducción de la cinta de video,
presione y suelte i / g o j / h.
Comenzará la búsqueda de imagen de avance y retro-
ceso rápido.
2
Para volver a la reproducción normal, presione
PLAY B .
Búsqueda de alta velocidad (LP/SLP)
1
Durante la reproducción de la cinta, presione y
suelte i / g o j / h,luego presione
nuevamente. El TV/VCR/DVD buscará la cinta en
alta velocidad.
Presione i / g o j / h repetidamente
para alternar entre búsqueda regular y de alta veloci-
dad.
2
Para volver a la reproducción normal, presione
PLAY B .
Visualización de una imagen detenida
1
Durante la reproducción de la cinta, presione
k (pausa).
En su pantalla aparecerá una imagen detenida. La ima-
gen avanza cada vez que presiona k (pausa).
Luego que la cinta esté en pausa durante cinco minu-
tos, se detendrá automáticamente la reproducción.
Esto evita que se dañe la cinta y el TV/VCR/DVD.
2
Si la imagen detenida vibra en forma vertical,
estabilícela presionando CH. ▲ o ▼.
3
Para desactivar la imagen detenida y volver a
la reproducción normal, presione PLAY B .
• SP/LP/SLP significa que esta fun-
ción se podrá usar con citas
grabadas en Standard Play, Long
Play o Super Long Play. LP/SLP sig-
nifica que esta función se podrá
usar con citas grabadas en Long
Play y Super Long Play. Los
detalles sobre las velocidades de
la cinta se encuentran en la pági-
na 26.
• Durante la búsqueda de avance
rápido y retroceso, aparecerán
líneas horizontales en la pantalla.
PLAY
STOP
ENTER
RECORD
DISC
MENU
RETURNTITLESETUP
A
-
B
REPEATSEARCH MODE
CLEAR
MODE
ANGLESUBTITLEAUDIO
DISPLAY
SPEED C.RESET
POWER PICTURE SELECTSLEEP
CH.
VOL.
MUTE
ZOOM
123
456
789
0 +10
+100
REPEAT
Consejos útiles
T0006UG_6006UG_SP_1.qx3 04.5.12 10:13 AM Page 39

40 Funciones de operación automática
Están disponibles las siguientes funciones de cinta de video.
Rebobinado automático, expulsión, apagado
Cuando reproduzca, avance rápido o grabe una cinta de
video y ésta se acabe, el TV/VCR/DVD rebobinará la cinta, la
parará, se apagará automáticamente y expulsará la cinta.
Si REPETIR está activado, comenzará la reproducción. Los
detalles se encuentran en la página 34.
La cinta no se rebobinará automáticamente luego que finalice
una grabación con temporizador o una grabación de un toque.
Para rebobinar la cinta luego de grabaciones con temporizador,
consulte los detalles de Rebobinado automático que se
encuentran en la página 32.
Ajuste automático de tracking
El TV/VCR/DVD ajustará automáticamente el tracking de la
cinta de video para darle la mejor calidad de imagen posible.
Sin embargo, con algunas grabaciones, puede obtener una
mejor imagen al usar los controles de tracking manuales
(consulte los datos que aparecen a continuación).
Tracking manual
Para ajustar el tracking en forma manual, presione los
botones CHANNEL ▲/▼ en la parte delantera del
TV/VCR/DVD o los botones CH. ▲/▼ en el control remoto
durante la reproducción. El tracking vuelve a ajuste automáti-
co de tracking cuando inserta una cinta o presiona STOP C.
Antes de
ajustar el
tracking
Después de
ajustar el
tracking
T0006UG_6006UG_SP_1.qx3 04.5.12 10:13 AM Page 40

Subtítulos encapsulados 41
Siga estos pasos para seleccionar subtítulos encapsulados
para la programación de TV. No todos los programas de TV y
comerciales tienen subtítulos encapsulados o todos los tipos
de subtítulos (segundo idioma, texto de mitad de pantalla,
etc.). Si no se transmiten los subtítulos, no puede recibirlos.
Esto no indica que exista un problema en el TV/VCR/DVD.
Revise la programación de TV para saber qué programas
tienen subtítulos encapsulados. Si el TV/VCR/DVD recibe una
señal de televisión de mala calidad, los subtítulos pueden con-
tener errores o puede que no existan subtítulos.Algunas
posibles causas de las señales de mala calidad son:
● El ruido del encendido de un automóvil
● El ruido de un motor eléctrico
● La recepción débil de la señal
● La recepción de señales múltiples (imágenes secundarias o
vibración de la pantalla)
● La reproducción de una cinta mal grabada o gastada.
1
Presione SETUP.
Presione ▲ o ▼ para seleccionar TITULO.
2
Presione ENTER repetidamente para selec-
cionar SUBTIT1, SUBTIT2,TEXTO1,TEXTO 2
u OFF.
SUBTIT1 muestra subtítulos encapsulados normales
(lo que un personaje dice). SUBTIT2 muestra los sub-
títulos encapsulados de idiomas extranjeros (las pal-
abras en el idioma extranjero muestran lo que un per-
sonaje dice).
TEXTO1 y TEXTO2 muestra un texto de mitad de
pantalla (como una guía de canales, programación o
anuncio).
OFF desactiva los subtítulos encapsulados. No apare-
cerán los subtítulos en pantalla.
3
Presione SETUP para salir del menú.
• Si aparece un cuadro negro en la
pantalla, se selecciona el modo
TEXTO. Seleccione SUBTIT1, SUB-
TIT2 u OFF.
• El TV/VCR/DVD mantiene el ajuste
Subtítulos encapsulados si se corta
la corriente.
• Se pueden usar abreviaturas, sím-
bolos y otras abreviaciones gra-
maticales con el fin de mantener
un equilibrio en relación con la
acción que ocurre en la pantalla.
Esto no es un problema del
TV/VCR/DVD.
• Es posible que al cambiar de
canal los subtítulos encapsulados
se borren durante algunos segun-
dos.
• Al ajustar o desactivar el volumen
se pueden borrar los subtítulos
encapsulados durante algunos
segundos.
Consejos útiles
PLAY
STOP
ENTER
RECORD
DISC
MENU
RETURNTITLESETUP
A
-
B
REPEATSEARCH MODE
CLEAR
MODE
ANGLESUBTITLEAUDIO
DISPLAY
SPEED C.RESET
STANDBY-ON
PICTURE SELECTSLEEP
CH.
VOL.
MUTE
ZOOM
123
456
789
0 +10
+100
REPEAT
1-2
1,3
— TV/VCR PREP. —
COMO PROGRAMAR
AJUSTE RELOJ
AJUSTE DE CANAL
AJUSTE DE USER
AJUSTE DE V-CHIP
IDIOMA [ENGLISH]
TITULO [OFF]
RETORNO A CERO
BUSQUEDA DE HORA
BUSCA HACIA INDICE
B
— TV/VCR PREP. —
COMO PROGRAMAR
AJUSTE RELOJ
AJUSTE DE CANAL
AJUSTE DE USER
AJUSTE DE V-CHIP
IDIOMA [ENGLISH]
TITULO [SUBTIT1]
RETORNO A CERO
BUSQUEDA DE HORA
BUSCA HACIA INDICE
B
T0006UG_6006UG_SP_1.qx3 04.5.12 10:13 AM Page 41

42 Ajuste de V-Chip
Explicaciones de clase
de TV
•TV-Y: apropiado para todos los
niños
•TV-Y7: apropiado para niños
mayores de siete años
•TV-G: todo espectador
• TV-PG: se sugiere supervisión
de los padres.
•TV-14: inadecuados para niños
menores de 14 años
•TV-MA: sólo personas con cri-
terio formado
Ajustes de clase de TV
V-CHIP permite que los padres eviten que sus hijos vean pro-
gramas de TV inapropiados.V-CHIP lee las clases de progra-
mación (excepto noticias y programas deportivos, películas sin
editar en canales del cable premium y señales de sistemas de
transmisión de emergencia), luego niega el acceso a dicha pro-
gramación si la clase de programa no cumple con las restric-
ciones que seleccione. En este caso, un mensaje de “PROGRA-
MA PROHIBIDO por ...” aparece en la pantalla del TV.
Si el mensaje “PROGRAMA...” aparece mientras usted ve TV,
cambie el canal a uno que no esté bloqueado. Luego, puede
acceder al menú AJUSTE DE V-CHIP y cambiar los ajustes para
permitirle ver todas la programación.
La programación puede estar clasificada por la Asociación
Norteamericana de Cintas Cinematográficas (MPAA, por sus
siglas en inglés) o de acuerdo a las Pautas de TV para los padres.
Para bloquear una programación inapropiada, ajuste sus restric-
ciones tanto en CLASE DE MPAA como en CLASE DE TV.
Antes de comenzar, asegúrese que...
● El TV/VCR/DVD esté encendido.
● La unidad esté en el modo TV/VCR. Presione SELECT en el
control remoto hasta que vea los canales de TV y vea la luz
roja de VCR/TV en la parte delantera del TV/VCR/DVD.
1
Presione SETUP. Presione ▲ o ▼ para selec-
cionar AJUSTE DE V-CHIP. Luego, presione
ENTER.
2
Presione los botones de número para ingresar el
código de acceso de cuatro dígitos. Cuando
ingrese el código de acceso por primera vez o si se ha
cortado la corriente, ingrese el código predeterminado
0000.Aparecerán cuatro X en lugar del código. De esta
manera se protege su código.
3
Presione ▲ o ▼ para seleccionar CLASE DE TV.
Luego, presione ENTER.
– TV/VCR PREP. –
COMO PROGRAMAR
AJUSTE RELOJ
AJUSTE DE CANAL
AJUSTE DE USER
AJUSTE DE V-CHIP
IDIOMA [ESPAÑOL]
TITULO [OFF]
RETORNO A CERO
BUSQUEDA DE HORA
BUSCA HACIA INDICE
B
CODIGO DE ACCESO
– – – –
– AJUSTE DE V-CHIP –
CLASE DE TV
CLASE DE MPAA
CAMBIAR CODIGO
B
PLAY
STOP
ENTER
RECORD
DISC
MENU
RETURNTITLESETUP
A
-
B
REPEATSEARCH MODE
CLEAR
MODE
ANGLESUBTITLEAUDIO
DISPLAY
SPEED C.RESET
STANDBY-ON
PICTURE SELECTSLEEP
CH.
VOL.
MUTE
ZOOM
123
456
789
0 +10
+100
REPEAT
1,3
1
2
T0006UG_6006UG_SP_1.qx3 04.5.12 10:13 AM Page 42

Ajuste de V-Chip (continuación) 43
4
Presione ▲ o ▼ para seleccionar el nivel de
Clase de TV que desea bloquear y luego pre-
sione ENTER una vez. Si presiona ENTER nueva-
mente, aparecerán las subclases para dicha categoría.
Los detalles se encuentran en las páginas 44 y 45.
Cuando seleccione una categoría de clase y la ajuste
en BLOQ., entonces las clases superiores se ajustarán
en BLOQ. en forma automática. Las clases inferiores
se ajustarán a MIRAR.
Cuando ajuste “TV-Y” a MIRAR (o BLOQ.), todas las
clases se ajustarán a MIRAR (o BLOQ.) automática-
mente.
5
Presione SETUP para guardar sus ajustes y
eliminar los menús.
• Si desea desactivar V-CHIP para
ver toda la programación de TV,
ajuste TV-Y en MIRAR.
• Los ajustes de V-CHIP se manten-
drán después de un corte de cor-
riente (excepto si el código de
acceso vuelva a ser 0000).
Consejos útiles
PLAY
STOP
ENTER
RECORD
DISC
MENU
RETURNTITLESETUP
A
-
B
REPEATSEARCH MODE
CLEAR
MODE
ANGLESUBTITLEAUDIO
DISPLAY
SPEED C.RESET
STANDBY-ON
PICTURE SELECTSLEEP
CH.
VOL.
MUTE
ZOOM
123
456
789
0 +10
+100
REPEAT
4
5
TV-Y
TV-Y7
TV-G
TV-PG
TV-14
TV-MA
[MIRAR]
[MIRAR]
[BLOQ]
[BLOQ]
[BLOQ]
[BLOQ]
( )
( )
( )
( )
B
T0006UG_6006UG_SP_1.qx3 04.5.12 10:13 AM Page 43

44 Ajuste de V-Chip (continuación)
Subclase de Clase de TV
Cuando selecciona TV-Y7,TV-PG,TV-14 ó TV-MA, puede usar
las subclases para bloquear elementos específicos de la pro-
gramación, tales como lenguaje o violencia.
1
Presione SETUP.
2
Presione ▲ o ▼ para seleccionar AJUSTE DE
V-CHIP. Presione ENTER.
3
Presione los botones de número para ingresar
el código de acceso de cuatro dígitos. El código
predeterminado es 0000 (si no ha ajustado su propio
código o si ha ocurrido un corte de corriente).
4
Presione ▲ o ▼ para seleccionar CLASE DE
TV. Presione ENTER.
PLAY
STOP
ENTER
RECORD
DISC
MENU
RETURNTITLESETUP
A
-
B
REPEATSEARCH MODE
CLEAR
MODE
ANGLESUBTITLEAUDIO
DISPLAY
SPEED C.RESET
STANDBY-ON
PICTURE SELECTSLEEP
CH.
VOL.
MUTE
ZOOM
123
456
789
0 +10
+100
REPEAT
2,4
1
3
— TV/VCR PREP. —
COMO PROGRAMAR
AJUSTE RELOJ
AJUSTE DE CANAL
AJUSTE DE USER
AJUSTE DE V-CHIP
IDIOMA [ENGLISH]
TITULO [OFF]
RETORNO A CERO
BUSQUEDA DE HORA
BUSCA HACIA INDICE
B
CODIGO DE ACCESO
– – – –
– AJUSTE DE V-CHIP –
CLASE DE TV
CLASE DE MPAA
CAMBIAR CODIGO
B
T0006UG_6006UG_SP_1.qx3 04.5.12 10:13 AM Page 44

Ajuste de V-Chip (continuación) 45
•Diálogo (D) no es una subclase
disponible para TV-MA.
• Las subclases bloqueadas apare-
cerán junto a la categoría de
clase en el menú de clases de
TV.
• No puede BLOQUEAR una sub-
clase (D, L, S, o V) si la categoría
principal está ajustada en
MIRAR. Sin embargo, puede ajus-
tar una subclase en MIRAR
incluso si la categoría principal
está ajustada en BLOQ.
• Al cambiar la categoría a BLOQ.
o MIRAR automáticamente tam-
bién cambia todas sus subclases
(BLOQ. o MIRAR).
5
Presione ▲ o L para seleccionar la clase que
desee ajustar. Luego, presione ENTER dos
veces para ir a sus subclases.
● Cuando seleccione TV-Y7:
Presione ▲ o ▼ para seleccionar FV (Violencia de
fantasía, violencia que pueda parecer real a los niños).
Luego, presione ENTER para seleccionar BLOQ. o
MIRAR.
● Cuando seleccione TV-PG,TV-14 ó TV-MA:
presione ▲ o ▼ para seleccionar “D” (diálogo suger-
ente),“L” (lenguaje grosero),“S” (situaciones sexu-
ales), o “V” (violencia). Luego, presione ENTER repeti-
damente para seleccionar BLOQ. o MIRAR para cada
subclase.
Para volver al menú anterior, presione RETURN.
6
Presione SETUP para guardar sus ajustes y eliminar
los menús.
PLAY
STOP
ENTER
RECORD
DISC
MENU
RETURNTITLESETUP
A
-
B
REPEATSEARCH MODE
CLEAR
MODE
ANGLESUBTITLEAUDIO
DISPLAY
SPEED C.RESET
STANDBY-ON
PICTURE SELECTSLEEP
CH.
VOL.
MUTE
ZOOM
123
456
789
0 +10
+100
REPEAT
5
6
Consejos útiles
TV-Y7
FV
[BLOQ.]
[BLOQ.]
B
Ejemplo:
Subclases TV-Y7
T0006UG_6006UG_SP_1.qx3 04.5.12 10:13 AM Page 45

46 Ajuste de V-Chip (continuación)
Ajuste de clase de MPAA
Puede bloquear los canales de TV de acuerdo a las clases
establecidas por la Asociación Norteamericana de Cintas
Cinematográficas. Para ello, siga estos pasos.
1
Presione SETUP.
2
Presione ▲ o ▼ para seleccionar AJUSTE DE
V-CHIP. Luego, presione ENTER.
3
Presione los botones de número para ingresar
el código de acceso de cuatro dígitos. (El código
predeterminado es 0000 si no ha ajustado su propio
código o si ha habido un corte de corriente).
4
Presione ▲ o ▼ para seleccionar CLASE DE
MPAA. Luego, presione ENTER.
5
Presione ▲ o ▼ para seleccionar el nivel que
desea bloquear. Luego, presione ENTER para
seleccionar BLOQ. o MIRAR.
Cuando bloquee una categoría, las clases superiores
se ajustan a BLOQ. automáticamente. Las clases infe-
riores se ajustan a MIRAR.
Cuando ajuste G en MIRAR o BLOQ., todas las clases
se ajustarán automáticamente en MIRAR o BLOQ.
6
Presione SETUP para guardar sus ajustes y
eliminar los menús.
Explicaciones de Clase de
MPAA
•G:todo espectador
• PG: se sugiere supervisión de los
padres.
• PG-13: inadecuados para niños
menores de 13 años
•R:restringido; menores de 17 años
deben estar acompañados por uno
de sus padres o por un adulto a
cargo.
• NC-17: no se admiten menores de
17 años
•X:sólo personas con criterio for-
mado
•Para desactivar todas las Clases
de MPAA, ajuste G en MIRAR.
• Los ajustes de V-CHIP se manten-
drán después de un corte de cor-
riente (excepto que el código de
acceso vuelve a ser 0000).
PLAY
STOP
ENTER
RECORD
DISC
MENU
RETURNTITLESETUP
A
-
B
REPEATSEARCH MODE
CLEAR
MODE
ANGLESUBTITLEAUDIO
DISPLAY
SPEED C.RESET
STANDBY-ON
PICTURE SELECTSLEEP
CH.
VOL.
MUTE
ZOOM
123
456
789
0 +10
+100
REPEAT
2,
4-5
1,6
3
Consejos útiles
— TV/VCR PREP. —
COMO PROGRAMAR
AJUSTE RELOJ
AJUSTE DE CANAL
AJUSTE DE USER
AJUSTE DE V-CHIP
IDIOMA [ENGLISH]
TITULO [OFF]
RETORNO A CERO
BUSQUEDA DE HORA
BUSCA HACIA INDICE
B
CODIGO DE ACCESO
– – – –
– AJUSTE DE V-CHIP –
CLASE DE TV
CLASE DE MPAA
CAMBIAR CODIGO
B
G
PG
PG-13
R
NC-17
X
[MIRAR]
[MIRAR]
[MIRAR]
[BLOQ.]
[BLOQ.]
[BLOQ.]
B
T0006UG_6006UG_SP_1.qx3 04.5.12 10:13 AM Page 46

• Si ingresa el código de manera
incorrecta en el espacio de CODI-
GO CONFIRMADO, repita el paso
5. Ingrese el mismo código nuevo
en el espacio CODIGO CONFIR-
MADO.
• Si desconecta el cable de sumin-
istro eléctrico o si hay un corte de
corriente, se activará nuevamente
el código predeterminado (0000).
Cambie nuevamente su código de
acceso según sea necesario.
Consejos útiles
Ajuste de V-Chip (continuación) 47
Cambio del código de acceso
Aunque el código predeterminado 0000 está incluido con el
TV/VCR/DVD, puede ajustar su propio código de acceso.
1
Presione SETUP.
2
Presione ▲ o ▼ para seleccionar AJUSTE DE V-
CHIP. Luego, presione ENTER.
3
Presione los botones de número para ingresar
el código de acceso antiguo. Al hacer esto por
primera vez, use 0000.Aparecerán cuatro X en lugar
del código para protegerlo.
4
Presione ▲ o ▼ para seleccionar CAMBIAR DE
CODIGO. Luego, presione ENTER.
5
Presione los botones de número para ingresar
su código de acceso preferido en el espacio de
CODIGO NUEVO. Luego, ingrese el mismo
código en el espacio de CODIGO CONFIRMA-
DO. Nuevamente, aparecerán cuatro X en lugar de los
números del código. El código de acceso debe tener
exactamente cuatro dígitos.
Volverá a aparecer la pantalla de AJUSTE V-CHIP.
6
Presione SETUP para guardar sus ajustes y
eliminar los menús.
PLAY
STOP
ENTER
RECORD
DISC
MENU
RETURNTITLESETUP
A
-
B
REPEATSEARCH MODE
CLEAR
MODE
ANGLESUBTITLEAUDIO
DISPLAY
SPEED C.RESET
STANDBY-ON
PICTURE SELECTSLEEP
CH.
VOL.
MUTE
ZOOM
123
456
789
0 +10
+100
REPEAT
2,4
1,6
3,5
CONDIGO DE ACCESO
– – – –
– AJUSTE DE V-CHIP –
CLASE DE TV
CLASE DE MPAA
CAMBIAR CODIGO
B
CODIGO NUEVO
CODIGO CONFIRMADO
T0006UG_6006UG_SP_1.qx3 04.5.12 10:13 AM Page 47

48 Sonido de televisión multicanal
1
Presione DISPLAY para consultar el estado del
sonido. Mientras ve TV, presione DISPLAY dos veces.
Mientras ve una cinta de video, presione DISPLAY una
vez.
Cuando un programa se transmite en estéreo,
ESTEREO aparece en la esquina superior derecha de
la pantalla. Cuando un programa se transmite en audio
secundario, SAP aparece en la esquina superior
derecha de la pantalla. Cuando un programa de TV se
transmite tanto en estéreo como en audio secundario,
aparece tanto ESTEREO como SAP en la pantalla.
Aunque un programa se puede transmitir en audio
estéreo y secundario, no puede recibir ambos al
mismo tiempo.
Durante la reproducción de una cinta, HIFI aparecerá
en la esquina superior izquierda de la pantalla si SON.
VIDSO se ajusta en HIFI. Los detalles se encuentran en
la página 49. Si reproduce una cinta que no sea HiFi y
SON.VIDSO esté ajustado en HIFI, HIFI desaparecerá
de la pantalla. La cinta de video se reproducirá en
sonido monofónico.
Debe ajustar el TV/VCR/DVD para grabar ya sea en
ESTEREO o SAP. Hágalo cambiando el ajuste SON.TV
según se describe en la página 50.
PLAY
STOP
ENTER
RECORD
DISC
MENU
RETURNTITLESETUP
A
-
B
REPEATSEARCH MODE
CLEAR
MODE
ANGLESUBTITLEAUDIO
DISPLAY
SPEED C.RESET
STANDBY-ON
PICTURE SELECTSLEEP
CH.
VOL.
MUTE
ZOOM
123
456
789
0 +10
+100
REPEAT
1
PARAR
HIFI
SP CONTEO
12:00AM
CA 123
ESTEREO/SAP
0:00:00
T0006UG_6006UG_SP_1.qx3 04.5.12 10:13 AM Page 48

Sonido de televisión multicanal (continuación) 49
• Las cintas que no sean HiFi se
reproducirán automáticamente
en sonido monofónico.
• Las transmisiones de sonido mul-
ticanal se grabarán automática-
mente en HiFi a menos que
seleccione SAP antes de la
grabación. Los detalles se
encuentran en la página 50.
Consejos útiles
Selección de sonido HIFI o monofónico
Puede reproducir cintas de video ya sea en sonido de alta
fidelidad (HIFI) o monofónicas (MONO o monocanal). Para
ello, siga estos pasos.
1
Presione SETUP.
2
Presione ▲ o ▼ para seleccionar AJUSTE DE
USER. Luego, presione ENTER.
3
Presione ▲ o ▼ para seleccionar SON.VIDSO.
4
Presione ENTER para seleccionar MONO o
HIFI.
5
Presione SETUP para salir de los menús.
PLAY
STOP
ENTER
RECORD
DISC
MENU
RETURNTITLESETUP
A
-
B
REPEATSEARCH MODE
CLEAR
MODE
ANGLESUBTITLEAUDIO
DISPLAY
SPEED C.RESET
STANDBY-ON
PICTURE SELECTSLEEP
CH.
VOL.
MUTE
ZOOM
123
456
789
0 +10
+100
REPEAT
2-4
1,5
— TV/VCR PREP. —
COMO PROGRAMAR
AJUSTE RELOJ
AJUSTE DE CANAL
AJUSTE DE USER
AJUSTE DE V-CHIP
IDIOMA [ENGLISH]
TITULO [OFF]
RETORNO A CERO
BUSQUEDA DE HORA
BUSCA HACIA INDICE
B
– AJUSTE DE USER –
CINTAS
REPETIR
REBOB. AUT.
SON. VIDSO
SON. TV
[ON]
[OFF]
[OFF]
[HIFI]
[ESTEREO]
B
– AJUSTE DE USER –
CINTAS
REPETIR
REBOB. AUT.
SON. VIDSO
SON. TV
[ON]
[OFF]
[OFF]
[HIFI]
[ESTEREO]
B
T0006UG_6006UG_SP_1.qx3 04.5.12 10:13 AM Page 49

50 Sonido de televisión multicanal (continuación)
• Si selecciona el audio secundario
cuando éste no esté disponible,
el TV/VCR/DVD recibirá y
grabará en audio normal.
Consejo útil
Ajuste del TV/VCR/DVD para recibir o
grabar programas de TV en sonido estéreo,
audio secundario o monofónico
Debido a que los canales de TV pueden transmitir en audio
estéreo o secundario, ajuste el TV/VCR/DVD para recibir y
grabar los canales en el modo de sonido que usted prefiera.
1
Presione SETUP. Presione ▲ o ▼ para selec-
cionar AJUSTE DE USER. Luego, presione
ENTER.
2
Presione ▲ o ▼ para seleccionar SON.TV.
3
Presione ENTER para seleccionar ESTEREO,
SAP (Segundo programa de audio),o MONO.
4
Presione SETUP para salir de los menús.
PLAY
STOP
ENTER
RECORD
DISC
MENU
RETURNTITLESETUP
A
-
B
REPEATSEARCH MODE
CLEAR
MODE
ANGLESUBTITLEAUDIO
DISPLAY
SPEED C.RESET
STANDBY-ON
PICTURE SELECTSLEEP
CH.
VOL.
MUTE
ZOOM
123
456
789
0 +10
+100
REPEAT
1-3
1,4
— TV/VCR PREP. —
COMO PROGRAMAR
AJUSTE RELOJ
AJUSTE DE CANAL
AJUSTE DE USER
AJUSTE DE V-CHIP
IDIOMA [ENGLISH]
TITULO [OFF]
RETORNO A CERO
BUSQUEDA DE HORA
BUSCA HACIA INDICE
B
– AJUSTE DE USER –
CINTAS
REPETIR
REBOB. AUT.
SON. VIDSO
SON. TV
[ON]
[OFF]
[OFF]
[HIFI]
[ESTEREO]
B
T0006UG_6006UG_SP_2.qx3 04.5.12 10:14 AM Page 50

Menús de título
Algunos DVD tienen un menú de título, que muestra los títu-
los disponibles en el DVD. Úselo para reproducir un título
específico.
● Antes de comenzar, presione SELECT para poner el
TV/VCR/DVD en el modo DVD. La luz verde de DVD
aparecerá en la parte delantera del TV/VCR/DVD.
1
Presione TITLE. Aparecerá el menú Titulo.
Si un menú Titulo no se encuentra disponible, la “X”
puede aparecer en la pantalla del TV. Si el DVD sólo
tiene un menú principal como se describió anterior-
mente, éste puede aparecer cuando presione TITLE.
2
Presione o, p, s,oB para seleccionar un títu-
lo, luego presione ENTER. La reproducción
comenzará en el título que seleccionó.
• Los menús varían entre los dis-
cos. Siga la información del DVD.
• No todos los DVD tienen menús
de disco o título.
• Algunos DVD pueden referirse a
los capítulos como “escenas”.
Algunos pueden referirse al
menú de título como el “índice
de escenas”.
• El botón TITLE puede que no
esté activo en todos los DVD.
Menús, Menús de título 51
Menús
Algunos DVD contienen menús que describen los con-
tenidos del disco o que permiten que usted personalice la
reproducción de éste. Por ejemplo, el menú puede ofrecer
opciones para los idiomas de los subtítulos, las funciones
especiales o la selección de la escena. Para usar el menú del
DVD y seleccionar las funciones de reproducción, siga estos
pasos.
● Antes de comenzar, presione SELECT para poner el
TV/VCR/DVD en el modo DVD. La luz verde de DVD
aparecerá en la parte delantera del TV/VCR/DVD.
1
Presione DISC MENU.
Aparecerá el menú del DVD.
2
Presione o, p, s,o B para seleccionar un ele-
mento, luego presione ENTER. Continúe este
proceso para preparar todas las funciones que desee
o para iniciar la reproducción del disco.
PLAY
STOP
ENTER
RECORD
DISC
MENU
RETURNTITLESETUP
A
-
B
REPEATSEARCH MODE
CLEAR
MODE
ANGLESUBTITLEAUDIO
DISPLAY
SPEED C.RESET
STANDBY-ON
PICTURE SELECTSLEEP
CH.
VOL.
MUTE
ZOOM
123
456
789
0 +10
+100
REPEAT
2
1
PLAY
STOP
ENTER
RECORD
DISC
MENU
RETURNTITLESETUP
A
-
B
REPEATSEARCH MODE
CLEAR
MODE
ANGLESUBTITLEAUDIO
DISPLAY
SPEED C.RESET
STANDBY-ON
PICTURE SELECTSLEEP
CH.
VOL.
MUTE
ZOOM
123
456
789
0 +10
+100
REPEAT
2
1
Consejos útiles
T0006UG_6006UG_SP_2.qx3 04.5.12 10:14 AM Page 51

52 Búsqueda de avance/retroceso rápido
● Antes de comenzar, presione SELECT para poner el
TV/VCR/DVD en el modo DVD. La luz verde de DVD
aparecerá en la parte delantera del TV/VCR/DVD.
1
Durante la reproducción, presione i/g o
j/h.
Use
i/g
para una búsqueda hacia
delante, y
j/h
para una búsqueda hacia atrás.
●
Durante la reproducción del DVD, si presiona
i/g
or
j/h
avanzará o rebobinará la
imagen a una velocidad dos, ocho, cincuenta o cien
veces superior a la velocidad normal de reproduc-
ción. La velocidad puede variar en función del disco.
h
1,
h
2,
h
3,
h
4 aparecerá brevemente
en la pantalla del televisor para indicar una búsqueda
rápida hacia atrás. El sonido estará silenciado
durante la búsqueda.
O bien 1
g
,2
g
,3
g
,4
g
indicará una
búsqueda rápida hacia delante.
● En los CDs de audio, la velocidad de búsqueda
aproximada es 16 veces superior a la velocidad de
búsqueda normal. g o h aparecerá breve-
mente en la pantalla. El sonido será intermitente
durante la búsqueda en un CD de audio.
● Durante la reproducción de un CD de vídeo, si
presiona i/g o j/h la imagen avanzará
o rebobinará a una velocidad dos, ocho o treinta
veces superior a la velocidad de reproducción nor-
mal. La velocidad puede variar en función del disco.
h 1, h 2, h3 aparecerán brevemente en la
pantalla del televisor para indicar una búsqueda
rápida hacia atrás.
O bien, g 1, g 2, g 3 indicarán una búsque-
da hacia delante.
● Para los MP3, la velocidad de búsqueda aproximada
es ocho veces superior a la velocidad de reproduc-
ción normal. g o h aparecerán brevemente en
el televisor.
2
Presione PLAY B para volver a la reproduc-
ción normal.
PLAY
STOP
ENTER
RECORD
DISC
MENU
RETURNTITLESETUP
A
-
B
REPEATSEARCH MODE
CLEAR
MODE
ANGLESUBTITLEAUDIO
DISPLAY
SPEED C.RESET
STANDBY-ON
PICTURE SELECTSLEEP
CH.
VOL.
MUTE
ZOOM
123
456
789
0 +10
+100
REPEAT
2
1
E
1
Ejemplo: reproducción de un DVD
hacia atrás a una velocidad dos veces
superior a la velocidad normal de
reproducción.
T0006UG_6006UG_SP_2.qx3 04.5.12 10:14 AM Page 52

• Cuando la reproducción esté para-
da, utilice los botones de número
para seleccionar un título y repro-
ducirlo inmediatamente.
Duante la reproducción, utilice los
botones de número para elegir un
capítulo y reproducirlo inmediata-
mente.
• La reproducción de título/capítulo
no está disponible en algunos
DVD.
Reproducción de título/capítulo, Reproducción de hora 53
Reproducción de título/capítulo
● Antes de comenzar, presione SELECT para poner el
TV/VCR/DVD en el modo DVD. La luz verde de DVD
aparecerá en la parte delantera del TV/VCR/DVD.
1
Durante la reproducción de DVD, presione SEARCH
MODE hasta que aparezca CH (por capítulo) o TT (por
título) en la pantalla del TV. El número de título o capítulos
disponibles aparecerá a la derecha (por ejemplo, /4).
2
Ingrese el número de título o capítulo usando los
botones de número.
Comenzará la reproducción del títu-
lo o capítulo.
● Para seleccionar un número de pista de un solo dígito
cuando hay más de
10 pistas, presione ENTER para
reproducir la pista.
● Si introduce un número de pista que no está disponible
en el disco, la reproducción no se iniciará (o bien la
pista actual se seguirá reproduciendo).
Reproducción de hora
● Antes de comenzar, presione SELECT para poner el
TV/VCR/DVD en el modo DVD. La luz verde de DVD
aparecerá en la parte delantera del TV/VCR/DVD.
1
Durante la reproducción de un DVD, CD de audio o
CD de vídeo (sin PBC), presione SEARCH MODE
hasta que aparezca la pantalla de búsqueda de tiempo.
2
Dentro de 30 segundos, use los botones de número
para ingresar el tiempo de reproducción transcurri-
do (de la pista o el título) en el cual usted desea que
comience la reproducción.
Ingrese el tiempo en horas,
minutos y segundos. Dentro de algunos segundos, la repro-
ducción se iniciará en el tiempo especificado.
● Ejemplo: 1 hora, 23 minutos y 30 segundos
1 → 2 → 3 → 3 → 0
● Asegúrese de que la hora que introdujo queda dentro del
intervalo de tiempo total de la pista o título en reproduc-
ción. Si no lo está, el espacio de la hora se borrará y se
reanudará la reproducción en el punto actual. El tiempo
total disponible en la pista o título actual aparecerá en la
pantalla de búsqueda de tiempo.
● Si comete un error al ingresar el tiempo, presione CLEAR
para borrar el área del tiempo. Ingrese la información
correcta.
12 / 174 / 4
PLAY
STOP
ENTER
RECORD
DISC
MENU
RETURNTITLESETUP
A
-
B
REPEATSEARCH MODE
CLEAR
MODE
ANGLESUBTITLEAUDIO
DISPLAY
SPEED C.RESET
STANDBY-ON
PICTURE SELECTSLEEP
CH.
VOL.
MUTE
ZOOM
123
456
789
0 +10
+100
REPEAT
1
2
PLAY
STOP
ENTER
RECORD
DISC
MENU
RETURNTITLESETUP
A
-
B
REPEATSEARCH MODE
CLEAR
MODE
ANGLESUBTITLEAUDIO
DISPLAY
SPEED C.RESET
STANDBY-ON
PICTURE SELECTSLEEP
CH.
VOL.
MUTE
ZOOM
123
456
789
0 +10
+100
REPEAT
1
2
Consejo útiles
_/4
TOTAL
1:29:00
_:_ _:_ _
T0006UG_6006UG_SP_2.qx3 04.5.12 10:14 AM Page 53

54 Reproducción de pista
Hay tres maneras de reproducir un CD de audio, CD de
vídeo (sin PBC), MP3 o JPEG en una pista concreta: Use los
botones de número, el botón SEARCH MODE o i/g y
j/h.
● Antes de comenzar, presione SELECT para poner el
TV/VCR/DVD en el modo DVD. La luz verde de DVD
aparecerá en la parte delantera del TV/VCR/DVD.
Asegúrese de que haya un disco que se pueda reproducir
en la bandeja del disco.
A
Uso de los botones de número
Presione los botones de número para ingresar un
número de pista. La reproducción se iniciará en la pista
seleccionada.
Para las pistas con un número superior a 10, presione el botón
+100/+10 para que aparezca la pantalla de búsqueda (TR _ _ /12
- un ejemplo de pistas totales) en el televisor. Presione el
número del primer dígito, y luego el del segundo dígito. Por
ejemplo, para reproducir la pista 26, presione +100/+10, después
el número 2, y finalmente, el número 6.
Para las pistas de un solo dígito (1-9), presione un solo botón de
número.
Si introduce un número de pista que no está disponible en el
disco, la reproducción no se iniciará (o se seguirá reproduciendo
el tema actual).
B
Uso del botón SEARCH MODE
Presione SEARCH MODE para que aparezca la pan-
talla Búsqueda de pista (TR). Dentro de 30 segundos,
presione los botones de número para seleccionar el
número de pista. La reproducción comenzará en la pista
seleccionada. Para una pista de un sólo dígito (1-9), ingrese
primero un cero. Por ejemplo, para reproducir la pista 5, pre-
sione 0, 5. Usted no tiene que usar el botón +100/+10 en
SEARCH MODE para la pista 10 o mayor.
C
Uso de i/g y j/E
Durante la reproducción, presione i/g para ade-
lantar la pista actual y desplazarse a la siguiente
pista. Presione j/h para volver al comienzo de
la pista actual o para pasar a las pistas anteriores.
• Los botones
H
/
h
y
G
/
g
están desactivados cuando
la reproducción está detenida.
• No puede usar
G
/
g
para
pasar de la última pista del disco
a la primera.
PLAY
STOP
ENTER
RECORD
DISC
MENU
RETURNTITLESETUP
A
-
B
REPEATSEARCH MODE
CLEAR
MODE
ANGLESUBTITLEAUDIO
DISPLAY
SPEED C.RESET
STANDBY-ON
PICTURE SELECTSLEEP
CH.
VOL.
MUTE
ZOOM
123
456
789
0 +10
+100
REPEAT
B
A-B
C
Consejos útiles
T0006UG_6006UG_SP_2.qx3 04.5.12 10:14 AM Page 54

Reproducción pausada y paso a paso, Reanudación activada 55
Reproducción pausada y paso a paso
● Antes de comenzar, presione SELECT para poner el
TV/VCR/DVD en el modo DVD. La luz verde de DVD
aparecerá en la parte delantera del TV/VCR/DVD.
1
Durante la reproducción de un disco, presione
F (pausa). La reproducción hará una pausa y el
sonido se desactivará.
2
Presione k (pausa) para ver la imagen de un
DVD o un CD de vídeo avanzar de un cuadro
(o paso) a la vez. El sonido permanecerá silenciado.
Presionar k (pausa) repetidamente durante la repro-
ducción del CD de audio, MP3 o JPEG no tendrá
ningún efecto.
3
Presione PLAY B para reanudar la reproduc-
ción.
Reanudación activada
● Antes de comenzar, presione SELECT para poner el
TV/VCR/DVD en el modo DVD. La luz verde de DVD
aparecerá en la parte delantera del TV/VCR/DVD.
1
Presione STOP C durante la reproducción. En
algunos segundos, el siguiente mensaje de
Reanudación aparecerá en la pantalla del TV.
2
Presione PLAY B. En algunos segundos, la repro-
ducción se reanudará desde el punto donde se detu-
vo la última vez.
Sin embargo, al abrir la bandeja del disco o apagar el
TV/VCR/DVD se cancelará la función de reanudación.
La reproducción se iniciará al comienzo la próxima
vez que coloque el disco.
Para los MP3, la reproducción se reanudará desde el
inicio de la pista actual.
Para cancelar la reanudación y comenzar a reproducir
el disco desde el principio, presione STOP C por
segunda vez mientras la reproducción está detenida.
El símbolo de parada (C) aparecerá brevemente en la
pantalla del televisor. Presione PLAY B para iniciar la
reproducción del disco desde el principio.
• Si las imágenes pausadas apare-
cen borrosas, ajuste el MODO
VISTA FIJA a IMAGEN en el
menú PANTALLA. Para más infor-
mación, consulte las páginas 70-
71.
PLAY
STOP
ENTER
RECORD
DISC
MENU
RETURNTITLESETUP
A
-
B
REPEATSEARCH MODE
CLEAR
MODE
ANGLESUBTITLEAUDIO
DISPLAY
SPEED C.RESET
STANDBY-ON
PICTURE SELECTSLEEP
CH.
VOL.
MUTE
ZOOM
123
456
789
0 +10
+100
REPEAT
3
PLAY
STOP
ENTER
RECORD
DISC
MENU
RETURNTITLESETUP
A
-
B
REPEATSEARCH MODE
CLEAR
MODE
ANGLESUBTITLEAUDIO
DISPLAY
SPEED C.RESET
STANDBY-ON
PICTURE SELECTSLEEP
CH.
VOL.
MUTE
ZOOM
123
456
789
0 +10
+100
REPEAT
2
1
1-2
Consejos útil
T0006UG_6006UG_SP_2.qx3 04.5.12 10:14 AM Page 55

56 Repetir, Repetir A-B
Repetir
● Antes de comenzar, presione SELECT para poner el
TV/VCR/DVD en el modo DVD. La luz verde de DVD
aparecerá en la parte delantera del TV/VCR/DVD.
1
Durante la reproducción, presione REPEAT hasta que
aparezca el modo de repetición deseado en el televisor.
En un DVD, seleccione CAPÍTULO,TÍTULO, o APDO.
En un CD de audio o CD de vídeo (sin PBC), seleccione
PISTA,TODO (todas las pistas del disco), o APDO.
Con archivos MP3 o JPEG, seleccione PISTA, GRUPO
(todas las pistas de la carpeta actual), o TODO.
Si selecciona una nueva pista, capítulo o título, la repro-
ducción repetida se cancelará.
• La repetición de la reproducción no
está disponible con algunos discos.
•
Las funciones de reproducción repeti-
da y reproducción de A hasta B no
están disponibles en todos los discos.
•Toda la sección de repetición de A
hasta B debe estar dentro de un
solo título o pista. Si no introduce el
punto B antes de llegar al final de
la pista o título, el final de la pista o
título pasarán a ser el punto B
automáticamente.
• Repetir A-B no está disponible con
las pistas MP3.
• Al parar la reproducción se cance-
lará Repetir play A-B.
Repetir A-B
Siga estos pasos para reproducir una sección de un DVD,
CD de audio o CD de vídeo de manera repetida.
1
Durante la reproducción del disco, presione
REPEAT A-B para ajustar el punto de partida
(A). Si comete un error, presione CLEAR. Esto bor-
rará el punto A y le permitirá volver a empezar.
APDO. aparecerá brevemente en la pantalla del TV
.
2
Reproduzca el disco hasta el punto en el cual
usted desea que termine la repetición de la
reproducción, luego presione REPEAT A-B otra
vez. Dentro de algunos segundos, la sección comen-
zará a reproducirse. El segmento se reproducirá una y
otra vez hasta que cancele la función Repetir A-B.
3
Para cancelar Repetir play A-B, presione
REPEAT A-B para que APDO. aparezca en
la pantalla del TV. Se reanudará la reproducción
normal.
A – B
A –
PLAY
STOP
ENTER
RECORD
DISC
MENU
RETURNTITLESETUP
A
-
B
REPEATSEARCH MODE
CLEAR
MODE
ANGLESUBTITLEAUDIO
DISPLAY
SPEED C.RESET
STANDBY-ON
PICTURE SELECTSLEEP
CH.
VOL.
MUTE
ZOOM
123
456
789
0 +10
+100
REPEAT
1
PLAY
STOP
ENTER
RECORD
DISC
MENU
RETURNTITLESETUP
A
-
B
REPEATSEARCH MODE
CLEAR
MODE
ANGLESUBTITLEAUDIO
DISPLAY
SPEED C.RESET
STANDBY-ON
PICTURE SELECTSLEEP
CH.
VOL.
MUTE
ZOOM
123
456
789
0 +10
+100
REPEAT
1-3
Consejos útiles
CAPÍTULO
PISTA
Ejemplo: Repetir el
capítulo de un DVD
Ejemplo: Repetir una
pista de un CD de audio
o CD de vídeo
T0006UG_6006UG_SP_2.qx3 04.5.12 10:14 AM Page 56

Marcadores 57
Utilice los marcadores para recordar sus momentos
favoritos de un DVD, CD de audio o CD de vídeo (sin PBC).
Para fijar los marcadores, siga los siguientes pasos:
● Antes de comenzar, presione SELECT para poner el
TV/VCR/DVD en el modo DVD. La luz verde de DVD
aparecerá en la parte delantera del TV/VCR/DVD.
1
Reproduzca el disco hasta dentro de los 30 segundos
anteriores al punto en que usted desea ajustar el
marcador. Durante la reproducción, presione
SEARCH MODE hasta que aparezcan los mar-
cadores en la parte superior de la pantalla del TV.
Ejemplo: DVD
2
Dentro de los 30 segundos, presione s o B para
seleccionar un marcador (1-10). Asegúrese que
_ _ _ _ : _ _ : _ _ aparezca bajo el número.
3
Permita que el disco se reproduzca hasta el
punto en que usted desea ajustar el marcador
(hasta 30 segundos de intervalo).
Cuando el disco llegue al punto que desee
recordar, presione ENTER. El número de capítulo
o pista y el tiempo de reproducción transcurrido
aparecerán debajo de los marcadores.
Una marca de verificación remplazará al número de
marcador.
La pantalla Marcador desaparecerá en cerca de 30
segundos o presione SEARCH MODE otra vez para
sacar la pantalla Marcador.
Ejemplo: DVD Ejemplo: CD de audio
4
Para volver a un marcador durante la repro-
ducción, presione SEARCH MODE hasta que
vea los marcadores.
Presione s o B para escoger el marcador que
desee, luego presione ENTER. La reproducción
del disco continuará desde el punto marcado.
• Al abrir la bandeja de discos,
cambiar al modo TV/VCR o apa-
gar el TV/VCR/DVD borrará
todos los marcadores.
•Para borrar sólo un marcador,
presione SEARCH MODE hasta
que vea los marcadores. Presione
s
o
B
para seleccionar un
marcador. Presione CLEAR.
Presione RETURN para sacar la
pantalla.
•Para borrar todos los mar-
cadores, presione SEARCH
MODE hasta que vea los mar-
cadores. Presione
B
para selec-
cionar AC (Todo borrado), luego
presione ENTER. Presione
SEARCH MODE o RETURN
para sacar la pantalla.
PLAY
STOP
ENTER
RECORD
DISC
MENU
RETURNTITLESETUP
A
-
B
REPEATSEARCH MODE
CLEAR
MODE
ANGLESUBTITLEAUDIO
DISPLAY
SPEED C.RESET
STANDBY-ON
PICTURE SELECTSLEEP
CH.
VOL.
MUTE
ZOOM
123
456
789
0 +10
+100
REPEAT
2-4
1,
3-4
Consejos útiles
T0006UG_6006UG_SP_2.qx3 04.5.12 10:14 AM Page 57

Ángulos de cámara
Algunos DVD contienen escenas grabadas desde distintos
ángulos. El ángulo de cámara no cambiará si el DVD no con-
tiene secuencias grabadas desde perspectivas diferentes de
cámara.
● Antes de comenzar, presione SELECT para poner el
TV/VCR/DVD en el modo DVD. La luz verde de DVD
aparecerá en la parte delantera del TV/VCR/DVD.
1
Durante la reproducción del DVD, presione
ANGLE repetidamente para seleccionar un
ángulo diferente. El número de ángulos disponibles
aparece a la derecha de la pantalla de ángulo. En este
ejemplo, hay 8 ángulos disponibles ( /8).
58 Subtítulos, Ángulos de cámara
Subtítulos
Durante la reproducción usted puede seleccionar un idioma
para los subtítulos del DVD. Sólo puede seleccionar los sub-
títulos que están disponibles en el DVD.
● Antes de comenzar, presione SELECT para poner el
TV/VCR/DVD en el modo DVD. La luz verde de DVD
aparecerá en la parte delantera del TV/VCR/DVD.
1
Durante la reproducción, presione SUBTITLE
repetidamente para seleccionar un idioma de
subtítulo. El número de idiomas disponibles aparece
a la derecha de la pantalla Subtítulo.
En el ejemplo a continuación, están disponibles seis
idiomas ( /6). Luego de algunos segundos, los subtítu-
los aparecerán.
O presione SUBTITLE repetidamente para apagar los
subtítulos.
Cuando no hay subtítulos disponibles, aparecerá el men-
saje “NOT AVAILABLE” a la derecha de la pantalla de
subtítulos.
• Con algunos DVD, usted debe selec-
cionar un idioma de subtítulo en el
menú.
• Si el idioma deseado no aparece
después de presionar SUBTITLE
varias veces, el disco no tiene subtí-
tulos en ese idioma.
• Abrir la bandeja de discos o apagar
el TV/VCR/DVD cancelará el ajuste
de subtítulo.
• Si la actual parte del disco tiene
varios ángulos de cámara,
aparecerá en la pantalla del TV.
El ICONO DE ÁNGULO debe estar
en ENC. Los detalles se encuentran
en las páginas 70 a 7
1.
PLAY
STOP
ENTER
RECORD
DISC
MENU
RETURNTITLESETUP
A
-
B
REPEATSEARCH MODE
CLEAR
MODE
ANGLESUBTITLEAUDIO
DISPLAY
SPEED C.RESET
STANDBY-ON
PICTURE SELECTSLEEP
CH.
VOL.
MUTE
ZOOM
123
456
789
0 +10
+100
REPEAT
1
PLAY
STOP
ENTER
RECORD
DISC
MENU
RETURNTITLESETUP
A
-
B
REPEATSEARCH MODE
CLEAR
MODE
ANGLESUBTITLEAUDIO
DISPLAY
SPEED C.RESET
STANDBY-ON
PICTURE SELECTSLEEP
CH.
VOL.
MUTE
ZOOM
123
456
789
0 +10
+100
REPEAT
1
Consejos útiles
Ejemplo: Inglés como el
primero de los seis
subtítulos disponibles
Ejemplo: ángulo 1
de 8 ángulos disponibles
T0006UG_6006UG_SP_2.qx3 04.5.12 10:14 AM Page 58

Cámara lenta
1
Presione F (pausa) durante la reproducción de
DVD o CD de vídeo.
2
Pulse y mantenga pulsado i/g o j/h
durante unos pocos segundos. La reproducción a
cámara lenta empezará. Pulse repetidamente
i/g o j/h para reproducir el DVD hacia
delante o hacia atrás a 1/16, 1/8 o 1/2 de la velocidad
normal. La reproducción a cámara lenta en retroceso
no se puede hacer con los discos Video CD.
Los números 1 (1/16), 2 (1/8), ó 3 (1/2)
aparecerán brevemente en la pantalla del televisor para
indicar una reproducción en cámara lenta hacia delante.
Los números 1 (1/
1
6), 2 (1/8), ó 3 (1/2) indi-
carán una reproducción en cámara lenta hacia atrás.
3
Presione PLAY B para volver a la reproduc-
ción normal.
Cámara lenta, Zoom 59
Zoom
Puede ampliar una imagen de DVD,Video CD o JPEG para
que ésta aparezca 1,3, dos o cuatro veces más grande de lo
normal.
1
Presione ZOOM durante la reproducción.
ZOOM1 aparecerá en la pantalla. La imagen será 1.3
veces más grande. Presione ZOOM otra vez para
aumentar la imagen a dos veces su tamaño normal.
ZOOM2 aparecerá. Presione ZOOM otra vez
para aumentar la imagen a cuatro veces su tamaño
normal. ZOOM3 aparecerá.
2
Presione o, p, s o B para desplazar la ima-
gen ampliada hacia arriba, hacia abajo, hacia la
izquierda o hacia la derecha.
3
Para volver la imagen a su tamaño normal,
presione ZOOM repetidamente.
• El sonido se desactivará durante
la reproducción en cámara lenta.
• El cuadro gris con un cuadro azul
en el interior que aparece durante
la imagen ampliada es la guía de
posición. Para sacarla o para que
aparezca, presione ENTER. La
posición del cuadro azul dentro
del cuadro gris indica la posición
de la imagen ampliada dentro de
la imagen total.
• La ampliación x4 no está activa en
algunos discos. Para CD de vídeo y
JPEG sólo estará disponible la
ampliación x2.
Zoom x2Zoom x1.3
Zoom x4
ZOOM 1 ZOOM 2 ZOOM 3
Ejemplo de guía de posición:
El área ampliada se encuentre
en la parte superior de la
imagen completa.
PLAY
STOP
ENTER
RECORD
DISC
MENU
RETURNTITLESETUP
A
-
B
REPEATSEARCH MODE
CLEAR
MODE
ANGLESUBTITLEAUDIO
DISPLAY
SPEED C.RESET
STANDBY-ON
PICTURE SELECTSLEEP
CH.
VOL.
MUTE
ZOOM
123
456
789
0 +10
+100
REPEAT
1
3
2
PLAY
STOP
ENTER
RECORD
DISC
MENU
RETURNTITLESETUP
A
-
B
REPEATSEARCH MODE
CLEAR
MODE
ANGLESUBTITLEAUDIO
DISPLAY
SPEED C.RESET
STANDBY-ON
PICTURE SELECTSLEEP
CH.
VOL.
MUTE
ZOOM
123
456
789
0 +10
+100
REPEAT
2
1,3
Consejos útiles
Ejemplo: reproducción de un
DVD hacia delante a la mitad
de la velocidad normal
3
T0006UG_6006UG_SP_2.qx3 04.5.12 10:14 AM Page 59

60 Código de acceso paterno
La función Paterno evita la visualización de DVD que
sobrepasen sus restricciones de clase. Esta función no limi-
tará la visualización si el DVD no está clasificado o codifica-
do. Revise los DVD y los ajustes antes de permitir el acceso
de menores al TV/VCR/DVD. Siga estos pasos para cambiar
su código de acceso.
● Antes de comenzar, presione SELECT para poner el
TV/VCR/DVD en el modo DVD. La luz verde de DVD
aparecerá en la parte delantera del TV/VCR/DVD.
1
Presione SETUP dos veces mientras la reproduc-
ción esté detenida.
2
Presione { o B para seleccionar CUSTOM en la
parte superior del menú, luego presione ENTER.
3
Presione { o B para seleccionar (el canda-
do), luego presione ENTER.
La primera vez que ajuste el código de acceso, aparecerá
este menú.
Presione los botones de número para introducir
un código de acceso de cuatro dígitos. El código
de acceso aparecerá en la pantalla. Escríbalo para que
no lo olvide.
Presione ENTER. ¡El procedimiento terminó!
Vaya al paso 6 en la página siguiente.
Si ajustó un código de acceso antes, aparecerá este menú.
Presione los botones de número para introducir
su actual código de acceso de cuatro dígitos.
Aparecerán asteriscos ( * ) en vez de su código de
acceso. Esto protege su identidad.
PLAY
STOP
ENTER
RECORD
DISC
MENU
RETURNTITLESETUP
A
-
B
REPEATSEARCH MODE
CLEAR
MODE
ANGLESUBTITLEAUDIO
DISPLAY
SPEED C.RESET
STANDBY-ON
PICTURE SELECTSLEEP
CH.
VOL.
MUTE
ZOOM
123
456
789
0 +10
+100
REPEAT
2-3
1
3
PRE. RÁPI.
ASPECTO TV
DOLBY DIGITAL
4:3 LETTER BOX
ENC.
ENTER
IDIOMA
AUDIO
SUBTÍTULO
MENÚ
ORIGINAL
APDO.
ENGLISH
ENTER
PATERNO
ENTER
CÓDIGO DE ACCESO
Ingrese un código de acceso de 4 dígitos.
PATERNO
Introduzca su código de acceso.
ENTER
T0006UG_6006UG_SP_2.qx3 04.5.12 10:14 AM Page 60

4
Presione p para seleccionar CAMBIO, luego
presione ENTER.
5
Presione los botones de número para introducir
un código de acceso de cuatro dígitos. Los
números del código de acceso aparecerán en la pantalla.
Escriba el código de acceso para que no lo olvide.
Presione ENTER. Volverá a aparecer el menú anteri-
or.
6
Presione SETUP para salir del menú.
• El código de acceso predetermi-
nado es 4737.
Si olvida su código de acceso,
presione los botones de número
4, 7, 3, 7 en el paso 3. Se le
solicitará que introduzca un
nuevo código de acceso de cua-
tro dígitos. Use los botones de
número para introducir un nuevo
código de acceso de cuatro dígi-
tos, luego presione ENTER. El
NIVEL PATERNO se reajustará a
TODO. Presione SETUP para
sacar el menú de la pantalla.
Consulte las páginas 62 y 63
para reajustar el NIVEL PATER-
NO como usted desee.
• Un corte de corriente no borrará
su código de acceso.
Código de acceso paterno (continuación) 61
PLAY
STOP
ENTER
RECORD
DISC
MENU
RETURNTITLESETUP
A
-
B
REPEATSEARCH MODE
CLEAR
MODE
ANGLESUBTITLEAUDIO
DISPLAY
SPEED C.RESET
STANDBY-ON
PICTURE SELECTSLEEP
CH.
VOL.
MUTE
ZOOM
123
456
789
0 +10
+100
REPEAT
4-5
6
5
Consejos útiles
PATERNO
ENTER
NIVEL PATERNO TODO
CAMBIO
T0006UG_6006UG_SP_2.qx3 04.5.12 10:14 AM Page 61

62 Niveles paternos
Siga estos pasos para ajustar el nivel de clase para los DVD.
Los DVD cuyas clases sobrepasen el nivel que ajustó no se
reproducirán.
● Antes de comenzar, presione SELECT para poner el
TV/VCR/DVD en el modo DVD. La luz verde de DVD
aparecerá en la parte delantera del TV/VCR/DVD.
1
Presione SETUP dos veces mientras la reproduc-
ción esté detenida.
2
Presione { o B para seleccionar CUSTOM en
la parte superior del menú, luego presione
ENTER.
3
Presione { o B para seleccionar (el canda-
do), luego presione ENTER.
4
Presione los botones de número para intro-
ducir su código de acceso de cuatro dígitos.
Aparecerán asteriscos ( * ) en vez de su código de
acceso. Esto protege su identidad.
5
Presione o o p para seleccionar NIVEL
PATERNO, luego presione ENTER.
•TODO: la función Paterno se
encuentra desactivada; se pueden
reproducir todos los discos.
•8:material para adultos
•7:NC-
1
7: inadecuado para niños
menores de
1
7 años
•6:R:restringido; se requiere la
aprobación paterna para especta-
dores menores de
1
8 años.
•4:PG-
1
3: inadecuado para niños
menores de
1
3 años
•3:PG: se sugiere supervisión de los
padres.
•
1
:G:todo espectador;
se recomienda para todas las
edades.
EXPLICACIONES
DE CLASES
PLAY
STOP
ENTER
RECORD
DISC
MENU
RETURNTITLESETUP
A
-
B
REPEATSEARCH MODE
CLEAR
MODE
ANGLESUBTITLEAUDIO
DISPLAY
SPEED C.RESET
STANDBY-ON
PICTURE SELECTSLEEP
CH.
VOL.
MUTE
ZOOM
123
456
789
0 +10
+100
REPEAT
2-3,
5
1
4
PRE. RÁPI.
ASPECTO TV
DOLBY DIGITAL
4:3 LETTER BOX
ENC.
ENTER
IDIOMA
AUDIO
SUBTÍTULO
MENÚ
ORIGINAL
APDO.
ENGLISH
ENTER
PATERNO
Introduzca su código de acceso.
ENTER
PATERNO
ENTER
NIVEL PATERNO TODO
CAMBIO
T0006UG_6006UG_SP_2.qx3 04.5.12 10:14 AM Page 62

6
Presione o o p para seleccionar un nivel,
luego presione ENTER. Los niveles de clase con-
tinúan en dos pantallas de menú. Presione o o p
repetidamente para desplazarse a la pantalla siguiente
o anterior para encontrar el nivel de clase que desea.
Después de tomar la decisión, aparecerá el menú
anterior. El nivel que seleccionó aparecerá junto a
NIVEL PATERNO.
7
Presione SETUP para salir del menú.
• Cuando trata de reproducir un
DVD cuya clase sobrepasa el nivel
que ajustó, un mensaje en pan-
talla indicará que no se puede
reproducir éste. Saque el DVD,
luego ajuste el NIVEL PATERNO
en TODO. Vuelva a colocar el
DVD y comience la reproducción.
Algunos DVD pueden dejar que
introduzca su código de acceso de
cuatro dígitos para comenzar la
reproducción. Siga los mensajes
en pantalla según se le indique.
• No puede usar el código de acce-
so predeterminado (4737) para
reproducir un DVD.
Niveles paternos (continuación) 63
PLAY
STOP
ENTER
RECORD
DISC
MENU
RETURNTITLESETUP
A
-
B
REPEATSEARCH MODE
CLEAR
MODE
ANGLESUBTITLEAUDIO
DISPLAY
SPEED C.RESET
STANDBY-ON
PICTURE SELECTSLEEP
CH.
VOL.
MUTE
ZOOM
123
456
789
0 +10
+100
REPEAT
6
7
Consejos útiles
PATERNO
ENTER
NIVEL PATERNO
TODO
8
7 [NC-17]
6 [R]
5
4 [PG13]
3 [PG]
T0006UG_6006UG_SP_2.qx3 04.5.12 10:14 AM Page 63

64 Audio, Sonido estéreo
Audio
Puede seleccionar un idioma para los DVD durante la repro-
ducción si es que se encuentran disponibles varios idiomas.
● Antes de comenzar, presione SELECT para poner el
TV/VCR/DVD en el modo DVD. La luz verde de DVD
aparecerá en la parte delantera del TV/VCR/DVD.
1
Durante la reproducción de DVD, presione
AUDIO repetidamente para escoger uno de
los idiomas disponibles. Se escuchará el nuevo
audio. La pantalla desaparecerá después de cinco
segundos.
La pantalla Audio puede aparecer si el DVD tiene
sonido Dolby Digital o multicanal (5.1 CH) o mostrar
su velocidad de muestreo (48k, por ejemplo). El
número de idiomas disponibles aparece después del “
/ “ a la derecha de la pantalla ( /3, por ejemplo).
• Si un idioma no se encuentra
disponible después de presionar
AUDIO varias veces, el DVD no
tiene ese idioma.
•Algunos DVD sólo le permiten
cambiar el idioma en el menú.
• Los idiomas pueden estar abrevia-
dos (como ENG para inglés). O
pueden aparecer tres guiones (- - -)
en vez de una abreviatura.
• Puede ajustar el sonido estéreo sólo
cuando Virtual Surround esté en
APDO. Los detalles se encuentran
en la página 74.
Sonido estéreo
Ajuste el sonido estéreo para determinar si escuchará el
canal izquierdo, el derecho o ambos canales (estéreo)
durante la reproducción de CD de audio o CD de vídeo.
1
Presione AUDIO repetidamente durante la
reproducción de CD de audio o CD de vídeo
para seleccionar ESTÉREO, L-CH, o R-CH. La
pantalla desaparecerá en cinco segundos.
PLAY
STOP
ENTER
RECORD
DISC
MENU
RETURNTITLESETUP
A
-
B
REPEATSEARCH MODE
CLEAR
MODE
ANGLESUBTITLEAUDIO
DISPLAY
SPEED C.RESET
STANDBY-ON
PICTURE SELECTSLEEP
CH.
VOL.
MUTE
ZOOM
123
456
789
0 +10
+100
REPEAT
1
PLAY
STOP
ENTER
RECORD
DISC
MENU
RETURNTITLESETUP
A
-
B
REPEATSEARCH MODE
CLEAR
MODE
ANGLESUBTITLEAUDIO
DISPLAY
SPEED C.RESET
STANDBY-ON
PICTURE SELECTSLEEP
CH.
VOL.
MUTE
ZOOM
123
456
789
0 +10
+100
REPEAT
1
Consejos útiles
1.ENG Dolby D 3/2.1ch 48k/3
Ejemplo: Audio en inglés
Sólo se oye el canal derecho.
Sólo se oye el canal izquierdo.
Se oyen los dos canales
(izquierdo y derecho).
T0006UG_6006UG_SP_2.qx3 04.5.12 10:14 AM Page 64

Reproducción programada
Puede determinar el orden de reproducción del CD de audio,
MP3, o JPEG. Para ajustar un programa, siga los siguientes pasos.
● Antes de comenzar, presione SELECT para poner el
TV/VCR/DVD en el modo DVD. La luz verde de DVD
aparecerá en la parte delantera del TV/VCR/DVD.
1
Mientras la reproducción esté detenida, presione
MODE hasta que aparezca la pantalla PROGRAMA.
Ejemplo de CD de audio
2
Presione
o
o
p
para seleccionar la pista que
desee reproducir, y luego presione OK. Repita este
paso hasta que haya seleccionado todas las pistas que
desea reproducir en el programa. Presione CLEAR para
borrar la última pista en el programa si se equivoca.
Las pistas adicionales pueden aparecer en otras pantallas.
Presione
p
o
o
para ver todas las pistas.
Para ver las pistas en un programa que contiene más de
8 pistas, use
i/g
o
j/h
para verlas todas.
Mientras esté abierta una carpeta de MP3/ JPEG, presione
s
o
B
para pasar al nivel de archivos o carpetas siguiente
o anterior. Presione TITLE para volver al primer elemen-
to en el nivel más alto de archivos o carpetas.
3
Presione PLAY B. Las pistas se reproducirán una
vez en el orden que determine. Si apaga el
TV/VCR/DVD o abre la bandeja del disco, el progra-
ma se borrará. Sólo puede iniciar la reproducción del
programa mientras esté en la pantalla PROGRAMA.
• No puede usar los botones de
número o SEARCH MODE para
seleccionar otra pista mientras se
reproduce un programa. Presione
i
/
g
o
j
/
h
para selec-
cionar otras pistas del programa.
• No puede combinar la reproducción
aleatoria con la reproducción pro-
gramada.
• Puede reproducir repetidamente un
programa o una pista dentro de un
programa. Durante la reproducción
programada, presione REPEAT para
que aparezca TODO (todas las pis-
tas del programa) o PISTA.Todo el
programa o la pista en reproducción
se reproducirán una y otra vez.
• No se puede alterar un programa
durante la reproducción.
• Sólo podrá iniciar la reproducción de
un programa mientras esté en la
pantalla PROGRAMA.
• Un programa puede contener un
máximo de 99 pistas.
•Para borrar todos las pistas en los
programas a la vez, seleccione
BORRA TODO en el paso 2.
Reproducción aleatoria, Reproducción programada 65
Reproducción aleatoria
Podrá reproducir pistas de CD de audio, JPEG, o MP3 en orden
aleatorio en vez del orden en que fueron grabadas (1,2,3...).
● Antes de comenzar, presione SELECT para poner el
TV/VCR/DVD en el modo DVD. La luz verde de DVD
aparecerá en la parte delantera del TV/VCR/DVD.
1
Mientras la reproducción esté detenida, presione MODE
hasta que aparezca la pantalla ALEATORIO.
Ejemplo: CD de audio
2
Mientras aparece la pantalla ALEATORIO, pre-
sione PLAY B. Las pistas se reproducirán en un
orden aleatorio. Después de reproducir una vez todas
las pistas, se detendrá la reproducción.
PLAY
STOP
ENTER
RECORD
DISC
MENU
RETURNTITLESETUP
A
-
B
REPEATSEARCH MODE
CLEAR
MODE
ANGLESUBTITLEAUDIO
DISPLAY
SPEED C.RESET
VOL.
MUTE
ZOOM
456
789
0 +10
+100
REPEAT
1
2
PLAY
STOP
ENTER
RECORD
DISC
MENU
RETURNTITLESETUP
A
-
B
REPEATSEARCH MODE
CLEAR
MODE
ANGLESUBTITLEAUDIO
DISPLAY
SPEED C.RESET
VOL.
MUTE
ZOOM
456
789
0 +10
+100
REPEAT
2
1
3
Consejos útiles
ALEATORIO
CD-DA
ALEATORIA PROGRAMADA
- - sin indicación - -
TOTAL 0:45:55
PLAY
PROGRAMA
CD-DA
1 3:30
2 4:30
3 5:00
4 3:10
5 5:10
6 1:30
7 2:30
1 3:30
TOTAL 0:08:40
1/11/2
ENTER
CLEAR
PLAY
1 3:30
5 5:10
T0006UG_6006UG_SP_2.qx3 04.5.12 10:14 AM Page 65

66 Reproducción de MP3/JPEG
El reproductor de DVD reproducirá archivos MP3 y JPEG que
grabe y finalice en un CD-RW (disco compacto regrabable) o CD-
R (disco compacto grabable).
Estos discos pueden contener imágenes en formato JPEG o pistas
de audio en formato MP3. Por ejemplo, puede tener una película
fotográfica desarrollada por un distribuidor minorista que colocó
las imágenes en un CD-R para usted. Estas imágenes pueden estar
en formato JPEG. O usted puede copiar o descargar archivos MP3
de música de ciertos sitios legales de Internet, luego copiar estos
archivos a un CD-R o CD-RW.
No puede usar el TV/VCR/DVD para hacer o grabar tales discos.
Consulte el manual de su computadora para obtener detalles
sobre la grabación.
Tenga en cuenta estas características al hacer discos con el objeti-
vo de reproducirlos en el reproductor de DVD del TV/VCR/DVD.
● Grabe las pistas MP3 a una frecuencia de muestreo de 44,1
kHz ó 48 kHz. Grabe con una velocidad de transmisión de
bits constante entre 112 kbps y 320 kbps.
● Cuando grabe archivos JPEG, el tamaño de la imagen debe
ser entre 32 x 32 y 6300 x 5100 puntos.
● Antes de comenzar, presione SELECT para poner el
TV/VCR/DVD en el modo DVD. La luz verde de DVD
aparecerá en la parte delantera del TV/VCR/DVD.
1
Cuando introduce un CD-RW o CD-R con archivos
MP3 o JPEG en el TV/VCR/DVD y presiona DISC
MENU, la lista de archivos aparecerá en la pantalla del
televisor. Presione o o p para seleccionar una
carpeta, pista MP3 o archivo JPEG.
2
Si escoge una pista o archivo, presione PLAY
B
o
ENTER. La reproducción se iniciará con la pista o el archivo
que seleccionó, luego las pistas/archivos se reproducirán en el
orden en que se grabaron, por ejemplo 1,2,3.
Si selecciona una carpeta y presiona
ENTER
,
aparecerán las pistas o archivos que están dentro
de ésta. Presione K o L para seleccionar la pista
o archivo que desea, luego presione
PLAY B
o
ENTER
.
● Presione TITLE para volver al primer elemento en el
nivel más alto de las carpetas o archivos.
● Presione { o B para pasar a los niveles anteriores o
siguientes.
●
Durante la reproducción de JPEG, presione MODE para
seleccionar un modo de transición (Insertar/Cortar o
Apar./Desap. gradual). Si selecciona Insertar/cortar, las
imágenes se insertarán y cortarán nítidamente a medida
que avanza la reproducción. Si selecciona apar./desap.
gradual, las imágenes aparecen y desaparecerán a medida
que avanza la reproducción. Presione MODE de nuevo
para eliminar los modos de transición.
● Durante la reproducción de JPEG, presione B or {
para girar la imagen 90 grados en la dirección de las
agujas del reloj o en la dirección contraria.
3
Para detener la reproducción, presione STOP C.
• Las imágenes JPEG y las pistas
MP3 se denominan archivos.A los
grupos de archivos se les denomi-
na carpetas.
• Las carpetas tienen el icono .
• Las pistas de MP3 tienen el icono
.
•Los archivos JPEG tienen el icono
.
• Se puede reconocer un máximo de
255 carpetas. Se puede reconocer
un máximo de 512 archivos.
• Durante la reproducción, presione
los botones de número para selec-
cionar otra pista. O presione
i
/
g
o
j
/
h
para cambiar
pistas.
Una “X” aparecerá en la pantalla
del TV si no está disponible una
pista. La reproducción puede
reanudarse en una pista incorrecta
o puede continuar con la pista
actual.
• La reproducción específica de hora
no es posible con las pistas MP3.
3
PLAY
STOP
ENTER
RECORD
DISC
MENU
RETURNTITLESETUP
A
-
B
REPEATSEARCH MODE
CLEAR
MODE
ANGLESUBTITLEAUDIO
DISPLAY
SPEED C.RESET
STANDBY-ON
PICTURE SELECTSLEEP
CH.
VOL.
MUTE
ZOOM
123
456
789
0 +10
+100
REPEAT
1-2
2
3
Consejos útiles
T0006UG_6006UG_SP_2.qx3 04.5.12 10:14 AM Page 66

Pantallas de MP3/JPEG 67
Puede revisar información de la pista MP3 y del archivo JPEG
durante la reproducción.
● Antes de comenzar, presione SELECT para poner el
TV/VCR/DVD en el modo DVD. La luz verde de DVD
aparecerá en la parte delantera del TV/VCR/DVD.
1
Presione DISPLAY durante la reproducción. El
nombre de la pista actual se mostrará en la pantalla
del televisor.
2
Presione DISPLAY de nuevo. Aparecerán el número
de pista actual, el número total de pistas disponibles y el
tiempo de reproducción transcurrido de la pista actual
(sólo en MP3).
Puede aparecer lo siguiente para indicar la repetición
de la reproducción.
T: La pista actual se reproducirá de manera repetida.
G: Las pistas de la carpeta actual (Grupo) se repro-
ducirán de manera repetida.
A:Todas las pistas se reproducirán de manera
repetida.
3
Presione
DISPLAY
otra vez para sacar la pan-
talla.
• Durante la reproducción de
MP3, cuando presione por
primera vez DISPLAY aparecerá
el icono y el nombre de la
pista actual.
• Durante la reproducción de
JPEG, cuando presione por
primera vez DISPLAY aparecerá
el icono y el nombre del
archivo actual.
3
PLAY
STOP
ENTER
RECORD
DISC
MENU
RETURNTITLESETUP
A
-
B
REPEATSEARCH MODE
CLEAR
MODE
ANGLESUBTITLEAUDIO
DISPLAY
SPEED C.RESET
STANDBY-ON
PICTURE SELECTSLEEP
CH.
VOL.
MUTE
ZOOM
123
456
789
0 +10
+100
REPEAT
1-3
Consejos útiles
TR 2/25 0:01:15
Tiempo de reproducción
transcurrido de la pista actual
(sólo MP3)
TR (pista):
Número de pista actual/
número total de pistas
T
Ajuste de repetición actual
T0006UG_6006UG_SP_2.qx3 04.5.12 10:14 AM Page 67

68 Ajustes de idioma
Puede utilizar los ajustes de IDIOMA para seleccionar distintos
idiomas para el audio o los subtítulos de los DVD, al igual que
para los idiomas de los menús del DVD.
● Antes de comenzar, presione SELECT para poner el
TV/VCR/DVD en el modo DVD. La luz verde de DVD apare-
cerá en la parte delantera del TV/VCR/DVD.
1
Mientras la reproducción esté detenida, presione
SETUP dos veces. La pantalla PRE. RÁPI. aparece.
2
Presione { o B para seleccionar CUSTOM en la
parte superior del menú, luego presione ENTER.
3
El menú de idioma ( ) se seleccionará. Presione ENTER.
4
Presione
oo
o
pp
para seleccionar el menú AUDIO,
SUBTÍTULO, o MENÚ. Luego, presione ENTER.
Aparecerán las opciones de idioma para el elemento selec-
cionado.
• Si los ajustes predeterminados
del DVD para Audio y Subtítulos
se encuentran en el mismo
idioma, no se mostrarán subtítu-
los a menos que los encienda.
• Use los botones AUDIO y
SUBTITLE para seleccionar el
audio y los subtítulos disponibles
en el DVD. Los detalles se
encuentran en las páginas 58 y
64.
• Si ajusta AUDIO a ORIGINAL, se
reproducirá el ajuste predetermi-
nado de Audio del DVD.
PLAY
STOP
ENTER
RECORD
DISC
MENU
RETURNTITLESETUP
A
-
B
REPEATSEARCH MODE
CLEAR
MODE
ANGLESUBTITLEAUDIO
DISPLAY
SPEED C.RESET
STANDBY-ON
PICTURE SELECTSLEEP
CH.
VOL.
MUTE
ZOOM
123
456
789
0 +10
+100
REPEAT
2-4
1
Consejos útiles
PRE. RÁPI.
ASPECTO TV
DOLBY DIGITAL
4:3 LETTER BOX
ENC.
ENTER
IDIOMA
AUDIO
SUBTÍTULO
MENÚ
ORIGINAL
APDO.
ENGLISH
ENTER
IDIOMA
AUDIO
SUBTÍTULO
MENÚ
ORIGINAL
APDO.
ENGLISH
ENTER
IDIOMA
ENTER
AUDIO
ORIGINAL
ENGLISH
FRANCÉS
ESPAÑOL
ALEMÁN
ITALIANO
SUECO
AUDIO:
El audio del DVD se reproduce
en el idioma seleccionado.
IDIOMA
ENTER
SUBTÍTULO
APDO.
ENGLISH
FRANCÉS
ESPAÑOL
ALEMÁN
ITALIANO
SUECO
SUBTÍTULO:
Los subtítulos aparecen en
el idioma escogido.
IDIOMA
ENTER
MENÚ
ENGLISH
FRANCÉS
ESPAÑOL
ALEMÁN
ITALIANO
SUECO
HOLANDES
MENÚ:
El menú de un DVD aparece
en el idioma escogido.
T0006UG_6006UG_SP_2.qx3 04.5.12 10:14 AM Page 68

Ajustes de idioma (continuación) 69
5
Presione o o p para seleccionar un idioma, luego
presione ENTER. Las listas de idiomas continuarán en
varias pantallas. Presione o o p para desplazarse a las
otras pantallas.
● Si selecciona OTRA, presione cuatro botones de
números para introducir el código para el idioma que
desee. Use los siguientes Códigos de idiomas. El idioma
o código de idioma que seleccione aparecerá en el menú
de Idioma al lado del de AUDIO, SUBTÍTULO o MENÚ.
● Puede seleccionar otros idiomas para AUDIO,
SUBTÍTULO o MENÚ DE DISCO sólo si están
disponibles en el disco. Si el idioma no está grabado en
el DVD, cambiar estos ajustes no tendrá efecto.
6
Presione SETUP para salir del menú.
A-B
Abjaso 4748
Afar 4747
Afrikaans 4752
Albanés 6563
Amárico 4759
Árabe 4764
Armenio 5471
Assamese 4765
Aymará 4771
Azerbaiyaní 4772
Bangla 4860
Bashkir 4847
Vasco 5167
Bengalí 4860
Bhutani 5072
Bihari 4854
Bislama 4855
Bretón 4864
Búlgaro 4853
Birmano 5971
Bielorruso 4851
C-E
Camboyano 5759
Catalán 4947
Chino 7254
Corso 4961
Croata 5464
Checo 4965
Danés 5047
Holandés 6058
Inglés 5160
Esperanto 5161
Estonio 5166
F-H
Faroés 5261
Fiji 5256
Finlandés 5255
Francés 5264
Frisón 5271
Gaélico (Escocés)
5350
Gallego 5358
Georgiano 5747
Alemán 5051
Griego 5158
Groenlandés 5758
Guaraní 5360
Gujaratí 5367
Hausa 5447
Hebreo 5569
Hindi 5455
Húngaro 5467
I-K
Islandés 5565
Indonesio 5560
Interlingua 5547
Interlingue 5551
Inupiak 5557
Irlandés 5347
Italiano 5566
Japonés 5647
Javanés 5669
Kannada 5760
Cachemir 5765
Kazajo 5757
Kinyaruanda 6469
Kirguiz 5771
Kirundi 6460
Coreano 5761
Kurdo 5767
L-N
Laosiano 5861
Latín 5847
Latvio 5868
Letón 5868
Lingala 5860
Lituano 5866
Macedonio 5957
Malagache 5953
Malayo 5965
Malayalam 5958
Maltés 5966
Maorí 5955
Marathi 5964
Moldavo 5961
Mongol 5960
Nauru 6047
Nepalés 6051
Noruego 6061
O-R
Occitano 6149
Oriya 6164
Oromo (Afan)6159
Penjabi 6247
Pashtu 6265
Persa 5247
Polaco 6258
Portugués 6266
Pushto 6265
Quechua 6367
Retorrománico 6459
Rumano 6461
Ruso 6467
S
Samoano 6559
Sangho 6553
Sánscrito 6547
Serbio 6564
Serbocroata
6554
Sesotho 6566
Setswana 6660
Shona 6560
Sindhi 6550
Cingalés 6555
Siswat 6565
Eslovaco 6557
Eslovenio 6558
Somalí 6561
Español 5165
Sudanés 6567
Suajili 6569
Sueco 6568
T
Tagalo 6658
Tayik 6653
Tamil 6647
Tártaro 6666
Telugu 6651
Tailandés 6654
Tibetano 4861
Tigrinya 6655
Tonga 6661
Tsonga 6665
Tu rco 6664
Turkmeno 6657
Tw i 6669
U-Z
Ucraniano 6757
Urdu 6764
Uzbeko 6772
Vietnamita 6855
Volapuk 6861
Galés 4971
Wolof 6961
Xhosa 7054
Yiddish 5655
Yoruba 7161
Zulú 7267
Códigos de idiomas
PLAY
STOP
ENTER
RECORD
DISC
MENU
RETURNTITLESETUP
A
-
B
REPEATSEARCH MODE
CLEAR
MODE
ANGLESUBTITLEAUDIO
DISPLAY
SPEED C.RESET
STANDBY-ON
PICTURE SELECTSLEEP
CH.
VOL.
MUTE
ZOOM
123
456
789
0 +10
+100
REPEAT
5
6
5
IDIOMA
CÓDIGO DE IDIOMA
ENTER
Insert 4 cod. Idioma.
T0006UG_6006UG_SP_2.qx3 04.5.12 10:14 AM Page 69

• Seleccionar un MODO TV difer-
ente sólo será efectivo si se
encuentra disponible en el DVD.
Revise el menú del DVD o su
caja para obtener detalles
•También puede ajustar el MODE
TV en el menú PRE. RÁPI. Una
vez que haya seleccionado RÁPI.,
presione ENTER. Se selec-
cionará el ASPECTO TV, así es
que debe presionar ENTER.
Presione
o
o
p
para escoger
un ajuste, luego presione ENTER.
Presione SETUP para sacar el
menú de la pantalla.
70 Ajustes de pantalla
En el menú Pantalla podrá cambiar la relación de aspecto de
la TV, la claridad del modo vista fija, la disponibilidad del
icono de ángulo, y las funciones de auto apagado del menú
del reproductor de DVD.
● Antes de comenzar, presione SELECT para poner el
TV/VCR/DVD en el modo DVD. La luz verde de DVD
aparecerá en la parte delantera del TV/VCR/DVD.
1
Cuando la reproducción esté detenida, pre-
sione SETUP dos veces. Aparecerá la pantalla
PRE. RÁPI.
2
Presione { o B para seleccionar CUSTOM en
la parte superior del menú, luego presione
ENTER.
3
Presione { o B para seleccionar (PAN-
TALLA), luego presione ENTER.
PLAY
STOP
ENTER
RECORD
DISC
MENU
RETURNTITLESETUP
A
-
B
REPEATSEARCH MODE
CLEAR
MODE
ANGLESUBTITLEAUDIO
DISPLAY
SPEED C.RESET
STANDBY-ON
PICTURE SELECTSLEEP
CH.
VOL.
MUTE
ZOOM
123
456
789
0 +10
+100
REPEAT
2-3
1
Consejos útiles
PRE. RÁPI.
ASPECTO TV
DOLBY DIGITAL
4:3 LETTER BOX
ENC.
ENTER
IDIOMA
AUDIO
SUBTÍTULO
MENÚ
ORIGINAL
APDO.
ENGLISH
ENTER
PANTALLA
ASPECTO TV
MODO VISTA FIJA
ICONO DE ÁNGULO
AUTO APAGAD
4:3 LETTER BOX
AUTO
ENC.
ENC.
ENTER
T0006UG_6006UG_SP_2.qx3 04.5.12 10:14 AM Page 70

Ajustes de pantalla (continuación) 71
4
Presione o o p para seleccionar un elemento,
luego presione ENTER.
● Ii seleccionó el ASPECTO TV, presione o o p
para seleccionar un ajuste, luego presione
ENTER.
Escoja 4:3 LETTER BOX si desea ver la imagen completa
y ampliada con las barras negras arriba y debajo de la
pantalla. Su apariencia da la impresión de ver una película
en el cine. Este ajuste es posible sólo si el DVD está
grabado en el formato de buzón o de pantalla ancha.
Escoja 4:3 PAN & SCAN para obtener una imagen de
altura normal, con los bordes ajustados. Algunas empre-
sas se refieren a esto como volver a dar formato a la
imagen para que se ajuste a la pantalla del televisor y
pueden llamarlo formato regular o normal.
●
Si seleccionó el MODO VISTA FIJA, presione
K
o
L
para seleccionar un ajuste, luego presione ENTER.
Esta función le permitirá ajustar la calidad de una imagen en
pausa. Por defecto, el ajuste es AUTO.
Si selecciona IMAGEN, las imágenes en pausa se estabilizarán
pero no serán nítidas debido a la reducida cantidad de datos.
Si selecciona CUADRO, las imágenes en pausa estarán alta-
mente definidas debido a la salida simultánea de dos imá-
genes.
●
Si seleccionó el ICONO DE ÁNGULO, presione
ENTER repetidamente para encender o apagar el
ICONO DE ÁNGULO. El ajuste predeterminado es
ENC. Escoja ENC. para ver el icono de ángulo cuando
se dispone de varios ángulos de cámara durante la repro-
ducción de DVD. Los detalles se encuentran en la página 58.
Escoja APDO. para desactivar el icono de ángulo.
●
Si seleccionó el AUTO APAGADO, presione
ENTER repetidamente para ajustarlo en ENC. o en
APDO. El ajuste predeterminado es ENC. Escoja ENC. si
desea que el TV/VCR/DVD se apague cuando no haya
actividad en el modo DVD durante 20 minutos.
ASPECTO TV MODO VISTA FIJA
ICONO DE ÁNGULO AUTO APAGADO
5
Presione SETUP para salir de los menús.
PLAY
STOP
ENTER
RECORD
DISC
MENU
RETURNTITLESETUP
A
-
B
REPEATSEARCH MODE
CLEAR
MODE
ANGLESUBTITLEAUDIO
DISPLAY
SPEED C.RESET
STANDBY-ON
PICTURE SELECTSLEEP
CH.
VOL.
MUTE
ZOOM
123
456
789
0 +10
+100
REPEAT
4
5
PANTALLA
ENTER
ASPECTO TV
4:3 LETTER BOX
4:3 PAN & SCAN
OFF
ON
ON
PANTALLA
ENTER
ASPECTO TV
MODO VISTA FIJA
ICONO DE ÁNGULO
AUTO APAGADO
4:3 LETTERBOX
AUTO
ENC.
ENC.
PANTALLA
ENTER
ASPECTO TV
MODO VISTA FIJA
ICONO DE ÁNGULO
AUTO APAGADO
4:3 LETTERBOX
AUTO
ENC.
ENC.
PANTALLA
ENTER
MODO VISTA FIJA
AUTO
IMAGEN
CUADRO
OFF
ON
ON
T0006UG_6006UG_SP_2.qx3 04.5.12 10:14 AM Page 71

72 Ajustes de audio
Modifique los ajustes de audio basándose en el otro equipo que haya
conectado al TV/VCR/DVD o según las funciones de sonido del disco.
Estos ajustes sólo afectarán al audio del reproductor de TV/VCR/DVD.
● Antes de comenzar, presione SELECT para poner el
TV/VCR/DVD en el modo DVD. La luz verde de DVD
aparecerá en la parte delantera del TV/VCR/DVD.
1
Mientras la reproducción esté detenida, presione
SETUP dos veces. Aparecerá la pantalla PRE. RÁPI.
2
Presione
{
o
B
para seleccionar CUSTOM en la
parte superior del menú, luego presione ENTER.
3
Presione { o B para seleccionar AUDIO ( ) ,
luego presione ENTER.
4
Presione
oo
o
pp
para seleccionar DRC,
DOLBY DIGITAL, o SUB MUESTREO, luego
siga el paso 5 de acuerdo a ello.
5
Presione
oo
o
pp
para seleccionar DRC, DOLBY DIGITAL, o
SUB MUESTREO, luego siga el paso 6 como corresponda.
●
Si seleccionó DRC, presione ENTER repetidamente para
activar o desactivar el control de rango dinámico (DRC). Si
selecciona ENC. comprimirá el rango de volumen al suprimir
los sonidos agudos y elevar los graves. La función DRC sólo
está disponible en discos grabados en el formato Dolby Digital.
●
Si seleccionó SUB MUESTREO, presione ENTER
repetidamente para seleccionar ON u OFF. Si lo activa, la
frecuencia de muestreo se ajustará a 48 kHz. Si lo desac-
tiva, OFF la frecuencia de muestreo se ajustará a 96 kHz.
El SUB MUESTREO sólo estará disponible cuando la
unidad esté conectada a un estéreo mediante un enchufe
AUDIO OUT COAXIAL (salida de audio coaxial).
●
Si seleccionó DOLBY DIGITAL, presione ENTER repeti-
damente para seleccionar ON u OFF. Seleccione ON. si uti-
lizó el enchufe AUDIO OUT COAXIAL (salida de audio
coaxial) para conectar el DVD/VCR al estéreo compatible
con Dolby Digital. Para más información, consulte la página 15.
En caso contrario, seleccione APDO.
6
Presione SETUP para salir del menú.
• El sistema de sonido Dolby Digital
debe estar disponible en el DVD.
• Puede ajustar DOLBY DIGITAL en
el menú PRE. RÁPI. Una vez que
haya seleccionado PRE RÁPI., pre-
sione ENTER. Presione p para
seleccionar DOLBY DIGITAL.
Presione ENTER para escoger
ENC. o APDO. Presione SETUP
para sacar el menú de la pantalla.
• Cuando reproduzca un disco que
posea protección del derecho de
autor, el submuestreo se encon-
trará a 48 kHz, aunque SUB
MUESTREO esté apagado.
PLAY
STOP
ENTER
RECORD
DISC
MENU
RETURNTITLESETUP
A
-
B
REPEATSEARCH MODE
CLEAR
MODE
ANGLESUBTITLEAUDIO
DISPLAY
SPEED C.RESET
STANDBY-ON
PICTURE SELECTSLEEP
CH.
VOL.
MUTE
ZOOM
123
456
789
0 +10
+100
REPEAT
2-5
1,6
Consejos útiles
PRE. RÁPI.
ASPECTO TV
DOLBY DIGITAL
4:3 LETTER BOX
ENC.
ENTER
IDIOMA
AUDIO
SUBTÍTULO
MENÚ
ORIGINAL
APDO.
ENGLISH
ENTER
AUDIO
DRC
ENC.
DOLBY DIGITAL
ENC.
SUB MUESTREO
ENC.
ENTER
DRC
AUDIO
DRC
ENC.
DOLBY DIGITAL
ENC.
SUB MUESTREO
ENC.
ENTER
Dolby Digital
AUDIO
DRC
ENC.
DOLBY DIGITAL
ENC.
SUB MUESTREO
ENC.
ENTER
Sub Muestreo
T0006UG_6006UG_SP_2.qx3 04.5.12 10:14 AM Page 72

Despliegues en pantalla 73
Pantalla de un CD de audio y CD de vídeo
● Antes de comenzar, presione SELECT para poner el
TV/VCR/DVD en el modo DVD. La luz verde de DVD
aparecerá en la parte delantera del TV/VCR/DVD.
1
Presione DISPLAY varias veces para ver las
siguientes pistas durante la reproducción de
CD de audio o CD de vídeo (sin PBC).
2
Presione DISPLAY repetidamente
o presione
RETURN para sacar la pantalla.
2
Presione DISPLAY repetidamente o presione
RETURN para sacar la pantalla.
VELOCIDAD DE TRANSMISIÓN DE
BITS: La cantidad de información de
audio y video que se lee actualmente.
C
L0
Número de capa, aparece sólo
cuando se reproduce un disco
de dos capas.
L0: se está reproduciendo la capa 0
L1: se está reproduciendo la capa 1
Ajuste repetir actual, si está activado
C: repetir capítulo
T: repetir título
A B: repetir A-B
TR 4/12 0:03:21 - 0:02:15
TR (pista):
Número de pista
actual / total de pistas
Tiempo de reproducción
transcurrido de la pista
actual; tiempo de
reproducción restante
de la pista actual
ALL 4/12 0:13:45 - 0:45:40
TODO:
Número de pista
actual / total de pistas
Tiempo de reproducción
transcurrido del CD de audio
actual; tiempo de reproducción
restante del CD de audio actual
T
Ajuste repetir actual, si está activado
T: repetir pista
A: repetir todas las pistas
A B: repetir A-B
Pantalla de DVD
● Antes de comenzar, presione SELECT para poner el
TV/VCR/DVD en el modo DVD. La luz verde de DVD
aparecerá en la parte delantera del TV/VCR/DVD.
1
Presione DISPLAY repetidamente para ver las
siguientes pantallas durante la reproducción
del DVD.
CH 7/49 0:01:46 - 0:03:27
CH (capítulo):
Número del capítulo
actual/capítulos totales
Tiempo de reproducción
transcurrido del capítulo
actual; tiempo de
reproducción restante del
capítulo actual
TT 1/2 0:00:00 - 1:23:45
TT (título):
Número del título
actual / títulos totales
Tiempo de reproducción
transcurrido del título actual;
tiempo de reproducción
restante del título actual
PLAY
STOP
ENTER
RECORD
DISC
MENU
RETURNTITLESETUP
A
-
B
REPEATSEARCH MODE
CLEAR
MODE
ANGLESUBTITLEAUDIO
DISPLAY
SPEED C.RESET
STANDBY-ON
PICTURE SELECTSLEEP
CH.
VOL.
MUTE
ZOOM
123
456
789
0 +10
+100
REPEAT
1-2
2
PLAY
STOP
ENTER
RECORD
DISC
MENU
RETURNTITLESETUP
A
-
B
REPEATSEARCH MODE
CLEAR
MODE
ANGLESUBTITLEAUDIO
DISPLAY
SPEED C.RESET
STANDBY-ON
PICTURE SELECTSLEEP
CH.
VOL.
MUTE
ZOOM
123
456
789
0 +10
+100
REPEAT
1-2
2
T0006UG_6006UG_SP_2.qx3 04.5.12 10:14 AM Page 73

74 Nivel de negro,Virtual Surround, Inicializar
Nivel de negro
Ajuste el nivel de negro para dar más brillo a la imagen del
DVD y CD de vídeo durante la reproducción.
1
Durante la reproducción de un DVD, CD de Vídeo
presione MODE de modo que se muestre el icono de nivel
de negro en la esquina superior izquierda de la pantalla del TV.
2
Al cabo de 10 segundos, presione ENTER repeti-
damente para escoger entre ENC. o APDO.
ENC. aumenta el brillo de las partes oscuras de la ima-
gen. APDO. muestra la imagen original tal cual se grabó.
Virtual Surround
Puede disfrutar de un sonido estéreo mejorado al reproducir DVD,
CD de vídeo, CD de audio, o archivos MP3 grabados en Dolby
Digital o en Modulación por codificación de pulsos (MIC). Revise la
caja del disco para ver los detalles sobre disponibilidad.
1
Durante la reproducción de un disco, presione
MODE de modo que aparezca el icono de Virtual Surround
en la esquina superior izquierda de la pantalla del TV.
2
Mientras aparece el icono de Virtual Surround, pre-
sione ENTER para escoger 1, 2, o APDO..
El ajuste predeterminado esAPDO.
El icono desaparecerá luego de aproximadamente 10 segundos.
• Virtual Surround está disponible
sólo si ajusta el sonido estéreo a
Estéreo. Los detalles se encuen-
tran en la página 64.
• Los ajustes de Virtual Surround y
nivel de negro se guardarán
aunque el DVD/VCR se apague.
PLAY
STOP
ENTER
RECORD
DISC
MENU
RETURNTITLESETUP
A
-
B
REPEATSEARCH MODE
CLEAR
MODE
ANGLESUBTITLEAUDIO
DISPLAY
REPEAT
2
1
PLAY
STOP
ENTER
RECORD
DISC
MENU
RETURNTITLESETUP
A
-
B
REPEATSEARCH MODE
CLEAR
MODE
ANGLESUBTITLEAUDIO
DISPLAY
REPEAT
2
1
Consejo útil
APDO.
APDO.
Inicializar
Puede disfrutar reajustar todos los elementos del menú de ajuste del
reproductor de DVD (excepto el PATERNO) a su configuración original.
● Antes de comenzar, presione SELECT para poner el
TV/VCR/DVD en el modo DVD. La luz verde de DVD
aparecerá en la parte delantera del TV/VCR/DVD.
1
Mientras la reproducción está detenida, presione
SETUP dos veces. Aparecerá la pantalla PREP. RÁPI.
2
Presione
s
o
B
para seleccionar INIC. (INICIALIZAR)
en la parte superior del menú, y luego presione ENTER.
3
Presione
oo
o
pp
para seleccionar SÍ. Luego, presione
ENTER dos veces. Para cancelar, seleccione NO.
4
Presione SETUP para salir del menú.
PLAY
STOP
ENTER
RECORD
DISC
MENU
RETURNTITLESETUP
A
-
B
REPEATSEARCH MODE
CLEAR
MODE
ANGLESUBTITLEAUDIO
DISPLAY
REPEAT
2-3
INICIALIZAR
¿Ejecuta la inicialización?
NO
SÍ
ENTER
INICIALIZAR
¿Ejecuta la inicialización?
NO
SÍ
ENTER
PRE. RÁPI.
MODO TV
DOLBY DIGITAL
4:3 LETTER BOX
ENC.
ENTER
1,4
T0006UG_6006UG_SP_2.qx3 04.5.12 10:14 AM Page 74

Agudeza: su ajuste suaviza o aclara la imagen en la pantalla.
Ajuste automático de canal: proceso en el que el TV/VCR/DVD memo-
riza todos los canales de TV disponibles. Luego, cuando presiona los botones
CH. ▲/▼ , sólo podrá explorar los canales que recibe.
Auxiliar (AUX): El canal en el cual ajustó el TV/VCR/DVD durante un pro-
ceso de copiado o mientras revisaba material que se reproducía en otro dis-
positivo conectado al TV/VCR/DVD (por ejemplo una Camcorder o VCR o
los canales de TV de una caja de cable/receptor satelital). Presione SELECT
para escoger AUX en el TV/VCR/DVD.
Bandas: ajustes que le permiten sintonizar los canales.
• Antena :VHF (muy alta frecuencia; canales 2-13) y UHF (ultrafrecuencia;
canales 14-69).
• Cable :los canales estándar se pueden recibir sin una caja de cable.
Claridad: ajustarla aumenta o disminuye el brillo del color en la pantalla.
Color: ajustarlo palidece o aumenta el brillo del color de la imagen del
TV/VCR/DVD.
Copia: copia de una cinta de video a partir de otro VCR o camcorder.
Dolby Digital: Un sistema de sonido surround que proporciona sonido de
canal 5.1 tal y como se usa en salas de cine. El sonido se escucha a través de
varios canales, no sólo a la izquierda y a la derecha como con el estéreo
estándar.
Enchufe COAXIAL de salida de audio digital: Envía audio digital a un
equipo estéreo y le permite ajustar el volumen del equipo.
Enchufes de entrada de AUDIO: enchufes rojo y blanco en la parte
frontal del TV/VCR/DVD que se usan para recibir o grabar audio a partir de
otra fuente (VCR, Camcorder, etc.).
Enchufes de entrada de VIDEO: enchufe amarillo en la parte frontal del
TV/VCR/DVD que se usa para recibir o grabar videos a partir de otra fuente
(VCR, Camcorder, etc.).
HQ: alta calidad; una función de los circuitos del VCR que proporciona
detalles mejorados de la imagen de la cinta de video a través del
TV/VCR/DVD.
Matiz: su ajuste cambia los tonos de la imagen desde violeta a verde.
OTR: Grabación de un toque; una grabación temporizada que comienza en
forma inmediata y que lo hace desde 30 minutos a ocho horas, la opción que
usted especifique.
Velocidades de la cinta: la velocidad con que la cinta avanza durante una
reproducción o grabación. Mientras más rápida sea la velocidad de la cinta,
mejor será la calidad de la grabación.Además, las velocidades más rápidas (SP)
utilizan más espacio en la cinta. De este modo, puede hacer más grabaciones
en una cinta si usa una velocidad de cinta más lenta (SLP).
• SP (standard play): la velocidad más rápida de cinta (el tiempo de grabación
para una cinta T120 es de aproximadamente dos horas); mejor calidad de
imagen.
• LP (long play): velocidad promedio de cinta; sólo se dispone de reproduc-
ción a esta velocidad en el TV/VCR/DVD.
• SLP (super long play): la velocidad más lenta de cinta (tiempo de grabación
para una cinta T120 es de aproximadamente seis horas).
Glosario 75
T0006UG_6006UG_SP_2.qx3 04.5.12 10:14 AM Page 75

76 Consejos útiles
Si tiene algún problema con su producto, revise la siguiente lista de problemas y posibles soluciones antes de
solicitar servicio. Puede que usted sea capaz de resolver el problema por sí solo.
Ubicación
Para obtener un funcionamiento seguro y un desempeño satisfactorio del TV/VCR/DVD, recuerde lo siguiente:
•Protéjalo de la luz directa del sol y manténgalo lejos de las fuentes de calor intenso.
• Evite los lugares húmedos y con polvo.
• Evite los lugares con ventilación insuficiente. No bloquee los orificios de ventilación que se encuentran en las
partes superior e inferior del TV/VCR/DVD. No ubique el TV/VCR/DVD sobre una alfombra ya que esto blo-
queará los orificios de ventilación.
• Evite ubicarlo en lugares sujetos a vibraciones extremas.
• No ubique el TV/VCR/DVD cerca de campos magnéticos fuertes.
• No mueva el TV/VCR/DVD desde un lugar frío a uno cálido y viceversa.
Peligro de descarga eléctrica y de incendios
• No manipule el cable de suministro eléctrico con las manos húmedas.
• No tire el cable de suministro eléctrico cuando desconecte el TV/VCR/DVD desde la toma de CA (corriente
alterna) en la pared.Tómelo desde el enchufe.
• En caso de derramar agua sobre el TV/VCR/DVD, desenchufe el cable de suministro eléctrico en forma
inmediata y lleve el TV/VCR/DVD a una centro de servicio autorizado.
• No ponga sus dedos u otros objetos en el compartimiento de casete o en la bandeja de discos.
• No ponga cosas sobre el TV/VCR/DVD.
Advertencia de rocío (Condensación de la humedad)
• La humedad se puede condensar dentro de la unidad cuando la mueve desde un lugar frío a uno cálido, luego
de calentar una habitación fría o cuando la humedad es alta. No hay indicio de que existe humedad en el
TV/VCR/DVD. Reproducir una cinta cuando se ha acumulado humedad puede dañar la cinta y el
TV/VCR/DVD. Si sospecha que existe humedad en el interior del TV/VCR/DVD, manténgalo encendido (sin
reproducir una cinta) durante al menos dos horas. Esto permitirá que el TV/VCR/DVD se seque.
El TV/VCR/DVD no realiza grabaciones con temporizador.
• Ajuste correctamente los tiempos de comienzo y de detención de la grabación. Los detalles se encuentran en
las páginas 28 a 3
1.
La medianoche es a las 12 a.m. El mediodía es a las 12 p.m.
•Asegúrese que el TV/VCR/DVD esté apagado para la grabación con temporizador.
• Ajuste el reloj.
Los detalles se encuentran en las páginas 20 y 23.
•Ponga una cinta de video en el compartimiento del casete del TV/VCR/DVD. La cinta debe tener una lengüeta
de grabación.
Los detalles se encuentran en la página siete.
• Si se corta la corriente, las grabaciones con temporizador se restaurarán al volver a ajustar el reloj. No se
realizarán grabaciones con temporizador si el ajuste se lleva a cabo durante el corte de corriente.
El TV/VCR/DVD no graba en una cinta de video.
•Asegúrese que la cinta de video tenga una lengüeta de grabación. Los detalles se encuentran en la página siete.
• Enchufe el cable de suministro eléctrico a una toma de CA activa. Los detalles se encuentran en la página nueve.
•Revise las conexiones. Los detalles se encuentran en las páginas ocho y nueve.
•Ajuste los canales de TV. Los detalles se encuentran en la página 18.
•No puede grabar un DVD en una cinta de video usando el TV/VCR/DVD.
La recepción de canales es deficiente.
•Revise las conexiones, luego ajuste nuevamente los canales. Los detalles se encuentran en la página 18.
El TV/VCR/DVD no recibe energía.
• Conecte completamente el enchufe de suministro eléctrico a una toma CA (corriente alterna).
El TV/VCR/DVD expulsa la cinta cuando intenta comenzar una grabación.
•Asegúrese que la cinta tenga una lengüeta de grabación. Los detalles se encuentran en la página siete.
El disco no puede reproducirse.
• Introduzca un disco reproducible.Asegúrese que el disco tenga la etiqueta para la Región 1 o ALL para todas
las regiones y que sea compatible con NTSC.
Los detalles se encuentran en la página seis.
• Sitúe correctamente el disco en la bandeja de discos. Si el disco tiene sólo un lado, sitúelo en la bandeja con la
etiqueta hacia arriba. Si el disco tiene dos caras, asegúrese de colocar la etiqueta de la cara que usted desea
reproducir hacia arriba.
• Limpie el disco.Asegúrese que el disco no esté rayado o deformado.
•Cancele los controles paternos, ingrese el código de acceso o cambie el nivel paterno.
Los detalles se encuen-
tran en las páginas 60 y 63.
T0006UG_6006UG_SP_2.qx3 04.5.12 10:14 AM Page 76

Consejos útiles (continuación) 77
El TV/VCR/DVD no tiene imagen.
•Ajuste la antena o revise la conexión de televisión por cable o de la señal satelital. Si usa una caja de
cable/receptor satelital, ajuste el TV/VCR/DVD en el canal 3, 4 ó AUX.
Los detalles se encuentran en las páginas
ocho y nueve.
•Ajuste de los controles de imagen. Los detalles se encuentran en la página 25.
• Seleccione un canal de TV activo. Los detalles se encuentran en las páginas 18-19.
•Asegúrese que el disco sea compatible con el reproductor de DVD del TV/VCR/DVD. Los detalles se encuentran
en la página seis.
El TV/VCR/DVD tiene un sonido deficiente o no tiene sonido.
•Presione VOL. K/L para ajustar el volumen. Presione MUTE para restaurar el volumen.
•Revise los ajustes de audio para el modo DVD.
Los detalles se encuentran en la página 72.
•Revise los ajustes de audio del disco. Por ejemplo, puede seleccionar reproducción de “banda sonora” o el
ajuste de sonido de idioma no disponible (como Dolby Digital)
Los detalles se encuentran en las páginas 64, 68, 69
y 72.
Intente otras opciones de sonido proporcionadas en el menú del DVD.
No puede escoger una función del DVD, como el ángulo de cámara, el audio o el idioma de subtítu-
lo.
• La función debe estar grabada en el DVD. No todos los DVD contienen varios ángulos, subtítulos, etc. Consulte
la caja del disco para ver qué funciones están disponibles. Si la función no está disponible, aparecerá una “X” en
la esquina superior derecha de la pantalla.
La reproducción de la cinta de video es deficiente o la cinta se destruyó.
• Ajuste el tracking. Los detalles se encuentran en la página 40.
• Use la función Cinta. Los detalles se encuentran en la página 35.
• Si la humedad se ha acumulado en la unidad, mantenga la energía encendida durante al menos dos horas, pero
no reproduzca una cinta.
El TV/VCR/DVD no muestra subtítulos encapsulados para los programas de TV.
•Asegúrese que los subtítulos encapsulados estén disponibles para el programa. Consulte las listas de TV en sus
periódicos locales.
El control remoto no opera en el TV/VCR/DVD.
• Apunte el control remoto directamente al sensor remoto en la parte frontal del TV/VCR/DVD.
Los detalles se encuentran en la página 16.
• Retire todos los obstáculos entre el control remoto y el TV/VCR/DVD.
•Revise y reemplace las baterías del control remoto.
Los detalles se encuentran en la página siete.
Los botones de número no seleccionan canales sobre el 69.
• Ingrese los números de canales como una cifra de dos dígitos. Si desea seleccionar el canal 100 y mayor, pre-
sione el botón +
100/+10, luego los botones de número para los dos últimos dígitos. Los detalles se encuentran en
la página
11.
•Si usa una antena y no tiene televisión por cable/satelital, sólo estarán disponibles los canales 2 a 69.
No puede insertar una cinta en el compartimiento del casete del TV/VCR/DVD.
• Inserte la cinta con la ventana hacia delante y la lengüeta de grabación hacia usted y a la izquierda.
•Presione STOP/EJECT
C A en la parte frontal del TV/VCR/DVD para asegurarse que no hay una cinta en el
interior
• Empuje ligeramente en el centro de la cinta. Nunca fuerce una cinta en el TV/VCR/DVD.
• Si ajustó una grabación con temporizador y está apagada, la unidad expulsará la cinta si le falta la lengüeta de
grabación.
No puede sacar la cinta del TV/VCR/DVD.
•Asegúrese que el enchufe de suministro eléctrico está completamente conectado a una toma CA (corriente
alterna).
• Si está programada una grabación con temporizador, encienda el TV/VCR/DVD, luego expulse la cinta.Asegúrese
de insertar una cinta y de apagar el TV/VCR/DVD para la grabación con temporizador.
• Desenchufe el cable de suministro eléctrico del TV/VCR/DVD durante cinco minutos. Luego, enchufe otra vez el
cable del suministro eléctrico, luego presione STANDBY-ON en el TV/VCR/DVD. Si la cinta no se expulsa, pre-
sione STOP/EJECT
C A en el TV/VCR/DVD de tres a cinco veces. Si la cinta todavía no se expulsa, un técnico
de un servicio autorizado puede necesitar sacar la cinta.
T0006UG_6006UG_SP_2.qx3 04.5.12 10:14 AM Page 77

78 Especificaciones
El diseño y las especificaciones están sujetos a cambios sin previo aviso y sin obligación legal de nuestra parte.
Generales TV/VCR
19MDTR20
CRT: Cañón en línea de19
pulgadas,
tubo de desviación de 90˚
27MDTR20
CRT: Cañón en línea de27
pulgadas,
tubo de desviación de 110˚
Sistema de subtítulos: §15.119/FCC
Cabezales del video: Cuatro cabezales rotativos
Ancho de la cinta: 1/2 pulgada
Velocidades de la cinta
SP 33,40 mm/seg
LP
16,67 mm/seg
SLP 11,12 mm/seg
Canales del sintonizador: 2-69
Televisión por cable: 1-125
Generales DVD
Sistema de color: NTSC
Especificaciones eléctricas
Salida de sonido: Dos altavoces, 1W, 8 ohmios
Otras especificaciones
Terminales
Entrada de antena: Para VHF/UHF/Televisión
por cable de 75 ohmios
desequilibrada (tipo F)
Entrada de video: Un conector RCA
Entrada de audio izquierda/derecha:
Dos conectores RCA
Auricular:
1/8” estéreo (3,5 mm)
Digital coaxial
Salida de audio: Enchufe de una clavija,
500m Vpp (75 ohmios)
Te mperatura de operación:
41ºF-104ºF (5ºC-40ºC)
Alimentación: CA 120V, 60Hz
19MDTR20
Consumo de energía
(Máximo): 90 W
Dimensiones: Altura: 19-11/16 pulg.
(500 mm)
Ancho: 23-13/16 pulg.
(605 mm)
Profundidad: 18-11/16 pulg.
(474 mm)
Peso: 48,5 libras (22 kg)
27MDTR20
Consumo de energía
(Máximo):
110 W
Dimensiones: Altura: 25-1/2 pulg.
(648mm)
Ancho: 26-9/16 pulg.
(675 mm)
Profundidad: 19-11/16 pulg.
(500 mm)
Peso: 86 libras (39 kg)
Accesorios: Control remoto con dos
baterías AA
Manual del usuario
Guia de uso rápido
T0006UG_6006UG_SP_2.qx3 04.5.12 10:14 AM Page 78

agudeza . . . . . . . . . . . . . . . . . . . .25
ajuste de la hora . . . . . . . . . . .20-23
ajuste de v-chip . . . . . . . . . . . .42-47
ajuste del reloj . . . . . . . . . . . .20-23
ajustes de audio (dvd) . . . . . . . . .72
ajustes de idioma . . . . . . . . . .68-69
ajustes de pantalla . . . . . . . . . .70-7
1
ángulo de cámara . . . . . . . . . . . . .58
apagado programado . . . . . . . . . .36
audio digital . . . . . . . . . . . . . .
10, 17
bandeja de discos . . . . . . . . . .
13, 16
baterías . . . . . . . . . . . . . . . . . . . . .7
botón angle . . . . . . . . . . . . . .
15, 58
botón audio . . . . . . . . . . . . . .
15, 64
botón c.reset . . . . . . . . . .
15, 31,36
botón clear . . . . . . . . . . . . . . . . .
15
botón display . . . . . . . . . .
14, 25, 73
botón enter . . . . . . . . . . . . . . . . .
15
botón menú . . . . . . . . . . . . . .
15, 51
botón mode . . . . . . . . . . .15, 65, 74
botón mute . . . . . . . . . . . . . . . . .
15
botón open/close
A . . . . . . . . . .16
botón output . . . . . . . . . . . . . . . .
16
botón (pausa)
k . . . . .14, 39, 55, 59
botón picture . . . . . . . . . . . . .
14, 25
botón play
B . . . . . . . . . .12-14, 16
botón rec/otr . . . . . . . . . . . . .
16, 27
botón record . . . . . . . . . . . . .
14, 26
botón repeat . . . . . . . . . . . . .
14, 56
botón repeat a-b . . . . . . . . . .
15, 56
botón return . . . . . . . . . . . . . . . .
14
botón search mode . . .
15, 53-54, 57
botón select . . . . . . . . . . . . . . . . .
14
botón setup . . . . . . . . . . . . . . .5,
15
botón sleep . . . . . . . . . . . . . .
14, 36
botón speed . . . . . . . . . . . . . .
15, 26
botón standby-on . . . . . . . . . .
14, 16
botón stop
C . . . . . . . . . . . . . . . .14
botón stop/eject
C A . . . . . . .12, 16
botón subtitle . . . . . . . . . . . . .
15, 58
botón title . . . . . . . . . . . . . . .
14, 51
botón zoom . . . . . . . . . . . . . .15, 59
botones de flecha . . . . . . . . . . . .
14
botones de número . . . . . . . . . . .
14
botones de volumen
▲/▼ . . .15-16
búsqueda . . . . . . . . . . . . . . . .39, 52
búsqueda de alta velocidad . . . . .39
búsqueda de avance rápido . .39, 52
búsqueda de hora . . . . . . . . . . . .37
búsqueda de retroceso . . . . .39, 52
cable coaxial rf . . . . . . . . . . . . . . . .8
cable de suministro eléctrico . .9,
17
cámara lenta . . . . . . . . . . . . . .39, 59
canal
agregar/borrar . . . . . . . . . . . . .
19
botones
o/p . . . . .11, 15-16, 40
preparación . . . . . . . . . . . . . . .
18
sobre
100 . . . . . . . . . . . . . . . .14
capítulos . . . . . . . . . . . . . . . . . . . .53
cd de audio . . . . . . . . . . . . . . .6, 54
claridad . . . . . . . . . . . . . . . . . . . .25
clases
mpaa . . . . . . . . . . . . . . . . . . . .46
tv . . . . . . . . . . . . . . . . . . . .42-45
código de acceso . . . . . . . . . .60-6
1
color . . . . . . . . . . . . . . . . . . . . . .25
compartimiento del casete . . . . .
16
conexiones . . . . . . . . . . . . .8-
10, 33
consejos útiles . . . . . . . . . . . .76-77
contador . . . . . . . . . . . . . . . .25, 36
contador de cinta de tiempo real 36
contenidos, tabla de . . . . . . . . . . . .4
contraste . . . . . . . . . . . . . . . . . . .25
control remoto
botones . . . . . . . . . . . . . . .
14-15
uso . . . . . . . . . . . . . . . . . . . . . .7
controles
control remoto . . . . . . . . .
14-15
tv/vcr/dvd . . . . . . . . . . . . . . . .
16
controles de imagen . . . . . . . . . .25
controles paternos . . . . . . . .60-63
despliegues de estado en pantalla
. . . . . . . . . . . . . . . . . . . . .25, 73
duplicado . . . . . . . . . . . . . . . . . . .33
duplicado de cintas . . . . . . . . . . .33
enchufe ant (antena) . . . . . . .8-9,
17
enchufe audio out coaxial . . .
10, 17
enchufe headphone (auricular) . .
16
enchufes entrada de video y audio l/r
. . . . . . . . . . . . . . . . . . . .9,
16, 33
especificaciones . . . . . . . . . . . . . .78
expulsar la cinta . . . . . . . . . . .
16, 77
expulsión de una cinta . . . . . . . . .77
garantía . . . . . . . . . . . . . . . . . . . .79
glosario . . . . . . . . . . . . . . . . . . . .75
grabación
básica . . . . . . . . . . . . . . . . . . .26
de un toque . . . . . . . . . . . . . .27
temporizador . . . . . . . . . . .28-3
1
grabación con temporizador
ajuste . . . . . . . . . . . . . . . . .28-30
cancelación . . . . . . . . . . . . . . .3
1
revisión . . . . . . . . . . . . . . . . . .31
grabación de transmisión
en estéreo . . . . . . . . . . . . . . .48-50
grabación de un toque . . . . . . . . .27
horario de verano . . . . . . . . . . . .24
idioma (dvd) . . . . . . . . . . .64, 68-69
idioma (menús de preparación) . .
18
imagen detenida . . . . . . . . . . .39, 55
lp (long play) . . . . . . . . . . . . . .26, 75
luz de dvd . . . . . . . . . . . . . . . . . .
16
luz rec/otr . . . . . . . . . . . . . . . . . .
16
luz vcr/tv . . . . . . . . . . . . . . . . . . .
16
matiz . . . . . . . . . . . . . . . . . . . . . .25
menús . . . . . . . . . . . . . . . . .5,
18, 51
modo auxiliar (aux) . . . . .8-9, 11,33
nivel de negro . . . . . . . . . . . . . . .74
panel delantero . . . . . . . . . . . . . .
16
panel posterior . . . . . . . . . . . . . .
17
pantalla de estado . . . . . . . . .25, 73
pantalla de mp3 . . . . . . . . . . . . . .67
pistas . . . . . . . . . . . . . . . . . . . . . .54
precauciones de seguridad . . . . . .3
programas . . . . . . . . . . . . . . . . . .65
protección de copyright . . . . . .3, 33
reanudación de la reproducción .55
rebobinado automático . . . . . . . .32
rebobinado automático, expulsión40
regrabación . . . . . . . . . . . . . . . . .33
repetir a-b . . . . . . . . . . . . . . . . . .56
repetir play . . . . . . . . . . . . . . .34, 56
reproducción aleatoria . . . . . . . .65
reproducción de cintas de video .
12
reproducción de discos . . . . . . . .
13
reproducción de mp3 . . . . . . . . .66
retorno a cero . . . . . . . . . . . . . . .36
segundo programa de audio . .48, 50
selección de pista de mp3 . . . . . .66
sensor remoto . . . . . . . . . . . . . . .
16
sistema de sonido multicanal .48-50
slp (super long play) . . . . . . . .26, 75
sp (standard play) . . . . . . . . . .26, 75
subtítulos encapsulados . . . . . . . .4
1
tabla de contenidos . . . . . . . . . . . .4
títulos . . . . . . . . . . . . . . . . . . . . . .5
1
tracking . . . . . . . . . . . . . . . . . . . .40
velocidad de la cinta . . . . . . . .26, 75
video dvd . . . . . . . . . . . . . . . . . . . .6
virtual surround . . . . . . . . . . . . . .74
80 Índice
IB8491S002
Impreso en Malasia
1EMN20077
T0006UG/T6006UG * * * *
T0006UG_6006UG_SP_2.qx3 04.5.12 10:20 AM Page 80
-
 1
1
-
 2
2
-
 3
3
-
 4
4
-
 5
5
-
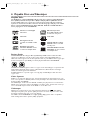 6
6
-
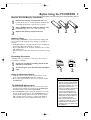 7
7
-
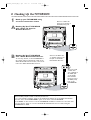 8
8
-
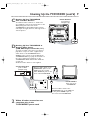 9
9
-
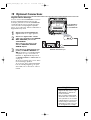 10
10
-
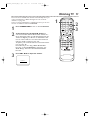 11
11
-
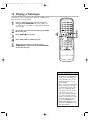 12
12
-
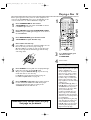 13
13
-
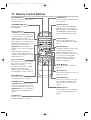 14
14
-
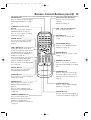 15
15
-
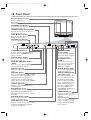 16
16
-
 17
17
-
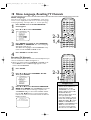 18
18
-
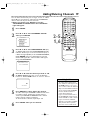 19
19
-
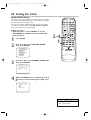 20
20
-
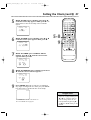 21
21
-
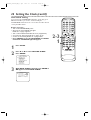 22
22
-
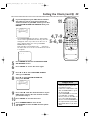 23
23
-
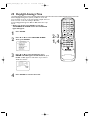 24
24
-
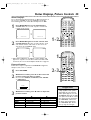 25
25
-
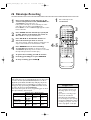 26
26
-
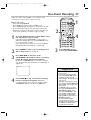 27
27
-
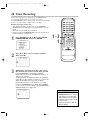 28
28
-
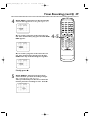 29
29
-
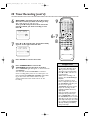 30
30
-
 31
31
-
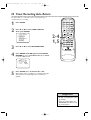 32
32
-
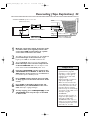 33
33
-
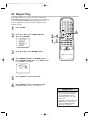 34
34
-
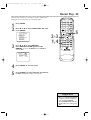 35
35
-
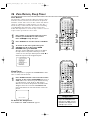 36
36
-
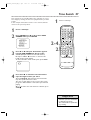 37
37
-
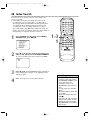 38
38
-
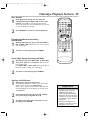 39
39
-
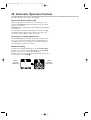 40
40
-
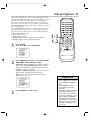 41
41
-
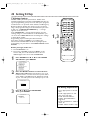 42
42
-
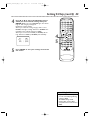 43
43
-
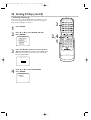 44
44
-
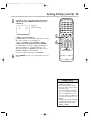 45
45
-
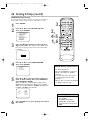 46
46
-
 47
47
-
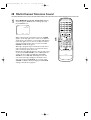 48
48
-
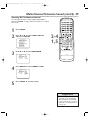 49
49
-
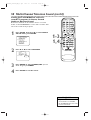 50
50
-
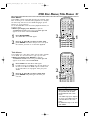 51
51
-
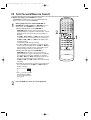 52
52
-
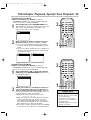 53
53
-
 54
54
-
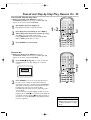 55
55
-
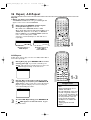 56
56
-
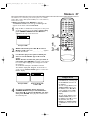 57
57
-
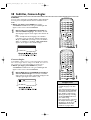 58
58
-
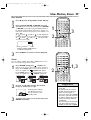 59
59
-
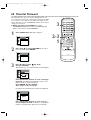 60
60
-
 61
61
-
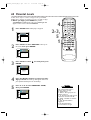 62
62
-
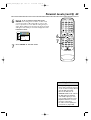 63
63
-
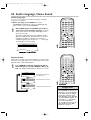 64
64
-
 65
65
-
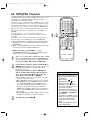 66
66
-
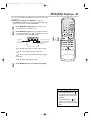 67
67
-
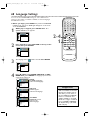 68
68
-
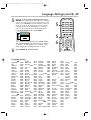 69
69
-
 70
70
-
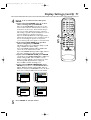 71
71
-
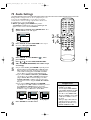 72
72
-
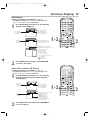 73
73
-
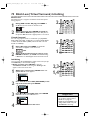 74
74
-
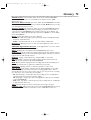 75
75
-
 76
76
-
 77
77
-
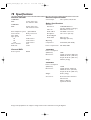 78
78
-
 79
79
-
 80
80
-
 81
81
-
 82
82
-
 83
83
-
 84
84
-
 85
85
-
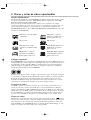 86
86
-
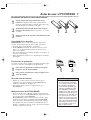 87
87
-
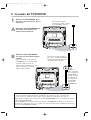 88
88
-
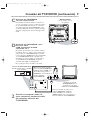 89
89
-
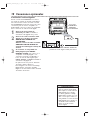 90
90
-
 91
91
-
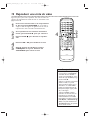 92
92
-
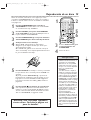 93
93
-
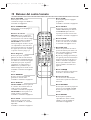 94
94
-
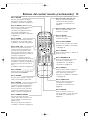 95
95
-
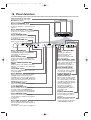 96
96
-
 97
97
-
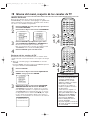 98
98
-
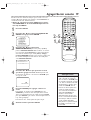 99
99
-
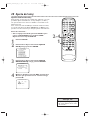 100
100
-
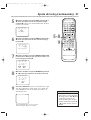 101
101
-
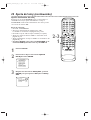 102
102
-
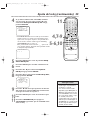 103
103
-
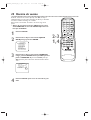 104
104
-
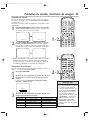 105
105
-
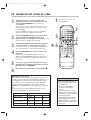 106
106
-
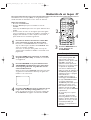 107
107
-
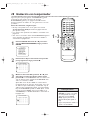 108
108
-
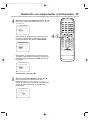 109
109
-
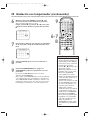 110
110
-
 111
111
-
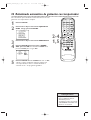 112
112
-
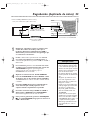 113
113
-
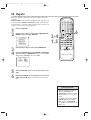 114
114
-
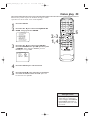 115
115
-
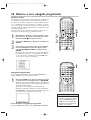 116
116
-
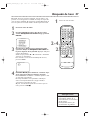 117
117
-
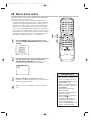 118
118
-
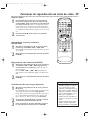 119
119
-
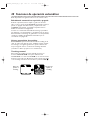 120
120
-
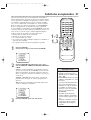 121
121
-
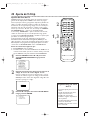 122
122
-
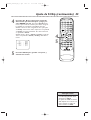 123
123
-
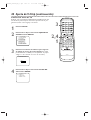 124
124
-
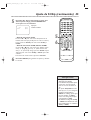 125
125
-
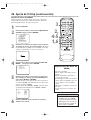 126
126
-
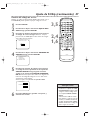 127
127
-
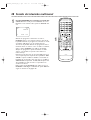 128
128
-
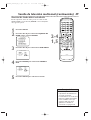 129
129
-
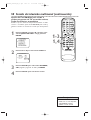 130
130
-
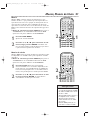 131
131
-
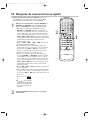 132
132
-
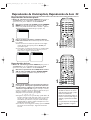 133
133
-
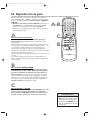 134
134
-
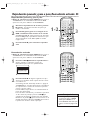 135
135
-
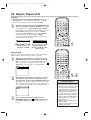 136
136
-
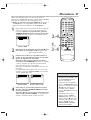 137
137
-
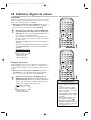 138
138
-
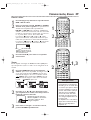 139
139
-
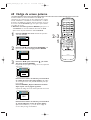 140
140
-
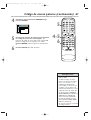 141
141
-
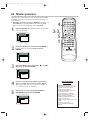 142
142
-
 143
143
-
 144
144
-
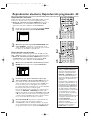 145
145
-
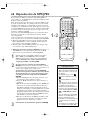 146
146
-
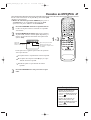 147
147
-
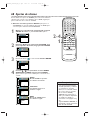 148
148
-
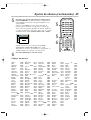 149
149
-
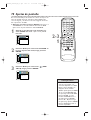 150
150
-
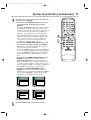 151
151
-
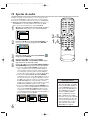 152
152
-
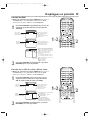 153
153
-
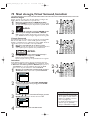 154
154
-
 155
155
-
 156
156
-
 157
157
-
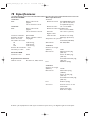 158
158
-
 159
159


Magnavox 27MDTR20s Manual de usuario
- Categoría
- Reproductores de casete
- Tipo
- Manual de usuario
- Este manual también es adecuado para
en otros idiomas
- English: Magnavox 27MDTR20s User manual
Artículos relacionados
Otros documentos
-
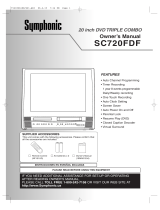 Symphonic SC720FDF Manual de usuario
-
Sanyo VWM950 Manual de usuario
-
-
Philips 27PC4326 Manual de usuario
-
 Symphonic SC520FDG Manual de usuario
-
Sylvania 6520FDG Manual de usuario
-
Insignia NS-F20TR Manual de usuario
-
-
Philips DVD VCR Combo DVP3345VB/F7 Manual de usuario
-

