
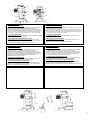
MANUALE D’USO
USER INSTRUCTION
BETRIEBSANLEITUNG
INSTRUCCIONES PARA EL EMPLEO
MANUEL D’UTILISATION
GEBRUIKSAANWIJZING
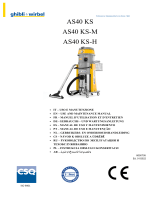
AS30 – AS40
ISO9001
GHIBLI & WIRBEL S.p.A.
Registered office:
Via Enrico Fermi, 43 - 37136 Verona (VR) - Italy
Headquarters:
Via Circonvallazione, 5 - 27020 Dorno (PV) - Italy
P.. +39.0382.848811 F. +39.0382.84668 - M. [email protected]
www.ghibliwirbel.com

2
1 INFORMAZIONI GENERALI
1.1 IL MANUALE ISTRUZIONI
Il manuale di istruzione è un documento redatto dal costruttore ed è parte integrante
dell’aspiratore.
Nel caso in cui l’aspiratore venga rivenduto, regalato o affittato ad altri, il manuale dovrà essere
consegnato al nuovo utente o proprietario dandone opportuna e sollecita comunicazione al
costruttore.
Si raccomanda di utilizzarlo e custodirlo con cura durante tutta la vita operativa.
L’obiettivo principale di questo manuale è quello di far conoscere il corretto modo di utilizzo
dell’apparecchiatura affinché si possano ottenere le migliori prestazioni mantenendola in
perfette condizioni di lavoro e di sicurezza.
Nessuna parte di questo documento può essere riprodotta, copiata o divulgata con qualsiasi
mezzo, senza l’autorizzazione scritta della GHIBLI S.p.A.
In caso di smarrimento o danneggiamento del libretto di istruzioni si prega di contattare il
distributore.
1.2 CONSIGLI DI SICUREZZA. ATTENZIONE !
Leggere attentamente tutte le indicazioni relative all’uso ed alla manutenzione contenute in
questo manuale. Questo apparecchio è destinato solo ed esclusivamente all’uso per il quale è
stato concepito ed il costruttore non può essere ritenuto responsabile per eventuali danni a
cose o persone dovuti ad un uso improprio. Non lasciare che i bambini si avvicinino
all’apparecchio durante l’uso né che giochino con esso o con le prese d’aspirazione.
L’apparecchio non è adatto all’aspirazione di materiali combustibili, velenosi, tossici ed acidi.
Il cavo elettrico deve essere in perfette condizioni e la sua eventuale sostituzione con un altro
delle medesime caratteristiche deve essere effettuata da personale qualificato.
Non lavare l’apparecchiatura con getti d’acqua, non immergerla in acqua.Non aspirare tizzoni
ardenti o mozziconi di sigarette che possono bruciare il filtro.
Sacchetti in plastica, polistirolo, graffe, ecc., non devono essere lasciati alla portata dei bambini
in quanto potenziali fonti di pericolo. Non utilizzare mai l’aspiratore senza sistema filtrante (filtro
in poliestere e/o cartuccia microfiltro).
In caso di malfunzionamento o di guasto, scollegare l’apparecchio e rivolgersi ad un centro di
assistenza autorizzato. Richiedere sempre ricambi originali.
1 GENERAL INFORMATION
1.1 THE USER GUIDE
The user guide is a fundamental document written by the builder, to be considered an integral
part of the central suction unit.
In case of resale, offering or lease to third parties, the user guide must be handed over to the
new user or to the new owner.
We recommend to store and keep the user guide throughout the whole operating life of
vacuum cleaner.
The main purpose of the user guide is to provide a correct knowledge of the user mode in order
to obtain the best performance and to maintain the vacuum cleaner at its best working and
security conditions. It is absolutely forbidden to duplicate, copy or release totally or part of this
user guide without previous written authorization by GHIBLI S.p.A.
In case of loss or damaging of the user guide please contact the distributor.
1.2 SAFETY AND SECURITY PRECAUTIONS. ATTENTION !!!!!
Read carefully any information written in this user guide regarding installation, use and
maintenance of the vacuum cleaner. This appliance must only be used for the purposes for
which it has been constructed. The producer is not responsible for eventual damages caused
by improper use.
Never let the children get near the appliance when it is working and never let them play with it
or with the suction inlets.
This appliance is not suitable for vacuuming inflammable, poisonous, toxic materials and acids.
The electrical wire must be in perfect conditions and in case of its substitution with another one
with the same characteristics, it must be done by qualified personnel.
Do not wash the appliance with jets of water and do not immerse it in water.
Never vacuum burning materials and burning ashes: they can burn the filter. Keep paper bags,
polystirol etc. out of the reach of children, they are a potential source of danger.
Never use the appliance without filtering system (polyester filter and/or microfilter).
In case of malfunctioning or damage, disconnect the machine from the electrical supply and
contact an authorized service centre.
Request always only original spare parts.
1 ALLGEMEINES
1.1 BENŰTZUNG DES LEIFADENS
Der Leitfaden wurde vom Hersteller verfasst und ist fester Bestandteil der Anlage.
Wird diese verkauft, verschenk oder vermietet, sollte der Leitfaden dem neuen Besitzer, bzw.
Benützer übergeben werden. Auch der Hersteller ist möglichst von dieser Übergabe zu
unterrichten.
Der Leitfaden sollte immer gut aufbewahrt werden.
Hauptanliegen dieses Leitfadens ist es über die korrekte Benützung der Anlage zu informieren,
damit ihre technischen Finessen, bei maximalem Sicherheitsstandard, optimal genützt werden
können und die Anlage immer gut in Schuss bleibt.
Dieser Leitfaden darf ohne schriftliche Genehmigung seitens der GHIBLI S.p.A., mit keinem
Medium, auch nicht in Ausschnitten, weder kopiert noch vervielfältig noch verbreitet werden. Im
Fall von Verlegung oder Beschädigung des Leitfadens, soll sich man an den Verteiler wenden.
1.2 SICHERHEITSVORSCHRIFEN. ACHTUNG!
Die Hinweise zur Installation, Benützung und Instandhaltung des Saugers, die in dieser
Leitfaden enthalten sind, sind genauestens zu lesen.
Dieser Sauger sollte nur für den vorbestimmten Gebrauch eingesetzt werden.
Bei Schäden durch nicht vorbestimmten Gebrauch haftet der Hersteller nicht.
Kinder sollen dem laufenden Sauger fernbleiben und nicht mit dem Sauger oder seinen
Anschlussdosen spielen. Niemals Explosive, Säuren, heiße Asche und Gifte aufsaugen.
Kontrollieren Sie immer, ob das Kabel nicht beschädigt ist. Wenn ja, sollte dies nur von
Fachkräften ausgetauscht werden. Immer dasselbe Kabeltyp verwenden.
Die Maschine nicht mit Wasserstrahlen reinigen und nie ins Wasser untertauchen.
Nicht brennendes Kohlenstück oder Zigarettenstummel saugen, die den Filter brennen können.
Plastikbeutel, Polystirol, Klammer, usw. sind Gefahrquellen und sollten nicht in Kinderhänden
gegeben werden. Nie den Sauger ohne Filtersystem (Polyester Filter oder Mikrofilter)
verwenden.
Falls der Sauger nicht gut funktioniert oder geschädigt ist, schalten den Sauger aus und
wenden Sie sich an einen ermächtigen Kundendienst.
Nur Original-Ersatzteile verwenden.
1 INFORMACIONES GENERALES
1.1 UTILIZACIÓN DEL MANUAL
El manual de instrucciones es un documento redactado por el constructor y es parte integrante
del aspirador. En el caso que se rivenda la central, se regala o alquila a otros, el manual de
instrucciones tiene que ser entregado al nuevo utilizador o propietario. Se recomienda
custodiar el manual con cuidado durante toda la vida operativa.
El objetivo principal de este manual es lo de hacer conocer al mundo el modo correcto de
utilización del equipo para que se puedan obtener las mejores prestaciones mantenendo del
aspirador en perfectas condiciones de funcionamiento y de seguridad.
Ninguna parte de este documento puede ser reproducida, copiada o divulgada de ninguna
manera sin la autorización escrita de GHIBLI S.p.A.
En caso de pérdida o daño, dirijirse al distribuidor.
1.2 CONSEJOS GENERALES DE SEGURIDAD. ATENCIÓN!
Leer atentamente y respectar todas las indicaciones relativas a la instalación, al empleo y al
mantenimiento contenidas en este manual.
Esta máquina debe ser utilizada solamente para la función para la que fue fabricada.
El fabricante no se hará cargo de eventuales daños ocasionados por un empleo incorrecto.
Mantener fuera del alcance de los niños aspirador durante el uso y no permitir que jueguen con
el mismo o con los tomas de aspiración
La máquina no es apta para aspirar materiales combustibles, venenos, tóxicos o ácidos.
Asegurarse que el cable de alimentación no tenga daños. En este caso, tiene que ser
sostituido por otro idéntico por personal cualificado. No se debe limpiar la máquina con la
manguera de agua ni sumergirla en el agua.
No aspirar tizones ardientes ni residuos de cigarillos que pueden quemar el filtro.
Mantener fuera del alcance de los niños el embalaje. Nunca utilizar la máquina sin sistema
filtrante (filtro en poliéster o microfiltro)
En caso de mal funcionamento, siempre desenchufar la máquina y hacerla revisar en un centro
de asistencia autorizado.
Pedir siempre repuestos originales

3
AS 30
AS 40
2 APERTURA DELL’IMBALLO
L’aspiratore è fissato ad un bancale in legno tramite staffe in metallo e viti per legno e
ricoperto da un cartone reggiato. All’apertura dell’imballo è necessario verificare che tutte le
parti siano intatte e non abbiano subito danni durante il trasporto.
Se l’imballo presenta danneggiamenti sporgere subito reclamo al trasportatore ed annotare
che il materiale viene ritirato con riserva.
Dimensione dell’imballo:
Modello AS30 Lunghezza: 890 mm; Larghezza: 680 mm; Altezza: 1445 mm; Peso: 60,5 kg.
Modello AS40 Lunghezza: 890 mm; Larghezza: 680 mm; Altezza: 1445 mm; Peso: 65 kg.
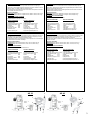
2.1 VERIFICA DOTAZIONE ACCESSORI
Eseguire l’inventario di quello che avete ricevuto:
AS30 230V 2300W GHIBLI AS40 230V 3450W GHIBLI
1) Aspiratore AS30 1) Aspiratore AS40
2) Coperchio liquidi (interno involucro) 2)Coperchio liquidi (interno involucro)
3)Tubo flessibile completo Ø 40 3) Tubo flessibile completo Ø 50
4) Pennello Ø 40 4) Pennello Ø 50
5) Lancia piatta Ø 40 5) Lancia piatta Ø 50
6) Prolunga a S 2 pezzi Ø 40 6) Prolunga curva Ø 50
7) Spazzola setole 7) Spazzola registrabile polvere 40 cm
8) Ventosa liquidi in nylon 8) Spazzola registrabile liquidi 40 cm
2 UNPACKING
The vacuum cleaner is in a cardboard box fixed to a wooden pallet with safety loops and
wood screws . When opening the cardboard box verify that all the parts are intact and have
not been damaged during the transport.
If the packaging is damaged make a complaint against the forwarder and take note that the
material will be collected under reserve.
Packaging dimensions:
AS30 model Length: 890 mm; Width: 680 mm; Height: 1445 mm; Weight: 60,5 kg.
AS40 model Length: 890 mm; Width: 680 mm; Height: 1445 mm; Weight: 65 kg.
2.1 CHECKING OF THE ACCESSORIES
Make an inventory of what you have received:
AS30 230V 2300W GHIBLI AS40 230V 3450W GHIBLI
1) AS30 vacuum cleaner 1) AS40 vacuum cleaner
2) Lid for liquid (inside the tank) 2) Lid for liquid (inside the tank)
3) Complete flexible hose Ø 40 3) Complete flexible hose Ø 50
4) Brush Ø 40 4) Brush Ø 50
5) Crevice tool Ø 40 5) Crevice tool Ø 50
6) Two-pieces S-wand Ø 40 6) Bent wand Ø 50
7) Floor tool Ø 40 7) Adjustable brush for dust 40 cm
8) Nylon squeege tool Ø 40 8) Adjustable brush for liquid 40cm
2 ÖFFNUNG DER V
ERPACKUNG
Der Sauger ist an einem Holzpalette durch Befestigungsbügel aus Metall und Schrauben für
Holz befestigt und in einem Karton enthält. Nach der Öffnung der Verpackung ist es nötig
festzustellen, ob das Material keineTransportschäden aufweist.
Im Gegenteil Fall reichen Sie eine Beschwerde an das Transporteur ein und ist unverzüglich
der Kundendienst des Herstellers verständigen.
Abmessung der Verpackung:
AS30 Modell Länge: 890 mm; Breite: 680 mm; Höhe: 1445 mm; Gewicht: 60,5 kg.
AS40 Modell Länge: 890 mm; Breite: 680 mm; Höhe: 1445 mm; Gewicht: 65 kg.
2.1 PRÜFUNG DER ZUBEHÖREN
Bitte nehmen Sie den Bestand von den Zubehören auf:
AS30 230V 2300W GHIBLI AS40 230V 3450W GHIBLI
1) Sauger AS30 1) Sauger AS40
2) Deckel für Flüssig(drinnen Kessel) 2) Deckel für Flüssig (drinnen Kessel)
3) Saugschlauch komplett Ø 40 3) Saugschlauch komplett Ø 50
4) Düse Ø 40 4) Düse Ø 50
5) Fugendüse Ø 40 5) Fugendüse Ø 50
6) Saugrohr-S 2 Stücke Ø 40 6) Krummsaugrohr Ø 50
7) Bürstendüse 7) Rollendüse für Staub 40 cm
8) Wassersaugdüse Nylon 8) Rollendüse für Flüssigkeit 40 cm
2 ABRIR EL EMBALAJE
El aspirador se encuentra en un carton fijado sobre un palet de madera por correas en metal
y tornillos para madera. Al abrir el embalaje es necesario verificar que la maquina esté
completa y que no presente daños evidentes causados por el transporte.
En caso contrario hacer una reclamación al transportista. Informarlo que el material vendrá
recogido con reserva.
Dimensión del embalaje:
Modelo AS30 Largura: 890 mm; Anchura: 680 mm; Altura: 1445 mm; Peso: 60,5 kg.
Modelo AS40 Largura: 890 mm; Anchura: 680 mm; Altura: 1445 mm; Peso: 65 kg.
2.1 VERIFICAR DE LOS ACCESORIOS
Inventariar los accesorios:
AS30 230V 2300W GHIBLI AS40 230V 3450W GHIBLI
1) Aspirador AS30 1) Aspirador AS40
2)Tapa para líquidos (interno involucro) 2) Tapa para líquidos (interno involucro)
3)Tubo flexible completo Ø 40 3) Tubo flexible completo Ø 50
4) Cepillo Ø 40 4) Cepillo Ø 50
5) Boquilla piana Ø 40 5) Boquilla piana Ø 50
6) Alargador a S 2 piezas Ø 40 6) Alargador curvo Ø 50
7) Boquilla suelos 7) Boquilla regulable para polvo 40 cm
8) Boquilla líquidos nylon 8) Boquilla regulable para líquidos 40
cm
1
2
1
2
3
4
7
6
3
4
7
6
8
5
5
8

4
3 DESCRIZIONE DELL’ASPIRATORE
3.1 INTRODUZIONE
E’ importante che l’aspiratore sia condotto da persone responsabili che ne mantengano un
corretto utilizzo di funzionamento, manutenzione e riparazione. Nel caso sorgessero
problemi di funzionamento, contattare il rivenditore. L’acquirente non è autorizzato a
modificare o manomettere l’aspiratore pena l’invalidazione della garanzia e l’esonero da ogni
responsabilità sugli eventuali danni a cose o persone da parte della ditta costruttrice.
3.2 USO PREVISTO E NON PREVISTO
L’aspiratore Ghibli S.p.A. modello AS30-AS40 è stato progettato per aspirare polvere, corpi
solidi di varie dimensioni, liquidi e residui di lavorazioni costituiti da un misto di polvere e
liquidi. E’ vietato aspirare materiali con rischio di esplosioni o materiali singolarmente inerti
ma che, una volta aspirati e miscelati nel contenitore di raccolta, possono provocare reazioni
chimiche pericolose. E’ fatto assoluto divieto di utilizzare l’aspiratore in atmosfere esplosive o
al di fuori dei valori standard di temperatura, pressione e umidità.
Non sono consentiti usi diversi da quelli sopraindicati. Qualsiasi impiego diverso da quello
per cui l’aspiratore è stato costruito, rappresenta una condizione anomala che può arrecare
danno al mezzo e costituire un serio pericolo per l’utilizzatore.
3.3 CONFORMITA’ ALLE DIRETTIVE COMUNITARIE
Gli aspiratori modello AS30-AS40 sono conformi alle seguenti Direttive Comunitarie:
98/37/CEE - Direttiva Macchine (ex 89/392/CEE)
73/23/CEE - Direttiva Bassa Tensione ( e successive modifiche)
89/336/CEE - Direttiva Compatibilità Elettromagnetica (e successive modifiche)
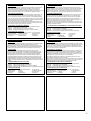
3.4 CARATTERISTICHE COSTRUTTIVE
1) Interruttore ON/OFF 5) Maniglia sollevamento involucro 9) Filtro in poliestere
2) Interruttore ON/OFF 6) Involucro raccoglitore 10) Coperchio liquidi
3) Cestello porta accessori 7) Filtro a cartuccia 11) Bocchetta
4) Prolunga a S 8) Cestello tendifiltro 12) Galleggiante
3 VACUUM CLEANER DESCRIPTION
3.1 INTRODUCTION
It is important that the vacuum cleaner be used by responsible people who can keep it
correctly operating and make maintenance and reparation. In case there are malfunctioning
problems contact the dealer. The buyer is not authorized to modify or to temper with the
vacuum cleaner under penalty of invalidation of the warranty and the exemption from all
liabilities on the GHIBLI S.p.A. side for any damage that might occur to things or persons.
3.2 ALLOWED AND IMPROPER USE
The GHIBLI S.p.A. AS30-AS40 vacuum cleaner models has been designed to vacuum dust,
solid bits of varied dimensions, liquids and residuals made of a mix of dust and liquids.
It is forbidden to vacuum highly explosive materials or inert materials, which can trigger
dangerous chemical reactions if vacuumed separately and then mixed up in the dust
container. It is strictly forbidden to use the vacuum cleaner in explosion hazard places or in
places where temperature, pressure and moisture are out-of-range.
Any different use from the ones indicated above is strictly forbidden. Any use different from
its intended use is to be considered improper and can cause damage to the vacuum cleaner
and present a health risk for the user.
3.3 COMPLIANCE WITH THE REQUIREMENTS OF THE EEC DIRECTIVES IN FORCE
The AS30-AS40 models fully comply with the requirements of following the EEC directives:
98/37/CEE - Machines Directive (ex 89/392/CEE)
73/23/CEE - Low tension Directive ( and following modifications)
89/336/CEE - Electromagnetic Compatibility Directive (and following modifications)
3.4 CONSTRUCTION FEATURES
1) ON/OFF switch 5) Lift-up tank handle 9) Polyestere filter
2) ON/OFF switch 6) Tank 10) Lid for liquid
3) Accessories basket 7) Cartridge filter 11) Intake
4) S-Wand 8) Cage bag support 12) Floater
3 BESCHREIBUNG DES SAUGERS
3.1 EINFÜHRUNG
Der Sauger muss von verantwortlichen Menschen verwendet wird. Diese Menschen sollten
sich um die Pflege, Wartung und Reparatur des Saugers kümmern. Im Fall von
Fehlfunktionen wenden Sie sich an den Verkäufer. Werden Eingriffe seitens unbefugter
Personen durchgeführt , verfällt der Garantieanspruch und der Hersteller übernimmt keine
Garantie für Sach oder Personenschäden, die auf diese Eingriffe zurückzuführen sind.
3.2 EINSATZGEBIET
Die GHIBLI S.p.A. AS30-AS40 Modelle wurden entwickelt um Staub, Feststoffe
verschiedener Ausmaßes Flüssigkeiten und Überbleibsel von Bearbeitungen aus einer
Mischung von Staub und Flüssigkeiten. Es ist verboten explosionsgefährdete Materialien
aufzusaugen, die für sich allein harmlos, aber in Verbindung mit anderen, gefährliche
chemische Reaktionen nach sich ziehen können Es ist absolut verboten den Sauger in
explosionsgefährdeter Atmosphäre oder außerhalb der normalen Temperatur-Druck und
Feuchtigkeitsstandards zu verwenden.Es ist nicht erlaubt den Sauger für andere als die
obengenannten Zwecke einzusetzen. Die Verwendung des Saugers für andere Zwecke als
die für die, der Sauger entwickelt wurde, ist ein Sicherheitsrisiko für den Sauger und für den
Benutzer.
3.3 ÜBEREINSTIMMUNG MIT DEN EU_RICHTLINIEN
Die AS30-AS40 Modelle entsprechen folgenden EU-Richtlinien:
98/37/CEE - Bestimmung über Maschinen (ex 89/392/CEE)
73/23/CEE - Bestimmung über Niederspannung ( e successive modifiche)
89/336/CEE - Bestimmung über das elektromag.Verhalten (und nachfolgende Änderungen)
3.4 KONSTRUKTIONSSCHEMA
1) ON/OFF Schalter 5)Handgriff für Kesselaufheben 9) Polyester Filter
2) ON/OFF Schalter 6) Kessel 10) Deckel für Flüssigkeit
3) Zubehöreskorb 7) Mikrofilter 11) Sauganschluss
4) Saugrohr-S 8) Filterspannkorb 12) Schwimmer
3
DESCRIPCIÓN DEL ASPIRADOR
3.1 INTRODUCCIÓN
Es importante que l’aspirador sea utilizado por personas responsables que tengan cuidado
en el functionamiento, manutención y reparación. En caso de malfuncionamiento, contacte el
vendedor. En caso de intervenciones de personal no autorizado, la garantia del producto
decae y exime al constructor de cualquier responsabilidad por eventuales daños a personas
y/o cosas como consecuencia de tal intervención.
3.2 USO PREVISTO Y NO PREVISTO
Los aspiradores Ghibli S.p.A. modelo AS30-AS40 han sido proyectados para aspirar polvo,
cuerpos sólidos de varias dimensiones, líquidos y residuos de laboraciónes constituidos por
una mezcla de polvo y líquidos. Se prohibe aspirar material con alto riesco de explosión o
materialiales individualmente inertes pero que, una vez aspirados y mezclados en la bolsa
de recogida polvo, pueden provocar reacciones químicas peligrosas.
Se prohibe absolutamente utilizar el aspirador en atmósferas explosivas o fuera de los
valores estándar de temperatura, presión o humedad.
No se permiten usos diferentes de los que se se han indicado arriba. Cualquier uso diferente
de aquello para el que se ha construido el aspirador, constituye una condición anómala que
puede provocar daño al aspirador y constituir un serio peligro para el usuario.
3.3 CONFORMIDAD CON LAS DIRECTIVAS COMUNITARIAS
Los modelos AS30-AS40 son conformes con las siguientes Directivas Comunitarias:
98/37/CEE - Directivas Máquinas (ex 89/392/CEE)
73/23/CEE - Directiva Baja Tensión (y modificaciones sucesivas)
89/336/CEE - Directiva Compatibilidad Electromagnética (y modificaciones sucesivas)
3.4 CARACTERĺSTICAS DE LA CONSTRUCCIÓN
1) Interruptor ON/OFF 5) Manilla levantamiento involucro 9) Filtro poliestere
2) Interruptor ON/OFF 6) Involucro recogedor 10) Tapa para líquidos
3) Cesta porta accesorios 7) Microfiltro 11) Terminal
4) Alargador a S 8) Rejilla filtro 12) Flotador

5
1
3
6
11
5
4
2
12
10
9
8
7
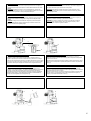
4 USO DELL’ASPIRATORE
4.1 ACCENSIONE DELL’ ASPIRATORE
Prima di collegare l’apparecchio alla presa controllare che la tensione di rete corrisponda
ai dati elettrici riportati sulla targhetta dati tecnici dell’aspiratore. Collegare il tubo
flessibile alla bocchetta d’aspirazione, la prolunga rigida al tubo flessibile, e l’accessorio
finale che si intende utilizzare alla prolunga. Premere il pulsante sx. del quadro elettrico
(accensione 1° motore), quindi successivamente, se necessario azionare l’interruttore
dx. (accensione 2° motore versione AS30; accensione 2° e 3° motore versione AS40).
4.1 USO COME ASPIRAPOLVERE
Togliere il coperchio liquidi dall’involucro raccoglitore, assicurarsi che i filtri siano presenti
e correttamente installati; accendere l’apparecchio.
4.2 SVUOTAMENTO DEL CONTENITORE DALLE POLVERI
Scollegare il tubo flessibile dalla bocchetta di aspirazione. Sollevare la maniglia di
sgancio dell’involucro raccoglitore (1), estrarre l’involucro (2) svuotare il contenuto (3)
Riposizionare l’involucro (4) e abbassare la maniglia sollevamento (5).
4 HOW TO USE THE VACUUM CLEANER
4.1 STARTING OF VACUUM CLEANER
Before plugging the vacuum cleaner, make sure that the main power supply corresponds to
the data indicated on the identification plate.
Connect the flexible hose to the intake, the wand straight to the flexible hose and the final
appliance to the wand straight. Push the left button of the electrical panel (starts the 1°
motor) then subsequently, if necessary, push the right button of the control panel (starts the
2° motor for AS30; starts the 2° and 3° motor for AS40)
4.1 USE AS DRY VACUUM CLEANER
Remove the liquid lid from the tank , make sure that the filters are present and corretly
installed, switch on the vacuum cleaner.
4.2 EMPTYING OF THE TANK FROM DUSTS
Disconnect the flexible hose from the intake. Lift up the tank handle (1), take out (2) and
empty the tank (3). Replace the tank (4) and pull down the handle (5)
4 BENÜTZUNG DES SAUGERS
4.1 EINSCHALTEN DES SAUGERS
Bevor der Anschluss des Saugers and das Stromnetz vorgenommen wrd, ist zu
überprüfen, ob die Spannung des Netzes, der für den Sauger entspricht.
Den Saugschlauch an den Sauganschluss verbinden, dann den Saugrohr and den
Saugschlauch verbinden und das Zubehör, das man gebrauchen will, an den Saugrohr
verbinden. Den linken Knopf des Bedienfeldes drücken (Inbetriebsetzen 1° Motor), dann,
wenn nötig, den 2° Knopf drücken. (Inbetriebsetzen des 2° Motor für AS30;
Inbetriebsetzen des 2° e 3° Motor für AS40).
4.1 GEBRAUCH ALS TROCKENSAUGER
Den Deckel für Flüssigkeit von dem Deckel beseitigen, Versichern Sie sich, dass die
Filter anwesend und richtig installiert sind; Den Sauger einschalten.
4.2 ENTLEERUNG DES KESSELS VON DEM STAUB
Den Saugschlauch von dem Sauganschluss abnehmen. Den Handgriff des Kessels
aufheben (1), den Kessel ausziehen (2) den Inhalt entfernen (3) ; den Kessel wieder
stellen (4) ; den Handgriff des Kessel niedriger stellen (5).
4 EMPLEO D
EL ASPIRADOR
4.1 ENCENDIDO DEL ASPIRADOR
Antes de conectar el aspirador al enchufe controle que la tensión de la red corresponda a los
datos eléctricos escritos sobre la tarjeta de los datos eléctricos del aspirador.
Junte el tubo flexible al terminal, el alargador al tubo flexible y el accesorio final que se
quiere utilizar al alargador. Aprete el pulsante izquierdo del tablero eléctrico (encendido del
1° motor), y sucesivamente, si necesario, aprete el pulsante derecho (encendido del 2°
motor versión AS30; encendido del 2° y 3° motor versión AS40).
4.1 UTILIZACIÓN COMO ASPIRADOR PARA POLVO
Saque el tapa para líquidos y después en el involucro recogedor, asegurese que los filtros
sean presentes y correctamente instalados; pone en marcha la maquina.
4.2 VACIAMIENTO DEL POLVO DESDE EL INVOLUCRO RECOGEDOR
Desjunte el tubo flexible desde la toma de aspiración. Levante la manilla levantamiento
involucro (1), saque el involucro recogedor (2) Vacíe el contenuto (3)
Disponga el involucro en su posición original (4) y baje la manilla levantamiento involucro (5).
1
2
3
4
5

6
4.3 USO ASPIRALIQUIDI
Svuotare l’involucro dalle polveri. Inserire il coperchio liquidi sull’involucro raccoglitore (3).
L’apparecchio è previsto per aspirare liquidi con il sistema filtrante intatto nella sua corretta
posizione.
ATTENZIONE! L’apparecchio è dotato di una valvola galleggiante (5) che interrompe
l’aspirazione quando l’involucro è colmo. In questo caso spegnere l’apparecchio e svuotare
l’involucro. Pulire regolarmente la valvola per l’aspirazione dei liquidi.
4.3 USE A
S WET VACUUM CLEANER
Empty the tank from dusts. Insert the liquid lid on the tank (3). The machine is supposed to
suck liquids with the filter system intact and in its correct position.
ATTENTION! The machine is equipped with a floater (5) which interrupts the vaccum
process when the tank is filled up. In this case switch off the machine and emtpy the tank.
Clean regurlarly the floater.
4.3 GEBRAUCH ALS WASSERSAUGER
Den Staub von dem Kessel entfernen. Den Deckel für Flüssigkeit in den Kessel einfügen (3).
Der Sauger wurde entwickelt um Flüssigkeiten zu saugen mit dem Filtersystem richtig
installiert.
ACHTUNG! Der Sauger ist mit einem Schwimmer ausgerüstet (5) der das Saugen bei
gefültem Behälter abschaltet. In diesem Fall den Sauger ausschalten und den Kessel
entleeren. Den Schwimmer regelmäßig reinigen.
4.3 1 UTILIZACI
ÓN COMO ASPIRADOR PARA Lĺ
QUIDOS
Vacíe el involucro recogedor. ponga Tapa para líquidos sobre el involucro recogedor (3).
asegurese que los filtros sean integros y correctamente instalados.
ATENCIÓN! La máquina es equipada con un flotador (5) que interrumpe la aspiración
cuando el involucro recogedor estė lleno. En ese caso apague la maquina y vacíe el
involucro recogedor. Limpie con regularidad el flotador.
4.4 SVUOTAMENTO DEL CONTENITORE DAI LIQUIDI
Scollegare il tubo flessibile dalla bocchetta di aspirazione.
Sollevare la maniglia di sgancio dell’involucro raccoglitore (1) Estrarre l’involucro (2).
Togliere il coperchio liquidi e scaricare il contenuto raccolto (3) aiutandosi con la maniglia
posta nella zona frontale inferiore dell’involucro raccoglitore. Riposizionare il coperchio liquidi
e l’involucro raccoglitore sotto il cilindro d’aspirazione fino a fine corsa (4) con la bocchetta il
più possibile centrale rispetto all’apparecchio ed abbassare la maniglia sollevamento (5).
4.4 EMPTYING OF THE TANK FROM LIQUIDS
Disconnect the flexible hose from the intake. Lift up the tank handle (1), take out (2) .
Remove the liquid lid and drain the liquid collected (3) with the help of the handle positioned
on the front-low of the tank.
Reposition the liquid lid and the tank under the aspiration cylinder until end travel (4) with the
intake as more in central position as possible with respect to the machine, and pull down the
handle (5).
4.4 ENTLEERUNG DES KESSELS VON DEN FLÜSSIGKEITEN
Den Saugschlauch von dem Sauganschluss abnehmen. Den Handgriff des Kessels
aufheben (1) den Kessel ausziehen (2) . Den Kessel für Flüssigkeit abnehmen und den Inhalt
entfernen (3) mit der Hilfe des Handgriffs an dem Kessel vorne-unten. Den Deckel für
Flüssigkeit und den Kessel unten den Zylinder der Ansaugung bis die ganze gegenläufige
Bewegung wieder stellen (4) mit dem Sauganschluss möglichst zentral hinsichtlich des
Saugers und den Handgriff des Kessel niedriger stellen (5).
4.4 VACIAMIENTO DEL LĺQUIDO DESDE EL INVOLUCRO RECOGEDOR
Desjunte el tubo flexible desde la toma de aspiración. Levante la manilla levantamiento
involucro (1), saque el involucro recogedor (2) Vacíe el líquido (3) ayudandose con la manilla
posicionada frente del involucro recogedor.
Disponga el tapa para líquidos y el involucro recogedor bajo del cilindro de aspiración hasta
el fin de carrera (4) con el terminal en posición lo más posible central con respeto a la
máquina y baje la manilla levantamiento involucro (5).
1
2
3
4
5
1
2
3
4
5

7
4.5 MONTAGGIO MICROFILTRO HEPA
Assicurarsi che l’aspiratore sia spento e scollegato dalla rete elettrica di
alimentazione.
Estrarre la cartuccia microfiltro versione standard (1) (2) e sostituirla con la con la
versione hepa (3) (4).
Essendo ad alta filtrazione, il filtro necessita di particolari cure.
Durante il montaggio si deve prestare la massima attenzione a non danneggiarlo.
4.5 MOUNTING OF THE HEPA MICROFILTER
Make sure that the vacuum cleaner is off and disconnected from the power supply.
Estract the standard microfilter (1) (2) and sobstitute it with the HEPA microfilter (3-4)
Being it at high filtration, this filter requires a particular maintenance.
It is necessary to take care during the mounting process.
4.5 EINBAU DES HEPA MIKROFILTERS
Versichern Sie sich, dass der Sauger ausgeschaltet ist und von der Stromzufuhr
getrennt ist. Den standard Mikrofilter abnehmen (1) (2) und ihn mit dem Hepa
Mikrofilter austauschen (3) (4).
Der Hepa Mikrofilter hat eine höhe Filterungskapazität und deshalb verlangt er eine
besondere Pflege.
Beim Einbau achten Sie sorgfältig darauf, den Hepa Mikrofilter nicht zu schäden.
4.5 MONTAJE DEL HEPA MICROFILTRO
Asegurese que la máquina no sea en marcha y no conectada a la red elėctrica.
Saque el microfiltro standard (1) (2) y sobstituyalo con el microfiltro HEPA (3-4).
Este es un filtro con una grande capacitad filtrante, por eso una manutención especial
es necesaria.
Es necesario poner mucho cuidado durante el montaje.
STANDARD HEPA
5 MANUTENZIONE E PULIZIA
Ogni intervento di manutenzione ordinaria o straordinaria deve essere eseguito da personale
qualificato e con aspiratore spento e con spina scollegata dalla rete di alimentazione
elettrica. Un buon uso ed una buona manutenzione garantiscono nel tempo la sicurezza e
l’efficienza dell’aspiratore.
5.1 PULIZIA FILTRO IN POLIESTERE
Aprire le cerniere e sollevare la testata dell’apparecchio completa di cartuccia microfiltro (1),
togliere il cestello tendifiltro (2) e scuotere ripetutamente il filtro in poliestere (3).
Prima di sganciare l’involucro raccoglitore o di riaccendere l’aspiratore assicurarsi di aver
lasciato decantare per 1 o 2 minuti la polvere all’ interno dell’aspiratore stesso.
Il filtro in poliestere può essere lavato con acqua tiepida e detersivo, tenendo conto che
prima del riutilizzo deve essere ben asciutto.
5 MAINTENANCE AND CLEANING
Every ordinary or extraordinary maintenance operation must be executed by qualified
personnel and with the machine switched off and disconnected from the power supply.
A good use and a good maintenance guarantee in time the safety and the efficiency of the
vacuum cleaner.
5.1 CLEANING OF THE POLYESTERE FILTER
Open the hinges and lift up the motor header complete with cartridge filter (1).
Remove the cage bag support (2) and shake repeatedly the polyestere filter (3).
Before unhooking the tank or switch on the vacuum cleaner again, make sure to let decant
the dust inside the vacuum cleaner for 1 or 2 minutes. The polyestere filter can be washed
with tepid water and detersive. Remember that after the washing the filter must be well dry
before re-
mounting it on the machine.
5 PFLEGE UND WARTUNG DES SAUGERS
Alle Eingriffe und Wartungen jeglicher Art dürfen bei ausgeschaltetem und von der
Strozufuhr getrenntem Sauger und nur von zugelassenen Kundendienststellen ausgeführt
werden. Eine optimale Benutzung und Wartung versichern eine dauernde Sicherheit und
Leistungsfähigkeit des Saugers.
5.1 REINIGUNG DES POLYESTERFILTERS
Die Verschlüsse öffnen und den Saugkopf komplett mit Mikrofilter aufheben (1); den
Filterspannkorb abnehmen (2) und den Polyesterfilter öfter schütteln (3).
Bevor den Kessel abhängen oder den Sauger wieder einschalten, den Staub innen des
Saugers für 1 oder 2 Minuten dekantieren lassen. Der Polyesterfilter kann mit lauwarmem
Wasser und Reinigungsmittel gewaschen werden. Nach der Waschung, lassen Sie den
Polyesterfilter gut trocken,
bevor ihn wieder installieren
5 MANTENIMIENTO Y LIMPIEZA
Todas las intervenciones ordinarias y extraordinarias deben ser realizadas por personal
cualificado del Servicio Asistencia y con la máquina apagada y desconectada de la red
elėctrica. Un correcto utilizo y un buen mantenimiento aseguran para mucho tiempo una
perfecta condición de funcionamiento y de seguridad.
5.1 LIMPIEZA DEL FILTRO POLIÉSTER
Abra las charnelas y soleve la cabezal compensiva del filtro a cartucho (1).
Saque la rejilla filtro (2) y sacudir reiteradamente el filtro políester (3).
Antes de desenganchar el involucro recogedor o poner en marcha de nuevo la máquina,
asegurese de dejar decantar el polvo en el interior de la máquina para 1 or 2 minutos.
El filtro políester se puede limpiar con agua tibia y con detersivo. Recuerde que después de
la lavadura el filtro políester tiene que ser bien seco antes de remontarlo en la máquina.
1 2 3 4
1 2
3

8
COD.8050829 – ED.04-2022
5.2 PULIZIA FILTRO A CARTUCCIA
Estrarre la cartuccia e pulirla con un getto d’aria compressa dall’interno verso l’esterno.
La cartuccia microfiltro può essere alternativamente rigenerata aspirando lo sporco presente sulla
superficie filtrante, utilizzando l’aspiratore stesso e l’accessorio “lancia piatta”. Verificare che non ci
siano lacerazioni sulla superficie filtrante, nel qual caso la cartuccia risulterebbe inutilizzabile.
6 MESSA FUORI SERVIZIO
6.1 REGOLE GENERALI
Qualora si decidesse di mettere fuori servizio l’aspiratore, è necessario eseguirlo nel rispetto della
nostra salute e dell’ambiente in cui viviamo. Informarsi se vi siano luoghi e/o persone autorizzate al
ritiro ed allo smaltimento del prodotto.Lo smaltimento e/o il riciclaggio di qualsiasi componente
dell’aspiratore deve essere eseguito in conformità delle leggi vigenti.
POSSIBILI PROBLEMI DI FUNZIONAMENTO E LORO RISOLUZIONE
PROBLEMA CAUSA SOLUZIONE
L’apparecchio non si avvia. Mancanza alimentazione
elettrica.
Controllare l’interruttore dell’apparecchio,
il fusibile dell’impianto,il cavo elettrico e
la presa di corrente.
La potenza di aspirazione
diminuisce.
Filtri intasati, tubo
d’aspirazione o accessori
intasati.
Spegnere l’aspiratore e scuotere il filtro,
pulire il tubo e gli accessori.
L’aspiratore in funzione è
molto rumoroso (la testata
presenta vibrazioni molto
forti).
Deposito eccessivo di sporco
sulle turbine dei motori
(eventuale rottura o mal
posizionamento dei filtri).
Pulire le turbine dei motori. Richiedere
assistenza tecnica autorizzata.
L’aspiratore in funzione
emette polvere.
Rottura o mal posizionamento
dei filtri.
Spegnere l’aspiratore e pulire i filtri o
riposizionarli correttamente.
L’aspiratore uno o più motori
spenti.
Spazzole carbone consumate. Richiedere assistenza tecnica
autorizzata.
5.2 CLEANING OF THE CARTRIDGE FILTER
Estract the cartridge filter and clean it with jets of compressed air from inside toward the outside.
The cartridge filter can be alternatively regenerated by sucking the filth present on its surface using
the vacuum cleaner itself along with the ‘crevice tool’ accessory. Verify that there are no rips on the
filtering surface. In that case, the cartridge filter would be unusable.
6 DISMANTLING
6.1 GENERAL INSTRUCTIONS
When dismantling the vacuum cleaner, it must be carried out respecting the human health or
well-being as well as the environment . You must be acquainted with sites/companies authorized to
collect and dispose of used parts and materials. The disposal and/or recycling of any part of the
suction system must be carried out in compliance with the legal regulations in force.
POSSIBLE MALFUNCTIONING PROBLEMS AND TROUBLESHOOTING
PROBLEM CAUSE SOLUTION
The appliance does not start The power supply lacks. Check the switch of the appliance,
the fuse of the power net, the cord and
the socket.
The suction power drops Filters, flexible hose or
accessories clogged.
Switch off the appliance and shake the
filter, clean the hose and the accessories.
The appliance when working is
very noisy (the motor header
vibrates very hard).
Eccessive deposit of filth
on the motors turbines
(possible break or bad
positioning of the filtersi).
Clean the turbines of the motors.
Ask for authorized technical assistance.
The appliance when working
emits dust.
Break or bad positioning of
the filters.
Switch off the appliance and clean the
filters or position them correctly.
The appliance shows one or
more non-working motors.
Carbon brushes worn out. Ask for authorized technical assistance.
5.2 REINIGUNG DES MIKROFILTERS
Den Mikrofilter abnehmen und mit Wasserstrahlen reinigen von innen nach außen.
Der Mikrofilter kann wechselweise wiedererzeugt werden durch die Einsaugung der Unsauberkeit
auf der Filtrierfläche mit dem Sauger und dem ‚Fugendüse’ Zubehör Vergewissern Sie sich, dass es
keine Zerreißungen auf der Filtrierfläche gibt, der Mikrofilter nicht mehr benutzbar wäre.
6 STILLEGUNG
6.1 GRUNDREGELN
Wenn die Anlage stillgelegt werden soll, dann sollte auf unsere Gesundheit und unsere Umwelt
Rücksicht genommen werden. Informieren Sie sich, ob es in Ihrer Nähe Personen und
Sammelstellen gibt, wo solche Anlagen entsorgt werden können. Die Entsorgung und das
eventuelle Recycling von Teilen den Anlage muss im Sinne der geltenden Gesetzgebung erfolgen.
STÖRUNGEN UND FEHLERSUCHE
FEHLER URSACHE ABHILFE
Der Sauger schaltet nicht ein. Der Netzanschluss fehlt Den Schalter, den Kabel, die
Steckdose und die
Schmelzsicherung kontrollieren.
Saugleistung ungenügend. Filter verstopft, Saugschlauch
oder Zubehören verstopft.
Den Sauger ausschalten und die
Filter und die Zubehören schütteln.
Der Sauger in Betrieb ist sehr
lärmend (Der Saugkopf rütteln
sehr viel).
Übermässige Unsauberkeit auf
den Turbine der Motoren.
( schlechte Stellung oder
Brechen des Filters).
Die Turbine der Motoren reinigen.
Wenden Sie sich an einen
berechtigten Kundendienst.
Der Sauger in Betrieb sendet
Staub aus.
Brechen oder schlechte
Stellung des Filters.
Den Sauger ausschaltet und die
Filter reinigen oder richtig stellen
Eins oder zwei Motoren aus. Kohlenbrüste abgenutzt Wenden Sie sich an einen
berechtigten Kundendienst.
5.2 LIMPIEZA DEL FILTRO CARTUCHO
Saque el filtro cartucho y limpielo con chorros de aire compreso desde el interior hacia el exterior.
El filtro cartucho se puede de un modo alternado regenerar aspirando la suciedad sobre su
superficie usando el aspirado junto al accesorio ‘boquilla piana’. Compruebe que no hay laceración
sobre la supercie filtrante. En ese caso, el filtro cartucho sería inservible.
6 PUESTA FUERA DE SERVICIO
6.1 REGLAS GENERALES
En el caso en que se decida poner fuera de servicio el aspirador, es necesario realizarlo en el
respeto de nuesta salud y del ambiente en el que vivimos. Hay que informarse de que haya lugares
y/o personas autorizadas a la recogida y al desarmado de tal producto. El desarmado y/o reciclado
de cualquier componente del aspirador debe ser realizado en conformidad con las leyes vigentes.
POSIBLES MALFUNCIONAMIENTOS Y BUSQUEDA DE AVERÍAS
PROBLEMA CAUSA SOLUCIÓN
La máquina no se pone en
marcha
Contactos elėctricos
interrumpidos o cable de
alimentacion
desconectado.
Verifique que el pulsador de puesta en
marcha, el fusibile de la red elėctrica, el
cable de alimentación y el enchufe.
La aspiración es insuficiente Obstrucción de los tubos
de Aspiración o de los
filtros.
Apague la máquina y sacuda el filtro,
limpie el tubo flexibile y los acessorios.
La máquina en marcha es muy
ruidosa (La cabezada del motor
vibra mucho).
Excesivo deposición de
sucio sobre (posible rotura
o malfuncionamiento).
Limpie las turbinas de los motores.
Pida Asistencia tėcnica authorizada.
La máquina cuando trabaja
emite polvo.
Rotura/malfuncionamiento
de los filtros.
Apague la máquina y limpie los filtros o
posicionelos correctamente.
La máquina ha uno o dos
motores que no marchan.
Boquillas carbón
consimidas.
Pida asistencia tėcnica authorizada.
-
 1
1
-
 2
2
-
 3
3
-
 4
4
-
 5
5
-
 6
6
-
 7
7
-
 8
8


Ghibli & Wirbel AS30 El manual del propietario
- Tipo
- El manual del propietario
en otros idiomas
- italiano: Ghibli & Wirbel AS30 Manuale del proprietario
- English: Ghibli & Wirbel AS30 Owner's manual
- Deutsch: Ghibli & Wirbel AS30 Bedienungsanleitung
Artículos relacionados
-
 Ghibli & Wirbel AS 40 KS H Use And Maintenance
-
 Ghibli & Wirbel AZ 35 400 V Manual de usuario
-
 Ghibli & Wirbel SaniPro 20.12 A P Use And Maintenance
-
 Ghibli & Wirbel TOOL PRO WDA 40 L Use And Maintenance
-
 Ghibli & Wirbel S-Team 6 V Use And Maintenance
-
 Ghibli & Wirbel ROLLY NRG 11 M 33 BC 10 Ah Use And Maintenance


Otros documentos
-
SICK AS30 Prime Edge Quickstart
-
-
-
Bosch VENTARO El manual del propietario
-
Numatic RSV130 Owner Instructions
-
Parkside PNTS 1500 A1 Translation Of Original Operation Manual
-
-
 CANAVAC CAN5D Manual de usuario
-
DeWalt DW793 T 1 El manual del propietario
