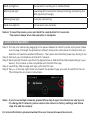
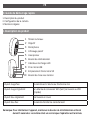
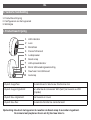
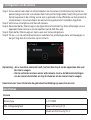
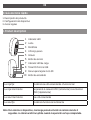
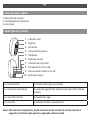
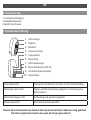
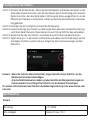
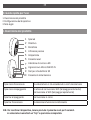
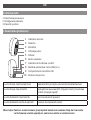
El Chacon IPCAM-BE03-PS es una cámara de vigilancia con conexión Wi-Fi, audio bidireccional y visión nocturna por infrarrojos, además, cuenta con una ranura para tarjeta micro SD para almacenar grabaciones, y su batería de 5200 mAh le da una autonomía prolongada. Con su gran angular de 120° y su resolución de 2 megapíxeles, esta cámara ofrece una imagen clara y nítida. Además, puedes controlarla de forma remota a través de su aplicación para smartphone.
El Chacon IPCAM-BE03-PS es una cámara de vigilancia con conexión Wi-Fi, audio bidireccional y visión nocturna por infrarrojos, además, cuenta con una ranura para tarjeta micro SD para almacenar grabaciones, y su batería de 5200 mAh le da una autonomía prolongada. Con su gran angular de 120° y su resolución de 2 megapíxeles, esta cámara ofrece una imagen clara y nítida. Además, puedes controlarla de forma remota a través de su aplicación para smartphone.


-
 1
1
-
 2
2
-
 3
3
-
 4
4
-
 5
5
-
 6
6
-
 7
7
-
 8
8
-
 9
9
-
 10
10
-
 11
11
-
 12
12
-
 13
13
-
 14
14
-
 15
15
-
 16
16
-
 17
17
-
 18
18
-
 19
19
-
 20
20
-
 21
21
-
 22
22
-
 23
23
-
 24
24
-
 25
25
-
 26
26
-
 27
27
-
 28
28
-
 29
29
-
 30
30
-
 31
31
-
 32
32
-
 33
33
-
 34
34
-
 35
35
-
 36
36
-
 37
37
-
 38
38
-
 39
39
-
 40
40
-
 41
41
-
 42
42
-
 43
43
-
 44
44
-
 45
45
-
 46
46
-
 47
47
-
 48
48


El Chacon IPCAM-BE03-PS es una cámara de vigilancia con conexión Wi-Fi, audio bidireccional y visión nocturna por infrarrojos, además, cuenta con una ranura para tarjeta micro SD para almacenar grabaciones, y su batería de 5200 mAh le da una autonomía prolongada. Con su gran angular de 120° y su resolución de 2 megapíxeles, esta cámara ofrece una imagen clara y nítida. Además, puedes controlarla de forma remota a través de su aplicación para smartphone.
en otros idiomas
- français: Chacon IPCAM-BE03-PS Manuel utilisateur
- italiano: Chacon IPCAM-BE03-PS Manuale utente
- português: Chacon IPCAM-BE03-PS Manual do usuário
- polski: Chacon IPCAM-BE03-PS Instrukcja obsługi
- română: Chacon IPCAM-BE03-PS Manual de utilizare
Artículos relacionados
-
Chacon IPCAM-DM02 Manual de usuario
-
-
-
-
Chacon 53023 Manual de usuario
-
-
Chacon 34448 Manual de usuario
-
-
Chacon DIOBELL-B01 Guía del usuario
-
Chacon 34036 Manual de usuario
Otros documentos
-
Well Health WH-DG El manual del propietario
-
Arenti OUTDOOR1 Guía del usuario
-
-
Kami H31 Guía de instalación
-
-
FLIR FX Guía de inicio rápido
-
DIO DIOCAM-RE01 Manual de usuario
-
DIO BELL-B11 Doorbell Guía del usuario
-
-
ASAHOM S1030 Manual de usuario