Cosatto Giggle 3 in 1 Instructions Manual
- Categoría
- Muebles de bebe
- Tipo
- Instructions Manual

...www.cosatto.com
GIGGLE
you’re
avin’ a...
f
l
e
x
i
b
l
e
l
i
g
h
t
w
e
i
g
h
t
f
a
n
t
a
s
t
i
c
compact travel system

IMPORTANT: RETAIN FOR FUTURE
REFERENCE. READ CAREFULLY.
YOUR CHILD’S SAFETY MAY BE
AFFECTED IF YOU DO NOT
FOLLOW THESE INSTRUCTIONS
user guide
Thank you for choosing a Cosatto product. Please take a little time to read the important safety
notes detailed below. This will ensure many years of happy, safe use.
safety: take note
WARNING: A CHILD’S SAFETY IS YOUR RESPONSIBILITY
•
WARNING: Never leave your child unattended.
•
WARNING:
Ensure that all the locking devices are engaged before use.
•
WARNING: To avoid injury ensure that your child is kept away
when unfolding and folding this product.
•
WARNING: Do not let your child play with this product.
•
WARNING:
The seat unit is not suitable for children under 6 months.
•
WARNING: Always use the restraint system.
•
WARNING: Check that the pram body or seat unit or cars seat
attachment devices are correctly engaged before use.
•
WARNING: This product is not suitable for running or skating.
•
This vehicle is intended for children from birth up to a maximum user weight of 15kg.
•
This product is only compatible with Giggle car seat (sold separately).
•
The child should be clear of moving parts while making adjustments. This vehicle requires regular
maintenance by the user.
•
Do not use replacement parts or accessories other than those approved by Cosatto as they may
render the pushchair unsafe.
•
Overloading, incorrect folding, and the use of non-approved accessories or spare parts may
damage or break this pushchair and could render the product unsafe. Read the instructions.
•
A basket is provided for the carriage of 2kg of goods, evenly distributed.
•
A mesh pocket is provided at the rear of seat unit for carriage of 500g of goods, evenly distributed.
•
Any additional load attached to the handle and/or on the back of the backrest and/or on the sides
of the vehicle will affect the stability of the vehicle.
•
Do not use a platform with this product as it may render the product unsafe.
•
Never leave raincovers on indoors, in a hot atmosphere or near a heat source as the baby could
overheat.
•
Ensure all users are familiar with the products operation. It should always open and fold easy. If it
does not, do not force the mechanism - stop and read the instructions.
•
Do not use your pushchair in a manner for which it is not designed.
•
Ensure your child wears a correctly fitted and adjusted harness at all times. D-rings are provided
on the existing harness for the attachment of a separate safety harness approved to BS EN 13210
should this be required.
GB

•
Do not allow your child to climb unassisted into, play with or hang onto your pushchair.
•
Always apply the brakes when the pushchair is stationary. Hold on to your pushchair when close
to moving road vehicles or trains. Even with the brake on the draught from the vehicle may move
the pushchair.
•
Exercise caution when mounting or dismounting a kerb. Remove your child and fold the pushchair
when ascending or descending stairs or escalators.
•
Ensure the folded pushchair is stored away from children so that it does not fall and cause injury.
•
Never carry a second child on the product.
•
This product complies with BS EN 1888:2012.
carrycot
IMPORTANT- READ THE INSTRUCTIONS
CAREFULLY BEFORE USE AND KEEP THEM
FOR FUTURE REFERENCE
•
WARNING: The carrycot is suitable only for a child who cannot sit
up unaided, roll over and cannot push itself up on its hands and
knees.
•
The carrycot is intended for child from birth up maximum weight
of 9kg.
•
WARNING: Do not let other children play unattended near the
carrycot.
•
WARNING: Do not use if any part is broken, torn or missing.
•
WARNING: Never use this carrycot on a stand.
•
WARNING: Never use the carrycot on a raised surface or stand
other than the chassis. Ensure the carrycot is fully locked in place
before use.
•
Carry handle and the bottom of the carrycot should be inspected regularly for signs of damage
and wear.
•
Use only replacement parts supplied or approved by Cosatto.
•
No additional mattress shall be added.
•
Be aware of the risk of open fire and other source of strong heat, such as electric bar fires, gas
fires, etc, in the near vicinity of carrycot.
•
Use only on a firm, horizontal level and dry surface.
•
This carrycot complies to BS EN 1466:2004 +A1 2007.
car seat (sold separately)
•
When car seat is used in conjunction with the chassis, this product does not replace a cot or a
bed. Should your child need to sleep, then it should be placed in suitable cot, bed or carrycot.

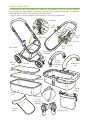
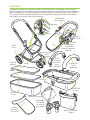
list of parts
Your pushchair is supplied in one carton. Some parts are packed in the carrycot.
1. Pushchair chassis 6. Carrycot with hood 11. Footmuff
2. Rear wheels x2 7. Carrycot apron 12. Seat unit
3. Front wheel assembly 8. Carrycot carry handle 13. Changing bag
4. Carrycot mattress 9. Seat unit hood 14. Raincover
5. Carrycot liner 10. Bumper bar with cover 15. Car seat mounting adaptors
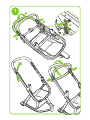
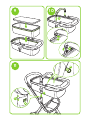
1 - opening the chassis
Press the buttons (a) on either side of the chassis and push the handle down (b). Release the
locking lever (c) and lift the handle upwards until the chassis locks in the open position (d).
WARNING: Ensure that all locking devices are engaged before use.
The height of the handle can be adjusted by pressing the buttons (e) on either side of the chassis
and lifting the handle up (f) or down (g) to the preferred position.
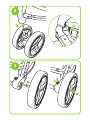
2 - fitting the front wheel assembly
To fit the front wheel assembly insert the pin at the top of the wheel assembly into the wheel
housing (a) until it locks in place.
To remove the wheel assembly, pull back the lever located at the back of the wheel housing (b) and
remove the wheel assembly from the housing.
3 - fitting the rear wheels
To fit a rear wheel insert the pin into the wheel housing (a) until it locks in place. Repeat this with the
other rear wheel.
To remove the rear wheels, press the buttons on top of the wheel housings (b) and pull the wheels
clear (c).
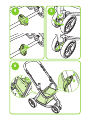
4 - using the parking brake
To apply the brake, press the lever down firmly with your toe (a). Test the brake is engaged
correctly by trying to push the pushchair forwards for a short distance. To release the brake, lift the
lever (b).
NOTE: Always apply brake before loading or unloading a child from the pushchair.
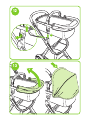
5 - using the swivel wheel lock
Press down on the lever (a). Swivel the wheel until it locks in the forward facing position (b).
Lift the lever (c) to release the lock.
6 - removing the basket
Undo the press studs at the back on the inside of the basket (a) and on the outside at the bottom of
the basket (b). Release the clips (c) at the front of the basket.
Re-fitting is a reversal of this procedure.
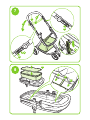
7 - folding the chassis
While pressing the release button (a), pull the two levers (b) back. Press down on the handle (c)
closing the chassis until the autocatch retains the chassis in the folded position (d).
The handle position is adjustable and can be folded inwards (e) to achieve the most compact fold.
Whilst pressing on both buttons on both sides of handle, adjust the handle position move the
handle up or down and let go at desired hand position.
Note: The chassis cannot be folded with the carrycot installed and can only be folded with the seat
unit installed forward facing in the most upright recline position.

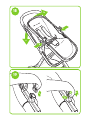
8 - erecting the carrycot - stage 1
Remove the mattress and liner from the cot (a). (The liner is retained by a strip of Velcro
®
at the top).
Open the lining at the base of the cot and slide the frame bars, using the straps (b), until the ‘V’
sections on the frame bars fit into the cutouts in the cot base (c).
Reattach the Velcro
®
strip to complete the step.
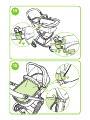
9 - erecting the carrycot - stage 2
Refit the liner into the carrycot and secure with the Velcro
®
strips at the top.
Place the mattress over the liner at the base of the carrycot.
10 - fitting and using the carry handle
To fit the carry handle push each end into the carrycot mountings until the buttons lock the handle
in place (a).
To open the carry handle press the button on one side of the handle (b) and lift the handle end
clear of the mounting (c).
Repeat this procedure at the other end of the handle to remove the handle from the carrycot.
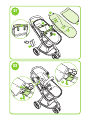
11 - fitting the carrycot
Place the carrycot on to the mounting points on each side of the chassis (a). Push down until the
tab locate in the holes of the carrycot mountings (b).
Note: The carrycot can only be fitted rearward facing as shown in illustration. Dots are marked on
the seat mounts and carrycot mounts (c). These should be on the same side and aligned if fitted
correctly.
There are a set of “D” ring located at the base of the carrycot for the attachment of a separate
safety harness approved to BS EN 13210 should this be required (harness not supplied). Push the
‘D’ rings through the lots in the liner (d).
12 - removing the carrycot
To remove the carrycot from the chassis, press the buttons on each side of the mountings (a) then
lift the carrycot free (b).
Note: Please ensure that the carry handle is securely fitted before lifting the carrycot clear of the chassis.
13 - opening and closing the carrycot hood
Pull the hood up to open (a). Push the hood back down to close (b).
14 - removing the carrycot hood
To remove the carrycot hood, pull the lip at the bottom of the hood mount (a) and pull the hood away.
To re-fit the hood place the top of the hood mount (b) over the chassis frame and then push hard
on the bottom (c) until the hood mount clips in place. Attach the Velcro
®
tabs (d) on both sides.
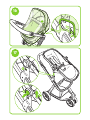
15 - fitting the carrycot apron
Lay the cot apron over the carrycot and attach the zip to the liner (a). Pull the zip around the cover
until secure. Place the bib of the cot apron inside of the hood on either side of the hood as shown (b).
Removal of the cover is a reversal of this procedure.
16 - fitting the raincover in pram mode
Fit the raincover over carrycot as shown. The air holes in the raincover should be just in front of the
hood on either side (a).
The cutouts in the raincover fit over the carrycot mounts. Secure with the Velcro
®
straps (b).
17 - fitting and removing the seat unit
Place the seat unit on to the mounting points on each side of the chassis. Push down until the
tabs locate in the holes of the seat mountings (a).
To remove the seat unit from the chassis, press the buttons on each side of the mountings (b) then
lift the seat unit free (c).
Note:
The seat unit can be fitted facing forwards or backwards.

18 - adjusting the recline position
The pushchair seat can be adjusted to 3 different positions of recline. Press the buttons (a) located
on both sides of the pushchair seat simultaneously and move to the desired position (b & c) until a
positive click is heard.
WARNING: Never adjust the seat unit with your child in the seat.
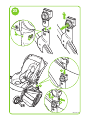
19 - Fitting, lifting and removing the bumper bar
Fit the bumper bar by pushing each end into the seat unit mountings until the buttons lock in place (a).
To open the bumper bar press the button on one side of the mounting (b) and lift the bumper bar
clear (c). Repeat this procedure at the other end of the bumper bar to remove the bar from the seat.
The bumper bar cover can be detached from the bumper bar by unzipping the cover at the back (d).
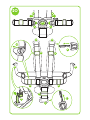
20 - using the harness
A five point harness is provided to restrain your child. To unfasten push the button on the buckle
(a) and pull the clips clear.
To fasten the harness push the shoulder strap clips onto the waist strap clips (b) then push the
waist strap clips into the buckle until they lock in place (c).
Sliding adjusters are fitted on the shoulder straps, waist straps and crotch strap (d). The harness
should be carefully adjusted so that it fits your child comfortably. To adjust to the smallest size on
the waist strap you will need to thread the adjusters through the “D” ring.
To adjust the shoulder strap height, unzip the liner on the back of the seat, locate the strap ends
(e) and pass through the slots, reposition to the desired height and pass the strap ends back
through relevant slot.
To remove the harness unzip the liner on the back of the seat, locate the strap ends (e) and
pass through the slots. Under the seat, pass the crotch strap end through its slot (f). On each side
of the seat feed the edge of the webbing through the opening in the ‘C’ clip (g). Push the ‘C’ clip
through the ‘D’ clip. The harness can now be removed from the seat.
Refitting the harness is a reversal of this procedure.
‘D’ rings are fitted at the end of each waist strap should you wish to attach a separate harness
complying to BS EN 13210.
To remove or fit the chest pads unclip the buckle and remove the shoulder strap clips from the
waist strap clips and slide the chest pads on or off the straps.
WARNING: Always use the crotch strap in combination with the
waist belt.
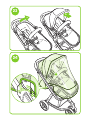
21 - fitting the footmuff
Unfasten the waist strap clips and shoulder strap clips. (See step 20.) Remove both chest pad and
crotch pad from the seat unit (a).
Unzip the footmuff cover and remove (b) Place the footmuff over the seat. Feed the harness straps
through the harness slots on the footmuff (c, d & e).
Attach the Velcro
®
strips at the top of the footmuff to the back of the seat (f).
Refit the crotch pad, chest pads and footmuff cover.
To remove the footmuff reverse the procedure above.
The two halves of the footmuff are reversible.
22 - fitting the seat hood
Place the hood on to the seat frame as shown.
Place the top of the hood mounts (a) over the chassis frame and then push hard on the bottom (b)
until the hood mounts clips in place.
To remove the hood pull the lip at the bottom of the hood mount away from chassis on both sides (c).

23 - opening and closing the seat hood
Pull the hood up to open (a). Push the hood back to close (b).
24 - fitting the raincover in seat unit mode
Fit the raincover over pushchair as shown.
The air holes in the raincover should be just in front of the hood on either side (a).
The cutouts in the raincover fit over the carrycot mounts. Secure with the Velcro
®
straps (b).
25 - fitting the car seat (purchase separately)
Note: The car seat mounting adaptors are supplied with the Giggle 3 in 1 pushchair.
Fit the mounting adaptors to the mounts on each side of the pushchair chassis (a). Push down until
the tabs locate in the holes on the mountings (b).
Note: The mounting adaptors are handed. Dots are marked on the seat mounts and mounting
adaptors (c). These should be on the same side if fitted correctly.
To remove the mounting adaptors press the buttons (d) on the side and lift the mounting adaptors
off the mounts on the pushchair chassis (e). store the mounting adaptors in a safe place for future use.
Place the car seat on to the mounting adaptors on each side of the chassis. Push down until the
car seat locks in place (f).
To remove the car seat press the release buttons (g) on each side and lift the car seat off the
pushchair chassis (h).
care
Your pushchair has been designed to meet safety standards and with correct use and maintenance
will give many years of trouble free performance.
The chassis is strong but will weaken should the back wheel be bumped down stairs or kerbs.
Continual impact will cause damage.
If your child wears hard shoes these might damage the soft fabric.
Store your pushchair in a dry, safe place.
Storing a damp pushchair will encourage mildew to form.
After exposure to damp conditions, dry off with a soft cloth, open fully and allow to dry
thoroughly before storing.
Do not leave the pushchair in sunlight for prolonged periods - some fabrics may fade.
maintenance
This pushchair requires regular maintenance by the user.
Regularly inspect the locking devices, brakes, wheels, harness assembly, catches, seat adjusters,
joints and fixtures to ensure they are secure and in full working order. They should be free to move
at all times.
Cosatto products are designed to operate with minimum maintenance, however regular lubrication
of moving parts will extend the life of your pushchair and make opening and folding easier.
Should parts of your pushchair become stiff or difficult to operate, apply a light application of a
spray lubricant e.g. silicone. Do not use oil or grease.
Wheels are subject to wear and should be replaced if necessary.
Your pushchair should be serviced and reconditioned before using it for a second baby, or after 18
months, whichever is the sooner.
cleaning
The carrycot hood may be cleaned by sponging lightly using warm water and a mild detergent.
Plastic and metal parts may be sponged clean with warm water and a mild detergent.
Never clean with abrasive, ammonia based, bleach based or spirit type cleaners.
For wash care instruction of the soft goods please refer to their respective wash care labels.

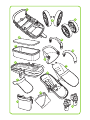
replacement parts
The replacement parts shown below are available for your product. In the event that you require
any of these parts, please contact your local distributor. For the contact information for your local
distributor please refer to http://www.cosatto.com/stockists
If you are a UK or Ireland customer, please contact us at [email protected]
Autocatch
Carrycot
handle &
Seat bumper
bar
Seat unit
hood
Harness
Seat unit
Rear wheel
Front wheel
assembly
Basket
Carrycot
apron
Mattress
Carrycot
liner
Raincover
Changing bag
Carrycot
Carrycot
hood
Foot muff
Car seat
mounting
adaptors
Bumper bar
cover
Mattress
cover
Chest
pads
Crotch
pad

IMPORTANTE: CONSERVE PARA FUTURA
REFERENCIA. LEA ATENTAMENTE.
EN CASO DE NO SEGUIR ESTAS
INSTRUCCIONES, LA SEGURIDAD DE SU
HIJO PODRÍA VERSE AFECTADA.
guía del usuario
Gracias por escoger un producto Cosatto. Le recomendamos que lea atentamente las notas
importantes relativas a la seguridad descritas a continuación. Esto le garantizará un uso seguro y
duradero del producto.
seguridad: le rogamos tenga en cuenta lo siguiente
ADVERTENCIA: LA SEGURIDAD DE SU HIJO ES RESPONSABILIDAD SUYA
•
ADVERTENCIA: Asegúrese de que el niño esté siempre bajo la
supervisión de un adulto.
•
ADVERTENCIA: Antes de utilizar la unidad, asegúrese de que todos
los dispositivos de bloqueo estén activados.
•
ADVERTENCIA: A fin de evitar lesiones personales, asegúrese de
que el niño se mantenga siempre alejado del producto cuando se
disponga a plegar y desplegar la unidad.
•
ADVERTENCIA: No permita que el niño juegue con este producto.
•
ADVERTENCIA: El asiento no es adecuado para niños menores de 6
meses.
•
ADVERTENCIA: Utilice siempre el sistema de seguridad.
•
ADVERTENCIA: Antes de utilizar la unidad, compruebe que los
dispositivos de acoplamiento del chasis del cochecito para bebés
o del asiento de la unidad o de la silla para coches estén
correctamente acoplados.
•
ADVERTENCIA:
Este producto no es adecuado para correr o patinar.
•
Este vehículo ha sido diseñado para niños a partir de 0 años y de hasta un máximo de 15 Kg. de peso.
•
Este producto es compatible únicamente con el asiento para coches Giggle (vendido por separado).
•
El niño deberá mantenerse alejado de las piezas móviles del producto durante la realización de
ajustes en el mismo. Este cochecito precisa de un mantenimiento periódico por parte del usuario.
•
No utilice accesorios o recambios que no hayan sido previamente homologados por Cosatto, ya
que podrían poner en peligro la seguridad de la silla de paseo.
•
Sobrecargar, plegar incorrectamente la unidad y el uso de accesorios o recambios que no hayan
sido previamente homologados por Cosatto podrían romper o dañar la silla de paseo y poner en
peligro la seguridad del producto. Lea las instrucciones.
•
El producto se suministra con una cesta para el trasporte de mercancías bien distribuidas y de
hasta 2 Kg. de peso.
•
El producto se suministra con un bolsillo de red para el transporte de mercancías bien distribuidas
y de hasta 500 g de peso.
•
Cualquier carga adicional acoplada al manillar y/o a la parte posterior del respaldo y/o a los latera
les podría tener efectos negativos en la estabilidad de la silla de paseo.
E

•
No use una plataforma con este producto ya que esto podría poner en entre dicho la seguridad
del mismo.
•
No deje nunca colocados los protectores para la lluvia cuando se encuentre en un espacio interior,
en un entorno expuesto a altas temperaturas o cerca de fuentes de calor, ya que el bebé podría
quedar expuesto a temperaturas extremas.
•
Asegúrese de que todos los usuarios estén familiarizados con el funcionamiento del producto. El
producto debería siempre abrirse y cerrarse con facilidad. De lo contrario, no fuerce el mecanismo
y vuelva a leer las instrucciones.
•
No utilice la silla de paseo con propósitos para los cuales no ha sido diseñada.
•
Asegúrese de que el niño lleve el arnés correctamente acoplado y ajustado en todo momento.
Las anillas “D” están instaladas en el arnés para facilitar el acoplamiento de un arnés de seguridad
adicional homologado según la normativa BS EN 13210, en caso de que sea necesario.
•
No permita que su hijo suba solo, juegue o se cuelgue de la silla de paseo.
•
Active los frenos siempre que la silla de paseo se encuentre es posición estacionaria. Sujete bien
la silla de paseo siempre que se encuentre cerca de trenes o de vehículos en movimiento
en una vía pública. Incluso cuando los frenos estén activados, el viento causado por un vehículo al
pasar podría desplazar la silla de paseo.
•
Tome todas las precauciones necesarias cuando suba o baje un bordillo. Baje a su hijo de la silla de
paseo y pliegue la unidad cuando suba o baje escaleras o escaleras mecánicas.
•
Asegúrese de guardar la silla de paseo en posición plegada y colocarla fuera del alcance de los
niños, para así evitar que pueda caerse y causar lesiones.
•
No lleve nunca un segundo niño en la silla de paseo.
•
Este producto cumple con la norma BS EN 1888: 2012.
capazo
IMPORTANTE: LEA ATENTAMENTE LAS INSTRUCCIONES
ANTES DE UTILIZAR EL PRODUCTO Y CONSÉRVELAS
PARA FUTURA REFERENCIA
•
ADVERTENCIA: El capazo es únicamente adecuado para niños que
no puedan sentarse, rodar o levantarse solos con las manos y las
rodillas, y sin la ayuda de un adulto.
•
El capazo ha sido diseñado para niños a partir de 0 años y hasta un
máximo de 9 Kg de peso.
•
ADVERTENCIA: No permita que ningún otro niño juegue cerca del
capazo sin estar bajo la supervisión de un adulto.
•
ADVERTENCIA: No utilice el producto si le falta cualquiera de sus
piezas o si una de estas está dañada o rota.
•
ADVERTENCIA: Nunca utilice este capazo sobre plataformas
elevadas.
•
ADVERTENCIA: No utilice nunca el capazo sobre una superficie
elevada o una plataforma más elevada que la del chasis. Asegúrese
de que el capazo esté correctamente bloqueado antes de utilizar la
unidad.
•
Las asas de transporte y la sección inferior del capazo deberían inspeccionarse regularmente a fin
de asegurarse de que no presentan signos de daños ni desgaste.
•
Utilice únicamente recambios que hayan recibido la autorización de Cosatto.

•
No deberá añadirse ningún colchón adicional.
•
Tenga en cuenta los riesgos que pueden suponer las chimeneas y otras fuentes de calor como las
estufas eléctricas, chimeneas de gas, etc., cuando éstas se encuentran cerca del capazo.
•
Utilice este producto únicamente sobre superficies firmes, horizontales, niveladas y secas.
•
Este capazo cumple con la norma BS EN 1466:2004 +A1 2007.
asiento de niños para coches (vendido por separado)
•
Aunque el asiento de niños para coches se utilice en combinación con el chasis, ello no significará
que el producto sustituya a una cuna o cama. Si su hijo necesita dormir, colóquelo en una cuna,
cama o capazo adecuados.
lista de piezas
La silla de paseo para niños se suministra embalada en una caja de cartón. Algunas piezas están
embaladas en la cesta.
1. Chasis de de la silla de paseo
2. 2 ruedas traseras
3. Conjunto de ruedas delanteras
4. Colchón de la cesta
5. Forro de la cesta
6. Cesta con capucha
7. Cubierta decorativa de la cesta
8. Asa de transporte de la cesta
1 - despliegue del chasis
Pulse los botones (a) de ambos lados del chasis y presione el manillar hacia abajo (b). Suelte la
palanca de bloqueo (c) y levante el manillar hasta que el chasis quede bloqueado en la posición
abierta (d).
ADVERTENCIA: Antes de utilizar la unidad, asegúrese de que todos
los dispositivos de bloqueo estén activados.
La altura del manillar puede ajustarse presionando los botones (e) de ambos lados del chasis y
tirando el manillar hacia arriba (f) o hacia abajo (g) hasta que alcance la posición deseada.
2 - instalación de las ruedas delanteras
Para instalar las ruedas delanteras, introduzca el pasador en la parte superior del conjunto de las
ruedas en el alojamiento de las ruedas (a), hasta que quede bloqueado en su posición.
Para extraer el conjunto de las ruedas, tire hacia atrás la palanca ubicada en la parte posterior del
alojamiento de la rueda (b) y extraiga el conjunto de las ruedas del alojamiento.
3 - instalación de la conjunto de ruedas delanteras
Para instalar la conjunto de ruedas delanteras, inserte el pasador en el alojamiento de la rueda (a)
hasta que quede bloqueada en su posición. Repita este procedimiento con la otra rueda de atrás.
Para extraer las ruedas traseras, presione los botones situados en la parte superior de los
alojamientos de las ruedas (b) y extraiga las ruedas.
4 - uso del freno de estacionamiento
Para activar el freno, presione firmemente y hacia bajo la palanca con la punta del pie (a).
Compruebe que el freno esté correctamente accionado empujando brevemente la silla de paseo
hacia delante. Para liberar el freno, eleve la palanca (b).
ATENCIÓN: Active siempre el freno antes de ayudar al niño a subir o bajar de la silla de paseo.
5 - uso del mecanismo de bloqueo de las ruedas giratorias
Presione la palanca hacia bajo (a). Haga girar la rueda hasta que quede bloqueada en la posición
9. Capucha del asiento
10. Barra protectora con funda
11. Cubierta protectora para pies
12. Asiento
13. Bolsa para cambiar al bebé
14. Protector para lluvia
15. Adaptadores de montaje del asiento para coches

orientada hacia delante (b).
Para liberar el mecanismo de bloqueo, levante la palanca (c).
6 - extracción de la cesta
Desabroche los corchetes situados en la parte posterior de la cesta (a y b). Suelte los clips (c) situados
en la parte delantera de la cesta.
Para volver a instalar la cesta siga el mismo procedimiento pero a la inversa.
7 - plegado del chasis
Mientras presiona el botón de liberación (a), estire hacia atrás las dos palancas (b). Presione el
manillar hacia abajo (c) para plegar el chasis hasta que el pestillo automático retenga el chasis en la
posición plegada (d).
La posición del manillar es ajustable y puede ser plegados hacia dentro (e) para alcanzar el pliegue
más compacto. Si bien presionando los dos botones a cada lado del manillar, ajuste la posición del
manillar mover la palanca hacia arriba o hacia abajo y dejar ir del manillar en la posición deseada.
Atención: El chasis no puede plegarse con la cesta instalada y solo puede plegarse con el asiento
instalado mirando hacia delante en la posición de reclinación más vertical posible.
8 - montaje de la cesta - etapa 1
Retire el colchón y el forro de la cesta (a). (El forro queda retenido por una correa de Velcro
®
ubicada
en la parte superior).
Abra el forro en la base de la cesta y deslice las barras del marco utilizando las correas (b) hasta que
las secciones en forma de ‘V’ de las barras del marco puedan introducirse en los recortes situados en
la base de la cesta.
Vuelva a conectar el correa de Velcro
®
para completar el paso.
9 - montaje de la cesta - etapa 2
Coloque el colchón sobre el forro en la base de la cesta.
Existe un conjunto de anilla ‘D’ en la base de la cesta finalidad es la de acoplar un arnés de
seguridad adicional homologado según la norma BS EN 13210 siempre que esto sea necesario
(arnés no suministrado).
10 - instalación y uso del asa de transporte
Para instalar el asa de transporte empuje los extremos, a fin de introducirlos en el montante de la
cesta, hasta que los botones bloqueen el asa en su lugar (a).
Para abrir el asa de transporte, presione el botón de uno de los lados del asa (b) y levante el
extremo del asa en dirección opuesta al montante (c).
Para extraer el asa de la cesta, repita este procedimiento en el otro extremo del asa.
11 - instalación de la cesta
Coloque la cesta sobre los puntos de montaje situados a cada lado del chasis (a). Empuje hacia
abajo hasta que los botones queden ubicados en los orificios de los montantes de la cesta (b).
Atención:
La cesta solo puede instalarse mirando hacia atrás tal y como se muestra en la ilustración.
los puntos están marcadas tanto en los montantes del asiento como en los de la cesta (c). Si están
bien instalados, deberían quedar alineadas.
Hay un conjunto de anillo “D” que se encuentra en la base del capazo para la fijación de un arnés
de seguridad separado, aprobado según BS EN 13210 si esto fuera necesario (arnés no suministrado).
Empuje los anillos ‘D’ a través de los lotes en el revestimiento (d).
12 - extracción de la cesta
Para extraer la cesta del chasis, presione los botones de ambos lados de los montantes (a) y, a
continuación, levante la cesta hasta que quede suelta (b).
Atención: Por favor, asegúrese de que el asa de transporte esté adecuadamente instalada antes de
levantar y separar la cesta del chasis.

13 - despliegue y pliegue de la capucha de la cesta
Para desplegarla, tire la capucha hacia arriba (a). Para plegarla, vuelva a tirar la capucha hacia atrás (b).
14 - extracción de la capucha de la cesta
Para extraer la capucha de la cesta, estire del saliente situado en la sección inferior del montante de la
capucha (a) y extraiga la capucha.
Para volver a instalar la capucha, coloque la parte superior del montante de la capucha (b) sobre el
marco del chasis y, a continuación, presione con firmeza el botón (c) hasta que el montante de la
capucha quede sujeto. Acople las tiras de
Velcro
®
(d) en ambos lados.
15 - instalación de cubierta decorativa de la cesta
Coloque la cubierta decorativa sobre la cesta y acople la cremallera al forro (a). Estire la cremallera a
lo largo de la cubierta hasta que quede bien fijada. Coloque el peto de la cubierta decorativa dentro
de la capucha en cualquiera de los lados de la misma tal y como se muestra en la ilustración (b).
Para extraer la cubierta siga el mismo procedimiento pero a la inversa.
16 - instalación del protector para lluvia en el modo cesta
Instale el protector para lluvia sobre la cesta tal y como se muestra en la ilustración. Los orificios de
ventilación del protector para lluvia deberán estar justo delante de la capucha en cualquiera de los
dos lados (a).
Los recortes del protector para lluvia deben colocarse sobre los montantes de la cesta. Abroche las
correas del Velcro
®
(b).
17 - Iinstalación y extracción del asiento
Coloque la unidad de asiento a los puntos de montaje en cada lado del chasis. Empuje hacia abajo
hasta que las lengüetas de localizar en los agujeros de los soportes del asiento (a).
Para extraer el asiento del chasis, presione los botones de ambos lados de los montantes (b) y, a
continuación, levante el asiento hasta que quede suelto (c).
Atención: el asiento puede instalarse mirando hacia delante o hacia atrás.
18 - ajuste de la posición de reclinación
El asiento de la silla de paseo puede ajustarse en 3 posiciones diferentes de reclinación. Presione
simultáneamente los botones (a) ubicados en ambos lados del asiento de la silla de paseo y
desplácelo a la posición deseada (b) hasta que oiga un clic.
ADVERTENCIA: Nunca ajuste el asiento cuando el niño esté sentado
en él.
19 - instalación, elevación y extracción de la barra de protección
Para instalar la barra de protección empuje los extremos, a fin de introducirlos en el montante del
asiento, hasta que los botones queden bloqueados en su lugar (a).
Para abrir la barra de protección, presione el botón de uno de los lados del montante (b) y levante
la barra de protección hasta extraerla (c). Para extraer la barra de protección del asiento, repita este
procedimiento en el otro extremo de la barra.
La funda de la barra protectora puede desacoplarse de la barra protectora desabrochando la
cremallera de la funda por la parte posterior de la misma (d).
20 - uso del arnés
La unidad se suministra con un arnés de cinco puntos con el fin de sujetar al niño. Para desabro-
charlo, apriete el botón de la hebilla (a) y extraiga los clips.
Para apretar el arnés, introduzca los clips de la correa del hombro en los clips de la correa de la
cintura (b) y, a continuación, introduzca los clips de la correa de la cintura en la hebilla (c).
En las correas para los hombros, las correas para cintura y la correa para la entrepierna (d)
encontrará unos ajustadores deslizantes. El arnés deberá ajustarse cuidadosamente a fin de que

se adapte a su hijo de manera cómoda. Para ajustarse a la medida más pequeña en la correa de la
cintura deberá pasar los ajustadores a través de la anilla “D”.
Para ajustar la altura de la correa del hombro, desabroche la cremallera del forro en la parte posterior
del asiento, sujete los extremos de la correa (e) y páselos a través de las ranuras, vuelva a colocarlo a
la altura deseada y pase los extremos de la correa otra vez a través de la ranura relevante.
Para extraer el arnés desabroche la cremallera del forro de la parte posterior del asiento, sujete los
extremos de la correa (e) y páselos a través de las ranuras. Debajo del asiento, pase la correa de la
entrepierna a través de su ranura (f). Desabroche el amarre entretejido del clip “C” (g) en ambos
lados del asiento.
Ahora ya puede extraer el arnés del asiento.Para volver a instalar el arnés, siga el mismo
procedimiento a la inversa.
Las anillas ‘D’ están instaladas en los extremos de las correas de la cintura, en caso de que desee
acoplar un arnés adicional que cumpla con la normativa BS EN 13210.
Para extraer o instalar las almohadillas para el pecho, desabroche la hebilla y extraiga los clips de la
correa de los hombros desde los clips de la correa de la cintura y haga deslizar las almohadillas para
el pecho a lo largo de las correas
ADVERTENCIA: Use siempre la correa situada entre las piernas en
combinación con la correa de la cintura.
21 - instalación de la cubierta protectora para pies
Desabroche los clips de la correa de la cintura y los clips de la correa de los hombros. (Consulte el
paso 20).
Descomprimir la tapa saco y quitar (b) Coloque el saco sobre el asiento. Alimentar a las correas del
arnés por las ranuras del arnés en el saco (c, d y e).
Fije las tiras de Velcro ® en la parte superior de la funda para los pies a la parte posterior del asiento (f).
Vuelva a colocar la almohadilla de la entrepierna, protectores de pecho y la cubierta de saco.
Para quitar el saco de silla invierta el procedimiento anterior.
Las dos mitades de la funda para los pies son reversibles.
22 - instalación de la capucha del asiento
Coloque la capucha en el marco del asiento tal y como se muestra en la ilustración.
Coloque la parte superior de los montantes de la capucha (a) sobre el marco del chasis y, a
continuación, apriete con fuerza en la parte inferior (b) hasta que los montantes de la capucha
hagan clic y queden bloqueados.
Para extraer la capucha, estire el saliente en la parte inferior del montante de la capucha en
dirección opuesta al chasis en ambos lados (c).
23 - despliegue y pliegue de la capucha del asiento
Para desplegarla, tire la capucha hacia arriba (a). Para cerrarla, estire la capucha hacia atrás (b).
24 - instalación del protector para lluvia en el modo asiento
Instale el protector para lluvia sobre la silla de paseo tal y como se muestra en la ilustración.
Los orificios de ventilación del protector para lluvia deberán estar justo delante de la capucha en
cualquiera de los dos lados (a).
Los recortes del protector para lluvia deben colocarse sobre los montantes de la cesta. Abroche las
correas del Velcro
®
(b).
25 - instalación del asiento para coches (se suministra por separado)
Atención: Los adaptadores de montaje del asiento de niños para coches se suministran con la
combinación Giggle 3 en 1.
Instale los adaptadores en los alojamientos de montaje en ambos lados del chasis de la silla de paseo (a).
Ejerza presión hacia abajo hasta que los adaptadores de montaje queden bloqueados en su posición (b).

Importante: Los adaptadores de montaje solo pueden instalarse en una única dirección.
Los puntos están marcados en los montajes de los asientos y adaptadores de montaje (c). Estos
deben estar en el mismo lado si está instalado correctamente.
Para extraer los adaptadores de montaje del asiento de niños para coches, presione los botones de
liberación (d) y levante los adaptadores de montaje hasta extraerlos de la silla de paseo (e). Guarde
los adaptadores de montaje en un lugar seguro para su futuro uso.
Coloque el asiento de niños para coches sobre los adaptadores de montaje situados en ambos lados
del chasis. Ejerza presión hacia abajo hasta que el asiento de niños para coches quede bloqueado (f).
Para extraer del asiento de niños para coches, presione los botones del asiento de niños para coches
(g) y levántelo hasta extraerlo de la silla de paseo (h).
cuidado
Esta silla de paseo ha sido diseñada según las normativas vigentes de seguridad. Un uso y
mantenimiento adecuados le permitirán disfrutar de un rendimiento óptimo del producto durante
un largo período de tiempo.
Aunque el chasis es robusto, la rueda giratoria se debilitará si la golpea cada vez que baje escaleras
o bordillos.
Un impacto continuado causará daños en la rueda.
Si su hijo lleva zapatos gruesos y duros, estos podrán dañar el tejido suave de la unidad.
Guarde la silla de paseo en un lugar seco y seguro.
Si almacena la silla de paseo cuando ésta esté mojada podría crearse moho en la misma.
Después de haber estado expuesto a condiciones húmedas, seque el producto con un paño de
tacto suave, ábralo por completo y permita que se seque antes de guardarlo.
No deje la silla de paseo expuesta a los rayos solares durante períodos prolongados ya que algunos
tejidos podrían desteñirse.
Mantenimiento
Esta silla de paseo precisa un mantenimiento periódico por parte del usuario.
Aunque los productos Cosatto están diseñados para funcionar con un mantenimiento mínimo, una
lubricación periódica de sus piezas móviles extenderá la vida útil del cochecito y facilitará las
operaciones de pliegue y despliegue del mismo.
En caso de que las piezas de su cochecito se atasquen o el funcionamiento de la unidad no sea tan
fácil como al principio, aplique un rociado suave de lubricante, como por ejemplo silicona. No use
ni aceite ni grasa.
Inspeccione regularmente los dispositivos de bloqueo, los frenos, las ruedas, el conjunto del arnés,
los pestillos, los ajustadores del asiento, las juntas y accesorios, y asegúrese de que todos
funcionen correctamente y presenten los mínimos de seguridad necesarios. Todas estas partes y
piezas deberán moverse con total libertad.
Las ruedas están sujetas al desgaste y deberán reemplazarse siempre que sea necesario.
Su silla de paseo deberá estar sujeta a revisiones y recibir un re-acondicionamiento adecuado antes
de volverla a utilizar para otro bebé, ó 18 meses después, cualesquiera que sea el primero.
limpieza
La capucha deberá limpiarse con una esponja suave, agua tibia y un detergente de dureza mínima.
Las piezas y partes de plástico y de metal deberán limpiarse con una esponja suave, agua tibia y un
detergente de dureza mínima.
No limpie nunca la unidad con limpiadores abrasivos, o basados en amoníaco, lejía o alcoholes.
Para acceder a las instrucciones de lavado de las denominadas mercancías blandas, le rogamos
consulte las respectivas etiquetas de cuidados y lavado.

Automático
Asa de
transporte
de la cesta -
Barra
protectora
Capucha
del asiento
Arnés
Asiento
Rueda
trasera
Conjunto de
rueda
delantera
Panier
Cubierta
decorativa
de la cesta
Colchón
Forro de
la cesta
Protector para lluvia
Bolsa para cambiar
al bebé
Cesta
Capucha de
la cesta
Cubierta protectora
para pies
Adaptadores
de montaje
del asiento
para coches
Funda de la
barra
protectora
Funda de
colchón
Entrepierna
almohadilla
recambios
Disponemos de todos los recambios listados a continuación para su producto. En caso de que
necesite cualquiera de estas piezas, póngase en contacto con su distribuidor local. Para conocer los
datos de contacto de su distribuidor local, le rogamos consulte http://www.cosatto.com/stockists
Si es usted un cliente del Reino Unido o Irlanda, le rogamos se ponga en contacto con nosotros
enviándonos un mensaje a [email protected]
Almohadillas
para el pecho

1
2
3
4
5
6
8
7
9
12
11
13
14
15
10

1
a
a
b
c
d
e
e
f
g

2
3
a
b
a
b
c

4 5
a
b
a
c
6
a
b
c
b

7
8
a
b
c
b
d
a
b
c
c
e
c

9 10
a
c
b
11
b
d
c
a

12
a
b
13
a
b
b

14
a
b
c
15
a
b
d

16
17
a
b
a
b
c

18
19
a
b
a
b
c
d
a
c

20
a
d
a
b
e
d
d
g
g
b
c c
e
d
d
d
f
e
g
f

21
a
f
22
a
b
c
b
c
c
d
d
f
e
e

23
24
b
a
a
b

25
a
e
d
f
f
g
h
c
b
ML26022014

follow us on...
facebook.com/clubcosatto
join the conversation...
@Cosatto_Tweets
...www.cosatto.com
GIGGLE
you’re
avin’ a...
f
l
e
x
i
b
l
e
l
i
g
h
t
w
e
i
g
h
t
f
a
n
t
a
s
t
i
c
compact travel system
log onto
www.cosatto.com/3towin
scan the QR
code to
enter
SIGN UP
SIGN UP
join our VIP club...
catch onto the newsletter at www.cosatto.com
Keep in the lovely loop...
for regular crazy competitions, exclusive
viewings of future stuff, grooviest giveaways
and exclusive invitations. Tell your friends too...
GIGGLE TRAVEL SYSTEM
MANUAL COVER
PANTONE
Cosatto Ltd, Bentinck Mill, Bentinck Street, Farnworth, Bolton, BL4 7EP, England
Tel: +44(0)800 014 9252 Fax: +44(0)871 977 3910 Email: [email protected]
376C
-
 1
1
-
 2
2
-
 3
3
-
 4
4
-
 5
5
-
 6
6
-
 7
7
-
 8
8
-
 9
9
-
 10
10
-
 11
11
-
 12
12
-
 13
13
-
 14
14
-
 15
15
-
 16
16
-
 17
17
-
 18
18
-
 19
19
-
 20
20
-
 21
21
-
 22
22
-
 23
23
-
 24
24
-
 25
25
-
 26
26
-
 27
27
-
 28
28
-
 29
29
-
 30
30
-
 31
31


Cosatto Giggle 3 in 1 Instructions Manual
- Categoría
- Muebles de bebe
- Tipo
- Instructions Manual
en otros idiomas
- English: Cosatto Giggle 3 in 1
Otros documentos
-
Silver Cross Wayfarer Pushchair & Carrycot Manual de usuario
-
-
iCandy Peach 2 Manual de usuario
-
-
-
-
mothercare Wayfarer Manual de usuario
-
Britax Romer GO BIG User Instructions
-
Graco Symbio El manual del propietario
-
Quinny Speedi Instructions For Use & Warranty